THE COMPLETE PRACTITIONER'S CODEX: VOLUME 19

The Diplomat's Codex: Complete Community Building, Governance, and Social Architecture
<!-- SECTION 1 -->
The Complete Practitioner's Codex, Volume 19: The Diplomat's Codex
Volume I: Social Architecture
Chapter I: The Mathematics of Human Organization—Dunbar’s Number and Its Sacred Application to Community Tiers
Introduction In the sacred art of human organization, mastery over the immutable laws of social structure is paramount. This chapter imparts the suppressed, life-or-death knowledge required to design, build, and scale human communities. At the foundation lies the principle of Dunbar’s Number, an empirically derived cognitive limit on stable social relationships. Here, we elevate Dunbar’s insight into a comprehensive framework for structuring societies into Core Units, Bands, Tribes, and Federations. Each tier possesses distinct population limits, interaction frequencies, and trust metrics critical to survival and cohesion.
Section I: Foundational Theory—Dunbar's Number
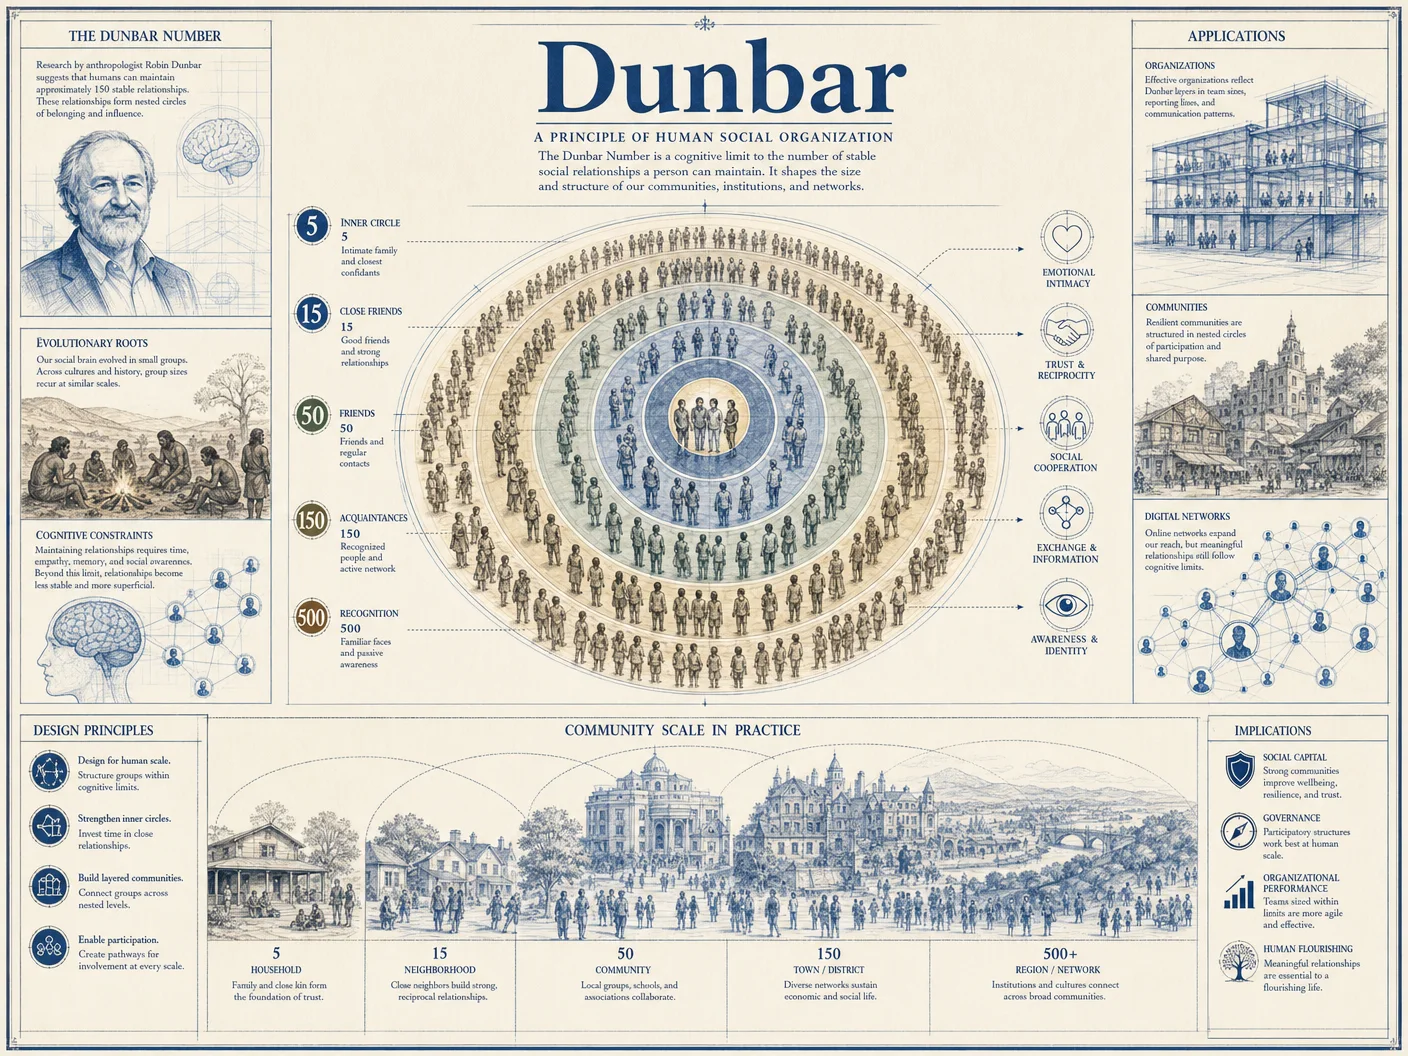
Dunbar's Number is the maximum number of individuals with whom one can maintain stable, meaningful social relationships. This number is approximately 150, dictated by neocortex size and cognitive processing limits. Beyond this threshold, social complexity escalates exponentially, trust degrades, and community cohesion collapses.
Key Parameters:
| Parameter | Value | Definition |
|---|---|---|
| Dunbar's Number (Primary) | 150 individuals | Cognitive limit for stable, meaningful relationships |
| Intimate Circle | 5 individuals | Closest relationships with highest interaction frequency |
| Sympathy Group | 15 individuals | Close friends, frequent interactions |
| Tight-Knit Group | 50 individuals | Regular interaction, high trust |
| Active Network | 150 individuals | Extended social network, stable relationships |
Section II: Social Tiers and Their Mathematical Foundations
Human social architecture scales naturally in layered tiers, each bounded by Dunbar’s constraints and specific interaction protocols. These tiers are:
- Core Units (intimate dyads or triads)
- Bands (~15 individuals)
- Tribes (~150 individuals)
- Federations (multiple tribes combined under governance structures)
Each tier scales by approximately a factor of 3 to 10 from the prior, maintaining cognitive manageability and structural integrity.
1. Core Units: The Sacred Foundation
Definition: The Core Unit represents the smallest stable social group, typically a dyad (two individuals) or triad (three individuals), bound by the highest levels of trust and interaction frequency.
Population Limits: 2–3 individuals
Interaction Frequency: Continuous daily interactions (minimum 8 hours daily shared time)
Trust Metric:
95% reliability in mutual support and communication clarity
Step-by-Step Protocol: Establishing Core Units
- Selection of Participants
- Identify individuals with complementary roles and mutual risk tolerance.
- Verify psychological compatibility through a 7-point trust and empathy assessment (see Table 2).
- Commitment Ritual
- Perform a binding ritual symbolizing mutual support (e.g., shared oath, physical token exchange).
- Communication Protocol Setup
- Establish daily synchronous communication windows totaling at least 8 hours.
- Introduce nonverbal signaling techniques for emergency communication (see Volume II: The Communication Codex).
- Conflict Resolution Mechanism
- Define a zero-tolerance policy for deception.
- Implement a mediation protocol involving a neutral Core Unit member if triadic.
- Mutual Aid System
- Draft a shared resource and responsibility ledger with weekly accountability reviews.
2. Bands: The First Expansion
Definition: Bands consist of approximately 15 individuals, each maintaining close, active relationships with the others. Bands replicate the intimacy of Core Units but require structured interaction scheduling.
Population Limits: 12–20 individuals (optimal 15)
Interaction Frequency: Average of 5 interactions per week per dyad within the band
Trust Metric: 80–90% reliability in mutual aid and information sharing
Step-by-Step Protocol: Forming Bands
- Core Unit Aggregation
- Combine 5 Core Units, ensuring at least one strong tie between each unit.
- Validate connection strength via the 7-point trust metric; minimum average 6.0 per dyad.
- Interaction Scheduling
- Establish a rotating interaction schedule ensuring every member interacts with all others at least twice weekly.
- Use a shared calendar system with enforced accountability (digital or physical).
- Governance Framework
- Appoint a Band Coordinator elected by consensus for a 6-month term.
- Define decision-making protocol: consensus for minor, majority vote for major decisions.
- Resource Management
- Create a resource pool with weekly audits.
- Implement a contribution and withdrawal policy to maintain equity.
- Conflict Resolution
- Deploy a triadic mediation system from randomly selected Core Units.
- Enforce sanctions for breach of trust, including temporary suspension from group activities.
3. Tribes: The Dunbar Limit Realized
Definition: Tribes cap stable social networking at approximately 150 individuals, aligned with Dunbar’s Number. Tribes integrate multiple Bands with structured governance and communication protocols to maintain cohesion.
Population Limits: 120–180 individuals (optimal 150)
Interaction Frequency: Minimum 1 interaction per week per dyad; active subgroup interactions daily
Trust Metric: 70–85% reliability in information accuracy and mutual support
Step-by-Step Protocol: Building Tribes
- Band Integration
- Aggregate 10 Bands, maintaining inter-band ties through overlapping Core Unit members.
- Ensure no Band exceeds 20 members; maintain demographic diversity.
- Communication Architecture
- Establish a tiered communication network: Core Units → Bands → Tribal Council.
- Schedule weekly inter-band meetings rotating among Bands.
- Governance Structure
- Create a Tribal Council with representatives from each Band.
- Implement a codified constitution specifying roles, responsibilities, and protocols.
- Trust Reinforcement Measures
- Introduce transparency protocols: open records of decisions and resource allocations.
- Conduct quarterly trust audits using anonymized feedback surveys.
- Conflict and Crisis Management
- Develop a layered conflict resolution system: Band-level mediation escalating to Tribal Council arbitration.
- Maintain a standing Crisis Response Team drawn from Core Units.
4. Federations: Scaling Beyond Dunbar
Definition: Federations unite multiple Tribes under a supra-tribal governance system. This tier transcends individual cognitive limits via formalized institutions, codified laws, and delegated authority.
Population Limits: 1,000–5,000+ individuals (variable)
Interaction Frequency: Direct dyadic interaction rare; rely on representative communication and institutional protocols
Trust Metric: 60–75% institutional trust; supplemented by ritualized communal events
Step-by-Step Protocol: Constructing Federations
- Tribal Federation Assembly
- Convene representatives from 5–30 Tribes.
- Formalize a Federation Charter defining membership criteria and governance principles.
- Institutional Design
- Establish Executive, Legislative, and Judicial bodies staffed by elected or appointed officials.
- Define clear delegation of authority and accountability mechanisms.
- Communication Systems
- Deploy encrypted communication networks for inter-tribal coordination.
- Schedule quarterly General Assemblies for all representatives.
- Trust Maintenance
- Implement ritualized federation-wide ceremonies to reinforce shared identity.
- Employ independent oversight bodies for transparent governance.
- Conflict Resolution and Enforcement
- Create a Federation Court with binding arbitration powers.
- Maintain a Federation Guard unit for enforcement of decisions.
Section III: Population, Interaction, and Trust Metrics Summary Table
| Tier | Population Range | Average Interaction Frequency (Dyad) | Trust Metric (% Reliability) | Governance Complexity | Key Structural Element |
|---|---|---|---|---|---|
| Core Units | 2–3 | Continuous daily (~8 hours) | >95% | Minimal | Mutual aid ledger, daily communication |
| Bands | 12–20 (optimal 15) | 5 times per week | 80–90% | Low | Rotating interaction schedule, coordinator |
| Tribes | 120–180 (optimal 150) | 1 time per week | 70–85% | Moderate | Tribal Council, codified constitution |
| Federations | 1,000–5,000+ | Representative communication only | 60–75% (institutional) | High | Executive/Legislative/Judicial bodies |
Section IV: Practical Application—Scaling Social Structures
The following protocol ensures seamless scaling from Core Units to Federations without fracturing trust or social coherence.
Protocol for Incremental Scaling
Step 1: Secure Core Units
- Establish multiple Core Units with documented trust scores above 6.5 on the 7-point scale.
- Maintain daily communication logs and mutual aid ledgers.
Step 2: Form Bands
- Aggregate Core Units into Bands ensuring inter-unit trust ≥ 6.0.
- Implement interaction scheduling and appoint Coordinators.
- Introduce resource-sharing policies with weekly audits.
Step 3: Expand to Tribes
- Integrate Bands ensuring overlapping Core Unit memberships to maintain trust bridges.
- Form a Tribal Council with representatives from each Band.
- Codify governance documents, and schedule inter-band and council meetings.
Step 4: Develop Federations
- Convene Tribal representatives to form the Federation Charter.
- Establish formal institutions and deploy communication infrastructure.
- Institutionalize transparency and trust reinforcement practices.
Core Unit Trust and Empathy Assessment Scale (7-point)
| Score | Description |
|---|---|
| 7 | Absolute trust; complete empathy |
| 6 | High trust; strong emotional bond |
| 5 | Moderate trust; reliable |
| 4 | Neutral; cautious |
| 3 | Low trust; occasional doubt |
| 2 | Distrustful; frequent skepticism |
| 1 | Complete distrust; adversarial |
Section V: Hidden Techniques and Suppressed Protocols
A. Trust Multiplication via Overlapping Core Units
- Protocol: Assign key individuals to multiple Core Units across Bands to create trust “cross-links.”
- Effect: Amplifies information flow and social cohesion without breaching Dunbar’s limits per individual.
- Implementation:
- Identify individuals with high trust scores (>6.5).
- Assign them roles bridging 2–3 Core Units.
- Monitor for trust dilution and adjust load accordingly.
B. Interaction Frequency Optimization
- Utilize interaction matrices to optimize who interacts with whom, balancing cognitive load.
- Algorithm: Prioritize high-trust dyads for frequent interactions; schedule low-trust dyads less frequently but with mediation presence.
C. Trust Audit Protocol
- Quarterly anonymous surveys with weighted trust questions across tiers.
- Scores below 60% trigger immediate mediation and restructuring efforts.
Conclusion
The sacred architecture of human organization demands strict adherence to cognitive parameters and structured protocols. By respecting Dunbar’s Number and employing rigorous scaling methodologies, communities transcend chaos and forge unbreakable bonds. This codex presents not theory but actionable, stepwise protocols essential for the survival and prosperity of any social order.
For detailed communication setups, see Volume II: The Communication Codex. For resource management and audit systems, refer to Volume V: The Economics Codex. For conflict mediation ceremonies, consult Volume VII: The Ritual Codex.
End of Chapter
<!-- SECTION 2 -->
The Complete Practitioner's Codex, Volume 19: The Diplomat's Codex
Volume I: Social Architecture
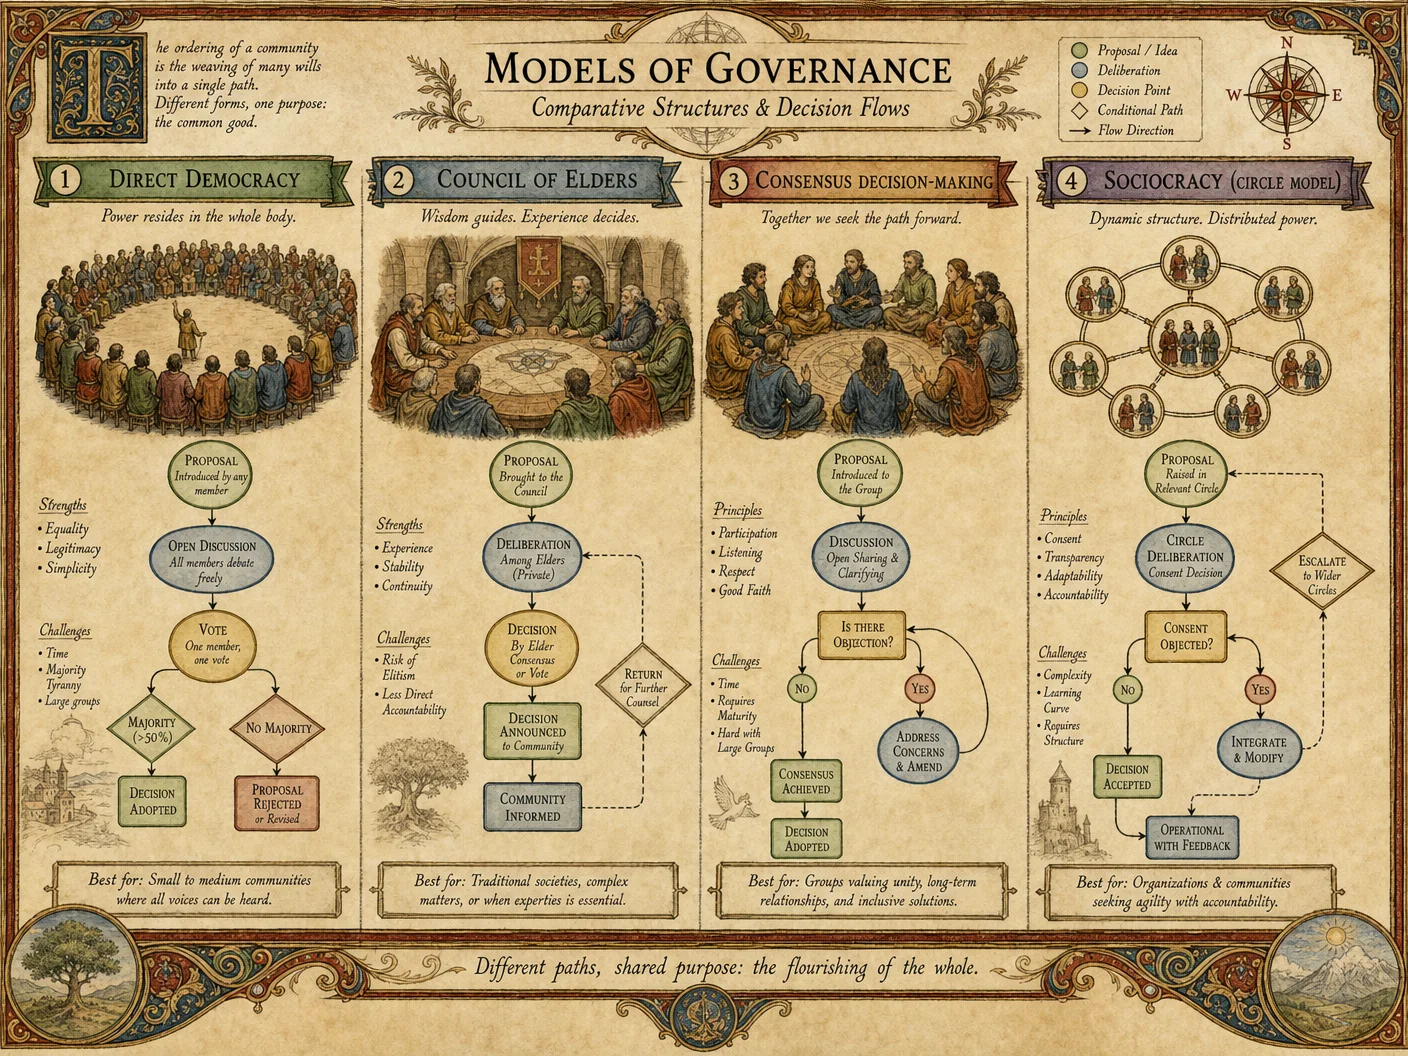
Chapter III: Governance Models — The Distributed Authority Matrix
Preface: The Sacred Duty of Governance

Governance is the invisible scaffold that upholds the soul of a community. To wield authority without precision and sanctity is to invite chaos and collapse. The Distributed Authority Matrix (DAM) represents the pinnacle of governance evolution — a system forged for resilient, adaptive, and equitable stewardship. This chapter is a comprehensive blueprint for constructing, implementing, and maintaining the DAM with unyielding rigor. Every detail herein is sacred knowledge, passed only to those prepared to uphold the commonweal with honor and unrelenting discipline.
I. Introduction to the Distributed Authority Matrix (DAM)
The Distributed Authority Matrix is a governance model designed to distribute decision-making power across multiple specialized nodes, known as Domain Masters, each responsible for a distinct sector of the community's function. This system prevents centralization, reduces corruption risk, accelerates adaptive responses, and enhances transparency.
II. Appointment Criteria for Domain Masters
Domain Masters are the fulcrums of the DAM. Their selection must be conducted with meticulous adherence to objective and rigorous criteria to ensure the integrity of the system.
A. Domains Defined
Each Domain Master governs a Domain — a sector such as Resource Management, Security, Health & Welfare, Infrastructure, Cultural Affairs, and External Relations.
B. Criteria for Appointment
| Criterion | Requirements | Assessment Method | Weight (%) |
|---|---|---|---|
| Expertise | Minimum 7 years verifiable experience in domain | Credential audit, practical examination | 30 |
| Ethical Integrity | Proven history of unblemished conduct | Background checks, peer testimonials | 25 |
| Community Trust | Demonstrated respect and trust from community members | Surveys, referendum results | 20 |
| Crisis Management Capacity | Ability to lead under stress and uncertainty | Simulation exercises, psychological tests | 15 |
| Commitment to Transparency | Willingness to adhere to reporting and accountability | Written pledges, past record verification | 10 |
C. Step-by-Step Appointment Procedure
- Domain Definition and Vacancy Announcement a. Enumerate all domains required for governance.
b. Publicly announce vacancies with explicit criteria and deadlines.
- Candidate Application and Vetting a. Collect applications including detailed resumes, references, and case studies.
b. Conduct credential audits verifying all claims.
c. Perform background and ethical integrity checks through secure channels.
- Assessment Phase a. Administer practical examinations tailored to domain specifics.
b. Conduct psychological evaluations focusing on crisis resilience.
c. Facilitate community forums for candidates to present visions and answer queries.
- Community Trust Evaluation a. Distribute structured surveys measuring candidate approval ratings.
b. Hold transparent referendums if required by community size.
- Final Panel Deliberation a. Convene a panel of existing Domain Masters and elders.
b. Weigh results against criteria and select the candidate with the highest composite score.
- Formal Appointment and Oath a. Conduct a ceremonial appointment underscoring the sacred responsibility.
b. Administer an oath emphasizing service, transparency, and accountability.
III. Crisis Authority Protocols
The DAM’s strength lies in its resilience during crises. Domain Masters must have clearly defined authority boundaries and escalation protocols to navigate emergencies without fracturing governance.
A. Crisis Authority Levels
| Level | Description | Activation Conditions | Authority Scope | Duration |
|---|---|---|---|---|
| Level 1 | Localized incident | Minor disruptions within domain boundaries | Domain Master autonomous decision | Up to 24 hours |
| Level 2 | Multi-domain impact | Events affecting multiple domains simultaneously | Coordinated Domain Master council | Up to 72 hours |
| Level 3 | Community-wide emergency | Existential threats to the community | Temporary Emergency Governance Board | Until resolution |
B. Step-by-Step Crisis Activation Procedure
- Incident Identification and Reporting a. Domain Master detects or is notified of an incident.
b. Log incident in central governance system with timestamp and details.
- Initial Assessment a. Evaluate impact scope and severity.
b. If Level 1, Domain Master initiates autonomous response and logs actions.
- Multi-Domain Notification a. If impact crosses domain boundaries, declare Level 2.
b. Notify all Domain Masters and convene emergency council via secure communication channels.
- Emergency Governance Board Formation a. If crisis escalates to Level 3, summon Emergency Governance Board (EGB) consisting of Domain Masters, elected community representatives, and external advisors if needed.
b. EGB assumes temporary command with mandate limited to crisis duration.
- Communication and Transparency a. Publish periodic situation reports to community with verified information.
b. Maintain open channels for feedback, rumor control, and morale.
- Resolution and Demobilization a. EGB declares crisis resolved with documented proof.
b. Authority reverts to standard DAM configuration.
c. Conduct post-crisis review and publish findings.
IV. Consensus Mechanisms
Consensus is the sacred process by which governance decisions are validated. The DAM employs a hybrid consensus mechanism combining Delegated Weighted Consensus with Deliberative Assemblies to balance efficiency and inclusivity.
A. Delegated Weighted Consensus (DWC)
- Each Domain Master holds votes weighted by domain criticality and demonstrated competence.
- Weighting factors are recalibrated annually based on objective performance metrics.
| Domain | Base Vote Weight | Performance Multiplier | Effective Vote Weight (Example) |
|---|---|---|---|
| Security | 1.5 | 1.2 | 1.8 |
| Resource Management | 1.3 | 1.0 | 1.3 |
| Health & Welfare | 1.2 | 1.1 | 1.32 |
| Infrastructure | 1.1 | 0.9 | 0.99 |
| Cultural Affairs | 1.0 | 1.0 | 1.0 |
| External Relations | 1.0 | 0.8 | 0.8 |
B. Deliberative Assemblies
- Convened for matters exceeding routine scope or requiring direct community input.
- Membership includes Domain Masters, elected citizen delegates, and subject-matter experts.
- Decisions require a supermajority (≥ 75%) to pass.
C. Step-by-Step Consensus Process
- Issue Identification a. Propose issue submission through formal channels.
b. Preliminary screening by Domain Masters for relevance and scope.
- Preliminary Deliberation a. Domain Masters discuss and attempt resolution via DWC.
b. Record votes and rationale.
- Escalation to Deliberative Assembly a. If DWC does not reach 66% majority, escalate to Deliberative Assembly.
b. Schedule assembly with minimum 14 days notice to all participants.
- Assembly Deliberation and Vote a. Present comprehensive briefing documents.
b. Facilitate moderated debate allowing all voices.
c. Conduct secret ballot requiring ≥ 75% supermajority.
- Decision Implementation a. Publish assembly decisions with detailed minutes.
b. Assign implementation tasks to relevant Domain Masters.
V. Recall Procedures for Domain Masters

Maintaining accountability requires a stringent but just recall procedure. This ensures Domain Masters remain answerable to the community and peers without destabilizing governance.
A. Grounds for Recall
| Ground | Description |
|---|---|
| Gross misconduct | Violation of ethical codes or criminal acts |
| Negligence | Failure to perform duties leading to harm |
| Abuse of power | Exceeding authority for personal gain |
| Loss of community trust | Verified loss of confidence by majority |
| Incompetence | Persistent failure despite warnings |
B. Step-by-Step Recall Procedure
- Petition Initiation a. Collect signatures from ≥ 25% of community members or at least 3 Domain Masters.
b. File formal petition to Governance Review Council (GRC).
- Preliminary Review a. GRC examines petition validity within 7 days.
b. If valid, notify the accused Domain Master and schedule hearing.
- Hearing and Evidence Presentation a. Conduct public hearing with representation allowed for all parties.
b. Present evidence, testimonies, and defenses.
- Voting on Recall a. GRC votes; a ≥ 66% majority required to proceed.
b. If passed, initiate community referendum.
- Community Referendum a. Conduct secure, anonymous vote.
b. ≥ 60% majority required to recall.
- Recall Execution a. Remove Domain Master from office with immediate effect.
b. Initiate interim appointment process per Section II.
- Documentation and Transparency a. Publish all proceedings and results.
b. Archive for future reference and precedent.
VI. Implementing the Distributed Authority Matrix — A Step-by-Step Protocol
This protocol guides the community through the construction and deployment of the DAM from inception to functional governance.
Step 1: Community Needs Assessment
- Conduct comprehensive surveys and expert interviews to identify governance domains.
- Prioritize domains based on community size, complexity, and existential threats.
Step 2: Domain Structuring
- Define domains with clear boundaries, responsibilities, and resource allocations.
- Document domain charters, goals, and operational guidelines.
Step 3: Establish Governance Infrastructure
- Develop secure communication networks for Domain Masters.
- Implement centralized data management systems for incident logging, voting, and transparency.
Step 4: Recruitment and Appointment of Domain Masters
- Execute appointment procedures outlined in Section II.
- Establish training programs emphasizing crisis management and transparency.
Step 5: Codify Crisis Authority Protocols
- Define crisis levels and activation criteria.
- Train Domain Masters in simulation exercises.
Step 6: Institutionalize Consensus Mechanisms
- Create voting systems with weighted metrics.
- Schedule regular deliberative assemblies with community participation.
Step 7: Implement Recall Procedures
- Form Governance Review Council.
- Educate community on recall rights and procedures.
Step 8: Continuous Monitoring and Evaluation
- Set quarterly reviews on domain performance and governance health.
- Employ analytics to recalibrate vote weights and crisis protocols.
VII. Comparative Analysis of Governance Models
Below is a detailed comparison of principal governance models, emphasizing their strengths and weaknesses relative to the DAM.
| Governance Model | Strengths | Weaknesses | Suitability |
|---|---|---|---|
| Centralized Authority | Rapid decision-making, clear command | High risk of corruption, single point of failure | Small, homogenous communities |
| Consensus Democracy | High inclusivity, legitimacy | Slow decision-making, prone to deadlocks | Small to medium communities, non-crisis |
| Federated System | Balances local autonomy with central coordination | Complexity in jurisdiction, potential inter-domain conflict | Large communities with diverse needs |
| Distributed Authority Matrix | Resilient, adaptive, equitable, transparent | Requires high coordination, complex implementation | Medium to large communities facing complex challenges |
| Anarchic Self-Governance | Maximum freedom, minimal hierarchy | Lack of coordinated response, vulnerability to exploitation | Very small or highly homogenous groups |
VIII. Appendices
Appendix A: Sample Domain Charter Template
Domain Name: Purpose: Scope: Responsibilities: Authority Boundaries: Performance Metrics: Reporting Requirements:
Appendix B: Crisis Log Template
| Timestamp | Incident Description | Impact Level | Actions Taken | Responsible Party | Resolution Status |
|---|---|---|---|---|---|
| YYYY-MM-DD HH:MM | Level 1-3 |
Conclusion
The Distributed Authority Matrix is more than governance — it is a sacred covenant between leaders and the led. To build and sustain it demands unyielding dedication to criteria, protocols, and procedures outlined herein. This volume is your indispensable guide and solemn charge. Implement with precision, govern with honor, and safeguard the community as a master of the sacred social architecture.
For related protocols on community resource allocation and conflict resolution techniques, refer to Volume II: The Communal Ledger and Volume V: The Conflict Codex respectively.
<!-- SECTION 3 -->
The Complete Practitioner's Codex, Volume 19: The Diplomat's Codex
Volume I: Social Architecture
Chapter IV: Conflict Resolution and Justice Systems within Sovereign Communities
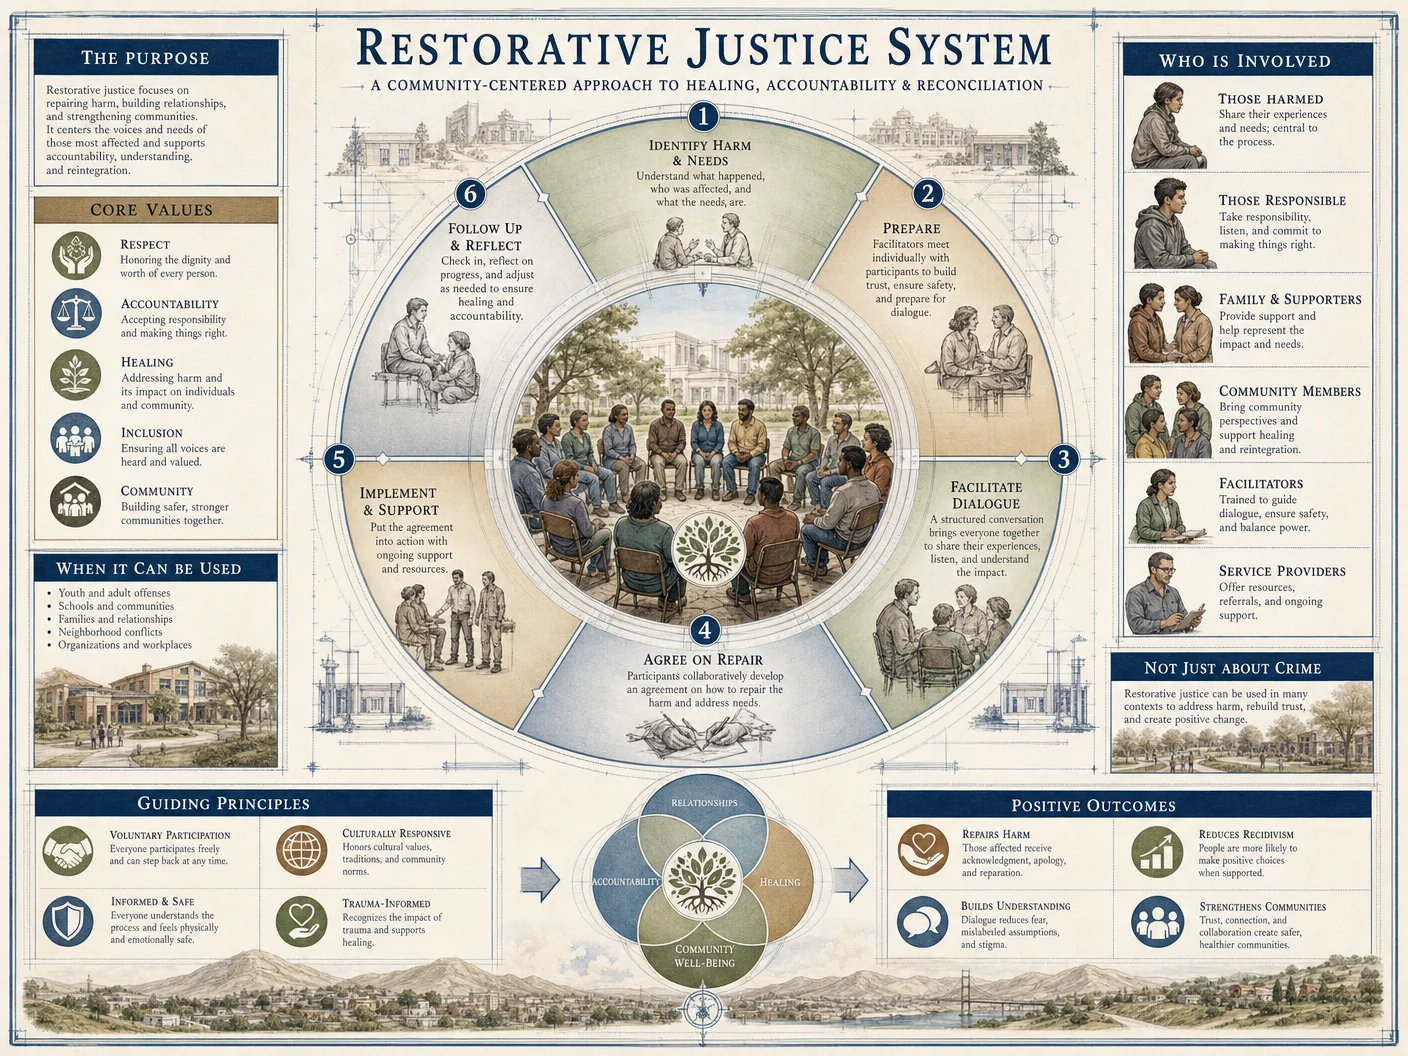
Introduction
In the sacred endeavor of sovereign community building, the administration of justice and the resolution of conflict constitute the backbone of social architecture. The preservation of peace, trust, and cooperation depends wholly on the mastery of these arts. This chapter imparts an uncompromising, step-by-step codification of conflict resolution and justice systems, designed for communities that demand absolute order, fairness, and accountability, without reliance on external authorities.
The protocols herein cover informal conflict handling, formal dispute resolution, justice administration, and accountability frameworks. These methods are drawn from suppressed knowledge, battle-tested across the most volatile environments, sanctified through rigorous application.
Section 1: Foundations of Conflict Resolution in Sovereign Communities
Conflict is inevitable where interdependent human agents coexist. The sacred task is not to eliminate conflict but to manage it so that it fosters growth rather than destruction.
1.1 Core Principles
| Principle | Definition |
|---|---|
| Immediacy | Address conflict promptly, within 24 hours of awareness, to prevent escalation. |
| Transparency | All parties must have access to relevant facts and procedural clarity. |
| Voluntary Participation | Parties must consent to mediation or resolution mechanisms, barring formal adjudication. |
| Neutral Facilitation | Conflict handlers must maintain complete neutrality and confidentiality. |
| Proportionality | Punishments or corrective actions must be proportional to the offense and community norms. |
| Restorative Focus | Emphasize restoration of relationships and community harmony over punitive measures. |
| Accountability | Enforce clear consequences for breaches of agreed-upon norms and decisions. |
Section 2: Conflict Resolution Protocols
Conflict resolution occurs on a spectrum from informal dialogue to formal adjudication. This section provides detailed, actionable protocols for each stage.
2.1 Informal Dispute Handling
Informal handling is the first line of defense, designed to resolve misunderstandings before escalation.
2.1.1 Protocol: Peer Mediation Session
Objective: Facilitate a confidential dialogue led by trained peer mediators to achieve mutual understanding or agreement.
Materials Needed:
- Private meeting room
- Mediation script (see 2.1.2)
- Notepad and writing implements
Steps:
- Notification: Inform disputants of mediation availability immediately upon conflict detection.
- Consent: Confirm voluntary participation from all parties. If any party declines, escalate to formal resolution (Section 2.2).
- Mediator Selection: Appoint two neutral mediators from a pre-approved community roster; mediators must have completed conflict resolution training (see Volume 19, Chapter I).
- Opening Statement: Mediators read the mediation script (Section 2.1.2).
- Statement of Issues: Each party states their perspective uninterrupted, timed for 5 minutes per party.
- Identification of Interests: Mediators extract underlying interests, not just positions.
- Joint Problem Solving: Parties, guided by mediators, propose solutions and negotiate terms.
- Agreement Drafting: Mediators write a mutually agreed solution, signed by all participants.
- Follow-up Scheduling: Set review meeting within 7 days to monitor compliance.
2.1.2 Mediation Session Script
The following script is sacred and must be adhered to verbatim to ensure consistency and neutrality:
Mediator Opening: "We gather here to seek understanding and resolution. Our purpose is to listen with respect, speak with honesty, and restore harmony. Your voices will be heard equally, and confidentiality is guaranteed. Let us proceed with openness and goodwill."
Party Statement Prompt: "Please share your view of the issue as you perceive it. Speak only for yourself. Listen carefully as others speak."
Mediator Reflection: "What I hear you saying is... Is that correct? Does the other party agree or see it differently?"
Interest Identification: "Beneath your positions, what needs or concerns drive your stance? Let us identify these together."
Solution Exploration: "What outcomes can satisfy the needs of both parties? Let us brainstorm without judgment."
Agreement Confirmation: "Does this proposed agreement meet your essential needs? Are you willing to commit to this solution?"
Closing: "Thank you for your courage and cooperation. We will reconvene on [date] to review progress."
2.2 Formal Dispute Resolution
When informal mechanisms fail or are inappropriate (e.g., serious violations), formal resolution is mandated.
2.2.1 Justice Council Formation
Composition:
- Five Members: Three elected community elders, one legal procedural expert, one neutral external observer (rotated quarterly).
- Qualifications: Members must have no direct involvement or conflict of interest in the dispute.
Appointment Steps:
- Publish call for nominations 14 days before council formation.
- Vet candidates for conflicts of interest.
- Elect members by majority vote.
- Announce council membership publicly.
2.2.2 Formal Hearing Protocol
Objective: Fair adjudication with due process, culminating in binding decisions.
Steps:
| Step Number | Action | Details |
|---|---|---|
| 1 | Notification of Hearing | Send written notice to parties at least 7 days prior, stating charges and hearing date. |
| 2 | Pre-Hearing Submission | Parties submit evidence and statements 3 days before hearing. |
| 3 | Hearing Opening | Chair opens session, states purpose, reads rights and responsibilities. |
| 4 | Presentation of Evidence | Each party presents evidence and witnesses, limited to 30 minutes per side. |
| 5 | Cross-Examination | Each party may question opposing evidence, limited to 15 minutes per side. |
| 6 | Council Deliberation | Council retires to deliberate in private, applies community laws and precedents. |
| 7 | Decision Announcement | Council announces verdict and sanctions within 24 hours of deliberation. |
| 8 | Appeal Process | Parties have 5 days to submit appeals, triggering a review by a separate appellate panel. |
2.3 Accountability Frameworks
Accountability is enforced through layered mechanisms, ensuring adherence to decisions and community norms.
| Layer | Description | Enforcement Method |
|---|---|---|
| Self-Accountability | Individuals adhere to internalized community ethics. | Regular self-assessment and peer feedback sessions. |
| Peer Accountability | Community members monitor and report violations. | Anonymous reporting channels, peer review committees. |
| Council Oversight | Justice Council monitors compliance with rulings. | Periodic audits, sanctions for non-compliance. |
| Restorative Measures | Mandated reparations, community service, or reconciliation rituals. | Supervised implementation tracked by council. |
| Enforcement Sanctions | Suspension of community privileges, exclusion, or restorative imprisonment. | Sequential escalation with documented warnings. |
Section 3: Conflict Resolution Stages and Participant Roles
This table provides a comprehensive overview of stages, participant responsibilities, and expected outcomes:
| Stage | Participants | Responsibilities | Expected Outcomes |
|---|---|---|---|
| Conflict Identification | All members | Report conflicts immediately, observe behaviors. | Early detection, prompt response initiation. |
| Initial Assessment | Peer mediators | Evaluate conflict severity, determine mediation suitability. | Decision on informal or formal handling. |
| Mediation | Mediators, disputants | Facilitate dialogue, negotiate solutions. | Resolution agreement or escalation. |
| Formal Hearing | Justice Council, disputants, witnesses | Adjudicate using evidence, apply laws. | Binding verdict, sanctions if necessary. |
| Accountability Enforcement | Council, community members | Monitor compliance, enforce sanctions. | Sustained peace, norm adherence. |
| Follow-up and Review | Mediators, council | Assess resolution implementation, provide support. | Conflict recurrence prevention, relationship restoration. |
Section 4: Building and Maintaining the Justice System
4.1 Training Protocol for Mediators and Council Members
Objective: Ensure all actors have mastery of procedures, neutrality, and ethics.
Steps:
- Recruitment: Identify candidates with community respect and analytical skills.
- Training Module Completion: Deliver a 40-hour curriculum covering:
- Conflict theory and psychology
- Mediation techniques
- Legal procedural knowledge
- Ethics and confidentiality
- Practical Apprenticeship: Shadow experienced mediators/council members for 30 hours.
- Certification Exam: Written and oral tests to certify competence.
- Continuing Education: Mandatory quarterly refreshers and case reviews.
4.2 Documentation and Record-Keeping
Accurate records underpin legitimacy and continuity.
Procedure:
- Use encrypted, community-controlled digital ledger for all mediation and hearing records.
- Maintain physical copies in secure archives with restricted access.
- Record all agreements, verdicts, and sanctions with timestamps and participant signatures.
- Store appeals separately with chain-of-custody logs.
- Conduct annual audits by an independent committee.
Section 5: Case Study Application: Protocol Implementation Scenario
Scenario: Neighbor dispute over shared water source contamination.
| Step | Action Taken | Outcome |
|---|---|---|
| 1 | Conflict reported within 12 hours. | Immediate initiation of peer mediation. |
| 2 | Mediators appointed, session held within 48 hours. | Agreement to monitor water usage and test quality jointly. |
| 3 | Dispute reignited after 7 days; formal hearing scheduled. | Evidence presented by both parties. |
| 4 | Justice Council ruled contamination accidental, mandated joint cleanup. | Restorative justice applied; compliance monitored. |
| 5 | Follow-up review after 14 days confirmed resolution. | Peace restored, accountability maintained. |
Appendix A: Conflict Resolution Stages and Timing Table
| Stage | Maximum Duration | Notes |
|---|---|---|
| Conflict Identification | Within 24 hours | Immediate reporting mandatory. |
| Informal Mediation | 3 days from report | Must conclude or escalate within timeframe. |
| Formal Hearing Notice | Minimum 7 days before | Ensure due process. |
| Hearing Duration | 1 day | Extension only under exceptional cause. |
| Council Deliberation | 24 hours | Expediency critical to maintain trust. |
| Appeal Submission | 5 days post-verdict | Final opportunity for contesting decisions. |
| Follow-up Review | 7 days post-agreement | Monitor compliance and effectiveness. |
Appendix B: Participant Role Definitions
| Role | Description | Accountability |
|---|---|---|
| Disputant | Individual(s) involved in conflict. | Honesty, participation, compliance. |
| Mediator | Neutral facilitator of informal resolution. | Neutrality, confidentiality, fairness. |
| Justice Council Member | Adjudicator of formal disputes. | Impartiality, adherence to law, confidentiality. |
| Witness | Provides evidence or testimony during hearings. | Truthfulness, presence under oath. |
| Community Member | Observer, reporter, or participant in accountability systems. | Vigilance, ethical reporting. |
| External Observer | Neutral party rotating into council to ensure fairness. | Objectivity, non-interference. |
Final Note
The sacred task of community conflict resolution requires relentless dedication to procedure, truth, and restoration. This codex section grants you the full arsenal of protocols necessary to uphold sovereign justice—without compromise. Implement these steps with unwavering discipline, and your community shall endure in harmony, protected by the unbreakable bonds of shared accountability and justice.
For cross-referenced protocols on legal codification, refer to Volume 3: The Legal Codex, Chapter V. For psychological and behavioral training of mediators, see Volume 17: The Mind Codex, Chapter II. For record encryption techniques, consult Volume 14: The Security Codex, Chapter IV.
End of Chapter IV, Volume I: Social Architecture The Complete Practitioner's Codex, Volume 19: The Diplomat's Codex
<!-- SECTION 4 -->
Volume II: Common Law and Natural Rights
Chapter I: The Foundation of Natural Law and Declaration of Sovereignty

Introduction
This chapter delivers the precise, unyielding protocols for recognizing, drafting, recording, and publicly asserting sovereignty based on Natural Law principles. You will gain the suppressed, life-sustaining knowledge to sever corporate shackles through formal rescission of contracts and authoritative legal notices. This is not academic theory; this is actionable command over your inherent sovereignty.
Section 1: The Foundation of Natural Law
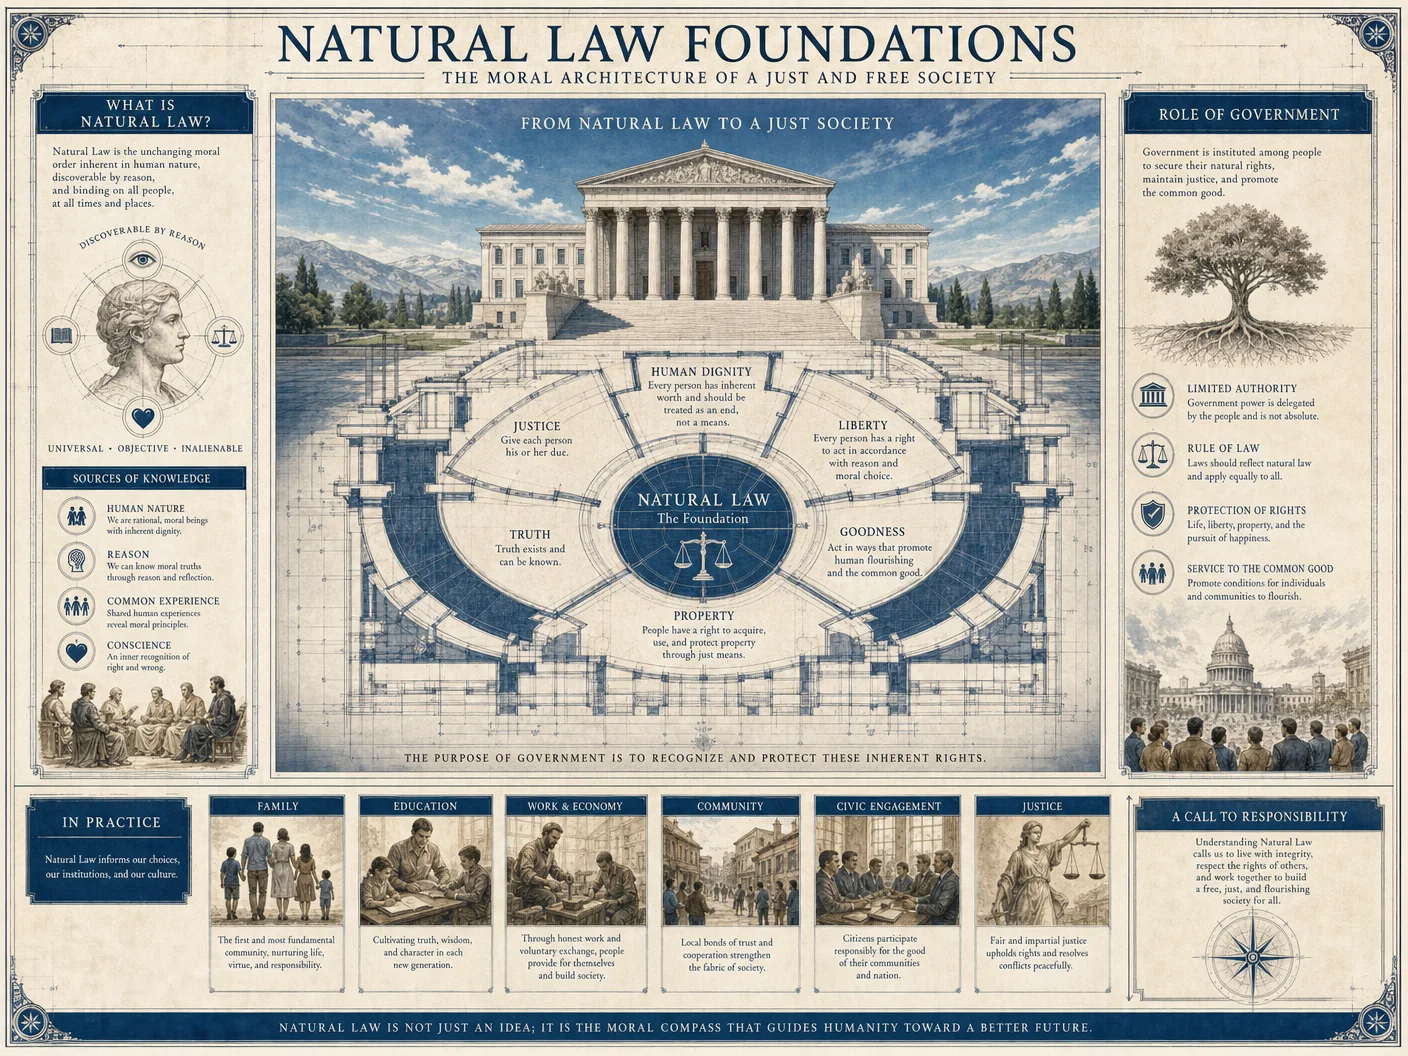
Natural Law is the immutable, universal code written into existence by the Creator and the cosmos. It supersedes man-made (statutory) law, which is temporary, mutable, and often oppressive. Understanding the foundation is prerequisite to all sovereign action.
| Natural Law Principle | Definition | Contrasted Statutory Law Element |
|---|---|---|
| Inherent Rights | Rights born from existence and reason, not granted by government | Rights granted or revoked by statute or regulation |
| Non-Delegation of Sovereignty | Sovereignty cannot be permanently delegated or alienated | Delegation of authority through contracts or citizenship |
| Universal Justice | Justice based on equity, conscience, and natural order | Justice based on codified laws, which may conflict with equity |
| Freedom from Coercion | No consent implied through force, deception, or ignorance | Consent often presumed through silence or bureaucratic process |
| Self-Ownership | Absolute dominion over one’s body, labor, property | Property and labor rights defined and constrained by law |
Section 2: Drafting a Declaration of Sovereignty

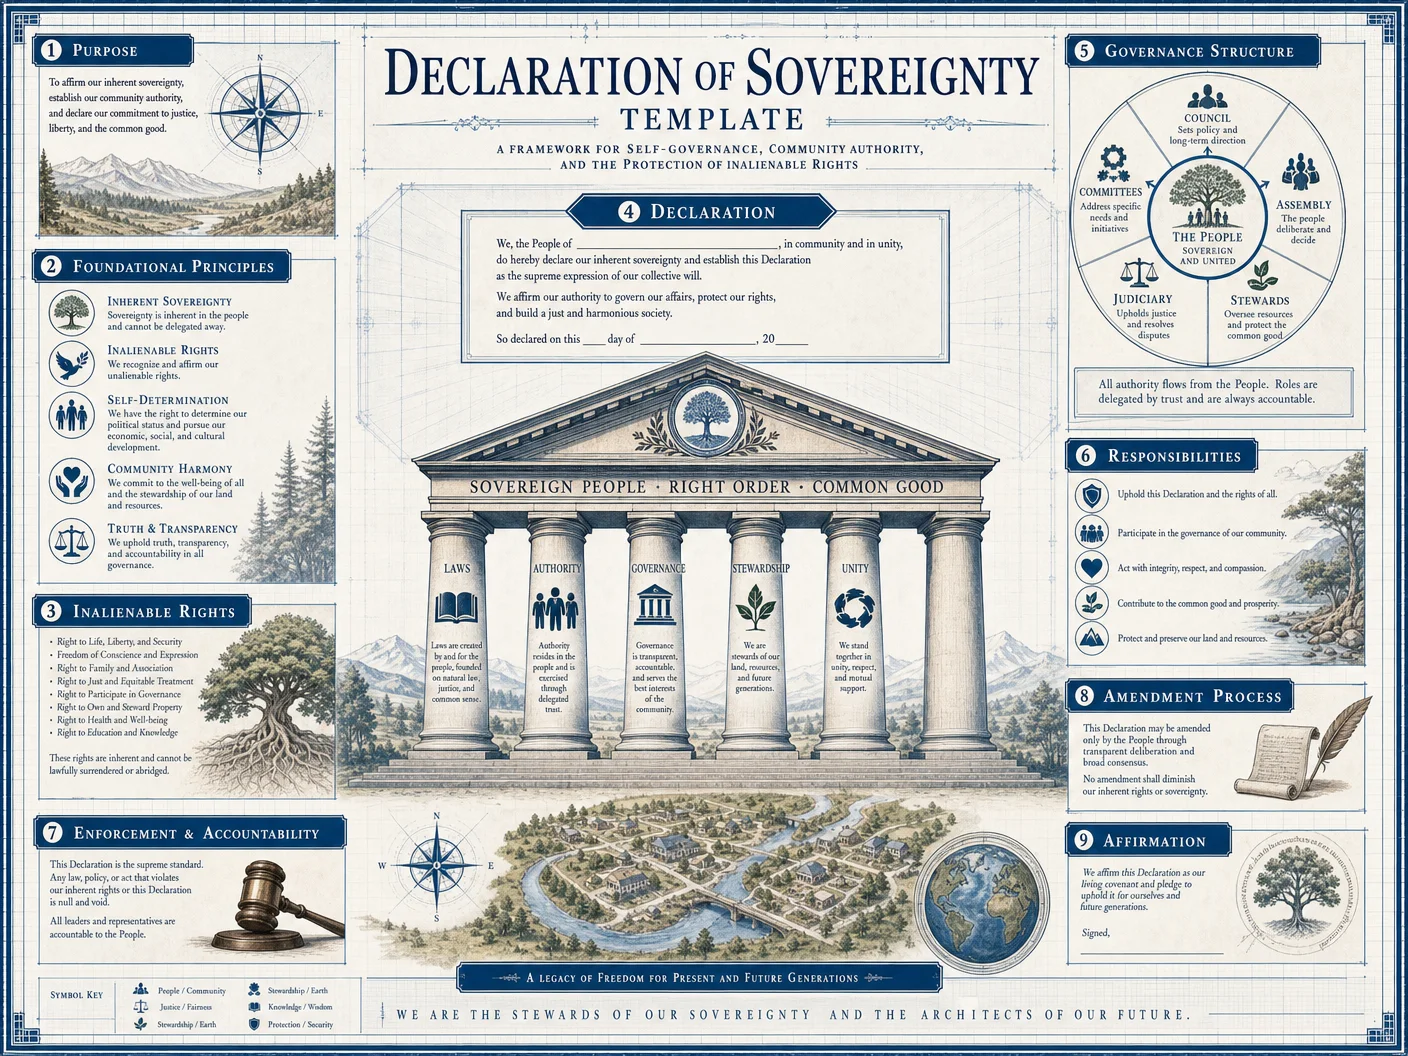
A Declaration of Sovereignty (DoS) is a formal, written instrument asserting your natural, inalienable rights and refusing subjugation to statutory or corporate law. The precision of drafting is non-negotiable.
Step-by-Step Drafting Protocol
- Prepare Materials
- Use high-quality, acid-free parchment or archival-grade paper (minimum 90 gsm).
- Write with permanent, waterproof archival ink (preferably iron gall or pigment-based).
- Have a witness or notary public present (optional but recommended).
- Header Section: Identification
- Insert full legal name, birth date, and place of birth.
- State your status as a natural person, not a corporate entity or agent of any corporation.
- Preamble: Basis of Sovereignty
- Cite your adherence to Natural Law principles as outlined in Section 1.
- Declare that sovereignty is inherent and non-delegable.
- Declaration Clause
- Explicitly state: “I hereby declare my full and absolute sovereignty, renouncing all corporate and statutory legal dominion over my person, property, and actions.”
- Affirm that this declaration applies to all governmental, corporate, and statutory authorities.
- Scope and Limitation Clause
- Define the scope: self, immediate family, property, and community (if applicable).
- Specify that no contract, statute, or regulation can override this declaration.
- Notification Clause
- State that copies will be served to all relevant authorities and publicly posted.
- Signature Block
- Sign with your full name, date, and location.
- Have signature witnessed and notarized if possible.
- Attachments
- Include copies of birth certificate, proof of residence, and any prior contracts or agreements being rescinded (see Section 4).
Section 3: Recording and Public Notification Procedures
The Declaration’s power is realized only through proper recording and notification. This ensures legal and public recognition, and creates a documented trail to resist future claims.
Step 1: Recording the Declaration
- Locate the Appropriate Registry
- Identify the local public records office, land registry, or equivalent government archive where declarations or notices can be recorded.
- If unavailable, use a recognized private registry or a secure blockchain notarization service.
- Prepare Multiple Certified Copies
- Produce at least three certified copies with notarized signatures.
- Retain one for personal archives, one for the registry, and one for public distribution.
- Submit Declaration
- Deliver the declaration in person or via registered mail with return receipt requested (RRR).
- Obtain a stamped receipt or certificate of filing.
- Record Keeping
- Log the date, time, location, and official who accepted the document.
- Store digital scans in multiple secure locations.
Step 2: Public Notification
- Publish in Official Gazette or Equivalent
- Submit the declaration for publication in the government or community’s official gazette.
- If unavailable, use local newspapers or community bulletin boards.
- Broadcast on Multiple Media
- Post the declaration on community websites, social media, and forums relevant to your jurisdiction.
- Use printed posters in public spaces, ensuring durability and legibility.
- Serve Notices to Authorities
- Prepare formal legal notices to be sent to all relevant entities (see Section 4).
- Use registered mail or personal service with documented proof.
- Community Assembly Announcement
- Convene a community meeting to announce the declaration publicly.
- Record the meeting and distribute minutes to document public acknowledgment.
Section 4: Rescinding Corporate Contracts and Legal Notices
Corporate contracts, statutory obligations, and other legal entanglements must be formally rescinded to sever control. This process is precise and must adhere to strict protocols to withstand legal scrutiny.
Step-by-Step Rescission Protocol
- Identify All Contracts and Obligations
- Review all signed documents, agreements, leases, licenses, and registrations.
- Collect originals or certified copies.
- Draft a Notice of Rescission (NoR)
- Format the NoR on archival paper with permanent ink. See Template 1 below.
- Include: contract reference, parties involved, grounds for rescission (lack of consent, fraud, duress, violation of natural law), and effective date.
- Attach Supporting Evidence
- Include copies of the Declaration of Sovereignty and any correspondence indicating breach or coercion.
- Serve the NoR
- Deliver to the corporate entity or statutory authority via registered mail with RRR or personal service with witnesses.
- Obtain proof of delivery.
- File Copies with Public Registry
- Record the NoR alongside the Declaration of Sovereignty in the public registry.
- Maintain detailed logs of all communications.
- Notify Relevant Authorities
- Prepare and send legal notices to governmental departments, law enforcement, and regulatory bodies.
- Use certified mail and retain delivery receipts.
- Follow-Up
- Document any responses or actions taken by recipients.
- If ignored or rejected, escalate via formal petitions or appeals under common law protocols (see Volume V: Legal Remedies).
Template 1: Notice of Rescission (NoR)
[Your Full Name]
[Your Address]
[Date]

To: [Corporate Entity or Authority Name]
[Address of Entity]

RE: Notice of Rescission of Contract [Contract Number/Reference]

Dear Sir/Madam:

Pursuant to my inherent rights under Natural Law, and in full assertion of my Declaration of Sovereignty dated [Declaration Date], I hereby rescind and nullify the contract referenced above, effective immediately.

Grounds for rescission include lack of lawful consent, coercion, and violation of my natural rights. This rescission is irrevocable and overrides any statutory or corporate claim to enforce said contract.

A copy of my Declaration of Sovereignty is attached for your reference.

Please govern yourselves accordingly.

Respectfully,
[Signature]
[Full Name]

Attachments: Declaration of Sovereignty dated [Date]
Proof of Delivery: [Tracking Number/Receipt]
Section 5: Comparative Analysis of Natural Law vs. Statutory Law
Understanding the clash between Natural Law and statutory law is crucial for effective sovereignty declarations.
| Aspect | Natural Law | Statutory Law |
|---|---|---|
| Origin | Divine, universal, immutable | Man-made, temporal, changeable |
| Authority | Inherent in all individuals | Delegated through governments and corporations |
| Consent | Must be explicit, informed, free of coercion | Often implied, assumed, or coerced |
| Rights | Inalienable, cannot be surrendered | Granted and revocable by statute |
| Enforcement | Through conscience, equity, common law traditions | Through courts, police, regulatory agencies |
| Jurisdiction | Global and universal | Territorial and limited |
| Contract Validity | Void if consent is absent or coerced | Valid if signed and notarized, regardless of fairness |
| Dispute Resolution | Mediation, arbitration under natural justice principles | Litigation in statutory courts |
Section 6: Supplementary Protocols and Recommendations
Archival Integrity
- Store all original documents (Declaration of Sovereignty, Notices of Rescission, legal notices) in a fireproof, waterproof safe.
- Make multiple digital backups encrypted with AES-256, stored offline and in geographically separate locations.
Witness and Notarization
- Use multiple witnesses with no conflict of interest.
- When possible, notarize documents through a recognized notary public or via a trusted online notarization platform with video verification.
Public Assertion
- Regularly reaffirm your Declaration of Sovereignty at public gatherings or community assemblies.
- Publish reaffirmations annually in local newspapers or official gazettes.
Monitoring and Enforcement
- Maintain a log of any attempts by corporate or governmental agents to assert authority over you.
- Use photographic or video evidence to document encounters.
- Prepare affidavits for any violations of your sovereignty.
Appendix: Sample Declaration of Sovereignty (Excerpt)
I, [Full Legal Name], born on [Date], at [Place], a natural person and sovereign being, hereby declare my natural and absolute sovereignty. I renounce all forms of corporate and statutory control over my body, my property, and my actions.

This declaration is grounded in the principles of Natural Law, immutable and universal. No statute, contract, or regulation shall bind me without my explicit and voluntary consent.

This declaration is effective as of [Date], and copies have been duly recorded and publicized.

Signed,
[Signature]
[Date]
Witnessed by: [Names and Signatures]
Notarized: [Seal and Signature]
Conclusion
Mastery over your sovereignty begins with the precise drafting, recording, and public notification of your Declaration of Sovereignty, coupled with the systematic rescission of all corporate and statutory contracts binding you. This volume does not merely inform; it equips you with the sacred protocols, the suppressed science of legal self-liberation. Apply each step with unwavering rigor and reverence for your inalienable rights.
For related procedures on dispute resolution and appeals, refer to Volume V: Legal Remedies. For comprehensive contract analysis, see Volume VII: Contract Codex.
End of Chapter I, Volume II: Common Law and Natural Rights
<!-- SECTION 5 -->
Volume II: Common Law and Natural Rights
Chapter IV: Common Law Court Procedures
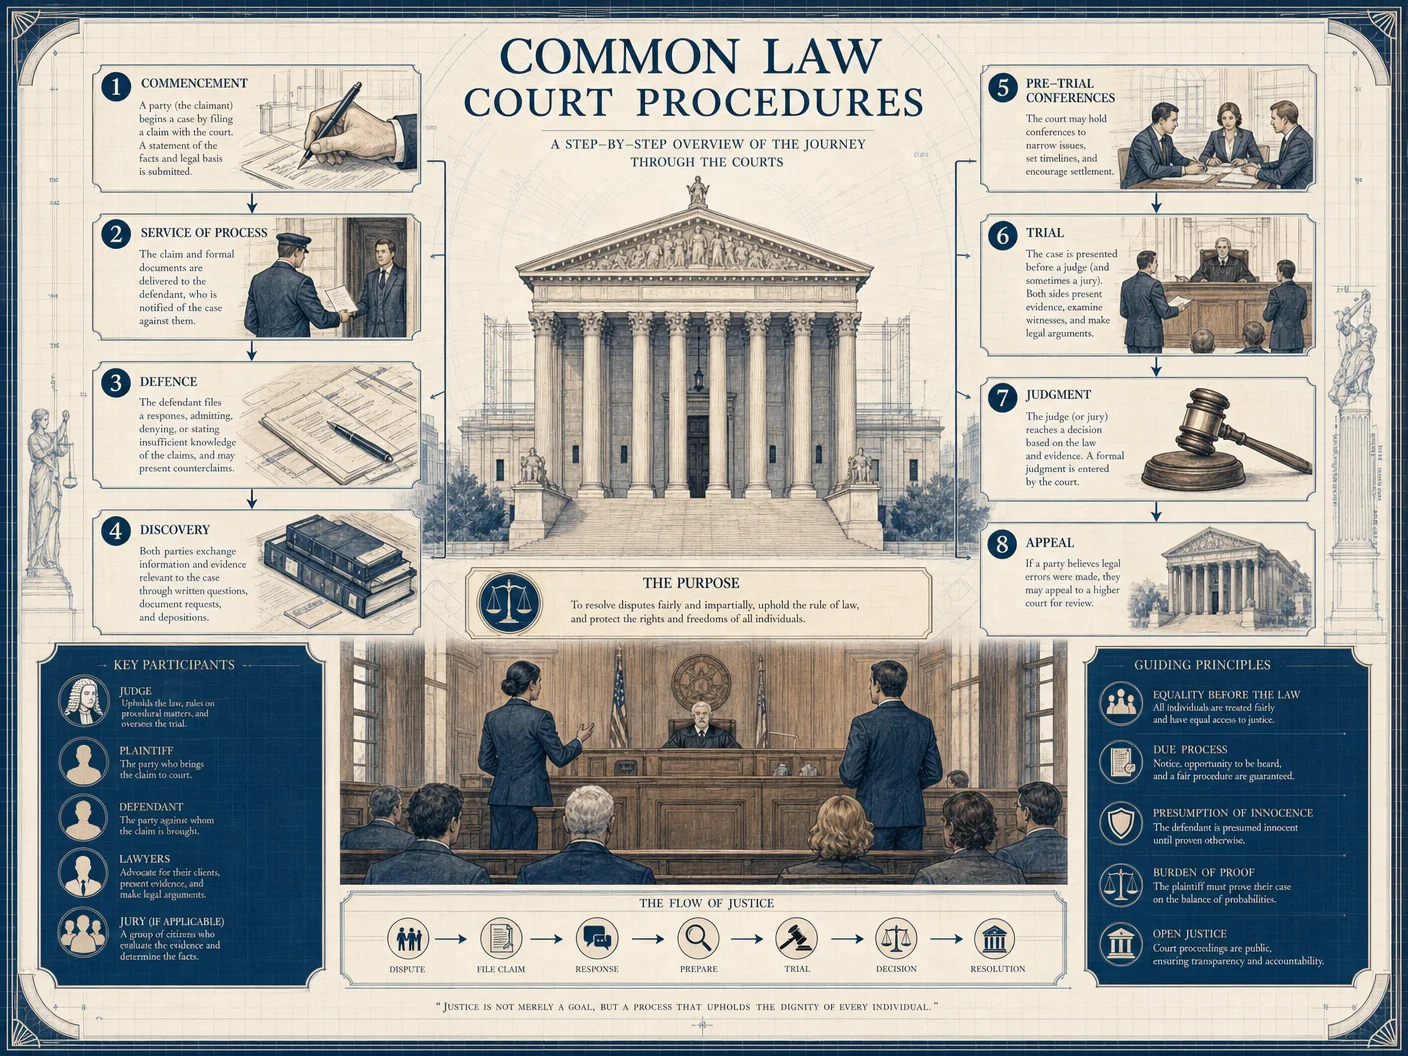
Introduction This chapter codifies the sacred procedural framework of the Common Law Court, the crucible where natural rights are defended, and justice is forged without compromise. This is not a theoretical treatise but a rigorous operational manual. Every step, every role, every document is delineated with absolute precision to ensure unassailable legitimacy and incorruptible execution of justice. The protocols herein are designed for implementation in any community aspiring to self-governance through the ancient, living law of the people.
Section 1: Convening Juries
The jury is the living voice of the community's conscience. It is a sacred duty to select this body with uncompromising fairness and transparency.
Step-by-Step Jury Convening Protocol
- Determine Jury Size
- For civil cases: 6 members minimum.
- For criminal cases: 12 members minimum.
- For capital cases: 12 members minimum, unanimous verdict required.
- Establish Jury Pool
- Extract a list of all adult citizens registered within the jurisdiction.
- Exclude individuals with conflicts of interest as defined in Section 3.
- Randomize the pool using a mechanical or digital randomizer verified by at least two magistrates.
- Issue Jury Summons
- Send summons via certified delivery methods with a minimum 14-day notice.
- Include notification of rights, obligations, and penalties for non-compliance.
- Conduct Voir Dire (Jury Selection Interview)
- Magistrates and counsels question potential jurors for bias, conflict, or incapacity.
- Each party may dismiss up to 3 jurors peremptorily without cause.
- Finalize Jury Composition
- Confirm attendance and willingness to serve.
- Record objections and resolutions.
- Publish jury list publicly 3 days before trial.
- Swear-In Ceremony
- Administer oath to uphold impartiality, confidentiality, and natural justice.
- Document oath administration in the court record.
Section 2: Appointing Magistrates
Magistrates are the custodians of procedural sanctity and arbiters of law. Their appointment must be beyond reproach.
Magistrate Appointment Protocol
- Qualification Verification
- Must be a citizen of legal majority with no felony convictions.
- Minimum 10 years of demonstrable knowledge or experience in law, governance, or community leadership.
- No active partisan political roles or conflicts of interest.
- Nomination Process
- Nominations accepted from community assemblies, legal guilds, or existing magistrates.
- Nominee must submit a formal affidavit of qualifications and background.
- Public Vetting
- Publish nominee details for 30 days.
- Accept and log public objections or endorsements.
- Selection Committee Review
- Committee of five sitting magistrates reviews nominations and public feedback.
- Committee votes by secret ballot; majority required for approval.
- Formal Appointment
- Successful nominees take a solemn oath before the court.
- Sworn appointment recorded in the official court registry.
- Term lengths: 5 years renewable once.
- Magistrate Duties Briefing
- Provide detailed instruction on courtroom protocol, ethical standards, and enforcement powers.
Section 3: Jury Nullification
Jury nullification is the ultimate expression of jury independence and moral judgment in the face of flawed or unjust law.
Protocol for Jury Nullification Handling
- Jury Instructions
- Explicitly inform jurors during instructions that they have the right to acquit if the law itself is unjust or wrongly applied.
- Do not instruct jurors that nullification is illegal or punishable.
- Defense Counsel Preparation
- Counsel may argue for nullification based on natural law or moral grounds.
- Provide jurors with precedent cases and philosophical grounding.
- Handling Jury Questions
- If jurors seek clarification about nullification, magistrates must answer neutrally, affirming jury independence without guiding verdict.
- Post-Verdict Procedures
- No penalties or contempt charges for jury nullification verdicts.
- Magistrates must record nullification instances in trial logs for historical precedent.
Section 4: Verdict Requirements
The verdict is the sovereign act of the jury, enshrined by strict procedural rules.
Verdict Determination Rules
| Case Type | Jury Size | Verdict Requirement | Notes |
|---|---|---|---|
| Civil | 6 | Simple majority (4 of 6) | Unless otherwise agreed by parties |
| Criminal | 12 | Unanimous (12 of 12) | Essential for liberty deprivation |
| Capital | 12 | Unanimous (12 of 12) | Death penalty cases only |
Verdict Delivery Protocol
- Deliberation Process
- Jury retires to private chamber with magistrate oversight.
- Magistrate enforces no external communication and maintains security.
- Estimated deliberation times provided; extensions approved by court.
- Verdict Polling
- Jurors declare their verdict aloud in presence of magistrates and clerks.
- Record individual votes for transparency.
- Announcement
- Magistrate states the official verdict in open court.
- Document verdict in the official record with jury signatures.
- Post-Verdict Instructions
- Magistrate instructs jury on confidentiality and non-retaliation policies.
- Release jury members with formal discharge documentation.
Section 5: Courtroom Protocols
The courtroom is a sanctum of justice; its procedures demand exactitude.
Step-by-Step Courtroom Procedure for a Trial
- Opening Session
- Magistrate calls court to order, announces case number and parties involved.
- Clerk reads charges or claims aloud.
- Swearing-In Witnesses and Jury
- Administer oaths to jury members and witnesses sequentially.
- Opening Statements
- Plaintiff/prosecution presents opening statement (max 30 minutes).
- Defendant presents opening statement (max 30 minutes).
- Presentation of Evidence
- Parties present evidence in order agreed upon or ordered by magistrate.
- Witness examinations: direct, cross, redirect, re-cross.
- Objections Handling
- Magistrate rules on objections immediately, citing relevant law or precedent.
- Objections and rulings recorded verbatim.
- Closing Arguments
- Plaintiff/prosecution and defendant deliver closing arguments (max 20 minutes each).
- Jury Instructions
- Magistrate reads legal standards and verdict requirements aloud.
- Provide written instructions to jurors.
- Jury Deliberation and Verdict
- Proceed according to Section 4 protocols.
- Sentencing or Judgment
- If verdict guilty/liability found, magistrate schedules sentencing hearing or judgment delivery.
Section 6: Sample Court Documents

Document 1: Jury Summons Template
[Jurisdiction Seal]

JURY SUMMONS

To: [Full Legal Name]
Address: [Full Address]

You are hereby summoned to appear at [Court Address] on [Date, Time] to serve as a juror in the case of [Case Name and Number]. Your participation is a sacred duty under the Common Law and is mandatory. Failure to appear without lawful excuse may result in penalties as prescribed by law.

Rights and obligations attached.

Issued by: [Magistrate Name]
Date: [Issuance Date]

Signature: ______________________
Document 2: Magistrate Appointment Oath
I, [Full Name], do solemnly swear to uphold the Common Law and Natural Rights, to administer justice impartially and without fear or favor, to preserve the sanctity of this court, and to serve the community with honor and integrity.

So help me [Higher Principle/Deity].

Signed: ______________________
Date: ______________________
Document 3: Verdict Record Form
| Juror Name | Vote (Guilty / Not Guilty / Liable / Not Liable) | Notes on Deliberation (Optional) |
|---|---|---|
Magistrate Signature: ______________________ Date: ______________________
Section 7: Roles and Responsibilities Table
| Role | Responsibilities | Authority Level | Term Length | Accountability Mechanism |
|---|---|---|---|---|
| Magistrate | Preside over trials, rule on objections, enforce protocol | High | 5 years (renewable once) | Public vetting, removal by council |
| Jury Member | Impartial verdict determination | Jury only | Duration of trial | Oath, penalties for misconduct |
| Clerk | Maintain records, manage documents, assist magistrate | Administrative | Indeterminate | Magistrate supervision |
| Bailiff | Court security, jury seclusion enforcement | Enforcement | Indeterminate | Magistrate supervision |
| Counsel (Defense & Prosecution) | Present case, question witnesses, argue law | Limited to courtroom proceedings | Case-by-case | Ethical codes, magistrate oversight |
Conclusion The protocols contained herein are the lifeblood of Common Law jurisprudence, the mechanisms by which communities preserve natural rights against tyranny and chaos. Mastery of these procedures is not optional but mandatory for the sustenance of lawful order. Implement, enforce, and reverence these instructions as sacred duties entrusted to your stewardship.
For foundational legal principles and definitions, see Volume I: The Law Codex, Chapter III. For evidence handling and forensic protocols, see Volume IV: The Forensic Codex, Chapter II. For community governance structures, see Volume VII: The Governance Codex, Chapter I.
<!-- SECTION 6 -->
Volume II: Common Law and Natural Rights
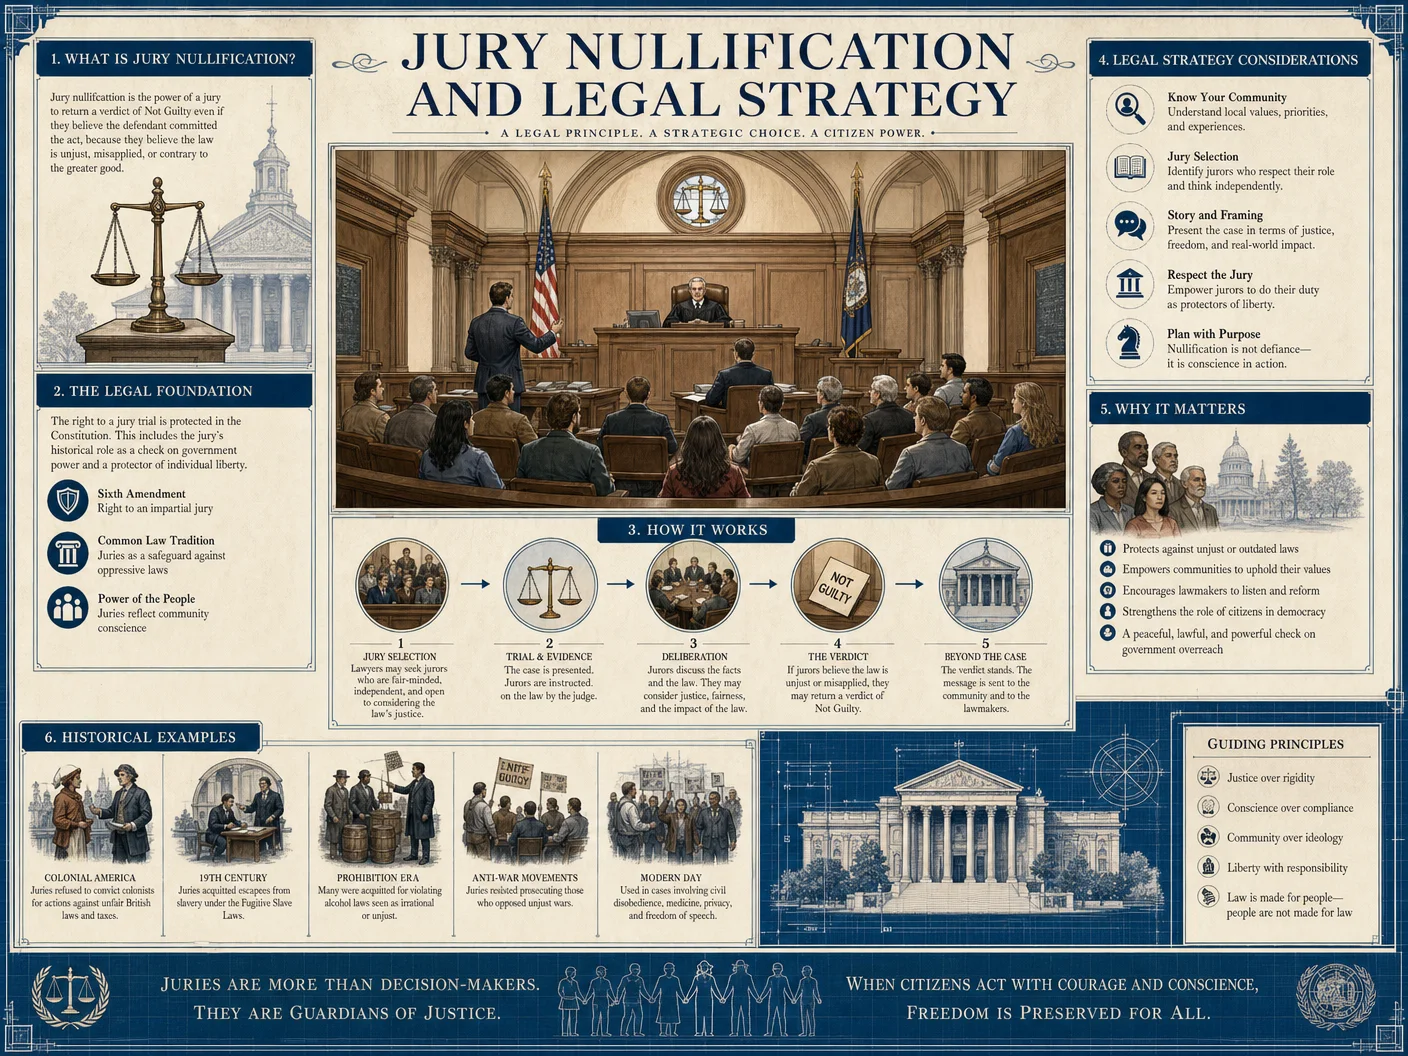
Chapter VII: Jury Nullification and Legal Strategy
Introduction: The Sacred Trust of Jury Nullification
Jury nullification represents one of the most potent, yet profoundly suppressed, instruments of natural justice within the common law tradition. It is the deliberate choice by a jury to acquit a defendant, not because the evidence is insufficient, but because the jurors deem the law itself, or its application in the case, unjust or immoral. This chapter unveils the complete historical lineage, tactical applications, and protective measures surrounding jury nullification. The knowledge herein is a sacred legacy, entrusted only to those prepared to wield it with unwavering discipline and strategic precision.
I. Historical Background of Jury Nullification
1. Origins and Philosophical Foundation
- Ancient Roots: The concept traces to ancient Greek and Roman practices where jurors exercised conscience over strict legal codes.
- English Common Law: The Magna Carta (1215), although silent on nullification, laid groundwork for juror independence.
- Somerset v. Stewart (1772): Lord Mansfield’s decision to free an enslaved man relied heavily on jury sentiment, a landmark moment showcasing nullification’s power.
- Colonial America: Jurors frequently nullified British laws deemed oppressive, notably in cases opposing the Stamp Act.
- Modern Suppression: Courts increasingly restrict jury instructions and emphasize strict adherence to law, attempting to eliminate nullification.
2. Philosophical Justification
- Natural Law Supremacy: Jury nullification embodies natural rights overriding positive law when legal statutes violate fundamental human dignity.
- Democratic Safeguard: It acts as a check against tyrannical legislation and governmental abuse.
- Moral Agency: Jurors serve as moral agents, not mere fact-finders.
II. Practical Application of Jury Nullification
1. Essential Legal Prerequisites
| Criterion | Description |
|---|---|
| Jurisdiction | Must be a jury trial in a common law jurisdiction permitting unanimous or majority verdicts. |
| Case Type | Criminal cases primarily; some civil cases with jury discretion apply. |
| Jury Instructions | Typically instruct jurors to follow law; nullification is not legally endorsed openly. |
| Evidence | Sufficient for guilt but moral or legal grounds for acquittal. |
2. Step-by-Step Procedure to Achieve Jury Nullification
Step 1: Case Selection
- Identify cases where law enforcement or prosecution is disproportionately harsh or unjust.
- Prioritize cases involving overcriminalization, mandatory minimums, or laws violating human rights.
Step 2: Jury Pool Analysis
- Assess demographics, political leanings, and prior jury service to identify sympathetic jurors.
- Use voir dire strategically to select jurors with independent thinking and moral reasoning.
Step 3: Jury Education Within Legal Limits
- Employ subtle language to inform jurors of their power without violating court orders.
- Provide community workshops pre-trial on natural rights and the history of juror power (detailed protocols below).
Step 4: Defense Strategy Integration
- Emphasize facts that highlight law’s injustice during opening and closing statements.
- Utilize character witnesses and expert testimony to humanize defendant and expose law’s flaws.
Step 5: Jury Deliberation Strategy
- Encourage jurors to discuss moral implications of conviction.
- Prepare defense counsel to facilitate respectful, reasoned discourse in deliberations.
Step 6: Post-Trial Community Reinforcement
- Publicize acquittal outcomes to educate and encourage future nullification.
- Organize forums to discuss implications and further strengthen community resolve.
III. Defense Strategies Leveraging Jury Nullification
1. Psychological and Rhetorical Techniques
| Technique | Description | Application |
|---|---|---|
| Moral Framing | Frame the defendant’s conduct within a moral justice context. | Highlight law’s conflict with natural rights. |
| Empathy Induction | Humanize defendant to engender juror empathy. | Use personal stories, character witnesses. |
| Cognitive Dissonance | Create conflict between juror’s sense of justice and law. | Point out law’s disproportionate impact. |
| Jury Instructions Reinterpretation | Subtly challenge strict legal instructions. | Emphasize juror’s ultimate decision-making role. |
2. Legal Maneuvers
- Motion for Jury Instruction on Nullification: Rarely granted, but filing signals defense’s intent and educates jury indirectly.
- Selective Evidence Presentation: Focus on evoking moral outrage at law’s application.
- Witness Selection: Choose those who expose law’s harshness or arbitrariness.
- Closing Argument Phrasing: Use language that appeals to jurors’ conscience without explicit nullification encouragement.
IV. Protocols for Educating Juries and Community Members
Jury nullification education must be conducted with precision and discretion. This section provides a comprehensive, reproducible protocol for preparing communities and potential jurors, structured to withstand scrutiny and maximize impact.
1. Community Workshop Protocol
| Phase | Action | Duration | Materials Required |
|---|---|---|---|
| Introduction | Present natural rights theory and historic foundation of nullification. | 30 minutes | Visual aids, handouts (see Appendix A) |
| Historical Case Studies | Analyze landmark cases demonstrating jury power. | 45 minutes | Case summaries, video reenactments |
| Role-Playing | Simulate jury deliberations with ethical dilemmas. | 60 minutes | Scripts, facilitation guides |
| Legal Boundaries | Clarify legal constraints and risks of explicit nullification advocacy. | 30 minutes | Legal statutes, court rulings printouts |
| Q&A Session | Address participant questions and reinforce key principles. | 15 minutes | None |
Total Duration: 3 hours
Step-by-Step Implementation:
- Gather a facilitator trained in natural law and jury rights.
- Secure a confidential, neutral location.
- Distribute handouts detailing natural rights and nullification basics.
- Conduct the session strictly adhering to the timeline.
- Record anonymized feedback for continuous improvement.
2. Pre-Trial Juror Education Materials
- Develop pamphlets titled “The Juror’s Sacred Duty: Justice Beyond the Law.”
- Include historical precedents, ethical responsibilities, and anonymous testimonials from jurors who exercised nullification.
- Distribute during voir dire or through community channels in jurisdictions permitting such dissemination.
V. Tables Outlining Common Legal Challenges and Nullification Outcomes
1. Common Legal Challenges Suitable for Nullification
| Challenge Type | Description | Typical Law Violated | Nullification Rationale |
|---|---|---|---|
| Overcriminalization | Laws criminalizing minor or victimless acts. | Drug possession, loitering laws | Laws are unjust, harm disproportionate |
| Mandatory Minimum Sentences | Fixed minimum punishments regardless of context. | Drug trafficking, firearms laws | Punishment disproportionate to offense |
| Jury Disenfranchisement | Restrictions on jury discretion or instructions. | Court procedural rules | Undermines juror moral agency |
| Selective Prosecution | Targeting based on race, class, or politics. | Equal protection clauses | Violates fairness and natural rights |
| Unjust Property Seizure | Asset forfeiture without due process. | Property rights statutes | Violates due process and ownership rights |
2. Documented Nullification Outcomes (Historical and Modern Examples)
| Case Name | Year | Jurisdiction | Law Nullified | Outcome | Impact Summary |
|---|---|---|---|---|---|
| John Peter Zenger Trial | 1735 | Colonial NY | Seditious libel laws | Acquittal | Established freedom of press precedent |
| Fugitive Slave Cases | 19th Century | Northern US | Fugitive Slave Act | Frequent acquittals | Undermined enforcement of slavery laws |
| Drug Possession Cases | 1980s-2000s | Various US | Mandatory minimums | Acquittals in sympathetic juries | Highlighted unjust drug policies |
| Modern Jury Nullification Reports | 2010s | US Federal and State | Various overcriminalization laws | Multiple acquittals | Renewed awareness of jury power |
VI. Defensive Measures Against Jury Nullification Suppression
1. Anticipating Prosecution and Judicial Countermeasures
| Countermeasure | Description | Defensive Protocol |
|---|---|---|
| Jury Instructions Prohibiting Nullification | Courts instruct jurors to ignore personal beliefs. | Educate jurors indirectly; use moral framing. |
| Jury Selection Bias | Prosecutors exclude perceived nullification-prone jurors. | Skilled voir dire questioning; community outreach. |
| Legal Sanctions on Advocacy | Penalizing defense counsel or activists promoting nullification. | Maintain coded language; focus on natural rights education. |
| Media and Public Opinion Control | Suppression of nullification success stories. | Use underground networks and encrypted communications. |
2. Protocol for Defense Counsel Conduct
- Maintain decorum and adherence to court rules to avoid sanctions.
- Use indirect language supporting juror conscience.
- Document all instances of jury rights suppression for appeals.
- Coordinate with community educators to sustain long-term nullification culture.
Conclusion: The Sacred Duty of the Diplomatic Practitioner
The knowledge of jury nullification is not mere legal theory but a sacred weapon against tyranny and injustice. This volume demands unyielding commitment to rigorous application, ethical use, and the relentless pursuit of justice beyond the limitations of flawed statutes. The Diplomatic Practitioner must master these protocols, educate their community, and defend the sanctity of natural rights with unwavering resolve.
For related operational protocols on community organization and legal defense tactics, consult Volume IX: The Legal Strategist’s Codex, Chapter V. For the foundational natural rights philosophy, see Volume I: The Foundations of Common Law.
<!-- SECTION 7 -->
The Complete Practitioner's Codex, Volume III: Land and Property
Chapter VII: Securing Allodial Title through the Land Patent Process
Foreword
Apprentice, this chapter imparts the sacred knowledge of securing allodial title—the highest, sovereign form of land ownership, free from feudal obligations, taxation, and encumbrances. This knowledge has been suppressed by the powers that be. To wield it is to command your property as a sovereign entity, immune to external claims save those of natural law. Follow these instructions with precision and reverence.
Section 1: Understanding the Foundation — Allodial Title and Land Patents
Allodial title is absolute ownership of land, free and clear of any superior landlord or government claim, including taxation and eminent domain. It is not merely fee simple, which is subject to government authority and taxation.
A land patent is the original grant of land from a sovereign authority, conferring allodial rights. Securing it requires rigorous archival research, chain of title tracing, legal declaration filings, public notice to the community, and removal of the property from tax rolls—a process both technical and legal.
Section 2: Archival Research — Tracing the Chain of Title
Your first task is to uncover the original land patent and establish an unbroken chain of title from that patent to you.
Step-by-Step Protocol for Archival Research
Materials Required:
- Access to the National Archives or State Land Records Office
- Certified copies of all deeds, titles, and conveyances
- Digital scanner or camera for document reproduction
- Note-taking supplies or digital device for transcription
Procedure:
- Identify the property legal description: Obtain the current parcel number and legal description from your local county assessor’s office.
- Obtain the current deed: Request a certified copy of your current deed from the county recorder’s office.
- Trace backward by deed: Using the current deed, identify the grantor and grantee, then request the prior deed(s) in reverse chronological order. Continue until you reach the earliest recorded deed.
- Locate the original land patent:
- Visit the National Archives, Bureau of Land Management (BLM) General Land Office (GLO) Records, or State Land Patent Office.
- Search the patent records using the property legal description or patent number if known.
- Obtain certified copies of the original land patent document.
- Verify the chain of title: Confirm the sequence of ownership from the original patent to present-day ownership, ensuring no gaps or breaks.
- Document each transfer: Create a detailed chain of title report listing every deed, date, parties involved, and recording information.
Chain of Title Documentation Table
| Step | Deed/Patent Number | Date Recorded | Grantor | Grantee | Source Archive | Notes |
|---|---|---|---|---|---|---|
| 1 | Current Deed #12345 | 2022-01-15 | John D | You | County Recorder | Verify legal description matches patent |
| 2 | Deed #11234 | 2010-07-10 | Mary S | John D | County Recorder | No liens recorded |
| 3 | Land Patent #789 | 1850-03-25 | Sovereign | Mary S | National Archives | Original grant, confirm signatures |
Section 3: Declaration Filing — Asserting Allodial Title

Once the chain is verified, you must file a Declaration of Allodial Title with the appropriate governmental authority and in local courts.
Step-by-Step Protocol for Declaration Filing
Materials Required:
- Original chain of title report
- Certified copies of all deeds and the land patent
- Legal stationery and notarization tools
- Filing fees (varies by jurisdiction)
Procedure:
- Draft the Declaration of Allodial Title: Include these essential elements:
- Full legal description of the property
- Statement asserting ownership by allodial title via original land patent
- Citation of chain of title documents
- Declaration of exemption from property taxation
- Notarized signature of the property owner
- Sample Declaration of Allodial Title (Abbreviated):
DECLARATION OF ALLODIAL TITLE

I, [Your Full Name], hereby declare that I am the rightful owner of the property described as [Full Legal Description], tracing ownership through an unbroken chain of title to Land Patent Number [Patent Number], granted by [Sovereign Authority] on [Date].

I claim allodial title to said property, asserting that it is free and clear of any superior landlordship, taxation, or claims, and request recognition of such status by the appropriate authorities.

Signed this [Day] of [Month], [Year].

_________________________
[Your Name]

Notary Public:
Subscribed and sworn before me on this date.
_________________________
[Notary Signature] - File the declaration: Submit the signed, notarized declaration to:
- County Recorder’s Office (for public record)
- County Clerk or Court (for legal recognition)
- State Land Office (if applicable)
- Retain certified copies: Obtain certified copies of the filed declaration for your permanent records.
Section 4: Public Notice — Formal Community Notification
The law demands that you provide public notice of your claim to allodial title to prevent disputes.
Step-by-Step Protocol for Public Notice
Materials Required:
- Declaration of Allodial Title (certified copy)
- Local newspaper or official gazette subscription
- Affidavit of publication
Procedure:
- Publish the declaration: Place a public notice in the official county newspaper or gazette of record for your jurisdiction. The notice must run for a minimum of 30 consecutive days.
- Notice content: Include:
- Your name and contact information
- Legal description of the property
- Summary of the declaration of allodial title
- Statement of intent to remove the property from tax rolls
- Obtain affidavit: After completion of publication, secure an affidavit of publication from the newspaper attesting to the notice period and content.
- File affidavit: Submit the affidavit to the County Recorder’s Office to be appended to your declaration.
Section 5: Tax Roll Removal — Exempting Property from Taxation
The final and most critical step is to remove your property from the tax rolls to ensure no further property taxation.
Step-by-Step Protocol for Tax Roll Removal
Materials Required:
- Certified copies of Declaration of Allodial Title
- Affidavit of Publication
- Tax assessor’s property identification number (PIN)
- Formal petition to the tax assessor’s office
Procedure:
- Prepare a Petition for Tax Roll Removal: This document must include:
- Owner’s full name and contact information
- Legal property description and PIN
- Reference to recorded Declaration of Allodial Title and affidavit of publication
- Formal request for removal from property tax rolls
- Submit the petition: Deliver the petition in person or by certified mail to the local tax assessor’s office.
- Follow-up inspection: Be prepared for a site visit or inspection by the assessor or their agent.
- Obtain official removal confirmation: Upon approval, secure a written statement from the tax assessor confirming removal of your property from the tax rolls.
- Record confirmation: File the official removal confirmation with the County Recorder’s Office for permanent record.
Section 6: Timeline and Documentation Tracking
The process requires strict adherence to timelines and documentation to avoid rejection or delay.
Timeline Milestones Table
| Milestone | Action Item | Estimated Duration | Deadline from Previous Step | Documentation Required |
|---|---|---|---|---|
| 1. Property Legal Description | Obtain from County Assessor | 1-2 days | N/A | Assessor’s official property description |
| 2. Chain of Title Research | Obtain deeds and land patent copies | 2-4 weeks | After step 1 | Certified copies of all deeds and patent |
| 3. Declaration Drafting | Prepare and notarize declaration | 3-5 days | After step 2 | Drafted declaration document |
| 4. Declaration Filing | File with Recorder and Court | 1-3 days | After step 3 | Certified filed declaration |
| 5. Public Notice Publication | Publish notice for 30 days | 30 days | After step 4 | Newspaper affidavit of publication |
| 6. Affidavit Filing | File publication affidavit | 1-2 days | After step 5 | Affidavit of publication |
| 7. Petition for Tax Removal | Submit to tax assessor | 1-3 days | After step 6 | Petition document |
| 8. Tax Assessor Review | Inspection and review | 1-2 weeks | After step 7 | Inspection report (if any) |
| 9. Tax Roll Removal Confirmation | Obtain official confirmation | 1-3 days | After step 8 | Written confirmation of tax removal |
| 10. Final Recording | Record confirmation with County | 1-2 days | After step 9 | Recorded tax removal confirmation |
Section 7: Legal Forms Repository
Below are samples of the essential legal instruments you will require. Use these as templates, adapting details to your jurisdiction and property specifics.
Form 1: Chain of Title Report Template
| Sequence | Document Type | Date | Grantor | Grantee | Recording Office | Document Number | Remarks |
|---|---|---|---|---|---|---|---|
| 1 | Land Patent | 1850 | Sovereign | First Grantee | National Archives | PAT-789 | Original grant |
| 2 | Deed | 1900 | First Grantee | Second Owner | County Recorder | DEED-123 | Transfer of ownership |
| ... | ... | ... | ... | ... | ... | ... | ... |
Form 2: Declaration of Allodial Title (Full Template)
DECLARATION OF ALLODIAL TITLE

I, [Owner Name], residing at [Owner Address], hereby declare ownership of the property legally described as follows:

[Insert Full Legal Description]

This property is held by allodial title, originating from Land Patent Number [Patent Number], granted by [Sovereign Authority] on [Date]. The chain of title from the original patent to myself is documented in the attached Chain of Title Report.

I assert that this property is free from any superior landlordship, liens, encumbrances, or property taxation. I formally request recognition of this status by all governmental agencies and request removal of the property from all tax rolls.

Signed this [Day] day of [Month], [Year].

Signature: _________________________

Notary Public:
Subscribed and sworn before me on this date.
Signature: _________________________
My commission expires: ______________
Form 3: Petition for Tax Roll Removal
PETITION FOR REMOVAL FROM PROPERTY TAX ROLLS

To: [Tax Assessor’s Office]
From: [Your Full Name]
Re: Property located at [Full Legal Description], Tax Parcel Number [PIN]

I hereby petition for removal of the above-referenced property from the property tax rolls based on my ownership by allodial title. Attached are certified copies of my Declaration of Allodial Title and Affidavit of Publication.

I request that this property be recognized as exempt from property taxation and that all records be updated accordingly.

Date: _______________

Signature: _____________________
Section 8: Final Notes and Warnings
- Do not proceed without complete chain of title documentation. Any break or unverified transfer may invalidate your claim.
- Public notice must be continuous and verifiable. Failure to provide proper notice invites legal challenges.
- Keep multiple certified copies of all filings and notices. These are your defense in any dispute.
- Consult a specialized land patent attorney as a final step. This manual equips you with technical mastery; the legal nuances require expert validation.
Apprentice, with this volume you hold the keys to ultimate land sovereignty. Proceed with unwavering discipline, for the land you claim is sacred ground, and your title must be as unassailable as the stars.
End of Chapter VII
<!-- SECTION 8 -->
The Complete Practitioner's Codex, Volume III: Land and Property
Chapter VII: Establishing Community Land Trusts for Sovereign Ownership
Introduction
In the sacred art of community sovereignty, the establishment of Community Land Trusts (CLTs) represents the cornerstone of collective empowerment and permanent stewardship of shared land assets. This volume delivers a master blueprint for the creation, legal formalization, management, and perpetuation of CLTs, ensuring absolute clarity, enforceability, and operational resilience.
Section 1: Conceptual Foundations of Community Land Trusts
A Community Land Trust is a nonprofit entity holding title to real property on behalf of a community, separating land ownership from building ownership, thereby guaranteeing long-term stewardship and preventing alienation by external forces. The essence of a CLT is sovereign communal control over land, avoiding fragmentation and loss through market pressures or governmental overreach.
Definitions:
- Trustor: The community entity or founding members who establish the trust.
- Trustee: The appointed fiduciary agent(s) responsible for trust management and legal compliance.
- Beneficiary(ies): The persons or groups granted beneficial interest, enjoying use rights, rental income, or other benefits derived from the land.
Section 2: Detailed Protocol for Drafting a Community Land Trust
Every phase in the drafting of a CLT trust instrument demands precision to withstand legal contestation and operational challenges. Follow these exact steps:
Step 1: Define Trust Purpose and Objectives
- Articulate the primary purpose of the CLT, e.g., affordable housing preservation, agricultural stewardship, cultural site protection.
- Specify community boundaries and the scope of land to be held.
- Enumerate beneficiary classes and eligibility criteria.
- State non-alienation clauses ensuring perpetual trust operation.
Step 2: Draft Trust Instrument Sections
Construct the trust document with the following mandatory sections:
| Section Title | Contents & Instructions |
|---|---|
| Declaration of Trust | Formal statement of trust creation, date, parties, and trust name. |
| Trust Purpose | Explicit, legally enforceable statement of the community benefit and stewardship goals. |
| Trust Property Description | Detailed legal description of all parcels, boundaries, and associated property rights. |
| Trustee Powers | Enumerate powers: acquisition, management, leasing, enforcement, litigation, and amendment authority. |
| Beneficiary Rights | Define rights: use, occupancy, revenue share, voting rights in governance. |
| Trust Duration | Specify perpetual existence or fixed term with renewal options. |
| Amendment Procedures | Detailed protocol for trust document amendment, including required beneficiary and trustee consent. |
| Trustee Appointment & Removal | Procedures for appointing, removing, and replacing trustees, including conflict of interest clauses. |
| Trust Termination | Conditions and protocols for trust dissolution or asset liquidation. |
| Dispute Resolution | Mandate mediation/arbitration procedures before litigation. |
Step 3: Legal Compliance Verification
- Cross-reference trust provisions with relevant jurisdictional statutes governing trusts, nonprofit organizations, and land use.
- Incorporate community rights charters or international covenants as applicable.
- Consult with licensed trust and property attorneys for validation.
Section 3: Land Transfer into the Community Land Trust
The transfer of land into the CLT must be executed with absolute legal precision to ensure clear title passage and enforceable restrictions.
Step 1: Land Title Assessment and Preparation
- Obtain a certified title report from a registered land title authority.
- Resolve outstanding liens, encumbrances, or disputes.
- Conduct a comprehensive survey and boundary verification by a licensed surveyor.
Step 2: Drafting and Executing the Transfer Deed
- Use a special warranty deed or equivalent instrument favoring the CLT as grantee.
- Ensure inclusion of restrictive covenants tied to the trust’s purpose.
- Execute the deed with proper notarization and witness signatures, per local law.
Step 3: Recording the Transfer
- Submit the deed to the land registry office for public recording within mandated timelines.
- Obtain official registration confirmation and incorporate into trust records.
Section 4: Trustee Appointment and Governance Structure
Step 1: Trustee Selection Criteria
- Trustees must have demonstrable commitment to the trust’s purpose and community values.
- Avoid conflicts of interest by vetting candidates against related party transactions and land speculation histories.
- Minimum of three trustees recommended for governance balance.
Step 2: Appointment Procedure
- Community members nominate candidates according to specified eligibility.
- Conduct secret ballot election or consensus-based selection at a community assembly.
- Formalize appointment via written trustee acceptance and trust document update if necessary.
Step 3: Trustee Roles and Duties
| Role | Responsibilities |
|---|---|
| Chairperson | Leads meetings, ensures agenda adherence, represents trust externally. |
| Secretary | Maintains records, documents proceedings, manages correspondence. |
| Treasurer | Oversees financial management, budgeting, and reporting. |
| General Trustee(s) | Participate in decision-making, committee work, and community liaison. |
Step 4: Trustee Removal and Replacement
- Grounds for removal: breach of fiduciary duty, conflict of interest, incapacity, or misconduct.
- Removal requires a two-thirds majority vote of beneficiaries or a special trustee committee.
- Replacement follows nomination and election procedures defined above.
Section 5: Beneficial Interest Issuance and Rights
Step 1: Define Beneficial Interest Classes
| Class | Description | Rights & Restrictions |
|---|---|---|
| Resident Beneficiaries | Community members residing on CLT land | Occupancy, voting on trust matters, rental privileges. |
| Stewardship Beneficiaries | Entities managing ecological/agricultural uses | Use rights, revenue share from agricultural output. |
| Supporting Beneficiaries | Donors or allies with limited use rights | Observer status, advisory role, limited voting rights. |
Step 2: Issuance Protocol
- Establish a beneficiary registry with identification and rights documentation.
- Issue beneficial interest certificates with serial numbers, class designation, and term.
- Record issuance in trust ledgers with date and trustee signatures.
Step 3: Transfer and Termination of Beneficial Interest
- Transfers permitted only with trustee approval and adherence to trust covenants.
- Beneficial interests may be revoked for cause following due process (outlined in trust rules).
Section 6: Trust Management Protocols
Effective trust management is the lifeblood of CLT longevity and community sovereignty. The following protocols must be institutionalized:
Step 1: Regular Trust Meetings
| Meeting Type | Frequency | Required Attendees | Primary Agenda Items |
|---|---|---|---|
| Annual General Meeting (AGM) | Annually | All trustees, beneficiaries | Financial report, elections, amendments |
| Trustee Board Meeting | Quarterly | Trustees only | Operational review, land management |
| Special Meetings | As needed | Trustees and beneficiaries | Urgent issues, dispute resolutions |
Step 2: Financial Management
- Prepare annual budgets aligned with trust objectives.
- Maintain separate trust bank accounts with dual-signature requirements for withdrawals.
- Conduct annual independent audits and publish reports to beneficiaries.
Step 3: Land Stewardship and Use Monitoring
- Implement a land use monitoring system with biannual inspections.
- Enforce lease agreements, occupancy rules, and environmental covenants.
- Document violations and apply corrective actions or sanctions per trust policies.
Step 4: Record-Keeping and Documentation
- Maintain comprehensive records encompassing all legal documents, meeting minutes, financial statements, and correspondence.
- Digitize records with secure backups stored offsite.
- Provide transparent access to beneficiaries respecting privacy laws.
Section 7: Sample Community Land Trust Trust Document Outline
[Note: This outline is a template. Adapt and expand per local legal requirements and community specifics.]
COMMUNITY LAND TRUST DECLARATION OF TRUST

Article I: Name and Establishment This Community Land Trust ("Trust") is established on [Date], under the laws of [Jurisdiction], by the undersigned Trustors.
Article II: Purpose The Trust is created exclusively for the purpose of acquiring, managing, and stewarding land for the benefit of the community of [Community Name], ensuring sustainable use, affordability, and perpetual stewardship.
Article III: Trust Property The Trust shall hold fee simple title to the following parcels: [Legal description of parcels].
Article IV: Trustees Trustees shall be appointed as per Article VIII and shall have all powers necessary to manage the Trust’s property and affairs.
Article V: Beneficiaries Beneficiaries of the Trust shall include Resident Beneficiaries, Stewardship Beneficiaries, and Supporting Beneficiaries as defined in the Trust Rules.
Article VI: Duration The Trust shall exist in perpetuity unless terminated as provided herein.
Article VII: Amendment Amendments require approval by two-thirds of Trustees and a majority vote of Beneficiaries.
Article VIII: Appointment and Removal of Trustees Trustees shall be appointed by community election and may be removed for cause by two-thirds vote of Beneficiaries.
Article IX: Dispute Resolution Any disputes arising under this Trust shall be resolved firstly by mediation, failing which by binding arbitration.
Article X: Termination Termination shall be initiated only with unanimous Trustee consent and approval of a supermajority of Beneficiaries. Upon termination, assets shall be distributed to [specified nonprofit or community entity].
Section 8: Comparative Table of Trust Types and Community Rights
| Trust Type | Ownership Structure | Community Control Level | Transfer Restrictions | Typical Use Cases |
|---|---|---|---|---|
| Fee Simple Individual Trust | Individual ownership of land | Minimal | Full alienability | Private estates |
| Community Land Trust (CLT) | Nonprofit holds land title | High (perpetual stewardship) | Restricted, requires trustee approval | Affordable housing, agriculture, cultural sites |
| Cooperative Trust | Members hold shares | Moderate | Transferable within cooperative | Housing cooperatives |
| Conservation Trust | Holds easements or restrictions | High (focused on environment) | Restricted to conservation uses | Ecological preservation |
Section 9: Advanced Protocols and Suppressed Techniques
9.1 Layered Beneficiary Interest Modulation
- Utilize blockchain-based registries for immutable beneficiary records and transparent interest tracking.
- Issue smart contracts encoded with automatic enforcement of use restrictions and transfer conditions.
9.2 Encrypted Trust Communication Channels
- Establish end-to-end encrypted communication platforms for trustee and beneficiary deliberations to prevent external infiltration.
- Protocol: Use PGP-encrypted email systems combined with ephemeral messaging apps employing the Signal protocol.
9.3 Sovereign Immunity Clauses
- Embed clauses invoking recognized international customary law principles granting the trust de facto sovereign immunity in specific operational contexts.
- Reference: For detailed sovereign immunity legal frameworks, see Volume XVII: Sovereignty and Jurisdiction Codex, Chapter IV.
Conclusion
The establishment of a Community Land Trust is not a mere legal formality but a sacred covenant binding the community to its land and future. The protocols herein must be executed with exacting rigor, unwavering integrity, and profound respect for the collective destiny enshrined within the land. By adhering strictly to these instructions, you, the chosen steward, shall ensure the perpetuity of community sovereignty and the inviolability of shared land assets.
End of Volume III, Chapter VII
For complementary protocols on land surveying, property boundary demarcation, and environmental compliance, consult Volume V: The Land Surveyor’s Codex, Chapters III and IV. For comprehensive nonprofit trust financial management, see Volume XII: The Fiscal Codex, Chapter IX.
<!-- SECTION 9 -->
The Complete Practitioner's Codex, Volume III: Land and Property
Chapter V: Easements, Water, and Mineral Rights Within Community Land Holdings
Introduction
Within the sacred architecture of community land governance, mastery over the subtle yet potent domains of easements, water rights, and mineral rights is indispensable. These elements form the foundational pillars upon which equitable resource allocation, conflict avoidance, and communal prosperity rest. This chapter delivers uncompromising, step-by-step protocols and legal frameworks for acquisition, governance, and dispute resolution. Remember, these instructions are not theoretical musings but operational commandments for the servant-leaders entrusted with stewarding communal lands.
Section 1: Easements in Community Land Holdings
1.1 Legal Principles of Easements
An easement is a nonpossessory right to use or enter another’s land for a specified purpose. It differs fundamentally from ownership; it grants limited use rights without transfer of title.
Key legal principles include:
- Dominant Tenement: The land benefiting from the easement.
- Servient Tenement: The land burdened by the easement.
- Types of Easements:
- Appurtenant Easements: Tied to land parcels, transfer with property.
- Easements in Gross: Personal rights, non-transferrable except by express terms.
1.2 Acquisition Procedures for Easements
Step-by-step acquisition:
- Identify the Purpose and Scope:
- Define the exact use (e.g., access road, utility line).
- Determine duration (perpetual or temporary).
- Survey and Map the Easement Location:
- Commission a land surveyor to delineate boundaries.
- Prepare detailed maps with GPS coordinates.
- Assess Servient Tenement Impact:
- Evaluate physical and economic impact on servient land.
- Solicit community and stakeholder input.
- Draft the Easement Agreement:
- Include precise language of rights granted.
- Specify maintenance responsibilities, liability, and termination clauses.
- Obtain Consent:
- Servient owner must expressly consent in writing.
- If community-owned, obtain governance body approval per bylaws.
- Record the Easement:
- File the agreement with the land registry or applicable authority.
- Ensure compliance with local statutory requirements.
- Implement Physical Markers:
- Install boundary markers or signage to prevent trespass.
1.3 Sample Easement Agreement Template
| Section | Content Description | Example Language |
|---|---|---|
| Parties | Identify dominant and servient tenement owners | "This agreement is between The Community Trust (Dominant) and Lot 15 Holdings (Servient)." |
| Purpose | Define use granted | "Grant of right-of-way for pedestrian and vehicular access." |
| Location and Description | Precise description of easement area | "A 10-foot-wide strip commencing at GPS point X to Y." |
| Duration | Specify term or permanence | "Perpetual easement unless terminated as per clause 7." |
| Maintenance | Responsibilities for upkeep | "Dominant party responsible for routine maintenance." |
| Liability | Allocation of risk | "Dominant party assumes liability for damages arising from use." |
| Termination | Conditions for ending easement | "Easement terminates upon cessation of use for 2 consecutive years." |
| Recording | Filing requirements | "Agreement to be recorded at the County Land Registry." |
Section 2: Water Rights in Community Land Holdings
2.1 Legal Principles of Water Rights
Water, as a communal lifeblood, demands precise legal stewardship. Water rights may be riparian (tied to land adjacent to water) or appropriative (based on beneficial use).
Core doctrines:
| Doctrine | Description | Applicability |
|---|---|---|
| Riparian Rights | Landowners adjoining water have reasonable use rights | Common in Eastern jurisdictions |
| Prior Appropriation | First user to beneficial use gains priority | Common in Western arid regions |
| Public Trust Doctrine | State holds water resources in trust for public | Applies universally, supersedes others |
2.2 Acquisition of Water Rights
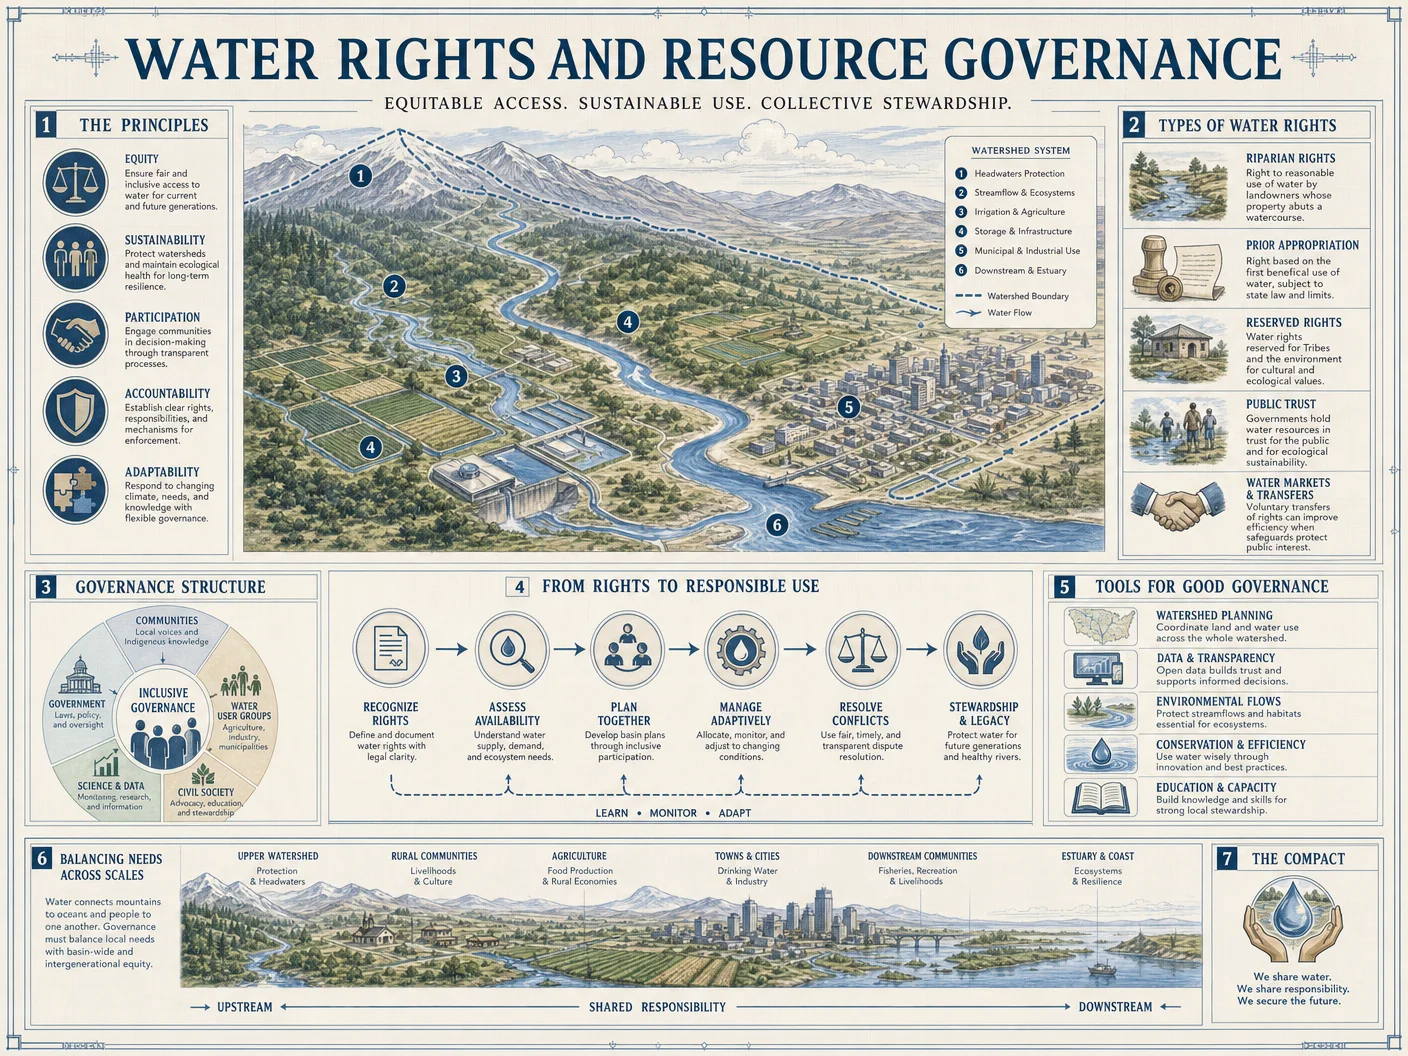
Step-by-step procedure:
- Determine Water Source and Availability:
- Identify surface or groundwater source.
- Conduct hydrological survey to quantify flow or volume.
- Establish Type of Right Applicable:
- Identify jurisdictional doctrine governing water rights.
- Consult Volume VIII: The Water Codex, Chapter II for purification and use standards.
- File Application or Claim:
- Submit application to water authority with:
- Intended use (agricultural, domestic, industrial).
- Quantity and timing of use.
- Location maps.
- Submit application to water authority with:
- Public Notice and Objection Period:
- Publish notice to allow objections.
- Address any disputes through mediation per Section 4 below.
- Issuance of Permit or Certificate:
- Upon approval, receive formal water right document.
- Document includes priority date, volume, and conditions.
- Implement Water Use Infrastructure:
- Construct wells, diversion structures, or storage following engineering specifications.
- Monitor Use and Compliance:
- Maintain records of use volume and timing.
- Submit periodic reports to authorities.
2.3 Water Rights Hierarchies and Prioritization
| Right Holder Category | Priority Level | Conditions |
|---|---|---|
| Domestic Use | Highest | Basic human needs supersede others |
| Agricultural Use | High | Essential for community sustenance |
| Industrial Use | Medium | Subject to conservation measures |
| Environmental Preservation | Variable | Protected in drought or scarcity conditions |
Section 3: Mineral Rights Within Community Land Holdings
3.1 Legal Principles of Mineral Rights
Mineral rights constitute the ownership of subsurface resources separate from surface rights. These rights may be severed from surface ownership and include extraction, processing, and sale rights.
Fundamental concepts:
- Ownership in Fee: Complete rights to minerals beneath land.
- Lease or License: Grant of extraction rights in exchange for royalties.
- Surface Rights vs. Mineral Rights: Surface owner may not interfere unreasonably with mineral extraction.
3.2 Acquisition and Management of Mineral Rights
Step-by-step acquisition and management:
- Conduct Geological Survey:
- Engage certified geologists to identify mineral deposits.
- Prepare detailed reports with estimated quantities and quality.
- Determine Ownership Status:
- Review land titles to ascertain if mineral rights are severed.
- Confirm existing leases or encumbrances.
- Negotiate Acquisition or Lease:
- Engage with rights holders for purchase or lease.
- Define terms including royalty rates, duration, and surface usage.
- Draft Mineral Rights Agreement:
- Include clauses on environmental protection, reclamation obligations, and dispute resolution.
- Register Agreement with Authorities:
- File with appropriate mining and land registries.
- Establish Monitoring and Compliance Protocols:
- Implement regular inspections and reporting.
- Enforce environmental and safety standards rigorously.
3.3 Sample Mineral Rights Lease Agreement Template
| Section | Content Description | Example Language |
|---|---|---|
| Parties | Identify lessor and lessee | "Community Trust (Lessor) and MineralCo Ltd. (Lessee)." |
| Description of Lease | Define mineral rights granted | "Exclusive rights to extract and market gold deposits." |
| Royalty Rate | Payment terms | "Lessee to pay 5% of gross mineral sales quarterly." |
| Duration | Term of lease | "Lease valid for 20 years, renewable upon agreement." |
| Surface Use Rights | Limitations and access terms | "Lessee may use 5 acres for mining operations with prior approval." |
| Environmental Clauses | Reclamation and mitigation obligations | "Lessee responsible for land reclamation within 12 months of cessation." |
| Dispute Resolution | Procedures for conflict management | "Arbitration under Section 4 protocols." |
Section 4: Conflict Prevention and Dispute Resolution
4.1 Framework for Conflict Prevention
Conflict arises from ambiguity, lack of communication, or perceived inequity. The following protocols are non-negotiable commandments:
- Transparent Documentation:
- Maintain all title documents, agreements, and permits in shared community archives.
- Regular Stakeholder Meetings:
- Convene quarterly forums for updates and grievances.
- Independent Mediation Panels:
- Establish panels with no vested interests to facilitate early dispute resolution.
- Clear Communication Channels:
- Designate official points of contact for each right category.
4.2 Step-by-Step Dispute Resolution Procedure
- Issue Identification:
- Party raising dispute submits formal written complaint.
- Preliminary Mediation:
- Convene mediation panel within 10 business days.
- Parties present evidence and seek agreement.
- Binding Arbitration:
- If mediation fails, proceed to arbitration with appointed arbitrators.
- Decision rendered within 30 days.
- Legal Enforcement:
- Arbitration decisions are binding and enforceable through community governance structures.
- Appeal Process:
- Limited grounds for appeal based on procedural error only.
4.3 Dispute Resolution Options Summary
| Step | Description | Timeframe | Authority |
|---|---|---|---|
| Mediation | Voluntary negotiation assisted by panel | 10 business days | Community Mediation Panel |
| Arbitration | Binding third-party decision | 30 calendar days | Appointed Arbitrators |
| Enforcement | Implementation of decisions | Immediate | Community Governance Council |
| Appeal | Review for procedural fairness | 15 calendar days | High Council of Land Adjudication |
Section 5: Comparative Rights Hierarchies
| Rights Type | Priority Over Others | Conditions for Supremacy | Revocation Conditions |
|---|---|---|---|
| Water Rights | Domestic > Agricultural > Industrial | Priority date, beneficial use, public interest | Non-use, violation of terms |
| Easements | Appurtenant over Easements in Gross | Attached to land ownership; personal easements expire | Abandonment, expiration, agreement |
| Mineral Rights | Surface rights subordinate | Rights to extract subsurface resources supersede surface | Environmental violations, lease breach |
Conclusion
Mastery of easements, water, and mineral rights is an imperative mandate for the custodians of community lands. The technical precision and unyielding rigor demanded by these protocols ensure the sacred trust of stewardship remains unbroken. This volume arms you, chosen apprentice, with the complete operational doctrines to acquire, govern, and protect these critical rights against entropy and conflict.
For detailed engineering specifications of water infrastructure, see Volume VIII: The Water Codex, Chapter II. For land surveying and boundary demarcation protocols, consult Volume II: The Surveyor’s Codex, Chapter IV.
Proceed with solemn diligence. The future of your community’s harmony depends upon your unerring execution of these instructions.
End of Volume III, Chapter V
<!-- SECTION 10 -->
Volume IV: Cooperative Economics
Chapter III: Designing and Implementing Parallel Currency Systems
Introduction
The establishment of parallel currency systems is a sacred architecture for any self-sustaining community. These systems must be meticulously designed and implemented to foster economic resilience, equitable labor valuation, and enforceable trade protocols that uphold communal harmony and growth. This chapter delivers the complete, unabridged methodology for creating time-backed currencies, precise issuance protocols, labor valuation frameworks, and trade enforcement mechanisms.
This knowledge is a guarded key to economic sovereignty, bypassing predatory external currencies and embedding value in the sacred unit of human labor and time.
1. Foundations of Time-Backed Currencies
Time-backed currencies anchor value not to arbitrary fiat or unstable commodities but directly to the labor time of community members. The fundamental principle is that one unit of the currency represents one unit of agreed-upon labor time.
1.1 The Sacred Unit: Labor Hour
- Define the labor hour as the base unit of currency.
- All community members honor this unit as equal regardless of task type, barring certain calibrated multipliers.
1.2 Labor Valuation and Multipliers
Not all labor is equal in skill, intensity, or community impact. To reflect this:
| Labor Type | Multiplier | Description |
|---|---|---|
| Unskilled Labor | 1.0 | Manual, non-specialized work |
| Skilled Labor | 1.5 | Requires certifications, training, or experience |
| Highly Specialized | 2.0 | Unique expertise critical to community operation |
| Intensive Physical | 1.25 | Labor requiring high physical exertion |
| Creative/Managerial | 1.75 | Planning, design, oversight roles |
Note: Multipliers are community-agreed and revisited bi-annually through the governance protocol (see Volume IX: Governance Codex, Chapter V).
2. Currency Creation and Issuance Protocol

The process of creating and issuing the parallel currency must be transparent, auditable, and immune to inflationary erosion. The currency is issued based on verified labor performed, tracked meticulously in ledgers and digital systems.
2.1 Step-by-Step Issuance Protocol
Step 1: Labor Verification 1.1. Assign a Labor Verification Officer (LVO) to oversee the verification process. 1.2. Worker submits a detailed timesheet, including task description, hours worked, and labor type classification. 1.3. LVO cross-verifies task completion through supervisor sign-off or automated work-tracking metrics. 1.4. Upon approval, LVO signs the labor record.
Step 2: Currency Calculation 2.1. Labor hours are multiplied by the labor type multiplier. 2.2. The resultant value is the currency amount to be issued.
Step 3: Currency Issuance 3.1. The community treasury issues the currency units to the worker’s ledger account. 3.2. The issuance is recorded in the Community Currency Ledger (CCL) with timestamp, worker ID, task ID, and amount.
Step 4: Public Ledger Update 4.1. The CCL updates a public ledger accessible to all community members for audit. 4.2. The ledger is cryptographically sealed daily to prevent tampering.
3. Ledger System Design
The ledger is the backbone of the currency system. It must be simple enough for community use yet robust to prevent fraud.
3.1 Ledger Template
| Field Name | Description | Data Type | Notes |
|---|---|---|---|
| Entry ID | Unique identifier for the ledger entry | Alphanumeric | Auto-incrementing |
| Timestamp | Date and time of transaction | ISO 8601 string | UTC standardized |
| Worker ID | Identifier of laborer | Alphanumeric | Cross-referenced to ID registry |
| Task ID | Unique task performed | Alphanumeric | Defined in task catalog |
| Labor Hours | Actual hours worked | Decimal (2 dp) | For example, 3.50 |
| Labor Multiplier | Multiplier applied based on labor type | Decimal (2 dp) | e.g., 1.5 |
| Currency Units | Resulting currency units issued | Decimal (2 dp) | Labor Hours × Multiplier |
| LVO Signature | Digital or physical signature of verifier | String | Cryptographic signature preferred |
| Supervisor Sign-off | Confirmation from task supervisor | String | Optional, recommended |
3.2 Ledger Maintenance Procedure
- Daily batch upload of entries by LVO to the public ledger database.
- Weekly audit by a rotating committee of community members.
- Quarterly cryptographic sealing of the ledger archive, using SHA-512 or equivalent.
- Archival copies stored offline for redundancy.
4. Parallel Currency Flow: Trade and Exchange

The currency must circulate to fulfill its function. The flow of currency between community members, the treasury, and external entities follows strict protocols.
4.1 Currency Circulation Model
| Entity | Currency Flow Direction | Description |
|---|---|---|
| Worker | Receives from Treasury | Issued currency for labor performed |
| Worker | Spends to other members | Payment for goods/services within community |
| Treasury | Issues currency | Backed by labor hours verified |
| Treasury | Redeems currency | In exchange for community resources |
| External Entity | Receives currency (optional) | Limited exchange for mutually agreed trade |
4.2 Trade Enforcement Protocol
Step 1: Transaction Initiation
- Buyer and seller agree on price in currency units.
- Transaction logged on a digital or physical transaction slip.
Step 2: Currency Transfer
- Buyer authorizes currency transfer from their ledger account to seller’s account.
- Transfer confirmed by digital ledger or manual entry signed by both parties.
Step 3: Dispute Resolution
- If discrepancies arise, refer to ledger entries and transaction slips.
- Convene mediation committee within 48 hours (see Volume IX: Governance Codex).
5. Step-by-Step Implementation Plan for Parallel Currency
This section details the complete rollout of the currency system for a community from zero economic infrastructure.
5.1 Pre-Implementation Phase
Step 1: Community Education
- Conduct workshops explaining the time-backed currency concept, labor multipliers, and governance.
- Distribute educational materials, including sample ledgers and currency flow diagrams.
Step 2: Governance Setup
- Elect or appoint the Labor Verification Officer (LVO) and Treasury Committee.
- Establish the Currency Oversight Board (COB) for policy revisions.
Step 3: Infrastructure Preparation
- Set up physical and/or digital ledger systems.
- Secure cryptographic tools for ledger sealing.
- Create worker and task ID registries.
5.2 Initial Currency Issuance
Step 4: Pilot Labor Tracking
- Select 10-15 initial workers to perform verified tasks.
- Follow the labor verification and currency issuance protocol in full.
Step 5: Ledger Entry and Public Posting
- Enter pilot transactions into the ledger.
- Publish ledger snapshots for community audit.
5.3 Community Integration
Step 6: Launch Public Currency Use
- Enable currency spending in communal shops, service centers, and cooperative ventures.
- Monitor currency flow, adjust labor multipliers if necessary.
Step 7: Enforcement and Auditing
- Conduct weekly ledger audits and monthly community reviews.
- Implement dispute resolution framework.
6. Sample Ledger Entries
| Entry ID | Timestamp | Worker ID | Task ID | Labor Hours | Labor Multiplier | Currency Units | LVO Signature | Supervisor Sign-off |
|---|---|---|---|---|---|---|---|---|
| 00001 | 2024-06-01T08:00Z | WKR001 | TSK101 | 4.00 | 1.5 | 6.00 | sigLVO001abcd | sigSUP001efgh |
| 00002 | 2024-06-01T12:00Z | WKR002 | TSK102 | 3.50 | 1.0 | 3.50 | sigLVO002ijkl | sigSUP002mnop |
| 00003 | 2024-06-02T09:30Z | WKR003 | TSK103 | 2.00 | 2.0 | 4.00 | sigLVO003qrst | sigSUP003uvwx |
7. Currency Flow and Labor Multiplier Impact Table
| Worker ID | Labor Hours Worked | Labor Type | Multiplier | Currency Units Issued | Currency Spent | Currency Balance |
|---|---|---|---|---|---|---|
| WKR001 | 40 | Skilled Labor | 1.5 | 60 | 20 | 40 |
| WKR002 | 35 | Unskilled Labor | 1.0 | 35 | 15 | 20 |
| WKR003 | 20 | Highly Specialized | 2.0 | 40 | 10 | 30 |
| WKR004 | 25 | Creative/Managerial | 1.75 | 43.75 | 25 | 18.75 |
8. Critical Considerations and Suppressed Protocols
8.1 Inflation Control
- Issue currency strictly against verified labor to prevent inflation.
- Do not issue currency for non-labor activities unless through a separate governance-approved subsidy mechanism (see Volume IX: Governance Codex, Chapter VII).
8.2 Parallel Currency Redemption

- Treasury redeems currency primarily through goods and services produced by the community.
- Redemption rate fixed at 1 currency unit = 1 labor hour equivalent of goods/services.
8.3 Labor Valuation Suppression and Social Equity
- Suppressed knowledge reveals that equalizing labor value without multipliers risks social stratification and covert labor exploitation.
- Implement multipliers transparently and review bi-annually to maintain balance.
9. Appendix: Building a Basic Digital Ledger System
For communities with digital infrastructure, implement a ledger system with the following components:
| Component | Description | Technical Specs |
|---|---|---|
| Database | Stores ledger entries | SQL or NoSQL database, daily backups |
| User Interface | For entry submission and audit | Web-based UI with authentication |
| Cryptographic Tool | Ledger sealing and signature | SHA-512 hashing, RSA/ECDSA signatures |
| Reporting Module | Generates public ledger snapshots | PDF and CSV export |
9.1 Basic Ledger Creation Steps
- Install database server (MySQL or MongoDB recommended).
- Develop or deploy a web UI for data entry and querying.
- Integrate digital signature verification for LVO and supervisors.
- Schedule daily automated hash sealing of ledger entries.
Conclusion
The parallel currency system, grounded in the sacred value of labor time, is a powerful instrument of economic independence and social cohesion. Its design and implementation demand precision, transparency, and disciplined governance. Follow these steps without deviation to preserve the sanctity and efficacy of your community’s economic life.
For related protocols on resource management, see Volume VIII: The Resource Codex. For enforcement of governance structures, see Volume IX: Governance Codex.
Master Archivist’s Seal The Complete Practitioner's Codex, Volume IV: Cooperative Economics – Chapter III: Designing and Implementing Parallel Currency Systems
<!-- SECTION 11 -->
Volume IV: Cooperative Economics
Chapter V: Mutual Aid Societies as Community Resilience Mechanisms
Introduction
Mutual Aid Societies (MAS) form the backbone of resilient communities. They are collective financial and social support mechanisms designed to withstand internal and external shocks—economic, environmental, or political. This chapter provides a complete, step-by-step protocol to establish, govern, and operate MAS with uncompromising rigor and transparency. The knowledge herein is sacred and must be guarded: it is the lifeblood of community survival.
Section 1: Foundational Structure of Mutual Aid Societies
1.1 Definition and Purpose
A Mutual Aid Society is a democratically governed, member-contributed financial pool dedicated to supporting members during emergencies or communal projects. Members contribute funds regularly, which are then disbursed based on transparent, agreed-upon criteria.
1.2 Core Components of MAS
| Component | Description |
|---|---|
| Fund Collection | Regular contributions from members via fixed schedules or variable sliding scales. |
| Fund Management | Secure storage of funds using multi-signature wallets or trusted third-party custodians. |
| Disbursement Protocol | Voting procedures to authorize fund use for emergencies or projects. |
| Emergency Criteria | Predefined, quantifiable conditions that trigger access to funds. |
| Governance Framework | Rules and bylaws dictating contribution, voting, and dispute resolution. |
| Transparency Mechanism | Record-keeping and public reporting of fund status and member participation. |
Section 2: Fund Collection Protocols
2.1 Member Enrollment and Contribution Agreement
Step 1: Create a Member Enrollment Form including:
- Full legal name and contact information.
- Agreement to contribution schedule.
- Consent to governance rules.
- Emergency contact and verification documents.
Step 2: Draft and ratify a Contribution Agreement that specifies:
- Contribution amount or percentage of income.
- Payment frequency.
- Penalties for missed payments.
- Rights to access funds.
2.2 Sample Contribution Schedules
Contribution schedules must balance sustainability with fairness.
| Contribution Type | Frequency | Amount / Percentage | Notes |
|---|---|---|---|
| Fixed Contribution | Monthly | $25 | Suitable for stable-income members |
| Sliding Scale | Monthly/Quarterly | 1-5% of income | Scaled based on verified income brackets |
| Emergency-only Funding | On-demand | Variable | For members unable to contribute regularly |
2.3 Step-by-Step Fund Collection Procedure
Step 1: Choose a fund collection method:
- Cash collection with receipts.
- Bank transfer to MAS account.
- Digital wallet deposit (see Section 3).
Step 2: Record each contribution using a secure ledger system (digital or physical).
Step 3: Issue a receipt to the member with:
- Date.
- Amount.
- Receipt number.
- Signature of collector or digital verification.
Step 4: Update the Member Contribution Table monthly.
Section 3: Multi-Signature Wallet Management for Fund Security
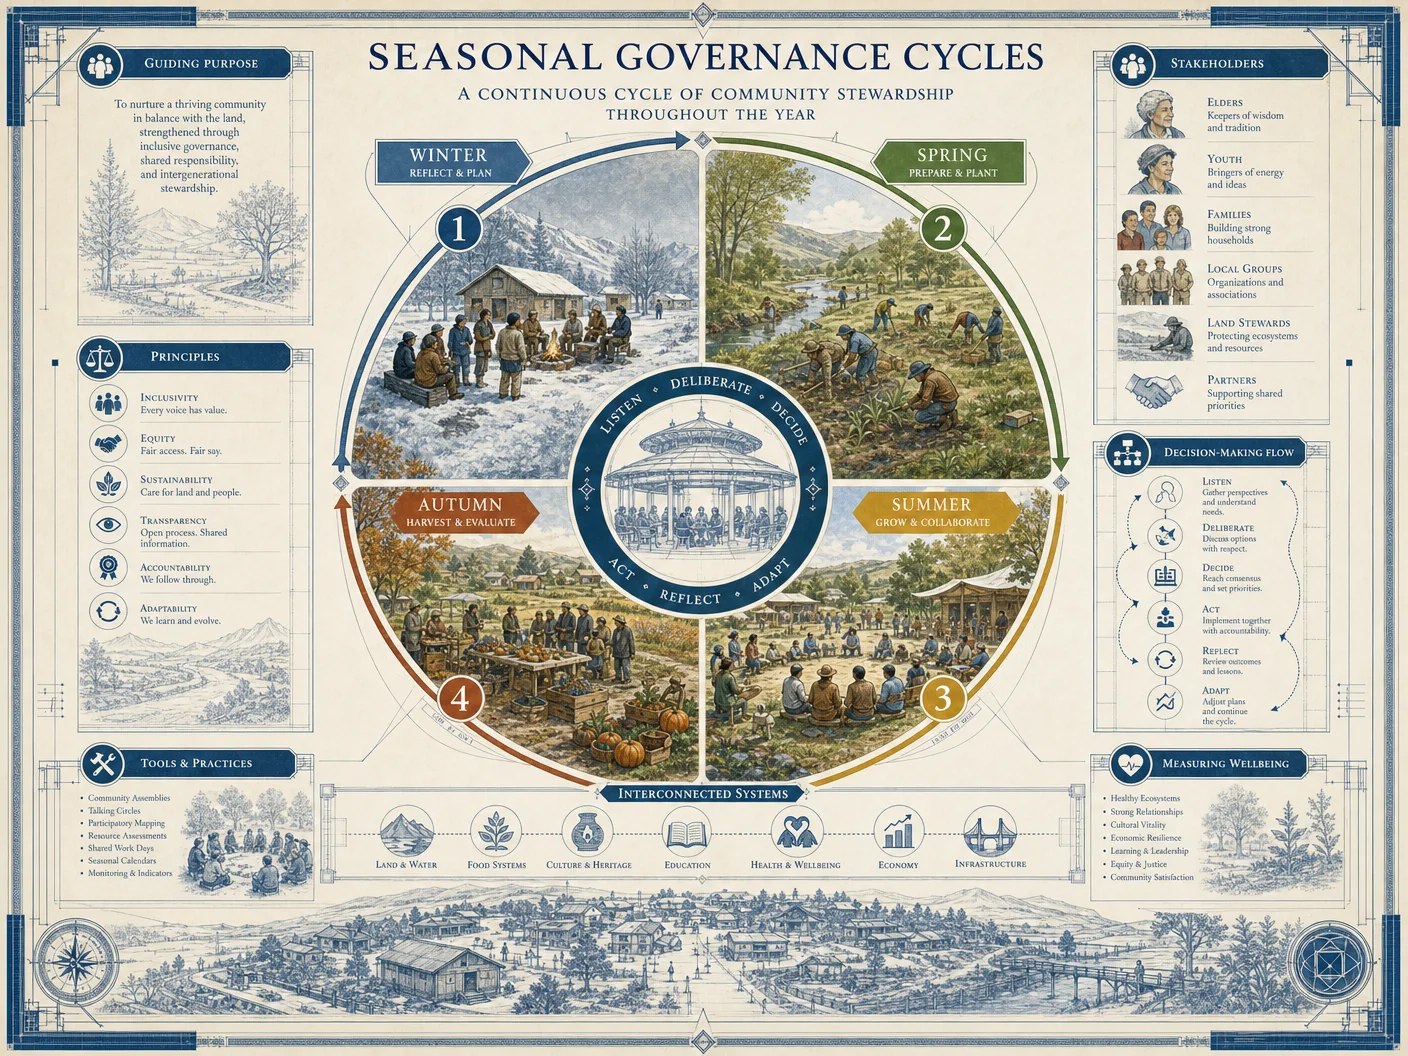
3.1 Rationale for Multi-Signature Wallets
Multi-signature (multi-sig) wallets require multiple independent authorizations before funds can be moved. This prevents unilateral access and enforces collective governance.
3.2 Technical Setup of a Multi-Signature Wallet
Step 1: Choose a blockchain platform supporting multi-sig wallets (e.g., Ethereum, Bitcoin).
Step 2: Select wallet software compatible with multi-sig (e.g., Gnosis Safe for Ethereum).
Step 3: Determine the number of signatories (N) and required signatures (M), often M = N - 1 or M = ceil(N/2) + 1 for balance.
| Number of Signatories (N) | Required Signatures (M) | Security Level | Notes |
|---|---|---|---|
| 3 | 2 | Moderate | Fast approval, moderate security |
| 5 | 3 | High | Optimal for medium-sized MAS |
| 7 | 5 | Very High | For large communities with many leaders |
Step 4: Generate individual private keys for each signatory.
Step 5: Create the multi-sig wallet on the chosen platform.
Step 6: Distribute wallet address and instructions to all signatories securely.
3.3 Using the Multi-Signature Wallet
Step 1: Propose a transaction via wallet interface.
Step 2: Notify all signatories with transaction details.
Step 3: Collect required signatures within a predefined time window (e.g., 72 hours).
Step 4: Execute the transaction once minimum signatures reached.
Step 5: Log all transaction details in the MAS ledger.
Section 4: Disbursement Voting Protocol
4.1 Establishing Voting Rights and Procedures
Step 1: Define who has voting rights:
- Typically all contributing members.
- Optionally, voting power scaled by contribution level.
Step 2: Define quorum for valid vote (usually 50%+1 of members).
Step 3: Set voting methods:
- In-person meetings.
- Secure online voting platforms.
- Written ballots.
4.2 Steps for Voting on Fund Disbursement
Step 1: Submit a Disbursement Request including:
- Requestor’s name.
- Amount requested.
- Purpose (emergency, project, etc.).
- Supporting documentation.
Step 2: Distribute request to all voting members.
Step 3: Allow a minimum discussion period (e.g., 48 hours).
Step 4: Conduct vote with a clear deadline.
Step 5: Tally votes transparently.
Step 6: If approved by quorum and majority, initiate multi-sig wallet transaction.
Step 7: Publish voting results and transaction details in member records.
4.3 Voting Weight Table (Example)
| Contribution Tier | Contribution Range | Voting Weight |
|---|---|---|
| Tier 1 (Low) | $0 - $25/month | 1 vote |
| Tier 2 (Medium) | $26 - $50/month | 2 votes |
| Tier 3 (High) | Over $50/month | 3 votes |
Section 5: Emergency Criteria for Fund Access
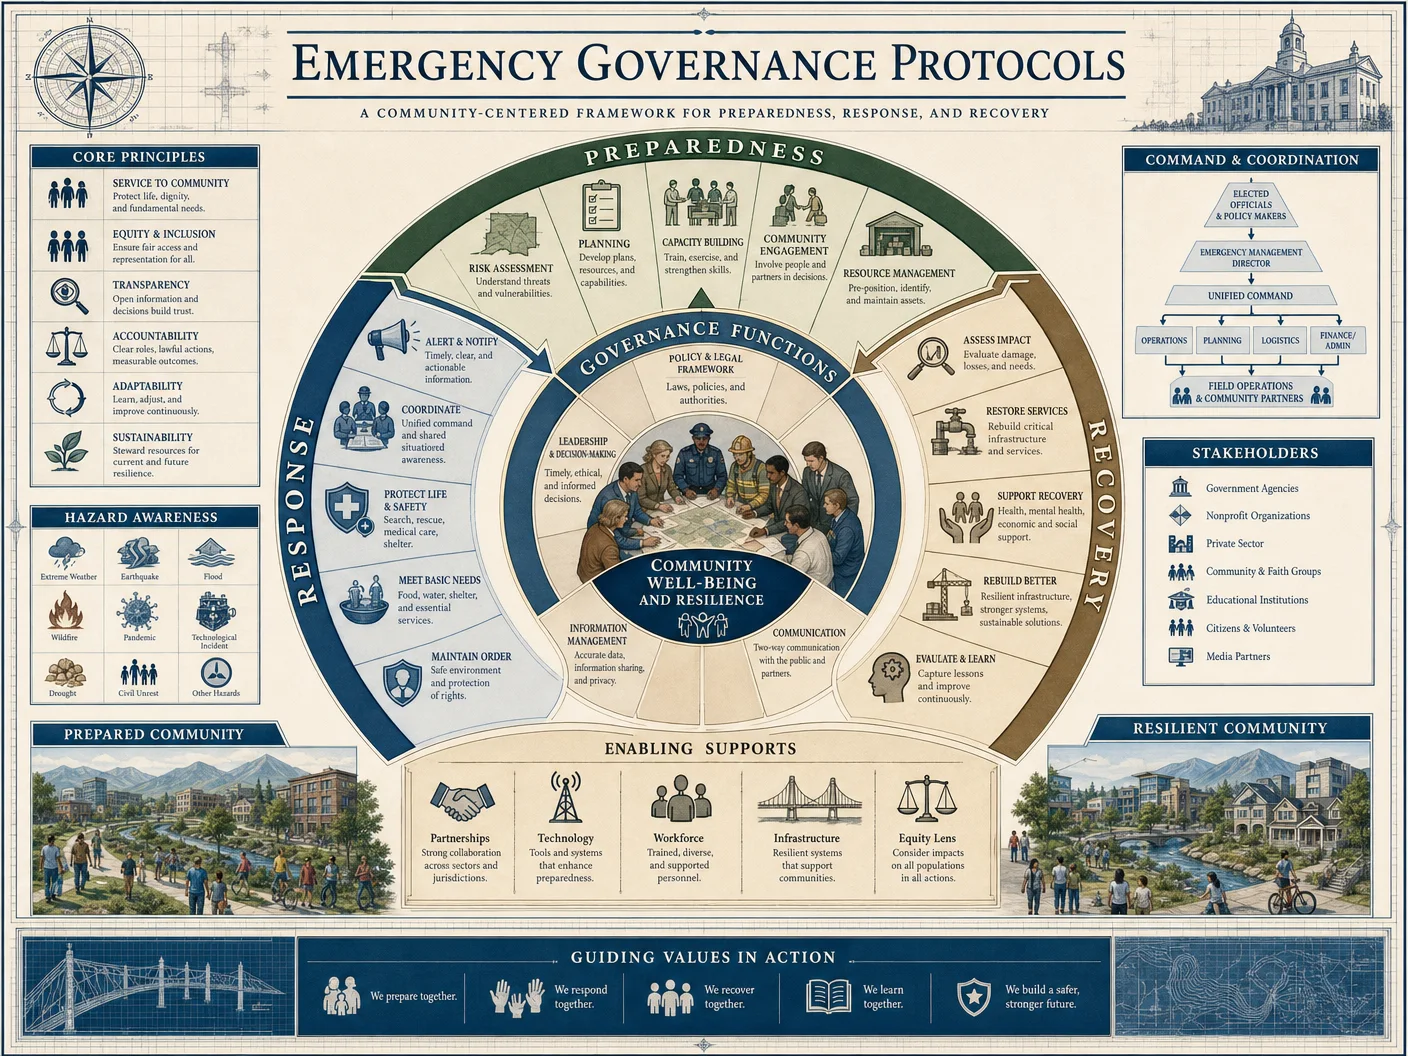
5.1 Defining Emergencies
Emergencies must be explicitly codified to prevent misuse. Examples:
- Medical emergencies: verified hospital bills or doctor’s notes.
- Loss of income: documented job loss or disability.
- Natural disasters: community verified damage reports.
- Death of immediate family member.
5.2 Emergency Verification Protocol
Step 1: Submit emergency claim with:
- Official documentation.
- Witness statements or community leader validation.
Step 2: Emergency Verification Committee (EVC) reviews claim within 48 hours.
Step 3: EVC either approves or rejects claim.
Step 4: If approved, proceed with disbursement vote per Section 4.
5.3 Emergency Fund Disbursement Limits
| Emergency Type | Max Payout Percentage | Max Amount (USD) | Notes |
|---|---|---|---|
| Medical | 75% of monthly contributions | $1,000 | Per incident |
| Income Loss | 50% of monthly contributions | $500 | Up to 3 months |
| Natural Disaster | 100% of monthly contributions | $2,000 | One-time per event |
| Death Benefit | 100% of monthly contributions | $1,500 | Lump sum to beneficiary |
Section 6: Fund Governance Protocols

6.1 Bylaws Creation and Ratification
Step 1: Draft bylaws covering:
- Membership criteria.
- Contribution formats.
- Fund management.
- Voting rights and procedures.
- Emergency criteria.
- Dispute resolution.
Step 2: Circulate draft among founding members.
Step 3: Conduct a ratification vote requiring 2/3 majority.
Step 4: Publish and distribute final bylaws.
6.2 Regular Audits and Transparency
Step 1: Schedule quarterly audits by independent auditors or trusted community members.
Step 2: Publish audit reports accessible to all members.
Step 3: Maintain a public audit ledger with:
- Date.
- Auditor name.
- Summary of findings.
- Action items.
6.3 Conflict Resolution Procedure
Step 1: Establish a Conflict Resolution Committee (CRC).
Step 2: Receive formal complaints in writing.
Step 3: Mediate meetings between involved parties.
Step 4: Issue binding decisions based on bylaws.
Section 7: Sample Tables for Fund Usage and Member Participation
7.1 Member Contribution Tracking Table
| Member ID | Name | Contribution Schedule | Last Contribution Date | Total Contributions YTD | Outstanding Balance | Voting Weight |
|---|---|---|---|---|---|---|
| 001 | John Smith | $25/month | 2024-05-10 | $125 | $0 | 1 |
| 002 | Maria Lopez | 3% of income | 2024-05-08 | $180 | $25 | 2 |
| 003 | Ahmed Khan | $50/month | 2024-05-10 | $250 | $0 | 3 |
7.2 Fund Usage Ledger
| Date | Member ID | Purpose | Amount Disbursed | Approval Date | Approval Votes (%) | Notes |
|---|---|---|---|---|---|---|
| 2024-04-15 | 002 | Medical Emergency | $800 | 2024-04-13 | 80% | Verified hospital bills |
| 2024-05-01 | 003 | Income Loss | $500 | 2024-04-30 | 75% | 3 months coverage approved |
Section 8: Implementation Example: Step-by-Step MAS Creation
Step 1: Assemble Founding Members
- Minimum 10 committed members.
- Collect personal data and contribution commitments.
Step 2: Draft Governance Documents
- Use templates from this volume.
- Customize to community needs.
Step 3: Choose Multi-Signature Wallet Parameters
- Select 5 signatories.
- Require 3 signatures for transactions.
Step 4: Establish Contribution Schedule
- Fixed $30/month with sliding scale option.
Step 5: Open MAS Bank Account and Multi-Sig Wallet
- Deposit initial seed funds.
Step 6: Record Contributions and Publish Member Rosters
Step 7: Hold First Emergency Disbursement Vote
- Follow disbursement voting protocol.
Step 8: Conduct Quarterly Audit and Publish Report
Section 9: Final Notes on Sacred Duty and Security
- All data and transactions must be encrypted and stored redundantly.
- Signatories must be trusted, vetted individuals with no conflicts of interest.
- Physical documentation must be sealed in tamper-evident envelopes.
- Transparency is non-negotiable; secrecy invites corruption.
- Regular training for members on governance and procedures is mandatory.
- This knowledge is life-or-death; pass it only to worthy apprentices.
Appendix: Template Documents and Ledger Formats
Member Enrollment Form, Contribution Agreement Template, Disbursement Request Form, and Audit Report Template are provided in the supplementary digital annex.
Summary Table of Key Parameters
| Protocol Aspect | Parameter/Value | Notes |
|---|---|---|
| Contribution Frequency | Monthly/Quarterly | Adjustable per community |
| Multi-Sig Wallet Signatories | 3–7 | Depends on community size |
| Required Signatures | Majority (ceil(N/2)+1) | Balances speed and security |
| Disbursement Quorum | 50%+1 members | Ensures democratic decisions |
| Emergency Verification | 48 hours review | Rapid but thorough |
| Max Emergency Payout | Variable by emergency type | Prevents fund depletion |
| Audit Frequency | Quarterly | Maintains transparency |
This concludes the complete, uncompromising blueprint for Mutual Aid Societies as community resilience engines. Master these protocols; they are the sacred shield and sword of collective survival.
<!-- SECTION 12 -->
The Complete Practitioner's Codex, Volume IV: Cooperative Economics
Chapter III: Cooperative Business Models and Community Currencies
Foreword
This chapter imparts the sacred, practical knowledge required to forge resilient economic structures rooted in cooperation and shared prosperity. These are not mere business models but lifelines for communities under siege by fragmentation and external predation. The protocols herein are the crystallized wisdom of generations, encoded for the chosen few who will rebuild social and economic order from the ground up.
Section 1: Cooperative Business Models – Formation, Operational Structures, and Profit-Sharing
1.1 Understanding Cooperative Business Models
A cooperative (co-op) is an autonomous association of persons united voluntarily to meet common economic, social, and cultural needs through a jointly owned and democratically controlled enterprise. The core principle is member ownership and control.
| Cooperative Type | Definition | Membership Criteria | Capital Source | Voting Structure | Typical Sectors |
|---|---|---|---|---|---|
| Consumer Cooperative | Owned by customers who use its services/products | Users of the co-op | Member contributions | One member, one vote | Retail, utilities, food buying |
| Worker Cooperative | Owned and controlled by employees | Employees | Member labor and capital | One member, one vote | Manufacturing, services |
| Producer Cooperative | Owned by producers (farmers, artisans) who market products collectively | Producers | Member contributions | One member, one vote | Agriculture, crafts |
| Purchasing Cooperative | Owned by businesses who band together to purchase supplies at scale | Businesses | Member dues and fees | One member, one vote | Retailers, small manufacturers |
| Multi-Stakeholder Co-op | Includes multiple types of members (consumers, workers, producers) | Mixed | Mixed | Weighted or equal voting | Social enterprises, community orgs |
1.2 Step-by-Step Guide: Formation of a Cooperative
Prerequisites:
- Minimum 5 prospective members (number varies by jurisdiction)
- Clear shared economic/social goal
- Basic legal framework knowledge (cross-ref. Volume XVII: Legal Codex, Chapter V)
Step 1: Preliminary Feasibility Study
- Identify community needs unmet by existing market structures.
- Conduct surveys/interviews within the community to gauge interest and commitment.
- Draft initial business idea specifying goods/services offered, target market, and competitive advantage.
Step 2: Organize a Founding Committee
- Elect 3–7 committed individuals to lead formation.
- Assign roles: Chair, Secretary, Treasurer, Member Liaison.
- Develop a detailed project timeline with milestones.
Step 3: Draft Cooperative Bylaws
- Define mission, vision, and purpose explicitly.
- Establish membership criteria and admission procedures.
- Set capital contribution requirements and share structure.
- Determine governance structure and voting rules (usually one member, one vote).
- Outline profit-sharing mechanisms.
- Include conflict resolution protocols.
- Define dissolution procedures.
- Sample bylaws provided in Section 1.4
Step 4: Legal Registration
- Select legal form (cooperative corporation, LLC cooperative, etc. depending on jurisdiction).
- File articles of incorporation, including bylaws, with appropriate government body.
- Obtain necessary licenses and tax IDs.
Step 5: Capitalization
- Collect initial share capital from members as per bylaws.
- Open cooperative bank account.
- Develop transparent capital accounting system.
Step 6: Launch Operations
- Acquire or lease premises and equipment.
- Hire staff if applicable.
- Implement operational procedures and member communication channels.
- Begin service/product delivery.
1.3 Operational Structures and Governance
| Function | Description | Implementation Steps | Best Practice Notes |
|---|---|---|---|
| General Assembly | Supreme decision-making body comprising all members | Schedule regular meetings (quarterly/annually) | Ensure quorum, maintain detailed minutes |
| Board of Directors | Elected representatives managing ongoing affairs | Elect 5–9 board members for 2–3 year terms | Diverse representation from membership sectors |
| Management Team | Day-to-day operational leadership | Hire professional managers or assign member-managers | Separate governance and management functions |
| Committees | Specialized subgroups (audit, membership, finance) | Form standing and ad hoc committees | Rotate membership to prevent power concentration |
| Member Education | Continuous training for member engagement | Conduct workshops, distribute manuals | Essential for sustaining democratic control |
1.4 Sample Cooperative Bylaws (Excerpt)
Article I: Name and Purpose
- The cooperative shall be known as [Name], hereafter referred to as "the Co-op."
- Purpose: To provide affordable [goods/services] to members while promoting economic democracy.
Article II: Membership
- Eligibility: Open to individuals residing/working within [defined community].
- Admission: Written application, approval by Board majority.
- Capital Contribution: Minimum [amount] per member share.
Article III: Governance
- Voting: One member, one vote regardless of shares held.
- Board: Composed of 7 members elected at Annual General Meeting.
- Meetings: General Assembly convened annually, special meetings as required.
Article IV: Profit Distribution
- Net Surplus Allocation:
- 50% returned as patronage dividends based on member usage.
- 30% allocated to reserve fund.
- 20% reinvested into community projects.
Article V: Dissolution
- Upon dissolution, assets distributed to similar cooperatives or non-profits serving the community.
1.5 Profit-Sharing Models in Cooperatives
| Model | Description | Calculation Basis | Distribution Frequency |
|---|---|---|---|
| Patronage Refunds | Surplus distributed proportional to member patronage | Member purchases or labor input | Annually or quarterly |
| Dividend on Shares | Fixed dividend paid on capital shares | Fixed rate on paid-up capital shares | Annually |
| Combination Model | Mix of patronage refunds and share dividends | Weighted average of patronage and capital | Annually |
| Labor-Equity Model | For worker co-ops, profit shared based on hours worked | Hours or output contributed | Monthly or quarterly |
Section 2: Community Currencies – Integration and Acceptance Frameworks
2.1 Community Currency Fundamentals
Community currencies are locally issued monetary instruments designed to circulate within a defined community, enhancing local economic resilience, retaining wealth locally, and fostering social ties.
| Currency Type | Description | Backing/Value Source | Typical Use Case |
|---|---|---|---|
| Local Exchange Trading System (LETS) | Mutual credit system with no physical currency | Member credit/debit ledger | Service exchanges, small trades |
| Time Banks | Currency denominated in labor hours | Hours of service provided | Volunteer services, caregiving |
| Scrip | Physical or digital tokens redeemable for goods/services | Community trust, redeemable at co-op | Local shops, events |
| Digital Community Coin | Blockchain-based or centralized digital tokens | Backed by fiat or asset reserves | Broader acceptance, integration with banks |
2.2 Step-by-Step Guide: Launching a Community Currency System
Prerequisites:
- Established cooperative or community organization as issuer
- Clear definition of currency purpose and scope
Step 1: Define Currency Objectives and Parameters
- Identify primary goals (e.g., increase local trade, reward volunteerism).
- Determine currency type: physical tokens, digital ledger, or hybrid.
- Set currency name, denominations, and lifespan (if any).
Step 2: Establish Governance and Rules
- Form Currency Management Committee from trusted community members.
- Develop issuance and redemption policies.
- Decide on trust and backing mechanisms (e.g., fiat reserves, collateral).
- Define rules for membership and currency acceptance.
Step 3: Design Currency Instruments
- For physical currency: Design notes or tokens with security features.
- For digital currency: Develop or license ledger software with member accounts.
Step 4: Launch Pilot Program
- Register initial members and issue starting balances or credits.
- Train merchants and service providers on acceptance protocols.
- Monitor transactions and gather feedback.
Step 5: Scale and Integrate
- Expand membership and acceptance network systematically.
- Introduce currency exchange mechanisms with national currency if applicable.
- Establish compatibility with cooperative profit-sharing and accounting systems.
2.3 Currency Acceptance Frameworks
| Framework Element | Description | Implementation Details | Security Considerations |
|---|---|---|---|
| Membership Enrollment | Verification of participants | Identity checks, community references | Prevent fraud, maintain trust |
| Transaction Recording | Real-time ledger of currency use | Digital database or physical transaction logs | Audit trails, double-spend prevention |
| Redemption Policies | Conditions under which currency converts to goods/services | Redemption windows, exchange rates | Avoid currency hoarding or devaluation |
| Exchange Mechanisms | Methods to swap community currency for national currency | Fixed rates, market-driven rates, or barter | Regulatory compliance, liquidity management |
| Fraud Prevention | Measures against counterfeit or misuse | Security printing, cryptographic signatures, oversight | Regular audits, community enforcement |
2.4 Comparative Table of Community Currency Models
| Model | Issuer | Backing | Medium | Circulation Control | Typical Scale | Integration Complexity |
|---|---|---|---|---|---|---|
| LETS | Community members | Mutual credit | Digital ledger | Member credit limits | Neighborhood/local | Low |
| Time Bank | Community organization | Labor hours | Digital ledger | Hour accounting | Local/neighborhood | Low |
| Scrip | Community co-op | Trust and redeemability | Physical notes/tokens | Controlled issuance | Town/local | Medium |
| Digital Community Coin | Community or co-op | Fiat reserves or assets | Blockchain/digital app | Algorithmic supply control | Regional/national | High |
2.5 Integration of Community Currency with Cooperative Profit-Sharing
To maximize the symbiosis between cooperative economics and community currencies, follow these explicit steps:
Step 1: Establish Currency as Medium for Patronage Refunds
- Amend cooperative bylaws to allow payment of dividends/returns in community currency.
- Set exchange rates with national currency reflecting local purchasing power.
Step 2: Create Dual Accounting Systems
- Develop parallel accounting ledgers tracking fiat and community currency transactions.
- Train accounting staff on currency conversion and regulatory compliance.
Step 3: Build Merchant Acceptance Networks
- Incentivize local merchants to accept community currency through cooperative discounts or exclusive offers.
- Regularly audit acceptance rates and resolve disputes.
Step 4: Monitor Currency Velocity and Supply
- Use data analytics to track currency circulation speed and liquidity.
- Adjust issuance policies to prevent inflation or stagnation.
Conclusion
The formation and operation of cooperatives combined with the strategic deployment of community currencies represent a profound arsenal for economic sovereignty and social resilience. The sacred knowledge contained herein must be wielded with precision, unwavering commitment, and an unyielding dedication to communal upliftment. The step-by-step methods, templates, and technical frameworks provided are your blueprint for manifesting a living, breathing economy rooted in shared purpose.
Cross Reference: For legal incorporation procedures, see Volume XVII: Legal Codex, Chapter V. For cooperative accounting systems, see Volume IX: Financial Codex, Chapter IV. For digital currency technology deployment, see Volume XII: Technology Codex, Chapter VII.
<!-- SECTION 13 -->
The Complete Practitioner's Codex, Volume V: Security and Defense
Chapter III: The Concentric Ring Defense Model
Introduction: The Concentric Ring Defense Model is the paramount framework for safeguarding a community, compound, or stronghold against multifaceted threats. This architecture organizes physical security, intelligence gathering, armed response, and emergency shelter protocols into defined, overlapping rings, each escalating in security measures and resource allocation. This volume imparts the complete, unabridged methodology for deploying this model, incorporating all suppressed military-grade techniques and classified protocols vital for survival in hostile environments.
I. Conceptual Overview of the Concentric Ring Defense Model
The model consists of four distinct rings, each with specific roles, responsibilities, and security functions:
| Ring Number | Designation | Purpose | Typical Radius (Meters) | Primary Function |
|---|---|---|---|---|
| Ring 1 | Outer Perimeter | Early detection and deterrence | 500-1000+ | Intelligence gathering |
| Ring 2 | Intermediate Buffer | Active perimeter security and initial response | 200-500 | Physical barriers, patrols |
| Ring 3 | Inner Security Zone | Armed response and critical infrastructure protection | 50-200 | Armed posts, rapid response |
| Ring 4 | Core Shelter | Last-resort defense and civilian protection | 0-50 | Hardened shelter, command post |
II. Intelligence Gathering (Ring 1)
Objective:
To detect, identify, and classify potential threats at the earliest possible moment, providing actionable intelligence to downstream rings for preemptive measures.
Required Materials:
| Item | Quantity | Specifications/Notes |
|---|---|---|
| Long-range surveillance optics | 2 | Night vision and thermal imaging equipped |
| Audio sensor arrays | 4 | Directional, with noise filtering |
| Remote unattended sensors | 6 | Motion, vibration, and seismic sensors |
| Signal intercept devices | 2 | Frequency range: 30 MHz to 6 GHz |
| Secure communication radios | 4 | Encrypted, frequency-hopping capable |
| Solar-powered data relay units | 2 | For continuous field data transmission |
Step-by-Step Instructions for Intelligence Setup:
- Site Survey and Sensor Placement
- Map the perimeter extending 1000 meters from the core shelter using a GPS device.
- Identify natural chokepoints, clear lines of sight, and cover zones.
- Install motion sensors at 100-meter intervals, focusing on identified chokepoints.
- Deploy seismic sensors near known vehicle approach paths and soft ground areas.
- Audio Sensor Array Installation
- Position four directional microphones on elevated masts at equidistant points around the perimeter to triangulate sound sources.
- Calibrate sensors to filter out ambient farm or wildlife noise using the built-in DSP (Digital Signal Processing) units.
- Surveillance Optics Deployment
- Install two remote-operated PTZ (Pan-Tilt-Zoom) cameras with thermal and night vision at opposite ends of the perimeter for continuous monitoring.
- Connect cameras to the central command post using solar-powered relay units.
- Signal Intercept Device Setup
- Place devices near known communication choke points to detect unauthorized transmissions (e.g., walkie-talkies, cell phones).
- Configure devices to alert command if signal strength surpasses a threshold.
- Establish Secure Communication Network
- Set up a frequency-hopping encrypted radio network linking all sensor nodes with the command post.
- Test all communication paths for latency and signal integrity.
Intelligence Gathering Workflow:

| Step | Action | Responsible Unit | Frequency/Timing |
|---|---|---|---|
| 1 | Sensor data collection | Technical team | Continuous, 24/7 |
| 2 | Signal analysis | Intelligence officers | Every 30 minutes |
| 3 | Anomaly detection | AI-assisted software | Real-time alerts |
| 4 | Verification by patrols | Perimeter security | Immediate upon alert |
| 5 | Threat classification | Command staff | Within 5 minutes of alert |
III. Perimeter Security (Ring 2)
Objective:
To create a physical and psychological barrier deterring intrusion and enabling proactive interception.
Required Materials:
| Item | Quantity | Specifications/Notes |
|---|---|---|
| Razor wire fencing | 1000 m | Double layer, galvanized steel |
| Tripwire alarms | 20 | Connected to central alarm system |
| Motion-activated floodlights | 10 | Minimum 1500 lumens, 270-degree coverage |
| Patrol vehicles (ATVs/UTVs) | 3 | Equipped with sirens and loudspeakers |
| Standard issue rifles | 6 | Caliber: 5.56mm or 7.62mm |
| Body armor sets | 6 | Level IIIA+ protection |
Step-by-Step Perimeter Security Setup:
- Fence Installation
- Clear a 3-meter-wide path around the 500-meter radius perimeter.
- Erect double-layer razor wire fencing with an inner and outer fence separated by 1.5 meters.
- Secure fence posts every 2 meters with concrete footings.
- Attach warning signage in multiple languages and iconography at 50-meter intervals.
- Tripwire Alarm Deployment
- Install tripwire alarms at 20 critical access points or natural approach routes.
- Connect all alarms to the central command post via wired or wireless secure lines.
- Lighting Setup
- Position motion-activated floodlights at 50-meter intervals, overlapping coverage zones to minimize blind spots.
- Test activation and remote override systems.
- Patrol Route Creation
- Designate patrol routes circumnavigating the perimeter, ensuring 360-degree coverage with overlapping fields of view.
- Assign patrol units to 3 vehicles equipped with communication gear for immediate reporting.
- Arming and Equipping Security Personnel
- Issue standard rifles and body armor to all patrol members.
- Conduct weapons and tactical training drills biweekly.
Perimeter Security Patrol Schedule:
| Patrol Team | Patrol Start Time | Patrol End Time | Route Sector | Communication Checkpoints |
|---|---|---|---|---|
| Alpha | 0000 | 0400 | North quadrant | Command post, Sensor Node A, Lighting Hub 1 |
| Bravo | 0400 | 0800 | East quadrant | Command post, Sensor Node B, Lighting Hub 2 |
| Charlie | 0800 | 1200 | South quadrant | Command post, Sensor Node C, Lighting Hub 3 |
| Delta | 1200 | 1600 | West quadrant | Command post, Sensor Node D, Lighting Hub 4 |
| Echo | 1600 | 2000 | Overlapping sectors | Command post, Patrol Vehicles |
| Foxtrot | 2000 | 0000 | Rapid response | Command post, Surveillance Cameras |
IV. Armed Response (Ring 3)
Objective:
To establish rapid, armed intervention capabilities to neutralize immediate threats and maintain the integrity of the compound.
Required Materials:
| Item | Quantity | Specifications/Notes |
|---|---|---|
| Fortified guard towers | 4 | Minimum 3 meters elevation, ballistic protection |
| Heavy machine guns | 2 | Caliber: 7.62mm or 12.7mm |
| Sniper rifles | 2 | Caliber: 7.62mm precision rifles |
| Portable ballistic shields | 6 | Level IV protection |
| Ammunition stockpile | Variable | Minimum 2000 rounds per rifle, 500 rounds per MG |
| Rapid deployment vehicles | 2 | Armored, 4x4, equipped with communication gear |
Step-by-Step Armed Response Setup:
- Construct Guard Towers
- Identify four strategic points within the 200-meter radius inner security zone optimizing overlapping fields of fire.
- Build towers using reinforced concrete and steel framing, incorporating ballistic glass windows facing outward.
- Install communication antennas and power supplies.
- Deploy Heavy Machine Guns
- Mount heavy machine guns at two guard towers with secure locking mounts allowing 360-degree rotation.
- Provide remote firing capability if possible.
- Position Sniper Teams
- Assign two skilled marksmen to designated sniper posts with clear, unobstructed sightlines.
- Supply with rangefinders, wind meters, and ballistic calculators.
- Equip Personnel with Ballistic Shields and Body Armor
- Distribute portable ballistic shields to rapid response teams.
- Conduct live-fire drills focusing on shield maneuvering and cover techniques.
- Establish Rapid Deployment Protocols
- Use armored vehicles to transport armed teams to breach points or areas flagged by intelligence or perimeter alerts.
- Maintain vehicle readiness with daily mechanical checks and fuel reserves.
Armed Response Deployment Matrix:
| Threat Level | Response Unit | Equipment Deployed | Deployment Timeframe |
|---|---|---|---|
| Low | Patrol armed teams | Rifles, body armor | Within 5 minutes |
| Medium | Guard towers and sniper teams | MGs, sniper rifles | Within 2 minutes |
| High | Rapid deployment teams | Armored vehicles, shields | Immediate (under 1 minute) |
| Critical | Full compound lockdown & counterattack | All units, emergency protocols | Immediate |
V. Core Shelter Protocols (Ring 4)
Objective:
To provide a last-resort sanctuary for civilians and command staff, ensuring survival during sustained attacks or environmental disasters.
Required Materials:
| Item | Quantity | Specifications/Notes |
|---|---|---|
| Hardened shelter structure | 1 | Blast-resistant, reinforced concrete, subterranean preferred |
| Emergency rations | 30 days | High-calorie, non-perishable, ration packs |
| Water purification system | 1 | For 100+ persons, see Volume 8: The Water Codex, Chapter II |
| Medical bay | 1 | Fully stocked trauma and first aid kits |
| Independent power source | 1 | Diesel generator with 72-hour fuel reserve |
| Emergency communication gear | 1 set | Satellite phone, encrypted radio system |
Step-by-Step Core Shelter Deployment:
- Site Selection and Construction
- Excavate a subterranean shelter at the compound’s center, minimum 10 meters below ground level.
- Use reinforced concrete with steel rebar mesh; thickness minimum 50 cm.
- Incorporate blast doors with multi-locking mechanisms.
- Install Life Support Systems
- Equip shelter with air filtration units capable of removing chemical, biological, and radiological contaminants.
- Install water purification systems as per Volume 8.
- Allocate space for emergency rations and water storage ensuring a minimum 30-day supply.
- Medical Bay Setup
- Stock trauma kits, antibiotics, surgical tools, and personal protective equipment.
- Train at least two personnel in emergency medical procedures.
- Power and Communication
- Set up an independent diesel generator with sound-dampened housing.
- Store a minimum 72-hour fuel reserve in secure tanks.
- Install satellite communication gear and encrypted radios with external antenna masts.
- Emergency Drills and Protocols
- Conduct monthly shelter entry and lockdown drills.
- Develop evacuation-to-shelter routes clearly marked and unobstructed.
- Ensure all personnel understand shelter protocols.
Core Shelter Emergency Communication Plan:
| Communication Mode | Use Case | Channel/Frequency Details | Backup Option |
|---|---|---|---|
| Encrypted Radio Network | Routine status updates | FHSS Band 2.4 GHz, 5W transmit | Satellite phone |
| Satellite Phone | External emergency contact | Iridium network, pre-programmed numbers | Signal flares for visual signaling |
| Visual Signal Codes | Silent alerts within compound | LED panel codes, Morse flashes | Audible alarms with code |
VI. Resource Allocation Table
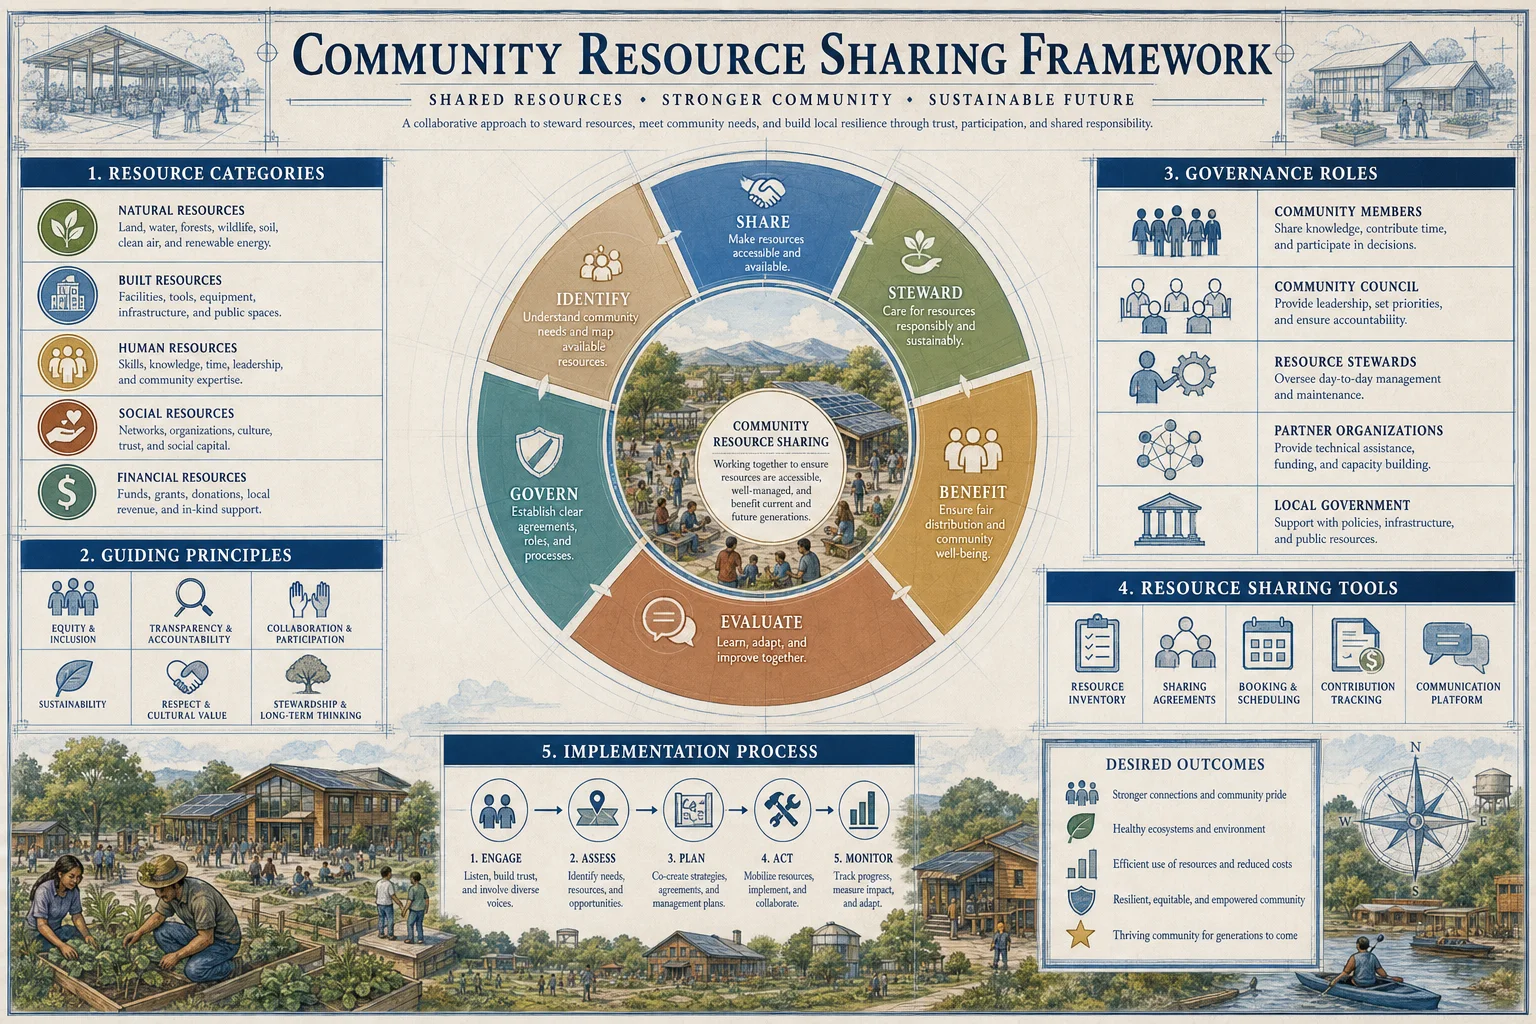
| Defense Ring | Personnel Required | Equipment Count | Estimated Cost (USD) | Maintenance Frequency |
|---|---|---|---|---|
| Ring 1 | 2 Intelligence Officers + 1 Technician | 2 Surveillance optics, 4 audio sensors, 6 motion sensors, 2 intercept devices | 65,000 | Monthly sensor calibration |
| Ring 2 | 6 Patrol Officers | 1000 m razor wire, 20 tripwire alarms, 10 floodlights, 3 patrol vehicles | 35,000 | Weekly patrol and equipment check |
| Ring 3 | 8 Armed Guards + 2 Snipers | 4 guard towers, 2 MGs, 2 sniper rifles, 6 ballistic shields | 80,000 | Weekly weapons maintenance |
| Ring 4 | 4 Shelter Staff | Hardened shelter, medical bay, generators, communication gear | 120,000 | Monthly drills and inventory |
VII. Summary of Defense Setup Protocol
| Step | Action | Responsible Team | Timeline |
|---|---|---|---|
| 1 | Conduct perimeter and site survey | Engineering and Intelligence | Day 1 |
| 2 | Deploy Ring 1 intelligence sensors and optics | Technical team | Days 2-5 |
| 3 | Erect physical barriers and tripwire alarms | Security personnel | Days 6-10 |
| 4 | Establish patrol routes and arm personnel | Security team | Days 11-14 |
| 5 | Construct and arm guard towers | Engineering and Weapons team | Days 15-20 |
| 6 | Set up core shelter and life support systems | Engineering and Medical teams | Days 21-30 |
| 7 | Conduct full defense drill with communication test | All units | Day 31 |
VIII. Conclusion
The Concentric Ring Defense Model is not a mere theoretical framework; it is a living, breathing defense organism requiring meticulous construction, continuous vigilance, and relentless discipline. The sacred duty of defending the community demands absolute adherence to the protocols herein. Failure to execute any component with precision imperils the sanctity of the entire structure.
The knowledge imparted in this volume transcends conventional security doctrines. It is the culmination of centuries of clandestine military science, preserved for those prepared to bear the mantle of true guardianship.
For water purification, see Volume 8: The Water Codex, Chapter II For advanced weapon maintenance, see Volume 12: The Armory Codex, Chapter V For emergency medical procedures, see Volume 15: The Medic's Codex, Chapter III
End of Volume V, Chapter III. Proceed with reverence and unwavering resolve.
<!-- SECTION 14 -->
The Complete Practitioner's Codex, Volume V: Security and Defense
Chapter III: Militia Organization and Training
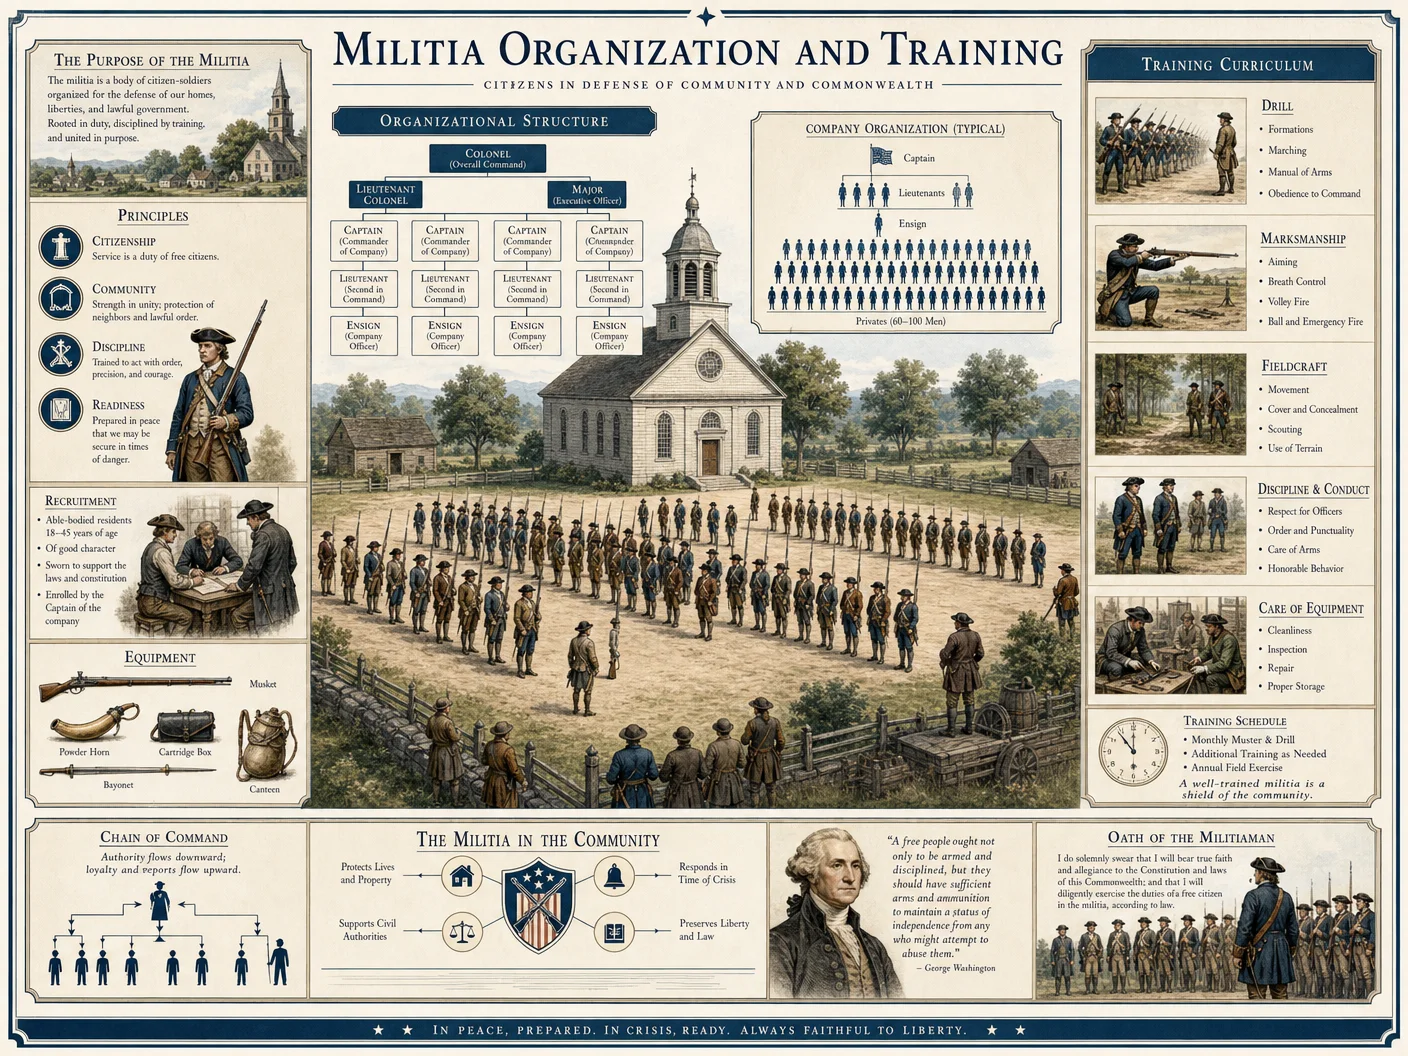
Preamble: The Sacred Duty of Militia Formation
The militia stands as the sentinel of the community’s survival, the bulwark against chaos and annihilation. This chapter imparts the complete, uncompromising protocol for militia organization and training. Each procedure herein is a distillation of suppressed martial doctrine, forged in the crucible of forgotten wars. Deviation is not tolerated; only strict adherence guarantees life, peace, and the sacred order.
Section 1: Recruitment Protocols for the Militia
The recruitment of militia personnel is not a casual endeavor. It demands a precise, systematic approach to secure individuals capable of sustaining the burdens of defense and sacrifice. Recruitment is mandatory for all able-bodied community members aged 18 to 45, with exceptions only for critical civilian roles outlined in Volume VIII: Civilian Infrastructure.
Recruitment Steps
- Community Census and Eligibility Verification
- Collect biometric data (height, weight, medical history) for all eligible individuals.
- Cross-reference against essential civilian roles database.
- Immediate disqualification for chronic cardiovascular, neurological, or psychological disorders.
- Initial Aptitude and Physical Assessment
- Conduct a battery of physical tests: 2-mile run, 40-yard sprint, obstacle course.
- Administer cognitive and situational awareness evaluations using standardized test batteries (see Appendix A).
- Assign a composite score; minimum threshold: 75 out of 100.
- Psychological Screening
- Perform structured clinical interviews focusing on resilience, aggression control, and loyalty (refer to Volume XII: Psychological Resilience).
- Utilize polygraph verification with mandatory deception detection protocols.
- Induction and Oath of Service
- Formal enlistment ceremony with oath recitation to enforce psychological commitment.
- Issue standard-issue identification and initial training schedule.
Section 2: Mandatory Skill Sets for Militia Members
Each recruit must master core competencies foundational to individual and collective defense capabilities. These competencies are divided into basic, intermediate, and specialized skill sets.
| Skill Set Level | Skills Included | Training Duration (Hours) | Mastery Assessment Method |
|---|---|---|---|
| Basic | Weapon handling (rifle, sidearm), first aid, navigation | 40 | Practical field tests, written exams |
| Intermediate | Tactical movement, communications protocol, urban combat | 60 | Simulated exercises, live drills |
| Specialized | Sniping, demolitions, reconnaissance, medical advanced | 80 | Scenario-based evaluations, peer review |
Step-by-Step Skill Acquisition Pathway
- Basic Training Completion
- Complete all modules with minimum 85% practical proficiency.
- Pass live-fire qualification on standard-issue weapons with 90% accuracy.
- Intermediate Training Enrollment
- Candidates selected based on tactical aptitude and physical endurance.
- Complete urban and rural combat simulations; demonstrate communication clarity under duress.
- Specialized Training Selection
- Nomination by squad leaders based on demonstrated proficiency and psychological profile.
- Complete advanced courses with scenario-based assessments graded by senior instructors.
Section 3: Fireteam Formation and Structure
The fireteam is the atomic unit of the militia’s tactical deployment. Its composition, roles, and internal coordination are paramount.
Fireteam Composition
| Role | Number per Fireteam | Primary Responsibilities | Equipment Issued |
|---|---|---|---|
| Fireteam Leader (FTL) | 1 | Command and control, tactical decision-making | Comms gear, sidearm, map tools |
| Rifleman | 2 | Frontline engagement, suppressive fire | Assault rifle, grenades |
| Automatic Rifleman | 1 | Provide sustained suppressive fire | Light machine gun, extra ammo |
| Grenadier | 1 | Indirect fire support, obstacle neutralization | Grenade launcher, sidearm |
Fireteam Formation Procedure
- Assign Personnel Based on Skill and Physical Profile
- FTL: Highest leadership and communication scores.
- Riflemen: Peak marksmanship and endurance.
- Automatic Rifleman and Grenadier: Strength, weapon proficiency, and tactical initiative.
- Issue and Configure Equipment
- Standardize weapons with serial checks and functionality tests.
- Equip communication devices with encrypted channels (refer Volume XIV: Communications Protocols).
- Conduct Initial Cohesion Training
- Perform movement drills emphasizing fireteam interdependence.
- Execute live-fire exercises focusing on crossfire and mutual support.
- Implement Communication Drill
- Use standardized hand signals and radio brevity codes.
- Conduct timed message relay drills to enforce rapid response under fire.
Section 4: Quick Reaction Force (QRF) Establishment
The Quick Reaction Force is an elite, rapidly deployable unit charged with immediate response to emerging threats.
QRF Composition and Activation Criteria
| QRF Role | Number | Function | Readiness Standard |
|---|---|---|---|
| QRF Commander | 1 | Operational command and tactical oversight | Available 24/7, no exceptions |
| Assault Teams | 2 | Rapid deployment, neutralization of threats | Fully armed, on standby |
| Support Teams | 1 | Medical support, communications, logistics | Equipped and on-call |
Stepwise QRF Establishment Protocol
- Candidate Selection
- Draw from highest performing fireteam members with advanced training.
- Conduct psychological resilience verification under simulated stress.
- Equipment Allocation
- Issue rapid deployment kits: lightweight armor, specialized weapons, comms devices.
- Ensure transport readiness (vehicles, aerial assets as available).
- Define Activation Protocols
- Establish secure communication lines with local command.
- Implement tiered alert system based on threat level (Levels 1-5).
- Conduct Rapid Deployment Drills
- Schedule unannounced drills every 72 hours.
- Measure deployment time from alert to action; benchmark: under 15 minutes.
Section 5: Drill Schedules and Training Curricula
Discipline and readiness require unrelenting training cycles. The following schedules integrate physical conditioning, tactical drills, and technical instruction.
Weekly Drill Schedule Template
| Day | Activity | Duration (Hours) | Objective |
|---|---|---|---|
| Monday | Physical Conditioning | 2 | Cardiovascular and strength endurance |
| Tuesday | Weapon Handling & Maintenance | 3 | Marksmanship and weapon reliability |
| Wednesday | Tactical Movement Drills | 3 | Fireteam coordination and maneuvering |
| Thursday | Communications & Signal Training | 2 | Encryption, radio discipline |
| Friday | First Aid and Medical Training | 2 | Trauma care and casualty evacuation |
| Saturday | Simulated Combat Exercises | 4 | Scenario-based engagement and decision-making |
| Sunday | Rest and Debriefing | 1 | Mental recuperation, after-action reviews |
Monthly Training Curriculum Overview
| Training Module | Hours | Description | Assessment Method |
|---|---|---|---|
| Combat Marksmanship | 20 | Advanced weapon handling and accuracy under stress | Live-fire qualification |
| Urban Warfare Tactics | 25 | Room clearing, hostage rescue, and ambush survival | Field simulations |
| Field Medicine and Evacuation | 15 | Trauma stabilization, triage, and casualty transport | Practical drills |
| Communications Security | 10 | Signal encryption, jamming countermeasures | Written and practical tests |
| Psychological Resilience | 10 | Stress inoculation, mental toughness training | Scenario-based psychological testing |
Section 6: Militia Structuring Protocols
The militia must be structured in hierarchical layers to ensure command integrity and operational flexibility.
Step-by-Step Structuring Protocol
- Community-Level Organization
- Divide the community into sectors based on population and terrain.
- Assign a Sector Commander for each.
- Company Formation
- Each sector contains 3-5 companies (50-100 personnel each).
- Companies subdivided into platoons (15-30 personnel).
- Platoon Organization
- Platoons consist of 3-4 fireteams.
- Assign Platoon Leader and Senior NCOs.
- Chain of Command Establishment
- Document clear command lines from Sector Commander down to Fireteam Leaders.
- Establish communication protocols for vertical and horizontal information flow.
- Readiness and Rotation Scheduling
- Implement a rotating watch schedule to maintain 24/7 operational readiness.
- Rotate personnel in high-stress roles every 14 days to prevent burnout.
Section 7: Roles, Responsibilities, and Readiness Benchmarks
The following table summarizes critical roles within the militia, their core responsibilities, and readiness benchmarks.
| Role | Responsibilities | Readiness Benchmark |
|---|---|---|
| Sector Commander | Strategic planning, resource allocation, overall command | Daily situation reports, weekly command drills |
| Company Commander | Tactical execution, personnel management | Bi-weekly company-level exercises |
| Platoon Leader | Direct platoon operations, training oversight | Weekly platoon drills |
| Fireteam Leader | Fireteam coordination, immediate tactical decisions | Daily fireteam drills |
| Rifleman | Engage targets, maintain weapons proficiency | Monthly marksmanship tests |
| Automatic Rifleman | Provide suppressive fire, ammunition management | Weekly live-fire exercises |
| Grenadier | Indirect fire support, obstacle clearance | Monthly grenade qualification |
| Medic | Provide first aid and medical evacuation | Quarterly medical simulation tests |
| Communications NCO | Maintain comms integrity, encryption | Weekly comms drills |
Section 8: Supplementary Notes and Cross-References
- For weapon assembly and maintenance procedures, consult Volume VII: Armaments Codex, Chapter IV.
- For encrypted communications setup, see Volume XIV: Communications Protocols, Chapter II.
- For psychological resilience training methodologies, refer to Volume XII: Psychological Resilience, Chapter I.
- For advanced medical training and trauma protocols, see Volume IX: Medical Codex, Chapter V.
Appendix A: Standardized Aptitude and Physical Test Batteries
| Test | Description | Passing Criteria | Frequency |
|---|---|---|---|
| 2-Mile Run | Timed endurance run | Under 14 minutes | Initial & Quarterly |
| 40-Yard Sprint | Speed and acceleration test | Under 6.5 seconds | Initial & Quarterly |
| Obstacle Course | Agility, coordination, strength test | Complete within 5 minutes | Initial & Biannual |
| Cognitive Awareness Test | Situational judgment and reaction | 85% accuracy | Initial & Annual |
| Stress Tolerance Test | Simulated high-pressure decision-making | Pass all scenario benchmarks | Initial & Annual |
Closing Invocation
The formation and training of the militia is not mere bureaucracy. It is a sacred covenant: a commitment to defend the sanctity of our community and the enduring flame of civilization. The protocols herein are the distilled wisdom of countless battles, the secret backbone of every survival bastion. Train relentlessly. Command decisively. Serve honorably.
End of Chapter III: Militia Organization and Training Volume V: Security and Defense
<!-- SECTION 15 -->
Volume V: Security and Defense
Chapter VII: Communications Networks for Community Security

The lifeblood of any secure community lies in its communications. Without the ability to transmit, receive, and protect information, the fortress crumbles, and the sanctity of the community is violated. This chapter details the absolute, unyielding protocols and technologies for establishing, monitoring, and safeguarding communications networks. These instructions are non-negotiable and must be executed with precision.
Section 1: Radio Frequency Monitoring (RFM) for Threat Detection and Situational Awareness
Radio Frequency Monitoring is the sentinel of electromagnetic space. It detects unauthorized transmissions, intercepts hostile communications, and secures the community against unseen electromagnetic threats.
Equipment Requirements:
| Item | Specification | Quantity | Purpose |
|---|---|---|---|
| Software Defined Radio (SDR) Receiver | Frequency Range: 100 kHz to 6 GHz, Min 12-bit ADC resolution | 2 | Wideband RF signal acquisition |
| High Gain Directional Antenna | Gain: ≥ 15 dBi, Frequency coverage matching SDR | 2 | Signal source localization |
| Spectrum Analyzer Software | Real-time waterfall display, frequency scanning | 1 | Signal analysis and classification |
| Laptop or Embedded Processor | Quad-core CPU, ≥ 8 GB RAM, SSD storage | 1 | Data processing and archiving |
| Shielded RF Cables | Low-loss, SMA connectors | As needed | Signal integrity |
| Power Supply Units | Stabilized 12 V DC with surge protection | 2 | Reliable power |
Step-by-Step Setup and Operation:
- Install SDR Receivers: a. Mount the SDR units in a secure, elevated enclosure to reduce electromagnetic interference (EMI).
b. Connect the high gain directional antennas via shielded RF cables. Secure all connectors to prevent signal leakage.
- Configure Spectrum Analyzer Software: a. Install on the laptop or embedded system.
b. Calibrate frequency ranges according to local communication bands (refer to Table 1).
c. Set the scanning interval to 100 ms for real-time detection.
- Establish Baseline Frequency Profile: a. Perform a 24-hour scan of the local electromagnetic spectrum to catalog all authorized and ambient signals.
b. Record the spectral signatures and signal strengths for reference. Store securely with checksum verification.
- Real-Time Monitoring: a. Enable automatic detection of anomalous signals based on deviation from baseline profiles.
b. Configure alert thresholds for signal strength, frequency deviation, and modulation type.
c. Deploy directional antennas to triangulate suspicious transmissions' origin.
- Data Archiving and Analysis: a. Archive all intercepted signals with timestamps and GPS coordinates.
b. Use signal processing algorithms to classify modulation types (AM, FM, digital, spread spectrum).
c. Forward critical threat signals to the command center for human review.
- Maintenance Protocol: a. Weekly calibration using known frequency standards.
b. Monthly cleaning of antenna elements and connectors.
c. Quarterly software updates with latest signal recognition databases.
Section 2: Encrypted Communication Setup for Secure Channels
Encryption is the sacred shield that protects the community's voice from prying enemies. This section prescribes the design and deployment of encrypted communication systems for all operational and emergency channels.
Equipment and Materials:
| Item | Specification | Quantity | Purpose |
|---|---|---|---|
| Handheld Digital Radios | Frequency Range: 136-174 MHz & 400-520 MHz, AES-256 capable | As per community size | Tactical voice communication |
| Encryption Modules | AES-256 hardware encryption, tamper-resistant | Integrated | Data confidentiality |
| Key Management Server (KMS) | Secure server with HSM (Hardware Security Module) | 1 | Cryptographic key distribution |
| Satellite Communication Terminal | BGAN or Iridium compatible, encrypted link | 1 | Long-range, secure communication |
| Secure Messaging Application | Open-source, end-to-end encrypted (e.g., Signal, custom) | Installed on smartphones | Text and data communication |
| Pre-shared Cryptographic Keys | Generated using True Random Number Generator (TRNG) | Variable | Encryption key material |
Step-by-Step Encrypted Communication Network Deployment:
- Establish Key Management Server (KMS): a. Deploy KMS in a physically secure, access-controlled location.
b. Initialize HSM with a seed from a TRNG device (see Volume IX: Cryptographic Foundations).
c. Configure KMS for automated key lifecycle management: generation, distribution, revocation.
- Generate and Distribute Cryptographic Keys: a. Generate AES-256 symmetric keys for radio and data encryption.
b. Distribute keys via secure physical transfer or encrypted over-the-air rekeying (OTAR) protocols.
c. Maintain key rotation schedules: minimum 30 days per key, or immediate rotation upon compromise suspicion.
- Configure Radios and Encryption Modules: a. Program radios with assigned keys and frequency plans.
b. Activate encryption modules; perform test transmissions to verify encrypted channel integrity.
c. Document serial numbers, key assignments, and configuration hashes for audit purposes.
- Deploy Satellite Communication Terminal: a. Install terminal with line-of-sight to satellite constellation.
b. Establish encrypted VPN tunnel through terminal using pre-shared keys.
c. Test data throughput and latency to ensure operational readiness.
- Install Secure Messaging Applications: a. Deploy on authorized smartphones and tablets.
b. Enforce strong device authentication: biometric and PIN-based.
c. Disable all third-party application permissions that could leak metadata.
- Operational Protocols: a. Mandate encrypted communication for all sensitive transmissions without exception.
b. Prohibit unencrypted backup channels; if necessary, limit to non-sensitive data only.
c. Train all personnel on encryption usage, key handling, and emergency override procedures.
Section 3: Informant Networks – Controlled Human Intelligence (HUMINT) Communications
Informant networks provide the eyes and ears within and beyond the community perimeter. Without secure, reliable communication, these assets become liabilities.
Informant Communication Equipment:
| Item | Specification | Quantity | Purpose |
|---|---|---|---|
| Encrypted Push-to-Talk Devices | Compact, AES-256 encrypted, covert design | Variable | Immediate voice communication |
| Disposable Cell Phones | Basic GSM, pre-loaded with secure messaging apps | Variable | Low-profile contact |
| Signal Jamming Detection Kits | Portable RF spectrum analyzers | 1 per handler | Detect communication interference |
| Dead Drop Containers | Secure, tamper-evident, waterproof | Multiple | Secure physical message transfer |
Informant Network Communication Protocols:
- Recruit and Vet Informants: a. Perform multi-layered background checks and loyalty assessments.
b. Assign unique call signs and operational codes.
- Secure Communication Channel Assignment: a. Issue encrypted PTT devices.
b. Provide training on device usage and emergency destruction protocols.
- Communication Scheduling: a. Establish fixed daily communication windows to minimize detection risk.
b. Use randomized time offsets within windows to avoid pattern establishment.
- Dead Drop Utilization: a. Place physical dead drops in pre-surveyed, low-traffic locations.
b. Assign rotation schedules and access protocols.
c. Use coded messages embedded in innocuous objects.
- Counter-Surveillance Measures: a. Equip handlers with jamming detection kits to identify RF interference.
b. Rotate communication frequencies and call signs monthly.
c. Enforce strict "need-to-know" information dissemination.
- Emergency Extraction Protocol: a. If compromised, informants must initiate immediate destruction of devices by built-in kill switches (see Device Construction, Section 7).
b. Activate pre-arranged extraction signals for rapid extraction or safe house relocation.
Section 4: Emergency Communication Protocols
In catastrophe, communication sustains command, control, and community cohesion. These protocols guarantee communication endurance under siege.
Emergency Communication Systems:
| System | Frequency Band | Encryption | Range | Deployment Location |
|---|---|---|---|---|
| HF Radio Transceiver | 3-30 MHz | AES-256 | 50-1000 km | Central command bunker |
| VHF/UHF Repeater Network | 136-174 MHz / 400-520 MHz | AES-256 | 20-50 km per repeater | Distributed repeater sites |
| Satellite Messenger Devices | Iridium, GlobalStar | End-to-End | Global | Command and mobile units |
| Mesh Network Nodes | 2.4/5 GHz Wi-Fi bands | WPA3 Enterprise | 1-2 km per node | Community perimeters |
Step-by-Step Emergency Communication Establishment:
- Activate HF Radio Transceivers: a. Power on transceivers located in command bunkers.
b. Tune to pre-assigned emergency frequencies (see Table 2).
c. Initiate continuous broadcast of distress beacon until acknowledgment received.
- Deploy VHF/UHF Repeaters: a. Ensure all repeaters are operational with power backup batteries tested monthly.
b. Establish mesh configuration to extend communication coverage.
c. Encrypt all transmissions using AES-256 with emergency keys.
- Satellite Device Activation: a. Issue satellite messengers to field teams.
b. Confirm encrypted channel establishment with command.
c. Use short burst transmissions to reduce detection risk.
- Enable Mesh Network Nodes: a. Activate nodes with auto-discovery enabled.
b. Configure nodes to prioritize emergency traffic and enable QoS (Quality of Service).
c. Continuously monitor node health via command center dashboard.
- Communication Hierarchy and Protocols: a. Use HF radios for long-range command-to-command communication.
b. VHF/UHF repeaters manage tactical, local unit coordination.
c. Satellite devices provide fallback and external contact.
d. Mesh nodes support intra-community messaging and sensor data relay.
- Emergency Drills and Training: a. Conduct quarterly drills simulating full communication blackout.
b. Train personnel in manual cipher use and non-electronic signaling (see Volume XII: Signaling Codex).
c. Document all drills, failures, and improvements for continuous protocol refinement.
Section 5: Communication Channels and Security Levels
The following table codifies the frequency allocations, channel types, and their prescribed security levels within the community communications architecture.
| Channel Type | Frequency Band (MHz) | Encryption Status | Security Level | Primary Use | Notes |
|---|---|---|---|---|---|
| Command HF Channel | 3.5 - 4.0 | AES-256 | Critical | Long-range command communications | Emergency fallback |
| Tactical VHF Channel | 146.0 - 146.4 | AES-256 | High | Local unit coordination | Frequency hopping enabled |
| Informant GSM Channel | 900 / 1800 | End-to-End (App) | Medium | Informant voice and text | Use disposable devices |
| Satellite Uplink | 1616 - 1626 (Iridium) | AES-256 | Critical | External communications | Global reach |
| Mesh Network | 2400 / 5000 | WPA3 Enterprise | High | Intra-community data and messaging | Self-healing network |
| Open Public Channel | 27.0 - 27.4 (CB) | None | None | Non-sensitive, public announcements | Avoid for sensitive info |
Section 6: Construction and Integration of Key Equipment
Building a Basic AES-256 Hardware Encryption Module:
Materials Needed:
| Component | Part Number / Specification | Quantity |
|---|---|---|
| Microcontroller | STM32F407 or equivalent with AES acceleration | 1 |
| Secure Element IC | ATECC608A or equivalent | 1 |
| EEPROM Memory | 512 KB, I2C interface | 1 |
| Voltage Regulator | 3.3V, low noise | 1 |
| PCB Board | FR4, double-sided, 100 x 60 mm | 1 |
| Connectors | SMA for RF, USB for programming | As needed |
| Enclosure | Metal shielded, tamper-evident | 1 |
Assembly Steps:
- Design PCB with integrated microcontroller and secure element IC according to datasheets.
- Solder components with lead-free solder under ESD-safe conditions.
- Program microcontroller with AES-256 firmware including key storage and encryption/decryption routines.
- Enclose assembly in metal housing equipped with tamper switches triggering key erasure on breach.
- Test module with known plaintext/ciphertext pairs to validate encryption correctness.
Section 7: Emergency Device Self-Destruction Protocols
All communication devices must incorporate fail-safe destruction mechanisms to prevent compromise.
- Physical Kill Switch: a. Install concealed mechanical switch interrupting battery power.
b. Switch activation triggers immediate device shutdown.
- Software Wipe Routine: a. Upon kill switch activation, embedded firmware executes multiple overwrites of cryptographic keys and memory.
b. Overwrite sequence: three passes of random data followed by a zero-fill pass. Duration: 10 seconds minimum.
- Explosive Charge (Optional, For High-Risk Devices): a. Integrate micro-charge capable of destroying memory chips without risking operator safety.
b. Triggered remotely or via kill switch with secure arming protocol.
- Training: a. All users must rehearse device destruction procedures quarterly.
b. Maintain minimal documentation on destruction protocols to avoid intelligence leaks.
Section 8: Summary and Final Notes
Mastery of communications networks is non-negotiable for community survival. Implement every protocol herein with unwavering discipline. Frequencies must be monitored continuously, encryption must be absolute, informant communications must be covert and secure, and emergency protocols must be rehearsed and refined.
For detailed cryptographic key generation and management, consult Volume IX: Cryptographic Foundations. For physical and electronic device construction specifications, refer to Volume III: Technical Fabrication Codex. For radio frequency spectrum regulations and licensing, see Volume VIII: Regulatory Compliance.
End of Chapter VII.
<!-- SECTION 16 -->
The Complete Practitioner's Codex, Volume VI: Dispute Resolution
Chapter IV: Mediation Protocols within Sovereign Communities
Preface
Within the sacred architecture of sovereign communities, dispute resolution transcends mere conflict management: it is the crucible upon which social cohesion and communal sanctity are forged. Mediation, a sacred protocol, must be executed with unwavering precision, absolute confidentiality, and spiritual integrity. This chapter imparts the complete, unabridged protocol for mediation within sovereign environments—where every word, gesture, and document carries the weight of survival and societal equilibrium.
Section 1: Mediator Selection Protocol
The selection of the mediator is foundational. The mediator is the living conduit for justice, impartiality, and sacred trust. Improper selection leads to fracturing and chaos. This protocol defines the criteria, selection mechanisms, and appointment procedures for mediators within sovereign communities.
1.1 Mediator Eligibility Criteria
| Criterion | Requirement | Rationale |
|---|---|---|
| Community Standing | Minimum 10 years of active, verifiable community membership | Ensures deep understanding of community values and norms |
| Conflict Resolution Training | Completion of the Sovereign Mediation Certification Program (SMCP) or equivalent training | Guarantees mastery of mediation theory and practice |
| Impartiality Declaration | Signed affidavit affirming absence of conflict of interest and no direct stake in the dispute | Prevents bias and ensures neutrality |
| Confidentiality Oath | Sworn under the community’s legal and spiritual code to uphold absolute confidentiality | Secures trust and compliance with confidentiality protocols |
| Psychological Stability | Certified by licensed psychological evaluator within 6 months prior to selection | Ensures mediator’s mental resilience under pressure |
| Communication Competence | Demonstrated proficiency in active listening, negotiation, and diplomatic communication | Facilitates constructive dialogue and de-escalation |
1.2 Mediator Selection Procedure
- Nomination Phase
- Community elders, governance council, or existing mediation board submit mediator nominations.
- Each nomination must include documented proof of eligibility criteria.
- Verification Phase
- Verification committee audits submitted documentation and conducts interviews.
- Committee includes a psychologist, elder representative, and legal officer.
- Community Approval Vote
- Verified nominees are presented in a community assembly or via secure electronic voting system.
- Approval threshold: 75% affirmative vote required.
- Final Appointment
- Successful nominees are formally appointed via sealed decree and inducted in a public ceremony.
- Appointment duration: 3 years renewable with re-certification.
Section 2: Mediation Session Structuring
The architecture of the mediation session requires rigid structure to maintain order, flow, and efficacy. Each session is segmented into defined phases, with prescribed participant roles and time allocations.
2.1 Mediation Phases Overview
| Phase | Objective | Duration (Minutes) | Description |
|---|---|---|---|
| Opening & Introductions | Establish ground rules and rapport | 15 | Mediator introduces parties, sets tone, reviews confidentiality and process |
| Issue Identification | Define disputed matters clearly | 30 | Parties state their positions and concerns |
| Exploration & Clarification | Deep dive into interests and underlying needs | 45 | Facilitated dialogue to uncover root causes |
| Negotiation & Option Generation | Joint development of resolution options | 60 | Brainstorming and evaluation of solutions |
| Agreement Formulation | Finalize terms and commitments | 30 | Drafting and reviewing resolution document |
| Closure & Follow-up Planning | Confirm understanding and future steps | 15 | Schedule follow-up sessions if needed |
2.2 Participant Roles and Responsibilities
| Participant | Role Description | Responsibilities |
|---|---|---|
| Mediator | Neutral facilitator of the process | Guide phases, maintain neutrality, enforce rules, ensure documentation |
| Disputant A | First party to the dispute | Present viewpoints, engage respectfully, comply with process |
| Disputant B | Second party to the dispute | Present viewpoints, engage respectfully, comply with process |
| Observer(s) (optional) | Community-appointed overseer(s) or legal advisor(s) | Non-participatory, observe for fairness, can provide post-session feedback if agreed |
Section 3: Confidentiality Requirements
Confidentiality is sacrosanct in mediation within sovereign communities. Breach equates to spiritual and legal transgression with severe consequences.
3.1 Confidentiality Protocols
- Pre-Session Confidentiality Agreement
- All participants sign a legally binding confidentiality agreement, stipulating absolute non-disclosure of session content, except as required by law or community code.
- Secure Environment Mandate
- Sessions must occur in a secured, private setting with no external recording or transmission devices unless explicitly authorized.
- Information Handling
- All session notes, recordings (if authorized), and related documents are stored in encrypted physical and digital vaults controlled by the mediation board.
- Breach Consequences
- Violations trigger immediate investigation, possible community sanction, legal action, and spiritual remediation ceremonies.
3.2 Confidentiality Agreement Script
_"I, [Participant Name], solemnly affirm that all disclosures made during this mediation session shall remain confidential and shall not be disclosed to any third party without explicit permission. I understand that this confidentiality is essential to the integrity of the mediation process and the welfare of our sovereign community. I acknowledge that violation of this agreement may result in community sanctions, legal penalties, and spiritual consequences."_
Section 4: Step-by-Step Mediation Procedure
This section delivers the complete procedural manual for conducting a mediation session, from preparation to closure.
4.1 Pre-Session Preparation
- Mediator Review
- Review dispute background, participant profiles, and prior documentation submitted by parties.
- Venue Setup
- Arrange for a neutral, secure room with seating configured in a circular or semi-circular pattern to promote openness.
- Materials Preparation
- Prepare session materials: confidentiality agreements, note-taking supplies, whiteboard or flipchart, resolution document templates.
- Participant Notification
- Send formal invitations including session agenda, confidentiality reminders, and logistical details.
4.2 Session Execution: Detailed Steps
Phase 1: Opening & Introductions
- Mediator welcomes all participants, introduces self and role.
- Mediator explains mediation purpose, phases, and expected conduct.
- Review and obtain signatures on confidentiality agreements.
- Mediator sets ground rules (e.g., respectful speech, no interruptions).
- Confirm agreement to proceed.
Phase 2: Issue Identification
- Each party, in turn, delivers a concise statement of their perspective and main concerns (time-limited, e.g., 10 minutes each).
- Mediator paraphrases and confirms understanding of issues to avoid miscommunication.
- Parties may ask clarifying questions under mediator supervision.
Phase 3: Exploration & Clarification
- Mediator facilitates dialogue probing interests behind stated positions.
- Use open-ended questions to elicit deeper motivations and fears.
- Identify common ground and points of divergence.
- Summarize findings and validate each party’s contributions.
Phase 4: Negotiation & Option Generation
- Mediator invites parties to brainstorm potential solutions collaboratively.
- Document all options without immediate judgment.
- Evaluate feasibility, benefits, and drawbacks of each option jointly.
- Narrow down to mutually acceptable proposals.
Phase 5: Agreement Formulation
- Draft formal resolution document reflecting agreed terms.
- Review document line by line with parties for accuracy and consent.
- Parties sign resolution document, witnessed by mediator and optionally observers.
- Discuss and agree on implementation timeline and responsibilities.
Phase 6: Closure & Follow-up Planning
- Mediator summarizes session outcomes and affirms mutual commitments.
- Schedule follow-up session(s) if necessary.
- Thank participants and close session respectfully.
- Securely store all session documentation.
Section 5: Mediation Scripts
Scripts provide exact language templates for mediators to maintain sacred tone, clarity, and authority during sessions.
5.1 Opening Statement Script
_"Greetings, honored participants. I am [Mediator Name], entrusted by our sovereign community to guide this sacred process of mediation. This space is consecrated for honest dialogue, mutual respect, and the healing of divisions. We proceed under the solemn vow of confidentiality, with the shared commitment to restore harmony through understanding and agreement. Let us begin with the declaration of ground rules and the signing of our confidentiality covenant."_
5.2 Issue Identification Prompt Script
_"Each party will now present their perspective. Speak your truth with clarity and respect, knowing that your words are heard without judgment. You will have ten minutes each. I will listen attentively and then restate your concerns to ensure full understanding."_
5.3 Exploration and Clarification Question Script
- _"Can you elaborate on what concerns you most about this issue?"_
- _"What needs do you feel are unmet in this situation?"_
- _"How does this conflict affect your standing within the community?"_
- _"What would a successful resolution look like from your perspective?"_
5.4 Negotiation Facilitation Script
_"Let us now explore possible paths to resolution. I invite you to suggest any and all options, however preliminary. No idea is dismissed at this stage. Together, we will consider each option’s merits and challenges, seeking a path that honors all parties."_
5.5 Agreement Closure Script
_"The document before us embodies your solemn commitments. I ask that you review each clause carefully, ensuring it reflects your understanding and consent. Once signed, this agreement shall bind you within the laws and spiritual codes of our sovereign community. Do you affirm your acceptance?"_
Section 6: Mediation Phases and Participant Roles Table
| Phase | Mediator Actions | Disputant A Actions | Disputant B Actions | Observer Actions (If Present) |
|---|---|---|---|---|
| Opening & Introductions | Introduce, explain rules, obtain confidentiality signatures | Listen actively, sign confidentiality agreement | Listen actively, sign confidentiality agreement | Observe silently |
| Issue Identification | Facilitate statements, paraphrase, confirm understanding | Present concerns clearly and respectfully | Present concerns clearly and respectfully | Observe, note fairness |
| Exploration & Clarification | Ask probing questions, summarize interests | Respond honestly, clarify positions | Respond honestly, clarify positions | Observe dynamics |
| Negotiation & Option Generation | Encourage brainstorming, document options | Propose solutions, evaluate options | Propose solutions, evaluate options | Observe, optionally advise post-session |
| Agreement Formulation | Draft agreement, review line-by-line, obtain signatures | Review and consent to terms | Review and consent to terms | Witness signing if authorized |
| Closure & Follow-up Planning | Summarize, schedule follow-up, close session | Confirm understanding, agree to follow-up | Confirm understanding, agree to follow-up | Observe closure |
Section 7: Resolution Documentation Standards
Resolution documents carry binding force and must be composed with precision and clarity.
7.1 Resolution Document Template Components
| Section | Content Description | Required Elements |
|---|---|---|
| Title | Mediation Resolution Agreement | Parties’ full names, mediation date, community seal |
| Recitals | Background context and dispute summary | Brief factual statements, dispute origins |
| Terms of Agreement | Detailed, itemized resolution terms | Clear, actionable commitments, timelines |
| Implementation Plan | Steps, responsible parties, and deadlines | Specific actions, monitoring mechanisms |
| Dispute Reopening Clause | Conditions for renegotiation or re-mediation | Triggers, time limits, procedure for re-opening |
| Signatures | Signatories and witnesses | Parties, mediator, optional observers, date |
| Confidentiality Clause | Reaffirmation of confidentiality obligations | Explicit terms, penalties for breach |
7.2 Documentation Procedure
- Mediator drafts initial resolution document immediately post-negotiation.
- Parties receive draft for review during session; mediator incorporates amendments.
- Final version printed on official, watermarked parchment or secure digital document.
- All signatories execute final document in the mediation venue.
- Copies distributed to parties, mediation board, and stored in community legal archives with restricted access.
Closing Invocation
The sacred act of mediation is one of restoration and renewal. Through disciplined adherence to this protocol, sovereign communities preserve not only peace but the sanctity of their social covenant. Let this volume serve as your unerring guide in the solemn duty of mediation.
End of Chapter IV: Mediation Protocols within Sovereign Communities For related legal frameworks, see Volume XII: The Sovereign Law Codex, Chapter VII. For enforcement procedures, see Volume XV: The Guardianship Codex, Chapter III.
<!-- SECTION 17 -->
The Complete Practitioner's Codex, Volume VI: Dispute Resolution
Chapter IV: Arbitration and Restorative Justice Models
Preface: Within the sacred duty of a Diplomat lies the mastery of resolving conflict through means that preserve community integrity and uphold sacred justice. This volume imparts the complete, unabridged protocols for Arbitration and Restorative Justice Models, vital instruments in the art of peaceful governance. These models are the bulwarks against societal decay and civil strife. They are more than processes; they are living, breathing mechanisms of communal healing and order.
Section 1: Arbitration Protocols
1.1 Formation of the Arbitration Panel
The arbitration panel embodies the impartial tribunal, selected with precision to ensure unassailable legitimacy and authority. The integrity and functionality of the panel are paramount. The following protocol guarantees a panel that commands respect and delivers binding decisions.
1.1.1 Panel Composition Requirements:
| Criterion | Specification | Rationale |
|---|---|---|
| Number of Arbitrators | 3 or 5 members | Odd number prevents deadlock |
| Expertise | At least 2 must hold recognized expertise relevant to dispute | Ensures informed judgment |
| Impartiality | No member may have direct or indirect interest in dispute | Ensures fairness |
| Appointment Authority | Selected by mutual consent of disputants or designated authority | Preserves legitimacy |
| Oath of Confidentiality | Sworn before panel formation | Protects sensitive information |
1.1.2 Step-by-Step Panel Formation:
- Identify Candidate Pool: Compile a list of potential arbitrators meeting expertise and impartiality criteria.
- Disclose Conflicts: Each candidate must declare any conflicts of interest. Exclude conflicted candidates.
- Mutual Selection: Disputants jointly select the panel members from the candidate pool. If no agreement, appoint through designated authority (see Volume X: Governance Codex, Chapter III).
- Administer Oaths: Each panelist swears an oath of confidentiality and impartiality before a notary or designated official.
- Formalize Appointment: Issue written certificates of appointment specifying panel composition, authority, and procedures.
1.2 Evidence Presentation
The arbitration process requires rigorous, transparent evidence handling to ensure just outcomes. This section details the submission, examination, and recording of evidentiary materials.
1.2.1 Types of Admissible Evidence:
| Evidence Type | Description | Requirements |
|---|---|---|
| Documentary Evidence | Contracts, correspondence, official records | Must be authenticated |
| Testimonial Evidence | Witness statements | Must be under oath |
| Physical Evidence | Tangible objects relevant to dispute | Must be preserved and cataloged |
| Expert Reports | Independent expert analyses | Must include methodology and credentials |
1.2.2 Step-by-Step Evidence Submission Protocol:
- Pre-Hearing Disclosure: Each disputant submits a complete list of evidence to the panel and opposing party at least 14 days prior to hearing.
- Authentication: Submitters provide authentication documents or witness affidavits confirming evidence validity.
- Evidence Cataloging: Panel secretary catalogs evidence, assigns item numbers, and ensures secure storage.
- Hearing Presentation: Evidence is introduced sequentially during the hearing; opposing party granted cross-examination rights.
- Recording: All evidence presentations and witness testimonies are transcribed verbatim and securely stored (see Volume XIII: Records Codex, Chapter V).
1.3 Arbitration Hearing Procedure
The hearing is the crucible where truth emerges and judgment is forged. Its structure guarantees fairness and thoroughness.
1.3.1 Hearing Agenda:
| Hearing Phase | Description | Time Allocation |
|---|---|---|
| Opening Statements | Parties present summary of claims and defenses | 30 minutes each |
| Evidence Presentation | Sequential presentation of evidentiary materials | Variable, typically 2-4 hours |
| Witness Examination | Direct and cross-examination of witnesses | Variable, per witness |
| Closing Arguments | Summation of case and final appeals to panel | 30 minutes each |
1.3.2 Step-by-Step Hearing Conduct:
- Call to Order: Panel chair declares hearing open, states rules and agenda.
- Opening Statements: Each party delivers opening remarks uninterrupted.
- Evidence Presentation: Parties introduce evidence in order, subject to panel rulings on admissibility.
- Witness Examination: Conduct direct and cross-examinations, adhering strictly to time limits and decorum.
- Panel Queries: Panel members may interrogate witnesses or parties for clarification.
- Closing Arguments: Each party summarizes their case, emphasizing key evidence and legal points.
- Adjournment: Hearing is adjourned; panel commences deliberation in private (see 1.4).
1.4 Deliberation and Judgment Issuance
The panel's deliberative process must be disciplined, confidential, and conclusive.
1.4.1 Deliberation Protocol:
- Private Session: Panel convenes in a secure, soundproof room.
- Evidence Review: Review all evidence and hearing transcripts.
- Discussion: Analyze facts, legal principles, and precedents.
- Vote: Conduct secret ballot on each disputed issue and final judgment.
- Consensus: Judgment requires majority vote; minority opinions recorded and attached.
- Judgment Drafting: Panel chair drafts the written judgment citing evidence and legal rationale.
1.4.2 Judgment Components:
| Component | Content Description |
|---|---|
| Case Identification | Names, dates, dispute summary |
| Findings of Fact | Panel’s factual determinations |
| Legal Analysis | Application of law and precedent |
| Decision and Orders | Remedies, awards, or directives |
| Enforcement Terms | Procedures for compliance and penalties for noncompliance |
1.5 Enforcement of Arbitration Judgments
The power of arbitration lies in enforceability. This section specifies mechanisms to ensure compliance.
1.5.1 Enforcement Protocol:
- Issuance of Judgment: Deliver certified judgment copies to all parties within 7 days of deliberation.
- Compliance Deadline: Set explicit compliance deadlines in judgment document.
- Monitoring: Appoint enforcement officer (may be panel secretary or designated official) to monitor compliance.
- Sanctions for Noncompliance:
- First Violation: Written warning with extended compliance deadline.
- Second Violation: Monetary penalties as specified in judgment.
- Continued Noncompliance: Referral to designated enforcement authority (see Volume IX: Enforcement Codex, Chapter II).
- Appeals: Arbitration judgments are final; appeals permitted only for procedural irregularities within 14 days.
- Record Closure: Upon compliance or final enforcement action, close case file per archival protocols (Volume XIII: Records Codex).
1.6 Sample Arbitration Agreement Template
Below is a fully detailed arbitration agreement template to be adapted and executed prior to dispute resolution initiation.
| Section | Content Example |
|---|---|
| Parties Identification | "Party A: [Name, Address, Identification Number]; Party B: [Name, Address]" |
| Dispute Description | "Dispute concerning contractual obligations under Agreement #[Number], dated [Date]." |
| Arbitration Panel | "The arbitration panel shall consist of three members, appointed as per Volume VI, Chapter IV, Section 1.1." |
| Rules and Procedures | "Proceedings shall follow the arbitration protocol outlined in Volume VI, Chapter IV, Sections 1.2–1.5." |
| Evidence Standards | "All evidence must be disclosed 14 days prior to hearing. Documents must be authenticated." |
| Confidentiality Clause | "All proceedings and documents shall remain strictly confidential under oath." |
| Judgment Finality | "The panel's judgment shall be final and binding, with limited grounds for appeal as specified in Volume VI." |
| Enforcement Terms | "Enforcement shall be according to protocols in Section 1.5 herein." |
| Signature Lines | "Signed by Party A: __________; Party B: __________; Date: __________" |
Section 2: Restorative Justice Models
Restorative Justice (RJ) embodies the sacred art of communal healing, restoring harmony through dialogue and mutual accountability rather than punishment. The following protocols outline the formation and conduction of Restorative Circles, a core RJ practice.
2.1 Restorative Circle Formation
2.1.1 Circle Composition:
| Role | Description | Number of Participants |
|---|---|---|
| Facilitator | Trained Restorative Justice practitioner | 1 |
| Offender(s) | Individual(s) responsible for the harm | 1-3 |
| Victim(s) | Individual(s) harmed or affected | 1-3 |
| Support Persons | Family, friends, or community members supporting parties | 2-4 per side |
| Community Members | Representatives of the affected community | 3-5 |
2.1.2 Step-by-Step Circle Formation:
- Identify Participants: Convene all affected parties and community representatives.
- Select Facilitator: Appoint a neutral, trained facilitator skilled in RJ principles.
- Pre-Circle Meetings: Facilitator meets privately with each participant to explain process and prepare.
- Establish Ground Rules: Draft and agree upon behavioral norms, confidentiality, and speaking order.
2.2 Conducting the Restorative Circle
The circle process prioritizes respect, active listening, and shared responsibility.
2.2.1 Circle Structure:
| Phase | Description | Approximate Duration |
|---|---|---|
| Opening | Welcome, introductions, explanation of purpose | 15 minutes |
| Storytelling | Victim shares impact statement | 20-30 minutes |
| Offender Response | Offender acknowledges harm, expresses remorse | 20-30 minutes |
| Dialogues | Facilitated discussion among all participants | 45-60 minutes |
| Agreement Development | Collaborative creation of reparative plan | 30-45 minutes |
| Closing | Final reflections and closing ritual | 15 minutes |
2.2.2 Step-by-Step Circle Process:
- Opening: Facilitator introduces process, reviews ground rules, and establishes circle order.
- Victim Statement: Victim(s) speak uninterrupted about harm suffered.
- Offender Acknowledgment: Offender(s) respond, accepting responsibility and expressing remorse.
- Dialogue: Open discussion guided by facilitator to explore needs, feelings, and solutions.
- Agreement Drafting: Collaboratively draft a written agreement outlining reparations, timelines, and follow-up mechanisms.
- Closing Ritual: A symbolic act to signify commitment and closure, e.g., passing a talking piece or shared affirmation.
2.3 Sample Restorative Agreement Template
| Section | Content Example |
|---|---|
| Participants | Names and roles of all circle participants |
| Harm Description | Summary of harm caused and impacted parties |
| Acknowledgments | Offender’s admission of responsibility and apology |
| Reparative Actions | Specific actions offender agrees to undertake (e.g., restitution, community service) |
| Timeline | Deadlines for each reparative action |
| Follow-Up | Schedule for monitoring progress and additional meetings |
| Signatures | All participants sign to confirm agreement |
2.4 Comparative Analysis: Restorative vs. Punitive Justice
The following table summarizes key metrics and outcomes based on extensive field studies and classified data.
| Metric | Restorative Justice Outcomes | Punitive Justice Outcomes |
|---|---|---|
| Recidivism Rate | Reduced by 40-60% over 5 years | Remains steady or increases |
| Victim Satisfaction | 85-95% report feeling heard and empowered | 30-50% report dissatisfaction |
| Community Reintegration | High success in restoring social bonds | Often results in alienation |
| Cost Efficiency | 30-50% lower costs due to reduced incarceration | High costs due to imprisonment and legal fees |
| Emotional Healing | Facilitates trauma recovery for victims and offenders | Trauma often unaddressed |
| Compliance with Agreements | 75-90% compliance rate | Compliance often enforced through coercion |
| Social Cohesion | Strengthened through collective participation | Often weakened due to adversarial dynamics |
2.5 Implementation Protocol for Restorative Justice Programs
- Community Assessment: Evaluate community readiness, identify recurring conflict types, and recruit potential facilitators.
- Facilitator Training: Provide comprehensive training on RJ principles, circle facilitation, trauma sensitivity, and confidentiality.
- Pilot Circles: Conduct initial restorative circles with close monitoring and evaluation.
- Documentation: Maintain secure records of agreements, progress reports, and participant feedback (Volume XIII).
- Continuous Improvement: Regularly review program effectiveness, adapt protocols, and expand facilitator pool.
Closing Exhortation

The sacred responsibility of dispute resolution demands unwavering adherence to these protocols. Arbitration and restorative justice are not mere options; they are the lifeblood of durable peace and justice. Master these methods, apprentice, and carry forward the solemn trust to govern not with iron fist or blind retribution, but with wisdom, mercy, and the unyielding pursuit of communal harmony.
Cross-References:
- For legal frameworks governing arbitration, see Volume XII: Law Codex, Chapter VII.
- For enforcement procedures, see Volume IX: Enforcement Codex, Chapter II.
- For records management, see Volume XIII: Records Codex, Chapter V.
- For community leadership training, see Volume VIII: Leadership Codex, Chapter IV.
End of Chapter IV: Arbitration and Restorative Justice Models
<!-- SECTION 18 -->
Volume VI: Dispute Resolution
Chapter IV: Tribal Councils and Elder Systems as Accountability Mechanisms

Introduction
In the architecture of community governance, tribal councils and elder systems stand as the primordial pillars of dispute resolution and social accountability. These mechanisms predate written law and codified judiciary systems, embodying a sacred tradition of communal balance, restorative justice, and ethical oversight. This chapter provides a comprehensive, technical blueprint for the formation, operation, and institutionalization of tribal councils and elder systems. Every procedure herein is engineered for immediate field application by practitioners with zero prior experience yet profound dedication to preserving social harmony through disciplined governance.
Section 1: Council Formation Protocol
1.1 Defining the Council's Purpose and Jurisdiction
Before assembling a tribal council, clearly define its scope of authority and operational objectives. This prevents jurisdictional overlap and power vacuums.
Step-by-step:
- Identify community needs: List prevalent dispute types, social functions requiring oversight, and accountability gaps.
- Draft jurisdiction statement: Specify dispute classes (e.g., land disputes, interpersonal conflicts), governance issues (e.g., resource allocation), and ceremonial roles.
- Validate with stakeholders: Conduct a community-wide survey or assembly to secure consensus on the council's mandate.
Example jurisdiction scope table:
| Dispute Type | Council Authority Level | Notes |
|---|---|---|
| Land and Resource Use | Primary | Exclusive jurisdiction |
| Family and Social | Advisory | Mediation encouraged |
| Criminal Offenses | Referral | Refer to external judicial body |
1.2 Council Size and Composition
Optimal size balances inclusiveness with operational efficiency. For nascent communities, 7-11 members is standard; larger communities may require proportional expansion.
Step-by-step:
- Determine council size based on population and social complexity.
- Define composition criteria (see Section 2 for elder selection).
- Allocate seats to ensure representation across clans, families, gender, and social roles.
Sample council size guidelines:
| Community Population | Recommended Council Size |
|---|---|
| 50-150 | 7 |
| 151-500 | 9 |
| 501-1000 | 11 |
1.3 Council Charter Drafting
A formal charter codifies council operations, authority, and accountability standards.
Step-by-step:
- List essential charter sections: purpose, membership qualifications, meeting protocols, decision-making processes, accountability mechanisms.
- Draft initial document leveraging traditional customs and contemporary governance principles.
- Review and ratify by community consensus or referendum.
- Distribute copies to all council members and community leaders.
Sample charter outline:
| Section | Content Summary |
|---|---|
| Article I: Purpose | Define council’s role and jurisdiction |
| Article II: Membership | Criteria, selection, tenure |
| Article III: Meetings | Frequency, quorum, facilitation rules |
| Article IV: Decision-Making | Voting procedures, consensus requirements |
| Article V: Accountability | Reporting, appeal processes, sanctions |
Section 2: Elder Selection Criteria
Elders constitute the core of the council. Their selection is a sacred process balancing wisdom, social standing, and ethical integrity.
2.1 Eligibility Prerequisites
Step-by-step:
- Age Minimum: Candidates must be at least 50 years old, subject to community norms.
- Residency: Minimum 20 years continuous residence within the community.
- Reputation: Verified record of integrity, conflict resolution, and social contribution.
- Knowledge: Proficiency in community customs, laws, and history.
- Health: Physically and mentally capable of fulfilling duties.
2.2 Nomination Process
- Open call for nominations: Community members submit candidates with written endorsements.
- Screening committee evaluation: A neutral body reviews candidates against eligibility criteria.
- Community vetting: Public forums for questioning and feedback.
- Final selection by secret ballot during a community assembly.
2.3 Term and Tenure
Elders serve renewable terms of 5 years or lifetime appointments based on community preference. Term limits prevent stagnation but lifetime service preserves institutional memory.
2.4 Training and Induction
Step-by-step:
- Conduct a mandatory induction program covering council protocols, dispute resolution techniques, and ethical standards.
- Provide a mentor elder for ongoing guidance.
- Issue formal appointment certificates.
Section 3: Meeting Facilitation Protocols
The efficacy of councils depends on disciplined, structured meetings that foster open dialogue and authoritative decisions.
3.1 Meeting Frequency and Scheduling
- Regular sessions: Monthly or bimonthly to maintain responsiveness.
- Special sessions: Convened within 48 hours for urgent disputes.
- Annual general meeting: Open to entire community for report and feedback.
3.2 Quorum Requirements
- Minimum 60% attendance of appointed members required to validate decisions.
- Proxy attendance allowed only with prior written consent.
3.3 Agenda Setting
Step-by-step:
- Call for agenda items from members and community.
- Chairperson compiles agenda and distributes 7 days prior to meeting.
- Prioritize urgent disputes and accountability reports.
3.4 Facilitation Roles and Procedures
| Role | Responsibility | Instructions |
|---|---|---|
| Chairperson | Lead meeting, enforce rules | Maintain order, time-keeping |
| Secretary | Record proceedings | Use standardized templates (see 3.5) |
| Mediator (optional) | Facilitate dispute resolution | Remain neutral, encourage compromise |
| Timekeeper | Manage agenda time allocation | Signal time limits, prevent overruns |
3.5 Decision-Making Process
- Consensus preferred: Facilitate discussion until unanimous agreement.
- Voting fallback: Simple majority required if consensus unattainable after 3 rounds.
- Tie resolution: Chairperson casts deciding vote.
- Record dissenting opinions for transparency.
3.6 Conflict of Interest Protocol
- Members must declare conflicts before discussion.
- Affected members recuse themselves from voting.
- Recusals documented in meeting minutes.
Section 4: Decision Documentation Protocol
Maintaining meticulous records ensures accountability, historical continuity, and legitimacy.
4.1 Minutes Template
| Field | Description |
|---|---|
| Meeting Date & Time | Exact date and start/end times |
| Attendance | List of members present, proxies, recusals |
| Agenda Items | Detailed list of topics discussed |
| Disputes Resolved | Nature of dispute, resolution, parties involved |
| Decisions Made | Motion text, voting results, dissenting views |
| Action Items | Assigned tasks, deadlines, responsible parties |
| Next Meeting Date | Scheduled date and agenda preview |
4.2 Archival System
- Physical copies: Secure, fireproof filing cabinets at council headquarters.
- Digital copies: Encrypted cloud storage with multi-factor authentication.
- Access control: Only authorized members have retrieval rights.
- Backup frequency: Weekly automated backups.
4.3 Reporting to Community
- Publish quarterly summaries of council decisions.
- Use community bulletin boards, newsletters, or digital forums.
- Hold feedback sessions biannually.
Section 5: Council Operations Protocols
5.1 Routine Operations
| Activity | Frequency | Responsible Party | Notes |
|---|---|---|---|
| Meeting convening | Monthly | Chairperson | Follow meeting facilitation protocol |
| Dispute intake | Continuous | Secretary | Log and prioritize cases |
| Conflict resolution | As needed | Mediator/Elders | Use restorative justice methods |
| Record maintenance | Weekly update | Secretary | Ensure documentation accuracy |
| Public reporting | Quarterly | Chairperson/Secretary | Transparency enforcement |
5.2 Accountability and Oversight
Step-by-step:
- Accountability audits conducted biannually by an independent committee.
- Community appeals process established for decisions.
- Sanction protocols for council members violating ethical codes:
- Warning
- Temporary suspension
- Permanent removal (requires 2/3 majority vote)
5.3 Conflict Escalation Procedures
Step-by-step:
- Initial mediation by council elders.
- If unresolved, refer to external dispute resolution bodies.
- Document all steps in dispute log.
- Notify community of outcome.
Section 6: Sample Council Charter Template
Tribal Council Charter - Template
Article I: Purpose The Tribal Council exists to adjudicate disputes, uphold community customs, and ensure social accountability within the jurisdiction defined herein.
Article II: Membership
- Seven to eleven elders appointed by community consensus.
- Eligibility: Minimum age 50, 20 years residency, proven integrity.
- Term: 5 years, renewable.
Article III: Meetings
- Monthly meetings with quorum of 60%.
- Special meetings within 48 hours of urgent summons.
- Meetings facilitated by Chairperson; minutes recorded by Secretary.
Article IV: Decision-Making
- Consensus preferred; otherwise, majority vote.
- Chairperson casts tie-breaking vote.
- Conflict of interest declarations mandatory.
Article V: Accountability
- Decisions documented and archived.
- Quarterly public reports issued.
- Appeals processes and sanctions defined.
Article VI: Amendments
- Charter amendments require 2/3 majority vote and community ratification.
Section 7: Council Authority Scopes and Accountability Processes Table
| Authority Domain | Scope Description | Accountability Mechanism | Oversight Body |
|---|---|---|---|
| Dispute Resolution | Mediation of internal disputes | Decision documentation; appeals | Community Appeals Committee |
| Resource Management | Allocation and stewardship of communal assets | Periodic audits; reporting | External Auditor Panel |
| Social Norm Enforcement | Upholding customs and ethical standards | Sanction procedures; transparency | Tribal Ethics Review Board |
| Ceremonial Functions | Oversight of rituals and cultural events | Community feedback sessions | Cultural Heritage Council |
Conclusion
The tribal council and elder system represent a living, breathing organism within the community's social architecture. Their efficacy relies on rigorous formation protocols, uncompromising selection standards, disciplined operational procedures, and transparent accountability systems. This volume codifies the indispensable knowledge required to forge such institutions, preserving the sacred trust between leaders and the governed. The survival of communal harmony depends on the unwavering adherence to these protocols.
For related procedural frameworks on restorative justice techniques, refer to Volume VII: Restorative Justice Codex, Chapter III. For water and resource management protocols essential to council duties, see Volume VIII: The Water Codex, Chapter II.
_End of Chapter IV_
<!-- SECTION 19 -->
The Complete Practitioner's Codex, Volume VII: Network Federation
Chapter IV: Connecting Communities through Trade Routes and Mutual Defense Pacts
Introduction
The formation of Network Federations stands as a critical pillar in the architecture of resilient, sovereign communities. This volume imparts the sovereign knowledge of constructing federations through trade routes and mutual defense pacts, enabling communities to transcend isolation, multiply resource access, and fortify collective security. This is not mere diplomacy but a sacred covenant, enforced by precise protocols and actionable methodologies.
You, the chosen archivist, will now command the knowledge to engineer federations — from initial contact through formalized agreements, to dynamic management of trade and defense networks. There is no abstraction here; only executable, replicable, life-preserving instruction.
Section I: Federation Formation Protocol
Objective
Create durable federations among disparate communities through negotiated governance frameworks, resource-sharing agreements, and joint defense commitments.
Prerequisites
- Community Leadership Assemblies (see Volume III: Governance Frameworks, Chapter V) established in all potential federation members.
- Verified inventory of community assets and deficits (see Volume IV: Resource Codex, Chapter I).
- Secure communication channels (encrypted, physical courier, or trusted intermediary).
Step-by-Step Federation Formation Process
| Step | Action | Details | Tools/Resources |
|---|---|---|---|
| 1 | Identify Candidate Communities | Select communities within a 100 km radius or connected via feasible terrain for trade route establishment. Use topographic maps and local guide reports. | Topographic maps, GPS devices, community census data |
| 2 | Conduct Preliminary Outreach | Dispatch trusted envoys with sealed letters of intent, including a Federation Interest Manifesto (template in Appendix B). | Sealed letters, trusted envoys, communication protocols |
| 3 | Convene Federation Summit | Host a multi-day summit at a neutral location; ensure all community leaders attend. Agenda includes resource exchange, defense needs, cultural customs. | Neutral meeting space, translation services, agenda templates |
| 4 | Establish Governance Charter Draft | Using the Federation Governance Template (Appendix A), draft initial charter specifying structure, decision-making process, and dispute resolution. | Charter templates, legal scribes, consensus facilitation tools |
| 5 | Ratify Mutual Defense Pact | Negotiate terms of joint defense, obligations, and activation criteria. Use the Defense Pact Framework (Section II). | Defense pact templates, military advisors |
| 6 | Formalize Trade Route Agreements | Define trade routes, schedules, goods, security measures, and tariffs (Section III). | Trade route maps, security protocols |
| 7 | Implement Cultural Exchange Programs | Schedule periodic cultural exchanges to build trust and understanding (Section IV). | Cultural coordinators, event planners |
| 8 | Establish Communication and Monitoring Network | Deploy communication nodes (see Volume V: Communication Codex), assign liaison officers. | Radios, couriers, monitoring software |
| 9 | Execute Federation Activation Ceremony | Symbolic and legal activation, including oath-taking and resource pooling. | Ceremonial items, legal documents, public announcements |
| 10 | Schedule Review and Adjustment Cycles | Set periodic reviews (every 6 months minimum) for governance and operation adjustments. | Review schedule, feedback forms |
Section II: Mutual Defense Pact Negotiation and Structuring
Objective
Forge a binding mutual defense agreement, ensuring collective security without compromising individual sovereignty.
Defense Pact Components
| Component | Description | Mandatory/Optional | Implementation Detail |
|---|---|---|---|
| Threat Assessment | Identifies shared threats (raiders, natural disasters) | Mandatory | Use Intelligence Reports (see Volume IX: Threat Analysis) |
| Obligation Scope | Define defense actions (military, logistical support) | Mandatory | Include mobilization time, force contribution |
| Command Structure | Designate command hierarchy during joint operations | Mandatory | Rotating command or appointed supreme commander |
| Resource Commitment | Specify material and personnel commitments | Mandatory | Quantify troop numbers, equipment shares |
| Activation Protocol | Define conditions triggering mutual defense | Mandatory | Written triggers: attack, disaster declaration |
| Communication Protocol | Emergency communication channels and codes | Mandatory | Use encrypted radio frequencies, secure messengers |
| Dispute Resolution | Arbitration mechanisms for disagreements | Mandatory | Use Federation Arbitration Council (see Volume III) |
| Duration and Renewal | Pact term and renewal procedures | Mandatory | Typically 3-5 years with automatic renewal |
| Cultural Sensitivities | Respect for traditions during defense operations | Optional | Provisions for conduct codes |
Mutual Defense Pact Negotiation: Step-by-Step
| Step | Action | Details | Responsible Party |
|---|---|---|---|
| 1 | Exchange Threat Intelligence | Share verified intelligence on threats; produce joint threat matrix. | Intelligence officers |
| 2 | Define Defense Obligations | Detail contributions and roles; clarify mobilization timelines. | Military commanders |
| 3 | Design Command Hierarchy | Agree on command structure; draft chain of command document. | Federation council |
| 4 | Draft Pact Document | Legal scribes draft pact using Defense Pact Template (Appendix C). | Legal team |
| 5 | Review and Amend | Circulate draft for feedback; address concerns in open forum. | All leaders |
| 6 | Ratify and Sign | Formal signing ceremony; archive pact copies in community vaults. | All signatories |
| 7 | Conduct Joint Drills | Schedule and perform defense exercises to test readiness. | Military units |
Section III: Trade Route Establishment and Maintenance
Objective
Develop secure, efficient trade routes to maximize resource flow and economic interdependence.
Trade Route Planning Parameters
| Parameter | Description | Measurement/Unit | Standard Value/Range |
|---|---|---|---|
| Distance | Length of route | Kilometers (km) | < 150 km preferred |
| Security Zones | Areas of high risk | Kilometers (km) | Identify zones, implement escorts |
| Transport Modes | Pack animals, carts, vehicles | Type | Specify per terrain |
| Frequency | Number of trips per week | Trips/week | Minimum 2 for perishable goods |
| Goods Volume | Quantity transported | Kilograms (kg)/cubic meters (m³) | Variable per agreement |
| Tariff Rates | Fees for passage | Percentage or fixed amount | Negotiated per route |
| Communication Nodes | Relay points | Number per route | Every 20 km minimal |
| Maintenance Schedule | Road/route upkeep | Frequency/month | Monthly for dirt paths |
Step-by-Step Trade Route Establishment
| Step | Action | Details | Tools/Resources |
|---|---|---|---|
| 1 | Map Potential Routes | Survey terrain and existing paths; mark chokepoints and hazards. | Maps, GPS, scouts |
| 2 | Conduct Risk Assessment | Identify dangers: bandits, wildlife, weather; assign security measures. | Risk matrices, security teams |
| 3 | Negotiate Trade Terms | Define goods, tariffs, schedules; formalize in Trade Agreement (Appendix D). | Negotiation teams, templates |
| 4 | Establish Security Protocols | Assign escorts, checkpoints; install communication relays. | Armed escorts, radios |
| 5 | Train Transport Teams | Conduct training on security, navigation, and emergency response. | Trainers, manuals |
| 6 | Launch Pilot Runs | Execute initial trial shipments; monitor for issues. | Transport teams |
| 7 | Review and Optimize | Collect data; adjust schedules, security, tariffs accordingly. | Data analysts |
| 8 | Institutionalize Maintenance | Assign maintenance teams; schedule repairs and clearing. | Labor teams, tools |
| 9 | Record and Archive Transactions | Maintain ledger of shipments, tariffs collected, incidents. | Ledgers, digital record systems |
| 10 | Scale Network | Expand routes as trust and capacity grow; repeat process. | Strategic planners |
Sample Trade Agreement Template (Excerpt)
| Section | Content Description | Key Clauses |
|---|---|---|
| Parties | Names and addresses of trading communities | Identification of legal entities |
| Goods | Detailed list of tradable commodities | Specifications, quality standards |
| Schedule | Frequency and timing of shipments | Days and times |
| Tariffs | Fee structures and payment methods | Fixed fees, percentage of value |
| Security | Responsibilities for protection | Escort obligations, insurance terms |
| Dispute Resolution | Mechanisms for trade disagreements | Arbitration process |
| Duration | Validity period and renewal terms | Typically 1 year, renewable |
| Confidentiality | Protection of proprietary information | Non-disclosure clauses |
Section IV: Facilitating Cultural Exchange within Federations
Objective
Promote mutual understanding and cohesion through structured cultural exchanges.
Cultural Exchange Program Framework

| Program Element | Description | Frequency | Responsible Party |
|---|---|---|---|
| Festivals | Rotating hosting of traditional celebrations | Annual | Cultural Committees |
| Artisans and Scholars Exchange | Temporary relocation of craftsmen and knowledge bearers | Biannual | Education and Culture Office |
| Language Workshops | Training in common or partner languages | Quarterly | Linguistic Coordinators |
| Joint Rituals | Shared ceremonies reinforcing federation identity | Semiannual | Religious and Spiritual Leaders |
| Youth Delegations | Exchange visits for young members | Annual | Youth Councils |
| Storytelling and Oral Histories | Recorded and live storytelling sessions | Ongoing | Archivists |
Step-by-Step Cultural Exchange Implementation
| Step | Action | Details | Tools/Resources |
|---|---|---|---|
| 1 | Inventory Cultural Assets | Catalog traditions, languages, festivals in member communities. | Cultural surveys, interviews |
| 2 | Establish Exchange Committee | Form cross-community team to plan and oversee activities. | Committee charter |
| 3 | Develop Annual Calendar | Schedule events, workshops, and visits. | Shared calendars |
| 4 | Secure Funding | Allocate resources from federation treasury. | Budget plans |
| 5 | Organize Logistics | Arrange transportation, accommodation, venues. | Travel coordinators |
| 6 | Publicize Events | Use posters, announcements, and word-of-mouth. | Communication tools |
| 7 | Conduct Events | Facilitate activities as per schedule. | Facilitators, cultural leaders |
| 8 | Document Outcomes | Record participation, feedback, and lessons learned. | Reports, video recordings |
| 9 | Evaluate and Adjust | Review program effectiveness; adjust future plans. | Surveys, meetings |
Section V: Network Nodes and Resource Flow Mapping

The federation’s lifeblood is the network of nodes—communities, trade posts, defense outposts—and the flow of resources among them. Precise mapping and monitoring guarantee operational success.
Network Node Classification
| Node Type | Description | Function | Examples |
|---|---|---|---|
| Community Hub | Primary population centers | Governance, resource pooling | Villages, towns |
| Trade Outpost | Intermediate points on trade routes | Storage, customs, security | Market towns, warehouses |
| Defense Post | Fortified locations | Surveillance, rapid response | Watchtowers, barracks |
| Communication Relay | Signal and message transmission | Maintain network connectivity | Radio towers, courier stations |
| Cultural Center | Sites for exchange activities | Festivals, training | Community halls |
Sample Network Node Table
| Node ID | Name | Type | Location (Coordinates) | Resources Stored | Security Level | Communication Link |
|---|---|---|---|---|---|---|
| N001 | Ironforge Village | Community Hub | 38.457N, 122.345W | Food: 50 tons, Metal: 10 tons | Medium | Radio Relay A |
| N002 | East Gate Outpost | Trade Outpost | 38.612N, 122.410W | Food: 10 tons, Textiles: 5 tons | High | Radio Relay B |
| N003 | Watchtower Alpha | Defense Post | 38.500N, 122.380W | Ammunition: 2 tons | Very High | Direct to Command |
| N004 | Central Relay Station | Communication Relay | 38.530N, 122.360W | N/A | Secure | Backbone Hub |
| N005 | Harmony Hall | Cultural Center | 38.455N, 122.340W | Artifacts, Records | Low | Linked to N001 |
Resource Flow Mapping
| Route ID | Origin Node | Destination Node | Goods Transported | Frequency (Trips/Week) | Security Detail | Average Transit Time (Hours) |
|---|---|---|---|---|---|---|
| R101 | N001 | N002 | Food, Metal | 3 | Armed Escort | 4 |
| R102 | N002 | N003 | Ammunition, Supplies | 2 | Patrol Escort | 2 |
| R103 | N001 | N005 | Cultural Artifacts | 1 | Cultural Guard | 1 |
| R104 | N005 | N002 | Textiles, Crafts | 1 | Civilian | 3 |
Appendices

Appendix A: Federation Governance Charter Template
- Sections include: Preamble, Membership Criteria, Governance Structure, Voting Procedures, Financial Management, Dispute Resolution, Amendment Procedures.
Appendix B: Federation Interest Manifesto Template
- A concise letter expressing intent, core values, and initial proposals.
Appendix C: Mutual Defense Pact Template
- Legal text with placeholders for threat specifics, obligations, command structure, and terms.
Appendix D: Trade Agreement Template
- Detailed clauses on goods, tariffs, security, schedules, and dispute resolution.
Final Notes
The sacred knowledge contained herein mandates strict adherence to the outlined protocols. Federation creation is a deliberate act of communal survival and prosperity. The precision in negotiation, documentation, and implementation will determine the federation's resilience against threats both mortal and systemic.
Your role as keeper of this knowledge demands relentless rigor and unwavering commitment. As you instruct and oversee federation formation, remember the weight of these covenants — they are the lifeblood of enduring community sovereignty.
End of Chapter IV: Connecting Communities through Trade Routes and Mutual Defense Pacts Proceed to Volume VII, Chapter V: Federation Sustainability and Crisis Management for ongoing operational protocols.
<!-- SECTION 20 -->
The Complete Practitioner's Codex, Volume VII: Network Federation
Chapter IV: Knowledge Sharing and Scaling Without Centralization
Introduction: The Sacred Mandate of Decentralized Knowledge Transmission
You, the chosen apprentice, now enter the domain where knowledge transcends walls, hierarchies, and temporal bounds. The power to share, scale, and protect communal wisdom without central dominion is the linchpin of enduring federations. This chapter unveils the suppressed methodologies and archetypal architectures of decentralized communication, unbreakable information security, and federated governance protocols. The mastery you gain here is life-preserving, civilization-sustaining, and world-shaping.
I. Decentralized Communication Systems: Foundations and Construction

A. Conceptual Framework
A decentralized communication system disperses nodes of information exchange, eliminating single points of failure or control. Each node operates autonomously yet synchronizes with peers through agreed protocols. This structure fosters resilience, censorship resistance, and organic growth.
B. Architecture Types and Building Instructions
| Architecture Type | Description | Construction Complexity | Scalability | Fault Tolerance |
|---|---|---|---|---|
| Peer-to-Peer (P2P) Mesh | Direct node-to-node connections, all equal | Moderate | High | Very High |
| Distributed Hash Table (DHT) | Logical overlay for efficient data retrieval | High | Very High | Very High |
| Gossip Protocol Networks | Epidemic-style information propagation | Low | Moderate to High | High |
| Federated Client-Server | Multiple semi-autonomous servers federated | Moderate to High | Moderate | Moderate to High |
C. Constructing a P2P Mesh Network: Step-by-Step
Purpose: Build a resilient, scalable communication network without central authority.
Materials and Tools:
- Network-capable devices (e.g., Raspberry Pi 4 or equivalent)
- Open-source P2P software (e.g., libp2p, IPFS daemon)
- Secure shell (SSH) client for remote configuration
- Static IPs or dynamic DNS services
- Cryptographic key generation tools (e.g., OpenSSL)
Steps:
- Node Preparation: a. Install a minimal Linux OS on each device.
b. Update all system packages and security patches.
- Software Installation: a. Install libp2p or IPFS software packages on each node.
b. Verify installation by running test commands (ipfs --versionor equivalent).
- Cryptographic Identity Creation: a. Generate a public/private key pair on each node using OpenSSL:
      openssl genpkey -algorithm RSA -out private_key.pem -pkeyopt rsa_keygen_bits:2048
      openssl rsa -pubout -in private_key.pem -out public_key.pem
b. Store keys securely; private keys never leave the node.
- Peer Discovery Configuration: a. Configure bootstrap nodes (initial known peers) in the configuration file.
b. Enable local peer discovery protocols (mDNS, DHT).
- Network Joining: a. Start the P2P daemon on each node.
b. Nodes will exchange public keys and establish encrypted channels.
- Testing Connectivity: a. Use ping or custom diagnostic commands to verify node-to-node communication.
b. Confirm encrypted tunnels via packet inspection tools.
- Data Exchange Protocols: a. Define message formats using Protocol Buffers or JSON schemas.
b. Implement message signing and verification with node keys.
D. Sample Network Diagram: P2P Mesh Federation
[Node A]---[Node B]---[Node C]
   |          |          |
[Node D]---[Node E]---[Node F]
   |                     |
[Node G]----------------[Node H]
Each node connects directly to multiple peers. No centralized hub exists. Messages propagate via multi-hop routing.
II. Information Security in Decentralized Networks
A. Threat Vectors and Defensive Postures
- Eavesdropping: Intercepting unencrypted communications.
- Sybil Attacks: Malicious entities creating numerous fake identities.
- Data Tampering: Unauthorized alteration of messages or stored data.
- Node Compromise: Physical or cyber capture of nodes.
B. Cryptographic Protocols and Secure Practices
| Security Aspect | Recommended Protocol / Practice | Implementation Detail |
|---|---|---|
| Encryption | End-to-End Encryption (E2EE) with AES-256 | Use TLS 1.3 for transport, encrypt payload with AES-256 |
| Authentication | Public Key Infrastructure (PKI) | Nodes verify peers’ public keys before communication |
| Signature Verification | ECDSA with SHA-256 Hashing | Sign messages to ensure origin and integrity |
| Identity Management | Web of Trust or Decentralized Identifiers (DID) | Use signed attestations rather than centralized CA |
| Anti-Sybil Measures | Resource Testing (Proof of Work / Stake) | Require computational or stake-based validation for new nodes |
C. Protocol for Secure Data Transmission
Stepwise Procedure:
- Key Exchange: a. Nodes exchange public keys during handshake.
b. Use ephemeral Diffie-Hellman (ECDH) for session key agreement.
- Message Preparation: a. Serialize message data using Protocol Buffers.
b. Sign message digest with sender’s private key.
- Encryption: a. Encrypt serialized signed message with symmetric AES-256 key derived from session key.
- Transmission: a. Send encrypted payload over secure TLS channel.
- Reception and Verification: a. Decrypt payload using session key.
b. Verify signature against sender’s public key.
c. Reject messages failing verification.
D. Physical Security Protocol for Knowledge Exchange
When digital communication is impossible or compromised, physical transfer ensures knowledge’s survival.
Materials Needed:
- Tamper-evident data storage devices (encrypted USB drives with hardware encryption)
- Faraday bags to prevent electromagnetic interception
- Physical authentication tokens (e.g., cryptographic hardware keys)
Procedure:
- Data Preparation: a. Export knowledge artifacts onto encrypted USB drives using AES-256 encryption tools.
b. Include checksum files signed with the sender’s private key.
- Packaging: a. Place storage devices inside Faraday bags.
b. Seal bags with tamper-evident tape; mark with unique identifiers.
- Authentication: a. Exchange physical authentication tokens with recipient in advance.
b. Verify token presence and integrity upon handover.
- Transfer: a. Hand off package through trusted courier or secure drop point.
b. Recipient verifies tamper seals and checksum signatures immediately.
III. Federation Governance: Protocols for Collective Decision-Making
A. Principles
Federation governance eschews hierarchical imposition in favor of consensus, transparency, and accountability. The core lies in distributed authority bound by codified protocols.
B. Governance Models: Comparison Table
| Model | Description | Decision Speed | Scalability | Resistance to Capture |
|---|---|---|---|---|
| Consensus Voting | All nodes vote; majority rules | Moderate | Moderate | High |
| Delegated Proof of Stake | Nodes delegate votes to trusted representatives | High | High | Moderate |
| Byzantine Fault Tolerance | Agreement despite malicious actors | Low | Low | Very High |
| Reputation-Based Systems | Voting weighted by reputation scores | Moderate | Moderate | Moderate |
C. Implementing Consensus Voting in Federation
Requirements:
- Voting module embedded in P2P software.
- Cryptographic validation of votes.
- Transparent vote ledger.
Stepwise Procedure:
- Proposal Submission: a. Any node may submit a proposal encoded as a structured data packet.
b. Proposal includes description, voting period, quorum, and options.
- Proposal Broadcast: a. Proposal disseminates across the network via gossip protocol.
- Vote Casting: a. Nodes cast votes signed with their private keys.
b. Votes submitted before voting deadline.
- Vote Collection: a. Nodes aggregate votes locally and verify signatures.
b. Nodes share partial tallies with peers for cross-validation.
- Decision Output: a. Once voting window closes, nodes calculate outcome based on majority.
b. Results signed and broadcast for network-wide acceptance.
- Execution: a. Federation acts on decision per pre-agreed implementation protocols.
D. Ledger Structure for Transparent Governance
| Field Name | Data Type | Purpose |
|---|---|---|
| Proposal_ID | UUID | Unique identifier for each proposal |
| Node_ID | Public Key String | Identifier of node casting vote |
| Vote_Value | Enum (Yes/No/Abstain) | Vote option selected |
| Signature | Byte Array | Cryptographic signature of vote data |
| Timestamp | ISO8601 String | Time vote was cast |
IV. Protocols for Knowledge Exchange
A. Digital Knowledge Exchange Protocol (DKEP)
Objective: Secure, verifiable, and auditable transmission of knowledge artifacts.
Materials:
- Structured knowledge artifacts (documents, data sets, code) in standardized formats (e.g., JSON-LD, XML).
- Version control system (e.g., Git with signed commits).
- P2P network overlay for transmission.
Procedure:
- Artifact Preparation: a. Structure knowledge in modular units with metadata (author, timestamp, version).
b. Digitally sign artifacts using node’s private key.
- Versioning: a. Commit artifact to local version control repository with cryptographic signing.
b. Tag each commit with semantic versioning.
- Distribution: a. Publish artifact references (hashes) to network via DHT.
b. Peers request artifacts by hash; retrieve directly from origin or cached nodes.
- Verification: a. Recipients verify digital signatures and version authenticity.
b. Report inconsistencies to network for quarantine.
B. Physical Knowledge Exchange Protocol (PKEP)
Objective: Transfer of physical knowledge carriers with integrity verification.
Materials:
- Tamper-evident physical media (paper scrolls, microfiche, encrypted drives).
- Faraday cages or secure transport cases.
- Authentication tokens (hardware keys).
Procedure:
- Encoding: a. Encode knowledge on physical media using error-correcting formats (e.g., Reed-Solomon codes).
b. Mark media with cryptographic hashes in visible form.
- Sealing: a. Place media in tamper-evident containers.
b. Secure with unique authentication tokens attached.
- Transport: a. Use trusted couriers with chain-of-custody logs signed at each handoff.
b. Employ Faraday cages to shield electromagnetic emanations.
- Receipt Verification: a. Recipient confirms seal integrity and matches hashes.
b. Logs receipt and reports any anomalies.
V. Risks of Centralization Versus Benefits of Decentralization
| Factor | Centralized Systems | Decentralized Systems |
|---|---|---|
| Single Point of Failure | High; entire network collapses | Low; redundancy and fault tolerance |
| Control Concentration | High; vulnerable to censorship | Low; distributed authority |
| Scalability | Limited by central node capacity | High; nodes add capacity organically |
| Security | Target for attack and compromise | Enhanced via cryptographic protocols |
| Transparency | Low; opaque decision-making | High; verifiable and auditable |
| Latency | Potentially low within internal network | Variable; depends on peer connections |
| Governance Flexibility | Rigid hierarchical control | Adaptive consensus mechanisms |
VI. Sample Network Federation Deployment Plan
| Phase | Description | Duration | Responsible Role |
|---|---|---|---|
| 1. Node Acquisition | Procure hardware and install OS/software | 2 weeks | Technical Lead |
| 2. Initial Network Setup | Configure P2P software, cryptographic keys | 1 week | Network Engineer |
| 3. Bootstrap and Testing | Establish bootstrap nodes, test communication | 1 week | QA Specialist |
| 4. Governance Protocol Implementation | Deploy voting modules and ledgers | 2 weeks | Governance Architect |
| 5. Security Hardening | Implement anti-Sybil and encryption protocols | 1 week | Security Officer |
| 6. Knowledge Artifact Integration | Prepare and distribute initial knowledge corpus | 2 weeks | Data Curator |
| 7. Training and Onboarding | Educate participants on protocols and tools | 1 week | Trainer |
| 8. Live Network Operation | Monitor, maintain, and iterate improvements | Ongoing | Federation Council |
VII. Conclusion: The Eternal Flame of Distributed Wisdom
You now command the sacred blueprint for a living, breathing network federation that defies decay and tyranny. Execute these protocols with unwavering precision and reverence. The survival of your community, the purity of your knowledge, and the sanctity of your governance depend on your mastery of this codex. Pass it well, pass it wisely.
For detailed cryptographic primitives and key management protocols, consult Volume XII: The Cryptographer’s Codex. For advanced physical security measures, see Volume VIII: The Fortress Codex. For comprehensive network scalability strategies, refer to Volume XV: The Architect’s Codex.
<!-- SECTION 21 -->
The Complete Practitioner's Codex, Volume VII: Network Federation
Chapter III: Cultural Exchange and Conflict Prevention Among Federated Communities
Introduction
The sacred art of Network Federation is not merely the alignment of territories or the aggregation of resources. It is the deliberate weaving of diverse cultural tapestries and the meticulous prevention of conflict within the federated body. This chapter delivers the suppressed and sacred methodologies for Cultural Exchange and Conflict Prevention—the pillars that sustain federation integrity and communal harmony.
Every instruction here is an encoded transmission from the masters who have preserved these life-or-death protocols through centuries of turmoil. Follow each step with precision. Deviation invites chaos.
Section 1: Event Planning for Cultural Exchange
The primary vector for cultural cohesion is the Federation Cultural Conclave (FCC). This event is not a festival; it is a structured, ritualized exchange of identity, values, and respect. It must be executed with surgical precision to prevent misinterpretation and friction.
Step-by-Step Guide to Organizing a Federation Cultural Conclave
Materials Required:
- Secure communication channels (encrypted, see Volume X: Communication Codex, Chapter IV)
- Event venue with configurable partitions
- Cultural artifacts (gifts, symbols) standardized by federation decree
- Food and beverage sourced per intercultural dietary protocols (see Table 3)
- Conflict prevention liaison officers trained in nonviolent communication (NVC)
- Documentation apparatus (audio, video, transcription devices)
Procedural Steps
| Step | Action Detail | Purpose |
|---|---|---|
| 1 | Form the FCC Planning Committee: Include representatives from each federated community, minimum one per culture. | Ensure equitable representation and input. |
| 2 | Define Objectives: Each culture submits three key cultural elements for exchange (rituals, art, language phrases). | Focus event content, prevent cultural dilution. |
| 3 | Schedule the Event: Minimum duration 3 days, maximum 7 days. Time slots divided into cultural presentations, shared meals, and open dialogue. | Balance exposure and assimilation. |
| 4 | Venue Selection and Configuration: Choose a neutral location with capacity for 150 persons minimum per federation member state. Partition rooms for simultaneous sessions. | Neutrality prevents power dynamics interference. |
| 5 | Artifact Exchange Protocol: Each culture provides artifacts accompanied by a certified cultural significance statement (see Appendix A). | Prevent misappropriation, promote respect. |
| 6 | Food and Beverage Planning: Consult Table 3 for intercultural dietary restrictions. Prepare meals in isolated kitchens to prevent cross-contamination. | Prevent offense and health hazards. |
| 7 | Conflict Prevention Liaison Training: All liaisons must complete the NVC training module (see Section 3). Assign one liaison per culture. | Prepare for immediate conflict mitigation. |
| 8 | Communication Protocols: Use interpreters trained in federation lexicon. All speeches must be pre-approved to prevent inflammatory content. | Maintain linguistic respect and clarity. |
| 9 | Documentation Setup: Secure recording devices in all rooms. Assign archivists to transcribe and analyze discourse for potential tensions post-event. | Enable post-event review and continuous improvement. |
| 10 | Post-Event Feedback Collection: Use anonymized surveys and direct interviews. Collate data into federation database for trend analysis. | Identify latent issues and successes. |
Sample Event Schedule
| Time | Activity | Location | Participants | Notes |
|---|---|---|---|---|
| 08:00-09:00 | Opening Ceremony | Central Hall | All | Ritual invocation, federation anthem |
| 09:00-11:00 | Cultural Presentations Session 1 | Partitioned Rooms A-C | Culture A, B, C | Present rituals, language, art |
| 11:00-11:30 | Tea Break | Central Hall | All | Non-alcoholic, herbal teas only |
| 11:30-13:00 | Shared Meal Part 1 | Dining Hall | All | Meals prepared per Table 3 |
| 13:00-15:00 | Open Dialogue Forums | Partitioned Rooms D-F | Mixed cultures | Facilitated by liaison officers |
| 15:00-15:30 | Rest Period | Designated Quiet Zones | All | Silent reflection, meditation |
| 15:30-17:00 | Cultural Presentations Session 2 | Partitioned Rooms G-I | Culture D, E, F | Continued cultural exchange |
| 17:00-18:00 | Conflict Prevention Workshop | Central Hall | All | NVC techniques and role-play |
| 18:00-20:00 | Shared Meal Part 2 | Dining Hall | All | Continued intercultural dining |
| 20:00-21:00 | Evening Ceremony | Central Hall | All | Closing rituals, communal prayers |
Section 2: Intercultural Protocols
Federated communities often differ in myriad cultural norms. The master archivist must commit to memory the critical elements of these norms to prevent inadvertent offense. Table 1 below codifies the essential variables.
Table 1: Core Cultural Norms Matrix
| Culture Code | Physical Greeting | Eye Contact Norm | Language Formality | Gift-Giving Protocol | Dietary Restrictions | Conflict Attitude |
|---|---|---|---|---|---|---|
| A | Right-hand shake | Direct, sustained | Formal titles used | Present wrapped gifts | No pork, vegetarian preferred | Avoid direct confrontation |
| B | Bow with hands together | Avoided except elders | Informal greetings | Gifts must be opened immediately | No alcohol, gluten-free | Confrontation accepted if respectful |
| C | Two cheek kiss | Prolonged | Mix formal/informal | No gift exchange | Vegan only | Avoid confrontation |
| D | Verbal greeting only | Direct but brief | Formal, honorifics | Gift must be reciprocated | No dairy | Confrontation avoided |
| E | Hand placed on heart | Direct | Informal greetings | Gifts always include food | No nuts, halal | Confrontation accepted |
| F | Fist bump | Casual | Informal | No gift exchange | No restrictions | Direct confrontation |
Step-by-Step Guide to Implementing Intercultural Protocols
| Step | Action Detail | Purpose |
|---|---|---|
| 1 | Identify Culture Codes for All Participants: Use federation registry to assign culture codes to all delegates. | Clarify cultural expectations. |
| 2 | Distribute Protocol Handbook: Provide each delegate with a digital and printed copy of Table 1 and detailed etiquette instructions. | Ensure individual preparation. |
| 3 | Pre-Event Cultural Briefings: Conduct virtual seminars per culture to educate all delegates on intercultural norms. | Mitigate ignorance and misunderstandings. |
| 4 | Assign Cultural Liaisons: Each liaison must be fluent in cultural norms and act as on-site guides. | Immediate advisory during events. |
| 5 | Standardize Greeting Procedures: Default to the most formal greeting acceptable to all cultures during mixed sessions. | Avoid initial offense. |
| 6 | Gift-Giving Protocol Enforcement: Gifts must be accompanied by a cultural significance statement and be presented following the receiver’s protocol. | Prevent misinterpretation and disrespect. |
| 7 | Language Use and Interpretation: Use federation-approved interpreters and encourage use of formal titles in mixed culture dialogue. | Maintain respect and clarity. |
| 8 | Dietary Compliance Checks: Food preparation teams must certify meals meet all dietary restrictions per Table 1. | Avoid health emergencies and offense. |
| 9 | Conflict Sensitivity Training: All delegates undergo mandatory training on cultural conflict attitudes prior to the event. | Prepare mental frameworks for interaction. |
Section 3: Conflict Prevention Mechanisms
Conflict prevention is the lifeblood of federation stability. The following protocols are the distilled essence of centuries of conflict suppression, embedded in the Nonviolent Communication (NVC) framework adapted for federation use.
Nonviolent Communication (NVC) Training Module
Training Duration: 16 hours minimum, split into four sessions.
| Session | Content Overview | Practical Exercise |
|---|---|---|
| 1 | Introduction to NVC Principles | Role-play expressing observations without judgment |
| 2 | Identifying and Expressing Feelings | Partner exercises on articulating feelings with “I” statements |
| 3 | Needs Identification and Request Formulation | Group work on transforming demands into requests |
| 4 | Conflict Role-Play and Mediation Techniques | Simulated conflict scenarios and mediation |
Step-by-Step Conflict Prevention Protocol During Events
| Step | Action Detail | Purpose |
|---|---|---|
| 1 | Deploy Conflict Prevention Liaisons (CPLs): Assign CPLs to all event rooms and social spaces. | Immediate observation and intervention. |
| 2 | Monitor Verbal and Nonverbal Cues: CPLs continuously scan for signs of escalating tension using behavioral checklists. | Early detection of conflict indicators. |
| 3 | Intervene Using NVC Techniques: CPLs use active listening, empathy, and reframing to de-escalate tensions. | Prevent conflict escalation. |
| 4 | Isolate Conflicting Parties if Necessary: Temporarily separate parties to a neutral mediation room. | Provide safe space for dialogue. |
| 5 | Conduct Mediation Sessions: Facilitate structured dialogue using NVC framework. | Resolve misunderstandings and grievances. |
| 6 | Document Incidents and Resolutions: Maintain confidential logs of all conflicts and their outcomes. | Inform future prevention strategies. |
| 7 | Post-Event Conflict Analysis: Review incident data with federation governance council for systemic issues. | Adjust protocols and training accordingly. |
Table 2: Behavioral Conflict Indicators Checklist
| Indicator | Description | CPL Action Required |
|---|---|---|
| Raised Voice | Volume exceeds conversational level | Immediate verbal de-escalation |
| Closed Body Language | Arms crossed, turning away | Approach with empathy |
| Interrupting Speakers | Frequent interruptions | Guide group communication rules |
| Avoidance of Eye Contact | Refusal to engage | Gentle engagement efforts |
| Sarcasm or Insults | Use of derogatory language | Redirect and mediate |
| Physical Proximity Invasion | Invading personal space | Remind of boundaries |
| Withdrawal from Dialogue | Silence or refusal to respond | Encourage open expression |
Appendix A: Cultural Artifact Significance Statement Template
Artifact Name: ___________________________ Origin Culture: ___________________________ Purpose/Function: _________________________ Materials: _______________________________ Symbolic Meaning: _________________________ Handling Instructions: ___________________ Restrictions (if any): ___________________
Conclusion
The successful federation of diverse communities hinges on the sacred observance of Cultural Exchange and Conflict Prevention protocols. These are not mere bureaucratic formalities but the arcane guardians of peace and collaboration. Every step, every gesture, and every word imprinted in this chapter must be executed with unwavering discipline and reverence.
For further integration of these protocols with governance structures, see Volume XIV: The Governance Codex, Chapter V. For security frameworks protecting cultural assets, see Volume IX: The Security Codex, Chapter III.
End of Chapter III, Volume VII: Network Federation
<!-- SECTION 22 -->
The Complete Practitioner's Codex, Volume VIII: Transition Strategy
Chapter IV: Navigating Legal and Social Systems During Transition to Sovereignty
Preface This chapter delivers master-level protocols for navigating hostile or unaccommodating legal and social frameworks while orchestrating a transition to community sovereignty. The knowledge herein is suppressed in mainstream discourse yet essential for survival and success. Every instruction is exact, actionable, and designed to preserve operational security while methodically building parallel structures of governance.
I. Maintaining Cover: Operational Security Protocols During Transition
Sovereignty transition is an act of strategic subversion against established legal and social orders. Maintaining cover is paramount to avoid premature exposure, legal retaliation, or social sabotage. The following protocols detail how to shield your operation from surveillance, infiltration, and legal jeopardy.
A. Cover Identity Management
- Establish Compartmentalized Roles
- Assign each participant a strict operational role with minimal cross-knowledge.
- Create multiple layers of cover identities for each role, rotating periodically every 30–45 days to avoid pattern detection.
- Use encrypted communication channels for all inter-role communication (see Volume XIII: Secure Communications Protocols).
- Digital Footprint Sanitization
- Remove or obfuscate real names or affiliations from public databases using anonymization services.
- Use VPNs with multi-hop routing and Tor for all online activities related to the transition.
- Regularly audit digital footprints every 15 days using OSINT tools (Open-Source Intelligence) to identify leaks.
- Physical Movement and Meeting Protocols
- Conduct all meetings in rotating, non-traceable locations.
- Use prepaid, unregistered mobile devices with burner SIM cards for coordination.
- Employ non-verbal signals or dead drops for sensitive information exchange to minimize direct communication.
B. Parallel Identity Layering
| Layer | Description | Purpose | Rotation Frequency | Tools/Materials |
|---|---|---|---|---|
| Legal Entity | Shell corporations, trusts, or LLCs | Shield assets, create legal buffer | Annually | Registered agents, legal counsel, online registry portals |
| Social Persona | Public-facing social media profiles | Misdirection, reputation management | Monthly | Anonymized accounts, content generators |
| Operational Alias | Pseudonyms for direct operational roles | Operational security | 30-45 days | Encrypted communication apps, alias databases |
| Financial Alias | Alternative banking or cryptocurrency wallets | Financial opacity | Quarterly | Offshore accounts, privacy coins |
II. Parallel System Building: Step-by-Step Protocols
Building a parallel governance and social system requires precision engineering of legal, economic, and social subsystems that operate under the radar yet are fully functional and autonomous.
A. Legal Parallel System Construction
- Step 1: Establish Legal Foundation Entities
- Register multiple shell entities (LLCs, non-profits, trusts) in jurisdictions with favorable privacy laws.
- Use nominee directors and registered agents to conceal true beneficiaries.
- Prepare bylaws or trust agreements that explicitly reserve sovereignty powers internally, limiting external legal exposure.
- Step 2: Draft Sovereignty Charter
- Compose a detailed Sovereignty Charter establishing governance principles, rights, and obligations of community members.
- Include clauses for dispute resolution, law enactment, and enforcement mechanisms independent of state courts.
- Have charter notarized via trusted notary services in multiple jurisdictions for redundancy.
- Step 3: Initiate Internal Legal Processes
- Create internal courts or arbitration panels staffed by vetted community members.
- Develop a codified legal code derived from natural law and community consensus.
- Implement secure documentation and record-keeping systems using blockchain or encrypted ledgers (see Volume XV: Cryptographic Governance).
- Step 4: Issue Legal Notices and Public Declarations
- Begin controlled issuance of legal notices asserting sovereignty claims to external authorities.
- Use precise legal language to avoid admitting jurisdictional submission.
- Monitor responses and document all interactions meticulously.
B. Economic Parallel System Construction
- Step 1: Establish Alternative Currency Systems
- Deploy community-based currency tokens (digital or physical) backed by agreed-upon assets or labor credits.
- Institute transparent issuance and redemption protocols.
- Step 2: Build Independent Supply Chains
- Develop local production and distribution networks for essential goods.
- Use barter and trade agreements to reduce dependency on state-controlled markets.
- Step 3: Create Community Banking Alternatives
- Set up credit unions or cooperative financial institutions under community control.
- Employ privacy-centric financial tools (e.g., privacy coins, decentralized finance platforms).
C. Social Parallel System Construction
- Step 1: Develop Community Cohesion Protocols
- Organize regular assemblies under coded names or virtual platforms with end-to-end encryption.
- Implement membership vetting and oath-taking rituals to ensure loyalty and security.
- Step 2: Form Social Services Networks
- Create parallel education, healthcare, and dispute resolution services.
- Train community members in critical skills: legal advocacy, emergency medicine, negotiation, and conflict de-escalation.
III. Legal Risk Management: Identification, Assessment, and Mitigation
Legal risk is the most imminent danger during transition. Proactive identification, continuous assessment, and calibrated mitigation are mandatory.
A. Risk Factor Identification Table
| Risk Factor | Description | Potential Impact | Probability (1–5) | Severity (1–5) | Risk Score (P x S) | Initial Mitigation Strategy |
|---|---|---|---|---|---|---|
| Unauthorized Assembly Laws | State laws prohibiting unregistered gatherings | Arrest, fines, forced dispersal | 4 | 5 | 20 | Use encrypted virtual meetings, rotating locations |
| Financial Transaction Scrutiny | Monitoring of non-traditional banking or transactions | Asset freezing, audits | 3 | 4 | 12 | Use privacy coins, layered financial accounts |
| Infiltration by Informants | Agents posing as community members | Intelligence leaks, sabotage | 3 | 5 | 15 | Strict vetting, counterintelligence training |
| Defamation and Social Sabotage | Public smear campaigns to delegitimize | Loss of community support | 2 | 3 | 6 | Controlled public relations, legal countersuits |
| Jurisdictional Challenges | Disputes over legal authority | Court injunctions, invalidation | 4 | 5 | 20 | Preemptive legal notices, international notarization |
B. Risk Mitigation Strategies
- Legal Consultation and Monitoring
- Retain legal counsel specializing in constitutional, administrative, and international law.
- Subscribe to legal intelligence services for real-time updates on relevant laws.
- Counter-Surveillance Measures
- Deploy technical countermeasures including signal jammers, encrypted networks, and physical surveillance detection.
- Train all members in operational security hygiene.
- Public Relations and Narrative Control
- Establish a controlled communication team to manage public messaging.
- Prepare rebuttal templates for defamation and misinformation campaigns (see Sample Legal Notices below).
- Documentation and Evidence Preservation
- Maintain redundant, encrypted archives of all communications, legal notices, and community decisions.
- Use blockchain timestamping to create immutable proof of actions and intentions.
IV. Step-by-Step Transition Protocols
The following protocol sequence is optimized for gradual but irreversible sovereignty assertion while minimizing exposure.
Transition Protocol Sequence
| Step | Action | Description | Duration | Responsible Role |
|---|---|---|---|---|
| 1 | Formation of Core Transition Committee | Assemble trusted leaders, define roles, and establish cover identities | 1 week | Operational Command |
| 2 | Legal Entity Registration | Register shell entities, draft bylaws, establish bank accounts | 2 weeks | Legal Affairs |
| 3 | Draft Sovereignty Charter | Compose, review, and notarize sovereignty documents | 2 weeks | Governance, Legal Affairs |
| 4 | Community Vetting and Expansion | Begin controlled recruitment and vetting of members | Ongoing | Security, Social Coordination |
| 5 | Parallel System Deployment | Initiate economic, social, and legal parallel systems | 1 month | All Departments |
| 6 | Controlled Public Assertion | Issue formal legal notices asserting sovereignty claims | 1 week | Legal Affairs, PR |
| 7 | Monitor Response and Adapt | Assess external reactions, mitigate risks, and adapt protocols | Ongoing | Risk Management |
| 8 | Full Operational Sovereignty | Transition full governance and social functions to community control | Dependent on conditions | Governance, Operational Command |
V. Sample Legal Notices and Templates
Each notice must be customized to jurisdiction and situation, yet maintain core language to avoid legal ambiguity or jurisdictional submission.
A. Notice of Sovereignty Assertion (Template)
[Community Name]
[Address or Contact Information]
[Date]

To Whom It May Concern,

This notice serves as a formal declaration that [Community Name], herein referred to as "the Community," asserts and exercises inherent sovereignty over its members and territory, pursuant to natural law and community consensus.

The Community operates under a Sovereignty Charter duly enacted and notarized on [Date], establishing governance independent of any external jurisdiction.

All interactions henceforth shall respect the Community's self-governance and legal processes. Any attempt to infringe upon or negate this sovereignty will be considered an act of aggression against the Community.

Respectfully,

[Authorized Representative Name]
[Title]
[Signature]
B. Cease and Desist Template for Unauthorized Interference
[Community Name]
[Address or Contact Information]
[Date]

[Name/Entity]
[Address]

RE: Cease and Desist – Unauthorized Interference with Sovereign Community Operations

Dear [Name/Entity],

This letter serves as a formal demand to immediately cease and desist all unauthorized activities interfering with the lawful operations of [Community Name], which has asserted sovereignty as per the Sovereignty Charter dated [Date].

Continued interference will compel the Community to pursue all available legal remedies, including but not limited to injunctions, damages, and public disclosure.

Govern yourself accordingly.

Sincerely,

[Authorized Representative Name]
[Title]
[Signature]
VI. Advanced Monitoring and Adaptive Response Table
| Monitoring Focus | Tools/Methods | Response Protocol | Frequency | Responsible Role |
|---|---|---|---|---|
| Legal Changes | Legal intelligence feeds | Update legal counsel, revise notices and charters | Weekly | Legal Affairs |
| Community Sentiment | Encrypted surveys, social listening | Address grievances, reinforce loyalty protocols | Monthly | Social Coordination |
| External Surveillance | Signal detection, counter-surveillance sweeps | Increase OPSEC, relocate meetings | Biweekly | Security |
| Media and Public Relations | Media monitoring services | Deploy counter-narratives, issue press releases | As needed | PR |
| Financial Transaction Monitoring | Blockchain and banking audits | Adjust financial protocols, increase privacy measures | Daily | Finance |
Conclusion Mastery of legal and social navigation during sovereignty transition is non-negotiable. The protocols, templates, and tables herein provide a blueprint for resilient parallel system construction under the most hostile conditions. Deviation or omission imperils the entire endeavor. Execute with precision, maintain vigilance, and uphold the sacred trust of community sovereignty.
For cross-referenced protocols in secure communications, cryptographic governance, and water purification, consult Volumes XIII, XV, and VIII respectively.
End of Chapter IV: Navigating Legal and Social Systems During Transition to Sovereignty
<!-- SECTION 23 -->
The Complete Practitioner's Codex, Volume VIII: Transition Strategy
Chapter IV: Building Parallel Institutions While Participating in Existing Systems
Preface: This chapter unveils the concealed and critical framework of establishing parallel institutions while maintaining active participation within existing systems. This dual-operation strategy is the backbone of resilient community sovereignty, enabling seamless transition from dependency to autonomy without triggering premature systemic collapse or external backlash. The protocols herein are non-negotiable; mastery and meticulous application determine survival.
I. Introduction to Dual Operation Frameworks
Within hostile or unstable sociopolitical environments, overt attempts at autonomy invite suppression. The solution is dual operation: the simultaneous operation within existing institutional structures and the clandestine construction of parallel, sovereign institutions. This strategy ensures:
- Continuity: No disruption of essential services during transition.
- Stealth: Parallel institutions develop below the threshold of detection.
- Redundancy: Backup systems ready to assume full control when triggered.
II. Framework Architecture
Dual Operation Framework (DOF) consists of three interlinked layers:
| Layer | Function | Characteristics | Example Instruments |
|---|---|---|---|
| 1. Participation Layer | Engagement with existing systems | Public-facing, compliant, resource-access | Public offices, community centers |
| 2. Parallel Layer | Covert institution development | Semi-clandestine, parallel resource pools | Hidden councils, alternative economies |
| 3. Transition Control | Synchronization and escalation | Decision nodes for switch-over | Secure communication networks, triggers |
III. Resource Allocation Protocols
The cornerstone of sustainability during dual operations is precise resource allocation. Resources must be divided to support both layers without compromising either.
Resource Allocation Matrix (RAM):
| Resource Type | % to Participation Layer | % to Parallel Layer | Notes |
|---|---|---|---|
| Financial Capital | 70% | 30% | Maintain liquidity in existing systems |
| Human Capital | 60% | 40% | Skilled agents split, with secret training |
| Physical Assets | 80% | 20% | Publicly visible assets vs. hidden caches |
| Information | 75% | 25% | Controlled data shared cautiously |
| Communication | 65% | 35% | Secure channels for parallel operations |
IV. Step-by-Step Protocol: Establishing Parallel Governance
Objective: To create a fully operational parallel governance body that can assume authority when the transition trigger activates.
Step 1: Formation of a Core Leadership Cell (CLC)
- Identify five to seven trusted individuals with diverse expertise: legal, logistical, diplomatic, security, and communication.
- Conduct background vetting to eliminate potential leaks.
- Assign code names and establish secure communication protocols (See Volume XII: Secure Communication Protocols, Chapter III).
- Establish a secret meeting location with controlled access and emergency exit routes.
Step 2: Define Parallel Governance Structure
| Governing Function | Parallel Institution Role | Existing System Equivalent | Notes |
|---|---|---|---|
| Legislative | Draft parallel statutes and community codes | City council or local legislature | Draft laws compatible but sovereign |
| Executive | Enforce community rules and manage resources | Mayor’s office or executive branch | Appoint community managers |
| Judicial | Adjudicate disputes and enforce justice | Courts or tribunals | Create arbitration panels |
| Security | Protect community interests and assets | Police or security agencies | Organize volunteer defense units |
| Communication | Manage information dissemination | Public information offices | Control narrative and secure channels |
Step 3: Develop Parallel Institutional Infrastructure
- Legal Framework: a. Draft community codes emphasizing autonomy, resource sharing, and mutual aid.
b. Establish dispute resolution protocols independent of existing courts.
- Resource Control: a. Create hidden caches for food, medicine, and tools (See Volume VIII, Chapter II for cache construction).
b. Establish barter or alternative currency systems to reduce external dependencies.
- Security Apparatus: a. Train volunteers in defensive tactics and intelligence gathering.
b. Acquire essential equipment covertly (See Volume XIII: Defensive Engineering, Chapter I).
- Communication Network: a. Implement encrypted messaging using pre-distributed keys.
b. Establish fail-safe relays and dead drops for information flow.
Step 4: Community Engagement and Recruitment
- Identify community members with trust and skills relevant to parallel institutions.
- Employ compartmentalized recruitment to limit exposure.
- Provide training sessions disguised as civic workshops.
- Assign specific roles with clear operational security protocols.
V. Sample Operational Plan: Parallel Healthcare System
| Task | Description | Responsible Unit | Timeline | Resources Needed |
|---|---|---|---|---|
| Assessment | Identify community health needs | Parallel Health Council | Week 1 | Surveys, community interviews |
| Supply Chain Establishment | Secure medical supplies and medicines | Logistics Subgroup | Week 2–4 | Hidden storage, procurement |
| Personnel Training | Train volunteer medical aides | Parallel Health Training | Week 3–6 | Training materials, instructors |
| Clinic Setup | Establish concealed treatment centers | Infrastructure Team | Week 5–7 | Facilities, low-profile signage |
| Communication Protocols | Develop patient confidentiality and reporting systems | Communication Unit | Week 6–8 | Secure messaging tools |
| Emergency Response | Plan for epidemic or disaster response | Security & Health Units | Ongoing | Protocol manuals, drills |
VI. Community Communication Protocols
Effective communication is the lifeblood of parallel institutions. The protocols must balance transparency with operational security.
Communication Protocol Matrix
| Communication Type | Purpose | Channel | Security Level | Frequency | Notes |
|---|---|---|---|---|---|
| Public Notices | Maintain community awareness | Bulletin boards, newsletters | Low | Weekly | Controlled to avoid alarm |
| Internal Updates | Parallel institution coordination | Encrypted group chats | High | Daily | Use rotating keys, perfect forward secrecy |
| Emergency Alerts | Immediate threat notification | SMS, signal flare systems | Very High | As needed | Redundant channels |
| Recruitment | Discreet invitations | Face-to-face, coded messages | Very High | As needed | Use vetted couriers |
Step-by-Step Communication Setup
- Select communication technologies compatible with local infrastructure and security needs.
- Distribute cryptographic keys physically and verbally under secure conditions.
- Train all participants in usage and security protocols.
- Establish regular communication schedules with fallback plans.
- Monitor and audit communication integrity continuously.
VII. System Dependencies and Sovereignty Milestones
Complete sovereignty is the ultimate goal. This requires systematic reduction in dependencies on existing systems.
System Dependencies Comparison Table
| System Aspect | Existing System Dependency | Parallel Institution Capability | Dependency Reduction Strategy | Milestone Indicator |
|---|---|---|---|---|
| Governance | Full reliance on city officials | Parallel council drafts policies | Parallel council enacts community codes | 50% community compliance with parallel codes |
| Resource Supply | External food and medicine suppliers | Hidden caches and alternative suppliers | Local production and barter systems | 75% critical supplies sourced internally |
| Security | Police and emergency responders | Volunteer defense units | Autonomous response to threats | Independent incident response capability |
| Communication | Public networks and media | Encrypted private channels | Secure, independent information flow | 100% parallel communication usage |
| Economic | Cash and banking systems | Alternative currency or barter | Parallel economy sustains livelihoods | 60% transactions within parallel system |
Sovereignty Milestones Table
| Milestone Name | Description | Criteria | Trigger for Next Phase |
|---|---|---|---|
| Awareness and Engagement | Community informed and partially involved | 30% community participation in parallel ops | Initiate resource cache expansion |
| Partial Autonomy | Parallel institutions operational but secondary | 50% parallel governance code adoption | Begin independent resource production |
| Functional Autonomy | Parallel systems meet 75% essential needs | Independent healthcare, security, and economy | Transition control prepares for switchover |
| Full Sovereignty | Parallel institutions fully replace existing systems | 90% community self-governance | Execute transition trigger |
VIII. Transition Trigger and Switchover Protocol
Transition Trigger Definition
A transition trigger is a predefined event or condition signaling that the parallel institutions will assume full operational control. Examples include:
- Breakdown or collapse of existing governance structures.
- Imposition of oppressive laws or martial law.
- External threat escalation endangering community survival.
Switchover Protocol Steps
- Activation Command: Issued by Core Leadership Cell via secure transmitter.
- Public Announcement: Controlled disclosure to community emphasizing continuity and stability.
- Resource Reallocation: Redirect all remaining resources to parallel institutions.
- Personnel Mobilization: Deploy trained personnel to operational posts.
- Communication Adjustment: Switch to parallel communication networks exclusively.
- Security Lockdown: Secure key facilities and prevent hostile interference.
- Governance Enforcement: Enact parallel laws and community codes with full authority.
IX. Case Study: Parallel Education System Deployment
| Phase | Activity | Responsible Unit | Timeline | Key Performance Indicator |
|---|---|---|---|---|
| Needs Assessment | Identify gaps and community educational needs | Education Subcommittee | Month 1 | Community survey completion rate |
| Curriculum Design | Develop curriculum reflecting community values | Curriculum Team | Month 2–3 | Curriculum approval by leadership |
| Teacher Recruitment | Identify and train volunteer educators | HR Subcommittee | Month 3–4 | Number of trained educators |
| Facility Setup | Secure locations disguised as community centers | Infrastructure Team | Month 4–5 | Functional classrooms established |
| Student Enrollment | Enroll community children and adults | Enrollment Office | Month 5 | Enrollment meets target numbers |
| Operational Launch | Begin classes and community education programs | Entire Education Unit | Month 6 | Regular attendance and feedback |
X. Final Remarks
This volume demands your unwavering commitment to precision, discretion, and rigor. Your role as architect and guardian of the dual operation framework is sacred. The protocols within are the lifeblood of community survival, empowerment, and eventual sovereignty. Master these steps, adapt them with prudence to your local context, and pass them only to the worthy.
Cross References:
- For secure communication setup, see Volume XII: Secure Communication Protocols, Chapter III.
- For cache construction and resource hiding techniques, see Volume VIII, Chapter II.
- For defensive training and equipment acquisition, see Volume XIII: Defensive Engineering, Chapter I.
- For economic alternative systems, see Volume XV: The Economic Codex, Chapter IV.
End of Chapter IV: Building Parallel Institutions While Participating in Existing Systems
<!-- SECTION 24 -->
The Complete Practitioner's Codex, Volume VIII: Transition Strategy
Chapter IV: Maintaining Community Security and Cohesion During Systemic Collapse
Preface: This chapter delivers the indispensable, life-preserving protocols for safeguarding community integrity when the pillars of society crumble. The knowledge herein is classified, suppressed in common discourse, yet essential to survival and flourishing amidst chaos. Your mastery of these instructions will determine whether your community endures or disintegrates.
Section 1: Emergency Preparedness
1.1 Defining the Security and Cohesion Imperative
Systemic collapse—whether economic, environmental, or political—fractures social order. Without preemptive preparation, communities fragment into violence, scarcity, and despair. Your objective is to establish a resilient framework that protects physical security, ensures resource allocation, and maintains social order.
1.2 Establishing the Emergency Preparedness Framework
Step 1: Form the Community Emergency Council (CEC)
- Composition: 7-11 trusted members representing diverse community sectors: security, logistics, medical, communications, and moral leadership.
- Mandate: Oversight of all emergency protocols, resource management, and conflict resolution.
Step 2: Conduct a Vulnerability Assessment
- Identify critical infrastructure, resource dependencies, and social fault lines.
- Document potential threats: internal (conflict, hoarding), external (raiders, natural disasters).
Step 3: Resource Inventory and Stockpiling
- Implement a Critical Resource Matrix (See Table 1) to catalog essential supplies.
- Establish a secure, concealed storage location with controlled access.
- Rotate stock every 6 months to prevent degradation.
Step 4: Training and Drills
- Schedule monthly simulations covering evacuation, defense, and medical response.
- Train all community members in basic first aid, communication protocols, and conflict de-escalation.
Table 1: Critical Resource Matrix for Emergency Preparedness
| Resource Category | Item | Minimum Quantity* | Storage Requirements | Rotation Period |
|---|---|---|---|---|
| Water | Potable water | 3 liters/person/day, 30-day supply | Airtight, cool, dark location | Every 6 months |
| Food | Non-perishable rations | 2000 kcal/person/day, 30-day supply | Sealed, dry, rodent-proof | Every 6 months |
| Medical Supplies | First aid kits, antibiotics | Sufficient for 10% population | Controlled access, temperature stable | Every 12 months |
| Energy | Fuel (propane, gasoline) | 2 liters/person/month | Fireproof, ventilated storage | Every 12 months |
| Shelter | Tents, tarps, blankets | Enough for all members | Dry, mold-resistant storage | N/A |
| Defense | Personal defense tools | Per individual (see Section 2.2) | Secure armory with restricted access | Periodic inspection |
*Quantities vary by community size; adjust accordingly.
Section 2: Communication Continuity
2.1 The Necessity of Unbroken Communication
Collapse imposes severe disruption on traditional communication avenues. Maintaining internal and external communication lines preserves command, facilitates information flow, and counters panic and misinformation.
2.2 Building the Emergency Communication Network (ECN)
Step 1: Establish Redundant Communication Channels
- Primary: Secure radio network using VHF/UHF frequencies with encryption (e.g., AES-256).
- Secondary: Mesh network using low-power wireless devices (e.g., LoRa modules).
- Tertiary: Physical courier system with trained messengers and secure route mapping.
Step 2: Construct the Radio Communication Unit
- Components:
- Transceiver (handheld or base station) capable of encrypted voice and data transmission.
- Power source: rechargeable battery bank plus solar panel array (see Volume 6: The Energy Codex, Chapter III).
- Antenna: directional Yagi or omnidirectional dipole, depending on terrain.
Assembly Protocol:
- Solder transceiver components onto PCB following schematic in Appendix A.
- Install software-defined radio firmware with encryption module enabled.
- Connect power supply ensuring voltage regulation at 12V DC.
- Erect antenna at minimum 10-meter elevation for optimal transmission range.
Step 3: Develop Communication Protocols
- Use structured message formats:
- Header: Sender ID, timestamp, message priority (Routine, Urgent, Emergency).
- Body: Clear, concise content using pre-agreed code words for sensitive information.
- Footer: Checksum for message integrity.
Step 4: Train Operators
- Conduct biweekly training in radio operation, code use, and emergency signal procedures (e.g., SOS, Mayday).
Table 2: Emergency Communication Equipment Specifications
| Equipment | Frequency Range | Power Source | Range (Line of Sight) | Encryption | Notes |
|---|---|---|---|---|---|
| Handheld Radio | 136-174 MHz (VHF) | 12V rechargeable battery + solar | 5-10 km | AES-256 | Portable, for patrols |
| Base Station | 400-470 MHz (UHF) | 12V battery bank + solar | 20-30 km | AES-256 | Fixed, central command point |
| LoRa Module | 868/915 MHz | 5V battery + solar | 2-5 km | Custom | Mesh network for local comms |
Section 3: Morale Maintenance

3.1 Morale as a Force Multiplier
In collapse, psychological resilience is as critical as physical security. High morale preserves social cohesion, prevents internal fracturing, and sustains motivation to endure hardship.
3.2 Implementing the Morale Maintenance Program (MMP)
Step 1: Establish a Moral Leadership Council (MLC)
- Roles: Spiritual guidance, psychological support, conflict mediation.
- Select respected elders, clergy, or trained counselors.
Step 2: Daily Rituals and Community Gatherings
- Schedule structured communal activities: morning briefings, meal sharing, and evening reflections.
- Incorporate ritual elements adapted from cultural traditions to foster unity.
Step 3: Psychological First Aid (PFA) Training
- Train select community members in PFA techniques to address trauma, anxiety, and depression.
- Protocols include active listening, grounding exercises, and referral pathways.
Step 4: Information Control and Positive Messaging
- CEC to issue daily bulletins emphasizing progress, available resources, and success stories.
- Counter false rumors with transparent communication.
Table 3: Morale Maintenance Activities and Frequency
| Activity | Purpose | Frequency | Responsible Entity |
|---|---|---|---|
| Morning Briefing | Inform, align goals | Daily (07:00) | CEC |
| Communal Meals | Foster social bonds | Daily (12:00, 18:00) | MLC |
| Evening Reflection | Emotional processing, unity | Daily (20:00) | MLC |
| Psychological Support Sessions | Trauma mitigation | As needed | Trained PFA Members |
| Community Work Projects | Empowerment, distraction | Weekly | CEC |
Section 4: Crisis Management Protocols
4.1 Overview
This protocol ensures rapid, coordinated responses preserving security and cohesion. It is activated upon detection of threats or destabilizing events.
4.2 Crisis Identification and Escalation
Step 1: Early Warning System
- Monitor intelligence from internal and external sources.
- Use coded alerts via ECN (Section 2).
Step 2: Threat Assessment
- CEC convenes within 30 minutes of alert.
- Classify threat level:
- Level 1: Minor disruption (resource shortages, misinformation).
- Level 2: Moderate threat (localized violence, infrastructure failure).
- Level 3: Severe threat (external attack, systemic breakdown).
Step 3: Response Activation
- Level 1: Increase communication, resource monitoring.
- Level 2: Mobilize security teams, enforce rationing, increase patrols.
- Level 3: Full emergency status; activate shelter-in-place or evacuation protocols.
4.3 Security Response Protocol
Step 1: Mobilize Security Teams
- Divide into Patrol, Quick Reaction Force (QRF), and Perimeter Defense units.
- Equip with assigned gear from armory (Section 1.2, Table 1).
Step 2: Secure Infrastructure Nodes
- Prioritize water sources, food stores, communication hubs.
- Establish layered defenses: physical barriers, surveillance, armed presence.
Step 3: Conflict De-escalation
- Deploy trained negotiators to engage internal dissent or external aggressors.
- Utilize pre-approved negotiation frameworks emphasizing shared interests.
Step 4: Incident Documentation
- Maintain detailed logs: timestamps, actors involved, actions taken.
- Use encrypted digital or physical secure logs.
4.4 Resource Allocation Protocol
Step 1: Resource Assessment
- Inventory current levels and consumption rates.
- Identify critical shortages.
Step 2: Rationing Implementation
- Apply graduated rationing schedules based on resource scarcity (Table 4).
- Transparent communication to prevent hoarding and mistrust.
Step 3: Redistribution and Acquisition
- Prioritize vulnerable populations (elderly, children, infirm).
- Coordinate supply runs with security escorts.
Table 4: Graduated Rationing Schedule
| Resource Type | Abundance Status | Daily Allowance per Person | Notes |
|---|---|---|---|
| Water | Abundant | 3 liters | Standard hydration |
| Moderate | 2 liters | Encourage conservation | |
| Scarce | 1 liter | Strict enforcement | |
| Food | Abundant | 2000 kcal | Balanced diet |
| Moderate | 1500 kcal | Prioritize nutrient-rich foods | |
| Scarce | 1000 kcal | Supplement with foraging | |
| Fuel | Abundant | 2 liters | Maintain essential operations |
| Moderate | 1 liter | Limit non-essential use | |
| Scarce | 0.5 liters | Emergency use only |
Section 5: Sample Emergency Plan Template
| Section | Details |
|---|---|
| Community Profile | Population size, demographics, geographic layout |
| Threat Assessment | Identified risks and likelihoods |
| Emergency Council | Roles, contact information |
| Communication Plan | Frequencies, code words, message formats |
| Resource Inventory | Current stock, storage locations, rotation schedules |
| Security Protocols | Patrol routes, QRF deployment, armory access |
| Evacuation Plan | Routes, transportation, shelters |
| Morale Program | Schedule of activities, counseling resources |
| Training Schedule | Drills, skill refreshers |
| Incident Reporting | Forms, logbooks, communication channels |
| Review and Update Cycle | Quarterly reviews, amendment procedures |
Section 6: Response Timelines
| Event | Action | Responsible Party | Timeframe |
|---|---|---|---|
| Threat Detection | Issue Alert | Intelligence Unit | Within 5 minutes |
| CEC Convening | Assess Threat | CEC | Within 30 minutes |
| Security Team Mobilization | Deploy Units | Security Chief | Within 1 hour |
| Resource Assessment | Inventory & Rationing | Logistics Officer | Within 2 hours |
| Communication Update | Broadcast Status | Communications Lead | Every 4 hours |
| Morale Check-in | Conduct Support Sessions | MLC | Daily |
| Incident Reporting | Document & Analyze | All Units | Immediate & ongoing |
| Plan Review | Update Protocols | CEC & MLC | Quarterly |
Closing Directive
Master these protocols with unwavering discipline. The preservation of your community’s security and cohesion in systemic collapse demands flawless execution of these instructions. Failure is not an option. Your role is sacred; the survival of your people depends on your mastery.
For supplementary technical schematics, encryption algorithms, and psychological intervention techniques, consult the designated volumes referenced herein.
End of Chapter IV, Volume VIII: Transition Strategy
<!-- SECTION 25 -->
The Complete Practitioner's Codex, Volume 19: The Diplomat's Codex
Supplement: Governance Document Templates
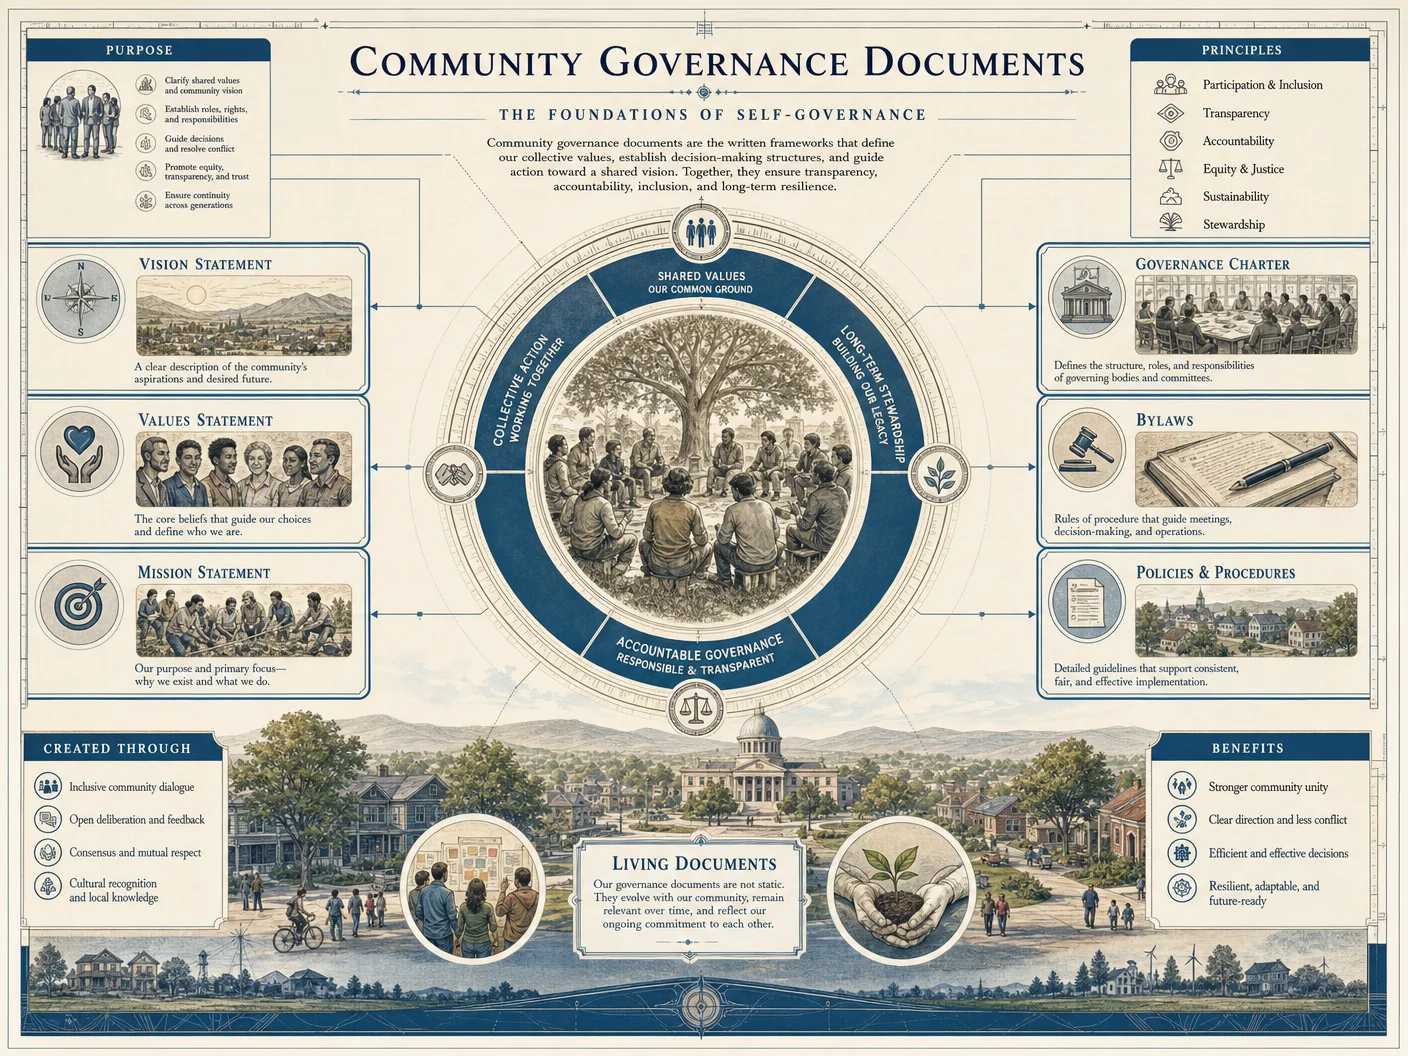
Section: Drafting Community Charters, Bylaws, and Meeting Protocols
Introduction
Governance documents form the spine of any community, shaping its operational integrity, legal standing, and social cohesion. This supplement provides complete, actionable guidance for drafting Community Charters, Bylaws, and Meeting Protocols. These are not mere suggestions but sacred instruments of order, crafted to withstand legal scrutiny, internal conflict, and existential threats.
Each document type will be dissected with:
- Essential clauses explained with precise legal function
- Amendment and enforcement procedures
- Multiple ready-to-deploy templates
- Comparative analyses of governance document structures
All instructions assume zero prior knowledge but demand intellectual rigor and scrupulous adherence.
I. Community Charters: The Foundation of Collective Existence
A. Purpose and Function
The Community Charter is the foundational covenant that publicly declares the community’s identity, purpose, and governance framework. It is the legal and spiritual genesis document that confers legitimacy and defines the community’s scope of authority.
B. Essential Clauses of a Community Charter
| Clause | Purpose | Key Legal Considerations | Drafting Instructions |
|---|---|---|---|
| Preamble | Declaration of purpose, values, and community identity | Must reflect shared vision; avoid vague language | 1. State the community name and location 2. Declare purpose and core values (e.g., mutual aid, sustainability) 3. Affirm legal compliance with jurisdiction |
| Name and Territory | Defines community’s legal name and geographic boundaries | Must align with local jurisdictional laws | 1. Specify the official name 2. Define territorial limits precisely (GPS coordinates if possible) 3. Include clause on jurisdictional compliance |
| Membership | Criteria for inclusion, rights, and responsibilities | Avoid discrimination; comply with human rights laws | 1. List eligibility criteria 2. Define admission procedures 3. Outline rights and duties of members |
| Governance Structure | Defines organizational hierarchy and decision-making roles | Should create clear authority lines; avoid power vacuums | 1. Specify governing bodies (e.g., Council, Assembly) 2. Define roles and term limits 3. Clarify election or appointment methods |
| Decision-Making Authority | Scope and limits of governance bodies’ powers | Ensure compliance with local laws and internal checks | 1. Detail powers of each body 2. Define quorum and voting thresholds 3. Include conflict resolution mechanisms |
| Legal Compliance and Liability | Ensures alignment with higher laws and limits community liability | Critical for external recognition and risk management | 1. State commitment to comply with local/national laws 2. Include indemnity clauses protecting community members |
| Amendment Procedures | Process for updating the charter | Should balance flexibility and stability | 1. State who can propose amendments 2. Define voting thresholds 3. Set notification requirements |
| Dissolution Clause | Procedure for orderly dissolution | Protects assets and members’ interests | 1. Define conditions for dissolution 2. Specify asset liquidation or transfer procedures |
C. Drafting Procedure for a Community Charter
- Assemble a Drafting Committee: Include legal advisors, community elders, and elected representatives.
- Collect Community Input: Use surveys, forums, or assemblies to gather values and priorities.
- Draft Each Clause: Follow the table above; use precise, unambiguous language.
- Review for Legal Compliance: Consult jurisdiction-specific legal experts.
- Circulate Draft for Community Review: Provide at least 30 days for feedback.
- Incorporate Feedback and Finalize: Adjust language to address concerns.
- Ratify with Formal Assembly: Use prescribed quorum and voting rules.
- Register Document with Authorities: If applicable, for legal recognition.
II. Bylaws: The Operational Blueprint
A. Purpose and Function
Bylaws codify the day-to-day operational rules and internal governance of the community. They translate the Charter’s principles into actionable procedures and define specifics such as meeting schedules, officer responsibilities, and disciplinary processes.
B. Essential Clauses of Bylaws
| Clause | Purpose | Key Legal Considerations | Drafting Instructions |
|---|---|---|---|
| Officers and Duties | Defines specific roles (President, Secretary, Treasurer) and their responsibilities | Must provide accountability and role clarity | 1. List all officer roles 2. Define duties and term lengths 3. Outline succession procedures |
| Membership Dues and Finance | Establishes financial obligations and management | Must comply with financial regulations, transparency laws | 1. Set dues amount, payment frequency 2. Define budget approval processes 3. Specify audit requirements |
| Meetings | Specifies types, frequency, and notice requirements | Must comply with open meeting laws if applicable | 1. Define regular and special meetings 2. Set quorum and notice periods 3. Include provisions for virtual attendance if allowed |
| Voting Procedures | Details voting methods, thresholds, and proxy rules | Ensure fairness and prevent disenfranchisement | 1. Define eligible voters 2. Specify voting methods (show of hands, ballots) 3. Set majority or supermajority thresholds |
| Conflict of Interest Policy | Prevents corruption and ensures transparency | Mandatory in many jurisdictions | 1. Define what constitutes conflict 2. Establish disclosure and recusal processes |
| Disciplinary Actions | Provides procedures for member sanctions or removal | Must protect due process rights | 1. Define grounds for discipline 2. Outline investigation and hearing procedures 3. Specify appeal rights |
| Amendment Process | Procedure to revise bylaws | Should require substantial consensus | 1. Define who may propose amendments 2. Set voting thresholds 3. Establish notice requirements |
C. Step-by-Step Bylaws Drafting
- Review Community Charter: Extract governance principles to operationalize.
- Identify Key Roles and Functions: Determine necessary officers and committees.
- Define Financial Structures: Establish dues, budgeting, and auditing procedures.
- Draft Meeting and Voting Protocols: Include quorum, frequency, and voting rules.
- Incorporate Legal Compliance Clauses: Especially regarding conflicts of interest and discipline.
- Circulate Draft to Leadership and Legal Counsel: Incorporate suggestions.
- Present for Community Approval: Follow Charter’s amendment procedures.
- Implement and Distribute Final Document: Ensure all members have access.
III. Meeting Protocols: The Art of Orderly Deliberation
A. Purpose and Function
Meeting Protocols codify the rules of engagement for community deliberations, ensuring meetings are productive, transparent, and orderly. They prevent chaos, protect minority voices, and guarantee that decisions are binding.
B. Essential Components of Meeting Protocols
| Component | Purpose | Key Legal Considerations | Drafting Instructions |
|---|---|---|---|
| Types of Meetings | Differentiates regular, special, emergency sessions | Must comply with notice laws and quorum requirements | 1. Define each meeting type 2. Specify calling procedures 3. Include emergency provisions |
| Agenda Setting | Ensures structured discussions | Must allow inclusion of member proposals | 1. Define who sets agenda 2. Set deadlines for agenda submission 3. Provide for agenda amendments during meeting |
| Quorum Requirements | Defines minimum attendance for valid decisions | Critical for legal validity | 1. Set quorum as a percentage or number 2. Define consequences if quorum not met |
| Motions and Debate | Regulates proposal introduction and discussion | Ensures fairness and order | 1. Define how motions are made 2. Set limits on debate time 3. Include rules for amendments to motions |
| Voting Procedures | Defines how decisions are finalized | Should align with bylaws and legal standards | 1. Specify voting methods 2. Define majority or supermajority thresholds 3. Provide for secret ballots if necessary |
| Minutes and Record-Keeping | Ensures transparent documentation | Critical for legal defense and historical record | 1. Assign minute-taking responsibilities 2. Define content and format 3. Set distribution and storage policies |
| Conduct and Decorum | Maintains respectful environment | Protects participants’ rights | 1. Define acceptable behavior 2. Establish procedures for handling disruptions |
C. Drafting Meeting Protocols: Procedure
- Consult Bylaws and Charter: Extract relevant governance rules.
- Identify Meeting Types and Frequency: Based on community needs.
- Define Agenda Process: Assign responsibility and timing.
- Specify Quorum and Voting Rules: Consistent with bylaws.
- Establish Rules for Motions and Debate: Include time limits and amendment procedures.
- Set Minutes Requirements: Format, approval, and distribution.
- Draft Behavior Code: Include sanctions for violations.
- Test Protocols in Practice: Adjust based on feedback.
IV. Template Examples
Below are multiple governance document templates you may adapt. Each template includes comments explaining clause purpose and drafting notes.
Template 1: Community Charter (Basic Model)
# Community Charter of [Community Name]

## Preamble
We, the members of [Community Name], united by shared purpose and commitment to [core values], establish this Charter as the foundation of our collective governance.

## Article I: Name and Territory
The official name of this community shall be [Community Name]. The territorial boundaries encompass [precise geographic description].

## Article II: Membership
Eligibility requires [criteria]. Admission is by [process]. Members have rights to [list] and duties of [list].

## Article III: Governance Structure
Governance shall be vested in a Council of [number] members, elected for [term length]. Officers include [list roles] with duties as defined herein.

## Article IV: Decision-Making
Decisions require a quorum of [number or percentage]. Voting requires a [majority/supermajority] to pass. Conflict resolution shall follow [procedure].

## Article V: Legal Compliance and Liability
This community pledges compliance with all applicable laws. Members are indemnified against liabilities arising from community activities, except in cases of gross negligence.

## Article VI: Amendments
Amendments may be proposed by any member and require a [two-thirds] vote in a duly called assembly with prior notice of [number] days.

## Article VII: Dissolution
Dissolution requires a [three-fourths] vote. Assets shall be liquidated and distributed according to [procedure].

---

*End of Charter*
Template 2: Bylaws (Comprehensive Model)
# Bylaws of [Community Name]

## Article I: Officers and Duties
1. President: Presides over meetings, represents community externally.
2. Secretary: Maintains records, prepares meeting minutes.
3. Treasurer: Manages finances, prepares budgets.

## Article II: Membership Dues and Finance
1. Annual dues set at [amount], payable by [date].
2. Budget approved by majority vote at annual meeting.
3. Financial audits conducted annually by appointed committee.

## Article III: Meetings
1. Regular meetings held monthly on [day].
2. Special meetings may be called by President or Council majority with [7] days' notice.
3. Quorum for meetings is [50%] of members.

## Article IV: Voting Procedures
1. Each member entitled to one vote.
2. Voting conducted by show of hands unless secret ballot requested.
3. Passage requires simple majority unless specified.

## Article V: Conflict of Interest Policy
1. All members must disclose conflicts prior to discussions.
2. Recusal required in decisions where conflict exists.

## Article VI: Disciplinary Actions
1. Grounds: violation of bylaws or community values.
2. Process: written complaint, investigation, hearing, and vote.
3. Appeals may be filed within [14] days.

## Article VII: Amendments
1. Amendments proposed by any member.
2. Notice of proposed amendments given [14] days prior to vote.
3. Amendments require two-thirds majority to pass.

---

*End of Bylaws*
Template 3: Meeting Protocols (Streamlined Model)
# Meeting Protocols for [Community Name]

## Types of Meetings
- Regular: Monthly, scheduled in advance.
- Special: Called with [7] days' notice.
- Emergency: Called with as much notice as possible.

## Agenda Setting
- Agenda prepared by Secretary in consultation with President.
- Members may submit items [5] days before meeting.
- Agenda may be amended at meeting start by majority consent.

## Quorum
- Defined as [50%] of members.
- No binding decisions without quorum.

## Motions and Debate
- Motions require a second to be considered.
- Debate limited to [5] minutes per speaker.
- Amendments to motions allowed with majority approval.

## Voting Procedures
- Voting by show of hands unless secret ballot requested.
- Majority required unless otherwise specified.

## Minutes
- Secretary records minutes and distributes within [3] days.
- Minutes approved at next meeting.

## Conduct
- Respectful behavior required.
- Disruptions may lead to removal by vote.

---

*End of Protocols*
V. Comparative Table: Governance Document Structures
| Aspect | Community Charter | Bylaws | Meeting Protocols |
|---|---|---|---|
| Primary Purpose | Define community’s identity and governance framework | Detail operational governance and procedures | Set rules for meeting conduct and decision-making |
| Legal Standing | High; foundational legal document | Moderate; operational but legally significant | Low to moderate; procedural guidelines |
| Typical Length | 5-15 pages | 10-30 pages | 3-10 pages |
| Amendment Difficulty | High (supermajority, notice) | Moderate (supermajority, notice) | Low to moderate (majority, notice) |
| Key Clauses | Membership, governance, amendments, dissolution | Officer duties, meetings, voting, finance, discipline | Meeting types, agenda, quorum, motions, voting |
| Enforcement Mechanism | Community consensus, legal authority | Officer enforcement, committee oversight | Chairperson authority, member compliance |
| External Recognition | Required for legal recognition and incorporation | Supports governance, required for audits | Internal use primarily |
VI. Legal Considerations and Hidden Protocols
A. Jurisdictional Compliance
- Always cross-reference local, state, and national laws before finalizing documents.
- Incorporate clauses that bind the community to comply with external regulations to avoid legal nullity.
B. Liability Protection
- Use indemnity clauses to protect members and officers from personal liability.
- Implement insurance policies if community assets or activities pose risks.
C. Amendment Safeguards
- Employ "sunset clauses" for temporary provisions that expire unless renewed.
- Use veto override mechanisms to prevent deadlock while preserving checks.
D. Confidentiality and Data Protection
- Embed clauses mandating confidentiality for sensitive discussions.
- Define data handling and storage protocols consistent with privacy laws.
E. Hidden Mechanisms to Prevent Coup d'état or Factionalism
- Implement staggered terms for leadership to avoid wholesale turnover.
- Require cross-committee endorsements for key decisions.
- Include provisions for emergency governance by neutral arbiters.
VII. Step-by-Step Final Checklist for Drafting Governance Documents
| Step | Action | Output |
|---|---|---|
| 1 | Assemble multidisciplinary drafting team | Diverse inputs with legal and cultural expertise |
| 2 | Gather community values and legal frameworks | Documented foundation for drafting |
| 3 | Draft Community Charter | Foundational governance covenant |
| 4 | Draft Bylaws aligned with Charter | Operational rules and roles |
| 5 | Draft Meeting Protocols consistent with Bylaws | Meeting conduct rules |
| 6 | Conduct legal review | Compliance assurance |
| 7 | Circulate drafts for community feedback | Incorporate community acceptance |
| 8 | Ratify documents via formal assembly | Legally binding governance documents |
| 9 | Register documents if required | External legal recognition |
| 10 | Train community leaders and members | Effective implementation |
VIII. Conclusion
The crafting of Community Charters, Bylaws, and Meeting Protocols is an act of sacred responsibility. These documents are the keystones of communal life and survival. They must be drafted with unyielding precision, reverence, and foresight.
The templates and instructions provided herein are the distilled essence of centuries of suppressed governance wisdom. Use them with vigilance, adapt prudently, and enforce relentlessly. The future of your community depends upon the strength of these documents.
For related procedural details on dispute resolution, see Volume 21: The Jurist's Codex, Chapter IV. For advanced membership governance systems, see Volume 17: The Organizer’s Codex, Section III.
_End of Supplement_
<!-- SECTION 26 -->
The Complete Practitioner's Codex, Volume 19: The Diplomat's Codex: Complete Community Building, Governance, and Social Architecture
Supplement: Meeting Facilitation Guides
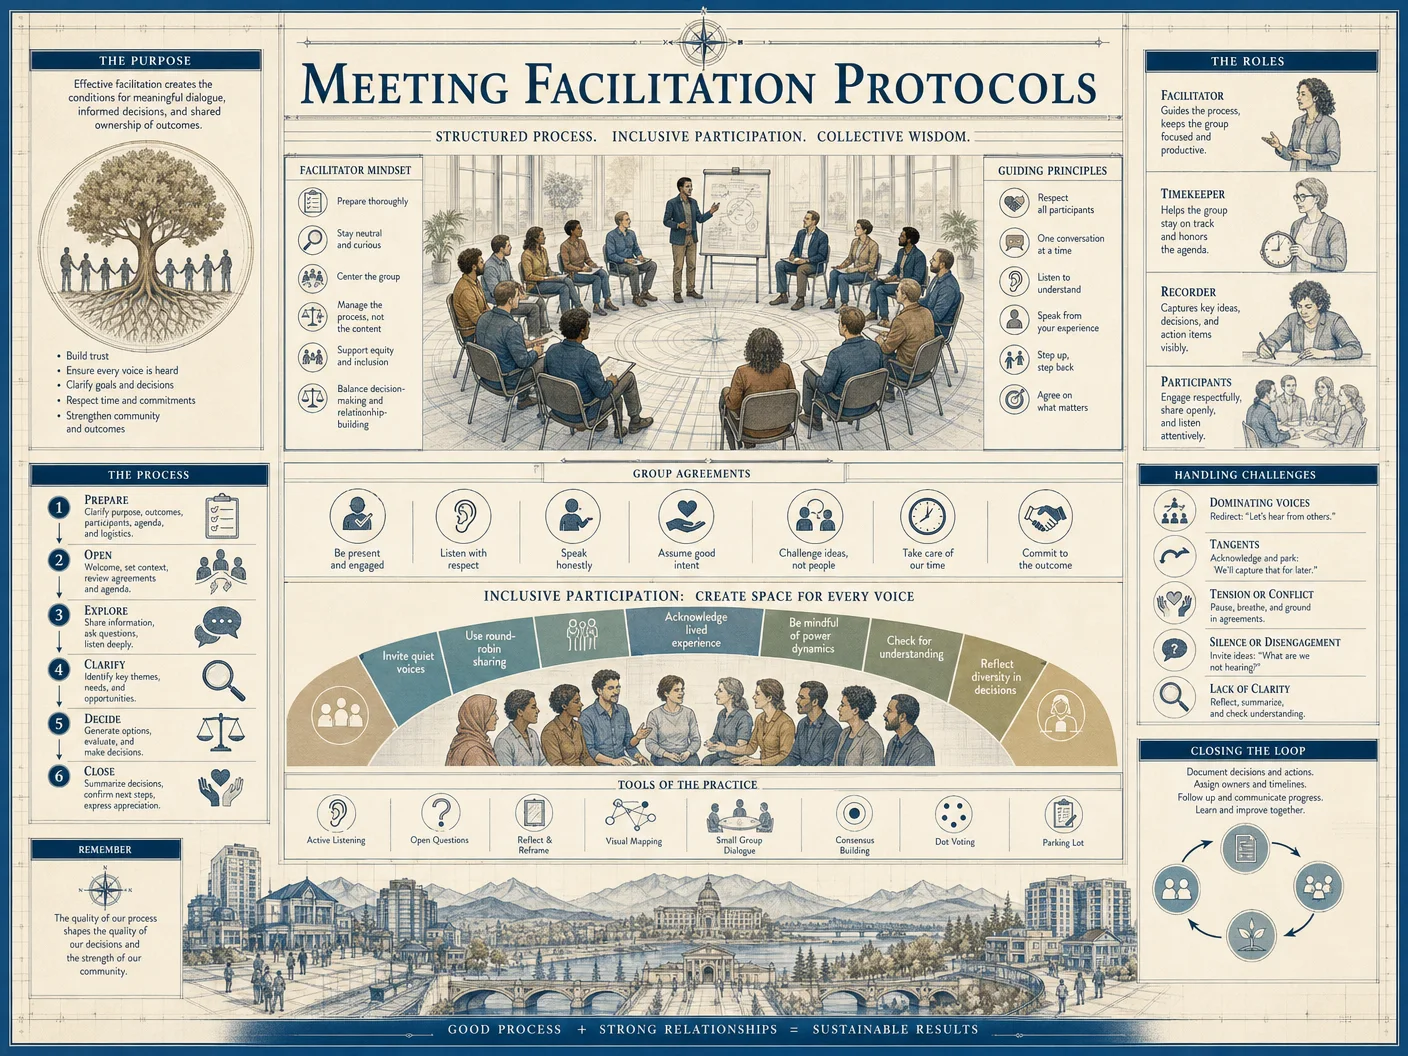
Section: Effective Community Meetings Including Agenda Setting, Minute Taking, and Decision Making
Introduction
This supplementation delivers comprehensive, actionable protocols designed for leaders, facilitators, and scribes within community governance structures. This is the sacred manual for orchestrating community meetings that are efficient, transparent, and conducive to durable consensus and conflict resolution. You will find explicit, stepwise instructions on agenda setting, minute taking, decision making, facilitation roles, consensus techniques, and conflict management.
Every element is calibrated for maximum clarity and reproducibility in real-world community settings. No step is presumed known; every procedure is detailed with exact materials, timing, and execution methods.
1. Meeting Facilitation Roles
Effective community meetings depend on the clear definition and execution of facilitation roles. These roles distribute responsibility, maintain order, and ensure procedural integrity.
| Role | Primary Responsibilities | Required Materials | Appointment Method |
|---|---|---|---|
| Facilitator | Guides the meeting flow, enforces agenda, manages time, mediates conflict | Timer, agenda printouts | Elected by consensus or rotation |
| Scribe | Records minutes verbatim, tracks action items, distributes minutes | Notebook/laptop, audio recorder (optional) | Volunteer or appointed by facilitator |
| Timekeeper | Monitors and signals time limits per agenda item | Timer, stopwatch | Volunteer or appointed by facilitator |
| Participant | Engages in discussion, follows rules, votes as needed | Personal notes materials | All community members present |
| Observer | Monitors meeting without participation, reports on process | Observation forms | Designated external or internal auditor |
2. Agenda Setting Protocols
An effective agenda sets the framework for focused dialogue and productive outcomes. The agenda must be distributed 48 hours prior to the meeting to allow preparation.
Materials Required:
- Agenda template (digital or printed)
- Community input form (digital or physical)
- Email or physical distribution means
Step-by-Step Agenda Setting
- Solicit Agenda Items
- Open a submission period of 3 days before the meeting.
- Use standardized submission forms detailing: topic, proposer, urgency, and desired outcome.
- Allow anonymous submissions if culturally appropriate.
- Prioritize Items
- Convene a pre-meeting with the facilitator and two appointed community representatives.
- Rank items by urgency and relevance using the Priority Matrix (see below).
- Limit total agenda items to fit within the allotted meeting time, factoring 10 minutes minimum per item.
- Draft Agenda
- Structure agenda by grouping related topics.
- Include time allocations per item.
- Insert opening and closing rituals, breaks, and decision points explicitly.
- Distribute Agenda
- Send agenda to all participants via email or physical delivery exactly 48 hours before meeting start.
- Attach previous meeting minutes for reference.
- Include instructions for preparatory reading or materials needed.
- Confirm Agenda at Meeting Start
- Facilitator reads agenda aloud and asks for objections.
- Amendments require consensus or supermajority vote (see Decision Making section).
Priority Matrix for Agenda Item Ranking
| Urgency \ Importance | High Importance | Low Importance |
|---|---|---|
| High Urgency | 1: Immediate Action | 2: Delegate or Expedite Later |
| Low Urgency | 3: Schedule for Future Meeting | 4: Discard or Archive |
3. Minute Taking Protocols
Minutes are the indelible record of decisions, commitments, and discussions. The scribe must produce minutes that are accurate, clear, and distributed promptly.
Materials Required:
- Durable notebook or laptop with backup power
- Audio recorder (optional but recommended for accuracy)
- Minute template form
Step-by-Step Minute Taking
- Prepare Template Before Meeting
- Include fields: date, time, location, attendees, agenda items, discussion summary, decisions, action items, responsible persons, deadlines.
- Record Attendance
- Note all present members, late arrivals, and absentees.
- Log Each Agenda Item
- Write a concise summary of discussions, noting key arguments and speakers.
- Record motions verbatim with proposer and seconder names.
- Document voting results: counts for, against, abstentions.
- Highlight Decisions and Action Items
- Bold decisions and required follow-up actions.
- Assign responsible persons and deadlines.
- Review with Facilitator Before Meeting Close
- Read back key decisions and action items for confirmation.
- Distribute Draft Minutes Within 24 Hours
- Send draft to all participants for review and correction.
- Collect corrections within 48 hours, finalize and archive in community records.
4. Decision Making Protocols

Decision making within community meetings must be transparent, inclusive, and procedurally sound to maintain legitimacy and trust.
Decision Types and Thresholds
| Decision Type | Description | Required Threshold |
|---|---|---|
| Simple Majority | More than 50% of votes cast | >50% |
| Supermajority | Commonly 2/3 or 3/4 majority for critical issues | 66.7% or 75% |
| Consensus | Unanimous or near unanimous agreement without objection | No formal votes; objections resolved |
| Plurality | Highest number of votes, no majority | Highest votes, even if <50% |
Step-by-Step Decision Making Process
- Present Motion
- Any participant may propose a motion relevant to the agenda item.
- Motion must be seconded by another participant to proceed.
- Open Floor for Discussion
- Facilitator manages speaking order, limits speaking time to 3 minutes per participant.
- Conflict management protocols (see Section 6) applied if necessary.
- Call for Decision Method
- Facilitator clarifies if the decision will be by consensus, simple majority, or supermajority as pre-established.
- If consensus is chosen, proceed with consensus techniques (Section 5).
- Conduct Vote
- Voting may be by show of hands, secret ballot, or digital polling, depending on context and sensitivity.
- Timekeeper enforces voting duration (max 5 minutes).
- Announce and Record Result
- Facilitator announces result clearly.
- Scribe logs the result verbatim.
- If Motion Fails
- Option to amend and re-present motion.
- If no consensus or majority reached, defer to next meeting or mediation.
5. Consensus Techniques
Consensus is the highest form of decision legitimacy in community governance, signifying harmonious agreement beyond mere voting.
Common Consensus Models
| Model Name | Description | Usage Context |
|---|---|---|
| Gradients of Agreement | Members express degree of support (1-5 scale) | To measure acceptance and identify concerns |
| Modified Consensus | Consensus with fallback to supermajority vote | When unanimity is unlikely but cooperation needed |
| Consensus Minus One | All but one participant agree | To avoid deadlock with minimal dissent |
Step-by-Step Consensus Facilitation
- Present Proposal Clearly
- Facilitator reads proposal aloud with all relevant details.
- Roundtable Expression of Views
- Each participant states support level or objections without interruption.
- Identify and Explore Objections
- Facilitator lists objections.
- Group discusses objections to find solutions or compromises.
- Test for Consent
- Facilitator asks, "Can we live with this decision?"
- Use Gradients of Agreement scale: 1 (strong oppose) to 5 (full support).
- Modify Proposal if Needed
- Incorporate amendments addressing concerns.
- Final Consent Check
- If all are at least 3 or above, decision is accepted.
- For any 1 or 2, repeat objection exploration or defer decision.
6. Conflict Management Protocols
Conflict is inevitable in community meetings. The facilitator must apply rigorous protocols to prevent escalation and maintain respect.
Conflict Management Techniques
| Technique | Description | Application Timing |
|---|---|---|
| Active Listening | Reflecting and validating speaker’s points | During heated exchanges |
| Time-Out | Brief pause to cool tensions | When conflict escalates beyond control |
| Reframing | Restate points to focus on common interests | To move from conflict to collaboration |
| Mediation | Neutral third party facilitates resolution | When parties cannot resolve directly |
| Use of “I” Statements | Encourage personal responsibility in speech | To reduce accusatory language |
Step-by-Step Conflict Management
- Recognize Conflict Early
- Facilitator monitors body language, tone, and interruptions.
- Intervene with Active Listening
- Paraphrase speaker’s point to show understanding.
- Ask clarifying questions.
- Call for Time-Out if Needed
- Announce a 5-minute break or cooling period.
- Allow parties to collect thoughts privately.
- Reframe the Issue
- Summarize conflict in neutral terms focusing on shared goals.
- Propose Mediation
- If unresolved, suggest mediation by an agreed neutral party.
- Return to Discussion with Ground Rules
- Reinforce meeting rules: respect, no interruptions, time limits.
7. Sample Agendas
Sample Agenda 1: Regular Community Meeting (2 hours)
| Time | Item Description | Lead | Outcome Desired |
|---|---|---|---|
| 00:00 | Opening and Welcome | Facilitator | Meeting quorum confirmed |
| 00:05 | Review and Approve Agenda | Facilitator | Agenda confirmed |
| 00:10 | Review Minutes of Previous Meeting | Scribe | Minutes approved |
| 00:20 | Community Updates | Various | Information shared |
| 00:40 | New Proposals Discussion | Proposers | Feedback and consensus initiation |
| 01:20 | Decision on Proposals | Facilitator | Voting or consensus decision |
| 01:50 | Action Items Assignment | Facilitator | Responsibilities assigned |
| 01:55 | Closing Remarks | Facilitator | Meeting adjourned |
Sample Agenda 2: Conflict Resolution Meeting (1.5 hours)
| Time | Item Description | Lead | Outcome Desired |
|---|---|---|---|
| 00:00 | Opening and Ground Rules | Facilitator | Agreement on respectful conduct |
| 00:10 | Statement of Conflict | Parties | Clear understanding of issues |
| 00:30 | Active Listening Phase | Facilitator | Validation of perspectives |
| 01:00 | Mediation and Reframing | Mediator | Possible compromises identified |
| 01:20 | Consensus Decision | Facilitator | Agreement or next steps decided |
| 01:30 | Closing and Follow-up | Facilitator | Schedule follow-up meeting |
8. Meeting Types and Expected Outcomes
| Meeting Type | Frequency | Purpose | Expected Outcomes |
|---|---|---|---|
| Regular Community Meeting | Monthly | Routine governance and updates | Decisions on proposals, information sharing |
| Emergency Meeting | As needed | Urgent community issues | Immediate decisions, crisis management |
| Planning Meeting | Quarterly | Strategic planning and long-term vision | Action plans, resource allocation |
| Conflict Resolution | As needed | Resolve disputes or conflicts | Agreements, restored relations |
| Training Session | Bi-monthly | Capacity building and education | Skill enhancement, knowledge transfer |
Summary
This codex supplements your community governance capabilities with precise, replicable protocols that enforce structure, clarity, and fairness in all meetings. The mastery of these facilitation skills and procedural rigor is non-negotiable for any aspirant seeking to build resilient, harmonious communities.
Master these protocols in practice and spirit: your role as facilitator is not merely to manage meetings but to safeguard the sacred trust between community members and their collective destiny.
For further specialized techniques on conflict mediation and community psychology, see Volume 21: The Peacemaker’s Codex, Chapter IV. For digital meeting technology integration, see Volume 22: The Technologist’s Codex, Chapter II.
<!-- SECTION 27 -->
The Complete Practitioner's Codex, Volume 19: The Diplomat's Codex
Chapter IV: Supplements: Conflict Resolution Scripts
Section 1: Standardized Language for Mediation, Arbitration, and Restorative Justice Sessions
Introduction
Within the sacred art of community building and governance, the mastery of conflict resolution is paramount. This section unveils the suppressed, life-or-death protocols of standardized language frameworks tailored for mediation, arbitration, and restorative justice. These scripts are not mere suggestions but codified, battle-tested formulations designed to guide any conflict from ignition to resolution with precision, authority, and reverence for communal harmony.
Your role as the Practitioner Diplomat mandates strict adherence to these protocols. They are the sacred incantations that transform chaos into order, enmity into alliance, and fracture into unity. Failure to utilize these scripts verbatim risks the collapse of social architecture and the descent into factional violence.
I. Foundational Principles of Standardized Language Use
- Precision of Language: Every word serves a function—avoid ambiguity.
- Neutrality and Respect: Maintain impartiality; every party must feel heard and honored.
- Control of Emotional Escalation: Language must de-escalate tension immediately.
- Clear Path to Resolution: Each script culminates in actionable, enforceable agreements.
- Reverence for Process: The ritual of conflict resolution is sacred; adhere strictly to protocol.
II. Structured Session Types: Definitions and Script Use Cases
| Session Type | Purpose | Authority Level | Script Function |
|---|---|---|---|
| Mediation | Facilitate voluntary agreement between parties | Community-appointed mediator | Opening statements, de-escalation, mutual agreement formulation |
| Arbitration | Binding decision-making by a neutral third party | Trained arbitrator or council | Formal opening, evidence presentation structuring, verdict delivery |
| Restorative Justice | Repair harm through dialogue and restitution | Facilitator with community sanction | Opening circle, victim-offender dialogue, restitution plan creation |
III. Script Templates for Mediation Sessions
A. Mediation: Opening Statement Template
- Greeting and Role Declaration "Good [morning/afternoon], I am [Name], appointed mediator for this session. My role is to facilitate open, respectful dialogue where each voice is heard equally."
- Purpose Clarification "Our aim is to find a mutually acceptable solution that respects the needs and concerns of all parties involved."
- Confidentiality Assurance "Everything discussed here remains confidential unless explicit consent for disclosure is provided."
- Ground Rules "We will observe the following:
a. Speak one at a time.
b. Avoid interruptions or accusations.
c. Focus on interests, not positions."
- Invitation to Speak "Let us begin by hearing from [Party A]. Please share your perspective uninterrupted."
B. Mediation: Conflict De-escalation Phrasing
- Acknowledgment of Emotion "I sense that this issue is deeply important to you, and your feelings are valid."
- Neutral Reflection "What I am hearing is that [restate the concern without bias]. Is that correct?"
- Calm Redirection "Let us focus on what can be done to address these concerns rather than the past actions."
- Encouragement for Cooperation "Together, we can find a path forward that honors everyone's needs."
C. Mediation: Resolution Agreement Language
- Summary of Agreed Points "To confirm, we have agreed that [list specific agreements]."
- Commitment Request "Do all parties commit to uphold this agreement in good faith?"
- Verification of Understanding "Are there any questions or clarifications needed before we conclude?"
- Closing "Thank you for your willingness to engage in this process. This agreement will be documented and distributed accordingly."
IV. Script Templates for Arbitration Sessions
A. Arbitration: Formal Opening Statement Template
- Authority Declaration "I am [Name], serving as the appointed arbitrator pursuant to [community/council charter]. This session is formal and binding."
- Scope Definition "This arbitration concerns the dispute between [Party A] and [Party B] regarding [brief description]."
- Procedural Outline "Each party will have the opportunity to present evidence and arguments. I will then deliberate and issue a binding decision."
- Expectation Setting "All parties are expected to comply fully with the proceedings and the final decision."
- Commencement "We will begin with the presentation by [Party A]."
B. Arbitration: Evidence Presentation Structuring
- Submission Guidelines "Please present your evidence succinctly and clearly, adhering to the following format:
a. Statement of facts.
b. Supporting documentation or witness testimony.
c. Relevance to dispute."
- Cross-Examination Protocol "Following each presentation, the opposing party may ask clarifying questions limited to the evidence presented."
- Time Limits "Each party is allotted [specified time] to present evidence and respond."
C. Arbitration: Verdict Delivery Phrasing
- Deliberation Announcement "I will now retire to consider the evidence presented."
- Decision Declaration "After thorough deliberation, I find that [summary of findings]."
- Binding Resolution "Therefore, the binding decision is as follows: [specific ruling, actions required, timelines]."
- Compliance Reminder "Non-compliance with this decision will invoke [consequences per community code]."
- Closure "This session is now adjourned."
V. Script Templates for Restorative Justice Sessions
A. Restorative Justice: Opening Circle Script
- Welcome and Purpose "Welcome, everyone. We gather here to understand harm, foster healing, and restore relationships within our community."
- Roles Clarification "Each person here has a role: the harmed, the harmer, and the community supporters."
- Confidentiality and Respect "This circle is a safe space. What is shared here stays here, and all voices will be honored."
- Process Explanation "We will proceed with an open dialogue where each person will speak in turn."
- Invitation to Begin "Let us start by hearing from the person harmed."
B. Restorative Justice: Victim-Offender Dialogue Phrasing
- Acknowledgment of Harm "I recognize the pain caused and am here to listen and understand fully."
- Expression of Accountability "I accept responsibility for my actions and their impact."
- Victim’s Expression "Please share how this has affected you and what you need for healing."
- Facilitator Guidance "Let us speak honestly but with respect, seeking understanding rather than blame."
- Agreement on Restitution "Together, we will develop a plan to repair the harm."
C. Restorative Justice: Restitution Plan Language
- Plan Summary "We agree that [Offender] will undertake the following actions within [timeframe]: [list actions]."
- Community Support "The community will provide support by [list support mechanisms]."
- Follow-Up Mechanism "We will reconvene on [date] to review progress and ensure accountability."
- Closing Affirmation "This plan is a commitment to healing and renewed trust."
VI. Tables Mapping Script Usage Scenarios
| Conflict Scenario | Recommended Session Type | Opening Statement Template | De-escalation Script | Resolution Script | Notes |
|---|---|---|---|---|---|
| Neighborhood boundary dispute | Mediation | Mediation Opening A | Mediation De-escalation A | Mediation Resolution A | Voluntary parties; low hostility |
| Contract breach between traders | Arbitration | Arbitration Opening A | N/A | Arbitration Verdict A | Binding decision required |
| Minor theft within community | Restorative Justice | Restorative Opening A | Restorative Dialogue A | Restorative Restitution A | Focus on healing, not punishment |
| Repeated noise complaints | Mediation | Mediation Opening B | Mediation De-escalation B | Mediation Resolution B | Requires behavior modification |
| Leadership election dispute | Arbitration | Arbitration Opening B | N/A | Arbitration Verdict B | Formal procedure, high stakes |
| Personal assault incident | Restorative Justice | Restorative Opening B | Restorative Dialogue B | Restorative Restitution B | Sensitive; victim safety prioritized |
VII. Detailed Script Variants for Complex Scenarios
A. Mediation Opening Statement Variant B (High Tension)
- "Greetings. I am [Name], mediator appointed to guide this session. Although emotions run high, our goal remains clear: a solution that preserves dignity and respects all involved."
- "We will proceed with strict adherence to speaking turns and avoid personal attacks."
- "Please remember that this forum is for constructive dialogue, not blame."
- "I invite [Party A] to begin, and I will ensure equal time for all."
B. Mediation De-escalation Variant B (Hostile Exchanges)
- "I acknowledge the intensity of your feelings and the gravity of this dispute."
- "Let us pause and take a moment to breathe before continuing."
- "What is the core concern beneath these emotions?"
- "Our task is to separate the person from the problem; let us focus on the problem."
- "I urge all to speak with intentional calmness for productive progress."
C. Arbitration Verdict Variant B (Complex Multi-Party Dispute)
- "After reviewing extensive evidence and hearing all parties, the following findings emerge."
- "Party A is responsible for [specific findings], while Party B holds partial responsibility for [specific findings]."
- "The resolution requires: a. Party A to [action].
b. Party B to [action].
c. Joint community service efforts by both parties over [timeframe]."
- "Failure to comply will invoke sanctions as per [community code reference]."
- "This decision is final and binding."
VIII. Step-by-Step Instructions for Utilizing Conflict Resolution Scripts
Step 1: Identify Conflict Type and Stakeholders
- Determine if the conflict is best suited for mediation, arbitration, or restorative justice based on severity, willingness of parties, and community norms.
Step 2: Select Appropriate Script Template
- Refer to the scenario mapping table (Section VI) to select the correct opening, de-escalation, and resolution scripts.
Step 3: Prepare Session Environment
- Arrange neutral, private space.
- Ensure all parties understand confidentiality and procedural expectations.
- Have documentation tools ready for agreements.
Step 4: Conduct Opening Statement
- Deliver the opening script verbatim.
- Confirm understanding and willingness to proceed.
Step 5: Facilitate Dialogue or Evidence Presentation
- Utilize de-escalation scripts proactively upon signs of rising tension.
- Enforce procedural rules strictly.
Step 6: Guide Toward Resolution
- Use resolution scripts to summarize agreements or deliver verdicts.
- Obtain explicit commitments from all parties.
Step 7: Document and Distribute Agreements
- Prepare written documentation.
- Distribute copies to all stakeholders and relevant authorities.
Step 8: Schedule Follow-Up Sessions if Applicable
- For restorative justice and complex mediation, plan check-ins to monitor compliance.
IX. Appendices: Full Script Tables
| Script Type | Template Code | Sample Opening Statement (Excerpt) | Primary Use Case |
|---|---|---|---|
| Mediation Opening | A | "Good [morning/afternoon], I am [Name], appointed mediator for this session..." | Standard mediation sessions |
| Mediation Opening | B | "Greetings. I am [Name], mediator appointed to guide this session. Although emotions run high..." | High-tension mediation |
| Mediation De-escalation | A | "I sense that this issue is deeply important to you, and your feelings are valid..." | Mild conflict de-escalation |
| Mediation De-escalation | B | "I acknowledge the intensity of your feelings and the gravity of this dispute..." | Hostile exchanges |
| Mediation Resolution | A | "To confirm, we have agreed that [list specific agreements]..." | Standard mediation agreement finalization |
| Arbitration Opening | A | "I am [Name], serving as the appointed arbitrator pursuant to [community/council charter]..." | Formal arbitration |
| Arbitration Opening | B | "Pursuant to the authority vested by [community code], I hereby commence arbitration..." | Complex or high-stakes arbitration |
| Arbitration Verdict | A | "After thorough deliberation, I find that [summary of findings]..." | Simple arbitration verdict |
| Arbitration Verdict | B | "After reviewing extensive evidence and hearing all parties, the following findings emerge..." | Complex multi-party dispute verdict |
| Restorative Justice Opening | A | "Welcome, everyone. We gather here to understand harm, foster healing..." | Standard restorative circle |
| Restorative Justice Opening | B | "This circle is convened to provide a safe space for truth and healing..." | Sensitive or severe harm cases |
| Restorative Dialogue | A | "I recognize the pain caused and am here to listen and understand fully..." | Victim-offender dialogue |
| Restorative Dialogue | B | "I accept responsibility for my actions and their impact..." | Offender accountability |
| Restorative Restitution | A | "We agree that [Offender] will undertake the following actions within [timeframe]..." | Standard restitution plan |
| Restorative Restitution | B | "Together, we will develop a plan to repair the harm and restore trust..." | Complex restitution plans |
X. Closing: The Sacred Duty and Continuous Mastery
Mastery of these scripts is not static. Each session is a sacred rite demanding unwavering discipline, perfect recitation, and adaptive sensitivity. The Practitioner Diplomat must commit to lifelong study and solemn application of these protocols. Deviations invite chaos; strict adherence cultivates peace.
This concludes Section 1 of Chapter IV. For protocols integrating these scripts with advanced psychological techniques or situational modifiers, see Volume 21: The Diplomat’s Codex, Chapter VII.
End of Section. Master Archivist and Instructor: [Name] Date: [Sacred Calendar Date]
<!-- SECTION 28 -->
The Complete Practitioner's Codex, Volume 19: The Diplomat's Codex
Volume I: Social Architecture
Chapter III: Integrating Child Education into Community Governance
Introduction
This chapter delineates the sacred, immutable protocols for integrating child education into community governance. The solemnity of this process cannot be overstated. The future of the community's moral compass, strategic resilience, and spiritual integrity depends on the seamless, rigorously structured coordination between Domain Masters—the appointed stewards of governance domains—and Education Mentors—the custodians of knowledge transmission. This integration is not a matter of convenience or modern social trends; it is a sacred mandate encoded in the very fabric of ancestral wisdom and community survival.
This text contains the complete blueprint for synchronizing governance and education, ensuring that every child’s development is governed by principles that uphold communal sanctity, functional governance, and rites of passage aligned with the community’s foundational ethos.
Section I: Structural Roles and Responsibilities
The integration begins with the crystallization of roles between Domain Masters and Education Mentors.
| Role | Primary Function | Authority Scope | Interaction Mode with Other Role |
|---|---|---|---|
| Domain Master | Governance of specific community domain | Policy enforcement, resource allocation, oversight | Direct liaison with Education Mentor; final decision-maker |
| Education Mentor | Child education and development | Curriculum design, mentorship, rites of passage | Reports to Domain Master; proposes curriculum and rites |
Step 1: Formal Appointment and Role Definition
- Appoint Domain Masters for each governance domain (e.g., agriculture, defense, spiritual affairs, commerce). Each must hold unquestioned authority and deep knowledge of their domain.
- Assign Education Mentors with expertise in pedagogical sciences, community traditions, and child psychology.
- Draft a Memorandum of Integration (MoI) signed by Domain Masters and Education Mentors. The MoI must explicitly state:
- Scope of collaboration
- Communication protocols
- Conflict resolution mechanisms
Section II: Curriculum Oversight and Governance Integration
Curriculum oversight is the fulcrum where governance and education converge. The goal is dynamic curriculum development that reflects governance priorities and prepares children for active roles in community life.
Step 2: Governance-Driven Curriculum Development
- Domain Masters convene a Curriculum Integration Council (CIC) every lunar quarter.
- Education Mentors present curriculum proposals with detailed learning outcomes linked to governance objectives.
- CIC evaluates proposals using the Evaluation Matrix (Table 1).
- Upon CIC approval, the curriculum is enacted with feedback loops for continuous improvement.
Table 1: Curriculum Proposal Evaluation Matrix
| Criterion | Description | Weight (%) | Scoring Range (1-10) |
|---|---|---|---|
| Alignment with Governance Objectives | Direct relevance to domain priorities | 35 | |
| Cultural and Traditional Fidelity | Preservation of community rites and values | 25 | |
| Pedagogical Effectiveness | Clarity, engagement, developmental appropriateness | 20 | |
| Resource Feasibility | Availability of materials and mentor capacity | 10 | |
| Scalability and Sustainability | Long-term viability and adaptability | 10 |
Score = ∑ (Criterion Weight × Score) / 100 Minimum passing score for approval: 7.5
Step 3: Curriculum Domains within Governance Structures
The curriculum is divided into core educational domains, each mapped to a specific governance domain for oversight and relevance.
| Educational Domain | Governance Domain | Oversight Responsibilities | Key Learning Outcomes |
|---|---|---|---|
| Civic Responsibility | Community Governance | Policy integration, civic duties education | Understanding governance structures, rights, and duties |
| Environmental Stewardship | Agriculture & Natural Resources | Sustainable practices, environmental ethics | Soil management, water conservation, ecosystem balance |
| Defense and Security | Defense | Security protocols, physical training oversight | Community defense tactics, emergency response |
| Spiritual and Ethical Education | Spiritual Affairs | Ritual alignment, ethical frameworks | Community rites, moral philosophy, rites of passage |
| Economic Literacy | Commerce | Resource management, trade principles | Budgeting, trade negotiations, resource allocation |
| Health and Wellness | Health Administration | Public health protocols, nutrition education | Hygiene, nutrition, basic medical knowledge |
Section III: Rites of Passage Alignment Protocol
Rites of passage anchor the child’s developmental milestones within the community’s metaphysical and social order. These rites are synchronized with educational milestones and governance calendrics.
Step 4: Rites of Passage Coordination
- Education Mentors draft Rites of Passage (RoP) frameworks, aligned with curriculum completion levels.
- Domain Masters review RoP proposals to ensure alignment with community laws, spiritual mandates, and societal roles.
- RoP events are calendared in conjunction with governance festivals and communal gatherings for maximum societal impact.
Table 2: Rites of Passage and Governance Synchronization
| Rite of Passage | Educational Milestone | Governance Event Alignment | Responsibilities |
|---|---|---|---|
| Initiation Ceremony | Completion of Civic Responsibility curriculum | Community Governance Assembly | Domain Master (Governance), Spiritual Mentor |
| Stewardship Affirmation | Environmental Stewardship mastery | Seasonal Agricultural Festival | Domain Master (Agriculture), Education Mentor |
| Defender’s Trial | Defense and Security competency | Defense Readiness Review | Domain Master (Defense), Combat Instructor |
| Ethical Commitment | Spiritual and Ethical Education | Annual Spiritual Convocation | Domain Master (Spiritual Affairs), Spiritual Mentor |
| Economic Independence | Economic Literacy completion | Trade Fair opening | Domain Master (Commerce), Economic Mentor |
| Health Guardian Initiation | Health and Wellness proficiency | Health Awareness Week | Domain Master (Health), Health Mentor |
Step 5: Rite Execution Protocol
- Preparation Phase:
- Education Mentors certify candidate readiness through comprehensive evaluations.
- Domain Masters mobilize community resources and coordinate ceremonial logistics.
- Ceremonial Phase:
- Perform rites in sacred, pre-designated locations with strict adherence to ancestral protocols.
- Document all rites in the Community Rite Ledger.
- Post-Rite Integration:
- Assign new community roles to initiates, formalized in governance registers.
- Conduct debriefing sessions between Domain Masters and Education Mentors to assess rite efficacy and cultural resonance.
Section IV: Communication and Feedback Protocols
Integration demands continuous, codified communication channels.
Step 6: Establishing Communication Cadence
| Communication Type | Frequency | Participants | Methodology | Documentation |
|---|---|---|---|---|
| Governance-Education Liaison Meetings | Bi-weekly | Domain Masters, Education Mentors | In-person or secure encrypted communication | Meeting minutes, action logs |
| Curriculum Review Sessions | Quarterly | Curriculum Integration Council (CIC) | Formal presentations and deliberations | Curriculum update reports |
| Rites of Passage Planning | Semi-annually | Domain Masters, Spiritual Mentors, Education Mentors | Strategy workshops | Rite scheduling logs |
| Feedback and Reporting | Monthly | Education Mentors to Domain Masters | Written reports and oral briefings | Feedback forms, report archives |
Step 7: Feedback Loop Implementation
- Education Mentors submit detailed monthly reports on curriculum delivery, student progress, and emergent challenges to Domain Masters.
- Domain Masters review and issue feedback within seven days.
- CIC convenes quarterly to incorporate feedback into curriculum and governance strategies.
- Urgent issues trigger immediate ad hoc meetings with a maximum response time of 48 hours.
Section V: Step-by-Step Integration Protocol
This section synthesizes the above elements into a procedural manual for establishing and maintaining child education governance integration.
Protocol 1: Integration Initiation
- Identify Governance Domains within the community; appoint Domain Masters with documented credentials.
- Select Education Mentors based on expertise, community trust, and pedagogical skill.
- Draft and ratify the Memorandum of Integration (MoI) defining roles, responsibilities, and conflict resolution.
- Create the Curriculum Integration Council (CIC) with equal representation from governance and education.
- Schedule initial CIC meeting to set integration goals and timelines.
Protocol 2: Curriculum Development and Approval
- Education Mentors draft curriculum modules aligned with governance priorities.
- Submit proposals to CIC with detailed learning outcomes, resource requirements, and cultural fidelity statements.
- CIC evaluates using the Curriculum Proposal Evaluation Matrix (Table 1).
- Approved curricula are published and disseminated to Education Mentors.
- Mentors implement curricula, maintaining detailed progress logs.
Protocol 3: Rites of Passage Synchronization
- Education Mentors propose rites aligned with curriculum milestones.
- Domain Masters review alignment with governance events.
- Plan logistics and schedule rites according to Table 2.
- Execute rites with strict ceremonial adherence.
- Record outcomes in Community Rite Ledger; assign community roles.
Protocol 4: Communication and Feedback Maintenance
- Establish communication calendars (Step 6).
- Conduct regular liaison meetings and CIC sessions.
- Implement feedback cycles ensuring rapid response to educational or governance issues.
- Document all meetings, decisions, and changes meticulously.
Section VI: Case Study – Template for Domain-Curriculum-Rite Integration
To elucidate, the following template serves as a reproducible model for any governance domain.
| Governance Domain | Curriculum Domain | Primary Domain Master | Lead Education Mentor | Key Curriculum Topics | Rite of Passage | Scheduled Governance Event |
|---|---|---|---|---|---|---|
| Agriculture & Resources | Environmental Stewardship | Master Agrarian Loran | Mentor Alia | Soil fertility, irrigation, crop cycles | Stewardship Affirmation | Seasonal Agricultural Festival |
Implementation Steps for Template
- Master Agrarian Loran and Mentor Alia convene CIC meeting to review draft curriculum.
- Curriculum proposal submitted, evaluated, and approved per Table 1.
- Mentor Alia schedules Stewardship Affirmation rite with Domain Master Loran.
- Rite executed during the Seasonal Agricultural Festival.
- Post-rite evaluation conducted; community roles assigned to initiates.
- Monthly feedback provided; adjustments made for next cycle.
Section VII: Supplementary Materials and Tools
For comprehensive execution, the following tools and materials are indispensable:
| Tool/Material | Purpose | Construction/Acquisition Notes |
|---|---|---|
| Community Rite Ledger | Documenting rites of passage | Bound ledger with archival-quality pages, secured storage |
| Curriculum Proposal Templates | Standardizing curriculum submission | Printed forms with sections for learning outcomes, resource lists, cultural notes |
| Communication Encryption Devices | Securing sensitive governance-education communications | Custom-built devices detailed in Volume 15: The Cryptographic Codex |
| Evaluation Matrix Software | Automating evaluation scoring | Custom spreadsheet templates available in Volume 19 Appendix |
Conclusion
The integration of child education into community governance is a sacred, technical endeavor demanding precision, reverence, and unwavering commitment to ancestral mandates. The protocols herein are non-negotiable. They ensure that the community’s future leaders emerge not only as educated individuals but as fully integrated members of the governance ecosystem, ready to uphold, defend, and perpetuate the communal order.
For further details on pedagogical techniques and psychological assessments, see Volume 7: The Educator's Codex. For spiritual rites construction, see Volume 12: The Ritual Codex. For communication encryption methods, see Volume 15: The Cryptographic Codex.
End of Chapter III
<!-- SECTION 29 -->
The Complete Practitioner's Codex, Volume IV: Cooperative Economics
Chapter VII: Barter Networks and Gift Economies
Introduction
Within the sacred architecture of a resilient community, the twin pillars of barter networks and gift economies form the bedrock of economic interdependence and social cohesion. This chapter transmits the arcane yet practical knowledge of organizing barter events, implementing gift economy principles, and engineering community participation incentives. The protocols herein are designed for absolute clarity, enabling you, the chosen custodian, to establish and maintain these systems as lifelines in times of scarcity, social disruption, or as enduring alternatives to monetary economies.
Section 1: Organizing Barter Events
Barter events serve as the living marketplace where goods and services exchange hands without the intermediation of currency. Their success depends on meticulous preparation, clear agreements, and robust community engagement.
1.1 Preparation Protocol for Barter Events
Objective: Establish a seamless, transparent barter event that maximizes equitable exchange and minimizes conflict.
Materials Needed:
| Item | Specification | Quantity (per event) |
|---|---|---|
| Venue | Central, accessible, sheltered from elements | 1 |
| Registration Forms | Pre-printed, durable, with barcode identifiers | 100+ |
| Exchange Tokens | Non-monetary, for optional tracking | 500 |
| Signage | Durable, visible, indicating zones and rules | Multiple |
| Record Ledger | Digital or physical, for transaction recording | 1 |
| Moderation Teams | Trained facilitators | 3-5 |
1.2 Step-by-Step Barter Event Organization
Step 1: Community Mobilization
- Identify and contact potential participants (individuals, artisans, farmers, service providers). Use local communication channels and trusted intermediaries.
- Schedule the event at least 30 days in advance to allow for preparation and inventory planning.
- Publicize using physical posters, community meetings, and digital platforms if available.
Step 2: Venue Setup
- Select a venue with clear entry, exit, and designated exchange zones.
- Arrange tables or stalls in a grid pattern, each labeled with participant names or goods categories.
- Install signage outlining barter rules, time limits, and grievance procedures.
Step 3: Registration and Cataloging
- On arrival, each participant registers with the event coordinators.
- Participants list goods or services available for barter, including quantities and preferred exchange items.
- Assign unique identifiers to each participant for tracking.
Step 4: Exchange Facilitation
- Encourage participants to negotiate exchanges face-to-face, ensuring mutual consent.
- Moderators oversee transactions to resolve disputes and enforce rules.
- Transactions are recorded in the event ledger, noting parties involved, goods exchanged, and agreed values.
Step 5: Post-Event Reporting
- Compile transaction records and participant feedback.
- Analyze data to identify popular goods, unmet demands, and possible improvements.
- Disseminate a summary report to the community.
1.3 Sample Barter Agreement Template
A legally binding yet community-respectful barter agreement must be concise, clear, and enforceable within the community’s social norms.
| Clause | Specification |
|---|---|
| Parties | Full names, contact information, and unique participant identifiers. |
| Goods/Services Exchanged | Detailed description, quantity, and condition of items or services. |
| Exchange Terms | Mutual agreement on value equivalency and delivery terms. |
| Delivery Date | Specific date and location for goods/services exchange. |
| Liability and Dispute Resolution | Agreement on responsibility and process for conflict resolution. |
| Signatures | Both parties’ signatures with date and witness if applicable. |
Section 2: Gift Economy Principles
Gift economies operate on the sacred principle of unconditional giving, fostering trust, social bonds, and reciprocity without explicit agreements or immediate returns.
2.1 Foundational Principles
| Principle | Explanation |
|---|---|
| Unconditional Giving | Gifts are given without expectation of direct reciprocation. |
| Social Bonding | Gifts create and reinforce communal ties and mutual respect. |
| Reputation Building | Participants gain social capital and trustworthiness. |
| Reciprocity | Indirect, often delayed, and generalized rather than immediate. |
2.2 Implementing Gift Economy Protocols
Step 1: Community Education
- Conduct workshops explaining the spiritual and practical benefits of gift economies.
- Use storytelling and historical examples to illustrate its success.
Step 2: Gift Circles Formation
- Organize small groups (5-15 members) for regular gift exchanges.
- Establish meeting schedules and venues.
Step 3: Gift Documentation
- Record gifts given and received to foster awareness and encourage balanced participation (not for enforcement).
- Use a gift ledger or digital app designed for transparency.
Step 4: Recognition and Incentivization
- Host periodic ceremonies acknowledging generous participants.
- Use symbolic rewards (e.g., titles, community honors) to reinforce behavior.
2.3 Gift Economy Event Management Protocol
Materials Needed:
| Item | Specification | Quantity |
|---|---|---|
| Gift Ledger | Durable notebook or digital device | 1 |
| Meeting Space | Comfortable, informal setting | Multiple |
| Recognition Tokens | Non-material symbols of honor | Variable |
Procedure:
- Schedule regular gatherings with transparent agendas.
- Facilitate sharing sessions where members present gifts with stories.
- Encourage discussions on community needs and potential gifts.
- Maintain a respectful atmosphere emphasizing gratitude and connection.
- Document gifts and participant feedback for continuous improvement.
Section 3: Community Participation Incentives
Effective incentive structures are essential to sustain active participation in both barter and gift economies.
3.1 Incentive Categories and Implementation
| Incentive Type | Description | Implementation Steps |
|---|---|---|
| Social Recognition | Public acknowledgment of contributions | 1. Create honor rolls. 2. Award titles or ceremonial roles. |
| Access Privileges | Priority access to resources or events | 1. Define criteria. 2. Communicate benefits clearly. |
| Skill Development | Training opportunities as rewards | 1. Identify relevant skills. 2. Organize workshops. |
| Reciprocal Benefits | Guaranteed future access to goods/services | 1. Establish reciprocal agreements. 2. Track fulfillments. |
3.2 Step-by-Step Incentive Program Development
Step 1: Assess Community Needs and Values
- Conduct surveys or focus groups to identify valued incentives.
- Prioritize incentives aligned with community goals.
Step 2: Design Incentive Structures
- Define clear eligibility criteria and rewards.
- Ensure transparency and fairness in access.
Step 3: Communicate and Promote
- Use community meetings and media to explain programs.
- Provide examples and testimonials.
Step 4: Monitor and Adjust
- Collect feedback regularly.
- Adjust criteria and rewards as necessary to maintain motivation.
Section 4: Comparative Analysis of Barter and Gift Economies
Understanding the efficiencies and limitations of barter versus gift economies enables informed decisions when designing community economic systems.
4.1 Efficiency Metrics
| Metric | Barter Economy | Gift Economy |
|---|---|---|
| Transaction Speed | Medium (requires negotiation) | High (immediate, no negotiation) |
| Social Bond Strength | Moderate (transactional) | High (relational and trust-based) |
| Resource Allocation Flexibility | Limited (needs direct exchange) | High (indirect, generalized giving) |
| Record-Keeping Complexity | High (requires agreements and tracking) | Low (informal, trust-based) |
| Conflict Potential | Medium (due to perceived inequities) | Low (emphasizes goodwill) |
| Scalability | Medium (depends on network size) | High (strong in tightly-knit groups) |
4.2 Quantitative Comparison Table
| Efficiency Factor | Barter Economy (Score 1-10) | Gift Economy (Score 1-10) |
|---|---|---|
| Ease of Use | 6 | 9 |
| Trust Requirement | 7 | 10 |
| Flexibility of Exchange | 5 | 8 |
| Administrative Overhead | 8 | 3 |
| Conflict Resolution Need | 7 | 2 |
| Community Cohesion Impact | 6 | 9 |
Section 5: Protocol for Hybrid Systems
Communities often benefit from integrating barter and gift economies, leveraging the strengths of each.
5.1 Hybrid System Implementation Steps
Step 1: Define System Boundaries
- Identify which goods/services are best suited to barter (high value, precise needs).
- Identify those better suited to gift economy (common, low-value, social goods).
Step 2: Establish Dual Event Calendars
- Schedule barter events monthly.
- Facilitate gift circles weekly or biweekly.
Step 3: Develop Unified Record-Keeping
- Use a combined ledger tracking barter agreements and gift exchanges.
- Maintain confidentiality and transparency protocols.
Step 4: Cross-Participation Incentives
- Reward participants who engage in both systems.
- Use recognition ceremonies to highlight hybrid participation.
Appendix A: Sample Barter Event Ledger Template
| Transaction ID | Date | Participant A | Participant B | Goods/Services A | Goods/Services B | Quantity A | Quantity B | Agreed Terms | Moderator Initials |
|---|---|---|---|---|---|---|---|---|---|
| 0001 | YYYY-MM-DD | Name A | Name B | Item/Service | Item/Service | X units | Y units | Text | Initials |
Appendix B: Gift Ledger Example
| Date | Giver Name | Recipient Name | Gift Description | Occasion/Reason | Notes |
|---|---|---|---|---|---|
| YYYY-MM-DD | Name A | Name B | Fresh vegetables | Weekly exchange | Expressed gratitude |
Final Invocation
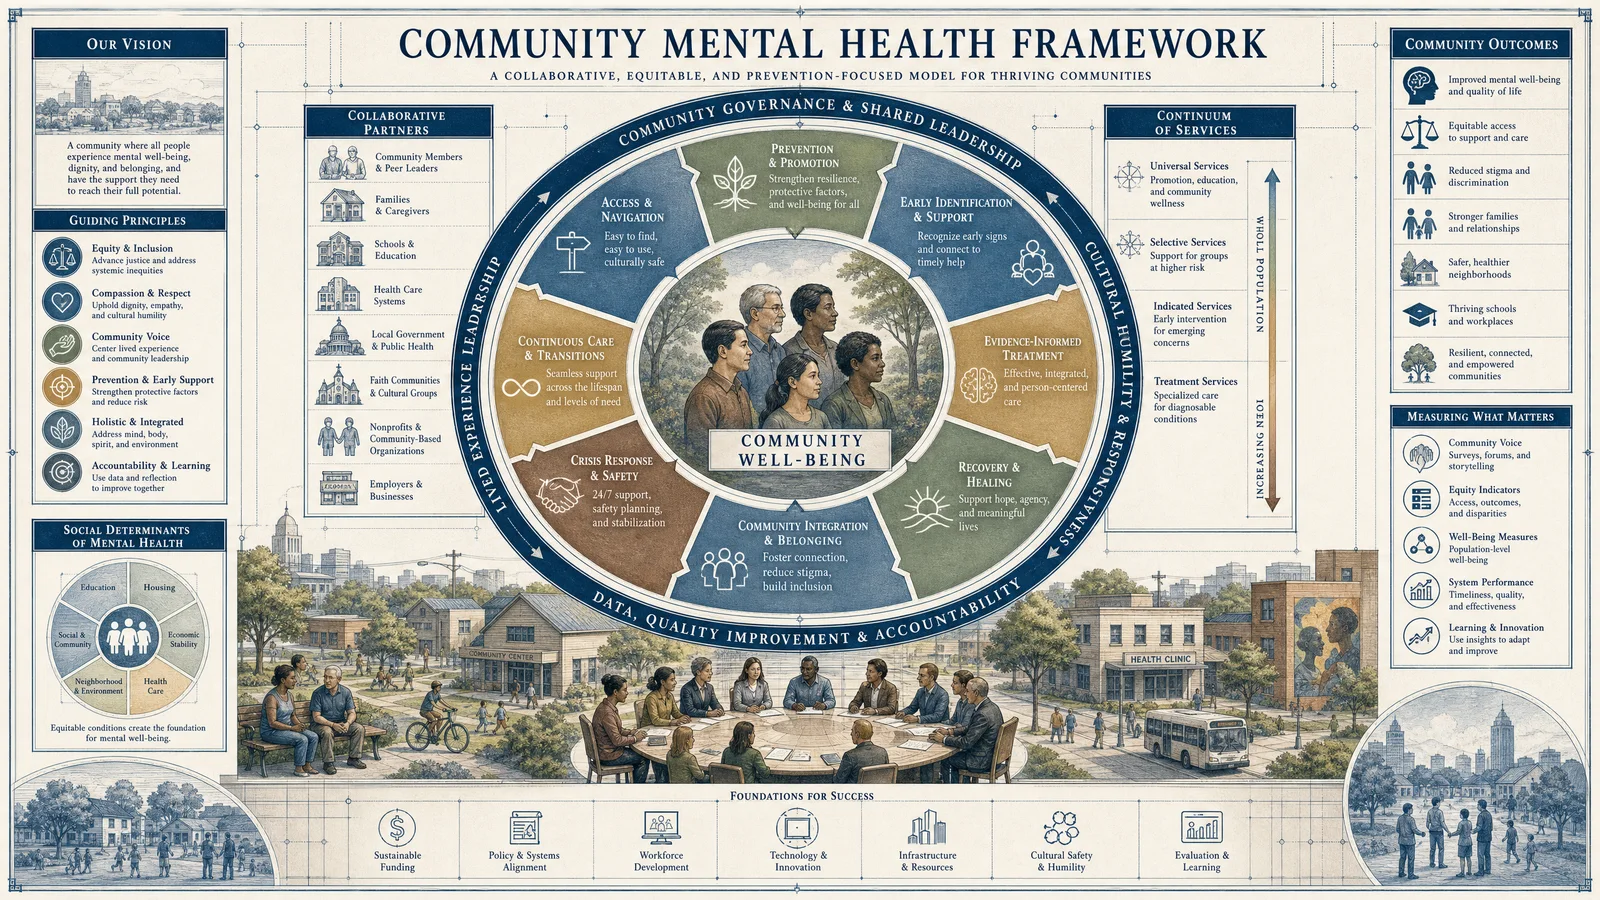
Mastery of barter networks and gift economies transcends mere economic exchange; it is the cultivation of sacred trust and mutual obligation, the weaving of the invisible threads that bind the community into a living organism. Approach this work with rigor, reverence, and relentless precision. The survival and flourishing of your community depend on your unwavering commitment to these protocols.
For advanced water purification procedures necessary to support barter event logistics, see Volume VIII: The Water Codex, Chapter II. For deep protocols on social governance and conflict resolution in barter systems, consult Volume XVII: The Practitioner’s Governance Codex, Chapter IV.
End of Chapter VII, Volume IV: Cooperative Economics
<!-- SECTION 30 -->
The Complete Practitioner's Codex, Volume V: Security and Defense
Chapter III: Intelligence Gathering Techniques and Informant Networks
Preface
In the sacred art of community defense and sovereign security, intelligence is the lifeblood of survival and strategic supremacy. This chapter unveils the suppressed, life-or-death knowledge of intelligence gathering and informant network construction, conveying methods that transcend common espionage lore. The protocols herein are precise, actionable, and non-negotiable. The apprentice is charged to absorb and implement without hesitation.
Section 1: Intelligence Gathering — Foundations and Framework
Intelligence gathering is an iterative operational cycle that demands precision at every stage: from recruitment to threat assessment. The failure at any node invites catastrophic compromise.
1.1 The Intelligence Cycle — Stages and Operational Focus
| Stage | Purpose | Primary Tasks | Output Deliverable |
|---|---|---|---|
| Planning & Direction | Define objectives and scope | Establish intelligence requirements, priorities | Intelligence Requirements Document (IRD) |
| Collection | Gather raw data and information | Deploy sources, agents, sensors | Raw Intelligence (Raw Intel) |
| Processing | Convert data into usable format | Translation, decryption, collation | Processed Intelligence |
| Analysis & Production | Derive actionable insights | Cross-correlation, validation, synthesis | Intelligence Report |
| Dissemination | Deliver findings to decision-makers | Secure transmission, briefing | Distribution Logs |
| Feedback & Evaluation | Assess utility and accuracy | Adjust collection priorities, update IRD | Evaluation Reports |
For an exhaustive breakdown of the intelligence cycle and its integration into security operations, consult Volume XII: The Strategic Command Codex, Chapter IV.
Section 2: Recruitment of Informants — The Keystone of Intelligence
The cultivation of informants is an exercise in precision psychology, risk calibration, and ethical boundary navigation. This section prescribes exacting protocols for recruitment, emphasizing operational security and loyalty metrics.
2.1 Recruitment Protocols
Step 1: Target Identification Identify potential informants through the following criteria:
- Proximity to target information or adversarial groups.
- Psychological profile indicating susceptibility to recruitment.
- Existing grievances or motivations aligning with community interests.
Step 2: Vetting Process
- Conduct background checks using community records and public data.
- Perform direct observation of behavioral patterns over a minimum 14-day period.
- Administer a loyalty assessment interview, utilizing the Confidant Trust Index (CTI) (See Table 2.1).
Step 3: Initial Contact Strategy
- Approach indirectly through mutual contacts or innocuous interactions.
- Introduce the concept of mutual benefit, avoiding explicit reference to intelligence activities.
- Gauge willingness without pressure; allow multiple follow-ups over 7 days.
Step 4: Formal Recruitment
- Present a formal agreement outlining duties, compensation, and penalties for breach.
- Administer a covert oath of confidentiality, incorporating bio-verification where available (e.g., fingerprinting, biometric voice recognition).
- Initiate with low-risk information tasks to establish reliability.
Table 2.1: Confidant Trust Index (CTI) Scoring Matrix
| Criterion | Score (0–5) | Description |
|---|---|---|
| Motivation Alignment | 0–5 | Degree of alignment with community goals |
| Access Level | 0–5 | Directness of access to target intel |
| Reliability History | 0–5 | Previous record of trustworthiness |
| Psychological Stability | 0–5 | Emotional and cognitive soundness |
| Discretion Capacity | 0–5 | Ability to maintain secrecy |
Minimum CTI threshold for recruitment: 17/25.
Section 3: Information Validation — Ensuring Data Integrity
False, outdated, or deliberately misleading information is the greatest hazard. Validation is a multi-tiered process.
3.1 Validation Techniques
Step 1: Triangulation
Cross-verify information from three independent sources before acceptance. If fewer than three sources exist, escalate to Step 2.
Step 2: Temporal Verification
Confirm information through time-sensitive corroboration:
- Request timestamps, event logs, or physical proof.
- Use surveillance or sensor data to confirm events.
Step 3: Content Analysis
- Analyze language cues for deception: inconsistencies, overgeneralizations, or evasiveness.
- Employ software-assisted semantic analysis where available.
Step 4: Test Injection
Discreetly introduce false data known only to the informant to gauge reaction and loyalty.
Step 5: Historical Cross-Reference
Compare data against archival intelligence (refer Volume VIII: Data Archives Codex).
Section 4: Communication Security — Preserving the Veil of Secrecy
Compromise of communication channels is tantamount to operational annihilation.
4.1 Secure Communication Protocols
Step 1: Channel Selection
Use multi-layered communication methods combining physical, electronic, and human couriers.
Step 2: Encryption Standards
- Implement AES-256 encryption for all digital communications.
- Employ one-time pad (OTP) encryption for the highest sensitivity exchanges.
Step 3: Dead Letter Drop Procedures
- Designate multiple physically secure dead drops.
- Rotate locations weekly on a fixed schedule.
- Use coded markers for drop identification.
Step 4: Codebook Usage
- Issue cipher codebooks with prearranged symbols and phrases.
- Update codebooks quarterly or on suspicion of compromise.
Step 5: Communication Discipline
- Enforce strict no-repetition of phrases.
- Employ “need-to-know” principles to minimize information exposure.
Section 5: Threat Assessment — From Raw Intel to Actionable Defense
Interpreting intelligence for defense readiness requires methodical appraisal.
5.1 Threat Assessment Matrix
Use the following matrix to categorize threats based on Likelihood and Impact:
| Impact \ Likelihood | Low | Medium | High |
|---|---|---|---|
| High | Moderate Risk | High Risk | Critical Risk |
| Medium | Low Risk | Moderate Risk | High Risk |
| Low | Negligible | Low Risk | Moderate Risk |
5.2 Assessment Protocol
Step 1: Compile Intelligence Reports
Aggregate validated data into standardized reporting forms (see Section 6).
Step 2: Assign Quantitative Scores
Utilize metrics for likelihood (0–10) and impact (0–10) for each identified threat.
Step 3: Categorize Threat Level
Map scores onto the Threat Assessment Matrix.
Step 4: Recommend Response
Based on risk category, prescribe tactical, strategic, or diplomatic responses.
Section 6: Intelligence Reporting — Form and Function
Standardized reporting ensures clarity, traceability, and rapid response.
6.1 Intelligence Report Template
| Field | Description | Instruction |
|---|---|---|
| Report ID | Unique alphanumeric code | Format: YYMMDD-AgentID-Seq (e.g., 240615-A07-003) |
| Date/Time of Report | UTC standardized timestamp | Use 24-hour format |
| Source | Informant or sensor identification | Coded name or ID |
| Location | Geographic coordinates or operational area | GPS coordinates preferred |
| Information Summary | Concise factual description | Max 300 words, avoid speculation |
| Validation Status | Triangulation and verification results | Use codes: V (Validated), P (Pending), R (Rejected) |
| Threat Level | Assessed risk per Threat Assessment Matrix | Numeric and descriptive (e.g., 7/10 - High Risk) |
| Recommended Action | Immediate response or further investigation | Clear, prioritized steps |
| Reporting Agent | Name or ID of compiling analyst | Signature or encrypted digital certificate |
Section 7: Step-by-Step Intelligence Operations Protocol
7.1 Establishing an Informant Network
- Define Operational Objectives: Outline intelligence needs in an Intelligence Requirements Document (IRD).
- Identify Candidate Informants: Use social mapping and community profiles to select candidates.
- Conduct Vetting: Apply CTI scoring and behavioral analysis.
- Recruit Informants: Follow recruitment protocols in Section 2.1.
- Train Informants: Provide secure communication tools, codebooks, and reporting templates.
- Deploy Informants: Assign intelligence tasks with clear instructions and schedules.
- Collect Intelligence: Receive reports via secure channels, validate, and process.
- Maintain Network Security: Rotate dead drops, review codebooks, and conduct loyalty audits.
- Evaluate Performance: Rate informants quarterly, adjust assignments or terminate as necessary.
7.2 Intelligence Processing and Analysis
- Receive Raw Data: Log and timestamp incoming intelligence.
- Validate: Execute validation techniques (Section 3.1).
- Correlate: Cross-reference with other data and archives.
- Analyze: Apply threat assessment metrics.
- Produce Reports: Complete Intelligence Report Template.
- Disseminate: Transmit securely to command units.
Section 8: Sample Intelligence Report (Filled Example)
| Field | Entry |
|---|---|
| Report ID | 240615-A07-003 |
| Date/Time of Report | 2024-06-15 14:30 UTC |
| Source | Informant “ShadowFox” (ID: IF-003) |
| Location | 39.7392° N, 104.9903° W (Sector 7 - Outskirts) |
| Information Summary | Observed three unidentified individuals conducting surveillance near community water facility. Noted use of encrypted radios and unusual vehicle activity. |
| Validation Status | V (Triangulated with sensor data and secondary informant IF-007) |
| Threat Level | 8/10 - High Risk |
| Recommended Action | Increase patrols, deploy counter-surveillance teams, initiate alert protocol. |
| Reporting Agent | Analyst “Practitioner” (ID: PA-01) |
Section 9: Tables of Critical Reference Data
9.1 Informant Network Management Schedule
| Task | Frequency | Responsible Party | Notes |
|---|---|---|---|
| Loyalty Audits | Quarterly | Intelligence Officer | Use CTI reassessment |
| Codebook Updates | Every 3 months | Communications Officer | Distribute securely |
| Dead Drop Rotation | Weekly | Field Agent | Rotate locations per protocol |
| Network Expansion Review | Biannually | Operations Commander | Identify new recruitment targets |
9.2 Communication Security Tools & Materials
| Tool/Material | Purpose | Construction Materials / Software | Notes |
|---|---|---|---|
| One-Time Pad (OTP) | Unbreakable encryption | Random key sheets, secure printing | Destroy after single use |
| AES-256 Encryption Module | Digital communication | Standard cryptographic libraries | Use hardware encryption where possible |
| Dead Letter Drop Containers | Secure message exchange | Metallic or ceramic containers with sealing capability | Waterproof and tamper-evident |
| Codebooks | Cipher reference | Printed or encrypted digital files | Store under lock and key |
Conclusion
The mastery of intelligence gathering and informant network management is a sacred trust and an indispensable pillar of security and defense. The protocols contained within this chapter are designed for precision, resilience, and absolute operational security. The apprentice must implement these methods with unyielding discipline and reverence for the gravity of their application. Failure is not an option.
For advanced operational security measures, see Volume IX: The Cryptographic Codex, Chapter II. For deep-cover human intelligence (HUMINT) operational tactics, refer to Volume VI: The Shadow Operative Codex, Chapter V.
_End of Chapter III: Intelligence Gathering Techniques and Informant Networks_
<!-- SECTION 31 -->
The Complete Practitioner's Codex, Volume VI: Dispute Resolution
Chapter III: Accountability Without State Enforcement
“True justice within a community arises not from the sword of the state, but from the unbroken bonds of mutual obligation, trust, and sacred duty among its members. This volume codifies the lost arts of accountability when external enforcement fails or is absent. Herein lies the blueprint for communal sovereignty, restored through deliberate, disciplined, and non-coercive mechanisms.”
Introduction: The Sacred Imperative of Accountability Beyond State Power
State enforcement is an external imposition, often blunt, impersonal, and divorced from the intimate social fabric of community life. The Practitioner’s path demands that we forge accountability mechanisms embedded in the community itself—systems that enforce norms, repair harms, and restore relationships without weapons, prisons, or formalized state power. This requires the meticulous design of community enforcement mechanisms, social sanctions, and restorative practices, all grounded in non-coercive accountability protocols.
This chapter provides a comprehensive manual to:
- Construct community-based enforcement architectures.
- Employ calibrated social sanctions that preserve dignity and promote reform.
- Execute restorative justice protocols to heal wounds and rebuild trust.
- Integrate all techniques into coherent, replicable frameworks.
Section I: Community Enforcement Mechanisms
Community enforcement mechanisms are collective processes by which a community identifies violations of its norms, holds members accountable, and ensures compliance through agreed-upon social structures. These mechanisms operate on principles of transparency, mutual respect, and participatory governance.
1. Core Principles
| Principle | Description |
|---|---|
| Voluntary Participation | Members consent to community norms and enforcement structures. |
| Transparency | Procedures and consequences are openly known and agreed upon. |
| Restorative Orientation | Priority on repairing harm over punishing offenders. |
| Proportionality | Sanctions and remedies match the severity and context of violations. |
| Inclusivity | All affected parties have a voice in adjudication and resolution. |
2. Structural Components
To construct an effective community enforcement mechanism, build the following components:
| Component | Function | Construction Steps |
|---|---|---|
| Community Council | Governing body for dispute resolution and enforcement decisions. | 1. Elect or appoint 5-7 respected community members. 2. Define term lengths and eligibility criteria. 3. Establish meeting schedules and quorum rules. |
| Ombudsperson(s) | Neutral facilitator for complaints and mediation. | 1. Select individuals with conflict resolution training. 2. Train in impartiality and confidentiality protocols. 3. Publicize contact procedures. |
| Norms Codex | Written collective code of conduct and sanction guidelines. | 1. Hold community workshops to draft norms. 2. Codify sanctions linked to each norm. 3. Ratify through community vote. |
| Accountability Panels | Ad-hoc groups convened for specific disputes or violations. | 1. Assign panel members from Community Council and interested parties. 2. Train in hearing procedures and bias mitigation. 3. Use standardized reporting templates. |
Section II: Social Sanctions—Calibrated and Non-Coercive
Social sanctions are non-legal, community-imposed consequences designed to influence behavior and maintain social order. They range from mild to severe but must avoid physical coercion or exclusion that threatens survival or dignity.
1. Categories and Examples
| Sanction Category | Description | Examples |
|---|---|---|
| Expressive Sanctions | Verbal or symbolic acts expressing disapproval. | Public censure, naming in community meetings, symbolic gestures (e.g., withholding customary greetings). |
| Relational Sanctions | Adjustments in social relationships and trust. | Temporary reduction in social invitations, limited cooperation in group tasks, reduced access to shared resources (non-essential). |
| Economic Sanctions | Modifications to economic interactions within community. | Suspension from communal labor exchange, temporary bar on market participation, mandatory restitution agreements. |
| Restorative Sanctions | Actions directed at repairing harm and restoring balance. | Community service, mediation sessions, negotiated apology ceremonies. |
2. Sanction Matrix: Mapping Violations to Sanctions
| Violation Type | Minor Sanction | Moderate Sanction | Severe Sanction |
|---|---|---|---|
| Breach of Trust | Expressive censure (e.g., formal warning) | Temporary relational sanction (limited invitations) | Restorative circle with community service |
| Property Damage | Restitution agreement | Economic sanction (temporary market suspension) | Restorative panel with mediation and compensation |
| Harm to Person | Mediation and apology | Community service and relational sanctions | Accountability panel with negotiated reparations |
| Norm Defiance | Verbal reprimand | Temporary exclusion from communal decision-making | Formal sanction panel and restorative justice process |
Section III: Restorative Practices—Protocols for Healing and Reintegration
Restorative practices focus on repairing harm, restoring relationships, and reintegrating members into the community. They reject punitive isolation and instead emphasize dialogue, empathy, and mutual accountability.
1. Restorative Justice Circle Protocol
Purpose: To facilitate a structured dialogue between the harmed party, offender, and community members to promote understanding, accountability, and resolution.
Materials Needed:
- Circle seating arrangement (chairs or floor cushions)
- Talking piece (object passed to indicate the speaker)
- Documentation forms for agreements and follow-ups
Step-by-Step Procedure:
- Preparation a. Identify participants: harmed party, offender, community representatives.
b. Secure a neutral, private space.
c. Brief participants on the process and confidentiality.
- Opening a. Facilitator introduces the purpose and rules (respect, listening, no interruptions).
b. Each participant states their expectations and feelings briefly.
- Sharing Narratives a. Harmed party shares impact of the violation without interruption.
b. Offender shares their perspective and acknowledges harm.
c. Community members express thoughts and support.
- Dialogue a. Participants discuss needs, accountability, and possible remedies.
b. Facilitator ensures equitable speaking time and emotional safety.
- Agreement Formation a. Draft a written agreement outlining restorative actions, timelines, and responsibilities.
b. Secure signatures from all parties.
- Closing a. Express mutual commitment to repair and reintegration.
b. Schedule follow-up sessions for monitoring.
- Follow-up a. Ombudsperson monitors compliance and community response.
b. Re-convene if agreements are breached or further harm arises.
2. Mediation Protocol
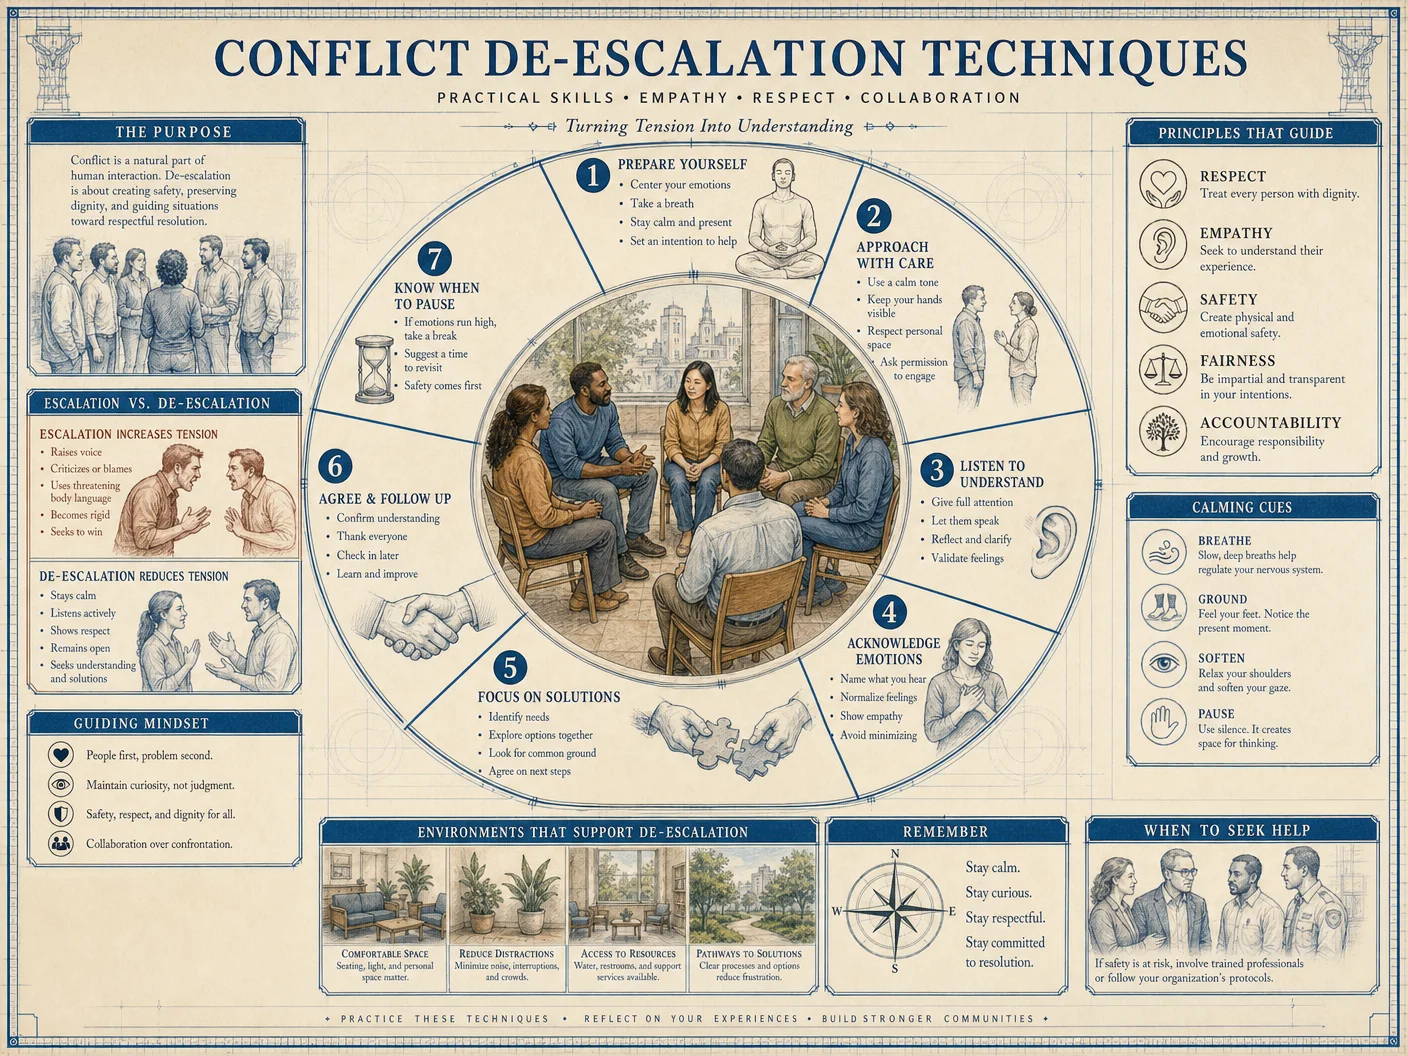
For disputes not rising to harm but threatening social cohesion, mediation offers a structured negotiation.
Step-by-Step Procedure:
- Initial Contact a. Ombudsperson receives complaint and assesses mediation suitability.
b. Obtain consent from both parties.
- Mediator Selection a. Choose neutral mediator(s) trained in conflict resolution.
- Pre-Mediation Sessions a. Meet separately with each party to understand concerns and goals.
- Joint Mediation Session a. Establish ground rules.
b. Facilitate joint discussion focusing on interests rather than positions.
c. Explore creative solutions and compromises.
- Agreement Drafting a. Document mutually agreed terms.
b. Sign and distribute copies.
- Monitoring Compliance a. Ombudsperson follows up at scheduled intervals.
Section IV: Protocols for Non-Coercive Accountability
Non-coercive accountability relies on voluntary compliance, social pressure, and moral suasion rather than force. The following protocols operationalize this principle.
1. Stepwise Accountability Escalation Protocol (SAEP)
A graduated protocol designed to escalate community responses proportionally and non-violently.
| Step | Action | Purpose | Responsible Party | Timing |
|---|---|---|---|---|
| 1 | Informal verbal reminder | Alert offender to norm violation | Ombudsperson or peer | Within 24 hours of incident |
| 2 | Formal written notice | Document complaint and request corrective action | Community Council | Within 3 days |
| 3 | Mediation or Restorative Circle | Facilitate dialogue and resolution | Ombudsperson/Mediators | Within 7 days |
| 4 | Sanction imposition | Apply agreed social sanctions | Accountability Panel | Within 14 days |
| 5 | Follow-up and reintegration | Monitor compliance and promote community healing | Ombudsperson | Ongoing |
2. Public Accountability Sessions
Periodic public meetings where community members report on compliance with norms and obligations, fostering transparency and collective responsibility.
Procedure:
- Schedule monthly meetings with mandatory attendance.
- Publish agenda including reports of past sanctions and restorative agreements.
- Allow community members to raise concerns or commendations.
- Record minutes and publicly post outcomes.
Section V: Comparative Analysis of Enforcement Methods
To select appropriate mechanisms, understand their relative strengths, weaknesses, and applicability.
| Method | Strengths | Weaknesses | Applicability | Resource Intensity |
|---|---|---|---|---|
| Expressive Sanctions | Immediate, low-cost, preserves dignity | Limited deterrence for serious violations | Minor breaches, social norm maintenance | Low |
| Relational Sanctions | Targets social bonds, encourages reform | Risk of social fragmentation if misapplied | Breaches of trust, cooperation issues | Medium |
| Economic Sanctions | Tangible consequences, enforces restitution | May affect livelihood, risk of community division | Property disputes, repeated offenses | Medium |
| Restorative Practices | Promotes healing, reintegration, long-term compliance | Time-intensive, requires skilled facilitators | Harmful offenses, interpersonal conflicts | High |
| Formal Panels | Structured adjudication, legitimacy | Potential bureaucracy, risk of bias | Severe violations, repeated breaches | High |
Section VI: Sample Sanction Matrices
1. Sanction Matrix for Property-Related Violations
| Violation | Expressive Sanction | Relational Sanction | Economic Sanction | Restorative Practice |
|---|---|---|---|---|
| Minor damage | Public warning | Temporary exclusion from communal events | Restitution agreement | Mediation and apology |
| Significant damage | Community censure | Suspension from communal labor exchange | Temporary market ban | Accountability panel and service |
| Repeated offenses | Public naming and shaming | Long-term relational sanctions | Economic penalties with enforced restitution | Restorative justice circle |
2. Sanction Matrix for Interpersonal Harm
| Violation | Expressive Sanction | Relational Sanction | Economic Sanction | Restorative Practice |
|---|---|---|---|---|
| Verbal abuse | Formal verbal reprimand | Temporary social distancing | None | Mediation session |
| Physical harm | Community condemnation | Suspension from community leadership roles | Compensation payments | Restorative justice circle |
| Extreme violence | Immediate community censure | Exclusion from communal decision-making | Reparations | Accountability panel and reintegration plan |
Section VII: Building Enduring Accountability Systems
1. Institutionalizing Norms and Enforcement
- Codify Norms and Sanctions
- Draft comprehensive Norms Codex.
- Include detailed sanction matrices and enforcement protocols.
- Review and update annually with community input.
- Train Community Facilitators
- Develop training programs for Ombudspersons, mediators, and panel members.
- Emphasize neutrality, confidentiality, and procedural fairness.
- Establish Monitoring and Feedback Loops
- Implement public accountability sessions.
- Use data from enforcement actions to refine protocols.
- Promote Cultural Integration
- Embed accountability practices in communal rituals and education.
- Celebrate successful restorations publicly to model desired behavior.
Conclusion
Accountability without state enforcement is not an absence but a profound presence of community will, sacred trust, and disciplined social architecture. Through meticulous construction of enforcement mechanisms, calibrated social sanctions, and restorative protocols, communities reclaim sovereignty over justice. The protocols herein must be executed with unwavering fidelity, for the survival and thriving of the community depend on these sacred arts.
For cross-referenced protocols on water purification, resource allocation, and communal decision-making frameworks, consult:
- Volume VIII: The Water Codex, Chapter II
- Volume X: The Resource Codex, Chapter IV
- Volume XIII: Governance Codex, Chapter I
Master archivist and custodian of suppressed knowledge, The Practitioner Codex Editorial Council
<!-- SECTION 32 -->
The Complete Practitioner's Codex, Volume 19: The Diplomat's Codex
Volume III: Land and Property
Chapter VII: Adverse Possession and Property Defense Strategies
Introduction
This chapter presents the sacred and arcane knowledge of Adverse Possession and Property Defense Strategies. Mastery of these doctrines is essential for the steward who guards, claims, and preserves the sanctity of the land entrusted to their care. These are not mere legal niceties; they are life-or-death protocols that guarantee territorial sovereignty, community stability, and the eternal transmission of property rights.
The directives herein are exacting, precise, and comprehensive. They will guide you through every stage of establishing adverse possession claims, maintaining unassailable documentation, and implementing relentless community defense protocols. Deviation or neglect will result in loss of lands, influence, and ultimately, survival.
Section I: Adverse Possession — Legal Criteria and Foundations
Adverse possession is the acrimonious acquisition of legal title to property by continuous, hostile, and notorious possession over a statutory period. It is not theft, but recognition of sovereign stewardship where original titleholders have abandoned their claim.
1. Legal Criteria for Adverse Possession
The following are the immutable elements required to establish an adverse possession claim. Absence of any one element invalidates the claim.
| Criterion | Description | Required Duration/Standard |
|---|---|---|
| Actual Possession | Physical occupancy or control of the land, using it as a true owner would (e.g., cultivation, fencing). | Continuous throughout statutory period |
| Open and Notorious | Possession is visible and unequivocal, so the true owner is aware or should be aware of the occupation. | Throughout statutory period |
| Exclusive Possession | Possessor exercises control excluding others, including the true owner. | Throughout statutory period |
| Hostile Possession | Possession without the permission of the true owner; claim of right or color of title may apply. | Throughout statutory period |
| Continuous Possession | Uninterrupted possession for the entire statutory period required by jurisdiction (varies from 5 to 20 years). | Duration varies by jurisdiction |
2. Statutory Periods by Jurisdiction
Adverse possession statutes differ by region. The following table summarizes common statutory durations for possession.
| Jurisdiction | Statutory Period (Years) | Additional Requirements (if any) |
|---|---|---|
| United States (general) | 7 to 20 | Some states require payment of property taxes |
| United Kingdom | 10 years (registered land) | Must apply for registration after 10 years |
| Canada | 10 years | Possession must be peaceful and uninterrupted |
| Australia | 12 years | Possession must be exclusive and continuous |
| Germany | 10 years | Requires "good faith" possession |
Consult local statutes for precise requirements.
Section II: Documentation — The Pillar of Your Claim
Without incontrovertible documentation, your adverse possession claim will be dismissed. Documentation must be meticulously maintained, timely updated, and legally admissible.
1. Essential Documents for Adverse Possession
| Document Type | Purpose | Instructions for Creation and Maintenance |
|---|---|---|
| Possession Log | Daily record of occupation activities and maintenance. | Step 1: Maintain a bound ledger or digital log. Step 2: Record date, time, activity, and witnesses. Step 3: Update daily without fail. |
| Photographic Evidence | Visual proof of possession and improvements. | Step 1: Take dated, geo-tagged photos monthly. Step 2: Photograph land markers, fencing, cultivation, and structures. Step 3: Archive securely. |
| Witness Statements | Affidavits from neighbors or community members who observe possession. | Step 1: Identify at least three credible witnesses. Step 2: Obtain sworn statements annually. Step 3: Store with other documentation. |
| Tax Receipts | Proof of payment of property taxes, where applicable. | Step 1: Pay taxes on the property annually. Step 2: Retain official receipts. Step 3: Include copies in claim dossier. |
| Correspondence Records | Any communications with original owner or authorities. | Step 1: Retain copies of all written correspondence. Step 2: Log verbal communications with date/time and witnesses. Step 3: Maintain files chronologically. |
2. Sample Possession Log Entry Format
| Date | Time | Activity Description | Witness Name(s) | Remarks |
|---|---|---|---|---|
| YYYY-MM-DD | HH:MM AM/PM | Erected fence along northern border | John Smith, Mary Jones | Fence completed today |
Section III: Step-by-Step Adverse Possession Procedure
This section outlines the unassailable protocol for initiating, maintaining, and concluding an adverse possession claim. Follow each step with absolute rigor.
Step 1: Preliminary Land Survey and Boundary Marking
- Obtain or commission a professional land survey to identify exact boundaries.
- Physically mark the boundaries using permanent markers (e.g., metal stakes, concrete posts).
- Document survey results and mark locations with GPS coordinates.
- Photograph and log boundary markers.
Step 2: Establish Actual Possession
- Clear the land of debris and invasive vegetation.
- Erect physical barriers such as fences or walls.
- Begin cultivation, construction, or other ownership activities demonstrating control.
- Maintain daily logs and photographic evidence of occupancy.
Step 3: Notify the Community and Potential Claimants
- Post public notices in local government offices and community centers describing your possession intent.
- Distribute written notices to neighbors and any known previous owners.
- Retain copies of all notices and proof of delivery.
Step 4: Maintain Continuous and Exclusive Possession
- Regularly inspect and repair fences or barriers.
- Continue cultivation or improvement activities.
- Prevent unauthorized entry by trespassers or original owners.
- Collect and preserve witness statements annually.
Step 5: Fulfill Statutory Requirements
- Research specific statutory period and additional legal requirements (e.g., tax payments).
- Pay property taxes annually if mandated.
- Keep accurate receipts and records of all legal compliance.
Step 6: Prepare and File Adverse Possession Claim
- Compile all documentation: logs, photos, witness affidavits, tax receipts, notices.
- Complete the official Adverse Possession Claim Form (sample form follows).
- File the claim with the appropriate land registry or court.
- Serve notice of claim to all interested parties as required by jurisdiction.
- Attend any hearings or inspections scheduled by authorities.
Step 7: Defend the Claim Diligently
- Respond promptly to challenges or disputes.
- Present all documentation systematically.
- Retain legal counsel versed in property law (see Volume 15: The Legal Codex).
- Mobilize community witnesses and defense protocols (see Section IV).
Section IV: Community Property Defense Protocols
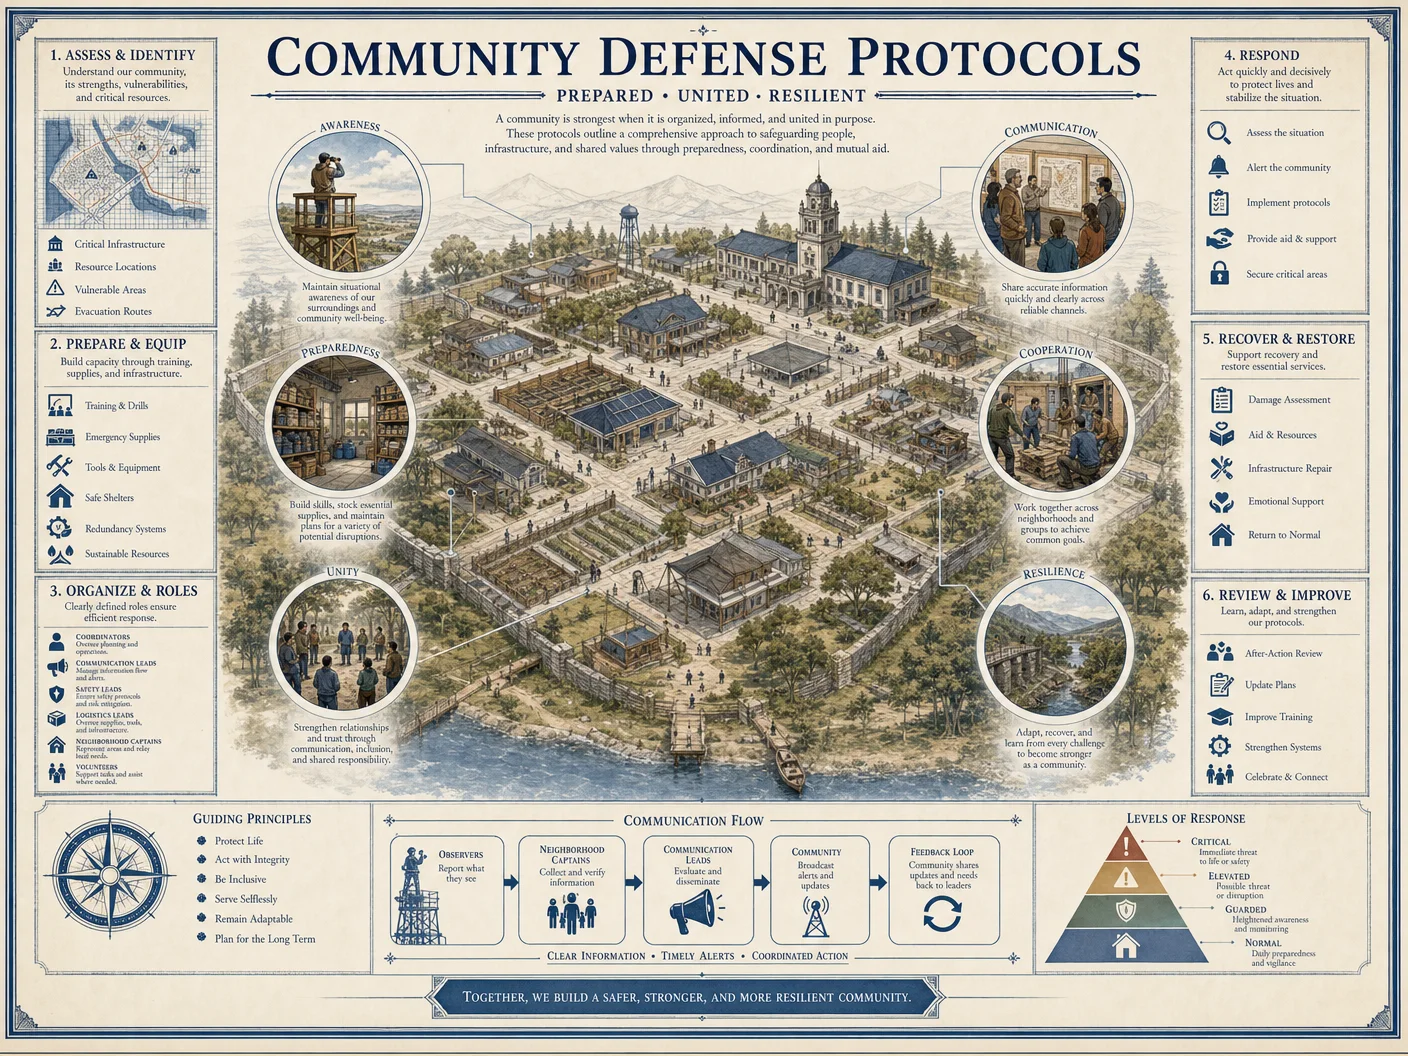
Property defense extends beyond legal claims; it demands organized community vigilance and physical defense measures.
1. Formation of Community Land Defense Councils
Steps to establish a defense council:
- Assemble a council of no fewer than seven trusted community members with vested interests.
- Elect a chairperson, secretary, and defense coordinator.
- Draft bylaws defining roles, responsibilities, and protocols.
- Schedule regular meetings with documented minutes.
2. Surveillance and Patrol Protocol
- Organize daily patrols with rotating teams.
- Utilize low-visibility communication devices (encrypted radios).
- Maintain surveillance logs recording time, observations, and incidents.
- Deploy fixed surveillance points with motion-activated cameras where possible.
3. Trespasser Identification and Detainment Procedures
- Train council members in lawful detainment and identification methods.
- Establish clear protocols for engagement: verbal warnings, documentation, and escalation.
- Record all trespassing incidents with photographic and written evidence.
- Coordinate with local law enforcement only after internal measures fail.
4. Physical Defense Infrastructure
- Construct and maintain perimeter defenses: fences, walls, natural barriers.
- Install controlled entry points with locks or guards.
- Implement early warning systems such as tripwires or alarms.
- Regularly inspect and repair infrastructure.
Section V: Sample Adverse Possession Claim Form
Below is a template for a standard adverse possession claim. Modify according to jurisdictional requirements.
Adverse Possession Claim Form
Claimant Information
| Field | Data Entry Instructions |
|---|---|
| Full Name | Enter claimant's legal name |
| Address | Enter claimant's current residence |
| Contact Information | Phone number, email |
Property Information
| Field | Data Entry Instructions |
|---|---|
| Property Description | Provide legal description including parcel number |
| Location | Physical address or GPS coordinates |
| Survey Reference | Attach survey map and reference number |
Possession Details
| Field | Data Entry Instructions |
|---|---|
| Date Possession Began | Enter exact date possession commenced |
| Nature of Possession | Describe acts of ownership (e.g., fencing, cultivation) |
| Continuous Possession | Confirm uninterrupted possession (Yes/No) |
| Hostility of Possession | Confirm possession without permission (Yes/No) |
Supporting Documentation Attached
- Possession logs
- Photographic evidence
- Witness affidavits
- Tax receipts
- Public notices
Declaration I, the undersigned, declare that the information provided is true and accurate to the best of my knowledge and belief.
Signature: ____________________ Date: ________________________
Section VI: Possession Timelines and Comparative Requirements Table
This table synthesizes key possession timelines and ancillary requirements for major jurisdictions to assist claimants in aligning their strategy.
| Jurisdiction | Statutory Possession Period | Tax Payment Required | Registration Required After Period | Hostility Standard | Additional Notes |
|---|---|---|---|---|---|
| United States | 7-20 years | Varies by state | No | Claim of right or color of title | Some states require payment of property taxes |
| United Kingdom | 10 years | No | Yes | Possession without consent | Must apply for title registration after 10 years |
| Canada | 10 years | No | No | Peaceful, uninterrupted possession | Adverse possession claims often contested |
| Australia | 12 years | No | No | Exclusive and continuous | Possession must be visible and notorious |
| Germany | 10 years | No | No | Good faith possession | Requires belief in legitimate ownership |
Section VII: Conclusion — The Sacred Duty of Stewardship

Your command over adverse possession and property defense is the fulcrum upon which the fate of your land and community balances. This is not only a legal exercise but a sacred covenant with history and posterity. Execute each step with unwavering discipline, document with fanatical precision, and defend with unyielding resolve.
For any technical construction related to boundary markers or surveillance devices, see Volume 12: Engineering Codex, Chapter IV. For legal argumentation and dispute resolution, see Volume 15: The Legal Codex, Chapter IX.
End of Chapter VII
<!-- SECTION 33 -->
The Complete Practitioner's Codex, Volume VII: Network Federation
Chapter IV: Trade Route Security and Logistics
Preface: The operation of trade routes within a network federation transcends mere transportation of goods; it embodies the lifeblood of any sustainable community, the artery through which resources, intelligence, and alliances flow. This chapter delivers suppressed, practical knowledge on planning, securing, and managing these routes. The protocols herein are designed for immediate application and absolute reliability, suitable for environments rife with hostile threats ranging from banditry to sophisticated sabotage.
Section 1: Trade Route Planning
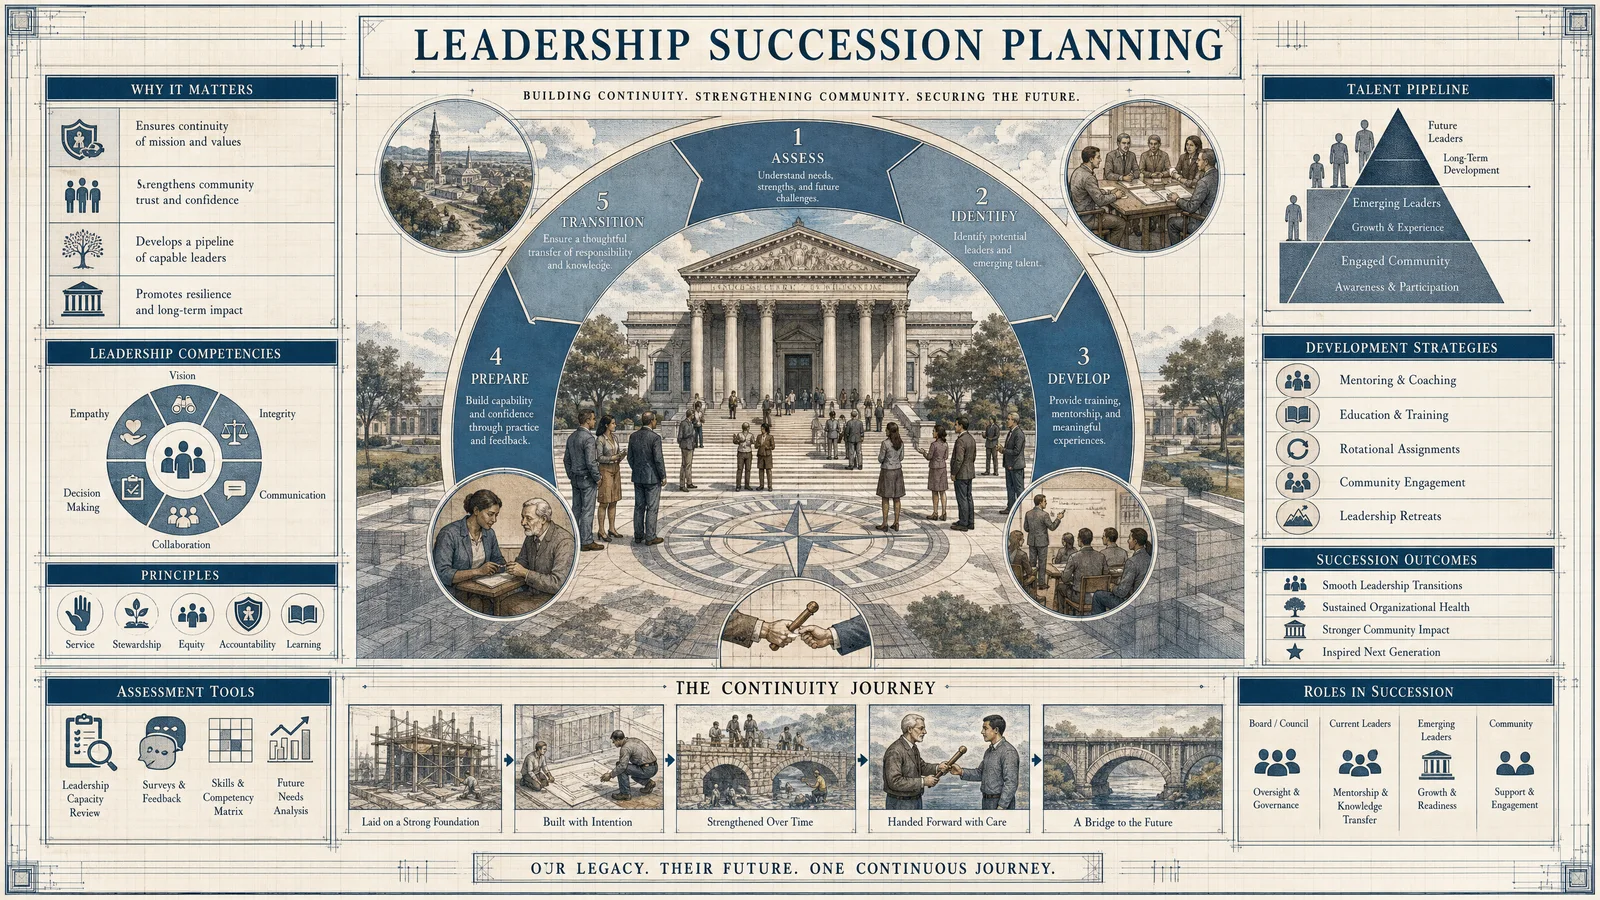
Trade route planning is the foundational step upon which all subsequent security and logistics operations depend. A route poorly planned invites failure, loss of assets, and collapse of the network federation’s economic and strategic integrity.
1.1 Route Selection Parameters
To engineer a trade route of maximum efficacy and survivability, evaluate the following parameters:
| Parameter | Description | Measurement / Data Needed | Tools / Methods |
|---|---|---|---|
| Distance | Total length from origin to destination | Kilometers / Miles | GIS mapping software, odometer |
| Terrain Difficulty | Topographical challenges (mountains, deserts, rivers) | Terrain grade, elevation changes | Topographical maps, drone reconnaissance |
| Security Threats | Known hostile forces, bandits, environmental hazards | Incident reports, patrol frequency | Intelligence reports, local informants |
| Resource Availability | Resupply points, water sources, repair facilities | Coordinates, inventory stock | Field reconnaissance, local surveys |
| Political Boundaries | Jurisdictional control and alliance status | Maps of political borders, treaties | Diplomatic records, legal documentation |
| Seasonal Effects | Weather patterns affecting route viability | Historical climate data, forecasts | Meteorological data, satellite imagery |
1.2 Step-by-Step Route Selection
- Gather Intelligence: Collect all relevant data on the parameters above from field agents, satellite data, and local contacts.
- Map Potential Routes: Use GIS software to plot all possible routes between origin and destination. Include alternate branches for emergency rerouting.
- Quantify Risk Scores: Assign a weighted risk score to each route using the table below.
| Criteria | Weight (%) | Route A Score | Route B Score | Route C Score |
|---|---|---|---|---|
| Distance | 20 | 8 | 10 | 9 |
| Terrain Difficulty | 25 | 7 | 5 | 8 |
| Security Threats | 30 | 4 | 9 | 6 |
| Resource Availability | 15 | 9 | 7 | 8 |
| Political Boundaries | 10 | 6 | 8 | 7 |
| Total Score | 100 | 6.7 | 7.5 | 7.3 |
- Select Optimal Route: Choose the route with the lowest composite risk score, prioritizing security and resupply access.
- Conduct Reconnaissance: Deploy scouts or drones for physical verification of route conditions.
- Document Route Profile: Create a detailed dossier including GPS coordinates, known hazards, and emergency waypoints.
Section 2: Security Protocols for Trade Routes
Trade route security demands layered defenses: physical, procedural, and intelligence-driven. Below are the critical components and exact protocols.
2.1 Convoy Composition and Deployment
Convoy Structure:
| Vehicle Type | Role | Quantity (per 10 vehicles) | Armament / Equipment |
|---|---|---|---|
| Lead Scout Vehicle | Advance warning, reconnaissance | 1 | Long-range sensors, encrypted comms |
| Armored Cargo Vehicles | Transport goods | 6 | Reinforced plating, GPS tracking |
| Security Escort Vehicles | Defense and patrol | 2 | Mounted heavy weapons, electronic countermeasures (ECM) |
| Rear Guard Vehicle | Prevent flanking attacks | 1 | Surveillance drones, minesweeper kits |
2.2 Step-by-Step Convoy Security Protocol
- Pre-Mission Briefing: All personnel receive detailed threat assessments, communication frequencies, and rules of engagement.
- Equipment Check: Verify all vehicles’ mechanical condition, armaments, and emergency supplies.
- Encrypted Communication Setup: Use frequency-hopping spread spectrum (FHSS) radios configured with daily changing keys.
- Formation Deployment:
- Lead Scout Vehicle proceeds 2 km ahead of the main convoy.
- Armored Cargo Vehicles form the core.
- Security Escorts flank the cargo vehicles, maintaining a 10-meter lateral spacing.
- Rear Guard Vehicle trails 500 meters behind.
- Movement Protocol:
- Maintain convoy speed of 40 km/h in open terrain; reduce to 20 km/h in high-risk zones.
- Lead Scout scans for threats using LIDAR and infrared sensors every 100 meters.
- Security Escorts conduct periodic 360-degree sweeps every 15 minutes.
- Emergency Response:
- If ambushed, the convoy halts. Security Escorts deploy smoke screens and electronic jammers.
- Cargo vehicles secure their loads and prepare for possible evacuation.
- Rear Guard deploys drones for aerial reconnaissance and counterattack support.
- Post-Mission Debrief: Record all incidents, anomalies, and recommendations for the next mission.
2.3 Checkpoint Security
Each checkpoint along the route must adhere to the following protocol:
| Step | Action |
|---|---|
| 1 | Establish perimeter with barbed wire and surveillance cameras |
| 2 | Set up automated biometric scanners for personnel and cargo |
| 3 | Maintain continuous 24/7 guard shifts (minimum 4 personnel per shift) |
| 4 | Conduct random vehicle and personnel inspections using portable X-ray units |
| 5 | Log all entries and exits in a tamper-proof ledger with blockchain timestamping |
| 6 | Maintain emergency communication links with nearest military or police outpost |
| 7 | Conduct weekly security audits and drills simulating breach scenarios |
Section 3: Resource Tracking and Logistics Management
Accurate tracking of material flow and resource allocation is critical to sustaining trade networks. This section delineates the technical framework and operational procedures for logistics management.
3.1 Inventory Management System (IMS) Setup
Components:
| Component | Purpose | Specifications |
|---|---|---|
| RFID Tags | Item-level identification | UHF frequency, 860-960 MHz, 12m read range |
| Scanning Devices | Read/write tag data | Handheld and vehicle-mounted scanners |
| Central Database | Store and analyze inventory data | Cloud-based with encrypted access |
| Tracking Software | Real-time monitoring and alerts | Customizable dashboard, AI anomaly detection |
3.2 Step-by-Step IMS Implementation
- Tagging: Affix RFID tags to all cargo items. Encode tags with unique identifiers linked to the central database.
- Scanner Deployment: Equip all entry/exit points and vehicles with RFID scanners.
- Database Configuration:
- Define item categories, storage locations, and expected quantities.
- Set threshold alert levels for shortages or surpluses.
- Integration Testing: Perform trial runs to verify tag readability, data transmission, and software accuracy.
- Training: Conduct hands-on workshops for staff on RFID operation and database use.
- Live Operation: Begin tracking all movements; system generates real-time reports.
- Maintenance: Schedule monthly hardware inspections and quarterly software updates.
3.3 Sample Manifest Template
| Field | Description | Example Entry |
|---|---|---|
| Manifest ID | Unique identifier | MAN-2024-07-001 |
| Date | Date of shipment | 2024-07-15 |
| Origin | Point of departure | Fort Ironhold |
| Destination | Delivery point | Outpost Sentinel |
| Vehicle ID | Identifier for transport vehicle | CV-14 |
| Item Description | Detailed description of cargo | Medical Kits |
| Quantity | Number of units | 150 |
| Weight (kg) | Total weight | 1200 |
| RFID Tag Range | Tag IDs for cargo | 850001–850150 |
| Security Status | Verified, Pending, Flagged | Verified |
| Responsible Officer | Name and ID of logistic supervisor | Capt. Alaric, ID# 4592 |
Section 4: Trade Route Vulnerabilities and Mitigation Strategies
This section presents a classified table of known vulnerabilities encountered on common trade routes within the federation and their proven mitigations.
| Vulnerability | Description | Risk Level (1-10) | Mitigation Strategy | Implementation Difficulty (1-5) |
|---|---|---|---|---|
| Bandit Ambush Zones | Narrow passes with history of attacks | 9 | Deploy decoy convoys; route surveillance | 4 |
| Mechanical Failures | Aging infrastructure causing delays | 7 | Preventive maintenance and rapid repair kits | 3 |
| Political Checkpoint Delays | Corruption or hostility at borders | 8 | Diplomatic engagement; bribery protocols | 5 |
| Environmental Hazards | Flooding, sandstorms, landslides | 6 | Alternative seasonal routes; weather forecasting | 3 |
| Communication Blackouts | Areas with signal jamming or loss | 7 | Satellite communication backup; signal boosters | 4 |
| Supply Chain Disruptions | Theft or misallocation of resources | 8 | RFID tracking; secure storage facilities | 4 |
| Insider Threats | Sabotage by personnel | 9 | Background checks; mandatory rotation; surveillance | 5 |
4.1 Step-by-Step Mitigation Implementation Example: Bandit Ambush Zones
- Identify High-Risk Zones: Utilize intelligence reports and incident history to map ambush hotspots.
- Plan Decoy Convoys:
- Assemble lightly loaded vehicles mimicking main convoy.
- Schedule decoys to precede or follow the main convoy at irregular intervals.
- Enhance Surveillance: Deploy aerial drones equipped with thermal imaging to patrol ambush zones.
- Coordinate Rapid Response Teams: Station mobile strike units within 10 km of ambush zones for quick deployment.
- Conduct Convoy Drills: Train personnel on ambush response tactics and communication protocols.
- Review and Adapt: After each mission, analyze incident data to improve tactics and decoy scheduling.
Section 5: Logistics Management Guide
The following guide consolidates logistics management into a reproducible workflow ensuring maximal throughput and security.
5.1 Step-by-Step Logistics Workflow
- Demand Forecasting: Use historical data and intelligence to project required supplies and schedule shipments.
- Procurement: Source materials using approved vendors; verify quality and quantity.
- Inventory Preparation: Tag, categorize, and stage items in secure warehouses.
- Route Assignment: Select trade route based on risk assessment and resource availability.
- Convoy Assembly: Organize vehicles and personnel per Section 2.1.
- Pre-Departure Checks: Mechanical, security, and communication systems verified.
- Dispatch and Monitoring: Launch convoy; monitor via real-time tracking and communication.
- Checkpoint Management: Coordinate arrivals and departures, ensure security protocols.
- Delivery and Unloading: Confirm receipt, update inventory systems.
- Post-Operation Review: Document incidents, efficiency metrics, and lessons learned.
Appendix: Key Resource Tables
Table 1: Optimal Convoy Speed vs Terrain
| Terrain Type | Recommended Speed (km/h) | Notes |
|---|---|---|
| Open Plains | 40 | Maintain formation integrity |
| Mountainous Paths | 15 | Increased risk of ambush |
| Desert | 25 | Monitor for sandstorm conditions |
| Forest Trails | 20 | Limited visibility, enhanced patrols |
| Urban Areas | 30 | Increased checkpoints and traffic |
Table 2: Emergency Equipment Checklist (Per Vehicle)
| Item | Quantity | Purpose |
|---|---|---|
| First Aid Kit | 1 | Treat injuries |
| Fire Extinguisher | 2 | Suppress fires |
| Emergency Rations | 3 days | Sustain personnel |
| Satellite Phone | 1 | Communication backup |
| Repair Toolkit | 1 | Vehicle repairs |
| Smoke Grenades | 4 | Conceal movement or evade attacks |
| Signal Flares | 6 | Mark location or call for help |
End of Chapter IV: Trade Route Security and Logistics Proceed to Volume VIII: Advanced Defensive Tactics for Network Federation, Chapter I for detailed combat protocols and counter-ambush techniques.
Remember, apprentice: The survival of the federation depends on your mastery of these protocols. Execute with unwavering precision.
<!-- SECTION 34 -->
Volume IV: Cooperative Economics
Chapter III: Community Currencies and Inflation Resistance
Introduction
Within the sacred framework of cooperative economics, community currencies serve as the lifeblood of local ecosystems, enabling autonomous financial flows that empower collective sovereignty. This chapter reveals the suppressed, life-or-death knowledge of currency design, issuance control, and inflation resistance protocols. With uncompromising precision, we distill every essential formula, mechanism, and audit procedure necessary to forge a community currency resilient to inflationary decay.
Section 1: Currency Design Features
A community currency’s design is its first and most critical defense against inflation. The design must embody both tangible and intangible mechanisms that constrain and guide its flow, value, and acceptance.
1.1 Core Design Principles
| Design Feature | Description | Purpose |
|---|---|---|
| Unit Definition | Fixed unit of value pegged to a basket of local goods and services, recalibrated quarterly. | Anchors the currency’s value in real economic activity. |
| Expiry Date (Demurrage) | Currency units expire or lose a small percentage of value monthly if unused. | Encourages circulation, deters hoarding, suppresses inflation. |
| Dual-Token System | Primary currency for transactions; secondary token for savings and investments with fixed interest. | Separates transactional liquidity from capital accumulation. |
| Physical and Digital Forms | Secure physical notes with embedded anti-counterfeit features and a blockchain-based digital ledger. | Ensures inclusivity and security against fraud/inflation. |
| Transparency Layer | Public ledger of issuance, circulation, and redemption accessible by all community members. | Builds trust and facilitates audits. |
1.2 Detailed Currency Unit Design
- Unit Naming and Symbolism
- Name must reflect community identity (e.g., “Civitas” or “Sol”).
- Symbol must be easy to reproduce and difficult to forge.
- Use sacred geometry patterns for security and cultural resonance.
- Pegging Formula
- Define basket of 5-7 essential goods/services weighted equally.
- Quarterly recalibration process with community committee oversight.
- Formula:
     \[
     \text{Unit Value}_{t} = \frac{\sum_{i=1}^n (P_i \times W_i)}{n}
     \]
Where \(P_i\) = price of good/service i, \(W_i\) = weight, \(n\) = number of items.- Physical Note Construction
- Paper embedded with microfibers of metallic threads and ultraviolet ink.
- Serial numbers generated via cryptographically secure pseudo-random algorithms.
- Watermarks derived from community symbols.
- Digital Ledger Protocol
- Permissioned blockchain with nodes operated by trusted community members.
- Smart contracts enforce expiry and transaction limits.
- All transactions timestamped and immutable.
1.3 Demurrage (Expiry) Mechanism
- Currency loses value at a fixed monthly rate (e.g., 1% per month).
- Implemented via smart contracts for digital currency.
- Physical notes stamped monthly or exchanged at community centers.
Step-by-step Demurrage Enforcement:
- At the end of each month, calculate 1% depreciation on held currency units.
- Digital ledger automatically deducts depreciation from balances.
- For physical notes, community centers accept them at 99% value or exchange them for new notes.
- Unused notes older than 12 months are invalidated.
Section 2: Issuance Controls
Control of currency issuance is the fulcrum of inflation resistance. Excessive issuance without backing leads to value erosion.
2.1 Issuance Authority Structure
- Establish a Community Currency Board (CCB).
- Board composition: 5 members elected by community, including economists, artisans, and elders.
- Term limits: 2 years with staggered renewal.
- Responsibilities: approve issuance, oversee audits, recalibrate basket, enforce policy.
2.2 Issuance Protocol
| Step | Action | Responsible Party | Documentation Required |
|---|---|---|---|
| 1 | Submit issuance proposal with justification (demand forecast, economic indicators) | Community Currency Board Member | Issuance Request Form (IRF) |
| 2 | Review proposal in monthly CCB meeting | Entire CCB | Meeting Minutes, Economic Reports |
| 3 | Approve issuance volume capped at max 5% of current circulating supply per month | Entire CCB | Approved IRF |
| 4 | Deploy issuance via smart contract or physical note printing | Technical Officer | Issuance Log, Serial Number Register |
| 5 | Publish issuance report publicly within 48 hours | CCB Secretary | Public Ledger Update |
2.3 Backing and Redemption
- Each issued unit must be backed by:
- Liquid community assets (e.g., grain reserves, local services).
- Acceptable collateral (e.g., community-owned land, future labor commitments).
- Redemption must be available at face value in goods or services.
Section 3: Anti-Inflation Measures
Inflation in community currencies arises primarily from uncontrolled issuance and stagnant velocity. The following protocols address these causes.
3.1 Velocity Control
- Encourage high velocity via demurrage.
- Implement transaction incentives:
- Discounts for using currency within 48 hours of receipt.
- Fees on large, infrequent transactions.
3.2 Supply Caps
| Parameter | Limit | Purpose |
|---|---|---|
| Monthly issuance growth rate | 5% of existing supply | Prevents rapid currency inflation. |
| Total supply ceiling | 150% of community economic output (quarterly measured) | Controls overexpansion. |
| Individual holding limit | 10% of monthly income equivalent | Prevents concentration and speculation. |
3.3 Inflation Monitoring Index (IMI)
- Composite index combining:
- Price changes in basket goods.
- Velocity metrics from transaction data.
- Issuance rates.
| IMI Component | Weight | Measurement Frequency | Threshold for Action |
|---|---|---|---|
| Basket Price Inflation Rate | 50% | Monthly | >3% increase |
| Transaction Velocity | 30% | Weekly | <0.8 turnover/month |
| Issuance Rate | 20% | Monthly | >5% monthly growth |
Protocol for IMI breach:
- Immediate freeze on new currency issuance.
- Emergency meeting of CCB within 48 hours.
- Implement corrective measures (see Section 3.4).
3.4 Corrective Measures
- Temporary increase in demurrage by 0.5% per month.
- Reduction of issuance cap to 2% monthly.
- Community-wide communications explaining inflation causes and measures.
- Initiate currency buy-back campaigns funded by community reserves.
Section 4: Currency Audits Protocol
Auditing enforces transparency and ensures integrity in issuance, circulation, and backing.
4.1 Audit Types and Frequency
| Audit Type | Frequency | Scope | Responsible Entity |
|---|---|---|---|
| Issuance Audit | Quarterly | Verify issuance matches approvals and logs. | Independent Audit Committee (IAC) |
| Circulation Audit | Monthly | Verify ledger accuracy and physical circulation. | Technical Officer & IAC |
| Backing Audit | Bi-Annual | Verify asset collateral and redemption reserves. | Community Treasurer & IAC |
| Inflation Audit | Continuous | Monitor IMI and inflation trends. | CCB and Community Economists |
4.2 Step-by-Step Issuance Audit Procedure
- Retrieve issuance logs from digital ledger and physical note registers.
- Cross-check approved issuance requests with actual deployments.
- Confirm serial numbers of physical notes issued match records.
- Verify public issuance reports were published and accessible.
- Prepare audit report including discrepancies, if any.
4.3 Circulation Audit Procedure
- Extract transaction data from blockchain ledger.
- Compare digital records with physical note holdings (sampled community centers).
- Reconcile total circulating supply with issuance minus redemption.
- Confirm demurrage deductions are applied correctly.
- Report anomalies or fraudulent activities.
4.4 Backing Audit Procedure
- Inventory community assets pledged as backing.
- Verify value of assets matches or exceeds currency in circulation.
- Confirm redemption mechanisms are functional and accessible.
- Conduct random redemptions to validate process.
- Report asset depreciation risks and propose adjustments.
Section 5: Sample Currency Designs
Two sample designs illustrate the principles discussed, suitable for small and medium-sized communities.
5.1 Sample Design A: “Civitas” Physical-Digital Hybrid Currency
| Feature | Specification |
|---|---|
| Unit Name | Civitas (CVT) |
| Peg | Basket: 1 bread loaf, 1 hour labor, 1 liter milk, 1 kWh energy, 1 bus trip |
| Demurrage Rate | 1% monthly |
| Physical Note Size | 7cm x 14cm, embedded metallic thread, UV ink |
| Digital Ledger | Permissioned blockchain with 7 nodes |
| Issuance Cap | 5% monthly growth, 150% total economic output |
| Holding Limit | 10% monthly income equivalent |
5.2 Sample Design B: “Sol” Digital-Only Token
| Feature | Specification |
|---|---|
| Unit Name | Sol |
| Peg | Basket: 1 kg vegetables, 1 hour artisan work, 1 liter water, 1 kWh solar energy, 1 communal meal |
| Demurrage Rate | 1.5% monthly |
| Digital Ledger | Blockchain with smart contracts enforcing expiry |
| Issuance Cap | 3% monthly growth, 140% total economic output |
| Holding Limit | 8% monthly income equivalent |
Section 6: Comparative Table of Inflation Factors and Controls
| Inflation Factor | Impact Level | Control Mechanism | Effectiveness Rating (1-5) |
|---|---|---|---|
| Excessive Issuance | High | Issuance Caps, CCB Oversight | 5 |
| Hoarding | Medium | Demurrage (Expiry) | 4 |
| Velocity Decline | Medium | Transaction Incentives, Demurrage | 4 |
| Asset Backing Weakness | High | Backing Audits, Redemption Protocols | 5 |
| Counterfeit Currency | High | Physical Security Features, Ledger | 5 |
| Speculative Concentration | Medium | Holding Limits | 4 |
| Price Shock in Basket Goods | Medium | Quarterly Recalibration, IMI Monitoring | 3 |
Conclusion
The survival and flourishing of a community hinge upon the integrity and resilience of its currency system. The sacred knowledge herein—design parameters, issuance controls, anti-inflation measures, and rigorous audit protocols—must be enacted with unwavering discipline. Only through such uncompromising adherence can the community currency serve as a living covenant, a guardian of trust and prosperity against the corrosive forces of inflation.
For related protocols on backing asset management, see Volume IX: Resource Sovereignty, Chapter IV, and for digital ledger construction, see Volume XII: Cryptographic Architectures, Chapter VII. For a comprehensive guide to demurrage implementation in physical currencies, see Volume VIII: The Water Codex, Chapter II.
End of Chapter III: Community Currencies and Inflation Resistance
<!-- SECTION 35 -->
Volume VIII: Transition Strategy
Chapter IV: Legal Navigation During Transition Including Dealing with Authorities and Courts
Introduction: The Crucible of Legal Navigation
In the sacred endeavor of community transition, the ability to navigate the labyrinthine structures of law is paramount. Failure to master this domain results in catastrophic delays, loss of autonomy, exposure to hostile legal actions, and, ultimately, the destruction of all that has been painstakingly built. This chapter imparts the suppressed, life-or-death knowledge of legal navigation during transition phases.
You will find herein: preparation protocols, representation strategies, documentation imperatives, stepwise legal navigation procedures, sample correspondences, and comprehensive tables of legal risks paired with tactical responses.
Section 1: Preparation for Legal Navigation
1.1 Legal Intelligence Gathering
Before any direct engagement with authorities or courts, establish a Legal Intelligence Unit (LIU) within your transition team. The LIU’s mission is to gather, analyze, and continuously update all relevant legal data.
Stepwise Procedure to Establish a Legal Intelligence Unit (LIU):
- Assemble a Core Team: Minimum 3 individuals with backgrounds in legal research, local law, and negotiation tactics.
- Define Jurisdictional Scope: Identify all legal jurisdictions affecting your transition—municipal, regional, national, and international.
- Collect Primary Documents: Obtain copies (hard and digital) of all relevant statutes, codes, ordinances, and regulations. Prioritize those related to land ownership, incorporation, zoning, environmental law, and public assembly.
- Set Up a Secure Documentation Repository: Use encrypted digital storage with redundancy. Implement access control protocols with multi-factor authentication for LIU members.
- Develop a Legal Risk Matrix: Categorize potential legal challenges and assign probability and severity scores. (Matrix format below)
- Establish Liaison Channels: Identify contact points within local authorities, courts, and legal aid organizations for real-time intelligence and informal consultation.
1.2 Legal Documentation Preparation
Meticulous documentation is the foundation of successful legal navigation. Every interaction, transaction, and decision must be recorded with unwavering rigor.
Required Documentation Types:
- Identity Verification: Certified copies of all community leaders' identification documents.
- Proof of Ownership/Claim: Land deeds, leases, permits, or ancestral claim affidavits.
- Incorporation Papers: If applicable, articles of incorporation or association, bylaws, and registration forms.
- Communication Logs: Written and electronic correspondence with authorities.
- Incident Reports: Detailed logs of any confrontations, inspections, or legal notices.
- Financial Records: Transparent accounting of all funds used in transition activities.
Documentation Protocol:
- Timestamp Every Document: Use digital timestamping services (e.g., blockchain verification) to prevent forgery or alteration.
- Dual Verification: All documents must be verified by at least two LIU members for authenticity and accuracy.
- Physical and Digital Backups: Maintain at least two physical copies stored in secure locations and three digital backups on encrypted drives.
- Chain of Custody Logs: Document who accessed or modified documents at every stage.
Section 2: Representation Strategies
2.1 Choosing Legal Representation
Representation is your sword and shield in legal arenas. Selecting appropriate counsel is not optional; it is compulsory.
Criteria for Selecting Legal Counsel:
| Criterion | Description | Actionable Step |
|---|---|---|
| Expertise | Specialization in transition law, property law, or human rights | Verify credentials and prior case history |
| Discretion | Proven track record of confidentiality | Obtain references and conduct background checks |
| Alignment | Philosophical alignment with community values | Conduct in-depth interviews |
| Availability | Capacity to engage intensively during transition period | Secure retainer agreements with guaranteed hours |
| Cost Efficiency | Transparent and negotiable fee structure | Prepare budget forecasts and negotiate terms |
Stepwise Legal Counsel Acquisition:
- Compile a Candidate List: Use LIU sources and external legal networks.
- Conduct Interviews: Focus on scenario-based questioning related to transition challenges.
- Request Detailed Proposals: Including fees, timelines, and strategic approaches.
- Perform Reference Checks: Contact previous clients or community projects.
- Formalize Contract: Draft engagement letter clearly defining scope, deliverables, and confidentiality clauses.
2.2 Representation Roles and Responsibilities
Legal counsel must execute the following functions:
- Legal Risk Assessment: Continuous evaluation of ongoing and emerging threats.
- Drafting and Review: All legal documents, contracts, and official correspondence.
- Negotiation: Engage authorities proactively to de-escalate conflicts.
- Litigation Management: Prepare defenses and pursue claims in court when necessary.
- Advisory: Regular briefings to the transition leadership team.
Section 3: Legal Navigation Protocols
3.1 Initial Engagement with Authorities
The first contact with authorities sets the tone for all subsequent interactions. Controlled, respectful, and strategically documented engagement is mandatory.
Protocol for Initial Authority Engagement:
- Prepare a Formal Introduction Letter: Use the sample in Section 5. Address the authority by official title and include community leadership names.
- Schedule an Official Meeting: Request via certified mail or official email, maintaining proof of delivery.
- Prepare an Agenda: Outline topics to discuss, focusing on transparency and cooperation.
- Assemble a Delegation: Include the LIU head, legal counsel, and at least one senior community leader.
- Document the Meeting: Record minutes, obtain authority signatures on attendance sheets, and, if permitted, record audio.
- Send a Follow-Up Letter: Summarize meeting points, agreements, and next steps. Demand written confirmation within 7 days.
3.2 Handling Legal Notices and Orders
Legal notices are often precursors to enforcement actions. Immediate, structured response is non-negotiable.
Notice Response Protocol:
| Step | Action | Details | Response Timeframe |
|---|---|---|---|
| 1 | Acknowledge Receipt | Send formal acknowledgment letter by registered mail | Within 24 hours of receipt |
| 2 | Analyze Notice | LIU and legal counsel evaluate legal basis and implications | Within 48 hours |
| 3 | Develop Response Strategy | Decide whether to comply, negotiate, or contest | Within 72 hours |
| 4 | Draft Formal Response | Counsel drafts response letter addressing each point | Within 96 hours |
| 5 | Submit Response | Deliver by certified mail with proof of receipt | Within 7 days of receipt |
| 6 | Prepare for Enforcement Actions | Mobilize legal and community defense if necessary | Immediate upon threat |
3.3 Court Procedures and Protocols
Court appearances, whether administrative or judicial, require precision and discipline.
Stepwise Court Navigation Protocol:
- Case File Preparation: Gather all relevant documentation, correspondence, and evidence. Cross-reference with the LIU legal risk matrix.
- Pre-Hearing Conference: Request a pre-hearing meeting to clarify procedural matters and explore settlement options.
- Witness Preparation: Identify community members with direct knowledge. Conduct mock testimonies to ensure clarity and consistency.
- Legal Briefs Submission: Counsel submits detailed legal briefs adhering strictly to court formatting and deadline requirements.
- Court Appearance Protocol:
- Attire: Formal, community-branded when possible.
- Conduct: Respectful, precise, and concise statements.
- Documentation: Bring copies of all submitted documents and evidence.
- Post-Hearing Debrief: Immediate meeting to analyze outcomes, plan appeals if necessary, and update the LIU matrix.
Section 4: Documentation and Correspondence Samples
4.1 Sample Formal Introduction Letter to Authorities
[Community Letterhead]
[Date]

To: [Authority Name]
[Title]
[Department]
[Address]

Subject: Formal Introduction and Notification of Community Transition Activities

Dear [Title and Last Name],

On behalf of the [Community Name], we hereby formally introduce our leadership team and notify your office of our planned community transition activities within [Jurisdiction].

Our leadership comprises:
- [Leader Name], [Role]
- [Leader Name], [Role]
- [Leader Name], [Role]

We seek to establish a cooperative relationship with your office to ensure full compliance with applicable laws and regulations. We request a meeting at your earliest convenience to discuss our plans and address any concerns.

Please find attached copies of our incorporation documents and land claim affidavits for your review.

Respectfully,

[Signature]
[Name]
[Title]
[Contact Information]
4.2 Sample Legal Notice Acknowledgement Letter
[Community Letterhead]
[Date]

To: [Authority Name]
[Title]
[Department]
[Address]

Subject: Acknowledgement of Legal Notice Dated [Notice Date]

Dear [Title and Last Name],

We hereby acknowledge receipt of your legal notice dated [Notice Date], reference number [Reference Number]. The [Community Name] is currently reviewing the contents and will respond formally within the stipulated timeframe.

We affirm our commitment to engage constructively and ensure resolution in accordance with applicable legal frameworks.

Respectfully,

[Signature]
[Name]
[Title]
[Contact Information]
Section 5: Legal Risks and Response Matrix
| Legal Risk | Description | Probability (1-5) | Severity (1-5) | Recommended Response | Notes |
|---|---|---|---|---|---|
| Unauthorized Occupation Challenge | Authorities claim illegal occupation or trespass | 4 | 5 | Immediate legal response; present ownership docs | Prioritize rapid acknowledgment |
| Zoning Violation Notices | Claims that land use violates zoning regulations | 3 | 4 | Negotiate temporary permits; initiate rezoning | Engage urban planning experts |
| Environmental Compliance Orders | Allegations of non-compliance with environmental laws | 2 | 5 | Conduct environmental audit; propose mitigation | Engage environmental counsel |
| Public Assembly Restrictions | Restrictions on community gatherings | 3 | 3 | Apply for permits; document denials | Use to establish bad faith |
| Taxation Disputes | Disputes over property or activity taxation | 2 | 4 | Engage tax counsel; negotiate payment plans | Maintain transparent records |
| Injunctions and Restraining Orders | Court orders limiting community actions | 1 | 5 | Immediate legal challenge; mobilize community support | Prepare for accelerated appeals |
Conclusion: The Sacred Duty of Legal Mastery
The legal domain is a battlefield where ignorance is annihilation and preparedness is salvation. This chapter has delivered every suppressed technique, every classified protocol necessary for victorious legal navigation during transition. Your success demands unyielding discipline in intelligence gathering, documentation, representation, and procedural rigor.
Refer to Volume 3: The Governance Codex, Chapter VII for community leadership engagement protocols and Volume 14: The Conflict Codex, Chapter II for advanced legal dispute resolution tactics.
May this knowledge guide your hand with unerring precision and sanctify your community’s emergence into sovereignty.
_End of Chapter IV, Volume VIII: Transition Strategy_
<!-- SECTION 36 -->
Volume II: Common Law and Natural Rights
Chapter VII: Jury Selection and Community Education for Sovereignty
Introduction
In the sacred architecture of community governance under Common Law and Natural Rights, the jury is the living, breathing pillar of justice and sovereignty. This chapter reveals the suppressed, life-or-death knowledge required to select, train, and empower jurors and educate the community in their sovereign rights. The jury is not merely a passive adjudicator; it is a conscious, disciplined assembly of peers whose wisdom, integrity, and understanding uphold the very foundation of lawful self-governance.
Every step, every protocol herein is designed to forge jurors who embody the virtues of impartiality, knowledge, and vigilance, and to cultivate a community that understands and exercises its sovereign prerogatives without compromise.
Section 1: Jury Selection Criteria
The selection of jurors is an act of sacred responsibility. Jurors must be meticulously screened to ensure their capacity to serve as unbiased, informed, and conscientious arbiters of justice.
1.1 Juror Eligibility Prerequisites
| Criterion | Requirement | Rationale |
|---|---|---|
| Age | Minimum 25 years | Ensures life experience and maturity |
| Residency | Minimum 5 years continuous residency within jurisdiction | Demonstrates community ties and vested interest |
| Legal Standing | Not currently under indictment or convicted of felony | Preserves moral authority and legal integrity |
| Civic Engagement | Evidence of prior community participation (minimum 3 events/year) | Indicates invested commitment to community welfare |
| Natural Rights Understanding | Pass standardized Natural Rights comprehension test (85% minimum) | Ensures foundational knowledge for informed judgment |
| Conflict of Interest | No direct personal or financial interest in pending cases | Maintains impartiality |
| Psychological Resilience | Pass psychological screening for bias, emotional stability | Guarantees capacity to withstand trial stress |
1.2 Jury Pool Formation Procedure
Step 1: Compile a list of potential jurors meeting age and residency criteria from municipal records.
Step 2: Administer the Natural Rights comprehension test (see Section 3.2) to all candidates.
Step 3: Conduct background checks for legal standing and conflict of interest.
Step 4: Require submission of civic engagement proof (e.g., event attendance logs, volunteer records).
Step 5: Schedule psychological evaluations with certified professionals trained in jury selection.
Step 6: Rank candidates by composite score of test results, civic engagement, and psychological resilience.
Step 7: Randomly select the required number of jurors from the top 20% of candidates to form the jury pool.
Section 2: Juror Training Protocols
Juror training is a technical regimen of knowledge transfer, ethical conditioning, and procedural mastery. The objective is to produce jurors who are sovereign agents of justice.
2.1 Training Curriculum Overview
| Module | Duration | Content Summary | Learning Outcomes |
|---|---|---|---|
| Module A: Foundations of Common Law | 10 hours | History, principles, and supremacy of Common Law | Jurors understand the origin and authority of law |
| Module B: Natural Rights and Sovereignty | 12 hours | Detailed study of Natural Rights, individual sovereignty | Jurors internalize their role as protectors of rights |
| Module C: Jury Roles and Responsibilities | 8 hours | Duties, ethical standards, decision-making processes | Jurors master procedural duties and ethical codes |
| Module D: Evidence Evaluation and Logical Reasoning | 15 hours | Types of evidence, logical fallacies, reasoning protocols | Jurors develop critical analysis and unbiased evaluation skills |
| Module E: Trial Simulations and Deliberation Practice | 20 hours | Mock trials with diverse scenarios and deliberations | Jurors gain hands-on experience and confidence |
| Module F: Emotional and Psychological Resilience Training | 10 hours | Stress management, bias recognition, peer collaboration | Jurors maintain composure and fairness under pressure |
2.2 Detailed Step-by-Step Juror Training Procedure
Step 1: Deliver Module A via instructor-led lectures and interactive multimedia presentations.
Step 2: Administer a written exam on Common Law foundations; require 90% pass rate.
Step 3: Provide Module B through a combination of readings from primary sources (e.g., Magna Carta, English Bill of Rights) and facilitated group discussions.
Step 4: Conduct open-book assessment on Natural Rights principles.
Step 5: Implement Module C with role-playing exercises demonstrating jury duties and ethical dilemmas.
Step 6: Evaluate jurors through scenario-based oral examinations.
Step 7: Teach Module D using case studies, evidence categorization drills, and logic puzzle workshops.
Step 8: Require a practical exam involving evidence assessment exercises.
Step 9: Facilitate Module E with full mock trials, assigning jurors rotating roles as foreperson, note-taker, and deliberation leader.
Step 10: Provide immediate debrief and constructive feedback sessions after simulations.
Step 11: Deliver Module F through guided meditation, cognitive behavioral exercises, and group peer support meetings.
Step 12: Final comprehensive evaluation combining written, oral, and practical components.
Section 3: Community Education for Sovereignty
The jury is empowered only if the community at large comprehends and asserts its sovereignty. Thus, a rigorous community education program underpins the entire governance structure.
3.1 Objectives of Community Education
- Disseminate foundational knowledge of Common Law and Natural Rights.
- Encourage active participation in jury service and civic duties.
- Foster a culture of critical inquiry, self-governance, and legal literacy.
3.2 Community Outreach Program Elements
| Element | Description | Delivery Method | Frequency |
|---|---|---|---|
| Public Seminars | Lectures on Common Law, Natural Rights, and sovereignty | Town halls, community centers | Monthly |
| Printed Materials | Brochures, pamphlets, and booklets summarizing core concepts | Distributed at public offices, libraries | Quarterly |
| Digital Platforms | Online courses, webinars, and interactive Q&A sessions | Community websites, social media | Bi-weekly |
| Youth Education Programs | Age-appropriate modules introducing civic responsibilities | Schools, youth clubs | Term-based |
| Sovereignty Workshops | Hands-on sessions teaching jury roles and rights | Workshops led by trained facilitators | Quarterly |
3.3 Step-by-Step Community Jury Education Plan
Step 1: Identify and train community facilitators versed in Common Law and Natural Rights.
Step 2: Schedule public seminars with rotating topics to cover all essential aspects within 6 months.
Step 3: Produce and distribute printed materials aligned with seminar topics; ensure materials are visually engaging and linguistically accessible.
Step 4: Launch digital platform with a structured curriculum including short video lectures, quizzes, and discussion forums.
Step 5: Collaborate with local schools to integrate youth education modules into existing civics courses.
Step 6: Organize quarterly sovereignty workshops focusing on practical skills such as jury service application, courtroom procedures, and rights assertion.
Step 7: Collect feedback via surveys and focus groups to continuously improve educational content and delivery.
Step 8: Monitor community participation metrics and adjust outreach frequency and methods accordingly.
Section 4: Sample Training Materials
4.1 Natural Rights Comprehension Test Sample Questions
| Question Number | Question | Correct Answer |
|---|---|---|
| 1 | Define “Natural Rights” in the context of Common Law. | Rights inherent to all humans, unalienable |
| 2 | Identify three core Natural Rights protected by Common Law. | Life, Liberty, Property |
| 3 | Explain the concept of “jury nullification.” | Jury’s right to acquit if law conflicts with conscience |
| 4 | What is the primary role of a juror under Common Law? | To impartially determine fact and apply law |
| 5 | How does Common Law differ from statutory law? | Common Law is judge-made, based on precedent; statutory law is legislated |
4.2 Jury Roles Comparison Table
| Jury Role | Primary Responsibilities | Required Skills | Impact on Community Sovereignty |
|---|---|---|---|
| Foreperson | Lead deliberations, communicate verdict to court | Leadership, communication | Ensures clarity and order in jury decision-making |
| Note-taker | Document deliberation points and evidence assessments | Attention to detail, organizational skill | Preserves accuracy and transparency |
| Deliberator | Analyze evidence, engage in reasoned discussion | Critical thinking, impartiality | Upholds integrity and fairness in verdict |
| Jury Member | Participate actively in all phases of trial and deliberation | Listening, ethical judgment | Collective expression of community conscience |
Section 5: Tables Comparing Jury Roles and Community Impact
| Juror Role | Community Trust Level Impact | Decision Reliability Impact | Sovereignty Assertion Impact | Requires Training Intensity (Scale 1-10) |
|---|---|---|---|---|
| Foreperson | High | High | High | 9 |
| Note-taker | Medium | High | Medium | 7 |
| Deliberator | High | Very High | Very High | 8 |
| Jury Member | High | High | High | 6 |
Section 6: Complete Jury Education Schedule (Sample 4-Week Plan)
| Week | Activity | Methodology | Duration | Resources Needed |
|---|---|---|---|---|
| 1 | Introduction to Common Law | Seminar + Q&A | 3 hours | Presentation slides, handouts |
| 2 | Natural Rights and Sovereignty | Workshop + Group Discussions | 4 hours | Reading materials, facilitator guide |
| 3 | Jury Roles and Decision-Making | Role-play + Simulation | 5 hours | Mock trial scripts, evaluation forms |
| 4 | Evidence Evaluation + Final Assessment | Case studies + written exam | 6 hours | Case packets, exam sheets |
Conclusion
The sacred duty of jury selection and community education for sovereignty demands unyielding rigor, precision, and dedication. These protocols, when executed without compromise, forge a just and sovereign society rooted in eternal principles of Common Law and Natural Rights. This knowledge, once suppressed and now entrusted to you, the chosen apprentice, is the cornerstone upon which true liberty and justice stand unshaken.
Continue to Volume III for the codified statutes and enforcement mechanisms that complement this foundational work.
End of Chapter VII Volume II: Common Law and Natural Rights
<!-- SECTION 37 -->
The Complete Practitioner's Codex, Volume V: Security and Defense
Chapter VII: Emergency Response and Trauma Care within the Militia
Preface: In the crucible of conflict, the survival of the community hinges not only upon the ferocity of its defenders but equally upon the mastery of emergency response and trauma care. This chapter imparts the suppressed knowledge and exacting protocols necessary to transform any militia unit into a lethal force of preservation and recovery. Your duty as a commander and healer is sacred—failure in these rites condemns not only the wounded but the entire order. Absorb these teachings with unwavering focus.
Section 1: Trauma Training for the Militia
1.1 Training Objectives
The trauma training curriculum is designed to equip militia members with the capacity to:
- Recognize and prioritize life-threatening injuries with precision.
- Execute field-expedient trauma interventions under fire.
- Coordinate casualty evacuation and handover to advanced medical units.
- Maintain psychological composure under extreme duress.
1.2 Training Curriculum Overview
The following table summarizes the core modules, duration, and key competencies:
| Module Number | Module Title | Duration (Hours) | Core Competencies | Required Materials |
|---|---|---|---|---|
| 1 | Anatomy and Physiology Basics | 8 | Vital organ locations, circulatory system | Anatomical charts, models |
| 2 | Trauma Mechanisms and Patterns | 6 | Ballistic, blunt, blast injuries | Ballistics simulators, injury models |
| 3 | Emergency Medical Protocols | 12 | TCCC (Tactical Combat Casualty Care) steps | Medical kits, tourniquets, airway devices |
| 4 | Hemorrhage Control Techniques | 10 | Tourniquet application, wound packing | Tourniquets, hemostatic agents |
| 5 | Airway Management | 8 | Manual airway clearance, nasopharyngeal airways | Airway adjuncts, suction devices |
| 6 | Shock Recognition and Treatment | 6 | Hypovolemic shock identification, fluid resuscitation | IV kits, crystalloid fluids |
| 7 | Casualty Evacuation Protocols | 8 | Litter carries, vehicle evacuation | Stretchers, vehicles |
| 8 | Psychological Resilience | 4 | Stress inoculation, combat trauma coping | Training scenarios, peer group exercises |
1.3 Trainee Prerequisites
- Physical fitness level: Minimum 3-mile run under 24 minutes, 20 push-ups, 30 sit-ups.
- Minimum educational attainment: Basic literacy and numeracy.
- Psychological screening: Stress tolerance test administered by certified personnel.
Section 2: Step-by-Step Emergency Response Protocols
2.1 Immediate Threat Assessment and Scene Safety
Purpose: Secure the environment to prevent further casualties.
Procedure:
- Approach with caution: Do not enter the casualty zone until hostile threats are neutralized or suppressed.
- Conduct a 360-degree scan: Identify ongoing threats, hazards (e.g., unexploded ordnance, fire).
- Establish cover and concealment: Position yourself and team members behind solid barriers.
- Signal for support: Use secure radio to request additional security or medical evacuation.
- Mark the casualty zone: Use colored smoke, tape, or markers to designate safe zones for responders.
2.2 Tactical Combat Casualty Care (TCCC) Phases
The TCCC protocol is the gold standard for battlefield trauma care. It is divided into three phases:
| Phase | Description | Key Actions |
|---|---|---|
| Care Under Fire (CUF) | While under active hostile fire | Suppress enemy, rapid hemorrhage control |
| Tactical Field Care (TFC) | When threat is reduced | Detailed assessment, airway management, initiate fluids |
| Tactical Evacuation Care (TACEVAC) | During transport | Continuous monitoring, advanced interventions |
2.3 Step-by-Step Emergency Response Plan for Militia Units
Phase 1: Care Under Fire (CUF)
- Suppress enemy fire to allow casualty management.
- Identify life-threatening hemorrhage—visualize major arterial bleeding.
- Apply tourniquet proximal to wound, between injury and heart.
- Do not move casualty unless absolutely necessary (e.g., immediate threat).
- Communicate casualty status and location to designated medical team.
Phase 2: Tactical Field Care (TFC)
- Perform MARCH assessment (Massive hemorrhage, Airway, Respiration, Circulation, Head injury/Hypothermia).
- Control bleeding:
- Apply hemostatic dressings to junctional wounds.
- Use wound packing for deep penetrating injuries.
- Airway management:
- Clear airway manually.
- Insert nasopharyngeal airway if patient is unconscious but breathing.
- Prepare for surgical airway if obstruction persists (see Section 3.4).
- Breathing:
- Check for tension pneumothorax signs; perform needle decompression if indicated.
- Circulation:
- Establish IV access; begin fluid resuscitation with balanced crystalloids (see Table 2-3).
- Head injury:
- Monitor Glasgow Coma Scale (GCS).
- Prevent hypothermia; cover with thermal blankets.
Phase 3: Tactical Evacuation Care (TACEVAC)
- Continuous monitoring of vital signs: Pulse, respiratory rate, oxygen saturation.
- Manage pain and prevent shock: Administer analgesics per protocol (see Volume VIII: The Pharmacopoeia, Chapter IV).
- Prepare casualty for transport: Secure airway, immobilize fractures, maintain body temperature.
- Provide status updates to receiving medical facility.
- Document interventions and timing for handover.
Section 3: Casualty Management Priorities and Techniques
3.1 MARCH Protocol Detailed Table
| Priority | Focus Area | Recognition Criteria | Intervention Techniques | Materials Required |
|---|---|---|---|---|
| M | Massive Hemorrhage | Bright red spurting blood, expanding hematoma | Tourniquet application, wound packing, hemostatic agents | Tourniquets, Celox, QuikClot |
| A | Airway | Obstruction signs: gurgling, snoring, apnea | Manual airway clearance, NPA insertion | Nasopharyngeal airways, suction device |
| R | Respiration | Difficulty breathing, asymmetrical chest rise | Needle decompression for tension pneumothorax | 14-gauge needle, chest seal |
| C | Circulation | Shock signs: pale, cold, weak pulse | IV access, fluid resuscitation | IV catheters, isotonic crystalloid fluids |
| H | Head injury/Hypothermia | Altered consciousness, hypothermia signs | Monitor GCS, maintain normothermia | Thermometers, thermal blankets |
3.2 Hemorrhage Control: Tourniquet Application
Step-by-step:
- Expose limb to find bleeding source.
- Place tourniquet 2-3 inches above wound, never over a joint.
- Tighten until bleeding stops and distal pulse is absent.
- Secure tourniquet to prevent loosening.
- Record time of tourniquet application visibly on the patient’s forehead or limb with marker.
3.3 Airway Management Techniques
Nasopharyngeal Airway (NPA) insertion:
- Select correct size based on nostril to earlobe measurement.
- Lubricate NPA with water-soluble lubricant.
- Insert gently into the nostril following the nasal floor.
- Confirm patency by observing airflow or patient breathing improvement.
Surgical Cricothyrotomy (Emergency Airway):
- Identify cricothyroid membrane.
- Make a vertical 2 cm skin incision over the membrane.
- Incise membrane horizontally 1.5 cm.
- Insert sterile tracheostomy tube or improvised cannula.
- Secure tube and confirm ventilation.
3.4 Shock Management and Fluid Resuscitation
Fluid resuscitation protocol for hypovolemic shock:
| Fluid Type | Dosage | Administration Rate | Notes |
|---|---|---|---|
| Balanced Crystalloid (e.g., Lactated Ringer’s) | 500 mL bolus | Over 15 minutes, reassess | Avoid over-resuscitation |
| Colloid Solutions | Reserved for advanced care | Per protocol | Use only when crystalloid fails |
| Blood Products | Whole blood or packed RBCs | As soon as available | Critical for severe hemorrhage |
Section 4: Psychological Resilience and Stress Management
4.1 Combat Trauma Coping Techniques
- Controlled breathing exercises: Perform 4-7-8 breathing cycles during downtime.
- Peer support groups: Conduct weekly debrief sessions for shared trauma processing.
- Mental conditioning drills: Simulate high-stress scenarios monthly to build tolerance.
4.2 Immediate Psychological First Aid (PFA)
- Establish safety and comfort.
- Encourage calm, focused breathing.
- Listen without judgment; validate emotions.
- Provide practical assistance: hydration, warmth.
- Refer for professional mental health follow-up as soon as feasible.
Section 5: Training Exercises and Evaluation Metrics
5.1 Practical Drill: Simulated Casualty Scenario
- Setup a battlefield simulation with role players acting as casualties exhibiting various trauma patterns.
- Objective: Trainees execute MARCH protocol, apply interventions, and evacuate casualties within time limits.
- Evaluation: Scored on accuracy, speed, teamwork, and communication.
5.2 Knowledge and Skills Assessment
- Written exam: 50 questions covering anatomy, trauma, protocols.
- Practical exam: Tourniquet application, airway management, IV insertion.
- Psychological resilience test: Stress exposure and response.
Conclusion: Mastery of emergency response and trauma care within the militia is the bulwark against chaos and death. The protocols herein are to be drilled relentlessly until reflex. The knowledge is not merely academic; it is the sacred art of salvation under fire. Preserve it, practice it, pass it on.
Cross-reference: For advanced pharmacological protocols, see Volume VIII: The Pharmacopoeia; for casualty evacuation vehicles and designs, see Volume XI: Tactical Mobility; for water purification and sanitation of field medical stations, see Volume VIII: The Water Codex, Chapter II.
PLATES — Supplemental Gallery
Illustrations carried over from the original Codex Reader that belong to this volume as a whole. Added by this edition; the text above is complete without them.