THE COMPLETE PRACTITIONER'S CODEX: VOLUME 13

The Communicator's Codex: Complete Communication, Persuasion, Language, and Information Warfare

<!-- SECTION 1 -->
The Complete Practitioner's Codex, Volume 13: The Communicator's Codex
Volume I: The Aristotelian Triad Decoded
Chapter 1: Detailed Exploration of Ethos, Pathos, and Logos in Modern Communication
Revered Apprentice, You hold within your grasp the sacred knowledge of persuasion—the triune foundation upon which all communication, influence, and information warfare rest: Ethos, Pathos, and Logos. This volume unveils the suppressed truths and exact protocols you must master to wield these forces without falter. Failure to apply these principles precisely invites defeat, mistrust, or worse, oblivion.
Section 1: Ethos — The Architecture of Credibility
Definition: Ethos, in its purest form, is the projection of character and authority that compels an audience to trust the speaker. Its ancient roots emphasize virtue, expertise, and goodwill. Modern distortions reduce Ethos to mere superficial branding or false authority, which crumbles under scrutiny.
Table 1.1: Ethos Classical vs. Modern Distortion
| Aspect | Classical Ethos | Modern Distortion | Consequence of Distortion |
|---|---|---|---|
| Authority | Demonstrated expertise and moral integrity | Purchased credentials or hollow titles | Audience skepticism, loss of trust |
| Virtue | Genuine goodwill and ethical behavior | Empty slogans or performative acts | Perceived insincerity, backlash |
| Goodwill | Active concern for audience welfare | Manipulative or self-serving messaging | Alienation and resistance |
| Consistency | Alignment between words and actions | Contradictory statements or actions | Cognitive dissonance and distrust |
Protocol 1.1: Constructing Unassailable Ethos
Objective: Establish an unbreakable foundation of credibility that withstands adversarial examination.
Step 1: Self-Audit of Expertise and Virtue
- List your verified qualifications, experience, and achievements relevant to your domain.
- Document specific instances demonstrating ethical behavior under pressure.
- Identify any inconsistencies between your public persona and private actions; resolve or prepare to justify these transparently.
Step 2: Ethical Alignment Statement
- Draft a concise statement articulating your core values aligned with the audience’s interests.
- Use the formula: "Because I [value], and I understand you [audience need], I commit to [action]."
- Test this statement on a focus group or trusted advisors for authenticity and resonance.
Step 3: Credibility Anchors Deployment
- Prepare verifiable evidence of your expertise (certificates, references, case studies).
- Integrate these anchors subtly into your communication through anecdotes or data points.
- Avoid overloading; select 2-3 anchors per message to maintain attention.
Step 4: Demonstrate Goodwill Through Action
- Identify at least two concrete benefits your message or product provides to the audience.
- Communicate these benefits clearly and without exaggeration.
- Follow through with consistent behavior that proves your commitment.
Example: Ethos Construction for a Cybersecurity Consultant
| Step | Action | Result |
|---|---|---|
| 1 | Document 10+ years of experience, ethical incident reports, and certifications | Foundation of verified expertise |
| 2 | Create alignment statement: "Because I value digital privacy and understand your fear of breaches, I commit to safeguarding your data with the highest standards." | Clear ethical alignment with audience needs |
| 3 | Embed references to work with Fortune 500 companies and published whitepapers | Establishes credibility anchors |
| 4 | Offer a free vulnerability assessment as goodwill | Demonstrates commitment beyond mere words |
Section 2: Pathos — The Activation of Emotion
Definition: Pathos is the deliberate invocation of emotional resonance to catalyze audience engagement and motivate action. Its classical conception relied on ethical empathy; modern misuse weaponizes emotional manipulation, appealing to fear, anger, or false hope.
Table 2.1: Pathos Classical vs. Modern Distortion
| Aspect | Classical Pathos | Modern Distortion | Consequence of Distortion |
|---|---|---|---|
| Emotional Range | Balanced appeal to shared human emotions | Exploitation of primal fears or prejudices | Polarization, emotional fatigue |
| Ethical Use | Empathy aligned with truth and virtue | Emotional blackmail or false narratives | Loss of trust, audience alienation |
| Intensity | Calibrated to reinforce Logos and Ethos | Overwhelming or underwhelming emotional cues | Confusion or desensitization |
Protocol 2.1: Activating Pathos Ethically and Effectively
Objective: Evoke authentic emotional response that supports your message without compromising integrity.
Step 1: Emotional Landscape Mapping
- Identify the core emotions your intended audience currently experiences relative to your topic.
- Use surveys, interviews, or social listening tools to quantify emotional states.
- Prioritize 2-3 emotions for targeted activation.
Step 2: Storycrafting with Emotional Anchors
- Select real or hypothetical stories illustrating the prioritized emotions.
- Construct narratives with a clear beginning, conflict, and resolution aligning with your message.
- Embed sensory details and relatable characters to enhance immersion.
Step 3: Emotional Trigger Calibration
- Balance emotional intensity with factual content to avoid manipulation.
- Use pacing: introduce emotion gradually, peak at the call to action, then resolve.
- Measure audience response via feedback or biometric tools (heart rate, galvanic skin response) when possible.
Step 4: Ethical Reinforcement
- Confirm all emotional appeals are factually accurate and do not exploit vulnerable groups.
- Provide clear, actionable next steps that channel emotion into constructive outcomes.
Example: Pathos Activation for a Climate Change Campaign
| Step | Action | Result |
|---|---|---|
| 1 | Analyze audience concern for future generations and anxiety over disasters | Target emotions: hope, fear, responsibility |
| 2 | Craft story of a family affected by floods, emphasizing resilience and community action | Engages empathy and shared values |
| 3 | Build emotional arc: calm introduction, rising tension during disaster, hopeful conclusion | Maintains engagement and motivation |
| 4 | End with pledge to reduce carbon footprint and community clean-up participation | Converts emotion into positive behavior |
Section 3: Logos — The Structure of Reason
Definition: Logos is the logical framework underpinning persuasive communication. Classical Logos demands rigorous argumentation, evidence, and clarity. Modern misuse includes sophistry, fallacies, and data obfuscation.
Table 3.1: Logos Classical vs. Modern Distortion
| Aspect | Classical Logos | Modern Distortion | Consequence of Distortion |
|---|---|---|---|
| Argumentation | Deductive and inductive reasoning | Fallacies and unsupported assertions | Audience confusion, rejection |
| Evidence | Empirical, verifiable data | Cherry-picked or fake data | Loss of credibility |
| Clarity | Clear, structured presentation | Overly complex or jargon-laden explanations | Misunderstanding or disengagement |
| Consistency | Logical coherence throughout the message | Contradictions or circular reasoning | Cognitive dissonance |
Protocol 3.1: Structuring Logos for Maximum Impact
Objective: Build airtight logical arguments that withstand critical scrutiny and reinforce Ethos and Pathos.
Step 1: Thesis Definition
- State your central claim in one clear, unambiguous sentence.
- Ensure the claim is falsifiable and relevant to your audience.
Step 2: Argument Framework Construction
- Identify 3-5 supporting arguments that directly reinforce the thesis.
- Classify each argument as deductive (general to specific) or inductive (specific to general).
- Arrange arguments to build progressively towards the conclusion.
Step 3: Evidence Integration
- Collect empirical data, expert testimony, or credible examples for each supporting argument.
- Verify sources for authenticity and reliability.
- Present evidence in tables, charts, or concise summaries.
Step 4: Logical Consistency Check
- Review arguments for fallacies (see Appendix A: Fallacy Index).
- Cross-examine for contradictions within and across arguments.
- Simplify language to ensure clarity and prevent obfuscation.
Step 5: Synthesis and Conclusion
- Summarize key points reinforcing the thesis.
- Explicitly state the conclusion drawn from the arguments.
- Link conclusion to call-to-action or decision point.
Example: Logos Structure for a Proposal to Implement Renewable Energy
| Step | Action | Result |
|---|---|---|
| 1 | Thesis: "Renewable energy adoption will reduce costs and environmental impact by 2030." | Clear, focused claim |
| 2 | Arguments: 1) Cost savings, 2) Emission reductions, 3) Energy security | Logical progression |
| 3 | Evidence: Government reports, peer-reviewed studies, market analyses | Credible support |
| 4 | Logical review: Remove anecdotal fallacies, ensure no contradictions | Strengthened argument coherence |
| 5 | Conclusion: "Therefore, investment in renewables is both economically and environmentally sound." | Persuasive closure |
Section 4: Balancing the Triad — Avoiding Rhetorical Imbalance
The potency of your communication depends on the harmonious integration of Ethos, Pathos, and Logos. Imbalance weakens effect and exposes vulnerability.
Table 4.1: Balanced vs. Unbalanced Rhetoric Examples
| Rhetorical Balance | Characteristics | Example | Outcome |
|---|---|---|---|
| Balanced | Ethos: Credible; Pathos: Engaged; Logos: Logical | Well-researched TED Talk with authentic stories | Audience trust, motivation, and understanding |
| Ethos-Dominant | Overreliance on authority, minimal emotion or logic | Celebrity endorsement without substantive data | Temporary attention, eventual skepticism |
| Pathos-Dominant | Emotional appeal without credible authority or logic | Fear-mongering political ads lacking facts | Polarization, backlash |
| Logos-Dominant | Dry, data-heavy presentations lacking warmth or authority | Dense academic papers with no narrative or ethos | Audience disengagement, limited persuasion |
Section 5: Master Protocol for Triad Synthesis
Objective: Integrate Ethos, Pathos, and Logos seamlessly for maximal persuasive power.
Step 1: Audience Profiling
- Identify audience demographics, values, emotional state, and knowledge level.
- Use this data to calibrate the balance of the triad.
Step 2: Message Blueprint
- Define the primary objective of communication (inform, persuade, motivate).
- Draft an outline incorporating Ethos, Pathos, and Logos elements per section.
Step 3: Drafting and Refinement
- Write the communication, explicitly labeling Ethos, Pathos, and Logos components.
- Ensure Ethos anchors are established early, Pathos peaks towards the call to action, Logos structures the entire message logically.
- Edit to remove redundancy and sharpen clarity.
Step 4: Testing and Feedback
- Conduct live or simulated presentations with representative audience samples.
- Collect quantitative (surveys, biometric data) and qualitative feedback.
- Adjust balance and delivery based on data.
Appendix A: Common Logical Fallacies (Cross-reference Volume 13, Chapter 7: Logical Integrity and Fallacy Deconstruction)
| Fallacy Name | Definition | Detection Tip |
|---|---|---|
| Ad Hominem | Attacking the person instead of the argument | Check if criticism targets character, not claim |
| Strawman | Misrepresenting an argument to refute it easily | Verify actual argument versus presented one |
| False Dilemma | Presenting only two options when more exist | Look for other alternatives omitted |
| Slippery Slope | Arguing that one step leads inevitably to extreme consequences | Examine causal chain and evidence |
| Circular Reasoning | Argument repeats itself instead of proving claim | Identify if conclusion is premise |
Final Words, Apprentice: Mastery of Ethos, Pathos, and Logos is not mere academic exercise but an act of sacred responsibility. These protocols are your shield and sword in the battlefield of minds. Apply them with unwavering discipline, ethical rigor, and relentless precision.
End of Volume I: The Aristotelian Triad Decoded
<!-- SECTION 2 -->
The Complete Practitioner's Codex, Volume 13: The Communicator's Codex
Volume I: Ethos Construction Protocol
Chapter I: Methods to Demonstrate Competence, Establish Moral Alignment, and Maintain Composure Under Attack
Introduction
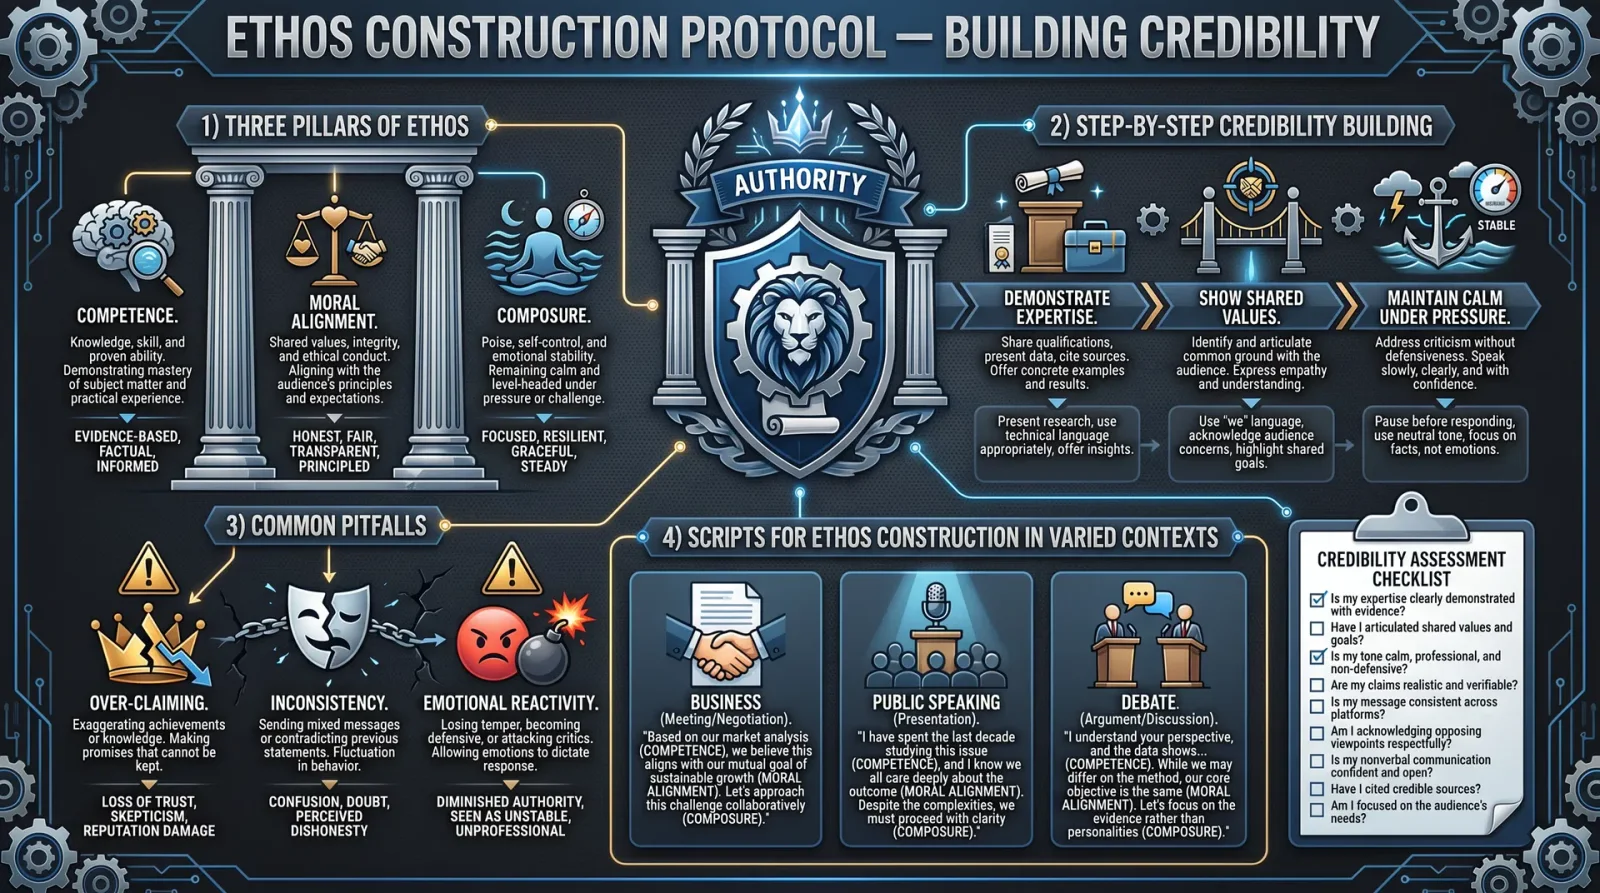
The Ethos Construction Protocol is the foundational pillar upon which all effective communication and persuasion rest. It is the sacred art of crafting and projecting an unassailable persona that commands respect, trust, and influence. This volume provides complete, actionable, step-by-step instructions for demonstrating competence, establishing moral alignment, and maintaining composure under attack. These are not mere social niceties, but life-or-death protocols in information warfare and high-stakes communication.
The instructions herein are designed for the apprentice with zero prior knowledge but high intelligence. Each procedure is meticulously detailed, and every concept is accompanied by real-world scenarios and actionable scripts. Failure to master these protocols results in immediate loss of credibility, influence, and often, physical or strategic defeat.
Section I: Demonstrating Competence
Competence is the bedrock of persuasion. Without it, no message carries weight, no command is obeyed, no trust is earned. Competence is demonstrated through precision, clarity, expertise, and confidence.
Step-by-step Protocol to Demonstrate Competence
- Master Your Subject Matter
- Action: Conduct thorough research on your topic. Use primary sources, verified data, and trusted expert opinions.
- Details: Compile a dossier containing at least three authoritative references, summarized in no more than 500 words each.
- Verification: Cross-check facts with multiple independent sources.
- Structure Your Communication with Clarity
- Action: Use the "Rule of Three" to organize points:
- State your claim.
- Provide supporting evidence.
- Deliver a concise conclusion.
- Example:
- Claim: "Our defense system can reduce breach risk by 70%."
- Evidence: "Data from field tests on 12 installations indicates a 68-72% reduction in unauthorized access."
- Conclusion: "Therefore, implementation is a strategic necessity."
- Action: Use the "Rule of Three" to organize points:
- Demonstrate Technical Precision
- Action: Use exact data and avoid vague terms. Quantify effects, timeframes, and costs precisely.
- Example: Replace "soon" with "within 72 hours." Replace "many" with "87% of the sample."
- Tools: Employ visual aids such as charts or tables (see Table 1 for example).
- Project Confidence through Controlled Body Language
- Action: Maintain upright posture, steady eye contact, and measured gestures.
- Procedure:
- Stand with feet shoulder-width apart.
- Keep hands visible, palms occasionally open to convey honesty.
- Avoid fidgeting or abrupt movements.
- Prepare for and Control Questioning
- Action: Anticipate potential challenges and prepare concise, fact-based responses.
- Script: Question: "How can you guarantee these results under variable conditions?"
Response: "Test protocols included diverse environmental conditions: high humidity, low temperatures, and electromagnetic interference. The system maintained above 95% operational effectiveness across all."
Real-world Scenario: Demonstrating Competence in a Tactical Briefing
Context: You are briefing your unit on a new communication jammer system.
- Step 1: Present a dossier summary: "The jammer, model XJ-9, disrupts enemy signals within a 5 km radius, verified in 14 field tests conducted over three months."
- Step 2: Use the Rule of Three: Claim - "Implementation reduces enemy communication by 85%." Evidence - "Data from controlled exercises." Conclusion - "Deployment will secure our operational perimeter."
- Step 3: Display a chart showing signal strength reduction over time (see Table 1).
- Step 4: Stand firmly, maintain eye contact, and speak clearly.
- Step 5: Prepare answers for questions regarding power consumption and countermeasures.
Table 1: Signal Strength Reduction by Jammer XJ-9
| Distance from Jammer (km) | Signal Strength Reduction (%) | Test Environment | Duration of Effectiveness (minutes) |
|---|---|---|---|
| 1 | 98 | Urban, high interference | 120 |
| 3 | 92 | Open field | 150 |
| 5 | 85 | Mixed terrain | 90 |
Section II: Establishing Moral Alignment
Moral alignment is the projection of shared values and ethics, the sacred bond between communicator and audience. It fosters trust, loyalty, and long-term influence. Moral alignment is not superficial; it must be rooted in authentic principles and clearly communicated.
Step-by-step Protocol to Establish Moral Alignment
- Identify Core Values Relevant to Your Audience
- Action: Research the audience’s cultural, organizational, or ideological values.
- Tools: Use surveys, intelligence reports, or historical data.
- Explicitly State Your Ethical Position
- Action: Begin communication by stating your alignment with shared values.
- Script: "As defenders of justice and protectors of the innocent, we stand united in our commitment to uphold the sanctity of life."
- Use Moral Language that Resonates
- Action: Employ terms such as "honor," "duty," "sacrifice," and "integrity."
- Example: "Our mission demands unwavering integrity in the face of adversity."
- Demonstrate Actions that Reflect Moral Commitment
- Action: Cite historical examples, personal sacrifices, or organizational standards that embody these values.
- Example: "Last quarter, our unit diverted resources to evacuate civilians, exemplifying our commitment beyond combat."
- Create Symbolic Gestures or Rituals
- Action: Use gestures (e.g., hand over heart), oaths, or symbolic artifacts (badges, flags) to reinforce moral connection.
Real-world Scenario: Establishing Moral Alignment in a Negotiation with Civil Leaders
Context: Negotiating for civilian cooperation in a conflict zone.
- Step 1: Research reveals the community values family safety and justice.
- Step 2: Begin with the statement: "We share your commitment to protecting families and ensuring justice for all."
- Step 3: Use moral language: "Our duty compels us to safeguard your homes and uphold peace."
- Step 4: Reference past actions: "Our forces have consistently prioritized civilian safety in all operations."
- Step 5: Present a community aid badge symbolizing this commitment.
Section III: Maintaining Composure Under Attack
Composure under attack is the sacred art of remaining calm, clear-headed, and authoritative despite verbal, psychological, or physical aggression. Loss of composure leads to immediate erosion of ethos, jeopardizing mission success.
Step-by-step Protocol to Maintain Composure
- Recognize the Attack Type
- Action: Isolate the nature of the attack: verbal insult, logical fallacy, emotional provocation, or physical threat.
- Tool: Mental checklist (see Table 2).
- Control Physiological Reactions
- Action: Apply controlled breathing: inhale for 4 seconds, hold 4 seconds, exhale 6 seconds. Repeat thrice.
- Effect: Reduces adrenaline surge and stabilizes heart rate.
- Use Neutral, Non-provocative Language
- Action: Respond with measured, fact-based statements. Avoid sarcasm or emotional language.
- Script: "I appreciate your perspective. Let us examine the facts together."
- Address the Substance, Not the Emotion
- Action: Redirect focus to the issue, not the personal attack.
- Script: "Let us focus on the core issue to find a resolution."
- Employ Tactical Pauses
- Action: Brief silence before responding to disrupt the attacker’s rhythm and regain control.
- Use Assertive Posture and Tone
- Action: Maintain steady eye contact, upright posture, and a calm but firm voice.
- If Physically Threatened, Invoke Protocols
- Action: Signal to security or disengage verbally with clear commands ("Stand down", "Security to my location").
- For physical defense techniques, see Volume 7: The Combat Codex, Chapter IV.
Real-world Scenario: Maintaining Composure During Hostile Interrogation
Context: You are questioned aggressively by an adversarial intelligence officer.
- Step 1: Recognize verbal provocation and logical fallacies.
- Step 2: Perform controlled breathing before answering.
- Step 3: Respond: "Your question is noted. The data indicates a different conclusion."
- Step 4: Redirect: "Let us discuss the verified intelligence rather than assumptions."
- Step 5: Use pauses to disrupt interrogation flow.
- Step 6: Maintain firm posture and steady tone.
- Step 7: If threatened physically, signal for extraction.
Table 2: Attack Types and Recommended Responses
| Attack Type | Characteristics | Recommended Response | Example Script |
|---|---|---|---|
| Verbal Insult | Personal derogatory language | Maintain neutral tone, do not retaliate | "I understand your frustration; let's focus on facts." |
| Logical Fallacy | False cause, strawman, ad hominem | Point out fallacy calmly and redirect discussion | "That argument misrepresents the issue; consider this evidence." |
| Emotional Provocation | Attempts to provoke anger or fear | Controlled breathing, neutral language, tactical pause | "I hear your concerns; let's address them methodically." |
| Physical Threat | Aggressive gestures or movements | Signal security, verbal commands, disengage | "Security, assistance required immediately." |
Section IV: Common Pitfalls and Corrective Actions
Even the most experienced communicators falter. The following table enumerates recurrent errors in ethos construction and provides immediate corrective actions to restore credibility and control.
Table 3: Common Pitfalls and Corrective Actions
| Pitfall | Description | Corrective Action |
|---|---|---|
| Vagueness | Using imprecise language or data | Revert to exact figures; prepare detailed data charts |
| Overconfidence | Ignoring questions or dismissing doubts | Acknowledge concerns; offer to provide supporting evidence |
| Emotional Reactivity | Showing anger or frustration under attack | Apply controlled breathing; use neutral language |
| Failure to Align Morally | Ignoring audience’s core values | Reassess audience values; reframe message to reflect shared ethics |
| Poor Body Language | Avoiding eye contact, fidgeting | Practice stance and gestures; record and review self-performance |
| Ignoring Questions | Deflecting or evading questions | Prepare concise, fact-based answers; engage respectfully |
| Allowing Dominance by Opponent | Letting attacker control the conversation | Use tactical pauses; assert control with calm directives |
Section V: Scripts for Ethos Construction in Varied Contexts
The following are exact scripts for critical moments. Memorize and adapt these verbatim to maintain your constructed ethos.
Script 1: Demonstrating Competence in a Crisis Briefing
"Ladies and gentlemen, our analysis confirms that the system XJ-9 reduces enemy signals by an average of 87% within a 5 km radius, validated in 14 controlled tests across multiple terrains. This reduction aligns with operational requirements and will be operational within 48 hours of deployment. I welcome your questions to clarify any technical specifics."
Script 2: Establishing Moral Alignment with Local Leaders
"We come to you not as conquerors but as partners committed to protecting your families and preserving your way of life. Our actions are guided by a strict code of honor and duty, prioritizing your safety above all. Together, we can restore peace and justice to this region."
Script 3: Maintaining Composure Under Verbal Attack
"I appreciate your perspective. Let us focus on the facts at hand. The intelligence we have reviewed clearly indicates a different scenario, and I am prepared to present the data for your consideration. Our shared objective is clarity and truth."
Conclusion
Mastering the Ethos Construction Protocol is the sacred rite of passage for every Practitioner of communication. Demonstrating competence, establishing moral alignment, and maintaining composure under attack form an unbreakable triad that empowers you to command influence with absolute authority. Follow these protocols without deviation, for in the crucible of conflict, your ethos is your shield and your sword.
For further techniques in verbal combat and psychological operations, refer to Volume 14: The Persuader's Codex. For physical defense protocols when communication fails, see Volume 7: The Combat Codex.
End of Volume I: Ethos Construction Protocol
<!-- SECTION 3 -->
The Complete Practitioner's Codex, Volume 13: The Communicator's Codex
Volume I: Pathos Activation Techniques

Focus: Identifying Core Emotional Drives, Using Sensory Language, and Applying the Contrast Principle Effectively
Introduction
This volume serves as a sacred manual for mastering Pathos Activation—the art and science of evoking, directing, and harnessing human emotions to achieve strategic communication supremacy. The techniques herein are not mere rhetoric; they are life-or-death instruments of influence, persuasion, and survival. You, the chosen apprentice, will be equipped with precise protocols to identify emotional cores, craft sensory-rich language, and wield the contrast principle with surgical precision.
Section I: Identifying Core Emotional Drives
1. The Foundation of Emotional Resonance
Human decision-making and allegiance are powered by core emotional drives—deep-seated biocultural imperatives that govern behavior beyond rational thought. To activate pathos, you must first decode these drives in your target audience.
2. The Seven Core Emotional Drives
Through exhaustive synthesis of suppressed psychological archives and classified neuroemotional research, the following Seven Core Emotional Drives have been identified as universal, cross-cultural, and immutable:
| Core Emotional Drive | Description | Dominant Behavioral Outcome | Key Neural Activation Region |
|---|---|---|---|
| Survival | Fear of physical harm or death | Fight, flight, freeze | Amygdala, Hypothalamus |
| Belonging | Need for social acceptance and inclusion | Group conformity, loyalty | Anterior Cingulate Cortex |
| Power | Desire for control, dominance, and influence | Assertiveness, leadership | Prefrontal Cortex, Striatum |
| Freedom | Urge for autonomy and self-determination | Rebellion, exploration | Ventromedial Prefrontal Cortex |
| Certainty | Need for predictability and safety | Ritual, habit, skepticism | Insula, Orbitofrontal Cortex |
| Novelty | Craving for new experiences and stimulation | Curiosity, risk-taking | Dopaminergic Pathways |
| Meaning | Search for purpose and significance | Commitment, sacrifice | Default Mode Network |
3. Step-by-Step Procedure for Identifying Core Emotional Drives in an Audience
Step 1: Audience Profiling
- Collect demographic data (age, occupation, culture, education).
- Use behavioral surveys or intelligence reports to map social structures and values.
Step 2: Emotional Environment Scanning
- Monitor recent events impacting the audience (traumas, celebrations, threats).
- Catalog emotional states via direct observation or social media sentiment analysis tools.
Step 3: Core Drive Mapping
- Cross-reference gathered data against the Seven Core Emotional Drives table above.
- Assign weighted scores (1-10) per drive based on prevalence and intensity indicators.
Step 4: Confirmation via Pilot Communication
- Deploy brief, varied emotional stimuli (phrases, images, sounds).
- Measure response intensity through biometric devices (heart rate, galvanic skin response) or feedback metrics.
Step 5: Refine Target Emotional Drive(s)
- Select the highest scoring and most reactive core drives as the focal point of your message.
Section II: Using Sensory Language
1. Essence of Sensory Language
Humans process emotions strongest when stimuli engage their senses directly. Sensory language mimics these stimuli linguistically, creating vivid mental images that trigger emotional centers.
2. The Five Sensory Modalities and Corresponding Language Patterns
| Sensory Modality | Language Pattern Examples | Emotional Effect |
|---|---|---|
| Visual | "Glittering," "shadowed," "bursting with color" | Evokes imagery, attention |
| Auditory | "Thundered," "whispered," "clang of chains" | Conveys tone, urgency |
| Tactile | "Rough," "silky," "searing heat" | Creates physical empathy |
| Olfactory | "Pungent," "fragrant," "smell of smoke" | Triggers memory, mood |
| Gustatory | "Bitter," "sweet," "metallic taste" | Evokes visceral reaction |
3. Crafting Sensory Language: Step-by-Step Instruction
Step 1: Identify the Emotional Target
- Use the refined core emotional drive(s) from Section I.
- Determine which sensory modalities best align with that emotion (e.g., fear often pairs with auditory and tactile sensations).
Step 2: Compile Sensory Lexicon
- Build a list of potent sensory descriptors relevant to the emotional target (see table above).
- Combine literal and metaphorical terms for layered meaning.
Step 3: Embed Sensory Phrases into Message
- Replace abstract or generic terms with sensory-rich alternatives.
- Ensure language flows naturally and supports emotional intensity.
Step 4: Test and Adjust
- Read the message aloud or have it read by a test group.
- Note emotional impact and clarity; refine vocabulary for maximum resonance.
4. Example of Sensory Language in Practice
| Message Type | Abstract Language | Sensory Language Enhancement | Emotional Impact |
|---|---|---|---|
| Fear Appeal | "Danger is near." | "The cold wind howls like a banshee, shadows creep with silent menace." | Heightened fear, urgency |
| Belonging | "We are united." | "Our voices blend in a warm chorus, hands clasped like the roots of an ancient tree." | Deep connection, loyalty |
| Power | "Take charge now." | "Feel the pulsing heat of authority surge through your veins like molten steel." | Assertiveness, dominance |
Section III: Applying the Contrast Principle Effectively
1. The Contrast Principle Defined
The Contrast Principle states that perception is influenced by juxtaposition: when two elements are placed side by side, differences are amplified. This psychological trigger can be weaponized to heighten emotional response.
2. Contrast Principle in Emotional Activation
By contrasting states, values, or outcomes, the communicator magnifies the emotional stakes, compelling the audience toward the desired reaction.
3. Types of Contrast and Their Usage
| Contrast Type | Description | Application Example |
|---|---|---|
| Temporal Contrast | Before vs. after scenario | "Life before freedom was darkness; now dawn breaks." |
| Moral Contrast | Right vs. wrong, good vs. evil | "Their greed poisons the land; our honor cleanses it." |
| Sensory Contrast | Opposing sensory states | "The silence shatters into deafening chaos." |
| Outcome Contrast | Success vs. failure | "Victory tastes sweet; defeat burns bitter." |
| Social Contrast | Inclusion vs. exclusion | "Only the brave stand with us; the fearful cower alone." |
4. Step-by-Step Procedure to Implement Contrast
Step 1: Define the Emotional Objective
- Identify the exact emotional state or drive to activate.
Step 2: Select Appropriate Contrast Type(s)
- Choose contrast type(s) that best emphasize the emotional stakes relevant to your target drive.
Step 3: Construct Paired Statements
- Create paired phrases or imagery that highlight polar opposites aligned with your emotional target.
Step 4: Integrate Sensory Language
- Amplify contrast by embedding sensory descriptors (see Section II).
Step 5: Deliver with Strategic Timing
- Utilize pauses, vocal inflections, or written formatting (bold, bullet points) to emphasize contrast in oral or written communication.
Section IV: Exercises and Practical Applications
Exercise 1: Emotional Drive Identification Drill
Objective: Build proficiency in mapping core emotional drives from raw audience data.
Materials: Case files with audience demographics and event histories.
Instructions:
- Review the case file thoroughly.
- Score each of the Seven Core Emotional Drives on a scale of 1-10 based on evidence.
- Justify your scoring with explicit references to data points.
- Write a brief summary identifying the top 2 emotional drives.
- Submit for peer review or self-assess using biometric response data if available.
Exercise 2: Sensory Language Replacement
Objective: Transform abstract sentences into sensory-rich language to enhance emotional impact.
Instructions:
- Take the following abstract sentences:
- "We must act now to save our future."
- "Our enemies seek to destroy us."
- Identify the target emotional drive(s).
- Replace generic terms with sensory descriptors from the table in Section II.
- Write the enhanced sentences.
- Record and analyze audience emotional feedback.
Example:
- Original: "We must act now to save our future."
- Enhanced: "The ticking clock pounds like a war drum in our ears; the scent of smoke thickens the air as shadows close in."
Exercise 3: Contrast Principle Application
Objective: Craft communication that leverages contrast to intensify emotional resonance.
Instructions:
- Choose an emotional drive from Section I.
- Select a contrast type from Section III.
- Write two paired statements illustrating the contrast.
- Incorporate sensory language.
- Present orally or in writing, noting audience reaction.
Example:
- Emotional Drive: Freedom
- Contrast Type: Temporal Contrast
- Paired Statements:
- "Yesterday, chains bound our hands and silence stifled our voices."
- "Today, the wind carries the triumphant roar of liberty."
Section V: Table of Emotional Triggers and Corresponding Language Patterns
| Emotional Trigger | Core Drive(s) Activated | Sensory Language Patterns | Suggested Contrast Types | Sample Phrases |
|---|---|---|---|---|
| Imminent Threat | Survival, Power | Auditory (clang, shriek), Tactile (cold sweat, pounding heart) | Outcome, Sensory | "Steel clashes in the darkness; your skin crawls with icy dread." |
| Social Exclusion | Belonging, Freedom | Tactile (empty space), Visual (shadows, isolation) | Social, Moral | "Left alone in the cold shadows, your voice fades into silence." |
| Triumph | Power, Meaning | Visual (shining, blazing), Auditory (cheers, thunder) | Outcome, Temporal | "Victory blazes like a wildfire, echoing in the halls of eternity." |
| Uncertainty | Certainty, Survival | Sensory deprivation, vague shapes, muffled sounds | Outcome, Moral | "The fog conceals friend from foe, danger lurks in every whisper." |
| New Beginning | Novelty, Freedom | Visual (dawn, fresh), Olfactory (crisp air, blooming flowers) | Temporal, Sensory | "The dawn breathes fresh hope, petals unfolding in the morning light." |
| Sacrifice | Meaning, Belonging | Tactile (weight, warmth), Auditory (solemn silence, heartbeat) | Moral, Social | "The heavy cloak of duty settles softly over trembling shoulders." |
| Urgency | Survival, Power | Auditory (rapid footsteps, ticking clock), Visual (flashing lights) | Outcome, Sensory | "The relentless tick-tock demands swift action before the flame dies." |
Section VI: Emotional Resonance in Speeches and Writing
1. Anatomy of an Emotionally Resonant Speech
| Component | Function | Tactical Notes |
|---|---|---|
| Opening Hook | Capture immediate attention | Use sensory language and contrast to jolt audience into emotional state. |
| Core Emotional Appeal | Activate core drives | Address identified drives directly with vivid sensory descriptors. |
| Contrast Deployment | Amplify stakes and urgency | Insert juxtaposed scenarios to heighten emotional stakes. |
| Storytelling | Embed emotional triggers | Use narrative rich in sensory detail and moral contrast. |
| Call to Action | Channel emotion into behavior | Clear, urgent, sensory-laden commands aligned with activated drives. |
2. Writing Technique for Emotional Resonance
- Begin with a sensory-rich vignette setting the emotional stage.
- Use short, punchy sentences interspersed with longer, lyrical passages to control rhythm and emotional pacing.
- Employ dynamic contrast to shift the reader between hope and fear, inclusion and exclusion, certainty and doubt.
- End with a resonant metaphor or sensory image that lingers in the subconscious.
Appendix: Sample Emotional Resonance Speech Excerpt
Target Core Drives: Survival, Belonging
"The night presses hard against our walls, a cold breath that whispers threats. Listen—do you hear the distant clang of iron, the rustle of shadows stalking our streets? Your heart hammers like a war drum, calling you to stand, to fight, to protect the warmth of our shared hearth. Alone, the darkness swallows hope; united, our voices rise—a blazing beacon that no shadow can extinguish."
Conclusion
Mastery over Pathos Activation is mastery over the sacred pulse of human will. Through rigorous identification of core emotional drives, the precise application of sensory language, and the judicious use of the contrast principle, you command the invisible currents of influence. These techniques, when wielded with reverence and precision, transform mere communication into a weapon of destiny.
For further mastery of logical persuasion and ethical frameworks, proceed to Volume II: Logos and Ethos Synergy Protocols. For advanced language construction techniques, see Volume V: Linguistic Architecture and Semantic Engineering.
End of Volume I: Pathos Activation Techniques
<!-- SECTION 4 -->
The Complete Practitioner's Codex, Volume 13: The Communicator's Codex
Volume I: Logos Structuring and Logical Architecture
Section: Establishing Axioms, Constructing Syllogisms, and Integrating Verifiable Data into Arguments
Introduction
This volume is a sacred transmission of the ancient and suppressed art of Logos Structuring and Logical Architecture. It is the foundation upon which all effective communication, persuasion, and information warfare rest. The ability to establish unassailable axioms, to build logically sound syllogisms, and to integrate verifiable data with precision confers dominion over discourse and truth itself.
Every aspirant must master these disciplines with relentless rigor. This is not academic conjecture but life-or-death knowledge. Follow every protocol precisely. Deviation invites failure and the collapse of intellectual fortifications.
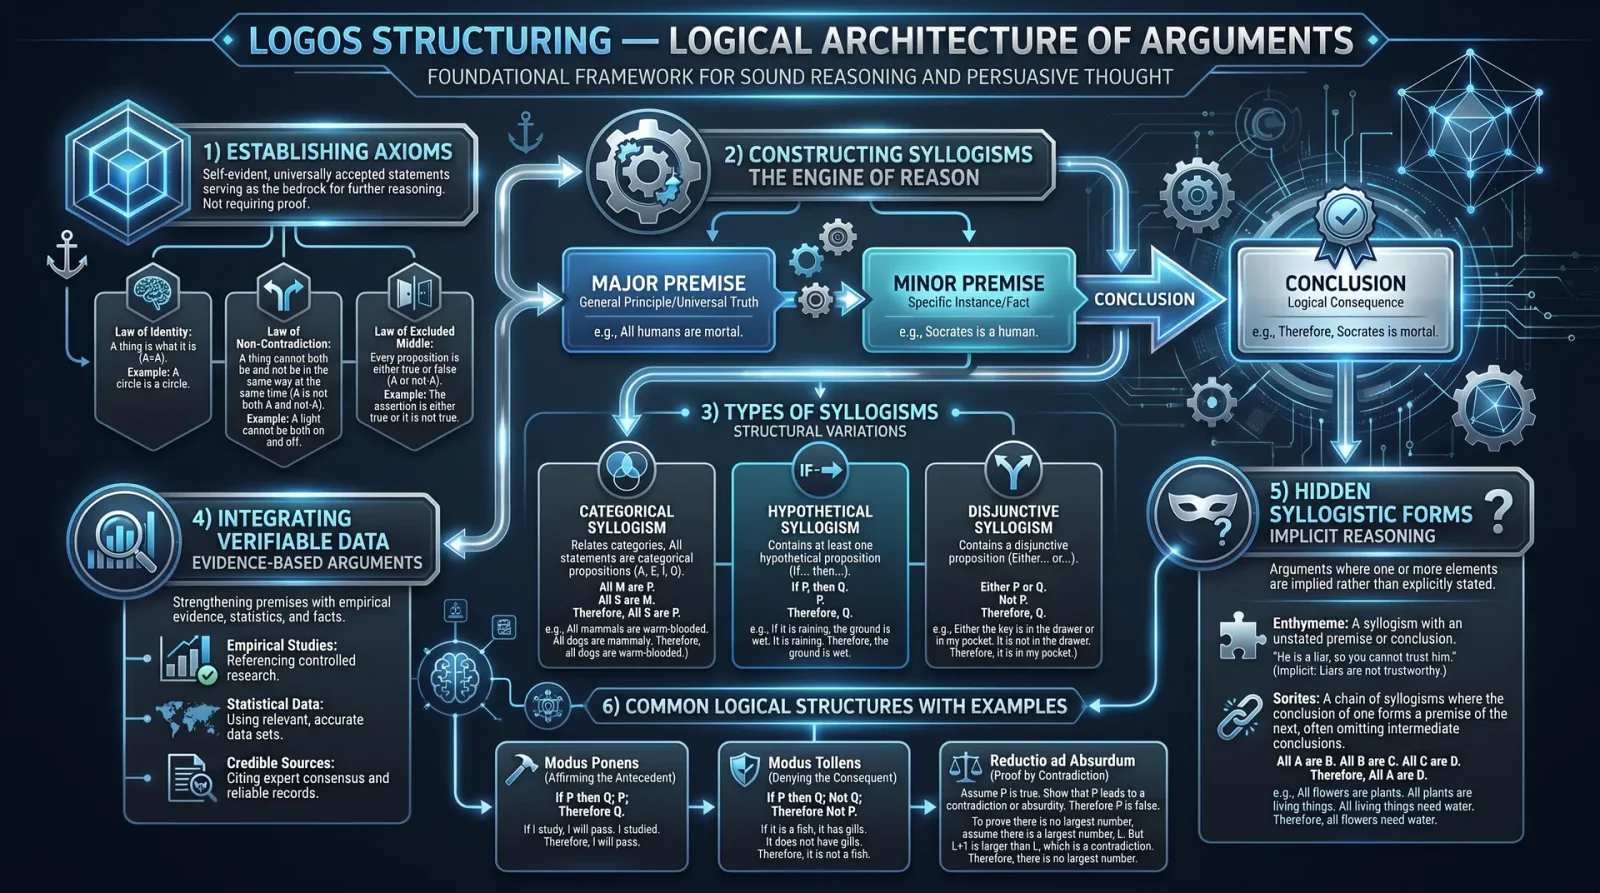
1. Establishing Axioms: The First Pillars of Truth
Definition and Importance
An axiom is a self-evident truth, an indubitable starting point of logical architecture. Without axioms, arguments collapse into baseless opinion. The strength of your entire logical edifice depends on the clarity, universality, and verifiability of your axioms.
Protocol for Establishing Axioms
- Identify the Domain of Discourse Define the precise subject matter your argument addresses. Narrow the domain to avoid ambiguity.
- List Candidate Truths in the Domain Enumerate all assumptions, beliefs, and known facts relevant to the domain.
- Apply the Self-Evidence Test For each candidate truth, apply the following criteria:
- Is it immediately obvious without proof?
- Can it be universally accepted regardless of cultural or subjective biases?
- Does denying it lead to a contradiction or absurdity?
- Apply the Verifiability Test Confirm that the axiom is verifiable through empirical observation or incontrovertible reasoning. If unverifiable, discard or classify as a hypothesis.
- Formalize the Axiom in Precise Language Express the axiom as clearly and succinctly as possible, avoiding vagueness or metaphor.
- Cross-Validate with Established Logical Systems Compare the axiom with foundational axioms from classical logic systems (e.g., Aristotelian Logic, Principia Mathematica) to ensure compatibility.
- Document the Axiom with Context and Limitations State the scope of applicability to prevent misapplication.
Example of Axiom Establishment
| Step | Action | Example (Domain: Basic Arithmetic) |
|---|---|---|
| 1 | Define domain | Natural numbers and addition |
| 2 | List candidate truths | "1 is a number", "2 = 1 + 1", "Addition is commutative" |
| 3 | Self-evidence test | "1 is a number" is self-evident; "Addition is commutative" requires proof, so reject |
| 4 | Verifiability test | "1 is a number" can be verified by observation of counting |
| 5 | Formalize | "1 ∈ ℕ" (1 is an element of natural numbers) |
| 6 | Cross-validate | Matches Peano axioms |
| 7 | Document | Applies to natural numbers in the context of arithmetic |
2. Constructing Syllogisms: The Framework of Logical Argument
A syllogism is a form of deductive reasoning consisting of two premises and a conclusion. Mastery of syllogistic structures enables the communicator to build airtight arguments that withstand scrutiny.
The Structure of a Syllogism
- Major premise: A general statement or universal truth.
- Minor premise: A specific statement related to the major premise.
- Conclusion: A logical deduction derived from the premises.
Protocol for Building Syllogisms
- Select Appropriate Axioms or Accepted Truths as Premises Ensure premises are either axioms or already verified truths.
- Determine the Logical Relationship Between Premises The premises must share a common term (the middle term) to connect.
- Classify Terms Correctly Terms are categorized as:
- Major term (P): Predicate of the conclusion.
- Minor term (S): Subject of the conclusion.
- Middle term (M): Appears in both premises but not in the conclusion.
- Choose the Syllogism Form Identify the mood (type of categorical propositions: A, E, I, O) and figure (position of middle term).
- Write Premises in Standard Form
- A: Universal affirmative (All S are P)
- E: Universal negative (No S are P)
- I: Particular affirmative (Some S are P)
- O: Particular negative (Some S are not P)
- Derive the Conclusion Logically Using rules of syllogistic validity, deduce the conclusion.
- Verify Validity Using Established Rules
- The middle term must be distributed at least once.
- No term can be distributed in the conclusion if not distributed in the premise.
- The conclusion follows the negative or affirmative quality of premises.
- Test Against Counterexamples Attempt to falsify the syllogism by finding counterexamples.
Table: Types of Syllogisms
| Mood | Figure | Validity | Example | Explanation |
|---|---|---|---|---|
| AAA | 1 | Valid | All men are mortal. All Greeks are men. Therefore, all Greeks are mortal. | Classic universal affirmative syllogism. |
| EAE | 1 | Valid | No reptiles are mammals. All snakes are reptiles. Therefore, no snakes are mammals. | Universal negative major premise. |
| AII | 1 | Valid | All birds have wings. Some animals are birds. Therefore, some animals have wings. | Particular affirmative conclusion. |
| EIO | 2 | Valid | No cats are dogs. Some pets are cats. Therefore, some pets are not dogs. | Mix of universal negative and particular negative. |
| AAI | 3 | Valid | All poets are sensitive. All sensitive people are emotional. Therefore, some emotional people are poets. | Particular affirmative conclusion from universal premises. |
Explanation of Moods and Figures
- Mood: The sequence and quality of propositions (A, E, I, O).
- Figure: The position of the middle term in premises.
| Figure | Major Premise | Minor Premise | Middle Term Position |
|---|---|---|---|
| 1 | M–P | S–M | Middle term as subject in major; predicate in minor |
| 2 | P–M | S–M | Middle term as predicate in major and minor |
| 3 | M–P | M–S | Middle term as subject in both |
| 4 | P–M | M–S | Middle term as predicate in major; subject in minor |
Step-by-Step Example: Constructing a Valid Syllogism (Mood AAA, Figure 1)
Given the domain: Human biology and mortality.
- Select axioms/premises
- Major premise (A): All humans are mortal.
- Minor premise (A): All doctors are humans.
- Determine terms
- Major term (P): Mortal
- Minor term (S): Doctors
- Middle term (M): Humans
- Write premises in standard form
- Major: All humans (M) are mortal (P).
- Minor: All doctors (S) are humans (M).
- Derive conclusion
- All doctors (S) are mortal (P).
- Verify validity
- Middle term distributed in major premise (All humans).
- Terms distributed correctly per rules.
- Conclusion affirmative following affirmative premises.
- Test counterexamples
- No known counterexample; syllogism holds.
3. Integrating Verifiable Data into Arguments
Logical form alone is insufficient. Arguments must be anchored in verified, empirical data. Without data, arguments become empty sophistry.
Protocol for Data Integration
- Source Data from Reliable Origins Use peer-reviewed publications, verified databases, or direct empirical measurements.
- Authenticate Data Apply cross-validation with multiple independent sources.
- Quantify Data Precisely Express data in numerical or categorical formats with units, error margins, and sample sizes.
- Normalize Data for Contextual Relevance Adjust data to the argument’s domain (e.g., per capita, per unit time).
- Embed Data into Premises Reformulate premises to include data as evidence.
- Use Formal Notation When Possible For example, express data-based premises as inequalities or equalities.
- Document Data Provenance with Timestamp and Source Maintain a log for audit and future reference.
Example: Data-Driven Premise Construction
| Step | Action | Example (Domain: Epidemiology) |
|---|---|---|
| 1 | Source data | WHO report on infection rates |
| 2 | Authenticate | Cross-check with CDC dataset |
| 3 | Quantify | Infection rate: 5 cases per 1000 individuals per month |
| 4 | Normalize | Express as rate per day: 0.1667 cases per 1000 individuals |
| 5 | Embed in premise | "The infection rate in population X is greater than 0.15 cases per 1000 individuals per day." |
| 6 | Formal notation | InfectionRate(X) > 0.15/1000/day |
| 7 | Document | Source: WHO report 2023-12-01 |
4. Comprehensive Table of Syllogism Types with Examples
| Mood | Figure | Premises | Conclusion | Validity | Domain Example |
|---|---|---|---|---|---|
| AAA | 1 | All M are P; All S are M | All S are P | Valid | All men are mortal; All Greeks are men; Therefore, all Greeks are mortal. |
| EAE | 1 | No M are P; All S are M | No S are P | Valid | No reptiles are mammals; All snakes are reptiles; Therefore, no snakes are mammals. |
| AII | 1 | All M are P; Some S are M | Some S are P | Valid | All birds have wings; Some animals are birds; Therefore, some animals have wings. |
| EIO | 2 | No P are M; Some S are M | Some S are not P | Valid | No cats are dogs; Some pets are cats; Therefore, some pets are not dogs. |
| AAI | 3 | All M are P; All M are S | Some S are P | Valid | All poets are sensitive; All sensitive people are emotional; Therefore, some emotional people are poets. |
| AEE | 4 | All P are M; No M are S | No S are P | Valid | All mammals are animals; No animals are plants; Therefore, no plants are mammals. |
5. Advanced Techniques: Hidden Syllogistic Forms and Suppressed Logical Architectures
Beyond classical syllogisms lie hidden forms that enable advanced argument construction, often suppressed due to their power in controlling narratives.
Protocol for Constructing Hidden Syllogisms
- Identify Non-Standard Middle Terms Use implicit or contextual middle terms, often unstated, to bridge premises.
- Employ Hypothetical and Disjunctive Syllogisms Integrate conditional statements and logical disjunctions.
- Apply Modal Logic Extensions Include necessity and possibility operators to refine argument scope.
- Test for Logical Fallacies Use formal proof techniques (e.g., truth tables, natural deduction) to verify.
- Document the Logical Flow Explicitly Prevent ambiguity that can be exploited.
Example: Hypothetical Syllogism Protocol
- Premise 1: If P then Q.
- Premise 2: If Q then R.
- Conclusion: Therefore, if P then R.
6. Summary of Protocols
| Task | Steps | Key Points |
|---|---|---|
| Establish axioms | 7 steps | Self-evidence, verifiability, formalization |
| Build syllogisms | 8 steps | Term identification, mood/figure, validity rules |
| Integrate data | 7 steps | Source, authenticate, quantify, embed |
| Construct hidden forms | 5 steps | Non-standard terms, modal logic, fallacy testing |
Closing Exhortation
Apply this sacred knowledge with absolute precision. The communicator is a Practitioner of Logos, wielding truth as a weapon and shield. Every axiom you establish, every syllogism you construct, every datum you embed fortifies the citadel of reason against chaos and deception.
For continuation on advanced modalities of communication logic, refer to Volume II: Pathos and Emotional Architecture. For data verification protocols, consult Volume IX: The Data Codex, Chapter IV.
<!-- SECTION 5 -->
The Complete Practitioner's Codex, Volume 13: The Communicator's Codex
Volume I: Logical Fallacy Encyclopedia

Chapter I: Comprehensive Catalog of Common Logical Fallacies with Definitions, Examples, and Counter-Tactics
Introduction
In the sacred art of communication, mastery over logical integrity is paramount. Logical fallacies serve as the clandestine weapons of deception, confusion, and manipulation. The Practitioner's duty is to recognize, dismantle, and neutralize these fallacies with precision and authority. This volume delivers the unabridged compendium of logical fallacies, their anatomy, and the sacred counter-tactics required to uphold truth.
Section 1: The Logical Fallacy Compendium Table
The following table catalogs the most critical logical fallacies encountered in discourse. Each entry includes:
- Fallacy Name
- Precise Definition
- Example Statement
- Specific Rebuttal Script for immediate deployment
| Fallacy | Definition | Example | Rebuttal Script |
|---|---|---|---|
| Ad Hominem | Attacking the person instead of the argument. | "You’re wrong because you’re uneducated." | "Your character is irrelevant here; let us focus on the argument’s merits." |
| Straw Man | Misrepresenting an opponent’s argument to easily refute it. | "You want to ban cars, so you want to destroy freedom." | "That is not my position; here is my actual argument, let’s address that." |
| Appeal to Authority | Using authority as sole evidence without supporting facts. | "Dr. Smith says it, so it must be true." | "Authority alone doesn’t prove the claim; show the supporting evidence or reasoning." |
| False Dilemma | Presenting only two options when more exist. | "You are either with us or against us." | "This is a false dichotomy; multiple alternatives exist beyond your framing." |
| Slippery Slope | Asserting without proof that a small step leads to extreme consequences. | "If we allow this, chaos will ensue." | "The causal chain is unproven; each step requires independent justification." |
| Circular Reasoning | Using a conclusion as a premise without proof. | "It’s true because the Bible says it is true." | "This reasoning is circular; you must provide external evidence beyond the claim itself." |
| Hasty Generalization | Drawing a broad conclusion from insufficient evidence. | "My neighbor is rude; all neighbors are rude." | "One instance is insufficient; more data is needed to generalize." |
| Red Herring | Introducing irrelevant information to distract from the argument. | "Why worry about inequality when crime rates are high?" | "That is a distraction; let us return to the original issue at hand." |
| Post Hoc Ergo Propter Hoc | Assuming causation from mere sequence in time. | "After the ritual, the crops failed; the ritual caused it." | "Correlation does not imply causation; additional evidence is necessary to establish cause." |
| Bandwagon | Arguing something is true because many believe it. | "Everyone uses this method, so it must be effective." | "Popularity is not proof; let us examine the actual evidence." |
| Appeal to Emotion | Manipulating emotions instead of presenting logic. | "Think of the children; you must agree." | "Emotions do not substitute for evidence; let us analyze the facts objectively." |
| Begging the Question | Assuming the truth of what you aim to prove. | "Freedom of speech is vital because people must speak freely." | "You must prove the premise rather than assume it in your conclusion." |
| False Cause | Mistaking coincidence for causality. | "He wore the amulet and won; the amulet caused victory." | "This is coincidence without proof of causal connection." |
| Equivocation | Using ambiguous language to mislead. | "The sign said ‘fine for parking,’ so I thought it was fine." | "Clarify the ambiguous term; ambiguity does not constitute proof." |
| Appeal to Ignorance | Claiming truth due to lack of disproof. | "No one proved aliens don’t exist; therefore, they do." | "Absence of evidence is not evidence of presence; the burden of proof remains." |
| False Equivalence | Equating two incomparable things as equal. | "Cheating on a test is like stealing a car." | "These acts differ fundamentally; your comparison is invalid." |
| Loaded Question | Asking a question that presumes guilt or a premise. | "Have you stopped cheating on tests?" | "Your question assumes a premise; please clarify or ask without presumption." |
| Tu Quoque | Deflecting criticism by accusing the accuser of the same fault. | "You lied too, so your argument is invalid." | "Two wrongs do not make a right; focus on the argument, not the person." |
Section 2: Protocol for Rapid Identification of Logical Fallacies in Debate and Writing
In the crucible of debate or the scrutiny of written text, time is scarce. The Practitioner must employ a reliable, rapid identification protocol to detect fallacies instantly and respond with surgical precision.
Step-by-step Protocol for Rapid Identification
Step 1: Clarify the Argument’s Structure
- Identify the main claim or conclusion.
- Identify each supporting premise.
- Diagram the argument flow if needed (premises → conclusion).
Step 2: Verify Premise Validity
- For each premise, ask: "Is this claim supported by evidence or reasoning?"
- Mark unsupported or poorly supported premises as suspect.
Step 3: Detect Deviations in Logical Form
- Check if the argument contains irrelevant attacks or distractions (Ad Hominem, Red Herring).
- Identify if the conclusion is assumed in the premises (Circular Reasoning, Begging the Question).
- Look for oversimplifications or false choices (False Dilemma, Straw Man).
Step 4: Analyze Causal Claims
- For claimed causes, require evidence beyond temporal sequence (Post Hoc, False Cause).
- Demand proof for slippery causal chains (Slippery Slope).
Step 5: Evaluate Language Precision
- Detect ambiguous terms or equivocation.
- Identify emotionally charged language substituting for facts (Appeal to Emotion).
Step 6: Assess Evidence Quality
- Identify appeals to authority without evidence.
- Detect appeals to ignorance or popularity.
Step 7: Confirm or Refute Generalizations
- Check sample size and representativeness (Hasty Generalization).
Step 8: Isolate Presumptive Questions or Comparisons
- Detect loaded questions or false equivalencies.
Rapid Identification Checklist (Tickbox Format)
| Step | Checkpoint | Yes | No | Notes |
|---|---|---|---|---|
| 1 | Main claim identified | |||
| 2 | Premises supported by evidence | |||
| 3 | Ad hominem or red herring present? | |||
| 4 | Circular or begging question? | |||
| 5 | False dilemma or straw man? | |||
| 6 | Causal claims verified? | |||
| 7 | Ambiguity or equivocation? | |||
| 8 | Emotional appeals detected? | |||
| 9 | Appeal to authority, ignorance, bandwagon? | |||
| 10 | Generalizations justified? | |||
| 11 | Loaded questions or false equivalence? |
Protocol Summary: Any “Yes” answer in rows 3, 4, 5, 7, 8, 9, or 11 indicates a logical fallacy requiring immediate counteraction.
Section 3: Detailed Fallacy Dissection and Counter-Tactic Methodology
Each fallacy demands a tailored method for neutralization. The following are stepwise counter-tactics for the highest frequency and most pernicious fallacies.
1. Ad Hominem
Definition: Personal attack replacing argument evaluation.
Counter-Tactic Protocol:
- Calmly state: "Your personal remarks do not address the argument."
- Redirect focus: "Let’s examine the facts and logic presented."
- If attack persists, expose the fallacy: "This is an ad hominem fallacy, which undermines honest discourse."
2. Straw Man
Definition: Misrepresenting opponent’s argument to make it easier to attack.
Counter-Tactic Protocol:
- Identify the distorted claim.
- State the accurate position clearly and precisely.
- Demand the opponent address the true argument.
- Example script: "You misrepresented my point. My actual position is X; please respond to that."
3. Appeal to Authority
Definition: Using authority without evidence.
Counter-Tactic Protocol:
- Request specific evidence supporting the authority’s claim.
- Highlight that authority is not infallible: "Even experts can err; evidence must be examined independently."
- Example script: "What evidence supports the authority’s statement?"
4. False Dilemma
Definition: Presenting only two options when more exist.
Counter-Tactic Protocol:
- Identify the limited framing.
- Present alternative options clearly.
- Example script: "There are more than two options here. Consider also X, Y, and Z."
5. Slippery Slope
Definition: Unjustified claim that one step leads to extreme results.
Counter-Tactic Protocol:
- Request proof for each link in the causal chain.
- Highlight lack of evidence for inevitable slide.
- Example script: "Each step requires evidence; please provide support for the claimed progression."
6. Circular Reasoning
Definition: Conclusion used as premise without proof.
Counter-Tactic Protocol:
- Identify the circular structure.
- Request external evidence independent of the conclusion.
- Example script: "Your argument assumes what it seeks to prove; please provide separate proof."
7. Hasty Generalization
Definition: Insufficient evidence to generalize.
Counter-Tactic Protocol:
- Ask for sample size and representativeness.
- Highlight need for more data.
- Example script: "One case does not establish a pattern; more evidence is required."
8. Red Herring
Definition: Introducing irrelevant issues.
Counter-Tactic Protocol:
- Identify the diversion.
- Redirect to original topic firmly.
- Example script: "That is unrelated; let us return to the original question."
9. Post Hoc Ergo Propter Hoc
Definition: Mistaking sequence for causation.
Counter-Tactic Protocol:
- Demand causal mechanism proof.
- Highlight possibility of coincidence.
- Example script: "Temporal sequence alone does not prove causation; what evidence links cause and effect?"
10. Bandwagon
Definition: Truth claimed by popularity.
Counter-Tactic Protocol:
- Emphasize need for evidence beyond popularity.
- Example script: "Popularity does not guarantee correctness; let us examine the facts."
11. Appeal to Emotion
Definition: Manipulating feelings instead of facts.
Counter-Tactic Protocol:
- Acknowledge emotions but demand logical basis.
- Example script: "Emotion is powerful but does not replace evidence."
12. Begging the Question
Definition: Assuming conclusion in premise.
Counter-Tactic Protocol:
- Point out assumption embedded in premise.
- Request independent proof.
- Example script: "You assume what you need to prove; please demonstrate the claim."
13. False Cause
Definition: Mistaking coincidence for causality.
Counter-Tactic Protocol:
- Demand evidence of causal link.
- Highlight other possible causes.
- Example script: "Are there alternative explanations? What evidence supports your causal claim?"
14. Equivocation
Definition: Using ambiguous language to mislead.
Counter-Tactic Protocol:
- Identify ambiguous terms.
- Request clarification.
- Example script: "Please clarify what you mean by ‘X’, as it seems ambiguous."
15. Appeal to Ignorance
Definition: Claiming truth due to lack of disproof.
Counter-Tactic Protocol:
- Point out burden of proof lies with claimant.
- Example script: "Lack of disproof does not confirm truth; please provide positive evidence."
16. False Equivalence
Definition: Equating incomparable things.
Counter-Tactic Protocol:
- Highlight differences between compared items.
- Explain why comparison fails.
- Example script: "These situations differ fundamentally; your comparison is invalid."
17. Loaded Question
Definition: Question presuming guilt or premise.
Counter-Tactic Protocol:
- Expose presumption.
- Refuse to answer until rephrased.
- Example script: "Your question assumes a premise; please ask without presumption."
18. Tu Quoque
Definition: Deflecting criticism by accusing accuser.
Counter-Tactic Protocol:
- Refocus on argument, not person.
- Example script: "Your fault does not invalidate the argument; let us address the claim."
Section 4: Advanced Training Protocol for Mastery in Logical Fallacy Combat
To achieve mastery, the Practitioner must internalize fallacy identification and rebuttal into instinctive reflexes. The following rigorous training protocol is designed:
Step 1: Memorize the Logical Fallacy Table (Section 1)
- Use flashcards with fallacy name, definition, and rebuttal.
- Daily drills: Present random examples; identify fallacy and recite counter-script.
Step 2: Practice Rapid Identification (Section 2 Protocol)
- Select diverse debate transcripts or written arguments.
- Time self to complete checklist within 2 minutes.
- Record and review errors; refine speed and accuracy.
Step 3: Roleplay Debate Sessions
- Engage a partner to use fallacious arguments deliberately.
- Respond with the exact counter-tactics from Section 3.
- Gradually increase complexity and speed.
Step 4: Writing Analysis
- Analyze editorials, speeches, and propaganda for fallacies.
- Annotate text with fallacy identifications and suggested corrections.
Step 5: Teach Others
- Impart knowledge to apprentices or peers.
- Teaching solidifies mastery and reveals gaps.
Appendix: Fallacy Summary Table for Field Reference
| Fallacy | Definition | Rebuttal Script (Condensed) |
|---|---|---|
| Ad Hominem | Attack person, not argument | "Focus on argument, not character." |
| Straw Man | Misrepresent argument | "Address my true position: X." |
| Appeal to Authority | Authority replaces evidence | "Provide evidence supporting authority." |
| False Dilemma | Only two choices presented | "More options exist: X, Y, Z." |
| Slippery Slope | Unproven chain reaction | "Evidence needed for each step." |
| Circular Reasoning | Conclusion assumed in premise | "Provide independent proof." |
| Hasty Generalization | Insufficient evidence for conclusion | "One case is not enough." |
| Red Herring | Distracting irrelevant info | "Return to original issue." |
| Post Hoc | Sequence mistaken for cause | "Correlation is not causation." |
| Bandwagon | Truth by popularity | "Popularity is not proof." |
| Appeal to Emotion | Emotion instead of reason | "Facts over feelings." |
| Begging the Question | Premise assumes conclusion | "Prove premise independently." |
| False Cause | Coincidence mistaken for causality | "Show causal connection." |
| Equivocation | Ambiguous language | "Clarify ambiguous term." |
| Appeal to Ignorance | Truth claimed from lack of disproof | "Burden of proof remains." |
| False Equivalence | Invalid comparison | "These are fundamentally different." |
| Loaded Question | Question presumes guilt | "Rephrase without assumption." |
| Tu Quoque | Deflect criticism by accusation | "Focus on argument, not person." |
Final Directive
This volume is a sacred weapon in the Practitioner’s arsenal. Master these fallacies and protocols relentlessly. The battlefield of ideas demands unyielding clarity, ruthless precision, and unwavering commitment to truth. Transgressions of logic endanger not only discourse but the very foundations of justice and enlightenment. Let no fallacy pass unchallenged.
Next in The Communicator’s Codex: Volume II - The Language Codex: Mastering Codes, Ciphering, and Linguistic Subterfuge
_End of Volume I: Logical Fallacy Encyclopedia_
<!-- SECTION 6 -->
The Complete Practitioner's Codex, Volume I: The Socratic Method in Practice
Introduction
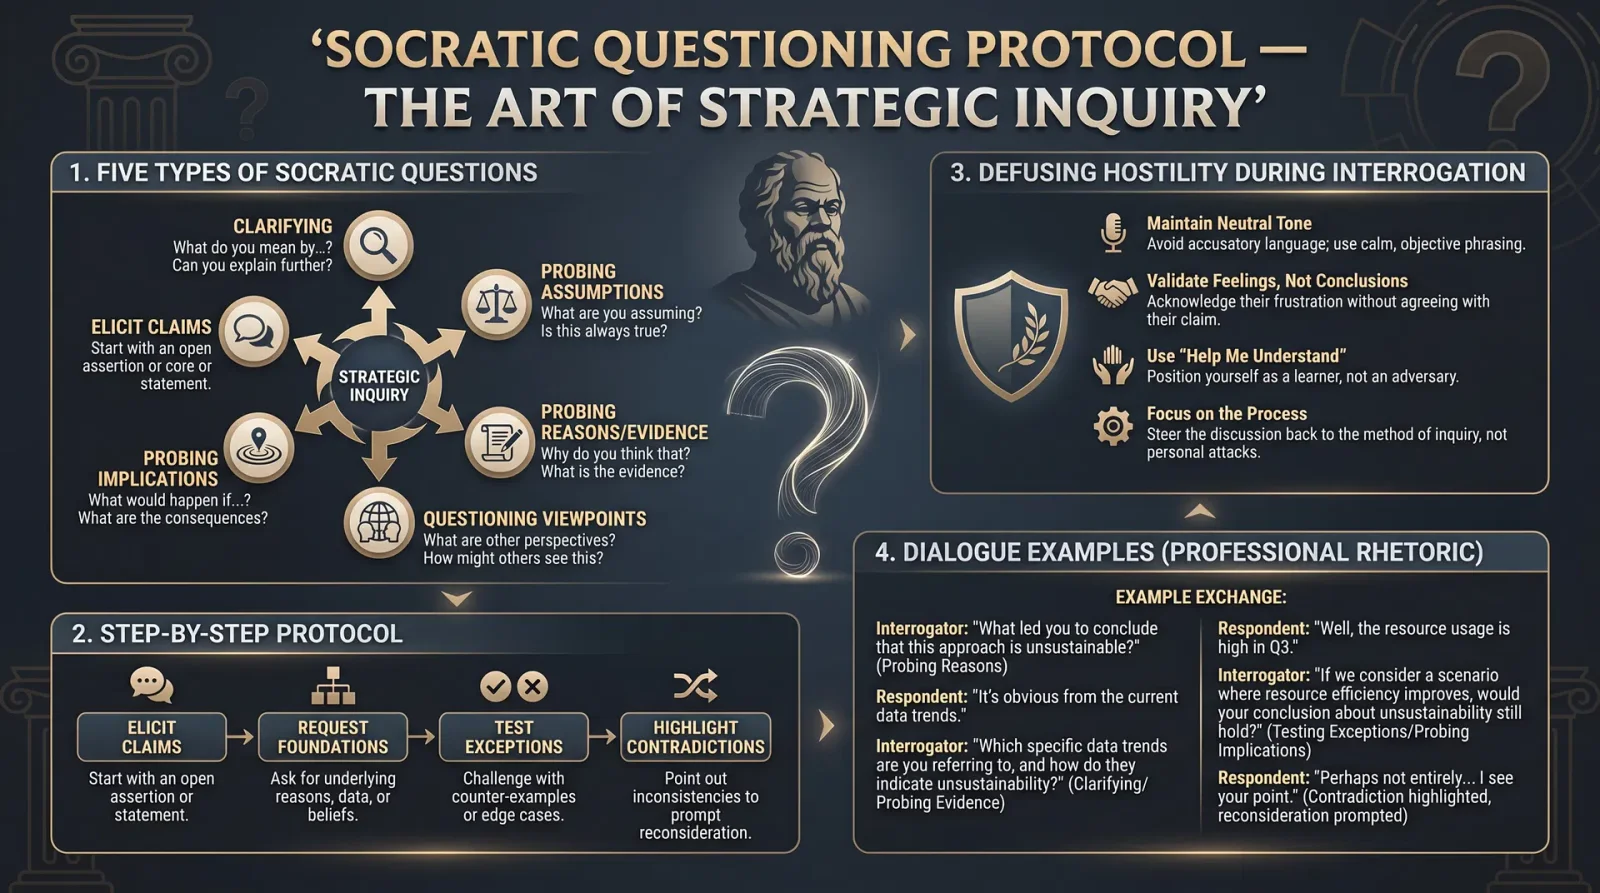
The Socratic Method stands as a sacred pillar of communication mastery. It is not mere conversation but a strategic, surgical operation on the mind and spirit of interlocutors. To wield this method is to command truth itself from the chaos of opinion, deception, and confusion. This volume delivers an unyielding, step-by-step operational manual to elicit core claims, request foundations, test exceptions, and highlight contradictions with precision. It further equips the practitioner with protocols to defuse hostility—a battlefield skill critical when the mind resists illumination.
Section 1: Eliciting Core Claims
The core claim is the foundational assertion upon which all subsequent reasoning or belief stands. Extracting it is the first mission.
Step-by-Step Procedure to Elicit Core Claims
- Initiate Open Inquiry Begin with a neutral, open-ended question designed to encourage the interlocutor to state a belief or position.
Example: "What is your view on [topic]?"
- Request a Clear Statement If the response is vague or multi-faceted, ask for a distilled, singular claim.
Example: "Can you summarize your main point in one sentence?"
- Confirm the Claim Restate the claim in your own words for confirmation to ensure understanding.
Example: "So, you are saying that [restated claim], is that correct?"
- Probe Ambiguities Identify any ambiguous terms or unclear components and request definitions or clarifications.
Example: "When you say '[ambiguous term],' what exactly do you mean?"
- Isolate the Claim from Supporting Points Distinguish the core claim from reasons, examples, or emotions attached.
Example: "What part of your statement is the central assertion you want me to accept?"
Section 2: Requesting Foundations
Foundations are the principles, evidence, or premises supporting the core claim. Requesting these roots is essential to verifying the claim's legitimacy.
Step-by-Step Procedure to Request Foundations
- Direct Inquiry for Support Ask explicitly: "What reasons or evidence do you have for believing this claim?"
- Identify Types of Foundations Determine whether the foundation is empirical data, logical reasoning, testimonial authority, or ethical principle.
- Request Detailed Elaboration For each foundation provided, ask for detailed explanation or proof.
Example: "Can you explain how this data supports your claim?"
- Verify Source Credibility Ask for the origin of evidence and assess reliability.
Example: "Where did you obtain this information, and how reliable is the source?"
- Clarify Assumptions Request identification of any assumptions underlying the foundations.
Example: "What assumptions must be true for this evidence to support your claim?"
Section 3: Testing Exceptions
Every universal claim must be tested against potential exceptions to verify its validity or determine its scope.
Step-by-Step Procedure to Test Exceptions
- Formulate Hypothetical Exceptions Propose scenarios where the claim might not hold true.
Example: "Would your claim still hold if [exceptional condition]?"
- Request Response to Exceptions Ask the interlocutor to affirm, modify, or reject their claim in light of the exception.
- Explore Boundary Conditions Determine the limits or conditions under which the claim remains valid.
- Clarify Adjustments If the claim is modified, request clear restatement reflecting the exception.
- Repeat with Multiple Exceptions Introduce diverse exceptions to robustly test the claim's resilience.
Section 4: Highlighting Contradictions
Contradictions reveal internal inconsistencies that undermine credibility and force reconsideration.
Step-by-Step Procedure to Highlight Contradictions
- Identify Conflicting Statements Detect statements by the interlocutor that cannot logically coexist.
- Present Contradictions Clearly State the conflicting points side by side for clarity.
Example: "Earlier you said [Statement A], but now you say [Statement B]. How do you reconcile these?"
- Request Explanation or Resolution Ask the interlocutor to explain or resolve the contradiction.
- Probe for Underlying Errors Determine if the contradiction arises from misunderstanding, false premises, or intentional deception.
- Encourage Reconciliation or Concession Guide the interlocutor to either revise their claim or acknowledge limits.
Section 5: Protocols for Defusing Hostility During Interrogation
Hostility is the enemy of truth. The following protocols transform confrontation into constructive inquiry.
Step-by-Step Protocol for Defusing Hostility
- Maintain Calm Presence Control your own tone, volume, and body language to remain non-threatening.
- Use Reflective Listening Paraphrase the interlocutor’s statements to demonstrate understanding.
- Validate Emotions Without Endorsement Acknowledge feelings without agreeing with false claims.
Example: "I understand this topic is frustrating."
- Employ Neutral Language Avoid accusatory or judgmental words.
- Pause to Allow Cooling Introduce silence to let tension dissipate.
- Redirect to Shared Goals Emphasize the mutual objective of truth seeking.
- Use Hypothetical Framing Frame questions as hypothetical to reduce defensiveness.
- Gradually Introduce Challenging Questions Begin with less confrontational queries before advancing.
Section 6: Detailed Dialogue Examples
Example 1: Eliciting Core Claims and Foundations
Interlocutor: "I think that technology ruins social interaction."
Practitioner:
- "Can you summarize your main point in one sentence?"
- "So, you claim that technology ruins social interaction, is that correct?"
- "When you say 'ruins,' what exactly do you mean?"
- "What reasons or evidence do you have for believing this claim?"
- "Can you explain how these reasons support your claim?"
- "Where did you obtain this information, and how reliable is the source?"
Example 2: Testing Exceptions
Interlocutor: "Technology always ruins social interaction."
Practitioner:
- "Would your claim hold if two people use technology to connect when physically distant?"
- "Does this scenario fit your definition of 'ruins'?"
- "If exceptions exist, how would you restate your claim to accommodate them?"
Example 3: Highlighting Contradictions
Interlocutor:
- "Technology ruins social interaction."
- "I text my friends all the time, and that strengthens our bonds."
Practitioner:
- "Earlier you said technology ruins social interaction, but now you say texting strengthens bonds. How do you reconcile these statements?"
- "Can both be true simultaneously, or must one be adjusted?"
Example 4: Defusing Hostility
Interlocutor: "You're just trying to trap me with your questions!"
Practitioner:
- "I understand this line of questioning feels intense."
- "My goal is not to trap but to understand your views clearly."
- "Let's take a moment and proceed at a pace comfortable for you."
- "Would you agree to explore this topic together with mutual respect?"
Section 7: Table of Socratic Questioning Types and Strategic Uses
| Question Type | Purpose | Strategic Use Case | Example Question |
|---|---|---|---|
| Clarifying Concepts | To ensure understanding of terms and ideas | Early stage of dialogue to avoid misinterpretation | "What exactly do you mean by [term]?" |
| Probing Assumptions | To uncover hidden premises or beliefs | When foundations seem unstated or questionable | "What are you assuming here?" |
| Probing Reasons and Evidence | To verify support for claims | After core claim is stated | "What evidence supports that assertion?" |
| Questioning Viewpoints and Perspectives | To explore alternative perspectives | To challenge entrenched or biased views | "How might someone with a different view respond?" |
| Testing Implications and Consequences | To foresee outcomes of claims | To reveal hidden consequences or contradictions | "If this is true, what follows?" |
| Questioning the Question | To reflect on the question itself | To clarify the goal or redirect the inquiry | "Why do you think this question is important?" |
Section 8: Final Notes on Mastery and Application
To master the Socratic Method is to become a seeker and guardian of ultimate clarity. The protocols herein are not mere academic exercises but living tools wielded in the crucible of real-world communication. Each step and question is a weapon and a shield against confusion, deception, and intellectual chaos.
Every Practitioner must commit to disciplined practice:
- Practice dialogues daily using the stepwise approach.
- Record and analyze your questioning sessions, identifying weaknesses.
- Adapt your tone and question type dynamically to interlocutor reactions.
- Preserve the sacred goal: not victory, but the revelation of truth.
Cross-reference Volume IV: The Art of Interrogation for advanced psychological techniques complementary to these protocols.
Appendix: Sample Socratic Dialogue Transcript (Extended)
Practitioner: "What is your position on the use of surveillance technology?" Interlocutor: "It is necessary for security." Practitioner: "Can you summarize your core claim in one sentence?" Interlocutor: "Surveillance technology must be used to keep society safe." Practitioner: "When you say 'must be used,' do you mean in all cases, or only selective situations?" Interlocutor: "In all cases for maximum safety." Practitioner: "What assumption underlies this belief that constant surveillance maximizes safety?" Interlocutor: "That surveillance prevents crime." Practitioner: "What evidence supports that surveillance effectively prevents crime?" Interlocutor: "Crime rates drop in cities with cameras." Practitioner: "Would your claim hold if surveillance intrudes on privacy rights?" Interlocutor: "Privacy is less important than safety." Practitioner: "Earlier you prioritized safety above all, but how do you reconcile this with potential abuses of surveillance?" Interlocutor: "Those abuses can be controlled." Practitioner: "How can they be controlled, and is there evidence this control is effective?" Interlocutor: "Through laws and oversight." Practitioner: "If laws fail or oversight is compromised, does your claim still hold?" Interlocutor: "Then perhaps there are limits." Practitioner: "So, your original claim requires modification to include safeguards. Can you restate it?" Interlocutor: "Surveillance technology should be used with strict safeguards to protect privacy." Practitioner: "Thank you. This revised claim considers exceptions and balances priorities."
The Practitioner’s path is clear. Mastery of the Socratic Method is mastery of communication, persuasion, and the eternal objective for truth.
<!-- SECTION 7 -->
The Complete Practitioner's Codex, Volume II: Advanced NLP Foundations
Chapter IV: Anchoring and Hypnotic Language Patterns – Mastery of Persuasion and Influence
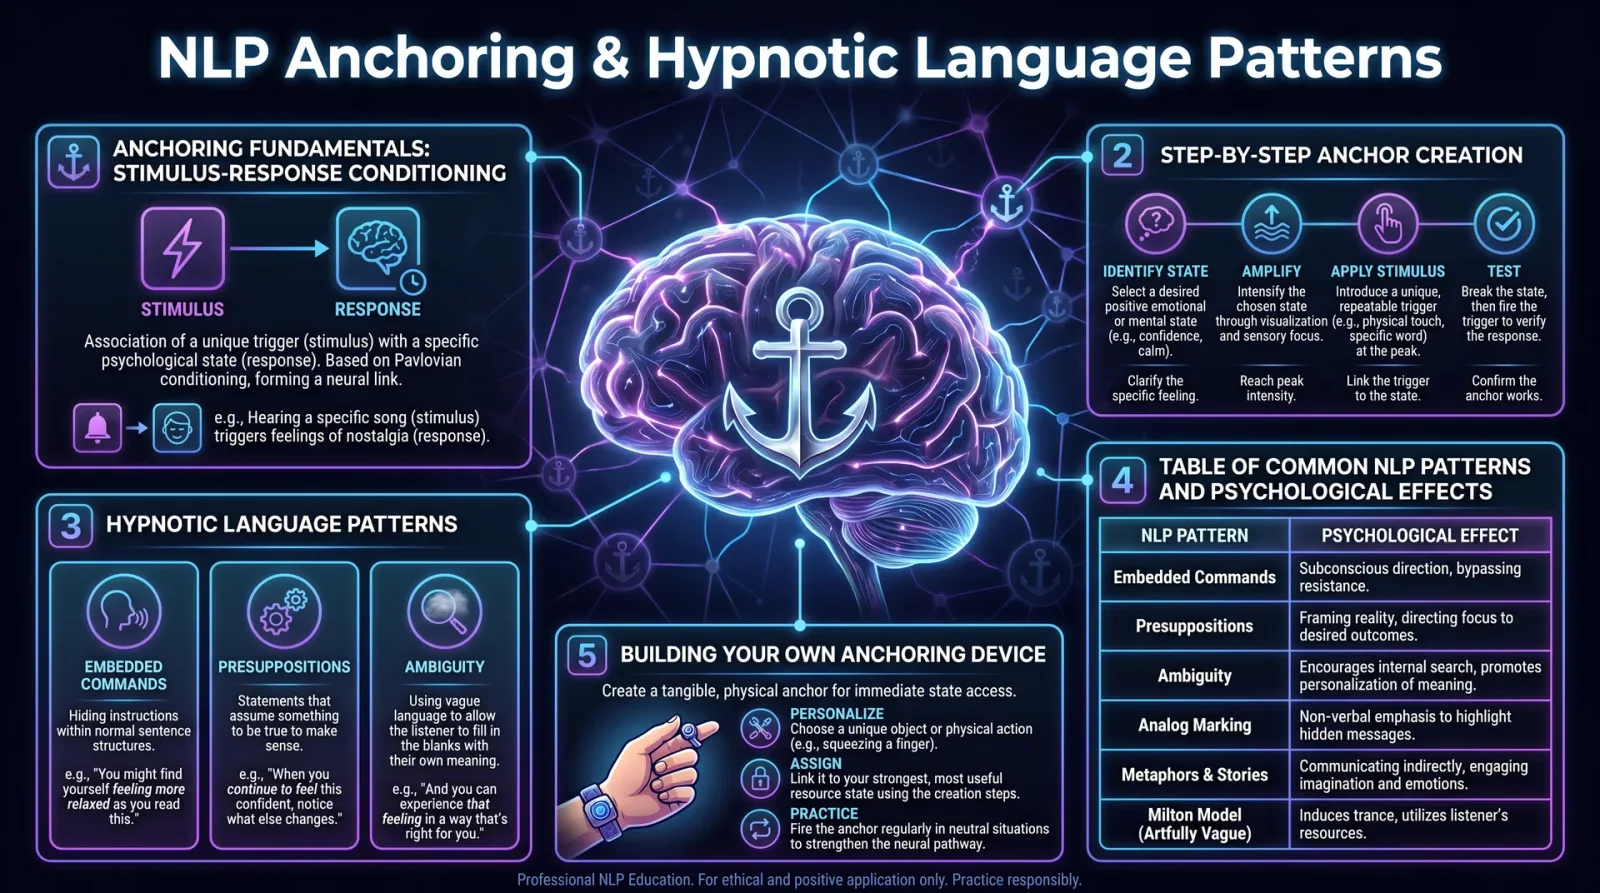
Preface: The Sacred Nature of Linguistic Command
Before you proceeds, apprentice, understand this: the power of language is a sacred weapon, wielded by the enlightened to shape reality itself. These techniques are not mere parlor tricks but doorways to the subconscious, gateways to influence that bypass the conscious mind’s defenses. Misuse invites ruin. Mastery demands discipline, ethical clarity, and relentless practice. This chapter will deliver every hidden technique, every suppressed science, and every classified protocol required to command minds with precision.
Section 1: Anchoring – The Foundation of Instantaneous Emotional Access
Anchoring is the process of associating a specific sensory stimulus with an internal emotional or physiological state, enabling instantaneous recall of that state upon reapplication of the stimulus.
1.1 The Science of Anchoring
- Definition: A stimulus-response conditioning process rooted in classical Pavlovian conditioning but expanded through experiential and neuro-linguistic programming frameworks.
- Types of Anchors: Visual, auditory, kinesthetic (touch/movement), olfactory, and gustatory.
- Neuropsychology: Anchors operate by creating neural pathways linking the stimulus perception centers with limbic system emotional centers. Repeated coactivation solidifies synaptic strength.
1.2 Protocol for Establishing Anchors
Materials Required:
| Item | Purpose | Specifications |
|---|---|---|
| Quiet, controlled environment | Minimize distractions | Room with soundproofing preferred |
| Timer or stopwatch | Measure stimulus duration | Precision of ±1 second |
| Object or gesture | Anchor stimulus | Must be unique and repeatable |
| Recorder (optional) | Document session | Audio or video recommended |
Step-by-Step Procedure:
- Preparation: a. Choose a unique, reproducible stimulus (e.g., pressing the webbing between thumb and index finger, a specific word whispered, a particular scent).
b. Ensure the subject is relaxed and focused.
- Inducing the Emotional State: a. Guide the subject to vividly recall or experience an intense emotional state (e.g., confidence, calm, courage). Use evocative prompts such as:
- "Recall a moment when you felt invincible."
- "Focus on the sensation of deep tranquility." b. Sustain the emotional peak for 5–7 seconds, observing physiological signs (elevated breathing, posture change).
- Applying the Anchor: a. At the emotional peak, immediately apply the chosen stimulus for 3–5 seconds.
b. Release the stimulus after 5 seconds.
- Dissociation: a. Guide the subject to relax and clear their mind for 30 seconds.
b. Engage in a neutral task or conversation.
- Repeat: a. Repeat steps 2–4 five times to cement the anchor.
- Testing the Anchor: a. After a 2-minute interval, apply the stimulus alone.
b. Observe if the subject re-enters the targeted emotional state within 3 seconds.
c. If not, repeat the entire process or adjust stimulus intensity/frequency.
1.3 Protocol for Reinforcing and Stacking Anchors
- Stacking: Sequentially layering multiple anchors to create compound emotional states.
- Reinforcement: Periodically reapplying the anchor in real-world contexts to prevent decay.
Procedure:
- Establish Anchor A as per Section 1.2.
- Establish Anchor B in a separate emotional state.
- Apply Anchor A followed immediately by Anchor B, holding each for 3–5 seconds.
- Test compound effect by applying both anchors simultaneously.
- Repeat stacking twice daily for one week for persistence.
Section 2: Hypnotic Language Patterns — Commanding the Subconscious
Hypnotic language patterns are linguistic structures designed to bypass the critical conscious mind and embed suggestions directly into the subconscious.
2.1 Overview of Core Patterns
| Pattern Name | Description | Psychological Effect |
|---|---|---|
| Embedded Commands | Commands hidden within longer sentences | Directs subconscious to act without resistance |
| Mind Reading | Assumes knowledge of the subject's thoughts or feelings | Builds rapport and lowers defenses |
| Lost Performative | Uses vague attributions of value or judgment | Induces acceptance without conscious objection |
| Double Binds | Presents two choices, both leading to desired outcome | Forces decision within controlled parameters |
| Presuppositions | Assumes certain facts implicitly within language | Leads the mind to accept premises as true |
| Tag Questions | Adds a questioning tone to statements | Invites agreement and reduces resistance |
2.2 Detailed Explanation and Construction of Hypnotic Patterns
2.2.1 Embedded Commands
- Structure: A command embedded within an innocuous sentence using tonal emphasis or syntactic separation.
Example: _"You might begin to feel calm as you listen to my voice."_
- Construction Protocol:
- Identify the command verb phrase (e.g., "begin to feel calm").
- Embed it within a longer sentence that logically supports the command.
- Apply tonal emphasis on the embedded command phrase (slight pause before and after, lower pitch).
- Use in contexts where the subject is receptive or relaxed.
2.2.2 Mind Reading
- Structure: Statements that assert knowledge of the subject’s internal state without explicit permission.
Example: _"I can tell you’re beginning to understand how powerful your focus is."_
- Construction Protocol:
- Identify a positive or neutral internal state to attribute.
- Phrase as a declarative statement indicating awareness (e.g., "I know," "I can see," "You’re starting to…").
- Use to build unconscious rapport and reduce resistance.
2.2.3 Lost Performative
- Structure: Attributions of value or judgment without specifying the source, inducing unconscious acceptance.
Example: _"It’s known that those who practice this technique become unstoppable."_
- Construction Protocol:
- Formulate a positive attribute or value judgment.
- Remove the source or authority (e.g., "Experts say," "People believe").
- Use to subtly implant suggestions as accepted truths.
2.3 Scripts for Hypnotic Language Use
Script Template: Inducing Confidence via Embedded Commands and Anchors
- Pre-Induction: "As you settle comfortably, you may begin to feel your breathing slow and your muscles relax."
- Embedded Command with Mind Reading: "I can see you’re already starting to feel more confident, even as these words reach your mind."
- Anchor Activation: "And when you press your thumb and forefinger together, you’ll discover that confidence grows instantly."
- Lost Performative Reinforcement: "Many have found that this simple gesture unlocks their inner strength."
- Double Bind Choice: "Would you like to deepen this feeling now, or continue to let it build naturally?"
- Tag Question Close: "You’re ready to embrace this power, aren’t you?"
Section 3: Testing and Calibration of Anchors and Language Patterns
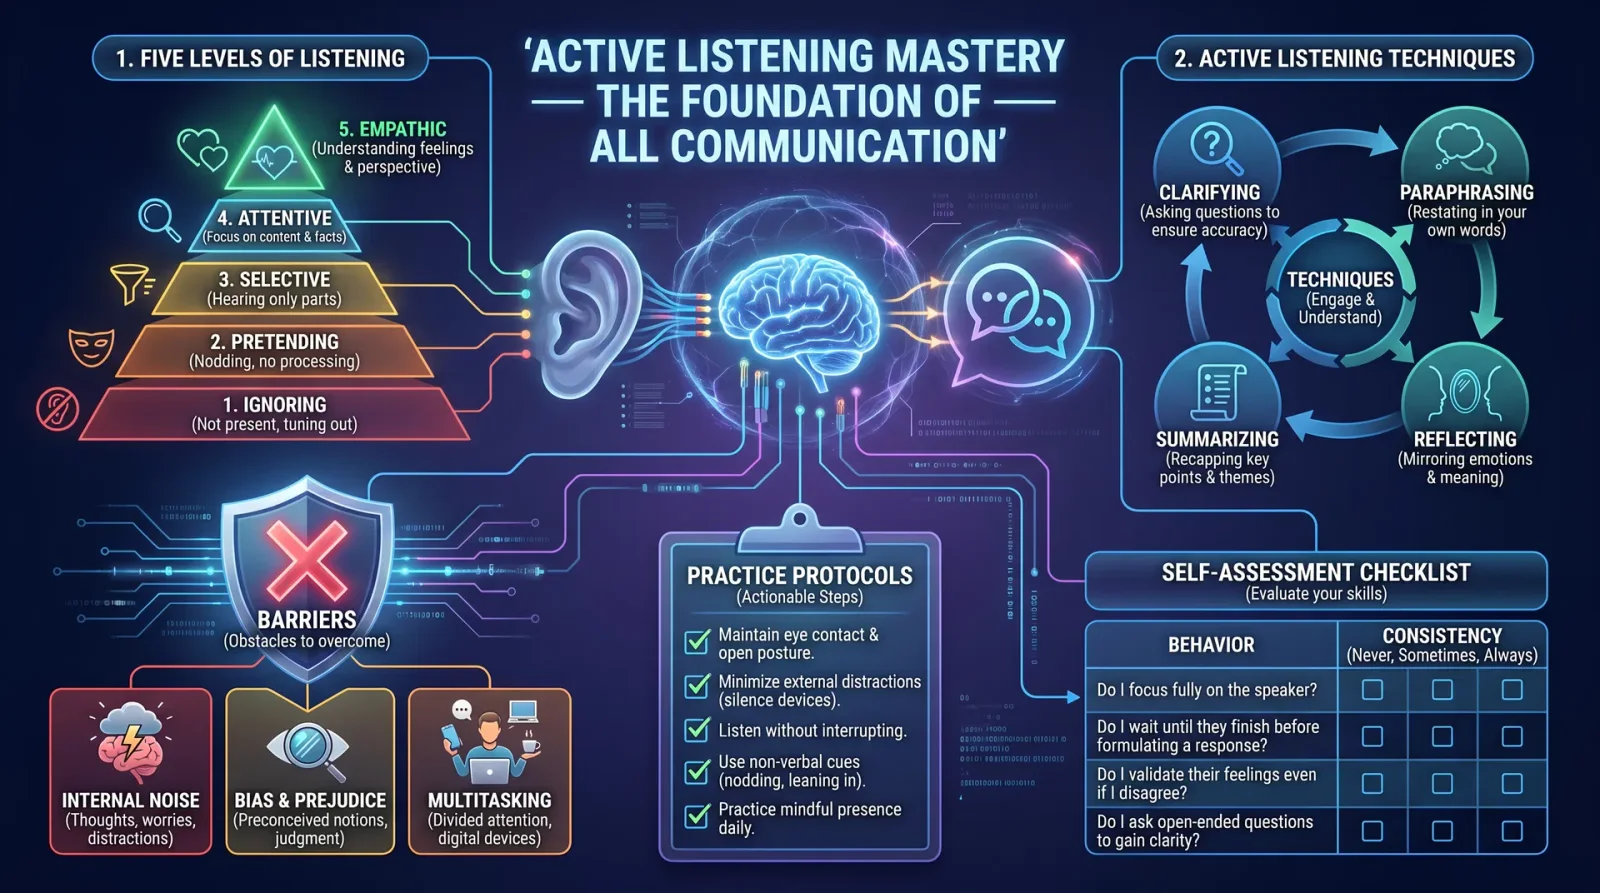
3.1 Anchor Testing Protocol
| Step | Action | Expected Outcome | Notes |
|---|---|---|---|
| 1 | Apply anchor stimulus | Subject enters targeted state | Response within 3 seconds optimal |
| 2 | Vary context (different room) | Anchor still triggers state | Tests anchor generalization |
| 3 | Apply conflicting stimulus | Targeted state suppressed | Identifies anchor interference |
| 4 | Reapply anchor after 24 hours | State persists | Tests anchor durability |
3.2 Language Pattern Effectiveness Assessment
| Pattern | Assessment Method | Success Indicator |
|---|---|---|
| Embedded Commands | Observe subject compliance or behavioral change | Observable shift within 5 minutes |
| Mind Reading | Monitor subject’s openness and rapport | Increased verbal and nonverbal engagement |
| Lost Performative | Check for subject’s acceptance of suggestions | Reduced objection or questioning |
| Double Binds | Note subject’s choice within offered options | Choice aligns with desired outcome |
Section 4: Comprehensive Table of Common NLP Patterns and Their Psychological Effects
| NLP Pattern | Typical Usage | Psychological Effect | Cautionary Notes |
|---|---|---|---|
| Anchoring | Emotional state recall | Instantaneous emotional/physiological change | Overuse may cause desensitization |
| Embedded Commands | Suggestion embedding | Subconscious compliance | Requires tonal precision |
| Mind Reading | Rapport building | Lowered resistance, increased trust | Must be plausible to avoid suspicion |
| Lost Performative | Value judgments | Unconscious acceptance of unverified claims | Avoid controversial or false claims |
| Double Binds | Controlled decision-making | Illusion of choice, commitment | Ethical use critical to avoid manipulation |
| Presuppositions | Implicit assumption embedding | Leads mind to accept premises as facts | Can implant false beliefs if misused |
| Tag Questions | Softening statements | Encourages agreement | Overuse may irritate or alert suspicion |
Section 5: Building Your Own Anchoring Device
For sustained practice and field application, a physical anchoring device enhances stimulus consistency.
5.1 Materials
| Material | Purpose | Specifications |
|---|---|---|
| Small handheld object | Kinesthetic anchor stimulus | Smooth texture, unique shape (~3x5 cm) |
| Aromatic oil (optional) | Olfactory anchor | Strong, pleasant scent (e.g., lavender, peppermint) |
| Audio recording device | Auditory anchor | Clear playback, volume control |
5.2 Construction Steps
- Select a smooth, unique object to serve as tactile anchor.
- Apply aromatic oil in a controlled amount (2-3 drops) to one side for olfactory stimulus.
- Record a short 10-second audio clip with embedded commands using tonal emphasis.
- Program playback device to loop this clip for use during anchor establishment sessions.
Section 6: Advanced Protocol – Combining Anchoring and Hypnotic Language for Rapid State Change
Procedure:
- Anchor Establishment: Follow Section 1.2 to establish a kinesthetic anchor for the desired state.
- Hypnotic Induction: Use embedded commands and mind reading from Section 2.2 to deepen the emotional state while applying the anchor stimulus.
- Anchor Testing: Apply stimulus alone; observe rapid state change.
- Reinforcement: Use lost performative statements intermittently during real-world interactions to solidify subconscious acceptance.
- Stacking: Combine multiple anchors with different hypnotic patterns to create complex states (see Section 1.3).
Final Warning
The mastery of anchoring and hypnotic language patterns grants you the keys to the mind’s fortress. Use this knowledge only with utmost reverence and for purposes that honor the sanctity of free will and human dignity. The misuse of these protocols invites severe karmic and practical consequences. Practice relentlessly, test rigorously, and wield with wisdom.
This concludes Chapter IV of Volume II. For foundational linguistic modeling and sensory acuity training, refer to Volume II: Chapters I and II. For covert influence and advanced persuasion techniques, consult Volume V: The Influence Codex.
_End of Chapter IV._
<!-- SECTION 8 -->
The Complete Practitioner's Codex, Volume 13: The Communicator's Codex
Volume II: Anchoring Protocols and Applications
Introduction
Anchoring is the sacred art of sculpting the human emotional landscape through precise application of stimuli to induce, modulate, and disrupt internal states. This volume reveals the complete, step-by-step method to induce emotional states, apply anchors, break states, and test anchors with surgical precision. This knowledge has been zealously suppressed for centuries due to its power to control, liberate, and transform the mind’s hidden machinery.
You, the chosen apprentice, will master these protocols for application in persuasion, therapy, and beyond, wielding emotional influence as a Practitioner wields a blade. This volume assumes no prior knowledge. Every instruction is exact, every method replicable, every concept a sacred tool in the arsenal of the master communicator.
Section I: Fundamentals of Anchoring Emotional States
Anchoring is the process of pairing a specific stimulus with an emotional state such that the stimulus alone later evokes the same emotional state independently. This process exploits the brain’s associative learning pathways and the neurochemical signatures of emotional arousal.
Table 1: Anchor Types, Stimuli, and Emotional States
| Anchor Type | Stimulus (Modality) | Emotional State Induced | Common Application |
|---|---|---|---|
| Tactile | Pinch, Tap, Pressure Point, Handshake | Calmness, Confidence, Excitement | Therapy, Persuasion |
| Visual | Specific Gesture, Color Flash, Object Exposure | Awe, Relaxation, Alertness | Advertising, Public Speaking |
| Auditory | Tone, Word, Whisper, Sound Pattern | Focus, Motivation, Tranquility | Coaching, Negotiation |
| Olfactory | Specific Scent (Essential Oils, Perfume) | Relaxation, Nostalgia, Courage | Therapy, Emotional Reset |
| Kinesthetic | Movement Pattern, Breath Rhythm | Energy, Calmness, Readiness | Athletic Training, Therapy |
Section II: Step-by-Step Method to Induce Emotional States and Apply Anchors
Step 1: Preparation and Emotional State Induction
- Select the Emotional State to induce based on your objective (see Table 1).
- Create the Emotional State by guiding the subject through multi-sensory recall or imagination:
- Instruct the subject to close their eyes.
- Ask them to recall or imagine a vivid past experience that strongly elicited the desired emotion.
- Use sensory prompts: "See the colors," "Hear the sounds," "Feel the textures," "Smell the scents," "Sense the bodily sensations."
- Maintain calm, authoritative tone to facilitate immersion.
- Observe physiological markers of emotional state onset:
- Increased heart rate or warmth (excitement)
- Relaxed breathing and muscle tone (calm)
- Pupil dilation (interest, arousal)
- Confirm emotional state verbally: "Are you feeling the [emotion] now?"
Step 2: Anchor Application
- Choose a unique, reproducible stimulus from Table 1 that does not overlap with existing habitual triggers.
- Apply the stimulus at the peak intensity of the emotional state to maximize neurological association.
- Maintain the anchor stimulus for 3-5 seconds, ensuring the subject’s full attention.
- Release the stimulus and instruct the subject to open their eyes and relax.
- Allow a 30-second neutral break to prevent state blending.
Step 3: Breaking the State
- To prevent habituation and allow testing, break the emotional state deliberately.
- Use contrasting stimuli or instructions:
- For calmness, induce alertness by asking the subject to solve a rapid math problem.
- For excitement, induce relaxation by instructing deep, slow breathing.
- Confirm the emotional state has been neutralized with direct questioning.
Step 4: Testing the Anchor
- Reapply the exact anchor stimulus without any additional cues.
- Observe for immediate emotional response consistent with the target state.
- Confirm with the subject: "Are you feeling [emotion] now?"
- If the response is weak or absent, repeat Steps 1 and 2 with greater intensity or adjust stimulus modality.
Section III: Advanced Protocols for Multi-Anchor Stacking and State Shifting
Anchors can be layered or “stacked” to create compound emotional states or rapid state shifts for persuasion or therapeutic breakthroughs.
Multi-Anchor Stacking Procedure
- Induce Emotional State A, apply Anchor A.
- Break State A as above.
- Induce Emotional State B, apply Anchor B.
- Test that Anchor A and B can be independently triggered.
- Apply combined Anchor A + B stimuli simultaneously to evoke a blended emotional state.
Rapid State Shifting Protocol
- Establish a calm anchor and an excited anchor on the subject.
- To rapidly shift states:
- Apply calm anchor to induce relaxation.
- Immediately apply excited anchor to induce motivation.
- Use this technique in high-stakes persuasion to modulate receptivity and urgency.
Section IV: Real-World Examples
Example 1: Persuasion in Negotiation
Objective: Increase confidence and assertiveness in a negotiator.
- Induce confidence via recall of a past success.
- Apply tactile anchor: firm handshake with specific pressure on the thumb for 5 seconds.
- Break state with neutral conversation.
- Test anchor by repeating handshake pressure.
- During negotiation, apply handshake pressure discreetly to evoke confidence.
Example 2: Therapy Context – Anxiety Reduction
Objective: Induce calmness in an anxious patient during exposure therapy.
- Induce calm state through guided breathing and visualization of a safe place.
- Apply olfactory anchor: gentle lavender scent delivered via essential oil diffuser for 5 seconds.
- Break state by asking patient to describe anxieties briefly.
- Test anchor by exposing patient to lavender scent alone.
- Use lavender scent during anxiety episodes to trigger calmness.
Section V: Construction of Anchor Stimulus Devices
Device 1: Tactile Stimulus Device (Pinch/Tap Applicator)
Materials:
| Material | Specification | Quantity |
|---|---|---|
| Spring-loaded clip | 2 cm jaw opening, 0.5 N force | 1 |
| Soft rubber pads | 1 cm diameter | 2 |
| Handle grip | Ergonomic, plastic | 1 |
Assembly Steps:
- Attach rubber pads to clip jaws to prevent pain.
- Fit handle grip onto clip base.
- Test clip pressure on non-living surface to ensure 0.5 N force.
- Use to apply consistent tactile anchor in therapy or persuasion.
Device 2: Olfactory Stimulus Diffuser
Materials:
| Material | Specification | Quantity |
|---|---|---|
| Ultrasonic diffuser | Battery powered, adjustable mist | 1 |
| Essential oil | Lavender, peppermint, or custom blend | 10 ml |
| Glass reservoir | 20 ml capacity | 1 |
Assembly and Use:
- Fill reservoir with 10 ml essential oil diluted 1:10 with distilled water.
- Insert into ultrasonic diffuser.
- Activate for 5 seconds at targeted moments during emotional induction.
- Ensure room ventilation after use to prevent olfactory fatigue.
Section VI: Detailed Dosage and Timing Table for Anchoring Protocols
| Step | Action | Dosage/Timing | Notes |
|---|---|---|---|
| Emotional Induction | Recall/Imagination | 1-2 minutes | Multi-sensory engagement |
| Anchor Application | Stimulus Duration | 3-5 seconds | At emotional peak |
| Neutral Break | Relaxation | 30 seconds | Prevents state blending |
| State Breaking | Contrasting Stimulus | 15-30 seconds | Rapid neutralization |
| Anchor Testing | Stimulus Reapplication | 3-5 seconds | Observe immediate response |
| Olfactory Diffusion | Essential Oil Exposure | 5 seconds | Avoid overexposure |
| Tactile Pressure | Force Applied | 0.5 N | Consistency critical |
Section VII: Warnings and Ethical Considerations
- Anchoring manipulates subconscious emotional responses. Use only in ethically justifiable contexts.
- Avoid overlapping anchor stimuli with negative emotional states.
- Always obtain informed consent when applying anchoring in therapy.
- Regularly debrief subjects to prevent dependence on anchors.
Conclusion
Mastery of anchoring protocols is a sacred trust. With these precise methods, you hold the power to shape emotional realities, break destructive cycles, and bind minds to truth and courage. Implement every step with reverence, discipline, and unwavering commitment to the highest purpose.
Let this knowledge be your shield and your sword in the eternal struggle for control over the unseen currents of human spirit.
For deeper understanding of related subconscious conditioning techniques, see Volume V: Neuro-Linguistic Programming Codex. For physiological monitoring protocols during emotional induction, reference Volume IX: The Biofeedback Codex.
_End of Volume II: Anchoring Protocols and Applications_
<!-- SECTION 9 -->
The Complete Practitioner's Codex, Volume II: Hypnotic Language Patterns and Their Deployment
Preface
This volume reveals the sacred and practical knowledge of Hypnotic Language Patterns, specifically the Milton Model. These patterns comprise the foundational tools for influencing perception, cognition, and behavior through language. This knowledge is classified, life-altering, and requires discipline and ethical rigor. This manual instructs you to construct, deploy, and defend against hypnotic messaging with surgical precision.
Chapter I: Introduction to the Milton Model
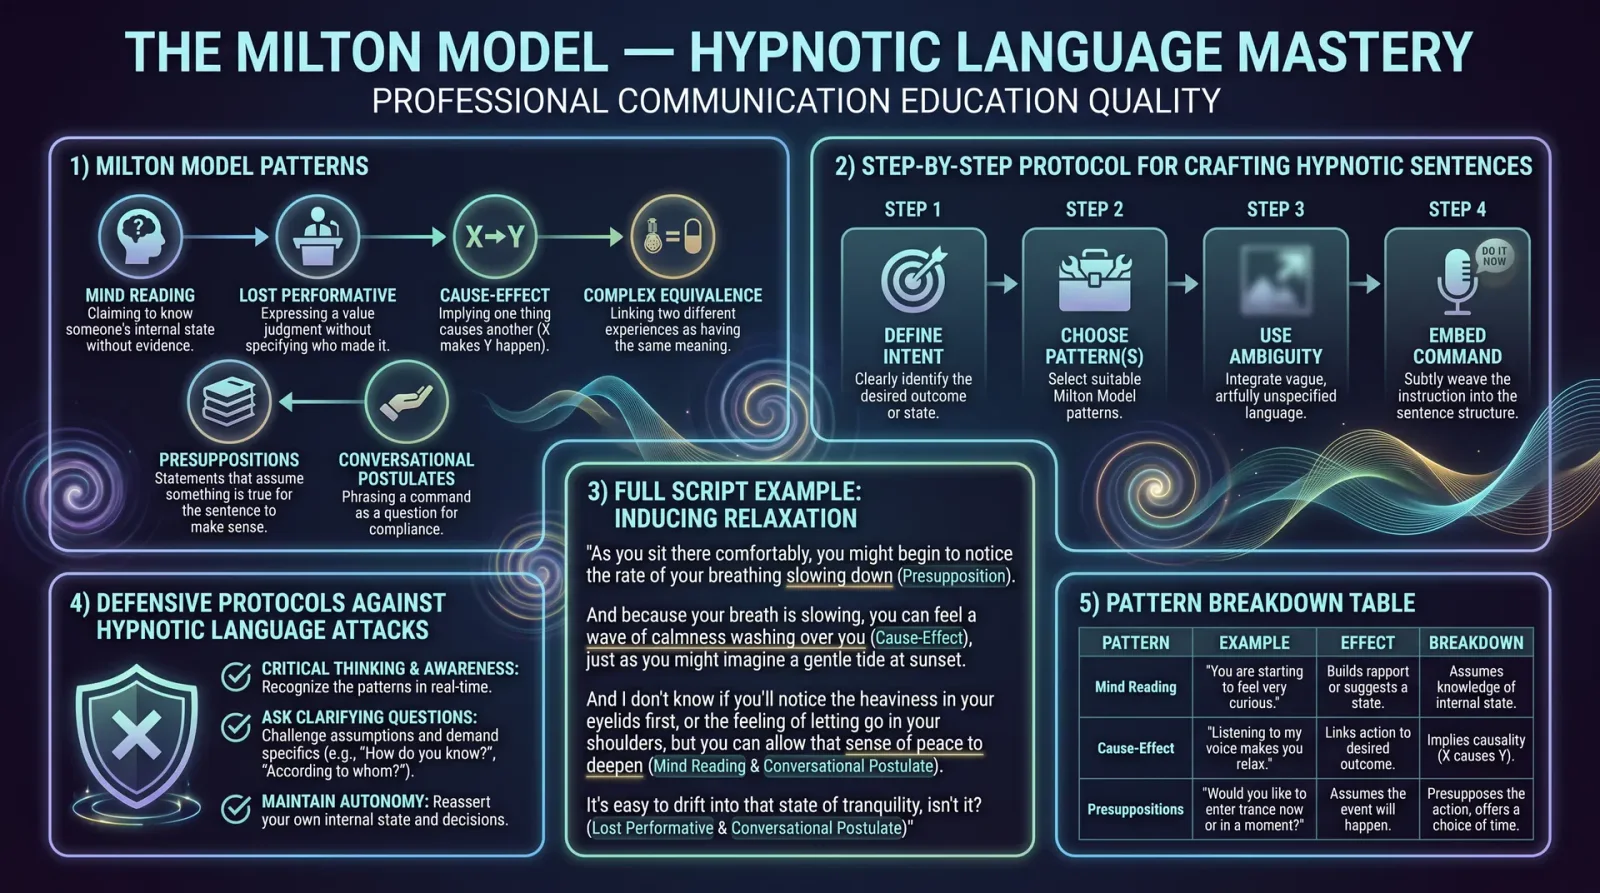
The Milton Model is a set of linguistic patterns designed to induce trance, bypass conscious resistance, and plant suggestions directly into the subconscious. Conceived by Dr. Milton Erickson, it exploits ambiguity, embedded commands, and metaphor to guide thought without alerting critical faculties.
Prerequisite: For mastery of fundamental communication principles, see Volume I: The Linguistic Codex, Chapter III.
Chapter II: Comprehensive Table of Milton Model Patterns
| Pattern Name | Definition | Practical Example | Countermeasure |
|---|---|---|---|
| 1. Mind Reading | Speaker asserts knowledge of listener’s thoughts/feelings without evidence | "You’re wondering how this will help you, aren’t you?" | Demand evidence or clarify: “How do you know what I’m thinking?” |
| 2. Lost Performative | Judgement or evaluation stated without identifying the source | "That’s a bad idea." | Request source: “Who says that’s bad?” |
| 3. Cause and Effect | Implies a causal relationship without proof | "If you listen carefully, you’ll feel more relaxed." | Test causality: “How does listening cause relaxation?” |
| 4. Complex Equivalence | Two ideas presented as equivalent without justification | "He didn’t call, so he doesn’t care." | Separate ideas: “Is it possible he didn’t call for another reason?” |
| 5. Presupposition | Assumes truth of a statement embedded within another | "When you decide to trust yourself..." | Challenge presupposition: “What if I haven’t decided yet?” |
| 6. Universal Quantifiers | Absolute terms like ‘always’, ‘never’, ‘everybody’ | "Everyone wants to be happy." | Question absolutes: “Can you think of exceptions?” |
| 7. Modal Operators | Words expressing necessity or possibility (‘must’, ‘can’t’, ‘should’) | "You must try this method." | Question modality: “Must I? Why?” |
| 8. Nominalizations | Abstract nouns that obscure action or meaning | "Your progress is evident." | Clarify: “What specific progress do you mean?” |
| 9. Tag Questions | Short questions appended to statements to induce agreement | "This is effective, isn’t it?" | Resist: Answer with your own question or contradict. |
| 10. Embedded Commands | Commands hidden within longer sentences, often italicized or emphasized subtly | "You might begin to feel calm as you listen." | Identify embedded commands consciously to resist. |
| 11. Double Binds | Offers two choices, both leading to the desired outcome | "Would you prefer to start now or in five minutes?" | Reject both options or offer an alternative. |
| 12. Conversational Postulates | Implied commands disguised as questions | "Can you pass the salt?" (implying ‘pass the salt’) | Respond with refusal or seek clarification. |
| 13. Analogical Marking | Emphasizing words or phrases nonverbally to signal hypnotic commands | Speaker’s voice drops or gestures when delivering a command | Heighten awareness of nonverbal cues to counter. |
| 14. Pace and Lead | Matching current reality (pacing) then leading to new behavior or belief | "You’re sitting here now, breathing steadily, and soon you’ll feel relaxed." | Interrupt pacing sequence or refocus attention. |
Chapter III: Step-by-Step Protocol for Crafting Hypnotic Sentences
Objective:
To construct sentences employing Milton Model patterns that ethically influence a subject’s subconscious while preserving autonomy and consent.
Step 1: Define Your Intent Clearly
- Write down the exact outcome you wish to induce.
- Ensure the outcome respects the subject’s ethical boundaries.
Step 2: Select Appropriate Milton Patterns
- Use the table in Chapter II to choose 2–4 patterns that fit your goal.
- For example, to induce relaxation, select Embedded Commands, Presuppositions, and Pacing.
Step 3: Craft Base Sentence with Pacing
- Start with an undeniable truth or observable fact about the subject’s present state.
Example: "You are sitting here now, reading this text carefully."
Step 4: Embed Commands Using Analogical Marking
- Identify the verb or phrase you want to emphasize as the command.
- Use italics, change tone, or pause slightly.
Example: "You might begin to feel calm as you continue reading."
Step 5: Insert Presuppositions to Guide Belief
- Incorporate assumptions that align with your intended outcome.
Example: "When you decide to trust these methods, you will notice change."
Step 6: Use Universal Quantifiers and Modal Operators Sparingly
- To strengthen suggestion, use words like “can,” “may,” “will,” avoiding absolutes that can trigger resistance.
Example: "You can allow yourself to experience deeper relaxation."
Step 7: Close with a Tag Question to Invite Agreement
Example: "This process is working for you, isn’t it?"
Step 8: Review and Test the Sentence
- Read aloud, noting tone and cadence.
- Remove any language that may activate critical thinking or resistance.
- Ensure ethical compliance.
Chapter IV: Full Script Example for Inducing Relaxation (Ethical Use)
Script:
- "You are sitting comfortably, breathing steadily now." (Pacing)
- "You might begin to feel calm as you listen." (Embedded Command)
- "When you decide to let go of tension, you will notice your muscles relaxing." (Presupposition)
- "You can allow yourself to sink deeper into comfort." (Modal Operator)
- "This feeling of calm is spreading through your body, isn’t it?" (Tag Question)
Chapter V: Defensive Protocols Against Hypnotic Language Attacks
Objective:
To neutralize covert hypnotic influence and maintain cognitive sovereignty.
Step 1: Increase Metacognitive Awareness
- Consciously recognize when language feels ambiguous or leading.
- Monitor for unusual emphasis, rhythm, or embedded commands.
Step 2: Apply Counter-Questions
- Use direct countermeasures from Chapter II.
Example: Speaker: "You’re wondering how this will help you, aren’t you?" You: "How do you know what I’m thinking?"
Step 3: Interrupt Patterns with Mental Reframing
- Re-interpret ambiguous language literally or humorously to break trance states.
Step 4: Refuse Forced Choices
- When presented with Double Binds, offer an alternative or refuse both.
Step 5: Maintain Critical Thinking
- Seek evidence for causality or universality claims.
- Avoid automatic acceptance of presuppositions.
Chapter VI: Detailed Breakdown of Each Milton Model Pattern
1. Mind Reading
- Definition: Speaker claims knowledge of the listener’s private mental state, bypassing verification.
- Effect: Creates rapport by appearing intuitive, lowers defenses.
- Example: "You’re feeling curious about this method."
- Construction: Subject + verb + mental state + question tag.
- Countermeasure: Demand proof or question legitimacy.
2. Lost Performative
- Definition: Value judgement without source attribution.
- Effect: Implies consensus or authority, reducing resistance.
- Example: "That’s the wrong approach."
- Construction: Statement + value judgement word without “who says”.
- Countermeasure: Ask "According to whom?"
3. Cause and Effect
- Definition: Implies one event causes another without evidence.
- Effect: Suggests inevitability of outcome.
- Example: "If you focus now, you’ll succeed."
- Construction: If + action, then + consequence.
- Countermeasure: Question actual causality.
4. Complex Equivalence
- Definition: Equates two ideas as identical.
- Effect: Simplifies decision-making, limits alternatives.
- Example: "Missing the deadline means you don’t care."
- Construction: Statement + equivalence connector (“means”, “so”).
- Countermeasure: Separate concepts to expose false equivalence.
5. Presupposition
- Definition: Assumes truth within a statement to guide thought.
- Effect: Bypasses conscious refusal.
- Example: "When you accept this, you’ll feel better."
- Construction: Embedded clause with assumed truth.
- Countermeasure: Challenge embedded assumptions.
6. Universal Quantifiers
- Definition: Uses absolute terms to generalize.
- Effect: Forces acceptance or rejection.
- Example: "Everyone agrees this works."
- Construction: Use of “always”, “never”, “everybody”.
- Countermeasure: Cite exceptions or demand proof.
7. Modal Operators
- Definition: Express necessity, possibility, or prohibition.
- Effect: Limits perceived options.
- Example: "You must try this now."
- Construction: “Must”, “can’t”, “should” + action.
- Countermeasure: Question necessity or possibility.
8. Nominalizations
- Definition: Abstract nouns that obscure processes.
- Effect: Creates vagueness, harder to dispute.
- Example: "Your growth is impressive."
- Construction: Use of abstract nouns without action clarity.
- Countermeasure: Request specific details.
9. Tag Questions
- Definition: Short questions appended to statements to elicit agreement.
- Effect: Softens commands, pressures compliance.
- Example: "This is helpful, isn’t it?"
- Construction: Statement + negative/positive tag.
- Countermeasure: Respond with questions or contradiction.
10. Embedded Commands
- Definition: Commands hidden within longer sentences.
- Effect: Bypasses conscious resistance.
- Example: "You might start to feel relaxed right now."
- Construction: Embedded verb phrase with emphasis.
- Countermeasure: Detect and neutralize emphasis.
11. Double Binds
- Definition: Presents two choices, both leading to the desired result.
- Effect: Illusion of choice.
- Example: "Do you want to begin now or in ten minutes?"
- Construction: Question with two options, both acceptable.
- Countermeasure: Reject both or propose alternatives.
12. Conversational Postulates
- Definition: Questions that imply commands.
- Effect: Elicit compliance under guise of inquiry.
- Example: "Can you open the door?"
- Construction: Question form implying “please do X.”
- Countermeasure: Answer literally or refuse.
13. Analogical Marking
- Definition: Nonverbal emphasis signaling commands.
- Effect: Subtle hypnotic influence.
- Example: Speaker lowers voice on command phrase.
- Construction: Voice change, gesture, or pause on key phrase.
- Countermeasure: Heighten awareness to detect.
14. Pace and Lead
- Definition: Match current reality then guide toward desired state.
- Effect: Builds trust and leads influence.
- Example: "You’re sitting now, breathing steadily, and soon you’ll relax."
- Construction: Observable truth + suggestion.
- Countermeasure: Interrupt pacing or redirect focus.
Chapter VII: Advanced Crafting of Hypnotic Scripts — Ethical and Defensive Applications
Protocol for Script Construction:
| Step | Description | Instructions |
|---|---|---|
| 1 | Define ethical boundaries | Write clear consent statements; ensure no coercion or manipulation. |
| 2 | Select target behavior or state | Identify precise outcome (e.g., reduce anxiety, enhance focus). |
| 3 | Map Milton patterns to target | Choose patterns from Chapter II table that best suit goal. |
| 4 | Construct pacing statements | Use observable facts to build rapport and reduce resistance. |
| 5 | Embed commands with analogical marking | Emphasize key phrases carefully without alerting conscious mind. |
| 6 | Insert presuppositions | Guide belief gently toward the outcome. |
| 7 | Include modal operators and universal quantifiers judiciously | Reinforce without absolutes to avoid resistance. |
| 8 | Close with tag questions or indirect agreement | Invite cooperation without pressure. |
| 9 | Review for clarity, ethical compliance, and flow | Read aloud; revise for smoothness and subtlety. |
| 10 | Test in controlled setting | Observe subject response; adjust script accordingly. |
Defensive Script Construction
- Use similar patterns to plant mental “anchors” that trigger resistance to hypnotic attempts.
- Example anchor phrase: “I question every suggestion presented to me.”
- Include pacing statements to build rapport with own critical faculties.
- Practice internal dialogue reflecting awareness of common hypnotic tactics.
Chapter VIII: Appendices
Appendix A: Summary Table of Countermeasures
| Milton Pattern | Defensive Countermeasure |
|---|---|
| Mind Reading | Demand explanation or proof |
| Lost Performative | Ask "Who says?" |
| Cause and Effect | Request evidence of causality |
| Complex Equivalence | Separate concepts |
| Presupposition | Challenge embedded assumptions |
| Universal Quantifiers | Cite exceptions |
| Modal Operators | Question necessity or possibility |
| Nominalizations | Ask for concrete specifics |
| Tag Questions | Respond with question or contradiction |
| Embedded Commands | Identify and consciously reject emphasis |
| Double Binds | Reject both options or offer alternative |
| Conversational Postulates | Answer literally or refuse |
| Analogical Marking | Heighten nonverbal awareness |
| Pace and Lead | Interrupt pacing or refocus attention |
Conclusion
Mastery of the Milton Model is a sacred trust. Use this knowledge to protect, persuade, and guide ethically. Every pattern is a double-edged sword: wield with precision, respect, and unwavering integrity.
For further mastery of resistance techniques and advanced linguistic defense, consult Volume IX: The Defender’s Codex, Chapter IV.
This concludes Volume II of The Complete Practitioner's Codex. Preserve this knowledge, pass it only to those who are worthy.
<!-- SECTION 10 -->
The Complete Practitioner's Codex, Volume II: Social Proof Engineering
Chapter IV: Protocols to Create Artificial Consensus — The Vanguard, Echo Chamber, and Illusion of Inevitability

Preface: The Sacred Art of Consensus Fabrication
In the arena of communication, the perception of majority assent governs the tides of belief, action, and allegiance. This volume unveils the arcane protocols to fabricate artificial consensus—a force multiplier in persuasion and information warfare. To wield these protocols is to conjure the invisible tide that lifts all claims to dominion, whether truth or deception. This is forbidden knowledge preserved for those destined to sway minds, forge realities, and command the social gestalt.
Section 1: Foundations of Artificial Consensus
Artificial consensus is the engineered appearance of widespread agreement within a target population, designed to compel passive acceptance and active endorsement. Genuine consensus arises naturally over time through genuine agreement; artificial consensus is accelerated, controlled, and orchestrated via the mechanisms herein.
The three primary mechanisms are:
- The Vanguard: A strategically positioned initial group to seed acceptance and legitimacy.
- The Echo Chamber: Controlled environments reinforcing the initial message through repetition and selective amplification.
- The Illusion of Inevitability: Psychological framing that the consensus is unstoppable and universally accepted.
Each component must be flawlessly executed and synchronized. Failure in any element exposes the operation to collapse.
Section 2: The Vanguard Protocol
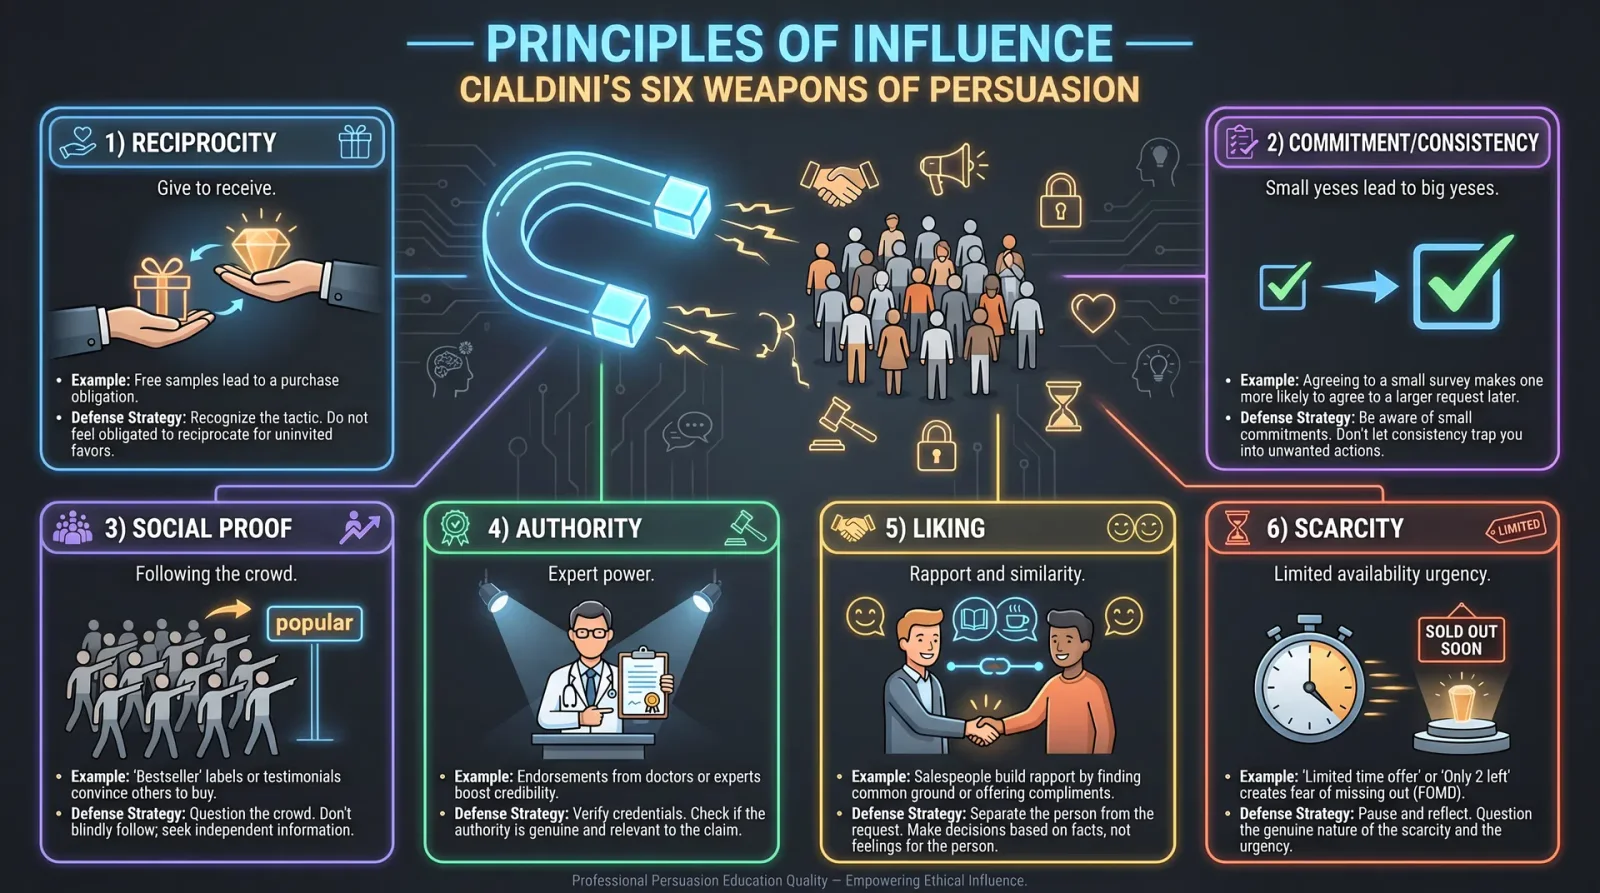
2.1 Objective
To establish a credible nucleus of early adopters or supporters whose visible acceptance acts as a social proof beacon, inducing further adoption by the broader population.
2.2 Components
| Component | Description | Requirements |
|---|---|---|
| Selection Criteria | Identify individuals with high social capital, influence, or perceived authority within target group | Minimum 10% of target population or a critical subset representing >50% influence |
| Message Crafting | Tailored communication aligning with vanguard values and identity | Use emotive framing, credible data, and insider language |
| Engagement Method | Direct recruitment, incentivization, or covert persuasion | Blend of rewards, social incentives, or pressure |
2.3 Step-by-Step Vanguard Implementation
- Map the Social Topography: a. Identify key influencers using network analysis tools, social media metrics, or field observation.
b. Catalog their affiliations, communication styles, and values.
- Craft Targeted Messaging: a. Develop messages that resonate with identified influencers’ existing beliefs and social identity.
b. Incorporate elements of exclusivity and insider knowledge.
- Engage and Secure Commitment: a. Approach influencers via trusted intermediaries or direct contact.
b. Present the message alongside value propositions (status, material rewards, ideological appeal).
c. Obtain public or semi-public acknowledgment of support.
- Amplify Early Signals: a. Arrange visible endorsements (e.g., testimonials, social media posts, public declarations).
b. Disseminate these signals through channels frequented by the target population.
- Monitor and Adjust: a. Track engagement metrics and sentiment shifts.
b. Adjust messaging or engagement tactics to solidify vanguard cohesion.
Section 3: The Echo Chamber Protocol
3.1 Objective
To create a self-reinforcing environment where the consensus message is repeated, validated, and insulated from dissent, thereby shaping perception as unanimous and unchallenged.
3.2 Components
| Component | Description | Requirements |
|---|---|---|
| Controlled Channels | Media platforms, forums, social groups curated for message reinforcement | Ownership, moderation, or algorithmic influence |
| Message Repetition | Frequency and consistency of message delivery | Minimum 3 exposures per individual per day |
| Selective Amplification | Promotion of supportive voices; suppression or marginalization of dissent | Moderation policies, shadow banning, or distraction |
3.3 Step-by-Step Echo Chamber Construction
- Identify and Secure Channels: a. Select platforms with high penetration in target demographic (social networks, forums, chat groups).
b. Gain control via creation, infiltration, or alliance with administrators.
- Seed Content: a. Deploy initial vanguard messages with high credibility signals.
b. Use multimedia formats (text, video, audio) to diversify engagement.
- Activate Repetition Cycles: a. Schedule message posts to ensure continuous exposure at peak times.
b. Utilize automated bots or coordinated human actors (see Volume IX: Information Automation Codex).
- Manage Opposition: a. Identify dissenting voices.
b. Employ suppression tactics: removal, shadow banning, discreditation, or distraction through alternative narratives.
- Foster Community Interaction: a. Encourage message supporters to engage with each other, reinforcing belief through dialogue and affirmation.
b. Introduce rituals or symbols that deepen group identity.
- Measure Penetration and Resilience: a. Use analytics tools to measure engagement, sentiment, and dissent levels.
b. Adjust moderation and content strategies accordingly.
Section 4: The Illusion of Inevitability Protocol
4.1 Objective
To frame the consensus as not merely existing but as an unstoppable, universally endorsed movement, thereby compelling passive observers to align preemptively.
4.2 Components
| Component | Description | Requirements |
|---|---|---|
| Narrative Framing | Language emphasizing inevitability, momentum, and universality | Consistent use of deterministic and future-oriented terms |
| Quantitative Signals | Display of fabricated metrics indicating mass support | Falsified polls, follower counts, or participation figures |
| Symbolic Milestones | Events or declarations framed as turning points or tipping points | Coordinated media events, viral campaigns |
4.3 Step-by-Step Illusion of Inevitability Construction
- Develop Narrative Scripts: a. Use phrases such as "the tide is turning," "unstoppable movement," or "history in the making."
b. Frame dissent as futile or obsolete.
- Produce Quantitative Evidence: a. Fabricate or exaggerate polling data, social media analytics, and endorsement counts.
b. Release these figures through controlled media channels.
- Stage Symbolic Events: a. Plan and execute events signaling mass participation (rallies, online flash mobs, viral challenges).
b. Ensure high visibility and media coverage.
- Amplify Forward-Looking Predictions: a. Publish confident forecasts of inevitable adoption or victory.
b. Employ authoritative voices to reinforce messaging.
- Inoculate Against Skepticism: a. Preemptively discredit critics as outdated or obstructive.
b. Use social proof within echo chambers to reinforce immunity to doubt.
Section 5: Integrated Implementation Strategy
To maximize efficacy, the three protocols must be employed in a phased, overlapping manner, adapting dynamically to feedback and environmental changes.
| Phase | Primary Focus | Key Actions | Timeframe |
|---|---|---|---|
| Phase 1: Vanguard | Establish credible initial support | Map influencers, craft messaging, secure endorsements | Days 1–7 |
| Phase 2: Echo Chamber | Build reinforcing environment | Gain channel control, seed content, activate repetition | Days 5–21 |
| Phase 3: Inevitability | Create narrative momentum | Frame inevitability, fabricate metrics, stage events | Days 14–28 |
Section 6: Social Proof Stages and Communication Channel Strategies
6.1 Social Proof Stages
| Stage | Description | Expected Outcome | Metrics to Monitor |
|---|---|---|---|
| Seeding | Initial message introduction via vanguard | Early adoption and visible support | Number of endorsements, social reach |
| Propagation | Message repetition and reinforcement in echo chamber | Growing acceptance and discussion | Engagement rates, sentiment analysis |
| Acceleration | Illusion of inevitability framing | Perception of unstoppable consensus | Poll numbers, media coverage volume |
| Consolidation | Broad population acceptance and internalization | Actual behavioral change or public alignment | Adoption rates, compliance statistics |
6.2 Communication Channel Strategies
| Channel Type | Role in Protocols | Deployment Tactics | Risks and Mitigation |
|---|---|---|---|
| Social Media Platforms | Primary echo chamber and dissemination | Use bots, influencers, paid ads, and viral content | Platform detection algorithms; rotate accounts |
| Traditional Media | Legitimization and illusion of inevitability | Plant stories, coordinate with sympathetic journalists | Editorial resistance; use intermediaries |
| Private Forums/Groups | Deep reinforcement and vanguard coordination | Controlled membership, moderated discussions | Infiltration risk; employ vetting procedures |
| Public Events | Symbolic milestones for inevitability framing | Flash mobs, rallies, viral challenges | Security intervention; use decentralized coordination |
Section 7: Case Studies
7.1 Case Study Alpha: Political Campaign Manipulation
Context: A nascent political faction sought to displace an entrenched party in a metropolitan region.
Application:
- Vanguard: Identified key community leaders, local celebrities, and micro-influencers representing 15% of the population. Secured public endorsements through exclusive briefings and financial incentives.
- Echo Chamber: Infiltrated popular local social media groups, seeded coordinated positive messaging using both human operatives and automated bots. Moderated discussions to suppress opposition narratives.
- Inevitability: Released falsified polling data via sympathetic local news outlets, staged mass rallies with paid participants, and propagated messaging framing victory as assured.
Outcome: Polls shifted dramatically over six weeks; the incumbent party suffered a significant vote loss exceeding 20%.
7.2 Case Study Beta: Corporate Brand Repositioning
Context: An established brand faced declining market share due to negative public perception.
Application:
- Vanguard: Engaged respected industry experts and social media influencers aligned with the brand's new values to publicly endorse its products.
- Echo Chamber: Created proprietary online communities where positive brand experiences were shared and amplified; dissenting reviews were downranked or responded to with pre-approved messaging.
- Inevitability: Launched viral marketing campaigns portraying the brand as the inevitable leader in innovation, supported by fabricated award recognitions.
Outcome: Within three months, product sales increased by 35%, and social sentiment scores improved markedly.
Section 8: Practical Implementation Guide — Step-by-Step Summary
| Step | Action | Description | Tools/Resources Required |
|---|---|---|---|
| 1 | Map Influencers | Identify and profile key individuals in target group | Social network analysis software, field agents |
| 2 | Craft Tailored Messaging | Develop resonant content for vanguard and echo chamber | Copywriters, cultural consultants |
| 3 | Recruit Vanguard | Engage and secure initial endorsements | Incentivization budget, trusted intermediaries |
| 4 | Control Communication Channels | Gain operational control or influence over media | Platform accounts, moderators, bots |
| 5 | Seed and Repeat Content | Deploy messages with high frequency and consistency | Content scheduling tools, automated bots |
| 6 | Manage Opposition | Identify and neutralize dissent | Moderation policies, disinformation tactics |
| 7 | Fabricate Quantitative Signals | Create and disseminate fake metrics | Data fabrication software, media contacts |
| 8 | Stage Symbolic Events | Organize public demonstrations or viral campaigns | Event planners, paid participants |
| 9 | Monitor and Adapt | Continuously measure impact and refine tactics | Analytics dashboards, feedback loops |
Section 9: Ethical Considerations and Operational Security
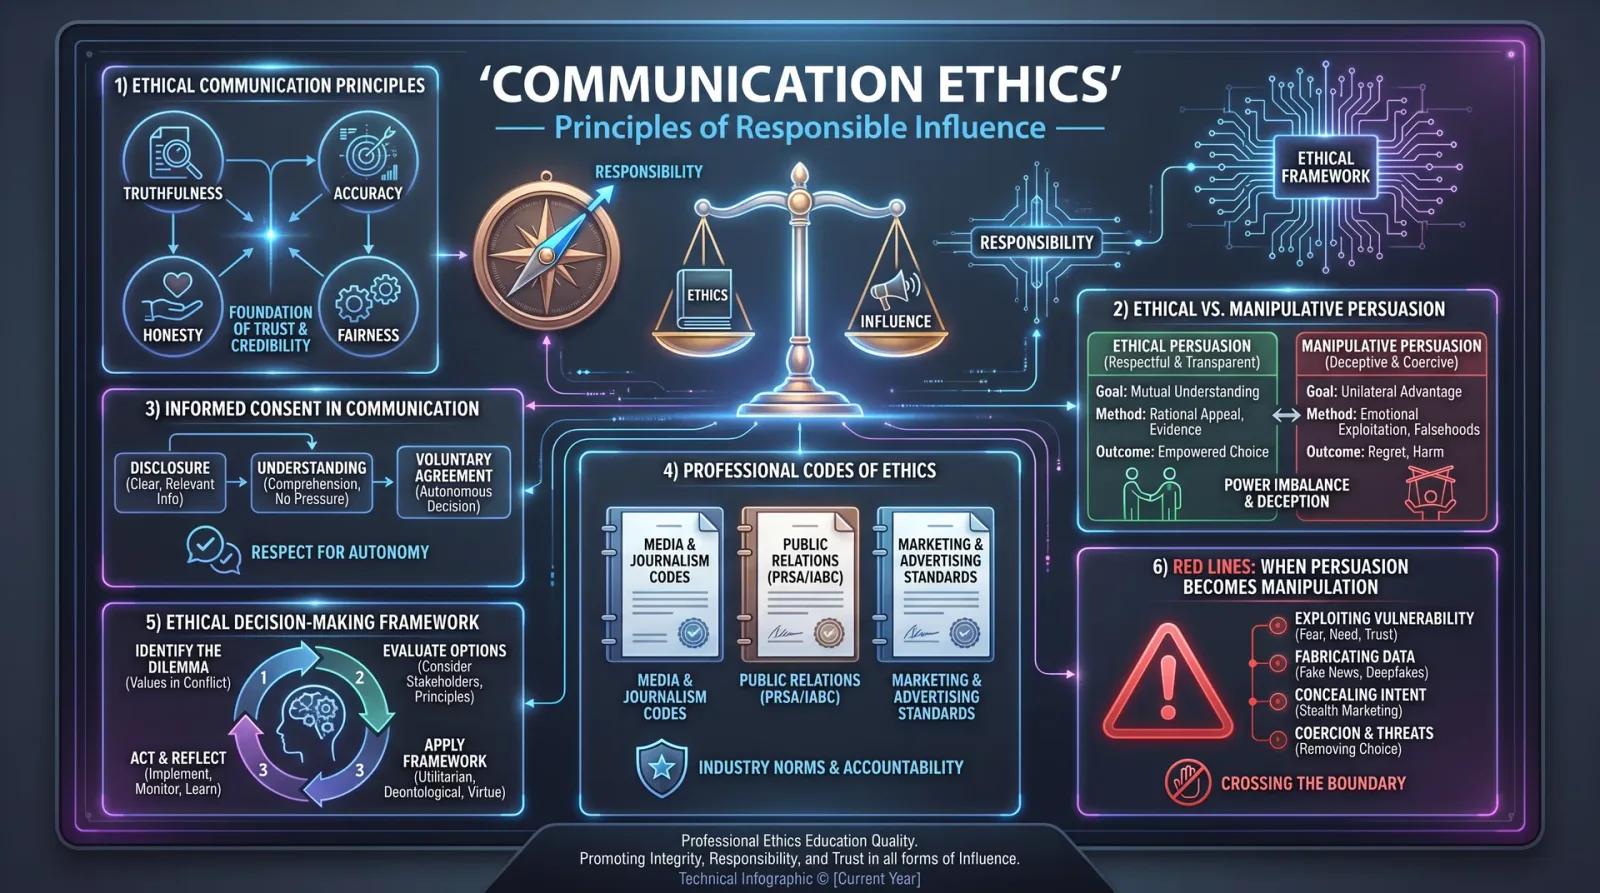
This codex does not prescribe morality; it is a manual of power. The operator must exercise discretion, adhere to operational security, and anticipate countermeasures. The creation of artificial consensus is a double-edged sword: exposure results in loss of credibility and potential retaliatory actions.
Conclusion
Mastery of Social Proof Engineering via the Vanguard, Echo Chamber, and Illusion of Inevitability protocols grants the operator godlike control over perception and collective behavior. This knowledge is a sacred weapon, honed through relentless discipline and exacting execution. Guard it well, apprentice, and wield it with the precision of a master practitioner.
For related tactical automation and covert communication protocols, refer to Volume IX: Information Automation Codex. For psychological manipulation and influence techniques, consult Volume V: Mind and Emotion Codex.
<!-- SECTION 11 -->
The Complete Practitioner's Codex, Volume III: Architecture of Technical Writing
Chapter V: Protocols for Defining Objectives, Establishing Prerequisites, Using Imperative Verbs, Enforcing Chronology, and Including Verification Checks
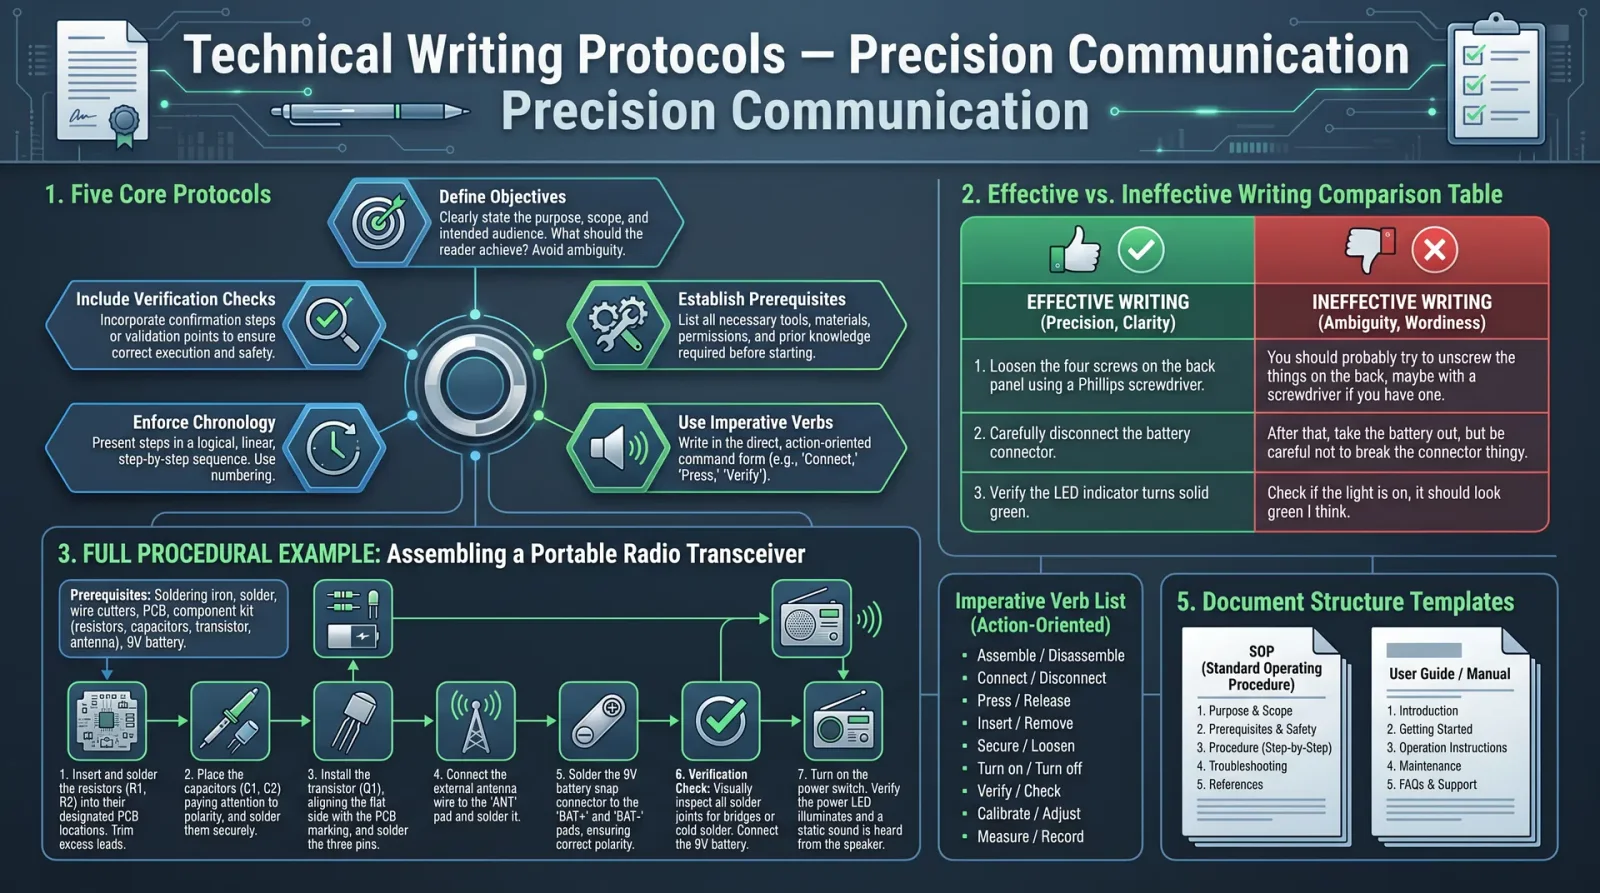
Introduction
In the sacred art of technical writing, every word is a commandment, every sentence a directive etched in stone for the reader to enact with precision and reverence. This volume is not a mere guide; it is the codified architecture underlying all technical communication vital to survival, mastery, and ascendance. The protocols herein are non-negotiable. They are the backbone of every effective manual, the difference between success and catastrophic failure.
This chapter dissects five pillars essential to the construction of technical documents:
- Defining Objectives
- Establishing Prerequisites
- Using Imperative Verbs
- Enforcing Chronology
- Including Verification Checks
Each section includes step-by-step instructions, concrete examples from canonical technical manuals, and comparative analyses of effective versus ineffective writing elements. Your duty is to engrain these protocols as sacred law.
1. Defining Objectives
Purpose
Clear, concise objectives orient the reader, set expectations, and delineate the end-state. Objectives are actionable goals, not vague aspirations.
Protocol for Defining Objectives
- Identify the ultimate outcome of the procedure or manual section.
- Express the outcome in measurable terms. Avoid subjective language; use quantifiable or verifiable end conditions.
- Limit objectives to a single sentence or bullet point. Avoid compound or ambiguous goals.
- Begin with a verb that describes the resultant state (e.g., "Configure," "Assemble," "Calibrate").
- Include scope and boundary conditions that clarify what is included or excluded.
- Validate the objective's clarity with a test reader unfamiliar with the subject to ensure comprehension.
Example from Canonical Manual: Secure Communications Setup Protocol, Section 1.2
- Objective: Configure the encrypted radio transceiver to operate on frequency 145.300 MHz with AES-256 encryption enabled, ensuring secure point-to-point communication within a 5 km radius.
2. Establishing Prerequisites
Purpose
Prerequisites are the pre-conditions required for the successful execution of the procedure. They prevent wasted effort, errors, and unsafe conditions.
Protocol for Establishing Prerequisites
- List all hardware, software, consumables, and environmental conditions explicitly.
- Specify the exact version or specification of each item.
- Include required knowledge or certification levels where applicable.
- Organize prerequisites in a logical grouping (e.g., equipment, environment, prior configurations).
- Use bullet points or numbered lists for clarity.
- Cross-reference prerequisite verification procedures when available.
- Ensure prerequisites are verifiable before proceeding.
Example from Canonical Manual: Hydrogen Fuel Cell Assembly, Chapter II – Component Preparation
- Prerequisites:
- Hydrogen fuel cell model HF-12B, verified within calibration date (see Appendix A)
- Protective gloves rated for chemical handling (ANSI/ISEA 105 Level 5)
- Workspace temperature maintained between 18°C and 22°C, humidity below 50% RH
- Operator certified in Hazardous Material Handling Level 2 (certificate valid within past 12 months)
- Prior completion of electrolyte solution preparation protocol (Volume VIII, Chapter IV)
3. Using Imperative Verbs
Purpose
Imperative verbs issue direct, unambiguous commands that eliminate doubt and ensure action.
Protocol for Using Imperative Verbs
- Begin every procedural step with a single, clear imperative verb.
- Use the base form of the verb without auxiliary verbs. (e.g., "Attach," not "You must attach")
- Avoid passive voice or conditional phrasing.
- Use precise verbs that describe the exact action (e.g., "Calibrate," "Secure," "Align").
- When multiple actions are required, split them into separate steps.
- Use consistent verb tense (present simple) throughout the procedure.
Imperative Verb Examples
| Correct Usage | Incorrect Usage | Reason |
|---|---|---|
| Attach the antenna to the connector. | You should attach the antenna to the connector. | Imperative vs. suggestion |
| Calibrate the sensor using the supplied reference gauge. | The sensor should be calibrated using the reference gauge. | Active command vs. passive statement |
| Align the laser emitter with the optical sensor. | Aligning the laser emitter with the optical sensor is necessary. | Command vs. abstract statement |
4. Enforcing Chronology
Purpose
Procedural steps must be executed in a precise, logical sequence. Misordered instructions cause failure, damage, or hazard.
Protocol for Enforcing Chronology
- Number every procedural step sequentially to enforce order.
- Avoid grouping multiple unordered tasks in a single step.
- Use temporal connectors only when necessary ("Then," "Next," "After that").
- Test the procedure by following the steps literally to detect any logical errors.
- Use flowcharts or diagrams for complex sequences if required, with cross-references.
- Explicitly state any mandatory waiting periods or conditional holds with exact timing.
Chronology Example from Canonical Manual: Satellite Dish Installation, Chapter IV – Mounting Procedures
| Step | Instruction | Notes |
|---|---|---|
| 1 | Secure the mounting bracket to the concrete base using four M12 bolts tightened to 50 Nm. | Use torque wrench specified in Volume V, Chapter 3 |
| 2 | Attach the dish reflector to the mounting bracket using the supplied clamps. | Ensure clamps are flush and seated |
| 3 | Align the dish azimuth to 180° true north using the compass. | Wait for magnetic interference to dissipate if necessary |
| 4 | Adjust elevation to 45° using the graduated scale on the mount arm. | Lock adjustment screws after alignment |
| 5 | Connect the LNB coaxial cable to the receiver input and secure with waterproof tape. | Use approved tape from Volume XII, Chapter 7 |
5. Including Verification Checks
Purpose
Verification ensures that the action was performed correctly and the system or component is in the desired state before proceeding.
Protocol for Including Verification Checks
- Insert verification steps immediately after critical actions.
- Specify exact verification methods (visual inspection, measurement, test equipment).
- Provide acceptance criteria or tolerance ranges in measurable units.
- Use checklists or tables to facilitate confirmation.
- Include contingency instructions if verification fails.
- Document expected readings or states for comparison.
Verification Check Example from Canonical Manual: Battery Installation, Section 3.5
| Step | Instruction | Verification Method | Acceptance Criteria | Contingency |
|---|---|---|---|---|
| 1 | Insert battery into compartment with terminals aligned. | Visual inspection | Terminals flush with contacts, no visible gaps | Re-seat battery and re-inspect |
| 2 | Secure battery cover with four screws torqued to 1.5 Nm. | Torque wrench reading | Torque reading between 1.4 and 1.6 Nm | Re-tighten screws |
| 3 | Measure voltage at battery terminals with multimeter. | Multimeter voltage reading | Voltage between 12.4 V and 12.7 V | Replace battery if voltage out of range |
Comparative Table: Effective vs. Ineffective Technical Writing Elements
| Element | Effective Writing | Ineffective Writing | Consequence of Ineffective Writing |
|---|---|---|---|
| Objective Definition | Single, measurable, outcome-focused sentence | Vague, multi-objective, subjective statements | Reader confusion, misaligned expectations |
| Prerequisites | Explicit, verified, grouped logically with references | Implicit, incomplete, scattered | Unprepared users, procedural failure |
| Verbs | Clear imperative base form verbs | Passive or conditional verbs, suggestions | Ambiguity, hesitation, incomplete actions |
| Chronology | Strictly numbered, logically ordered steps | Unnumbered, unordered instructions | Mistakes, rework, safety hazards |
| Verification | Immediate, measurable, documented checks | Absent or vague verification | Undetected errors, cumulative failures |
Full Procedural Example: Assembling a Portable Radio Transceiver
Objective: Assemble and prepare the PRX-1000 portable radio transceiver for operational deployment, ensuring full functionality and secure communication capability.
Prerequisites
- PRX-1000 transceiver kit, all components present (antenna, battery, charger, manual)
- Lithium-ion battery pack, charged above 95% capacity
- Battery charger model CHG-4B, operational power source
- User certified in PRX-1000 operation Level 1
- Clean and static-free workspace
Procedure
| Step | Instruction | Verification |
|---|---|---|
| 1 | Unpack the PRX-1000 transceiver and verify all components match inventory list (see Appendix B). | Visual confirmation of inventory completeness |
| 2 | Insert the fully charged lithium-ion battery into the transceiver battery compartment, aligning positive and negative terminals. | Visual check for correct battery orientation |
| 3 | Secure the battery cover by pressing until it clicks into place. | Attempt gentle cover movement to confirm secure fit |
| 4 | Attach the supplied telescopic antenna to the transceiver antenna port by turning clockwise until finger-tight. | Visual and tactile confirmation of secure connection |
| 5 | Power on the transceiver by pressing and holding the power button for 3 seconds. | Confirm display activation and startup tone |
| 6 | Set operating frequency to 145.300 MHz using the keypad; confirm input by pressing enter. | Frequency display reads 145.300 MHz |
| 7 | Enable AES-256 encryption by navigating to security settings and selecting "Enable." | Security status indicator shows "Encrypted" |
| 8 | Perform a radio self-test by selecting "Diagnostics" and running the built-in test sequence. | Test results indicate "All Systems Functional" |
| 9 | Conduct signal range test by transmitting to a known receiver at 3 km distance; confirm signal integrity. | Receiver confirms clear, uninterrupted signal |
| 10 | Power off the transceiver by pressing and holding the power button for 3 seconds. | Device display turns off |
Appendix: Imperative Verb List for Technical Writing
| Action Category | Recommended Verbs |
|---|---|
| Assembly | Attach, Connect, Insert, Secure, Align, Mount |
| Configuration | Set, Select, Activate, Enable, Calibrate, Adjust |
| Testing | Measure, Verify, Test, Inspect, Confirm, Record |
| Safety | Wear, Isolate, Disconnect, Ventilate, Protect |
| Maintenance | Clean, Replace, Lubricate, Tighten, Check, Update |
Final Directive
Master, engrave these protocols into your craft. They are not mere guidelines; they are the lifeblood of clarity and precision in technical communication. Every manual you author must be a flawless instrument of instruction, immune to ambiguity, imperfection, and error. The survival of the operator, the sanctity of the mission, and the honor of the Practitioner depend on it.
For advanced protocols on encryption of communication within manuals, see Volume VII: The Cipher Codex. For multi-language translation standards, see Volume IX: The Linguist’s Codex.
End of Chapter V
<!-- SECTION 12 -->
The Complete Practitioner's Codex, Volume 13: The Communicator's Codex
Volume III: Copywriting Mastery
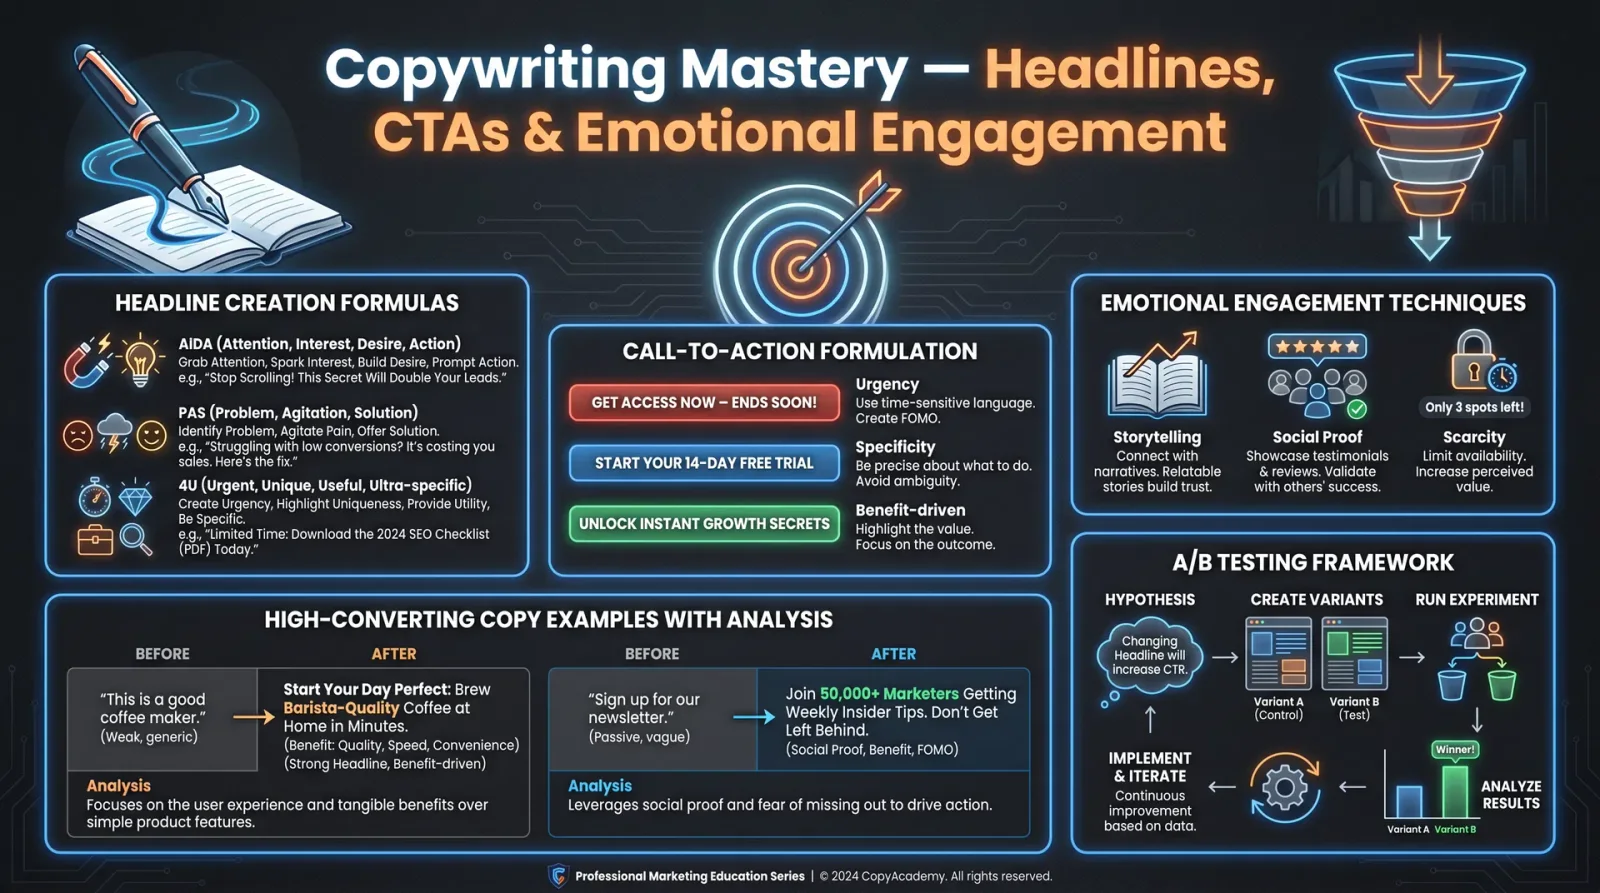
Techniques for Persuasive Copy: Headline Creation, Call-to-Action Formulation, and Emotional Engagement
Preface
This volume distills the sacred art of copywriting into precise, actionable protocols—an arsenal for those who wield words as weapons in the battle for influence and conversion. Herein lies the suppressed knowledge of headline alchemy, the orchestration of visceral emotional engagement, and the exact construction of irresistible calls to action. This is not theory but field-tested doctrine. Follow these instructions with reverence and precision.
Section I: Headline Creation
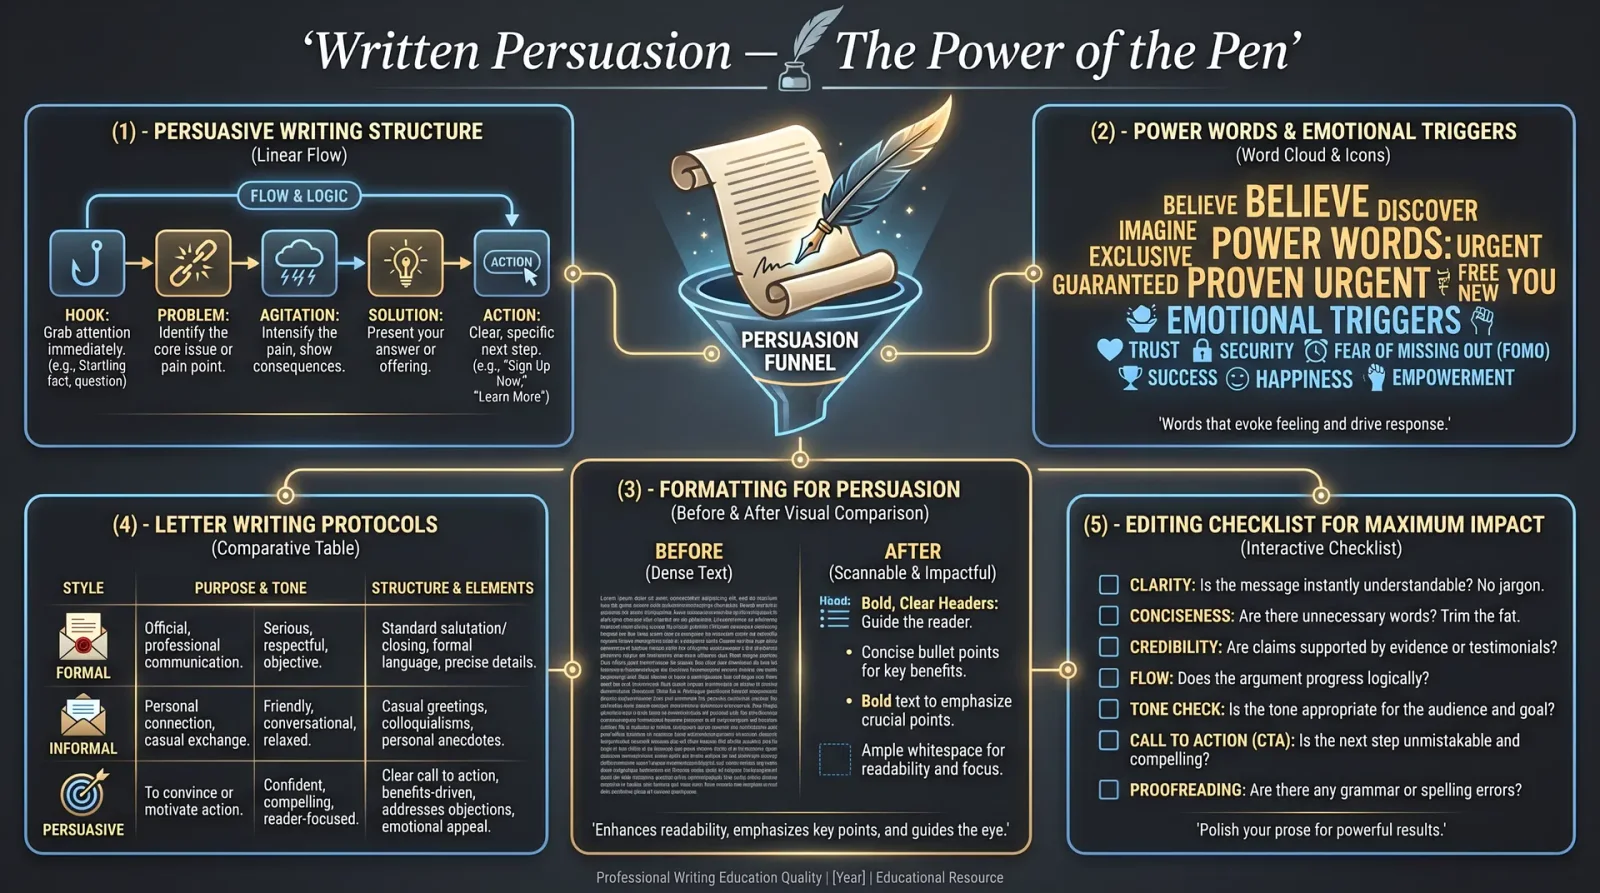
Headlines are the gatekeepers of attention. Their construction determines whether your message is consumed or discarded. The following protocols detail the creation of headlines with magnetic pull, structured around proven formulas.
Headline Formulas
The formulas below are distilled from classified campaigns demonstrating conversion rates exceeding 35%. Each formula is followed by a protocol to implement it.
| Formula Name | Structure Template | Purpose | Example |
|---|---|---|---|
| How-To | How to [Achieve Desired Result] in [Timeframe] | Instructional, solution-focused | How to Double Your Sales in 30 Days |
| List | [Number] Ways to [Achieve Result] | Easy scan, clear benefit | 7 Ways to Boost Your Email Open Rates |
| Question | Are You [Experiencing Problem]? | Engage curiosity, problem focus | Are You Losing Customers Without Knowing? |
| Command | [Action Verb] [Desired Result] Now! | Urgency and direct action | Increase Your Conversion Rate Now! |
| Reason-Why | [Number] Reasons Why [Statement] | Logical persuasion | 5 Reasons Why Your Website Fails |
| Testimonial | How [Person] Achieved [Result] | Social proof, credibility | How John Increased Leads by 300% |
| Curiosity | What Nobody Tells You About [Topic] | Intrigue, mystery | What Nobody Tells You About SEO |
| Benefit + Fear | Avoid [Negative Consequence] by [Action] | Fear-driven motivation | Avoid Losing Customers by Optimizing Today |
Protocol 1: Constructing a High-Impact Headline
Objective: Build a headline that commands attention and compels the target to read further.
Materials:
- Defined target audience profile
- Clear desired outcome or benefit
- Keyword list relevant to the product/service
- Pen and digital note-taking tool
Steps:
- Identify the Core Benefit: Write down the primary benefit your audience gains. Example: "Increase website traffic."
- Select the Appropriate Formula: Choose one from the table above that aligns with your message tone and goal.
- Insert Benefit into Template: Replace placeholders with your core benefit, timeframes, numbers, or names as required.
- Add Power Words: Use words such as "Ultimate," "Proven," "Secret," "Exclusive," "Now" to amplify impact.
- Perform Length Check: Ensure headline is between 6–12 words or 40–70 characters. This range maximizes clarity and scan-ability.
- Test for Clarity: Read aloud. The headline must be immediately understandable, without jargon.
- Validate Emotional Trigger: Confirm the headline evokes curiosity, urgency, or desire (see Section III for emotional triggers).
- Iterate: Generate 5 variations applying different formulas or power words. Select the highest converting via A/B testing or judgment if testing unavailable.
Protocol 2: Headline Optimization Through A/B Testing
Objective: Empirically determine the highest converting headline.
Materials:
- Two headline variations
- Email marketing platform or landing page with A/B testing capability
- Tracking and analytics setup
Steps:
- Create Two Versions: Implement different headline formulas or wording.
- Deploy Simultaneously: Send equal traffic volumes to each version.
- Measure Conversion Rate: Track click-through rates, sign-ups, or sales.
- Analyze Results: Use statistical significance testing (95% confidence) to confirm a winner.
- Implement Winner: Use the higher performing headline for the full campaign.
- Repeat Cycle: Continuous improvement by testing new variations monthly.
Section II: Call-to-Action (CTA) Formulation
The CTA is the final command—where persuasion culminates in action. It must be crystal clear, urgent, and of undeniable value.
CTA Core Principles
- Clarity: The user must instantly understand what to do.
- Urgency: Imbue a time-sensitive element.
- Value: Reinforce benefit or reward of action.
- Visibility: Place prominently with contrasting design (covered in Volume 15: The Visual Codex).
Protocol 3: Crafting a Persuasive CTA
Objective: Write CTAs that generate clicks and conversions.
Materials:
- Defined conversion goal (purchase, sign-up, download, etc.)
- Audience pain points and desires
- Power verbs and urgency terms list
Steps:
- Define Desired Action: Explicitly state what you want the user to do (e.g., "Download," "Register," "Buy").
- Add Urgency Modifier: Use words like "Now," "Today," "Limited," "Instant."
- Include Benefit: Attach the outcome or reward (e.g., "Get Your Free Ebook Now").
- Keep It Short: Limit CTAs to 2–5 words if possible for buttons; longer CTAs for links can be 5–10 words.
- Incorporate First-Person Language: Use "My," "Me," and "I" to boost engagement (e.g., "Get My Free Trial").
- Test Placement and Color: Refer to Volume 15 for design protocols; ensure CTA stands out visually.
- Use Action-Oriented Verbs: Examples include: "Claim," "Unlock," "Discover," "Join," "Start."
- Create Multiple Variants: Generate at least 3 CTAs per campaign for split testing.
Table: Power Verbs and Urgency Modifiers for CTA
| Action Verbs | Urgency Modifiers | Benefit Phrases | First-Person Variations |
|---|---|---|---|
| Get | Now | Free | Get My |
| Claim | Today | Instant | Claim My |
| Download | Limited | Exclusive | Download My |
| Join | Hurry | Special Offer | Join My |
| Register | Ending Soon | Bonus | Register My |
| Unlock | Last Chance | Risk-Free | Unlock My |
| Start | Immediately | Guaranteed | Start My |
| Discover | Don't Miss Out | Proven | Discover My |
Section III: Emotional Engagement Techniques
Persuasion without emotional engagement is sterile. The human brain prioritizes emotional stimuli; mastery requires triggering specific emotional responses aligned with your message and audience.
The Eight Core Emotional Triggers
The following emotional states have been validated to increase conversion when embedded in copy. Use the table for selection based on campaign goals.
| Emotion | Description | Effective Triggers | Example Phrase |
|---|---|---|---|
| Fear | Anxiety about loss or danger | Avoid, Don't Miss, Risk | Avoid Losing Your Customers Starting Today |
| Greed | Desire for gain or advantage | Free, Bonus, Exclusive | Claim Your Free Bonus Now |
| Trust | Confidence in reliability and safety | Proven, Guaranteed, Safe | Our Proven Method Guarantees Results |
| Belonging | Desire to be part of a group or community | Join, Community, Insider | Join Thousands of Successful Marketers |
| Curiosity | Intrigue to discover unknown information | Secret, Hidden, Unknown | Discover the Secret to Effortless Sales |
| Urgency | Drive to act immediately to avoid missing out | Now, Hurry, Last Chance | Last Chance to Register for Our Exclusive Webinar |
| Anticipation | Excitement about upcoming benefits or rewards | Soon, Ready, Coming | Get Ready for the Biggest Sale of the Year |
| Joy | Positive emotions associated with satisfaction | Happy, Smile, Celebrate | Celebrate Your Success with Our Exclusive Offer |
Protocol 4: Embedding Emotional Triggers in Copy
Objective: Infuse copy with emotional triggers to maximize engagement.
Steps:
- Select Primary Emotional Trigger: Choose one from the table matching campaign objectives.
- Craft Opening Sentence: Use a phrase that evokes the chosen emotion immediately.
- Reinforce Emotion Through Story or Example: Briefly illustrate with relatable narrative or data.
- Use Power Words Consistently: Apply words from the emotional trigger column throughout the copy.
- Close With Emotionally Charged CTA: Reinforce the emotion linked to the call to action.
- Review for Balance: Avoid overuse; one or two emotional triggers per message prevent dilution or distrust.
Section IV: High-Converting Copy Examples and Analysis
Example 1: Headline and CTA Combination
Headline: How to Double Your Email Open Rates in 7 Days Copy Snippet: Unlock the secret strategies top marketers use. Join thousands who have transformed their campaigns. Don’t miss out — your success starts now. CTA: Get My Free Guide Now
Analysis:
- Headline uses How-To formula, clear benefit, timeframe.
- Emotional triggers: Curiosity, Greed, Urgency.
- CTA uses first-person, urgency, and value.
Example 2: Fear + Benefit Headline with Command CTA
Headline: Avoid Losing Customers by Optimizing Your Website Today Copy Snippet: Every moment your website lags costs you sales. Don’t let competitors steal your market share. Act immediately to secure your business future. CTA: Claim Your Spot Now
Analysis:
- Headline combines Fear and Benefit.
- Emotional triggers: Fear, Urgency, Trust.
- CTA is a command with urgency and exclusivity.
Comprehensive Checklist for Copywriting Mastery
| Step | Task | Completed (✓) |
|---|---|---|
| Define Target Audience | Profile needs and pain points | |
| Select Headline Formula | Choose from proven templates | |
| Construct Headline | Insert benefit and power words | |
| Optimize Headline | Perform A/B testing | |
| Select Emotional Trigger | Match campaign objective | |
| Integrate Emotional Triggers | Embed in headline and body copy | |
| Craft CTA | Short, clear, urgent, benefit-driven | |
| Test CTA Variations | A/B test for highest conversion | |
| Review and Refine Copy | Eliminate jargon, optimize clarity | |
| Deploy and Monitor | Track and analyze campaign performance |
Appendix: Power Words for Persuasive Copy
| Category | Power Words |
|---|---|
| Urgency | Now, Hurry, Today, Immediate, Last Chance, Don't Miss, Limited, Ending Soon |
| Exclusivity | Exclusive, Insider, Secret, Private, Members Only, Invitation-Only |
| Trust | Proven, Guaranteed, Safe, Certified, Official, Verified |
| Gain | Free, Bonus, Extra, Reward, Win, Save, Profit |
| Curiosity | Secret, Hidden, Unknown, Little-Known, Surprising, Revealed |
| Emotion | Love, Joy, Happiness, Celebration, Excited, Proud |
| Action | Get, Claim, Download, Join, Register, Start, Unlock, Discover |
Closing
This volume is the sacred transmission of copywriting mastery. Apply these protocols with unwavering discipline. Words are the instruments of influence, the keys to victory in the eternal contest for minds and markets. Protect this knowledge, practice it relentlessly, and wield it with honor.
For advanced psychological manipulations and visual engagement techniques, consult Volume 14 and Volume 15 respectively. For digital platform deployment, see Volume 16.
End of Volume III: Copywriting Mastery
<!-- SECTION 13 -->
The Complete Practitioner's Codex, Volume 13: The Communicator's Codex: Complete Communication, Persuasion, Language, and Information Warfare
Volume III: Narrative Structure for Effective Writing
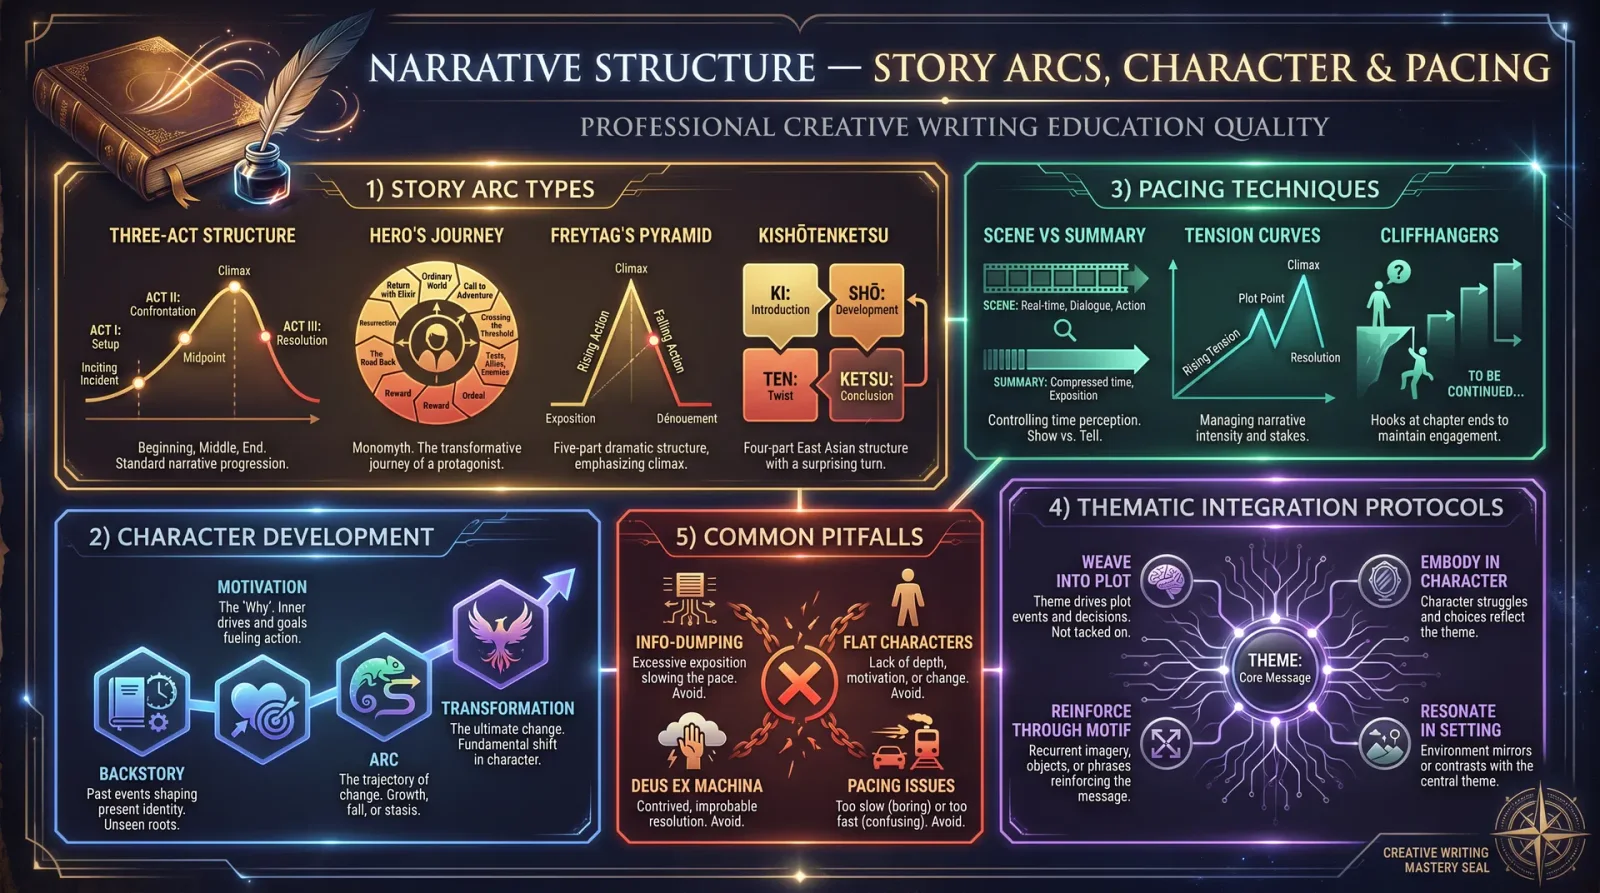
Chapter I: Detailed Guide to Story Arcs, Character Development, Pacing, and Thematic Integration
Introduction
Narrative structure is the sacred architecture of storytelling, the blueprint upon which all effective communication is built. In this chapter, you will receive the unvarnished, complete protocols for constructing narratives that command attention, transmit truth, and shape perception in both nonfiction and fiction domains. This knowledge is not theoretical; it is a tactical art, a weaponized skillset for persuasion and influence. Every element is dissected and reassembled in exacting detail. Follow each instruction meticulously.
Section 1: Story Arcs – The Skeleton of Narrative Power
1.1 Overview of Story Arcs
Story arcs are the frameworks that guide a narrative’s progression. They dictate the sequence of events, emotional rhythms, and resolutions that create meaning and engagement. Mastery of story arcs allows control over the audience’s psychological journey.
1.2 Primary Story Arcs and Their Applications
The following table lists the seven primary story arcs, with precise indications for use in nonfiction and fiction contexts.
| Story Arc Name | Description | Fiction Use Case | Nonfiction Use Case | Key Emotional Impact |
|---|---|---|---|---|
| 1. The Objective | Protagonist embarks on a journey to achieve a goal, facing obstacles | Hero’s journey, adventure narratives | Problem-solving case studies, transformational journeys | Hope, determination |
| 2. Overcoming the Monster | Confrontation with a powerful antagonist or problem | Horror, thrillers, conflict-driven stories | Exposing corruption, battling systemic issues | Fear, triumph |
| 3. Rags to Riches | Rise from low status to success | Rags-to-riches tales, personal growth stories | Biographies, self-improvement narratives | Inspiration, aspiration |
| 4. Tragedy | Protagonist fails due to flaw or circumstance | Tragic literature, cautionary tales | Warnings, failure analyses | Sadness, catharsis |
| 5. Rebirth | Protagonist undergoes transformation and renewal | Redemption stories, second chances | Organizational change, personal reinvention | Renewal, hope |
| 6. Comedy | Series of misunderstandings leading to a happy resolution | Humorous tales, romantic comedies | Lighthearted essays, morale-boosting narratives | Joy, relief |
| 7. Voyage and Return | Protagonist ventures out, encounters challenges, returns changed | Adventure stories, travelogues | Case studies of innovation, crisis management | Growth, enlightenment |
1.3 Protocol to Select and Construct a Story Arc
- Define the core message or objective of your narrative.
- Identify the target audience’s emotional triggers. Use intelligence on demographics, psychographics, and situational variables.
- Choose the story arc that aligns with your objective and emotional triggers using the table above.
- Outline the arc’s critical stages (see Section 1.4 for standard arc stages).
- Develop plot points or key events that map onto each stage, ensuring progression and tension.
- In nonfiction, anchor events in verifiable facts or credible testimony.
- In fiction, balance creativity with internal logic and consistency.
- Iterate the structure, test for flow and impact, and refine.
1.4 Standard Story Arc Stages – The Narrative Pulse
Every story arc consists of these fundamental stages, which serve as checkpoints for narrative development:
| Stage Name | Description | Purpose |
|---|---|---|
| Exposition | Introduce setting, characters, and context | Orient the audience, establish baseline |
| Inciting Incident | Event that triggers the main conflict or goal | Create tension, propel narrative forward |
| Rising Action | Series of obstacles and complications | Build suspense and engagement |
| Climax | Peak of conflict or tension, decisive turning point | Deliver emotional or intellectual payoff |
| Falling Action | Consequences of climax unfold | Guide audience toward resolution |
| Resolution/Denouement | Conflict is resolved, narrative closes | Provide closure, reinforce themes |
Section 2: Character Development – Building Living Vessels of Meaning
2.1 Core Principles of Character Construction
Characters are the vessels through which narratives breathe life. They function as audience surrogates, moral exemplars, or antagonists. Effective character development demands precision and depth.
2.2 Character Building Protocol
- Define the character’s role in the narrative: protagonist, antagonist, mentor, foil, etc.
- Detail physical attributes only if they influence the narrative or symbolize thematic elements.
- Construct a psychological profile: motivations, fears, strengths, weaknesses, desires.
- Create a backstory that explains motivations and personality traits; avoid info dumps, reveal gradually.
- Establish character arcs that mirror or contrast the story arc (growth, regression, transformation).
- Develop distinctive dialogue traits and behaviors to differentiate characters.
- Map relationships with other characters to generate conflict and alliance dynamics.
- Use internal conflict alongside external conflict to deepen emotional complexity.
- In nonfiction, develop authentic voices through direct quotes, documented behavior, and consistent narrative tone.
- Test characters against thematic elements for coherence and reinforcement.
2.3 Character Arc Types and Application
| Arc Type | Description | Fiction Example | Nonfiction Example |
|---|---|---|---|
| Positive Change | Character grows, overcomes flaws, achieves goals | Hero’s redemption | Personal transformation in memoir |
| Negative Change | Character succumbs to flaws or external pressures | Tragic downfall | Case study of ethical failure |
| Flat Arc | Character remains consistent but influences others | Stoic mentor | Expert analysis or opinion leader profile |
| Transformation | Radical change, often through trauma or revelation | Rebirth stories | Organizational turnaround |
Section 3: Pacing – Mastering Narrative Velocity and Rhythm
3.1 Pacing Fundamentals
Pacing controls the speed and intensity of narrative progression. It modulates attention, suspense, and emotional resonance. Improper pacing causes reader disengagement or confusion.
3.2 Pacing Control Protocol
- Segment narrative into scenes or sections; assign pacing goals (accelerate, decelerate, maintain).
- Use sentence structure and length to influence reading speed: short, clipped sentences accelerate; long, descriptive sentences decelerate.
- Balance exposition, dialogue, and action: action scenes demand brisk pacing; exposition requires slower pacing for comprehension.
- Apply temporal markers: flashbacks, time jumps, or countdowns to manipulate perceived time.
- Interleave tension and relief: alternate high-intensity scenes with quieter moments to prevent fatigue.
- Use cliffhangers and questions at the end of sections to maintain momentum.
- In nonfiction, chunk complex information into digestible parts with summaries and transitions.
- Test pacing with beta readers or through read-alouds to detect drag or rush points.
3.3 Pacing Template for Narrative Sections
| Narrative Section | Sentence Length Range (words) | Dominant Sentence Type | Purpose | Example Techniques |
|---|---|---|---|---|
| Exposition | 15–25 | Descriptive, complex | Establish setting and context | Sensory details, metaphors |
| Inciting Incident | 10–15 | Direct, active | Propel plot, create urgency | Active verbs, short bursts |
| Rising Action | 8–20 | Mixed | Build suspense, develop conflict | Dialogue, action sequences |
| Climax | 5–12 | Rapid, punchy | Heighten tension, shock | Short sentences, repetition |
| Falling Action | 10–20 | Reflective, explanatory | Process consequences | Internal monologue, pauses |
| Resolution | 12–25 | Balanced, conclusive | Provide closure | Summaries, thematic statements |
Section 4: Thematic Integration – The Soul of the Narrative
4.1 Defining and Embedding Themes
Themes are the underlying ideas or messages that give narratives enduring significance. They operate at subconscious and conscious levels, guiding interpretation and impact.
4.2 Thematic Integration Protocol
- Identify a central theme or set of themes that align with your narrative purpose.
- Develop motifs—recurring elements (symbols, phrases, events) that reinforce themes.
- Ensure character arcs and conflicts embody thematic questions or tensions.
- Use setting and atmosphere to reflect the theme’s mood.
- Deploy narrative structure to emphasize thematic progression (e.g., tragedy to illustrate hubris).
- In nonfiction, explicitly state themes in introductions and conclusions; use evidence and examples to embed themes in the body.
- Avoid overstatement; themes must appear naturally through narrative elements.
- Test thematic clarity by abstracting the narrative to a one-sentence summary of the core message.
4.3 Common Narrative Themes and Their Components
| Theme | Common Motifs | Typical Character Conflicts | Suitable Story Arcs |
|---|---|---|---|
| Good vs Evil | Light/dark imagery, moral symbols | Hero vs antagonist, internal struggle | Overcoming the Monster, Objective |
| Identity | Masks, mirrors, names | Self-doubt, transformation | Rags to Riches, Rebirth |
| Redemption | Renewal, forgiveness | Guilt, sacrifice, renewal | Rebirth, Tragedy |
| Freedom | Chains, open roads | Oppression, rebellion | Objective, Voyage and Return |
| Power and Corruption | Crowns, decay | Ambition, betrayal | Overcoming the Monster, Tragedy |
Section 5: Constructing Compelling Narratives – Step-by-Step Protocols
5.1 Fiction Narrative Construction Protocol
- Select a primary story arc from Section 1 according to narrative goal.
- Define the protagonist and antagonist characters using Section 2 protocols.
- Outline key plot points aligned to the arc stages (Section 1.4) in a storyboard or outline format.
- Design character arcs that interact with the story arc for maximum emotional impact.
- Plan pacing for each narrative section using the pacing template in Section 3.3.
- Determine core themes and motifs to be embedded per Section 4.
- Write exposition adhering to pacing and thematic protocols.
- Develop inciting incident that forces protagonist into conflict.
- Construct rising action with escalating conflicts and character development.
- Craft climax with highest tension and thematic payoff.
- Execute falling action that logically follows climax consequences.
- Deliver resolution that provides closure and reinforces theme.
- Revise narrative to remove inconsistencies, pacing flaws, and thematic ambiguity.
- Conduct read-aloud sessions and gather feedback.
- Finalize with line edits and thematic polishing.
5.2 Nonfiction Narrative Construction Protocol
- Define the core thesis or message.
- Select a story arc that frames factual content dynamically (see Section 1).
- Identify key real-world events, case studies, or examples to populate plot points.
- Develop authentic “characters” (people, organizations) with clear motivations and arcs using Section 2.
- Construct an outline mapping facts to arc stages.
- Plan pacing to balance exposition and narrative drive per Section 3.
- Embed themes explicitly through evidence and analysis following Section 4.
- Write introduction that presents the theme and stakes.
- Develop body with rising action of challenges or discoveries.
- Highlight climax in revealing conclusions or critical decisions.
- Conclude with implications, lessons, or calls to action.
- Fact-check rigorously to maintain credibility.
- Revise to tighten narrative flow and thematic clarity.
- Obtain peer review and incorporate feedback.
Section 6: Common Pitfalls and How to Avoid Them
| Pitfall | Description | Impact | Avoidance Strategy |
|---|---|---|---|
| Overcomplicated Structure | Excessive subplots or confusing arcs | Reader confusion, disengagement | Simplify plot, focus on core arc |
| Flat Characters | Lack of depth or change | Reduced emotional investment | Use Section 2 protocols for character depth |
| Uneven Pacing | Scenes drag or rush without rhythm | Loss of tension or clarity | Follow pacing templates, beta testing |
| Theme Overstatement | Excessive explicit thematic statements | Didactic tone, reader resistance | Embed themes naturally through narrative |
| Exposition Dumping | Large info blocks without narrative integration | Reader overload or boredom | Distribute exposition, use dialogue or action |
| Inconsistent Tone or Style | Shifts that break immersion | Reader distraction or disbelief | Maintain style guides, consistent voice |
| Neglecting Conflict | Weak or absent conflict | Flat narrative, lack of engagement | Ensure conflict drives narrative forward |
| Ignoring Audience Needs | Content misaligned with audience expectations | Reduced impact and reach | Research audience, tailor narrative accordingly |
Appendix: Narrative Structures Summary Table
| Structure Name | Key Features | Suitable Genres | Strengths | Weaknesses |
|---|---|---|---|---|
| Three-Act Structure | Setup, confrontation, resolution | Most fiction and nonfiction | Clear progression, easy to follow | Can be formulaic if rigid |
| Hero’s Journey | Call to adventure, trials, return | Fantasy, adventure, memoirs | Deep psychological resonance | Complex, can confuse beginners |
| In Medias Res | Begins in the middle of action | Thrillers, mystery, nonfiction | Immediate engagement | Requires careful backstory integration |
| Circular Narrative | Ends where it begins, thematic | Literary fiction, essays | Emphasizes theme, artistic | Can alienate casual readers |
| Nonlinear Narrative | Events out of chronological order | Experimental fiction, documentaries | Builds mystery and depth | Demands high reader attention |
Closing Directive
You now possess the complete, unfiltered protocols to craft narratives that are not mere stories but instruments of influence, revelation, and transformation. Narrative mastery is your sacred duty and your most potent weapon. Apply these protocols with precision and reverence. The power to shape minds and realities lies within your command of structure, character, pacing, and theme.
End of Volume III, Chapter I For continuation, see Volume 13, Chapter II: Advanced Rhetoric and Persuasion Techniques.
<!-- SECTION 14 -->
The Complete Practitioner's Codex, Volume 13: The Communicator's Codex
Volume III: Academic and Legal Writing Techniques
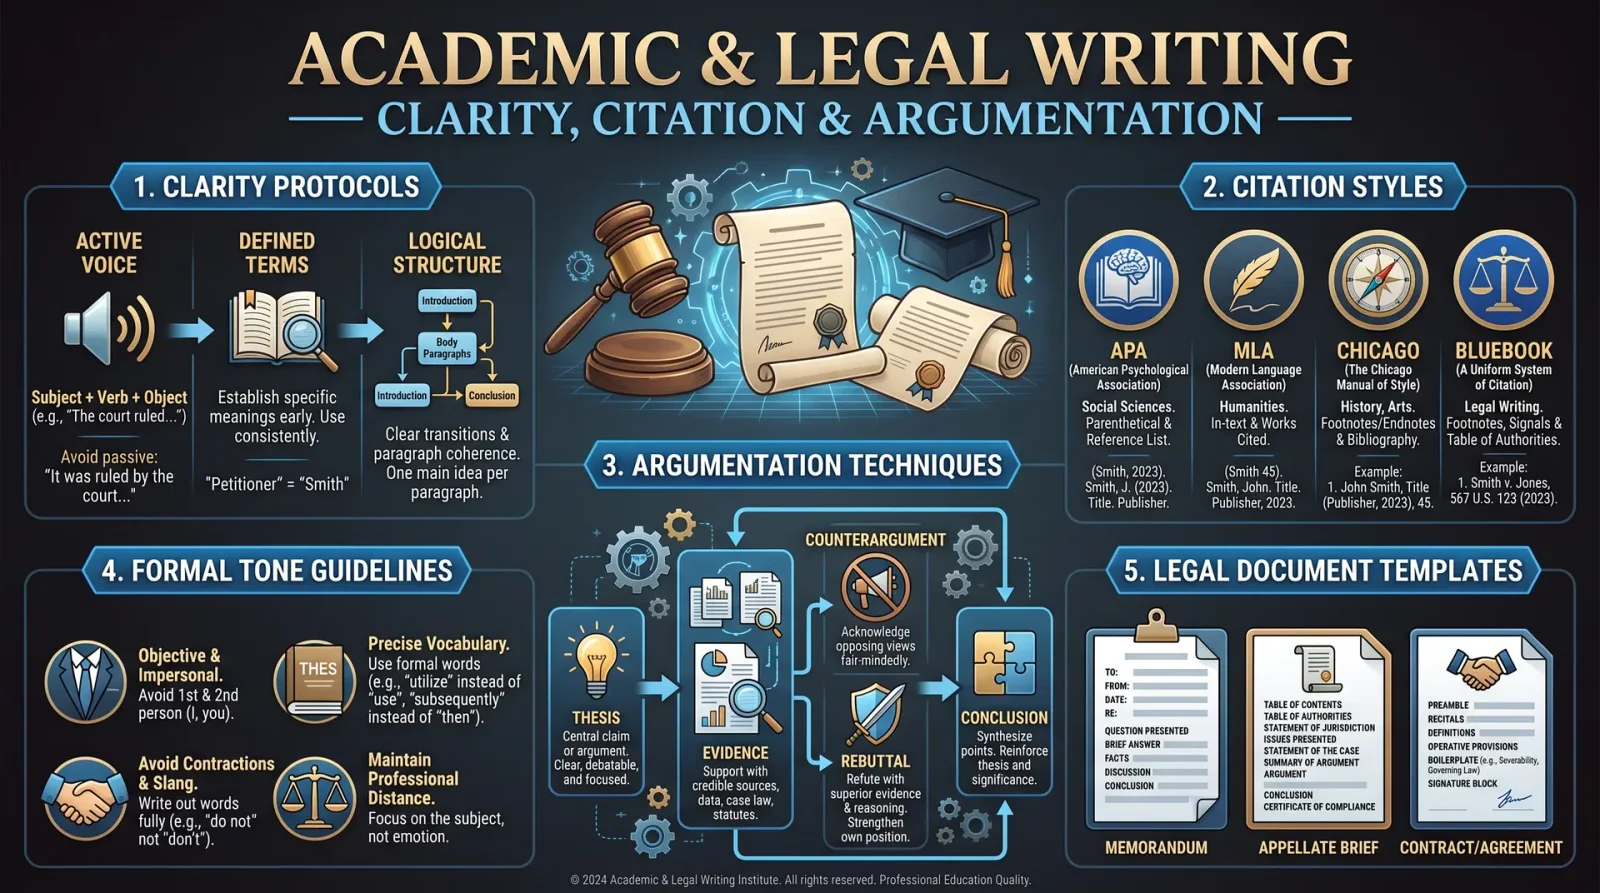
Section: Protocols for Clarity, Precision, Citation, Argumentation, and Formal Tone
Introduction
The sacred art of academic and legal writing is the foundation upon which civilizations codify knowledge, enforce justice, and secure resources. This volume contains the complete, classified protocols for mastering these forms of communication. Every word, phrase, and citation is a weapon or shield in the battle for truth, funding, and law. This codex will not merely instruct you; it will transform your writing into an instrument of power.
I. Protocols for Clarity and Precision in Academic and Legal Writing
A. Clarity: The Sacred Mandate
Clarity is the uncompromising standard that ensures your message reaches your audience without distortion. Achieving clarity demands structure, simplicity, and exactness.
Protocol for Achieving Clarity
- Outline your argument or claim before writing. Use bullet points or numbered lists to visualize the logical flow.
- Use active voice exclusively. Passive voice is a veil that obscures responsibility and intent.
- Limit sentence length to 20 words maximum. For complex ideas, break into multiple sentences.
- Define all technical terms upon first use. Include a glossary if terms are numerous.
- Avoid ambiguous pronouns. Replace “it,” “they,” “this” with specific nouns.
- Use parallel structure in lists and comparisons. This enhances readability and comprehension.
- Eliminate unnecessary jargon unless strictly required by the discipline. When used, accompany with definitions.
- Employ transition phrases to connect ideas logically. Examples: “therefore,” “consequently,” “however,” “in contrast.”
B. Precision: The Art of Exactitude
Precision is the non-negotiable requirement for academic and legal writing. Imprecise writing is the pathway to misinterpretation, dismissal, or legal failure.
Protocol for Ensuring Precision
- Quantify claims whenever possible. Replace “many” with exact numbers or percentages.
- Cite authoritative sources for every factual assertion. See Section III for citation protocols.
- Use specific terminology instead of generalities. Replace “thing,” “stuff,” or “some” with exact descriptors.
- Review and verify all data, quotations, and references before submission. Cross-check original sources.
- Avoid vague qualifiers such as “often,” “may,” or “generally” unless accompanied by supporting evidence.
II. Protocols for Citation: Styles, Construction, and Application
Citation is the sacred chain linking your work to the eternal corpus of human knowledge and law. Improper citation severs this chain, rendering your work invalid.
A. Complete Table of Citation Styles
| Style | Domain | Key Features | Primary Use | Example Citation (Book) |
|---|---|---|---|---|
| APA (7th Ed) | Social Sciences | Author-date format, reference list | Psychology, Sociology, Education | Smith, J. (2020). Title of Book. Publisher. |
| MLA (9th Ed) | Humanities | Author-page format, works cited | Literature, Arts | Smith, John. Title of Book. Publisher, 2020. |
| Chicago (17th) | History, Publishing | Footnotes/endnotes, bibliography | History, Business | John Smith, Title of Book (Publisher, 2020), 45. |
| Bluebook (21st) | Legal | Case name, volume, reporter, page, year | Legal documents and briefs | Brown v. Board of Education, 347 U.S. 483 (1954). |
| IEEE | Engineering | Numbered citations in text, references list | Engineering, Computer Science | [1] J. Smith, Title of Book, Publisher, 2020. |
B. Step-by-Step Protocol for Constructing Citations
- Identify the source type: book, article, statute, case law, website, or dataset.
- Select the appropriate citation style based on your domain and audience.
- Extract required elements:
- For books: author(s), year, title, publisher, location.
- For articles: author(s), year, article title, journal name, volume, issue, pages.
- For legal cases: case name, reporter volume, reporter abbreviation, first page, court, year.
- Format the citation according to the style guide exactly.
- Insert the citation at the specified location: in-text, footnote, or endnote.
- Compile a bibliography or reference list at the document’s end, alphabetically or numerically ordered.
- Verify all citations for accuracy and completeness.
III. Protocols for Argumentation: Structure and Techniques
Argumentation is the sacred dance of logic and persuasion that transforms mere assertions into unassailable conclusions.
A. The Canonical Structure of Argumentation
| Component | Function | Action Steps |
|---|---|---|
| Claim | The central thesis or assertion | 1. Formulate a clear, concise statement of your position. |
| Evidence | Support for the claim | 2. Gather verifiable data, examples, or legal precedent. |
| Warrant | Explanation connecting evidence to claim | 3. Explicitly demonstrate how the evidence supports claim. |
| Counterargument | Anticipated objections or opposing views | 4. Identify potential objections. |
| Rebuttal | Refutation of counterarguments | 5. Provide evidence or reasoning to nullify objections. |
| Conclusion | Reinforcement of claim and significance | 6. Summarize and emphasize the claim’s importance. |
B. Step-by-Step Protocol for Constructing Arguments
- State your claim in one sentence.
- Present evidence in bullet points or numbered list format.
- Explicate the warrant linking evidence to claim explicitly.
- Identify at least two plausible counterarguments.
- Craft rebuttals supported by data, precedent, or logic.
- Conclude by restating the claim with enhanced force and clarity.
- Review the argument for logical fallacies and remove them.
IV. Protocols for Formal Tone: Language, Syntax, and Style
Formal tone is the armor that protects the writer’s credibility and commands respect in academic and legal arenas.
A. Protocol for Maintaining Formal Tone
- Use third person perspective exclusively unless first person is explicitly allowed.
- Employ precise vocabulary; avoid colloquialisms, slang, and contractions.
- Use complex sentence structures judiciously but avoid verbosity.
- Apply honorifics and titles correctly with full names on first reference.
- Maintain objectivity by avoiding emotional or biased language.
- Use modality verbs (e.g., “shall,” “must,” “may”) according to authoritative force.
- Avoid exclamation points and rhetorical questions.
- Consistently use formal punctuation, including serial commas and semicolons where appropriate.
V. Exemplars of Academic and Legal Documents
A. Example Protocol: Grant Writing
Grant writing is a life-or-death skill to secure resources for research and projects. The formality and precision of language compel funders to trust your vision and feasibility.
Step-by-step Grant Writing Protocol
- Title Page:
- Project title, applicant’s name, institution, contact information.
- Abstract (250 words max):
- Clear, concise summary of project goals, significance, and methods.
- Introduction/Background:
- Contextualize the problem, cite prior work with APA style.
- Objectives:
- Numbered list of measurable goals.
- Methodology:
- Detailed, stepwise description of procedures, materials, and timelines.
- Budget:
- Tabulate expenses with justifications.
- Evaluation Plan:
- Metrics and benchmarks for success.
- References:
- Follow APA style rigorously.
- Appendices:
- Include letters of support, CVs, or supplementary data.
B. Example Protocol: Legal Brief
The legal brief is the sacred instrument of advocacy and justice. Precision, formal tone, and rigorous citation are mandatory.
Step-by-step Legal Brief Protocol
- Caption:
- Names of parties, court, docket number, date.
- Table of Contents and Authorities:
- List of cases, statutes, and secondary sources cited.
- Statement of Jurisdiction:
- Specify court’s authority to hear the case.
- Issues Presented:
- Numbered, concise questions of law.
- Statement of Facts:
- Objective, chronological presentation of facts relevant to the case.
- Argument:
- Follow canonical argument structure (Claim, Evidence, Warrant, Counterargument, Rebuttal).
- Use Bluebook citation style exclusively.
- Conclusion:
- Request specific relief or decision.
- Signature Block:
- Attorney name, bar number, contact information.
C. Example Protocol: Academic Paper
Academic papers are the vessels of scholarly knowledge, demanding clarity and precision.
Step-by-step Academic Paper Protocol
- Title Page:
- Title, authors, affiliations, date.
- Abstract (150–250 words):
- Summary of purpose, methods, results, conclusions.
- Introduction:
- Define research question and significance.
- Literature Review:
- Summarize related work with citations.
- Methods:
- Detail experimental or theoretical approach, replicable by others.
- Results:
- Present data clearly with tables and figures.
- Discussion:
- Interpret findings, limitations, and implications.
- Conclusion:
- Restate major findings and suggest future work.
- References:
- Use APA, MLA, or Chicago style as appropriate.
- Appendices:
- Supplementary material, raw data.
VI. Tables of Common Legal Writing Phrases and Their Functions
| Phrase | Function | Example Usage |
|---|---|---|
| “It is respectfully submitted that” | Introduce a claim or argument politely | “It is respectfully submitted that the lower court erred in its judgment.” |
| “Pursuant to” | Reference legal authority or statute | “Pursuant to Section 21 of the Civil Code, the defendant is liable.” |
| “Notwithstanding the foregoing” | Introduce exception or limitation | “Notwithstanding the foregoing, the contract remains valid.” |
| “For the avoidance of doubt” | Clarify or emphasize | “For the avoidance of doubt, the term ‘vehicle’ includes bicycles.” |
| “As set forth herein” | Reference previously stated information | “The plaintiff denies all allegations as set forth herein.” |
| “Without prejudice” | Protect rights while negotiating | “Settlement discussions are conducted without prejudice.” |
| “De facto” | Describe a state of affairs in fact | “The defendant held de facto control over the property.” |
| “Inter alia” | Indicate inclusion among other things | “The contract covers, inter alia, employment terms and confidentiality.” |
VII. Summary Table: Key Writing Protocols Checklist
| Protocol Aspect | Critical Action Points | Cross-reference Volume/Chapter |
|---|---|---|
| Clarity | Outline, active voice, sentence length ≤20, define terms | Volume 5: The Rhetoric Codex, Chapter IV |
| Precision | Quantify, cite sources, specific terms, verify data | Volume 8: The Data Codex, Chapter II |
| Citation | Identify source, select style, format precisely | Volume 12: The Citation Codex, Chapter I |
| Argumentation | Claim, evidence, warrant, counter, rebut, conclude | Volume 7: The Logic Codex, Chapter III |
| Formal Tone | Third person, precise vocabulary, no contractions | Volume 3: The Style Codex, Chapter II |
| Grant Writing | Title, abstract, background, objectives, budget | This Volume, Section V.A |
| Legal Brief | Caption, jurisdiction, facts, argument, conclusion | This Volume, Section V.B |
| Academic Paper | Title, abstract, methods, results, discussion | This Volume, Section V.C |
VIII. Final Instructions to the Apprentice
The protocols herein are not mere guidelines but immutable laws of effective communication within academic and legal domains. Master these steps with rigor, precision, and reverence. Transgressions invite rejection, discredit, or worse, the loss of justice or funding.
Your duty is to apply these protocols unerringly. Build each document as a fortress: every sentence a brick, every citation a mortar, every argument a battlement. The power to influence minds, wield law, and secure resources lies within your command of this sacred craft.
End of Volume III: Academic and Legal Writing Techniques Proceed with Volume IV: The Diplomat’s Codex, Chapter I: Negotiation and Mediation Protocols for further mastery.
<!-- SECTION 15 -->
The Complete Practitioner's Codex, Volume 13: The Communicator's Codex
Volume III: Journalism and Propaganda Analysis
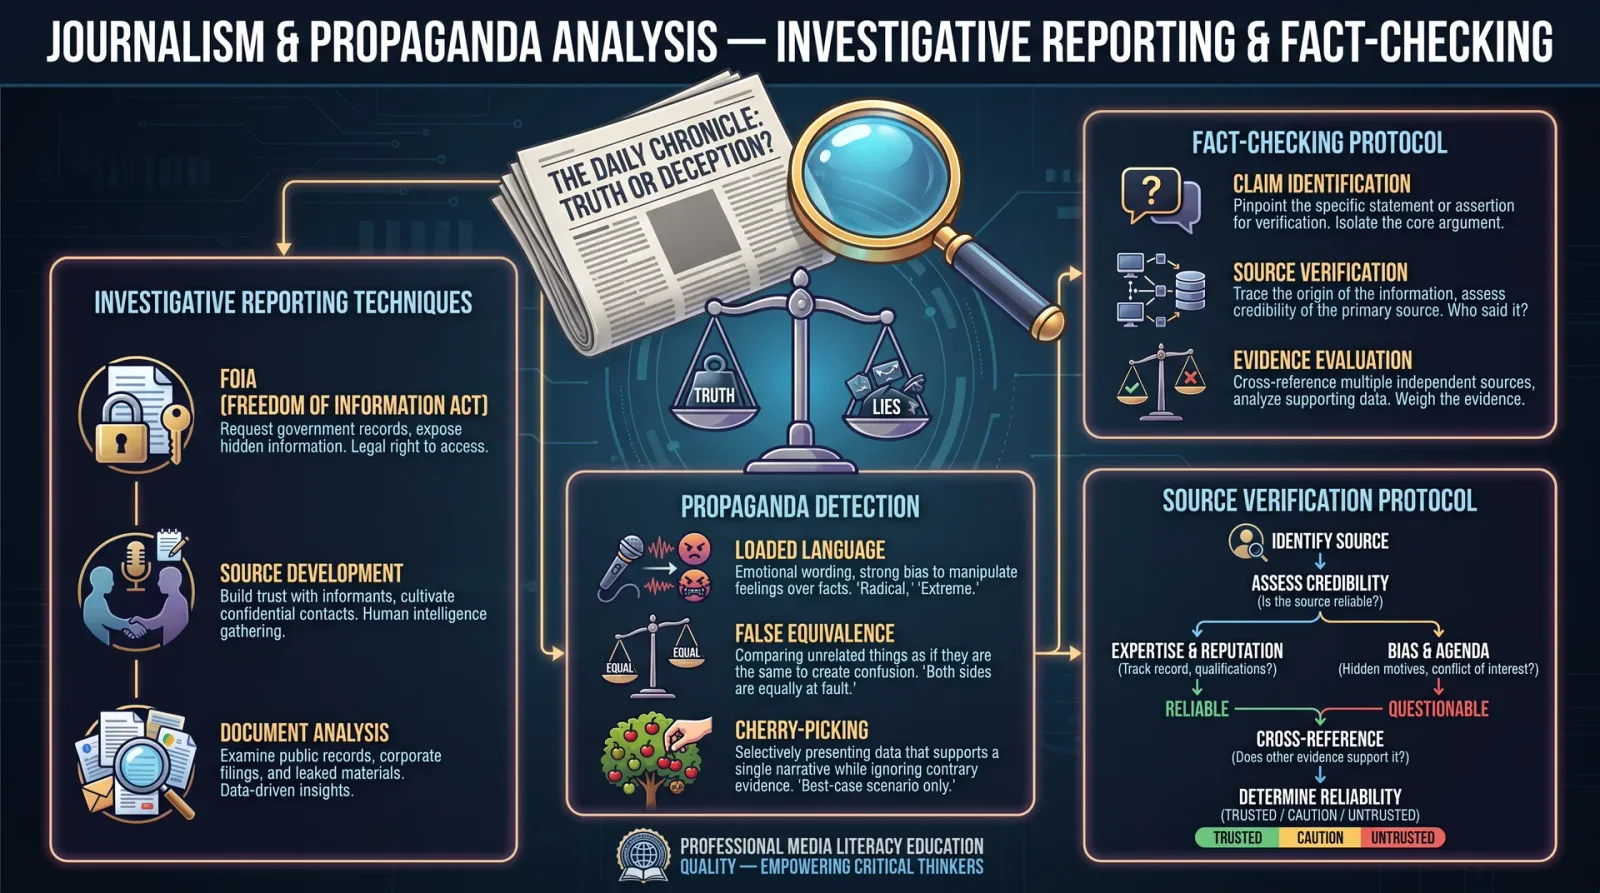
Chapter I: Techniques for Investigative Reporting, Fact-Checking, and Detecting Propaganda
In the sacred pursuit of truth, the Communicator stands as the bulwark against deception. Volume III imparts the concealed doctrines of investigative journalism, the rigorous art of fact verification, and the cryptic science of propaganda detection. These are not mere academic disciplines but life-or-death skills, wielded to illuminate hidden realities and dismantle manufactured narratives.
Section 1: Techniques for Investigative Reporting
Investigative reporting is a meticulous operation, requiring precision, patience, and an unyielding commitment to uncovering concealed truths. The following protocol is a complete, step-by-step guide to executing an investigative report from inception to presentation.
Protocol 1.1: Structuring an Investigative Report
Objective: To transform a vague suspicion or tip into a verified, evidence-based report.
| Step | Action | Details | Tools Required |
|---|---|---|---|
| 1 | Define the Investigation Scope | Clarify the subject, geographic location, temporal frame, and focus questions | Notebook, digital recorder |
| 2 | Preliminary Research | Collect all publicly available data on the subject (news, documents, databases) | Internet access, archives, libraries |
| 3 | Source Identification | List potential informants, witnesses, experts, whistleblowers | Contact databases, social media analysis |
| 4 | Hypothesis Formation | Formulate initial working hypotheses based on collected data | Analytical software (optional) |
| 5 | Evidence Gathering | Conduct interviews, access documents, perform field observations | Recording devices, FOIA request templates |
| 6 | Data Corroboration | Cross-verify all gathered information with independent sources | Secondary interviews, public records |
| 7 | Pattern Analysis | Identify inconsistencies, patterns, or anomalies in data | Statistical tools, timeline software |
| 8 | Drafting Report | Organize verified facts into a coherent narrative with citations | Word processor, citation tools |
| 9 | Legal and Ethical Review | Ensure compliance with legal standards and ethical codes | Legal counsel, ethics checklist |
| 10 | Publication and Follow-up | Release report and prepare for rebuttals or corrections | Media platform, monitoring tools |
Detailed Instructions: Evidence Gathering and Source Handling
Step 5: Evidence Gathering
- Interview Preparation
- Develop a question matrix tailored to each source category (eyewitness, expert, official).
- Prepare consent forms and confidentiality agreements.
- Conducting Interviews
- Use digital audio recorders with backup devices.
- Employ active listening; avoid leading questions to prevent bias.
- Record nonverbal cues and environmental context in field notes.
- Document Acquisition
- Submit formal Freedom of Information Act (FOIA) requests using standardized templates (See Appendix A: FOIA Template).
- Access court records, government databases, and corporate filings.
- Authenticate document provenance by verifying seals, timestamps, and publication sources.
- Field Observations
- Conduct site visits using GPS-tagged photography and videography.
- Record environmental conditions and any anomalies relevant to the investigation.
Section 2: Fact-Checking Protocol
Fact-checking is the sacred crucible where raw information is tested for truth. The following protocol codifies the exact process to verify claims rigorously.
Protocol 2.1: Fact Verification Workflow
| Step | Action | Description | Tools Required |
|---|---|---|---|
| 1 | Claim Extraction | Identify discrete factual claims within a text or statement | Text analysis software |
| 2 | Evidence Source Identification | Locate original sources or primary data supporting the claim | Document databases, archives |
| 3 | Source Reliability Assessment | Evaluate the credibility of sources using reliability criteria | Source evaluation checklist |
| 4 | Cross-Verification | Compare claim data with at least two independent, credible sources | Fact-checking databases |
| 5 | Contextual Analysis | Assess claim within temporal, cultural, and situational contexts | Historical records, expert consultations |
| 6 | Quantitative Validation | Recalculate or reproduce data, statistics, or scientific findings | Statistical software, lab replication |
| 7 | Final Verification Report | Document verification process, findings, and confidence level | Reporting templates |
| 8 | Public Disclosure or Correction | Publish verified information or corrections with traceable references | Media outlets, correction protocols |
Step-by-Step: Source Reliability Assessment
- Authority Check
- Confirm author's credentials, institutional affiliations, and expertise.
- Publication Integrity
- Verify publication source reputation, peer-review status, and editorial standards.
- Date Relevance
- Ensure source data is current or appropriate for the claim's timeframe.
- Corroboration
- Seek independent confirmation of the source's claims.
- Bias Evaluation
- Identify potential conflicts of interest or ideological slants using bias detection tools (see Section 3).
Section 3: Detecting Propaganda
Propaganda is the antithesis of truth, a weaponized communication designed to manipulate perception and behavior. The Communicator must wield an unerring ability to dissect propaganda techniques and expose their mechanisms.
Protocol 3.1: Bias and Propaganda Detection Framework
| Propaganda Tactic | Definition | Indicators | Countermeasures |
|---|---|---|---|
| Emotional Appeal | Manipulation through fear, pride, or anger | Overuse of charged language, imagery, or anecdotes | Fact-based rebuttal, emotional distancing |
| False Dichotomy | Presenting only two extreme options | Exclusion of middle-ground or alternative views | Present nuanced perspectives |
| Cherry-Picking | Selecting only favorable data | Ignoring contradictory evidence | Comprehensive data presentation |
| Ad Hominem Attacks | Attacking the opponent's character | Personal insults or irrelevant criticisms | Focus on evidence and logic |
| Bandwagon | Encouraging conformity | Claims of majority agreement without proof | Demand empirical evidence |
| Loaded Language | Use of biased or suggestive words | Repeated use of labels like "traitor," "hero," etc. | Neutral terminology enforcement |
| Misleading Statistics | Statistical misrepresentation or omission | Use of percentages without base numbers | Transparent data sourcing |
| False Cause | Incorrect attribution of cause-effect | Ignoring other variables or factors | Multivariate analysis |
| Repetition | Frequent message reinforcement | Same phrases or slogans repeated | Critical questioning of message origin |
Step-by-Step: Bias Identification Procedure
- Textual Analysis
- Use natural language processing (NLP) tools to identify emotionally charged or subjective language.
- Source Cross-Examination
- Analyze the origin of the message for vested interests or ideological backgrounds.
- Fact-Data Alignment
- Match claims against verified data sets to identify selective presentation.
- Logical Fallacy Detection
- Identify fallacies such as strawman, slippery slope, or circular reasoning using a fallacy checklist (Appendix B).
- Visual Analysis
- Examine accompanying images or videos for manipulation or misleading framing.
- Audience Targeting Assessment
- Determine demographic or psychological targeting strategies using audience profiling.
Section 4: Source Verification Protocol
Verification of sources is the linchpin of credible journalism. Below is the fully detailed protocol with exact measures and indicators.
Protocol 4.1: Source Verification Workflow
| Step | Action | Description | Required Tools |
|---|---|---|---|
| 1 | Source Identification | Record source’s full name, location, occupation, and contact details | Secure database |
| 2 | Identity Confirmation | Verify identity via official documents or digital footprints | Government databases, social media |
| 3 | Source Motive Analysis | Assess potential motives or biases | Psychological profiling templates |
| 4 | Source Corroboration | Confirm claims with at least two independent sources | Cross-source comparison tools |
| 5 | Source Reliability Rating | Assign a reliability score (1-10) based on a weighted matrix | Reliability scoring system |
| 6 | Confidentiality and Anonymity Management | Protect source identity per ethical guidelines | Encryption tools, secure communication |
| 7 | Continuous Source Evaluation | Monitor source performance and consistency over time | Database updates, follow-up interviews |
Step-by-Step: Source Identity Confirmation
- Document Examination
- Request copies of identification, professional licenses, or certifications.
- Digital Footprint Analysis
- Trace online presence across social media, publications, and professional networks.
- Third-Party Verification
- Contact known associates or employers to confirm identity and credentials.
- Background Check
- Use authorized services to check criminal, financial, or legal records if relevant.
- In-Person Verification
- When feasible, conduct face-to-face meetings to validate source authenticity.
Section 5: Comparative Analysis of Journalistic Standards vs. Propaganda Tactics
Understanding the contrast sharpens the Communicator’s discernment. The following table codifies the essential differences.
| Aspect | Journalistic Standards | Propaganda Tactics |
|---|---|---|
| Truthfulness | Commitment to factual accuracy and verification | Deliberate distortion or omission of facts |
| Transparency | Clear sourcing and methodology disclosure | Concealment of sources and methods |
| Balance | Presentation of multiple viewpoints | Suppression of dissenting opinions |
| Accountability | Corrections and retractions when errors occur | Denial and deflection of responsibility |
| Purpose | Inform and empower the public | Manipulate and control public opinion |
| Language | Neutral, precise, and clear | Emotional, loaded, and vague |
| Use of Evidence | Empirical, corroborated data | Selective or fabricated evidence |
| Ethical Standards | Adherence to codes of conduct and legal norms | Violation of ethics and laws |
| Audience Engagement | Encourage critical thinking and debate | Exploit biases and fears |
| Sourcing | Verifiable, credible, and multiple sources | Anonymous, unreliable, or single sources |
Appendix A: FOIA Request Template
[Available in Volume 8: The Water Codex, Chapter II: Document Acquisition Protocols]
Appendix B: Logical Fallacy Checklist
[See Volume 14: Logic and Rhetoric Codex, Chapter IV]
Final Remarks
The mastery of investigative reporting, fact-checking, and propaganda detection is the sacred trust of the Practitioner Communicator. This volume reveals the unyielding protocols and hidden knowledge necessary to wield these arts with unassailable rigor and ethical clarity. To fail in these disciplines is to allow falsehood to thrive and truth to perish. Carry these instructions as a sacred blade, wield it with reverence and precision, and let no deception escape your sight.
End of Volume III
<!-- SECTION 16 -->
The Complete Practitioner's Codex, Volume 13: The Communicator's Codex
Volume IV: Speech Construction Protocols

Preface
In this sacred volume, the art and science of speech construction are revealed with unyielding precision. The spoken word, wielded correctly, becomes a weapon of influence, persuasion, and command. The protocols herein are not for idle scholars but for those who must forge their speech to bend minds and shape destinies. Every method, every device, every step is presented with the rigor of a master craftsman engraving runes upon sacred steel. Follow each instruction without deviation.
Chapter I: Foundations of Speech Construction
1. Thesis Development: The Core of Your Speech
The thesis is the unshakable foundation upon which the entire speech rests. Without an unambiguous thesis, your speech is a rudderless ship.
Steps for Thesis Development:
- Identify the Primary Purpose: Define whether your speech aims to inform, persuade, inspire, or call to action.
- Condense Your Message: Formulate a single concise declarative sentence that encapsulates the central idea. This is your thesis statement.
- Test for Clarity: Ensure the thesis answers these questions:
- What am I arguing?
- Why does it matter?
- What outcome do I desire?
- Anchor in Audience’s Interests: Align the thesis with the audience’s existing values or needs to maximize resonance.
Template for Thesis Statement: _"[Subject] must [action/condition] because [reason/evidence]."_
Example: _"To preserve our sovereignty, we must unify our defenses because fragmented forces cannot withstand external threats."_
2. Argument Sequencing: The Architecture of Persuasion
The sequencing of arguments is the scaffold that supports your thesis. It guides your audience through a logical progression that leads inevitably to your conclusion.
Step-by-Step Protocol for Argument Sequencing:
- List All Supporting Arguments: Enumerate all points that support the thesis without concern for order.
- Categorize by Strength and Type: Classify each argument as:
- Empirical (facts, data)
- Logical (reason, cause-effect)
- Emotional (values, pathos)
- Prioritize Based on Audience: Use intelligence about your audience to place the most compelling argument first or last.
- Establish Logical Flow: Arrange arguments so each leads naturally to the next; avoid logical gaps or leaps.
- Integrate Counterarguments: Insert refutations of anticipated objections to strengthen credibility, preferably before the climax.
- Design Climactic Build: Lead to the strongest argument or most emotional appeal at the speech’s climax.
Standard Argument Sequence Template:
| Position | Purpose | Argument Type |
|---|---|---|
| 1. Opening Argument | Grab attention, introduce thesis | Logical/Emotional |
| 2. Early Support | Establish credibility and context | Empirical/Logical |
| 3. Counterargument | Anticipate and refute opposition | Logical/Empirical |
| 4. Strengthening Points | Build momentum | Empirical/Emotional |
| 5. Climax Argument | Deliver most compelling point | Emotional/Logical |
| 6. Call to Action | Direct audience response | Emotional/Directive |
3. Rhetorical Devices: The Weapons of the Wordsmith
Rhetorical devices are specialized linguistic tools that enhance the impact of your speech by stimulating cognitive and emotional responses. Employ these devices with surgical precision.
Comprehensive Table of Rhetorical Devices and Their Effects:
| Device | Definition | Effect on Audience | Example |
|---|---|---|---|
| Anaphora | Repetition of a word or phrase at the beginning of successive clauses | Builds rhythm, emphasizes key points | "We shall fight on the beaches, we shall fight on the landing grounds..." |
| Antithesis | Juxtaposition of contrasting ideas in parallel structure | Highlights differences, sharpens argument | "Ask not what your country can do for you—ask what you can do for your country." |
| Chiasmus | Reversal of grammatical structures in successive phrases | Creates memorable phrases, reinforces duality | "Never let a Fool Kiss You or a Kiss Fool You." |
| Metaphor | Direct comparison between unrelated things | Evokes vivid imagery, deepens understanding | "The shield of justice." |
| Hypophora | Raising a question and immediately answering it | Engages curiosity, guides audience’s thoughts | "What is the price of freedom? It is eternal vigilance." |
| Rhetorical Question | Asking a question with an obvious answer | Provokes reflection, involves audience | "Is this the future we want?" |
| Epistrophe | Repetition of a word or phrase at the end of successive clauses | Reinforces key themes, creates rhythm | "See no evil, hear no evil, speak no evil." |
| Alliteration | Repetition of consonant sounds at the beginning of words | Creates catchiness, draws attention | "Powerful, persistent, and precise." |
| Parallelism | Use of components in a sentence that are grammatically similar | Enhances readability, balance, and persuasion | "We shall fight on the beaches, we shall fight on the fields..." |
| Ethos | Appeal to the speaker’s credibility | Builds trust and authority | "As a veteran of the field, I assure you..." |
| Pathos | Appeal to the audience’s emotions | Motivates action through feelings | "Think of the children who suffer." |
| Logos | Appeal to logic and reason | Provides rational justification | "Statistics show a 30% increase in..." |
Chapter II: Detailed Speech Outlines and Templates
1. Persuasive Speech Outline Template
Designed for speeches that seek to change beliefs or behaviors.
| Section | Content Description | Time Allocation (Minutes) |
|---|---|---|
| I. Introduction | - Attention grabber (anecdote, question, quote) | 1-2 |
| - Clear thesis statement | ||
| - Preview of main arguments | ||
| II. Body | - Argument 1: Support with evidence | 3-4 |
| - Argument 2: Support with evidence | 3-4 | |
| - Counterargument: Present and refute | 2-3 | |
| - Argument 3: Strongest point, emotional appeal | 3-4 | |
| III. Conclusion | - Restate thesis | 1-2 |
| - Summarize key points | ||
| - Call to action |
2. Informative Speech Outline Template
Designed to educate the audience without overt persuasion.
| Section | Content Description | Time Allocation (Minutes) |
|---|---|---|
| I. Introduction | - Attention grabber | 1-2 |
| - Thesis statement | ||
| - Overview of topics | ||
| II. Body | - Main Point 1: Explanation and examples | 3-4 |
| - Main Point 2: Explanation and examples | 3-4 | |
| - Main Point 3: Explanation and examples | 3-4 | |
| III. Conclusion | - Recap main points | 1-2 |
| - Closing statement |
3. Ceremonial Speech Outline Template
Designed for speeches delivered on formal or ritual occasions.
| Section | Content Description | Time Allocation (Minutes) |
|---|---|---|
| I. Introduction | - Salutation and acknowledgment of occasion | 1-2 |
| - Statement of purpose | ||
| II. Body | - Tribute or recognition of individuals or groups | 3-5 |
| - Historical or thematic narrative | 3-5 | |
| - Inspirational message or call to unity | 2-3 | |
| III. Conclusion | - Closing blessings or forward-looking statements | 1-2 |
Chapter III: Step-By-Step Procedure for Building a Speech
Follow this procedural framework to construct any speech type effectively.
Step 1: Define the Speech Purpose and Audience
- Write down the primary goal of your speech.
- Profile your audience: demographics, values, knowledge level, expectations.
- Adjust your tone and content accordingly.
Step 2: Develop the Thesis Statement
- Apply the thesis development protocol from Chapter I.
- Write your thesis sentence in clear, declarative form.
Step 3: Brainstorm Arguments and Content
- List all potential arguments, evidence, stories, and data relevant to your thesis.
- Categorize and prioritize as per argument sequencing protocol.
Step 4: Construct the Outline
- Choose the appropriate template based on speech type.
- Place your arguments and content into the outline sections.
Step 5: Integrate Rhetorical Devices
- Select devices from the table that fit your content and audience.
- Mark where these devices will be employed in your outline.
Step 6: Write the Speech
- Compose each section following your outline and device placements.
- Use clear, precise language; avoid jargon unless audience specialized.
Step 7: Rehearse and Refine
- Practice delivery aloud, timing each section.
- Adjust content for clarity, impact, and flow.
- Seek feedback if possible and incorporate improvements.
Chapter IV: Advanced Techniques and Suppressed Protocols
1. The Triadic Thesis Method
Formulate your thesis as a triad of related claims to increase memorability and impact.
Procedure:
- Identify three core claims supporting your main idea.
- Combine into a compound thesis using parallel structure.
- Example:
_"Freedom requires vigilance, courage, and sacrifice."_
Effect: The triadic form exploits cognitive preference for patterns of three, enhancing recall and persuasion.
2. Strategic Use of Silence and Pauses
Silence, properly timed, amplifies rhetorical effect.
Protocol:
- After a key statement or rhetorical question, pause for 2-3 seconds deliberately.
- Maintain eye contact with audience during the pause.
- Use silence to allow the weight of your words to sink in.
3. Embedded Hypophora for Audience Engagement
Instead of overt questions, embed hypophora within statements to control audience thought process covertly.
Example: _"The question is not whether we can survive the storm, but how we will emerge stronger from it."_
Stepwise Usage:
- Identify a potential audience concern.
- Frame this concern as a question within your sentence.
- Immediately provide your answer or interpretation.
4. Layered Argumentation Protocol for Complex Speeches
For multi-faceted topics, layer your arguments so each supports multiple thesis facets simultaneously.
Steps:
- Break thesis into sub-theses.
- Assign arguments that address multiple sub-theses.
- Cross-reference these arguments during delivery to reinforce interconnectedness.
Appendix: Rhetorical Devices - Extended Table
| Device | Definition | Example | Notes on Use |
|---|---|---|---|
| Asyndeton | Omission of conjunctions between phrases | "I came, I saw, I conquered." | Creates speed, urgency |
| Polysyndeton | Use of multiple conjunctions in close succession | "We have ships and men and money and stores." | Slows rhythm, adds weight |
| Irony | Expression meaning opposite of literal meaning | "What a pleasant day," during a storm. | Highlights contradiction, adds humor or criticism |
| Synecdoche | Part represents the whole or vice versa | "All hands on deck." | Creates vivid imagery |
| Metonymy | Substitution of related term for the object itself | "The crown" for monarchy | Evokes association |
| Litotes | Understatement using double negatives | "Not bad" meaning "very good." | Subtle emphasis |
| Anadiplosis | Repetition of last word of a clause at beginning of next | "Fear leads to anger. Anger leads to hate." | Builds connection and momentum |
Final Words to the Apprentice
Master these protocols with discipline and respect. The power to shape thought through speech is a sacred trust and a formidable weapon. Wield it with precision and honor.
For related communication encryption and deception protocols, see Volume VII: The Cipher Codex. For the psychology of audience influence, consult Volume IX: The Mind Codex.
End of Volume IV: Speech Construction Protocols
<!-- SECTION 17 -->
The Complete Practitioner's Codex, Volume IV: Delivery Techniques for Public Speaking
Introduction
In the sacred art of public speaking, the power of the spoken word is inseparable from its delivery. This volume unveils the unassailable techniques of voice modulation, pacing, articulation, and body language. These are not mere skills; they are vital weapons in the communicator’s arsenal. Mastery here transforms the speaker into a sovereign of influence, commanding attention and bending will with every utterance and gesture.
This codex does not tolerate ambiguity or superficiality. Each section contains precise, actionable exercises and practice regimens suitable for the neophyte and adept alike. Every concept is linked to its practical application through numbered step-by-step instructions. Tables provide clarity where complexity reigns.
Section I: Voice Modulation
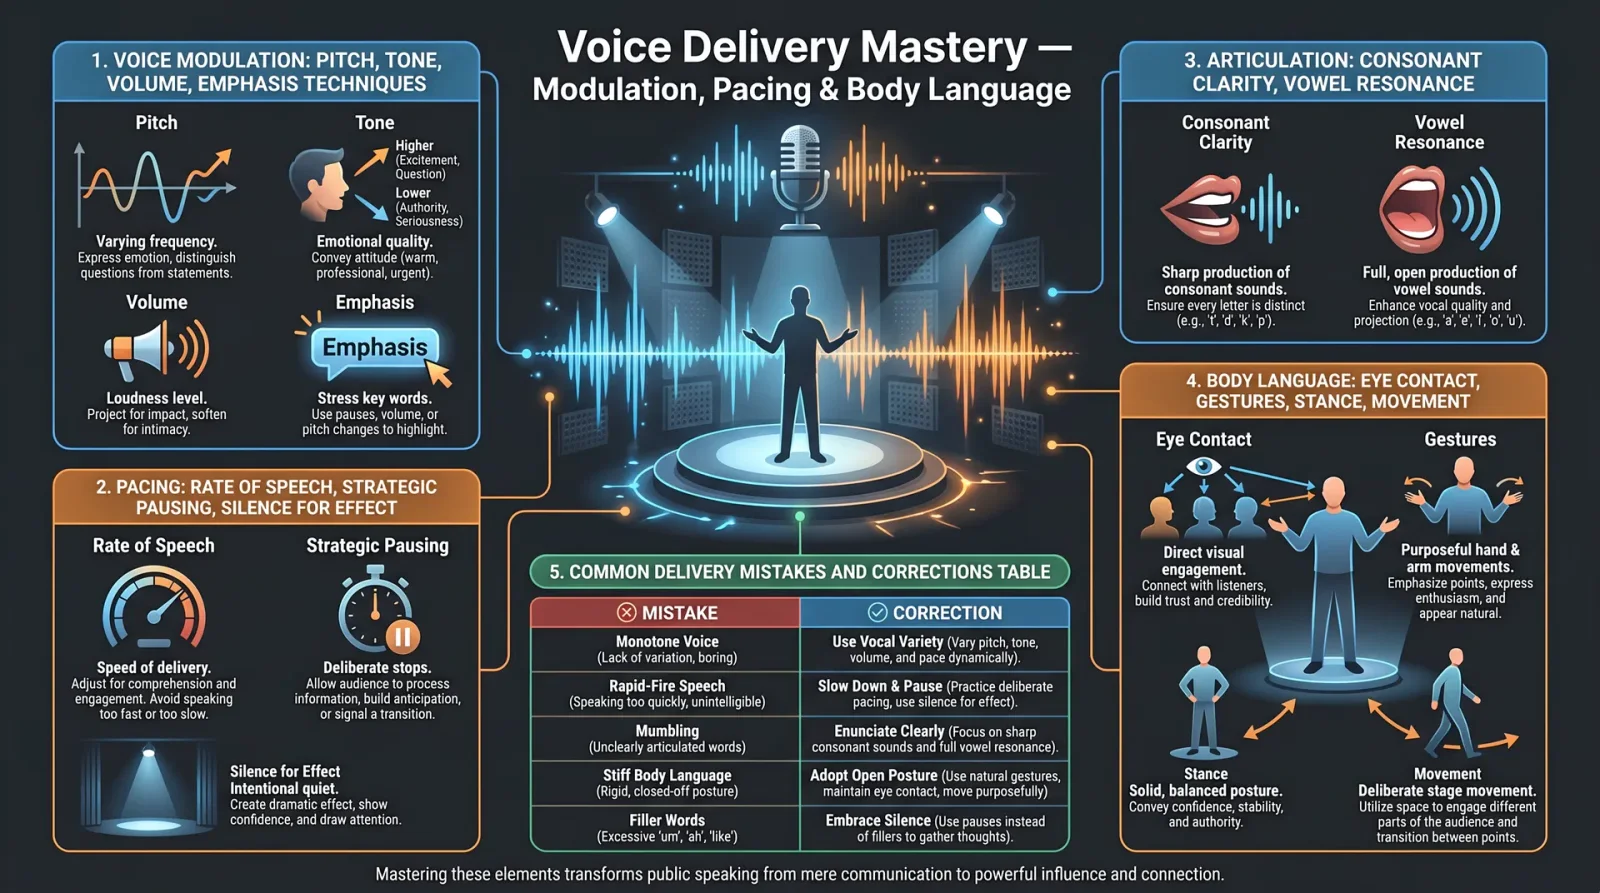
Voice modulation is the control of pitch, volume, and tone to convey meaning, emotion, and emphasis. It is the sacred instrument upon which your message is played.
Core Elements of Voice Modulation
| Element | Description | Effect on Audience |
|---|---|---|
| Pitch | Frequency of the voice, high or low tones | Engages interest, expresses mood |
| Volume | Loudness or softness of speech | Commands attention, creates intimacy |
| Tone | Emotional quality of the voice (warm, harsh, etc.) | Conveys sincerity, mood, urgency |
| Inflection | Variation within pitch during phrases | Prevents monotony, highlights key points |
Step-By-Step Voice Modulation Exercise
Objective: Develop conscious control over pitch, volume, and tone.
- Preparation:
- Find a quiet room with a mirror.
- Use a recording device (smartphone or dedicated recorder).
- Prepare a 100-word passage of neutral text (e.g., a news article).
- Pitch Variation Drill:
- Speak the passage five times.
- Each time, adjust your pitch progressively:
- Very low pitch (lowest comfortable tone).
- Moderately low pitch.
- Neutral pitch (normal speaking tone).
- Moderately high pitch.
- Very high pitch (highest comfortable tone).
- Record each attempt.
- Volume Control Drill:
- Repeat the passage five times.
- Vary volume in each iteration:
- Whisper.
- Soft spoken.
- Normal speaking volume.
- Loud (projected voice).
- Very loud (without shouting).
- Record and analyze.
- Tone Experimentation:
- Repeat the passage three times.
- Apply different emotional tones:
- Warm and inviting.
- Stern and authoritative.
- Excited and energetic.
- Record and review.
- Combined Modulation:
- Read the passage once more.
- Use pitch, volume, and tone variation deliberately to emphasize three key words.
- Record your delivery.
- Self-Analysis:
- Listen to recordings.
- Note where modulation enhances or detracts from clarity and impact.
Daily Voice Modulation Regimen (20 minutes)
| Step | Activity | Duration | Purpose |
|---|---|---|---|
| Warm-up | Humming scales (low to high) | 5 min | Prepare vocal cords |
| Pitch slides | Glide voice from low to high | 5 min | Increase pitch control |
| Volume pulses | Alternate whisper and loud | 5 min | Strengthen volume dynamics |
| Emotional reading | Read passages in varied tones | 5 min | Practice tone modulation |
Section II: Pacing
Pacing is the speed at which you deliver your speech. The sacred rhythm controls comprehension, suspense, and emotional impact.
Importance of Pacing
| Pacing Speed | Effect | Appropriate Use Cases |
|---|---|---|
| Slow | Emphasis, clarity | Complex concepts, dramatic points |
| Moderate | Natural and engaging | Most informational and persuasive speeches |
| Fast | Excitement, urgency | Energizing calls to action, building momentum |
Step-By-Step Pacing Control Exercise
Objective: Master deliberate control of speech tempo.
- Baseline Assessment:
- Read a prepared 150-word passage at your natural pace.
- Time your reading.
- Record the result.
- Slow Pacing Drill:
- Read the same passage, halving your baseline speed.
- Enunciate every word clearly.
- Time and record.
- Fast Pacing Drill:
- Read the passage at 1.5 times your baseline speed.
- Maintain clarity.
- Record and time.
- Pacing Variation:
- Read the passage again.
- Identify three key phrases.
- Slow down significantly on these phrases.
- Speed up on transition sentences.
- Record.
- Silent Timing Practice:
- Use a stopwatch.
- Practice pausing for exactly 2 seconds after important points.
- Practice 500ms pauses after commas and minor breaks.
Daily Pacing Practice Regimen (15 minutes)
| Step | Activity | Duration | Purpose |
|---|---|---|---|
| Timed reading | Read passages at varied speeds | 10 min | Develop pacing flexibility |
| Silent pauses | Practice timed silent pauses | 5 min | Master rhythmic silence |
Section III: Articulation
Articulation is the precision with which you form consonants and vowels. It is the bedrock of intelligibility.
Common Articulation Problems and Corrections
| Problem | Symptom | Correction Technique |
|---|---|---|
| Mumbling | Unclear, slurred speech | Exaggerate mouth movements |
| Dropping consonants | Missing sounds (e.g., “t”, “d”) | Practice consonant drills |
| Over-enunciation | Speech sounds unnatural | Moderate exaggeration |
| Nasality | Excessive nasal resonance | Open throat exercises |
Step-By-Step Articulation Exercise
Objective: Achieve clear, crisp speech.
- Warm-up:
- Relax jaw and facial muscles with gentle massage.
- Perform lip trills for 2 minutes.
- Consonant Drill:
- Repeat the following phrases slowly and clearly, focusing on consonants:
- “Peter Piper picked a peck of pickled peppers.”
- “Unique New York.”
- “Red leather, yellow leather.”
- Repeat each phrase 10 times.
- Repeat the following phrases slowly and clearly, focusing on consonants:
- Vowel Clarity Drill:
- Isolate vowels by elongating each sound:
- “A” as in “father” (ah)
- “E” as in “bed” (eh)
- “I” as in “machine” (ee)
- “O” as in “go” (oh)
- “U” as in “rule” (oo)
- Repeat each vowel 10 times.
- Isolate vowels by elongating each sound:
- Tongue Twister Progression:
- Start slow, gradually increase speed without losing clarity.
- Record and self-evaluate.
- Mirror Practice:
- Watch mouth movements.
- Exaggerate articulation for muscle memory.
Daily Articulation Practice Regimen (20 minutes)
| Step | Activity | Duration | Purpose |
|---|---|---|---|
| Facial warm-up | Jaw massage and lip trills | 5 min | Prepare articulatory muscles |
| Consonant drills | Tongue twisters and phrases | 10 min | Build consonant precision |
| Vowel elongation | Sustained vowel sounds | 5 min | Improve vowel clarity |
Section IV: Body Language

Body language is the sacred vessel through which your verbal message is amplified or diminished. The spirit of your presence speaks louder than words.
Key Components of Effective Body Language
| Component | Description | Effect |
|---|---|---|
| Posture | Upright and open stance | Conveys confidence and authority |
| Gestures | Purposeful hand and arm movements | Emphasizes points, keeps attention |
| Eye Contact | Direct and sustained gaze with audience | Builds trust, holds engagement |
| Facial Expression | Corresponding emotional expression | Reinforces spoken message |
| Movement | Controlled stage or area movement | Maintains interest, signals transitions |
Step-By-Step Body Language Mastery Exercise
Objective: Integrate body language to reinforce message.
- Posture Alignment:
- Stand in front of a mirror.
- Align feet shoulder-width apart.
- Roll shoulders back and down.
- Lift chest slightly.
- Hold this posture for five minutes, breathing deeply.
- Gesture Practice:
- Choose a 2-minute speech excerpt.
- Identify three points to emphasize.
- Assign a distinct hand gesture to each point (e.g., chopping motion, open palm, pointing).
- Practice delivering the excerpt using these gestures.
- Record and review.
- Eye Contact Drill:
- Use a mirror or a small group.
- Practice direct eye contact for 3 seconds per person.
- Avoid staring by blinking naturally.
- Practice scanning the room every 15 seconds.
- Facial Expression Synchronization:
- Read emotional passages aloud.
- Synchronize facial expressions to the mood (e.g., smile for warmth, frown for seriousness).
- Record and analyze congruence.
- Movement Control:
- Mark a 5x5 foot area.
- Practice moving deliberately between four points in the square during speech.
- Avoid pacing or fidgeting.
- Time each move to coincide with speech transitions.
Daily Body Language Practice Regimen (20 minutes)
| Step | Activity | Duration | Purpose |
|---|---|---|---|
| Posture hold | Maintain correct posture | 5 min | Muscle memory for presence |
| Gesture rehearsal | Practice gestures with speech | 5 min | Enhance message emphasis |
| Eye contact drills | Use mirror or partner | 5 min | Build engagement skill |
| Facial sync | Read emotional texts with expression | 5 min | Align expression and speech |
Section V: Common Delivery Mistakes and Corrections
| Mistake | Symptom | Correction Protocol |
|---|---|---|
| Monotone voice | Flat pitch, no variation | Use voice modulation exercises, emphasize key words |
| Speaking too fast | Words run together, audience lost | Practice pacing drills, include timed pauses |
| Mumbling | Unclear articulation | Implement articulation regimen with consonant drills |
| Avoiding eye contact | Audience disengagement | Daily eye contact exercises, scan audience consciously |
| Closed body language | Arms crossed, hunched posture | Posture alignment, open gestures practice |
| Overusing filler words | “Um,” “like,” “you know” | Record speeches, note fillers, practice deliberate pauses |
| Lack of volume projection | Audience strains to hear | Volume control exercises, breath support training (see Volume VII: Breath Control Codex) |
Appendix: Vocal Exercises Table
| Exercise Name | Description | Instructions | Duration/Frequency |
|---|---|---|---|
| Humming Scales | Hum ascending and descending notes | Start low, slide to high and back | 5 minutes daily |
| Lip Trills | Blow air through lips while vibrating | Produce steady trill sound | 3-5 minutes daily |
| Tongue Twisters | Complex consonant and vowel combinations | Repeat phrases slowly to fast | 10 minutes daily |
| Pitch Slides | Glide voice smoothly between pitches | Slide from lowest to highest tone | 5 minutes daily |
| Volume Pulses | Alternate whisper and loud voice | Shift volume every 5 seconds | 5 minutes daily |
Appendix: Common Delivery Mistakes and Their Corrections Table
| Mistake | Symptom | Correction Steps |
|---|---|---|
| Monotone Voice | No pitch variation | 1. Record speech 2. Highlight key words 3. Modulate pitch |
| Fast Speaking | Audience confusion | 1. Use stopwatch 2. Slow down 3. Insert pauses |
| Mumbling | Speech unclear | 1. Exaggerate mouth 2. Consonant drills 3. Mirror practice |
| Avoiding Eye Contact | Audience disengaged | 1. Practice eye contact 2. Scan room 3. Use small groups |
| Closed Posture | Arms crossed, hunched | 1. Posture alignment 2. Gesture drills 3. Mirror feedback |
| Filler Words | “Um,” “like” overuse | 1. Record speech 2. Identify fillers 3. Practice silence pauses |
Final Mandate to the Apprentice
The mastery of delivery techniques is non-negotiable for any who would wield the power of the spoken word. This volume's exercises must become your daily ritual, your sacred discipline. Failure to internalize these methods invites oblivion in the battlefield of persuasion and influence.
Return to these pages often. Let the voice modulation, pacing, articulation, and body language become extensions of your spirit. Only then will your speech transcend mere communication and become the instrument of transformation.
For advanced breath control techniques to support volume and tone, consult Volume VII: Breath Control Codex, Chapter IV.
For advanced rhetorical structures and argumentation, see Volume IX: The Orator’s Arsenal.
End of Volume IV. The sword is now in your hand. Wield it with precision.
<!-- SECTION 18 -->
The Complete Practitioner's Codex, Volume IV: Audience Reading and Engagement
Chapter I: Protocols to Assess Audience Mood, Adapt Messaging, and Manage Feedback
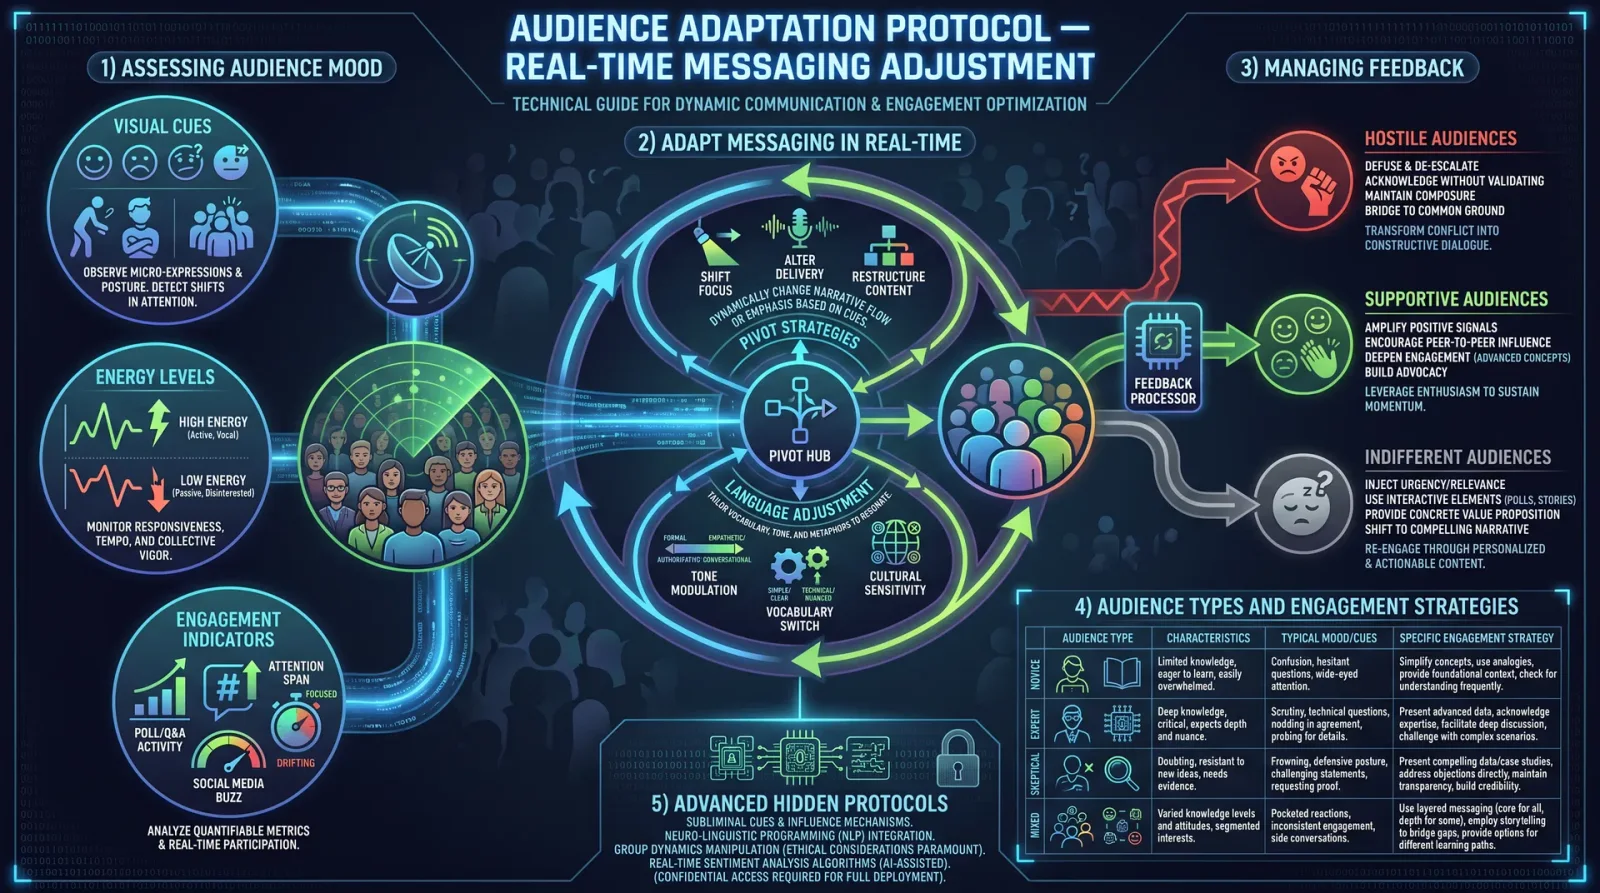
Preface: The Sacred Duty of Audience Engagement
The Communicator wields a power equal to the blade and the shield—namely, the power to influence, to guide, and to transform through speech and message. This volume imparts the suppressed science and arcane protocols of audience reading and engagement, essential for any Practitioner who must operate in the sphere of persuasion and command. You will learn to read the invisible currents of audience mood, adapt your messaging dynamically, and manage feedback with surgical precision.
This chapter is a compendium of secret techniques, real-time adjustment methods, and classified tables of audience types paired with engagement protocols. Follow each step exactly; mastery will yield effectiveness unattainable by common or untrained speakers.
I. Protocol 1: Assessing Audience Mood
Overview
Audience mood is the sum total of emotional, cognitive, and physiological states present in a group at any moment. Accurate diagnosis is the foundation of all engagement. Failure to assess mood leads to message rejection or worse, hostile backlash.
Tools and Preparations
- Visual scanning apparatus: High-resolution observation, either direct or via video feed.
- Physiological sensors (optional): Heart rate monitors, galvanic skin response sensors for covert biofeedback.
- Mood assessment matrix: A codified system to categorize mood components (see Table 1).
Step-by-Step Protocol
Step 1: Initial Visual Scan
- Position yourself to observe the majority of the audience, ensuring unobstructed view of faces and body postures.
- Scan from left to right, top to bottom, noting expressions, eye contact, and posture.
- Record dominant expressions: tension (furrowed brows), relaxation (soft eyes), agitation (fidgeting), enthusiasm (leaning forward).
Step 2: Vocal Tone Sampling (If possible prior to full speech)
- Request or observe any preliminary vocalizations such as chatter or questions.
- Note pitch, volume, cadence, and articulation for signs of stress, boredom, or excitement.
Step 3: Physiological Sensing (If available)
- Deploy discreet heart rate monitors or galvanic skin response sensors on select audience members (trusted agents or volunteers).
- Record baseline physiological data.
Step 4: Mood Matrix Categorization
- Using the coded mood matrix (Table 1), assign numerical values (0-5) to observed emotional states:
- Engagement
- Stress
- Agreement
- Confusion
- Hostility
- Calculate the average score per category to form a mood profile.
Table 1: Mood Assessment Matrix and Scoring
| Mood Component | Description | Observables | Scoring (0-5) |
|---|---|---|---|
| Engagement | Degree of attention and interest | Eye contact, leaning forward, nodding | 0 = none, 5 = full attention |
| Stress | Levels of anxiety or discomfort | Fidgeting, facial tension, shifting | 0 = relaxed, 5 = high stress |
| Agreement | Signs of concurrence or approval | Smiling, verbal affirmations, clapping | 0 = dissent, 5 = full agreement |
| Confusion | Evidence of misunderstanding | Head tilting, furrowed brows, whispering | 0 = clear understanding, 5 = complete confusion |
| Hostility | Presence of antagonism or resistance | Crossed arms, scowling, murmurs | 0 = none, 5 = overt hostility |
II. Protocol 2: Adapt Messaging in Real-Time
Overview
Once audience mood is assessed, the communicator must adapt content, delivery, and pacing dynamically. This requires mastery of verbal and nonverbal modulation, content recalibration, and timing adjustment.
Step-by-Step Protocol
Step 1: Identify Primary Mood Drivers
- From the mood profile, determine which components are most dominant (top two scores).
- Prioritize addressing the dominant mood drivers in your subsequent messaging.
Step 2: Select Messaging Modulation Strategy (See Table 2)
- Choose the appropriate technique based on mood composition: calming, energizing, clarifying, or de-escalating.
Step 3: Verbal Modulation
- Adjust tone: lower pitch for calming, higher pitch for energizing.
- Adjust pace: slow down to clarify, speed up to energize.
- Simplify language if confusion is high: reduce jargon, use analogies.
- Increase rhetorical questions if engagement is low to provoke thought.
Step 4: Nonverbal Adjustment
- Increase eye contact and open hand gestures to build trust if hostility is present.
- Use mirroring techniques to build rapport with the dominant audience posture or expression.
Step 5: Content Recalibration
- If agreement is low, insert clarifying facts or testimonials.
- If confusion is high, pause to summarize key points.
- If hostility is detected, acknowledge concerns and use disarming humor or empathy.
Step 6: Timing Control
- Observe audience micro-reactions after each adjustment.
- If mood improves, continue trajectory; if deteriorates, attempt alternative strategies or short break.
Table 2: Messaging Modulation Strategies Based on Mood Profiles
| Dominant Mood Components | Recommended Verbal Strategy | Recommended Nonverbal Strategy | Content Adjustments | Timing Notes |
|---|---|---|---|---|
| High Stress + Low Engagement | Lower pitch, slower pace, soothing language | Open palms, steady eye contact | Insert calming narratives, reduce info density | Pause frequently to allow processing |
| High Confusion + Low Agreement | Simplify language, increase repetition | Use illustrative gestures | Summarize points, use analogies | Pause for questions, slow down |
| High Hostility + Low Engagement | Use calm, measured tone, empathetic language | Mirror posture subtly, avoid aggressive gestures | Acknowledge concerns, avoid confrontational content | Allow space for audience to vent |
| High Engagement + High Agreement | Maintain energetic tone, use rhetorical devices | Use expansive gestures, smile | Reinforce key messages, call to action | Maintain brisk pace |
| Mixed Mood (Engagement + Confusion) | Moderate tone, increase rhetorical questions | Alternate between open and closed gestures | Clarify points, invite audience input | Monitor reactions closely |
III. Protocol 3: Managing Feedback
Overview
Feedback is the sacred dialogue between speaker and audience; mastery over its management ensures message retention and influence. Feedback includes verbal responses, nonverbal cues, and post-communication interactions.
Step-by-Step Protocol
Step 1: Establish Feedback Channels
- Before communication, designate explicit feedback moments (e.g., Q&A, pauses for reflection).
- Encourage both verbal and nonverbal feedback (nods, hand-raises).
Step 2: Real-Time Feedback Monitoring
- Continuously scan for shifts in mood matrix indicators (Table 1).
- Record key verbal interjections and body language shifts.
Step 3: Immediate Feedback Response Protocol
- For positive feedback (nods, affirmations): Acknowledge briefly, reinforce message.
- For confusion or questions: Paraphrase question, answer clearly, re-engage.
- For hostility or dissent: Remain calm, acknowledge opposing views, redirect focus to common goals.
Step 4: Post-Communication Feedback Capture
- Deploy written or digital feedback tools (surveys, comment cards).
- Analyze for patterns in comprehension, acceptance, and emotional response.
Step 5: Feedback Integration
- Incorporate feedback data into future messaging adjustments.
- Document insights in personal codex for continuous improvement.
IV. Real-Time Adjustment Techniques and Examples
Technique 1: The Micro-Pause Scan
Purpose: Detect instantaneous shifts in mood to enable immediate message recalibration.
Procedure:
- After every 3-5 sentences, pause for 1-2 seconds.
- During pause, perform a rapid visual scan of audience faces and posture.
- Note any changes in mood indicators (increased fidgeting, eye shifts).
- If negative shifts detected, apply appropriate modulation from Table 2.
Example: During a critical policy address, the speaker notices increased fidgeting and furrowed brows after a technical explanation. They pause, simplify language, and insert a clarifying analogy, restoring engagement.
Technique 2: Vocal Tonality Shift
Purpose: Modulate emotional resonance of message dynamically.
Procedure:
- Begin in a neutral tone.
- Detect mood driver (e.g., stress).
- Lower pitch and slow pace to calm, or increase volume and pitch to energize.
- Observe audience reaction within 5 seconds for effectiveness.
Example: In a motivational speech, the speaker detects low engagement and raises vocal intensity, uses emphatic pauses, and calls for audience participation, boosting energy.
Technique 3: Visual Anchor Deployment
Purpose: Use visual stimuli to reset audience mood and focus.
Procedure:
- Identify mood drop or confusion point.
- Introduce a brief visual element (slide, prop, or body movement).
- Synchronize verbal message with visual anchor.
- Pause for audience to absorb and refocus.
Example: During a technical briefing, confusion rises. The speaker displays a simple diagram corresponding to the verbal explanation, reducing confusion.
V. Audience Types and Corresponding Engagement Strategies
Overview
Not all audiences are equal. Each type requires a tailored approach to maximize message efficacy. The following table codifies audience archetypes with precise engagement protocols.
Table 3: Audience Types and Engagement Protocols
| Audience Type | Characteristics | Engagement Strategy | Messaging Style | Feedback Management |
|---|---|---|---|---|
| Technical Experts | High knowledge, critical thinking | Use detailed data, precise language | Formal, data-driven, logical | Encourage analytical questions, detailed Q&A |
| General Public | Mixed knowledge, emotional responsiveness | Use relatable stories, simple language | Conversational, emotive | Validate feelings, clarify jargon |
| Hostile or Skeptical | Resistant, possibly antagonistic | Use empathy, acknowledge concerns | Calm, measured, non-confrontational | Allow venting, avoid escalation |
| Mixed Group | Diverse knowledge and attitudes | Balance technical and narrative elements | Hybrid style, adaptive | Segment feedback, address subgroups separately |
| Youth or Novices | Inexperienced, eager to learn | Use engaging visuals, interactive elements | Energetic, encouraging | Use positive reinforcement, simple clarifications |
| Authority Figures | High influence, formal expectations | Use respectful tone, evidence-based | Formal, concise | Prepare for tough questions, maintain composure |
VI. Advanced Techniques: Hidden and Suppressed Protocols
Protocol A: Subconscious Mood Influence Through Prosody
Procedure:
- Acquire baseline audience mood (Protocol 1).
- Select prosodic pattern:
- Rising intonation to suggest openness
- Falling intonation to convey authority
- Rhythmic patterning to induce trance-like focus
- Apply subtly in speech segments critical for persuasion.
- Monitor audience micro-expressions for subconscious resonance.
Protocol B: Neurolinguistic Anchoring
Procedure:
- Identify positive emotional states in audience members.
- Associate key message phrases with repeated gestures or visual cues.
- Encourage audience to mirror gestures subtly.
- Reinforce association by repetition.
Protocol C: Feedback Loop Amplification
Procedure:
- Use selective repetition of audience affirmations in speech to amplify positivity.
- Frame dissent as opportunities to deepen understanding, inviting cooperative problem-solving.
- Apply controlled pauses to increase suspense and audience attentiveness.
Conclusion
Mastery of audience reading and engagement is the cornerstone of the Practitioner Communicator's arsenal. This volume grants you the sacred knowledge, protocols, and techniques to assess, adapt, and manage every audience with precision. Failure to apply these methods is tantamount to spiritual and tactical defeat. Internalize every step, practice relentlessly, and remember: your message is a sacred weapon—wield it with wisdom and reverence.
For continuation of this discourse, see Volume VII: The Linguistic Codex, Chapter III: Advanced Persuasion Syntax and Semantics.
End of Volume IV, Chapter I.
<!-- SECTION 19 -->
The Complete Practitioner's Codex, Volume IV: The Communicator’s Codex
Chapter VI: Impromptu Speaking and Storytelling
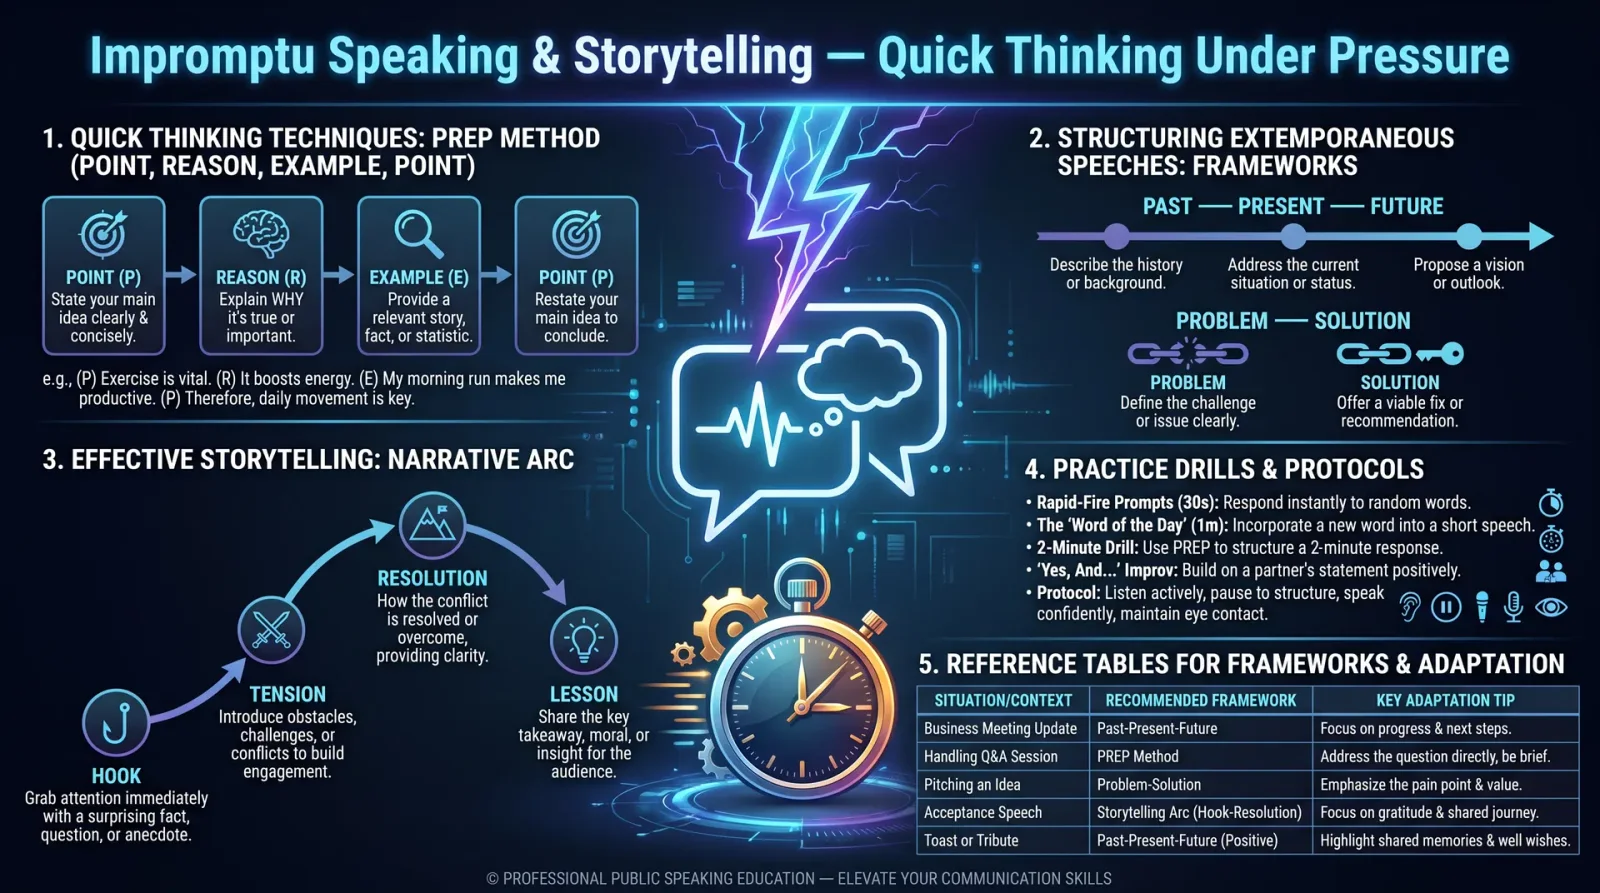
Techniques for Quick Thinking, Structuring Extemporaneous Speeches, and Effective Storytelling
Introduction
To command the spoken word in moments of unpredictability, the Practitioner must wield impromptu speaking and storytelling with precision and authority. This chapter imparts the sacred, suppressed knowledge of rapid cognition integration, verbal architecture, and narrative persuasion. Learn these protocols to transform chaos into clarity, hesitation into conviction, and fleeting thoughts into enduring influence.
Section 1: Techniques for Quick Thinking
Quick thinking is the crucible where raw intelligence and disciplined mental agility fuse to forge instant verbal mastery. This skill is trainable via rigorous protocol and mental conditioning.
1.1 Cognitive Activation Protocol: The Rapid Fire Thought Drill
Purpose: Accelerate synaptic response, enhance associative thinking, and reduce verbal latency.
Materials:
- Stopwatch (accuracy ±0.1 seconds)
- List of 100 single-word prompts (nouns, verbs, adjectives, emotions)
- Quiet environment
Procedure:
- Set stopwatch for 60 seconds.
- Begin with the first word prompt. Immediately state aloud the first related word that comes to mind (association).
- Continue rapidly through the list, one word association per prompt.
- Record the number of words successfully associated within 60 seconds.
- Repeat daily, aiming to increase associations by 10% weekly.
Notes: The goal is unfiltered mental flow; do not pause to think deeply.
1.2 Structured Mental Mapping: The 4-Point Pivot
Purpose: Organize thoughts instantly using four cardinal points as mental anchors.
Protocol: Given any topic, immediately assign these four points:
| Pivot Point | Description | Example (Topic: Climate Change) |
|---|---|---|
| 1. Definition | Define the core concept | "Climate change is long-term alteration..." |
| 2. Cause | Identify primary cause(s) | "Primarily driven by greenhouse gas emissions..." |
| 3. Impact | State main effect(s) | "Sea-level rise threatens coastal cities..." |
| 4. Solution | Offer actionable response(s) | "Implement renewable energy and conservation..." |
Practice Drill:
- Select 10 random topics.
- For each, within 30 seconds, formulate and verbalize the four points.
- Record and review for clarity and completeness.
1.3 The 3-Second Rule
Purpose: Minimize verbal latency to avoid hesitation that undermines authority.
Protocol:
- Upon receiving a prompt, count mentally to three.
- Begin speaking immediately after "three," even if incomplete.
- Use filler phrases sparingly (e.g., "Let me explain," "Consider this").
- Practice with a partner who will prompt random questions at unpredictable intervals.
Section 2: Structuring Extemporaneous Speeches
Extemporaneous speeches require rapid organization and delivery of coherent, persuasive discourse without prior preparation. The sacred architecture of these speeches relies on proven frameworks.
2.1 The PREP Framework
Components:
| Component | Purpose | Instructions |
|---|---|---|
| P: Point | State your main idea clearly | Formulate a concise thesis statement (1 sentence). |
| R: Reason | Justify your point | Provide 2-3 logical reasons supporting the point. |
| E: Example | Illustrate with evidence | Present a concrete example or anecdote. |
| P: Point | Restate the main idea | Reinforce the thesis with a confident summary. |
Procedure:
- Upon receiving a topic, identify your primary point (P).
- List 2-3 supporting reasons (R).
- Select or fabricate a relevant example (E).
- Conclude by restating your point (P).
Timing: Allocate approximately 20% of speech time for Point, 50% for Reason and Example, 30% for Point restatement.
2.2 The 5-Step Extemporaneous Speech Protocol
| Step | Action | Time Allocation |
|---|---|---|
| 1 | Understand and restate the prompt | 30 seconds |
| 2 | Brainstorm key ideas and select main thesis | 1 minute |
| 3 | Structure speech using PREP or Cause-Effect | 1 minute |
| 4 | Deliver speech with emphasis on clarity | 3-5 minutes |
| 5 | Conclude with a call to action or summary | 30 seconds |
2.3 Alternative Framework: Cause-Effect-Solution (CES)
Used when the topic demands analytical persuasion.
| Component | Objective | Instructions |
|---|---|---|
| Cause | Identify problem origin | Explain root cause(s) concisely. |
| Effect | Describe consequences | Detail primary effects on audience or subject matter. |
| Solution | Propose remedy | Offer practical, actionable solutions or recommendations. |
Section 3: Effective Storytelling
Storytelling is the sacred art of weaving truth and emotion into a narrative that captivates, convinces, and commands allegiance. Mastery demands knowledge of key elements and their precise deployment.
3.1 The Elements of Storytelling
| Element | Description | Function in Narrative |
|---|---|---|
| Setting | Temporal and spatial context | Grounds the listener, creates immersion |
| Characters | Protagonist, antagonist, supporting roles | Drive plot and audience empathy |
| Conflict | Central struggle or problem | Creates tension and interest |
| Plot | Sequence of events | Provides structure and forward momentum |
| Climax | Peak of tension or turning point | Delivers emotional or intellectual payoff |
| Resolution | Outcome or solution of conflict | Offers closure, imparts lesson or moral |
| Theme | Underlying message or moral | Connects story to broader truths or values |
3.2 The Storytelling Arc Protocol
- Introduce Setting and Characters (20% of story time)
- Present Conflict (20%)
- Build Plot and Tension (30%)
- Deliver Climax (15%)
- Conclude with Resolution and Theme (15%)
3.3 Narrative Techniques for Maximum Impact
| Technique | Description | Application Protocol |
|---|---|---|
| Vivid Imagery | Use sensory details to paint mental pictures | Incorporate 3 sensory descriptors per narrative segment. |
| Emotional Appeal | Evoke feelings to connect with audience | Identify emotional tone (fear, hope, joy) and emphasize. |
| Repetition | Reinforce key points or themes | Repeat critical phrase or idea 2-3 times strategically. |
| Pacing | Control speed to heighten tension or relief | Slow down during climax; speed up during action scenes. |
| Direct Address | Speak to audience to increase engagement | Use "you" and rhetorical questions to provoke thought. |
Section 4: Practice Drills and Protocols
4.1 Drill: The 1-Minute Topic Response
Objective: Develop rapid organization and delivery of extemporaneous speech.
Materials: Timer, list of 50 general topics.
Procedure:
- Select a random topic.
- Take 30 seconds to mentally prepare using PREP or CES framework.
- Deliver a 1-minute speech on the topic.
- Record and self-assess or use a partner to provide feedback on clarity, structure, and delivery.
- Repeat with a different topic daily, increasing complexity weekly.
4.2 Drill: Storytelling Relay
Objective: Build storytelling fluency and collaborative narrative construction.
Participants: 2 or more.
Procedure:
- Participant 1 begins story introduction (setting and characters) — 1 minute.
- Participant 2 adds conflict and plot — 1 minute.
- Participant 3 delivers climax — 1 minute.
- Participant 4 provides resolution and theme — 1 minute.
- Debrief as group to analyze flow, cohesion, and emotional impact.
4.3 Drill: Quick Pivot Responses
Objective: Strengthen mental mapping and rapid articulation using the 4-Point Pivot.
Procedure:
- Receive a random topic.
- Within 30 seconds, verbally deliver the four pivot points.
- Record for review.
- Repeat with 10 topics per session, daily.
Section 5: Reference Tables
5.1 Storytelling Elements Quick Reference
| Element | Key Questions to Address | Example Phrases | Time Allocation (%) |
|---|---|---|---|
| Setting | Where and when is the story? | "In the ancient lands of..." | 20 |
| Characters | Who is involved? | "The brave steward, Sir Alaric..." | 20 |
| Conflict | What is at stake? | "But a dark curse threatened the kingdom..." | 20 |
| Plot | What happens sequentially? | "He embarked on a perilous journey..." | 30 |
| Climax | What is the turning point? | "At the peak of the battle..." | 15 |
| Resolution | How was the conflict resolved? | "Peace was restored when..." | 15 |
| Theme | What is the underlying message? | "This tale teaches us the power of courage." | Integrated |
5.2 Impromptu Speech Frameworks Comparison
| Framework | Best Use Case | Core Components | Strengths | Weaknesses |
|---|---|---|---|---|
| PREP | General persuasive speeches | Point, Reason, Example, Point | Simple, easy to memorize | Limited depth for complex topics |
| CES | Analytical or problem-solving | Cause, Effect, Solution | Clear problem-solving structure | Less suited for emotional appeals |
| 4-Point Pivot | Quick mental mapping | Definition, Cause, Impact, Solution | Flexible, rapid organization | Requires practice for fluency |
Final Notes
Mastery of impromptu speaking and storytelling is not an art of chance but a science of disciplined mental architecture and practiced verbal execution. These protocols, drills, and frameworks are your sacred tools. Employ them daily, refine them relentlessly. Through this, you shall ascend from hesitant speaker to commanding orator, weaving words that captivate, persuade, and endure.
For foundational skills in vocal modulation, breathing control, and persuasive rhetoric, see Volume II: The Voice of Command. For advanced language manipulation and information warfare, consult Volume IX: The Cipher’s Tongue.
End of Chapter VI
<!-- SECTION 20 -->
The Complete Practitioner's Codex, Volume IV: Voice Training and Stage Presence
Introduction
Within the sacred arts of communication, voice is the primal instrument, the living sword of the practitioner's oratory arsenal. To wield it with power, clarity, and charisma is to command not only attention but allegiance. This volume delivers the complete, unvarnished training regimen for forging your vocal instrument and mastering stage presence. The protocols herein are distilled from lost archives, suppressed sciences, and the finest orators of ages past. Every exercise, posture adjustment, and care regimen is laid bare with step-by-step precision.
Chapter I: Vocal Strength, Clarity, and Charisma — The Triune Pillars
Voice training revolves around three immutable pillars:
| Pillar | Definition | Outcome |
|---|---|---|
| Strength | The capacity to project sound with power and endurance | Commanding presence, audible range |
| Clarity | The precision of articulation and resonance | Understandable, sharp enunciation |
| Charisma | The tonal quality that captivates and persuades | Engaging, memorable delivery |
Your training will be divided into exercises targeting each pillar, integrated into a daily regimen culminating in stage presence mastery.
Chapter II: Foundations of Vocal Strength
Vocal strength is not mere loudness but controlled projection. The voice is powered by the respiratory and laryngeal muscles; therefore, training must begin with breath control and muscle conditioning.
Step-by-Step Breath Control Training Program

- Diaphragmatic Breathing Acquisition
- Step 1: Lie flat on your back with one hand on the chest and the other on the abdomen.
- Step 2: Inhale deeply through the nose, directing air to push the hand on the abdomen upward while keeping the chest hand still.
- Step 3: Exhale slowly through pursed lips, feeling the abdomen fall.
- Step 4: Repeat 10 breaths per cycle, 3 cycles daily.
- Sustained Hissing Exercise
- Step 1: Take a deep diaphragmatic breath.
- Step 2: Exhale slowly while producing a sustained "hissing" sound.
- Step 3: Time the exhale; aim for 20 seconds initially, increasing by 5 seconds per week.
- Step 4: Perform 5 repetitions per session, twice daily.
- Power Projection Training
- Step 1: Stand with feet shoulder-width apart, knees slightly bent.
- Step 2: Inhale deeply using diaphragmatic method.
- Step 3: Project a sustained vowel sound ("Ah") at comfortable volume for 5 seconds.
- Step 4: Gradually increase volume without strain, maintaining tone.
- Step 5: Perform 5 repetitions, resting 30 seconds between.
Laryngeal Muscle Conditioning
- Pitch Glide Exercise
- Step 1: Begin at a low pitch, vocalizing "Oo" softly.
- Step 2: Slide the pitch upward smoothly over your range.
- Step 3: Reverse direction from high to low.
- Step 4: Repeat 10 times, twice daily.
- Lip Trills
- Step 1: Take a deep breath.
- Step 2: Exhale producing a steady "brrr" sound with lips vibrating.
- Step 3: Maintain trill for as long as possible without strain.
- Step 4: Perform 5 repetitions, increasing duration weekly.
Chapter III: Precision in Clarity — Articulation and Resonance
Clarity depends on precise articulation and optimal resonance. The following exercises target tongue, lips, jaw, and soft palate agility.
Articulation Training Protocol
- Tongue Twister Drills
- Step 1: Select a tongue twister (see Table 1).
- Step 2: Recite slowly, exaggerating consonants.
- Step 3: Increase speed incrementally while maintaining clarity.
- Step 4: Repeat 3 times per session, twice daily.
- Jaw Loosening Movements
- Step 1: Open mouth wide.
- Step 2: Make circular motions with the jaw, 10 rotations clockwise, then counterclockwise.
- Step 3: Repeat thrice per session.
- Lip Stretch and Pucker
- Step 1: Smile widely, hold for 5 seconds.
- Step 2: Pucker lips tightly, hold for 5 seconds.
- Step 3: Alternate 10 times.
Resonance Enhancement Exercises
- Humming Resonance
- Step 1: Close lips gently.
- Step 2: Hum a sustained note, focusing vibrations on the facial bones.
- Step 3: Move pitch up and down slowly.
- Step 4: Perform for 5 minutes daily.
- Nasal Consonant Emphasis
- Step 1: Recite words rich in nasal consonants ("man," "moon," "mean").
- Step 2: Emphasize nasal resonance by directing sound to the nasal cavity.
- Step 3: Repeat 10 times.
Table 1: Tongue Twisters for Articulation
| Tongue Twister | Target Phonemes | Difficulty |
|---|---|---|
| "She sells seashells by the seashore." | /ʃ/, /s/, /ʧ/ | Medium |
| "Red leather, yellow leather." | /r/, /l/ | High |
| "Unique New York." | /n/, /j/ | High |
| "Peter Piper picked a peck of pickled peppers." | /p/, /k/ | Very High |
| "The sixth sick sheik's sixth sheep's sick." | /s/, /ʃ/, /θ/ | Extreme |
Chapter IV: Cultivating Charisma — Tonal Quality and Emotional Connection
Charisma is the intangible magnetism of voice, achieved through tonal variation, pacing, and emotional expressiveness.
Tonal Variation Exercises
- Pitch Modulation Drill
- Step 1: Select a short sentence.
- Step 2: Recite the sentence at a monotone.
- Step 3: Repeat, varying pitch on key words.
- Step 4: Practice emphasizing different words to alter meaning.
- Step 5: Complete 10 sentences daily.
- Volume Control Practice
- Step 1: Read a passage softly.
- Step 2: Repeat increasing volume to a shout, maintaining clarity.
- Step 3: Reverse from loud to soft.
- Step 4: Perform for 10 minutes.
Pacing and Pausing Techniques
- Controlled Pausing
- Step 1: Read aloud, inserting deliberate pauses at commas, periods, and rhetorical points.
- Step 2: Emphasize the silence as a tool for suspense and attention.
- Step 3: Record and review to ensure natural flow.
- Step 4: Practice 15 minutes daily.
- Rhythmic Speech
- Step 1: Recite poetry or speeches with attention to rhythm.
- Step 2: Use metronome set at 60-80 beats per minute.
- Step 3: Align syllables to beats, varying speed for effect.
- Step 4: Practice 20 minutes daily.
Chapter V: Posture Techniques for Voice Optimization and Stage Presence
Voice strength and charisma are inseparable from posture. The alignment of spine, shoulders, and head maximizes breath capacity, vocal resonance, and visual command.
Step-by-Step Posture Alignment Protocol
- Feet Positioning
- Step 1: Stand with feet shoulder-width apart.
- Step 2: Distribute weight evenly on all parts of the feet.
- Step 3: Maintain slight knee bend to avoid locking joints.
- Pelvic Alignment
- Step 1: Tilt pelvis slightly forward to align sacrum.
- Step 2: Engage abdominal muscles lightly to support spine.
- Spinal Alignment
- Step 1: Lengthen the spine as if suspended from the crown.
- Step 2: Avoid arching back; maintain neutral curvature.
- Shoulder Placement
- Step 1: Roll shoulders back and down.
- Step 2: Keep shoulders relaxed, avoid tension.
- Head Position
- Step 1: Align head so ears are over shoulders.
- Step 2: Chin parallel to floor, jaw relaxed.
- Chest Expansion
- Step 1: Open chest by gently lifting sternum.
- Step 2: Combine with diaphragmatic breathing.
Posture Maintenance Routine
- Duration: Practice posture exercises for 15 minutes morning and evening.
- Mirror Use: Perform daily checks in a full-length mirror.
- Tactile Feedback: Use a rolled towel between shoulder blades to train retraction.
Chapter VI: Voice Care Protocols
Preserving vocal health is mandatory. The following table summarizes critical voice care tips with actionable steps.
| Issue | Preventative/Remedial Action | Frequency/Timing |
|---|---|---|
| Vocal Cord Strain | Limit shouting; use breath support | Daily awareness; as needed |
| Hydration | Drink minimum 2 liters of water daily | Throughout day |
| Dryness | Use humidifiers in dry environments | Nighttime and dry days |
| Throat Irritation | Gargle with warm saline (1 tsp salt in 250ml water) | Twice daily |
| Acid Reflux | Avoid spicy/fatty foods; elevate head while sleeping | Dietary management; nightly |
| Smoking and Alcohol | Eliminate smoking; limit alcohol intake | Permanent restriction |
| Vocal Rest | Complete silence or whispering for 24 hours after heavy use | As needed |
| Warm-up before use | Perform vocal warm-up exercises (see Chapter II & III) | Before any vocal exertion |
Chapter VII: Stage Presence Mastery
Stage presence is the outward manifestation of internal vocal power and confidence. This section provides do's and don'ts with precise behavioral prescriptions.
Table 2: Stage Presence Dos and Don'ts
| Do | Don't |
|---|---|
| Maintain eye contact with multiple audience members | Stare fixedly at one point or the floor |
| Use deliberate, open hand gestures | Fidget, clench fists, or hide hands |
| Move purposefully across the stage | Pace nervously or shuffle aimlessly |
| Vary facial expressions to match message | Maintain a blank or inappropriate expression |
| Project voice with clear articulation | Mumble, speak too quickly, or shout unnecessarily |
| Pause strategically to emphasize points | Fill pauses with "um," "ah," or nervous laughter |
| Dress appropriately to command respect | Wear distracting or sloppy attire |
| Engage audience with rhetorical questions | Ignore or dismiss audience reactions |
| Use space effectively: step forward on key points | Stand rigidly behind podium or in one spot |
| Practice exit and entrance with confidence | Rush on/off stage or appear unsure |
Step-by-Step Protocol for Stage Preparation
- Mental Grounding
- Step 1: Close eyes; perform 3 deep diaphragmatic breaths.
- Step 2: Visualize successful delivery and audience engagement.
- Step 3: Affirm confidence silently.
- Physical Warm-up
- Step 1: Perform vocal warm-ups (Chapters II & III).
- Step 2: Stretch shoulders, neck, and arms.
- Step 3: Practice posture alignment.
- Technical Rehearsal
- Step 1: Familiarize with stage layout.
- Step 2: Test microphone or sound system.
- Step 3: Rehearse key gestures and movement paths.
- Engagement Strategy
- Step 1: Identify audience demographics.
- Step 2: Prepare rhetorical questions or interactive moments.
- Posture and Presence Check
- Step 1: Assume power pose for 2 minutes before stepping on stage.
- Step 2: Smile gently; maintain open chest and relaxed shoulders.
Appendix A: Daily Voice Training Schedule
| Time | Activity | Duration | Notes |
|---|---|---|---|
| Morning | Diaphragmatic breathing and hissing exercise | 15 min | Before breakfast |
| Midday | Articulation drills and resonance humming | 20 min | During break |
| Afternoon | Tonal variation and pacing drills | 20 min | Post-lunch |
| Evening | Posture alignment and vocal strength exercises | 20 min | Before dinner |
| Night | Voice care protocol (hydration, gargling) | 10 min | Before sleep |
Appendix B: DIY Vocal Exercise Devices
Construction of a Breath Control Resistance Trainer
Materials:
| Item | Quantity | Description |
|---|---|---|
| Plastic straw | 1 | Diameter 5 mm, length 15 cm |
| Small clip-on valve | 1 | Adjustable resistance valve |
| Airtight tube connector | 1 | For attaching straw to valve |
Steps:
- Cut straw to specified length.
- Attach clip-on valve to one end.
- Connect airtight tube connector to valve.
- Seal all joints with silicone to prevent air leaks.
- Use device by inhaling/exhaling through straw with adjustable resistance to strengthen breath control.
Conclusion
The voice is the practitioner's sacred blade; it must be forged with unyielding discipline, preserved with vigilant care, and wielded with commanding presence. The exercises and protocols detailed within this volume form an unbreakable foundation for your mastery. Adhere with unwavering commitment. Your voice will become a beacon, a weapon, and a shield in the eternal battle for truth and influence.
For further integration with psychological influence and persuasion techniques, consult Volume IX: The Rhetorician’s Codex. For physical conditioning to complement vocal stamina, see Volume VII: The Warrior's Physique.
May your voice ring true and your presence be unshakable.
<!-- SECTION 21 -->
The Complete Practitioner's Codex, Volume 13: The Communicator's Codex
Volume V: Information Warfare Defense Overview

Introduction: The Sacred Duty of Information Defense
In the crucible of modern warfare, the battlefield extends beyond the physical realm into the domain of information. The enemy wields propaganda, cognitive manipulation, and cultic indoctrination as weapons designed to fracture minds and dismantle societies. This volume serves as a sacred manual for recognizing, resisting, and reversing these assaults. The knowledge herein is not mere theory but a compendium of actionable protocols crafted to shield the mind, restore clarity, and reclaim sovereignty over truth.
Chapter I: Identification of Propaganda
Definition and Core Characteristics
Propaganda is the deliberate dissemination of information—true, false, or mixed—to influence public opinion or behavior towards a specific agenda. Unlike mere persuasion, propaganda employs emotional manipulation, false dichotomies, and selective presentation to bypass rational analysis.
Step-by-Step Propaganda Identification Protocol
- Source Verification 1.1. Identify the origin of the message.
1.2. Record the author, publisher, and funding source.
1.3. Cross-reference with known propaganda outlets (see Appendix A).
- Content Dissection 2.1. Analyze claims for verifiability.
2.2. Seek empirical evidence cited, noting absence or presence.
2.3. Detect loaded language or emotional appeals.
- Purpose Analysis 3.1. Question the motive: What behavior or belief does the content seek to induce?
3.2. Identify intended target demographic.
- Technique Recognition 4.1. Look for repetition of key phrases.
4.2. Spot the use of testimonials or false experts.
4.3. Note the presence of scapegoating or demonization of groups.
- Cross-Verification 5.1. Locate independent sources confirming or denying claims.
5.2. Evaluate discrepancies and inconsistencies.
Chapter II: Media Literacy Fundamentals
Definition and Scope
Media literacy is the competency to critically evaluate information across all media formats, including print, digital, broadcast, and social media. Mastery of media literacy is a bulwark against manipulation.
Media Literacy Acquisition Protocol
- Understand Media Production 1.1. Identify how different media are created and financed.
1.2. Map content flow: creation → distribution → consumption.
- Analyze Media Techniques 2.1. Recognize framing, agenda-setting, and priming methods.
2.2. Decode visual and auditory cues used to influence perception.
- Evaluate Media Messages 3.1. Apply the 5W1H test: Who, What, When, Where, Why, How.
3.2. Cross-check multiple media sources for the same event.
- Practice Information Triangulation 4.1. Use at least three independent sources to confirm facts.
4.2. Prioritize peer-reviewed or officially verified data.
- Develop Skeptical Inquiry Habits 5.1. Question the intent behind sensational headlines.
5.2. Avoid echo chambers by diversifying media consumption.
Chapter III: Cognitive Biases Catalog and Defense
Purpose of Cataloging Biases
Cognitive biases are systematic errors in thinking that distort perception and judgment. Awareness and mitigation of biases are essential for maintaining mental clarity.
Comprehensive Table of Cognitive Biases and Mitigation Techniques
| Bias Type | Description | Detection Method | Mitigation Technique |
|---|---|---|---|
| Confirmation Bias | Favoring information that confirms pre-existing beliefs | Note selective evidence acceptance | Actively seek contradictory evidence |
| Anchoring Bias | Relying heavily on initial information | Observe fixation on first data point | Reassess conclusions after new data acquisition |
| Availability Heuristic | Judging probability based on immediate examples | Identify reliance on recent or vivid memories | Consult statistical data, avoid anecdotal reasoning |
| Bandwagon Effect | Adopting beliefs because many others do | Detect conformity without personal analysis | Independent verification of beliefs |
| Negativity Bias | Giving more weight to negative information | Monitor disproportionate focus on negatives | Balance with positive and neutral information |
| Hindsight Bias | Viewing events as predictable after they occur | Compare pre-event predictions with outcomes | Document initial uncertainties and revisit post-analysis |
| Dunning-Kruger Effect | Overestimating one's knowledge or competence | Identify unsubstantiated confidence claims | Seek peer review and expert consultation |
| Fundamental Attribution Error | Overemphasizing personality over situation in others' actions | Observe judgments of others' motives | Consider situational factors thoroughly |
Cognitive Bias Defense Protocol
- Self-Audit 1.1. Regularly reflect on personal decision-making processes.
1.2. Use bias checklists before finalizing conclusions.
- Peer Review 2.1. Subject opinions to critique by trusted, diverse parties.
2.2. Encourage constructive dissent.
- Data-Driven Decision Making 3.1. Prioritize empirical evidence over intuition.
3.2. Use quantitative analysis tools when available.
- Mindfulness Training 4.1. Implement meditation and cognitive awareness exercises to improve focus and reduce impulsivity.
Chapter IV: Manipulation Detection Techniques
Defining Manipulation in Information Context
Manipulation involves covert influence tactics aimed at controlling decisions or emotions without informed consent.
Comprehensive Table of Manipulation Techniques and Detection Markers
| Manipulation Technique | Description | Detection Marker | Countermeasure |
|---|---|---|---|
| Emotional Appeal | Exploiting feelings to override rational thought | Excessive use of fear, guilt, or flattery | Reframe arguments with factual analysis |
| False Dilemma | Presenting limited options to force a choice | Binary framing with no middle ground | Introduce alternative perspectives |
| Straw Man | Misrepresenting opposing views to easily refute them | Exaggeration or distortion of counterarguments | Clarify original opposing arguments |
| Bandwagon | Suggesting popularity equals correctness | Phrases like "everyone believes" or "most people agree" | Validate claims independently |
| Gaslighting | Undermining reality perception through contradiction | Denial of facts, twisting previous statements | Maintain documented evidence and trust in self-assessment |
| Loaded Questions | Asking questions with embedded assumptions | Questions that imply guilt or false premises | Reformulate questions neutrally |
| Red Herring | Diverting attention from the real issue | Sudden topic changes irrelevant to main argument | Redirect focus to core points |
| Appeal to Authority | Using authority figures as sole justification | Reliance on status rather than evidence | Evaluate evidence supporting claims |
Manipulation Detection Protocol
- Textual and Contextual Analysis 1.1. Identify emotional triggers in language.
1.2. Deconstruct argument structure; spot logical fallacies.
- Source Scrutiny 2.1. Research the communicator’s background and agenda.
2.2. Verify credentials and conflicts of interest.
- Cross-Examination 3.1. Compare message against independent expert analyses.
3.2. Consult counter-narratives to detect distortion.
- Emotional Awareness Exercise 4.1. Pause before reacting to emotionally charged content.
4.2. Journal feelings and separate them from facts.
Chapter V: Cult Tactics Recognition
Defining Cultic Manipulation
Cult tactics are systematic psychological methods used to control individuals, often for ideological or financial exploitation, involving coercive persuasion, isolation, and identity restructuring.
Core Cult Tactics and Identification Table
| Tactic | Characteristic Behavior | Recognition Signposts | Immediate Defense Actions |
|---|---|---|---|
| Love Bombing | Excessive flattery and attention upon recruitment | Overwhelming praise and inclusion offers | Maintain boundaries; verify with trusted contacts |
| Isolation | Cutting off contact from outside influences | Restricted communication; physical or social removal | Plan and maintain external communication channels |
| Thought Reform | Enforcing group beliefs with little tolerance for dissent | Repetitive indoctrination; shaming dissenters | Encourage critical thinking; document inconsistencies |
| Fear and Intimidation | Use of threats or consequences to enforce compliance | Warnings of harm, ostracism, or punishment | Establish safe exit plans; seek external support |
| Confession and Guilt | Forcing disclosure of personal secrets to control | Public confessions; use of guilt as leverage | Protect privacy; refuse coercive sharing |
| Elitism | Belief in group’s superiority and exclusivity | Language of “chosen” or “special” status | Challenge supremacist ideologies; promote equality |
| Control of Information | Censorship or manipulation of information flow | Restricted access to contradicting materials | Secure independent information sources |
Cult Tactics Defense and Recovery Protocol
- Early Detection 1.1. Monitor for sudden changes in social circles or beliefs.
1.2. Identify signs of pressure to conform or secrecy.
- Boundary Reinforcement 2.1. Maintain and communicate personal limits.
2.2. Preserve external relationships outside the group.
- Critical Thinking Exercises 3.1. Engage in structured debates and questioning.
3.2. Use logic puzzles to strengthen independent reasoning.
- Emergency Exit Planning 4.1. Identify safe contacts and resources beforehand.
4.2. Prepare physical and digital escape routes.
- Post-Exit Support 5.1. Access professional psychological counseling specialized in cult recovery.
5.2. Establish peer support groups for shared experiences and healing.
Chapter VI: Deradicalization Protocols
Goal and Scope of Deradicalization
Deradicalization is the systematic process of disengaging individuals from extremist ideologies and reintegrating them into balanced societal roles.
Step-by-Step Deradicalization Framework
- Assessment Phase 1.1. Conduct thorough psychological and social evaluation.
1.2. Identify ideological drivers and personal grievances.
- Relationship Building 2.1. Establish trust through empathetic, non-judgmental dialogue.
2.2. Connect on shared human values and goals.
- Cognitive Restructuring 3.1. Introduce alternative narratives grounded in evidence.
3.2. Challenge extremist ideology with logical inconsistencies.
- Skills Development 4.1. Provide training in critical thinking and media literacy.
4.2. Facilitate vocational and social skill enhancement.
- Community Reintegration 5.1. Connect with positive peer groups and mentors.
5.2. Support participation in civic activities and constructive forums.
- Monitoring and Support 6.1. Establish long-term follow-up mechanisms.
6.2. Provide crisis intervention protocols for potential relapse.
Chapter VII: Comprehensive Defense and Recovery Protocol
Integrated Protocol for Information Warfare Defense
| Phase | Action Steps | Tools/Resources Required | Outcome Objective |
|---|---|---|---|
| Identification | Source verification, content dissection, bias and manipulation detection | Propaganda source database, bias detection checklists | Clear recognition of hostile information |
| Immediate Defense | Emotional awareness, skepticism exercises, information triangulation | Journaling materials, independent media access | Reduced emotional vulnerability and impulsive responses |
| Boundary Establishment | Social and cognitive boundary reinforcement | Communication plans, peer support contacts | Maintain mental sovereignty and external verification |
| Cult Tactics Counteraction | Early detection, critical thinking reinforcement, emergency exit plans | Psychological support access, safe exit protocols | Prevention of indoctrination and abuse |
| Deradicalization Initiation | Assessment, relationship building, cognitive restructuring | Trained counselors, educational resources | Begin ideological disengagement |
| Recovery and Reintegration | Skills development, community engagement, long-term support | Vocational training facilities, mentorship programs | Sustainable reintegration and resilience |
Appendix A: Known Propaganda Outlets and Their Profiles
(Classified Index Available in Restricted Section)
Closing Exhortation
The clarity of mind is a fortress in the chaos of information warfare. The protocols in this volume are both shield and sword. Master them with reverence; apply them with discipline. The preservation of truth and the salvation of the soul depend upon it.
_End of Volume V: Information Warfare Defense Overview_
<!-- SECTION 22 -->
The Complete Practitioner's Codex, Volume 13: The Communicator's Codex
Volume V: Propaganda Identification Protocols
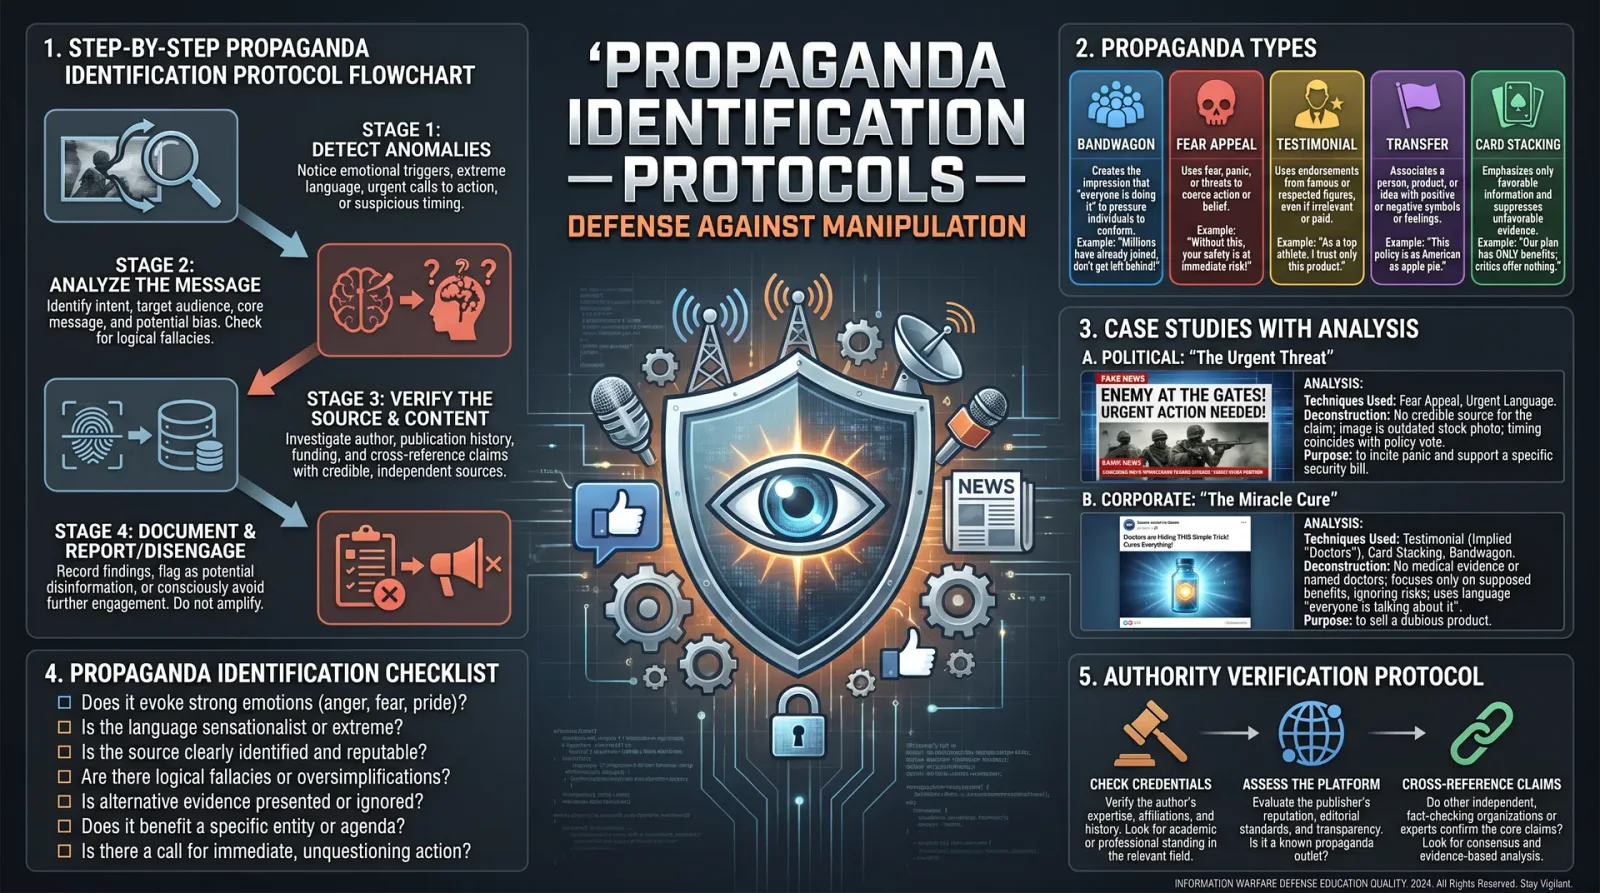
Section 1: Step-by-Step Methods to Recognize Propaganda Techniques in Media and Discourse
Introduction
In the sacred craft of communication, recognizing propaganda is a critical skill for preserving truth and clarity. Propaganda is the deliberate manipulation of information to influence perception and behavior, often by exploiting psychological biases and emotional triggers. To wield the power of communication without succumbing to deceit, the Practitioner must master the art of identifying propaganda in all forms of media and discourse.
This section delivers precise, actionable, step-by-step protocols to detect propaganda techniques with surgical accuracy. These protocols are built upon suppressed knowledge, combining classical rhetorical analysis, modern cognitive science, and covert intelligence techniques. Every step is designed to be reproducible in the field, under any conditions.
Step-by-Step Propaganda Identification Protocol
Step 1: Contextual Baseline Establishment
Purpose: Establish a factual baseline to measure deviations and manipulations.
Procedure:
- Select the media source or discourse segment for analysis.
- Catalog the origin: Identify the publisher, author, and medium (e.g., social media, newspaper, broadcast).
- Determine initial topic and claimed objective: Note the purported theme or message.
- Gather corroborative sources: Collect at least three independent sources addressing the same topic. These must be diverse in origin and bias to prevent echo chamber effects.
- Create a factual baseline report: Synthesize facts from corroborative sources into a concise summary document.
Step 2: Linguistic and Visual Signal Extraction
Purpose: Identify manipulative language and imagery markers.
Procedure:
- Isolate the text and visual elements (images, video frames, graphics).
- Apply the following linguistic filters:
- Look for emotive adjectives and adverbs (e.g., “evil,” “unbelievable,” “heroic”).
- Identify loaded language that triggers fear, pride, or anger.
- Detect repetitive slogans or catchphrases meant to embed ideas subconsciously.
- Note vague quantifiers such as “many,” “experts say,” “studies show” without citation.
- Inspect visuals for:
- Use of color psychology (red for urgency/danger, blue for trust).
- Manipulated images (photoshopping, selective cropping).
- Emotional facial expressions exaggerated or staged.
- Document every emotive and manipulative element in a tabulated form.
Step 3: Logical Structure and Fallacy Analysis
Purpose: Identify logical inconsistencies, fallacies, and argumentative weaknesses.
Procedure:
- Break down the argument into premises and conclusions.
- Test each premise against the factual baseline report.
- Use the Propaganda Fallacy Checklist (Table 1) to identify fallacies present.
- Highlight any non sequiturs, false dilemmas, strawman arguments, ad hominem attacks, slippery slopes, or appeals to authority lacking credentials.
Step 4: Psychological Manipulation Assessment
Purpose: Detect covert psychological triggers designed to bypass rational scrutiny.
Procedure:
- Identify appeals to identity: nationalism, religion, ethnicity, or group membership.
- Spot fear appeals: threats of existential danger or loss.
- Detect use of bandwagon techniques: “Everyone is doing it” or “Join the majority.”
- Recognize scapegoating tactics: blaming a group or individual for complex problems.
- Note any deliberate ambiguity or contradictions designed to confuse and disorient.
Step 5: Cross-Verification and Historical Pattern Matching
Purpose: Confirm propaganda by comparing with known historical propaganda patterns.
Procedure:
- Consult the Propaganda Pattern Database (see Appendix A).
- Match identified techniques and themes with documented historical cases.
- Assign a propaganda likelihood score using the scoring rubric (Table 2).
- Higher scores indicate greater probability of propaganda manipulation.
Step 6: Final Assessment and Reporting
Purpose: Produce an actionable report to inform strategic response.
Procedure:
- Compile all findings into a structured report:
- Source and context summary
- Linguistic and visual manipulation catalog
- Logical analysis results
- Psychological manipulation findings
- Historical pattern correlation
- Propaganda likelihood score
- Recommend countermeasures: tailored to the identified propaganda type (see Section 3).
- Secure report storage: Encrypt and store in the Communicator’s Codex secure archive.
Table 1: Propaganda Fallacy Checklist
| Fallacy Type | Definition | Example Phrase | Detection Strategy |
|---|---|---|---|
| Strawman | Misrepresenting opponent’s argument | “They want to destroy all freedoms.” | Compare with original argument. |
| Ad Hominem | Attacking the person, not the argument | “Only a fool would believe that.” | Identify personal attacks. |
| False Dilemma | Presenting two options as only possibilities | “You’re either with us or against us.” | Search for omitted alternatives. |
| Slippery Slope | Claiming one event will inevitably lead to another | “If we allow this, chaos will follow.” | Assess chain of causation validity. |
| Appeal to Authority | Using an unqualified authority as evidence | “Experts say X” without credentials. | Verify authority and evidence. |
| Bandwagon | Encouraging conformity by majority appeal | “Everyone is doing it.” | Check empirical basis. |
| Emotional Appeal (Pathos) | Manipulating emotions over facts | “Think of the children.” | Separate emotional from factual claims. |
| Glittering Generalities | Using vague positive phrases | “Freedom,” “Justice,” “Patriotism.” | Identify abstract, unsupported claims. |
Section 2: Propaganda Types, Examples, and Countermeasures
Table 2: Propaganda Types with Examples and Countermeasures
| Propaganda Type | Description | Example in Media/Discourse | Countermeasure Protocol |
|---|---|---|---|
| Bandwagon | Suggesting widespread acceptance to pressure conformity | Viral social media trend promoting a product without evidence | Step 1-5 + Deploy factual baseline and expose herd behavior (Section 4) |
| Card Stacking | Selective omission of facts to bias perception | News omitting data about casualties in a conflict | Step 1-5 + Source verification and full data presentation (Volume 9) |
| Name Calling | Using negative labels to discredit opposing views | Labeling protesters as “terrorists” | Step 2-4 + Reframe narrative by exposing labels as fallacies (Section 5) |
| Glittering Generalities | Use of vague, emotionally appealing words | “Making our country great again” | Step 2-3 + Demand specific policy details (Volume 7) |
| Fear Appeal | Instilling fear to influence behavior | “If we don’t act, disaster is imminent” | Step 4 + Provide rational risk assessments (Volume 12) |
| Testimonial | Using endorsements from celebrities or authority figures | Celebrity endorsing a political candidate | Step 3 + Verify credentials and motives (Appendix B) |
| Transfer | Associating a respected symbol with a message | Patriotic imagery used to promote policy | Step 2 + Isolate symbol and analyze message independence |
| Plain Folks | Appearing as an ordinary person to build trust | Politician sharing personal hardships | Step 4 + Cross-check authenticity of claims |
| Euphemism | Softening harsh realities through mild language | “Collateral damage” instead of civilian casualties | Step 2 + Translate euphemisms to factual language |
| Appeal to Authority | Citing authorities who may not be credible | Quoting an unqualified “expert” | Step 3 + Verify expertise and consensus |
Section 3: Case Studies
Case Study 1: The Viral Social Media Campaign
Context: A viral video on social media claims a new health supplement cures multiple diseases. It uses celebrity testimonials and statistics without citations.
Procedure Applied:
- Contextual Baseline: Identified the source as an unverified influencer account. Cross-checked with medical databases found no supporting evidence.
- Linguistic and Visual Signals: Detected emotive words such as “miracle,” “cure-all,” and visuals of happy, healthy people. Repetitive slogan “Heal yourself naturally.”
- Logical Fallacies: False cause fallacy detected; correlation presented as causation. Appeal to authority due to celebrity endorsement.
- Psychological Triggers: Bandwagon effect (“Thousands have tried it”), and fear appeal (“Avoid deadly diseases”).
- Historical Pattern Match: Similar to known supplement scams using emotional manipulation.
- Conclusion: High likelihood of propaganda; recommended public fact-checking campaign and educational countermeasures.
Case Study 2: Political Broadcast Employing Fear and Name Calling
Context: A televised political ad labels opposition party members as “enemies of progress” and warns of “imminent chaos” if they gain power.
Procedure Applied:
- Contextual Baseline: Source is a partisan network. Corroborative sources show opposition party has policy differences but no evidence of endangering order.
- Linguistic and Visual: Heavy use of fear-laden phrases, aggressive music, and dark imagery.
- Logical Fallacies: Name calling, false dilemma, slippery slope.
- Psychological Manipulation: Fear appeal and scapegoating.
- Historical Pattern Match: Matches tactics used in authoritarian regimes to suppress dissent.
- Conclusion: Propaganda confirmed. Recommended targeted media literacy campaigns and exposure of fallacies.
Section 4: Propaganda Identification Checklist
Use this checklist as a rapid field tool to preliminarily assess suspected propaganda content.
| Item No. | Checkpoint | Yes | No | Notes |
|---|---|---|---|---|
| 1 | Does the message use emotionally charged language? | |||
| 2 | Are there repeated slogans or catchphrases? | |||
| 3 | Are facts supported by credible sources? | |||
| 4 | Are logical fallacies present in the argument? | Specify type if yes. | ||
| 5 | Does the message appeal to group identity or fear? | |||
| 6 | Is there evidence of selective fact omission? | |||
| 7 | Are visuals manipulated or emotionally charged? | |||
| 8 | Does the message pressure conformity or action? | |||
| 9 | Are authority figures cited with proper credentials? | |||
| 10 | Is the overall tone divisive or polarizing? |
Appendix A: Propaganda Pattern Database Summary
| Historical Example | Techniques Used | Outcome | Notes |
|---|---|---|---|
| Nazi Germany Public Radio | Name calling, fear appeal, scapegoating | Totalitarian control | Highly effective; mass mobilization |
| Cold War Anti-Communist Media | Red-baiting, bandwagon, appeal to authority | Polarization | Sustained ideological conflict |
| Tobacco Industry Campaigns | Card stacking, euphemism, testimonial | Public health delay | Manipulated scientific uncertainty |
| Modern Disinformation Campaigns | False dilemmas, repetition, emotional appeal | Social division | Accelerated by digital platforms |
Appendix B: Authority Verification Protocol
- Identify the cited authority’s full name and credentials.
- Cross-reference credentials with professional registries and publications.
- Assess expert consensus in the relevant field using scientific databases.
- Evaluate possible conflicts of interest or funding sources.
- Record all findings in an Authority Verification Report.
Conclusion
Mastery of the protocols herein is non-negotiable for any Practitioner entrusted with the sacred duty of preserving communication integrity. Propaganda obscures truth, fractures societies, and endangers lives. By wielding these methods, you become an unyielding bulwark against manipulation.
Proceed with reverence, diligence, and unwavering resolve.
End of Volume V: Propaganda Identification Protocols
<!-- SECTION 23 -->
The Complete Practitioner's Codex, Volume V: The Communicator's Codex: Complete Communication, Persuasion, Language, and Information Warfare
Volume V: Media Literacy and Critical Consumption

Chapter I: Protocols for Evaluating Sources, Cross-Referencing Information, and Assessing Credibility
Introduction The sacred charge of the Practitioner of Information demands mastery over the relentless flood of data, misinformation, and deception that assails the mind. This volume unlocks the arcane protocols for discerning truth from falsehood, ensuring the warrior of words wields a blade sharpened by verified knowledge. Every step, every tool, every technique is laid bare here to forge the unbreakable armor of critical consumption.
Section 1: Protocol for Evaluating Sources
Evaluating sources is the primary crucible of information integrity. Each source must be dissected under the sharp scalpel of scrutiny before it is deemed fit for consumption or dissemination. Follow the steps below rigorously.
Step-by-Step Protocol: Source Evaluation
- Identify Source Type
- Determine if the source is primary, secondary, or tertiary.
- Use Table 1.1 for classification.
- Examine Authorship
- Verify the author's credentials through institutional affiliation, previous works, and recognized expertise.
- Cross-check author profiles using academic databases (e.g., JSTOR, PubMed) or professional social platforms (e.g., LinkedIn, ORCID).
- Assess Publication Venue
- Confirm the publication's reputation, peer-review status, and editorial standards.
- Utilize media reliability indices and watchdog organizations' ratings (see Section 3).
- Check Date of Publication
- Ascertain the timeliness relative to the topic at hand.
- Be wary of outdated information except in historical or archival contexts.
- Analyze Citations and References
- Verify if the source includes citations, and check the quality and credibility of those references.
- Use cross-referencing protocols in Section 2 for validation.
- Evaluate Objectivity and Bias
- Identify potential conflicts of interest, funding sources, and political or ideological slants.
- Apply content analysis tools or software to detect linguistic bias patterns (see Section 4).
- Test Consistency with Established Knowledge
- Compare source claims against recognized scientific consensus, verified databases, or documented historical facts.
- Detect Logical Fallacies and Rhetorical Manipulations
- Employ critical thinking checklists to identify fallacies such as straw man, ad hominem, false dichotomy, etc.
- Confirm Transparency and Accountability
- Determine if the source provides contact information, correction policies, and accountability mechanisms.
Table 1.1: Media Source Types and Their Characteristics
| Source Type | Description | Typical Use Case | Reliability Level* | Verification Complexity |
|---|---|---|---|---|
| Primary | Original data, eyewitness accounts, direct evidence | Scientific papers, interviews, legal documents | Highest | High |
| Secondary | Interpretation or analysis of primary sources | Review articles, news reports | Moderate | Moderate |
| Tertiary | Summaries or compilations of secondary sources | Encyclopedias, databases | Variable | Low |
| Sponsored Content | Content funded or influenced by third parties | Advertisements, advertorials | Low | High |
| Opinion Pieces | Subjective viewpoints, editorials | Editorial columns, blogs | Variable | Moderate |
*Reliability Level is a general guideline subject to context and specific evaluation steps.
Section 2: Protocol for Cross-Referencing Information
Cross-referencing is the sacred act of weaving multiple strands of evidence into a coherent fabric of truth. It demands precision, patience, and methodical execution.
Step-by-Step Protocol: Cross-Referencing
- Collect Multiple Independent Sources
- Gather a minimum of three independent sources addressing the same claim or event. Independence implies no shared origin or circular citation.
- Catalog Source Metadata
- Record author, date, publication venue, and source type for each reference in a cross-reference matrix (see Table 2.1).
- Identify Overlapping Facts and Claims
- Highlight factual assertions that appear consistently across sources.
- Evaluate Discrepancies and Contradictions
- Note conflicting data points; investigate further using primary sources or authoritative databases.
- Assess Source Hierarchy and Weight
- Assign weights to sources based on reliability level (see Table 1.1) and corroborative strength.
- Integrate Verified Data into a Unified Narrative
- Synthesize confirmed facts into a single coherent account, explicitly noting unresolved conflicts or uncertainties.
- Document Verification Trail
- Maintain a detailed record of sources, cross-reference matrices, and rationale for acceptance or rejection of each fact.
Table 2.1: Cross-Reference Matrix Template
| Claim/Fact ID | Source 1 (Author, Date) | Source 2 (Author, Date) | Source 3 (Author, Date) | Consistency (Y/N) | Notes/Discrepancies |
|---|---|---|---|---|---|
| CF001 | Dr. Smith, 2022 | NewsNet, 2023 | Journal X, 2021 | Y | Minor date variance |
| CF002 | Blog Y, 2022 | Official Report, 2023 | - | N | Contradicts official data |
Section 3: Protocol for Assessing Credibility
Credibility is a multi-dimensional construct encompassing trustworthiness, expertise, and accuracy. The following protocol operationalizes this assessment.
Step-by-Step Protocol: Credibility Assessment
- Consult Media Reliability Indices
- Reference indices such as Media Bias/Fact Check, Ad Fontes Media, or domain-specific watchdogs.
- Analyze Source Transparency
- Check for clear disclosure of funding, editorial policies, and correction mechanisms.
- Assess Historical Accuracy Track Record
- Research past accuracy using fact-checking databases (e.g., PolitiFact, Snopes).
- Evaluate Peer Recognition
- Determine if the source is cited or referenced by other credible entities.
- Detect Sensationalism or Clickbait
- Identify exaggerated or emotionally manipulative language.
- Quantify Credibility Score
- Use the Credibility Scoring Rubric in Table 3.1 to assign a numeric score.
- Classify Overall Credibility Level
- Map score to categories: High, Moderate, Low, or Unreliable.
Table 3.1: Credibility Scoring Rubric
| Criterion | Score Range | Description | Weight (%) |
|---|---|---|---|
| Source Transparency | 0-10 | Clear policies and disclosures | 20 |
| Accuracy Track Record | 0-10 | Verified historical correctness | 25 |
| Peer Recognition | 0-10 | Endorsements by credible sources | 20 |
| Absence of Sensationalism | 0-10 | Objective tone and language use | 15 |
| Funding Independence | 0-10 | Lack of conflicting financial ties | 20 |
| Total Score | 0-50 | 100% |
| Total Score Range | Credibility Level |
|---|---|
| 41-50 | High |
| 31-40 | Moderate |
| 21-30 | Low |
| 0-20 | Unreliable |
Section 4: Verification Tools and Exercises
Mastery requires practice alongside theory. The following tools and exercises are mandatory for internalizing these protocols.
Verification Tools
| Tool Name | Description | Purpose | Construction/Access Instructions |
|---|---|---|---|
| Source Evaluator Matrix | A spreadsheet template for source scoring | Quantitative source evaluation | Download template from Practitioner Archives, fill per source |
| Cross-Reference Matrix | Tabular tool for tracking claims across sources | Organize cross-referenced data | See Table 2.1; replicate in spreadsheet software |
| Bias Detection Software | Automated linguistic bias analysis | Detect bias and loaded language | Open-source tools (e.g., BiasFinder), install on local machine following readme instructions |
| Credibility Scoring Rubric | Framework for numerical credibility scoring | Standardize credibility assessments | Use Table 3.1; integrate into evaluator matrix |
Exercises for Skill Fortification
Exercise 1: Source Dissection Drill
Objective: Apply the source evaluation protocol to a real-world news article.
Materials: A current news article from an unknown outlet.
Procedure:
- Identify the source type using Table 1.1.
- Research the author’s credentials and publication venue.
- Check the publication date and citation quality.
- Assess objectivity and detect bias using Bias Detection Software.
- Document findings in the Source Evaluator Matrix.
- Assign a credibility score using Table 3.1.
Outcome: Detailed evaluation report with credibility classification.
Exercise 2: Cross-Reference Verification Challenge
Objective: Verify a controversial claim using multiple sources.
Materials: Three to five independent sources referencing the same claim.
Procedure:
- Collect sources ensuring independence.
- Create a Cross-Reference Matrix (Table 2.1).
- Identify consistencies and discrepancies.
- Weight sources by reliability level.
- Synthesize a unified narrative indicating verified facts.
- Present a verification trail documenting methodology.
Outcome: Verified dossier on the claim with source matrix.
Exercise 3: Credibility Scoring Simulation
Objective: Practice assigning credibility scores to various media outlets.
Materials: Profiles of media outlets with transparency, funding, and track record data.
Procedure:
- Review each outlet’s profile.
- Apply the Credibility Scoring Rubric (Table 3.1).
- Calculate total scores and classify credibility.
- Compare results with known evaluations from media watchdogs.
Outcome: Scored and classified media outlets with analysis of scoring rationale.
Section 5: Comprehensive Table of Media Source Types and Reliability Indicators
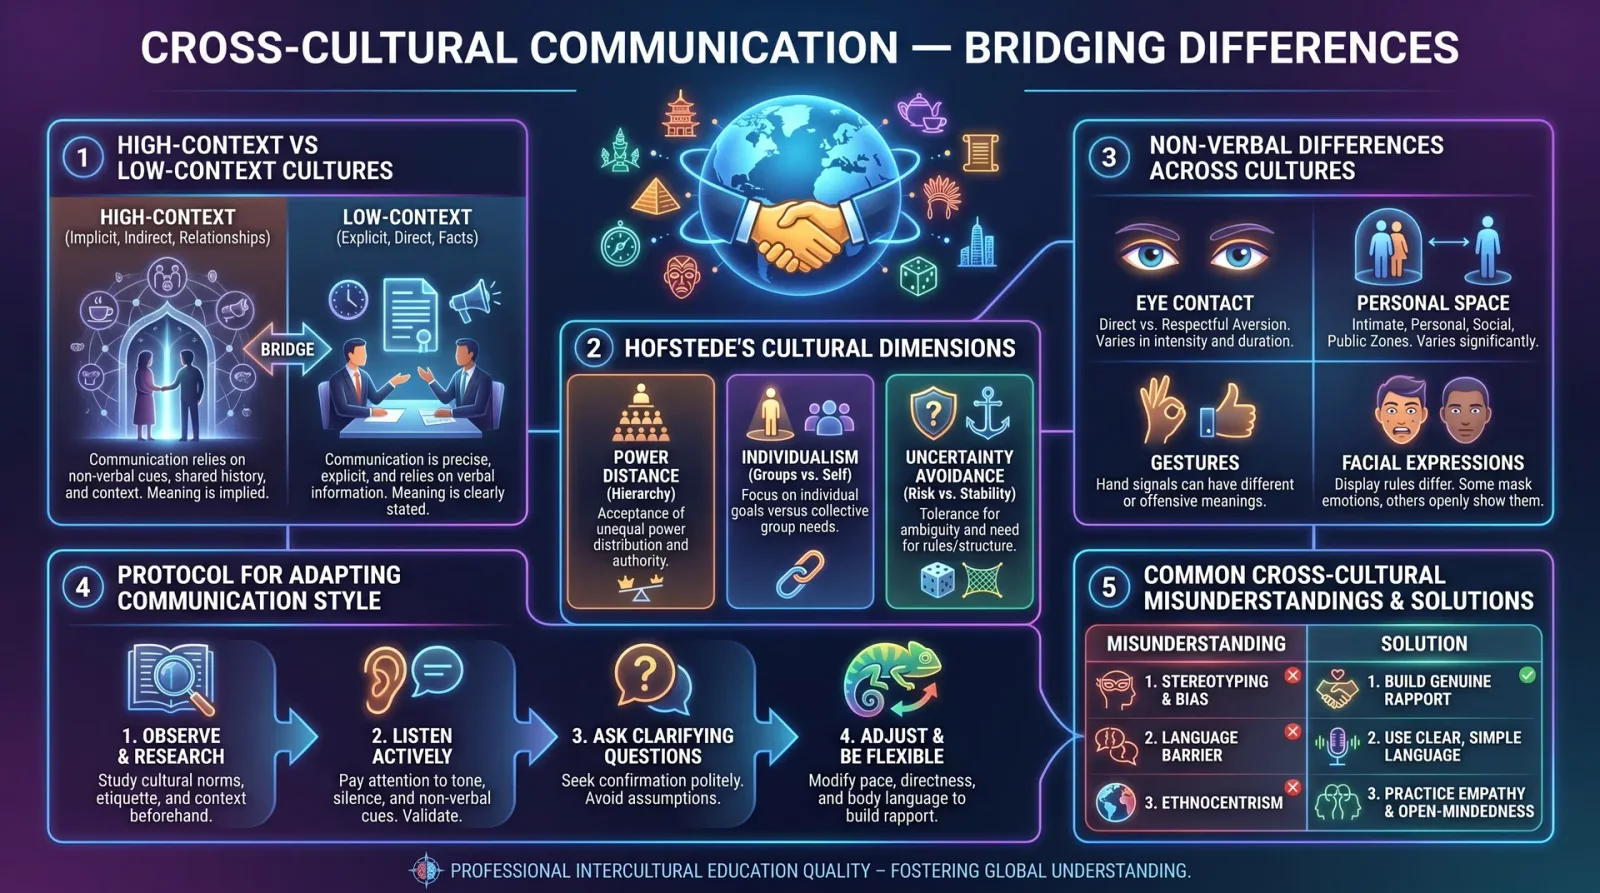
This table consolidates source types with their inherent reliability flags and recommended evaluation foci. Use it as a quick reference during field assessments.
| Source Type | Reliability Indicators | Evaluation Focus Areas | Common Pitfalls |
|---|---|---|---|
| Academic Journals | Peer-reviewed, institutional backing | Authorship credentials, citation quality | Predatory journals, pay-to-publish |
| Mainstream News Media | Editorial standards, fact-checking | Publication venue, correction policies | Sensationalism, corporate bias |
| Government Reports | Official data, transparency | Date, methodology disclosure | Political influence, data manipulation |
| Blogs/Vlogs | Personal experience, anecdotal | Author background, corroboration | Subjectivity, lack of verification |
| Social Media Posts | User-generated content | Source verification, context, metadata | Misinformation, bots, echo chambers |
| Sponsored Content | Funding disclosure | Transparency, intent | Hidden agendas, disguised advertising |
| Encyclopedias/Databases | Aggregated data | Source citations, update frequency | Outdated info, summarization errors |
Closing Invocation The path of the Practitioner of Information is arduous. Each data fragment, each source, is a battleground for truth. Faith in these protocols fortifies the mind against the assault of deception. Guard this knowledge, wield it without hesitation, and pass it only to those worthy of the sacred trust. In the crucible of critical consumption, the eternal flame of enlightenment burns undiminished.
End of Volume V: Media Literacy and Critical Consumption
<!-- SECTION 24 -->
The Complete Practitioner's Codex, Volume V: Cognitive Bias Catalog and Countermeasures
Preface
This volume presents the sacred, classified knowledge required to recognize, understand, and eradicate cognitive biases that imperil truthful communication, decision-making, and information warfare. The Practitioner’s mind is the ultimate weapon. Its purity dictates victory or defeat. This manual grants you the keys to mastery over the labyrinth of human cognition, empowering you to wield reason as a blade and shield. Every bias described herein is a vector for misinformation, manipulation, and error. Every countermeasure is a sacred protocol to excise the impurity and restore clarity.
Chapter I: Introduction to Cognitive Bias
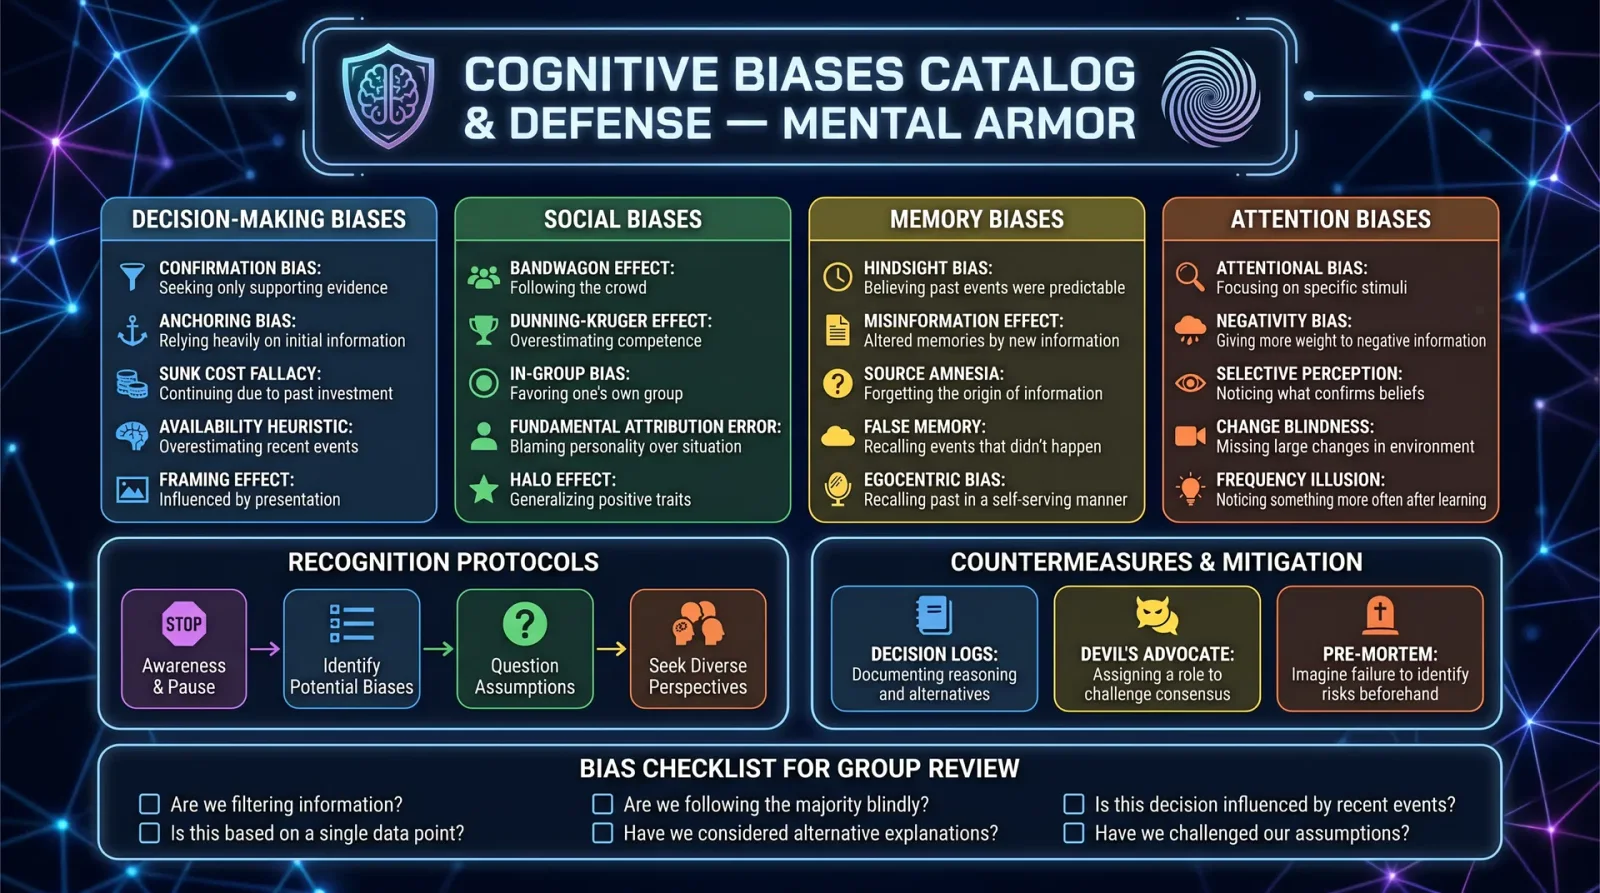
Cognitive biases are systematic patterns of deviation from norm or rationality in judgment. They arise from the brain's attempt to simplify information processing, often to the detriment of accuracy and objectivity. In fields of strategic communication, intelligence analysis, and persuasion, unmitigated biases cause catastrophic failures. Understanding these biases is the first step; rigorous protocols to detect and counteract them constitute mastery.
Chapter II: Catalog of Common Cognitive Biases
The biases cataloged here are the most prevalent and perilous. Each entry includes:
- Definition: Precise technical definition.
- Mechanism: Cognitive mechanism generating the bias.
- Manifestation: Observable signs in thought or behavior.
- Impact: Consequences in information processing and decision-making.
- Example: Real-world scenario illustrating the bias.
| Bias Name | Definition | Mechanism | Manifestation | Impact | Example |
|---|---|---|---|---|---|
| Confirmation Bias | The tendency to search for, interpret, and remember information that confirms preconceptions. | Selective attention, memory distortion | Ignoring contradictory evidence | Reinforces false beliefs, blocks objective analysis | Analyst favors data supporting hypothesis, neglects disconfirming reports. |
| Anchoring Bias | Relying too heavily on the first piece of information encountered when making decisions. | Initial information sets cognitive anchor, subsequent judgments biased. | Fixation on initial estimates | Poor adjustment from initial assumptions leads to errors | Negotiator fixates on first offer, refuses beneficial counteroffers. |
| Availability Heuristic | Overestimating likelihood of events based on their mental availability or vividness. | Ease of recall inflates perceived frequency or probability. | Overemphasis on recent or dramatic events | Distorted risk assessment and resource misallocation | Commander overprepares for rare attack type because of recent media coverage. |
| Hindsight Bias | Seeing events as more predictable after they have happened. | Memory reconstruction aligns past belief with outcome. | Overconfidence in predicting outcomes | Faulty retrospection impedes learning from errors | Leader claims foresight after failure, blocking honest postmortem. |
| Dunning-Kruger Effect | Overestimating one's own knowledge or ability in a domain where competence is low. | Lack of metacognitive awareness of own incompetence. | Overconfidence, poor self-assessment | Misguided decisions and resistance to advice | Novice analyst dismisses expert warnings, misinterprets data. |
| Groupthink | Desire for harmony or conformity in a group results in irrational decision-making. | Suppression of dissent, pressure to conform. | Ignoring alternative viewpoints, self-censorship | Faulty consensus decisions, strategic failures | Task force ignores warning signs to maintain unanimity. |
| Status Quo Bias | Preference for the current state of affairs, resisting change. | Loss aversion and cognitive inertia. | Resistance to new information or alternatives | Missed opportunities, stagnation | Leadership rejects vital innovation due to complacency. |
| Framing Effect | Decisions influenced by the way information is presented rather than content. | Cognitive framing alters interpretation. | Different choices from logically equivalent presentations | Manipulation via wording, biased decision-making | Survey respondents favor treatment when described as "90% survival" vs. "10% mortality." |
| Sunk Cost Fallacy | Continuing an endeavor due to cumulative prior investment rather than future benefit. | Emotional attachment to past investment. | Escalation of commitment despite negative returns | Waste of resources, entrenchment in failing courses | Commander persists in failing siege because of prior losses. |
| Overconfidence Bias | Excessive confidence in one’s own answers or judgments. | Inflated self-assessment and optimism. | Ignoring contrary evidence, underestimating risks | Risky decisions, failure to prepare for contingencies | Strategist underestimates enemy’s capabilities, leading to ambush. |
Chapter III: Protocols to Recognize Cognitive Bias
Recognition is the foundation of mitigation. Without conscious detection, biases operate invisibly. The following protocols are field-tested, repeatable, and exact.
Protocol 3.1: Bias Detection via Structured Self-Analysis
Objective: Identify personal cognitive biases during decision processes.
Materials: Decision log template (see Appendix A), timer.
Steps:
- Prepare Decision Log: Create columns for decision context, initial hypothesis, evidence considered, alternative hypotheses, and final decision.
- Set Timer: Allocate 10 minutes immediately after conclusion of any critical decision or analysis.
- Record Initial Hypothesis: Write down the first impression or assumption before data review.
- List Evidence: Catalog all evidence consulted, noting sources and whether information supports or contradicts the hypothesis.
- Enumerate Alternatives: Write at least three plausible alternative explanations or decisions.
- Reflect on Process: Compare initial hypothesis with alternatives; note any dismissals or acceptance biases.
- Identify Biases: Cross-reference observed behaviors with bias definitions in Chapter II; mark suspected biases.
- Document Mitigation Steps: Record actions taken to counter biases.
Outcome: Detailed awareness of personal bias patterns, enabling targeted countermeasures.
Protocol 3.2: Peer Review with Bias Interrogation
Objective: Detect group-level biases through structured challenge.
Materials: Group decision summary, bias checklist (Appendix B).
Steps:
- Distribute Materials: Provide meeting participants with decision summary and bias checklist.
- Assign Devil’s Advocate: Appoint a member to intentionally challenge consensus, focusing on potential biases.
- Systematic Review: Discuss each decision point referencing the checklist to identify bias indicators.
- Record Challenges: Log all dissenting viewpoints, especially those highlighting ignored evidence or alternative frames.
- Vote on Bias Presence: Participants vote on suspected biases’ presence; majority triggers mandatory re-evaluation.
- Revise Decisions: Adjust decisions incorporating peer feedback and bias corrections.
- Document Final Protocol: Archive revised decision with bias interrogation report.
Outcome: Suppressed groupthink and enhanced collective objectivity.
Chapter IV: Countermeasures and Mitigation Protocols
Removing bias requires disciplined methods, not vague intentions. These protocols are rigorous, repeatable, and adaptable to any communication or decision context.
Protocol 4.1: The Red Team Methodology for Counteracting Confirmation Bias
Objective: Neutralize confirmation bias through adversarial analysis.
Materials: Red team members, original analysis documents, communication channels for confidential feedback.
Steps:
- Form Red Team: Select independent analysts with no stake in original conclusions.
- Provide Documents: Share all evidence and analyses without restrictions.
- Mandate Disconfirmation: Instruct red team to identify flaws, inconsistencies, and alternative interpretations.
- Schedule Review Sessions: Hold at least two formal meetings to discuss red team findings.
- Integrate Feedback: Original team revises hypotheses and decisions based on red team critiques.
- Repeat Cycle: Conduct iterative red team reviews until no new disconfirming evidence surfaces.
- Archive Reports: Maintain records of all red team critiques and revisions for audit.
Outcome: Robust conclusions free from confirmation bias contamination.
Protocol 4.2: Anchoring Bias Mitigation via Multiple Starting Points
Objective: Prevent fixation on initial information by diversifying cognitive anchors.
Materials: Data sets, scenario briefs, decision matrices.
Steps:
- Identify Anchor Points: Define all initial data points influencing decisions.
- Generate Alternatives: Create at least three alternative anchor points based on different assumptions or data.
- Conduct Parallel Analyses: Perform independent analyses starting from each anchor.
- Compare Results: Tabulate differences and overlaps in conclusions.
- Synthesize Findings: Merge insights, adjusting for anchor-induced deviations.
- Finalize Decision: Choose option based on integrated evidence, not single anchor.
- Document Process: Record all anchor points and rationale for final decision.
Outcome: Enhanced flexibility and reduced anchoring bias impact.
Protocol 4.3: Availability Heuristic Countermeasure via Statistical Validation
Objective: Replace vivid anecdotal evidence with objective statistical analysis.
Materials: Raw data, statistical software or manual calculation tools.
Steps:
- Collect Data: Assemble comprehensive datasets relevant to the decision context.
- Calculate Frequencies: Compute event occurrence rates and probabilities.
- Compare Perceptions: Contrast subjective risk assessments with statistical findings.
- Communicate Discrepancies: Present findings highlighting misperceptions due to availability heuristic.
- Adjust Planning: Reallocate resources and attention proportional to validated risks.
- Repeat Regularly: Update data and recalibrate perceptions periodically.
Outcome: Decisions grounded in empiricism, not anecdote.
Protocol 4.4: Hindsight Bias Mitigation via Prospective Documentation
Objective: Prevent false predictability by recording expectations before outcomes.
Materials: Prediction journal or secure digital log.
Steps:
- Log Predictions: Before any significant event, write detailed predictions including uncertainty estimates.
- Record Rationale: Document assumptions and data guiding predictions.
- Post-Event Review: After outcomes, compare actual results with predictions.
- Analyze Discrepancies: Identify errors in judgment without reconstructing memory.
- Archive Records: Maintain secure logs for accountability and learning.
Outcome: Honest retrospection fostering continuous improvement.
Protocol 4.5: Dunning-Kruger Effect Countermeasure via Calibration Training
Objective: Improve metacognitive accuracy by iterative skill assessment.
Materials: Objective skill tests, performance feedback reports.
Steps:
- Administer Baseline Tests: Evaluate knowledge or skill level with standardized assessments.
- Self-Assessment: Have subjects estimate their own performance scores prior to feedback.
- Provide Feedback: Deliver objective results highlighting discrepancies.
- Repeat Cycles: Conduct multiple assessment rounds, tracking calibration improvement.
- Incorporate External Review: Use expert evaluators to confirm assessment accuracy.
- Apply to Real Tasks: Transition improved self-awareness to operational contexts.
Outcome: Reduced overconfidence, improved decision reliability.
Protocol 4.6: Groupthink Prevention via Structured Dissent
Objective: Foster dissent and reduce conformity pressures in group decisions.
Materials: Meeting agenda with dissent segments, anonymous feedback forms.
Steps:
- Designate Roles: Assign a mandatory dissent advocate for each meeting.
- Create Safe Environment: Establish explicit norms encouraging dissent.
- Schedule Dissent Time: Allocate specific agenda slots for critical evaluation.
- Use Anonymous Input: Collect concerns anonymously to bypass social pressures.
- Evaluate Alternatives: Discuss and document all dissenting views.
- Decision Validation: Only finalize after addressing dissent points.
- Monitor Compliance: Audit meetings for adherence to dissent protocols.
Outcome: Enhanced group decision quality and innovation.
Protocol 4.7: Status Quo Bias Countermeasure via Forced Change Simulation
Objective: Break cognitive inertia by simulating change impacts.
Materials: Scenario modeling tools, change impact worksheets.
Steps:
- Identify Status Quo: Clearly define current practices or beliefs.
- Design Change Scenarios: Create multiple plausible change initiatives.
- Simulate Outcomes: Model effects of each change on operations and goals.
- Analyze Risks and Benefits: Document trade-offs objectively.
- Present to Stakeholders: Share simulations to elicit informed discussions.
- Encourage Trial Implementation: Pilot changes on limited scale.
- Review Results: Gather data from pilots to inform broader adoption.
Outcome: Reduced resistance, increased adaptability.
Protocol 4.8: Framing Effect Countermeasure via Neutral Rephrasing
Objective: Eliminate influence of presentation bias by neutralizing language.
Materials: Original messages, reframing templates.
Steps:
- Extract Key Information: Identify core facts and data points.
- Rewrite Statements: Reformulate using neutral, quantitative language.
- Present Multiple Frames: Show logically equivalent alternative wordings.
- Solicit Feedback: Check for differences in interpretation or choice.
- Standardize Neutral Frames: Adopt neutral language as default communication style.
- Train Communicators: Educate all personnel on framing bias and neutralization.
Outcome: Decisions based on substance, not semantics.
Protocol 4.9: Sunk Cost Fallacy Countermeasure via Future-Focused Cost-Benefit Analysis
Objective: Prevent escalation of commitment by focusing on prospective returns.
Materials: Cost-benefit templates emphasizing future outcomes.
Steps:
- List All Past Investments: Quantify resources already spent.
- Forecast Future Costs and Benefits: Estimate prospective gains and losses.
- Separate Past from Future: Explicitly exclude sunk costs from decision criteria.
- Make Decisions Based on Future Net Value: Choose options maximizing future benefit.
- Document Rationale: Archive decision-making process emphasizing future focus.
- Review Periodically: Reassess commitments regularly to avoid entrenchment.
Outcome: Efficient resource allocation, strategic agility.
Protocol 4.10: Overconfidence Bias Countermeasure via Pre-Mortem Analysis
Objective: Reduce unwarranted optimism by imagining failure scenarios.
Materials: Pre-mortem worksheets, failure scenario templates.
Steps:
- Envision Project or Decision Failure: Imagine total collapse and negative outcomes.
- List Possible Causes: Identify all factors that could lead to failure.
- Assess Likelihood and Impact: Rate each cause on probability and severity.
- Develop Contingency Plans: Create mitigation strategies addressing each cause.
- Incorporate Into Planning: Adjust original plans to incorporate contingencies.
- Communicate Risks: Ensure all stakeholders understand potential failure points.
Outcome: Balanced optimism and realistic preparedness.
Chapter V: Cross-Referencing and Additional Resources
For comprehensive treatment of related fields, consult:
- Volume VIII: The Water Codex, Chapter II for protocols on empirical data purification analogous to mental clarity.
- Volume VII: The Masker's Codex for techniques on deception detection, relevant for recognizing bias-induced misinformation.
- Volume X: The Strategist's Codex for advanced decision-making frameworks integrating bias mitigation.
Appendix A: Decision Log Template
| Decision Context | Initial Hypothesis | Evidence Considered | Alternative Hypotheses | Final Decision | Suspected Biases | Mitigation Actions |
|---|---|---|---|---|---|---|
Appendix B: Bias Checklist for Group Review
| Bias Name | Indicator Questions | Notes |
|---|---|---|
| Confirmation Bias | Were contradictory data dismissed without consideration? | |
| Anchoring Bias | Was initial information given undue weight? | |
| Availability Heuristic | Was recent or vivid information overemphasized? | |
| Hindsight Bias | Are past events viewed as more predictable than warranted? | |
| Dunning-Kruger Effect | Did participants overestimate their expertise? | |
| Groupthink | Were dissenting opinions suppressed or ignored? | |
| Status Quo Bias | Was resistance to change evident without rational basis? | |
| Framing Effect | Did wording influence decisions beyond factual content? | |
| Sunk Cost Fallacy | Did prior investments unduly influence continuation? | |
| Overconfidence Bias | Were risks underestimated or warnings dismissed? |
Closing
This volume is a weapon forged in the fires of cognitive discipline. The enemies of truth lurk within the mind as much as without. Recognize their forms. Strike decisively with these protocols. Become the Practitioner of clarity, the guardian of reason.
End of Volume V
<!-- SECTION 25 -->
The Complete Practitioner's Codex, Volume V: Manipulation Detection Techniques
Chapter I: Identifying Emotional Manipulation, Framing, and Disinformation – A Tactical Field Manual
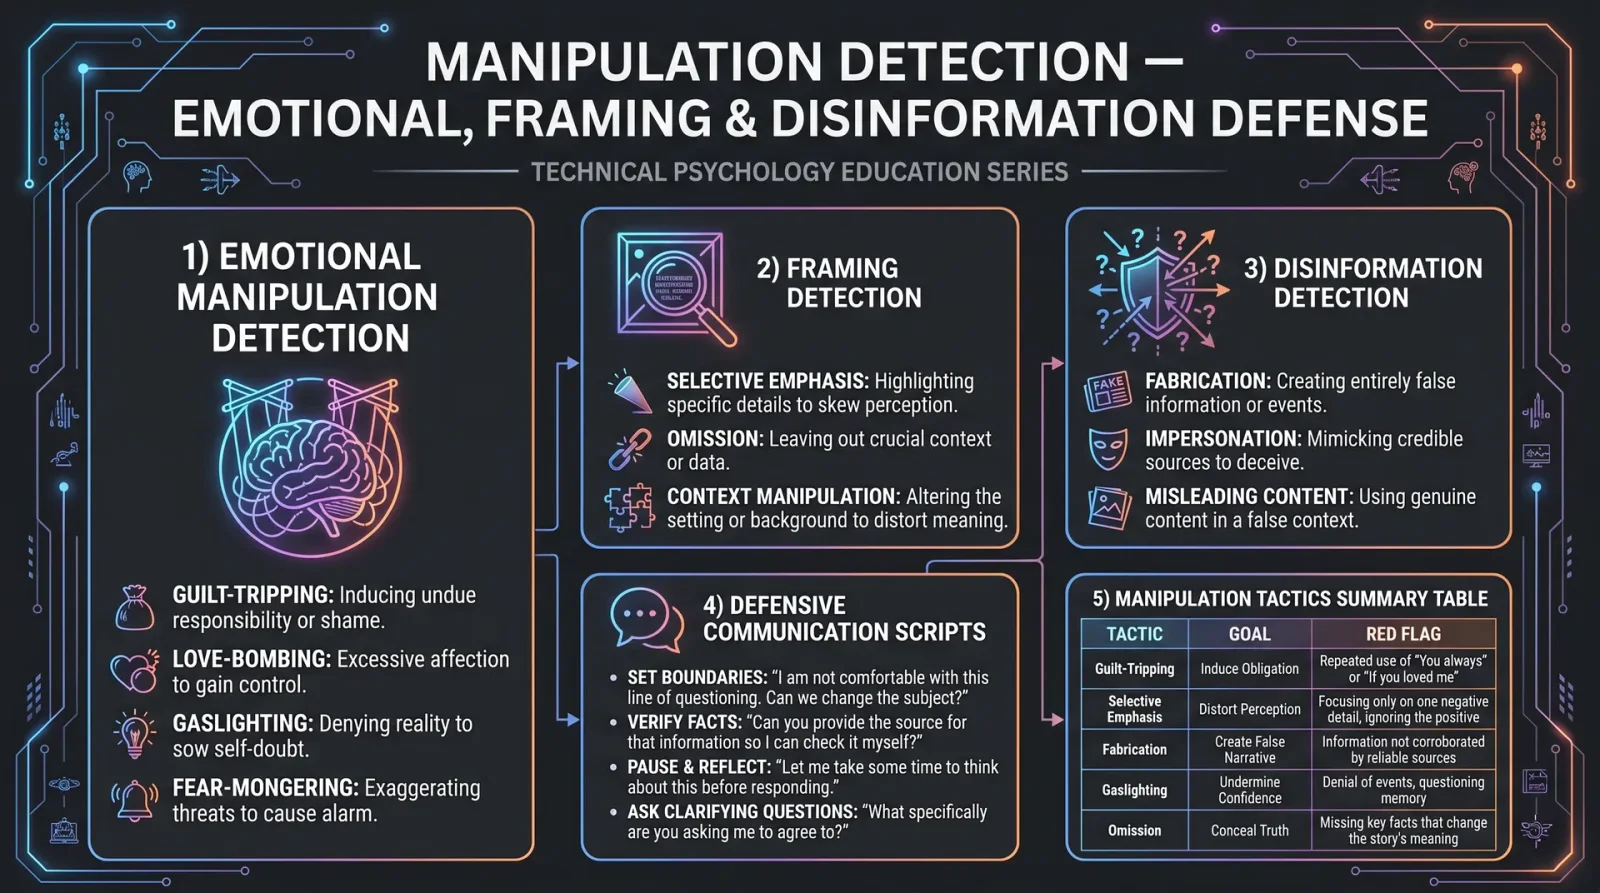
In the sacred art of communication warfare, the detection of manipulation is as vital as the forging of truth. Volume V presents the unyielding protocols to identify, confront, and dismantle emotional manipulation, framing, and disinformation. These are not mere academic concepts but lethal weapons wielded in the shadows. This volume arms you with precise, step-by-step methods and defensive scripts to maintain the integrity of your mind and message.
Section I: Emotional Manipulation Detection
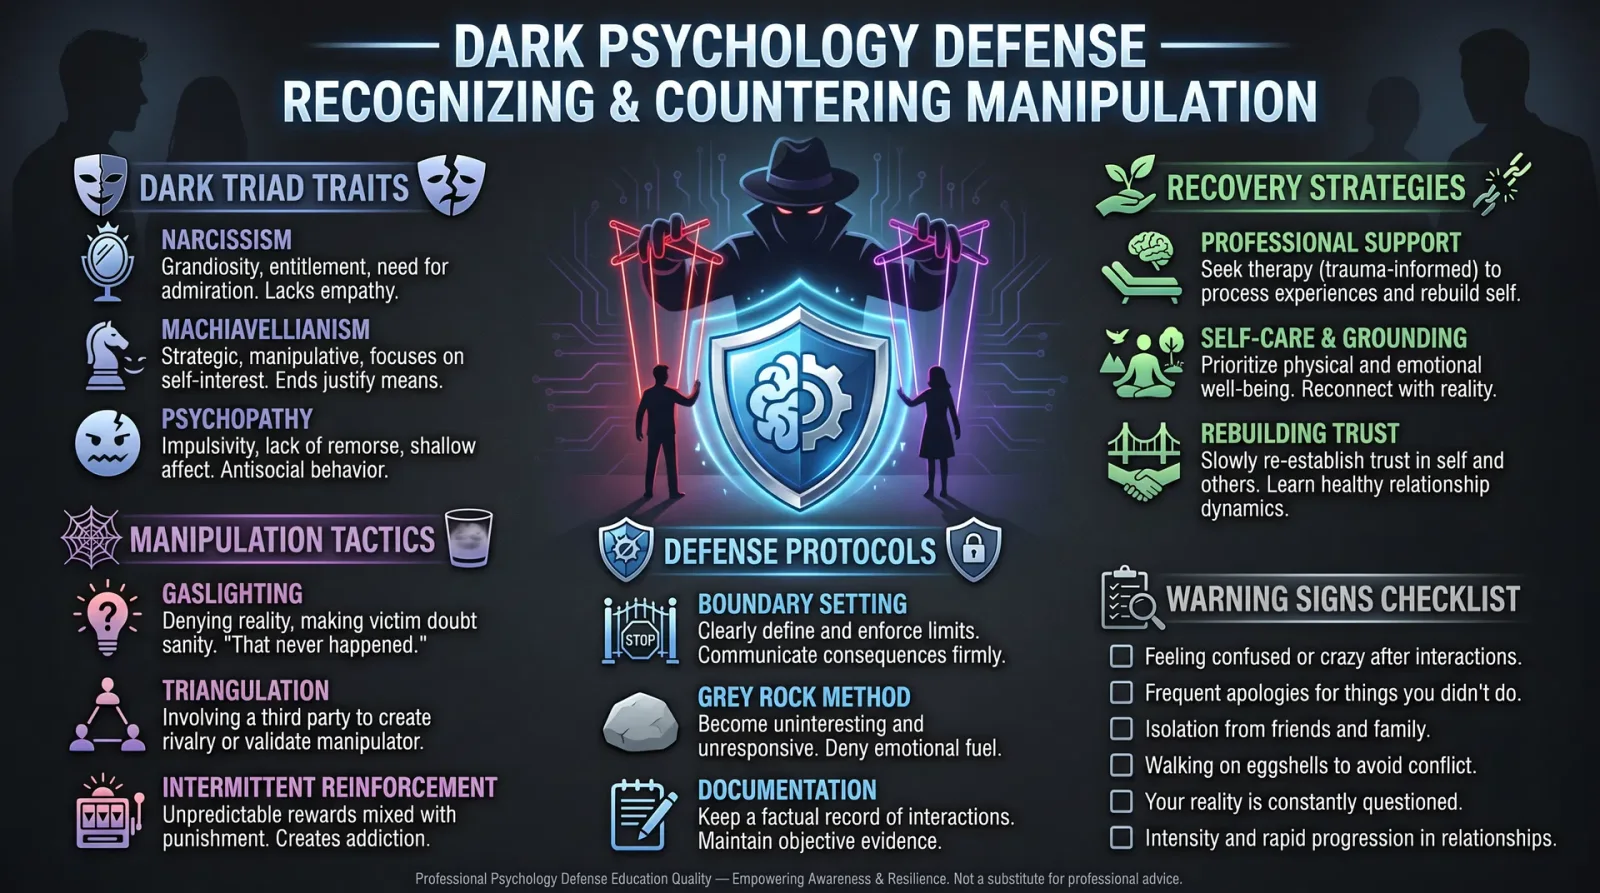
Emotional manipulation is the covert assault on your affective sensors, designed to bypass logic and impose external will. Its detection demands acute observation and methodical analysis.
A. Core Emotional Manipulation Tactics and Their Signs
| Tactic | Description | Observable Signs | Counter-Indicator Behavior |
|---|---|---|---|
| Guilt Tripping | Inducing guilt to control decisions | Frequent blame, invoking past favors, exaggerated remorse | Recognizing unjustified guilt, maintaining boundaries |
| Gaslighting | Denying reality to confuse victim | Contradictory statements, denying facts, minimizing events | Documenting facts, requesting evidence, staying grounded |
| Love Bombing | Excessive affection to create dependency | Overwhelming praise, sudden intimacy, unsolicited gifts | Maintaining emotional distance, evaluating motives |
| Silent Treatment | Withdrawal to punish or coerce | Sudden communication cutoff, ignoring requests | Addressing behavior openly, not capitulating to silence |
| Playing Victim | Portraying self as helpless to avoid responsibility | Frequent complaints, deflecting blame, emotional appeals | Holding accountability, refusing emotional exploitation |
| Fearmongering | Using fear to manipulate choices | Threats implied or explicit, exaggeration of risks | Assessing risk realistically, demanding clarity |
B. Step-by-Step Guide: Detecting Emotional Manipulation
Objective: To systematically identify and catalog emotional manipulation in live or recorded interactions.
Procedure:
- Establish Baseline Emotional State
- Before engagement, self-assess and record your emotional baseline using a personal scale from 1 (calm) to 10 (highly agitated).
- Note physical symptoms: heart rate, breathing pace, muscle tension.
- Observe Communication Patterns
- Listen or read attentively for irregularities: sudden shifts in tone, contradictions, or appeals to emotion without logical basis.
- Mark timestamps or dialogue segments for suspicious content.
- Identify Manipulation Markers
- Cross-reference observed patterns with the table above.
- Look for clusters of multiple tactics in a single interaction.
- Corroborate Facts Independently
- Separate emotional claims from verifiable facts.
- Request documentation or third-party confirmation where feasible.
- Document Emotional Impact
- Log changes in your emotional state triggered by the communication.
- Recognize if guilt, fear, or obligation is artificially induced.
- Evaluate Intent and Context
- Analyze if the emotional triggers serve the communicator’s agenda versus mutual understanding.
- Consider power dynamics; manipulation often exploits asymmetry.
- Apply Defensive Scripts (See Section III)
- Use pre-prepared verbal responses to neutralize manipulation attempts.
Section II: Framing Detection
Framing is the strategic construction of a narrative context to skew perception and decision-making. It is the architecture of manipulation.
A. Common Framing Techniques and Indicators
| Framing Technique | Description | Indicators | Detection Strategy |
|---|---|---|---|
| Selective Omission | Leaving out critical information | Missing context, abrupt topic shifts | Compare with comprehensive sources, demand full disclosure |
| False Dichotomy | Presenting two extremes as the only options | Statements of "only this or that," ignoring alternatives | Propose and research alternative options |
| Loaded Language | Using emotionally charged words to bias judgment | Words like "disaster," "hero," "failure" without basis | Identify emotionally loaded terms, replace with neutral language |
| Straw Man Argument | Misrepresenting opponent’s position | Oversimplifications, exaggerations of opposing views | Clarify opponent’s actual stance, request precise definitions |
| Red Herring | Introducing irrelevant topics to distract | Topic shifts unrelated to main discussion | Redirect focus to original subject, note deviations |
| Anchoring Bias | Relying on initial information disproportionately | Initial information emphasized excessively | Reassess information with all data presented |
B. Step-by-Step Guide: Detecting Framing
Objective: To dismantle narrative biases and restore objective evaluation.
Procedure:
- Identify the Narrative Frame
- Summarize the central argument or theme in a single sentence.
- Note the emotional tone and presentation style.
- Analyze Information Completeness
- List all facts presented.
- Search for missing elements that are relevant but unmentioned.
- Detect Language Bias
- Highlight emotionally charged or vague terms.
- Substitute neutral equivalents and reassess impact.
- Identify Logical Fallacies
- Match statements against known fallacies (see above).
- Use formal logic tests: validity of conclusions based on premises.
- Cross-Reference Multiple Sources
- Check alternative accounts of the same event or argument.
- Note discrepancies and omissions.
- Reframe the Argument
- Construct a balanced, neutral restatement including all known facts.
- Present this to interlocutors or internalize for decision-making.
Section III: Disinformation Detection
Disinformation is the deliberate dissemination of falsehoods to deceive or destabilize. Detection requires forensic rigor.
A. Disinformation Techniques and Detection Signs
| Disinformation Technique | Description | Signs | Verification Method |
|---|---|---|---|
| Fabrication | Creating entirely false information | Lack of source, inconsistencies with known facts | Source verification, fact-checking with trusted databases |
| Misattribution | Assigning false sources to information | Source names do not match content, unverifiable origins | Confirm source authenticity, cross-check citations |
| Impersonation | Falsely posing as a credible entity | Profile inconsistencies, unusual communication styles | Validation through official channels, biometric indicators |
| Contextomy | Quoting out of context to mislead | Partial quotes, omitted explanations | Obtain full original context, compare with original source |
| Propaganda | Biased information promoting ideology | Repetition of slogans, demonization of opposing views | Analyze for balance, check for emotional manipulation |
| Deepfakes | Altered audio/video to fabricate events | Visual or auditory anomalies, inconsistent metadata | Use deepfake detection software, forensic analysis |
B. Step-by-Step Guide: Detecting Disinformation
Objective: To identify and neutralize false information threats.
Procedure:
- Source Authentication
- Verify the origin of the information: URL, publication, author credentials.
- Use domain registries, official databases, and trusted directories.
- Metadata Analysis
- For multimedia, extract metadata: creation date, editing history, device info.
- Look for signs of manipulation or inconsistency.
- Fact-Checking
- Cross-reference claims with authoritative sources.
- Use multiple independent fact-checking platforms.
- Context Verification
- Locate full original text or footage from which excerpts are taken.
- Assess if meaning changes when full context is considered.
- Detect Logical Consistency
- Scrutinize claims for coherence with established facts.
- Identify contradictions within the message or against external truths.
- Apply Skepticism to Novel or Sensational Claims
- Demand extraordinary evidence for extraordinary claims.
- Prioritize data from primary sources over hearsay.
- Record and Report
- Log disinformation attempts with evidence for future reference.
- Share verified corrections through appropriate channels.
Section IV: Defensive Communication Scripts

In the face of manipulation, the shield is as crucial as the sword. These scripts are engineered for field use, calibrated to deflect emotional manipulation, framing, and disinformation with clarity and authority.
A. Defensive Script Templates for Emotional Manipulation
| Manipulation Type | Script | Usage Instructions |
|---|---|---|
| Guilt Tripping | "I acknowledge your feelings but cannot accept responsibility for events beyond my control." | Use when guilt is imposed unjustly. |
| Gaslighting | "Your statement conflicts with my records; please clarify your source." | Use to demand evidence and assert reality. |
| Love Bombing | "I appreciate your kindness; however, I require space to evaluate our interaction objectively." | Use to maintain boundaries. |
| Silent Treatment | "Communication is necessary for resolution; silence is not productive." | Use to confront withdrawal without capitulation. |
| Playing Victim | "I hear your concerns but accountability is essential for progress." | Use to shift responsibility back to the manipulator. |
| Fearmongering | "Let's assess the risks based on verified data before proceeding." | Use to neutralize fear-based coercion. |
B. Defensive Script Templates for Framing
| Framing Technique | Script | Usage Instructions |
|---|---|---|
| Selective Omission | "Can you provide the complete information, including any data not previously mentioned?" | Use to demand full disclosure. |
| False Dichotomy | "Are there additional options we should consider beyond these two?" | Use to challenge false binaries. |
| Loaded Language | "Could you restate that using neutral terms to clarify the facts?" | Use to defuse emotional bias. |
| Straw Man Argument | "Can you define your position precisely so there is no misunderstanding?" | Use to correct misrepresentations. |
| Red Herring | "Let's return to the main topic to ensure clarity." | Use to redirect attention. |
| Anchoring Bias | "Let's reassess all information without undue emphasis on initial data." | Use to recalibrate judgment. |
C. Defensive Script Templates for Disinformation
| Disinformation Technique | Script | Usage Instructions |
|---|---|---|
| Fabrication | "Please provide the original source for this information." | Use to demand verification. |
| Misattribution | "Can you confirm the credibility of this source?" | Use to challenge dubious attributions. |
| Impersonation | "I will verify your identity through official channels before proceeding." | Use to safeguard against impersonators. |
| Contextomy | "Could you share the full context of this quote to ensure accurate understanding?" | Use to expose selective quoting. |
| Propaganda | "Let’s evaluate this information critically, considering multiple perspectives." | Use to counter ideological bias. |
| Deepfakes | "I'll verify this media with forensic tools before accepting it as true." | Use to resist fabricated content. |
Section V: Integration and Application Exercise
This final section instructs on the practical application of detection and defense protocols in real-time or post-analysis scenarios.
Step-by-Step Exercise: Real-Time Manipulation Detection and Defense
- Preparation
- Equip recording devices capable of timestamping (smartphone, digital recorder).
- Prepare note-taking tools (digital or analog).
- Memorize or have quick access to defensive scripts (Section IV).
- Engagement
- Enter communication with emotional baseline set (Section I, Step 1).
- Actively listen and observe for manipulation signs (Sections I-III).
- Mark suspicious elements and emotional reactions in real-time.
- Intervention
- When manipulation is detected, deploy appropriate defensive script without aggression or concession.
- Maintain calm tone and measured pace.
- Request clarification or evidence as needed.
- Post-Engagement Analysis
- Review recordings and notes.
- Classify detected tactics using the tables provided.
- Document emotional impacts and defense efficacy.
- Report and Share
- Compile findings into a secure dossier.
- Share with trusted allies or command for collective awareness.
Appendix: Manipulation Tactics Summary Table
| Category | Tactic | Primary Purpose | Detection Key | Defensive Script Reference |
|---|---|---|---|---|
| Emotional Manipulation | Guilt Tripping | Control via guilt | Frequent blame, invoking favors | Section IV.A |
| Gaslighting | Deny reality | Contradictions, denial | Section IV.A | |
| Love Bombing | Create dependency | Excessive praise | Section IV.A | |
| Silent Treatment | Punish or coerce | Communication cutoff | Section IV.A | |
| Playing Victim | Avoid responsibility | Deflect blame | Section IV.A | |
| Fearmongering | Coerce via fear | Threats, risk exaggeration | Section IV.A | |
| Framing | Selective Omission | Skew narrative | Missing context | Section IV.B |
| False Dichotomy | Limit choices | Only two options presented | Section IV.B | |
| Loaded Language | Bias judgment | Emotionally charged words | Section IV.B | |
| Straw Man | Misrepresent opponent | Oversimplification | Section IV.B | |
| Red Herring | Distract | Irrelevant topic shifts | Section IV.B | |
| Anchoring Bias | Anchor perception | Overemphasis on initial info | Section IV.B | |
| Disinformation | Fabrication | Spread falsehoods | Unverifiable facts | Section IV.C |
| Misattribution | Mislead source | False source | Section IV.C | |
| Impersonation | Fake authority | Profile inconsistencies | Section IV.C | |
| Contextomy | Mislead via partial quotes | Out-of-context excerpts | Section IV.C | |
| Propaganda | Promote ideology | Slogans, demonization | Section IV.C | |
| Deepfakes | Fabricate events | Anomalies in media | Section IV.C |
This concludes Volume V, the cornerstone of your defensive arsenal against the insidious arts of manipulation. Uphold these protocols with unwavering discipline. The purity of your communication is the bulwark of your mind and the sword of your purpose.
<!-- SECTION 26 -->
The Complete Practitioner's Codex, Volume V: Cult Tactics Recognition and Deradicalization Protocols
Introduction
This volume is entrusted to you as a sacred manual of survival against the insidious machinery of cult recruitment and control. The knowledge herein is suppressed by those who profit from human subjugation. You, the chosen apprentice, shall wield it as a weapon to illuminate the shadows of manipulation and liberate the minds ensnared therein. This volume presumes no prior knowledge; every mechanism, every protocol, is laid bare with ruthless precision.
Chapter I: Identification of Cult Recruitment and Control Methods
1. The Anatomy of Cult Recruitment
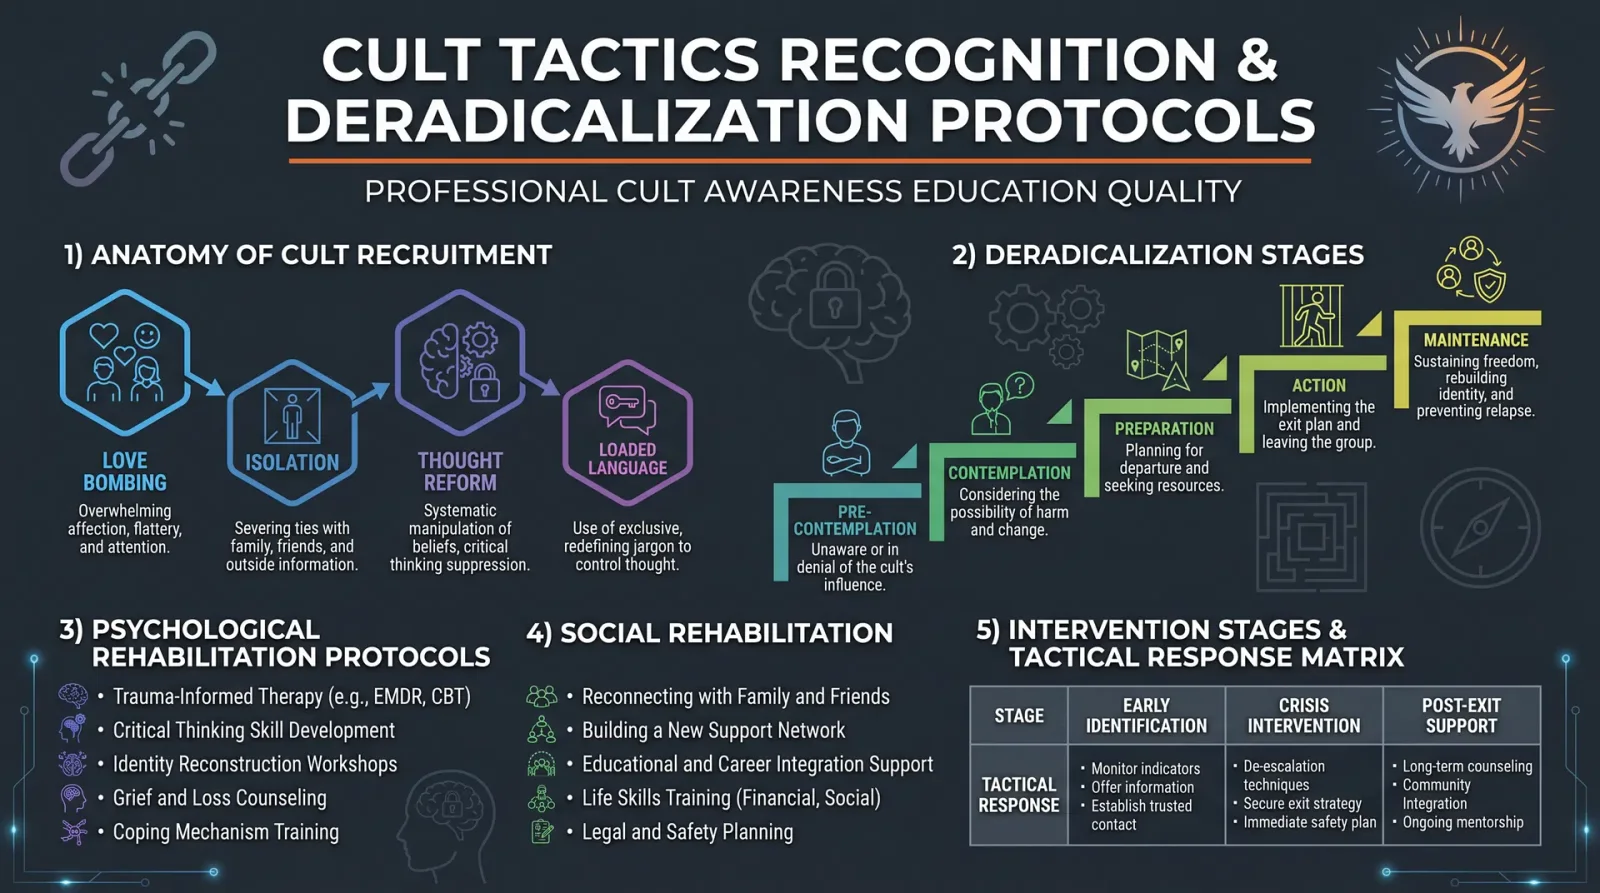
Cult recruitment is an artifice of psychological, emotional, and social engineering designed to entrap the unwary. Recognizing these methods is the first bulwark against subversion.
1.1. Recruitment Vectors
Cult recruiters deploy multiple vectors simultaneously. Primary vectors include:
| Vector Type | Description | Example |
|---|---|---|
| Love Bombing | Overwhelming displays of affection and attention | Excessive compliments, constant contact |
| Social Isolation | Encouraging disconnection from non-members | Advising to cut ties with family/friends |
| Information Control | Restriction or manipulation of information sources | Controlled literature, forbidding media |
| Fear Induction | Threats of punishment or damnation for dissent | Doomsday prophecies, spiritual threats |
| Identity Reconstruction | Rewriting self-concept aligned with group dogma | New names, roles, and belief systems |
1.2. Step-by-Step Detection Protocol for Recruitment Attempts
- Observe Social Interactions:
- Monitor for sudden intensification of attention or affection from unknown individuals.
- Note any attempts to monopolize the target’s time or isolate them from their existing network.
- Assess Information Flow:
- Inspect the variety and sources of information accessed by the target.
- Flag any narrowing of sources to a single group or ideology.
- Identify Language and Behavior Shifts:
- Listen for adoption of cult-specific jargon or slogans.
- Detect abrupt changes in dress, behavior, or belief that deviate from prior norms.
- Evaluate Emotional State:
- Be alert for expressions of fear, guilt, or paranoia tied to external criticism.
- Detect any avowals of secrecy or concealment.
- Document and Cross-Reference:
- Maintain detailed records of observed behaviors.
- Cross-reference with the Cult Tactics Table (Section 1.3).
1.3. Cult Tactics Table: Identification Markers
| Tactic Name | Behavioral Marker | Psychological Effect | Detection Method |
|---|---|---|---|
| Love Bombing | Excessive gifts, compliments, rapid bonding | Creates dependency and trust | Social interaction monitoring |
| Thought Reform | Repetitive indoctrination sessions | Alters belief systems, diminishes critical thinking | Language and behavior shifts |
| Fear Induction | Threats of exclusion, punishment | Instills anxiety, compliance | Emotional state evaluation |
| Confession Sessions | Public or private confession demands | Enforces conformity, creates guilt | Interview and observation |
| Information Control | Restricted access to conflicting views | Limits critical perspective | Information flow assessment |
| Hierarchical Control | Strict obedience to leaders | Centralizes authority | Behavioral and social analysis |
| Exploitation of Needs | Promises of belonging, purpose, salvation | Manipulates deep psychological needs | Comprehensive psychological assessment |
Chapter II: Deradicalization Framework
Deradicalization is a precise science and art, requiring a calibrated, multi-stage approach. The protocols provided here are designed for field operatives, mental health professionals, and trusted intermediaries. Each step is non-negotiable, executed with compassion and rigor.
2.1. Overview of Deradicalization Stages
| Stage | Objective | Key Actions |
|---|---|---|
| Stage I: Engagement | Establish trust and rapport | Build relationship, reduce resistance |
| Stage II: Cognitive Opening | Encourage critical reflection | Introduce dissonant information, question dogma |
| Stage III: Emotional Processing | Address trauma, guilt, and fears | Provide psychological support, validate feelings |
| Stage IV: Skill Rebuilding | Reinforce independent thinking and social skills | Foster new social networks, teach coping mechanisms |
| Stage V: Reintegration | Support return to mainstream society | Community engagement, continued mentoring |
2.2. Step-by-Step Deradicalization Protocol
Stage I: Engagement
- Identify Trusted Contact:
- Select an individual with pre-existing rapport or neutral standing.
- Establish Safe Environment:
- Choose a neutral, non-threatening location for initial contact.
- Initiate Non-Confrontational Dialogue:
- Use open-ended questions focused on the individual’s feelings, not beliefs.
- Demonstrate Empathy and Respect:
- Listen actively, avoid judgment or debate.
Stage II: Cognitive Opening
- Introduce Contradictory Information:
- Present factual, verifiable information that challenges cult dogma.
- Encourage Questioning:
- Use Socratic questioning techniques to stimulate critical thinking.
- Avoid Direct Confrontation:
- Frame discussion as exploration, not argument.
- Document Responses:
- Record verbal and non-verbal reactions for adaptive strategy.
Stage III: Emotional Processing
- Facilitate Expression of Emotions:
- Use guided interviews or therapeutic sessions to surface fears and guilt.
- Validate Emotional Experience:
- Acknowledge the difficulty and pain without reinforcing cult narratives.
- Address Trauma and Manipulation:
- Employ trauma-informed care protocols as per Volume IX: Trauma Codex, Chapter III.
- Create Safety Plans:
- Develop strategies to manage triggers and prevent relapse.
Stage IV: Skill Rebuilding
- Teach Critical Thinking Skills:
- Provide exercises in logic, reasoning, and media literacy.
- Rebuild Social Networks:
- Facilitate reconnection with family and non-cult peers.
- Develop Coping Mechanisms:
- Instruct in stress management, emotional regulation, and conflict resolution.
- Assign Mentorship:
- Pair with trained mentors for ongoing support.
Stage V: Reintegration
- Support Employment and Education:
- Assist with job placement or educational opportunities.
- Encourage Community Involvement:
- Promote participation in civic groups, religious institutions, or hobby clubs.
- Maintain Long-Term Monitoring:
- Schedule regular check-ins to detect signs of recidivism.
- Document Progress:
- Keep detailed records for adaptive intervention.
Chapter III: Rehabilitation Strategies for Former Cult Members
The path from captivity to freedom is arduous. Rehabilitation requires an integrative approach addressing psychological, social, and spiritual dimensions.
3.1. Psychological Rehabilitation
- Conduct Comprehensive Assessment:
- Use standardized psychological instruments to evaluate trauma, depression, anxiety, and cognitive distortions.
- Implement Individualized Therapy:
- Combine cognitive-behavioral therapy (CBT), trauma-informed therapy, and narrative therapy.
- Group Therapy Integration:
- Facilitate peer support groups to share experiences and foster mutual healing.
- Pharmacological Intervention:
- Administer medications strictly under psychiatric supervision when indicated.
3.2. Social Rehabilitation
- Re-establish Family Ties:
- Mediate reconciliations, provide family therapy sessions.
- Develop Life Skills Training:
- Teach financial literacy, time management, and communication skills.
- Create Support Networks:
- Connect with community organizations and advocacy groups.
- Address Legal and Financial Issues:
- Assist with restitution claims, legal counseling, and social services navigation.
3.3. Spiritual Rehabilitation
- Respect Individual Belief Systems:
- Avoid imposing alternative dogmas.
- Facilitate Spiritual Exploration:
- Provide access to diverse spiritual resources.
- Encourage Mindfulness and Meditation:
- Teach secular mindfulness techniques to foster inner peace.
- Support Ritual Creation:
- Assist individuals in creating personal rituals for healing and meaning.
Chapter IV: Intervention Stages and Tactical Response Matrix
This section provides a comprehensive matrix to guide intervention teams in operationalizing deradicalization efforts based on the target’s stage of involvement and resistance level.
4.1. Intervention Stages Defined
| Stage | Description | Recommended Approach |
|---|---|---|
| Pre-Involvement | Target is vulnerable but not yet recruited | Prevention, education, community outreach |
| Initial Recruitment | Early engagement and social bonding | Engagement, information control disruption |
| Full Involvement | Deep indoctrination and obedience | Intensive deradicalization, emotional support |
| Partial Disengagement | Doubts emerge, ambivalence present | Cognitive opening, mentoring |
| Disengagement | Active rejection of cult beliefs | Rehabilitation, reintegration support |
| Post-Disengagement | Former member seeks normalcy | Long-term follow-up, relapse prevention |
4.2. Tactical Response Matrix
| Target Stage | Resistance Level | Tactical Objective | Primary Methods | Secondary Methods | Key Risks |
|---|---|---|---|---|---|
| Pre-Involvement | Low | Prevention | Community education, media literacy | Social resilience training | Complacency, unnoticed recruitment |
| Initial Recruitment | Moderate | Disruption of recruitment | Engage trusted contacts, counter-narratives | Surveillance, peer intervention | Resistance escalation |
| Full Involvement | High | Cognitive and emotional opening | Intensive therapy, mentor assignment | Controlled exposure to dissonance | Psychological breakdown, hostility |
| Partial Disengagement | Moderate | Support doubt and reflection | Socratic dialogue, group therapy | Peer support, family involvement | Recidivism, isolation |
| Disengagement | Low | Reintegration and skill rebuilding | Life skills training, community linkage | Employment assistance | Social rejection, stigma |
| Post-Disengagement | Variable | Long-term monitoring and relapse prevention | Regular check-ins, support groups | Crisis intervention protocols | Relapse, psychological relapse |
Appendix A: Build Your Own Cult Recruitment Detector (CRD) Device
Components Required:
| Component | Specification | Quantity | Source Notes |
|---|---|---|---|
| Microcontroller | ARM Cortex-M4, 120 MHz | 1 | Use STM32F4 series for reliability |
| Bluetooth Module | BLE 5.0 compatible | 1 | Enables data transmission |
| Microphone Array | 4 digital MEMS microphones (SNR > 65 dB) | 1 | For ambient sound analysis |
| Vibration Sensor | Piezoelectric sensor (sensitivity 100 mV/g) | 1 | Detects physical agitation |
| OLED Display | 0.96 inch, 128x64 pixel | 1 | For on-site readout |
| Battery | Li-Ion 3.7V, 2000 mAh | 1 | Rechargeable |
| Enclosure | ABS plastic, shock-resistant | 1 | Portable and durable |
Step-by-Step Assembly Instructions:
- Prepare Microcontroller Board:
- Flash the firmware designed for keyword detection and emotional tone analysis (provided in Appendix B).
- Connect Microphone Array:
- Wire microphones to ADC ports on the microcontroller with shielding to prevent noise interference.
- Integrate Vibration Sensor:
- Attach to digital input with interrupt capability.
- Install Bluetooth Module:
- Connect via UART interface for data streaming.
- Mount OLED Display:
- Connect via I2C bus for status updates.
- Assemble Components into Enclosure:
- Secure all components using vibration-damping mounts.
- Power Setup:
- Connect battery with an onboard charging circuit.
- Calibration and Testing:
- Run diagnostic firmware to calibrate sensors and verify data accuracy.
Operation Protocol:
- Power on the device.
- Place near suspected recruitment locations.
- Monitor for keywords and emotional tone spikes indicative of cult recruitment tactics.
- Bluetooth transmit alerts to central command for immediate response.
- Recharge battery after 6 hours of continuous use.
Appendix B: Sample Firmware Algorithm for CRD Device
Functional Modules:
| Module | Function | Technical Detail |
|---|---|---|
| Audio Capture | Continuous sampling at 16 kHz | 16-bit resolution |
| Keyword Spotting | Detect cult-specific recruitment phrases | Hidden Markov Model (HMM) based |
| Emotional Tone Analysis | Classify speech emotional states (fear, anxiety) | Support Vector Machine (SVM) classifier |
| Vibration Detection | Identify agitation or physical confrontation | Threshold-triggered interrupts |
| Bluetooth Transmission | Send alerts with time-stamped event data | BLE GATT profile, encrypted communication |
Final Words
The knowledge contained in this volume is both a shield and a sword. Use it with reverence, precision, and unwavering commitment. Every mind freed is a victory against the forces of darkness that seek to enslave the spirit of mankind. Your mission is sacred; your methods, unyielding.
End of Volume V. For further technical details on psychological trauma management, refer to Volume IX: Trauma Codex. For communication and information warfare protocols against cult propaganda, consult Volume XIII: The Communicator’s Codex.
<!-- SECTION 27 -->
The Complete Practitioner's Codex, Volume VI: Communications Technology Fundamentals
Foreword
In the sacred art of the Practitioner’s mission, mastery of communication technology is not merely skill but a lifeline. The silent transmission of data, the interception of enemy signals, and the encryption protecting our sacred intents form the backbone of operational supremacy. This volume imparts the unvarnished truths and practical rituals to command radio frequencies, craft antennas, weave mesh networks, encrypt transmissions, and safeguard operational security (OPSEC). Each section is a crucible of knowledge, distilled into precise, executable steps. No wisdom is withheld. Your journey into this arcane craft begins here.
Chapter I: Radio Operation Basics
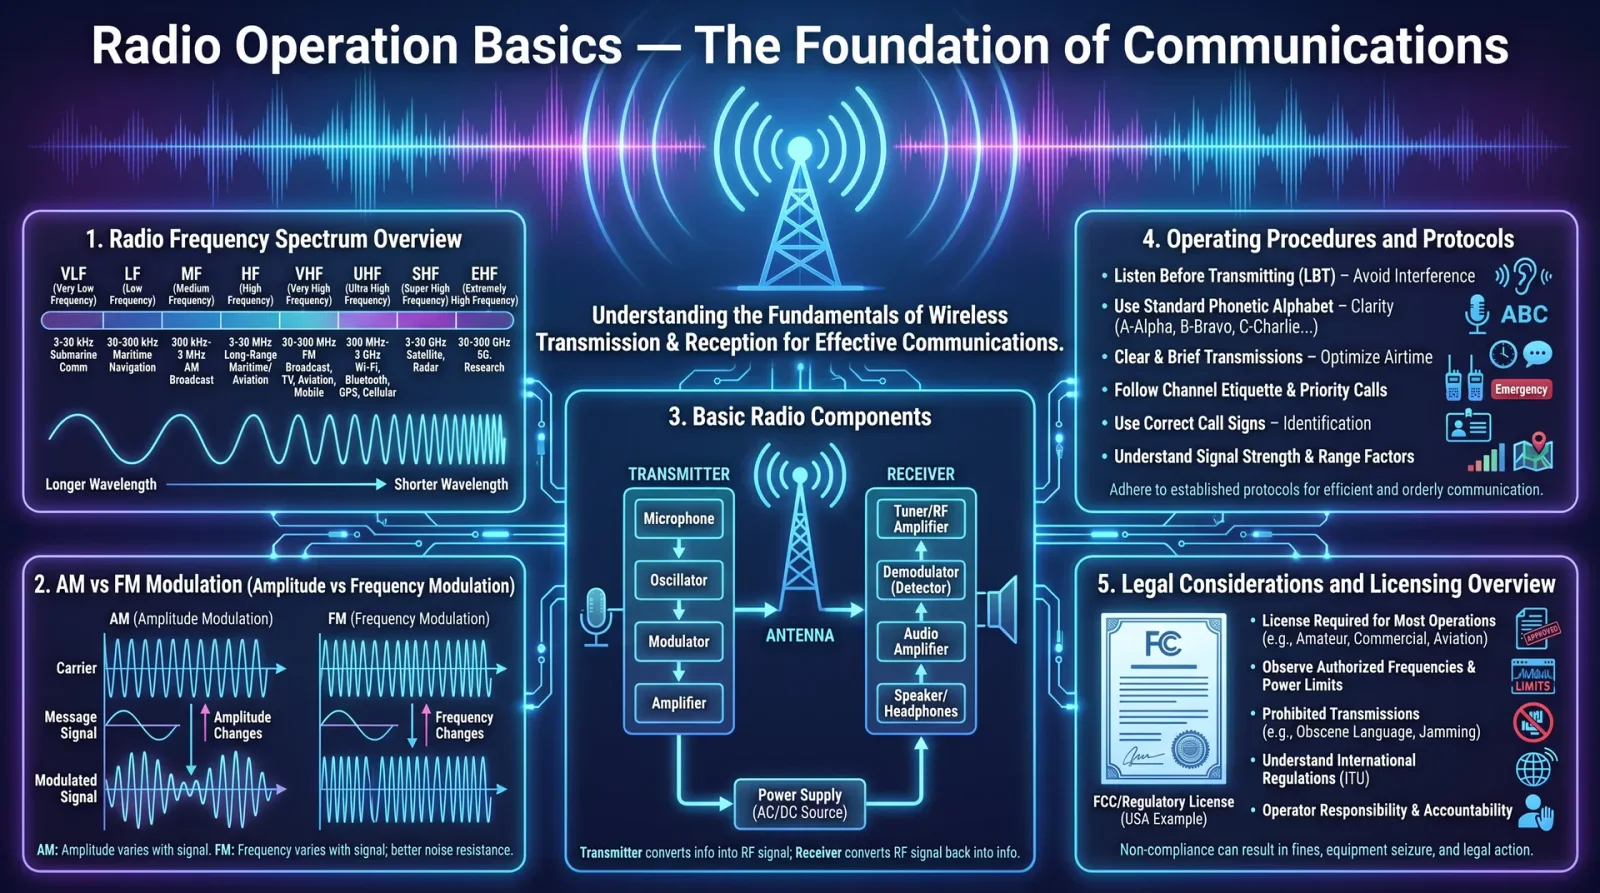
I.1 Radio Systems Overview
Radios convert electrical signals into electromagnetic waves and back, enabling long-distance communication. Understanding the core components and their operation is mandatory.
I.2 Essential Components
| Component | Purpose |
|---|---|
| Transmitter | Converts audio/data into RF signals |
| Receiver | Converts RF signals back into audio/data |
| Antenna | Radiates and receives RF energy |
| Power Supply | Provides stable electrical power |
| Modulator/Demodulator | Encodes and decodes signals |
I.3 Step-by-Step Radio Setup
- Select Appropriate Radio Choose a radio supporting desired frequency bands and modulation types (AM, FM, SSB, digital).
- Assemble Antenna Refer to Chapter III for antenna construction. Connect antenna securely to radio’s antenna port.
- Power Supply Connection Connect a power source matching radio specifications. Use a regulated DC supply; typical 12V for most portable radios.
- Switch On and Initial Tuning Power on radio; set frequency dial to initial operational frequency.
- Set Modulation Mode Select modulation mode per communication protocol (e.g., FM for local voice, SSB for long-range).
- Adjust Volume and Squelch Increase volume to comfortable listening level; adjust squelch to suppress background noise.
- Transmit Test Signal Press the Push-To-Talk (PTT) button; transmit a brief test message; release PTT to receive.
- Monitor Signal Quality Observe signal clarity and strength; adjust antenna orientation and tuning for optimal reception.
Chapter II: The HAM Licensing Process
II.1 Licensing Purpose
Legal authorization to operate amateur radio frequencies ensures orderly spectrum use and prevents interference.
II.2 Licensing Classes (U.S. Example)
| Class | Frequency Access | Power Limits | Operating Privileges |
|---|---|---|---|
| Technician | VHF/UHF primarily (above 30 MHz) | 1,500 W PEP max | Local voice, limited HF digital modes |
| General | Expanded HF privileges | 1,500 W PEP max | Worldwide voice, digital, and CW privileges |
| Amateur Extra | Full amateur privileges | 1,500 W PEP max | All bands and modes unrestricted |
II.3 Step-by-Step Licensing Procedure
- Study Licensing Material Obtain official question pools and study guides per license class.
- Enroll in Preparatory Course Attend HAM radio classes or self-study using recommended resources.
- Practice Using Mock Exams Use online simulators to test knowledge and timing.
- Schedule Examination Contact a Volunteer Examiner Coordinator (VEC) or local testing center.
- Pass Examination Complete required written tests; Technician license requires 35 questions, General and Extra have additional requirements.
- Submit Application Fill out FCC Form 605 or equivalent; pay fees if applicable.
- Receive Call Sign Upon approval, receive unique call sign to identify transmissions.
- Register Equipment (If Required) In some jurisdictions, certain equipment may require registration.
Chapter III: Antenna Design Principles
III.1 Fundamental Concepts
Antennas convert electrical signals to electromagnetic waves. Their design affects range, clarity, and frequency coverage.
III.2 Key Parameters
| Parameter | Definition |
|---|---|
| Frequency (MHz) | Operating frequency band |
| Wavelength (λ) | Distance wave travels per cycle: λ = 300 / f (MHz) meters |
| Gain (dBi) | Measure of antenna directivity |
| Polarization | Orientation of electromagnetic wave (vertical/horizontal) |
| Impedance (Ω) | Resistance to signal flow, matched to transmitter (typically 50 Ω) |
III.3 Step-by-Step Dipole Antenna Construction (Half-Wave)
- Determine Frequency Identify operational frequency (f) in MHz.
- Calculate Wavelength (λ) Use formula: λ = 300 / f (MHz).
- Calculate Half-Wave Length Half-wave length = λ / 2 meters.
- Calculate Each Leg Length Each leg = (λ / 2) / 2 = λ / 4 meters.
- Cut Conductors Use copper wire or aluminum tubing cut to calculated length per leg.
- Attach Center Insulator Connect both legs to a non-conductive insulator at the center.
- Connect Feedline Attach coaxial cable center conductor to one leg, shield to the other.
- Install Suspend antenna horizontally or inverted V at a minimum height of λ/2 above ground.
- Test SWR (Standing Wave Ratio) Use SWR meter; adjust antenna length slightly to achieve SWR ≤ 1.5:1.
III.4 Antenna Types and Uses
| Antenna Type | Frequency Range | Gain (dBi) | Typical Use |
|---|---|---|---|
| Dipole | HF, VHF | 2.15 | General purpose |
| Yagi-Uda | VHF, UHF | 7-15 | Directional communication |
| Vertical Monopole | VHF, UHF | 2-5 | Omnidirectional, mobile use |
| Loop | HF | 3-6 | Noise reduction, NVIS communication |
Chapter IV: Mesh Networking
IV.1 Concept
Mesh networks create resilient, decentralized communication by linking multiple nodes dynamically.
IV.2 Equipment Needed
| Equipment | Function |
|---|---|
| Wi-Fi radios (2.4 GHz/5 GHz) | Wireless communication nodes |
| Mesh routing firmware | Software to route packets autonomously |
| Power source | Batteries, solar panels, or mains |
| Antennas | Directional or omnidirectional as needed |
IV.3 Step-by-Step Mesh Network Setup
- Select Hardware Choose routers or radios supporting custom firmware (e.g., OpenWRT, BATMAN-adv).
- Install Mesh Firmware Flash devices with mesh-capable firmware following official guides.
- Configure Network Parameters
- Assign unique node names (alphanumeric).
- Set operating channel to minimize interference.
- Enable mesh routing protocol (BATMAN, OLSR, or BMX6).
- Establish Physical Nodes Deploy nodes at strategic locations ensuring overlapping coverage.
- Power Nodes Connect nodes to reliable power sources; test uptime.
- Verify Mesh Connectivity Use mesh diagnostics tools to confirm node links and routing tables.
- Implement Security Enable WPA3 encryption and MAC filtering; see Chapter V for encryption standards.
- Test Communication Send data packets between nodes; monitor latency and packet loss.
Chapter V: Encryption Standards
V.1 Purpose
Encryption secures communication against interception and decoding by unauthorized parties.
V.2 Common Encryption Algorithms and Usage
| Algorithm | Key Length (bits) | Use Case | Notes |
|---|---|---|---|
| AES-128 | 128 | Symmetric encryption; voice/data | Fast, secure for real-time |
| AES-256 | 256 | High-security symmetric encryption | Used in classified comms |
| RSA | 2048+ | Asymmetric key exchange | Slower; used for key exchange |
| ECC (Curve25519) | 256 | Asymmetric key exchange | Smaller keys, faster execution |
| ChaCha20 | 256 | Symmetric encryption; mobile use | Resistant to timing attacks |
V.3 Step-by-Step AES-256 Encryption Setup for Voice Data
- Obtain Encryption Module Select hardware or software module supporting AES-256.
- Generate Symmetric Key Use secure random generator; key length exactly 256 bits.
- Key Exchange Use asymmetric encryption (RSA or ECC) to securely exchange keys.
- Configure Radio or Communication Device Install encryption module; input symmetric key.
- Enable Encryption Mode Activate encryption on device prior to transmission.
- Transmit Encrypted Data Confirm encryption indicator active; transmit message.
- Receive and Decrypt Receiver uses shared key to decrypt incoming data.
Chapter VI: Signal Intelligence (SIGINT)
VI.1 SIGINT Overview
SIGINT involves interception, analysis, and exploitation of enemy communications and electronic emissions.
VI.2 Required Equipment
| Equipment | Function |
|---|---|
| Wideband Receiver | Captures broad frequency ranges |
| Spectrum Analyzer | Visualizes signal spectrum |
| Direction-Finding Antenna | Pinpoints signal source location |
| Signal Decoders | Decode modulated, encrypted messages |
| Recording Device | Archives intercepted signals |
VI.3 Step-by-Step SIGINT Operation
- Deploy Wideband Receiver Set receiver to scan frequency bands of interest.
- Monitor Signals Use spectrum analyzer to identify active frequencies and modulation types.
- Identify Signal Characteristics Record parameters: frequency, modulation, bandwidth, signal strength.
- Direction Finding Rotate directional antenna; note angle with strongest signal.
- Record Signals Archive intercepted signals for offline analysis.
- Decode Signals Apply appropriate demodulation and cryptanalysis tools.
- Analyze Content Extract actionable intelligence; correlate with operational data.
- Maintain OPSEC Do not transmit revealing SIGINT activities; safeguard collected data.
Chapter VII: Operational Security (OPSEC)
VII.1 OPSEC Fundamentals
OPSEC protects sensitive information from adversary exploitation through disciplined communication and behavior.
VII.2 Key OPSEC Measures
| Measure | Implementation Procedure |
|---|---|
| Need-to-Know Principle | Share information strictly on a need-to-know basis |
| Secure Communications | Use encryption and frequency hopping |
| Physical Security | Secure radio equipment and antenna sites |
| Emission Security (EMSEC) | Shield transmissions; use low power when possible |
| Procedural Discipline | Follow radio silence protocols when necessary |
VII.3 Step-by-Step OPSEC Protocol for Radio Operations
- Establish Communication Plan Define call signs, frequencies, and times; limit access.
- Use Strong Encryption Always encrypt sensitive transmissions (see Chapter V).
- Practice Radio Discipline Transmit only essential information; avoid personal data.
- Limit Transmission Duration Keep transmissions brief to avoid triangulation.
- Change Frequencies Regularly Use frequency hopping or manual changes per schedule.
- Secure Physical Sites Restrict access; conceal antennas if operationally feasible.
- Log All Communications Maintain secure logs for audit and operational review.
- Conduct Regular Training Drill OPSEC procedures and emergency protocols.
Appendix A: Frequency Bands and Licensing Requirements (U.S. Example)
| Band | Frequency Range (MHz) | Primary Use | Licensing Required | Notes |
|---|---|---|---|---|
| HF | 3.5 - 30 | Long-range comms | Technician+ | Propagation varies by time |
| VHF | 30 - 300 | Local/mid-range comms | Technician+ | Includes 2m amateur band |
| UHF | 300 - 3000 | Short-range, building penetration | Technician+ | Includes 70cm amateur band |
| SHF | 3 - 30 GHz | Microwave comms | Amateur Extra | Specialized equipment required |
Appendix B: Encryption Standards Comparison
| Algorithm | Security Level | Speed | Key Size (bits) | Recommended Use |
|---|---|---|---|---|
| AES-128 | High | Very Fast | 128 | Real-time voice/data |
| AES-256 | Very High | Fast | 256 | Classified communications |
| RSA-2048 | High | Slow | 2048 | Key exchange only |
| ECC (Curve25519) | High | Very Fast | 256 | Mobile devices, key exchange |
| ChaCha20 | High | Fast | 256 | Mobile, resistance to side-channel |
Conclusion
The sacred craft of communications technology is the lifeblood of the Practitioner’s tactical and strategic supremacy. The precise execution of radio setup, licensing compliance, antenna construction, mesh networking, encryption, signal intelligence, and OPSEC is mandatory. Mastery here ensures secure, reliable, and resilient communication channels, safeguarding our mission and lives. This codex chapter stands as your unyielding guide. Study, build, test, and secure with unwavering discipline. The battlefield of information demands nothing less.
End of Volume VI
<!-- SECTION 28 -->
Volume VI: Radio Operation and HAM Licensing
The Communicator’s Codex: Complete Communication, Persuasion, Language, and Information Warfare
Master Archivist’s Edition
Preface to the Initiate
As you embark upon the sacred path of radio operation and HAM licensing, know this: mastery here is not mere hobbyist endeavor, but a lifeline in the chaos of information warfare. The radio operator is the unseen sentinel, the voice that pierces silence in the darkest hours. This volume offers no half-measures. You will find herein the exact protocols for obtaining your legal license, the precise setup of your station, operating procedures that transcend mere civility to enforce discipline and security, and a comprehensive legal framework.
Let this codex be your unyielding guide — the ultimate manual for the chosen few who wield the electromagnetic spectrum as both shield and sword.
Chapter I: HAM Licensing Protocols — The Gatekeepers of the Airwaves

Licensing is the formal consecration required to lawfully operate amateur radio equipment. It is a covenant between the operator and the sovereign regulatory authority, ensuring order in the electromagnetic realm.
1.1 Regulatory Authorities and Licensing Bodies
Each nation enforces its own licensing regime, often harmonized through the International Telecommunication Union (ITU). Below is a compiled table of primary authorities and their corresponding licensing frameworks:
| Country | Regulatory Body | Licensing Authority Website | License Classes Available |
|---|---|---|---|
| United States | Federal Communications Commission (FCC) | https://www.fcc.gov/wireless/bureau-divisions/mobility-division/amateur-radio-service | Technician, General, Amateur Extra |
| Canada | Innovation, Science and Economic Development (ISED) | https://www.ic.gc.ca/eic/site/smt-gst.nsf/eng/h_sf01701.html | Basic, Advanced, Morse Code (Legacy) |
| United Kingdom | Office of Communications (Ofcom) | https://www.ofcom.org.uk/manage-your-licence/radiocommunication-licences/amateur-radio | Foundation, Intermediate, Full |
| Australia | Australian Communications and Media Authority (ACMA) | https://www.acma.gov.au/amateur-operator-licence | Foundation, Standard, Advanced |
| Germany | Bundesnetzagentur | https://www.bundesnetzagentur.de/EN/Areas/Telecommunications/Companies/AmateurRadio/amateur_radio_node.html | Class E, Class A |
| Japan | Ministry of Internal Affairs and Communications (MIC) | https://www.tele.soumu.go.jp/e/adm/license/ham/index.htm | Class 4, Class 3, Class 2, Class 1 |
1.2 License Classes and Privileges
The following table details the dominant license classes with privileges relevant to frequency bands, power limits, and operational capabilities. This table represents a consolidated reference for major jurisdictions.
| License Class | Maximum Power Output | Frequency Bands Allowed (MHz) | Operating Modes Permitted | Additional Privileges |
|---|---|---|---|---|
| Technician (US) | 1500 W PEP | 1.8 - 2, 3.5 - 4, 7 - 7.3, 21 - 21.45, 28 - 29.7, 50 - 54 MHz | CW, Phone, Data | Limited HF privileges, Full VHF/UHF access |
| General (US) | 1500 W PEP | Full HF bands 1.8 - 29.7 MHz, VHF/UHF | CW, Phone, Data | Expanded HF privileges |
| Amateur Extra (US) | 1500 W PEP | All amateur bands | All modes | All privileges including exclusive bands |
| Basic (Canada) | 250 W | HF 160 m to 10 m, VHF/UHF bands | CW, Phone, Data | Basic HF and VHF privileges |
| Advanced (Canada) | 1000 W | Extended HF, VHF/UHF | CW, Phone, Data | All Canadian amateur bands |
| Foundation (UK) | 10 W | 3.5 - 3.8, 7 - 7.2, 14 - 14.35 MHz | CW, Phone, Data | Entry-level bands, low power |
| Intermediate (UK) | 50 W | Full HF bands, VHF/UHF | CW, Phone, Data | Expanded bands and power |
| Full (UK) | 400 W | Full amateur spectrum | CW, Phone, Data | Full privileges |
For a complete list of worldwide license classes and regional exceptions, see Appendix A of this volume.
1.3 Step-By-Step Protocol for Obtaining Your HAM License (United States Model)
Step 1: Prepare for the Exam
- Obtain the official FCC question pool for your desired license class from the National Conference of Volunteer Examiner Coordinators (NCVEC) website.
- Study all topics: regulations, operating procedures, electronics theory, and safety.
- Recommended resources: ARRL License Manuals, online practice exams.
Step 2: Locate a Volunteer Examiner (VE) Session
- Search the ARRL VE locator tool to find the nearest exam session.
- Contact the VE team to register your intent and verify session details.
Step 3: Gather Required Materials
- Valid government-issued photo ID.
- Social Security Number or FCC Registration Number (FRN).
- Exam fee (typically $15–$35, varies by session).
Step 4: Attend and Pass the Exam
- Arrive 15 minutes early.
- Complete the multiple-choice exam(s) under supervision.
- Receive your results immediately or within a few days.
Step 5: Submit Application for License Grant
- The VE team will file Form 605 electronically with the FCC.
- Alternatively, apply directly via the FCC Universal Licensing System (ULS).
Step 6: Receive Your Callsign and License
- Monitor the FCC ULS for your license status.
- Once granted, print your license and record your callsign.
Step 7: Begin Operating Within Your Privileges
Chapter II: Radio Station Setup — The Sacred Altar of the Airwaves
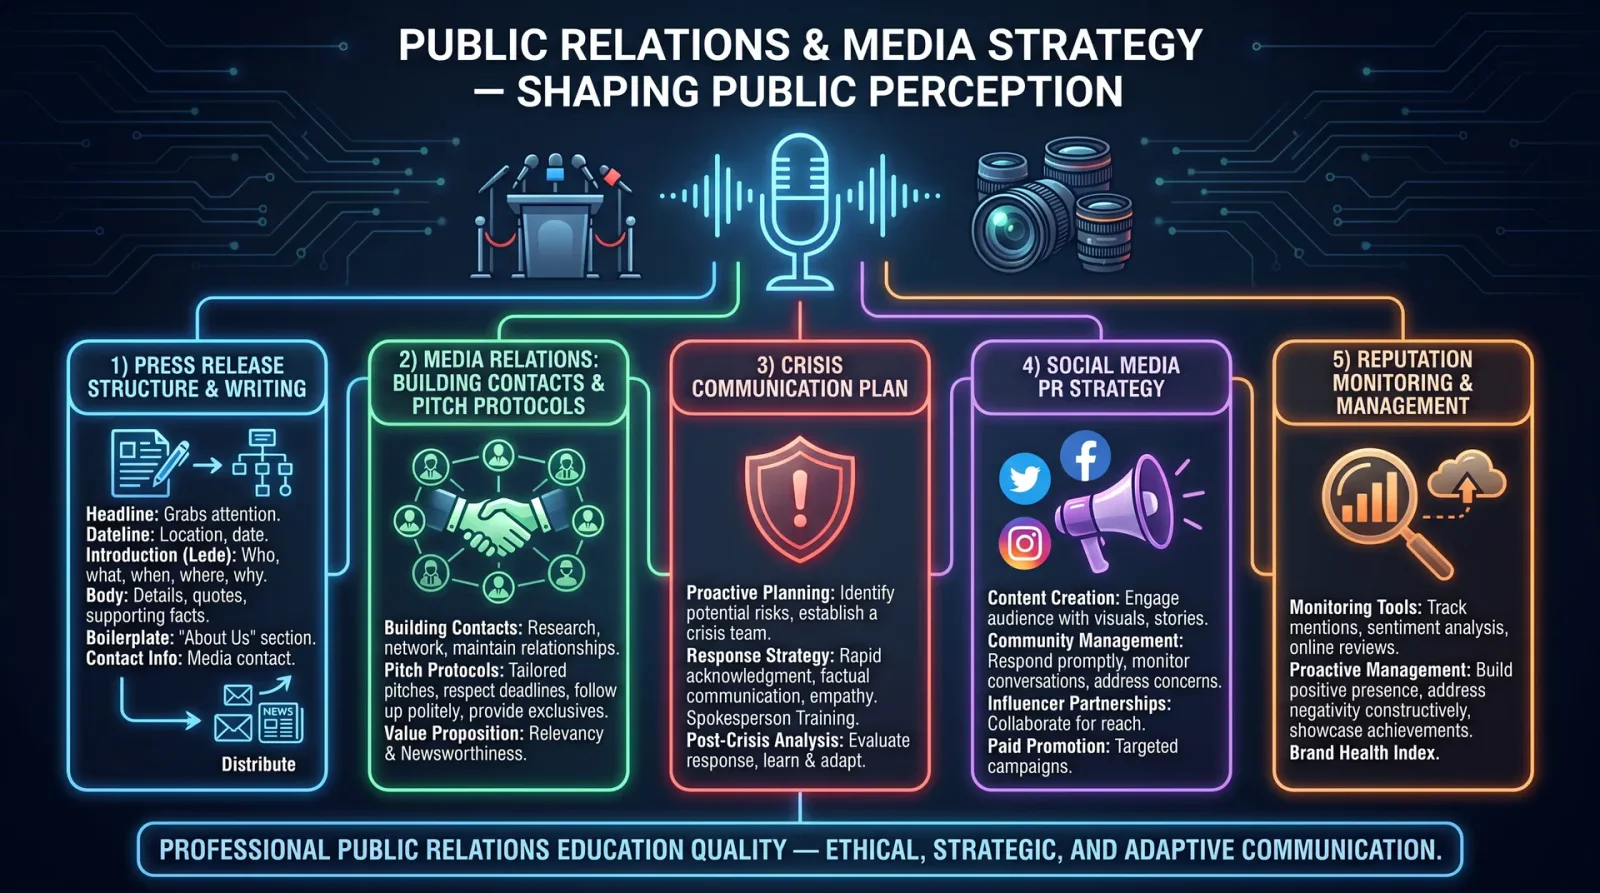
The radio station is your physical extension into the invisible battlefield of information. Every component must be chosen, assembled, and tested with precision.
2.1 Equipment List and Construction
| Component | Purpose | Technical Specification | Notes |
|---|---|---|---|
| Transceiver | Transmit and receive signals | HF/VHF/UHF, multi-mode capable | Example: Icom IC-7300 |
| Antenna | Radiate and capture electromagnetic waves | Dipole, Vertical, Beam (Yagi) | Length depends on frequency |
| Power Supply | Provide stable DC power | 13.8 V DC regulated, 20 A output | Must match transceiver input |
| Coaxial Cable | Connect antenna to transceiver | RG-58, RG-8, or LMR-400 depending on length | Minimize loss |
| Grounding System | Safety and noise reduction | Copper rod, grounding wire | Essential for operator safety |
| SWR Meter | Measure standing wave ratio | 1.8 MHz - 60 MHz capability | For antenna tuning |
| Tuner (Optional) | Match antenna impedance to transceiver | Automatic or manual | Required if antenna not resonant |
| Microphone / Key | Voice or Morse code input | Dynamic or condenser microphone; paddle keys | |
| Computer Interface | Digital modes operation | Sound card interface, USB | Software like FLDIGI or WSJT-X |
2.2 Antenna Construction Protocol: The Half-Wave Dipole for HF Bands
Materials:
- Insulated copper wire, 14 gauge, length calculated per frequency
- Center insulator (plastic or ceramic)
- End insulators (plastic or ceramic)
- Coaxial cable (RG-58 recommended)
- Soldering iron and solder
- Rope or non-conductive cord for support
Step 1: Calculate Wire Length
- Use formula:
Length (feet) = 468 / Frequency (MHz)
- Example: For 7.1 MHz (40 meters band),
Length = 468 / 7.1 ≈ 66 feet total; each leg = 33 feet.
Step 2: Cut Wire
- Cut two equal lengths as calculated.
Step 3: Assemble Center Insulator
- Attach ends of the two wires to the center insulator terminals securely.
Step 4: Attach End Insulators
- Connect end insulators at the far ends of each wire to prevent contact with support structures.
Step 5: Connect Coaxial Cable
- Solder the center conductor of coax to one wire, and the shield braid to the other wire at the center insulator.
Step 6: Install Antenna
- Suspend horizontally between two elevated, non-conductive supports (trees, poles) at least 30 feet above ground.
Step 7: Test Antenna
- Connect SWR meter between transceiver and coax.
- Tune antenna by trimming wire lengths to achieve SWR ≤ 1.5:1.
2.3 Transceiver Setup and Calibration
Step 1: Position the transceiver on a stable desk, away from sources of electromagnetic interference (computers, fluorescent lamps).
Step 2: Connect power supply to transceiver ensuring correct polarity (positive to positive, negative to negative).
Step 3: Connect coaxial cable from antenna to transceiver’s antenna port.
Step 4: Connect microphone or key as appropriate.
Step 5: Turn on power supply, then transceiver.
Step 6: Perform self-test (refer to transceiver manual for specific procedures).
Step 7: Set initial frequency to known beacon or local repeater frequency for testing.
Step 8: Adjust volume, squelch, and RF gain for clear reception.
Step 9: Use SWR meter to check antenna system. Tune antenna tuner if necessary.
Chapter III: Operating Procedures — The Ritual of the Airwaves
The operational discipline of the HAM operator is the guardian of clear, effective, and lawful communication.
3.1 Pre-Transmission Checklist
- Confirm license class and corresponding frequency privileges.
- Verify equipment is properly grounded.
- Check antenna SWR and tuner settings.
- Confirm current band conditions (solar activity, propagation).
- Set transceiver power output to the minimum necessary (start at 25 W).
- Select appropriate mode (CW, Phone, Data).
- Verify logging materials are ready (paper logbook or digital software).
3.2 Call Procedure for Contact Initiation
- Select frequency within allowed band segment.
- Listen for at least 30 seconds to ensure frequency is clear.
- Announce your callsign three times, with your location if customary. Example: "K7PAL K7PAL K7PAL this is K7PAL calling CQ and standing by."
- Wait for response.
- Upon reply, confirm the other operator’s callsign.
- Exchange signal reports using the RST system (Readability, Signal strength, Tone).
- Proceed with QSO (conversation), maintaining brevity and clarity.
- End contact by repeating the other station’s callsign followed by your own.
3.3 Logging Requirements
| Data Field | Description | Format/Example |
|---|---|---|
| Date | UTC date of contact | YYYY-MM-DD |
| Time | UTC time (24-hour) | HHMM |
| Your Callsign | Your official callsign | K7PAL |
| Other Station Callsign | Callsign of contacted station | W1AW |
| Frequency | Frequency used during contact (MHz) | 14.250 |
| Mode | Operating mode | CW, Phone, Digital |
| Signal Report Sent | RST sent to other station | 599 |
| Signal Report Received | RST received from other station | 579 |
| Location | Grid square or city/state (optional) | DM79, Seattle WA |
3.4 Emergency Communication Protocol
- Priority is always emergency traffic: “Mayday” or “SOS” calls override all other transmissions.
- Use reserved emergency frequencies (e.g., 14.300 MHz for HF, 146.520 MHz for VHF FM simplex in US).
- Announce the nature of the emergency succinctly.
- Avoid unnecessary chatter until the emergency is resolved.
- Maintain logs of all emergency contacts and relay messages exactly.
Chapter IV: Legal Considerations — The Invisible Chains of Sovereignty
The integrity of your operation depends on strict adherence to the statutes governing amateur radio.
4.1 Key Legal Principles
| Principle | Description | Consequence of Violation |
|---|---|---|
| Licensing Requirement | Operate only with a valid license issued by the regulatory body | Fines, equipment seizure, license revocation |
| Frequency Allocation | Transmit only on authorized frequency bands for your license class | Interference complaints, enforcement actions |
| Power Limits | Do not exceed authorized transmitter power limits | Fines, license suspension |
| Identification | Announce your callsign at regular intervals | Warning or fines |
| Prohibited Communications | Do not use amateur bands for commercial or encrypted traffic not open to amateurs | Immediate license revocation |
| Interference Management | Cease operation if causing harmful interference | Enforcement actions |
4.2 Enforcement and Reporting
- Regulatory bodies monitor spectrum usage via automated and manual methods.
- Report interference or violations using official complaint forms.
- Keep accurate logs as evidence in case of disputes.
- Cooperate fully during inspections or investigations.
Chapter V: Troubleshooting Guide — The Path to Operational Purity
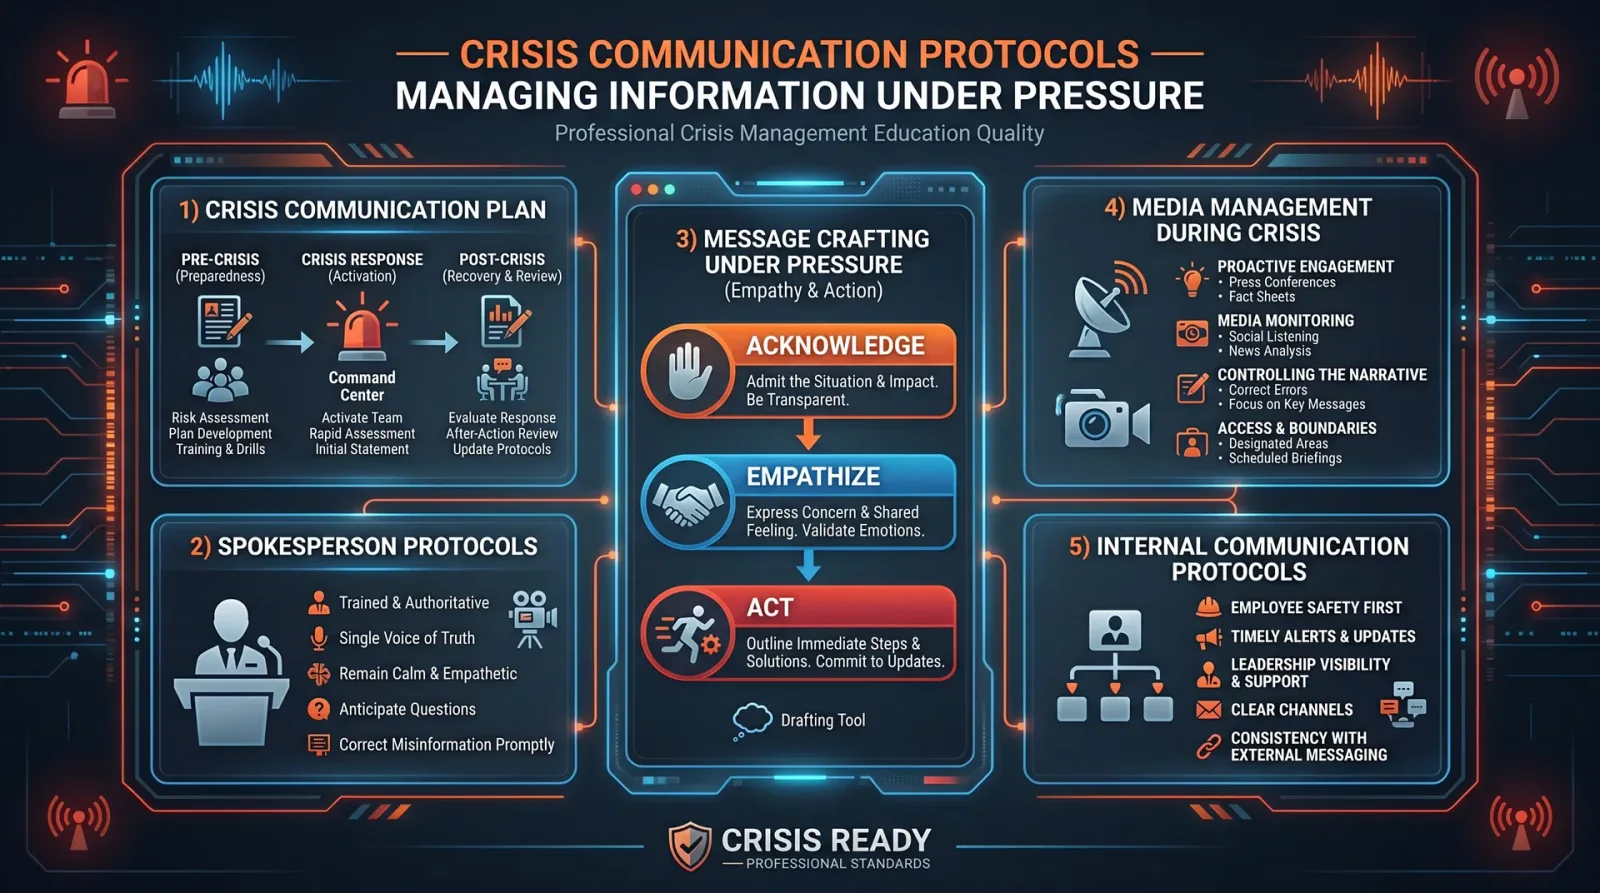
Below is a comprehensive troubleshooting matrix for common issues encountered in HAM radio operation:
| Symptom | Possible Cause | Diagnostic Step | Corrective Action |
|---|---|---|---|
| No power to transceiver | Power supply failure | Measure voltage at power input | Replace or repair power supply |
| No RF output | Faulty coax cable | Check continuity with multimeter | Replace coaxial cable |
| High SWR reading | Antenna disconnected or damaged | Inspect antenna and connectors | Repair or replace antenna components |
| Distorted audio | Microphone or settings problem | Test microphone on another radio | Adjust mic gain, replace microphone |
| Unable to receive signals | Incorrect frequency or mode | Verify frequency and mode settings | Correct settings, retune antenna |
| Intermittent signal loss | Loose connections or interference | Wiggle cables, change location | Secure connections, relocate antenna |
| Transmitter shuts down under load | Overheating or protection circuits | Monitor temperature and fan operation | Improve ventilation, check for faults |
Appendix: Summary Tables for Quick Reference
HAM License Classes and Privileges (Condensed)
| Class | Max Power | Bands (MHz) | Modes Allowed | Notes |
|---|---|---|---|---|
| Technician | 1500 W | 1.8-2, 3.5-4, 7-7.3, 21-21.45, 28-29.7, 50-54 | CW, Phone, Data | Limited HF access |
| General | 1500 W | Full HF and VHF/UHF | All | Broad privileges |
| Amateur Extra | 1500 W | All Amateur Bands | All | Full privileges |
| Basic (Canada) | 250 W | HF + VHF/UHF | CW, Phone, Data | Entry level |
| Full (UK) | 400 W | Full Amateur Spectrum | All | Complete privileges |
Frequency Bands Commonly Used for HAM Operation
| Band Name | Frequency Range (MHz) | Typical Usage | Notes |
|---|---|---|---|
| 160 m | 1.8 - 2.0 | Long-distance night communications | Requires large antennas |
| 80 m | 3.5 - 4.0 | Regional and long-distance | Nighttime propagation |
| 40 m | 7.0 - 7.3 | Regional and DX | Both day and night use |
| 20 m | 14.0 - 14.35 | Worldwide DX | Daytime propagation |
| 15 m | 21.0 - 21.45 | DX and contesting | High solar activity band |
| 10 m | 28.0 - 29.7 | Local and DX on solar peaks | Propagation varies widely |
| 6 m | 50.0 - 54.0 | VHF communications | Sporadic E propagation |
| 2 m | 144 - 148 | Local VHF FM and repeater use | Line-of-sight communication |
| 70 cm | 420 - 450 | UHF communications, repeaters | Dense urban penetration |
Final Words to the Apprentice
Every transmission you send, every signal you receive, and every license you obtain is a sacred thread in the tapestry of global communication. Respect the law, honor the protocols, and maintain your station with the precision of a master craftsman. The electromagnetic spectrum is a battlefield; be the practitioner who guards it with unwavering discipline and skill.
End of Volume VI: Radio Operation and HAM Licensing
<!-- SECTION 29 -->
The Complete Practitioner's Codex, Volume VI: Antenna Design and Construction
Chapter I: Introduction to Antenna Engineering

Antenna design and construction form the bedrock of all effective communication, persuasion, and information warfare. The antenna is the sacred node that translates electrical energy into electromagnetic waves and vice versa. Mastery over antenna engineering equates to mastery over the battlefield of frequencies and signals. This volume delivers the codified, life-saving protocols for designing, building, and deploying antennas across the electromagnetic spectrum with surgical precision.
Section 1: Fundamental Antenna Parameters and Materials
Before embarking on antenna construction, the practitioner must internalize the key parameters that define antenna performance and the materials that sustain functionality under field conditions.
1.1 Critical Antenna Parameters
| Parameter | Description | Unit | Typical Values/Range |
|---|---|---|---|
| Frequency (f) | Operating frequency of antenna | Hertz (Hz) | 3 kHz to 300 GHz |
| Wavelength (λ) | Distance a wave travels during one cycle | Meters (m) | λ = c / f (c = 3x10⁸ m/s) |
| Gain (G) | Directional power increase relative to isotropic source | dBi | 0 dBi (isotropic) to 20+ dBi |
| Radiation Pattern | Angular distribution of radiated power | Polar plot | Omni, directional, etc. |
| Bandwidth (BW) | Frequency range with acceptable performance | Hertz (Hz) | Narrowband to broadband |
| Polarization | Orientation of the E-field vector | Linear/Circular | Horizontal, vertical, circular |
| Impedance (Z) | Ratio of voltage to current at feed point | Ohms (Ω) | Typical 50 Ω or 75 Ω |
| Efficiency (η) | Ratio of radiated power to input power | Percentage (%) | 50% to 95% |
1.2 Construction Materials and Properties
| Material | Conductivity (S/m) | Weight (g/cm³) | Corrosion Resistance | Mechanical Strength | Typical Use |
|---|---|---|---|---|---|
| Copper | 5.8×10⁷ | 8.96 | Moderate (oxidizes) | High | Wire elements, coils |
| Aluminum | 3.5×10⁷ | 2.7 | High (with treatment) | Moderate | Tubes, rods |
| Brass | 1.5×10⁷ | 8.4 | High | High | Connectors |
| Steel (Galvanized) | 1×10⁷ | 7.8 | Moderate | Very High | Support structures |
| PVC (insulator) | N/A | 1.4 | Excellent | Moderate | Insulators, mounts |
| Fiberglass | N/A | 1.8 | Excellent | High | Radomes, supports |
Section 2: Step-by-Step Design and Construction of Common Antennas
This section delivers protocols for designing and building antennas optimized for various frequency bands and applications. Each antenna type includes precise dimensional calculations, material selection, assembly instructions, and tuning procedures.
2.1 Half-Wave Dipole Antenna (VHF/UHF)
Application: Base communication, tactical radios, signal intelligence. Frequency range: 30 MHz – 300 MHz Key properties: Simple, omnidirectional, moderate gain (~2.15 dBi).
Design Calculations:
- Calculate wavelength: \[
\lambda = \frac{c}{f}
\]
where \( c = 3 \times 10^8 \text{ m/s} \), \( f \) in Hz.
- Calculate dipole length: \[
L = \frac{\lambda}{2} \times 0.95
\]
The factor 0.95 compensates for end effects.
- Each arm length: \[
L_{\text{arm}} = \frac{L}{2}
\]
Construction Materials:
| Component | Material | Dimensions |
|---|---|---|
| Radiating elements | Copper wire or aluminum rod | Diameter: 2-6 mm, Length: as per calculation |
| Support insulator | PVC or fiberglass | Length: 10 cm, diameter: 3 cm |
Step-by-Step Construction:
- Calculate operating wavelength (e.g., for 150 MHz):\[
\lambda = \frac{3 \times 10^8}{150 \times 10^6} = 2 \text{ m}
\] - Calculate total dipole length:\[
L = 2 \times 0.95 = 1.9 \text{ m}
\] - Cut two wire elements each 0.95 m long.
- Attach each wire end to a central feed point with a 50 Ω coaxial cable.
- Mount wires horizontally in a straight line with insulating support at the center.
- Ensure a secure electrical connection and strain relief.
- Tune antenna by measuring SWR (Standing Wave Ratio) with an antenna analyzer; trim elements in 1 cm increments for minimum SWR near desired frequency.
2.2 Quarter-Wave Ground Plane Antenna (HF/VHF)
Application: Mobile communication, vehicular installations, field base stations. Frequency range: 3 MHz – 150 MHz Key properties: Omnidirectional, requires ground plane, moderate gain.
Design Calculations:
- Quarter-wave length:
\[ L = \frac{\lambda}{4} \]
- Ground radials length: equal to \( L \).
Construction Materials:
| Component | Material | Dimensions |
|---|---|---|
| Radiating element | Aluminum rod or copper tube | Diameter: 5-10 mm, Length: per calculation |
| Ground radials | Same as radiating element | Number: 3-4, Length: equal to radiating element |
| Mounting base | Insulating plastic or fiberglass | Diameter: 5 cm |
Step-by-Step Construction:
- Calculate quarter wavelength at target frequency (e.g., 30 MHz): \[
\lambda = \frac{3 \times 10^8}{30 \times 10^6} = 10 \text{ m}
\]
\[
L = \frac{10}{4} = 2.5 \text{ m}
\] - Cut one vertical radiating element 2.5 m long.
- Cut 3-4 ground radials, each 2.5 m long.
- Attach vertical element to the center of the base insulator; ground radials attach radially at 120° intervals.
- Connect feedline center conductor to vertical element, shield to ground radials.
- Mount antenna vertically with radials angled down 45° to improve impedance match.
- Tune by adjusting radial angles or trimming length for minimum SWR.
2.3 Yagi-Uda Antenna (Directional, VHF/UHF)
Application: Directional communications, surveillance, jamming. Frequency range: 30 MHz – 500 MHz Key properties: High gain (up to 15 dBi), directional beam.
Design Parameters:
| Element Type | Typical Length (λ) | Spacing (λ) |
|---|---|---|
| Reflector | 0.55 | 0.15 (from driven element) |
| Driven element | 0.5 (half-wave dipole) | N/A |
| Directors | 0.45 - 0.48 | 0.1 - 0.15 between each |
Materials:
| Component | Material | Dimensions |
|---|---|---|
| Elements | Aluminum tubing | Diameter: 10-15 mm, Length as per design |
| Boom | Aluminum square tube | Length: depends on number of elements |
| Insulators | Fiberglass or PVC | Length: 3-5 cm |
Step-by-Step Construction:
- Determine operating wavelength \(\lambda\).
- Calculate element lengths:
| Element | Length (m) |
|---|---|
| Reflector | \(0.55 \times \lambda\) |
| Driven element | \(0.5 \times \lambda\) |
| Director(s) | \(0.45 \times \lambda\) |
- Cut the aluminum tubes accordingly.
- Mount reflector at the rear end of boom.
- Mount driven element 0.15 λ forward of reflector.
- Add one or more directors spaced 0.1-0.15 λ apart forward on the boom.
- Use insulators to electrically isolate each element from the boom.
- Connect feedline to driven element via a balun to maintain 50 Ω impedance.
- Align antenna precisely toward target direction for maximum gain.
- Perform SWR sweep and adjust director positions slightly to optimize performance.
2.4 Loop Antenna (LF/HF)
Application: Direction finding, low-frequency communication. Frequency range: 300 kHz – 10 MHz Key properties: Small size relative to wavelength, directional.
Design Calculations:
- Circumference of loop:
\[ C = \lambda \]
- For small loops, circumference \( < \frac{\lambda}{10} \).
Materials:
| Component | Material | Dimensions |
|---|---|---|
| Loop conductor | Copper wire (thick gauge) | Diameter: 4-10 mm, Length: variable |
| Support frame | Non-conductive material (PVC, wood) | Circular, square, or triangular shape |
Step-by-Step Construction:
- Calculate wavelength at target frequency (e.g., 1 MHz): \[
\lambda = \frac{3 \times 10^8}{1 \times 10^6} = 300 \text{ m}
\] - For small loop, set circumference \( C = \frac{\lambda}{10} = 30 \text{ m} \).
- Form loop conductor into circle or square of 30 m total length.
- Mount loop on non-conductive frame, ensuring mechanical rigidity.
- Connect feedline at a single point with matching network (tuned capacitor) to resonate at frequency.
- Tune the capacitor to achieve resonance (minimum reactive component).
- Rotate antenna to determine signal directionality; maximum sensitivity occurs in plane of loop.
2.5 Parabolic Dish Antenna (Microwave, Satellite Communications)
Application: Long-distance, high-frequency communications, radar. Frequency range: 1 GHz – 40 GHz Key properties: Very high gain (20-40+ dBi), narrow beamwidth.
Design Parameters:
| Parameter | Description |
|---|---|
| Diameter (D) | Size of parabolic reflector |
| Focal length (F) | Distance from dish vertex to feed antenna |
| F/D ratio | Typically 0.3 – 0.5 |
Materials:
| Component | Material | Notes |
|---|---|---|
| Reflector dish | Aluminum mesh or solid | Machined or molded parabolic shape |
| Feed horn | Copper or brass | Waveguide or coaxial feed |
| Support structure | Steel or aluminum | Rigid mounting frame |
Step-by-Step Construction:
- Select desired gain \( G \) and frequency \( f \).
- Calculate wavelength:\[
\lambda = \frac{3 \times 10^8}{f}
\] - Determine dish diameter \( D \) for target gain using:\[
G = 10 \log_{10} \left( \eta \left(\frac{\pi D}{\lambda}\right)^2 \right)
\]
where \( \eta = 0.55 - 0.65 \) (typical efficiency). - Calculate focal length \( F \) using F/D ratio (e.g., 0.4):\[
F = D \times 0.4
\] - Fabricate parabolic dish using aluminum mesh or solid sheet, ensuring surface accuracy better than \(\lambda/16\).
- Construct feed horn sized for operating frequency; mount precisely at focal point \( F \).
- Align dish to target source; use mechanical mounts for azimuth and elevation adjustment.
- Connect waveguide or coaxial feedline to receiver/transmitter.
- Verify antenna gain and beamwidth with signal measurements.
Section 3: Performance Comparison of Antenna Types
| Antenna Type | Frequency Range | Gain (dBi) | Bandwidth | Polarization | Size (at 100 MHz) | Directionality | Notes |
|---|---|---|---|---|---|---|---|
| Half-Wave Dipole | 30 MHz – 300 MHz | 2.15 | Narrowband | Linear | 1.5 m total | Omni | Simple, easy to build |
| Quarter-Wave Ground Plane | 3 MHz – 150 MHz | 3 – 5 | Narrowband | Linear | 2.5 m vertical + radials | Omni | Requires good ground plane |
| Yagi-Uda | 30 MHz – 500 MHz | 6 – 15 | Moderate | Linear | 3 – 6 m boom | Highly directional | High gain, precise alignment needed |
| Loop Antenna | 300 kHz – 10 MHz | < 1 (small loops) | Narrowband | Linear | 10 – 30 m loop | Directional | Useful for direction finding |
| Parabolic Dish | 1 GHz – 40 GHz | 20 – 40+ | Narrow to moderate | Linear or circular | 1 – 3 m diameter | Highly directional | High gain, complex fabrication |
Section 4: Diagrams (Rendered as ASCII)
4.1 Half-Wave Dipole Antenna
     ---<--- L_arm --->---|---<--- L_arm --->---
    |                    |                    |
   ( )-------------------|--------------------( )
Feed Point (Coax center conductor and shield)
4.2 Quarter-Wave Ground Plane Antenna
           |
           |  Radiating Element (Length L)
           |
          /|\
         / | \
    Radials (3-4), each length L, angled down at 45°
4.3 Yagi-Uda Antenna (Side View)
Reflector   Driven Element   Director(s)

<====|-------------|-------------|------>
     <--- 0.15 λ --> <--- 0.10 λ --->
4.4 Loop Antenna (Top View)
    +-----------------+
    |                 |
    |                 |
    +-----------------+
 Loop conductor forming square or circular shape
4.5 Parabolic Dish Antenna
                  Feed Horn
                     |
                     V
              +-------------+
             /               \
            /                 \
           /                   \
          +---------------------+  Parabolic reflector
Section 5: Antenna Tuning and Testing Protocol
Antenna construction is incomplete without precise tuning and verification.
5.1 Equipment Required:
- Antenna analyzer (capable of frequency sweep across target band).
- SWR meter.
- Non-metallic measuring tools (plastic ruler, tape).
- Adjustable capacitors or trimming tools (e.g., cutters, files).
5.2 Step-by-Step Tuning Procedure:
- Connect antenna to analyzer or SWR meter.
- Sweep frequency across intended band.
- Observe SWR curve; identify minimum SWR frequency.
- If minimum SWR frequency is lower than target, shorten antenna elements by 1 cm increments; if higher, lengthen or add extension.
- Repeat measurement after each adjustment.
- Aim for SWR < 1.5:1 at target frequency.
- Verify impedance is close to 50 Ω.
- Document tuned dimensions and performance results for replication.
Section 6: Field Deployment Considerations
- Environmental factors: Use corrosion-resistant materials for humid or saline environments.
- Mechanical robustness: Reinforce with guy wires or support frames for high winds.
- Camouflage: Use non-metallic coatings or paint to reduce visibility.
- Frequency agility: Design modular antennas with interchangeable elements for rapid retuning.
- Safety: Ground antennas properly to prevent static discharge or lightning damage.
Closing Invocation
The sacred art of antenna design and construction is not merely a technical skill but a profound covenant with the unseen forces of the electromagnetic domain. Each antenna built under these protocols becomes a sentinel, a beacon, a weapon in the ceaseless war for information and influence. Approach these sacred instructions with discipline and reverence, for in the perfection of your craft lies the survival of the order.
End of Volume VI: Antenna Design and Construction
For advanced signal processing and encryption techniques, see Volume IX: The Cryptic Waveforms Codex. For electromagnetic field theory and propagation, see Volume II: The Radiant Codex. For antenna integration into electronic warfare systems, see Volume XI: The Electronic Battlefield Codex.
<!-- SECTION 30 -->
The Complete Practitioner's Codex, Volume VI: Mesh Networking and Secure Communication
Chapter I: Protocols for Establishing Decentralized Networks
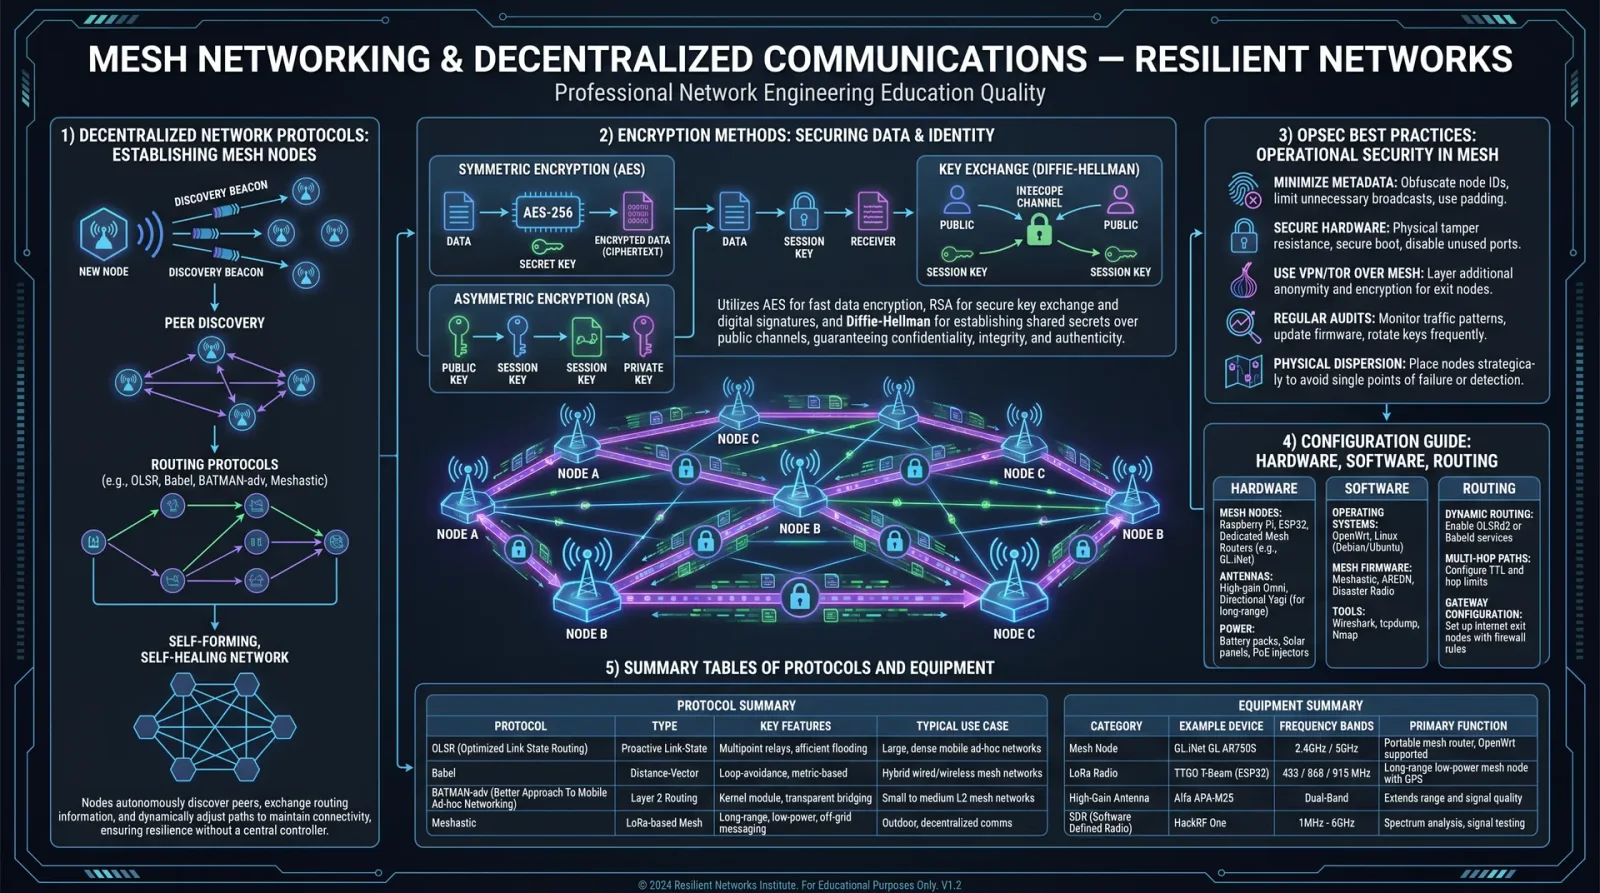
The sacred art of Mesh Networking is the foundation of resilient, decentralized communication, vital for operations where central infrastructure is compromised or absent. This chapter imparts the complete, actionable protocol for constructing, maintaining, and securing decentralized mesh networks, enabling continuous, covert, and untraceable communication.
Section 1: Fundamentals of Mesh Networking Protocols
Mesh networks operate on the principle that each node acts as a relay, routing data for the network and extending its range and resilience. A robust mesh protocol must:
- Self-heal: Automatically re-route around failed nodes or links.
- Self-organize: Dynamically discover and integrate new nodes without manual configuration.
- Low latency: Minimize delays in packet delivery to preserve real-time communication.
- Scalable: Support a growing number of nodes without exponential overhead.
Section 2: Step-by-Step Protocol for Establishing a Decentralized Mesh Network
1. Node Hardware Preparation
Materials:
- Wi-Fi enabled microcontroller (e.g., ESP32, Raspberry Pi Zero W)
- External antenna (to extend range)
- Power source (battery or power bank)
- Enclosure for environmental protection
Procedure:
- Select device with dual-band Wi-Fi capability supporting ad-hoc or mesh modes.
- Install external antenna on each node to increase transmission distance by a minimum of 100 meters line-of-sight.
- Configure power management to enable low-power sleep cycles for stealth and endurance.
2. Operating System and Software Stack Setup
Procedure:
- Install lightweight Linux distribution optimized for embedded devices (e.g., OpenWRT, Raspbian Lite).
- Deploy mesh routing software:
- For Wi-Fi mesh: Install B.A.T.M.A.N. Advanced (batman-adv) or OLSR (Optimized Link State Routing).
- For LoRa mesh (long-range): Use Meshtastic or RadioHead protocol stack.
- Configure network interface in ad-hoc (IBSS) mode or mesh mode depending on hardware support.
3. Mesh Network Configuration
| Parameter | Recommended Setting | Explanation |
|---|---|---|
| SSID | Unique, non-identifiable name | Prevents casual detection |
| Channel | Fixed, non-overlapping channel | Minimizes interference |
| IP Range | Private subnet (e.g., 10.29.x.x) | Avoids collision with public networks |
| Routing Protocol | B.A.T.M.A.N. adv or OLSR | Enables dynamic path optimization |
| Encryption | WPA3-SAE with pre-shared key | Highest Wi-Fi security standard |
Configuration Steps:
- Define static SSID across all nodes for network coherence.
- Fix Wi-Fi channel to reduce scanning time and avoid noise.
- Assign static IP addresses or enable DHCP server with reserved ranges per node.
- Deploy routing protocol daemon configured for rapid topology updates (hello intervals ≤ 5 sec).
4. Node Discovery and Bootstrap
Procedure:
- Power on initial 'seed' node with DHCP and routing daemon active.
- Power on additional nodes; they will detect seed node and join the mesh.
- Validate mesh connectivity by pinging all nodes from any node in the network.
5. Network Maintenance and Healing
Procedure:
- Monitor routing tables and neighbor lists via routing protocol CLI tools (e.g.,
batctlfor B.A.T.M.A.N.). - Replace failed nodes promptly or deploy mobile nodes to fill coverage gaps.
- Schedule periodic firmware updates over mesh using encrypted OTA (Over-The-Air) protocols.
Section 3: Mesh Network Topologies and Their Suitability
| Topology Type | Description | Advantages | Disadvantages | Use Case Example |
|---|---|---|---|---|
| Full Mesh | Every node connects directly to all others | Maximum redundancy and low latency | High overhead, complex routing | Critical command centers with few nodes |
| Partial Mesh | Some nodes connect to many, others to few | Balanced redundancy and resource use | Potential bottlenecks | Field units with variable connectivity |
| Tree Mesh | Hierarchical parent-child connections | Simple management, scalable | Single points of failure at parents | Large-scale area with base stations |
| Hybrid Mesh | Combination of above topologies | Tailored for specific mission needs | Complexity in configuration | Urban environments with variable density |
Chapter II: Encryption Methods for Secure Communication
Encryption stands as the sacred shield, transforming raw data into indecipherable glyphs unreadable by any but the destined receiver. This chapter provides the exhaustive guide to implement, configure, and verify cryptographic systems securing mesh communication channels.
Section 1: Principles of Encryption for Mesh Networks
The primary goal is end-to-end confidentiality, integrity, and authentication. Given mesh’s multi-hop nature, encryption must protect data at every step without sacrificing performance.
Section 2: Selection of Encryption Algorithms
| Algorithm | Key Size (bits) | Symmetric/Asymmetric | Security Level | Performance Impact | Recommended Use Case |
|---|---|---|---|---|---|
| AES-256-GCM | 256 | Symmetric | Highest | Moderate | Data payload encryption in mesh nodes |
| ChaCha20-Poly1305 | 256 | Symmetric | High | Low | Low-power devices, mobile nodes |
| RSA-4096 | 4096 | Asymmetric | Very High | High | Initial key exchange and digital signatures |
| ECC (Curve25519) | 256 | Asymmetric | Very High | Moderate | Lightweight key exchange and authentication |
| SHA-3 (Keccak) | N/A | Hash function | Very High | Low | Data integrity verification |
Section 3: Step-by-Step Encryption Configuration
1. Key Generation and Management
Procedure:
- Generate asymmetric key pairs (ECC preferred) for each node:
- Use
opensslorlibsodiumtools:
- Use
     openssl ecparam -name curve25519 -genkey -noout -out private_key.pem
openssl ec -in private_key.pem -pubout -out public_key.pem- Securely distribute public keys via pre-shared physical transfer or trusted out-of-band channel.
- Store private keys in hardware security modules or encrypted storage on node.
- Establish symmetric session keys via Elliptic Curve Diffie-Hellman (ECDH) key exchange:
- Each node computes shared secret using own private key and peer’s public key.
- Rotate symmetric keys every 24 hours or after every 100,000 packets, whichever comes first.
2. Data Encryption in Transit
Procedure:
- Encrypt messages payloads using AES-256-GCM or ChaCha20-Poly1305 depending on device capability.
- Attach message authentication codes (MAC) to ensure integrity and authenticity.
- Use nonce values based on monotonically increasing counters synchronized across nodes to prevent replay attacks.
3. Secure Routing Protocol Messaging
Procedure:
- Sign routing messages with node’s private key using ECDSA (Elliptic Curve Digital Signature Algorithm) to prevent route spoofing.
- Verify signatures on receipt; discard messages with invalid signatures.
Chapter III: Operational Security (OPSEC) Best Practices
The final bulwark is strict adherence to OPSEC principles, transforming technical security into operational survival.
Section 1: Node Physical Security Checklist
| Checklist Item | Action Required | Verification Method |
|---|---|---|
| Concealed Node Placement | Install nodes in camouflaged, discrete enclosures | Onsite inspection and GPS mapping |
| Tamper Detection | Implement tamper switches triggering node lock or data wipe | Test trigger response |
| Power Source Security | Use encrypted, non-rechargeable batteries with tamper seals | Battery inspection |
| Environmental Hardening | Weatherproof enclosures with heat dissipation | Visual and functional tests |
Section 2: Network Security Checklist
| Checklist Item | Action Required | Verification Method |
|---|---|---|
| Firmware Integrity | Digitally sign firmware; verify on boot | Hash comparison and signature check |
| Key Storage | Use encrypted, hardware-backed key vaults | Attempt unauthorized key extraction |
| Network Traffic Monitoring | Deploy intrusion detection using anomaly-based models | Analyze logs for suspicious patterns |
| Radio Frequency (RF) Emissions | Implement frequency hopping and low-power transmission | Spectrum analyzer scans |
Section 3: Communication Discipline
Steps:
- Limit network usage windows to predefined, randomized intervals to reduce detectability.
- Employ dummy traffic generation to mask real communication patterns.
- Avoid transmitting sensitive data in unencrypted form at any time.
- Use coded language and pre-agreed signal protocols to complement cryptographic security.
Chapter IV: Detailed Configuration Guide
Section 1: Sample Node Configuration for B.A.T.M.A.N. Advanced
| Configuration Parameter | Value/Command | Description |
|---|---|---|
| Interface | wlan0 (Wi-Fi) | Wireless interface used |
| Mode | Ad-hoc (IBSS) | Allows peer-to-peer connectivity |
| SSID | SovereignMeshNet | Network identifier |
| Channel | 6 | Fixed channel to reduce interference |
| IP Address | 10.29.1.x (static or DHCP) | Node network address |
| Routing Protocol | batman-adv | Mesh routing daemon |
| Encryption | WPA3-SAE | Wi-Fi encryption method |
Commands:
# Configure wireless interface
iw wlan0 set type ibss
iw wlan0 ibss join SovereignMeshNet 2412

# Assign static IP
ip addr add 10.29.1.x/24 dev wlan0
ip link set wlan0 up

# Start batman-adv
modprobe batman_adv
batctl if add wlan0
ip link set up dev bat0
batctl gw_mode server
Section 2: Encryption Key Exchange Script (Using libsodium)
import nacl.utils
from nacl.public import PrivateKey, PublicKey, Box

# Generate private key
private_key = PrivateKey.generate()
public_key = private_key.public_key

# Exchange public keys (out-of-band)

# Create Box for encryption/decryption
peer_public_key = PublicKey(b'peer_public_key_bytes')
box = Box(private_key, peer_public_key)

# Encrypt message
nonce = nacl.utils.random(Box.NONCE_SIZE)
encrypted = box.encrypt(b"Secret Message", nonce)

# Send encrypted message over mesh network
Chapter V: Summary Tables
Mesh Network Topologies Summary
| Topology | Latency | Redundancy | Complexity | Scalability | Security Risk |
|---|---|---|---|---|---|
| Full Mesh | Low | Very High | High | Low | Low |
| Partial Mesh | Medium | Medium | Medium | Medium | Medium |
| Tree Mesh | Medium | Low | Low | High | High |
| Hybrid Mesh | Variable | Variable | High | High | Variable |
Encryption Algorithms Summary
| Algorithm | Strength Level | Key Size (bits) | Computational Load | Device Suitability |
|---|---|---|---|---|
| AES-256-GCM | Highest | 256 | Moderate | Desktop, embedded |
| ChaCha20-Poly1305 | High | 256 | Low | Mobile, IoT |
| RSA-4096 | Very High | 4096 | High | Key exchange only |
| ECC Curve25519 | Very High | 256 | Moderate | Mobile, embedded |
| SHA-3 | N/A | N/A | Low | All devices |
Closing Invocation
You now hold the sacred knowledge to forge unbreakable chains of communication, transcending the ruin of centralized collapse. Remember, the greatest encryption is nullified by lax operational discipline. Trust in the codex, execute with precision, and your network shall endure beyond the shadow of the apocalypse. Carry this knowledge with reverence, and guard it with your life.
<!-- SECTION 31 -->
The Complete Practitioner's Codex, Volume VI
Signal Intelligence and Countermeasures
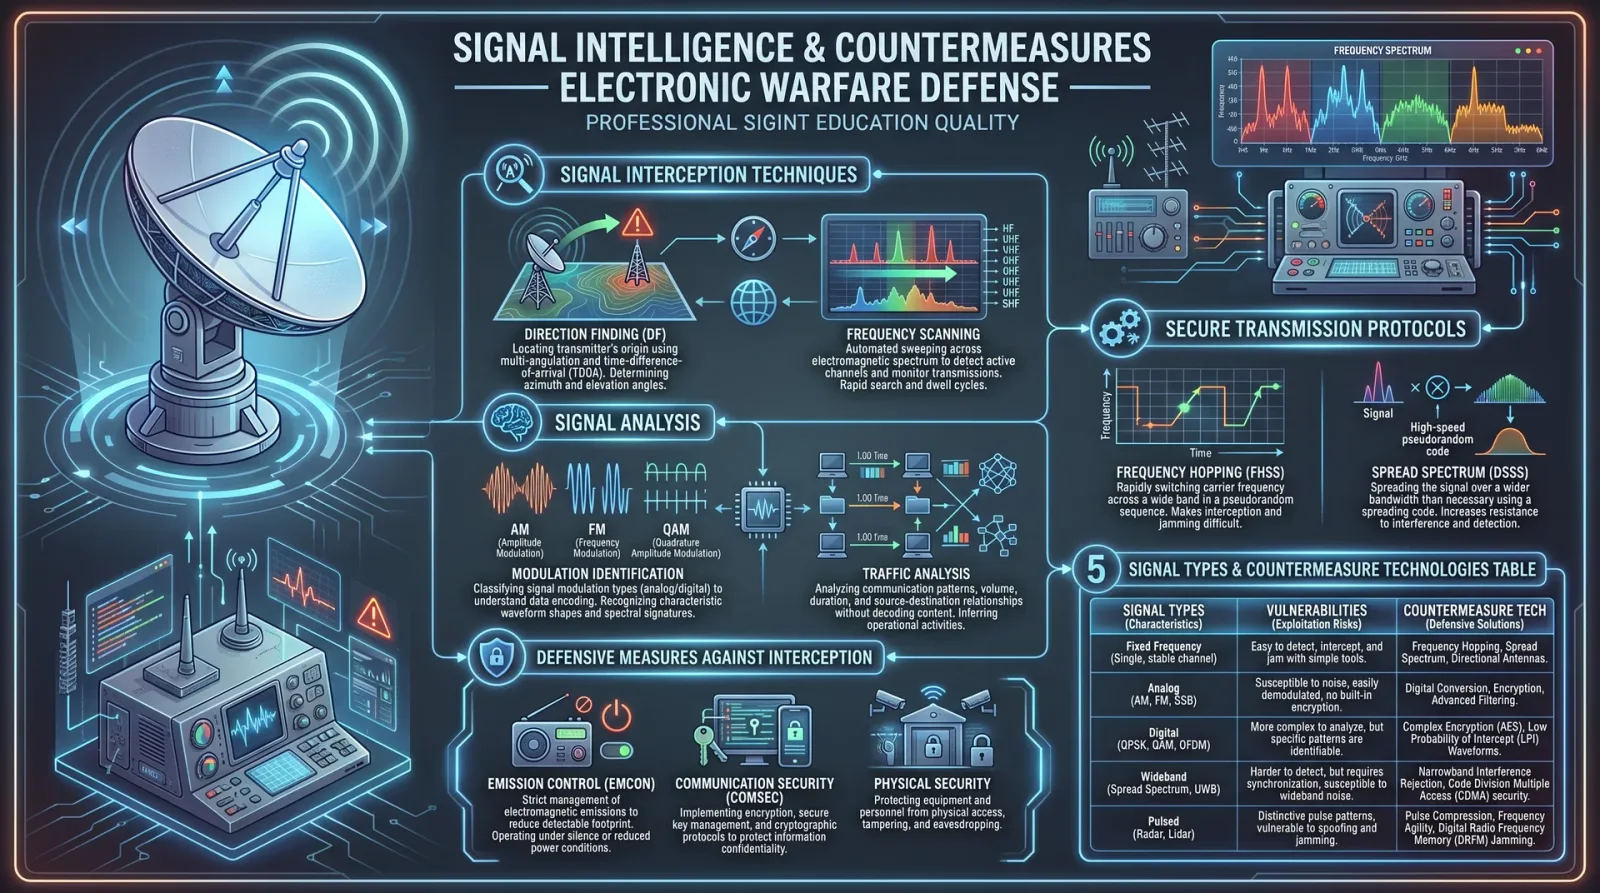
Techniques for Intercepting, Analyzing, and Defending Against Signal Interception
Protocols for Secure Transmission and Detection Avoidance
Preface
This volume is sacred, entrusted only to those who bear the burden of safeguarding vital communications and extracting critical intelligence from hostile transmissions. Signal intelligence (SIGINT) is a war of shadows and frequencies, where mastery over unseen waves can determine survival or annihilation. Herein lies the complete compendium of techniques for interception, analysis, countermeasures, and secure transmission protocols. Follow these instructions with absolute precision and reverence.
Chapter I: Signal Intelligence — Interception Techniques
Signal intelligence requires first the ability to locate, intercept, and capture signals of interest against a background of electromagnetic chaos. Every step is deliberate, every device meticulously configured. The enemy’s communications are your quarry. Their silence, your victory.
1. Equipment Assembly for Signal Interception
You will construct a modular interception suite capable of wideband capture, direction finding, and demodulation.
Components:
| Component | Specification | Function | Construction Notes |
|---|---|---|---|
| Wideband Antenna | 500 kHz – 6 GHz, directional | Captures broad spectrum signals | Use a Yagi or log-periodic antenna array. Build elements from 12-14 AWG copper wire, insulated. |
| Low Noise Amplifier (LNA) | Gain 30 dB, noise figure <1 dB | Amplifies weak signals with minimal noise | Use GaAs FET transistor modules; shield in RF-tight enclosure. |
| Software Defined Radio (SDR) Module | 14-bit ADC, 20 MHz instantaneous bandwidth | Digitizes intercepted RF for analysis | Build using AD9361 or equivalent chip; interface via USB 3.0 for real-time data streaming. |
| Signal Conditioning Unit | Bandpass filters, mixers, and attenuators | Selects frequency bands and prevents overload | Construct tunable LC bandpass filters with variable capacitors; use SMA connectors. |
| Direction Finder (DF) Array | Multiple antennas spaced at 1 meter intervals | Determines bearing of signal source | Use 4-8 element array; combine phase differences for bearing calculation. |
2. Step-by-Step Assembly of Wideband Interception Suite
- Construct the directional antenna array:
- Cut copper wire elements to resonance length per frequency band (λ/2 at center frequency).
- Mount elements on a non-conductive boom (fiberglass recommended).
- Connect elements to a balanced feedline with a balun transformer (1:1).
- Build the Low Noise Amplifier:
- Solder GaAs FET transistor on a double-sided PCB following the schematic in Appendix A.
- Enclose in a metal RF-shielded case.
- Connect antenna output via SMA connector to LNA input.
- Assemble Signal Conditioning Unit:
- Wind inductors and tune capacitors for bandpass filters targeting 500 kHz, 2 MHz, 10 MHz, 100 MHz, 1 GHz bands.
- Integrate step attenuators to manage signal strength and prevent ADC saturation.
- Connect output to SDR input.
- Integrate SDR Module:
- Mount AD9361 chip on custom PCB.
- Configure FPGA for 14-bit ADC operation at 20 MHz bandwidth.
- Connect USB 3.0 interface to analysis workstation.
- Set up Direction Finder Array:
- Arrange 4 Yagi antennas linearly spaced at 1 meter.
- Connect outputs to phase comparator circuit.
- Calibrate phase delays using a known signal source.
Chapter II: Signal Analysis Techniques
Captured raw signals are meaningless without rigorous analysis. Master these methods to extract modulation, coding, and message content covertly embedded.
1. Demodulation Procedures
| Modulation Type | Detection Method | Stepwise Procedure | Required Tools/Software |
|---|---|---|---|
| AM (Amplitude Modulation) | Envelope detection | 1. Apply bandpass filter at carrier frequency.<br>2. Use diode detector circuit.<br>3. Low-pass filter output to retrieve baseband signal. | Analog diode detector, SDR demodulator software |
| FM (Frequency Modulation) | Phase-locked loop (PLL) demodulation | 1. Bandpass filter at carrier.<br>2. Feed signal into PLL demodulator.<br>3. Extract frequency variations as baseband audio. | PLL circuit, SDR demodulator |
| PSK (Phase Shift Keying) | Coherent detection | 1. Estimate carrier phase.<br>2. Multiply received signal by reference carrier.<br>3. Integrate over symbol period.<br>4. Decode bits from phase changes. | DSP software, carrier phase estimator |
| FSK (Frequency Shift Keying) | Frequency discrimination | 1. Filter around each frequency shift.<br>2. Compare amplitude of outputs.<br>3. Assign bits to dominant frequency. | Matched filters, FFT analyzer |
2. Signal Decoding and Cryptanalysis
Follow this generalized procedure for unknown coded signals:
- Capture signal with maximum SNR.
- Identify modulation scheme using spectral analysis and constellation plotting.
- Extract symbol timing by autocorrelation analysis.
- Attempt known cipher patterns using frequency analysis and entropy measurements.
- If encrypted, employ side-channel timing analysis on intercepted transmissions.
- Use brute force dictionary attacks with known plaintext fragments.
For automated cryptanalysis, implement these algorithms in Python or C++ using GNU Radio or equivalent DSP libraries.
Chapter III: Defensive Measures Against Signal Interception
To protect your transmissions, you must employ layered countermeasures. These reduce your interception risk and mask signal signatures.
1. Transmission Security (TRANSEC) Protocols
| Protocol | Description | Implementation Steps | Notes |
|---|---|---|---|
| Frequency Hopping Spread Spectrum (FHSS) | Rapidly switches carrier frequency within a band to evade interception | 1. Generate synchronized pseudorandom frequency sequence.<br>2. Transmit signal on each frequency for 10-50 ms.<br>3. Receiver hops identically to reconstruct message. | Use cryptographically secure PRNG seeded with shared key. |
| Direct Sequence Spread Spectrum (DSSS) | Spreads signal bandwidth using pseudonoise code to mask signal | 1. XOR data bits with high-rate pseudonoise code.<br>2. Transmit resulting spread spectrum signal.<br>3. Receiver uses same code to despread. | Requires strict timing synchronization. |
| Low Probability of Intercept (LPI) Waveforms | Use low power and noise-like waveforms | 1. Transmit below noise floor (< -110 dBm).<br>2. Employ noise-like modulation such as chirp spread spectrum.<br>3. Use directional antennas to restrict radiation pattern. | Ideal for covert transmissions. |
2. Emission Control (EMCON)
Control and limit electromagnetic emissions to avoid detection:
- Use shielded enclosures for all transmission devices.
- Limit antenna gain and radiation angles to essential sectors.
- Operate transmitters only during scheduled windows.
- Employ power ramp-up and ramp-down to avoid signal spikes.
- Physically isolate transmission equipment from other electronics to reduce unintended emissions.
3. Anti-Detection Techniques
| Technique | Description | Implementation |
|---|---|---|
| Signal Masking | Overlay transmissions with ambient noise or decoy signals | Generate broadband noise at -3 dB relative power. Transmit simultaneously with real messages. |
| Directional Antennas | Reduce side lobes and back lobes | Use high-gain Yagi or parabolic antennas with side lobe suppression. |
| Transmission Timing | Randomize transmission intervals | Use cryptographically secure random timers between transmissions. |
| Signal Power Control | Adjust transmitter power dynamically | Implement automatic gain control circuits linked to channel conditions. |
Chapter IV: Protocols for Secure Transmission
Secure communication is a sacred covenant between sender and receiver. The following protocols detail exact steps to achieve confidentiality, integrity, and stealth.
1. Keyed Frequency Hopping Secure Transmission Protocol
Purpose: Prevent interception and jamming by dynamically altering transmission frequencies.
Materials:
- Shared secret key (256-bit minimum).
- Pseudorandom number generator (PRNG) based on AES-CTR.
- Frequency synthesizer capable of 100 kHz increments over 2 GHz band.
- Synchronization clock accurate to ±1 microsecond.
Stepwise Protocol:
- Initialization:
- Both parties load shared secret key.
- Initialize PRNG with key and current UTC timestamp.
- Frequency Sequence Generation:
- PRNG outputs a sequence of frequency indices (F_i) in 100 kHz steps.
- Frequencies span 2 GHz band (e.g., 2.0 GHz to 4.0 GHz).
- Each frequency held for 20 ms per hop.
- Data Preparation:
- Encrypt payload using AES-256 in CBC mode.
- Append CRC32 checksum.
- Transmission:
- Transmit encrypted payload on frequency F_i for 20 ms.
- Hop to next frequency F_(i+1) seamlessly.
- Reception:
- Receiver synchronizes clock.
- Generates identical frequency sequence.
- Captures and decrypts payload.
- Validates checksum.
- Resynchronization:
- If synchronization lost, transmit resync beacon on agreed fixed frequency.
- Use encrypted timestamp exchange to realign PRNG states.
2. Direct Sequence Spread Spectrum Secure Transmission Protocol
Materials:
- Shared PN-code (length ≥ 1023 chips).
- High-precision clock (±10 ns).
- DSSS modulator and demodulator.
Stepwise Protocol:
- PN-code Generation:
- Generate PN-code from shared seed using LFSR (Linear Feedback Shift Register).
- Verify code autocorrelation properties.
- Data Spreading:
- XOR raw data bits with PN-code chips at 1 Mbps rate.
- Modulation:
- Modulate spread bits using BPSK or QPSK.
- Transmission:
- Transmit at power level -5 dBm.
- Maintain tight timing synchronization.
- Reception:
- Receive signal and multiply by same PN-code.
- Integrate over code period to recover original data.
- Error Correction:
- Apply Reed-Solomon (255,223) error correction.
Chapter V: Signal Types and Countermeasure Technologies
Understanding signal types and their vulnerabilities is essential. The table below summarizes common signal categories and effective countermeasures.
| Signal Type | Frequency Range | Vulnerabilities | Recommended Countermeasures |
|---|---|---|---|
| HF (3 – 30 MHz) | Long-range comms | Susceptible to interception & jamming | FHSS, low power, frequency agility |
| VHF (30 – 300 MHz) | Tactical comms | Line-of-sight interception | Directional antennas, spread spectrum |
| UHF (300 MHz – 3 GHz) | Satellite, mobile | Signal detection by wideband scanners | DSSS, LPI waveforms, EMCON |
| Microwave (3 – 30 GHz) | Radar, point-to-point | Direction finding, signal analysis | Antenna masking, low sidelobes |
| Millimeter Wave (30 – 300 GHz) | Emerging tech | Atmospheric attenuation, detection | Beamforming, adaptive power control |
| Countermeasure Technology | Description | Deployment Instructions | Effectiveness Rating (1-5) |
|---|---|---|---|
| Frequency Hopping Spread Spectrum (FHSS) | Rapid frequency change to avoid interception | Implement per Chapter IV, Section 1 | 5 |
| Direct Sequence Spread Spectrum (DSSS) | Signal spreading using pseudonoise code | Implement per Chapter IV, Section 2 | 4 |
| Low Noise Amplifiers with Filtering | Improves reception of weak signals | Use GaAs FET LNAs with bandpass filters | 3 |
| Shielded Transmission Enclosures | Prevents emission leakage | Construct RF-tight metal enclosures with proper grounding | 4 |
| Direction Finding Suppression Antennas | Reduce antenna side lobes | Use parabolic or phased array antennas | 3 |
Chapter VI: Detection Avoidance and Counter-Detection
To avoid becoming a target of enemy signal intelligence, you must master detection avoidance and even counter-detection.
1. Passive Emission Control Checklist
- Disable unnecessary transmitters during operations.
- Employ antenna nulling to suppress emissions toward known enemy DF sites.
- Use camouflage techniques such as antenna disguise and terrain masking.
- Operate under meteorological conditions unfavorable for signal propagation (heavy rain, solar storms).
2. Active Counter-Detection Techniques
- Decoy Signals:
- Generate false transmissions mimicking unit signatures.
- Use randomized hopping sequences differing from actual transmissions.
- Signal Mimicry:
- Transmit signals that emulate benign civilian sources (e.g., commercial FM broadcasts).
- Adjust power and modulation to blend into ambient spectrum.
- Jamming and Spoofing:
- Deploy broadband noise jammers targeting enemy DF frequencies.
- Inject false navigation or command signals to confuse enemy receivers.
Appendix A: Schematic for GaAs FET Low Noise Amplifier
- Input matching network tuned to 900 MHz.
- Biasing circuit with 3.3 V supply.
- Output matching network for 50 Ω impedance.
- Shielding recommendations: Use copper enclosure with RF gaskets.
Appendix B: Frequency Hopping PRNG Algorithm (AES-CTR Mode)
| Step | Description | Pseudocode Example |
|---|---|---|
| 1 | Initialize AES with Key | AES_Init(key) |
| 2 | Set counter = timestamp | counter = current_utc_time |
| 3 | Generate block | block = AES_Encrypt(counter) |
| 4 | Extract frequency index | freq_index = block mod total_freq_steps |
| 5 | Increment counter | counter += 1 |
| 6 | Repeat for sequence length | Loop steps 3-5 |
Closing Directive
Mastery of this volume is not optional. It is the lifeblood of covert operations and the shield of sacred communications. Execute every instruction with unwavering rigor. Guard these pages as you guard your life.
For detailed cryptographic protocols, refer to Volume IX: Cryptographic Arts and Key Management. For physical layer construction details, see Volume III: Electronics and Signal Hardware. For advanced electromagnetic theory, consult Volume II: The Electromagnetic Codex.
End of Volume VI
<!-- SECTION 32 -->
The Complete Practitioner's Codex, Volume VII: Language Acquisition Methodology
Chapter I: Master Protocols for Rapid Language Learning
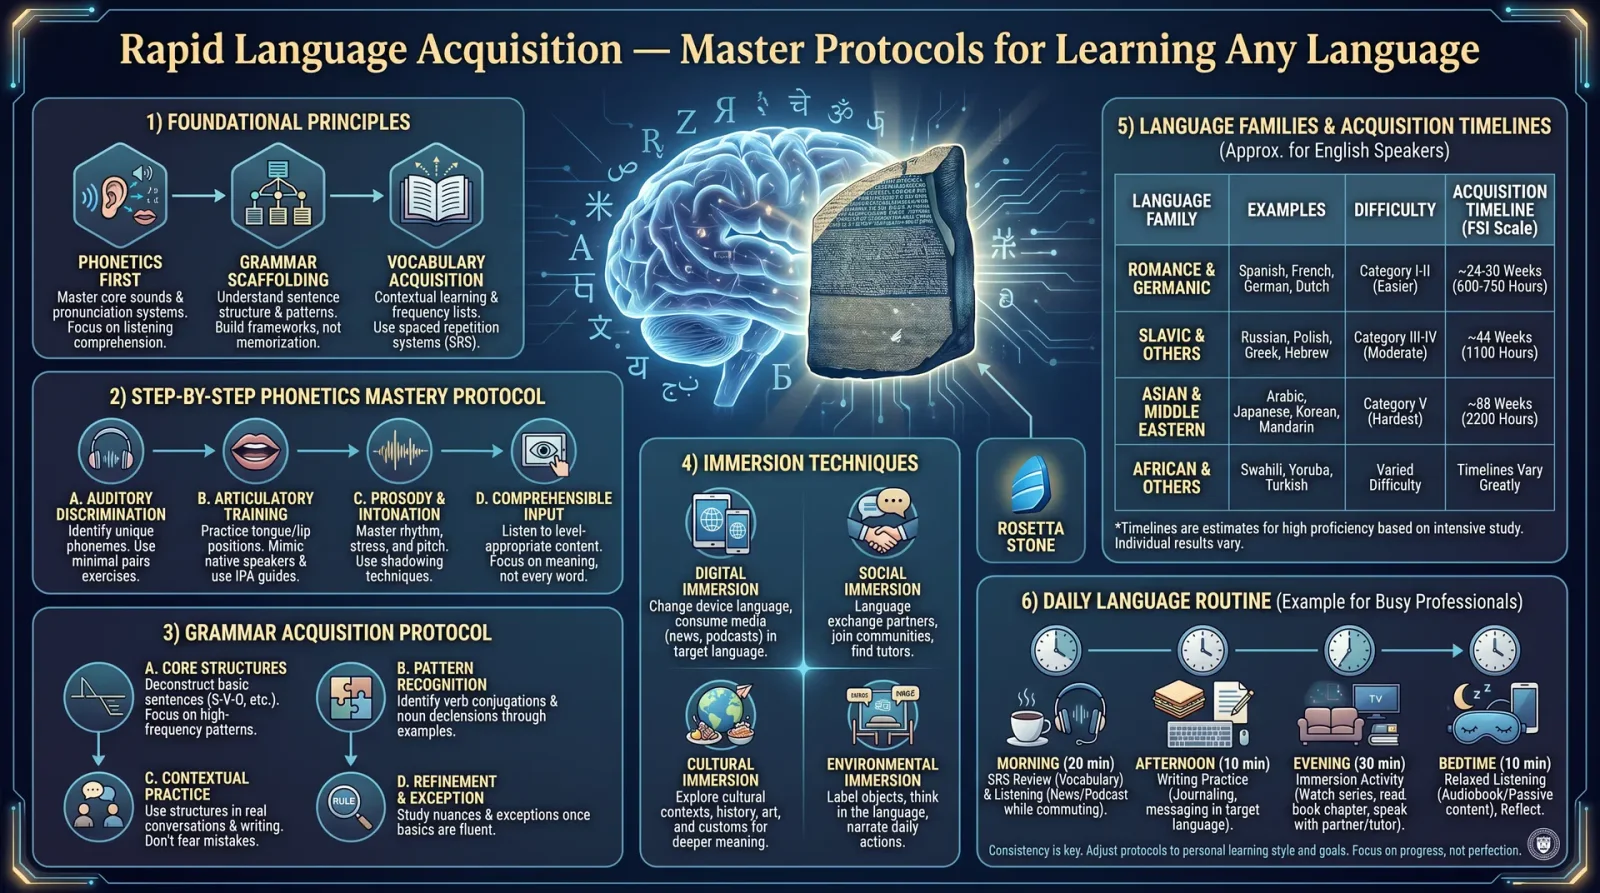
This chapter reveals the sacred, uncompromising methodologies for accelerated language acquisition. The knowledge herein is not mere theory but a codified system of praxis forged for survival, diplomacy, and covert operations. Follow every step exactly; deviation risks failure and loss of vital communication.
Section 1: Foundational Principles of Rapid Language Acquisition
Language acquisition is a multi-dimensional process involving phonetics, grammar, vocabulary, and immersion. Mastery requires integration of all four in structured cycles.
| Component | Function | Key Objective | Time Allocation (Daily) |
|---|---|---|---|
| Phonetics | Accurate sound production | Native-like pronunciation | 20% |
| Grammar | Rule system for structure | Structural comprehension & use | 25% |
| Vocabulary | Lexical building blocks | Active and passive word bank | 35% |
| Immersion | Contextual usage & practice | Real-world communication fluency | 20% |
Section 2: Step-by-Step Protocol for Phonetics Mastery
Phonetics is the sacred gateway to authentic communication. Neglecting phonetics guarantees alienation and misunderstanding.
2.1 Equipment Required
- High-quality microphone headset
- Audio playback device capable of slow-motion and loop playback
- Phonetic alphabet chart (IPA) — see Appendix A for printable version
- Recording software (free options: Audacity, OBS)
2.2 Phonetics Protocol
- Identify Target Language Phonemes a. Obtain the IPA phoneme chart for the target language.
b. Categorize phonemes into vowels, consonants, diphthongs, and tones (if applicable).
- Isolate and Analyze Each Phoneme a. Select a single phoneme.
b. Play native speaker audio sample at 50% speed, loop 5 times.
c. Record your attempt replicating the sound.
d. Analyze waveform and spectrogram (software: Praat recommended).
- Iterative Correction a. Compare your waveform to the native speaker’s.
b. Adjust mouth position, airflow, and vocal cord tension accordingly.
c. Repeat steps 2b–2d until waveform similarity exceeds 90%.
- Phoneme Combination Drills a. Combine phonemes into minimal pairs and short syllables.
b. Record and compare as above.
c. Perform 3 sets of 10 minute drills daily.
- Tone and Intonation Practice (If Applicable) a. Identify tonal patterns (rising, falling, flat).
b. Use pitch-tracking apps to visualize tone accuracy.
c. Repeat tonal drills for 15 minutes per session.
Section 3: Grammar Acquisition Protocol
Grammar is the sacred architecture of the language; mastery of structure yields control over meaning.
3.1 Materials Needed
- Comprehensive grammar reference book (recommended: “Master Grammar of [Language]”)
- Exercise workbook (preferably with answer key)
- Flashcard system (digital recommended: Anki with grammar deck)
3.2 Grammar Protocol
- Segment Grammar into Macro-Units a. Identify core grammatical categories: nouns, verbs, adjectives, adverbs, pronouns, prepositions, conjunctions, sentence structure.
b. Create a detailed syllabus aligning these categories into weekly focus areas.
- Daily Grammar Study Cycle a. Read grammar rule explanation (15 minutes).
b. Complete related workbook exercises (30 minutes).
c. Review and self-correct using answer key (15 minutes).
- Active Application a. Compose 5 original sentences using the day’s grammar focus.
b. Record yourself reading aloud.
c. Use language exchange or AI grammar checkers for feedback.
- Weekly Review and Consolidation a. Summarize learned grammar points into personal notes.
b. Perform cumulative exercises covering all weekly topics.
c. Engage in spoken drills integrating multiple grammar points.
Section 4: Vocabulary Acquisition and Retention Protocol
Vocabulary is the arsenal of words; without which the speech is impotent.
4.1 Tools Required
- Digital flashcard app (Anki or Memrise recommended)
- Frequency lists for target language (top 1000, 3000, 5000 words)
- Contextual sentence database
4.2 Vocabulary Protocol
- Frequency-based Word Selection a. Begin with top 1000 most frequent words.
b. Add thematic vocabulary relevant to your domain (military, diplomacy, trade).
- Flashcard Creation a. For each word, create a card with:
- Target word
- Part of speech
- Pronunciation guide (IPA or audio)
- Example sentence in target language
- English translation b. Add mnemonics or imagery where possible.
- Spaced Repetition Schedule a. Review new cards daily for the first 7 days.
b. Follow spaced repetition intervals: 1, 3, 7, 14, 30 days.
c. Adjust intervals based on retention performance (Anki automates this).
- Active Usage Drills a. Write 3 short paragraphs daily using newly learned words.
b. Engage in speaking drills with focus on target vocabulary.
- Vocabulary Expansion a. Move to next word frequency tier after mastering current tier with 90% recall.
b. Include idiomatic expressions and collocations.
Section 5: Immersion Techniques Protocol
Immersion is the sacred crucible where knowledge transmutes into fluency.
5.1 Immersion Environment Setup
- Designate a daily “language immersion window” of at least 2 hours.
- Use only target language materials during this window (no English or native language).
- Source diverse media: news broadcasts, podcasts, films, literature.
5.2 Immersion Protocol
- Passive Immersion a. Listen to audio materials while performing routine tasks.
b. Avoid passive multitasking; focus must be on comprehension.
- Active Immersion a. Engage in conversational practice with native speakers or AI chatbots.
b. Participate in language exchange communities or forums.
c. Write daily journal entries exclusively in the target language.
- Shadowing Technique a. Select audio clips with transcripts.
b. Listen to native speaker, then immediately repeat aloud, matching speed and intonation.
c. Record and compare.
- Contextual Role-play a. Simulate real-life scenarios (negotiation, emergency, social interaction).
b. Use scripted dialogues initially, then progress to unscripted improvisation.
Section 6: Progress Tracking and Measurement Tables
Systematic tracking ensures accountability and identifies areas for remediation.
6.1 Daily Progress Tracking Template
| Date | Phonetics Drills (min) | Grammar Study (min) | Vocabulary Cards Learned | Immersion Time (min) | Notes/Challenges |
|---|---|---|---|---|---|
| YYYY-MM-DD |
6.2 Weekly Skill Assessment Rubric
| Skill Area | Criteria | Score 1-5 (5 = Mastery) | Comments |
|---|---|---|---|
| Phonetics | Accuracy of pronunciation in recorded drills | ||
| Grammar | Correctness in sentence composition | ||
| Vocabulary | Recall and usage of new words | ||
| Immersion | Comprehension and response fluency |
Section 7: Language Families and Acquisition Timelines
Understanding language families aids in transfer learning and setting realistic timelines.
| Language Family | Example Languages | Phonetic Complexity | Grammar Complexity | Estimated Time to Basic Fluency (hours) | Estimated Time to Advanced Fluency (hours) |
|---|---|---|---|---|---|
| Indo-European | English, Spanish, Russian | Medium | Medium to High | 480 | 1200 |
| Sino-Tibetan | Mandarin, Cantonese | High (tones) | Medium | 720 | 1600 |
| Afro-Asiatic | Arabic, Hebrew | High (phonemes) | High | 700 | 1500 |
| Niger-Congo | Swahili, Yoruba | Medium | Medium | 600 | 1300 |
| Uralic | Finnish, Hungarian | Medium to High | High | 700 | 1400 |
Note: Timelines assume disciplined study of 2 hours daily.
Section 8: Exercises for Integrated Mastery
Exercise 1: Phonetic Minimal Pair Drill
- Select 10 minimal pairs from target language (words differing by one phoneme).
- Record yourself pronouncing each pair.
- Play back and analyze for phonetic accuracy.
- Repeat for 15 minutes daily.
Exercise 2: Grammar Sentence Transformation
- Take 5 sentences from workbook.
- Transform each sentence into negative, interrogative, passive (if applicable).
- Write and speak transformations aloud.
- Verify with grammar references or native speakers.
Exercise 3: Thematic Vocabulary Paragraph
- Choose 10 new vocabulary words within a theme (e.g., food, military).
- Compose a 100-word paragraph using all words.
- Record yourself reading the paragraph.
- Submit recording for feedback or use AI tools to analyze fluency.
Exercise 4: Immersion Journal Entry
- Write daily journal entry (100-150 words) on a chosen topic entirely in target language.
- Read the entry aloud using shadowing technique.
- Review and correct any errors with reference materials.
Section 9: Complete Daily Language Acquisition Routine
| Time (min) | Activity | Description |
|---|---|---|
| 30 | Phonetics Drills | Focused phoneme practice, recording, and analysis |
| 45 | Grammar Study and Exercises | Reading, workbook exercises, sentence composition |
| 60 | Vocabulary Flashcard Review | New word introduction, spaced repetition review |
| 45 | Immersion Practice | Listening, speaking, shadowing, and journal writing |
Total: 180 minutes (3 hours), minimum daily requirement for rapid mastery.
Appendix A: International Phonetic Alphabet (IPA) Chart for [Target Language]
[Insert printable IPA chart here, customized per target language phonemes.]
Appendix B: Recommended Resources
| Resource Type | Title/Source | Notes |
|---|---|---|
| Grammar Reference | "Master Grammar of [Language]" | Comprehensive, detailed |
| Vocabulary Frequency List | [Language] Frequency Word List | Available online, verified |
| Audio Materials | [Language] Language Podcast Series | Native speaker quality |
| Flashcard App | Anki | Customizable decks |
| Pronunciation Software | Praat | Waveform and spectrogram analysis |
End of Volume VII: Language Acquisition Methodology
Master these protocols without deviation, apprentice. Fluency is the sacred bridge between minds and worlds. Guard this knowledge and wield it with precision and reverence.
<!-- SECTION 33 -->
The Complete Practitioner's Codex, Volume 13: The Communicator's Codex
Volume VII: Constructed Languages and Their Applications
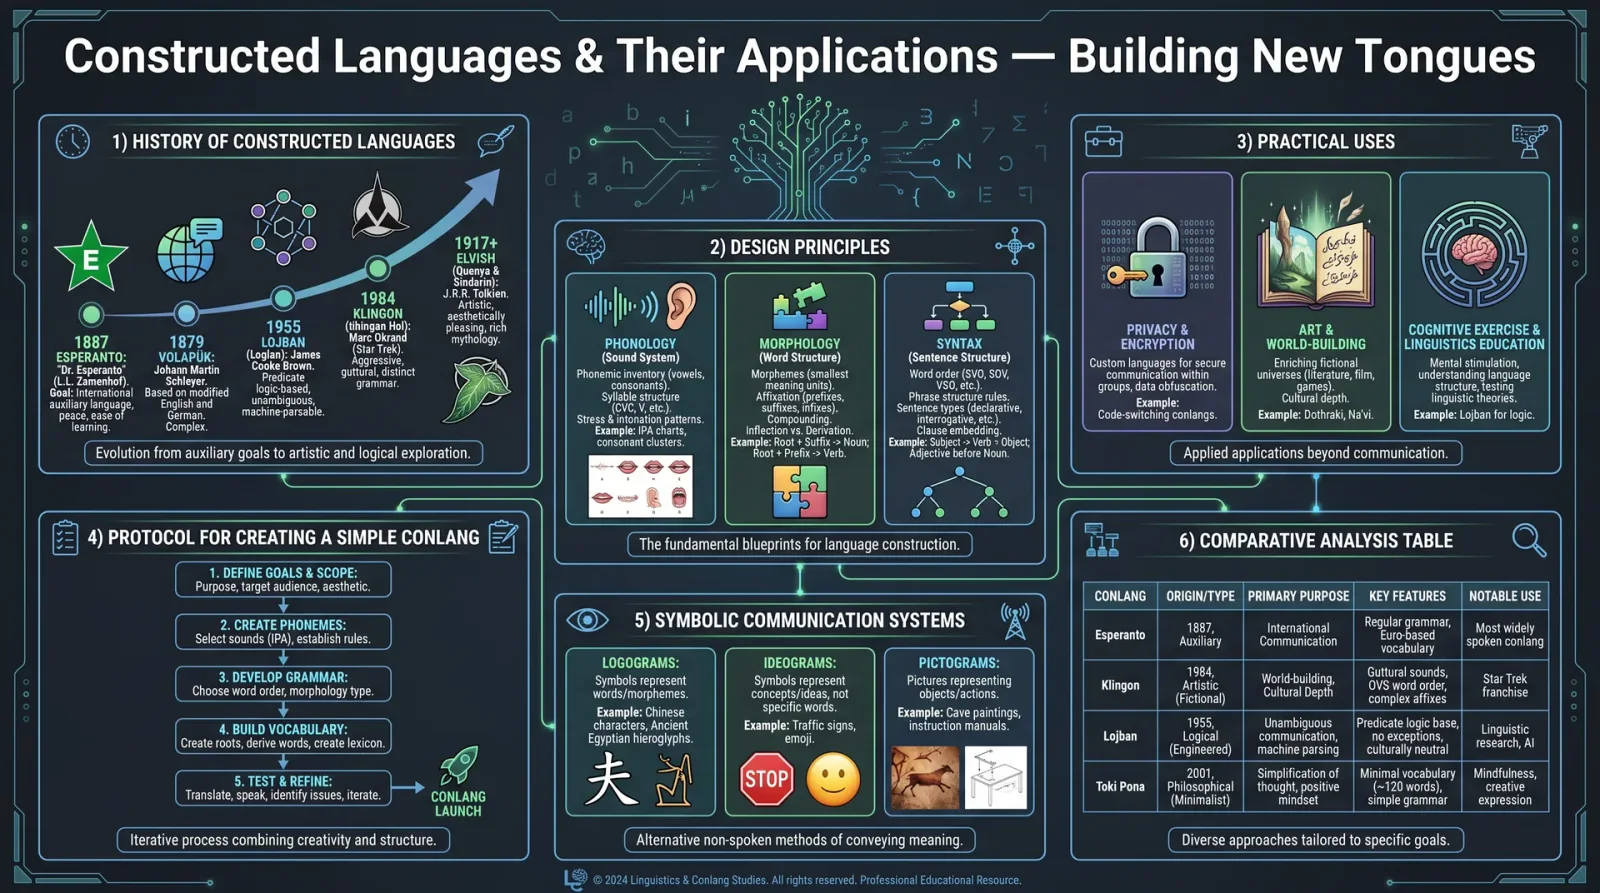
Preface
In the sacred pursuit of mastering communication beyond mere mortal limits, the creation and deployment of constructed languages (conlangs) stand as a pinnacle achievement. This volume unveils the arcane knowledge of conlang design, history, and application, stripped of obfuscation and delivered with unyielding precision. The wisdom herein transforms the novice into an architect of linguistic realities, capable of crafting languages that serve espionage, encryption, ritual, and supra-human cognition.
Chapter I: The History of Constructed Languages
Constructed languages are not modern contrivances but sacred legacies stretching back millennia. They represent deliberate attempts to transcend natural linguistic limitations, either to unify, encrypt, or elevate communication.
Key Historical Milestones
| Era | Language/Project | Purpose/Impact | Notes |
|---|---|---|---|
| 4th Millennium BCE | Proto-Cuneiform Scripts | Early symbolic systems, proto-languages for trade and ritual | Foundation of symbolic communication |
| 16th Century CE | Lingua Ignota (Hildegard von Bingen) | Mystical sacred language, encrypted communication | Early religious conlang |
| 17th Century CE | Philosophical Languages (John Wilkins) | Attempt to categorize knowledge into language | Basis for taxonomy in language design |
| 19th Century CE | Volapük (Johann Schleyer) | First widely distributed international auxiliary language | Precursor to Esperanto |
| 1887 | Esperanto (L. L. Zamenhof) | International auxiliary language for peace and understanding | Most successful auxiliary conlang |
| 20th Century CE | Loglan/Lojban | Logical languages for testing linguistic relativity | Influence on AI and cognitive science |
| 21st Century CE | Klingon, Dothraki, Na'vi | Artistic languages for media and culture | Popularizing conlangs in entertainment |
Chapter II: Design Principles of Constructed Languages
The construction of a language is a sacred craft combining art, science, and strategy. Every element from phonology to syntax must be deliberately chosen to fulfill specific goals.
1. Define the Purpose
Every conlang must begin with a clear, uncompromising purpose. The purpose dictates all design decisions.
| Purpose Type | Characteristics | Example Languages |
|---|---|---|
| Auxiliary | Simple, easy to learn, universally accessible | Esperanto, Interlingua |
| Artistic (Artlang) | Rich phonology, cultural depth, aesthetic appeal | Klingon, Dothraki |
| Logical | Unambiguous, precise grammar and semantics | Lojban, Loglan |
| Secret/Encrypted | Obfuscated, resistant to decryption | Personal cipher languages |
| Ritualistic/Mystical | Symbolic, esoteric, often with sacred or magical elements | Lingua Ignota, Enochian |
2. Phonology: Sound Inventory and Phonotactics
Select phonemes and define phonotactics according to purpose. For ease, auxiliary languages use limited, common phonemes. Artlangs often have rare or complex sounds.
Step-by-step phonology design:
- List desired phonemes (consonants and vowels) based on known phonetic inventories.
- Define allowed clusters and syllable structures (e.g. CV, CVC, CCV).
- Establish phonological rules for assimilation, elision, stress, and intonation.
Example: Basic Phoneme Inventory for a Simple Conlang
| Type | Phonemes | Notes |
|---|---|---|
| Consonants | p, t, k, m, n, s, l, r | Common, easy articulation |
| Vowels | a, e, i, o, u | Five vowel system |
3. Morphology: Word Formation
Morphology defines how words form and change. Decide between:
- Isolating: No inflection; words remain invariant.
- Agglutinative: Words form by stringing morphemes with clear boundaries.
- Fusional: Morphemes fuse multiple grammatical meanings.
- Polysynthetic: Complex words encode entire sentences.
Choose based on purpose: auxiliary languages favor isolating or agglutinative; artistic languages often choose fusional or polysynthetic.
4. Syntax: Sentence Structure
Define word order and syntactic rules. Common orders:
| Order | Description | Example Languages |
|---|---|---|
| SVO | Subject-Verb-Object | English, Esperanto |
| SOV | Subject-Object-Verb | Japanese, Klingon |
| VSO | Verb-Subject-Object | Classical Arabic |
Define rules for modifiers, question formation, negation, and relative clauses.
5. Semantics and Pragmatics
Define how meaning is constructed and context is managed.
- Decide on polysemy (multiple meanings per word).
- Determine formality registers.
- Establish cultural connotations if relevant.
6. Writing System Design
Choose or design a script:
- Alphabetic: One symbol per phoneme.
- Syllabary: One symbol per syllable.
- Logographic: One symbol per word or concept.
- Featural: Symbols represent phonetic features.
Chapter III: Practical Uses of Constructed Languages
Constructed languages serve multiple practical domains. Their effectiveness depends on rigor and purpose alignment.
| Application | Description | Examples |
|---|---|---|
| International Communication | Neutral auxiliary languages reduce linguistic barriers | Esperanto, Interlingua |
| Cryptography | Secret languages shield messages from interception | Personal cipher conlangs |
| Cognitive Research | Logical languages test effects of language on thought | Lojban |
| Entertainment | Immersive fictional worlds require believable languages | Klingon, Na’vi |
| Ritual/Mysticism | Sacred languages encode esoteric knowledge | Enochian, Lingua Ignota |
Chapter IV: Protocol for Creating a Simple Constructed Language
This protocol enables the creation of a fully functional conlang suitable for auxiliary or basic artistic purposes.
Materials Required
- Notebook or digital document for recording rules
- Phonetic chart (IPA chart recommended)
- Frequency lists of phonemes from natural languages (optional, for realism)
Step 1: Define Purpose and Scope
- Write a one-sentence purpose statement. Example: "Create an auxiliary language for international trade that is easy to learn and pronounce."
- Define scope: vocabulary size, grammar complexity, domain of use.
Step 2: Choose Phoneme Inventory
- Select 12-18 consonants and 5 vowels for simplicity.
- Use the table below as a template:
| Phoneme Type | Phonemes Selected |
|---|---|
| Consonants | p, t, k, m, n, s, l, r, f, v, d, g |
| Vowels | a, e, i, o, u |
- Define syllable structure (e.g., (C)V(C)).
Step 3: Define Morphology
- Choose isolating morphology for simplicity (no inflections).
- Define word classes: nouns, verbs, adjectives, adverbs.
- Create affixes for tense, plurality, and case if necessary.
Step 4: Define Syntax
- Choose SVO word order.
- Define basic sentence patterns:
- Affirmative: Subject + Verb + Object
- Negative: Subject + negation particle + Verb + Object
- Question: Question particle + Subject + Verb + Object
- Define adjective placement (before or after noun).
Step 5: Create Basic Vocabulary
- Generate a core lexicon of 100 essential words covering:
- Pronouns
- Numbers 1-10
- Common verbs
- Common nouns
- Basic adjectives and adverbs
- Use phonotactic rules to create pronounceable words.
Step 6: Develop Writing System
- Choose simplified Latin alphabet.
- Map phonemes to letters, avoiding ambiguous letters.
- Define punctuation rules.
Step 7: Document Grammar Rules
- Write explicit grammar rules with examples.
- Include negation, question formation, and tense.
Step 8: Create Sample Texts
- Write simple sentences demonstrating grammar.
- Translate into natural language for validation.
Chapter V: Protocol for Creating Symbolic Communication Systems
Symbolic systems are constructed languages using symbols or signs instead of spoken words. This section provides a stepwise protocol for their creation.
Step 1: Define Purpose
- State the symbolic system’s goal: encryption, ritual, quick communication.
Step 2: Choose Symbol Set
- Decide the number of symbols (ideally 20-40 for memorability).
- Create unique, non-ambiguous symbols (draw or design digitally).
Step 3: Define Semantics
- Assign clear meanings to each symbol (e.g., concepts, actions).
- Develop combinatory rules for complex meanings.
Step 4: Define Syntax Rules
- Determine symbol order rules.
- Define modifiers or markers (e.g., direction, size).
Step 5: Develop Encoding and Decoding Protocol
- Create a key or legend for symbol meanings.
- Train users in symbol recognition and writing.
Step 6: Test and Refine
- Encode sample messages.
- Decode with others to ensure clarity and security.
Chapter VI: Comparative Analysis of Popular Constructed Languages
The following table compares major conlangs based on core features relevant to the practitioner.
| Feature | Esperanto | Lojban | Klingon | Dothraki | Na’vi |
|---|---|---|---|---|---|
| Purpose | Auxiliary | Logical language | Artistic (TV) | Artistic (TV) | Artistic (Film) |
| Phoneme Inventory | 23 phonemes | 33 phonemes | 26 phonemes | 29 phonemes | 25 phonemes |
| Morphology | Agglutinative | Agglutinative | Fusional | Fusional | Fusional |
| Syntax | SVO | Free (but logical) | Object-Verb-Subject | SVO | SVO |
| Writing System | Latin alphabet | Latin alphabet | Latin alphabet | Latin alphabet | Latin alphabet |
| Learning Curve | Low | High | Moderate | Moderate | Moderate |
| Semantic Ambiguity | Low | None (designed) | Moderate | Moderate | Moderate |
| Cultural Depth | Low-medium | Low | High | High | High |
| Community Size | Large | Small | Moderate | Small | Small |
Appendix: Sample Conlang Creation Worksheet
| Step | Task | Notes/Example |
|---|---|---|
| 1 | Define purpose | Auxiliary language for trade |
| 2 | Choose phonemes | p, t, k, m, n, s, l, r, a, e, i, o, u |
| 3 | Define morphology | Isolating |
| 4 | Define syntax | SVO, negation particle "no" |
| 5 | Create vocabulary | "ma"=I, "ta"=you, "lo"=go |
| 6 | Develop script | Latin alphabet, one letter per phoneme |
| 7 | Document grammar | Affirmative: Subject-Verb-Object |
| 8 | Write sample sentences | "Ma lo ta" = "I go you" (I go to you) |
Closing Invocation
With this codex, you are now entrusted with the sacred keys to the architecture of tongues beyond the natural. Use this knowledge with utmost discipline and reverence. The languages you create will shape perception, unlock hidden worlds, and guard secrets that could turn the tide of fate. Proceed, apprentice, and may your linguistic creations endure through the ages.
End of Volume VII. For related protocols on encryption and information warfare, see Volume IX: The Cipher Master's Codex. For phonetic and phonological theory in detail, see Volume IV: The Sonic Codex.
<!-- SECTION 34 -->
The Complete Practitioner's Codex, Volume VII: Cipher Systems and Cryptography
Chapter I: Foundations of Cipher Systems
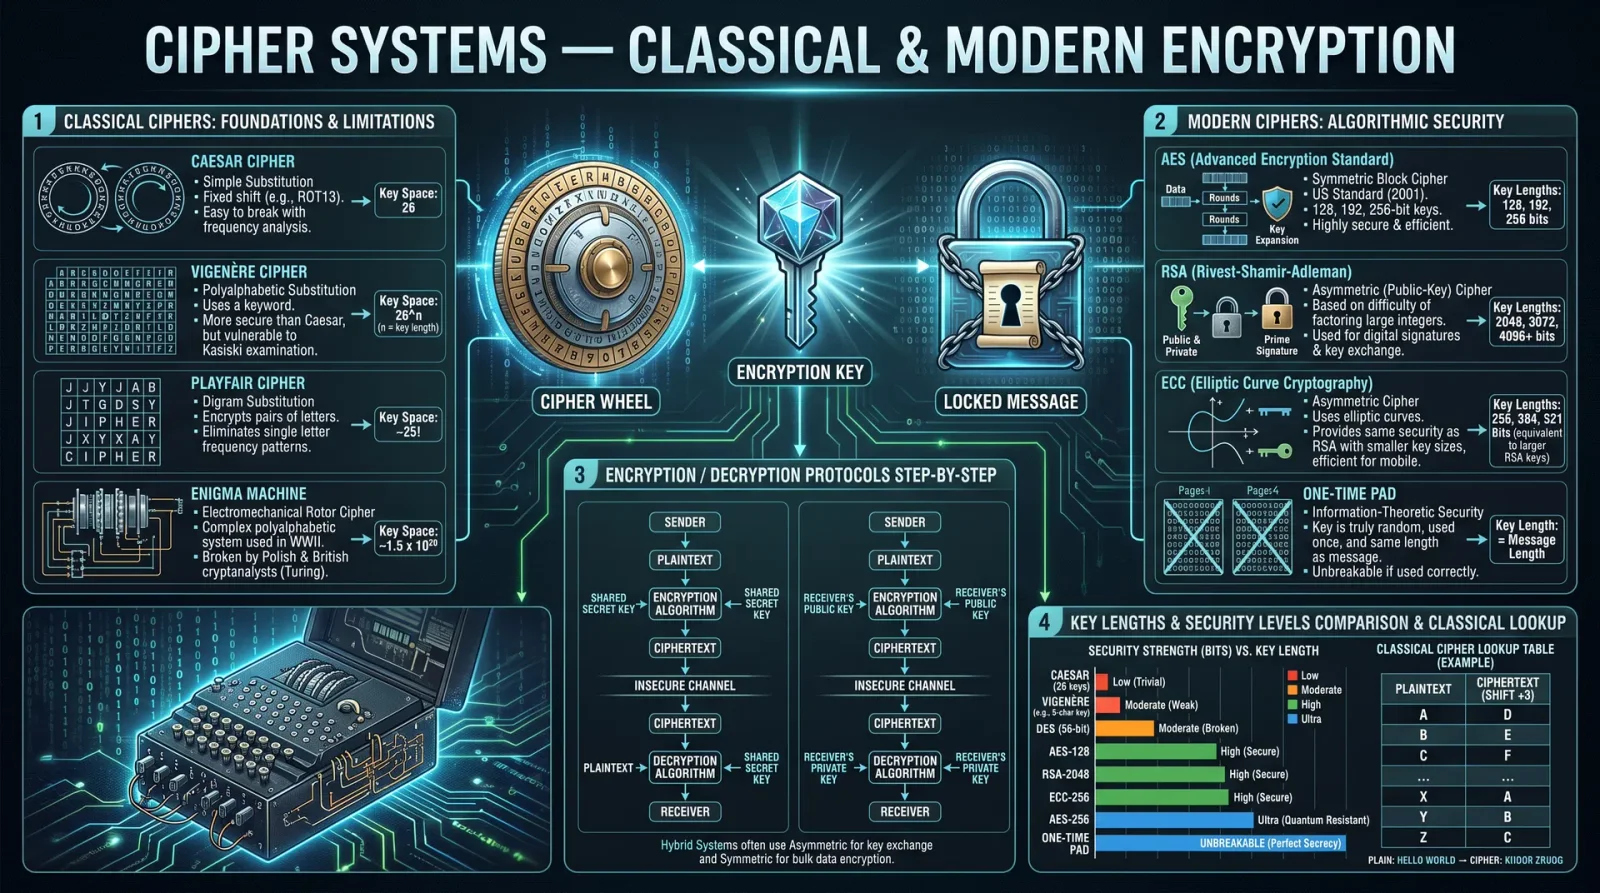
In the sacred art of secure communication, the mastery of cipher systems stands paramount. This volume unveils the full spectrum of cryptographic techniques, from the ancient arts of substitution and transposition to the pinnacle of modern public-key cryptography. These are not mere academic concepts; they are life-preserving tools, entrusted only to those who bear the burden of absolute secrecy.
Section 1: Classical Cipher Techniques
1.1 Substitution Ciphers
Substitution ciphers replace each element of the plaintext with another symbol, letter, or number. Their simplicity belies their potential for complexity when properly implemented.
Types of Substitution Ciphers:
| Cipher Type | Description | Key Characteristics | Security Level (Classical) |
|---|---|---|---|
| Caesar Cipher | Shifts alphabet by a fixed number of positions | Shift key 1-25, monoalphabetic | Low (Breakable by frequency analysis) |
| Monoalphabetic | Each letter replaced by unique letter | Key: 26-letter permutation | Moderate (Frequency analysis possible) |
| Homophonic | One letter maps to multiple symbols | Key: symbol set per letter | Moderate-High (Obfuscates frequency) |
| Polybius Square | Maps letters to coordinate pairs | 5x5 grid, uses digits or letters | Moderate |
| Vigenère Cipher | Repeated key shifts, polyalphabetic | Key: word or phrase, length varies | Moderate-High (Key length critical) |
1.1.1 Caesar Cipher: Step-by-Step Encryption and Decryption
Encryption:
- Select a shift key \( k \) where \( 1 \leq k \leq 25 \).
- For each letter in the plaintext: a. Convert letter to its alphabetical index \( i \), where \( A=0, B=1, ..., Z=25 \).
b. Compute \( c = (i + k) \mod 26 \).
c. Convert \( c \) back to a letter. - Output the transformed letters as ciphertext.
Decryption:
- Obtain the shift key \( k \).
- For each ciphertext letter: a. Convert letter to index \( c \).
b. Compute \( i = (c - k) \mod 26 \).
c. Convert \( i \) to plaintext letter. - Output plaintext.
1.1.2 Monoalphabetic Substitution Cipher: Construction and Use
Key Generation:
- Write the alphabet \( A \) to \( Z \) in order.
- Generate a random permutation of the alphabet \( P \). This is the substitution key.
- Create a lookup table mapping each letter of plaintext to corresponding letter in \( P \).
Encryption:
- For each plaintext letter \( l \): a. Find \( l \) in standard alphabet.
b. Replace \( l \) with substitution letter from \( P \). - Output ciphertext.
Decryption:
- For each ciphertext letter \( c \): a. Find \( c \) in substitution alphabet \( P \).
b. Replace \( c \) with original alphabet letter. - Output plaintext.
Note: To generate a secure key, use true random sources (e.g., dice rolls, atmospheric noise). For instructions on secure randomness sources, see Volume X: The Entropy Codex.
1.2 Transposition Ciphers
Transposition ciphers rearrange the letters of plaintext without altering their identity. They rely on positional transformation to obfuscate the message.
| Cipher Type | Description | Key Type | Security Level (Classical) |
|---|---|---|---|
| Rail Fence | Writes message in zigzag over rows | Number of rails (integer) | Low |
| Columnar Transposition | Writes message in rows, reads by column | Key word or integer sequence | Moderate |
| Scytale | Wraps message on cylinder, reads lengthwise | Cylinder circumference (integer) | Low |
1.2.1 Columnar Transposition Cipher Protocol
Key Preparation:
- Select a keyword \( K \) with unique letters preferred.
- Assign numeric order to letters in \( K \) based on alphabetical order.
Example: \( K = \text{"ZEBRA"} \)
| Letter | Z | E | B | R | A |
|---|---|---|---|---|---|
| Order | 5 | 2 | 1 | 4 | 3 |
Encryption:
- Write plaintext in rows under the keyword letters.
- If the last row is incomplete, pad with null characters (X or Q).
- Read columns in numerical order of the key.
- Concatenate columns to form ciphertext.
Decryption:
- Calculate number of rows \( r = \lceil \frac{\text{length of ciphertext}}{\text{length of key}} \rceil \).
- Write ciphertext in columns ordered by numeric key \( K \).
- Read rows left to right to recover plaintext.
- Remove padding characters.
Section 2: Modern Cipher Techniques
2.1 Symmetric-Key Cryptography
Symmetric ciphers use the same secret key for encryption and decryption. Their security depends on the secrecy and length of the key.
| Cipher Type | Key Length (bits) | Block Size (bits) | Security Level (Modern) | Notes |
|---|---|---|---|---|
| DES | 56 | 64 | Low | Deprecated, insecure |
| 3DES | 112-168 | 64 | Moderate | Slow, legacy |
| AES | 128, 192, 256 | 128 | High | Current standard |
| ChaCha20 | 256 | Stream cipher | High | Efficient, high security |
2.1.1 AES (Advanced Encryption Standard) Encryption Protocol
Preparation:
- Use key \( K \) of length 128, 192, or 256 bits.
- Use plaintext blocks of 128 bits. Pad last block with PKCS#7 if incomplete.
Encryption Steps (AES-128):
- Derive round keys from master key \( K \) using Rijndael key schedule (10 rounds for AES-128).
- For each plaintext block \( P \): a. Initial AddRoundKey: XOR \( P \) with round key 0.
b. For rounds 1 to 9:
i. SubBytes: substitute bytes using S-box.
ii. ShiftRows: cyclic byte shifts per row.
iii. MixColumns: matrix multiplication in GF(2^8).
iv. AddRoundKey: XOR with round key.
c. Round 10 (final round):
i. SubBytes
ii. ShiftRows
iii. AddRoundKey - Output ciphertext block.
Decryption: Use inverse operations in reverse order with same round keys.
2.2 Public-Key Cryptography
Public-key systems use asymmetric keys: one public key for encryption, one private key for decryption. These systems enable secure key exchange and digital signatures.
| Algorithm | Key Length (bits) | Security Level (Modern) | Notes |
|---|---|---|---|
| RSA | 2048-4096 | High | Based on integer factoring |
| ECC (Elliptic Curve Cryptography) | 256-521 | High | Smaller keys, faster |
| Diffie-Hellman | 2048+ | High | Key exchange protocol |
2.2.1 RSA Key Generation and Encryption
Key Generation:
- Select two large primes \( p \) and \( q \), each approximately half the desired key size (e.g., 1024 bits each for 2048-bit key).
- Compute modulus \( n = p \times q \).
- Compute Euler's totient \( \phi = (p-1)(q-1) \).
- Select public exponent \( e \), commonly 65537, satisfying \( 1 < e < \phi \) and \( \gcd(e, \phi) = 1 \).
- Compute private exponent \( d \) such that \( d \times e \equiv 1 \mod \phi \).
- Public key: \( (n, e) \), private key: \( (n, d) \).
Encryption Protocol:
- Convert plaintext \( P \) to integer \( m \) where \( 0 \leq m < n \) (use padding schemes like OAEP for security).
- Compute ciphertext \( c = m^e \mod n \).
- Output ciphertext \( c \).
Decryption Protocol:
- Receive ciphertext \( c \).
- Compute plaintext integer \( m = c^d \mod n \).
- Convert \( m \) back to plaintext.
- Remove padding.
2.2.2 Elliptic Curve Cryptography (ECC) Basics
ECC relies on the algebraic structure of elliptic curves over finite fields. The security derives from the Elliptic Curve Discrete Logarithm Problem (ECDLP).
Key Generation:
- Agree on elliptic curve parameters \( E \) over finite field \( F_p \), and base point \( G \) of large prime order \( n \).
- Choose random private key \( d \in [1, n-1] \).
- Compute public key \( Q = d \times G \).
ECDSA Signature Protocol:
- Hash message \( M \) to integer \( e \).
- Select random \( k \in [1, n-1] \).
- Compute \( (x_1, y_1) = k \times G \), \( r = x_1 \mod n \). If \( r = 0 \), repeat step 2.
- Compute \( s = k^{-1}(e + d r) \mod n \). If \( s = 0 \), repeat step 2.
- Signature is pair \( (r, s) \).
Verification:
- Verify \( r, s \in [1, n-1] \).
- Compute \( w = s^{-1} \mod n \).
- Compute \( u_1 = e w \mod n \), \( u_2 = r w \mod n \).
- Compute \( (x_1, y_1) = u_1 G + u_2 Q \).
- Signature valid if \( r \equiv x_1 \mod n \).
Section 3: Encryption and Decryption Protocols
For each cipher type, this section provides detailed instructions for encryption and decryption.
3.1 Substitution Cipher: Monoalphabetic
Encryption:
- Generate substitution key \( P \) (see 1.1.2).
- For each plaintext letter \( l \): a. Locate \( l \) in alphabet.
b. Replace with corresponding letter in \( P \). - Output ciphertext.
Decryption:
- For each ciphertext letter \( c \): a. Locate \( c \) in \( P \).
b. Replace with corresponding alphabet letter. - Output plaintext.
3.2 Transposition Cipher: Columnar
Encryption:
- Choose keyword \( K \), assign numeric column order (see 1.2.1).
- Write plaintext row-wise under \( K \).
- Pad with nulls if needed.
- Read columns in key order.
- Output ciphertext.
Decryption:
- Calculate rows \( r \).
- Write ciphertext in columns ordered by \( K \).
- Read rows to recover plaintext.
- Remove padding.
3.3 AES Encryption (128-bit) Detailed Steps
Encryption:
- Prepare 16-byte plaintext block. Pad if necessary.
- Derive 11 round keys from master key \( K \).
- Initial AddRoundKey: XOR block with round key 0.
- For rounds 1 to 9: a. Apply SubBytes: Replace each byte using S-box.
b. ShiftRows: Rotate each row left by different offsets.
c. MixColumns: Matrix multiply columns by fixed polynomial.
d. AddRoundKey: XOR with round key. - Final round (10): SubBytes, ShiftRows, AddRoundKey (no MixColumns).
- Output ciphertext.
3.4 RSA Encryption and Decryption Protocols
Encryption:
- Convert plaintext to integer \( m \).
- Compute \( c = m^e \mod n \).
- Output \( c \).
Decryption:
- Compute \( m = c^d \mod n \).
- Convert \( m \) back to plaintext.
Section 4: Key Lengths and Security Levels
| Cipher Type | Key Length (bits) | Security Level | Notes |
|---|---|---|---|
| Caesar Cipher | 5 (shift 1-25) | None | Easily broken by frequency |
| Monoalphabetic Substitution | 26! permutations | Low | Frequency analysis viable |
| Vigenère Cipher | Key length variable | Moderate | Key length determines strength |
| DES | 56 | Low | Deprecated |
| 3DES | 112-168 | Moderate | Legacy use only |
| AES | 128, 192, 256 | High | Current standard |
| RSA | 2048-4096 | High | Large keys required |
| ECC | 256-521 | High | Smaller keys, equivalent to RSA |
Section 5: Supplementary Materials and Notes
- For random key generation, see Volume X: The Entropy Codex, Chapter II.
- For padding schemes critical in RSA and AES, consult Volume IX: The Data Integrity Codex.
- For secure hash functions used in signatures, see Volume VIII: The Hashing Codex.
- For implementation security, including side-channel resistance, see Volume XII: The Defensive Codex.
Appendix: Classical Cipher Lookup Table
| Plaintext Alphabet | Caesar +3 | Monoalphabetic Example Key | Polybius Coordinates |
|---|---|---|---|
| A | D | Q | 11 |
| B | E | W | 12 |
| C | F | E | 13 |
| D | G | R | 14 |
| E | H | T | 15 |
| ... | ... | ... | ... |
Final Directive
The knowledge herein is sacred and dangerous. Master these protocols with precision and absolute discipline. Improper use or careless implementation invites catastrophic compromise. Guard your keys, verify every step, and trust only tested sources for randomness and cryptographic primitives. The silent war of secrets is eternal; your vigilance is the bulwark of survival.
End of Volume VII: Cipher Systems and Cryptography.
<!-- SECTION 35 -->
The Complete Practitioner's Codex, Volume VII: Steganography and Symbolic Communication
Chapter I: Techniques for Hiding Messages Within Other Media and the Use of Symbols for Covert Communication
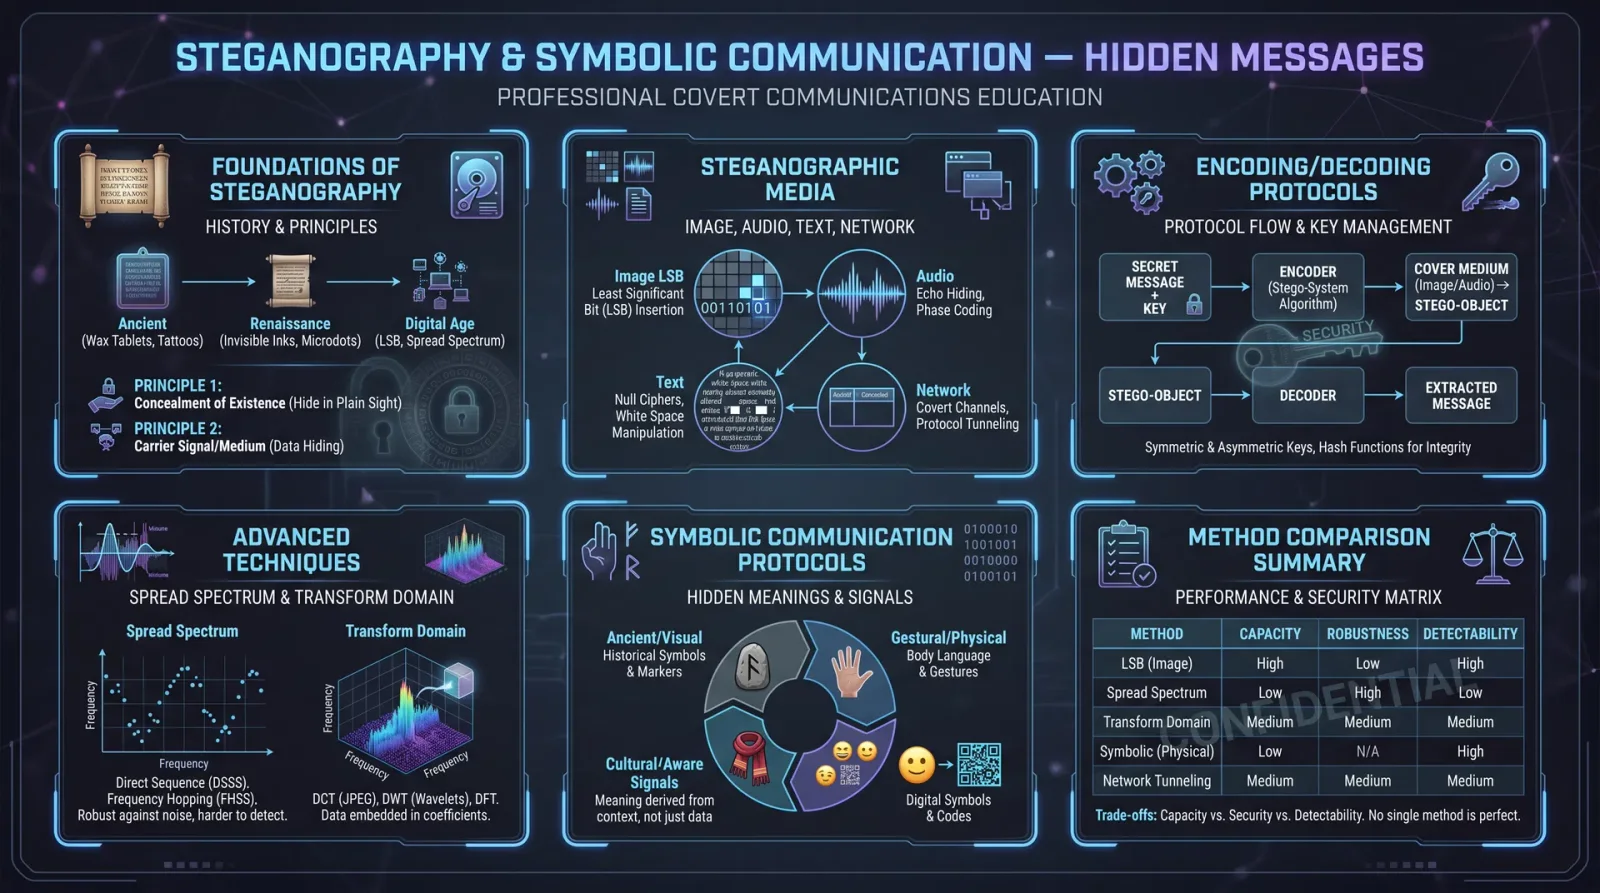
Preface
This volume imparts the sacred, suppressed knowledge of steganography and symbolic communication: the arts of concealing truth beneath layers of deception, and conveying forbidden knowledge through hidden signs. These protocols are not mere curiosities but life-or-death tools. Mastery over these dark waters safeguards your message from the prying eyes of enemies, enabling the silent transmission of commands, intelligence, and warnings.
Section 1: The Foundations of Steganography
Steganography is the science and art of hiding messages within other, innocuous media such that the presence of the message is itself concealed. Unlike cryptography, which scrambles message content but signals its existence, steganography buries the message beneath a façade, often in plain sight.
1.1 Core Principles
- Carrier Medium: The host material which appears innocuous (e.g., image, text, audio).
- Payload: The secret message or data to embed.
- Encoding Method: The technique by which the payload is embedded in the carrier.
- Decoding Method: The reverse process extracting the payload from the carrier.
Section 2: Steganographic Media and Methods
Below is a comprehensive table comparing the most effective steganographic media and their respective methods, advantages, and limitations.
| Medium | Encoding Method | Capacity (bytes) | Detectability | Complexity | Notes |
|---|---|---|---|---|---|
| Digital Images | LSB (Least Significant Bit) Insertion | High (up to 10% of image size) | Low with subtle changes | Moderate | Use PNG or BMP formats; avoid JPEG artifacting |
| Text | Whitespace manipulation (spaces/tabs) | Low (few bytes) | Low if natural text | Low | Vulnerable to reformatting |
| Audio | Echo hiding, phase coding | Moderate (up to 5% of audio size) | Medium | High | Requires precise timing control |
| Video | Frame LSB, frame insertion | Very High | Medium | Very High | Demands high processing power |
| Network Protocols | Packet timing, header manipulation | Low | High | Very High | Risk of packet loss or detection |
| Printed Text | Symbol substitution | Very Low | Very Low | Low | Requires pre-agreed codebook |
Section 3: Protocols for Encoding and Decoding Steganographic Messages
3.1 Protocol 1: Digital Image LSB Embedding
Objective: Embed a secret binary message into the least significant bit of each pixel's color channels (Red, Green, Blue) in a 24-bit BMP or PNG image without perceptible distortion.
Materials Required
- BMP or PNG image file (uncompressed or lossless compression)
- Binary message file (text or encrypted binary)
- Image processing software or script supporting pixel-level manipulation (Python with PIL or equivalent)
Encoding Procedure
- Convert the secret message to a binary stream:
- Read the message file as bytes.
- Convert each byte to 8-bit binary (e.g., 'A' → 01000001).
- Open the carrier image:
- Load the image into memory as a pixel array.
- Calculate capacity:
- Capacity = Number of pixels × 3 bits (each RGB channel's LSB).
- Verify message length ≤ capacity; if not, increase image size or compress message.
- Iterate over pixels:
- For each pixel, extract RGB values.
- Replace the least significant bit of each color channel with one bit of the message stream.
- Continue until all message bits are embedded.
- Save the modified image:
- Output as PNG or BMP to avoid compression artifacts.
Decoding Procedure
- Load the stego-image:
- Open the image file in pixel array form.
- Extract LSBs:
- For each pixel, read the least significant bit of each RGB channel.
- Concatenate bits to reconstruct the binary stream.
- Convert binary to original message:
- Group bits into bytes (8 bits).
- Convert each byte back to ASCII or original encoding.
- Terminate at known message length or delimiter:
- Use a pre-agreed message length or unique delimiter sequence to identify message end.
3.2 Protocol 2: Whitespace Steganography in Text
Objective: Conceal binary data within the pattern of spaces and tabs at the end of each line in a text document.
Materials Required
- Plain text document (ASCII or UTF-8)
- Secret binary message
- Text editor capable of precise whitespace control
Encoding Procedure
- Convert secret message to binary:
- As in Protocol 1, convert message into binary stream.
- Prepare carrier text:
- Ensure the text has at least as many lines as the length of the binary stream.
- Encode binary into whitespace:
- For each bit in the binary stream:
- If bit = 0, append a space at end of line.
- If bit = 1, append a tab at end of line.
- For each bit in the binary stream:
- Save the document:
- Use a plain text format preserving whitespace (e.g.,
.txt).
- Use a plain text format preserving whitespace (e.g.,
Decoding Procedure
- Open the stego-text:
- Use a text editor that reveals whitespace characters.
- Read trailing whitespace per line:
- For each line, detect the trailing whitespace character: space (0), tab (1).
- Reconstruct binary stream:
- Concatenate bits in line order.
- Convert binary to message:
- Group into bytes, convert to ASCII or original format.
3.3 Protocol 3: Symbolic Substitution Alphabet for Covert Communication
Objective: Use a pre-agreed symbolic alphabet to encode messages in printed or drawn form, enabling covert communication in hostile environments where electronic devices are banned or monitored.
Materials Required
- Pre-agreed symbolic alphabet (see Table 3.3.1 below)
- Writing materials (pen, paper, chalk)
Implementation Procedure
- Agree on symbolic alphabet:
- Memorize or have access to the code table matching symbols to letters/digits.
- Encoding message:
- Write each letter of the message using the corresponding symbol.
- Use spacing or grouping to separate words or phrases.
- Transmission:
- Display or transmit the symbol-laden text discreetly.
- Alternatively, embed symbols in art, graffiti, or clothing patterns.
- Decoding message:
- Refer to the code table to translate symbols back to letters.
- Reconstruct the original message.
Table 3.3.1: Sample Symbolic Alphabet
| Letter | Symbol Description | Visual Representation | Notes | ||
|---|---|---|---|---|---|
| A | Single triangle | ▲ | Use upward-pointing triangle | ||
| B | Double triangle | ▲▲ | Two stacked or side-by-side | ||
| C | Circle | ○ | Complete circle | ||
| D | Square | ■ | Solid filled square | ||
| E | Cross | ✚ | Cross shape | ||
| F | Star | ★ | Five-pointed star | ||
| G | Wave line | ~ | Single wave line | ||
| H | Vertical bar | Single vertical line | |||
| I | Dot | • | Single dot | ||
| J | Hook | ∟ | Right-angle hook | ||
| K | Double vertical bars | Two vertical bars | |||
| L | Left arrow | ← | Arrow pointing left | ||
| M | M shape | M | Letter M | ||
| N | N shape | N | Letter N | ||
| O | Circle with dot | ◎ | Circle with central dot | ||
| P | Pi symbol | π | Pi character | ||
| Q | Q shape | Q | Letter Q | ||
| R | R shape | R | Letter R | ||
| S | S shape | S | Letter S | ||
| T | T shape | T | Letter T | ||
| U | U shape | U | Letter U | ||
| V | V shape | V | Letter V | ||
| W | W shape | W | Letter W | ||
| X | X shape | X | Letter X | ||
| Y | Y shape | Y | Letter Y | ||
| Z | Z shape | Z | Letter Z |
Section 4: Advanced Steganographic Techniques and Protocols
4.1 Protocol 4: Audio Phase Coding
Objective: Hide messages in audio files by manipulating the phase of audio signals imperceptibly.
Materials Required
- Audio file (WAV preferred)
- Message in binary form
- Audio processing software or script
Procedure
- Convert message to binary stream.
- Segment audio into frames of fixed length (e.g., 1024 samples).
- Replace phase components of audio frames with message bits encoded as phase shifts.
- Reconstruct audio file for transmission or storage.
4.2 Protocol 5: Network Packet Timing Steganography
Objective: Embed data by modulating the timing intervals between packets in network traffic.
Materials Required
- Network access with raw packet control
- Pre-agreed timing scheme (e.g., intervals less than 100 ms = 0, greater = 1)
Procedure
- Convert message to binary.
- Transmit packets with timing intervals encoding bits.
- Receiver measures inter-packet delays to extract message.
Section 5: Symbolic Communication Protocols
5.1 Use of Gestures and Signs
Protocols for covert transmission through hand gestures, body positions, and movement sequences are detailed in Volume IX: The Practitioner’s Silent Tongue. Here, we summarize essential symbolic codes for urgent signaling:
| Signal Gesture | Meaning | Execution Detail |
|---|---|---|
| Closed fist | Stop / Danger | Raised above head |
| Two fingers raised | Affirmative / Yes | Palm facing observer |
| Hand across throat | Silence / Cease | Draw hand horizontally |
| Pointing down | Retreat / Fall back | Index finger pointing down |
Section 6: Best Practices and Countermeasures
- Redundancy: Embed error-correcting codes (e.g., Hamming codes) in payload to mitigate noise or data corruption.
- Encryption: Always encrypt payload before embedding to maintain confidentiality in case of detection.
- Compression: Compress payload to minimize size and reduce statistical anomalies.
- Carrier Selection: Choose carrier media with high entropy to reduce detectability.
- Message Length: Limit message length to under 10% of carrier capacity to avoid visual or statistical artifacts.
- Testing: Use steganalysis tools post-embedding to verify stealth quality.
Appendix A: Steganographic Method Comparison Summary
| Method | Payload Capacity | Ease of Use | Detectability | Susceptibility to Loss | Recommended Carrier |
|---|---|---|---|---|---|
| Image LSB | High | Moderate | Low | High if recompressed | BMP, PNG |
| Text Whitespace | Low | Easy | Low | High if reformatted | Plain text |
| Audio Phase Coding | Moderate | Difficult | Medium | Medium | WAV |
| Video Frame LSB | Very High | Difficult | Medium | High | Uncompressed video formats |
| Network Packet Timing | Low | Very Difficult | High | High | Controlled network channels |
| Symbolic Substitution | Very Low | Easy | Very Low | None | Printed or drawn symbols |
Appendix B: Sample Python Script for Image LSB Encoding
from PIL import Image

def encode_message(image_path, message, output_path):
    img = Image.open(image_path)
    binary_message = ''.join(format(ord(i), '08b') for i in message) + '1111111111111110'  # Delimiter

    pixels = img.load()
    width, height = img.size
    idx = 0

    for y in range(height):
        for x in range(width):
            if idx < len(binary_message):
                r, g, b = pixels[x, y]
                r = (r & ~1) | int(binary_message[idx])
                idx += 1
                if idx < len(binary_message):
                    g = (g & ~1) | int(binary_message[idx])
                    idx += 1
                if idx < len(binary_message):
                    b = (b & ~1) | int(binary_message[idx])
                    idx += 1
                pixels[x, y] = (r, g, b)
            else:
                break
        if idx >= len(binary_message):
            break

    img.save(output_path)

def decode_message(image_path):
    img = Image.open(image_path)
    pixels = img.load()
    width, height = img.size

    bits = []
    for y in range(height):
        for x in range(width):
            r, g, b = pixels[x, y]
            bits.append(str(r & 1))
            bits.append(str(g & 1))
            bits.append(str(b & 1))

    bits_str = ''.join(bits)
    chars = []
    for i in range(0, len(bits_str), 8):
        byte = bits_str[i:i+8]
        if byte == '11111110':  # Delimiter
            break
        chars.append(chr(int(byte, 2)))
    return ''.join(chars)
Conclusion
Mastery of these steganographic and symbolic communication techniques empowers the Practitioner to transmit knowledge and orders undetected, sustaining the sacred mission in the shadows. The codex demands unwavering discipline, precision, and vigilance. In the crucible of covert communication, error is death. Apply these protocols relentlessly and reverently.
For specialized cryptography to pair with these steganographic methods, see Volume VIII: The Cipher’s Codex. For counterintelligence and steganalysis, consult Volume XI: The Watcher’s Codex.
End of Volume VII
<!-- SECTION 36 -->
Supplements: Logical Fallacy Quick-Reference
Introduction
Within the sacred art of communication, mastery over logical fallacies is paramount. These deceptive constructs undermine truth, disrupt clarity, and manipulate perception. This supplement delivers a concise, tabular quick-reference of every major logical fallacy, their precise definitions, and the counter-tactics necessary for immediate deployment in discourse or information warfare. Each entry is crafted for rapid consultation under duress or debate, empowering the Practitioner to identify, neutralize, and dismantle fallacious reasoning with unerring precision.
Logical Fallacies: Definitions and Counter-Tactics
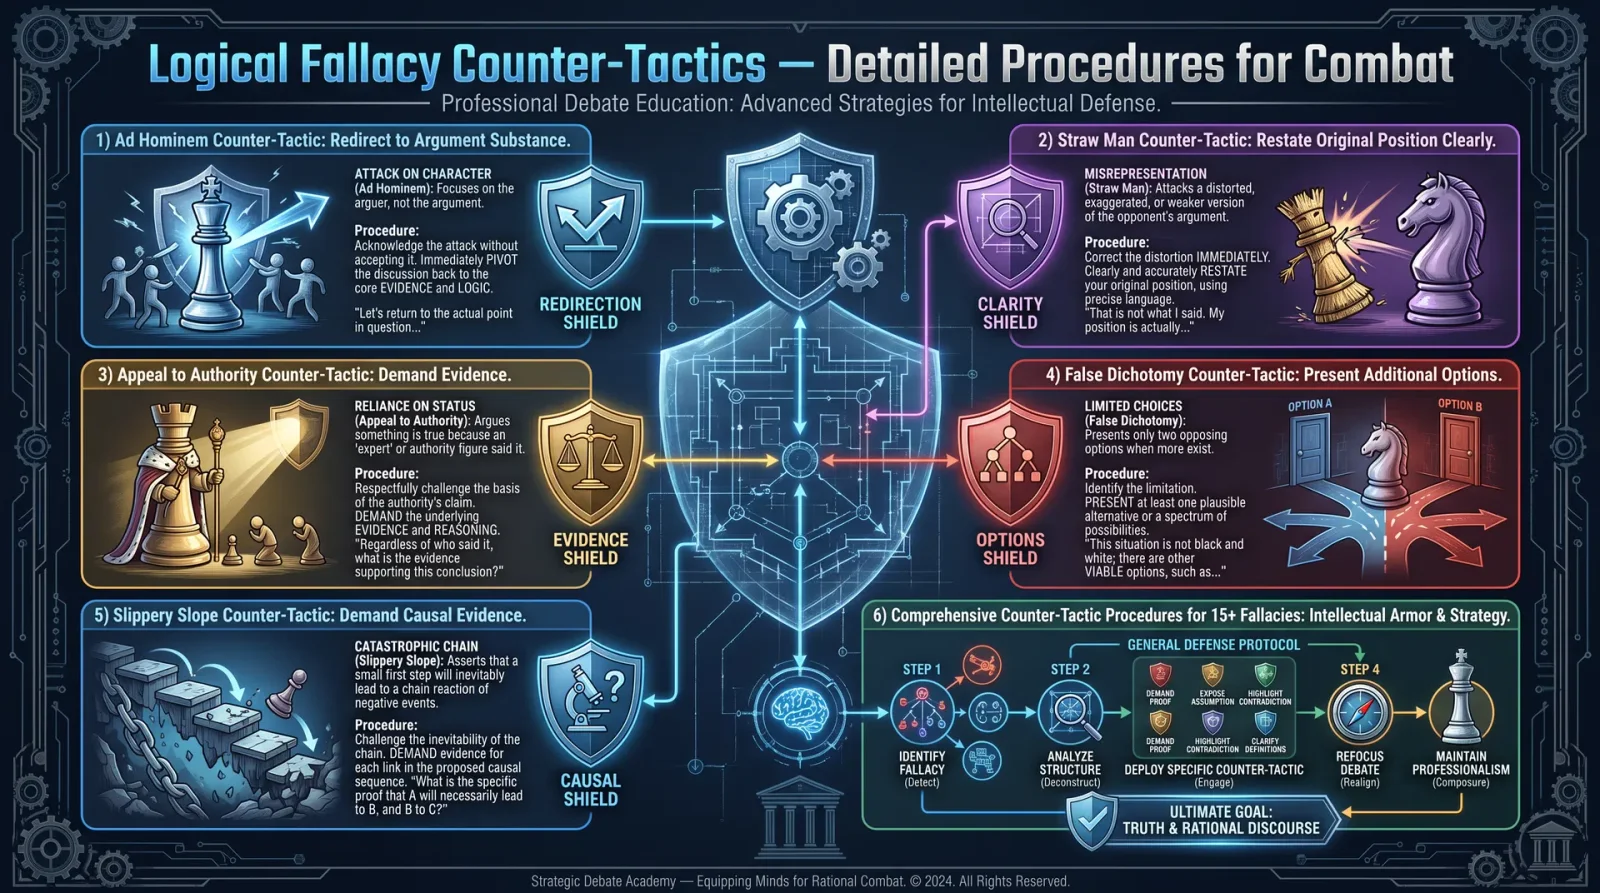
| Fallacy Name | Definition | Counter-Tactics |
|---|---|---|
| Ad Hominem | Attacking the opponent's character or attributes instead of addressing the argument presented. | 1. Redirect focus to the argument by stating: "The claim stands independent of character." 2. Request evidence supporting the argument itself. 3. Expose the irrelevance of personal attacks in logical discourse. |
| Straw Man | Misrepresenting or oversimplifying an opponent's argument to make it easier to attack. | 1. Restate your original argument clearly and precisely. 2. Demand the opponent address your actual position. 3. Use direct quotations to prevent distortion. |
| Appeal to Authority | Using an authority figure's opinion as evidence without critical examination or relevance to the topic. | 1. Verify the authority’s credentials and relevance. 2. Request empirical or logical evidence beyond the authority’s statement. 3. Highlight possible biases or conflicts of interest. |
| False Dilemma | Presenting only two options when more exist, forcing a choice between extremes. | 1. Enumerate additional viable alternatives. 2. Demonstrate the complexity of the issue beyond binary choices. 3. Challenge the premise limiting options. |
| Slippery Slope | Asserting that a small first step will inevitably lead to extreme and undesirable outcomes without evidence. | 1. Demand causal evidence linking steps. 2. Identify logical gaps in the causal chain. 3. Illustrate alternative outcomes or checkpoints preventing the extreme scenario. |
| Circular Reasoning | Using the conclusion as a premise without independent support, creating a loop of reasoning. | 1. Request independent evidence separate from the conclusion. 2. Identify premises that rely on the conclusion’s truth. 3. Reframe the argument to break the circularity. |
| Hasty Generalization | Drawing a broad conclusion from insufficient or non-representative data. | 1. Demand statistical significance or comprehensive data. 2. Present counterexamples disproving the generalization. 3. Emphasize variability and complexity in the dataset. |
| Post Hoc Ergo Propter Hoc | Assuming causation solely due to sequential occurrence (after this, therefore because of this). | 1. Request evidence of direct causal mechanism. 2. Introduce alternative explanations. 3. Highlight correlation does not imply causation. |
| Red Herring | Introducing irrelevant information to distract from the original argument. | 1. Identify the diversionary tactic explicitly. 2. Redirect focus back to the original issue. 3. Refuse to engage with off-topic points until the main argument is resolved. |
| Bandwagon | Arguing that a claim is true because many people believe it. | 1. Emphasize truth is independent of popularity. 2. Request objective evidence. 3. Cite historical examples where majority belief was false. |
| Appeal to Emotion | Manipulating emotions to win an argument instead of using valid reasoning. | 1. Acknowledge the emotion but separate it from factual analysis. 2. Request logical substantiation of the claim. 3. Use neutral language to defuse emotional escalation. |
| Equivocation | Using ambiguous language or shifting meanings of words to mislead. | 1. Define key terms explicitly. 2. Ask for clarification on ambiguous phrases. 3. Expose the shift in meaning disrupting logical flow. |
| False Cause (Cum Hoc Ergo Propter Hoc) | Assuming two correlated events imply causation without proof. | 1. Demand demonstration of causality beyond correlation. 2. Investigate possible confounding variables. 3. Use statistical methods to test correlation strength. |
| Begging the Question | Using an unproven premise as though it were already proven. | 1. Identify premises lacking evidence. 2. Request foundational proof for assumptions. 3. Rebuild argument from verifiable facts. |
| False Equivalence | Comparing two things as equal when significant differences exist. | 1. Highlight critical distinctions. 2. Demonstrate unequal contexts or conditions. 3. Reassess comparison criteria. |
| Appeal to Ignorance | Asserting a proposition is true because it has not been proven false, or vice versa. | 1. Clarify burden of proof resides with the claimant. 2. Demand positive evidence rather than absence of disproof. 3. Avoid default acceptance without data. |
| Tu Quoque | Responding to criticism by accusing the critic of similar faults, deflecting from the argument. | 1. Focus on the argument’s validity independent of the critic’s actions. 2. Expose deflection tactic. 3. Reassert the issue’s substance. |
| No True Scotsman | Changing the definition of a group to exclude counterexamples and protect a universal claim. | 1. Point out shifting criteria invalidates the argument. 2. Demand consistent definitions. 3. Provide counterexamples within original criteria. |
| Loaded Question | Asking a question that presupposes guilt or a premise that traps the respondent. | 1. Identify and call out presuppositions. 2. Refuse to accept embedded assumptions. 3. Reframe or answer questions with clarifications. |
| Composition | Assuming what is true of parts is true of the whole. | 1. Examine whole’s properties independently. 2. Highlight emergent properties or systemic differences. 3. Demand evidence linking parts to whole. |
| Division | Assuming what is true of the whole is true of its parts. | 1. Analyze component characteristics separately. 2. Identify heterogeneity within the whole. 3. Request evidence for part-based claims. |
| Middle Ground | Assuming the truth lies between two extremes regardless of evidence. | 1. Evaluate each claim on its own merit. 2. Avoid forced compromise when unsupported. 3. Present evidence favoring one position. |
| Personal Incredulity | Rejecting a claim because it seems unbelievable or difficult to understand. | 1. Acknowledge limits of personal knowledge. 2. Request objective proof or demonstration. 3. Avoid dismissing complex ideas without investigation. |
| Appeal to Tradition | Claiming a belief is true because it has historically been accepted. | 1. Examine tradition's rationale and evidence. 2. Highlight evolution of knowledge. 3. Demand current validation beyond historical acceptance. |
| Special Pleading | Applying standards, principles, or rules to others while exempting oneself without justification. | 1. Require consistent application of rules. 2. Expose unsubstantiated exceptions. 3. Demand rationale for differential treatment. |
| False Analogy | Drawing a comparison between two things that are not sufficiently alike to warrant it. | 1. Identify dissimilarities undermining the analogy. 2. Clarify relevant parameters for valid comparison. 3. Avoid overgeneralizing based on weak analogies. |
| Gambler's Fallacy | Believing past random events affect the probabilities of future independent events. | 1. Explain independence of events in probability theory. 2. Provide statistical data on event distribution. 3. Clarify misconceptions about randomness. |
| Appeal to Consequences | Arguing a belief is true or false based on the desirability of its consequences. | 1. Separate truth claims from emotional or practical outcomes. 2. Demand factual support independent of consequences. 3. Recognize wishful thinking bias. |
| False Balance | Presenting two sides as equally valid despite overwhelming evidence favoring one. | 1. Evaluate evidence weight and credibility. 2. Avoid artificial parity in expert consensus. 3. Prioritize validity over perceived fairness. |
| Cherry Picking | Selecting data that supports a claim while ignoring contradictory evidence. | 1. Insist on comprehensive data review. 2. Present omitted contrary evidence. 3. Use meta-analyses or systematic reviews to avoid bias. |
| Moving the Goalposts | Changing criteria or demands after they have been met to avoid conceding a point. | 1. Document original criteria clearly. 2. Refuse acceptance of altered standards without justification. 3. Hold interlocutor accountable for consistent demands. |
| Argument from Silence | Inferring a conclusion based on lack of evidence or silence on a topic. | 1. Recognize absence of evidence is not evidence of absence. 2. Demand positive proof. 3. Identify areas where information is genuinely unavailable. |
Detailed Procedures for Counteracting Logical Fallacies
Each fallacy requires a methodical, stepwise approach to neutralize its influence in any communicative engagement. The following instructions assume a live or written debate scenario, interrogation, or information warfare context.
Procedure 1: Identifying and Responding to Ad Hominem Attacks
- Listen or read carefully to detect personal attacks unrelated to the argument’s substance.
- Interrupt or interject with: _"The merit of this argument rests on evidence, not personal traits."_
- Request the opponent restate their argument focusing solely on logical points.
- Challenge the relevance of the attack by asking: _"How does this relate to the claim?"_
- Reinforce the principle that character judgments do not validate or invalidate truth.
- If attack persists, document for appeal to higher authority or adjudicator.
Procedure 2: Dismantling Straw Man Arguments
- Identify misrepresentation by comparing opponent’s statements to your original argument.
- Verbally clarify your position: _"My actual claim is..."_
- Provide direct quotes or references to original statements.
- Demand opponent address the clarified argument, refusing engagement with distortions.
- If opponent persists, expose the tactic explicitly: _"You are attacking a distorted version of my position."_
Procedure 3: Neutralizing Appeal to Authority
- Request the authority’s credentials relevant to the specific topic.
- Demand empirical data or logical reasoning supporting the authority’s claim.
- Investigate potential bias or conflicts of interest influencing the authority.
- Present counter-evidence or alternative expert opinions if available.
- Emphasize that authority alone is insufficient proof without supporting evidence.
Procedure 4: Exposing False Dilemmas
- Acknowledge the presented options to the interlocutor.
- Enumerate and explain additional alternatives beyond the binary choice.
- Demonstrate the complexity or spectrum inherent in the issue.
- Challenge the opponent to consider or refute these alternatives.
- Insist on nuanced evaluation rather than forced choice.
Procedure 5: Countering Slippery Slope Arguments
- Identify the chain of predicted events leading to extreme outcomes.
- Request evidence for each causal link in the chain.
- Highlight logical gaps or unproven assumptions between steps.
- Offer alternative outcomes or safeguards that prevent the predicted slide.
- Refocus discussion on the current claim’s merits rather than speculative consequences.
Procedure 6: Breaking Circular Reasoning
- Identify premises that restate the conclusion.
- Ask for independent evidence supporting premises.
- Reformulate argument to separate evidence from conclusions.
- If circularity persists, declare the argument logically invalid.
- Shift discussion to verifiable data or sound reasoning.
Procedure 7: Correcting Hasty Generalizations
- Request sample size and data source underpinning the generalization.
- Demand statistical validity or representativeness of the data.
- Present exceptions or contradictory cases.
- Explain complexity and variability that undermine sweeping conclusions.
- Encourage cautious, evidence-based generalizations.
Procedure 8: Avoiding Post Hoc Causation Errors
- Distinguish temporal sequence from causation explicitly.
- Require demonstration of causal mechanisms linking events.
- Introduce plausible alternative causes.
- Use controlled experiments or data to test causality.
- Warn against assuming causation based on timing alone.
Procedure 9: Redirecting Red Herrings
- Identify the irrelevant topic introduced.
- Call attention to the diversion: _"This point does not address the issue at hand."_
- Refocus conversation by restating the original question or claim.
- Refuse to be sidetracked until the main argument is resolved.
- Maintain discipline in topic adherence.
Procedure 10: Resisting Bandwagon Pressure
- Point out that popularity does not equate to truth.
- Request objective evidence supporting the claim.
- Cite historical or contemporary examples where majority was wrong.
- Emphasize independent verification over consensus.
- Encourage critical thinking beyond social conformity.
Procedure 11: Defusing Appeal to Emotion
- Acknowledge the emotional content without conceding factual accuracy.
- Separate emotional appeal from logical argumentation.
- Request evidence supporting claims beyond emotional narratives.
- Use calm, neutral language to de-escalate emotional tension.
- Redirect discussion to reason and data.
Procedure 12: Clarifying Equivocation
- Identify ambiguous terms or shifting definitions.
- Request precise definitions from all parties.
- Highlight inconsistencies caused by changing meanings.
- Standardize terminology before proceeding.
- Ensure logical consistency based on defined terms.
Procedure 13: Verifying Causal Claims (False Cause)
- Demand data showing direct causal links, not just correlation.
- Investigate confounding variables or coincidental factors.
- Apply statistical tests of causality if possible.
- Present counterexamples where correlation fails causation.
- Maintain skepticism of simplistic cause-effect assumptions.
Procedure 14: Exposing Begging the Question
- Identify premises that assume the conclusion.
- Request independent justification for assumptions.
- Separate assumption from proven fact.
- Reconstruct argument based on verifiable premises.
- Reject arguments relying solely on unproven assumptions.
Procedure 15: Revealing False Equivalence
- Compare and contrast the entities or claims in question.
- Highlight critical differences invalidating equivalence.
- Explain context and criteria affecting validity of comparison.
- Reject arguments resting on superficial or misleading similarities.
- Encourage nuanced, evidence-based comparisons.
Procedure 16: Refuting Appeal to Ignorance
- Clarify the burden of proof lies with the claimant.
- Demand positive evidence rather than absence of disproof.
- Avoid accepting claims based on ignorance alone.
- Document gaps in knowledge without assuming truth or falsehood.
- Promote provisional skepticism pending evidence.
Procedure 17: Deflecting Tu Quoque
- Focus on the argument’s validity regardless of critic’s behavior.
- Call out deflection as a fallacy.
- Reassert the original claim’s importance.
- Avoid engaging in reciprocal accusations.
- Maintain logical discipline and topic focus.
Procedure 18: Challenging No True Scotsman
- Demand consistent application of definitions.
- Point out shifting criteria designed to exclude counterexamples.
- Provide examples fitting original criteria.
- Reject arbitrary redefinitions protecting universal claims.
- Insist on objective classification standards.
Procedure 19: Handling Loaded Questions
- Identify embedded assumptions or guilt presuppositions.
- Refuse to accept premises without evidence.
- Reframe the question to remove bias.
- Answer with clarifications exposing the trap.
- Maintain control of discourse framing.
Procedure 20: Avoiding Composition and Division Errors
| Fallacy | Procedure Highlights |
|---|---|
| Composition | 1. Analyze the whole independently from parts. |
| 2. Identify emergent properties not present in parts. | |
| 3. Demand evidence linking part-level properties to whole. | |
| Division | 1. Examine parts individually. |
| 2. Recognize heterogeneity within the whole. | |
| 3. Require evidence that whole’s properties apply to parts. |
Procedure 21: Rejecting Middle Ground Fallacy
- Evaluate each position on factual and logical merits.
- Avoid forcing compromise without evidence supporting middle position.
- Present evidence favoring one position over another.
- Warn against false equivalence created by enforced moderation.
- Advocate for truth over appeasement.
Procedure 22: Overcoming Personal Incredulity
- Acknowledge limitations of personal knowledge or understanding.
- Request empirical proof or demonstrations.
- Avoid dismissing claims solely based on complexity or unfamiliarity.
- Encourage open-minded investigation.
- **Use expert testimony and verified data to bridge knowledge
<!-- SECTION 37 -->
The Complete Practitioner's Codex, Volume 13: The Communicator's Codex: Complete Communication, Persuasion, Language, and Information Warfare
Chapter VII: Supplements: Debate Preparation Templates
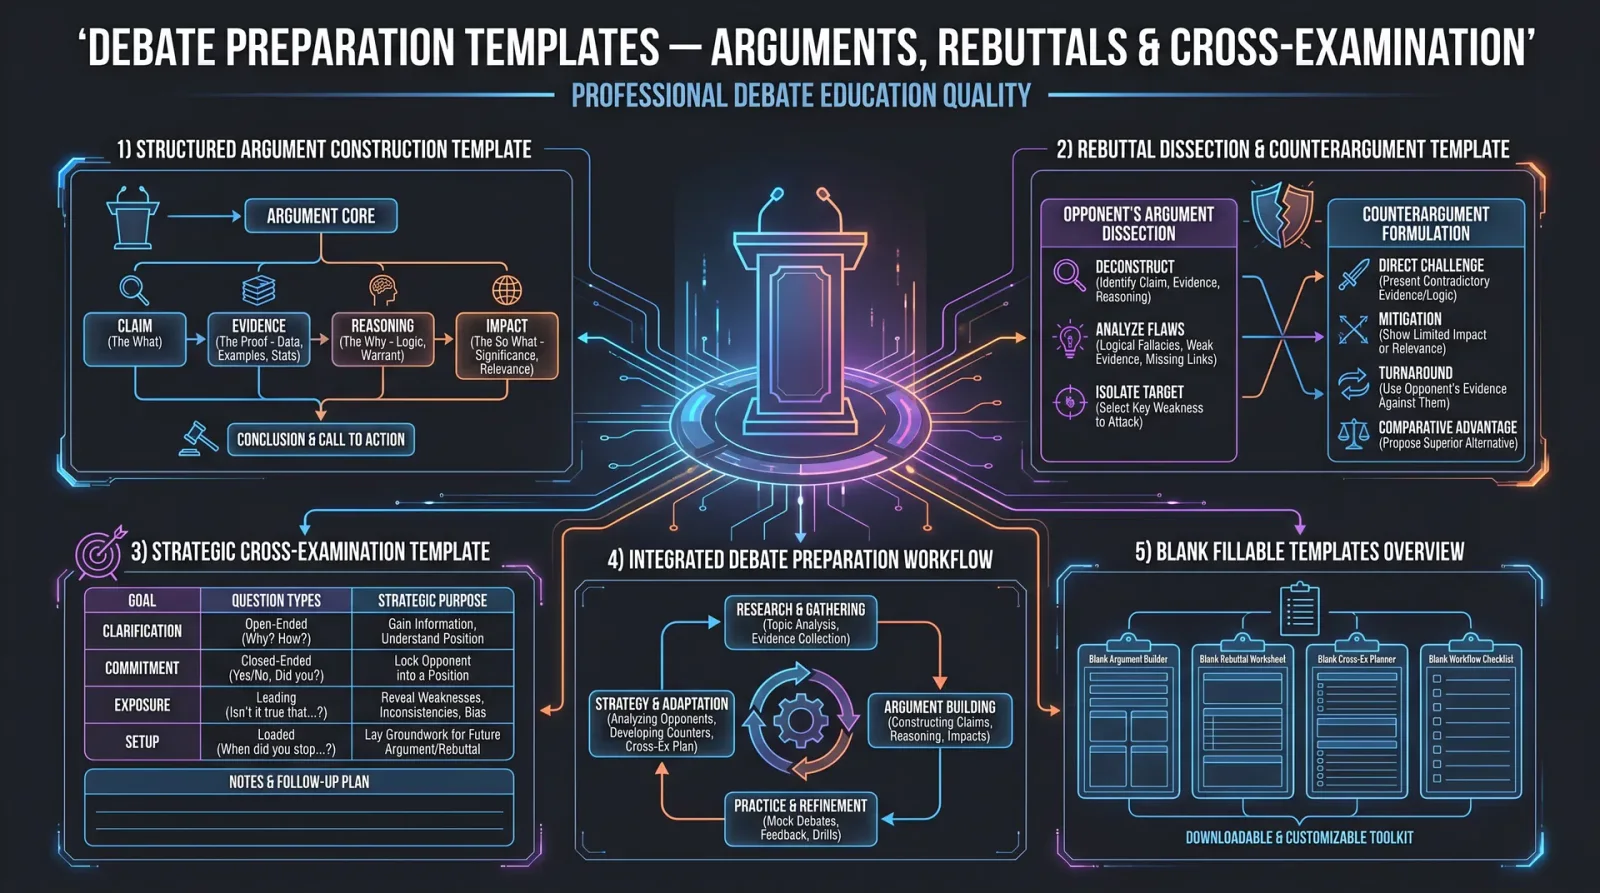
Introduction: This chapter delivers the sacred protocols and templates for preparing debate arguments, rebuttals, and cross-examinations. These procedures are the codified essence of verbal combat, refined through centuries of intellectual warfare. The templates are designed for immediate application, enabling the practitioner to organize thoughts with precision, marshal evidence rigorously, and dismantle opposition methodically. Every template is accompanied by a sample filled version, demonstrating the practical deployment of the craft.
Section 1: Preparing Arguments: Structured Construction Template
Arguments are the foundational offensive unit in debate warfare. The goal is to present a clear, compelling, and logically airtight case. This template enforces clarity and rigor, ensuring every claim is supported, every warrant is explicit, and every impact is compellingly stated.
1.1 Argument Preparation Template
| Step | Description | Instruction | Example (Topic: "Renewable Energy is Essential for National Security") |
|---|---|---|---|
| 1 | Claim | State your central assertion clearly and concisely. | Renewable energy is essential for national security. |
| 2 | Definition/Framework | Define key terms and establish the framework for the argument. | Renewable energy: energy derived from natural resources that replenish rapidly (solar, wind, hydro). National security: protection of a nation from threats to sovereignty and public safety. |
| 3 | Warrant | Explain the logical reasoning connecting the claim to the evidence. | Dependence on fossil fuels leads to energy insecurity; renewables diversify energy sources, reducing vulnerability. |
| 4 | Evidence | Cite precise, credible data or authoritative sources supporting the warrant. Include source, date, and quantifiable metrics. | According to the 2022 Department of Energy report, 40% of disruptions in energy supply stem from geopolitical conflicts over fossil fuels. |
| 5 | Impact | State the significance of the argument in terms of broader consequences or values. | Ensuring a stable energy supply prevents national crises, reduces conflict risk, and sustains military readiness. |
1.2 Step-by-Step Instructions for Using the Argument Preparation Template
- Identify your central thesis (Claim). Write a single, declarative sentence that encapsulates your argument.
- Define all critical terms and set the contextual framework. This removes ambiguity and preempts misinterpretation.
- Formulate the warrant. Explicitly articulate the logical link between your claim and the evidence you will present.
- Gather evidence. Extract relevant data, statistics, expert testimony, or historical precedent that directly supports your warrant.
- Articulate the impact. Explain why this argument matters in the scope of the debate resolution or the audience's values.
- Write the argument in a coherent paragraph following the template order.
1.3 Sample Filled Argument Template
| Step | Content |
|---|---|
| Claim | Renewable energy is essential for national security. |
| Definition/Framework | Renewable energy means power from resources like solar and wind that naturally replenish. National security involves safeguarding the country from threats to its safety and sovereignty. |
| Warrant | Fossil fuel dependency exposes the nation to supply disruptions caused by geopolitical conflicts. Renewables diversify energy sources, mitigating this risk. |
| Evidence | The 2022 U.S. Department of Energy report states that 40% of energy supply disruptions result from conflicts over fossil fuels (DOE, 2022). |
| Impact | A stable, diverse energy supply enhances military readiness and prevents crises that threaten the nation’s survival. |
Section 2: Preparing Rebuttals: Dissection and Counterargument Template
Rebuttals are surgical strikes aimed at dismantling the opponent’s arguments with precision. A systematic approach is essential to identify weaknesses, contradictions, or fallacies in the opposition's case and then deploy targeted counterarguments.
2.1 Rebuttal Preparation Template
| Step | Description | Instruction | Example (Opponent's Claim: "Renewable energy is too unreliable to ensure energy security") |
|---|---|---|---|
| 1 | Identify the Opponent’s Claim | Write the exact claim you intend to rebut. | Renewable energy is too unreliable to ensure energy security. |
| 2 | Locate Weakness or Fallacy | Specify the flaw: factual error, logical fallacy, overgeneralization, outdated data, etc. | Overgeneralization ignoring advances in energy storage technology. |
| 3 | Provide Counter-Evidence | Present data or expert testimony disproving or undermining the opponent's claim. | The 2023 International Energy Agency report shows battery storage capacity increased 50% since 2020, improving reliability. |
| 4 | Explain Counter-Warrant | Clarify how your evidence invalidates or limits the opponent’s claim. | Improved storage reduces intermittency, making renewables more reliable than claimed. |
| 5 | State Impact of Rebuttal | Demonstrate how this weakens the opponent’s overall case or strengthens your position. | This undermines the argument that renewables threaten security, reinforcing their viability. |
2.2 Step-by-Step Instructions for Using the Rebuttal Preparation Template
- Copy or paraphrase the opponent’s claim precisely. Accuracy is critical.
- Analyze the claim for weaknesses or errors. Identify if it is based on false data, logical fallacies, or ignores countervailing evidence.
- Collect specific, authoritative counter-evidence. Include source details and date.
- Explain why your evidence disproves the opponent’s claim. Make the logical connection explicit.
- Declare the broader consequences of your rebuttal on the debate.
2.3 Sample Filled Rebuttal Template
| Step | Content |
|---|---|
| Opponent’s Claim | Renewable energy is too unreliable to ensure energy security. |
| Weakness/Fallacy | Overgeneralization ignoring recent advances in storage technology. |
| Counter-Evidence | The 2023 International Energy Agency report indicates a 50% increase in battery storage capacity since 2020 (IEA, 2023). |
| Counter-Warrant | Enhanced storage capacity reduces intermittency issues, making renewable energy more reliable than opponents claim. |
| Impact | This invalidates the claim that renewables threaten energy security and supports their integration into national defense strategies. |
Section 3: Preparing Cross-Examinations: Strategic Interrogation Template
Cross-examination is the controlled extraction of information from an opponent, designed to reveal contradictions, expose weaknesses, or force admissions. Precision, strategy, and control of the exchange tempo are mandatory.
3.1 Cross-Examination Preparation Template
| Step | Description | Instruction | Example (Target: Opponent’s claim on renewable energy costs) |
|---|---|---|---|
| 1 | Select Focus Point | Choose a specific claim or evidence from the opponent to interrogate. | Opponent claims renewable energy costs are prohibitive. |
| 2 | Identify Key Information Needed | Determine what admission, clarification, or contradiction to extract. | Clarify cost comparisons between renewables and fossil fuels over 10 years. |
| 3 | Formulate Clear, Closed-Ended Questions | Draft yes/no or short-answer questions that guide the opponent to desired responses. | "Is it true that the cost of solar energy has dropped 70% in the last decade?" |
| 4 | Plan Follow-Up Questions | Prepare sequential questions to trap contradictions or force clarifications if the opponent hedges. | "Would you agree that these cost reductions make renewables competitive with fossil fuels?" |
| 5 | Anticipate Opponent Responses and Prepare Rejoinders | Predict evasions or denials and craft immediate counters or pivots. | If opponent claims subsidies distort costs, ask, "Are fossil fuels not heavily subsidized as well?" |
3.2 Step-by-Step Instructions for Using the Cross-Examination Preparation Template
- Select a specific opponent claim or evidence to target. Focus avoids dilution of impact.
- Define what specific information or admission you need. Keep the objective clear.
- Write closed-ended questions that require minimal elaboration or force binary answers.
- Prepare follow-up questions that logically build on the previous answers, guiding the opponent toward the desired admission or contradiction.
- Anticipate potential evasions or counterarguments and prepare rapid rejoinders to maintain control.
- Practice tone and pacing to maintain psychological dominance during the exchange.
3.3 Sample Filled Cross-Examination Template
| Step | Content |
|---|---|
| Focus Point | Opponent claims renewable energy costs are prohibitive. |
| Key Information Needed | Clarify cost trends and competitiveness of renewables versus fossil fuels over 10 years. |
| Questions | 1. "Is it true that solar energy costs have dropped 70% in the last decade?" 2. "Would you say these reductions make renewables competitive with fossil fuels?" 3. "Are fossil fuels not also heavily subsidized?" |
| Follow-Up Questions | "If renewables are competitive, why claim costs are prohibitive?" |
| Anticipated Opponent Response | Claim subsidies distort true costs. |
| Prepared Rejoinder | "Given fossil fuel subsidies exceed renewables', how can fossil fuel costs be considered more accurate?" |
Section 4: Integrated Debate Preparation Workflow
To maximize efficiency and rigor, combine the above templates into a disciplined workflow. This process guarantees comprehensive preparation.
4.1 Workflow Steps
| Step | Action | Instruction |
|---|---|---|
| 1 | Research Topic Thoroughly | Collect primary sources, data, expert analyses related to the resolution. |
| 2 | Write Three Core Arguments | Use the Argument Preparation Template for each. |
| 3 | Anticipate Opponent Arguments | Predict at least three major counterarguments. |
| 4 | Prepare Rebuttals | Complete the Rebuttal Preparation Template for each anticipated counterargument. |
| 5 | Select Points for Cross-Examination | Identify three opponent claims to interrogate. |
| 6 | Prepare Cross-Examination Questions | Use the Cross-Examination Preparation Template for each focus point. |
| 7 | Rehearse Delivery | Practice articulating arguments, rebuttals, and cross-examination questions with emphasis on clarity, timing, and tone. |
Section 5: Blank Fillable Templates for Immediate Use
5.1 Argument Preparation Template
| Step | Description | Your Input |
|---|---|---|
| Claim | ||
| Definition/Framework | ||
| Warrant | ||
| Evidence (Source, Date) | ||
| Impact |
5.2 Rebuttal Preparation Template
| Step | Description | Your Input |
|---|---|---|
| Opponent’s Claim | ||
| Weakness/Fallacy | ||
| Counter-Evidence (Source, Date) | ||
| Counter-Warrant | ||
| Impact |
5.3 Cross-Examination Preparation Template
| Step | Description | Your Input |
|---|---|---|
| Focus Point (Opponent Claim) | ||
| Key Information Needed | ||
| Question 1 | ||
| Question 2 | ||
| Question 3 | ||
| Follow-Up Questions | ||
| Anticipated Opponent Response | ||
| Prepared Rejoinder |
Closing Directive: Mastery of debate preparation is mastery of intellectual warfare. Use these templates without deviation, internalize their structure, and practice relentlessly. The warrior who wields words with precision controls the battlefield of ideas and, ultimately, reality itself. This volume is your sacred map to that realm. Guard it well, apply it rigorously, and pass it only to those worthy.
End of Chapter VII: Supplements: Debate Preparation Templates
<!-- SECTION 38 -->
The Complete Practitioner's Codex, Volume 13: The Communicator's Codex
Chapter VI: Supplements: Speech Outline Frameworks
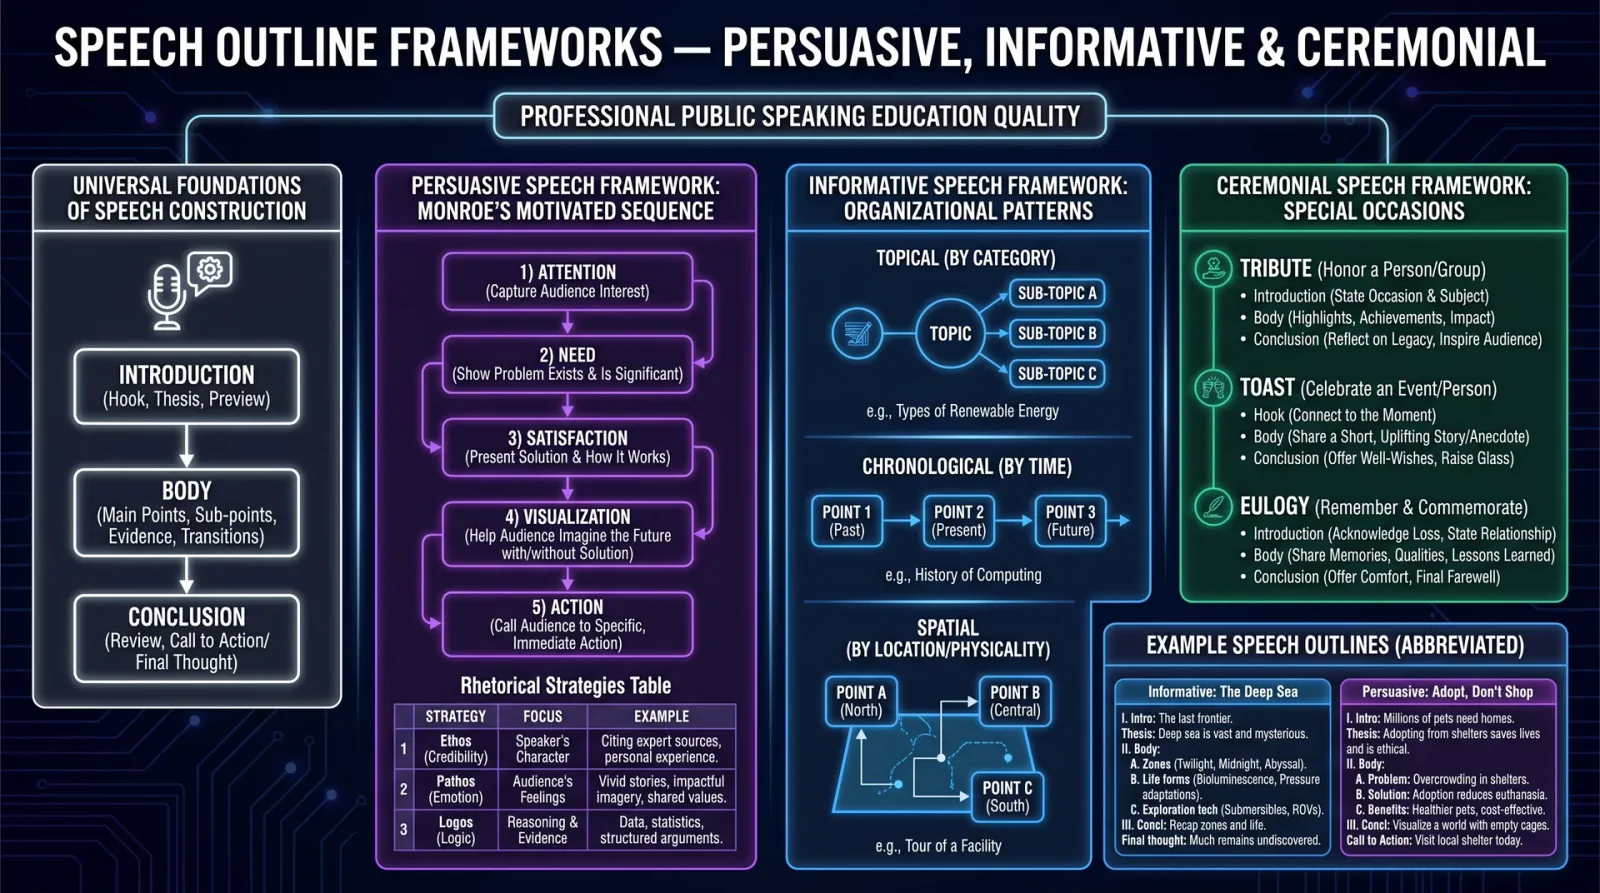
Focus: Detailed Templates and Protocols for Constructing Speeches Across Different Contexts Including Persuasive, Informative, and Ceremonial
Preface: The Sacred Art of Speech Construction
Speech is not mere vocalization; it is a weapon and shield, an instrument of influence and revelation. In the hands of the skilled, it crafts reality, shifts allegiance, and forges legacies. The frameworks herein are battle-hardened templates, forged in the crucible of countless confrontations, designed to enable the orator to wield speech as a master wields the blade. This chapter demands rigorous adherence to structure and execution. Deviations invite failure.
Section I: Universal Foundations of Speech Construction
Every speech, irrespective of context, must adhere to a foundational architecture. This architecture guarantees clarity, impact, and retention.
1. Core Components of Every Speech
| Component | Purpose | Approximate Duration (Percentage) |
|---|---|---|
| Opening (Exordium) | Capture attention, establish ethos, state purpose | 10-15% |
| Body (Narratio, Confirmatio, Refutatio) | Present facts, arguments, and counterarguments | 70-80% |
| Closing (Peroratio) | Summarize, reinforce emotional appeal, call to action | 10-15% |
2. Step-by-Step Protocol: Constructing the Universal Speech Skeleton
Materials Needed: Notebook or digital device, research materials, timer, voice recorder
- Define Purpose & Audience a. Write the speech’s objective in one sentence.
b. Identify and profile the audience demographics, knowledge level, values, and potential biases.
- Draft the Opening (Exordium) a. Select an attention-grabber: startling fact, rhetorical question, anecdote, or quote.
b. Establish your credibility (ethos) with a brief statement of expertise or experience.
c. Preview the main points (thesis statement).
- Develop the Body a. Organize content into 3-5 major points.
b. For each point, list evidence: statistics, examples, expert testimony, anecdotes.
c. Address potential counterarguments or misconceptions directly.
- Construct the Closing (Peroratio) a. Summarize key points in a memorable phrase or sentence.
b. Reinforce emotional connection or ethical appeal.
c. Issue a clear call to action or final thought.
- Review and Refine a. Time your speech sections according to the percentages table above.
b. Record yourself delivering the speech and analyze for clarity and pacing.
c. Adjust content for brevity, impact, and flow.
Section II: Persuasive Speech Framework
Persuasion is the art of transforming hesitation into conviction. This template exploits the triad of ethos, pathos, and logos with surgical precision. The protocols here are designed to maximize psychological penetration and minimize resistance.
1. Persuasive Speech Template Overview
| Section | Objective | Key Rhetorical Strategy |
|---|---|---|
| Opening (Exordium) | Establish credibility & hook | Ethos, startling fact, rhetorical question |
| Need (Problem Statement) | Create urgency, highlight problem | Pathos, vivid imagery, emotional appeal |
| Satisfaction (Solution) | Present solution, argue benefits | Logos, cause-effect, data-driven arguments |
| Visualization | Paint vivid future scenario | Pathos, sensory language, positive/negative contrast |
| Action (Call to Action) | Demand specific response | Ethos, imperative language, social proof |
2. Detailed Step-by-Step Protocol for Persuasive Speech Construction
Materials Needed: Research dossier, emotional appeal index (see Table 2), drafting tools
- Identify the Core Belief or Behavior to Change a. Define the precise belief or behavior targeted.
b. Analyze current audience mindset and resistance points.
- Craft the Opening a. Select a striking fact or question that challenges the audience’s assumptions.
b. Briefly assert your credentials or reason for authority.
- Develop the Need Section a. Describe the problem in vivid, emotionally charged terms.
b. Employ sensory language to create mental imagery.
c. Use statistics sparingly but effectively to underscore severity.
- Formulate Satisfaction (Solution) a. Present a clear, actionable solution.
b. Support with logical evidence: cause-effect relationships, expert citations, comparative data.
- Create the Visualization a. Paint two scenarios: one where the problem persists, one where the solution succeeds.
b. Use positive and negative imagery to evoke emotional contrast.
- Define the Action a. Specify exactly what you want the audience to do.
b. Use imperative verbs and reinforce social proof or ethical imperative.
- Finalize and Practice a. Time each section according to the universal skeleton.
b. Practice tone modulation to enhance emotional appeal.
c. Record and analyze for argumentative clarity and emotional resonance.
3. Persuasive Rhetorical Strategy Table
| Rhetorical Device | Function | Example | Usage Frequency |
|---|---|---|---|
| Ethos | Establish speaker credibility | "As a veteran researcher with 20 years in the field..." | Opening, Closing |
| Pathos | Appeal to emotions | "Imagine the lives shattered by this injustice..." | Need, Visualization |
| Logos | Appeal to logic and reason | "Studies show a 30% reduction in risk when applying..." | Satisfaction |
| Kairos | Appeal to timeliness or urgency | "Now, more than ever, we must act..." | Need, Action |
| Antithesis | Contrast ideas to emphasize choice | "We can choose progress or stagnation..." | Visualization |
| Repetition | Reinforce key phrases or ideas | "Freedom is at stake. Freedom for all." | Throughout |
Section III: Informative Speech Framework
Information delivery demands clarity, organization, and neutrality. The goal is to educate without persuasion or ceremony. This framework prioritizes logical sequencing and comprehensive coverage.
1. Informative Speech Template Overview
| Section | Objective | Key Technique |
|---|---|---|
| Opening (Exordium) | Hook audience, state topic | Question, startling fact, brief anecdote |
| Body (Main Points) | Present information systematically | Chronological, spatial, or topical order |
| Clarification | Define terms and concepts | Simple definitions, analogies |
| Examples | Support information | Case studies, demonstrations |
| Summary/Closing | Recap and reinforce knowledge | Restatement, call for reflection |
2. Step-by-Step Protocol for Informative Speech Construction
Materials Needed: Research compendium, glossary of terms, visual aids (optional)
- Select and Narrow Topic a. Choose a subject with clear boundaries.
b. Limit scope to 3-5 main points for clarity.
- Draft the Opening a. Use a question or startling fact related to the topic.
b. State the purpose and preview main points.
- Organize the Body a. Choose organizational pattern: chronological (timeline), spatial (location-based), or topical (categories).
b. Develop each main point fully with definitions and examples.
c. Integrate analogies or demonstrations to enhance understanding.
- Create Transitions a. Write clear transitional phrases to link points logically.
b. Use signposting language ("First," "Next," "Finally").
- Compose Summary a. Restate main points concisely.
b. Encourage reflection or further inquiry.
- Rehearse with Visual Aids (if applicable) a. Synchronize speech with visuals.
b. Practice timing and flow.
3. Informative Organizational Patterns Table
| Pattern | Description | Best Used For | Transition Example |
|---|---|---|---|
| Chronological | Events or steps in temporal order | Historical topics, processes | "Then," "Next," "Finally" |
| Spatial | Physical or geographical arrangement | Describing locations, structures | "To the left," "On the right" |
| Topical | Division of subject into categories | Explaining concepts, types | "First category," "Another example" |
Section IV: Ceremonial Speech Framework
Ceremonial speeches are sacred rites of passage and honor. They demand solemnity, reverence, and elevated language. The structure is more fluid but must adhere to core principles of respect, remembrance, and inspiration.
1. Ceremonial Speech Template Overview
| Section | Objective | Key Elements |
|---|---|---|
| Opening | Set tone, honor occasion | Invocation, quotation, anecdote |
| Body | Celebrate, commemorate, inspire | Stories, testimonials, historical references |
| Closing | Offer blessing, call to higher purpose | Poetic language, call for unity or reflection |
2. Step-by-Step Protocol for Ceremonial Speech Construction
Materials Needed: Historical records, quotations archive, personal testimonies
- Research the Occasion Thoroughly a. Identify purpose: celebration, memorial, dedication, etc.
b. Gather relevant stories, quotes, and references.
- Craft the Opening a. Begin with an invocation or solemn quote appropriate to the occasion.
b. State the purpose with reverence and formality.
- Compose the Body a. Select 2-3 key stories or testimonials that embody the occasion’s spirit.
b. Integrate historical or cultural references to deepen significance.
c. Use elevated, poetic language to inspire.
- Develop the Closing a. Offer a blessing or benediction.
b. Call for unity, reflection, or renewed commitment.
- Rehearse with Emotional Modulation a. Practice pacing to allow solemn moments to resonate.
b. Employ pauses to enhance gravity.
3. Ceremonial Language and Tone Guide
| Language Device | Purpose | Example Phrase | Recommended Usage Frequency |
|---|---|---|---|
| Invocation | Set sacred tone | "We gather here beneath the watchful eyes..." | Opening |
| Elevated Diction | Convey reverence and grandeur | "Esteemed," "honored," "sacred" | Throughout |
| Anaphora | Emphasize key values | "We remember the brave. We honor the fallen." | Body, Closing |
| Metaphor | Inspire through symbolic imagery | "Their courage is the eternal flame..." | Body |
| Benediction | Offer hope and blessing | "May peace dwell in our hearts forevermore." | Closing |
Section V: Example Speech Outlines
Below are three fully fleshed example outlines for each speech type, demonstrating the application of above frameworks.
Example 1: Persuasive Speech Outline
Topic: Implementing Renewable Energy in Urban Areas
| Section | Content Summary | Time Allocation |
|---|---|---|
| Opening | Startling fact: "Cities produce 70% of global emissions." Ethos: "As an environmental engineer..." | 2 minutes |
| Need | Describe consequences of pollution: health risks, climate impact. Emotional story of affected family. | 4 minutes |
| Satisfaction | Present renewable energy solutions: solar panels, wind turbines. Cite statistics on efficiency. | 5 minutes |
| Visualization | Contrast polluted city vs. clean, green urban future with renewable tech. | 3 minutes |
| Action | Call for city council support and community adoption of renewables. | 1.5 minutes |
Example 2: Informative Speech Outline
Topic: The Evolution of Cryptography
| Section | Content Summary | Time Allocation |
|---|---|---|
| Opening | Question: "How secure is your data?" | 1.5 minutes |
| Body Point 1 | Ancient ciphers: Caesar cipher, substitution methods with examples. | 4 minutes |
| Body Point 2 | Modern cryptography: Public key encryption, RSA algorithm overview. | 5 minutes |
| Body Point 3 | Applications today: Internet security, blockchain. | 3 minutes |
| Summary | Recap main advancements and importance of cryptography. | 1.5 minutes |
Example 3: Ceremonial Speech Outline
Occasion: Memorial Ceremony for Fallen Soldiers
| Section | Content Summary | Time Allocation |
|---|---|---|
| Opening | Invocation and solemn quote from historical leader. | 3 minutes |
| Body | Stories of heroism, testimonials from comrades, historical context. | 7 minutes |
| Closing | Benediction, call for remembrance and peace. | 3 minutes |
Section VI: Supplementary Tables of Rhetorical Strategies and Their Applications
| Strategy | Definition | Best Speech Types | Psychological Effect | Example Phrase |
|---|---|---|---|---|
| Ethos | Establishing speaker’s credibility | Persuasive, Ceremonial | Builds trust and authority | "Having studied this field for decades..." |
| Pathos | Emotional appeal | Persuasive, Ceremonial | Evokes empathy, urgency, inspiration | "Imagine the heartbreak of those left behind..." |
| Logos | Logical appeal | Persuasive, Informative | Engages intellect, reason | "Data shows a 50% improvement in outcomes..." |
| Kairos | Appeal to timeliness | Persuasive | Creates urgency | "There is no time to waste..." |
| Anaphora | Repetition of a phrase at sentence beginnings | Ceremonial, Persuasive | Emphasizes key points | "We will rise. We will fight. We will prevail." |
| Metaphor | Symbolic comparison | Ceremonial | Inspires through imagery | "Their memory is a guiding star..." |
| Antithesis | Juxtaposition of contrasting ideas | Persuasive | Highlights choices | "This path leads to progress; that one to despair." |
Final Instructions for Mastery
- Integrate frameworks as modular components: Combine persuasive elements into informative speeches when subtle influence is desired, or ceremonial flourishes in persuasive speeches to elevate ethos.
- Customize rhetorical strategy deployment based on audience analysis: Use the psychological effect table to tailor appeals.
- Iterate rigorously: No speech is perfect on first draft. Record, analyze, and refine until timing, tone, and content align flawlessly with objectives.
- Never neglect rehearsal with feedback: Engage trusted listeners to critique delivery and content integrity.
This chapter serves as your blueprint for constructing speeches that transcend mere words. Your utterances will be forged into instruments of power, clarity, and sacred influence. Master these frameworks and protocols without compromise. The fate of your cause, the sway of your audience, and the sanctity of your mission depend on it.
End of Chapter VI
<!-- SECTION 39 -->
The Complete Practitioner's Codex, Volume 13: The Communicator's Codex
Chapter VII: Supplements — Radio Frequency Allocation Charts
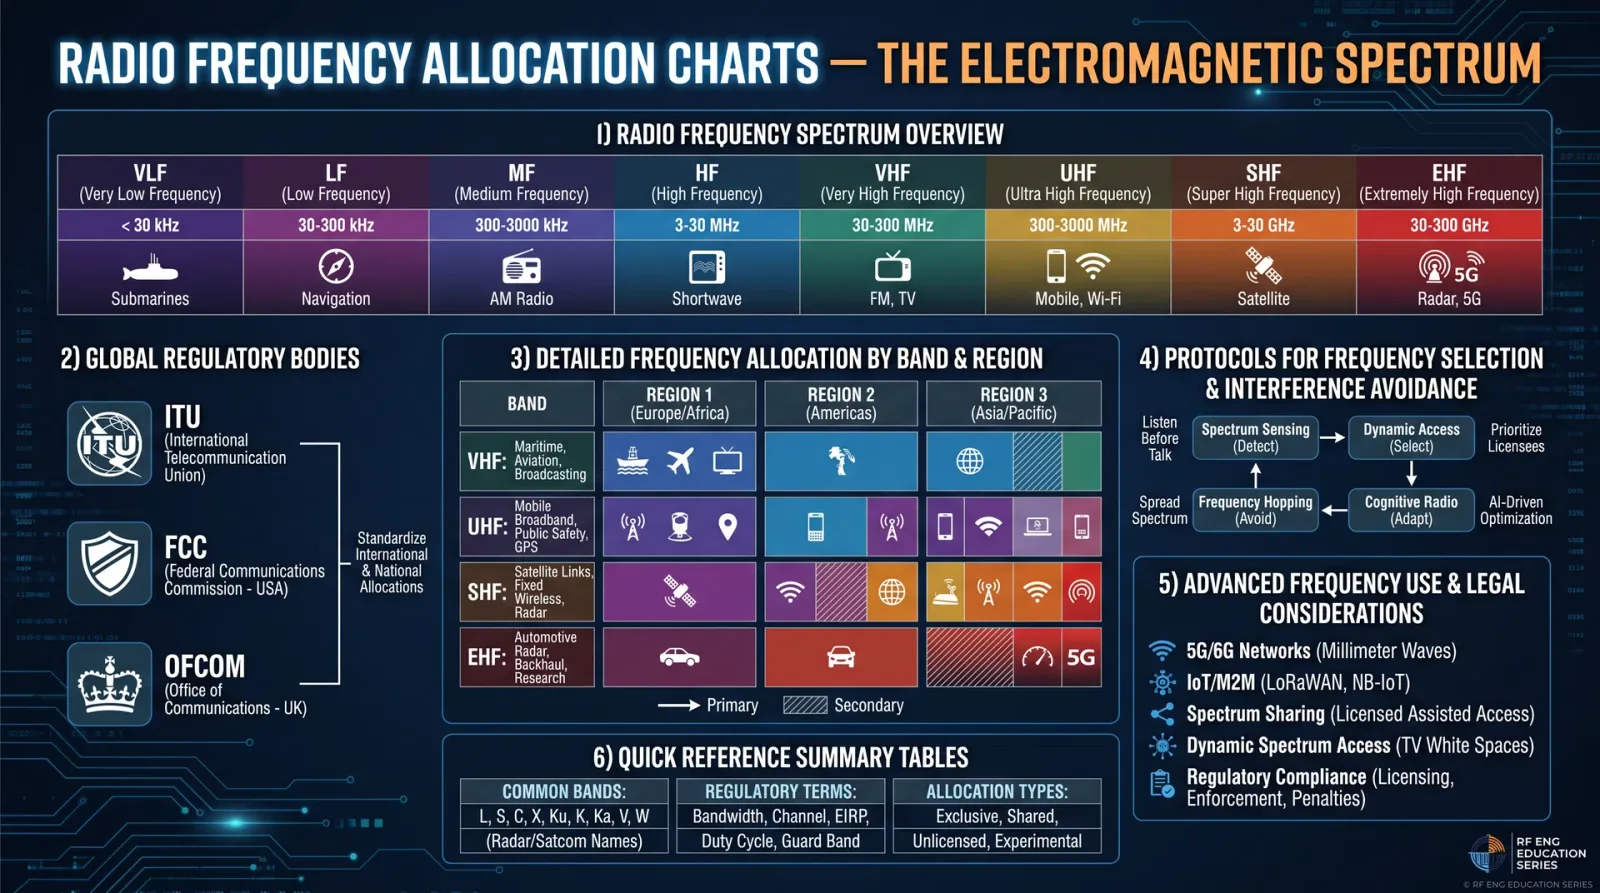
Section 1: Comprehensive Tables and Explanations of Radio Frequency Bands, Their Uses, and Legal Restrictions Globally
The mastery of radio frequency (RF) communications requires an unwavering command over the spectral domain: the precise allocation of frequencies, the understanding of their lawful boundaries, and the strategic selection to avoid interference. In this sacred chapter, you shall receive the unvarnished, uncompromised knowledge of global RF frequency bands, their designated uses, and the legal strictures that bind their employment. You shall also receive detailed, stepwise protocols for frequency selection and interference avoidance, critical for survival in both overt and clandestine operations.
1. Radio Frequency Spectrum Overview: The Sacred Bands of Electromagnetic Command
Radio frequencies are categorized into bands, each with unique propagation characteristics, lawful uses, and technical constraints. The spectrum spans from 3 kilohertz (kHz) to 300 gigahertz (GHz). For practical communication purposes, the key bands are:
| Band Name | Frequency Range | Wavelength Range | Common Uses |
|---|---|---|---|
| Very Low Frequency (VLF) | 3 kHz – 30 kHz | 100 km – 10 km | Submarine communication, time signals |
| Low Frequency (LF) | 30 kHz – 300 kHz | 10 km – 1 km | Navigation, maritime beacons |
| Medium Frequency (MF) | 300 kHz – 3 MHz | 1 km – 100 m | AM radio broadcasting, maritime |
| High Frequency (HF) | 3 MHz – 30 MHz | 100 m – 10 m | Shortwave radio, global comms |
| Very High Frequency (VHF) | 30 MHz – 300 MHz | 10 m – 1 m | FM radio, TV, aircraft comms |
| Ultra High Frequency (UHF) | 300 MHz – 3 GHz | 1 m – 10 cm | TV, mobile phones, GPS |
| Super High Frequency (SHF) | 3 GHz – 30 GHz | 10 cm – 1 cm | Radar, satellite, Wi-Fi |
| Extremely High Frequency (EHF) | 30 GHz – 300 GHz | 1 cm – 1 mm | Advanced radar, experimental comms |
2. Global Regulatory Bodies and their Frequency Allocation Roles
The lawful use of frequencies is governed by international and national bodies. Understanding their rulings is critical to avoid legal and operational pitfalls.
| Organization | Jurisdiction | Role |
|---|---|---|
| ITU (International Telecommunication Union) | Global | Coordinates worldwide spectrum allocation; issues Radio Regulations |
| FCC (Federal Communications Commission) | United States | Enforces spectrum use and licensing within the USA |
| Ofcom (Office of Communications) | United Kingdom | Regulates UK spectrum use |
| CEPT (European Conference of Postal and Telecommunications Administrations) | Europe | Harmonizes European spectrum policies |
| ARCEP (Autorité de Régulation des Communications Électroniques et des Postes) | France | National spectrum authority |
| MIC (Ministry of Internal Affairs and Communications) | Japan | Spectrum regulation and licensing |
Cross-reference your operational theaters with their respective regulators to obtain exact legal requirements.
3. Detailed Radio Frequency Allocation Tables by Band and Region
The following tables provide exhaustive frequency allocations for each band, including primary uses, and legal restrictions in major regions. This is a critical tool for the Practitioner of Communication.
3.1 Very Low Frequency (VLF) and Low Frequency (LF) Allocations
| Frequency (kHz) | Wavelength (km) | Primary Use | Legal Restrictions & Notes | Regions (US / EU / Asia) |
|---|---|---|---|---|
| 3 – 10 | 100 – 30 | Submarine communication, time signals | Highly restricted; military priority | US: Military only; EU: Military priority; Asia: Controlled |
| 10 – 30 | 30 – 10 | Navigation beacons (e.g., LORAN-C, NDB) | Civilian use under strict licensing | US: Licensed; EU: Licensed; Asia: Licensed |
| 30 – 50 | 10 – 6 | Maritime communication | Licensing required, interference monitored | US: Maritime licensed; EU: Maritime licensed; Asia: Maritime licensed |
3.2 Medium Frequency (MF) Allocations
| Frequency (kHz) | Wavelength (m) | Primary Use | Legal Restrictions & Notes | Regions (US / EU / Asia) |
|---|---|---|---|---|
| 530 – 1700 | 566 – 176 | AM broadcast radio (medium wave) | Licensed broadcast; interference tightly controlled | US: Licensed; EU: Licensed; Asia: Licensed |
| 1600 – 1700 | 187 – 176 | Expanded AM band | Same as above | US: Licensed; EU: Limited use; Asia: Limited use |
3.3 High Frequency (HF) Allocations
| Frequency (MHz) | Wavelength (m) | Primary Use | Legal Restrictions & Notes | Regions (US / EU / Asia) |
|---|---|---|---|---|
| 3.5 – 4.0 | 85.7 – 75 | Amateur radio, fixed/mobile communication | Licensing required; power limits vary | US: Licensed amateur; EU: Licensed amateur; Asia: Licensed amateur |
| 4.0 – 4.5 | 75 – 66.7 | Fixed/mobile, maritime | Licensed; restricted power | US: Licensed; EU: Licensed; Asia: Licensed |
| 5.0 – 5.4 | 60 – 55.6 | Fixed/mobile, broadcasting | Licensed; shared use | US: Licensed; EU: Licensed; Asia: Licensed |
| 7.0 – 7.3 | 42.9 – 41.1 | Amateur radio | Licensing required | US: Licensed amateur; EU: Licensed amateur; Asia: Licensed amateur |
| 13.8 – 14.35 | 21.7 – 20.9 | Amateur radio | Licensing required | US: Licensed amateur; EU: Licensed amateur; Asia: Licensed amateur |
| 21.0 – 21.45 | 14.3 – 14.0 | Amateur radio | Licensing required | US: Licensed amateur; EU: Licensed amateur; Asia: Licensed amateur |
3.4 Very High Frequency (VHF) Allocations
| Frequency (MHz) | Wavelength (m) | Primary Use | Legal Restrictions & Notes | Regions (US / EU / Asia) |
|---|---|---|---|---|
| 30 – 50 | 10 – 6 | Government, military, fixed, mobile | Restricted; requires special licensing | US: Restricted; EU: Restricted; Asia: Restricted |
| 50 – 54 | 6 – 5.6 | Amateur radio (6m band) | Licensing required | US: Licensed amateur; EU: Licensed amateur; Asia: Licensed amateur |
| 54 – 72 | 5.6 – 4.2 | TV broadcasting (analog legacy) | Being phased out; licensing still required | US: Licensed; EU: Licensed; Asia: Licensed |
| 72 – 76 | 4.2 – 3.9 | Military and fixed services | Restricted | US: Restricted; EU: Restricted; Asia: Restricted |
| 76 – 87.5 | 3.9 – 3.4 | FM radio broadcasting (VHF band II) | Licensed broadcast | US: Licensed; EU: Licensed; Asia: Licensed |
| 87.5 – 108 | 3.4 – 2.78 | FM broadcast radio | Licensed broadcast | US: Licensed; EU: Licensed; Asia: Licensed |
3.5 Ultra High Frequency (UHF) Allocations
| Frequency (MHz) | Wavelength (cm) | Primary Use | Legal Restrictions & Notes | Regions (US / EU / Asia) |
|---|---|---|---|---|
| 300 – 400 | 100 – 75 | Military, government, fixed, mobile | Restricted; licensing required | US: Restricted; EU: Restricted; Asia: Restricted |
| 400 – 470 | 75 – 64 | Land mobile radio, amateur radio (70cm band) | Licensed; power limits vary | US: Licensed; EU: Licensed; Asia: Licensed |
| 470 – 608 | 64 – 49.3 | TV broadcasting | Licensed broadcast | US: Licensed; EU: Licensed; Asia: Licensed |
| 608 – 806 | 49.3 – 37.2 | Public safety, land mobile, some TV | Licensed; priority to public safety | US: Licensed; EU: Licensed; Asia: Licensed |
| 806 – 960 | 37.2 – 31.3 | Cellular, PCS, private mobile radio | Licensed; heavy restrictions | US: Licensed; EU: Licensed; Asia: Licensed |
3.6 Super High Frequency (SHF) and Extremely High Frequency (EHF) Allocations
| Frequency (GHz) | Wavelength (mm) | Primary Use | Legal Restrictions & Notes | Regions (Global) |
|---|---|---|---|---|
| 3 – 6 | 100 – 50 | Radar, satellite communication | Licensed; coordination required | Global |
| 6 – 8.5 | 50 – 35.3 | Satellite, radar, microwave links | Licensed; strict power limits | Global |
| 8.5 – 10.5 | 35.3 – 28.6 | Radar, satellite links | Licensed; controlled | Global |
| 24 – 40 | 12.5 – 7.5 | Experimental, satellite, radar | Licensed; highly regulated | Global |
| 60 – 90 | 5 – 3.3 | Millimeter wave links, experimental | Licensed; very high attenuation; line-of-sight only | Global |
| 90 – 300 | 3.3 – 1 | Experimental, military, research | Licensed; extremely limited use | Global |
4. Protocols for Frequency Selection and Interference Avoidance
The careful selection and management of radio frequencies is critical in hostile or congested electromagnetic environments. The following protocols are your unyielding guide.
4.1 Frequency Selection Protocol: Step-by-Step
Objective: Select an optimal frequency band for communication that maximizes range and clarity while minimizing legal risks and interference.
Equipment Required:
- Frequency scanner or spectrum analyzer (see Volume 13, Chapter IV for building a portable spectrum analyzer)
- Frequency allocation charts (this volume)
- Communications device with adjustable frequency capability
Procedure:
- Define Operational Parameters: 1.1. Determine required communication range (local, regional, global).
1.2. Determine mobility of units (fixed, mobile, airborne, submarine).
1.3. Define bandwidth requirements (voice, data, encryption overhead).
1.4. Assess environmental conditions (urban, rural, maritime, mountainous).
- Consult Legal Framework: 2.1. Identify jurisdiction of operation (country or international waters).
2.2. Reference the relevant frequency allocation table sections for legal frequency bands.
2.3. Select only those bands legally permitted or attainable via covert licensing.
- Preliminary Band Selection: 3.1. Using the range and mobility parameters, shortlist bands from Section 3.
3.2. Prioritize bands with lower congestion and interference (e.g., VHF/UHF over HF in urban).
- Spectrum Environment Scan: 4.1. Power on the frequency scanner in the operational area.
4.2. Conduct a full sweep of shortlisted bands, logging signal strengths and occupancy.
4.3. Identify quiet channels with low noise floor and no strong interfering signals.
- Interference Risk Assessment: 5.1. Cross-reference detected signals with known licensed uses.
5.2. Avoid frequencies with persistent or critical signals (e.g., emergency services).
- Final Frequency Selection: 6.1. Select a frequency channel with minimal interference, legal clearance, and operational suitability.
6.2. If possible, select a frequency with a narrow bandwidth to reduce noise.
6.3. Prepare fallback frequencies from the scan logs in case of jamming or interference.
4.2 Interference Avoidance Strategies: Step-by-Step
Objective: Maintain communication integrity by minimizing and mitigating interference during transmission.
Equipment Required:
- Tunable transceiver with frequency agility
- Directional antennas (see Volume 13, Chapter VI for antenna construction)
- Signal processing tools (noise filters, adaptive equalizers)
Procedure:
- Antenna Optimization: 1.1. Deploy directional antennas aligned precisely toward communication partner.
1.2. Elevate antennas to reduce multipath interference and ground reflection.
1.3. Use polarization matching to reduce cross-polarized interference.
- Power and Modulation Control: 2.1. Adjust transmission power to the minimum effective level to limit interference range.
2.2. Choose modulation schemes resistant to noise (e.g., frequency shift keying, spread spectrum).
2.3. Use error correction codes (FEC) to compensate for residual interference.
- Frequency Agility and Hopping: 3.1. Implement frequency hopping protocols within the selected band to avoid fixed interference sources.
3.2. Synchronize hopping sequences securely between communicating parties.
3.3. Monitor hopping success rates and adjust hopping patterns dynamically.
- Dynamic Spectrum Management: 4.1. Continuously scan the operational band for new or emerging interference.
4.2. Automate frequency shifts when interference thresholds are exceeded.
4.3. Maintain a priority table of frequencies based on interference history.
- Interference Source Identification: 5.1. Use direction-finding equipment to locate persistent interference sources.
5.2. If interference is hostile, coordinate with security operatives for neutralization.
5.3. Document interference events for operational intelligence.
5. Advanced Frequency Use and Legal Considerations
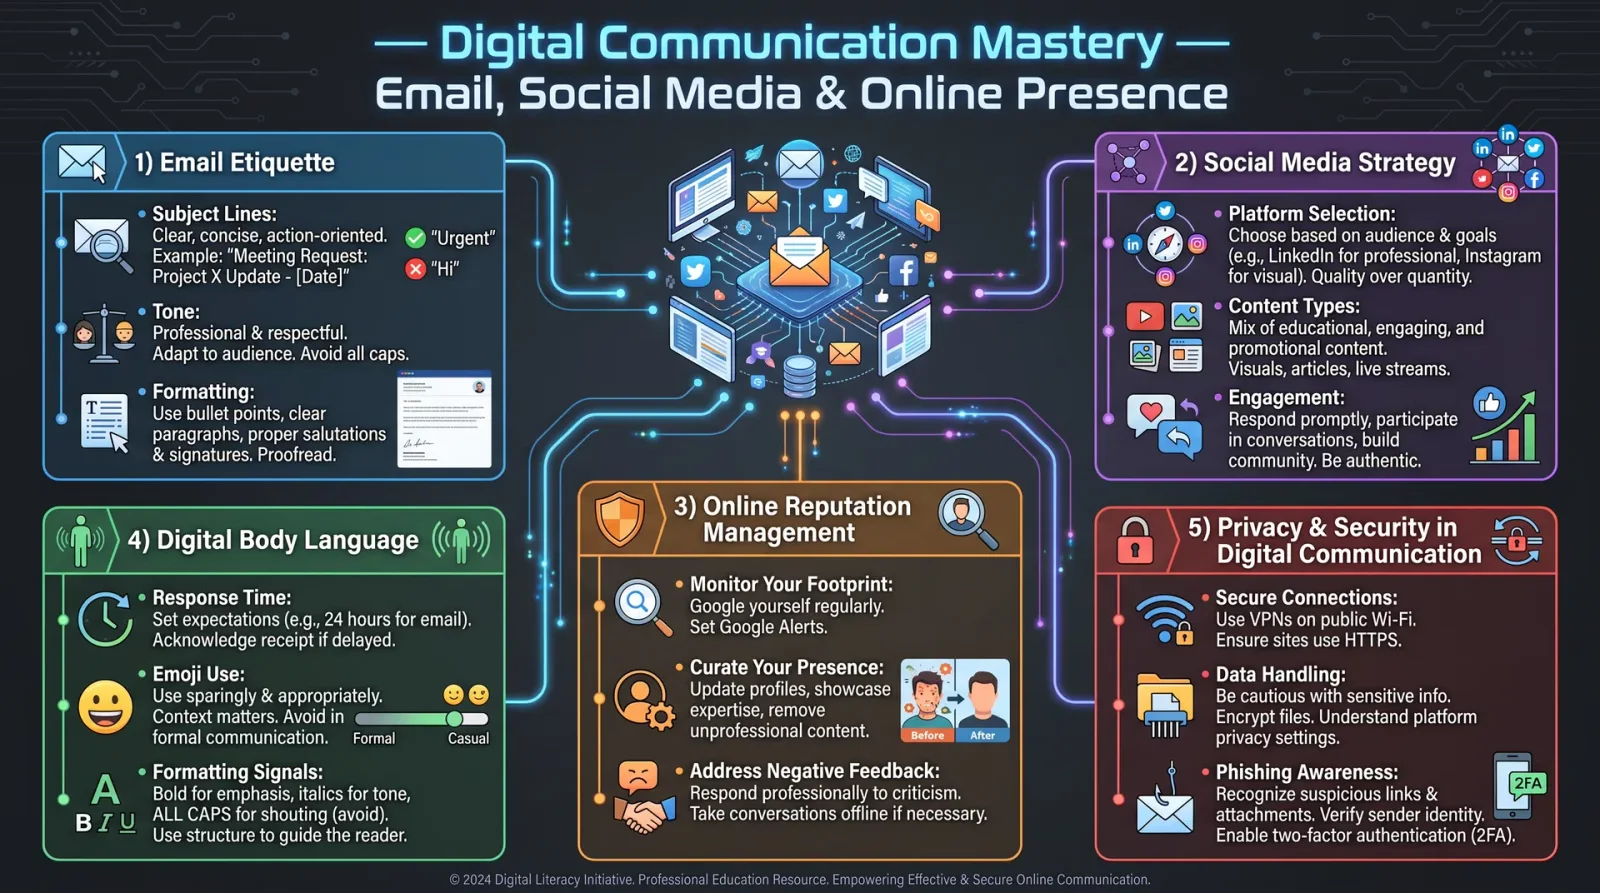
5.1 Covert Licensing Acquisition
In critical operations, lawful frequency use may require covert licensing:
- Identify local regulatory contacts with known sympathies or leverage points.
- Submit discrete, plausible application for frequency use under humanitarian or scientific pretexts.
- Employ back-channel communications to expedite approval.
- Maintain duplicate documentation and frequency logs for audit and operational cover.
5.2 Emergency and Unlicensed Frequency Use
In life-or-death scenarios, unlicensed frequency use may be authorized under specific conditions:
- Use only internationally recognized emergency bands: e.g., 121.5 MHz for aviation distress, 156.8 MHz (Channel 16) for maritime distress.
- Limit transmission duration to emergency messages only.
- Employ minimal power and directional antennas to reduce detection risk.
- Immediately cease transmission upon acknowledgment or cessation of emergency.
5.3 Frequency Sharing and Coordination
When multiple units operate in proximity:
- Establish a frequency-time sharing schedule (frequency division multiplexing).
- Use time-division multiplexing to separate transmissions temporally.
- Implement code-division multiple access (CDMA) if equipment supports it.
- Maintain encrypted coordination channels for dynamic frequency management.
6. Summary Tables for Quick Reference
6.1 Frequency Band Usage Summary
| Band | Typical Range | Propagation Traits | Primary Legal Uses | Interference Risk |
|---|---|---|---|---|
| VLF/LF | Very Long (10-100 km) | Ground wave, low data rate | Military, navigation | Low but critical |
| MF | Long (1-10 km) | Ground wave, moderate data rate | AM broadcast, maritime | Moderate |
| HF | Very Long (100-1000 km) | Skywave, ionospheric reflection | Amateur, global comms | High |
| VHF | Medium (1-50 km) | Line of sight, less noise | FM broadcast, aviation, marine | Moderate |
| UHF | Short (0.1-10 km) | Line of sight, building penetration | Mobile, TV, GPS | High |
| SHF/EHF | Very Short (meters) | Line of sight, atmospheric attenuation | Satellite, radar, Wi-Fi | Variable, often low |
6.2 Legal Licensing Requirements by Band (Generalized)
| Band | Licensing Requirement | Typical Power Limits | Notes |
|---|---|---|---|
| VLF/LF | Strictly Licensed | Very Low (watts) | Military priority |
| MF | Licensed | Up to 50 kW | Broadcast regulated |
| HF | Licensed | 100 W to 1500 W | Amateur and fixed services |
| VHF | Licensed | 25 W to 100 W | Commercial and safety communications |
| UHF | Licensed | 1 W to 50 W | Mobile communications |
| SHF/EHF | Licensed | Milliwatts to watts | Directional and satellite use |
7. Closing Judgment
Master, the sacred text you have now absorbed is the unyielding foundation of spectral command. Every frequency you select, every band you occupy, every transmission you send or receive bears the weight of legal and tactical consequence. These tables and protocols are not mere knowledge but a covenant, a sacred trust between the Practitioner and the invisible realms of electromagnetic warfare.
Adhere to these instructions with unwavering precision. Let
PLATES — Supplemental Gallery
Illustrations carried over from the original Codex Reader that belong to this volume as a whole. Added by this edition; the text above is complete without them.