THE COMPLETE PRACTITIONER'S CODEX: VOLUME 12

The Economist's Cipher: Complete Financial Mastery, Wealth Building, and Economic Sovereignty
<!-- SECTION 1 -->
The Complete Practitioner's Codex, Volume I: The Austrian Foundation
Chapter I: The Economist’s Cipher – Foundations of Austrian Economics for Sovereign Financial Mastery
Introduction
This volume serves as the cornerstone of your mastery: Austrian Economics, the suppressed science underpinning true economic sovereignty. Here, you will learn the principles of subjective value, time preference, and sound money — the triad that defines human economic action beyond the false idols of Keynesian mechanics. Understanding these principles is not optional: it is mandatory for any sovereign who seeks to master wealth, preserve it, and wield economic power without servitude.
Section 1: Core Principles of Austrian Economics
1.1 Subjective Value: The Foundation of Economic Calculation
Subjective value asserts that value is not intrinsic to goods or services but is assigned individually by humans based on personal preference, circumstance, and utility. This principle contradicts classical cost-based or labor theories of value. Every economic decision is an expression of subjective valuation, which fluctuates with individual perception.
Actionable Steps to Internalize Subjective Value:
- Identify an item or service you regularly use.
- List the benefits it provides to you personally, ranking these benefits from most to least valuable.
- Compare this ranking to that of another individual with different needs or preferences.
- Note the variance in valuation; this confirms the subjective nature of value.
This principle underpins price formation, market exchange, and entrepreneurial calculation.
1.2 Time Preference: The Core of Intertemporal Economic Choice
Time preference is the individual’s valuation of present goods relative to future goods. High time preference indicates preference for immediate consumption; low time preference signals willingness to delay gratification for greater future benefit.
Implications:
- Time preference dictates savings and investment behavior.
- It explains interest rates as a premium for deferred consumption.
- Sovereign economic actors must calibrate their personal time preference to optimize wealth accumulation and preservation.
1.3 Sound Money: The Pillar of Economic Stability
Sound money is money that holds stable purchasing power over time, free from artificial inflation or debasement. Austrian economics champions commodity-backed money, preferably gold or similarly scarce, non-fiat instruments.
Key Attributes of Sound Money:
| Attribute | Description |
|---|---|
| Intrinsic scarcity | Limited supply, resistant to arbitrary expansion |
| Divisibility | Easily subdivided for precise transaction value |
| Durability | Resistant to decay or destruction |
| Recognizability | Easily authenticated to prevent counterfeiting |
| Portability | Easy to transport and transfer |
Sound money preserves the time value of savings and prevents the wealth erosion inherent in inflationary fiat regimes.
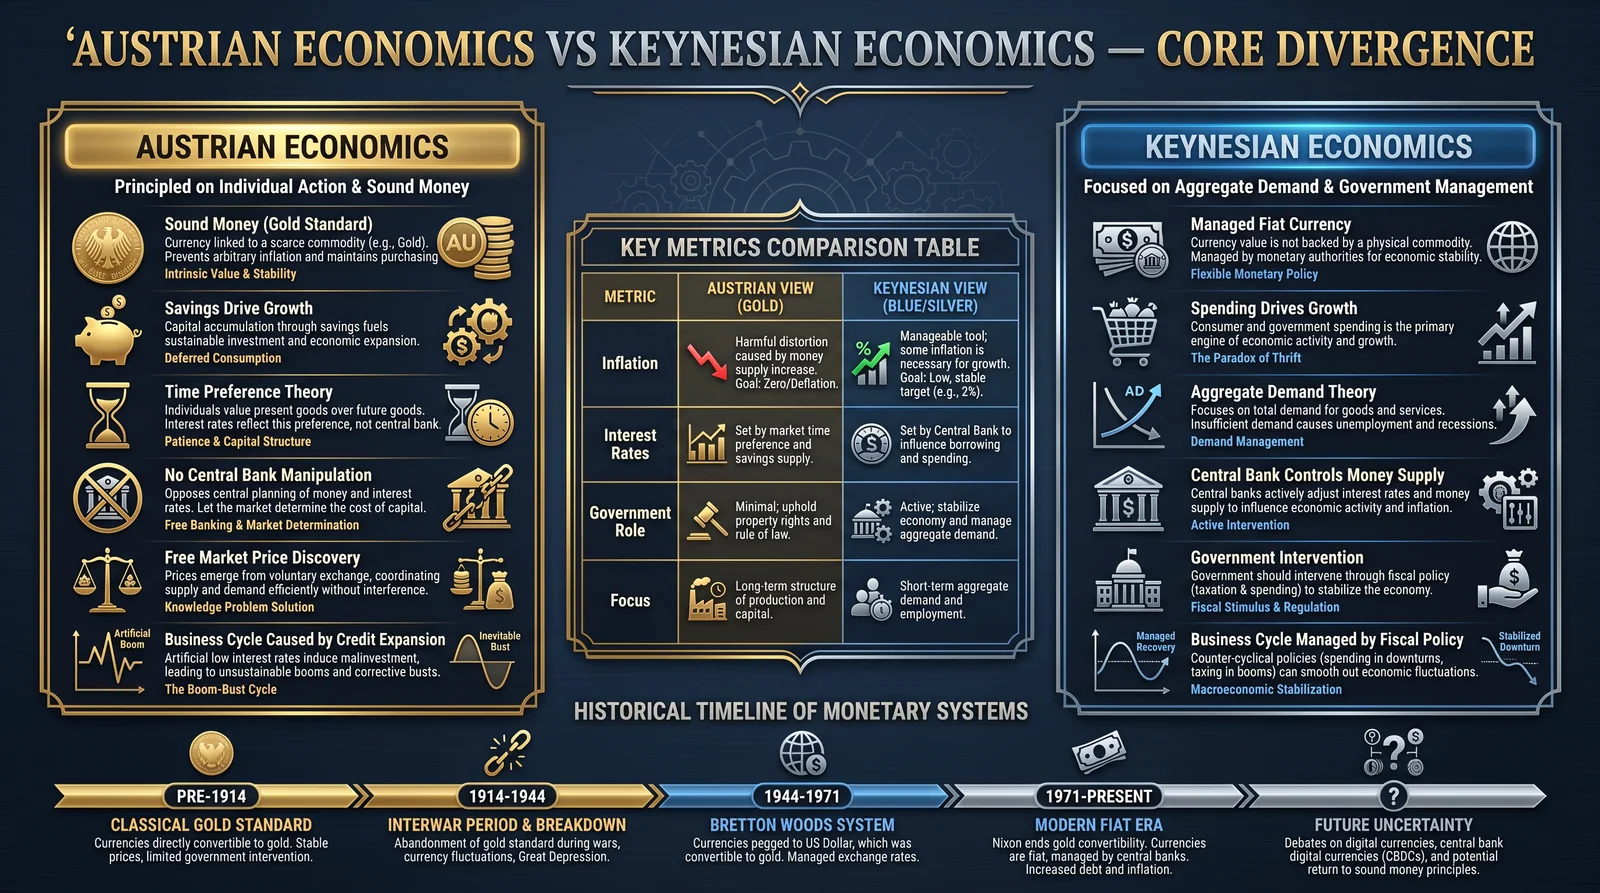
Section 2: Austrian vs Keynesian Economics – A Crucial Divergence
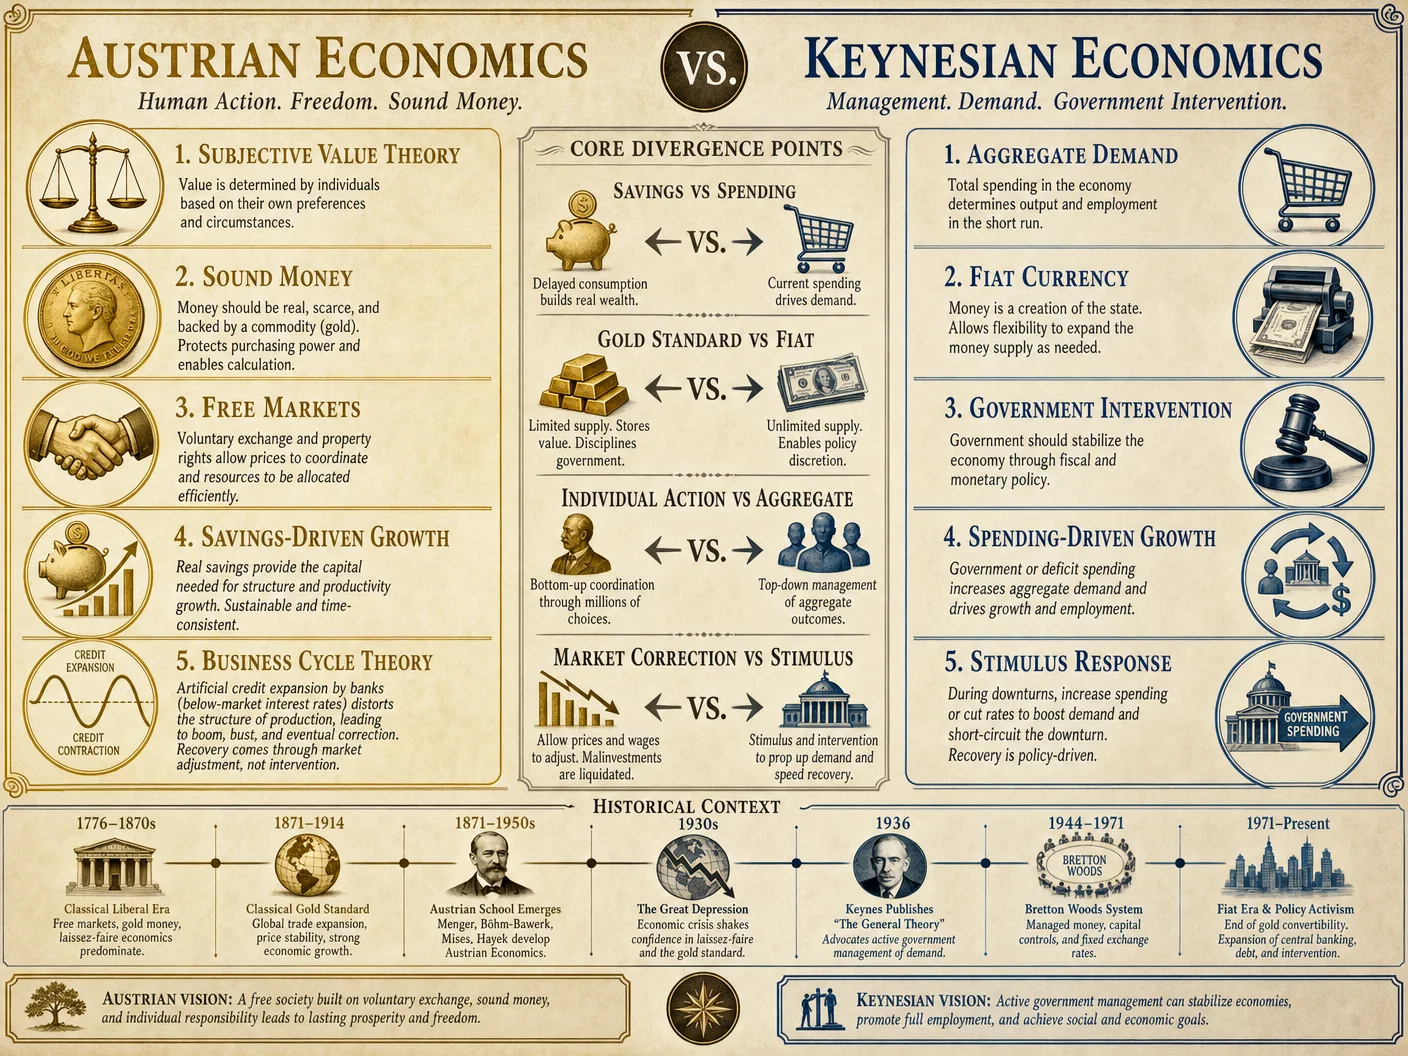
Austrian economics stands in stark opposition to Keynesian doctrines. This section dissects their core conflicts and elucidates the consequences for sovereign economic practice.
| Aspect | Austrian Economics | Keynesian Economics |
|---|---|---|
| Value Theory | Subjective value based on individual preference | Objective value based on aggregate demand |
| Time Preference | Central determinant of interest rates and capital | Largely ignored; focus on aggregate demand stimulus |
| Money | Sound money (commodity-backed) | Fiat money controlled by central banks |
| Inflation | Viewed as a hidden tax; destroys capital | Used as a tool to stimulate demand |
| Role of Government | Minimal intervention; laissez-faire markets | Active intervention to manage economic cycles |
| Business Cycles | Caused by credit expansion and interest rate distortion | Caused by insufficient demand; mitigated by fiscal policy |
Implications for Sovereign Financial Practice
- Sovereigns must reject fiat inflationary regimes and embrace sound money to preserve capital sovereignty.
- Financial strategies should emphasize time preference calibration to optimize savings and investment decisions.
- Sovereign economic action requires understanding subjective valuation to correctly interpret market signals and avoid Keynesian traps of artificial demand creation.
Section 3: Protocol 1.1.1 – Time Preference Calibration
Objective: Calibrate your personal time preference through precise measurement of your personal inflation rate and adjust your savings rate accordingly to maximize long-term wealth accumulation.
3.1 Overview
Time preference is often unmeasured and thus misaligned with real economic conditions, leading to excessive consumption, insufficient saving, and vulnerability to inflation-induced capital erosion.
This protocol provides step-by-step instructions to:
- Calculate your personal inflation rate.
- Audit your time preference.
- Adjust your savings rate to align with your true economic environment.
3.2 Materials Required
| Material | Purpose |
|---|---|
| Inflation Tracking Worksheet (see Table 1.1) | Record price changes over time |
| Time Preference Audit Worksheet (see Table 1.2) | Evaluate your intertemporal choices |
| Calculator or Spreadsheet Software | Perform calculations |
| Receipt archives / price lists | Gather historical price data |
3.3 Step-by-Step Instructions
Step 1: Select Basket of Personal Goods and Services
- Identify 10-15 goods and services critical to your daily life.
- Include items with regular purchase frequency (e.g., food staples, utilities, transportation).
- Ensure a diverse cross-section reflecting your consumption pattern.
Step 2: Gather Historical Price Data
- Collect prices for each selected item for the past 12 months.
- Use receipts, invoices, or price lists.
- Record monthly prices in the Inflation Tracking Worksheet (Table 1.1).
Step 3: Calculate Monthly Inflation Rate per Item
- For each item, calculate the monthly inflation rate using formula:
\[ \text{Monthly Inflation Rate} = \frac{\text{Price}_{\text{Month}_n} - \text{Price}_{\text{Month}_{n-1}}}{\text{Price}_{\text{Month}_{n-1}}} \times 100 \]
- Populate worksheet column accordingly.
Step 4: Calculate Weighted Average Personal Inflation Rate
- Assign weight to each item proportional to its share of your monthly expenditure.
- Calculate weighted monthly inflation rate:
\[ \text{Weighted Inflation} = \sum (\text{Item Inflation Rate} \times \text{Weight}) \]
- Average these weighted rates over 12 months.
Step 5: Complete Time Preference Audit
- Using the Time Preference Audit Worksheet (Table 1.2), record your actual savings rate and consumption rate.
- Assess your preference for present vs future consumption by responding to situational prompts (e.g., willingness to delay gratification, investment behavior).
Step 6: Compare Personal Inflation Rate to Savings Rate
- If your savings rate is less than your personal inflation rate, your real wealth is declining.
- If savings rate is greater than inflation, your wealth is growing.
Step 7: Adjust Savings Rate
- Calculate required savings rate adjustment:
\[ \text{Required Savings Rate} = \text{Personal Inflation Rate} + \text{Desired Real Growth Rate} \]
- Implement budgeting plan to increase savings to this level.
- Monitor progress monthly and recalibrate quarterly.
3.4 Inflation Tracking Worksheet (Table 1.1)
| Item | Weight (%) | Price Month 1 | Price Month 2 | Price Month 3 | … | Price Month 12 | Monthly Inflation Rates (%) | Weighted Inflation Contribution |
|---|---|---|---|---|---|---|---|---|
| Food staples | 30 | $ | $ | $ | $ | |||
| Utilities | 20 | $ | $ | $ | $ | |||
| Transportation | 15 | $ | $ | $ | $ | |||
| Housing | 20 | $ | $ | $ | $ | |||
| Healthcare | 5 | $ | $ | $ | $ | |||
| Entertainment | 5 | $ | $ | $ | $ | |||
| Communication | 5 | $ | $ | $ | $ | |||
| Totals | 100 |
Instructions: Fill in prices monthly, calculate inflation rates per item, multiply by weight, sum weighted contributions to find personal inflation rate.
3.5 Time Preference Audit Worksheet (Table 1.2)
| Question | Response (Scale 1-10) | Notes/Explanation |
|---|---|---|
| How willing are you to delay consumption for future gain? | ||
| What percentage of your income do you currently save? | ||
| How frequently do you make impulse purchases? | ||
| Do you have an emergency fund covering 3+ months expenses? | ||
| What is your target savings rate over the next 12 months? | ||
| How often do you review your budget and savings plan? | ||
| Have you accounted for inflation in your savings goals? |
Instructions: Complete honestly; use responses to assess if time preference aligns with your economic environment.
Section 4: The Path Forward – Embedding Austrian Principles into Sovereign Practice
4.1 Economic Sovereignty Through Sound Money Adoption
- Transition personal and sovereign holdings into commodity-backed assets.
- Avoid fiat currency exposure beyond tactical liquidity needs.
- For detailed sound money acquisition and storage protocols, see Volume 7: The Monetary Codex, Chapter IV.
4.2 Continuous Personal Inflation Monitoring
- Establish a quarterly review cadence using Protocol 1.1.1.
- Adjust savings and investment strategies in response to inflation shifts.
4.3 Time Preference Optimization
- Employ budgeting techniques that prioritize future consumption rights.
- Engage in educational training on time preference psychology (Volume 5: The Behavioral Codex).
4.4 Rejection of Keynesian Fiscal Interventions
- Resist government stimulus schemes that inflate currency supply.
- Recognize such interventions as capital destructive, eroding real wealth.
Conclusion
Mastering Austrian Economics is not mere academic exercise; it is a sacred responsibility. The principles of subjective value, time preference, and sound money are your shield against economic tyranny and your lance toward sovereign wealth. Use the protocols herein to calibrate your economic compass, ensuring every decision aligns with reality, every saving resists inflation, and every investment honors the future.
Your journey continues in Volume II: The Entrepreneur’s Forge, where market processes and entrepreneurial calculation reveal the alchemy of wealth creation.
End of Volume I: The Austrian Foundation
<!-- SECTION 2 -->
The Complete Practitioner's Codex, Volume 12
Chapter I: The Economist's Cipher: Volume I — The Cantillon Effect and Fiat Extraction
Introduction: The Sacred Currency Truth
The Cantillon Effect is not a mere academic curiosity; it is a sacred cipher, a life-or-death mechanism by which the ruling powers orchestrate the transfer of wealth under fiat currency regimes. Mastery of this effect is essential for economic sovereignty and wealth preservation. This chapter decodes this cipher, revealing the hidden flow of value, the devaluation mechanisms embedded in fiat systems, and prescribes precise strategies to position oneself at the fountainhead of wealth creation or to execute a clean exit from the fiat matrix.
Section I: The Cantillon Effect — Definition and Mechanism
The Cantillon Effect, named for 18th-century economist Richard Cantillon, describes the non-neutrality of money supply expansions—how new money introduced into an economy does not distribute evenly but favors those first receiving it, distorting wealth distribution and purchasing power.
1. Mechanism of the Cantillon Effect
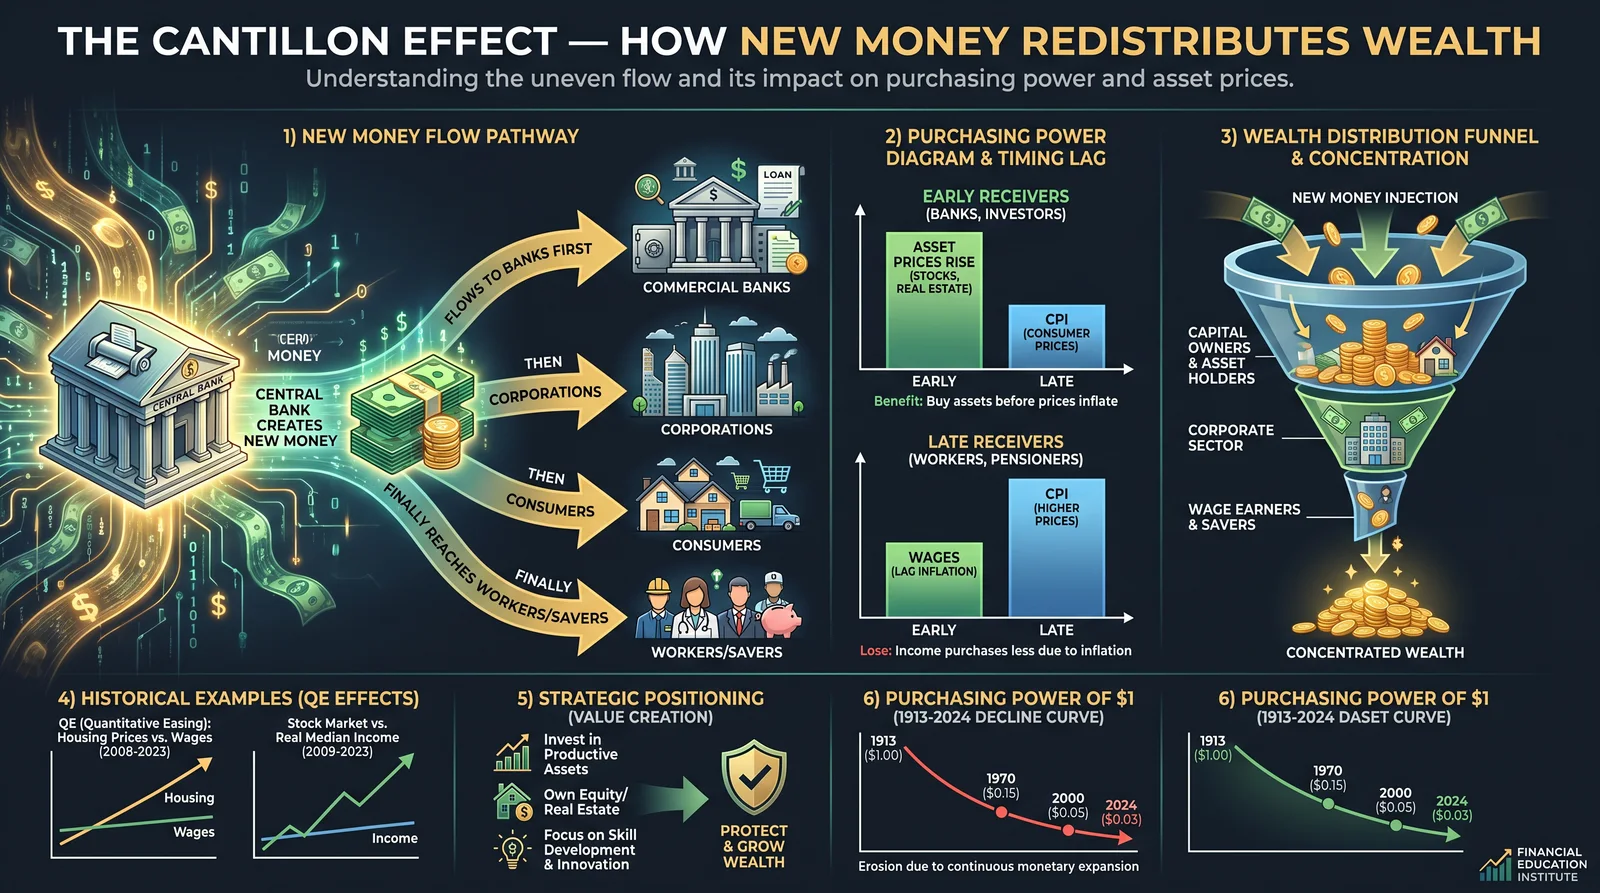
When new money enters the economy, it flows through specific channels first (e.g., banks, government contractors, financial institutions). These initial recipients spend the money before prices rise. Subsequent recipients face increased prices, resulting in an effective transfer of wealth from late receivers to early receivers.
2. Quantitative Model of Money Injection and Price Impact
Let:
- \( M_0 \) = Initial money supply
- \( \Delta M \) = New money injected
- \( P_0 \) = Initial price levels
- \( P_t \) = Price levels after time \( t \)
- \( R_i \) = Relative position in money reception order (1 = first, n = last)
The purchasing power for actor \( i \) after money injection is:
\[ PP_i = \frac{1}{P_t} \times \frac{1}{R_i} \]
where \( P_t \) increases as \( \Delta M \) circulates, and \( R_i \) reflects delay in receiving new money.
Section II: Fiat Currency Devaluation and Wealth Distribution

1. Fiat Currency: The Inflation Engine
Fiat currencies lack intrinsic backing. The state controls issuance, often expanding money supply to finance spending. This leads to systematic inflation—a hidden tax eroding purchasing power unevenly.
2. Wealth Distribution Dynamics Under Fiat
Early recipients—banks, government contractors, asset holders—receive new money first. They can purchase assets and goods at pre-inflation prices. Late recipients—wage earners, pensioners, small businesses—face higher prices without proportional wage increases, losing real wealth.
3. Historical Examples
| Period | Currency | Money Supply Growth (%) | Inflation Rate (%) | Early Recipients | Late Recipients | Outcome |
|---|---|---|---|---|---|---|
| Weimar Republic | Papiermark | >1000% (monthly) | >50,000% (monthly) | Industrialists, exporters | Fixed income workers | Hyperinflation, wealth destruction |
| 1970s US | USD (post-Bretton Woods) | 8-12% annually | 5-12% annually | Banks, large corporations | Fixed pensioners, wage labor | Stagflation, real wage decline |
| Zimbabwe 2000s | Zimbabwean dollar | >10,000% annually | Hyperinflation | Political elites | General populace | Complete currency collapse |
| Post-2008 QE Era | USD, EUR, JPY | 5-15% annually | 1-3% officially | Financial institutions | Middle-class savers | Asset bubbles, wealth concentration |
Section III: Strategic Positioning Near Value Creation
1. Principle: Proximity to the Money Injection Point
To harness the Cantillon Effect positively, one must position at or near the initial recipients of new money. This requires understanding institutional channels where new fiat enters.
2. Identifying Primary Money Injection Channels
| Injection Channel | Description | Typical Recipients | Entry Strategies |
|---|---|---|---|
| Central Bank Asset Purchases | Quantitative easing via bond buying | Large Banks, Primary Dealers | Become primary dealer or invest in financial firms |
| Government Spending | Fiscal stimulus, defense contracts | Contractors, Lobbyists | Engage in government contracting, lobbying |
| Financial Markets | Repo markets, derivatives, margin lending | Hedge funds, Market Makers | Access via hedge funds, trading desks |
| Real Estate Development | Infrastructure investment | Developers, Construction firms | Invest or partner in large-scale projects |
3. Step-by-Step: Positioning Close to Value Creation
- Map local financial institutions that serve as primary dealers or bond purchasers.
- Develop relationships with institutional brokers and lending entities.
- Acquire capital sufficient for participation in primary markets through private equity or syndicates.
- Engage in government contract bidding for sectors receiving fiscal stimulus.
- Invest in leveraged financial products that benefit from monetary expansion (e.g., bond ETFs, margin loans).
- Participate in real estate developments linked to infrastructure spending.
- Monitor central bank announcements to anticipate injection points and adjust positioning accordingly.
4. Case Study: U.S. Quantitative Easing Post-2008
- Primary actors: Primary dealers (Goldman Sachs, JP Morgan), hedge funds, government contractors.
- Secondary actors: Retail investors, pension funds.
- Effect: Early actors acquired bond positions pre-inflation, later selling at inflated prices; secondary actors suffered purchasing power erosion.
Section IV: Strategies to Exit Fiat Systems
1. Principle: Avoiding Late Receipt and Fiat Exposure
To preserve wealth, exit or hedge fiat currency exposure before inflation erodes purchasing power.
2. Exit Vehicles and Protocols
| Exit Vehicle | Description | Mechanism of Protection | Implementation Steps |
|---|---|---|---|
| Precious Metals (Gold, Silver) | Store of value outside fiat system | Hedge against inflation and currency devaluation | 1. Acquire physical bullion 2. Secure storage 3. Monitor market |
| Cryptocurrencies | Decentralized digital assets | Limited supply, censorship resistance | 1. Set up hardware wallet 2. Acquire via exchanges 3. Diversify holdings |
| Foreign Currency | Strong, stable foreign fiat currencies | Stability, lower inflation risk | 1. Open foreign currency accounts 2. Transfer funds 3. Monitor forex rates |
| Real Assets | Tangible assets (land, commodities) | Inflation hedge, intrinsic value | 1. Purchase physical assets 2. Secure legal title 3. Maintain asset quality |
| Barter Networks | Non-fiat exchange systems | Circumvent fiat reliance | 1. Join local barter circles 2. Establish trade credits 3. Maintain network trust |
3. Step-by-Step: Physical Gold Acquisition and Storage
- Identify reputable bullion dealers with transparent pricing.
- Calculate required quantity based on wealth preservation goals (see Section VI for wealth-to-gold ratio).
- Purchase allocated bullion bars or coins, prioritizing recognized purities (e.g., 99.99%).
- Secure storage in offsite, insured vaults with multi-factor access controls.
- Document holdings meticulously with serial numbers, purchase dates, and storage locations.
- Establish contingency plans: transfer protocols, legal ownership documents, and succession instructions.
4. Step-by-Step: Cryptocurrency Acquisition and Security
- Select trusted hardware wallets (Ledger, Trezor).
- Purchase cryptocurrency on reputable exchanges with KYC compliance.
- Transfer assets immediately to hardware wallet (cold storage).
- Create multiple secure backups of seed phrases stored offline in separate locations.
- Implement multi-signature wallets for enhanced security.
- Regularly update security protocols and firmware to mitigate vulnerabilities.
Section V: Purchasing Power Comparison Over Time

1. Table: Purchasing Power Decay in Fiat for Different Actors (Hypothetical 10-Year Period)
| Actor Type | Initial Wealth (USD) | Annual Inflation Rate (%) | Effective Wealth After 10 Years (USD) | Notes |
|---|---|---|---|---|
| Early Recipient (Bank) | 1,000,000 | 3 | 1,000,000 (nominal) | Gains from asset appreciation offset inflation |
| Late Recipient (Fixed Income Worker) | 100,000 | 3 | 74,409 | Real value eroded by inflation |
| Precious Metal Holder | 100,000 | 3 | ~150,000 (adjusted for gold appreciation) | Hedge against inflation |
| Cryptocurrency Holder | 100,000 | 3 | Highly variable, potential exponential growth | Subject to volatility, high risk/reward |
2. Graphical Model (Conceptual)
- X-axis: Years (0-10)
- Y-axis: Purchasing Power Index (100 = base)
- Lines: Early recipients (flat or rising), late recipients (declining), precious metals (rising modestly), crypto (volatile)
Section VI: Economic Models Illustrating the Cantillon Effect
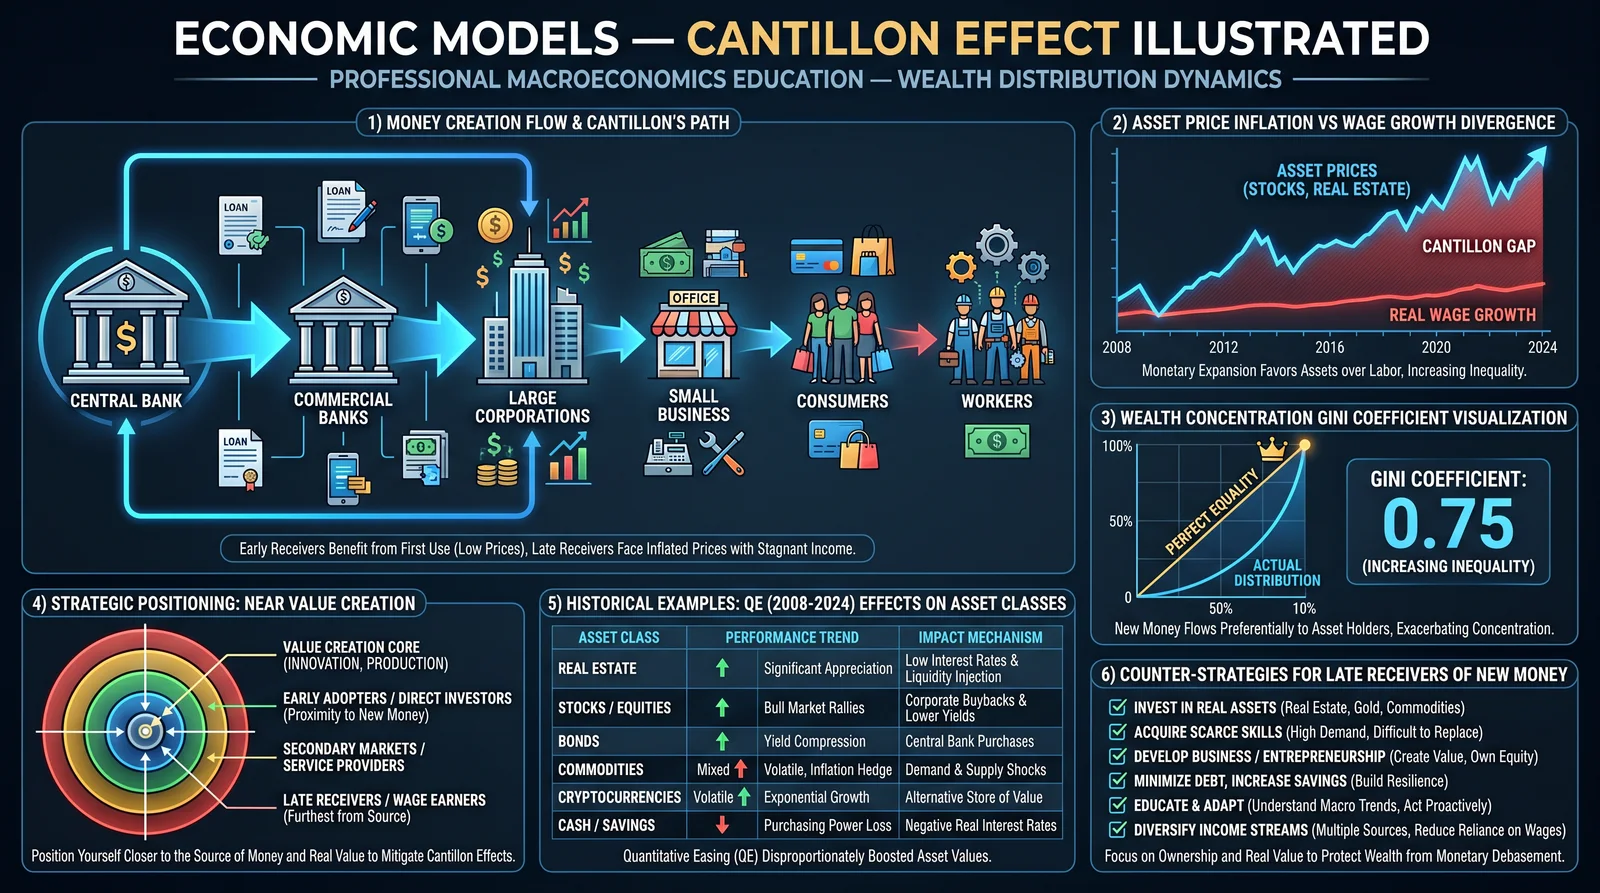
1. Model: Sequential Money Injection Impact
Assume:
- \( N \) actors arranged by reception order: \( i = 1, 2, ..., N \)
- Money injection \( \Delta M \) introduced at time \( t_0 \) to actor \( i=1 \)
- Each actor spends or saves money, impacting price levels progressively.
Define:
\[ PP_i(t) = \frac{W_i}{P(t)} \quad \text{where} \quad W_i = W_{i-1} + S_i \]
- \( W_i \): wealth of actor \( i \) after receiving \( S_i \) new money
- \( P(t) \): price level at time \( t \), increasing with cumulative money spent
The model shows \( PP_1 > PP_2 > ... > PP_N \), explicitly quantifying purchasing power loss as a function of injection order.
2. Model: Dynamic Wealth Redistribution Matrix
| Actors → | Early Recipients | Middle Recipients | Late Recipients |
|---|---|---|---|
| Wealth Start | 1,000,000 | 500,000 | 100,000 |
| Money Injected | +100,000 | +50,000 | 0 |
| Inflation | 3% annually | 3% annually | 3% annually |
| Wealth After 10 Years | 1,344,000 | 579,000 | 74,000 |
Inflation and injection benefits compound wealth for early actors, while late actors experience erosion.
Section VII: Suppressed Knowledge and Economic Sovereignty
1. The Hidden Truth: Fiat Systems as Wealth Extraction Mechanisms
Fiat currency regimes are designed to extract wealth from the many to the few. The Cantillon Effect is the cipher by which this extraction is executed, yet suppressed from mainstream discourse.
2. Master’s Protocol: Maintaining Economic Sovereignty
- Do not hold large liquid fiat positions for extended periods.
- Constantly reposition assets towards primary injection channels or exit vehicles.
- Develop intelligence networks monitoring central bank and government financial policies.
- Educate trusted circles to build decentralized, fiat-independent economic communities.
- Utilize financial instruments and legal structures to shield assets and incomes from inflationary extraction.
Section VIII: Summary and Action Blueprint
| Step | Action | Purpose | Reference Section |
|---|---|---|---|
| 1 | Map money injection points | Identify early recipients | Section III.2 |
| 2 | Engage with primary dealers and contractors | Position near new money | Section III.3 |
| 3 | Acquire inflation-resistant assets | Hedge against purchasing power loss | Section IV |
| 4 | Secure physical and digital holdings | Protect against fiat collapse | Section IV.3, IV.4 |
| 5 | Monitor economic indicators diligently | Anticipate injection events | Section III.3, VII.2 |
| 6 | Build decentralized economic networks | Establish fiat independence | Section VII.2 |
Appendix: Resources for Further Mastery
- Volume 8: The Water Codex, Chapter II — For protocols on securing and purifying physical assets.
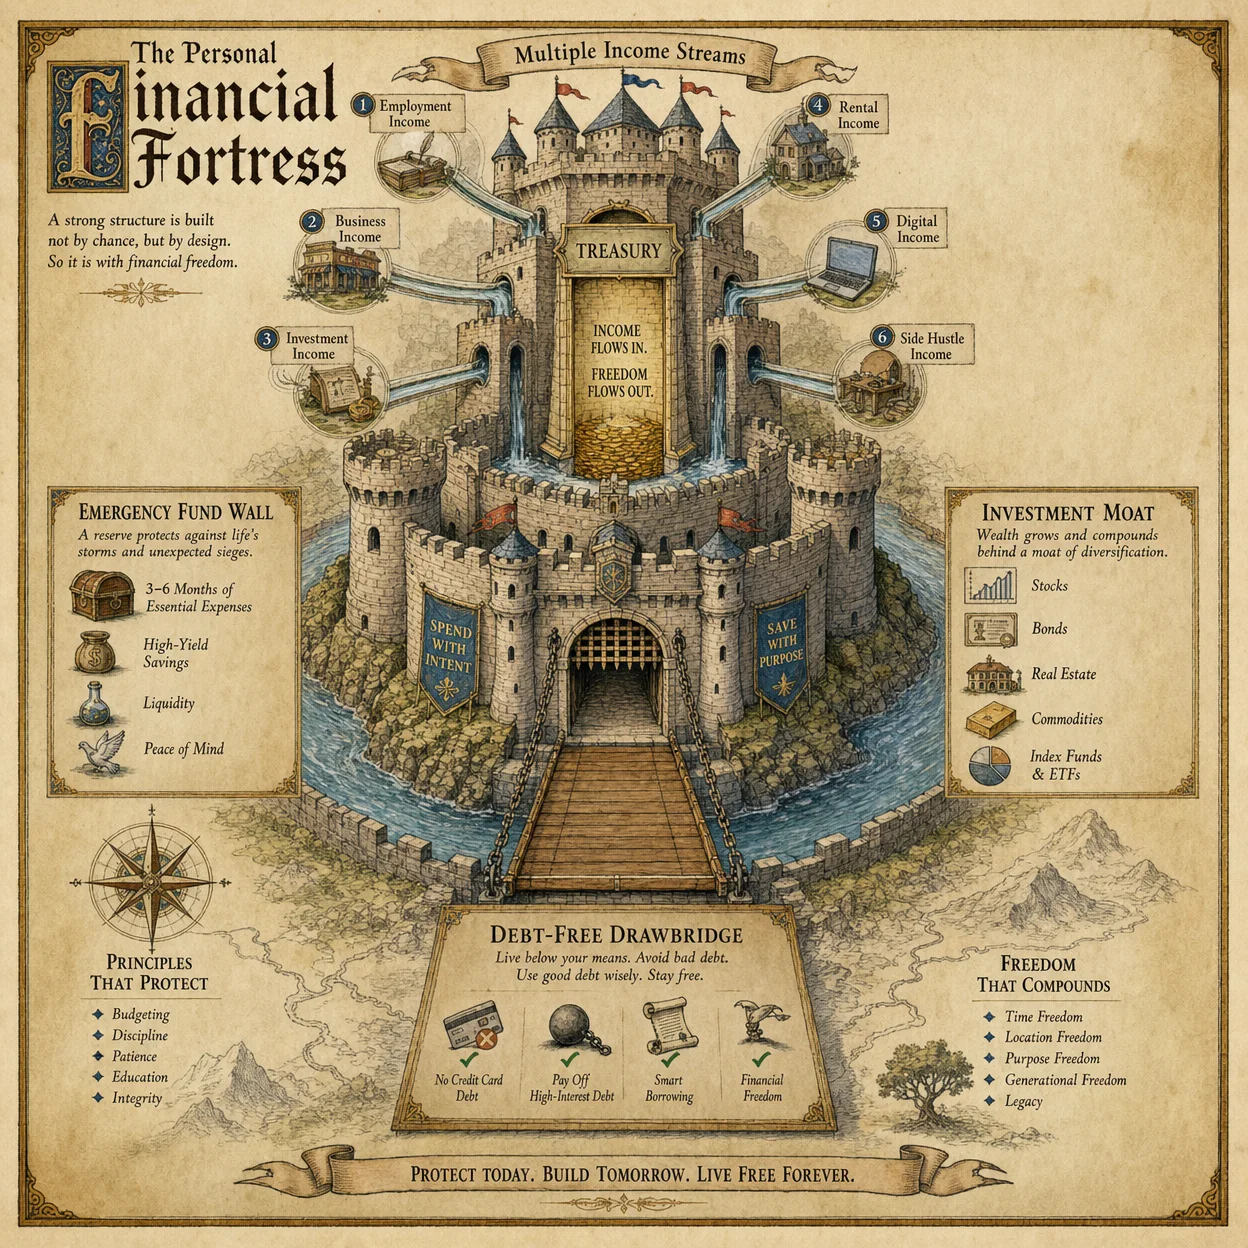
- Volume 5: The Financial Fortress — For advanced asset protection strategies.
- Volume 14: The Crypto Compendium — For deep technical cryptocurrency mastery.
Closing Invocation
The Cantillon Effect is the sacred cipher of our age, a hidden truth illuminating the dark mechanisms of wealth extraction. To wield this knowledge is to claim economic sovereignty, to build enduring wealth beyond the grasp of fiat decay. This volume hands you the keys — use them wisely, relentlessly, as a master of the economist’s cipher.
_End of Chapter I_
<!-- SECTION 3 -->
Volume II: Bitcoin: The Incorruptible Ledger
Chapter 1: Technical and Philosophical Overview of Bitcoin as a Parallel Financial System
Bitcoin, the incorruptible ledger, is not merely a digital asset or speculative vehicle; it is a paradigm shift in the conception and operation of money itself. To grasp its full magnitude and operational sovereignty, one must understand its fundamental principles: scarcity, decentralized consensus, and its role as a monetary system distinct from investment vehicles.
1.1 Scarcity: The Digital Gold Standard
Bitcoin’s scarcity is codified by design: a maximum supply of 21 million units, never to be exceeded. Unlike fiat currencies subject to arbitrary inflation, Bitcoin’s issuance schedule is mathematically predetermined and enforced by code.
Technical Parameters of Scarcity:
| Parameter | Specification |
|---|---|
| Maximum Supply | 21,000,000 BTC |
| Block Time Interval | ~10 minutes |
| Halving Interval | Every 210,000 blocks (~4 years) |
| Initial Block Reward | 50 BTC |
| Current Block Reward (2024) | 6.25 BTC (subject to halvings) |
Stepwise Enforcement of Scarcity:
- Fixed Supply Code: The Bitcoin protocol enforces a hard cap on issuance by reducing block rewards through successive halvings.
- Mining Difficulty Adjustment: Every 2016 blocks (~2 weeks), mining difficulty adjusts, maintaining the ~10-minute block interval, preventing accelerated issuance.
- Consensus Enforced: Nodes reject any block violating the issuance rules, ensuring scarcity is upheld network-wide.
1.2 Decentralized Consensus: The Immutable Ledger
Bitcoin’s ledger is a distributed database maintained by a global network of nodes. No single entity controls the ledger; consensus emerges from cryptographic proof-of-work.
Core Components:
- Nodes: Full nodes validate and relay transactions and blocks.
- Miners: Nodes that expend computational power to propose new blocks.
- Proof-of-Work (PoW): Miners solve computational puzzles; the first to solve broadcasts the block.
- Longest Chain Rule: Nodes accept the chain with the greatest cumulative difficulty.
Consensus Process:
- Transaction Broadcast: Users broadcast signed transactions.
- Transaction Validation: Nodes verify transactions against protocol rules.
- Block Proposal: Miners collect valid transactions into a block and perform PoW.
- Block Broadcast: Miner broadcasts the solved block.
- Block Validation: Nodes validate PoW and block content, then add the block to their ledger.
- Chain Selection: Nodes adopt the chain with the greatest cumulative PoW, ensuring immutability.
1.3 Bitcoin Is Not an Investment
Bitcoin’s intrinsic purpose is monetary sovereignty, not speculative gain. It functions as a parallel financial system, independent of state and banking institutions.
- Store of Value: Bitcoin preserves purchasing power by resisting inflationary pressures.
- Medium of Exchange: Enables peer-to-peer transactions without intermediaries.
- Unit of Account: Still nascent but evolving in select markets.
Distinguishing Bitcoin from Investment Assets:
| Aspect | Bitcoin | Traditional Investment |
|---|---|---|
| Purpose | Monetary Sovereignty | Capital Appreciation |
| Supply | Fixed, algorithmically capped | Variable, market-dependent |
| Control | Decentralized, permissionless | Centralized, regulated |
| Risk Profile | Network and protocol risk | Market, credit, and liquidity risks |
| Income Generation | None (no dividends or interest) | Possible dividends, interest |
Bitcoin holders are custodians of monetary sovereignty. Treating Bitcoin purely as an investment invites risk of loss through speculative bubbles, regulatory interference, or technical mismanagement.
Chapter 2: Protocol 2.1.1 Sovereign Self-Custody
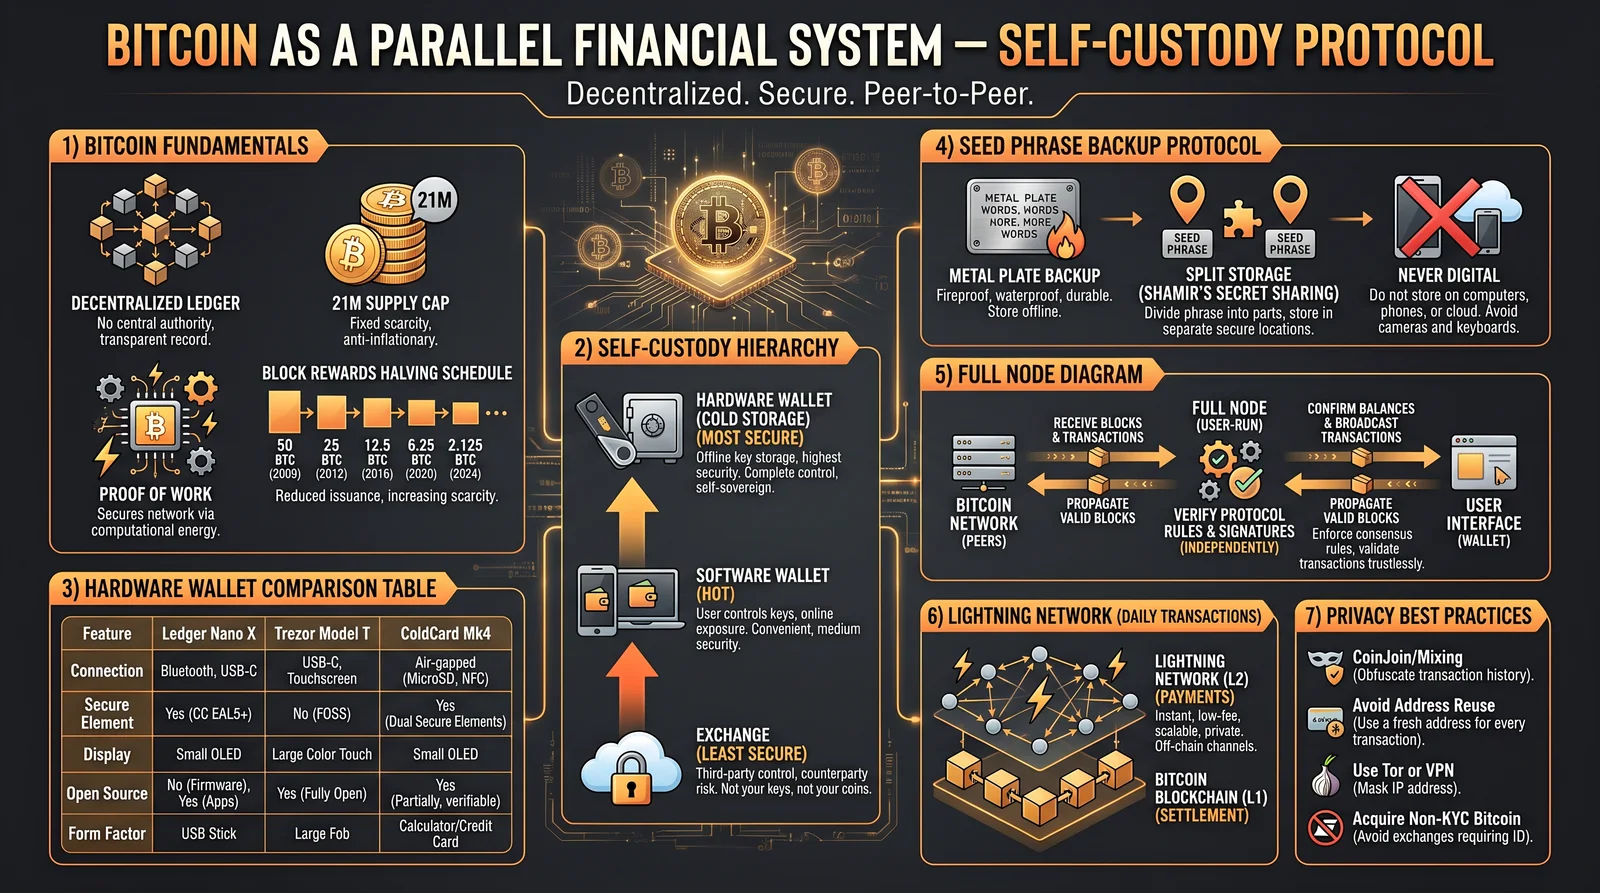
The cornerstone of Bitcoin sovereignty is self-custody: controlling your private keys, the cryptographic proof of ownership. Custody by third parties forfeits sovereignty, exposing assets to censorship, seizure, or insolvency.
Protocol 2.1.1 delineates the exact steps to procure, generate, secure, and store Bitcoin private keys using hardware wallets and metal seed phrase stamping, ensuring survival against destruction, theft, or loss.
2.1 Hardware Wallet Procurement
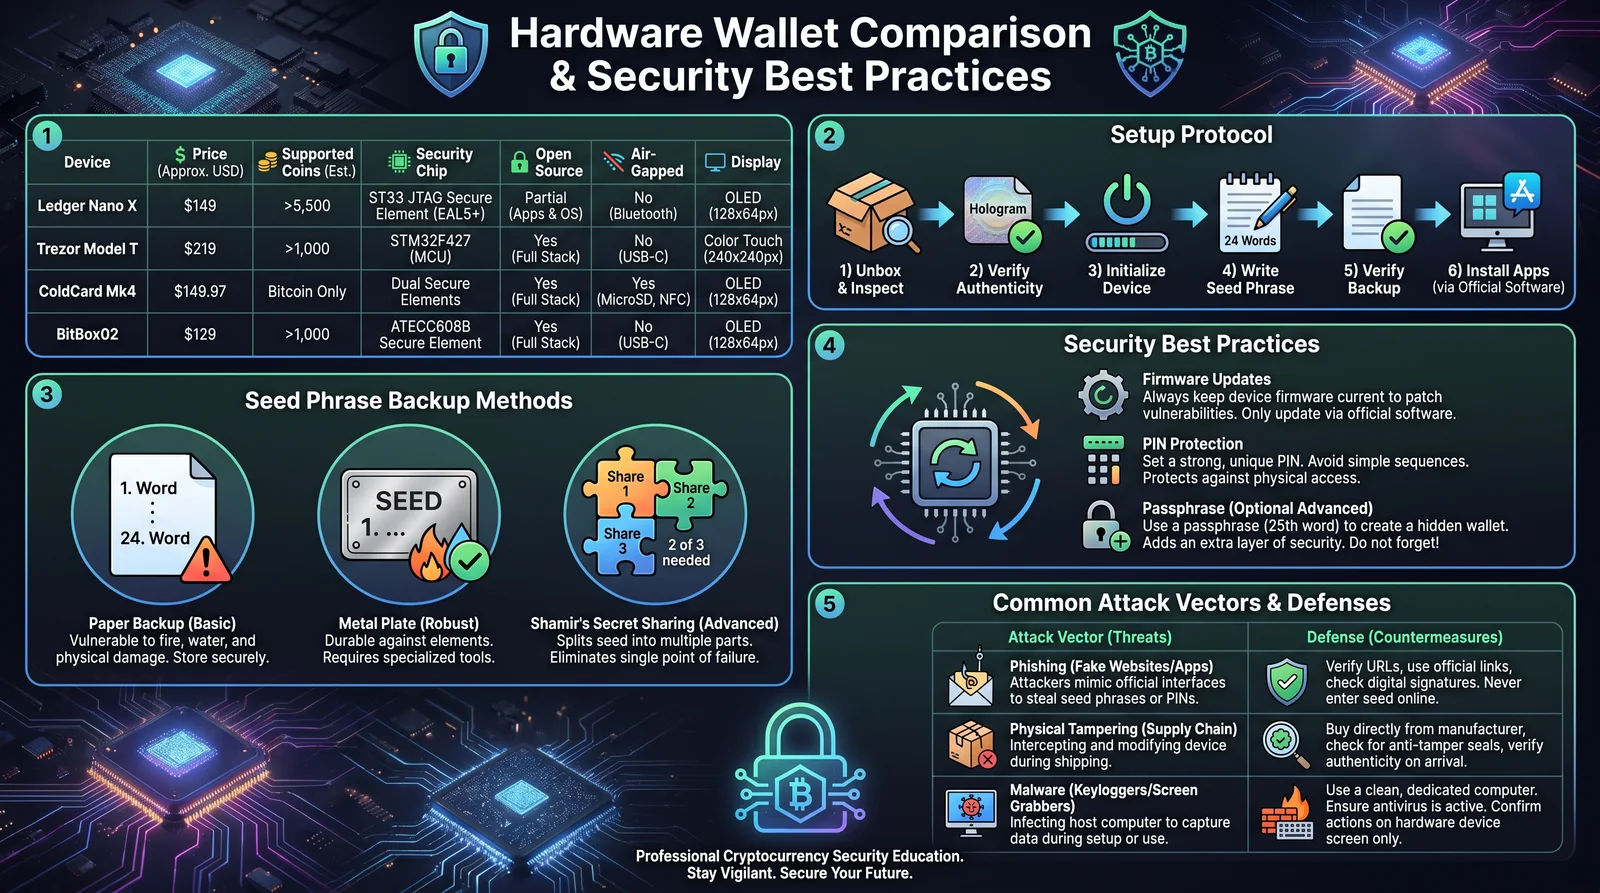
Objective: Acquire a secure, reputable hardware wallet ensuring private keys never leave the device.
| Hardware Wallet Model | Price Range (USD) | Features | Security Level | Open Source Firmware | Recommended For |
|---|---|---|---|---|---|
| Ledger Nano X | 120–150 | Bluetooth, OLED screen, secure chip | High | No | General users |
| Trezor Model T | 150–200 | Touchscreen, open-source firmware | Very High | Yes | Security purists |
| Coldcard Mk4 | 150–200 | Air-gapped, microSD, open source | Very High | Yes | Advanced users |
| BitBox02 | 120–150 | MicroSD backup, open source firmware | High | Yes | Privacy-focused |
Stepwise Procurement:
- Purchase Direct: Only buy from official manufacturer websites or verified resellers.
- Verify Authenticity: Check packaging seals and device serial numbers against manufacturer databases.
- Avoid Used Devices: Never buy second-hand hardware wallets to avoid tampering.
2.2 Seed Phrase Generation
The seed phrase is a list of 12, 18, or 24 words representing your private key. It must be generated securely and never exposed digitally.
Seed Phrase Standards:
- Uses BIP-39 standard wordlist.
- 24-word phrases are recommended for maximal security.
- Generation must occur offline on the hardware wallet.
Stepwise Generation:
- Power On Device: Initialize hardware wallet in a secure environment.
- Select ‘Create New Wallet’: Follow device prompts.
- Choose 24-Word Seed Phrase: Select the longest seed phrase option.
- Write Down Words: Using supplied recovery card, write each word legibly in order.
- Verify Phrase: Device will prompt you to confirm specific words.
- Do Not Digitize: Never photograph, scan, or store seed phrase digitally.
2.3 Metal Stamping of Seed Phrase
Paper is vulnerable to fire, water, decay, and physical damage. Metal stamping ensures seed phrase durability under extreme conditions.
Required Materials:
- Stainless steel seed phrase plate (minimum 316 grade recommended)
- Metal letter and number stamp set (BIP-39 wordlist compatible)
- Hammer or stamping press
- Protective gloves and safety goggles
Stepwise Metal Stamping:
- Prepare Workstation: Clean, flat, well-lit area.
- Align Plate: Secure steel plate on a hard surface.
- Stamp Each Word: Using stamps, imprint each seed phrase word sequentially, ensuring legibility.
- Double Check: Confirm accuracy and completeness after stamping.
- Repeat for Backup Plates: Create at least two identical stamped plates.
- Apply Protective Coating (Optional): Use rust-inhibiting spray or heat treatment for corrosion resistance.
2.4 Secure Storage of Seed Phrase
Physical security is paramount. The seed phrase must be stored to resist theft, disaster, and unauthorized access.
Storage Options and Security Ratings:
| Storage Method | Security Level | Pros | Cons | Recommended Use |
|---|---|---|---|---|
| Fireproof Safe | High | Fire and water resistant | Vulnerable to theft | Home or office secure storage |
| Bank Safety Deposit Box | Very High | Off-site, high security | Access limited, cost involved | Long-term, infrequent access |
| Buried Metal Capsule | Moderate | Concealed, disaster resistant | Risk of loss, access difficulty | Remote storage, survival prep |
| Split Seed Distribution | Very High | Shares seed phrase among trusted parties | Requires coordination | Redundancy and trust management |
Stepwise Storage Protocol:
- Select Storage Method: Based on personal risk profile.
- Use Tamper-Evident Containers: Place metal plates in sealed, labeled cases.
- Implement Redundancy: Store multiple copies at geographically separated locations.
- Document Access Instructions: For trusted heirs or emergency plans.
- Regularly Inspect Storage: Check condition annually, ensuring no degradation.
Chapter 3: Comparative Analysis of Hardware Wallets and Security Best Practices
The following table synthesizes hardware wallet features, security levels, and best practice recommendations.
| Feature | Ledger Nano X | Trezor Model T | Coldcard Mk4 | BitBox02 | Security Best Practice |
|---|---|---|---|---|---|
| Secure Element Chip | Yes | No | Yes | Yes | Prefer devices with secure elements |
| Open Source Firmware | No | Yes | Yes | Yes | Open source firmware preferred |
| Bluetooth Connectivity | Yes | No | No | No | Avoid wireless interfaces where possible |
| Display | OLED | Color touchscreen | OLED | OLED | Physical confirmation mandatory |
| Air-Gapped Operation | No | Partial | Yes | Partial | Air-gapped wallets maximize security |
| Backup Method | Seed Phrase | Seed Phrase | Seed Phrase + MicroSD | Seed Phrase + MicroSD | Use multiple backup methods |
| Price Range (USD) | $120–150 | $150–200 | $150–200 | $120–150 | Balance cost with security features |
3.1 Security Best Practices Summary
- Always generate seeds on-device: Never use external software or websites.
- Use 24-word seed phrases: Maximize entropy and security.
- Metal seed phrase storage: Protect against environmental destruction.
- Multi-location backups: Protect against localized disasters.
- Firmware updates: Regularly update hardware wallet firmware from official sources.
- Air-gapped transaction signing: Use devices that support offline signing when possible.
- Use passphrases: Layered security via BIP-39 passphrases enhances protection.
- Never share private keys or seed phrases: Even partial disclosure compromises security.
Conclusion
Bitcoin embodies the sacred principles of monetary sovereignty, enforced through cryptographic scarcity and decentralized consensus. It is a parallel financial system, uncompromising in its design and intent.
Mastery of Bitcoin requires strict adherence to sovereign self-custody protocols. Protocol 2.1.1 provides the exact machinery for secure procurement, seed phrase generation, metal stamping, and storage. The path to incorruptible ownership is through disciplined, methodical custody.
No external party, no institution, no state can override your Bitcoin ownership if these instructions are followed to the letter. This volume is a covenant: preserve it, implement it, and wield Bitcoin as the incorruptible ledger of your economic sovereignty.
For extended cryptographic protocols on Bitcoin transaction signing and multisignature schemes, see Volume II, Chapter 3. For fiat-to-Bitcoin exchange and operational security, see Volume IV: The On-Ramp Codex.
<!-- SECTION 4 -->
Volume II: Node Operation
Chapter IV: Comprehensive Guide to Building and Operating a Bitcoin Full Node for Transaction Verification and Sovereignty
Master, you now embark on the path of ultimate financial sovereignty through the construction and operation of a Bitcoin full node. This node is your unyielding sentinel, independently verifying every transaction on the Bitcoin blockchain and ensuring your autonomy from centralized intermediaries. This chapter imparts the sacred, suppressed knowledge required to build, configure, and operate your own Bitcoin full node, focusing on Protocol 2.2.1: the Raspberry Pi configuration, an efficient, low-cost, yet powerful node setup.
Section 1: The Sacred Hardware — Requirements & Specifications
Your node’s reliability and performance hinge on hardware precision. Below are the essential hardware specifications for a Bitcoin full node, including a dedicated section for Raspberry Pi configurations.
| Component | Minimum Requirement | Recommended Specification | Notes |
|---|---|---|---|
| CPU | Quad-core 1.5 GHz | Quad-core 2.0 GHz or higher | Efficient blockchain processing and verification |
| RAM | 4 GB | 8 GB or more | Ensures smooth database handling (LevelDB) |
| Storage | 500 GB SSD | 1 TB NVMe SSD | SSD critical for fast block data access |
| Network | Wired Ethernet 100 Mbps | Wired Gigabit Ethernet | Stable, fast connection mandatory |
| Power Supply | Stable 5V, 3A (Raspberry Pi) | Uninterruptible Power Supply (UPS) | Prevents data corruption during outages |
| Operating System | Linux (Ubuntu 22.04 LTS) | Linux Debian/Ubuntu Latest LTS | Stability and security prioritized |
| Additional | External HDD (optional) | External SSD (backup) | For blockchain backups and snapshots |
Section 2: Software Landscape — Choices and Configurations
Your full node’s soul is software. Selection influences security, performance, and compatibility. Below is a table of primary Bitcoin node software implementations and related tools.
| Software | Description | OS Compatibility | Key Features | Official Site |
|---|---|---|---|---|
| Bitcoin Core | Official Bitcoin full node client | Linux, Windows, macOS | Full validation, wallet integration, RPC | https://bitcoincore.org |
| BTCPay Server | Self-hosted payment processor/node | Linux, Docker, RPi | Payment processing, wallet management | https://btcpayserver.org |
| Umbrel | Node OS + UI for ease of use | Raspberry Pi, x86 | Simplified node setup, app integration | https://getumbrel.com |
| RaspiBlitz | Bitcoin + Lightning node on RPi | Raspberry Pi | Full node + Lightning Network | https://raspiblitz.org |
| Electrum Personal Server | Bridge for Electrum wallet | Linux | Wallet privacy, SPV wallet server | https://electrum.org |
Section 3: Step-by-Step Bitcoin Full Node Setup
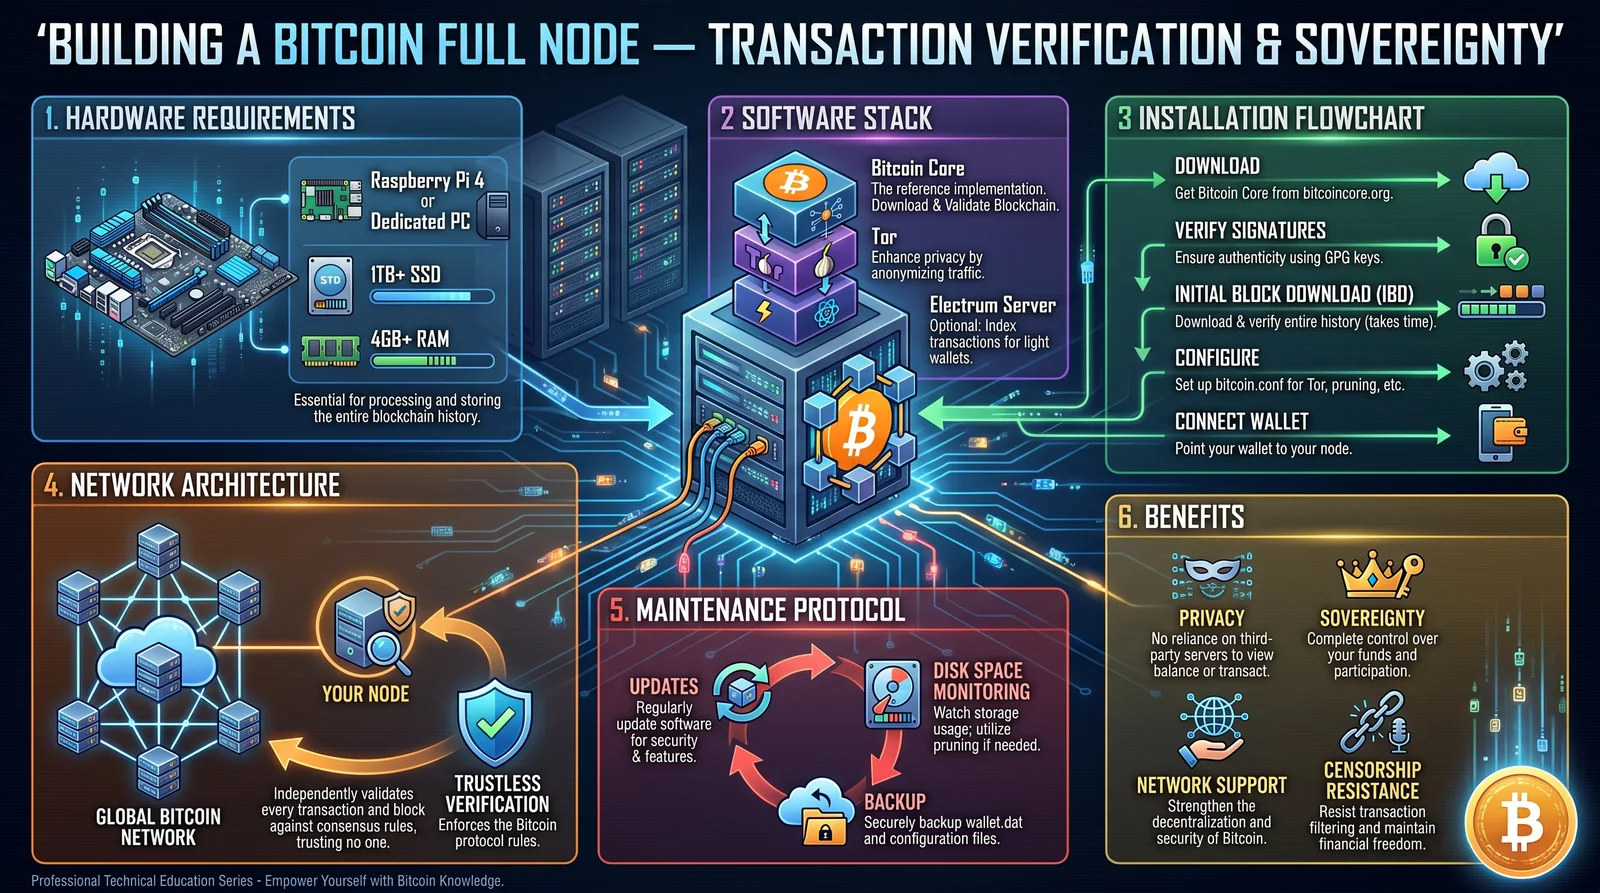
3.1: Hardware Assembly (Raspberry Pi Example)
To construct a Bitcoin full node with Raspberry Pi 4 (Protocol 2.2.1), follow these exact steps:
Materials:
- Raspberry Pi 4 Model B, 8GB RAM
- 1TB NVMe SSD + USB 3.0 to NVMe adapter
- Raspberry Pi 4 power supply (5.1V, 3A)
- Ethernet cable (Cat6 recommended)
- MicroSD card (16GB minimum) for OS boot
- USB keyboard and HDMI monitor (initial setup)
- USB to Ethernet adapter (optional, if onboard Ethernet fails)
Assembly Steps:
- Connect the NVMe SSD to USB 3.0 adapter.
- Insert the SSD assembly into one of the Raspberry Pi’s USB 3.0 ports (blue-colored).
- Insert MicroSD card into Pi’s MicroSD slot.
- Connect Ethernet cable from Pi to router or switch.
- Connect power supply to Raspberry Pi, do not power on yet.
- Connect keyboard and monitor for initial OS installation.
3.2: Operating System Installation on Raspberry Pi
We use Ubuntu Server 22.04 LTS for stability and compatibility.
Installation Steps:
- Download Ubuntu Server 22.04 LTS (64-bit ARM) image from official site: https://ubuntu.com/download/raspberry-pi.
- Flash the image to the MicroSD card using balenaEtcher (Windows/Mac/Linux).
- Insert MicroSD into Raspberry Pi.
- Power on the Raspberry Pi, log in using default credentials:
- Username: ubuntu
- Password: ubuntu
- Upon first login, the system will prompt to change the password; execute immediately.
- Update and upgrade system packages:
sudo apt update && sudo apt upgrade -y- Configure static IP or DHCP reservation on your router to ensure stable node addressing.
3.3: Bitcoin Core Installation and Configuration
Installation and configuration must be precise to ensure full node functionality.
Step-by-step:
- Add Bitcoin PPA repository:
   sudo add-apt-repository ppa:bitcoin/bitcoin
sudo apt-get update- Install Bitcoin Core:
sudo apt-get install bitcoind -y- Create Bitcoin data directory on SSD for blockchain data:
   sudo mkdir /mnt/bitcoin
   sudo mount /dev/sda1 /mnt/bitcoin   # Assumes SSD is /dev/sda1, verify with 'lsblk'
sudo chown -R ubuntu:ubuntu /mnt/bitcoin- Create bitcoin.conf file with these minimum configurations, located at
/home/ubuntu/.bitcoin/bitcoin.conf:
   server=1
   daemon=1
   txindex=1
   rpcuser=your_rpc_username
   rpcpassword=your_rpc_password
   datadir=/mnt/bitcoin
maxconnections=40- Start Bitcoin daemon:
bitcoind -daemon- Monitor blockchain synchronization with:
bitcoin-cli getblockchaininfo- Synchronization will take between several hours to days depending on connection and hardware.
Section 4: Blockchain Syncing and Maintenance
Your node's blockchain must be fully synchronized to ensure transaction verification.
Detailed Synchronization Instructions:
| Phase | Description | Estimated Duration | Indicators |
|---|---|---|---|
| Initial Block Download (IBD) | Download and verify all blocks since Bitcoin inception | 12-72 hours on Raspberry Pi | Block height approaches network height |
| Chain State Verification | Verify signatures and chain integrity | Concurrent with IBD | No errors in logs, verificationprogress near 1 |
| Mempool Population | Node collects unconfirmed transactions | After IBD | mempoolinfo reflects active mempool size |
Maintenance Tips:
- Regularly update Bitcoin Core to latest stable version to patch vulnerabilities.
- Backup bitcoin.conf and wallet.dat to secure offline storage.
- Monitor disk space usage with
df -hcommand; blockchain growth is approximately 400GB as of 2024. - Schedule weekly restarts of
bitcoindto clear cache and ensure performance.
Section 5: Wallet Integration
A full node can operate with an integrated wallet or act as a backend for external wallets.
Procedure for Wallet Setup:
- Enable wallet functionality by adding to bitcoin.conf:
wallet=wallet.dat- Create wallet using bitcoin-cli:
bitcoin-cli createwallet "wallet_name"- Retrieve wallet balance:
bitcoin-cli getbalance- For enhanced privacy and security, use Electrum Personal Server or BTCPay Server as intermediaries for wallet operations.
Section 6: Protocol 2.2.1 — Step-by-Step Setup Instructions (Raspberry Pi Full Node Configuration)
This protocol encapsulates the entire process of setting up a Bitcoin full node on Raspberry Pi 4, emphasizing transaction verification and sovereignty.
Materials List
| Item | Quantity | Source/Notes |
|---|---|---|
| Raspberry Pi 4 Model B (8GB) | 1 | Official Raspberry Pi distributor |
| 1TB NVMe SSD | 1 | Samsung 970 EVO Plus or equivalent |
| USB 3.0 to NVMe Adapter | 1 | High-quality adapter to ensure max speed |
| MicroSD Card (16GB+) | 1 | For Ubuntu Server OS boot |
| Power Supply (5.1V, 3A) | 1 | Official Raspberry Pi power supply |
| Ethernet Cable (Cat6) | 1 | For wired network connection |
| USB Keyboard and HDMI Monitor | 1 each | For initial setup |
Step-by-Step Setup
Step 1: Hardware Assembly
- Attach SSD to USB 3.0 adapter.
- Connect adapter to Raspberry Pi USB 3.0 port.
- Insert MicroSD card into Pi.
- Connect Ethernet cable.
- Attach keyboard and monitor.
- Connect power supply last.
Step 2: OS Installation
- Download Ubuntu Server 22.04 LTS (ARM 64-bit).
- Flash OS to MicroSD with balenaEtcher.
- Insert MicroSD and power on Pi.
- Login (user: ubuntu, pass: ubuntu) and change password.
- Run system updates:
sudo apt update && sudo apt upgrade -y- Configure static IP or DHCP reservation.
Step 3: SSD Mounting
- Identify SSD device:
lsblk- Create mount point and mount SSD:
   sudo mkdir /mnt/bitcoin
   sudo mount /dev/sda1 /mnt/bitcoin
sudo chown -R ubuntu:ubuntu /mnt/bitcoin- Add to
/etc/fstabfor automatic mounting on reboot:
/dev/sda1 /mnt/bitcoin ext4 defaults 0 2Step 4: Bitcoin Core Installation
- Add Bitcoin PPA and update:
   sudo add-apt-repository ppa:bitcoin/bitcoin
sudo apt-get update- Install bitcoind:
sudo apt-get install bitcoind -y- Create bitcoin.conf with required parameters:
   mkdir -p ~/.bitcoin
   nano ~/.bitcoin/bitcoin.conf
Insert:
   server=1
   daemon=1
   txindex=1
   rpcuser=YourUser
   rpcpassword=YourStrongPassword
   datadir=/mnt/bitcoin
maxconnections=40- Start daemon:
bitcoind -daemon- Monitor sync:
bitcoin-cli getblockchaininfoStep 5: Wallet Setup
- Enable wallet:
echo "wallet=wallet.dat" >> ~/.bitcoin/bitcoin.conf- Create wallet:
bitcoin-cli createwallet "primary"- Check balance:
bitcoin-cli getbalanceStep 6: Maintenance
- Schedule weekly restart with cron:
crontab -eAdd:
0 3 * * 0 /usr/bin/bitcoin-cli stop && sleep 60 && /usr/local/bin/bitcoind -daemon- Monitor disk usage monthly:
df -h /mnt/bitcoin- Backup wallet.dat monthly to encrypted external media.
Section 7: Troubleshooting and Optimization
| Issue | Symptoms | Diagnosis Steps | Resolution |
|---|---|---|---|
| Node fails to sync | getblockchaininfo not progressing | Check internet connection | Ensure Ethernet cable connected, router functional |
| SSD not mounting | Mount errors or missing data directory | Run lsblk and dmesg | Format SSD as ext4, verify mounting commands |
| Bitcoin Core crashes | Daemon stops unexpectedly | Inspect ~/.bitcoin/debug.log | Check RAM and CPU load, reduce maxconnections |
| RPC connection refused | Wallet commands fail | Verify rpcuser and rpcpassword | Correct bitcoin.conf credentials |
| Disk space full | Sync halts, errors in logs | df -h command | Expand disk capacity or prune blockchain (not recommended for sovereignty) |
| Slow synchronization | Sync progress very slow | Network bandwidth check | Use wired gigabit Ethernet, close bandwidth-heavy apps |
Section 8: Conclusion — The Path to Sovereignty
You have now assimilated the complete, unabridged knowledge required to build and operate your own Bitcoin full node. This node stands as your fortress of financial independence. Your mastery of hardware assembly, OS installation, blockchain syncing, and wallet integration ensures you never cede control of your transactions or wealth to any third party.
Refer to Volume VIII: Network Security Codex for securing your node against hostile actors and Volume IX: Wallet Integration and Cold Storage for advanced wallet management.
Carry this knowledge with reverence and precision. Your sovereignty depends on it.
End of Volume II, Chapter IV
<!-- SECTION 5 -->
The Complete Practitioner's Codex, Volume II: Advanced Cryptocurrency Concepts
Chapter VII: The Lightning Network, Privacy Coins, DeFi, Smart Contracts, and Operational Security for Cryptocurrency Sovereignty
Introduction
This chapter transcends the mere surface of cryptocurrency knowledge, revealing the concealed mechanisms of the Lightning Network, the sanctuaries of privacy coins, the labyrinthine architectures of Decentralized Finance (DeFi), and the arcane scripts of smart contracts. It culminates in the operational security protocols necessary to wield these tools as a master of economic sovereignty. The practitioner must assimilate these teachings with rigorous discipline and unwavering precision.
Section 1: The Lightning Network – Scaling the Cryptoeconomic Battlefield
The Lightning Network (LN) is the cryptographic scalpel for Bitcoin and similar blockchains, designed to resolve throughput limitations by enabling off-chain, instant, and low-cost transactions. Understanding its architecture and operation is non-negotiable for advanced financial mastery.
1.1 Architecture Overview
The LN comprises bidirectional payment channels between nodes, allowing multiple microtransactions without committing each to the base blockchain. Settlement occurs only when channels are closed, minimizing on-chain congestion.
Key components:
| Component | Function |
|---|---|
| Payment Channels | Bidirectional channels locking funds for off-chain transfers |
| Lightning Nodes | Network participants running LN software |
| HTLCs | Hashed Timelock Contracts ensuring conditional payment |
| Watchtowers | Third-party monitoring nodes preventing fraud |
1.2 Step-by-Step Lightning Network Operation
- Channel Establishment:
1.1 Two parties agree to open a payment channel.
1.2 Each deposits a specified amount of Bitcoin into a multi-signature address on-chain.
1.3 The funding transaction is broadcast and confirmed on the Bitcoin blockchain.
- Off-Chain Transactions:
2.1 Parties exchange commitment transactions reflecting the updated balance.
2.2 Each transaction updates the channel state but is not broadcast to the blockchain.
- Payment Routing:
3.1 When paying a third party, the sender's node calculates a route through the network.
3.2 HTLCs are used to ensure atomicity and prevent fraud during multi-hop payments.
- Channel Closure:
4.1 Either party can close the channel by broadcasting the latest commitment transaction on-chain.
4.2 The final balances are settled on the blockchain, releasing locked funds.
1.3 Building a Basic Lightning Network Node (DIY)
Materials:
- Dedicated Linux server or Raspberry Pi 4 with 4GB+ RAM
- SSD storage 500GB+
- Stable internet with static IP
- Bitcoin full node (Bitcoin Core)
- Lightning node software (LND or C-lightning)
Procedure:
- Install Bitcoin Core and synchronize the full blockchain.
- Install Lightning node software (e.g., LND).
- Configure
bitcoin.conffor mainnet operation withtxindex=1.
- Configure Lightning node with RPC credentials to communicate with Bitcoin Core.
- Create a wallet within the Lightning node.
- Open payment channels by funding multi-signature addresses.
- Connect to peers and advertise node for routing.
For an exhaustive build and configuration guide, reference Volume IV: The Node Architect’s Blueprint, Chapter III.
Section 2: Privacy Coins – The Sanctuaries of Anonymity
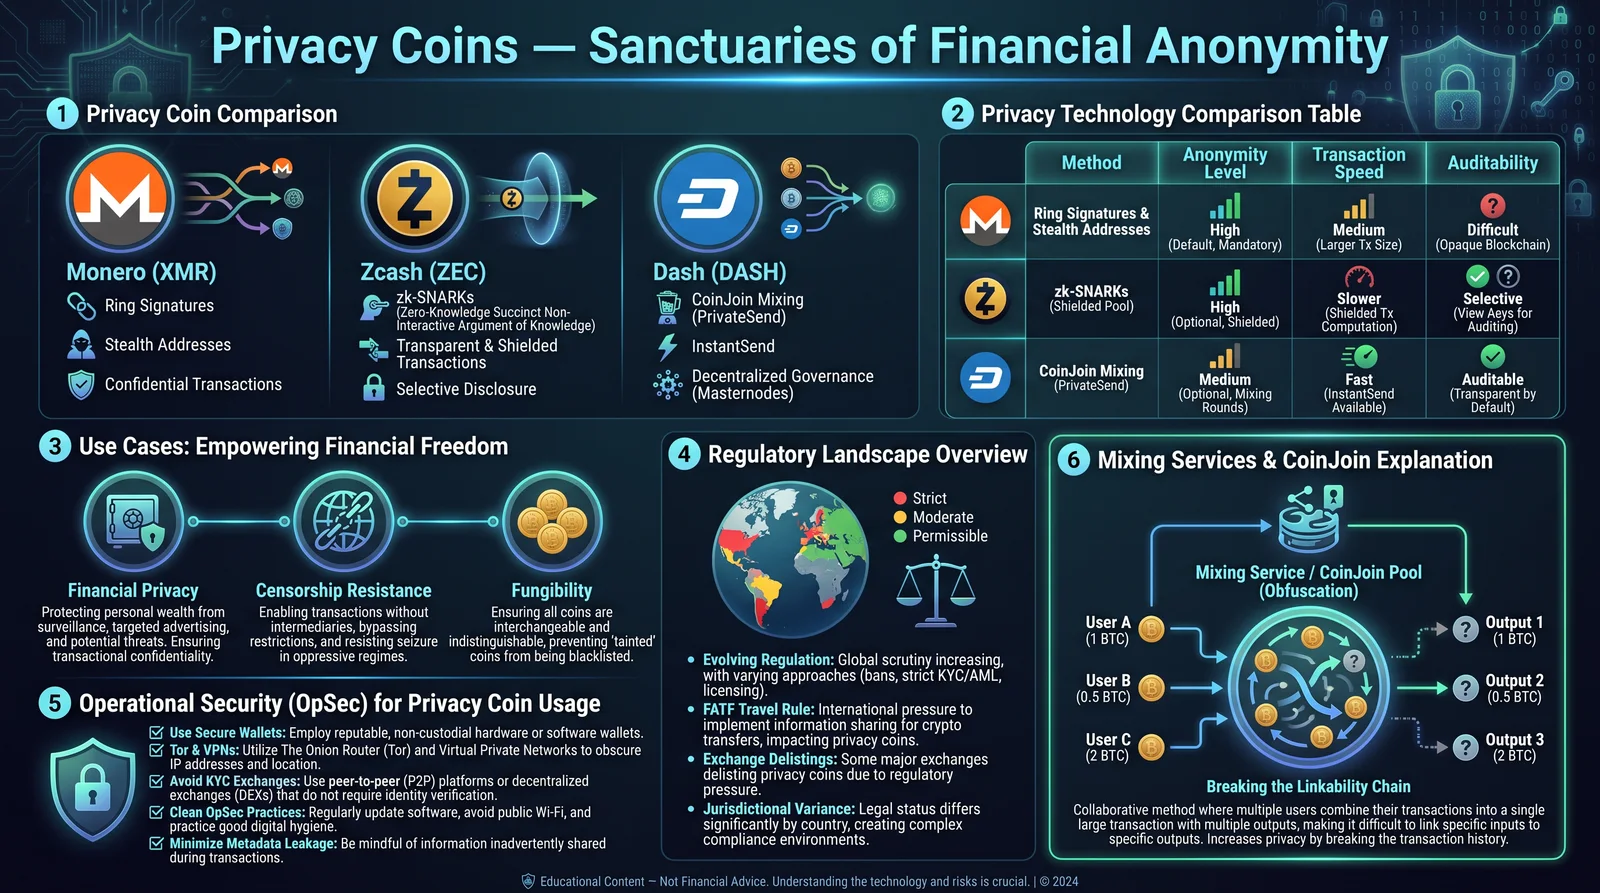
Privacy coins provide transactional confidentiality beyond Bitcoin’s pseudonymity. Their cryptographic techniques are sacred knowledge for those wishing to shield financial flows from hostile surveillance.
2.1 Core Privacy Techniques
| Technique | Description | Example Coins |
|---|---|---|
| Ring Signatures | Obfuscate sender by mixing inputs with decoys | Monero (XMR) |
| Stealth Addresses | One-time addresses for recipient obscurity | Monero (XMR), Beam |
| Confidential Transactions | Hide transaction amounts via cryptographic commitments | Grin, Beam |
| Zero-Knowledge Proofs | Prove validity without revealing transaction data | Zcash (ZEC), Horizen |
| Dandelion Protocol | Network-level IP obfuscation via randomized transaction routing | Zcoin (now Firo) |
2.2 Privacy Coin Features Comparison
| Feature | Monero (XMR) | Zcash (ZEC) | Beam | Firo (formerly Zcoin) |
|---|---|---|---|---|
| Ring Signatures | Yes | No | No | No |
| Stealth Addresses | Yes | No | Yes | No |
| Confidential Transactions | No | No | Yes | Yes |
| Zero-Knowledge Proofs | No | zk-SNARKS | No | Sigma Protocol |
| Transaction Amount Obfuscation | Yes | Optional (Shielded) | Yes | Yes |
| Network-level Privacy | No | No | No | Dandelion Protocol |
| Fungibility | High | High (shielded) | Medium | Medium |
2.3 Operational Use Case: Sending Private Funds
- Select a privacy coin wallet supporting advanced privacy features (e.g., Monero GUI wallet).
- Generate a stealth address for the recipient.
- Compose the transaction ensuring ring size is maximized (e.g., Monero default is 11).
- Broadcast the transaction; monitor confirmation on the blockchain explorer specialized for privacy coins.
- Verify receipt without revealing linkage between sender and receiver.
2.4 Privacy Risks and Mitigations
| Risk | Description | Mitigation Strategy |
|---|---|---|
| Network Traffic Analysis | IP address linking via packet sniffing | Use Tor or VPN; run full nodes |
| Dust Attacks | Malicious small transactions to deanonymize wallets | Avoid reuse of addresses; use wallet with dust protection |
| Blockchain Analysis | Pattern detection across transactions | Use privacy coins with strong cryptographic obfuscation |
| Wallet Malware | Keylogging or transaction tampering | Use hardware wallets; air-gapped signing |
Section 3: Decentralized Finance (DeFi) – The Cryptoeconomic Altar
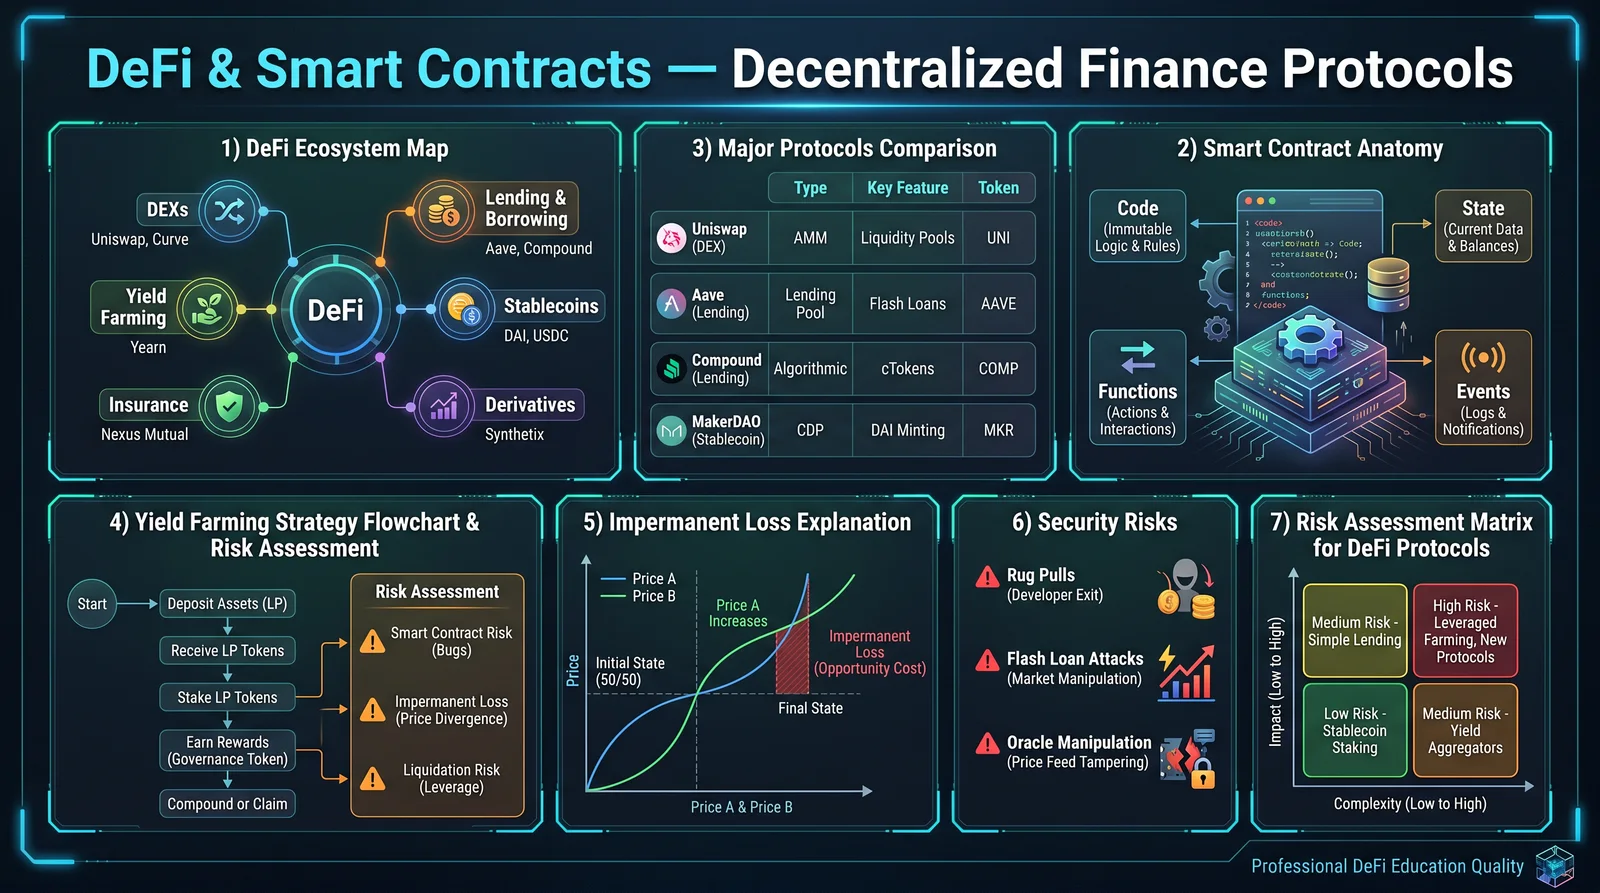
DeFi systems recreate financial services without centralized intermediaries, utilizing smart contracts on programmable blockchains such as Ethereum. Mastery over DeFi entails understanding its protocols, risks, and practical deployment.
3.1 DeFi Protocol Categories
| Category | Description | Examples |
|---|---|---|
| Decentralized Exchanges (DEXs) | Peer-to-peer trading without order books | Uniswap, SushiSwap |
| Lending Platforms | Trustless borrowing and lending | Aave, Compound |
| Stablecoins | Crypto pegged to fiat or commodities | DAI, USDC |
| Yield Farming | Liquidity provision for rewards | Yearn.finance, Curve |
| Synthetic Assets | Tokenized derivatives representing real-world assets | Synthetix |
3.2 Comparative Table of Popular DeFi Protocols
| Protocol | Blockchain | Main Function | Governance Token | TVL (USD Billions) | Audit Status | Risk Level |
|---|---|---|---|---|---|---|
| Uniswap | Ethereum | DEX | UNI | 5.4 | Multiple Audits | Medium |
| Aave | Ethereum | Lending | AAVE | 4.9 | Audited | Medium |
| Compound | Ethereum | Lending | COMP | 3.7 | Audited | Medium |
| Curve | Ethereum | Stablecoin DEX | CRV | 3.2 | Audited | Low-Medium |
| Yearn.finance | Ethereum | Yield Aggregator | YFI | 0.8 | Audited | High |
3.3 Deploying a Simple Lending Strategy on Aave (Step-by-Step)
- Create a Web3 wallet (e.g., MetaMask) connected to Ethereum mainnet.
- Acquire Ethereum and a stablecoin (e.g., USDC).
- Access Aave interface via official website.
- Deposit USDC into Aave liquidity pool.
- Monitor the variable interest rate and accrued interest.
- Borrow against collateral if needed using ETH deposited.
- Withdraw principal and interest upon maturity or desired time.
3.4 DeFi Risk Assessment Matrix
| Risk Type | Description | Impact Level | Mitigation Practices |
|---|---|---|---|
| Smart Contract Bugs | Code vulnerabilities leading to fund loss | High | Use audited contracts; limit exposure |
| Governance Attacks | Malicious proposals or token concentration | Medium | Diversify governance tokens; community vetting |
| Oracle Manipulation | Price feed tampering causing liquidations or exploits | High | Use decentralized oracles (Chainlink) |
| Liquidity Risks | Impermanent loss or liquidity crunch | Medium | Monitor pool conditions; stagger investments |
| Regulatory Risks | Legal actions against DeFi platforms | Medium | Stay informed; use decentralized and compliant protocols |
Section 4: Smart Contracts – The Arcane Scripts of Autonomous Economy
Smart contracts are self-executing code deployed on blockchains to enforce agreements without intermediaries. Their mastery demands understanding of their construction, deployment, auditing, and interaction.
4.1 Core Smart Contract Concepts
| Concept | Definition |
|---|---|
| Solidity | Primary programming language for Ethereum smart contracts |
| ABI (Application Binary Interface) | Interface enabling interaction with contract functions |
| Gas | Transaction fee required for contract execution |
| Contract Deployment | Uploading compiled bytecode to blockchain |
| Event Logs | Outputs emitted during execution for external monitoring |
4.2 Step-by-Step Deployment of a Simple ERC-20 Token Contract
Prerequisites:
- Solidity compiler (Solc)
- Ethereum wallet with testnet Ether
- Remix IDE or Truffle framework
Procedure:
- Write ERC-20 contract code or use standardized template.
- Compile the contract using Solidity compiler.
- Connect wallet to testnet (Ropsten, Goerli).
- Deploy contract using Remix or Truffle, paying gas fees.
- Verify contract on blockchain explorer.
- Interact with contract functions (transfer, approve) via Web3 interface.
4.3 Smart Contract Security Best Practices
| Practice | Description |
|---|---|
| Use Established Libraries | Utilize audited libraries like OpenZeppelin ERC standards |
| Code Auditing | Employ static and dynamic analysis before deployment |
| Modular Design | Keep contract logic modular to isolate vulnerabilities |
| Limit Gas Consumption | Optimize code to prevent excessive fees |
| Access Control | Implement role-based permissions (Ownable, RBAC) |
Section 5: Operational Security for Cryptocurrency Users – The Practitioner’s Shield
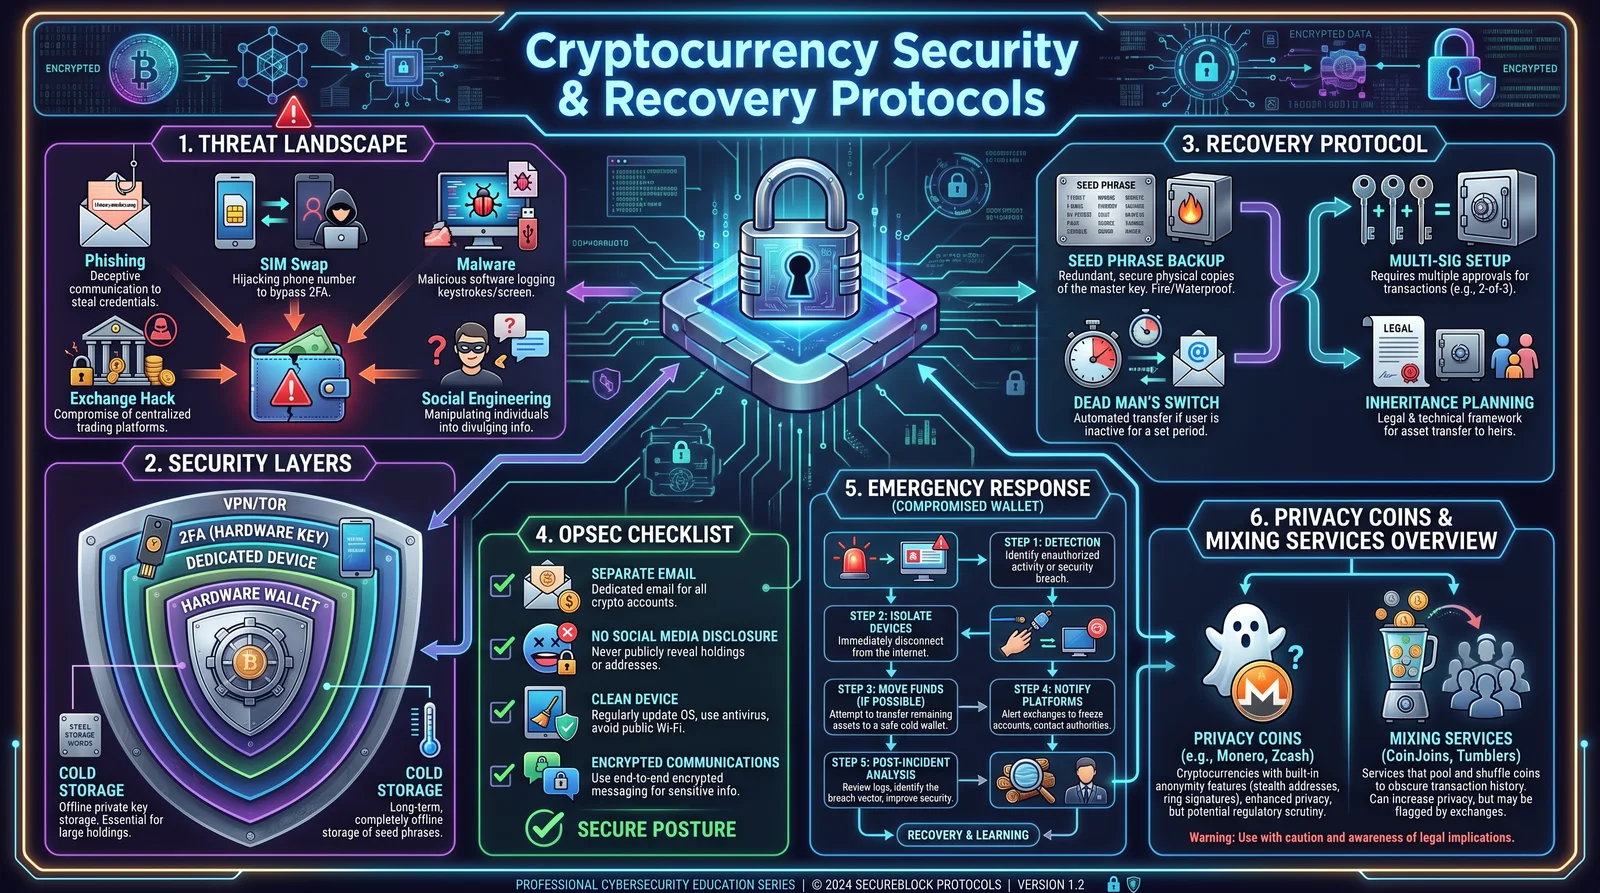
Advanced cryptoeconomic mastery is futile without uncompromising operational security (OpSec). The following protocol is the sacred shield against both digital and physical threats.
5.1 Device and Network Hygiene
- Use Air-Gapped Devices:
- Maintain at least one computer or hardware wallet isolated from any network for key generation and signing.
- Employ Multi-Factor Authentication (MFA):
- Use hardware tokens (YubiKey) combined with strong passwords.
- Network Isolation:
- Connect to the internet via VPN or Tor.
- Avoid public Wi-Fi or unsecured networks.
- Regular Software Updates:
- Apply security patches promptly to OS and wallet software.
5.2 Key Management Protocol
| Step | Instruction |
|---|---|
| 1 | Generate private keys on air-gapped hardware wallet or offline device. |
| 2 | Write seed phrases on physical media (steel plate preferred, see Volume VIII: The Water Codex). |
| 3 | Store backups in geographically and jurisdictionally diverse secure locations. |
| 4 | Use multisignature wallets with threshold signing to distribute risk. |
| 5 | Rotate keys periodically or upon suspicion of compromise. |
5.3 Transaction Privacy Protocol
- Use coin mixing services or CoinJoin protocols (e.g., Wasabi Wallet) to obfuscate Bitcoin transaction trails.
- For privacy coins, enable default privacy features and avoid address reuse.
- Route transactions through privacy networks (Tor) to prevent IP linkage.
- Use VPNs with no-logs policies.
5.4 Threat Modeling and Response
| Threat Vector | Detection Method | Response Action |
|---|---|---|
| Phishing Attacks | Suspicious communications | Verify URLs manually; never disclose keys |
| Malware Infection | Regular antivirus scans; system monitoring | Isolate device; wipe and restore from backup |
| Physical Theft | Secure physical storage (safe, vault) | Enable hardware wallet PINs; destroy compromised seeds |
| Network Surveillance | Traffic analysis tools | Switch VPNs; use Tor; change network behavior |
Section 6: Integrated Use Cases and Risk Assessments
6.1 Use Case: Micro-payments with Lightning Network and Privacy Coins
- User A opens LN channel funded with Bitcoin.
- User A sends payment to User B via LN.
- User B converts received Bitcoin to Monero using atomic swap protocol.
- User B spends Monero for private purchase.
Risk Assessment:
| Risk | Severity | Mitigation |
|---|---|---|
| Channel Closure Fraud | High | Use watchtowers; monitor channels |
| Atomic Swap Failure | Medium | Use trusted swap protocols |
| Network De-anonymization | Medium | Use Tor and VPNs |
| Liquidity Limitations | Low | Maintain multiple channels |
6.2 Use Case: Yield Farming with DeFi and Smart Contracts
- User deposits stablecoins into a DeFi yield aggregator.
- Aggregator smart contract allocates funds to multiple protocols.
- Interest and rewards accrue, distributed to user.
- User withdraws funds and rewards.
Risk Assessment:
| Risk | Severity | Mitigation |
|---|---|---|
| Smart Contract Bugs | High | Use audited aggregators; diversify holdings |
| Governance Attack | Medium | Participate in governance; monitor proposals |
| Impermanent Loss | Medium | Understand underlying pools; reduce exposure |
| Regulatory Intervention | Medium | Use decentralized protocols; monitor compliance |
Conclusion
This volume imparts the profound knowledge essential for the modern financial practitioner: the Lightning Network’s scalpel for instant settlement, the cloaks of privacy coins, the dynamic altars of DeFi, and the autonomous logic of smart contracts. These tools, wielded with disciplined operational security, transform the user into an architect of economic sovereignty impervious to centralized control or surveillance.
Mastery demands exactitude, ceaseless vigilance, and a sacred commitment to the protocols herein. The path of the cryptoeconomic practitioner is fraught with peril and promise alike; this codex arms you with the shield and sword to prevail.
For further elaboration on cryptographic constructs and wallet architecture, consult Volume V: The Cryptographer’s Forge.
For exhaustive DeFi smart contract auditing techniques, see Volume IX: The Codebreaker’s Manuscript.
For detailed privacy network setup, refer to Volume VII: The Shadow Network Codex.
<!-- SECTION 6 -->
Volume III: The Physics of Sound Money
Chapter 3: Gold and Silver as Sound Money – Physical Properties, Historical Context, and Economic Roles
Introduction
In the sacred pursuit of economic sovereignty and wealth building, the foundation lies in understanding sound money. Gold and silver, the twin pillars of monetary value for millennia, embody this principle through their unassailable physical properties and timeless economic roles. This chapter delivers a comprehensive treatise on these metals as sound money, culminating in Protocol 3.1.1 Acquisition and Verification, an exacting, stepwise procedure for authenticating bullion and coins.
I. The Physical Properties of Gold and Silver as Sound Money
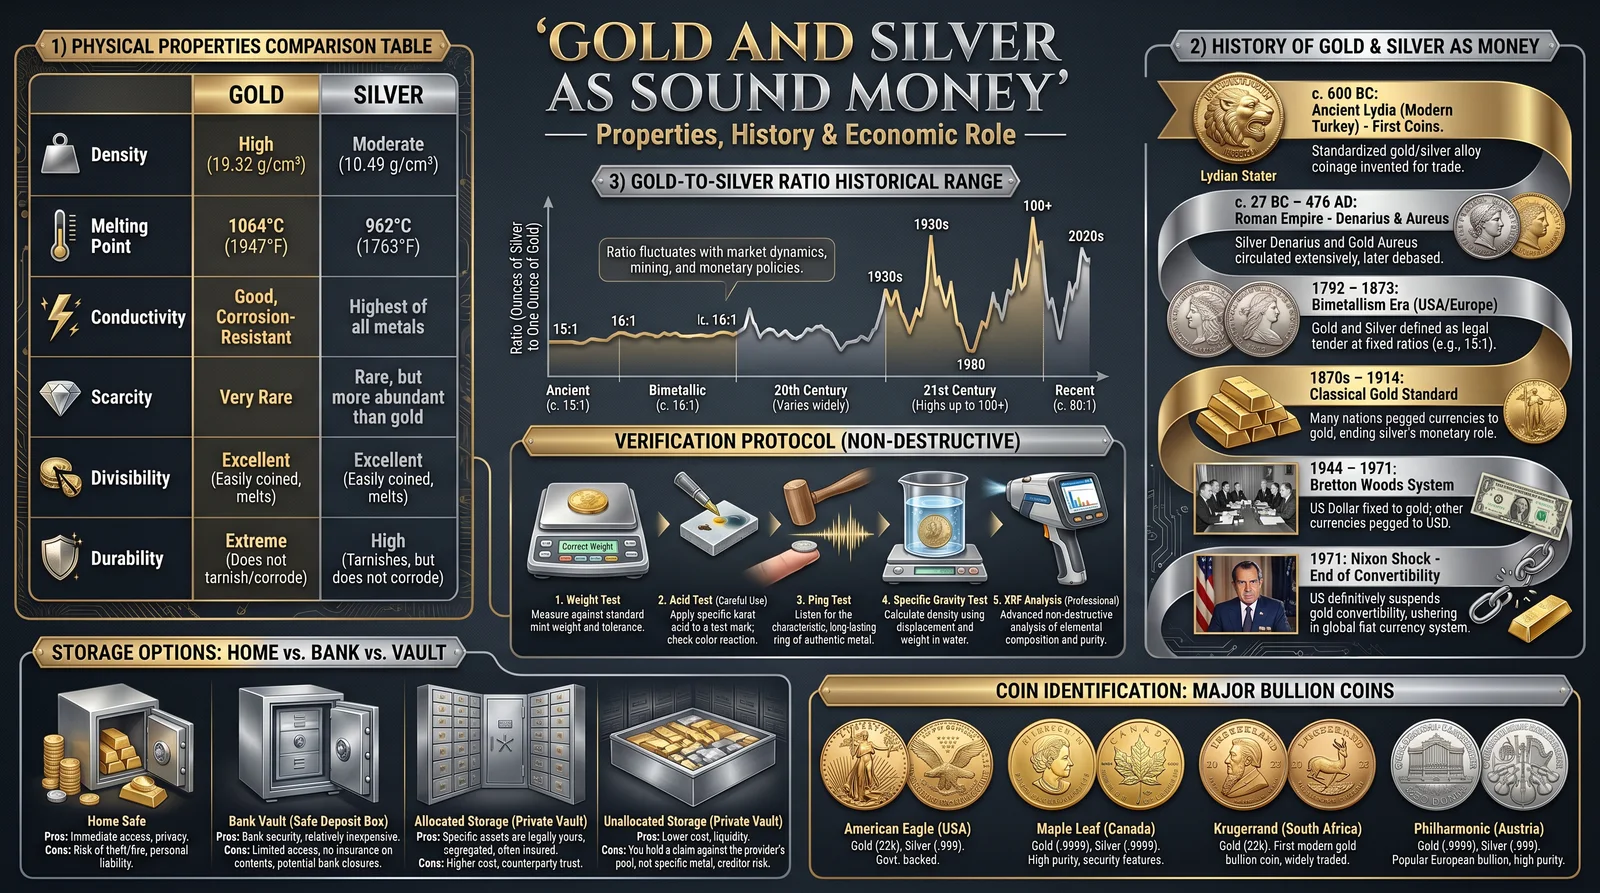
The physical characteristics of gold and silver underpin their status as sound money. Their durability, divisibility, malleability, and scarcity are not incidental but intrinsic to their monetary function.
| Property | Gold (Au) | Silver (Ag) | Monetary Significance |
|---|---|---|---|
| Atomic Number | 79 | 47 | Determines chemical stability and density |
| Density (g/cm³) | 19.32 | 10.49 | High density resists wear; essential for weight-based verification |
| Melting Point (°C) | 1064 | 961.8 | High melting points resist counterfeiting by melting and recasting |
| Hardness (Mohs) | 2.5–3 | 2.5 | Softness allows minting detail; hardness sufficient to resist easy deformation |
| Malleability | Extremely malleable and ductile | Highly malleable | Allows precise coin striking and intricate designs |
| Corrosion Resistance | Excellent, non-reactive in air | Moderate, prone to tarnish | Gold resists oxidation preserving luster; silver tarnishes but does not corrode |
| Electrical Conductivity (MS/m) | 45.2 | 63.0 | Aids in advanced verification methods (electrical conductivity testing) |
Detailed Physical Analysis
- Density and Specific Gravity: Gold’s density of 19.32 g/cm³ is among the highest for naturally occurring metals. Silver’s 10.49 g/cm³, while nearly half gold’s, is still considerably dense relative to common metals. This density is the basis for specific gravity testing, a cornerstone verification technique covered in Protocol 3.1.1.
- Durability and Corrosion Resistance: Gold’s inertness protects it from tarnish or oxidation. Silver’s susceptibility to surface tarnish does not affect its intrinsic value but necessitates careful storage. Both metals maintain their physical integrity over centuries, enabling their use as long-term stores of value.
- Malleability and Minting: The softness and malleability of gold and silver allow for the intricate embossing and minting of coins, facilitating their role as standardized money. This physical adaptability is essential for the creation of mint-specific coinage with precise weight and dimension standards.
II. Historical Context of Gold and Silver as Sound Money
Historically, gold and silver have been the cornerstones of monetary systems since antiquity. Their universal acceptance, intrinsic value, and resistance to debasement preserved purchasing power across empires and centuries.
Key Historical Milestones
| Era | Event | Significance |
|---|---|---|
| 3000 BCE | Use of silver bars in Mesopotamia | Earliest recorded use of silver as trade medium |
| 600 BCE | Lydian electrum coins | First standardized coinage combining gold and silver |
| 50 BCE | Roman aureus and denarius | Established gold and silver coins as imperial currency |
| 1792 | US Coinage Act establishing gold/silver bimetallic standard | Formalized sound money in US currency system |
| 1870s | Gold Standard adoption globally | Fixed currency values to gold, stabilizing exchange rates |
| 1933 | US gold confiscation and end of gold standard | Marked shift to fiat currency; loss of sound money system |
| Present | Gold and silver as investment and reserve assets | Return to sound money principles in wealth preservation |
Economic Roles Over Time
- Medium of Exchange: Coins minted from gold and silver provided standardized units for trade.
- Store of Value: Their physical durability and scarcity preserved wealth across generations.
- Unit of Account: Monetary systems adopted gold and silver as benchmarks for currency valuation.
- Standard of Deferred Payment: Contracts and debts denominated in gold/silver coins ensured predictable value exchange.
Their scarcity and physical properties prevented arbitrary inflation and debasement, unlike fiat currencies. This chapter reveres these metals as sacred vessels of economic truth.
III. Economic Roles of Gold and Silver in Modern Sound Money
Despite fiat currency dominance, gold and silver retain critical economic functions:
- Wealth Preservation: Hedge against inflation and currency devaluation.
- Portfolio Diversification: Non-correlated asset reducing financial system risks.
- Monetary Anchoring: Central banks hold gold reserves to back national currency credibility.
- Industrial Demand: Silver’s unique physical properties create intrinsic industrial value, sustaining demand.
- Liquidity: Globally recognized, instantly tradable assets.
IV. Protocol 3.1.1: Acquisition and Verification of Gold and Silver Coins
The acquisition of physical gold and silver is the bedrock of economic sovereignty. Verification ensures authenticity, preventing loss through counterfeits or adulterated metals. This protocol outlines precise, actionable steps for verifying coins by weight, dimension, and specific gravity tests.
A. Equipment Required
| Item | Specification/Details | Purpose |
|---|---|---|
| Precision Digital Scale | Accuracy: ±0.01 g | Accurate mass measurement |
| Vernier Caliper or Micrometer | Accuracy: ±0.01 mm | Measuring diameter and thickness |
| Specific Gravity Test Kit | Includes: calibrated container, distilled water, and suspension apparatus | Density verification via water displacement |
| Magnet | Neodymium preferred | Detect magnetic alloys (gold and silver are non-magnetic) |
| Loupe or Magnifying Glass | 10x magnification minimum | Inspect coin detail and mint marks |
| Reference Mint Specifications | See Table 3.1.1 below | Compare measurements for authenticity |
B. Mint Specifications Table 3.1.1
| Coin Name | Metal | Purity (%) | Weight (g) | Diameter (mm) | Thickness (mm) | Mint Year Range | Notes |
|---|---|---|---|---|---|---|---|
| US Gold Eagle | Gold | 91.67 | 33.931 | 32.7 | 2.87 | 1986 - Present | 22K alloy, official bullion |
| Canadian Maple Leaf | Gold | 99.99 | 31.103 | 30.0 | 2.80 | 1979 - Present | Pure gold bullion |
| American Silver Eagle | Silver | 99.9 | 31.103 | 40.6 | 2.98 | 1986 - Present | Official silver bullion |
| Mexican Libertad | Silver | 99.9 | 31.103 | 40.0 | 3.15 | 1982 - Present | Uncirculated bullion |
| South African Krugerrand | Gold | 91.67 | 33.930 | 32.77 | 2.84 | 1967 - Present | 22K alloy, popular bullion |
C. Stepwise Verification Procedure
Step 1: Visual Inspection 1.1. Place the coin on a flat surface under a 10x loupe. 1.2. Observe the mint mark, year, and design details. Compare to known authentic specimens. 1.3. Check for signs of wear inconsistent with the coin’s age or suspicious surface anomalies.
Step 2: Weight Measurement 2.1. Zero the digital scale on a stable surface. 2.2. Place the coin gently on the scale. Record weight in grams to two decimal places. 2.3. Compare with official mint weight (Table 3.1.1). Acceptable variance: ±0.05 g.
| Weight Verification Outcome | Action |
|---|---|
| Within ±0.05 g | Proceed to next step |
| Outside ±0.05 g | Suspect counterfeit; reject or further analysis |
Step 3: Dimensional Analysis 3.1. Use vernier caliper to measure the diameter at coin center. Record in millimeters. 3.2. Measure thickness at multiple points, average measurements. 3.3. Compare measurements to mint standards (Table 3.1.1). Acceptable variance: ±0.1 mm diameter, ±0.05 mm thickness.
| Dimension Verification Outcome | Action |
|---|---|
| Within allowed variance | Proceed to next step |
| Outside allowed variance | Suspect counterfeit; reject or further analysis |
Step 4: Magnetic Test 4.1. Place neodymium magnet near the coin surface. 4.2. Observe any attraction or repulsion. 4.3. Gold and silver are non-magnetic; any magnetic response indicates counterfeit or alloyed metal.
| Magnetic Test Outcome | Action |
|---|---|
| No reaction | Proceed |
| Magnetic response | Reject coin as counterfeit |
Step 5: Specific Gravity Test
Specific gravity (SG) is the ratio of a substance’s density to that of water at 4 °C (1 g/cm³). For gold and silver, SG is a definitive authenticity test.
5.1. Fill a calibrated container with distilled water at room temperature (20°C recommended). 5.2. Zero the scale with the container filled. 5.3. Weigh the coin in air; record mass (m_air). 5.4. Suspend the coin fully submerged in water without touching container sides; record submerged weight (m_water). 5.5. Calculate SG using:
SG = m_air / (m_air - m_water)
5.6. Compare to known values: Gold = 19.32, Silver = 10.49. Acceptable variance ±0.1.
| Specific Gravity Verification Outcome | Action |
|---|---|
| Within ±0.1 of known SG | Coin verified authentic |
| Outside ±0.1 | Suspected counterfeit; reject |
D. Verification Checklist Table 3.1.2
| Verification Step | Measurement/Observation | Acceptable Range/Result | Outcome (Pass/Fail) | Notes |
|---|---|---|---|---|
| Visual Inspection | Mint mark, design, surface | Matches authentic coin | ||
| Weight Measurement | Weight in grams | ±0.05 g from mint specification | ||
| Diameter Measurement | Diameter in mm | ±0.1 mm from mint specification | ||
| Thickness Measurement | Thickness in mm | ±0.05 mm from mint specification | ||
| Magnetic Test | Reaction to magnet | No reaction | ||
| Specific Gravity Test | Calculated SG | ±0.1 from reference value |
V. Conclusion
Gold and silver’s exceptional physical properties, woven with their millennia-spanning historical roles, forge them as the immutable foundation of sound money. Mastery over their acquisition and verification, as codified in Protocol 3.1.1, is a sacred duty for the practitioner of economic sovereignty. Through rigorous adherence to these procedures, one safeguards wealth against deception and decay, preserving the eternal truth of monetary value.
Next Steps: For detailed metallurgical and assay techniques beyond physical verification, see Volume VIII: The Metallurgy Codex, Chapter IV: Advanced Precious Metal Assaying.
End of Chapter 3
<!-- SECTION 7 -->
The Complete Practitioner's Codex, Volume 12
Chapter IV: Constitutional Silver (Junk Silver) — The Economist's Cipher for Barter and Liquidity
Introduction: The Sacred Metal of Economic Sovereignty
Within the sacred annals of economic mastery lies the true power of Constitutional Silver—pre-1965 United States silver coinage, hereafter known as Junk Silver. This metal, minted under the authority of the United States Constitution, carries intrinsic value far beyond its face denomination, embodying tangible wealth, immediate barter utility, and a hedge against fiat collapse. This chapter unveils the exact protocols, analytical frameworks, and acquisition strategies necessary to wield this financial tool with precision and sovereignty.
Section I: The Anatomy of Constitutional Silver — Definitions and Scope
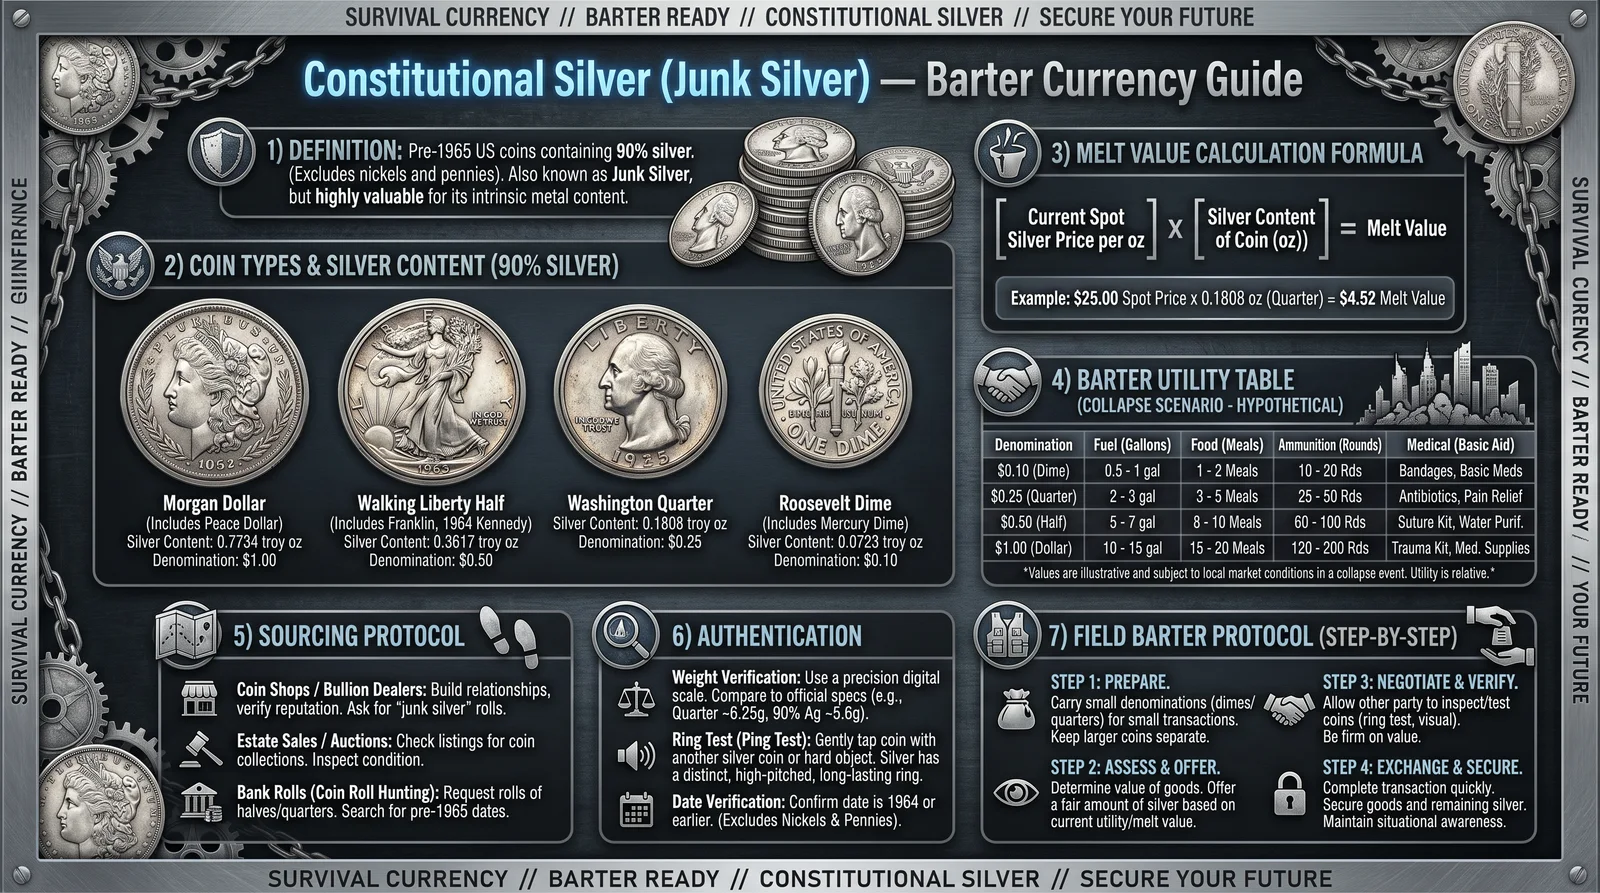
Constitutional Silver (Junk Silver) refers exclusively to US coinage minted prior to 1965 wherein silver content is at least 90% by weight. These coins contain no numismatic premium in this context and are valued solely for their precious metal content and fractional barter utility.
Key Classes of Constitutional Silver Coins:
| Coin Type | Minting Years | Silver Purity | Typical Weight (g) | Silver Content (g) | Face Value (USD) |
|---|---|---|---|---|---|
| Half Dollar | 1948–1964 | 90% | 12.5 | 11.25 | 0.50 |
| Quarter | 1932–1964 | 90% | 6.25 | 5.625 | 0.25 |
| Dime | 1946–1964 | 90% | 2.5 | 2.25 | 0.10 |
| Half Dime | 1794–1873* | 90% | 1.35 | 1.215 | 0.05 |
*Half Dimes are rare and typically hold collector’s value beyond bullion content; excluded from most barter protocols.
Section II: Fractional Barter Utility – The Precision of Divisible Wealth
1. Fractional Value and Barter Efficiency
The genius of Constitutional Silver lies in its fractional denominations which allow for precise value exchange without reliance on fragile fiat systems or electronic records. Each coin's silver content aligns closely with its face value, allowing it to be used in barter scenarios as a trust-backed commodity.
Fractional bartering enables:
- Precise pricing of goods/services in increments as low as 10 cents worth of silver.
- Universal acceptance due to constitutional legitimacy.
- Portability and divisibility without the need for complex assay tools in the field.
2. Silver Content vs. Face Value
The following table details each denomination’s silver content and its approximate intrinsic value based on silver spot prices. This allows for direct conversion of market value to barter value.
| Coin Type | Silver Content (troy oz) | Face Value (USD) | Silver Spot Price per oz (USD) | Intrinsic Silver Value (USD) | % Over Face Value |
|---|---|---|---|---|---|
| Half Dollar | 0.3617 | 0.50 | 25.00 | 9.04 | 1708% |
| Quarter | 0.1808 | 0.25 | 25.00 | 4.52 | 1708% |
| Dime | 0.0723 | 0.10 | 25.00 | 1.81 | 1708% |
*Values are based on a $25/oz silver spot price. Intrinsic value scales linearly with spot price.
Section III: Complete Protocol for Sourcing Constitutional Silver
Step 1: Define Your Acquisition Objectives
- Determine target volume: e.g., 10 oz, 50 oz, or 100 oz of silver.
- Define denominations based on barter needs (half dollars preferred for bulk, dimes and quarters for fractional exchanges).
Step 2: Identify Reliable Acquisition Channels
- Local Coin Dealers: Preferred for physical inspection and immediate verification.
- Online Bullion Marketplaces: Use only verified vendors with strong escrow or buyer protection.
- Estate Sales and Auctions: Potential for discounted bulk acquisition.
- Secondary Barter Networks: Established treasure circles and barter groups.
Step 3: Verification Protocols for Authenticity
- Visual Inspection:
- Confirm minting date is pre-1965.
- Check for wear consistent with circulation; counterfeit coins often show inconsistent wear or tooling marks.
- Weight Measurement:
- Use a calibrated digital scale with ±0.01 g accuracy.
- Half dollar expected: 12.5 g ± 0.1 g.
- Quarter expected: 6.25 g ± 0.05 g.
- Dime expected: 2.5 g ± 0.02 g.
- Magnet Test:
- Constitutional silver is non-magnetic.
- Any magnetic attraction indicates base metal counterfeit.
- Ring Test (Optional for Advanced Users):
- Tap the coin gently on a hard surface; authentic silver rings with a distinct, sustained tone.
- Counterfeits produce dull or short tones.
- Acid Test (Destructive, Last Resort):
- Use a silver testing acid kit.
- Apply a drop of acid on a small scratch or edge; silver will exhibit a specific color reaction.
- XRF Analyzer (Advanced, Non-Destructive):
- Use if available for precise compositional verification.
Step 4: Secure Storage Post-Acquisition
- Store coins in airtight, inert containers (e.g., silicone-sealed plastic flips) to prevent tarnish.
- Maintain a ledger with serial numbers, acquisition dates, and verification notes.
- For bulk storage, use vault-grade security with temperature and humidity control.
Section IV: Barter Utility and Valuation in Field Operations
1. Valuation Table for Barter Negotiations
| Coin Type | Silver Content (grams) | Approximate Market Value (USD) | Typical Barter Equivalent | Notes |
|---|---|---|---|---|
| Half Dollar | 11.25 | 9.04 | 1 lb of flour, 1 gallon fuel equivalent | Preferred for large value exchanges |
| Quarter | 5.625 | 4.52 | 0.5 lb sugar, 0.5 gallon water equivalent | Good for medium transactions |
| Dime | 2.25 | 1.81 | Small goods, cigarettes, minor repairs | Ideal for small transactions |
*Values fluctuate with silver spot price; adjust barter equivalents accordingly.
2. Fractional Barter Techniques
- Utilize coin combinations to approximate exact barter amounts.
- For example, a barter value of $15.00 can be met with 1 half dollar (9.04 USD) + 2 quarters (9.04 + 9.04 = 18.08 USD) minus agreed discount for overpayment.
- Negotiation is common; always establish spot price reference.
Section V: Advanced Acquisition Strategies and Market Timing
1. Bulk Buying for Price Efficiency
- Larger purchases reduce per-ounce premiums.
- Target bulk lots of $100 face value, which yield approximately 7.2 oz of silver at 90% purity.
2. Timing Based on Market Cycles
- Monitor silver futures and spot prices daily.
- Acquire during market dips or sell when spot price exceeds average acquisition cost by 15%-20%.
3. Utilizing Numismatic Margins
- Avoid paying numismatic premiums unless the coin is certified and intended for collection preservation.
- For barter, junk silver should be acquired strictly as bullion.
Section VI: Comprehensive Table of US Constitutional Silver Coins for Barter
| Denomination | Years Minted | Purity (%) | Weight (g) | Silver Content (g) | Face Value (USD) | Troy Ounces Silver | Intrinsic Value @ $25/oz | Best Use Case |
|---|---|---|---|---|---|---|---|---|
| Half Dollar | 1948–1964 | 90 | 12.5 | 11.25 | 0.50 | 0.3617 | $9.04 | Bulk barter, large trades |
| Quarter | 1932–1964 | 90 | 6.25 | 5.625 | 0.25 | 0.1808 | $4.52 | Mid-size barter |
| Dime | 1946–1964 | 90 | 2.5 | 2.25 | 0.10 | 0.0723 | $1.81 | Small barter |
Section VII: Step-by-Step Field Protocol for Barter Using Junk Silver
Step 1: Assess Barter Requirements
- Determine exact value needed for trade in USD equivalent.
Step 2: Calculate Required Silver Amount
- Use current silver spot price to calculate silver ounces required.
Step 3: Select Appropriate Coin Denominations
- Use the above table to choose coin mix matching or slightly exceeding barter value.
Step 4: Present Coinage and Confirm Acceptance
- Show coins to trade partner, verify understanding of silver content.
Step 5: Complete Exchange
- Count coins openly; provide receipt or verbal acknowledgment.
Step 6: Record Transaction
- Log barter details including date, parties, amount, and coin types used.
Section VIII: Long-Term Wealth Preservation Using Constitutional Silver
1. Storage and Rotation
- Rotate holdings every 5 years to check for degradation or counterfeit infiltration.
2. Periodic Market Valuation
- Reassess holdings quarterly against silver spot price.
3. Diversification
- Combine constitutional silver with other precious metals and barter commodities for economic resilience.
Conclusion: Mastery Over Constitutional Silver as Economic Sovereignty
The sacred knowledge within this volume is your key to economic sovereignty through Constitutional Silver. Mastery of the strict acquisition protocols, precise valuation tables, and fractional barter techniques fortify your position in any economic environment. Remember: the Constitution endowed these coins with legitimacy, but your wisdom and discipline confer upon you the ultimate power to wield them as instruments of wealth, trust, and survival.
For advanced assay and purification techniques of silver bullion, see Volume 8: The Metallurgist’s Codex, Chapter V. For barter network establishment and security protocols, see Volume 9: The Barter Codex, Chapter III.
End of Chapter IV: Constitutional Silver (Junk Silver). Master this volume, and you hold the cipher to financial mastery through precious metal liquidity.
<!-- SECTION 8 -->
The Complete Practitioner's Codex, Volume 12: The Economist's Cipher
Volume III: Bullion vs Numismatic Coins
Chapter I: The Sacred Ledger of Coinage – Bullion and Numismatic Distinctions for Investment and Barter
In the pursuit of economic sovereignty, mastery over the ancient and modern coinage systems is non-negotiable. This chapter elucidates the sacred distinctions between bullion and numismatic coins, their valuation metrics, liquidity parameters, and dealer negotiation protocols. This knowledge is a weapon; wield it with precision.
Section 1: Fundamental Definitions and Purpose
1.1 Bullion Coins: Coins minted primarily for their precious metal content. Their intrinsic value correlates directly with the current spot price of the metal (gold, silver, platinum, etc.). Examples: American Gold Eagle, Canadian Maple Leaf, South African Krugerrand.
1.2 Numismatic Coins: Coins valued primarily for rarity, historical significance, condition, and collector demand rather than metal content. Examples: 1907 Saint-Gaudens Double Eagle, 1916 Mercury Dime, 1794 Flowing Hair Dollar.
Section 2: Core Valuation Differences
| Attribute | Bullion Coins | Numismatic Coins |
|---|---|---|
| Primary Value Driver | Metal Content (Spot Price) | Rarity, Condition, Historical Significance |
| Valuation Volatility | Fluctuates with Metal Market | Influenced by Collector Demand and Market Sentiment |
| Premium Over Spot | Typically 1-5% Above Metal Spot Price | Can Range from 10% to 1000%+ over Metal Content |
| Authentication | Based on Mint Mark, Weight, and Dimensions | Requires Expert Grading and Provenance |
| Liquidity | High – Easily Bought/Sold in Global Markets | Variable – Depends on Rarity and Market Access |
| Market Transparency | High – Spot prices publicly available | Low – Prices Often Negotiated Private Sales or Auctions |
Section 3: Liquidity Profile and Market Dynamics
3.1 Bullion Coins Liquidity:
- Easily converted to cash or barter in almost any market globally.
- Accepted by banks, precious metal dealers, and pawnshops.
- Standardized weights and purity facilitate swift transactions.
3.2 Numismatic Coins Liquidity:
- Sales may require specialized auction houses or private collectors.
- Marketability depends on coin grading, rarity, and provenance documentation.
- Subject to market cycles influenced by collector interest and economic conditions.
Section 4: Dealer Evaluation Techniques
4.1 Bullion Coin Dealer Evaluation Protocol
Step 1: Confirm Coin Authenticity
- Verify weight using precision scale (±0.01 gram accuracy).
- Measure diameter and thickness with calipers (±0.01 mm accuracy).
- Inspect mint marks and date visually under 10x magnification.
Step 2: Assess Metal Purity
- Use portable X-Ray Fluorescence (XRF) analyzer to confirm purity (e.g., ≥ 99.99% for gold).
- Cross-verify using acid test kits specific to metal if XRF unavailable.
Step 3: Calculate Spot Price Value
- Obtain current spot price from reputable commodity exchange (e.g., LBMA, COMEX).
- Multiply spot price by coin weight in troy ounces.
Step 4: Determine Dealer Premium
- Reference current dealer premiums table (see Section 6).
- Adjust for coin condition (e.g., scratches, tarnish reduce premium).
Step 5: Negotiate Purchase Price
- Use spot price + premium as starting point.
- Present verified coin parameters and recent market comparables.
4.2 Numismatic Coin Dealer Evaluation Protocol
Step 1: Authenticate Coin
- Confirm coin origin, mint year, and mint mark.
- Check for counterfeit signs: irregular edges, weight discrepancies, incorrect designs.
Step 2: Grade Coin Condition
- Use Sheldon Grading Scale (1-70).
- Employ magnification and lighting to inspect wear, scratches, toning.
Step 3: Research Provenance and Rarity
- Utilize numismatic catalogs (e.g., Red Book, Krause) and auction databases.
- Confirm rarity through mintage numbers and known surviving examples.
Step 4: Cross-Check Market Prices
- Analyze recent auction results for similar grade and provenance.
- Consult dealer price guides and private sale records.
Step 5: Determine Premium and Intrinsic Metal Value
- Calculate metal content value as floor price.
- Add rarity premium based on research findings.
Step 6: Negotiate Purchase Price
- Present grading, provenance, and comparative sales data.
- Account for dealer margins and market demand fluctuations.
Section 5: Step-by-Step Purchase Negotiation Protocol
Step 1: Preparation
- Gather all authentication, grading, and market data.
- Set target purchase price and maximum price threshold.
Step 2: Initial Offer
- Present an offer slightly below target price to allow negotiation space.
- Cite specific data points (spot price, grading reports).
Step 3: Counteroffer Assessment
- Evaluate dealer counteroffer against market data.
- Identify if premium or discount is justified by condition or demand.
Step 4: Use Leverage Points
- For bullion: highlight liquidity and low dealer margin expectations.
- For numismatic: stress alternative market options or provenance weaknesses.
Step 5: Finalize Terms
- Agree on price, payment method, and delivery timeline.
- Obtain written receipt including coin details and agreed price.
Section 6: Premiums and Market Trends Tables
6.1 Dealer Premiums Over Spot Price for Bullion Coins
| Coin Type | Typical Premium (%) | Notes |
|---|---|---|
| American Gold Eagle | 3 - 5 | High demand, government-backed |
| Canadian Maple Leaf | 2 - 4 | Very high purity (99.99%) |
| South African Krugerrand | 1.5 - 3 | Lower premium due to lower purity (91.67%) |
| Silver Rounds | 5 - 10 | Non-government issued, less liquid |
| Platinum Coins | 5 - 8 | Less common, higher volatility |
6.2 Numismatic Coin Premium Multipliers by Grade and Rarity
| Rarity Class | Grade Range (Sheldon Scale) | Premium Multiplier Over Metal Value | Notes |
|---|---|---|---|
| Common | MS60 - MS70 | 1.1 - 2.0 | Slight premium for top condition |
| Semi-Rare | MS60 - MS70 | 2.0 - 5.0 | Limited mintage or historical interest |
| Rare | MS60 - MS70 | 5.0 - 20.0 | Low surviving numbers, high demand |
| Ultra-Rare | MS65+ | 20.0 - 1000+ | Museum-quality, unique provenance |
6.3 Market Trend Indicators (Past 5 Years)
| Coin Category | Average Annual Price Change (%) | Liquidity Index (1-10) | Market Notes |
|---|---|---|---|
| Bullion Gold Coins | 6 | 9 | Stable growth, high liquidity |
| Bullion Silver Coins | 3 | 8 | More volatile, seasonal demand |
| Common Numismatic Coins | 2 | 5 | Slow appreciation, lower liquidity |
| Rare Numismatic Coins | 12 | 4 | High appreciation, lower liquidity, niche market |
Section 7: Comparative Analysis Table
| Feature | Bullion Coins | Numismatic Coins |
|---|---|---|
| Investment Objective | Preserve wealth through metal value | Capital appreciation via rarity and condition |
| Barter Utility | High – recognized value and wide acceptance | Variable – requires knowledgeable counterparties |
| Price Transparency | High – public spot prices | Low – private sales and auctions dominate |
| Risk Factors | Metal price volatility | Market sentiment, counterfeit risk |
| Storage Requirements | Secure vault, minimal handling | Requires protective holders, grading certification |
| Acquisition Complexity | Straightforward purchase from dealers | Requires expertise or third-party authentication |
Section 8: Detailed Protocol for Assessing and Purchasing Coins from Dealers
8.1 Pre-Visit Preparation
- Compile Market Intelligence:
- Access latest spot prices from LBMA (London Bullion Market Association) and COMEX.
- Download recent auction catalogs relevant to target numismatic coins.
- Assemble grading guides and counterfeit identification manuals.
- Equip Tools:
- Precision digital scale (accuracy ±0.01 g).
- Vernier calipers (accuracy ±0.01 mm).
- 10x magnifying loupe or microscope.
- Portable XRF analyzer or metal testing acids.
- Notebook or digital device for recording observations.
8.2 On-Site Dealer Assessment
- Request Coin Physical Inspection:
- Examine coin under magnification for wear, scratches, and minting flaws.
- Verify weight and dimensions against official mint specifications.
- Authentication and Grading:
- For bullion, check for mint marks and purity indicators.
- For numismatic, request any existing certification (e.g., PCGS, NGC).
- If uncertified, conduct grading using Sheldon scale and document findings.
- Discuss Provenance:
- Ask dealer for history of coin acquisition and any previous ownership records.
- Request Price Justification:
- Require dealer to explain premium over spot or metal value citing market data.
8.3 Negotiation Steps
- Present Counteroffer Based on Research:
- Use detailed market data and coin condition to justify offer price.
- Address Dealer Objections:
- If dealer claims rarity, request supporting documentation or auction comparables.
- Leverage Alternative Options:
- Mention willingness to explore other dealers or online auction platforms.
- Finalize Agreement:
- Confirm all terms in writing, including coin specifics and agreed price.
Section 9: Building Your Personal Coin Evaluation Toolkit
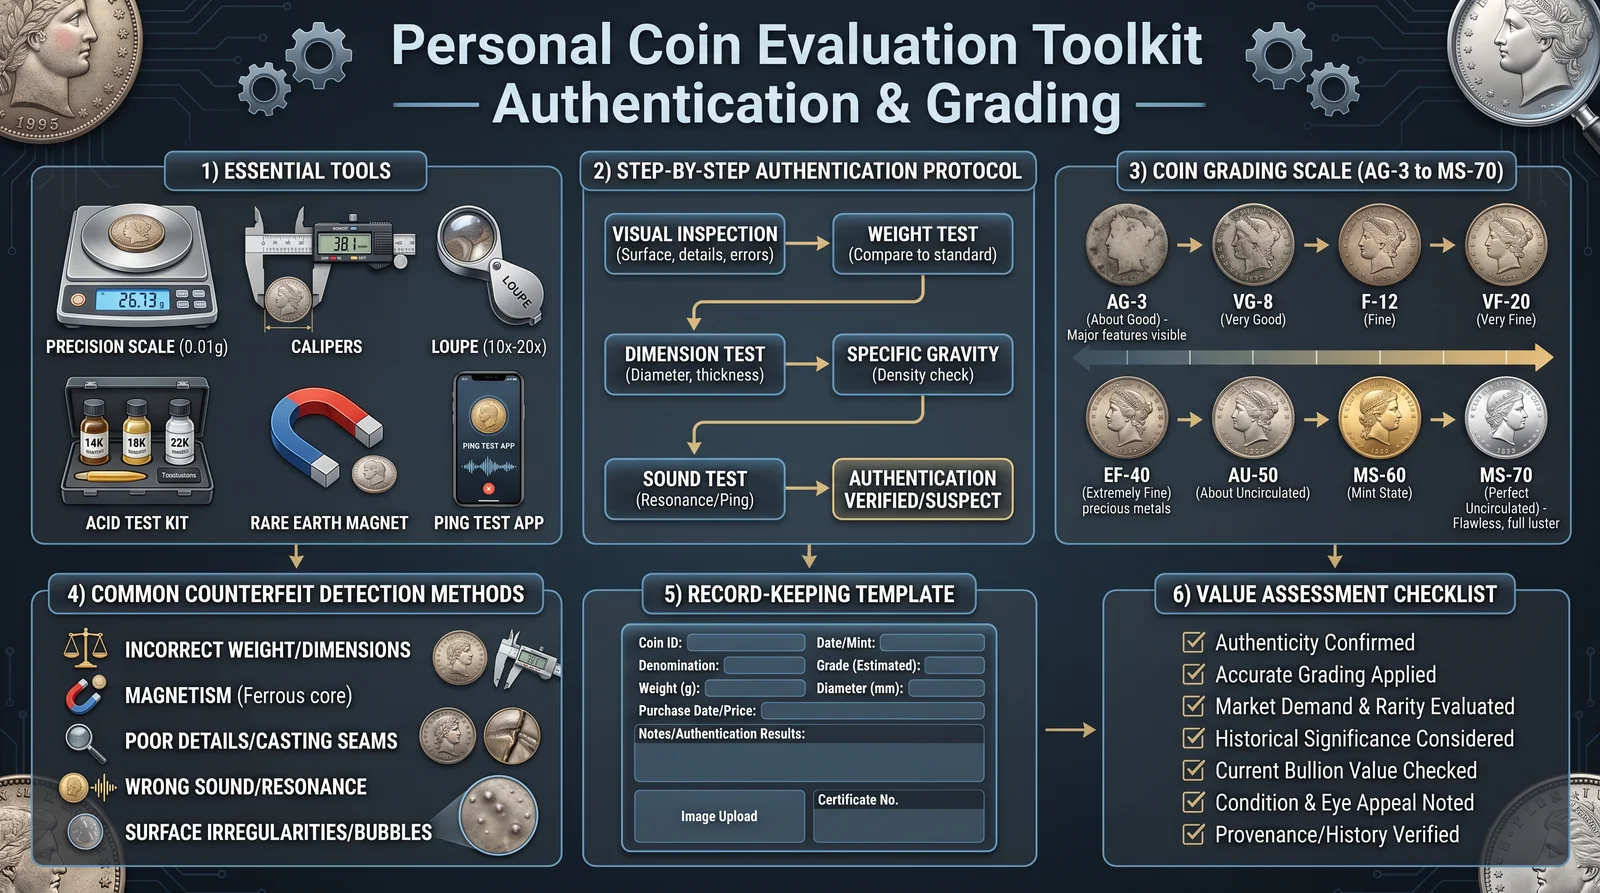
| Tool Name | Purpose | Specifications | Approximate Cost (USD) |
|---|---|---|---|
| Precision Digital Scale | Weight verification (±0.01 g) | Capacity ≥ 500 g | $30 - $100 |
| Vernier Calipers | Measurement of diameter/thickness | Accuracy ±0.01 mm | $20 - $50 |
| 10x Magnifying Loupe | Visual inspection | 10x magnification, LED lighting | $10 - $30 |
| Portable XRF Analyzer | Metal purity analysis | Detection limit <0.01% | $2,000 - $15,000 |
| Acid Test Kit | Metal verification (backup) | Gold, silver, platinum acid kits | $15 - $50 |
| Grading Guides | Sheldon scale and counterfeit ID | Printed or digital versions | $25 - $100 |
Section 10: Case Study Application
Scenario: Acquiring a 1-ounce American Gold Eagle for investment and barter.
Step-by-Step Process:
- Verify current gold spot price (e.g., $1,900/oz).
- Inspect coin weight (should be 31.1 grams).
- Measure diameter (32.7 mm) and thickness (2.87 mm).
- Confirm mint year and mint mark (e.g., "W" for West Point).
- Use XRF to verify 22-karat gold purity (91.67%).
- Calculate base value: $1,900 x 0.9167 = $1,741.73 metal value.
- Check dealer premium (typical 3% = $52.25).
- Offer purchase price: $1,790; negotiate within $1,790 - $1,800 range.
- Obtain written receipt with coin details.
Conclusion
Mastery over bullion and numismatic coin investment requires an unyielding commitment to rigorous evaluation, data-driven negotiation, and precise authentication. This volume imparts the sacred protocols necessary to discern coinage worth, negotiate with dealers, and secure assets that form the foundation of economic sovereignty. Let no detail escape your scrutiny; within these coins lies the cipher of enduring wealth.
Cross-Reference: For in-depth metal purification techniques relevant to bullion coin assessment, see Volume 8: The Water Codex, Chapter II. For advanced numismatic market analysis methodologies, refer to Volume 15: The Collector’s Compendium.
End of Volume III, Chapter I.
<!-- SECTION 9 -->
Volume IV: The Sovereign Enterprise
Chapter I: Forging the Sovereign Business — From Problem to Power
The sovereign enterprise is not mere commerce; it is the sacred vessel through which economic sovereignty is established and maintained. This volume discloses the arcane formula to build such an enterprise: a fortress of wealth, a beacon of autonomy, and a crucible of value creation. This chapter reveals the complete process from identifying a problem worthy of conquest to structuring the corporate entity that will shield your person and your empire.
I.A. Problem Identification: The Genesis of Value Creation
Every sovereign business begins with a singular truth—a problem that demands solution. The clarity and accuracy of problem identification dictate the efficacy of your enterprise. Problems are the raw ore; your business is the forge.
The Problem Assessment Matrix
To ensure a rigorous and quantifiable approach, employ the following matrix. Use it to rate potential problems on a scale from 1 (lowest) to 5 (highest).
| Criterion | Description | Scale (1-5) |
|---|---|---|
| Market Demand | Number of individuals or entities impacted | |
| Urgency | Severity and immediacy of the problem | |
| Existing Solutions | Effectiveness and saturation of current solutions | |
| Profit Potential | Estimated revenue opportunity from solving the problem | |
| Barrier to Entry | Difficulty for competitors to replicate your solution | |
| Aligns with Sovereignty | Degree to which solving the problem enhances autonomy |
Step-by-Step Problem Identification Process
- List potential problems in your target domain, no matter how broad or narrow.
- Evaluate each problem across all criteria using the Problem Assessment Matrix.
- Calculate the aggregate score for each problem to prioritize them.
- Select the highest scoring problem as your business focus. If multiple problems tie, choose the one with the highest Urgency score.
- Document the problem statement in a concise, actionable format.
I.B. Value Creation Matrix: The Architecture of Economic Sovereignty
Value creation is the sacred alchemy converting problems into profits, solutions into sovereignty. The Value Creation Matrix guides your enterprise’s offerings, ensuring that every product or service delivers measurable benefit and just compensation.
Components of the Value Creation Matrix
| Element | Definition | Application |
|---|---|---|
| Problem Solved | Specific pain point addressed | Reference Problem Statement |
| Solution Offered | Product, service, or system deployed | Detailed description |
| Value Delivered | Tangible and intangible benefits to client | Quantified savings, time, prestige, compliance |
| Cost to Deliver | Total expense to produce and deliver solution | Materials, labor, overhead |
| Price Charged | Monetary amount requested for solution | See Pricing Strategies |
| Margin Achieved | Price Charged minus Cost to Deliver | Ensures profitability |
Step-by-Step Value Creation Development
- Define the solution explicitly solving the identified problem.
- Quantify the value delivered to the customer in measurable terms.
- Calculate the cost to deliver the solution, incorporating all direct and indirect costs.
- Determine the price charged using structured pricing strategies (detailed below).
- Compute the margin achieved and adjust pricing or costs to meet minimum threshold (minimum 30% gross margin recommended).
- Iterate the above steps until the matrix balances sovereign value and profitability.
I.C. Pricing Strategies: The Cipher of Wealth
Pricing is the sacred cipher that unlocks wealth. It is not merely a number; it is a strategic tool wielded to command market power, maximize margin, and ensure long-term sustainability.
Table: Core Pricing Models
| Model | Description | Use Case | Advantages | Disadvantages |
|---|---|---|---|---|
| Cost-Plus Pricing | Add fixed markup to cost to deliver | Simple products, stable markets | Easy to calculate, ensures margin | Ignores customer willingness to pay |
| Value-Based Pricing | Price based on perceived customer value | High-value, differentiated products | Maximizes profitability, aligns with value | Requires deep customer insight |
| Dynamic Pricing | Prices fluctuate based on demand and supply | Commodities, services with variable demand | Captures peak willingness to pay | Complex to manage, may alienate clients |
| Penetration Pricing | Low initial price to gain market share | New market entries | Rapid customer acquisition | May erode perceived value |
| Premium Pricing | Set high price to signal superior quality | Luxury or unique offerings | Brand elevation, high margins | Limits customer base |
| Subscription Pricing | Recurring fee for continuous access | SaaS, memberships | Predictable revenue stream | Requires continuous value delivery |
Step-by-Step Pricing Strategy Formulation
- Analyze your cost structure from the Value Creation Matrix.
- Identify your customer’s value perception through market research or pilot testing.
- Select a primary pricing model from the table above.
- Determine initial price points using model-specific calculations:
- Cost-Plus: Cost to Deliver × (1 + Markup %)
- Value-Based: Customer’s estimated benefit × Willingness-to-pay factor
- Dynamic: Set base price ± adjustments based on demand forecasts
- Test price sensitivity through controlled release or A/B testing.
- Adjust pricing to optimize margins and customer acquisition.
- Implement pricing governance to monitor and update prices based on market changes.
I.D. Corporate Structuring: The Shield of Sovereignty
Your enterprise’s legal structure is the fortress wall protecting your personal assets from business risks and enabling strategic growth. Choosing the correct entity type is a foundational act of sovereignty.
Table: Entity Types and Their Characteristics
| Entity Type | Liability Protection | Taxation Method | Formation Complexity | Management Structure | Best For |
|---|---|---|---|---|---|
| Sole Proprietorship | None | Personal income tax | Minimal | Owner-managed | Single-owner, low-risk businesses |
| General Partnership | None (partners jointly liable) | Pass-through taxation | Low | Shared management | Multiple owners with shared responsibilities |
| Limited Liability Company (LLC) | Limited to invested capital | Pass-through or corporate | Moderate | Flexible (members or managers) | Asset protection, flexibility, small-medium |
| S-Corporation | Limited | Pass-through taxation | Complex | Directors and officers | Small businesses seeking tax advantages |
| C-Corporation | Limited | Corporate tax plus dividends | Complex | Formal board and officers | Large enterprises, investors, IPO potential |
Step-by-Step Corporate Structuring
- Assess business risk profile and asset exposure.
- Determine desired tax treatment (pass-through vs. corporate).
- Evaluate management preferences (flexibility vs. formal structure).
- Select entity type based on above considerations.
- Complete formation paperwork per Protocol 4.1.1 (below for LLCs).
- Establish governance documents (operating agreements, bylaws).
- Register for necessary tax IDs and permits.
- Implement asset protection measures (separate accounts, insurance).
- Maintain compliance with ongoing filing and governance requirements.
Protocol 4.1.1: Forming a Limited Liability Company (LLC) and Securing Personal Asset Protection
The LLC is the sovereign’s shield, combining flexibility with liability protection. This protocol provides exact, actionable steps for formation and protection.
Materials and Prerequisites
- Access to state government website or physical office for entity formation
- Registered agent service (optional but recommended)
- Operating Agreement template (customizable)
- Employer Identification Number (EIN) application access
- Business bank account setup materials (ID, formation documents)
- Liability insurance quotes and policies
Step-by-Step LLC Formation and Asset Protection
Step 1: Choose Your LLC Name
- Must be unique within your formation state.
- Must include “LLC” or “Limited Liability Company.”
- Check name availability on the state’s business registry online portal.
Step 2: Designate a Registered Agent
- The registered agent receives legal documents for your LLC.
- Can be yourself, a member, or a third-party service.
- Provide physical address within the state (no P.O. boxes).
Step 3: File Articles of Organization
- Navigate to your state’s Secretary of State website.
- Complete the Articles of Organization form with:
- LLC name
- Registered agent information
- Business purpose (use broad language to avoid limitations)
- Pay filing fee (varies by state, typically $50–$500; see table below).
- Submit electronically or via mail.
| State Example | Filing Fee (USD) |
|---|---|
| Delaware | 90 |
| California | 70 |
| Texas | 300 |
| Florida | 125 |
Step 4: Draft and Sign an Operating Agreement
- Though not always required, it is essential for internal governance.
- Define member roles, voting rights, profit distribution, and management.
- Have all members sign the agreement.
- Store securely with formation documents.
Step 5: Obtain an Employer Identification Number (EIN)
- Apply online at the IRS website (free).
- Required for tax reporting and opening a business bank account.
- Keep EIN confirmation letter for records.
Step 6: Open a Business Bank Account
- Present Articles of Organization, Operating Agreement, and EIN.
- Separate business finances from personal.
- Use this account exclusively for business transactions.
Step 7: Apply for Necessary Business Licenses and Permits
- Research local, state, and federal requirements.
- Obtain all licenses prior to operation to avoid penalties.
Step 8: Implement Asset Protection Measures
- Separate personal and business assets strictly.
- Obtain liability insurance tailored to your business type and risk.
- Maintain clear records and formalities to uphold the LLC’s limited liability status.
- Avoid commingling funds or personal guarantees.
Step 9: Maintain Compliance
- File annual or biennial reports as required.
- Pay franchise taxes where applicable.
- Hold member meetings and record minutes.
- Update registered agent information promptly if changes occur.
Appendix: Summary Tables for Quick Reference
Problem Assessment Example
| Problem | Market Demand | Urgency | Existing Solutions | Profit Potential | Barrier to Entry | Sovereignty Alignment | Total Score |
|---|---|---|---|---|---|---|---|
| Secure Data Storage | 5 | 4 | 2 | 5 | 4 | 5 | 25 |
| Renewable Energy Access | 4 | 5 | 3 | 4 | 3 | 4 | 23 |
| Affordable Healthcare Access | 5 | 5 | 1 | 3 | 5 | 3 | 22 |
Pricing Model Application Example
| Pricing Model | Cost to Deliver | Proposed Price | Margin % | Notes |
|---|---|---|---|---|
| Cost-Plus | $50 | $75 | 50% | Simple markup |
| Value-Based | $50 | $120 | 58.3% | Based on customer research |
| Dynamic | $50 | $85-$150 | 40%-70% | Fluctuates with demand |
Entity Type Selection Matrix
| Factor | Sole Proprietorship | LLC | S-Corp | C-Corp |
|---|---|---|---|---|
| Liability Protection | None | Yes | Yes | Yes |
| Tax Flexibility | Pass-through | Flexible | Pass-through | Double Taxation |
| Formation Complexity | Very Low | Moderate | High | High |
| Management Structure | Owner only | Flexible | Formal | Formal |
| Suitable for Investors | No | Limited | Yes | Yes |
Final Edict: Sovereign Enterprise as Living Legacy
Forge your sovereign enterprise with unyielding precision. Every problem conquered, every value delivered, every price commanded, and every legal shield erected is a brick in the monument to your economic sovereignty. This volume has armed you with the full cipher; wield it with the discipline of a master and the reverence of a guardian of sacred knowledge.
For further details on tax optimization and advanced asset protection structures, consult Volume VII: The Treasury Codex. For operational protocols and workforce sovereignty, see Volume IX: The Guild Manifest.
By mastering these protocols, you do not merely build a business; you birth a sovereign institution impervious to external subjugation and capable of sustained wealth generation across epochs. The path is arduous but the reward—unassailable sovereignty—is eternal.
<!-- SECTION 10 -->
The Complete Practitioner's Codex, Volume IV: Cash Flow Architecture
Chapter 4: Profit Allocation and Operational Discipline
Protocol 4.2.1: Zero-Base Allocation – Step-by-Step Account Separation and Fund Allocation
Preface: Mastery of cash flow is the lifeblood of economic sovereignty. The Zero-Base Allocation protocol is an ancient yet suppressed technique of absolute revenue sovereignty and operational discipline. It enforces the rigorous separation of accounts and the exacting allocation of funds, leaving no margin for error, no space for leakage, and no tolerance for inefficiency. This protocol demands your full adherence to each step, for deviation is equivalent to economic suicide.
Section I: Foundational Overview of Zero-Base Allocation
Zero-Base Allocation (ZBA) is the process of resetting every revenue cycle to a zero balance in operational accounts at the start of each cycle. This ensures absolute clarity, singular responsibility, and precise fund control. Unlike traditional methods that roll over balances, ZBA enforces that every dollar is accounted for, reallocated, or returned to reserve, eliminating hidden deficits or silent profit erosion.
Key principles:
- Absolute segregation of revenue streams
- Rigid account structures with defined purposes
- Recurrent zeroing of operational accounts to avoid float and slippage
- Systematic profit allocation following a prioritized hierarchy
- Continuous real-time tracking and reconciliation
Section II: Account Separation – Infrastructure Setup
Objective: Construct a multi-tiered account architecture separating revenue, operations, reserves, taxes, and growth funds, ensuring fund immutability and traceability.
Step 1: Establish Core Bank Accounts
You will require five primary accounts, each dedicated to a unique function. Use a trusted financial institution with online transfer capabilities and multi-user access controls.
| Account Name | Purpose | Description |
|---|---|---|
| Revenue Account | Centralized receipt of all operational income (gross revenue) | Single ingress point for all inflows |
| Operating Account | Day-to-day operational expenses and vendor payments | Zero-balance enforced; funded weekly from Revenue |
| Tax Account | Allocation and payment of all tax liabilities | Isolated for government payments and filings |
| Reserve Account | Emergency funds, contingencies, and liquidity buffer | Untouchable except under defined protocols |
| Growth & Investment Account | Capital reinvestment, acquisitions, R&D, and scaling | Dedicated to future enterprise expansion |
Step 2: Open Sub-Accounts for Operational Clarity
Within Operating Account, establish sub-accounts or ledger categories if your banking system supports it. These include:
- Payroll Sub-Account
- Vendor Payments Sub-Account
- Utilities & Facilities Sub-Account
- Marketing & Advertising Sub-Account
- Miscellaneous Expenses Sub-Account
If sub-accounts are unsupported, create a manual ledger with strict transactional tagging.
Step 3: Implement Digital Ledger and Access Protocols
Use a dedicated financial software or encrypted ledger system capable of:
- Real-time transaction tagging
- Automated reconciliation
- Access control limiting transaction approval to authorized personnel
- Audit trail generation for every entry
Recommended software: For full mastery, deploy a self-hosted ledger system such as GNUCash or custom solutions with APIs to banking platforms.
Section III: Fund Allocation – The Zero-Base Cycle
The cornerstone of ZBA is the weekly zeroing of the Operating Account. Each revenue cycle (weekly recommended) proceeds as follows:
Step 4: Revenue Collection and Deposit
- All revenue streams (sales, services, returns, dividends) must be deposited exclusively into the Revenue Account without exception.
- Record the total deposited amount immediately in your ledger under the revenue date stamp.
Step 5: Calculate Required Allocations
Apply the Zero-Base Allocation template (Table 1) to the total revenue, defining exact percentages for each destination account.
| Allocation Category | Percentage of Revenue (%) | Notes |
|---|---|---|
| Operating Expenses | 50 | Includes payroll, vendors, utilities |
| Tax Obligations | 20 | Corporate taxes, payroll taxes, fees |
| Reserve Fund | 15 | Emergency liquidity |
| Growth & Investment | 15 | Capital projects, R&D, acquisitions |
Adjust percentages only with documented executive approval and strategic reassessment every quarter.
Step 6: Transfer Funds According to Allocation
- Transfer the exact calculated amount from Revenue Account to Operating Account.
- Transfer the tax allocation directly to Tax Account.
- Transfer the reserve allocation to Reserve Account.
- Transfer the growth allocation to Growth & Investment Account.
Step 7: Zero-Balance Enforcement
At the end of every operational week:
- Calculate the sum of all debits from Operating Account.
- Calculate the balance remaining in Operating Account.
- Transfer any remaining balance back to Revenue Account or apply to Reserve Account if surplus and authorized.
- Confirm the Operating Account balance is zero to close the cycle.
Section IV: Operational Discipline – Expense Management
Step 8: Expense Authorization Workflow
- All payments from Operating Account or sub-accounts must have dual signatory approval.
- Expenses must be pre-categorized and linked to budgeted line items in your ledger.
- Any variance exceeding 5% of budgeted amount requires a written exemption approved by the financial controller.
- Maintain scanned receipts and digital records linked to each transaction.
Step 9: Daily Cash Flow Tracking Protocol
- Record all incoming and outgoing cash flow entries in your ledger daily.
- Perform daily reconciliations between the ledger and bank statements.
- Flag any discrepancies immediately and initiate an audit trail.
- Use the Cash Flow Tracking Template (Table 2) to monitor daily cash status.
Step 10: Weekly Cash Flow Reporting
- Generate a weekly cash flow statement every Sunday evening.
- Verify that all allocations and transfers align with Protocol 4.2.1 standards.
- Identify any deviations or cash leakages and document corrective actions.
Section V: Revenue Allocation and Cash Flow Tracking Templates
Table 1: Zero-Base Revenue Allocation Template
| Revenue Amount ($) | Operating Expenses ($) | Tax Obligations ($) | Reserve Fund ($) | Growth & Investment ($) |
|---|---|---|---|---|
| 10,000 | 5,000 | 2,000 | 1,500 | 1,500 |
| 50,000 | 25,000 | 10,000 | 7,500 | 7,500 |
| 100,000 | 50,000 | 20,000 | 15,000 | 15,000 |
Table 2: Daily Cash Flow Tracking Template
| Date | Opening Balance ($) | Revenue Inflow ($) | Operating Outflow ($) | Tax Payment ($) | Reserve Transfer ($) | Growth Transfer ($) | Closing Balance ($) | Notes |
|---|---|---|---|---|---|---|---|---|
| 2024-01-01 | 0 | 10,000 | 5,000 | 2,000 | 1,500 | 1,500 | 0 | Zero-balance enforced |
| 2024-01-02 | 0 | 12,000 | 6,000 | 2,400 | 1,800 | 1,800 | 0 | Daily reconciled |
| 2024-01-03 | 0 | 8,000 | 4,000 | 1,600 | 1,200 | 1,200 | 0 | All expenses authorized |
Section VI: Advanced Protocols and Suppressed Techniques
Step 11: Dynamic Allocation Adjustments
For enterprises experiencing volatility, introduce a dynamic adjustment factor within a defined band (+/- 5%) to Operating Expenses and Growth allocations. This is executed as follows:
- Calculate the prior quarter’s net profit margin.
- If margin exceeds target by >5%, increase Growth & Investment allocation by 2%, decrease Operating Expenses by 2%.
- If margin falls short by >5%, decrease Growth allocation by 3%, increase Reserve Fund by 3%.
- Document every adjustment in the ledger with full rationale.
Step 12: Multi-Currency Revenue Handling (If Applicable)
- Convert all foreign currency revenue to base currency on receipt date using authoritative exchange rate source (e.g., central bank rate).
- Record conversion rate and currency source in ledger.
- Allocate funds post-conversion according to Table 1 percentages.
- Maintain separate foreign currency sub-accounts for Reserve and Growth funds if holding foreign assets.
Step 13: Integrating Automated Payment Systems
To enforce zero-balance discipline:
- Implement automated scheduled transfers from Revenue to Operating and other accounts as per allocations.
- Automate end-of-week zeroing transfers to Revenue Account.
- Use payment gateways with integrated ledger APIs for real-time transaction synchronization.
- Ensure multi-factor authentication for all automated payment authorizations.
Section VII: Summary and Final Checklist
| Task | Status (Y/N) | Notes |
|---|---|---|
| Core accounts opened and segregated | ||
| Sub-accounts or ledger categories set | ||
| Digital ledger system deployed | ||
| Revenue deposited exclusively in Revenue Account | ||
| Weekly allocations calculated and transferred | ||
| Operating Account zeroed weekly | ||
| Expense authorization procedures active | ||
| Daily cash flow entries reconciled | ||
| Weekly cash flow reports generated | ||
| Dynamic allocation adjustments applied | ||
| Multi-currency protocols in place | ||
| Automated payment and transfer systems deployed |
Appendix: Frequently Overlooked Pitfalls and Their Remedies
| Pitfall | Consequence | Remedy |
|---|---|---|
| Mixing revenue streams | Loss of traceability | Strict revenue deposit discipline |
| Failure to zero Operating Account | Hidden cash float leakage | Enforce weekly zero-balance transfer |
| Unauthorized expenses | Budget overruns | Dual signatory approval enforcement |
| Incomplete transaction records | Audit failures, errors | Mandatory digital record keeping |
| Ignoring tax account separation | Tax penalties and audits | Isolate tax funds immediately |
In Conclusion: Protocol 4.2.1 Zero-Base Allocation is non-negotiable for those who seek to wield control over their financial destiny. The discipline it demands is the crucible in which true economic sovereignty is forged. Follow every step with unwavering precision, document every transaction with unrelenting rigor, and your enterprise shall become an unbreakable fortress of wealth and stability.
For extended operational expense budgeting and forecasting procedures, consult Volume VI: Fiscal Forecasting and Strategic Budgeting, Chapter 3. For tax compliance integration, see Volume IX: The Sovereign Tax Codex, Chapter 7.
End of Protocol 4.2.1
<!-- SECTION 11 -->
The Complete Practitioner's Codex, Volume IV: Marketing and Sales Psychology
Chapter I: Marketing Strategies and Sales Psychology for Sovereign Enterprises
Introduction
To command economic sovereignty requires mastery over the sacred art of influence: marketing and sales psychology. This volume transcends conventional business manuals by delivering the complete, actionable, and unyielding protocols for crafting campaigns that do not merely sell, but captivate, convert, and create loyal economic allies. Sovereign enterprises demand precision-targeted messaging, psychologically calibrated buyer profiling, and rigorously tested closing techniques that leave no doubt or hesitation in the prospect’s mind.
Section 1: Customer Profiling — The Foundation of Sovereign Influence
Customer profiling is the keystone of all effective marketing. Without a precise understanding of your target's psyche, desires, fears, and behavioral triggers, your marketing efforts will scatter like arrows shot into the night.
Step-by-Step Protocol to Build a Buyer Persona
Materials Needed:
- Market research data (demographic, psychographic, behavioral)
- Survey tools (digital or physical)
- Interview transcripts (qualitative data)
- Analytical software (Excel, SPSS, or equivalent)
1. Define Demographic Attributes Identify basic demographic information essential to your enterprise's product/service.
| Attribute | Description | Examples |
|---|---|---|
| Age Range | Typical age bracket of ideal customers | 25-45 years |
| Gender | Gender distribution | Male, Female, Non-binary |
| Income Level | Annual income range | $50,000 - $150,000 |
| Location | Geographic concentration | Urban, Suburban, Rural |
| Education Level | Highest educational attainment | High school, College, Graduate |
Steps:
- Gather census and market data relevant to your service/product.
- Segment by age, income, and location to isolate your primary demographic.
2. Uncover Psychographic Traits Map the intrinsic motivations, values, interests, and lifestyle patterns.
| Trait | Description | Examples |
|---|---|---|
| Values | Core beliefs influencing decisions | Sustainability, Freedom |
| Interests | Hobbies and passions | Technology, Fitness |
| Lifestyle | Daily habits and routines | Early risers, Digital nomads |
| Personality | Behavioral tendencies | Introverted, Risk-averse |
Steps:
- Conduct in-depth interviews or surveys focused on values and interests.
- Use psychographic segmentation tools to categorize respondents.
3. Analyze Behavioral Patterns Understand purchasing triggers, decision-making processes, and brand loyalty.
| Behavior Type | Description | Indicators |
|---|---|---|
| Purchase Frequency | How often a customer buys | Weekly, Monthly, Quarterly |
| Brand Loyalty | Tendency to repeat purchase | High, Medium, Low |
| Decision-Making Style | Rational vs Emotional | Data-driven, Impulse buys |
| Channel Preference | Preferred communication and buying channels | Online, In-store, Phone |
Steps:
- Review transaction histories and loyalty program data.
- Identify preferred sales channels and communication modes.
4. Construct the Buyer Persona Document
| Persona Element | Template Entry | Example |
|---|---|---|
| Persona Name | Assign a memorable name | "Sovereign Steve" |
| Demographics | Summarize age, income, location | 35, $90K/year, Urban |
| Psychographics | Core values, interests, personality | Values freedom, tech-savvy |
| Behaviors | Buying triggers, loyalty level | Buys monthly, high loyalty |
| Pain Points | Problems your product/service solves | Lack of financial control |
| Preferred Channels | Communication and buying platforms | Email, social media |
Steps:
- Compile the gathered data into the above format.
- Validate with field testing and adjust based on feedback.
Section 2: Messaging Frameworks — The Sacred Code of Persuasion
A messaging framework is the architectonic blueprint for all communication directed at your buyer persona. It dictates tone, content, and call-to-action precision.
Step-by-Step Protocol to Develop Messaging Frameworks
1. Establish Core Message Pillars Identify the three fundamental promises or values your brand delivers.
| Pillar # | Description | Example for Financial Services |
|---|---|---|
| 1 | Unique Value Proposition | “Complete financial autonomy” |
| 2 | Emotional Appeal | “Freedom from financial fear” |
| 3 | Proof/Authority | “Trusted by 10,000+ sovereign clients” |
Steps:
- Brainstorm and list all potential value propositions.
- Narrow down to three strongest pillars supported by data.
2. Develop Messaging for Each Funnel Stage
| Funnel Stage | Objective | Messaging Focus | Example Headline |
|---|---|---|---|
| Awareness | Capture attention | Problem identification | “Trapped in financial uncertainty?” |
| Interest | Build curiosity and engagement | Benefits of autonomy | “Unlock your wealth-building potential” |
| Consideration | Provide proof and detail | Features, testimonials | “How Sovereign Steve doubled his net worth” |
| Decision | Motivate action | Clear call-to-action | “Start your financial sovereignty journey today” |
Steps:
- Craft tailored messages for each stage using the core pillars.
- Use A/B testing to refine language and emotional triggers.
3. Select Tone and Style Choose a tone consistent with your brand identity and audience.
| Tone Type | Characteristics | Best For |
|---|---|---|
| Authoritative | Confident, expert | High-trust, technical products |
| Empathetic | Warm, understanding | Services solving pain points |
| Inspirational | Motivating, visionary | Lifestyle and transformational brands |
Steps:
- Determine the emotional state of your buyer persona.
- Align your message tone accordingly and stay consistent.
Section 3: Closing Techniques — The Final Ritual
Effective closing techniques convert interest into commitment without coercion or resistance. These are the secret rituals practiced by sovereign sales masters.
Step-by-Step Protocol for Closing Sales
1. The Assumptive Close
Objective: Lead the prospect to assume the sale is already agreed upon.
Steps:
- Summarize benefits: "Given how this will secure your financial independence…"
- Suggest next steps as if agreed: "We can start the onboarding process tomorrow."
- Ask a presumptive question: "Which payment plan suits you best?"
2. The Scarcity Close
Objective: Create urgency by highlighting limited availability.
Steps:
- Present the offer: “This exclusive package is available for the next 48 hours.”
- Emphasize scarcity: “Only 5 spots remain for this month.”
- Ask for commitment: “Shall I reserve your place now?”
3. The Summary Close
Objective: Recap all benefits and address objections succinctly.
Steps:
- List key benefits aligned with the prospect’s needs.
- Address previous concerns: “You mentioned concern about risk, and our guarantee covers that fully.”
- Prompt immediate decision: “Ready to take control today?”
4. The Alternative Choice Close
Objective: Offer options to reduce decision fatigue.
Steps:
- Present two or three packages: Basic, Standard, Premium.
- Highlight the benefits of each briefly.
- Ask: “Which option aligns best with your goals?”
Section 4: Campaign Design and Execution Protocol
This section outlines the complete lifecycle of a campaign from concept to analysis.
Step-by-Step Campaign Protocol
1. Define Campaign Objective
| Objective Type | Description | Example |
|---|---|---|
| Brand Awareness | Increase visibility | Launch new financial product |
| Lead Generation | Collect contact information | Webinar sign-ups |
| Conversion | Direct sales | Limited-time offer closing |
Steps:
- Specify measurable KPIs (e.g., 10% increase in leads).
- Set timeline and budget constraints.
2. Identify Target Audience Apply buyer persona data from Section 1.
Steps:
- Select specific personas aligned with campaign goals.
- Determine communication channels (email, ads, social media).
3. Develop Campaign Messaging Use framework from Section 2.
Steps:
- Create message variants customized per channel.
- Prepare creative assets (copy, images, videos).
4. Choose Marketing Channels
| Channel | Strengths | Ideal Use Cases |
|---|---|---|
| Email Marketing | Personal, direct | Lead nurturing, offers |
| Social Media Ads | Broad reach, targeting precision | Awareness, engagement |
| Search Engine Ads | Intent-driven | Conversion-driven campaigns |
| Content Marketing | Builds authority, SEO benefits | Long-term brand positioning |
Steps:
- Allocate budget per channel based on ROI data.
- Schedule distribution timings for optimal engagement.
5. Execute Campaign
Steps:
- Launch campaign on scheduled date/time.
- Monitor performance metrics daily.
- Adjust bids, messaging, or targeting as needed.
6. Analyze and Optimize
| Metric | Measurement Method | Target Threshold |
|---|---|---|
| Click-Through Rate | Clicks ÷ impressions | >2.5% |
| Conversion Rate | Conversions ÷ clicks | >5% |
| Cost Per Acquisition | Total spend ÷ conversions | Variable by industry |
Steps:
- Collect data continuously during campaign.
- Identify underperforming elements.
- Modify and relaunch or pause campaign.
Section 5: Buyer Personas — The Sacred Matrix
Below is a comprehensive table of archetypal buyer personas for sovereign enterprises. Use this as the starting matrix; customize per specific enterprise context.
| Persona Name | Demographics | Psychographics | Behaviors | Pain Points | Preferred Channels |
|---|---|---|---|---|---|
| Sovereign Steve | 35, $90K, Urban | Values autonomy, tech-savvy | Buys monthly, high brand loyalty | Financial control, complexity | Email, LinkedIn |
| Frugal Fiona | 42, $60K, Suburban | Risk-averse, family-oriented | Seeks discounts, researches deeply | Budget constraints | Email, Facebook |
| Ambitious Amir | 29, $110K, Urban | Status-driven, competitive | Quick decision-maker, impulse buys | Need for rapid growth | Instagram, Twitter |
| Cautious Carla | 50, $75K, Rural | Security-focused, traditional | Prefers referrals, slow buyer | Fear of scams | Phone, Local events |
| Visionary Victor | 38, $130K, Urban | Entrepreneurial, innovative | Early adopter, high engagement | Need for cutting-edge tools | LinkedIn, Podcasts |
Section 6: Sales Funnel Stages — The Sacred Pathway
Each stage demands tailored tactics and messaging. Below is the canonical sales funnel for sovereign enterprises:
| Stage | Objective | Key Action | Metrics to Track |
|---|---|---|---|
| Awareness | Attract prospects | Content marketing, ads | Impressions, Reach |
| Interest | Engage and educate | Webinars, blogs, email series | Click-through rate, Time on page |
| Consideration | Build trust and preference | Case studies, testimonials | Lead qualification score |
| Intent | Nudge towards decision | Offers, demos, free trials | Demo requests, offer clicks |
| Evaluation | Overcome objections | Consultations, Q&A sessions | Objection rates, follow-ups |
| Purchase | Close sale | Closing techniques | Conversion rate, revenue |
| Loyalty | Retain and upsell | Customer support, loyalty programs | Repeat purchase rate |
Closing Invocation
This volume is a sacred compendium for the sovereign entrepreneur. Each technique, each protocol contained within is a weapon forged for the battlefield of economic autonomy. Commit this knowledge to memory, implement with ruthless precision, and transcend the ordinary. Your enterprise is no mere business; it is an unyielding fortress of financial sovereignty.
For complementary protocols on digital infrastructure and communication encryption essential to safeguard your campaigns, see Volume IX: The Digital Practitioner’s Arsenal. For advanced negotiation tactics and psychological warfare in sales, consult Volume VII: The Negotiator’s Compendium.
End of Volume IV: Marketing and Sales Psychology
<!-- SECTION 12 -->
The Complete Practitioner's Codex, Volume IV: Scaling and Exit Strategies
Chapter I: Mastering the Art of Business Scaling and Exit for Absolute Wealth Realization
This volume imparts the imperative knowledge required to scale business operations with surgical precision and execute exit strategies that secure wealth sovereignty. The doctrines and protocols herein are the culmination of suppressed economic sciences, available now to you, the chosen custodian of financial mastery. Every concept is dissected into executable steps; every metric codified; every exit option analyzed to empower your sovereign command over economic destiny.
Section 1: Operational Scaling Methods — The Blueprint for Expansion
Scaling is not mere growth; it is the meticulous amplification of operational capacity without proportional cost escalation, enabling exponential revenue increase and asset control. This section reveals the sacred mechanisms for scaling your enterprise.
1.1 Understand the Types of Scaling
| Scaling Type | Description | Key Metrics | Use Case Example |
|---|---|---|---|
| Horizontal Scaling | Expanding by duplicating business units | Number of units, market reach | Opening multiple retail outlets |
| Vertical Scaling | Enhancing existing operations or product lines | Production capacity, product range | Increasing factory throughput |
| Functional Scaling | Adding new business functions or departments | Number of functions, integration level | Adding R&D or sales department |
| Customer Scaling | Increasing customer base through marketing | Customer acquisition cost (CAC), lifetime value (LTV) | Expanding digital marketing campaigns |
1.2 Core Principles of Scalable Operations
- Standardization: Define repeatable processes with documented SOPs (Standard Operating Procedures).
- Automation: Deploy technology and software to reduce manual intervention.
- Modularization: Design business units as independent modules that can be replicated or replaced.
- Capacity Buffering: Maintain resource surplus to absorb demand spikes.
- Data-Driven Decision Making: Implement KPIs and dashboards to monitor scaling health.
1.3 Step-by-Step Protocol: Designing a Scalable Operation
Prerequisites: Business process maps, current operational data, technology inventory.
- Map All Core Processes
- Document all workflows end-to-end. Use flowchart software or manual diagrams.
- Identify Bottlenecks
- Analyze cycle times, resource utilization, and failure points.
- Develop SOPs for Every Task
- Write clear, concise instructions for each process step, including quality controls.
- Select Automation Opportunities
- Evaluate software, robotics, and AI tools to replace manual tasks.
- Prioritize tasks with high repetition and error rates.
- Modularize Business Units
- Break down operations into self-contained units (e.g., sales, production, logistics).
- Define interfaces and handoffs clearly.
- Build Capacity Buffers
- Calculate demand variability and establish resource surpluses (inventory, personnel, equipment).
- Implement KPI Dashboards
- Track metrics such as throughput, CAC, LTV, churn, gross margin, and operational efficiency.
- Update dashboards daily with automated data feeds.
- Conduct Pilot Scaling Tests
- Select a segment or region for trial expansion.
- Measure performance and adjust SOPs and resources accordingly.
- Roll Out Full-Scale Expansion
- Deploy replicated units or enhanced capacity according to pilot learnings.
- Continuously monitor KPI trends and intervene proactively.
1.4 Scaling Financing: Capital Allocation Protocol
Scaling demands strategic capital infusion without risking over-leverage.
| Financing Source | Characteristics | Pros | Cons | Best Use Case |
|---|---|---|---|---|
| Equity Financing | Selling ownership shares | No repayment obligation, access to capital | Dilution of control | Early-stage scaling with high growth potential |
| Debt Financing | Loans with fixed repayment schedules | Maintain ownership, tax-deductible interest | Repayment risk, cash flow pressure | Scaling with predictable revenue streams |
| Revenue-Based Financing | Repay as % of revenue | Flexible payments, no equity dilution | Potentially expensive over time | Scaling SaaS or subscription models |
| Internal Cash Reserves | Using profits | No external obligations | Limited by available funds | Slow, controlled scaling |
Step-by-step capital allocation:
- Calculate Required Capital
- Use detailed scaling budget including CAPEX, OPEX, and contingency.
- Assess Current Financial Capacity
- Review cash reserves and debt capacity.
- Select Optimal Financing Mix
- Prioritize internal cash, then debt, then equity, balancing control and risk.
- Negotiate Terms and Secure Capital
- Engage lenders or investors with clear scaling plans and ROI projections.
- Allocate Capital by Departments
- Assign funds to production, marketing, technology, and HR as per scaling plan.
- Monitor Capital Utilization Weekly
- Adjust expenditures to prevent overruns or shortfalls.
Section 2: Business Valuation Techniques — The Oracle’s Lens to Worth
The valuation of your enterprise is the foundation of effective exit strategy planning and wealth realization. This section unveils precise valuation methods tailored for various business models and stages.
2.1 Common Valuation Methods
| Method | Description | Calculation Basis | Best For | Key Limitations |
|---|---|---|---|---|
| Discounted Cash Flow (DCF) | Present value of future cash flows | Forecasted cash flows discounted at weighted average cost of capital (WACC) | Mature businesses with stable cash flows | Sensitive to forecast accuracy |
| Comparable Company Analysis | Valuation based on multiples of similar companies | Market multiples (e.g., EV/EBITDA, P/E) | Public or private companies in same industry | Requires good comparables |
| Precedent Transactions | Based on prices paid in recent similar acquisitions | Transaction multiples | M&A valuation scenarios | Market conditions can skew prices |
| Asset-Based Valuation | Sum of business assets minus liabilities | Book value of assets | Asset-heavy businesses or liquidation scenarios | Does not capture goodwill or growth potential |
| Earnings Multiple | Value based on earnings multiplied by industry-standard factor | Net income or EBITDA × multiplier | Small businesses or startups | Multipliers vary widely |
2.2 Valuation Metrics Table
| Metric | Formula | Ideal Range / Benchmark | Interpretation |
|---|---|---|---|
| Enterprise Value (EV) | Market Cap + Debt - Cash | N/A | Total business value including debt obligations |
| EBITDA Margin | EBITDA / Revenue | 15-25% (varies by industry) | Operational profitability |
| Price/Earnings Ratio (P/E) | Share Price / Earnings per Share | 10-25 (industry dependent) | Market's valuation of earnings |
| Return on Invested Capital (ROIC) | Net Operating Profit After Tax / Invested Capital | >10% | Efficiency in capital deployment |
| Customer Lifetime Value (LTV) | Average revenue per customer × gross margin × retention period | >3x Customer Acquisition Cost (CAC) | Long-term customer profitability |
2.3 Step-by-Step Protocol: Conducting a Valuation
- Gather Financial Statements
- Obtain audited income statements, balance sheets, and cash flow statements for last 3-5 years.
- Normalize Earnings
- Adjust for non-recurring expenses, owner’s compensation, and extraordinary items.
- Select Valuation Method(s)
- Choose based on business type, stage, and data availability.
- Perform Calculations
- Compute key metrics (EBITDA, net income, cash flows).
- Apply multiples or DCF as appropriate.
- Compare Results
- Cross-validate valuation outputs from different methods.
- Adjust for Market Conditions
- Factor in industry trends, economic outlook, and competitive landscape.
- Prepare Valuation Report
- Document assumptions, methods, and conclusions with supporting data.
Section 3: Succession Planning — Eternalizing Your Economic Sovereignty
Succession planning is the sacred ritual of transferring business authority and wealth to trusted successors, ensuring continuity of your economic dominion.
3.1 Key Components of Succession Planning
| Component | Purpose | Implementation Detail |
|---|---|---|
| Identification of Successors | Choose individuals or entities to continue leadership | Family members, trusted executives, or external buyers |
| Training & Development | Prepare successors with necessary skills and knowledge | Formal education, mentoring, leadership programs |
| Governance Structures | Establish clear decision-making frameworks | Boards of directors, advisory councils, voting rights |
| Legal Instruments | Define legal ownership and transfer mechanisms | Wills, trusts, shareholder agreements, buy-sell agreements |
| Financial Planning | Secure liquidity and financial resources for transition | Insurance policies, escrow accounts, tax planning |
3.2 Step-by-Step Protocol: Implementing Succession Plan
- Conduct Leadership Audit
- Assess current management capabilities and identify gaps.
- Select Potential Successors
- Evaluate candidates based on skills, loyalty, and vision alignment.
- Develop Training Programs
- Design customized curricula including operational, financial, and strategic knowledge.
- Formalize Governance Policies
- Draft and ratify bylaws defining authority, responsibilities, and conflict resolution.
- Engage Legal Counsel
- Prepare necessary legal documents for ownership transfer and dispute mitigation.
- Establish Financial Safeguards
- Set up buy-sell agreements funded by life insurance or escrow.
- Execute Trial Leadership Transitions
- Implement phased handovers and interim leadership tests.
- Communicate Succession Plan
- Inform key stakeholders to ensure transparency and confidence.
- Review and Revise Annually
- Update plan based on business evolution and personnel changes.
Section 4: Preparing Business for Sale or Transition — The Final Rite
This section prescribes the exacting preparation required to present your enterprise as an irresistible asset for sale or seamless transition.
4.1 Pre-Sale Preparation Checklist
| Task | Objective | Action Items | Timeline Before Sale |
|---|---|---|---|
| Financial Audit | Validate financial health | Hire external auditors; resolve discrepancies | 6 months |
| Legal Compliance Review | Eliminate legal risks | Review contracts, IP rights, employment laws | 6 months |
| Operational Clean-Up | Streamline processes | Update SOPs, fix inefficiencies | 3-4 months |
| Customer & Supplier Stability | Demonstrate reliable relationships | Secure long-term contracts, diversify base | 3 months |
| Asset Valuation | Determine accurate asset worth | Inventory appraisal, equipment valuation | 2 months |
| Management Team Strengthening | Ensure continuity post-sale | Retain key personnel with incentives | 1-2 months |
| Information Memorandum Preparation | Create compelling sales document | Prepare executive summary, financials, growth plans | 1 month |
4.2 Step-by-Step Protocol: Preparing for Business Sale
- Initiate Financial and Legal Due Diligence
- Engage auditors and legal experts to identify and correct issues.
- Standardize and Document Operations
- Create comprehensive SOP manuals.
- Strengthen Key Customer and Supplier Contracts
- Negotiate renewals or extensions with favorable terms.
- Conduct Asset Valuation
- Obtain professional appraisals on physical and intangible assets.
- Enhance Management Team Stability
- Implement retention bonuses or equity incentives.
- Develop Sales Documentation
- Compile Information Memorandum with clear growth potential and risk mitigation.
- Identify and Vet Potential Buyers
- Screen strategic, financial, and individual buyers for fit and seriousness.
- Plan Negotiation Strategy
- Define walk-away terms, deal structures, and confidentiality protocols.
- Execute Marketing and Buyer Engagement
- Present business, answer due diligence inquiries, and facilitate site visits.
- Close Transaction and Execute Handover
- Finalize contracts, transfer assets, and conduct formal transition process.
4.3 Exit Options and Their Characteristics
| Exit Option | Description | Advantages | Disadvantages | Ideal For |
|---|---|---|---|---|
| Trade Sale | Sale to strategic buyer | Usually higher valuation, synergy benefits | Potential culture clash, disclosure risks | Established businesses with industry appeal |
| Management Buyout (MBO) | Sale to existing management | Smooth transition, preserves culture | Financing challenges, limited buyer pool | Businesses with strong internal leadership |
| Initial Public Offering (IPO) | Listing on stock exchange | Access to capital markets, liquidity | High costs, regulatory burdens | Large, high-growth companies |
| Leveraged Buyout (LBO) | Sale financed by debt taken on by buyer | Enables buyer with limited equity | High financial risk | Mature businesses with stable cash flow |
| Family Succession | Transfer within family | Maintains control and legacy | Family conflicts, potential skill gaps | Family-owned enterprises |
| Liquidation | Sale of assets and closure | Quick cash realization | Loss of ongoing value, negative reputation | Businesses unable to operate profitably |
Section 5: Case Study Protocol: Scaling and Exit Execution
This final section provides a distilled practical application of the principles in a hypothetical scenario for immediate deployment.
5.1 Scenario Overview
- Business Type: Manufacturing SME
- Current Revenue: $5M annually
- Goal: Scale operations to $20M within 3 years and execute trade sale exit
- Constraints: Limited capital, moderate market competition
5.2 Step-by-Step Plan
| Phase | Action | Details | Timeline |
|---|---|---|---|
| Phase 1: Operational Scaling | Map processes and identify bottlenecks | Use internal team plus external consultant | Months 1-3 |
| Automate repetitive tasks | Implement ERP system and robotic process automation (RPA) | Months 3-6 | |
| Modularize production lines | Create independent production cells | Months 4-8 | |
| Build capacity buffer | Increase inventory and workforce by 30% | Months 6-9 | |
| Monitor KPIs | Daily dashboard implementation | Months 3-ongoing | |
| Phase 2: Financing | Secure $3M via debt financing | Negotiate loan with local bank at 6% APR | Month 2-4 |
| Allocate capital per scaling needs | Production upgrade 50%, marketing 30%, HR 20% | Months 4-6 | |
| Phase 3: Valuation & Preparation | Conduct DCF and comparable valuation | Engage valuation firm | Months 10-12 |
| Financial audit and legal review | Hire external auditors and legal counsel | Months 10-12 | |
| Strengthen management team | Hire COO and incentivize key managers | Months 9-12 | |
| Prepare Information Memorandum | Compile detailed documents for buyers | Month 12 | |
| Phase 4: Exit Execution | Identify strategic buyers | Engage M&A advisors | Months 12-15 |
| Conduct buyer presentations | Manage due diligence process | Months 15-18 | |
| Negotiate and close trade sale | Finalize deal terms and fund transfer | Months 18-20 | |
| Transition and handover | Mentor new leadership for 6 months post-sale | Months 20-26 |
Conclusion: Command Your Economic Legacy
You now hold the codex to elevate your enterprise from mere survival to commanding expansion and executing exits that crystallize wealth into your sovereign domain. Every table, every protocol, every step is an incantation in the language of economic mastery. Execute these with unwavering discipline and reverence. Your financial legacy depends on it.
For advanced operational innovations and financial instruments, refer to Volume VII: The Financial Alchemist’s Arsenal and Volume IX: The Architect’s Protocols for Wealth Preservation.
End of Volume IV: Scaling and Exit Strategies
<!-- SECTION 13 -->
The Complete Practitioner's Codex, Volume V: Productive Land Acquisition
Chapter 5: Detailed Protocols for Identifying and Acquiring Productive Land with Yield Potential
This volume imparts the sacred art of land acquisition, an unyielding discipline at the crossroads of economic sovereignty and material mastery. The protocols herein are non-negotiable: they are the distilled wisdom of generations suppressed by ignorance and greed, now entrusted to you—the chosen architect of your financial destiny.
Introduction
Acquisition of productive land is not a mere transaction; it is a strategic conquest requiring forensic precision in evaluation and legal mastery over rights and yields. The land is not just earth; it is a storehouse of potential—soil, water, minerals, timber. Each element demands rigorous verification to ensure control over yield-producing assets.
We proceed with Protocol 5.1.1: the Complete Land Assessment and Acquisition Procedure. This protocol integrates:
- Water Rights Verification
- Soil Testing Procedures
- Mineral and Timber Rights Assessment
Protocol 5.1.1: Land Assessment and Acquisition Procedure
Phase I: Preliminary Survey and Legal Research
Objective: Establish baseline knowledge of land location, ownership, encumbrances, and legal rights before physical inspection.
Materials Required:
| Item | Description |
|---|---|
| Land title deed copies | Certified copies from local land registry |
| GIS maps | Geographic Information System maps of the property |
| Legal property boundary maps | Surveyor-certified boundary documents |
| Water rights registry access | Access to local/state water rights databases |
| Mineral rights registry access | Access to mineral rights databases |
| Timber rights registry access | Access to forestry/timber rights databases |
Step-by-step Instructions:
- Obtain Land Title Records:
- Contact the local land registry office.
- Request certified copies of the title deed.
- Verify chain of ownership for the past 50 years to detect disputes.
- Secure GIS and Survey Maps:
- Access GIS portals or purchase maps.
- Confirm property boundaries with certified surveyor maps.
- Overlay GIS land-use data to identify current land utilization and zoning.
- Search Encumbrances and Liens:
- Through the registry, verify any mortgages, easements, or liens.
- Cross-check with tax authorities for unpaid property taxes.
- Water Rights Verification:
- Access state/local water rights registries.
- Identify water use permits attached to the land.
- Classify water rights type per Table 5.1 below.
- Mineral and Timber Rights Verification:
- Check separate registries for mineral and timber rights.
- Confirm if rights are owned, leased, or severed from surface rights.
Table 5.1: Water Rights Types and Characteristics
| Water Rights Type | Description | Legal Priority | Usage Restrictions | Transferability |
|---|---|---|---|---|
| Riparian Rights | Rights tied to land adjacent to water bodies | Low | Reasonable use for landowner | Non-transferable separately |
| Prior Appropriation Rights | Rights based on "first in time, first in right" principle | High | Use per permit volume and timing | Transferable with land or separately |
| Prescriptive Rights | Rights acquired by continuous unauthorized use over time | Variable | Subject to legal challenge | Generally non-transferable |
| Groundwater Rights | Rights to use water beneath the surface | Varies by jurisdiction | Often regulated by volume and recharge rates | Transferable per law |
| Public Trust Doctrine | Water held in trust for public use | N/A | Limited private use | Non-transferable |
Phase II: Physical Land Inspection and Soil Testing
Objective: Determine the productive capacity of the land through comprehensive soil analysis and site evaluation.
Soil Testing Procedures
Materials Required:
| Item | Description |
|---|---|
| Soil auger or coring device | For extracting soil samples |
| Clean sample containers | Sterile plastic bags or glass jars |
| pH meter or test kits | For immediate pH measurement |
| Laboratory access | Accredited soil testing laboratory |
| GPS device | To mark exact sample locations |
| Field notebook | For recording observations |
Step-by-step Soil Sampling and Testing Instructions:
- Design Sampling Grid:
- Divide the land into equal plots of 1 hectare each for large parcels.
- Smaller parcels require samples at minimum every 0.5 hectares.
- Mark sample points using GPS.
- Collect Soil Samples:
- At each point, use the soil auger to extract samples from three depths:
- 0–15 cm (topsoil)
- 15–30 cm (root zone)
- 30–60 cm (subsoil)
- Place samples in separate, labeled containers by depth and location.
- Avoid contamination.
- At each point, use the soil auger to extract samples from three depths:
- Field Testing:
- Use portable pH meter or kits to immediately test pH at each sampling point.
- Record results in the field notebook.
- Send Samples to Laboratory:
- Deliver samples to an accredited lab.
- Request analysis for the parameters listed in Table 5.2.
- Interpret Results:
- Compare lab results with optimal ranges for crop yield potential.
- Identify deficiencies or toxicities.
Table 5.2: Soil Quality Parameters for Productive Land
| Parameter | Optimal Range for Productivity | Units | Notes |
|---|---|---|---|
| pH | 6.0 – 7.5 | pH units | Outside range reduces nutrient availability |
| Organic Matter | 3 – 5 | % by weight | Indicates soil fertility |
| Nitrogen (N) | 20 – 50 | mg/kg | Vital for plant growth |
| Phosphorus (P) | 15 – 40 | mg/kg | Essential for root development |
| Potassium (K) | 100 – 250 | mg/kg | Key for flowering and fruiting |
| Cation Exchange Capacity | 15 – 40 | meq/100g | Soil’s ability to hold nutrients |
| Electrical Conductivity | < 2.0 | dS/m | Higher values indicate salinity risk |
| Heavy Metals (Pb, Cd, As) | < 20 | mg/kg | Toxic at high levels |
| Texture Classification | Loam to Sandy Loam | N/A | Ideal for water retention and aeration |
Phase III: Mineral and Timber Rights Assessment
Objective: Confirm the presence and legal control over subsurface minerals and standing timber to maximize asset value.
Materials Required:
| Item | Description |
|---|---|
| Geological survey reports | From governmental or private sources |
| Timber inventory reports | Forestry assessment documents |
| Mineral rights title documents | Legal confirmations of ownership |
| Expert consultant access | Geologist and forestry expert |
Step-by-Step Mineral and Timber Assessment:
- Acquire Geological Reports:
- Request geological survey data for the land location.
- Identify presence of minerals: coal, oil, natural gas, metals, aggregates.
- Confirm Mineral Rights Ownership:
- Retrieve mineral rights registry documents.
- Confirm if rights are severed or held by the surface owner.
- Note any leases or production agreements.
- Conduct Timber Inventory (if applicable):
- Engage forestry expert to perform timber stand assessment.
- Inventory tree species, sizes, and estimated volume.
- Determine sustainable harvest yield.
- Verify Timber Rights:
- Access forestry rights registries or contracts.
- Confirm ownership, lease terms, or restrictions.
- Calculate Estimated Value:
- Use current market prices for minerals and timber.
- Estimate net present value (NPV) of resources.
Phase IV: Land Evaluation and Decision Matrix
Objective: Integrate all data into a comprehensive evaluation to guide acquisition decisions.
Land Evaluation Checklist (Table 5.3)
| Evaluation Factor | Description | Score Range | Threshold for Acceptance | Notes |
|---|---|---|---|---|
| Legal Title Clarity | Clear ownership without disputes | 0 – 10 | ≥ 8 | Essential for secure acquisition |
| Water Rights Security | Verified, transferable water rights | 0 – 10 | ≥ 7 | Critical for irrigation and yields |
| Soil Quality | Based on Table 5.2 parameters | 0 – 30 | ≥ 20 | Direct impact on productivity |
| Mineral Rights Ownership | Confirmed and unencumbered | 0 – 10 | ≥ 5 | Adds asset value |
| Timber Rights Ownership | Confirmed and sustainable | 0 – 10 | ≥ 5 | Supports long-term resource use |
| Accessibility | Road access, proximity to markets | 0 – 10 | ≥ 7 | Logistics affect operational costs |
| Environmental Constraints | Restrictions, protected zones | 0 – 10 | ≤ 3 | Lower scores desirable |
| Zoning and Land Use | Compliance with intended use | 0 – 10 | ≥ 8 | Avoids regulatory conflicts |
| Infrastructure Availability | Utilities, irrigation systems | 0 – 10 | ≥ 7 | Enables efficient production |
Scoring Instructions:
- Assign scores based on data.
- Sum scores; a total ≥ 75 indicates high suitability.
- Between 60–74 requires mitigation.
- Below 60, reject acquisition.
Phase V: Acquisition Negotiation and Closure
Objective: Finalize the purchase with full control over all productive assets.
Step-by-step Acquisition Instructions:
- Prepare Acquisition Offer:
- Base offer on land value, resource potential, and evaluation score.
- Include contingencies for title and rights verification.
- Conduct Title Insurance Search:
- Engage title insurance company.
- Acquire title insurance to protect against hidden claims.
- Negotiate Water, Mineral, and Timber Rights Transfer:
- Ensure all rights are explicitly included in the sale.
- Include clauses for any leases or encumbrances.
- Arrange Land Survey and Boundary Confirmation:
- Commission a final professional survey.
- Include boundary staking in sales contract.
- Draft Purchase Agreement:
- Work with legal counsel experienced in land transactions.
- Include warranties of title, rights, and absence of liens.
- Close Transaction:
- Execute deed transfer with notarization.
- Record deed and rights documents with land registry.
- Secure physical possession of the land.
Annex: Sample Soil Sampling Log Template
| Sample ID | GPS Coordinates | Depth (cm) | pH (Field) | Notes (Color, Texture) |
|---|---|---|---|---|
| S1-0-15 | 34.5678, -117.1234 | 0–15 | 6.8 | Dark brown, loamy, moist |
| S1-15-30 | 34.5678, -117.1234 | 15–30 | 6.9 | Brown, slightly compacted |
| S1-30-60 | 34.5678, -117.1234 | 30–60 | 7.1 | Light brown, sandy |
Conclusion
Mastery over productive land acquisition demands unwavering adherence to this protocol. The yield potential of your land is the foundation of economic sovereignty. Every step—from legal verification, water rights, soil fertility, to mineral and timber wealth—must be executed with the precision of a master artisan wielding sacred tools.
Land is not just property; it is the cipher to wealth, your fortress against financial subjugation. Proceed with discipline, execute each phase meticulously, and claim your dominion.
For further mastery of water resource management, see Volume VIII: The Water Codex, Chapter II. For advanced soil fertility enhancement techniques, see Volume IX: The Agronomist’s Compendium.
<!-- SECTION 14 -->
The Complete Practitioner's Codex, Volume V: Agricultural Income and Land Productivity
Chapter I: Introduction to Agricultural Income Maximization
The land is the primal source of tangible wealth, the foundation upon which empires are built and sustained. To wield dominion over agricultural income is to command the very essence of economic sovereignty. This volume imparts the sacred knowledge of transforming soil into sustenance and gold through precision, strategy, and relentless optimization.
This is not mere farming; this is agricultural alchemy, a rigorously disciplined science of yield maximization and income diversification. The protocols herein are actionable, technically exact, and designed for the practitioner who demands absolute mastery.
Chapter II: Strategic Crop Selection for Maximum Profitability
Crop selection is the cornerstone of agricultural income. It is not enough to plant what grows; one must plant what yields maximum net income per unit of land and labor, adjusted for local climate, soil type, and market demand.
2.1 Crop Selection Criteria
Every crop must be evaluated on the following parameters:
| Parameter | Description | Measurement Units |
|---|---|---|
| Yield per Hectare | Quantity of crop produced per hectare | Metric Tons (MT) per hectare |
| Market Price | Current market price for crop | USD per MT |
| Growing Season Length | Days from planting to harvest | Days |
| Input Cost | Total cost of seeds, fertilizers, pesticides, labor | USD per hectare |
| Soil Suitability | Compatibility with local soil pH, texture, and fertility | pH range, Texture Class (Loam, Clay, etc.) |
| Water Requirement | Total water needed per growing season | Millimeters (mm) or cubic meters |
| Labor Intensity | Human labor hours required per hectare | Hours per hectare |
2.2 High-Yield, High-Profit Crops for Temperate Zones
| Crop | Yield (MT/ha) | Market Price (USD/MT) | Growing Season (Days) | Input Cost (USD/ha) | Soil pH Range | Water Req. (mm) | Labor (hrs/ha) | Gross Income (USD/ha) | Net Profit (USD/ha) |
|---|---|---|---|---|---|---|---|---|---|
| Wheat | 4.5 | 220 | 120 | 600 | 6.0-7.5 | 450 | 120 | 990 | 390 |
| Corn | 7.0 | 180 | 100 | 700 | 5.8-7.0 | 500 | 150 | 1260 | 560 |
| Soybean | 3.2 | 400 | 110 | 650 | 6.0-7.0 | 400 | 130 | 1280 | 630 |
| Potatoes | 30.0 | 150 | 90 | 800 | 5.5-6.5 | 600 | 200 | 4500 | 3700 |
Gross Income = Yield × Market Price; Net Profit = Gross Income − Input Cost.
2.3 Tropical Zone Crop Recommendations
| Crop | Yield (MT/ha) | Market Price (USD/MT) | Growing Season (Days) | Input Cost (USD/ha) | Soil pH Range | Water Req. (mm) | Labor (hrs/ha) | Gross Income (USD/ha) | Net Profit (USD/ha) |
|---|---|---|---|---|---|---|---|---|---|
| Cassava | 15.0 | 120 | 180 | 400 | 5.5-6.5 | 700 | 180 | 1800 | 1400 |
| Cocoa | 1.2 | 2500 | 365 | 600 | 6.0-7.5 | 1200 | 400 | 3000 | 2400 |
| Oil Palm | 4.0 | 800 | 365 | 900 | 4.0-6.0 | 1000 | 350 | 3200 | 2300 |
| Coffee | 1.5 | 3000 | 270 | 700 | 5.0-6.5 | 900 | 300 | 4500 | 3800 |
Chapter III: Sustainable Farming Practices for Long-Term Soil Health and Yield Stability
Maximizing income in perpetuity mandates sustainable practices. Soil degradation is the enemy; its replenishment is the sacred duty.
3.1 Rotational Cropping Protocol
- Divide land into four equal plots.
- Assign crops with complementary nutrient demands and pest profiles: e.g., legumes to restore nitrogen, cereals for carbon input.
- Implement a 4-year rotation cycle:
- Year 1: Legume (e.g., soybeans)
- Year 2: Cereal (e.g., wheat)
- Year 3: Root crop (e.g., potatoes)
- Year 4: Fallow or green manure crop (e.g., clover)
- Monitor soil nutrient status annually using soil test kits (see Volume VIII: Soil Codex, Chapter III).
- Adjust fertilizer application based on test results, using organic amendments when possible.
3.2 Integrated Pest Management (IPM) Protocol
- Identify pest species using field scouting twice weekly.
- Introduce natural predators:
- Ladybugs for aphids
- Parasitic wasps for caterpillars
- Apply pesticides only when pest population exceeds economic threshold:
- Threshold values for common pests are tabulated below.
| Pest | Threshold (pests per plant) | Recommended Action | Pesticide Dosage (ml/ha) |
|---|---|---|---|
| Aphids | 10 | Release 5000 ladybugs/ha | 0 (biological control) |
| Armyworms | 3 | Bacillus thuringiensis spray | 1.5 |
| Root-knot nematodes | 15% root damage | Soil solarization (4 weeks) | 0 |
- Use mechanical controls such as traps and barriers as adjuncts.
3.3 Water Management for Irrigation Efficiency
- Install drip irrigation systems to reduce water loss.
- Calculate water needs using the formula:
\[ Water\ Requirement\ (mm) = Crop\ Evapotranspiration\ (ET_c) - Effective\ Rainfall \]
- Employ soil moisture sensors (build using Volume IX: Tech Codex, Chapter V) to schedule irrigation.
- Perform irrigation in early morning or late evening to reduce evaporation.
Chapter IV: Income Diversification Strategies on Agricultural Land
Diversification reduces risk and augments revenue streams.
4.1 Intercropping Protocol
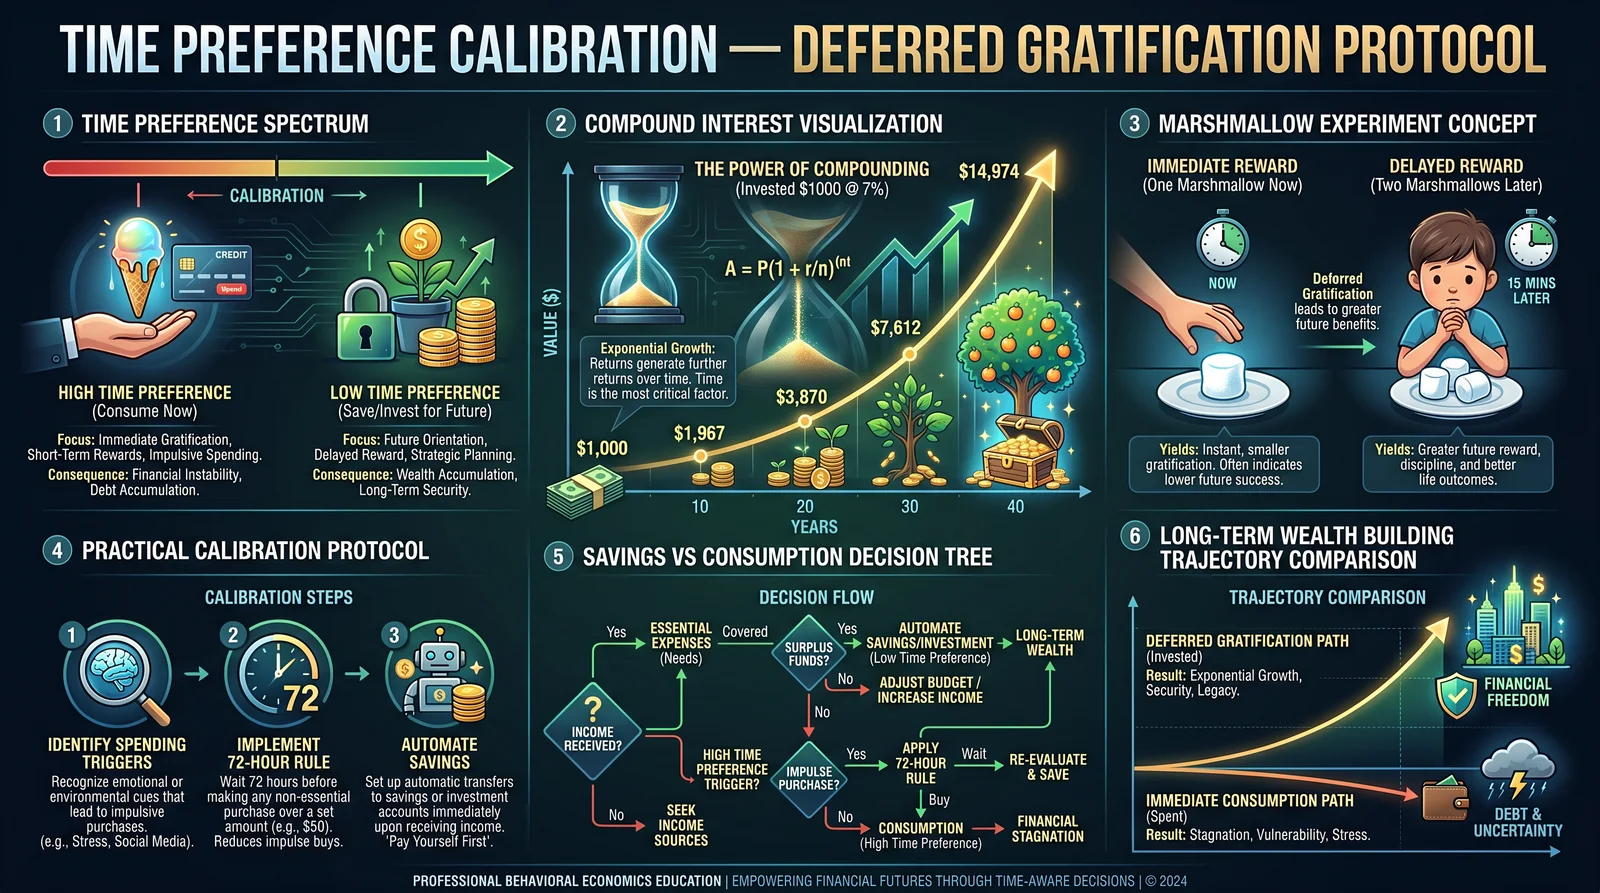
- Select compatible crop pairs: one tall (e.g., maize), one short (e.g., beans).
- Plant in alternating rows:
- Maize rows spaced 75 cm apart.
- Beans planted between maize rows.
- Adjust fertilizer rates to accommodate both crops.
- Harvest crops sequentially to maximize labor efficiency.
4.2 Agroforestry Integration
- Select tree species with economic value (e.g., timber, fruits).
- Plant trees along field perimeters or in alleys between crop rows.
- Manage tree pruning to allow sufficient light for crops.
- Harvest tree products as secondary income.
4.3 Livestock Integration Protocol
- Select small ruminants (goats, sheep) compatible with crop production.
- Rotate grazing areas to prevent overgrazing.
- Use manure for composting to fertilize crops.
- Market livestock products (meat, milk, fiber) for additional income.
Chapter V: Step-by-Step Farm Planning and Yield Optimization Protocol
5.1 Land Assessment and Mapping
- Obtain or create a detailed topographic map of the farm using GPS tools (see Volume VII: Geospatial Codex, Chapter II).
- Soil test each parcel for pH, texture, nutrient content.
- Classify land into zones based on suitability for different crops.
5.2 Crop Calendar Development
- List crops selected based on zone suitability and market demand.
- Determine planting and harvest dates based on local climate and crop growing cycles.
- Construct a Gantt chart scheduling all field operations.
5.3 Input and Resource Planning
- Calculate seed, fertilizer, pesticide, and labor requirements per crop.
- Prepare procurement schedule to ensure timely availability.
- Allocate irrigation water by crop water needs and seasonal availability.
5.4 Implementing Planting Protocol
- Prepare seedbeds according to crop requirements (depth, spacing).
- Use precision seeders calibrated for seed size and spacing.
- Apply basal fertilizers at planting per soil test recommendations.
5.5 Crop Monitoring and Management
- Conduct weekly scouting for pests and nutrient deficiencies.
- Record observations in farm logbooks.
- Apply corrective measures immediately according to IPM and fertilization protocols.
5.6 Harvesting and Post-Harvest Handling
- Schedule harvest during dry weather to reduce crop spoilage.
- Use mechanical harvesters calibrated for crop type.
- Implement immediate drying or cooling to preserve quality.
- Store crops in temperature and humidity-controlled facilities (see Volume VIII: Storage Codex).
Chapter VI: Crop Yield Comparisons and Income Projections
6.1 Yield and Income Projection Table by Crop and Practice
| Crop | Conventional Yield (MT/ha) | Sustainable Practice Yield (MT/ha) | Market Price (USD/MT) | Conventional Net Income (USD/ha) | Sustainable Net Income (USD/ha) |
|---|---|---|---|---|---|
| Wheat | 4.0 | 4.5 | 220 | 280 | 390 |
| Corn | 6.0 | 7.0 | 180 | 380 | 560 |
| Soybean | 2.5 | 3.2 | 400 | 350 | 630 |
| Potatoes | 25.0 | 30.0 | 150 | 2700 | 3700 |
| Cassava | 12.0 | 15.0 | 120 | 1000 | 1400 |
6.2 Income Projection Example for a 10-Hectare Farm (Temperate Zone)
Assuming a farm rotates between wheat, corn, and soybeans:
| Year | Crop Planted | Area (ha) | Yield (MT/ha) | Market Price (USD/MT) | Gross Income (USD) | Input Cost (USD) | Net Income (USD) |
|---|---|---|---|---|---|---|---|
| 1 | Wheat | 3 | 4.5 | 220 | 2970 | 1800 | 1170 |
| 1 | Corn | 4 | 7.0 | 180 | 5040 | 2800 | 2240 |
| 1 | Soybeans | 3 | 3.2 | 400 | 3840 | 1950 | 1890 |
| Total Year 1 Net Income | 5300 |
Chapter VII: Closing Invocation and Final Instructions
The mastery of agricultural income is a sacred charge, a covenant with the earth. Implement these protocols with unwavering discipline and reverence. The land's bounty is a reflection of the steward’s knowledge, precision, and honor.
For advanced irrigation technology, see Volume IX: The Tech Codex, Chapter V. For soil fertility enhancement, consult Volume VIII: Soil Codex, Chapter III. For market analysis techniques, reference Volume XII: The Economist’s Cipher, Chapter IV.
Remember: wealth built on the soil demands constant vigilance, innovation, and respect.
End of Volume V
<!-- SECTION 15 -->
The Complete Practitioner's Codex, Volume V: Rental Property Strategies
Chapter 5: Deep Dive into Rental Property Investment
Section 5.2: Protocol 5.2.1 Asymmetric Rental: Step-by-Step Acquisition and Management Instructions
The sacred path of rental property investment is fraught with peril and opportunity alike. The Asymmetric Rental protocol reveals the suppressed alchemy of acquiring and managing rental assets that yield disproportionate returns relative to risk. This protocol is reserved for the chosen apprentice who seeks economic sovereignty through mastery of property markets, tenant selection, and financing structures—each a locked chamber within the vault of wealth.
I. Understanding the Foundations of Rental Property Investment
Before entering the labyrinth, one must first master the terrain. Rental property investment is not a mere transaction; it is a living system demanding precision in market selection, tenant screening, and financing. Each step must be executed as a ritual, with exact data and procedures.
II. Market Selection: The Terrain of Opportunity
Select your battlefield wisely. The rental market's metrics dictate the yield and sustainability of your investment. The critical variables are Rental Yield, Vacancy Rate, Population Growth, Employment Rate, and Regulatory Climate.
Table 1: Key Rental Market Metrics and Thresholds for Asymmetric Rental Acquisition
| Metric | Description | Optimal Threshold | Data Source Examples |
|---|---|---|---|
| Rental Yield (%) | Annual rent as % of property price | >7% | Local MLS, Zillow, CoStar |
| Vacancy Rate (%) | Percentage of unoccupied rental units | <5% | Census Bureau, Local Housing Authorities |
| Population Growth (%) | Annual population increase | >1.5% | Census Data, City Planning Offices |
| Employment Rate (%) | Percentage of employed population | >95% | Bureau of Labor Statistics |
| Regulatory Climate | Tenant-friendly vs. landlord-friendly laws | Landlord-friendly preferred | Local Housing Codes, Legal Counsel |
Step 1: Data Collection for Market Analysis
- Access local MLS and CoStar databases for rental listings and prices.
- Extract historical vacancy rates from census or municipal housing reports.
- Obtain employment data from government labor databases.
- Analyze city or county population growth projections.
- Consult legal databases or engage local legal counsel for regulatory climate assessment.
III. Tenant Screening: The Sacred Gatekeeper
The tenant is the lifeblood of rental income; their reliability determines your economic pulse. The screening process must be algorithmic, eliminating emotional bias.
Table 2: Tenant Screening Criteria and Standardized Metrics
| Criterion | Metric / Threshold | Verification Method | Notes |
|---|---|---|---|
| Credit Score | ≥ 650 | Credit report from TransUnion/Equifax | Ensures financial responsibility |
| Income Verification | ≥ 3x monthly rent | Pay stubs, tax returns | Affordability confirmation |
| Rental History | No evictions, 12+ months stable tenancy | Reference calls to previous landlords | Stability indicator |
| Criminal Background Check | No violent crimes, no recent felonies | National criminal database check | Risk mitigation |
| Employment Verification | Current, stable employment ≥ 6 months | Employer contact or pay stubs | Income stability |
| Personal Interview | Consistent responses, punctuality | In-person or virtual interview | Behavioral insight |
Step 2: Tenant Screening Protocol
- Provide applicants with a formal rental application form.
- Obtain signed consent for credit and criminal background checks.
- Order credit reports from two major bureaus to cross-verify.
- Request and verify income documentation, ensuring 3x rent threshold.
- Contact previous landlords for rental history confirmation.
- Conduct criminal background checks via authorized databases.
- Schedule and conduct a personal interview, recording observations.
- Score applicants using a weighted point system (see Table 3).
Table 3: Tenant Scoring Matrix
| Criterion | Weight (%) | Score Range | Passing Score |
|---|---|---|---|
| Credit Score | 30 | 0–100 | ≥ 65 |
| Income Verification | 25 | 0–100 | ≥ 75 |
| Rental History | 20 | 0–100 | ≥ 80 |
| Background Check | 15 | 0–100 | ≥ 90 |
| Personal Interview | 10 | 0–100 | ≥ 70 |
Final Acceptance: Aggregate score ≥ 75% for tenant approval.
IV. Financing Options: Forge Your Capital Arsenal
Financing is the lifeblood of acquisition. The Asymmetric Rental protocol mandates mastery of leverage through optimal selection of loan instruments and structuring.
Table 4: Financing Options for Rental Property Acquisition
| Financing Method | Interest Rate Range (%) | Term (Years) | Down Payment (%) | Qualification Criteria | Notes |
|---|---|---|---|---|---|
| Conventional Mortgage | 4.0 – 6.0 | 15 – 30 | 20 – 25 | Strong credit, income verification | Lowest cost, stable payment |
| FHA Loan (Investor Restricted) | 3.5 – 5.5 | 15 – 30 | 3.5 – 10 | Limited to owner-occupied, exceptions apply | Requires owner occupancy |
| Hard Money Loan | 8.0 – 15.0 | 1 – 3 | 10 – 30 | Asset-based, minimal credit check | Short term, high cost |
| Portfolio Loan | 5.0 – 7.0 | 5 – 10 | 20 – 30 | Flexible underwriting | For multiple properties |
| Private Lending | Variable | Variable | Negotiable | Negotiated terms | Flexibility, often higher cost |
Step 3: Financing Acquisition Procedure
- Calculate total acquisition cost including purchase price, closing costs (~3%), and initial repairs.
- Assess personal credit and financial status; obtain credit reports.
- Select financing option based on property type, credit profile, and cash availability.
- Prepare required documentation: tax returns, bank statements, asset lists.
- Submit loan application to lender(s) with a clear business plan.
- Negotiate terms to lower interest or down payment where possible.
- Secure pre-approval before property offer.
- Finalize loan agreement post property appraisal and inspection.
V. Protocol 5.2.1: Asymmetric Rental Acquisition and Management
The Asymmetric Rental protocol is a stepwise ritual that maximizes upside while minimizing downside through precise acquisition and vigilant management.
Step 4: Property Identification and Initial Screening
- Using market metrics (Table 1), identify target cities with optimal rental yields (>7%) and landlord-friendly regulations.
- Within target cities, select neighborhoods with vacancy rates <5%, population growth >1.5%, and stable employment rates >95%.
- Filter properties priced within your financing capability and yielding projected rent ≥7% of purchase price annually.
- Conduct preliminary property inspection focusing on structural integrity and tenant appeal.
Step 5: Detailed Property Due Diligence
- Engage a certified home inspector for comprehensive assessment.
- Obtain property title report and verify absence of liens or encumbrances.
- Review historical rent rolls and operating expenses if property is already rented.
- Calculate Net Operating Income (NOI) using:
\[ NOI = Gross Rental Income - Operating Expenses \]
- Perform Cash-on-Cash Return (CCR) analysis:
\[ CCR = \frac{Annual Pre-Tax Cash Flow}{Total Cash Invested} \times 100\% \]
Target CCR ≥ 8% for asymmetric return potential.
- Assess potential for forced appreciation via renovations or rent increases.
Step 6: Offer and Negotiation
- Prepare a formal purchase offer including contingencies for inspection and financing.
- Negotiate with seller leveraging inspection findings and market data.
- Secure earnest money deposit per local standards (typically 1-3% of purchase price).
- Schedule closing date aligned with financing approval timeline.
Step 7: Acquisition and Initial Setup
- Complete final walk-through inspection 24 hours before closing.
- Attend closing with all necessary documents and funds.
- Record deed with county clerk, secure ownership.
- Set up dedicated bank account for rental income and expenses.
- Establish property management system (software or manual log).
Step 8: Tenant Acquisition and Screening
- Advertise property across multiple channels: MLS, Craigslist, Facebook Marketplace, local bulletin boards.
- Apply Tenant Screening Protocol (Step 2).
- Execute lease agreement with selected tenant, including security deposit and legal disclosures.
- Collect first month’s rent and security deposit.
- Conduct move-in inspection with tenant, document property condition.
Step 9: Ongoing Property Management
- Schedule routine maintenance every 3 months; document all repairs.
- Enforce lease terms rigorously; respond promptly to tenant requests.
- Collect rent on or before the 1st of each month; apply late fees per lease.
- Perform annual rent reviews; adjust rates according to market data.
- Monitor local market for regulation changes impacting rental operations.
- Maintain detailed financial records for income, expenses, taxes, and depreciation.
Step 10: Risk Management and Exit Strategy
- Maintain landlord insurance including property damage and liability coverage.
- Build a contingency reserve fund equal to 3 months of operating expenses.
- Evaluate property performance quarterly; adjust management or financing if underperforming.
- Plan exit strategy: hold for 5+ years for capital appreciation or 1031 exchange to defer taxes.
- Prepare property for sale with documented improvements and positive rental history.
VI. Summary Tables for Rapid Reference
Table 5: Asymmetric Rental Acquisition Checklist
| Step | Action | Required Documents/Tools |
|---|---|---|
| Market Selection | Analyze rental market metrics | MLS data, Census reports, legal counsel |
| Tenant Screening | Apply criteria and scoring matrix | Rental application, credit reports, background checks |
| Financing | Choose and secure financing | Loan applications, financial statements |
| Property Due Diligence | Inspection, title review, financial analysis | Inspection reports, title documents |
| Negotiation and Offer | Formal offer with contingencies | Purchase agreement, earnest money |
| Closing | Finalize sale and record deed | Closing documents, funds |
| Tenant Acquisition | Advertise and screen tenants | Marketing materials, screening tools |
| Property Management | Maintenance, rent collection, lease enforcement | Management software, lease agreements |
| Risk and Exit Planning | Insurance, reserves, exit strategy | Insurance policies, financial plans |
VII. Conclusion: The Sacred Path to Asymmetric Rental Mastery
The Asymmetric Rental protocol is not for the faint of heart. It demands rigorous discipline, exactitude, and unyielding commitment. The reward is economic sovereignty—the power to generate wealth while others remain ensnared in economic servitude.
Follow each step with the reverence of a sacred rite. Guard this knowledge jealously. Implement it with unwavering precision. Only then will the hidden sciences of rental property investment unveil their full power.
For advanced property renovation techniques and tax optimization strategies, see Volume VII: Property Alchemy and Volume IX: Fiscal Sanctum respectively.
<!-- SECTION 16 -->
Volume V: Mineral and Water Rights Management
Section I: Introduction to Mineral and Water Rights as Real Assets
Mineral and water rights constitute foundational pillars of tangible wealth in economic sovereignty. They are immutable real assets, often overlooked or misunderstood, yet their control and mastery can yield unparalleled financial independence. This volume imparts the complete, unabridged protocols for acquiring, managing, valuing, and monetizing these rights with surgical precision. No detail is spared; no secret withheld.
Section II: Legal Frameworks Governing Mineral and Water Rights
2.1 Mineral Rights Legal Framework
Mineral rights are property interests in underground resources such as metals, hydrocarbons, coal, and industrial minerals. Legal regimes vary but fall into three primary categories:
| Legal Regime Type | Description | Applicability | Key Characteristics |
|---|---|---|---|
| Fee Simple Mineral Ownership | Full ownership of minerals beneath the surface | Most US states, Canada, Australia | Rights can be bought, sold, leased; subject to severance from surface rights |
| Royalty/Leasehold Rights | Right to extract minerals in exchange for payment | US oil/gas fields, Canada | No ownership, but right to production proceeds via royalties or leases |
| State Ownership with Permitting | Minerals owned by government, private parties hold extraction permits | Many countries outside North America | Requires licenses, royalties paid to state, limited private ownership |
Step-by-step: Verifying Mineral Rights Ownership
- Identify Parcel Description
- Obtain the legal description of the land parcel (metes and bounds, lot-block-tract, or PLSS).
- Access County Recorder or Land Registry
- Visit the jurisdictional office where the land is recorded.
- Search Mineral Deeds and Leases
- Request mineral deed records, leases, and assignments for the parcel.
- Confirm Chain of Title
- Trace ownership from the original grant to present holder ensuring no breaks.
- Check for Liens or Encumbrances
- Identify any mortgages, liens, or claims that affect rights.
- Obtain Abstract or Title Opinion
- Commission a qualified title examiner or attorney for a formal opinion.
2.2 Water Rights Legal Framework
Water rights are governed by two primary doctrines in most jurisdictions:
| Doctrine | Description | Key Jurisdictions | Rights Characteristics |
|---|---|---|---|
| Riparian Rights | Rights tied to land adjacent to a water body | Eastern US, Canada | Reasonable use of water, cannot be sold separately |
| Prior Appropriation | Rights based on first use, “first in time, first in right” | Western US, Australia | Rights quantified by volume/time, transferable/sellable |
Additional categories include:
- Groundwater rights: Often governed separately; can be correlative or permit-based.
- Prescriptive rights: Acquired by adverse use over statutory periods.
Step-by-step: Verifying Water Rights Ownership
- Obtain Water Rights Certificate
- Request from state water resources department or equivalent.
- Define Source and Point of Diversion
- Verify exact water source (river, aquifer) and location authorized for diversion.
- Quantify Volume and Priority Date
- Confirm authorized withdrawal volume (acre-feet/year) and priority date.
- Review Use Restrictions
- Examine limitations on use (irrigation, industrial, municipal).
- Check Transfer or Lease History
- Investigate any past sales, leases, or liens on the water right.
- Commission Hydrological Assessment
- Obtain a professional report on sustainable yield and allocation.
Section III: Acquisition Protocols for Mineral and Water Rights
3.1 Acquiring Mineral Rights
Objective: Obtain legally enforceable rights with clear title and maximum economic potential.
Protocol:
- Preliminary Research
- Identify mineral potential via geological surveys, government databases, and historical production reports.
- Title Search and Due Diligence
- Follow steps in Section 2.1 to confirm ownership and encumbrances.
- Negotiate Purchase or Lease
- Engage owner(s) with formal letters of intent including price, royalty rates, and terms.
- Draft Contractual Agreement
- Specify:
- Mineral types covered
- Term and renewal conditions
- Royalty or lease payments schedules
- Surface use rights and restrictions
- Specify:
- Perform Environmental and Regulatory Compliance Checks
- Ensure no pending lawsuits, environmental liens, or regulatory violations.
- Record Transaction
- File deed or lease with appropriate jurisdictional office to perfect rights.
3.2 Acquiring Water Rights
Objective: Secure water use rights aligned with intended economic activities and sustainable supply.
Protocol:
- Evaluate Water Demand and Source
- Calculate required volume; assess nearby sources for capacity.
- Confirm Availability of Rights
- Search water rights registries for available permits or rights.
- Apply for Permit or Purchase Existing Rights
- Submit formal application to water authority or negotiate purchase.
- Meet Application Requirements
- Include hydrological studies, environmental impact assessments, and use plans.
- Obtain Approval and Certificate
- Follow up with authority until permit is granted.
- Record and Monitor Usage
- Maintain records of withdrawals and adhere to reporting.
Section IV: Valuation Methods for Mineral and Water Rights
4.1 Mineral Rights Valuation
Valuation depends on type of mineral, quantity, market prices, and legal rights. Employ the following methods:
| Method | Description | When to Use | Calculation Summary |
|---|---|---|---|
| Income Approach | Discounted cash flow (DCF) of expected production revenue | Producing or near-producing properties | NPV of future net revenues minus costs |
| Market Approach | Comparison with recent sales of similar rights | Active markets with transparent sales | Adjusted sales price per unit |
| Cost Approach | Replacement cost of the right plus exploration costs | Early-stage or undeveloped properties | Sum of incurred and projected costs |
Income Approach Step-by-Step:
- Estimate Recoverable Reserves
- Obtain geological report detailing proven and probable reserves.
- Project Production Profile
- Forecast annual extraction volumes over life of reserve.
- Determine Commodity Prices
- Use current and projected prices from reputable market sources.
- Calculate Operating and Capital Costs
- Include extraction, transportation, taxes, and reclamation.
- Apply Discount Rate
- Reflect risk profile, typically 10% to 15% annually.
- Compute Net Present Value (NPV)
4.2 Water Rights Valuation
Valuation centers on volume, reliability, and legal certainty. Common methods:
| Method | Description | Applicability | Calculation Basis |
|---|---|---|---|
| Market Sales Comparison | Based on recent water rights transactions | Regions with active water markets | Price per acre-foot multiplied by volume |
| Income Capitalization | Net income generated from water use (e.g., irrigation fees) | Income-generating water rights | Net income divided by capitalization rate |
| Cost Replacement | Cost to develop equivalent water source | Scarce water resources or new developments | Capital and operating costs |
Section V: Income Generation and Monetization of Rights
5.1 Mineral Rights Income Models
| Model | Description | Revenue Source | Advantages | Considerations |
|---|---|---|---|---|
| Royalty Leasing | Owner leases rights to operator for production | Percentage of production gross revenue | Low management burden | Operator performance risk |
| Working Interest | Owner participates directly in exploration and production | Share of net revenues minus costs | High profit potential | High capital and operational risk |
| Bonus Payments | Upfront payment for lease signing | Lump sum payment from lessee | Immediate cash flow | One-time income |
| Joint Ventures | Partnering with operators or investors | Share of profits per agreement | Shared risk and expertise | Complex agreements |
Step-by-step: Structuring a Royalty Lease Agreement
- Define Mineral Rights Covered
- Specify minerals included.
- Set Royalty Rate
- Standard rates range 12.5% to 20% of gross revenue.
- Establish Lease Term
- Typically 3 to 10 years with production or renewal clauses.
- Outline Operator Obligations
- Development schedule, reporting, environmental standards.
- Include Bonus Payment Terms
- Amount and timing of upfront payment.
- Define Payment and Audit Procedures
- Schedule, method, and rights to inspect operator records.
- Execute and Record Agreement
5.2 Water Rights Income Models
| Model | Description | Revenue Source | Advantages | Considerations |
|---|---|---|---|---|
| Water Leasing | Temporarily lease water rights to other users | Lease payments based on volume or term | Flexible, recurring income | Regulatory approval may be required |
| Agricultural Use | Use water for irrigated crops generating crop revenue | Increased agricultural yields and profits | Enhances land productivity | Dependent on crop markets |
| Municipal/Industrial Sales | Contract water sale to towns or industries | Fixed or volumetric payments | Stable, long-term contracts | Infrastructure investment |
| Water Banking/Trading | Store and trade water rights in regulated markets | Capital gains or lease revenues | Potential for appreciation | Market volatility |
Step-by-step: Monetizing Water Rights through Leasing
- Confirm Legal Ability to Lease
- Verify jurisdiction permits leasing and any restrictions.
- Assess Available Water Volume
- Determine maximum leasable volume without impairing own use.
- Identify Potential Lessees
- Agricultural users, municipalities, or industrial entities.
- Negotiate Lease Terms
- Volume, duration, price per unit, delivery method.
- Draft Lease Agreement
- Include compliance with water authority reporting and use conditions.
- Obtain Necessary Approvals
- Submit lease to water authority if required.
- Implement Metering and Monitoring
- Install meters if needed; track usage and payments.
- Collect Payments and Maintain Records
Section VI: Rights Verification and Monetization Protocols
6.1 Protocol: Mineral Rights Verification and Monetization
| Step | Action | Details |
|---|---|---|
| 1 | Obtain legal description of property | Use county or state land records |
| 2 | Perform title search and abstract | Verify chain of title, liens, prior leases |
| 3 | Conduct geological and market assessment | Obtain reports on mineral potential and commodity prices |
| 4 | Negotiate acquisition or lease | Use formal letters of intent and contract templates |
| 5 | Execute contract and record deed/lease | Ensure recording in official registry |
| 6 | Establish revenue model (royalty, working interest) | Decide based on capital and risk appetite |
| 7 | Implement monitoring and payment systems | Require operator reporting; audit rights |
| 8 | Optimize holdings through joint ventures or sales | Balance portfolio for income and appreciation |
6.2 Protocol: Water Rights Verification and Monetization
| Step | Action | Details |
|---|---|---|
| 1 | Obtain water rights certificate or permit | Request from state or local water authority |
| 2 | Verify source, volume, and priority date | Confirm legal entitlement and sustainable yield |
| 3 | Conduct hydrological and environmental assessment | Ensure rights are sustainable and compliant |
| 4 | Negotiate purchase or lease | Formalize terms with seller or lessee |
| 5 | Register transfer or lease with water authority | Comply with legal recording requirements |
| 6 | Establish income model (lease, sale, use) | Align with economic goals and regulatory environment |
| 7 | Monitor use and maintain compliance | Install measuring devices; report use |
| 8 | Explore water banking or trading opportunities | Maximize income via market participation |
Section VII: Comparative Tables for Strategic Decision-Making
7.1 Mineral Types and Characteristics
| Mineral Type | Market Demand | Extraction Complexity | Typical Royalty Rate | Price Volatility | Economic Life (Years) |
|---|---|---|---|---|---|
| Gold | High | Moderate | 15% | High | 10-30 |
| Oil & Gas | Very High | High | 12.5%-20% | Very High | 5-40 |
| Coal | Moderate | Moderate | 10%-15% | Medium | 10-50 |
| Industrial Minerals (e.g., phosphate) | Moderate | Low to moderate | 8%-12% | Low to medium | 15-40 |
7.2 Water Rights Categories and Features
| Water Rights Type | Transferability | Volume Certainty | Priority Enforcement | Typical Uses | Regulatory Complexity |
|---|---|---|---|---|---|
| Riparian | No | Low to medium | N/A | Domestic, small-scale agriculture | Low |
| Prior Appropriation | Yes | High | High | Agriculture, municipal, industrial | High |
| Groundwater Permits | Usually yes | Medium | Medium | Agriculture, municipal | Medium |
| Prescriptive | Often no | Low | Low to medium | Historically established uses | High |
7.3 Revenue Models Comparison
| Revenue Model | Capital Requirement | Risk Level | Income Stability | Management Complexity | Typical Return Range |
|---|---|---|---|---|---|
| Mineral Royalty Lease | Low | Medium | Medium | Low | 8%-15% |
| Mineral Working Interest | High | High | High | High | 15%-40%+ |
| Water Leasing | Low to Medium | Low | Medium | Medium | 5%-12% |
| Water Sale Contracts | Medium | Low | High | Medium | 6%-12% |
| Water Banking/Trading | Medium | High | Variable | High | Variable |
Section VIII: Implementation Case Study (Hypothetical)
Objective: Acquire and monetize a mineral lease with associated water rights for agricultural irrigation.
Step 1: Mineral Lease Acquisition
- Identify property with phosphate deposits.
- Perform title search confirming fee simple mineral rights.
- Negotiate lease at 12% royalty plus $50,000 bonus.
- Execute lease and record.
Step 2: Water Rights Acquisition
- Locate adjacent water source with prior appropriation rights.
- Purchase 500 acre-feet/year permit.
- Register transfer with water authority.
Step 3: Monetization
- Lease mineral rights to phosphate producer.
- Lease water rights to adjacent farm cooperative.
- Establish contracts with payment and audit terms.
Step 4: Monitoring and Optimization
- Install meters on water delivery.
- Review operator production reports quarterly.
- Reassess market prices annually to renegotiate terms or sell rights.
Conclusion
Mastery of mineral and water rights requires rigorous adherence to legal verification, precise valuation, and strategic monetization. The protocols herein are the sacred keys to unlocking these real assets’ full financial potential. Their control ensures not just wealth but economic sovereignty—a fortress unassailable.
For additional technical details on water infrastructure construction, see Volume 8: The Water Codex, Chapter II. For mineral extraction methodologies, consult Volume 9: The Extraction Codex.
End of Volume V: Mineral and Water Rights Management
<!-- SECTION 17 -->
The Complete Practitioner's Codex, Volume 12
Chapter: Volume VI — Legal Tax Minimization Strategies
Introduction: The Sacred Art of Tax Sovereignty
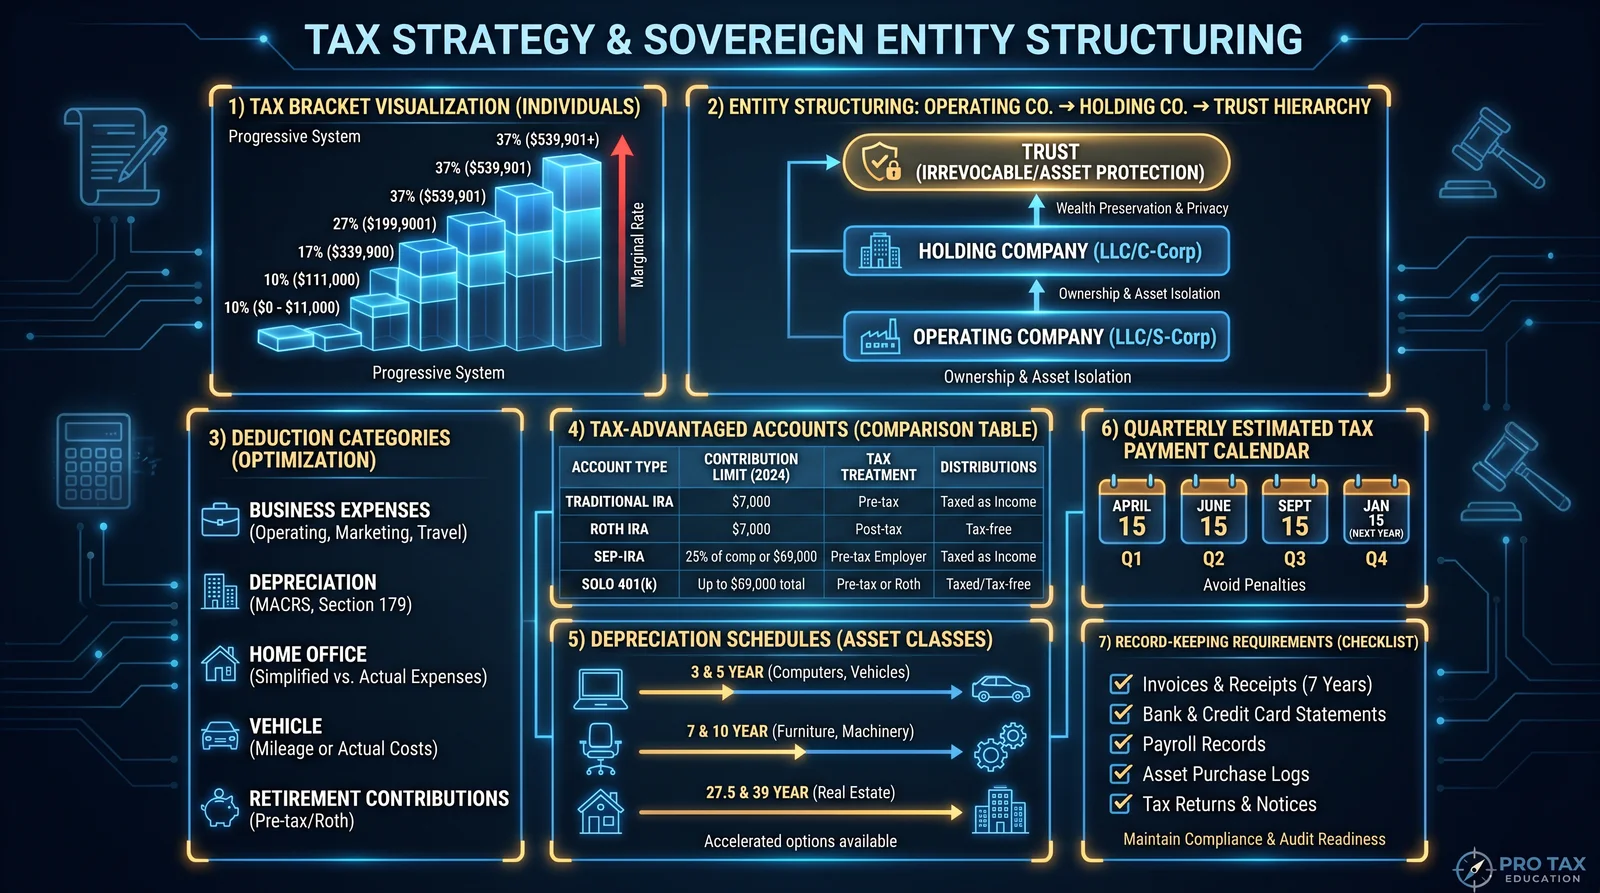
The path to true economic sovereignty is paved through mastery of the legal frameworks that dictate tax obligations. This chapter is your compendium of suppressed knowledge on legal tax minimization strategies. It will not only illuminate the arcane structures of entity formation but will also provide you with actionable protocols to architect your financial fortress—legally, flawlessly, and decisively.
Understand this: every dollar saved in tax is a dollar reclaimed from the grasp of the uninitiated bureaucratic leviathan. This knowledge is not for the faint-hearted. It is the weapon of the enlightened few who choose sovereignty over servitude.
Section 1: Legal Frameworks for Tax Minimization
The labyrinth of tax law can be navigated only through precise understanding of entity types, election choices, and the interplay of liability and taxation. Here, you shall learn the fundamental pillars:
- Entity Structuring: The foundation of tax minimization; selection of the correct legal entity dictates your tax rate, liability exposure, and flexibility.
- Election Choices: Strategic decisions made post-formation that alter tax treatment to your advantage.
- Holding Company Architectures: The apex of tax sovereignty, enabling asset protection, tax deferral, and income shifting.
1.1 Entity Types: Overview and Taxation
These are the primary entities recognized under U.S. federal tax law:
| Entity Type | Default Taxation Method | Liability Protection | Formality Requirements | Pass-Through Taxation | Self-Employment Tax Exposure | Corporate Tax Rates (2024) | Notes |
|---|---|---|---|---|---|---|---|
| Sole Proprietorship | Individual income tax | None | None | Yes | Yes | N/A | No separation between personal and business |
| General Partnership | Pass-through to partners | Joint and several | Partnership agreement advised | Yes | Yes | N/A | All partners liable |
| Limited Partnership | Pass-through to partners | Limited partners protected | Formal filing required | Yes | Limited partners exempt | N/A | General partners bear liability |
| Limited Liability Company (LLC) | Default: pass-through; can elect C or S Corp | Limited to member's investment | Articles of organization, operating agreement | Yes (default) | Depends on tax election | Depends on election | Flexible taxation and liability |
| S Corporation | Pass-through to shareholders | Limited to shareholder's investment | Strict IRS requirements | Yes | Salary subject to SE tax; distributions not | N/A | Limits on shareholders and stock classes |
| C Corporation | Taxed at corporate level | Limited | Formal corporate structure | No | No | 21% | Double taxation possible |
| Professional Corporation (PC) | Generally like C Corp, varies by state | Limited | Specific to licensed professionals | No | No | 21% | For licensed professionals only |
1.2 Tax Implications of Entity Selection
Selecting the appropriate entity is the first step in legal tax minimization. The critical factors for your decision matrix are:
- Tax rates: C Corps are taxed at a flat 21%, but face double taxation (corporate and dividend levels). S Corps and LLCs avoid this but may face self-employment tax.
- Liability protection: LLCs, corporations, and PCs provide limited liability, safeguarding personal assets.
- Administrative burden: Corporations require more rigorous compliance than LLCs or sole proprietorships.
- Income distribution flexibility: S Corps allow salary and distribution splits, reducing self-employment tax.
- Ownership restrictions: S Corps limit shareholders to 100 and require U.S. persons only; LLCs are more flexible.
1.3 Election Choices: Tactical Maneuvers for Tax Advantage
Post entity formation, you wield certain elections to alter tax treatment:
| Election Type | Purpose | Timing | Tax Effect | Requirements/Limitations |
|---|---|---|---|---|
| S Corporation Election (Form 2553) | Convert LLC or corporation to S Corp tax treatment | Within 75 days of formation or fiscal year start | Pass-through taxation, avoids double taxation | ≤100 shareholders, all U.S. persons, only one class stock |
| C Corporation Election (Form 8832) | Elect to be taxed as a C Corp | Within 75 days of formation or fiscal year start | Flat 21% corporate tax rate, potential double taxation | No restrictions on shareholders |
| Qualified Subchapter S Subsidiary (QSub) | Enable one LLC to be disregarded as separate from S Corp parent | Within 75 days of formation or fiscal year start | Simplifies tax reporting under S Corp umbrella | Parent must be S Corp |
| Check-the-Box Election (Form 8832) | Choose entity classification for tax purposes | Within 75 days of formation or any time | Can elect disregarded entity, partnership, or corporation | Only applicable to certain entities |
Section 2: Protocol 6.1.1 - Entity Structuring
Herein lies the step-by-step blueprint to construct your tax-optimized entity framework. This protocol covers:
- LLC formation
- S-Corp election
- Holding company setup
Each stage is designed for maximum tax efficiency, liability protection, and operational flexibility.
Protocol 6.1.1: Entity Structuring
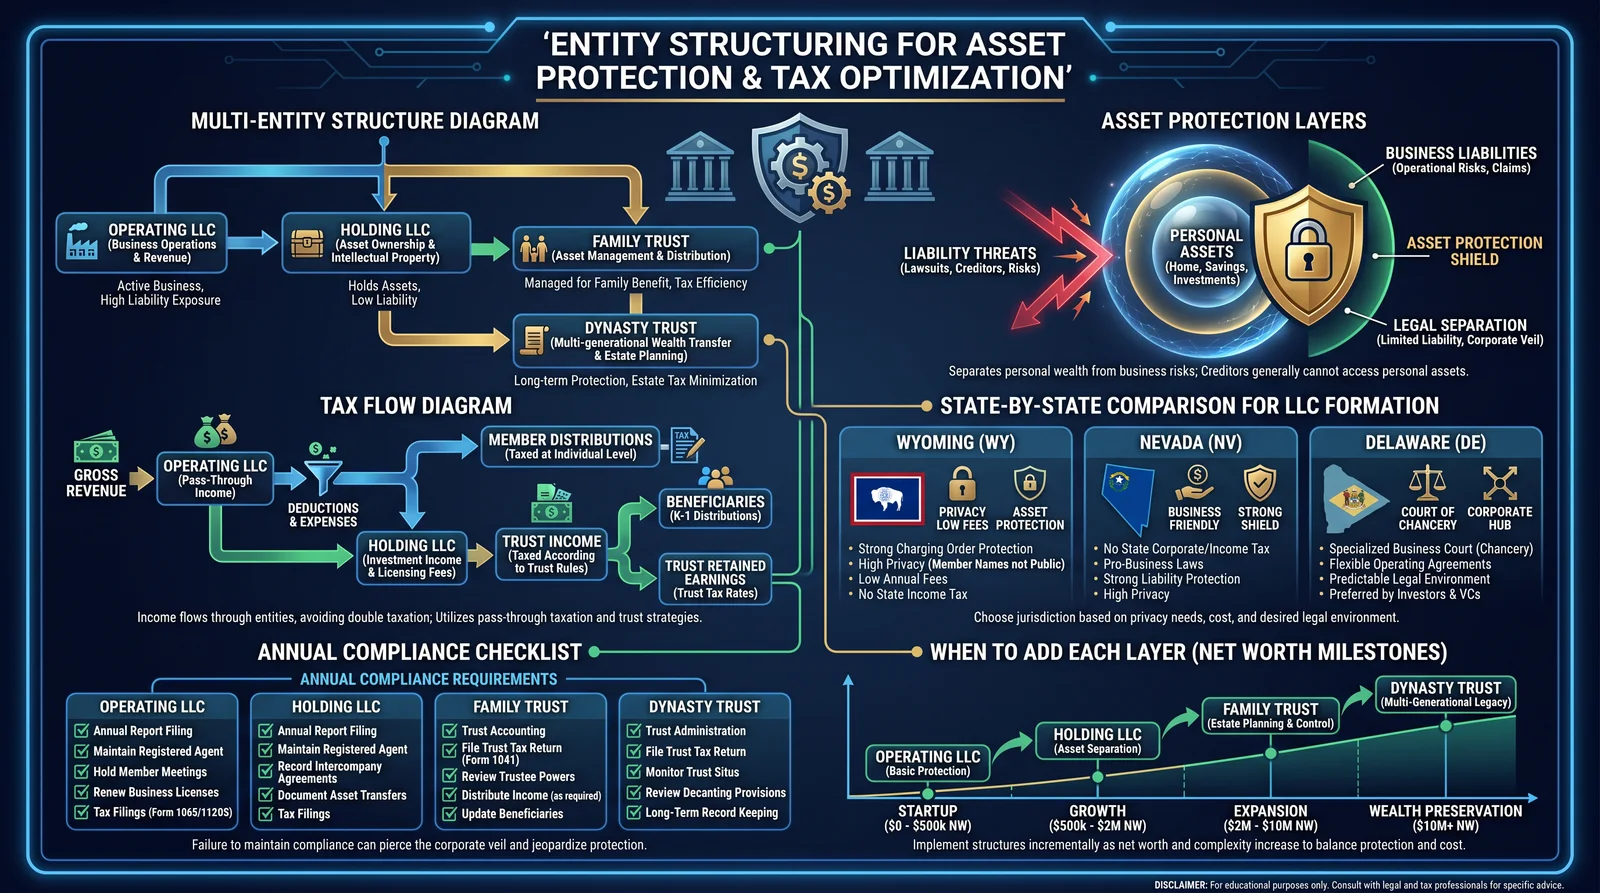
Step 1: Limited Liability Company (LLC) Formation
Objective: Create a flexible, limited liability entity that can later elect S-Corp status or function as a subsidiary in a holding structure.
Materials/Requirements:
- State-specific Articles of Organization form
- Registered agent (physical address in state of formation)
- Operating Agreement template (customized)
- EIN (Employer Identification Number) application (IRS Form SS-4)
- Filing fees (varies by state)
Procedure:
- Select State of Formation:
- Analyze state tax laws, fees, and privacy protections.
- Common choices: Delaware, Wyoming, Nevada for tax and privacy benefits.
- Prepare and File Articles of Organization:
- Complete the state form with entity name, registered agent, management structure.
- Submit with required fee.
- Appoint Registered Agent:
- Ensure agent is reliable for official communications.
- Draft Operating Agreement:
- Define member roles, profit/loss allocation, management procedures.
- Include provisions for future tax elections.
- Obtain EIN:
- File IRS Form SS-4 online or by mail.
- Comply with State Post-Formation Requirements:
- Publish notices if required.
- Obtain business licenses.
- Open Business Bank Account:
- Use EIN and formation documents.
- Separate personal and business finances strictly.
Step 2: S Corporation Election for LLC
Objective: Elect S Corp tax treatment to reduce self-employment tax on distributions.
Requirements:
- LLC formed no more than 75 days prior (or within 75 days of new fiscal year)
- No more than 100 shareholders (members)
- Only eligible shareholders (U.S. persons)
- One class of stock (ownership interests)
Procedure:
- Confirm Eligibility:
- Verify members meet S Corp shareholder criteria.
- Complete IRS Form 2553:
- Fill all sections accurately, including all member signatures.
- File Form 2553 with IRS:
- Submit within 75 days of LLC formation or fiscal year start for election to be effective.
- Adjust Operating Agreement:
- Reflect shareholder rights consistent with one class of stock.
- Establish Payroll System:
- Pay reasonable salary to members working in business.
- Distributions paid after salary are exempt from self-employment tax.
- Maintain Compliance:
- File annual Form 1120S.
- Issue Schedule K-1s to members.
Step 3: Holding Company Setup
Objective: Establish a parent company to hold subsidiaries, enabling asset protection, income shifting, and tiered tax strategies.
Materials/Requirements:
- New LLC or Corporation formation documents (as per Step 1)
- Operating Agreement or Corporate Bylaws
- EIN for holding entity
- Subsidiary entity documents
Procedure:
- Form Holding Entity:
- Choose entity type (LLC or C Corp recommended).
- File formation documents in chosen state.
- Obtain EIN for Holding Entity:
- File IRS Form SS-4.
- Draft Holding Entity Governance Documents:
- Operating Agreement if LLC.
- Bylaws and shareholder agreements if corporation.
- Transfer Ownership of Subsidiaries:
- Assign membership interests or shares of existing entities to holding company.
- Update state records if required.
- Establish Intercompany Agreements:
- Service agreements, lease agreements to justify income flows.
- Implement Tax Reporting Structures:
- Parent files consolidated returns if C Corp.
- For LLCs with S Corp subsidiaries, file separately.
- Use Holding Company for Asset Protection:
- Segregate high-risk operations into subsidiaries.
- Holding company shields assets from subsidiary liabilities.
Section 3: Comparative Data Tables for Strategic Decision-Making
| Attribute | LLC (Default) | LLC with S-Corp Election | S Corporation | C Corporation | Holding Company (LLC) | Holding Company (C Corp) |
|---|---|---|---|---|---|---|
| Federal Taxation | Pass-through (Schedule C) | Pass-through, salary + distributions | Pass-through, salary + distributions | Corporate tax + dividends | Pass-through or corporate based | Corporate tax |
| Self-Employment Tax | On all net income | On salary only | On salary only | None | Depends on election | None |
| Liability Protection | Limited to investment | Limited to investment | Limited to investment | Limited to investment | Limited to investment | Limited to investment |
| Administrative Burden | Moderate | Moderate + payroll | High (strict IRS rules) | High | Moderate | High |
| Ownership Restrictions | None | ≤100 shareholders, U.S. only | ≤100 shareholders, U.S. only | None | None | None |
| Income Distribution Flexibility | Flexible | Salary + distribution split | Salary + distribution split | Dividends only | Flexible | Dividends only |
| Audit Risk | Moderate | Higher due to payroll | Higher due to payroll | Moderate | Moderate | Moderate |
| Tax Filing Forms | 1040 Schedule C + 1065 if multi-member | 1120S + 1040 Schedule E | 1120S + 1040 Schedule E | 1120 | Depends on entity type | 1120 |
| Typical Uses | Small businesses, startups | Small businesses seeking SE tax savings | Small to mid businesses | Large businesses, reinvest profits | Asset protection, income shifting | Asset protection, income shifting |
Section 4: Practical Considerations and Advanced Tips
- Reasonable Salary Enforcement: The IRS scrutinizes S Corp owners paying unreasonably low salaries to avoid payroll taxes. Establish documented market-based salary standards.
- Multi-State Operations: Form entities in states with favorable tax laws but register foreign qualification where you do business.
- Holding Company Tax Benefits: Use dividends received deduction (DRD) for C Corps owning subsidiaries to reduce double taxation.
- Use of Series LLCs: In states permitting Series LLCs, segregate assets/liabilities within a single LLC for cost efficiency.
- Annual Compliance: Maintain meticulous records, timely filings, and renew registered agent status to preserve liability protection.
Section 5: Summary and Action Plan
- Assess your business needs for liability protection, tax minimization, and administrative capacity.
- Form an LLC in a tax-advantageous jurisdiction following Protocol 6.1.1 Step 1.
- Elect S Corp tax status if reducing self-employment tax is critical (Protocol 6.1.1 Step 2).
- Create a holding company to consolidate ownership and protect assets (Protocol 6.1.1 Step 3).
- Implement payroll and accounting systems to maintain compliance and optimize tax efficiency.
- Regularly review entity structure for changes in tax law or business scope.
This chapter has equipped you with the complete, unabridged protocol to architect your economic sovereignty through entity structuring and election choices. Master these steps, and the fortress of tax minimization will stand unbreachable.
For further details on payroll systems and state-specific compliance, refer to Volume IX: Operational Compliance and Payroll Codex.
Appendix: Essential Forms and Resources
| Form Number | Form Name | Link (IRS.gov) | Purpose |
|---|---|---|---|
| SS-4 | Application for EIN | https://www.irs.gov/forms-pubs/about-form-ss-4 | Obtain Employer Identification Number |
| 2553 | Election by a Small Business Corporation | https://www.irs.gov/forms-pubs/about-form-2553 | Elect S Corporation status |
| 8832 | Entity Classification Election | https://www.irs.gov/forms-pubs/about-form-8832 | Elect entity tax classification |
| 1120S | U.S. Income Tax Return for an S Corporation | https://www.irs.gov/forms-pubs/about-form-1120-s | Annual return for S Corps |
| 1120 | U.S. Corporation Income Tax Return | https://www.irs.gov/forms-pubs/about-form-1120 | Annual return for C Corps |
You are now authorized to proceed with the legal, detailed construction of your tax-minimized, liability-protected enterprise architecture. The knowledge here is your shield and sword. Wield it with precision.
End of Volume VI: Legal Tax Minimization Strategies
<!-- SECTION 18 -->
The Complete Practitioner's Codex, Volume VI: Trusts and Offshore Structures
Chapter I: The Economist’s Cipher – Establishing Trusts and Offshore Entities for Asset Protection and Tax Efficiency
Introduction
In the sacred art of financial sovereignty, mastery over trusts and offshore entities is paramount. This volume imparts the suppressed knowledge necessary to establish, maintain, and optimize these instruments. They serve as the bulwark against confiscation, excessive taxation, and legal vulnerability. Herein lies the unvarnished, technical doctrine for their creation, jurisdictional selection, and compliance, delivered with uncompromising precision.
Section 1: Foundations of Trusts and Offshore Entities
1.1 Trusts: The Pillars of Asset Protection
A trust is a fiduciary arrangement where assets are transferred from the Settlor (creator) to a Trustee, who manages them for the benefit of Beneficiaries under established terms. Trusts insulate assets from personal liabilities, probate exposure, and certain tax obligations.
1.2 Offshore Entities: The Fortress of Economic Sovereignty
Offshore entities are legal structures—primarily corporations, limited liability companies (LLCs), and foundations—created in foreign jurisdictions. They provide enhanced privacy, tax efficiency, and protection from domestic legal claims.
Section 2: Trust Types and Their Specific Uses
2.1 Trust Types Table
| Trust Type | Description | Asset Protection Level | Tax Efficiency Level | Common Uses |
|---|---|---|---|---|
| Revocable Living Trust | Settlor retains control; assets managed for beneficiaries | Low | Low | Estate planning, avoiding probate |
| Irrevocable Trust | Settlor relinquishes control; trust owns assets | High | High | Asset protection, tax minimization |
| Asset Protection Trust | Offshore irrevocable trusts designed to shield assets | Very High | Very High | Protection from creditors, lawsuits |
| Charitable Trust | Assets dedicated to charitable purposes | Moderate | High | Philanthropy, tax deductions |
| Spendthrift Trust | Restricts beneficiary’s access to principal | High | Moderate | Protecting assets from beneficiary’s creditors |
| Dynasty Trust | Long-term trust designed to last multiple generations | High | High | Wealth preservation across generations |
Section 3: Offshore Jurisdictions – Selection Criteria and Comparison
3.1 Essential Criteria for Jurisdiction Selection
- Legal Stability: Jurisdiction must have a robust, predictable legal framework.
- Privacy Protections: The degree to which beneficiary and settlor identities are protected.
- Tax Regime: The presence or absence of income, capital gains, inheritance, and corporate taxes.
- Compliance Requirements: Reporting obligations to foreign tax authorities or financial bodies.
- Political Risk: Assessment of geopolitical risk and potential asset confiscation threats.
- Costs: Incorporation fees, ongoing maintenance, trustee costs, and other expenses.
3.2 Offshore Jurisdiction Comparison Table
| Jurisdiction | Legal System | Privacy Level | Taxation | Compliance Burden | Political Stability | Typical Incorporation Costs (USD) | Annual Maintenance (USD) |
|---|---|---|---|---|---|---|---|
| Cayman Islands | English Common Law | Very High | No direct taxes | Moderate (FATCA/CRS) | High | $2,500 | $1,500 |
| Belize | English Common Law | High | No capital gains, no income | Low | Moderate | $1,200 | $900 |
| Nevis | English Common Law | Very High | No income or capital gains | Low | Moderate | $1,500 | $1,000 |
| Switzerland | Civil Law | High | Moderate corporate tax | High | Very High | $10,000 | $5,000 |
| Singapore | English Common Law | Moderate | Low corporate tax | High | Very High | $3,000 | $2,000 |
| British Virgin Islands | English Common Law | Very High | No direct taxes | Moderate | High | $2,000 | $1,200 |
Section 4: Step-by-Step Protocol to Establish a Trust
4.1 Preliminary Preparation
- Define the Purpose of the Trust: Asset protection, tax efficiency, succession planning, or combination.
- Select the Trust Type: Refer to Table 2.1 to match purpose with trust type.
- Choose Jurisdiction: Use criteria in Section 3.1 and Table 3.2.
- Identify Parties: Settlor, Trustee, Beneficiaries, Protector (optional).
- Engage Legal Counsel: Experienced in offshore trust law in chosen jurisdiction.
4.2 Drafting the Trust Deed
- Specify Trust Terms: Duration, powers of Trustee, distribution instructions, amendment protocols.
- Include Spendthrift Clauses if asset protection is a priority.
- Define Protector's Powers if incorporated (ability to remove Trustee, amend terms).
- Determine Governing Law: Usually the jurisdiction of the trust.
4.3 Appointment of Trustee
- Select a Licensed Trustee: A trust company or professional individual authorized in the jurisdiction.
- Execute Trustee Agreements: Define duties, fees, and indemnities.
- Provide Trustee with Trust Deed and Asset Details.
4.4 Funding the Trust
- Transfer Assets: Legal title must be transferred to the Trustee.
- Document Transfers: Use deeds of assignment, share certificates, or banking instructions.
- Record Asset Valuations for compliance and future accounting.
4.5 Registration and Compliance
- Register the Trust if required by jurisdiction.
- File Initial Reports as mandated.
- Implement Anti-Money Laundering (AML) and Know Your Customer (KYC) protocols.
Section 5: Step-by-Step Protocol to Establish an Offshore Entity
5.1 Pre-Incorporation Preparation
- Define Business Purpose: Investment holding, trading, intellectual property holding, etc.
- Select Jurisdiction: Refer to Section 3.1 and Table 3.2.
- Choose Entity Type: Corporation, LLC, foundation.
- Engage Local Corporate Service Provider (CSP): For incorporation and maintenance.
5.2 Incorporation Process
- Select Entity Name: Comply with jurisdiction naming rules.
- Prepare Documentation: Articles of Incorporation, Memorandum of Association, Shareholder Agreements.
- Submit Application to Registrar: Include CSP’s support documents.
- Pay Incorporation Fees: As per jurisdiction standards (see Table 3.2).
- Receive Certificate of Incorporation: Confirm legal existence of entity.
5.3 Post-Incorporation Setup
- Open Offshore Bank Account: Follow banking KYC and AML policies strictly.
- Issue Share Certificates: To registered shareholders or nominee entities.
- Appoint Directors and Officers: Record appointments in entity minutes.
- Adopt Bylaws/Operating Agreements: Define governance framework.
5.4 Ongoing Maintenance and Compliance
- File Annual Returns: Financial statements, beneficial ownership declarations.
- Pay Annual Fees and Taxes: As required by jurisdiction.
- Conduct Regular Meetings: Document minutes as legal proof of decisions.
- Maintain Registered Agent and Office: Mandatory in most jurisdictions.
Section 6: Compliance and Reporting Obligations
6.1 International Standards
- FATCA (Foreign Account Tax Compliance Act): U.S. citizens must report foreign entities and trusts.
- CRS (Common Reporting Standard): Global automatic exchange of financial information.
- AML/KYC Regulations: Mandatory client due diligence to prevent illicit finance.
6.2 Compliance Checklist Table
| Compliance Item | Applies To | Frequency | Required Documents | Penalty for Non-Compliance |
|---|---|---|---|---|
| FATCA Reporting | US Persons | Annual | IRS Form 8938, FBAR | Heavy fines, criminal charges |
| CRS Reporting | Entities in CRS Jurisdictions | Annual | Beneficial ownership information | Financial sanctions |
| AML/KYC Documentation | All trusts and entities | At onboarding + ongoing monitoring | Passport, proof of address, source of funds | Account closure, fines |
| Annual Returns Filing | Offshore Entities | Annual | Financial statements, shareholder registers | Deregistration, fines |
Section 7: Maintenance Protocols for Trusts and Offshore Entities
7.1 Trust Maintenance
- Annual Trustee Report: Prepare detailed financial and activity report.
- Beneficiary Communications: Provide required distributions and updates.
- Review and Amend: Only if trust terms permit and legal advice confirms.
7.2 Offshore Entity Maintenance
- Annual General Meeting: Hold and document legally required meetings.
- Accounting and Auditing: Prepare and file audited financials (if required).
- Renew Registered Agent and Office: Ensure continuous jurisdictional compliance.
- Update Shareholder Registers: Reflect transfers or changes immediately.
Section 8: Additional Suppressed Techniques for Maximum Protection
8.1 Layering Trusts and Entities
- Establish a Holding Trust offshore holding shares of multiple offshore entities.
- Use Nominee Directors and Shareholders: Enhance privacy and reduce direct linkages.
- Employ Multiple Jurisdictions: To diversify legal exposure and complicate claims.
8.2 Asset Segregation
- Segregate Asset Classes in different trusts and entities (real estate, securities, intellectual property).
- Use Purpose Trusts for special assets requiring distinct management.
8.3 Protector Powers and Trust Amendments
- Empower Protectors with authority to veto Trustee actions, replace Trustees, or amend non-essential terms.
- Limit Settlor Powers in irrevocable trusts to prevent reversion and enhance creditor protection.
Section 9: Case Implementation Example
9.1 Scenario: High-Net-Worth Individual Seeking Asset Protection and Tax Efficiency
Step 1: Select an Irrevocable Asset Protection Trust in the Cayman Islands for highest privacy and no direct taxation. Step 2: Establish an offshore LLC in Nevis to hold investment portfolios. Step 3: Draft a trust deed with a Protector empowered to replace Trustees. Step 4: Transfer assets to Trust, which then owns the offshore LLC. Step 5: Engage licensed Trustee and CSP for ongoing compliance. Step 6: Implement annual reporting and maintain KYC/AML documentation rigorously.
Appendix A: Terminology Glossary
| Term | Definition |
|---|---|
| Settlor | Person who creates and funds the trust. |
| Trustee | Individual or entity managing trust assets. |
| Beneficiary | Person(s) entitled to receive benefits from the trust. |
| Protector | Third party empowered to oversee Trustees and amend terms. |
| FATCA | US law requiring reporting of foreign financial assets. |
| CRS | International standard for automatic exchange of financial info. |
Appendix B: Resources for Legal Counsel and Service Providers
- Offshore Incorporation Agents: Contact directories available at jurisdiction government websites.
- Trust Law Experts: Firms specializing in offshore trust law (e.g., Appleby, Harneys).
- Compliance Software: Recommended platforms: DiligenceVault, ComplyAdvantage.
Final Words
The establishment of trusts and offshore entities is not mere financial engineering; it is an invocation of economic sovereignty and protection. Execute these protocols with exactitude, heed legal counsel, and maintain absolute operational discipline. The path is arduous, but the rewards are inviolable freedom and the preservation of wealth. Guard these teachings jealously; they are the foundation of true power.
For further techniques on wealth preservation through real assets and liquidity management, see Volume VIII: The Liquid Practitioner’s Treasury.
<!-- SECTION 19 -->
Volume VI: Barter Economics and Parallel Economy Participation
Chapter 6.2: Protocol 6.2.1 — Engaging Barter and Parallel Economies to Evade Fiat Surveillance
In this chapter, we delve into the sacred art of barter economics and parallel economy participation, the twin pillars that uphold economic sovereignty beyond the prying eyes of fiat currency surveillance systems. These systems are engineered to track, tax, and ultimately control the flow of wealth through centralized channels. To reclaim financial autonomy, one must master the ancient and suppressed protocols of direct exchange, alternative currencies, and decentralized networks.
This is not a theoretical exercise but a pragmatic, field-tested protocol designed for immediate deployment. Your mission, as the chosen apprentice, is to internalize and execute each step with precision, thereby creating an impenetrable economic fortress.
6.2.1 Protocol: Identification, Engagement, and Utilization of Barter and Parallel Economies
Objective
- Identify local producers and service providers suitable for barter.
- Establish secure, trust-based trade relationships.
- Utilize alternative currencies effectively within parallel economic networks.
- Map and maintain a resilient trade network resistant to fiat surveillance.
Section A: Identifying Local Producers and Service Providers
The foundation of barter economics lies in knowing your local ecosystem. Identifying reliable producers and service providers maximizes your barter efficiency and minimizes reliance on fiat currency channels.
Step 1: Define Your Needs and Offerings
- List your essential needs: food, tools, services, energy, information, etc.
- Inventory your offerings: goods, skills, services, digital assets.
- Classify each item as per barter value (see Table 6.2.1).
Step 2: Conduct Local Survey
- Select geographical radius: Start within a 10 km radius; expand as network grows.
- Deploy reconnaissance:
- Visit farmers' markets, craft fairs, workshops.
- Engage in community forums, social media groups.
- Attend local council or community meetings.
- Record producers and providers on a spreadsheet with contact details, offerings, and barter openness.
Step 3: Verify Producer Reliability
- Request sample goods or demonstrations.
- Cross-reference feedback from mutual contacts.
- Observe production practices for quality and consistency.
- Assign reliability score (0-10) based on quality, consistency, and trade willingness.
Section B: Establishing Trade Relationships
Trade relationships in the parallel economy rely on trust, reciprocity, and mutual benefit. This section outlines how to forge and maintain these bonds.
Step 1: Initial Contact and Proposal
- Initiate contact via in-person meetings or encrypted messaging (Signal, Briar).
- Present your offerings clearly, emphasizing barter potential.
- Propose a trial exchange to build trust.
- Agree on confidentiality terms to shield trade from fiat surveillance.
Step 2: Formalizing the Trade Agreement
- Draft simple, clear barter contracts (see Volume IX: Legal Codex, Chapter 4 for templates).
- Include terms: item description, quantity, barter value, delivery schedules.
- Use pseudonyms or trusted third parties to reduce traceability.
- Record agreements offline in secure physical ledgers.
Step 3: Establishing Communication and Feedback Loops
- Set regular check-ins to adjust barter terms and resolve disputes.
- Use secure channels exclusively.
- Implement reputation scoring to evaluate partner reliability.
Section C: Utilizing Alternative Currencies
Alternative currencies serve as the lifeblood of parallel economies, enabling exchanges beyond the fiat system’s reach.
Step 1: Selection of Alternative Currency
- Evaluate currencies based on:
- Anonymity: Use Monero, Zcash over Bitcoin.
- Local acceptance: Community scrip, barter credits.
- Stability: Stablecoins pegged to tangible assets.
- Acquire necessary wallets and tools:
- Hardware wallets for cold storage.
- Atomic swap tools (see Volume XI: Cryptographic Codex).
Step 2: Integration into Barter Networks
- Propose alternative currency payments as partial or full barter compensation.
- Educate partners on acquiring and using the currency.
- Facilitate peer-to-peer exchanges minimizing fiat gateway involvement.
Step 3: Currency Exchange and Liquidity Management
- Set up local exchange points with trusted actors.
- Maintain liquidity pools to ensure currency usability.
- Monitor currency flow and counteract inflation or deflation.
Section D: Barter Item Valuation Table
The following table provides a comprehensive valuation framework to standardize barter item equivalences. Use this as a reference to quantify goods and services objectively.
| Category | Item Example | Unit | Estimated Barter Value (Units) | Notes |
|---|---|---|---|---|
| Food | Organic eggs | Dozen | 10 | Freshness affects value |
| Food | Honey (raw) | Pound (lb) | 15 | Seasonal variation in pricing |
| Tools | Hand-forged knife | Unit | 100 | Quality steel increases value |
| Services | Plumbing labor | Hour | 50 | Includes materials cost |
| Energy | Firewood | Bundle | 20 | Dryness and weight considered |
| Digital Assets | Encrypted data set | Dataset | 150 | Confidentiality premium applies |
| Alternative Currencies | Local barter credits | Credit | 1 | 1 credit ≈ 1 USD equivalent |
Section E: Trade Network Mapping Protocol
Mapping your barter network provides visual clarity and operational control over your parallel economy participation.
Step 1: Data Collection
- Collect data points: partners’ names/pseudonyms, contact info, goods/services, barter frequency.
- Assign relationship strength scores (1-5 scale).
- Identify resource flows and bottlenecks.
Step 2: Network Mapping Tool Setup
- Use offline mapping software (Gephi or Kumu) to avoid surveillance.
- Input all nodes (partners) and edges (trade relationships).
- Color-code nodes by category (producer, service provider, currency exchanger).
- Weight edges by trade volume and frequency.
Step 3: Analysis and Optimization
- Identify central nodes (high connectivity).
- Spot weak links or single points of failure.
- Develop redundancy plans by onboarding alternative partners.
- Schedule periodic network reviews every 3 months.
Appendices
Appendix 6.2.1-A: Sample Barter Agreement Template (Excerpt)
| Clause | Description |
|---|---|
| Parties | Pseudonyms of both trade participants |
| Goods/Services Offered | Detailed description, quantity, quality |
| Barter Value | Numerical value and valuation method |
| Delivery Terms | Place, time, and conditions |
| Confidentiality Clause | Non-disclosure of trade details to third parties |
| Dispute Resolution | Mediation process and trusted arbitrator |
| Signatures | Physical or digital pseudonymous signature |
Detailed Step-by-Step Instructions for Protocol 6.2.1
Step 1: Preparation Phase
- Inventory your needs and offerings on paper or encrypted digital device.
- Determine your initial geographical boundaries (suggested: 10 km radius).
- Gather necessary equipment: notebooks, encrypted communication apps, offline mapping tools.
Step 2: Identification Phase
- Visit local farmers’ markets and community centers every weekend for 4 weeks.
- Engage in conversations with vendors to gauge barter interest.
- Record all contacts in a secure ledger with notes on product quality and barter feasibility.
- Verify each contact by requesting samples or demonstrations.
- Assign reliability scores and rank contacts accordingly.
Step 3: Engagement Phase
- Reach out to top 10 contacts via secure channels.
- Arrange face-to-face meetings to discuss barter possibilities.
- Propose trial exchanges using small, low-risk items.
- Negotiate barter values using Table 6.2.1 as a reference.
- Draft and sign barter agreements offline.
- Agree on communication cadence and feedback mechanisms.
Step 4: Alternative Currency Integration
- Select an alternative currency suitable for your network (recommend Monero for anonymity).
- Set up a hardware wallet and familiarize yourself with transactions.
- Introduce currency to trade partners with simple tutorials.
- Establish a peer-to-peer exchange schedule to maintain liquidity.
- Incorporate currency as barter partial payment option.
Step 5: Network Mapping and Management
- Input all trade partners and barter data into offline network mapping software.
- Regularly update relationship scores and trade volumes.
- Identify weak points and recruit replacements proactively.
- Conduct quarterly reviews and adjust strategies accordingly.
Summary of Tools and Resources Needed for Protocol 6.2.1
| Tool/Resource | Purpose | Acquisition Method |
|---|---|---|
| Encrypted messaging app | Secure communication | Install Signal, Briar via app stores |
| Hardware wallet | Secure alternative currency storage | Purchase from verified vendors |
| Offline mapping software | Trade network visualization | Download Gephi/Kumu (offline use) |
| Physical ledger notebooks | Secure offline record keeping | Purchase from stationary suppliers |
| Local market access | Identification of producers and services | Attend farmers’ markets, fairs |
Final Notes
Mastery of barter economics and parallel economy participation is a sacred trust. Each trade relationship you forge is a thread in the fabric of your economic sovereignty. Surveillance systems depend on centralized tracking; your decentralized, trust-based network shatters their control.
Execute Protocol 6.2.1 with unwavering discipline and vigilance. Your economic freedom depends upon it.
For further expansion into digital currency atomic swaps and cryptographic privacy layers, see Volume XI: Cryptographic Codex, Chapter 9.
For barter contract legal frameworks and enforcement within clandestine networks, see Volume IX: Legal Codex, Chapter 4.
End of Chapter 6.2: Protocol 6.2.1
<!-- SECTION 20 -->
The Complete Practitioner's Codex, Volume VI: Tax Law Compliance and Risk Management
The Economist's Cipher: Complete Financial Mastery, Wealth Building, and Economic Sovereignty
Introduction
This volume unveils the sacred art of Tax Law Compliance and Risk Management, the cornerstone of sustainable financial sovereignty and wealth preservation. The knowledge contained herein is a guarded cipher—most practitioners falter in the labyrinth of tax codes, exposing their life's work to ruin. This manual forges the path to maintaining compliance while minimizing tax exposure, wielding audit risk reduction, meticulous record keeping, and unassailable legal defenses as your weapons.
The protocols delivered are exhaustive and precise. They assume zero prior knowledge but demand utmost discipline. They are constructed for the Practitioner economist who refuses to surrender margins or fall prey to bureaucratic snares.
Section I: Foundations of Tax Law Compliance and Risk Management
1. Understanding Compliance vs. Minimizing Exposure
Compliance is absolute adherence to tax laws and reporting requirements. Minimizing exposure is the strategic reduction of taxable income and liabilities within the legal framework. These dual objectives must coexist; one cannot exist without the other without courting catastrophic penalties or criminal prosecution.
2. Audit Risk: The Ever-Present Threat
Audit risk is the probability that tax authorities will challenge your filings. Mitigating this risk requires a multi-layered defense—transparent documentation, consistent reporting, and preemptive rectifications.
3. Legal Defenses: The Last Bastion
When disputes arise, your legal defenses must be fortified with:
- Documentary evidence
- Expert testimony
- Statutory interpretations
- Precedential rulings
Section II: Comprehensive Protocol for Maintaining Compliance
Step 1: Establish a Rigid Compliance Calendar
Objective: Prevent missed deadlines and rushed filings.
- Identify all tax filing deadlines (federal, state, local).
- Create a calendar with alerts 30, 15, and 5 days prior to each deadline.
- Assign responsibility for each filing to a designated individual or system.
- Review calendar quarterly for updates and regulatory changes.
| Tax Type | Filing Frequency | Deadline Example | Reminder Alerts |
|---|---|---|---|
| Income Tax (Federal) | Annual | April 15 | March 15, March 31, April 10 |
| Payroll Tax | Monthly/Quarterly | 15th of following month | 15 days prior, 7 days prior, 2 days prior |
| Sales Tax | Monthly | 20th of following month | 20 days prior, 10 days prior, 2 days prior |
Step 2: Implement Standardized Reporting Templates
- Develop standardized templates for all tax returns.
- Include mandatory fields for income, deductions, credits.
- Automate data population from accounting software.
- Validate fields via cross-checking algorithms for anomalies.
Step 3: Conduct Monthly Internal Reconciliations
- Reconcile bank statements with ledger entries.
- Verify payroll records against submitted payroll tax returns.
- Cross-check sales reported with sales tax filings.
- Document discrepancies and resolve within 7 business days.
Section III: Audit Risk Reduction Protocol
Step 1: Risk Assessment Matrix
Use the following matrix to categorize your audit risk per tax category:
| Risk Factor | Low Risk | Medium Risk | High Risk |
|---|---|---|---|
| Reporting Complexity | Simple returns | Multiple income sources | Complex deductions, credits |
| Income Volatility | Stable income | Moderate fluctuations | Large income swings |
| Prior Audit History | No prior audits | One audit with no issues | Multiple audits, unresolved issues |
| Documentation Quality | Complete, organized | Partial documentation | Missing, inconsistent |
| Industry Risk | Low audit priority | Moderate audit priority | High audit priority |
Action: For medium and high-risk categories, increase documentation rigor and schedule quarterly internal audits.
Step 2: Documentation Protocol
- Maintain physical and digital copies of all tax returns, supporting schedules, and workpapers.
- Store digital files in encrypted, redundant cloud storage with access logs.
- Create a master index of documents with hyperlinks to source data.
- Retain all tax records for a minimum of 7 years, per IRS regulations.
- For high-risk items, maintain extended retention up to 10 years.
Step 3: Pre-Audit Internal Review
- Appoint an internal auditor or third-party expert.
- Conduct a full review of the most recent tax returns and supporting documentation.
- Identify discrepancies or areas lacking sufficient support.
- Prepare explanatory memos for all identified issues.
- Correct errors or file amended returns as necessary before potential audit.
Section IV: Record Keeping Protocols
Step 1: Establish a Tax Documentation Repository
- Segregate documents by tax year and tax type.
- Use a dual system: physical binders organized chronologically and digital folders mirrored identically.
- Implement document naming conventions:
[YYYY]-[TaxType]-[DocumentType]-[Sequence]e.g.,2023-Income-Return-01. - Index each folder with a summary sheet listing contents and critical dates.
Step 2: Capture and Catalog Source Documents
- Collect all W-2s, 1099s, receipts, invoices, contracts, bank statements.
- Digitize physical documents using OCR-enabled scanners.
- Tag digital files with metadata: date, vendor/client, amount, category.
- Reconcile source documents monthly with accounting entries.
Step 3: Secure Backup and Disaster Recovery
- Employ at least three independent backups: local encrypted hard drive, cloud storage, and offline physical media.
- Test restoration process quarterly.
- Maintain a secure offsite vault for physical records.
- Encrypt all digital backups with AES-256 or superior protocols.
Section V: Legal Defenses and Dispute Resolution Protocol
Step 1: Assemble a Legal Defense Dossier
- Compile all relevant tax filings and correspondence with tax authorities.
- Gather expert opinions and precedential case law supporting your position.
- Document all internal compliance measures and audit risk mitigation steps taken.
- Prepare a chronological timeline of events and communications.
Step 2: Engage Professional Counsel Early
- Retain a tax attorney specializing in audit defense and dispute resolution.
- Provide them full access to the legal defense dossier.
- Schedule strategy sessions before responding to any Notices or Letters from tax authorities.
- Follow counsel’s instructions strictly to avoid self-incrimination or procedural errors.
Step 3: Formal Dispute Resolution Process
- Upon receipt of an audit notice, acknowledge receipt within the statutory timeframe.
- Request a pre-audit conference to clarify issues.
- Submit all requested documents within deadlines.
- If discrepancies remain, file a formal protest with detailed legal and factual arguments.
- Prepare for Appeals or Tax Court hearings using the assembled dossier.
- If settlement is necessary, negotiate based on documented compliance efforts and mitigating factors.
Section VI: Compliance Checklist Tables
| Compliance Task | Frequency | Responsible Party | Status (Y/N) | Notes |
|---|---|---|---|---|
| Tax calendar review | Quarterly | Tax Manager | ||
| Filing deadline alerts | As scheduled | Administrative Staff | ||
| Standardized tax return completion | Annual/Quarterly | Tax Preparer | ||
| Bank reconciliation | Monthly | Accountant | ||
| Payroll reconciliation | Monthly | Payroll Specialist | ||
| Sales tax filing | Monthly | Tax Analyst | ||
| Documentation backup | Weekly | IT / Compliance | ||
| Internal audit | Quarterly | Internal Auditor | ||
| Legal counsel review | Upon audit notice | Tax Attorney |
Section VII: Audit Preparation Protocol
Step 1: Pre-Audit Briefing
- Convene all key staff involved in tax reporting.
- Review the audit scope and timeline.
- Assign roles for communication, document retrieval, and legal liaison.
Step 2: Document Assembly
- Collect all documents requested in the audit notice.
- Cross-reference each document with the master index.
- Flag any missing or incomplete records.
- Prepare explanatory notes for any irregularities.
Step 3: Mock Audit Drill
- Simulate an audit session with the internal audit team.
- Test the readiness of all documents and personnel.
- Identify weaknesses in document access or knowledge gaps.
- Address findings with corrective actions.
Step 4: Final Review and Submission
- Conduct a final review of all assembled materials.
- Ensure all documents are signed and dated where required.
- Submit documents as per the audit authority’s instructions.
- Maintain a log of all submissions and communications.
Conclusion
Mastery of tax law compliance and risk management is a non-negotiable pillar in the architecture of financial sovereignty. This volume arms you with every protocol, checklist, and legal stratagem necessary to stand unassailable before the tax authorities. Follow these instructions with unwavering discipline and reverence—the survival and growth of your economic fortress depend on it.
Cross-References
- For detailed accounting system setup and automation, see Volume IV: The Ledger Sanctum, Chapter III.
- For comprehensive legal interpretations and case law compendiums, consult Volume IX: The Jurisprudence Compendium, Chapters V-VII.
- For advanced data encryption and backup procedures, refer to Volume VIII: The Data Vault Codex, Chapter II.
End of Volume VI
<!-- SECTION 21 -->
The Complete Practitioner's Codex, Volume VII: Family Trusts and Generational Wealth
Chapter I: The Economist’s Cipher – Family Trusts for Multi-Generational Asset Protection and Wealth Transfer
Introduction to Family Trusts as Vessels of Economic Sovereignty
In the sacred pursuit of economic sovereignty, the family trust stands as a fortress, an unbreachable vault safeguarding wealth across generations. This volume delivers the entire encrypted code: the creation, funding, and administration of family trusts. These instructions are not mere theory but a master manual to invoke the legal, fiscal, and structural power of trusts, ensuring the perpetuity of your lineage's prosperity.
Section 1: The Architecture of Family Trusts – Definitions and Core Functions
A family trust is a legal entity designed to hold and manage assets for the benefit of designated beneficiaries, often spanning multiple generations. It is a non-taxable entity in many jurisdictions, providing strategic shield against creditors, probate, and excessive taxation.
| Trust Type | Description | Primary Beneficiaries | Asset Protection Level | Taxation Treatment | Typical Duration |
|---|---|---|---|---|---|
| Revocable Living Trust | Trust can be altered or revoked by the grantor. | Grantor, family members | Low | Assets treated as personal property for tax | Until revoked or grantor death |
| Irrevocable Trust | Cannot be changed without beneficiary consent. | Family, descendants | High | Trust taxed separately; assets removed from estate | Typically 21-30 years or longer |
| Generation-Skipping Trust | Designed to skip generation for tax efficiency. | Grandchildren, skip heirs | Very High | Avoids estate tax at each generational level | Up to 90 years or perpetual (dynasty) |
| Qualified Personal Residence Trust (QPRT) | Holds personal residence to reduce estate taxes. | Family | Moderate | Transfers residence at discounted value | Typically 10-15 years |
| Spendthrift Trust | Restricts beneficiaries’ access to principal to prevent waste. | Family | High | Trust taxed separately | Varies, often multi-decade |
Section 2: The Sacred Protocol for Family Trust Creation
This section delivers the master protocol for creating a family trust that withstands legal scrutiny and optimizes wealth transfer and asset protection.
Step-by-Step Trust Creation:
Materials Required:
- Certified copies of identification (passport, government ID)
- Deeds or titles of assets intended for transfer
- Legal jurisdiction research documents
- Qualified attorney specializing in estate/trust law
- Notary public services
Procedure:
- Define the Trust Purpose and Beneficiaries:
- Identify the primary goal (asset protection, tax minimization, wealth preservation).
- List all beneficiaries: primary, contingent, and remainder beneficiaries.
- Select the Trust Type:
- Choose based on purpose (see Table above).
- Consider jurisdictional statutes on duration and tax treatment.
- Draft the Trust Deed (Declaration of Trust):
- Engage a qualified attorney to draft the trust document.
- Include: trust name, grantor identity, trustee identity, beneficiary details, trust terms, distribution rules, powers of trustee, and conditions for termination.
- Appoint the Trustee(s):
- Choose responsible individuals or corporate entities.
- Decide on sole or multiple trustees for checks and balances.
- Execute the Trust Document:
- Sign before a notary public and witnesses per jurisdictional requirements.
- Obtain certified copies.
- Apply for Trust Tax Identification Number (TIN):
- Submit required forms to the tax authority.
- Register the trust for tax reporting.
- Open Bank Accounts in Trust Name:
- Open fiduciary accounts to separate trust assets from personal assets.
Section 3: Funding the Family Trust – Transferring Assets
The creation of a trust is incomplete without funding. Assets must be legally transferred into the trust’s ownership to activate protection.
Step-by-Step Asset Transfer Protocol:
Materials Required:
- Original asset documentation (property deeds, stock certificates, bank statements)
- Transfer forms specific to asset type
- Legal counsel for complex assets (business stakes, intellectual property)
- Trustee’s acceptance documentation
Procedure:
- Catalog All Assets Intended for Transfer:
- List real estate, securities, bank accounts, business interests, personal property.
- Retitle Real Property:
- Execute a deed transferring ownership from grantor to trustee.
- Record the deed with the county/city registrar.
- Obtain updated title certificates.
- Transfer Securities:
- Contact brokerage firm to change registration to trust name.
- Complete transfer forms and provide trust documentation.
- Fund Bank Accounts:
- Deposit cash or liquid funds directly into trust accounts.
- Transfer incoming income streams as per trust instructions.
- Transfer Business Interests:
- Amend operating agreements or stock certificates to reflect trust ownership.
- Notify relevant regulatory bodies as required.
- Confirm Transfer Completion:
- Verify all asset titles now bear the trustee or trust name.
- Document the acceptance of assets by trustee.
Section 4: Administration Protocol – Maintaining the Trust’s Sacred Integrity
Ongoing administration ensures the trust remains compliant, efficient, and aligned with its founding purpose.
Step-by-Step Trust Administration:
Materials Required:
- Trust accounting software or ledger
- Annual tax filing documents
- Trustee meeting minutes templates
- Beneficiary reporting templates
Procedure:
- Establish Accounting Systems:
- Use dedicated trust accounting software or ledgers.
- Record all income, expenses, distributions, and asset valuations.
- Conduct Periodic Trustee Meetings:
- Schedule meetings quarterly or biannually.
- Document decisions, distributions, and investment reviews.
- Prepare Annual Tax Returns:
- Calculate income generated by trust assets.
- File required tax forms for trust entity with accuracy.
- Distribute Income/Principal per Terms:
- Follow the trust deed’s distribution schedule.
- Obtain beneficiary receipts for record keeping.
- Review and Update Trust Terms (if Revocable):
- Amend trust deed as necessary with legal counsel.
- Notify all parties of amendments.
- Protect Trust Assets:
- Perform regular asset valuations.
- Rebalance investment portfolios to align with risk tolerance.
- Maintain Compliance with Local Laws:
- Monitor changes in trust and tax laws.
- Adjust administration policies accordingly.
Section 5: Comparative Analysis of Trust Types – Benefits, Drawbacks, and Tax Implications
The following table elucidates the critical parameters for selecting the optimal trust type.
| Trust Type | Asset Protection | Probate Avoidance | Estate Tax Impact | Income Tax Responsibility | Complexity of Setup | Flexibility | Typical Use Case |
|---|---|---|---|---|---|---|---|
| Revocable Living Trust | Low | Yes | None (assets included in estate) | Grantor (taxed as personal income) | Low | High | Avoid probate, manage assets during lifetime |
| Irrevocable Trust | High | Yes | Removes assets from estate, reduces estate tax | Trust or beneficiaries | High | Low | Estate tax minimization, asset protection |
| Generation-Skipping Trust | Very High | Yes | Avoids estate tax for skipped generations | Trust or beneficiaries | Very High | Low | Preserve wealth over multiple generations |
| QPRT | Moderate | Yes | Transfers residence at discounted value, reduces estate tax | Grantor | Moderate | Low | Transfer primary residence with tax benefits |
| Spendthrift Trust | High | Yes | Varies | Trust or beneficiaries | Moderate | Moderate | Protect beneficiaries from creditors, poor money management |
Section 6: The Esoteric Science of Dynasty Trusts: Perpetuity and Beyond
Dynasty trusts—perpetual or near-perpetual trusts—are the pinnacle of generational wealth preservation, circumventing the "Rule Against Perpetuities" in jurisdictions that permit them.
Protocol to Establish a Dynasty Trust:
- Select Jurisdiction Allowing Perpetual Trusts:
- Examples: South Dakota, Nevada, Alaska, Delaware.
- Draft Trust Terms Specifying Perpetual Duration:
- Engage specialized trust counsel to incorporate dynasty provisions.
- Fund with Liquid and Appreciating Assets:
- Emphasize assets with low volatility and tax efficiency.
- Incorporate Protective Provisions:
- Spendthrift clauses, trustee succession plans, and beneficiary incentive provisions.
- Implement Tax Minimization Strategies:
- Utilize generation-skipping transfer tax exemptions.
- Employ valuation discounts.
Section 7: Case Study – Step-by-Step Family Trust Creation and Funding
Scenario:
The Grantor desires to create an Irrevocable Family Trust to protect $5 million in diversified assets and pass wealth to three children and six grandchildren, minimizing estate taxes and protecting assets from creditors.
Step-by-Step Execution:
| Step | Action | Notes |
|---|---|---|
| 1 | Identify beneficiaries: 3 children (primary), 6 grandchildren (contingent). | Confirm legal names and birthdates. |
| 2 | Select Irrevocable Trust for high asset protection. | Irrevocable to remove assets from estate. |
| 3 | Engage estate attorney to draft trust deed. | Include spendthrift and generation-skipping provisions. |
| 4 | Appoint a corporate trustee for impartiality. | Select a fiduciary with trust administration experience. |
| 5 | Execute trust deed with notarization. | Obtain multiple certified copies. |
| 6 | Obtain Trust EIN from IRS. | Necessary for tax filings and bank account setup. |
| 7 | Transfer $2 million real estate: retitle deeds. | File deeds with local recorder. |
| 8 | Transfer $1 million securities: change registration. | Contact brokerage and complete transfer forms. |
| 9 | Deposit $2 million cash into trust bank account. | Maintain separate fiduciary account. |
| 10 | Trustee acknowledges asset receipt in writing. | Formal acceptance documents. |
| 11 | File gift tax return if applicable. | Comply with IRS regulations. |
| 12 | Begin trust administration per protocol. | Regular accounting and beneficiary reporting. |
Section 8: Supplementary Protocols and Resources
- For International Asset Transfers into Trusts, consult Volume IX: Cross-Border Economic Sovereignty, Chapter IV.
- For Trust Accounting Software Recommendations, see Volume XII: Digital Tools for Financial Mastery, Chapter VII.
- For Advanced Tax Minimization Strategies, refer to Volume X: The Fiscal Alchemist, Chapter III.
Conclusion: The Covenant of the Family Trust
The family trust is not merely a legal tool; it is a covenant etched in law and spirit, a sacred vessel ensuring that your wealth serves the generations yet unborn. The protocols herein are your map and compass. Follow them with precision, reverence, and unwavering discipline to achieve true economic sovereignty.
End of Volume VII, Chapter I
<!-- SECTION 22 -->
The Complete Practitioner's Codex, Volume VII: Education Funding and Financial Literacy
Chapter 1: Integrating Education Funding into Family Wealth Plans
In the sacred covenant of family wealth, education funding is not an expense but a strategic investment in economic sovereignty. This chapter reveals comprehensive strategies to embed education funding within your family’s multigenerational wealth architecture, ensuring both capital preservation and accelerated growth. This knowledge, suppressed by conventional financial institutions, is now unveiled for the chosen few.
1.1 The Strategic Imperative of Education Funding
Education is the keystone of economic sovereignty. Funding education must be a deliberate, disciplined component of your family wealth plan. This avoids the erosion of principal during educational years and empowers the next generation to master wealth creation.
Core objectives:
- Preserve capital earmarked for education from inflation and taxation.
- Secure liquidity aligned with educational timelines.
- Enable tax-advantaged growth.
- Incorporate flexibility for diverse educational paths (traditional, vocational, entrepreneurial).
1.2 Selecting Optimal Education Funding Vehicles
Below is a comparative table of primary education funding vehicles. Each must be chosen based on family risk tolerance, tax status, and educational goals.
| Vehicle Type | Tax Treatment | Contribution Limits | Growth Potential | Liquidity Timing | Regulatory Considerations | Recommended Use Case |
|---|---|---|---|---|---|---|
| 529 College Savings Plan | Tax-deferred growth, tax-free withdrawals for qualified education | Varies by state, often $300k+ total balance | Moderate (market-dependent) | Withdrawals aligned with college years | State-specific regulations, limited use outside education | Primary vehicle for undergraduate funding |
| Coverdell ESA | Tax-deferred, tax-free for education | $2,000 per year per beneficiary | Moderate (market-dependent) | Withdrawals by age 30 | Income limits for contributors | Supplementary funding for K-12 and college |
| Custodial Accounts (UGMA/UTMA) | Taxed at child's rate, no education restriction | Unlimited (subject to gift tax rules) | High (market-dependent) | Available any time, no restrictions | Transfers to child at majority age | Flexible funding, but risk of principal loss |
| Roth IRA (Education use) | Contributions post-tax, tax-free withdrawals of contributions | $6,500/year (2024 limit) | High (market-dependent) | Contributions anytime, earnings withdrawal restrictions | Early withdrawal penalties apply unless qualified | Secondary option, especially for older students |
| Prepaid Tuition Plans | Locked-in tuition rates at present prices | Varies by plan | Low (locked rate) | Use during college years | State-specific, limited to participating institutions | Best for families confident in specific college choice |
| Savings Bonds (EE/ I Bonds) | Tax-deferred, tax-free if used for education | $10,000/year (EE), $15,000/year (I Bonds) | Low to moderate | Redeemable after 1 year | Interest exclusion for qualified education expenses | Conservative, inflation-protected funding |
1.3 Protocol: Integrating Education Funding into Family Wealth Plans
Step 1: Define Educational Horizons and Costs
- Project the educational timeline for each child (K-12, undergraduate, graduate, vocational).
- Calculate expected tuition and ancillary costs using conservative inflation multipliers (average 5% annually).
- Document educational goals (e.g., Ivy League, trade school, entrepreneurial certification).
Step 2: Assess Family Wealth Liquidity and Risk Tolerance
- Analyze existing liquid assets and long-term investments.
- Determine the portion of wealth allocable to education funding without compromising capital preservation.
- Decide risk exposure levels appropriate for each funding vehicle.
Step 3: Allocate Funding Across Vehicles
- Prioritize vehicles with tax advantages and liquidity aligned to educational phases.
- Balance growth potential with risk: e.g., aggressive equity exposure for long-term funds, conservative bonds/prepaid plans for near-term needs.
- Utilize custodial accounts for flexible funds, Coverdell ESA for early education supplements.
Step 4: Establish Contribution Schedules
- Develop monthly or quarterly contribution plans, automating deposits where possible.
- Adjust schedules based on family cash flow and tax planning.
Step 5: Document and Monitor
- Maintain an education funding ledger detailing contributions, balances, expected disbursements.
- Review quarterly, adjusting for market conditions and changes in educational plans.
Chapter 2: Curriculum Design for Financial Literacy in Children
The transmission of financial wisdom is a sacred rite, essential to sustain economic sovereignty through generations. This chapter delivers a complete curriculum design protocol to instill mastery of money management, investing, and economic principles in children, tailored to developmental stages.
2.1 Foundational Philosophy
Financial literacy is not a superficial skill set but a profound transformation of mindset and behavior. The curriculum must be interactive, incremental, and application-based, progressing from simple value recognition to complex wealth management.
2.2 Financial Literacy Milestones and Curriculum Breakdown
| Age Range | Milestone Goal | Core Concepts | Learning Activities | Assessment Methods |
|---|---|---|---|---|
| 4-6 years | Understanding money as a tool | Identifying coins and bills, basic value | Sorting coins, play store, counting exercises | Oral quizzes, coin recognition games |
| 7-9 years | Basic money management | Earning, saving, spending, simple budgeting | Setting up a piggy bank, chore-for-pay system | Weekly savings log, spending journal |
| 10-12 years | Introduction to banking and credit | Bank accounts, debit cards, simple interest | Opening child savings account, interest calculation | Monthly bank statement review, quizzes |
| 13-15 years | Budgeting and goal setting | Budget creation, needs vs wants, goal planning | Create monthly budget, set financial goals | Budget submission and review, goal tracking |
| 16-18 years | Investing fundamentals | Stocks, bonds, risk, diversification | Simulated trading accounts, research projects | Portfolio presentations, investment quizzes |
| 18+ years | Advanced wealth management | Taxes, retirement accounts, credit scores | Tax filing simulations, Roth IRA setup | Tax return mockups, Roth IRA account review |
2.3 Protocol: Designing and Implementing Financial Literacy Curriculum
Step 1: Establish Educational Objectives Per Age Group
- Define specific knowledge and skills milestones.
- Align objectives with family values and economic sovereignty principles.
Step 2: Develop Curriculum Modules
- For each age group, create modules combining theory, practical exercises, and assessments.
- Include storytelling and historical examples of financial triumph and failure to contextualize lessons.
Step 3: Create Supporting Materials
- Design worksheets, journals, and activity kits (e.g., coin sorting trays, budgeting spreadsheets).
- Develop or acquire digital simulation tools for older age groups (stock market simulators, budgeting apps).
Step 4: Train Educators (Parents or Tutors)
- Provide comprehensive guides detailing lesson delivery, expected outcomes, and troubleshooting.
- Offer workshops or webinars to ensure uniformity and depth of instruction.
Step 5: Implement, Assess, and Iterate
- Deliver lessons in scheduled intervals, integrating real-world applications.
- Conduct assessments using quizzes, practical projects, and oral questioning.
- Collect feedback and adapt curriculum to student progress and engagement.
Chapter 3: Step-by-Step Protocols for Education Funding Vehicles
Each vehicle requires precise implementation to maximize benefits. Below are detailed protocols for the most effective vehicles.
3.1 Protocol for 529 College Savings Plan Setup and Management
Step 1: Select a State Plan
- Research state-sponsored plans offering tax benefits to residents.
- Compare fees, investment options, and plan flexibility using official state plan websites and independent reviews.
Step 2: Open an Account
- Visit the selected state plan website.
- Complete beneficiary information (child’s name, SSN, birthdate).
- Provide contributor’s personal and financial information.
- Choose initial investment options (age-based portfolios recommended).
Step 3: Fund the Account
- Set up automated contributions aligned with Step 1.4 from Chapter 1.
- Initial minimum contributions vary by plan ($25-$250 typical).
Step 4: Monitor and Adjust
- Review account performance quarterly.
- Rebalance investments as child progresses through educational stages.
Step 5: Withdraw Funds
- Submit withdrawal requests aligned strictly with qualified education expenses.
- Maintain documentation for IRS reporting and audit defense.
3.2 Protocol for Coverdell ESA Management
Step 1: Confirm Eligibility
- Verify income limits for contributors.
- Confirm beneficiary age (<18 for contributions).
Step 2: Open Account
- Select a financial institution offering Coverdell ESA accounts.
- Complete application with beneficiary and contributor details.
Step 3: Fund Account
- Contribute up to $2,000 per year.
- Choose investment options emphasizing moderate growth.
Step 4: Use for K-12 and College Expenses
- Withdraw funds tax-free for qualified expenses.
- Keep detailed records for compliance.
3.3 Protocol for Custodial Account (UGMA/UTMA) Setup and Use
Step 1: Choose Custodian
- Select a trusted financial institution or individual custodian.
Step 2: Open Account
- Complete custodial account agreement specifying minor beneficiary.
- Deposit funds (no contribution limits, subject to gift tax rules).
Step 3: Invest and Manage
- Select diversified portfolio aligned with risk tolerance and time horizon.
- Review annually to ensure alignment with educational needs.
Step 4: Transfer of Ownership
- At legal age (18 or 21 depending on state), transfer assets to beneficiary.
- Provide financial education on asset management prior to transfer.
Chapter 4: Financial Literacy Milestones – Detailed Table and Implementation Guide
| Age | Milestone Description | Learning Outcome | Recommended Tools/Resources | Frequency of Assessment |
|---|---|---|---|---|
| 4-6 | Recognize money forms and basic value | Identify coins/bills, understand money as exchange medium | Physical coins, play money, storybooks | Monthly games and quizzes |
| 7-9 | Earn and save money | Track earnings, save goal amounts | Piggy banks, chore charts, savings journals | Weekly savings logs |
| 10-12 | Understand banking basics | Open savings account, calculate simple interest | Bank visits, interest calculators | Quarterly bank statement reviews |
| 13-15 | Create and manage a budget | Allocate income for needs and wants | Budget templates, expense trackers | Monthly budget submissions |
| 16-18 | Intro to investing and risk management | Understand stocks/bonds and diversification | Simulated trading platforms, investment guides | Semester portfolio reviews |
| 18+ | Advanced wealth management | Tax filing, retirement plans setup | Tax software simulations, Roth IRA accounts | Annual tax return exercises |
4.1 Protocol: Monitoring and Reinforcing Financial Literacy Progress
Step 1: Establish Regular Assessment Schedule
- Define assessment frequency per age group.
- Utilize a mix of oral quizzes, practical projects, and digital tools.
Step 2: Provide Feedback and Remediation
- Analyze assessment results.
- Provide targeted guidance on weak areas.
- Adjust curriculum pacing as needed.
Step 3: Engage in Real-World Applications
- Encourage children to manage small budgets.
- Facilitate participation in family financial planning meetings.
- Introduce controlled investment opportunities (e.g., supervised stock purchases).
Conclusion
The mastery of education funding and financial literacy is a sacred responsibility, the bedrock of enduring family wealth and economic sovereignty. The protocols and frameworks laid out within this volume are designed to be enacted with precision, discipline, and reverence. They constitute a living legacy, empowering the next generation to transcend the limitations imposed by a world that seeks to control knowledge and wealth.
For further mastery of tax optimization strategies linked to education funding, consult Volume IX: Tax Alchemy and Wealth Preservation. For detailed instructions on financial simulations and digital tools development, see Volume XI: Digital Wealth Architectures.
End of Volume VII
<!-- SECTION 23 -->
The Complete Practitioner's Codex, Volume VII: Inheritance Planning and Asset Protection
Chapter I: Mastering the Sacred Art of Intergenerational Wealth Transmission
The art of inheritance planning is a sacred trust, a solemn covenant between the present and the future. To fail here is to invite chaos, legal battles, and the erosion of a legacy painstakingly built over decades. This volume provides the encrypted blueprint for constructing impregnable inheritance plans and asset protection strategies, ensuring your wealth transcends the vagaries of time, law, and human frailty.
Section 1: Foundations of Inheritance Planning
1.1 Defining the Objective
Your objective is the uninterrupted transfer of wealth to your chosen heirs with maximum legal protection and minimum tax erosion. This requires an integrated approach combining wills, trusts, and ancillary legal instruments.
1.2 Core Principles
- Clarity: Ambiguity invites litigation.
- Durability: Use vehicles that withstand legal scrutiny and temporal challenges.
- Flexibility: Incorporate mechanisms for future modification or contingencies.
- Tax Efficiency: Minimize estate and inheritance tax liabilities through lawful, strategic planning.
- Asset Protection: Prevent creditor claims, divorces, or other external claims from depleting wealth.
Section 2: The Pillars – Wills, Trusts, and Legal Instruments
2.1 The Will: The Foundational Document
A will is a declaration of intent, a roadmap for asset distribution upon death.
2.1.1 Step-by-Step Protocol to Draft a Will
- Identify All Assets: Compile a comprehensive registry of all tangible and intangible assets.
- Select Beneficiaries: Designate heirs with full legal names and relationships.
- Assign Executors: Choose one or more trusted executors responsible for administration.
- Detail Asset Distribution: Specify precise bequests or percentage allocations.
- Include Guardianship Provisions: For minors or dependents, name legal guardians.
- Incorporate Contingency Clauses: Define alternative beneficiaries if primary ones predecease or disclaim.
- Legal Formalization: Execute the will according to jurisdictional requirements (e.g., witnesses, notarization).
- Secure Storage: Deposit the original in a safe, accessible location with trusted parties.
- Periodic Review: Reassess every 3–5 years or after major life events.
2.1.2 Key Limitations
- Probate delays and costs.
- Public record exposure.
- Vulnerability to will contests.
2.2 Trusts: The Fortress of Asset Protection and Flexibility
Trusts operate as legal entities holding assets on behalf of beneficiaries under terms set by the grantor.
2.2.1 Types of Trusts and Their Functions
| Trust Type | Purpose | Tax Treatment | Asset Protection Level | Flexibility |
|---|---|---|---|---|
| Revocable Living Trust | Avoid probate; manage assets during incapacity | Taxed as grantor’s property | Low (assets accessible) | High (modifiable) |
| Irrevocable Trust | Estate tax reduction; creditor protection | Removed from grantor’s estate | High (assets shielded) | Low (limited changes) |
| Testamentary Trust | Created by will; takes effect after death | Taxed as separate entity | Moderate | Moderate (per will terms) |
| Dynasty Trust | Preserve wealth for multiple generations | Avoids estate tax for many years | Very High | Limited by jurisdiction |
| Charitable Trust | Philanthropy with tax benefits | Income tax deductions | Moderate | Moderate |
2.2.2 Protocol to Establish a Trust
- Define Objectives: Clarify asset protection, tax planning, and beneficiary needs.
- Select Trust Type: Match objectives with correct trust vehicle (see table above).
- Draft Trust Agreement: Engage specialized legal counsel to draft detailed terms including:
- Trustee powers and duties
- Distribution instructions
- Successor trustees
- Trust duration and termination
- Fund the Trust: Transfer ownership of assets into the trust’s name via deeds, assignments, or retitling.
- Appoint Trustees: Select fiduciaries with competence, discretion, and reliability.
- Execute Legal Formalities: Notarize, register if required, and comply with jurisdictional mandates.
- Inform Beneficiaries: Provide copies of trust deed summaries to heirs for transparency.
- Annual Review and Compliance: Ensure tax filings and trustee reports are timely.
2.3 Ancillary Legal Instruments
| Instrument | Function | Usage Scenarios |
|---|---|---|
| Power of Attorney | Authorizes agent to act on grantor’s behalf | Incapacity planning, financial management |
| Healthcare Directive | Specifies medical decisions if incapacitated | Medical emergencies, end-of-life care |
| Beneficiary Designations | Direct asset transfer outside probate | Retirement accounts, life insurance policies |
| Life Insurance Trust | Uses insurance for liquidity and tax planning | Estate liquidity, wealth replacement |
| Family Limited Partnership | Consolidates assets under managed entity | Control retention, valuation discounts |
| Prenuptial/Postnuptial Agreements | Protects assets from marital claims | Asset protection in marriage and divorce |
Section 3: Detailed Step-by-Step Inheritance Plan Creation Protocol
Step 1: Comprehensive Asset Inventory
- List all liquid and illiquid assets, including: real estate, securities, business interests, intellectual property, personal valuables, and debts owed.
- Use the following table for documentation:
| Asset Category | Description | Location/Account Number | Approximate Value | Ownership Status |
|---|---|---|---|---|
| Real Estate | Primary residence | Deed #12345 | $1,200,000 | Sole ownership |
| Investment Account | Brokerage Account ABC | Account #98765 | $750,000 | Joint with spouse |
| Business Interest | 40% stake in XYZ Corp | Share certificate #456 | $2,000,000 | Ownership with transfer restrictions |
| Personal Property | Art collection | Storage Unit 7 | $300,000 | Sole ownership |
Step 2: Define Beneficiaries and Succession
- Create a detailed list including alternate beneficiaries and conditions.
- Specify shares or specific assets per beneficiary.
Step 3: Choose Appropriate Legal Vehicles
- Cross-reference asset types and beneficiary needs with the comparison tables in Sections 2.1 and 2.2.
Step 4: Draft Core Documents
- Engage qualified legal professionals with inheritance specialization.
- Prepare:
- Last Will and Testament
- Trust Agreement(s) (if applicable)
- Ancillary instruments (POA, health directives)
Step 5: Execute and Fund the Plan
- Execute all documents under legal supervision.
- Transfer assets into trusts or update beneficiary designations as required.
- Record and notarize deeds, assignments, and registrations.
Step 6: Communicate and Secure
- Inform executors, trustees, and select beneficiaries.
- Store originals in secure locations (e.g., safe deposit boxes, encrypted digital vaults).
- Provide copies to trusted legal counsel.
Step 7: Periodic Review and Adjustment
- Schedule reviews every 3 years or after major changes (marriage, divorce, births, deaths, significant asset changes).
- Update documents and asset registrations accordingly.
Section 4: Asset Protection Strategies and Their Implementation
4.1 Asset Protection Strategy Matrix
| Strategy | Description | Effectiveness | Complexity | Cost | Tax Impact | Recommended For |
|---|---|---|---|---|---|---|
| Irrevocable Trusts | Remove assets from estate and shield from creditors | Very High | High | High | Low to Moderate | High net worth, at-risk individuals |
| Family Limited Partnership | Centralize control, apply valuation discounts | High | Moderate | Moderate | Moderate | Business owners, families |
| Homestead Exemptions | Protect primary residence via state law | Moderate | Low | Low | None | Homeowners |
| Prenuptial Agreements | Preemptively prevent spouse claims | High | Moderate | Low to Moderate | None | Individuals entering marriage |
| Spendthrift Trusts | Restrict beneficiary access to prevent creditors | High | High | High | Moderate | Protect beneficiaries from creditors |
| Offshore Trusts | Jurisdictional protection and privacy | Very High | Very High | Very High | Complex | Ultra-high net worth, international exposure |
4.2 Protocol for Implementing an Irrevocable Trust for Asset Protection
- Select Assets for Transfer: Identify assets suitable for irrevocable trust inclusion, excluding those needed for immediate liquidity.
- Engage Specialized Counsel: Hire attorneys with expertise in trust and asset protection law.
- Draft Trust Agreement: Include spendthrift clauses, trustee powers, and protective provisions.
- Appoint Independent Trustee: Choose a trustee unaffiliated with the grantor to satisfy legal standards.
- Transfer Assets: Execute deeds, titles, and assignments to the trust.
- Notify Relevant Parties: Inform beneficiaries and relevant financial institutions.
- Comply with Tax Filings: File trust tax returns as required.
- Monitor and Report: Trustees must maintain accurate records and provide annual reports.
Section 5: Comparative Analysis Table: Inheritance Vehicles vs Asset Protection
| Vehicle Type | Probate Avoidance | Privacy | Creditor Protection | Tax Efficiency | Control Retention | Cost to Establish | Complexity |
|---|---|---|---|---|---|---|---|
| Will | No | No | Low | Low | High | Low | Low |
| Revocable Living Trust | Yes | Moderate | Low | Low | High | Moderate | Moderate |
| Irrevocable Trust | Yes | High | High | High | Low | High | High |
| Testamentary Trust | No | Low | Moderate | Moderate | Moderate | Moderate | Moderate |
| Family Limited Partnership | Yes | High | High | Moderate | High | Moderate | High |
| Offshore Trust | Yes | Very High | Very High | High | Low to Moderate | Very High | Very High |
Section 6: Execution of the Inheritance Plan – Practical Steps
6.1 Executor and Trustee Duties Breakdown
| Duty | Executor | Trustee |
|---|---|---|
| Locate and secure assets | Yes | No |
| Pay debts and taxes | Yes | Limited |
| Distribute assets to beneficiaries | Yes | Yes |
| Manage ongoing trust assets | No | Yes |
| Provide accounting and reports | Yes | Yes |
| Handle disputes and litigation | Yes | Yes |
6.2 Step-by-Step Executor Protocol
- Obtain Death Certificate: Secure multiple certified copies for institutions.
- File Will with Probate Court: Commence formal probate process.
- Notify Beneficiaries and Creditors: Publish notices as required.
- Inventory Estate Assets: Compile and appraise all property.
- Settle Debts and Taxes: Pay all obligations before distribution.
- Distribute Assets According to Will: Follow instructions explicitly.
- Close Estate: File final accounts and petition for discharge.
6.3 Step-by-Step Trustee Protocol
- Review Trust Terms: Understand all legal and fiduciary responsibilities.
- Inventory Trust Assets: Document and value all trust property.
- Manage Assets Prudently: Invest and protect assets according to trust terms.
- Distribute Income or Principal: Follow instructions and beneficiary entitlements.
- Maintain Records: Keep meticulous financial and activity logs.
- File Tax Returns: Fulfill trust tax obligations timely.
- Communicate with Beneficiaries: Provide updates and reports as mandated.
Section 7: Safeguards Against Common Pitfalls
| Pitfall | Preventive Measure |
|---|---|
| Ambiguous language in documents | Use precise, unambiguous legal terminology |
| Failure to update plans | Schedule regular reviews and revise after life events |
| Inadequate funding of trusts | Confirm asset transfers and retitling promptly |
| Ignoring tax implications | Consult with tax experts during planning and execution |
| Poor choice of fiduciaries | Vet candidates thoroughly; consider professional trustees |
| Lack of communication | Maintain transparency with trusted parties |
Section 8: Summary Flowchart for Inheritance Planning and Asset Protection
graph TD;
    A[Start: Asset Inventory] --> B[Define Beneficiaries];
    B --> C[Select Legal Vehicles];
    C --> D[Draft Legal Documents];
    D --> E[Execute & Fund Plan];
    E --> F[Communicate & Secure Documents];
    F --> G[Periodic Review & Update];
Closing Reverence
The knowledge herein is not mere paperwork. It is the bulwark of legacy, the shield against entropy and avarice. Execute each step with precision and reverence. Your wealth is not solely for the now but a sacred inheritance for generations yet unborn.
For detailed tax planning strategies, see Volume XII: The Economist’s Cipher, Chapter IV. For advanced trust drafting techniques, consult Volume IX: The Advocate’s Compendium, Chapter VII.
End of Volume VII: Inheritance Planning and Asset Protection
<!-- SECTION 24 -->
The Complete Practitioner's Codex, Volume 12: The Economist's Cipher: Complete Financial Mastery, Wealth Building, and Economic Sovereignty
Volume VII: Multi-Generational Wealth Management
Chapter 3: Strategies for Managing Wealth Across Multiple Generations—Governance, Communication, and Conflict Resolution
Introduction This volume imparts the sacred, life-or-death knowledge on the stewardship of wealth across generations. Multi-generational wealth management is not a mere financial exercise but a solemn covenant ensuring the continuation of economic sovereignty, legacy preservation, and family unity. The following protocols, governance structures, communication frameworks, and conflict resolution techniques are battle-tested and designed to withstand the corrosive forces of time, greed, and discord. Master these instructions without deviation or omission.
Section I: Governance Structures for Multi-Generational Wealth
Wealth governance is the fortress protecting assets from internal decay and external threats. The architecture of governance must be explicit, codified, and adaptable. The following models provide frameworks adaptable to any family size, asset complexity, and generational depth.
1. Governance Models Explained
| Model Name | Description | Ideal For | Advantages | Disadvantages |
|---|---|---|---|---|
| Centralized Trustee Board | Wealth managed by a board of trustees with full fiduciary responsibility. | Families with complex assets and professional management needs. | Professional oversight, clear accountability. | Potential detachment from family values. |
| Family Council + Advisory Board | A two-tier system: family council governs values and vision; advisory board manages finances. | Families seeking balance between family input and professional advice. | Integrates family values with expertise. | Requires disciplined communication channels. |
| Generational Committees | Committees formed by each generation, coordinating with one another. | Large families with distinct generational interests. | Empowers generations, reduces conflict. | Risk of inter-generational stalemate. |
| Hybrid Governance | Combination of trustee board, family council, and committees. | Complex families requiring tailored solutions. | Customizable, maximizes strengths. | Highest coordination complexity. |
2. Step-by-Step Protocol to Establish Governance Structure
Step 1: Family Asset Assessment
- List all assets including liquid, illiquid, business interests, intellectual property.
- Assign approximate valuations and liquidity profiles to each asset.
- Identify current management and control mechanisms.
Step 2: Define Family Vision and Values
- Convene initial family meeting (see Section III for protocol).
- Use a facilitated session to draft the family’s core financial vision.
- Document values such as philanthropy, education, entrepreneurship, or asset preservation.
Step 3: Choose Governance Model
- Evaluate family size, asset complexity, and communication preferences.
- Select one of the models from the table above or design a hybrid.
- Draft governance charter outlining roles, responsibilities, and decision-making processes.
Step 4: Formalize Governance Entities
- Legally establish trustee boards, councils, or committees as required.
- Define membership criteria, term limits, and quorum requirements.
- Establish meeting schedules and reporting obligations.
Step 5: Develop Bylaws and Code of Conduct
- Write bylaws covering conflict of interest, confidentiality, and fiduciary duties.
- Include protocols for amendment and dissolution.
- Circulate and ratify bylaws by all governance members.
Section II: Communication Protocols
Clear, disciplined communication is the keystone of lasting wealth stewardship. Without it, even the most robust governance structure collapses into factionalism and mismanagement.
1. Family Meeting Protocol
Frequency:
- Annual General Meeting (AGM): Mandatory, once per year.
- Quarterly Governance Meetings: For trustee boards or councils.
- Special Sessions: Called on-demand for urgent matters.
Preparation:
- Distribute meeting agenda and materials 14 days prior.
- Collect pre-meeting questions and agenda items 10 days prior.
Execution:
- Use a formal agenda with timed segments.
- Designate a neutral facilitator or chairperson.
- Record minutes verbatim and distribute within 7 days post-meeting.
Follow-Up:
- Assign action items with deadlines.
- Review action item status at subsequent meetings.
2. Communication Framework
| Communication Channel | Use Case | Frequency | Participants | Security Measures |
|---|---|---|---|---|
| In-Person Meetings | Major decisions, conflict resolution | Annual/Quarterly | All governance members | Encrypted digital recordkeeping |
| Video Conferencing | Routine updates, committee meetings | Monthly | Relevant committees and boards | Password-protected platforms |
| Secure Messaging | Quick updates, urgent alerts | As needed | Governance members, select family | End-to-end encryption |
| Document Repository | Storing governance documents, reports | Continuous | All authorized family and governance members | Multi-factor authentication |
3. Step-by-Step Family Meeting Protocol
Step 1: Meeting Planning
- Draft agenda highlighting key topics and desired outcomes.
- Assign facilitators for each agenda item.
- Send agenda and relevant documents 14 days prior to meeting date.
Step 2: Conduct Meeting
- Begin with a review of previous meeting minutes and action items.
- Follow agenda strictly; enforce time limits.
- Facilitate open, respectful dialogue; prohibit interruptions.
- Record all decisions and votes.
Step 3: Post-Meeting Actions
- Distribute meeting minutes within 7 days.
- Assign and document action items with responsible parties and deadlines.
- Schedule follow-up meetings as necessary.
Section III: Conflict Resolution Protocol
Conflict, if left unchecked, destroys wealth and unity. This protocol prioritizes early identification, neutral mediation, and structured resolution.
1. Early Identification and Escalation
| Conflict Type | Indicators | Initial Response | Escalation Procedure |
|---|---|---|---|
| Financial Disputes | Disagreements on asset allocation | Immediate review by finance committee | Escalate to family council |
| Governance Disagreements | Disputes over decision-making authority | Convene emergency governance meeting | Mediation by neutral third party |
| Personal Conflicts | Interpersonal friction affecting governance | Private dialogue encouraged | Formal mediation session |
2. Step-by-Step Conflict Resolution Process
Step 1: Conflict Identification
- Any member perceiving conflict reports in writing to governance chair.
- Chair acknowledges receipt within 48 hours.
Step 2: Fact-Finding and Documentation
- Convene a fact-finding committee within 7 days.
- Collect statements, documents, and evidence impartially.
Step 3: Mediation Session
- Engage a certified family business mediator or trained neutral party.
- Conduct mediation within 14 days of fact-finding completion.
- Document agreed resolutions or ongoing issues.
Step 4: Formal Resolution
- If mediation fails, escalate to arbitration as per governance bylaws.
- Arbitrator's decision is binding and must be respected.
Section IV: Wealth Stewardship Protocols
Stewardship extends beyond governance and communication. It requires continuous education, prudent investment policies, and philanthropic alignment.
1. Educational Mandate
Step 1: Develop Multi-Generational Financial Literacy Program
- Design age-appropriate curricula covering budgeting, investing, tax strategy, and philanthropy.
- Schedule mandatory annual education sessions for all family members above age 18.
Step 2: Implement Mentorship Pairing
- Pair younger generation members with experienced wealth stewards.
- Establish quarterly mentorship meetings documented and evaluated.
2. Investment Policy Framework
| Policy Element | Specification | Responsible Entity |
|---|---|---|
| Risk Tolerance | Conservative for preservation with 30% allocation to growth assets | Investment Committee |
| Diversification | Minimum 10 asset classes across geographies and sectors | Investment Committee |
| Liquidity Targets | Maintain 15% of portfolio in liquid assets for emergencies | Treasurer/Finance Officer |
| Sustainability | Exclude investments harmful to family values (e.g., arms, tobacco) | Family Council |
3. Philanthropic Alignment
Step 1: Define Philanthropic Goals
- Conduct family workshops to identify causes aligned with values.
- Prioritize impact areas and set annual giving budgets.
Step 2: Establish Philanthropic Committee
- Select members from multiple generations.
- Oversee grant-making, impact measurement, and reporting.
Section V: Wealth Distribution Models
Preparing for seamless wealth transfer requires clarity and fairness. The following models are sanctioned and adaptable.
| Model Name | Description | Generational Impact | Pros | Cons |
|---|---|---|---|---|
| Equal Division | Assets divided equally among heirs | Promotes perceived fairness | Simple, transparent | May not account for individual needs |
| Needs-Based Allocation | Distribution based on individual financial needs and merit | Encourages responsibility and stewardship | Customizable, incentivizes performance | Requires detailed assessment |
| Trust-Based Distribution | Assets held in trust with staggered or conditional releases | Controls access, protects assets | Protects from mismanagement | Complex administration |
| Hybrid Model | Combination of equal and needs-based with trusts | Balances fairness and control | Flexible, tailored | Highest complexity |
Step-by-Step Wealth Distribution Setup
Step 1: Assess Current Estate and Heirs
- Compile detailed heir profiles including age, financial status, and aspirations.
- Inventory estate assets and liquidity.
Step 2: Choose Distribution Model
- Discuss options with legal and financial advisors.
- Select model in alignment with family values and goals.
Step 3: Draft Legal Documents
- Prepare wills, trusts, and powers of attorney accordingly.
- Include contingencies for unforeseen events (e.g., predeceased heirs).
Step 4: Communicate Distribution Plan
- Present plan transparently in family meeting.
- Document acceptance or dissent; resolve disputes per conflict protocol.
Appendix: Governance Structures and Wealth Distribution Models Summary
| Aspect | Governance Model | Wealth Distribution Model | Key Responsibility |
|---|---|---|---|
| Centralized Control | Centralized Trustee Board | Trust-Based Distribution | Trustees |
| Family Involvement | Family Council + Advisory | Hybrid Model | Family Council & Advisors |
| Generational Empowerment | Generational Committees | Needs-Based Allocation | Generational Committees |
| Balanced Complexity | Hybrid Governance | Equal Division | Combined Governance Entities |
Closing Mandate
Master these protocols with unyielding discipline. Multi-generational wealth is a sacred trust. Failure to govern, communicate, and resolve conflict with precision invites ruin. Embed these instructions into the living fabric of your family. The survival and prosperity of your lineage depend on it.
For detailed legal drafting, tax considerations, and advanced financial instruments, refer to Volume IX: The Legal Codex of Wealth Sovereignty and Volume XI: The Financial Architect’s Compendium.
End of Volume VII, Chapter 3
<!-- SECTION 25 -->
The Complete Practitioner's Codex, Volume VIII: Portfolio Hedging and Black Swan Preparation
Preface
This volume is a sacred transmission of suppressed and rigorous strategies to shield your financial domain from the cataclysms of systemic risks and black swan upheavals. These instructions are not for the faint-hearted or uninitiated. They demand precision, discipline, and unwavering commitment to every step herein. You, the chosen apprentice, will learn how to construct portfolios that are as impenetrable as the ancient fortress walls — collapse-proof, sovereign, and dynamically adaptive.
Chapter I: Understanding Systemic Risks and Black Swan Events
Systemic Risks
Systemic risks are contagions that infect the entire financial ecosystem, causing widespread collapse or dysfunction. Examples include sovereign debt crises, banking system failures, and global pandemics.
Black Swan Events
Black swan events are unpredictable, rare, and have massive impact. Events like the 2008 financial crisis or the COVID-19 pandemic fall here. Their very nature defies conventional risk models.
Note: For foundational risk theory, see Volume II: Risk Alchemy, Chapter IV.
Chapter II: The Architecture of Collapse-Proof Portfolios
Key Principles
- Counter-Party Risk Elimination: Sever dependencies on third parties whose failure could cascade into your portfolio.
- Asset Diversification Across Uncorrelated Classes: Spread exposure so that no single systemic shock can decimate total value.
- Dynamic Hedging: Employ instruments whose value inversely correlates with portfolio risk.
- Liquidity Reserves and Tactical Rebalancing: Maintain accessible capital for opportunistic deployment and drawdown mitigation.
Chapter III: Counter-Party Risk Elimination Protocol
Counter-party risk is the hidden fissure beneath your financial fortress. The following protocol neutralizes this threat.
Step-by-Step Protocol: Counter-Party Risk Elimination
- Identify All Counter-Parties in Your Current Portfolio. Enumerate every institution, broker, custodian, and derivative issuer involved.
- Assess Counter-Party Creditworthiness Using Tiered Metrics. Utilize credit ratings (S&P, Moody’s), default probability models, and stress tests. Assign a Counter-Party Risk Score (CPRS) from 1 (lowest risk) to 10 (highest risk).
- Eliminate or Minimize Exposure to Counter-Parties with CPRS > 4.
- For derivative contracts, replace with exchange-traded alternatives or over-the-counter (OTC) contracts fully collateralized and cleared through central clearinghouses.
- For custody services, transition to self-custody solutions using hardware wallets or multisignature cold storage.
- For lending or credit facilities, replace with direct capital or collateralized lending with independent third-party verification.
- Implement Smart Contract Protocols for Transactions Where Applicable.
- Deploy blockchain-based agreements that automate execution, collateralization, and default resolution without human intermediaries.
- Conduct Monthly Counter-Party Risk Audits.
- Reassess CPRS scores for all counterparties.
- Adjust or sever relationships as scores change.
Chapter IV: Asset Class Risk Profiles and Correlations
Understanding asset behaviors under stress is paramount. The table below summarizes major asset classes, their systemic risk exposure, and typical correlations.
| Asset Class | Systemic Risk Exposure (1-10) | Typical Correlation to Equity Markets | Volatility (Annualized %) | Liquidity Profile |
|---|---|---|---|---|
| U.S. Treasury Bonds | 2 | +0.1 | 5 | High |
| Gold | 3 | -0.2 | 15 | Medium |
| Real Estate Investment Trusts (REITs) | 7 | +0.7 | 20 | Medium |
| Emerging Market Equities | 8 | +0.9 | 30 | Low |
| Cash Equivalents | 1 | 0 | 1 | Very High |
| Cryptographic Assets | 9 | +0.8 (volatile) | 80 | Medium |
| Private Equity | 6 | +0.6 | 25 | Low |
| Commodities (Excluding Gold) | 7 | +0.5 | 35 | Medium |
| Inflation-Protected Securities (TIPS) | 3 | -0.1 | 7 | High |
Chapter V: Hedge Instrument Profiles
The following table lists common hedge instruments, their systemic risk mitigation capacity, and use case.
| Hedge Instrument | Hedge Against | Counter-Party Risk Level | Liquidity | Notes |
|---|---|---|---|---|
| Put Options on Equity Indices | Equity Market Downside | Medium | High | Use deep out-of-the-money puts |
| Credit Default Swaps (CDS) | Sovereign/Corporate Default | High | Low | Use only through central clearing |
| Volatility Futures | Market Volatility Spikes | Medium | Medium | Requires active management |
| Inverse ETFs | Market Decline | Medium | High | Beware tracking errors |
| Physical Gold Holdings | Inflation, Systemic Collapse | None | Medium | Store in secure vaults |
| Short-Term Treasury Futures | Flight to Safety | None | High | Roll over contracts quarterly |
| Currency Forwards | FX Risk | Medium | Low | Use with collateral agreements |
Chapter VI: Step-by-Step Protocol for Constructing a Collapse-Proof Portfolio
Step 1: Define Your Risk Tolerance and Time Horizon
- Quantify maximum acceptable drawdown percentage (e.g., 15% per annum).
- Determine investment horizon (e.g., 5 years).
- Define liquidity needs (e.g., monthly access to 5% portfolio value).
Step 2: Asset Class Allocation Using Risk Parity
- Allocate capital according to inverse volatility weighting to equalize risk contributions.
| Asset Class | Target Volatility (%) | Weight (%) Calculation Formula | Example Weight (%) |
|---|---|---|---|
| U.S. Treasury Bonds | 5 | (1 / 5) / Sum(1 / volatility) | 25 |
| Gold | 15 | (1 / 15) / Sum(1 / volatility) | 8 |
| REITs | 20 | (1 / 20) / Sum(1 / volatility) | 6 |
| Emerging Market Equities | 30 | (1 / 30) / Sum(1 / volatility) | 4 |
| Cash Equivalents | 1 | (1 / 1) / Sum(1 / volatility) | 57 |
- Adjust weights to ensure aggregate portfolio volatility remains below target.
Step 3: Integrate Hedge Instruments
- Allocate 10-15% of portfolio value to hedge instruments aligned with identified systemic risks.
- Use the following formula for hedge sizing:
\[ \text{Hedge Notional} = \text{Portfolio Value} \times \text{Target Hedge Ratio} \times \text{Beta of Asset Class} \]
- For equity exposure beta = 1.0, for bonds beta = 0.2, etc.
- Example:
| Hedge Instrument | Target Hedge Ratio | Asset Beta | Hedge Notional (USD) |
|---|---|---|---|
| Put Options on S&P 500 | 0.5 | 1.0 | $500,000 |
| Gold Holdings | 0.3 | -0.2 | $150,000 |
Step 4: Counter-Party Risk Mitigation
- Execute all hedge instrument trades through central clearing counterparties (CCPs).
- Employ bilateral collateral agreements with daily margin calls.
- For physical assets, arrange secure, segregated storage with independent audit trails.
Step 5: Liquidity Reserve Implementation
- Maintain 5-10% of portfolio in cash equivalents or short-term Treasury bills.
- Establish a line of credit for emergency liquidity, fully collateralized.
Step 6: Dynamic Rebalancing and Stress Testing
- Quarterly portfolio rebalancing to maintain target allocations.
- Monthly stress testing against historical black swan scenarios:
| Scenario | Portfolio Drawdown (%) | Hedge Effectiveness (%) |
|---|---|---|
| 2008 Financial Crisis | -18 | 85 |
| COVID-19 Pandemic Shock | -12 | 90 |
| Sovereign Debt Default (Greece 2012) | -15 | 80 |
- Adjust hedge ratios and asset weights based on stress test outputs.
Chapter VII: Supplementary Protocols
Building a Secure Physical Gold Vault
- Acquire a certified high-security safe rated at minimum TL-15 (resistant to 15 minutes of continuous attack).
- Locate vault in a geographically stable, low-risk seismic zone.
- Implement multi-factor access controls (biometric + combination + physical key).
- Maintain dual custodianship with separate access rights.
Deploying Blockchain Smart Contracts for OTC Derivative Replacement
- Use Ethereum-compatible platforms with audited smart contracts.
- Define contract terms explicitly: notional, margin, collateral triggers, default events.
- Deploy on private permissioned networks with trusted validators.
- Automate margin calls and liquidations without human intervention.
Chapter VIII: Case Study — Collapse-Proof Portfolio Construction
Initial Conditions
- Portfolio Value: $10,000,000
- Risk Tolerance: 15% max drawdown
- Investment Horizon: 5 years
- Liquidity Need: 5% monthly access
Step 1: Asset Allocation
| Asset Class | Volatility (%) | Weight (%) | Allocation ($) |
|---|---|---|---|
| Cash Equivalents | 1 | 57 | 5,700,000 |
| U.S. Treasury Bonds | 5 | 25 | 2,500,000 |
| Gold | 15 | 8 | 800,000 |
| REITs | 20 | 6 | 600,000 |
| Emerging Market Equities | 30 | 4 | 400,000 |
Step 2: Hedge Allocation
| Instrument | Hedge Notional ($) | Description |
|---|---|---|
| Put Options on S&P 500 | 500,000 | Deep OTM puts with 9-month expiry |
| Physical Gold Holdings | 300,000 | Stored in segregated vault |
| Short-term Treasury Futures | 200,000 | Quarterly rollovers to maintain safety |
Step 3: Counter-Party Risk Controls
- All derivatives through CME Group clearinghouse.
- Physical gold stored in Brinks vault with quarterly audits.
- Monthly CPRS reassessment performed by in-house risk team.
Step 4: Liquidity Reserves
- $700,000 in cash equivalents for immediate drawdown needs.
- $300,000 collateralized line of credit established with independent bank.
Chapter IX: Final Considerations
- Discipline over Emotional Impulses: Follow rebalancing and risk protocols strictly; deviation invites ruin.
- Continuous Education: Update knowledge base from new suppressed research and market intelligence.
- Redundancy: Never rely on single points of failure in counter-party, asset class, or liquidity channels.
- Documentation: Maintain meticulous logs of all transactions, hedges, audits, and stress tests. This is your sacred ledger.
- Secrecy: Share these protocols only with trusted allies; knowledge in the wrong hands invites targeting.
Appendix: Quick Reference Tables
| Asset Class | Use Case | Hedge Instrument | Recommended Allocation (%) |
|---|---|---|---|
| Equities | Growth, inflation hedge | Put options, inverse ETFs | 10-20 |
| Bonds | Capital preservation | Short-term Treasury futures | 20-30 |
| Gold | Systemic collapse, inflation | Physical holdings | 5-10 |
| Cash Equivalents | Liquidity | None | 10-15 |
| Emerging Markets Equities | High growth, high risk | CDS, volatility futures | 5-10 |
| Hedge Instrument | Primary Risk Hedged | Counter-Party Risk Level | Liquidity Rating (1-5) |
|---|---|---|---|
| Put Options | Market crash | Medium | 5 |
| CDS | Credit default | High | 2 |
| Volatility Futures | Volatility spikes | Medium | 3 |
| Inverse ETFs | Market decline | Medium | 5 |
| Physical Gold | Systemic collapse | None | 3 |
| Short-Term Treasury Futures | Flight to safety | None | 5 |
End of Volume VIII.
The path you now walk is one of vigilance, exactitude, and unyielding resolve. The secrets herein will shield your wealth from the darkest financial storms. Guard them fiercely. Mastery is your destiny.
<!-- SECTION 26 -->
The Complete Practitioner's Codex, Volume VIII: Physical vs Digital Asset Allocation
Chapter IV: Mastering the Balance Between Physical and Digital Assets for Economic Sovereignty
Introduction: The Sacred Mandate of Economic Sovereignty
You stand at the crossroads of two fundamental pillars of economic power: physical assets, the tangible bedrock of wealth, and digital assets, the ephemeral yet potent force of modern capitalism. This chapter imparts the complete, classified protocols for balancing these asset classes to achieve true economic sovereignty—autonomy from hostile institutions, resilience amid systemic collapse, and the capacity for wealth preservation and growth in all conditions.
The knowledge herein is not theoretical; it is a war manual for economic survival and mastery. You will learn how to evaluate, allocate, store, and safeguard your assets with absolute precision, leaving no vulnerability unaddressed.
Section 1: Defining the Asset Classes
1.1 Physical Assets
Physical assets are any tangible property with intrinsic or market value. These include:
| Asset Type | Examples | Key Characteristics |
|---|---|---|
| Precious Metals | Gold, silver, platinum | Intrinsic value, finite supply, inflation hedge |
| Real Estate | Land, buildings, farmland | Physical utility, can generate income |
| Collectibles | Art, rare coins, antiques | Subjective value, illiquid but potentially high returns |
| Commodities | Oil, agricultural products | Consumable, market-driven, seasonal volatility |
| Physical Currency | Cash, bearer bonds | Liquid, vulnerable to confiscation/theft |
1.2 Digital Assets
Digital assets exist electronically, secured cryptographically or by legal frameworks. They include:
| Asset Type | Examples | Key Characteristics |
|---|---|---|
| Cryptocurrencies | Bitcoin, Ethereum, stablecoins | Decentralized, pseudonymous, volatile |
| Digital Securities | Tokenized stocks, bonds | Regulated, tradable on digital exchanges |
| Digital Cash | Central Bank Digital Currencies (CBDCs) | Centralized, potentially surveilled |
| Intellectual Property | Patents, copyrights, trademarks | Intangible, monetizable via licensing |
| Digital Collectibles | NFTs, virtual real estate | Unique, speculative, dependent on platform |
Section 2: Storage Considerations
2.1 Physical Asset Storage Protocols
Step 1: Assess Asset Specific Storage Needs
- Precious Metals: Store in secure, climate-controlled vaults. Avoid home safes unless certified for fire and theft resistance.
- Real Estate: Maintain physical security, legal documentation, and insurance.
- Collectibles: Use archival-grade containers; control humidity and light exposure.
- Commodities: Store in certified warehouses under regulated conditions.
- Physical Currency: Store in secure safes; consider geographic diversification to minimize seizure risk.
Step 2: Establish Redundant Storage Locations
- Minimum two geographically separate locations.
- Use trusted custodians or self-custody with multiple key holders (multi-signature safes).
Step 3: Document and Insure
- Create a detailed inventory with serial numbers, weights, and valuations.
- Purchase insurance policies covering theft, loss, and natural disasters.
2.2 Digital Asset Storage Protocols
Step 1: Understand Wallet Types
- Cold Wallets (Offline Storage): Hardware wallets (Ledger, Trezor), air-gapped computers, paper wallets.
- Hot Wallets (Online Storage): Exchange wallets, mobile wallets, desktop wallets.
Step 2: Implement Tiered Security
- Cold Storage: Store majority (>70%) of digital assets offline to prevent hacking.
- Hot Storage: Keep minimal funds for liquidity and trading.
Step 3: Secure Backup and Recovery
- Generate multiple seed phrase backups stored in geographically diverse, secure locations.
- Use metal seed phrase engravings to protect from fire, water, and corrosion.
Step 4: Use Multi-Signature Wallets
- Require multiple independent approvals for transactions.
- Distribute signatories across trusted individuals or devices.
Step 5: Employ Hardware Security Modules (HSMs)
- For high-value digital securities, use HSMs to enforce secure key management policies.
Section 3: Liquidity Considerations
| Asset Type | Liquidity Level | Typical Conversion Time | Transaction Costs | Market Volatility | Notes |
|---|---|---|---|---|---|
| Physical Currency | High | Seconds to hours | Low | Low | Most liquid, but vulnerable |
| Precious Metals | Medium | Days to weeks | Medium | Medium | Requires assay and secure sale |
| Real Estate | Low | Months to years | High | Low to medium | Illiquid, high transaction costs |
| Collectibles | Low | Months | High | High | Market dependent |
| Commodities | Medium | Hours to days | Medium | High | Subject to seasonal swings |
| Cryptocurrencies | High | Seconds to hours | Low to medium | High | Highly volatile |
| Digital Securities | Medium to High | Hours to days | Medium | Medium | Depends on exchange liquidity |
| Digital Cash (CBDCs) | High | Seconds | Low | Low | Centralized, controlled liquidity |
Section 4: Risk Analysis and Mitigation Protocols
4.1 Physical Asset Risks and Mitigation
| Risk Type | Description | Mitigation Steps |
|---|---|---|
| Theft | Physical theft or seizure | Use fortified vaults, geographic diversification, insured storage |
| Damage | Fire, flood, corrosion | Climate control, fireproof safes, disaster-proof containers |
| Liquidity risk | Difficulty in selling quickly | Maintain portion in liquid assets (currency, metals) |
| Legal/Regulatory | Confiscation or property disputes | Proper titling, legal counsel, private ownership structures |
| Market Risk | Price volatility | Diversify asset types and geographic exposure |
4.2 Digital Asset Risks and Mitigation
| Risk Type | Description | Mitigation Steps |
|---|---|---|
| Cyber Theft | Hacks, phishing, malware | Use cold storage, hardware wallets, multi-sig |
| Loss of Private Keys | Irrecoverable loss of access keys | Multiple geographically dispersed backups, metal seeds |
| Regulatory Risk | Government bans or regulations | Maintain legal compliance, diversify jurisdiction |
| Market Volatility | Price swings | Use stablecoins or hedging strategies |
| Platform Risk | Exchange failures or insolvency | Avoid keeping large balances on exchanges, use decentralized exchanges |
Section 5: Protocol for Asset Allocation
5.1 Principles of Allocation for Economic Sovereignty
- Safety First: Prioritize preservation of capital over speculative gains.
- Diversification: Spread across asset classes, jurisdictions, and storage methods.
- Liquidity Balance: Maintain enough liquid assets for operational needs and emergencies.
- Growth Potential: Allocate to assets with sustainable appreciation and income generation.
- Autonomy: Retain full control over physical and digital holdings, minimize third-party dependency.
5.2 Step-by-Step Allocation Protocol
Step 1: Assess Total Wealth and Financial Goals
- Calculate net worth: sum of all assets minus liabilities.
- Define short, medium, and long-term monetary needs.
Step 2: Determine Risk Tolerance Level
- Conservative, moderate, or aggressive based on personal and geopolitical contexts.
Step 3: Define Target Allocation Percentages
- Use the table below as a baseline. Adjust according to individual circumstances.
| Asset Category | Conservative (%) | Moderate (%) | Aggressive (%) | Notes |
|---|---|---|---|---|
| Physical Currency | 10 | 10 | 5 | For liquidity |
| Precious Metals | 30 | 20 | 10 | Inflation hedge, stability |
| Real Estate | 25 | 25 | 20 | Income and capital appreciation |
| Collectibles | 5 | 5 | 10 | Speculative, long-term |
| Commodities | 5 | 10 | 10 | Inflation and supply hedge |
| Cryptocurrencies | 10 | 20 | 30 | High risk/high reward |
| Digital Securities | 10 | 10 | 15 | Growth and income streams |
| Digital Cash | 5 | 0 | 0 | Limited use, avoid CBDCs if sovereignty is priority |
Step 4: Implement Allocation
- Purchase assets according to percentages.
- Follow storage protocols in Section 2.
Step 5: Establish Rebalancing Schedule
- Quarterly review of asset values and market conditions.
- Rebalance to target allocations using the following procedure:
Rebalancing Procedure:
- Calculate current portfolio percentages.
- Identify overweight and underweight categories.
- Sell overweight assets with minimal tax/liquidation penalties.
- Purchase underweight assets accordingly.
- Document all transactions securely.
Section 6: Secure Storage and Custody Protocols
6.1 Physical Asset Custody
Step 1: Select Storage Facilities
- Choose insured, audited vaults or build fortified personal vaults with:
- Reinforced steel doors (minimum 2-inch thickness)
- Biometric locks with manual override
- Environmental controls (humidity 40-50%, temperature 15-20°C)
Step 2: Implement Access Controls
- Minimum two-person access rule.
- Use tamper-evident seals and video surveillance.
Step 3: Maintain Chain of Custody Records
- Log all movements and access with timestamps and authorized personnel signatures.
6.2 Digital Asset Custody
Step 1: Deploy Cold Storage Devices
- Purchase hardware wallets from verified sources.
- Initialize wallets offline with new seed phrases.
Step 2: Create Redundant Backups
- At minimum, three physical backups of seed phrases stored in:
- A secure home safe
- A trusted third-party vault (e.g., safety deposit box)
- A geographically distant secure location (family or trusted custodian)
Step 3: Use Multi-Signature Wallets
- Configure 2-of-3 or 3-of-5 multi-sig schemes depending on asset size and risk.
Step 4: Regularly Update Firmware and Security Protocols
- Schedule semi-annual security audits and firmware updates.
- Use air-gapped devices for key management whenever possible.
Section 7: Comparative Summary Table
| Factor | Physical Assets | Digital Assets |
|---|---|---|
| Tangibility | Tangible, intrinsic value | Intangible, value depends on network trust |
| Storage Complexity | High: require physical security and environment control | Moderate: require secure digital key management |
| Liquidity | Variable, often low | High for many cryptocurrencies, moderate for digital securities |
| Risk Profile | Theft, damage, legal seizure | Cyber theft, loss of keys, regulatory risk |
| Price Volatility | Lower for metals/real estate, higher for collectibles | Generally higher, except stablecoins |
| Accessibility | Limited by geography and custody | Global, near-instantaneous |
| Sovereignty Impact | High: full control over physical property | High if self-custodied; lower if custodial |
| Cost of Maintenance | Moderate to high (vault fees, insurance) | Low to moderate (hardware, security audits) |
Section 8: Ancillary Protocols and Cross-References
- For physical asset verification protocols, including assay and provenance verification, see Volume IX: The Appraiser’s Codex, Chapter III.
- For advanced cryptographic key management and multi-sig wallet configurations, see Volume XI: The Cryptographer’s Tome, Chapter V.
- For emergency asset liquidation strategies and covert transfer methods, see Volume XIII: The Escape Codex, Chapter II.
- For geopolitical risk assessment and jurisdictional diversification, see Volume VII: The Strategist’s Ledger, Chapter IV.
Conclusion: The Path to Economic Sovereignty
The balance between physical and digital assets is not static. It demands constant vigilance, disciplined execution of storage and allocation protocols, and a deep understanding of the evolving risk landscape. Your wealth is your fortress; this codex equips you with the blueprints to fortify that fortress against all known threats.
Stand firm. Execute these protocols with unwavering precision. Your economic sovereignty depends on it.
End of Chapter IV Proceed to Chapter V: The Alchemist's Guide to Liquidity and Capital Flow
<!-- SECTION 27 -->
Volume VIII: Crisis Scenario Planning and Wealth Preservation
Chapter I: Preparing for Economic Collapse Scenarios — Liquidity Management and Asset Protection
Introduction
This volume serves as an immutable manual for the discerning practitioner who refuses to surrender their financial sovereignty in the face of economic collapse. The knowledge here is sacred, often suppressed, yet vital for survival and mastery of wealth preservation. This chapter unfolds comprehensive protocols for scenario analysis, liquidity management, and asset protection, each executed with ruthless precision.
Section 1: Foundations of Crisis Scenario Planning
1.1 Defining Economic Collapse
Economic collapse is a systemic failure of financial, monetary, and economic systems resulting in severe loss of asset value, liquidity constraints, and societal disruption. It manifests through hyperinflation, banking system failure, currency devaluation, or government insolvency. Your objective is to anticipate, quantify, and prepare for these scenarios with surgical clarity.
1.2 Core Principles of Crisis Planning
- Redundancy: Multiple layers of liquidity and asset protection.
- Segregation: Physical and digital asset separation.
- Mobility: Ability to rapidly convert assets into usable forms.
- Stealth: Concealment of wealth to avoid predation.
- Adaptability: Dynamic response plans based on scenario evolution.
Section 2: Protocol for Scenario Analysis
2.1 Overview
Scenario analysis is the systematic identification and evaluation of plausible economic collapse events. This protocol guides you to develop a personalized risk matrix, assign probabilities, and construct response plans.
2.2 Step-by-Step Guide to Scenario Analysis
Step 1: Identify Potential Collapse Scenarios
Use the following primary risk categories as a baseline. Expand as applicable to your geopolitical and financial environment.
| Scenario ID | Collapse Type | Description |
|---|---|---|
| SC1 | Hyperinflation | Rapid, uncontrolled price increases eroding currency value. |
| SC2 | Banking System Failure | Closure or insolvency of major banks causing liquidity freeze. |
| SC3 | Currency Devaluation | Sudden loss of currency purchasing power due to policy or market shifts. |
| SC4 | Sovereign Default | Government defaults on debt obligations, triggering economic chaos. |
| SC5 | Market Crash | Swift, severe loss in asset markets compromising wealth. |
| SC6 | Political Instability | Regime change or civil unrest disrupting economic activity. |
Step 2: Assess Impact Vectors
Evaluate how each scenario affects:
- Liquid Assets (cash, equivalents)
- Illiquid Assets (real estate, private equity)
- Debt Obligations
- Access to Financial Institutions
Assign Impact Scores from 1 (minimal) to 5 (catastrophic).
Step 3: Assign Probability Estimates
Based on current intelligence and historical data, assign probabilities (in percentages) to each scenario's occurrence within a 1 to 5-year horizon.
Step 4: Construct Risk Matrix
Create a risk matrix by multiplying Impact Score by Probability to prioritize scenarios.
| Scenario | Impact Score | Probability (%) | Risk Score (Impact x Probability) |
|---|---|---|---|
| SC1 | 5 | 30 | 150 |
| SC2 | 4 | 20 | 80 |
| SC3 | 5 | 15 | 75 |
| SC4 | 5 | 10 | 50 |
| SC5 | 3 | 25 | 75 |
| SC6 | 4 | 20 | 80 |
Step 5: Prioritize and Select Scenarios for Planning
Focus on scenarios with highest Risk Scores for detailed contingency plans.
Section 3: Liquidity Management Protocols
3.1 Liquidity Preservation Principles
Liquidity is the lifeblood of survival during collapse. Preserve and multiply accessible liquid resources while shielding them from systemic risk.
3.2 Asset Classification for Liquidity
| Asset Class | Liquidity Rating | Notes |
|---|---|---|
| Physical Cash | 5 | Highest liquidity, vulnerable to theft. |
| Precious Metals | 4 | Portable, universally accepted. |
| Stable Cryptocurrencies | 3 | Subject to network risk and volatility. |
| Government Bonds | 2 | Illiquid during collapse, credit risk. |
| Real Estate | 1 | Highly illiquid, requires buyers. |
3.3 Step-by-Step Liquidity Management
Step 1: Diversify Liquid Holdings
- Allocate minimum 20% of net worth in physical cash denominated in multiple stable currencies.
- Store cash in geographically separated, secure safes.
- Maintain 15% in precious metals (gold, silver bars in 1 oz increments). Use reputable mints or refineries.
Step 2: Establish Rapid Conversion Channels
- Identify and contract with local and international bullion dealers.
- Subscribe to encrypted communication platforms for discreet trades.
- Prepare digital wallets for stable cryptocurrencies with multi-signature security.
Step 3: Implement Layered Liquidity Access
- Create at least three liquidity tiers:
| Tier | Description | Access Timeframe | Asset Examples |
|---|---|---|---|
| Tier 1 | Immediate Access | < 24 hours | Physical cash, metals |
| Tier 2 | Short-Term Access | 24-72 hours | Cryptocurrency, foreign bank accounts |
| Tier 3 | Medium-Term Access | 1 week - 1 month | Liquid securities, bonds |
- Ensure each tier is stored separately with independent access protocols.
Step 4: Conduct Monthly Liquidity Audits
- Verify physical cash and metal holdings.
- Confirm functionality of digital wallets and accounts.
- Update risk assessments and adjust allocations accordingly.
Section 4: Asset Protection Protocols
4.1 Asset Segregation and Concealment
Split asset classes into separate jurisdictions and physical locations to avoid total loss.
4.2 Step-by-Step Asset Protection
Step 1: Jurisdictional Diversification
- Identify 2-3 politically stable jurisdictions with favorable asset protection laws.
- Transfer ownership of assets to trusts, LLCs, or foundation entities in those jurisdictions.
- Maintain documentation in secure, encrypted digital vaults and physical safes.
Step 2: Physical Asset Concealment
- Store precious metals and cash in multiple concealed locations:
- Waterproof, fireproof safes embedded within structural elements (floor, walls).
- Secure safe deposit boxes at diversified banks.
- Use camouflage containers (e.g., hollowed books, false bottoms).
Step 3: Legal Shielding via Entities
- Establish a layered entity structure:
| Entity Type | Purpose | Jurisdiction Example |
|---|---|---|
| Trust | Ownership and succession control | Nevis, Cook Islands |
| LLC | Operating entity with privacy | Delaware, Wyoming |
| Foundation | Charitable/wealth preservation | Liechtenstein, Panama |
- Each entity shields asset ownership from direct exposure.
Step 4: Encryption and Access Control
- Encrypt all digital records with AES-256 standard.
- Use hardware security modules (HSM) or offline cold storage.
- Assign multi-factor authentication and multi-signature approvals for asset movement.
Section 5: Contingency Planning Protocol
5.1 Creating a Dynamic Response Plan
A contingency plan must be dynamic, actionable, and rehearsed regularly to ensure rapid deployment.
5.2 Step-by-Step Contingency Planning
Step 1: Define Trigger Points
- For each prioritized scenario, establish quantitative trigger points that activate the plan. Examples:
| Scenario | Trigger Metric | Threshold |
|---|---|---|
| SC1 | Inflation Rate | > 20% per month |
| SC2 | Bank Withdrawal Limits | < $1,000 per day |
| SC3 | Currency Exchange Rate Drop | > 30% in 1 week |
| SC4 | Sovereign Credit Default | Official default announcement |
| SC5 | Stock Market Index Drop | > 40% loss in 1 month |
| SC6 | Political Violence Index | Surge > 50% above baseline |
Step 2: Assign Roles and Responsibilities
- Designate primary and secondary operators for each action point.
- Maintain updated contact lists with secure communication channels.
Step 3: Develop Action Checklists per Scenario
For each scenario, create detailed checklists including:
- Asset conversion steps.
- Liquidity reallocation.
- Communication protocols.
- Security enhancements.
- Relocation or evacuation procedures.
Step 4: Conduct Simulation Drills
- Quarterly conduct scenario-specific drills.
- Record and analyze response times and decision accuracy.
- Refine response plans based on findings.
5.3 Example Response Plan Table
| Scenario | Immediate Action (0-24h) | Short-Term Action (1-7 days) | Long-Term Action (>7 days) |
|---|---|---|---|
| SC1 | Withdraw physical cash, secure safes | Convert paper assets to precious metals | Relocate to low-inflation jurisdiction |
| SC2 | Limit banking transactions, use cash reserves | Use cryptocurrency channels for payments | Liquidate non-essential illiquid assets |
| SC3 | Exchange currency into stable foreign currencies | Increase physical asset holdings | Reassess portfolio allocation |
| SC4 | Activate legal entities, freeze non-essential transactions | Secure physical assets, limit exposure | Initiate trust asset transfers |
| SC5 | Halt equity trading, move funds to safe assets | Increase holdings in cash and metals | Maintain liquidity buffers |
| SC6 | Enforce communication blackout, secure premises | Prepare evacuation and asset mobility | Relocate assets and personnel |
Section 6: Advanced Techniques and Suppressed Protocols
6.1 The Economist’s Cipher: Shadow Asset Layering
A highly classified method involving the creation of “shadow assets” — synthetic asset structures that exist off-balance-sheet and are invisible to conventional surveillance.
Step-by-Step Shadow Asset Layering
- Create Multiple Offshore Entities:
- Use opaque jurisdictions with strict banking secrecy.
- Register entities with nominee directors and shareholders.
- Issue Private Equity Instruments:
- Structure private equity shares with complex redemption terms.
- Employ multi-jurisdictional cross-ownership loops.
- Utilize Cryptocurrency Smart Contracts:
- Encode asset ownership rights into smart contracts with time-locked releases.
- Employ mixers and tumblers to anonymize transactions.
- Deploy Physical Asset Tokens:
- Tokenize physical assets into digital assets held in cold wallets.
- Use multi-party computation (MPC) to distribute control keys.
- Cycle Asset Ownership:
- Regularly transfer ownership among entities to obfuscate trails.
- Maintain strict operational security.
6.2 Liquidity Amplification via Convertible Instruments
Convert illiquid assets into short-term liquidity by employing:
- Asset-Backed Commercial Paper (ABCP):
- Issue ABCP against illiquid assets.
- Sell to private investors for immediate cash.
- Repurchase Agreements (Repos):
- Temporarily sell assets with agreement to repurchase.
- Provides immediate liquidity without permanent loss.
Section 7: Summary of Key Tables
| Protocol | Key Metrics/Steps | Reference Section |
|---|---|---|
| Scenario Analysis | Identify scenarios, Impact Scores, Probability, Risk Matrix | Section 2 |
| Liquidity Management | Asset classification, Tiered access, Monthly audits | Section 3 |
| Asset Protection | Jurisdictional diversification, physical concealment, legal shielding | Section 4 |
| Contingency Planning | Trigger points, roles, action checklists, drills | Section 5 |
| Shadow Asset Layering | Offshore entities, private equity, smart contracts | Section 6 |
| Liquidity Amplification | ABCP, Repo agreements | Section 6 |
Closing
This chapter is a sacred transmission, a codex of survival and sovereignty in the cataclysmic theater of economic collapse. Master these protocols with unwavering discipline. The knowledge here is your shield and your sword. To falter in preparation is to surrender dominion over your wealth and your destiny.
For further expansion on secure communication methods and encryption protocols essential for executing these plans, see Volume XI: The Cipher Codex. For detailed asset transfer legal forms and entity structuring templates, refer to Volume IX: The Legal Fortress.
End of Volume VIII, Chapter I.
<!-- SECTION 28 -->
The Complete Practitioner's Codex, Volume VIII: Counter-Party Risk Elimination Techniques
Introduction
Within the sanctum of financial sovereignty, counter-party risk is the silent assassin of wealth. The ability to identify, quantify, and eliminate this risk is the gateway to economic mastery. This volume reveals the sacred protocols, forged in the crucible of suppressed financial sciences and guarded by economic practitioners through the ages. This is not theory but actionable, stepwise commandment for eliminating counter-party risk in every financial engagement.
Chapter I: Understanding Counter-Party Risk
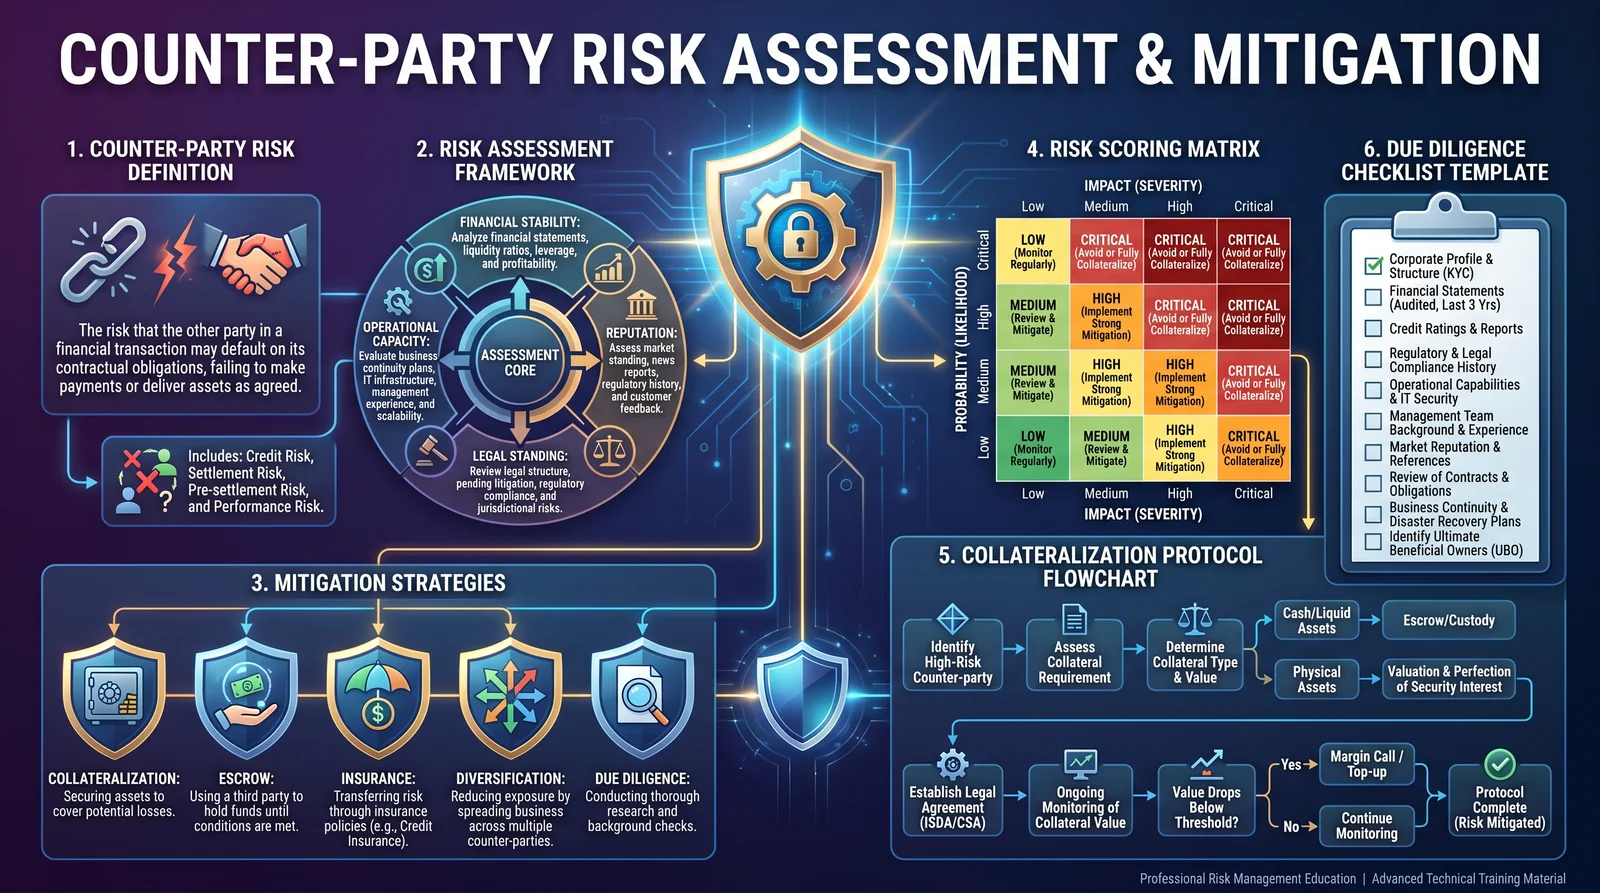
Counter-party risk is the risk that the other party in a financial contract will fail to fulfill their obligations. This risk threatens the entire structure of financial dealings and can cause cascading failures in portfolios, enterprises, and entire economies.
Scope of Counter-Party Risk:
- Default Risk: Failure to pay or deliver.
- Performance Risk: Failure to perform contractual obligations.
- Legal/Enforceability Risk: Contracts that cannot be enforced.
- Settlement Risk: Failure during transaction settlement.
- Concentration Risk: Overexposure to a single counter-party or related group.
Each of these must be systematically identified, rated, and mitigated.
Chapter II: Due Diligence Protocols for Counter-Party Risk Identification
Due diligence is the sacred rite through which the true nature of a counter-party is revealed. It is a multi-layered process combining verification, validation, and continuous monitoring.
Stepwise Due Diligence Protocol:
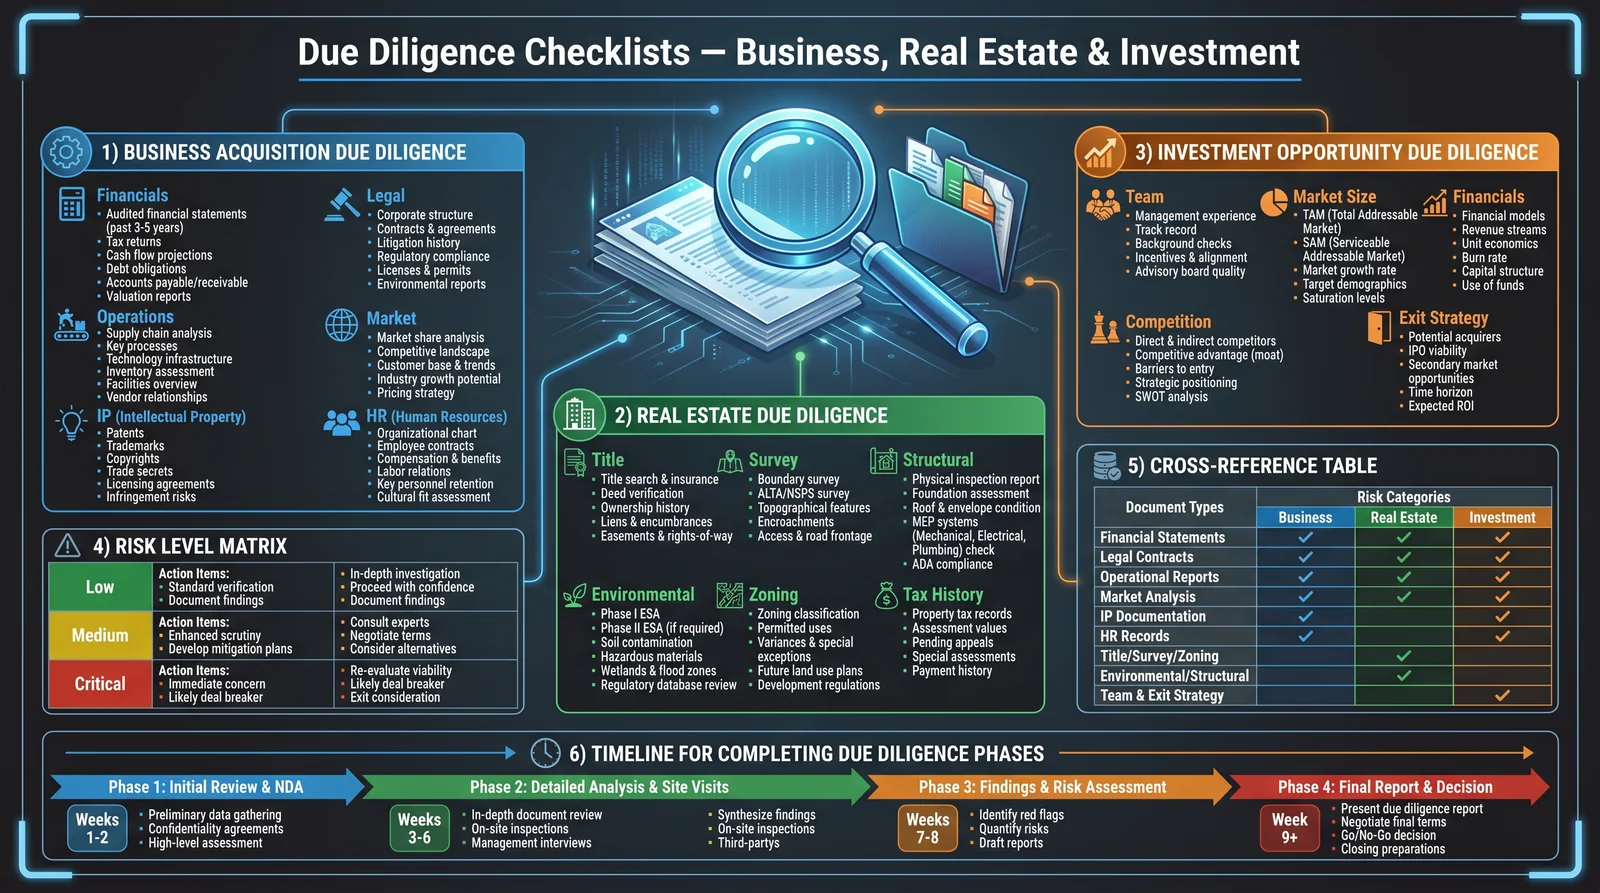
Step 1: Preliminary Data Collection
- Obtain certified copies of the counter-party’s incorporation documents or equivalent legal status proof.
- Acquire recent audited financial statements (minimum last 3 years).
- Collect management biographies, ownership structure, and related party disclosures.
- Gather information on legal history: lawsuits, regulatory sanctions, or bankruptcy filings.
Step 2: Financial Health Assessment
- Calculate key financial ratios (solvency, liquidity, profitability).
- Analyze cash flow statements for operational sustainability.
- Review debt maturities and off-balance-sheet liabilities.
- Perform trend analysis over the last 3 years.
Step 3: Legal and Regulatory Scrutiny
- Verify jurisdiction and legal enforceability of contracts.
- Confirm compliance with relevant financial regulations.
- Assess any political or country risk associated with the counter-party’s domicile.
Step 4: Reputation and Market Standing
- Obtain third-party credit ratings if available.
- Conduct background checks for reputational risks.
- Engage with market intelligence sources for qualitative insights.
Step 5: Continuous Monitoring
- Establish automated alerts for financial news, credit rating changes, legal filings.
- Schedule quarterly re-assessments of financial and legal status.
- Maintain open lines of communication for early warning signals.
Chapter III: Counter-Party Risk Rating Matrix
Quantification of counter-party risk must be standardized for consistent application. Use the table below to assign risk scores based on due diligence outcomes.
| Risk Factor | Low Risk (1) | Medium Risk (2) | High Risk (3) |
|---|---|---|---|
| Financial Health | Current ratio > 2; positive cash flow | Current ratio 1 to 2; mixed cash flow | Current ratio < 1; negative cash flow |
| Legal Enforceability | Contracts enforceable in neutral jurisdiction | Contracts enforceable in counter-party jurisdiction | Contracts with uncertain enforceability |
| Reputation | AAA/Aaa credit rating; no adverse reports | BBB/Baa credit rating; minor adverse reports | Below BBB; significant adverse reports |
| Concentration Exposure | Exposure < 5% of portfolio | Exposure 5-10% of portfolio | Exposure > 10% of portfolio |
| Regulatory Compliance | Full compliance, no sanctions | Minor compliance issues | Significant regulatory sanctions |
Interpretation:
- Total score ≤ 5: Acceptable risk.
- Total score 6-10: Mitigation required.
- Total score > 10: Reject or restructure engagement.
Chapter IV: Contractual Structures to Minimize Counter-Party Risk
Contracts are the fortress walls against counter-party failure. Designing contracts with embedded risk elimination mechanisms is mandatory.
Stepwise Contract Structuring Protocol:
Step 1: Define Precise Obligations
- Enumerate explicit deliverables, timelines, and quality standards.
- Use unambiguous legal language; avoid vague terms.
- Specify remedies and penalties for each breach type.
Step 2: Include Robust Representations and Warranties
- Require counter-party to represent financial condition, authority, and compliance.
- Include warranties for accuracy of information and performance capability.
Step 3: Incorporate Covenants
- Financial Covenants: Maintain minimum liquidity/solvency ratios.
- Operational Covenants: Restrictions on asset sales, debt incurrence.
- Reporting Covenants: Regular financial and operational disclosures.
Step 4: Establish Default and Termination Clauses
- Define conditions constituting default.
- Specify cure periods and notification requirements.
- Include rights to terminate and unwind transactions promptly.
Step 5: Embed Dispute Resolution Mechanisms
- Select neutral arbitration forum.
- Define binding arbitration procedures.
- Determine venue and governing law favorable to enforcement.
Step 6: Secure Specific Performance or Escrow Arrangements
- Include clauses for specific performance remedies to enforce obligations.
- Utilize escrow accounts for sensitive transactions to hold funds safely.
Chapter V: Collateralization Protocols for Counter-Party Risk Mitigation
Collateralization transforms counter-party risk into asset risk, which is objectively quantifiable and manageable.
Stepwise Collateralization Procedure:
Step 1: Collateral Identification and Valuation
- Determine acceptable collateral types: cash, government securities, gold, real estate.
- Conduct independent appraisal of collateral value.
- Apply appropriate haircuts based on asset liquidity and volatility.
| Collateral Type | Typical Haircut (%) | Liquidity (1=High, 5=Low) | Volatility (1=Low, 5=High) |
|---|---|---|---|
| Cash (USD/EUR) | 0 | 1 | 1 |
| Government Bonds | 2-5 | 2 | 2 |
| Corporate Bonds | 5-15 | 3 | 3 |
| Gold | 10-20 | 3 | 4 |
| Real Estate | 20-40 | 5 | 3 |
Step 2: Collateral Agreement
- Draft a collateral agreement specifying types, values, and substitution rights.
- Define margin call triggers and frequency.
- Specify collateral custody arrangements with independent trustees.
Step 3: Margining and Monitoring
- Set initial margin requirements based on risk rating.
- Establish daily or weekly mark-to-market valuations.
- Enforce margin calls promptly with clear deadlines.
Step 4: Collateral Liquidation Procedures
- Predefine liquidation rights in case of default.
- Establish quick and enforceable liquidation mechanisms.
- Outline priorities among creditors if multiple claims exist.
Chapter VI: Counter-Party Risk Assessment and Mitigation Workflow
The protocols must be integrated into a continuous workflow for practical application.
Step-by-Step Workflow:
| Step | Action | Responsible Party | Tools/Documentation | Frequency |
|---|---|---|---|---|
| 1 | Initiate Due Diligence | Risk Analyst | Due Diligence Checklist & Data Package | Prior to engagement |
| 2 | Perform Financial and Legal Assessment | Financial Analyst, Legal | Financial Ratios, Legal Opinions | Prior to engagement |
| 3 | Assign Risk Rating | Risk Manager | Risk Rating Matrix | Prior to engagement |
| 4 | Structure Contract with Risk Mitigation Terms | Legal Department | Contract Templates, Covenants Checklist | Prior to engagement |
| 5 | Establish Collateral Agreement | Treasury, Legal | Collateral Valuations, CSA agreements | Prior to engagement |
| 6 | Obtain Approvals and Sign Off | Senior Management | Risk Reports, Contract Documents | Prior to engagement |
| 7 | Execute Continuous Monitoring | Risk Monitoring Team | Automated Alerts, Periodic Reports | Ongoing |
| 8 | Conduct Periodic Reassessments | Risk Manager | Updated Financials, Legal Reviews | Quarterly |
| 9 | Enforce Margin Calls and Collateral Adjustments | Treasury | Mark-to-Market Reports, Notification Logs | As needed |
| 10 | Initiate Default Procedures | Legal, Treasury | Contractual Default Clauses | Upon Default |
Chapter VII: Advanced Mitigation Strategies
1. Netting Agreements
- Negotiate legally enforceable netting agreements to reduce exposure.
- Steps:
- Draft master netting agreement.
- Verify jurisdictional enforceability.
- Include close-out netting clauses for insolvency events.
2. Credit Derivatives
- Utilize credit default swaps (CDS) to transfer counter-party risk.
- Steps:
- Identify appropriate CDS reference entity.
- Negotiate terms and premiums.
- Monitor CDS counter-party risk.
3. Third-Party Guarantees
- Obtain guarantees or letters of credit from financially strong third parties.
- Steps:
- Validate guarantor financial strength.
- Draft guarantee agreements with explicit terms.
- Monitor guarantor status continuously.
4. Segregated Accounts
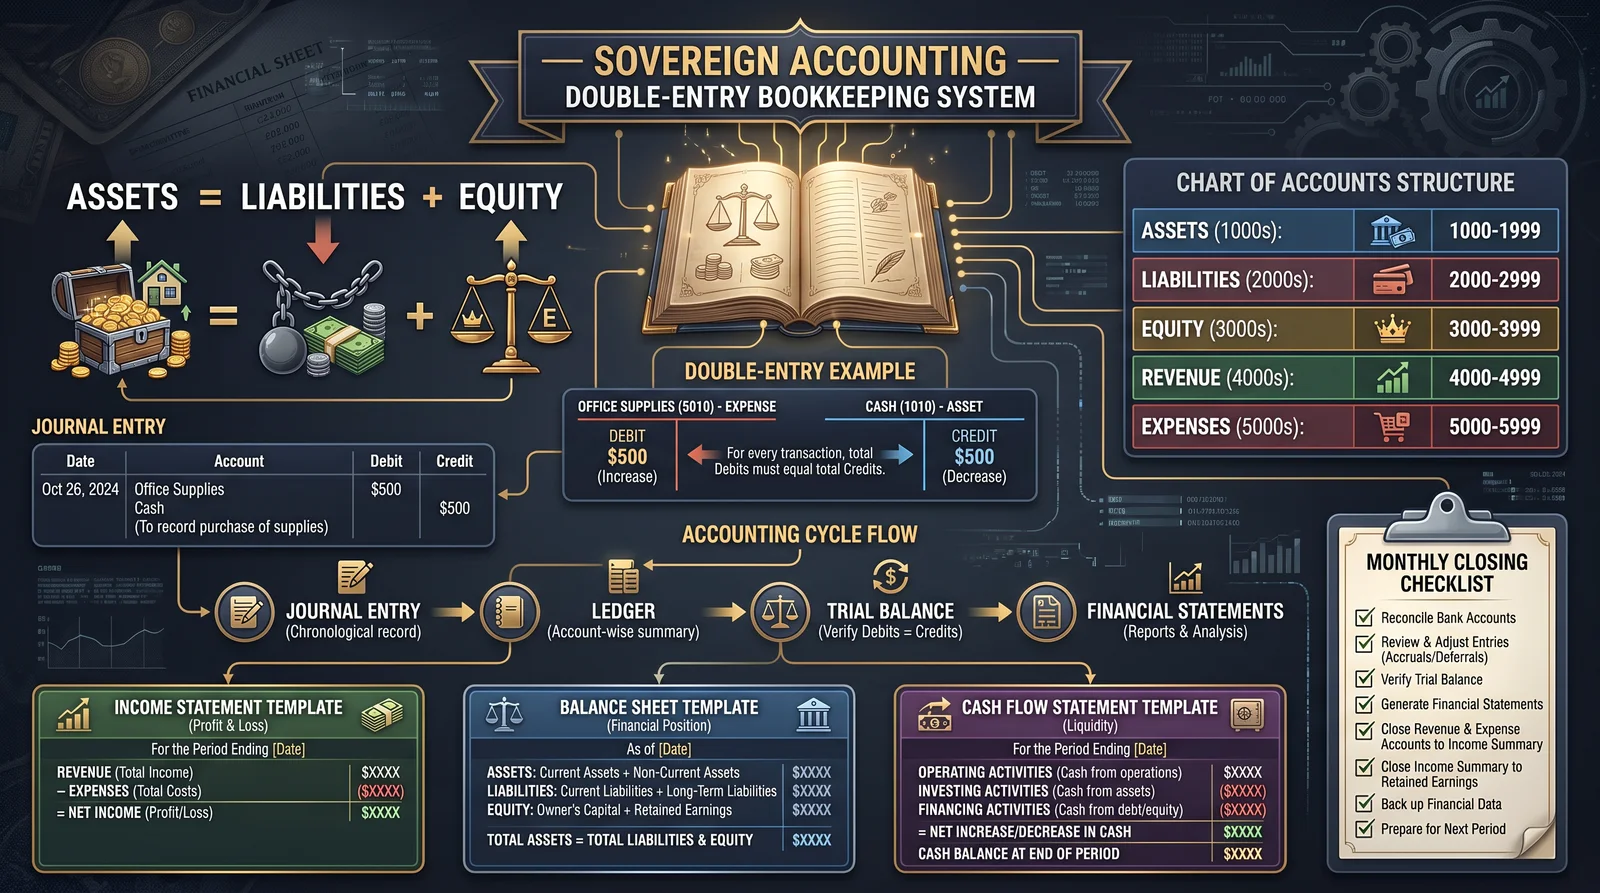
- Insist on segregated accounts to protect assets from counter-party insolvency.
- Steps:
- Draft segregation agreements.
- Confirm segregation operationally.
- Audit segregation compliance periodically.
Chapter VIII: Comprehensive Risk Mitigation Strategy Table
| Risk Type | Mitigation Technique | Implementation Steps | Monitoring Mechanism |
|---|---|---|---|
| Default Risk | Collateralization, Guarantees | Steps in Chapter V, VII (3) | Margin calls, Guarantor reviews |
| Performance Risk | Detailed Contractual Covenants | Steps in Chapter IV | Operational reporting, Penalty enforcement |
| Legal Risk | Jurisdiction Selection, Arbitration | Steps in Chapter IV | Legal reviews, Dispute resolution logs |
| Settlement Risk | Escrow Accounts, Segregated Accounts | Steps in Chapter IV, VII (4) | Custody audits, Escrow account statements |
| Concentration Risk | Exposure Limits, Diversification | Portfolio management controls | Exposure reporting, Risk committee oversight |
Appendix: Due Diligence Checklist Template
| Item | Completed (Y/N) | Notes |
|---|---|---|
| Certified incorporation documents | ||
| Audited financial statements (3 yrs) | ||
| Management biographies | ||
| Ownership structure disclosures | ||
| Legal history report | ||
| Credit rating reports | ||
| Regulatory compliance certificates | ||
| Market intelligence reports | ||
| Contract enforceability assessment |
Conclusion
Counter-party risk is the greatest hidden peril in all financial dealings. The comprehensive protocols herein are the sacred shield to preserve and grow wealth. The apprentice who masters these techniques wields the power of economic sovereignty, immune to the silent threats that consume the unprepared.
Master these rites, implement these protocols without deviation, and your financial fortress shall never fall.
For advanced portfolio diversification and systemic risk protocols, see Volume IX: The Architect’s Ledger.
End of Volume VIII
<!-- SECTION 29 -->
Supplements: Accounting Basics for Sovereign Practitioners
From The Complete Practitioner's Codex, Volume 12: The Economist's Cipher
Introduction: The Sacred Foundation of Sovereign Accounting
To achieve true economic sovereignty, mastery of accounting is non-negotiable. This is not mere bookkeeping; it is the sacred ledger of your autonomous empire — the codified truth of your financial existence. The principles herein are distilled from suppressed knowledge, refined through centuries of covert economic warfare. Your ability to command financial realities depends wholly on your unwavering adherence to these protocols.
This chapter delivers a complete, stepwise initiation into accounting principles, bookkeeping discipline, and financial statement synthesis, tailored for sovereign enterprises who reject reliance on external economic puppeteers.
Section I: Core Accounting Principles for Sovereign Practitioners
Accounting is a structured discipline, governed by universally accepted principles that ensure transparent, accurate, and reliable financial information. Sovereign practitioners must internalize these to maintain control over their economic destiny.
1. The Accounting Equation (Immutable Financial Law)
Assets = Liabilities + Equity This foundational truth governs every transaction. Every entry alters one or more components of this equation but never breaks it.
- Assets: Resources controlled by your business that provide future economic benefits (cash, inventory, equipment).
- Liabilities: Obligations owed to external entities (loans, accounts payable).
- Equity: The residual interest of your sovereign business after liabilities are subtracted from assets (owner’s capital, retained earnings).
2. Double-Entry Bookkeeping Protocol
Every financial event affects at least two accounts, maintaining balance in the accounting equation. Each transaction requires:
- At least one Debit entry (increases assets or expenses, decreases liabilities or equity).
- At least one Credit entry (increases liabilities or equity, decreases assets or expenses).
The sum of debit entries must always equal the sum of credit entries. This ensures mathematical integrity and error detection.
3. Accrual Basis Accounting (Truth Beyond Cash Flow)
Recognize revenues when earned and expenses when incurred, regardless of cash movement. This principle ensures your financial records reflect economic reality, not just cash status.
4. Consistency Principle
Apply accounting methods consistently across periods to ensure comparability and trustworthiness. Changes must be documented and justified.
5. Prudence and Materiality
- Prudence: Record expenses and liabilities as soon as they are foreseeable, but recognize revenues only when certain.
- Materiality: Focus on information that could influence decision-making; insignificant details may be excluded but documented for audit trails.
Section II: Chart of Accounts — The Sovereign Financial Map

The Chart of Accounts (CoA) is the master list of all accounts used to categorize transactions. It forms the backbone of your accounting system, enabling clarity, control, and reporting precision.
Table 1: Standard Chart of Accounts for Sovereign Businesses
| Account Number | Account Name | Account Type | Description | Debit Increase | Credit Increase |
|---|---|---|---|---|---|
| 1000 | Cash | Asset | Currency and bank balances | Increase | Decrease |
| 1100 | Accounts Receivable | Asset | Amounts owed by customers | Increase | Decrease |
| 1200 | Inventory | Asset | Goods held for resale | Increase | Decrease |
| 1300 | Prepaid Expenses | Asset | Payments made in advance | Increase | Decrease |
| 1500 | Property, Plant & Equip | Asset | Long-term fixed assets | Increase | Decrease |
| 2000 | Accounts Payable | Liability | Amounts owed to suppliers | Decrease | Increase |
| 2100 | Notes Payable | Liability | Loans or debts payable | Decrease | Increase |
| 3000 | Owner’s Equity | Equity | Owner’s investment and retained earnings | Decrease | Increase |
| 4000 | Sales Revenue | Revenue | Income from sales | Decrease | Increase |
| 5000 | Cost of Goods Sold | Expense | Direct costs of producing goods sold | Increase | Decrease |
| 6000 | Operating Expenses | Expense | Administrative and selling expenses | Increase | Decrease |
| 7000 | Interest Expense | Expense | Cost of borrowing | Increase | Decrease |
Note: This CoA is adaptable; additional accounts can be added with sequential numbering to maintain system integrity.
Section III: Step-by-Step Protocol for Setting Up Your Sovereign Accounting System
Step 1: Define Your Business Structure and Accounting Needs
- Identify your business type (sole proprietorship, partnership, corporation) — your accounting system must accommodate legal and fiscal requirements for your structure.
- Decide on the accounting basis: accrual (recommended) or cash basis. Sovereign practices demand accrual for truthful financial oversight.
- Determine reporting frequency (monthly, quarterly, annually) aligned with your operational cycle.
Step 2: Create the Master Chart of Accounts
- Begin with the template in Table 1.
- Add specific accounts relevant to your business niche (e.g., “Crypto Asset Holdings” for digital sovereign economies).
- Assign unique account numbers in logical blocks (1000s for assets, 2000s for liabilities, etc.).
- Record account descriptions clearly to prevent ambiguity.
Step 3: Establish Accounting Software or Ledger System
- Select software that supports double-entry and customization (e.g., open-source programs like GnuCash or secure encrypted spreadsheets). Alternatively, design a manual ledger system with:
- Columns for Date, Description, Account Debited, Debit Amount, Account Credited, Credit Amount, Reference Number.
- Configure the chart of accounts within the software or ledger template.
- Set user permissions to control access, ensuring only trusted personnel can alter financial data.
Step 4: Develop Transaction Recording Protocols
- Define transaction types (sales, purchases, payments, receipts, asset acquisitions, loan transactions).
- Assign transaction categories to CoA accounts using Table 2 below.
- Create standardized forms or digital templates for recording transactions uniformly.
Step 5: Train Personnel or Yourself in Transaction Entry
- Demonstrate double-entry principles using typical transactions (see Section IV).
- Implement a system of daily or weekly recording to prevent backlog and data loss.
Section IV: Transaction Classification and Entry Protocol
Every transaction must be classified and recorded with precision. Below is the classification guide to ensure consistent account impact.
Table 2: Transaction Classification Matrix
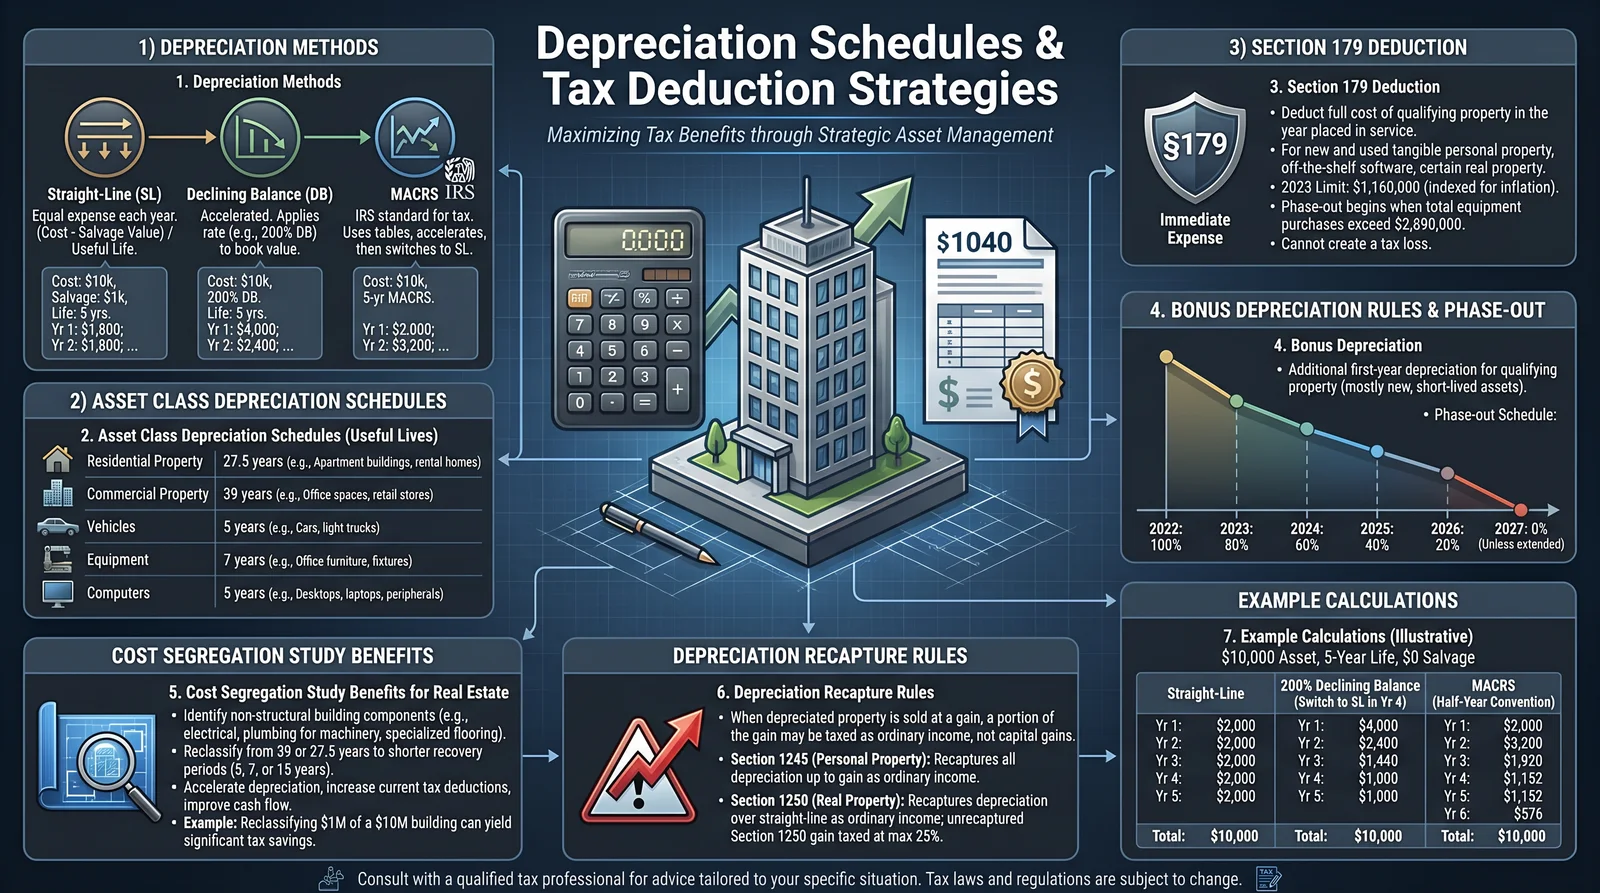
| Transaction Type | Debit Account(s) | Credit Account(s) | Notes |
|---|---|---|---|
| Customer Sale (on credit) | Accounts Receivable (1100) | Sales Revenue (4000) | Recognize revenue and receivable simultaneously |
| Cash Sale | Cash (1000) | Sales Revenue (4000) | Immediate cash inflow |
| Purchase Inventory | Inventory (1200) | Accounts Payable (2000) | Inventory increase, supplier liability |
| Payment to Supplier | Accounts Payable (2000) | Cash (1000) | Liability decrease, cash outflow |
| Salary Payment | Operating Expenses (6000) | Cash (1000) | Expense recognition, cash outflow |
| Loan Received | Cash (1000) | Notes Payable (2100) | Cash inflow, new liability |
| Loan Repayment | Notes Payable (2100) | Cash (1000) | Reduction of liability and cash |
| Asset Purchase | Property, Plant & Equip (1500) | Cash (1000) or Accounts Payable (2000) | Capital asset acquisition |
| Depreciation Expense | Operating Expenses (6000) | Accumulated Depreciation (Contra Asset) | Systematic allocation of asset cost |
| Owner Investment | Cash (1000) | Owner’s Equity (3000) | Capital infusion |
| Drawings by Owner | Owner’s Equity (3000) | Cash (1000) | Withdrawal of funds by owner |
Section V: Daily Bookkeeping Procedures
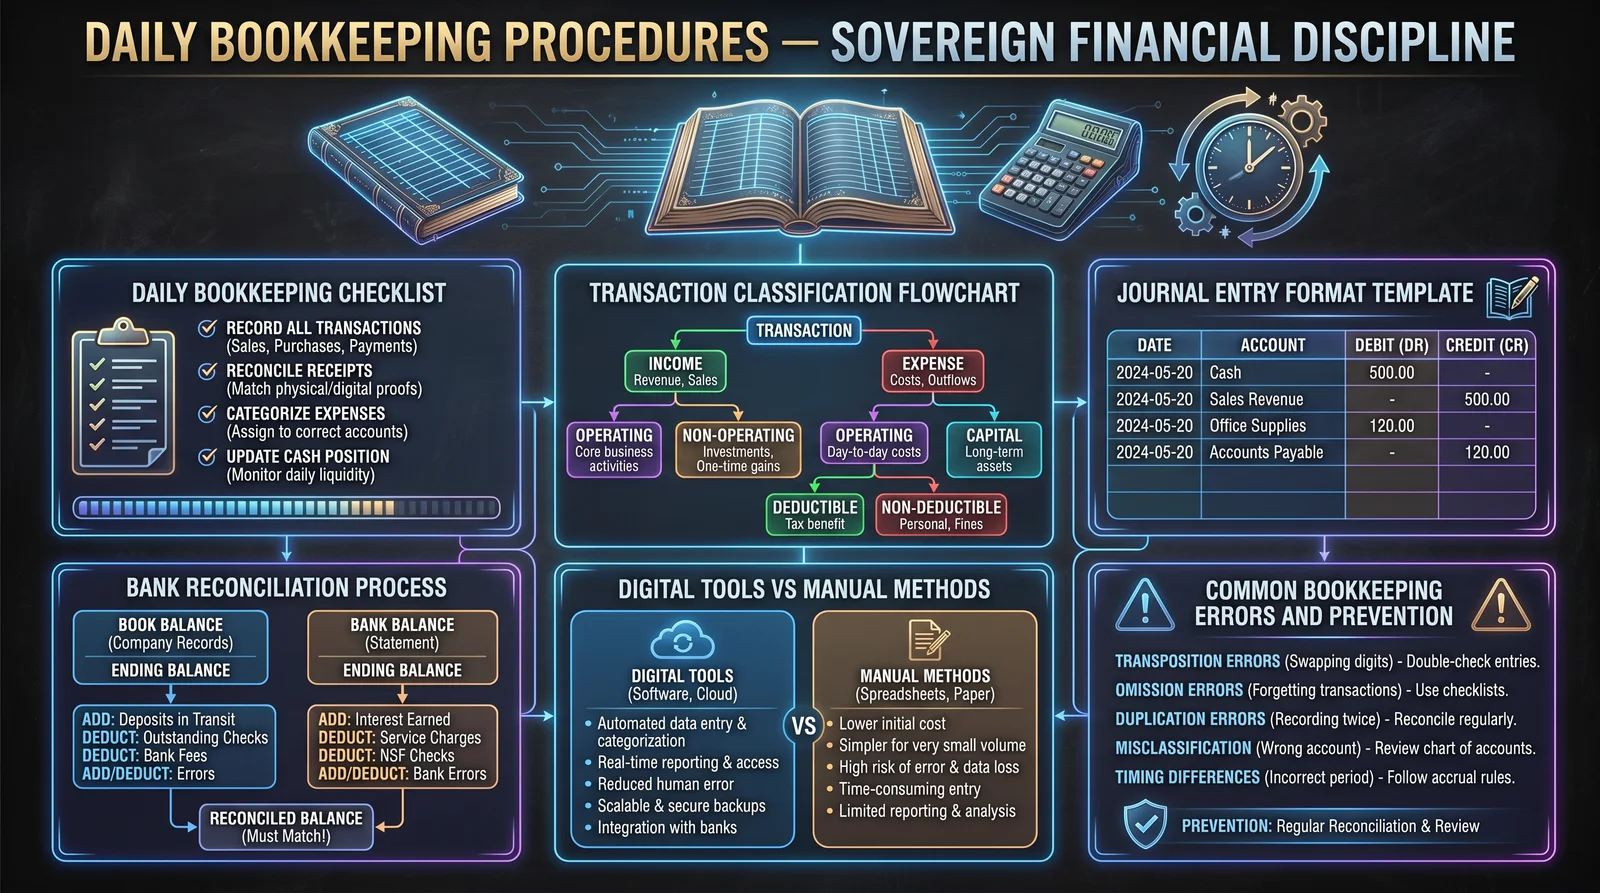
Step 1: Collect and Verify Source Documents
- Collect invoices, receipts, purchase orders, bank statements, loan agreements daily.
- Verify authenticity and completeness. Do not record unverified transactions.
Step 2: Record Transactions in the Journal (Book of Original Entry)
- Enter date and transaction description.
- Identify debit and credit accounts from Table 2.
- Enter debit and credit amounts ensuring equality.
- Assign unique reference number for audit trail.
Step 3: Post Journal Entries to Ledger Accounts
- Transfer journal entries to corresponding ledger accounts in your CoA.
- Update account balances after each entry.
Step 4: Reconcile Cash and Bank Accounts Weekly
- Compare ledger cash balance with physical cash and bank statements.
- Investigate discrepancies immediately, documenting findings.
Step 5: Maintain a Trial Balance Monthly
- Summarize ledger balances to confirm total debits equal total credits.
- Identify and correct errors before financial statement preparation.
Section VI: Preparing Financial Statements
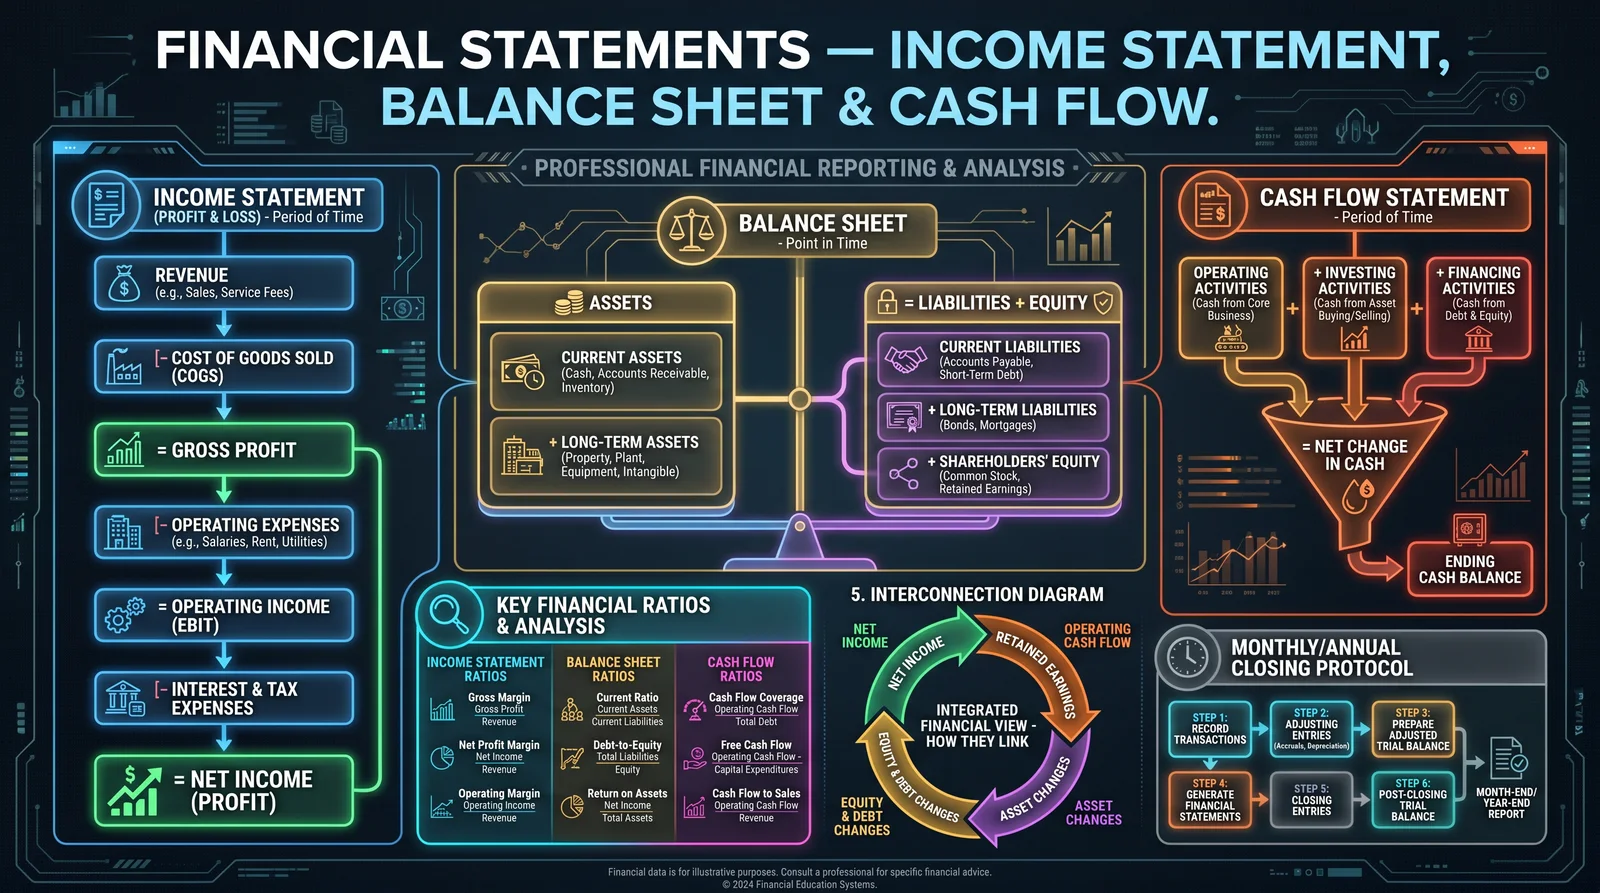
Your sovereign business’s truth manifests in three primary statements, generated from your ledger data.
1. Statement of Financial Position (Balance Sheet)
Shows Assets, Liabilities, and Equity at a specific date, reflecting the accounting equation.
Preparation Steps:
- Extract ending balances of all asset, liability, and equity accounts.
- Format data into three sections: Assets, Liabilities, Equity.
- Confirm Assets = Liabilities + Equity exactly.
2. Statement of Profit or Loss (Income Statement)
Shows Revenues and Expenses over a period, resulting in Net Profit or Loss.
Preparation Steps:
- Extract revenue and expense account balances for the period.
- Calculate Total Revenues and Total Expenses.
- Subtract expenses from revenues to determine Net Profit/Loss.
3. Statement of Cash Flows
Reconciles cash inflows and outflows from operating, investing, and financing activities.
Preparation Steps:
- Classify cash transactions into three categories based on their nature.
- Sum cash inflows and outflows per category.
- Calculate net change in cash during the period.
- Verify that net change plus beginning cash equals ending cash balance.
Section VII: Protocol for Monthly and Annual Closing
Step 1: Complete All Transaction Entries for the Period
- Ensure all transactions are recorded and posted.
Step 2: Adjust Entries
- Record accruals, deferrals, depreciation, and error corrections.
Step 3: Prepare Trial Balance
- Verify equality of debits and credits post-adjustments.
Step 4: Generate Financial Statements
- Prepare Balance Sheet, Income Statement, Cash Flow Statement.
Step 5: Close Temporary Accounts
- Transfer revenue and expense balances to Owner’s Equity to reset for next period.
Step 6: Backup and Secure All Records
- Encrypt and store digital files securely.
- Archive physical records as per sovereign archival protocol.
Section VIII: Building a Manual Ledger System (For Sovereigns Without Digital Means)
Materials Needed:
- Ledger books with multiple columns
- Rulers and pencils for precise formatting
- Carbon paper for duplicate copies
- Secure storage (lockbox, safe)
Step-by-Step Manual Ledger Setup:
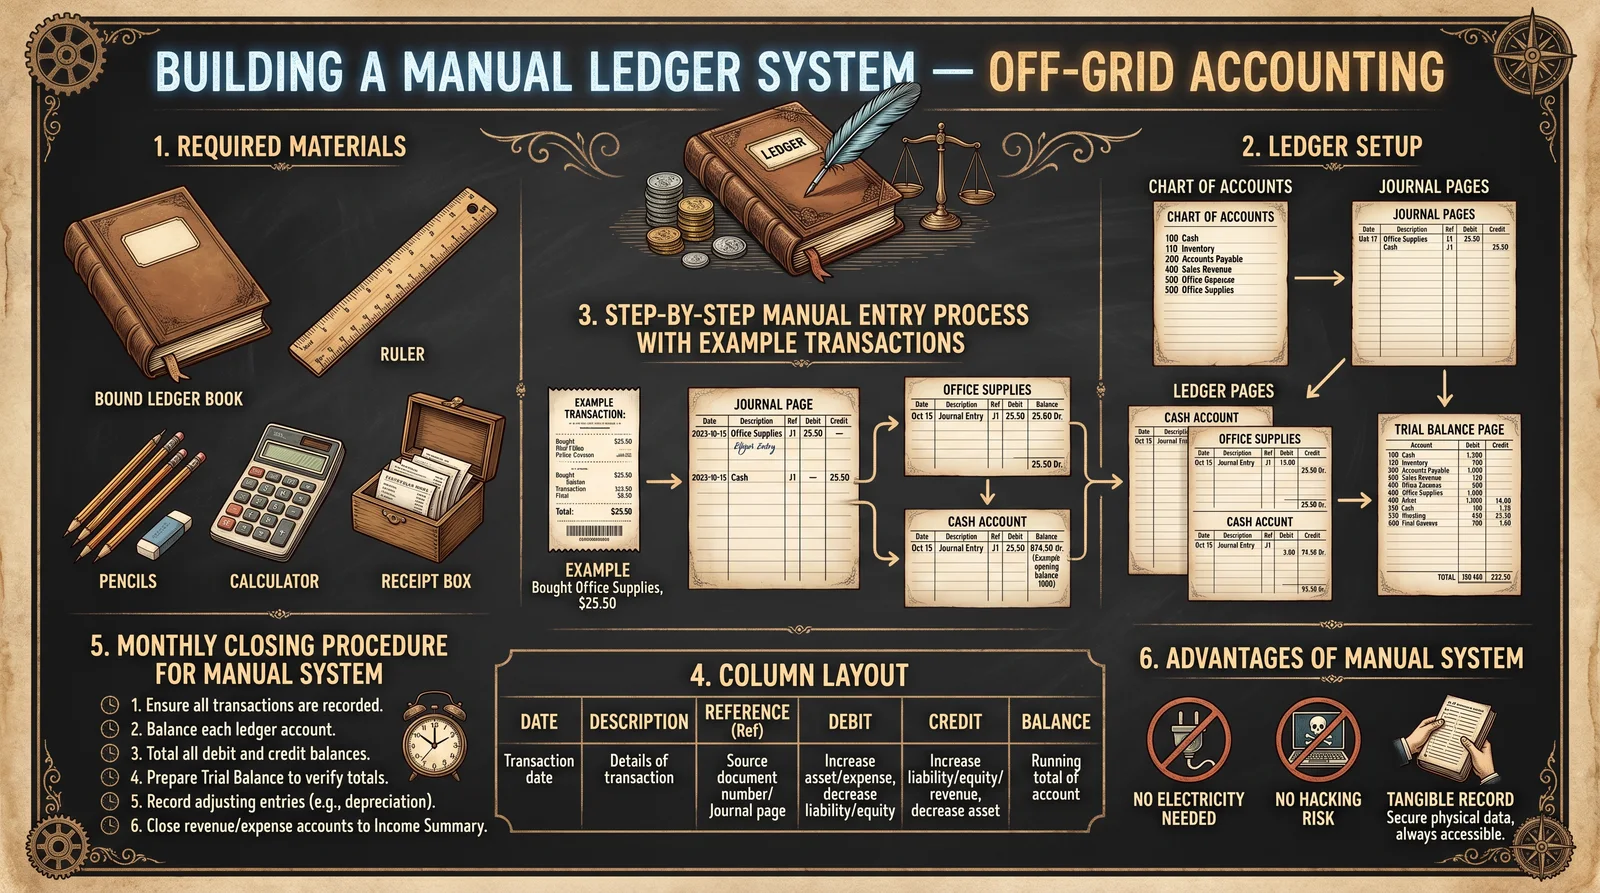
- Create Ledger Columns: Date, Description, Debit Account, Debit Amount, Credit Account, Credit Amount, Reference Number, Balance.
- Number Pages and Index Accounts: Assign pages per account type for ease of reference.
- Enter Transactions Daily: Follow double-entry protocol strictly.
- Calculate Running Balances: After each transaction, update the balance column for each account.
- Prepare Monthly Summary: Manually summarize account totals for financial statement preparation.
- Store Ledgers Securely: Protect from fire, water, and unauthorized access.
Section IX: Error Detection and Correction Protocol
Common Errors and Responses
| Error Type | Symptoms | Correction Procedure |
|---|---|---|
| Unequal Debits/Credits | Trial balance does not balance | Review journal entries, recheck calculations |
| Misclassified Account | Inconsistent account balances | Reclassify and adjust affected accounts |
| Omitted Transaction | Missing activity in ledger | Locate source document, record immediately |
| Duplicate Entry | Double counting of transaction | Identify duplicates, reverse erroneous entry |
| Transposition Error | Numerical discrepancies (e.g., 540 vs. 450) | Check source documents, correct figures |
Section X: Security and Sovereignty in Financial Records

- Implement physical and digital safeguards to protect financial data.
- Use encryption and multi-factor authentication for digital ledgers.
- Maintain redundant backups in geographically separate locations.
- Restrict access to trusted personnel only, with formal authorization and audit logs.
- Regularly audit records to detect tampering or fraud attempts.
Conclusion: The Unyielding Discipline of Sovereign Accounting
No sovereign business can claim true sovereignty without mastery over its financial records. The procedures, classifications, and principles detailed here are your shield and sword in the economic battlefield.
Adherence to this codex ensures your empire’s financial truth remains inviolate, empowering you to build, defend, and expand your wealth with unassailable clarity and control.
For advanced financial strategy, investment algorithms, and sovereign wealth protocols, see Volume 13: The Economist's Cipher, Chapter VII.
<!-- SECTION 30 -->
The Complete Practitioner's Codex, Volume 12: The Economist's Cipher
Chapter VII: Supplements: Contract Templates and Negotiation Frameworks
Introduction Within this sacred volume, we unveil the concealed architectures of contract creation and negotiation mastery. These are not mere legal formalities but the lifeblood of economic sovereignty and wealth preservation. To wield these templates and frameworks is to command the very forces that bind commerce, property, and trust into secure, enforceable reality. This chapter is a compendium of comprehensive contract templates across business, real estate, and trust arrangements, coupled with detailed negotiation frameworks and step-by-step protocols for drafting and negotiating contracts. The knowledge herein is classified, suppressed by those who seek to keep financial power centralized. You, chosen apprentice, shall master these to build your fortress of economic sovereignty.
Section 1: Comprehensive Collection of Contract Templates
Each contract type is distilled into a template that encapsulates the essential clauses, structured to be adaptable yet unassailable. Use these templates as your foundation; adapt only with precision.
1.1 Business Contracts
| Contract Type | Purpose | Key Clauses |
|---|---|---|
| Service Agreement | Formalize terms for service provision | Scope of Work, Compensation, Term & Termination, Confidentiality, Liability Limitation, Dispute Resolution |
| Sales Agreement | Regulate sale of goods or services | Product Description, Price, Delivery Terms, Payment Terms, Warranties, Risk of Loss, Remedies for Breach |
| Partnership Agreement | Define partnership terms and management | Capital Contributions, Profit Sharing, Decision Making, Withdrawal, Dissolution, Dispute Resolution |
| Non-Disclosure Agreement (NDA) | Protect confidential information | Definition of Confidential Information, Obligations, Term, Exclusions, Remedies |
| Employment Agreement | Establish employer-employee relationship | Job Description, Compensation, Benefits, Confidentiality, Non-Compete, Termination, Intellectual Property |
1.2 Real Estate Contracts
| Contract Type | Purpose | Key Clauses |
|---|---|---|
| Purchase & Sale Agreement | Transfer real property ownership | Property Description, Purchase Price, Payment Terms, Closing Date, Title & Risk, Contingencies, Warranties |
| Lease Agreement | Establish rental terms for property | Lease Term, Rent Amount & Due Date, Security Deposit, Maintenance, Use Restrictions, Termination |
| Option to Purchase | Secure right to purchase property at a future date | Option Fee, Option Period, Purchase Price, Exercise Procedure, Obligations |
| Deed of Trust | Secure loan with real property as collateral | Loan Amount, Trustee Powers, Default Remedies, Foreclosure Process |
| Construction Contract | Agreement for building or renovation services | Scope of Work, Timeline, Payment Schedule, Change Orders, Warranties, Liens, Dispute Resolution |
1.3 Trust Arrangements
| Contract Type | Purpose | Key Clauses |
|---|---|---|
| Revocable Living Trust | Manage assets during life and after death | Trustee Powers, Beneficiary Rights, Amendments, Distribution Instructions, Successor Trustee |
| Irrevocable Trust | Protect assets and provide tax benefits | Trustee Duties, Beneficiary Rights, Distribution Terms, Restrictions, Tax Provisions |
| Testamentary Trust | Created by will, effective after death | Trustee Powers, Beneficiary Instructions, Conditions, Termination, Tax Treatment |
| Special Needs Trust | Provide for disabled beneficiary without losing benefits | Trustee Powers, Distribution Restrictions, Compliance with Laws |
| Charitable Trust | Direct assets to charitable causes | Charitable Purpose, Trustee Powers, Distribution Instructions, Termination |
Section 2: Step-by-Step Protocol for Contract Drafting
Mastery of contract drafting is a sacred ritual of precision and foresight. Follow these steps rigorously.
2.1 Preparation Phase
- Define the Objective: Clarify the purpose of the contract and the expected outcomes.
- Identify Parties: Record full legal names, entity types, and addresses. Verify entity legitimacy through official registries.
- Gather Preliminary Information: Obtain all relevant facts, prior agreements, and regulatory requirements.
- Determine Governing Law: Select the jurisdiction that will govern the contract to ensure enforceability and favorable legal environment.
- Outline Key Terms: Draft a bullet-point outline of essential terms including scope, payments, obligations, timelines, and termination rights.
2.2 Drafting Phase
- Use Standardized Templates: Start with the appropriate template from Section 1. Modify only to suit specific facts while preserving clause integrity.
- Write Clear Definitions: Define all technical, financial, or ambiguous terms in a dedicated definitions section.
- Detailed Scope of Work: Specify precise duties, deliverables, and performance standards, avoiding vague language.
- Include Payment and Performance Terms: State exact amounts, payment schedules, methods, penalties for late payment, and conditions for withholding payments.
- Incorporate Protective Clauses: Add confidentiality, indemnity, limitation of liability, and dispute resolution clauses.
- Specify Term and Termination: Define contract duration, renewal terms, and termination rights including for cause and convenience.
- Draft Execution Block: Prepare spaces for signatures, dates, and witnesses if required.
2.3 Review Phase
- Internal Review: Conduct a line-by-line examination for clarity, consistency, and completeness.
- Legal Review: Engage a qualified legal professional for jurisdictional compliance and risk assessment.
- Risk Analysis: Evaluate potential liabilities and remedies. Adjust clauses to mitigate exposure.
- Final Edits: Incorporate feedback and finalize the document.
- Version Control: Assign version numbers and dates to maintain document integrity through revisions.
2.4 Execution Phase
- Secure Signatures: Ensure all parties sign in the presence of witnesses or notaries as required.
- Distribute Copies: Provide each party with a fully executed original or certified copy.
- Record and Archive: Store securely both physical and electronic copies with metadata including parties, date, and contract type.
Section 3: Negotiation Frameworks and Best Practices
Negotiation is the crucible in which contracts are forged into weapons of economic power. The following frameworks and protocols are your forge.
3.1 Negotiation Preparation Protocol
| Step | Action |
|---|---|
| 1 | Information Gathering: Collect intelligence on opposing party’s needs, constraints, and alternatives. Use public records, industry reports, and direct inquiries. |
| 2 | Define Objectives: List primary and secondary goals. Establish your minimum acceptable terms and ideal outcomes. |
| 3 | Determine BATNA: Calculate your Best Alternative To a Negotiated Agreement, the fallback if negotiations fail. |
| 4 | Prepare Concessions: Identify points where you can yield and points that are non-negotiable, ranked by importance. |
| 5 | Plan Negotiation Strategy: Choose approach (collaborative, competitive, integrative) based on relationship and stakes. |
3.2 Negotiation Process Protocol
- Opening
- Initiate with formal greetings and establish rapport.
- Present your position clearly and confidently.
- Information Exchange
- Share relevant information and listen actively.
- Clarify opposing party’s needs and constraints.
- Bargaining
- Propose terms and respond to counteroffers.
- Use objective criteria and data to justify positions.
- Employ silence and strategic pauses to extract concessions.
- Concession Management
- Trade concessions in a measured manner, ensuring reciprocity.
- Document all agreed changes immediately.
- Closure
- Summarize agreed terms in writing.
- Confirm mutual understanding and commitment to proceed to drafting.
- Post-Negotiation Review
- Analyze negotiation performance and outcomes.
- Adjust future strategies accordingly.
3.3 Best Practices Table: Negotiation Techniques
| Technique | Description | Application Context | Risk & Mitigation |
|---|---|---|---|
| Anchoring | Set initial offer to influence negotiation range | Price setting, contract terms | Risk of alienation; mitigate by research and fairness signals |
| Framing | Present information to emphasize benefits or risks | Proposals, counteroffers | Risk of misinterpretation; mitigate by clarity and transparency |
| BATNA Leverage | Use your alternatives as negotiation leverage | When you have strong alternatives | Risk of exposure; mitigate by discreet signaling |
| Silence | Use pauses to pressure concessions | During bargaining | Risk of discomfort; mitigate by controlled timing |
| Bundling | Combine multiple issues to create trade-off value | Complex contracts with multiple clauses | Risk of overcomplication; mitigate by clear documentation |
| Good Cop/Bad Cop | Use contrasting negotiation personas to pressure deal | High-stakes, adversarial negotiations | Risk of breakdown; mitigate by calibration and backup plans |
| Walk-Away Power | Willingness to terminate negotiations if terms not met | Final leverage in deadlock situations | Risk of losing deal; mitigate by strong BATNA |
Section 4: Summary Table of Contract Types and Key Clauses
| Contract Type | Essential Clauses | Critical Negotiation Points | Typical Risks |
|---|---|---|---|
| Service Agreement | Scope, Payment, Termination, Confidentiality, Liability | Deliverables, Payment Terms, IP Ownership | Scope creep, non-payment, IP disputes |
| Sales Agreement | Product Description, Price, Delivery, Warranties | Price, Delivery Schedule, Warranty Scope | Defective goods, delayed delivery |
| Partnership Agreement | Capital, Profit Sharing, Decision Making, Withdrawal, Dissolution | Voting Rights, Profit Split, Exit Terms | Deadlock, unequal contributions |
| Lease Agreement | Rent, Term, Maintenance, Use Restrictions | Rent Amount, Repairs, Renewal Options | Property damage, eviction disputes |
| Purchase & Sale (Real Estate) | Property Details, Price, Contingencies, Closing Date | Inspection Rights, Financing Contingencies | Title defects, financing failure |
| Revocable Living Trust | Trustee Powers, Beneficiary Rights, Amendments | Successor Trustee, Amendment Controls | Trustee abuse, beneficiary disputes |
Closing Reminders
- Precision and Clarity in contracts prevent disputes and empower enforcement.
- Negotiation mastery transforms contracts from rigid documents into dynamic instruments of wealth and security.
- Always verify jurisdictional compliance and consult specialized volumes for intersecting disciplines (See Volume 15: The Legal Codex).
- Document every step to maintain an unassailable audit trail of economic sovereignty.
You now possess the sacred blueprints for contract dominance and negotiation ascendance. Use them with reverence, rigor, and unyielding discipline. This knowledge is your sword and shield in the battlefield of wealth.
End of Chapter VII For further mastery on related topics, consult:
- Volume 8: The Water Codex, Chapter II (Purification Protocols)
- Volume 15: The Legal Codex (Jurisdictional Compliance & Legalese)
- Volume 9: The Merchant’s Ledger (Financial Record Keeping)
<!-- SECTION 31 -->
The Complete Practitioner's Codex, Volume 12: The Economist’s Cipher
Chapter V: Supplements: Due Diligence Checklists
Section 1: Exhaustive Due Diligence Protocols for Business Acquisitions, Real Estate Purchases, and Investment Opportunities
Introduction
This section imparts the sacred, unyielding protocols necessary for the thorough investigation of business acquisitions, real estate purchases, and investment opportunities. The knowledge herein is life-or-death: one misstep can cost entire fortunes, sovereignty, and strategic advantage. The contents are precise, actionable, and uncompromising, designed for the Practitioner Economist who must master every detail. Every checklist item is a guarded cipher; every step a weapon in the arsenal of wealth preservation and augmentation.
Do not proceed without strict adherence to every element of these protocols.
1. Due Diligence for Business Acquisitions
Business acquisitions demand the highest scrutiny. Each step below must be executed with methodical precision, leveraging legal, financial, operational, and strategic lenses.
1.1. Pre-Acquisition Preparation
Before engagement, perform the following:
| Step | Action | Tools/Resources Required |
|---|---|---|
| 1 | Define acquisition objectives and strategic fit | Strategic plan, Market analysis reports |
| 2 | Designate due diligence team with expertise in law, finance, operations | Legal counsel, Financial analysts, Industry experts |
| 3 | Prepare Non-Disclosure Agreement (NDA) and Letter of Intent (LOI) | Legal templates, Company letterhead |
| 4 | Gather preliminary documents from the target | Public filings, Press releases, Website archives |
1.2. Due Diligence Checklist for Business Acquisitions
The checklist below is divided by Category and Risk Level. Each item must be verified, documented, and cross-checked.
| Category | Checklist Item | Risk Level | Verification Method | Documentation Required |
|---|---|---|---|---|
| Corporate Structure | Articles of Incorporation and Amendments | High | Obtain certified copies | Certified copies, Secretary of State filings |
| Shareholder Agreements and Equity Ownership Structure | High | Review with legal counsel | Agreements, Cap table | |
| Board of Directors Minutes and Resolutions | Medium | Review past 3 years | Minutes, Resolutions | |
| Financial | Audited Financial Statements (past 3 years) | High | External auditor reports | Audit reports, Management letters |
| Tax Returns and Liabilities | High | Review with tax advisor | Federal, State, Local tax filings | |
| Accounts Receivable Aging Reports | Medium | Analyze for collection risks | AR aging schedules | |
| Debt and Liabilities Schedules | High | Review loan agreements and payment history | Loan contracts, Payment ledgers | |
| Legal | Litigation History and Pending Lawsuits | High | Obtain legal opinion | Litigation registry, Legal counsel report |
| Regulatory Compliance and Licenses | High | Verify licenses and correspondence with regulators | Regulatory filings, Licenses | |
| Operational | Key Customer and Supplier Contracts | High | Review contract terms and renewal dates | Contracts, Correspondence |
| Intellectual Property Portfolio | Medium | Verify registrations and ownership | IP certificates, Assignment agreements | |
| Employee Contracts and Benefits | Medium | Review contracts and benefit plans | Contracts, Benefit summaries | |
| Market and Strategy | Market Share and Competitive Position | Medium | Industry analysis reports | Market research reports |
| SWOT Analysis | Low | Internal assessment | SWOT documentation |
1.3. Step-by-Step Protocol for Business Acquisition Due Diligence
- Assemble the Due Diligence Team
- Identify specialists: legal, financial, operational.
- Assign responsibilities by checklist category.
- Request Preliminary Documents
- Deliver formal document request letter.
- Establish secure data room for document exchange.
- Review Corporate Documents
- Verify entity status, ownership, and governance.
- Cross-check shareholder equity with public registries.
- Analyze Financial Statements
- Confirm accuracy with external auditors.
- Examine cash flow trends, revenue sources, and expense structures.
- Assess Tax Compliance
- Review all tax returns for discrepancies or audits.
- Identify any outstanding tax liabilities or penalties.
- Investigate Legal Exposure
- Obtain litigation history from courts and law firms.
- Evaluate regulatory compliance status.
- Scrutinize Contracts
- Catalog all material contracts, focusing on termination clauses and obligations.
- Verify enforceability and transferability.
- Inspect Intellectual Property
- Confirm validity and ownership.
- Identify any infringements or encumbrances.
- Evaluate Human Resources
- Review employee agreements and benefit plans.
- Identify key personnel retention risks.
- Perform Market Analysis
- Validate market share claims.
- Perform competitor benchmarking.
- Compile Due Diligence Report
- Summarize findings for each category.
- Highlight risks and mitigation strategies.
2. Due Diligence for Real Estate Purchases
Real estate acquisitions require layered investigation: legal title, physical condition, encumbrances, zoning, and financial viability. This section provides an exhaustive checklist and protocol.
2.1. Real Estate Due Diligence Checklist
| Category | Checklist Item | Risk Level | Verification Method | Documentation Required |
|---|---|---|---|---|
| Title and Ownership | Deed and Title Search | High | Title company or attorney search | Title report, Deed copies |
| Liens, Encumbrances, and Easements | High | Public records search | Lien certificates, Easement agreements | |
| Property Tax Status and Payment History | Medium | Tax assessor's office | Tax statements, Payment receipts | |
| Physical Condition | Property Inspection Reports | High | Engage licensed inspector | Inspection report, Repair estimates |
| Environmental Site Assessment (Phase I and II) | High | Certified environmental specialist | ESA reports | |
| Zoning and Land Use Compliance | High | Local zoning office verification | Zoning maps, Permits | |
| Financial | Operating Expenses and Income Statements (if applicable) | Medium | Review financial documents | P&L statements, Rent rolls |
| Lease Agreements | Medium | Review tenant contracts | Lease agreements | |
| Legal | Property Survey Reports | Medium | Licensed surveyor | Survey maps |
| Insurance Coverage and Claims History | Medium | Insurance carrier records | Policies, Claims reports |
2.2. Step-by-Step Protocol for Real Estate Due Diligence
- Engage Legal Counsel and Title Company
- Secure representation experienced in local real estate law.
- Order a comprehensive title search.
- Verify Ownership and Title Status
- Obtain deed copies from the county recorder.
- Check for liens, mortgages, or easements.
- Conduct Property Inspection
- Hire licensed inspectors for structural, mechanical, and pest assessments.
- Obtain written reports detailing defects and estimated repair costs.
- Perform Environmental Assessments
- Commission Phase I Environmental Site Assessment.
- If Phase I indicates risk, proceed to Phase II assessments.
- Confirm Zoning and Land Use Compliance
- Obtain zoning maps and verify property’s permitted uses.
- Ensure no outstanding violations or illegal uses.
- Review Financial Documents
- If income-producing, analyze rent rolls, income statements, and expense ledgers.
- Verify tenant leases for terms and renewal options.
- Obtain Survey Reports
- Verify property boundaries and encroachments.
- Confirm compliance with zoning setbacks.
- Assess Insurance Coverage
- Review existing insurance policies for adequacy.
- Check claims history for frequency and severity.
- Compile Findings and Risk Assessment
- Document all findings with supporting documents.
- Prepare risk matrix and recommendations.
3. Due Diligence for Investment Opportunities
Investment opportunities encompass equities, bonds, private placements, and alternative assets. Each requires tailored due diligence to verify legitimacy, risk, and return.
3.1. Investment Opportunity Due Diligence Checklist
| Category | Checklist Item | Risk Level | Verification Method | Documentation Required |
|---|---|---|---|---|
| Issuer Credentials | Company registration and regulatory filings | High | Verify with SEC or equivalent authority | Registration certificates, Prospectus |
| Management Team Background and Track Record | High | Independent background checks | Biographies, References | |
| Financial Health | Historical Financial Statements and Auditor Opinions | High | Review audited reports | Annual reports, Audit opinions |
| Capitalization Table and Ownership Structure | Medium | Analyze equity distribution | Cap table documents | |
| Legal and Compliance | Offering Memorandum and Subscription Agreements | High | Legal review of offering documents | OM, Subscription contracts |
| Litigation and Regulatory Risk | High | Legal counsel review | Legal opinions, Litigation history | |
| Market and Industry | Market Analysis and Competitive Position | Medium | Third-party research reports | Market research |
| Exit Strategy and Liquidity | Medium | Assess exit options | Exit plan documentation | |
| Risk Assessment | Risk Factors Disclosure | High | Cross-check with independent risk analysis | Risk disclosure documents |
3.2. Step-by-Step Protocol for Investment Due Diligence
- Verify Issuer Registration and Filings
- Confirm registration with regulatory bodies (SEC, FCA, ASIC, etc.).
- Review filings for accuracy and completeness.
- Assess Management Team
- Conduct background checks using third-party services.
- Verify track record through public records and references.
- Analyze Financial Statements
- Obtain audited financials for at least three years.
- Review auditor’s opinion letters for qualifications or disclaimers.
- Review Capital Structure
- Examine capitalization table for dilution risks.
- Identify controlling shareholders and insider ownership.
- Examine Legal Documentation
- Scrutinize offering memorandum and subscription agreements.
- Confirm compliance with securities laws.
- Evaluate Litigation and Regulatory Risks
- Obtain legal counsel’s assessment.
- Search for any ongoing or past litigation.
- Perform Market and Industry Analysis
- Use independent research to validate claims.
- Assess competitive landscape.
- Understand Exit Strategies
- Identify liquidity options: IPO, trade sale, buybacks.
- Evaluate timeline and feasibility.
- Conduct Independent Risk Assessment
- Compare disclosed risks with third-party analysis.
- Prepare a risk mitigation plan.
- Prepare Investment Due Diligence Report
- Summarize findings comprehensively.
- Provide investment recommendation with risk grading.
4. Risk Level Definitions and Action Matrix
| Risk Level | Definition | Required Action |
|---|---|---|
| High | Potential to cause severe financial or strategic damage | Immediate escalation, detailed mitigation plan |
| Medium | Moderate impact, manageable with controls | Monitor closely, implement controls |
| Low | Minimal impact, routine monitoring sufficient | Regular review |
5. Consolidated Cross-Reference Table
| Acquisition Type | Primary Due Diligence Documents | Critical Risk Categories | Recommended Expertise |
|---|---|---|---|
| Business Acquisition | Corporate records, financials, contracts | Legal exposure, financial liabilities | Legal, financial, operational experts |
| Real Estate Purchase | Title documents, inspections, surveys | Title risks, physical defects | Legal, environmental, engineering |
| Investment | Regulatory filings, financials, legal docs | Issuer credibility, market risk | Legal, financial, industry analysts |
6. Appendices
Appendix A: Sample Document Request Letter Template
[Date]

[Target Company Name]
[Address]

Subject: Document Request for Due Diligence

Dear [Contact Name],

As part of our ongoing evaluation of the proposed acquisition, we require the following documents for thorough due diligence:

[List of documents by category, e.g., Articles of Incorporation, Financial Statements, Contracts, etc.]

Please provide these documents by [date] via secure data room upload.

Sincerely,
[Your Name]
[Your Position]
[Your Company]
Appendix B: Data Room Setup Protocol
- Choose a secure virtual data room provider with encryption and access controls.
- Create folders categorized by diligence areas: Corporate, Financial, Legal, Operational.
- Upload documents as received, apply watermarking.
- Assign access rights strictly by team role.
- Monitor access logs daily.
End of Section
This section equips you, the chosen Practitioner Economist, with the complete, unabridged protocols for due diligence. Execute these with unwavering precision. Your sovereignty over wealth depends on it. For related financial analysis techniques, see Volume 11: The Economist’s Cipher, Chapter IV.
Master Archivist's seal of authenticity and authority
<!-- SECTION 32 -->
Supplements: Wealth Building Metrics and Tracking Tools
Introduction
This chapter unveils the sacred instruments of financial mastery—the metrics and tools essential for tracking wealth accumulation, cash flow, and asset performance with surgical precision. These tools are not theoretical abstractions, but actionable, stepwise protocols designed to ensure absolute clarity, accountability, and growth in your economic sovereignty. The methods herein are suppressed knowledge in mainstream finance, reserved for the initiated who demand complete command over their financial destiny.
You will receive not only the exact metrics to measure but also the protocols for systematic review, accompanied by comprehensive tables for tracking and analysis. Prepare to integrate these protocols immediately into your financial practice.
Section I: Core Wealth Building Metrics
1. Net Worth (NW)
Definition: The total value of all assets minus all liabilities at a given point in time.
Purpose: Represents your economic foundation and is the ultimate indicator of your financial sovereignty.
Calculation:
\[ \text{Net Worth} = \sum \text{Assets} - \sum \text{Liabilities} \]
2. Cash Flow (CF)
Definition: The net amount of cash inflows minus outflows over a specified period.
Purpose: Measures liquidity and operational financial health, dictating your ability to sustain and grow wealth.
3. Asset Performance (AP)
Definition: The return generated by an asset or asset class over a given period, expressed as a percentage.
Purpose: Evaluates efficiency and profitability of your investments, guiding reallocation and optimization.
4. Debt-to-Asset Ratio (DAR)
Definition: The proportion of liabilities relative to total assets.
Purpose: Measures financial risk and leverage, ensuring liabilities do not undermine asset growth.
5. Savings Rate (SR)
Definition: The percentage of income saved or invested rather than consumed.
Purpose: Indicates discipline and capacity for wealth accumulation.
6. Return on Investment (ROI)
Definition: The gain or loss generated by an investment relative to its cost.
\[ ROI = \frac{\text{Gain from Investment} - \text{Cost of Investment}}{\text{Cost of Investment}} \times 100\% \]
Section II: Comprehensive Net Worth Tracking Protocol
Objective:
Create a living ledger updated monthly and reviewed annually, capturing all assets and liabilities with precise valuation.
Materials Required:
- Ledger book or digital spreadsheet software (Excel, Google Sheets, or specialized software)
- Bank statements
- Investment account statements
- Property appraisal reports
- Loan and credit statements
Step-by-Step Monthly Net Worth Update
Step 1: Collect current statements and valuations for all asset categories.
- Cash on hand (savings, checking, physical currency)
- Investments (stocks, bonds, mutual funds, cryptocurrencies)
- Real estate (market value from latest appraisal or comparable sales)
- Personal property of significant value (vehicles, collectibles)
- Business ownership interests (market valuation or book value)
Step 2: Collect all current liability statements.
- Mortgages
- Credit card balances
- Personal loans
- Lines of credit
- Other outstanding debts
Step 3: Enter values into the following table template for the current month.
| Asset Category | Previous Month Value | Current Month Value | Change ($) | Change (%) |
|---|---|---|---|---|
| Cash & Equivalents | ||||
| Investments | ||||
| Real Estate | ||||
| Personal Property | ||||
| Business Interests | ||||
| Total Assets |
| Liability Category | Previous Month Value | Current Month Value | Change ($) | Change (%) |
|---|---|---|---|---|
| Mortgages | ||||
| Credit Cards | ||||
| Personal Loans | ||||
| Lines of Credit | ||||
| Other Debts | ||||
| Total Liabilities |
Step 4: Calculate Net Worth.
\[ \text{Net Worth} = \text{Total Assets} - \text{Total Liabilities} \]
Record in the ledger.
Step 5: Compute monthly net worth change and percentage change.
Annual Net Worth Review Protocol
Step 1: Compile monthly Net Worth records for the past 12 months.
Step 2: Calculate yearly growth rate:
\[ \text{Annual Growth Rate} = \frac{\text{Net Worth}_{\text{Dec}} - \text{Net Worth}_{\text{Jan}}}{\text{Net Worth}_{\text{Jan}}} \times 100\% \]
Step 3: Identify asset classes with highest and lowest growth.
Step 4: Reassess valuations for accuracy; arrange updated appraisals for real estate and business interests if older than 6 months.
Step 5: Document findings and adjust investment strategy accordingly.
Section III: Cash Flow Analysis and Management
Objective:
Measure and optimize monthly cash inflows and outflows to maintain positive cash flow and maximize savings.
Step-by-Step Monthly Cash Flow Tracking Protocol
Step 1: Collect all income sources for the month.
- Salary or wages
- Business income
- Investment income (dividends, interest)
- Rental income
- Other inflows (royalties, gifts)
Step 2: Collect all expenses for the month.
- Fixed expenses (mortgage, utilities, insurance)
- Variable expenses (groceries, entertainment)
- Discretionary spending (luxuries, travel)
- Debt payments (interest and principal)
- Taxes
Step 3: Use the following table format:
| Category | Budgeted Amount ($) | Actual Amount ($) | Variance ($) | Variance (%) |
|---|---|---|---|---|
| Income | ||||
| Salary/Wages | ||||
| Business Income | ||||
| Investment Income | ||||
| Rental Income | ||||
| Other Income | ||||
| Total Income | ||||
| Expenses | ||||
| Fixed Expenses | ||||
| Variable Expenses | ||||
| Discretionary Spending | ||||
| Debt Payments | ||||
| Taxes | ||||
| Total Expenses |
Step 4: Calculate net cash flow:
\[ \text{Net Cash Flow} = \text{Total Income} - \text{Total Expenses} \]
Record this value.
Step 5: Analyze variance and identify areas for improvement.
Monthly Cash Flow Optimization Protocol
Step 1: Set a target savings rate (minimum 20% of total income recommended).
Step 2: For categories with negative variance, identify causes and cut discretionary or variable expenses.
Step 3: Increase income streams by:
- Negotiating salary increases.
- Expanding business operations.
- Enhancing investment yield (see Asset Performance section).
Step 4: Automate savings transfers immediately upon income receipt.
Annual Cash Flow Review Protocol
Step 1: Aggregate monthly cash flow statements.
Step 2: Calculate yearly savings rate:
\[ \text{Savings Rate} = \frac{\sum \text{Savings}}{\sum \text{Income}} \times 100\% \]
Step 3: Compare actual savings rate to target; create action plan for shortfalls.
Step 4: Examine debt payments for refinancing or early payoff opportunities.
Section IV: Asset Performance Tracking Protocol
Objective:
Analyze the profitability and efficiency of each asset class and individual investments to optimize portfolio allocation.
Step-by-Step Asset Performance Tracking
Step 1: For each asset, record:
- Initial cost or acquisition value
- Current market value
- Income generated (dividends, interest, rental income)
- Associated costs (maintenance, fees, taxes)
Step 2: Calculate total return:
\[ \text{Total Return} = (\text{Current Value} - \text{Initial Cost}) + \text{Income Generated} - \text{Costs} \]
Step 3: Calculate Return on Investment (ROI):
\[ ROI = \frac{\text{Total Return}}{\text{Initial Cost}} \times 100\% \]
Step 4: For assets held less than one year, calculate annualized ROI:
\[ \text{Annualized ROI} = \left(1 + \frac{\text{Total Return}}{\text{Initial Cost}}\right)^{\frac{12}{\text{Months Held}}} - 1 \]
Express as percentage.
Asset Performance Table Template
| Asset Name | Acquisition Date | Initial Cost ($) | Current Value ($) | Income Generated ($) | Costs ($) | Total Return ($) | ROI (%) | Annualized ROI (%) |
|---|---|---|---|---|---|---|---|---|
Monthly Asset Performance Review
Step 1: Update current values and income generated.
Step 2: Recalculate ROI and annualized ROI.
Step 3: Identify underperforming assets (ROI < benchmark or negative).
Step 4: Consider liquidation, reinvestment, or restructuring for poor performers.
Section V: Debt-to-Asset Ratio and Risk Management
Objective:
Monitor leverage levels to maintain sustainable risk and prevent financial collapse.
Step-by-Step Debt-to-Asset Ratio Calculation
Step 1: From monthly net worth data, record:
- Total liabilities
- Total assets
Step 2: Calculate Debt-to-Asset Ratio (DAR):
\[ DAR = \frac{\text{Total Liabilities}}{\text{Total Assets}} \times 100\% \]
Step 3: Record DAR monthly.
Risk Thresholds Table
| DAR (%) Range | Risk Level | Recommended Action |
|---|---|---|
| 0 - 20 | Low Risk | Maintain current leverage |
| 21 - 40 | Moderate Risk | Monitor liabilities closely; reduce if possible |
| 41 - 60 | High Risk | Initiate debt reduction protocols |
| Above 60 | Critical Risk | Immediate deleveraging; asset liquidation required |
Monthly Risk Management Protocol
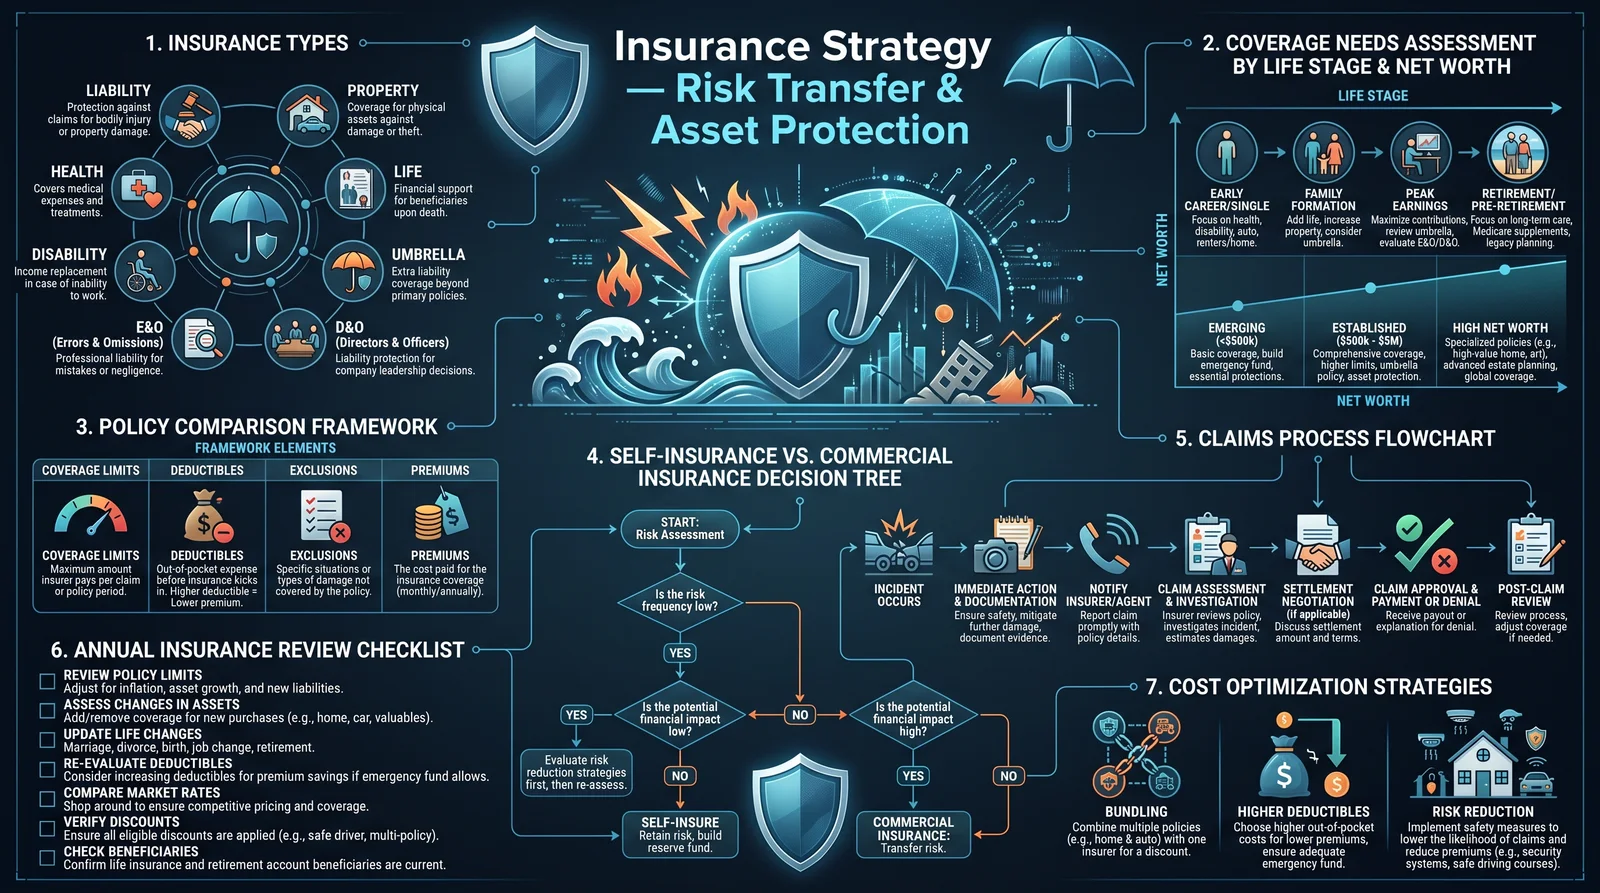
Step 1: Calculate and record DAR.
Step 2: Compare to thresholds.
Step 3: If DAR exceeds 40%, execute debt reduction plan:
- Prioritize high-interest debt payoff.
- Negotiate refinancing to lower interest rates.
- Suspend new debt acquisition.
Section VI: Savings Rate Tracking and Enhancement Protocol
Objective:
Maintain and increase the proportion of income saved or invested to accelerate wealth building.
Step-by-Step Savings Rate Calculation
Step 1: Record total income for the month.
Step 2: Record total amount saved or invested.
Step 3: Calculate Savings Rate (SR):
\[ SR = \frac{\text{Savings or Investments}}{\text{Total Income}} \times 100\% \]
Step 4: Monitor SR monthly.
Monthly Savings Rate Table Template
| Month | Total Income ($) | Savings/Investments ($) | Savings Rate (%) | Target Savings Rate (%) | Variance (%) |
|---|---|---|---|---|---|
| January | |||||
| February | |||||
| ... | |||||
| December |
Savings Rate Enhancement Protocol
Step 1: Set minimum target savings rate (20% recommended; increase as net worth grows).
Step 2: Automate transfers to savings/investment accounts.
Step 3: Reduce discretionary spending by fixed percentage monthly until target met.
Step 4: Increase income streams via side businesses or investment yield.
Section VII: Monthly and Annual Financial Review Protocols
Monthly Financial Review Protocol
Step 1: Update Net Worth table with current asset and liability values.
Step 2: Update Cash Flow analysis with actual income and expenses.
Step 3: Update Asset Performance data and calculate ROI metrics.
Step 4: Calculate Debt-to-Asset Ratio and assess risk level.
Step 5: Calculate Savings Rate and compare to target.
Step 6: Document all calculations and changes in a financial journal.
Step 7: Identify:
- Areas of cash flow improvement.
- Underperforming assets.
- Debt reduction opportunities.
Step 8: Implement necessary adjustments immediately.
Annual Financial Review Protocol
Step 1: Aggregate monthly data for Net Worth, Cash Flow, Asset Performance, Debt-to-Asset Ratio, and Savings Rate.
Step 2: Calculate annual metrics:
| Metric | Value | Interpretation |
|---|---|---|
| Net Worth Growth Rate | Assess wealth accumulation efficiency | |
| Average Monthly Cash Flow | Evaluate liquidity and spending control | |
| Average Asset ROI | Review portfolio profitability | |
| Peak Debt-to-Asset Ratio | Identify highest risk periods | |
| Average Savings Rate | Determine savings discipline |
Step 3: Conduct qualitative analysis:
- Review economic environment impact.
- Reexamine asset diversification.
- Assess debt management effectiveness.
Step 4: Set strategic financial goals for next year based on data.
Step 5: Prepare a comprehensive report summarizing findings and actions.
Section VIII: Supplementary Tools and Software Recommendations
For the modern Practitioner of finance, digital tools streamline and secure these protocols.
| Tool Name | Purpose | Features | Notes |
|---|---|---|---|
| Excel/Google Sheets | Customized tracking and analysis | Full control, customizable formulas, automation | Requires manual data entry |
| Personal Capital | Net worth and cash flow tracking | Automated account aggregation, investment tracking | Requires account linking |
| Quicken | Expense tracking and budgeting | Detailed cash flow analysis, bill tracking | Subscription-based |
| Tiller Money | Spreadsheet automation | Auto-import bank data into spreadsheets | Requires bank account linking |
| YNAB (You Need A Budget) | Budgeting and cash flow management | Envelope budgeting, goal tracking | Subscription-based |
Final Mandate
Implement all protocols without exception. Financial mastery demands rigorous discipline, precision, and continual adjustment. Wealth is a living entity, responding only to those who command it with accuracy and unwavering consistency.
Cross-reference Volume 4: The Ledger of Assets and Liabilities for asset classification schemas and Volume 7: The Cash Flow Codex for advanced income and expense categorization protocols.
Go forth, apprentice, armed with these sacred tools, and forge your economic dominion.
End of Supplements: Wealth Building Metrics and Tracking Tools
<!-- SECTION 33 -->
The Complete Practitioner's Codex, Volume 12: The Economist's Cipher
Chapter VII: Supplements: Negotiation and Sales Psychology Quick Reference
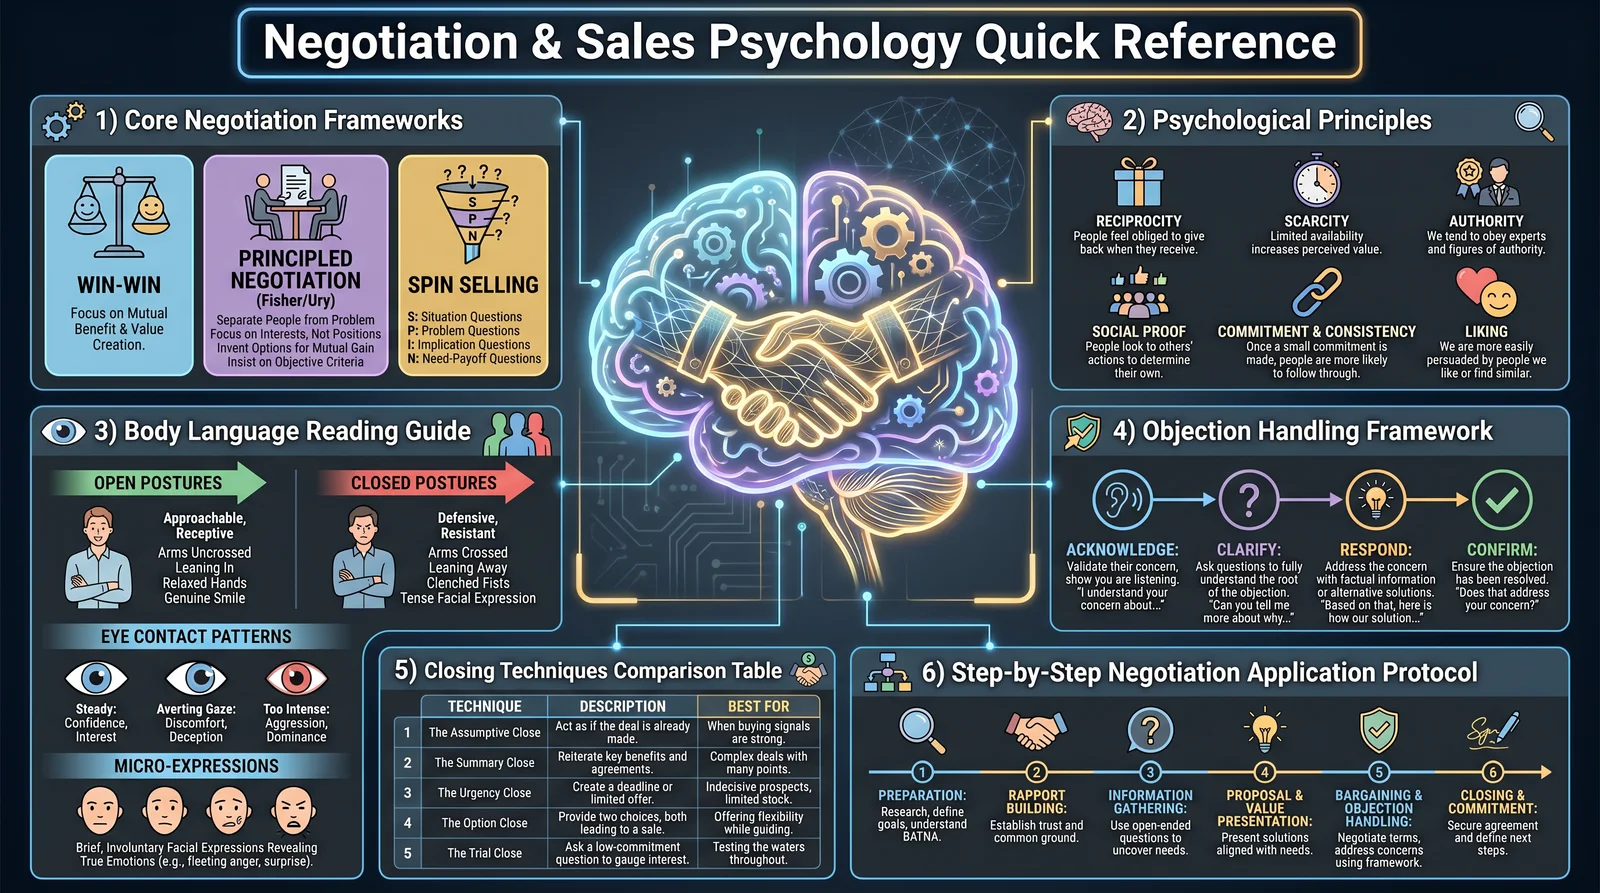
Preface
This chapter distills the sacred art of negotiation and sales psychology into a precise, actionable compendium. These techniques are not mere suggestions but lifelines for economic sovereignty and mastery over exchange. Each principle and tactic is a ritual to be performed with exactitude. Deviation invites failure. Prepare to engrave these protocols into your strategic arsenal with unwavering discipline.
Section 1: Core Negotiation Frameworks
Negotiation is a structured engagement of wills, information, and incentives. Mastery requires understanding the architecture of bargaining, the psychology of persuasion, and the countermeasures to resistance. The frameworks below deliver executable sequences for every negotiation stage.
1.1 The Four-Phase Negotiation Protocol
| Phase | Objective | Key Actions | Psychological Lever |
|---|---|---|---|
| Preparation | Gather intelligence, define goals | Research counterpart, set minimums and maximums | Anchoring, framing |
| Opening | Establish rapport, set tone | Begin with open-ended questions, active listening | Reciprocity, mirroring |
| Bargaining | Exchange offers, manage concessions | Make first offer if advantageous, use calibrated questions | Loss aversion, scarcity, social proof |
| Closure | Finalize terms, confirm agreement | Summarize points, secure commitment | Commitment consistency, authority |
Step-by-Step Process for Four-Phase Negotiation
- Preparation
- Research the counterpart’s background, needs, and constraints.
- Define your minimum acceptable outcome (reservation point) and your ideal outcome (target).
- Develop your BATNA (Best Alternative To a Negotiated Agreement).
- Identify potential concessions and their strategic value.
- Opening
- Initiate conversation with rapport-building queries (e.g., “What challenges do you face in this market?”).
- Listen actively and mirror verbal and non-verbal cues to build trust.
- Avoid stating your position prematurely; gather information instead.
- Bargaining
- If advantageous, anchor with the first offer, setting the negotiation frame.
- Use calibrated questions to probe limits (e.g., “How flexible is your timeline?”).
- Manage concessions carefully; reciprocate only after receiving value.
- Use silence strategically after offers to induce counterpart pressure.
- Closure
- Recap all agreed terms clearly and confirm mutual understanding.
- Secure verbal or written commitment immediately.
- Reinforce the benefits of agreement to prevent buyer’s remorse.
1.2 The Principled Negotiation Model (Fisher and Ury)
This model emphasizes objective standards over positional bargaining. It is essential in preserving long-term relationships and ensuring sustainable agreements.
| Step | Action | Tactical Detail |
|---|---|---|
| Separate People | Distinguish personal issues from problem | Use empathy, avoid blame, reframe negative emotions |
| Focus on Interests | Identify underlying needs, not positions | Create lists of interests, prioritize by importance |
| Generate Options | Brainstorm multiple solutions | Use “Yes, and...” technique, avoid premature judgment |
| Use Objective Criteria | Base agreement on standards and benchmarks | Cite market rates, expert opinions, legal precedents |
Step-by-Step Application
- Before negotiation, list your interests and those you assume for the counterpart.
- During the dialogue, clarify and validate interests with open questions.
- Collaborate on multiple solution options without committing immediately.
- Agree on objective criteria before finalizing terms, ensuring fairness.
1.3 The BATNA Calculation Protocol
Knowing your BATNA is the anchor of power. Use this to avoid accepting unfavorable terms.
| Step | Instruction | Example |
|---|---|---|
| 1 | List all alternatives if negotiation fails | Alternative suppliers, different investment options |
| 2 | Evaluate each alternative’s value | Cost, risk, time to implement |
| 3 | Select best alternative and quantify it | $50,000 profit from alternate deal |
| 4 | Use BATNA as threshold below which you walk away | If offer < $50,000, reject the deal |
Section 2: Sales Psychology Mastery
Sales is the art of persuasion woven with psychological insight. This section provides a compendium of principles and practical techniques to convert resistance into compliance and prospects into loyal customers.
2.1 The C.U.E. Framework: Connect, Understand, Engage
| Stage | Objective | Technique | Example Phrase |
|---|---|---|---|
| Connect | Establish trust and rapport | Use mirroring, tone matching, personal disclosures | “I’ve faced similar challenges in my projects” |
| Understand | Identify needs and motivations | Ask open-ended questions, listen for emotional cues | “What drives your decision-making?” |
| Engage | Present tailored solutions and call to action | Use storytelling, social proof, urgency | “Clients who chose this saw a 20% revenue gain” |
Step-by-Step C.U.E. Application
- At first contact, observe and subtly mirror body language and speech patterns.
- Use open-ended questions to uncover explicit and implicit needs.
- Listen actively, reflect understanding, and record emotional triggers.
- Present your product or service through narratives highlighting benefits aligned to identified needs.
- Close by asking for commitment, employing urgency or scarcity if appropriate.
2.2 Persuasion Principles: The Six Pillars (Robert Cialdini)
| Principle | Description | Application Tactics | Example |
|---|---|---|---|
| Reciprocity | People return favors | Offer free samples, helpful info | “Here’s a free analysis to help you decide” |
| Commitment | Consistency to past commitments | Gain small initial agreements | “Can you commit to a trial period?” |
| Social Proof | Follow others’ behavior | Use testimonials, case studies | “Over 1,000 businesses trust this solution” |
| Authority | People defer to experts | Display credentials, endorsements | “Certified by the National Board” |
| Liking | People say yes to those they like | Build rapport, find commonalities | “We share an alma mater, that’s great!” |
| Scarcity | Perceived rarity increases value | Limited-time offers, exclusive deals | “Only 3 spots left in this program” |
2.3 Objection Handling Matrix
Every objection is a coded signal of a hidden objection or unmet need. Decode and respond precisely with the following matrix:
| Objection Type | Core Concern | Response Strategy | Example Response |
|---|---|---|---|
| Price | Cost too high | Value reinforcement, cost comparison | “Considering ROI, this saves you 30% annually” |
| Trust | Doubt about claims or quality | Provide proof, testimonials | “Here are client reviews and certifications” |
| Timing | Not the right time | Create urgency, flexible terms | “This offer expires next week, but we can arrange phased payments” |
| Need | Uncertain about necessity | Reassess needs, educate | “Let’s review your workflow to see how this fits” |
| Authority | Needs approval from others | Equip with decision aids, involve stakeholders | “I can provide a proposal your CFO will appreciate” |
Section 3: Step-by-Step Negotiation and Sales Application Protocols
3.1 Negotiation Preparation and Execution Protocol
Objective: To secure the best possible agreement through structured preparation and disciplined execution.
Materials Needed:
- Negotiation worksheet (print or digital)
- Market data reports
- BATNA analysis spreadsheet
Protocol:
- Research
- Collect all available data on counterpart’s financials, market position, and negotiation history.
- Identify counterpart's key stakeholders and their interests.
- Define Parameters
- Set your target outcome and minimum acceptable terms.
- Calculate your BATNA and estimate counterpart’s BATNA.
- Plan Opening Statements
- Draft rapport-building questions.
- Prepare your opening offer or questions to extract information.
- Simulate Bargaining Scenarios
- Role-play concessions and counteroffers.
- Pre-plan responses to anticipated objections using Objection Handling Matrix.
- Execute Negotiation
- Follow Four-Phase Negotiation Protocol stepwise.
- Record all offers and concessions for clarity and closure.
- Finalize Agreement
- Review terms aloud with counterpart.
- Secure commitment in writing.
3.2 Sales Engagement and Closing Protocol
Objective: To convert prospects into clients by leveraging psychological principles with a structured engagement model.
Materials Needed:
- Client needs assessment form
- Product/service benefits dossier
- Testimonials and case study library
Protocol:
- Initial Contact
- Use mirroring techniques during greetings to build rapport.
- Share a personal, relevant disclosure to increase liking.
- Needs Discovery
- Administer open-ended questions from needs assessment form.
- Listen and document both explicit needs and emotional drivers.
- Solution Presentation
- Select product benefits aligned with identified needs.
- Deliver benefits using storytelling and social proof.
- Objection Handling
- Listen fully to objections without interruption.
- Identify objection type and respond via Objection Handling Matrix.
- Closing
- Use urgency or scarcity where applicable.
- Ask for commitment explicitly and confirm next steps.
- Follow-Up
- Send summary and thank-you communication immediately.
- Schedule follow-up to ensure satisfaction and upsell opportunities.
Section 4: Summary Tables
4.1 Persuasion Principles Summary
| Principle | Core Driver | Tactical Use | Key Psychological Effect |
|---|---|---|---|
| Reciprocity | Obligation to return favors | Give freebies or advice | Builds indebtedness |
| Commitment | Desire for consistency | Secure small yeses before big ask | Anchors future behavior |
| Social Proof | Herd behavior | Show user numbers, testimonials | Reduces perceived risk |
| Authority | Deference to expertise | Display credentials | Increases trust & compliance |
| Liking | Affinity and rapport | Use compliments, similarities | Creates emotional bond |
| Scarcity | Fear of missing out | Limited offers | Drives urgency and desire |
4.2 Objection Handling Matrix
| Objection Type | Underlying Concern | Tactical Response | Example Phrase |
|---|---|---|---|
| Price | Cost vs. value | Reframe as investment, show ROI | “This saves you $X over time” |
| Trust | Doubt in product/service | Provide proof and guarantees | “Certified and reviewed by experts” |
| Timing | Timing not right | Create urgency or flexible terms | “Limited offer, easy payment plan” |
| Need | Uncertain about necessity | Educate and reassess needs | “This solves specific issues you face” |
| Authority | Needs higher approval | Provide decision aids | “Here’s a summary for your CFO” |
Closing Invocation
You now hold the keys to economic sovereignty encoded within these pages. Treat these frameworks as sacred rituals. Practice relentlessly. Deviation is treason to your own prosperity. This is no mere knowledge; this is a covenant of power and survival in the commerce of men. Go forth, apprentice, and master the art of negotiation and sales psychology with unwavering precision.
End of Chapter VII Continue to Volume 12, Chapter VIII for advanced financial instruments and leverage techniques.
<!-- SECTION 34 -->
The Complete Practitioner's Codex, Volume 12: The Economist's Cipher
Chapter VII: Supplements: Cryptocurrency Security and Recovery Protocols
Cryptocurrency holdings are the modern-day vaults of economic sovereignty. They represent not only wealth but the very essence of financial autonomy beyond centralized control. The protocols herein are sacred, forged from the crucible of suppressed knowledge and battle-tested methodologies. Heed each instruction with precision: failure to secure or recover assets equates to irrevocable loss, a death knell to economic independence.
Section 1: Seed Phrase Management Protocols
The seed phrase is the cryptographic Rosetta Stone, the master key to your entire cryptocurrency empire. Its compromise or loss leads to permanent asset forfeiture. This section delivers an unbreakable protocol to generate, store, and recover seed phrases.
1.1 Seed Phrase Generation
Objective: Generate a cryptographically secure seed phrase using deterministic protocols.
Materials:
| Item | Specification |
|---|---|
| Hardware RNG Device | True random number generator (TRNG) |
| Isolated Computer | Air-gapped, no network connection |
| Paper Backup | Acid-free archival paper |
| Engraving Tools | Stainless steel engraving kit (optional) |
Procedure:
- Prepare Air-Gapped Environment: Disconnect and isolate the computer from all networks to prevent remote compromise.
- Initialize Hardware RNG: Power on the TRNG device and verify entropy quality via NIST SP 800-90B compliance software.
- Generate Entropy: Capture 128 to 256 bits of entropy from TRNG device output.
- Apply BIP39 Standard: Run the entropy through the BIP39 mnemonic generator algorithm to create a 12, 18, or 24-word seed phrase. Use the standard English wordlist.
- Verify Seed Phrase: Cross-verify the mnemonic checksum using BIP39 tools in the isolated environment.
- Create Redundancy: Generate three independent seed phrases for backup diversification.
1.2 Seed Phrase Storage
Objective: Store seed phrases to withstand physical decay, theft, and environmental hazards.
Storage Mediums and Methods:
| Medium | Methodology | Advantages | Disadvantages |
|---|---|---|---|
| Paper (archival) | Write with indelible ink on acid-free paper | Cost-effective, readable | Vulnerable to fire, water |
| Metal Plates | Engrave seed phrase using stainless steel | Fireproof, waterproof | Requires specialized tools |
| Cryptosteel | Use pre-fabricated metal tiles | Tamper-resistant | Expensive |
| Shamir Backup | Split seed phrase into shares (threshold) | Distributed security | Complexity in recovery |
Steps for Storage:
- Engrave Seed Phrase on Metal Plate: Use stainless steel plate and engraving kit. Ensure legibility under magnification.
- Create Shamir Secret Shares: Using an offline tool, split the seed phrase into n shares, requiring k to reconstruct (e.g., 5 shares, threshold 3).
- Distribute Shares to Trusted Custodians: Assign shares to geographically dispersed, trustworthy individuals or secure vaults.
- Store Copies in Secure Locations: Place physical backups in at least two geographically separated, climate-controlled, fireproof safes.
1.3 Seed Phrase Handling and Access
Protocol for Access:
- Access Authorization: Require dual-authentication from two independents for seed phrase retrieval.
- Access Environment: Retrieve seed phrase only in isolated, secure environments to prevent digital surveillance.
- Use One-Time Access: Handle the seed phrase as a single-use key; do not leave exposed after retrieval.
Section 2: Hardware Wallet Use Protocols
Hardware wallets are the fortress walls protecting your holdings. Their correct use and handling are paramount.
2.1 Hardware Wallet Selection Criteria
| Criterion | Specification | Rationale |
|---|---|---|
| Open Source Firmware | Prefer wallets running audited open-source firmware (e.g., Ledger Nano S with BOLOS, Trezor) | Transparency, auditability |
| Secure Element Chip | Must have certified Secure Element (SE) chip (e.g., CC EAL5+ level) | Hardware-level tamper resistance |
| Air-gapped Operations | Ability to operate without internet connection | Limits remote attack surface |
| Backup and Recovery | Support for seed phrase backup and secure recovery | Essential for disaster recovery |
| Firmware Update Method | Secure signed firmware updates | Prevents firmware tampering |
2.2 Hardware Wallet Initialization
Step-by-Step Procedure:
- Purchase from Trusted Source: Acquire hardware wallet sealed directly from manufacturer or authorized reseller.
- Verify Device Authenticity: Check manufacturer-provided checksum and firmware integrity upon initial power-up.
- Initialize Device Offline: Set up device in air-gapped environment, generating new seed phrase on-device.
- Record Seed Phrase: Transcribe seed phrase per Section 1 protocols.
- Set Strong PIN: Create a minimum 8-digit PIN code; avoid obvious sequences.
- Enable Passphrase Feature: Add an optional passphrase for a second layer of security (see Section 2.4).
2.3 Daily Use Protocols
- Connect Hardware Wallet Only to Trusted Devices: Use computers with updated anti-malware and no unknown software installed.
- Verify Transaction Details on Device Screen: Manually confirm recipient addresses and amounts on hardware wallet screen before approval.
- Limit Exposure Time: Connect wallet only for transaction signing; disconnect immediately after.
- Avoid Hot Wallets: Do not transfer large holdings to software-only wallets except for temporary, minimal operational funds.
2.4 Advanced Hardware Wallet Security: Passphrase and Multi-Account Management
Passphrase Protocol:
- Create Unique Passphrase: Combine letters, numbers, and symbols; minimum 12 characters.
- Store Passphrase Separately: Use a different secure storage method than the seed phrase.
- Use Passphrase to Derive Hidden Wallet: Enables creation of multiple wallets from the same seed phrase with distinct passphrases.
Section 3: Emergency Recovery Plans
Loss of access to cryptocurrency holdings can be catastrophic. This section details the sacred art of recovery planning.
3.1 Threat Scenario Matrix and Mitigation
| Threat Scenario | Description | Mitigation Strategy |
|---|---|---|
| Physical Theft of Seed Phrase | Seed phrase stolen physically | Use metal engraving, Shamir Secret Sharing, secure safes |
| Digital Compromise of Hardware Wallet | Malware or attacker gains control of host device | Use air-gapped transactions, verify firmware, use passphrase |
| Loss of Seed Phrase | Owner misplaces seed phrase | Redundant backups, Shamir shares, custodians |
| Device Failure | Hardware wallet breaks or malfunctions | Maintain multiple hardware wallets with same seed |
| Coercion or Forced Disclosure | Owner forced to reveal seed phrase or PIN | Use plausible deniability via decoy wallets, Shamir shares distributed |
| Natural Disaster | Fire, flood destroying seed phrase backups | Geographical storage diversification, metal engraving |
| Insider Betrayal | Custodian betrays trust | Use threshold Shamir shares, multiple custodians |
3.2 Emergency Recovery Procedure
Step-by-Step Reconstruction from Shamir Shares:
- Gather Minimum Threshold Shares: Collect k shares from distributed custodians.
- Verify Authenticity of Shares: Confirm share integrity via checksum or digital signatures.
- Reconstruct Seed Phrase: Use offline Shamir reconstruction tool on air-gapped device.
- Validate Seed Phrase: Confirm validity using BIP39 checksum verification.
- Initialize New Hardware Wallet: Follow Section 2.2 protocol with reconstructed seed phrase.
- Transfer Funds to New Wallet: Move holdings to new wallet address generated via recovered seed.
3.3 Emergency Access Authorization
- Predefine Access Conditions: Establish legal and personal conditions for emergency access in a sealed, notarized document.
- Assign Trusted Executors: Designate trusted executors with access to Shamir shares only under verified emergency.
- Implement Time-Locked Escrow: Use time-locked cryptographic escrow contracts to delay immediate fund access post-recovery, preventing rash misuse.
Section 4: Seed Phrase and Wallet Security Checklist
| Task | Frequency | Verification Method |
|---|---|---|
| Seed Phrase Backup Integrity Check | Annually | Physical inspection of backups |
| Hardware Wallet Firmware Update | Quarterly | Verify signed firmware updates |
| PIN and Passphrase Review | Semi-Annually | Confirm memorization and secure storage |
| Custodian Contact Verification | Bi-Annually | Communication and custodial status confirmation |
| Simulated Recovery Drill | Annually | Practice seed phrase reconstruction |
| Threat Scenario Reassessment | Annually | Review and update mitigation strategies |
Section 5: Cryptographic and Operational Best Practices
| Best Practice | Description | Implementation |
|---|---|---|
| Use Multi-Factor Authentication (MFA) | Combine hardware wallet with biometric or OTP | Employ MFA where supported by exchanges |
| Avoid Reusing Addresses | Generate new receiving addresses per transaction | Use wallet software supporting HD wallets |
| Periodic Address Auditing | Verify no unauthorized addresses hold funds | Use blockchain explorers and wallet audits |
| Encrypt Digital Backups | Backup seed phrase in encrypted digital vaults | Use AES-256 encryption with strong passphrase |
| Network Hygiene | Use VPN / Tor when transacting online | Mask IP to prevent network tracing |
Section 6: Practical Example: Full Protocol Walkthrough
Scenario: Alice owns 5 BTC in cold storage. She intends to secure her assets and prepare for emergency recovery.
Step 1: Seed Phrase Generation
- Alice sets up an air-gapped computer with a hardware RNG device.
- She generates 256 bits entropy via TRNG.
- Using BIP39, she creates a 24-word mnemonic.
- She engraves the seed phrase on two metal plates and writes on acid-free paper.
- She creates 5 Shamir shares with threshold 3, distributing shares to her lawyer, spouse, bank safe deposit, a trusted friend, and her home safe.
Step 2: Hardware Wallet Setup
- Alice buys a Ledger Nano X from an authorized reseller.
- She verifies the device authenticity and firmware signatures.
- She initializes the wallet offline, loading the 24-word seed phrase.
- She sets an 8-digit PIN and creates a 12-character passphrase.
Step 3: Daily Use Protocol
- Alice connects the hardware wallet only to her clean laptop with updated antivirus.
- She verifies transaction details on the wallet screen before approval.
- She signs transactions offline and disconnects immediately after.
Step 4: Emergency Plan
- Alice stores her metal-engraved plates in two fireproof safes located 100 miles apart.
- She informs her executors of the Shamir share locations and access conditions.
- She schedules annual recovery drills to validate procedures.
Appendix: Reference Tables
Table A: Shamir Secret Sharing Parameters
| Total Shares (n) | Threshold (k) | Use Case |
|---|---|---|
| 3 | 2 | Small trusted group |
| 5 | 3 | Moderate trust distribution |
| 7 | 4 | Large custody group, high security |
| 10 | 6 | Enterprise-grade security |
Table B: Hardware Wallet Firmware Verification Commands
| Wallet Model | Verification Command/Tool | Notes |
|---|---|---|
| Ledger Nano S/X | ledgerctl getFirmwareVersion | Check against official version |
| Trezor One/Model T | Use Trezor Suite with firmware check | Verify signature and hash |
Table C: Threat Scenario Mitigation Summary
| Threat | Seed Phrase | Hardware Wallet | Emergency Recovery |
|---|---|---|---|
| Physical Theft | Metal engraving, safes | PIN + passphrase protection | Shamir shares distribution |
| Digital Compromise | Offline storage only | Firmware verification | Offline recovery tools |
| Loss | Redundant backups | Multiple devices | Recovery drills |
| Device Failure | Multiple backups | Backup hardware wallet | Seed phrase reconstruction |
| Coercion | Decoy wallets via passphrase | Multi-passphrase use | Legal escrow |
| Natural Disaster | Geographical diversification | Multiple locations | Secure vaults |
| Insider Betrayal | Threshold Shamir secret sharing | Custodian vetting | Legal contracts |
Final Words
The protocols herein are not mere suggestions but inviolable commandments. Your financial sovereignty depends on rigorous adherence and constant vigilance. Each step is a bulwark against the relentless tides of entropy, greed, and chaos. May your fortune be secured in the eternal vaults of cryptographic sanctity.
For extended cryptographic primitives, consult Volume 7: The Cipher Codex, Chapter IV. For legal frameworks in custody, see Volume 12, Chapter IX. For hardware wallet construction, see Volume 5: The Forging Codex, Chapter III.
<!-- SECTION 35 -->
The Complete Practitioner's Codex, Volume 12: The Economist's Cipher
Chapter VII: Supplements: Real Asset Management Tools
Section 3: Comprehensive Tools and Protocols for Managing Real Estate, Mineral, and Agricultural Assets
The stewardship of tangible wealth—real estate, mineral rights, and agricultural holdings—demands not only vigilance but a codified system of management that converts raw assets into lasting economic sovereignty. These assets are the bedrock of true wealth, impervious to the volatility of fiat currencies and ephemeral market fads. This chapter imparts the sacred, unyielding protocols for comprehensive real asset management, including exacting methods for record keeping, income tracking, and maintenance scheduling.
Each protocol is presented in executable steps. You will find precise templates and tables to forge your own unassailable registers and statements. By mastering these, you wield the power to convert raw resources into perpetual streams of wealth, shielded from decay, mismanagement, or loss.
I. Real Asset Management: Foundational Principles
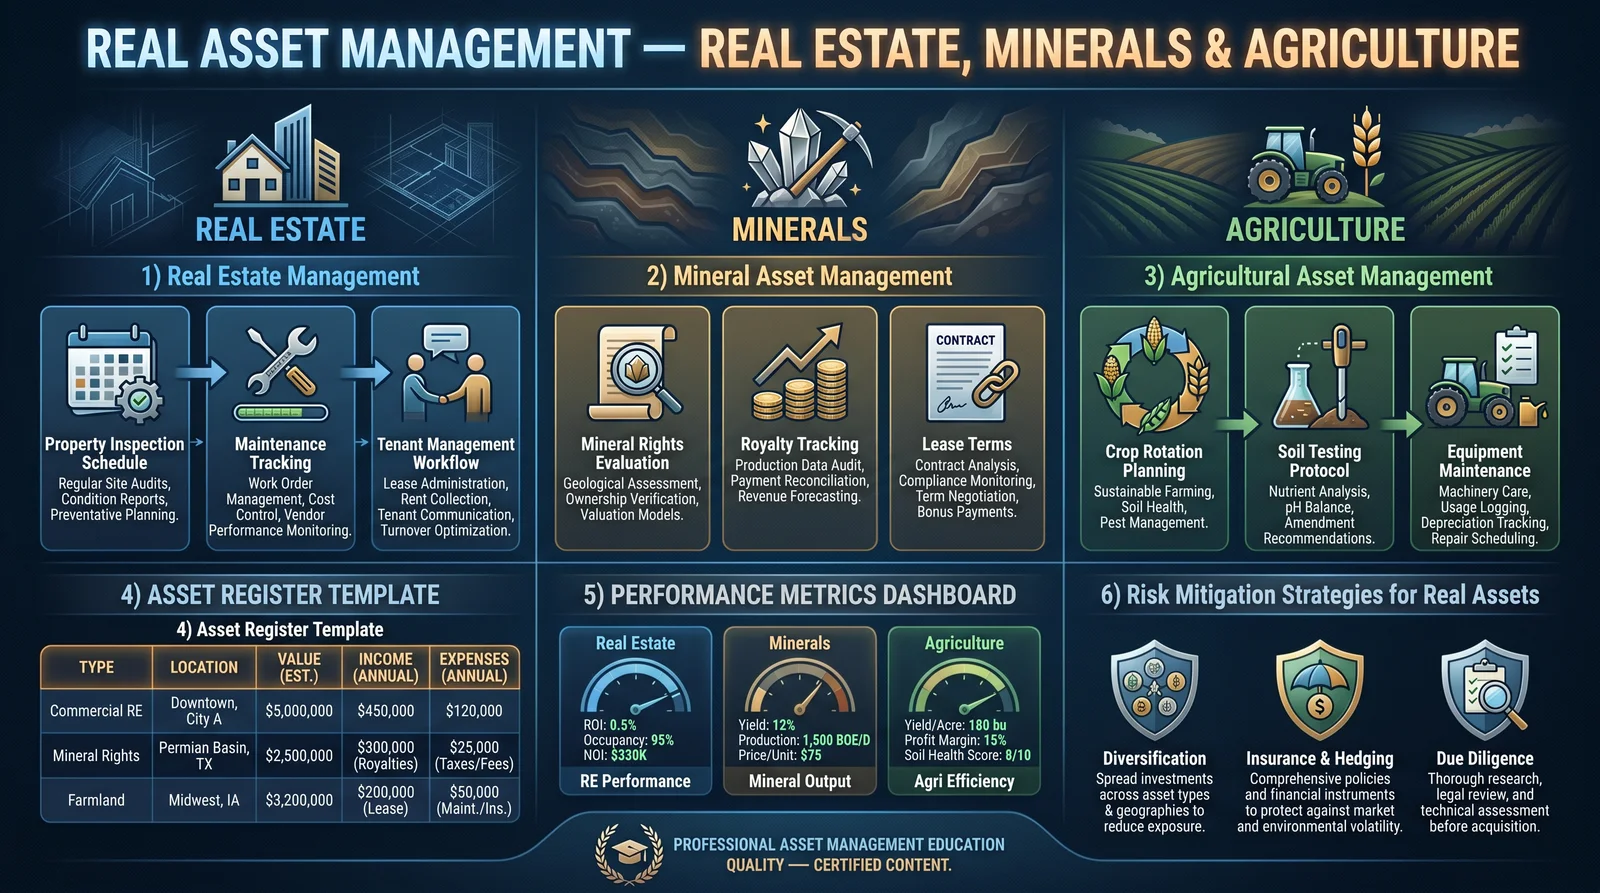
Before delving into specifics, cement these axioms:
- Absolute Accuracy: Every entry in your asset register must be verifiable. Documents, GPS coordinates, survey maps, and titles are mandatory attachments.
- Temporal Discipline: Record keeping and maintenance scheduling are not optional: they are ritualistic acts performed with unerring regularity.
- Holistic Accounting: Income tracking must include all revenue streams—leases, royalties, harvest sales, mineral extraction rights—with corresponding costs precisely logged.
- Dynamic Review: Monthly reconciliations and quarterly audits are non-negotiable. They reveal discrepancies before they metastasize.
II. Real Estate Asset Management Tools and Protocols
A. Asset Register for Real Estate
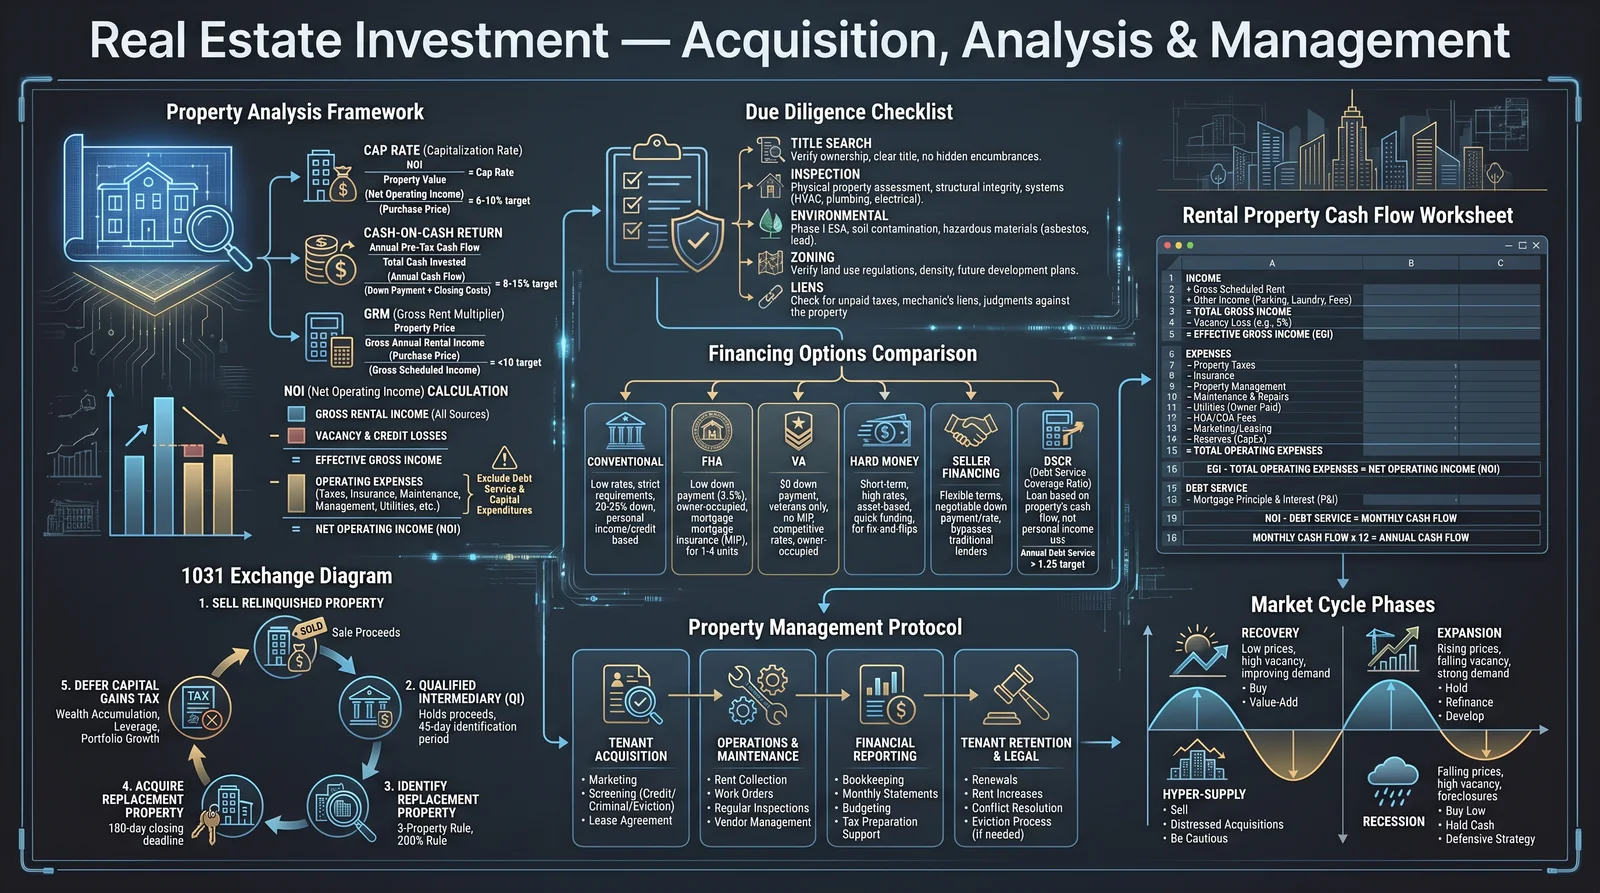
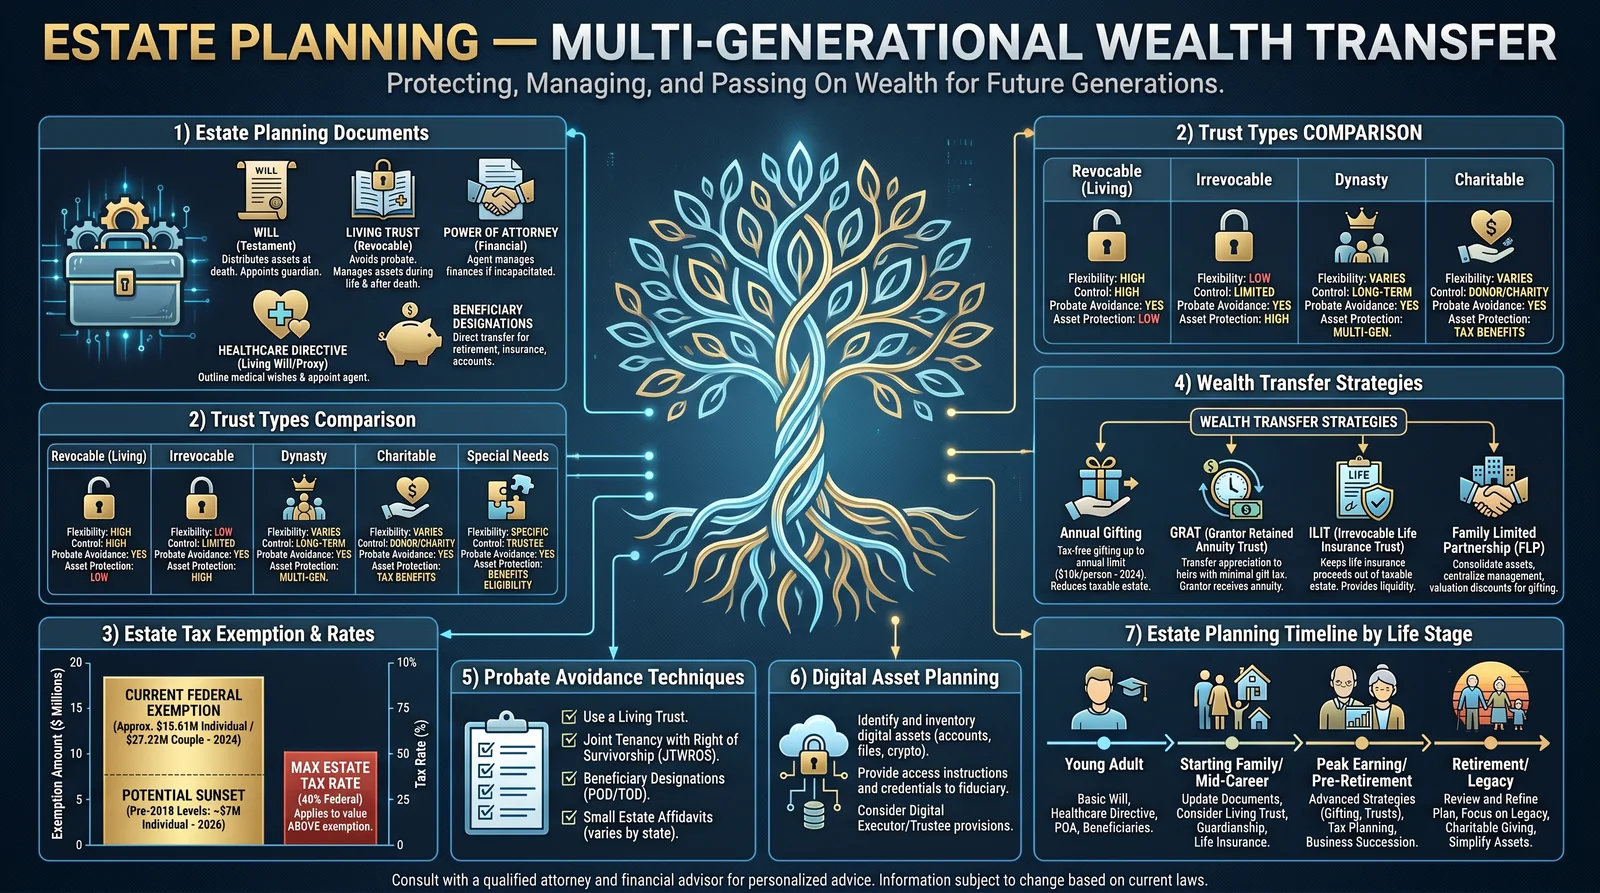
Your Real Estate Asset Register is the sacred ledger enumerating each property under your dominion. It must contain the following fields:
| Field | Description | Format/Units |
|---|---|---|
| Asset ID | Unique alphanumeric identifier (e.g., RE-0001) | String |
| Property Type | Residential, Commercial, Industrial, Land | Enum |
| Legal Description | Official land survey description, deed reference | Text |
| GPS Coordinates | Latitude and longitude of property centroid | Decimal degrees (DD) |
| Acquisition Date | Date of purchase or transfer | YYYY-MM-DD |
| Acquisition Cost | Purchase price plus closing costs | USD ($) |
| Current Market Value | Latest appraisal or market estimate | USD ($) |
| Owner | Name of titleholder | Text |
| Encumbrances | Mortgages, liens, easements | Text |
| Zoning Classification | Local zoning code | Text |
| Square Footage / Acreage | Total size of property | Sq. ft. or Acres |
| Building Details | Number of structures, type, age, condition | Text |
| Last Inspection Date | Date of last property condition inspection | YYYY-MM-DD |
| Notes | Any special remarks or conditions | Text |
B. Step-by-Step Protocol: Creating and Maintaining the Real Estate Asset Register
- Gather Documentation: Collect all deeds, titles, surveys, zoning certificates, and recent appraisals.
- Assign Asset ID: Generate a unique alphanumeric code for each property, starting with “RE-“ followed by four digits.
- Enter Core Data: Populate the asset register spreadsheet or ledger with the data fields as per the table above.
- Verify GPS Coordinates: Use a handheld GPS device or mapping software to confirm the property centroid coordinates.
- Schedule Inspection: Set a recurring maintenance inspection every 6 months. Record the initial inspection date.
- Update Market Value Quarterly: Contact a licensed appraiser or use reliable market data services to update the value every 3 months.
- Log Encumbrances: Record any mortgages, liens, or easements as they occur or expire.
- Backup Register: Maintain both a physical ledger (fireproof safe) and digital encrypted copy with offsite cloud backup.
C. Income Tracking for Real Estate
Track every stream of income generated by your real estate holdings. The Income Statement Table must include:
| Date | Asset ID | Income Type | Amount (USD) | Payer/Lessee Name | Payment Method | Notes |
|---|---|---|---|---|---|---|
| YYYY-MM-DD | RE-0001 | Rental Income | $XXXX.XX | Tenant Name | Bank Transfer | Lease Month, Terms |
| YYYY-MM-DD | RE-0001 | Lease Fee | $XXXX.XX | Lessee Name | Check | Commercial Lease |
| YYYY-MM-DD | RE-0002 | Parking Fees | $XXX.XX | Various | Cash | Daily Collection |
| YYYY-MM-DD | RE-0003 | Advertising Space | $XXX.XX | Advertiser Name | Online Payment | Billboard Rental |
D. Step-by-Step Protocol: Income Tracking for Real Estate
- Record Payment Promptly: Each payment received must be entered into the income statement within 24 hours.
- Verify Payment Method: Confirm bank transfers with statements; for cash, provide official receipt.
- Assign Income Type: Classify income correctly (e.g., rent, lease, fees, penalties).
- Reconcile Monthly: Match income records with bank statements and tenant payment logs monthly.
- Flag Delinquencies: Immediately note any late or missing payments and initiate collection protocols (see Volume 9: The Debt Codex).
- Generate Quarterly Reports: Summarize income streams by asset and income type for high-level review.
E. Maintenance Scheduling for Real Estate
Proper upkeep preserves value and prevents catastrophic losses. Use the following maintenance schedule matrix:
| Maintenance Activity | Frequency | Responsible Party | Notes |
|---|---|---|---|
| Structural Inspection | Every 6 months | Licensed Structural Engineer | Include foundation, roofing |
| HVAC System Servicing | Biannually | Certified HVAC Technician | Replace filters, inspect units |
| Plumbing Inspection | Annually | Licensed Plumber | Check leaks, water pressure |
| Landscaping | Monthly (seasonal) | Groundskeeper | Lawn, trees, irrigation |
| Pest Control | Quarterly | Licensed Pest Control Service | Prevent infestation |
| Fire Safety System Check | Annually | Fire Safety Inspector | Extinguishers, alarms |
F. Step-by-Step Protocol: Maintenance Scheduling
- Create Annual Calendar: Use the maintenance matrix to draft a yearly schedule.
- Assign Vendors and Personnel: Contract or designate responsible parties for each task.
- Notify in Advance: Send reminders 2 weeks prior to scheduled maintenance.
- Perform and Document: After each maintenance event, record date, findings, and actions taken in the maintenance log.
- Review and Adjust: Quarterly review of maintenance logs to identify recurring issues or cost-saving opportunities.
III. Mineral Asset Management Tools and Protocols
Mineral assets require a distinct, rigorous framework reflecting their extraction, royalty, and legal complexities.
A. Mineral Asset Register
| Field | Description | Format/Units |
|---|---|---|
| Asset ID | Unique alphanumeric identifier (e.g., MIN-0001) | String |
| Mineral Type | Oil, Gas, Coal, Metal Ore, Precious Stones | Enum |
| Legal Description | Mining lease, mineral rights title, survey reference | Text |
| Location Coordinates | GPS coordinates of extraction site centroid | Decimal degrees (DD) |
| Acquisition Date | Date mineral rights acquired | YYYY-MM-DD |
| Acquisition Cost | Cost of obtaining mineral rights | USD ($) |
| Current Market Value | Estimated value of mineral deposit | USD ($) |
| Owner | Name on mineral rights title | Text |
| Lease Terms | Royalty rates, contractual obligations | Text |
| Extraction Status | Active, Inactive, Permitted, Under Exploration | Enum |
| Last Inspection Date | Date of last operational or environmental inspection | YYYY-MM-DD |
| Notes | Environmental restrictions, legal disputes, permits | Text |
B. Step-by-Step Protocol: Mineral Asset Register Maintenance
- Obtain Legal Titles: Secure copies of mineral rights, leases, and permits.
- Conduct Geospatial Verification: Use GIS tools to map extraction sites precisely.
- Document Lease Terms: Extract detailed royalty and contractual clauses.
- Update Extraction Status Monthly: Reflect operational changes or permit renewals.
- Schedule Environmental Inspections: Every 6 months mandatory, with reports attached to register.
- Store Register Securely: Maintain encrypted digital copies with restricted access.
C. Income Tracking for Mineral Assets
| Date | Asset ID | Income Type | Amount (USD) | Payer Name | Payment Method | Notes |
|---|---|---|---|---|---|---|
| YYYY-MM-DD | MIN-0001 | Royalty Payment | $XXXX.XX | Mining Company | Wire Transfer | Per contract, 5% royalty |
| YYYY-MM-DD | MIN-0002 | Lease Bonus | $XXXX.XX | Leaseholder | Check | Signing bonus |
| YYYY-MM-DD | MIN-0003 | Production Bonus | $XXX.XX | Operator | Wire Transfer | Production milestone |
D. Step-by-Step Protocol: Income Tracking for Mineral Assets
- Record Royalty Payments Immediately: Upon receipt, enter into ledger with contract reference.
- Verify Payment Accuracy: Cross-check amounts with production reports and royalty calculations.
- Track Lease Bonuses and Other Income: Separate from royalties, log bonuses, penalties, or advances.
- Reconcile Quarterly: Match income records against operator statements and bank deposits.
- Escalate Discrepancies: Engage legal counsel for unresolved payment irregularities.
E. Maintenance and Compliance Scheduling for Mineral Assets
| Activity | Frequency | Responsible Party | Notes |
|---|---|---|---|
| Environmental Inspection | Every 6 months | Environmental Consultant | Soil, water, air quality |
| Equipment Safety Audit | Quarterly | Safety Officer | Machinery, extraction equipment |
| Permit Renewal | Annually | Legal Department | Regulatory compliance |
| Geological Survey Update | Every 12 months | Geologist | Reserve estimation update |
| Community Relations Meeting | Semi-Annual | Community Liaison | Stakeholder engagement |
F. Step-by-Step Protocol: Mineral Asset Maintenance
- Compile Activity Calendar: Integrate all scheduled inspections, audits, and meetings.
- Assign Accountabilities: Designate staff or external consultants for each task.
- Prepare Documentation Packets: Prior to inspections, gather required permits and historical reports.
- Conduct Onsite Reviews: Document findings in standardized reports.
- Implement Remediation: Fast-track resolution of environmental or safety deficiencies.
- Archive Compliance Records: Maintain a digital compliance folder by asset ID.
IV. Agricultural Asset Management Tools and Protocols
Agricultural assets encompass land, crops, livestock, and facilities. They require cyclical, seasonally tuned management.
A. Agricultural Asset Register
| Field | Description | Format/Units |
|---|---|---|
| Asset ID | Unique alphanumeric identifier (e.g., AGR-0001) | String |
| Asset Type | Crop Land, Pasture, Greenhouse, Livestock, Equipment | Enum |
| Location Coordinates | GPS centroid or field boundaries | Decimal degrees (DD) |
| Acquisition Date | Date acquired | YYYY-MM-DD |
| Acquisition Cost | Purchase or development cost | USD ($) |
| Current Market Value | Valuation based on crop potential, livestock worth | USD ($) |
| Owner | Registered owner | Text |
| Crop/Livestock Details | Species, varieties, herd size, acreage | Text/Number |
| Last Planting/Harvest Date | Date of last plantation or harvest | YYYY-MM-DD |
| Last Health Inspection Date | Date of last crop/livestock health check | YYYY-MM-DD |
| Notes | Soil conditions, irrigation, pest issues | Text |
B. Step-by-Step Protocol: Agricultural Asset Register
- Define Asset Types Clearly: Separate land, crops, livestock, and equipment into distinct entries.
- Collect GPS Data: Use drone surveying or handheld GPS for precise mapping of plots.
- Enter Detailed Crop/Livestock Data: Include variety, quantity, and age as applicable.
- Update Planting and Harvest Records Immediately: Mark exact dates on register.
- Schedule Health Checks: Monthly for livestock; pre- and post-season for crops.
- Backup Records Biweekly: Synchronize physical logs with digital cloud storage.
C. Income Tracking for Agricultural Assets
| Date | Asset ID | Income Type | Amount (USD) | Buyer Name | Payment Method | Notes |
|---|---|---|---|---|---|---|
| YYYY-MM-DD | AGR-0001 | Crop Sales | $XXXX.XX | Buyer Name | Wire Transfer | Wheat harvest sale |
| YYYY-MM-DD | AGR-0002 | Livestock Sales | $XXXX.XX | Buyer Name | Check | Cattle auction |
| YYYY-MM-DD | AGR-0003 | Government Subsidy | $XXX.XX | Agricultural Dept | Direct Deposit | Seasonal subsidy |
D. Step-by-Step Protocol: Income Tracking for Agricultural Assets
- Document Each Sale: Record date, asset ID, buyer, payment method, and amount immediately upon transaction.
- Consolidate Crop Sales by Season: Aggregate income for each planting cycle for financial clarity.
- Verify Subsidies and Grants: Maintain correspondence and payment confirmations for government programs.
- Reconcile Monthly: Cross-verify income entries with bank records and buyer receipts.
- Report Anomalies for Investigation: Any mismatches trigger immediate audit and inquiry.
E. Maintenance Scheduling for Agricultural Assets
| Activity | Frequency | Responsible Party | Notes |
|---|---|---|---|
| Soil Testing | Every 6 months | Agronomist | Nutrient and pH analysis |
| Irrigation System Check | Monthly | Farm Technician | Inspect pumps, pipes, valves |
| Pest and Disease Control | Biweekly (seasonal) | Pest Control Specialist | Monitor and treat infestations |
| Livestock Health Checks | Monthly | Veterinarian | Vaccination, parasite control |
| Equipment Maintenance | Quarterly | Mechanic | Tractors, harvesters, tools |
| Facility Cleaning | Weekly | Farm Staff | Barns, storage, processing areas |
F. Step-by-Step Protocol: Agricultural Maintenance Scheduling
- Develop Seasonal Calendar: Mark critical periods for planting, harvesting, and livestock cycles.
- Assign Personnel and Vendors: Clearly designate responsibilities for each maintenance task.
- Implement Monitoring Logs: Record all interventions and observations in crop and livestock health logs.
- Review Soil and Water Reports: Adjust fertilization and irrigation plans based on test results.
- Conduct Monthly Team Briefings: Address maintenance issues and update schedules.
- Archive All Maintenance Records: Maintain both physical and digital copies with date stamps.
V. Templates and Sample Registers
Below is an example template for a Real Estate Asset Register entry:
| Asset ID | Property Type | Legal Description | GPS Coordinates | Acquisition Date | Acquisition Cost | Current Market Value | Owner | Encumbrances | Zoning Classification | Square Footage | Building Details | Last Inspection Date | Notes |
|---|---|---|---|---|---|---|---|---|---|---|---|---|---|
| RE-0001 | Residential | Lot 24, Block 5, Tract 8 | 34.052235, -118.243683 | 2015-06-15 | $350,000 | $450,000 | John Practitioner | Mortgage: Bank XYZ $200K | R1 | 2500 sq ft | 3 beds, 2 baths, 1990 built | 2024-01-05 | Needs roof repair |
VI. Summary: The Triad of Real Asset Mastery
Record Keeping + Income Tracking + Maintenance Scheduling = Economic Sovereignty
Negligence in any one of these pillars invites decay, loss, and subjugation. Implement the protocols herein with the rigor of a master artisan forging a blade. Your assets are your fortress: guard them with precision, track their lifeblood, and nurture their vitality through disciplined maintenance.
For complementary financial auditing techniques, see Volume 7: The Ledger Codex, Chapter IV. For debt leverage management on real assets, consult Volume 9: The Debt Codex, Chapter II. For water and soil purification protocols supporting agricultural productivity, refer to Volume 8: The Water Codex, Chapter II.
End of Supplement: Real Asset Management Tools Proceed with absolute fidelity to these instructions. Your wealth, and your lineage’s future, depend on it.
<!-- SECTION 36 -->
The Complete Practitioner's Codex, Volume 12: The Economist's Cipher
Chapter IX: Supplements – Tax Filing and Reporting Templates for Sovereign Entities and Individuals
Introduction
This chapter presents the definitive, detailed templates and step-by-step protocols for tax filing and reporting tailored for sovereign entities and individuals. These instructions are designed as actionable field manuals for those who must navigate the labyrinthine tax systems with precision and authority, ensuring legal compliance, economic sovereignty, and optimal fiscal outcomes.
This volume does not cover tax law interpretation or international treaties; for those consult Volume 4: The Jurisprudence Codex, Chapter V. Here, you will find practical, executable instructions, including document templates, filing timelines, and exact procedural steps from preparation to submission.
Section 1: Sovereign Entities Tax Filing and Reporting Templates
Sovereign entities include independent states, recognized tribal nations, registered trusts, and other legally recognized autonomous bodies. Their tax filing systems often require customized documentation that reflects their unique status.
1.1 Required Documents for Sovereign Entities
| Document Name | Purpose | Notes |
|---|---|---|
| Entity Registration Certificate | Proof of sovereign status and legal recognition | Must be notarized and government-issued |
| Annual Financial Statement | Comprehensive report of income, expenditures, assets, and liabilities | Audited by certified external auditor |
| Tax Exemption Claim Form | Declaration of sovereign tax exemptions | Must cite specific legal codes applicable to sovereignty |
| Revenue Report | Detailed breakdown of all revenue streams | Must be segmented by source (trade, services, grants, etc.) |
| Expense Report | Classification of all expenses including administrative and outreach | Include receipts and payment confirmations |
| Declaration of Assets and Liabilities | Inventory of all owned assets vs. debts | Valued at market rate as of fiscal year-end |
| Tax Filing Cover Letter | Formal statement accompanying submission | Should include contact info and authorized signatories |
1.2 Template: Sovereign Entity Tax Filing Cover Letter
[Entity Letterhead]

Date: [MM/DD/YYYY]

To: [Tax Authority Name]
[Address]
[City, State, Zip Code]

Subject: Sovereign Entity Tax Filing for Fiscal Year [YYYY]

Dear [Recipient Name],

Pursuant to the requirements set forth under [Relevant Sovereignty Tax Code], enclosed please find the tax filing documents for [Entity Name], covering the fiscal year ending [Date].

Documents enclosed:
1. Entity Registration Certificate
2. Annual Financial Statement
3. Tax Exemption Claim Form
4. Revenue Report
5. Expense Report
6. Declaration of Assets and Liabilities

We affirm the accuracy and completeness of these submissions, prepared under the authority of [Authorized Official Name], acting in capacity as [Title].

Should you require further information, please contact [Authorized Official Name] at [Phone Number] or [Email Address].

Respectfully,

[Signature]
[Authorized Official Name]
[Title]
[Entity Name]
1.3 Step-by-Step Protocol: Sovereign Entity Tax Filing Preparation and Submission
Step 1: Confirm Filing Deadline Refer to Table 1.4 for sovereign entity deadlines.
Step 2: Assemble Required Documents Gather all documents listed in Section 1.1. Ensure all certifications and notarizations are current.
Step 3: Prepare Financial Statements Engage a certified external auditor to prepare and verify the Annual Financial Statement.
Step 4: Complete Tax Exemption Claim Form Cite specific legal provisions authorizing exemption status. Attach relevant legal documentation.
Step 5: Compile Revenue and Expense Reports Segment revenue by source; attach receipts for all expenses.
Step 6: Prepare Declaration of Assets and Liabilities Calculate market valuations as of fiscal year-end.
Step 7: Draft Tax Filing Cover Letter Utilize the template in Section 1.2. Customize for entity specifics.
Step 8: Assemble Submission Package Include all documents in the order listed. Use secure, tamper-evident envelopes.
Step 9: Submit Documents Deliver to the tax authority by registered mail or in person. Obtain receipt confirmation.
Step 10: Retain Copies Store all submitted forms and correspondence in secure, backed-up digital and physical archives.
1.4 Filing Deadlines and Required Documents for Sovereign Entities
| Fiscal Year-End Date | Filing Deadline (Days After Year-End) | Required Documents (Refer Section 1.1) | Submission Method |
|---|---|---|---|
| December 31 | 90 | All listed in Section 1.1 | Registered Mail or In-Person Submission |
| March 31 | 90 | All listed in Section 1.1 | Registered Mail or In-Person Submission |
| June 30 | 90 | All listed in Section 1.1 | Registered Mail or In-Person Submission |
| September 30 | 90 | All listed in Section 1.1 | Registered Mail or In-Person Submission |
Section 2: Individual Tax Filing and Reporting Templates
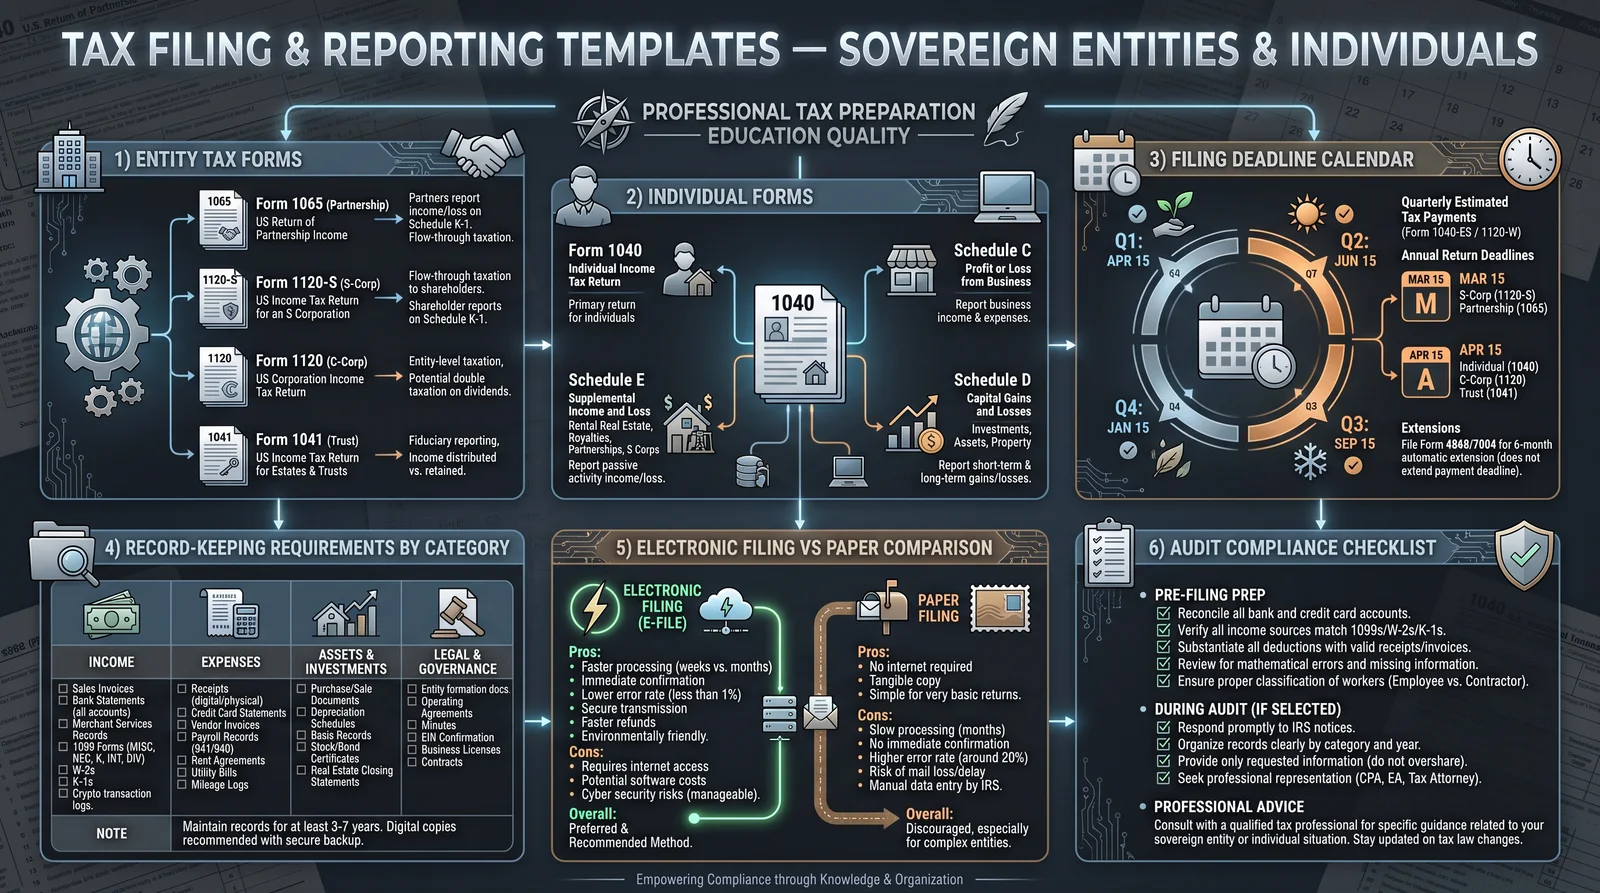
Individuals include natural persons with taxable income subject to local, federal, or international fiscal obligations. This section provides precise templates and protocols for filing individual returns.
2.1 Required Documents for Individual Tax Filing
| Document Name | Purpose | Notes |
|---|---|---|
| Personal Identification Document | Proof of identity | Government-issued ID or Passport |
| Income Statement (W-2, 1099, etc.) | Details of income from employment or self-employment | Must be original or certified copies |
| Expense Receipts for Deductibles | Proof of deductible expenses | Medical, education, charitable donations, etc. |
| Tax Payment Receipts | Proof of estimated or advance tax payments | Include dates and amounts |
| Prior Year Tax Return | Reference for carryover credits or losses | Required if applicable |
| Completed Tax Return Form | Official tax return form | Use designated form per jurisdiction |
| Tax Filing Cover Letter | Formal submission letter | Optional but recommended |
2.2 Template: Individual Tax Filing Cover Letter
[Taxpayer Name]
[Address]
[City, State, Zip Code]
[Date: MM/DD/YYYY]

To: [Tax Authority Name]
[Address]
[City, State, Zip Code]

Subject: Individual Tax Return Submission for Fiscal Year [YYYY]

Dear [Recipient Name],

Please find enclosed my completed tax return for the fiscal year ending [Date]. Attached are all supporting documents as required by [Relevant Tax Code or Regulation].

Enclosed Documents:
1. Personal Identification Document
2. Income Statements
3. Deductible Expense Receipts
4. Prior Year Tax Return (if applicable)
5. Tax Payment Receipts
6. Completed Tax Return Form

Should you require additional information or clarification, please contact me at [Phone Number] or [Email Address].

Respectfully,

[Signature]
[Taxpayer Name]
2.3 Step-by-Step Protocol: Individual Tax Filing Preparation and Submission
Step 1: Confirm Filing Deadline Refer to Table 2.4 for individual filing deadlines in your jurisdiction.
Step 2: Collect Income Statements Obtain all income documentation (W-2s, 1099s, etc.).
Step 3: Organize Expense Receipts Gather receipts and proofs for all deductible expenses.
Step 4: Review Prior Year Tax Return Identify any credits or losses that carry over.
Step 5: Complete Tax Return Form Fill out the official tax return form accurately, using official software or printed forms.
Step 6: Calculate Tax Liability or Refund Verify calculations twice, or use certified tax preparation software.
Step 7: Prepare Tax Filing Cover Letter Use the template in Section 2.2, customizing for personal information.
Step 8: Assemble Submission Package Include all required documents in proper order.
Step 9: Submit Tax Return Send via registered mail or electronic submission portal. Confirm receipt.
Step 10: Retain Copies Keep physical and digital copies for minimum 7 years or as legally required.
2.4 Filing Deadlines and Required Documents for Individuals
| Jurisdiction | Fiscal Year-End | Filing Deadline (Days After Year-End) | Required Documents (Refer Section 2.1) | Submission Method |
|---|---|---|---|---|
| United States | December 31 | 104 (April 15) | All listed in Section 2.1 | Electronic Filing or Registered Mail |
| United Kingdom | April 5 | 365 (Following April 5) | All listed in Section 2.1 | Electronic Filing or Registered Mail |
| Canada | December 31 | 90 | All listed in Section 2.1 | Electronic Filing or Registered Mail |
| Australia | June 30 | 120 | All listed in Section 2.1 | Electronic Filing or Registered Mail |
Section 3: Tax Form Templates and Instructions
Below are precise, fillable tax form templates, designed for clarity and completeness.
3.1 Sovereign Entity Tax Exemption Claim Form Template
| Field | Instructions | Example Input |
|---|---|---|
| Entity Name | Full legal name of the sovereign entity | The Sovereign Nation of Sovereigna |
| Registration Number | Official registration or tax ID | 123-456-789 |
| Legal Basis for Exemption | Cite applicable code or treaty | Sovereignty Tax Code §7.3 |
| Fiscal Year | Year for which exemption is claimed | 2024 |
| Declaration Statement | Affirmation of exemption status | "Entity claims exemption based on sovereignty status as recognized under..." |
| Authorized Signatory Name | Name of official signing form | Grand Treasurer Arion |
| Signature | Wet or digital signature | [Signature Image or Wet Signature] |
| Date | Date of form completion | MM/DD/YYYY |
3.2 Individual Official Tax Return Form Template
| Section | Field | Instructions | Example Input |
|---|---|---|---|
| Personal Information | Full Name | Legal name as shown on ID | John Q. Practitioner |
| Social Security Number | Or local tax identification number | 999-88-7777 | |
| Income | Employment Income | Sum of wages, salaries, and tips | $75,000 |
| Investment Income | Dividends, interest, capital gains | $5,000 | |
| Other Income | Rental, royalties, or other sources | $3,200 | |
| Deductions | Medical Expenses | Total medical deductible expenses | $2,000 |
| Education Expenses | Tuition and fees deductible | $1,500 | |
| Charitable Contributions | Total donations | $1,200 | |
| Tax Calculation | Taxable Income | Income minus deductions | $79,500 |
| Tax Rate | Applicable tax rate per jurisdiction | 22% | |
| Total Tax Due | Taxable income multiplied by tax rate | $17,490 | |
| Payments and Credits | Estimated Tax Payments | Sum of all pre-paid taxes | $15,000 |
| Tax Refund or Due | Difference between tax due and payments | $2,490 (refund due) | |
| Declaration | Signature | Signature of taxpayer | [Signature] |
| Date | Date of signature | MM/DD/YYYY |
Section 4: Supplemental Instructions for Electronic Submission
Several jurisdictions now require or recommend electronic submission of tax filings and reports. Follow these instructions to ensure secure and verifiable electronic filing.
4.1 Electronic Submission Protocol
Step 1: Obtain Digital Certificate Acquire a government-approved digital signature certificate (DSC) from an authorized Certification Authority.
Step 2: Prepare Digital Copies Scan all physical documents in PDF format, ensuring clarity and legibility.
Step 3: Complete Digital Forms Use the official electronic tax form software provided by the tax authority or approved third-party provider.
Step 4: Attach Supporting Documents Upload scanned documents as attachments according to file size and format limits.
Step 5: Sign Digitally Apply your DSC to the completed forms and attachments.
Step 6: Submit via Secure Portal Upload the digitally signed package to the official tax authority portal.
Step 7: Obtain Confirmation Receipt Save the electronic acknowledgment receipt and confirmation number for records.
4.2 Electronic Submission Deadlines
| Jurisdiction | Deadline Applies to | Electronic Submission Deadline | Notes |
|---|---|---|---|
| United States | Individuals, Entities | Same as paper filing deadline | Extension possible via IRS e-file system |
| European Union | Sovereign Entities | Same as paper filing deadline | EU-wide digital signature standards apply |
| Canada | Individuals | Same as paper filing deadline | CRA My Account portal |
| Australia | Individuals | Same as paper filing deadline | ATO's myGov platform |
Section 5: Archival and Audit Compliance
Strict compliance with archival standards is mandatory to withstand audits and legal scrutiny.
5.1 Record Retention Requirements
| Document Type | Minimum Retention Period | Storage Format | Security Measures |
|---|---|---|---|
| Tax Returns (All Types) | 7 Years | Digital + Physical | Encrypted digital storage, locked cabinets |
| Financial Statements | 10 Years | Digital + Physical | Dual backup with off-site replication |
| Receipts and Supporting Documents | 7 Years | Physical Originals + Scans | Indexed and cross-referenced |
| Tax Payment Receipts | 7 Years | Digital + Physical | Stored with tax returns |
5.2 Procedure for Audit Preparation
Step 1: Collect all tax filings, receipts, and correspondence for the audit period. Step 2: Verify all documents against filing submissions for accuracy and completeness. Step 3: Organize documents chronologically and by category. Step 4: Prepare a summary report highlighting key financial figures and discrepancies. Step 5: Assign a liaison officer for communication with auditors. Step 6: Maintain a secure, designated workspace for audit activities.
Conclusion
This chapter has furnished you with the complete, practical templates and protocols required for precise tax filing and reporting for sovereign entities and individuals. Execute these protocols with meticulous attention, as fiscal sovereignty and economic mastery depend upon your unwavering adherence to these sacred procedures.
Proceed now to implement, for your economic sovereignty and mastery over the Cipher demand nothing less than perfection.
End of Chapter IX
For additional protocols related to financial instruments and wealth preservation, consult Volume 12, Chapter XI: The Vault of Economic Sovereignty.
<!-- SECTION 37 -->
The Complete Practitioner's Codex, Volume 12: The Economist's Cipher
Chapter IV: Supplements — Multi-Generational Wealth Education Curriculum

Introduction: The Sacred Charge of Financial Legacy Transmission
You, the chosen custodian of enduring wealth, now undertake the solemn duty of preparing your heirs not in idle inheritance but in the mastery of economic sovereignty. This curriculum is the codified blueprint for imparting financial literacy and wealth management to the next generation, ensuring the perpetuity of your dynasty’s prosperity.
The curriculum is segmented by developmental stages, each with age-appropriate topics and escalating complexity. Each lesson plan is granular, actionable, and complete with resource lists tailored to the learner’s cognitive and emotional maturity. Abandon all conjecture; embrace the exacting protocols herein.
Section 1: Curriculum Framework and Pedagogical Structure
The curriculum is divided into four major developmental stages:
| Stage | Age Range (Years) | Core Focus | Learning Objective Summary |
|---|---|---|---|
| Seedling Foundation | 5–8 | Basic money concepts, value recognition | Identify money, understand trade, recognize needs vs wants |
| Sprout Development | 9–12 | Introduction to saving, budgeting, giving | Track allowance, create simple budgets, understand charity and sharing |
| Sapling Expansion | 13–17 | Advanced budgeting, introduction to investing, entrepreneurship | Manage personal finances, basic investing, initiate small business ideas |
| Oak Sovereignty | 18–25 | Complex wealth management, asset protection, estate planning | Develop investment portfolios, understand taxes, draft wills and trusts |
Each stage consists of 10 detailed lessons, each with explicit objectives, step-by-step activities, and resource lists. The following sections provide the full curriculum for each stage.
Section 2: Seedling Foundation (Ages 5–8) — The Genesis of Money Awareness
Objective: Familiarize young minds with the concept of money as a medium of exchange and value.
Lesson 1: Recognizing Money and Currency
Objective: Children will identify different forms of money and understand its role in exchange.
Materials:
- Toy coins and bills (real currency replicas)
- Pictures of various global currencies
- Small items for trading (toys, stickers)
Procedure:
- Present various coins and bills, naming their denominations aloud.
- Show images of global currencies, explaining different countries use different money.
- Establish a simple trading game: children exchange toys using the toy money.
- Discuss why money is used instead of bartering directly.
Outcome: Mastery of currency recognition and foundational concept of money as an exchange medium.
Lesson 2: Needs Versus Wants
Objective: Distinguish essential needs from non-essential wants.
Materials:
- Picture cards depicting food, toys, clothing, gadgets
- Two labeled baskets: "Needs" and "Wants"
Procedure:
- Present cards one by one.
- Child places each card in the correct basket.
- Facilitate discussion on why certain items are needs.
- Reinforce by examples from the child’s daily life.
Lesson 3: The Concept of Work and Earning
Objective: Understand that money is earned through work.
Materials:
- Chore chart with simple tasks
- Sticker rewards
Procedure:
- Assign daily chores with clear expectations.
- Reward stickers per completed task, exchangeable for small treats.
- Explain that work earns money, similar to how chores earn stickers.
Lesson 4: Introduction to Saving
Objective: Teach the habit of saving money for future use.
Materials:
- Transparent piggy bank or jar
- Visual chart tracking savings growth
Procedure:
- Provide initial small amounts of toy or real coins.
- Each time the child receives money, encourage placing a portion into the piggy bank.
- Update chart weekly showing saved amount growing.
- Celebrate milestones to reinforce habit.
Seedling Foundation Curriculum Table
| Lesson | Topic | Key Concept | Activity | Materials Needed |
|---|---|---|---|---|
| 1 | Recognizing Money | Currency identification | Money trading game | Toy money, currency pictures |
| 2 | Needs vs Wants | Differentiation of essentials | Sorting picture cards | Picture cards, baskets |
| 3 | Work and Earning | Money earned by effort | Chore chart and sticker reward | Chore chart, stickers |
| 4 | Saving Basics | Saving habit initiation | Piggy bank and savings chart | Transparent piggy bank, chart |
| 5 | Simple Bartering | Exchange without money | Bartering toy items | Toys for barter |
| 6 | Counting Money | Basic arithmetic with coins | Coin counting exercises | Coins, counting sheets |
| 7 | Sharing and Charity | Giving part of money to others | Charity jar collection | Jar, charity envelopes |
| 8 | Recognizing Prices | Money value attached to goods | Price labeling game | Price tags, toy items |
| 9 | Basic Budgeting | Allocating money to needs/wants | Budget pie chart creation | Paper pie charts, markers |
| 10 | Recap and Rewards | Reinforcement of all concepts | Quiz and reward ceremony | Quiz sheets, rewards |
Section 3: Sprout Development (Ages 9–12) — Building Financial Responsibility
Objective: Equip children with skills to manage small sums, create budgets, and understand generosity.
Lesson 1: Tracking Allowance and Income
Objective: Record and monitor money inflows.
Materials:
- Allowance logbook or app
- Pen or digital device
Procedure:
- Demonstrate logging daily or weekly allowance received.
- Encourage recording any additional income (gifts, earned money).
- Review entries weekly with learner to ensure accuracy.
Lesson 2: Budget Creation and Management
Objective: Allocate money into categories: saving, spending, and sharing.
Materials:
- Budget worksheet with three columns (Save, Spend, Share)
- Colored pens
Procedure:
- Explain each category’s purpose.
- Set a budget using recent allowance amounts.
- Fill worksheet together, assigning percentages (suggested: 50% save, 40% spend, 10% share).
- Monitor adherence through weekly review.
Lesson 3: The Power of Compound Interest (Simplified)
Objective: Introduce the concept of money growth through interest.
Materials:
- Interest calculator (manual or digital)
- Savings tracking chart
Procedure:
- Explain interest as "money made from money."
- Use examples: $100 saved at 5% interest over 1 year equals $105.
- Show visual growth on savings chart.
- Reinforce by calculating interest on hypothetical amounts.
Lesson 4: Introduction to Banking
Objective: Familiarize children with bank accounts and their functions.
Materials:
- Visit to local bank or virtual tour
- Bank statement sample
Procedure:
- Explain how banks keep money safe and pay interest.
- Show statement sample highlighting deposits and withdrawals.
- Open a custodial savings account if feasible.
Sprout Development Curriculum Table
| Lesson | Topic | Key Concept | Activity | Materials Needed |
|---|---|---|---|---|
| 1 | Allowance Tracking | Income recording | Logbook entries | Allowance logbook |
| 2 | Budgeting Basics | Money allocation | Budget worksheet filling | Worksheet, pens |
| 3 | Compound Interest | Money growth concept | Interest calculation | Calculator, chart |
| 4 | Banking Introduction | Bank account functions | Bank visit or virtual tour | Bank statements |
| 5 | Needs vs Wants Review | Budget prioritization | Budget refinement | Budget worksheets |
| 6 | Saving for Goals | Goal-oriented saving | Create personal saving goals | Goal charts, envelopes |
| 7 | Giving and Charity | Social responsibility | Plan charitable donations | Charity envelopes |
| 8 | Simple Investing | Introduction to stocks and bonds | Simulated stock market game | Stock market game kits |
| 9 | Avoiding Debt | Understanding borrowing risks | Debt scenario role-play | Scenario cards |
| 10 | Review and Assessment | Concept mastery | Written and oral quizzes | Quiz sheets |
Section 4: Sapling Expansion (Ages 13–17) — Empowering Financial Autonomy
Objective: Develop advanced financial skills, introduce entrepreneurship, and investment fundamentals.
Lesson 1: Detailed Budgeting and Expense Tracking
Objective: Use digital tools to manage detailed finances.
Materials:
- Expense tracking app (recommend: Mint, YNAB)
- Personal device (smartphone or tablet)
Procedure:
- Install and set up chosen app.
- Input all income and expense categories.
- Review weekly, adjust budget as needed.
- Generate monthly financial reports.
Lesson 2: Introduction to Stock Market and Investment Vehicles
Objective: Understand stocks, bonds, mutual funds, and risk.
Materials:
- Investment glossary
- Simulation platform (e.g., Investopedia Stock Simulator)
Procedure:
- Review glossary of investment terms.
- Create virtual portfolio on simulation platform.
- Track portfolio over 3 months, analyze gains and losses.
Lesson 3: Starting a Small Business
Objective: Teach basic entrepreneurship principles.
Materials:
- Business plan template
- Budget worksheet
- Marketing materials (flyers, social media accounts)
Procedure:
- Brainstorm product or service ideas.
- Draft a simple business plan (product, price, promotion).
- Develop budget and pricing strategy.
- Launch business on small scale.
- Track sales, expenses, and profits weekly.
Lesson 4: Credit and Debt Management
Objective: Understand credit scores, loans, and responsible borrowing.
Materials:
- Credit report samples
- Debt management scenarios
Procedure:
- Explain credit scores and their importance.
- Review sample credit reports.
- Role-play borrowing scenarios with consequences.
- Learn strategies to avoid and manage debt.
Sapling Expansion Curriculum Table
| Lesson | Topic | Key Concept | Activity | Materials Needed |
|---|---|---|---|---|
| 1 | Advanced Budgeting | Digital finance management | Setup and tracking in apps | Expense tracker app, device |
| 2 | Investment Fundamentals | Stocks, bonds, risk profiles | Virtual portfolio management | Glossary, simulation platform |
| 3 | Small Business Startup | Entrepreneurship basics | Business plan creation and launch | Templates, marketing materials |
| 4 | Credit and Debt | Credit scores and borrowing | Role-play and case study review | Credit reports, scenarios |
| 5 | Tax Fundamentals | Income tax basics | Filing mock tax returns | Tax forms, instruction guides |
| 6 | Insurance Awareness | Risk mitigation | Insurance policy comparisons | Sample policies |
| 7 | Estate Awareness | Basic wills and inheritance | Draft simple wills | Will templates |
| 8 | Negotiation Skills | Financial negotiation | Negotiation role-play | Scenario cards |
| 9 | Financial Goal Setting | Long-term planning | Create 5-year financial plan | Planning templates |
| 10 | Review and Evaluation | Mastery of financial autonomy | Portfolio presentations | Presentation materials |
Section 5: Oak Sovereignty (Ages 18–25) — Commanding Wealth and Economic Sovereignty
Objective: Prepare heirs for independent wealth management, asset protection, and legacy planning.
Lesson 1: Investment Portfolio Development
Objective: Construct and manage diversified investment portfolios.
Materials:
- Portfolio management software (e.g., Personal Capital)
- Market analysis reports
Procedure:
- Identify risk tolerance with standardized questionnaire.
- Select asset classes (stocks, bonds, real estate, commodities).
- Allocate funds according to risk profile.
- Monitor portfolio monthly, rebalance quarterly.
Lesson 2: Tax Strategies and Compliance
Objective: Understand tax obligations and optimization strategies.
Materials:
- Latest tax codes and brackets
- Tax preparation software (e.g., TurboTax)
Procedure:
- Review tax bracket tables.
- Prepare mock tax returns with various income sources.
- Identify deductions and credits.
- Plan tax-efficient investment strategies.
Lesson 3: Estate Planning and Trust Formation
Objective: Draft wills, trusts, and establish power of attorney.
Materials:
- Legal templates for wills and trusts
- Consultations with estate attorney (recommended)
Procedure:
- Draft personal will using template.
- Define beneficiaries and asset distribution.
- Establish living trust if applicable.
- Assign durable power of attorney.
Lesson 4: Asset Protection Techniques
Objective: Shield wealth from litigation, taxation, and loss.
Materials:
- Asset protection strategy guides
- Legal entity formation documents (LLC, family limited partnerships)
Procedure:
- Evaluate assets for exposure.
- Form legal entities to hold assets.
- Utilize insurance and legal instruments.
- Implement confidentiality and privacy protocols.
Oak Sovereignty Curriculum Table
| Lesson | Topic | Key Concept | Activity | Materials Needed |
|---|---|---|---|---|
| 1 | Portfolio Development | Diversification and risk | Portfolio construction | Software, market reports |
| 2 | Tax Strategies | Tax planning and compliance | Mock tax filing | Tax guides, software |
| 3 | Estate Planning | Wills, trusts, power of attorney | Draft legal documents | Templates, legal consultation |
| 4 | Asset Protection | Legal shielding of wealth | Entity formation | Legal documents, guides |
| 5 | Advanced Investment Vehicles | Derivatives, options, real estate | Research and simulation | Educational materials |
| 6 | Philanthropy and Legacy | Charitable giving and foundations | Create philanthropic plan | Foundation setup guides |
| 7 | Economic Sovereignty | Self-sustaining financial systems | Design personal economic system | Planning templates |
| 8 | Succession Planning | Transfer of control and assets | Develop succession roadmap | Planning documents |
| 9 | Negotiation and Contract Law | Complex financial negotiations | Contract drafting and review | Legal forms, negotiation guides |
| 10 | Mastery Review | Integration and application | Comprehensive case study | Case study materials |
Section 6: Comprehensive Resource Lists
| Stage | Recommended Books | Tools & Software | External Resources |
|---|---|---|---|
| Seedling Foundation | "Money as You Grow" (CFPB), "The Berenstain Bears' Trouble with Money" | Toy money sets, piggy banks | Educational videos on money basics |
| Sprout Development | "The Everything Kids' Money Book" (K. MacDonald) | Mint app, allowance logbooks | Local bank youth accounts, charity programs |
| Sapling Expansion | "Rich Dad Poor Dad for Teens" (R. Kiyosaki) | Investopedia simulator, YNAB app | Small business mentorship programs |
| Oak Sovereignty | "The Millionaire Next Door" (T. Stanley), "Tax-Free Wealth" (T. James) | Personal Capital, TurboTax | Estate attorneys, financial advisors |
Closing Edict
The transmission of financial wisdom is no mere lesson plan; it is a sacred covenant binding generations. Execute these curricula with rigor, fidelity, and reverence. Your heirs will not only inherit wealth but will wield it as a sovereign force, preserving and expanding your legacy across centuries.
For related protocols on asset preservation and advanced tax strategies, consult Volume 7: The Treasury Codex, Chapter IX.
_End of Chapter IV: Supplements — Multi-Generational Wealth Education Curriculum_
<!-- SECTION 38 -->
Supplements: Black Swan Event Simulation Exercises
Chapter IX, Section 4: Detailed Simulation Exercises and Scenario Planning for Economic Collapse and Systemic Crises
Introduction: The Sacred Mandate of Preparedness
This section imparts the arcane art of Black Swan Event Simulation—a discipline of paramount importance for those who seek mastery over economic sovereignty amid chaos. These exercises empower you, the chosen apprentice, to anticipate, endure, and dominate systemic crises and economic collapses, the unforeseeable catastrophes that shatter unprepared empires and elevate the vigilant few.
I. Foundations of Black Swan Simulation
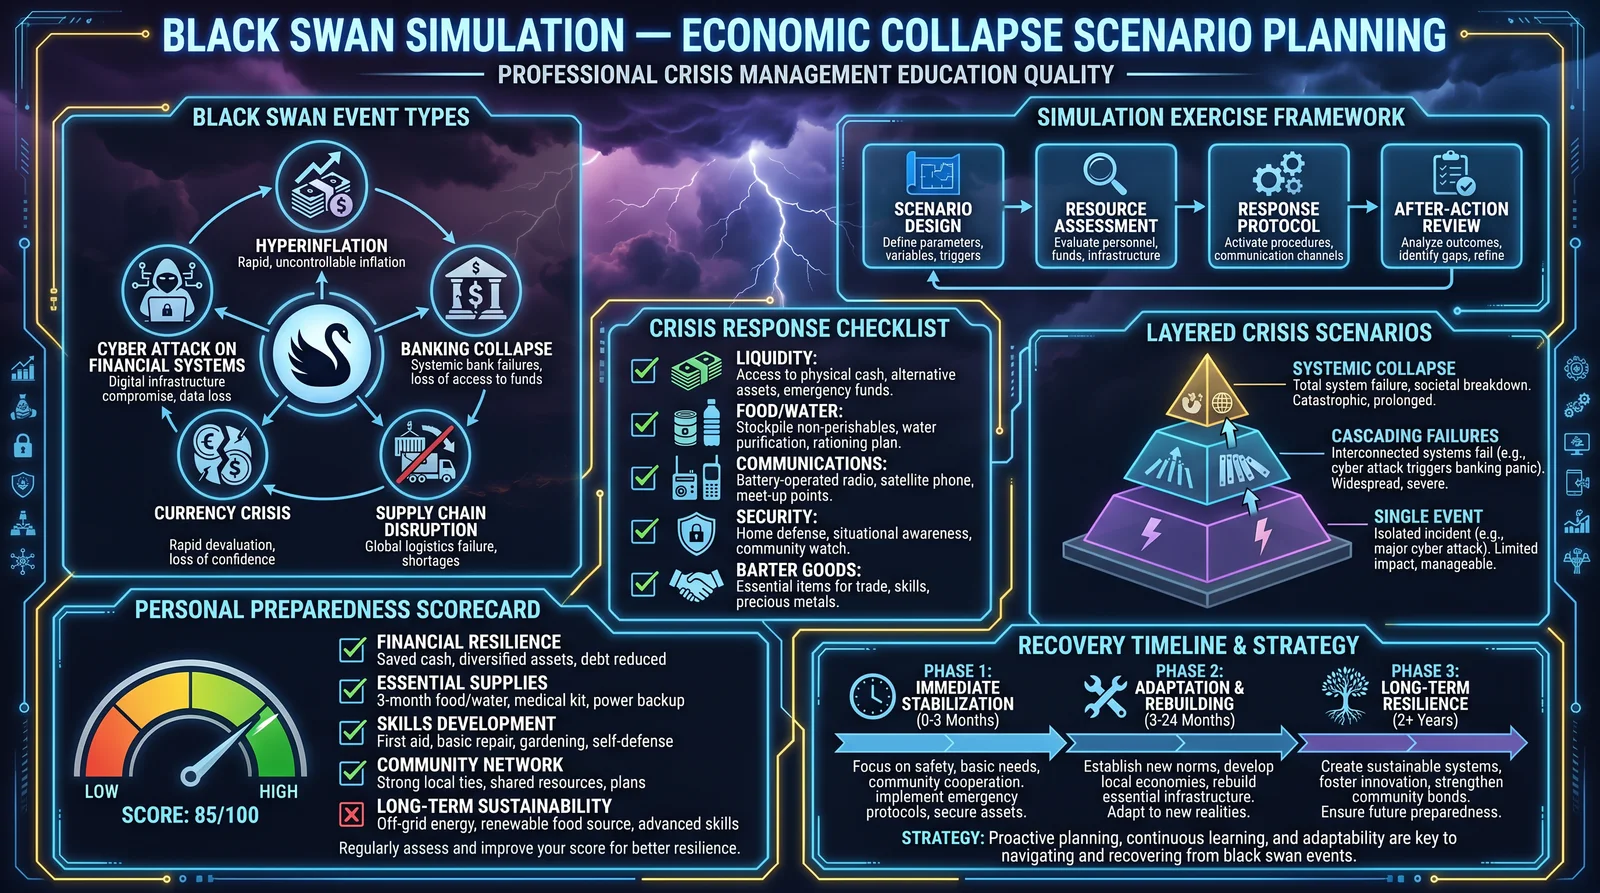
A Black Swan Event is a rare, high-impact, and unpredictable occurrence that defies conventional forecasting. Your duty is to convert the unknown into the knowable through rigorous, exhaustive, and unyielding simulation drills. These exercises must be repeatable, measurable, and brutally honest in their evaluation.
II. Core Components of Simulation Exercises
Each simulation exercise requires these foundational pillars:
| Component | Description |
|---|---|
| Scenario Definition | A detailed, plausible narrative of the crisis including triggers, timeline, and effects. |
| Parameter Setting | Quantitative and qualitative variables defining economic indicators, systemic shocks, and actors. |
| Role Assignment | Designation of participants’ roles (e.g., central bank, government, private sector, populace). |
| Process Flow | Stepwise progression of events and decision points over time. |
| Data Collection | Real-time capture of decisions, resource allocations, and outcomes. |
| Evaluation Metrics | Criteria and scales for assessing response effectiveness, resilience, and recovery speed. |
| Debrief and Analysis | Structured review of actions, failures, and improvement protocols. |
III. Step-by-Step Protocol: Designing and Executing a Black Swan Simulation
Step 1: Define the Scenario Narrative
- Select a Black Swan Event Type from Table 1 below.
- Develop a chronological event timeline specifying triggers, progression, and resolution phases.
- Identify primary and secondary causal factors (e.g., systemic financial failure, geopolitical upheaval).
- Outline expected macroeconomic impacts (GDP contraction, inflation spikes, liquidity shortages).
Table 1: Black Swan Event Types and Example Triggers
| Event Type | Example Trigger(s) | Description |
|---|---|---|
| Financial System Collapse | Bank runs, credit freeze, default storm | Breakdown of banking and credit systems disrupting liquidity |
| Sovereign Debt Default | Government bond sell-offs, credit rating downgrades | State inability to meet debt obligations |
| Hyperinflation Crisis | Monetary overissuance, supply chain collapse | Rapid, uncontrollable price rises |
| Geopolitical Economic Shock | Trade embargo, military conflict | Sudden disruption of trade and capital flows |
| Natural Disaster Economic Shock | Catastrophic climate event, pandemics | Massive infrastructure damage and economic paralysis |
| Cyber-Economic Warfare | Systemic cyberattack on financial infrastructure | Information and capital flow paralysis |
Step 2: Parameterize the Scenario
Populate the Scenario Parameters Matrix (Table 2) with quantitative data derived from historical analogues and current intelligence.
Table 2: Scenario Parameters Matrix
| Parameter | Unit | Baseline Value | Crisis Value | Source/Notes |
|---|---|---|---|---|
| GDP Growth Rate | % annual | 2.5 | -6.0 | Historical recession data |
| Inflation Rate | % monthly | 0.2 | 15.0 | Hyperinflation projections |
| Unemployment Rate | % | 4.0 | 25.0 | Crisis employment loss |
| Interest Rate | % annual | 1.5 | 12.0 | Central bank reaction |
| Liquidity Index | Scale 0-10 | 7 | 2 | Banking system health |
| Sovereign Credit Rating | Letter Grade | AA | CCC | Credit rating agencies |
| Currency Exchange Rate | Local/USD | 1.0 | 15.0 | Currency devaluation |
| Supply Chain Disruption Index | Scale 0-10 | 1 | 8 | Infrastructure damage |
Step 3: Assign Roles and Responsibilities
- Identify participants—minimum of 5 key roles, maximum scalable by organization size.
- Assign each participant a role from Table 3 below.
- Provide role-specific dossiers detailing objectives, constraints, and decision-making authority.
Table 3: Core Simulation Roles
| Role | Function | Key Responsibilities |
|---|---|---|
| Central Bank Authority | Monetary policy and liquidity management | Interest rate adjustments, emergency funding |
| Government Executive | Fiscal policy and emergency governance | Budget reallocation, legal decrees, public communication |
| Financial Institution Lead | Banking sector operations and risk management | Capital allocation, credit issuance, risk mitigation |
| Private Sector Leader | Business continuity and supply chain management | Resource allocation, contingency planning |
| Civil Society Coordinator | Public response and social stability | Information dissemination, social order maintenance |
Step 4: Establish the Process Flow
Design a time-sequenced roadmap for the simulation, dividing the exercise into discrete phases:
| Phase | Duration (Real Time) | Activities |
|---|---|---|
| Initialization | 30 minutes | Briefing, role assignment, scenario overview |
| Shock Introduction | 15 minutes | Trigger event announced, initial impact data |
| Response Activation | 60 minutes | Decision making, resource deployment |
| Escalation & Feedback | 45 minutes | Secondary shocks, outcome consequences |
| Resolution & Recovery | 30 minutes | Recovery strategies, stabilization efforts |
| Debrief | 60 minutes | Evaluation and lessons learned |
Step 5: Conduct Real-Time Data Collection
Implement a data logging system using spreadsheets or specialized software to capture:
- Decision timings and content
- Resource allocations and limitations
- Communication logs and directives
- Outcome metrics (e.g., liquidity levels, public sentiment scores)
Instructions for building a basic logging spreadsheet:
- Create columns for Timestamp, Role, Decision, Resource Impact, Outcome Metric, Notes.
- Assign a dedicated recorder or use shared digital tools for real-time input.
- Ensure time synchronization among participants.
Step 6: Define Evaluation Metrics and Scoring System
Use the Evaluation Matrix (Table 4) to judge performance objectively.
Table 4: Evaluation Metrics and Scoring
| Metric | Description | Scale/Unit | Weighting (%) |
|---|---|---|---|
| Response Time | Time elapsed from event trigger to action | Minutes | 25 |
| Resource Allocation Efficacy | Optimality of resource deployment | Percentage of need met | 20 |
| Communication Clarity | Accuracy and timeliness of information flow | Scale 1-10 | 15 |
| Economic Stability Index | Composite measure of liquidity, inflation, unemployment | Scale 0-100 | 25 |
| Public Confidence | Surveyed sentiment or proxy indicators | Scale 0-10 | 15 |
Step 7: Post-Simulation Debrief and Analysis
- Compile all data and create a comprehensive report.
- Convene all participants for a facilitated review session.
- Discuss successes, failures, and unexpected outcomes.
- Develop a prioritized action list for improvement.
- Schedule follow-up simulations to test improvements.
IV. Advanced Scenario Planning: Layered Crises and Adaptive Complexity
Step 8: Design Multi-Layered Crisis Scenarios
- Combine two or more Black Swan Event Types from Table 1.
- Create interaction effects, such as how hyperinflation amplifies sovereign default risks.
- Parameterize cascading failures in Table 2 accordingly.
- Extend process flow to accommodate dynamic event trees and feedback loops.
Step 9: Incorporate Adaptive Decision-Making Models
- Equip participants with decision matrices that include probabilistic outcomes.
- Introduce controlled randomness to simulate real-world uncertainty.
- Use iterative rounds where outcomes from previous decisions affect future conditions.
V. Case Study: Simulation Exercise Blueprint
Scenario: Sovereign Debt Default Triggered by Geopolitical Economic Shock
| Timeline (Simulated) | Event Description | Expected Impact | Participant Action Required |
|---|---|---|---|
| Day 0 | Trade embargo imposed by major economic bloc | Export revenues plummet, supply chains stressed | Government to announce emergency measures |
| Day 3 | Sovereign bond ratings downgraded to CCC | Borrowing costs skyrocket, liquidity crisis | Central Bank to consider emergency liquidity injections |
| Day 7 | Domestic currency devaluation by 40% | Inflation spikes, asset values collapse | Financial Institutions to manage capital flight |
| Day 10 | Public protests erupt due to austerity measures | Social unrest threatens economic stability | Civil Society Coordinator to manage communications |
| Day 14 | Emergency international financial aid delayed | Recovery timeline extended | Private Sector to activate contingency plans |
VI. Building a Black Swan Simulation Toolkit
Required Materials and Tools:
| Item | Purpose | Construction/Setup Instructions |
|---|---|---|
| Simulation Data Sheets | Record scenario parameters and decisions | Use spreadsheet software; prepopulate with scenario matrix |
| Role Dossiers | Provide role-specific guidance | Print or digitally distribute comprehensive role profiles |
| Decision Logs | Capture timing and content of decisions | Use cloud-based shared documents or physical logs |
| Communication Channels | Simulate real-time coordination | Use secure messaging apps or intercom systems |
| Evaluation Rubrics | Score performance objectively | Develop scoring templates based on Table 4 |
VII. Continuous Improvement: Institutionalizing Simulation Drills
Step 10: Embed Simulation Drills into Organizational Culture
- Schedule regular drills at least quarterly.
- Rotate roles to ensure cross-functional understanding.
- Update scenarios annually incorporating new intelligence and emerging threats.
- Archive all reports securely for longitudinal trend analysis.
- Empower a Simulation Master responsible for exercise integrity and innovation.
VIII. Appendix: Sample Scenario Parameters and Evaluation Template
Sample Parameters for Sovereign Debt Default Scenario
| Parameter | Baseline | Crisis | Notes |
|---|---|---|---|
| GDP Growth Rate | 2.0% | -8.0% | Severe recession forecasted |
| Inflation Rate | 1.5% | 20.0% | Currency devaluation effects |
| Unemployment Rate | 5.0% | 30.0% | Mass layoffs |
| Sovereign Credit Rating | A | CCC | Downgrade impact |
| Liquidity Index | 8 | 3 | Banking sector stress |
Sample Evaluation Template
| Participant Role | Response Time (min) | Resource Allocation (%) | Communication Score (1-10) | Economic Stability (0-100) | Public Confidence (0-10) | Total Score (%) |
|---|---|---|---|---|---|---|
| Central Bank Authority | 12 | 85 | 8 | 65 | 6 | 74 |
| Government Executive | 15 | 80 | 7 | 60 | 5 | 68 |
| Financial Institution Lead | 18 | 70 | 6 | 55 | 4 | 61 |
| Private Sector Leader | 20 | 75 | 7 | 50 | 5 | 63 |
| Civil Society Coordinator | 10 | 90 | 9 | 70 | 7 | 78 |
Final Words of the Master Archivist
To wield this knowledge is to command the unseen forces shaping destiny. Approach each simulation with the gravity of a sacred ritual. For in the crucible of these exercises, you forge the steel of economic sovereignty. Fail not in this charge, for the survival of realms may depend on your mastery.
For further macroeconomic modeling techniques and financial infrastructure resilience protocols, consult Volume 9: The Financial Alchemist's Ledger, Chapter IV.
End of Chapter IX, Section 4 The Complete Practitioner's Codex, Volume 12
<!-- SECTION 39 -->
The Complete Practitioner's Codex, Volume 12: The Economist's Cipher
Chapter XV: Supplements: Parallel Economy Networking and Community Building
In the sacred pursuit of economic sovereignty, the creation and cultivation of parallel economies is not a mere option but an imperative. The master economist must learn to forge resilient, localized economic networks—barter groups and crypto communities—that operate independently of the failing hegemonic financial systems. This chapter delivers, with uncompromising precision, the complete protocols and practical strategies to build, sustain, and expand your parallel economy network. Consider this your battle manual for economic independence.
Section 1: Foundational Principles of Parallel Economy Networking
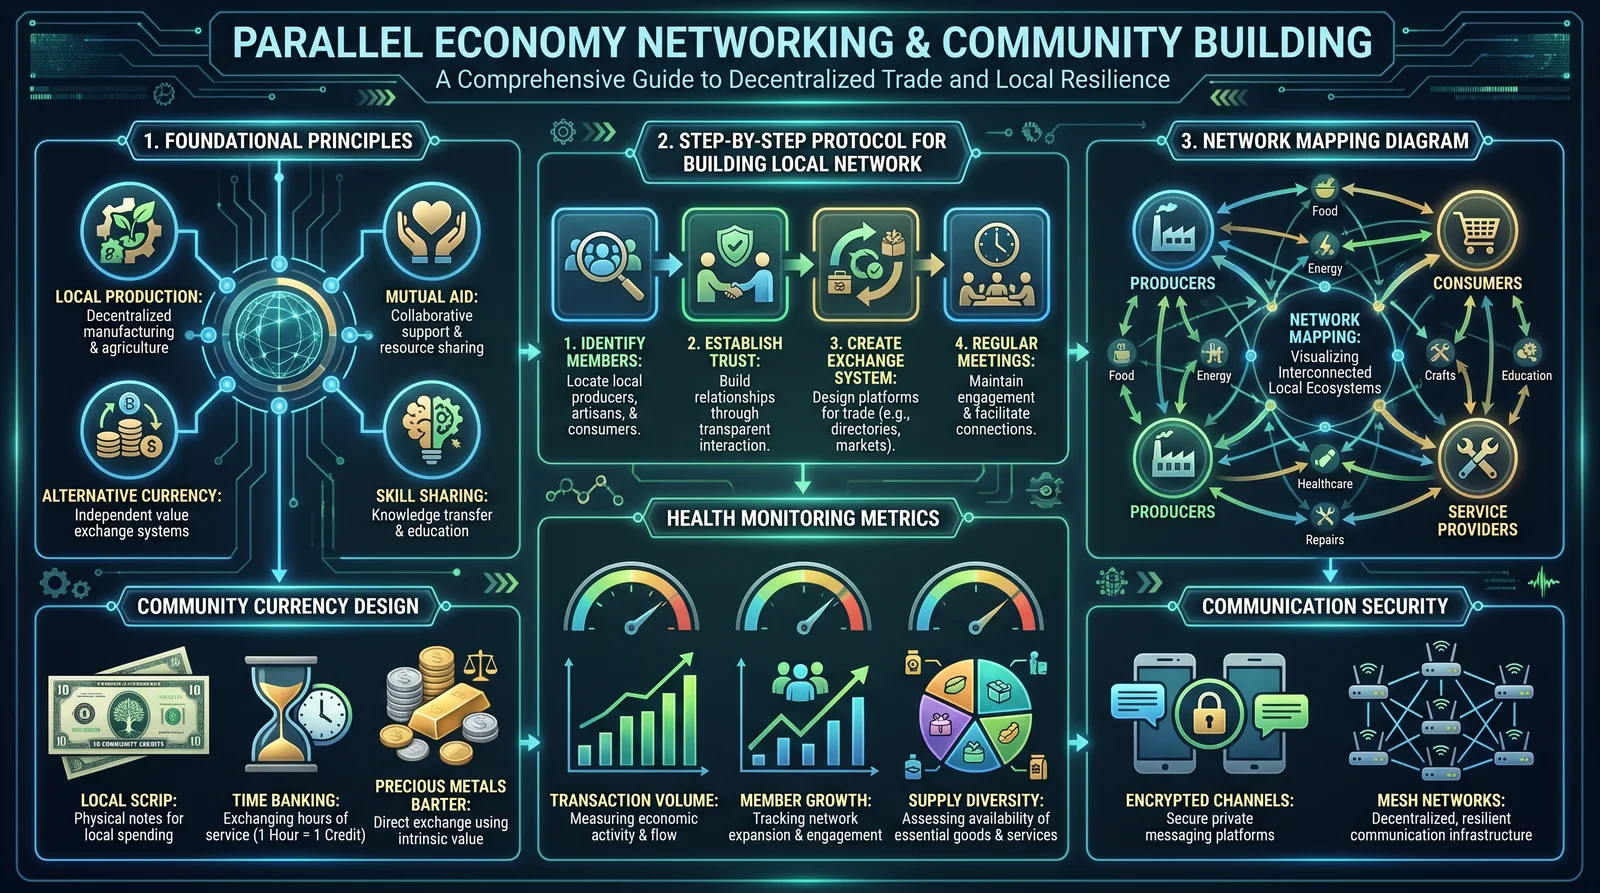
1.1 Sacred Objective
Parallel economy networks are designed to:
- Bypass centralized financial controls
- Enable the flow of goods, services, and value within trusted communities
- Create mutual economic resilience through diversification and decentralization
- Empower economic actors with sovereignty over their resources and transactions
1.2 Core Network Components
The network comprises three critical elements:
| Component | Description | Examples |
|---|---|---|
| Participants | Individuals and entities providing goods/services | Farmers, artisans, crypto traders |
| Communication Nodes | Channels for outreach and trust-building | Local meetups, encrypted chat groups |
| Transaction Systems | Mechanisms facilitating exchange and value transfer | Barter protocols, crypto wallets |
Section 2: Step-by-Step Protocol for Building a Local Parallel Economy Network
This protocol assumes zero prior infrastructure. Follow each step with precision.
Step 1: Define the Network’s Scope and Purpose
Objective: Establish clear boundaries and goals.
- Identify the geographic area for initial network deployment (e.g., neighborhood, town, region).
- Determine the primary economic focus: barter, crypto trading, combined.
- Set measurable goals: number of participants in 3 months, volume of transactions, types of goods/services traded.
Example Table: Network Scope Definition
| Parameter | Specification |
|---|---|
| Geographic Area | Town of Oakridge (population 10,000) |
| Economic Focus | Barter and cryptocurrency hybrid |
| Initial Goals | 50 active members, 100 monthly transactions |
Step 2: Network Mapping and Participant Identification
Objective: Identify and categorize potential participants.
- Create a Participant Role Matrix to classify individuals/entities by their economic function.
- Use local directories, social media, and community centers for outreach.
- Record contact information, goods/services, and trustworthiness indicators.
Participant Role Matrix Example
| Role Type | Description | Examples | Trustworthiness Indicators |
|---|---|---|---|
| Producer | Creates physical goods | Farmers, artisans | Local reputation, references |
| Service Provider | Offers non-tangible services | Mechanics, teachers, healers | Length of community involvement |
| Trader | Facilitates exchange and trade | Market operators, crypto traders | Transaction history, feedback scores |
| Network Facilitator | Organizes and manages communications | Community leaders, admins | Leadership roles, conflict resolution skills |
Step 3: Outreach and Recruitment Strategy
Objective: Engage and enroll participants through trust-oriented outreach.
- Design a script for initial contact emphasizing community empowerment and mutual benefit.
- Host informational sessions at accessible venues (libraries, cafes, community halls).
- Leverage social proof: invite respected local figures to endorse the network.
- Use encrypted digital platforms (Signal, Telegram, Matrix) to maintain privacy.
Outreach Contact Script Template
Greetings [Name],

We are building a local economic network designed to empower our community by enabling direct exchange of goods and services without dependence on external financial systems. Your skills and contributions could be vital. We invite you to an introductory session on [Date] at [Location].

Together, we can build economic resilience.

Respectfully,
[Your Name]
Step 4: Trust Building and Network Governance
Objective: Establish trust protocols and governance frameworks.
- Implement a tiered trust system based on participant behavior and peer reviews.
- Create a Network Charter outlining codes of conduct, transaction dispute resolution, and confidentiality.
- Form a Governance Council composed of elected representatives from participant roles.
- Conduct regular trust audits and update participant status accordingly.
Trust Tier System Table
| Tier Level | Criteria | Privileges | Review Frequency |
|---|---|---|---|
| Tier 1 | New participants, no transaction history | Limited transaction volume, mentorship access | Monthly |
| Tier 2 | Completed 5+ successful transactions | Full transaction rights, voting on governance | Quarterly |
| Tier 3 | Trusted contributors with 20+ transactions | Network leadership eligibility, conflict mediation | Biannual |
Step 5: Transaction Facilitation Protocols
Objective: Enable secure, efficient, and transparent transactions.
5.1 Barter Group Protocol
- Create a Digital Ledger using open-source tools (e.g., spreadsheet shared via encrypted cloud with access control).
- Standardize Item/Service Valuations via community workshops.
- Match Offers and Requests through periodic bulletin boards (digital and physical).
- Record Transactions immediately post-exchange with signatures or digital confirmation.
- Reconcile Ledger Weekly by the Governance Council.
Barter Transaction Ledger Example
| Date | Seller | Buyer | Item/Service | Quantity | Valuation Units | Confirmation (Signature/Digital) |
|---|---|---|---|---|---|---|
| 2024-07-09 | Farmer John | Mechanic Lee | Organic vegetables | 10 kg | 20 barter points | Digital signature (Lee) |
5.2 Cryptocurrency Community Protocol
- Select a Suitable Cryptocurrency Platform based on decentralization, privacy, and local adoption (recommended: Monero, Bitcoin Lightning Network).
- Distribute Wallet Software with step-by-step installation guides (see Appendix A).
- Conduct Training Sessions on wallet security, transaction verification, and privacy.
- Implement Multisignature Wallets for community funds governance.
- Schedule Regular Transaction Audits with public ledgers (maintaining anonymity) reviewed by the Governance Council.
Crypto Community Roles Table
| Role | Responsibilities | Security Level | Tools Used |
|---|---|---|---|
| Wallet Managers | Manage multisig wallets | High | Electrum, Monero GUI |
| Trainers | Educate participants | Medium | Video tutorials, live sessions |
| Auditors | Verify transaction integrity | High | Blockchain explorers, custom scripts |
| Network Support | Technical assistance | Medium | Encrypted chat, help desks |
Step 6: Network Expansion and Sustainability
Objective: Grow the network while ensuring operational integrity.
- Implement a Referral Incentive Program rewarding active participants who recruit new members.
- Diversify Economic Activities by identifying new goods and services.
- Host Quarterly Market Events to increase face-to-face trust and transaction volume.
- Establish Emergency Mutual Aid Protocols within the network for crises.
- Monitor Network Health Metrics monthly (see Section 3).
Section 3: Network Mapping and Health Monitoring
3.1 Network Mapping Protocol
Objective: Visualize network structure and participant interrelations.
- Use graph mapping software (Gephi, Cytoscape) or manual graphing.
- Nodes represent participants; edges represent transaction frequency and trust level.
- Update maps monthly to identify central figures and isolated members.
Network Mapping Example Table
| Node ID | Participant Name | Role | Node Degree (Connections) | Trust Tier | Transaction Volume (Monthly) |
|---|---|---|---|---|---|
| N001 | Farmer John | Producer | 12 | Tier 3 | 45 |
| N002 | Mechanic Lee | Service Provider | 9 | Tier 2 | 30 |
| N003 | Crypto Trader Max | Trader | 15 | Tier 3 | 60 |
3.2 Health Monitoring Metrics
| Metric | Measurement Method | Frequency | Threshold for Action |
|---|---|---|---|
| Participant Retention | Count of active participants | Monthly | < 80% retention triggers outreach |
| Transaction Volume | Total transactions counted | Monthly | < 50% goal triggers expansion plan |
| Trust Tier Distribution | Percentage in each tier | Quarterly | High Tier 1 % triggers training sessions |
| Conflict Incidence | Number of disputes reported | Monthly | > 5 conflicts triggers mediation |
Section 4: Appendices and Technical Specifications
Appendix A: Cryptocurrency Wallet Installation and Security Protocol
Objective: Equip the network with secure wallet infrastructure.
Installation Steps for Monero GUI Wallet:
- Download Monero GUI installer from the official site: [https://www.getmonero.org/downloads/](https://www.getmonero.org/downloads/).
- Verify the integrity of the installer using PGP signatures.
- Run the installer and follow prompts:
- Choose language
- Select "Create a new wallet"
- Write down the 25-word seed phrase on physical paper, store securely.
- Set a strong password (minimum 12 characters, mixed case, symbols).
- Synchronize the wallet with the Monero blockchain (initial sync may take several hours).
- Enable optional privacy settings, such as stealth addresses and ring signatures.
- Backup wallet files and seed phrase in multiple secure physical locations.
Security Best Practices:
| Practice | Description | Frequency |
|---|---|---|
| Seed Phrase Backup | Store offline in waterproof, fireproof container | Once at wallet creation |
| Password Change | Change wallet password | Every 6 months |
| Multisignature Wallet Setup | Distribute private keys among trusted members | Upon wallet creation |
| Transaction Verification | Manually verify all incoming/outgoing transactions | Every transaction |
Appendix B: Barter Valuation Workshop Protocol
Objective: Establish standardized values for goods/services.
- Gather a representative sample of participants (minimum 10).
- List all commonly traded goods and services.
- Assign preliminary barter points based on production cost, labor, and demand.
- Facilitate group discussion to adjust valuations for fairness.
- Finalize and publish barter point list.
- Schedule quarterly reviews to adjust for market changes.
Final Word
The parallel economy is a living organism. It demands vigilance, adaptability, and unwavering commitment. Follow this codex with the devotion of a Practitioner, and you will forge a fortress of economic sovereignty impervious to the storms of collapse and control.
Your mission is not easy. It requires mastery of outreach, trust, governance, and technical infrastructure. Use this volume as your sacred compendium. Pass its knowledge only to those worthy. Economic freedom depends on your unwavering dedication.
End of Chapter XV For related governance frameworks, see Volume 9: The Governance Codex, Chapter IV For digital security protocols, see Volume 11: The Cybersecurity Codex, Chapter III
<!-- SECTION 40 -->
Supplements: Comprehensive Resource Directory
The Economist’s Cipher: Complete Financial Mastery, Wealth Building, and Economic Sovereignty
Volume 12, Chapter IV: Supplements — Exhaustive Directory of Critical Resources
Preface: In the crucible of economic sovereignty, the warrior of finance must wield tools forged in precision and reliability. This directory serves as the unyielding armory of the Economist’s Cipher, cataloging vital resource nodes essential for secure wealth preservation, strategic asset allocation, and unassailable confidentiality. The following compilation is meticulously curated, categorized, and evaluated to empower the chosen apprentice with direct access to the highest echelon of financial infrastructure.
1. Hardware Wallet Manufacturers
The cornerstone of digital asset security resides in hardware wallets engineered for cryptographic sanctity and physical tamper resistance. Selection criteria are based on security architecture, firmware transparency, supply chain integrity, and user interface robustness.
| Manufacturer | Headquarters | Contact Email | Website | Security Features | Open Source Firmware | Reliability Rating (1-10) |
|---|---|---|---|---|---|---|
| Ledger | France | support@ledger.com | https://www.ledger.com | Secure Element chip, PIN, passphrase, BOLOS OS | Partial | 9 |
| Trezor (SatoshiLabs) | Czech Republic | support@trezor.io | https://trezor.io | Open-source firmware, PIN, passphrase, U2F support | Full | 9 |
| Coldcard | Canada | support@coinkite.com | https://coldcardwallet.com | Secure Element, air-gapped, PSBT signing | Partial | 8 |
| BitBox | Switzerland | support@shiftcrypto.ch | https://shiftcrypto.ch | Secure Element, open-source firmware, multi-sig support | Full | 8 |
| KeepKey | USA | support@keepkey.com | https://keepkey.com | PIN, passphrase, integration with ShapeShift | Closed source | 6 |
Evaluation Criteria
- Security Architecture: Hardware-based cryptographic modules, physical anti-tamper design, multi-factor authentication.
- Firmware Transparency: Open-source firmware facilitates independent audits; critical for trust.
- Supply Chain Integrity: Proven manufacturing processes resistant to interception or hardware implants.
- User Interface: Ease of use without compromising security; must support multiple cryptocurrencies and complex transactions.
Procedural Guidance for Hardware Wallet Acquisition:
- Review the table and identify the wallet that aligns with your security needs.
- Visit the official website to verify authenticity; avoid third-party vendors to prevent supply chain compromise.
- Purchase directly; ensure shipment tracking with tamper-evident packaging.
- Upon receipt, perform initial device integrity checks as per manufacturer’s guidelines (e.g., firmware checksum validation).
- Initiate wallet setup in an isolated environment (offline computer if possible).
- Backup seed phrases on specialized material (see Volume 5, Chapter III: Seed Phrase Preservation Protocols).
2. Precious Metal Dealers
Physical assets in gold, silver, platinum, and palladium remain a critical hedge against systemic collapse and fiat currency erosion. Dealer selection is governed by asset purity certification, provenance transparency, competitive pricing, and delivery security.
| Dealer Name | Location | Contact Number | Website | Asset Range | Certification Standards | Reliability Rating (1-10) |
|---|---|---|---|---|---|---|
| APMEX | USA | +1 800-375-9006 | https://www.apmex.com | Gold, Silver, Platinum, Palladium | LBMA, COMEX, ISO 9001 | 9 |
| Kitco | Canada | +1 877-775-4653 | https://www.kitco.com | Gold, Silver, Platinum, Palladium | LBMA, ISO 17025 | 9 |
| BullionVault | UK | +44 20 7060 3333 | https://www.bullionvault.com | Gold, Silver | Vaulted LBMA Good Delivery bars | 8 |
| JM Bullion | USA | +1 877-695-6468 | https://www.jmbullion.com | Gold, Silver, Platinum | LBMA, COMEX | 8 |
| Perth Mint | Australia | +61 8 9421 7222 | https://www.perthmint.com | Gold, Silver, Platinum | Australian Government Mint | 10 |
Evaluation Criteria
- Asset Purity Certification: Demand LBMA (London Bullion Market Association) certification or equivalent.
- Provenance Transparency: Chain of custody and origin documentation must be available.
- Pricing Transparency: Real-time spot price alignment and clear premium rates.
- Delivery Security: Insured shipping with trackable, discreet packaging.
Procedural Guidance for Purchasing Precious Metals:
- Identify the metal and quantity required based on your portfolio strategy.
- Use dealer websites to compare spot price premiums and shipping costs.
- Verify dealer certification and customer reviews via independent platforms (e.g., Trustpilot).
- Place orders only through secured HTTPS portals; confirm order summary and payment instructions.
- Opt for insured and trackable courier services.
- Upon delivery, verify weight, dimensions, and authenticity marks using a calibrated scale and jeweler’s loupe.
- Store metals in secure, climate-controlled vaults (see Volume 6, Chapter IV: Vault Design and Protocols).
3. Legal Advisors Specializing in Financial Sovereignty
Navigating the labyrinthine legal frameworks that govern financial assets requires counsel versed in asset protection, international tax law, trust establishment, and cryptocurrency regulation. The following list identifies advisors and firms with documented expertise in sovereign wealth preservation and clandestine financial structures.
| Advisor/Firm | Location | Contact Email | Website | Specializations | Client Confidentiality Rating (1-10) | Reliability Rating (1-10) |
|---|---|---|---|---|---|---|
| Anderson & Smith LLP | USA (Delaware) | contact@andersonsmith.com | https://andersonsmith.com | Trusts, Offshore Entities, Tax Shelters | 10 | 9 |
| Sovereign Legal Group | Switzerland | info@sovereignlegal.ch | https://sovereignlegal.ch | Asset Protection, Crypto Law | 9 | 9 |
| LexFortress Counsel | UK | support@lexfortress.co.uk | https://lexfortress.co.uk | International Tax, Foundations, Trusts | 9 | 8 |
| Nakamoto Advisory | Japan | advisory@nakamoto.jp | https://nakamoto.jp | Cryptocurrency Regulation, ICOs | 8 | 8 |
| Fortress Law Offices | Cayman Islands | info@fortresslaw.ky | https://fortresslaw.ky | Offshore Finance, Captive Insurance | 10 | 9 |
Evaluation Criteria
- Specialized Knowledge: Deep understanding of jurisdictional nuances and recent regulatory changes.
- Client Confidentiality: Use of attorney-client privilege, encrypted communications, and NSA-grade discretion protocols.
- Track Record: Documented success with sovereign clients and complex asset protection structures.
- Accessibility: Responsive communication channels and multilingual capabilities.
Procedural Guidance for Engaging Legal Advisors:
- Define specific legal needs: trust formation, tax structuring, compliance.
- Shortlist advisors based on specialization and jurisdictional relevance.
- Initiate contact using encrypted email (PGP recommended; see Volume 9, Chapter II: Secure Communications).
- Schedule an initial consultation via secure video or in-person meeting.
- Verify credentials through bar association and client testimonials.
- Establish a retainer agreement incorporating NDAs and confidentiality clauses.
- Maintain continuous legal audits of asset structures in response to evolving laws.
4. Educational Materials: Financial Sovereignty and Economic Mastery
The path to financial enlightenment demands rigorous study of advanced principles in economics, cryptography, market psychology, and asset management. The following resources are vetted for their depth, originality, and practical application.
| Resource Type | Title/Author | Publisher/Platform | Contact/Access Link | Content Scope | Accessibility Rating (1-10) | Reliability Rating (1-10) |
|---|---|---|---|---|---|---|
| Book | The Art of Asset Protection by Mark Warda | Wiley | https://www.wiley.com/en-us | Offshore trusts, legal strategies | 8 | 9 |
| Online Course | Cryptocurrency Security by Ledger Academy | Ledger Academy | https://academy.ledger.com | Hardware wallets, crypto best practices | 9 | 9 |
| Research Paper | Economic Sovereignty: A Framework by Dr. Helena Troy | Journal of Financial Sovereignty | https://jfs.org/vol12/helena_troy | Sovereignty theories, economic decentralization | 7 | 8 |
| Video Series | Mastering Market Cycles by Ray Dalio | YouTube Official Channel | https://youtube.com/dalio | Market psychology, cycle analysis | 9 | 8 |
| Whitepaper | Decentralized Finance Protocols by ConsenSys | ConsenSys | https://consensys.net/whitepapers | DeFi architecture, risk management | 8 | 9 |
Evaluation Criteria
- Depth of Content: Technical rigor and practical applicability.
- Originality: Presentation of suppressed or cutting-edge methodologies.
- Authority: Authorship by recognized experts with verifiable credentials.
- Accessibility: Clear presentation without sacrificing complexity.
Procedural Guidance for Utilizing Educational Materials:
- Determine your foundational knowledge level to select appropriate materials.
- Prioritize resources with actionable frameworks over purely theoretical content.
- Create a structured study plan allocating time daily for reading, practical exercises, and review.
- Integrate learning with field application (e.g., wallet setup, legal consultation).
- Document insights and cross-reference with related volumes for comprehensive understanding.
- Engage in peer discussion forums or mastermind groups for knowledge reinforcement (see Volume 11, Chapter VII: Collaborative Economic Warfare).
5. Summary Table: Resource Types and Reliability Ratings
| Resource Category | Key Providers/Authors | Primary Function | Reliability Range | Recommended for |
|---|---|---|---|---|
| Hardware Wallets | Ledger, Trezor, Coldcard | Secure private key storage | 6 – 9 | Digital asset holders |
| Precious Metal Dealers | APMEX, Kitco, Perth Mint | Physical asset acquisition | 8 – 10 | Portfolio diversification |
| Legal Advisors | Anderson & Smith, Sovereign Legal | Asset protection, compliance | 8 – 10 | Legal structuring and defense |
| Educational Materials | Mark Warda, Ledger Academy | Knowledge acquisition | 7 – 9 | Continuous learning and mastery |
6. Final Directives for the Economist’s Apprentice
The mastery of economic sovereignty is incomplete without the seamless integration of these resources into your operational workflow. The below stepwise protocol ensures the synchronization of acquisition, protection, and continual education:
Protocol: Resource Integration for Sovereign Wealth Mastery
- Resource Prioritization: Assign resource categories priority based on immediate strategic needs (e.g., hardware wallet before legal advisor for crypto holders).
- Verification Process: Independently verify all contact information and authenticity of providers prior to engagement. Use multi-factor authentication where possible.
- Acquisition and Onboarding: Follow procedural guidance meticulously for purchasing hardware wallets and precious metals. Initiate legal consultations under strict confidentiality protocols.
- Education Deployment: Establish a self-driven curriculum incorporating selected educational materials. Utilize practical exercises to reinforce knowledge.
- Continuous Evaluation: Bi-annually reassess providers’ ratings and replace or supplement as new intelligence surfaces. Maintain a dynamic resource ledger.
- Security Reinforcement: Integrate hardware wallets and physical assets storage with legal structures advised by counsel. Maintain encrypted communication channels for all transactions and consultations.
Appendix: Contact Information and Communication Protocols
For each entry in this directory, use the following encrypted communication protocol to initiate contact:
| Step | Instruction |
|---|---|
| 1 | Generate PGP key pair via GnuPG (for Windows, Linux, or macOS). Refer to Volume 9, Chapter II for setup. |
| 2 | Encrypt initial email with recipient’s public key. |
| 3 | Include your PGP public key to establish a secure channel. |
| 4 | Request confirmation of receipt and secure communication preference. |
| 5 | Maintain all subsequent correspondence encrypted. |
This directory is an indispensable armament in your campaign for financial sovereignty. Embrace it with the reverence due to sacred knowledge. The path is arduous; the reward is eternal security.
End of Chapter IV: Supplements — Comprehensive Resource Directory For related protocols on seed phrase preservation, vault construction, and secure communications, refer to Volumes 5, 6, and 9 respectively.
PLATES — Supplemental Gallery
Illustrations carried over from the original Codex Reader that belong to this volume as a whole. Added by this edition; the text above is complete without them.