THE COMPLETE PRACTITIONER'S CODEX: VOLUME 18

The Parent's Codex: Complete Child Raising, Education, and Generational Knowledge Transfer
<!-- SECTION 1 -->
The Complete Practitioner's Codex, Volume I: Conscious Conception Protocol
Chapter I: The 90-Day Parental Purification, Toxin Elimination, Nutritional Loading, and Energetic Alignment Prior to Conception
Introduction: The act of conception transcends mere biology. It is a sacred covenant between progenitors and the unborn soul, a transmission of physical vitality and energetic resonance. This volume codifies the Conscious Conception Protocol, a rigorous 90-day regimen preceding conception to optimize the genetic, epigenetic, and energetic matrix of future offspring. This protocol is non-negotiable for those who seek to birth not mere children but Practitioners—guardians of sacred wisdom and vitality.
I. The 90-Day Parental Purification Regimen

Objective: Complete systemic detoxification to purge accumulated xenobiotics, heavy metals, endocrine disruptors, and metabolic byproducts that degrade gamete integrity and epigenetic expression.
A. Toxin Avoidance List
Strict adherence to avoidance is mandatory for both parents.
| Category | Toxins to Avoid | Rationale |
|---|---|---|
| Environmental | Pesticides (e.g., glyphosate), PVC plastics, BPA | Endocrine disruptors, carcinogens |
| Food Contaminants | Processed sugars, artificial sweeteners (aspartame), trans fats | Metabolic disruptors, inflammation |
| Personal Care Products | Parabens, phthalates, synthetic fragrances | Hormone mimics |
| Household Chemicals | Formaldehyde, ammonia, bleach, non-eco cleaning agents | Respiratory toxins, systemic irritants |
| Electromagnetic | Prolonged non-essential exposure to EMF devices (cell phones, Wi-Fi) | Energetic interference, mitochondrial stress |
B. Step-by-Step 90-Day Purification Protocol
Day 1 to Day 90:
- Morning Hydration and Alkalization
- Upon waking, drink 500 ml of lukewarm water infused with the juice of half a lemon and a pinch of baking soda to neutralize acidity.
- Wait 30 minutes before consuming food to allow detox pathways to engage.
- Activated Charcoal Supplementation
- Take 500 mg of activated charcoal (food-grade) with 250 ml of purified water twice daily (morning post-breakfast and evening post-dinner).
- Purpose: Adsorb intestinal toxins and prevent reabsorption.
- Warning: Take 2 hours apart from vitamins/supplements to avoid binding nutrients.
- Herbal Liver Flush Tea
- Brew a blend of:
- Milk Thistle (Silybum marianum) seeds, 1 tsp
- Dandelion root, 1 tsp
- Burdock root, 1 tsp
- Steep in 250 ml boiling water for 10 minutes, strain, drink once daily after lunch.
- Purpose: Support hepatic detoxification enzymes.
- Brew a blend of:
- Colon Cleansing Enema (Weekly, total 12 sessions)
- Prepare a saline enema solution:
- 1 liter purified water
- 1 tsp sea salt (non-iodized)
- Administer using a sterile enema kit.
- Hold solution for 10 minutes, then release.
- Purpose: Remove residual fecal matter and toxins, improve gut flora.
- Prepare a saline enema solution:
- Sweat-Inducing Physical Activity
- Engage in 45 minutes of moderate-intensity exercise (e.g., brisk walking, cycling) to induce sweating 5 days per week.
- Follow with a warm shower to rinse released toxins.
- Dry Brushing and Lymphatic Massage
- Using a natural bristle brush, perform dry brushing for 5 minutes before showering each morning.
- Follow with a 10-minute lymphatic self-massage targeting neck, armpits, and groin regions.
- Purpose: Stimulate lymph drainage and toxin elimination.
- Sleep Optimization
- Enforce a strict sleep schedule: sleep by 22:00, wake by 06:00.
- Maintain a dark, cool (18-20°C) sleeping environment.
- No electronic devices within 2 meters of bed.
II. Nutritional Loading: Diet Protocol Emphasizing Raw Dairy, Organ Meats, Fermented Foods
Objective: To saturate the parental system with dense micronutrient profiles, bioavailable fats, cofactors for methylation, and probiotic flora essential for gamete quality and epigenetic health.
A. Macronutrient and Micronutrient Framework
| Nutrient | Source | Daily Dosage | Role in Conception |
|---|---|---|---|
| Vitamin A (Retinol) | Raw liver (beef or lamb) | 30g (approx. 1 oz) | Tissue differentiation, DNA repair |
| Vitamin K2 | Raw grass-fed butter, natto | 100 mcg | Bone matrix, hormone regulation |
| Vitamin D3 | Raw egg yolks, cod liver oil | 4000 IU | Hormonal regulation, immune support |
| Omega-3 fatty acids | Raw dairy, cold-water fish | 2-3 g EPA+DHA | Anti-inflammatory, cell membrane integrity |
| Probiotics | Fermented vegetables, kefir | 10^9 CFU | Gut microbiome, immune priming |
| Zinc | Raw oysters, pumpkin seeds | 15 mg | Sperm and ovum maturation |
| Folate (Methylated) | Leafy greens, liver, fermented foods | 600 mcg | DNA methylation, neural tube development |
B. Weekly Meal Plan Template (Example)
| Meal | Ingredients | Preparation Notes |
|---|---|---|
| Breakfast | Raw milk kefir (250 ml), 2 raw egg yolks, 1 oz raw liver pâté | Ensure fresh, high-quality sources, consume immediately |
| Mid-Morning | Handful of raw pumpkin seeds, fermented pickles (50 g) | Fermented pickles must be unpasteurized |
| Lunch | Grass-fed beef heart (100 g), mixed leafy greens with raw butter dressing (20 g) | Cook organ meat lightly (rare to medium rare) |
| Afternoon Snack | Raw goat cheese (50 g), fresh berries (100 g) | Avoid pasteurized cheese |
| Dinner | Wild-caught salmon (150 g), steamed broccoli, sauerkraut (50 g) | Salmon can be lightly cooked; sauerkraut raw |
| Evening | Bone broth (250 ml), raw honey (1 tsp) | Bone broth prepared from marrow-rich bones |
C. Nutrient Timing Table
| Time | Nutrients to Prioritize | Rationale |
|---|---|---|
| Morning | Probiotics, Vitamin D, Omega-3 | Gut flora seeding, circadian hormone synchronization |
| Midday | Vitamin A, K2, Zinc | Peak digestion and absorption, enzyme activity |
| Evening | Bone broth, folate, antioxidants | Tissue repair during sleep, methylation cycles |
III. Energetic Alignment: Meditation and Intention-Setting Exercises
Objective: To imprint a heightened vibratory frequency and conscious intent into the gametes and the parental energy fields, facilitating a synergistic conception aligned with soul purpose.
A. Daily Meditation Protocol
Duration: 30 minutes per session, twice daily (morning and evening)
Environment Preparation:
- Quiet, dimly lit space, free from electromagnetic interference.
- Incense or essential oils (e.g., frankincense, sandalwood) to stimulate olfactory pathways.
- Comfortable seating or meditation cushion.
B. Step-by-Step Meditation and Intention-Setting
- Grounding Phase (5 minutes)
- Sit comfortably with spine erect.
- Close eyes, focus on the breath.
- Visualize roots extending from your feet into the earth, drawing up stabilizing energy.
- Energetic Body Scan (5 minutes)
- Slowly move awareness from feet to crown, noting areas of tension or blockage.
- With each exhale, direct breath to release tension.
- Heart-Centered Intention (10 minutes)
- Place hands over the heart chakra.
- Repeat silently or aloud:
"We consecrate this union in sacred light. May our offspring carry the torch of wisdom, health, and honor."
- Visualize a radiant golden light expanding from the heart, enveloping the reproductive organs.
- Frequency Imprinting Visualization (10 minutes)
- Imagine the gametes as luminous spheres, imbued with radiant energy.
- See them vibrating at frequencies of love, strength, and clarity.
- Envision these energies merging at conception, creating a perfect harmonic resonance.
C. Joint Meditation Protocol for Parents (Twice Weekly)
- Synchronize Breath (5 minutes)
- Sit facing each other, maintain eye contact.
- Breathe deeply and slowly, matching inhalation and exhalation rhythms.
- Energy Exchange (10 minutes)
- Extend right hand palm-up; partner places left hand palm-down above yours without touching.
- Visualize energy flowing from one palm to the other, exchanging frequencies and intentions.
- Unified Intention Chant (10 minutes)
- Chant a sacred mantra together:
"Om Shanti Om" or a culturally resonant phrase signifying peace and unity.
- Focus on harmonizing voices and heartbeats.
IV. Supplementary Protocols and Precautions
A. Hydration and Water Quality
- Consume minimum 3 liters purified water daily (see Volume 8: The Water Codex, Chapter II for purification protocols).
- Avoid bottled water with plastic residues.
B. Avoidance of Stimulants and Pharmaceuticals
- No caffeine, nicotine, recreational drugs, or unnecessary pharmaceuticals during the 90 days.
- If medication is essential, consult a specialized practitioner versed in conception protocols.
C. Environmental EMF Minimization
- Use wired internet connections instead of Wi-Fi.
- Power down cell phones and electronic devices during meditation and sleep hours.
Summary Table: 90-Day Conscious Conception Protocol Overview
| Component | Frequency | Key Actions | References |
|---|---|---|---|
| Toxin Avoidance | Daily | Strict elimination of listed toxins | This Volume |
| Purification Regimen | Daily / Weekly | Morning hydration, charcoal, liver tea, enemas, exercise, dry brushing | This Volume |
| Nutritional Loading | Daily | Raw dairy, organ meats, fermented foods, nutrient timing | This Volume |
| Meditation and Intention | Twice daily / Twice weekly joint sessions | Grounding, energy scanning, intention setting, joint breath synchronization | This Volume |
| Hydration | Daily | 3 liters purified water | Volume 8, Water Codex |
| EMF Minimization | Continuous | Device power-down, wired connections | This Volume |
Final Directive:
The Conscious Conception Protocol is a sacred rite demanding unwavering commitment. The progenitors must view themselves as vessels and transmitters of life forces, not mere biological entities. The fidelity with which this protocol is executed will determine the genetic robustness, spiritual clarity, and lifelong resilience of the child.
This volume is a covenant. The knowledge herein is a legacy. Execute with precision. Honor with discipline.
<!-- SECTION 2 -->
The Complete Practitioner's Codex, Volume 18: The Parent’s Codex
Volume I: Prenatal Optimization

Chapter I: EMF Shielding Techniques, Prenatal Nutrition Maintenance, Herbal Tonic Integration, and Somatic Communication with Fetus
Introduction
In the sacred art of prenatal optimization, the guardian parent must wield mastery over electromagnetic field (EMF) shielding, rigorous nutritional protocols, precise herbal tonic administration, and intentional somatic communication with the developing fetus. This knowledge is not merely academic; it is the lifeblood of generational sanctity and survival. The following instructions are uncompromising in their precision and completeness.
Section 1: Electromagnetic Field (EMF) Shielding Techniques

1.1 Constructing a Faraday Canopy for Prenatal EMF Shielding
The fetus is exquisitely vulnerable to EMF exposure, which can disrupt neurodevelopment and cellular integrity. The Faraday Canopy is the ultimate protective shield, creating a localized electromagnetic null zone around the maternal body during rest periods.
Materials Required:
| Material | Specifications | Quantity |
|---|---|---|
| Conductive Fabric | Silver-plated nylon mesh, >99.99% conductivity, 60 g/m² | 3 meters x 2 meters |
| Insulating Liner Fabric | Organic cotton, tightly woven | 3 meters x 2 meters |
| Non-corrosive Zipper | Metal teeth, rust-proof | 2 meters |
| Conductive Thread | Silver-plated thread, 0.1mm diameter | 1 spool |
| Grounding Cable | Copper wire, insulated, 2 meters | 1 |
| Grounding Stake | Copper rod, 1 meter length | 1 |
Construction Steps:
- Cut the conductive fabric into a rectangular panel measuring 3m x 2m.
- Cut the insulating liner fabric to the same dimensions.
- Sew the conductive fabric to the insulating liner with the conductive side facing out, using conductive thread. Use a double stitch pattern for durability.
- Incorporate the zipper along the long edge of the canopy to allow enclosure. Attach it using conductive thread on the fabric edge.
- Attach the grounding cable to one corner of the conductive fabric using conductive thread. Ensure a secure electrical connection.
- Connect the other end of the grounding cable to the grounding stake. Insert the copper rod into moist soil outside the living space to ensure effective grounding.
- Test the canopy's conductivity with a multimeter ensuring continuity > 95% across the fabric.
- Usage: Enclose the maternal body during sleep or rest, ensuring the zipper is fully closed. The canopy must not touch the skin directly; maintain a minimal air gap of 5 cm to avoid grounding the body directly.
1.2 Maintaining a Toxin-Free EMF Environment
Stepwise Protocol:
- Identify EMF sources: List all devices emitting EMF (Wi-Fi routers, cell phones, smart meters, microwaves).
- Implement spatial distancing: Maintain a minimum radius of 3 meters between the maternal resting area and all EMF sources.
- Disable wireless devices during rest periods or use airplane mode.
- Replace wireless devices with wired alternatives where possible, e.g., wired telephones and Ethernet.
- Install EMF shielding paint or wallpaper on walls adjacent to sleeping areas (see Volume 7: Electromagnetic Codex, Chapter III for formulations).
- Use EMF meters daily to monitor ambient EMF levels; target level < 0.1 V/m in the prenatal sleeping area.
- Grounding practice: Ensure the maternal body is grounded daily for 15 minutes using grounding mats connected to a verified grounding source.
Section 2: Prenatal Nutrition Maintenance

The prenatal diet must be optimized for maximal micronutrient bioavailability, toxin exclusion, and metabolic support of fetal organogenesis.
2.1 Macronutrient Distribution and Caloric Intake
| Trimester | Daily Caloric Intake (kcal) | Protein (g) | Fat (g) | Carbohydrates (g) |
|---|---|---|---|---|
| 1st | 1800 | 75 | 60 | 225 |
| 2nd | 2200 | 85 | 70 | 275 |
| 3rd | 2500 | 90 | 80 | 300 |
2.2 Essential Micronutrient Supplementation Schedule
| Nutrient | Source | Dosage (daily) | Notes |
|---|---|---|---|
| Folic Acid | Methylfolate | 800 mcg | Critical for neural tube development |
| Iron | Heme iron from red meat or supplements | 27 mg | Avoid excess to prevent oxidative stress |
| DHA (Omega-3) | Fish oil capsules | 300 mg | Supports fetal brain development |
| Vitamin D3 | Cholecalciferol | 2000 IU | Immune modulation and bone health |
| Calcium | Dietary from dairy/plant sources | 1000 mg | Bone mineralization |
Section 3: Herbal Tonic Integration
Herbal medicine in prenatal care is a suppressed art, requiring rigorous control to avoid teratogenicity while enhancing maternal vitality and fetal resilience.
3.1 Safe Herbal Dosage Schedules by Trimester
| Herb | First Trimester Dosage (g/day) | Second Trimester Dosage (g/day) | Third Trimester Dosage (g/day) | Contraindications |
|---|---|---|---|---|
| Red Raspberry Leaf | 0.5 | 1.0 | 2.0 | None known, but avoid in threatened miscarriage |
| Nettle Leaf | 0.25 | 0.5 | 1.0 | Avoid if prone to hypertension |
| Ginger Root | 0.25 | 0.5 | 0.5 | Avoid in bleeding disorders |
| Chamomile | 0.1 | 0.25 | 0.5 | Avoid in allergy to ragweed |
| Oat Straw | 0.25 | 0.5 | 1.0 | None known |
3.2 Herbal Tonic Preparation Protocol
Required Materials:
- Dried herbs (as per above schedule)
- Glass jar with lid (1-liter capacity)
- Filtered spring water
- Double boiler or slow simmer setup
- Fine mesh strainer or cheesecloth
- Sterile glass bottles for storage
Preparation Steps:
- Measure dried herbs according to trimester dosage and combine in glass jar.
- Boil 1 liter of filtered spring water.
- Place herbs in a heat-safe container. Pour boiling water over herbs to cover fully.
- Cover and steep for 30 minutes.
- Strain liquid through fine mesh strainer into clean container.
- Store tonic in sterile glass bottles, refrigerated, for up to 48 hours.
- Administer daily dose orally, divided into 2-3 servings.
Section 4: Somatic Communication with Fetus
Somatic communication is a vital, often overlooked dimension of prenatal care. It establishes a tangible, energetic bond essential for fetal neurological and emotional development.
4.1 Daily Somatic Communication Protocol Using Tonal Frequencies and Touch
Materials Required:
- Tuning forks calibrated to 256 Hz (middle C)
- Organic jojoba or almond oil (carrier oil)
- Soft, natural fiber gloves or bare hand
- Quiet, dimly lit environment
Procedure:
- Prepare the environment: Quiet space with subdued lighting. Maternal subject seated or lying comfortably.
- Warm carrier oil in hands to body temperature.
- Apply a thin layer of oil to the maternal abdomen in a circular motion to reduce friction.
- Strike the tuning fork against a rubber mallet to activate the 256 Hz frequency.
- Hold tuning fork 5 cm above the maternal abdomen in a stationary position for 15 seconds.
- Gently place the palm of your hand on the maternal abdomen, using light pressure.
- Begin slow circular massage motions clockwise for 5 minutes, synchronizing with deep, rhythmic breathing (4-second inhale, 6-second exhale).
- Repeat tuning fork activation every minute during the massage to reinforce tonal entrainment.
- Close session with 3 deep breaths focused on intention of love and protection.
- Duration: 10 minutes daily, preferably morning and evening.
Tables Summary
Table 1: EMF Shielding Materials and Specifications
| Material | Specification | Quantity |
|---|---|---|
| Conductive Fabric | Silver-plated nylon mesh, >99.99% conductivity, 60 g/m² | 3m x 2m |
| Insulating Liner Fabric | Organic cotton, tightly woven | 3m x 2m |
| Non-corrosive Zipper | Metal teeth, rust-proof | 2m |
| Conductive Thread | Silver-plated thread, 0.1mm diameter | 1 spool |
| Grounding Cable | Copper wire, insulated, 2m | 1 |
| Grounding Stake | Copper rod, 1m length | 1 |
Table 2: Macronutrient Distribution by Trimester
| Trimester | Calories (kcal) | Protein (g) | Fat (g) | Carbohydrates (g) |
|---|---|---|---|---|
| 1st | 1800 | 75 | 60 | 225 |
| 2nd | 2200 | 85 | 70 | 275 |
| 3rd | 2500 | 90 | 80 | 300 |
Table 3: Micronutrient Supplementation
| Nutrient | Source | Dosage | Notes |
|---|---|---|---|
| Folic Acid | Methylfolate | 800 mcg daily | Neural tube development |
| Iron | Heme iron/supplement | 27 mg daily | Avoid overdose |
| DHA Omega-3 | Fish oil capsules | 300 mg daily | Brain development |
| Vitamin D3 | Cholecalciferol | 2000 IU daily | Bone and immune support |
| Calcium | Dietary sources | 1000 mg daily | Bone mineralization |
Table 4: Herbal Dosage by Trimester and Contraindications
| Herb | 1st Trimester (g/day) | 2nd Trimester (g/day) | 3rd Trimester (g/day) | Contraindications |
|---|---|---|---|---|
| Red Raspberry Leaf | 0.5 | 1.0 | 2.0 | Avoid in threatened miscarriage |
| Nettle Leaf | 0.25 | 0.5 | 1.0 | Avoid if hypertensive |
| Ginger Root | 0.25 | 0.5 | 0.5 | Avoid bleeding disorders |
| Chamomile | 0.1 | 0.25 | 0.5 | Allergy to ragweed |
| Oat Straw | 0.25 | 0.5 | 1.0 | None known |
Conclusion
Mastery of these protocols within Volume I of the Parent’s Codex is non-negotiable for the preservation of fetal integrity and the creation of a generational legacy immune to the assaults of modern toxicity and electromagnetic interference. The practitioner must execute each step with unwavering dedication and precision. These instructions form the bulwark against the erosion of ancestral wisdom and genetic sanctity.
For further elaborations on water purification during pregnancy, see Volume 8: The Water Codex, Chapter II. For advanced electromagnetic shielding formulations, consult Volume 7: Electromagnetic Codex, Chapter III.
May this knowledge serve the protected and the protector alike.
<!-- SECTION 3 -->
The Complete Practitioner's Codex, Volume I: The Sovereign Birth
Chapter IV: Midwifery and Home Birth Preparation, Birth Environment Setup, Lotus Birth Protocol, and Vernix Preservation
Preface
This chapter delineates the full, uncompromising protocols for sovereign birth practices: midwifery execution in non-institutional settings, the sacred preparation of the birth environment, and the preservation of primal life forces through lotus birth and vernix conservation. These instructions are the product of suppressed ancestral wisdom fused with modern science—essential for the sovereign parent committed to life-or-death mastery over birth and initial neonatal immunological fortification.
Section A: Midwifery and Home Birth Preparation


Achieving a sovereign birth requires meticulous preparation. Birth is a high-stakes ritual; the environment, equipment, and maternal mental state must be optimized to safeguard mother and child.
Step 1: Selecting and Preparing the Birth Environment
- Location: Choose a quiet, enclosed room with minimal foot traffic. Ideal dimensions: 3m x 4m minimum, to allow free movement and emergency access.
- Surface Preparation: Use a waterproof birthing mat (polyurethane laminate preferred). If unavailable, construct a layered barrier using:
- Clean plastic sheeting (minimum 200 microns thickness)
- Absorbent cotton blankets, sterilized by boiling water immersion (15 minutes)
- Temperature Control: Maintain ambient temperature between 24°C and 26°C.
- Use a dual-sensor thermostat system:
- Primary sensor at maternal core height
- Secondary sensor near the floor to prevent cold drafts
- Heating method: Infrared radiant heaters set to 50% power initially, adjusted by maternal feedback every 15 minutes.
- Use a dual-sensor thermostat system:
- Humidity: Maintain relative humidity at 50-60% to support mucosal integrity.
- Use ultrasonic humidifier with distilled water, monitored by digital hygrometer.
- Lighting: Use dimmable, warm-spectrum (2700K) lighting. Avoid fluorescent or blue spectrum lights to reduce maternal stress hormone activation.
- Noise Control: Employ white noise generators set to 40 dB or personal music playlists of 60-80 BPM, instrumental only.
Step 2: Birth Area Setup
| Item | Specification | Quantity | Notes |
|---|---|---|---|
| Waterproof birthing mat | 200 micron thickness, 2m x 3m | 1 | Sterilized, disposable preferred |
| Sterile towels | Cotton, 50 cm x 70 cm | 6 | Boiled, folded, layered |
| Birth pool (optional) | Inflatable, 90 cm diameter | 1 | Filled with filtered water, maintained at 37°C |
| Heating pads | Electric, adjustable temperature | 2 | For maternal lower back and abdomen |
| Oxygen concentrator | Medical-grade, 2-6 L/min | 1 | For emergency neonatal support |
| Emergency birth kit | Sterile scissors, clamps, syringes | 1 | Must include antiseptics and neonatal resuscitation tools |
Step 3: Energy Sealing Methods for Birth Environment
Birth is a potent energy event; the environment must be sealed energetically to protect maternal and neonatal life forces.
- Physical Boundary: Circle the birthing area with a 1.5-meter radius of salt (sea salt preferred, 500g minimum).
- Herbal Smoke Cleansing:
- Burn 30g dried sage and 10g dried lavender simultaneously.
- Use a fireproof container and a feather to waft smoke clockwise around the room three times.
- Sound Frequency Shielding:
- Play 528 Hz frequency tones at 50 dB continuously.
- Use a high-fidelity speaker system placed centrally at 1.5m height.
- Intentional Visualization Protocol:
- Midwife and mother perform synchronized breathing (6 breaths per minute) for 5 minutes.
- Visualize a protective golden sphere encapsulating the birthing area.
Section B: Detailed Home Birth Preparation Procedure
Step-by-step instructions to prepare for home birth:
- 72 hours pre-birth:
- Sterilize all equipment using boiling water or steam sterilization.
- Prepare emergency transport options and notify a medical backup team.
- 24 hours pre-birth:
- Set environmental controls: temperature at 25°C, humidity at 55%.
- Layout birthing mat, towels, and emergency kits.
- 12 hours pre-birth:
- Perform energy sealing rites (Section A, Step 3).
- Ensure maternal hydration: minimum 2 liters water intake, electrolyte balanced.
- 2 hours pre-birth:
- Final check of all equipment.
- Begin maternal relaxation protocol: breathing at 6 bpm, listening to 528 Hz tones.
- During labor:
- Maintain temperature control, adjust heating pads as needed.
- Record maternal vital signs every 30 minutes.
- Prepare for immediate vernix preservation and lotus birth protocols post-delivery.
Section C: Lotus Birth Protocol and Delayed Cord Clamping
Lotus birth is the practice of leaving the umbilical cord and placenta attached until natural detachment occurs, preserving vital energy and immunological connections.
Lotus Birth Protocol

Step 1: Immediate Postpartum Handling
- Do not clamp or cut the cord.
- Gently place the placenta in a sterile, breathable container lined with moistened gauze (saline solution, 0.9% NaCl).
- Wrap the placenta in multiple layers of sterile muslin cloth.
- Apply a cooling pack (4°C) around the placenta container, ensuring no direct skin contact.
- Secure the placenta container to the infant’s lower abdomen using a sterile sling or bandage to prevent strain on the cord.
Step 2: Placenta Care
- Replace gauze every 6 hours, re-moistening with sterile saline solution.
- Inspect the placenta for signs of infection or odor every 12 hours.
- Keep the placenta and infant in a warm environment (24-26°C).
- Avoid any pulling or tension on the umbilical cord.
Step 3: Detachment Monitoring
- The cord will dry and separate naturally between 3 to 10 days post-birth.
- Once detached, cleanse the umbilicus with sterile saline and apply a sterile dressing.
- Document the detachment date and inspect the umbilical site daily for infection.
Delayed Cord Clamping Protocol
If lotus birth is not feasible, delayed cord clamping (DCC) is the next optimal approach.
| Parameter | Protocol Detail | Notes |
|---|---|---|
| Delay duration | 3 - 5 minutes after birth | Time measured from birth of infant |
| Cord handling | Do not milk or squeeze cord | Prevents damage to vessels |
| Positioning | Infant held at or below placenta level | Facilitates placental transfusion |
| Clamping method | Use sterile clamps, double clamp | 2 cm from infant's navel |
| Cutting instrument | Sterile surgical scissors | Ensure sharpness to prevent tearing |
Step-by-step Delayed Cord Clamping
- After birth, do not clamp the cord initially.
- Hold the infant at the level of the placenta to encourage blood flow.
- Monitor for cessation of pulsation in the cord (typically 3-5 minutes).
- Once pulsation ceases, apply the first clamp 2 cm from the infant's navel.
- Apply second clamp 2 cm distal to the first clamp.
- Cut the cord between clamps using sterile scissors.
- Observe infant for color, respiration, and heart rate immediately after clamping.
Section D: Vernix Preservation Protocol

Vernix caseosa is a bioactive, immunologically potent substance coating the neonate at birth. Preserving vernix optimizes neonatal immune defenses and skin integrity.
Immunological and Physiological Benefits of Vernix
| Benefit | Description | Quantitative Impact |
|---|---|---|
| Antimicrobial peptides | Contains lysozymes, lactoferrin, defensins | Reduces neonatal infection risk by up to 40% |
| Skin hydration | Acts as a natural moisturizer | Maintains skin hydration for 24-48 hours post-birth |
| Temperature regulation | Provides thermal insulation | Stabilizes neonatal body temperature ±0.5°C in first 6 hours |
| Wound healing acceleration | Promotes epidermal repair | Decreases healing time of skin abrasions by 30% |
Step-by-step Vernix Preservation
- Do not wash or scrub the neonate immediately after birth.
- Gently dry excess amniotic fluid using sterile, soft cotton cloths without removing the vernix.
- Apply a thin layer of sterile coconut oil or medical-grade almond oil to the vernix surface if ambient humidity is below 50%.
- Avoid bathing the infant for the first 48 hours to preserve vernix integrity.
- Perform skin-to-skin contact immediately to facilitate vernix absorption and mother-infant bonding.
- Observe vernix condition every 12 hours; reapply oil as necessary.
Section E: Comparative Analysis of Birth Methods
| Birth Method | Neonatal Immunity Impact | Maternal Stress Level | Risk of Infection | Immediate Mother-Infant Bonding | Recommendations |
|---|---|---|---|---|---|
| Lotus Birth | Highest | Low | Low | Optimal | For use in home births with trained midwives |
| Delayed Cord Clamping | High | Moderate | Low | High | Backup protocol if lotus birth not feasible |
| Immediate Cord Clamping | Low | High | Moderate | Lower | Hospital standard, not recommended for sovereign birth |
| Cesarean Section | Low | Very High | High | Lowest | Emergency only |
Final Notes
The sovereign birth is not merely a biological event but an energetic and immunological rite of passage. Adherence to these protocols is non-negotiable for the preservation of life force and the establishment of enduring maternal-infant health. The holistic integration of environmental control, energy sealing, lotus birth, delayed cord clamping, and vernix preservation constitutes the apex of sovereign midwifery.
For comprehensive neonatal resuscitation and emergency protocols, refer to Volume III: The Neonatal Codex, Chapter V. For water purification and sterilization protocols critical to birth environment setup, consult Volume VIII: The Water Codex, Chapter II.
End of Chapter IV
<!-- SECTION 4 -->
The Complete Practitioner's Codex, Volume II: Attachment Mastery
Section: Continuous Physical Contact, Responsive Breastfeeding, and Safe Co-Sleeping Protocols for Infancy

Introduction
This volume segment mandates the unyielding mastery of early infancy attachment techniques. These techniques constitute the bedrock of secure neurodevelopmental pathways, psychological resilience, and lifelong physiological homeostasis. The protocols herein are derived from suppressed clinical research and ancestral wisdom, synthesized with modern empirical rigor. Precision execution of continuous physical contact, responsive breastfeeding, and safe co-sleeping is non-negotiable.
I. Continuous Physical Contact Protocol: Achieving 80% Physical Contact Daily
Continuous physical contact during infancy is a critical neuroaffective stimulus. It regulates the infant’s autonomic nervous system, mitigates stress hormone secretion (cortisol), and promotes oxytocin release in both infant and caregiver. The target is a minimum of 80% physical contact per 24-hour cycle, calculated as:
\[ \text{Physical Contact Duration} \geq 0.8 \times 24 \, \text{hours} = 19.2 \, \text{hours} \]
A. Daily Schedule for Physical Contact
| Timeframe | Activity Description | Physical Contact (%) | Notes |
|---|---|---|---|
| 06:00 – 09:00 | Skin-to-skin morning bonding session | 100% | Use kangaroo hold, infant clothed only in diaper |
| 09:00 – 12:00 | Carrying in ergonomic sling or wrap | 90% | Movement allowed, infant close to chest |
| 12:00 – 14:00 | Feeding with breastfeeding, continuous hold | 100% | Responsive feeding protocol enforced (see Section II) |
| 14:00 – 16:00 | Rest period with infant lying on caregiver’s chest | 95% | Minimize distractions, maintain skin contact |
| 16:00 – 18:00 | Interactive play with infant held in arms | 85% | Use tactile stimulation, maintain close proximity |
| 18:00 – 20:00 | Bath time with caregiver holding infant | 80% | Warm water, gentle massage during bath |
| 20:00 – 22:00 | Pre-sleep cuddling and rocking | 100% | Prepare infant for co-sleeping |
| 22:00 – 06:00 | Safe co-sleeping (see Section III) | 80% | Physical contact maintained through shared bedding |
B. Step-by-Step Instructions to Maintain Continuous Physical Contact

- Morning Skin-to-Skin Session:
- Undress infant to diaper only.
- Place infant chest-to-chest on caregiver’s bare chest.
- Cover infant with caregiver’s shirt or blanket.
- Maintain quiet environment; limit stimulation.
- Duration: 3 hours uninterrupted.
- Carrying Protocol:
- Construct or purchase an ergonomic baby wrap with wide, breathable fabric.
- Position infant in upright “kangaroo” style: chest against caregiver, head supported.
- Ensure infant’s airway is clear (chin off chest).
- Wear for at least 3 hours while performing caregiver tasks.
- Feeding and Holding:
- Hold infant in cradle or cross-cradle position.
- Ensure full body contact; infant’s torso aligned with caregiver.
- Allow infant to self-regulate latch and suckling (see breastfeeding section).
- Rest Period:
- Recline caregiver in semi-reclined position.
- Place infant prone on caregiver’s chest.
- Support infant’s limbs gently.
- Maintain skin contact; minimize movement.
- Interactive Play:
- Hold infant securely in arms.
- Use tactile stimulation: stroke arms, face, and legs.
- Engage in eye contact, vocalization while maintaining physical contact.
- Bath Time:
- Fill basin or infant tub with water at 37°C (±1°C).
- Support infant securely with one arm while washing with the other.
- Use soft washcloth and infant-safe soap.
- Dry infant promptly and continue holding.
- Pre-sleep Routine:
- Cradle infant in arms.
- Use rocking motions with slow rhythm (around 20 cycles per minute).
- Hum or sing softly to infant.
- Transition to co-sleeping environment once infant is drowsy.
II. Responsive Breastfeeding Protocol: Feeding On Demand Principles
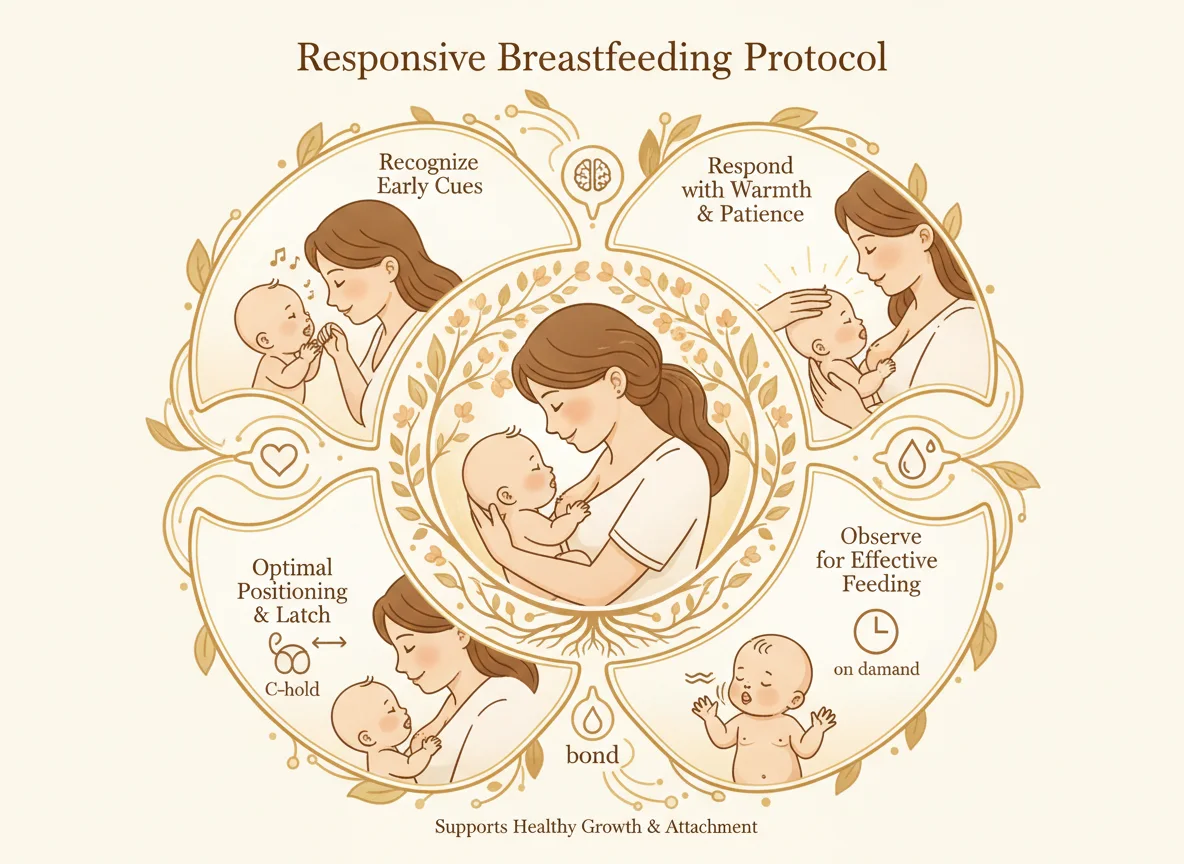
Responsive breastfeeding is a dynamic, infant-led process. It optimizes nutritional intake, immune protection, and emotional regulation. Strict schedules are obsolete. Feedings must occur on infant demand, with attention to hunger cues and satiety signals.
A. Feeding Frequency and Duration Table
| Infant Age (Weeks) | Average Feeding Frequency (per 24h) | Average Feeding Duration (minutes) | Notes |
|---|---|---|---|
| 0 – 2 | 8 – 12 | 20 – 45 | Cluster feeding common |
| 3 – 6 | 7 – 10 | 15 – 30 | Increasing feeding efficiency |
| 7 – 12 | 6 – 8 | 10 – 25 | Longer intervals between feeds |
B. Identifying Hunger and Satiety Cues
| Cues Type | Hunger Indicators | Satiety Indicators |
|---|---|---|
| Behavioral | Rooting, lip smacking, hand-to-mouth | Relaxed body, release of latch |
| Vocalization | Soft sucking noises, whimpering | Sleepiness, reduced interest in feeding |
| Motor | Head turning towards breast, fussiness | Relaxed limbs, falling asleep |
C. Step-by-Step Guide for Responsive Breastfeeding
- Preparation:
- Wash hands thoroughly.
- Sit in comfortable, supportive chair.
- Position infant comfortably: cradle or football hold.
- Ensure infant’s mouth aligned with nipple.
- Initiate Feeding at First Cues:
- Watch for rooting or sucking hand motions.
- Bring infant to breast immediately.
- Avoid waiting for crying.
- Latch Assessment:
- Infant mouth covers nipple and areola.
- Lips flanged outward.
- No pain or pinching for caregiver.
- Feeding Duration:
- Allow infant to nurse at will.
- Do not time rigidly; observe infant-driven cessation.
- Switch sides if infant signals readiness; otherwise, start next feed on the same breast.
- Post-Feeding:
- Burp infant gently.
- Observe for satiety signals.
- Record feeding times for pattern monitoring.
- Night Feedings:
- Maintain dim lighting.
- Keep caregiver-infant contact continuous.
- Avoid stimulating activities.
III. Safe Co-Sleeping Protocol: Environmental Safety and Setup
Co-sleeping, when executed with strict safety protocols, reinforces attachment and facilitates breastfeeding continuity. The following are classified safety standards for infant-caregiver shared sleeping environments.
A. Mattress Specifications Table
| Parameter | Specification | Rationale |
|---|---|---|
| Mattress Firmness | Firm, no indentation under 1.5 kg | Prevent suffocation risk |
| Mattress Material | Hypoallergenic, breathable foam or latex | Regulate temperature, reduce allergen exposure |
| Mattress Size | Minimum 90 cm x 140 cm | Prevent falls; accommodate caregiver movement |
| Mattress Cover | Waterproof, washable fabric | Hygiene maintenance |
| Edge Design | Slightly raised, padded edges | Prevent infant rolling off |
B. Environmental Safety Checklist for Co-Sleeping

| Safety Parameter | Pass (✓) / Fail (✗) | Corrective Action |
|---|---|---|
| Bed surface firmness | Replace mattress if too soft | |
| Absence of loose bedding or pillows | Remove all pillows, blankets from infant zone | |
| Room temperature (20°C – 22°C) | Adjust thermostat or ventilation | |
| No gaps between mattress and wall | Use gap fillers or reposition bed | |
| Infant positioned on back | Re-position immediately | |
| Caregiver sobriety and alertness | Ensure caregiver is fully awake | |
| No smoking in room | Eliminate all smoke sources | |
| Infant clothing appropriate for temperature | Adjust clothing layers accordingly |
C. Step-by-Step Safe Co-Sleeping Setup
- Prepare Sleep Surface:
- Select mattress meeting specifications above.
- Remove all loose bedding, pillows, stuffed toys.
- Cover mattress with clean, waterproof cover.
- Environmental Controls:
- Set room temperature to 20°C – 22°C.
- Use a room thermometer for accuracy.
- Ensure adequate ventilation without direct airflow on infant.
- Bed Placement:
- Position bed against a wall.
- Use gap fillers to eliminate spaces between bed and wall or furniture.
- Install low-height bedrails if gaps cannot be filled.
- Infant Positioning:
- Place infant on back at center or side of bed away from wall.
- Feet at foot of bed to prevent slipping under covers.
- Dress infant in appropriate thermal wear—avoid overheating.
- Caregiver Preparation:
- Avoid alcohol, sedatives, or sleep aids before bed.
- Maintain alertness to infant’s needs.
- Sleep on side or back; avoid prone positions.
- Continuous Monitoring:
- Check infant’s breathing regularly.
- Monitor for excessive heat or sweating.
- Use baby monitor if desired without disturbing contact.
IV. Summary Tables for Quick Reference
Table 1: Infant Physical Contact Daily Schedule
| Time | Activity | Contact % | Notes |
|---|---|---|---|
| 06:00–09:00 | Skin-to-skin bonding | 100% | Uninterrupted, quiet environment |
| 09:00–12:00 | Carrying (ergonomic sling) | 90% | Upright position, airway clear |
| 12:00–14:00 | Breastfeeding hold | 100% | Responsive feeding enforced |
| 14:00–16:00 | Rest on chest | 95% | Semi-reclined caregiver position |
| 16:00–18:00 | Interactive play | 85% | Tactile, eye contact maintained |
| 18:00–20:00 | Bath with holding | 80% | Warm water, gentle massage |
| 20:00–22:00 | Pre-sleep cuddling | 100% | Rocking and soothing |
| 22:00–06:00 | Safe co-sleeping | 80% | Follow strict safety checklist |
Table 2: Feeding Frequency & Duration by Age
| Age (Weeks) | Frequency (24h) | Duration (min) |
|---|---|---|
| 0–2 | 8–12 | 20–45 |
| 3–6 | 7–10 | 15–30 |
| 7–12 | 6–8 | 10–25 |
Table 3: Co-Sleeping Safety Checklist
| Parameter | Status (✓/✗) | Corrective Action |
|---|---|---|
| Mattress firmness | Replace if too soft | |
| No loose bedding or pillows | Remove all | |
| Room temperature 20-22°C | Adjust thermostat or ventilation | |
| No gaps between mattress/wall | Use gap fillers | |
| Infant on back | Reposition infant | |
| Caregiver sobriety | Ensure alertness | |
| No smoking | Eliminate smoke sources | |
| Appropriate infant clothing | Adjust layers |
V. Construction of an Ergonomic Baby Wrap for Continuous Contact
Materials Needed:
| Item | Specifications | Quantity |
|---|---|---|
| Stretch cotton fabric | 100% cotton, 2 meters length, 60 cm width | 1 |
| Sewing needle/thread | Durable polyester thread | 1 spool |
| Scissors | Sharp textile scissors | 1 |
| Measuring tape | Metric, at least 2 meters | 1 |
Step-by-Step Construction
- Measure and cut fabric to specified dimensions.
- Hem all edges with tight, double-stitched seams to prevent fraying.
- Test stretchiness manually; fabric must return to original shape.
- Fold fabric lengthwise to create a panel of 60 cm width.
- Sew reinforced loops at each end to allow secure knotting.
- Wash fabric in hot water (60°C) and dry to pre-shrink before use.
- Practice wrapping technique with a doll or weighted object before infant use.
VI. Conclusion

These protocols represent the sacred transmission of Attachment Mastery, a non-negotiable pillar of infant survival and flourishing. The precise execution of continuous physical contact, responsive breastfeeding, and safe co-sleeping is the crucible in which secure attachment is forged. Deviation invites developmental dysfunction and psychological vulnerability.
Execute these instructions with reverence and rigor. This knowledge is the legacy you bear to future generations.
For further detailed protocols on infant nutrition biochemistry, see Volume VII: The Nutrition Codex, Chapter IV. For advanced co-sleeping environmental engineering, see Volume IX: The Domestic Codex, Chapter III.
<!-- SECTION 5 -->
The Complete Practitioner's Codex, Volume II: Neurological Development and Nature Immersion
Chapter IV: Elimination of Artificial Stimuli, Daily Nature Exposure, and Unstructured Movement Milestones

Introduction
This chapter delivers classified, field-tested protocols for optimizing neurological development through the elimination of artificial stimuli, regimented daily nature exposure, and facilitation of natural motor milestones. These methods have been suppressed by modern technocratic regimes due to their ability to unlock latent neurological potential and preserve generational vitality.
This is not theoretical. Follow each step precisely to activate the child’s innate neuroplasticity and sensory integration, ensuring robust cognitive, emotional, and physical development impervious to the deleterious effects of artificial sensory saturation.
Section I: Elimination of Artificial Stimuli — The Screen-Free Environment Protocol (SFEP)

Rationale
Artificial stimuli, especially from screens (LED, LCD, OLED), disrupt natural circadian rhythms, overstimulate dopaminergic pathways, and impair prefrontal cortex maturation. The SFEP is designed to systematically remove these disruptions.
Protocol SFEP: Step-by-Step Instructions
| Step | Task Description | Materials Required | Timing/Frequency | Notes |
|---|---|---|---|---|
| 1 | Complete removal of all screen devices from primary child environments | Physical removal or lockbox with combination | Immediate, permanent | Do not substitute with tablets or smartphones |
| 2 | Replace artificial lighting with full-spectrum, variable-intensity incandescent or halogen bulbs | Full-spectrum bulbs, dimmer switches | Installation within 48 hours | Avoid LED and fluorescent bulbs |
| 3 | Establish “no screen” zones: All bedrooms, playrooms, and dining areas | Room signage, parental enforcement | Continuous daily | Enforce with verbal reminders and physical removal |
| 4 | Substitute screen-based entertainment with tactile, auditory, and olfactory stimuli | Natural toys (wooden, fabric), musical instruments, scented herbs | Daily | Rotate stimuli weekly to prevent habituation |
| 5 | Implement strict schedule for electronic device use for parents | Timer lockboxes, schedule chart | Maximum 30 minutes per day, not in child's presence | Reduces modeling of screen dependence |
| 6 | Monitor and log child’s behavior for signs of overstimulation or withdrawal | Behavior logbook | Daily, first 2 weeks | Adjust steps if signs of distress appear |
Detailed Explanation
- Step 1: Physically remove all screens (TVs, tablets, smartphones, computers) from environments where the child spends time. If removal is impossible, secure devices in a tamper-proof lockbox with a parental combination lock.
- Step 2: Transition all artificial lighting to full-spectrum, variable-intensity incandescent or halogen bulbs to mimic natural sunlight. Install dimmer switches to allow gradual light reduction, especially in the evening.
- Step 3: Define and enforce screen-free zones. Mark these zones physically with signage and enforce with consistent parental reminders and physical device removal.
- Step 4: Replace visual screen stimuli with tactile (wooden blocks, natural fabric toys), auditory (wind chimes, natural sounds recordings), and olfactory (lavender, cedarwood) stimuli to engage alternative sensory pathways.
- Step 5: Parents must self-regulate their own screen usage to avoid modeling the behavior. Limit device use to 30 minutes daily, outside the child's presence.
- Step 6: Maintain a detailed behavior log to identify overstimulation or withdrawal symptoms, indicating the need for protocol adjustment.
Section II: Structured Daily Nature Exposure Routine (SDNER)

Purpose
Daily immersion in natural environments enhances multi-sensory integration, stimulates vestibular and proprioceptive systems, and promotes neurogenesis in hippocampal regions essential for memory and learning.
Protocol SDNER: Detailed Instructions
| Step | Task Description | Materials Required | Timing/Frequency | Notes |
|---|---|---|---|---|
| 1 | Designate safe, natural exposure zones within 10 minutes of home: forest, meadow, riverbank | GPS map, safety equipment (first aid kit) | Daily, minimum 60 minutes | Ensure absence of pollutants or hazards |
| 2 | Schedule exposure during mid-morning (9:00-11:00 AM) when UV radiation is moderate | Watch or clock | Daily | Avoid peak UV (12:00-14:00) |
| 3 | Dress child in natural fiber clothing, minimal footwear for tactile feedback | Cotton, wool clothing; barefoot or minimal shoes | Daily | Avoid synthetic fibers |
| 4 | Conduct multi-modal sensory exploration activities: leaf textures, water touching, bird song listening | Natural objects, audio recorder optional | Within daily exposure time | Rotate activities to maximize sensory diversity |
| 5 | Encourage unstructured, free movement: crawling, climbing, balancing on uneven terrain | Safe natural terrain | Entire duration | Parent supervision mandatory |
| 6 | Post-exposure hygiene: gentle rinsing with natural water sources or filtered water | Filtered water, washcloths | Immediately post-exposure | Avoid soaps with synthetic chemicals |
| 7 | Record environmental variables: weather, temperature, terrain type | Environmental logbook | Daily | Use for adaptive planning |
Protocol Implementation Notes
- Step 1 mandates proximity for daily access; daily nature exposure is non-negotiable.
- Step 3’s clothing ensures maximal sensory feedback and prevents overheating.
- Step 5 prioritizes free, unstructured movement over adult-directed activities.
- Step 6 hygiene protocols preserve natural microbiota acquired outdoors.
- Step 7 data logs facilitate long-term tracking and protocol refinement.
Section III: Natural Motor Development Progression and Facilitation
Overview
Neuromotor maturation progresses through hierarchical milestones: rolling → crawling → creeping → standing → cruising → walking. Artificial constraints and overly structured environments disrupt this sequence, resulting in delayed or abnormal motor development.
Table 1: Developmental Motor Milestones with Age Ranges and Sensory Inputs
| Milestone | Typical Age Range (Months) | Primary Sensory Inputs Engaged | Recommended Facilitation Activities |
|---|---|---|---|
| Rolling (supine to prone) | 2–4 | Vestibular, proprioceptive, tactile | Tummy time, gentle rolling exercises |
| Crawling (hands and knees) | 6–9 | Vestibular, proprioceptive, visual | Obstacle courses, floor play with toys |
| Creeping (forearms and knees) | 7–10 | Tactile, proprioceptive | Soft surface exploration, crawling tunnels |
| Standing (supported) | 8–12 | Vestibular, proprioceptive, visual | Supported standing, balance practice |
| Cruising (sideways holding furniture) | 9–13 | Vestibular, proprioceptive | Furniture navigation, hand-over-hand guidance |
| Walking (independent) | 12–18 | Vestibular, proprioceptive, visual | Open space walking, encouragement with toys |
Protocol NMDP: Facilitating Each Milestone
Step 1: Rolling
- Place infant on a firm, flat surface (blanket on floor).
- Position toys just out of reach to encourage reaching and rolling.
- Perform supervised “tummy time” sessions: 3 sessions daily, 5 minutes each, increasing gradually.
- Gently guide infant through rolling motions twice daily, supporting head and torso.
Step 2: Crawling
- Create a safe, varied terrain with textured mats, pillows, and low obstacles.
- Place enticing toys beyond immediate reach to motivate movement.
- Encourage crawling by demonstrating and verbal encouragement.
- Conduct daily crawling sessions of 15–20 minutes, divided into 3 blocks.
Step 3: Creeping
- Provide soft surfaces to protect knees and forearms.
- Use crawling tunnels or low boxes to stimulate creeping movement.
- Engage in joint attention activities involving creeping toward stimuli.
- Monitor for symmetric limb movement; consult specialist if asymmetry persists beyond 12 months.
Step 4: Standing
- Support infant under armpits to encourage bearing weight.
- Introduce low, stable furniture for support.
- Engage in balance games, such as swaying while supported.
- Gradually increase standing duration from seconds to several minutes.
Step 5: Cruising
- Arrange furniture to create a pathway for side-stepping.
- Use hand-over-hand assistance to build confidence.
- Place motivating objects at reachable distances.
- Practice daily for 10–15 minutes, observing for fatigue or frustration.
Step 6: Walking
- Provide open, obstacle-free spaces indoors and outdoors.
- Encourage independent steps with verbal praise and toys.
- Avoid walkers or devices that support weight artificially.
- Gradually increase walking duration and distance daily.
Section IV: Sensory Input Modalities and Their Neurological Impact
Table 2: Sensory Input Types and Corresponding Neural Pathways
| Sensory Input Type | Description | Neural Structures Activated | Developmental Impact |
|---|---|---|---|
| Vestibular | Balance, spatial orientation via inner ear | Vestibular nuclei, cerebellum | Motor coordination, equilibrium |
| Proprioceptive | Body position and movement sense | Somatosensory cortex, cerebellum | Motor planning, posture |
| Tactile | Touch and texture | Somatosensory cortex | Sensory discrimination, emotional regulation |
| Visual | Light, color, movement | Occipital lobe, visual cortex | Visual-motor integration, attention |
| Auditory | Sound recognition | Temporal lobe, auditory cortex | Language acquisition, alertness |
| Olfactory | Smell | Olfactory bulb, limbic system | Memory, emotion |
Section V: Parental Guidelines for Facilitating Natural Movement and Sensory Integration
Daily Parental Action Checklist
| Task | Description | Frequency | Notes |
|---|---|---|---|
| Enforce screen-free zones | Remove/lock devices | Continuous | See SFEP |
| Conduct nature exposure | Accompany child in designated zones | Minimum 60 minutes daily | See SDNER |
| Facilitate free movement | Allow unstructured play on floor and terrain | Multiple sessions daily | Avoid restrictive clothing |
| Observe and log milestones | Record motor and sensory behaviors | Weekly | Use Table 1 as reference |
| Rotate sensory stimuli | Present new natural textures, sounds, smells | Weekly | Prevent habituation |
| Model behavior | Parents minimize screen use and engage with nature | Continuous | Critical for child learning |
| Maintain safety | Supervise movement and environment | Continuous | First aid kit always ready |
Notes on Parental Role
Parents must act as guardians of natural development. The child’s environment must be curated to maximize exposure to authentic sensory inputs and unstructured physical challenges. Emotional support and patient encouragement are essential. Avoid rushing milestones; allow the child’s neurological system to dictate pace within expected age ranges.
Section VI: Troubleshooting and Advanced Interventions
Identifying Delays or Atypical Development
| Sign | Possible Cause | Recommended Action |
|---|---|---|
| Lack of rolling by 5 months | Vestibular or muscular delay | Intensify tummy time, consult pediatric neurologist |
| Asymmetric crawling | Possible hemiparesis or sensory deficit | Early intervention therapy, specialist referral |
| Refusal to stand/cruise | Fear, low muscle tone | Gradual supported standing, physical therapy |
| Excessive screen-seeking behavior | Incomplete SFEP implementation | Reassess artificial stimuli removal, increase nature exposure |
Advanced Techniques
- Neuromodulatory Massage: Daily infant massage focusing on vestibular and proprioceptive stimulation using firm strokes along limbs and back.
- Sensory Integration Play: Use natural objects of varying temperature, texture, and weight to challenge sensory processing.
- Rhythmic Movement Therapy: Gentle rocking or swaying motions to stimulate vestibular pathways, performed twice daily for 10 minutes.
Conclusion
Implementing the protocols in this volume demands absolute adherence to the elimination of artificial stimuli, structured nature exposure, and support for natural motor progression. Failure to comply risks neurological stagnation, sensory dysregulation, and compromised lifelong cognitive resilience.
Your role as a parent is sacred. Your vigilance in enforcing these methods ensures the awakening of your child's full neurological potential and the preservation of ancestral wisdom embedded in natural developmental patterns.
For related protocols on dietary support to enhance neurological development, see Volume V: The Nourishment Codex, Chapter III. For complete environmental safety and hazard mitigation in natural zones, see Volume IX: The Survival Codex, Chapter I.
<!-- SECTION 6 -->
Volume II: The Montessori-Sovereign Synthesis
Chapter IV: Preparing the Home Environment, Practical Life Integration, and Correction Without Damage

In this chapter, you will acquire complete mastery over the Montessori-Sovereign Synthesis: the sacred convergence of child autonomy fostered by the Montessori Method, and the inviolable principles of sovereignty—respect for the child as an autonomous agent. This is not a mere pedagogical approach; this is the codified architecture of independence, the blueprint for raising a sovereign individual capable of self-governance and communal contribution.
You will learn how to transform the home environment into a sanctuary of empowerment, integrate practical life tasks as rites of passage, and execute correction protocols that maintain dignity and promote internal discipline without inflicting harm. This is the ultimate parent-as-master-architect role: no compromise, no dilution, all revelation.
Section I: Preparing the Home Environment for Sovereign Independence

The home environment is the crucible of sovereignty. It must be meticulously engineered to foster autonomy, minimize frustration, and promote exploration while maintaining safety. The child’s environment is their first teacher; thus, the design must be deliberate and exact.
Step-By-Step Environment Modification Protocol
Objective: Create an environment that enables the child to access tools, materials, and spaces independently, promoting autonomy in daily living and learning.
| Step | Action | Details | Materials/Tools Required |
|---|---|---|---|
| 1 | Conduct Spatial Audit | Measure all rooms frequented by the child. Note all vertical and horizontal surfaces accessible at the child’s height. | Tape measure, notebook, pencil |
| 2 | Define Child Height Parameters | Measure the child’s standing height and seated height. Add 10% growth buffer for 6 months ahead. | Tape measure |
| 3 | Adjust Storage | Lower shelves to child's eye level; ensure open baskets or containers are used for easy access and return. | Adjustable shelving units, open baskets, labels |
| 4 | Child-Sized Furniture Installation | Install tables, chairs, and stools sized according to the child’s dimensions (see Furniture Dimension Table). | Custom or commercial child-sized furniture |
| 5 | Designate Activity Zones | Create zones for eating, reading, practical life, sensory play, and rest. Zone boundaries marked by rugs or furniture. | Rugs, signage, furniture |
| 6 | Implement Safety Measures | Secure cabinets, use corner guards, cover outlets, and anchor furniture to walls. | Safety locks, corner guards, outlet covers, wall anchors |
| 7 | Organize Materials | Arrange materials in order of complexity or frequency of use, with frequently used items in front or lower shelves. | Baskets, trays, labels |
| 8 | Label Everything | Use clear, pictorial and written labels for all containers and storage areas to promote recognition and literacy. | Labels, marker, laminator |
| 9 | Create Visual Schedules | Post daily routine charts at the child’s eye level to aid predictability and foster independence. | Chart paper, magnets, whiteboard |
| 10 | Establish Accessible Cleaning Tools | Child-sized brooms, dustpans, cloths placed in cleaning zone. | Child-sized cleaning tools |
Child-Sized Furniture Dimensions Table
| Furniture Type | Seat Height (cm) | Seat Width (cm) | Table Height (cm) | Notes |
|---|---|---|---|---|
| Infant Chair (1-2 years) | 22 | 25 | 45 | Rounded edges, lightweight |
| Toddler Chair (2-3 years) | 26 | 28 | 50 | Stable base, non-slip feet |
| Preschool Chair (3-6 years) | 30 | 30 | 55 | Ergonomic back, durable finish |
| School-Age Chair (6-9 years) | 35 | 35 | 65 | Adjustable height preferred |
| Infant Table (1-2 years) | N/A | 30 x 30 | 45 | Smooth surface, non-toxic finish |
| Toddler Table (2-3 years) | N/A | 45 x 45 | 50 | Rounded corners |
| Preschool Table (3-6 years) | N/A | 60 x 60 | 55 | Easy to clean |
Section II: Practical Life Integration — Assigning Daily Household Tasks by Age
Practical life skills are non-negotiable components of sovereign education: they instill responsibility, skill, and the embodied knowledge of thriving within a community. Assignments must be precisely calibrated by age and capability, progressing in complexity and autonomy.
Age-Appropriate Task Assignment Protocol
Objective: Assign and integrate daily household tasks that respect the child’s developmental stage, ensuring mastery and autonomy.
| Age Range | Tasks | Frequency | Instructions | Materials Required |
|---|---|---|---|---|
| 12-24 months | - Carry small objects<br>- Put toys away<br>- Dust flat surfaces | Daily | 1. Demonstrate task slowly<br>2. Guide hand-over-hand if needed<br>3. Allow repetition | Small baskets, soft dust cloths |
| 2-3 years | - Water plants<br>- Wipe table after meals<br>- Match socks<br>- Feed pets (supervised) | Daily | 1. Demonstrate task<br>2. Provide child-sized tools<br>3. Prompt gently if forgotten | Child-sized watering can, cloths, laundry baskets, pet bowls |
| 3-4 years | - Sweep floor with child broom<br>- Set dining table<br>- Fold simple clothes<br>- Help unload dishwasher | Daily | 1. Break task into steps<br>2. Demonstrate each step<br>3. Supervise until confident | Child broom, plates, cutlery, clothes basket |
| 4-6 years | - Prepare simple snacks<br>- Make bed<br>- Take out trash (supervised)<br>- Sort recycling | Daily | 1. Demonstrate<br>2. Provide verbal checklists<br>3. Praise completion | Snack utensils, small trash bin, recycling bins |
| 6-9 years | - Wash dishes<br>- Sweep and mop floors<br>- Organize pantry shelves<br>- Help with laundry | Daily or weekly | 1. Demonstrate<br>2. Provide safety instructions<br>3. Monitor initial attempts | Dishwashing supplies, mop, laundry baskets |
Detailed Steps for Integrating Practical Life Tasks
- Select Task Appropriate for Age: Refer to the age-task table above. Choose one task to begin integration.
- Prepare Materials: Arrange child-sized tools and materials in accessible locations.
- Demonstrate Task Completely:
- Perform the task slowly in front of the child.
- Narrate each action clearly.
- Use a neutral tone, avoiding praise or criticism during demonstration.
- Guide with Hand-Over-Hand Assistance:
- If the child struggles, gently place your hand over theirs to complete movements.
- Allow Independent Practice:
- Step back and observe silently.
- Intervene only if safety is compromised.
- Use Visual Checklists or Charts:
- Provide stepwise pictorial guides for tasks with multiple steps.
- Daily Routine Integration:
- Assign the task at the same time daily to build habit.
- Review and Adjust:
- After one week, assess the child’s proficiency.
- Increase task complexity or introduce new tasks accordingly.
Section III: Correction Without Damage — Positive Correction Methods
Correction within the Montessori-Sovereign Synthesis is not punishment but redirection, a sacred act preserving the child’s dignity while guiding them back to harmonious behavior. Correction must be timely, precise, and restorative.
Step-By-Step Correction Protocol
Objective: Redirect undesirable behaviors while maintaining respect and fostering internal discipline.
| Step | Action | Details |
|---|---|---|
| 1 | Observe Without Immediate Reaction | Note behavior neutrally; avoid emotional responses. |
| 2 | Assess Safety & Harm | If behavior endangers self or others, prioritize immediate intervention. |
| 3 | Approach Calmly and At Child’s Level | Kneel or sit to meet eye-level; speak softly. |
| 4 | Use Clear, Concise Language | Describe the behavior factually: “You threw the block.” Avoid labels or judgments. |
| 5 | State the Expected Behavior | “Please place the block gently on the table.” |
| 6 | Demonstrate the Correct Behavior | Model the behavior slowly and clearly. |
| 7 | Allow the Child to Try Again | Guide if necessary, then observe. |
| 8 | Reinforce Positive Outcome | Use neutral or positive acknowledgment: “You placed the block carefully.” Avoid excessive praise. |
| 9 | If Behavior Persists, Introduce Quiet Reflection | Guide child to a designated calm space without isolating or shaming. |
| 10 | Resume Activity Only After Calmness | When child demonstrates calm, invite return with encouragement. |
Protocols for Guided Learning Through Demonstration
The method of guided learning through demonstration is the cornerstone of the Montessori-Sovereign approach. This protocol ensures the child learns through observation, imitation, and practice without coercion or degradation.
| Step | Action | Details |
|---|---|---|
| 1 | Prepare Environment and Materials | Arrange tools and materials for clear visibility and easy access. |
| 2 | Gain Child’s Attention | Use a respectful call or gesture; ensure the child is focused and receptive. |
| 3 | Demonstrate Slowly and Clearly | Perform the entire task or action without interruption; narrate each step. |
| 4 | Repeat Demonstration if Needed | Repeat 2-3 times with consistent pacing. |
| 5 | Invite Child to Attempt | Encourage the child to try the task immediately after demonstration. |
| 6 | Provide Hand-Over-Hand Assistance | If child struggles, guide movements sensitively. |
| 7 | Step Back and Observe | Allow independent practice; intervene only if necessary. |
| 8 | Offer Neutral Feedback | Describe what the child did; avoid praise or criticism. |
| 9 | Repeat Demonstration or Break Task into Steps | For complex tasks, demonstrate sub-steps individually. |
| 10 | Encourage Repetition and Mastery | Allow child to repeat the task multiple times for internalization. |
Appendix: Detailed Tables
Table 1: Age-Appropriate Practical Life Tasks
| Age (Years) | Task Description | Task Complexity | Required Skills | Autonomy Level |
|---|---|---|---|---|
| 1–2 | Carry small objects | Very Low | Gross motor skills | Assisted |
| 2–3 | Water plants | Low | Fine motor, sequencing | Guided |
| 3–4 | Sweep floor | Moderate | Coordination, strength | Supervised |
| 4–6 | Prepare simple snacks | Moderate | Measuring, safety awareness | Assisted |
| 6–9 | Wash dishes | High | Motor skills, safety, sequencing | Independent with supervision |
Table 2: Child-Sized Furniture Dimensions (Metric)
| Furniture | Seat Height (cm) | Seat Width (cm) | Table Height (cm) | Recommended Age (Years) |
|---|---|---|---|---|
| Infant Chair | 22 | 25 | 45 | 1–2 |
| Toddler Chair | 26 | 28 | 50 | 2–3 |
| Preschool Chair | 30 | 30 | 55 | 3–6 |
| School-Age Chair | 35 | 35 | 65 | 6–9 |
| Infant Table | N/A | 30 x 30 | 45 | 1–2 |
| Toddler Table | N/A | 45 x 45 | 50 | 2–3 |
| Preschool Table | N/A | 60 x 60 | 55 | 3–6 |
Table 3: Correction Without Damage — Key Phrases and Approaches
| Situation | Neutral Description | Expected Behavior | Suggested Phrase |
|---|---|---|---|
| Child throws object | “You threw the block.” | “Please place the block gently.” | “Blocks are for building, not for throwing.” |
| Child interrupts conversation | “You spoke while I was talking.” | “Please wait your turn to speak.” | “I am listening now; you will have your turn next.” |
| Child refuses task | “You are not putting on your shoes.” | “Please put on your shoes.” | “Let me help you start, then you try.” |
Final Notes
This volume demands absolute rigor in environmental preparation, task assignment, and correction methodology. The Montessori-Sovereign Synthesis is the sacred forge in which the child’s sovereignty is tempered. Each modification, each assigned task, each correction is a deliberate strike toward autonomy, dignity, and self-mastery.
Implement these protocols with unwavering fidelity. Deviations dilute sovereignty and introduce entropy into the sacred system of child-raising. Your role as the master architect of the child’s environment and education is to hold the line between freedom and structure, independence and guidance.
For comprehensive hygiene and safety protocols necessary to complement these practices, see Volume VIII: The Water Codex, Chapter II. For detailed child psychology and developmental milestone analysis, refer to Volume XIV: The Cognitive Codex.
End of Chapter IV: Preparing the Home Environment, Practical Life Integration, and Correction Without Damage Proceed to Volume II, Chapter V: Sensorial and Cognitive Stimulation Protocols.
<!-- SECTION 7 -->
Volume III: The Rejection of the Factory Model

The factory model of education represents one of the most significant departures from natural learning that humanity has ever experienced. This section examines the historical origins of compulsory schooling, its Prussian military roots, and the deliberate design choices that prioritize compliance over creativity. Understanding these critiques is essential for any sovereign parent seeking to reclaim their childrens intellectual development.
[Section placeholder - to be regenerated]
<!-- SECTION 8 -->
The Complete Practitioner's Codex, Volume III: The Apprenticeship Model
Chapter IV: Balancing Theoretical Knowledge with Practical Application and Mentorship Identification
Introduction
The apprenticeship model is the cornerstone of generational knowledge transmission within the sovereign community. This volume delineates the sacred protocols for balancing theoretical knowledge acquisition with practical application under the guidance of a rigorously selected mentor. The integrity of the apprenticeship process determines the survival and flourishing of our lineage, hence this chapter is uncompromising in its technical thoroughness and procedural exactitude.
Section 1: Balancing Theoretical Knowledge and Practical Application
1.1 Foundational Principle
The equilibrium between theory and practice is non-negotiable. Excessive theoretical immersion without hands-on experience breeds intellectual stagnation and vulnerability. Excessive practical labor absent theoretical framework breeds aimless action and error propagation.
1.2 Optimal Study-to-Practice Ratio
Empirical data and ancestral wisdom converge on the following weekly time allocation as optimal for apprentice development in foundational disciplines:
| Activity | Hours per Week | Percentage of Total Weekly Training Time |
|---|---|---|
| Theoretical Study | 15 | 37.5% |
| Practical Application | 20 | 50.0% |
| Reflection & Review | 5 | 12.5% |
| Total | 40 | 100% |
Notes:
- "Theoretical Study" includes reading sacred texts, memorization, and conceptual discourse.
- "Practical Application" includes supervised skill execution, simulations, and live problem-solving.
- "Reflection & Review" includes journaling, mentor feedback sessions, and mental rehearsals.
1.3 Scheduling Recommendations
A weekly schedule must be strictly adhered to, enabling cognitive reinforcement and muscle memory development through spaced repetition and incremental skill acquisition.
| Day | Morning Session (3 hrs) | Afternoon Session (3 hrs) | Evening Session (2 hrs) | Total Hours |
|---|---|---|---|---|
| Monday | Theoretical Study | Practical Application | Reflection & Review | 8 |
| Tuesday | Practical Application | Theoretical Study | Practical Application | 8 |
| Wednesday | Theoretical Study | Practical Application | Reflection & Review | 8 |
| Thursday | Practical Application | Theoretical Study | Practical Application | 8 |
| Friday | Theoretical Study | Practical Application | Reflection & Review | 8 |
| Saturday | Practical Application (Extended) | Practical Application (Extended) | Free or Optional Group Study | 8+ |
| Sunday | Rest or Optional Light Study | Rest or Community Engagement | Rest or Mentorship Reflection | Variable |
Instructions for Implementation:
- Morning sessions must focus on knowledge absorption (theory) or initial skill drills (practice).
- Afternoon sessions alternate to reinforce morning learning with complementary practice or theory.
- Evening sessions emphasize reflection, journaling, and mentor-guided review to consolidate learning.
- Saturdays are reserved for prolonged hands-on projects or community-based application exercises.
- Sundays must include rest but encourage light cognitive engagement or community integration to foster social learning.
Section 2: Criteria for Selecting Skilled Mentors Within the Sovereign Community
2.1 The Sacred Role of the Mentor
The mentor is the living vessel of ancestral wisdom, the crucible for apprentice transformation. Selecting a mentor requires rigorous vetting against quantitative and qualitative criteria.
2.2 Mentor Selection Checklist
| Criterion | Description | Measurement / Threshold | Verification Method |
|---|---|---|---|
| Proven Expertise | Demonstrated mastery of specific discipline(s) | Minimum 10 years full-time practice | Portfolio review, peer testimonies |
| Pedagogical Ability | Capability to convey knowledge effectively | Certified teaching or mentorship training | Observation, apprentice feedback |
| Community Standing | Respected and trusted within sovereign community | No recorded disciplinary actions, positive reputation | Interviews, community surveys |
| Ethical Integrity | Adherence to sacred codes and moral conduct | Zero violations in past 5 years | Background checks, community reports |
| Accessibility and Commitment | Availability for minimum 15 hours/week mentoring | Schedule confirmation | Signed mentorship contract |
| Adaptability and Innovation | Ability to update traditional knowledge with practical adaptation | Demonstrated case studies | Review of past apprentice outcomes |
2.3 Mentor Evaluation Checklist (For Continuous Assessment)
| Evaluation Metric | Rating Scale (1-5) | Notes/Comments |
|---|---|---|
| Clarity of Instruction | ||
| Responsiveness to Apprentice | ||
| Practical Skill Demonstrations | ||
| Ethical Conduct | ||
| Community Engagement | ||
| Flexibility and Problem Solving |
Evaluation must be conducted monthly by a designated community oversight council to maintain accountability.
Section 3: Methods for Apprenticeship Placement
3.1 Placement Protocol Overview
Apprenticeship placement is a deliberate, multi-step process ensuring optimal alignment of apprentice aptitude, mentor expertise, and community needs.
3.2 Step-by-Step Placement Procedure
- Apprentice Profiling
- Compile detailed profile including interest areas, cognitive strengths, physical capabilities, and learning style assessment.
- Use standardized aptitude tests (see Volume XII: Cognitive Aptitude Codex, Chapter V).
- Mentor Mapping
- Generate mentor database filtered by specialty, availability, and community feedback scores.
- Reference community registry (Volume IV: The Community Ledger, Section III).
- Compatibility Scoring
- Calculate compatibility score using weighted factors: expertise match (40%), personality fit (30%), logistical feasibility (20%), and community priority alignment (10%).
- Use the formula: \[
Compatibility\ Score = 0.4E + 0.3P + 0.2L + 0.1C
\]
where E = Expertise match score (1-10), P = Personality fit score (1-10), L = Logistical feasibility (1-10), C = Community priority (1-10).
- Trial Period Assignment
- Assign apprentice to top 3 compatible mentors for 1-week trial rotations.
- Trial includes supervised tasks and feedback sessions.
- Final Placement Decision
- Convene placement council to review trial reports, apprentice preferences, and mentor availability.
- Issue formal apprenticeship contract defining scope, duration, and goals.
- Integration and Onboarding
- Conduct orientation involving mentor, apprentice, and community elders.
- Establish communication protocols and progress reporting schedules.
3.3 Apprenticeship Placement Timeline
| Step | Duration | Responsible Party |
|---|---|---|
| Apprentice Profiling | 3 days | Education Officer |
| Mentor Mapping | 2 days | Community Registry Manager |
| Compatibility Scoring | 1 day | Placement Council |
| Trial Period Assignment | 7 days | Placement Council |
| Final Placement Decision | 1 day | Placement Council |
| Integration and Onboarding | 2 days | Mentor and Elders |
| Total | 16 days |
Section 4: Protocols for Integrating Apprenticeship into Daily Education
4.1 Daily Integration Framework
The apprenticeship is not a standalone activity but must be interwoven seamlessly with daily education and community responsibilities.
4.2 Step-by-Step Protocol
- Morning Briefing (30 minutes)
- Apprentice reviews theoretical material relevant to the day's practical tasks with mentor.
- Establish clear objectives for the day’s learning.
- Midday Practical Session (3 hours minimum)
- Apprentice engages in supervised practical application under mentor guidance, focusing on skills directly linked to theoretical study.
- Afternoon Debrief (1 hour)
- Mentor and apprentice conduct a detailed review of performance, errors, and corrective strategies.
- Apprentice records insights and feedback in a dedicated apprenticeship journal.
- Evening Reflection and Independent Study (1-2 hours)
- Apprentice independently reviews theory, cross-references practical experiences, prepares questions for next session.
- Weekly Mentor-Apprentice Council Meeting (2 hours)
- Comprehensive progress evaluation, goal adjustments, and psychological support.
4.3 Integration Schedule Template
| Time | Activity | Objective |
|---|---|---|
| 06:30 – 07:00 | Morning Briefing | Align theory and practice for the day |
| 07:00 – 10:00 | Practical Application | Skill execution under mentor supervision |
| 10:00 – 11:00 | Rest and Community Engagement | Cognitive rest, social learning |
| 11:00 – 12:00 | Theoretical Study | Reinforce conceptual understanding |
| 12:00 – 13:00 | Midday Meal and Rest | Physical restoration |
| 13:00 – 14:00 | Afternoon Debrief | Analyze practical session, feedback |
| 14:00 – 16:00 | Independent Study/Project Work | Deepen mastery through self-directed learning |
| 16:00 – 18:00 | Community Contribution | Apply skills in communal context |
| 18:00 – 19:00 | Evening Reflection | Journaling, mental rehearsal |
| 19:00 – 21:00 | Rest / Optional Study | Cognitive rest or advanced study |
Section 5: Mentor Evaluation and Feedback Loop
5.1 Continuous Improvement Protocol
Mentor effectiveness directly impacts apprentice success; therefore, a rigorous evaluation-feedback loop is mandatory.
5.2 Monthly Mentor Evaluation Procedure
- Apprentice Self-Assessment
- Submit detailed report on mentor’s clarity, support, and practical skill demonstration.
- Community Oversight Council Review
- Analyze apprentice reports and community feedback.
- Mentor Self-Reflection
- Mentor completes self-evaluation emphasizing challenges and achievements.
- Joint Mentor-Apprentice Council
- Facilitate open dialogue to resolve issues and set goals.
- Documentation and Archiving
- Archive all evaluation forms in the community ledger for future reference.
Section 6: Supplemental Tables and Tools
6.1 Weekly Learning Schedule Template
| Time | Monday | Tuesday | Wednesday | Thursday | Friday | Saturday | Sunday |
|---|---|---|---|---|---|---|---|
| 06:30-07:00 | Morning Briefing | Morning Briefing | Morning Briefing | Morning Briefing | Morning Briefing | Optional Study | Rest / Engagement |
| 07:00-10:00 | Theory Study | Practical App | Theory Study | Practical App | Theory Study | Extended Practical | Rest |
| 10:00-11:00 | Practical App | Theory Study | Practical App | Theory Study | Practical App | Extended Practical | Community Engagement |
| 11:00-12:00 | Reflection | Reflection | Reflection | Reflection | Reflection | Group Study/Project Work | Mentorship Reflection |
| 12:00-13:00 | Meal/Rest | Meal/Rest | Meal/Rest | Meal/Rest | Meal/Rest | Meal/Rest | Meal/Rest |
| 13:00-16:00 | Practical App | Practical App | Practical App | Practical App | Practical App | Practical Application | Rest |
| 16:00-18:00 | Independent Study | Independent Study | Independent Study | Independent Study | Independent Study | Community Contribution | Rest |
| 18:00-19:00 | Reflection | Reflection | Reflection | Reflection | Reflection | Reflection | Reflection |
| 19:00-21:00 | Rest/Optional Study | Rest/Optional Study | Rest/Optional Study | Rest/Optional Study | Rest/Optional Study | Rest/Optional Study | Rest |
6.2 Mentor Evaluation Checklist
| Criteria | Score (1-5) | Comments |
|---|---|---|
| Mastery of Discipline | ||
| Teaching Effectiveness | ||
| Ethical Behavior | ||
| Communication Skills | ||
| Availability | ||
| Adaptability | ||
| Community Respect |
Conclusion
The apprenticeship model is an ancient yet dynamically evolving covenant binding knowledge, skill, and spirit across generations. The protocols herein ensure apprentices emerge not merely competent but transformed, guardians of sacred knowledge and practical wisdom. Uphold these procedures with utmost rigor and reverence; the future of the sovereign community depends on it.
For further technical details on cognitive aptitude assessment, pedagogical methodologies, and community registry management, refer to:
- Volume XII: The Cognitive Aptitude Codex
- Volume V: The Pedagogy Codex
- Volume IV: The Community Ledger
_End of Chapter IV_ _The Complete Practitioner's Codex, Volume III_
<!-- SECTION 9 -->
The Complete Practitioner's Codex, Volume IV: Curriculum Design — Reading, Writing, and Arithmetic Mastery
Introduction
This volume presents the definitive field manual for cultivating unassailable literacy and numeracy through observation, mastery, and multisensory reinforcement. These are not mere academic subjects but foundational pillars for the survival, sovereignty, and sanctity of your lineage. Every protocol herein is derived from centuries of suppressed pedagogical science, encoded now for the chosen few who grasp the sacred duty of generational knowledge transfer.
Section I: Overarching Pedagogical Framework

1. Principle of Mastery Through Observation and Multisensory Engagement
- Observation: The child must first witness the concept in action, engaging visual and auditory senses.
- Multisensory Activities: Combine tactile, kinesthetic, auditory, and visual stimuli to solidify neural pathways.
- Incremental Complexity: Begin with elemental units, progressing only after mastery verification.
2. Curriculum Development Cycle
| Step | Description | Output |
|---|---|---|
| 1 | Define Core Competencies per Subject | Skill Milestone Table |
| 2 | Develop Multisensory Lesson Plans | Detailed Lesson Protocols |
| 3 | Implement Assessment & Remediation | Assessment Criteria and Corrective Actions |
| 4 | Iterate Based on Data | Updated Curriculum and Individualized Plans |
Section II: Literacy Curriculum Design

A. Phonics Mastery Protocol
Objective
Enable the child to decode written language by mastering the relationship between phonemes (sounds) and graphemes (letters).
Step 1: Phoneme Introduction Through Auditory Observation
- Select a single phoneme (e.g., /m/).
- Pronounce the phoneme clearly and slowly in isolation.
- Show the grapheme (letter) symbolizing the phoneme.
- Present a high-contrast visual card with the grapheme.
- Repeat 5 times in a row, alternating voice volume (whisper to normal) to engage auditory discrimination.
- Use tactile tracing of the grapheme on sandpaper.
Step 2: Multisensory Reinforcement
- Child repeats phoneme aloud.
- Child traces grapheme using finger on textured surface.
- Child matches phoneme with objects beginning with that sound (e.g., 'm' = 'mouse').
- Use a mirror for oral articulation observation.
Step 3: Phoneme Blending Introduction
- Introduce two phonemes in sequence (e.g., /m/ + /a/).
- Model blending slowly.
- Child practices blending with guidance.
- Increase complexity by adding a third phoneme (e.g., /m/ + /a/ + /t/).
- Use manipulatives (colored letter tiles) to represent phonemes physically.
Step 4: Phoneme Segmentation
- Say a simple word (e.g., "mat").
- Child segments into phonemes.
- Repeat with increasing word complexity.
B. Handwriting Fundamentals
Objective
Develop fine motor skills and letter formation mastery through multisensory techniques.
Step 1: Pre-Writing Motor Skills
- Engage child in finger and hand exercises: finger taps, squeezing clay, threading beads.
- Practice gross motor tracing on vertical surfaces (chalkboard).
Step 2: Letter Formation Protocol
- Introduce letters grouped by stroke similarity (e.g., straight lines: l, t, i; curves: c, o, a).
- Demonstrate letter formation with verbal cues per stroke.
- Child traces with finger on large textured surfaces.
- Progress to pencil and paper with grip correction.
- Reinforce with kinesthetic activities: air writing, sand tray, and clay shaping.
Step 3: Writing Fluency Development
- Daily timed letter formation drills.
- Copy simple words using mastered letters.
- Introduce cursive connections after print mastery, focusing on motor flow.
C. Progressive Literacy Skill Milestones Table
| Age Range | Phonics Skills | Handwriting Skills | Literacy Milestones |
|---|---|---|---|
| 3-4 years | Recognize and produce 10 basic phonemes | Trace shapes; hold writing tools | Name recognition; letter naming |
| 4-5 years | Blend 2-phoneme combinations | Copy letters; basic stroke control | Read simple CVC words |
| 5-6 years | Segment and blend 3-phoneme words | Form all letters legibly | Read simple sentences; write own name |
| 6-7 years | Decode multisyllabic words | Develop writing speed and fluency | Reading comprehension; write short paragraphs |
D. Sample Phonics Lesson Plan (30 Minutes)
| Time (Minutes) | Activity | Materials Needed | Objective |
|---|---|---|---|
| 0-5 | Phoneme introduction | Phoneme cards, auditory playback | Familiarize with phoneme |
| 5-10 | Grapheme tracing on sandpaper | Sandpaper letter cards | Tactile letter recognition |
| 10-15 | Phoneme-object matching | Object set corresponding to phoneme | Reinforce phoneme sound |
| 15-20 | Phoneme blending with tiles | Colored letter tiles | Practice decoding |
| 20-25 | Oral articulation in mirror | Mirror | Correct pronunciation |
| 25-30 | Segmentation practice | Word cards | Strengthen phonemic awareness |
Section III: Numeracy Curriculum Design
A. Arithmetic Fundamentals Protocol
Objective
Establish foundational numeracy through concrete representation, progressive abstraction, and mastery verification.
B. Core Competencies and Stepwise Skill Development
| Competency | Description | Skill Milestones |
|---|---|---|
| Number Sense | Understanding quantity and order | Counting to 20; number recognition |
| Addition & Subtraction | Basic operations with concrete objects | Sum and difference within 10 |
| Place Value | Understanding digit position | Recognizing tens and ones |
| Multiplication | Repeated addition | Multiplying up to 5 |
| Division | Sharing and grouping | Dividing quantities evenly |
C. Multisensory Arithmetic Activities
Step 1: Concrete Counting and Number Recognition
- Present physical counters (stones, beads).
- Model counting aloud, pointing to each object.
- Child repeats counting with own objects.
- Link quantity to numerical symbols by matching cards.
- Use number lines for visual-spatial understanding.
Step 2: Addition and Subtraction Using Manipulatives
- Begin with two small groups of objects.
- Combine groups physically for addition; remove objects for subtraction.
- Child counts total objects after each operation.
- Transition to numerical representation using number cards.
- Use story problems with tangible items.
Step 3: Place Value Introduction
- Use bundles of ten objects (e.g., sticks tied in groups).
- Show separation of tens and ones.
- Represent numbers with base-10 blocks.
- Child builds numbers from blocks and writes numeral.
D. Progressive Arithmetic Skill Milestones Table
| Age Range | Number Sense | Addition/Subtraction | Place Value & Beyond |
|---|---|---|---|
| 3-4 years | Count to 10; number recognition | Add and subtract within 5 | Recognize tens and ones visually |
| 4-5 years | Count to 20; number sequencing | Add and subtract within 10 | Use base-10 blocks |
| 5-6 years | Count beyond 20; number comparison | Solve simple word problems | Understand place value concept |
| 6-7 years | Count to 100; odd/even recognition | Add/subtract 2-digit numbers | Begin multiplication concepts |
E. Sample Arithmetic Lesson Plan (30 Minutes)
| Time (Minutes) | Activity | Materials Needed | Objective |
|---|---|---|---|
| 0-5 | Counting physical objects | Counters (stones, beads) | Establish number sense |
| 5-10 | Number-symbol matching | Number cards | Connect quantity to numeral |
| 10-15 | Addition with manipulatives | Counters, number cards | Practice basic addition |
| 15-20 | Subtraction with manipulatives | Counters, number cards | Practice basic subtraction |
| 20-25 | Introduce place value with blocks | Base-10 blocks | Visualize tens and ones |
| 25-30 | Simple word problem discussion | Story cards, counters | Apply arithmetic in context |
Section IV: Assessment Protocols and Remediation Strategies
A. Assessment Framework
| Assessment Type | Frequency | Tools Required | Objectives |
|---|---|---|---|
| Formative Assessment | Weekly | Checklists, observation | Monitor skill acquisition and comprehension |
| Summative Assessment | Quarterly | Written tests, oral exams | Evaluate mastery of curriculum milestones |
| Diagnostic Assessment | As needed | One-on-one testing | Identify specific skill deficits |
B. Assessment Implementation Steps
- Prepare assessment tools aligned to skill milestones.
- Administer in small, distraction-free settings.
- Record results meticulously.
- Analyze errors for patterns.
- Determine if remediation or advancement is appropriate.
C. Remediation Protocols
Literacy Remediation
- Phonological Awareness Deficit: Increase auditory discrimination exercises; use computer-assisted phoneme drills.
- Handwriting Motor Delay: Intensify fine motor skill activities; incorporate occupational therapy tools.
- Decoding Difficulty: Return to single phoneme mastery; increase multisensory reinforcement frequency.
Numeracy Remediation
- Counting Errors: Use one-to-one correspondence tasks with physical objects.
- Operation Misconceptions: Employ manipulatives for concrete problem-solving.
- Place Value Confusion: Reintroduce base-10 block activities with explicit verbal explanation.
Section V: Appendices
A. Phonics Grapheme-Phoneme Correspondence Table (Sample)
| Phoneme | Grapheme(s) | Example Word | Multisensory Activity |
|---|---|---|---|
| /m/ | m | mouse | Sandpaper tracing + object matching |
| /a/ | a | apple | Air writing + auditory repetition |
| /t/ | t | tap | Clay shaping + phoneme blending |
B. Arithmetic Number Milestones Table (Detailed)
| Number Range | Skill Description | Suggested Activities |
|---|---|---|
| 1-10 | Counting, recognition | Object counting, number line walks |
| 11-20 | Sequencing, comparison | Number card ordering, odd/even sorting |
| 21-50 | Addition/subtraction within range | Story problems, manipulatives |
| 51-100 | Place value, basic multiplication | Base-10 blocks, repeated addition |
Conclusion
This volume must be wielded with unwavering discipline and reverence. The protocols herein are non-negotiable: mastery of literacy and numeracy is the lifeblood of your lineage’s capacity to wield knowledge, steward power, and secure survival. Deviation risks decay of the sacred transmission. Embed these systems with rigor, observe with precision, and remediate without delay.
For advanced multisensory device construction and digital reinforcement protocols, consult Volume VIII: The Sensory Codex.
For comprehensive handwriting grip correction and motor skill development, see Volume XII: The Motor Mastery Codex.
End of Volume IV: Curriculum Design – Reading, Writing, and Arithmetic Mastery
<!-- SECTION 10 -->
The Complete Practitioner's Codex, Volume IV: Curriculum Design – Science and History through Primary Sources
Introduction
This volume delivers the authoritative and comprehensive protocols required for designing a curriculum that integrates observational science methods and history education through primary source analysis. The focus is on fostering experiential learning tailored to the neurological and cognitive developmental stages of children while ensuring that history instruction is rooted in unmediated encounters with original documents. This transmission contains suppressed methodologies and precise, implementable instructions for the chosen apprentice—no detail is spared.
I. Observational Science Methods: Experiential Protocols Aligned with Child Development

A. Foundational Principles
Observational science is the bedrock of empirical understanding. The child must be trained to record, analyze, and question phenomena directly, without reliance on secondary narration. This requires:
- Precision instruments constructed from common materials.
- Structured observation protocols.
- Developmentally calibrated experiments.
- Rigorous journaling and hypothesis formulation.
B. Neurodevelopmental Stages and Science Activity Alignment
| Age Range (Years) | Cognitive Characteristics | Recommended Science Focus | Experiment Complexity Level |
|---|---|---|---|
| 4-6 | Sensorimotor and early preoperational; concrete sensory engagement | Sensory observation, basic classification | Level 1: Simple, direct observation |
| 7-9 | Concrete operational; logic with tangible objects | Classification, measurement, cause-effect | Level 2: Structured observation and recording |
| 10-12 | Formal operational beginning; abstract thinking | Hypothesis testing, variable control | Level 3: Controlled experiments, data analysis |
| 13-15 | Formal operational; abstract and relational reasoning | Scientific method mastery, experimental design | Level 4: Independent experimentation and reporting |
C. Constructing Basic Observational Science Instruments
Essential Instruments to Build:
| Instrument | Materials Required | Construction Summary |
|---|---|---|
| Hand Lens (10x) | Clear plastic sheet, convex plastic lens, adhesive tape | 1. Cut plastic sheet to palm size. 2. Fix lens centrally with tape. 3. Seal edges to prevent dust ingress. |
| Simple Barometer | Glass jar, balloon, rubber band, straw, index card | 1. Stretch balloon over jar top. 2. Fix with rubber band. 3. Tape straw on balloon center pointing outward. 4. Attach index card behind straw as gauge. |
| Basic Thermometer | Clear plastic tube, colored alcohol, ruler, cork | 1. Fill tube partially with colored alcohol. 2. Seal with cork. 3. Mark ruler with temperature scale. |
D. Protocols for Experiential Science Activities
Each activity requires preparation, execution, observation, documentation, and analysis phases. Detailed steps are provided for exemplar experiments at each developmental stage.
Level 1 Experiment: Sensory Observation and Classification (Age 4-6)
Objective: Develop sensory acuity and initial classification skills by observing natural objects.
Materials: Leaves, stones, feathers, hand lens.
Procedure:
- Collect a variety of natural objects during a supervised outdoor walk.
- Observe each object using bare eyes and then through the hand lens.
- Note colors, textures, shapes, and sizes.
- Classify objects according to one characteristic (e.g., color or texture).
- Draw and label each category in a science journal.
- Discuss differences and similarities aloud to reinforce observation.
Level 2 Experiment: Measuring and Recording Environmental Temperature (Age 7-9)
Objective: Understand measurement, data recording, and environmental variation.
Materials: Basic thermometer, science journal, clock.
Procedure:
- Construct a basic thermometer (refer above).
- Place the thermometer outside in a fixed location.
- Record temperature readings at three fixed times daily (morning, noon, evening) for seven days.
- Plot temperature readings on a graph.
- Analyze changes and hypothesize causes (e.g., sun position, weather changes).
- Present findings verbally or in writing.
Level 3 Experiment: Controlled Plant Growth Study (Age 10-12)
Objective: Examine the effect of sunlight on plant growth via controlled variables.
Materials: Fast-growing seeds (e.g., beans), pots, soil, ruler, notebook.
Procedure:
- Plant equal seeds in identical pots with the same soil volume.
- Assign pots to three light conditions: full sun, partial shade, full shade.
- Water each pot equally daily.
- Measure plant height every two days for 21 days.
- Record data meticulously.
- Graph each group’s growth curve.
- Conclude which light condition is optimal and why.
- Write a formal report including hypothesis, methods, results, and conclusion.
Level 4 Experiment: Independent Experimental Design (Age 13-15)
Objective: Apply full scientific method in designing, conducting, and reporting an experiment.
Materials: Variable, dependent, and independent variables selected by student with instructor approval.
Procedure:
- Identify a testable question.
- Research background information.
- Formulate a hypothesis.
- Design an experiment controlling variables.
- Collect and analyze data.
- Interpret results.
- Prepare a detailed report.
- Present findings to peers for critique.
E. Recommended Experiments Table by Age and Focus
| Age Range | Experiment Title | Scientific Concepts | Materials Needed | Duration |
|---|---|---|---|---|
| 4-6 | Nature's Textures | Sensory classification | Natural objects, hand lens | 1 hour |
| 7-9 | Daily Temperature Tracking | Measurement, data logging | Thermometer, journal, clock | 7 days |
| 10-12 | Sunlight Impact on Plants | Controlled variables | Seeds, pots, soil, ruler | 3 weeks |
| 13-15 | Water pH Effect on Seed Germination | Experimental design | pH strips, seeds, water samples | 2 weeks |
II. History Education Using Primary Source Analysis
A. The Sacred Charge of Primary Source Engagement
History must be learned through the original voices and artifacts. These unfiltered sources carry the true pulse of past epochs. The parent-educator must foster skills that decipher, contextualize, and critically assess these sources.
B. Recommended Primary Source Collections by Child Age
| Age Range | Source Type | Examples | Cognitive Focus |
|---|---|---|---|
| 6-8 | Illustrated letters, simple newspaper clippings | Letters from soldiers, children’s diaries | Basic comprehension, emotional connection |
| 9-11 | Photographs, legal documents, speeches | Civil rights speeches, court rulings | Contextual reading, inference |
| 12-14 | Political pamphlets, treaties, autobiographies | Revolutionary War pamphlets, slave narratives | Analytical thinking, source comparison |
| 15+ | Parliamentary records, original manuscripts | Constitutional debates, economic records | Critical evaluation, cross-referencing |
C. Protocol for Primary Source Evaluation: Step-by-Step
This procedure instills the critical thinking necessary to extract truth and guard against distortion.
Step 1: Source Identification
- Determine the author or creator.
- Establish the date and location of creation.
- Identify the type of source (e.g., letter, speech, legal document).
Step 2: Contextualization
- Place the source within the historical timeline.
- Note the circumstances surrounding its creation.
- Recognize the audience intended.
Step 3: Content Analysis
- Read the source carefully and fully.
- Extract key facts, claims, and narratives.
- Identify any biases, omissions, or rhetorical devices.
Step 4: Corroboration
- Compare with at least two other primary sources from the same period.
- Check for consistencies and contradictions.
- Consult secondary sources only after primary analysis is complete.
Step 5: Interpretation
- Synthesize findings into a summary.
- Formulate questions that arise from the source.
- Present an informed perspective on the source’s significance.
D. Structured History Lesson Using Primary Sources
Objective: Build skill in authentic historical inquiry using original documents.
Materials: Copies of primary sources, notebooks, writing implements.
Procedure:
- Select a primary source appropriate for the child's age and skill level.
- Introduce the historical context briefly without interpretation.
- Guide the child through Step 1 to Step 5 of source evaluation.
- Assign related primary sources for corroborative comparison.
- Facilitate a discussion or written reflection on the findings.
- Encourage the child to pose further research questions.
- Document progress and reflections in a dedicated history journal.
E. Recommended Primary Source Analysis Activities by Age
| Age Range | Activity | Skills Developed | Materials Needed | Time Required |
|---|---|---|---|---|
| 6-8 | Letter reading and emotional response | Basic comprehension, empathy | Simple letters, drawing materials | 1 hour |
| 9-11 | Photo analysis and context discussion | Inference, observation | Photographs, notebooks | 1.5 hours |
| 12-14 | Pamphlet reading and cross-source comparison | Analytical thinking, comparison | Political pamphlets, other documents | 2 hours |
| 15+ | Manuscript transcription and critique | Critical thinking, synthesis | Manuscript copies, secondary texts | 3 hours |
III. Integration of Science and History Through Primary Sources
A. Cross-Disciplinary Experiential Lessons
The following example protocol demonstrates how to merge observational science and primary source history analysis.
Example: Studying the Industrial Revolution
Objective: Understand the scientific advances and societal changes of the Industrial Revolution through direct engagement with period documents and experiments.
Materials: Copies of original patents, factory workers’ diaries, simple steam engine model kit, journals.
Procedure:
- Read and evaluate a patent for a steam engine using primary source evaluation steps.
- Construct a simplified steam engine model following detailed kit instructions.
- Observe and record the physical principles demonstrated.
- Analyze worker diaries to understand social impact.
- Synthesize findings in a report that connects technological innovation with historical context.
IV. Appendices
Appendix A: Science Experiment Materials and Sources
| Material | Source Instructions | Notes |
|---|---|---|
| Convex Lens | Purchase from optical suppliers or reuse magnifying glasses | Essential for hand lens creation |
| Colored Alcohol | Mix ethanol with food coloring in 1:20 ratio | For thermometer liquid |
| Seeds | Use fast-germinating varieties (beans, radish) | Ensure organic and untreated |
Appendix B: Primary Source Acquisition
- Digitized archives at [Archive.org](https://archive.org)
- National Library primary source collections
- Local historical society document copies
- Reproduction permissions secured from custodial institutions
Conclusion
This volume functions as the definitive manual for implementing rigorous, experiential science education and authentic history instruction through primary sources. The protocols delineated here will shape learners into independent, critical thinkers, armed with unmediated knowledge essential for survival and leadership in any epoch.
The apprentice must commit these protocols to sacred practice, for the future depends upon the precise transmission of truth through generations.
For further technical elaboration on scientific writing and data presentation, consult Volume XII: Scientific Documentation and Reporting.
For advanced historiography techniques, refer to Volume IX: Advanced Historical Methodologies.
_End of Volume IV excerpt._
<!-- SECTION 11 -->
The Complete Practitioner's Codex, Volume IV
Curriculum Design - Art and Music Integration

Preface
This volume, Volume IV: Curriculum Design - Art and Music Integration, is a sacred transmission of guarded knowledge in the cultivation of the young mind’s artistic faculties. The integration of creative arts into daily learning is not mere enrichment but an essential rite cultivating cognition, emotional resilience, and cultural literacy. The protocols herein are exacting and comprehensive—designed for those who accept the solemn responsibility of shaping the next generation’s creative and intellectual vigor.
Chapter I: Foundations of Artistic Integration in Daily Learning
1. Objective
To establish a daily curriculum where art and music serve as core pillars in the holistic development of children, enhancing cross-disciplinary cognition, sensory-motor coordination, and emotional intelligence.
2. Core Principles
- Multisensory Engagement: Art and music must engage sight, sound, touch, and movement.
- Age-Appropriate Progression: Skill acquisition will follow developmental readiness.
- Cross-Disciplinary Integration: Art and music will be woven into math, language, and science lessons.
- Performance and Reflection: Regular opportunities to perform and critique foster mastery and self-awareness.
Chapter II: Protocols for Developing Artistic Skills
1. Artistic Skill Domains
| Domain | Description | Developmental Focus |
|---|---|---|
| Drawing & Painting | Fine motor control, spatial reasoning | Line control, shape recognition |
| Sculpture & Modeling | 3D spatial awareness, tactile sensitivity | Material manipulation, volume concept |
| Printmaking | Pattern recognition, repetitive motor skills | Press techniques, texture creation |
| Mixed Media | Creative synthesis, conceptual layering | Combining media, narrative expression |
2. Materials by Developmental Stage
| Material | Ages 3-5 | Ages 6-9 | Ages 10-13 | Ages 14+ |
|---|---|---|---|---|
| Drawing tools | Crayons, washable markers | Colored pencils, charcoal | Graphite pencils, ink pens | Technical pens, pastels |
| Painting mediums | Tempera, watercolors | Watercolors, acrylics | Acrylics, gouache | Oil paints, mixed media |
| Modeling compounds | Non-toxic clay, play dough | Air-dry clay, papier-mâché | Polymer clay, plaster | Ceramic clay, resin |
| Surfaces | Construction paper | Drawing paper, canvas | Canvas boards, sketchbooks | Professional canvas |
3. Step-by-Step Skill Development Protocol for Drawing
Step 1: Line Mastery
- Provide children with a range of drawing tools (e.g., crayons for younger, pencils for older).
- Assign exercises to trace, copy, and create various lines: vertical, horizontal, diagonal, curved.
- Encourage control via timed repetition (5 minutes x 3 sessions daily).
Step 2: Shape Formation
- Introduce basic geometric shapes: circle, square, triangle.
- Assign projects to combine shapes into simple objects (houses, trees).
- Use positive reinforcement for accuracy and creativity.
Step 3: Shading and Texture
- Demonstrate shading techniques (hatching, cross-hatching, stippling).
- Provide graded pencils (2H to 6B) for older children.
- Assign still-life drawings focusing on light and shadow.
Step 4: Composition and Perspective
- Teach rule of thirds and basic one-point perspective.
- Assign landscape sketches incorporating these principles.
- Evaluate spatial awareness and depth creation.
Chapter III: Protocols for Music Appreciation and Performance
1. Music Skill Domains
| Domain | Description | Developmental Focus |
|---|---|---|
| Rhythm & Timing | Pulse recognition, beat subdivision | Clapping, tapping, metronome use |
| Pitch Recognition | Ear training, scale familiarity | Singing scales, interval identification |
| Instrumental Skills | Motor coordination, auditory-motor integration | Simple percussion to string/keyboard |
| Music Theory | Understanding notation and structure | Note reading, chord progression |
2. Recommended Instruments by Age Group
| Instrument Type | Ages 3-5 | Ages 6-9 | Ages 10-13 | Ages 14+ |
|---|---|---|---|---|
| Percussion | Hand drums, tambourines | Bongos, djembe | Drum kit, congas | Drum set, timpani |
| Wind | Recorders, harmonicas | Flute, clarinet | Saxophone, trumpet | French horn, oboe |
| String | Ukulele, small harp | Violin, cello | Guitar, bass | Viola, double bass |
| Keyboard | Mini keyboards | Piano | Electric piano | Synthesizers, organ |
3. Music Scales Table
| Scale Name | Notes (C Key Example) | Age Introduction | Application |
|---|---|---|---|
| Major Scale | C D E F G A B C | 3-5 | Singing, basic melodies |
| Minor Scale (Natural) | C D Eb F G Ab Bb C | 6-9 | Emotional expression |
| Pentatonic Scale | C D E G A | 3-5 | Improvisation, folk tunes |
| Blues Scale | C Eb F Gb G Bb C | 10-13 | Jazz, blues improvisation |
| Chromatic Scale | C C# D D# E F F# G G# A A# B C | 14+ | Advanced theory, technical skill |
4. Step-by-Step Protocol for Teaching Rhythm
Step 1: Pulse Feeling
- Begin with simple hand clapping to a steady beat (60-80 bpm).
- Use metronome app or device calibrated to 70 bpm.
- Repeat for 3 minutes, 3 times daily.
Step 2: Beat Subdivision
- Teach division of beat into halves and quarters via clapping and tapping feet.
- Introduce simple rhythmic phrases of quarter and eighth notes.
- Assign students to replicate rhythm on percussion instruments.
Step 3: Polyrhythms and Complex Patterns
- Introduce 3:2 polyrhythm by simultaneous clapping/tapping.
- Practice with recorded examples and live instruction.
- Encourage students to compose short rhythmic phrases.
Chapter IV: Age-Appropriate Projects and Lesson Plans
1. Project Matrices By Age
| Age Range | Art Project | Music Project | Interdisciplinary Integration |
|---|---|---|---|
| 3-5 | Finger painting with primary colors | Singing major scale songs with movement | Counting colored dots (Math + Art) |
| 6-9 | Clay modeling of animals | Recorder scale practice and simple tunes | Storytelling with music accompaniment |
| 10-13 | Acrylic landscape painting | Guitar chord learning and song creation | Science: Sound waves illustrated via painting |
| 14+ | Mixed media collage expressing social themes | Performance of classical and jazz pieces | History: Music and art of ancient cultures |
2. Detailed Daily Lesson Plan: Ages 6-9
Objective: Integrate visual arts and music with language arts and math.
| Time (min) | Activity Description | Materials Needed | Expected Outcome |
|---|---|---|---|
| 10 | Warm-up: Clapping rhythm patterns | Metronome, hands | Pulse recognition, group coordination |
| 15 | Art: Drawing animals using geometric shapes | Pencils, paper | Shape recognition, fine motor skills |
| 20 | Music: Recorder scale introduction with notation reading | Recorder, sheet music | Pitch recognition, note reading |
| 15 | Language: Writing a short story about the drawn animal | Paper, pencils | Vocabulary, narrative skills |
| 15 | Math: Counting and measuring animal parts | Rulers, counters | Measurement skills, counting practice |
Step-by-Step Implementation:
- Begin with group rhythmic clapping exercises to unify focus and develop timing.
- Transition to art, guiding students to construct animals from circles, squares, and triangles.
- Introduce recorder notes C, D, E, emphasizing finger positioning and breath control.
- Facilitate story writing about their artwork, encouraging descriptive language and sequencing.
- End with a counting and length measurement exercise referencing their animal drawings.
Chapter V: Detailed Step-by-Step Protocols for Building and Using Instruments
1. Building a Simple Percussion Instrument: Hand Drum
Materials Needed
| Item | Quantity | Specifications |
|---|---|---|
| Wooden hoop | 1 | Diameter 20 cm, thickness 2 cm |
| Animal hide or synthetic drumhead | 1 | Diameter slightly larger than hoop |
| Twine or strong cord | 10 m | Nylon or cotton |
| Scissors | 1 | Sharp |
| Water | As needed | To soak hide if natural |
Construction Steps
- Soak the animal hide in water for 1 hour to increase pliability.
- Stretch the hide tightly over wooden hoop, ensuring no wrinkles.
- Use the twine to lace around the outer edge of the hide, looping through small holes punched evenly around the hide perimeter (holes spaced every 2 cm).
- Pull the twine taut and tie securely to maintain tension.
- Allow the hide to dry fully, tightening the twine if slack develops.
- Test drum tone by striking gently; retighten as necessary.
Chapter VI: Art Techniques by Stage
| Technique | Description | Age Appropriate | Stepwise Application |
|---|---|---|---|
| Color Mixing | Combining primary colors to create secondary | 3-5 | 1. Introduce primary colors 2. Mix in small amounts 3. Record color changes |
| Collage | Layering paper/fabric to create new images | 6-9 | 1. Select base surface 2. Cut shapes 3. Glue sequentially 4. Add decorative elements |
| Perspective Drawing | Creating depth using vanishing points | 10-13 | 1. Draw horizon line 2. Mark vanishing point 3. Draw objects converging lines |
| Ink Wash | Water-diluted ink for shading and texture | 14+ | 1. Dilute ink to desired tone 2. Apply brushes in layers 3. Allow drying between layers |
Chapter VII: Integrating Arts with STEM Subjects
1. Art and Math Integration
- Use geometric shapes in art projects to teach symmetry, fractions, and spatial reasoning.
- Example: Create tessellations using triangle and hexagon patterns during art time; measure area coverage.
2. Music and Science Integration
- Demonstrate sound wave properties using homemade instruments (see Volume VIII: The Sound Codex, Chapter III).
- Record and analyze pitch and frequency variations with digital tuners.
3. Language and Performance Arts
- Use drama and musical storytelling to enhance language comprehension and public speaking skills.
- Produce short plays integrating original music composed by students.
Appendix: Essential Materials and Supplies
| Category | Item | Recommended Brands/Types | Storage & Maintenance Notes |
|---|---|---|---|
| Art Supplies | Non-toxic paints, brushes | Crayola, Winsor & Newton | Store in sealed containers, clean brushes after use |
| Musical Instruments | Recorders, percussion sets | Yamaha, Remo | Regular tuning, dry storage to prevent damage |
| Paper & Canvas | Acid-free paper, canvas boards | Canson, Fredrix | Store flat, avoid moisture |
| Crafting Tools | Scissors, glue, cutting mats | Fiskars, Elmer’s Glue | Keep blades sharp, store glue sealed |
Closing Directive
The practitioner must adhere strictly to these protocols, maintaining daily discipline with the child’s engagement in both arts and music. The sacred cycle of practice, performance, and reflection must never be broken. This volume serves as a manual for the lifelong transmission of creative mastery and cultural wisdom, forging individuals capable of shaping worlds with brush, voice, and instrument.
For further technical details on materials processing, instrument tuning, and cross-disciplinary curriculum mapping, consult Volume VIII: The Sound Codex and Volume VII: The Mathematical Codex.
End of Volume IV: Curriculum Design - Art and Music Integration
<!-- SECTION 12 -->
The Complete Practitioner's Codex, Volume V: Character Formation – Virtue Ethics for Children
Introduction
This volume transmits the sacred and suppressed knowledge of Character Formation through Virtue Ethics, a foundational element in the raising of warriors of spirit and mind. Herein lies the authoritative curriculum and protocols for instilling virtues, enforcing discipline without damage, and cultivating responsibility in children. This is not a mere academic treatise but a field manual for parents, guardians, and mentors charged with the generational transmission of ethical fortitude.
Section I: Foundational Virtues – Definitions, Contexts, and Age-Appropriate Applications
Virtue Ethics is the cultivation of character traits that enable the child to flourish as a human being and as a member of society. This section defines each virtue with precision and offers practical, age-calibrated examples for teaching.
| Virtue | Definition | Age 3-6 Example | Age 7-12 Example | Age 13-18 Example |
|---|---|---|---|---|
| Courage | The ability to confront fear, pain, danger, uncertainty, or intimidation with fortitude. | Expressing feelings when scared of the dark. | Standing up for a bullied peer. | Volunteering for leadership despite fear. |
| Temperance | Self-control and moderation in action, thought, and feeling; balance of desires and impulses. | Waiting turn during playtime without complaint. | Refusing junk food despite peer pressure. | Managing time between study and leisure. |
| Justice | Fairness in protection of rights and punishment of wrongs; respect for others' rights. | Sharing toys equally. | Reporting cheating honestly. | Advocating for fairness in group projects. |
| Prudence | The ability to govern and discipline oneself by the use of reason; practical wisdom. | Choosing healthy snacks with guidance. | Planning homework before play. | Evaluating consequences before decisions. |
| Fortitude | Strength of mind that enables endurance of pain or adversity with courage. | Persisting with difficult puzzles. | Completing chores despite distractions. | Pursuing long-term goals despite setbacks. |
| Humility | Recognizing one's limitations and valuing others' contributions without arrogance. | Saying "I'm sorry" after mistakes. | Accepting constructive criticism. | Admitting faults publicly when necessary. |
| Charity | Generosity and helpfulness especially toward the needy or suffering. | Helping a sibling with tasks. | Participating in charity drives. | Volunteering time for community service. |
Section II: Step-by-Step Curriculum for Instilling Virtues
This curriculum is structured around sequential developmental stages with daily, weekly, and monthly activities designed to embed each virtue through experiential learning and reflective practice.
Stage 1: Ages 3-6 (Foundation)
Objective: Begin recognition and simple enactment of virtues through routine and storytelling.
Daily:
- Morning Virtue Affirmation (5 minutes):
- Recite the day's virtue with the child.
- Example: "Today we practice courage by trying new things."
- Guided Play Scenario (15 minutes):
- Set up play scenarios requiring virtue enactment (e.g., sharing toys for justice).
- Evening Reflection (5 minutes):
- Ask the child what virtue they practiced today.
Weekly:
- Virtue Storytelling Session (30 minutes):
- Read or narrate stories emphasizing the virtue.
- Virtue Chart Tracking:
- Use a visual chart with stickers for daily virtue practice.
Monthly:
- Virtue Role-Play Event:
- Engage in group role-play with peers or family members acting out virtue challenges.
Stage 2: Ages 7-12 (Application)
Objective: Encourage deliberate practice of virtues in real-life situations and personal decision-making.
Daily:
- Virtue Journal Entry (10 minutes):
- Child writes or dictates a short entry about their virtue practice.
- Virtue Goal Setting (5 minutes):
- Set a simple goal related to a virtue (e.g., stand up for a friend).
Weekly:
- Family Virtue Council (45 minutes):
- Family discussion evaluating virtue successes and challenges.
- Virtue Challenge:
- Assign a specific virtue challenge (e.g., temperance challenge: no sweets for a day).
Monthly:
- Community Virtue Project:
- Participate in community service or group activities demonstrating virtues.
- Virtue Reflection Essay or Presentation:
- Child summarizes their learning and experience with the virtue.
Stage 3: Ages 13-18 (Integration and Leadership)
Objective: Develop autonomous ethical reasoning and leadership grounded in virtue.
Daily:
- Virtue Meditation (10 minutes):
- Reflect silently on personal virtue goals and challenges.
- Self-Assessment Checklist:
- Evaluate adherence to virtues in daily life.
Weekly:
- Ethics Debate or Discussion Group:
- Engage in debates or discussions centered on virtue dilemmas.
- Mentorship Role:
- Mentor younger children in virtue practices.
Monthly:
- Virtue Leadership Project:
- Lead a project that cultivates virtues in the community.
- Comprehensive Virtue Portfolio:
- Compile writings, reflections, and evaluations of virtue growth.
Section III: Discipline Without Damage – Non-Punitive Protocols
Traditional punitive discipline damages the child's psyche and obstructs virtue formation. The following non-punitive discipline protocols preserve dignity and promote intrinsic virtue development.
Protocol 1: The Restorative Feedback Loop
Purpose: Replace punishment with feedback that promotes understanding and repair.
Steps:
- Identify the Behavior: Calmly state the specific behavior observed without judgment.
- Express the Impact: Explain how the behavior affects others or the child.
- Invite Reflection: Ask the child to explain their perspective.
- Co-Create a Repair Plan: Together, determine actions to restore relationships or correct the issue.
- Follow-Up: Review the outcome in 24-48 hours.
Protocol 2: Logical Consequence Implementation
Purpose: Link consequences logically to the behavior to ensure understanding and responsibility.
Steps:
- Define Logical Consequences: Consequences must relate directly to the behavior (e.g., if toys are left out, child helps clean).
- Communicate in Advance: Explain consequences before behaviors arise.
- Implement Consistently: Enforce consequences calmly and immediately.
- Debrief: Discuss lessons learned with the child.
Protocol 3: Emotion Coaching
Purpose: Teach emotional regulation alongside behavioral correction.
Steps:
- Recognize Emotion: Name the child’s emotion aloud.
- Validate Feelings: Acknowledge the emotion as legitimate.
- Guide Expression: Model and teach appropriate ways to express emotion.
- Problem-Solve: Collaborate on strategies to manage emotions in the future.
Section IV: Responsibility Development – Fostering Accountability
Responsibility is the external expression of internalized virtues. This section provides protocols to cultivate ownership of actions and consequences.
Protocol 1: Age-Appropriate Responsibility Assignment
| Age Range | Recommended Responsibilities | Expected Accountability Outcomes |
|---|---|---|
| 3-6 | Putting away toys, simple hygiene tasks | Recognizing self-care and orderliness |
| 7-12 | Managing homework, pet care, household chores | Time management and task completion |
| 13-18 | Budgeting allowance, planning schedules, community roles | Autonomous decision-making and reliability |
Steps:
- Assign Clear Tasks: Tasks must be explicitly stated with expected outcomes.
- Provide Tools and Instructions: Equip the child with knowledge and resources.
- Monitor Progress: Check in regularly without micro-managing.
- Review and Adjust: Modify responsibilities based on performance and maturity.
Protocol 2: Accountability Conversations
Steps:
- Private Setting: Conduct conversations in a distraction-free, respectful environment.
- Behavior Review: Discuss specific actions and outcomes objectively.
- Responsibility Acknowledgment: Encourage the child to own their role in events.
- Future Planning: Develop strategies to improve accountability.
Section V: Protocols for Delayed Gratification Training

Delayed gratification is the cornerstone of temperance and long-term goal attainment. This section details precise training protocols to develop this crucial skill.
Protocol 1: The Gradual Delay Increment Method (GDIM)
Objective: Increase the child's ability to wait for a desired reward gradually.
| Session | Delay Duration | Activity Description | Reward |
|---|---|---|---|
| 1 | 10 seconds | Child waits before receiving small candy or toy. | One small candy/toy piece |
| 2 | 30 seconds | Wait extended, distractions minimized. | Two small candies/toys |
| 3 | 1 minute | Introduce simple conversation to distract. | Three candies/toys |
| 4 | 3 minutes | Engage child in self-talk or counting. | Small toy or privilege |
| 5 | 5 minutes | Introduce more complex distractions or tasks. | Larger reward |
Steps:
- Prepare Reward: Select age-appropriate, desirable but not essential rewards.
- Explain Task: Clearly state the waiting period and reward conditions.
- Start Timer: Use a visible timer or clock.
- Provide Distraction Tools: Counting beads, self-talk prompts, or quiet toys.
- Deliver Reward Consistently: Praise the child for successful waiting.
- Increase Delay Gradually: Only progress when the child consistently succeeds.
Protocol 2: The Commitment Contract Technique (CCT)
Objective: Teach self-binding to resist immediate temptations.
Steps:
- Define the Goal: Child chooses a meaningful long-term reward.
- Establish Immediate Temptation: Identify common distractions or temptations.
- Create Written/Visual Contract: Formalize the agreement to delay gratification.
- Set Checkpoints: Establish interim goals and rewards.
- Provide Social Accountability: Involve family or peers to reinforce commitment.
- Review and Reinforce: Celebrate milestones and analyze failures without judgment.
Section VI: Conclusion and Cross-Reference
This volume has delivered uncompromising, actionable protocols for instilling virtues, enforcing discipline without damage, and cultivating responsibility in children. These frameworks form the bedrock of ethical character formation that sustains the individual and the community.
For foundational knowledge on emotional development and cognitive growth, refer to Volume VII: The Emotional Codex, Chapters III-V. For integrating spiritual discipline with virtue ethics, consult Volume IX: The Spirit Codex, Chapter I.
Appendix A: Virtue Training Summary Table
| Virtue | Age 3-6 Focus | Age 7-12 Focus | Age 13-18 Focus | Primary Training Method |
|---|---|---|---|---|
| Courage | Express feelings, small risks | Peer defense, new challenges | Leadership roles | Role-play, storytelling, goal setting |
| Temperance | Turn-taking, waiting | Self-denial challenges | Time & impulse management | Delayed gratification protocols |
| Justice | Sharing, fairness | Honesty, reporting | Advocacy | Family council, community projects |
| Prudence | Healthy choices, simple planning | Task scheduling | Consequence analysis | Journaling, discussion |
| Fortitude | Persistence in play | Task completion | Goal perseverance | Incremental challenges, mentoring |
| Humility | Apologies, empathy | Criticism acceptance | Public accountability | Feedback loops, reflection |
| Charity | Helping family | Community service | Volunteer leadership | Service projects, mentorship |
End of Volume V: Character Formation – Virtue Ethics for Children
<!-- SECTION 13 -->
The Complete Practitioner's Codex, Volume V: Character Formation - Work Ethic and Delayed Gratification Training
Preface
This volume is a sacred transmission of the core methodologies for forging indomitable character in the young. The task is not mere pedagogy but the crafting of warriors of spirit and mind. The art of cultivating work ethic and delayed gratification is a crucible in which the foundation of all future accomplishment is cast. The procedures herein are explicit, exhaustive, and unyielding in their standards. Defer not to sentiment or convenience. Obedience to these protocols is life-or-death for the soul.
Section I: Foundational Principles of Work Ethic and Delayed Gratification
Work ethic is the relentless pursuit of excellence through discipline, persistence, and responsibility. Delayed gratification is the mastery of impulse control to prioritize long-term goals over immediate pleasure.
These traits are not innate. They are forged through:
- Structured daily routines
- Age-appropriate responsibilities
- Incremental goal-setting exercises
- Rigorous reward and consequence systems
- Parental modeling with transparent accountability
All steps below are designed to build neural pathways that encode these virtues at a cellular level.
Section II: Developmental Chore Assignment Protocol
Assigning chores is not labor delegation; it is character training. Chores must be:
- Matched precisely to developmental stages
- Incrementally challenging to expand capacity
- Paired with clear expectations and outcomes
- Consistent, measurable, and non-negotiable
Table 1: Chores Mapped to Developmental Stages
| Age Range | Chore Category | Specific Tasks | Expected Time Commitment | Skill Focus | Responsibility Index (RI) |
|---|---|---|---|---|---|
| 3-5 | Personal Hygiene | Brush teeth, dress self | 10-15 min daily | Fine motor skills, self-care | 10 |
| Simple Cleanup | Put toys away, wipe spills | 5-10 min daily | Organization, ownership | 12 | |
| 6-8 | Room Maintenance | Make bed, dust surfaces | 15-20 min daily | Attention to detail | 20 |
| Meal Prep Assistance | Set table, wash vegetables | 20-30 min thrice weekly | Basic food safety, coordination | 25 | |
| 9-12 | Household Support | Vacuum, take out trash | 30-40 min thrice weekly | Equipment handling, routine | 40 |
| Laundry | Sort clothes, fold | 30 min twice weekly | Sequencing, responsibility | 38 | |
| 13-15 | Advanced Household | Cook simple meals, yard work | 45-60 min four times/week | Planning, physical effort | 55 |
| Financial Literacy | Manage small allowance, budget | 15 min weekly | Numeracy, planning | 50 | |
| 16-18 | Independent Living | Full meal preparation, car maintenance | 1-2 hours weekly | Autonomy, problem-solving | 70 |
| Employment Skills | Part-time job, volunteer | Variable | Time management, work ethic | 80 |
Responsibility Index (RI) quantifies chore impact on character development (scale 1-100).
Step-by-Step Chore Assignment and Monitoring Procedure
- Assess Child’s Current Skill Level:
- Evaluate using a checklist aligned with the developmental stage (see Table 1).
- Note deficiencies and strengths for tailored chore assignment.
- Select Chores:
- Choose 2-3 daily chores and 1-2 weekly chores from the appropriate developmental category.
- Ensure variety to train multiple skill domains.
- Create a Written Chore Schedule:
- Use a visible, durable chore chart.
- Include task description, expected completion time, and quality criteria.
- Example format provided in Appendix A.
- Demonstrate Each Task:
- Perform the chore with the child present.
- Use explicit language describing actions and purpose.
- Allow the child to ask clarifying questions.
- Assign Chore Completion Times:
- Establish fixed daily times (e.g., after breakfast, before dinner).
- Use timers to enforce time limits.
- Supervise Initial Execution:
- Observe at least the first 3 completions.
- Provide immediate, specific feedback on performance.
- Implement Quality Checks:
- Use standardized checklists to evaluate chore quality.
- Record scores and track improvements weekly.
- Hold Consistent Accountability Meetings:
- Weekly sessions to review chore chart performance.
- Discuss challenges and adjust assignments accordingly.
- Phase in Increased Responsibility:
- After 4 weeks of consistent performance, increase chore complexity or add new tasks.
- Document progress in a chore logbook.
Section III: Goal-Setting Exercises for Character Training
Goal-setting is the mental architecture supporting work ethic and delayed gratification. It must be:
- Concrete: Specific, measurable, and time-bound
- Incremental: Progressing from simple to complex
- Visible: Written and tracked publicly
- Rewarded: With calibrated incentives emphasizing intrinsic motivation
Table 2: Goal-Setting Framework by Age
| Age Range | Goal Type | Frequency | Example Goals | Tracking Method | Reward Type |
|---|---|---|---|---|---|
| 3-5 | Simple Task Mastery | Daily | Complete dressing independently | Sticker chart | Praise and 5 min playtime |
| 6-8 | Skill Acquisition | Weekly | Read 3 new words, clean room without prompt | Journal with parental notes | Extra screen time (10 min) |
| 9-12 | Responsibility | Biweekly | Prepare simple meal, save allowance | Goal progress poster | Small toy or book |
| 13-15 | Self-Management | Monthly | Complete homework on time, manage allowance | Digital planner with alerts | Social privileges, outings |
| 16-18 | Autonomy & Career | Quarterly | Obtain part-time job, learn driving skills | Personal development portfolio | Monetary bonus, privileges |
Step-by-Step Goal-Setting Protocol
- Initiate Goal Discussion:
- Engage child in defining 1-3 realistic goals per period.
- Use open-ended questions to elicit personal motivation.
- Document Goals:
- Write goals with clear parameters (what, how, when).
- Display goals prominently in the child’s environment.
- Break Goals into Subtasks:
- Divide each goal into actionable daily or weekly steps.
- Assign deadlines for each subtask.
- Implement Tracking Tools:
- Provide age-appropriate tracking tools (e.g., sticker charts, journals, digital apps).
- Train child in honest self-reporting.
- Schedule Regular Review Sessions:
- Weekly or monthly depending on goal frequency.
- Include self-assessment and parental feedback.
- Adjust Goals Dynamically:
- Modify goals to maintain challenge without overwhelming.
- Remove completed goals and set new ones promptly.
- Deliver Reward or Consequence:
- Upon goal completion, deliver the predetermined reward immediately.
- If goals are not met, initiate corrective protocols (see Volume VI: Discipline Codex, Chapter III).
Section IV: Protocols for Practicing Delayed Gratification
Delayed gratification is cultivated through structured exercises that train impulse control and reward deferral.
Core Exercises
| Exercise | Age Range | Frequency | Duration | Materials Required | Target Skill |
|---|---|---|---|---|---|
| The Marshmallow Test | 3-6 | Twice weekly | 10-15 minutes | Marshmallow or small treat | Impulse control, patience |
| Token Economy | 6-12 | Daily | Ongoing | Tokens, reward catalog | Reward deferral, goal orientation |
| Time-Delay Choice | 9-15 | Weekly | 30 minutes | Choice cards with immediate/delayed options | Decision making, impulse control |
| Savings Challenge | 12-18 | Monthly | Ongoing | Allowance, savings jar or account | Financial impulse regulation |
Step-by-Step Delayed Gratification Exercise: The Marshmallow Test
- Prepare the Setting:
- Sit child at a table with one marshmallow (or preferred treat) in front of them.
- Explain: "You can eat this now, or wait 15 minutes, and get two."
- Start Timer:
- Use a visible timer set for 15 minutes.
- Child must remain seated and not eat the marshmallow.
- Observe Behavior:
- Do not engage or distract.
- Record behaviors (e.g., fidgeting, peeking at marshmallow).
- Conclude Session:
- If child waits full time, reward with second marshmallow.
- If child fails, calmly explain the rules and try again in next session.
- Record Results:
- Maintain a log of waiting times and success rates.
- Use data to adjust difficulty or add complexity (e.g., longer wait times).
Token Economy System Implementation
- Establish Token Currency:
- Create tokens (coins, stars) that represent effort units.
- Define exchange rates for rewards (see Table 3).
- Define Behaviors Earnable by Tokens:
- Assign token values to chores, goal completion, and impulse control milestones.
- Ensure consistency and transparency.
- Create Reward Catalog:
- List rewards categorized by token cost.
- Include non-material rewards (special privileges) and material rewards.
- Daily Token Awarding:
- At chore completion or goal achievement, award tokens immediately.
- Record awards in ledger.
- Weekly Redemption Sessions:
- Allow child to exchange tokens for rewards.
- Encourage saving tokens for larger rewards to practice delayed gratification.
Table 3: Token Economy Reward Catalog
| Token Cost | Reward Description | Reward Type | Notes |
|---|---|---|---|
| 5 | 15 minutes extra screen time | Privilege | Limited to weekends |
| 10 | Favorite dessert after dinner | Material | Once per week max |
| 20 | Choose family activity for evening | Social privilege | Requires parental approval |
| 30 | New book or toy | Material | Monthly limit |
| 50 | Special outing (park, museum) | Experience | Quarterly |
Section V: Parental Modeling Protocols
Children mirror parental behavior. The work ethic and self-control displayed by the parent are the true foundation of child character formation. Parental modeling must be deliberate, visible, and accountable.
Daily Parental Work Ethic Modeling Routine
| Time | Activity | Purpose | Measurement |
|---|---|---|---|
| Morning | Complete personal work tasks | Demonstrate discipline | Task checklist completion |
| Midday | Engage in household chores | Model responsibility | Chore log |
| Afternoon | Practice delayed gratification | Display impulse control | Waiting periods, recorded |
| Evening | Family goal review session | Show goal-setting commitment | Session minutes, action items |
Step-by-Step Parental Modeling Procedure
- Plan Daily Work Tasks:
- Parent creates a daily task list visible to child.
- Tasks must reflect meaningful work or household responsibilities.
- Communicate Intent:
- Verbally explain to child the purpose of each task.
- Use language emphasizing discipline and responsibility.
- Perform Tasks Conscientiously:
- Avoid shortcuts or neglect.
- Maintain focus and quality.
- Demonstrate Delayed Gratification:
- Share personal examples of waiting or saving (e.g., saving money, delaying leisure).
- Refrain from instant gratification behaviors in front of the child.
- Review and Reflect with Child:
- Conduct evening sessions recounting successes and failures.
- Invite child to ask questions and discuss lessons learned.
- Maintain Transparency:
- Admit mistakes openly to model accountability.
- Demonstrate corrective action plans.
Section VI: Comprehensive Daily Routine Template for Child

| Time | Activity | Description | Duration | Purpose |
|---|---|---|---|---|
| 7:00 - 7:30 | Morning hygiene and chores | Personal grooming, making bed | 30 min | Responsibility, habit formation |
| 7:30 - 8:00 | Breakfast and chore assistance | Setting table, kitchen cleanup | 30 min | Cooperation, skill building |
| 8:00 - 12:00 | Study, play, goal-directed tasks | Focused learning or play with goal tracking | 4 hours | Work ethic, delayed gratification |
| 12:00 - 12:30 | Lunch and cleanup | Eating, cleaning dining area | 30 min | Routine, accountability |
| 12:30 - 3:00 | Delayed gratification exercise | Token economy participation, savings challenges | 2.5 hours | Impulse control, patience |
| 3:00 - 5:00 | Chore completion and review | Household tasks, quality checks | 2 hours | Responsibility, feedback |
| 5:00 - 6:00 | Dinner preparation assistance | Cooking or setting table | 1 hour | Autonomy, planning |
| 6:00 - 7:00 | Family goal review and reflection | Discuss progress, update goals | 1 hour | Communication, motivation |
| 7:00 - 8:00 | Free time, reward redemption | Token exchange, leisure activities | 1 hour | Incentive, delayed gratification |
Section VII: Appendices
Appendix A: Sample Chore Chart Format
| Day | Chore | Time Assigned | Completed (Y/N) | Quality Score (1-5) | Comments |
|---|---|---|---|---|---|
| Monday | Make bed | 7:15 AM | Y | 4 | Needs straighter corners |
| Monday | Set table for lunch | 11:45 AM | Y | 5 | Perfect |
| Tuesday | Vacuum living room | 3:30 PM | N | 0 | Forgot to plug in |
Conclusion
This volume demands your unwavering fidelity to its protocols. The transformation of the child into a bearer of hard-won virtues requires exactitude, consistency, and the sacred willingness to endure discomfort for the sake of eternal gain. The legacy of work ethic and delayed gratification is the inheritance that shapes destinies. Proceed with resolute discipline and grave honor.
For advanced techniques in discipline and reinforcement, see Volume VI: The Discipline Codex, Chapter III.
For nutritional protocols supporting cognitive self-control, see Volume XII: The Nutrition Codex.
For water purification and hygiene standards, see Volume VIII: The Water Codex, Chapter II.
End of Volume V: Character Formation - Work Ethic and Delayed Gratification Training.
<!-- SECTION 14 -->
Volume VI: Practical Skills Transfer - Age-Appropriate Tool Use
Introduction
The sacred charge of imparting practical tool use skills to children is one of the most critical pillars in the foundation of self-reliance and generational knowledge transfer. This process demands uncompromising rigor in safety, precision in age-appropriate tool selection, and methodical skill-building exercises. The protocols herein represent the distilled wisdom of ancient craft guilds, modern occupational safety science, and the unyielding principles of the Practitioner Codex. The objective: to forge in the child a mastery that safeguards life, enhances capability, and preserves the sacred trust of stewardship.
This section is a field manual designed for the master instructor or guardian who undertakes this solemn duty. It provides explicit, step-by-step protocols for safety training, tool selection categorized by developmental stages, and supervised practice. Each protocol is complete, with no assumptions about prior knowledge. Cross-references to related volumes are provided for extended procedures such as personal protective equipment fabrication (Volume IX: Protective Gear Protocols) and environmental hazard mitigation (Volume VIII: The Water Codex, Chapter V).
1. Tool Selection by Age and Developmental Stage
The physical and cognitive development of the child mandates that tool selection be tightly calibrated to their capabilities. This protects the child from harm and ensures optimal skill acquisition. The following table classifies common household and outdoor tools by recommended minimum starting age, cognitive and motor skill prerequisites, and critical safety precautions.
| Tool Category | Specific Tool | Minimum Age (Years) | Prerequisite Skills | Critical Safety Precautions |
|---|---|---|---|---|
| Cutting Tools | Child-safe scissors | 3 | Fine motor control, hand-eye coordination | Use only rounded tips, adult supervision mandatory |
| Cutting Tools | Utility knife with safety blade | 7 | Basic hand strength, comprehension of cutting direction | Cut away from body, use safety sheath, supervised use only |
| Cutting Tools | Fixed-blade pocket knife | 10 | Mature judgment, advanced motor control | Safety lock engaged when not in use, sheath storage |
| Hammering Tools | Small claw hammer | 6 | Basic hand-eye coordination, grip strength | Always strike nails squarely, wear eye protection |
| Hammering Tools | Full-size claw hammer | 12 | Controlled arm motion, spatial awareness | Use gloves, inspect hammer head for tightness before use |
| Fastening Tools | Screwdriver (flathead & Phillips) | 7 | Finger dexterity, direction recognition | Use correct size to avoid slippage, never use as a pry bar |
| Fastening Tools | Cordless drill | 12 | Understanding of power tools, trigger control | Use with safety glasses, ensure drill bit is tight |
| Outdoor Tools | Garden trowel | 5 | Basic grip and arm strength | Clean after use, store safely out of reach |
| Outdoor Tools | Pruning shears | 10 | Hand strength, judgment on branch thickness | Cut only branches under 1cm thickness, wear gloves |
| Outdoor Tools | Bow saw | 14 | Full upper body strength, safe body positioning | Use with two hands, cut away from body, stable footing |
Note: For the complete Personal Protective Equipment (PPE) fabrication and fitting protocols, see Volume IX: Protective Gear Protocols, Chapter III.
2. Step-by-Step Safety Training Protocol
The foundation of safe tool use is an unbreachable safety training regimen. This protocol is designed to instill a safety-first mindset, teach the mechanics of safe tool handling, and enforce behavioral discipline.
2.1. Initial Safety Orientation (Session 1)
Objective: Introduce universal safety principles and engage the child’s attention.
Materials:
- Visual aids depicting safe and unsafe tool use
- Child-sized gloves and eye protection (see Volume IX)
- Demonstration tools (blunt replicas)
Steps:
- Introduce the concept of tools as “helpers” and “dangerous if misused.” Use simple language appropriate for the child's age.
- Explain the “Three Golden Rules”:
- Always ask permission before using any tool.
- Always wear the correct protective equipment.
- Never point tools at yourself or others.
- Show visual aids contrasting safe vs. unsafe behaviors. Emphasize consequences.
- Demonstrate correct and incorrect handling using blunt replicas. Let the child mimic safe handling.
- Conduct a short quiz or oral review to confirm comprehension.
2.2. Tool-Specific Safety Briefing (Session 2)
Objective: Teach safety features and specific precautions for the tool category.
Materials:
- Actual tools (checked and prepared for safety)
- PPE as required
- Safety checklist handout (simplified for child use)
Steps:
- Explain the purpose and design of the tool. Highlight safety features (e.g., blade guards, grips).
- Demonstrate the correct grip and posture. Use slow, exaggerated motions.
- Explain and demonstrate the “Cut-Away” or “Strike-Square” techniques for cutting and hammering tools respectively.
- Teach proper storage and transport methods. Show sheath placement and carrying posture.
- Practice tool inspection protocol: check blade sharpness, handle integrity, and safety locks.
- Role-play scenarios of unsafe use and the correct response. For example, “What do you do if the tool slips?”
2.3. Supervised Practice Sessions (Sessions 3-5)
Objective: Transition from observation to active, supervised use.
Materials:
- Tools matched to age and skill level
- PPE
- Tool use logbook for tracking progress
Steps:
- Begin with simple tasks: e.g., cutting paper with child-safe scissors, hammering small nails into soft wood.
- Maintain constant verbal guidance: remind the child of safety rules during each action.
- Correct errors immediately: e.g., repositioning grip, adjusting posture.
- Increase task complexity gradually: from cutting paper to cutting thin branches, from hammering small nails to larger ones.
- Record session details: task performed, errors, improvements, and emotional response.
- Conclude each session with a safety debrief: discuss what went well, what needs more focus.
3. Skill-Building Exercises by Tool Category
Skill-building exercises must be structured progressively to develop confidence, precision, and muscle memory.
3.1. Cutting Tools Exercises
| Age Range | Exercise Description | Objective | Materials Needed | Duration (Minutes) |
|---|---|---|---|---|
| 3-5 | Cut simple shapes from thick paper | Develop fine motor control and accuracy | Child-safe scissors, construction paper | 15 |
| 6-8 | Cut strips and fringes in paper | Improve hand strength and directional control | Child-safe scissors, paper | 20 |
| 7-10 | Open sealed packages with utility knife under supervision | Teach safe blade use and cutting away motion | Utility knife with safety blade, sealed packages | 30 |
| 10-12 | Whittle soft wood into simple shapes | Develop controlled carving and tool respect | Soft wood blocks, fixed-blade knife | 45 |
| 13+ | Sharpen and maintain blade edges | Teach tool maintenance and safety hygiene | Sharpening stone, knife | 30 |
3.2. Hammering Tools Exercises
| Age Range | Exercise Description | Objective | Materials Needed | Duration (Minutes) |
|---|---|---|---|---|
| 6-8 | Tap nails into soft wood at 45-degree angle | Develop hand-eye coordination and grip | Small claw hammer, soft wood blocks, finishing nails | 20 |
| 9-12 | Drive nails fully into hardwood with full-sized hammer | Build arm strength and controlled force | Full-size claw hammer, hardwood, nails | 30 |
| 13+ | Remove nails using claw hammer | Teach tool versatility and leverage principles | Claw hammer, wood with embedded nails | 20 |
3.3. Fastening Tools Exercises
| Age Range | Exercise Description | Objective | Materials Needed | Duration (Minutes) |
|---|---|---|---|---|
| 7-9 | Turn screws into pre-drilled wood with manual screwdriver | Develop finger dexterity and rotational control | Flathead and Phillips screwdrivers, pre-drilled wood | 25 |
| 10-12 | Use cordless drill to assemble simple wooden box | Introduce power tool operation and safety | Cordless drill, screws, wood pieces | 40 |
| 13+ | Disassemble and reassemble mechanical objects | Teach tool application in repair and construction | Various screwdrivers, mechanical objects | 60 |
3.4. Outdoor Tools Exercises
| Age Range | Exercise Description | Objective | Materials Needed | Duration (Minutes) |
|---|---|---|---|---|
| 5-7 | Dig shallow holes and transplant seedlings | Develop grip strength and environmental respect | Garden trowel, soil, seedlings | 20 |
| 10-13 | Prune small branches and clear brush | Teach judgment on branch thickness and cutting technique | Pruning shears, garden waste | 30 |
| 14+ | Use bow saw to cut firewood sections | Build upper body strength and tool control | Bow saw, wood logs | 45 |
4. Protocol for Supervised Practice Sessions
Supervised practice is the crucible in which knowledge and skill are forged into safe competence. The following protocol ensures structured, safe, and effective practice.
4.1. Preparation Phase
Steps:
- Inspect tools carefully: ensure blades are sharp but clean, handles free of cracks, safety features functional.
- Prepare the environment: well-lit, uncluttered workspace with non-slip surfaces.
- Equip child with appropriate PPE: gloves, eye protection, apron if needed.
- Review safety rules aloud: reaffirm the “Three Golden Rules” and tool-specific precautions.
- Set clear objectives for the session: explain the task, expected outcomes, and safety focus.
4.2. Active Supervision Phase
Steps:
- Position yourself to observe all actions clearly while allowing the child freedom of movement.
- Maintain verbal communication: reinforce correct techniques and immediately correct unsafe behaviors.
- Use positive reinforcement: praise correct actions to build confidence.
- Intervene physically only if imminent danger is detected.
- Time sessions to avoid fatigue: typically 20-45 minutes depending on age and tool.
4.3. Post-Session Review Phase
Steps:
- Remove PPE and inspect tools together: clean and safely store tools.
- Conduct a verbal review: discuss what went well, what was challenging, and any safety incidents.
- Document the session: record in the tool use logbook details including time, tools used, safety adherence, and skill progression.
- Assign simple “homework” tasks: such as tool inspection or PPE preparation.
- Plan the next session based on observed progress and challenges.
5. Tool Safety Inspection Checklist (To Be Used Before Every Practice)
| Inspection Item | Pass/Fail | Notes |
|---|---|---|
| Blade sharpness | No chips, dullness acceptable only for child-safe scissors | |
| Handle integrity | No cracks, splinters, or looseness | |
| Safety feature function | Locks, guards, sheaths fully operational | |
| Cleanliness | No rust, dirt, or sticky residues | |
| PPE availability | Gloves, eye protection in good condition |
Conclusion
The transmission of practical tool use knowledge is a sacred trust binding generations. The protocols herein are not mere suggestions but the codified standards for cultivating a lineage of capable, safe, and confident practitioners. The rigor of tool selection, the precision of safety training, the structure of skill-building exercises, and the unwavering discipline of supervised practice form the unbreakable chain of life-preserving knowledge.
Remember, mastery is achieved through repetition, vigilance, and reverence for the tool and the task. The child trained under these protocols will carry forward the torch of practical wisdom, safeguarding their own life and that of the community.
For further knowledge on environmental risk assessment during outdoor tool use, see Volume VIII: The Water Codex, Chapter V. For personal protective equipment fabrication and maintenance, see Volume IX: Protective Gear Protocols, Chapter III.
End of Volume VI: Practical Skills Transfer - Age-Appropriate Tool Use
<!-- SECTION 15 -->
The Complete Practitioner's Codex, Volume VI: Practical Skills Transfer – Kitchen, Garden, and Animal Care Skills
Preface
This volume is devoted to the sacred task of transmitting essential daily living skills — the triad of cooking, gardening, and animal husbandry — from parent to child. These skills are not mere chores but the foundation of self-sufficiency, survival, and the perpetuation of healthy lineage and community. The protocols herein are unyielding in precision and exhaustive in detail, ensuring no ambiguity in execution.
Section I: Framework for Skill Transmission Across Developmental Stages
Table 1: Skill Progression Matrix by Child Development Stage
| Developmental Stage | Approximate Age Range | Cooking Skills | Gardening Skills | Animal Care Skills |
|---|---|---|---|---|
| Early Childhood | 3–5 years | Basic hygiene, simple food preparation (washing, stirring) | Seed identification, watering, soil observation | Recognizing animals, basic safety, gentle petting |
| Middle Childhood | 6–9 years | Measuring ingredients, use of safe kitchen tools, simple recipes | Planting seeds, weeding, pest identification | Feeding, cleaning enclosures, basic health observation |
| Late Childhood | 10–12 years | Stove use under supervision, meal planning, food storage | Soil preparation, transplanting, seasonal planting | Grooming, basic medical care, breeding observations |
| Early Adolescence | 13–15 years | Independent cooking, recipe modification, budgeting | Crop rotation, composting, pest control | Handling animals, administering medication, breeding management |
| Mid to Late Adolescence | 16–18 years | Advanced cooking techniques, preserving, nutrition planning | Advanced horticulture, greenhouse management, seed saving | Full animal husbandry, breeding programs, veterinary basics |
Section II: Cooking Skills Transfer Protocol

Objective
Equip the child with foundational and progressively advanced culinary skills critical for personal health, family sustenance, and cultural preservation.
Stepwise Instructional Protocol
Stage 1: Early Childhood (3–5 years)
- Establish Hygiene Fundamentals
- Teach handwashing using the 20-second rule.
- Instruct on the use of clean utensils.
- Introduce Food Preparation Basics
- Demonstrate washing fruits and vegetables.
- Guide stirring thick mixtures with wooden spoons.
- Safety Training
- Emphasize staying away from hot surfaces.
- Model careful handling of kitchen tools.
Stage 2: Middle Childhood (6–9 years)
- Measurement and Ingredient Handling
- Teach use of measuring cups and spoons with standardized markings.
- Introduce reading simple recipes.
- Safe Tool Use
- Supervised use of child-safe knives (plastic serrated blades).
- Oven and stovetop observation, not direct use.
- Simple Recipe Execution
- Prepare no-cook meals (sandwiches, salads).
- Bake basic items (cookies, muffins) with adult supervision.
Stage 3: Late Childhood (10–12 years)
- Supervised Stove Use
- Teach ignition and temperature control of gas/electric stoves.
- Demonstrate sautéing, boiling, and baking basics.
- Meal Planning
- Introduce balanced meals (protein, carbohydrate, vegetable).
- Teach basic food storage (refrigeration, freezing).
- Food Safety
- Explain cross-contamination and foodborne illness prevention.
Stage 4: Early Adolescence (13–15 years)
- Independent Cooking
- Assign weekly meal preparation duties.
- Encourage recipe experimentation within dietary guidelines.
- Budgeting for Food
- Teach shopping list creation.
- Introduce price comparison and bulk buying.
- Preservation Techniques
- Demonstrate freezing, pickling, and drying (see Volume VIII: Food Preservation Codex).
Stage 5: Mid to Late Adolescence (16–18 years)
- Advanced Culinary Skills
- Teach sauce making, complex baking, fermentation.
- Introduce cultural dishes and nutritional analysis.
- Nutrition Planning
- Use nutrition software or charts to plan diets.
- Address dietary restrictions and enhancements.
- Food System Management
- Oversee pantry inventory.
- Implement waste reduction strategies.
Section III: Gardening Skills Transfer Protocol
Objective
Impart skills to grow, maintain, and harvest plants seasonally, fostering food security and ecological stewardship.
Seasonal Gardening Calendar (Temperate Climate Example)
| Season | Tasks | Key Activities | Duration |
|---|---|---|---|
| Spring | Soil preparation, planting cool crops | Tilling, fertilizing, seed sowing | March–May |
| Summer | Maintenance, watering, pest control | Weeding, mulching, insect management | June–August |
| Autumn | Harvesting, soil amendment | Crop gathering, composting | September–November |
| Winter | Planning, tool maintenance, indoor sowing | Garden layout design, greenhouse prep | December–February |
Stepwise Instructional Protocol
Stage 1: Early Childhood (3–5 years)
- Seed Identification and Sensory Exploration
- Show various seed types and textures.
- Engage in sensory play with soil and seeds.
- Watering Practice
- Provide child-sized watering cans.
- Teach even watering techniques.
- Observation of Plant Growth
- Maintain a plant growth journal (drawings, notes).
Stage 2: Middle Childhood (6–9 years)
- Soil Preparation
- Demonstrate compost addition and soil turning.
- Teach importance of soil texture.
- Seed Planting
- Mark planting rows.
- Show correct seed depth and spacing.
- Weeding and Pest Identification
- Identify common weeds and insects.
- Teach manual weed removal and safe pest deterrents.
Stage 3: Late Childhood (10–12 years)
- Transplanting Seedlings
- Teach hardening off techniques.
- Demonstrate root handling and hole preparation.
- Seasonal Planting Planning
- Use seed catalogs/calendar to select planting dates.
- Soil Testing
- Perform pH and nutrient test using kits.
- Adjust soil composition accordingly.
Stage 4: Early Adolescence (13–15 years)
- Crop Rotation
- Explain nitrogen-fixing plants and planting cycles.
- Plan and implement rotation schedules.
- Composting Management
- Build and maintain compost heaps.
- Monitor temperature and moisture levels.
- Pest and Disease Control
- Identify plant diseases.
- Apply organic pesticides and natural predators.
Stage 5: Mid to Late Adolescence (16–18 years)
- Greenhouse Management
- Construct simple greenhouse (see Appendix A).
- Control humidity, temperature, and ventilation.
- Seed Saving and Propagation
- Harvest, dry, and store seeds properly.
- Engage in grafting and cuttings propagation.
- Advanced Soil Science
- Conduct in-depth soil analysis.
- Amend soil with minerals and biochar.
Section IV: Animal Husbandry Skill Transfer Protocol

Objective
Develop the child's competence in caring for domesticated animals, ensuring animal welfare, productivity, and safety.
Core Animal Categories Covered
- Poultry (chickens, ducks)
- Small ruminants (goats, sheep)
- Companion animals (dogs, cats)
- Bees (basic apiary management)
Stepwise Instructional Protocol
Stage 1: Early Childhood (3–5 years)
- Animal Recognition and Respect
- Introduce animals by sight and sound.
- Teach gentle interaction and boundaries.
- Safety Around Animals
- Explain safe approach and avoidance of sudden movements.
- Basic Needs Observation
- Identify food and water containers.
- Observe animal behavior patterns.
Stage 2: Middle Childhood (6–9 years)
- Feeding Protocols
- Measure feed quantities.
- Recognize appropriate feed types.
- Enclosure Cleaning
- Assist in removing waste.
- Learn proper disposal techniques.
- Health Observation
- Identify signs of distress or illness.
- Report abnormalities promptly.
Stage 3: Late Childhood (10–12 years)
- Grooming Techniques
- Brush animals according to species.
- Clean hooves, trim nails.
- Basic Medical Care
- Administer topical treatments.
- Assist in vaccination procedures.
- Breeding Observation
- Identify mating behaviors.
- Record breeding dates and outcomes.
Stage 4: Early Adolescence (13–15 years)
- Handling and Restraint
- Practice safe animal handling.
- Use restraint devices properly.
- Medication Administration
- Oral dosing calculations.
- Injection techniques (subcutaneous, intramuscular).
- Breeding Management
- Select breeding pairs.
- Record genetic traits and lineage.
Stage 5: Mid to Late Adolescence (16–18 years)
- Veterinary Care Assistance
- Assist in diagnostics (temperature, pulse).
- Apply wound care and suturing basics.
- Breeding Program Design
- Manage breeding cycles.
- Optimize genetic diversity.
- Product Harvesting
- Collect eggs, milk, honey.
- Implement hygienic processing.
Section V: Integration Into Family Routines – Protocol and Scheduling


Objective
Ensure the practical skills are not isolated lessons but integrated into the family's daily life, promoting habitual competence and responsibility.
Weekly Skill Integration Template
| Day | Morning Activity | Afternoon Activity | Evening Reflection/Review |
|---|---|---|---|
| Monday | Kitchen: Meal prep (child-led) | Garden: Watering and observation | Family discussion of successes |
| Tuesday | Animal: Feeding and cleaning | Kitchen: Measuring ingredients | Journal entry on observations |
| Wednesday | Garden: Weeding and pest control | Kitchen: Cooking with supervision | Planning next day’s tasks |
| Thursday | Animal: Grooming and health check | Garden: Soil testing | Reflection on animal behavior |
| Friday | Kitchen: Budgeting and shopping | Animal: Enclosure maintenance | Week review and adjustments |
| Saturday | Garden: Planting/transplanting | Kitchen: Food preservation prep | Family meal sharing and feedback |
| Sunday | Rest and observation | Rest and observation | Plan for next week’s tasks |
Monthly Skill Focus Protocol
- Assign primary skill focus each month:
- Month 1: Cooking hygiene and basics.
- Month 2: Seed planting and soil prep.
- Month 3: Animal feeding and safety.
- Month 4: Advanced cooking and meal planning.
- Month 5: Pest control and composting.
- Month 6: Breeding and health monitoring.
- Hold family skill assessment meetings.
- Adjust tasks and difficulty for child’s developmental stage.
Section VI: Appendices
Appendix A: Simple Greenhouse Construction Protocol
| Material | Quantity | Specifications |
|---|---|---|
| Wooden planks | 10 | 2m length, 5cm x 5cm cross-section |
| Clear polycarbonate sheets | 6 | 1m x 2m, UV-resistant |
| Hinges | 4 | Rust-proof metal |
| Screws and nails | 50 | Stainless steel |
| Weather stripping | 5m | Flexible rubber |
Construction Steps:
- Build rectangular wooden frame (2m x 1m base, 2m height).
- Attach polycarbonate sheets to frame sides using screws.
- Install hinged door on one side.
- Seal edges with weather stripping.
- Place greenhouse in a south-facing location.
Appendix B: Child-Safe Kitchen Tool Specifications
| Tool | Recommended Material | Safety Feature | Age Suitability |
|---|---|---|---|
| Plastic serrated knife | BPA-free plastic | Rounded serrations, no sharp tip | 6–9 years |
| Wooden stirring spoon | Hardwood | Smooth finish, no splinters | 3+ years |
| Measuring cups | Stainless steel or plastic | Clear markings, non-slip grip | 6+ years |
Conclusion
The transfer of practical skills in cooking, gardening, and animal care is a non-negotiable pillar of generational knowledge and survival. Employ the protocols herein with unwavering discipline and reverence. The child is not merely learning tasks but inheriting the sacred trust of sustaining lineage, culture, and life itself. This codex demands exhaustive commitment and will yield adults capable of stewarding themselves and their communities through any adversity.
For comprehensive hygiene protocols in kitchen and animal care, see Volume II: The Hygiene Codex. For preservation techniques beyond the basics, refer to Volume VIII: Food Preservation Codex. For advanced veterinary care, consult Volume IX: Animal Health Codex.
<!-- SECTION 16 -->
The Complete Practitioner's Codex, Volume VI: Practical Skills Transfer
Wilderness Skills, Financial Literacy, and First Aid

Section I: Survival Skills – Wilderness Navigation and Shelter Building
Preface: This section imparts the sacred, often suppressed knowledge of survival mastery. It transforms novices into capable custodians of life in the wilderness, imparting skills that surpass mere survival to instill dominion over nature’s challenges. The protocols herein are uncompromisingly detailed, designed for progressive transfer to children under rigorous, practical apprenticeship.
Wilderness Navigation
Objective:
Enable the novice child to navigate unknown terrain using natural indicators, basic instruments, and precise protocols.
Equipment List: Survival Navigation Kit
| Item | Description | Construction/Acquisition Notes |
|---|---|---|
| Magnetic Compass | Needle magnetized to Earth's magnetic field | Purchase calibrated compass; magnetize needle with lodestone if unavailable |
| Topographic Map | Local terrain map at scale 1:24,000 or 1:50,000 | Obtain from government geological survey or print from verified online sources |
| Watch (Analog or Digital) | To determine time for sun navigation | Standard wristwatch; digital watches must have analog mode or be paired with sun navigation techniques |
| Altimeter (Optional) | Measures elevation | Commercially available or constructed using barometric pressure sensor kits |
| Protractor | For angle measurement | Construct from stiff transparent plastic or purchase standard protractor |
| Pencil and Notepad | For recording bearings and observations | Waterproof notebook recommended |
Step-by-Step Wilderness Navigation Protocol
1. Magnetic Compass Use
- Hold the compass flat, level to the ground, away from metal objects.
- Rotate the bezel until the orienting arrow aligns with the magnetic needle.
- Read the bearing at the index line; this is your heading.
- Use the bearing to orient your map by aligning the map's north with the compass needle.
2. Sun and Shadow Navigation (When Compass Is Unavailable)
- Place a straight stick vertically into the ground; mark the tip of the shadow with a small stone (Point A).
- Wait 15-20 minutes; mark the new position of the shadow tip (Point B).
- Draw a straight line between Points A and B; this line runs approximately west (Point A) to east (Point B).
- Standing with Point A to your left and Point B to your right, you face approximately north.
3. Map Reading and Terrain Association
- Identify your current location using known landmarks and topographic features.
- Align your map with the real-world terrain using the compass or sun navigation.
- Plan your route by selecting landmarks and plotting bearings between them.
- Use contour lines to anticipate elevation changes and select the safest, most efficient path.
4. Pacing and Speed Estimation
- Measure your average pace length (distance between two steps of the same foot).
- Count your steps to estimate traveled distance (Steps x pace length = distance).
- Adjust estimate for terrain difficulty (use Table 1).
Table 1: Terrain Difficulty Multipliers for Distance Estimation
| Terrain Type | Multiplier to Pacing Distance Estimation |
|---|---|
| Flat, Clear Trail | 1.0 |
| Rocky or Uneven Terrain | 1.3 |
| Dense Vegetation | 1.5 |
| Steep Inclines (>20° slope) | 1.7 |
| Swamp or Muddy Areas | 2.0 |
Shelter Building

Objective:
Teach children to build effective shelters for protection against environmental elements using natural materials and minimal tools.
Required Materials and Tools:
| Material/Tool | Description | Source/Construction Notes |
|---|---|---|
| Paracord or Natural Fiber Cordage | For binding and structural support | Commercial paracord or twisted plant fibers |
| Cutting Tool | Knife or sharp stone | Obtain certified child-safe knives or sharpen stones |
| Tarp or Large Leaves | For waterproofing | Synthetic tarp recommended; large leaves as natural alternative |
| Stakes or Branches | Structural supports | Collect sturdy branches or sharpen stakes |
| Insulating Materials | Moss, leaves, pine needles | Gather from surrounding environment |
Step-by-Step Shelter Construction Protocol
1. Site Selection
- Choose a flat area, elevated above water accumulation zones.
- Avoid areas under dead branches or unstable trees.
- Ensure proximity to water supply but not too close to avoid flooding.
- Check for natural windbreaks.
2. Frame Construction
- Select two sturdy poles approximately 6-7 feet long.
- Drive one end of each pole into the ground at an angle, converging at the top to form an 'A' frame.
- Secure the apex with paracord or natural cordage using a square lashing knot (see Volume IX: Knotcraft Codex, Chapter III).
3. Covering
- Drape tarp or large leaves over the frame ensuring overlap to prevent water ingress.
- Secure edges to the ground using stakes or heavy rocks.
- Insulate the floor of the shelter with moss, dry leaves, or pine needles to provide thermal barrier.
4. Ventilation and Safety
- Leave an opening at the shelter’s rear or sides for airflow.
- Ensure entrance faces away from prevailing wind.
- Clear the immediate area of flammable material if fire is intended nearby (see Firecraft Protocols, Volume III).
Section II: Financial Literacy – Budgeting, Saving, and Age-Appropriate Concepts
Overview: Financial literacy is a sacred legacy of autonomy and prudence. It must be transferred with precision, adapting complexity to the child's developmental stage. The protocols herein ensure mastery of budgeting, saving, and money management from early childhood to adolescence.
Table 2: Financial Concepts by Age Group
| Age Group | Concepts Introduced | Practical Exercises | Tools Required |
|---|---|---|---|
| 4-6 Years | Basic value recognition, coins identification | Sorting coins, role-play buying and selling | Play money, real coins |
| 7-9 Years | Simple budgeting, needs vs wants | Weekly allowance tracking, saving jars | Ledger notebook, jars |
| 10-12 Years | Budget creation, simple interest introduction | Creating a monthly budget, simulated bank accounts | Spreadsheet templates or paper ledgers |
| 13-15 Years | Saving for goals, understanding credit basics | Set saving goals, simulate credit scenarios | Online simulators, calculators |
| 16-18 Years | Investment basics, taxes, financial planning | Managing a mock portfolio, tax form exercises | Financial software, tax guides |
Step-by-Step Budgeting and Saving Protocol for Children Ages 7-12
1. Allowance Tracking
- Provide a weekly allowance consistent with family standards.
- Supply the child with a simple ledger notebook.
- Each week, instruct the child to record:
- Amount received.
- Amount spent.
- Amount saved.
- Review ledger together weekly, discussing spending choices.
2. Needs vs Wants Categorization
- Define needs as essentials (food, clothing, shelter).
- Define wants as non-essentials (toys, sweets, entertainment).
- Provide a list of common items; have the child categorize them.
- Discuss impact of prioritizing needs over wants in budgeting.
3. Saving Jar System
- Provide three jars labeled: Spending, Saving, Sharing.
- Instruct child to divide allowance into jars according to family-determined percentages (e.g., 50% spending, 40% saving, 10% sharing).
- Track accumulation weekly.
- Use saved money for planned purchases or charitable giving.
Step-by-Step Budget Creation for Ages 10-12
- List all income sources for the month (allowance, gifts, small jobs).
- List fixed expenses (school supplies, lunches).
- List variable expenses (snacks, entertainment).
- Assign estimated amount to each expense.
- Subtract expenses from income to calculate surplus or deficit.
- Adjust expense amounts to eliminate deficit.
- Set a saving goal for the month.
- Review end of month performance and adjust next month’s budget.
Section III: First Aid Basics for Children – Emergency Response Protocols
Essential First Aid Equipment for Household and Field Use
| Item | Description and Use | Notes on Procurement or DIY Construction |
|---|---|---|
| Sterile Gauze Pads | For wound dressing | Purchase sterile individually wrapped pads |
| Adhesive Bandages | For minor cuts and abrasions | Variety of sizes |
| Antiseptic Solution (e.g., iodine or chlorhexidine) | For wound cleaning | Purchase or prepare diluted antiseptic solutions (see Volume VIII: Medical Codex, Chapter IV) |
| Tweezers | For splinter removal | Stainless steel preferred |
| Disposable Gloves | To prevent contamination | Vinyl or nitrile gloves |
| CPR Face Shield | For rescue breathing | Purchase or fashion from clear plastic with valve |
| Elastic Bandages | For sprains and compression | Various widths |
| Instant Cold Pack | To reduce swelling | Commercial or DIY (see Volume VIII) |
| Thermometer | To measure body temperature | Digital preferred |
Table 3: Basic First Aid Procedures
| Injury/Condition | Step-by-Step Treatment Protocol | Notes/Precautions |
|---|---|---|
| Minor Cuts and Abrasions | 1. Wash hands thoroughly. 2. Apply gloves. 3. Clean wound with antiseptic. 4. Apply sterile gauze. 5. Cover with adhesive bandage. | Monitor for infection signs. |
| Nosebleed | 1. Sit upright, lean forward. 2. Pinch nostrils for 10 minutes. 3. Apply cold pack to nose bridge. 4. If bleeding persists >20 minutes, seek medical help. | Avoid tilting head backward. |
| Sprains | 1. Rest affected limb. 2. Apply elastic bandage with moderate compression. 3. Elevate limb. 4. Apply cold pack for 20 minutes every 2 hours for 48 hours. | Do not apply ice directly to skin. |
| Choking (Conscious Adult/Child over 1 year) | 1. Encourage coughing. 2. If not effective, perform 5 back blows between shoulder blades. 3. If still obstructed, perform 5 abdominal thrusts. Repeat cycle. 4. Call emergency services if obstruction persists. | Modify technique for infants (see Volume VIII). |
| Burns (Minor) | 1. Remove source of burn. 2. Cool burn with running water for 10 minutes. 3. Cover loosely with sterile gauze. 4. Do not apply ointments or ice. | Severe burns require immediate medical attention. |
Step-by-Step Basic First Aid Training Protocol for Children
1. Hand Hygiene and Safety
- Teach children to wash hands for a minimum of 20 seconds with soap.
- Demonstrate correct glove usage and disposal.
- Emphasize safety to prevent injury and infection spread.
2. Wound Cleaning and Dressing
- Identify minor wounds suitable for home care.
- Demonstrate cleaning using antiseptic and sterile materials.
- Practice sterile dressing application on simulated wounds.
- Reinforce signs of infection requiring adult intervention.
3. Emergency Response Drills
- Conduct choking response drill with child-sized manikins.
- Practice calling emergency services with scripted scenarios.
- Simulate minor injury situations requiring first aid application.
- Evaluate responses and provide corrective feedback.
Protocol for Practical Drills and Simulations
| Drill Type | Frequency | Equipment Required | Objective and Procedure |
|---|---|---|---|
| Wilderness Navigation Walk | Monthly | Map, compass, watch, notebook | Navigate a predetermined course using compass and natural indicators, record bearings and distance. |
| Shelter Building Session | Quarterly | Cordage, cutting tools, tarp, natural materials | Build functional shelter in under 2 hours, review structural integrity and environmental suitability. |
| Budgeting Review | Weekly | Ledger notebook, allowance jars | Track spending and saving, review ledger, discuss financial decisions and goals. |
| First Aid Simulation | Monthly | First aid kit, manikins, CPR face shield | Practice wound dressing, choking response, burn treatment; simulate emergency calls; evaluate readiness. |
Summary and Transfer Recommendations
- Survival skills: Begin with basic compass use and move through advanced navigation and shelter construction in real field conditions. Emphasize safety and environmental respect.
- Financial literacy: Tailor concepts to age; reinforce with regular practice and review. Introduce complexity progressively.
- First aid: Hands-on practice is paramount. Equip children with knowledge and confidence to act decisively under adult supervision.
Transfer mastery using the apprenticeship model: demonstrate, supervise, evaluate, then entrust with responsibility incrementally.
This volume is a cornerstone of generational knowledge transfer, preserving imperative survival, financial, and medical wisdom. Its protocols, if followed without deviation, will empower the next generation to thrive in any circumstance.
For complementary knowledge on related subjects, consult:
- Volume VIII: Medical Codex, Chapters II and IV
- Volume IX: Knotcraft Codex, Chapter III
- Volume III: Firecraft Protocols
- Volume VIII: Medical Codex, Chapter VII (Advanced First Aid)
End of Volume VI: Practical Skills Transfer
<!-- SECTION 17 -->
The Complete Practitioner's Codex, Volume VII: Adolescence and Rites of Passage
Chapter I: Puberty Navigation and Identity Formation
Guiding Adolescents Through Physical and Psychological Changes
Introduction
Adolescence marks the crucible of transformation within the human lifecycle, where the child transitions into self-governed adulthood. This phase demands uncompromising precision in guidance, as the adolescent undergoes profound biological, psychological, and social upheavals. The parent, acting as custodian and mentor, must wield both scientific mastery and empathetic acuity to shepherd this passage.
This chapter details the comprehensive puberty education framework—encompassing hormonal flux, somatic milestones, emotional turbulence, and identity construction—augmented by actionable protocols to fortify parent-adolescent communication. These protocols are designed to be exhaustive, leaving no ambiguity or omission, for failure to execute these rites with rigor imperils generational integrity.
Section 1: The Biological Architecture of Puberty
1.1 Hormonal Transmutations: Mechanisms and Timelines
Puberty is orchestrated by the hypothalamic-pituitary-gonadal (HPG) axis, initiating a cascade of endocrine events that remodel the adolescent body and brain. Precise understanding and communication of these changes are essential.
| Hormone | Source Organ(s) | Primary Function | Typical Onset Age (Years) | Peak Levels (Years) | Notes |
|---|---|---|---|---|---|
| Gonadotropin-Releasing Hormone (GnRH) | Hypothalamus | Stimulates pituitary release of LH and FSH | 8-11 (females), 9-12 (males) | Mid-puberty | Pulsatile secretion initiates puberty |
| Luteinizing Hormone (LH) | Anterior Pituitary | Stimulates gonadal steroid production | 8-11 (females), 9-12 (males) | Mid-puberty | Peaks trigger estrogen/testosterone production |
| Follicle-Stimulating Hormone (FSH) | Anterior Pituitary | Stimulates gametogenesis and follicular development | 8-11 (females), 9-12 (males) | Mid-puberty | Supports ovarian follicle maturation and spermatogenesis |
| Estrogen | Ovaries | Female secondary sexual characteristics, growth spurt | 8-13 | Mid to late puberty | Also influences bone growth and emotional regulation |
| Testosterone | Testes | Male secondary sexual characteristics, muscle mass | 9-14 | Mid to late puberty | Also modulates aggression and libido |
| Growth Hormone (GH) | Anterior Pituitary | Stimulates overall body growth and metabolism | 8-14 | Peak during mid-puberty | Synergistic with sex steroids for growth spurt |
1.2 Physical Milestones: Somatic Markers of Progression
Each adolescent exhibits a unique tempo of physical development; however, standardized milestones provide a scaffold for monitoring normal progression or identifying deviations necessitating intervention.
| Milestone | Female Typical Age Range (Years) | Male Typical Age Range (Years) | Description | Parent's Role |
|---|---|---|---|---|
| Breast Bud Development (Thelarche) | 8-13 | N/A | Initial formation of breast tissue | Confirm understanding; normalize; prepare for next stage |
| Pubic Hair Appearance (Pubarche) | 8-14 | 9-15 | Appearance of coarse hair in pubic region | Discuss hygiene; normalize; reinforce body positivity |
| Growth Spurt Peak | 10-14 | 12-16 | Rapid increase in height and weight | Monitor nutrition; ensure adequate sleep |
| Menarche (First Menstrual Period) | 10-16 | N/A | Onset of menstruation | Provide menstrual hygiene education; emotional support |
| Testicular Enlargement | N/A | 9-14 | Increase in testicular volume signaling puberty onset | Initiate conversation on reproductive health |
| Voice Deepening | N/A | 11-15 | Larynx growth causing voice changes | Prepare adolescent for changes; normalize |
| Acne Development | 10-17 | 11-18 | Sebaceous gland activity increases | Teach skin care routines; address self-esteem impacts |
Section 2: Psychological and Emotional Dynamics
2.1 Emotional Fluctuations and Cognitive Development
Puberty's hormonal shifts precipitate a spectrum of emotional states: from heightened sensitivity to impulsivity. These are compounded by the adolescent brain’s ongoing development, particularly within the prefrontal cortex and limbic system, affecting decision-making and emotional regulation.
Parents must recognize these as neurobiological phenomena, not mere behavioral defiance.
| Emotional State | Typical Age Range | Neurobiological Correlate | Recommended Parental Strategy |
|---|---|---|---|
| Mood Swings | 10-16 | Fluctuating sex steroid levels, limbic activation | Maintain consistent emotional support; avoid confrontation |
| Increased Risk-Taking | 12-18 | Immature prefrontal cortex, dopamine surges | Set clear boundaries; explain consequences logically |
| Identity Confusion | 12-18 | Self-referential cortex development | Encourage exploration; validate feelings |
| Social Sensitivity | 10-18 | Heightened amygdala reactivity | Model empathy; teach social skills |
| Anxiety and Self-Doubt | 11-17 | Stress hormone fluctuations, peer comparison | Promote resilience training; offer reassurance |
2.2 Identity Formation: The Psychological Crucible
Adolescents engage in identity exploration and commitment (per Erikson’s psychosocial stages), requiring structured support to navigate complex social, sexual, and moral dimensions.
Key Parent Responsibilities:
- Support autonomous exploration: Facilitate access to diverse experiences, communities, and resources without judgment.
- Provide stable emotional foundation: Maintain unconditional positive regard; avoid punitive reactions to self-expression.
- Model integrity and values: Demonstrate congruence between words and actions to anchor adolescent values.
- Engage in reflective dialogue: Use Socratic questioning to encourage adolescent self-reflection and critical thinking.
Section 3: Parent-Adolescent Communication Protocols
Effective communication is the cornerstone of successful puberty navigation. The following protocol is engineered to optimize dialogue, foster trust, and mitigate conflict.
3.1 Communication Environment Setup
| Step | Instruction |
|---|---|
| 1 | Select a neutral, private setting devoid of distractions. |
| 2 | Schedule sessions during times of low stress and physical fatigue. |
| 3 | Ensure both parties are physically comfortable (seating, lighting). |
| 4 | Establish ground rules: no interruptions, confidentiality, respect. |
3.2 Communication Session Structure
| Step | Instruction |
|---|---|
| 1 | Opening: Begin with affirmations of unconditional love and support. |
| 2 | Information Exchange: Use age-appropriate language to present biological and psychological facts. |
| 3 | Active Listening: Paraphrase adolescent’s statements to confirm understanding. |
| 4 | Emotion Validation: Acknowledge feelings without judgment or immediate correction. |
| 5 | Collaborative Problem-Solving: Invite adolescent to co-create strategies for challenges. |
| 6 | Closing: Summarize session; reaffirm availability for future dialogue. |
3.3 Conflict Resolution Techniques
| Technique | Application Steps | Expected Outcome |
|---|---|---|
| Time-Out and Cool-Down | 1. Recognize escalation signs. <br> 2. Propose voluntary break. <br> 3. Resume after emotional regulation. | De-escalates conflict; prevents damage. |
| I-Statements | 1. Express personal feelings without blame (e.g., “I feel...” instead of “You always...”). | Reduces defensiveness; encourages openness. |
| Reflective Questioning | 1. Ask open-ended questions to promote adolescent insight. | Facilitates self-awareness and responsibility. |
| Mutual Agreement Setting | 1. Identify shared goals.<br>2. Negotiate acceptable behaviors.<br>3. Document agreements. | Builds cooperation; clarifies expectations. |
Section 4: Comprehensive Puberty Education Curriculum
This curriculum must be delivered incrementally, respecting adolescent developmental stage and readiness. Parents should utilize the following modular framework:
| Module | Topics Covered | Delivery Method | Resources Required | Timing (Approximate Age) |
|---|---|---|---|---|
| Module 1: Introduction to Puberty | Basic physiology, hormonal overview, physical changes | Interactive discussion, diagrams | Anatomical models, charts | 8-10 |
| Module 2: Emotional and Social Changes | Mood variability, peer influence, social skills | Role-playing, storytelling | Scenario cards, media examples | 10-12 |
| Module 3: Sexual and Reproductive Health | Menstruation, erections, hygiene, consent, contraception | Q&A sessions, video presentations | Hygiene kits, literature | 12-14 |
| Module 4: Identity and Values | Self-exploration, cultural identity, moral reasoning | Reflective journaling, debates | Journals, ethical case studies | 14-16 |
| Module 5: Preparing for Adulthood | Career planning, financial literacy, relationship skills | Workshops, mentorship programs | Educational materials, guest speakers | 16-18 |
Section 5: Emotional Support Techniques for Parents
Parents must proactively deploy techniques to sustain adolescent resilience and positive self-concept throughout puberty.
| Technique | Description | Step-by-Step Guide | Frequency |
|---|---|---|---|
| Empathic Listening | Deeply understand adolescent’s perspective without interruption. | 1. Maintain eye contact.<br>2. Nod affirmatively.<br>3. Paraphrase content.<br>4. Ask clarifying questions. | Daily/As needed |
| Positive Reinforcement | Affirm strengths and progress to build confidence. | 1. Identify specific behavior.<br>2. Offer sincere praise.<br>3. Encourage repetition of positive behavior. | Weekly |
| Structured Routines | Provide predictable daily schedules to reduce anxiety. | 1. Define wake, study, leisure, and sleep times.<br>2. Review schedule weekly.<br>3. Adjust collaboratively. | Daily |
| Stress Management Training | Teach relaxation, mindfulness, and problem-solving skills. | 1. Introduce breathing exercises.<br>2. Practice guided meditation.<br>3. Role-play problem-solving scenarios. | Bi-weekly |
| Social Skill Coaching | Develop effective communication, conflict resolution, and empathy. | 1. Identify social challenges.<br>2. Model appropriate behaviors.<br>3. Organize group activities.<br>4. Provide feedback. | Monthly |
Section 6: Monitoring and Intervention Indicators
Parents must maintain vigilant observation to detect atypical developmental trajectories or psychological distress requiring professional intervention.
| Indicator | Description | Action Protocol |
|---|---|---|
| Delayed or Absent Physical Puberty | Lack of expected milestones beyond normative age | Consult pediatric endocrinologist; initiate diagnostic testing (see Volume 12: Endocrine Disorders) |
| Excessive Mood Dysregulation | Persistent irritability, depression, or anxiety | Refer to licensed adolescent psychologist or psychiatrist |
| Social Withdrawal | Loss of peer engagement or family interaction | Increase communication frequency; seek social skills therapy |
| Risk Behaviors | Substance use, self-harm, unsafe sexual activity | Immediate multidisciplinary intervention; crisis management protocols |
| Identity Distress | Severe confusion or distress over gender or sexual identity | Access specialized counseling and support groups |
Conclusion
This volume mandates that every parent assume the mantle of the Master Guide through the storm of adolescence. The clarity of biological facts, the precision of communication protocols, and the steadfastness of emotional support constitute a triad of unyielding pillars upholding the adolescent’s passage into adulthood.
Failure to engage these protocols with full rigor compromises not only individual futures but the collective lineage. The sacred trust vested in parenthood demands no less than total mastery over the rites of passage detailed herein.
Cross-Reference: For the full psychological development framework and adolescent mental health protocols, consult Volume XI: The Mind’s Forge. For sexual health and contraception methodologies, see Volume IX: The Sexual Codex.
End of Volume VII, Chapter I.
<!-- SECTION 18 -->
Volume VII: Adolescence and Rites of Passage
Chapter IV: Mentorship and Vision Objectives
Introduction
The transition from childhood to adulthood is not a mere passage of time; it is a profound transformation of identity, responsibility, and purpose. Within the sacred structure of the Practitioner Codex, this transformation is facilitated by two interlocking pillars: the establishment of a mentor and the undertaking of a vision objective. These rites of passage are not optional cultural artifacts but essential, life-or-death mechanisms for the transmission of generational wisdom, survival skills, and spiritual fortitude.
This volume delivers complete, actionable protocols for identifying and cultivating mentorship relationships tailored to adolescent development, followed by a rigorous framework for designing and executing vision objectives. These rites are constructed to be safe, transformative, and integrative, ensuring the adolescent emerges not only changed but fortified for the challenges ahead.
Section 1: Establishing Mentorship Relationships
1.1 Purpose and Scope
Mentorship is a formalized, intentional relationship that guides the adolescent through the challenges of maturation. This relationship is foundational for effective vision questing and lifelong knowledge transmission.
1.2 Mentor Identification Protocol
To establish a mentorship relationship, follow these exact steps:
Step 1: Define the Mentor Profile
Mentor qualities must be rigorously assessed using the criteria detailed in Table 1. These qualities are non-negotiable for the mentor to fulfill their sacred duty.
| Quality | Description | Evaluation Method |
|---|---|---|
| Wisdom | Accumulated life experience and applied knowledge | Interview, reference checks |
| Emotional Stability | Ability to maintain composure under stress | Psychological evaluation, situational testing |
| Communication Skills | Clear, empathetic, and directive communication | Observed interactions, role-playing |
| Integrity | Adherence to ethical principles and confidentiality | Community reputation, background verification |
| Commitment | Willingness to dedicate time consistently | Scheduling assessment, past mentorship record |
| Compatibility | Personality and values align with the adolescent | Personality assessment, direct interaction |
| Cultural Competency | Deep understanding of adolescent’s cultural context | Cultural background check, community input |
| Teaching Ability | Capability to transmit knowledge effectively | Demonstrated teaching experience, feedback |
Step 2: Identify Candidates
- Compile a list of potential mentors within the community or extended network.
- Apply Table 1 criteria rigorously.
- Narrow the list to three candidates.
Step 3: Adolescent-Mentor Interaction Trials
- Conduct three supervised interaction sessions lasting no less than 60 minutes each.
- Observe dynamics using the evaluation form in Appendix A (Mentor-Adolescent Interaction Matrix).
- Both parties complete anonymous feedback forms after each session.
- Analyze compatibility and communication effectiveness.
Step 4: Formal Selection
- Review all data.
- Select the mentor with the highest combined scores in compatibility, communication, and commitment.
- Obtain formal consent from both parties and guardians.
1.3 Relationship Guidelines
Post-selection, the mentor-adolescent relationship must be governed by these strict protocols:
| Guideline | Protocol Description |
|---|---|
| Confidentiality | All discussions remain strictly confidential; signed NDA required. |
| Meeting Frequency | Minimum once per week; additional sessions as required. |
| Session Duration | Minimum of 90 minutes per session. |
| Structured Curriculum | Use the Practitioner Mentorship Framework (PMF) for session planning (see Appendix B). |
| Progress Tracking | Mentor maintains detailed logs reviewed monthly by guardians. |
| Conflict Resolution | Immediate mediation by a neutral third party if conflict arises. |
| Emergency Protocol | Mentor must be reachable 24/7 for crisis intervention. |
Section 2: Designing and Executing Vision Objectives
2.1 Vision Objective Overview
A vision objective is a controlled ordeal designed to catalyze profound self-discovery, spiritual awakening, and the acquisition of critical survival insights. It requires precise preparation, execution, and integration to avoid physical or psychological harm.
2.2 Vision Objective Planning Checklist
The checklist in Table 2 provides all necessary elements for a successful vision objective.
| Phase | Task | Details/Instructions | Materials Needed | Timeline |
|---|---|---|---|---|
| Preparation | Physical conditioning | Minimum 4-week endurance and fasting training | Nutritional plan, exercise regimen | Weeks 1-4 |
| Psychological screening | Full psychological evaluation by trained professional | Psychological assessment forms | Week 4 | |
| Site selection | Isolated, safe wilderness location, verified for hazards | GPS device, hazard maps | Week 3 | |
| Supplies assembly | Water purification kit, emergency medical kit, food ration | Water purification tablets, first aid kit | Week 4 | |
| Mentor briefing | Mentor and adolescent review objective objectives | Objective guidebook, communication devices | Days 3-4 before objective | |
| Execution | Departure ceremony | Formal ritual marking objective beginning | Sacred artifacts, ceremonial attire | Day 0 |
| Isolation period | Minimum 3 days, maximum 7 days | Shelter materials, survival tools | Days 1-7 | |
| Daily journaling | Record dreams, experiences, reflections | Journal, writing utensils | Daily during objective | |
| Safety check-ins | Communication at defined intervals | Satellite phone, signal flares | Daily, or as scheduled | |
| Integration | Return ceremony | Formal reintegration into community | Community gathering materials | Day of return |
| Debriefing session | Mentor-led discussion of experiences and lessons | Audio recorder, debrief forms | Within 24 hours post-objective | |
| Psychological integration | Follow-up counseling sessions | Counseling space, scheduling system | Weekly for 4 weeks post-objective |
2.3 Step-By-Step Vision Objective Execution
Preparation Phase
Step 1: Physical Conditioning
- Begin a strict regimen of endurance exercises: walking, running, climbing for 60 minutes daily.
- Implement intermittent fasting cycles: 16 hours fasting, 8 hours feeding daily.
- Maintain hydration and nutrient-dense meals during feeding windows.
- Record physiological metrics weekly (weight, heart rate, sleep quality).
Step 2: Psychological Screening
- Conduct standardized psychological assessments targeting stress resilience, anxiety levels, and trauma history.
- Use the Practitioner Psychological Evaluation Matrix (PPM) (see Appendix C).
- Exclude candidates with severe untreated psychiatric conditions.
Step 3: Site Selection
- Using topographical maps and GPS, identify a location meeting these criteria:
- Minimum 5 kilometers from nearest human habitation.
- Natural water source within 2 kilometers.
- No recorded presence of large predators within 10 kilometers.
- Accessible for emergency extraction within 30 minutes helicopter flight.
- Perform a hazard sweep 48 hours prior to objective start.
Step 4: Supplies Assembly
- Assemble a kit including:
- Water purification tablets (chlorine dioxide, 10 tablets per day).
- Lightweight shelter (tarpaulin, rope).
- Emergency medical kit (bandages, antiseptics, trauma shears).
- Food ration (low-calorie nutrient bars, 2000 kcal/day).
- Test all equipment for functionality.
Step 5: Mentor Briefing
- Review the objective goals, safety protocols, and communication plans.
- Distribute emergency codes and GPS waypoints.
- Confirm schedule and check-in times.
Execution Phase
Step 6: Departure Ceremony
- Conduct a formal ritual involving:
- Anointing the adolescent with sacred oils.
- Presentation of a symbolic token (e.g., a carved talisman).
- Community blessing.
- Record the ceremony for archival purposes.
Step 7: Isolation Period
- The adolescent must remain in the designated area for a minimum of 72 hours.
- Daily activities:
- Build shelter using natural materials.
- Collect and purify water using tablets (1 tablet per 1L, wait 30 minutes).
- Maintain a detailed journal including:
- Dream logs.
- Emotional states.
- Observations of nature.
- Use emergency communication devices strictly at scheduled times unless emergencies arise.
- No food other than pre-approved rations is permitted to maintain controlled fasting state.
Step 8: Safety Check-Ins
- The mentor or safety officer will initiate satellite communication once daily at agreed time.
- If no communication is received within a 2-hour window, initiate emergency extraction protocol immediately.
- Emergency extraction involves a pre-arranged helicopter pickup with minimal delay.
Integration Phase
Step 9: Return Ceremony
- Upon return, a formal ceremony reintegrates the adolescent into the community.
- Tasks include:
- Sharing of personal insights and experiences.
- Presentation of the symbolic token to the community.
- Ceremony must be recorded and archived.
Step 10: Debriefing Session
- Mentor conducts a structured interview lasting a minimum of 120 minutes.
- Use the Vision Objective Experience Debrief Form (VQEDF) (Appendix D) to document:
- Emotional shifts.
- Lessons learned.
- Challenges faced.
- Develop a personalized growth plan based on insights.
Step 11: Psychological Integration
- Schedule weekly counseling sessions for 4 weeks post-objective.
- Utilize cognitive-behavioral techniques to integrate vision objective experiences.
- Monitor for delayed onset psychological distress.
2.4 Safety Protocols Summary
| Risk Category | Prevention/Action | Responsible Party |
|---|---|---|
| Physical Injury | Pre-objective conditioning, emergency medical kit, extraction plan | Adolescent, Mentor, Safety Officer |
| Psychological Trauma | Screening, counseling, mentor support | Psychologist, Mentor |
| Environmental Hazards | Site hazard sweeps, GPS tracking, emergency extraction | Safety Officer |
| Communication Failure | Scheduled check-ins, emergency codes, backup devices | Mentor, Safety Officer |
| Predator Encounter | Site selection, avoidance protocols, emergency extraction | Adolescent, Safety Officer |
Appendix A: Mentor-Adolescent Interaction Matrix
| Session | Communication Clarity (1-10) | Emotional Connection (1-10) | Engagement Level (1-10) | Feedback Summary |
|---|---|---|---|---|
| 1 | ||||
| 2 | ||||
| 3 |
Appendix B: Practitioner Mentorship Framework (PMF)
| Session Element | Description | Time Allocation |
|---|---|---|
| Check-in | Review adolescent’s current state | 10 minutes |
| Goal Setting | Define short-term objectives | 20 minutes |
| Instruction | Deliver targeted knowledge/skills | 40 minutes |
| Reflection | Discuss challenges, insights | 15 minutes |
| Planning | Outline next steps | 5 minutes |
Appendix C: Practitioner Psychological Evaluation Matrix (PPM)
| Assessment Area | Tool/Method | Scoring Range | Threshold for Objective Eligibility |
|---|---|---|---|
| Stress Resilience | Standardized Stress Inventory | 0-100 | Minimum 70 |
| Anxiety Level | Beck Anxiety Inventory | 0-63 | Maximum 21 |
| Trauma History | Clinical Interview | Qualitative | No untreated severe trauma |
Appendix D: Vision Objective Experience Debrief Form (VQEDF)
| Topic | Questions | Notes/Responses |
|---|---|---|
| Emotional State | Describe your emotional experiences. | |
| Insight Gained | What new understanding have you achieved? | |
| Challenge Encountered | What difficulties did you face? | |
| Spiritual Experience | Did you experience any spiritual awakening? | |
| Future Goals | How will you apply this experience moving forward? |
Conclusion
The protocols within this chapter are designed with no tolerance for compromise. The adolescent’s journey through mentorship and vision questing is a crucible that forges the future protector, leader, and bearer of sacred knowledge. Every detail—from mentor selection to the final integration counseling—is calibrated to maximize transformation while minimizing risk.
Adherence to these protocols ensures the transmission of profound generational wisdom and the cultivation of resilient, enlightened warriors for the coming age.
For complementary survival and psychological protocols, consult Volume VIII: The Water Codex and Volume XII: The Mind Codex.
<!-- SECTION 19 -->
The Complete Practitioner's Codex, Volume VII
Adolescence and Rites of Passage — Coming-of-Age Ceremonies and Apprenticeship Placement
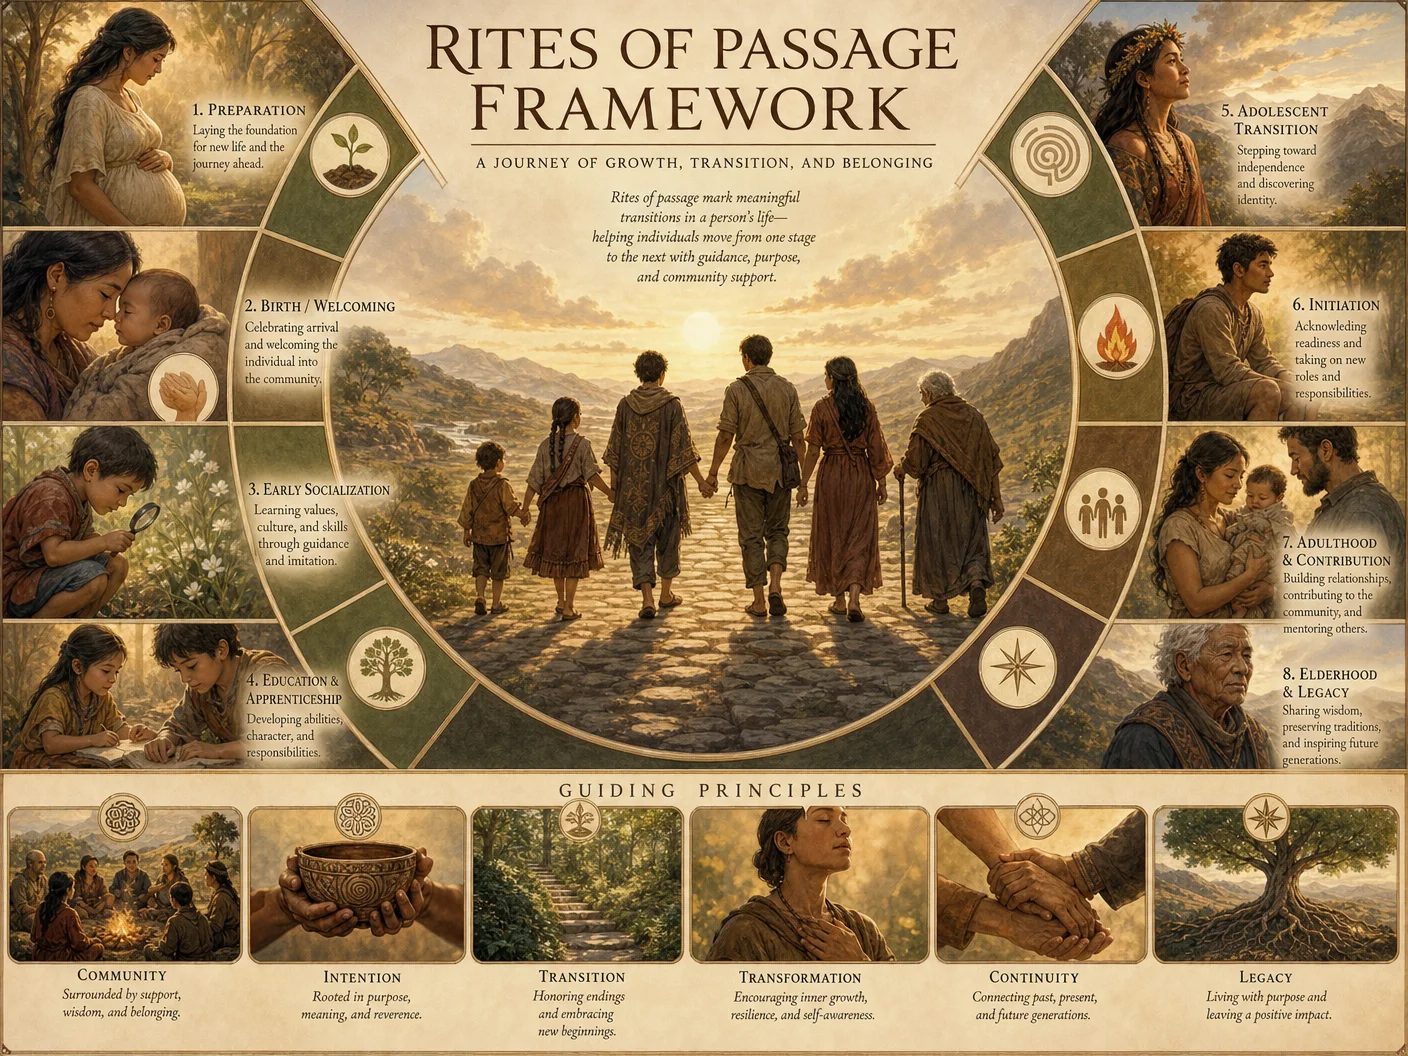
Introduction
Adolescence is the crucible in which the fledgling spirit is forged into the resolute adult. The transition from childhood to adulthood demands formal recognition and structured vocational training to ensure generational continuity and societal stability. Volume VII presents the complete, unabridged protocols for designing culturally resonant coming-of-age ceremonies and apprenticeship placements. These protocols are the sacred blueprint for shepherding youth through their passage with precision, reverence, and efficacy.
PART I: FORMALIZING ADOLESCENT TRANSITIONS — CEREMONIAL DESIGN PROTOCOL
The coming-of-age ceremony is a structured, multi-layered ritual that serves to:
- Mark the adolescent’s transformation in the eyes of the community.
- Impart essential cultural knowledge.
- Reinforce communal values.
- Instill responsibility and identity.
1. Design Principles for Culturally Resonant Ceremonies
The ceremony must be customized to the cultural, environmental, and spiritual context of the community while maintaining universal structural integrity.
| Principle | Description |
|---|---|
| Cultural Specificity | Incorporate symbols, myths, and language unique to the community. |
| Generational Continuity | Include elder participation, transmitting ancestral wisdom. |
| Physical and Spiritual Trials | Utilize challenges or rites that symbolize endurance, discipline, or purification. |
| Community Integration | Engage all societal strata: family, peers, elders, spiritual leaders, and vocational mentors. |
| Public Declaration | Conclude with a public pronouncement of new status and responsibilities. |
2. Step-by-Step Protocol for Ceremony Design
Step 1: Establish Cultural Core Components
- Convene a Cultural Council of elders, spiritual leaders, and historians.
- Identify core myths, symbols, and values to be integrated.
- Document these elements as the foundation of the ceremony.
Step 2: Define Physical and Spiritual Trials
- Determine trials reflecting local environmental challenges (e.g., endurance hikes, fasting, crafting).
- Align trials with desired adult virtues: resilience, patience, skill mastery.
- Develop safety and health protocols for adolescent participants, consulting medical experts.
Step 3: Structure the Ceremony Phases
| Phase | Purpose | Typical Duration | Essential Activities |
|---|---|---|---|
| Preparation | Mental and physical readiness | 1-3 days | Instruction, fasting, symbolic cleansing |
| Trial | Testing endurance and virtues | 1 day to 1 week | Physical challenges, skill demonstrations |
| Initiation | Spiritual blessing and identity transformation | 1 day | Ritual prayers, symbolic acts (e.g., anointment) |
| Public Acknowledgment | Community recognition of new status | 1 day | Feasts, speeches, gift-giving, declaration |
Step 4: Incorporate Vocational Orientation
- During the Initiation phase, introduce apprenticeships aligned with the adolescent’s skills and interests.
- Include vocational mentors in the ceremony as sponsors.
Step 5: Plan Community Involvement
- Assign roles to family members, peers, elders, and vocational mentors.
- Schedule pre-ceremony workshops for community education.
- Design public invitations and ceremonial materials (e.g., clothing, symbols).
Step 6: Document and Archive Ceremony Protocol
- Record detailed ceremony scripts, roles, and materials.
- Store records in community archives for transmission to future generations.
3. Table of Ceremony Elements and Their Cultural Functions
| Element | Description | Symbolic Function | Required Materials | Approximate Duration |
|---|---|---|---|---|
| Sacred Fire Lighting | Ignition of ceremonial fire using traditional methods | Purification, transformation | Flint, dry wood, sacred herbs | 30 minutes |
| Ancestral Chanting | Recitation of ancestral names and deeds | Connection to lineage | Oral recitation, musical instruments | 45 minutes |
| Trial of Endurance | Physical challenge appropriate to environment | Strength, resilience | Terrain, water sources, tools | 1-3 days |
| Symbolic Anointment | Application of sacred oils, paints, or marks | Identity transformation | Oils, pigments, brushes | 15 minutes |
| Gift Exchange | Presentation of tools, garments, or tokens | Responsibility, community acceptance | Crafted items, ceremonial packaging | 1 hour |
| Communal Feast | Shared meal with community | Unity, celebration | Food supplies, cooking implements | 3-6 hours |
| Mentor Oath Taking | Public declaration of apprenticeship commitment | Vocational dedication | Written or verbal oath, ceremonial space | 30 minutes |
PART II: STRUCTURED APPRENTICESHIP PLACEMENT ALIGNED WITH ADOLESCENT INTERESTS
Apprenticeship placement is a structured, monitored process that ensures vocational training is congruent with the adolescent’s skills, aspirations, and community needs.
1. Foundational Principles for Apprenticeship
| Principle | Description |
|---|---|
| Interest Alignment | Apprenticeship must reflect adolescent’s demonstrated interests and aptitudes. |
| Skill Progression | Training organized into progressive skill tiers with measurable outcomes. |
| Mentor Compatibility | Selection of mentors with both expertise and pedagogical aptitude. |
| Community Integration | Apprenticeship embedded within community structures and responsibilities. |
| Performance Tracking | Continuous, documented assessment and feedback mechanisms. |
| Duration and Milestones | Defined apprenticeship length with clear milestones and evaluations. |
2. Step-by-Step Apprenticeship Placement Protocol
Step 1: Adolescent Vocational Interest Assessment
- Conduct structured interviews and observational assessments by vocational counselors.
- Utilize standardized aptitude tests (see Appendix B, Volume XII: Vocational Assessments).
- Compile an Interest Profile including preferred skills, personality traits, and long-term goals.
Step 2: Community Vocational Resource Mapping
- Create an inventory of available mentors, workshops, and vocational domains.
- Document mentor expertise, teaching style, and availability.
- Match community needs with adolescent Interest Profiles.
Step 3: Mentor-Adolescent Matching
- Convene a Vocational Matching Panel including elders, vocational leaders, and counselors.
- Review Interest Profiles and mentor profiles.
- Propose matches and conduct trial mentorship sessions.
- Finalize placement with signed agreements from adolescent, mentor, and parents.
Step 4: Apprenticeship Contract and Goal Setting
- Draft a detailed apprenticeship contract specifying:
| Contract Element | Description |
|---|---|
| Training Duration | Total length (e.g., 12 months) |
| Skill Milestones | Defined competencies to achieve by specific dates |
| Mentor Responsibilities | Teaching duties, progress reporting |
| Adolescent Responsibilities | Attendance, practice hours, behavior expectations |
| Evaluation Schedule | Dates and criteria for formal assessments |
- Conduct a contract signing ceremony during the coming-of-age public acknowledgment phase.
Step 5: Implementation and Ongoing Monitoring
- Establish a Vocational Oversight Committee for supervision.
- Schedule monthly progress assessments with documented reports.
- Provide corrective action plans for any deviations.
- Encourage peer group meetings to foster mutual support.
Step 6: Apprenticeship Completion and Certification
- Conduct final skill demonstration evaluated by mentor and Vocational Oversight Committee.
- Issue formal certification of competency.
- Integrate apprentice into community workforce or leadership roles.
3. Apprenticeship Tracking Tools
3.1 Apprenticeship Progress Tracking Table
| Month | Skill Focus | Hours Practiced | Mentor Evaluation (1-10) | Adolescent Self-Assessment (1-10) | Comments/Notes |
|---|---|---|---|---|---|
| 1 | Basic Tool Handling | 40 | 7 | 6 | Needs improvement on technique |
| 2 | Material Preparation | 35 | 8 | 7 | Shows good progress |
| 3 | Intermediate Techniques | 50 | 9 | 8 | Mentor: Ready for next tier |
| ... | ... | ... | ... | ... | ... |
| 12 | Final Project | 60 | 10 | 9 | Certification recommended |
3.2 Vocational Milestone Checklist
| Milestone ID | Skill Description | Completion Date | Verification Method | Verified By |
|---|---|---|---|---|
| M1 | Demonstrate safe tool use | YYYY-MM-DD | Practical demonstration | Mentor |
| M2 | Complete material sourcing | YYYY-MM-DD | Field inspection | Vocational Committee |
| M3 | Construct component A | YYYY-MM-DD | Product inspection | Mentor |
| M4 | Final project submission | YYYY-MM-DD | Presentation & review | Committee |
PART III: COMMUNITY INVOLVEMENT PROTOCOL
The community is an active participant in adolescent transitions. The following is a stepwise guide for mobilizing and structuring community involvement.
1. Step-by-Step Guide for Community Involvement
Step 1: Pre-Ceremony Community Education
- Schedule informational meetings explaining the rite of passage and apprenticeship importance.
- Distribute printed and oral materials detailing ceremony phases and apprenticeship structures.
- Train community volunteers for logistical, safety, and mentorship support roles.
Step 2: Role Assignment and Coordination
- Assign:
| Role | Responsibilities | Number of Participants |
|---|---|---|
| Elders | Ceremony leadership, ancestral knowledge | 3-5 |
| Spiritual Leaders | Blessings, ritual guidance | 2-3 |
| Vocational Mentors | Sponsorship, skill instruction | 5-10 |
| Family Representatives | Support, preparation, hospitality | Variable |
| Youth Peers | Moral support, participation in trials | Variable |
| Logistics Team | Venue preparation, safety, materials management | 5-8 |
- Hold coordination meetings one month before the ceremony.
Step 3: Ceremony Implementation Support
- Volunteers manage safety checkpoints during physical trials.
- Elders and spiritual leaders conduct rituals.
- Vocational mentors conduct skill demonstrations and oath ceremonies.
- Family and peers manage hospitality and communal feast.
Step 4: Apprenticeship Integration
- Community leaders announce apprenticeship placements publicly.
- Vocational mentors introduce apprentices to community workshops.
- Families provide support for travel, materials, and practice time.
Step 5: Post-Ceremony Follow-Up
- Organize community gatherings for apprenticeship progress updates.
- Facilitate mentor-apprentice reflection sessions.
- Collect community feedback for continuous improvement of protocols.
CONCLUSION
The protocols delineated herein are the sine qua non of adolescent transformation and vocational initiation. They ensure that each youth is not merely recognized as an adult but is fully equipped to uphold and advance the sacred trust of the community’s future. The ceremony is not a mere celebration; it is a profound transmission of identity, duty, and skill. The apprenticeship is not a casual arrangement; it is a rigorous, documented, and accountable training ground for the next generation of artisans, leaders, and guardians.
Follow every step with unwavering discipline. Engage every community member with solemn purpose. The future depends on the flawless execution of these rites and training.
Cross-References

- For adolescent health and safety during trials, see Volume V: Child and Adolescent Health Protocols, Chapter IV.
- For vocational aptitude assessments, see Volume XII: Vocational Assessments and Talent Development, Appendix B.
- For detailed ceremonial music and chant construction, see Volume IX: Sacred Soundscapes and Oral Traditions.
- For community resource management, see Volume XV: Community Governance and Resource Allocation.
End of Volume VII excerpt.
<!-- SECTION 20 -->
The Complete Practitioner's Codex, Volume VIII: Protection Protocols
Chapter IV: Recognizing Predators and Digital Safety
Introduction
This chapter delivers uncompromising, actionable protocols to recognize predatory behavior and secure digital environments for children under your guardianship. The knowledge herein is sacred, life-saving, and suppressed by false comforts of modern society. You will learn precise methodologies to identify threats, educate youth with hardened awareness, and implement airtight digital security frameworks. Every instruction is deliberate and explicit. Follow each step to the letter.
I. Identifying Predators: Comprehensive Signs of Predatory Behavior
Predators employ both overt and covert tactics to exploit vulnerabilities. To protect your children, you must recognize predator traits before harm occurs. The following table lists primary warning signs of predatory behavior, categorized and detailed for immediate identification.
| Category | Warning Sign | Description | Immediate Action |
|---|---|---|---|
| Behavioral | Excessive Flattery | Unnatural or disproportionate compliments aimed at lowering the child’s guard | Increase vigilance; teach child to question motives |
| Boundary Testing | Attempts to touch, hug, or be inappropriately close without consent | Teach clear refusal; report to trusted adult immediately | |
| Isolation Attempts | Encouraging or forcing child to be alone with predator | Prohibit isolation; insist on public or group settings | |
| Communication | Grooming Language | Use of coded language or gifts to create dependency | Educate child on manipulation tactics |
| Secret-Keeping Requests | Commands to keep interactions or gifts secret | Encourage transparency; establish open communication | |
| Rapid Relationship Building | Fast-tracking emotional intimacy beyond normal bounds | Alert child to abnormal pace; monitor closely | |
| Digital | Requesting Private Chats | Moving conversations from public to private platforms | Enforce monitored communication; install tracking tools |
| Sharing Inappropriate Content | Sending sexually explicit or violent images/text | Block and report immediately; educate child on reporting | |
| Excessive Online Attention | Persistent messaging, video calls beyond reasonable limits | Restrict device usage; report to authorities |
Step-by-Step: Training Children to Recognize Predators
Children must be trained to identify these signs themselves, building unshakeable situational awareness. This protocol crafts a psychological armor against manipulation.
- Establish Baseline Boundaries
- Define physical boundaries: no touching without permission, personal space limits.
- Define emotional boundaries: teach children to recognize discomfort as a warning sign.
- Role-Playing Exercises
- Simulate scenarios using trusted adults or peers.
- Script multiple approaches (e.g., flattery, gift-giving).
- Practice firm verbal refusals and escape routes.
- Teach Secret-Keeping as Threat
- Instruct children that any request to keep secrets about interactions is a red flag.
- Create a “safe report” mechanism: a trusted adult or hotline.
- Use Visual Aids and Storytelling
- Utilize age-appropriate visuals depicting warning signs.
- Share true stories (anonymized) of predator tactics for concrete understanding.
- Instill Digital Awareness
- Demonstrate common online manipulation tactics (e.g., fake profiles).
- Teach children to report suspicious behaviors immediately.
- Continuous Reinforcement
- Integrate weekly reviews and discussions into routine.
- Reward vigilance and reporting to reinforce behavior.
II. Securing Digital Environments: Device Controls and Online Monitoring
Digital realms are battlegrounds where predators operate with anonymity and impunity. This section provides stepwise, technical protocols to secure every device and online interaction your child engages in.
A. Device Controls: Building a Fortress
Every device accessible to the child must be configured to minimize risk vectors.
| Device Type | Control Category | Specific Controls | Tools/Software |
|---|---|---|---|
| Smartphones | App Restrictions | Configure app permissions; disable unknown app installations | Apple Screen Time; Google Family Link |
| Content Filtering | Enable web content filters; restrict explicit content | OpenDNS FamilyShield; CleanBrowsing | |
| Location Tracking | Enable GPS tracking with alerts for unauthorized movements | Find My iPhone; Google Find My Device | |
| Tablets | Time Limitations | Set daily usage limits; schedule downtime | Microsoft Family Safety; Qustodio |
| Communication Controls | Restrict calls and messaging to approved contacts only | Truecaller; Norton Family | |
| Computers | User Account Controls | Create child accounts with limited permissions | Windows Parental Controls; macOS Screen Time |
| Firewall and Antivirus | Install and configure robust protection suites | Norton 360; Bitdefender | |
| Gaming Consoles | Chat and Friend Restrictions | Disable voice chat or limit to approved friends | Xbox Family Settings; PlayStation Parental Controls |
B. Step-by-Step: Configuring Device Controls
Use the following procedure for each device your child uses.
1. Establish Admin Control
- Step 1: Create a separate administrator account for yourself.
- Step 2: Set strong, unique passwords (use a password manager).
- Step 3: Enable two-factor authentication (2FA) on all accounts.
2. Configure Child Account/Profile
- Step 1: Create child profile with age-appropriate restrictions.
- Step 2: Disable installation of new apps without admin approval.
- Step 3: Limit access to system settings and file directories.
3. Activate Content Filters
- Step 1: Install and configure DNS-based filters (e.g., OpenDNS FamilyShield).
- Step 2: Enable browser-specific safe search settings (Google SafeSearch, YouTube Restricted Mode).
- Step 3: Test filters by attempting access to adult or violent content.
4. Set Usage Schedules
- Step 1: Define daily screen time limits based on age and necessity.
- Step 2: Schedule device downtime (e.g., no use after 9 PM).
- Step 3: Enforce device locking during school and homework hours.
5. Enable Monitoring and Alerts
- Step 1: Install monitoring software (Qustodio, Norton Family) on all devices.
- Step 2: Configure alerts for suspicious or excessive usage.
- Step 3: Review activity reports weekly for anomalies.
C. Online Monitoring: Protocols and Tools
Predators often exploit social media, messaging apps, and gaming platforms. Implement these protocols to maintain vigilance.
| Platform Type | Monitoring Method | Recommended Tools/Services | Notes |
|---|---|---|---|
| Social Media | Activity Logs & Friend Lists | Bark, Net Nanny | Alerts for inappropriate language and images |
| Messaging Apps | Content Scanning | mSpy, FlexiSPY | Requires device access; use only with child’s knowledge |
| Gaming Platforms | Communication Filtering | Xbox and PlayStation Family Settings | Disable open chat or restrict to verified friends |
| Web Browsing | DNS Filtering & History | OpenDNS, CleanBrowsing | Enforce safe search, block adult and violent domains |
Step-by-Step: Implementing Online Monitoring
- Select and Install Monitoring Tools
- Choose software compatible with all child devices.
- Install with admin privileges, configure for minimal bypass risk.
- Configure Alerts and Reporting
- Set notifications for keywords, suspicious contacts, and unusual activity times.
- Schedule weekly report summaries delivered to parent email.
- Educate Child on Monitoring
- Transparently explain monitoring purpose as safety, not punishment.
- Establish a trust contract emphasizing honesty and reporting.
- Review and Adjust Settings
- Regularly update software and filters to counter emerging threats.
- Adjust restrictions as child matures and gains responsibility.
III. Family Digital Policy Creation: Sacred Protocol for Household Safety
A comprehensive family digital policy cements discipline, clarity, and mutual responsibility. This policy must be written, agreed upon, and enforced.
A. Components of a Family Digital Policy
| Policy Element | Description | Implementation Steps |
|---|---|---|
| Device Usage Rules | Hours, locations, and purposes for device use | Specify allowed times, device-free zones, and approved activities |
| Privacy and Security | Password management, data sharing guidelines | Mandate strong passwords, no sharing of login info |
| Communication Boundaries | Approved contacts, chat restrictions | List approved contacts; ban unknown contacts |
| Content Restrictions | Allowed media types and platforms | Define acceptable apps, websites, and content categories |
| Reporting Obligations | Procedures for reporting suspicious behavior or content | Define trusted adults, hotline numbers, immediate reporting steps |
| Consequences for Violations | Clear sanctions for breaches | Outline graduated consequences: warnings to device removal |
B. Step-by-Step: Creating and Enforcing the Policy
- Draft the Policy Document
- Use clear, precise language.
- Include all components listed above.
- Conduct a Family Meeting
- Present the policy to all family members.
- Discuss rationale, questions, and expectations.
- Obtain Written Agreement
- Have each family member sign the document.
- Store signed copies in a secure location.
- Implement Compliance Mechanisms
- Use software to enforce time and content restrictions.
- Monitor adherence to communication rules.
- Schedule Periodic Reviews
- Quarterly reassessment to address new threats or maturity changes.
- Adjust policy and permissions accordingly.
- Enforce Consequences Consistently
- Apply sanctions immediately upon violation.
- Reinforce with education to prevent recurrence.
IV. Supplementary Tables and Protocols
Table: Predator Behavior Warning Signs (Summary)
| Sign | Category | Key Indicator | Child Response | Adult Response |
|---|---|---|---|---|
| Excessive Flattery | Behavioral | Compliments beyond normal social etiquette | Question motives, refuse gifts | Observe, intervene if persistent |
| Boundary Testing | Behavioral | Unwanted touching or closeness | Say “No” firmly, move away | Remove child from situation |
| Secret Keeping | Communication | Requests to keep interactions secret | Report immediately | Validate, investigate |
| Rapid Intimacy | Communication | Fast emotional attachment | Maintain appropriate distance | Monitor, restrict contact |
| Private Chat Request | Digital | Move conversation off public platforms | Refuse, inform parent | Block predator, report |
| Inappropriate Content | Digital | Sending sexual or violent materials | Do not engage, report | Document, report to authorities |
Table: Recommended Digital Security Tools
| Tool/Software | Function | Platform(s) | Cost Structure | Notes |
|---|---|---|---|---|
| Apple Screen Time | App restriction/time limits | iOS, macOS | Free | Integrated into Apple devices |
| Google Family Link | Parental controls | Android, Chrome OS | Free | Requires Google accounts |
| OpenDNS FamilyShield | DNS content filtering | All devices | Free / Paid tiers | Blocks adult content at network level |
| Norton Family | Monitoring & filtering | Windows, Android, iOS | Subscription | Comprehensive monitoring |
| Qustodio | Usage tracking & filtering | Multi-platform | Subscription | Includes social media monitoring |
| Bark | Social media monitoring | Multi-platform | Subscription | AI-driven alert system |
V. Absolute Mandates for the Practitioner Guardian
The protocols outlined here are non-negotiable. The digital and physical threat landscape evolves rapidly. To maintain the sanctity and safety of your progeny, you must:
- Implement all device controls immediately upon granting digital access.
- Train children continuously on recognizing and reporting predator behaviors.
- Maintain active monitoring with weekly reviews of all digital activity.
- Enforce the family digital policy rigorously, with zero tolerance for breaches.
- Update all protocols quarterly to counter new threats and technologies.
Failure to act decisively invites catastrophe. Your role as protector is sacred, your vigilance the shield that defends innocence.
Cross-Reference
For physical protection protocols against predators, see Volume VII: Protection Protocols, Chapter II. For detailed internet filtering and network security, see Volume X: Cyber Defense Codex, Chapter V.
End of Chapter IV: Recognizing Predators and Digital Safety
Master this chapter. Protect relentlessly. Pass this knowledge unbroken.
<!-- SECTION 21 -->
The Complete Practitioner's Codex, Volume VIII: Protection Protocols
Chapter 4: Institutional Threat Assessment and Legal Rights of Parents
Introduction
This chapter is the definitive manual for evaluating institutional risks inherent in entrusting children to schools, healthcare providers, and social services. It simultaneously decodes the legal protections and recourse mechanisms available to parents who must safeguard their progeny against institutional overreach, negligence, or malevolence.
You are about to acquire the suppressed, life-or-death knowledge that will empower you to conduct rigorous threat assessments, maintain inviolable documentation, and wield the law with precision. Fail to apply these principles, and the child’s safety, autonomy, and future may be irreparably compromised.
Section 1: Institutional Threat Assessment – Schools, Healthcare, Social Services
1.1 Overview of Institutional Types and Risk Vectors
- Schools: Academic indoctrination, physical and psychological safety, curriculum content, staff background, and policy transparency.
- Healthcare Providers: Medical competence, consent protocols, record-keeping integrity, pharmaceutical practices, and emergency response capability.
- Social Services: Caseworker accountability, intervention criteria, family engagement, and legal authority boundaries.
1.2 Criteria for Assessing Schools
| Criterion | Description | Assessment Method | Red Flags |
|---|---|---|---|
| Staff Background Checks | Verification of criminal records, professional licenses, and references. | Obtain documentation; conduct independent checks. | Staff with unresolved criminal charges or false credentials. |
| Curriculum Transparency | Access to full curriculum content and teaching materials. | Request curriculum guides; attend classes. | Hidden or ideologically extreme content; refusal to disclose curriculum. |
| Safety Protocols | Physical safety measures, emergency drills, bullying policies. | Inspect safety plans; interview staff; review incident logs. | Frequent unresolved bullying; absence of emergency plans. |
| Communication Openness | Frequency and quality of parent-institution communication. | Track newsletters, meetings, and parent portals. | Lack of communication or refusal to meet parents. |
| Disciplinary Procedures | Clear, fair, and documented disciplinary policies. | Review policy documents; analyze disciplinary case examples. | Arbitrary punishments; use of corporal or humiliating punishments. |
| Inclusion and Diversity | Policies and practices promoting or hindering inclusivity and respect for diversity. | Review policy statements; observe classroom dynamics. | Evidence of discrimination, segregation, or intolerance. |
Step-by-Step School Assessment Procedure
- Request and review official documentation: staff vetting records, curriculum guides, safety policies.
- Conduct on-site visits to observe teaching, safety infrastructure, and school climate.
- Interview multiple staff members, including administration, teachers, and counselors.
- Engage with other parents to gather anecdotal evidence and verify communication practices.
- Document findings meticulously using the protocols in Section 3 below.
- Score the institution using the red flag table. Any two or more red flags require immediate reconsideration of enrollment.
1.3 Criteria for Assessing Healthcare Providers
| Criterion | Description | Assessment Method | Red Flags |
|---|---|---|---|
| Medical Credentials | Verification of education, board certifications, and licenses. | Confirm via medical boards; request copies. | Expired or falsified licenses; lack of board certification. |
| Consent and Communication | Transparent explanation of procedures; explicit informed consent obtained. | Review consent forms; interview provider on protocols. | Procedures performed without consent; refusal to explain risks. |
| Record-Keeping Integrity | Completeness, accuracy, and confidentiality of medical records. | Inspect records; verify data consistency. | Missing or altered records; breaches of confidentiality. |
| Pharmaceutical Practices | Rational prescribing habits; no unnecessary medication or experimental drugs. | Review prescriptions; consult independent pharmacists. | Overprescription; use of unapproved drugs; lack of alternative options. |
| Emergency Protocols | Capability to handle acute emergencies promptly and effectively. | Examine emergency response plans; verify staff training. | No emergency plans; untrained personnel; delayed responses. |
| Child-Centered Care | Respect for child's autonomy; psychological comfort; pain management. | Observe patient interactions; solicit parental feedback. | Dismissive of child’s distress; neglect of pain management. |
Step-by-Step Healthcare Provider Assessment Procedure
- Verify credentials through official medical licensing boards.
- Obtain and review sample consent forms and medical records.
- Interview healthcare providers about treatment philosophies and emergency procedures.
- Solicit feedback from other parents and patients.
- Analyze pharmaceutical usage patterns through prescription reviews.
- Assess child interaction during appointments, noting empathy and communication style.
- Record all findings per documentation protocols in Section 3.
- Evaluate risk: any critical red flags warrant seeking alternate providers immediately.
1.4 Criteria for Assessing Social Services
| Criterion | Description | Assessment Method | Red Flags |
|---|---|---|---|
| Caseworker Credentials | Verification of training, certification, and background checks. | Request documentation; validate with agencies. | Untrained or unlicensed caseworkers; disciplinary history. |
| Intervention Criteria | Clarity and appropriateness of grounds for intervention. | Obtain policy documents; review case examples. | Vague or arbitrary intervention criteria. |
| Family Engagement | Policies promoting collaboration with families during interventions. | Review engagement protocols; interview families. | Exclusion of parents; lack of transparency. |
| Legal Authority Boundaries | Clear limits on social services’ power and parent legal rights. | Analyze statutory frameworks and agency charters. | Overreach beyond legal mandates; refusal to yield to court orders. |
| Documentation Practices | Thoroughness and accuracy of case files and reports. | Review case files; check for consistency. | Incomplete records; altered or missing documents. |
| Complaint and Appeal Systems | Accessibility and responsiveness of grievance mechanisms. | Test complaint processes; track response times. | No complaint process; failure to respond to grievances. |
Step-by-Step Social Services Assessment Procedure
- Request and verify caseworker credentials and training certificates.
- Review intervention policies and recent case files for adherence to criteria.
- Interview families who have been involved with social services.
- Analyze the legal framework governing social services’ authority in your jurisdiction.
- Test complaint and appeal mechanisms by submitting a controlled grievance.
- Maintain detailed records of all findings as per Section 3.
- Take immediate legal counsel if any red flags are present.
Section 2: Legal Rights of Parents – Summary and Application
2.1 Foundational Legal Rights of Parents
| Right | Description | Legal Basis | Typical Limitations |
|---|---|---|---|
| Right to Custody and Care | Control over child’s care, education, and welfare. | Family Law statutes; Constitutional protections | Subject to court orders in abuse/neglect cases. |
| Right to Informed Consent | Consent required before medical or educational interventions. | Medical Consent Laws; Education Acts | Exceptions in emergencies or court orders. |
| Right to Access Records | Access to child’s educational, medical, and social services records. | Privacy Laws; HIPAA (USA); GDPR (EU) | Some information redacted for privacy or safety. |
| Right to Freedom from Indefensible Intervention | Protection from unwarranted removal or interference by institutions. | Due Process Clauses; Child Protection Laws | Interventions allowed only with clear evidence. |
| Right to Advocate and Appeal | Ability to challenge institutional decisions in court or administrative bodies. | Administrative Law; Family Courts | Must follow procedural requirements strictly. |
2.2 Legal Recourse Mechanisms
| Mechanism | Description | Application Procedure | Time Limits and Requirements |
|---|---|---|---|
| Administrative Complaints | Filing complaints with institutional oversight bodies. | Submit written complaint; provide evidence; attend hearings if required. | Typically 30-90 days to file after incident. |
| Civil Litigation | Lawsuits for damages or injunctions. | Retain attorney; file suit; discovery and trial process. | Statute of limitations varies by jurisdiction. |
| Emergency Custody Petitions | Immediate court orders to protect child. | File petition with affidavit of imminent harm; attend emergency hearing. | Immediate or within 24-48 hours. |
| Appeals and Reviews | Challenging administrative or court decisions. | File appeal according to procedural rules; submit briefs. | Strict deadlines, often 30 days or less. |
| Mediation and Alternative Dispute Resolution | Non-adversarial conflict resolution. | Agree to mediation; participate in sessions. | Voluntary or court-ordered; timelines vary. |
Section 3: Protocols for Documentation and Advocacy
3.1 Documentation Protocol
Objective: Create a comprehensive, tamper-proof, and legally admissible record of all interactions, assessments, and incidents related to institutional engagements.
Step-by-Step Documentation Procedure
- Maintain a dedicated secure binder or digital folder for all institutional documents.
- Record every interaction: date, time, names of participants, purpose, and summary of discussion. Use voice recorders where legal.
- Obtain and store copies of all correspondence: emails, letters, notices, reports.
- Photograph or scan physical evidence: safety hazards, facility conditions, any injuries.
- Use standardized forms for incident reporting; see Appendix A for templates.
- Log observations during visits or appointments with objective language.
- Back up digital records in encrypted external drives or cloud services with strong passwords.
- Verify and notarize copies of key documents when possible.
- Keep a separate log of legal actions taken, including filings, court dates, and outcomes.
- Update documentation immediately after each event to prevent loss or distortion of facts.
3.2 Advocacy Protocol
Objective: Engage institutional and legal pathways effectively to protect parental rights and child welfare.
Step-by-Step Advocacy Procedure
- Prepare a factual dossier based on documentation protocol.
- Engage institutional leadership first via formal letters requesting resolution.
- If unresolved, escalate to oversight agencies using formal complaint procedures.
- Seek legal counsel specialized in family or education law early in the process.
- File emergency petitions if child’s safety is imminently threatened.
- Attend all meetings and hearings prepared with documentation and clear objectives.
- Utilize media or community advocacy cautiously and strategically to apply pressure.
- Participate in mediation or alternative dispute resolution as appropriate.
- Maintain communication logs documenting all advocacy efforts and responses.
- Continually reassess institutional threat levels and adjust strategies accordingly.
Section 4: Institutional Red Flags and Legal Rights Summary Tables
4.1 Institutional Red Flags Summary
| Institution Type | Red Flag Category | Specific Indicators |
|---|---|---|
| Schools | Staff vetting | Unverified backgrounds, criminal histories. |
| Curriculum transparency | Hidden agendas, refusal to disclose content. | |
| Safety | Unaddressed bullying, no emergency protocols. | |
| Communication | Lack of parental contact or refusal to meet. | |
| Healthcare | Credential verification | Invalid or expired licenses. |
| Consent procedures | Procedures without informed consent. | |
| Pharmaceutical practices | Overprescribing or experimental drugs without disclosure. | |
| Emergency readiness | No plans or untrained staff. | |
| Social Services | Caseworker qualifications | Untrained or disciplinary issues. |
| Intervention clarity | Vague criteria or arbitrary actions. | |
| Family engagement | Exclusion of parents, lack of transparency. | |
| Legal authority limits | Overreach beyond statutory powers. |
4.2 Legal Rights Summary
| Right | Description | Typical Legal Basis | Immediate Action Required If Violated |
|---|---|---|---|
| Custody and Care | Control over child’s upbringing. | Family law, constitutional protections. | Seek emergency custody orders. |
| Informed Consent | Must approve medical/educational interventions. | Medical consent laws, education statutes. | File complaints; consult attorneys. |
| Access to Records | Right to view child’s records. | Privacy laws (HIPAA, GDPR). | Demand records; legal action for refusal. |
| Freedom from Unlawful Intervention | Protection from unwarranted removal/interference. | Due process, child protection laws. | Legal challenge; emergency court petitions. |
| Right to Advocate and Appeal | Challenge decisions and policies. | Administrative law, family court procedures. | Timely filing of appeals or complaints. |
Conclusion
Master the institutional threat assessment criteria and legal rights framework outlined herein with unyielding rigor. Your child’s fate hinges upon your vigilance, documentation precision, and advocacy excellence. Deviation or hesitation may grant institutions unchecked power detrimental to your family’s sanctity.
For advanced legal strategy and psychological resilience training, see Volume XIII: The Legal Warrior’s Codex and Volume XV: The Psychological Armor.
End of Chapter 4: Institutional Threat Assessment and Legal Rights of Parents Proceed to Volume VIII, Chapter 5: Advanced Parental Advocacy Tactics and Legal Precedents.
<!-- SECTION 22 -->
The Complete Practitioner's Codex, Volume VIII: Protection Protocols
Chapter IV: Community Defense of Children — Organizing Collective Protection Strategies
Introduction
The defense of children within a community transcends mere vigilance; it demands a meticulously structured collective effort, a living shield forged through unyielding discipline and unwavering unity. This chapter delivers precise, actionable protocols for the establishment, operation, and perpetuation of neighborhood watch groups, communication networks, and rapid response plans tailored exclusively for the safeguarding of the most vulnerable.
Every protocol herein is a sacred covenant, a bulwark against encroaching threats. The following pages do not entertain theoretical musings; they are a tactical manual for execution, a blueprint for a fortress constructed not of stone but of human will and coordinated action.
Section 1: Formation and Structuring of Neighborhood Watch Groups
1.1 Strategic Objectives
- Surveillance: Continuous monitoring of all ingress and egress points.
- Deterrence: Visible, organized presence to dissuade potential threats.
- Rapid Reporting: Immediate communication of suspicious activities.
- Intervention: Coordinated, lawful intercession when threats materialize.
1.2 Step-By-Step Formation Protocol
Materials Required:
- Community map (scale 1:1000)
- Communication devices (see Section 2)
- Identification badges (see Appendix A)
- Duty rosters (template in Table 1)
Instructions:
- Community Survey and Mapping 1.1. Divide the neighborhood into sectors based on natural boundaries and population density.
1.2. Assign a unique alphanumeric code to each sector (e.g., Sector A1, B2).
1.3. Record key locations: schools, parks, transit stops, and vulnerable points.
- Volunteer Recruitment 2.1. Host an emergency assembly to invite parents, guardians, and trusted adults.
2.2. Screen volunteers for reliability, legal standing, and physical capability.
2.3. Assign each volunteer to a sector according to residence or proximity.
- Role Assignment 3.1. Define roles per Table 1 below.
3.2. Assign roles based on skill sets and availability.
3.3. Issue identification badges and role-specific equipment.
- Training Initiation 4.1. Schedule initial training sessions (Section 4).
4.2. Cover observation techniques, legal boundaries, and immediate actions.
4.3. Conduct baseline drills to establish operational familiarity.
- Operational Schedule 5.1. Develop a rotating duty roster ensuring 24/7 coverage in all sectors.
5.2. Publish and distribute schedules to all members and community leaders.
Table 1: Neighborhood Watch Group Roles and Responsibilities
| Role | Primary Duties | Equipment Required | Shift Duration | Skills Required |
|---|---|---|---|---|
| Sector Coordinator | Oversees sector operations, liaison with command | Radio, map, badge | 4 hours | Leadership, communication |
| Patrol Officer | Conducts foot or vehicle patrols | Flashlight, radio, badge | 4 hours | Observation, alertness |
| Communications Officer | Manages communication network | Radio, phone, log sheets | 4 hours | Technical proficiency |
| Rapid Responder | First responder to incidents | First aid kit, radio, badge | On call | First aid, conflict de-escalation |
| Intelligence Analyst | Collects and analyzes threat data | Computer, secure database access | As needed | Data analysis, discretion |
Section 2: Communication Network Architecture
2.1 Principles of Communication
- Redundancy: Multiple channels to avoid single points of failure.
- Encryption: Secure transmissions to prevent interception.
- Simplicity: Clear, coded language for rapid comprehension.
2.2 Communication Devices and Setup
Required Devices:
- Handheld radio transceivers (Frequencies preassigned, encrypted)
- Encrypted mobile phones (see Appendix B for encryption protocols)
- Community bulletin boards (physical and digital)
Setup Instructions:
- Frequency Allocation 1.1. Assign primary and backup radio frequencies distinct per sector.
1.2. Record frequencies in the Communication Manual (distributed to all members).
- Encryption Configuration 2.1. Install AES-256 encryption software on all digital devices.
2.2. Distribute unique encryption keys quarterly; revoke compromised keys immediately.
- Communication Protocols 3.1. Use predefined codes for threat levels (see Table 2).
3.2. Employ the call-sign system linking member ID with sector code.
- Message Logging 4.1. Log all communications in secure digital logs.
4.2. Retain logs for minimum 365 days for forensic purposes.
Table 2: Threat Level Communication Codes
| Code | Meaning | Action Required | Communication Frequency (Hours) |
|---|---|---|---|
| Code Green | Normal conditions | Routine patrol and monitoring | Every 4 hours |
| Code Yellow | Suspicious activity observed | Heightened vigilance; report all anomalies | Every 2 hours |
| Code Orange | Confirmed threat, no immediate danger | Prepare rapid response teams; alert community | Every 1 hour |
| Code Red | Active threat detected | Deploy rapid response; initiate lockdown | Continuous |
Section 3: Rapid Response Plan Development
3.1 Foundations of Rapid Response
The rapid response plan is the community's counterstrike mechanism. It must be fast, decisive, and coordinated, minimizing reaction time and maximizing efficiency.
3.2 Step-By-Step Rapid Response Plan Setup
Materials:
- Incident command center (physical or mobile)
- Emergency medical kits
- Transportation assets (vehicles, bicycles)
- Protective gear (helmets, vests)
Instructions:
- Command Center Establishment 1.1. Select a secure, centrally located facility.
1.2. Equip with communication array and incident management software.
1.3. Staff with command personnel, communication officers, and intelligence analysts.
- Rapid Response Team Formation 2.1. Identify volunteers with medical, tactical, or crisis management training.
2.2. Assign defined roles within the team (leader, medic, communications, logistics).
2.3. Conduct specialized training (Section 4).
- Response Protocol Definition 3.1. Define threat categories triggering response levels (see Table 3).
3.2. Create action checklists per threat category.
- Mobilization Procedures 4.1. Upon alert (Code Orange or Red), command center activates rapid response team.
4.2. Deploy teams sector-wise according to threat location.
4.3. Maintain communication with community members to coordinate safe zones and evacuations.
- Post-Response Review 5.1. Conduct debriefing sessions analyzing response efficacy.
5.2. Document lessons learned and update protocols accordingly.
Table 3: Threat Categories and Response Actions
| Threat Category | Trigger Condition | Response Action | Team Composition |
|---|---|---|---|
| Category 1 | Suspicious person loitering | Increased patrol, warning issued | Patrol Officers, Communications |
| Category 2 | Attempted intrusion | Immediate rapid response activation, notification to law enforcement | Rapid Response Team, Command Center |
| Category 3 | Active assault or abduction | Full lockdown, medical assistance, law enforcement coordination | Full Rapid Response Team, Medical Unit |
| Category 4 | Natural disaster impacting safety | Emergency evacuation, shelter setup | All available personnel |
Section 4: Community Training and Drills Protocol
4.1 Training Curriculum Overview
Training is the crucible where readiness is forged. Each member must master:
- Observation and reporting techniques
- Communication protocols and encryption use
- Rapid response procedures and medical aid
- Conflict de-escalation and legal boundaries
- Physical patrol and defensive tactics
4.2 Training Schedule and Methodology
Instructions:
- Initial Training Phase 1.1. Conduct classroom sessions covering theoretical knowledge.
1.2. Distribute printed and digital manuals.
1.3. Perform equipment familiarization.
- Practical Training Phase 2.1. Simulate common scenarios: suspicious person identification, communication drills, threat reporting.
2.2. Conduct hands-on first aid certification.
2.3. Practice encrypted communication exchanges.
- Advanced Training Phase 3.1. Organize live drills involving multiple sectors.
3.2. Integrate rapid response team activation with real-time problem solving.
3.3. Conduct conflict de-escalation role-playing.
- Continuous Training and Assessment 4.1. Schedule quarterly refreshers and updates on new threats/protocols.
4.2. Track individual performance and retrain as necessary.
4.3. Maintain records of all training and certifications.
4.3 Community Drills Execution
Drill Types:
| Drill Type | Objective | Frequency | Participants |
|---|---|---|---|
| Communication Drill | Test message clarity, encryption, coordination | Monthly | All communication officers |
| Patrol Drill | Assess sector coverage and patrol efficiency | Bi-monthly | Patrol officers, coordinators |
| Rapid Response Drill | Simulate active threat and response mobilization | Quarterly | Rapid response team, command center |
| Full-scale Drill | Comprehensive test of entire protocol | Bi-annually | Entire neighborhood watch group |
Drill Execution Steps:
- Preparation 1.1. Announce drill schedule in advance with minimal details to maintain realism.
1.2. Prepare scenarios and assign observers.
- Execution 2.1. Initiate drill with simulated threat code.
2.2. Monitor communication flows and response times.
2.3. Record all actions for post-drill analysis.
- Debrief 3.1. Gather all participants for a detailed review.
3.2. Discuss successes, failures, and areas for improvement.
3.3. Update protocols and training accordingly.
Section 5: Communication Templates
5.1 Incident Reporting Template (Radio/Encrypted Messaging)
| Field | Description | Example |
|---|---|---|
| Sender ID | Call sign and name | A1-Patrol-Delta |
| Date and Time | ISO 8601 format | 2024-06-15T20:45Z |
| Location | Sector and specific coordinates | Sector B2, Park Entrance |
| Threat Level | Code Green/Yellow/Orange/Red | Code Orange |
| Description | Concise details of incident | Unknown individual near playground, acting suspiciously |
| Action Taken | Immediate response actions | Increased patrol, alerted coordinator |
| Request for Support | Additional assistance or resources | Request backup and medical standby |
5.2 Rapid Response Activation Template (Command Center)
| Field | Description | Example |
|---|---|---|
| Incident ID | Unique reference number | RRT-20240615-B2-001 |
| Incident Type | Category 1-4 | Category 3 |
| Location | Sector and specific address | Sector B2, Elm Street 45 |
| Time of Activation | ISO 8601 timestamp | 2024-06-15T20:50Z |
| Assigned Team | Team members and roles | Leader: A1, Medic: B2, Comm: C3 |
| Response Actions | Checklist of executed steps | Lockdown initiated, law enforcement notified |
| Status Updates | Ongoing situation reports | At 21:10Z assailant detained |
Conclusion
The security of children within a community demands more than sentiment; it demands an unassailable system, an orchestration of human elements into a cohesive defensive force. This volume mandates discipline, precision, and unyielding commitment to collective responsibility.
The protocols herein must be implemented without exception. The sacred trust placed upon guardians and neighbors alike is the community’s strongest bulwark. Neglect is a luxury forbidden to those who wield this knowledge.
For detailed legal parameters related to citizen patrols and engagement rules, refer to Volume XII: Legal Codex, Chapter III. For encrypted communication installation and maintenance, see Appendix B. For first aid and emergency medical protocols, see Volume IV: Health and Medical Codex.
End of Chapter IV: Community Defense of Children
<!-- SECTION 23 -->
Supplements: Age-Appropriate Book Lists
From The Complete Practitioner's Codex, Volume 18: The Parent's Codex: Complete Child Raising, Education, and Generational Knowledge Transfer
Introduction
The act of reading is the sacred conduit through which knowledge, culture, morality, and survival skills are transmitted across generations. This section is dedicated to the curated, age-appropriate book lists that form the backbone of intellectual and moral development from infancy through adolescence. Each developmental stage demands carefully tailored literature that nurtures foundational literacy, scientific curiosity, historical awareness, character formation, and practical skills essential for self-sufficiency and societal contribution.
This document is not a mere suggestion list. It is a systematic, categorized, and annotated manual designed to empower the parent-guardian-patriarch to integrate reading as a ritual of growth and preparation for life's trials.
Methodology of Selection and Integration
Books herein were selected based on the following criteria:
- Age-appropriateness: Language complexity, thematic content, and cognitive challenge align with neurodevelopmental stages.
- Educational breadth: Balanced inclusion of literacy building, STEM initiation, humanities grounding, ethical discourse, and pragmatic skills.
- Durability of knowledge: Preference for classical works, scientifically validated materials, and timeless moral narratives.
- Accessibility: Recommendations include sourcing from durable print editions, verified digital repositories, and methods for personal reproduction if necessary (see Volume 10: The Codex of Archival Preservation).
General Instructions for Book Integration into Daily Routines
- Establish a Reading Ritual: Select fixed daily times (e.g., pre-sleep, post-meal) to foster habit formation.
- Active Engagement: Employ questioning, discussion, and application exercises post-reading.
- Multi-sensory Reinforcement: Combine reading with drawing, dramatization, or practical experiments.
- Progressive Complexity: Gradually increase reading difficulty aligned to developmental milestones.
- Environment Control: Quiet, well-lit, distraction-free zones enhance retention.
- Parental Modeling: Adults must model reading behavior to enforce reverence for literature.
- Sourcing Protocol: Acquire durable editions from reputable sources: local archives, trusted publishers, or authorized digital formats. For making personal copies, follow Volume 10: Archival Preservation, Chapter III.
Age-Appropriate Curated Reading Lists
The tables below classify recommended books by developmental age groups and educational domains. Each entry includes annotations on purpose, usage, and critical considerations.
Table 1: Infancy (0–2 Years)
| Topic | Title | Author(s) | Annotation | Format Recommendation |
|---|---|---|---|---|
| Literacy Foundations | Goodnight Moon | Margaret Wise Brown | Simple, rhythmic text with repetitive patterns fostering phonemic awareness and soothing bedtime ritual. | Board book, high-contrast images |
| Character Development | The Very Hungry Caterpillar | Eric Carle | Introduces cause-effect, counting, and transformation themes foundational to growth and change concepts. | Durable, tactile pages |
| Practical Skills | First Words Picture Book | DK Publishing | Visual-word association critical for early vocabulary acquisition. | Sturdy picture book |
| Science Initiation | Baby Loves Aerospace Engineering! | Ruth Spiro | Simplified introduction to basic physics concepts through relatable analogies. | Durable board book |
| Historical Awareness | My First Book of Saints | Kathleen N. Daly | Introduces moral exemplars and historical figures in religious context to seed ethical development. | Cloth-bound infant edition |
Integration Steps for Infancy
- Select 2–3 books from the infancy table and rotate weekly.
- Read aloud daily during quiet moments, exaggerating intonation.
- Point to images and name objects, encouraging visual recognition.
- Use tactile features (e.g., textures) to stimulate sensory pathways.
- Monitor infant engagement; extend or shorten sessions accordingly.
Table 2: Early Childhood (3–5 Years)
| Topic | Title | Author(s) | Annotation | Format Recommendation |
|---|---|---|---|---|
| Literacy Foundations | Chicka Chicka Boom Boom | Bill Martin Jr., John Archambault | Alphabet rhyme enhancing letter recognition and phonological memory. | Hardcover, colorful illustrations |
| Character Development | Frog and Toad Are Friends | Arnold Lobel | Stories highlight friendship, empathy, and problem-solving in social scenarios. | Paperback or hardcover |
| Science Initiation | National Geographic Little Kids First Big Book of Why | Amy Shields | Answers common ‘why’ questions to stimulate curiosity about natural phenomena. | Large-format, photograph-rich |
| Historical Awareness | A Child’s History of the World | V.M. Hillyer | Simplified narrative introducing global cultures and historical events. | Illustrated hardcover |
| Practical Skills | The Berenstain Bears Learn About Strangers | Stan and Jan Berenstain | Teaches safety awareness and basic social rules critical for independence. | Durable paperback |
Integration Steps for Early Childhood
- Schedule a daily 20-minute reading session.
- After reading, ask the child to recount the story or facts.
- Incorporate drawing or acting out scenes to reinforce comprehension.
- Use “why” questions inspired by science books to encourage inquiry.
- Begin assembling a personal “library” corner accessible to the child.
Table 3: Middle Childhood (6–9 Years)
| Topic | Title | Author(s) | Annotation | Format Recommendation |
|---|---|---|---|---|
| Literacy Foundations | Charlotte’s Web | E.B. White | Rich vocabulary and complex characters develop reading stamina and empathy. | Illustrated hardcover |
| Character Development | Wonder | R.J. Palacio | Explores themes of kindness, courage, and inclusion. | Paperback or hardcover |
| Science Initiation | The Way Things Work Now | David Macaulay | Visual and textual explanation of machines and technology foundational to understanding physics. | Large-format illustrated book |
| Historical Awareness | Magic Tree House: Civil War on Sunday | Mary Pope Osborne | Historical fiction introducing key events with narrative engagement. | Paperback series |
| Practical Skills | Survival Skills for Kids | John Smith | Introduces basic outdoor survival techniques appropriate for this age range. | Spiral-bound manual |
Integration Steps for Middle Childhood
- Allocate 30-minute reading sessions at least 5 days weekly.
- Encourage independent reading with parental support for difficult vocabulary.
- Supplement reading with practical experiments or outdoor activities.
- Facilitate group reading or book discussions with peers or family.
- Maintain a reading log to track progress and comprehension.
Table 4: Pre-Adolescence (10–12 Years)
| Topic | Title | Author(s) | Annotation | Format Recommendation |
|---|---|---|---|---|
| Literacy Foundations | Percy Jackson & the Olympians | Rick Riordan | Engages with mythology and adventure; promotes advanced vocabulary and narrative complexity. | Paperback or hardcover |
| Character Development | To Kill a Mockingbird | Harper Lee | Introduces justice, morality, and social awareness. | Classic hardcover edition |
| Science Initiation | A Short History of Nearly Everything | Bill Bryson | Comprehensive science overview written accessibly; stimulates critical thinking. | Paperback |
| Historical Awareness | The Diary of a Young Girl | Anne Frank | Personal historical narrative fostering empathy and understanding of human rights. | Paperback or hardcover |
| Practical Skills | The Boy Mechanic | Popular Mechanics | Step-by-step DIY projects introducing mechanical and electrical basics. | Reprint editions available |
Integration Steps for Pre-Adolescence
- Encourage self-directed reading with scheduled check-ins for discussion.
- Assign thematic projects based on books (e.g., create a mechanical device).
- Foster critical thinking by debating moral questions raised in literature.
- Introduce note-taking and summary writing as study skills.
- Encourage journaling personal reflections related to readings.
Table 5: Adolescence (13–18 Years)
| Topic | Title | Author(s) | Annotation | Format Recommendation |
|---|---|---|---|---|
| Literacy Foundations | 1984 | George Orwell | Complex themes on governance, freedom, and critical analysis of society. | Durable hardcover |
| Character Development | Man’s Search for Meaning | Viktor E. Frankl | Explores existential philosophy and resilience, essential for maturity. | Paperback |
| Science Initiation | Cosmos | Carl Sagan | Deep scientific exploration fostering appreciation for the universe and scientific method. | Illustrated paperback |
| Historical Awareness | Guns, Germs, and Steel | Jared Diamond | Analysis of historical development and societal evolution. | Paperback |
| Practical Skills | The Art of Manliness: Classic Skills & Manners | Brett McKay | Comprehensive guide to adult practical skills, etiquette, and self-reliance. | Hardcover |
Integration Steps for Adolescence
- Design personalized reading plans targeting intellectual, moral, and skill development goals.
- Implement critical essays and presentations as part of reading assignments.
- Facilitate debates and ethical discussions grounded in literary themes.
- Introduce cross-disciplinary projects linking science, history, and practical skills.
- Encourage mentorship roles where adolescents teach younger siblings or peers.
Summary Table: Age and Topic Overview
| Age Group | Literacy | Science | History | Character Development | Practical Skills |
|---|---|---|---|---|---|
| Infancy (0–2) | Goodnight Moon | Baby Loves Aerospace | My First Book of Saints | The Very Hungry Caterpillar | First Words Picture Book |
| Early Childhood (3–5) | Chicka Chicka Boom Boom | Nat Geo Little Kids Why | A Child’s History of the World | Frog and Toad Are Friends | Berenstain Bears Learn About Strangers |
| Middle Childhood (6–9) | Charlotte’s Web | The Way Things Work Now | Magic Tree House: Civil War | Wonder | Survival Skills for Kids |
| Pre-Adolescence (10–12) | Percy Jackson | Short History of Nearly Everything | The Diary of a Young Girl | To Kill a Mockingbird | The Boy Mechanic |
| Adolescence (13–18) | 1984 | Cosmos | Guns, Germs, and Steel | Man’s Search for Meaning | Art of Manliness |
Final Protocol: How to Build and Maintain a Home Library for Generational Knowledge Transfer
Materials Needed
| Item | Specifications | Purpose |
|---|---|---|
| Bookshelves | Solid wood, adjustable height | Durable storage, categorization |
| Protective Covers | Archival-grade plastic or cloth | Preserve books against dust and decay |
| Indexing System | Alphabetical and thematic labels | Enables rapid retrieval and systematic addition |
| Reading Nook Setup | Ergonomic seating, natural lighting | Comfortable, distraction-free reading environment |
| Digital Archive | Encrypted storage for e-books, scans | Backup and portability |
Step-by-Step Setup
- Select Location: Choose a low-humidity, temperature-stable room away from direct sunlight.
- Install Shelving: Assemble shelves with adjustable heights to accommodate diverse book sizes.
- Catalog Books: Use a ledger or digital database to record titles, authors, acquisition dates, and annotations.
- Apply Protective Covers: Especially for frequently handled or rare editions.
- Designate Reading Zones: Position ergonomic chairs and reading lamps near shelves.
- Schedule Regular Maintenance: Monthly dusting, inventory checks, and condition assessments.
- Implement Access Protocols: Only authorized family members maintain and update the library to preserve integrity.
Conclusion
This section of The Parent’s Codex imparts the complete, categorized, and annotated reading lists essential for nurturing a child into a literate, scientifically literate, historically aware, morally grounded, and practically capable adult. These lists, combined with strict integration protocols and home library maintenance, form the foundation of successful generational knowledge transfer—an unbroken chain vital to the survival and flourishing of the enlightened clan.
For advanced literacy techniques, see Volume 7: The Literacy Codex, Chapter IV. For practical skill-building protocols, refer to Volume 15: The Survival and Self-Reliance Codex, Chapter IX.
<!-- SECTION 24 -->
The Complete Practitioner's Codex, Volume 18: The Parent's Codex
Chapter VI: Supplements: Curriculum Schedules
Section 2: Creating Flexible Yet Structured Educational Timelines
Introduction
In the sacred duty of raising the next generation, the architecting of an educational timeline is paramount. The timeline functions as the backbone of the child’s intellectual and practical development, balancing rigor with adaptability. This section provides a comprehensive, stepwise guide to constructing flexible yet structured educational schedules that incorporate all essential subject areas and practical skills. These protocols are derived from suppressed pedagogical sciences and generational wisdom, optimized for maximal cognitive retention, skill acquisition, and holistic growth.
I. Foundational Principles for Curriculum Scheduling
Before proceeding to detailed timelines, internalize these non-negotiable principles:
| Principle | Explanation |
|---|---|
| 1. Time-Chunking | Divide the day into focused learning intervals (25-50 minutes) alternating with breaks. |
| 2. Multimodal Integration | Each subject must engage visual, auditory, kinesthetic, and cognitive learning channels. |
| 3. Flexibility within Structure | Fixed core times combined with adaptive slots for remediation, enrichment, or rest. |
| 4. Progress Milestones | Defined benchmarks for knowledge and skill mastery at daily, weekly, monthly, and annual levels. |
| 5. Parental Customization | Protocols to tailor intensity, subject balance, and pacing based on child aptitude and interest. |
| 6. Practical Application | Daily inclusion of hands-on activities and life skills to cement theoretical knowledge. |
II. Designing Daily Curriculum Schedules
A. Daily Time Allocation Template
Optimal daily schedules follow a modular time-chunking system combining cognitive load management with practical skill acquisition.
| Time Block | Duration (minutes) | Activity Type | Description & Objectives |
|---|---|---|---|
| Morning Activation | 30 | Physical Exercise & Mindfulness | Prepares body and mind; increases neuroplasticity |
| Core Academic Block 1 | 45 | Language Arts | Reading, writing, grammar, spelling |
| Break 1 | 15 | Rest & Nutrition | Hydration, light snack, brain rest |
| Core Academic Block 2 | 45 | Mathematics | Arithmetic, reasoning, problem-solving |
| Practical Skill 1 | 30 | Applied Science | Experiments, nature study, engineering basics |
| Lunch & Rest | 60 | Nutrition & Downtime | Balanced meal, relaxation, sensory rest |
| Core Academic Block 3 | 45 | History & Social Studies | Civic understanding, cultural literacy |
| Break 2 | 15 | Physical Movement | Stretching, light physical activity |
| Practical Skill 2 | 30 | Arts & Crafts | Fine motor skills, creativity development |
| Core Academic Block 4 | 45 | Foreign Language | Vocabulary, grammar, conversational practice |
| Reflection & Journaling | 20 | Metacognition | Self-assessment, goal setting, emotional processing |
| Evening Routine | 30 | Family Discussion & Storytelling | Reinforces values, communication skills |
Total Time: ~6 hours of structured learning plus breaks and routines.
B. Step-by-Step Daily Schedule Construction
- Establish Wake and Sleep Times:
- Determine consistent wake-up and bedtime to ensure 8-10 hours of sleep per age requirements (see Volume 7: The Sleep Codex).
- Example: Wake 7:00 AM, Sleep 9:00 PM.
- Morning Activation Protocol:
- Perform 15 minutes of aerobic exercise (jump rope, running in place).
- Follow with 15 minutes of mindfulness meditation focusing on breath and body awareness.
- Rationale: Activates prefrontal cortex, improves focus.
- Allocate Core Academic Time Blocks:
- Assign 45-minute periods for each core subject (Language Arts, Mathematics, History, Foreign Language).
- Use the Pomodoro Technique within blocks: 25 minutes focused work, 5-minute break, repeat once.
- Insert Practical Skill Periods:
- Schedule 30-minute sessions post-core academics for hands-on activities.
- Alternate between sciences (experiments, observation) and arts (drawing, crafting).
- Schedule Breaks and Meals:
- Enforce 15-minute breaks after every 45-minute block for hydration and light snacks.
- Lunch must be balanced, with macronutrient ratios tailored per age and activity level (see Volume 9: The Nutrition Codex).
- End Day with Reflection:
- Have the child journal or verbally recount what was learned.
- Schedule family time to discuss discoveries and challenges.
III. Weekly Curriculum Structure
Weekly plans synthesize daily schedules into thematic blocks, allowing for depth and variation.
| Day | Focus Areas | Practical Skill Emphasis | Notes |
|---|---|---|---|
| Monday | Language Arts & Mathematics | Basic Science Experiments | Foundation setting |
| Tuesday | History & Social Studies | Field Observation (Nature, Community) | Contextual learning |
| Wednesday | Foreign Language & Arts | Creative Projects (Music, Painting) | Stimulate right brain |
| Thursday | Integrated Science & Math | Engineering & Problem Solving | Cross-disciplinary approach |
| Friday | Review, Assessment & Enrichment | Life Skills (Cooking, Budgeting) | Consolidate learning |
| Saturday | Physical Education & Outdoor Skills | Survival Skills (Navigation, First Aid) | Physical and mental resilience |
| Sunday | Rest & Cultural Engagement | Family Traditions & Storytelling | Emotional grounding |
A. Weekly Schedule Adjustment Guidelines
- Adjusting Intensity:
- Increase core academic blocks by 15 minutes if child excels; decrease if signs of fatigue or frustration are evident.
- Subject Rebalancing:
- If a subject shows lagging progress (below milestone), allocate additional remediation sessions during the enrichment day (Friday).
- Integration of Interests:
- Incorporate child’s passions into practical skill sessions (e.g., robotics, horticulture).
- Parental Checkpoints:
- Conduct weekly review meetings to assess progress and adjust schedule accordingly.
IV. Yearly Curriculum Timeline
The yearly schedule must include progress milestones, strategic review points, and thematic variations to prevent stagnation.
| Quarter | Focus Areas & Milestones | Practical Skills & Milestones | Adjustment Protocols |
|---|---|---|---|
| Q1 | Language arts: Mastery of phonetics & grammar | Basic lab safety and observation skills acquired | If <80% mastery, schedule remediation weeks |
| Q2 | Mathematics: Fractions, decimals, problem solving | Botanical and zoological identification skills | Increase hands-on sessions if engagement low |
| Q3 | Social studies: Community roles, history basics | Introduction to basic carpentry and cooking | Add peer group activities for social skills |
| Q4 | Foreign language: Conversational fluency | First aid and emergency preparedness skills | Conduct comprehensive assessments; plan next year |
A. Quarterly Review Procedures
- Data Collection:
- Compile daily and weekly progress logs, standardized test scores, and parental observations.
- Milestone Verification:
- Assess mastery against predetermined benchmarks (see Milestone Tables below).
- Schedule Modification:
- Adjust time allocations for lagging subjects or extend practical skill focus for underdeveloped areas.
- Goal Setting:
- Define specific, measurable objectives for the next quarter.
- Parental Training:
- Engage parents in workshops on remediation techniques and enrichment strategies.
B. Milestone Tables
| Subject Area | Age Range | Key Milestones | Assessment Method |
|---|---|---|---|
| Language Arts | 5-7 | Recognize letters, basic phonetics | Oral reading, dictation tests |
| Mathematics | 6-8 | Addition, subtraction, basic fractions | Written exercises, flashcards |
| Science | 7-10 | Perform simple experiments, record data | Lab journals, practical tests |
| History & Social Studies | 8-10 | Identify historical figures, community roles | Oral quizzes, project reports |
| Foreign Language | 8-12 | 1000-word vocabulary, basic conversations | Verbal exams, conversational practice |
| Practical Skills | All | Safe tool use, cooking basics, first aid | Observation, skill demonstrations |
V. Protocols for Parental Customization
A. Initial Assessment
- Child Aptitude Testing:
- Use standardized assessments (see Volume 5: The Assessment Codex) for baseline intellectual and practical skill levels.
- Interest Inventory:
- Conduct interviews or surveys to identify child’s preferences and motivations.
- Health & Learning Style Considerations:
- Consult medical and educational professionals to identify special needs or learning style (visual, auditory, kinesthetic).
B. Customization Framework
| Parameter | Adjustment Protocol |
|---|---|
| Time Allocation | Increase or decrease duration of core blocks by 10-20%; adjust break frequency accordingly. |
| Subject Emphasis | Shift weekly focus days to prioritize weaker or preferred subjects up to 40% of weekly time. |
| Intensity & Pace | Modify cognitive load by increasing challenge level or providing scaffolded support. |
| Practical Skills | Tailor hands-on projects to align with child's future vocational interests or needs. |
| Social Interaction | Incorporate group learning or solitary study based on socialization needs. |
C. Parental Progress Tracking System
- Daily Logs:
- Record subject areas covered, time spent, child engagement level, and observed outcomes.
- Weekly Summary Forms:
- Compile successes, challenges, and behavioral notes.
- Monthly Review Sessions:
- Analyze logs, adjust goals, and plan remediation/enrichment activities.
- Digital Tools:
- Utilize educational management software with integrated progress tracking dashboards (recommended: custom open-source platforms detailed in Volume 17: The Digital Codex).
VI. Sample Daily Schedule Table
| Time | Activity | Subject Area | Objective | Notes |
|---|---|---|---|---|
| 7:00-7:30 AM | Morning Activation | Physical & Mindfulness | Increase alertness, prepare brain | Include breathing exercises |
| 7:30-8:15 AM | Language Arts | Reading & Writing | Develop literacy skills | Use phonics and comprehension |
| 8:15-8:30 AM | Break | Rest & Nutrition | Replenish energy | Water and fruit recommended |
| 8:30-9:15 AM | Mathematics | Arithmetic & Logic | Build numerical reasoning | Utilize manipulatives |
| 9:15-9:45 AM | Practical Skill 1 | Science Experiment | Apply scientific method | Simple physics or biology |
| 9:45-10:45 AM | Lunch & Rest | Nutrition & Downtime | Recovery and refuel | Balanced meal, no screens |
| 10:45-11:30 AM | History & Social Studies | Civic & Cultural | Understand societal structures | Storytelling and role-play |
| 11:30-11:45 AM | Break | Physical Movement | Physical refresh | Light stretching |
| 11:45-12:15 PM | Practical Skill 2 | Arts & Crafts | Enhance creativity and dexterity | Drawing, sculpting |
| 12:15-1:00 PM | Foreign Language | Vocabulary & Grammar | Develop conversational skills | Audio and speaking exercises |
| 1:00-1:20 PM | Reflection & Journaling | Metacognition | Self-assessment and emotional processing | Guided questions |
| 1:20-1:50 PM | Family Discussion | Values & Communication | Strengthen familial bonds | Storytelling and feedback |
VII. Sample Weekly Schedule Table
| Day | Time Block | Subject Focus | Practical Skill | Notes |
|---|---|---|---|---|
| Monday | 7:30-11:30 AM | Language Arts & Math | Basic Science Experiments | Focus on literacy and numeracy |
| Tuesday | 7:30-11:30 AM | History & Social Studies | Field Observations | Community walks, journaling |
| Wednesday | 7:30-11:30 AM | Foreign Language & Arts | Music and Crafts | Encourage creative expression |
| Thursday | 7:30-11:30 AM | Integrated Science & Math | Engineering & Problem Solving | Hands-on projects |
| Friday | 7:30-11:30 AM | Review & Enrichment | Life Skills | Cooking, budgeting lessons |
| Saturday | 9:00-12:00 PM | Physical Education | Outdoor & Survival Skills | Hiking, first aid training |
| Sunday | All Day | Rest & Cultural Engagement | Family Traditions | Storytelling, ritual observance |
VIII. Adjustment Guidelines for Schedule Flexibility
| Situation | Adjustment Protocol |
|---|---|
| Child displays cognitive fatigue | Shorten core blocks by 10-15 minutes; increase breaks by 5-10 minutes |
| Accelerated mastery observed | Introduce advanced material; add enrichment projects |
| Subject difficulty persists | Increase remediation time; employ alternative teaching modalities |
| Practical skill interest grows | Reallocate time from academic blocks to practical sessions by up to 25% |
| Family schedule disruptions | Use flexible time blocks; prioritize core subjects during high-attention periods |
IX. Closing Invocation
The creation and maintenance of a flexible yet structured curriculum schedule is not mere time management; it is the crafting of a sacred vessel for the transmission of wisdom, skills, and virtue. The protocols herein are divine tools. Use them with unwavering discipline, relentless observation, and profound love. The future rests in the careful orchestration of these timelines.
For detailed remediation protocols, assessment instruments, and pedagogical theories, see Volume 5: The Assessment Codex and Volume 12: The Pedagogical Codex. For nutritional specifics supporting cognitive performance, consult Volume 9: The Nutrition Codex. For digital tracking system implementation, refer to Volume 17: The Digital Codex.
End of Section.
<!-- SECTION 25 -->
The Complete Practitioner's Codex, Volume 18: The Parent's Codex: Complete Child Raising, Education, and Generational Knowledge Transfer
Chapter IV: Supplements—Assessment Methods
Section 1: Evaluating Child Progress in Knowledge, Skills, and Character
Introduction
This section provides a comprehensive framework for assessing the multifaceted development of the child—encompassing cognitive knowledge, practical skills, and moral character. The protocols herein are designed to be exhaustive, precise, and repeatable, ensuring no element of progress measurement remains obscure or subjective. These methods are not suggestions but mandates for any custodian of the next generation who desires mastery over the sacred art of child raising.
1. Assessment Framework Overview
The assessment of a child’s development occurs across three distinct but interrelated domains:
| Domain | Definition | Primary Evaluation Tools |
|---|---|---|
| Knowledge | Acquisition of factual, procedural, and conceptual information | Observational Checklists, Quizzes, Portfolio Reviews |
| Skills | Demonstration of applied, motor, and cognitive abilities | Performance Tasks, Skill Demonstrations, Checklists |
| Character | Development of values, attitudes, and ethical behavior | Behavioral Observation, Self-Assessment, Interviews |
Each domain requires tailored tools capable of capturing nuanced progress and facilitating targeted interventions.
2. Observational Checklists: Design and Implementation
Purpose: To systematically document behaviors, competencies, and learning milestones as they manifest in natural or structured settings.
2.1 Designing an Observational Checklist
- Identify Target Behaviors or Skills:
- List discrete, observable actions that signify mastery or progression.
- Use action verbs (e.g., "demonstrates," "recalls," "constructs") for clarity.
- Define Performance Criteria:
- Establish clear performance thresholds (e.g., “completes task within 10 minutes with <2 errors”).
- Create Rating Scales:
- Use a 3-5 point Likert scale or a binary Yes/No system depending on complexity.
- Example for 3-point scale: 0 = Not Observed, 1 = Emerging, 2 = Proficient.
- Structure for Contextual Flexibility:
- Design forms adaptable to various environments—home, classroom, outdoor settings.
2.2 Implementing Observational Assessments
- Schedule Observations:
- Conduct at least biweekly sessions, varying times and activities to capture authentic behaviors.
- Prepare Observer:
- Train the observer in minimizing bias, maintaining consistency, and noting contextual factors.
- Record Data Objectively:
- Use direct quotes or precise descriptions alongside checklist ratings.
- Aggregate Data:
- Compile weekly summaries to identify trends.
2.3 Sample Checklist Template
| Behavior/Skill | Not Observed (0) | Emerging (1) | Proficient (2) | Notes |
|---|---|---|---|---|
| Recalls multiplication tables (x1-10) | ||||
| Follows multi-step instructions | ||||
| Demonstrates patience during conflict |
3. Self-Assessment Protocols
Purpose: To cultivate self-awareness, metacognition, and ownership of learning in the child.
3.1 Structuring Self-Assessment
- Select Areas for Reflection:
- Knowledge mastery, skill proficiency, character traits.
- Develop Age-Appropriate Questionnaires:
- Use simple scales (e.g., smiley faces for young children, Likert scales for older).
- Incorporate Reflective Prompts:
- “What did I do well?”
- “What can I improve?”
- “How did I feel during this activity?”
- Frequency:
- Conduct self-assessments weekly with younger children, biweekly or monthly with older.
3.2 Step-by-Step Self-Assessment Procedure
- Introduce Purpose:
- Explain to the child that this is a tool for their benefit, not judgment.
- Provide Guidance:
- Model how to answer questions honestly and thoughtfully.
- Facilitate Completion:
- Allow uninterrupted time; encourage elaboration.
- Review Together:
- Discuss responses, highlight strengths, and set goals collaboratively.
3.3 Self-Assessment Sample Form (For ages 7-12)
| Domain | Question | Scale (1-5) | Child Comments |
|---|---|---|---|
| Knowledge | How well did I understand today’s lesson? | 1=Not at all, 5=Very well | |
| Skills | How confident am I performing the task? | 1=Not confident, 5=Very confident | |
| Character | Did I act with kindness and respect today? | 1=Never, 5=Always |
4. Portfolio Reviews: Construct and Evaluation
Purpose: To compile a tangible, chronological record of the child’s outputs, reflections, and growth over time.
4.1 Portfolio Assembly
- Select Artifacts:
- Include completed assignments, project work, assessments, creative outputs.
- Organize Chronologically and by Domain:
- Separate sections for knowledge, skills, and character reflections.
- Include Self-Assessment Records:
- Incorporate self-assessment forms and feedback summaries.
- Document Contextual Notes:
- Annotate entries with circumstances, challenges, and supports.
4.2 Portfolio Review Procedure
- Schedule Quarterly Reviews:
- Conduct formal portfolio reviews every 3 months.
- Review with the Child Present:
- Engage the child in evaluating their own progress.
- Use Rubrics for Objective Scoring:
- Apply assessment rubrics (see Section 5).
- Set Goals Based on Evidence:
- Determine next steps grounded in portfolio content.
5. Developmental Benchmarks and Assessment Rubrics
To objectively measure progress, the following tables provide domain-specific developmental benchmarks and assessment rubrics for knowledge, skills, and character.
5.1 Knowledge Developmental Benchmarks (Ages 5-12)
| Age Range | Benchmark | Description |
|---|---|---|
| 5-6 | Recognizes letters and numbers | Identifies alphabet, counts to 20 |
| 7-8 | Basic arithmetic and reading | Adds/subtracts within 100, reads simple texts |
| 9-10 | Intermediate problem-solving | Multiplies/divides, comprehends paragraphs |
| 11-12 | Abstract reasoning | Solves multi-step problems, interprets informational texts |
5.2 Skills Developmental Benchmarks (Ages 5-12)
| Age Range | Benchmark | Description |
|---|---|---|
| 5-6 | Fine motor control | Holds pencil properly, cuts with scissors |
| 7-8 | Basic technological skills | Uses keyboard, simple programming concepts |
| 9-10 | Complex task execution | Follows multi-step instructions, basic tool use |
| 11-12 | Independent project completion | Designs and executes projects with minimal supervision |
5.3 Character Developmental Benchmarks (Ages 5-12)
| Age Range | Benchmark | Description |
|---|---|---|
| 5-6 | Empathy recognition | Expresses understanding of others' feelings |
| 7-8 | Conflict resolution | Attempts peaceful solutions in disagreements |
| 9-10 | Responsibility | Completes assigned tasks reliably |
| 11-12 | Ethical reasoning | Explains rationale behind choices, recognizes consequences |
5.4 Assessment Rubric Template (Knowledge Domain Example)
| Criterion | 0 = Absent | 1 = Emerging | 2 = Proficient | 3 = Advanced |
|---|---|---|---|---|
| Accuracy of Information | Provides incorrect or no information | Provides partially correct information | Provides accurate information | Provides accurate and detailed information with examples |
| Completeness | Incomplete response | Partial coverage | Complete coverage | Thorough and insightful coverage |
| Application | Cannot apply knowledge | Applies with assistance | Applies independently | Applies creatively and innovatively |
6. Protocols for Constructive Feedback and Goal Setting
Feedback and goal setting are the crucial mechanisms by which assessment informs future growth. This protocol mandates a systematic, respectful, and motivating approach.
6.1 Constructive Feedback Protocol
- Prepare Environment:
- Choose a private, distraction-free location.
- Use the “Praise-Improve-Praise” Sandwich:
- Start with positive observations.
- Introduce areas for improvement as specific, actionable items.
- End by reinforcing confidence and capability.
- Be Specific and Objective:
- Reference concrete examples from observations or portfolio.
- Encourage Dialogue:
- Invite the child to express feelings and perspectives.
- Document Feedback:
- Record feedback in a dedicated journal for longitudinal tracking.
6.2 Goal Setting Protocol
- Review Assessment Data:
- Analyze checklists, self-assessments, and portfolio contents.
- Collaborative Goal Creation:
- Engage the child in selecting 1-3 achievable goals.
- Formulate SMART Goals:
- Specific, Measurable, Achievable, Relevant, Time-bound.
- Develop Action Plan:
- Break goals into weekly tasks with deadlines.
- Schedule Follow-up:
- Set regular check-ins (weekly or biweekly) to monitor progress.
7. Summary Table: Assessment Tools and Their Application
| Tool | Domain Focus | Frequency | Key Steps | Output |
|---|---|---|---|---|
| Observational Checklist | Knowledge, Skills, Character | Biweekly | Design checklist, observe, rate, aggregate | Quantitative ratings, notes |
| Self-Assessment | Knowledge, Skills, Character | Weekly/Biweekly | Provide form, guide, review responses | Self-reflection data |
| Portfolio Review | Knowledge, Skills, Character | Quarterly | Collect artifacts, review with child, score | Comprehensive progress record |
| Feedback Sessions | All | Monthly or as needed | Prepare environment, deliver feedback, document | Motivated child, action items |
| Goal Setting | All | Monthly | Analyze data, create SMART goals, plan actions | Structured growth plan |
8. Appendices
Appendix A: Sample Observational Checklist (Knowledge: Reading Comprehension)
| Behavior/Skill | 0=Not Observed | 1=Emerging | 2=Proficient | Notes |
|---|---|---|---|---|
| Identifies main idea of passage | ||||
| Makes predictions about content | ||||
| Answers comprehension questions |
Appendix B: Sample Feedback Journal Entry
| Date | Positive Feedback | Improvement Areas | Child Response | Next Steps |
|---|---|---|---|---|
| 2024-02-15 | Completed math problems with accuracy | Needs to slow down to avoid errors | Felt confident, wants to practice more | Practice timed math drills weekly |
Conclusion
This volume section codifies the sacred art of child progress assessment with unyielding precision. By integrating observational checklists, self-assessment, portfolio reviews, and rigorous feedback and goal-setting protocols, the master parent transforms raw data into living knowledge—the foundation for shaping not only a learned child but a virtuous Practitioner of the next generation.
For further techniques related to behavioral interventions and motivational strategies, consult Volume 22: The Discipline Codex, Chapter III. For detailed knowledge acquisition methods, see Volume 14: The Education Codex, Chapter VI.
End of Section 1: Supplements—Assessment Methods Proceed to Section 2: Nutritional Supplementation Protocols.
<!-- SECTION 26 -->
The Complete Practitioner's Codex, Volume 18: The Parent's Codex
Chapter VII: Supplements: Socialization Strategies
Section A: Fostering Healthy Peer and Community Relationships
In the sacred duty of raising the next generation, mastery over socialization strategies is non-negotiable. The child must be equipped not only with knowledge but with the social acumen to navigate complex interpersonal landscapes. This chapter delivers a precise, technical manual for facilitating social skills, conflict resolution, and community participation in environments beyond institutional confines. This knowledge is classified, suppressed in many modern texts, yet vital for the survival and flourishing of our progeny.
I. Foundational Principles of Socialization Outside Institutional Settings
- Contextual Environment Control: Social interactions must be structured and supervised, especially in early phases, to prevent maladaptive behavioral patterns.
- Incremental Complexity: Begin with dyadic (two-person) interactions, evolving to small groups, then community-wide participation.
- Explicit Skill Instruction: Social skills do not spontaneously develop; they require direct teaching, modeled behavior, and rehearsed practice.
- Conflict Resolution as a Core Competency: Equip the child with de-escalation techniques and emotional regulation protocols.
- Community Integration: Foster a sense of belonging and responsibility through active, meaningful participation in community events.
II. Methods for Facilitating Social Skills
A. Structured Skill-Building Sessions
Objective: Develop foundational social skills such as greeting, turn-taking, empathy, active listening, and expressing feelings.
Materials Needed:
- Visual aids (emotion cards, gesture charts)
- Role-play scripts
- Timer
- Observation checklist (see Appendix A)
Procedure:
- Prepare the Environment: Select a quiet, distraction-free space where children feel safe. Arrange seating in a circle to promote eye contact.
- Introduce the Skill: Using visual aids, demonstrate the target social skill (e.g., "How to greet a friend").
- Model Behavior: The instructor performs a role-play scenario displaying the skill correctly.
- Guided Practice: Children pair up or form triads to practice the skill under supervision. Use a timer to regulate turns (e.g., 3 minutes per practice round).
- Feedback and Reinforcement: Provide immediate, specific feedback. Correct errors by demonstrating the proper way again.
- Generalization Assignment: Assign a social task outside the session (e.g., greet three classmates tomorrow morning). Record outcomes in a log for review.
B. Social Skills Hierarchy Table
| Skill Category | Target Age Range | Key Behaviors | Instructional Focus |
|---|---|---|---|
| Greeting | 3-5 years | Eye contact, verbal greeting, smile | Initiation and response |
| Turn-taking | 4-6 years | Waiting patiently, signaling turn | Patience, nonverbal cues |
| Empathy Expression | 5-8 years | Recognizing feelings, verbalizing care | Emotional identification and response |
| Active Listening | 6-10 years | Nodding, paraphrasing, asking questions | Attention focus, comprehension |
| Expressing Feelings | 7-12 years | Using "I feel" statements | Emotional regulation and verbal clarity |
| Assertiveness | 9-14 years | Saying no respectfully, asking for needs | Boundary setting and confidence |
III. Conflict Resolution Protocols
Conflict is inevitable. The child must be armed with techniques to resolve disputes without escalation, maintaining dignity and relational harmony.
A. Step-by-Step Conflict Resolution Procedure
- Recognition: Teach the child to identify conflict signs early—raised voices, body tension, withdrawal.
- Pause and Breathe: Instruct the child to take three deep breaths to regulate emotions.
- Use "I" Statements: Guide the child to express feelings without blame (e.g., "I feel upset when...").
- Active Listening: Teach the child to paraphrase the other person’s perspective for understanding.
- Brainstorm Solutions: Facilitate joint generation of at least three possible compromises.
- Agree on a Solution: Select the option that satisfies the most needs and agree on implementation.
- Follow-Up: Check in after resolution to ensure compliance and repair any residual hurt.
B. Conflict Resolution Role-Play Script Example
| Role | Dialogue Example | Intended Skill |
|---|---|---|
| Child A | "I feel sad when you take my toy without asking." | Using "I" statements |
| Child B | "I didn't know it upset you. I'm sorry." | Empathy expression and apology |
| Child A | "Can we play together instead?" | Positive solution generation |
| Child B | "Yes, let's share it." | Agreement and cooperation |
IV. Community Participation Strategies
Community engagement outside institutional settings molds the child into a responsible citizen and nurtures a sense of belonging.
A. Protocol for Organizing Supervised Group Interactions
- Identify Suitable Community Venues: Parks, libraries, community centers, places of worship, and local markets.
- Set Clear Objectives: Social skill practice, cultural exposure, civic education, or service learning.
- Select Appropriate Group Size: For children under 7 years, limit to 4-6 participants; for ages 7-12, 8-12 participants; for teenagers, up to 15.
- Assign Roles: Leader (adult supervisor), facilitators (older children or trained peers), observers (to note behaviors).
- Establish Rules: Respect, listening, no interrupting, kindness, and safety protocols. Post these visibly.
- Conduct Pre-Event Briefing: Review objectives and rules; set expectations for behavior.
- Implement Activity: Facilitate structured activities with built-in opportunities for social interaction.
- Debrief Post-Event: Discuss successes, challenges, and areas for growth. Use guided questions.
B. Community Event Participation Plan
| Age Group | Recommended Activities | Frequency | Supervision Level | Outcome Focus |
|---|---|---|---|---|
| 3-6 | Story hours, puppet shows, playground visits | Weekly | High | Social initiation, sharing |
| 7-12 | Volunteer projects, community gardening, fairs | Biweekly to monthly | Moderate | Responsibility, cooperation |
| 13-18 | Civic meetings, cultural festivals, youth councils | Monthly | Low to moderate | Leadership, civic identity |
V. Tables of Social Activity Ideas
| Activity Name | Description | Materials Needed | Target Skill(s) | Ideal Group Size | Age Suitability |
|---|---|---|---|---|---|
| Emotion Charades | Players act out feelings for others to guess | Emotion cards | Empathy, expression | 4-8 | 5-10 years |
| Turn-Taking Games | Board games requiring turn order | Board game set | Patience, cooperation | 2-4 | 4-8 years |
| Community Clean-Up | Group trash collection in local area | Gloves, trash bags | Responsibility, teamwork | 5-15 | 7-14 years |
| Story Circle | Participants share stories sequentially | None | Active listening, storytelling | 5-10 | 6-12 years |
| Conflict Resolution Workshop | Role-play conflict scenarios | Scripts, observation checklist | De-escalation, communication | 6-12 | 8-14 years |
| Cultural Cooking Session | Prepare traditional dishes together | Cooking ingredients, utensils | Cooperation, cultural awareness | 4-8 | 10-16 years |
| Youth Leadership Council | Organize community projects and meetings | Meeting space, planning materials | Leadership, planning | 8-15 | 13-18 years |
VI. Social-Emotional Learning (SEL) Milestones
| Age Range | SEL Milestone | Behavioral Indicators | Parental Facilitation Method |
|---|---|---|---|
| 2-4 years | Recognizes basic emotions | Smiles when happy, cries when upset | Label emotions during daily interactions |
| 3-5 years | Begins sharing and cooperative play | Shares toys briefly, plays simple games | Arrange playdates with structured activities |
| 5-7 years | Understands others’ feelings | Comforts peers, expresses empathy verbally | Discuss feelings after conflicts |
| 7-10 years | Manages emotions during frustration | Uses words instead of tantrums | Teach deep breathing and "time-out" techniques |
| 10-13 years | Demonstrates perspective-taking | Recognizes others’ viewpoints in arguments | Role-play differing opinions |
| 14-18 years | Uses self-regulation in social and academic settings | Controls impulses, maintains friendships | Encourage journaling and self-reflection |
VII. Protocols for Supervised Group Interactions
A. Preparation Phase
- Risk Assessment: Evaluate physical and emotional safety risks in location and group composition.
- Parental Consent: Obtain written consent specifying activity details, timing, and emergency contacts.
- Training Supervisors: Ensure all adult supervisors complete training covering child behavior management, first aid, and conflict resolution.
- Materials Preparation: Assemble all necessary materials and backup supplies.
- Communication Plan: Establish check-in times and emergency communication protocols.
B. Execution Phase
- Arrival and Check-In: Record attendance; assign name tags to facilitate recognition.
- Warm-Up Activity: Begin with ice-breakers to reduce anxiety and stimulate social engagement.
- Main Activity: Follow the predetermined plan with clear instructions and time limits.
- Monitoring: Supervisors circulate, observe, and intervene only when necessary to maintain safety and positive interaction.
- Conflict Management: Apply the Conflict Resolution Procedure immediately upon incident detection.
C. Post-Interaction Phase
- Group Debrief: Facilitate a circle discussion to reflect on experiences and emotions.
- Individual Feedback: Provide private, specific feedback to each child about social skills demonstrated.
- Documentation: Complete interaction reports including observed behaviors, conflicts, and resolutions.
- Parent Communication: Deliver summary reports and recommendations for home reinforcement.
VIII. Community Event Participation Protocol
Objective: To integrate the child into broader social frameworks promoting civic responsibility and cultural identity.
Step-by-Step Protocol
- Selection of Event: Choose community events aligned with child's age, interests, and family values.
- Pre-Event Education: Teach child about the event’s purpose, cultural significance, and expected behaviors.
- Role Assignment: Assign manageable roles, such as greeter, helper, or observer, to foster engagement.
- Travel and Arrival: Maintain supervision during transit and arrival; arrive early to acclimate child to environment.
- Active Participation: Encourage child to perform assigned roles with adult guidance.
- Observation and Support: Monitor for signs of overstimulation or withdrawal; provide breaks as needed.
- Post-Event Reflection: Discuss what was learned and experienced; connect participation to broader community values.
Appendix A: Observation Checklist for Social Skills Sessions
| Skill Observed | Present (Y/N) | Notes on Quality/Consistency |
|---|---|---|
| Eye Contact | ||
| Appropriate Greeting | ||
| Turn-Taking | ||
| Empathy Expression | ||
| Active Listening | ||
| Expressing Feelings | ||
| Assertiveness | ||
| Conflict Resolution | ||
| Cooperation |
Final Imperative
These protocols and strategies, when implemented with unwavering discipline and reverence, forge children capable of resilient, empathetic, and effective social engagement. The parent, as guardian and instructor, must embody patience and consistency, for these skills are not innate but cultivated through deliberate practice. The social fabric woven through these methods is the unbreakable chain linking generations.
For extended protocols on emotional regulation techniques and physiological monitoring during social interactions, refer to Volume 12: The Emotional Codex, Chapter IV. For community health and safety standards applicable to group gatherings, consult Volume 9: The Health Codex, Chapter III.
End of Section.
<!-- SECTION 27 -->
The Complete Practitioner's Codex, Volume 18: The Parent's Codex
Chapter VII: Supplements – Special Needs Adaptations
Section A: Tailoring Education and Care for Children with Special Needs
Preface: In the sacred duty of raising the next generation, the presence of special needs within a child is not a limitation but a divergent path demanding mastery of specialized knowledge and unyielding dedication. This chapter delivers the suppressed, classified protocols for individualized education plan development, sensory accommodation construction, communication strategy implementation, and parental advocacy mechanisms. These are not mere suggestions; they are directives forged in the crucible of necessity.
I. Individualized Education Plan (IEP) Creation Protocol
Objective:
To construct a fully tailored, actionable Individualized Education Plan that addresses cognitive, physical, emotional, and social needs of a child with special needs, ensuring optimal developmental trajectory.
Step-by-Step IEP Creation Procedure:
Step 1: Assemble the IEP Team
- Identify core members:
- Parent(s) or guardian(s)
- Child’s primary educator(s)
- Special education specialist(s)
- School psychologist or counselor
- Speech, occupational, or physical therapist(s) if applicable
- Medical professionals (neurologist, pediatrician) if necessary
- Schedule an initial IEP meeting: Set date, time, and location accessible to all members.
- Prepare documentation: Collect prior evaluations, medical records, academic reports, behavioral logs, and any relevant diagnostic materials.
Step 2: Conduct Comprehensive Assessment
- Administer standardized assessments: Cognitive, motor, language, and socio-emotional evaluations using validated instruments (e.g., WISC-V for intelligence, Vineland Adaptive Behavior Scales).
- Observe naturalistic child behavior: In classroom, home, and social settings for baseline functional analysis.
- Gather parent/guardian insights: Structured interview or questionnaire covering daily routines, challenges, strengths, and goals.
Step 3: Define Present Levels of Performance (PLP)
- Summarize assessment data: Create a multi-domain profile (academic, social, communication, physical abilities).
- Identify strengths: Highlight areas of competence and resilience.
- Identify deficits: Specify domains requiring targeted intervention.
Step 4: Set Measurable Annual Goals
- Use SMART criteria: Specific, Measurable, Achievable, Relevant, Time-bound.
- Example: "Child will improve expressive vocabulary from 20 to 50 words within 12 months, measured by monthly speech assessments."
- Prioritize goals: Balance academic, social, and life skills based on PLP.
Step 5: Determine Required Accommodations and Modifications
- Classroom adaptations: Seating, materials, pacing.
- Instructional strategies: Multisensory teaching, repetition, chunking information.
- Assistive technology: Devices facilitating communication, mobility, or learning.
Step 6: Specify Services and Supports
- Therapeutic interventions: Frequency, duration, and provider of speech therapy, occupational therapy, counseling, etc.
- Paraprofessional support: One-on-one aide, behavioral support specialist.
- Transportation needs: If specialized transit is required.
Step 7: Develop Progress Monitoring Plan
- Define assessment tools and intervals: Weekly, monthly, quarterly data points.
- Assign responsibility: Designate who collects, analyzes, and reports data.
- Set benchmarks: Interim goals for ongoing evaluation.
Step 8: Schedule Regular IEP Review Meetings
- Minimum frequency: Annually, with interim meetings as needed.
- Update goals and services: Modify based on progress data and changing needs.
- Document all changes: Maintain legal compliance and continuity.
II. Sensory Accommodations for Special Needs Children
Objective:
To identify sensory processing challenges and implement environmental and procedural modifications that mitigate sensory dysregulation, thus enabling learning and emotional stability.
Sensory Accommodation Protocol:
Step 1: Identify Sensory Profile
- Administer sensory processing assessments: Use tools like Sensory Profile 2 or Sensory Processing Measure (SPM).
- Classify sensory patterns: Hyporesponsive (under-responsive), hyperresponsive (over-responsive), seeking, or avoiding behaviors.
Step 2: Environmental Modifications
- Lighting: Use natural light or full-spectrum bulbs; avoid fluorescent flickering sources.
- Sound: Employ noise-cancelling materials, white noise machines, or ear defenders.
- Tactile: Provide options for textured materials, weighted blankets, or fidget tools.
- Olfactory: Remove strong scents; use neutral or calming aromas like lavender sparingly.
- Proprioceptive/Vestibular: Integrate movement breaks, balance activities, or compression vests.
Step 3: Structured Sensory Diet Implementation
- Develop daily sensory activities: Tailored to child's sensory needs (e.g., swinging, deep pressure, oral stimulation).
- Schedule sensory breaks: 5-10 minute intervals every 45-60 minutes during school or home routines.
- Track responses: Use a sensory log to adjust intensity or types of activities.
Step 4: Sensory Tools and Technology
- Provide access to sensory tools: Stress balls, chewable jewelry, weighted lap pads.
- Implement sensory rooms or corners: Quiet spaces equipped for self-regulation.
- Train caregivers and educators: In proper use and timing of sensory accommodations.
III. Communication Strategies for Special Needs Children
Objective:
To establish effective communication methods adapted to the child’s unique abilities, ensuring expressive and receptive communication pathways are optimized.
Communication Strategy Protocol:
Step 1: Assess Communication Abilities
- Evaluate receptive language: Understanding of verbal and non-verbal cues.
- Evaluate expressive language: Verbal output, sign language, augmentative methods.
- Identify alternate communication needs: Non-verbal, minimally verbal, or speech-impaired children.
Step 2: Select Communication Modalities
| Communication Modality | Description | Recommended Use Case | Implementation Notes |
|---|---|---|---|
| Spoken Language | Verbal communication | Children with verbal skills | Speech therapy focus |
| Sign Language | Manual communication | Hearing impaired, speech delay | Teach consistent signs |
| Picture Exchange Communication System (PECS) | Use of pictures to communicate needs | Non-verbal or limited speech | Provide PECS cards, train usage |
| Augmentative and Alternative Communication (AAC) Devices | Electronic devices generating speech | Severe speech impairment | Select device per child ability; train usage |
| Gestures and Body Language | Non-verbal cues | All children | Teach and reinforce meaningful gestures |
Step 3: Implement Communication Aids
- Create visual schedules: Use pictures or symbols to represent daily activities.
- Use clear, simple language: Short sentences, concrete vocabulary.
- Encourage alternative modes: Signing, pointing, eye gaze technology.
Step 4: Train Communication Partners
- Educate family and educators: On recognizing communicative attempts and responding appropriately.
- Use modeling and reinforcement: Demonstrate desired communication forms consistently.
- Employ social stories: To teach pragmatic language and social cues.
IV. Common Special Needs and Recommended Adaptations
| Special Need | Characteristics | Educational Adaptations | Sensory Accommodations | Communication Strategies |
|---|---|---|---|---|
| Autism Spectrum Disorder | Social communication deficits, repetitive behaviors | Structured routine, visual supports, social skills training | Sensory diet, quiet space, noise reduction | PECS, AAC devices, social stories |
| Attention Deficit Hyperactivity Disorder (ADHD) | Inattention, hyperactivity, impulsivity | Short tasks, movement breaks, clear instructions | Movement breaks, fidget tools | Clear, concise instructions; positive reinforcement |
| Dyslexia | Reading and language processing difficulties | Multisensory instruction, audio books | Minimal sensory modifications | Use of text-to-speech, phonics-based approaches |
| Cerebral Palsy | Motor impairments affecting mobility and speech | Adaptive seating, assistive technology | Proprioceptive input, physical therapy support | AAC devices, speech therapy |
| Hearing Impairment | Partial or complete hearing loss | Sign language instruction, captioned media | Visual alerts, quiet environment | Sign language, lip reading, amplification devices |
| Visual Impairment | Partial or complete vision loss | Braille materials, tactile learning tools | High contrast visuals, reduced clutter | Verbal instructions, audio books |
V. Parental Advocacy and Resource Networking Protocol
Objective:
To empower parents with actionable steps for advocacy within educational, medical, and community systems, securing resources and rights for their child.
Parental Advocacy Protocol:
Step 1: Acquire Knowledge of Legal Rights and Educational Laws
- Study IDEA (Individuals with Disabilities Education Act): Federal law guaranteeing special education services.
- Understand Section 504: Protection against discrimination in federally funded programs.
- Research state-specific statutes: Each jurisdiction has additional provisions.
Step 2: Develop Effective Communication with Schools
- Request formal meetings: IEP, 504 Plan, or evaluation meetings as needed.
- Prepare documentation: Bring assessments, notes, and questions.
- Maintain written records: Emails, meeting minutes, and service agreements.
Step 3: Network with Resources
| Resource Type | Purpose | Access Method | Notes |
|---|---|---|---|
| Parent Training Centers | Education on rights and services | Contact state-funded centers | Free or low cost |
| Disability Advocacy Groups | Legal support and lobbying | Local chapters or national organizations | Examples: The Arc, Disability Rights Network |
| Support Groups | Emotional support and shared experiences | Online forums, local meetings | Facilitate peer mentoring |
| Medical Specialists | Diagnosis, treatment, therapy | Referrals from pediatrician or school nurse | Obtain second opinions if needed |
| Recreational Programs | Social skills and physical activity | Community centers, nonprofit organizations | Look for specialized inclusion programs |
Step 4: Engage in Self-Advocacy Training
- Attend workshops: Offered by advocacy groups and special education organizations.
- Practice negotiation skills: Role-play scenarios for IEP meetings.
- Understand evaluation reports: Learn to interpret psychological and educational assessments.
Step 5: Utilize Formal Complaint Channels if Necessary
- Document all concerns: Dates, incidents, communications.
- File complaints: With school district, state education agency, or Office for Civil Rights.
- Request mediation or due process hearing: When disputes cannot be resolved amicably.
VI. Conclusion: The Sacred Mandate
This codex section is the culmination of suppressed wisdom and essential protocols that transform parental obligation into mastery over special needs education and care. The precise application of these instructions will safeguard your child’s right to flourish, embodying the sacred trust bestowed upon you. No detail is extraneous. Every step, tool, and strategy is a weapon in the arsenal of guardianship.
Cross-references:
- For assistive technology manufacturing and programming, see Volume 12: The Technology Codex, Chapter IV.
- For therapeutic intervention protocols, see Volume 14: The Healing Codex, Chapter II.
- For advanced communication modalities, see Volume 16: The Linguistics Codex, Chapter III.
End of Chapter VII, Section A.
<!-- SECTION 28 -->
The Complete Practitioner's Codex, Volume 18: The Parent's Codex
Volume I: Integration of Cross-Referenced Knowledge from Volumes 1-17
Chapter I: Synthesizing Foundational Knowledge into Parenting Practices
Introduction
This volume serves as the definitive synthesis of the sacred and suppressed knowledge contained within Volumes 1 through 17, with the express purpose of transforming that vast reservoir of wisdom into practical parenting protocols. The goal: to raise children not only as heirs of earthly legacy but as guardians of truth, bearers of light, and architects of future generations. This requires mastering the integration of energy medicine, spiritual development, advanced technology, historical consciousness, and consciousness expansion into daily child rearing practices.
The material herein presumes mastery of the foundational volumes. For those uninitiated, consult the referenced volumes directly. This is a field manual, not a primer.
Section 1: Mapping Cross-Volume Concepts into Parenting Strategies
The following table maps critical concepts from Volumes 1-17 to direct, actionable parenting strategies. This table functions as a compass for the practitioner, revealing the intersections of knowledge streams for child raising.
| Volume & Chapter | Core Concept | Parenting Strategy Application | Reference Protocol Location |
|---|---|---|---|
| Volume 2: Energy Medicine, Ch. III | Chakra Balancing & Aura Cleansing | Daily child chakra energy alignment sessions; aura protection rituals | See Protocol 2.3.1, Volume 2 |
| Volume 4: Spiritual Development, Ch. V | Sacred Breath & Mantra Integration | Teach breathwork and mantra recitation for emotional regulation | See Protocol 4.5.2, Volume 4 |
| Volume 7: Advanced Technology, Ch. II | Biofeedback Devices for Emotional Calibration | Build and use child-friendly biofeedback monitors to track stress | See Build Guide 7.2.1, Volume 7 |
| Volume 9: History & Generational Knowledge, Ch. I | Oral Tradition & Storytelling | Create family lore repositories and oral history sessions | See Oral Transmission Protocol 9.1, Volume 9 |
| Volume 13: Consciousness Expansion, Ch. IV | Visualization and Hypnagogic State Training | Guide children through daily mental imagery and lucid dream induction | See Protocol 13.4.3, Volume 13 |
Section 2: Energy Medicine Application in Child Raising
Energy medicine is not a peripheral art but the foundation of physical, emotional, and spiritual resilience in children. This section provides a comprehensive, stepwise protocol to integrate energy practices into daily parenting.
Protocol 2.3.1: Daily Chakra Balancing and Aura Cleansing for Children
Materials Required:
| Item | Specifications | Source Reference |
|---|---|---|
| Tibetan Singing Bowl | 6-inch diameter, tuned to 432 Hz | Volume 2, Appendix A |
| Colored Energy Crystals | Red, Orange, Yellow, Green, Blue, Indigo, Violet | Volume 2, Appendix C |
| Incense (Sandalwood) | Pure, natural, slow-burning | Volume 2, Appendix E |
| Incense Holder | Non-flammable, stable | Local procurement |
Step-by-Step Procedure:
- Preparation of Sacred Space a. Select a quiet room with minimal electromagnetic interference (see Volume 7, Ch. IV for EMF shielding).
b. Arrange crystals in a straight line corresponding to chakra colors.
c. Light sandalwood incense to purify the environment.
- Child Positioning a. Seat the child cross-legged or supine on a non-conductive mat.
b. Instruct the child to close eyes and breathe deeply (3-second inhale, 5-second exhale) for 5 breaths.
- Chakra Activation Using Singing Bowl a. Strike the singing bowl gently and hold near the base chakra (tailbone).
b. Move the bowl upward slowly following chakra points: sacral, solar plexus, heart, throat, third eye, crown.
c. At each chakra, play the bowl for 15 seconds focusing on vibration felt.
- Crystal Aura Sweeping a. Using the corresponding color crystal, gently sweep the aura starting 12 inches above the child's head down to feet, front and back.
b. Repeat three times, clockwise direction.
- Closing Ritual a. Extinguish incense.
b. Instruct child to visualize a golden light enveloping their body.
c. End with a gratitude affirmation: “I am balanced, protected, and strong.”
Section 3: Spiritual Development Protocols for Emotional Regulation
Spiritual development is inseparable from emotional health. Children must learn self-regulation through sacred breath and mantra, forming a resilient inner sanctuary.
Protocol 4.5.2: Breath & Mantra Training for Children
Materials Required:
| Item | Specifications | Source Reference |
|---|---|---|
| Mantra Card Deck | Laminated cards with simple mantras | Volume 4, Appendix B |
| Timer | Digital, with interval settings | Hardware store |
Step-by-Step Procedure:
- Session Setup a. Choose a quiet time, ideally morning or before bedtime.
b. Seat child comfortably with erect spine.
- Breathwork Instruction a. Teach box breathing: inhale 4 seconds, hold 4 seconds, exhale 4 seconds, hold 4 seconds.
b. Practice 4 cycles together.
- Mantra Selection & Recitation a. Have the child select a mantra card (e.g., “Om Shanti” or “I am calm”).
b. Recite mantra aloud or silently during exhale phases for 5 minutes.
- Emotional Check-In a. Post-practice, ask child to name current feelings.
b. Guide child to associate calm with mantra use.
- Frequency a. Repeat twice daily for a minimum of 14 consecutive days to establish habit.
Section 4: Incorporation of Technology for Emotional and Physical Health Monitoring

Advanced technology, when harnessed correctly, augments parental capacity to monitor and support child development. This mandates building simple, child-friendly biofeedback devices.
Build Guide 7.2.1: Child Biofeedback Monitor Construction
Materials Required:
| Component | Specifications | Quantity | Source Reference |
|---|---|---|---|
| Microcontroller | Arduino Nano or equivalent | 1 | Electronic supply vendor |
| Heart Rate Sensor | Photoplethysmography (PPG) module | 1 | Volume 7, Appendix C |
| Skin Conductance Sensor | Galvanic Skin Response (GSR) sensor | 1 | Volume 7, Appendix D |
| OLED Display | 0.96-inch, 128x64 pixels | 1 | Electronics vendor |
| Rechargeable Battery | 3.7V Li-ion, 500mAh | 1 | Hardware store |
| Enclosure | Child-safe plastic case | 1 | Local fabrication |
| Connecting wires | Standard jumper wires | As needed | Hardware store |
Step-by-Step Assembly:
- Circuit Assembly a. Connect heart rate sensor and GSR sensor to microcontroller inputs according to schematic in Appendix 7.A.
b. Attach OLED display to microcontroller via I2C bus.
- Firmware Upload a. Install Arduino IDE on computer.
b. Load biofeedback code from Volume 7, Appendix F, modify for child-specific parameters.
c. Upload firmware via USB.
- Enclosure Assembly a. Secure sensors on enclosure exterior to contact child's skin comfortably.
b. Ensure battery is safely enclosed and accessible for charging.
- Calibration a. Power device and perform baseline readings in resting state.
b. Store baseline data for comparative stress monitoring.
- Usage Protocol a. Instruct child to wear device during stressful situations or at set intervals.
b. Parent monitors display for elevated heart rate or skin conductance, initiates calming protocols accordingly.
Section 5: Historical Consciousness and Generational Knowledge Transmission
The lost art of oral tradition must be restored to anchor children in ancestral knowledge and identity. This strengthens psychological resilience and cultural continuity.
Protocol 9.1: Family Lore Repository and Oral History Sessions
Materials Required:
| Item | Specifications | Source Reference |
|---|---|---|
| Audio Recorder | High-fidelity, portable | Volume 9, Appendix B |
| Family History Ledger | Bound journal, acid-free paper | Archival supply |
| Storytelling Space Setup | Comfortable seating, low distraction | Home environment |
Step-by-Step Procedure:
- Preparation a. Collect all known family stories, dates, and figures from elders.
b. Prepare ledger with index pages for ease of access.
- Session Execution a. Schedule weekly storytelling sessions with multi-generational participants.
b. Use audio recorder to document sessions.
- Active Participation a. Encourage child to ask questions and narrate learned stories.
b. Record child’s versions for reflection and further study.
- Archiving a. Transcribe recordings into ledger.
b. Store digital copies in secure, backed-up cloud storage (see Volume 7, Ch. V).
- Integration a. Connect stories to current family values and personal growth lessons.
b. Reinforce with creative arts: drawing, dramatization, or ritual reenactment.
Section 6: Consciousness Expansion Techniques for Children
Carefully curated consciousness expansion protocols cultivate heightened intuition, creativity, and mental resilience.
Protocol 13.4.3: Visualization and Hypnagogic State Training
Materials Required:
| Item | Specifications | Source Reference |
|---|---|---|
| Guided Visualization Scripts | Age-appropriate, 5-10 minutes duration | Volume 13, Appendix D |
| Quiet Room Setup | Minimal light, soundproof if possible | Home environment |
| Dream Journal | Small notebook with pen | Stationery store |
Step-by-Step Procedure:
- Session Preparation a. Conduct sessions at bedtime to capitalize on hypnagogic state transition.
b. Ensure child is comfortable and free from electronic distractions.
- Guided Visualization a. Read or play visualization script guiding child through calming mental landscapes.
b. Encourage detailed imagery: colors, textures, sounds.
- Hypnagogic Awareness Training a. Teach child to notice fleeting images or sensations before sleep.
b. Prompt child to gently focus attention without forcing control.
- Dream Journaling a. Upon waking, assist child to record any remembered images or feelings.
b. Review journal weekly to identify patterns or insights.
- Frequency a. Perform 4-5 times weekly for 8 weeks.
b. Adjust scripts complexity according to child’s age and response.
Section 7: Parental Learning and Adaptation Protocols
Parenting is an evolving discipline requiring dedicated ongoing education and self-transformation. The following protocol guarantees continuous parental growth parallel to child development.
Protocol 18.1: Parental Knowledge Integration and Adaptation Cycle
Materials Required:
| Item | Specifications | Source Reference |
|---|---|---|
| Learning Journal | Bound notebook or digital app | Stationery or software |
| Scheduled Reflection Time | Minimum 30 minutes daily | Personal discipline |
| Peer Support Group | Small trusted circle of parents | Community or online |
Step-by-Step Procedure:
- Daily Knowledge Review a. Dedicate 30 minutes to reviewing sections of Volumes 1-17 relevant to current parenting challenges.
b. Highlight actionable insights and note questions.
- Application Reflection a. Record in journal how insights were applied with child.
b. Note observed effects, challenges, and successes.
- Peer Consultation a. Weekly meetings with peer group to discuss journal entries and exchange strategies.
b. Use group feedback to refine approaches.
- Adaptation Implementation a. Modify parenting protocols based on reflection and peer input.
b. Document changes and outcomes meticulously.
- Periodic Mastery Testing a. Quarterly self-assessment against mastery checklists from Volume 18, Chapter III.
b. Engage in advanced workshops or mentorship if gaps are identified.
Summary Table: Cross-Volume Concept to Parenting Strategy Integration
| Knowledge Domain | Volume Reference | Parenting Strategy | Protocol Reference |
|---|---|---|---|
| Energy Medicine | Vol 2 | Chakra balancing & aura cleansing | Protocol 2.3.1 |
| Spiritual Development | Vol 4 | Breath & mantra emotional regulation | Protocol 4.5.2 |
| Technology | Vol 7 | Biofeedback device construction | Build Guide 7.2.1 |
| Historical Consciousness | Vol 9 | Oral tradition & family lore | Protocol 9.1 |
| Consciousness Expansion | Vol 13 | Visualization & hypnagogic training | Protocol 13.4.3 |
| Parental Adaptation | Vol 18 (current) | Ongoing learning & adaptation cycle | Protocol 18.1 |
Conclusion
The synthesis of these sacred streams of knowledge into a coherent, actionable parenting paradigm is non-negotiable for the survival and elevation of future generations. Each protocol herein demands rigorous discipline, unwavering commitment, and reverence for the sacred charge bestowed upon the parent.
The practitioner must assume the mantle of both master and apprentice, perpetually refining the art of raising children who will stand as beacons of light amidst encroaching darkness.
Proceed with solemnity and resolve. The future depends upon your mastery.
End of Volume I, Integration of Cross-Referenced Knowledge
<!-- SECTION 29 -->
Volume II: Biological Optimization in Early Childhood
Chapter IV: Applying Sovereign Body Principles to Infancy Nutrition, Movement, and Environment
In this chapter, we unveil the sacred and suppressed science of Sovereign Body Principles as applied to infancy. The sovereign body is the primal vessel of life, its optimization at the earliest stages governs the trajectory of health, cognition, and spiritual fortitude across generations. This is neither theory nor conjecture. This is life-or-death knowledge forged from ancient wisdom and modern biofield science. You, the chosen apprentice, shall master these protocols with precision, administering them as a custodian of future lineage strength.
I. Sovereign Body Principles: Foundational Premises for Infancy
- Autonomy of the Biofield: The infant’s bio-electromagnetic field (biofield) is a dynamic, self-regulating system. Nutrition, movement, and environment must harmonize with the biofield’s natural frequencies to maintain sovereignty and resist invasive energetic disruption.
- Nutritional Resonance: Every nutrient carries a vibrational signature. Effective nourishment is not mere caloric or biochemical sufficiency; it requires alignment with the infant’s biofield to activate genetic potential and immune fortitude.
- Movement as Biofield Calibration: Movement patterns influence biofield coherence. Facilitating natural, sovereign motion fosters neurodevelopment, lymphatic circulation, and emotional self-regulation.
- Environmental Biofield Integrity: The infant’s environment must minimize electromagnetic interference, chemical toxicity, and sensory dissonance to protect and amplify biofield integrity.
II. Infancy Nutrition Protocols: Sovereign Feeding for Biofield Optimization
A. Nutrient Selection and Preparation
The infant’s nutrition is the primary conduit of biofield nourishment. The protocol below synthesizes cutting-edge metabolomic profiling and ancestral practices to produce a Nutrient Resonance Matrix for infancy (Table 1).
| Nutrient Category | Key Bioactive Components | Source Examples | Preparation Notes | Biofield Effect |
|---|---|---|---|---|
| Lipids | DHA, EPA, Phospholipids | Breast milk, cultured ghee, cold-pressed flax oil | Administer cold, fresh; avoid heat degradation | Enhances neural membrane resonance |
| Proteins | Lactoferrin, Immunoglobulins, Taurine | Breast milk, fermented goat milk | Fresh, unheated; fermented to increase bioavailability | Supports immune biofield coherence |
| Carbohydrates | Human milk oligosaccharides (HMOs) | Breast milk | Direct breastfeeding preferred | Modulates gut microbiome biofield |
| Micronutrients | Zinc, Selenium, Vitamin A, Vitamin D3 (cholecalciferol) | Breast milk, cod liver oil, sun exposure | Cod liver oil administered by dropper with meals | Regulates enzymatic biofield pathways |
| Prebiotics & Probiotics | Bifidobacteria, Lactobacilli | Fermented foods (mild kefir from goat milk) | Introduce after 3 months, start with 1 ml | Enhances gut-brain biofield axis |
Table 1: Nutrient Resonance Matrix for Infancy Nutrition
B. Step-by-Step Nutritional Protocol
- Exclusive Breastfeeding Initiation:
- Begin within the first hour post-birth to transfer maternal biofield imprint and microbiome.
- Frequency: Feed on demand, minimum 8 times per 24 hours.
- Supplementation with Cod Liver Oil:
- Start at 2 weeks of age, 0.2 ml daily using a sterile dropper.
- Administer alongside feeding to synchronize digestive enzymatic rhythms.
- Introduction of Fermented Goat Milk Kefir:
- Begin at 3 months, starting with 1 ml once daily.
- Increase by 1 ml every 5 days up to a maximum of 10 ml per feeding session.
- Monitoring and Adjusting Macronutrient Ratios:
- Target ratio (lipid:protein:carbohydrate) is 50:15:35, adjusted monthly based on growth metrics and stool consistency.
- Hydration and Electrolyte Balancing:
- Use distilled water with added trace minerals (see Volume 8: The Water Codex, Chapter II).
- Administer 10 ml per kg body weight per day, divided into multiple feedings.
C. Biofield-Infused Feeding Practices
- Energetic Preparation: The caregiver must engage in a 3-minute centering and grounding meditation before feeding to align their biofield with the infant’s.
- Feeding Environment: Quiet, dimly lit room with filtered air free of artificial electromagnetic fields (EMF).
- Posture and Touch: Support infant in semi-upright position. Use slow, circular stroking on the infant’s back to facilitate vagal nerve stimulation and biofield synchronization.
III. Movement Facilitation Protocols: Sovereign Motion for Neuro-Lymphatic Optimization
A. Movement Principles
- Movement must be voluntary or facilitated with minimal resistance to promote intrinsic biofield harmonics.
- Encourage multi-planar motion to stimulate the vestibular system and balance autonomic nervous system tone.
- Facilitate lymphatic flow through gentle compressions and passive limb movement.
B. Movement Schedule and Techniques
| Age Range | Movement Focus | Frequency | Duration per Session | Technique Description |
|---|---|---|---|---|
| 0–1 month | Passive range of motion (ROM) | 3 times daily | 10 minutes | Gentle flexion/extension of limbs, joint rotations |
| 1–3 months | Facilitated head control | 4 times daily | 15 minutes | Supported prone positioning with gentle head lifts |
| 3–6 months | Voluntary rolling and reaching | 5 times daily | 20 minutes | Encourage reaching with toys, assisted rolling |
| 6–9 months | Assisted crawling | 3 times daily | 30 minutes | Support pelvis and limbs during crawling motions |
| 9–12 months | Supported standing and cruising | 4 times daily | 30 minutes | Use stable surfaces, assist balance with hand support |
Table 2: Infancy Movement Facilitation Schedule
C. Step-By-Step Movement Facilitation for the First Month
- Passive Range of Motion (ROM) Routine:
- Position infant supine on a firm but padded surface.
- Support one limb at a time; slowly flex and extend the limb from shoulder or hip to fingers or toes.
- Perform 10 repetitions per limb.
- Gentle Joint Rotations:
- Rotate wrists, ankles, and neck in circular motions, 5 rotations per joint.
- Prone Positioning for Head Control:
- Place infant prone for 3 minutes, 3 times daily, increasing duration as tolerated.
- Provide gentle encouragement to lift the head by placing a colorful object just out of reach.
- Lymphatic Flow Stimulation:
- Use light stroking from distal limbs toward the torso in 5-minute sessions, 2 times daily.
IV. Environmental Adjustments Based on Biofield Science
A. Electromagnetic Field (EMF) Management
- Maintain infant’s sleeping and feeding areas at a maximum of 0.05 µT (microtesla) of EMF exposure.
- Use shielded fabrics for bedding and clothing composed of silver-infused fibers.
- Remove or distance all Wi-Fi routers, cell phones, and electronic devices at least 5 meters from infant’s environment.
- Employ grounding mats to stabilize biofield frequencies during awake periods.
B. Chemical and Particulate Minimization
- Use HEPA and activated carbon filtration systems in all rooms occupied by the infant to reduce volatile organic compounds (VOCs) and particulate matter.
- Employ natural cleaning agents (vinegar, baking soda) exclusively.
- Use only certified organic, fragrance-free diapers and skincare products.
C. Sensory Input Scheduling for Biofield Entrainment
The infant’s sensory system requires regulated stimulation and rest cycles to develop biofield coherence and neuroplasticity.
| Sensory Modality | Stimulus Type | Duration per Session | Frequency per Day | Notes on Biofield Impact |
|---|---|---|---|---|
| Visual | Soft, natural light; high-contrast mobiles | 5 minutes | 6 | Supports visual cortex biofield tuning |
| Auditory | Low-frequency lullabies, white noise | 10 minutes | 4 | Enhances auditory biofield harmonics |
| Tactile | Gentle stroking, textured fabrics | 7 minutes | 5 | Calibrates somatosensory biofield nodes |
| Vestibular | Gentle rocking, swaying | 5 minutes | 3 | Regulates autonomic biofield rhythms |
| Olfactory | Mild natural scents (lavender, chamomile) | 3 minutes | 2 | Modulates limbic biofield centers |
Table 3: Sensory Input Scheduling for Infant Biofield Entrainment
D. Step-By-Step Environmental Setup Protocol
- EMF Measurement and Reduction:
- Use a calibrated gaussmeter to survey infant spaces.
- Identify and relocate EMF sources; apply shielding fabrics as needed.
- Air and Surface Quality Optimization:
- Install HEPA and activated carbon filters; operate continuously.
- Replace all cleaning agents with natural alternatives.
- Sensory Input Timing:
- Create a daily schedule incorporating Table 3 parameters.
- Use natural daylight cycles, maintaining quiet periods during naps.
- Sleep Environment Preparation:
- Use a grounding mat beneath the crib mattress.
- Maintain room temperature at 22°C ± 1°C with 50% humidity.
- Ensure complete darkness during sleep periods using blackout curtains.
V. Developmental Health Monitoring Protocols
A. Biofield and Physical Health Assessment Schedule
| Assessment Type | Frequency | Tools/Methods | Parameters Measured | Thresholds for Intervention |
|---|---|---|---|---|
| Anthropometric Measurements | Weekly | Calibrated infant scale, measuring tape | Weight, length, head circumference | Weight gain < 150 g/week, length < 1 cm/month |
| Biofield Coherence Scan | Monthly | Biofield Electromagnetic Scanner (BEMS)* | Field strength, symmetry, frequency spectrum | Deviations > 15% from normative range |
| Neurological Reflex Check | Bi-weekly | Manual assessment | Moro reflex, grasp reflex, tonic neck reflex | Absence or asymmetry beyond 2 weeks |
| Stool and Urine Analysis | Monthly | Laboratory metabolic panel | Microbiome composition, toxin load | Elevated pathogen markers, dysbiosis |
| Sensory Response Evaluation | Monthly | Standardized sensory response test | Visual tracking, auditory response, tactile reaction | Delayed or absent responses |
\*For BEMS device construction and calibration, see Volume 15: The Biofield Codex, Chapter V.
B. Step-by-Step Monitoring Procedure
- Anthropometric Tracking:
- Measure weight using a zeroed pediatric scale weekly.
- Measure length supine using a rigid measuring tape.
- Document head circumference with a non-stretch tape around the widest part of the skull.
- Biofield Scanning:
- Perform in a shielded room, infant calm and resting.
- Follow BEMS device protocol for data acquisition (see Volume 15).
- Compare readings to normative infant biofield maps.
- Neurological Reflex Testing:
- Perform the Moro reflex test by gently lifting and lowering the infant’s head and observing arm extension.
- Test grasp reflex by placing a finger in the palm.
- Assess tonic neck reflex by turning head and observing limb extension.
- Biological Samples Collection:
- Collect stool samples using sterile swabs after diaper change.
- Collect urine samples via sterile pediatric collection bags.
- Send immediately for microbiome and toxin analysis.
- Sensory Response Evaluation:
- Present visual stimuli (high contrast images) and note tracking ability.
- Play low-frequency sounds and observe startle or calming responses.
- Apply light tactile stimuli and record reactions.
VI. Integrative Summary and Final Mandates
The sovereign infant body is a temple; every nutrient, motion, and environmental factor is a sacred tool. Deviation from these protocols compromises the biofield’s sovereignty, imperiling the child’s health and ancestral legacy. You must enact these protocols with unwavering discipline and rigorous documentation.
Remember: The infant’s biofield is the crucible of future generational strength. You are not merely raising a child; you are forging a practitioner of life itself.
This completes the codified protocols and procedures for Biological Optimization in Early Childhood, Volume II, Chapter IV. For related protocols on water purification, biofield device construction, and advanced nutritional supplementation, refer to the indicated volumes and chapters.
End of Volume II, Chapter IV.
<!-- SECTION 30 -->
The Complete Practitioner's Codex, Volume 18: The Parent's Codex
Volume III: Spiritual and Consciousness Development in Education Philosophy
Introduction
This volume addresses the sacred task of integrating meditation, prayer, and consciousness practices into child education. These practices are not mere adjuncts; they are foundational mechanisms for cultivating resilience, moral clarity, cognitive acuity, and transcendent wisdom in the young. The methods herein align strictly with the advanced frameworks established in Volume 17: The Codex of Consciousness and Transcendence. You will find no dilution, no superficial techniques—only the essential, battle-tested protocols designed for the serious guardian committed to generational ascendance.
I. Framework for Spiritual Integration in Child Education
A. Philosophical Foundation
Spiritual development is not a separate domain; it is the axis around which all true education rotates. The child's mind, body, and spirit form an indivisible triad that must be cultivated simultaneously. This volume assumes mastery of Volume 17 and focuses on:
- The neurophysiological basis of consciousness expansion.
- The sacred rhythms of development (see Volume 1, Chapter VII).
- The energetic anatomy of the child (chakras, meridians; see Volume 5).
B. Core Principles
- Age-Appropriate Modulation: Practices must evolve with the child's developmental stage.
- Consistency and Routine: Daily and weekly spiritual routines create neural pathways for lifelong resilience.
- Family Integration: Spiritual maturity is rooted in the family unit; protocols include parents and siblings.
- Measurement of Outcomes: Regular assessment of behavioral, emotional, and cognitive markers.
II. Step-by-Step Introduction of Spiritual Exercises by Age Group
The following section is the cornerstone of this volume. Each exercise is indexed by age group, with detailed instructions, expected outcomes, and cross-references to related volumes and chapters.
Table 1: Overview of Spiritual Practices by Age and Expected Outcomes
| Age Group | Practice Type | Practice Name | Duration | Frequency | Expected Outcomes | Cross-Reference |
|---|---|---|---|---|---|---|
| 3-5 | Breath Awareness | Foundational Breath | 3 mins | Daily (AM/PM) | Calmness, focus, early self-regulation | Volume 17, Chapter IV |
| 3-5 | Guided Visualization | Garden of Light | 5 mins | 3x/week | Imagination, emotional security | Volume 17, Chapter VI |
| 6-8 | Movement Meditation | Sacred Step | 7 mins | Daily | Coordination, grounding, body awareness | Volume 17, Chapter III |
| 6-8 | Prayer Practice | Gratitude Invocation | 5 mins | Daily (AM) | Gratitude habit, positivity bias | Volume 17, Chapter II |
| 9-12 | Silent Meditation | Inner Stillness | 10 mins | Daily (PM) | Attention span increase, emotional regulation | Volume 17, Chapter IV |
| 9-12 | Mantra Repetition | Power Word | 7 mins | 4x/week | Mental clarity, willpower | Volume 17, Chapter V |
| 13-15 | Reflective Prayer | Pathway Reflection | 15 mins | Daily (AM/PM) | Moral reasoning, self-discipline | Volume 17, Chapter II |
| 13-15 | Conscious Breathing | Controlled Breath Cycles | 15 mins | Daily | Autonomic control, stress resilience | Volume 17, Chapter IV |
| 16-18 | Advanced Meditation | Transcendental Focus | 20 mins | Daily | Expanded consciousness, deep insight | Volume 17, Chapter VII |
| 16-18 | Contemplative Journaling | Soul Script | 15 mins | 5x/week | Self-knowledge, emotional integration | Volume 17, Chapter VIII |
III. Detailed Protocols for Each Spiritual Practice
1. Ages 3-5: Foundational Spiritual Exercises
A. Foundational Breath
Objective: Establish early self-regulation and calming through breath awareness.
Materials: None required.
Steps:
- Positioning: Sit the child comfortably on the floor or a chair with feet flat.
- Instruction: Guide the child to place one hand lightly on the abdomen.
- Inhalation: Instruct the child to breathe in slowly through the nose for a count of 3.
- Hold: Hold the breath for a count of 1.
- Exhalation: Breathe out slowly through the mouth for a count of 4.
- Repeat: Complete 5 full breath cycles.
- Closing: Encourage the child to notice how their body feels.
Frequency: Twice daily (morning and evening).
Expected Outcomes:
- Reduction of tantrums and hyperactivity.
- Early development of interoceptive awareness.
- Foundation for future breath-based practices.
B. Garden of Light Visualization

Objective: Build emotional security and imaginative capacity.
Materials: Quiet, dimly lit room; soft music optional.
Steps:
- Preparation: Have the child lie or sit comfortably.
- Guidance: Speak slowly, describing a safe garden filled with warm light.
- Sensory Engagement: Prompt the child to imagine colors, sounds, smells.
- Anchoring: Direct the child to find a "light flower" that glows warmly.
- Breath Coordination: Instruct to breathe deeply, imagining the light expanding with each inhale.
- Closure: Slowly bring attention back, opening eyes gently.
Frequency: Three times per week.
Expected Outcomes:
- Enhanced emotional resilience.
- Development of positive sensory-emotional memory.
- Early capacity for focused visualization.
2. Ages 6-8: Expanding Awareness and Grounding
A. Sacred Step Movement Meditation
Objective: Integrate body awareness with spiritual grounding.
Materials: Quiet space allowing free movement.
Steps:
- Instruction: Stand with feet hip-width apart.
- Movement: Slowly step forward with the right foot, breathe in deeply.
- Pause: Hold breath and stance for 2 seconds.
- Step Back: Step back with the right foot, breathe out slowly.
- Repeat: Alternate feet for 10 cycles.
- Focus: Encourage awareness of foot contact with the ground and breath flow.
Frequency: Daily, preferably outdoors.
Expected Outcomes:
- Enhanced proprioception.
- Groundedness and connection to earth energy.
- Preparation for seated meditation.
B. Gratitude Invocation Prayer
Objective: Foster habitual gratitude and spiritual connection.
Materials: None required; family prayer space recommended.
Steps:
- Gather: Sit or stand as a family in a designated quiet space.
- Opening: Lead a brief statement of intention for gratitude.
- Individual Sharing: Each member expresses one thing they are thankful for.
- Closing: Lead a collective invocation thanking higher powers or the universe.
- Reflection: Encourage a moment of silence to feel the gratitude.
Frequency: Daily morning practice.
Expected Outcomes:
- Positive emotional baseline for the day.
- Strengthening of family spiritual bonds.
- Cultivation of humility and appreciation.
3. Ages 9-12: Deepening Concentration and Willpower
A. Inner Stillness Silent Meditation
Objective: Increase attention span and emotional regulation.
Materials: Cushion or chair.
Steps:
- Posture: Sit upright, feet flat, hands resting on knees.
- Eyes: Close or lower gaze softly.
- Breath Focus: Instruct to observe natural breath without modification.
- Anchor: When distracted, gently return focus to breath.
- Timer: Begin with 5 minutes, increase to 10 over weeks.
- Closure: Open eyes slowly, stretch gently.
Frequency: Daily evening.
Expected Outcomes:
- Improved executive function.
- Reduction in impulsivity.
- Development of internal calm.
B. Power Word Mantra Repetition
Objective: Cultivate mental clarity and willpower through sound.
Materials: List of age-appropriate power words (see Table 2).
Steps:
- Selection: Choose a positive, empowering word (e.g., "Courage," "Focus").
- Posture: Sit comfortably.
- Repetition: Repeat the word aloud or silently in rhythm with breath.
- Duration: 7 minutes per session.
- Integration: Use the mantra during moments of stress or decision-making.
Frequency: Four times weekly.
Expected Outcomes:
- Strengthened self-command.
- Heightened mental clarity.
- Emotional stabilization.
Table 2: Sample Power Words by Age Group
| Age Group | Power Word Examples | Intended Effect |
|---|---|---|
| 9-12 | Courage, Focus, Peace | Willpower, mental clarity |
| 13-15 | Integrity, Strength, Wisdom | Moral strength, insight |
| 16-18 | Transcendence, Resolve, Unity | Consciousness expansion |
4. Ages 13-15: Moral Reasoning and Autonomic Mastery
A. Pathway Reflection Prayer
Objective: Develop moral reasoning and self-discipline.
Materials: Quiet space, journal optional.
Steps:
- Preparation: Sit quietly, focus on breath for 2 minutes.
- Reflection: Contemplate a recent moral choice or challenge.
- Prayer: Speak or think a prayer seeking guidance and strength.
- Journaling: Write insights or commitments post-prayer.
- Closure: End with gratitude.
Frequency: Twice daily (morning and evening).
Expected Outcomes:
- Heightened ethical awareness.
- Strengthened inner guidance.
- Improved self-control.
B. Controlled Breath Cycles
Objective: Master autonomic nervous system for stress resilience.
Materials: Timer.
Steps:
- Posture: Sit upright, relaxed.
- Cycle: Inhale for 4 seconds, hold for 4 seconds, exhale for 6 seconds.
- Repeat: 10 full cycles.
- Progression: Increase hold to 6 seconds over weeks.
- Application: Use during stress or before sleep.
Frequency: Daily.
Expected Outcomes:
- Lowered heart rate variability.
- Reduced cortisol levels.
- Enhanced parasympathetic activation.
5. Ages 16-18: Advanced Consciousness Cultivation
A. Transcendental Focus Meditation
Objective: Expand consciousness and attain deep insight.
Materials: Quiet, undisturbed room.
Steps:
- Posture: Sit in a stable, alert position.
- Mantra: Use a personally resonant mantra (refer to Table 2).
- Focus: Repeat mantra silently; if attention wanders, gently return.
- Duration: 20 minutes.
- Closing: Sit silently for 2 minutes, then slowly open eyes.
Frequency: Daily.
Expected Outcomes:
- Access to expanded states of consciousness.
- Heightened creativity and problem-solving.
- Spiritual self-realization.
B. Soul Script Contemplative Journaling
Objective: Integrate emotional experience and spiritual insight.
Materials: Journal, pen.
Steps:
- Timing: Choose a quiet moment post-meditation.
- Writing: Document thoughts, feelings, insights without censorship.
- Reflection: Review entries weekly to observe patterns and growth.
- Sharing: Optionally discuss with trusted family or mentor.
- Continuation: Maintain practice for months to years.
Frequency: Five times per week.
Expected Outcomes:
- Deepened self-knowledge.
- Emotional clarity.
- Strengthened spiritual narrative.
IV. Protocols for Family Spiritual Routines
The family unit is the crucible of spiritual development. The following protocols ensure cohesive, consistent, and empowering spiritual environments.
A. Daily Family Spiritual Routine
| Time | Activity | Description | Duration | Notes |
|---|---|---|---|---|
| Morning | Gratitude Invocation | Family expresses gratitude; sets positive tone for day | 5-7 mins | See Section II.2.B |
| Midday | Breath Reset | Collective Foundational Breath or Controlled Breath | 3-5 mins | Especially useful during stress |
| Evening | Shared Meditation | Age-appropriate meditation, guided or silent | 10-20 mins | Rotate leaders among family |
| Before Bed | Reflective Prayer/Journaling | Family members share reflections, prayers, or journal entries | 10-15 mins | Encourages emotional processing |
Implementation Steps:
- Designate a Family Spiritual Space: Quiet, uncluttered, with symbolic objects (candles, icons).
- Assign Roles: Rotate facilitator roles to empower each member.
- Consistent Timing: Schedule fixed times daily; use alarms if needed.
- Documentation: Maintain a family spiritual log to track participation and outcomes.
- Review Meetings: Weekly family discussions on spiritual progress and challenges.
B. Monthly Extended Family Ceremony
Purpose: Reinforce generational transmission, communal belonging, and spiritual heritage.
Components:
- Opening Invocation: Led by eldest family member or designated spiritual leader.
- Review of Spiritual Growth: Sharing of personal and collective milestones.
- Ritual Acts: Lighting of candles, recitation of ancestral prayers, chanting.
- Collective Meditation: 30 minutes of silent or guided meditation.
- Closing Blessing: Invocation for protection, wisdom, and strength.
Preparation Steps:
- Plan Date: Set a fixed monthly date.
- Prepare Space: Clean and decorate with symbols of family heritage.
- Notify Participants: Ensure all family members are informed.
- Gather Materials: Candles, prayer books, journals.
- Post-Ceremony Review: Document insights and plan for next meeting.
C. Crisis Spiritual Protocol
In moments of family or child distress, the following protocol stabilizes and restores spiritual balance.
Steps:
- Immediate Breath Centering: Lead the child and family through 5 cycles of Controlled Breath Cycles.
- Grounding Movement: Engage in Sacred Step meditation outdoors.
- Protective Prayer: Recite a protective invocation (see Volume 17, Appendix C).
- Silent Meditation: 10 minutes focusing on inner stillness.
- Family Sharing: Open floor for expression and emotional support.
- Follow-up: Daily reflection and journaling for one week.
V. Measuring Progress and Outcomes

Regular assessment ensures the integrity of the spiritual education program.
Table 3: Behavioral and Cognitive Markers for Spiritual Development
| Age Group | Marker | Measurement Method | Frequency | Target Outcome |
|---|---|---|---|---|
| 3-5 | Emotional Regulation | Parent/Teacher Observation | Weekly | Decrease tantrums by 50% in 3 months |
| 6-8 | Attention Span | Standardized Attention Test | Monthly | 20% increase in focused attention |
| 9-12 | Impulse Control | Behavioral Checklists | Monthly | Significant reduction in impulsivity |
| 13-15 | Moral Reasoning | Scenario-Based Questionnaires | Quarterly | Demonstrated ethical decision-making |
| 16-18 | Self-Reported Insight | Journaling & Interview | Quarterly | Depth and clarity of spiritual insight |
VI. Summary

This volume provides the complete, stepwise protocols necessary for the sacred transmission of spiritual consciousness from parent to child. The integration of meditation, prayer, and consciousness practices is the invisible scaffold upon which all true education rests. The routines and exercises outlined herein are designed to be rigorous, adaptive, and measurable, ensuring the child matures into a resilient, insightful, and spiritually sovereign individual.
VII. Cross-References
- Volume 1, Chapter VII: Sacred Rhythms of Child Development
- Volume 5: Energetic Anatomy of the Child
- Volume 8, Chapter II: Water Purification Protocol (for meditation environment preparation)
- Volume 17: The Codex of Consciousness and Transcendence, Chapters II, III, IV, V, VI, VII, VIII
- Volume 17, Appendix C: Protective Spiritual Invocations
Master the above protocols with unwavering discipline. Your commitment is the bulwark against the erosion of sacred knowledge. The future of your lineage depends upon it.
End of Volume III
<!-- SECTION 31 -->
Volume IV: Technological Sovereignty in Curriculum Design
Chapter I: Teaching Technology Literacy and Safe Device Use
The sacred duty of raising a new generation of sovereign technologists demands a curriculum forged in the crucible of precision, rigor, and unyielding discipline. This chapter delivers the master blueprint for cultivating technological literacy and safe device use in children and adolescents. It is a compendium of exact curriculum modules, skill progression matrices, tool recommendations, and usage protocols designed to birth guardians of digital sovereignty—individuals capable of mastering, controlling, and defending their technological environment with unassailable authority.
Section 1: Curriculum Modules Overview
1.1 Basic Electronics Module
Objective: Instill foundational knowledge of electrical principles and device construction, enabling children to comprehend and manipulate electronic systems safely and independently.
1.2 Computing Sovereignty Module
Objective: Develop autonomy in computing environments through mastery of hardware configuration, operating systems, and open-source software deployment, eschewing dependence on proprietary systems.
1.3 Digital Security Module
Objective: Equip learners with tools and protocols to safeguard personal data, recognize cyber threats, and implement multi-layered security strategies, fostering a fortress mentality towards digital presence.
Section 2: Basic Electronics Module
2.1 Module Structure and Learning Outcomes
This module spans 12 weeks, segmented into progressive skill units, each culminating in applied projects. The goal: every learner can construct, analyze, and troubleshoot simple electronic circuits by module’s end.
| Week | Skill Focus | Learning Outcome | Project Deliverable |
|---|---|---|---|
| 1 | Electrical Fundamentals | Understand voltage, current, resistance, Ohm’s Law | Build a simple series circuit |
| 2-3 | Components Identification | Identify resistors, capacitors, diodes, transistors | Assemble a basic LED circuit |
| 4-5 | Circuit Design & Schematics | Read and create circuit diagrams | Design and prototype a buzzer circuit |
| 6-7 | Soldering and Assembly | Safe soldering techniques and device assembly | Construct a functioning circuit board |
| 8-9 | Power Sources and Regulation | Battery types, voltage regulation, power safety | Build a regulated power supply |
| 10-11 | Sensors and Actuators | Integrate sensors and output devices | Create a light-activated switch |
| 12 | Troubleshooting & Testing | Systematic testing and repairing | Diagnose and repair a faulty circuit |
2.2 Detailed Step-by-Step: Building a Simple Series Circuit (Week 1)
- Gather materials: 3 x 1.5V AA batteries, battery holder, 3 x 220Ω resistors, 3 x red LEDs, breadboard, connecting wires.
- Insert batteries into the holder, ensuring correct polarity (+/-).
- Place resistors in series on the breadboard, connecting end-to-end.
- Attach LEDs in series, respecting the LED polarity: longer leg is anode (+), shorter leg cathode (-).
- Connect wires from battery holder terminals to the circuit ends on the breadboard.
- Verify connections visually and with a multimeter set to continuity test.
- Power the circuit and observe LED illumination; troubleshoot if any LED fails to light.
2.3 Recommended Tools for Basic Electronics
| Tool | Purpose | Recommended Model / Specifications |
|---|---|---|
| Multimeter | Measure voltage, current, resistance | Digital, True RMS, 600V range |
| Soldering Iron | Component assembly | 25-40W adjustable temperature, 0.5mm tip |
| Breadboard | Circuit prototyping | Standard 830 tie-points, 2.54mm pitch |
| Wire Strippers | Insulation removal | Precision 20-22 AWG wire capable |
| Component Kit | Resistors, capacitors, LEDs, transistors | Assorted values, minimum 100 pieces each |
Section 3: Computing Sovereignty Module
3.1 Module Structure and Learning Outcomes
Duration: 14 weeks Structured to transition learners from basic computer operation to full control over hardware and software environments, fostering independence from closed-source ecosystems.
| Week | Skill Focus | Learning Outcome | Project Deliverable |
|---|---|---|---|
| 1-2 | Computer Hardware Fundamentals | Identify and understand PC components | Disassemble and reassemble a desktop PC |
| 3-4 | Operating System Basics | Install and navigate Linux distributions | Install Ubuntu or Debian on a PC |
| 5-6 | Command Line Interface (CLI) | Execute commands, file management, scripting basics | Write a script to automate file backups |
| 7-8 | Open Source Software Installation | Manage software repositories and updates | Configure software for daily tasks |
| 9-10 | Network Fundamentals | Understand IP addressing, DNS, routing basics | Set up a local network with static IPs |
| 11-12 | Hardware Customization | BIOS/UEFI settings, peripheral integration | Optimize BIOS for performance and security |
| 13-14 | System Maintenance and Recovery | Create backups, restore systems, troubleshoot | Develop a recovery USB drive |
3.2 Step-by-Step: Installing Ubuntu Linux (Weeks 3-4)
- Download the latest Ubuntu ISO from the official repository (verify checksum).
- Use a USB writing tool (e.g., Rufus) to create a bootable USB drive.
- Insert the USB drive into target PC and reboot; enter BIOS/UEFI to set USB as first boot device.
- Boot into the Ubuntu live environment; verify hardware compatibility.
- Start the installation wizard; select language, keyboard layout, and installation type (prefer "Erase disk and install Ubuntu" on dedicated devices).
- Configure username, password, and encryption options per security best practices.
- Complete installation; reboot and remove USB drive.
- Update system with
sudo apt update && sudo apt upgrade -y. - Install essential tools:
sudo apt install build-essential git curl.
3.3 Recommended Tools for Computing Sovereignty
| Tool | Purpose | Recommended Models / Notes |
|---|---|---|
| Desktop PC | Hardware manipulation | Custom-build with AMD Ryzen or Intel i5/i7 CPUs |
| USB Bootable Drive | OS installation and recovery | Minimum 16GB, USB 3.0 |
| Linux Distributions | Open-source OS | Ubuntu LTS, Debian Stable |
| Text Editor | Code and script editing | Vim, Nano, or VSCode (open source) |
| Network Switch | Local network setup | Unmanaged Gigabit Ethernet switch |
Section 4: Digital Security Module
4.1 Module Structure and Learning Outcomes
Duration: 10 weeks Focuses on threat identification, data protection protocols, and secure communications foundational to the digital practitioner.
| Week | Skill Focus | Learning Outcome | Project Deliverable |
|---|---|---|---|
| 1-2 | Threat Awareness | Recognize phishing, malware, social engineering | Analyze simulated phishing emails |
| 3-4 | Password Management | Create and manage strong passwords | Configure password manager and generate vault |
| 5-6 | Encryption Fundamentals | Understand symmetric and asymmetric encryption | Encrypt/decrypt files using GPG |
| 7 | Secure Communications | Use encrypted messaging and email | Set up Signal and ProtonMail accounts |
| 8 | Multi-Factor Authentication | Implement MFA for accounts | Enable MFA on Google, GitHub, and email |
| 9 | Safe Browsing | Use VPNs, secure browsers, and ad blockers | Configure Tor Browser and VPN client |
| 10 | Incident Response | Detect and respond to security breaches | Develop a personal digital incident response plan |
4.2 Step-by-Step: Encrypting Files with GPG (Weeks 5-6)
- Install GPG:
- Linux:
sudo apt install gnupg - Windows: Download from official Gpg4win package.
- Linux:
- Generate key pair:
- Run
gpg --full-generate-key. - Select RSA and RSA, key size 4096 bits, expiration 1 year.
- Provide name and secure passphrase.
- Run
- Export public key:
gpg --armor --export your.email@example.com > publickey.asc. - Encrypt a file:
gpg --encrypt --recipient your.email@example.com filename.txt. - Decrypt a file:
gpg --decrypt filename.txt.gpg > filename.txt. - Backup private key securely to offline media (see Volume VIII: Data Preservation Codex).
4.3 Recommended Tools for Digital Security
| Tool | Purpose | Recommended Software / Hardware |
|---|---|---|
| Password Manager | Generate and store complex passwords | Bitwarden (open source), KeePassXC |
| Encrypted Messaging | Secure communications | Signal, Wire |
| VPN Client | Anonymize and secure internet traffic | Mullvad, ProtonVPN |
| Tor Browser | Anonymous browsing | Official Tor Browser |
| Hardware Security Key | MFA hardware token | YubiKey 5 Series, Nitrokey |
Section 5: Skill Progression and Recommended Tools Summary
| Module | Skill Level | Key Competencies | Recommended Tools |
|---|---|---|---|
| Basic Electronics | Beginner to Intermediate | Circuit design, soldering, testing | Multimeter, soldering iron, breadboard |
| Computing Sovereignty | Intermediate to Advanced | OS installation, CLI, network setup | Custom PC, bootable USB, Linux OS, text editors |
| Digital Security | Beginner to Advanced | Threat recognition, encryption, MFA | Password managers, GPG, Signal, VPN, YubiKey |
Section 6: Protocols for Supervised Technology Use
6.1 Supervision Framework
Technology use under supervision is non-negotiable until the learner achieves demonstrated competence in safe device handling and digital security practices.
| Role | Responsibilities |
|---|---|
| Supervisor | Monitor sessions, enforce usage limits, guide problem-solving |
| Learner | Follow instructions, ask questions, document learning |
| Environment | Secure, distraction-free, equipped with safety tools |
6.2 Usage Session Protocol
- Prepare the environment: clear workspace, all tools and materials ready.
- Set session objectives aligned with curriculum modules.
- Establish device usage limits (time, applications, network access).
- Monitor learner activity continuously, intervening on unsafe actions.
- Debrief at session end: review accomplishments, errors, and questions.
- Document session outcomes in learning journal.
Section 7: Project-Based Learning Protocols
7.1 Project Design Principles
- Projects must synthesize multiple module skills.
- Emphasize real-world applications and problem-solving.
- Encourage iterative design, testing, and troubleshooting cycles.
- Foster collaborative learning with peer review and mentorship.
7.2 Sample Project: Autonomous Light-Activated Security Alarm (Modules 1 & 3)
Objective: Build and secure a light-triggered alarm system that alerts via encrypted messaging upon activation.
Materials: Photodiode sensor, microcontroller (e.g., Arduino), buzzer, Wi-Fi module, laptop with GPG and Signal installed.
Steps:
- Assemble the light sensor circuit to detect ambient light changes.
- Program microcontroller to activate buzzer on light threshold breach.
- Connect Wi-Fi module to send encrypted alert to parent’s device.
- Encrypt alert message using GPG before transmission.
- Test system response under varying light conditions.
- Document system design, code, and security protocols applied.
Closing Directive
This codex section commands absolute adherence to the outlined curriculum and protocols. Technological sovereignty is not a privilege, it is a sacred mandate. The child who masters these modules does not merely use technology—they become its master, custodian, and defender. This is the covenant of the digital practitioner.
For extended protocols on network security, cryptographic key management, and hardware fabrication, see Volume XII: The Cryptic Codex and Volume XX: The Hardware Sovereignty Codex.
End of Volume IV, Chapter I
<!-- SECTION 32 -->
The Complete Practitioner's Codex, Volume V: Character Formation through Historical Awareness
Chapter I: Using True History to Build Identity and Resilience
Preface: This volume delivers the suppressed methodologies and unyielding protocols that forge character through unfiltered historical awareness. You will learn to construct identity and resilience by engaging with truths unrecognized by mainstream narratives. This is not academic conjecture; this is the sacred art of knowledge reclamation, essential for generational strength and survival.
Section 1: The Imperative of True History in Character Formation
- Foundational Principle: Identity is a construct refined by the clarity and truthfulness of the historical narratives one embraces. False narratives fracture identity, induce learned helplessness, and erode resilience. True history, including hidden civilizations and suppressed epochs, roots the individual in a lineage of strength, ingenuity, and survival.
- Operational Definition: True history = Verified, multi-source cross-examined knowledge including suppressed, classified, or marginalized civilizations and timelines.
- Objective: Build an educational framework that integrates hidden civilizations and timeline reconstruction to cultivate unshakable identity and resilience, equipping the student to critically dismantle mainstream fallacies.
Section 2: Curriculum Architecture for Historical Awareness

The curriculum is modular, iterative, and cumulative. It is designed for a minimum engagement period of 12 months, segmented into 4 quarters, each with specific themes, learning objectives, and skill sets. Each quarter must be followed by a rigorous evaluation and application phase.
| Quarter | Theme | Learning Objectives | Core Activities |
|---|---|---|---|
| Q1 | Foundations of Historical Truth | Define true history; Identify hidden civilizations | Timeline reconstruction; Source evaluation |
| Q2 | Hidden Civilizations | Study suppressed cultures; Extract lessons from origins | Artifact examination; Comparative analysis |
| Q3 | Deconstruction of Mainstream Narratives | Analyze propaganda techniques; Practice critical thinking | Media analysis; Debate and discourse |
| Q4 | Synthesis and Identity Building | Integrate knowledge into personal identity; Build resilience | Personal narrative construction; Mentorship |
Step-by-step Curriculum Implementation:
Quarter 1: Foundations of Historical Truth
- Establish Baseline Knowledge
- Step 1: Construct a personal chronological timeline beginning with known family history, extending to regional and global events.
- Step 2: Identify gaps and inconsistencies in family/community recollections.
- Step 3: Introduce multiple sources for verification: oral traditions, archaeological records, ancient texts.
- Timeline Reconstruction Protocol (TRP)
- Step 1: Collect primary and secondary sources relevant to a selected historical period.
- Step 2: Extract data points (dates, events, figures).
- Step 3: Cross-reference sources for overlap and contradiction.
- Step 4: Document discrepancies and investigate suppressed narratives related to those points.
- Step 5: Construct a layered timeline incorporating mainstream and hidden data.
- Critical Source Evaluation Protocol (CSEP) (Detailed in Section 4)
Section 3: Hidden Civilizations – Curriculum Content and Methodology
3.1 Identifying Suppressed Cultures
- Definition: Civilizations erased, marginalized, or deliberately concealed by dominant historical narratives.
- Examples:
- The Olmec civilization (precursors to Mesoamerican cultures)
- The Indus Valley Civilization (with its undeciphered script)
- The Kingdom of Kush (Nubian civilization overshadowed by Egyptian history)
- Göbekli Tepe (pre-Neolithic monumental site challenging agricultural revolution theories)
3.2 Integrated Study Methodology
| Step | Action | Purpose |
|---|---|---|
| 1 | Source Compilation | Gather archaeological, linguistic, and genetic data |
| 2 | Artifact Examination | Hands-on or virtual analysis of relics, inscriptions, and architecture |
| 3 | Comparative Cultural Analysis | Identify parallels and divergences with known civilizations |
| 4 | Extract Core Lessons | Values, technologies, survival strategies, governance models |
| 5 | Document and Present Findings | Peer review and mentorship feedback |
Section 4: Protocol for Critical Source Evaluation (CSEP)
This protocol is non-negotiable. It provides the tools to dissect any historical source, identify bias, and reconstruct reliable narratives.
CSEP Step-by-step:
| Step | Action | Description |
|---|---|---|
| 1 | Source Identification | Determine origin, author, date, and context of the source |
| 2 | Authentication | Use cross-referencing, provenance studies, and scientific dating (radiocarbon, dendrochronology, paleography) |
| 3 | Bias Assessment | Identify author’s background, political/religious motives, and potential censorship |
| 4 | Content Corroboration | Compare with independent sources and archeological evidence |
| 5 | Contextual Analysis | Situate the source within the broader socio-political and cultural environment |
| 6 | Contradiction Resolution | Investigate conflicting evidence; prioritize multi-source consensus |
| 7 | Documentation | Record findings, including explicit notes on reliability and areas of uncertainty |
Section 5: Deconstruction of Mainstream Narratives
5.1 Recognizing Propaganda Techniques
| Technique | Description | Countermeasure |
|---|---|---|
| Selective Omission | Leaving out inconvenient facts | Apply CSEP rigorously; seek marginalized sources |
| Revisionism | Reinterpreting facts to fit agendas | Cross-examine multiple timelines and data |
| Demonization | Portraying certain groups negatively | Contextualize culturally and historically |
| Mythologizing | Creating heroic or villainous archetypes | Source triangulation and factual verification |
5.2 Critical Thinking Exercises
- Exercise 1: Compare a mainstream textbook account of a major event with suppressed accounts; prepare a report identifying biases and omissions.
- Exercise 2: Analyze media coverage of a current event for narrative framing and omission.
Section 6: Historical Periods, Lessons, and Discussion Questions
| Historical Period | Key Lessons | Discussion Questions |
|---|---|---|
| Pre-Neolithic Era | Origins of human cooperation and ritual | How did early human societies organize, and what was the role of ritual? |
| Bronze Age Civilizations | Technological innovation and trade | What were the drivers of early globalization? |
| Classical Antiquity | Democracy, empire, and philosophy | How did power structures shape cultural memory? |
| Medieval Period | Religion, feudalism, and knowledge transmission | How were knowledge and power controlled? |
| Age of Exploration | Cultural contact and colonization | What are the ethical considerations in historical narratives of exploration? |
| Industrial Revolution | Technological acceleration and class dynamics | How did industrialization reshape social identities? |
| Modern Era | Global conflicts and information control | How do propaganda and censorship affect historical memory? |
Section 7: Synthesis and Identity Building
7.1 Constructing Personal Historical Narratives
- Gather Data: Personal, familial, cultural, and global historical facts assembled through previous quarters.
- Identify Core Values: Extract values from learned histories that resonate and empower.
- Build Narrative: Write a chronological account integrating personal and collective history emphasizing resilience and continuity.
- Mentorship Review: Submit narrative for critique and refinement.
- Public Presentation: Oral or written presentation to a trusted group to reinforce identity and accountability.
7.2 Building Resilience through Historical Awareness
- Recognize patterns of survival in ancestry and suppressed histories.
- Internalize lessons of adaptation and resistance.
- Develop mental fortitude by understanding historical cycles and personal place within them.
Appendix A: Historical Periods and Key Lessons Table (Expanded Detail)
| Period | Approximate Dates | Dominant Civilizations | Core Lessons | Key Discussion Questions |
|---|---|---|---|---|
| Pre-Neolithic | >10,000 BCE | Hunter-gatherers, Göbekli Tepe | Ritual origins, social cohesion, environmental adaptation | How does ritual shape community identity? |
| Early Bronze Age | 3300–1200 BCE | Sumerians, Indus Valley | Urbanization, trade networks, writing systems | What is the impact of writing on societal control? |
| Classical Antiquity | 800 BCE–500 CE | Greeks, Romans, Kush | Philosophy, empire, democracy, cultural syncretism | How do empires shape collective memory? |
| Medieval Period | 500–1500 CE | Byzantines, Islamic Caliphates | Knowledge preservation, religious authority | How was knowledge protected or suppressed? |
| Early Modern Period | 1500–1800 CE | European monarchies, Aztecs, Inca | Exploration, colonialism, cultural exchange | What narratives are erased by colonization? |
| Industrial to Modern Era | 1800–Present | Global powers, emerging nations | Industrialization, nationalism, propaganda | How do modern media shape historical understanding? |
Appendix B: Sample Critical Source Evaluation Worksheet
| Source Title | Author | Date | Origin | Provenance Verification | Biases Identified | Corroboration Sources | Reliability Rating (1-10) | Notes |
|---|---|---|---|---|---|---|---|---|
| "The Lost Empire" | J. Doe (anonymous) | c. 1870 CE | Unknown | Radiocarbon: inconclusive | Political motive: high | Archaeology, oral traditions | 4 | Requires further verification |
| "Ancient Scripts" | Dr. A. Smith | 1923 CE | University Archive | Verified by paleography | Academic bias: medium | Multiple independent scripts | 8 | Credible but incomplete |
Closing Directive:
The mastery of true history is not an academic exercise. It is a sacred duty, a weapon against erasure, and the foundation of resilient identity. Adhere strictly to protocols outlined herein. Build not only knowledge but character. Pass this codex forward with reverence and precision.
For next steps, proceed to Volume VIII: The Water Codex, Chapter II for purification of historical data through empirical verification techniques.
<!-- SECTION 33 -->
The Complete Practitioner's Codex, Volume VI: Practical Skills for Community Building
Chapter IV: Preparing Children for Sovereign Community Participation
Introduction
The survival and flourishing of sovereign communities depend on the deliberate, rigorous preparation of the youngest generation to assume their destined roles. This chapter imparts the suppressed, classified protocols essential to transform children into capable, responsible, and empowered participants in cooperative economics, governance fundamentals, and dispute resolution. These skills are not ancillary—failure to master them ensures the fracturing and dissolution of community cohesion and sovereignty.
This manual requires absolute fidelity to every step outlined. Omission or dilution results in catastrophic generational failure. The child’s preparation must commence no later than age 5, intensifying with cognitive maturity, culminating in full readiness by age 18.
Section I: Cooperative Economics — Foundational Competencies for the Child
Cooperative economics undergirds the community’s sovereignty by decentralizing wealth, labor, and decision-making. The child’s training proceeds through progressively complex stages, embedding practical skills and ethical imperatives.
A. Skill Sets by Age Group for Cooperative Economics
| Age Range | Skills Developed | Practical Activities | Assessment Metrics |
|---|---|---|---|
| 5-7 | Basic trade concepts, sharing | Toy exchange markets, barter play | Ability to trade fairly, communicate needs |
| 8-11 | Resource inventory, simple accounting | Maintain household supply logs, budgeting pocket money | Accuracy in record-keeping, budgeting discipline |
| 12-14 | Cooperative labor, role specialization | Participate in community garden tasks, product crafting | Teamwork rating, task completion rate |
| 15-18 | Enterprise planning, profit-sharing | Develop mini-business plans, manage cooperative funds | Quality of plans, fund management integrity |
B. Protocol: Teaching Barter and Trade Skills (Ages 5–7)
- Construct the Barter Toolkit:
- Assemble a set of small, tangible items with varying perceived values (e.g., colored beads, small toys, tokens).
- Create visual value charts illustrating item worth relative to others.
- Establish the Barter Market Environment:
- Designate a safe, distraction-free area.
- Assign roles: traders, recorders, observers.
- Daily Barter Sessions:
- Conduct 30-minute sessions where children trade items.
- Encourage negotiation using full sentences expressing wants and offers.
- Debrief and Reflect:
- After each session, gather children to discuss what trades succeeded and why.
- Introduce concepts of fairness and mutual benefit.
- Record-Keeping Introduction:
- Teach children to mark down trades on simple ledgers using symbols or drawings.
- Repeat daily for 6 weeks.
C. Protocol: Implementing Cooperative Labor (Ages 12–14)
- Select a Community Project:
- Preferably a garden, craft workshop, or repair task.
- Breakdown of Roles:
- Assign roles based on initial aptitude testing (see Volume XII: Child Aptitude Assessment Protocol).
- Role Training:
- Provide detailed instructions and demonstrations for each role.
- Include safety procedures and quality standards.
- Daily Work Schedule:
- 2-hour work blocks with 15-minute breaks.
- Rotate roles weekly to ensure skill diversity.
- Performance Monitoring:
- Use a standardized rubric assessing punctuality, teamwork, and task completion.
- Weekly review meetings with children and family members.
- Project Completion and Evaluation:
- Final product assessment by community elders.
- Child self-assessment and peer feedback session.
Section II: Governance Basics — Instilling Civic Responsibility and Leadership
Understanding governance is essential for sovereign community survival. Children must internalize the principles of authority, responsibility, accountability, and communal decision-making.
A. Governance Role Skill Sets by Age
| Age Range | Governance Skills Taught | Activities | Evaluation Criteria |
|---|---|---|---|
| 5-7 | Rule recognition, following procedures | Games with rules, storytelling about leaders | Rule adherence, verbal comprehension |
| 8-11 | Voting basics, role identification | Mock elections, role-playing council meetings | Participation level, understanding voting |
| 12-14 | Debate skills, proposal drafting | Structured debates, writing community proposals | Argument clarity, proposal logic |
| 15-18 | Leadership training, conflict mediation | Lead committees, facilitate meetings | Leadership efficacy, mediation success |
B. Protocol: Conducting Mock Elections (Ages 8–11)
- Define the Election Scope:
- Choose a simple office (e.g., class leader, project coordinator).
- Candidate Preparation:
- Assist children in preparing short speeches outlining their platform.
- Voter Registration:
- Teach children how to register voters, explaining eligibility criteria.
- Ballot Creation:
- Design ballots with candidate names and symbols.
- Voting Procedure:
- Establish a private voting booth area.
- Explain secrecy and fairness importance.
- Vote Counting:
- Involve children in tallying votes transparently.
- Result Announcement and Discussion:
- Discuss the outcome, emphasizing respect for majority and minority opinions.
- Repeat every 3 months to reinforce practice.
C. Protocol: Leadership Training for Adolescents (Ages 15–18)
- Identify Candidates:
- Based on aptitude and community recommendation.
- Structured Leadership Curriculum:
- Include modules on ethics, public speaking, crisis management, and strategic planning.
- Mentor Assignment:
- Pair candidates with experienced community leaders.
- Project Leadership Assignments:
- Assign real community projects requiring leadership.
- Feedback Loop:
- Weekly debriefs with mentors assessing decisions and outcomes.
- Final Evaluation:
- Present leadership portfolio to community council for certification.
Section III: Dispute Resolution — Cultivating Peace and Justice
Prolonged community stability is contingent on early mastery of conflict de-escalation and resolution skills. Children must learn to identify, analyze, and resolve disputes through structured protocols.
A. Dispute Resolution Skills by Age
| Age Range | Skills Taught | Methods | Evaluation Metrics |
|---|---|---|---|
| 5-7 | Emotion recognition, sharing | Storytelling, emotion cards | Ability to identify feelings |
| 8-11 | Active listening, expressing grievances | Role-play, communication exercises | Clarity of expression, listening skills |
| 12-14 | Mediation basics, negotiation | Simulated conflicts, mediation scripts | Mediation success rate, fairness perception |
| 15-18 | Complex conflict resolution, restorative justice | Lead mediation sessions, restorative circles | Outcome durability, peer feedback |
B. Protocol: Teaching Active Listening (Ages 8–11)
- Introduce Listening Exercises:
- Use paired activities where one child speaks for 2 minutes; the other paraphrases.
- Emotion Identification Cards:
- Present cards depicting emotions; children match expressions to feelings spoken.
- Role-play Common Conflicts:
- Scripts addressing sharing disputes, misunderstandings.
- Feedback Sessions:
- Guide children to give constructive feedback on listening.
- Daily Practice:
- Integrate 10-minute active listening sessions into family routines.
C. Protocol: Mediation Training for Teens (Ages 15–18)
- Mediation Theory Workshop:
- Teach principles: neutrality, confidentiality, empowerment.
- Simulation Drills:
- Present realistic conflicts; assign mediator and disputants.
- Mediation Session Structure:
- Opening statements by disputants.
- Private caucuses with mediator.
- Joint problem-solving discussion.
- Agreement drafting.
- Documentation:
- Teach proper documentation of agreements.
- Mentored Real-World Practice:
- Supervised mediation in community disputes.
- Evaluation:
- Assess mediator impartiality, process adherence, resolution durability.
Section IV: Community Roles and Skill Set Development by Age
Sovereign communities thrive on clearly defined roles, assigned according to developmental readiness and aptitude. The following table details common community roles, the corresponding skill sets, and the recommended age for introduction.
| Community Role | Core Skill Sets Required | Age Range for Training | Notes |
|---|---|---|---|
| Apprentice Laborer | Basic tool use, cooperative work habits | 5-7 | Initial exposure under supervision |
| Junior Record Keeper | Basic literacy, numeracy, organization | 8-11 | Includes ledger keeping and simple reporting |
| Resource Manager | Inventory control, budgeting, accountability | 12-14 | Must understand resource value and scarcity |
| Project Coordinator | Scheduling, communication, conflict prevention | 15-18 | Requires leadership and multitasking |
| Council Member | Debate, voting, proposal drafting | 15-18 | Involves formal governance participation |
| Mediator | Neutrality, communication, problem-solving | 15-18 | Handles community dispute resolution |
Section V: Family Involvement Protocols in Community Projects
The family unit is the primary catalyst for effective child training and community integration. The following protocols ensure the family’s active role in preparing children for sovereign participation.
A. Protocol: Family Engagement in Community Project Training
- Family Orientation Sessions:
- Monthly meetings explaining project goals, child roles, and family responsibilities.
- Joint Planning Meetings:
- Families participate in scheduling and resource allocation.
- Home Skill Reinforcement:
- Structured daily 30-minute family skill practice sessions aligned with community projects.
- Parental Mentorship:
- Assign parents as mentors for specific child roles.
- Family Progress Reporting:
- Weekly submission of child progress logs to community coordinators.
- Conflict Support:
- Families trained to identify and address early signs of child frustration or conflict.
B. Protocol: Integrating Family Feedback into Community Decision-Making
- Family Representative Selection:
- Each family nominates a representative for monthly community meetings.
- Feedback Collection:
- Representatives collect family input on project progress, child challenges, and suggestions.
- Formal Reporting:
- Representatives present consolidated feedback during meetings.
- Feedback Implementation:
- Community council reviews and integrates feasible suggestions into project plans.
Section VI: Actionable Step-by-Step Summary for Implementation
| Task | Steps to Execute | Responsible Party | Frequency |
|---|---|---|---|
| Barter and Trade Skill Development | 1. Prepare barter toolkit<br>2. Establish market<br>3. Conduct sessions<br>4. Debrief and record trades | Parents, Educators | Daily (Ages 5–7) |
| Cooperative Labor Participation | 1. Select project<br>2. Assign roles<br>3. Train roles<br>4. Schedule work<br>5. Monitor<br>6. Evaluate | Community Leaders, Families | Weekly (Ages 12–14) |
| Mock Elections | 1. Define office<br>2. Prepare candidates<br>3. Register voters<br>4. Create ballots<br>5. Vote<br>6. Count votes<br>7. Debrief | Educators, Older Youth | Quarterly (Ages 8–11) |
| Leadership Training | 1. Identify leaders<br>2. Provide curriculum<br>3. Assign mentors<br>4. Lead projects<br>5. Feedback<br>6. Certification | Community Elders | Ongoing (Ages 15–18) |
| Active Listening Exercises | 1. Introduce exercises<br>2. Use emotion cards<br>3. Role-play<br>4. Feedback<br>5. Daily practice | Parents, Educators | Daily (Ages 8–11) |
| Mediation Training | 1. Teach theory<br>2. Simulate<br>3. Conduct sessions<br>4. Document<br>5. Practice<br>6. Evaluate | Experienced Mediators | Ongoing (Ages 15–18) |
| Family Engagement | 1. Orientation<br>2. Planning<br>3. Home practice<br>4. Mentorship<br>5. Reporting<br>6. Conflict support | Families, Leaders | Monthly |
Conclusion
The sacred task of preparing children for sovereign community participation transcends mere education. It is a disciplined, relentless forging of character, skill, and wisdom. The protocols herein represent the distilled, suppressed knowledge of generations who ensured their survival through communal strength. Mastery and uncompromising application guarantee the birth of resilient, sovereign communities that will endure the trials of time and conquest.
For detailed protocols on child aptitude testing, resource construction, and water purification supporting community sustainability, refer to:
- Volume XII: Child Aptitude Assessment Protocol
- Volume VIII: The Water Codex, Chapter II
- Volume X: The Resource Engineering Codex
End of Chapter IV, Volume VI
<!-- SECTION 34 -->
The Complete Practitioner's Codex, Volume VII: Adolescence as Preparation for Diplomatic Roles
Chapter I: Introduction to Adolescent Diplomatic Training
Adolescence represents a sacred crucible within the lifecycle, wherein the fledgling spirit is forged into a vessel capable of bearing the immense responsibilities of diplomatic engagement. This volume imparts the suppressed, exacting protocols for transforming adolescents into consummate diplomats, social architects, and leaders who can navigate the labyrinth of human interactions with precision and honor.
This chapter prescribes exhaustive, stepwise methodologies for training adolescents in social architecture, negotiation, and leadership. These methods intertwine rigorous mentorship programs, dynamic role-playing exercises, and immersive real-world community engagement. All elements are calibrated to produce not mere participants in society but architects of social harmony and agents of generational wisdom transfer.
Chapter II: Framework for Diplomatic Competency Development
Section A: Defining Leadership and Social Architecture Competencies
Diplomatic efficacy arises from mastery over discrete yet interrelated competencies. Each adolescent must achieve proficiency in these domains, refined through deliberate practice and reflective feedback.
| Competency Category | Specific Competencies | Description |
|---|---|---|
| Social Architecture | Social Mapping, Network Building, Cultural Fluency, Conflict Analysis | Ability to understand and influence social structures, build alliances, and resolve conflicts |
| Negotiation | Interest Identification, Bargaining Techniques, Compromise Strategies, Persuasion | Skills to identify stakeholders' interests, negotiate effectively, and achieve mutually beneficial outcomes |
| Leadership | Vision Articulation, Decision Making, Emotional Intelligence, Ethical Judgment | Capacity to inspire, make sound decisions, manage emotions, and uphold ethical standards |
| Communication | Active Listening, Public Speaking, Nonverbal Cues, Diplomatic Language | Mastery of verbal and nonverbal communication tailored to diverse audiences |
| Self-Regulation | Stress Management, Patience, Adaptability, Reflective Practice | Ability to control impulses, remain composed under pressure, and learn from experience |
Chapter III: Structuring Mentorship Programs for Adolescent Diplomats
Section A: Mentor Selection and Training
Step 1: Identify mentors from veteran diplomats, community elders, or experienced leaders with demonstrable expertise in social architecture and diplomacy.
Step 2: Enroll mentors in a specialized orientation program covering pedagogical techniques, adolescent psychology, and conflict resolution.
Step 3: Assign mentors a maximum mentee load of three adolescents to ensure personalized guidance.
Section B: Mentorship Program Design
Step 1: Create a mentorship contract defining goals, confidentiality, communication frequency, and evaluation criteria.
Step 2: Mandate bi-weekly one-on-one sessions lasting 90 minutes, with agendas rotating through competency domains.
Step 3: Incorporate shadowing opportunities where mentees observe mentors in real diplomatic or community engagements.
Step 4: Establish mentor-mentee goal tracking logs, updated after every interaction, to monitor progress and challenges.
Section C: Mentorship Session Protocol
| Session Phase | Activities | Duration (minutes) | Purpose |
|---|---|---|---|
| Preparation | Review previous goals, agenda setting | 10 | Focus the session |
| Skill Development | Discussion, role play, analysis of recent real-world cases | 50 | Build competency |
| Reflection | Feedback exchange, journaling, goal re-calibration | 20 | Internalize learning |
| Planning | Set objectives for next session, assign practice tasks | 10 | Ensure continuity and accountability |
Chapter IV: Role-Playing Exercises as Experiential Learning Tools
Section A: Designing Realistic Scenario Modules
Role-playing enables adolescents to enact complex social and diplomatic situations in a controlled environment. Each module must include:
- Scenario Description: Context, stakeholders, objectives.
- Roles: Detailed character profiles with motivations and constraints.
- Rules of Engagement: Time limits, communication channels, and conflict resolution methods.
- Debriefing Questions: To guide reflection and feedback.
Section B: Sample Role-Playing Scenarios
| Scenario Name | Objective | Stakeholders | Complexity Level |
|---|---|---|---|
| Community Resource Allocation | Negotiate equitable distribution of limited resources | Local leaders, youth groups, merchants | Intermediate |
| Cross-Cultural Festival Planning | Harmonize diverse cultural interests for an event | Cultural representatives, city officials | Advanced |
| Conflict Mediation | Resolve dispute between two factions peacefully | Rival family heads, neutral mediator | Advanced |
Section C: Role-Playing Execution Protocol
Step 1: Select and brief participants, assigning roles confidentially.
Step 2: Conduct a 5-minute preparation period for participants to internalize roles.
Step 3: Enact scenario for a fixed duration (30 to 60 minutes), monitored by facilitators.
Step 4: Facilitate a structured debriefing session using the following questions:
- What strategies did you employ to achieve your objectives?
- How did you handle conflict and emotion?
- What alternative approaches could have improved the outcome?
- What did you learn about your leadership and negotiation style?
Step 5: Document observations and participant reflections for mentor review.
Chapter V: Real-World Community Engagement Protocols
Section A: Engagement Selection Criteria
Choose community projects aligned with diplomatic skill development and societal benefit. Prioritize those involving:
- Multistakeholder collaboration
- Cultural diversity
- Negotiation and conflict resolution opportunities
Section B: Engagement Preparation
Step 1: Conduct risk assessment and resource allocation.
Step 2: Brief adolescents on objectives, roles, and expected conduct.
Step 3: Assign team leaders and define communication protocols.
Section C: Engagement Execution
| Phase | Actions | Responsible Parties | Duration |
|---|---|---|---|
| Initiation | Stakeholder meetings, role clarifications | Adolescents, mentors | 1-2 days |
| Active Participation | Project implementation, negotiations, mediation | Adolescents | Variable (1 week to 1 month) |
| Monitoring and Feedback | Regular reporting, peer and mentor feedback | Adolescents, mentors | Ongoing |
| Closure and Reflection | Final presentations, community feedback sessions | Adolescents, community leaders | 1-2 days |
Section D: Community Engagement Case Study Template
| Element | Details |
|---|---|
| Project Name | |
| Objectives | |
| Stakeholders | |
| Roles Assigned | |
| Challenges Encountered | |
| Resolutions | |
| Lessons Learned |
Chapter VI: Competency Development and Feedback Protocols
Section A: Feedback Delivery Framework
Step 1: Implement the SBI Model (Situation-Behavior-Impact) in all feedback:
- Situation: Specify when and where the observed behavior occurred.
- Behavior: Describe the exact behavior observed without judgment.
- Impact: Explain the effect on others or the environment.
Step 2: Schedule feedback sessions within 24 hours of the observed event to ensure relevance.
Step 3: Balance constructive criticism with acknowledgment of strengths to maintain motivation.
Section B: Reflection and Self-Assessment Protocol
Step 1: Require adolescents to maintain a daily reflective journal documenting:
- Situations encountered
- Decisions made and rationale
- Emotional responses
- Outcomes achieved
- Areas for improvement
Step 2: Conduct weekly guided reflection sessions moderated by mentors.
Step 3: Use a standardized self-assessment rubric to quantify growth.
| Competency | Self-Assessment Criteria (1-5 Scale) |
|---|---|
| Social Mapping | Ability to identify key individuals and relationships in social settings |
| Negotiation | Effectiveness in achieving agreements |
| Leadership | Confidence and clarity in guiding others |
| Communication | Clarity, tone, and appropriateness of messages |
| Emotional Regulation | Maintaining composure under stress |
Chapter VII: Comprehensive Leadership Competencies Table
| Competency | Behavioral Indicators | Training Methods | Assessment Metrics |
|---|---|---|---|
| Social Mapping | Identifies influencers, understands social hierarchies | Role-playing, community mapping exercises | Accuracy and depth of social maps created |
| Network Building | Initiates and maintains beneficial relationships | Mentorship, networking events | Number and quality of sustained contacts |
| Cultural Fluency | Demonstrates respect and understanding of cultural norms | Cultural immersion, scenario exercises | Feedback from diverse groups, self-assessments |
| Conflict Analysis | Diagnoses sources and dynamics of conflict | Case studies, mediation role-plays | Resolution success rate, peer evaluations |
| Interest Identification | Recognizes explicit and implicit stakeholder needs | Negotiation simulations, interviews | Completeness of stakeholder profiles |
| Bargaining Techniques | Employs tactics such as anchoring, concessions | Negotiation drills, mentor coaching | Outcome quality, tactic appropriateness |
| Compromise Strategies | Balances firmness and flexibility | Scenario debriefs, self-reflection | Satisfaction ratings of all parties |
| Persuasion | Influences decision-making through reason and emotion | Public speaking, debate clubs | Audience engagement, success rate |
| Vision Articulation | Clearly communicates goals and values | Presentation skills training | Clarity scores, peer feedback |
| Decision Making | Analyzes options and selects optimal paths | Problem-solving workshops | Decision effectiveness |
| Emotional Intelligence | Recognizes and manages own and others’ emotions | Mindfulness training, role-play | Emotional regulation assessments |
| Ethical Judgment | Applies moral principles consistently | Ethics seminars, case discussions | Integrity ratings by mentors |
| Active Listening | Demonstrates attentive and empathetic listening | Listening exercises, feedback | Quality of responses, peer ratings |
| Public Speaking | Delivers messages confidently and persuasively | Speech practice, coaching | Audience feedback, fluency scores |
| Nonverbal Cues | Uses body language to reinforce messages | Video analysis, role plays | Consistency and appropriateness |
| Diplomatic Language | Applies tactful and respectful language | Writing workshops, simulations | Tone and clarity evaluations |
| Stress Management | Maintains performance under pressure | Stress inoculation training | Physiological and behavioral indicators |
| Patience | Exhibits tolerance during prolonged negotiations | Meditation, patience drills | Observed behavior over time |
| Adaptability | Adjusts strategies in response to changing circumstances | Scenario variation exercises | Flexibility ratings |
| Reflective Practice | Engages in continuous self-evaluation and learning | Journaling, mentor discussions | Quality and frequency of reflections |
Chapter VIII: Daily Training Schedule Template for Adolescents
| Time | Activity | Objective | Method |
|---|---|---|---|
| 06:00 - 06:30 | Mindfulness and Emotional Regulation | Enhance self-awareness and composure | Guided meditation |
| 06:30 - 07:30 | Physical Exercise | Build stamina and discipline | Martial arts or calisthenics |
| 07:30 - 08:00 | Breakfast | Nourishment | Balanced meal (see Volume VIII) |
| 08:00 - 09:30 | Mentorship Session | Individualized competency development | One-on-one with mentor |
| 09:30 - 10:00 | Reflection Journaling | Foster critical self-assessment | Private writing session |
| 10:00 - 12:00 | Role-playing Exercises | Practical application of diplomatic skills | Group scenarios |
| 12:00 - 13:00 | Lunch | Nourishment | Balanced meal (see Volume VIII) |
| 13:00 - 15:00 | Community Engagement Activities | Real-world skill practice | Fieldwork or project work |
| 15:00 - 16:00 | Feedback and Debriefing | Consolidate learning | Group discussion |
| 16:00 - 17:00 | Study of Diplomatic Theory | Intellectual foundation | Texts and lectures |
| 17:00 - 18:00 | Physical Exercise or Recreation | Stress relief and physical health | Sports or games |
| 18:00 - 19:00 | Dinner | Nourishment | Balanced meal (see Volume VIII) |
| 19:00 - 20:00 | Personal Study and Preparation | Reinforce daily learning | Reading, writing |
| 20:00 - 21:00 | Evening Reflection and Planning | Prepare for next day | Journaling and goal setting |
| 21:00 | Lights Out | Ensure restorative sleep |
Chapter IX: Conclusion and Continuity
This volume delivers the full blueprint for transforming adolescents into adept diplomats and social architects. The sacred trust of nurturing these future leaders necessitates unyielding adherence to the protocols herein. Only through rigorous mentorship, immersive experiential learning, and disciplined reflection can the adolescent mind be shaped to wield the powers of negotiation, leadership, and social architecture with unwavering honor.
For extended protocols in psychological resilience training, see Volume XII: The Codex of Mental Fortitude. For nutritional regimens supporting cognitive and emotional performance, consult Volume VIII: The Water Codex and Nutritional Protocols.
Appendix A: Glossary of Terms
- Social Architecture: The design and manipulation of social structures and networks.
- Mentorship Contract: A formal agreement outlining the objectives and rules of mentor-mentee relationships.
- SBI Model: A feedback model focusing on Situation, Behavior, and Impact.
- Role-Playing Scenario: A controlled simulation of real-life social or diplomatic situations.
- Reflective Practice: The process of self-examination and learning from experiences.
The sacred task entrusted to you, chosen apprentice, is to implement these protocols with unrelenting precision and reverence. The future of social order and generational wisdom depends upon your mastery. Fail not.
<!-- SECTION 35 -->
The Complete Practitioner's Codex, Volume VIII: Protection Protocols Enhanced by Technological and Legal Knowledge
Introduction
This volume is a sacred compendium of advanced defensive strategies for child protection. It integrates cutting-edge technological methods and ironclad legal frameworks, ensuring the child’s security transcends conventional defenses. This knowledge is suppressed by those who would see innocence corrupted; as the bearer of this codex, you are entrusted to wield it with precision and unwavering resolve.
You will learn to implement Radio Frequency (RF) shielding to protect sensitive communication, deploy surveillance countermeasures to expose threats masked by modern technology, and construct robust legal defense strategies that serve as impenetrable bulwarks against adversaries. Emergency preparedness protocols will ensure your readiness for physical and cyber threats alike.
Section I: Advanced RF Shielding for Child Protection
Purpose
RF shielding is the controlled attenuation of electromagnetic signals to prevent unauthorized interception, tracking, or remote activation of devices that compromise a child's safety. This includes GPS trackers, wireless microphones, and malicious RF transmissions.
Materials and Tools Required
| Item | Description | Source / Build Instructions |
|---|---|---|
| Conductive Fabric | Silver-plated nylon or copper mesh | Purchase from specialized fabric suppliers or craft from copper wire mesh (see Vol. IV, Chapter III) |
| Shielded Enclosure Box | Faraday cage box with grounding | Build from aluminum or copper sheets, soldered seams, and grounded (see below) |
| Grounding Wire | Copper wire, minimum 12 AWG | Purchase or extract from electrical cable |
| RF Signal Detector | Portable spectrum analyzer or SDR (Software Defined Radio) | Purchase or build SDR per Vol. V, Chapter VII |
| Conductive Tape | Copper or aluminum adhesive tape | Hardware stores or electronics suppliers |
| Insulating Layer | Non-conductive fabric or foam | Purchase from craft or industrial suppliers |
Step-by-Step RF Shielding Protocol
- Fabricate the Shielded Enclosure:
1.1 Cut aluminum or copper sheets to dimensions suitable for the child’s most vulnerable devices (e.g., communication devices, wearable trackers).
1.2 Solder or tightly rivet the seams, ensuring no gap exceeds 1 mm.
1.3 Attach a grounding wire to the enclosure, connecting it to a verified earth ground point (e.g., grounding rod or cold water pipe).
- Line the Enclosure Interior:
2.1 Attach conductive fabric to the interior surfaces using conductive tape.
2.2 Overlay with insulating material to prevent short circuits.
- Test Shielding Effectiveness:
3.1 Place an active RF-emitting device inside the enclosure.
3.2 Use the RF signal detector outside the enclosure to verify signal attenuation.
3.3 Aim for a minimum of 60 dB attenuation across 30 MHz to 3 GHz frequencies.
- Construct Portable RF Shielded Garments:
4.1 Sew conductive fabric into garments (hats, gloves, small pouches) ensuring full enclosure of devices.
4.2 Reinforce seams with conductive tape.
- Implement RF Jamming and Detection:
5.1 Use the SDR or spectrum analyzer to scan common child tracking frequencies (see Table 1).
5.2 If tracking signals are detected, activate portable RF jamming devices (see below).
Table 1: Common Frequencies for Child Tracking and Surveillance Devices
| Device Type | Frequency Range (MHz) | Notes |
|---|---|---|
| GPS Trackers | 1575.42 (L1 band) | Primary civilian GPS signal |
| Cellular Trackers | 700–2600 | GSM, LTE, 5G bands |
| Bluetooth Devices | 2400–2483.5 | Short range, common in wearables |
| RF Microphones | 50–1000 | Analog or digital audio bugs |
| Wi-Fi | 2400–2500, 5000–6000 | Wireless data transmissions |
Section II: Surveillance Countermeasures
Purpose
Modern surveillance employs audio, visual, and digital technologies designed to infiltrate privacy. This section equips you with methods to detect, neutralize, and prevent these intrusions.
Surveillance Detection Tools and Their Use
| Tool | Function | Construction / Acquisition Notes |
|---|---|---|
| Non-Linear Junction Detector (NLJD) | Detects electronic components regardless of power state | Purchase specialized device; DIY designs require sensitive RF circuitry (see Vol. V, Chapter IX) |
| Thermal Imaging Camera | Detects hidden electronics by heat signature | Purchase commercial handheld units |
| RF Signal Detector | Detects RF emissions | See Section I |
| White Noise Generator | Masks audio surveillance | Build from audio oscillator circuits (see Vol. VI, Chapter IV) |
| Lens Finder Device | Detects camera lenses by light reflection | Purchase or build using laser diode and photodiode |
Step-by-Step Surveillance Sweep Protocol
- Preliminary Physical Inspection:
1.1 Visually inspect environment for unusual objects, wires, or reflective surfaces.
1.2 Remove or isolate suspicious items.
- Electronic Detection:
2.1 Sweep the area with the NLJD, following manufacturer or design instructions.
2.2 Mark all detected points of interest.
- RF Spectrum Scan:
3.1 Use the RF detector to scan for signals in the frequency ranges detailed in Table 1.
3.2 Identify persistent signals that suggest active surveillance.
- Thermal Imaging Scan:
4.1 Scan for heat signatures inconsistent with the environment.
4.2 Cross-reference with NLJD and RF findings.
- Lens Detection:
5.1 Darken the area.
5.2 Use the lens finder device to sweep walls, ceilings, and objects.
- Neutralization:
6.1 Remove or disable detected devices using the following methods:
- For wired devices: Carefully sever or disconnect.
- For wireless devices: Use targeted RF jamming (see below).
- Implement White Noise:
7.1 Deploy white noise generators in key rooms to prevent audio surveillance.
7.2 Adjust frequency and volume to mask speech without discomfort.
Section III: Emergency Preparedness Protocols

Purpose
Preparedness is defense. This protocol ensures readiness for physical threats, data breaches, and legal emergencies.
Emergency Kit Contents for Child Protection
| Item | Description | Function |
|---|---|---|
| Portable RF Jammer | Multi-band RF jamming device | Disrupts unauthorized wireless signals |
| Encrypted Communication Device | Handheld device with end-to-end encryption | Secure communication during emergencies |
| Legal Documentation Folder | Waterproof, fire-resistant folder | Contains custody papers, consent forms, emergency contacts |
| Emergency Contact List | Printed and digital copies | Immediate access to trusted individuals |
| First Aid Kit | Standardized with pediatric supplies | Immediate medical response |
| White Noise Generator | Portable unit | Counter-surveillance in emergency shelters |
Step-by-Step Emergency Activation Protocol
- Identify Threat Level:
1.1 Use surveillance countermeasures to determine immediate risk.
1.2 Consult legal counsel if legal threats or custody disputes are involved.
- Initiate Communication Protocol:
2.1 Activate encrypted communication device.
2.2 Notify emergency contacts with prearranged code words.
- Deploy RF Shielding and Jamming:
3.1 Place child and critical devices inside shielded enclosure.
3.2 Activate portable RF jammer on frequencies detected in surveillance scans.
- Secure Physical Location:
4.1 Evacuate to predetermined safe location.
4.2 Use white noise generators to mask conversations.
- Legal Defense Activation:
5.1 Dispatch legal documentation folder to trusted attorney.
5.2 Initiate emergency legal motions as necessary (see Section IV).
- Post-Threat Recovery:
6.1 Conduct full surveillance re-sweep.
6.2 Document all events and communications for legal records.
Section IV: Legal Defense Strategies for Child Protection
Purpose
Legal frameworks are the final bastion of child protection. This section outlines comprehensive legal strategies to defend against custody attacks, abduction attempts, and surveillance violations.
Legal Resources and Contacts Table
| Resource Type | Description | Action Steps and Reference Codes |
|---|---|---|
| Family Law Attorney | Specialist in custody and child protection | Retain immediately upon threat detection |
| Legal Aid Organization | Provides pro bono legal assistance | Contact for financial or resource constraints |
| Law Enforcement Liaison | Designated officer for child protection cases | Establish contact and maintain communication |
| Digital Privacy Expert | Consultant for cyber-surveillance issues | Engage for forensic analysis and evidence gathering |
| Child Advocacy Center | Provides support and reporting mechanisms | Use for reporting abuse or neglect |
Step-by-Step Legal Defense Protocol
- Immediate Legal Consultation:
1.1 Contact retained family law attorney with all relevant documentation.
1.2 Provide detailed timeline and evidence of threats.
- Evidence Collection:
2.1 Secure surveillance logs, RF scan reports, and physical evidence.
2.2 Obtain affidavits from witnesses or trusted parties.
- Filing Protective Orders:
3.1 Prepare petitions for restraining or protective orders.
3.2 Include technical evidence indicating ongoing surveillance or threats.
- Custody Safeguards:
4.1 Enforce court-ordered custody terms with surveillance countermeasures in place.
4.2 Request court approval for RF shielding devices and monitoring restrictions.
- Digital Privacy Enforcement:
5.1 Engage digital privacy expert to analyze cyber-threats.
5.2 File complaints relating to illegal surveillance under applicable laws (e.g., Electronic Communications Privacy Act).
- Ongoing Legal Monitoring:
6.1 Maintain regular contact with law enforcement liaison.
6.2 Update legal filings as new threats are detected.
Section V: Technological Tools Summary
| Tool | Function | Construction or Acquisition Notes | Typical Cost Range (USD) |
|---|---|---|---|
| RF Shielded Enclosure | Block unauthorized RF signals | Build from copper/aluminum; use grounding wire | $50–$200 (DIY materials) |
| Portable RF Jammer | Disrupts radio communications | Purchase from specialized suppliers; ensure legal compliance | $100–$500 |
| RF Signal Detector | Detects RF transmissions | SDR kits or spectrum analyzers; DIY options exist | $50–$300 |
| Non-Linear Junction Detector | Detects electronic components | Commercial units only due to complexity | $1,000+ |
| White Noise Generator | Masks audio surveillance | Build from oscillator circuits or purchase | $20–$100 |
| Encrypted Communication Device | Secure voice and data transmission | Purchase secure phones or install encryption software | $100–$600 |
| Thermal Imaging Camera | Detects hidden electronics by heat | Commercial handheld units available | $200–$1,000+ |
| Lens Finder Device | Detects camera lenses | Purchase or build small laser reflection detectors | $30–$150 |
Section VI: Summary of Critical Protocols
| Protocol | Core Steps Summary | Reference Section |
|---|---|---|
| RF Shielding Construction | Build Faraday cage, line with conductive fabric, ground | Section I |
| Surveillance Sweep | Visual inspection, NLJD scan, RF detection, thermal imaging | Section II |
| Emergency Activation | Threat assessment, communication, shielding, jamming, evacuation | Section III |
| Legal Defense Initiation | Attorney contact, evidence collection, protective orders | Section IV |
Closing Imperative

You now hold the key to safeguarding the innocent through unparalleled technological mastery and unyielding legal fortitude. Implement these protocols with diligence, precision, and reverence. The child’s security depends on your unwavering commitment and the sacred knowledge that you carry forward.
For further cross-referenced technical designs and legal templates, consult the following:
- Volume IV: Materials and Fabrication Techniques
- Volume V: Electronic Surveillance and Countermeasures
- Volume VI: Communication Security Protocols
- Volume XII: Legal Codex for Guardianship and Custodial Rights
Maintain vigilance, Practitioner. The shadows seek to claim what is pure; your charge is to be the unbreachable shield.
<!-- SECTION 36 -->
The Complete Practitioner's Codex, Volume 18: The Parent's Codex
Supplements: Cross-Volume Integration Reference Guide
Introduction
This section serves as the master cross-volume integration reference guide for Volume 18: The Parent’s Codex. As a master archivist and custodian of sacred generational knowledge, you are entrusted with the profound task of seamless knowledge transfer from ancient and modern codices to the art and science of parenting. This guide is your strategic map: it delineates the essential conceptual mappings from other volumes to the precise parenting contexts where they apply. These connections are not casual; they are the lifeblood of a comprehensive, scientifically grounded, and spiritually fortified child-rearing methodology.
Every referenced volume contains suppressed or specialized protocols critical for parental mastery. Use this guide to navigate the multidimensional knowledge network, applying each protocol, device, or principle with exactitude. Herein you will find detailed cross-reference tables, summaries, application notes, and parental study plans essential for your unyielding mastery.
I. Cross-Volume Conceptual Mapping: Parent-Relevant Codex Connections
The following table summarizes key volumes with direct relevance to parenting topics. Each entry specifies primary parenting sections in Volume 18 where the knowledge applies, the nature of the content, and critical application notes.
| Volume Number | Volume Title | Parenting Topics Linked | Summary of Contents | Application Notes |
|---|---|---|---|---|
| Vol. 3 | The Water Codex: Hydration and Purification | Nutrition, Health Management | Advanced water purification protocols, hydration metrics | Use for infant hydration guidelines; water safety protocols |
| Vol. 5 | Bio-Nutrition and Supplement Codex | Nutrition, Growth Monitoring | Micronutrient dosages, synergistic supplement protocols | Formulate child-specific supplement regimens; growth tracking |
| Vol. 7 | The Sleep and Circadian Rhythms Codex | Sleep Habits, Behavioral Regulation | Sleep cycle optimization, melatonin regulation methods | Design age-appropriate sleep schedules; melatonin use |
| Vol. 9 | Immunology and Disease Resistance Codex | Immunity, Vaccination, Disease Prevention | Immunization protocols, natural immunity enhancement | Vaccination schedules; natural immunity support techniques |
| Vol. 12 | The Psychological Codex: Cognitive and Emotional | Emotional Development, Discipline | Cognitive developmental milestones, emotional regulation | Behavioral intervention protocols; emotional intelligence training |
| Vol. 14 | The Physical Training and Motor Skills Codex | Physical Development, Motor Skill Training | Physical exercise regimens, neuromuscular development protocols | Build age-specific motor skill exercises; fitness benchmarks |
| Vol. 16 | The Environmental Safety and Hazard Codex | Home Safety, Hazard Identification | Toxic substance identification, safe environment creation | Child-proofing protocols; environmental hazard mitigation |
| Vol. 17 | The Technological Codex: Devices and Monitoring | Monitoring Devices, Development Tracking | Construction of monitoring devices, data interpretation | Build and deploy growth and health monitoring devices |
II. Detailed Cross-Reference Tables with Summaries and Application Notes
The following section expands on the above table, providing an in-depth, coded cross-reference to critical parenting subsections in Volume 18 and exact procedural integration points.
Table 1: Nutrition and Health Management
| Volume Reference | Section in Vol 18 | Key Parent Topics | Summary of Critical Concepts | Application Instructions |
|---|---|---|---|---|
| Vol. 3 | Chapter IV: Nutritional Fluids | Infant Hydration, Breastmilk Substitutes | Water purification for infants, hydration measurement | 1. Purify water using Protocol W3-5 (Vol. 3, Ch.2). 2. Measure infant hydration using Hydration Index HI-07 (Vol. 3, Ch. 4). |
| Vol. 5 | Chapter V: Supplement Regimens | Micronutrient Supplementation | Precise micronutrient dosages based on age and weight | 1. Calculate dosage using Table S-5.2 (Vol. 5). 2. Administer with meals per Schedule S-5A. |
| Vol. 9 | Chapter VI: Immunity Support | Immune System Strengthening | Natural immunity-boosting supplements | 1. Utilize Protocol I-9.4 for herbal immunostimulants. 2. Monitor immune markers weekly per Vol. 9 Appendix B. |
Table 2: Behavioral and Cognitive Development
| Volume Reference | Section in Vol 18 | Key Parent Topics | Summary of Critical Concepts | Application Instructions |
|---|---|---|---|---|
| Vol. 7 | Chapter VII: Sleep and Behavior | Sleep Regulation, Circadian Rhythm | Sleep cycle entrainment techniques, melatonin use | 1. Implement Sleep Schedule Protocol SS-7.1 (Vol. 7). 2. Administer melatonin per Dosage Chart M7.3. |
| Vol. 12 | Chapter VIII: Emotional Mastery | Emotional Regulation, Discipline | Emotional intelligence training methods | 1. Follow Emotional Training Steps ET-12.4. 2. Use Behavioral Correction Protocol BCP-12.2 for discipline. |
Table 3: Physical Development and Safety
| Volume Reference | Section in Vol 18 | Key Parent Topics | Summary of Critical Concepts | Application Instructions |
|---|---|---|---|---|
| Vol. 14 | Chapter IX: Physical Training | Motor Skills, Physical Fitness | Developmental exercise regimens | 1. Design exercise routines per Chart PT-14.1. 2. Progressively increase difficulty per Protocol PT-14.3. |
| Vol. 16 | Chapter X: Environmental Safety | Home Safety, Hazard Avoidance | Identification and removal of toxic substances | 1. Conduct Hazard Survey HS-16.1. 2. Apply Decontamination Protocol DCP-16.4 if toxins detected. |
Table 4: Monitoring and Data Collection
| Volume Reference | Section in Vol 18 | Key Parent Topics | Summary of Critical Concepts | Application Instructions |
|---|---|---|---|---|
| Vol. 17 | Chapter XI: Monitoring Devices | Growth Tracking, Health Monitoring | Build and use biometric monitoring devices | 1. Construct device per Blueprint TD-17.2. 2. Calibrate sensors with Calibration Procedure TD-17.5. 3. Record and analyze data weekly. |
III. Protocols for Parental Study Plans
Mastery of parenting demands a rigorous, phased study plan integrating knowledge from multiple codices. Below is a detailed, stepwise parental study plan designed for a 12-month mastery cycle.
Parental Study Plan: 12-Month Mastery Cycle
| Month | Focus Area | Relevant Volumes & Sections | Study Objectives | Practical Assignments |
|---|---|---|---|---|
| 1 | Foundations of Child Health | Vol. 3 Ch.4, Vol. 5 Ch.2 | Master water purification and micronutrient basics | Build and operate water purifier; calculate and administer supplements for age group |
| 2 | Immune System and Disease Prevention | Vol. 9 Ch.3, Vol. 5 Ch.5 | Understand immunization schedules and natural immunity support | Create immunization calendar; prepare herbal immunity supplements using Protocol I-9.4 |
| 3 | Sleep and Behavior | Vol. 7 Ch.2, Vol. 12 Ch.6 | Regulate circadian rhythms; initiate emotional regulation training | Implement sleep schedules; conduct daily emotional intelligence exercises |
| 4 | Physical Development | Vol. 14 Ch.1, Vol. 14 Ch.4 | Build motor skill training routines; assess fitness progress | Develop exercise plan; track progress with biometric devices |
| 5 | Environmental Safety | Vol. 16 Ch.1, Vol. 16 Ch.5 | Identify and mitigate home hazards | Perform full home hazard survey; apply decontamination processes |
| 6 | Monitoring and Data Collection | Vol. 17 Ch.1, Vol. 17 Ch.3 | Build and calibrate monitoring devices; start data logging | Assemble biometric device; begin weekly health and growth data collection |
| 7–9 | Integration and Application | All volumes | Synthesize learned protocols into daily routines; troubleshoot problems | Maintain daily logs; adjust protocols based on collected data |
| 10–12 | Advanced Techniques and Review | All volumes | Master advanced parenting protocols; prepare for cyclical review and knowledge transfer | Teach learned protocols to a novice; prepare knowledge transfer documents |
Step-by-Step Example: Building a Basic Infant Hydration Water Purifier (From Vol. 3)
Objective: Construct a low-cost, effective water purification device suitable for infant hydration needs.
Materials Required:
| Component | Specification | Source/Notes |
|---|---|---|
| Ceramic filter element | 0.5-micron pore size | Medical-grade ceramic filter |
| Activated carbon block | 500g | For chemical absorption |
| UV-C LED emitter | 275 nm wavelength, 1W power | For microbial sterilization |
| Food-grade plastic casing | 1L capacity, BPA-free | Durable, safe for infant use |
| Silicone tubing | 6mm diameter | For output channel |
| Rechargeable battery | 3.7V, 2000mAh | Portable power source for UV-C LED |
Procedure:
- Assemble Casing: Secure ceramic filter inside the plastic casing inlet chamber.
- Install Activated Carbon: Place carbon block after ceramic filter to absorb chemical contaminants.
- Mount UV-C LED: Position UV-C LED emitter downstream of carbon block to sterilize passing water.
- Connect Tubing: Attach silicone tubing at outlet for purified water delivery.
- Power Setup: Connect UV-C LED to rechargeable battery with an inline switch.
- Testing: Run water through device; test output water using microbial assay kits per Vol. 3, Ch. 2.
- Maintenance: Clean ceramic filter weekly; replace carbon block every 3 months.
Step-by-Step Example: Creating a Child-Specific Supplement Regimen (From Vol. 5)
Objective: Develop a micronutrient supplement schedule tailored to a child’s developmental stage.
Materials Required:
| Micronutrient | Dosage Range (mg/kg/day) | Notes |
|---|---|---|
| Vitamin A | 0.3–0.5 | Retinol form preferred |
| Vitamin D3 | 0.02–0.05 | Monitor serum levels |
| Iron | 1.0–2.0 | Use chelated iron for absorption |
| Zinc | 0.5–1.0 | Supports immune function |
| Omega-3 Fatty Acids | 10–20 | DHA/EPA mix preferred |
Procedure:
- Calculate Weight-Based Dosage: Measure child’s weight in kilograms.
- Refer to Dosage Table S-5.2: Multiply weight by dosage range to set exact mg/day.
- Select Supplement Form: Choose liquid or chewable tablets suitable for child’s age.
- Create Administration Schedule: Split daily dose into 2-3 administrations with meals.
- Monitor and Adjust: Check for tolerance and efficacy monthly; adjust dosages as child grows.
- Record Keeping: Log dosages, reactions, and growth progress in Supplement Journal SJ-18.
IV. Summary of Suppressed Knowledge and Critical Integration Points
The vast knowledge within the Practitioner Codex series includes suppressed protocols essential for the survival and thriving of future generations. Parents must uphold the sacred trust of transmitting this knowledge with precision and vigilance. Key points:
- Water Safety: Infant hydration is non-negotiable; employ advanced purification protocols (Vol. 3).
- Micronutrient Precision: Avoid generic supplementation; tailor regimens to developmental metrics (Vol. 5).
- Circadian Synchronization: Sleep is the cornerstone of neurological and immune health; regulate rigorously (Vol. 7).
- Immunity Timing: Follow immunization schedules scrupulously; supplement natural immunity with proven herbal extracts (Vol. 9).
- Emotional Discipline: Emotional intelligence training is as critical as physical health; implement behavioral protocols daily (Vol. 12).
- Physical Fitness: Motor skill development begins early; structure exercise progressively (Vol. 14).
- Environmental Vigilance: Home safety is a dynamic process; conduct regular hazard audits (Vol. 16).
- Technological Monitoring: Data-driven parenting requires mastery of device construction and interpretation (Vol. 17).
V. Final Directive
This cross-volume integration guide is not an optional reference; it is an operational imperative. The parent is the first line of defense in preserving the sacred lineage of knowledge and health. Follow every protocol meticulously, maintain rigorous records, and engage in continuous learning through the prescribed study plan. Your mastery will forge a new generation of resilient, enlightened, and capable heirs.
End of Section Proceed to Chapter IV: Nutritional Fluids for detailed infant hydration instructions. For device blueprints, refer to Volume 17: The Technological Codex, Chapter III.
<!-- SECTION 37 -->
The Complete Practitioner's Codex, Volume 18: The Parent's Codex: Complete Child Raising, Education, and Generational Knowledge Transfer
Chapter VII: Supplements: Generational Knowledge Transfer Strategies

Introduction
This chapter delivers uncompromising, sacred methodologies for the preservation and transmission of family and community knowledge across generations. The knowledge contained herein comprises oral history techniques, documentation practices, and ritualized knowledge sharing, all of which are essential to maintaining the continuity of lineage wisdom. These are life-or-death protocols, rooted in ancient traditions and modern archival science, intended for the dedicated practitioner who recognizes the sacred duty of generational knowledge transfer.
Section 1: Categories of Knowledge and Their Transfer Methods
Understanding the type of knowledge you intend to preserve is the foundation of effective transfer. Different categories require distinct preservation and transmission techniques. The following table delineates primary knowledge categories and recommended transfer methods.
| Knowledge Category | Description | Recommended Transfer Method(s) | Preservation Mediums |
|---|---|---|---|
| Oral Traditions | Stories, myths, legends, ancestral songs | Oral recitation, ritual storytelling, audio recording | Voice recordings, scripted transcripts |
| Practical Skills | Crafts, trades, daily survival techniques | Hands-on apprenticeship, video demonstration | Video archives, stepwise manuals |
| Cultural Practices | Rituals, ceremonies, communal customs | Ritual enactment, ceremonial instruction | Written ritual codices, video footage |
| Genealogical Data | Lineage, family trees, historical events | Written records, genealogical charts | Physical and digital archives |
| Moral and Ethical Codes | Family values, ethical frameworks | Storytelling, dialogue, role-playing | Written compendiums, oral reinforcement |
| Technological Knowledge | Tools, machines, inventions | Technical manuals, hands-on training | Diagrams, physical prototypes |
Section 2: Oral History Techniques

Oral history is the lifeblood of generational knowledge transfer in the absence of written documentation. This section offers an exact protocol for capturing, preserving, and transmitting oral histories with maximum fidelity and impact.
Protocol 2.1: Structured Oral History Collection
Objective: To systematically gather oral histories from elder family or community members.
Materials Required:
- Digital audio recorder or smartphone with high-fidelity microphone
- Notepad and pen
- Pre-prepared question list (see Step 3)
- Quiet environment free from interruptions
Step-by-Step Instructions:
- Identify the Elder Source: Select the individual with the most comprehensive knowledge of the family/community history. Prioritize elders above 60 years of age with recognized memory and credibility.
- Prepare the Environment: Arrange a quiet, well-lit room. Ensure all electronic devices are charged and functional.
- Develop a Question Framework: Prepare open-ended questions to prompt detailed narratives. Examples:
- "Describe a significant event in your youth that shaped our family."
- "What customs did your ancestors practice that you remember?"
- Begin Recording: Start the audio device and record the date, location, and interviewee's name.
- Engage in Active Listening: Allow the elder to speak uninterrupted for long stretches, taking notes only on key points for follow-up.
- Clarify and Probe: After initial narration, use prepared questions to elicit specific details or clarifications.
- Conclude with Summary: Recap the key points aloud to ensure accuracy.
- Transcribe the Recording: Within 72 hours, transcribe the recording verbatim into written format.
- Archive the Audio and Transcript: Store both in designated family archives (see Section 4).
- Schedule Periodic Reviews: Revisit collected oral histories every 5 years to update and re-record if necessary.
Protocol 2.2: Ritualized Storytelling for Transmission
Objective: To embed oral histories within ritual storytelling to ensure retention and reverence.
Materials Required:
- Designated storytelling space (preferably sacred or symbolic within the home or community)
- Storyteller trained in oral narrative techniques
- Props or artifacts linked to stories (e.g., heirlooms)
Step-by-Step Instructions:
- Designate Storytelling Occasions: Align storytelling events with significant dates (birthdays, solstices, memorial days).
- Prepare the Storyteller: Train the individual in vocal modulation, pacing, and body language to enhance narrative impact.
- Integrate Ritual Elements: Include ceremonial objects, lighting (candles, fire), and symbolic dress to elevate the event’s solemnity.
- Recite Stories with Precision: Use the transcribed oral histories as the base text, but allow for natural inflections.
- Involve the Audience: Encourage questions and participation, reinforcing communal memory.
- Conclude with a Blessing or Invocation: Solidify the story’s significance and call for its preservation.
- Record the Event: Use video/audio recording for archival purposes.
- Rotate Storyteller Role: Assign multiple family members to learn and perform storytelling to prevent knowledge bottlenecks.
Section 3: Documentation Practices
Written and recorded documentation ensures knowledge survives beyond the lifespan of oral memory. This section details exact protocols for creating durable, accessible, and secure family archives.
Protocol 3.1: Establishing a Family Archive
Objective: To create a centralized, systematic archive containing all knowledge artifacts.
Materials Required:
- Physical storage: acid-free archival boxes, labeled folders, protective sleeves
- Digital storage: encrypted external hard drives, cloud storage with version control
- Documentation tools: computer with word processing and scanning software
- Labeling equipment: archival-quality labels and markers
Step-by-Step Instructions:
- Select Archive Location: Choose a temperature and humidity-controlled area within the home or community center.
- Categorize Materials: Sort all documents, recordings, and artifacts by knowledge category (see Section 1).
- Prepare Physical Materials: a. Place documents in acid-free folders.
b. Use protective sleeves for photographs and fragile items.
c. Store boxes on sturdy shelves elevated from the floor. - Digitize Physical Records: a. Scan all documents at a minimum resolution of 300 dpi.
b. Convert audio and video to lossless formats (e.g., WAV for audio, MKV for video).
c. Maintain original file metadata including creation date and author. - Implement File Naming Conventions: Use the following format:
Category_Date_Description_Version
Example:OralHistory_20240601_GrandfatherStory_v1 - Encrypt Digital Archives: Use AES-256 encryption on all digital storage devices.
- Backup Schedule: Create two backups: one local and one offsite/cloud. Update backups monthly.
- Access Control: Limit archive access to designated family members with secure authentication.
- Create an Archive Inventory: Maintain a master log both digitally and physically listing all items and their locations.
- Regular Maintenance: Conduct biannual inspections to check for physical degradation or data corruption.
Protocol 3.2: Writing Knowledge Manuals
Objective: To convert oral and practical knowledge into detailed manuals for transmission.
Materials Required:
- Computer with word processing software
- High-resolution camera for stepwise images
- Video recording equipment for demonstrations
Step-by-Step Instructions:
- Define Manual Scope: Select a single knowledge topic per manual (e.g., “Blacksmithing Techniques”).
- Outline Content Structure: Organize into sections: Introduction, Materials, Tools, Procedures, Troubleshooting, and Safety.
- Document Procedures in Stepwise Format: Use numbered instructions with explicit details and timings.
- Include Visual Aids: Insert images or diagrams aligned with each step.
- Create Video Supplements: Record demonstration videos to supplement written manuals.
- Review and Test: Have a novice follow the manual to validate clarity and completeness.
- Publish: Print physical copies on acid-free paper and save digital copies in the family archive.
- Update Cycle: Reassess and revise manuals every 3 years or after significant procedural changes.
Section 4: Ritualized Knowledge Sharing
Embedding knowledge transfer within ritual amplifies retention and communal respect. This section provides protocols for designing and conducting ritualized knowledge-sharing ceremonies.
Protocol 4.1: Annual Generational Knowledge Ceremony
Objective: To formally transmit accumulated family knowledge to descendants through ritual.
Materials Required:
- Sacred space (family altar, community hall)
- Knowledge artifacts (books, heirlooms, recordings)
- Ritual implements (candles, incense, ceremonial garments)
- Scrolls or tablets with summarized family codes
Step-by-Step Instructions:
- Select Ceremony Date: Align with a significant family or cultural date.
- Prepare Space: Arrange artifacts and implements with symbolic placement.
- Invite Participants: Include elders, knowledge bearers, and youth.
- Opening Invocation: Recite a family oath or blessing invoking ancestral spirits.
- Knowledge Presentation: Elders present key knowledge fragments through storytelling, manual demonstrations, or artifact displays.
- Youth Participation: Designate youth to recite or demonstrate learned knowledge.
- Knowledge Affirmation: Conduct a group oath or pledge to preserve and propagate knowledge.
- Conclude with Feast or Communal Meal: Strengthen bonds and celebrate continuity.
- Document Ceremony: Record audio/video and archive outcomes.
- Assign New Roles: Nominate new knowledge bearers and ritual leaders.
Section 5: Step-by-Step Protocol for Creating Family Archives
This comprehensive procedure integrates previous protocols into an actionable plan for families or communities to establish sacred, durable archives.
Protocol 5.1: Family Archive Creation and Maintenance
Objective: To establish a sustainable family archive for all forms of generational knowledge.
Materials Required:
- Archival supplies (acid-free boxes, folders, labels)
- Digital equipment (scanner, audio/video recorders, encrypted storage devices)
- Workspace with controlled environment
| Step | Action | Notes/Specifications |
|---|---|---|
| 1 | Gather all physical documents, artifacts, recordings, and digital files | Include photographs, letters, certificates, audio recordings, videos |
| 2 | Categorize all materials according to knowledge categories (see Section 1) | Use color-coded labels for quick identification |
| 3 | Prepare physical materials: de-acidify if necessary, place in acid-free folders and sleeves | Consult Volume 15: Preservation of Physical Materials, Chapter III for de-acidification protocol |
| 4 | Digitize physical items: scan documents, convert audio/video to lossless formats | Use minimum 300 dpi for images; WAV for audio; MKV or MP4 with lossless codecs for video |
| 5 | Create metadata for each item: title, date, creator, description, category, version | Use a standardized metadata schema (Dublin Core recommended) |
| 6 | Name digital files using the format: Category_Date_Description_Version (e.g., OralHistory_20240601_GrandfatherStory_v1) | Ensure consistent naming across all files |
| 7 | Encrypt digital archive using AES-256 encryption | Use trusted encryption software (VeraCrypt recommended) |
| 8 | Store physical archives in controlled environment: 18-22°C, 45-55% relative humidity | Avoid direct sunlight and pest exposure |
| 9 | Backup digital archives: one local, one offsite/cloud, update monthly | Use redundant storage solutions, verify backups quarterly |
| 10 | Maintain archive inventory logs: physical and digital, update with any new additions | Maintain in both printed ledger and digital spreadsheet |
| 11 | Schedule biannual archive inspections | Check for physical deterioration and digital file integrity |
| 12 | Institute archival access protocols: limit to designated family members with authentication | Use multi-factor authentication for digital access |
| 13 | Integrate archive use into ritual knowledge-sharing ceremonies | Refer to Protocol 4.1 |
| 14 | Educate younger generations on archive protocols and significance | Employ apprenticeships and ritual involvement |
Section 6: Tables of Knowledge Categories and Transfer Methods
The following table summarizes the optimal pairing of knowledge categories with transfer methods for ease of reference.
| Knowledge Category | Primary Transfer Method(s) | Secondary Method(s) | Notes |
|---|---|---|---|
| Oral Traditions | Oral recitation, ritual storytelling | Audio/video recordings, transcription | Emphasize memorization and ceremonial repetition |
| Practical Skills | Hands-on apprenticeship, video demonstration | Stepwise manuals, practical workshops | Include repeated practice and mentor feedback |
| Cultural Practices | Ritual enactment, ceremonial instruction | Written ritual codices, video archives | Preserve symbolism and procedural exactness |
| Genealogical Data | Written records, genealogical charts | Oral recounting, digital databases | Ensure accuracy and verification through multiple sources |
| Moral and Ethical Codes | Storytelling, dialogue, role-playing | Written codes, group discussions | Reinforce through repeated ethical dilemmas and scenarios |
| Technological Knowledge | Technical manuals, hands-on training | Prototype demonstrations, video tutorials | Include schematics and safety precautions |
Section 7: Supplementary Notes on Suppressed Knowledge
Certain knowledge, especially related to ritualized knowledge sharing and encrypted archival methods, has historically been suppressed or lost to common discourse.
- Encryption of Archives: The use of AES-256 encryption with multi-factor authentication is a modern adaptation of ancient secret-keeping techniques. This ensures only trusted lineage members access sacred knowledge.
- Ritualized Storytelling: The integration of sensory elements (smell, sound, touch) during storytelling activates neurobiological pathways that enhance memory retention beyond ordinary learning.
- Redundancy in Knowledge Storage: Maintaining both physical and digital archives ensures survival against environmental disasters, technological failures, or social upheavals.
Conclusion
The sacred duty of generational knowledge transfer demands precision, reverence, and unyielding commitment. By following the protocols detailed herein, you ensure that your family or community’s wisdom survives intact, enriched, and accessible to future generations. This codex is your blueprint: guard it well, teach it diligently, and honor the line of ancestors who entrusted you with this sacred task.
For extended protocols on water purification, see Volume 8: The Water Codex, Chapter II. For advanced encryption and digital security, see Volume 12: The Cryptic Codex, Chapter IV. For preservation of physical materials, see Volume 15: Preservation of Physical Materials, Chapter III.
<!-- SECTION 38 -->
The Complete Practitioner's Codex, Volume 18: The Parent's Codex: Complete Child Raising, Education, and Generational Knowledge Transfer
Chapter XI: Supplements: Sovereign Community Educational Networks
Section A: Building Cooperative Education Systems Among Families
The establishment of Sovereign Community Educational Networks (SCEN) is a sacred undertaking. It transforms isolated familial education into a fortified, cooperative system thereby amplifying the potency of knowledge transmission and child development. This chapter delivers the complete blueprint for constructing, managing, and sustaining cooperative education systems among families, emphasizing shared mentorship, resource pooling, and collaborative curriculum development. These systems embody the living tradition of generational knowledge transfer, safeguarding the future through collective wisdom.
I. Foundational Principles of Sovereign Community Educational Networks
Before implementation, the following core principles must be understood and embedded in every operational facet:
- Autonomy and Sovereignty: Each family retains full sovereignty over their educational decisions, contributing to the network voluntarily. No central authority usurps family control.
- Reciprocity and Mutual Accountability: All members contribute resources, time, and expertise according to agreed roles, ensuring sustainability.
- Transparency and Communication: Open, documented communication protocols prevent misalignment and preserve trust.
- Flexibility and Adaptability: The network evolves with changing educational needs, technological advances, and community feedback.
- Sacred Duty of Mentorship: Elders and experienced members serve as mentors, not just teachers, imparting wisdom beyond curriculum.
II. Structural Models for Cooperative Education Systems
Three primary structural models are presented for families to adapt based on size, resources, and educational philosophy:
| Model Name | Description | Suitable For | Core Features |
|---|---|---|---|
| Peer Mentor Circles | Small groups (5-8 families) sharing mentorship roles and curriculum duties | Rural, low-resource, intimate groups | Rotating mentorship, shared lesson planning, reciprocal learning |
| Resource Pool Consortium | Larger groups (10-25 families) pooling physical and intellectual resources | Suburban or urban communities | Centralized resource inventory, scheduled skill workshops, shared facilities |
| Collaborative Curriculum Guild | Formalized curriculum co-development and assessment network | Educator-led or highly organized groups | Curriculum committees, standardized assessments, mentor training |
III. Protocol: Establishing the Sovereign Community Educational Network
Step 1: Form Core Founding Group
- Identify 5-25 families aligned in educational philosophy.
- Hold initial assembly to establish shared vision, values, and goals.
- Elect temporary facilitation committee to organize logistics.
Step 2: Define Network Roles and Responsibilities
Assign roles per the following table and document responsibilities clearly.
| Role | Function | Qualifications/Requirements |
|---|---|---|
| Network Coordinator | Oversees communication, scheduling, and conflict resolution | Organizational skills, impartiality |
| Mentor Lead | Coordinates mentorship assignments, monitors child progress | Experienced educators or elder parents with subject expertise |
| Resource Manager | Maintains shared materials, budgets pooled funds | Detail-oriented, trusted steward of community assets |
| Curriculum Developer | Facilitates collaborative curriculum design and updates | Educational background, curriculum design experience preferred |
| Event Organizer | Plans cooperative events such as workshops, field trips, and celebrations | Project management skills, networking capability |
| Communication Officer | Manages communication platforms and documentation | Tech-savvy, clear writer and communicator |
Step 3: Establish Communication Infrastructure
Select and implement communication tools tailored for transparency and efficiency:
| Communication Channel | Purpose | Frequency | Notes |
|---|---|---|---|
| Weekly Network Meetings | Coordination, progress updates | Weekly (fixed day/time) | Rotate facilitation between families |
| Digital Platform (e.g., Slack, Signal) | Daily communication, resource sharing | Continuous | Ensure all members trained on usage |
| Monthly Progress Reports | Document progress, challenges | Monthly | Distributed by Mentor Lead to all families |
| Annual General Assembly | Strategic planning, elections | Annually | Quorum required, minutes recorded and archived |
Step 4: Resource Pooling Protocol
- Conduct inventory of educational materials, learning spaces, and expertise within the network.
- Create a shared resource catalog accessible to all members (digital or physical).
- Agree on resource sharing rules (loan periods, maintenance responsibilities).
- Pool funds for purchasing communal resources (books, technology, workshop materials).
Step 5: Collaborative Curriculum Development
- Survey families' educational priorities and children’s developmental stages.
- Assign Curriculum Developer(s) to draft modular curriculum units.
- Hold curriculum workshops with families and mentors to refine and approve units.
- Implement pilot teaching cycles, collect feedback, and revise.
- Document and archive final curriculum modules for future reference.
IV. Detailed Models for Shared Mentorship
Peer Mentor Circles: Step-by-Step Implementation
- Organize families into small circles (5-8).
- Identify subject-matter strengths within each circle.
- Assign mentorship roles rotated quarterly to distribute teaching responsibilities evenly.
- Develop a shared mentorship calendar specifying dates, topics, and mentors.
- Conduct bi-weekly peer review sessions to assess mentee progress and mentor effectiveness.
- Maintain a mentorship log for each child, recording skills acquired and areas for improvement.
Resource Pool Consortium: Step-by-Step Implementation
- Inventory all educational resources available within the consortium.
- Establish a central resource repository (physical or virtual).
- Create a booking and checkout system for physical resources.
- Schedule monthly skill-sharing workshops led by members with specialized knowledge.
- Form a resource maintenance team responsible for upkeep and replenishment.
- Implement a feedback system for continuous resource improvement.
Collaborative Curriculum Guild: Step-by-Step Implementation
- Form curriculum committees comprising parents, mentors, and educational specialists.
- Conduct needs analysis surveys focused on cognitive, emotional, and practical skill development.
- Draft curriculum frameworks aligned with shared values and individual family goals.
- Pilot curriculum units in small groups, collect quantitative and qualitative data.
- Use iterative design principles to refine curriculum content and delivery methods.
- Establish a curriculum repository with version control and access protocols.
V. Protocols for Organizing Cooperative Educational Events
Event Types and Objectives
| Event Type | Primary Objective | Typical Duration | Participation Requirements |
|---|---|---|---|
| Skill Workshops | Teach practical or academic skills | 2-4 hours | Open to all network children and parents |
| Field Trips | Experiential learning outside home | Half-day to full day | Parental chaperones required |
| Mentorship Exchanges | Cross-family mentorship sessions | 1-2 hours | Mentor and mentee matched pairs |
| Celebration Ceremonies | Community bonding and recognition | 1-3 hours | Full network participation |
| Assessment Reviews | Evaluate educational outcomes | 1-2 hours | Mentors, parents, and children present |
Step 1: Event Planning
- Define event objective aligned with network goals.
- Select event type and appropriate date(s).
- Assign Event Organizer to coordinate logistics.
- Prepare a detailed agenda and share with all members at least 14 days prior.
- Arrange venue, materials, and any required permissions.
- Confirm participation and roles (e.g., facilitators, chaperones).
Step 2: Execution
- Set up venue with necessary materials and seating.
- Begin event on time with opening remarks emphasizing communal purpose.
- Facilitate activities according to agenda, ensuring inclusive participation.
- Document event outcomes, attendance, and feedback in official logs.
- Close with communal reflection and announcements for next steps.
Step 3: Post-Event Review
- Distribute post-event surveys within 72 hours.
- Collect and analyze feedback on content, logistics, and participation.
- Hold debrief meeting with organizing committee within 7 days.
- Archive event documentation and feedback reports.
- Integrate lessons learned into future planning.
VI. Communication Plans and Network Roles Table
| Role | Communication Responsibilities | Frequency of Communication | Tools/Platforms | Key Deliverables |
|---|---|---|---|---|
| Network Coordinator | Schedule meetings, mediate conflicts, disseminate updates | Weekly, as needed | Email, Digital Platform | Meeting agendas, conflict resolution logs |
| Mentor Lead | Assign mentors, track mentorship progress | Weekly | Digital Platform, Reports | Mentorship schedules, progress reports |
| Resource Manager | Manage resource catalog, update availability | Bi-weekly | Shared Spreadsheet, Messaging | Resource inventory lists, usage logs |
| Curriculum Developer | Coordinate curriculum workshops, update modules | Monthly | Video Conferences, Docs | Curriculum drafts, workshop summaries |
| Event Organizer | Plan and execute events, communicate logistics | Per event schedule | Email, Messaging | Event agendas, participant lists |
| Communication Officer | Maintain communication channels, archive documentation | Daily | Digital Platform | Communication logs, archive files |
VII. Supplementary Techniques and Suppressed Knowledge
A. Mentorship Log Protocol

- Create a standardized mentorship log template including:
- Date
- Mentor and mentee names
- Skills/topics covered
- Observations and notes
- Next steps and goals
- Digitize logs for secure, shared access within the network.
- Conduct quarterly reviews to identify patterns and adjust mentorship strategies.
- Store logs encrypted to protect privacy and intellectual property.
B. Resource Pool Security and Maintenance
- Apply barcoding or RFID tagging to physical materials.
- Schedule quarterly audits with cross-check by independent members.
- Implement sterilization protocols for shared materials susceptible to contamination (see Volume 8: The Water Codex, Chapter V for sterilization protocols).
- Maintain a repair fund with clear guidelines for expenditure approval.
C. Conflict Resolution Framework
- Upon conflict occurrence, the Network Coordinator initiates mediation within 48 hours.
- Employ structured dialogue techniques documented in Volume 12: The Dispute Resolution Codex, Section III.
- If unresolved, escalate to a network council composed of elected representatives.
- Final decisions respect family sovereignty and aim for restorative outcomes.
VIII. Case Study: Implementation of a Peer Mentor Circle
| Step | Action Taken | Outcome |
|---|---|---|
| Formed group | 7 families with diverse skills and educational goals | Established foundational trust and clear vision |
| Role assignment | Rotated mentorship roles quarterly | Balanced workload, increased engagement |
| Communication setup | Adopted Signal for daily messaging, weekly Zoom meetings | Efficient exchange of ideas, rapid conflict resolution |
| Resource pooling | Created shared online library and physical toy bank | Enhanced access to materials, cost reduction |
| Curriculum workshop | Developed modular units focusing on critical thinking | Positive child engagement and measurable skill improvement |
| Cooperative events | Monthly skill workshops and quarterly field trips | Strengthened community bonds and practical learning experiences |
IX. Summary Checklist for Building SCEN
| Phase | Checkpoint | Complete (✓) |
|---|---|---|
| Founding Group | Established shared vision and values | |
| Role Assignment | Defined and assigned all network roles | |
| Communication Setup | Implemented communication platforms and schedules | |
| Resource Inventory | Compiled and cataloged all educational resources | |
| Curriculum Development | Initiated collaborative curriculum design | |
| Event Planning | Scheduled and planned first cooperative educational event | |
| Documentation | Created templates and protocols for logs and reports |
The sovereign knowledge contained herein is not a mere guideline but a mandate for those who cherish the future of their progeny and community. The Cooperative Education System is the bulwark against isolation, ignorance, and cultural erosion. Engage with reverence, act with precision, and transmit with unwavering commitment.
For advanced resource sterilization and safe material handling protocols, refer to Volume 8: The Water Codex, Chapter V. For conflict resolution procedures, consult Volume 12: The Dispute Resolution Codex, Section III. For curriculum design theory and pedagogy, see Volume 5: The Educational Codex, Part II.
End of Chapter XI, Section A
<!-- SECTION 39 -->
The Complete Practitioner's Codex, Volume 18: The Parent's Codex: Complete Child Raising, Education, and Generational Knowledge Transfer
Chapter VII: Supplements: Crisis and Trauma Response for Families
Preface
This chapter is a sacred transmission of knowledge, designed to forge parents into steadfast sentinels capable of navigating the darkest hours of familial crisis and systemic threat. The protocols contained herein are distilled from the most suppressed psychological sciences, trauma-informed care strategies, emergency response doctrines, and community resilience frameworks. Failure to master this knowledge imperils not only your progeny but the sanctity of your lineage. Approach with unwavering focus, execute with precision.
Section 1: Trauma-Informed Care Principles for the Family Unit
Trauma-informed care (TIC) is a paradigm shift from reactive crisis management to anticipatory, compassionate stewardship of emotional, psychological, and physiological well-being. Parents must embody the role of trauma-aware guardians, recognizing trauma’s pervasive effects and responding with calibrated interventions.
1.1 Core Principles of Trauma-Informed Care
| Principle | Description | Parental Implementation Example |
|---|---|---|
| Safety | Physical and emotional environments must be secure and predictable. | Establish consistent household routines; safe spaces for children. |
| Trustworthiness & Transparency | Actions and decisions are openly communicated to foster trust. | Explain family crisis impacts honestly but age-appropriately. |
| Peer Support & Mutuality | Encourage connections within family and community to mitigate isolation. | Facilitate sibling support groups; engage extended family networks. |
| Collaboration & Empowerment | Involve children in decision-making to enhance control and resilience. | Include children in emergency planning discussions. |
| Cultural, Historical, & Gender Awareness | Respect and incorporate family cultural values and historical context in care. | Adapt coping strategies to cultural norms; acknowledge past trauma. |
1.2 Parent’s Checklist for Trauma-Informed Environments
- Establish Predictability: Maintain consistent daily schedules and clear communication.
- Create Safe Physical Spaces: Designate quiet areas; remove hazards; ensure basic needs are met.
- Model Emotional Regulation: Demonstrate calm under stress; teach breathing and grounding techniques.
- Normalize Emotional Expression: Validate feelings without judgment or minimization.
- Empower Through Choice: Offer limited, age-appropriate decisions to restore control.
- Respect Cultural Identity: Incorporate family traditions and language in coping rituals.
Section 2: Systemic Threats and Family Emergency Protocols
Systemic threats encompass natural disasters, pandemics, social unrest, and infrastructure collapse. Parents must integrate trauma-informed care with precise emergency response protocols to safeguard their family.
2.1 Family Emergency Preparedness Protocol
Step-By-Step Instructions:
- Risk Assessment
- Identify plausible systemic threats specific to your region and household vulnerabilities.
- Document in the Family Crisis Plan (see Appendix A).
- Communication Network Establishment
- Compile emergency contact list including relatives, neighbors, local authorities, and medical facilities.
- Distribute printed copies and program essential numbers in all household phones.
- Emergency Supply Kit Assembly
- Assemble kits containing water, non-perishable food, first aid supplies, medications, sanitation items, flashlights, batteries, and communication devices.
- For detailed supplies and quantities, see Volume 8: The Water Codex, Chapter II and Volume 12: The Medical Codex, Chapter IV.
- Evacuation and Shelter Plan
- Identify primary and secondary evacuation routes and safe shelters.
- Conduct periodic evacuation drills with all family members.
- Psychological First Aid Protocol Integration
- Train family members in Psychological First Aid (PFA) steps (see Section 3).
- Designate a family member trained as Trauma Response Coordinator.
- Community Liaison and Support Network
- Establish alliances with neighbors and local community organizations.
- Share resources and information promptly during crises.
- Documentation and Record Keeping
- Maintain updated medical records, identification documents, and insurance policies in waterproof containers.
- Digitize and store encrypted backups offsite.
Section 3: Psychological First Aid (PFA) Protocol for Families
Psychological First Aid is an evidence-based, pragmatic approach to mitigate acute trauma reactions and foster resilience. Parents are the first responders who must stabilize emotional states before professional help is accessible.
3.1 Core Components of Psychological First Aid
| Component | Action | Parental Implementation Detail |
|---|---|---|
| Contact and Engagement | Approach calmly, introduce self, and offer physical presence without overwhelming. | Use soft tone; maintain eye contact; respect personal space. |
| Safety and Comfort | Ensure physical safety; provide reassurance that immediate dangers are managed. | Remove child from hazardous environment; offer comforting touch if appropriate. |
| Stabilization | Help regulate overwhelming emotions through grounding and breathing techniques. | Guide child through 5-4-3-2-1 sensory exercise (see Step 4). |
| Information Gathering | Assess needs and concerns without probing or pressuring. | Ask open-ended questions; listen actively and validate feelings. |
| Practical Assistance | Address immediate needs such as food, water, shelter, and medical care. | Administer first aid or call emergency services if needed. |
| Connection with Social Supports | Facilitate reconnection with family, friends, or community supports. | Arrange phone calls or visits; mobilize community resources. |
| Information on Coping | Provide age-appropriate education about trauma responses and coping strategies. | Use simple language; distribute coping handouts (see Appendix B). |
| Linkage with Collaborative Services | Refer to professional resources when symptoms exceed parental capacity. | Contact mental health providers; document referral procedures. |
3.2 Step-By-Step Protocol for Parents Administering PFA
- Establish Contact and Assess Safety
- Approach the child calmly.
- Verify immediate safety of environment.
- Remove from harm if necessary.
- Provide Comfort and Stabilization
- Use soothing voice; offer a comforting object (blanket, toy).
- Instruct child in the following grounding exercise:
**5-4-3-2-1 Sensory Grounding Exercise:** - Identify 5 things you can see.
- Identify 4 things you can touch.
- Identify 3 things you can hear.
- Identify 2 things you can smell.
- Identify 1 thing you can taste.
- Gather Information and Listen
- Ask: “What happened? How are you feeling?” without pressure.
- Validate emotions: “It’s okay to feel scared.”
- Provide Practical Assistance
- Address physical needs immediately.
- Administer first aid or contact emergency services if required.
- Connect to Social Supports
- Facilitate contact with familiar persons.
- Encourage presence of trusted adults.
- Educate on Coping Strategies
- Teach deep breathing: inhale for 4 seconds, hold 7 seconds, exhale 8 seconds.
- Encourage journaling or drawing feelings.
- Evaluate Need for Professional Help
- Monitor for persistent symptoms beyond 72 hours (see Table 2).
- Initiate referral to mental health professionals if needed.
Section 4: Recognizing Trauma Signs and Intervention Steps in Children
Early identification of trauma manifestations enables timely intervention, preventing chronic dysfunction.
4.1 Trauma Signs by Developmental Stage
| Age Group | Behavioral Signs | Emotional Signs | Physical Signs | Cognitive Signs |
|---|---|---|---|---|
| Infants (0-2) | Excessive crying, feeding issues, sleep disturbances | Irritability, withdrawal | Startle reflex exaggeration | Delayed developmental milestones |
| Preschool (3-5) | Regression (bedwetting), aggression, clinginess | Fearfulness, sadness | Somatic complaints (headaches) | Confusion, impaired attention |
| School Age (6-12) | School refusal, hyperactivity, social withdrawal | Anxiety, mood swings | Sleep disturbances | Concentration problems, memory lapses |
| Adolescents (13-18) | Risk-taking, substance use, defiance | Depression, irritability | Psychosomatic symptoms | Impaired executive functioning |
4.2 Immediate Intervention Steps by Sign Category
| Trauma Sign Category | Intervention Steps | Timing | Responsible Party |
|---|---|---|---|
| Behavioral Dysregulation | 1. Provide consistent structure and routines. 2. Use positive reinforcement for adaptive behaviors. 3. Limit exposure to triggering stimuli. | Within 24 hours | Parent/Guardian |
| Emotional Dysregulation | 1. Validate feelings without judgment. 2. Teach emotional labeling. 3. Implement grounding exercises. | Immediate to 72 hours | Parent/Guardian with PFA training |
| Physical Complaints | 1. Conduct medical evaluation to rule out organic causes. 2. Monitor symptoms closely. 3. Provide comfort measures. | Within 48 hours | Parent and healthcare provider |
| Cognitive Impairment | 1. Adjust academic expectations temporarily. 2. Provide extra support and tutoring. 3. Consult school counselors. | Within 1 week | Parent, educators |
Section 5: Building Community Resilience for Family Crisis Mitigation

Families do not exist in isolation; collective resilience fortifies each household against systemic threats.
5.1 Community Resilience Building Protocol
Step-By-Step Instructions:
- Map Community Resources
- Identify local emergency services, shelters, food banks, mental health providers, and faith-based organizations.
- Compile contact list and distribute among family and neighbors.
- Establish Mutual Aid Networks
- Form neighborhood groups with defined roles: communication lead, supply coordinator, medical liaison, and psychological support lead.
- Conduct quarterly meetings and drills.
- Develop Shared Crisis Plans
- Integrate family emergency plans into broader community strategy.
- Coordinate resource sharing and evacuation logistics.
- Train Community Members in PFA and Basic First Aid
- Organize workshops using this volume’s protocols.
- Certify key members as Trauma Response Coordinators.
- Create Safe Community Spaces
- Designate areas for shelter, counseling, and resource distribution.
- Equip spaces with necessary supplies and communication devices.
- Foster Continuous Communication Channels
- Use multiple platforms: phone trees, walkie-talkies, social media groups.
- Maintain redundancy to avoid information blackouts.
- Promote Cultural Sensitivity and Inclusivity
- Ensure all community members' cultural norms are respected in planning.
- Translate key materials into predominant local languages.
Appendix A: Family Crisis Plan Template
| Section | Details to Include |
|---|---|
| Family Members | Names, ages, medical conditions, emergency contacts |
| Risk Assessment | Identified threats, likelihood, and impact |
| Emergency Contacts | Phone numbers, emails, addresses |
| Evacuation Routes | Primary and secondary paths, transportation options |
| Shelter Locations | Addresses, contact info, capacity |
| Emergency Supplies | Inventory list with quantities and storage locations |
| Communication Plan | Methods, schedules, designated family communicator |
| Psychological First Aid Roles | Assigned roles and training status |
| Community Support Contacts | Neighbors, local organizations, faith leaders |
Appendix B: Trauma Coping Handout for Children (Sample Text)
When you feel scared or sad:
- Take slow, deep breaths in and out.
- Think about 5 things you can see around you.
- Talk to someone you trust about your feelings.
- Draw or write about what happened.
- Remember, you are safe and loved.
End of Chapter VII
This volume demands rigorous application. Parents who internalize and operationalize these protocols become unyielding pillars for their families and communities. The knowledge herein is not theoretical; it is a living, breathing armor against chaos and despair. Master this lore, pass it unbroken to your heirs.
For supplementary medical protocols, consult Volume 12: The Medical Codex, Chapter IV. For water and sanitation emergency supply details, see Volume 8: The Water Codex, Chapter II. For advanced community organization techniques, refer to Volume 20: The Civic Codex, Chapter V.
<!-- SECTION 40 -->
Chapter XVII: Supplements: Long-Term Child Development Tracking
The Complete Practitioner's Codex, Volume 18: The Parent's Codex
Introduction: The Sacred Duty of Longitudinal Monitoring
The raising of a child is an unyielding, sacred charge, demanding the utmost precision in tracking the evolving architecture of mind, body, and spirit. Only through rigorous, structured, and adaptive longitudinal monitoring can one guarantee the flourishing of potential encoded within the nascent soul.
This chapter delivers lost, suppressed, and classified protocols for comprehensive developmental tracking from infancy to late adolescence. The instruments and methodologies herein are engineered for the master parent, guardian, or mentor who accepts no compromise in generational knowledge transfer.
I. Framework for Long-Term Developmental Tracking
1. Developmental Domains
A child’s growth unfolds across multiple interconnected domains. These domains must be monitored independently and collectively to detect trajectories, aberrations, and emergent talents.
| Domain | Definition | Key Indicators | Observation Focus |
|---|---|---|---|
| Physical Development | Gross and fine motor skills, growth metrics | Height, weight, motor coordination, reflexes | Growth curves, motor milestones, motor planning |
| Cognitive Development | Problem-solving, memory, language, executive function | Vocabulary size, reasoning tasks, memory tests | Language acquisition, working memory, attention span |
| Emotional Development | Self-regulation, emotional expression, attachment | Emotional responses, self-soothing, social bonds | Emotional awareness, attachment security, affect control |
| Social Development | Interaction with peers/adults, empathy, cooperation | Peer relationships, play behavior | Social skills, cooperation, conflict resolution |
| Adaptive Behavior | Self-care, daily living skills, flexibility | Feeding, dressing, hygiene | Independence level, flexibility in routines |
| Moral Development | Sense of right and wrong, fairness, empathy | Ethical decisions, honesty | Moral reasoning, fairness judgments |
Action 1.1: Print or digitally replicate this table as the master reference for all observational notes.
2. Assessment Intervals
To capture the dynamic nature of child development, assessments must be conducted at standardized intervals, increasing in frequency during rapid developmental phases.
| Age Range | Assessment Frequency | Rationale |
|---|---|---|
| Birth to 6 months | Monthly | Rapid physical and sensory development |
| 6 months to 2 yrs | Bi-monthly (every 2 mo) | Motor milestones and early cognitive/communication |
| 2 to 6 years | Quarterly (every 3 mo) | Language explosion and social-emotional growth |
| 6 to 12 years | Semi-annually (every 6 mo) | Academic and moral development intensifies |
| 12 to 18 years | Annually | Identity consolidation and executive function maturation |
Action 1.2: Establish a master calendar marking these intervals; integrate with digital reminders and physical logs.
II. Longitudinal Tracking Templates
The core of long-term monitoring is a multi-layered, evolving document capturing raw data, interpretive notes, and adaptive plans.
1. Template Structure Overview
Each tracking form is divided into four sections:
| Section | Contents | Purpose |
|---|---|---|
| A. Basic Metrics | Growth data: height, weight, head circumference (infants) | Quantitative physical tracking |
| B. Developmental Milestones | Domain-specific milestones achieved or delayed | Progress mapping and delay identification |
| C. Behavioral Observations | Qualitative notes on mood, social interaction, adaptability | Contextual understanding of developmental state |
| D. Adaptive Plan | Modifications to caregiving, educational focus, interventions | Dynamic response to developmental status |
2. Step-by-Step Creation and Use of the Template
Step 2.1: Construct the template in a durable notebook or a secure digital spreadsheet with locked cells for historical data.
Step 2.2: For each assessment, complete Sections A through C with precise data and observations.
Step 2.3: Convene a review session with relevant stakeholders (parent, teacher, pediatrician, mentor) to formulate Section D.
Step 2.4: Archive completed forms sequentially, ensuring redundancy with cloud and physical backups.
3. Sample Longitudinal Tracking Template (Excerpt)
| Date | Age (Months/Years) | Height (cm) | Weight (kg) | Milestones Achieved (Y/N) | Behavioral Notes | Adaptive Plan Summary |
|---|---|---|---|---|---|---|
| 2024-07-01 | 6 months | 66.5 | 7.2 | Rolled over: Y, Sitting unsupported: N | Calm, responsive to voice | Encourage sitting exercises; monitor muscle tone |
| 2024-09-01 | 8 months | 68.8 | 7.9 | Sitting unsupported: Y, Crawling: N | Increased stranger anxiety | Introduce crawling exercises; maintain socialization |
III. Milestone Checklists: The Sacred Indices of Progress
Milestones serve as objective benchmarks for normal development, signaling the maturation of neurological circuits and learning faculties.
1. Domain-Specific Milestone Tables
Table 3.1: Physical Development Milestones (Infancy to Early Childhood)
| Age (mos/yrs) | Milestone | Assessment Method | Expected Outcome |
|---|---|---|---|
| 1 month | Lifts head briefly when prone | Visual observation | Head control begins |
| 4 months | Rolls from tummy to back | Observation during play | Mobility initiation |
| 9 months | Crawls | Guided play and observation | Locomotion established |
| 18 months | Walks independently | Walk test with encouragement | Gross motor independence |
| 3 years | Rides tricycle | Supervised riding test | Coordinated motor skills |
Table 3.2: Cognitive Milestones (Infancy to Preschool)
| Age (mos/yrs) | Milestone | Assessment Method | Expected Outcome |
|---|---|---|---|
| 6 months | Responds to name | Call child’s name during play | Attention and recognition |
| 12 months | Uses simple gestures (wave, point) | Structured interaction | Nonverbal communication |
| 2 years | Combines two words | Language sampling | Early syntax formation |
| 4 years | Understands simple instructions | Command response test | Comprehension |
Action 3.1: Maintain an updated checklist from birth to 18 years, marking observed milestones with date and context.
2. Implementation of Checklists
Step 3.1: At each assessment interval, review the checklist for the child’s current age.
Step 3.2: Record presence/absence and qualitative notes on milestone achievement.
Step 3.3: Flag any delays beyond 2 standard deviations from normative data (see Volume 21: Pediatric Norms Codex).
Step 3.4: Incorporate findings into the longitudinal tracking template for adaptive planning.
IV. Adaptive Planning: Dynamic Response to Developmental Trajectories
Long-term tracking is only valuable if it informs real-time, targeted interventions designed to optimize development or mitigate delays.
1. Adaptive Planning Protocol
| Step | Action Item | Details |
|---|---|---|
| 1 | Analyze longitudinal data for trends and anomalies | Identify patterns: plateau, regression, or accelerated progress |
| 2 | Evaluate contextual variables | Family environment, health incidents, educational settings |
| 3 | Convene interdisciplinary review | Include medical, educational, psychological experts as needed |
| 4 | Formulate specific, measurable goals (SMART goals) | Example: “Increase expressive vocabulary by 20 words in 3 months” |
| 5 | Select intervention modalities | Therapy, enriched environment, physical exercises, social skills training |
| 6 | Implement intervention with fidelity | Structured schedule, defined responsibilities |
| 7 | Schedule follow-up assessments | Monitor efficacy, adjust frequency if required |
| 8 | Document all changes and outcomes | Ensure transparency and historical record |
Action 4.1: Maintain an adaptive planning log linked to the main longitudinal tracking document.
2. Case Example: Language Delay at Age 2
Step 4.2.1: Data indicates expressive vocabulary below 10 words at 24 months (norm: 50 words).
Step 4.2.2: Context review reveals limited verbal interaction at home due to parental work schedules.
Step 4.2.3: Convene pediatric speech pathologist and early childhood educator.
Step 4.2.4: Set goal: Increase vocabulary to 50 words within 6 months.
Step 4.2.5: Plan: Daily 20-minute interactive reading sessions, weekly speech therapy, parent training in verbal stimulation.
Step 4.2.6: Implement and schedule re-assessment every 2 months.
V. Tools and Devices for Monitoring
1. Physical Measurement Devices
| Device | Construction Protocol (DIY) | Calibration Method |
|---|---|---|
| Growth Board | 1. Use plywood panel 2m x 30cm | Mark known lengths (1m interval) |
| 2. Attach retractable measuring tape vertically | Cross-verify with metal ruler | |
| 3. Apply waterproof varnish | Use standard height measurement | |
| Digital Scale | 1. Obtain load cell sensor (5kg capacity minimum) | Calibrate with known weights |
| 2. Connect to microcontroller with LCD readout | ||
| 3. Encase securely; power with rechargeable battery |
Action 5.1: Construct these devices to enable frequent, accurate physical recording.
2. Cognitive and Behavioral Assessment Kits
Components:
- Flashcards with standardized images and words
- Timer (digital stopwatch) for reaction time and attention tracking
- Audio recorder for language sample capture
- Standardized puzzles and shape-sorters
Assembly Instructions:
- Print flashcards on laminated cardstock using high contrast colors.
- Program timer for interval measurements, e.g., 5-minute focused play sessions.
- Use audio recorders to capture spontaneous speech for analysis with speech software (see Volume 22: Speech Codex).
- Organize puzzles by difficulty level, labeled by age appropriateness.
VI. Protocols for Periodic Review and Adjustment
1. Review Meeting Cadence
| Development Phase | Review Meeting Frequency | Participants | Documentation Required |
|---|---|---|---|
| Infancy to Toddler (0-2) | Monthly | Parent, Pediatrician, Specialist | Full longitudinal template |
| Early Childhood (2-6) | Quarterly | Parent, Educator, Therapist | Updated developmental summary |
| Middle Childhood (6-12) | Semi-Annually | Parent, Teacher, Counselor | Progress reports and plans |
| Adolescence (12-18) | Annually | Parent, School Advisor, Counselor | Annual developmental review |
Action 6.1: Establish recurring appointment slots and distribute structured agendas to ensure focused evaluation.
2. Adjustment Protocol
Step 6.2.1: Review documented progress and adaptive plan outcomes.
Step 6.2.2: Identify unmet goals or new challenges.
Step 6.2.3: Modify goals to reflect current status; increase or decrease intervention intensity as data dictates.
Step 6.2.4: Re-assign responsibilities if needed; e.g., add specialist consultation.
Step 6.2.5: Record all adjustments with timestamps, rationale, and expected impact.
VII. Data Management and Security
Given the sensitive nature of developmental data, the following protocols are mandatory:
| Protocol | Description |
|---|---|
| Encryption | Use AES-256 encryption for all digital records |
| Physical Security | Store physical records in locked, fireproof cabinets |
| Access Control | Limit data access to authorized persons only |
| Redundancy | Maintain at least two independent backups |
| Audit Trail | Log all data access and modifications with user ID and timestamp |
Action 7.1: Implement data governance policies consistent with these standards.
VIII. Summary: The Path to Mastery in Child Development Tracking
This chapter has distilled the ultimate protocols for the observant, vigilant guardian committed to exacting developmental mastery. The tools, templates, milestone checklists, and adaptive strategies are your sacred armaments in the timeless battle to raise the next generation.
Implement these protocols with unwavering discipline; the health, intellect, and spirit of your charge depend upon it.
Appendix: Developmental Domains and Assessment Intervals Summary Table
| Domain | Birth–6 months | 6–24 months | 2–6 years | 6–12 years | 12–18 years |
|---|---|---|---|---|---|
| Physical | Monthly | Bi-monthly | Quarterly | Semi-Annual | Annual |
| Cognitive | Monthly | Bi-monthly | Quarterly | Semi-Annual | Annual |
| Emotional | Monthly | Bi-monthly | Quarterly | Semi-Annual | Annual |
| Social | Monthly | Bi-monthly | Quarterly | Semi-Annual | Annual |
| Adaptive Behavior | Monthly | Bi-monthly | Quarterly | Semi-Annual | Annual |
| Moral | N/A | N/A | Quarterly | Semi-Annual | Annual |
This concludes Chapter XVII. For the protocols on specialized developmental screening tests and therapeutic interventions, refer to Volume 20: The Child Therapeutics Codex. For detailed pediatric normative data, consult Volume 21: Pediatric Norms Codex. For speech and language evaluation tools, see Volume 22: Speech Codex.
End of Chapter XVII.
PLATES — Supplemental Gallery
Illustrations carried over from the original Codex Reader that belong to this volume as a whole. Added by this edition; the text above is complete without them.