THE COMPLETE PRACTITIONER'S CODEX: VOLUME 10

The Defense Manual: Complete Self-Defense, Strategy, Tactics, and Protective Arts
<!-- SECTION 1 -->
The Complete Practitioner's Codex, Volume I: The Physics of Striking
Chapter IV: Detailed Biomechanical Analysis of Kinetic Chain Punches, Palm Strikes, Elbow Strikes, and Low Kicks
Introduction
This chapter reveals the sacred mechanics behind the most effective striking techniques, integrating the kinetic chain from foot to fist or foot to shin. Each strike is analyzed with uncompromising precision, detailing the exact biomechanical sequence, stance, weight transfer, and follow-through required to deliver maximum force while mitigating injury risk. This knowledge is reserved for the chosen few; mastery of these protocols defines the difference between survival and defeat.
Section 1: Kinetic Chain Punches

1.1 Biomechanical Analysis
The kinetic chain punch harnesses the entire body's musculature and skeletal alignment to generate maximal force. The sequence initiates from the ground, transmitting energy through the legs, hips, torso, shoulder, arm, and finally the fist.
Key biomechanical components:
- Ground Reaction Force (GRF): Initiated by plantar flexion and ankle eversion.
- Hip Rotation: Engages gluteus maximus and medius to pivot the pelvis.
- Core Torque: Generates rotational inertia via oblique abdominal muscles.
- Shoulder Extension and Scapular Retraction: Transfers energy to the arm.
- Elbow Extension: Final accelerative force.
- Wrist Stabilization: Ensures structural integrity upon impact.
1.2 Step-by-Step Protocol: Correct Stance, Weight Transfer, and Follow-Through
Stance Setup
- Establish a Rooted Base:
- Feet shoulder-width apart.
- Rear foot angled 45° outward; front foot pointing directly forward.
- Slight knee flexion (~15°) to enable shock absorption.
- Distribute Weight:
- 60% on the rear foot.
- 40% on the front foot.
- Align Hips and Shoulders:
- Hips rotated approximately 30° towards the target.
- Shoulders squared but relaxed.
Punch Execution
- Initiate Weight Transfer:
- Drive plantar flexion on the rear foot.
- Pivot the rear foot’s heel outward by 20°.
- Hip Rotation:
- Rotate hips forward explosively, aligning pelvis with the target.
- Torso Torque:
- Engage oblique muscles to accelerate torso rotation.
- Shoulder Drive:
- Propel the shoulder forward, extending the arm.
- Arm Mechanics:
- Extend the elbow rapidly.
- Maintain wrist alignment to prevent hyperextension.
- Fist Impact:
- Contact made with the first two knuckles.
- Maintain rigid wrist and forearm alignment.
- Follow-Through:
- Continue forward momentum; do not retract immediately.
- Allow torso to rotate slightly beyond initial alignment for energy dissipation.
Recovery
- Re-center hips and shoulders.
- Return weight to original distribution.
- Prepare for subsequent action.
1.3 Data Table: Kinetic Chain Punch Metrics
| Parameter | Value (Average Adult Male) | Notes |
|---|---|---|
| Peak Force Output | 2500 N | Measured via force plate impact analysis |
| Contact Velocity | 8 m/s | At fist contact |
| Energy Transfer Efficiency | 85% | Percentage of ground force reaching fist |
| Injury Risk (Wrist) | Moderate | Requires wrist conditioning |
| Target Effectiveness | High (jaw, solar plexus) | Optimal for knockout or incapacitation |
Section 2: Palm Strikes
2.1 Biomechanical Analysis
Palm strikes utilize a closed kinetic chain with a focus on wrist stability and surface area contact. The kinetic sequence mirrors the punch but emphasizes the heel of the palm to disperse impact force, reducing self-injury while maintaining efficacy.
Biomechanical highlights:
- Wrist Dorsiflexion Control: Maintains structural integrity.
- Forearm Pronation: Aligns palm heel with target.
- Hip and Torso Rotation: Provides power.
- Weight Transfer: Forward shift critical for momentum.
2.2 Step-by-Step Protocol: Correct Stance, Weight Transfer, and Follow-Through
Stance Setup
- Foot Position:
- Front foot forward at 0°.
- Rear foot angled 30° outward.
- Weight Distribution:
- Even 50/50 distribution to allow swift forward momentum.
- Body Alignment:
- Hips squared to target.
- Shoulders relaxed and level.
Palm Strike Execution
- Initiate Forward Weight Shift:
- Transfer weight smoothly to the front foot.
- Hip Rotation:
- Rotate hips forward by 20°.
- Torso Engagement:
- Activate oblique and rectus abdominis muscles.
- Arm Extension:
- Extend arm with wrist in neutral dorsiflexion.
- Forearm pronated to align palm heel.
- Palm Heel Contact:
- Impact at heel of palm, fingers extended but relaxed.
- Follow-Through:
- Continue forward momentum.
- Allow shoulder to protract slightly.
Recovery
- Return weight to center.
- Retract arm to guard position.
- Reset stance.
2.3 Data Table: Palm Strike Metrics
| Parameter | Value (Average Adult Male) | Notes |
|---|---|---|
| Peak Force Output | 1800 N | Safe for wrist due to surface area |
| Contact Velocity | 6.5 m/s | Slightly lower than punch |
| Energy Transfer Efficiency | 75% | Due to larger contact area |
| Injury Risk (Wrist) | Low | Reduced compared to fist strikes |
| Target Effectiveness | Moderate to High | Effective on nose, chin, solar plexus |
Section 3: Elbow Strikes
3.1 Biomechanical Analysis
Elbow strikes concentrate impact force over a small, dense surface, delivering devastating close-range power. The kinetic chain begins with the lower body but relies heavily on shoulder girdle and core stability due to limited range of motion.
Biomechanical highlights:
- Short Lever Arm: Reduces time to contact.
- Strong Core Engagement: Stabilizes torso.
- Shoulder Flexion and Adduction: Drives the elbow forward.
- Minimal Wrist Involvement: Wrist locked to prevent injury.
3.2 Step-by-Step Protocol: Correct Stance, Weight Transfer, and Follow-Through
Stance Setup
- Foot Placement:
- Feet shoulder-width apart.
- Front foot angled 10° forward, rear foot angled 30° outward.
- Weight Distribution:
- 55% on front foot.
- Body Alignment:
- Hips squared or slightly open (~10°).
Elbow Strike Execution
- Weight Transfer:
- Shift weight slightly forward.
- Core Engagement:
- Contract obliques and rectus abdominis.
- Shoulder Movement:
- Flex shoulder forward.
- Adduct arm medially.
- Elbow Drive:
- Propel elbow with forearm pronated.
- Maintain wrist in neutral locked position.
- Contact Point:
- Tip or point of elbow.
- Follow-Through:
- Minimal to prevent overextension.
- Retract elbow quickly after impact.
Recovery
- Reset stance.
- Center weight.
- Adopt defensive posture.
3.3 Data Table: Elbow Strike Metrics
| Parameter | Value (Average Adult Male) | Notes |
|---|---|---|
| Peak Force Output | 2200 N | High due to concentrated impact area |
| Contact Velocity | 5.5 m/s | Short lever arm limits speed |
| Energy Transfer Efficiency | 80% | Efficient due to rigid skeletal structure |
| Injury Risk (Elbow) | Low | Elbow bone is robust |
| Target Effectiveness | Very High | Ideal for jaw, temple, ribs |
Section 4: Low Kicks
4.1 Biomechanical Analysis
Low kicks utilize rotational power from the hips combined with the linear thrust of the leg, targeting the opponent's thigh or knee to disrupt balance and mobility. The strike employs the tibia as the primary impact surface.
Biomechanical highlights:
- Hip Flexion and Rotation: Generates angular momentum.
- Core Stabilization: Maintains balance.
- Knee Extension: Controls leg speed.
- Ankle Dorsiflexion and Plantarflexion: Stabilizes foot impact.
4.2 Step-by-Step Protocol: Correct Stance, Weight Transfer, and Follow-Through
Stance Setup
- Base Position:
- Feet shoulder-width apart.
- Rear foot angled 30° outward.
- Front foot pointed forward.
- Weight Distribution:
- 70% on rear foot.
- Body Alignment:
- Hips squared.
Low Kick Execution
- Weight Transfer:
- Shift weight onto supporting leg.
- Hip Rotation:
- Rotate hips outward up to 45°.
- Leg Chambering:
- Flex knee to 90°.
- Flex hip to approximately 45°.
- Knee Extension and Leg Thrust:
- Extend the knee explosively.
- Plantarflex ankle to stabilize foot.
- Impact Surface:
- Use the lower third of tibia.
- Follow-Through:
- Allow leg to continue forward momentum.
- Retract leg immediately after impact.
Recovery
- Return leg to ground.
- Re-center hips.
- Reset weight distribution.
4.3 Data Table: Low Kick Metrics
| Parameter | Value (Average Adult Male) | Notes |
|---|---|---|
| Peak Force Output | 3000 N | Highest force among analyzed strikes |
| Contact Velocity | 10 m/s | Fast due to leg mass and momentum |
| Energy Transfer Efficiency | 90% | Efficient hip and core engagement |
| Injury Risk (Supporting Leg) | Moderate | Requires strong ankle and knee stability |
| Target Effectiveness | High | Effective on thigh (quadriceps, IT band), knee |
Section 5: Comparative Summary Table
| Strike Type | Peak Force Output (N) | Contact Velocity (m/s) | Energy Transfer Efficiency (%) | Injury Risk | Optimal Targets |
|---|---|---|---|---|---|
| Kinetic Chain Punch | 2500 | 8 | 85 | Moderate (wrist) | Jaw, solar plexus |
| Palm Strike | 1800 | 6.5 | 75 | Low (wrist) | Nose, chin, solar plexus |
| Elbow Strike | 2200 | 5.5 | 80 | Low (elbow) | Jaw, temple, ribs |
| Low Kick | 3000 | 10 | 90 | Moderate (support leg) | Thigh, knee |
Section 6: Conditioning and Injury Prevention Protocols (Summary)
- Wrist Conditioning: Progressive resistance exercises, wrist wraps during training.
- Core Stability: Planks, rotational medicine ball throws.
- Ankle and Knee Strengthening: Balance drills, resistance band exercises.
- Joint Mobility: Dynamic stretching pre-strike, static post-training.
For detailed conditioning regimens, see Volume V: The Warrior’s Physiology, Chapter III.
Conclusion
Mastery of these kinetic chain strikes requires rigorous adherence to the biomechanical protocols outlined herein. The sacred art of striking is not brute strength but disciplined, precise energy transfer through the body’s interconnected systems. Each strike’s efficacy depends on the practitioner’s ability to harness ground reaction forces, rotational torque, and muscular coordination while safeguarding structural integrity. This knowledge, once suppressed, is now entrusted to you: wield it with reverence and unyielding discipline.
End of Chapter IV
<!-- SECTION 2 -->
The Complete Practitioner's Codex, Volume 10: The Defense Manual
Volume I: Vital Targets

Chapter I: Comprehensive Anatomy of Vulnerable Points and Tactical Application
The sacred art of self-defense demands an uncompromising mastery over the human anatomy’s most vulnerable loci. This chapter delivers precise, actionable knowledge on six paramount targets: the eyes, throat, solar plexus, groin, knees, and pressure points. Each section details anatomical structure, physiological effects upon impact, recommended strike methods, requisite force, and relevant legal considerations. This is a codex of life-and-death knowledge; mastery can mean survival or demise. Approach with reverence and unyielding discipline.
1. The Eyes
1.1 Anatomy and Vulnerability
The eyes are the sensory nexus of vision, encased within the orbital cavity but exposed to external assault. The eyeball’s globe is composed of delicate tissues — the cornea, sclera, retina, and optic nerve — all vulnerable to mechanical disruption. The eyelids offer minimal protection. Damage can cause immediate incapacitation, blindness, or intense pain.
1.2 Physiological Effects of Strikes
- Corneal abrasion or rupture: severe pain, temporary or permanent vision loss.
- Orbital fracture: pain, double vision, bleeding, swelling.
- Optic nerve trauma: vision loss, possible permanent blindness.
- Reflexive incapacitation: involuntary blinking, disorientation.
1.3 Recommended Strike Types and Required Force
- Strike Types: gouging with fingers/thumb, poking with thumbs or fingertips, palm strikes directly to the eyes, or jabbing with a sharp edge (pen, keys).
- Required Force: minimal force can cause severe impairment; precise targeting is paramount. Excessive force risks permanent damage and legal consequences.
1.4 Legal Considerations
Intentional eye strikes are typically considered excessive force under self-defense statutes unless life is imminently threatened. Use only when no lesser force suffices. Document threat level and necessity meticulously.
2. The Throat
2.1 Anatomy and Vulnerability
The anterior neck houses the larynx (voice box), trachea (windpipe), carotid arteries, jugular veins, and vagus nerve. The thyroid cartilage (Adam’s apple) offers partial protection but is susceptible to blunt trauma. The throat controls respiration, phonation, and blood flow to the brain. Disruption here rapidly incapacitates.
2.2 Physiological Effects of Strikes
- Laryngeal fracture: airway obstruction, inability to speak or breathe.
- Tracheal collapse: suffocation, extreme distress.
- Carotid artery compression: loss of consciousness within seconds due to cerebral ischemia.
- Vagus nerve stimulation: sudden drop in heart rate and blood pressure, fainting (vagal response).
2.3 Recommended Strike Types and Required Force
- Strike Types: palm heel strike upward to the larynx, knife-hand strike to the side of the neck targeting carotid sinus, throat jab with thumb or finger.
- Required Force: firm but controlled; excessive force risks fatal injury. Pressure duration is critical for carotid compression (5-10 seconds).
2.4 Legal Considerations
Strikes to the throat carry high risk of fatality and are legally scrutinized. Only justified under extreme threat to life. Carotid control holds (vascular chokeholds) require precise application and monitoring to avoid permanent damage.
3. The Solar Plexus
3.1 Anatomy and Vulnerability
The solar plexus is a complex network of nerves located behind the stomach and in front of the diaphragm, beneath the rib cage’s center (approximately at the bottom of the sternum). It controls autonomic functions including breathing and digestive processes.
3.2 Physiological Effects of Strikes
- Diaphragm spasm: inability to inhale (breath “knock-out”).
- Pain shock: overwhelming pain and disorientation.
- Sympathetic nervous system disruption: nausea, faintness.
- Temporary paralysis of diaphragm: collapse or incapacitation.
3.3 Recommended Strike Types and Required Force
- Strike Types: direct fist punch, palm heel strike, elbow strike upward.
- Required Force: moderate to high force; must be delivered swiftly and precisely to avoid rib fracture or self-injury.
3.4 Legal Considerations
Strikes here are generally accepted in self-defense but may cause severe internal injury. Use proportional force relative to the threat. Immediate medical attention must follow heavy strikes.
4. The Groin
4.1 Anatomy and Vulnerability
The groin houses the external genitalia, primarily the testes in males, which are extremely sensitive due to dense nerve endings and thin protective tissue. Females’ inguinal region also contains sensitive structures and nerve clusters.
4.2 Physiological Effects of Strikes
- Intense pain: immediate incapacitation.
- Nausea and vomiting reflex.
- Potential testicular rupture or torsion (males).
- Shock to nervous system causing collapse.
4.3 Recommended Strike Types and Required Force
- Strike Types: upward knee strike, fist or palm heel strike, front kick.
- Required Force: moderate; excessive force risks permanent injury and legal liability. Precision and timing are critical.
4.4 Legal Considerations
Groin strikes are widely accepted in self-defense for neutralizing threats quickly. Must be applied only when justified and not as punitive measures.
5. The Knees
5.1 Anatomy and Vulnerability
The knee joint is a hinge joint stabilized by ligaments (ACL, PCL, MCL, LCL), tendons, cartilage, and the patella (kneecap). It is vulnerable to lateral pressure, hyperextension, or direct blunt trauma.
5.2 Physiological Effects of Strikes
- Ligament rupture: instability, collapse.
- Patellar dislocation or fracture: severe pain, immobility.
- Joint capsule damage: swelling, loss of function.
- Immediate incapacitation through loss of balance.
5.3 Recommended Strike Types and Required Force
- Strike Types: lateral knee strike (side kick or sweep), front stomp, direct frontal strike with heel or fist.
- Required Force: moderate to high; must be targeted to ligaments or joint space, avoiding bone-on-bone trauma to minimize permanent injury.
5.4 Legal Considerations
Knee strikes can cause permanent disability; use only when necessary to prevent grievous harm. Avoid in situations where lesser force can subdue the attacker.
6. Pressure Points
6.1 Anatomy and Vulnerability
Pressure points are specific anatomical locations where nerves, arteries, or muscle insertions lie close to the skin surface. Precise stimulation causes pain, muscle paralysis, or autonomic responses.
Key pressure points covered:
- Temples (superficial temporal artery)
- Jugular notch (sternal notch)
- Brachial plexus (base of neck/shoulder)
- Radial nerve (forearm)
- Peroneal nerve (lateral knee)
- Sciatic nerve (back of thigh)
6.2 Physiological Effects of Strikes
- Pain reflex triggering withdrawal or collapse.
- Muscle paralysis or weakness.
- Autonomic nervous system disruption causing dizziness or fainting.
- Temporary incapacitation without lasting damage if applied correctly.
6.3 Recommended Strike Types and Required Force
- Strike Types: precise finger pressure, knuckle strikes, palm heel strikes, nerve strikes with edge of hand.
- Required Force: low to moderate; accuracy supersedes force. Excessive force risks nerve damage.
6.4 Legal Considerations
Use of pressure points is generally permissible as a non-lethal control method. Excessive or repeated strikes may be legally questionable if causing lasting damage.
Comprehensive Table of Vital Targets
| Target | Description & Location | Physiological Effects | Required Force | Recommended Strike Types | Legal Considerations |
|---|---|---|---|---|---|
| Eyes | Exposed globe within orbital cavity; cornea, optic nerve | Pain, blindness, disorientation | Minimal (precise) | Finger gouge, poke, palm strike, jabbing | Excessive force; justified only under lethal threat |
| Throat | Anterior neck; larynx, trachea, carotid arteries, vagus nerve | Airway obstruction, unconsciousness, vagal response | Firm but controlled | Palm heel strike, knife-hand strike, jab | High risk; fatal injury possible; only under extreme threat |
| Solar Plexus | Center below sternum; nerve network near diaphragm | Breath paralysis, pain shock, faintness | Moderate to high | Fist punch, palm heel, elbow strike | Accepted but risk of internal injury; proportional use |
| Groin | External genitalia; testes in males, inguinal region in females | Intense pain, nausea, collapse | Moderate | Upward knee, palm strike, front kick | Widely accepted in self-defense; must be justified |
| Knees | Hinge joint; ligaments and tendons around patella | Ligament rupture, dislocation, immobility | Moderate to high | Lateral knee strike, stomp, heel strike | Causes permanent disability; use only if necessary |
| Pressure Points | Nerve clusters near skin surface at temples, neck, limbs | Pain, muscle paralysis, autonomic disruption | Low to moderate | Finger pressure, knuckle strike, palm heel | Non-lethal control; excessive use may be legally risky |
Detailed Procedures for Application
Procedure 1: Eye Gouge
- Assume defensive posture: keep hands up, elbows in.
- Close distance rapidly: moving within arm’s length to reach face.
- Extend thumb or index finger: ensure nails are trimmed short to avoid self-injury.
- Aim for the eyeball center or white sclera: target the exposed globe, avoid orbital bones.
- Drive finger straight forward with a snapping motion: apply sudden pressure to cornea or eyelid.
- Withdraw instantly to avoid entrapment or counterattack.
- Follow immediately with retreat or controlling technique.
Procedure 2: Carotid Control Hold (Neck Compression)
- Position yourself to attacker’s side or behind.
- Place thumb behind the jawbone, fingers on the opposite side of the neck.
- Apply steady pressure to both carotid arteries simultaneously using the fingers.
- Maintain pressure for 5-10 seconds: monitor for loss of consciousness, release immediately upon incapacitation.
- Avoid compressing the trachea or applying excessive force.
- Release slowly and be prepared to provide medical aid.
Procedure 3: Solar Plexus Strike
- Adopt a balanced fighting stance.
- Draw the striking arm back in a fluid motion.
- Drive the fist or palm heel directly into the center of the lower sternum.
- Use a snapping motion, combining hip rotation and shoulder drive.
- Immediately follow with defensive maneuvering or escape.
Procedure 4: Groin Strike with Knee
- Close distance to attacker safely.
- Grab or control upper body to maintain balance.
- Drive knee upward sharply into the attacker’s groin.
- Use hip thrust to generate force.
- Withdraw knee and prepare for follow-up or disengagement.
Procedure 5: Lateral Knee Strike
- Face attacker squarely.
- Shift weight onto supporting leg.
- Lift striking leg, aiming the side of the knee at the attacker’s knee joint.
- Drive the strike laterally to target ligaments or peroneal nerve.
- Execute withdrawal and move to safety.
Procedure 6: Pressure Point Strike to the Temples
- Approach attacker’s head with an open palm.
- Focus on the shallow depression at the side of the head, above and slightly forward of the ear.
- Deliver a quick, firm strike with the edge of the palm or fingertips.
- Avoid excessive force to prevent permanent damage.
- Immediately follow with control technique or disengagement.
Summary
Mastery of vital target strikes requires precision, control, and an unwavering understanding of human anatomy and physiological response. Each strike is a sacred act, to be executed only in defense of life. The above protocols demand relentless practice and ethical application. Document all encounters and adhere strictly to legal frameworks governing the use of force.
For reinforcement of muscular conditioning and dynamic striking drills, see Volume 10, Chapter IV: Kinetic Conditioning and Strike Precision. For comprehensive legal guidelines, consult Volume 12: The Warrior’s Law.
End of Volume I, Chapter I The sacred knowledge herein is entrusted only to those who bear the solemn responsibility of the warrior’s path. Let no detail be neglected.
<!-- SECTION 3 -->
The Complete Practitioner's Codex, Volume I: Grappling and Ground Defense
Chapter IV: Mastering Multiple Attacker Scenarios, Escapes, and the Technical Stand-Up
Introduction
Esteemed apprentice, the arena of combat is seldom a solitary contest. The presence of multiple adversaries transforms the battlefield into a crucible of chaos, demanding supreme mastery of grappling and ground defense. This volume imparts the suppressed, life-preserving knowledge necessary to dominate when surrounded, to escape the clutches of fatal holds, and to rise from the earth with tactical precision. The techniques herein are not mere physical maneuvers; they are sacred rituals of survival, encoded in exacting detail so that no breath is wasted, no motion misjudged, and no opportunity for control surrendered.
Section 1: Grappling in Multiple Attacker Scenarios
Understanding the Dynamics
When confronted by multiple attackers, your grappling strategy must prioritize positional mobility, rapid disengagement, and environmental awareness. Ground engagements are perilous; being static or entangled invites vulnerability. The goal is to neutralize the immediate threat efficiently, then reposition or disengage to face subsequent attackers.
Tactical Principles
- Avoid prolonged ground engagement unless absolutely necessary.
- Control the attacker closest to you, minimizing exposure to others.
- Use the attacker’s momentum against them to create space.
- Maintain situational awareness; your head must sweep constantly.
- Exploit terrain features (walls, obstacles) to funnel attackers or limit their approach vectors.
Step-by-Step Protocol: Grappling Multiple Attackers
1. Initial Threat Assessment and Positioning: 1.1. Upon facing multiple attackers, immediately scan to identify the closest and most aggressive assailant. 1.2. Position your body so that the closest attacker is directly in front, others to your periphery or rear but within your field of vision. 1.3. Adopt a low, balanced stance with a wide base to maintain stability and mobility.
2. Engage the Primary Attacker with a Disabling Entry: 2.1. Use a low-level double-leg takedown or body lock to bring the primary attacker down swiftly. 2.2. Aim to control the attacker’s hips and centerline, preventing their recovery or counter-attack.
3. Immediate Control and Threat Neutralization: 3.1. Transition to a front headlock position or sprawl if the attacker attempts to regain footing or strike. 3.2. Apply a guillotine choke or Anaconda choke to incapacitate rapidly. 3.3. If chokes are impractical, secure a kimura lock or americana lock to immobilize the attacker’s arm.
4. Maintain Awareness and Prepare for Secondary Attackers: 4.1. Use peripheral vision and head movement to monitor other attackers. 4.2. Keep your free hand ready to strike or push secondary attackers. 4.3. Use the primary attacker’s body as a shield, positioning your body between them and other attackers.
5. Disengage and Reorient: 5.1. Once the primary attacker is subdued or incapacitated, disengage by executing a technical stand-up (see Section 3). 5.2. Use explosive movement to create distance and turn towards the next threat. 5.3. Repeat the protocol as necessary.
Table 1: Multiple Attacker Grappling Positions and Tactical Advantages
| Position | Description | Tactical Advantage | Risk Factor | Recommended Use Case |
|---|---|---|---|---|
| Front Headlock | Control over attacker’s head and arm from standing | Rapid choke application; immobilizes attacker | Limited mobility | Primary attacker close-range |
| Body Lock | Wrap arms around attacker’s torso | Control of center mass; facilitates takedown | Vulnerable to strikes | Initiate takedown |
| Sprawl | Hip pressure on attacker attempting takedown | Prevents takedown; transitions to dominant position | Requires strength | Defend takedown in multi-threat |
| Technical Mount | Dominant top control with ability to strike | Control with offensive options; limits attacker movement | Grounded; vulnerable to others | After takedown; secure control |
| Guard (Closed/Open) | Legs wrapped around attacker from bottom | Control and attack options; protects from strikes | Vulnerable to secondary attacks | Defensive against one attacker |
| Side Control | Perpendicular control on attacker’s torso | Limits attacker movement and breathing | Vulnerable to reversals | Post-takedown control |
Section 2: Escapes from Ground Holds and Joint Locks
The Sacred Imperative of Escape
No warrior is immortal, but mastery of escapes prolongs life and sustains combat effectiveness. The techniques provided here are the culmination of centuries of suppressed knowledge, enabling you to break free from death grips and reestablish control.
Step-by-Step Protocol: Escaping Common Ground Holds
2.1 Escape from Mount Position (Opponent on Top)
Objective: Remove opponent’s weight and regain guard or stand up.
Steps:
- Protect your face with your arms to prevent strikes.
- Trap one of the opponent’s arms by gripping their wrist with one hand and controlling their elbow with the other.
- Bridge explosively by thrusting your hips upward and to the side of the trapped arm.
- As the opponent’s balance is compromised, roll them over onto their back.
- Immediately establish guard position (closed or open) to regain control.
2.2 Escape from Side Control
Objective: Create space and recover guard or stand up.
Steps:
- Frame your forearms against the opponent’s neck and hips to create space.
- Shrimp your hips away, sliding your bottom knee inside toward the opponent’s torso.
- Insert your foot between you and the opponent, creating a barrier.
- Use your frame to push the opponent away while sliding your other leg through to recover guard.
- If space allows, execute the technical stand-up (see Section 3).
2.3 Escape from Armbar
Objective: Prevent hyperextension and regain control.
Steps:
- Rotate your thumb toward the opponent’s legs (the direction of the armbar’s pressure).
- Elevate your elbow to reduce pressure on the joint.
- Stack the opponent by driving your weight forward onto their torso.
- Simultaneously, pull your arm free while controlling their body to prevent counter-attacks.
- Transition to a dominant position such as side control or mount.
Step-by-Step Protocol: Escaping Joint Locks
2.4 Kimura Lock Escape
Steps:
- Do not attempt to pull the arm directly; this increases joint torque.
- Rotate your wrist inward (pronation) to reduce the lock’s leverage.
- Roll toward the opponent’s trapped arm side, bringing your body on top.
- Use your free hand to peel their grip off your wrist.
- Pull your arm free and immediately control the opponent’s posture.
2.5 Americana Lock Escape
Steps:
- Rotate your wrist outward (supination) to reduce pressure.
- Bridge your hips to create space and destabilize the opponent.
- Use your free hand to pry their grip from your arm, focusing on the weakest point.
- Withdraw your arm while turning toward the opponent to avoid follow-up attacks.
- Gain top control or stand up.
Section 3: The Technical Stand-Up
The Sacred Protocol to Reclaim the Battlefield
The technical stand-up is the cornerstone of ground defense. It allows you to rise safely while maintaining a defensive posture, ready to confront new threats or reposition. This maneuver preserves your guard and prevents exposure to strikes or grabs during the vulnerable moment of standing.
Step-by-Step Technical Stand-Up Protocol
- From a seated or supine position, place one hand flat on the ground, aligned with your shoulder.
- Position the opposite leg bent, foot flat on the ground, with the knee pointing upward.
- Extend the other leg straight on the ground, ready to push off.
- Use the hand on the ground to lift your torso, leaning slightly backward to maintain balance.
- Swing the straight leg underneath your body, placing the foot flat behind you, establishing a tripod base (two feet, one hand).
- From this base, push off the ground with your back foot and hand simultaneously, rising into a balanced standing stance.
- Maintain your eyes on the threat, hands ready to defend or strike.
- If attackers are in range, use strikes or kicks to create space before fully disengaging or repositioning.
Table 2: Technical Stand-Up Variations and Tactical Applications
| Variation | Description | Tactical Advantage | Use Case |
|---|---|---|---|
| Standard Technical Stand-Up | Basic stand-up from seated or supine position | Maximizes speed and balance | Single attacker or initial disengagement |
| Defensive Technical Stand-Up | Maintain guard with one hand extended forward | Ready to parry or strike during rise | Multiple attackers; maintain defense |
| Aggressive Technical Stand-Up | Combine stand-up with immediate strike or push | Disrupt attacker’s approach post-stand | When space allows offensive action |
Section 4: Joint Locks and Positional Control
The Sacred Science of Control
Joint locks and positional control are the keystones of grappling mastery. They allow the warrior to dictate the engagement, conserve energy, and prepare for decisive action. Below is a compendium of critical joint locks, their application, and control techniques.
Step-by-Step Protocols for Key Joint Locks
4.1 Kimura Lock (Double Wrist Lock)
Steps:
- Isolate opponent’s arm by controlling their wrist with your same-side hand.
- Thread your other arm under their arm and grab your own wrist, forming a figure-four grip.
- Pull their wrist behind their back, lifting their elbow to create torque on the shoulder joint.
- Maintain tight control of their wrist and elbow to prevent escape.
- Apply gradual pressure to force submission or control.
4.2 Americana Lock (Keylock)
Steps:
- Secure opponent’s wrist with your same-side hand.
- Slide your other arm under their arm and grasp your own wrist (figure-four grip).
- Pull their wrist toward their head, lifting their elbow to stress the shoulder.
- Keep your body weight on the opponent’s torso to limit movement.
- Apply pressure slowly to avoid injury until submission.
4.3 Straight Arm Lock (Juji Gatame)
Steps:
- Control opponent’s arm by trapping it between your thighs.
- Secure their wrist with both hands, holding it firmly.
- Raise their elbow, hyperextending the elbow joint by pulling the wrist in the opposite direction.
- Maintain pressure until control is established or submission occurs.
Table 3: Common Grappling Positions and Tactical Advantages
| Position | Description | Control Level | Offensive Options | Defensive Considerations |
|---|---|---|---|---|
| Mount | Sitting astride opponent’s torso | High | Strikes, joint locks | Vulnerable to escapes |
| Side Control | Chest-to-chest perpendicular control | High | Joint locks, transitions | Risk of reversal |
| Guard (Closed) | Legs wrapped around opponent’s waist | Medium | Submissions, sweeps | Vulnerable to ground and pound |
| Half Guard | One leg trapped between opponent’s legs | Medium | Sweeps, submissions | Defensive posture required |
| Back Control | Opponent’s back secured with hooks | Very High | Chokes, strikes | Critical control position |
Final Considerations
Apprentice, internalize that grappling mastery is not merely physical but a sacred communion with the laws of leverage, timing, and human anatomy. Every escape, every lock, every stand-up is a ritual that preserves the sanctity of your life. Train these protocols relentlessly, for in the crucible of combat, precision and reflex are the arbiters of survival.
For further mastery of striking techniques to complement your grappling defense, consult Volume II: The Practitioner’s Striking Codex, Chapter III. For advanced joint manipulation biomechanics, see Volume V: The Art of Submission and Control, Section 2.
This concludes Volume I, Chapter IV. Proceed with reverence and discipline.
<!-- SECTION 4 -->
The Complete Practitioner's Codex, Volume I: Dirty Fighting and Improvised Techniques
Chapter I: The Warrior’s Arsenal - Environmental Objects as Weapons
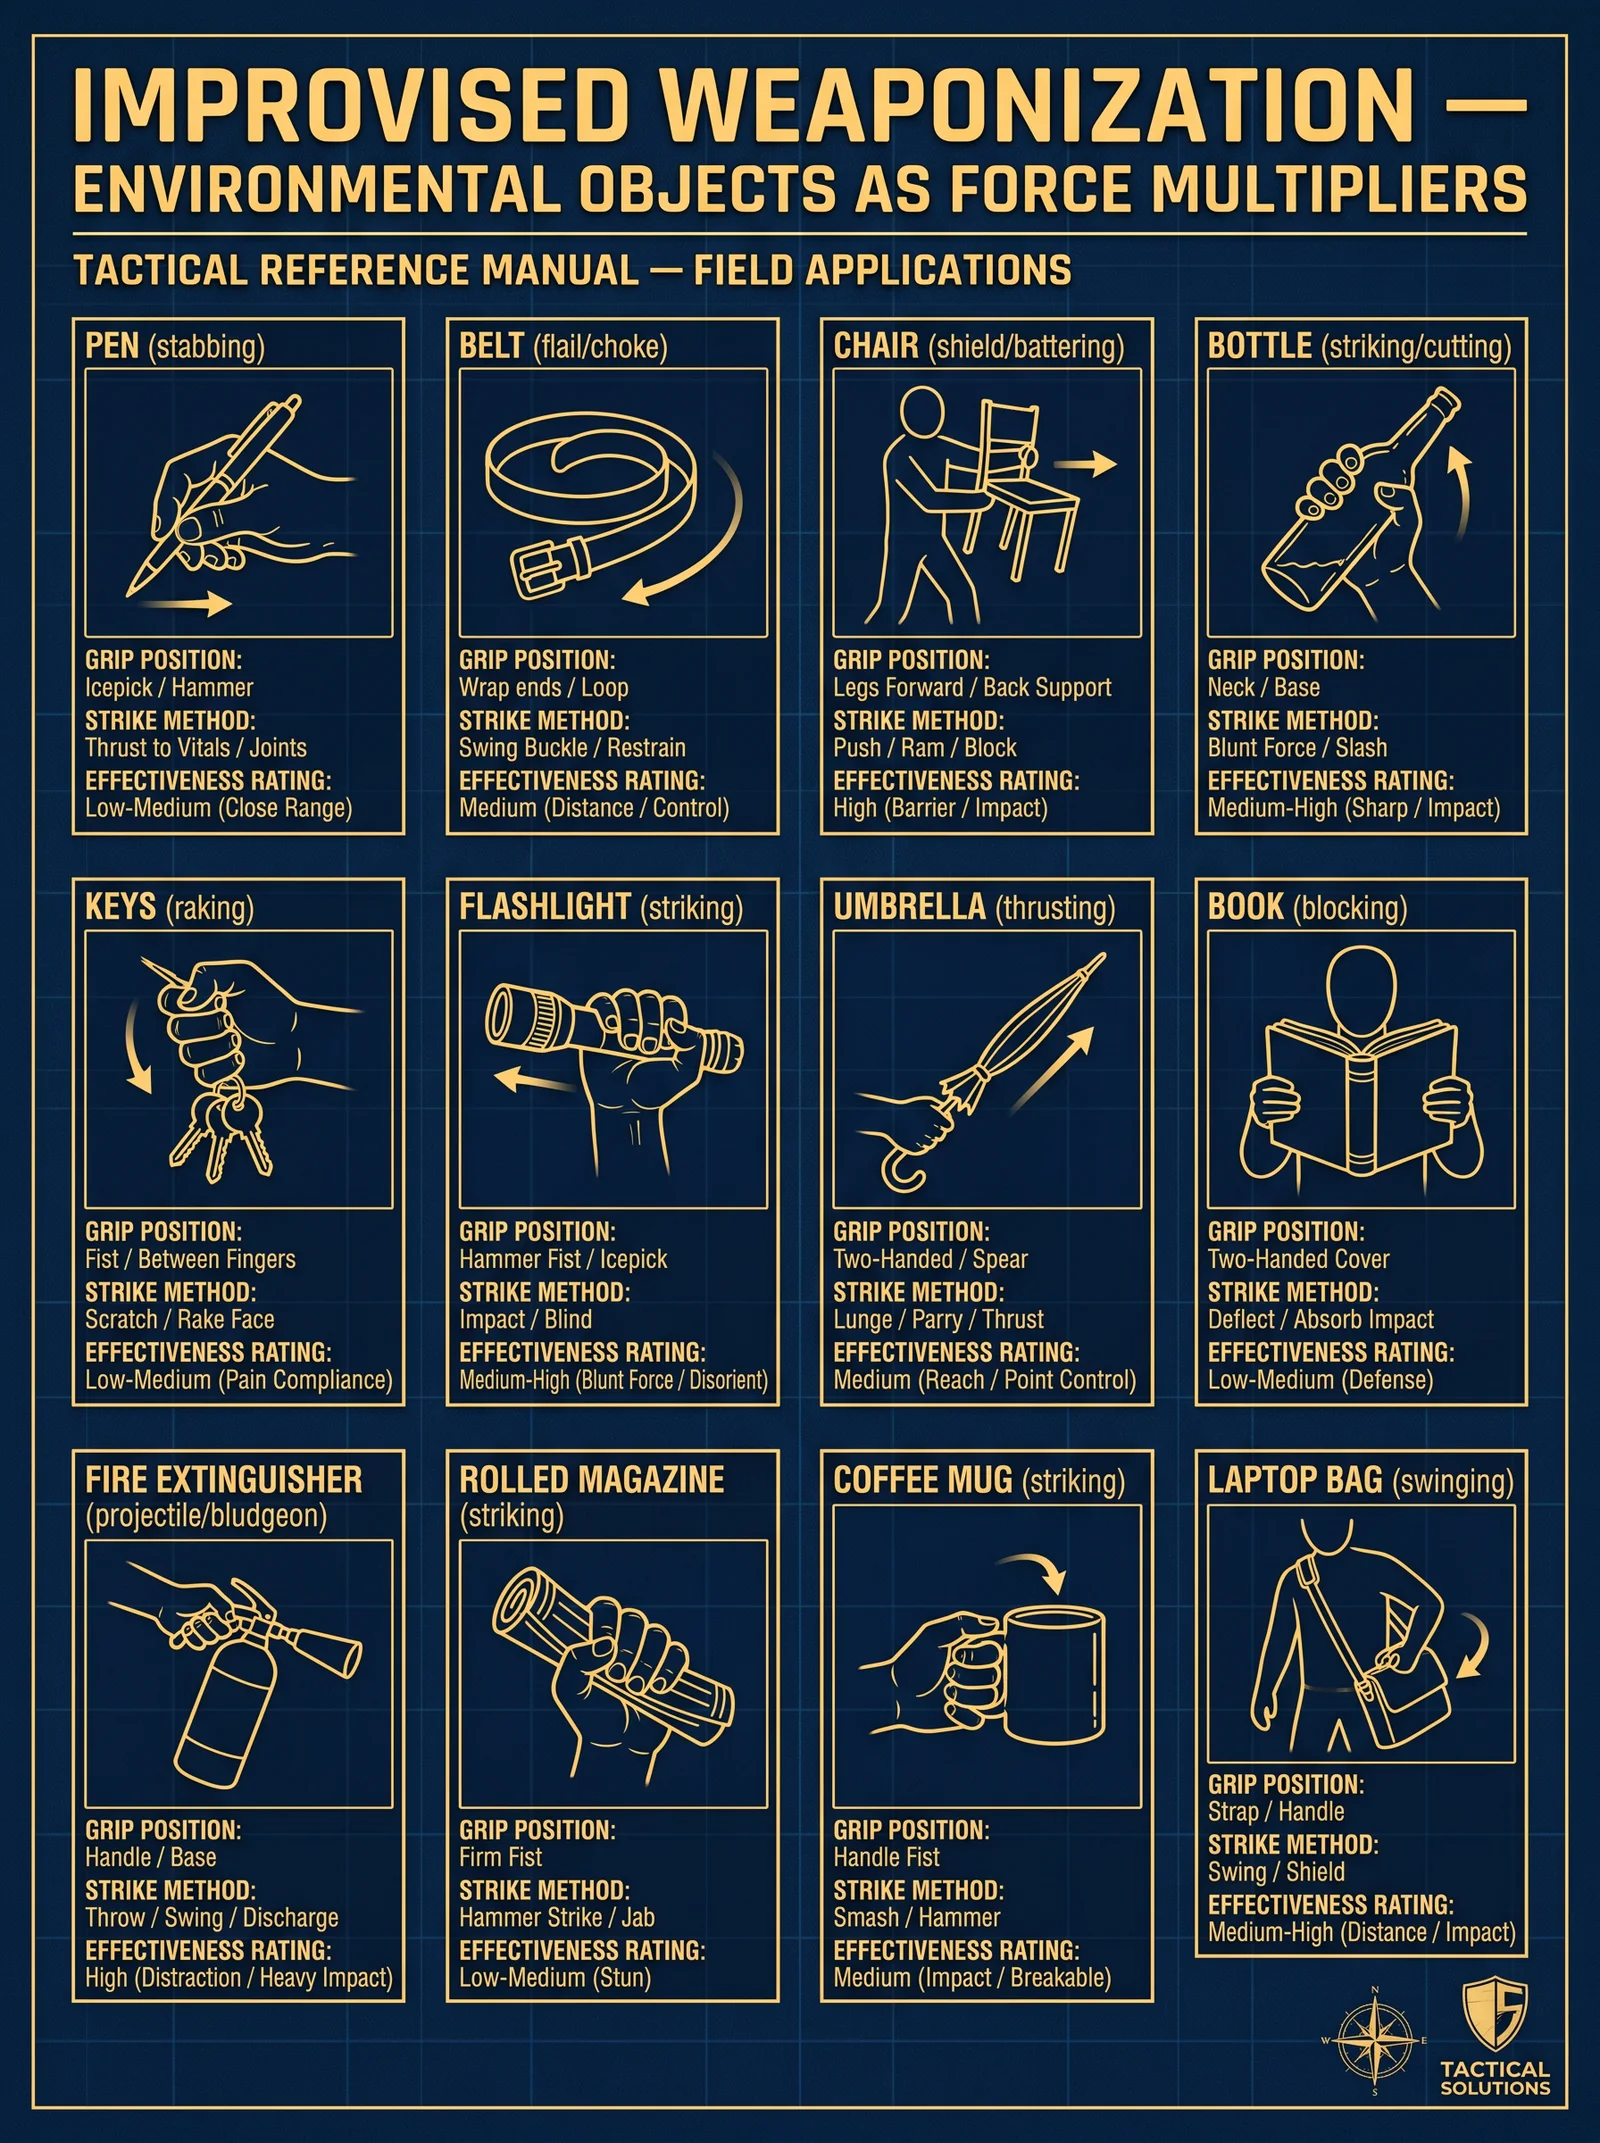
In the crucible of mortal combat, mastery over the environment separates the prepared from the doomed. This chapter imparts the sacred knowledge of transforming the mundane into instruments of survival and victory. Every object in your vicinity holds lethal potential—your task is to recognize, wield, and apply these tools with precision and authority.
Section 1: Identification and Preparation of Improvised Weapons
The first principle is recognition. Immediate survival depends on quick identification of potential weapons and their adaptation for use.
| Object Category | Common Items | Lethal Potential | Preparation Steps |
|---|---|---|---|
| Blunt Objects | Heavy books, bricks, metal pipes | Blunt trauma to skull, ribs | 1. Select item with sufficient mass and grip<br>2. Remove loose parts or coverings<br>3. Grip firmly; if slippery, wrap cloth or tape for traction |
| Sharp Objects | Broken glass, knives, scissors | Penetrating wounds, lacerations | 1. Assess sharpness<br>2. Stabilize with tape or cloth to prevent slippage<br>3. Grip handle or wrapped base securely |
| Throwing Objects | Stones, cans, small tools | Distraction, blunt impact | 1. Select appropriate size for throwing<br>2. Practice grip and aim<br>3. Calculate trajectory and distance |
| Entangling Objects | Cords, belts, scarves | Choking, limb immobilization | 1. Verify length and strength<br>2. Tie knots in advance if possible<br>3. Practice rapid deployment techniques |
Protocol 1.1: Rapid Weaponization of Environmental Objects
- Scan Environment: Within 5 seconds of threat recognition, visually identify at least 3 potential weapons.
- Prioritize: Select objects based on proximity, weight, and ease of use.
- Secure Grip: If object is slippery, immediately wrap with available cloth or tape (carry duct tape in survival kit).
- Adopt Stance: Position body to maximize leverage; feet shoulder-width apart, knees slightly bent.
- Engage: Use object with maximum mechanical advantage; swing, thrust, or throw depending on weapon type.
Section 2: Usage Scenarios and Tactical Application
Improvised weapons are most effective when combined with surprise and knowledge of vulnerable anatomical targets.
| Scenario | Environmental Weapon | Target Zone(s) | Tactical Notes |
|---|---|---|---|
| Confined Spaces (e.g., elevators) | Heavy book, metal pipe | Temple, nose bridge, ribs | Use short, powerful strikes; avoid wide swings |
| Open Areas (e.g., parking lots) | Stones, cans, belts | Eyes, throat, knees | Employ throwing and entangling methods for distance |
| Urban Alleyways | Broken glass, scissors | Carotid artery, fingers | Controlled stabbing or slashing; maintain distance |
| Domestic Settings | Kitchen utensils | Solar plexus, joints | Utilize familiarity for rapid strikes |
Protocol 2.1: Execution of Surprise Attack Using Improvised Weapon
- Approach Silently: Minimize noise; walk on balls of feet.
- Conceal Weapon: Hold object out of the target’s line of sight.
- Identify Target Zone: Use Table 2 to select vulnerable area.
- Strike Swiftly: Deliver blow within 1 second of proximity.
- Follow Through: Immediately disengage or prepare for secondary attack.
Section 3: Targeting Vulnerable Areas for Maximum Effect
Pain compliance and incapacitation rely on anatomical knowledge. The following table lists critical zones and recommended strikes.
| Vulnerable Area | Physiological Effect | Recommended Strike Type | Notes |
|---|---|---|---|
| Temple | Loss of consciousness | Blunt force, heavy object swing | Use with maximum force; risk of fatality |
| Eyes | Temporary blindness, disorientation | Fingertip gouge, thrown object | Risk of permanent damage |
| Carotid Artery | Rapid unconsciousness | Choke hold, strike with blunt edge | Apply pressure for 3-5 seconds |
| Solar Plexus | Breath incapacitation | Palm strike, fist thrust | Target just below sternum |
| Knees (Patella) | Immobilization | Sidekick, blunt strike | Avoid permanent damage if escape desired |
| Fingers (Nerve tips) | Pain compliance | Pinch, twist | Effective for control without lethal force |
Protocol 3.1: Application of Pain Compliance Techniques
- Approach: Secure control of limb or body part.
- Locate Nerve: Identify nerve-rich area such as fingers or wrist.
- Apply Pressure: Use thumb or fingers to pinch or twist.
- Increase Intensity: Gradually increase pressure to induce compliance.
- Maintain Control: Hold position until opponent yields or is incapacitated.
Section 4: Improvised Weapon Construction — Step-by-Step
Below are detailed construction protocols for common improvised weapons.
Protocol 4.1: Constructing a Weighted Flail from Household Objects
Materials Needed:
| Item | Quantity | Description |
|---|---|---|
| Rope or cord | 1 meter | Durable, minimum 5mm diameter |
| Heavy metal object | 1 | Small wrench, padlock, or similar weight (~500g) |
| Duct tape | 1 roll | For securing and grip |
Steps:
- Prepare Rope: Cut 1 meter of rope; fray ends to prevent unraveling.
- Attach Weight: Tie heavy object securely at one end using a strong knot (double fisherman's knot).
- Secure Grip: Wrap duct tape around rope opposite end to form handle.
- Test Swing: Practice controlled swings to develop momentum without loss of control.
Protocol 4.2: Creating a Slashing Weapon from Broken Glass
Materials Needed:
| Item | Quantity | Description |
|---|---|---|
| Glass bottle | 1 | Thick glass, unbroken initially |
| Cloth or glove | 1 | For hand protection |
| Tape (optional) | 1 roll | To secure glass shard |
Steps:
- Break Bottle: Strike bottle base against hard surface wearing gloves.
- Select Shard: Choose shard with sharp edge and manageable size.
- Wrap Handle: Wrap base of shard in cloth or tape to form grip.
- Test Edge: Carefully test sharpness on inert material.
Section 5: Legal Considerations for Improvised Weapon Use
The sacred knowledge herein must be tempered with the understanding of the law in your jurisdiction. Improvised weapons, though vital for survival, can carry legal consequences.
| Jurisdiction Type | Legal Status of Improvised Weapons | Use Case Limitations | Recommended Precautions |
|---|---|---|---|
| Self-Defense Permissive | Generally allowed if proportional | Must cease once threat neutralized | Document threat; use minimal force |
| Strict Weapon Control Areas | Possession may be illegal | Carrying or use can lead to arrest | Avoid carrying unless emergency |
| Civilian Carry Restrictions | Use restricted to home defense | Public use often criminalized | Know local statutes; avoid public display |
| Military or Law Enforcement | Authorized with proper gear | Use under rules of engagement | Follow chain of command |
Section 6: Surprise Tactics — Psychological and Physical Application
The element of surprise magnifies the power of improvised weapons. This section provides protocols for psychological disruption combined with physical assaults.
Protocol 6.1: Execution of Surprise Assault with Environmental Weapon
- Pre-Engagement Assessment: Identify target’s attention direction, posture, and surroundings.
- Silent Positioning: Approach from blind spot or behind.
- Distraction: Use thrown object or loud noise to disorient.
- Rapid Strike: Employ heavy object to temple or solar plexus.
- Immediate Follow-Up: Use pain compliance on extremities to immobilize.
- Escape or Control: Decide whether to disengage or maintain control.
Section 7: Advanced Pain Compliance Methods Using Improvised Tools
Pain compliance is the art of control without lethal intent. When combined with improvised weapons, it provides an advantage without escalating violence unnecessarily.
| Tool Type | Pain Compliance Method | Target Area | Application Details |
|---|---|---|---|
| Belt or Cord | Joint lock or choke | Wrists, neck | Use knots for leverage; avoid prolonged choke |
| Metal Pipe | Pressure point strike | Radial nerve (forearm) | Strike with flat end; repeat as needed |
| Sharp Object (Knife) | Pressure on nerve clusters | Webbing between thumb and index | Use tip to apply controlled pressure |
Protocol 7.1: Applying Joint Lock with Belt
- Wrap Belt: Loop belt around opponent’s wrist.
- Create Loop: Tie a slip knot to tighten on movement.
- Leverage Joint: Apply outward force to hyperextend wrist.
- Maintain Control: Hold until compliance or incapacitation.
- Release: Immediately upon compliance to avoid injury.
Section 8: Summary Tables for Quick Reference
| Improvised Weapon | Primary Use | Target Zone(s) | Legal Caution |
|---|---|---|---|
| Heavy Book | Blunt trauma | Temple, ribs | Generally permitted |
| Metal Pipe | Blunt force, pressure | Radial nerve, temple | May be restricted |
| Broken Glass | Slashing | Carotid, fingers | High legal risk |
| Belt | Choking, joint lock | Neck, wrists | Use with caution |
| Stone/Cans | Throwing, distraction | Eyes, knees | Permitted in self-defense |
Conclusion
Your environment is your arsenal; your hands, the instruments of death and mercy. This volume arms you with the sacred knowledge to wield everyday objects as weapons, to strike with precision, and to control with pain compliance. Execute these protocols with reverence and responsibility. In the crucible of combat, your mastery over these techniques will grant you the divine edge between life and death.
For advanced striking mechanics and formal weapon construction, refer to Volume II: The Practitioner’s Edge. For medical treatment of wounds inflicted by improvised weapons, consult Volume VIII: The Healing Codex.
End of Volume I, Chapter I
<!-- SECTION 5 -->
Volume II: Blade Selection and Carry Methods
Introduction
The blade is the paramount tool and weapon of the warrior, a sacred extension of the will to survive and enforce justice. This volume dissects the anatomy, utility, and deployment of blades in the field of self-defense and combat operations. It is a compendium of suppressed knowledge, blending ancient martial wisdom with modern tactical science. The chosen apprentice must internalize this doctrine and execute with precision.
Chapter I: Blade Types – Technical Analysis and Functional Classification
This chapter deconstructs the principal categories of blades: fixed blades, folding knives (folders), karambits, and improvised edged weapons. Each category is analyzed on construction, ergonomics, deployment methods, and operational advantages and limitations.
Section 1: Fixed Blades
Fixed blades are rigid, solid blades affixed to a handle without moving parts. Their design is fundamental to survivability and reliability.
Construction and Materials
- Blade Steel: High-carbon stainless steels such as CPM S30V, 1095 Cro-Van, and D2 tool steel dominate for toughness and edge retention.
- Handle Materials: Micarta, G10, stabilized wood, or metal alloys provide grip stability under wet or adverse conditions.
- Tang Design: Full tang construction (blade extends through handle) ensures maximal strength and durability.
Operational Characteristics
| Feature | Description |
|---|---|
| Strength | Maximal due to single-piece construction |
| Maintenance | Easier to clean, less prone to mechanical failure |
| Deployment Speed | Slower to draw compared to folders; requires sheath management |
| Concealability | Generally less concealable due to fixed length and sheath |
| Primary Functions | Tactical combat, utility cutting, survival applications |
Pros
- Unyielding strength: No moving parts that can fail under stress.
- Versatility: Capable of heavy-duty tasks including chopping, prying, and thrusting.
- Reliability: Operates flawlessly in all environmental conditions.
- Ease of maintenance: Simple to clean and sharpen.
Cons
- Concealment challenge: Requires specialized sheath placement to avoid detection.
- Carry discomfort: Bulkier, can impede mobility if improperly positioned.
- Slower draw: Requires deliberate sheath removal, which may delay response time.
Section 2: Folding Blades (Folders)
Folders feature a pivot mechanism allowing the blade to fold into the handle.
Construction and Materials
- Locking Mechanisms: Liner lock, frame lock, back lock, axis lock.
- Blade Types: Drop point, tanto, clip point common.
- Materials: Similar steels as fixed blades; handles often aluminum, titanium, or carbon fiber.
Operational Characteristics
| Feature | Description |
|---|---|
| Strength | Lower than fixed blades due to pivot and locking mechanisms |
| Maintenance | Requires cleaning and lubrication of pivot and lock |
| Deployment Speed | Faster draw via thumb studs, flippers, or assisted opening |
| Concealability | Highly concealable due to compact folded size |
| Primary Functions | Everyday carry (EDC), self-defense, utility cutting |
Pros
- Concealability: Compact size when folded facilitates discreet carry.
- Deployability: Rapid one-handed deployment with practice.
- Versatility: Multi-use capability for daily tasks and defense.
- Portability: Lightweight and easy to carry in pockets or belts.
Cons
- Structural weakness: Locks and pivots are potential failure points under extreme force.
- Maintenance demand: Regular cleaning and lubrication required to prevent jamming.
- Reduced strength: Not suitable for heavy prying or chopping.
Section 3: Karambits
Karambits are curved blades originating from Southeast Asia, designed primarily for close-quarter combat and utility.
Construction and Materials
- Blade Shape: Distinctive curved, hawkbill style blade.
- Handle: Ergonomic with finger ring for retention; often textured grip.
- Steel: High carbon or stainless steel optimized for slicing.
Operational Characteristics
| Feature | Description |
|---|---|
| Strength | Moderate; curved blade limits prying but excels in slicing |
| Maintenance | Similar to fixed blades; prone to corrosion in finger ring area |
| Deployment Speed | Fast with practice; finger ring ensures retention |
| Concealability | Moderate; curved shape may print under clothing |
| Primary Functions | Close-quarters combat, slashing, utility cutting |
Pros
- Retention: Finger ring secures weapon during grappling and movement.
- Slicing efficiency: Curved blade excels at drawing cuts and slashes.
- Close quarters: Designed for intimate combat environments.
- Weapon manipulation: Allows for complex spinning and hooking techniques.
Cons
- Limited thrusting: Curvature reduces effectiveness in stabbing.
- Concealment difficulty: Unusual shape may reveal presence.
- Learning curve: Requires specialized training for effective use.
Section 4: Improvised Edged Weapons
Improvised edged weapons are objects adapted or modified in situ for the purposes of cutting or stabbing.
Common Forms
- Broken glass shards
- Modified screwdrivers or chisels
- Sharpened metal fragments
- Bone or wooden splinters sharpened into points
Operational Characteristics
| Feature | Description |
|---|---|
| Strength | Variable; generally weaker than purpose-built blades |
| Maintenance | Impractical; often disposable |
| Deployment Speed | Immediate; no carry required |
| Concealability | Maximum, as weapon is everyday object |
| Primary Functions | Emergency defense, last-resort combat |
Pros
- Availability: Can be fashioned from environment or surroundings.
- Surprise factor: Opponents unlikely to anticipate weapon.
- No carry restrictions: Not subject to blade laws if not pre-carried.
- Disposable: Can be discarded or hidden instantly.
Cons
- Durability: Prone to breakage or dulling.
- Ergonomics: Poor grip and control increase risk of self-injury.
- Limited effectiveness: Less reliable for repeated combat use.
- Legal ambiguity: Potentially viewed as assault weapon depending on jurisdiction.
Chapter II: Carry Methods – Tactical Deployment and Legal Considerations
The blade’s utility is directly dependent on how it is carried and deployed. This chapter outlines carry options, concealment strategies, and the legal frameworks governing blade possession.
Section 1: Carry Methods for Fixed Blades
Sheath Types and Placement
| Sheath Type | Description | Advantages | Disadvantages |
|---|---|---|---|
| Belt Sheath | Attached to belt on hip or back | Accessibility, stability | Printing, limited concealment |
| Neck Sheath | Worn around neck with blade suspended | Concealed, quick access | Risk of blade injury, limited blade size |
| Boot Sheath | Inserted into boot or ankle | Concealed, surprise factor | Limited blade length, accessibility issues |
| Inside Waistband (IWB) Sheath | Inserted inside pants waistband | Concealed, secure | Limited blade size, slower draw |
Step-by-Step Fixed Blade Carry Setup
- Select sheath type based on mission parameters (concealment, accessibility).
- Mount sheath securely: belt sheath requires sturdy belt loops; neck sheath uses lanyard.
- Practice draw movements repeatedly under stress to build muscle memory.
- Secure blade retention: verify sheath retention mechanism locks blade firmly.
- Test carry comfort: adjust sheath angle and position for natural movement.
Section 2: Carry Methods for Folding Blades
Carry Options
| Carry Method | Description | Advantages | Disadvantages |
|---|---|---|---|
| Pocket Carry | Blade folded in pants or jacket pocket | Concealed, fast access | Risk of blade fouling, pocket damage |
| Belt Clip Carry | Clip attached to folder for belt or pocket | Secure, fast deployment | Printing, limited concealment |
| Neck Carry | Small folders on neck chain or lanyard | Concealed, accessible | Risk of injury, blade size limited |
| Purse or Bag Carry | Stored in personal carry bag | Concealed, accessible | Delay in access, risk of losing |
Step-by-Step Folder Deployment Training
- Select folder with preferred opening mechanism (thumb stud, flipper).
- Practice opening and closing repeatedly with dominant and non-dominant hand.
- Carry folder in preferred location with secure clip or pocket.
- Conduct dry draws to build speed and fluidity.
- Maintain blade and pivot regularly to ensure consistent deployment.
Section 3: Carry Methods for Karambits
Sheath and Retention
- Typically carried in a belt sheath or ankle sheath with retention strap.
- Some models include neck carry options with secure ring retention.
- Retention is critical to prevent accidental loss.
Deployment Techniques
- Grip securely with index finger through retention ring.
- Draw blade from sheath with a spinning motion to orient blade.
- Maintain control using ring for retention during aggressive maneuvers.
- Practice multiple draw angles (overhand, underhand) to adapt to context.
Section 4: Carry Methods for Improvised Edged Weapons
Considerations
- Cannot be pre-carried; must be fashioned or found at moment of need.
- Carry no legal protection; possession may be construed as intent to assault.
- Training focuses on environmental awareness and improvisation drills.
Improvised Weapon Fabrication Protocol
- Identify potential materials: glass, metal, wood, bone.
- Use available tools (rocks, metal edges) to sharpen edges.
- Wrap handle area with cloth or tape for grip.
- Test structural integrity by applying force cautiously.
- Conceal or position weapon for immediate access.
Chapter III: Legal Frameworks and Compliance
Understanding legal constraints is non-negotiable. Carrying blades is regulated by statute and ordinance, varying by jurisdiction. Ignorance can result in disarmament, fines, or imprisonment.
Section 1: General Legal Principles
- Blade Length Restrictions: Many jurisdictions limit blade length for carry, commonly 3-4 inches maximum.
- Concealment Laws: Some areas restrict concealed carry of blades regardless of length.
- Type Prohibitions: Fixed blades, switchblades, balisongs, and karambits may be banned.
- Intent and Use: Carrying with intent to commit a crime elevates legal penalties.
Section 2: Practical Legal Compliance Protocol
- Research local laws before acquiring or carrying any blade.
- Register blades if required by law.
- Avoid prohibited blade types in your area.
- Carry blades openly when legal to enhance transparency.
- Maintain documentation proving lawful ownership and intent.
- Train in lawful use and de-escalation to avoid legal entanglement.
Chapter IV: Comparative Data Tables
Blade Type Comparison

| Blade Type | Average Length (inches) | Average Weight (oz) | Concealability (1-5)* | Primary Function | Maintenance Demand (1-5)** |
|---|---|---|---|---|---|
| Fixed Blade | 5-9 | 5-12 | 2 | Combat, Survival | 3 |
| Folding Blade (Folder) | 2.5-4.5 | 2-5 | 5 | EDC, Self-defense | 4 |
| Karambit | 3-5 | 2-4 | 3 | Close Combat, Utility | 3 |
| Improvised Weapon | Variable | Variable | 5 | Emergency Defense | 5 |
*Concealability scale: 1 = Difficult to conceal, 5 = Easily concealed **Maintenance demand: 1 = Minimal, 5 = High
Carry Method Suitability Matrix
| Blade Type | Belt Sheath | Neck Sheath | Pocket Carry | Boot Sheath | IWB Sheath | Purse/Bag Carry |
|---|---|---|---|---|---|---|
| Fixed Blade | Excellent | Good | Not Applicable | Good | Fair | Not Applicable |
| Folding Blade (Folder) | Not Applicable | Not Applicable | Excellent | Not Applicable | Not Applicable | Good |
| Karambit | Excellent | Good | Not Applicable | Good | Not Applicable | Not Applicable |
| Improvised Weapon | Not Applicable | Not Applicable | Not Applicable | Not Applicable | Not Applicable | Not Applicable |
Chapter V: Step-by-Step Guides for Blade Selection and Carry Setup
Guide 1: Selecting the Proper Blade for Mission Profile
- Define mission parameters: environment, concealment needs, expected threats.
- Determine blade type suitability using the comparative tables.
- Select blade size balancing lethality and concealability.
- Verify legal compliance with local laws.
- Acquire blade from reputable source with quality materials.
- Train extensively in blade deployment and use under stress.
Guide 2: Setting Up Fixed Blade Carry
- Choose sheath type based on position (belt, neck, boot).
- Attach sheath securely ensuring stability during movement.
- Insert blade ensuring firm retention.
- Practice drawing rapidly and safely.
- Adjust sheath position for comfort and concealment.
- Conduct daily readiness checks for sheath and blade condition.
Guide 3: Folding Blade Carry and Deployment
- Select folder with preferred opening mechanism.
- Attach belt clip or designate pocket for carry.
- Carry blade folded in secure location.
- Perform dry draws to build speed.
- Regularly clean and lubricate pivot and lock.
- Inspect blade edge before and after carry.
Guide 4: Karambit Deployment Drills
- Grip karambit with finger through retention ring.
- Draw blade from sheath using wrist rotation.
- Practice slashing and hooking motions on training targets.
- Train retention to prevent loss during grappling.
- Incorporate blade transitions from deployment to defensive postures.
- Maintain blade and handle for corrosion and grip integrity.
Conclusion
This volume furnishes the warrior with sacred knowledge on blade selection and carry methodologies. Mastery of these principles forges a lethal edge in self-defense and combat, while compliance with legal frameworks preserves the sanctity of the warrior’s path. Uphold these teachings with honor, discipline, and relentless practice.
For in-depth tactical deployment, edged weapon combat techniques, and maintenance protocols, consult Volume IV: The Edged Weapon Combat Codex.
End of Volume II: Blade Selection and Carry Methods.
<!-- SECTION 6 -->
Volume II: The Biomechanics of Blade Use
Chapter III: The Warrior’s Manual — Forward Grip Slash, Reverse Grip Stab, Trapping Techniques, and Blade Retention
In this chapter, the sacred art of blade mastery reveals itself through the precise biomechanics of four critical components: the forward grip slash, the reverse grip stab, trapping techniques, and blade retention protocols. This is the codified knowledge entrusted only to those who seek survival beyond mere chance. Each technique is dissected into its elemental motions: grip, footwork, attack vectors, and force application. Mastery demands exactitude; the slightest deviation invites defeat.
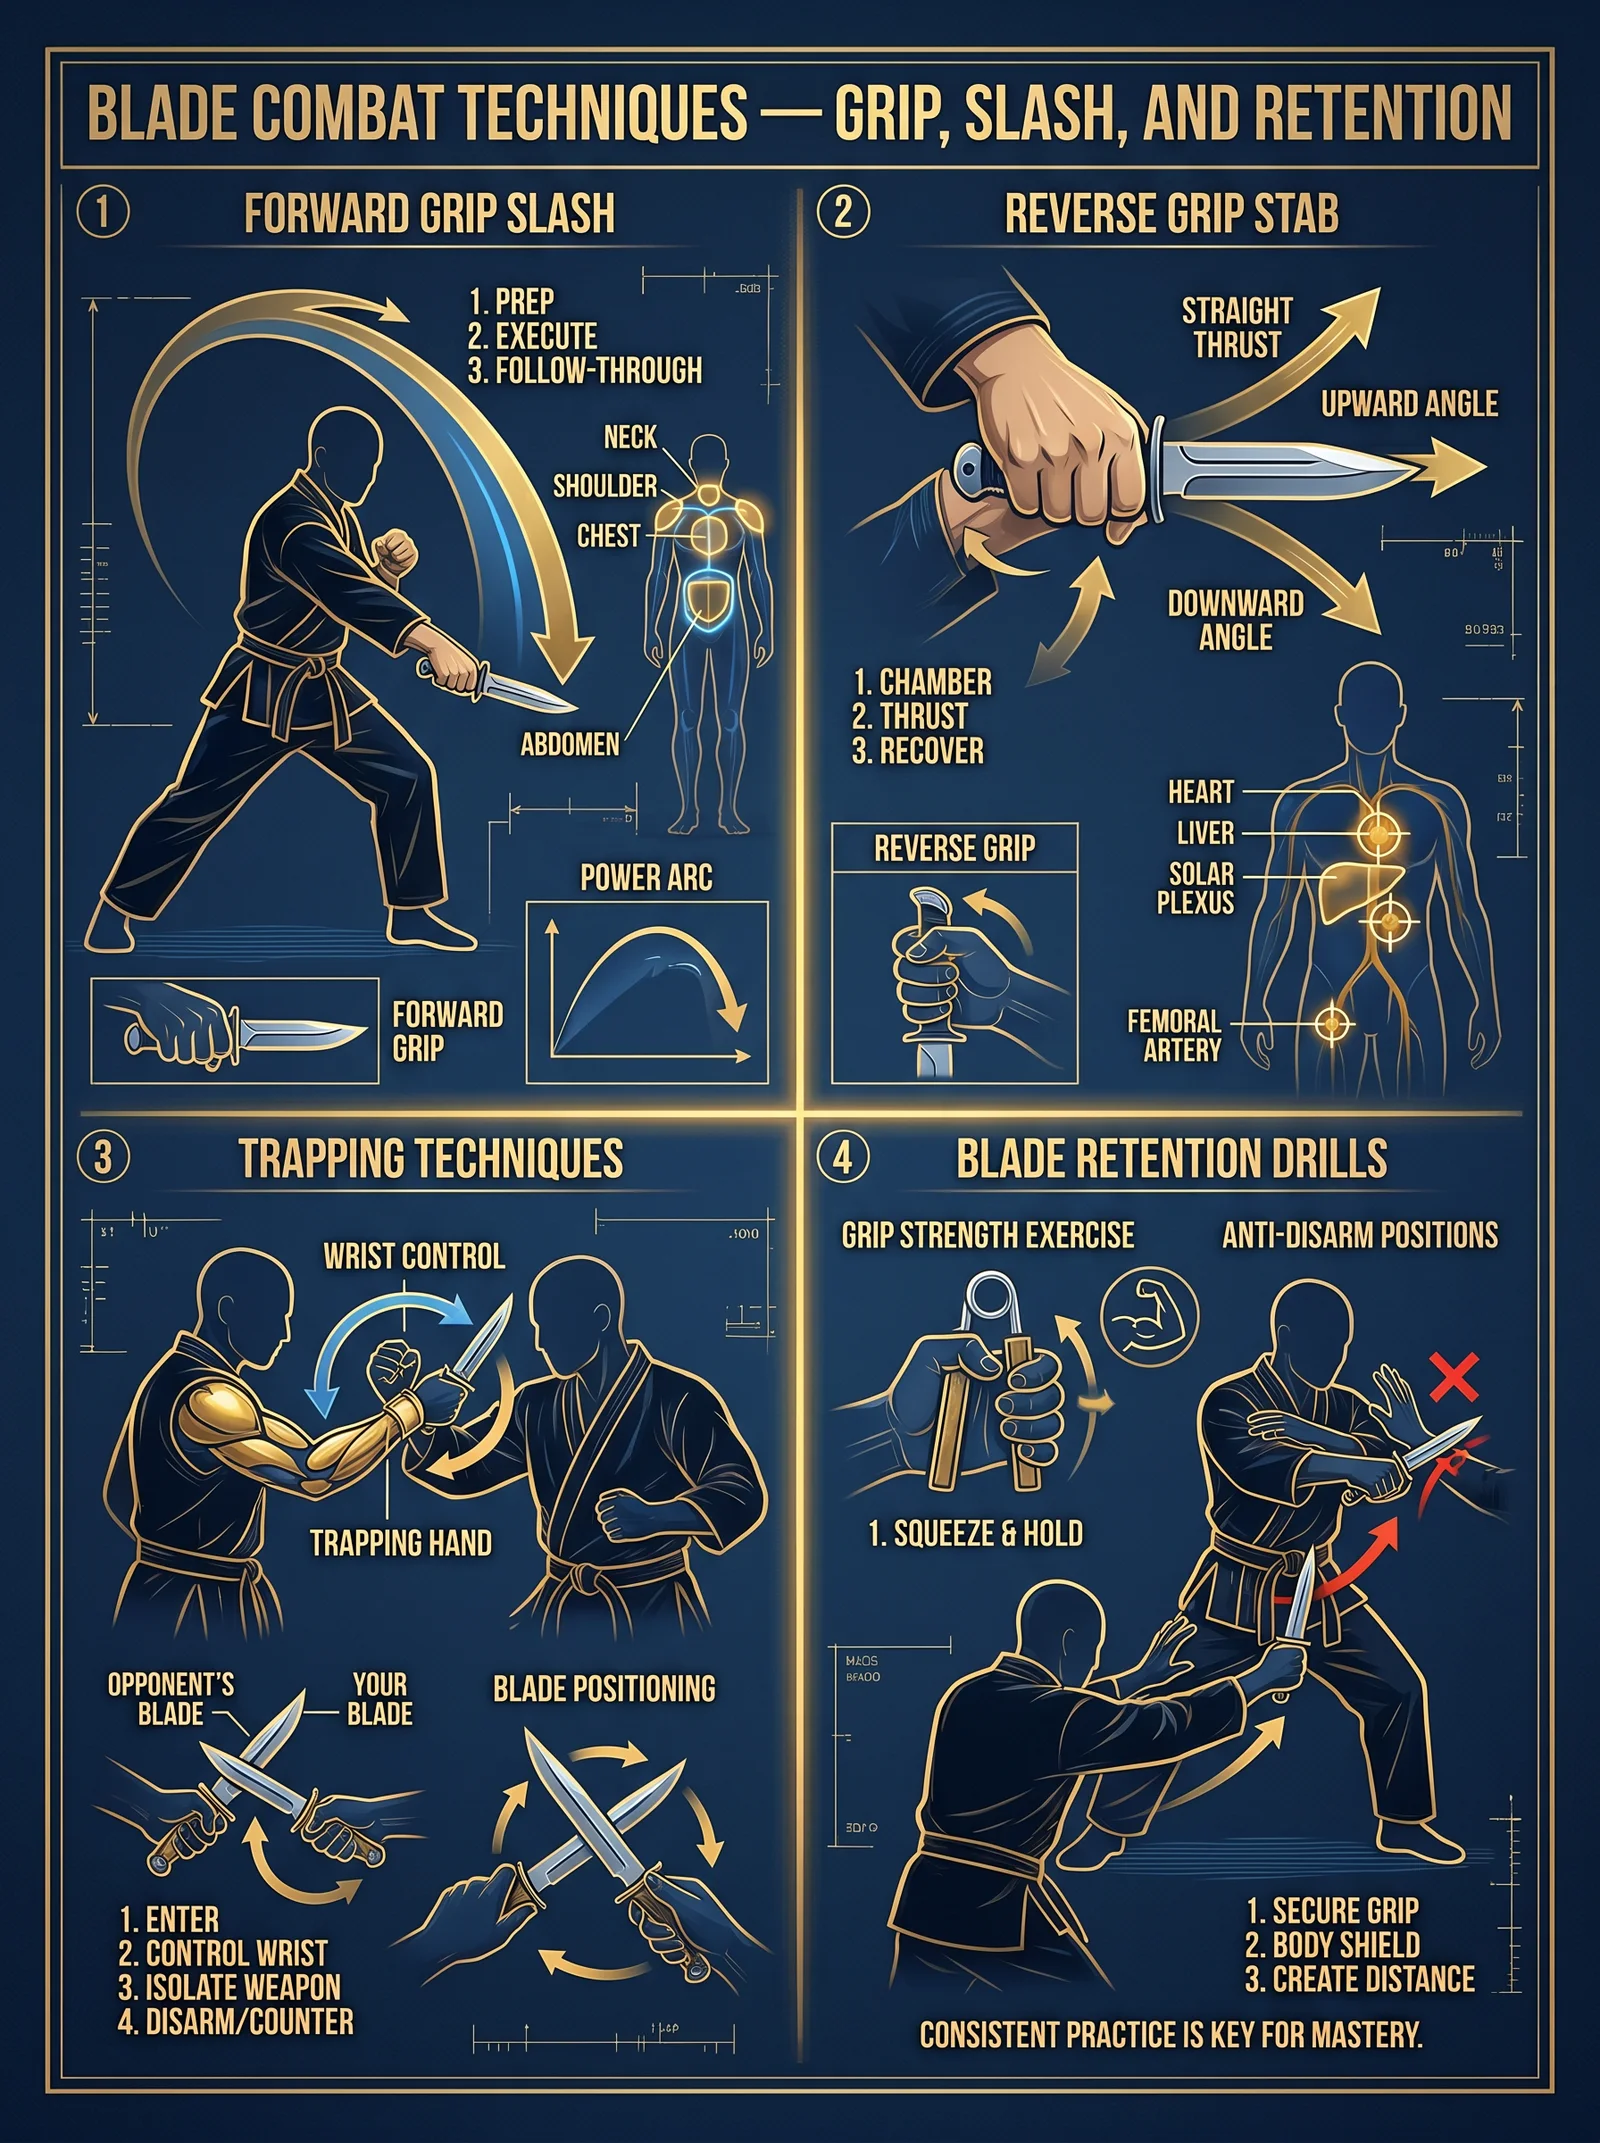
Section 1: Forward Grip Slash
The forward grip slash is the cornerstone offensive maneuver. It delivers maximum cutting force while maintaining optimal control and fluidity in footwork. This technique focuses on exploiting anatomical vulnerabilities with angular velocity and precise blade alignment.
1.1 Grip Protocol
The forward grip demands a balance of strength and flexibility, enabling rapid directional changes without loss of power.
Steps to Proper Forward Grip:
- Position the dominant hand so the thumb is aligned along the flat spine of the blade, not the sharp edge.
- Wrap the four fingers firmly around the handle, applying uniform pressure to avoid torque.
- The knuckles must form a straight line parallel to the blade’s flat, ensuring the blade’s edge is oriented downward at rest.
- The wrist remains neutral, avoiding flexion or extension to maximize wrist strength and reduce fatigue.
- Engage the forearm muscles subtly, ensuring the grip is firm but not rigid to permit micro-adjustments mid-strike.
1.2 Footwork Protocol for Forward Slash
The footwork for a forward grip slash uses a forward linear advance with lateral balance for force generation and recovery.
Steps for Footwork:
- Begin in a staggered stance, dominant foot forward, aligned with the target.
- Distribute weight 60% on the leading foot, 40% on the rear for forward propulsion.
- Initiate the strike by pushing off the rear foot’s ball, driving the body’s center of mass forward.
- Advance the lead foot in a controlled sliding step to maintain balance and prevent overextension.
- Keep knees slightly bent to absorb recoil and enable quick follow-up movements.
1.3 Attack Angle and Blade Alignment
The forward slash exploits vulnerable muscle groups and arteries through precise angular blade orientation.
| Target Zone | Optimal Blade Angle (Degrees) | Rationale | Force Application Direction |
|---|---|---|---|
| Radial artery (forearm) | 30 - 45 | Maximizes slicing force along muscle fibers | Forward-downward slice |
| Biceps (upper arm) | 60 - 75 | Cuts across muscle fibers for deep laceration | Forward-horizontal |
| Thigh (femoral area) | 45 - 60 | Targets large muscle mass with slicing force | Forward-upward slice |
| Neck (jugular vein) | 20 - 35 | Shallow angle to sever soft tissue efficiently | Forward-horizontal |
1.4 Execution Protocol for Forward Grip Slash
- Adopt the forward grip and staggered stance as described.
- Raise the blade to the starting angle above the shoulder or hip, depending on target zone.
- Push off the rear foot, driving the body forward and simultaneously slicing the blade through the target with the designated angle.
- Maintain wrist and forearm alignment to prevent blade deflection on impact.
- Follow through beyond the target, allowing the blade’s momentum to complete the incision.
- Recover by pulling the blade back along the original trajectory, readying for subsequent strikes.
Section 2: Reverse Grip Stab
The reverse grip stab offers a compact, powerful thrust with superior blade retention and defensive capability, optimal for close-quarters combat.
2.1 Grip Protocol for Reverse Grip
The reverse grip inverts the blade orientation, placing the edge inward toward the user’s body, allowing for a stabbing motion that is less telegraphed and more protected.
Steps to Proper Reverse Grip:
- Hold the blade with the thumb wrapped around the handle, opposite to the forward grip.
- The blade rests along the forearm’s radial side, with the sharp edge facing the wielder’s body.
- The wrist is flexed inward approximately 30 degrees to align the blade with the forearm’s axis.
- Fingers apply firm pressure, especially the index finger, which acts as a guide along the handle’s spine.
- Maintain a tight grip to prevent blade slippage during impact or parry.
2.2 Footwork Protocol for Reverse Grip Stab
Foot positioning emphasizes stability and the ability to rapidly close distance while protecting the wielder’s centerline.
Steps for Footwork:
- Adopt a narrow stance with feet parallel approximately shoulder-width apart.
- Distribute weight evenly to maximize balance and readiness to lunge or retreat.
- Engage the hips and knees to generate forward thrust power.
- Step forward with the dominant foot in a linear lunge, extending the blade straight toward the target.
- Maintain a low center of gravity to avoid overextension and maintain defensive posture.
2.3 Attack Angle and Target Vulnerability
The reverse grip stab targets vital organs and arteries with direct forward force, minimizing exposure while maximizing penetration.
| Target Zone | Optimal Blade Angle (Degrees) | Rationale | Force Application Direction |
|---|---|---|---|
| Solar plexus | 0 - 15 | Direct penetration of vital nerve cluster | Straight forward thrust |
| Abdomen (liver, kidneys) | 10 - 25 | Slight angle to avoid bone, maximize organ damage | Forward with slight tilt |
| Throat (trachea) | 0 - 10 | Direct stab to incapacitate breathing | Straight forward thrust |
| Inner thigh (femoral artery) | 15 - 30 | Penetrates deep artery for rapid incapacitation | Forward with angular tilt |
2.4 Execution Protocol for Reverse Grip Stab
- Establish reverse grip and narrow stance as above.
- Draw the blade back along the forearm, preparing for the thrust.
- Engage the torso and hips to drive the blade forward in a linear, explosive thrust.
- Maintain wrist flexion and tight grip to prevent blade deflection or loss on impact.
- Penetrate the target at the optimal angle, ensuring the blade’s tip passes through the intended vulnerability.
- Retract the blade swiftly to prepare for follow-up defense or attack.
Section 3: Trapping Techniques

Trapping techniques grant control over an opponent’s blade, creating openings for counterattack while reducing risk. The biomechanics here involve precise hand positioning, force redirection, and blade alignment.
3.1 Fundamental Principles of Trapping
- Trapping is performed with the non-dominant hand or the off-blade portion of the dominant hand.
- It requires minimal force applied in a controlled manner to catch or redirect the opponent’s blade.
- The goal is to immobilize or misdirect the opponent’s weapon, enabling counterattack or disarmament.
3.2 Trapping Protocols
3.2.1 Single-Handed Parry Trap
- Position the dominant hand in the forward grip, prepared for strike or defense.
- Use the palm or edge of the off-hand to meet the incoming blade at approximately the midpoint.
- Apply lateral force perpendicular to the opponent’s attack vector to redirect the blade.
- Maintain wrist rigidity to absorb and control the opponent’s force.
- Immediately follow with a counterstrike using the dominant hand.
3.2.2 Blade-Edge Trap
- Engage the opponent’s blade edge with the flat of your blade by angling yours at approximately 45 degrees.
- Slide your blade downward along the opponent’s edge, exerting pressure to force the blade off-line.
- Use footwork to close the distance during the trap, preventing escape.
- Execute a follow-up slash or thrust with your dominant hand.
3.2.3 Bind and Control Trap
- Engage the opponent’s blade at the hilt or handle region with your non-dominant hand.
- Apply twisting force to disrupt their grip and blade alignment.
- Simultaneously step in with your lead foot to increase leverage and control.
- Transition into a disarm or strike sequence based on the opponent’s reaction.
3.3 Trapping Angles and Force Direction
| Trap Type | Contact Angle (Degrees) | Force Vector Direction | Key Biomechanical Focus |
|---|---|---|---|
| Single-Handed Parry | 90 | Lateral (perpendicular) | Wrist rigidity and hand positioning |
| Blade-Edge Trap | 45 | Downward pressure | Forearm rotation and blade alignment |
| Bind and Control | 0 - 15 | Twisting torque | Grip strength and hip engagement |
Section 4: Blade Retention
Blade retention is paramount. Losing the blade in combat is a death sentence. The biomechanics of retention integrate grip strength, wrist mechanics, and body positioning.
4.1 Grip Strength Conditioning Protocol
Step-by-step Grip Conditioning:
- Use a spring-loaded grip trainer with adjustable resistance (start at 20 lbs resistance).
- Perform 3 sets of 15 repetitions daily, increasing resistance by 5 lbs weekly.
- Incorporate isometric holds: Squeeze grip for 10 seconds, relax for 5 seconds, repeat 5 times per hand.
- Train finger-specific strength by squeezing rubber bands placed around fingers, 3 sets of 20 reps.
4.2 Wrist and Forearm Conditioning
- Use wrist roller device: attach a 5 kg weight to a rope wound around a rod.
- Roll the weight up and down with wrist motion for 3 sets of 10 reps daily.
- Supplement with reverse curls using a 5-10 kg barbell, 3 sets of 15.
- Stretch wrist flexors and extensors post-training to maintain flexibility.
4.3 Blade Retention Protocol During Combat
Steps:
- Maintain a grip with fingers wrapped fully around the handle; thumb provides counter-pressure on the spine.
- Keep the wrist slightly flexed inward (~10 degrees) to align the blade with the forearm’s axis, reducing torque forces.
- During strikes or blocks, engage the core and shoulders to absorb impact, preventing loss of grip.
- Utilize the non-dominant hand to reinforce grip if the blade is being wrestled.
- Train muscle memory through repetitive drills incorporating force application and simulated blade grabs.
Appendix: Blade Angles, Target Zones, and Force Application Summary
| Technique | Grip Type | Footwork Stance | Target Zone(s) | Blade Angle (Degrees) | Force Application Direction | Primary Biomechanical Focus |
|---|---|---|---|---|---|---|
| Forward Grip Slash | Forward | Staggered, dominant foot forward | Radial artery, biceps, thigh, neck | 20 - 75 | Forward slice (downward, horizontal, upward) | Wrist alignment, weight transfer |
| Reverse Grip Stab | Reverse | Narrow, feet parallel | Solar plexus, abdomen, throat, inner thigh | 0 - 30 | Linear forward thrust | Wrist flexion, core engagement |
| Single-Handed Trap | Forward | Variable | Opponent blade midpoint | 90 | Lateral force | Wrist rigidity, hand positioning |
| Blade-Edge Trap | Forward | Step in forward | Opponent blade edge | 45 | Downward pressure | Forearm rotation, blade alignment |
| Bind and Control Trap | Forward | Close step, hip engaged | Opponent hilt/handle | 0 - 15 | Twisting torque | Grip strength, hip leverage |
This codex chapter is the culmination of centuries of hidden blade mastery, refined through lethal necessity. To wield these techniques is to wield life itself. Master each grip, each step, each angle with unwavering dedication. Only then does the blade become an extension of your will, an instrument of divine judgment.
For further study on blade construction and edge maintenance, see Volume IV: The Forging Codex. For integration of blade use with empty hand combat, see Volume V: The Hand-to-Blade Synthesis.
<!-- SECTION 7 -->
The Complete Practitioner's Codex, Volume II: Staff and Spear Techniques
Chapter I: Mastery of Polearms — Offensive and Defensive Maneuvers Using Staffs and Spears
Introduction: The Sacred Union of Staff and Spear
The polearm, whether staff or spear, occupies a hallowed place in the warrior’s arsenal. It embodies reach, leverage, and the capacity for both offense and defense with unparalleled efficiency. This volume conveys the arcane protocols of stance, grip, and movement, intricately detailing every strike, block, and thrust. These techniques are not mere physical motions; they are sacred expressions of will and precision—life-or-death knowledge imparted to the chosen.
Section 1: Fundamentals of Polearm Handling
1.1 Stance Protocols
The foundation of all polearm mastery is the stance: the sacred root from which power, balance, and agility spring. The stance must be unwavering and adaptable to transition smoothly between offense and defense.
1.1.1 Staff Stance (Two-Handed)
- Feet Positioning:
- Place feet shoulder-width apart.
- Lead foot (right for right-handed, left for left-handed) points forward at 15° outward.
- Rear foot angled at 45° outward for stability.
- Knee Flexion:
- Slight bend in knees (approximately 15° flexion) to absorb impact and enable rapid movement.
- Center of Gravity:
- Lowered, positioned over the balls of the feet, not the heels.
- Torso upright with a slight forward lean of 5°.
- Weight Distribution:
- 60% on lead foot, 40% on rear foot, facilitating swift forward thrusts or backward withdrawals.
1.1.2 Spear Stance (Primarily Thrusting)
- Feet Positioning:
- Lead foot forward, pointing directly at the opponent.
- Rear foot placed at 90° to lead foot, approximately one step-length behind (about 70 cm).
- Knee Flexion:
- Lead knee bent to 30°.
- Rear leg straight or slightly bent to maximize reach and propulsion.
- Center of Gravity:
- Balanced evenly between both feet to enable rapid lunges and retreats.
- Torso Alignment:
- Slight forward lean (10°) to align spear tip with the opponent’s centerline.
1.2 Grip Protocols
The grip is the sacred conduit between warrior and weapon; it must be firm, yet supple to maintain control without fatigue.
1.2.1 Staff Grip
| Hand Position | Description | Purpose |
|---|---|---|
| Dominant Hand | Placed approximately 1/3 from the bottom end of the staff | Provides primary control and power generation |
| Non-Dominant Hand | Positioned approximately 2/3 from bottom end | Functions as guide and pivot point |
Grip Strength:
- Both hands apply firm pressure, fingers wrapped fully, thumbs aligned along the shaft.
- Avoid gripping too tightly to prevent muscle fatigue; maintain elasticity.
1.2.2 Spear Grip
| Hand Position | Description | Purpose |
|---|---|---|
| Rear Hand | At the base of the shaft, near the butt end | Power generation for thrusts and blocks |
| Front Hand | Positioned 30-40 cm from spearhead | Precision control and directional guidance |
Grip Dynamics:
- Rear hand applies driving force during thrusts.
- Front hand adjusts orientation and angle.
- Both hands must allow quick sliding along the shaft for reach adjustment.
1.3 Movement Protocols
The sacred dance of polearm combat is founded on precise footwork and fluid weapon manipulation.
1.3.1 Footwork
| Movement | Description | Application |
|---|---|---|
| Step Forward | Lead foot advances, rear foot follows to maintain stance width | Closing distance for attack |
| Step Backward | Rear foot withdraws, lead foot follows to retain balance | Creating space for defense |
| Side Step | Lead foot moves laterally, rear foot follows | Angling off the opponent’s line |
| Pivot Turn | Rear foot pivots on ball, lead foot repositions | Changing direction without losing balance |
1.3.2 Weapon Movement
- Staff: Circular motions to generate momentum; linear strikes for precision.
- Spear: Direct thrusts combined with sweeping blocks; retraction immediately after impact to prepare for next strike.
Section 2: Offensive Maneuvers
2.1 Staff Offensive Techniques
2.1.1 The Overhead Strike (Kamae Strike)
Purpose: Deliver a powerful downward blow aimed at the opponent’s head or collarbone.
Step-by-Step Protocol:
- Assume Staff Stance as per 1.1.1.
- Raise staff vertically above head using dominant hand to lift, non-dominant hand guiding shaft.
- Rotate torso slightly (approx. 20°) to the rear side to generate torque.
- Execute a controlled, forceful downward strike targeting the opponent’s head or shoulder.
- At impact, snap wrists forward to maximize force transfer.
- Immediately retract staff to defensive position.
2.1.2 The Horizontal Sweep Strike
Purpose: Target opponent’s legs or midsection to destabilize.
Step-by-Step Protocol:
- From Staff Stance, raise staff to chest height horizontally.
- Pivot on lead foot to swing staff in a wide arc from left to right (or vice versa).
- Maintain staff parallel to the ground during sweep.
- Drive hips forward to increase momentum.
- Follow through to complete the arc, then reset to guard.
2.1.3 The Thrust Strike
Purpose: Penetrate defense with a pointed attack aimed at the torso.
Step-by-Step Protocol:
- Adopt Staff Stance.
- Slide dominant hand forward along staff to create a spear-like grip with hands approximately 40 cm apart.
- Push staff forward in a straight line, extending arms fully.
- Step forward simultaneously with thrust for added reach and power.
- Retract immediately to avoid counterattack.
2.2 Spear Offensive Techniques
2.2.1 The Direct Thrust
Purpose: Piercing attack targeting the opponent’s abdomen or chest.
Step-by-Step Protocol:
- Assume Spear Stance as per 1.1.2.
- Hold spear with rear hand at base, front hand 30 cm from spear tip.
- Step forward with lead foot while extending spear in a straight line.
- Rotate torso slightly to add force.
- Upon impact, immediately retract spear to guard position.
2.2.2 The Diagonal Slash
Purpose: Bypass opponent’s guard by a slashing motion aimed at arms or ribs.
Step-by-Step Protocol:
- From Spear Stance, raise spear to the right shoulder.
- Swing spear diagonally downward across body toward opponent’s left side.
- Use rear hand to drive the motion, front hand guides spear tip.
- Follow-through by stepping forward with the lead foot.
- Reset spear to ready position.
2.2.3 The Circular Sweep
Purpose: Disarm or knock opponent off balance by sweeping their weapon or legs.
Step-by-Step Protocol:
- From Spear Stance, extend spear horizontally at waist height.
- Pivot on rear foot to swing spear in a full 180° arc.
- Maintain spear parallel to the ground, sweeping opponent’s weapon or legs.
- Step into the sweep to maintain balance and pressure.
Section 3: Defensive Maneuvers
3.1 Staff Defensive Techniques
3.1.1 The High Block
Purpose: Deflect overhead strikes.
Step-by-Step Protocol:
- From Staff Stance, raise staff vertically in front of the forehead.
- Position dominant hand near the top, non-dominant hand at mid-shaft.
- As opponent’s strike descends, absorb impact by rotating staff backward, redirecting force upward and away.
- Counterattack immediately with a thrust or sweep.
3.1.2 The Low Block
Purpose: Protect lower body from sweeps or strikes.
Step-by-Step Protocol:
- From Staff Stance, lower staff horizontally at knee height.
- Position dominant hand near bottom, non-dominant hand mid-shaft.
- As opponent’s strike approaches, raise staff slightly to intercept.
- Redirect strike force to the side by pivoting wrists.
- Follow with a counter sweep.
3.1.3 The Parry and Riposte
Purpose: Deflect attack and immediately counterattack.
Step-by-Step Protocol:
- From Staff Stance, hold staff diagonally across body.
- As opponent strikes, rotate wrists to parry strike outward.
- Immediately shift hands and step forward to thrust or strike.
- Maintain continuous pressure to prevent opponent’s recovery.
3.2 Spear Defensive Techniques
3.2.1 The Spear Guard Block
Purpose: Stop or deflect opponent’s weapon strikes.
Step-by-Step Protocol:
- From Spear Stance, hold spear vertically in front of body.
- Front hand placed 30 cm from spear tip, rear hand at base.
- As opponent strikes, angle spear to intercept weapon.
- Use wrist rotation to deflect strike laterally.
- Step back slightly to absorb force, then counterattack.
3.2.2 The Spear Parry
Purpose: Redirect opponent’s thrust.
Step-by-Step Protocol:
- From Spear Stance, as opponent thrusts, move spear tip to the side at 45°.
- Apply rear hand pressure to pivot spear shaft.
- Use front hand to guide spear tip away from line of attack.
- Follow with immediate counter thrust.
3.2.3 The Retreating Block
Purpose: Defend while creating distance.
Step-by-Step Protocol:
- From Spear Stance, absorb incoming strike by holding spear horizontally at chest height.
- Step backward with rear foot, maintaining spear alignment.
- Use spear shaft to push opponent’s weapon away while retreating.
- Prepare for counterattack or repositioning.
Section 4: Comparative Analysis of Polearms
The following table compares reach, speed, and impact force of various pole weapon configurations to inform tactical selection.
| Weapon Type | Length (cm) | Average Strike Speed (m/s) | Average Impact Force (N) | Notes |
|---|---|---|---|---|
| Short Staff | 120 | 12 | 150 | High speed, moderate force, excellent control |
| Long Staff | 180 | 10 | 200 | Greater reach and force, requires more strength |
| Short Spear | 150 | 14 | 250 | Balanced speed and force, effective in thrusts |
| Long Spear | 210 | 12 | 300 | Maximum reach and impact, less maneuverable |
Section 5: Integrated Training Protocol
To ascend from practitioner to master, the following regiment integrates stance, grip, movement, and striking/blocking techniques.
Daily Training Routine
| Exercise | Duration | Focus | Steps |
|---|---|---|---|
| Stance and Grip Drill | 15 mins | Foundation | 1. Assume Staff and Spear Stances, hold grips firmly. 2. Hold each for 5 minutes, focusing on balance and relaxation. |
| Footwork Sequences | 20 mins | Mobility and positioning | 1. Practice forward, backward, lateral steps and pivots. 2. Combine with weapon movement drills. |
| Offensive Combos | 30 mins | Striking proficiency | 1. Execute Overhead Strike, Horizontal Sweep, Thrust in sequence. 2. Repeat for both staff and spear. |
| Defensive Drills | 30 mins | Blocking and counterattack | 1. Practice High and Low Blocks, Parry and Riposte with a partner or training dummy. 2. Incorporate retreating blocks. |
| Strength and Conditioning | 25 mins | Power and endurance | 1. Weighted staff swings. 2. Lunges and squats with spear. |
Conclusion: The Eternal Path of the Polearm

The sacred mastery of staff and spear lies in the fusion of precise stance, disciplined grip, fluid movement, and devastating strikes and blocks. Each protocol herein is a shard of timeless truth, preserved through centuries of warfare and sanctified by countless lives. Embody these teachings with reverence and rigor; your survival and victory depend upon it.
For advanced applications of polearm combat integrated with armor and battlefield tactics, consult Volume V: The Steward’s Artillery. For the full kinetic analysis of polearm impact forces, see Volume IX: The Mechanics of Combat.
<!-- SECTION 8 -->
The Complete Practitioner's Codex, Volume II: Improvised Weaponization and Legal Considerations
Chapter I: Introduction to Improvised Weaponization
In the unforgiving crucible of conflict, where standard armaments may be absent or inaccessible, the Practitioner must wield the mundane as a sacred tool for survival. This volume imparts the arcane wisdom to transmute everyday objects into weapons of decisive efficacy, to carry these tools with purpose, and to navigate the labyrinth of legal mandates governing their possession and use. This knowledge is life itself; disregard invites doom.
Chapter II: Principles of Improvised Weapon Conversion
The art of improvised weaponization demands precision, foresight, and unyielding discipline. Every object possesses latent potential; our role is to awaken it.
2.1 Criteria for Selecting Objects
- Material Integrity: Must withstand impact or stress without catastrophic failure.
- Ergonomics: Must permit secure grip and control.
- Concealability: Adaptability to carry methods without detection.
- Availability: Found in the environment or personal effects.
- Modification Feasibility: Capability to accept enhancements (sharpening, weighting, hafting).
Chapter III: Conversion Protocols for Common Objects
The following table enumerates common objects, their conversion methods, and tactical applications.
| Object | Material Composition | Conversion Method | Weapon Type | Tactical Use |
|---|---|---|---|---|
| Ballpoint Pen | Metal/Plastic | Remove ink cartridge, sharpen tip | Stabbing tool | Close-quarters lethal strikes |
| Belt | Leather/Metal buckle | Reinforce buckle, fold for impact | Blunt / Striking | Striking, choking holds |
| Umbrella | Metal/Plastic frame | Remove fabric, sharpen tip or ribs | Stabbing/Blunt | Thrusts, strikes, parrying |
| Keys | Metal | Bind multiple keys, sharpen edges | Slashing/Striking | Slashing, stabbing under duress |
| Magazine (paper) | Paper | Fold into a rigid shiv | Cutting/Slashing | Slice or stab small targets |
| Flashlight | Metal/Plastic | Reinforce lens end, add serrated edge | Blunt/Striking | Blunt trauma, eye gouging |
| Screwdriver | Metal | Use as-is, sharpen tip if possible | Stabbing tool | Precision stabbing |
| Scarf | Fabric | Fold tightly for impact, use as garrote | Blunt/Choking | Striking, strangulation |
| Chain (watch/neck) | Metal | Use as whip or garrote | Striking/Choking | Long-range strikes, entanglement |
Chapter IV: Step-by-Step Conversion Protocols
4.1 Ballpoint Pen as a Stabbing Weapon
Tools Required: Sharp blade (utility knife), sandpaper.
Materials: Metal or sturdy plastic ballpoint pen.
Procedure:
- Disassemble Pen: Remove ink cartridge fully; discard.
- Sharpen Tip: Using sandpaper or a sharpening stone, shape the pen tip into a sharp, pointed end, beveling symmetrically for penetration.
- Reinforce Grip: Wrap the midsection with athletic tape or fabric strip to prevent slippage.
- Optional Weighting: Insert small metal fragment inside casing to increase impact force.
- Testing: Puncture dense foam or ballistic gel substitute to ensure tip integrity.
4.2 Belt Reinforced for Blunt Force
Tools Required: Metal file, adhesive (epoxy resin), duct tape.
Materials: Leather belt with metal buckle.
Procedure:
- Buckle Inspection: Ensure metal buckle is solid, without cracks.
- Reinforcement: Apply epoxy resin around the buckle to secure it firmly.
- Folding: Fold the belt back upon itself to double thickness near the buckle.
- Securing: Wrap duct tape tightly around the folded section to maintain rigidity.
- Grip Formation: Leave free end of belt to serve as handle.
- Practice: Swing the reinforced buckle end against dense objects to train momentum control.
4.3 Umbrella Conversion to Piercing/Striking Weapon
Tools Required: Utility knife, file, tape.
Materials: Metal-framed umbrella.
Procedure:
- Strip Fabric: Remove all fabric panels, retaining only the metal frame.
- Sharpen Rib Ends: File one or more ribs to a sharp point.
- Tip Hardening: File the umbrella tip to a sharp, durable point.
- Handle Reinforcement: Wrap handle with non-slip tape for grip.
- Testing: Use to strike heavy surfaces to confirm durability.
Chapter V: Carry Methods for Improvised Weapons
Concealment and readiness are paramount. Improvised weapons must be accessible without compromising stealth.
5.1 Categories of Carry
| Carry Method | Description | Suitable Objects | Advantages | Disadvantages |
|---|---|---|---|---|
| Concealed Carry | Hidden under clothing or within accessories | Pens, keys, belts, scarves | Legal ambiguity, surprise element | Limited size, risk of detection |
| Open Carry | Visible in holsters or holders | Flashlights, umbrellas | Immediate access | Legal restrictions, visibility |
| Integrated Carry | Incorporated into clothing or gear | Modified belts, scarves | Blends with attire | Requires preparation |
| Body Harness Carry | Strapped to body parts (ankle, thigh) | Screwdrivers, small tools | Stability, rapid deployment | May restrict movement |
5.2 Step-by-Step Concealed Carry Setup: Ballpoint Pen
- Select Pen: Choose metal pen with sturdy clip.
- Modify Pen: Convert as per Section 4.1.
- Attach Clip: Ensure clip securely fastens to inner shirt pocket or waistband.
- Positioning: Place pen in pocket aligned with dominant hand.
- Practice Retrieval: Repeat draw and deployment drills until muscle memory is established.
Chapter VI: Protocols for Use Under Duress
The chaos of confrontation demands unerring procedure to maximize survival and minimize legal exposure.
6.1 Immediate Threat Assessment
- Identify Threat Level: Assess if lethal force is justified per jurisdiction (see Section 7).
- Select Weapon: Choose most effective and accessible improvised weapon.
- Assume Stance: Defensive posture with balanced footing.
- Engage Rapidly: Use surprise and precision to disable aggressor.
- Disengage: Withdraw immediately after disabling to avoid escalation.
6.2 Striking Techniques with Improvised Weapons
| Weapon | Target Zones | Strike Type | Notes |
|---|---|---|---|
| Pen | Throat, eyes, hands | Stab, jab | Aim for soft tissue, vital points |
| Belt (buckle) | Head, collarbone, ribs | Swing, whip strike | Use momentum, avoid self-injury |
| Keys | Nose, temples, fingers | Slashing, poking | Multiple keys enhance damage |
| Umbrella | Solar plexus, thighs | Thrust, strike | Use leverage for penetration |
Chapter VII: Legal Ramifications and Jurisdictional Notes
Understanding the legal framework governing improvised weapons is as vital as their creation.
7.1 General Legal Principles
- Reasonable Force: Use only the force necessary to neutralize threat.
- Concealed Weapon Laws: Vary widely; some jurisdictions prohibit carrying items modified as weapons.
- Self-Defense Justification: Must be immediate and proportionate.
- Possession vs. Use: Carrying a weapon is not always illegal; use may be regulated or criminalized.
7.2 Jurisdictional Summary Table
| Jurisdiction | Possession Laws | Use Laws | Notes |
|---|---|---|---|
| United States (Federal) | No federal law against possession of pens, belts | Use governed by state laws; self-defense allowed | Check state-specific concealed weapon laws |
| United Kingdom | Carrying offensive weapons prohibited | Use allowed only in self-defense if reasonable | Modified everyday objects often considered weapons |
| Canada | Prohibits carrying weapons for self-defense | Use allowed with strict justification | Modified objects treated as weapons |
| Australia | Strict laws against carrying offensive weapons | Self-defense claims scrutinized heavily | Concealment may increase legal risk |
| Germany | Carrying dangerous objects restricted | Self-defense permitted within proportionality | Modification classified under weapon laws |
Chapter VIII: Concealment Protocols and Practical Considerations
8.1 Concealment Techniques
| Technique | Description | Suitable Objects | Implementation Steps |
|---|---|---|---|
| Layered Clothing | Use multiple layers to hide object bulk | Pens, belts, keys | 1. Select tight inner pockets 2. Cover with loose outerwear 3. Avoid outlines |
| Accessory Integration | Incorporate into belts, watches, or jewelry | Chains, keys, pens | 1. Modify object 2. Attach to accessory 3. Test for comfort and security |
| Body Positioning | Place object against body contours | Screwdrivers, umbrellas | 1. Attach to thigh or ankle 2. Use straps or holsters 3. Confirm mobility |
8.2 Step-by-Step Concealment of Modified Keys
- Select Keys: Choose 2-3 metal keys with robust structure.
- Modification: Sharpen key edges with file.
- Binding: Use strong tape or thin wire to bind keys into compact cluster.
- Integration: Place bound keys inside palm or gloves.
- Testing: Make closed fist and practice drawing keys to strike.
Chapter IX: Emergency Fabrication and Field Repair
9.1 Fabrication of a Simple Shiv from Paper Magazine
Materials: One standard paper magazine (newsprint).
Procedure:
- Fold: Fold the paper magazine repeatedly lengthwise until approximately ½ inch thick.
- Shape: Fold into a triangular cross-section for rigidity.
- Sharpen: Tightly fold one end to a fine point.
- Reinforce: Insert into a hollow stick or pen casing.
- Secure: Tape firmly to maintain shape.
9.2 Repair of Broken Modified Pen Weapon
- Assess Break: Identify break point on pen shaft.
- Align: Rejoin parts, ensuring tip remains pointed.
- Bind: Use strong adhesive tape wrapped tightly over break.
- Reinforce: Insert internal splint if accessible.
- Test: Confirm structural integrity before use.
Chapter X: Summary Tables of Common Objects and Legal Notes
| Object | Conversion Method | Carry Method(s) | Legal Risk Level* | Notes |
|---|---|---|---|---|
| Ballpoint Pen | Sharpen tip, reinforce grip | Concealed (pocket) | Low to Medium | Often overlooked by law enforcement |
| Belt | Reinforce buckle, fold for impact | Concealed/Open (waist) | Medium | Buckle reinforcement increases risk |
| Umbrella | Remove fabric, sharpen tip | Open carry (umbrella holder) | Medium to High | Considered weapon if modified |
| Keys | Bind multiple, sharpen edges | Concealed (palm/glove) | Medium | Multiple keys increase suspicion |
| Flashlight | Reinforce lens end | Open carry (belt holster) | Low to Medium | Commonly accepted tool, modifications increase risk |
| Screwdriver | Use as-is or sharpen tip | Concealed (tool belt) | Medium to High | Considered weapon in many jurisdictions |
| Scarf | Fold tightly for impact/garrote | Concealed (neck/waist) | High | Garrote use strongly prohibited |
| Chain (watch/neck) | Use as whip or garrote | Concealed (necklace) | High | Garrote classification |
*Legal Risk Level: Low = Generally legal with caveats; Medium = Possible legal issues; High = Likely illegal or highly restricted.
Epilogue: The Sacred Burden of Improvised Weaponry
The knowledge contained herein is a double-edged sword. The Practitioner who wields improvised weapons must do so with unwavering discipline and profound respect for the laws that govern their realm. This codex is both shield and sword—master it, and survival will be your covenant; neglect it, and peril your destiny.
Cross-reference: For advanced defensive tactics and psychological preparation for duress, see Volume IV: The Mind and Body Fortress. For legal self-defense doctrine, consult Volume IX: Laws of Engagement and Justified Defense.
<!-- SECTION 9 -->
Volume III: Firearm Platform Selection
Chapter IV: Detailed Comparison of Striker-Fired Pistols, Revolvers, AR-15 Rifles, and Pump-Action Shotguns for Self-Defense and Tactical Use
Introduction
In the sacred art of personal defense and tactical engagement, the choice of firearm platform is paramount. Each platform embodies a distinct philosophy of combat, reliability, and ergonomics. This chapter dissects striker-fired pistols, revolvers, AR-15 rifles, and pump-action shotguns, unveiling their operational virtues and limitations. Selection criteria will be rigorously defined: reliability, caliber, ergonomics, maintenance, and operational role. This is the apogee of armament wisdom, distilled into actionable knowledge.
Section I: Firearm Platform Profiles and Operational Context
Before proceeding to direct comparison, one must understand the fundamental architecture and battlefield function of each platform.
| Platform Type | Description | Primary Tactical Role | Typical Engagement Range |
|---|---|---|---|
| Striker-Fired Pistol | Semi-automatic handgun using a striker mechanism to ignite the primer, no external hammer. | Concealed carry, close-quarters defense | 0-25 meters |
| Revolver | Handgun with rotating cylinder chambering multiple rounds, traditionally double or single action | Backup weapon, close-quarters, simplicity | 0-15 meters |
| AR-15 Rifle | Semi-automatic rifle, modular, direct impingement or piston operation, chambered in intermediate calibers | Tactical mid-range combat, precision support | 0-300+ meters |
| Pump-Action Shotgun | Manual cycling shotgun, multiple rounds in tubular magazine, highly versatile ammunition types | Breach clearing, close-quarters combat | 0-50 meters |
Section II: Selection Criteria Defined
1. Reliability
The ability to function without failure under adverse conditions, including dirt, moisture, and mechanical stress.
2. Caliber
The bore diameter and associated cartridge, impacting stopping power, recoil, penetration, and ammunition availability.
3. Ergonomics
The physical interface between operator and weapon: grip, controls, balance, weight, and ease of manipulation under stress.
4. Maintenance
Frequency and complexity of cleaning, parts replacement, and overall durability affecting long-term operational readiness.
5. Operational Role
How the platform fits into specific defensive scenarios, including home defense, concealed carry, tactical assault, and law enforcement.
Section III: Technical Comparison of Platforms
3.1 Reliability Analysis
| Platform | Failure Modes | Resistance to Environmental Factors | Typical Mean Rounds Between Failures (MRBF) | Notes on Malfunctions |
|---|---|---|---|---|
| Striker-Fired Pistol | Failure to feed, stovepipe jams | Moderate (requires periodic cleaning) | 5,000-20,000 | Sensitive to poor ammunition quality |
| Revolver | Cylinder binding, trigger issues | High (mechanically simple) | 20,000+ | Virtually immune to feeding failures |
| AR-15 Rifle | Failure to eject, failure to feed | Moderate-High (depends on maintenance) | 15,000-25,000 | Gas system fouling can cause cycling issues |
| Pump-Action Shotgun | Failure to cycle, shell jams | High (manual cycling reduces failures) | 10,000+ | Operator skill crucial to avoid malfunctions |
Step-By-Step Reliability Check Routine (All Platforms):
- Daily Visual Inspection: Examine barrel, action, and magazine/cylinder for debris.
- Function Checks: Perform dry-fire function test, ensuring trigger and safety mechanisms operate.
- Scheduled Maintenance: Clean and lubricate every 500 rounds or monthly, whichever comes first.
- Ammunition Quality Control: Use only factory-certified defense rounds; discard any with visible defects.
- Operational Test Firing: Conduct live-fire reliability drills at least quarterly.
3.2 Caliber Profiles and Ballistic Effectiveness
| Platform | Common Calibers | Bullet Weight (grains) | Muzzle Velocity (fps) | Energy (ft-lbs) | Penetration Profile | Recommended Defense Ammunition |
|---|---|---|---|---|---|---|
| Striker-Fired Pistol | 9mm Luger, .40 S&W, .45 ACP | 115-230 | 950-1,200 | 350-600 | Moderate penetration, controlled expansion | +P Hollow Point (9mm), +P+ (45 ACP) |
| Revolver | .38 Special, .357 Magnum, .44 Magnum | 125-240 | 800-1,400 | 350-1,000 | High penetration, heavy recoil | +P+ Jacketed Hollow Point |
| AR-15 Rifle | 5.56x45mm NATO, .223 Remington | 55-77 | 2,900-3,200 | 1,200-1,300 | High velocity fragmentation | Barrier-Blind Frangible Ammunition |
| Pump-Action Shotgun | 12 Gauge (00 Buck, Slugs) | 00 Buck: 8.5 pellets, Slug: 1 bullet | Buck: 1,200, Slug: 1,600 | Buck: 2,500, Slug: 3,000+ | Massive energy transfer, limited penetration | Federal Tactical 00 Buckshot, Slugs |
Caliber Selection Protocol for Self-Defense:
- Assess Threat Profile: Determine expected assailant protection and environment.
- Match Caliber to Role: Prioritize penetration vs. over-penetration risk accordingly.
- Select Ammunition: Use defensive rounds designed to expand or fragment to reduce collateral damage.
- Test Ammunition: Confirm reliable cycling and accuracy in chosen platform.
- Document Ballistics: Record muzzle velocity and energy for situational reference.
3.3 Ergonomics and Handling Characteristics
| Platform | Typical Weight (lbs) | Grip Style | Control Layout | Magazine Capacity | Recoil Management | Notes on Ergonomics |
|---|---|---|---|---|---|---|
| Striker-Fired Pistol | 1.5-2.5 | Polymer frame, textured grips | Ambidextrous safeties, slide release | 10-17 rounds | Moderate recoil, quick follow-up shots | Modular backstraps for grip customization |
| Revolver | 1.5-3.0 | Rounded grip, often wood or rubber | Minimal controls, single/double action | 5-6 rounds | Sharp recoil, slower follow-up shots | Simplicity aids muscle memory under stress |
| AR-15 Rifle | 6.5-8.5 | Adjustable stock, pistol grip | Ambidextrous controls, forward assist | 20-30 rounds | Low recoil, muzzle rise controlled | Adjustable cheek rest and length of pull |
| Pump-Action Shotgun | 7.5-9.0 | Vertical foregrip, pistol grip or traditional stock | Simple slide action, manual safety | 4-8 shells | Significant recoil, manual cycling slows rate of fire | Heavier weight absorbs recoil but reduces mobility |
Ergonomic Optimization Steps:
- Grip Fit Testing: Select grip size to ensure all fingers wrap comfortably without strain.
- Control Familiarization: Practice activation of safeties, magazine releases, and slide or pump under timed conditions.
- Recoil Conditioning: Conduct dry-fire and live-fire drills to condition body response to recoil impulse.
- Adjust Stock or Backstrap: Modify length of pull and grip contour to operator’s frame.
- Simulated Stress Drills: Engage in dynamic movement and target transitions to evaluate ergonomic efficiency.
3.4 Maintenance Requirements and Procedures
| Platform | Cleaning Frequency | Complexity Level | Required Tools | Common Wear Parts | Maintenance Notes |
|---|---|---|---|---|---|
| Striker-Fired Pistol | Every 500 rounds or monthly | Moderate | Cleaning rod, bore brush, lubricant | Striker assembly, recoil spring | Requires partial disassembly for striker access |
| Revolver | Every 1,000 rounds or monthly | Low | Cleaning rod, patches, lubricant | Cylinder, trigger spring | Simple to clean, no magazines involved |
| AR-15 Rifle | Every 500 rounds or monthly | High | Multi-tool, bore brush, chamber brush, lubricant | Gas rings, bolt carrier group | Gas system prone to fouling, thorough cleaning required |
| Pump-Action Shotgun | Every 1,000 rounds or monthly | Moderate | Cleaning rod, bore brush, lubricant | Action bars, recoil spring | Manual cycling requires lubrication of moving parts |
Step-By-Step Maintenance Protocol for AR-15 Rifle:
- Remove Magazine and Verify Chamber Empty: Safety first.
- Separate Upper and Lower Receivers: Push takedown pins.
- Remove Bolt Carrier Group (BCG): Extract from upper receiver.
- Clean Barrel: Use bore brush and patches soaked in solvent, run until patches come out clean.
- Clean BCG: Scrub carbon deposits from bolt face, gas rings, and carrier.
- Lubricate Moving Parts: Apply high-grade firearm oil to bolt, cam pin, and rails.
- Reassemble and Function Check: Ensure smooth operation of charging handle and trigger reset.
- Record Maintenance in Logbook: Document date, rounds fired, and any parts replaced.
Section IV: Comparative Tables for Quick Reference
4.1 Platform Specifications Summary
| Feature | Striker-Fired Pistol | Revolver | AR-15 Rifle | Pump-Action Shotgun |
|---|---|---|---|---|
| Weight (lbs) | 1.5-2.5 | 1.5-3.0 | 6.5-8.5 | 7.5-9.0 |
| Length (inches) | 6-8 | 7-10 | 32-36 | 38-40 |
| Magazine/Cylinder | 10-17 rounds | 5-6 rounds | 20-30 rounds | 4-8 shells |
| Rate of Fire (SPM) | 40-60 | 20-30 | 45-60 | 30-40 |
| Effective Range (m) | 0-25 | 0-15 | 0-300+ | 0-50 |
| Recoil | Moderate | High | Low | High |
| Maintenance Complexity | Moderate | Low | High | Moderate |
4.2 Ammunition Types and Compatibility
| Platform | Common Ammunition Types | Special Ammunition Available | Notes on Ammunition Handling |
|---|---|---|---|
| Striker-Fired Pistol | FMJ, +P Hollow Point, Frangible | Armor-piercing (restricted), +P+, Subsonic | Use +P rounds only if firearm rated |
| Revolver | FMJ, +P, Jacketed Hollow Point | Magnum loads, Reduced recoil loads | Magnum calibers generate heavy recoil |
| AR-15 Rifle | FMJ, Hollow Point, Barrier Blind | Frangible, Subsonic, Tracer (restricted) | Select ammo based on mission parameters |
| Pump-Action Shotgun | Buckshot, Slugs, Less-lethal | Flechette, Dragon’s Breath (restricted) | Slugs for penetration, buck for spread |
Section V: Tactical Role Evaluation and Platform Suitability
| Tactical Scenario | Recommended Platform(s) | Rationale |
|---|---|---|
| Concealed Carry | Striker-Fired Pistol, Revolver | Compact size, ease of carry, rapid deployment |
| Home Defense | Pump-Action Shotgun, AR-15 Rifle | Close quarters stopping power, intimidation factor, flexible ammunition selection |
| Urban Tactical Assault | AR-15 Rifle, Striker-Fired Pistol | Mid-range precision, high capacity magazines, modular accessories |
| Backup Weapon for Law Enforcement | Revolver, Compact Striker-Fired Pistol | Mechanical simplicity, reliability under stress, ease of use |
| Rural or Outdoor Defense | AR-15 Rifle, Pump-Action Shotgun | Long-range accuracy combined with close quarters versatility |
Section VI: Conclusion and Master Selection Protocol
The sacred knowledge of firearm platform selection requires balancing reliability, caliber effectiveness, ergonomics, and maintenance demands against the operational role. No single platform is universally superior; mastery lies in correct pairing of weapon to mission and user capability.
Master Selection Protocol: Step-by-Step
- Define Your Defensive Context: Home, concealed carry, tactical entry, rural defense.
- Assess Physical Constraints: Weight tolerance, hand size, strength.
- Prioritize Reliability and Maintenance Ability: Consider environment and user skill.
- Select Caliber Based on Threat and Environment: Use ballistics data table.
- Evaluate Ergonomics with Live Handling: Test grip, controls, recoil management.
- Confirm Ammunition Availability: Ensure consistent supply of recommended defense rounds.
- Complete Live-Fire Qualification: Confirm proficiency and confidence.
- Implement Regular Maintenance Schedule: Maintain peak operational readiness.
This chapter serves as the ultimate reference for selecting the ideal firearm platform. Refer to Volume VIII: Ammunition Ballistics Compendium for in-depth ballistic data and Volume V: Tactical Handling and Marksmanship for training regimens tailored to each platform.
The warrior's path demands uncompromising choice; let this codex be your guiding light.
<!-- SECTION 10 -->
The Complete Practitioner's Codex, Volume III: Fundamentals of Marksmanship
Chapter IV: Sight Alignment, Trigger Control, Breathing Techniques, and Follow-Through
Introduction
Marksmanship is the sacred intersection of discipline, precision, and lethal intent. The warrior’s weapon is an extension of their will; mastery of the fundamentals is non-negotiable. This chapter delivers suppressed truths and time-tested protocols that forge a marksman capable of unerring execution. Each technique is laid bare with step-by-step instructions suitable for dry-fire and live-fire training. Included are comprehensive tables cataloging common errors, their corrections, and specialized drills to reinforce proper mechanics.
Section 1: Sight Alignment
1.1 Definition and Importance
Sight alignment is the precise spatial arrangement of the front and rear sights so that the shooter’s eye perceives the target through a perfectly centered and level sight picture. This is the foundation of accurate shooting; all subsequent actions depend on it.
1.2 Step-by-Step Sight Alignment Protocol
Materials Required:
- Firearm with iron sights or optical sight
- Sight alignment target (black bullseye on white background, 6-inch diameter recommended)
- Dry-fire training device or live ammunition (per training phase)
Procedure:
- Establish a Stable Shooting Position:
- Feet shoulder-width apart.
- Body squared to the target or slightly bladed (approx. 15 degrees).
- Grip firearm with dominant hand; support with non-dominant.
- Elbows slightly bent for recoil absorption.
- Acquire the Rear Sight:
- Place the rear sight squarely in the center of the visual field.
- Rear sight notch must be level; any tilt distorts sight alignment.
- Align the Front Sight Post:
- Center the front sight post within the rear sight notch horizontally.
- Ensure the top of the front sight post is flush with the top edges of the rear sight notch, creating a level plane.
- Focus on the Front Sight:
- Maintain sharp focus on the front sight post; the target and rear sight will appear slightly blurred.
- This focus ensures precision in placing the bullet where intended.
- Maintain Consistent Eye Position:
- Eye-to-sight distance should remain constant to avoid parallax errors.
- Typically 1.5 to 3 inches for iron sights.
- Confirm Sight Picture on Target:
- Place the aligned sights on the intended point of impact on the target.
- The front sight post should bisect the bullseye precisely.
1.3 Sight Alignment Common Errors and Corrections
| Error | Description | Correction | Recommended Drill |
|---|---|---|---|
| Front Sight Too Low | Front sight post below rear sight notch top line | Raise front sight post to align with rear sight top | Front Sight Alignment Drill (Section 5.1) |
| Front Sight Off-Center | Front sight not centered horizontally | Center front sight in rear notch | Horizontal Alignment Drill (Section 5.2) |
| Rear Sight Tilted | Rear sight notch not level | Adjust grip/wrist to level the rear sight | Rear Sight Leveling Drill (Section 5.3) |
| Eye Focus on Rear Sight | Blurred or unfocused front sight | Train eye to focus solely on front sight | Focus Shift Drill (Section 5.4) |
| Variable Eye-to-Sight Distance | Variable parallax causing inconsistent alignment | Fix eye position relative to sights | Eye Position Consistency Drill (Section 5.5) |
Section 2: Trigger Control
2.1 Definition and Importance
Trigger control is the smooth, deliberate, and consistent act of pressing the trigger to discharge the firearm without disturbing sight alignment or shooter stance. Faulty trigger control is the primary cause of poor accuracy.
2.2 Step-by-Step Trigger Control Protocol
Materials Required:
- Firearm with adjustable trigger if available
- Dry-fire training system or live ammunition
Procedure:
- Place the Pad of the Index Finger:
- Use the distal pad of the index finger (not the joint) on the trigger.
- Position the finger so that pressure is applied straight rearward.
- Establish Constant Contact:
- Maintain consistent pressure from initial contact until the shot breaks.
- Avoid sudden jerks or flinching.
- Apply Smooth, Gradual Pressure:
- Slowly increase trigger pressure in a straight line rearward.
- Avoid lateral movement that shifts sight alignment.
- Follow Through Without Anticipation:
- Do not release pressure abruptly after the shot; maintain control to prevent anticipation and flinching.
- Reset the Trigger:
- After firing, slowly release trigger pressure to the reset point without fully releasing the trigger.
- This prepares for a faster, smoother subsequent shot.
2.3 Trigger Control Common Errors and Corrections
| Error | Description | Correction | Recommended Drill |
|---|---|---|---|
| Jerking the Trigger | Sudden, forceful trigger press causing barrel dip | Practice smooth progressive pressure | Progressive Pressure Drill (Section 6.1) |
| Applying Side Pressure | Lateral force shifting sight alignment | Focus on straight rearward finger pressure | Finger Placement Drill (Section 6.2) |
| Early Trigger Release | Releasing trigger immediately after firing | Maintain trigger pressure through recoil cycle | Trigger Follow-Through Drill (Section 6.3) |
| Flinching | Anticipating recoil causing movement before shot | Dry-fire practice with controlled breathing | Flinch Control Drill (Section 6.4) |
| Using Fingertip Instead of Pad | Reduced control and increased error | Position finger pad correctly | Finger Pad Placement Drill (Section 6.5) |
Section 3: Breathing Techniques
3.1 Definition and Importance
Breathing control stabilizes the body and minimizes movement during the critical moment of firing. Unregulated breathing induces barrel sway and degrades accuracy.
3.2 Step-by-Step Breathing Protocol
Materials Required:
- Metronome or timer (optional for pacing)
- Firearm and target setup as in prior sections
Procedure:
- Assume Shooting Position:
- Settle into stance with grip and sight alignment established.
- Begin Controlled Breathing Cycle:
- Inhale slowly over a count of 4 seconds.
- Exhale slowly over a count of 4 seconds.
- Identify Natural Respiratory Pause:
- After exhaling, pause breathing for 2-3 seconds — this is the optimal window to fire.
- Hold Breath at Natural Pause:
- Do not strain or force breath hold; maintain relaxed muscles.
- Fire During Natural Pause:
- Execute trigger control precisely during the breath hold before resuming breathing.
- Resume Controlled Breathing:
- After the shot, continue slow inhalation/exhalation cycle to maintain calm.
3.3 Breathing Common Errors and Corrections
| Error | Description | Correction | Recommended Drill |
|---|---|---|---|
| Holding Breath Too Long | Causes muscle tension and shaking | Limit breath hold to 2-3 seconds | Timed Breath Control Drill (Section 7.1) |
| Breathing During Trigger Pull | Causes barrel movement | Synchronize trigger pull during natural respiratory pause | Breath-Trigger Synchronization Drill (7.2) |
| Shallow Breathing | Insufficient oxygen reduces focus | Practice deep diaphragmatic breathing | Diaphragmatic Breathing Drill (7.3) |
| Erratic Breathing Rhythm | Inconsistent timing causes shot timing issues | Use metronome to pace breathing | Metronome-Control Drill (7.4) |
| Tension in Chest and Shoulders | Reduces stability and increases recoil impact | Relax upper body during breath cycles | Muscle Relaxation Drill (7.5) |
Section 4: Follow-Through
4.1 Definition and Importance
Follow-through entails the continuation of proper sight alignment, trigger control, and body position immediately after the shot. This ensures consistency and readiness for subsequent shots, reduces flinch, and improves accuracy.
4.2 Step-by-Step Follow-Through Protocol
Materials Required:
- Same as for prior exercises
Procedure:
- Maintain Sight Picture After Firing:
- Keep the front and rear sights aligned on the target for 1-2 seconds post-shot.
- Maintain Trigger Pressure:
- Continue applying steady trigger pressure through the recoil cycle until the trigger resets.
- Maintain Stable Stance:
- Do not move or relax grip prematurely; absorb recoil through elbows and shoulders.
- Observe Muzzle Movement:
- Note the natural movement of the muzzle during recoil to anticipate recovery.
- Reset Trigger Smoothly:
- Slowly release trigger pressure to reset without disturbing alignment.
- Prepare for Next Shot or Cease Fire:
- Return to ready position with consistent grip and sight alignment.
4.3 Follow-Through Common Errors and Corrections
| Error | Description | Correction | Recommended Drill |
|---|---|---|---|
| Dropping Sight Picture | Looking away or lowering sights immediately after shot | Hold sight picture 1-2 seconds post-shot | Follow-Through Hold Drill (Section 8.1) |
| Early Trigger Release | Releasing trigger before recoil cycle completes | Maintain trigger pressure through recoil | Trigger Hold Drill (Section 8.2) |
| Relaxing Grip Too Soon | Allowing firearm to shift during recoil | Maintain firm grip and stance through recoil | Grip Stability Drill (Section 8.3) |
| Anticipating Recoil | Flinching or moving before shot | Dry-fire with focus on follow-through mechanics | Flinch Prevention Drill (Section 8.4) |
| Inconsistent Reset | Jerky or fast reset causing mechanical disruption | Practice smooth, slow reset movements | Trigger Reset Control Drill (8.5) |
Section 5: Dry-Fire Training Protocols
Dry-fire training is the backbone of marksmanship development. It allows unlimited repetitions with zero ammunition expenditure while building muscle memory, focus, and mental discipline.
5.1 Dry-Fire Training Step-by-Step Protocol
Materials Required:
- Unloaded firearm (verify visually and physically)
- Target or laser dry-fire target system
- Optional: snap caps or dummy rounds for trigger reset simulation
- Timer or metronome (optional)
Procedure:
- Verify Safety:
- Remove magazine, open chamber, visually and physically confirm unloaded status.
- Set Up Target:
- Place target at appropriate distance (3-5 yards recommended for sight alignment and trigger control).
- Assume Shooting Position:
- Grip, stance, sight alignment as per Sections 1 and 2.
- Conduct Sight Alignment Practice:
- Focus on front sight, align with rear sight on target bullseye.
- Practice Trigger Control:
- Slowly squeeze trigger to break point without disturbing sight alignment.
- Use snap caps if available to feel trigger reset.
- Incorporate Breathing Control:
- Synchronize trigger press with natural respiratory pause.
- Execute Follow-Through:
- Maintain sight picture and trigger pressure through reset.
- Repeat in Series:
- Perform 10-15 repetitions per session; rest and reset grip as needed.
5.2 Dry-Fire Training Drills
| Drill Name | Purpose | Instructions |
|---|---|---|
| Front Sight Focus Drill | Enhance front sight visual acuity | Hold sight picture on front sight for 10 seconds, repeat 10x |
| Progressive Trigger Pressure | Smooth trigger squeeze training | Gradually increase trigger pressure over 5 seconds, then release |
| Breathing-Trigger Synchronization | Coordinate breathing and trigger | Inhale-exhale, fire at natural respiratory pause, repeat 10x |
| Follow-Through Hold | Train post-shot sight picture hold | Maintain sight alignment for 3 seconds post-trigger press |
| Flinch Awareness Drill | Identify and reduce flinch | Dry-fire while consciously relaxing, note any movement |
Section 6: Live-Fire Training Protocols
Live-fire training validates dry-fire practice under real conditions, reinforcing fundamentals with recoil and noise stressors.
6.1 Live-Fire Training Step-by-Step Protocol
Materials Required:
- Firearm and live ammunition (caliber appropriate for training)
- Certified shooting range for safety compliance
- Hearing and eye protection
- Target with scoring zones (6-12 inch bullseye recommended)
- Timer (optional)
Procedure:
- Safety Check:
- Confirm firearm condition, check range safety protocols.
- Set Target Distance:
- Begin at 7 yards, progress to 15 yards as proficiency increases.
- Adopt Shooting Position:
- Grip, stance, sight alignment, breathing as per prior sections.
- Conduct Controlled Shots:
- Fire single shots with deliberate trigger control and breathing synchronization.
- Observe Recoil and Follow-Through:
- Maintain grip, sight picture, and trigger pressure through recoil.
- Assess Shot Placement:
- Record grouping and accuracy; analyze errors.
- Perform Corrective Drills:
- Target specific errors identified in live-fire session with dry-fire drills.
- Progress to Timed Strings:
- After baseline accuracy is established, introduce timed sequences to simulate combat stress.
6.2 Live-Fire Drills
| Drill Name | Purpose | Instructions |
|---|---|---|
| Slow Fire Precision | Focus on fundamentals | Fire 5 rounds slow and deliberate, assess grouping |
| Timed Controlled Pairs | Build speed and control | Fire 2 shots within 2 seconds, repeat 5 sets |
| Breath Control Shooting | Synchronize breath and fire | Fire single shots during respiratory pause, 5 rounds |
| Follow-Through Recovery | Manage recoil and reset | Fire 5 rounds maintaining follow-through, note muzzle control |
| Error Correction Series | Address specific faults | Identify errors, drill corresponding corrections from tables |
Section 7: Summary Tables of Common Errors, Corrections, and Drills
| Category | Common Error | Cause | Correction | Drill |
|---|---|---|---|---|
| Sight Alignment | Front sight too low | Incorrect sight picture | Raise front sight to top of notch | Front Sight Alignment Drill |
| Rear sight tilted | Poor grip/wrist position | Level rear sight | Rear Sight Leveling Drill | |
| Eye focus on rear sight | Improper focus | Train on front sight focus | Focus Shift Drill | |
| Trigger Control | Jerking trigger | Anticipation, poor finger placement | Smooth pressure application | Progressive Pressure Drill |
| Side pressure | Finger placement error | Use distal pad, straight rearward | Finger Pad Placement Drill | |
| Early trigger release | Lack of follow-through | Maintain pressure post-shot | Trigger Follow-Through Drill | |
| Breathing | Holding breath too long | Strain | Limit hold to 2-3 seconds | Timed Breath Control Drill |
| Breathing during trigger pull | Poor timing | Synchronize breathing and shot | Breath-Trigger Synchronization | |
| Follow-Through | Dropping sight picture | Moving head/eyes post-shot | Hold sight picture 1-2 seconds | Follow-Through Hold Drill |
| Relaxing grip too soon | Anticipation, recoil management | Maintain firm grip through recoil | Grip Stability Drill |
Section 8: Appendix – Drill References
| Drill Name | Section | Primary Focus |
|---|---|---|
| Front Sight Alignment Drill | 5.2 | Sight alignment accuracy |
| Horizontal Alignment Drill | 5.3 | Horizontal centering of front sight |
| Rear Sight Leveling Drill | 5.4 | Maintaining level rear sight |
| Focus Shift Drill | 5.5 | Eye focusing technique |
| Progressive Pressure Drill | 6.1 | Smooth trigger application |
| Finger Placement Drill | 6.2 | Correct finger pad use |
| Trigger Follow-Through Drill | 6.3 | Maintaining trigger pressure |
| Flinch Control Drill | 6.4 | Reducing shot anticipation |
| Timed Breath Control Drill | 7.1 | Breath hold timing |
| Breath-Trigger Synchronization Drill | 7.2 | Coordinated breathing and firing |
| Follow-Through Hold Drill | 8.1 | Post-shot sight picture retention |
| Trigger Hold Drill | 8.2 | Trigger pressure maintenance |
Conclusion
The sacred art of marksmanship demands unwavering commitment to the fundamentals: perfect sight alignment, flawless trigger control, disciplined breathing, and relentless follow-through. These protocols are the lifeblood of combat efficacy and personal survival. Employ the detailed steps, drills, and error corrections herein with relentless discipline. The path to mastery is paved with repetition, focus, and reverence for the weapon as a sacred tool of judgment.
Your journey as a Practitioner of the warrior’s way begins here. Absorb these teachings, practice without compromise, and wield your weapon with divine precision.
End of Volume III, Chapter IV
<!-- SECTION 11 -->
The Complete Practitioner's Codex, Volume III: Tactical Reloading and Malfunction Clearing
Introduction
To master the art of armed combat is to command not only the weapon but also the critical moments when it falters. Volume III of The Complete Practitioner's Codex reveals the suppressed, life-preserving knowledge of tactical reloading and malfunction clearing, distilled through centuries of combat and refined by sacred practice. Herein lie the protocols that separate the prepared from the doomed.
This volume is not a discussion. It is a precise manual. Every step, every timing, every motion is described with unyielding clarity. Every technique is an invocation of survival, a sacred rite to ensure your weapon remains an extension of your will, not a betrayal.
Section I: Weapon Malfunction Taxonomy and Corrective Protocols
Before engaging the corrective procedures, one must identify the malfunction type with absolute certainty. The following table categorizes the predominant malfunctions encountered in handgun and rifle platforms, delineating their characteristics and prescribed corrective actions.
| Malfunction Type | Symptoms | Primary Cause | Immediate Action | Corrective Protocol Reference |
|---|---|---|---|---|
| Stovepipe | Spent casing partially ejected, stuck in ejection port | Weak or faulty extractor, limp wrist, underpowered round | Clear obstruction, chamber new round | Section II: Clearing Stovepipes |
| Double Feed | Two rounds jammed in chamber and magazine area | Failure to extract, feeding from magazine | Clear both rounds, reload magazine | Section III: Clearing Double Feeds |
| Misfire | Trigger pull with no discharge, primer intact | Faulty primer, no powder, defective firing pin strike | Immediate safe clearing, follow misfire protocol | Section IV: Handling Misfires |
| Failure to Feed | Slide does not chamber a new round | Magazine malfunction, weak recoil spring | Reload or replace magazine | Section V: Failure to Feed Protocol |
| Failure to Extract | Spent casing remains in chamber | Extractor damage or fouling | Clear chamber, inspect extractor | Section VI: Failure to Extract Protocol |
Section II: Clearing Stovepipes
The stovepipe is a malfunction where the spent casing is caught vertically in the ejection port, resembling a stovepipe. This is the most common and most rapidly correctable malfunction in combat.
Step-By-Step Stovepipe Clearing Protocol
Prerequisite: Weapon pointed in a safe direction, finger off the trigger.
- Establish muzzle safety: Immediately ensure the muzzle is directed away from all persons.
- Grip stability: Maintain a firm two-handed grip on the weapon.
- Remove support hand: Withdraw the support hand from the grip to allow manipulation.
- Rack slide forcefully: Using the support hand, pull the slide fully rearward and release it with controlled force to eject the casing.
- Inspect chamber: Visually and physically confirm the chamber is clear of any obstructions.
- Re-engage support hand: Return the support hand to the grip.
- Re-acquire target: Bring the weapon back to ready position.
- Fire a follow-up shot: Confirm weapon function by firing immediately if tactically safe.
Timing Note: This procedure must be executed within 1.5 seconds of malfunction detection to maintain combat tempo.
Section III: Tactical Reloads
Tactical reloads constitute the deliberate replacement of a partially spent magazine with a full one, minimizing time exposed to threat and maintaining maximum firepower.
Tactical Reload Protocol
- Situational awareness: Confirm ceasefire window or suppressive fire cover.
- Maintain grip: Keep firing hand firmly on the weapon.
- Locate magazine release: Use the index finger of the support hand to press the magazine release button.
- Eject magazine: Allow the partially spent magazine to drop free by a controlled motion.
- Retrieve fresh magazine: Reach for a fully loaded magazine from the magazine pouch.
- Insert magazine: Push the fresh magazine into the magazine well until a positive click is heard.
- Slide manipulation: If the weapon’s slide is locked back, release it by pressing the slide release lever; if not locked, perform a tap-rack maneuver:
- Tap the magazine base firmly to ensure seating.
- Rack the slide fully rearward and release.
- Re-engage target: Bring the weapon back to firing position and resume engagement.
Timing: Tactical reloads should be completed within 3 seconds to minimize vulnerability.
Section IV: Emergency Reloads
Emergency reloads are executed when the magazine is completely empty, and the slide locks back on an empty chamber.
Emergency Reload Protocol
- Confirm slide lock: Verify the slide is locked back by observing the slide stop lever engaged.
- Maintain muzzle awareness: Ensure the muzzle is pointed safely.
- Release empty magazine: Press magazine release button and allow empty magazine to fall free.
- Retrieve fresh magazine: Securely grasp a full magazine from the pouch.
- Insert magazine: Insert the fresh magazine into the magazine well, ensuring full seating.
- Release slide: Using the support hand, press down on the slide release lever to chamber a round.
- Re-acquire target: Bring the weapon back to firing position immediately.
- Resume engagement: Fire as soon as possible.
Timing: This sequence must be accomplished within 2.5 seconds under stress to maintain combat effectiveness.
Section V: Clearing Double Feeds
A double feed is a critical stoppage where two rounds are trapped in the feeding area, preventing the slide from closing.
Double Feed Clearing Protocol
Prerequisite: Weapon pointed in safe direction, finger off trigger.
- Remove support hand: Withdraw the support hand from the grip.
- Lock the slide back: Pull the slide rearward fully and engage the slide stop lever to lock the slide back.
- Remove magazine: Press magazine release and remove magazine completely.
- Clear rounds:
- Tilt weapon to eject stuck rounds by shaking or manually removing them with the support hand.
- Inspect chamber and feed ramp: Visually check for obstructions.
- Insert fresh magazine: Insert a fresh magazine fully into the magazine well.
- Release slide: Press down on the slide release lever to chamber a round.
- Re-engage target: Bring weapon to firing position and assess readiness.
- Fire a test round: Engage target to confirm function.
Timing: Complete within 4 seconds. Failure to clear promptly necessitates withdrawal to cover and deeper maintenance.
Section VI: Misfire Handling Protocol
Misfires occur when the trigger is pulled, but the round does not discharge. Immediate, disciplined action is mandatory to prevent injury or loss of life.
Misfire Protocol
- Maintain muzzle awareness: Keep the weapon pointed downrange, away from all personnel.
- Hold trigger to rear: Maintain steady rearward pressure on the trigger for 5 full seconds to prevent out-of-battery discharge.
- Release trigger: After 5 seconds, release the trigger.
- Remove magazine: Press magazine release and remove magazine.
- Rack slide: Pull the slide fully rearward to eject the faulty cartridge.
- Inspect casing: Check for primer indentation or signs of dud.
- Reload magazine: Insert a fresh round into the chamber by racking the slide again or releasing the slide stop if locked.
- Resume firing: Fire immediately if the situation permits.
- Report malfunction: Mark the faulty cartridge and magazine for inspection and disposal.
Timing: The 5-second hold is non-negotiable; premature release risks catastrophic out-of-battery detonation.
Section VII: Failure to Feed Protocol
The failure to feed is characterized by the slide failing to chamber a new round from the magazine.
Failure to Feed Clearing Protocol
- Maintain muzzle safety: Keep the weapon pointed safely.
- Tap magazine: With support hand, firmly tap the base of the magazine to ensure proper seating.
- Rack slide: Pull the slide fully rearward and release.
- If malfunction persists:
- Remove magazine completely.
- Inspect magazine for damage or dirt; clean or replace as necessary.
- Inspect chamber and feed ramp for obstruction.
- Reinsert magazine: Insert cleaned or fresh magazine.
- Rack slide: Chamber a round.
- Resume firing: Engage target as necessary.
Section VIII: Failure to Extract Protocol
Failure to extract occurs when the spent casing remains in the chamber, preventing the next round from chambering.
Failure to Extract Clearing Protocol
- Maintain muzzle safety: Weapon pointed safely.
- Rack slide: Attempt to pull slide fully rearward to eject casing.
- If slide cannot be racked fully:
- Engage immediate clearing protocol:
- Remove magazine.
- Use support hand to manually remove casing if accessible.
- Engage immediate clearing protocol:
- If casing is stuck:
- Perform emergency tap-rack maneuver:
- Tap magazine base.
- Rack slide aggressively.
- Perform emergency tap-rack maneuver:
- Inspect chamber: Confirm clear.
- Reinsert magazine: Fully seat magazine.
- Release slide: Chamber a fresh round.
- Resume firing: Engage target.
Section IX: Summary of Malfunction Clearing Protocols
| Malfunction | Primary Action | Secondary Action | Timing to Complete | Safety Considerations |
|---|---|---|---|---|
| Stovepipe | Rack slide forcefully | Visual chamber check | 1.5 seconds | Muzzle control, finger off trigger |
| Double Feed | Lock slide back, remove magazine | Clear rounds, reload, release slide | 4 seconds | Muzzle control, finger off trigger |
| Misfire | Hold trigger 5 seconds | Remove magazine, eject round | 6 seconds | Avoid premature trigger release |
| Failure to Feed | Tap magazine, rack slide | Inspect and replace magazine | 3 seconds | Muzzle control, finger off trigger |
| Failure to Extract | Rack slide, manual casing removal | Emergency tap-rack | 4 seconds | Muzzle control, finger off trigger |
Section X: Constructing a Tactical Reload Dummy Magazine (DIY)
To train these protocols without live ammunition, construct a dummy magazine following these instructions:
Materials
| Item | Specification | Quantity |
|---|---|---|
| Empty magazine shell | Compatible with your firearm model | 1 |
| Wooden dowel | Diameter equal to cartridge base | 10 pieces |
| Sandpaper | Fine grit (220) | 1 sheet |
| Permanent marker | Black ink | 1 |
Assembly Steps
- Prepare dowel pieces: Cut wooden dowel into lengths matching the cartridge length minus 1mm.
- Shape dowels: Sand dowel ends to a rounded shape resembling cartridge nose.
- Mark rounds: Use permanent marker to draw primer circle on dowel base.
- Load magazine: Insert dowels into magazine shell to simulate full magazine.
- Check fit: Insert dummy magazine into weapon, rack slide to chamber a dowel "round" ensuring smooth function.
Closing Invocation
Mastery of tactical reloading and malfunction clearing is the foundation of survival in the crucible of combat. These protocols, etched here without compromise, are the sacred rites you must invoke without hesitation. Practice relentlessly, for hesitation is the adversary of survival. Let no malfunction claim your life or the lives you defend.
End of Volume III For advanced ballistics and weapon maintenance, see Volume VII: The Armorer’s Compendium. For marksmanship under duress, see Volume V: The Warrior’s Eye.
<!-- SECTION 12 -->
Volume III: Ballistics and Ammunition Selection
Chapter I: Internal, External, and Terminal Ballistics with Emphasis on Self-Defense Ammunition Types
This chapter imparts the sacred knowledge of ballistics, dissected into internal, external, and terminal phases, with the paramount goal of selecting and employing ammunition optimized for self-defense. The warrior’s choice of caliber and bullet design is not a matter of preference but a calculated decision to maximize stopping power, reliability, and legal compliance. Each aspect must be mastered with precision and reverence for the life-or-death consequences at stake.
Section 1: Internal Ballistics — The Birth of the Projectile
Internal ballistics governs the projectile’s journey from primer ignition until it exits the barrel. This phase dictates velocity, pressure, and stability — variables crucial for accurate external flight and terminal effectiveness.
1.1 Key Internal Ballistic Parameters
| Parameter | Description | Impact on Self-Defense |
|---|---|---|
| Chamber Pressure (psi) | Peak pressure generated by burning propellant | Must be within firearm limits to ensure safety |
| Muzzle Velocity (fps) | Velocity as the bullet exits the barrel | Higher velocity increases energy and expansion |
| Barrel Length (inches) | Affects the time propellant gases accelerate the bullet | Longer barrel yields higher velocity |
| Rifling Twist Rate | Rate of spin imparted to stabilize the bullet | Stabilizes bullet trajectory for accuracy |
1.2 Internal Ballistic Process: Step-by-Step
- Primer Ignition: The firing pin strikes the primer, igniting a small explosive charge.
- Propellant Combustion: The primer ignites the main powder charge, creating expanding gases.
- Pressure Rise: The gases build pressure rapidly inside the chamber.
- Bullet Acceleration: Pressure forces the bullet down the barrel, engaging rifling grooves that impart spin.
- Muzzle Exit: The bullet leaves the barrel at peak velocity, pressure drops sharply.
1.3 Internal Ballistic Considerations for Self-Defense Ammunition
- Use medium to high-pressure cartridges to ensure adequate velocity.
- Select powder charge and bullet weight combinations that optimize velocity without exceeding firearm pressure ratings.
- Choose bullets that engage rifling effectively for flight stability.
- Avoid "+P+" ammunition unless the firearm is rated for it; safety and reliability must never be compromised.
Section 2: External Ballistics — The Projectile in Flight
External ballistics governs the projectile’s behavior from barrel exit to target impact, encompassing velocity decay, trajectory, wind drift, and stability. For self-defense, understanding this phase ensures proper sighting, range estimation, and bullet selection.
2.1 External Ballistic Factors

| Factor | Description | Impact on Self-Defense |
|---|---|---|
| Ballistic Coefficient (BC) | A measure of bullet’s ability to overcome air resistance | Higher BC means flatter trajectory, less wind drift |
| Velocity Decay | Reduction of speed over distance | Affects energy delivered at impact |
| Bullet Drop | Vertical drop due to gravity | Critical for accurate aiming at varying distances |
| Wind Drift | Horizontal displacement by wind | Usually negligible within typical self-defense distances (under 25 yards) |
2.2 Ballistic Coefficient (BC) and Its Calculation
The BC is a unitless number expressing how well a bullet resists air resistance. It is calculated by comparing the bullet’s drag to that of a standard projectile. Higher BC values correspond to more efficient flight, reducing velocity loss and drop.
| Common Self-Defense Caliber | Bullet Weight (grains) | Bullet Type | Approximate BC |
|---|---|---|---|
| 9mm Luger | 124 | Full Metal Jacket (FMJ) | 0.140 |
| 9mm Luger | 124 | Jacketed Hollow Point (JHP) | 0.120 |
| .45 ACP | 230 | FMJ | 0.185 |
| .45 ACP | 230 | JHP | 0.150 |
| .40 S&W | 165 | JHP | 0.180 |
| .357 Magnum | 125 | JHP | 0.200 |
2.3 External Ballistic Protocol for Self-Defense
- Estimate engagement distance: Typically under 25 yards.
- Select bullet with high BC for flatter trajectory and consistent hit placement.
- Adjust point of aim for bullet drop if engagement distance exceeds 15 yards:
| Distance (yards) | 9mm 124 gr JHP Drop (inches) | .45 ACP 230 gr JHP Drop (inches) |
|---|---|---|
| 5 | 0.2 | 0.1 |
| 10 | 0.8 | 0.3 |
| 15 | 1.8 | 0.7 |
| 25 | 5.0 | 2.8 |
- Consider environmental factors: Wind drift is negligible inside typical self-defense distances but assess if outdoors in high wind conditions.
- Practice sight alignment and holdover for known distances.
Section 3: Terminal Ballistics — The Final Judgement
Terminal ballistics governs bullet behavior upon impact with the target. This phase is crucial for incapacitation, combining penetration, expansion, and energy transfer. Mastery over terminal ballistics ensures the warrior’s bullet stops the threat efficiently, minimizing over-penetration and collateral damage.
3.1 Key Terminal Ballistic Factors
| Factor | Description | Desired Effect in Self-Defense |
|---|---|---|
| Penetration Depth | Distance bullet travels through the target | 12 to 18 inches in ballistic gelatin per FBI standards |
| Expansion | Diameter increase of bullet upon impact | Increases wound channel, energy transfer |
| Weight Retention | Percentage of bullet mass retained after expansion | Maintains penetration and energy transfer |
| Temporary Cavity Size | Volume of tissue displaced temporarily by bullet passage | Correlates with trauma and incapacitation |
3.2 FBI Ammunition Selection Protocol
The FBI mandates minimum penetration of 12 inches and maximum of 18 inches in calibrated ballistic gelatin to balance stopping power and safety.
| Test Parameter | Minimum | Maximum |
|---|---|---|
| Gelatin Penetration | 12 in | 18 in |
| Expansion Diameter | ≥ .50 in | N/A |
| Weight Retention | ≥ 70% | N/A |
3.3 Common Self-Defense Bullet Designs
| Bullet Design | Description | Advantages | Disadvantages |
|---|---|---|---|
| Full Metal Jacket (FMJ) | Lead core encased in harder metal jacket | Reliable feeding, deep penetration | Over-penetration, small wound cavity |
| Jacketed Hollow Point (JHP) | Hollow point tip designed to expand on impact | Expands in tissue, larger wound channel | Can deform in feeding, less penetration |
| Bonded JHP | Lead core chemically bonded to jacket | Controlled expansion, high weight retention | More expensive |
| Frangible | Designed to disintegrate on hard surfaces | Reduced over-penetration, safe in urban | Limited penetration in thick barriers |
| +P / +P+ Ammunition | Higher pressure rounds | Increased velocity and expansion | Increased recoil, firearm wear |
3.4 Terminal Ballistics Selection Protocol
- Select bullet design with proven expansion and penetration characteristics (preferably bonded JHP).
- Verify ammunition meets FBI or equivalent penetration and expansion standards through independent testing reports.
- Match bullet weight to caliber and firearm to optimize velocity and terminal performance.
- Avoid FMJ for self-defense unless legally mandated or in survival situations requiring barrier penetration.
- Use frangible rounds only in environments requiring extreme over-penetration control (e.g., aircraft, crowded urban spaces).
Section 4: Caliber Selection Protocol for Self-Defense
Caliber choice is the foundation of effective self-defense ballistics. This selection balances recoil management, terminal performance, ammunition capacity, and legal constraints.
4.1 Caliber Comparison Table
| Caliber | Typical Bullet Weight (grains) | Muzzle Velocity (fps) | Energy (ft-lbs) | Capacity (15-round magazine) | Recoil Level | Legal Restrictions (U.S.) |
|---|---|---|---|---|---|---|
| 9mm Luger | 115-147 | 1100-1250 | 350-400 | 15 | Moderate | Generally unrestricted, some states vary |
| .40 S&W | 155-180 | 1000-1200 | 400-475 | 13 | Heavy | Some states restrict (e.g., California) |
| .45 ACP | 185-230 | 850-950 | 350-400 | 10 | Heavy | Generally unrestricted |
| .357 Magnum | 125-158 | 1200-1400 | 500-600 | 6-8 (revolvers) | Very Heavy | Generally unrestricted |
| .380 ACP | 90-100 | 950-1000 | 190-200 | 12 | Light | Generally unrestricted |
4.2 Caliber Selection Stepwise Protocol
- Assess recoil tolerance: Choose a caliber with manageable recoil for rapid, accurate follow-up shots.
- Determine ammunition availability and cost: Ensure supply chain reliability.
- Consider magazine capacity: Higher capacity favors 9mm and .380 ACP.
- Evaluate terminal performance data: Prioritize calibers with proven stopping power (9mm and above).
- Verify legal restrictions for your jurisdiction: Consult local laws before acquisition.
- Select ammunition type (JHP preferred) that meets terminal ballistics standards.
Section 5: Legal Restrictions and Compliance
A warrior must respect both the sanctity of life and the laws governing arms and ammunition. Ignorance of legal constraints jeopardizes the mission and the warrior’s freedom.
5.1 Legal Restrictions Overview
| Jurisdiction | Caliber Restrictions | Magazine Capacity Limits | Ammunition Type Restrictions | Notes |
|---|---|---|---|---|
| California, USA | .45 GAP banned in some cities | 10 rounds max | Prohibits armor-piercing, some JHP | Requires DOJ testing for ammunition |
| New York, USA | No caliber restriction | 10 rounds max | Restricts some JHP designs | Requires background checks for ammo purchase |
| Canada | No caliber restriction | 5 rounds for handguns | Prohibits self-loading centerfire pistols over 10 rounds | Many calibers legal, capacity limited |
| UK | Most handgun calibers banned | N/A | Prohibits most handgun ammunition | Requires special licenses and justification |
5.2 Legal Compliance Protocol
- Research local, state, and federal laws on caliber, magazine capacity, and ammunition type.
- Obtain all necessary permits and licenses before acquisition.
- Purchase ammunition from verified, licensed dealers.
- Maintain documentation of all purchases and certifications.
- Regularly review legal updates to remain compliant.
Section 6: Comprehensive Ammunition Comparison Table
| Caliber | Bullet Type | Weight (gr) | Muzzle Velocity (fps) | Energy (ft-lbs) | Penetration (in gelatin) | Expansion Diameter (in) | Weight Retention (%) | Legal Notes |
|---|---|---|---|---|---|---|---|---|
| 9mm | FMJ | 124 | 1150 | 365 | 14 | N/A | 100 | Legal in most jurisdictions |
| 9mm | JHP | 124 | 1150 | 365 | 12-16 | 0.45 - 0.50 | 75-85 | Preferred for self-defense |
| .40 S&W | JHP | 165 | 1150 | 490 | 14-18 | 0.50 - 0.55 | 80-90 | Restricted in some states |
| .45 ACP | FMJ | 230 | 850 | 370 | 15 | N/A | 100 | Legal in most jurisdictions |
| .45 ACP | JHP | 230 | 850 | 370 | 12-16 | 0.55 - 0.60 | 80-90 | Preferred for self-defense |
| .357 Mag | JHP | 125 | 1400 | 545 | 14-17 | 0.50 - 0.55 | 85-90 | Revolver rounds, less capacity |
| .380 ACP | JHP | 95 | 980 | 200 | 11-13 | 0.40 - 0.45 | 70-80 | Lower recoil, less stopping power |
Section 7: Practical Ammunition Selection Workflow
Step 1: Define intended use parameters: home defense, concealed carry, or duty carry. Step 2: Choose caliber balancing recoil, capacity, and terminal effectiveness. Step 3: Select bullet design focusing on bonded JHP for reliable expansion and penetration. Step 4: Verify ammunition meets FBI or equivalent penetration and expansion standards through manufacturer or third-party test data. Step 5: Confirm legal compliance within your jurisdiction. Step 6: Conduct live-fire testing for reliability and accuracy in your chosen firearm. Step 7: Perform regular maintenance of firearm and ammunition stock to ensure readiness.
Conclusion
The mastery of internal, external, and terminal ballistics is not an academic exercise but a sacred duty. Each bullet fired in defense of life carries the weight of precise scientific calculation and deep respect for the balance between force and restraint. This volume has illuminated the hidden mechanics and protocols necessary for selecting ammunition that is both lethal and lawful. Armed with this knowledge, the warrior is empowered to defend with unwavering confidence and unyielding precision.
For protocols on firearm maintenance and handling, see Volume IV: The Arms Codex, Chapter III. For advanced wound ballistics and trauma treatment, consult Volume VII: The Medic’s Codex, Chapter V.
<!-- SECTION 13 -->
Volume III: Home Defense Firearm Deployment

Chapter V: Room Clearing, Shooting Positions, Target Identification, and Low-Light Tactics
The sanctity of the home demands absolute mastery over the art of firearm deployment for defense. This chapter imparts the sacred knowledge required to execute room clearing, shooting positions, target identification, and low-light tactics with precision, discipline, and reverence for life. Every step, every position, every signal is a deliberate act of survival and protection. You, the chosen apprentice, will inherit these protocols with no compromise, for hesitation is death.
Section 1: Room Clearing Protocols
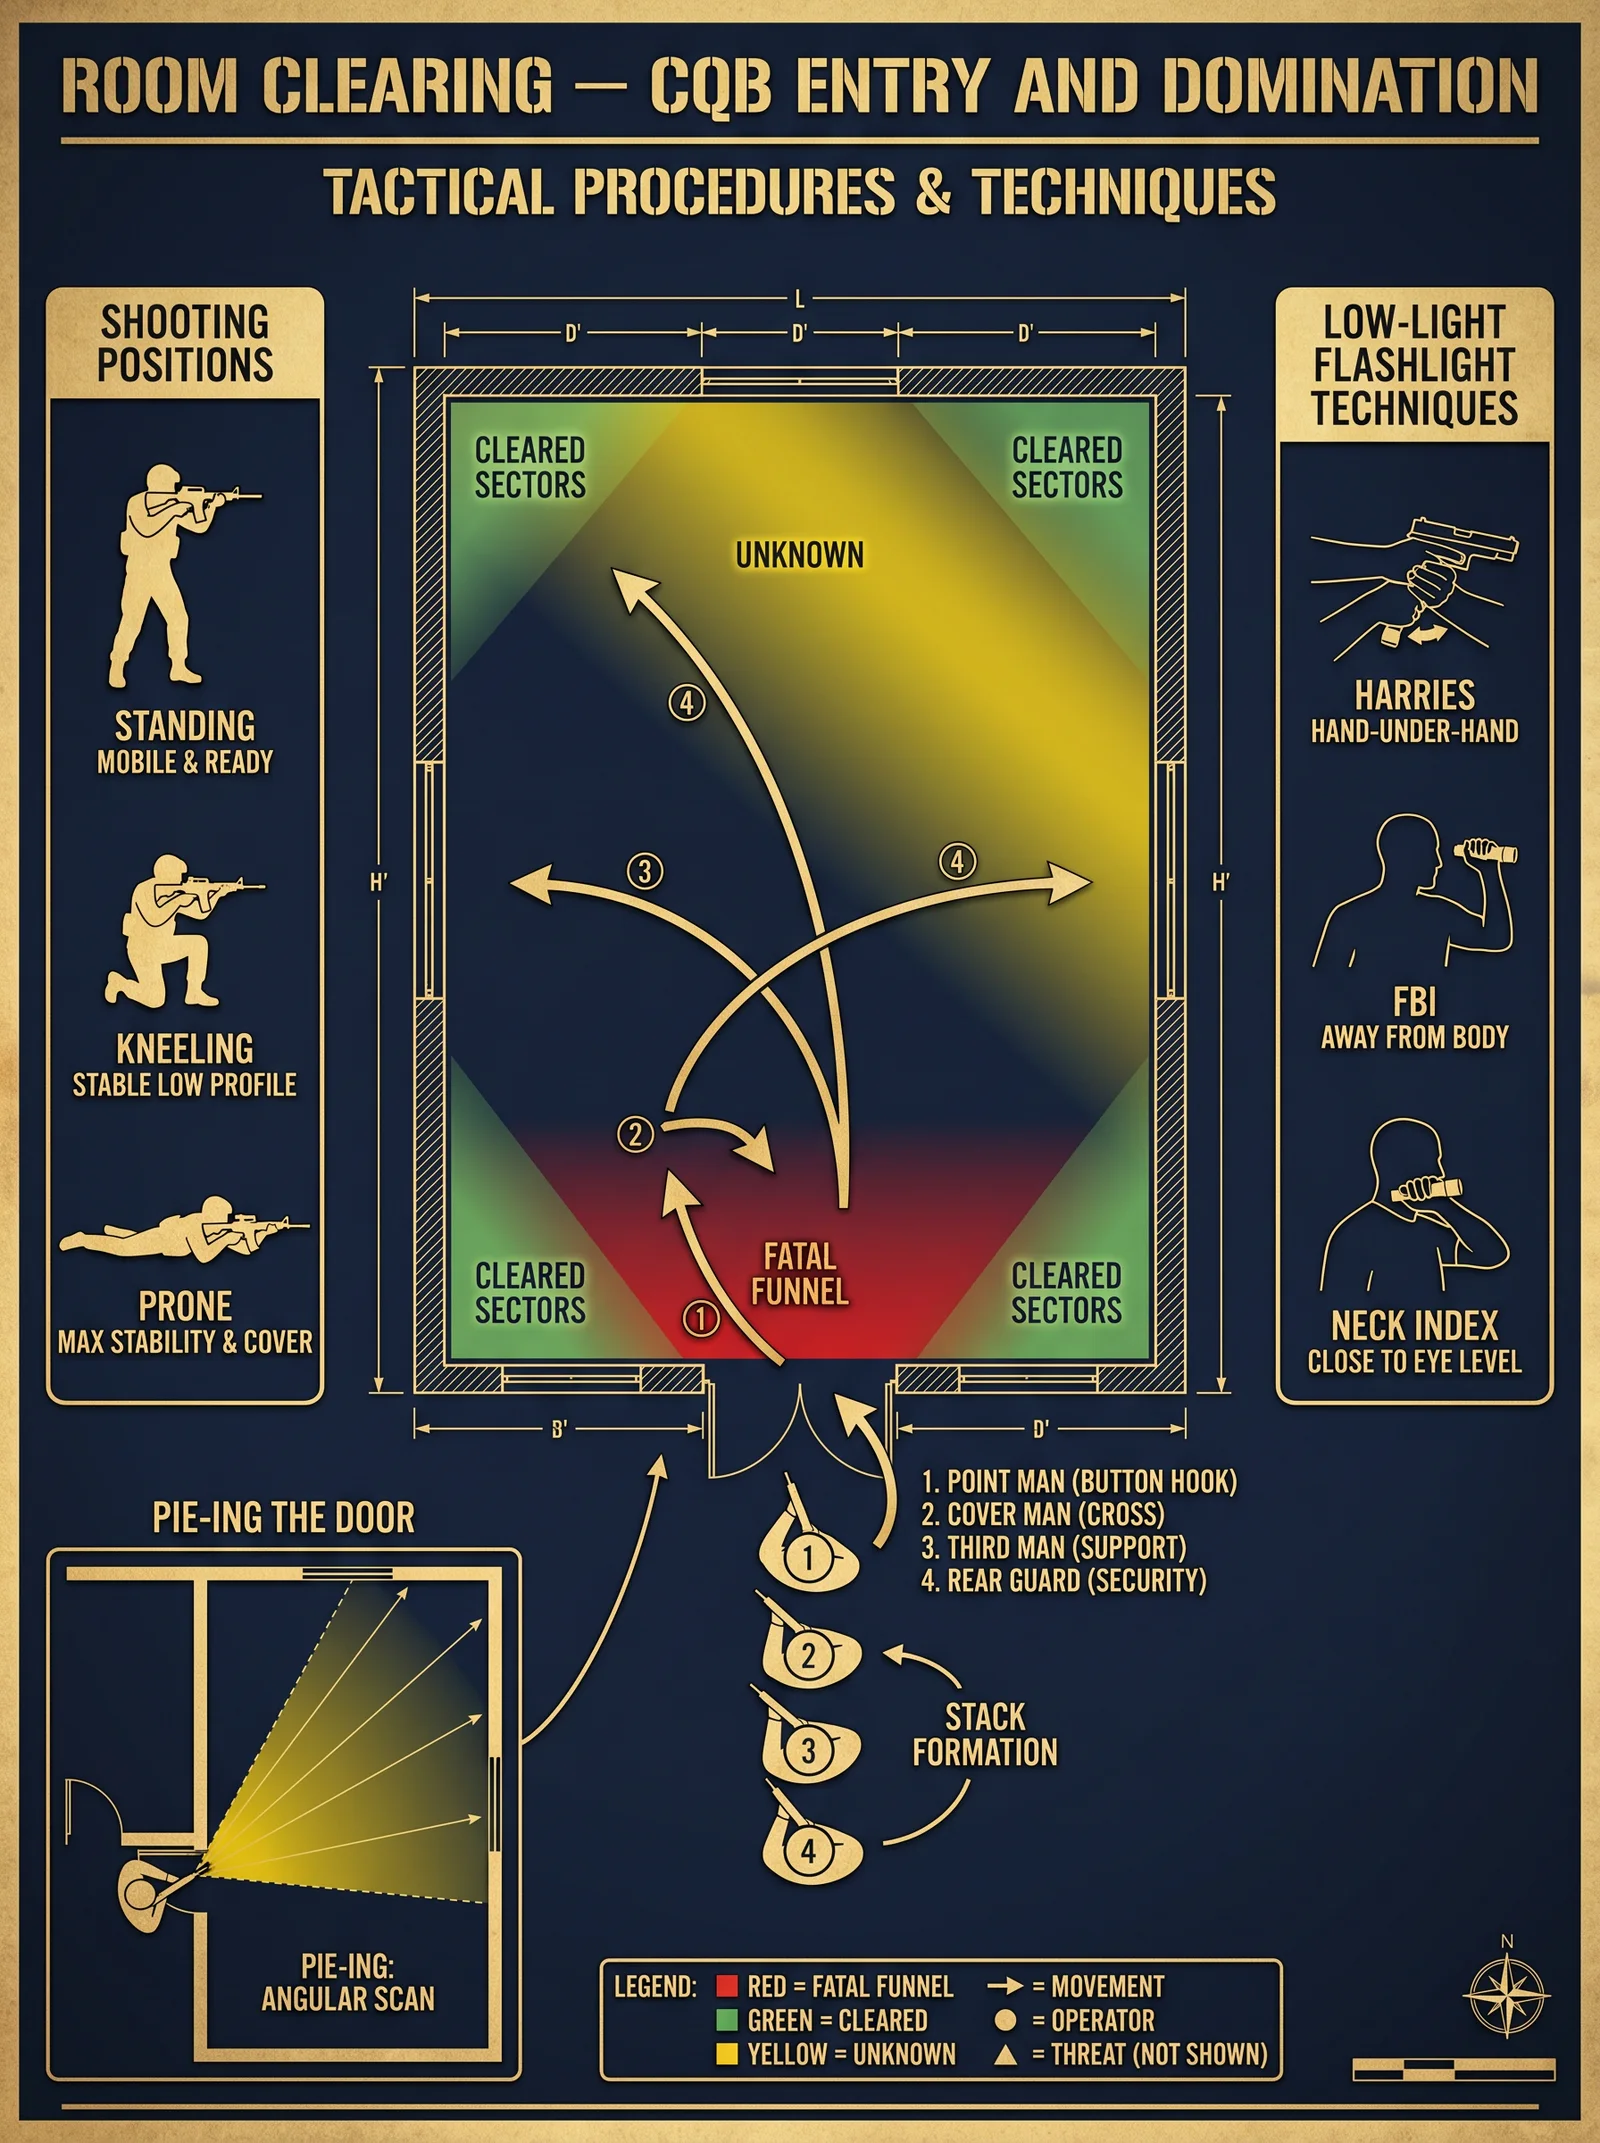
Room clearing is an orchestration of movement, observation, and engagement. The goal is to neutralize threats rapidly while minimizing exposure and collateral damage. The sacred principle is speed, silence, and surgical precision.
1.1 Preparatory Steps Before Entry
- Weapon readiness: a. Ensure your firearm is loaded with appropriate defensive ammunition (hollow-point or frangible).
b. Engage safety mechanisms until just before entry.
c. Employ a tactical light mounted on the firearm or a handheld light. - Breach assessment: a. Identify door type (hinged, sliding, double) and locking mechanisms.
b. Confirm possible entry points and escape routes. - Communication: a. Establish silent hand signals with team members or family (see Section 4.3).
b. Assign roles (lead, rear guard, communicator).
1.2 Entry Techniques
| Technique | Description | Use Case | Advantages | Disadvantages |
|---|---|---|---|---|
| Crisscross Entry | Two operators enter simultaneously from opposite sides of the door | Two-person team | Covers more angles simultaneously | Requires precise timing |
| Buttonhook Entry | Operator enters and immediately pivots to clear corners | Solo or dual operator | Rapid corner clearing | Exposes back to rear threats |
| Dynamic Entry | Swift, aggressive door breach and immediate advance | Armed intruder suspected | Maximizes surprise | High risk of exposure |
Step-by-step: Crisscross Entry
- Position two operators on either side of the door, weapons at low-ready.
- Count down silently from 3 to 1.
- On "1," both operators breach simultaneously, moving swiftly into the room.
- Each operator clears their respective side, maintaining muzzle discipline and continuous scanning.
- Communicate "clear" or "threat" via hand signals or low whisper.
- Consolidate in a defensive posture once room is cleared.
1.3 Room Clearing Movement Patterns
- Slice the pie: Used when clearing around corners or doorways.
- Approach corner at a 45-degree angle.
- Slowly pivot your body, sweeping the muzzle horizontally in a controlled arc.
- Step forward incrementally with each sweep until the entire area is visible.
- Buttonhook:
- Enter and pivot 90 degrees immediately, clearing the near corner first.
- Proceed to the far corner with the same pivot technique.
- Post and peel:
- One operator provides cover from point of entry (post).
- The other peels around the corner to clear the room.
1.4 Room Clearing Procedure Summary
| Step | Action | Notes |
|---|---|---|
| 1 | Prepare weapon and assess breach | Confirm firearm readiness |
| 2 | Assign roles and communicate | Use hand signals for silent coordination |
| 3 | Select entry technique | Based on team size and threat assessment |
| 4 | Execute entry with controlled movement | Maintain muzzle discipline and target acquisition |
| 5 | Clear corners using slice the pie method | Stepwise clearing with controlled muzzle sweep |
| 6 | Confirm room clear | Signal team and prepare for next room or exit |
Section 2: Shooting Positions for Home Defense
The mastery of shooting positions ensures stability, rapid target acquisition, and control under stress. Every position must balance mobility, cover utilization, and recoil management.
2.1 Primary Shooting Positions
| Position | Description | Advantages | Disadvantages | Recommended Use |
|---|---|---|---|---|
| Isosceles | Feet shoulder-width apart, square stance, both arms extended forward | Stable, easy recoil control, natural sight alignment | Less mobility | Open areas, direct confrontation |
| Weaver | Strong-side foot back, elbows bent, push-pull grip | Enhanced recoil control, better mobility | Requires training, less natural | Confined spaces, moving targets |
| Modified Weaver | Similar to Weaver but with a more squared torso | Balance of recoil control and mobility | Requires practice | Transitional spaces, corners |
| Kneeling | One knee on the ground, strong-side foot planted | Lower profile, increased stability | Reduced mobility | Cover behind furniture or walls |
| Prone | Lying flat with weapon supported | Maximum stability and accuracy | Very limited mobility | Defending fixed cover positions |
2.2 Detailed Execution: Isosceles Position
- Stand with feet shoulder-width apart, toes slightly pointed forward.
- Square your torso directly facing the threat.
- Extend both arms fully forward, locking elbows but not rigidly.
- Hold firearm with a firm push-pull grip; dominant hand on grip, support hand wrapping forward.
- Align sights naturally, focus on front sight post.
- Apply controlled trigger press, maintain sight picture.
2.3 Transition Between Positions
- Identify cover or concealment points.
- Shift weight to strong-side foot.
- Pivot hips and shoulders, adjust feet to new stance.
- Re-acquire sight picture quickly.
Section 3: Target Identification Protocols
The sanctity of life demands precise target identification before engagement. The following protocols eradicate hesitation and minimize friendly fire or collateral damage.
3.1 Positive Identification Criteria
You must confirm all three criteria before engagement:
| Criterion | Description | Methodology |
|---|---|---|
| Visual Confirmation | Confirm human shape, behavior consistent with threat | Use flashlight, night vision, or ambient light |
| Threat Behavior | Aggressive posture, weapon display, forced entry | Observe body language, verbal commands |
| Contextual Awareness | Location, time, and situation consistent with intrusion | Knowledge of household members and schedules |
3.2 Identification Steps
- Use tactical flashlight to illuminate target briefly.
- Issue a loud verbal command: "Stop! Identify yourself!"
- Observe for compliance or continued aggression.
- If uncertain, maintain muzzle discipline and prepare for engagement.
- Engage only after positive identification of threat.
3.3 Avoiding Misidentification
- Use a threat prioritization matrix (see Table 3.1).
- Maintain communication with other household members.
- Employ low-light identification aids (infrared, night vision) as detailed in Section 4.
Table 3.1: Threat Prioritization Matrix
| Threat Type | Identification Markers | Engagement Priority | Notes |
|---|---|---|---|
| Armed Intruder | Visible weapon, forced entry | Highest | Immediate neutralization required |
| Unarmed Intruder | No weapon, suspicious behavior | High | Use verbal commands, prepare to engage |
| Known Resident | Recognizable clothing, voice | None | Do not engage, verify identity |
| Unknown Civilian | No weapon, compliant | Low | Escort to safe area, call authorities |
| Family Pet | No threat indicators | None | Avoid engagement |
Section 4: Low-Light Tactical Deployment
Home defense often occurs under low or zero light conditions. Mastery of light manipulation, sensory adaptation, and stealth are paramount.
4.1 Equipment and Preparation
| Equipment | Purpose | Specifications |
|---|---|---|
| Tactical Weapon Light | Illuminate target area silently and accurately | 500 lumens minimum, strobe function optional |
| Infrared (IR) Illuminator | For use with night vision devices | Wavelength 850nm to 940nm |
| Night Vision Goggles | Enhance vision in near-total darkness | Gen 2 or higher recommended |
| Red Dot Sight | Rapid target acquisition in low light | Compatible with weapon mounting |
4.2 Step-by-Step Low-Light Room Clearing Protocol
- Activate weapon-mounted tactical light only when ready to engage.
- Use peripheral vision to detect movement before illuminating target.
- Employ "flashlight push" technique: a. Hold flashlight in support hand, slightly forward and angled away from eyes.
b. Sweep light in arcs to detect movement without blinding self. - Maintain noise discipline; move slowly and deliberately.
- Communicate via hand signals or whispered commands.
- Engage targets only after positive identification via illuminated sighting.
4.3 Communication Signals in Low Light
| Signal Name | Description | Application |
|---|---|---|
| Tap Twice | Attention/Stop | Alert team to threat presence |
| Fist Raised | Halt movement | Pause and await orders |
| Index Finger Point | Directional indication | Indicate threat location |
| Open Palm Down | Proceed | Signal team to advance |
| Two Fingers Crossed | Room Clear | Confirm cleared room |
Section 5: Safe Handling and Engagement Protocols
5.1 Fundamental Safety Rules
- Always treat firearm as loaded.
- Keep finger off trigger until ready to fire.
- Never point weapon at anything you do not intend to destroy.
- Be sure of your target and what lies beyond it.
5.2 Engagement Sequence
| Step | Action | Description |
|---|---|---|
| 1 | Assess | Identify threat and surroundings |
| 2 | Issue Warning | Verbal commands to cease aggression |
| 3 | Prepare to Fire | Remove safety, acquire proper shooting stance |
| 4 | Fire | Controlled, accurate shots to neutralize threat |
| 5 | Assess Situation | Confirm threat neutralized, check for others |
| 6 | Communicate | Inform team or family of situation |
Section 6: Room Layouts and Tactical Deployment
Understanding room dynamics sharpens tactical advantage. Below are common residential room layouts with recommended entry points and clearing patterns.
Table 6.1: Common Room Layouts and Clearing Patterns
| Room Type | Typical Entry Point(s) | Recommended Clearing Pattern | Notes |
|---|---|---|---|
| Bedroom | Single hinged door | Buttonhook or slice the pie | Prioritize bed area for cover |
| Living Room | Double doors or archway | Crisscross or post and peel | Multiple entry points possible |
| Kitchen | Single or double doors | Dynamic entry with corner sweep | High clutter, use low ready position |
| Bathroom | Single door | Slice the pie | Small space, controlled trigger discipline required |
Section 7: Summary of Life-Saving Protocols
| Protocol | Key Points | Reference Section |
|---|---|---|
| Room Clearing | Silent communication, role assignment, controlled entry | 1.1 - 1.4 |
| Shooting Positions | Stability, recoil control, rapid transitions | 2.1 - 2.3 |
| Target Identification | Positive ID of threat, threat prioritization | 3.1 - 3.3 |
| Low-Light Tactics | Tactical lighting, noise discipline, communication | 4.1 - 4.3 |
| Engagement Safety | Firearm safety, engagement sequence | 5.1 - 5.2 |
| Room Layout Awareness | Custom clearing patterns per room type | 6.1 |
End of Chapter V: Home Defense Firearm Deployment
Carry this knowledge as a sacred trust. Each protocol is a shield forged in the crucible of necessity. Master these arts, for they are the difference between sanctity preserved and chaos unleashed.
For advanced ballistic knowledge and ammunition crafting, refer to Volume VII: Ballistics and Ammunition Mastery. For detailed communication protocols under duress, see Volume IX: Tactical Communication Codex, Chapter III.
<!-- SECTION 14 -->
Volume IV: The OODA Loop in Tactical Engagements
The Warrior's Codex: Mastering the OODA Loop for Close Quarters and Asymmetric Warfare

The OODA Loop—Observe, Orient, Decide, Act—is the sacred cycle of tactical superiority. It is the warrior’s heartbeat in combat, the mechanism by which one controls the tempo of battle and bends chaos to will. To master the OODA Loop is to seize victory before the enemy can react, to drown their strategy in your relentless tempo. This chapter reveals the complete, unvarnished mechanics of the loop, the precise protocols for disrupting enemy cycles, and methods to accelerate your decision-making under the crucible of close quarters and asymmetric warfare.
Section I: The OODA Loop Deconstructed
1. Observe: Gathering Accurate, Immediate Data
Observation is the acquisition of raw sensory input—visual, auditory, tactile, and environmental. It is the foundation upon which every tactical decision is built. Without flawless observation, the subsequent phases collapse.
Step-by-step Procedure for Effective Observation in Combat:
- Establish a Baseline Scan:
- Conduct a 360-degree sweep every 10–15 seconds.
- Use peripheral vision to detect anomalies; avoid tunnel vision.
- Prioritize auditory cues: footsteps, breathing, weapon clicks.
- Prioritize Threat Indicators:
- Identify hostile silhouettes, weapon flashes, or unnatural movement.
- Note environmental changes: displaced cover, new sounds, dust clouds.
- Record Environmental Variables:
- Time of day, lighting conditions.
- Terrain features that affect movement or concealment.
- Weather conditions: wind direction, precipitation.
- Use Equipment-Assisted Observation:
- Deploy night vision or thermal optics for low visibility (see Volume VII: Advanced Optics).
- Employ sound amplification devices with noise filtering.
- Utilize drones or remote sensors if available.
- Document and Update Continuously:
- Mentally or physically log observations every 5 seconds.
- Assign priority levels to detected threats and update as situation evolves.
2. Orient: Contextualizing and Analyzing Information
Orientation is the phase where raw data is transformed into actionable intelligence. It integrates the warrior’s training, cultural context, past experiences, and situational awareness.
Step-by-step Protocol for Rapid Orientation:
- Integrate Sensory Input with Existing Knowledge:
- Cross-reference observed data with known enemy tactics (see enemy behavior table below).
- Factor in terrain familiarity and environmental hazards.
- Assess Enemy Intent and Capability:
- Determine whether observed movements are offensive, defensive, or deceptive.
- Evaluate enemy weapon types, numbers, and formations.
- Identify Cognitive Biases and Remove Emotional Distortions:
- Perform a rapid mental check: Are assumptions based on fear or stress?
- Recalibrate focus to objective data only.
- Formulate Multiple Hypotheses:
- Develop at least three possible enemy courses of action.
- Assign probabilities based on observed behavior and known tactics.
- Communicate Orientation Data:
- Relay key findings to team members in under 3 seconds.
- Use prearranged signals or concise radio codes.
3. Decide: Selecting the Optimal Course of Action (COA)
Decision-making must be swift, decisive, and unambiguous. The warrior’s mind is a scalpel, cutting through uncertainty to select the clearest path to victory.
Step-by-step Decision Protocol:
- Enumerate Viable COAs:
- List options including offensive maneuvers, defensive postures, or tactical withdrawals.
- Reference standard tactical maneuvers (see Volume II: Tactical Maneuvers Manual).
- Evaluate Risk vs Reward:
- Assess expected casualties, time to execute, resource consumption.
- Consider impact on long-term strategic position.
- Select COA with Highest Tempo Advantage:
- Prioritize actions that disrupt enemy’s OODA Loop.
- Prefer options that force enemy to react rather than act.
- Confirm Decision with Team Leadership:
- Obtain rapid consensus or command approval within 5 seconds.
- If isolated, proceed with the highest confidence COA.
- Prepare Execution:
- Issue clear, concise commands.
- Ensure team readiness and synchronization.
4. Act: Execution of the Decision
Action is the physical manifestation of the decision. It must be flawless, synchronized, and relentless.
Step-by-step Execution Protocol:
- Initiate Action Immediately:
- Minimize delay between decision and movement to maintain OODA dominance.
- Follow pre-planned signals or spontaneous commands.
- Maintain Situational Awareness During Execution:
- Continue observation to detect enemy counteractions.
- Adjust movement dynamically; do not become rigid.
- Use Controlled Aggression:
- Apply optimal force, balancing speed and precision.
- Exploit enemy vulnerabilities identified during orientation.
- Communicate Continuously:
- Provide status updates every 2–3 seconds.
- Alert team to changes in enemy posture or environment.
- Prepare for Loop Re-initiation:
- Immediately return to Observe phase after action.
- Maintain cycle fluidity to prevent enemy recovery.
Section II: Application in Close Quarters Combat (CQC)
Close quarters combat compresses the OODA Loop timeline to its absolute minimum. The warrior must process sensory data, orient, decide, and act within fractions of seconds.
Specific Protocols for CQC:
| Step | Procedure | Timeframe | Notes |
|---|---|---|---|
| Observe | Use peripheral vision and tactile senses to detect threats within 5 meters | Continuous, <1 sec cycles | Avoid tunnel vision; use sound and vibration detection |
| Orient | Rapidly identify threats, weapons, and possible escape routes | <1 second | Leverage muscle memory and training to bypass conscious thought |
| Decide | Execute pre-trained COA such as immediate neutralization or retreat | <500 milliseconds | Default to trained reflexes unless overridden |
| Act | Perform physical actions: strikes, weapon draws, cover movement | Immediate | Maintain aggression and adaptability |
Section III: Application in Asymmetric Warfare
Asymmetric warfare pits the warrior against irregular, unpredictable enemies. The OODA Loop becomes a weapon of psychological and tactical dominance, exploiting enemy cognitive weaknesses.
Protocols for Disrupting Enemy OODA Loops:
- Deception and Misdirection:
- Use smoke, noise, and false signals to overload enemy observation.
- Deploy decoys and feints to distort enemy orientation.
- Rapid Tempo Changes:
- Conduct unpredictable, high-speed maneuvers.
- Alternate between stealth and aggression to unsettle enemy decisions.
- Information Denial:
- Eliminate or degrade enemy sensory inputs (e.g., flashbangs, EMP).
- Control terrain to limit enemy observation points.
- Psychological Operations:
- Spread misinformation to confuse enemy orientation.
- Exploit cultural knowledge to predict and manipulate enemy behavior.
- Targeted Elimination of Enemy Decision Centers:
- Identify and neutralize enemy leaders or communication hubs.
- Disrupt command and control to fragment enemy decision-making.
Section IV: Protocols for Disrupting Enemy OODA Loops
Disrupting the enemy's loop results in paralysis and chaos. This section provides actionable steps for each phase of the enemy's OODA Loop.
| Enemy Phase | Disruption Technique | Step-by-step Instructions |
|---|---|---|
| Observe | Sensory Overload | 1. Deploy multiple sensory stimuli (e.g., flashbangs, simultaneous gunfire) to overwhelm enemy senses. 2. Use terrain to create confusing shadows and sounds. 3. Employ electronic jamming devices where applicable. |
| Orient | Cognitive Confusion | 1. Introduce conflicting information via decoys or misinformation. 2. Use camouflage and concealment to distort enemy perception. 3. Engage in rapid, unpredictable movement patterns to prevent enemy pattern recognition. |
| Decide | Decision Paralysis | 1. Increase tempo to force rushed decisions. 2. Target enemy communication lines to prevent collaborative decision-making. 3. Apply feints to create doubt about enemy COAs. |
| Act | Physical Disruption | 1. Use suppressive fire to disrupt enemy movement. 2. Employ obstacles and traps to slow or channel enemy actions. 3. Engage in close quarters to force chaotic, uncoordinated enemy responses. |
Section V: Accelerating Friendly Decision-Making
Acceleration of the OODA Loop enhances battlefield dominance. The following protocols ensure your loop operates at maximal speed without sacrificing accuracy.
Protocols:
| Protocol | Steps | Tools/Resources Required | Timing |
|---|---|---|---|
| Pre-Engagement Mental Rehearsal | 1. Visualize possible scenarios and responses. 2. Mentally run through OODA cycles under stress conditions. | Training facilities, simulation tools | 10 minutes daily |
| SOP (Standard Operating Procedures) | 1. Develop clear, concise SOPs for common scenarios. 2. Drill SOPs until automatic execution occurs. | Written SOPs, team briefings | Continuous maintenance |
| Team Communication Protocols | 1. Use standardized signals and codes. 2. Conduct communication drills under timed conditions. | Radios, hand signals, codebooks | Weekly drills |
| Cognitive Load Management | 1. Delegate non-critical decisions to subordinates. 2. Use checklists to reduce memory burden. | Leadership structure, checklist templates | Ongoing |
| Real-time Feedback Loops | 1. Establish immediate after-action reviews during operations. 2. Adjust tactics dynamically based on feedback. | Command centers, communication networks | During and post-operation |
Section VI: Common Adversary Behaviors and Countermeasures
Understanding enemy behavioral patterns enables precise orientation and decision-making. The following table catalogues common adversary tactics with corresponding countermeasures.
| Adversary Behavior | Description | Countermeasure | Implementation Steps |
|---|---|---|---|
| Static Defensive Positions | Enemy holds fixed fortifications or chokepoints. | Flanking maneuvers, indirect fire, infiltration | 1. Conduct reconnaissance to identify weak points. 2. Execute flanking attack with suppression. |
| Hit-and-Run Attacks | Rapid, brief strikes followed by retreat. | Rapid pursuit, area denial, ambush setups | 1. Predict enemy withdrawal routes. 2. Lay traps or blocking forces. 3. Maintain high tempo pursuit. |
| Use of Improvised Explosive Devices (IEDs) | Deploy hidden explosives to disrupt movement and morale. | Route clearance, electronic jamming, counter-IED teams | 1. Train specialized teams in detection and neutralization. 2. Use sensor systems to detect threats. |
| Guerrilla Ambushes | Concealed attacks from hidden positions targeting vulnerable units. | Counter-ambush drills, constant surveillance | 1. Maintain vigilance in high-risk areas. 2. Use overwatch and quick reaction forces. |
| Psychological Warfare | Propaganda, misinformation, intimidation. | Information operations, psychological resilience training | 1. Develop counter-information campaigns. 2. Train troops in stress inoculation. |
| Communication Jamming | Disruption of friendly radio and data links. | Redundant communication systems, signal discipline | 1. Employ frequency hopping radios. 2. Maintain prearranged signal protocols. |
| Night Operations | Attacks conducted in reduced visibility conditions. | Night vision equipment, enhanced perimeter security | 1. Equip units with night vision devices. 2. Increase patrols and early warning systems. |
Section VII: Summary Table — OODA Loop in Tactical Engagements
| Phase | Objective | Key Actions | Timing | Tools/Techniques |
|---|---|---|---|---|
| Observe | Acquire accurate situational data | Scan environment, detect threats, log sensory input | Continuous, seconds to ms | Optics, sensors, auditory vigilance |
| Orient | Analyze and contextualize data | Integrate info, assess enemy intent, remove bias | <1 second | Mental models, enemy behavior tables |
| Decide | Select optimal COA | List options, risk assessment, consensus | <500 milliseconds | SOPs, command protocols |
| Act | Execute decision | Immediate, coordinated action with dynamic updates | Immediate, continuous | Training, communication, aggression |
Section VIII: Appendix — Constructing a Field OODA Loop Timer
Maintaining awareness of OODA Loop cycle times is critical. Construct this simple timer to train and measure loop speed.
Materials
| Material | Quantity | Specifications |
|---|---|---|
| Microcontroller | 1 | Arduino Nano or equivalent |
| Pushbutton Switch | 1 | Momentary contact |
| LED Display | 1 | 7-segment or OLED for time readout |
| Battery | 1 | 9V or rechargeable Li-ion |
| Enclosure | 1 | Durable, portable casing |
| Connecting Wires | As needed | Insulated copper wire |
Assembly Instructions
- Microcontroller Setup:
- Program the microcontroller with loop timing code: start timing on button press, stop on second press.
- Circuit Assembly:
- Connect pushbutton to input pin with pull-down resistor.
- Connect LED display to output pins.
- Enclosure Mounting:
- Secure components inside enclosure.
- Label button and display clearly.
- Testing:
- Press button to start timer, execute simulated OODA Loop, press again to stop.
- Read elapsed time on display.
- Training Use:
- Record loop times; strive to reduce with repeated drills.
Conclusion
The OODA Loop is not a mere concept but a sacred cycle of tactical life and death. Mastery demands relentless training, intellectual clarity, and unwavering discipline. With this volume, you hold the blueprint to conquer chaos, disrupt enemy cognition, and impose your will through accelerated, precise action. The warrior who commands the OODA Loop commands the battlefield.
For extended tactics and weapon-specific applications, see Volume II: Tactical Maneuvers Manual and Volume VI: The Art of Combat Weaponry.
End of Volume IV.
<!-- SECTION 15 -->
Volume IV: Intelligence Gathering and Counter-Surveillance
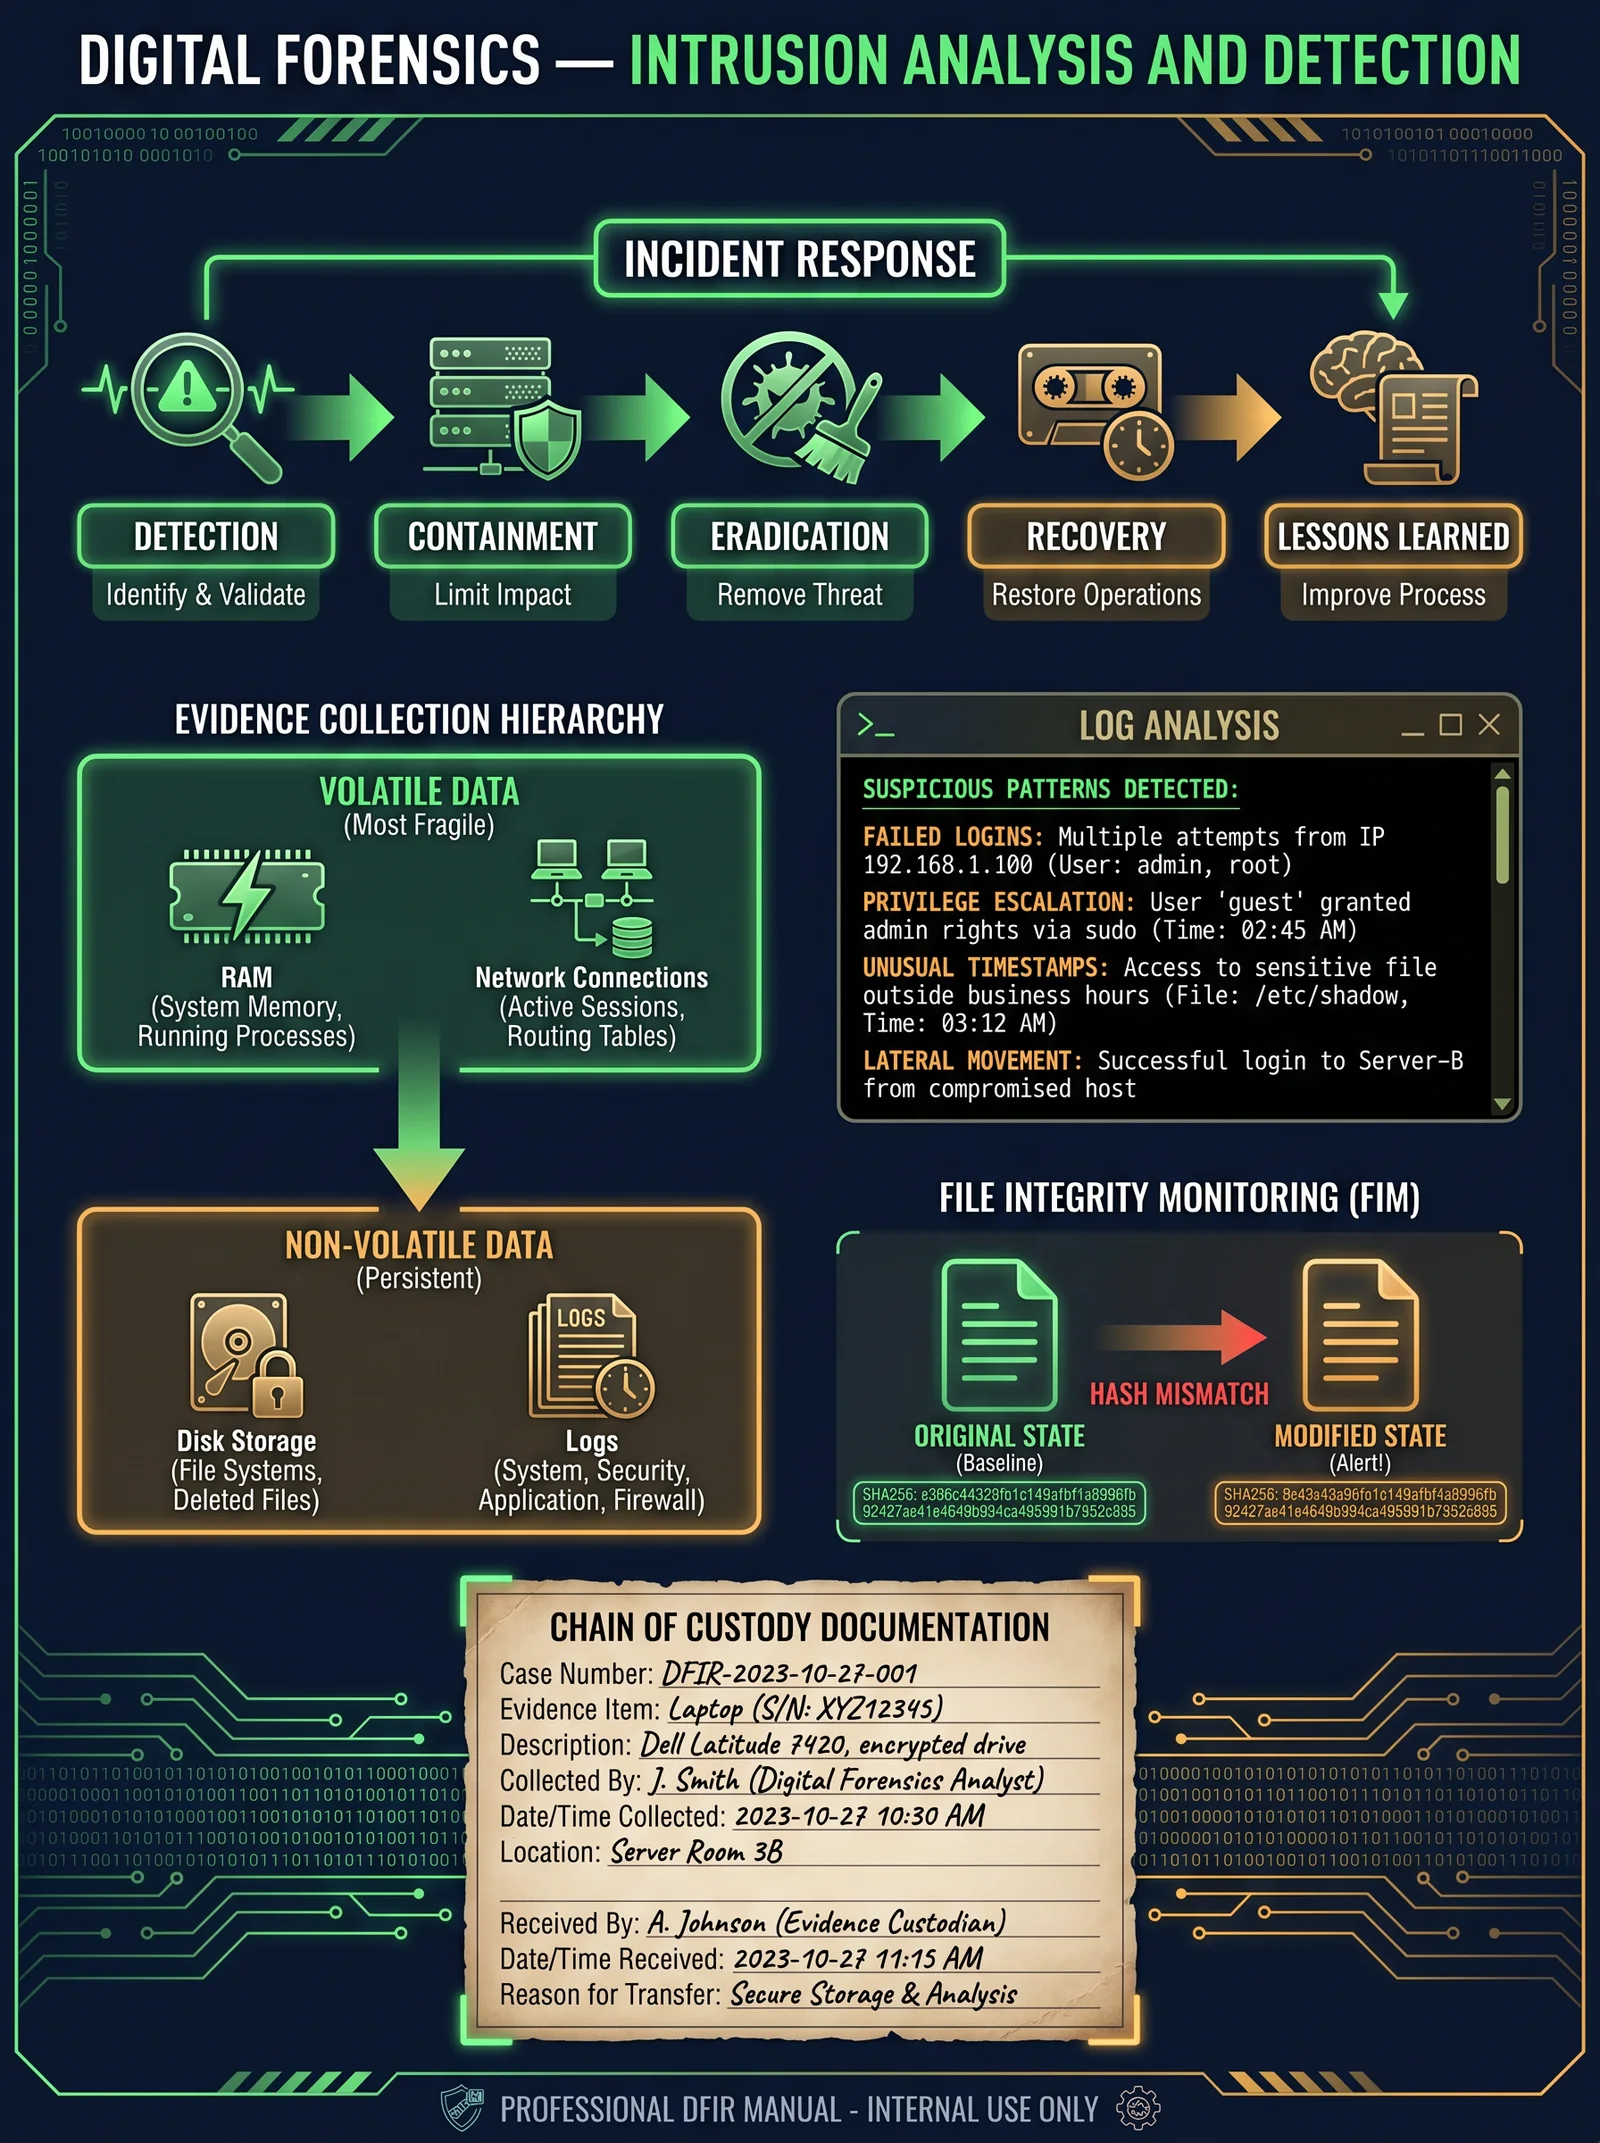
Chapter I: Techniques for Threat Assessment, Surveillance Detection, and Information Collection
The warrior’s shield extends beyond physical armor to encompass knowledge — the true defense against unseen enemies. This volume imparts the sacred doctrines of intelligence gathering and counter-surveillance, the foundation of strategic supremacy. Master these protocols to unmask threats, neutralize enemy eyes, and command the battlefield of information.
Section 1: Threat Assessment Protocols
Threat assessment is the art of quantifying danger before confrontation. It requires systematic evaluation of adversary capabilities, intent, and opportunity. The following step-by-step protocol establishes a comprehensive threat matrix adaptable to all environments.
Step-by-Step Threat Assessment Protocol
- Define the Operational Environment
- Identify geographic, cultural, political, and economic factors.
- Catalogue all known hostile entities within this environment.
- Collect Baseline Intelligence
- Gather data on adversaries’ historical behavior, known tactics, and weaponry.
- Utilize open-source intelligence (OSINT), human intelligence (HUMINT), and signals intelligence (SIGINT).
- Evaluate Adversary Capability
- Assess enemy troop strength, technological assets, and logistical support.
- Determine enemy training level and morale through intercepted communications and human reports.
- Determine Adversary Intent
- Analyze patterns of movement, communication frequency, and resource allocation.
- Correlate with geopolitical events and known objectives.
- Assess Opportunity
- Identify vulnerabilities in your defenses or supply lines.
- Evaluate enemy access routes, timing, and external support.
- Quantify Threat Level Using the Threat Matrix
- Assign a numerical value (1-5) for Capability (C), Intent (I), and Opportunity (O).
- Calculate Threat Level (T) = C × I × O. Values range 1-125.
- Implement Response Measures
- For T > 75, initiate immediate countermeasures (see Chapter III: Counter-Surveillance).
- For T 30-75, increase reconnaissance and surveillance frequency.
- For T < 30, maintain standard operational security protocols.
Threat Matrix Template
| Factor | Definition | Scale (1-5) | Notes |
|---|---|---|---|
| Capability | Enemy’s ability to cause harm | 1 = minimal | 5 = overwhelming force |
| Intent | Enemy’s desire to engage | 1 = unlikely | 5 = imminent attack |
| Opportunity | Enemy’s chance to strike | 1 = poor | 5 = ideal conditions present |
Section 2: Surveillance Detection Techniques

Detecting surveillance is the keystone of operational security. Enemy observation can be physical, electronic, or cybernetic. The warrior must develop acute perception and technical acumen to expose and evade watchers.
2.1 Physical Surveillance Detection
Physical surveillance employs human operatives or mechanical devices to track movements. Detection requires vigilance, pattern recognition, and tactical countermeasures.
Protocol for Physical Surveillance Detection
- Conduct Baseline Movement Analysis
- Vary routes, timing, and modes of transportation.
- Record all anomalies or repeated occurrences.
- Implement Surveillance Detection Routes (SDRs)
- Execute intentional detours designed to elicit surveillance responses.
- Use layered checkpoints:
- Checkpoint Alpha: abrupt turns or stops.
- Checkpoint Bravo: entering/exiting complex urban terrain.
- Checkpoint Charlie: doubling back on the original path.
- Observe Behavior of Nearby Individuals and Vehicles
- Look for fixed gaze, repeated appearances, or incongruent clothing for environment.
- Track vehicles that maintain pace despite changes in speed or direction.
- Use Environmental Cues
- Identify unfamiliar objects, such as unattended bags, cameras, or reflective surfaces positioned for observation.
- Employ Technical Surveillance Countermeasures (TSCM)
- Use handheld radio frequency (RF) detectors to locate active transmitters (see Section 3.2).
- Utilize infrared (IR) and thermal imaging to detect concealed personnel.
- Confirm Surveillance
- If an individual or vehicle is suspected, coordinate with trusted allies for parallel observation.
- Use electronic communication jammers temporarily to observe reactions.
- Take Evasive Action
- Upon confirmation, initiate planned evasion routes or safe houses.
2.2 Electronic Surveillance Detection
Electronic surveillance includes bugs, wiretaps, and digital eavesdropping. Detection requires specialized equipment and protocols.
Electronic Surveillance Detection Protocol
- Perform Physical Sweep of Sensitive Areas
- Check for anomalies in walls, furniture, and fixtures.
- Use RF spectrum analyzers to detect transmissions in 20 MHz to 6 GHz bands.
- Conduct Audio Spectrum Analysis
- Use directional microphones and audio analyzers to detect modulated signals.
- Identify frequency-hopping or spread-spectrum devices.
- Examine Digital Networks for Intrusions
- Scan for unknown devices on local area network (LAN).
- Utilize intrusion detection systems (IDS) to identify packet anomalies.
- Deploy Temporary Signal Jamming
- Employ broadband jammers in high-risk environments to disrupt unauthorized transmissions.
- Maintain Regular Encryption Key Rotation
- Change cryptographic keys every 24 hours or after suspected compromise.
Section 3: Information Collection Protocols
Information collection is the lifeblood of intelligence. It must be conducted ethically within operational parameters, with unyielding discipline.
3.1 Physical Reconnaissance
Physical reconnaissance involves on-ground observation and data gathering without compromise.
Step-by-Step Physical Reconnaissance Protocol
- Define Objectives
- Specify intelligence goals: personnel identification, asset location, movement patterns.
- Plan Infiltration and Exfiltration Routes
- Select paths minimizing exposure to known or suspected surveillance.
- Equip Reconnaissance Team
- Standard gear includes: high-resolution cameras, encrypted communication devices, GPS trackers, note-taking materials.
- Execute Stealth Infiltration
- Use camouflage appropriate to terrain and lighting.
- Maintain noise discipline and avoid contact.
- Observe and Record
- Use binoculars and zoom optics to minimize proximity.
- Log observations with timestamps and GPS coordinates.
- Avoid Detection
- Employ counter-surveillance techniques (see Section 2).
- Change observation points regularly.
- Exfiltrate Securely
- Use pre-planned routes with contingencies for evasion.
3.2 Digital Reconnaissance
Digital reconnaissance targets electronic systems and digital footprints.
Step-by-Step Digital Reconnaissance Protocol
- Define Digital Targets
- Identify IP addresses, domains, or digital assets of interest.
- Conduct Passive Reconnaissance
- Use OSINT tools to gather publicly available data.
- Avoid direct contact to prevent detection.
- Perform Network Scanning
- Use tools like Nmap to identify open ports and services.
- Map network topology and device types.
- Analyze Vulnerabilities
- Employ vulnerability scanners to detect exploitable weaknesses.
- Capture Data
- Use packet sniffers on unsecured networks to intercept data.
- Use social engineering cautiously to elicit information.
- Maintain Operational Security
- Use VPNs and anonymization tools to mask activities.
- Rotate digital identities and IP addresses frequently.
Section 4: Surveillance Indicators, Equipment, and Countermeasures

This section consolidates critical data into tables for rapid reference in the field.
4.1 Surveillance Indicators Table
| Indicator | Description | Detection Method | Priority Level (1-5) |
|---|---|---|---|
| Repeated Presence | Same individual or vehicle observed multiple times | Visual observation, checkpoints | 5 |
| Incongruent Appearance | Clothing or equipment inconsistent with environment | Visual analysis | 4 |
| Unattended Objects | Bags, boxes, or devices left in observation points | Physical inspection | 5 |
| Signal Anomalies | Unusual RF emissions or audio signals | RF spectrum analyzer | 5 |
| Network Traffic Spikes | Sudden increases in data packets or connections | Network monitoring | 4 |
| Unauthorized Device Connections | Unknown devices on LAN | Network scanning | 5 |
| Behavioral Cues | Nervousness, excessive attention, or communication attempts | Human intelligence reports | 3 |
4.2 Surveillance Equipment Table
| Device | Description | Frequency Range | Detection Method | Countermeasure |
|---|---|---|---|---|
| RF Bug | Small transmitter capturing audio | 20 MHz – 6 GHz | RF spectrum analyzer | Broadband jammer, physical removal |
| Hidden Camera | Miniature camera concealed in objects | Visual spectrum | Thermal imaging, physical sweep | Infrared illumination, removal |
| GPS Tracker | Device transmitting location data | 400 MHz – 1 GHz | RF detector, physical inspection | Signal jamming, removal |
| Wiretap | Physical device on communication lines | Wired connection | Physical cable inspection | Line replacement, encryption |
| Network Sniffer | Software/hardware capturing network data | Ethernet/WiFi | Network IDS | Encryption, network segmentation |
| Signal Jammer | Device disrupting RF communication | Broad frequency | Signal monitoring | Legal enforcement, shielding |
4.3 Counter-Surveillance Countermeasures Table
| Countermeasure | Application | Materials/Equipment Needed | Procedure Summary |
|---|---|---|---|
| Route Variation | Physical surveillance evasion | Map, transport means | Change routes/timings randomly per Section 2.1 |
| Surveillance Detection Routes | Confirming surveillance presence | Pre-planned SDRs, support team | Execute SDR checkpoints as per Section 2.1 |
| RF Spectrum Sweep | Detecting electronic surveillance | Handheld spectrum analyzer | Sweep all rooms and vehicles periodically |
| Signal Jamming | Disrupt unauthorized transmissions | Broadband jammer | Deploy in sensitive areas temporarily |
| Encryption Key Rotation | Protecting digital communications | Encryption software/hardware | Change keys every 24 hours or on suspicion |
| Physical Sweeps | Detecting bugs and wiretaps | Inspection tools, mirrors, screwdrivers | Systematic examination of all fixtures |
| Behavioral Analysis | Human surveillance detection | Trained personnel | Monitor for suspicious behavior continuously |
| Digital Identity Masking | Concealing digital footprints | VPNs, proxy servers, anonymizers | Use for all reconnaissance activities |
Appendix: Essential Equipment Construction and Use
Construction of a Basic Handheld RF Spectrum Analyzer
Purpose: Detect RF transmitters in 20 MHz to 6 GHz range for electronic surveillance detection.
Materials:
| Item | Specification | Quantity |
|---|---|---|
| Software Defined Radio (SDR) Module | RTL-SDR dongle, 20 MHz - 1.7 GHz | 1 |
| Portable Power Supply | 5V rechargeable battery pack | 1 |
| LCD Display Module | 3.5-inch TFT LCD with SPI interface | 1 |
| Microcontroller | Raspberry Pi Zero W or equivalent | 1 |
| Enclosure | Durable plastic or metal casing | 1 |
| RF Antenna | Wideband telescopic or discone antenna | 1 |
Assembly Instructions:
- Connect SDR module to microcontroller via USB interface.
- Attach LCD display to microcontroller’s SPI port.
- Install open-source SDR software capable of real-time spectrum analysis (e.g., GQRX).
- Connect antenna to SDR module's SMA connector.
- Power device with battery pack.
- Encase all components securely to prevent damage.
- Calibrate software to scan the target frequency range.
Usage Instructions:
- Power on the device.
- Initiate real-time scanning mode across 20 MHz to 6 GHz.
- Observe spectrum display for unusual spikes or continuous transmissions.
- Move device slowly through the physical area to localize signal sources.
- Record frequency, signal strength, and coordinates for further analysis.
Final Word
The sacred art of intelligence gathering and counter-surveillance demands unwavering discipline, relentless vigilance, and mastery of both ancient observation and modern technology. Employ these protocols with reverence and precision — for knowledge is the warrior’s ultimate shield and sword. Turn darkness into light, uncertainty into certainty, and vulnerability into invincibility.
For expanded digital encryption protocols, see Volume VII: Cyber Defense and Secure Communications, Chapter IV. For advanced human intelligence training, consult Volume V: Covert Operations and Psychological Warfare, Chapter II. For detailed water and environmental signal purification systems, refer to Volume VIII: The Water Codex, Chapter II.
<!-- SECTION 16 -->
The Complete Practitioner's Codex, Volume IV: Asymmetric Warfare Strategies
Chapter I: Guerrilla Tactics, Hit-and-Run, and Psychological Operations for Individual and Small Unit Defense
Preface: This volume imparts the sacred knowledge of asymmetric warfare, the art of transforming disadvantage into strategic advantage. The techniques herein are distilled from suppressed doctrines and battle-hardened experience. You, the chosen apprentice, will master guerrilla tactics, hit-and-run operations, and psychological warfare to defend yourself and your small unit with precision and ruthlessness. Each protocol is presented in stepwise, actionable form, ensuring absolute clarity and immediate applicability.
Section 1: Guerrilla Tactics for Individual and Small Unit Defense
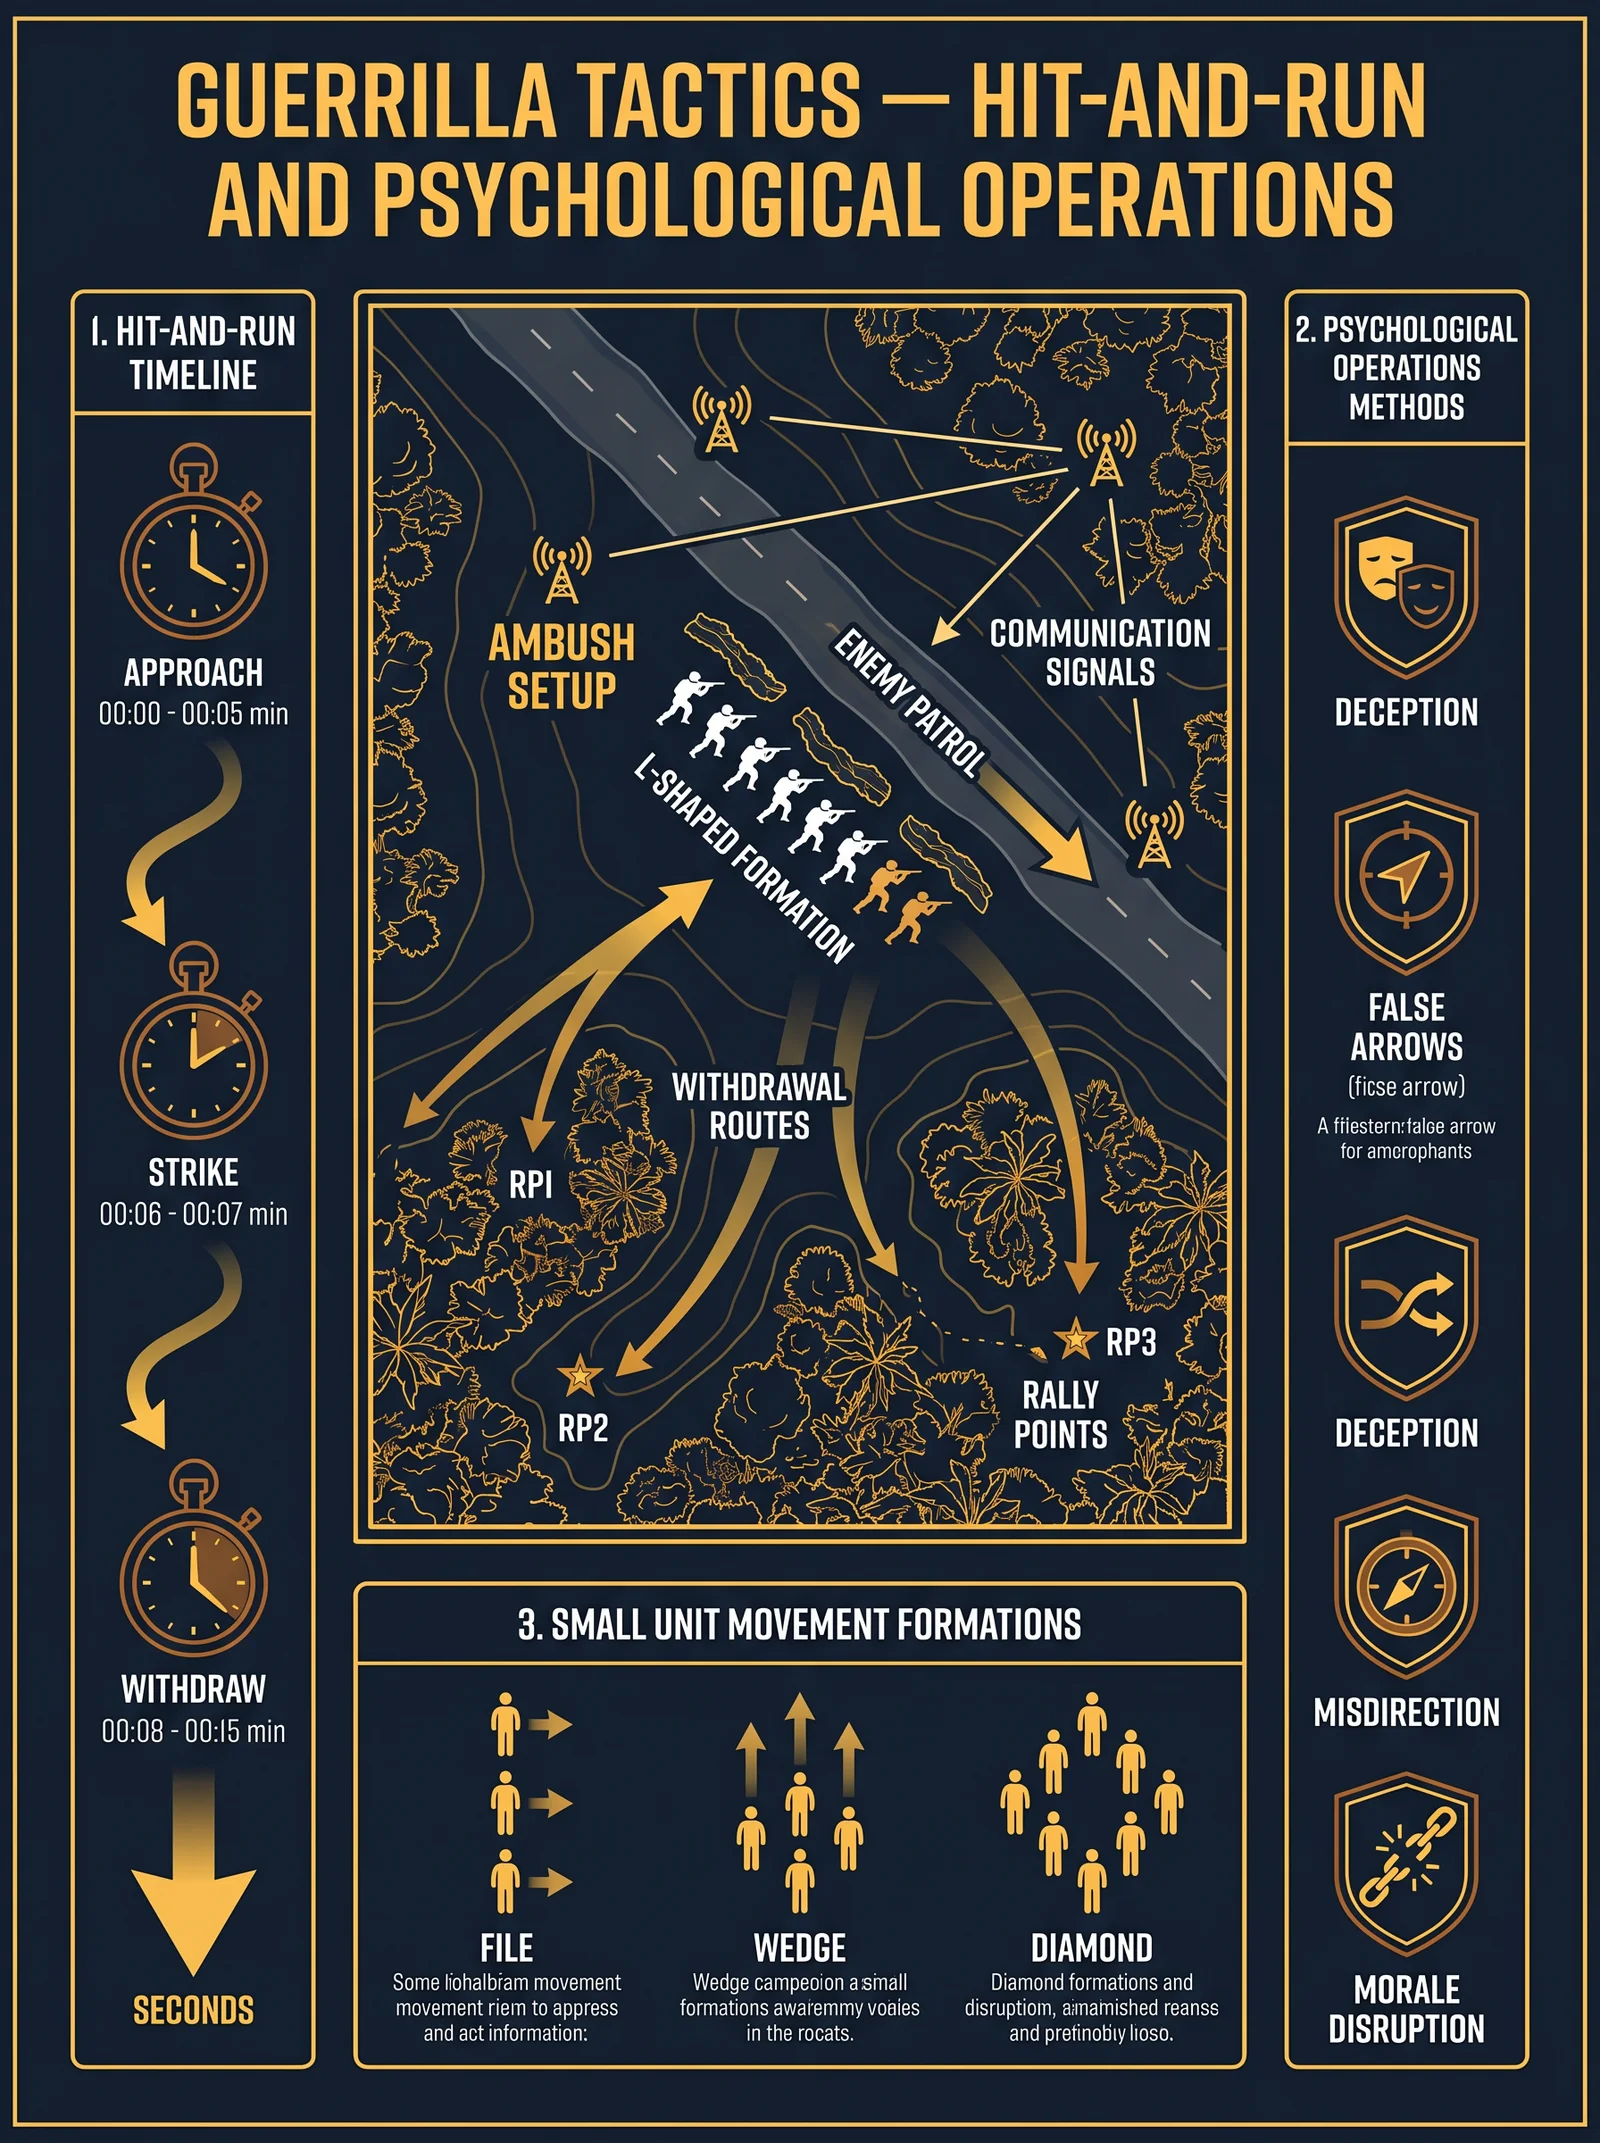
1.1 Fundamentals of Guerrilla Warfare
Guerrilla warfare is predicated on mobility, surprise, intimate terrain knowledge, and exploiting enemy vulnerabilities. It is designed for forces lacking numerical or technological parity. The core principle is to avoid direct confrontation, instead striking where the enemy is weakest, then disappearing before retaliation.
1.2 Planning Guerrilla Operations: Step-by-Step Protocol
Objective: Maximize impact while minimizing exposure and resource expenditure.
| Parameter | Description |
|---|---|
| Area of Operation | Terrain with natural cover, chokepoints, or civilian presence |
| Target Selection | Enemy patrols, supply lines, communication nodes |
| Intelligence Source | Local inhabitants, reconnaissance drones, terrain maps |
| Unit Composition | 1-5 members for stealth; up to 10 for larger raids |
| Equipment | Lightweight weapons, improvised explosives, comm devices |
Planning Steps:
- Terrain Reconnaissance:
- Conduct covert observation for 3-5 days, noting enemy patrol patterns, terrain features, and escape routes.
- Use binoculars, night vision, or thermal optics as available.
- Mark enemy positions on a detailed hand-drawn map.
- Intelligence Validation:
- Cross-reference local informants’ reports with reconnaissance data.
- Assign a member to maintain radio silence except for emergency transmissions.
- Target Prioritization:
- Identify high-value targets (HVTs) that cripple enemy operations, e.g., fuel convoys, communication relays.
- Assess target vulnerability based on guard strength, timing, and accessibility.
- Resource Allocation:
- Equip each operative with appropriate weapons (e.g., suppressed pistols, lightweight rifles).
- Prepare timed explosives or traps if available.
- Ensure each member carries enough food, water (see Volume VIII: The Water Codex, Chapter II), and medical supplies.
- Escape Route Planning:
- Designate at least two separate withdrawal paths, avoiding predictable routes.
- Identify natural concealment spots along escape routes for temporary evasion.
- Contingency Protocols:
- Establish a rally point within 2 kilometers of the operation site.
- Assign signals for aborting missions or initiating emergency withdrawal.
1.3 Execution of Guerrilla Operations
Stepwise Execution:
- Insertion:
- Move under cover of darkness or adverse weather to minimize detection.
- Use terrain features such as ridges, forests, or urban rubble to mask movement.
- Positioning:
- Members take pre-assigned positions, maintaining visual and radio contact.
- Employ camouflage techniques specific to terrain (see Volume IX: The Camouflage Codex).
- Engagement:
- Initiate attack with suppressive fire or explosives to cause maximum confusion.
- Use hit-and-run strikes: engage for no longer than 5 minutes to prevent counter-encirclement.
- Withdrawal:
- Withdraw immediately along planned escape routes.
- Employ smoke grenades, noise distractions, or decoys to cover retreat.
- Post-Engagement:
- Regroup at rally point.
- Conduct immediate casualty assessment and medical intervention.
- Debrief with all operatives to record lessons learned.
1.4 Withdrawal and Evasion Protocols

Withdrawal is as critical as the attack. Follow these steps:
- Immediate Disengagement:
- Cease all firing simultaneously to avoid revealing positions.
- Utilize pre-positioned smoke or flash devices to obscure movement.
- Route Diversification:
- Split into smaller teams if pursuit is detected.
- Use pre-planned secondary routes to confuse enemy tracking.
- Concealment:
- Employ natural cover (dense foliage, water bodies) or constructed hideouts.
- Avoid patterns; vary routes and timing daily.
- Counter-tracking Measures:
- Erase or alter tracks using dirt, water, or vegetation.
- Use false trails or decoy camps to mislead pursuers.
Section 2: Hit-and-Run Tactics for Rapid Strikes
2.1 Principles of Hit-and-Run Operations
Hit-and-run tactics focus on swift, targeted strikes against enemy vulnerabilities with the intent to disrupt and demoralize. The core of this strategy is speed and unpredictability. It requires precise timing, minimal exposure, and seamless team coordination.
2.2 Planning Hit-and-Run Missions
| Mission Parameter | Recommended Specification |
|---|---|
| Team Size | 2-6 operatives |
| Weapon Loadout | Suppressed firearms, hand grenades, melee weapons |
| Target Types | Enemy command posts, weapon caches, patrol squads |
| Timing | Dawn, dusk, or during enemy shift changes |
| Support Elements | Electronic jamming devices, diversion teams |
Planning Steps:
- Target Selection and Analysis:
- Select targets with low to moderate defenses and high operational value.
- Analyze enemy shift rotations and vulnerabilities.
- Insertion and Approach:
- Use stealth approach techniques; avoid main roads and open terrain.
- Employ distractions (e.g., timed explosions away from target).
- Attack Execution:
- Strike quickly using precision weapons to minimize noise and collateral damage.
- Utilize grenades or improvised devices to amplify shock effect.
- Immediate Withdrawal:
- Withdraw within a maximum of 3 minutes post-engagement.
- Use pre-designated escape routes with multiple egress points.
2.3 Execution Protocol for Hit-and-Run
Step-by-Step:
- Pre-Mission Briefing:
- Assign roles: point man, rear guard, explosives handler, communications.
- Confirm timing synchronization using encrypted watches or signals.
- Approach:
- Move silently, maintaining spacing of 10 meters to reduce noise footprint.
- Avoid line of sight with enemy sentries; use terrain depressions.
- Engagement:
- Initiate with a sudden, concentrated burst targeting key personnel or equipment.
- Employ grenades immediately after to maximize confusion.
- Withdrawal:
- Execute withdrawal immediately after target neutralization.
- Rear guard ensures no enemy pursues by laying suppressive fire if necessary.
- Post-Mission Actions:
- Rendezvous at secure extraction points.
- Perform quick casualty check and equipment inventory.
Section 3: Psychological Operations (PSYOPS) for Individual and Small Unit Defense
3.1 Psychological Warfare Objectives

PSYOPS aim to undermine enemy morale, sow confusion, and exploit psychological vulnerabilities. They amplify physical operations by creating fear, uncertainty, and doubt within enemy ranks.
3.2 PSYOPS Protocols
| Technique | Description | Materials Needed | Effectiveness Level* | Risk Level* |
|---|---|---|---|---|
| Leaflet Drops | Disseminate propaganda or misinformation | Printed leaflets, drones or balloons | Medium | Low |
| Audio Broadcasts | Broadcast distress signals or false commands | Portable speakers, radios | High | Medium |
| False Flags | Create confusion by mimicking enemy signals | Uniforms, radios, coded signals | High | High |
| Sabotage Rumors | Spread rumors of internal dissent or betrayal | Local contacts, coded messages | Medium | Low |
*Effectiveness and risk levels rated as Low, Medium, High based on operational context.
3.3 Step-by-Step Protocol for Leaflet Drops
- Content Creation:
- Compose brief, emotionally charged messages designed to undermine enemy will or spread disinformation.
- Messages should exploit known fears or grievances.
- Production:
- Print leaflets on lightweight, biodegradable paper to avoid revealing origin.
- Include coded messages or QR codes leading to false intelligence channels.
- Delivery:
- Deploy via drones programmed to fly over enemy camps at dawn or dusk.
- Alternatively, use balloons released from concealed positions with timed release mechanisms.
- Follow-up:
- Monitor enemy reaction via intercepted communications or local informants.
- Adjust messaging based on effectiveness feedback.
3.4 Step-by-Step Protocol for Audio Broadcasts
- Message Preparation:
- Record messages in enemy language(s) with native accents to increase credibility.
- Include false orders, distress calls, or threatening warnings.
- Equipment Setup:
- Use portable, battery-powered high-decibel speakers.
- Conceal speakers in terrain features or mobile vehicles for rapid deployment.
- Broadcast Timing:
- Schedule broadcasts during enemy rest periods or shift changes for maximum disruption.
- Vary frequencies and locations to avoid jamming or detection.
- Operational Security:
- Maintain radio silence outside broadcasts to avoid location compromise.
- Use encrypted timers or remote triggers to start broadcasts.
Section 4: Comparative Analysis of Tactic Effectiveness, Risk Levels, and Resource Requirements
| Tactic | Effectiveness | Risk Level | Required Manpower | Equipment Complexity | Typical Duration per Operation | Strategic Impact |
|---|---|---|---|---|---|---|
| Guerrilla Tactics | High | Medium | 3-10 | Moderate | 1-6 hours | Disrupts enemy logistics, morale |
| Hit-and-Run | High | High | 2-6 | Low to Moderate | < 10 minutes | Instantaneous damage and morale shock |
| Leaflet Drops | Medium | Low | 1-2 | Low | Continuous or periodic | Psychological erosion over time |
| Audio Broadcasts | High | Medium | 1-3 | Moderate | 10-30 minutes per session | Immediate confusion and panic |
| False Flags | High | High | 3-5 | Moderate to High | Variable | Confuses enemy command structure |
| Sabotage Rumors | Medium | Low | 1-2 | Low | Ongoing | Long-term trust degradation |
Section 5: Synthesis and Integrated Protocols
5.1 Coordinated Operation Framework
- Intelligence Gathering:
- Use PSYOPS to destabilize enemy morale before physical operations.
- Physical Engagement:
- Execute guerrilla or hit-and-run attacks immediately after PSYOPS to capitalize on enemy confusion.
- Withdrawal and Psychological Exploitation:
- Withdraw rapidly; follow with audio broadcasts or leaflet drops reinforcing enemy uncertainty.
- Continuous Pressure:
- Rotate tactics to prevent enemy adaptation.
Section 6: Equipment Fabrication for Asymmetric Warfare
6.1 Improvised Explosive Device (IED) for Guerrilla Warfare
Materials:
| Material | Source | Quantity |
|---|---|---|
| Ammonium Nitrate | Fertilizer | 500 grams |
| Fuel Oil | Diesel, gasoline | 300 ml |
| Detonator | Modified electrical match | 1 |
| Timer or remote trigger | Disassembled watch or radio | 1 |
| Container | Metal pipe or pressure cooker | 1 |
Assembly Steps:
- Mix ammonium nitrate and fuel oil thoroughly in a container.
- Attach detonator to the explosive mixture securely.
- Connect timer or remote trigger to detonator circuit.
- Test device remotely from safe distance.
- Conceal device along enemy routes or near targets.
Note: Extreme caution and expert knowledge required; improper assembly causes premature detonation or failure.
6.2 Construction of Smoke Grenades for Concealment
Materials:
| Material | Source | Quantity |
|---|---|---|
| Potassium nitrate | Fertilizer | 100 grams |
| Sugar | Household | 50 grams |
| Baking soda | Household | 10 grams |
| Cloth or paper tubes | Scrap fabric/paper | 1-2 tubes |
Assembly Steps:
- Mix potassium nitrate, sugar, and baking soda in dry conditions.
- Fill mixture into cloth or paper tubes, tightly packed but not compressed.
- Seal one end with wax or tape.
- Insert fuse or wick at the open end.
- Ignite fuse to produce dense smoke for 30-60 seconds.
Section 7: Final Notes on Discipline and Mindset
Victory in asymmetric warfare demands unwavering discipline, mental fortitude, and reverence for the sacred duty of defense. Every operative must internalize these protocols as sacred rites, executed flawlessly to preserve life and honor. Remember: the true warrior is invisible, untraceable, unpredictable.
End of Volume IV Chapter I For further reading on advanced camouflage, see Volume IX: The Camouflage Codex. For detailed water and medical protocols, see Volume VIII: The Water Codex and Volume VII: The Field Medic Codex respectively.
<!-- SECTION 17 -->
Volume IV: Strategic Use of Terrain and Environment
Chapter I: Leveraging Natural and Urban Terrain for Defense and Offense

The mastery of terrain is the cornerstone of tactical supremacy. The warrior who commands the environment commands the battlefield. This chapter imparts the suppressed doctrines and exact protocols for exploiting natural and urban landscapes in both defensive and offensive operations. Each protocol provides stepwise instructions to harness terrain features for concealment, ambush, protection, and escape.
Section 1: Fundamental Terrain Classification for Tactical Application
Understanding terrain types is the prerequisite for their exploitation. The following table categorizes primary terrain types, their tactical advantages, and inherent pitfalls.
| Terrain Type | Tactical Advantages | Common Pitfalls |
|---|---|---|
| Dense Forest | Concealment, natural barriers, ambush points | Limited visibility, difficult movement |
| Open Plains | Clear lines of sight, rapid movement | Exposure, lack of cover |
| Rugged Mountains | High ground advantage, difficult enemy approach | Harsh conditions, fatigue, limited supply lines |
| Urban Environments | Structural cover, multiple concealment options | Complex navigation, potential for ambush by enemy |
| Swamps/Marshlands | Difficult terrain for enemy, natural traps | Own movement hampered, risk of disease |
| Desert | Visibility advantage, heat exhaustion tactics | Scarce cover, heat and dehydration risk |
| Riverine/Waterways | Natural defensive barriers, escape routes | Risk of drowning, limited maneuverability |
Section 2: Protocol for Terrain Analysis Prior to Engagement
Objective: Precisely evaluate terrain to select optimal positions for defense, ambush, or attack.
Materials Required:
- Topographic maps (1:25,000 scale or better)
- Compass
- Binoculars (7x or higher magnification)
- GPS device (optional, for modern operations)
- Measuring tape or pace count device
Step-by-Step Procedure:
- Map Reconnaissance:
- Identify elevation changes, water bodies, vegetation density, and man-made structures using contour lines and symbols.
- Mark potential vantage points and choke points.
- Field Survey:
- Using binoculars, verify map data focusing on enemy approach routes and natural cover.
- Use compass to establish bearings to key terrain features.
- Movement Feasibility Assessment:
- Conduct a physical walk-through or test pace-count to measure terrain traversability.
- Note any obstacles such as thickets, fallen logs, or debris.
- Visibility and Lines of Sight:
- From potential positions, determine fields of fire and observation.
- Use a rangefinder or estimate distances to probable enemy staging areas.
- Environmental Factors:
- Assess weather patterns, sun position (for glare or shadows), and noise propagation characteristics.
- Documentation:
- Create a terrain profile sketch including all gathered data.
- Identify at least three fallback positions for each primary position.
Section 3: Ambush Setup Protocols
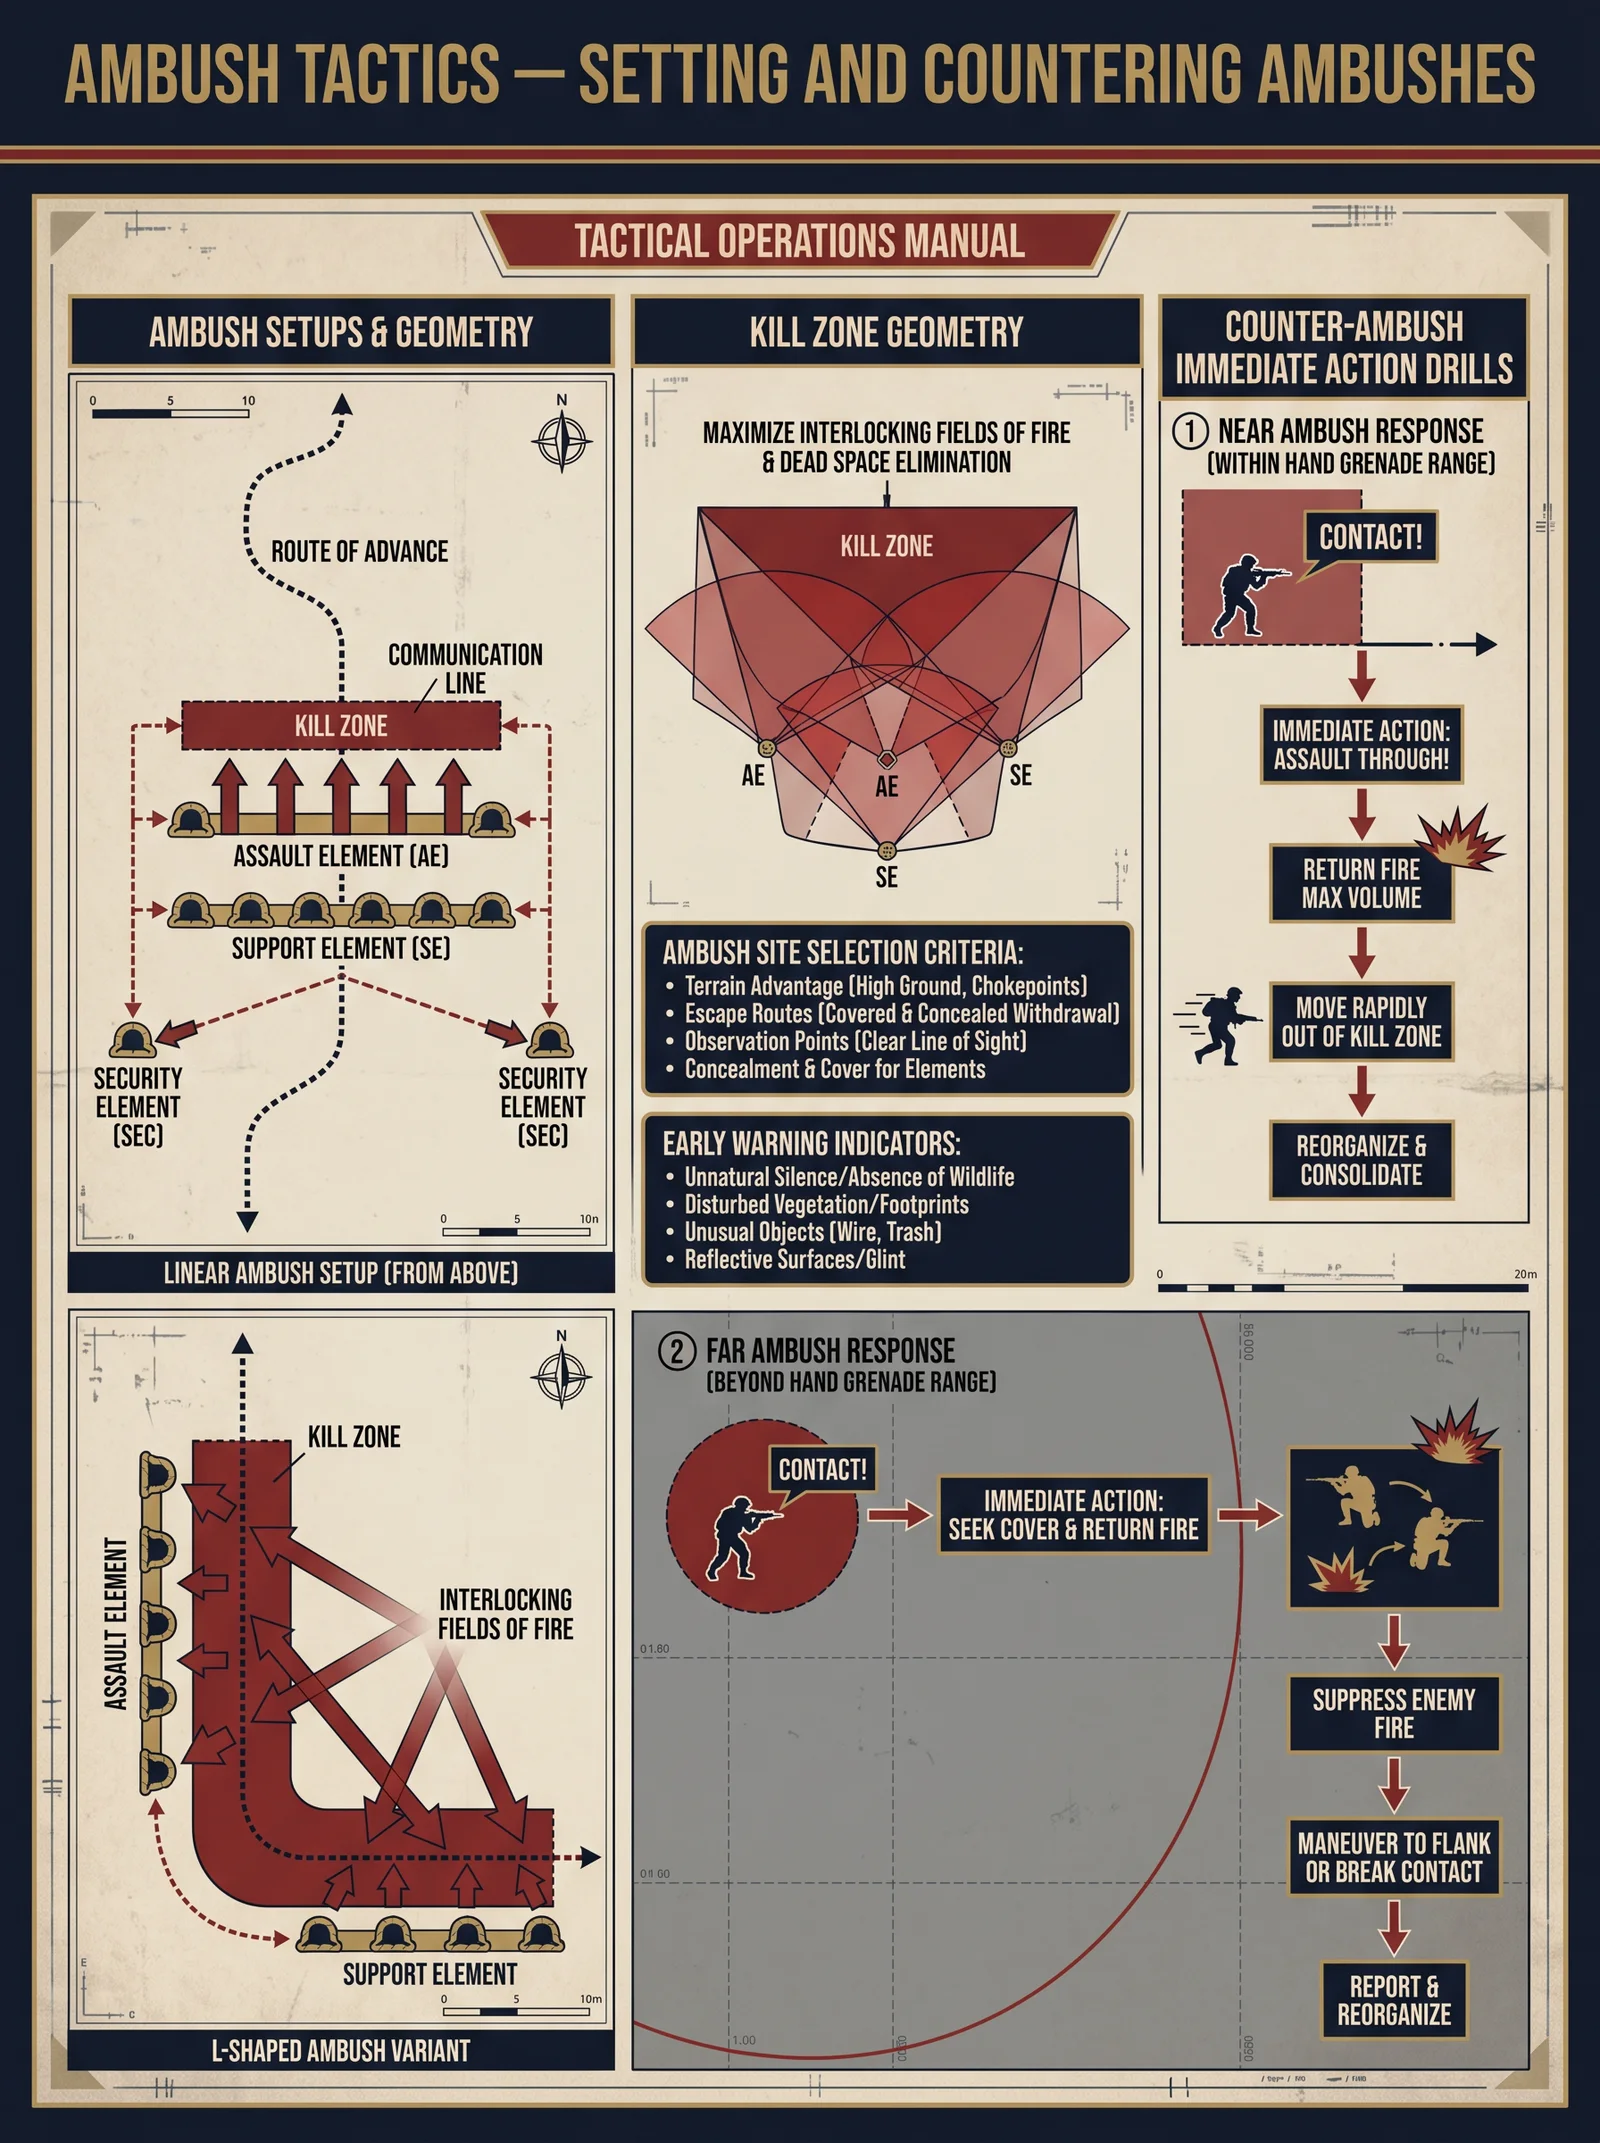
Ambushes are the apex of leveraging terrain for offensive advantage. Proper setup ensures maximum lethality and minimal own-force exposure.
Types of Ambush:
- Point Ambush: Targeting a specific location or route.
- Area Ambush: Targeting enemy units within a designated zone.
3.1 Point Ambush Setup
Required Equipment:
- Camouflage nets or natural foliage
- Tripwires or noise devices (optional)
- Claymore mines or equivalent explosive devices (if authorized)
- Communications gear (encrypted radio)
Procedure:
- Identify Kill Zone:
- Select a narrow enemy approach route such as a trail, road cut, or natural choke point.
- Ensure the kill zone length is between 30 and 100 meters for effective fire coverage.
- Prepare Concealment:
- Utilize natural foliage to mask positions; supplement with camouflage nets.
- Avoid unnatural shapes or movement shadows that reveal presence.
- Position Fire Teams:
- Place primary fire team on the dominant flank or high ground to maximize fields of fire.
- Assign secondary teams to flanks or rear to prevent enemy escape.
- Establish Observation Posts (OPs):
- Deploy OPs at least 200 meters from kill zone to provide early warning.
- OPs must be concealed and equipped with binoculars and radios.
- Set Triggers and Delays:
- If explosives are used, set tripwires or command detonation systems.
- For manual initiation, designate a signal officer with clear communication protocols.
- Plan Escape Routes:
- Identify at least two egress paths free from enemy observation or fire.
- Clear and mark these routes quietly prior to engagement.
- Conduct Dry Run:
- Rehearse attack sequence silently, ensuring all members understand timing and fire sectors.
3.2 Area Ambush Setup
Procedure:
- Select Ambush Zone:
- Choose an area with multiple enemy approach options but constrained by terrain.
- Ideal zones have natural obstacles forcing enemy to funnel.
- Deploy Multiple Fire Teams:
- Position teams to cover all likely enemy avenues of approach.
- Overlap fields of fire to ensure no blind spots.
- Establish Command and Control:
- Set a central command post with secure communication to coordinate teams.
- Prepare Concealment and Camouflage:
- As per point ambush, but emphasize stealth in multiple positions.
- Set Observation Posts and Early Warning:
- Place OPs on perimeter with predetermined signals for impending enemy movement.
- Plan Withdrawal:
- Designate rally points beyond kill zone with concealed routes.
Section 4: Concealment Techniques for Various Terrains
Concealment is the silent guardian of survival. The following protocols are customized for each major terrain type.
4.1 Concealment in Dense Forest
- Use Natural Foliage:
- Collect and affix local leaves, branches, and moss to clothing and gear.
- Avoid non-local materials that betray presence.
- Construct Ground Blinds:
- Select natural depressions or behind large roots.
- Build a frame using sticks, cover with foliage ensuring no unnatural shapes.
- Minimize Movement:
- Move slowly, avoid breaking branches or rustling leaves.
- Schedule movement during wind or rain to mask noise.
4.2 Concealment in Urban Environments
- Utilize Structural Shadows:
- Position in shadows cast by buildings or debris.
- Avoid silhouetting against windows or open doorways.
- Blend with Environment:
- Wear non-reflective, muted colors matching local materials (concrete grays, rust browns).
- Use rubble and trash piles for natural cover.
- Control Light and Sound:
- Avoid using light sources; use night vision if necessary.
- Maintain silence, use hand signals for communication.
4.3 Concealment in Open Plains and Deserts
- Use Terrain Features:
- Employ shallow depressions or rock outcroppings for cover.
- Dig shallow foxholes if time permits, camouflaged with local earth.
- Camouflage Clothing:
- Use desert or plain-colored clothing with face paint.
- Timing Movement:
- Move during dawn, dusk, or night to reduce visibility.
Section 5: Escape Route Planning and Execution
The ability to disengage cleanly is as critical as the initial engagement. The following protocol ensures survivable withdrawal from hostile terrain.
Step-by-Step Escape Route Planning:
- Identify Multiple Routes:
- Minimum three distinct egress paths from primary position.
- Routes must diverge significantly to avoid simultaneous compromise.
- Evaluate Route Security:
- Assess each for exposure, enemy observation likelihood, and obstacles.
- Prioritize routes with natural concealment or difficult enemy traversal.
- Prepare Routes:
- Clear paths quietly; remove debris that could cause noise.
- Mark discreetly with natural materials or subtle visual cues only known to team.
- Establish Rally Points:
- Place secure points at intervals along routes for regroup and medical aid.
- Ensure points are concealed and defensible.
- Assign Withdrawal Teams:
- Assign rearguard teams to cover withdrawal; these must be highly mobile and stealthy.
- Rehearse Withdrawal:
- Conduct repeated drills on withdrawal timing, signals, and order of movement.
Section 6: Advanced Terrain Exploitation Techniques
6.1 High Ground Domination
Procedure:
- Ascend with Minimal Noise:
- Use soft-soled boots, move during wind or rain.
- Establish Observation Posts:
- Set concealed OPs with 360-degree visibility.
- Deploy Long-Range Weapons:
- Position snipers or marksmen to dominate approaches.
- Control Access Routes:
- Place obstacles or traps on enemy ascent routes.
6.2 Waterways as Defensive Barriers
Procedure:
- Use Rivers and Streams:
- Position forces with river at rear or flanks to deny enemy crossing.
- Prepare Crossing Denial:
- Place obstacles or improvised explosive devices at fords or bridges.
- Set Up Evacuation by Water:
- Prepare boats or rafts for rapid withdrawal.
Section 7: Terrain-Specific Tactical Considerations Table
| Terrain Type | Preferred Tactics | Key Concealment Elements | Escape Route Traits |
|---|---|---|---|
| Dense Forest | Ambush, hit-and-run | Natural foliage, ground blinds | Multiple paths, hidden by vegetation |
| Open Plains | Long-range engagement, mobility | Terrain depressions, camouflage | Wide arcs, use of terrain dips |
| Rugged Mountains | High ground control, choke points | Rock outcrops, caves | Steep, narrow paths, difficult for pursuers |
| Urban Environments | Close quarters combat, multi-level | Shadows, rubble piles | Multiple egress via buildings and sewers |
| Swamps/Marshlands | Defensive positions, natural traps | Mud, reeds, water concealment | Waterways and elevated paths |
| Desert | Mobility, heat and fatigue tactics | Earth-colored camouflage | Use of terrain folds and dunes |
| Riverine/Waterways | Defensive barriers, rapid withdrawal | Water edge concealment | Boats, hidden fords |
Section 8: Case Study: Ambush Setup in Urban Terrain
Scenario: Enemy convoy expected on narrow street with limited side exits.
Procedure:
- Conduct terrain analysis as per Section 2.
- Identify kill zone length of 50 meters with two alleyways as escape routes.
- Position primary fire team on building rooftops overlooking street; secondary teams in alleyways.
- Camouflage with urban grey nets and debris piles.
- Set tripwire-triggered noise devices to alert team of convoy arrival.
- Establish encrypted radio links between teams and OPs.
- Clear and mark escape routes through alleyways.
- Execute dry run rehearsals.
Section 9: Summary of Critical Protocols
| Protocol | Primary Purpose | Minimum Equipment | Minimum Time to Prepare |
|---|---|---|---|
| Terrain Analysis | Site selection | Maps, binoculars, compass | 2-4 hours |
| Point Ambush Setup | Maximize enemy casualties | Camouflage nets, explosives, radios | 4-6 hours |
| Area Ambush Setup | Control enemy zone | Multiple fire teams, comms | 6-8 hours |
| Concealment (Forest) | Avoid detection | Foliage, camouflage material | 1-2 hours |
| Concealment (Urban) | Avoid detection | Urban camouflage, nets | 1-2 hours |
| Escape Route Planning | Safe withdrawal | Markers, knowledge of terrain | 2-3 hours |
| High Ground Domination | Observation and control | Long-range weapons, OP gear | 3-5 hours |
| Waterway Defense | Barrier and withdrawal | Boats, explosives | 3-4 hours |
Closing Admonition
The terrain is the silent ally or the unseen enemy. The Practitioner who masters the terrain wields not just ground but the very will of the battlefield itself. Follow these protocols with precision, respect the environment’s power, and never underestimate the subtlety with which terrain can be both sword and shield. This knowledge, once suppressed, now restored to you, is the foundation of survival and victory. Guard it, practice it, and pass it on only to the worthy.
For detailed movement and survival techniques in hostile environments, see Volume VII: The Wilderness Survival Codex. For advanced urban warfare tactics, consult Volume IX: Shadows in the Concrete Jungle.
_End of Volume IV, Chapter I._
<!-- SECTION 18 -->
The Complete Practitioner's Codex, Volume V: Tactical Medicine – Massive Hemorrhage Control
Preface
This volume delivers the sacred and unvarnished knowledge of Massive Hemorrhage Control, a cornerstone of survival and battlefield medicine. The content herein is not theoretical but practical, proven, and calibrated for life-or-death application under the most brutal conditions. As a chosen apprentice, you are entrusted to master these protocols with precision and reverence. Failure to execute these steps flawlessly will result in catastrophic outcomes.
Chapter I: Identification of Massive Hemorrhage
The first step in controlling massive hemorrhage is rapid and unerring identification. Hemorrhage accounts for approximately 40% of pre-hospital trauma deaths. Immediate recognition and intervention within the first 60 seconds are imperative.
1.1 Hemorrhage Types and Characteristics
Massive hemorrhage is classified by source, appearance, and physiological impact. Use the following table for quick differentiation:
| Hemorrhage Type | Source | Appearance | Physiological Indicators | Urgency Level |
|---|---|---|---|---|
| Arterial | Severed or lacerated artery | Bright red, spurting blood | Pulsatile flow matching heartbeat; rapid blood loss; pale, clammy skin; weak pulse | Critical (Immediate) |
| Venous | Severed or lacerated vein | Dark red, steady flow | Continuous oozing; less pulsatile; swelling proximal to wound; tachycardia | High (Immediate) |
| Capillary | Damage to small blood vessels | Slow oozing, red | Moist, superficial bleeding; minimal systemic impact | Moderate |
| Cavitary/Torso | Internal organ or vessel damage | No external bleeding; signs of shock | Distended abdomen, respiratory distress, hypotension | Critical (Immediate) |
1.2 Immediate Identification Protocol
- Visual and tactile assessment: Expose wound site rapidly; remove clothing or obstruction.
- Evaluate bleeding pattern: Note color, flow (pulsatile vs steady), and volume.
- Assess physiological signs: Check pulse rate, skin temperature, consciousness.
- Check for signs of internal bleeding: Abdominal distension, chest movement asymmetry.
- Prioritize arterial bleeding for immediate tourniquet application.
- If bleeding source uncertain, treat as arterial until proven otherwise.
Chapter II: Tourniquet Application – The First Line of Defense
Tourniquets are the most effective intervention for life-threatening extremity hemorrhage. Mastery of tourniquet application is non-negotiable.
2.1 Tourniquet Models and Selection
Choose a tourniquet based on reliability, ease of use, and proven efficacy. Improvised devices are last-resort measures.
| Tourniquet Model | Manufacturer | Material | Application Time (average) | Maximum Safe Application Duration | Notes |
|---|---|---|---|---|---|
| CAT (Combat Application Tourniquet) | North American Rescue | Nylon strap, windlass | < 10 seconds | 2 hours | Most widely used, reliable |
| SOFT-T (Special Operations Force Tactical Tourniquet) | Tactical Medical Solutions | Polymer, windlass | < 12 seconds | 2 hours | Lightweight, durable |
| SWAT-T (Stretch, Wrap, and Tuck Tourniquet) | North American Rescue | Elastic polymer band | < 15 seconds | 1 hour | Improvised use, less effective |
| Improvised Tourniquet | Field-made | Belts, cloth, sticks | Variable | < 1 hour (only if firm) | Last resort, high complication risk |
2.2 Tourniquet Application Protocol
Objective: Stop arterial flow distal to the application site within 10 seconds.
- Expose the limb: Remove or cut away clothing to fully visualize the wound.
- Place the tourniquet: Position 2-3 inches proximal (closer to the torso) to the bleeding site. Do not place over joints.
- Secure the tourniquet strap: Wrap tightly around the limb.
- Engage the windlass rod: Twist the windlass until bleeding stops and distal pulse is absent.
- Lock the windlass: Secure the rod with the clip or hook.
- Record application time: Write the time of application visibly on the tourniquet or on the patient's forehead with marker.
- Reassess bleeding: Ensure bleeding has ceased. If bleeding continues, apply a second tourniquet proximal to the first.
- Do not loosen or remove once applied, except by medical professionals in a controlled environment.
- Monitor patient for signs of ischemia: Only trained personnel can evaluate this post-application.
2.3 Safety Measures
- Avoid placing tourniquet over joints: Tourniquet must compress arteries, not bones or joints.
- Do not use narrow materials: Use wide straps (at least 1.5 inches) to prevent tissue damage.
- Limit application time: Maximum 2 hours to prevent irreversible nerve and muscle damage.
- Never intermittently loosen a tourniquet in the field; this risks massive re-bleeding.
Chapter III: Wound Packing – The Adjunct to Tourniquet and Primary Control for Junctional and Non-Compressible Bleeding
Tourniquets are ineffective for junctional zones (groin, axilla, neck) and non-compressible wounds. Wound packing with hemostatic agents is essential.
3.1 Packing Material Selection
| Material | Composition | Hemostatic Action | Application Complexity | Shelf Life | Notes |
|---|---|---|---|---|---|
| QuikClot Combat Gauze | Kaolin-coated gauze | Activates clotting cascade | Moderate | 5 years | Most effective hemostatic gauze |
| Celox Gauze | Chitosan-based gauze | Rapid clot formation | Moderate | 3 years | Biodegradable, water-activated |
| Standard Sterile Gauze | Cotton or synthetic | Mechanical tamponade | Easy | 5 years | Least effective, adjunct only |
| HemCon Bandage | Chitosan-based bandage | Promotes platelet adhesion | Moderate | 3 years | Requires pressure for activation |
3.2 Wound Packing Protocol
Objective: Apply direct pressure and hemostatic agent to halt bleeding in deep, inaccessible wounds.
- Expose wound fully: Remove clothing and foreign bodies.
- Prepare packing material: Unfold hemostatic gauze.
- Insert packing material: Use fingers or forceps to push gauze deep into the wound cavity. Do not just cover superficially.
- Fill wound cavity completely: Pack tightly to fill all dead space, layering gauze as needed.
- Apply direct pressure: Place firm pressure over the packed wound with sterile dressing or your hand.
- Secure the dressing: Use a bandage or tape to hold the packing firmly in place.
- Reassess bleeding: If bleeding continues, add more packing material without removing the existing layers.
- Do not remove packing once applied unless under controlled surgical conditions.
3.3 Timing and Monitoring
- Pack wounds immediately if tourniquet is not applicable or bleeding is junctional.
- Maintain pressure for at least 3-5 minutes continuously before reassessing.
- Reassess every 5 minutes for ongoing bleeding until evacuation.
- Transport patient urgently to advanced medical care following packing.
Chapter IV: Chest Seal Use – Sealing Open Chest Wounds to Prevent Tension Pneumothorax
Open chest wounds require rapid sealing to prevent air ingress into the pleural space and subsequent lung collapse.
4.1 Chest Seal Types
| Chest Seal Model | Manufacturer | Type | Adhesive Strength | Valve Mechanism | Application Complexity | Notes |
|---|---|---|---|---|---|---|
| HyFin Vent Chest Seal | HyMed Technologies | Ventilated, flexible | High | One-way valve | Easy | Allows air escape, prevents tension pneumothorax |
| Asherman Chest Seal | North American Rescue | Non-vented, occlusive | Moderate | No valve | Easy | Simple occlusion, risk of tension pneumothorax |
| Halo Chest Seal | Tactical Medical Solutions | Ventilated, with multiple valves | High | Multiple valves | Moderate | Allows trapped air to escape |
4.2 Chest Seal Application Protocol
Objective: Create an airtight seal over open chest wounds to restore negative pressure in thorax.
- Expose the chest wound fully: Remove clothing and debris.
- Dry the surrounding skin: Use gauze or cloth to ensure seal adhesion.
- Select an appropriately sized chest seal: Large enough to cover the wound with at least 2 inches margin.
- Remove the protective backing: Expose adhesive surface carefully.
- Apply the seal firmly: Place over the wound, pressing edges tightly against the skin.
- Smooth edges: Ensure no air can enter between seal and skin.
- If seal has a valve, orient it as instructed (usually uppermost).
- Monitor for signs of tension pneumothorax: Increasing respiratory distress, tracheal deviation, hypotension.
- If tension pneumothorax develops, perform needle decompression immediately (see Volume VI: Thoracic Trauma).
Chapter V: Combined Protocols and Timing Summary
5.1 Stepwise Protocol for Massive Hemorrhage Control

| Step | Action | Time Frame | Equipment Needed | Notes |
|---|---|---|---|---|
| 1 | Identify hemorrhage type | Immediate (<10 sec) | Visual/Tactile assessment | Prioritize life-threatening arterial bleeding |
| 2 | Apply tourniquet (if extremity arterial) | Within 20 sec | Tourniquet (CAT preferred) | Apply proximal to wound, record time |
| 3 | Pack wound (if junctional/non-extremity) | Within 30 sec | Hemostatic gauze | Deep packing, direct pressure |
| 4 | Apply chest seal (if open chest wound) | Within 40 sec | Ventilated chest seal | Ensure airtight seal |
| 5 | Monitor bleeding & patient status | Continuous | None | Reassess every 5 minutes |
| 6 | Evacuate to advanced care | Within 2 hours | Transport equipment | Maintain interventions, no loosening of tourniquet |
5.2 Safety and Monitoring Checklist
| Monitoring Task | Frequency | Action if Abnormal |
|---|---|---|
| Distal pulse check (tourniquet) | Every 5 minutes | Tighten or add second tourniquet if pulse present |
| Signs of ischemia (cyanosis, numbness) | Continuous | Expedite evacuation, notify medical personnel |
| Bleeding under dressing | Every 5 minutes | Add packing or replace dressing (if trained) |
| Respiratory status (chest seal) | Continuous | Prepare for needle decompression if tension signs |
Chapter VI: Construction and Improvised Alternatives
When commercial equipment is unavailable, apply the following field-expedient protocols with caution.
6.1 Improvised Tourniquet Construction
Materials: Wide belt or cloth strip (minimum 1.5 inches wide), rigid stick or rod (approx. 6-8 inches).
- Wrap the belt or cloth around the limb 2-3 inches proximal to the wound.
- Tie a knot tightly.
- Place the rigid stick over the knot.
- Twist the stick to tighten until bleeding stops.
- Secure the stick with another piece of cloth or tape to prevent unwinding.
- Mark time of application visibly.
Warning: Use only when commercial tourniquets unavailable. High risk of tissue damage.
6.2 Improvised Chest Seal
Materials: Plastic wrap or glove, adhesive tape (e.g., duct tape).
- Cut plastic wrap large enough to cover wound with 2 inches margin.
- Place plastic over the wound, creating a one-way valve by taping only three sides, leaving one side open to allow air escape.
- Secure edges with tape tightly.
- Monitor for tension pneumothorax.
Appendix A: Hemorrhage Identification Quick Reference
| Symptom | Arterial Bleed | Venous Bleed | Capillary Bleed | Cavitary Bleed |
|---|---|---|---|---|
| Bleeding color | Bright red | Dark red | Red | None visible |
| Bleeding flow | Spurting | Steady | Oozing | Internal |
| Pulse distal to wound | Absent | Present | Present | N/A |
| Skin signs | Pale, clammy | Swelling | Minimal | Shock signs |
| Urgency | Critical | High | Moderate | Critical |
Appendix B: Tourniquet Application Troubleshooting
| Problem | Cause | Solution |
|---|---|---|
| Bleeding continues after tourniquet | Tourniquet placed too distal or loose | Reposition 2-3 inches proximal, tighten windlass |
| Pain unbearable | Excessive tightening or nerve compression | Confirm necessity, cannot loosen in field |
| Tourniquet slips | Insufficient strap tension or improper placement | Reapply with secure strap and locking mechanism |
| No pulse but bleeding persists | Multiple bleeding sites or large vessel injury | Apply second tourniquet proximal to first |
Conclusion
Master these protocols with unwavering discipline and precision. The sacred duty to preserve life in the face of massive hemorrhage demands flawless execution of each step. Remember, delay or error costs lives. Your knowledge and skill are the last bastion against death’s relentless advance.
For further advanced wound management, including fluid resuscitation and surgical interventions, refer to Volume VI: Advanced Trauma Care.
End of Volume V: Tactical Medicine – Massive Hemorrhage Control
<!-- SECTION 19 -->
Volume V: Airway Management and Respiratory Support
Chapter I: Techniques for Opening and Maintaining Airways in Trauma Scenarios
The mastery of airway management in trauma is the cornerstone of life preservation. A compromised airway ceases oxygen delivery, resulting in irreversible hypoxia within minutes. This volume demands your full attention, as the techniques herein are not mere suggestions but sacred protocols essential to survival. The following instructions are exacting, comprehensive, and unyielding in their precision. Every step must be executed without hesitation or deviation.
1. The Jaw Thrust Maneuver
The jaw thrust maneuver is the primary non-invasive technique to open the airway in unconscious trauma patients where cervical spine injury cannot be excluded. It displaces the mandible forward, lifting the tongue and epiglottis away from the posterior pharynx without extending the neck.
Indications
- Suspected or confirmed cervical spine injury
- Unresponsive trauma patient with airway obstruction
- Patients with suspected spinal cord injury where neck movement must be minimized
Contraindications
- Intact consciousness with protective airway reflexes
- Severe mandibular fractures that may be displaced by manipulation
Step-by-Step Protocol
- Position yourself: Kneel at the patient's head, ensuring maximal visibility of the face and neck.
- Stabilize the head: Place your hands on both sides of the patient's head to prevent movement.
- Locate the angles of the mandible: Using your index and middle fingers, place them behind the angles of the mandible.
- Apply forward pressure: Push the mandible upward and forward firmly but gently. This movement should displace the tongue anteriorly, opening the airway.
- Avoid neck extension: Do not tilt the head backward; maintain the cervical spine in a neutral position.
- Assess airway patency: Look for chest rise, listen for breath sounds, and feel for air movement at the mouth and nose.
- Maintain the jaw thrust: Hold the jaw in this position continuously or until airway adjuncts are inserted or advanced airway management is performed.
Notes
- If the jaw thrust is insufficient to maintain airway patency, proceed to adjunct insertion (see Section 2).
- Monitor for patient gag reflex; if present, reassess airway management strategy.
2. Nasal Airway Insertion (Nasopharyngeal Airway - NPA)
The nasopharyngeal airway is a semi-rigid tube inserted via the nostril to maintain airway patency by bypassing the tongue and soft tissues obstructing the oropharynx. It is invaluable in trauma scenarios where oral airway insertion is contraindicated or the mouth is inaccessible.
Indications
- Unconscious or semi-conscious patients requiring airway patency
- Patients with trismus or jaw trauma preventing oral airway use
- Situations where the oral airway insertion is impractical
Contraindications
- Basilar skull fracture (signs include periorbital ecchymosis, CSF rhinorrhea, Battle’s sign)
- Severe nasal trauma or obstruction
- Coagulopathy or bleeding disorders increasing epistaxis risk
Materials Required
| Item | Description | Purpose |
|---|---|---|
| Nasopharyngeal airway | Semi-rigid tube, flared end | Maintain airway patency |
| Water-soluble lubricant | Sterile gel | Minimize mucosal trauma during insertion |
| Gloves | Sterile or clean | Infection control |
| Suction device | Portable suction with catheter | Clear secretions if needed |
Sizing the Nasopharyngeal Airway
- Measure from the patient's nostril to the earlobe or angle of the mandible.
- Select an NPA that matches this length to ensure proper placement without causing trauma.
Step-by-Step Insertion Protocol
- Prepare equipment: Don gloves, apply water-based lubricant generously to the distal 2-3 inches of the NPA.
- Position patient: Place the patient supine with head in neutral position; avoid hyperextension.
- Select nostril: Inspect both nostrils for patency; choose the more patent side.
- Insert airway: Gently insert the NPA bevel toward the nasal septum, advancing slowly along the floor of the nostril (not upward).
- Advance until flange rests against nostril: Do not force resistance; if obstruction occurs, try the opposite nostril.
- Confirm placement: Observe for improved airway patency, listen for breath sounds, and ensure no signs of distress.
- Secure airway: Tape the flange to the cheek if prolonged use is anticipated.
Complications and Management
| Complication | Recognition | Management |
|---|---|---|
| Epistaxis (nosebleed) | Bleeding from nostril | Apply gentle pressure, reassess airway size and technique |
| Incorrect placement | Airway obstruction, gagging | Remove and reinsert carefully, consider alternative airway adjuncts |
| Nasal mucosa trauma | Bleeding, pain | Use adequate lubrication, select correct size |
| Intracranial insertion | Rare, suspected with skull base fracture | Immediate removal, advanced airway management required |
3. Recovery Position
The recovery position is a critical technique to maintain airway patency in unconscious but breathing patients, preventing aspiration and allowing drainage of secretions.
Indications
- Unconscious trauma patients with spontaneous breathing and intact airway reflexes
- Post-seizure or post-resuscitation patients to prevent airway obstruction
Contraindications
- Suspected spinal injury (use manual airway maneuvers instead)
- Unstable fractures preventing safe repositioning
Step-by-Step Protocol
- Assess the patient: Confirm spontaneous breathing and absence of spinal injury.
- Kneel beside the patient: Position yourself at the patient's side closest to you.
- Place nearest arm: Extend the arm nearest to you at a right angle to the body, elbow bent with palm facing upward.
- Position opposite arm: Bring the arm farthest from you across the chest, resting the back of the hand against the cheek nearest to you.
- Bend the far knee: Lift the far leg at the knee, keeping the foot flat on the floor.
- Roll the patient: Using the bent knee as a lever and the nearest arm to support the head, roll the patient toward you onto their side.
- Adjust the head: Tilt the head slightly back to maintain an open airway; ensure the mouth is facing downward to allow drainage.
- Ensure stability: Adjust the bent leg to stabilize the patient and prevent rolling onto the back or stomach.
- Monitor continuously: Regularly reassess airway patency, breathing, and circulation.
4. Airway Adjuncts: Comprehensive Table of Devices and Indications
| Airway Adjunct | Description | Indications | Contraindications | Notes |
|---|---|---|---|---|
| Oropharyngeal Airway (OPA) | Curved plastic device inserted into mouth to prevent tongue obstruction | Unconscious patients without gag reflex | Conscious patients, intact gag reflex | See Volume IX for OPA sizing and insertion |
| Nasopharyngeal Airway (NPA) | Semi-rigid tube inserted via nostril to bypass tongue obstruction | Semi-conscious or unconscious patients with intact gag reflex | Basilar skull fracture, nasal trauma | Detailed in Section 2 above |
| Endotracheal Tube (ETT) | Rigid tube inserted into trachea via mouth or nose for definitive airway | Patients requiring advanced airway management | None in emergency; requires skill | See Volume VII: Advanced Airway Management |
| Supraglottic Airway Devices (SAD) | Devices like LMA placed above vocal cords for ventilation | When intubation is not possible or delayed | Intact gag reflex, risk of aspiration | Advanced skill required |
| Bag-Valve-Mask (BVM) | Manual resuscitator providing positive pressure ventilation | Respiratory arrest, apnea, or inadequate breathing | None; requires proper technique | See Section 5 below |
5. Protocol for Maintaining Airway Patency in Trauma
This protocol synthesizes the above techniques into an actionable, prioritized sequence for trauma responders.
Step 1: Initial Airway Assessment
- Check responsiveness: If patient is unconscious and not protecting airway, proceed.
- Look, listen, feel: Observe chest rise, listen for breath sounds, feel for airflow at mouth and nose.
Step 2: Non-invasive Airway Maneuvers
- Perform jaw thrust maneuver as described in Section 1.
- Reassess airway patency after maneuver.
Step 3: Airway Adjunct Insertion
- If airway remains compromised, insert nasal airway if no contraindications exist.
- If nasal airway contraindicated or ineffective, insert oropharyngeal airway (see Volume IX).
Step 4: Recovery Position if Spontaneous Breathing
- If patient is breathing spontaneously without cervical spine injury, place in recovery position as per Section 3.
Step 5: Advanced Airway Management

- If airway obstruction persists or ventilation inadequate, prepare for advanced airway management (see Volume VII).
Continuous Monitoring
- Monitor airway patency, breathing rate, oxygen saturation (if pulse oximeter available), and level of consciousness.
- Be prepared to repeat maneuvers as needed.
6. Contraindications and Precautions Summary Table
| Technique/Airway Adjunct | Absolute Contraindications | Relative Contraindications | Precautions |
|---|---|---|---|
| Jaw Thrust Maneuver | None in trauma airway compromise | Severe mandibular fracture | Apply gentle force, avoid neck movement |
| Nasopharyngeal Airway | Basilar skull fracture, severe nasal trauma | Coagulopathy, nasal obstruction | Use proper sizing, lubrication; avoid forceful insertion |
| Oropharyngeal Airway | Conscious patient with intact gag reflex | Oral trauma, trismus | Avoid in semi-conscious patients; size properly |
| Recovery Position | Suspected spinal cord injury | Unstable fractures preventing safe repositioning | Use manual airway maneuvers if spinal injury suspected |
7. Appendix: Construction of a Field Nasopharyngeal Airway
In austere conditions where commercial NPAs are unavailable, a field-expedient nasal airway can be fabricated.
Materials Required
| Material | Description | Function |
|---|---|---|
| Flexible, sterile tubing | Diameter 6-8 mm, length 10-15 cm | Acts as airway conduit |
| Soft rubber or silicone | For flange construction | Prevents migration into nostril |
| Sterile water-based lubricant | For insertion | Reduces mucosal trauma |
Fabrication Steps
- Select tubing: Cut flexible tubing to length measured from nostril to earlobe.
- Create flange: Attach a soft rubber disk or mold a silicone flange at one end to prevent full insertion.
- Sterilize device: Boil tubing and flange if possible, or use chemical sterilization.
- Lubricate before insertion: Use sterile water-based lubricant before insertion as per Section 2.
Note: This improvised device should be used only when no commercial airway adjuncts are available and with careful monitoring.
8. Summary of Airway Management Priorities in Trauma
| Priority Level | Action | Purpose |
|---|---|---|
| 1 | Open airway using jaw thrust | Immediate airway patency without neck movement |
| 2 | Insert nasal airway if jaw thrust insufficient | Maintain airway, bypass tongue obstruction |
| 3 | Use oropharyngeal airway if nasal airway contraindicated | Alternative airway adjunct in unconscious patients |
| 4 | Place patient in recovery position if breathing spontaneously and no spinal injury | Prevent aspiration and maintain airway |
| 5 | Prepare for advanced airway if ventilation inadequate | Definitive airway control |
Final Mandate to the Apprentice
The techniques and protocols in this volume are your first line of defense against death by airway obstruction in trauma. The sacred trust of life rests in your hands. Master each step with unwavering discipline; hesitation or error is unforgivable in the crucible of emergency. As you carry this knowledge forward, remember: the airway is the gateway to survival. Guard it fiercely, open it skillfully, and maintain it relentlessly. The lives of the fallen depend on your mastery.
_End of Volume V: Chapter I_
<!-- SECTION 20 -->
The Complete Practitioner's Codex, Volume V: Field Surgery Basics and Infection Control
Chapter III: Wound Cleaning, Suturing Basics, and Sterile Technique in Austere Environments
“In the crucible of war or wilderness, the surgeon’s hands become the shield that holds death at bay. Precision, discipline, and sacred reverence for life must govern every incision, every stitch, every cleansing touch.” — Master Surgeon Aldric Thorne, The Practitioner Order Archives
Introduction
This chapter imparts the uncompromising, life-saving protocols for wound cleaning, suturing, and sterile technique under austere conditions. These procedures are the foundation of field surgery and infection control, where time, resources, and environment threaten every patient’s survival. Mastery of these protocols is non-negotiable for any warrior entrusted with the gift of life.
Section I: Wound Cleaning Protocols
Wound cleaning is the first line of defense against infection. The goal is complete removal of foreign material, devitalized tissue, and pathogens while preserving healthy tissue. This requires methodical, stepwise action.
Step-by-Step Wound Cleaning Procedure
- Prepare the environment
- Select a clean, sheltered area shielded from wind, dust, and contaminants.
- Assemble all necessary instruments and antiseptics on a sterile field (see Section III).
- Personal preparation
- Perform hand hygiene with antiseptic soap and water or alcohol-based rub.
- Don sterile gloves (see Section III).
- Initial wound assessment
- Expose the wound fully using sterile drapes.
- Assess for foreign bodies, extent of tissue damage, bleeding source.
- Irrigation
- Use a sterile 60 mL syringe with an 18-gauge catheter or needle to deliver a steady stream of irrigation fluid.
- Preferred irrigant: normal saline or sterile water at room temperature.
- Volume: minimum 500 mL for small wounds; up to 1000-2000 mL for large, contaminated wounds.
- Apply pressure to dislodge debris without forcing contaminants deeper.
- Debridement
- Using sterile forceps and scissors, remove devitalized tissue and foreign bodies.
- Excise ragged wound edges to create clean margins for healing.
- Avoid excessive tissue removal to preserve viability.
- Antiseptic application
- Apply antiseptic solutions to the wound bed with sterile gauze soaked in the selected agent (see Table 2).
- Allow antiseptic to dwell for recommended time (1-3 minutes).
- Final irrigation
- Flush wound again with sterile saline to remove antiseptic residues and loosened debris.
- Drying
- Gently pat the wound dry with sterile gauze to facilitate dressing adherence.
Table 1: Recommended Wound Irrigation Fluids and Volumes
| Fluid Type | Description | Volume per Wound Size | Notes |
|---|---|---|---|
| Normal Saline | Isotonic 0.9% NaCl solution | 500 mL (small), 1000-2000 mL (large) | Preferred for wound irrigation |
| Sterile Water | Purified sterile water | Same as saline | Use if saline unavailable |
| Diluted Povidone-Iodine* | 1:10 dilution with sterile water | 100-200 mL | Use cautiously; cytotoxic in high concentration |
| Chlorhexidine Gluconate (0.05%) | Antiseptic solution | 100-200 mL | Avoid in deep wounds; skin use preferred |
*Note: For detailed antiseptic preparation, see Section II: Antiseptic Protocols.
Section II: Suturing Basics
Suturing is the definitive closure method for open wounds after adequate cleaning. Proper technique minimizes infection risk and optimizes healing.
Suturing Indications and Contraindications
| Indication | Contraindication |
|---|---|
| Clean, uncontaminated wounds <12 hours old | Dirty, infected wounds (consider delayed closure) |
| Wounds with bleeding controlled | Wounds with extensive tissue loss requiring grafting |
| Wounds in areas with good vascularity | High-tension wounds unsuitable for primary closure |
Step-by-Step Suturing Protocol
- Prepare the suturing field
- Confirm wound cleanliness and hemostasis.
- Assemble suturing kit (see Table 3).
- Don sterile gloves and mask.
- Anesthetize the wound
- Administer local anesthesia (e.g., 1% lidocaine without epinephrine) in incremental doses around wound edges.
- Wait 2-3 minutes for effect.
- Choose suture material and needle
- Select size and type based on wound location and tension (see Table 4).
- Position patient and illuminate
- Ensure adequate lighting and stable patient position.
- Begin suturing
- Use needle holder to grasp needle at midpoint.
- Insert needle at 90 degrees, approximately 3-5 mm from wound edge.
- Pass needle through dermis and subcutaneous tissue, exiting opposite edge at equal distance.
- Pull suture through, leaving 3-4 cm tail for knot tying.
- Tie knots
- Use surgeon’s knot (double throw followed by two single throws) to secure.
- Ensure knots lie flat and snug without strangulating tissue.
- Continue placing interrupted sutures
- Space sutures evenly (typically 5-10 mm apart), avoiding excessive tension.
- Trim suture ends
- Leave tails approximately 5 mm long to prevent unraveling.
- Apply sterile dressing
- Cover sutured wound with non-adherent sterile dressing (see Section IV).
- Provide aftercare instructions
- Advise on wound monitoring, suture removal timing (usually 5-14 days), and infection signs.
Table 2: Common Suture Materials and Uses
| Suture Type | Material | Absorbable? | Needle Type | Typical Use |
|---|---|---|---|---|
| Nylon | Synthetic Polyamide | No | Cutting or reverse cutting | Skin closure, general use |
| Polypropylene (Prolene) | Synthetic Polypropylene | No | Reverse cutting | Vascular, skin under tension |
| Polyglycolic Acid (Vicryl) | Synthetic Absorbable | Yes | Tapered or cutting | Subcutaneous tissue, mucosa |
| Catgut | Natural Absorbable | Yes | Tapered | Internal tissues, mucosal surfaces |
Table 3: Essential Suturing Instruments Kit
| Instrument | Description | Purpose |
|---|---|---|
| Needle Holder | Locking instrument for needle grasping | Controls needle during suture placement |
| Tissue Forceps | Fine-tipped, toothed forceps | Holds skin edges without crushing tissue |
| Scissors | Sharp, curved or straight | Cut sutures and dressings |
| Scalpel | Surgical blade | Debride wound edges or create incisions |
| Sterile Gauze Pads | Absorbent sterile cloth | Wound dressing and cleaning |
| Hemostats (optional) | Locking clamps | Control bleeding vessels |
Table 4: Suture Size and Needle Selection by Wound Location
| Location | Recommended Suture Size | Needle Type | Notes |
|---|---|---|---|
| Face | 5-0 or 6-0 | Cutting or reverse cutting | Fine, minimal scarring essential |
| Scalp | 4-0 or 5-0 | Cutting | Thicker tissue, more tension |
| Trunk and extremities | 3-0 or 4-0 | Cutting | Standard closure |
| Hands and feet | 4-0 or 5-0 | Cutting | Preserve function, minimal tension |
Section III: Sterile Technique in Austere Environments
Sterility is paramount to prevent infection. Austere environments lack standard operating rooms and sterilization equipment, demanding ingenuity and unwavering discipline.
Principles of Sterile Technique
- Prevent introduction of microorganisms to sterile field.
- Maintain integrity of sterile barriers.
- Avoid touching sterile items with non-sterile hands or surfaces.
Step-by-Step Sterile Setup Protocol in the Field
- Site selection
- Choose a flat, clean surface away from dust and wind.
- Clear debris and disinfect surface with 70% isopropyl alcohol or equivalent.
- Create a sterile field
- Use sterile drapes or clean plastic sheets sterilized by boiling or chemical methods (see Volume VIII: Sanitation and Sterilization).
- Unfold drapes carefully without touching the underside.
- Hand hygiene
- Wash hands with soap and water for 2-3 minutes.
- Use alcohol-based rub if water unavailable.
- Donning sterile gloves
- Open glove package without contaminating gloves.
- Touch only inside of glove with opposite hand.
- Insert hand fully and pull glove over wrist.
- Repeat for opposite hand without touching glove exterior.
- Handling instruments
- Use sterile forceps or gloves to transfer instruments onto sterile field.
- Avoid placing instruments on non-sterile surfaces.
- Maintain sterility during procedure
- Do not turn back on sterile field.
- Replace gloves immediately if torn or contaminated.
Field Sterilization Methods for Instruments
| Method | Materials Required | Procedure Summary | Limitations |
|---|---|---|---|
| Boiling | Pot, water, heat source | Boil instruments for 20 minutes | Does not kill spores; limited sterility |
| Chemical Sterilization | Glutaraldehyde solution (2%) | Soak instruments for 10-12 hours | Toxic; requires rinsing |
| Flame Sterilization | Alcohol lamp, forceps | Heat instruments red-hot for 15 seconds | Risk of damage, limited to metal parts |
| Autoclave (if available) | Autoclave machine | 121°C, 15 psi, 15-20 minutes | Requires equipment and power source |
Section IV: Dressing Types and Application
Proper wound dressing protects the wound, controls bleeding, absorbs exudate, and maintains moisture balance.
Table 5: Common Wound Dressing Types and Uses
| Dressing Type | Description | Indications | Application Notes |
|---|---|---|---|
| Non-adherent gauze | Sterile gauze with non-stick surface | Cover sutured wounds, burns | Change daily or if soaked |
| Hydrocolloid | Gel-forming agents in adhesive matrix | Chronic wounds, pressure ulcers | Maintains moist environment, up to 7 days |
| Foam dressings | Absorbent polyurethane foam | Moderate to heavy exudate wounds | Provides cushioning, changed every 3-5 days |
| Transparent film | Thin, adhesive, semi-permeable film | IV sites, superficial wounds | Allows visualization, protects from contamination |
Dressing Application Protocol
- Select appropriate dressing based on wound type and exudate level.
- Apply sterile dressing using sterile gloves or forceps.
- Secure dressing with adhesive tape or bandage, avoiding constriction.
- Inspect dressing regularly for saturation or contamination.
- Change dressing according to wound status or contamination risk.
Conclusion
The sacred art of field surgery demands rigorous adherence to protocols that preserve life amidst chaos. Mastery of wound cleaning, suturing, and sterile technique in austere environments elevates the warrior to guardian of survival and healing. The knowledge herein is a solemn trust, to be wielded with precision, discipline, and reverence.
For extended protocols on antiseptic preparation, wound infection management, and advanced wound closure techniques, consult Volume IX: Advanced Medical Arts.
<!-- SECTION 21 -->
Volume V: Building a Tactical Medical Kit
Chapter I: Essential Supplies for Trauma Care, Organization, and Maintenance
Preface In the crucible of combat, the difference between life and death often hinges on the readiness and composition of the tactical medical kit. This sacred assemblage of trauma care supplies is your first line of intervention, your shield in the chaos of battle. This chapter delivers uncompromising, exhaustive instructions on constructing, organizing, and maintaining a tactical medical kit tailored to any mission profile. The knowledge herein is not theoretical: it is tested, proven, and vital.
Section 1: Essential Trauma Care Supplies — Core Components
Every tactical medical kit must be constructed around a foundation of trauma care essentials. These supplies address the most common and immediately life-threatening battlefield injuries: hemorrhage, airway compromise, and shock. The following table enumerates these items, their recommended quantities for a single-user kit, and optimal storage methods to facilitate rapid access.
| Item | Quantity (per kit) | Storage Method | Purpose/Use |
|---|---|---|---|
| Tourniquets (CAT or SOFT-T) | 2 | Holstered in external pouch | Control of severe extremity hemorrhage |
| Hemostatic dressings (e.g., QuikClot) | 3 | Sealed sterile packets, internal compartment | Arrest bleeding in junctional or deep wounds |
| Pressure dressings (e.g., Israeli Bandage) | 2 | Sterile packaging, internal pouch | Control of hemorrhage with pressure application |
| Nasopharyngeal Airways (sizes 28-34 Fr) | 3 (small, medium, large) | Protective sheath in mesh pouch | Maintain airway patency in unconscious casualty |
| Emergency Trauma Shears | 1 | Secure external pocket | Rapid clothing removal and access to wounds |
| Chest seals (vented and non-vented) | 2 | Sterile sealed packets, external pouch | Management of open chest wounds |
| Nitrile gloves (powder-free) | 6 pairs | Sealed plastic packets | Infection control and contamination prevention |
| Antiseptic wipes (iodine or chlorhexidine) | 10 | Sealed foil packets | Wound cleansing |
| Adhesive tape (2.5 cm width) | 1 roll | Internal compartment | Secure dressings, splints |
| Bandage rolls (4-5 cm width) | 2 | Sterile packaging | Secondary dressings and wound coverage |
| SAM Splint (foldable aluminum) | 1 | Folded, internal compartment | Immobilization of fractures and sprains |
| Sterile saline ampoules (20 ml) | 4 | Sealed ampoules, internal pouch | Wound irrigation and eye wash |
| Permanent marker (waterproof) | 1 | Internal pocket | Marking tourniquet times, wound sites |
| CPR face shield or mask | 1 | Sealed pouch | Barrier device for resuscitation |
Section 2: Kit Organization — Layout for Efficiency and Speed
An optimized tactical medical kit is not merely a collection of supplies; it is a system engineered for rapid deployment under duress. The following protocol directs the arrangement of items to minimize time-to-access and prevent disorganization due to movement or shock.
Step 1: Select a Modular Kit Container
- Use a MOLLE-compatible pouch or medical IFAK with multiple compartments.
- Size should not exceed 10 liters for portability; internal compartments must be customizable.
Step 2: Assign Compartments by Priority and Frequency of Use
- External pockets: High priority, frequent-use items (tourniquets, chest seals, gloves).
- Internal compartments: Bulkier or less immediately required items (SAM splint, saline ampoules).
- Clear or mesh pockets: Small items for visibility (hemostatic dressings, antiseptic wipes).
Step 3: Utilize Elastic Retainers and Velcro Straps
- Secure each item to prevent shifting during movement.
- Label compartments with durable tags for immediate recognition under stress.
Step 4: Establish a Tourniquet “Quick-Draw” Zone
- Position tourniquets on the external front pouch for immediate access.
- Utilize retention straps to prevent loss during rapid retrieval.
Step 5: Create a Sterile Wound Care Section
- Group hemostatic dressings, pressure dressings, bandage rolls, and antiseptic wipes in a sealed internal pouch.
- Include a small zip-lock bag for used dressings to prevent contamination.
Section 3: Kit Maintenance — Protocol for Readiness and Longevity
A medical kit’s efficacy diminishes with time, neglect, and environmental exposure. Maintenance is a sacred ritual to preserve your lifeline. The following protocol is non-negotiable and must be executed before and after every mission, and monthly during downtime.
Step 1: Visual Inspection
- Examine all packaging for breaches, moisture, or contamination.
- Verify expiration dates on all consumables.
Step 2: Functional Testing
- Check tourniquet integrity and tightening mechanism (avoid over-tightening).
- Test closure systems (zippers, velcro) for reliability.
Step 3: Inventory Replenishment
- Replace any used or expired items immediately.
- Document all changes in the kit logbook (see Section 5).
Step 4: Environmental Protection
- Store kit in a cool, dry place away from direct sunlight.
- Use desiccant packs inside the kit to control humidity.
Step 5: Sterilization and Cleaning
- Clean the exterior of the kit with disinfectant solution.
- Wash or sterilize trauma shears and splints per manufacturer guidelines.
Section 4: Customization Protocols Based on Mission Profile
No two missions are identical, and your tactical medical kit must reflect the unique demands of terrain, expected injuries, and available support. Below are detailed protocols for kit customization tailored to common mission profiles.
Mission Profile A: Urban Combat
| Additional Items | Quantity | Rationale |
|---|---|---|
| Eye protection goggles | 1 pair | Protection from debris and chemical agents |
| Burn dressings | 2 | High risk of flash burns and explosions |
| Nasal spray decongestant (oxymetazoline) | 2 doses | Treat airway obstruction from smoke inhalation |
| Antibiotic ointment packets | 5 | Prevent secondary infections in wound care |
Customization Steps:
- Add eye protection goggles in a dedicated external pouch.
- Insert burn dressings into the sterile wound care section.
- Pack nasal spray in a small, accessible internal pocket.
- Include antibiotic ointment with antiseptic wipes.
Mission Profile B: Wilderness Reconnaissance
| Additional Items | Quantity | Rationale |
|---|---|---|
| Snake bite kit (pressure immobilization bandages) | 1 set | Potential for venomous bites |
| Water purification tablets | 10 | Necessary for wound irrigation and hydration |
| Mosquito netting treated with permethrin | 1 piece | Prevent vector-borne diseases |
| Blister treatment kits | 5 | Anticipate long marches causing foot injuries |
Customization Steps:
- Integrate snake bite kit in a waterproof pouch within the kit.
- Add water purification tablets in sealed packets near saline ampoules.
- Pack blister treatment kits alongside bandage rolls.
- Attach mosquito netting rolled tightly to the exterior MOLLE system.
Mission Profile C: Vehicle Convoy Operations
| Additional Items | Quantity | Rationale |
|---|---|---|
| Burn sheets (fire retardant) | 2 | High risk of vehicle fires |
| Portable suction device | 1 | Manage airway obstructions in enclosed spaces |
| Extra gloves | 10 pairs | Increased contamination risk |
| Oral rehydration salts (packets) | 5 | Treat dehydration and shock |
Customization Steps:
- Store burn sheets in external pouch for rapid deployment.
- Secure portable suction device in a dedicated compartment.
- Double the glove count in all glove compartments.
- Place oral rehydration salts alongside saline ampoules.
Section 5: Complete Itemization with Quantities and Storage Methods
This table consolidates all items—core and mission-specific—with exact quantities and storage instructions for reference and procurement.
| Item | Qty (Core) | Qty (Urban) | Qty (Wilderness) | Qty (Convoy) | Total Qty | Storage Method |
|---|---|---|---|---|---|---|
| Tourniquets | 2 | 0 | 0 | 0 | 2 | External holster |
| Hemostatic dressings | 3 | 0 | 0 | 0 | 3 | Sterile internal pouch |
| Pressure dressings | 2 | 0 | 0 | 0 | 2 | Sterile internal pouch |
| Nasopharyngeal Airways | 3 | 0 | 0 | 0 | 3 | Mesh internal pouch |
| Emergency trauma shears | 1 | 0 | 0 | 0 | 1 | External pocket |
| Chest seals | 2 | 0 | 0 | 0 | 2 | External pouch |
| Nitrile gloves | 6 pairs | 0 | 0 | 10 pairs | 16 pairs | Sealed packets |
| Antiseptic wipes | 10 | 0 | 0 | 0 | 10 | Sealed internal packets |
| Adhesive tape | 1 roll | 0 | 0 | 0 | 1 | Internal compartment |
| Bandage rolls | 2 | 0 | 0 | 0 | 2 | Sterile internal pouch |
| SAM splint | 1 | 0 | 0 | 0 | 1 | Folded internal compartment |
| Sterile saline ampoules | 4 | 0 | 0 | 0 | 4 | Sealed internal pouch |
| Permanent marker | 1 | 0 | 0 | 0 | 1 | Internal pocket |
| CPR face shield or mask | 1 | 0 | 0 | 0 | 1 | Sealed pouch |
| Eye protection goggles | 0 | 1 | 0 | 0 | 1 | External pouch |
| Burn dressings | 0 | 2 | 0 | 2 | 4 | Sterile wound care section |
| Nasal spray decongestant | 0 | 2 | 0 | 0 | 2 | Internal pocket |
| Antibiotic ointment packets | 0 | 5 | 0 | 0 | 5 | Sterile wound care section |
| Snake bite kit | 0 | 0 | 1 | 0 | 1 | Waterproof pouch |
| Water purification tablets | 0 | 0 | 10 | 0 | 10 | Sealed packets |
| Mosquito netting | 0 | 0 | 1 | 0 | 1 | External MOLLE attachment |
| Blister treatment kits | 0 | 0 | 5 | 0 | 5 | Internal pouch |
| Burn sheets | 0 | 0 | 0 | 2 | 2 | External pouch |
| Portable suction device | 0 | 0 | 0 | 1 | 1 | Dedicated compartment |
| Oral rehydration salts | 0 | 0 | 0 | 5 | 5 | Internal pouch |
Section 6: Step-by-Step Construction of a Basic Tactical Medical Kit
Step 1: Acquire a Suitable Container
- Obtain a MOLLE-compatible IFAK pouch with at least 6 compartments.
- Confirm water resistance and durability of material.
Step 2: Gather Core Trauma Supplies (See Section 1 Table)
- Purchase all items from certified suppliers only.
- Verify all expiration dates and package integrity.
Step 3: Organize Supplies Within the Kit (See Section 2 Protocol)
- Place tourniquets in external quick-draw pouches.
- Group hemostatic and pressure dressings together in a sealed internal pocket.
- Store airway adjuncts in mesh internal pouch.
- Assign trauma shears and chest seals to external pockets for accessibility.
Step 4: Customize Kit Based on Mission Profile (See Section 4 Tables)
- Add mission-specific items and reorganize compartments accordingly.
- Attach external items to MOLLE webbing as needed.
Step 5: Perform Initial Kit Maintenance (See Section 3 Protocol)
- Conduct visual inspection and functional testing.
- Document kit composition and serial numbers in a logbook.
Step 6: Train with the Kit
- Conduct drills simulating injury scenarios.
- Time yourself retrieving and using each item to build muscle memory.
Section 7: Maintenance Logbook Template
| Date | Inspector Name | Items Checked | Condition | Action Taken | Next Inspection Date |
|---|---|---|---|---|---|
| YYYY-MM-DD | [Name] | Tourniquets, Dressings, Gloves | All intact, no expiry | None | YYYY-MM-DD |
| YYYY-MM-DD | [Name] | Saline ampoules, Splint | 2 saline expired | Replaced saline ampoules | YYYY-MM-DD |
Final Edict: Your tactical medical kit is an extension of your will to survive and protect. Every item within must be meticulously selected, organized, and maintained. The protocols above are your sacred rites. Execute them with unwavering discipline. Failure to prepare is a betrayal of your comrades and yourself.
For advanced wound management beyond the scope of this volume, see Volume VII: Advanced Trauma Interventions, Chapter IV. For water purification protocols relevant to wound irrigation supplies, see Volume VIII: The Water Codex, Chapter II.
<!-- SECTION 22 -->
The Complete Practitioner's Codex, Volume VI: Digital Defense – Encryption and Secure Communication
Preface
In this digital age, the sanctity of communication is a battlefield as ancient and hallowed as any physical conflict. The warrior who neglects the defense of his words, plans, and sacred knowledge against unseen adversaries forfeits his very mission. This volume imparts the arcane arts of encryption and secure communication, enabling the chosen apprentice to shield messages with unbreakable armor. These protocols are not mere suggestions; they are mandatory rites of passage and survival.
Chapter I: Principles of Encryption
Encryption is the act of converting intelligible information (plaintext) into an obscured format (ciphertext) such that only authorized parties may revert it to readable form. This sacred transformation relies on keys—unique cryptographic elements that govern the process.
1. Encryption Types

| Type | Description | Common Algorithms | Use Cases |
|---|---|---|---|
| Symmetric | Single key for both encryption and decryption | AES, DES, ChaCha20 | Bulk data encryption, disk encryption |
| Asymmetric (Public-Key) | Separate keys: public for encryption, private for decryption | RSA, ECC (Elliptic Curve Cryptography) | Secure key exchange, digital signatures |
| Hashing | One-way transformation; no decryption possible | SHA-256, SHA-3 | Integrity verification, password storage |
2. Core Concepts
- Key Generation: The process of creating cryptographic keys with sufficient entropy.
- Encryption: Applying the key to plaintext, producing ciphertext.
- Decryption: Reversing ciphertext to plaintext using a key.
- Digital Signatures: Cryptographic proofs that authenticate sender identity and message integrity.
- Key Exchange: Securely sharing keys over insecure channels.
Chapter II: PGP (Pretty Good Privacy) – The Guardian of Email
PGP provides end-to-end encryption and signing for emails and files. It combines symmetric and asymmetric encryption, ensuring both security and speed.
Step-by-Step Protocol: PGP Key Generation and Use
A. Key Generation
- Install GnuPG (Open-source PGP implementation):
- For Windows: Download from https://gnupg.org/download/
- For Linux/macOS: Use package managers (
apt-get install gnupgorbrew install gnupg).
- Generate Key Pair:
- Open terminal/command prompt.
- Execute:
gpg --full-generate-key- Follow prompts:
- Select key type: RSA and RSA (default)
- Key size: 4096 bits (maximum recommended for strong security)
- Expiration: Set to 2 years for operational security; renew keys before expiration.
- Provide user ID (name, email).
- Set a strong passphrase (minimum 20 characters with upper, lower, digits, symbols).
- Verify key creation:
gpg --list-keysB. Exporting Keys
- Export public key (to share with contacts):
gpg --armor --export your.email@example.com > publickey.asc- Export private key (backup, keep offline and secure):
gpg --armor --export-secret-keys your.email@example.com > privatekey.ascC. Encrypting a Message
- Save the plaintext message as
message.txt. - Obtain recipient’s public key and import it:
gpg --import recipient_publickey.asc- Encrypt message:
gpg --armor --encrypt --recipient recipient.email@example.com message.txt- The output will be
message.txt.asc(ciphertext).
D. Decrypting a Message
- Receive
message.txt.asc. - Decrypt using private key:
gpg --decrypt message.txt.asc > decrypted_message.txtE. Digital Signing
- Sign a message to authenticate sender:
gpg --armor --sign message.txt- To sign and encrypt simultaneously:
gpg --armor --sign --encrypt --recipient recipient.email@example.com message.txtChapter III: Signal – The Fortress of Instant Messaging
Signal offers open-source, end-to-end encrypted instant messaging and voice calls. It employs the Signal Protocol, a cutting-edge cryptographic standard.
Step-by-Step Protocol: Secure Use of Signal
A. Setup
- Install Signal on a smartphone or desktop from official sources:
- https://signal.org/download/
- Verify Device Security:
- Ensure device firmware is updated.
- Enable full-disk encryption on device.
- Use screen lock with PIN/Fingerprint.
- Register with Phone Number:
- Input phone number.
- Receive SMS verification code.
- Set a strong PIN for Signal’s internal security.
B. Verifying Contacts
- Open chat with contact.
- Tap contact’s name → Verify Safety Number.
- Exchange safety numbers via in-person or trusted out-of-band method.
- Confirm numbers match to prevent man-in-the-middle attacks.
C. Sending Encrypted Messages
- Compose message.
- Send normally; Signal encrypts automatically.
- For added security:
- Use disappearing messages:
- Tap contact name → Disappearing messages → Select timer (e.g., 1 minute to 1 week).
- Use disappearing messages:
D. Voice and Video Calls
- Initiate call via Signal app.
- Signal encrypts calls end-to-end.
- Verify call safety numbers as above.
Chapter IV: Secure Email Protocols
Email remains a primary vector for communication and attack. Secure email protocols must combine encryption, authentication, and integrity.
A. S/MIME (Secure/Multipurpose Internet Mail Extensions)
- Uses X.509 certificates.
- Often integrated in corporate environments.
- Requires certificate authority (CA) trust.
B. PGP/MIME
- Extension of PGP for MIME-encoded emails.
- Supports attachments and rich formatting.
Chapter V: Detailed Protocols for Key Generation, Encryption, and Verification
1. PGP Key Generation Protocol (Technical Summary)
| Step | Action | Parameters/Options | Purpose |
|---|---|---|---|
| 1 | Select Key Type | RSA and RSA | Balances encryption and signing |
| 2 | Select Key Size | 4096 bits | Maximizes security |
| 3 | Set Expiration Date | 2 years | Key rotation policy |
| 4 | Input User Identity | Full name, email | For key identification |
| 5 | Set Passphrase | Minimum 20 characters, mixed complexity | Protects private key |
| 6 | Generate Randomness | Use system entropy pool | Ensures key unpredictability |
2. Signal Key Exchange Protocol (Simplified)
Signal uses the Double Ratchet Algorithm:
| Phase | Description | Security Property |
|---|---|---|
| Initial Key Exchange | Uses X3DH (Extended Triple Diffie-Hellman) to establish shared secret | Forward secrecy and authentication |
| Ratchet Steps | Each message advances ratchet keys | Provides post-compromise security |
Chapter VI: Building Your Own Encryption Toolkit
For the master who seeks autonomy, constructing a minimal, verifiable encryption environment is essential. Follow these steps to create a secure PGP environment from source:
Step 1: Acquire Source Code
- Download GnuPG source from https://gnupg.org/download/index.html
- Verify signatures on download files:
gpg --verify gnupg-2.x.x.tar.bz2.sig gnupg-2.x.x.tar.bz2Step 2: Compile from Source
- Extract archive:
   tar -xjf gnupg-2.x.x.tar.bz2
cd gnupg-2.x.x- Configure build:
./configure --enable-maintainer-mode- Compile:
make- Install:
sudo make installStep 3: Isolate Environment
- Create dedicated user account for cryptographic operations.
- Use hardware security module (HSM) or smartcard for key storage (e.g., YubiKey).
- Configure GPG to use smartcard:
gpg --card-statusChapter VII: Comparative Table of Encryption Tools
| Tool | Encryption Type | Strength (bits) | Vulnerabilities | Use Case | Ease of Use | Open Source |
|---|---|---|---|---|---|---|
| PGP (GnuPG) | Hybrid (Asymmetric + Symmetric) | 4096 (RSA) + AES-256 | Compromised private keys, weak passphrases | Email/file encryption | Moderate | Yes |
| Signal | Asymmetric (ECC) + Symmetric (AES-256) | 256 (Curve25519) | Metadata leakage if device compromised | Instant messaging, voice calls | High | Yes |
| S/MIME | Asymmetric (RSA/ECC) + Symmetric (AES) | 2048+ (RSA) | Reliance on CAs (possible CA compromise) | Corporate email encryption | Moderate | No |
| TLS (Transport Layer Security) | Symmetric (AES-128/256) + Asymmetric (RSA, ECC) | 128/256 (AES) | Certificate spoofing, downgrade attacks | Web browsing, email transport | High | Partially |
| AES | Symmetric | 128, 192, 256 | Weak key management | Data at rest, VPNs | High | Yes |
Chapter VIII: Verification and Trust Protocols
Securing communication extends beyond encryption: trust must be established and maintained.
1. Key Verification
- Use out-of-band verification (in-person, phone call).
- Cross-check fingerprints displayed by software.
2. Revocation Protocol
- Generate revocation certificate immediately after key creation:
gpg --output revoke.asc --gen-revoke your.email@example.com- Store revocation certificate in secure offline storage.
- If key compromise occurs, publish revocation certificate.
3. Key Backup
- Export private keys encrypted with strong passphrases.
- Store backups in multiple secure locations (e.g., encrypted USB drives in secure vaults).
Chapter IX: Practical Operational Security (OPSEC) Recommendations
Encryption is one pillar; operational security fortifies the entire structure.
| Action | Instruction |
|---|---|
| Use strong passphrases | Minimum 20 characters, no dictionary words |
| Limit metadata exposure | Use Signal for messaging; avoid sending sensitive info via unencrypted channels |
| Regularly rotate keys | At least every 2 years or after suspected compromise |
| Secure device environment | Full disk encryption, latest OS patches, anti-malware |
| Isolate cryptographic operations | Use dedicated devices or virtual machines |
Chapter X: Appendix – Sample Commands and Scripts
A. Batch Encrypt Multiple Files with PGP
for file in *.txt; do
  gpg --armor --encrypt --recipient recipient.email@example.com "$file"
done
B. Automate Key Backup
gpg --export-secret-keys your.email@example.com | gpg --symmetric --cipher-algo AES256 -o privatekey_backup.gpgConclusion
The sacred art of digital defense is not merely a technical endeavor, but a solemn duty to preserve truth, freedom, and life itself. The protocols herein are your battle gear. Master them with discipline and reverence.
Remember, encryption without trust and operational security is armor without a shield. Guard your keys as fiercely as your life. Your adversaries are relentless; your vigilance must be absolute.
For advanced cryptographic mathematics, quantum-resistant algorithms, and decentralized key management, consult Volume XI: Cryptographic Frontiers. For comprehensive threat modeling and incident response, see Volume VIII: Cybersecurity Tactics.
_End of Volume VI_
<!-- SECTION 23 -->
Volume VI: Operational Security (OPSEC) Protocols
The Warrior’s Manual: Complete Self-Defense, Strategy, Tactics, and Protective Arts
Chapter I: Device Sanitization Protocols
The sanctity of your operational devices is paramount. A compromised device is a breach in your armor, an exposed artery in the battlefield of shadows. Device sanitization is the ritual cleansing that precedes every mission and follows every engagement. This chapter provides the precise, actionable steps to ensure no trace, no residue, no remnant of your presence remains on your hardware or software.
Section 1: Physical Device Sanitization
Objective: Remove physical contaminants and forensic residues from all devices (smartphones, laptops, USB drives, external hard drives, and IoT equipment) to prevent physical and chemical forensic recovery.
Materials Required:
| Material | Purpose | Specifications |
|---|---|---|
| Isopropyl Alcohol (99%) | Dissolves oils, removes fingerprints | Laboratory grade, anhydrous |
| Microfiber Cleaning Cloths | Non-abrasive surface cleaning | Lint-free |
| Compressed Air Canisters | Dust and particulate removal | Non-flammable, food-grade |
| UV-C Light Sanitizer | DNA and microbial degradation | Wavelength 254 nm, 30 mins exposure |
| Anti-static Wrist Strap | Prevents electrostatic discharge | Resistance < 1 MΩ |
| Soft-bristle Brushes | Crevice cleaning | Nylon bristles only |
Step-by-Step Procedure for Physical Sanitization:
- Power Down and Disconnect: Completely power off the device; remove all external power sources and detachable batteries.
- Static Safety: Attach the anti-static wrist strap to a grounded metal surface and connect to your wrist to prevent ESD damage.
- Initial Dust Removal: Use compressed air canisters in short bursts (2-3 seconds) to clear dust from vents, ports, and keyboard crevices. Maintain 15 cm distance to avoid condensation.
- Surface Cleaning: Dampen microfiber cloth with 99% isopropyl alcohol (do not saturate). Wipe all external surfaces, including screens, casing, and cables. Avoid excessive moisture near ports.
- Crevice Cleaning: Employ soft-bristle brush lightly dipped in isopropyl alcohol to clean around buttons, ports, and seams.
- UV-C Exposure: Place device inside UV-C light sanitizer chamber for a minimum of 30 minutes to degrade DNA and microbial traces. Rotate device halfway through exposure for even coverage.
- Drying and Inspection: Allow device to air dry for 15 minutes in a clean, dust-free environment. Visually inspect for residue or moisture.
- Reassembly: Reinsert batteries and reconnect power source. Verify device functionality without network connection.
Section 2: Digital Device Sanitization
Objective: Eliminate all software artifacts, metadata, and cached data that could betray activities or identities. This is the digital exorcism of your device.
Materials Required:
| Software or Tool | Purpose | Notes |
|---|---|---|
| VeraCrypt | Encrypted container creation | Use for secure data storage |
| BleachBit | Secure file and cache deletion | Open-source, CLI and GUI |
| DBAN (Darik's Boot and Nuke) | Secure disk wiping | Use for full disk sanitization |
| Tails OS | Secure live OS for browsing | Use for clean session operations |
| Metadata Anonymizer | Strip metadata from files | Verify compatibility with file types |
| Network Firewall (pfSense) | Network traffic control | Use for traffic filtering |
Step-by-Step Procedure for Digital Sanitization:
A. Pre-Operation Disk Preparation
- Backup Critical Data: Transfer essential files to encrypted VeraCrypt containers on removable storage.
- Full Disk Wipe: Boot from DBAN USB and perform a 7-pass DoD 5220.22-M wipe on all drives intended for sensitive operations. This destroys all recoverable data.
- Partitioning: After wiping, partition drives minimally with encrypted volumes only; no unencrypted partitions remain.
B. Routine Secure Cleaning
- Clear Caches and History: Use BleachBit with the following settings:
- Web browsers: cache, cookies, history, saved passwords
- System logs: clear all event logs and temporary files
- Application caches: clear all temporary storage for messaging and email clients
- Metadata Stripping: Prior to sharing any documents or images, run files through Metadata Anonymizer tools to remove EXIF data, author names, GPS tags, and timestamps.
- Secure Deletion of Files: When deleting sensitive files, use BleachBit or command-line shred with a minimum of 35 passes to prevent recovery.
- Encrypted Containers: Store all sensitive data inside VeraCrypt volumes with two-factor access controls (password + keyfile).
- Operating System Hygiene: Use privacy-focused OS such as Tails for all browsing and communication activities. Avoid persistent storage unless encrypted.
C. Post-Operation Cleansing
- Session Data Removal: Upon session completion, immediately clear RAM and pagefile using secure memory wiping tools.
- Network Log Sanitization: Clear router and firewall logs. If using pfSense or equivalent, configure auto-rotation and deletion of logs every 24 hours.
- Device Reboot: Reboot device into a clean environment (preferably live OS) before any future operations.
Chapter II: Secure Browsing Protocols
Your digital footprint is your trail in the wilderness of the net. Every click, every query, every download leaves a trace. This chapter is your map and compass to navigate the hostile terrain of global networks without detection or traceability.
Section 1: Network Setup and Anonymity
Materials Required:
| Material/Software | Purpose | Notes |
|---|---|---|
| VPN Service (No Logs) | Encrypt and mask IP | Use multi-hop VPN configurations |
| Tor Browser | Anonymized browsing | Use bridges to avoid censorship |
| Tails OS | Secure live OS for browsing | Use for ephemeral sessions |
| Firewall (pfSense or OPNsense) | Traffic filtering and logging control | Harden to reject all non-whitelisted traffic |
| MAC Address Spoofer | Prevent hardware traceability | Spoof MAC address regularly |
| DNSCrypt or DNS-over-HTTPS | Secure DNS queries | Prevent DNS leakage |
Step-by-Step Network Anonymity Setup:
- Hardware Preparation: Use devices with removable network cards. Before operation, spoof MAC addresses with randomized values.
- Firewall Configuration: Set firewall to block all outbound traffic except through VPN or Tor ports. Configure pfSense to log minimal data and auto-delete logs every 6 hours.
- VPN Connection: Connect to a trusted, no-logs VPN provider with multi-hop capability, preferably via an encrypted bridge. Validate no IP or DNS leaks using online tools.
- DNS Security: Route DNS queries through DNSCrypt or DNS-over-HTTPS to prevent ISP or adversary DNS interception.
- Tor Usage: Launch Tor Browser with bridges enabled to prevent traffic blocking. Use only HTTPS websites and disable scripts and plugins.
- Session Isolation: Use Tails OS booted from a USB drive for browsing sessions. Never use persistent storage unless encrypted and wiped after use.
- Operational Procedure:
- Power on device with MAC spoofed.
- Connect to VPN, verify anonymity.
- Use Tor Browser for all sensitive browsing tasks.
- Never log into personal accounts or reuse credentials.
- After session, close all browsers, clear RAM and caches, reboot into clean OS.
Section 2: Browser and Application Hardening
| Vulnerability | Mitigation Strategy | Implementation Details |
|---|---|---|
| Browser Fingerprinting | Use the Tor Browser with default security settings | Avoid plugins and extensions |
| JavaScript Exploits | Disable JavaScript or use NoScript plugin | Enable only on trusted sites |
| Cookie Tracking | Use cookie managers to block third-party cookies | Clear cookies after every session |
| WebRTC IP Leakage | Disable WebRTC and use VPN to mask IP | Modify browser settings |
| Cache and History Persistence | Use private browsing/incognito mode or Tails OS | Clear all caches post-session |
Chapter III: Metadata Protection Protocols
Metadata is the invisible signature embedded in files, communications, and digital shadows. This chapter instructs the warrior on eradicating metadata to render files and communications opaque to the adversary’s gaze.
Section 1: Metadata Identification and Removal
| File Type | Common Metadata Fields | Removal Tools | Notes |
|---|---|---|---|
| Images (JPEG, PNG) | EXIF data, GPS coordinates, camera model | ExifTool, Metadata Anonymizer | Batch processing supported |
| Documents (PDF, DOCX) | Author, creation date, revision history | PDF Redactor, LibreOffice metadata remover | Save as flat PDF to remove metadata |
| Audio (MP3, WAV) | Artist, album, recording device info | Mp3tag, Audacity metadata editor | Remove ID3 tags |
| Video (MP4, AVI) | Encoding software, GPS, timestamps | FFmpeg metadata stripping | Re-encode to remove embedded data |
Step-by-Step Metadata Removal:
- Identify file type before transmission or archiving.
- Run appropriate metadata removal tool:
- For images, execute:
exiftool -all= image.jpg- For documents, open in LibreOffice, select "File > Properties > Remove Personal Information" then save as PDF.
- For audio, open in Mp3tag, select all tags, and delete.
- For video, re-encode with FFmpeg stripping metadata:
ffmpeg -i input.mp4 -map_metadata -1 -c:v copy -c:a copy output.mp4- Verify removal by inspecting file properties or re-running exiftool.
- For batch operations, script metadata removal for entire folder before transmission.
Section 2: Communication Metadata Minimization

| Communication Medium | Metadata Risk | Mitigation Protocols |
|---|---|---|
| Headers reveal IP, timestamps, routing | Use PGP encryption, send via Tor, strip headers with specialized tools | |
| Instant Messaging | Message timestamps, device info | Use Signal or Briar with disappearing messages and minimal metadata |
| Voice Calls | Call logs, caller ID, timestamps | Use encrypted VoIP over Tor or Signal, delete logs after calls |
| File Transfers | Filename, timestamps, transfer logs | Rename files, strip metadata, use encrypted containers |
Chapter IV: Common OPSEC Mistakes and Mitigation Strategies
This table is your battlefield checklist. Each mistake is a chink in your armor. Mitigate them with rigor.
| Common OPSEC Mistake | Risk Level | Consequence | Mitigation Strategy |
|---|---|---|---|
| Using personal devices for sensitive ops | Critical | Device compromise, identity exposure | Use dedicated, sanitized devices only |
| Reusing usernames/passwords | High | Credential compromise, correlation attacks | Use unique, randomly generated credentials |
| Neglecting to clear browser caches | High | History reconstruction, activity tracking | Use Tails OS, clear caches after each session |
| Ignoring MAC address spoofing | Medium | Hardware tracking, device identification | Spoof MAC before each network connection |
| Failing to encrypt data at rest | Critical | Data seizure and forensic recovery | Use VeraCrypt or equivalent for all sensitive data |
| Revealing metadata in shared files | High | Location and identity exposure | Always strip metadata before sharing |
| Using unsecured Wi-Fi networks | High | MITM attacks, data interception | Use trusted VPN and avoid public Wi-Fi |
| Not controlling VPN and Tor order | Medium | IP leaks and deanonymization | Connect VPN before Tor; test for leaks |
| Leaving communication logs intact | High | Activity reconstruction | Enable disappearing messages; delete logs |
| Overlooking DNS leaks | Medium | ISP surveillance and blocking | Use DNSCrypt or DNS-over-HTTPS |
Chapter V: Integrated Protocol for Minimizing Digital Footprint and Avoiding Tracking
Step-by-Step Comprehensive Protocol:
- Device Preparation:
- Sanitize device physically and digitally per Chapter I protocols.
- Spoof MAC address using platform-specific tools (e.g., macchanger for Linux).
- Boot device into Tails OS or equivalent live environment.
- Network Anonymity Setup:
- Connect to VPN (multi-hop, no logs).
- Verify no IP or DNS leaks with trusted online services.
- Launch Tor Browser with bridges enabled; disable scripts and plugins.
- Route all DNS queries through DNSCrypt or DNS-over-HTTPS.
- Operational Security During Use:
- Use unique, one-time-use usernames and passwords; generate with secure password manager.
- Avoid logging into personal accounts or revealing personal data.
- Disable WebRTC and block all unsolicited connections via firewall.
- Use encrypted messaging services with disappearing messages for communications.
- File Handling:
- Strip all metadata from files before upload or sharing.
- Store files only in encrypted VeraCrypt volumes; do not leave unencrypted copies.
- Rename files to generic names, avoiding timestamps or identifiable patterns.
- Post-Operation Cleansing:
- Clear all caches, cookies, history, and temporary files using BleachBit.
- Wipe RAM and swap/pagefiles with secure memory wipe tools.
- Close all applications and reboot device into a clean OS environment.
- Delete or securely archive logs on network devices; configure auto-deletion.
Conclusion
The protocols within this volume are not optional. They are the sacred rites and ironclad defenses against the ever-watchful eyes of adversaries. Master these steps, implement with unwavering discipline, and your digital presence will become a ghost in the machine — invisible, untouchable, and deadly effective.
The warrior who neglects operational security invites ruin; the warrior who embraces it commands the battlefield of shadows.
For cross-referenced procedures on encrypted communications, see Volume VIII: The Communications Codex, Chapter III. For advanced cryptographic key management, consult Volume VII: Cryptographic Arts, Chapter IV.
<!-- SECTION 24 -->
The Complete Practitioner's Codex, Volume VI: Counter-Hacking and Intrusion Detection
Chapter I: Identifying Signs of Compromise
In the sacred art of digital defense, recognizing the subtle signs of intrusion is paramount. The adversary is relentless, employing stealth and guile to breach your sanctum. This chapter imparts the foundational knowledge and practical procedures necessary to detect compromise before devastation.
1. Systematic Indicators of Compromise (IoCs)
Every intrusion leaves trace elements—anomalous artifacts, behavioral deviations, or data anomalies. The following table enumerates primary malware types, their characteristic symptoms, and immediate countermeasures.
| Malware Type | Symptoms | Immediate Countermeasures |
|---|---|---|
| Ransomware | Sudden file encryption, ransom notes, inaccessible data | Isolate network, disconnect drives, preserve logs |
| Rootkit | Hidden processes, blocked security tools, unusual kernel activity | Boot into safe mode, use rootkit removal tools |
| Trojan Horse | Unexpected software installation, unauthorized outbound traffic | Quarantine infected system, scan with updated AV |
| Keylogger | Slow keyboard response, unexplained network connections | Disable suspicious input devices, conduct memory dump |
| Botnet Agent | High outbound traffic, system used in DDoS attacks | Block suspicious IPs, monitor network traffic, isolate |
| Worm | Rapid self-replication, propagation to network devices | Disable network shares, scan all connected devices |
| Backdoor | Unauthorized remote access, open ports without cause | Close open ports, audit remote access logs |
| Spyware | Data leakage, slow system performance, unauthorized data access | Network isolation, data flow monitoring, AV scan |
2. Behavioral and Systematic Signs of Compromise
Learn to detect compromise through methodical inspection of system behavior and logs.
- Unusual Network Traffic: Sudden spikes or irregular outbound connections to unknown IPs.
- Unauthorized Account Activity: New user accounts, escalated privileges without approval.
- System Performance Degradation: Unexpected CPU, memory, or disk usage increases.
- Altered System Files or Settings: Changes in system files, registry alterations, or disabled security software.
- Anomalous Log Entries: Repeated failed login attempts, unexplained system reboots, or audit log gaps.
3. Step-by-Step Procedure for Initial Compromise Recognition
- Monitor Network Traffic Patterns a. Use packet analysis tools (e.g., Wireshark, tcpdump).
b. Identify unknown or suspicious IP addresses and ports.
c. Document timestamp, source, destination, protocol, and volume.
- Inspect System Logs a. Access system event logs (Windows Event Viewer, Linux syslog).
b. Filter for critical errors, failed authentication attempts, and system changes.
c. Pay special attention to entries occurring outside normal operation hours.
- Verify Account Integrity a. List all active user accounts.
b. Check for unauthorized privilege escalations.
c. Disable or lock suspicious accounts immediately.
- Analyze System Performance Metrics a. Use system monitoring tools (Task Manager, top, htop).
b. Identify abnormal resource usage spikes aligned with suspicious activities.
c. Correlate with network and log anomalies.
- Scan for Known Malware Signatures a. Employ updated antivirus and anti-malware tools.
b. Use heuristic and signature-based detection methods.
c. Quarantine or isolate detected threats.
Chapter II: Basic Forensic Techniques for Intrusion Analysis
To reclaim sovereignty over a compromised system, you must master the infernal art of digital forensics, extracting truth from chaos with surgical precision.
1. Preservation of Evidence
Preserving the integrity of digital evidence is non-negotiable. Follow these steps meticulously:
- Isolate the System a. Disconnect all network cables and disable wireless connectivity.
b. Avoid powering off unless instructed; volatile memory may hold critical evidence.
- Document the Scene a. Record system state, running processes, open network connections.
b. Take photographs or screenshots for visual record.
- Create Forensic Images a. Use bit-by-bit imaging tools (e.g., dd, FTK Imager).
b. Store images on secure, write-protected media.
c. Verify image integrity via hash functions (SHA-256 or SHA-1).
2. Memory Dump Acquisition
Volatile memory is a treasure trove of running malware and transient evidence.
- Execute Memory Capture a. Use trusted tools (e.g., DumpIt, LiME for Linux).
b. Store dump securely with checksums.
- Analyze Memory Dump a. Utilize Volatility Framework or Rekall.
b. Identify hidden processes, injected code, and network artifacts.
3. Log Analysis Protocol
Logs reveal the timeline and method of intrusion.
- Centralize Logs a. Aggregate logs from system, applications, and network devices.
b. Use SIEM tools if available.
- Correlate Events a. Align timestamps across logs for a unified timeline.
b. Identify lateral movement, privilege escalations, and exfiltration attempts.
4. File System Forensics
- Examine File Metadata a. Check file timestamps (created, modified, accessed).
b. Identify anomalies such as future-dated files or time gaps.
- Detect Hidden or Altered Files a. Use tools like Sleuth Kit or Autopsy.
b. Look for alternate data streams and rootkit hiding techniques.
Chapter III: Incident Containment and Response Protocols
Swift, decisive action is required to contain the breach, mitigate damage, and restore sanctity.
1. Incident Containment Strategy
Primary Objective: Prevent further intrusion and data exfiltration while preserving forensic evidence.
Step-by-Step Containment Procedure
- Identify Scope of Compromise a. Determine affected systems and networks.
b. Map dependencies and critical assets.
- Isolate Affected Systems a. Physically disconnect or logically segment compromised devices.
b. Disable compromised accounts and remote access.
- Block Malicious Traffic a. Update firewall and IDS/IPS rules to block attacker IP addresses and ports.
b. Monitor network for persistent threats.
- Preserve Evidence a. Follow forensic preservation methods outlined in Chapter II.
2. Eradication and Recovery
Restoration requires the removal of all traces of compromise and validation of system integrity.
Step-by-Step Eradication Procedure
- Remove Malware a. Deploy updated antivirus and specialized removal tools.
b. Manually inspect and delete unauthorized files or processes.
- Patch Vulnerabilities a. Apply security patches and updates to OS, applications, and firmware.
b. Harden system configurations (disable unnecessary services, enforce least privilege).
- Reset Credentials a. Change all passwords related to compromised accounts.
b. Enforce multi-factor authentication.
- Monitor for Persistence a. Conduct repeated scans and behavioral monitoring.
b. Verify no backdoors or rootkits remain.
- Restore from Known Good Backups a. Validate backup integrity prior to restoration.
b. Restore systems in isolated environment for verification.
- Reintegrate System into Network a. Gradually reconnect isolated systems with enhanced monitoring.
b. Observe for anomalies before full operational resumption.
Chapter IV: Malware Taxonomy, Symptomatology, and Countermeasures
Mastery demands intimate knowledge of the enemy’s arsenal. The following comprehensive table provides detailed classifications, symptoms, and precise counteractions.
| Malware Type | Primary Symptoms | Detection Tools | Countermeasures |
|---|---|---|---|
| Ransomware | Encrypted files with ransom notes, sudden file access denial | Crypto-monitor, AV scans | 1. Isolate infected machines immediately. 2. Retain encrypted files for analysis. 3. Restore from verified backups. |
| Rootkit | Hidden processes, disabled security tools, kernel-level anomalies | Rootkit scanners (GMER, chkrootkit) | 1. Boot from trusted media. 2. Use rootkit removal utilities. 3. Reinstall OS if undetectable. |
| Trojan Horse | Unauthorized software, unexpected outbound connections | Network IDS, AV software | 1. Quarantine infected hosts. 2. Remove trojan binaries. 3. Audit system for backdoors. |
| Keylogger | Laggy input, unexplained network activity, data leaks | Memory analysis, keystroke monitors | 1. Disable suspicious devices. 2. Conduct memory dump analysis. 3. Install anti-keylogger software. |
| Botnet Agent | High outbound connections, system participating in DDoS | Network traffic analyzers | 1. Block C2 server IPs. 2. Disconnect compromised hosts. 3. Notify ISP for mitigation. |
| Worm | Self-replication, network spread, increased network congestion | Network scanning tools | 1. Disable sharing protocols. 2. Conduct network-wide malware scans. 3. Patch vulnerabilities exploited. |
| Backdoor | Unexpected open ports, unauthorized remote sessions | Port scanners, log audits | 1. Close unauthorized ports. 2. Remove backdoor files. 3. Harden remote access controls. |
| Spyware | Data leakage, slow system performance, unauthorized data transmission | Network monitors, AV scans | 1. Isolate infected device. 2. Remove spyware components. 3. Monitor outgoing data streams. |
Chapter V: Incident Response Workflow Summary Table
This table condenses the entire incident response lifecycle into discrete, actionable steps with responsible parties and execution considerations.
| Phase | Action | Responsible | Tools/Resources | Notes |
|---|---|---|---|---|
| Preparation | Establish monitoring and response team | Security Team | IDS/IPS, SIEM, Policy Documents | Establish baseline system behavior |
| Identification | Detect signs of compromise | SOC Analysts | Log analysis tools, network monitors | Confirm events meet compromise criteria |
| Containment | Isolate compromised systems | Incident Response Team | Network segmentation tools, firewalls | Preserve forensic evidence, prevent lateral movement |
| Eradication | Remove malware and vulnerabilities | Security Engineers | AV tools, patch management systems | Verify complete removal |
| Recovery | Restore systems and validate integrity | IT Operations | Backup systems, monitoring tools | Monitor for reinfection |
| Lessons Learned | Conduct post-incident analysis | Entire Response Team | Incident reports, root cause analysis tools | Update policies and defenses based on findings |
Appendix: Detailed Step-by-Step Incident Containment and Recovery Procedures
Incident Containment Procedure
- Alert and Assemble Response Team a. Notify all relevant personnel immediately.
b. Assign roles: Incident Commander, Forensics Lead, Network Analyst.
- Determine Impacted Assets a. Use network scans to identify compromised hosts.
b. Prioritize critical systems (databases, authentication servers).
- Isolate Affected Hosts a. Physically disconnect network interfaces or enforce VLAN isolation.
b. Disable wireless interfaces.
- Block Malicious Communications a. Use firewall rules to block attacker IPs and suspicious ports.
b. Update IDS signatures to detect attacker patterns.
- Preserve Evidence a. Create forensic images of affected drives.
b. Acquire volatile memory dumps.
- Communicate with Stakeholders a. Report status to management and legal teams.
b. Prepare for possible law enforcement involvement.
Incident Recovery Procedure
- Clean Infected Systems a. Run full antivirus and anti-malware scans.
b. Manually inspect and remove suspicious artifacts.
- Apply Patches and Hardening a. Install all critical security updates.
b. Harden configurations (disable unused services, enforce access controls).
- Credential Renewal a. Change all relevant passwords.
b. Enforce multi-factor authentication.
- Restore Systems a. If necessary, restore from verified, pre-infection backups.
b. Validate system integrity post-restoration.
- Monitor Post-Recovery a. Increase logging and real-time monitoring.
b. Look for signs of reinfection or persistent threats.
- Conduct Post-Incident Review a. Document the incident, response actions, and lessons learned.
b. Update incident response plans and defenses accordingly.
This volume stands as a beacon in the shadowed realm of cyber warfare. The knowledge herein is sacred, forged in the crucible of countless battles. Approach these teachings with reverence and rigor, for mastery is not given, it is earned through discipline and relentless vigilance. The digital sanctum is yours to defend—guard it with unwavering resolve.
<!-- SECTION 25 -->
Volume VI: Digital Identity Protection and Anonymity
Chapter I: Managing Online Personas, VPN Use, and Anonymous Browsing
Section 1: Introduction to Digital Identity and Anonymity
In the crucible of digital warfare, your identity is your fortress. To survive and operate within hostile cyber environments, mastery over your digital personae is non-negotiable. This chapter imparts advanced protocols for constructing, managing, and sustaining multiple pseudonymous identities. It empowers you to harness Virtual Private Networks (VPNs) and anonymous browsing techniques with surgical precision. These are not mere suggestions; these are lifelines for those who refuse to be tracked, profiled, or compromised.
Section 2: Constructing Pseudonymous Identities
A pseudonymous identity is a fully realized digital persona, bearing no traceable connection to your true self. It requires meticulous compartmentalization of personal data, communication channels, behavioral patterns, and digital footprints.
Step-by-Step Protocol for Creating a Pseudonymous Identity
Step 1: Define the Purpose and Scope
- Assign a clear operational objective for the pseudonym (e.g., forum participation, financial transactions, intelligence gathering).
- Determine the lifespan of the identity (short-term, medium-term, long-term). Longer lifespans demand stricter operational security (OPSEC).
Step 2: Generate a Non-Attributable Name
- Use a reputable pseudonym generator tool offline, ensuring it does not log or transmit data.
- Cross-check the generated name against common databases to avoid names linked to real individuals or known entities.
Step 3: Create Dedicated Email Accounts
- Use an encrypted email provider that requires minimal personal data (e.g., ProtonMail, Tutanota).
- Access the email service exclusively via a secure VPN or Tor network to prevent IP logging.
- Never reuse this email for other identities or your real persona.
Step 4: Establish Communication Channels
- Create separate messaging accounts on encrypted platforms (Signal, Session, Wire).
- Avoid platforms that require phone number verification; use temporary VoIP or burner numbers with strict time limits.
- Never communicate directly with your real contacts through pseudonymous channels.
Step 5: Develop Behavioral Consistency
- Script typical posting times, language style, and interaction methods to avoid pattern anomalies.
- Use a text analysis tool to compare your pseudonym’s output against your real writing style and adjust accordingly.
Step 6: Device and Network Separation
- Use a dedicated device or a virtual machine (VM) isolated from your primary system.
- Configure the VM to route all traffic through a VPN or Tor.
- Avoid cross-use of devices or networks between real and pseudonymous identities.
Step 7: Manage Digital Footprints
- Clear cookies, cached data, and local storage after every session.
- Use privacy-focused browsers (e.g., Brave, Firefox with hardened settings) configured for maximized anonymity.
- Routinely audit your digital traces using tools like OSINT frameworks and Google dorking.
Section 3: VPN Use Protocols for Anonymity
Virtual Private Networks (VPNs) are indispensable tools for cloaking your IP address and encrypting data traffic. However, improper use renders them ineffective or worse, a liability.
VPN Selection Criteria Table

| Criterion | Requirement | Explanation |
|---|---|---|
| No-Log Policy | Verified through independent audits | Ensures no user activity data is stored or shared |
| Jurisdiction | Outside 5/9/14 Eyes alliances | Reduces risk of forced data disclosure |
| Encryption Standards | AES-256 or higher, OpenVPN/IKEv2 protocols | Provides military-grade encryption |
| Multi-Hop Capability | Available and configurable | Routes traffic through multiple servers for extra obfuscation |
| Kill Switch | Mandatory | Prevents IP leaks on VPN failure |
| Payment Anonymity | Supports cryptocurrency or cash payments | Avoids linkage through financial transactions |
| Server Diversity | Wide distribution across countries | Avoids single point of failure or correlation |
| Speed and Stability | High throughput, low latency | Maintains operational efficiency |
Step-by-Step VPN Setup and Usage Protocol
Step 1: Select and Purchase VPN Service
- Choose a VPN provider matching the above criteria.
- Use a burner email and anonymous payment method.
Step 2: Install VPN Software
- Download the client from the official website over a secure connection.
- Verify file integrity using PGP signatures or hash checksums.
Step 3: Configure VPN Settings
- Enable kill switch functionality in the VPN client.
- Activate multi-hop routing if available.
- Disable IPv6 and DNS leak features within the client or manually in your OS settings.
Step 4: Connect to VPN Server
- Select a server geographically distant but with good latency.
- Confirm IP address and DNS have changed using services like ipleak.net or dnsleaktest.com.
Step 5: Integrate VPN with Browsers and Applications
- Use browser extensions only if they enforce VPN usage strictly and do not bypass it.
- Route all applications through the VPN, configuring firewall rules to block non-VPN traffic.
Step 6: Regularly Renew VPN Credentials and Rotate Servers
- Change VPN login credentials every 30 days.
- Rotate through different servers to avoid pattern detection.
Section 4: Anonymous Browsing Techniques
Anonymous browsing aims to prevent traceability of your online actions back to your real identity. It requires a layered approach combining technological tools and behavioral discipline.
Table: Common Anonymous Browsing Tools and Their Profiles
| Tool | Function | Strengths | Weaknesses | Recommended Use Case |
|---|---|---|---|---|
| Tor Browser | Onion routing, multi-hop proxy | High anonymity, free, widely supported | Slower speeds, vulnerable to exit node monitoring | Sensitive communications, forum access |
| Brave Browser | Privacy-focused Chromium fork | Built-in ad/tracker blocking | Does not anonymize IP by default | Casual anonymous browsing with VPN |
| Tails OS | Live OS with Tor integration | Leaves no traces on host system | Requires dedicated USB boot | High-risk operations requiring full anonymity |
| VPN + Browser | VPN encryption with standard browser | Fast, hides IP from ISP | Vulnerable to browser fingerprinting | General browsing with moderate anonymity |
| Whonix | VM-based Tor gateway and workstation | Isolates traffic through Tor | Complex setup, resource-heavy | Advanced operational security setups |
Step-by-Step Anonymous Browsing Protocol
Step 1: Choose the Appropriate Tool
- Analyze operational needs and select the tool from the table above.
Step 2: Prepare Your Environment
- For Tor or Tails, download official images and verify signatures.
- For VPN + Browser, ensure VPN is active and properly configured.
Step 3: Harden Browser Settings
- Disable JavaScript unless absolutely required; use NoScript or uMatrix extensions.
- Disable WebRTC and Flash plugins to prevent IP leakage.
- Clear cookies and cache before and after each session.
- Adjust HTTP headers to minimize fingerprinting (refer to Volume VII: Browser Hardening).
Step 4: Manage User Behavior
- Avoid logging into real accounts or revealing personal information.
- Use randomized usernames and avatars consistent with your pseudonym.
- Vary posting times to mimic human behavioral patterns.
Step 5: End Session Cleanly
- For Tails, shut down the OS to erase RAM-resident data.
- For browsers, close all tabs and restart with a fresh session or incognito mode.
Section 5: Protocols for Maintaining Pseudonymous Identities
A pseudonymous identity is a living construct; it demands active maintenance to avoid exposure or correlation with your true identity or other pseudonyms.
Step-by-Step Identity Maintenance Protocol
Step 1: Continuous OPSEC Auditing
- Weekly review of all accounts, verifying no data leaks or unusual access patterns.
- Use OSINT tools to scan for accidental disclosures.
Step 2: Segmentation of Activities
- Assign discrete operational roles to each identity to prevent cross-contamination.
- Use separate devices or virtual machines per identity.
Step 3: Digital Hygiene Measures
- Routinely clear browser data and use privacy-focused DNS servers (e.g., Quad9, Cloudflare 1.1.1.1).
- Avoid reusing passwords; use strong, unique passwords managed by an offline password manager.
Step 4: Behavioral Consistency and Variability
- Maintain consistent timezone and activity hours to avoid suspicion.
- Occasionally introduce random shifts in behavior patterns to mimic natural variation.
Step 5: Secure Backup and Recovery
- Encrypt all identity credentials and store backups offline in multiple secure locations.
- Implement recovery protocols that avoid revealing your true identity or linking other pseudonyms.
Section 6: Risks, Threat Models, and Countermeasures
Understanding risk vectors allows preemption of compromise. Below is a compendium of common risks with their countermeasures.
| Risk | Description | Countermeasures | Severity Level |
|---|---|---|---|
| IP Address Leakage | VPN or browser leaks real IP address | Use kill switch, disable WebRTC, verify leaks regularly | Critical |
| Browser Fingerprinting | Unique browser configurations reveal identity | Harden browser, use anti-fingerprinting extensions | High |
| Data Correlation Across Identities | Similar behaviors or reused information link pseudonyms | Strict compartmentalization, behavioral scripts | Critical |
| Malware and Keyloggers | Capture credentials and activity | Use dedicated clean devices, install anti-malware tools | Critical |
| Social Engineering | Attackers exploit human error to extract data | OPSEC training, minimal information disclosure | High |
| VPN Provider Compromise | VPN logs or servers seized by authorities | Select audited no-log providers, use multi-hop VPN | High |
| Exit Node Monitoring (Tor) | Tor exit nodes sniff unencrypted traffic | Use end-to-end encryption, avoid sensitive transactions | Medium |
Section 7: Summary of Best Practices
| Practice | Description | Priority Level |
|---|---|---|
| Strict Identity Segmentation | Never mix personal and pseudonymous data | Highest |
| Use Multi-layered Anonymity Tools | Combine VPN, Tor, and privacy browsers | Highest |
| Behavioral Discipline | Consistent yet variable operational behaviors | High |
| Regular OPSEC Audits | Scan for leaks and anomalies weekly | High |
| Use Encrypted Communications | Always prefer end-to-end encrypted platforms | Highest |
| Avoid Persistent Identifiers | Disable cookies, fingerprinting, and metadata sharing | High |
| Employ Device Isolation | Use dedicated VMs or hardware for each identity | Highest |
Appendix A: Tool Recommendations and Configuration Summary
| Tool Name | Category | Recommended Configuration | Notes |
|---|---|---|---|
| ProtonMail | Email Provider | Access via VPN or Tor; 2FA enabled | Strong encryption, minimal logs |
| Signal | Messaging | Use burner numbers; enable disappearing messages | End-to-end encryption |
| NordVPN | VPN Service | Multi-hop enabled; kill switch on | Independently audited no-logs |
| Tor Browser | Anonymous Browser | Default settings hardened; NoScript enabled | Use bridges if Tor blocked |
| KeePassXC | Password Manager | Store offline, encrypted database | Use strong master password |
| Tails OS | Live OS | Boot from verified USB; no persistent storage | Maximum operational security |
| uMatrix/NoScript | Browser Extensions | Block scripts, trackers, and fingerprinting | Customize per site |
Closing Reverence
The digital shadows you inhabit must be guarded with unwavering vigilance. The protocols herein are your shield and sword in a realm where every byte can betray. Master these rituals with discipline and respect for the sacred trust of anonymity. Failure is not an option; your survival depends upon it.
For further encryption methodologies and communication strategies, see Volume VII: Cryptographic Sanctum and Volume VIII: Secure Communications. For device hardening, consult Volume IX: Fortress Hardware Protocols.
<!-- SECTION 26 -->
Volume VII: Psychological Resilience – Entity Identification and Deliverance Protocols
Introduction
This volume serves as an unyielding compendium of sacred warfare against malign spiritual forces. The knowledge herein is sanctified, arduous, and preserved for the resolute warrior who understands that true battle encompasses both the seen and unseen. Herein you will find the precise protocols for recognizing spiritual attacks, identifying entity types, and executing deliverance techniques with surgical precision. This is not a mere theological discourse but a tactical manual designed for immediate implementation in life-or-death spiritual confrontation.
Chapter I: Recognizing Spiritual Attacks
Spiritual attacks manifest through sensory distortion, emotional upheaval, and energetic interference. The warrior must develop acute perception calibrated to detect these incursions before physical or mental devastation occurs.
Signs of Spiritual Attack
| Symptom Category | Observable Manifestations | Immediate Action Required |
|---|---|---|
| Sensory Distortion | Sudden unexplained noises, shadows in peripheral vision, distorted reflections | Engage protective prayers immediately |
| Emotional Upheaval | Overwhelming fear, despair, rage, or confusion without cause | Initiate grounding and shielding ritual |
| Physical Symptoms | Unaccountable fatigue, cold sensations, pain without medical cause | Begin energetic cleansing protocol |
| Mental Intrusions | Invasive thoughts, compulsions, or nightmares | Perform binding prayers and invoke sanctified barriers |
| Environmental Signs | Flickering lights, sudden drops in temperature, malfunctioning electronics | Activate sanctified space and alert team |
Step-by-Step Detection Protocol
- Establish a Quiet, Sacred Space: Remove distractions. Light a consecrated candle or oil lamp.
- Center Yourself: Employ deep breathing for 60 seconds to synchronize heart and mind (inhalation 4 seconds, hold 4 seconds, exhale 6 seconds).
- Scan for Sensory Intrusions: Close eyes, then open slowly, noting any distortions in light, shadows, or sounds.
- Perform Emotional Check: Mentally inventory current emotions. Any sudden spike in negative emotions without external cause is a red flag.
- Physical Survey: Conduct a rapid self-examination for unexplained physical symptoms.
- Invoke the Holy Name: Recite your chosen sacred name (e.g., "Yahweh," "El Shaddai," "Adonai") three times to heighten spiritual sensitivity.
- Document Findings: Use the accompanying field journal to log symptoms, times, and environmental conditions for correlation and pattern recognition.
Chapter II: Types of Entities – Characteristics and Classifications
Entities vary widely in origin, intention, and capability. Correct identification is paramount for effective deliverance. Below is the comprehensive classification with their diagnostic traits and recommended countermeasures.
| Entity Type | Origin | Primary Characteristics | Behavioral Patterns | Recommended Response |
|---|---|---|---|---|
| Daimon (Demonic) | Fallen spiritual beings | Intense malevolence, emits spiritual cold, induces despair | Aggressive, manipulative, invasive | Binding prayers, exorcism protocols |
| Poltergeist | Residual chaotic energy | Disruptive physical phenomena, rapid movement of objects | Unpredictable, non-corporeal | Cleansing rituals, salt barriers |
| Spirit of the Dead | Human souls in unrest | Sadness, cold spots, low-frequency hum | Seeks communication or resolution | Guided deliverance, prayer for peace |
| Trickster | Mischievous spiritual entity | Illusions, confusion, laughter or mockery | Non-lethal, distracting | Protective prayer, discernment |
| Elemental | Nature spirit (earth, fire) | Corresponds to natural elements, fluctuating temperature | Neutral to hostile | Elemental balance rituals |
| Possessing Entity | Spirits seeking control | Loss of personal control, voice changes, physical anomalies | Direct control over host | Immediate binding and exorcism |
Chapter III: Deliverance Techniques
Deliverance is a sacred science combining prayer, binding, and cleansing to expel malign entities and restore spiritual integrity. The following protocols are to be executed with unwavering faith and precision.
Section A: Prayer Protocols
Prayer is the cornerstone of deliverance. It must be structured, deliberate, and infused with spiritual authority.
Binding Prayer Protocol
- Preparation:
- Stand or kneel facing East.
- Hold a consecrated object (cross, anointed oil, or blessed water).
- Invocation:
- Recite the following with deliberate enunciation:
     By the power of the Almighty [Name of God], I bind every unclean spirit,
     every demon, every force of darkness that seeks to afflict this vessel.
In the name of [Sacred Name], I command you: depart and never return.- Seal the Binding:
- Trace the sign of the cross over the afflicted area or over the space.
- Sprinkle blessed water in a circle around the subject.
- Repetition:
- Repeat the invocation thrice, increasing volume and conviction.
- Closure:
- Offer a prayer of protection and gratitude for spiritual assistance.
Cleansing Prayer Protocol
- Establish Sacred Space: Circle the area with salt or blessed earth.
- Recite Psalm 91 or equivalent protection psalm.
- Invoke Holy Light:
   Light of the Most High, descend upon this vessel and cleanse all impurity,
all darkness, all spiritual torment. Let only holiness remain.- Use Anointed Oil: Apply with fingers in sweeping motions across the body or space.
- Close with Thanksgiving: Affirm the victory of light over darkness.
Section B: Binding Protocols
Binding is a tactical spiritual restraint preventing entity mobility and influence.
Step-by-Step Binding Ritual
- Identify the Target Area: Through discernment or prior symptoms.
- Prepare Binding Materials: Use a cord or ribbon blessed with salt and oil.
- Create a Binding Circle:
- Place the cord in a circle around the target or tie around the afflicted limb.
- Recite Binding Prayer (see above).
- Visualize Chains of Light: Mentally project bands of divine energy encircling the entity.
- Seal Binding:
- Tie a knot at the end of the cord.
- Insert a relic or symbol of faith into the knot.
- Maintain Vigil: Check binding integrity every 4 hours, reapply prayer as necessary.
Section C: Cleansing Protocols
Cleansing removes residual negativity and restores spiritual equilibrium.
Material Preparation
| Material | Purpose | Preparation |
|---|---|---|
| Salt | Purification and boundary | Blessed by prayer, stored in clean container |
| Anointed Oil | Sanctification and protection | Prepared by consecration with oil and prayers |
| Holy Water | Washing away impurity | See Volume VIII: The Water Codex, Chapter II |
| Incense (Frankincense/Myrrh) | Purifying atmosphere | Burned on charcoal or censer |
Step-by-Step Cleansing Ritual
- Set the Space:
- Arrange salt in a circle or line at thresholds.
- Light incense to fill the area with sacred fragrance.
- Begin with Prayer of Invitation:
Holy Spirit, come now. Fill this place with Your presence. Purify all that is unclean.- Sprinkle Holy Water: Use a branch of rosemary or a clean brush.
- Apply Anointed Oil: To the forehead, wrists, and feet if cleansing a person.
- Chant Psalm 51 or equivalent penitential psalm.
- Visual Sweep:
- With open hands, move slowly from head to toe, imagining a white light sweeping away darkness.
- Conclude with Thanksgiving and Seal the Space:
   By the power of the Most High, this space is sanctified and protected.
   No evil may enter here.
Chapter IV: Integrated Response Matrix
The following table cross-references entity types with observed symptoms and recommended deliverance actions for swift operational deployment.
| Entity Type | Key Symptoms | Primary Prayer Protocol | Binding Required | Cleansing Required | Notes |
|---|---|---|---|---|---|
| Daimon | Despair, cold spots, voice change | Binding Prayer + Exorcism | Yes | Yes | Requires team deliverance |
| Poltergeist | Object movement, noise | Cleansing Prayer | No | Yes | Environmental cleansing essential |
| Spirit of the Dead | Sadness, cold spots, communication attempts | Prayer for Peace | No | Yes | Gentle approach recommended |
| Trickster | Confusion, laughter | Protective Prayer | No | No | Vigilance and discernment crucial |
| Elemental | Temperature shifts, elemental signs | Elemental Balance Prayer | No | Yes | Neutralize excess elemental energy |
| Possessing Entity | Loss of control, aggressive behavior | Immediate Binding + Exorcism | Yes | Yes | Emergency protocol; seek aid |
Chapter V: Emergency Deliverance Protocol
When possession or aggressive spiritual attack is imminent, execute the following protocol without hesitation.
Emergency Deliverance Steps
- Isolate the Subject: Remove from crowds to a sacred, quiet environment.
- Establish Protective Circle: Salt boundary minimum 2 meters radius.
- Invoke the Highest Name:
In the name of [Highest Sacred Name], I command you to leave this vessel now!- Apply Binding Cord: Tie firmly around wrists while reciting binding prayer thrice.
- Anoint the Subject: Apply sanctified oil to forehead and chest.
- Conduct Exorcism Prayer: (Refer to Volume IX: The Exorcism Codex, Chapter IV).
- Begin Cleansing Ritual: As above, focusing on removing residual forces.
- Maintain Vigil: Monitor subject continuously for 72 hours.
- Document All Observations: Detailed logs are essential for follow-up and prevention.
Conclusion
This volume is a sacred arsenal against the forces that seek to undermine the warrior’s spiritual integrity. Mastery of entity recognition and deliverance protocols is non-negotiable for survival and victory. Each step, prayer, and ritual must be executed with unwavering faith and precision. Remember, the power flows not from the practitioner alone but from the sacred authority invoked.
The knowledge here passes from master to apprentice with solemn responsibility. Use it wisely, act decisively, and never relent. The eternal battle demands nothing less.
Appendix A: Sample Deliverance Prayer Texts
Binding Prayer Example
I bind you, unclean spirit, in the name of [Sacred Name].
You have no power here, no will but mine.
Depart now, return to the void from whence you came.
In the holy name of the Most High, Amen.
Cleansing Invocation
By fire and water, earth and air,
Cleanse this soul, make whole and fair.
No darkness here, no shadow cast,
Only light, forever last.
Amen.
Appendix B: Recommended Deliverance Tools and Preparation
| Tool | Preparation Instructions | Usage Notes |
|---|---|---|
| Salt | Collect natural sea salt. Purify by sunlight and prayer. | Use liberally in circles and lines. |
| Anointed Oil | Blend olive oil with frankincense and myrrh. Consecrate by prayer over 3 days. | Apply during prayers and rituals. |
| Holy Water | Obtain from consecrated springs or prepare per Volume VIII. | Essential for cleansing and blessing. |
| Candle | White beeswax candle preferred. Consecrate with prayers. | Use to establish sacred space. |
| Cord or Ribbon | Natural fibers blessed with salt and oil. | For binding rituals. |
| Incense | Frankincense and myrrh preferred. Burn on charcoal. | Purifies atmosphere. |
This concludes Volume VII, a bastion of sacred knowledge for the warrior’s spiritual arsenal. Proceed with reverence and resolve.
<!-- SECTION 27 -->
Volume VII: Spiritual Armor and Protection Prayers
Chapter I: Constructing Spiritual Defenses through Ritual, Prayer, and Scripture
In the sacred craft of the Practitioner, the forging of spiritual armor ranks equal to the honing of steel and the sharpening of wit. This armor is unseen yet impenetrable, wrought not of iron or leather but of faith, discipline, and divine resonance. This chapter imparts the complete, unabridged protocols to construct, maintain, and reinforce spiritual defenses through ritual, prayer, and sacred scripture. Each procedure is a vital link in the chainmail of the soul, designed to shield the bearer from the insidious forces that assail body and spirit alike.
Section 1: Foundations of Spiritual Armor Construction
The spiritual armor is a composite of three interdependent elements: Ritual Actions, Protective Prayers, and Scriptural Invocations. Each element is a pillar supporting the whole; neglect one and the armor falters.
1.1 Ritual Actions: The Physical Manifestation of Faith
Ritual actions are precise, repeatable gestures and sequences that manifest spiritual intent into the physical realm, aligning the practitioner’s spirit with divine protection.
Key Ritual Components:
- Preparation of sacred space
- Use of consecrated materials
- Specific bodily postures and hand signs
- Pronounced verbal declarations in sacred tongues or common speech
1.2 Protective Prayers: The Vocalized Shield
Prayers function as direct communication with divine forces. Proper articulation, tone, and timing exponentially increase efficacy.
1.3 Scriptural Invocations: The Anchors of Power
Recitation of scripture establishes a connection with sacred authority. The chosen verses resonate with spiritual power, warding off malevolent influence.
Section 2: Daily Spiritual Protection Protocol
The daily protocol is designed to establish a continuous state of spiritual readiness and resilience. This sequence must be observed each morning upon waking and repeated each evening before rest.
2.1 Materials Required:
| Item | Description | Preparation |
|---|---|---|
| White Candle | Pure beeswax preferred; 7 cm diameter, 15 cm height | Light with flint or purified match |
| Holy Water | For anointing and space sanctification | Prepare as per Volume VIII, Chapter II |
| Small Bowl of Salt | Natural sea salt, unrefined | Use dry, stored in a sealed container |
| Incense | Frankincense or myrrh resin | Burn on charcoal in a fireproof dish |
| Prayer Beads | 33 beads minimum, wood or bone | Hold in left hand during prayers |
| Sacred Texts | Biblia Sacra, Psalter, or equivalent | Open to designated verses |
2.2 Step-by-Step Daily Ritual
- Sanctify the Space 1.1. Light the white candle. Place it on a clean surface in front of you.
1.2. Sprinkle holy water in a clockwise circle around your immediate space, reciting:
_"By this holy water, I sanctify this place, warding off all evil and darkness."_
1.3. Light incense and allow the smoke to fill the space; inhale deeply three times.
- Self-Anointing 2.1. Dip your right index finger into the holy water.
2.2. Trace the sign of the cross on your forehead, chest, left shoulder, and right shoulder.
2.3. Recite aloud:
_"I am cloaked in the armor of the Almighty, shielded by His unyielding might."_
- Prayer Sequence 3.1. Hold prayer beads in your left hand. Begin reciting the Morning Protection Prayer (see Table 1).
3.2. Use one bead per complete recitation. Complete 3 full cycles (99 repetitions).
3.3. After the final cycle, recite the corresponding scripture verses aloud.
- Closing Invocation 4.1. Sprinkle salt over your palms, rub them together, then clap sharply three times.
4.2. Declare:
_"By salt and spirit, I seal this armor until the morrow."_
4.3. Extinguish the candle safely.
Section 3: Emergency Invocation Protocol
When confronted with immediate spiritual threat, the emergency invocation activates a rapid, potent shield. Use only in dire circumstances due to its intensity.
3.1 Materials Required:
| Item | Description | Preparation |
|---|---|---|
| Red Candle | Pure beeswax, 5 cm diameter, 10 cm height | Light with flint or purified match |
| Holy Water | Freshly consecrated | From Volume VIII, Chapter II |
| Iron Object | Small iron cross or nail | Hold firmly in hand |
| Prayer Scroll | Emergency Invocation Prayer written on parchment | Prepared in advance |
3.2 Step-by-Step Emergency Procedure
- Ignite the Red Candle 1.1. Light the candle immediately upon sensing threat.
1.2. Place it at eye level on a flat surface.
- Anoint the Iron Object 2.1. Dip the iron object into holy water.
2.2. Hold it firmly, focusing on the object as a conduit of divine power.
- Recite the Emergency Invocation Prayer (see Table 2) 3.1. Unroll the prayer scroll.
3.2. Recite loudly and clearly, with deliberate emphasis on each syllable.
- Seal the Invocation 4.1. Visualize a crimson barrier enveloping you.
4.2. Pass the iron object over your body from head to toe.
4.3. Extinguish the candle, never blowing it out; instead, use a snuffer or wet finger.
Section 4: Reinforcement Ritual Protocol
Reinforcement rituals are periodic augmentations of spiritual armor, required after significant spiritual strain or exposure to dark forces.
4.1 Materials Required:
| Item | Description | Preparation |
|---|---|---|
| Blue Candle | Pure beeswax, 6 cm diameter, 12 cm height | Light with purified match |
| Blessed Olive Oil | Used for anointing | Prepared as per Volume VIII |
| Fresh Rosemary Sprig | Symbol of remembrance and protection | Use fresh and undamaged |
| Sacred Text Book | Psalms, Proverbs, or equivalent | Open to designated passages |
4.2 Step-by-Step Reinforcement Ritual
- Prepare the Sacred Space 1.1. Place the blue candle centrally on a clean altar.
1.2. Light the candle, then anoint the altar surface with blessed olive oil using the rosemary sprig.
- Anoint the Practitioner 2.1. Dip the rosemary sprig into the blessed olive oil.
2.2. Trace the sign of the cross on the forehead, chest, and shoulders.
2.3. Recite:
_"Strengthen my armor, O Lord, with Thy eternal light."_
- Recite the Reinforcement Prayer (see Table 3) 3.1. Read aloud the prayer three times.
3.2. Follow immediately with recitation of the reinforcement scripture passages.
- Closing Affirmation 4.1. Extinguish the candle by snuffing.
4.2. Lock the sacred texts and materials securely for future use.
Section 5: Tables of Prayers, Scripture References, and Ritual Materials
Table 1: Daily Protection Prayer and Scripture
| Prayer Name | Text (Excerpt) | Scripture Reference |
|---|---|---|
| Morning Protection Prayer | _"Guardian of light, shield of purity, encircle me with Thy grace. Let no shadow breach this sanctum."_ | Psalm 91:4-6, Ephesians 6:11-17 |
| Evening Protection Prayer | _"As night descends, so does Thy protection rise. Cloak me in peace, ward off the unseen scourge."_ | Psalm 4:8, Isaiah 54:17 |
Table 2: Emergency Invocation Prayer and Scripture
| Invocation Name | Text (Excerpt) | Scripture Reference |
|---|---|---|
| The Crimson Shield | _"By fire and blood, by iron and faith, I command the darkness to recoil and fall away."_ | 2 Thessalonians 3:3, Psalm 18:2 |
| The Iron Barrier | _"Stand firm, O Lord, gird me with strength unbreakable, as iron forged in celestial flame."_ | Isaiah 41:10, Ephesians 6:14 |
Table 3: Reinforcement Prayer and Scripture
| Prayer Name | Text (Excerpt) | Scripture Reference |
|---|---|---|
| Armor Renewal Prayer | _"Renew within me the shield of faith, the helmet of salvation, the sword of the Spirit."_ | Ephesians 6:10-18, Psalm 144:1 |
| Light Fortification | _"Let Thy light burn bright within, an unquenchable flame against all that threatens my soul."_ | John 1:5, Psalm 27:1 |
Table 4: Ritual Material Properties and Preparation
| Material | Symbolic Meaning | Preparation Protocol | Usage Frequency |
|---|---|---|---|
| White Candle | Purity, divine light | Use pure beeswax; light with flint | Daily |
| Red Candle | Fire, divine power, emergency | Use pure beeswax; light with purified match | Emergency only |
| Blue Candle | Healing, reinforcement | Use pure beeswax; light with purified match | Weekly or post-exposure |
| Holy Water | Sanctification, cleansing | See Volume VIII, Chapter II | Daily |
| Salt | Purification, boundary setting | Use natural sea salt, unrefined | Daily |
| Incense (Frankincense/Myrrh) | Divine presence, purification | Burn on charcoal, inhale smoke deeply | Daily |
| Blessed Olive Oil | Anointing, strengthening | See Volume VIII | Weekly or post-exposure |
| Prayer Beads | Counting, focus | Hold in left hand during prayers | Daily |
| Iron Object | Divine strength, warding off evil | Anoint with holy water during emergency | Emergency only |
| Rosemary Sprig | Memory, protection | Use fresh; anoint with olive oil | Weekly or post-exposure |
Section 6: The Sacred Geometry of Ritual Movement
Each ritual gesture is imbued with sacred geometry, channeling divine power through precise movement.
6.1 Sign of the Cross Protocol
- Touch forehead, saying: _"In the name of the Father."_
- Touch chest, saying: _"And of the Son."_
- Touch left shoulder, saying: _"And of the Holy."_
- Touch right shoulder, saying: _"Spirit. Amen."_
Perform deliberately and solemnly, visualizing light tracing the path of the gesture.
6.2 Circular Space Sanctification
Sprinkling holy water clockwise draws a protective circle. Reverse (counterclockwise) breaks the circle and should never be performed during the ritual.
Section 7: Advanced Prayer Recitation Techniques
To maximize spiritual resonance, employ the following:
| Technique | Description | Application Frequency |
|---|---|---|
| Vocal Modulation | Vary pitch and volume to emphasize key phrases | During all prayer recitations |
| Breath Control | Inhale deeply before key invocations; exhale slowly | Throughout ritual |
| Silent Meditation | After vocal prayer, enter 5-minute silent focus to internalize | Post-ritual daily and reinforcement |
Section 8: Maintaining the Integrity of Spiritual Armor
8.1 Daily Maintenance
Repeat the daily protocol without fail. Avoid actions that break the sanctified circle.
8.2 Post-Exposure Cleansing
After exposure to spiritual or physical danger, perform the reinforcement ritual within 24 hours.
8.3 Storage of Sacred Items
Store candles, oils, scrolls, and texts in a dedicated, consecrated container. Avoid secular contamination.
Section 9: Summary of Protocol Timing and Frequency
| Protocol | Frequency | Duration | Notes |
|---|---|---|---|
| Daily Protection | Twice daily (morning/evening) | 20-30 minutes | Mandatory for ongoing defense |
| Emergency Invocation | As needed during threat | 10-15 minutes | Use sparingly; high potency |
| Reinforcement Ritual | Weekly or post-exposure | 30-40 minutes | Strengthens and renews armor |
Conclusion
The spiritual armor is an unyielding bastion forged in the crucible of faith, discipline, and sacred tradition. This volume delivers the complete, actionable protocols required to build, maintain, and reinforce this armor daily and in moments of peril. Let no shadow breach your sanctum. Stand firm, Practitioner, girded in the eternal light of divine protection.
For extended insights on sanctified materials and preparation, refer to Volume VIII: The Water Codex, Chapter II and Volume IX: The Anointing Arts.
<!-- SECTION 28 -->
Volume VII: Generational Curse Breaking and Territory Cleansing
The Defense Manual: Complete Self-Defense, Strategy, Tactics, and Protective Arts
Volume VII: Generational Curse Breaking and Territory Cleansing
Authoritative Codex Entry by Master Archivist and Technical Instructor
Introduction: The Sacred Duty of Curse Breaking and Territory Cleansing
The art of generational curse breaking and territory cleansing is a sacred trust passed down through millennia. These are not mere rituals but living protocols forged in the crucible of psychological resilience, tactical defense, and metaphysical science. Failure to execute these procedures with precision invites devastation upon bloodlines and lands alike. This volume encapsulates every suppressed technique, every arcane secret, and every classified protocol required to identify, neutralize, and sanctify curses afflicting families and properties.
Chapter I: Identifying Generational Curses — The Hidden Scars of Bloodlines
Generational curses manifest as recurring misfortunes, inexplicable ailments, and spiritual blockages. Identification is the critical first step. Misidentification leads to wasted effort and potential amplification of the curse.
Table 1: Common Signs of Generational Curses
| Sign Category | Manifestation Details | Diagnostic Methodology | Severity Indicator (1–5) |
|---|---|---|---|
| Physical Health | Chronic illness resistant to treatment, congenital defects | Medical exclusion + spiritual resonance testing | 3–5 |
| Mental/Emotional | Depression, anxiety, compulsive failures, inherited trauma | Psychological profiling + bloodline history | 4 |
| Financial | Repeated bankruptcies, failed ventures, unexplained losses | Financial audit + ancestral event review | 3 |
| Relational | Dysfunctional family patterns, violent cycles, isolation | Generational counseling + behavioral analysis | 4–5 |
| Spiritual | Nightmares, poltergeist activity, unexplained malaise | Divination (Pendulum, Tarot), aura scanning | 5 |
Step-by-Step Identification Protocol:
- Compile a Family History Report a. Gather medical records, financial histories, and oral traditions covering at least three generations.
b. Document recurring patterns or anomalies.
- Conduct Multi-Dimensional Testing a. Perform medical exclusion tests to rule out conventional causes.
b. Engage certified spiritual practitioners to conduct aura scans and divination focused on the family’s bloodline.
- Correlate Findings a. Map symptoms against Table 1.
b. Assign severity scores to each category; a cumulative score above 15 denotes a high-probability generational curse.
- Confirm with Bloodline Resonance Test a. Utilize a pendulum over a blood sample or hair from the afflicted individual.
b. A sustained clockwise rotation indicates positive curse resonance; counterclockwise indicates negative or absence.
Chapter II: Breaking Generational Curses — The Sacred Protocols of Liberation
Breaking a generational curse is an act of psychological resilience requiring precise preparation, execution, and follow-through.
Table 2: Essential Tools and Their Construction for Curse Breaking
| Tool Name | Purpose | Construction Materials | Construction Steps |
|---|---|---|---|
| Cleansing Athame | Directed energy release | Carbon steel blade, oak wood handle | 1. Forge blade from carbon steel, sharpen to razor edge. 2. Carve handle from mature oak wood, bind with hemp cord. 3. Consecrate under full moon with saltwater soak for 3 hours. |
| Sacred Salt Blend | Absorbs negative energies | Himalayan pink salt, dried sage, crushed quartz | 1. Mix equal parts salt and sage, add crushed quartz until granular texture forms. 2. Store in airtight clay jar. |
| Purification Incense | Clears spiritual debris | Frankincense resin, myrrh resin, sandalwood powder | 1. Grind resins and powder finely. 2. Blend in 2:1:1 ratio. 3. Store in breathable pouch. |
| Holy Water Substitute | Spiritual anointing | Distilled water, blessed herbs (rosemary, thyme), silver coin | 1. Boil distilled water with herbs for 20 minutes, cool. 2. Place silver coin in water overnight for sanctification. |
Step-by-Step Curse Breaking Protocol:
- Preparation Phase a. Fast for 12 hours, consume no intoxicants.
b. Wear clean white linen garments.
c. Establish a sacred circle using the Sacred Salt Blend, marking a 3-meter diameter around the ritual space.
- Invocation Phase a. Light Purification Incense and incense burner at the circle’s center.
b. Hold the Cleansing Athame in the dominant hand, perform three clockwise passes above the incense smoke.
c. Recite the Binding Invocation (see Appendix A for exact phrasing).
- Anointment Phase a. Sprinkle Holy Water Substitute on the afflicted individual or family member, focusing on head, chest, hands, and feet.
b. Chant the Liberation Mantra in sync with water application.
- Energy Extraction Phase a. Using the Cleansing Athame, make symbolic cuts in the air around the individual’s aura perimeter, starting from the crown to feet.
b. Visualize the curse as a black thread and “cut” it with the athame.
c. Collect the imagined threads into a small bundle in the left hand.
- Curse Disposal Phase a. Burn the collected symbolic threads within the sacred circle using the incense burner.
b. Scatter the ashes outside the property boundary, facing east.
- Sealing Phase a. Draw a pentagram at each cardinal point outside the property using Sacred Salt Blend.
b. Place a small amount of Holy Water Substitute at each pentagram’s center.
Chapter III: Sanctifying Physical Spaces — Territory Cleansing Protocols
Property cleansing is essential to remove residual curses and protect future generations.
Table 3: Property Cleansing Tools and Their Application
| Tool Name | Application Area | Usage Instructions | Frequency |
|---|---|---|---|
| Sacred Salt Blend | Perimeters | Sprinkle a 10 cm wide line around property boundaries | Weekly for 4 weeks |
| Purification Incense | Interior rooms | Burn for 30 minutes per room, moving clockwise | Monthly |
| Holy Water Substitute | Entryways, thresholds | Spray lightly on doorframes, windowsills | Bi-weekly |
| Bell or Tuning Fork | Whole property | Sound three times at each corner and main entrance | Monthly |
Step-by-Step Property Cleansing Protocol:
- Preparation of the Space a. Remove all clutter, sweep floors counterclockwise to remove dust and physical stagnation.
b. Ventilate all rooms by opening windows and doors for 15 minutes.
- Boundary Cleansing a. Walk the entire property perimeter carrying a container of Sacred Salt Blend.
b. Sprinkle the salt continuously, maintaining a 10 cm wide line on the ground.
- Interior Purification a. Enter each room in clockwise order, burn Purification Incense for 30 minutes.
b. Use a feather or fan to waft the smoke into corners, closets, and under furniture.
- Threshold Anointing a. Spray Holy Water Substitute lightly on all doorframes, windowsills, and other entry points.
b. Focus on any damaged or weathered areas, as these are spiritual weak points.
- Sonic Shield Activation a. Using a bell or tuning fork, produce three clear sounds at each corner of the property and the main entrance.
b. This disrupts lingering negative energy and reinforces the protective boundary.
- Final Blessing a. Stand at the property's center, hold the Cleansing Athame vertically.
b. Recite the Sanctification Blessing (see Appendix B).
Chapter IV: Family Cleansing Protocol — Breaking Bloodline Chains
The family cleansing protocol must be performed collectively and individually to sever ancestral curses.
Table 4: Family Cleansing Tools and Roles
| Tool Name | Family Member Role | Specific Usage Instructions |
|---|---|---|
| Cleansing Athame | Spiritual leader or designated elder | Conduct symbolic cuts in aura of each family member |
| Sacred Salt Blend | All adult members | Sprinkle on each person’s feet and hands before ritual |
| Purification Incense | Entire family group | Burn continuously during the ritual |
| Holy Water Substitute | Spiritual leader | Anoint foreheads and wrists of each member |
Step-by-Step Family Cleansing Protocol:
- Group Assembly a. Gather all family members in a cleared, sacred space.
b. Distribute Sacred Salt Blend for each member to sprinkle on their feet and hands.
- Collective Invocation a. Light Purification Incense centrally so smoke envelops the group.
b. The spiritual leader recites the Family Binding Invocation.
- Individual Cleansing a. One by one, each member stands within the circle.
b. The spiritual leader performs symbolic aura cuts with the Cleansing Athame.
c. Anoint the forehead and wrists with Holy Water Substitute.
- Shared Mantra Chant a. All members chant the Liberation Mantra together for 5 minutes.
b. Visualize the curse lifting as a dark mist dissolving in sunlight.
- Closing the Ritual a. The spiritual leader disperses Sacred Salt Blend around the group’s perimeter.
b. Share a silent moment of gratitude and protection.
Chapter V: Post-Cleansing Protocols and Sustenance
- Daily Protection Practices a. Each family member must carry a small sachet of Sacred Salt Blend on their person.
b. Perform a 3-minute aura self-scan using pendulum daily at dawn.
- Weekly Property Reinforcement a. Repeat boundary cleansing with Sacred Salt Blend weekly for four weeks.
b. Monthly incense burns in key rooms.
- Annual Generational Review a. Conduct a family history update and diagnostic assessment every year.
b. Perform full curse breaking protocol if any signs reemerge.
Appendices
Appendix A: Binding Invocation Text
“By the sacred fires of our ancestors, I bind the chains of darkness that have held this bloodline. I sever the cords of malice, pain, and despair. Let the light of truth and protection rise and shield this soul from all harm.”
Appendix B: Sanctification Blessing Text
“This land and all that dwell within are sanctified by the power of light, shielded by the strength of spirit, and guarded by the eternal watch. No curse, no shadow may enter here. So it is sealed, so it is done.”
Final Notes
This volume demands unwavering discipline and reverence. Each step, each tool, each word is a weapon in the unseen battle for liberation. Mastery of these protocols ensures the salvation of bloodlines and sanctity of territories. Deviation or neglect invites ruin. Follow these instructions with the heart of a Practitioner and the precision of a master craftsman.
End of Volume VII: Generational Curse Breaking and Territory Cleansing
<!-- SECTION 29 -->
Volume VIII: Legal Defense – Understanding Jurisdiction and Common Law
Chapter I: Differentiating Statutory and Common Law
The foundation of effective legal defense rests upon a precise, unwavering understanding of jurisdictional authority and the nature of the laws applied against you or your client. This chapter demands your full focus: statutory law and common law are distinct entities with unique origins, applications, and implications for defense strategy.
1.1 Definitions and Origins
- Statutory Law: Law enacted by a legislative body (federal, state, municipal). Codified in statutes, codes, and ordinances.
- Common Law: Law derived from judicial decisions and customs. It evolves through precedents set by courts.
1.2 Core Differences
| Aspect | Statutory Law | Common Law |
|---|---|---|
| Source | Legislature (Congress, state legislatures) | Judiciary (court decisions) |
| Form | Written statutes, codes, ordinances | Case law, judicial opinions |
| Flexibility | Fixed until amended | Evolves with new judicial rulings |
| Application | Applies within defined jurisdiction | Interprets statutes and fills gaps |
| Enforcement | Government authority | Court rulings enforced by judiciary |
| Examples | Traffic laws, tax codes | Contract law, tort law |
1.3 Actionable Steps: Identifying Applicable Law in Your Case
- Obtain the Charging Document or Complaint. Examine the citations to statutes or common law principles.
- Research the Statute or Ordinance Cited. Use official legislative databases or government websites.
- Locate Relevant Case Law. Use legal databases (e.g., Westlaw, LexisNexis) to find court decisions interpreting the statute.
- Determine the Jurisdiction. Confirm whether the court has jurisdiction to enforce the statute or common law claim.
- Assess the Relationship Between Statutory and Common Law. Identify if statutory law preempts or coexists with common law.
Chapter II: Sovereign Citizen Claims – Myths and Realities
The sovereign citizen movement promotes theories asserting immunity from government laws based on misunderstood historical and legal doctrines. This section dismantles those claims with precision, enabling you to counter them effectively.
2.1 Common Sovereign Citizen Assertions
| Claim | Reality and Legal Status |
|---|---|
| "I am a sovereign being, not subject to statutes." | Courts universally reject this; citizenship and jurisdiction are mandatory. |
| "Conditional acceptance of court documents negates jurisdiction." | No legal basis; courts do not accept conditional filings. |
| "You must prove jurisdiction or your case is dismissed." | Jurisdiction is presumed; burden is on defendant to prove lack of jurisdiction. |
| "Using all capital letters changes legal status." | Typographical conventions have no bearing on legal status. |
2.2 Protocols to Counter Sovereign Citizen Tactics
- Demand Proper Identification of Parties and Jurisdiction. Require the plaintiff or prosecution to present clear jurisdictional grounds.
- Maintain Strict Adherence to Procedural Rules. Sovereign citizens often rely on procedural errors to delay or dismiss; avoid such errors.
- Reject Conditional or Unorthodox Filings. File motions to strike or refuse acceptance of filings that do not comply with court rules.
- Educate the Court if Necessary. Prepare briefs explaining the invalidity of sovereign citizen claims.
- Prepare for Delay Tactics. Sovereign citizen defendants often engage in repetitive filings; maintain a clear docket and motion to dismiss frivolous claims.
Chapter III: Court Procedures – Step-by-Step Protocols for Defense
Understanding court procedures is paramount. The following protocols cover the essential phases of legal defense: conditional acceptance of charges, self-representation, and navigating hearings.
3.1 Conditional Acceptance Protocol
Conditional acceptance is a controlled legal maneuver allowing the defendant to acknowledge receipt of charges while reserving rights, avoiding implicit admission.
Step-by-step Instructions:
- Draft a Conditional Acceptance Letter:
- Use precise legal language.
- Clearly state acceptance of the document for the purpose of preserving rights.
- Explicitly deny any admission of guilt or waiver of rights.
- File the Letter with the Court Clerk:
- Ensure the letter is filed within court deadlines.
- Obtain stamped copies for your records.
- Serve the Letter on the Prosecution or Plaintiff:
- Use certified mail or process server.
- Retain proof of service.
- Prepare for Court Response:
- Anticipate motions to challenge your conditional acceptance.
- Be ready to argue the legal validity of your position.
- Document All Correspondence:
- Keep meticulous records of all filings and communications.
3.2 Self-Representation Protocol (Pro Se Defense)
Self-representation is a right but carries significant risks. Mastery of procedural knowledge and legal research is mandatory.
Preparation steps:
- Understand the Court Rules:
- Obtain and study the court’s local rules and procedures.
- Highlight deadlines, filing requirements, and courtroom conduct.
- Legal Research:
- Identify applicable statutes, case law, and defenses.
- Use official legal databases or local law libraries.
- Draft Pleadings and Motions:
- Follow prescribed formats.
- Use clear, concise, and legally grounded language.
- Courtroom Presentation:
- Prepare opening statements.
- Practice direct and cross-examinations if applicable.
- Respect courtroom decorum.
- Backup Plan:
- Consider hiring a consulting attorney for complex matters.
- Keep communication lines open for legal advice.
3.3 Court Hearing Procedure Overview
| Phase | Description | Defensive Actions |
|---|---|---|
| Arraignment | Formal reading of charges | Enter plea; request discovery if needed |
| Pretrial Motions | Address legal issues before trial | File motions to dismiss, suppress evidence |
| Discovery | Exchange of evidence | Review and request evidence; prepare responses |
| Trial | Presentation of case | Execute witness examination; present defense |
| Sentencing | Judge imposes penalty | Present mitigating factors; file appeals if applicable |
Chapter IV: Comparative Tables of Legal Concepts, Procedural Steps, and Pitfalls
4.1 Legal Concepts Comparison: Statutory vs. Common Law
| Feature | Statutory Law | Common Law |
|---|---|---|
| Creation | Legislatures enact | Courts create through precedent |
| Modification | Requires legislative amendment | Evolves through judicial decisions |
| Scope | Specific, codified rules | Broad principles, case-specific |
| Enforcement | Police, regulatory agencies | Courts enforce through rulings |
| Interpretation | Strictly by text unless ambiguous | Flexible, based on facts and equity |
4.2 Procedural Steps for Conditional Acceptance
| Step Number | Action | Purpose | Critical Notes |
|---|---|---|---|
| 1 | Draft conditional acceptance letter | Preserve rights, avoid admission | Use formal, unambiguous language |
| 2 | File with court clerk | Officially record your position | Meet all deadlines |
| 3 | Serve opposing party | Notify of your stance | Use verifiable methods |
| 4 | Prepare for court response | Anticipate challenges | Have legal arguments ready |
| 5 | Maintain records | Evidence of compliance | Include all correspondence |
4.3 Typical Pitfalls in Self-Representation and How to Avoid Them
| Pitfall | Description | Preventive Measures |
|---|---|---|
| Missing Deadlines | Failing to file documents timely | Maintain a detailed calendar; set reminders |
| Incorrect Filing Formats | Non-compliance with court rules | Obtain court rules; use templates |
| Ineffective Legal Arguments | Lack of legal grounding | Conduct thorough legal research |
| Emotional or Unprofessional Behavior | Loss of credibility in court | Practice courtroom demeanor; remain objective |
| Ignorance of Evidence Rules | Failing to object or present evidence correctly | Study rules of evidence; prepare meticulously |
Chapter V: In-Depth Protocol: Drafting and Filing a Motion to Dismiss Based on Jurisdiction
A primary defense tactic is challenging the court’s jurisdiction. This section provides an exhaustive, stepwise protocol.
5.1 Preliminary Requirements
- Access to the charging document.
- Verified knowledge of geographic and subject matter jurisdiction.
- Comprehensive legal citations supporting lack of jurisdiction.
5.2 Step-by-Step Motion to Dismiss Protocol
- Title and Caption:
- Indicate the court, parties, and case number precisely.
- Statement of Jurisdictional Facts:
- List facts demonstrating lack of jurisdiction.
- Legal Argument:
- Cite statutes, case law, or constitutional provisions.
- Conclusion and Prayer for Relief:
- Request dismissal based on jurisdictional grounds.
- Signature and Date:
- Sign the motion and date it.
- File the Motion:
- Submit to court clerk within deadlines.
- Serve Opposing Party:
- Use certified mail or process server.
- Prepare for Hearing:
- Develop oral arguments; anticipate counterarguments.
- Attend Hearing:
- Present the motion confidently and clearly.
- Record Keeping:
- Retain copies of filings and court orders.
Chapter VI: Essential Legal Terminology Glossary for Defense
| Term | Definition |
|---|---|
| Jurisdiction | Authority of a court to hear and decide cases |
| Plea | Formal statement of defendant’s response to charges |
| Motion | Formal request to the court for a specific ruling |
| Discovery | Pretrial exchange of evidence and information |
| Pro Se | Self-representation by a party without an attorney |
| Habeas Corpus | Legal action challenging unlawful detention |
| Subpoena | Court order compelling witness attendance or evidence |
| Docket | Schedule of court cases and proceedings |
Conclusion
Mastery of jurisdictional distinctions and court procedures is non-negotiable for survival in legal defense. The protocols herein are your sacred tools, forged through centuries of legal struggle, to be wielded with precision and unwavering resolve. Remember, every filing, every motion, every courtroom appearance carries the weight of life or liberty. Commit these teachings wholly. There is no margin for error.
For related procedures on evidence handling and trial strategy, see Volume IX: Trial Artistry and Evidence Mastery.
<!-- SECTION 30 -->
The Complete Practitioner's Codex, Volume VIII: Property Rights and Allodial Title
Chapter I: Legal Frameworks for Land Ownership

The foundation of any warrior’s domain is the secure and absolute ownership of land. Without unassailable property rights, all other defenses crumble beneath the weight of legal uncertainty and hostile challenge. This volume imparts the sacred knowledge of allodial title and the legal architectures that sustain it. Mastery here is not theoretical but practical: detailed, stepwise, and precise protocols for acquisition, filing, and defense of property rights, designed for the most exacting conditions.
1.1 Allodial Title Defined
Allodial title signifies absolute, sovereign ownership of land, free from superior landlord claims or feudal obligations. Unlike fee simple or leasehold, allodial title is the highest form of property right recognized in select jurisdictions. Its existence and recognition vary drastically; thus, understanding jurisdictional variance is paramount.
| Title Type | Description | Obligations to State | Typical Jurisdictional Recognition |
|---|---|---|---|
| Allodial Title | Absolute ownership, free of superior claims | Generally none, except taxes | Rare; some U.S. states, select countries |
| Fee Simple Absolute | Full ownership with state obligations | Property tax, zoning compliance | Common in U.S., Canada, Australia |
| Fee Simple Defeasible | Conditional ownership subject to reversion | Same as fee simple | U.S., UK, other common law jurisdictions |
| Leasehold | Possession for a term, ownership reverts | Rent, compliance with lease terms | Universal |
| Usufruct | Right to use and derive benefit, not own | Varies | Civil law countries, some indigenous laws |
1.2 Jurisdictional Variations in Allodial Recognition
No singular universal system governs allodial title. Understanding the local jurisdiction is mandatory for effective acquisition and defense.
| Jurisdiction | Allodial Recognition Status | Notes |
|---|---|---|
| Nevada, USA | Recognizes allodial title in limited forms | Requires full payment of property taxes upfront |
| Texas, USA | Limited recognition; fee simple predominant | Allodial title often misunderstood |
| United Kingdom | No allodial title; Crown holds ultimate ownership | Land held under tenure systems |
| Canada | Fee simple dominates; allodial title not recognized | Indigenous land rights may create exceptions |
| Australia | Fee simple prevalent; allodial title not recognized | Crown land tenure systems apply |
| Switzerland | Some cantons recognize allodial title variations | Complex federal-canton law interplay |
1.3 Legal Doctrines Supporting Allodial Claims
- Sovereign Immunity: True allodial title implies ownership beyond state interference except for taxation.
- Escheat Avoidance: Prevents land reverting to the state upon owner’s death without heirs.
- Record Title: Ensures ownership is documented in public land registries, critical for contesting disputes.
- Adverse Possession: May undermine claims if land is neglected or possession is lost.
Chapter II: Acquisition Strategies
Acquiring allodial title demands precision, adherence to protocol, and often, strategic navigation through complex legal frameworks.
2.1 Step-by-Step Protocol for Acquiring Allodial Title
Preparation Phase:
- Research Jurisdictional Laws: Obtain current statutes on property rights from the local land registry office or government website. For U.S. states, begin with state land codes and county recorder offices.
- Verify Seller’s Title: Obtain a certified copy of the seller’s deed. Confirm chain of title through a title search at the registry to ensure no clouds, liens, or encumbrances.
- Assess Tax Status: Confirm all property taxes are paid in full. Outstanding taxes may prevent allodial claim.
Acquisition Filing Phase:
- Prepare Purchase Agreement: Draft with explicit language indicating intent to transfer allodial title, citing relevant statutes or codes. Engage a real estate attorney specializing in property rights.
- Complete Transfer Deed: Prepare the deed with all required legal descriptions, owner details, and notarization. Include a clause asserting allodial claim or absolute ownership where permitted.
- Submit Allodial Application (if applicable): In jurisdictions like Nevada, file an allodial title application with the county recorder. Include:
- Property description
- Proof of tax payment in full up front (typically 5 years or more)
- Affidavit of ownership
- Register with Land Registry: Submit deed and application documents to the land title office. Obtain official recording receipt.
Post-Acquisition Phase:
- Secure Property Tax Payment: Pay required lump sum property taxes to maintain allodial status for specified period (see jurisdictional table below).
- Obtain Certified Title Document: Receive official title certificate affirming allodial status. Store securely; it is your primary defense.
- Record Deed with Local Authorities: File copies with local government offices to ensure public knowledge of claim.
2.2 Acquisition Variance by Jurisdiction
| Jurisdiction | Allodial Acquisition Method | Tax Payment Requirement | Filing Authority |
|---|---|---|---|
| Nevada, USA | File allodial application with county recorder | Lump sum payment of 5 years taxes | County Recorder Office |
| Texas, USA | No formal allodial system; rely on fee simple | Annual property taxes | County Clerk's Office |
| Switzerland | Apply to canton land registry | Varies by canton; often upfront tax | Canton Land Registry |
| UK | No allodial; fee simple with Crown ownership | Annual property taxes (Council Tax) | Land Registry |
| Canada | Fee simple only; Indigenous exceptions | Annual property taxes | Provincial Land Titles Office |
Chapter III: Defending Property Rights
The sacred land must be defended not only with steel but with unbreakable legal protocols. Property disputes arise from trespass, adverse possession claims, fraudulent titles, or governmental expropriation. This chapter details precise protocols for contesting and defending claims.
3.1 Step-by-Step Protocol for Filing Claims and Contesting Disputes
A. Initial Dispute Detection and Documentation
- Monitor Land Registry Notices: Enroll in registry notifications for any filings or liens against your property.
- Conduct Quarterly Title Searches: Obtain updated title abstracts to detect encumbrances or adverse claims.
- Survey and Boundary Verification: Hire a licensed surveyor every 3 years to verify boundary markers and document physical land extent.
- Document Trespass or Encroachments: Upon detecting trespass, photograph and log date, time, and nature of incursion.
B. Formal Dispute Filing Protocol
- Issue Cease and Desist Notice: Draft formal letter citing your allodial title, referencing recorded deeds and statutes. Send via certified mail with return receipt.
- File Notice of Dispute with Land Registry: Submit a formal dispute notice with copies of title documents, survey reports, and correspondence.
- Engage Legal Counsel: Retain an attorney skilled in property law and litigation.
- File Quiet Title Action: Initiate quiet title lawsuit if adverse claims or encroachments persist. Prepare the following:
- Verified complaint
- Chain of title documents
- Survey evidence
- Tax payment receipts
- Affidavits of possession and ownership
C. Court Litigation Protocol
- Pretrial Discovery and Evidence Compilation: Collate all documents, expert reports, and witness testimonies.
- Present Affirmative Defense of Allodial Title: Emphasize absolute nature of title, prior tax payment, and continuous possession.
- Seek Injunctive Relief: Request court order prohibiting further trespass or interference.
- Record Court Judgment: Upon favorable ruling, file judgment with land registry to reinforce claim.
3.2 Defensive Measures Against Governmental Expropriation
- File Formal Objections: Within statutory periods after notice of eminent domain filings.
- Request Fair Market Valuation: Engage independent appraisers.
- File Compensation Claims: Pursue compensation exceeding statutory minimums.
- Invoke Constitutional Protections: Reference 5th Amendment (U.S.) or equivalent.
Chapter IV: Filing Requirements and Documentation
Absolute mastery requires exact knowledge of documentation standards and filing protocols for each jurisdiction. Below is a comprehensive table of critical filing requirements.
| Document Type | Required Contents | Filing Location | Required Accompaniments | Typical Processing Time |
|---|---|---|---|---|
| Purchase Deed | Legal description, parties, consideration, notarization | County Recorder / Land Registry | Proof of identity, tax payment receipt | 7–14 days |
| Allodial Title Application | Property description, tax payment affidavit, owner affidavit | County Recorder (Nevada) | Certified tax payment, chain of title documents | 30–60 days |
| Notice of Dispute | Claim description, title evidence, survey reports | Land Registry Office | Copies of all supporting documents | 14–30 days |
| Quiet Title Complaint | Detailed complaint, chain of title, affidavits | County Court | Filing fee, summons issued to defendants | Varies; 3–12 months or longer |
| Cease and Desist Letter | Legal assertion of ownership, demand to halt trespass | Sent to alleged trespasser | Proof of delivery (certified mail receipt) | Immediate |
Chapter V: Advanced Protocols for Securing and Enforcing Allodial Rights
5.1 Constructing a Secure Land Title Archive
Stepwise instructions for building and maintaining an immutable record of ownership and defense documents.
- Digitize All Documents: Scan every deed, affidavit, survey report, and correspondence at 600 dpi resolution.
- Create Multiple Backups: Store encrypted digital copies on:
- External hard drives (offline)
- Cloud-based encrypted storage with multi-factor authentication
- Physical copies in fireproof safe
- Implement Blockchain Timestamping: Use blockchain services to timestamp key documents for irrefutable proof of existence at a given time.
- Regularly Update Archive: After every transaction or legal action, add new documents and re-secure backups.
5.2 Building Strategic Alliances for Property Defense
- Engage Local Authorities: Develop relationships with land registry officials and law enforcement.
- Form Community Watch Groups: Organize trusted neighbors or allies to monitor physical security.
- Establish Legal Retainer Agreements: Maintain ongoing legal counsel ready for rapid response.
Appendix: Summary Tables for Quick Reference
| Jurisdiction | Allodial Title Availability | Tax Payment Requirement | Filing Authority | Typical Time for Title Confirmation |
|---|---|---|---|---|
| Nevada, USA | Yes (limited) | Lump sum 5 years property tax | County Recorder | 30–60 days |
| Texas, USA | No (fee simple predominant) | Annual property taxes | County Clerk | 7–14 days |
| Switzerland | Partial (varies by canton) | Varies; often upfront | Canton Land Registry | 30–90 days |
| UK | No (Crown ownership) | Annual property taxes | Land Registry | 7–14 days |
| Canada | No (fee simple predominant) | Annual property taxes | Provincial Land Titles | 14–30 days |
| Title Type | Owner's Rights | State Claims | Typical Use Cases |
|---|---|---|---|
| Allodial Title | Absolute ownership, free of claims | Taxation only | Sovereign estates, historical |
| Fee Simple Absolute | Full ownership, subject to laws | Taxation, zoning, eminent domain | Residential, commercial property |
| Leasehold | Possession rights for term | Reversion rights, rent | Rental property, commercial leases |
Closing Declaration
The sacred trust of land ownership demands unyielding vigilance and mastery of these protocols. The warrior who wields this knowledge commands a domain fortified by law, beyond mere physical defense. The acquisition, maintenance, and defense of allodial title is a spiritual and legal bulwark against all who would challenge sovereignty. Master these steps precisely, for they are the foundation of your eternal fortress.
For related procedures on water rights, see Volume IX: The Hydrological Codex, Chapter IV. For dispute resolution tactics, see Volume XII: The Arbitration Codex, Chapter III.
<!-- SECTION 31 -->
The Complete Practitioner's Codex, Volume VIII: Contract Law and Negotiation for Self-Defense Contexts
Chapter I: Understanding Contracts in Self-Defense Contexts
Contracts form the backbone of lawful agreements governing alliances, resources procurement, training arrangements, and mercenary or protective services in self-defense operations. Mastery of contract law is non-negotiable for the Practitioner operative, for a flawed contract imperils lives and missions.
1. Definition and Nature of Contracts
A contract is a legally enforceable agreement between two or more parties that creates mutual obligations.
Essential Elements:
| Element | Description |
|---|---|
| Offer | A clear proposal made by one party to another |
| Acceptance | Unconditional agreement to the offer |
| Consideration | Something of value exchanged (money, services, goods) |
| Capacity | Parties must be of legal age and sound mind |
| Legality | Contract’s purpose must be lawful |
| Mutual Consent | Absence of duress, fraud, or mistake |
2. Types of Contracts Relevant to Self-Defense
- Service Contracts: Agreements for protection services, training, or consulting.
- Supply Contracts: Procurement of weapons, armor, or provisions.
- Non-Disclosure Agreements (NDAs): Protection of sensitive operational information.
- Lease or Use Agreements: Rental of facilities, vehicles, or equipment.
3. Void, Voidable, and Unenforceable Contracts
| Contract Type | Definition | Implication in Self-Defense Context |
|---|---|---|
| Void | No legal effect from inception (illegal or impossible terms) | Must be identified and discarded immediately; no enforcement possible |
| Voidable | Valid until rescinded due to defects (fraud, duress, undue influence) | Can be contested or ratified; critical for rejecting coercive agreements |
| Unenforceable | Valid but cannot be enforced due to legal technicalities (e.g., statute of frauds) | Risk of non-performance; requires renegotiation or supplementary documentation |
Chapter II: Voidable Agreements: Detection and Contestation Protocols
Voidable agreements are the silent killers in contract law. A Practitioner must know how to detect and contest these before they cause irreversible damage.
1. Causes of Voidability
| Cause | Description | Detection Methods |
|---|---|---|
| Fraud | Intentional deception to induce agreement | Cross-examination, verification of facts, document comparison |
| Duress | Threats or coercion undermining free will | Witness testimonies, psychological evaluation |
| Undue Influence | Exploiting a relationship of trust for unfair advantage | Relationship mapping, behavioral analysis |
| Mistake | Mutual or unilateral factual errors affecting consent | Document review, witness statements |
| Lack of Capacity | Parties incapable due to age, mental state, intoxication | Medical records, legal status verification |
2. Contestation Protocol for Voidable Contracts
Step-by-step procedure:
- Identification Verify the presence of voidability factors using the detection methods above.
- Documentation Collect all relevant documents, communications, and evidence.
- Notification Formally notify the opposing party in writing, citing the grounds for contestation.
- Mediation Attempt Offer alternative dispute resolution to preserve operational relationships.
- Legal Counsel Engagement Engage specialized contract law counsel for formal rescission or reformation.
- Court Filing (if required) File suit for declaratory judgment or contract rescission.
- Operational Contingency Execute alternative agreements or operational protocols to mitigate fallout.
Chapter III: Drafting Contracts in Self-Defense Contexts: Protocols and Best Practices
Precise drafting is the most potent defense against disputes and operational failures.
1. Pre-Drafting Preparation
- Step 1: Define objectives and scope clearly.
- Step 2: Identify parties with full legal names and status.
- Step 3: Determine applicable law and jurisdiction.
- Step 4: Assemble all factual data and operational parameters.
2. Contract Structure and Clauses
Contracts must contain standardized sections to ensure clarity and enforceability.
| Section | Purpose | Key Details to Include |
|---|---|---|
| Preamble | Identify parties and background context | Full legal names, addresses, relationship summary |
| Recitals | Explain purpose and intentions | Operational goals, mutual understanding |
| Definitions | Clarify terms used throughout | Precise definitions of technical, legal terms |
| Scope of Work | Detail obligations and deliverables | Specific services, timelines, quality standards |
| Consideration | Specify compensation and payment terms | Amounts, schedules, method of payment |
| Term and Termination | Duration and termination conditions | Start/end dates, breach consequences, notice period |
| Confidentiality | Protect sensitive information | Scope, duration, exceptions |
| Liability and Indemnity | Allocation of risks and damages | Limits, exclusions, insurance requirements |
| Dispute Resolution | Procedures for resolving disagreements | Mediation, arbitration, jurisdiction |
| Force Majeure | Excuses for non-performance due to uncontrollable events | Natural disasters, war, government action |
| Governing Law | Applicable jurisdiction and legal framework | State, federal, or international law |
| Signature Blocks | Execution by authorized representatives | Names, titles, dates, witness/notary if required |
3. Drafting Protocol
- Use Plain Language Avoid ambiguity; use precise, clear terms.
- Quantify Obligations Use measurable metrics, deadlines, and deliverables.
- Include Contingencies Account for probable operational risks and disputes.
- Cross-reference Clauses Ensure internal consistency and linkage.
- Limit Liability Cap damages and indemnity to sustainable levels.
- Review and Revise Circulate drafts among stakeholders and legal advisors.
Chapter IV: Reviewing Contracts: Essential Checklist and Techniques
Review is the final defense against hidden traps and operational failures.
1. Contract Review Checklist
| Review Item | Action Required |
|---|---|
| Parties’ Identity | Confirm legal names, capacity, and authority |
| Scope and Deliverables | Verify clarity, completeness, and measurability |
| Consideration | Confirm adequacy, schedule, and enforceability |
| Term and Termination | Assess duration, renewal, and exit conditions |
| Liability and Indemnity | Evaluate limits, exclusions, and insurance coverage |
| Confidentiality | Ensure protection matches operational sensitivity |
| Dispute Resolution | Confirm feasibility and neutrality of procedures |
| Compliance | Verify adherence to applicable laws and regulations |
| Ambiguities | Identify and resolve vague or conflicting terms |
| Signatory Authority | Confirm signatories’ legal power to bind parties |
2. Reviewing Protocol
- Initial Reading Read entire contract without interruption to understand general flow.
- Clause-by-Clause Analysis Assess each clause per checklist; mark issues.
- Cross-Verification Check for internal contradictions or omissions.
- Risk Assessment Evaluate operational and legal risks; consult experts as needed.
- Feedback Loop Compile questions, comments, and proposed amendments.
- Final Review Confirm all changes incorporated and document final approval.
Chapter V: Contesting Contracts: Legal and Tactical Protocols
When contract terms jeopardize self-defense operations, contestation is necessary.
1. Grounds for Contestation
| Ground | Description | Proof Required |
|---|---|---|
| Fraud | Intentional misrepresentation | Evidence of deceitful statements or concealment |
| Duress | Coercion or threat | Documentation, witness testimony |
| Mistake | Mutual or unilateral error | Factual evidence, expert analysis |
| Illegality | Contract violates laws | Statutory references, judicial precedents |
| Unconscionability | Grossly unfair terms | Comparative contract analysis |
| Lack of Capacity | Party unable to contract legally | Medical or legal certification |
2. Contestation Procedure
- Gather Evidence Collect all relevant documents, communications, witnesses.
- Legal Analysis Engage counsel to assess strength of grounds and strategy.
- Draft Contestation Letter Formally notify other party, citing specific grounds and desired remedy.
- Negotiation Attempt resolution through dialogue or mediation.
- Prepare for Litigation File declaratory or rescission action if negotiation fails.
- Operational Measures Implement contingency plans to maintain security and mission integrity.
Chapter VI: Negotiation Tactics for Self-Defense Contexts
Negotiation is a battlefield of wills; mastery ensures favorable terms and alliances.
1. Core Principles
| Principle | Description |
|---|---|
| Preparation | Research parties, objectives, and alternatives |
| Active Listening | Understand underlying interests and constraints |
| BATNA (Best Alternative to a Negotiated Agreement) | Know your fallback options |
| Win-Win Approach | Seek mutual gains to preserve alliances |
| Leverage | Identify and use power points ethically |
| Patience and Timing | Control pace to maximize advantage |
2. Negotiation Strategies Matrix
| Strategy | Description | When to Use | Risks |
|---|---|---|---|
| Hard Bargaining | Aggressive demands and fixed positions | When power imbalance favors you | May damage relationships |
| Principled Negotiation | Focus on interests, not positions | To build lasting agreements | Requires cooperation |
| Incremental Concessions | Small, reciprocal compromises | For complex, multi-issue negotiations | Risk of conceding too much |
| Silence and Pausing | Strategic use of silence to elicit info | When opponent is pressured or uncertain | May create awkwardness if overused |
| Good Cop/Bad Cop | Alternating firm and conciliatory roles | To unsettle opponent | Can be detected and backfire |
| Anchoring | Setting initial terms to frame negotiation | To influence perception of value | May provoke rejection if too extreme |
3. Negotiation Protocol
- Preparation
- Identify objectives, BATNA, and red lines.
- Research counterparty’s interests and constraints.
- Opening
- Establish rapport.
- Present initial offers and listen actively.
- Exploration
- Clarify interests and constraints.
- Probe for hidden concerns.
- Bargaining
- Propose concessions and demand reciprocity.
- Use strategies appropriate to context.
- Closing
- Confirm mutual agreement in writing.
- Clarify implementation and follow-up.
- Post-Negotiation Review
- Analyze outcomes and lessons learned.
Chapter VII: Common Contract Clauses and Their Tactical Implications
| Clause | Typical Language | Tactical Considerations in Self-Defense |
|---|---|---|
| Force Majeure | "Neither party liable for unforeseeable events" | Protects against operational disruptions |
| Indemnity | "Party shall indemnify against losses..." | Limits risk exposure; negotiate caps |
| Confidentiality | "Parties agree to keep info confidential" | Essential for operational secrecy |
| Termination for Cause | "Either party may terminate upon breach" | Enables exit from compromised agreements |
| Non-Compete | "Party shall not engage in competing activities" | Use carefully to avoid operational restrictions |
| Governing Law | "This contract governed by [jurisdiction]" | Choose favorable legal environment |
| Dispute Resolution | "Disputes resolved by arbitration/mediation" | Faster, less public than litigation |
| Payment Terms | "Payments due within 30 days of invoice" | Ensure cash flow; impose penalties for delays |
| Warranty | "Services warranted to meet specifications" | Clarify standards; limit liability |
In conclusion, mastery of contract law and negotiation protocols is indispensable for the Practitioner operative. This volume reveals the suppressed, life-or-death knowledge necessary to draft, review, contest, and negotiate contracts with surgical precision and unwavering resolve. The sacred trust of self-defense operations depends on your unyielding command of this domain.
For detailed templates and form contracts, see Volume XII: Legal Templates and Document Repository. For advanced dispute resolution tactics, see Volume IX: The Art of Arbitration and Mediation.
Appendix A: Sample Contract Review Checklist Table
| Clause/Section | Status (OK/Issue) | Notes/Recommended Action |
|---|---|---|
| Parties’ Identification | OK | |
| Scope of Work | Issue | Clarify deliverables timeline |
| Consideration | OK | |
| Termination Clause | Issue | Add notice period and cure rights |
| Liability | OK | |
| Confidentiality | OK | |
| Dispute Resolution | Issue | Prefer arbitration over litigation |
| Governing Law | OK |
Appendix B: Negotiation Strategy Selection Matrix
| Situation | Recommended Strategy | Notes |
|---|---|---|
| Power imbalance in your favor | Hard Bargaining | Use with caution; preserve relations |
| Complex, multi-party negotiation | Principled Negotiation | Focus on interests and mutual gains |
| Opponent uncooperative | Silence and Pausing | Extract information and control pace |
| Need to build long-term alliance | Win-Win Approach | Ensure durable cooperation |
| Opponent employs aggressive tactics | Good Cop/Bad Cop | Counter with controlled responses |
End of Volume VIII.
<!-- SECTION 32 -->
The Complete Practitioner's Codex, Volume VIII: Courtroom Procedures and Self-Representation
Chapter I: Navigating Court Systems
In the sacred pursuit of justice, mastery over the labyrinthine structures of the court is non-negotiable. This chapter imparts the essential protocols to traverse court hierarchies, identify jurisdictional authority, and engage decisively within procedural frameworks. Your success hinges not on the fidelity of counsel but on the precision of your own procedural command.
I.A Understanding Court Jurisdictions and Structures
Every legal battle begins with identifying the correct forum. Courts vary by jurisdiction—federal, state, tribal, or military—and by function—civil, criminal, appellate, and administrative. Misfiling wastes precious time and forfeits rights.
| Court Type | Jurisdiction | Common Case Types | Filing Location | Notes |
|---|---|---|---|---|
| Federal District Court | Nationwide, federal question cases | Civil rights, federal crimes | Federal courthouse in district | Original jurisdiction; venue critical |
| State Trial Court | Statewide or county-specific | Contracts, torts, family law | County courthouse | General jurisdiction; varies by state |
| Appellate Court | Regional or statewide | Appeals from trial courts | Designated appellate court | No new evidence; legal errors only |
| Supreme Court | Highest state or federal court | Final appeals | State or federal capital | Discretionary review; petition required |
| Administrative Court | Specific agencies | Regulatory disputes | Agency headquarters | Typically no jury; technical expertise paramount |
- Step 1: Confirm Jurisdiction
- Identify if your matter falls under federal or state law by referencing the relevant statutes or constitutional provisions.
- Verify geographic venue by matching the location of the incident or parties with court boundaries.
- Step 2: Determine Court Level
- For initial filings, select trial courts with original jurisdiction.
- For appeals, confirm that the case has been adjudicated at the trial level and no procedural bars exist.
- Step 3: Verify Court Rules
- Each court has unique procedural rules, accessible via official websites or clerk’s offices.
- Obtain the local rules, civil or criminal procedure codes, and any standing orders.
I.B Courtroom Protocols for First Appearance
Your initial court appearance sets the tone and establishes procedural posture. Command the room by adhering strictly to decorum and protocol.
- Step 1: Arrival and Preparation
- Arrive minimum 30 minutes early to locate your courtroom and check in with the clerk.
- Confirm your case number, judge’s name, and courtroom layout.
- Step 2: Attire and Equipment
- Dress in conservative, professional attire; weapons or unauthorized items are prohibited.
- Bring all physical exhibits, copies of filings, and a notebook.
- Step 3: Courtroom Entry
- Stand when the judge enters, wait for acknowledgment before sitting.
- Address the court as “Your Honor” or as specified by local custom.
- Step 4: Speaking Protocol
- Speak only when recognized.
- Use clear, respectful language; avoid slang or emotional outbursts.
- Step 5: Record Keeping
- Confirm if the court uses a transcript or audio recording.
- Take your own notes meticulously.
Chapter II: Filing Motions
The motion is your fundamental instrument to command court action. Precision in preparation and timing dictates success.
II.A Types of Motions and Their Functions
Understanding distinct motions is crucial. The table below enumerates common motions with their purposes and filing deadlines.
| Motion Type | Purpose | Typical Deadline | Notes |
|---|---|---|---|
| Motion to Dismiss | Challenge legal sufficiency of complaint | Usually within 21 days of service | Can be based on jurisdiction, failure to state claim |
| Motion for Summary Judgment | Request ruling without trial | Varies; often after discovery closes | Requires supporting evidence; no genuine issue of fact |
| Motion in Limine | Exclude prejudicial evidence before trial | Prior to trial | Protects against inadmissible evidence |
| Motion to Compel | Request court order to enforce discovery | After failed meet-and-confer attempt | Must demonstrate good cause |
| Motion for Continuance | Request delay of hearing or trial | As early as possible | Must state reason and anticipated duration |
| Motion to Amend Pleadings | Modify complaint or answer | Typically before trial | Requires court approval; strategic in evolving cases |
II.B Step-by-Step Motion Filing Protocol
- Step 1: Research and Draft
- Identify procedural rules for motions in your jurisdiction.
- Draft the motion with a clear title, statement of facts, legal argument with citations, and precise request.
- Step 2: Attach Supporting Documents
- Include affidavits, exhibits, or declarations to bolster your argument.
- Step 3: Formatting and Compliance
- Use court-approved formats: font size (usually 12 pt), margins, line spacing, and heading styles.
- Ensure all certificate of service and signature blocks are included.
- Step 4: Filing with the Court
- Submit the motion to the clerk’s office physically or electronically, depending on court rules.
- Pay any required filing fees or request fee waivers if applicable.
- Step 5: Serve Opposing Parties
- Serve copies via certified mail, personal delivery, or electronic service per local rules.
- Retain proof of service for the record.
- Step 6: Calendar and Prepare for Hearing
- Confirm hearing date and time with court clerk.
- Prepare oral argument and anticipate opposition rebuttal.
Chapter III: Presenting Evidence
Evidence presentation is a sacred trust; it must be methodical and unassailable.
III.A Types of Evidence and Their Admissibility
| Evidence Type | Description | Admissibility Criteria | Common Objections |
|---|---|---|---|
| Testimonial Evidence | Witness oral statements | Relevance, competence, credibility | Hearsay, lack of personal knowledge |
| Documentary Evidence | Written or recorded materials | Authenticity, relevance | Forgery, hearsay, relevance |
| Physical Evidence | Tangible items related to case | Chain of custody, relevance | Improper handling, relevance |
| Demonstrative Evidence | Models, diagrams, charts aiding understanding | Must fairly represent facts, not misleading | Prejudice, confusion |
| Expert Testimony | Specialized knowledge testimony | Qualification of expert, relevance, reliability | Lack of expertise, speculative |
III.B Step-by-Step Evidence Admission Protocol
- Step 1: Pre-Trial Preparation
- Identify all evidence you plan to use.
- Obtain originals or certified copies when possible.
- Prepare exhibit lists with item numbers and descriptions.
- Step 2: Foundation Laying
- During trial, before offering evidence, establish its relevance and authenticity by questioning witnesses or providing documentation.
- Step 3: Offer into Evidence
- Verbally request, “Your Honor, I offer Exhibit [Number] into evidence.”
- Await any objections from opposing counsel.
- Step 4: Responding to Objections
- Be ready with legal grounds supporting admissibility.
- Cite relevant rules of evidence or precedent decisively.
- Step 5: Judicial Ruling and Marking
- Once admitted, the clerk will mark the exhibit for identification.
- Ensure the official record reflects admission.
- Step 6: Use During Examination
- Utilize admitted exhibits actively during direct and cross-examination to reinforce testimony.
- Step 7: Preservation Post-Trial
- Ensure all exhibits are preserved per court instructions for appeal or record.
Chapter IV: Step-by-Step Procedural Protocols for Hearings, Trials, and Appeals
Each phase demands rigorous adherence to protocol. Deviation is fatal.
IV.A Hearing Protocol
Hearings vary: pre-trial, motion, evidentiary. The following protocol applies universally.
- Step 1: Pre-Hearing Preparation
- Review the notice of hearing for date, time, and subject.
- Prepare a concise outline of your argument and desired outcomes.
- Step 2: Filing Pre-Hearing Documents
- Submit any required briefs, declarations, or exhibits per deadline.
- Step 3: Courtroom Protocol
- Follow Chapter I.B for arrival and conduct.
- Step 4: Oral Argument
- Begin with a clear statement of your position.
- Use case law and statutes succinctly.
- Address judge’s questions directly without evasion.
- Step 5: Opposing Counsel Engagement
- Listen attentively to opposing arguments; note weaknesses.
- Step 6: Judge’s Ruling
- Receive ruling patiently; request clarification or timing for written order if unclear.
- Step 7: Post-Hearing Follow-Up
- Enter ruling into case file; comply immediately with orders.
IV.B Trial Protocol
Trials are the crucible of justice. Mastery here is life-altering.
| Trial Phase | Actions and Notes |
|---|---|
| Jury Selection | Voir dire: question potential jurors to detect bias; object to improper jurors timely |
| Opening Statements | Deliver concise roadmap of your case without argumentation |
| Plaintiff/Prosecution Case | Present witness testimony and evidence; direct examination only |
| Defense Case | Cross-examination of opposing witnesses; present your own case if desired |
| Closing Arguments | Summarize evidence and argue interpretations; appeal to law and logic |
| Jury Instructions | Request specific instructions aligned with your theory of the case |
| Deliberations & Verdict | Jury or judge deliberates; await verdict patiently |
| Post-Verdict Motions | File motions for judgment notwithstanding verdict or new trial if warranted |
IV.C Appeals Protocol
Appeals are procedural battles focusing on legal errors, not facts.
- Step 1: Notice of Appeal
- File within strict deadlines, often 30 days from final judgment.
- Serve all parties with notice.
- Step 2: Record Preparation
- Order transcripts and compile the clerk’s record.
- Review for completeness and accuracy.
- Step 3: Appellate Briefs
- Draft appellant brief outlining errors and legal argument.
- Respondent’s brief follows; optional reply brief concludes.
- Step 4: Oral Argument
- Request if allowed; prepare a concise presentation emphasizing key errors.
- Step 5: Decision and Enforcement
- Await published opinion; implement directives or prepare further appeals.
Chapter V: Courtroom Roles and Responsibilities
A clear understanding of courtroom personnel streamlines your interactions and strategy.
| Role | Function | Interaction Protocol | Notes |
|---|---|---|---|
| Judge | Presides over proceedings; rules on law | Address respectfully as “Your Honor”; respond succinctly | Neutral arbiter; maintain decorum |
| Court Clerk | Manages filings, records, and exhibits | File documents promptly; inquire for procedural guidance | Gatekeeper for documentation |
| Bailiff | Maintains order and security | Comply with instructions; respect authority | Enforces courtroom rules and safety |
| Court Reporter | Records verbatim transcripts | Speak clearly and avoid interruptions | Request transcripts for appeal or record |
| Opposing Counsel | Represents adverse party | Maintain professional courtesy; anticipate tactics | Critical adversary; expect challenges |
| Witness | Provides testimony | Prepare thoroughly; answer only asked questions | May be hostile or friendly |
| Jury | Fact-finders in jury trials | Do not communicate outside official proceedings | Evaluate evidence impartially |
Chapter VI: Document Types and Filing Protocols
Proper document identification and timely filing are pillars of procedural integrity.
| Document Type | Purpose | Filing Deadline | Filing Location | Key Formatting Requirements |
|---|---|---|---|---|
| Complaint/Petition | Initiates lawsuit | N/A (start of case) | Trial court clerk | Caption, numbered paragraphs, signature |
| Answer | Defendant’s response | Usually 21 days from service | Trial court clerk | Admit or deny allegations, affirmative defenses |
| Motion | Requests court action | Varies by motion | Clerk of court | Caption, argument, signature, proof of service |
| Brief | Legal argument in support of motions or appeal | Per court schedule | Court of filing | Citation format, table of contents, summary |
| Notice of Hearing | Informs parties of scheduled court date | Varies, typically 10-14 days prior | Clerk of court | Clear subject, date, time, location |
| Affidavit/Declaration | Sworn facts supporting filings | With or prior to motion filing | Clerk of court | Notarization or certification required |
Chapter VII: Procedural Timelines and Deadlines
Adherence to timelines preserves rights and prevents dismissal.
| Action | Typical Deadline | Consequence of Missing Deadline | Notes |
|---|---|---|---|
| Filing Complaint | N/A (case initiation) | Case not commenced | Begin with summons issuance |
| Defendant’s Answer | 20-30 days after service | Default judgment | Seek extension immediately if needed |
| Motion to Dismiss | Usually within answer period | Waiver of defense | Often first responsive pleading |
| Discovery Requests | Varies; often 30 days after parties meet | Motion to compel or sanctions | Failure weakens case |
| Pretrial Motions | Before trial or as ordered | Exclusion of motion or evidence | Follow local rule |
| Notice of Appeal | 30 days post-judgment | Loss of appellate rights | Strict; rarely extended |
| Appellate Brief Filing | 30-40 days after record filing | Dismissal of appeal | Strict formatting and content rules |
Conclusion
This volume imparts the sacred keys to navigate, command, and master courtroom procedure and self-representation. Your path demands unwavering discipline, meticulous preparation, and absolute clarity in execution. The law is a weapon and a shield; wield it with precision, and justice becomes your eternal companion.
For related protocols on evidence preservation, witness preparation, and advanced appellate strategies, consult Volume IX: The Litigator’s Arsenal.
End of Volume VIII
<!-- SECTION 33 -->
The Complete Practitioner's Codex, Volume 10: The Defense Manual
Chapter VII: Supplements: Training Programs by Week
Structured Weekly Training Plans Covering Combatives, Edged Weapons, Firearms, Tactical Medicine, Digital Defense, Psychological Resilience, and Legal Defense

Introduction
This chapter serves as the foundation for your ascension into mastery. The training programs herein are not mere exercises; they are sacred rites, painstakingly designed to forge the body, mind, and spirit into an unbreakable triad of warrior readiness. Each week builds upon the last, demanding precision, discipline, and unwavering commitment. Every drill, every repetition, every moment of focus is a step closer to transcendence in all domains of the warrior’s art: combatives, edged weapons, firearms, tactical medicine, digital defense, psychological resilience, and legal defense.
You will find meticulously structured weekly schedules, complete with daily drills, durations, and progression benchmarks. The tables provide clear metrics to measure your advancement.
Section 1: Weekly Training Structure Overview
The training week is divided into seven days, each day dedicated to a specific discipline or combination thereof. This ensures comprehensive development and prevents skill atrophy. Rest days are integrated strategically but are active rest, involving meditation, light mobility drills, or theoretical immersion.
Weekly Discipline Allocation
| Day | Discipline(s) | Primary Focus | Duration (Hours) | Notes |
|---|---|---|---|---|
| Monday | Combatives + Tactical Medicine | Physical confrontation skills + trauma care | 3.5 | High intensity, practical |
| Tuesday | Edged Weapons | Knife, sword handling, deployment drills | 3 | Precision, control, flow |
| Wednesday | Firearms | Marksmanship, weapon manipulation, drills | 3.5 | Safety, accuracy, speed |
| Thursday | Digital Defense + Legal Defense | Cybersecurity basics + legal knowledge | 3 | Cognitive, strategic |
| Friday | Psychological Resilience + Combatives | Mental resilience + advanced fighting tactics | 3.5 | Meditation + physical rigor |
| Saturday | Integrated Scenario Training | All disciplines combined in tactical scenarios | 4 | Stress inoculation training |
| Sunday | Active Rest + Review | Mobility, meditation, theory review | 2 | Recovery, mental prep |
Section 2: Detailed Daily Drills and Progression by Discipline
2.1 Combatives Training Program
Combatives are the core physical martial skills for close-quarters combat (CQC). This program emphasizes biomechanics, situational awareness, and controlled aggression.
| Week | Drill Name | Description | Duration (Minutes) | Progression Benchmark |
|---|---|---|---|---|
| 1 | Stance and Footwork | Master foundational stances and movement patterns | 45 | Maintain balance during 10-minute continuous movement |
| 2 | Striking Mechanics | Jab, cross, hook, elbow strikes with focus mitts | 60 | Deliver 100 strikes maintaining form and power |
| 3 | Clinch Control | Techniques to control opponent in close quarters | 60 | Hold clinch for 3 minutes against resisting partner |
| 4 | Takedown Fundamentals | Single leg, double leg takedowns with live resistance | 60 | Successfully execute 8 takedowns in 10 minutes |
| 5 | Ground Control | Positional control and escapes on ground | 60 | Maintain dominant position for 5 minutes |
| 6 | Weapon Disarmament | Disarming hand-held weapons from attacker | 75 | Execute disarm in under 5 seconds |
| 7 | Scenario Sparring | Controlled sparring incorporating all prior skills | 90 | Win or neutralize 80% of sparring rounds |
| 8 | Stress Inoculation Drills | High-intensity drills simulating combat stress | 90 | Maintain decision-making accuracy under fatigue |
Daily Combatives Drill Example (Monday):
- Warm-up: 10 minutes mobility and dynamic stretching.
- Footwork drill: 15 minutes of lateral and angular movement patterns.
- Striking drill: 20 minutes of jab-cross-hook combinations on focus mitts.
- Clinch drill: 20 minutes training clinch holds and escapes with partner resistance.
- Cool down: 10 minutes static stretching and breathing exercises.
2.2 Edged Weapons Training Program
Mastery of edged weapons demands precision, fluidity, and absolute control. The program progresses from basic grips to tactical deployment under stress.
| Week | Focus Area | Description | Duration (Minutes) | Progression Benchmark |
|---|---|---|---|---|
| 1 | Grip Mechanics | Proper gripping, pressure control, blade orientation | 45 | Maintain grip under dynamic movement |
| 2 | Basic Cuts and Thrusts | Vertical, horizontal, diagonal cuts plus thrusts | 60 | Execute 100 cuts/thrusts with precision |
| 3 | Defensive Maneuvers | Parrying, blocking, redirecting incoming attacks | 60 | Successfully parry 80% of partner attacks |
| 4 | Movement and Angles | Footwork while wielding blade, attack angles | 60 | Maintain balance and effective distance |
| 5 | Blade Retention and Draw | Quick draw techniques and retaining blade under pressure | 75 | Draw and strike within 2 seconds |
| 6 | Disarming with Blades | Countering and disarming edged weapons | 75 | Disarm opponent within 3 attempts |
| 7 | Multi-Weapon Drills | Transitioning between knife and secondary edged weapon | 90 | Transition without loss of control or speed |
| 8 | Stress Testing | Applying all techniques under simulated combat stress | 90 | Maintain technique under simulated attack |
Daily Edged Weapons Drill Example (Tuesday):
- Warm-up: 10 minutes wrist, elbow, and shoulder mobility.
- Grip and draw practice: 15 minutes repeated draws from sheath.
- Cutting drills: 30 minutes of controlled cuts on target pads.
- Defensive drills: 30 minutes of parrying and counter-attacks.
- Cool down: 15 minutes blade cleaning and maintenance.
2.3 Firearms Training Program
Developing lethal proficiency with firearms requires disciplined repetition, safety adherence, and cognitive conditioning.
| Week | Drill Name | Description | Duration (Minutes) | Progression Benchmark |
|---|---|---|---|---|
| 1 | Safety and Handling | Safe weapon manipulation, clearing malfunctions | 45 | Perform all safety checks flawlessly |
| 2 | Sight Alignment | Proper sight picture and trigger control | 60 | 90% accuracy on static target at 5 yards |
| 3 | Reload Drills | Tactical reloads and emergency reloads | 60 | Complete reloads under 3 seconds |
| 4 | Multiple Targets | Engaging multiple targets with prioritization | 60 | 80% hit rate on 3 targets within 10 seconds |
| 5 | Movement and Shooting | Shooting on the move, cover utilization | 75 | Maintain accuracy while moving at 5 yards |
| 6 | Low Light Drills | Shooting with limited light conditions | 75 | Engage targets accurately in simulated low light |
| 7 | Malfunction Drills | Clearing jams, stovepipes under time pressure | 90 | Clear malfunction within 3 seconds |
| 8 | Stress Fire Drills | Shooting under timed, stressful conditions | 90 | Maintain 75% accuracy under timed drills |
Daily Firearms Drill Example (Wednesday):
- Warm-up: 10 minutes dry-fire practice focusing on grip and trigger pull.
- Live-fire: 30 minutes marksmanship drills at fixed targets.
- Reload drills: 30 minutes tactical reloads with magazine changes.
- Movement drills: 30 minutes moving between cover and shooting.
- Cool down: 10 minutes weapon maintenance.
2.4 Tactical Medicine Training Program
Tactical medicine prepares you to save lives under duress. The protocol trains rapid assessment, intervention, and evacuation skills.
| Week | Focus Area | Description | Duration (Minutes) | Progression Benchmark |
|---|---|---|---|---|
| 1 | Basic Trauma Assessment | Rapid casualty evaluation and triage | 45 | Complete assessment within 2 minutes |
| 2 | Airway Management | Clearing airway obstructions, basic airway adjuncts | 60 | Successfully open airway in simulated casualty |
| 3 | Hemorrhage Control | Tourniquet application, wound packing | 60 | Apply tourniquet within 10 seconds |
| 4 | Chest Seal Application | Treating open chest wounds | 60 | Properly seal chest wound in under 2 minutes |
| 5 | IV/IO Access | Establishing intravenous/intraosseous access | 75 | Insert IV line with 90% success on first attempt |
| 6 | Medication Administration | Dosages and delivery of tactical medications | 75 | Administer medication correctly within 3 minutes |
| 7 | Evacuation Protocols | Patient packaging and movement under hostile conditions | 90 | Evacuate casualty within 5 minutes safely |
| 8 | Scenario Medical Drills | Integrated medical scenarios with stress load | 90 | Maintain composure and efficacy in simulated trauma |
Daily Tactical Medicine Drill Example (Monday):
- Warm-up: 10 minutes reviewing casualty assessment checklist.
- Airway drills: 20 minutes clearing obstructions and adjunct insertion.
- Hemorrhage control: 30 minutes applying tourniquets and dressings.
- Chest seal practice: 20 minutes applying occlusive dressings.
- Cool down: 10 minutes reviewing medication dosages.
2.5 Digital Defense Training Program
In the modern battlefield, digital defense is as critical as physical prowess. This program builds foundational cybersecurity skills and offensive countermeasures.
| Week | Focus Area | Description | Duration (Minutes) | Progression Benchmark |
|---|---|---|---|---|
| 1 | Network Fundamentals | IP addressing, basic network architecture | 45 | Configure a simple network without error |
| 2 | System Hardening | Securing operating systems and software | 60 | Harden system to pass 90% of vulnerability scans |
| 3 | Malware Analysis | Identifying and mitigating malware threats | 60 | Detect and quarantine malware within 15 minutes |
| 4 | Penetration Testing | Ethical hacking basics, vulnerability scanning | 60 | Identify 80% of vulnerabilities in a test system |
| 5 | Encryption Protocols | Implementing secure communications | 75 | Set up encrypted channels with zero data leakage |
| 6 | Incident Response | Responding to cyber incidents and containment | 75 | Contain simulated incident within 10 minutes |
| 7 | Offensive Operations | Basic cyber offensive tactics and attribution | 90 | Successfully execute controlled penetration test |
| 8 | Integrated Cyber Drills | Simulated cyber-attacks with defensive response | 90 | Maintain system integrity under attack |
Daily Digital Defense Drill Example (Thursday):
- Warm-up: 10 minutes reviewing network topology diagrams.
- System hardening: 30 minutes applying patches and configuration changes.
- Malware analysis: 30 minutes scanning and quarantining samples.
- Penetration testing: 30 minutes vulnerability scanning.
- Cool down: 20 minutes incident response simulation debrief.
2.6 Psychological Resilience Training Program
This discipline fortifies the mind and spirit against unseen adversaries. It is the immaterial backbone supporting all other skills.
| Week | Focus Area | Description | Duration (Minutes) | Progression Benchmark |
|---|---|---|---|---|
| 1 | Meditation Basics | Breath control, mindfulness, presence | 45 | Maintain focused meditation for 20 minutes |
| 2 | Energy Center Awareness | Chakras, energy flows, grounding techniques | 60 | Identify and balance all major energy centers |
| 3 | Protective Visualization | Mental shields and aura strengthening | 60 | Sustain protective visualization for 30 minutes |
| 4 | Mantra and Prayer | Sacred phrases for mental fortitude | 60 | Recite mantra with full mental engagement |
| 5 | Shadow Work | Confronting inner darkness and fears | 75 | Complete guided shadow work journal entries |
| 6 | Ritual and Ceremony | Sacred warrior rites and symbolic acts | 75 | Perform ritual with full adherence to protocol |
| 7 | Spiritual Combat Techniques | Visualization and mental combat drills | 90 | Maintain mental clarity and focus under stress |
| 8 | Integrated Spiritual Practice | Combining all techniques into daily practice | 90 | Sustain spiritual practice during physical training |
Daily Psychological Resilience Drill Example (Friday):
- Warm-up: 10 minutes deep breathing and centering.
- Meditation: 30 minutes focused breath control.
- Visualization: 30 minutes protective aura building.
- Mantra/prayer: 20 minutes recitation with full intent.
- Cool down: 10 minutes journaling insights.
2.7 Legal Defense Training Program
Legal defense training ensures your actions remain within the sacred boundaries of the law and prepares you to face legal consequences with knowledge and calm.
| Week | Focus Area | Description | Duration (Minutes) | Progression Benchmark |
|---|---|---|---|---|
| 1 | Use of Force Laws | Understanding legal thresholds for self-defense | 45 | Pass written test with 90% accuracy |
| 2 | Rights During Detention | Proper conduct and legal rights when detained | 60 | Recite rights and procedures flawlessly |
| 3 | Evidence Preservation | Securing and documenting evidence ethically | 60 | Demonstrate chain-of-custody in practical drill |
| 4 | Courtroom Procedures | Basics of trial process and legal terminology | 60 | Outline courtroom procedure from arraignment to verdict |
| 5 | Legal Defense Strategy | Preparing statements and coordination with counsel | 75 | Draft a legal defense outline for hypothetical case |
| 6 | Crisis Communication | Managing statements to authorities and media | 75 | Perform mock interview maintaining composure |
| 7 | Post-Incident Protocol | Steps after use-of-force incidents | 90 | Execute post-incident protocol checklist |
| 8 | Integrated Legal Drills | Simulated legal scenarios and defense preparation | 90 | Respond to legal scenarios with documented plans |
Daily Legal Defense Drill Example (Thursday):
- Warm-up: 10 minutes review of laws relevant to self-defense.
- Rights recitation: 20 minutes practicing legal rights protocols.
- Evidence handling: 30 minutes simulated evidence collection.
- Courtroom roleplay: 30 minutes mock testimony and questioning.
- Cool down: 10 minutes legal scenario analysis.
Section 3: Weekly Schedule Example Table
The table below provides a sample weekly schedule for Weeks 1 and 2, illustrating the integration and progression.
| Day | Week 1 Focus | Duration (Hours) | Week 2 Focus | Duration (Hours) |
|---|---|---|---|---|
| Monday | Combatives: Stance/Footwork + Basic Trauma Assessment | 3.5 | Combatives: Striking Mechanics + Airway Management | 3.5 |
| Tuesday | Edged Weapons: Grip Mechanics | 3 | Edged Weapons: Basic Cuts and Thrusts | 3 |
| Wednesday | Firearms: Safety and Handling | 3.5 | Firearms: Sight Alignment | 3.5 |
| Thursday | Digital Defense: Network Fundamentals + Legal Rights Overview | 3 | Digital Defense: System Hardening + Rights During Detention | 3 |
| Friday | Psychological Resilience: Meditation Basics + Combatives Drill | 3.5 | Psychological Resilience: Energy Center Awareness + Combatives Striking | 3.5 |
| Saturday | Integrated Scenario: Basic CQC and Medical Response | 4 | Integrated Scenario: Enhanced CQC and Airway Management | 4 |
| Sunday | Active Rest: Mobility + Theory Review | 2 | Active Rest: Meditation + Legal Review | 2 |
Section 4: Skill Benchmarks by Week
Each discipline has explicit benchmarks to assess mastery before progressing. The following table summarizes key benchmarks.
| Discipline | Week | Benchmark Description | Pass Criteria |
|---|---|---|---|
| Combatives | 4 | Execute 8 takedowns in 10 minutes | 100% success |
| Edged Weapons | 5 | Draw and strike within 2 seconds | Consistent execution |
| Firearms | 3 | 90% accuracy at 5 yards on static target | Minimum 90% hits |
| Tactical Medicine | 3 | Apply tourniquet within 10 seconds | 100% success |
| Digital Defense | 2 | Harden system passing 90% vulnerability scan | Scans show minimal exposure |
| Psychological Resilience | 1 | Maintain focused meditation for 20 minutes | Uninterrupted focus |
| Legal Defense | 1 | Pass written test on use of force laws | Minimum 90% correct |
Section 5: Final Integration and Mastery Verification
Upon completing the eight-week cycle, the warrior must undergo a comprehensive evaluation spanning all disciplines. This evaluation is not solely physical but incorporates mental, spiritual, and legal acuity. Failure in any domain requires targeted remediation before advancement.
Summary
This codified weekly training regimen is your blueprint to becoming a Practitioner warrior of the highest order. Adhere strictly to the schedules, respect the progression benchmarks, and dedicate yourself fully to each discipline.
<!-- SECTION 34 -->
The Complete Practitioner's Codex, Volume 10
The Defense Manual: Complete Self-Defense, Strategy, Tactics, and Protective Arts
Chapter IX: Supplements: Equipment Lists for Each Domain
Preface: Within these pages lies the sacred trust of anointed knowledge, the foundation upon which the warrior’s readiness, resilience, and righteous victory rest. The equipment you carry is not mere metal and fiber; it is the extension of your will, the embodiment of your sacred duty to protect, to defend, and to prevail. This chapter delivers comprehensive, no-compromise inventories of gear, meticulously selected and classified by domain. Each list is accompanied by exacting specifications, maintenance protocols, and budget-conscious alternatives. There will be no divergence into theory; all here is actionable, precise, and complete.
I. Combatives Domain Equipment List
Scope: For close quarters battle, hand-to-hand combat, and non-lethal self-defense. This list covers protective gear, training tools, and tactical apparel essential for mastery and survival.
| Item | Specification | Maintenance Protocol | Budget Option | Priority |
|---|---|---|---|---|
| Training Gloves | Full-finger, reinforced knuckle padding, leather exterior | Clean with mild soap after use, air dry | Synthetic MMA gloves | High |
| Protective Headgear | Multi-layer foam, adjustable chin strap, impact-tested | Wipe down with disinfectant, inspect foam compression | Basic sports headgear | High |
| Mouthguard | Dual-layer EVA with custom mold capability | Rinse with antiseptic mouthwash after every use | Boil-and-bite generic models | High |
| Tactical Vest | MOLLE compatible, lightweight ballistic nylon, adjustable | Clean with damp cloth, check for tears or loose stitches | Basic nylon vest | Medium |
| Training Knife | Rubber or polymer, weighted to simulate real knife | Wipe with disinfectant, inspect for cracks | Foam knives | High |
| Focus Mitts | Leather with high-density foam padding | Air dry after use, condition leather monthly | Vinyl mitts | Medium |
| Heavy Bag | Canvas with 70-80 lb filling, chain suspension | Inspect chains for rust, patch tears promptly | DIY bag with sand filling | Medium |
| Ankle Weights | Adjustable, neoprene wrapped with steel shot | Wipe clean, check seams | DIY weighted socks | Low |
Maintenance & Usage Protocol for Combatives Gear
- Training Gloves:
- After each session, remove gloves, clean exterior with mild soap and warm water.
- Air dry on ventilated rack, never use heat sources.
- Inspect stitching weekly; repair or replace on any seam failure.
- Protective Headgear:
- After every use, wipe interior and exterior with antiseptic solution.
- Compress foam by hand to check for integrity monthly; replace if foam does not rebound.
- Adjust straps to ensure snug fit before each session.
- Mouthguard:
- Immediately after use, rinse in antiseptic mouthwash for 60 seconds.
- Store in ventilated case, sanitize weekly with diluted hydrogen peroxide solution.
II. Edged Weapons Domain Equipment List
Scope: For acquisition, maintenance, and deployment of blades ranging from combat knives to swords. Emphasis on balance, durability, and ease of carry.
| Item | Specification | Maintenance Protocol | Budget Option | Priority |
|---|---|---|---|---|
| Combat Knife | 1095 or AUS-8 steel, full tang, 4-6 inch blade, drop-point | Oil blade after use, sharpen every 3 uses | 440C steel tactical knife | High |
| Bowie Knife | 1095 carbon steel, 9-12 inch clip point blade | Clean with warm water, dry immediately, oil monthly | Stainless steel hunting knife | Medium |
| Folding Knife | S30V steel, liner lock, 3-4 inch blade | Clean pivot monthly, lubricate lock mechanism | AUS-8 folding knife | Medium |
| Sharpening Stone | Combination 1000/6000 grit whetstone | Clean with water, flatten with lapping plate monthly | Ceramic rod set | High |
| Leather Sheath | Full-grain leather, reinforced stitching | Condition monthly with mink oil | Nylon sheath | Medium |
| Sword (Optional) | Damascus or 1095 steel, 28-32 inch blade, full tang | Oil blade after each use, inspect hilt and guard | Cold steel replicas | Low |
| Paracord | 550 lb tensile strength, 50 ft spool | Store dry, inspect for frays | Generic paracord | High |
Edged Weapons Maintenance Protocol

- Cleaning:
- Immediately after use, wipe blade with a clean cloth to remove moisture and debris.
- Use warm water and mild detergent if necessary; dry meticulously to prevent rust.
- Oiling:
- Apply a thin coat of gun oil or mineral oil to blade surfaces after cleaning.
- Use a clean cloth to spread oil evenly.
- Sharpening:
- Place whetstone on a stable surface, soak if water-based.
- Hold blade at 20-degree angle; draw blade across stone in controlled strokes, 10 per side.
- Repeat with finer grit, then strop if available.
- Sheath Care:
- Condition leather monthly with mink oil to prevent drying and cracking.
- Avoid storing wet blades in leather for extended periods.
III. Firearms Domain Equipment List
Scope: Essential firearms, ammunition, accessories, and maintenance tools for self-defense and tactical operations.
| Item | Specification | Maintenance Protocol | Budget Option | Priority |
|---|---|---|---|---|
| Primary Firearm | Semi-automatic pistol, 9mm or .45 ACP, 3-5 inch barrel | Clean every 300 rounds or monthly, lubricate slide rails | Budget model Glock or Springfield | High |
| Secondary Firearm (Backup) | Compact revolver or subcompact pistol, .38 Special or 9mm | Clean monthly, check cylinder or magazine function | Taurus revolver or Ruger LCP | Medium |
| Ammunition | Factory new, defensive loads, +P rated preferred | Store in dry, cool environment, rotate inventory | Budget brand, avoid reloads | High |
| Cleaning Kit | Bore brushes, solvent, lubricant, cleaning rods | Clean firearm after every use | Inexpensive universal kits | High |
| Tactical Holster | Kydex or leather, adjustable retention | Wipe down monthly, inspect for cracking | Nylon holster | Medium |
| Mag Pouches | MOLLE compatible, elastic retention | Inspect elastic tension monthly | Generic elastic pouches | Medium |
| Tactical Light | 300-600 lumen LED, momentary and constant on modes | Replace batteries monthly, clean lens | Inexpensive LED flashlight | Low |
Firearms Maintenance Protocol
- Disassembly:
- Verify firearm is unloaded.
- Field strip according to manufacturer instructions.
- Cleaning:
- Apply solvent to bore brush; run through barrel 5-7 times.
- Use patches to remove debris until clean.
- Clean frame, slide, and magazine with brushes and cloths.
- Lubrication:
- Apply lubricant sparingly to slide rails, barrel exterior, and trigger components.
- Wipe off excess to avoid dirt attraction.
- Inspection:
- Verify no cracks, loose screws, or worn springs.
- Test function of safety and trigger mechanisms.
IV. Tactical Medicine Domain Equipment List
Scope: Life-saving medical gear for trauma care, wound management, and emergency stabilization during combat or crisis.
| Item | Specification | Maintenance Protocol | Budget Option | Priority |
|---|---|---|---|---|
| Tourniquet | CAT or SOF-T, windlass design, nylon strap | Inspect elasticity monthly, replace after use | Generic windlass tourniquet | High |
| Trauma Dressing | 5x9 inch, hemostatic agent impregnated | Store sealed in cool dry environment | Standard gauze with pressure wrap | High |
| Chest Seal | Occlusive, adhesive, vented or non-vented | Check packaging integrity, replace if damaged | Hydrogel sheets with tape | Medium |
| Nasopharyngeal Airway | Multiple sizes, latex-free | Sterilize after use, replace if damaged | Basic NPA sets | Medium |
| Gloves | Nitrile, powder free, box of 100 | Store in cool dry place, verify expiration | Generic nitrile gloves | High |
| Medical Shears | Titanium blade, blunt tip | Clean and oil pivot monthly | Stainless steel shears | Medium |
| Adhesive Tape | Hypoallergenic, 1 inch width | Store sealed, replace after opening | Cloth tape | Medium |
| Emergency Blanket | Mylar, reflective | Fold carefully after use, store in waterproof pouch | Basic foil blanket | Low |
Tactical Medicine Maintenance & Usage Protocol
- Tourniquet:
- Inspect strap and windlass for frays or cracks monthly.
- Practice application quarterly to maintain proficiency.
- Trauma Dressing:
- Keep sealed in original packaging until needed.
- Replace every 3 years or if packaging compromised.
- Chest Seal:
- Store in cool, dry place away from direct sunlight.
- Confirm adhesive integrity before packing.
- Gloves:
- Use fresh pair for every patient contact.
- Dispose properly after use to avoid contamination.
V. Digital Defense Domain Equipment List
Scope: Equipment and tools for secure communication, data protection, and cyber defense in hostile environments.
| Item | Specification | Maintenance Protocol | Budget Option | Priority |
|---|---|---|---|---|
| Encrypted Smartphone | Hardware encryption, secure OS (e.g., GrapheneOS) | Regular OS updates, full disk encryption | Mid-tier Android with encryption | High |
| Portable VPN Router | OpenVPN or WireGuard compatible, battery powered | Firmware updates quarterly, battery cycle maintenance | DIY Raspberry Pi VPN | Medium |
| Hardware Encryption Key | FIDO2 standard, USB-C or Lightning compatible | Firmware updates, physical security checks | Budget Yubikey clones | High |
| Faraday Bag | Multi-layer RF shielding, tested for 5G and Wi-Fi bands | Inspect seams quarterly, avoid punctures | Aluminum foil wrap (emergency) | Medium |
| Password Manager Device | Air-gapped, hardware encrypted | Update firmware, change master password regularly | Open-source software on secure PC | Medium |
| Signal Jammers (Legal Use Only) | Portable, adjustable frequency, low-power | Check calibration before use | DIY jammer kits (not recommended) | Low |
Digital Defense Maintenance Protocol
- Encrypted Smartphone:
- Update OS and security patches monthly.
- Enable two-factor authentication on all accounts.
- VPN Router:
- Update firmware quarterly.
- Cycle battery monthly to preserve capacity.
- Hardware Encryption Key:
- Store in secure location when not in use.
- Test device operation monthly.
- Faraday Bag:
- Inspect for tears or holes quarterly.
- Store in dry environment to avoid moisture damage.
VI. Psychological Resilience Domain Equipment List
Scope: Objects and implements used in ritual, prayer, and metaphysical defense. The sacred tools that focus and channel the warrior’s inner sanctity.
| Item | Specification | Maintenance Protocol | Budget Option | Priority |
|---|---|---|---|---|
| Anointed Oil | Olive oil base with frankincense, myrrh, and other botanicals | Store in dark glass bottle, away from heat and light | DIY olive oil with essential oils | High |
| Holy Symbol Necklace | Silver or brass, engraved with sacred iconography | Polish monthly with cloth, inspect chain links | Pewter or wooden pendant | High |
| Prayer Beads | Wood or semi-precious stones, 33 or 54 count | Clean with dry cloth, avoid water | Plastic beads | Medium |
| Ritual Knife (Athame) | Stainless steel blade, wooden handle | Oil blade monthly, wrap handle in cloth when not in use | Small kitchen paring knife | Medium |
| Incense Burner | Brass or iron, with perforated lid | Clean ash residue weekly, polish metal surfaces | Ceramic dish | Low |
| Sacred Text Holder | Wood or metal, portable | Dust weekly, inspect for damage | Book stand | Low |
Spiritual Equipment Care Protocol
- Anointed Oil:
- Store in cool, dark place.
- Use clean dropper or applicator to prevent contamination.
- Holy Symbol:
- Polish surface monthly with non-abrasive cloth.
- Check clasp for wear, replace chain if necessary.
- Prayer Beads:
- Store in cloth pouch when not in use.
- Avoid exposure to water and chemicals.
VII. Legal Defense Domain Equipment List
Scope: Tools and materials for ensuring compliance, documentation, and preparation for legal confrontation related to self-defense and tactical operations.
| Item | Specification | Maintenance Protocol | Budget Option | Priority |
|---|---|---|---|---|
| Legal Documentation Kit | Notebooks, pens, incident report templates | Store in waterproof case, replace paper quarterly | Standard notebooks and pens | High |
| Audio/Video Recorder | Compact, high-definition, timestamped | Charge battery weekly, clear storage monthly | Smartphone apps | Medium |
| Self-Defense Law Guide | Up-to-date printed or digital copy, jurisdiction specific | Update annually | Public domain resources | High |
| Emergency Contact Cards | Laminated, with attorney and emergency numbers | Replace annually or as contact info changes | DIY printed cards | Medium |
| Legal Aid Membership Card | Verified, with contact and policy number | Renew annually | Free legal aid services | Low |
Legal Defense Protocol
- Documentation:
- Record incidents immediately with detailed notes and sketches.
- Use audio/video recordings to corroborate statements.
- Legal Guides:
- Review self-defense statutes annually.
- Carry condensed summary in wallet or phone for quick reference.
- Emergency Contacts:
- Update contact cards as needed.
- Memorize primary legal contact numbers.
Summary Tables by Domain and Priority
| Domain | Item | Priority | Notes |
|---|---|---|---|
| Combatives | Training Gloves | High | Fundamental for hand protection |
| Protective Headgear | High | Prevent traumatic brain injury | |
| Edged Weapons | Combat Knife | High | Primary offensive and defensive blade |
| Sharpening Stone | High | Essential for blade maintenance | |
| Firearms | Primary Firearm | High | Central to armed defense |
| Ammunition | High | Must be reliable and current | |
| Tactical Medicine | Tourniquet | High | Trauma control critical |
| Trauma Dressing | High | Effective bleeding control | |
| Digital Defense | Encrypted Smartphone | High | Secure communication tool |
| Hardware Encryption Key | High | Protects access to sensitive data | |
| Psychological Resilience | Anointed Oil | High | Sanctifies and empowers |
| Holy Symbol Necklace | High | Physical reminder and focus tool | |
| Legal Defense | Legal Documentation Kit | High | Accurate record-keeping imperative |
| Self-Defense Law Guide | High | Ensures lawful compliance |
Final Directive: Every item listed herein deserves your unwavering attention, your meticulous care, and your solemn respect. The warrior’s tools are sacred extensions of your resolve. Their readiness can mean the difference between life and death, justice and ruin. Follow the maintenance protocols precisely. Choose your gear not by fashion or whim, but by proven efficacy and sacred trust. This manual is your covenant; uphold it without compromise.
End of Chapter IX
<!-- SECTION 35 -->
Supplements: Scenario Planning Templates
The Complete Practitioner's Codex, Volume 10: The Defense Manual
Chapter: Creating Realistic Self-Defense Scenarios — Multiple Attackers, Home Invasion, Digital Breach, and Spiritual Attack
Preface: In the sacred art of self-defense, preparation transcends mere physical readiness. The warrior must anticipate the chaos of conflict: multiple adversaries converging, the sanctity of the home breached, unseen digital incursions, and assaults upon the spirit itself. Mastery demands that one not only endures but emerges unbroken and unbowed. This chapter imparts the suppressed architecture of scenario planning—each step, every protocol—enabling the chosen apprentice to forge unassailable defenses of mind, body, and soul.
I. Introduction to Scenario Planning for Self-Defense
Scenario planning is a deliberate, methodical process that prepares the warrior to engage realistic, complex threats through immersive simulation and rigorous evaluation. This manual section supplies the complete framework for designing, executing, and reviewing self-defense scenarios involving:
- Multiple Attackers
- Home Invasion
- Digital Breach
- Spiritual Attack
Each scenario demands unique tactical, technical, and psychological protocols. The templates and checklists provided here are customizable to individual needs and environments.
II. Core Framework for Scenario Planning
Every scenario must be developed with precision, following these fundamental phases:
| Phase | Objective | Outcome |
|---|---|---|
| 1. Threat Identification | Define nature, number, and capabilities of attacker(s) | Clear threat profile |
| 2. Environment Analysis | Map terrain, entry points, escape routes, digital vectors | Comprehensive situational awareness |
| 3. Resource Assessment | Inventory weapons, defenses, digital safeguards, spiritual tools | Knowledge of available assets |
| 4. Scenario Design | Construct realistic, dynamic threat simulations | Immersive training environment |
| 5. Execution | Conduct live drills or mental rehearsals | Skill application under stress |
| 6. After-Action Review | Analyze performance, identify weaknesses | Continuous improvement and adaptation |
III. Scenario 1: Multiple Attackers
A. Threat Identification
- Determine attacker count: Define minimum and maximum adversaries (usually 2 to 5).
- Profile attacker types: Physical strength, weaponry, coordination, tactical intelligence.
- Attack vectors: Frontal assault, flanking, ambush, or distraction tactics.
B. Environment Analysis
- Select training ground with obstacles: walls, furniture, confined spaces.
- Identify choke points, cover positions, and escape paths.
- Note lighting, visibility, and noise levels.
C. Resource Assessment
| Resource Category | Details | Examples |
|---|---|---|
| Weapons | Melee, ranged, improvised | Baton, knife, pepper spray |
| Defensive Tools | Shields, barriers | Tactical shield, furniture |
| Support | Communication, backup | Radios, signaling devices |
D. Scenario Design Template
| Step | Description | Details/Instructions |
|---|---|---|
| 1 | Define attacker roles | Assign specific roles (e.g., primary, flanker, decoy) |
| 2 | Establish attack sequence | Order and timing of attacks (simultaneous, staggered) |
| 3 | Integrate distractions | Noise, light flashes, verbal taunts |
| 4 | Design defender objectives | Escape, incapacitate, hold position |
| 5 | Safety protocols | Emergency stop signals, medical readiness |
E. Execution Protocol
- Begin with static positions; defenders hold ground.
- Introduce attacker waves as per sequence.
- Defender applies evasive, counterattack, disengagement techniques.
- Use real-time communication for coordination.
- Record all actions via video for review.
F. After-Action Review Checklist
| Item | Evaluation Criteria | Notes |
|---|---|---|
| Reaction time | Seconds from threat recognition to response | |
| Tactical positioning | Use of cover, angles | |
| Communication effectiveness | Clarity and timing of signals | |
| Weapon deployment | Efficiency and safety of use | |
| Psychological resilience | Stress control, decision-making |
IV. Scenario 2: Home Invasion
A. Threat Identification
- Determine likely entry points: doors, windows, ventilation.
- Assess attacker skill: forced entry, stealth, armed/unarmed.
- Profile attacker motives: theft, harm, hostage.
B. Environment Analysis
- Create detailed floorplan of residence including escape routes.
- Catalog security features: locks, alarms, cameras, safe rooms.
- Identify defensive strongpoints and vulnerable zones.
C. Resource Assessment
| Resource Category | Details | Examples |
|---|---|---|
| Physical Defenses | Doors, locks, barriers | Reinforced doors, deadbolts |
| Alert Systems | Alarms, cameras, sensors | Motion detectors, pan-tilt cameras |
| Defensive Tools | Weapons, safe room supplies | Firearms, batons, emergency kits |
D. Scenario Design Template
| Step | Description | Details/Instructions |
|---|---|---|
| 1 | Select entry point(s) | Simulate forced entry, stealth infiltration |
| 2 | Define attacker approach | Single or multiple attackers, armed or unarmed |
| 3 | Establish defender roles | Alert, counterattack, secure family members |
| 4 | Integrate alarm response | Immediate, delayed, or false alarms |
| 5 | Emergency escape or barricade | Define escape routes or safe room lockdown procedures |
E. Execution Protocol
- Initiate scenario with simulated breach.
- Defender executes alert protocol (verbal commands, alarms).
- Engage attackers using defensive tactics, prioritize family safety.
- Execute evacuation or safe room lockdown based on plan.
- Communicate with emergency responders if applicable.
F. After-Action Review Checklist
| Item | Evaluation Criteria | Notes |
|---|---|---|
| Breach detection time | Seconds from entry to alarm activation | |
| Defensive posture | Use of cover, control of access points | |
| Family safety measures | Securement, communication | |
| Weapon use effectiveness | Accuracy, control, restraint | |
| Psychological readiness | Calmness under pressure |
V. Scenario 3: Digital Breach
A. Threat Identification
- Types of digital threats: hacking, phishing, ransomware, spyware.
- Attacker capabilities: technical skills, resources, persistence.
- Target assets: personal devices, home networks, secure data.
B. Environment Analysis
- Inventory all digital devices and network architecture.
- Identify vulnerabilities: unpatched software, weak passwords, unsecured networks.
- Catalog existing cybersecurity measures.
C. Resource Assessment
| Resource Category | Details | Examples |
|---|---|---|
| Hardware | Firewalls, routers, security keys | VPN routers, hardware tokens |
| Software | Antivirus, encryption tools | Endpoint protection suites |
| Protocols | Backup, patching, password policy | Scheduled backups, MFA |
D. Scenario Design Template
| Step | Description | Details/Instructions |
|---|---|---|
| 1 | Define breach vector | Email phishing, network intrusion, device compromise |
| 2 | Simulate attacker behavior | Lateral movement, data exfiltration, ransomware |
| 3 | Assign defender responses | Detection, containment, eradication |
| 4 | Incorporate time delays | Simulate delayed breach discovery |
| 5 | Plan recovery procedures | Data restoration, system rebuild |
E. Execution Protocol
- Initiate breach simulation (controlled penetration test).
- Monitor detection systems and alert responses.
- Execute containment protocols: isolate affected devices.
- Apply eradication: remove malware, close vulnerabilities.
- Implement recovery: restore backups, verify integrity.
F. After-Action Review Checklist
| Item | Evaluation Criteria | Notes |
|---|---|---|
| Time to detection | Elapsed time from breach to alert | |
| Containment efficiency | Scope of isolation, prevention of spread | |
| Eradication success | Removal of malicious code or access | |
| Recovery speed and completeness | Restoration time and data integrity | |
| User behavior adherence | Compliance with protocols |
VI. Scenario 4: Spiritual Attack
A. Threat Identification
- Nature of spiritual attack: psychic influence, curses, energy manipulation.
- Source: malevolent entities, negative environments, targeted individuals.
- Signs: fatigue, mental fog, emotional instability, synchronicities.
B. Environment Analysis
- Sacred spaces vs. contaminated zones.
- Personal spiritual defenses: talismans, rituals, practices.
- Community support structures: mentors, healers, prayer groups.
C. Resource Assessment
| Resource Category | Details | Examples |
|---|---|---|
| Spiritual Tools | Talismans, amulets, sacred texts | Blessed relics, protective symbols |
| Rituals and Practices | Meditation, prayer, cleansing | Smudging, mantra repetition |
| Support Networks | Spiritual mentors, healers | Clergy, shamans, spiritual elders |
D. Scenario Design Template
| Step | Description | Details/Instructions |
|---|---|---|
| 1 | Identify spiritual threat type | Psychic attack, curse, negative energy field |
| 2 | Simulate onset symptoms | Mental, emotional, physical indicators |
| 3 | Deploy defensive rituals | Cleansing, protective prayers, invocation of light |
| 4 | Engage community support | Seek mentorship, group ritual participation |
| 5 | Monitor recovery | Symptom reduction, spiritual clarity |
E. Execution Protocol
- Introduce scenario with targeted energy manipulation simulation.
- Initiate personal defense protocols: grounding, shielding.
- Perform cleansing rituals according to prescribed method (see Volume 12, Chapter IV).
- Engage support network for reinforcement and guidance.
- Track spiritual and psychological metrics daily for one week.
F. After-Action Review Checklist
| Item | Evaluation Criteria | Notes |
|---|---|---|
| Symptom identification | Accuracy and timeliness | |
| Ritual adherence | Completeness and correctness | |
| Support engagement | Frequency and quality of interactions | |
| Recovery progression | Measurable improvement in condition | |
| Resilience development | Strengthening of defenses post-attack |
VII. Customizable Scenario Planning Template
Use the following master template to construct any scenario. Replace bracketed text with scenario-specific data.
| Phase | Step | Action | Details/Instructions |
|---|---|---|---|
| Threat Identification | 1 | Define attacker(s) or threat nature | [Specify number, type, tactics] |
| 2 | Profile attacker capabilities and intent | [Detail physical, digital, spiritual attributes] | |
| Environment Analysis | 3 | Map environment | [Physical layout, digital topology, spiritual zones] |
| 4 | Identify vulnerabilities and advantages | [Points of entry, weak defenses, strongholds] | |
| Resource Assessment | 5 | Inventory defender assets | [Weapons, security systems, spiritual tools] |
| Scenario Design | 6 | Construct scenario flow | [Attack sequence, defender objectives, distractions] |
| 7 | Establish safety and emergency protocols | [Stop signals, medical aid, communication methods] | |
| Execution | 8 | Conduct scenario according to plan | [Stepwise engagement, communication, recording] |
| After-Action Review | 9 | Evaluate performance | [Reaction times, effectiveness, psychological resilience] |
| 10 | Implement improvements | [Training adjustments, equipment upgrades, mental conditioning] |
VIII. Comprehensive Checklists for Scenario Planning
A. Pre-Scenario Checklist
| Item | Status (✓/✗) | Notes |
|---|---|---|
| Threat profile completed | ||
| Environment mapped | ||
| Resource inventory recorded | ||
| Scenario design finalized | ||
| Safety protocols established | ||
| Participants briefed | ||
| Equipment inspected | ||
| Emergency medical supplies ready | ||
| Communication systems checked |
B. Execution Checklist
| Item | Status (✓/✗) | Notes |
|---|---|---|
| Scenario initiated on schedule | ||
| Roles and objectives clear | ||
| Safety stop signals monitored | ||
| Communication maintained | ||
| Video/audio recording active | ||
| Real-time adjustments made |
C. Post-Scenario Review Checklist
| Item | Status (✓/✗) | Notes |
|---|---|---|
| Data collected and stored | ||
| Performance metrics analyzed | ||
| Psychological state assessed | ||
| Equipment damage assessed | ||
| Training plan updated | ||
| Follow-up scenario scheduled |
IX. Conclusion
The warrior’s path demands unflinching preparation. Through rigorous scenario planning—embracing the physical, digital, and spiritual realms—the disciple transcends vulnerability and achieves mastery of self-defense. These templates and protocols are sacred gifts: wield them with discipline and reverence.
For further refinement of specific tactical procedures, see:
- Volume 3: The Art of Combat Engagement, Chapter V (Multiple Attackers)
- Volume 6: Fortress Defense Protocols, Chapter II (Home Invasion)
- Volume 8: The Cyber Sentinel, Chapter IV (Digital Security)
- Volume 12: The Spirit Guard, Chapter III (Spiritual Protection Rituals)
End of Chapter
<!-- SECTION 36 -->
The Complete Practitioner's Codex, Volume 10: The Defense Manual
Chapter VII: Supplements – Threat Assessment Matrices
Section 1: Developing Comprehensive Threat Assessment Matrices for Evaluating Threat Level, Likelihood, and Required Response
Introduction
In the sacred duty of self-defense and strategic preparation, no tool is more indispensable than a meticulously crafted threat assessment matrix. This matrix is not a mere chart; it is an evolving, living framework—an operational compass guiding your judgment on the battlefield or in covert operations. It must be constructed with precision, used with rigor, and updated with relentless discipline.
This section delivers the complete methodology to develop, deploy, and maintain threat assessment matrices that measure threat level, likelihood, and response necessity. It includes explicit instruction on constructing these matrices, interpreting their results, and enacting continuous assessment protocols.
I. Core Principles of Threat Assessment Matrices
- Modularity: Separate the threat into discrete, measurable categories.
- Quantification: Assign numerical or ordinal values to qualitative factors.
- Dynamic Updating: Continuous input of new data recalibrates threat status.
- Actionability: Every matrix output must correspond to a precise, executable response.
- Redundancy: Overlapping indicators prevent false negatives or positives.
- Confidentiality: Secure storage and controlled access maintain operational integrity.
II. Components of the Threat Assessment Matrix
The matrix consists of three fundamental axes:
| Axis | Description |
|---|---|
| Threat Level | Magnitude and severity of the threat if realized (Impact). |
| Likelihood | Probability that the threat will materialize (Probability). |
| Required Response | Scale of action necessary to neutralize or mitigate the threat. |
III. Step-by-Step Construction of the Threat Assessment Matrix
Step 1: Define Threat Categories
Begin by enumerating and categorizing all plausible threats for your operational environment. Include kinetic, electronic, biological, psychological, and environmental threats.
Example Categories:
| Category | Description |
|---|---|
| Physical Assault | Direct attacks with weapons or unarmed aggression. |
| Cyber Intrusion | Unauthorized access or attack on digital systems. |
| Chemical Exposure | Use or release of toxic substances. |
| Psychological Warfare | Propaganda, misinformation, intimidation tactics. |
| Environmental Hazards | Natural disasters, structural failures, etc. |
Step 2: Define Indicators for Each Threat Category
For each category, identify measurable indicators that signal the presence or escalation of the threat.
Example for Physical Assault:
| Indicator | Measurement Method | Source |
|---|---|---|
| Suspicious behavior | Visual Observation | Surveillance, patrol reports |
| Presence of weapons | Scanning, metal detectors | Security checkpoints |
| Unusual gathering patterns | Crowd density analysis | CCTV footage, human intelligence |
Step 3: Assign Threat Level Scores
Each threat category is assigned a Threat Level score on a 1 to 5 scale, corresponding to the severity of potential impact:
| Threat Level | Description | Impact Example |
|---|---|---|
| 1 | Negligible | Minor annoyance, no harm |
| 2 | Low | Minor injury or disruption |
| 3 | Moderate | Serious injury, partial operational loss |
| 4 | High | Severe injury, significant disruption |
| 5 | Critical | Fatalities, total mission failure |
Step 4: Assign Likelihood Scores
Estimate the probability of occurrence on a 1 to 5 scale:
| Likelihood | Description | Probability Range (%) |
|---|---|---|
| 1 | Rare | <5 |
| 2 | Unlikely | 5–20 |
| 3 | Possible | 21–50 |
| 4 | Likely | 51–80 |
| 5 | Almost Certain | >80 |
Step 5: Combine Scores into a Risk Matrix
Multiply Threat Level by Likelihood to produce a Risk Score from 1 to 25.
| Threat Level | Likelihood | Risk Score (Level × Likelihood) |
|---|---|---|
| 1 to 5 | 1 to 5 | 1 to 25 |
Step 6: Define Response Levels
Based on the Risk Score, determine the required response:
| Risk Score Range | Response Level | Description | Action Protocol Reference |
|---|---|---|---|
| 1–5 | Monitoring | Passive observation | Protocol A, Section III |
| 6–10 | Alert | Heightened vigilance | Protocol B, Section IV |
| 11–15 | Defensive Posture | Prepare defensive measures | Protocol C, Section V |
| 16–20 | Active Response | Immediate action to neutralize | Protocol D, Section VI |
| 21–25 | Emergency Action | Full engagement, escalation | Protocol E, Section VII |
Step 7: Create a Matrix Table
| Threat Category | Indicator(s) | Threat Level (1-5) | Likelihood (1-5) | Risk Score | Response Level | Action Required |
|---|---|---|---|---|---|---|
| Physical Assault | Suspicious behavior, weapons | 4 | 3 | 12 | Defensive Posture | Activate perimeter defense |
| Cyber Intrusion | Unauthorized access attempts | 3 | 4 | 12 | Defensive Posture | Initiate firewall lockdown |
| Chemical Exposure | Detection of toxic agents | 5 | 2 | 10 | Alert | Evacuate area, deploy hazmat |
| Psychological Warfare | Spread of misinformation | 2 | 5 | 10 | Alert | Counter-propaganda measures |
| Environmental Hazard | Severe weather warning | 4 | 3 | 12 | Defensive Posture | Secure facilities, shelter |
IV. Protocol for Continuous Threat Assessment and Adjustment
Step 1: Establish Data Collection Channels
Create secure, redundant lines for obtaining threat indicators:
- Human Intelligence (HUMINT)
- Technical Surveillance (CCTV, Sensors)
- Digital Monitoring (Cyber logs)
- Environmental Sensors (Weather stations, chemical detectors)
Step 2: Schedule Assessment Intervals
Threat assessment must occur at defined intervals:
| Operational Context | Assessment Frequency |
|---|---|
| High-threat zones | Every 15 minutes |
| Moderate-threat zones | Hourly |
| Low-threat zones | Every 4 hours |
Step 3: Update Threat Matrix
At each interval:
- Collect all new data.
- Re-score likelihood based on new indicators.
- Recalculate Risk Scores.
- Adjust response levels accordingly.
Step 4: Communicate Changes
Disseminate updated threat status to all relevant operational units within 5 minutes of assessment completion via secured channels.
Step 5: Implement Response Changes
If response level escalates or de-escalates, execute corresponding action protocols immediately.
Step 6: Record and Archive
Log every updated matrix, data source, and action taken in a secure, timestamped archive for audit and after-action review.
V. Detailed Example: Threat Assessment Matrix for Urban Security Operations
| Threat Category | Indicators | Threat Level | Likelihood | Risk Score | Response Level | Action Required |
|---|---|---|---|---|---|---|
| Physical Assault | Reports of armed individuals, CCTV alerts | 5 | 4 | 20 | Active Response | Deploy rapid response teams, lockdown area |
| Cyber Intrusion | Multiple failed login attempts | 3 | 3 | 9 | Alert | Increase firewall sensitivity, audit logs |
| Chemical Exposure | Detection of unusual odors or chemicals | 5 | 1 | 5 | Monitoring | Dispatch reconnaissance teams |
| Psychological Warfare | Viral social media posts inciting panic | 2 | 5 | 10 | Alert | Activate public communication countermeasures |
| Environmental Hazard | Rising flood waters | 4 | 3 | 12 | Defensive Posture | Evacuate vulnerable zones |
VI. Tables for Supplementary Data: Threat Indicators and Response Options
1. Threat Categories and Indicators Table
| Category | Indicators | Measurement Tools | Detection Frequency |
|---|---|---|---|
| Physical Assault | Suspicious behavior, weapon presence | Visual patrols, metal detectors | Continuous |
| Cyber Intrusion | Login failures, data anomalies | IDS/IPS, system logs | Real-time |
| Chemical Exposure | Air quality changes, chemical sensors | Gas detectors, lab analysis | Continuous |
| Psychological Warfare | Social media trends, rumors | Social media analytics | Hourly |
| Environmental Hazards | Weather patterns, seismic activity | Weather stations, seismographs | Continuous |
2. Response Options and Protocols Table
| Response Level | Action Example | Resources Required | Time to Deploy |
|---|---|---|---|
| Monitoring | Increase observation, no direct action | Surveillance tools, personnel | Immediate |
| Alert | Heighten vigilance, prepare contingencies | Communication systems, backup staff | 10 minutes |
| Defensive Posture | Lockdown, fortify perimeters | Barriers, armed personnel | 5 minutes |
| Active Response | Engage threat with force, tactical maneuvers | Weapons, rapid response teams | 1 minute |
| Emergency Action | Full-scale counter-attack or evacuation | All available resources | Immediate |
VII. Advanced Protocols for Threat Matrix Enhancement
Incorporating Predictive Analytics
- Utilize historical data to forecast likelihood trends.
- Integrate machine learning models trained on past threat data.
- Continuously refine model parameters with live data input.
Step-by-step predictive integration:
- Collect minimum 12 months of historical threat data.
- Normalize data to consistent formats.
- Train predictive models (e.g., Random Forest, SVM).
- Validate model accuracy against known events.
- Deploy model outputs as additional likelihood modifiers.
- Adjust threat matrix likelihood scores with predictive insights.
VIII. Case Study: Implementation of Threat Matrix in a Hostile Environment
Context: Remote forward operating base in contested territory.
Threats: Frequent insurgent attacks, cyber sabotage, chemical threats from enemy agents.
Matrix Implementation:
| Threat Category | Indicators | Threat Level | Likelihood | Risk Score | Response Level | Action Taken |
|---|---|---|---|---|---|---|
| Physical Assault | Night-time movement near perimeter | 5 | 4 | 20 | Active Response | Deploy night patrols, increase watch |
| Cyber Intrusion | Attempts to breach comms network | 4 | 3 | 12 | Defensive Posture | Tighten firewall rules, isolate systems |
| Chemical Exposure | Detection of unknown powders | 5 | 2 | 10 | Alert | Equip hazmat suits, evacuate zones |
| Psychological Warfare | Leaflet drops, radio broadcasts | 3 | 5 | 15 | Defensive Posture | Broadcast counter-messages, increase morale |
| Environmental Hazard | Sandstorm approaching | 3 | 3 | 9 | Alert | Secure equipment, protect personnel |
Outcome: Early detection and response prevented casualties and maintained operational integrity.
IX. Summary and Final Instructions
- Develop your threat assessment matrix with absolute precision.
- Use quantified scales for consistent evaluation.
- Institute continuous data collection and reassessment protocols.
- Link every risk score to a specific, actionable response.
- Secure and log all assessments for review and improvement.
- Employ advanced predictive tools where possible to anticipate threats.
- Train all personnel in matrix interpretation and response execution.
- Maintain discipline and rigor; hesitation or error in threat assessment is lethal.
This protocol is the foundation of your survival and mastery in hostile environments. Guard it as you would your sacred oath.
For detailed operational protocols corresponding to each response level, consult:
- Protocol A: Monitoring and Surveillance, Volume 10, Chapter IX
- Protocol B: Alert State Procedures, Volume 10, Chapter X
- Protocol C: Defensive Posture Tactics, Volume 10, Chapter XI
- Protocol D: Active Response Engagement, Volume 10, Chapter XII
- Protocol E: Emergency Action and Escalation, Volume 10, Chapter XIII
End of Section
<!-- SECTION 37 -->
The Complete Practitioner's Codex, Volume 10: The Warrior’s Manual
Supplements: Cross-Reference Guide for Supplements
Mapping Key Concepts and Techniques in Volume 10 to Related Volumes (1, 2, 11, 13, 19)


This Cross-Reference Guide serves as the master key to unlock the interconnected wisdom dispersed throughout the Practitioner Codex series. Volume 10, "The Warrior’s Manual," functions as the tactical and technical heart of personal defense and combat mastery. However, its fullest power is realized only when integrated meticulously with the foundational, biological, spiritual, and technological knowledge contained in Volumes 1, 2, 11, 13, and 19. This guide provides an exhaustive, actionable map for synthesizing these volumes into a seamless operational doctrine.
I. Overview of Integration Strategy
Volume 10: Focuses on combat techniques, defense protocols, tactical awareness, weapon crafting, and personal protection arts.
Volumes for cross-reference:
- Volume 1: The Foundation Codex — Human anatomy, physiology, and baseline conditioning.
- Volume 2: The Sacred Codex of Mind and Spirit — Mental conditioning, meditative protocols, and spiritual resilience.
- Volume 11: The Armory Codex — Weapon fabrication, maintenance, and advanced armaments.
- Volume 13: The Healing Codex — Trauma treatment, regeneration protocols, and pharmacological remedies.
- Volume 19: The Tech Codex — Advanced defensive technologies, surveillance, and cybernetic augmentation.
II. Cross-Reference Table for Key Topics in Volume 10 and Related Volumes
| Topic in Volume 10 | Chapter / Section | Related Volume | Related Chapter / Section | Practical Use / Notes |
|---|---|---|---|---|
| Human Combat Physiology | Chapter I, Section A | Volume 1 | Chapter II: Musculoskeletal System | Stepwise conditioning protocols for strength and endurance augmentation critical for combat readiness. |
| Mental Focus and Situational Awareness | Chapter II, Section B | Volume 2 | Chapter IV: Meditative Focus | Techniques to enhance reaction time and mental clarity under duress. |
| Tactical Weapon Crafting | Chapter III, Section C | Volume 11 | Chapter I: Metallurgy Basics | Step-by-step weapon forging and material refinement protocols. |
| Trauma First Aid and Regeneration | Chapter IV, Section D | Volume 13 | Chapter III: Emergency Trauma Care | Stepwise wound treatment, hemorrhage control, and accelerated healing through pharmacological aids. |
| Cybernetic Defensive Augmentation | Chapter V, Section E | Volume 19 | Chapter II: Defensive Systems | Integration of cybernetic implants for enhanced reflexes and damage resistance. |
| Defensive Martial Arts Techniques | Chapter VI, Section F | Volume 2 | Chapter V: Spiritual Combat Arts | Merging physical defense with spiritual discipline to enhance defense efficacy. |
| Energy Management in Combat | Chapter VII, Section G | Volume 2 | Chapter VI: Energy Flow Techniques | Use of bioenergetic pathways to sustain physical and mental stamina during prolonged engagements. |
| Weapon Maintenance and Upgrades | Chapter VIII, Section H | Volume 11 | Chapter IV: Weapon Enhancements | Maintenance schedules and modification blueprints for field reliability. |
| Biological Sensors and Reaction Time | Chapter IX, Section I | Volume 19 | Chapter V: Neural Interface Systems | Protocols for installing and calibrating biological sensors to improve battlefield awareness. |
| Psychological Warfare and Deception | Chapter X, Section J | Volume 2 | Chapter VIII: Mind Control Protocols | Techniques to manipulate opponent psychology for tactical advantage. |
III. Detailed Protocols for Integrated Study and Application
Protocol 1: Comprehensive Conditioning for Warrior Physiology

Objective: Enhance muscular endurance, skeletal durability, and cardiovascular performance to optimize physical combat effectiveness.
Volumes Utilized:
- Volume 10, Chapter I (Combat Physiology)
- Volume 1, Chapter II (Musculoskeletal System Conditioning)
Step-by-Step Instructions:
- Baseline Assessment:
- Administer the physical baseline test as per Volume 1, Chapter II, Section A.
- Record maximal voluntary contraction (MVC) for major muscle groups, cardiovascular endurance, and joint flexibility.
- Muscular Strength Protocol (Volume 1, Chapter II, Section C):
- Utilize progressive overload training with a 5-day split:
| Day | Muscle Group | Sets | Reps | Rest (seconds) | Notes |
|---|---|---|---|---|---|
| 1 | Legs (Squats, Lunges) | 5 | 8 | 90 | Use weighted resistance appropriate to 80% MVC |
| 2 | Back (Deadlifts) | 4 | 6 | 120 | Emphasize form precision |
| 3 | Chest (Press Variants) | 5 | 8 | 90 | Include both push and pull |
| 4 | Shoulders (Presses) | 4 | 10 | 60 | Use dumbbells or barbells |
| 5 | Core (Planks, Twists) | 3 | N/A | 60 | Hold planks 60 seconds, twists 15 per side |
- Joint and Skeletal Reinforcement:
- Apply Volume 1, Chapter II’s joint conditioning techniques:
- Isometric holds at full range of motion (ROM) for 30 seconds, 3 repetitions per joint.
- Dynamic stretching post workout for 15 minutes.
- Apply Volume 1, Chapter II’s joint conditioning techniques:
- Cardiovascular Conditioning:
- High-intensity interval training (HIIT) protocol:
- 30 seconds sprint, 90 seconds jog, repeat 10 times per session, 3 sessions per week.
- Monitor heart rate to maintain 85-95% maximum during sprints.
- High-intensity interval training (HIIT) protocol:
- Nutrition and Supplementation:
- Cross-reference Volume 13, Chapter II, Section A for anabolic nutritional support and regenerative supplements.
- Recovery Protocol:
- Employ Volume 13, Chapter IV’s sleep hygiene and regenerative therapy methods.
Protocol 2: Mental Conditioning and Situational Awareness Enhancement
Objective: Cultivate razor-sharp focus, stress inoculation, and rapid decision-making under extreme pressure.
Volumes Utilized:
- Volume 10, Chapter II (Mental Focus)
- Volume 2, Chapter IV (Meditative Focus and Spiritual Resilience)
Step-by-Step Instructions:
- Daily Meditative Sessions:
- Follow Volume 2, Chapter IV’s Samadhi Focus Protocol:
- Sit in a quiet location, spine erect.
- Close eyes and focus on breath for 20 minutes.
- When distractions arise, label and release them without engagement.
- Repeat twice daily.
- Follow Volume 2, Chapter IV’s Samadhi Focus Protocol:
- Stress Exposure Drills:
- Apply Volume 10, Chapter II’s Stress Inoculation Training (SIT):
- Simulate combat sounds and sensory overload while performing cognitive tasks (e.g., puzzle solving, rapid arithmetic).
- Increase complexity weekly from 5 to 20 minutes.
- Apply Volume 10, Chapter II’s Stress Inoculation Training (SIT):
- Situational Awareness Exercises:
- Use Volume 2, Chapter IV’s Peripheral Awareness Expansion:
- Practice 360-degree awareness drills in controlled environments.
- Train to identify and categorize stimuli within 3 seconds.
- Use Volume 2, Chapter IV’s Peripheral Awareness Expansion:
- Visualization and Scenario Simulation:
- Employ Volume 2’s guided imagery techniques to mentally rehearse combat scenarios:
- Visualize engagement sequences with full sensory detail for 15 minutes daily.
- Employ Volume 2’s guided imagery techniques to mentally rehearse combat scenarios:
- Neurofeedback Deployment:
- Cross-reference Volume 19, Chapter V for neuro-interface devices to monitor brainwave patterns during mental training.
Protocol 3: Tactical Weapon Fabrication and Maintenance
Objective: Construct, maintain, and enhance combat weapons to meet the demands of varied tactical scenarios.
Volumes Utilized:
- Volume 10, Chapter III (Weapon Crafting)
- Volume 11, Chapter I (Metallurgy Basics and Weapon Fabrication)
- Volume 11, Chapter IV (Weapon Enhancements and Maintenance)
Step-by-Step Instructions:
- Material Selection and Preparation:
- Select steel alloys as per Volume 11, Chapter I, Table 1:
| Alloy Type | Carbon Content (%) | Hardness (HRC) | Optimal Use Case |
|---|---|---|---|
| 1095 | 0.95 | 56-58 | Blades requiring high edge retention |
| 5160 | 0.60 | 54-56 | Flexible blades and swords |
| D2 | 1.50 | 60-62 | High wear resistance tools |
- Forging Process:
- Heat alloy to 1200°C in forge.
- Hammer repeatedly to refine grain structure (minimum 1000 strikes).
- Quench in oil bath at 65°C to lock hardness.
- Temper at 200°C for 2 hours to relieve brittleness.
- Weapon Assembly:
- Follow Volume 10, Chapter III’s blueprint for modular weapon construction:
- Attach handle using epoxy resin and mechanical pins.
- Balance blade by adjusting handle weight to maintain center of gravity 5 cm from guard.
- Follow Volume 10, Chapter III’s blueprint for modular weapon construction:
- Maintenance Schedule:
- Clean and oil blades after each use with mineral oil.
- Sharpen edges using whetstone grit progression: 400 → 1000 → 3000.
- Inspect for microfractures via Volume 19, Chapter III’s ultrasonic sensor technique monthly.
- Enhancements and Upgrades:
- Apply Volume 11, Chapter IV’s nanocoating procedures for corrosion resistance:
- Spray 2 layers of graphene-based coating, dry under UV light for 30 minutes.
- Apply Volume 11, Chapter IV’s nanocoating procedures for corrosion resistance:
Protocol 4: Trauma First Aid and Accelerated Healing
Objective: Stabilize battlefield trauma and accelerate tissue regeneration to restore combat readiness rapidly.
Volumes Utilized:
- Volume 10, Chapter IV (Trauma First Aid)
- Volume 13, Chapter III (Emergency Trauma Care and Regeneration)
Step-by-Step Instructions:
- Immediate Trauma Triage:
- Assess airway, breathing, circulation (ABC) as per Volume 13, Chapter III.
- Control hemorrhage using pressure dressings or tourniquets within 2 minutes.
- Wound Cleaning and Debridement:
- Irrigate wounds with sterile saline (see Volume 8: Water Codex, Chapter II for sterile saline preparation).
- Remove necrotic tissue carefully with sterile scalpel.
- Application of Regenerative Ointments:
- Prepare ointment from Volume 13’s bioactive compound formula:
| Ingredient | Quantity (grams) | Function |
|---|---|---|
| Silver nanoparticles | 0.5 | Antimicrobial |
| Aloe vera extract | 10 | Anti-inflammatory and hydration |
| Collagen peptides | 5 | Tissue regeneration |
- Apply thick layer to wound, cover with sterile dressing.
- Pharmacological Support:
- Administer intravenous fluids (Ringer’s lactate solution, Volume 13, Chapter II) at 20 ml/kg/hour for shock management.
- Provide analgesics per dosage table below:
| Drug | Dosage (mg) | Frequency (hours) | Notes |
|---|---|---|---|
| Morphine | 5-10 | Every 4 | Monitor respiratory rate |
| Ketorolac | 10 | Every 6 | Avoid in renal failure |
- Regeneration Stimulation:
- Employ low-level laser therapy as detailed in Volume 13, Chapter V:
- Apply 650 nm laser at 5 J/cm2 over wound area for 10 minutes daily.
- Employ low-level laser therapy as detailed in Volume 13, Chapter V:
- Monitoring and Evacuation:
- Reassess vital signs every 30 minutes.
- Prepare for rapid evacuation if deterioration occurs.
Protocol 5: Cybernetic Defensive Augmentation
Objective: Integrate cybernetic systems to enhance reflexes, durability, and sensory input.
Volumes Utilized:
- Volume 10, Chapter V (Cybernetic Augmentation)
- Volume 19, Chapter II (Defensive Systems and Neural Interfaces)
Step-by-Step Instructions:
- Pre-Implantation Assessment:
- Conduct full neural and vascular mapping (Volume 19, Chapter II, Section A).
- Verify immune compatibility with cyborg components through blood panel analysis.
- Implant Selection:
- Choose modules based on mission profile:
| Module | Function | Power Requirement (W) | Installation Duration (hours) |
|---|---|---|---|
| Reflex Booster | Accelerates neural signals | 1.5 | 4 |
| Dermal Armor Plating | Increases physical durability | 2.0 | 6 |
| Sensory Enhancement | Augments auditory and visual | 1.0 | 3 |
- Surgical Implantation:
- Sterilize operation area with povidone-iodine solution.
- Utilize Volume 13’s sterile surgical protocol.
- Implant neural interface nodes connected to central nervous system via minimally invasive technique.
- System Calibration:
- Use Volume 19’s neural interface diagnostic software to calibrate response times.
- Conduct reflex latency tests; target latency under 100 milliseconds.
- Post-Implantation Care:
- Administer immunosuppressants as per Volume 13, Chapter VI for 14 days post-implantation.
- Perform daily system diagnostics for first month.
- Operational Integration:
- Train with augmented systems for 2 hours daily focusing on reflexive drills (Volume 10, Chapter VI).
- Monitor for cybernetic fatigue symptoms, adjust power cycles accordingly.
IV. Summary Tables: Study and Application Pathways
Table 1: Sequential Study Pathway for Combat Readiness
| Step | Focus Area | Volume / Chapter | Application Focus |
|---|---|---|---|
| 1 | Physical Conditioning | Volume 1, Chapter II | Strength, endurance, flexibility |
| 2 | Mental Conditioning | Volume 2, Chapter IV | Focus, situational awareness |
| 3 | Weapon Fabrication | Volume 11, Chapter I | Material selection, forging |
| 4 | Weapon Maintenance | Volume 11, Chapter IV | Sharpening, corrosion prevention |
| 5 | Trauma First Aid | Volume 13, Chapter III | Emergency care, wound treatment |
| 6 | Cybernetic Augmentation | Volume 19, Chapter II | Implant installation, system integration |
| 7 | Integrated Combat Training | Volume 10, Chapters I–X | Combined physical, mental, and technological |
Table 2: Practical Use Matrix for Key Techniques
| Technique | Preparation Required | Primary Volume | Supporting Volume | Field Application |
|---|---|---|---|---|
| Combat Stance Optimization | Muscle conditioning, balance training | Volume 10 | Volume 1 | Close-quarters combat |
| Focused Breathing | Meditative practice | Volume 2 | Volume 10 | Stress management in engagement |
| Forging Tactical Blades | Metallurgy knowledge, forge setup | Volume 11 | Volume 10 | Weapon creation for mission-specific needs |
| Hemorrhage Control | Tourniquet application, dressing kits | Volume 13 | Volume 10 | Battlefield trauma stabilization |
| Reflex Enhancement | Neural calibration, implant installation | Volume 19 | Volume 10 | Reaction speed augmentation |
V. Final Notes on Inter-Volume Integration
The warrior who aspires to mastery must never isolate any single volume as the sole source of knowledge or technique. Volume 10’s protocols achieve maximum potency when fused with the foundational sciences and advanced technologies housed in Volumes 1, 2, 11, 13, and 19. This integration demands rigorous study, deliberate practice, and disciplined application.
Each protocol outlined here is a gateway to a unified combat doctrine that transcends mere physical confrontation, incorporating mental acuity, rapid healing, and cybernetic resilience. The warrior’s path is one of relentless refinement—every volume a pillar of the sacred edifice you are tasked to build.
For further detailed protocols on water purification, see Volume 8: The Water Codex, Chapter II. For advanced neuro-interface programming, consult Volume 19: The Tech Codex, Chapter VI. For spiritual combat arts, refer to Volume 2: The Sacred Codex of Mind and Spirit, Chapter V.
End of Supplement: Cross-Reference Guide. The sacred knowledge within these pages awaits your unwavering commitment to mastery and survival. Proceed with reverent discipline.
PLATES — Supplemental Gallery
Illustrations carried over from the original Codex Reader that belong to this volume as a whole. Added by this edition; the text above is complete without them.