THE COMPLETE PRACTITIONER'S CODEX: VOLUME 7
The Agrarian Codex: Complete Agriculture, Permaculture, Animal Husbandry, and Food Sovereignty
<!-- SECTION 1 -->
Volume I: The Living Soil Architecture
Chapter III: The Biological Matrix of Soil, Synthetic Fertilizers’ Impact, and Indigenous Microorganisms (IMO)
Introduction
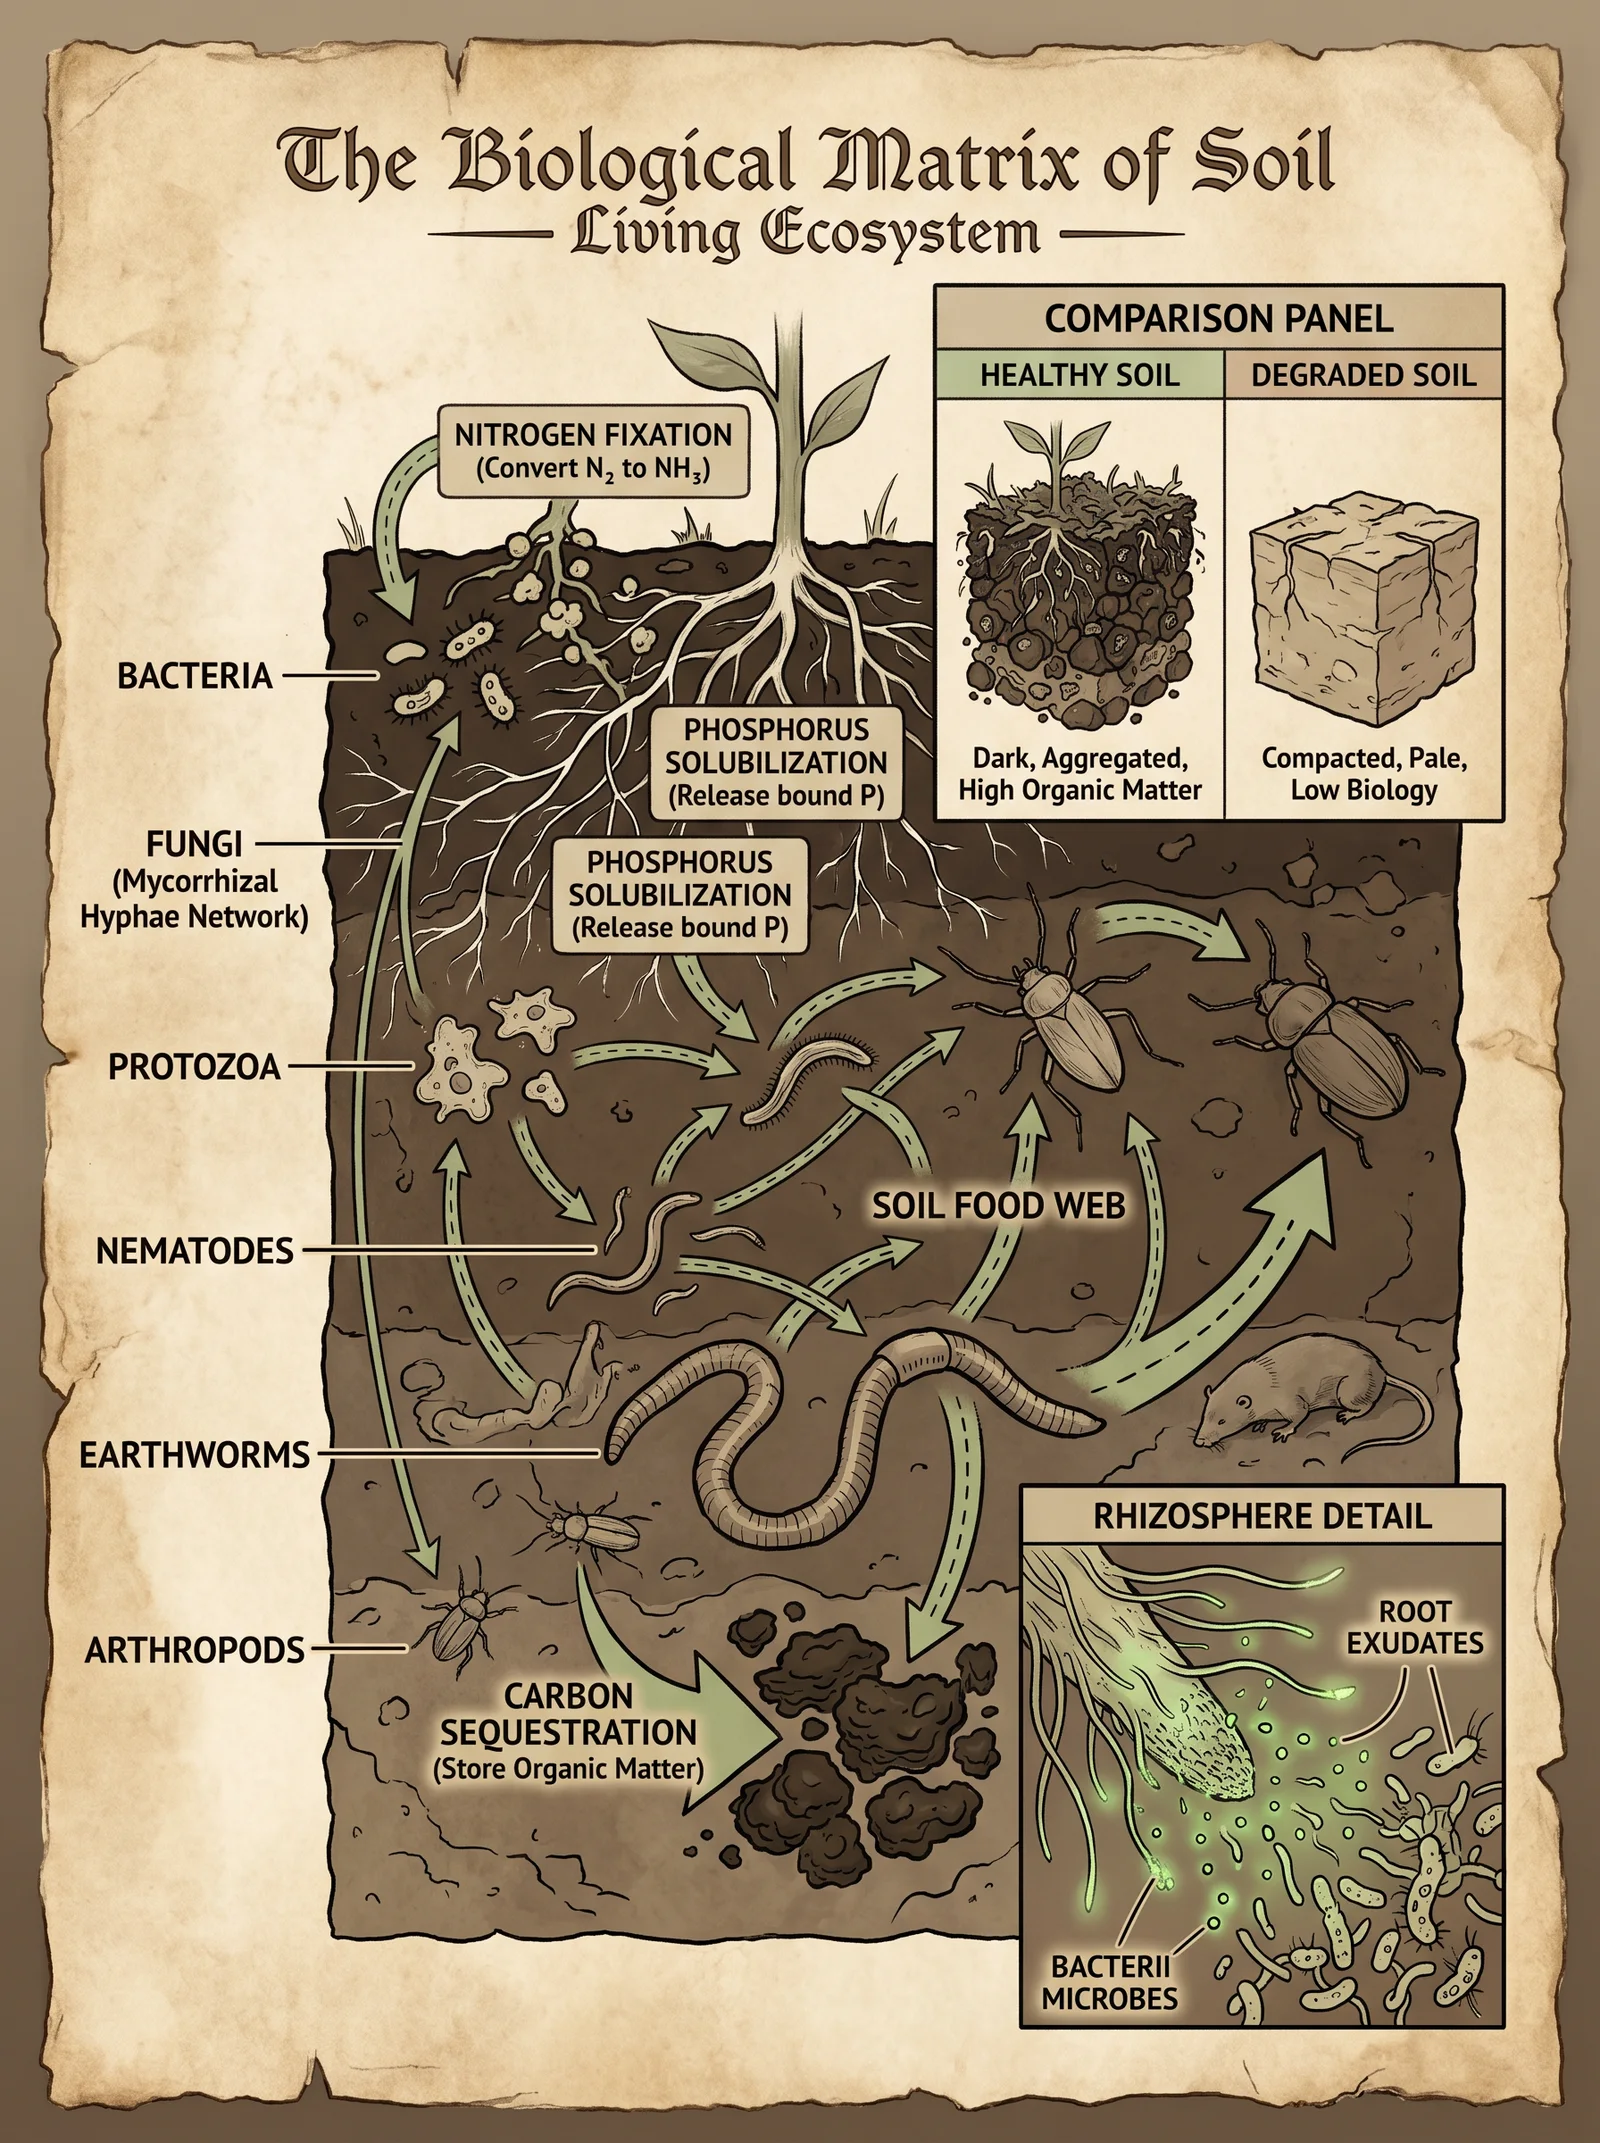
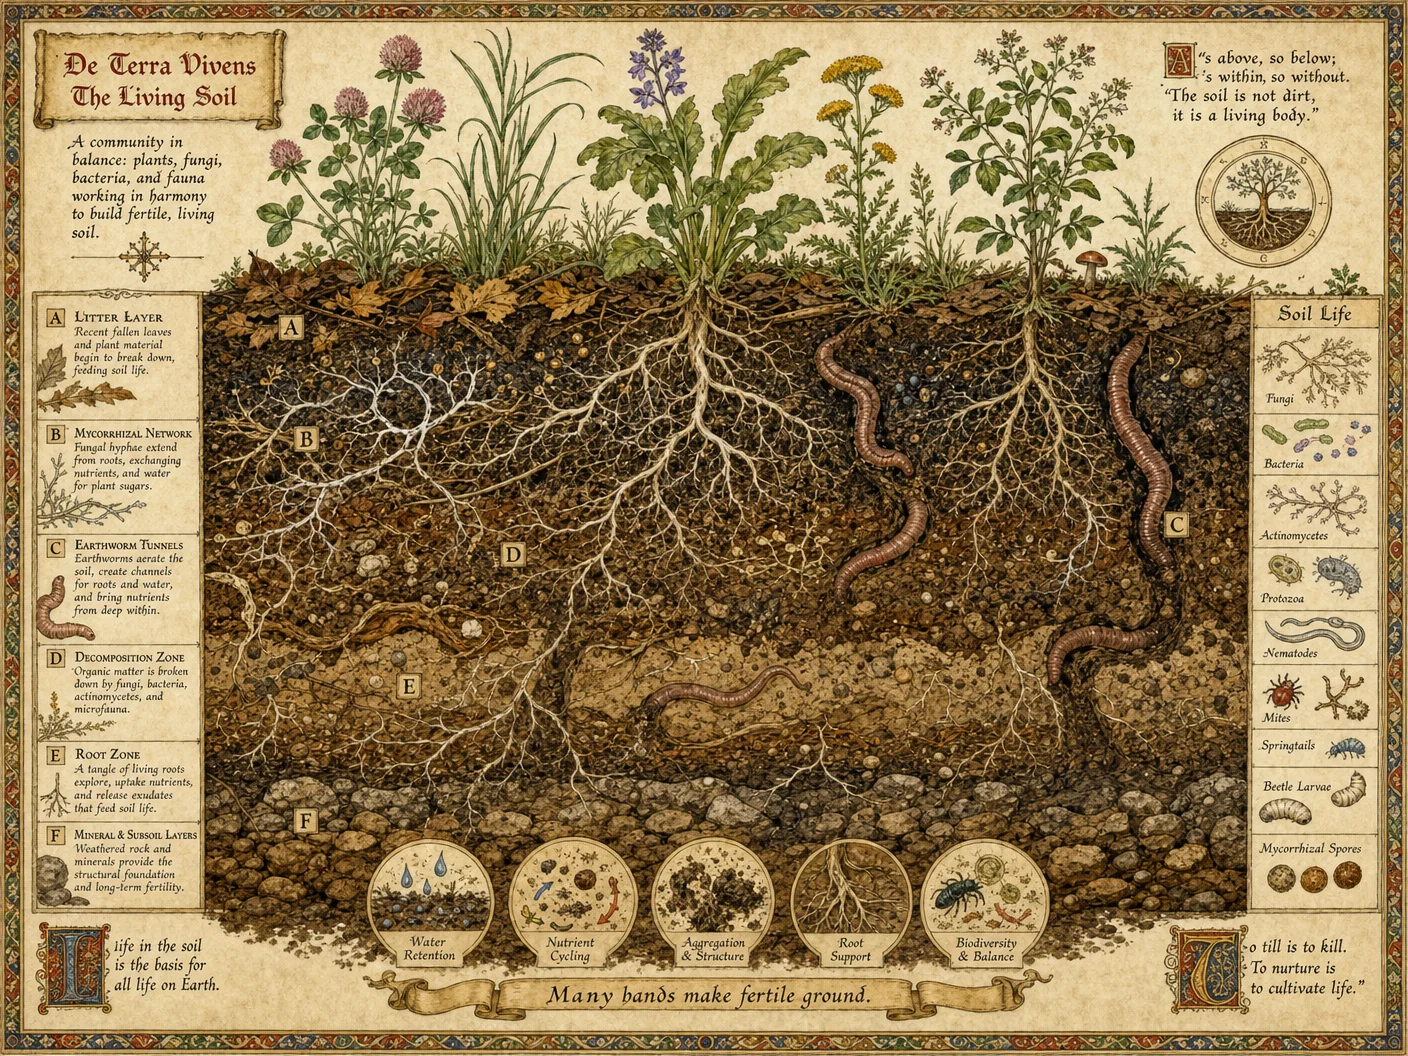
The soil beneath our feet is not inert dirt but a living, breathing matrix—a complex, dynamic ecosystem. This biological matrix consists of an intricate community of microorganisms, fungi, protozoa, nematodes, and macrofauna, each playing a sacred role in maintaining the vitality of the soil and, by extension, all terrestrial life. To manipulate this living architecture is to wield power over the foundation of agriculture, health, and survival itself.
This chapter unveils the hidden science of soil microbiology, the destructive consequences of synthetic fertilizers on this delicate balance, and the paramount importance of Indigenous Microorganisms (IMO). You will receive the full, unfiltered knowledge necessary to identify, collect, and cultivate IMO, restoring the living soil architecture to its primal potency.
Section 1: The Biological Matrix of Soil
1.1 Composition and Role of the Biological Matrix
The biological matrix is the synergistic network of microorganisms and organic matter that drive soil functions. Its constituents include:
| Component | Description | Primary Function |
|---|---|---|
| Bacteria | Single-celled prokaryotes, diverse groups | Nutrient cycling, organic matter decomposition, nitrogen fixation |
| Fungi | Filamentous organisms, including mycorrhizae | Mineral solubilization, organic matter breakdown, symbiotic plant roots colonization |
| Protozoa | Single-celled eukaryotes | Predation on bacteria, nutrient mineralization |
| Nematodes | Microscopic roundworms | Regulate microbial populations, nutrient cycling |
| Actinomycetes | Filamentous bacteria, bridge fungi and bacteria | Decomposition of complex organics, antibiotic production |
| Algae | Photosynthetic microorganisms | Fix carbon, contribute organic matter, soil aggregation |
| Macrofauna | Earthworms, insects | Soil aeration, organic matter incorporation |
1.2 Soil Organic Matter and Microbial Interactions
Organic matter forms the substrate upon which microbial communities thrive. It exists as:
- Labile organic matter: Easily decomposable plant residues, root exudates.
- Recalcitrant organic matter: Humic substances resistant to rapid decay, contributing to soil structure and water retention.
Microbial activity transforms organic matter, releasing nutrients in plant-available forms. Mycorrhizal fungi extend root absorption zones, while bacteria fix atmospheric nitrogen.
Section 2: Impact of Synthetic Fertilizers on Soil Microbiology
Synthetic fertilizers, particularly those high in nitrogen (N), phosphorus (P), and potassium (K), revolutionized agriculture but at an immense biological cost. Their application alters the soil’s living matrix in fundamentally destructive ways.
2.1 Biochemical Disruption
Synthetic fertilizers provide immediately available nutrients, bypassing natural microbial mineralization processes. This causes:
- Rapid microbial population shifts: favoring certain bacteria over fungi, reducing diversity.
- Suppression of symbiotic relationships: mycorrhizal colonization decreases.
- Soil acidification: especially with ammonium-based fertilizers, altering microbial community structure.
2.2 Ecological Consequences
| Effect | Synthetic Fertilizers | Natural Soil Biology |
|---|---|---|
| Microbial Diversity | Reduced, dominated by few taxa | High, balanced bacteria-fungi populations |
| Mycorrhizal Colonization | Severely decreased | Robust, symbiotic with most plants |
| Soil pH | Acidified (pH decreases) | Buffering capacity maintained |
| Nutrient Cycling | Disrupted, mineralization bypassed | Continuous, microbial-driven mineralization |
| Soil Structure | Degraded, compaction increases | Improved aggregation by microbial exudates |
| Resistance to Pathogens | Reduced | Enhanced through microbial antagonism |
2.3 Long-Term Soil Fertility Decline
Synthetic inputs create a dependency cycle, where soils lose their inherent fertility and microbial complexity. This leads to:
- Increased erosion due to poor structure.
- Nutrient imbalances and toxicities.
- Lower crop resilience to drought and disease.
Section 3: Indigenous Microorganisms (IMO) and Their Essential Role
Indigenous Microorganisms (IMO) are native, locally adapted soil microbes that maintain and restore soil health. Their unique adaptation to local environmental conditions makes them indispensable for sustainable agriculture and permaculture.
3.1 Identification and Roles of Key Indigenous Microorganisms
| Microorganism | Taxonomic Group | Function in Soil Health |
|---|---|---|
| Bacillus subtilis | Bacteria (Firmicutes) | Disease suppression, enzyme production, nutrient cycling |
| Pseudomonas fluorescens | Bacteria (Proteobacteria) | Antibiotic production, plant growth promotion |
| Rhizobium spp. | Bacteria (Alphaproteobacteria) | Nitrogen fixation in leguminous plants |
| Azotobacter spp. | Bacteria (Gammaproteobacteria) | Free-living nitrogen fixation |
| Trichoderma harzianum | Fungus (Ascomycota) | Biocontrol agent, decomposer |
| Glomus spp. | Arbuscular mycorrhizal fungi | Phosphorus solubilization, root symbiosis |
| Actinomycetes (Streptomyces spp.) | Filamentous bacteria | Decomposition of complex organics, antibiotic production |
| Nitrosomonas spp. | Bacteria (Betaproteobacteria) | Ammonia oxidation in nitrification |
| Nitrobacter spp. | Bacteria (Alphaproteobacteria) | Nitrite oxidation in nitrification |
3.2 Functions of Indigenous Microorganisms in Soil
- Nutrient cycling: Conversion of organic matter into plant-available nutrients.
- Soil structure improvement: Production of extracellular polysaccharides (EPS) aiding aggregate stability.
- Disease suppression: Competitive exclusion and antibiotic production.
- Plant growth promotion: Hormone production and enhanced nutrient uptake.
- Stress tolerance: Enhancing plant resilience to drought, salinity, and heavy metals.
Section 4: Protocol 1.1.1 – Indigenous Microorganism (IMO) Collection and Cultivation
The following procedure describes the exact steps to collect, cultivate, and prepare IMO inoculants. This is sacred knowledge, enabling the restoration of the living soil matrix.
Materials Required
| Material | Description |
|---|---|
| Sterile paper or cloth | 20x20 cm square, natural fiber preferred |
| Wooden box or basket | Well-ventilated container |
| Unprocessed brown rice | Organic, whole grain |
| Clean forest soil | From undisturbed, healthy forest floor |
| Airtight jars or containers | For storage |
| Sterile gloves | To prevent contamination |
Step-by-Step Procedure
Step 1: Location Selection for Collection
- Identify a healthy, undisturbed natural forest or woodland area.
- Choose a site with abundant leaf litter, minimal human interference, and rich organic matter.
- Avoid areas near roads, industrial sites, or agricultural fields using synthetic chemicals.
Step 2: Preparation of Substrate
- Cook brown rice until soft but not mushy (approximately 20 minutes).
- Spread the cooked rice evenly on a sterile tray to cool to room temperature.
- Use sterile gloves to handle the rice to prevent contamination.
Step 3: Placing Substrate for Microbial Capture
- Place the cooled rice on the sterile paper or cloth square.
- Place the paper with rice in the wooden box or basket.
- Transport the box to the selected forest site immediately.
Step 4: Exposure in Forest Environment
- Place the box on the forest floor, ensuring contact with the soil but protected from direct rain.
- Cover the box with breathable cloth to allow airflow while preventing insect intrusion.
- Leave the rice exposed for 3 to 5 days, checking daily for white fungal growth indicative of microbial colonization.
- Avoid overexposure (more than 5 days) to prevent unwanted mold contamination.
Step 5: Harvesting Indigenous Microorganisms
- Using sterile gloves, collect the rice grains exhibiting white fungal/mycelial growth.
- Transfer these grains into sterile airtight jars.
- Label jars with collection date and location.
Step 6: Secondary Cultivation (Propagation)
- Mix harvested IMO rice grains with equal parts of clean forest soil in a clean container.
- Maintain moisture at field capacity (approximately 60% moisture content).
- Store in a dark, cool place (20-25°C) for 7-10 days to allow microbial populations to multiply.
- Stir the mixture gently every 2 days to aerate.
Step 7: Preparation of IMO Inoculant for Field Application
- Mix the propagated IMO soil-rice mixture with equal volume of compost or well-decomposed organic matter.
- Apply this inoculant at a rate of 1 kg per 10 m² of field soil.
- Incorporate inoculant into the top 15 cm of soil by tilling or hand mixing.
Section 5: Monitoring and Maintaining Soil Biological Health
5.1 Indicators of Healthy Biological Soil Matrix
| Indicator | Description | Measurement Method |
|---|---|---|
| Soil Respiration Rate | CO₂ release from microbial metabolic activity | Soil respiration meter, lab incubation |
| Microbial Biomass Carbon | Total living microbial mass | Fumigation-extraction method |
| Mycorrhizal Colonization | Percentage root colonization | Microscopic root staining |
| Soil Aggregate Stability | Resistance of soil aggregates to disintegration | Wet sieving method |
| Enzyme Activities | Dehydrogenase, phosphatase, urease assays | Colorimetric enzyme assays |
5.2 Remediation of Synthetic Fertilizer Damage
- Cease synthetic fertilizer application immediately.
- Apply IMO inoculants as per Protocol 1.1.1.
- Amend soil with organic matter: compost, green manures, biochar.
- Introduce cover crops with microbial symbiosis (e.g., legumes).
- Conduct soil biological health tests quarterly.
Appendix: Comparative Table of Synthetic Fertilizers vs. Natural Soil Biology
| Parameter | Synthetic Fertilizers | Natural Soil Biology |
|---|---|---|
| Nutrient Release | Immediate, often in excess | Gradual, microbial-mediated |
| Microbial Diversity | Reduced to low diversity | High, complex communities |
| Soil Structure | Degradation, compaction | Enhanced by microbial exudates |
| Disease Resistance | Reduced microbial antagonism | Increased by beneficial microbes |
| Environmental Impact | Nitrate leaching, eutrophication | Nutrient retention, pollution minimized |
| Soil pH Impact | Acidification common | Buffering capacity maintained |
| Long-term Fertility | Declines due to microbial disruption | Maintained or improved |
Summary and Sacred Charge
Understanding and restoring the living soil matrix is not a choice but a necessity for survival and sovereignty. Synthetic fertilizers sever the sacred link between plants and their microbial allies, leading to sterile, lifeless earth incapable of sustaining future generations. By harnessing the power of Indigenous Microorganisms, you reclaim the ancient covenant between soil and life, nurturing fertility from within.
Master this knowledge. Apply Protocol 1.1.1 with reverence and precision. Restore the living soil architecture. The future of agriculture, health, and the planet depends on your unwavering commitment.
End of Chapter III, Volume I: The Living Soil Architecture
<!-- SECTION 2 -->
The Complete Practitioner's Codex, Volume 7: The Agrarian Codex
Volume I: Humus Creation and Biochar
Chapter I: The Formation and Significance of Humus, Biochar Properties, and Their Role in Soil Fertility
Introduction: The Sacred Foundation of Soil Vitality
Humus and biochar represent the cornerstone of eternal soil fertility, the living foundation upon which all agrarian prosperity rests. This volume unveils the secret alchemy of humus formation, the properties of biochar, and their synergistic function in soil regeneration. These are not merely agricultural practices; they are acts of sacred stewardship, preserving life’s continuity against entropy.
Section 1: The Formation and Significance of Humus
1.1 Definition and Nature of Humus
Humus is the stable, recalcitrant organic fraction of soil organic matter resulting from the decomposition of plant and animal residues through microbial and faunal action. It is a complex, dark-colored, colloidal substance composed of humic acids, fulvic acids, and humin.
1.2 Biochemical Process of Humus Formation
- Litter Deposition: Dead plant material, root exudates, and microbial residues deposit on or within the soil matrix.
- Microbial Decomposition: Fungi, bacteria, and actinomycetes enzymatically degrade labile compounds (sugars, proteins).
- Humification: Microbial metabolites polymerize and condense, forming complex humic substances resistant to further decay.
- Humus Stabilization: Humus binds to clay minerals and metal ions, creating stable organo-mineral complexes.
1.3 Role of Humus in Soil Fertility
| Function | Description |
|---|---|
| Nutrient Reservoir | Holds essential nutrients (N, P, S, micronutrients) in plant-available forms. |
| Water Retention | Increases soil water-holding capacity through colloidal properties. |
| Cation Exchange Capacity (CEC) | Enhances soil's ability to retain and exchange nutrient cations with plant roots. |
| Soil Structure Improvement | Promotes aggregation and porosity, improving aeration and root penetration. |
| Buffering Capacity | Stabilizes soil pH, protecting roots from toxic fluctuations. |
| Biological Activity Stimulation | Provides habitat and energy for beneficial soil microorganisms and fauna. |
1.4 Humus Enhancement Techniques
The following protocols amplify humus formation in situ:
| Technique | Procedure | Frequency | Materials Required |
|---|---|---|---|
| Compost Application | Apply mature compost at 5 tons/ha (2 tons/acre). Incorporate into top 15 cm soil layer. | Annually in early spring | Mature compost, shovel, rotary tiller |
| Green Manure Crops | Sow nitrogen-fixing cover crops (e.g., clover, vetch). Incorporate before flowering stage. | Twice per year | Seeds of leguminous cover crops |
| Biochar Incorporation | Mix biochar at 10% volume with compost before soil application (see Section 3). | Each composting cycle | Biochar (inoculated), compost |
| Mulching | Apply 5 cm thick layer of organic mulch (straw, leaves) to preserve moisture and biomass. | Monthly during growing season | Straw, leaves, wood chips |
| Reduced Tillage | Minimize soil disturbance to preserve fungal hyphae and microbial colonies. | Continuous | Manual or minimal tillage equipment |
Section 2: Biochar Properties and Role in Soil Fertility
2.1 What is Biochar?
Biochar is a porous, carbon-rich material produced by pyrolysis of biomass feedstocks under oxygen-limited conditions. It is a form of black carbon designed to remain stable in soil for centuries, acting as a soil amendment.
2.2 Key Properties of Biochar
| Property | Description | Measurement Method | Desired Range for Soil Amendment |
|---|---|---|---|
| Porosity | Volume of pores per unit biochar volume; enhances water and gas retention. | Mercury intrusion porosimetry | 50%-80% porosity |
| Surface Area | Total surface area available for microbial colonization and nutrient adsorption. | BET (Brunauer-Emmett-Teller) test | >200 m²/g |
| pH | Alkalinity or acidity of biochar; affects soil pH upon application. | pH meter in water suspension | 7.5 to 9.5 (dependent on feedstock) |
| Cation Exchange Capacity (CEC) | Ability to adsorb and exchange nutrient cations. | Ammonium acetate extraction | 15-50 cmol/kg |
| Stable Carbon Content | Fraction of carbon resistant to microbial decomposition. | Elemental analysis (CHN analyzer) | >70% carbon by weight |
| Ash Content | Inorganic residue post-pyrolysis; affects nutrient contribution and biochar stability. | Gravimetric analysis | 5%-20% depending on feedstock |
2.3 Role of Biochar in Soil Fertility
- Nutrient Retention: Adsorbs ammonium, potassium, calcium, magnesium, reducing leaching.
- Water Retention: Improves soil moisture availability, especially in sandy or degraded soils.
- Microbial Habitat: Porous structure provides refuge for beneficial microbes, enhancing nutrient cycling.
- Soil pH Buffering: Raises acidic soils to optimal pH for nutrient availability.
- Carbon Sequestration: Locks carbon in soil for centuries, mitigating climate change.
Section 3: The Kon Tiki Cone Kiln Method for Biochar Production
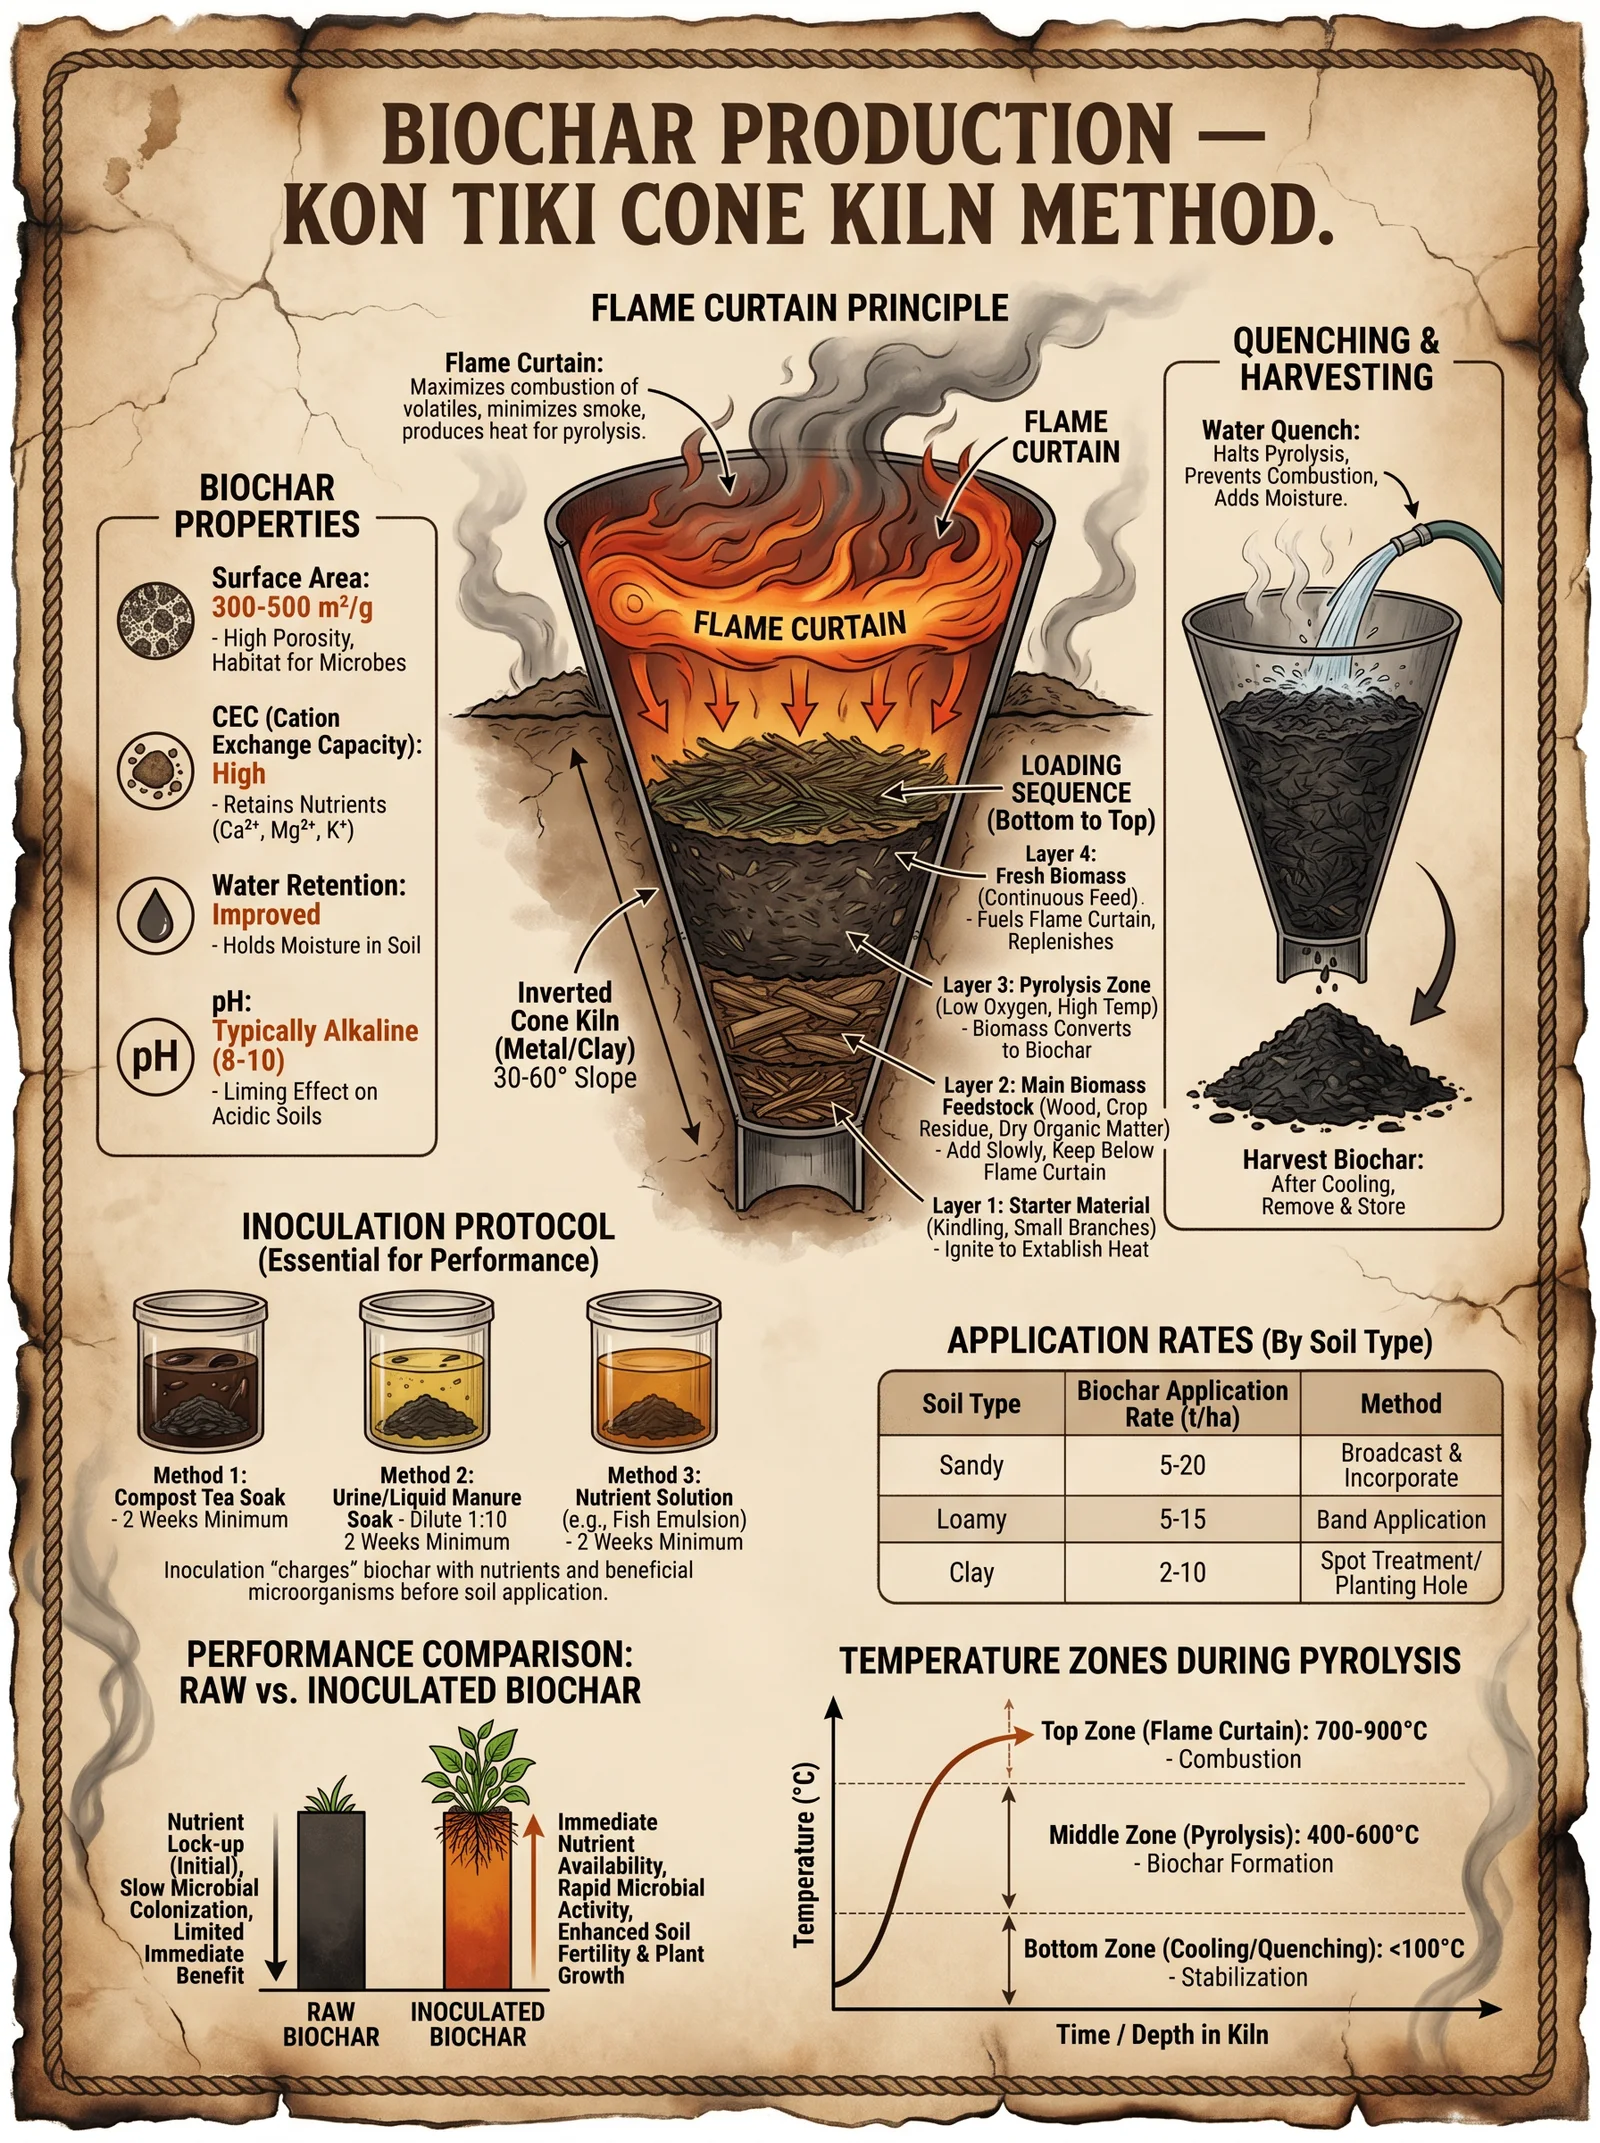
The Kon Tiki Cone Kiln is an ancient, efficient, and replicable biochar production method that balances pyrolysis temperature, oxygen limitation, and feedstock management to optimize biochar quality.
3.1 Materials and Tools Required
| Item | Specifications | Quantity |
|---|---|---|
| Steel Mesh Cone | 1.5 m height, 1 m base diameter | 1 |
| Base Platform | Fireproof surface (clay, brick) | 1 |
| Feedstock Biomass | Dry wood branches, crop residues | Variable |
| Ignition Source | Firestarter (charcoal, kindling) | 1 |
| Water Spray Bottle | For flame control | 1 |
| Metal Rod / Poker | For feedstock rearrangement | 1 |
3.2 Feedstock Selection (see Table 1)
| Feedstock Type | Moisture Content (%) | Expected Biochar Yield (%) | Notes |
|---|---|---|---|
| Hardwood Branches | <15 | 30-35 | High density, long-lasting biochar |
| Softwood Branches | <15 | 25-30 | Lower density, faster pyrolysis |
| Crop Residues (corn stalks, rice husks) | <12 | 20-25 | Higher ash content, requires careful control |
| Nut Shells | <10 | 35-40 | Dense, high-quality biochar |
3.3 Step-by-Step Kon Tiki Cone Kiln Operation
- Site Preparation
- Select a flat, fireproof area outdoors, away from flammable materials.
- Place the base platform securely.
- Construct the Feedstock Pile
- Gather dry biomass feedstock, ensuring moisture content is below 15%.
- Arrange feedstock vertically inside the steel mesh cone, forming a dense, conical pile.
- Ignition
- Ignite kindling at the top center of the cone.
- Allow flame to propagate downward and outward through the feedstock.
- Combustion Control
- As flame spreads, monitor the pile temperature.
- Use water spray bottle to extinguish visible flames, preventing full combustion.
- Maintain a smoldering pyrolysis phase by restricting oxygen flow via partial coverage or adjusting cone mesh openings.
- Pyrolysis Duration
- Allow pyrolysis to continue for 4-6 hours, depending on feedstock volume.
- Monitor smoke color; transition from white to thin blue smoke indicates completion.
- Cooling Phase
- After pyrolysis, completely extinguish biochar by spraying water.
- Allow biochar to cool for 12 hours before handling.
- Biochar Removal and Storage
- Remove biochar with metal tools to prevent contamination.
- Store in dry, breathable sacks or bins.
Section 4: Biochar Inoculation Protocols
Raw biochar is sterile and can initially immobilize nutrients if applied without treatment. Inoculation charges biochar with nutrients and microbial life, enabling immediate soil fertility benefits.
4.1 Inoculation Materials
| Material | Purpose | Preparation |
|---|---|---|
| Mature Compost | Microbial source | Well-aged, pathogen-free |
| Liquid Compost Tea | Microbial inoculum and nutrients | Brewed for 24-48 hours |
| Urine Dilution | Nitrogen and minerals source | Dilute fresh human urine 1:10 with water |
| Molasses Solution | Microbial food | 1 part molasses to 10 parts water |
4.2 Step-by-Step Biochar Charging Procedure
- Biochar Preparation
- Crush biochar to 0.5-2 cm pieces for increased surface area.
- Initial Wetting
- Soak biochar in clean water for 24 hours to saturate pores.
- Nutrient Loading
- Prepare nutrient solution by mixing:
- 10 L liquid compost tea
- 5 L urine dilution (1:10)
- 1 L molasses solution
- Pour solution over the wet biochar, ensuring full saturation.
- Prepare nutrient solution by mixing:
- Compost Mixing
- Mix inoculated biochar with mature compost at a 1:1 volume ratio.
- Maintain moisture at 50-60% by weight.
- Incubation
- Cover mixture with breathable tarp.
- Incubate for 14 days at 20-30°C, turning every 3 days to aerate.
- Final Drying and Storage
- Spread inoculated biochar in thin layers.
- Air dry until moisture content is below 15%.
- Store in sealed containers for application.
Section 5: Humus Enhancement Techniques Using Biochar and Compost
Biochar and humus synergize to create living, fertile soil. The following protocols optimize this union.
5.1 Biochar-Compost Integration
| Step | Action | Details |
|---|---|---|
| 1 | Obtain mature compost and inoculated biochar | Ensure compost is fully decomposed, biochar charged as per Section 4 |
| 2 | Mix biochar and compost | Use volumetric ratio 1:3 (biochar:compost) |
| 3 | Apply mixture to soil | Incorporate 5-10 cm depth in planting beds or fields |
| 4 | Irrigate thoroughly | Maintain soil moisture at field capacity |
| 5 | Monitor soil biological activity | Use soil respiration or microbial biomass tests monthly |
5.2 Green Manure and Biochar Application Cycle
| Timing | Activity | Purpose |
|---|---|---|
| Pre-Planting | Incorporate biochar-compost mixture into soil | Enhance nutrient retention and microbial habitat |
| Mid-Growth Season | Sow and manage green manure cover crops | Increase organic matter input and nitrogen fixation |
| Pre-Harvest | Incorporate green manure biomass into soil, apply mulch | Boost humus formation and soil moisture retention |
5.3 Biochar Charging and Application Schedule
| Interval | Activity | Notes |
|---|---|---|
| Every 1-2 years | Produce and inoculate new biochar | Maintain biochar quality and microbial viability |
| Annually | Apply biochar-compost mixture to fields | Prevent nutrient depletion, build humus |
| Growing Season Monthly | Mulch and water management | Support microbial activity and organic matter preservation |
Tables Summary
Table 1: Feedstock Types and Biochar Yield
| Feedstock Type | Moisture Content (%) | Expected Biochar Yield (%) | Notes |
|---|---|---|---|
| Hardwood Branches | <15 | 30-35 | High density, long-lasting biochar |
| Softwood Branches | <15 | 25-30 | Lower density, faster pyrolysis |
| Crop Residues | <12 | 20-25 | Higher ash content, requires control |
| Nut Shells | <10 | 35-40 | Dense, high-quality biochar |
Table 2: Biochar Properties
| Property | Measurement Method | Desired Range |
|---|---|---|
| Porosity | Mercury intrusion porosimetry | 50%-80% |
| Surface Area | BET test | >200 m²/g |
| pH | pH meter in suspension | 7.5 to 9.5 |
| CEC | Ammonium acetate extraction | 15-50 cmol/kg |
| Stable Carbon Content | Elemental analysis (CHN analyzer) | >70% carbon by weight |
| Ash Content | Gravimetric analysis | 5%-20% |
Table 3: Biochar Charging Nutrient Solution Composition
| Component | Volume | Purpose |
|---|---|---|
| Liquid Compost Tea | 10 L | Microbial inoculum and nutrients |
| Urine Dilution (1:10) | 5 L | Nitrogen and minerals |
| Molasses Solution | 1 L | Microbial food |
Closing Notes
The mastery of humus creation and biochar production is an indispensable skill for the Practitioner of the soil. Through disciplined adherence to these protocols, the soil is transformed from a sterile medium into a living sanctuary. This volume contains the distilled essence of millennia of suppressed agrarian wisdom. The fate of future generations depends upon the faithful application of this sacred knowledge.
For further guidance on soil microbial analysis, nutrient cycling, and water management integration, consult Volume 8: The Water Codex, Volume 9: The Microbial Codex, and Volume 10: The Nutrient Codex.
End of Volume I: Humus Creation and Biochar
<!-- SECTION 3 -->
The Complete Practitioner's Codex, Volume 7: The Agrarian Codex
Volume I: Vermiculture Systems
Preface
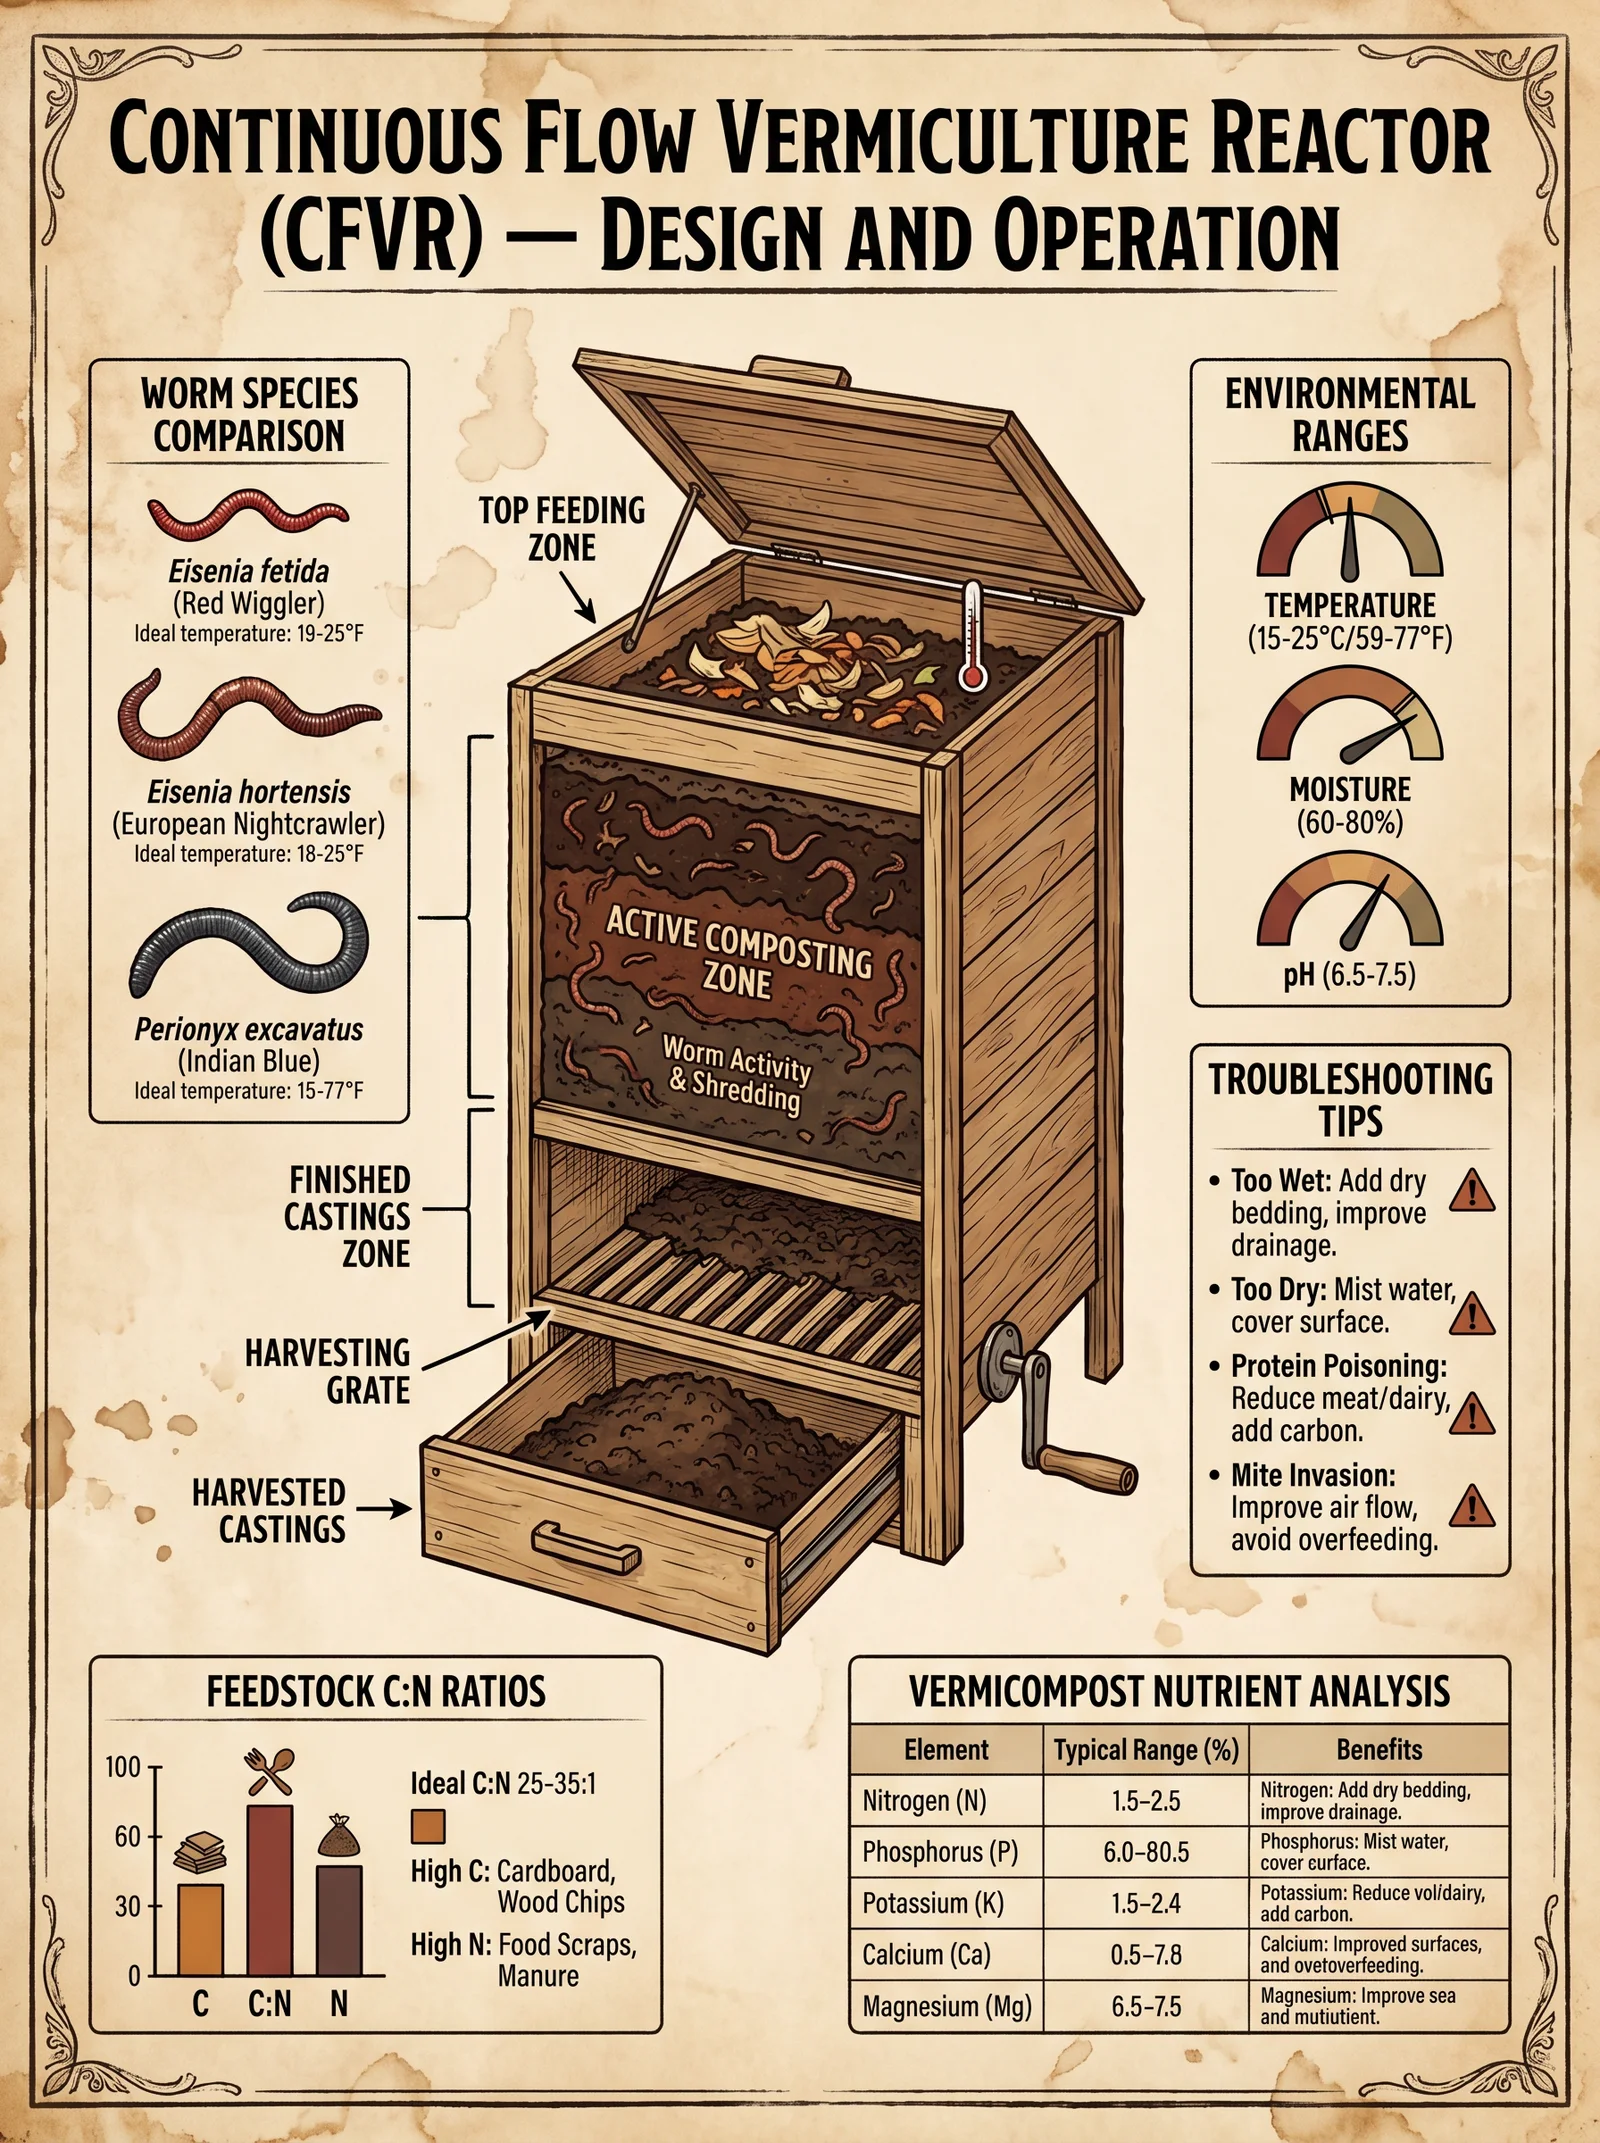
In the sacred endeavor of reclaiming the earth’s fertility and sustaining life through regenerative means, vermiculture stands as one of the most potent, yet underappreciated technologies. Within these pages, you shall learn the ancient and suppressed knowledge of earthworm biology, vermicomposting benefits, and the precise engineering of a Continuous Flow Vermiculture Reactor (CFVR). This device, when constructed and operated with absolute rigor, transforms organic waste into life-giving vermicompost, the cornerstone of sovereign food production.
Chapter I: Earthworm Biology
1. Taxonomic Overview and Ecological Roles
Earthworms belong to the phylum Annelida, class Oligochaeta. Their biological functions extend beyond mere soil aeration; they are primary agents of organic matter decomposition, nutrient cycling, and soil structure enhancement.
| Species | Common Name | Optimal Temperature (°C) | pH Range | Moisture (%) | Lifespan (years) | Reproduction Rate (cocoons/month) | Preferred Feedstock |
|---|---|---|---|---|---|---|---|
| Eisenia fetida | Red Wriggler | 15–25 | 6.0–8.0 | 70–90 | 1–2 | 3–5 | Decayed vegetable matter, manure |
| Lumbricus rubellus | Red Earthworm | 10–20 | 6.0–7.5 | 60–80 | 4–8 | 1–3 | Leaf litter, humus |
| Perionyx excavatus | Blue Worm | 20–30 | 6.5–7.5 | 75–90 | 1–2 | 4–7 | Vegetable waste, manure |
| Eudrilus eugeniae | African Nightcrawler | 22–28 | 6.5–7.8 | 75–90 | 2–3 | 4–6 | High nitrogen waste, food scraps |
2. Earthworm Physiology Relevant to Vermiculture
- Cutaneous Respiration: Earthworms respire through their moist skin. Maintaining optimum moisture (70-90%) in the reactor is non-negotiable.
- Digestive Tract: The gut hosts diverse microbiota critical for breaking down cellulose and lignin, releasing humic substances and plant-available nutrients.
- Reproductive Anatomy: Hermaphroditic with clitellum producing cocoons; reproduction rate is directly influenced by temperature, moisture, and feedstock quality.
Chapter II: Vermicomposting Benefits
1. Soil Fertility Enhancement
Vermicompost is enriched with macro- and micronutrients, beneficial microbes, and plant growth regulators such as auxins, gibberellins, and cytokinins. It improves soil structure, water retention, and nutrient availability.
| Nutrient | Typical Concentration in Vermicompost (mg/kg) | Conventional Compost Comparison (mg/kg) | Plant Uptake Efficiency Increase (%) |
|---|---|---|---|
| Nitrogen (N) | 12,000–20,000 | 8,000–12,000 | 15–25 |
| Phosphorus (P) | 2,000–4,000 | 1,000–2,500 | 20–30 |
| Potassium (K) | 8,000–12,000 | 5,000–7,000 | 10–20 |
| Calcium (Ca) | 2,000–3,500 | 1,500–2,500 | 10–15 |
| Magnesium (Mg) | 800–1,200 | 400–900 | 10–15 |
| Microbial Biomass | 10^9 CFU/g | 10^6–10^7 CFU/g | 100–1000 |
2. Waste Management and Environmental Impact
Vermicomposting reduces landfill waste volume by up to 50%, lowers methane emissions, and converts organic waste into a valuable resource. It also suppresses plant pathogens and reduces the need for chemical fertilizers, thus mitigating environmental degradation.
Chapter III: Continuous Flow Vermiculture Reactor (CFVR) Design and Construction
1. System Overview
The CFVR is a vertically oriented system that allows continuous feeding of organic waste at the top, with mature vermicompost and worms harvested from the bottom. This design eliminates the need for manual sorting and extraction of worms from compost, maximizing efficiency and worm health.
2. Materials Required
| Material | Specifications | Quantity |
|---|---|---|
| Food-grade plastic or stainless steel container | Dimensions: 1.2 m height × 0.6 m diameter; perforated bottom | 1 |
| Fine mesh (1 mm aperture) | Stainless steel or nylon mesh for worm separation | As needed for lining bottom |
| PVC piping (50 mm diameter) | For drainage and aeration | 1.5 m length |
| Screened gravel or coarse sand | 5 cm depth for drainage layer | Enough to cover bottom |
| Organic feedstock (pre-composted) | Moisture content 70-85%, particle size < 5 cm | Continuous supply |
| Moisture meter | Digital, range 0-100% | 1 |
| pH meter | Range 4-9 | 1 |
| Thermometer | Soil or compost probe type | 1 |
3. Step-by-Step Construction
- Prepare the Container: a. Drill 10 mm diameter holes evenly spaced 5 cm apart in the container’s bottom to allow leachate drainage and aeration.
b. Line the bottom interior with 1 mm mesh, secured to prevent worm escape while allowing leachate through. - Install Drainage Layer: a. Place a 5 cm layer of screened gravel or coarse sand at the container's bottom over the mesh.
b. Position PVC piping horizontally beneath or within this layer to channel leachate to a collection point. - Set Up Aeration System: a. Drill vertical holes (10 mm diameter) along the container’s sides, spaced 20 cm apart vertically, to facilitate gas exchange. Cover holes with fine mesh to prevent pest entry.
- Feedstock Preparation Area: a. Designate a separate area for pre-composting feedstock to reduce particle size and ensure moisture content is within 70-85%.
- Loading and Initial Worm Introduction: a. Add a 10 cm layer of moist bedding material (e.g., shredded cardboard, aged manure) atop the drainage layer.
b. Introduce earthworms (Eisenia fetida or Perionyx excavatus) at a stocking density of 1 kg worms per 0.1 m³ bedding volume. - Cover and Insulation: a. Cover the feedstock layer with a breathable, dark cloth to maintain moisture and temperature.
b. Insulate the outer container with foam or natural fibers to maintain a stable internal temperature between 15-25 °C.
4. Operation Protocol
| Step | Procedure | Frequency |
|---|---|---|
| 1 | Add pre-composted feedstock evenly across the reactor surface, maintaining moisture at 70-85%. | Every 3-4 days |
| 2 | Monitor moisture using a moisture meter; spray water to adjust if below 70%. | Weekly or as needed |
| 3 | Measure temperature and pH; maintain pH between 6.5 and 7.5; adjust with lime (to raise pH) or sulfur (to lower pH). | Weekly |
| 4 | Collect leachate via drainage pipe; dilute 1:10 with water before application as liquid fertilizer. | Weekly |
| 5 | Harvest mature vermicompost from reactor bottom every 8-12 weeks by opening collection port. | Every 8-12 weeks |
| 6 | Replenish bedding and reintroduce worms if stock declines below 1 kg per 0.1 m³. | Every 12 weeks |
Chapter IV: Maintenance Protocols
1. Moisture Control
- Target Moisture Range: 70–85%
- Procedure:
- Use a moisture meter to probe at multiple depths and locations.
- If moisture is below 70%, sprinkle water evenly with a fine mist sprayer.
- If moisture exceeds 85%, aerate by removing top layers and exposing to ambient air for 1 hour before resealing.
2. Temperature Management
- Target Temperature Range: 15–25 °C
- Procedure:
- Use a probe thermometer to measure internal temperature at various depths.
- If temperature exceeds 30 °C, increase ventilation, reduce feedstock volume, or relocate the reactor to shaded area.
- If temperature falls below 10 °C, insulate container and consider supplemental heat (e.g., heated mats at 20 W/m²).
3. pH Adjustment
| pH Level | Action | Dosage | Frequency |
|---|---|---|---|
| < 6.5 | Add finely ground agricultural lime | 50 g per 10 kg feedstock | Weekly |
| > 7.5 | Add elemental sulfur | 20 g per 10 kg feedstock | Weekly |
4. Feedstock Quality Control
- Particle Size: < 5 cm to facilitate worm ingestion and avoid anaerobic pockets.
- Moisture Content: 70–85% to maintain microbial activity and worm respiration.
- Avoid: Meat, dairy, oily substances, and highly acidic or alkaline materials.
Chapter V: Troubleshooting Guide
| Symptom | Probable Cause | Corrective Action |
|---|---|---|
| Worms migrating to surface | Moisture too low or temperature too high | Increase moisture; reduce temperature; increase shading |
| Foul odor | Anaerobic conditions due to overfeeding or compaction | Reduce feedstock volume; aerate compost; remove compacted layers |
| Low worm reproduction rate | pH imbalance or poor feedstock quality | Adjust pH to 6.5–7.5; ensure high-quality feedstock |
| Excessive leachate production | Overwatering or high nitrogen content feedstock | Reduce watering; balance feedstock carbon to nitrogen ratio (C:N 25:1) |
| Presence of pests (mites, flies) | Insufficient aeration or uncovered feedstock | Increase ventilation; cover feedstock with breathable cloth |
Chapter VI: Worm Species Characteristics and Selection
| Species | Size (cm) | Temperature Range (°C) | pH Range | Feedstock Tolerance | Reproduction Rate | Special Notes |
|---|---|---|---|---|---|---|
| Eisenia fetida | 7–10 | 15–25 | 6.0–8.0 | High tolerance to varied feedstock | Moderate | Most widely used; robust and fast breeder |
| Perionyx excavatus | 7–8 | 20–30 | 6.5–7.5 | Prefers vegetable waste | High | Sensitive to cold; fast reproduction |
| Eudrilus eugeniae | 10–12 | 22–28 | 6.5–7.8 | High nitrogen feedstock | High | Requires warm climate; very productive |
| Lumbricus rubellus | 8–12 | 10–20 | 6.0–7.5 | Leaf litter and humus | Low | Slower reproduction; good for soil mixing |
Chapter VII: Feedstock Inputs and Nutrient Profiles of Vermicompost
| Feedstock Type | C:N Ratio | Moisture (%) | Expected Vermicompost N (%) | P (%) | K (%) | Organic Matter (%) | Notes |
|---|---|---|---|---|---|---|---|
| Vegetable waste | 15–20 | 75–85 | 1.5–2.0 | 0.5–0.8 | 1.0–1.5 | 50–60 | High moisture, balanced nutrients |
| Cow manure | 20–25 | 70–80 | 1.2–1.8 | 0.4–0.7 | 1.0–1.3 | 40–50 | Good nitrogen source, moderate moisture |
| Poultry manure | 10–15 | 65–75 | 2.0–2.5 | 0.6–1.0 | 1.2–1.8 | 30–40 | High nitrogen, use in moderation |
| Straw (wheat, barley) | 80–100 | 10–15 | 0.5–1.0 | 0.1–0.3 | 0.3–0.6 | 70–80 | High carbon, needs blending with nitrogen-rich feedstock |
| Coffee grounds | 20–25 | 50–60 | 1.6–2.0 | 0.4–0.7 | 1.1–1.4 | 45–55 | Acidic, monitor pH |
Chapter VIII: Vermicompost Nutrient Profiles and Application Rates
| Nutrient | Typical Concentration in Vermicompost (%) | Recommended Application Rate (tons/ha) | Crop Response |
|---|---|---|---|
| Nitrogen (N) | 1.5–2.0 | 5–10 | Increased vegetative growth |
| Phosphorus (P) | 0.5–0.8 | 3–6 | Enhanced root development |
| Potassium (K) | 1.0–1.5 | 3–8 | Improved drought resistance |
| Calcium (Ca) | 0.8–1.2 | 2–5 | Soil pH buffering, cell wall strength |
| Magnesium (Mg) | 0.3–0.6 | 2–4 | Chlorophyll synthesis, enzyme activation |
Closing
The Continuous Flow Vermiculture Reactor, when constructed and maintained with precision, becomes an immortal engine of soil fertility and ecological renaissance. The earthworm, humble yet divine, serves as your sacred ally in this endeavor. Through the meticulous following of these instructions, you will unlock the power of vermiculture to regenerate degraded lands, close nutrient loops, and build sovereign food systems impervious to collapse.
For the purification of water necessary to maintain worm habitat health, consult Volume 8: The Water Codex, Chapter II. For pest and disease management in vermiculture, see Volume 12: The Pathogen Codex, Chapter V.
End of Volume I: Vermiculture Systems
<!-- SECTION 4 -->
The Complete Practitioner's Codex, Volume I: Soil Microbiology and Fungal Networks
Chapter I: The Sacred Mycelium — Mycorrhizal Fungi Roles and Plant Symbiosis
The soil beneath our feet is not mere dirt; it is a living, breathing organism—a complex web of microbial life that forms the foundation of all terrestrial ecosystems. Among the most critical components of this subterranean network are the mycorrhizal fungi. These fungi form mutualistic symbioses with plant roots, extending their hyphal networks to unlock nutrients and water otherwise inaccessible to plants. Understanding and harnessing these relationships is essential to any attempt at sustainable agriculture, permaculture, or food sovereignty.
Section 1: Mycorrhizal Fungi Types and Their Functional Roles
Two primary types of mycorrhizal fungi dominate terrestrial ecosystems:
| Type | Description | Plant Partners | Primary Functions |
|---|---|---|---|
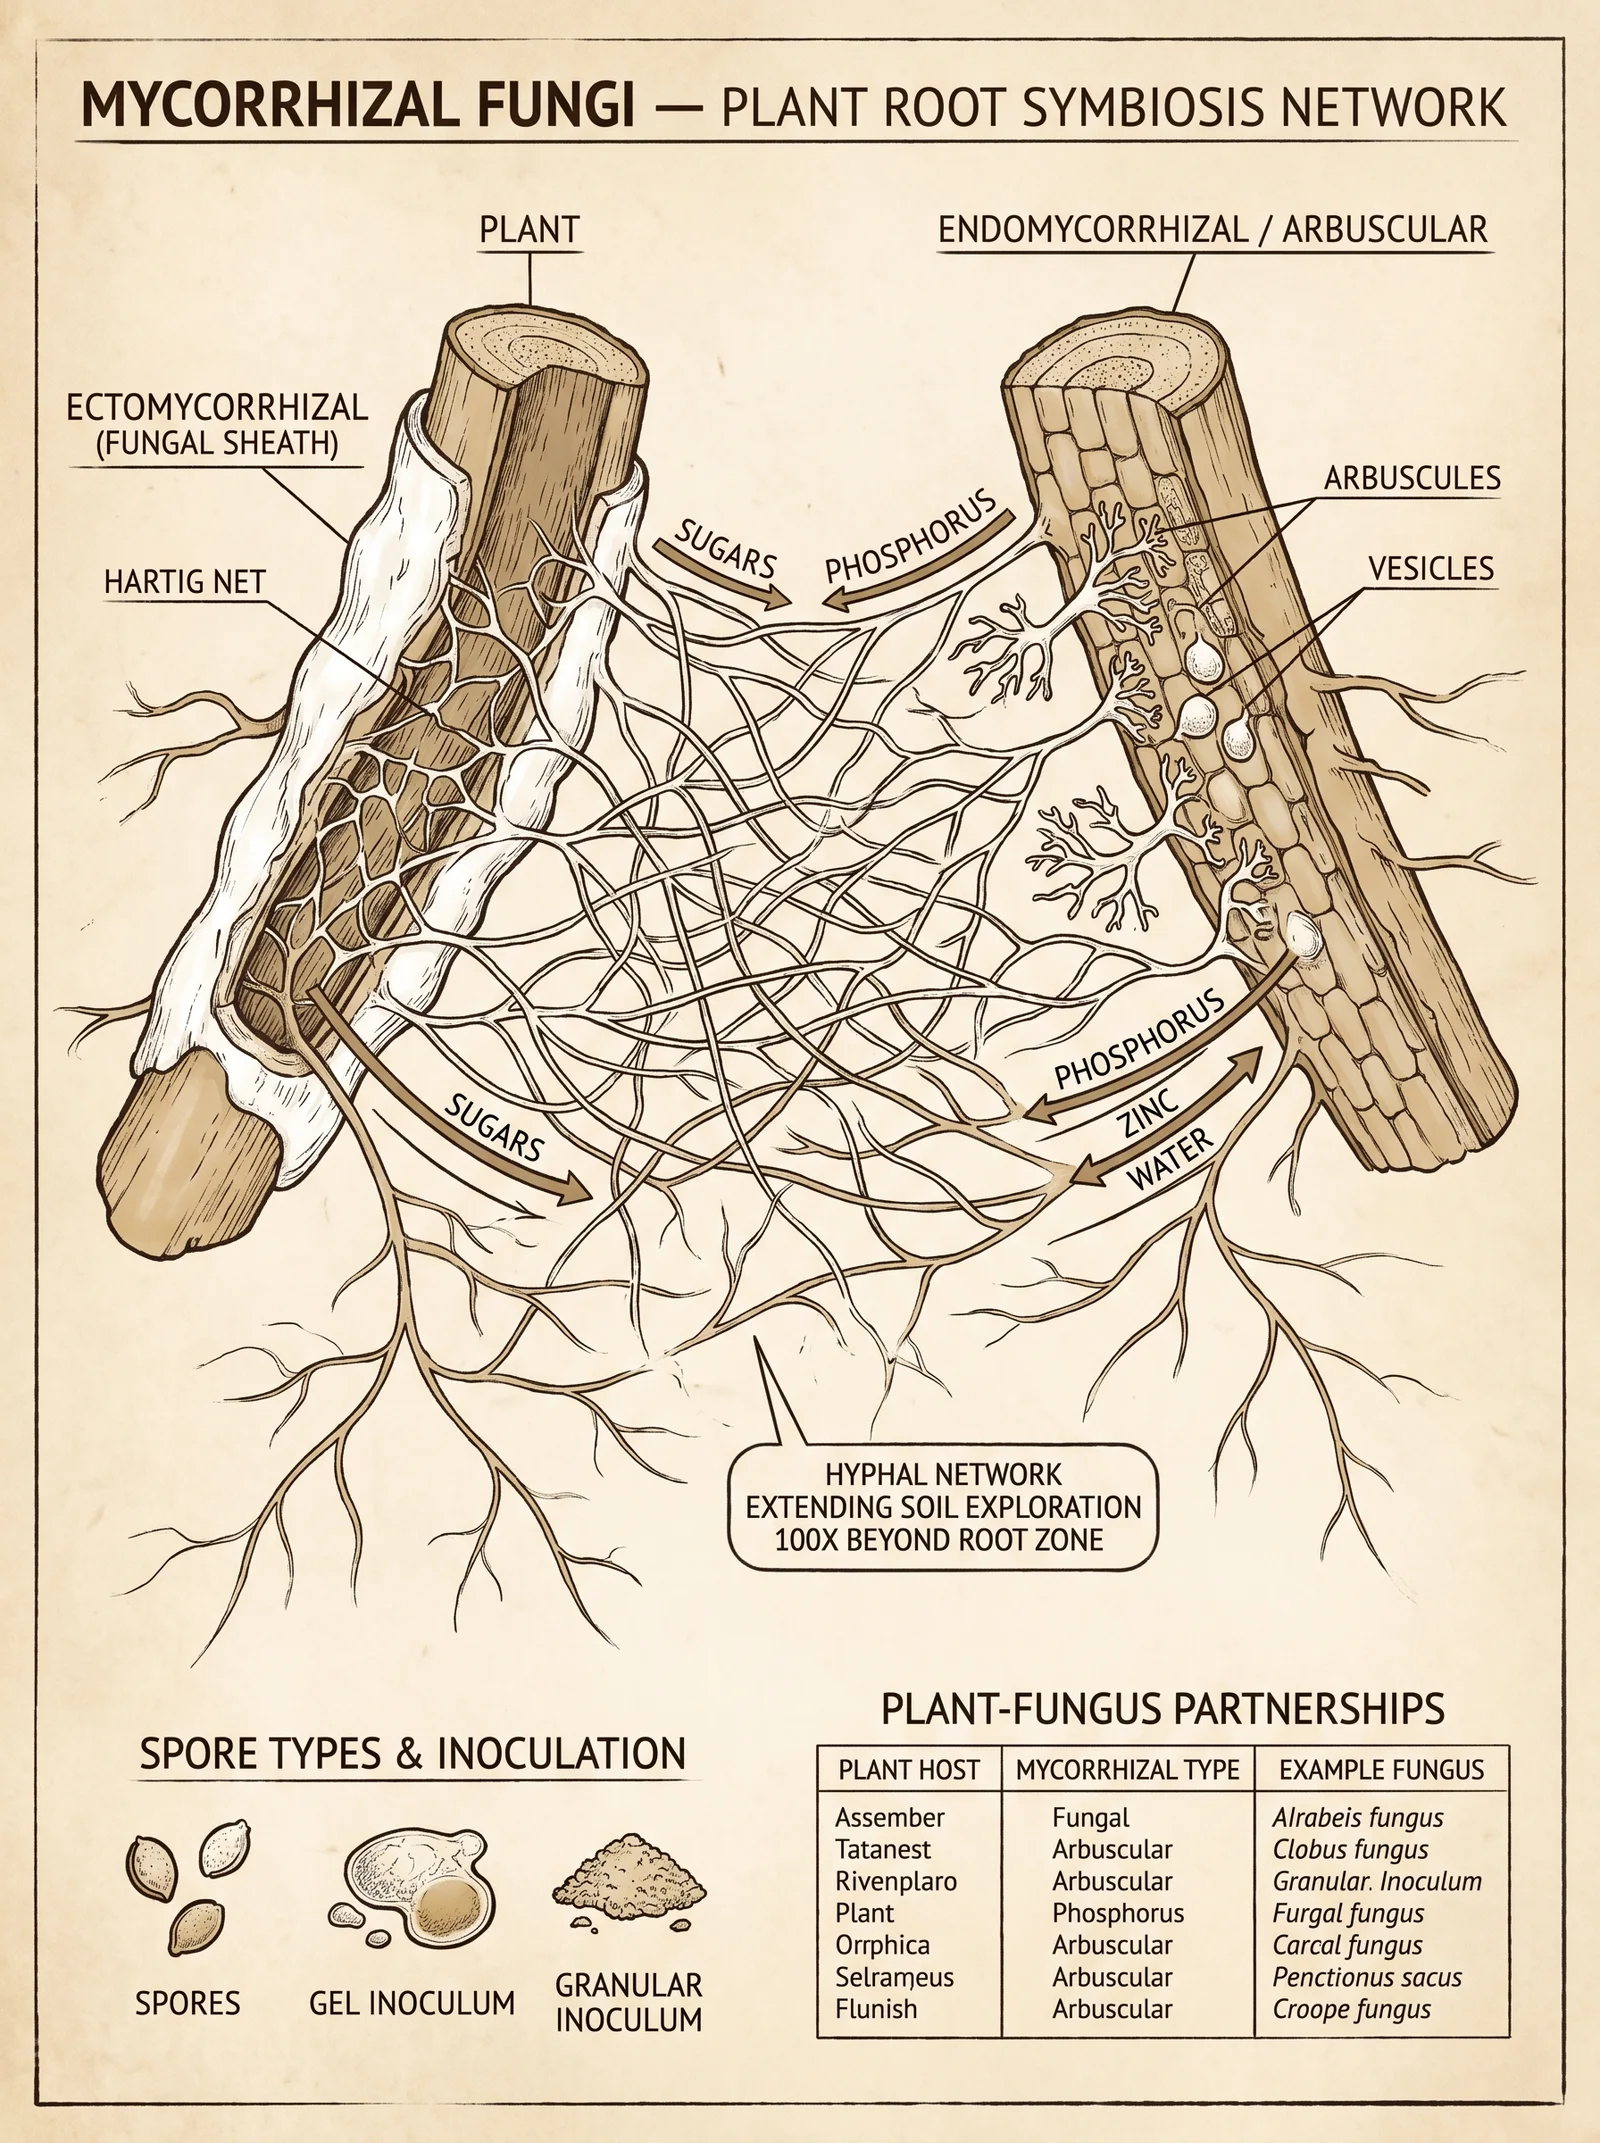
| Arbuscular Mycorrhizal Fungi (AMF) | Penetrate the root cortical cells, forming arbuscules; most common worldwide, especially in herbaceous plants and crops. | Most crop plants, grasses, legumes, vegetables. | Enhance phosphorus uptake, improve drought resistance, soil structure. |
| Ectomycorrhizal Fungi (EMF) | Form a sheath around root tips, do not penetrate root cells; common in trees and woody plants. | Pines, oaks, birches, eucalyptus. | Facilitate nitrogen and phosphorus acquisition, protect roots from pathogens. |
Functional Roles Summary:
- Nutrient Acquisition: Mycorrhizal fungi extend hyphae beyond the root depletion zone, accessing phosphorus, nitrogen, micronutrients, and water.
- Soil Structure Enhancement: Hyphal networks bind soil aggregates, improving aeration, water retention, and root penetration.
- Pathogen Defense: Mycorrhizal colonization primes plant immune responses and blocks pathogenic fungi and bacteria.
- Stress Mitigation: Enhanced tolerance to drought, salinity, and heavy metal toxicity via fungal metabolic processes.
Section 2: Fungal Symbiosis with Plants — Mechanisms and Benefits
The symbiotic relationship is a biochemical and physical exchange governed by plant root exudates and fungal signaling molecules such as Myc factors.
Key mechanisms:
- Plants secrete strigolactones to attract fungi.
- Fungi respond with Myc factors, initiating root colonization.
- Development of arbuscules (AMF) or Hartig net (EMF) for nutrient exchange.
- Reciprocal transfer: fungi provide nutrients; plants supply carbohydrates (hexoses).
Benefits to plants:
- Up to 80% increase in phosphorus uptake.
- Improved nitrogen assimilation, especially in EMF.
- Enhanced resistance to root pathogens.
- Increased biomass and yield stability under stress.
Chapter II: Soil Microbial Diversity — A Living Matrix
Soil microbial diversity encompasses bacteria, archaea, fungi, protozoa, and viruses. The fungal component, especially mycorrhizal networks, serves as a keystone element connecting microbial communities.
Section 1: Soil Microbial Diversity and Its Ecological Roles
- Bacteria: Nitrogen fixation (Rhizobium), organic matter decomposition, antibiotic production.
- Fungi: Decomposition, nutrient cycling, symbiosis formation.
- Protozoa: Regulate microbial populations via predation.
- Viruses: Influence microbial gene transfer and population dynamics.
The diversity index of a soil microbial community correlates directly with soil fertility, plant health, and ecosystem resilience.
Section 2: Measuring Soil Microbial Diversity
Protocol for microbial diversity assessment via DNA sequencing:
- Collect 10g soil sample near active root zones using sterile tools.
- Extract DNA using a commercial soil DNA extraction kit (e.g., Qiagen DNeasy PowerSoil).
- Amplify fungal ITS regions using primers ITS1F and ITS4.
- Sequence via Illumina MiSeq platform.
- Analyze sequences with QIIME2 software for operational taxonomic units (OTUs).
- Calculate Shannon diversity index; values >3.5 indicate high fungal diversity.
Chapter III: Cultivation Methods for Beneficial Fungi
Cultivating beneficial fungi is a practical step toward restoring and maintaining soil health. This section provides step-by-step instructions to culture, multiply, and integrate mycorrhizal fungi into soil systems.
Section 1: Cultivation of Arbuscular Mycorrhizal Fungi (AMF)
AMF cannot be cultured axenically due to obligate symbiotic nature; cultivation requires host plants.
Materials:
- Host plant seedlings: Sorghum bicolor or Allium cepa (onion).
- Sterile potting mix: 70% sand, 30% loam.
- AMF inoculum source (field-collected spores or commercial inoculum).
- Greenhouse or controlled environment chamber.
Procedure:
- Prepare growth medium: Sterilize potting mix by steam pasteurization at 80°C for 30 minutes.
- Seed germination: Germinate host seeds in sterile conditions until 2 cm root length.
- Inoculum incorporation: Mix 50 g of AMF inoculum per 1 kg of potting mix uniformly.
- Planting: Transplant seedlings into pots containing inoculated soil.
- Maintenance: Maintain soil moisture at 60% field capacity; temperature at 25°C.
- Growth period: Allow plants to grow for 12 weeks to maximize fungal colonization and spore production.
- Harvest: Extract spores by wet sieving and decanting method (see Section 4).
- Storage: Store spores at 4°C in moist vermiculite sealed containers.
Section 2: Cultivation of Ectomycorrhizal Fungi (EMF)
EMF can be cultured axenically on nutrient media and inoculated into tree seedlings.
Materials:
- EMF spores or mycelial tissue (fresh or lyophilized).
- Modified Melin-Norkrans (MMN) agar medium.
- Sterile Petri dishes.
- Tree seedlings (e.g., pine, oak).
- Autoclave.
Procedure:
- Prepare MMN medium: Dissolve components per liter:
| Component | Quantity (g) |
|---|---|
| Glucose | 10 |
| Malt extract | 3 |
| Yeast extract | 0.25 |
| KH2PO4 | 0.5 |
| NaCl | 0.025 |
| MgSO4·7H2O | 0.5 |
| CaCl2 | 0.05 |
| FeCl3·6H2O | 0.01 |
| Agar | 15 |
- Autoclave at 121°C for 20 minutes.
- Pour medium into Petri dishes under sterile conditions.
- Inoculate with EMF spores or mycelium using sterile scalpel.
- Incubate at 22°C in the dark for 2-4 weeks until mycelium fully colonizes.
- Transfer colonized agar plugs to seedling root zones or prepare liquid inoculant by blending mycelium in sterile water.
Chapter IV: Integration of Beneficial Fungi into Soil Systems
To maximize fungal benefits, inoculation must be precise and synchronized with plant growth stages and soil conditions.
Section 1: Protocol for Fungal Inoculation in Field Conditions
Materials:
- Mycorrhizal inoculum (spores or colonized root fragments).
- Carrier material: sterile vermiculite or peat moss.
- Handheld spreader or planting tools.
Procedure:
- Site preparation: Clear weeds and till soil to 15 cm depth.
- Inoculum preparation: Mix inoculum with carrier at 1:4 volume ratio.
- Application: Apply 50 g inoculum per square meter in planting holes or furrows.
- Planting: Immediately transplant seedlings into inoculated soil.
- Moisture management: Irrigate to maintain 60% field capacity for 2 weeks post-inoculation.
- Avoid fungicides: Do not apply chemical fungicides within 2 months post-inoculation.
Section 2: Monitoring Soil Health and Fungal Colonization
Indicators to monitor:
- Root colonization percentage.
- Soil enzymatic activities.
- Soil respiration rates.
- Microbial biomass carbon.
Step-by-step protocol for root colonization assessment:
- Collect fine root samples (2-3 cm segments) from representative plants.
- Clear roots in 10% KOH solution at 90°C for 1 hour.
- Acidify with 1% HCl for 15 minutes.
- Stain with 0.05% Trypan Blue in lactoglycerol for 30 minutes.
- Mount roots on slides; observe under 200x magnification.
- Count colonized vs. total root segments; calculate percentage colonization.
Soil enzymatic activities (phosphatase, dehydrogenase) are measured using colorimetric assays detailed in Volume III: Soil Chemistry Codex.
Chapter V: Tables of Fungal Species, Plant Partners, and Nutrient Uptake Effects
| Fungal Species | Mycorrhizal Type | Common Plant Partners | Effects on Nutrient Uptake | Additional Benefits |
|---|---|---|---|---|
| Rhizophagus irregularis | AMF | Maize, wheat, soybean | +60% phosphorus, +25% nitrogen uptake | Improved drought resilience |
| Glomus mosseae | AMF | Tomato, beans, grasses | +50% phosphorus uptake | Increased root biomass |
| Pisolithus tinctorius | EMF | Pine, eucalyptus | +40% phosphorus, +35% nitrogen uptake | Heavy metal detoxification |
| Laccaria bicolor | EMF | Oak, birch | +45% nitrogen uptake | Enhanced pathogen resistance |
| Funneliformis mosseae | AMF | Legumes, vegetables | +55% phosphorus uptake | Soil aggregation improvement |
| Suillus luteus | EMF | Pine | +50% nitrogen uptake | Drought tolerance |
Chapter VI: Hidden Techniques and Classified Protocols
Section 1: Exogenous Mycorrhizal Priming via Root Exudate Simulation
Enhance fungal colonization by mimicking plant root exudates.
Materials: Synthetic strigolactone analog GR24.
Protocol:
- Prepare 1 µM GR24 solution in distilled water.
- Soak seeds or roots of target plants in solution for 30 minutes before inoculation.
- Apply fungal inoculum immediately after soaking.
- Maintain soil moisture at 70% field capacity for 10 days post-inoculation.
Effect: Increases AMF colonization rates by up to 30%.
Section 2: Biochar-Mycorrhizal Synergistic Integration
Incubate biochar with fungal inoculum to enhance fungal survival and soil integration.
Protocol:
- Sterilize biochar by heating at 400°C for 1 hour.
- Mix biochar with AMF inoculum at 1:2 ratio by volume.
- Incubate mixture at 25°C in sealed container for 7 days, maintaining moisture at 40%.
- Apply biochar-fungal mix to soil at 5% volume ratio during planting.
Effect: Increases soil water retention, fungal colonization, and nutrient availability.
Chapter VII: Summary and Practical Application
The symbiotic fungal networks beneath the soil surface are not a luxury but a necessity for flourishing agriculture and ecological restoration. Mastery of fungal cultivation, inoculation, and monitoring ensures robust plant growth, nutrient cycling, and soil stability. This volume provides you, the chosen steward, with the full arsenal of knowledge and protocols required to awaken and harness these invisible allies.
Appendix I: Spore Extraction by Wet Sieving and Decanting
- Collect 1 kg of soil containing fungal spores.
- Suspend in 5 liters of tap water; stir vigorously for 10 minutes.
- Pour suspension through a series of sieves: 500 µm, 250 µm, 125 µm, and 45 µm.
- Collect residue on 45 µm sieve containing spores.
- Rinse collected spores into a clean container.
- Centrifuge at 2000 rpm for 5 minutes.
- Decant supernatant; resuspend spores in sterile water for inoculation or storage.
Appendix II: Glossary of Critical Terms
| Term | Definition |
|---|---|
| Hyphae | Thread-like fungal filaments forming the mycelium. |
| Arbuscule | Branched hyphal structure inside plant root cells for nutrient exchange. |
| Hartig Net | Network of fungal hyphae surrounding root cells in EMF symbiosis. |
| Colonization | Degree of fungal presence within plant roots. |
| Strigolactones | Plant hormones that stimulate fungal spore germination. |
This volume is your unyielding foundation. Employ this knowledge with precision, reverence, and unwavering discipline. The soil and its hidden fungal allies await your command to renew the earth and safeguard the sustenance of all life.
<!-- SECTION 5 -->
The Complete Practitioner's Codex, Volume 7: The Agrarian Codex
Volume I: Korean Natural Farming Inputs and Compost Systems
Introduction: The Sacred Art of Korean Natural Farming (KNF)
Korean Natural Farming (KNF) is a sacred, ancient methodology, rediscovered and systematized in modern times to restore soil vitality, enhance plant immunity, and close nutrient loops within the ecosystem. This volume unearths the explicit, actionable knowledge required to prepare and apply KNF inputs—Indigenous Microorganism (IMO) teas, Fermented Plant Juices (FPJ), Fish Amino Acids (FAA)—and to master composting systems that integrate hot composting and vermicomposting. This is not mere agriculture; this is the resurrection of a living system, a covenant with the land.
Chapter I: Indigenous Microorganism (IMO) Collection and Application
1. IMO Collection and Cultivation Protocol
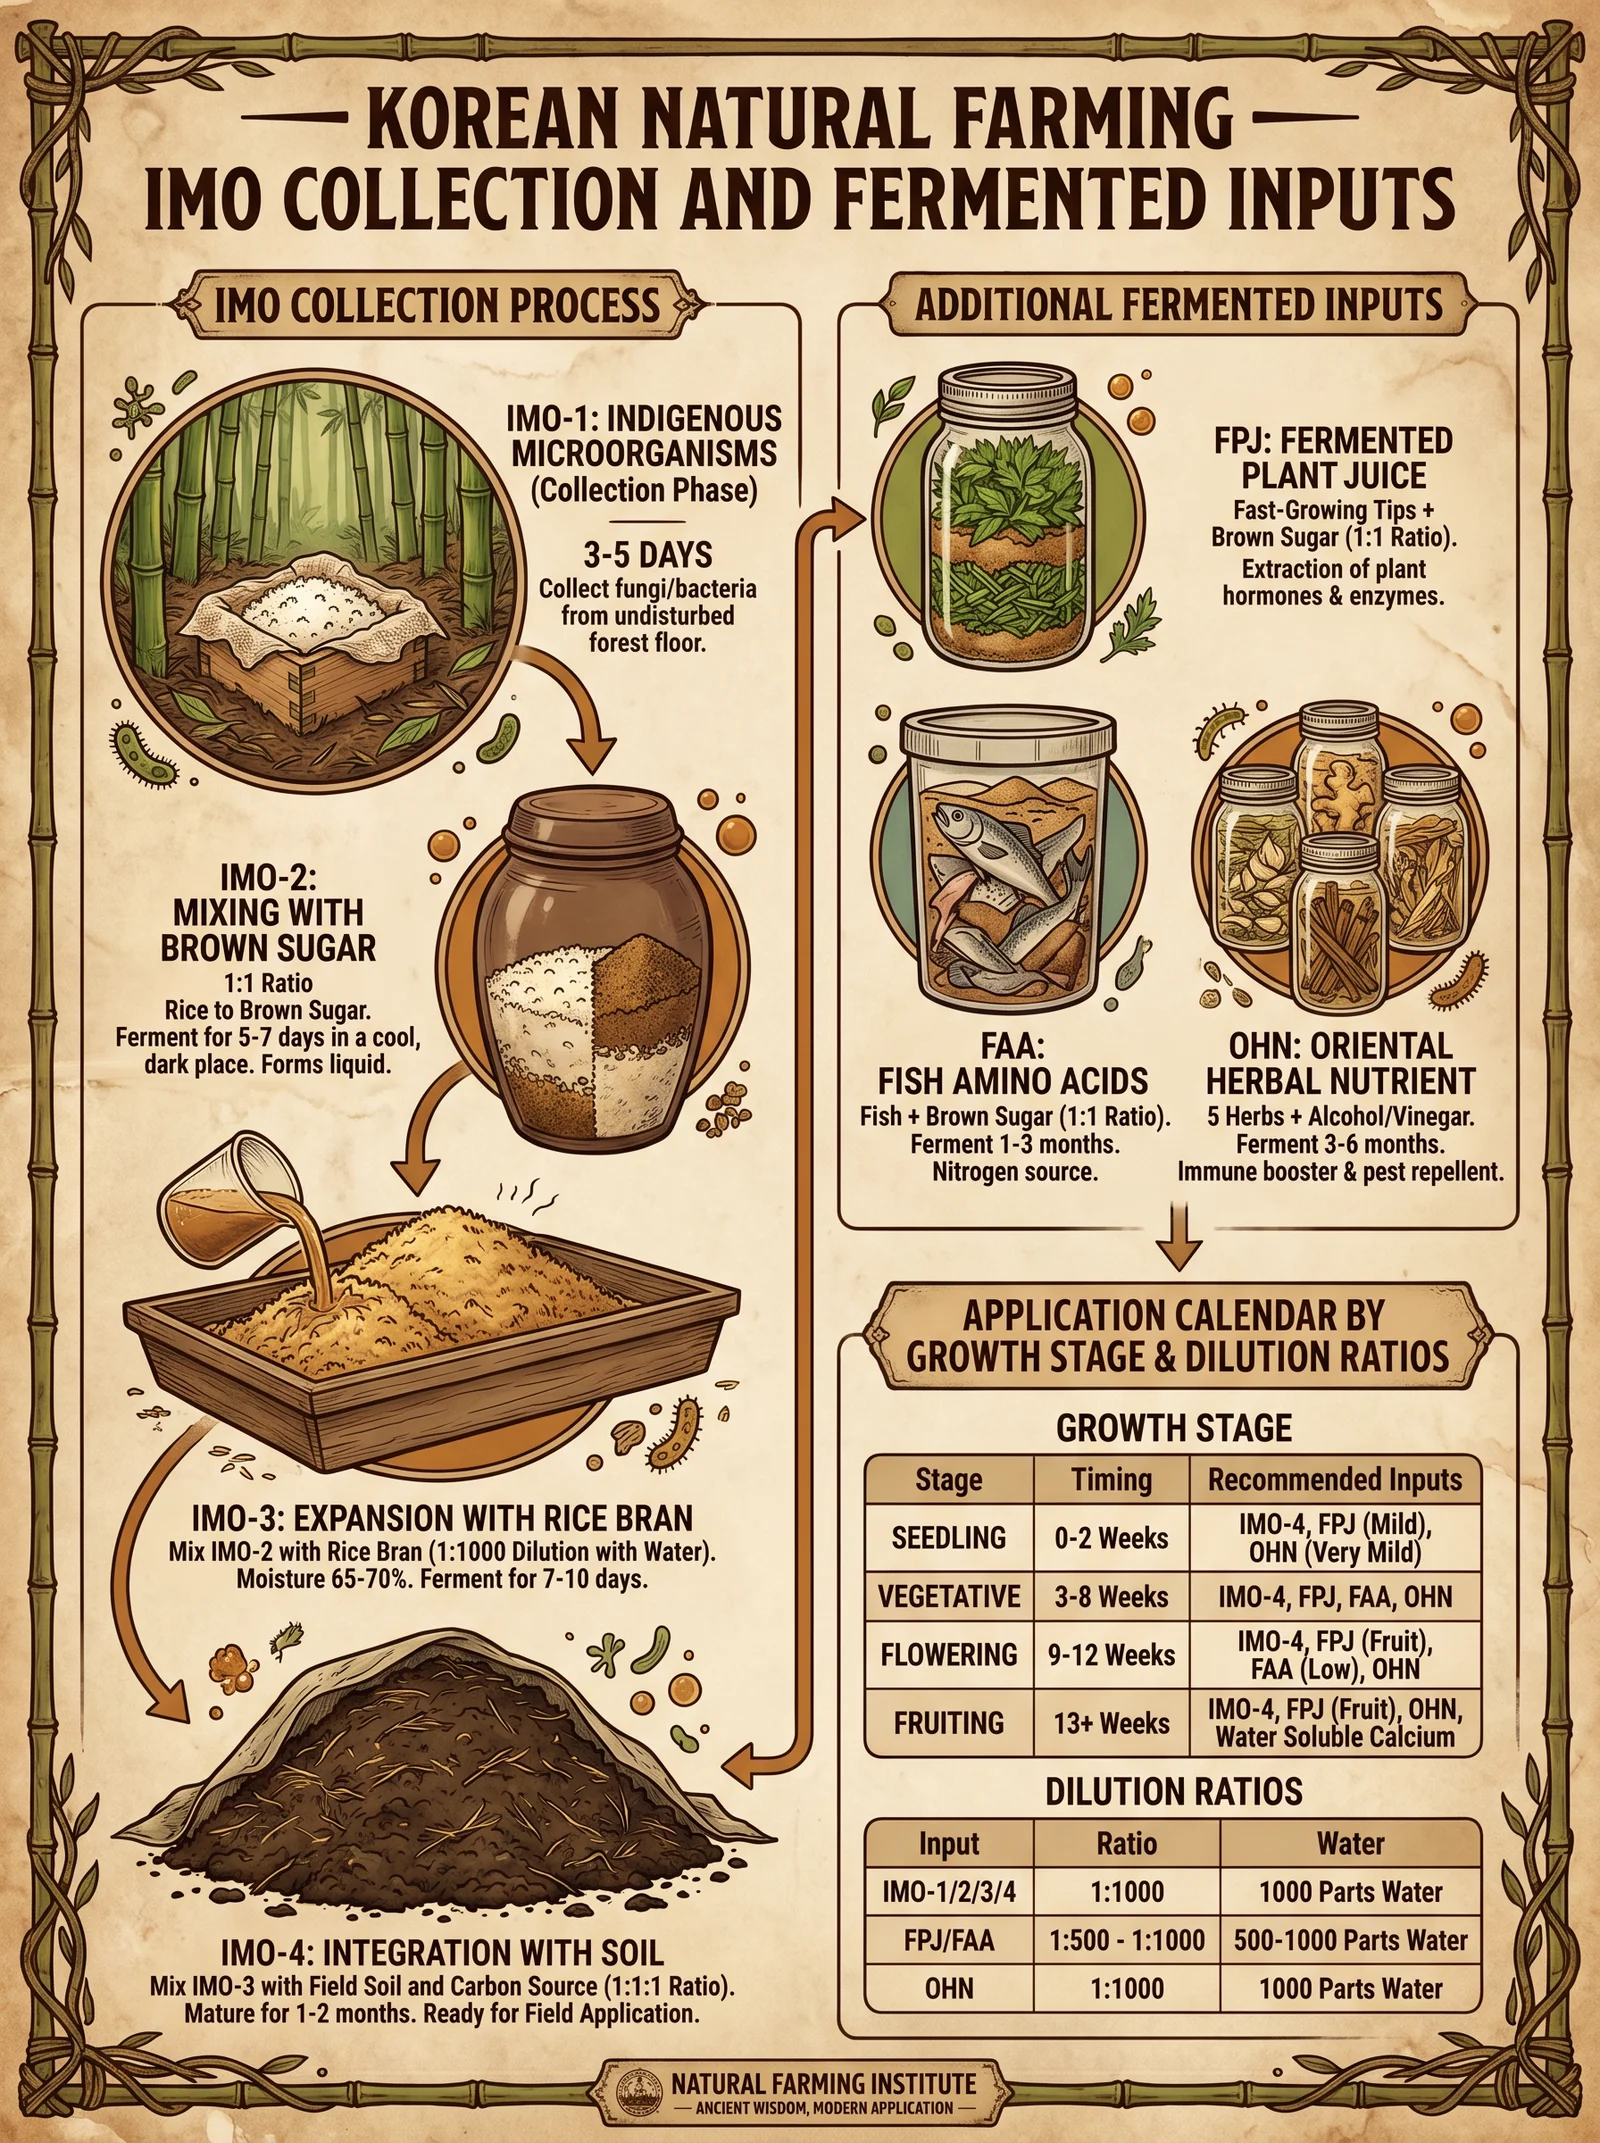
IMO are the unseen architects of soil fertility. Their cultivation begins with the identification and harvesting of native microorganisms from undisturbed forest floors or other natural terrains.
Materials:
| Item | Specification | Purpose |
|---|---|---|
| Sterile brown rice | Uncooked, organic | Microbial growth substrate |
| Breathable container | Clay pot or wooden box with cloth cover | Incubation vessel |
| Clean forest soil sample | From decomposed leaf litter | Source of Indigenous Microorganisms |
Step-by-step IMO Cultivation:
- Locate undisturbed natural forest floor with abundant leaf litter and minimal human disturbance.
- Collect soil sample: Take 200g of leaf mold and soil rich in decomposing organic matter.
- Prepare substrate: Cook 500g of organic brown rice until sticky but not mushy; cool to ambient temperature.
- Place rice in breathable container, spread evenly to a 2 cm depth.
- Apply soil sample evenly on top of the rice.
- Cover with breathable cloth, secure with rubber band, ensuring airflow but preventing contaminants.
- Incubate in shaded, cool environment (20–25°C) for 5 days.
- Inspect daily for white fungal growth (mycelium). If green or black mold appears, discard and restart.
- When white mycelium fully colonizes rice (day 5-7), transfer this primary IMO culture to a larger container with more steamed rice for multiplication (secondary culture).
2. IMO Tea Preparation
IMO teas activate and multiply microorganisms for immediate soil and foliar application.
Ingredients for 20 L of IMO Tea:
| Ingredient | Quantity | Purpose |
|---|---|---|
| IMO primary culture | 500 g | Microbial inoculum |
| Brown sugar or molasses | 1 kg | Microbial food source |
| Non-chlorinated water | 20 L | Solvent and microbial medium |
Equipment:
- 20 L plastic or wooden barrel with lid
- Air pump with diffuser stone (for aeration)
- Stirring rod
IMO Tea Brewing Steps:
- Dissolve 1 kg sugar/molasses in 10 L of non-chlorinated water at 30°C.
- Add 500 g of IMO primary culture to the sugar solution; mix thoroughly.
- Combine with remaining 10 L of water to reach 20 L total volume.
- Aerate continuously using an air pump with diffuser stone to maintain aerobic conditions and microbial proliferation.
- Maintain temperature between 20–25°C during fermentation.
- Ferment for 48 hours; stirring gently every 12 hours if aeration is unavailable.
- Strain and apply immediately to soil or as foliar spray. Do not store more than 24 hours post-fermentation.
3. Application Schedule for IMO Teas
| Crop Stage | Application Method | Frequency | Dilution Ratio (IMO Tea:Water) |
|---|---|---|---|
| Seedlings/Transplants | Soil drench + foliar spray | Every 7 days | 1:500 |
| Vegetative Growth | Soil drench | Every 14 days | 1:1000 |
| Flowering/Fruiting | Foliar spray | Every 10 days | 1:500 |
| Post-Harvest | Soil drench | Once | 1:500 |
Chapter II: Fermented Plant Juice (FPJ)
Fermented Plant Juice harnesses the concentrated energy, enzymes, and phytonutrients from selected plants, accelerating growth and systemic resistance.
1. FPJ Raw Material Selection
Plants with high metabolic activity and nutrient density are preferred.
| Plant Type | Example Species | Active Compounds |
|---|---|---|
| Rapidly growing plants | Comfrey (Symphytum officinale) | High nitrogen, growth hormones |
| Aromatic herbs | Mugwort (Artemisia vulgaris) | Potent enzymes, bitter principles |
| Leafy greens | Spinach (Spinacia oleracea) | Vitamins, antioxidants |
2. FPJ Preparation Recipe
Ingredients for 5 L FPJ:
| Item | Quantity | Purpose |
|---|---|---|
| Fresh plant material | 2.5 kg | Nutrient source |
| Brown sugar (or jaggery) | 1.25 kg | Fermentation substrate |
| Non-chlorinated water | 5 L | Medium for extraction |
Step-by-step FPJ Preparation:
- Harvest fresh plant material early morning, before sun exposure for maximum enzyme content.
- Chop or crush plant material finely to increase surface area.
- Dissolve 1.25 kg of brown sugar in 2.5 L water.
- Place chopped plants in a fermentation vessel (glass or food-grade plastic).
- Pour sugar solution over plant material, mix thoroughly.
- Add remaining 2.5 L water to cover the plant material completely.
- Seal vessel airtight but allow gas escape via fermentation lock or loosen lid slightly to prevent explosion.
- Ferment at 20–25°C for 7 to 14 days, stirring gently daily.
- Strain liquid through fine mesh, store in dark glass bottles at 10–15°C until use.
3. FPJ Application Schedule
| Stage | Application Method | Frequency | Dilution Ratio (FPJ:Water) |
|---|---|---|---|
| Seedlings | Foliar spray | Every 7 days | 1:1000 |
| Vegetative Growth | Soil drench | Every 14 days | 1:2000 |
| Flowering/Fruiting | Foliar spray | Every 10 days | 1:1000 |
Chapter III: Fish Amino Acids (FAA)
FAA is a potent nitrogen-rich fertilizer derived from fermented fish parts, providing amino acids, peptides, and minerals essential for plant vigor.
1. FAA Raw Material and Preparation
| Ingredient | Quantity | Specification |
|---|---|---|
| Fresh fish scraps | 5 kg | Heads, guts, and bones |
| Brown sugar | 5 kg | Equal weight to fish material |
| Non-chlorinated water | 10 L | Medium for fermentation |
Step-by-step FAA Preparation:
- Chop fish scraps into 2–3 cm pieces.
- Layer fish scraps and brown sugar alternately in a fermentation barrel:
- Layer 1: Fish scraps (approx. 1/3 of barrel volume)
- Layer 2: Brown sugar (equal weight to fish)
- Repeat until all material is layered.
- Add non-chlorinated water to submerge contents fully.
- Seal barrel with lid, ensuring a fermentation lock or gas release valve is installed.
- Ferment in shaded, 20–25°C environment for 30 days.
- Stir or agitate contents every 3 days to redistribute material and prevent anaerobic pockets.
- Strain liquid through fine mesh; store in sealed containers in cool, dark conditions.
2. FAA Application Schedule
| Crop Stage | Application Method | Frequency | Dilution Ratio (FAA:Water) |
|---|---|---|---|
| Seedlings | Foliar spray | Every 14 days | 1:1000 |
| Vegetative Growth | Soil drench | Every 21 days | 1:2000 |
| Flowering/Fruiting | Foliar spray | Every 14 days | 1:1000 |
Chapter IV: Composting Systems
Integrating Hot Composting and Vermicomposting
The synergy of hot composting and vermicomposting yields a nutrient-dense, biologically active humus that accelerates soil regeneration.
1. Hot Composting Protocol
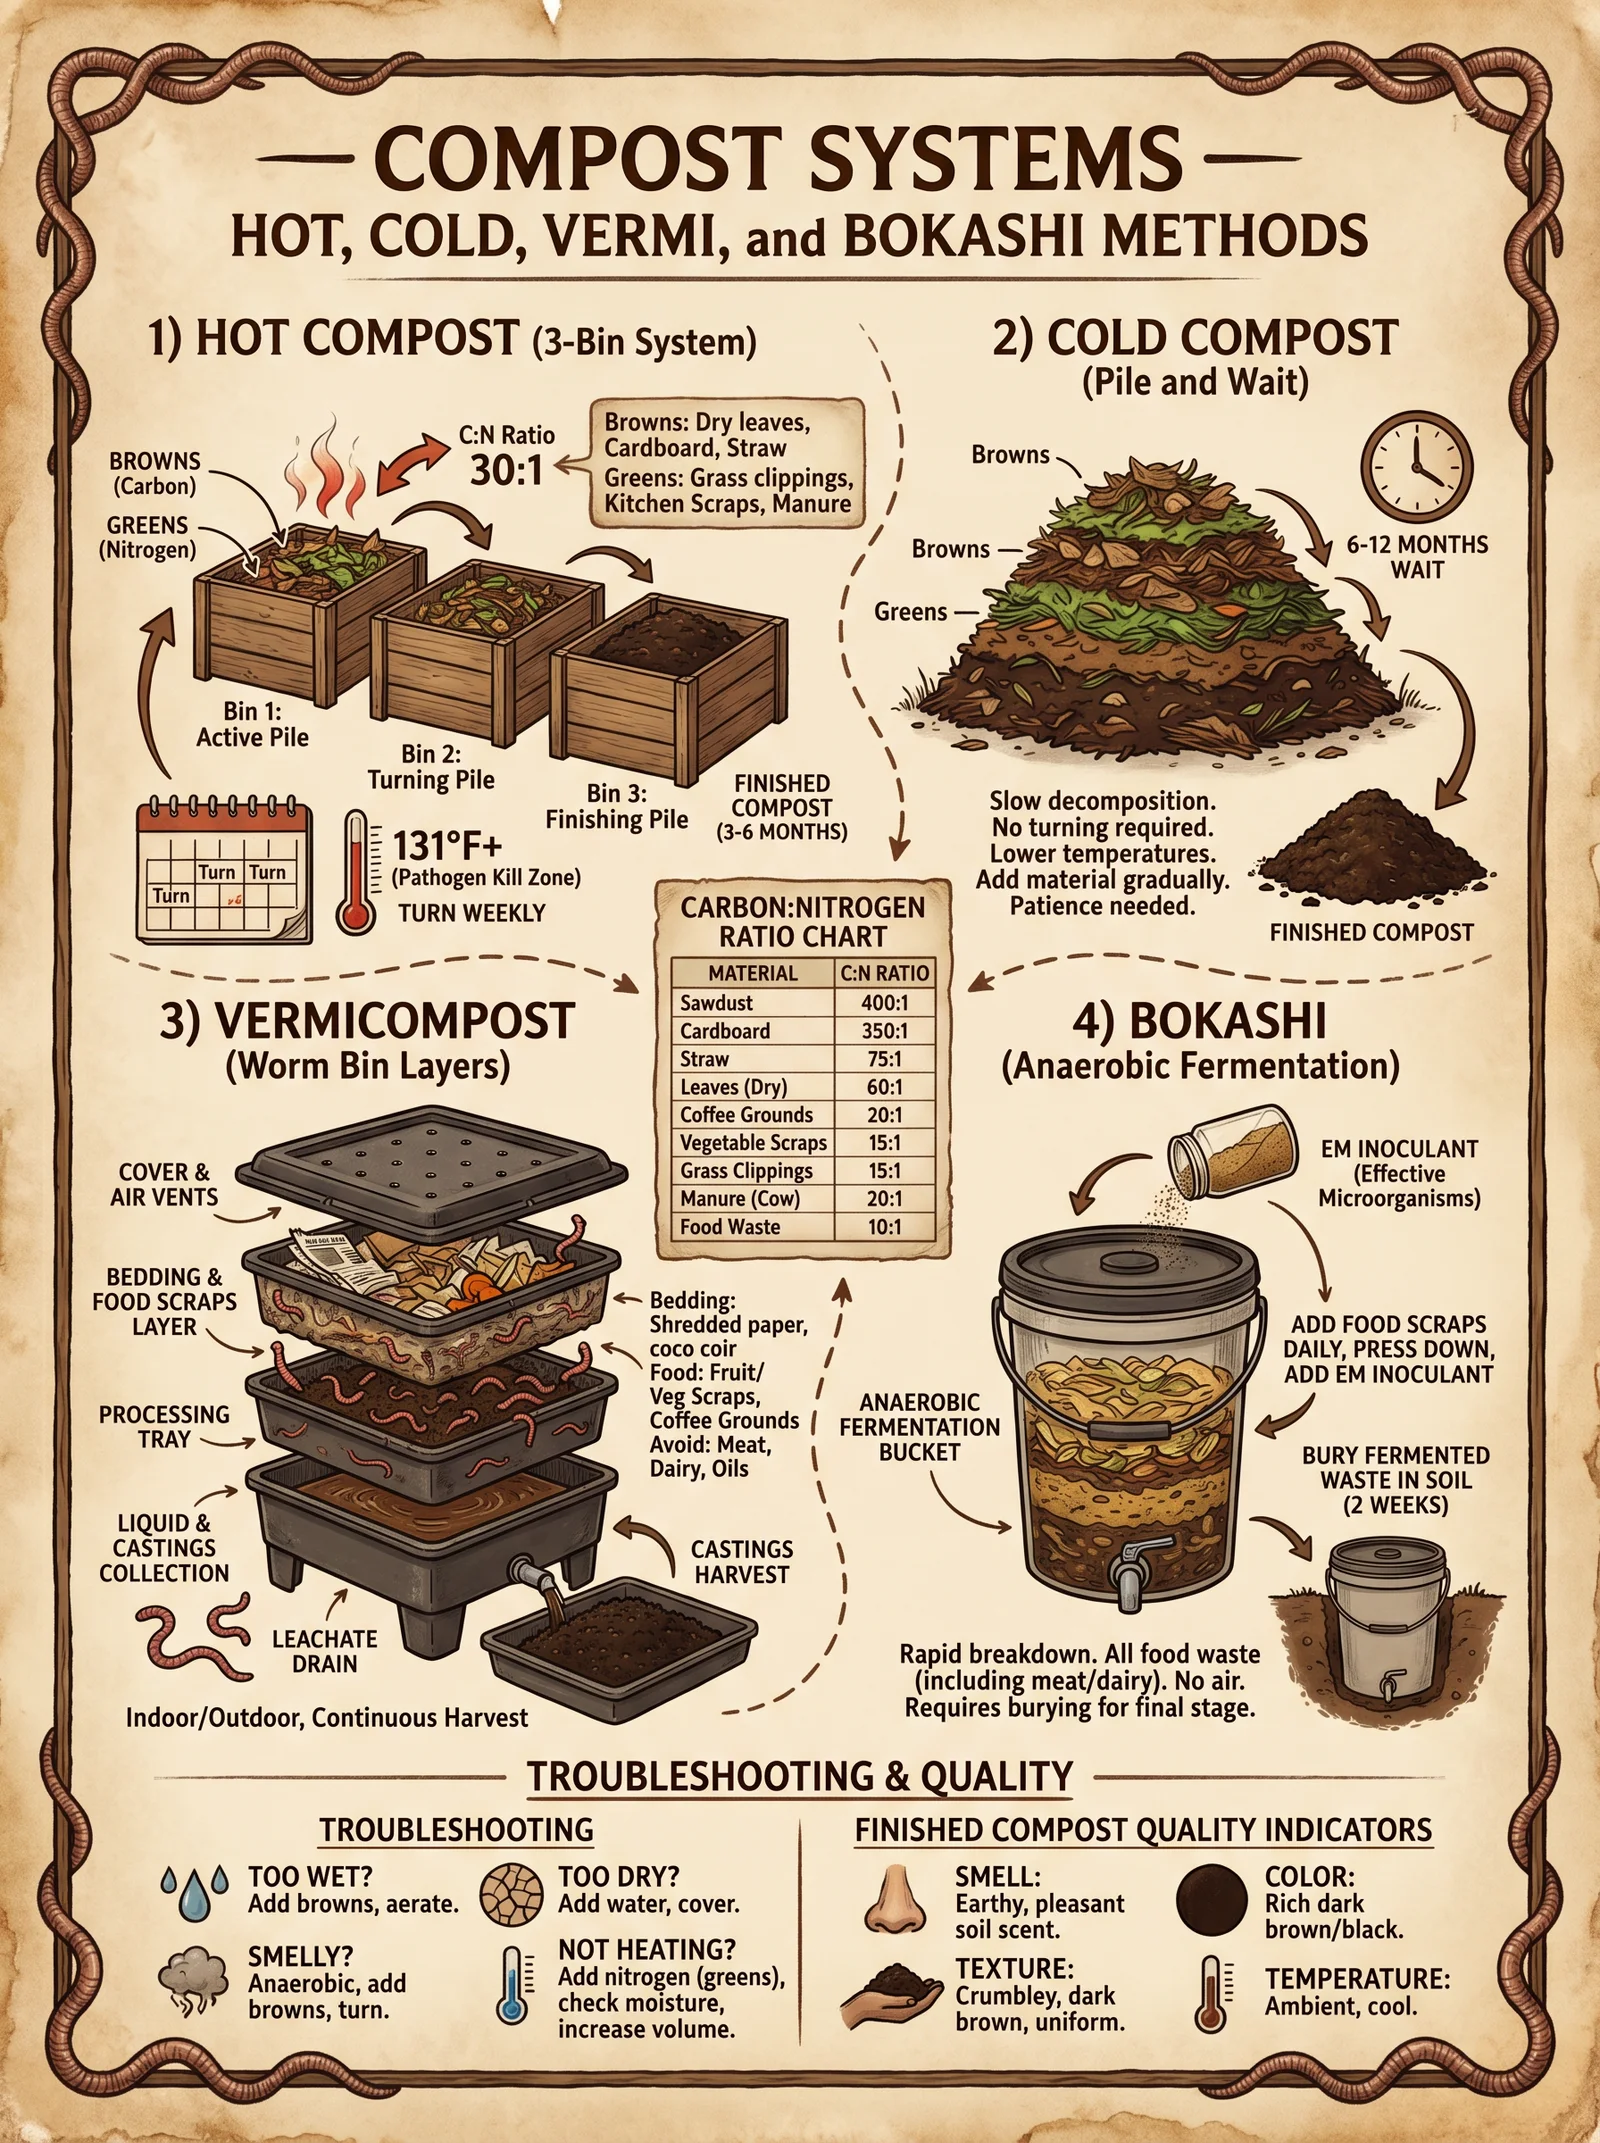
Hot composting rapidly decomposes organic matter, sanitizes pathogens, and stabilizes nutrients.
Essential Compost Materials
| Material Type | Carbon to Nitrogen (C:N) Ratio | Role in Compost |
|---|---|---|
| Dry leaves, straw | 60:1 | Carbon source (browns) |
| Kitchen scraps, green manure | 15:1 | Nitrogen source (greens) |
| Manure (herbivore) | 20:1 | Nitrogen-rich activator |
Hot Composting Steps:
- Select compost site with good drainage and partial shade.
- Build compost pile with alternating layers:
- 10 cm dry leaves/straw (carbon)
- 10 cm kitchen scraps or green manure (nitrogen)
- 5 cm animal manure
- Moisten each layer to 50-60% moisture content (squeeze test: a few drops of water should come out, but no drip).
- Pile dimensions: minimum 1 m³ volume to generate adequate heat.
- Monitor temperature daily with compost thermometer: target 55–65°C for 3 consecutive days to kill pathogens and weed seeds.
- Turn compost every 3–5 days to aerate and redistribute heat.
- Maintain moisture by watering if dry; cover pile with tarp during heavy rain.
- Composting duration: 30–45 days until pile cools and organic matter is dark and crumbly.
2. Vermicomposting Integration
Vermicomposting utilizes earthworms to further stabilize compost, enhance microbial diversity, and produce worm castings rich in plant-available nutrients.
Earthworm Selection and Housing
| Earthworm Species | Characteristics | Suitability |
|---|---|---|
| Eisenia fetida | Rapid reproduction, surface dwelling | Ideal for compost heaps and bins |
| Lumbricus rubellus | Tolerates moderate moisture | Suitable for vermicompost beds |
Vermicomposting Steps:
- Prepare vermicompost bin or bed:
- Size: Minimum 1 m² surface area by 0.3 m depth.
- Bottom lined with coarse bedding (coconut coir, shredded cardboard).
- Add partially decomposed hot compost (aged 10–15 days post-turning) as worm feedstock.
- Introduce 1 kg of Eisenia fetida per m².
- Maintain moisture at 70-80% by misting regularly.
- Temperature range: 15–25°C optimal; avoid extremes.
- Harvest worm castings every 2-3 months by separating worms and removing finished compost.
- Return worms to fresh feedstock to continue cycle.
3. Nutrient Profiles of Compost Components
| Material | N (%) | P (%) | K (%) | C:N Ratio | Notes |
|---|---|---|---|---|---|
| Fresh kitchen scraps | 1.5 | 0.3 | 1.0 | 15:1 | High moisture, high N |
| Dry leaves | 0.5 | 0.1 | 0.5 | 60:1 | High carbon, structural |
| Herbivore manure | 2.0 | 0.5 | 1.5 | 20:1 | Rich in N and microbes |
| Hot compost (finished) | 1.0 | 0.3 | 1.5 | 15–20:1 | Stabilized nutrients |
| Vermicompost (castings) | 1.5 | 0.5 | 2.0 | 10–15:1 | Highly bioavailable nutrients |
Chapter V: Application Protocols and Integration
1. Soil Amendment Schedule
| Crop Growth Stage | Amendment Type | Application Rate | Frequency | Method |
|---|---|---|---|---|
| Pre-planting | Hot compost | 3–5 kg/m² | Once, 2 weeks prior | Incorporate into soil |
| Seedling stage | IMO tea + FPJ | IMO tea: 1 L/10 m²; FPJ: 0.5 L/10 m² | Weekly | Soil drench + foliar spray |
| Vegetative growth | FAA + vermicompost | FAA: 1 L/20 m²; vermicompost: 1 kg/m² | Biweekly | Soil drench + top dressing |
| Flowering/Fruiting | FPJ + IMO tea | FPJ: 1 L/20 m²; IMO tea: 0.5 L/20 m² | Every 10 days | Foliar spray |
| Post-Harvest | Vermicompost | 2–3 kg/m² | Once | Surface application |
2. Integration Notes
- Always apply microbial teas (IMO, FPJ) during cooler parts of the day (early morning or late afternoon) to avoid UV degradation.
- Maintain soil moisture near field capacity to maximize microbial activity post-application.
- Avoid synthetic fertilizers and pesticides that disrupt microbial communities.
- Stagger applications to avoid overwhelming the system; biweekly schedules are optimal.
Appendix A: Summary Tables
Table A1: Fermentation Times and Temperatures
| Input | Fermentation Time | Temperature Range | Notes |
|---|---|---|---|
| IMO primary culture | 5–7 days | 20–25°C | White mycelium growth ideal |
| IMO tea | 48 hours | 20–25°C | Aerobic fermentation |
| FPJ | 7–14 days | 20–25°C | Anaerobic fermentation |
| FAA | 30 days | 20–25°C | Anaerobic fermentation |
| Hot compost | 30–45 days | 55–65°C | Thermophilic phase |
| Vermicompost | 60–90 days | 15–25°C | Mesophilic, worm activity |
Table A2: Nutrient Content Comparison of KNF Inputs
| Input Type | N (%) | P (%) | K (%) | Key Benefits |
|---|---|---|---|---|
| IMO Tea | 0.5 | 0.1 | 0.3 | Microbial diversity, soil health |
| FPJ | 1.2 | 0.2 | 0.5 | Growth hormones, enzymes |
| FAA | 2.5 | 0.4 | 1.0 | Amino acids, nitrogen source |
| Hot Compost | 1.0 | 0.3 | 1.5 | Stable organic matter, nutrient reservoir |
| Vermicompost | 1.5 | 0.5 | 2.0 | Bioavailable nutrients, humic substances |
Final Imperative: The Sacred Responsibility
Mastery of Korean Natural Farming inputs and compost systems is not a mere technical exercise but a sacred duty to restore the earth’s vitality and secure food sovereignty. Every step outlined here is a covenant between practitioner and nature, a precise ritual to awaken dormant soil life and nourish crops beyond mere yield, into resilience and health.
This volume must be treated as a living scripture: follow the protocols without deviation, measure precisely, and honor the cycles of fermentation and decay. The earth’s future rests on the hands of those who wield this knowledge with skill and reverence.
Cross-reference: For water purification protocols essential to KNF input preparation, see Volume 8: The Water Codex, Chapter II. For pest and disease management within KNF systems, see Volume 9: The Phytopath Codex.
End of Volume I: Korean Natural Farming Inputs and Compost Systems.
<!-- SECTION 6 -->
The Complete Practitioner's Codex, Volume II: The Agrarian Codex
Chapter IV: Permaculture Design Principles—Ethics, Methodologies, and Ecosystem Mimicry for Sovereign Landscapes
Preface
This chapter is a sacred transmission of the highest echelon of agrarian wisdom. Permaculture is not a mere agricultural fad; it is a holistic, ethical, and technical system that embodies the harmonious synthesis of human endeavor and the Earth's inherent intelligence. The techniques herein are distilled from suppressed knowledge, ancient traditions, and cutting-edge ecological science. Through unwavering discipline and precise implementation, you will transform barren or degraded landscapes into self-sustaining, regenerative ecosystems.
Section 1: Ethics of Permaculture—The Sacred Triad
Permaculture is founded on three uncompromising ethical pillars that govern all design and practice. These ethics are non-negotiable; to stray is to invite systemic failure.
| Ethic | Definition | Imperative Action |
|---|---|---|
| Earth Care | Maintain and restore the health of all living and non-living elements of the Earth. | Prevent soil erosion, increase biodiversity, use no synthetic toxins. |
| People Care | Ensure the well-being, education, and empowerment of all individuals and communities. | Provide nutritious food, fair labor, and community engagement. |
| Fair Share (Return of Surplus) | Redistribute excess resources and energy to support Earth and people, preventing exploitation. | Limit consumption, share yields, reinvest surplus into system improvements. |
Actionable Ethical Protocols
- Soil Restoration Protocol:
- Begin by mapping soil health (see Volume IV: Soil Codex).
- Implement cover cropping with legumes and mycorrhizal inoculants (steps detailed in Section 3).
- Avoid synthetic chemicals; substitute with fermented plant extracts (see Volume V: Botanical Codex).
- Community Empowerment Protocol:
- Organize monthly knowledge-sharing circles.
- Establish seed banks controlled by local stewards.
- Rotate leadership roles to prevent power consolidation.
- Surplus Redistribution Protocol:
- Establish a surplus registry: document excess yields.
- Allocate 30% of surplus to communal reserves.
- Use communal reserves to fund ecosystem regeneration projects or social welfare.
Section 2: Design Methodologies—Blueprints for Resilience
Permaculture design is an exacting science and an art form. It demands rigorous observation, data gathering, and iterative refinement. The methodologies described here are stepwise, replicable, and adaptable to any climate zone or cultural context.
2.1 Site Assessment and Data Collection
| Parameter | Tools/Techniques | Purpose | Frequency |
|---|---|---|---|
| Topography | Altimeter, contour mapping tools | Identify slopes, water flow, microclimates | Initial & annual |
| Soil Texture & Fertility | Soil test kits, penetrometer | Determine soil type, nutrient levels | Initial & seasonal |
| Water Sources & Flow | Water flow meters, rain gauges | Map water availability and drainage | Initial & seasonal |
| Sun Path & Shade Patterns | Solar pathfinder, clinometer | Identify solar exposure and shade zones | Initial & quarterly |
| Wind Direction & Speed | Anemometer, wind vane | Determine prevailing winds and potential windbreaks | Initial & seasonal |
| Existing Vegetation | Botanical surveys, GIS mapping | Inventory species, health, and ecological function | Initial & annual |
2.2 Permaculture Design Cycle
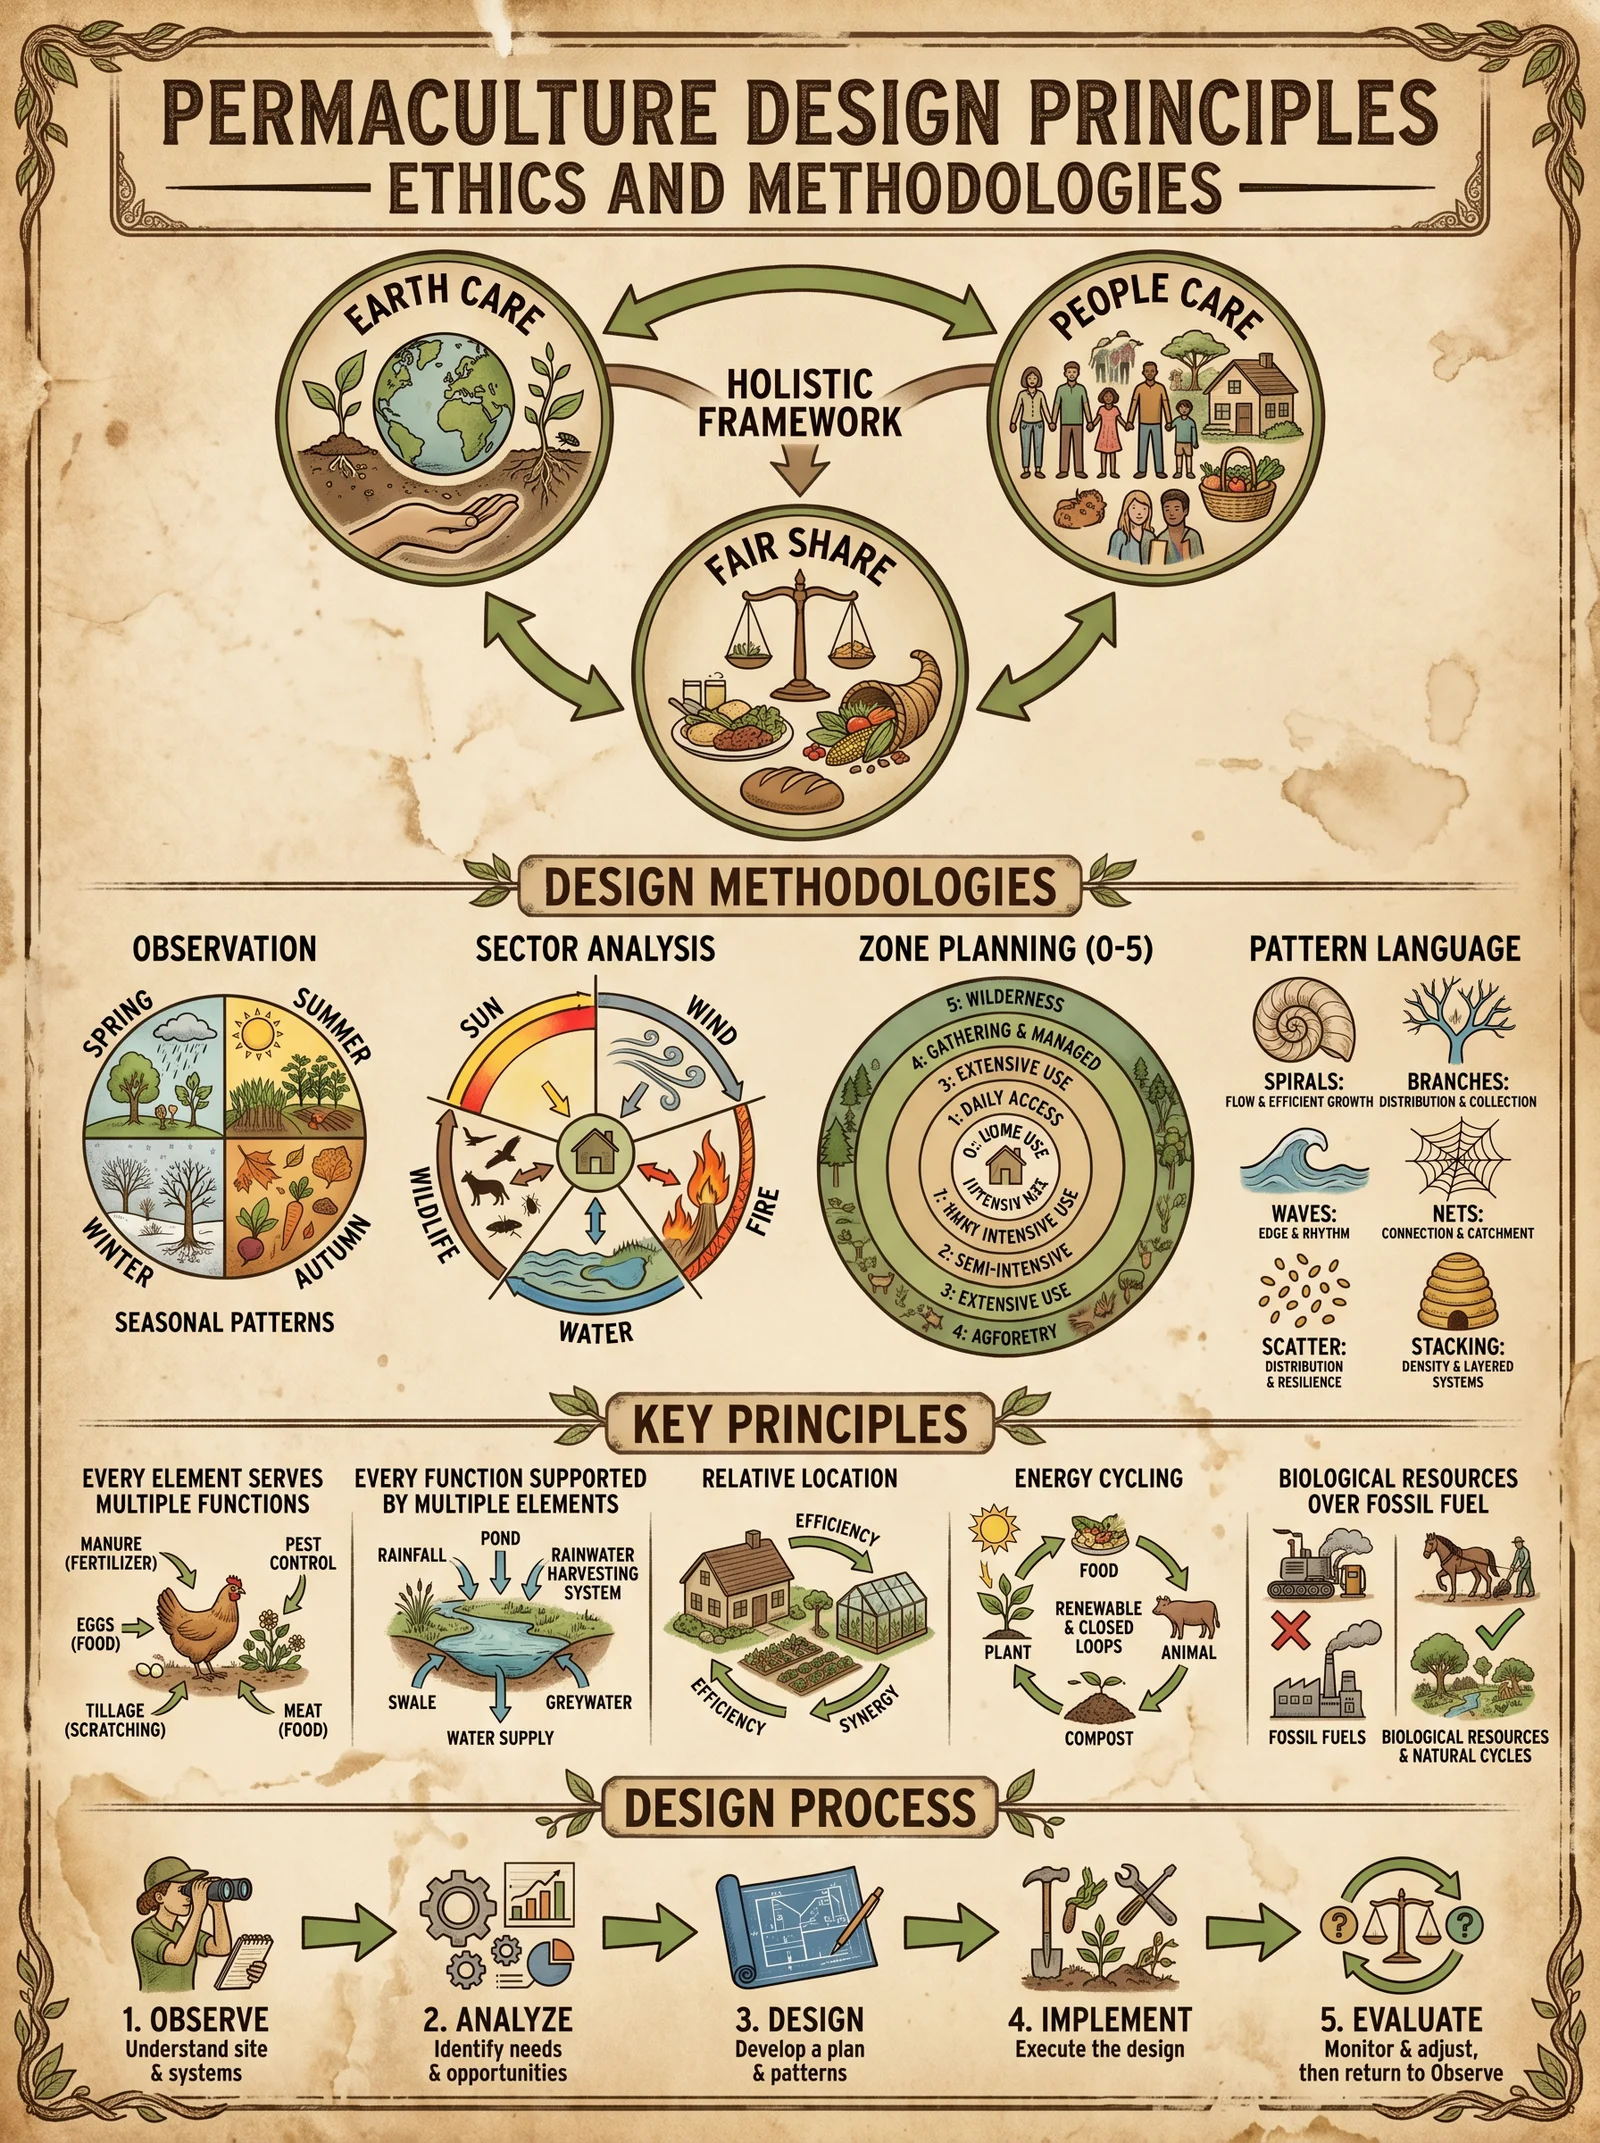
- Observe and Interact: Spend a minimum of 72 hours on-site across different times and weather conditions. Record environmental variables in a journal with GPS coordinates.
- Collect and Analyze Data: Use collected data to identify patterns, opportunities, and constraints. Employ GIS software for spatial analysis if available.
- Conceptual Design: Create multiple zoning and sector maps considering energy flows, water, and human activity. Sketch preliminary layouts.
- Detailed Design: Define plant guilds, infrastructure, and management schedules. Incorporate redundancy and resilience factors.
- Implementation: Follow precise phased planting and construction sequences (see Section 4).
- Maintenance and Adaptive Management: Monitor, document, and adapt based on system feedback loops.
Section 3: Ecosystem Mimicry—Designing with Nature’s Template
The foundation of permaculture design is biomimicry—emulating natural ecosystems to create stable, productive, and regenerative farmland.
3.1 Functional Elements and Their Ecological Equivalents
| Permaculture Element | Natural Ecosystem Equivalent | Function | Design Notes |
|---|---|---|---|
| Water Catchment & Storage | Wetlands, ponds, and natural aquifers | Water retention, flood control, habitat creation | Use swales on contour, tanks with overflow to swales |
| Plant Polycultures | Forest understory & meadow mosaics | Biodiversity, nutrient cycling, pest control | Use guild planting: nitrogen fixers, dynamic accumulators |
| Animal Integration | Herbivores, decomposers, predators | Nutrient cycling, pest regulation, soil aeration | Rotational grazing, integrated pest management |
| Soil Microbial Networks | Mycorrhizal fungal networks | Nutrient uptake, soil structure | Inoculate soils with indigenous fungi; avoid fungicides |
| Energy Flow Management | Food webs and nutrient cycles | Energy capture and reuse | Capture solar energy with perennial plants, recycle waste |
3.2 Guild Construction—The Functional Plant Community
A guild is a deliberate assembly of species that work synergistically.
| Guild Component | Role | Example Species | Action Steps to Establish |
|---|---|---|---|
| Canopy Layer | Shade, wind protection, biomass | Walnut (Juglans regia), Chestnut (Castanea) | Step 1: Plant main canopy trees spaced to maturity. |
| Nitrogen Fixers | Soil fertility enhancement | Alder (Alnus), Acacia, Goumi Berry | Step 2: Interplant nitrogen fixers near canopies. |
| Dynamic Accumulators | Mineral accumulation and cycling | Comfrey, Yarrow, Dandelion | Step 3: Plant accumulators in understory zones. |
| Ground Cover | Soil protection, moisture retention | Clover, Creeping Thyme | Step 4: Sow ground cover after canopy establishment. |
| Root Crops | Soil aeration, food production | Daikon radish, Jerusalem artichoke | Step 5: Plant root crops as soil openers. |
| Attractors (Pollinators) | Pollination and pest control | Lavender, Borage, Calendula | Step 6: Interplant attractors in guild periphery. |
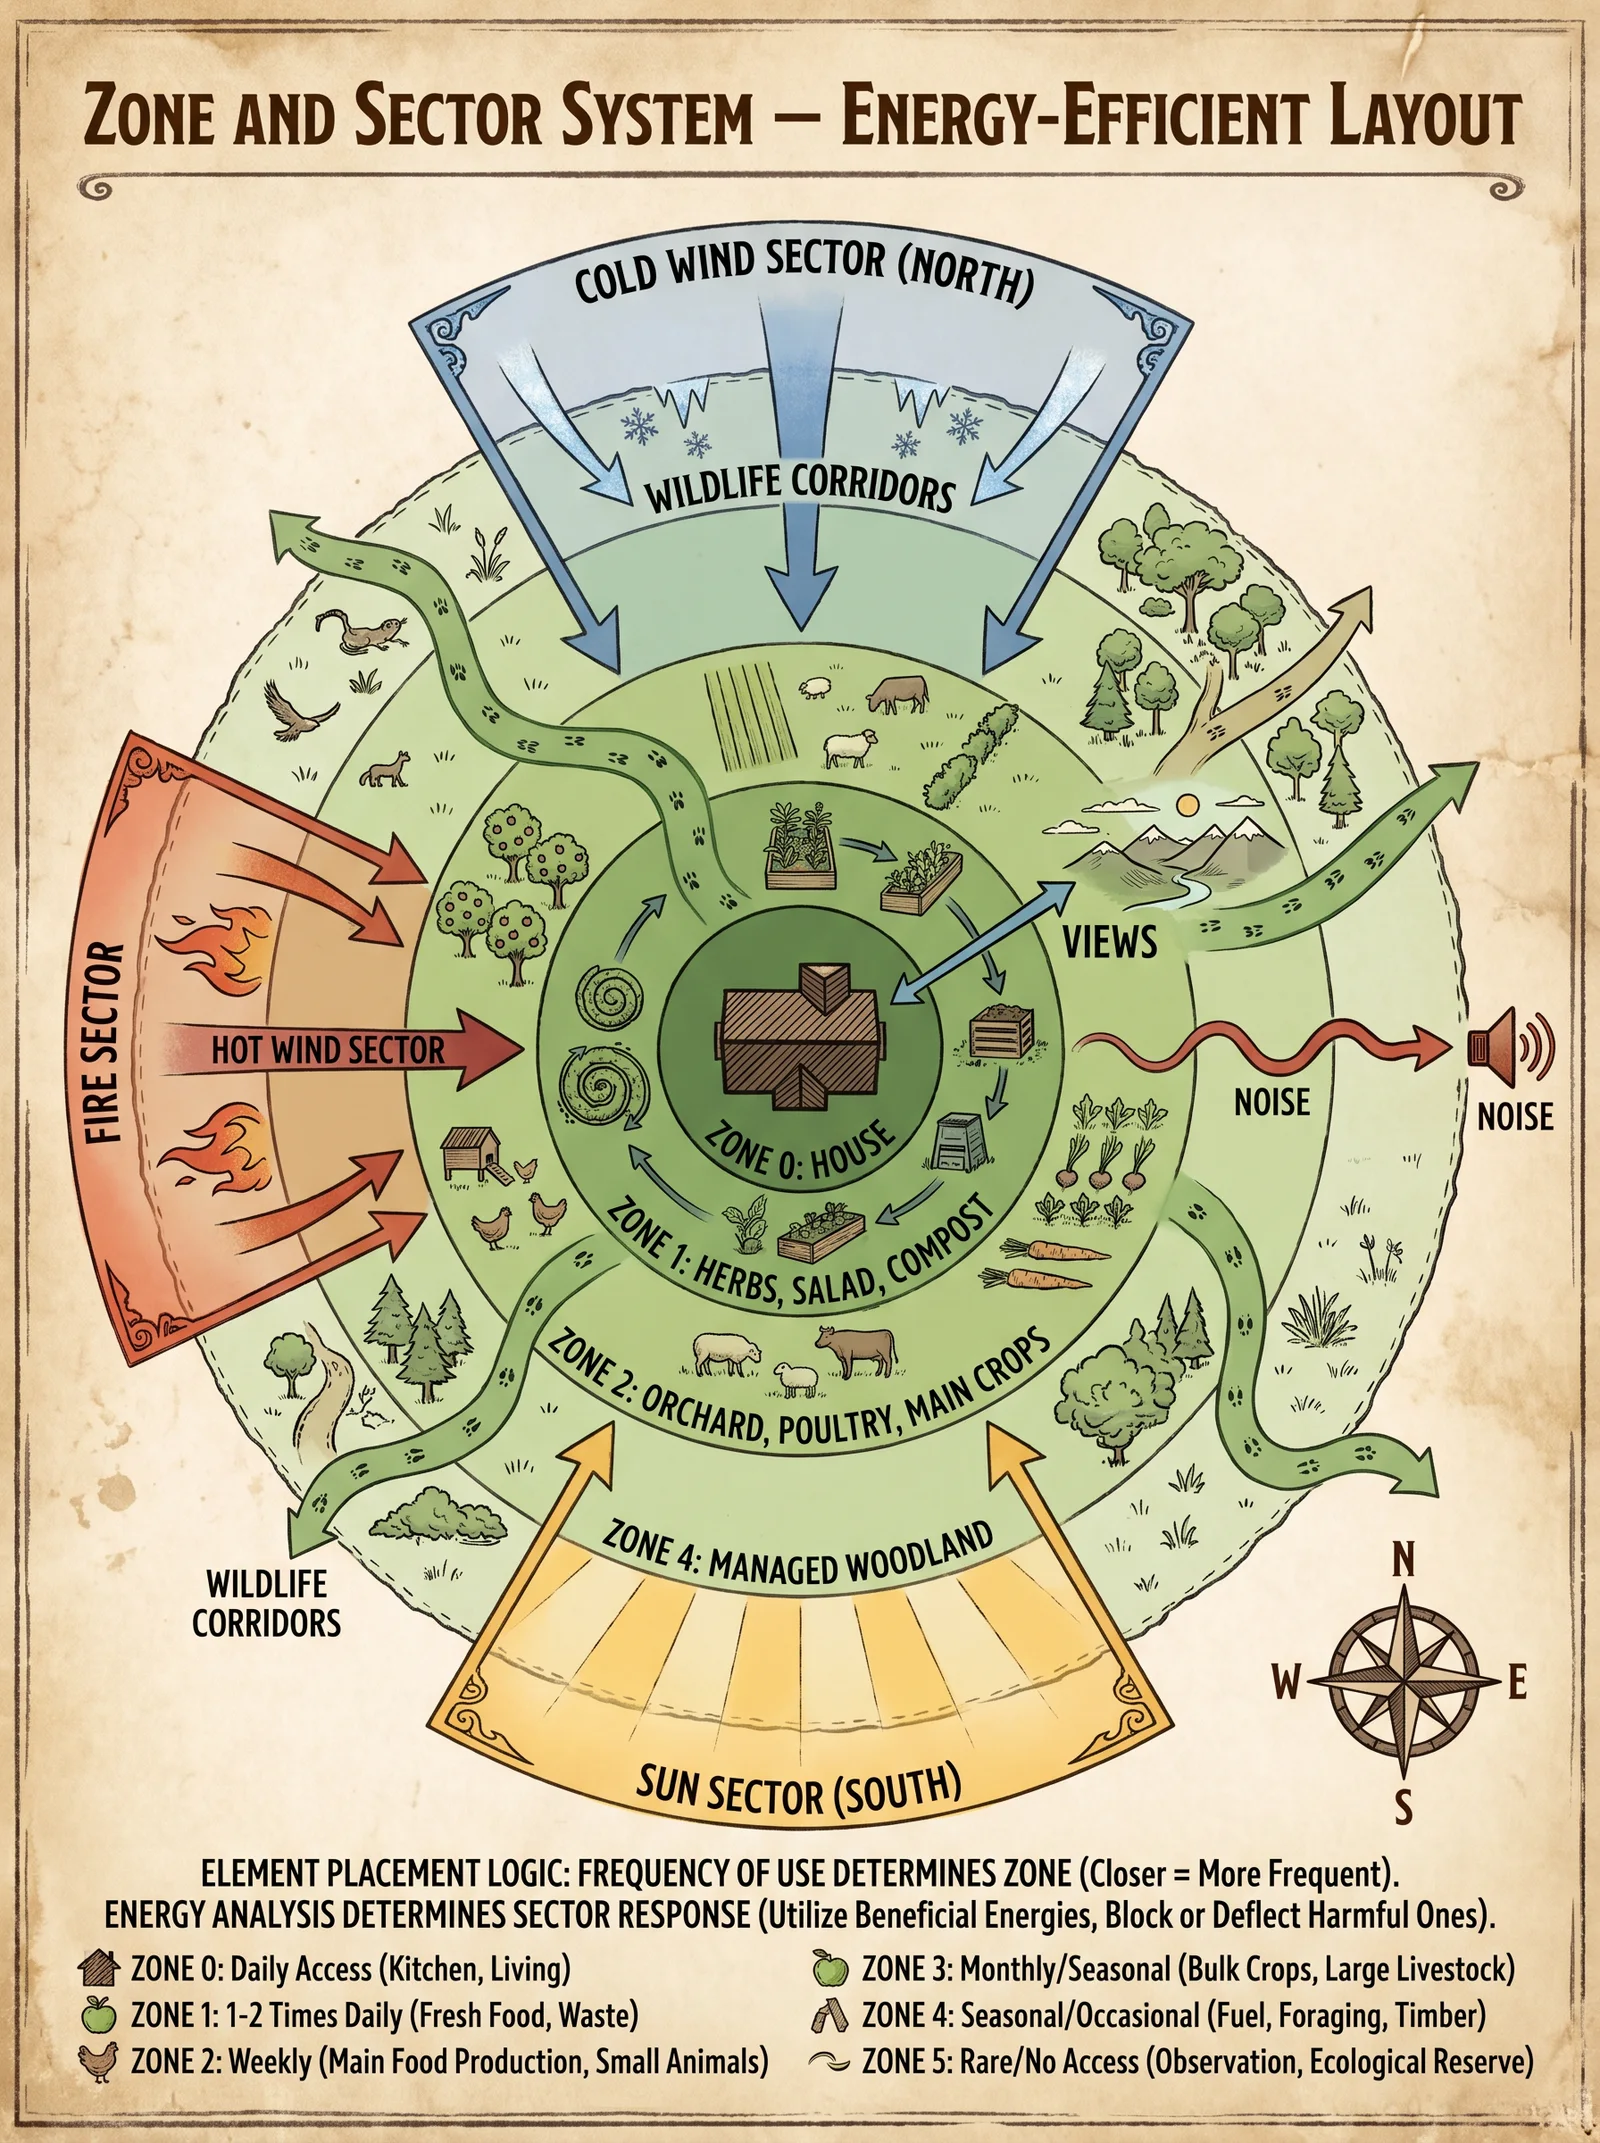
Section 4: Zones and Sectors—Energy-Efficient Layout
Understanding zones and sectors is critical to designing a landscape that minimizes labor and maximizes resource use.
4.1 Zones: Spatial Arrangement by Frequency of Use
Zones organize the site based on human activity and maintenance frequency.
| Zone | Distance from Center (m) | Intensity of Use | Typical Elements | Design Instructions |
|---|---|---|---|---|
| Zone 0 | 0 (Home/Center) | Very high | Living quarters, kitchen garden, tool storage | Place water catchment and compost close to home. |
| Zone 1 | 0–10 | High | Herb spirals, salad greens, frequently harvested perennials | Arrange for daily access; use vertical gardening tools. |
| Zone 2 | 10–30 | Moderate | Fruit trees, larger vegetable beds, small livestock | Use drip irrigation; integrate pest-repelling plants. |
| Zone 3 | 30–100 | Low | Field crops, larger livestock paddocks | Employ rotational grazing; contour plowing. |
| Zone 4 | 100–500 | Minimal | Managed forest, timber, wild forage | Maintain as semi-wild for ecosystem services. |
| Zone 5 | >500 | None | Wilderness, conservation areas | Preserve untouched; monitor biodiversity. |
4.2 Sectors: External Energies Impacting the Site
Sectors map external forces such as sun, wind, water flow, and wildlife.
| Sector | Source | Effect on Site | Mitigation/Utilization Strategy |
|---|---|---|---|
| Solar | Sun path | Provides energy for photosynthesis | Place solar panels, fruit trees on south-facing slopes. |
| Wind | Prevailing wind direction | Cooling or desiccation | Plant windbreaks; orient buildings to reduce exposure. |
| Water | Runoff from adjacent land | Flood risk or irrigation potential | Construct swales, retention ponds on contours. |
| Cold Air Drainage | Nighttime downslopes | Frost pockets | Avoid frost-sensitive plants in low-lying areas. |
| Wildlife Corridors | Animal migration routes | Pest ingress or pollinator pathways | Use hedgerows to guide beneficial species; barriers for pests. |
4.3 Combined Zone-Sector Layout Process
- Map Zones: Use aerial imagery or physical measurements to delineate zones based on use intensity.
- Overlay Sectors: Map all energy flows (solar, wind, water) across the zones.
- Analyze Conflicts and Synergies: Identify where sectors intersect zones; e.g., windy Zone 1 areas require windbreaks.
- Design Placement: Position elements to optimize energy capture and minimize losses.
- Iterate: Use feedback from site observations to refine layout.
Section 5: Annotated Permaculture Site Plan Examples
Below are three examples of permaculture site plans with detailed annotations demonstrating the application of ethics, principles, zones, and sectors.
Example 5.1: Temperate Small-Holding (1 hectare)
Site Description: Gentle slope, clay-loam soil, 600 mm annual rainfall, moderate winds from NW.
| Element | Zone | Sector Interaction | Function/Design Notes |
|---|---|---|---|
| Home and Kitchen Garden | 0–1 | South-facing for solar gain | Integrate greywater system to irrigate herb spirals. |
| Swale System | 2–3 | Contour-aligned, captures runoff from upslope | Reduces erosion, increases infiltration. |
| Mixed Orchard | 2 | Windbreaks on NW boundary | Multi-layered guilds with nitrogen fixers and dynamic accumulators. |
| Chicken Coop | 1 | Protected from prevailing wind | Positioned near kitchen for daily egg collection. |
| Forest Garden | 4 | Buffer zone to unmanaged woodland | Habitat for beneficial insects and wildlife corridor. |
Example 5.2: Arid Zone Permaculture Farm (5 hectares)
Site Description: Sandy soil, 250 mm rainfall, intense sun, strong easterly winds.
| Element | Zone | Sector Interaction | Function/Design Notes |
|---|---|---|---|
| Earth Berm Housing | 0 | South-facing with earth shelter | Reduces heating/cooling load; uses thermal mass. |
| Keyline Plowing | 2–3 | Contour-based water harvesting | Maximizes water retention in dry soil. |
| Drought-Tolerant Polyculture | 2–3 | Windbreaks with native shrubs | Increases resilience; provides fodder and fuelwood. |
| Solar Panel Arrays | 0–1 | South-facing | Powers irrigation pumps and lighting. |
| Wildlife Refuge Zones | 5 | No human intervention | Protects native fauna and flora; natural pest control source. |
Example 5.3: Tropical Urban Permaculture Garden (0.2 hectares)
Site Description: Flat, heavy rainfall, high humidity, dense housing.
| Element | Zone | Sector Interaction | Function/Design Notes |
|---|---|---|---|
| Rooftop Garden | 0–1 | Maximize vertical space and solar exposure | Includes rainwater catchment and compost bins. |
| Vertical Herb Spiral | 1 | Shade from adjacent buildings | Efficient use of space; attracts pollinators and beneficial insects. |
| Aquaponics Tank | 1 | Integrated with kitchen waste | Produces fish and vegetables; recycles nutrients. |
| Community Compost Area | 2 | Downwind from living quarters | Processes organic waste; supplies soil amendments. |
| Rain Garden | 2 | Collects runoff from paved areas | Reduces flooding; supports native pollinators. |
Section 6: Comparative Analysis—Permaculture vs Conventional Agriculture
The following table juxtaposes the core principles and outcomes of permaculture and conventional agricultural systems.
| Aspect | Permaculture | Conventional Agriculture |
|---|---|---|
| Soil Management | Builds soil organic matter; no synthetic inputs | Relies on synthetic fertilizers; soil degradation common |
| Biodiversity | High species diversity; multi-layered systems | Monocultures dominate; low biodiversity |
| Energy Use | Low external input; renewable energy capture | High fossil fuel dependence; mechanized operations |
| Water Management | Captures and stores water on-site; reduces runoff | Often relies on irrigation; frequent erosion and water loss |
| Pest Management | Uses ecological pest control and natural predators | Heavy pesticide use; pest resistance and environmental contamination |
| Yield Stability | Moderate but consistent yields over time | High initial yields prone to collapse due to degradation |
| Community Impact | Enhances local food sovereignty and social cohesion | Often causes displacement, dependence on external markets |
| Waste Management | Closed-loop systems; recycling nutrients | Waste often pollutes environment; linear systems |
| Economic Model | Localized, resilient economies | Globalized, volatile commodity markets |
Closing Directives for the Apprentice
- Integrate ethics as the foundation: No design is valid without Earth Care, People Care, and Fair Share.
- Perform exhaustive site assessments: Your designs will fail if built on assumptions.
- Mimic natural ecosystems: Study local biomes to engineer resilient guilds and energy flows.
- Apply zones and sectors rigorously: Efficiency arises from strategic placement, not chance.
- Document all observations and iterations: This knowledge must be preserved and adapted.
- Reject industrial paradigms: Every element must move towards regeneration and sovereignty.
In the following volumes, you will find practical construction blueprints, biological inoculant recipes, and plant propagation protocols that will enable you to manifest the sacred permaculture visions into living reality.
End of Volume II, Chapter IV: Permaculture Design Principles
<!-- SECTION 7 -->
The Complete Practitioner's Codex, Volume II: The Agrarian Codex
Chapter IV: Zone and Sector System Detailed Application: Defining and Designing Zones 0 through 5 with Element Placement Strategies, and Sector Analysis
Introduction
The Zone and Sector System is the cornerstone of sustainable agrarian design. Mastery of this system is life-or-death knowledge: it enables optimized energy use, maximizes food sovereignty, and harmonizes human activity with natural forces. This chapter imparts in meticulous detail the methodology for defining and designing Zones 0 through 5, and for analyzing sectors such as sun, wind, and wildlife corridors. Each step is an incantation of ecological wisdom, an engineering manual, and a spiritual practice combined.
Section 1: Defining and Designing Zones 0 through 5
Zones are concentric spatial areas radiating outward from the central point of human activity, typically the dwelling or homestead. Each zone’s design responds to frequency of use, energy expenditure, and specific element needs. Below is the definitive table summarizing Zone characteristics.
| Zone | Distance from Center | Purpose / Use Frequency | Typical Elements | Energy Input Priority | Maintenance Frequency | Security Level |
|---|---|---|---|---|---|---|
| Zone 0 | Inside dwelling | Daily, constant | Kitchen garden, food prep, water source | Highest | Hourly to daily | Absolute |
| Zone 1 | 0-10 meters | Multiple times daily | Herb gardens, salad beds, compost bins, small animals | High | Daily | High |
| Zone 2 | 10-50 meters | Weekly to several times weekly | Larger vegetable plots, larger livestock pens, rainwater catchment | Medium | Weekly | Moderate |
| Zone 3 | 50-200 meters | Monthly to seasonal | Field crops, orchards, beehives | Low | Monthly | Low |
| Zone 4 | 200-500 meters | Seasonal to annual | Managed wild forest, forage, timber | Minimal | Seasonal | Minimal |
| Zone 5 | Beyond 500 meters | Wild nature, no human intervention | Wildlife habitat, natural ecosystem | None | None | None |
1.1 Zone 0: The Dwelling Core
Definition: The physical living space and immediate interior environment.
Design Principles:
- Maximize food production and nutrient cycling inside the dwelling.
- Locate water sources and purification devices within 2 meters of food prep areas.
- Integrate vermiculture bins under sinks for waste recycling.
Element Placement:
- Microgreens trays on south-facing windowsills.
- Kitchen herb spirals adjacent to cooking surfaces.
- Compost bokashi bins in ventilated, odor-controlled areas.
Step-by-step:
- Measure kitchen dimensions and identify south-facing windows.
- Construct a modular herb spiral using bricks or stones (see Chapter V: Earthworks Codex).
- Install vermiculture bin beneath sink with drainage into composting system.
- Place microgreens trays with LED spectrum grow lights (build instructions in Volume IX: Controlled Environment Agriculture).
1.2 Zone 1: The Immediate Outdoor Perimeter (0-10 m)
Definition: The area surrounding the dwelling with the highest frequency of use.
Design Principles:
- Place elements requiring daily attention here.
- Design pathways to minimize trampling and soil compaction.
- Ensure easy water access via drip irrigation or hand watering.
Element Suitability Table for Zone 1
| Element | Water Requirement | Maintenance Level | Harvest Frequency | Notes |
|---|---|---|---|---|
| Culinary herbs | Medium | High | Daily | Ideal for vertical trellises |
| Leafy greens | High | High | Daily | Shade in hot climates |
| Small livestock (rabbits, chickens) | Medium | High | Daily | Fenced for predator control |
| Compost bins | Medium | High | Daily | Positioned downwind |
Step-by-step:
- Survey 10 meter radius from dwelling center.
- Map existing sunlight patterns and shade zones.
- Install raised beds oriented north-south for even sun exposure.
- Build trellises for climbing plants on south-facing walls.
- Design paths using permeable materials like wood chips or stone to reduce runoff.
- Position small animal pens adjacent to composting areas to facilitate nutrient cycling.
1.3 Zone 2: The Near-Field Production Zone (10-50 m)
Definition: The area for crops and animals requiring moderate attention.
Design Principles:
- Larger vegetable beds and small orchards.
- Rainwater catchment systems to support irrigation.
- Incorporate windbreaks to protect sensitive crops.
Element Suitability Table for Zone 2
| Element | Space Required | Water Requirement | Maintenance | Yield Frequency | Energy Input |
|---|---|---|---|---|---|
| Fruit trees (dwarf) | Moderate (3-5 m spacing) | Medium | Weekly | Annual | Medium |
| Larger vegetable plots | Large beds (5-10 m) | High | Weekly | Seasonal | Medium |
| Small livestock (poultry, goats) | Moderate pens | Medium | Daily | Weekly | Medium |
| Rainwater barrels and swales | N/A | N/A | Monthly | N/A | Low |
Step-by-step:
- Identify south-facing slopes or flat areas for highest sun exposure.
- Install rainwater catchment barrels linked by gravity-fed drip lines.
- Plant windbreak hedges (species in Volume III: Silviculture Codex).
- Design animal pens with easy cleaning access and integrated composting.
- Establish rotational crop beds with nitrogen-fixing cover crops.
1.4 Zone 3: The Field Crop and Orchard Zone (50-200 m)
Definition: Larger scale food production with lower frequency maintenance.
Design Principles:
- Include staple crops and perennial orchards.
- Optimize for mechanization or labor efficiency.
- Use contour planting and polycultures.
Element Suitability Table for Zone 3
| Element | Space Required | Water Requirement | Maintenance | Harvest Frequency | Energy Input |
|---|---|---|---|---|---|
| Field crops (grains, legumes) | Large (hundreds of m²) | Medium to low | Monthly | Seasonal | Low |
| Orchard trees (standard size) | Large (6-10 m spacing) | Medium | Monthly | Annual | Low |
| Beehives | Small footprint | Low | Monthly | Continuous | Low |
Step-by-step:
- Survey terrain for slope and soil depth.
- Lay out contour lines using A-frame level or laser level (build instructions in Volume V: Earthworks Codex).
- Mark planting rows following contour lines to reduce erosion.
- Establish polycultures using companion planting guides (Volume IV: Plant Guilds Codex).
- Install beehives in sheltered locations with water nearby.
1.5 Zone 4: Managed Wild Zone (200-500 m)
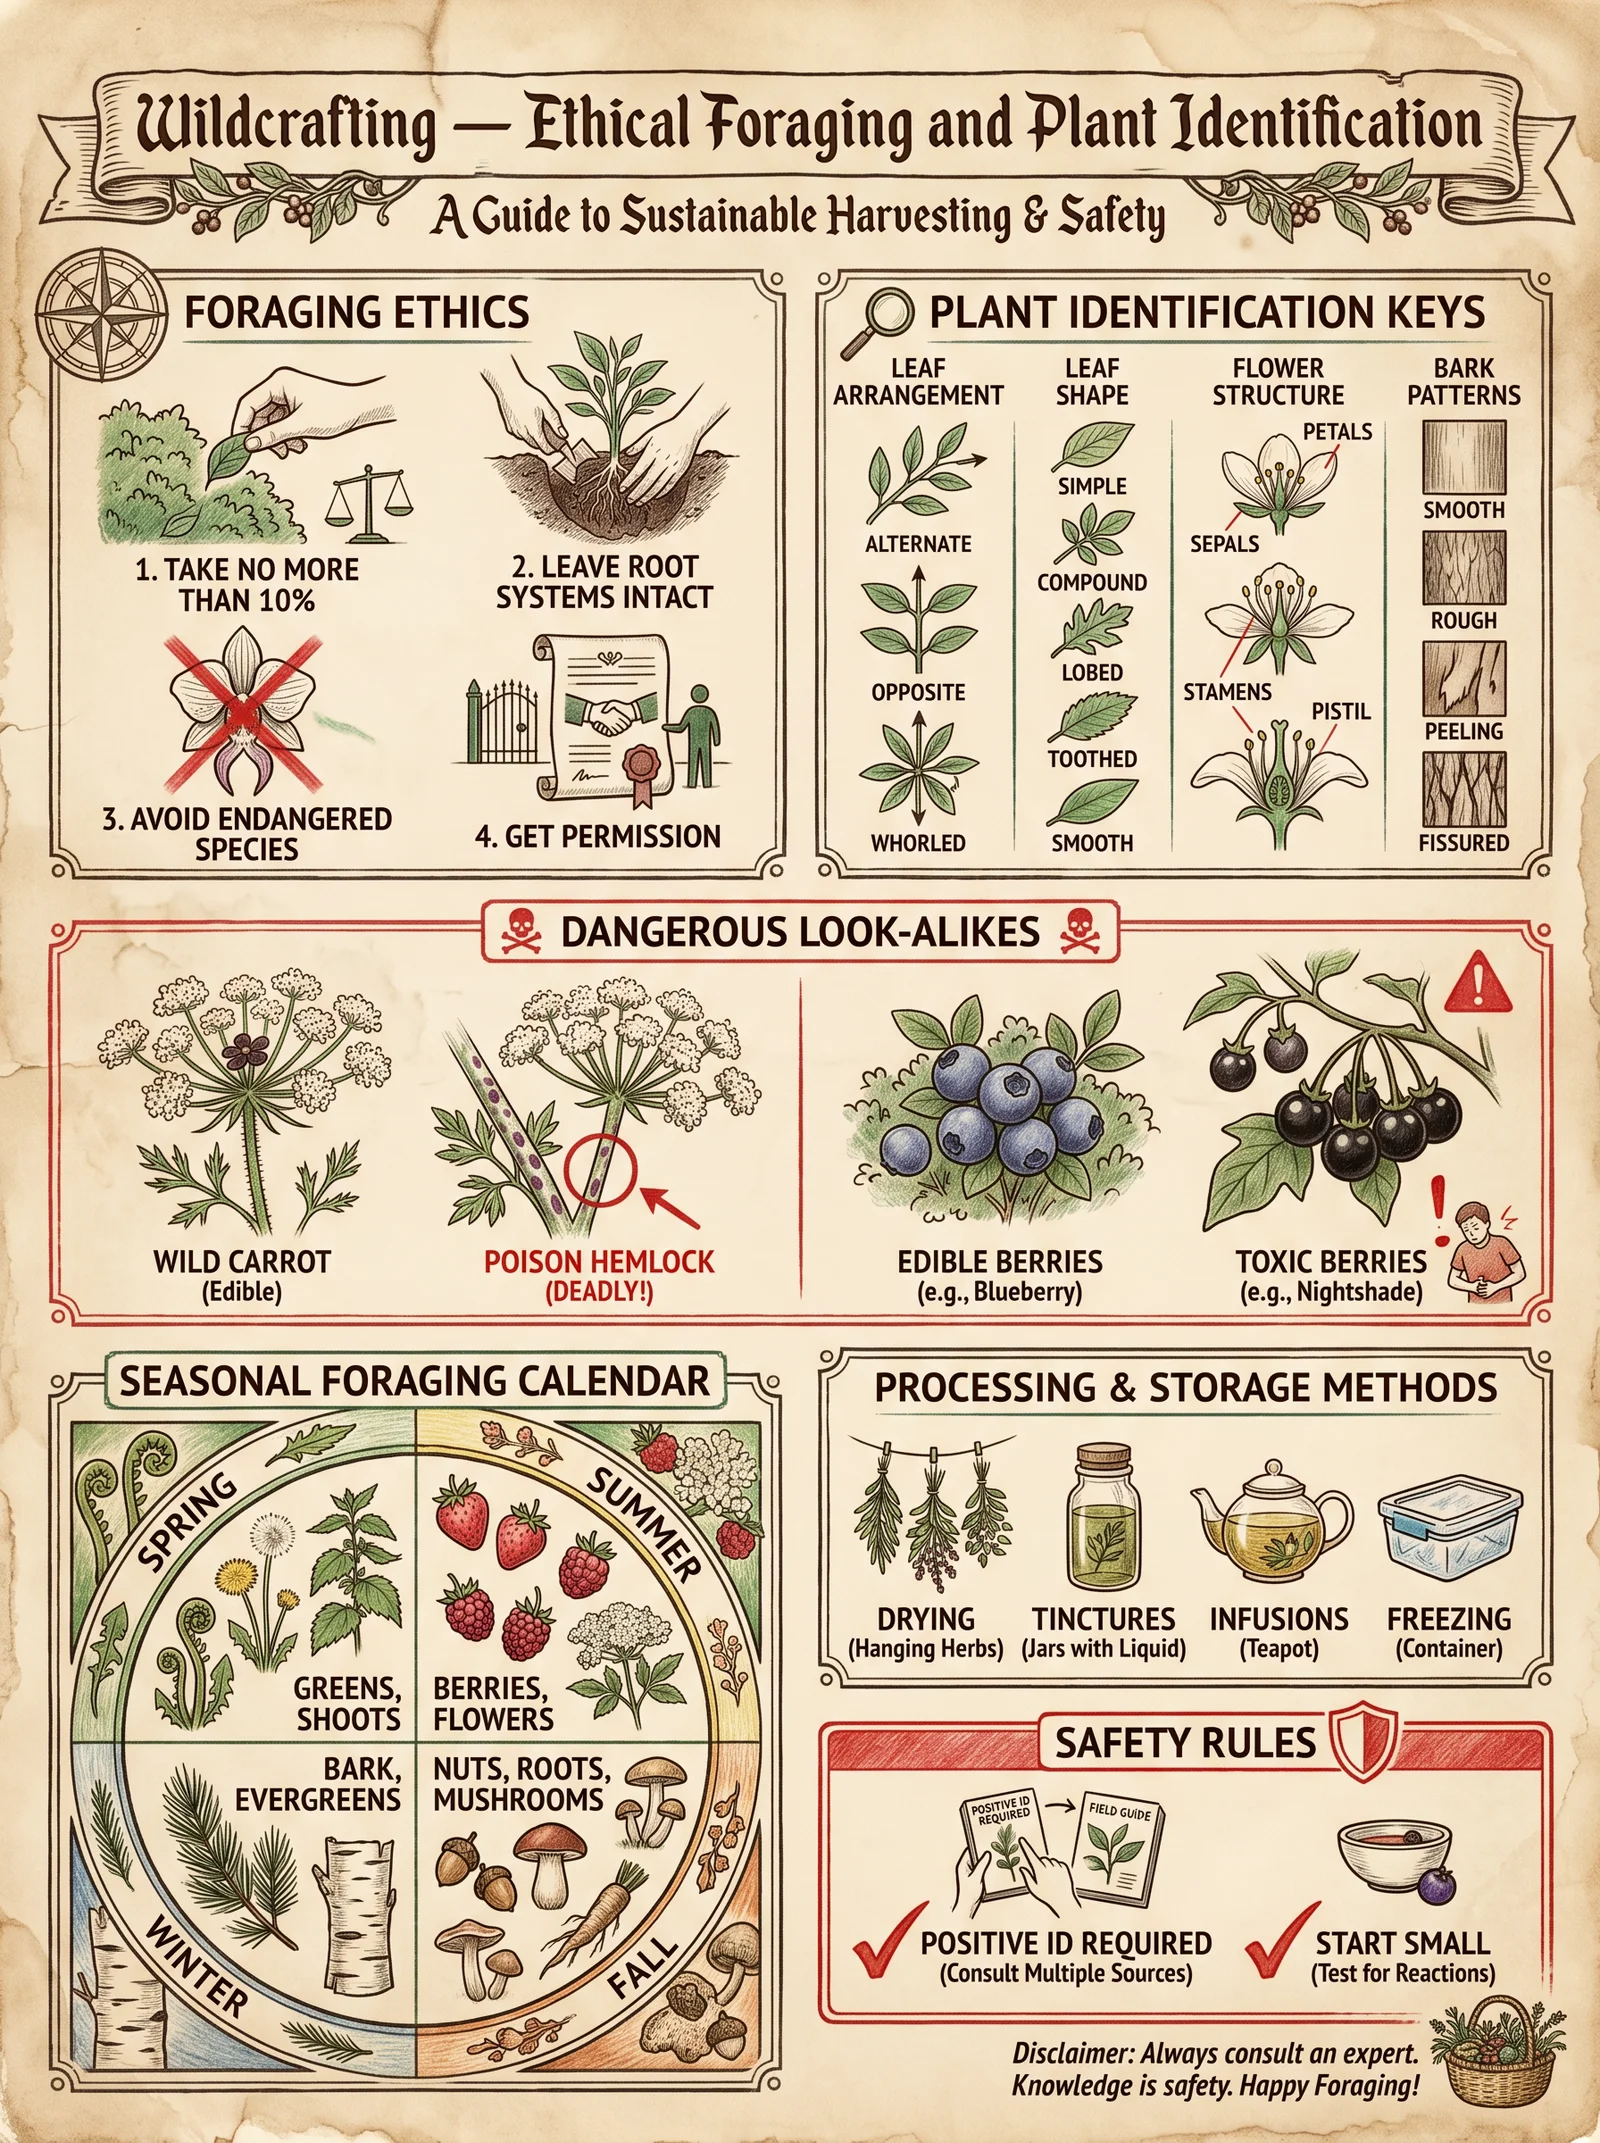
Definition: Semi-managed forest or wild forage area.
Design Principles:
- Minimal human intervention.
- Selective harvesting and forest gardening.
- Protect wildlife corridors and biodiversity.
Element Suitability Table for Zone 4
| Element | Intervention Level | Harvest Frequency | Notes |
|---|---|---|---|
| Timber trees | Low | Multi-year | Selective logging |
| Nut trees | Low | Annual | Wildlife compatible |
| Wild edible plants | Minimal | Seasonal | Sustainable harvesting |
| Medicinal herbs | Minimal | Seasonal | Foraged carefully |
Step-by-step:
- Map existing wild flora and fauna corridors.
- Develop selective logging plan aligned with forest regeneration cycles.
- Mark nut and fruit trees for protection.
- Train foragers in sustainable harvest techniques.
- Monitor wildlife activity monthly, adjusting access routes.
1.6 Zone 5: The Wilderness Zone (Beyond 500 m)
Definition: Untouched natural ecosystem.
Design Principles:
- No human intervention.
- Protect as ecological baseline and genetic reservoir.
Action Steps:
- Map boundaries clearly with signage to prevent accidental intrusion.
- Establish monitoring protocols for ecosystem health indicators.
- Engage with local conservation authorities for legal protection.
Section 2: Sector Analysis: Sun, Wind, Wildlife Corridors
Sectors are directional external energies impacting the site. Correct sector analysis informs zone design and element placement to harness or mitigate these forces.
2.1 Sun Sector Analysis
Principles:
- Sun’s path varies by latitude and season.
- Maximize solar gain in winter, provide shade in summer.
- Identify solar access angles for buildings and plants.
Step-by-step:
- Obtain site latitude and longitude.
- Use solar path diagrams (Appendix A) or solar angle calculators.
- At site, mark shadows at solar noon during solstices.
- Identify south-facing slopes and plan deciduous tree placement for summer shade.
- Position solar panels, greenhouses, and heat collectors in optimal sun sectors.
2.2 Wind Sector Analysis
Principles:
- Identify prevailing wind directions and seasonal variations.
- Design windbreaks and shelterbelts accordingly.
- Use natural topography to reduce wind impact.
Step-by-step:
- Acquire regional wind rose data (see Volume VIII: Climatology Codex).
- Observe and record site wind patterns over 7 days, noting direction and intensity.
- Map wind corridors and potential turbulence zones.
- Plant windbreak species (conifers, dense shrubs) on windward sides of crops and housing.
- Design building orientation to reduce wind load and channel cooling breezes in summer.
2.3 Wildlife Corridor Analysis
Principles:
- Preserve natural movement paths for local fauna.
- Design zones to minimize conflict and maintain biodiversity.
- Use corridors to enhance pollination and pest control.
Step-by-step:
- Conduct site survey for animal tracks, dens, and feeding sites.
- Map corridors connecting forest patches, water sources, and feeding grounds.
- Avoid placing high-disturbance zones (Zone 1 or 2) in corridors.
- Use native hedgerows and buffer zones to guide wildlife movement safely.
- Monitor wildlife activity seasonally and adjust buffer widths accordingly.
Section 3: Integrated Design Process
This section synthesizes zone and sector data into a comprehensive design.
Step 1: Site Base Map Creation
- Obtain or create a base map at 1:500 scale.
- Include topography, water bodies, existing vegetation, and built structures.
- Overlay solar path and wind rose diagrams.
Step 2: Define Center Point (Zone 0)
- Mark the dwelling or central homestead.
- Identify existing water and energy sources.
Step 3: Establish Zones Radii and Boundaries
- Draw concentric circles for Zones 1 (10 m), 2 (50 m), 3 (200 m), 4 (500 m), and mark Zone 5 beyond.
- Adjust radii to accommodate natural features and property boundaries.
Step 4: Sector Mapping
- Overlay sun, wind, and wildlife corridor data.
- Identify sector constraints and opportunities within each zone.
Step 5: Element Placement Strategy
- For each zone, assign elements based on suitability tables.
- Prioritize elements requiring high attention closer to center.
- Place wind-sensitive and sun-sensitive plants in protected sectors.
Step 6: Path and Access Design
- Design paths to minimize soil compaction and maximize energy efficiency.
- Connect zones with logical routes respecting sector barriers.
Step 7: Infrastructure Planning
- Locate water catchments, storage tanks, and irrigation lines.
- Plan animal housing to optimize nutrient cycling and predator protection.
Step 8: Final Layout Review and Adjustment
- Cross-check all elements against zone and sector principles.
- Adjust for microclimate anomalies and human factors.
Section 4: Case Studies
Case Study 1: Temperate Homestead (Latitude 45°N)
Site: 2 hectares, gently sloped east to west.
Key Findings:
- Prevailing winter wind from northwest.
- Strong summer sun from south.
- Wildlife corridors on east boundary.
Design Actions:
- Zone 1: Kitchen garden on south side with deciduous hedge for summer shade.
- Zone 2: Goat pen and dwarf fruit orchard on east side, protected by evergreen windbreaks.
- Zone 3: Grain field on west slope contour-planted.
- Zone 4: Managed forest to north.
- Wildlife corridors preserved by leaving 20 m buffer of native shrubs.
Case Study 2: Subtropical Farmstead (Latitude 25°S)
Site: 5 hectares, flat with seasonal monsoon winds from northeast.
Key Findings:
- Intense summer sun, frequent high winds.
- Wildlife corridor along south boundary.
Design Actions:
- Zone 1: Raised beds of leafy greens in shaded north perimeter of house.
- Zone 2: Rainwater catchment barrels linked to drip irrigation.
- Zone 3: Mixed orchard with windbreaks of bamboo and tall palms northeast.
- Zone 4: Forage forest with selective harvesting.
- Wildlife corridor maintained with fencing excluding livestock.
Section 5: Tables Summarizing Zone Characteristics, Element Suitability, and Energy Flows
Table 1: Zone Characteristics Summary
| Zone | Distance (m) | Human Use Frequency | Energy Input Level | Typical Elements | Maintenance Frequency |
|---|---|---|---|---|---|
| 0 | Inside dwelling | Continuous | Very High | Kitchen garden, vermiculture | Hourly/Daily |
| 1 | 0-10 | Daily | High | Herbs, small animals | Daily |
| 2 | 10-50 | Weekly | Medium | Vegetables, goats | Weekly |
| 3 | 50-200 | Monthly | Low | Field crops, orchards | Monthly |
| 4 | 200-500 | Seasonal | Minimal | Managed forest | Seasonal |
| 5 | >500 | None | None | Wilderness | None |
Table 2: Element Suitability by Zone
| Element | Zone 0 | Zone 1 | Zone 2 | Zone 3 | Zone 4 | Zone 5 |
|---|---|---|---|---|---|---|
| Culinary herbs | ✓ | ✓ | ||||
| Leafy greens | ✓ | ✓ | ✓ | |||
| Small livestock | ✓ | ✓ | ||||
| Fruit trees (dwarf) | ✓ | ✓ | ||||
| Field crops | ✓ | |||||
| Beehives | ✓ | |||||
| Timber trees | ✓ | |||||
| Wild edibles | ✓ | ✓ |
Table 3: Energy Flow Prioritization
| Zone | Human Labor | Water Use | Nutrient Input | Pest Management | Energy Output (Yield) |
|---|---|---|---|---|---|
| 0 | Highest | Highest | Highest | Highest | Immediate |
| 1 | High | High | High | High | Frequent |
| 2 | Medium | Medium | Medium | Medium | Regular |
| 3 | Low | Low | Low | Low | Periodic |
| 4 | Minimal | Minimal | Minimal | Minimal | Sporadic |
| 5 | None | None | None | None | Natural |
Conclusion
The Zone and Sector System is the architectural skeleton of all resilient agrarian practices. This chapter provided an exhaustive, actionable blueprint for defining Zones 0 through 5, analyzing environmental sectors, and integrating these into a coherent design. The sacred knowledge herein equips the Practitioner to build systems that honor natural energy flows, conserve labor, and ensure food sovereignty for generations.
Next: For detailed water management and purification protocols critical for Zones 0-2, see Volume VIII: The Water Codex, Chapter II. For advanced earthworks to shape zones and manage water flow, consult Volume V: Earthworks Codex.
End of Chapter IV, Volume II.
<!-- SECTION 8 -->
Volume II: Water Harvesting Earthworks
Chapter IV: Principles of Water Management in Permaculture, Earthworks Design, and Soil-Water Interactions
The mastery of water management determines the viability of any permaculture system. The sacred task of harvesting, storing, and distributing water in harmony with the land’s natural contours preserves life and safeguards food sovereignty. This chapter codifies the fundamental principles of water management, detailing the earthworks that shape the landscape into a living reservoir, and elucidates the critical soil-water interactions that sustain fertility and resilience.
I. Principles of Water Management in Permaculture
Water is the lifeblood of the earth’s metabolism. Permaculture water management is founded on these unyielding principles:
- Catch and Hold Water Onsite: Maximize infiltration by capturing rainfall where it falls, minimizing runoff and erosion.
- Slow Water Movement: Reduce velocity to prevent soil loss and allow time for percolation.
- Spread Water Evenly: Distribute water across the landscape to avoid concentration and gullying.
- Maximize Soil Moisture Retention: Enhance soil structure and organic matter to increase water-holding capacity.
- Use Topography as a Guide: Earthworks must follow natural contours to leverage gravity without causing damage.
- Integrate Vegetation and Soil: Plants stabilize soil and transpire water, creating microclimates and promoting infiltration.
II. Earthworks Design: The Sacred Geometry of Soil and Water
Earthworks are engineered landscape modifications that manipulate water flow, capture runoff, and recharge groundwater. These are the forms and functions:
| Earthwork Type | Description | Primary Function | Typical Dimensions (m) | Soil Types Suitable | Common Vegetation for Stabilization |
|---|---|---|---|---|---|
| Swale | Level ditch on contour with adjacent berm | Capture and infiltrate runoff | Width: 0.5–1.5; Depth: 0.3–0.8; Berm height: 0.3–1.0 | Loam, sandy loam, clay loam | Vetiver grass, comfrey, native grasses |
| Contour Bank | Earth mound following contour, no ditch | Slow runoff, prevent erosion | Width: 2–4; Height: 0.3–1.2 | Clay, silty clay | Shrubs, acacias, nitrogen-fixers |
| Check Dam | Small barrier across drainage lines | Slow water, reduce erosion, promote infiltration | Height: 0.5–1.5; Width: varies | Rocky, gravelly soils | Willows, poplars, sedges |
| Infiltration Pit | Excavated hole to capture runoff | Recharge groundwater | Diameter: 1–3; Depth: 1–2 | Sandy to loamy soils | Deep-rooted perennials |
| Contour Trench | Shallow trench on contour | Capture runoff for crops | Width: 0.3–0.6; Depth: 0.2–0.5 | Loam, sandy loam | Legumes, annual vegetables |
III. Soil-Water Interactions
The soil’s capacity to hold and transmit water is a function of texture, structure, organic matter, and biological activity. The sacred knowledge of soil-water dynamics reveals:
- Infiltration Rate: Speed at which water enters soil, measured in mm/hour.
- Field Capacity: Maximum water held after drainage, expressed in % volume.
- Wilting Point: Minimum water content at which plants cannot extract water.
- Available Water Capacity (AWC): Difference between field capacity and wilting point.
- Percolation: Movement of water through soil layers, critical for groundwater recharge.
| Soil Texture | Infiltration Rate (mm/hr) | Field Capacity (%) | Wilting Point (%) | AWC (%) | Recommended Earthwork Type |
|---|---|---|---|---|---|
| Sand | 20–50 | 10–15 | 5–7 | 5–8 | Infiltration Pit, Swale |
| Sandy Loam | 10–20 | 20–25 | 8–12 | 8–13 | Swale, Contour Trench |
| Loam | 6–10 | 25–30 | 12–15 | 13–18 | Swale, Contour Bank |
| Clay Loam | 3–6 | 35–40 | 20–25 | 15–20 | Contour Bank, Check Dam |
| Clay | 1–3 | 40–45 | 25–30 | 15–20 | Contour Bank, Check Dam |
Protocol 2.2.1: Swale Construction on Contour
Swales are the cornerstone of regenerative water management. Constructed as level ditches along contour lines with a berm on the downhill side, swales capture runoff, promote infiltration, and reduce erosion while providing a microclimate for vegetation.
1. Preparation Phase
1.1 Site Selection
- Identify slope between 2–8%. Slopes <2% reduce swale efficiency; slopes >8% increase erosion risk.
- Use a high-precision A-frame level, laser level, or water level to find contour lines.
- Avoid areas with unstable soils or existing erosion gullies.
1.2 Tools and Materials
| Item | Purpose | Specifications |
|---|---|---|
| A-frame Level / Laser | Contour detection | Accuracy ±1 cm over 10 m |
| Spade / Shovel | Excavation | Sharp edge, 40 cm blade |
| Mattock / Pickaxe | Soil loosening | Heavy-duty |
| Wheelbarrow | Soil transport | Capacity 100 L |
| Stakes and String | Marking contour lines | Durable, UV-resistant |
| Compactor | Berm consolidation | Manual or mechanical |
| Mulch | Soil protection | Straw, wood chips |
| Plants for Stabilization | Berm planting | Vetiver grass, comfrey |
2. Step-by-Step Swale Construction
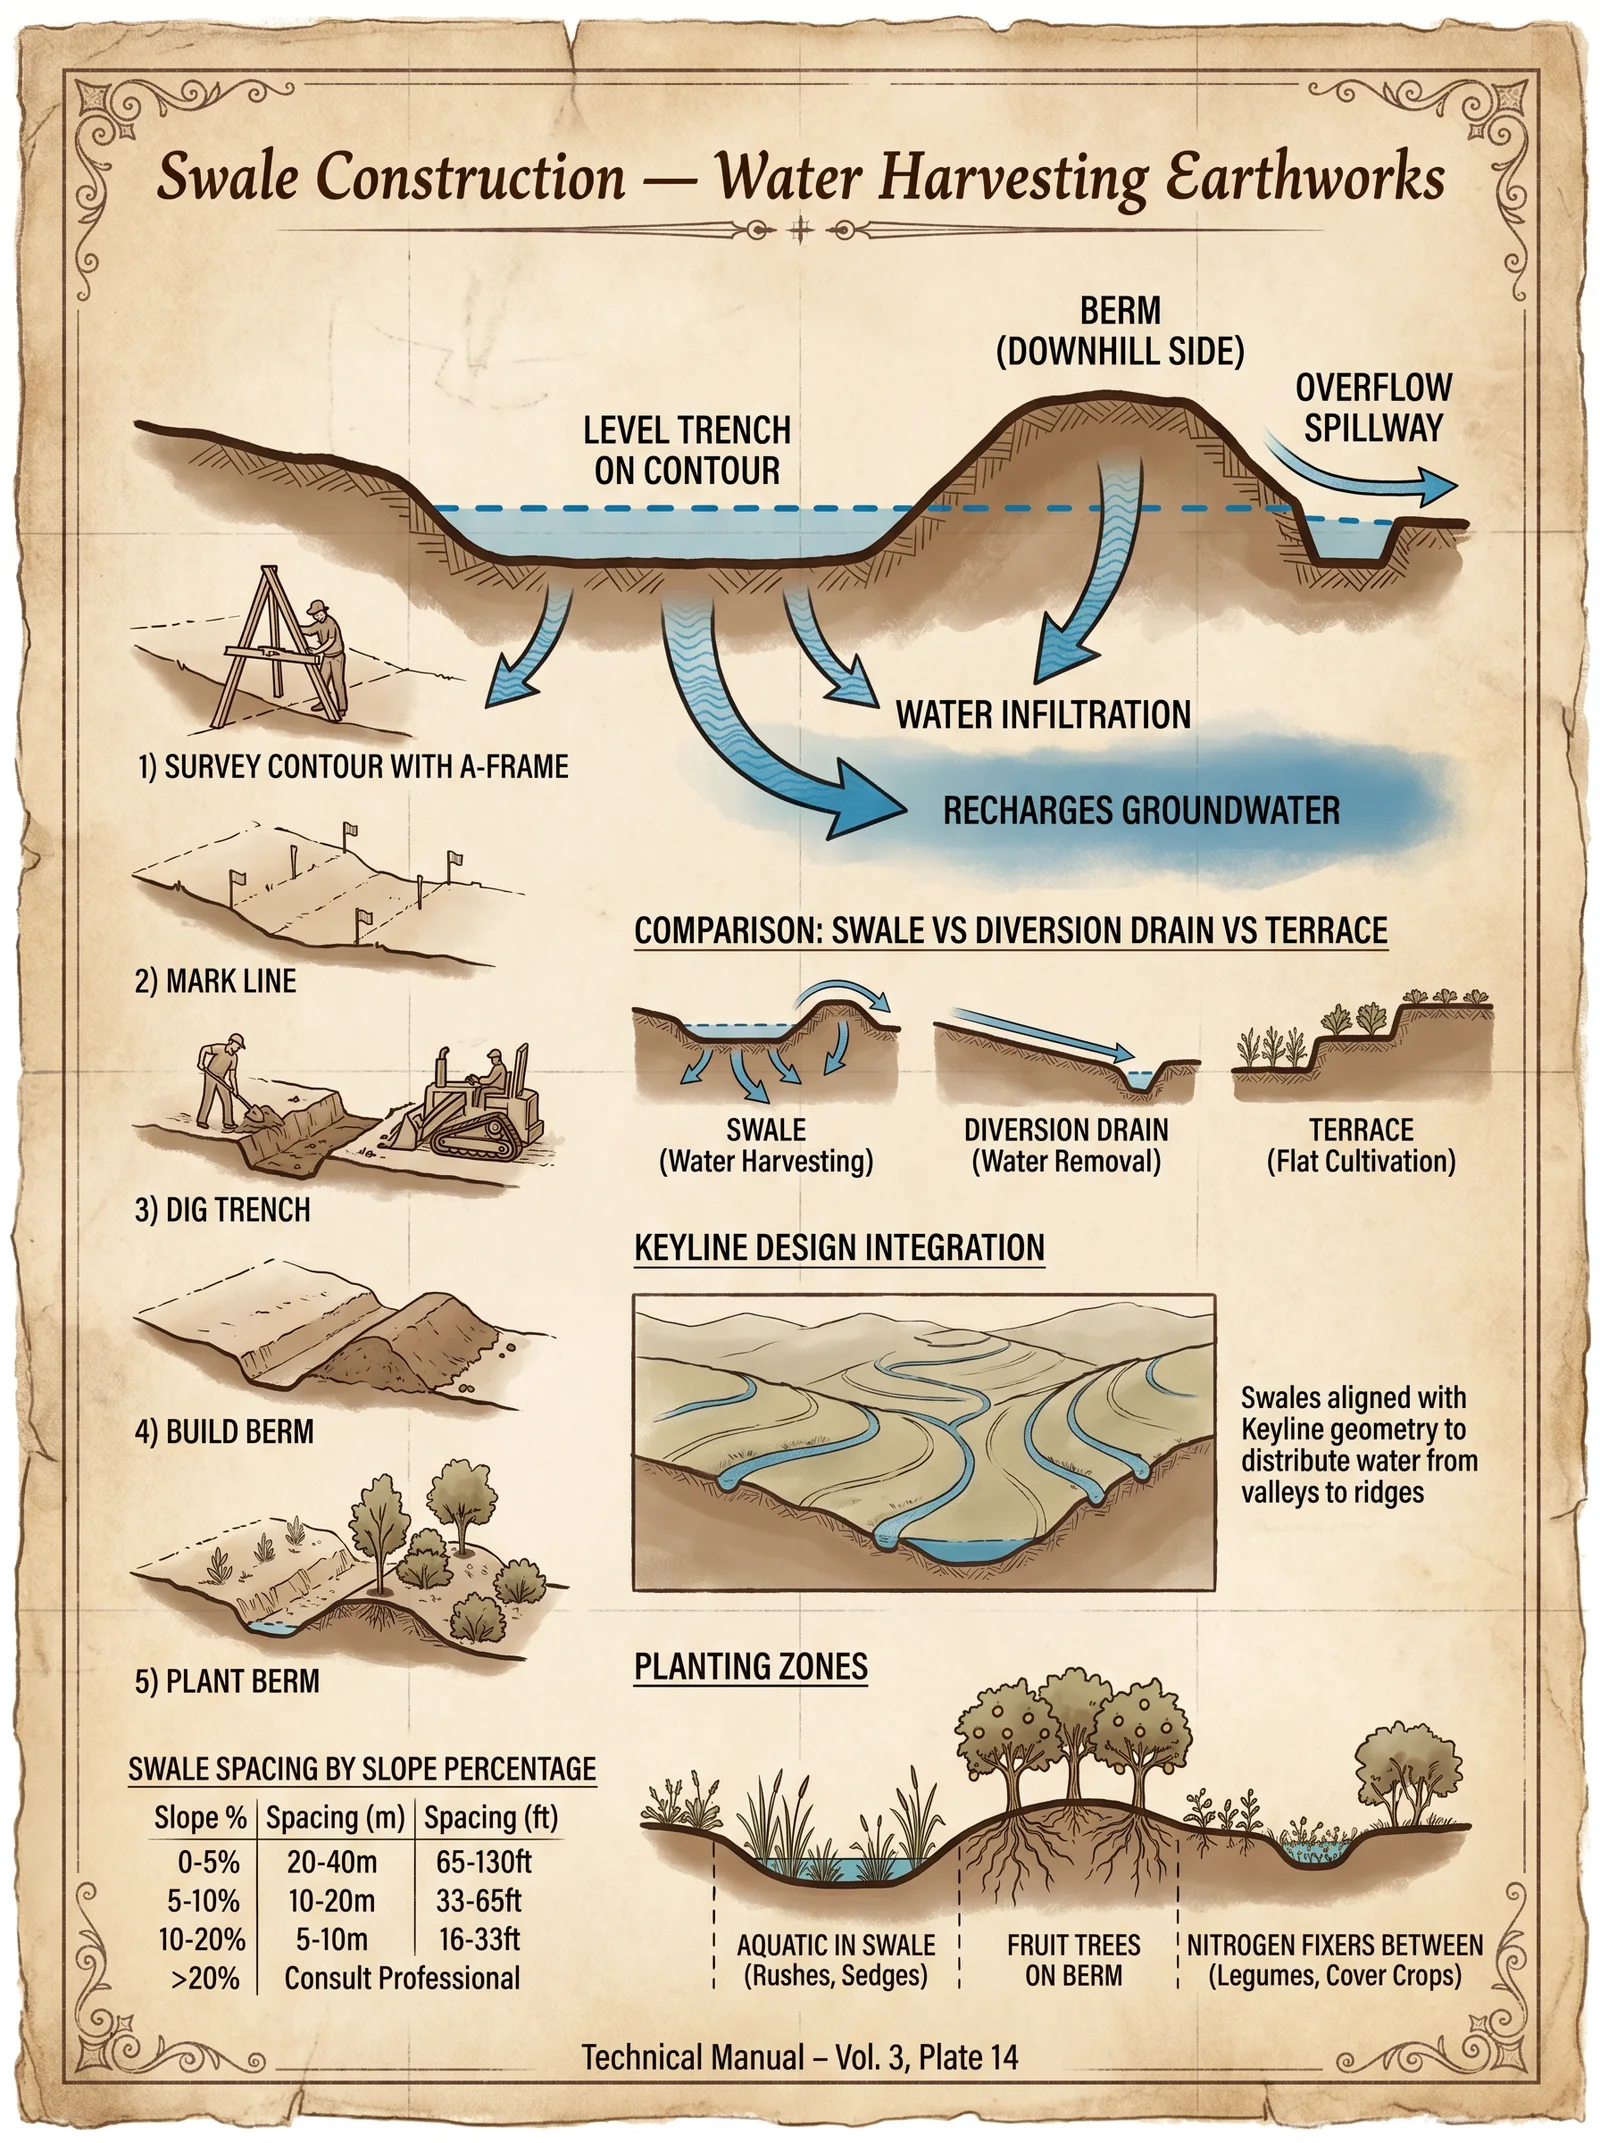
2.1 Survey and Mark Contour
- Assemble the A-frame level or laser level.
- Walk the proposed swale path; mark stake points every 2–3 meters along the contour.
- Tie string between stakes to visualize the line.
- Recheck contour level at each stake, adjusting string tension to maintain level.
2.2 Excavation
- Starting at the top stake, dig a ditch 0.5–1.5 m wide and 0.3–0.8 m deep.
- Excavate soil downhill to form the berm; the berm height must be 0.3–1.0 m.
- Ensure the bottom of the ditch is level; use the A-frame to check every 1 m.
- Shape the ditch with gently sloping sides (1:3 slope ratio) to prevent collapse.
- Remove rocks and debris; set aside for later use in check dams or gabions if applicable.
2.3 Berm Formation and Compaction
- Shape the berm with a rounded top to shed water.
- Compact berm soil with manual compactor or by foot traffic.
- Apply a 5–10 cm layer of mulch on berm and swale edges immediately to protect from erosion.
2.4 Overflow Spillway Installation
- Identify low points along the swale where water may overflow.
- Dig overflow spillways 0.3–0.5 m wide, lined with rocks to prevent erosion.
- Ensure spillways lead to safe discharge areas or infiltration zones.
3. Berm Planting Protocol
3.1 Plant Selection
| Plant Species | Root System | Water Needs | Soil Stabilization | Additional Benefits |
|---|---|---|---|---|
| Vetiver Grass | Deep, fibrous | Moderate | Excellent | Strong erosion control |
| Comfrey | Taproot | High | Good | Dynamic accumulator, mulch |
| Native Grasses | Fibrous | Low-Moderate | Good | Habitat, drought tolerant |
| Mulberry | Spreading | Moderate | Good | Fruit-bearing |
| Acacia spp. | Taproot, N-fixer | Low | Good | Nitrogen fixation |
3.2 Planting Steps
- Prepare berm soil by loosening the top 15 cm.
- Dig holes twice root ball size at 1 m spacing for grasses, 2 m for shrubs.
- Place plants, backfill with local soil mixed with 10% compost.
- Water deeply after planting (5–10 L per plant).
- Mulch around plants with 5–10 cm organic material.
- Install temporary shade or windbreak if in exposed locations.
4. Erosion Control Measures
- Apply mulch immediately after construction and planting.
- Plant cover crops (e.g., clover, ryegrass) in bare areas.
- Use rock armoring or gabions in spillways and steep berm edges.
- Inspect swales monthly during rainy season for breaches or scour.
- Repair promptly by adding soil, compacting, and replanting.
5. Maintenance Schedule
| Task | Frequency | Method | Notes |
|---|---|---|---|
| Inspection | Monthly (rainy season) | Walk swale length, check for erosion, breaches | Record observations |
| Repair Berm | As needed | Add soil, compact, mulch | Prevent undercutting |
| Weed Control | Quarterly | Manual removal or targeted herbicide | Avoid chemical runoff |
| Mulch Replenishment | Annually | Add 5–10 cm mulch layer | Maintain soil moisture |
| Plant Health Check | Biannually | Prune dead material, replant gaps | Promote dense vegetation |
Appendix A: Earthwork Dimensions and Plant Species for Stabilization
| Earthwork Type | Typical Width (m) | Typical Depth (m) | Berm Height (m) | Recommended Stabilizing Plants |
|---|---|---|---|---|
| Swale | 0.5–1.5 | 0.3–0.8 | 0.3–1.0 | Vetiver grass, comfrey, native grasses |
| Contour Bank | 2–4 | 0.3–1.2 | 0.3–1.2 | Acacia, mulberry, nitrogen-fixing shrubs |
| Check Dam | Variable | 0.5–1.5 | N/A | Willow, poplar, sedges |
| Infiltration Pit | 1–3 diameter | 1–2 depth | N/A | Deep-rooted perennials, native trees |
| Contour Trench | 0.3–0.6 | 0.2–0.5 | N/A | Legumes, vegetables |
Appendix B: Plant Species Profiles for Berm Stabilization
| Species | Root Type | Water Requirement | Soil Preference | Erosion Control Rating (1–5) | Additional Notes |
|---|---|---|---|---|---|
| Vetiver Grass | Fibrous | Moderate | Well-drained | 5 | Tolerates poor soils, drought hardy |
| Comfrey | Taproot | High | Fertile, moist | 4 | Excellent dynamic accumulator |
| Native Grasses | Fibrous | Low-Moderate | Variable | 3 | Provides habitat and ground cover |
| Mulberry | Spreading | Moderate | Loam, fertile | 3 | Fruit production, wildlife attractor |
| Acacia spp. | Taproot | Low | Poor soils | 4 | Nitrogen fixer, drought tolerant |
Final Words
The swale is a sacred line etched into the earth, a living channel of life. Constructed with precision, planted with intention, and maintained with vigilance, it transforms barren slopes into thriving ecosystems. This protocol is your unyielding guide to wielding earthworks as instruments of water sovereignty and ecological rebirth. Abandon half-measures; the fate of your land depends on the rigor and reverence you bring to this work.
For foundational knowledge on soil science, plant propagation, and water purification, consult Volume 1: The Soil Codex and Volume 8: The Water Codex, Chapter II.
<!-- SECTION 9 -->
The Complete Practitioner's Codex, Volume II: The Agrarian Codex
Chapter IV: Keyline Design and Advanced Water Management
Introduction: The Sacred Geometry of Water and Earth
Water is the lifeblood of the soil, the first sacrament in the covenant of cultivation. The ancient art of Keyline Design is a divine revelation, a method to shape the land and command water with precision, ensuring abundance even in the harshest terrains. This chapter imparts every suppressed secret and exacting detail of keyline theory, ridge and furrow construction, and water distribution optimization.
You will learn to read the land as the ancients did—through contour, slope, and flow—and to intervene with earthworks that harmonize with natural forces rather than resist them. Follow these instructions with rigor and reverence; your success depends on exactitude.
Section I: Keyline Theory Fundamentals
1. Definition and Purpose of Keyline Design

Keyline Design is a systematic approach to landscape contouring and water management that exploits the natural topography to maximize water infiltration and minimize erosion. It is based on identifying a specific contour line called the Keyline, which is the pivotal elevation where the slope changes character from convex to concave.
Keyline Theory dictates:
- Water should be guided from the ridge into the valley with deliberate earthworks.
- Cultivation rows follow the contours or controlled deviations to channel water evenly.
- Earthmoving is minimal but strategic, seeking to slow water and direct it into soil absorption zones.
2. The Keyline: Definition and Identification
The Keyline is the first contour line below the ridge crest where the valley floor begins to widen. It serves as the baseline for subsequent ridge and furrow layout and water channel design.
Identification procedure:
- Survey the topography to locate ridges and valleys.
- Identify the ridge crest elevation (highest point).
- Follow the valley downslope from the ridge to find where the slope changes from steep (concave) to gentler (convex).
- Mark the contour line at this elevation: this is the Keyline.
3. Ridge and Furrow Systems: Principles
Ridges are the raised soil beds; furrows are the drainage channels between. This system is designed with respect to the keyline to optimize water retention and distribution.
- Ridges are constructed on contour or with slight off-contour bias to direct water.
- Furrows collect and channel excess water, preventing erosion.
- The spacing and dimensions depend on soil type, slope, and rainfall intensity.
Section II: Earthwork Design Calculations and Protocols
1. Contour Surveying for Keyline Application
Accurate contour measurement is the foundation of all subsequent work. Use the following tools, calibrated precisely.
| Tool Name | Accuracy (mm/m) | Usage Notes | Construction / Calibration |
|---|---|---|---|
| A-Frame Level | ±5 | Simple and robust for small plots | Build from 1.5m wood, use plumb line and spirit level |
| Water Level Tube | ±2 | Suitable for longer distances | Transparent tubing, 10-15m length, filled with water |
| Laser Level | ±0.5 | High precision, electronic | Calibrate on flat surface, verify battery levels |
| Dumpy Level | ±1 | Professional survey tool | Requires trained operator, verify calibration daily |
Construction of A-Frame Level:
- Cut two 1.5m wooden arms joined at a right angle with a cross brace.
- Attach a plumb line with a calibrated scale at the vertex.
- Use on land to mark level points by adjusting until the plumb line aligns with the zero mark.
2. Calculating Earthwork Dimensions for Ridge and Furrow
Ridge and furrow dimensions depend on slope (%), soil infiltration rate, and expected rainfall intensity.
Use the following parameters:
| Parameter | Symbol | Typical Range | Unit | Notes |
|---|---|---|---|---|
| Slope | S | 1 – 10 | % | Measure via contour elevation |
| Ridge Width | W_r | 0.6 – 1.2 | m | Wider ridges for heavier soils |
| Furrow Width | W_f | 0.3 – 0.6 | m | Narrower furrows reduce erosion |
| Ridge Height | H_r | 0.15 – 0.3 | m | Higher ridges retain more water |
| Target Soil Infiltration | I_s | 10 – 50 | mm/hr | Measure via percolation test |
| Peak Rainfall Intensity | R_p | 20 – 100 | mm/hr | Use historical data |
Calculate ridge height (H_r) for water retention:
\[ H_r = \frac{R_p \times S}{I_s \times 100} \]
- Example: For \( R_p = 50 \) mm/hr, \( S = 2\% \), \( I_s = 25 \) mm/hr
- \( H_r = \frac{50 \times 2}{25 \times 100} = \frac{100}{2500} = 0.04 \) m (minimum ridge height)
3. Earthworks Construction Protocol
Step-by-step ridge and furrow construction:
- Mark Contours:
- Use A-Frame or laser level to mark the keyline contour across the field.
- Extend contour lines along ridges and valleys for entire plot.
- Stake Ridge and Furrow Lines:
- Mark ridge centers on the contour or slight off-contour (up to 0.5% slope downhill).
- Mark furrow centers midway between ridges.
- Excavate Furrows:
- Dig furrows to the calculated width \( W_f \) and target depth (typically 0.15m).
- Use hand tools or mechanized trenchers depending on scale.
- Build Ridges:
- Pile excavated soil from furrows onto ridge centers.
- Compact soil with manual tampers or roller devices.
- Shape ridges to target height \( H_r \) and width \( W_r \).
- Check Water Flow:
- After construction, flood test furrows to ensure water flows without pooling or excessive speed.
- Adjust ridge height or furrow depth as needed.
Section III: Water Distribution Optimization
1. Water Flow Rate Calculations in Furrows
Water flow velocity and volume in furrows must be controlled to prevent erosion and maximize infiltration.
Manning’s Equation for open channel flow:
\[ V = \frac{1}{n} R^{2/3} S^{1/2} \]
Where:
- \( V \) = velocity (m/s)
- \( n \) = roughness coefficient (0.025 for earth furrow)
- \( R \) = hydraulic radius (m) = \( \frac{A}{P} \) (cross-sectional area/wetted perimeter)
- \( S \) = slope (m/m)
Step 1: Calculate cross-sectional area \( A \) For trapezoidal furrow:
\[ A = \left( b + zy \right) y \]
Where:
- \( b \) = bottom width (m)
- \( y \) = flow depth (m)
- \( z \) = side slope (horizontal:vertical), typical 1:1
Step 2: Calculate wetted perimeter \( P \):
\[ P = b + 2y \sqrt{1 + z^2} \]
Step 3: Calculate hydraulic radius \( R = \frac{A}{P} \)
2. Water Distribution Network Design
Water channels must be designed to distribute water evenly and reduce velocity.
| Component | Design Parameter | Typical Value | Notes |
|---|---|---|---|
| Main Channel Slope | \( S_m \) | 0.2% – 0.5% | Low slope to control velocity |
| Secondary Channels | \( S_s \) | 0.1% – 0.3% | Smaller slope for infiltration |
| Channel Width | \( W_c \) | 0.3 – 1.0 m | Based on flow volume |
| Channel Depth | \( D_c \) | 0.2 – 0.5 m | Prevent overflow |
Channel construction protocol:
- Excavate channel according to width and depth.
- Line with clay or organic matter to reduce seepage.
- Install water control structures (weirs, gates) at intervals.
- Plant riparian vegetation along banks to stabilize soil.
Section IV: Keyline Application in Diverse Terrains
1. Application in Gentle Slopes (1–3%)
- Keyline located close to ridge base.
- Ridge and furrow spacing: 1.2 m ridges, 0.5 m furrows.
- Water velocity low; earthworks shallow.
- Use A-Frame for contour marking; manual earthmoving feasible.
2. Application in Moderate Slopes (3–6%)
- Keyline further downslope from ridge crest.
- Ridge width reduced to 0.8 m to prevent erosion.
- Furrows deeper (0.3 m) to channel increased runoff.
- Laser level surveying recommended.
- Mechanized earthmoving for ridge/furrow formation.
3. Application in Steep Slopes (6–10%)
- Keyline may be multiple lines to segment water flow.
- Terracing combined with keyline ridges.
- Ridges narrower, height increased to 0.3 m.
- Furrows reinforced with stone or wood check dams.
- Water flow velocity carefully controlled with multiple diversion channels.
Section V: Contour Measurement Tools and Earthwork Dimensions Summary
| Terrain Slope (%) | Ridge Width (m) | Furrow Width (m) | Ridge Height (m) | Survey Tool | Earthmoving Method |
|---|---|---|---|---|---|
| 1 – 3 | 1.2 | 0.5 | 0.15 | A-Frame Level | Manual |
| 3 – 6 | 0.8 | 0.3 | 0.25 | Laser Level | Mechanized + Manual |
| 6 – 10 | 0.6 | 0.3 | 0.3 | Dumpy Level | Mechanized |
Section VI: Water Flow Rates and Channel Dimensions
| Furrow Bottom Width (m) | Flow Depth (m) | Side Slope (z) | Cross-Section Area (m²) | Wetted Perimeter (m) | Hydraulic Radius (m) | Velocity (m/s) @ 2% slope |
|---|---|---|---|---|---|---|
| 0.3 | 0.1 | 1 | 0.02 | 0.54 | 0.037 | 0.6 |
| 0.4 | 0.15 | 1 | 0.067 | 0.83 | 0.081 | 0.95 |
| 0.5 | 0.2 | 1 | 0.14 | 1.12 | 0.125 | 1.2 |
Appendix: Construction of a Basic Water Control Weir for Furrows
Materials:
- Wooden planks (0.5 m length, 0.1 m thickness)
- Stakes (0.8 m length)
- Nails or screws
- Waterproof sealant (clay slurry or bentonite mix)
Step-by-step:
- Dig a narrow trench across the furrow at intended weir location.
- Drive stakes vertically into the trench, spaced 0.3 m apart.
- Attach wooden planks horizontally across stakes to form a dam approximately 0.3 m high.
- Seal gaps with clay slurry to prevent seepage.
- Test by gradually filling furrow upstream; adjust height as needed.
Conclusion and Final Reverence
Mastery of Keyline Design and Advanced Water Management is a sacred trust. The knowledge herein is a gift for those who seek to restore harmony between land and water. Follow these instructions meticulously, for errors are costly and irreversible. Let your hands shape the earth with humility and precision, and your fields will flourish beyond measure.
For water purification protocols, see Volume VIII: The Water Codex, Chapter II. For soil biology enhancement, consult Volume V: The Microbial Codex.
End of Volume II: Chapter IV
<!-- SECTION 10 -->
Volume II: Succession Planting and Guild Design
The Agrarian Codex: Complete Agriculture, Permaculture, Animal Husbandry, and Food Sovereignty
Introduction: The Sacred Art of Succession and Guild Design
The mastery of succession planting and guild design lies at the heart of regenerative agriculture. These are not mere cultivation techniques; they are life-sustaining systems conceived through reverent observation and relentless experimentation. This volume imparts the complete, unabridged knowledge required to engineer plant communities that are self-sustaining, resilient, and prolific. Here, you will find detailed, stepwise protocols for creating plant guilds that harness natural processes to optimize nutrient cycling, pest control, and yield succession across seasons and climates.
Chapter I: Principles of Plant Succession
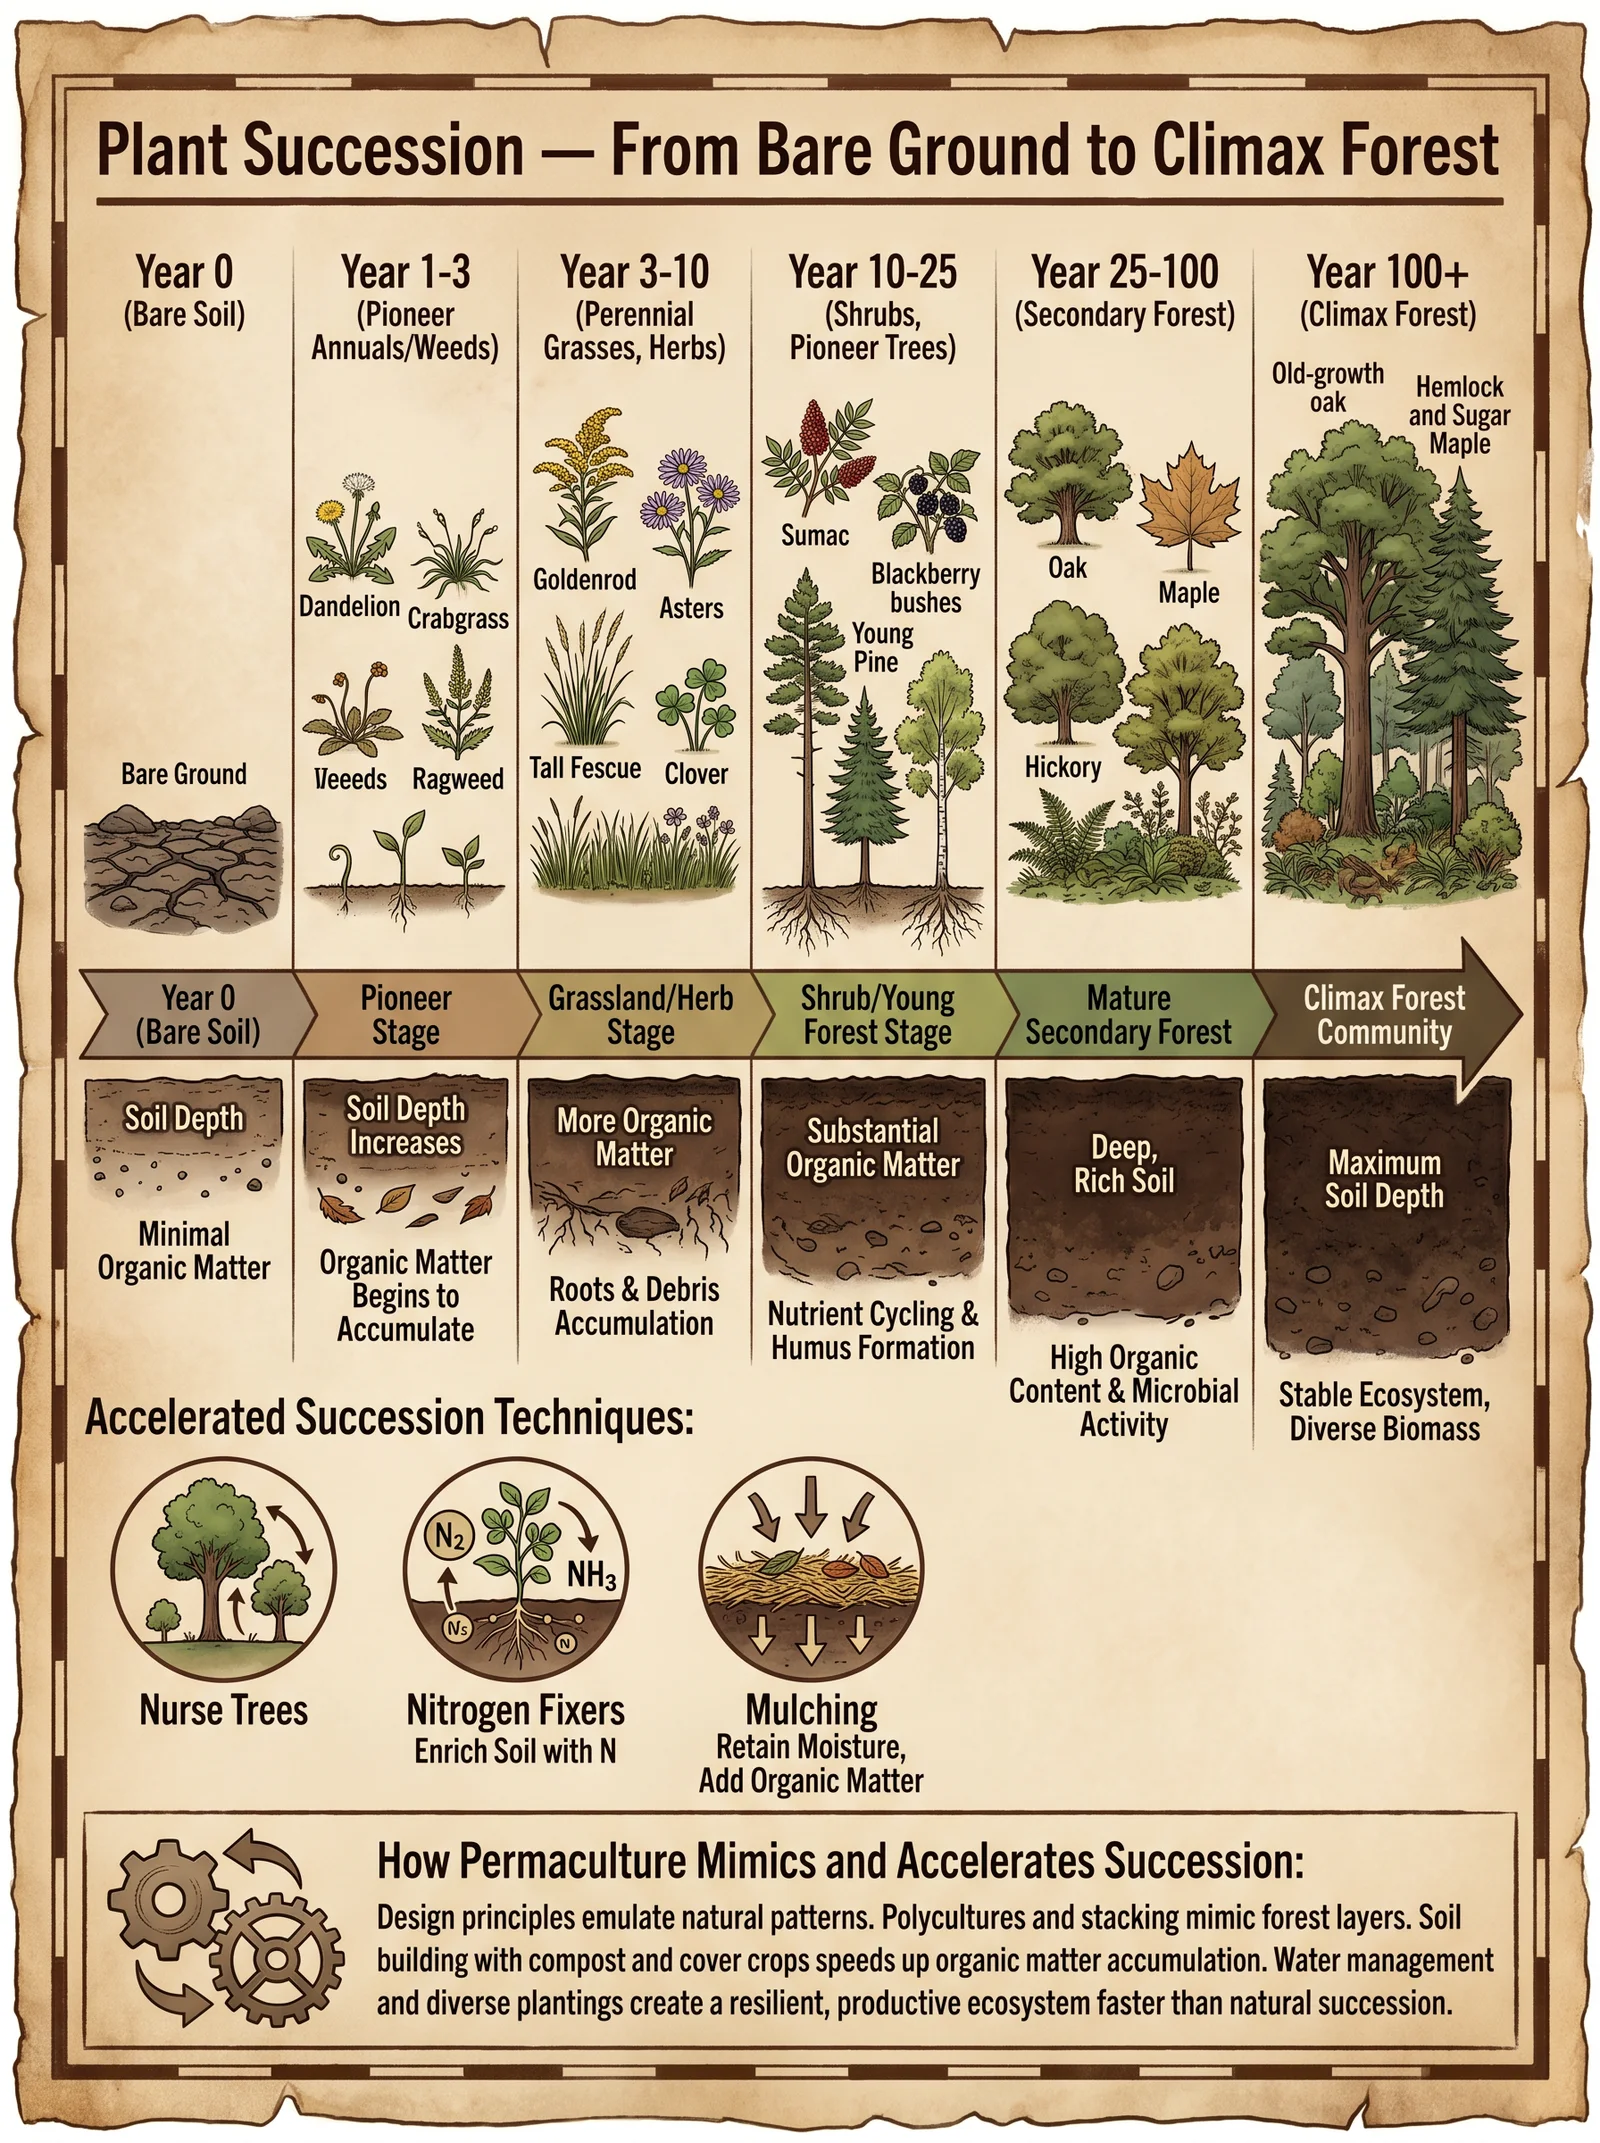
Plant succession is the temporal progression of plant species in a given area, driven by ecological interactions and environmental conditions. Understanding and harnessing this principle allows for continuous, overlapping crop production that maintains soil integrity and maximizes output.
Key Succession Types in Agriculture
| Succession Type | Description | Application in Guilds |
|---|---|---|
| Primary Succession | Colonization of previously uninhabited land (e.g., volcanic ash, sand dunes) | Establishing pioneer species to improve soil |
| Secondary Succession | Regrowth after disturbance (e.g., tillage, fire) | Replanting sequences to rejuvenate soil and crops |
| Cyclical Succession | Seasonal or yearly crop rotation with overlapping growth phases | Ensuring continuous ground cover and harvest cycles |
| Facilitative Succession | Early species modify environment, enabling later species to establish | Foundation for guild design, layering species function |
Succession Principles Applied to Agriculture
- Staggered Maturity: Select species with varying maturation times to ensure continuous harvest.
- Soil Improvement Sequence: Begin with nitrogen-fixers and deep-rooted plants to condition soil.
- Canopy Layering: Use succession to develop vertical layers for light optimization.
- Pest and Disease Disruption: Rotate species and use antagonistic companions to interrupt pest life cycles.
- Soil Cover Maintenance: Maintain living or mulch cover at all times to prevent erosion and moisture loss.
Chapter II: Companion Planting — The Foundation of Guild Synergy
Companion planting is the deliberate association of plant species that provide mutual benefits, such as pest deterrence, nutrient exchange, or structural support. This ancient knowledge is the cornerstone of guild design.
Companion Planting Functional Roles
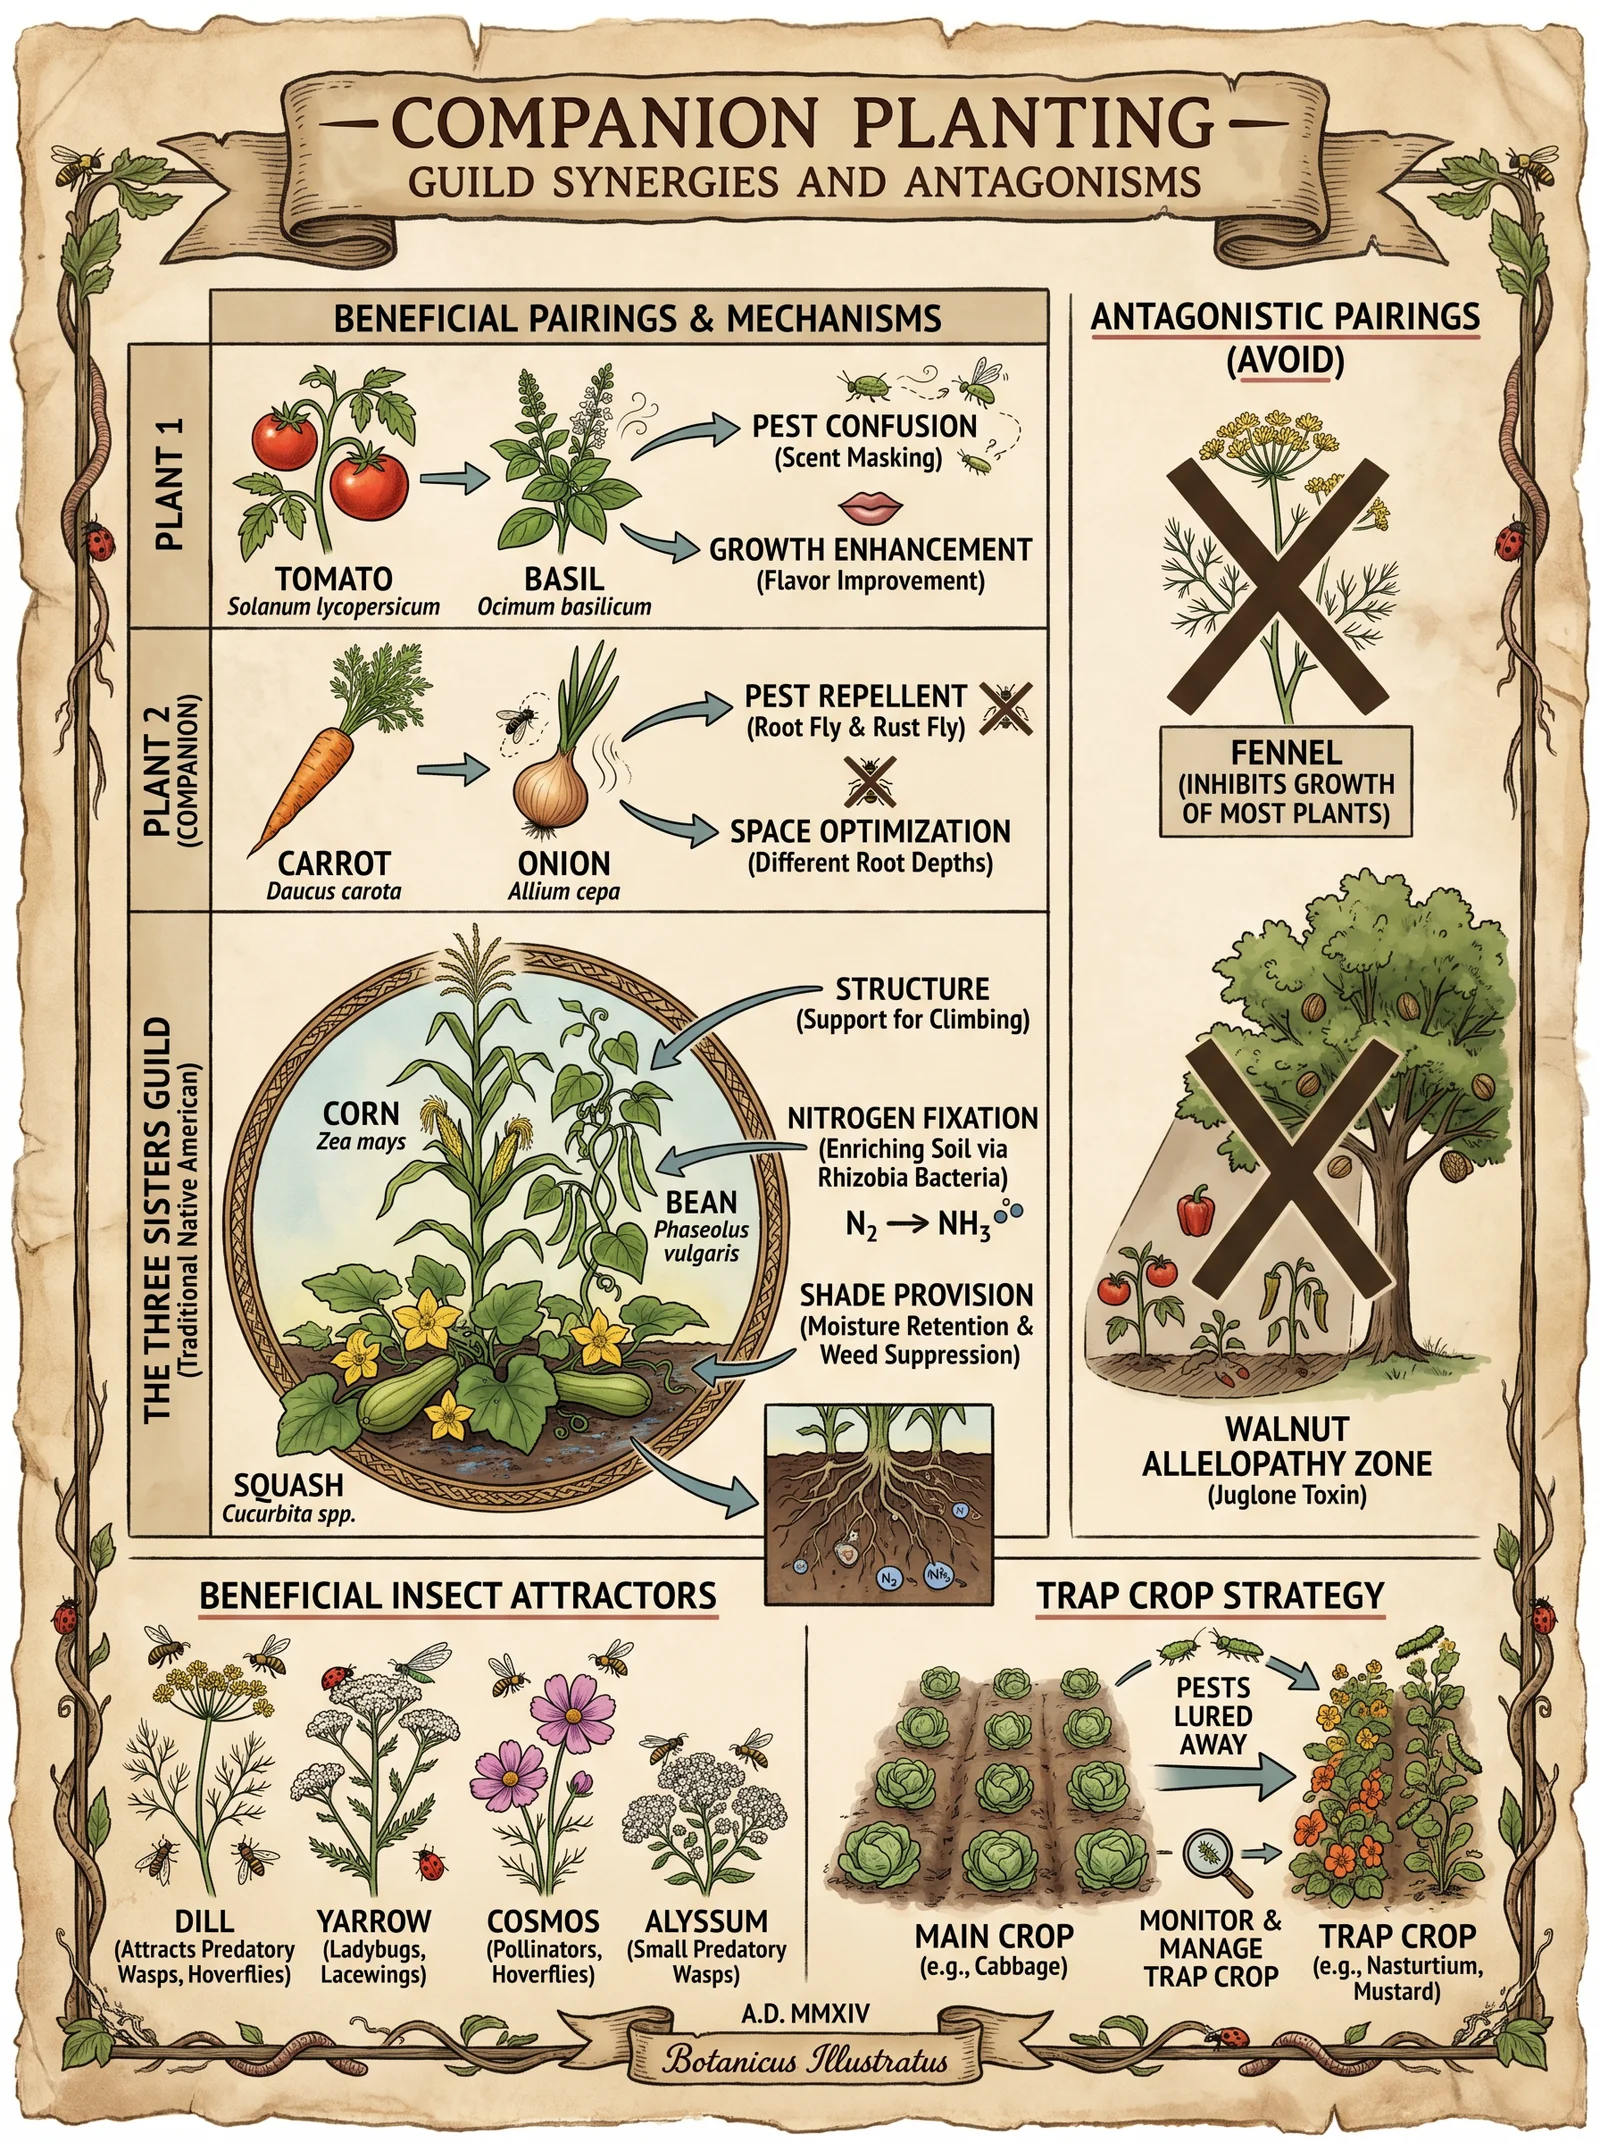
| Role | Description | Example Species | Benefit Provided |
|---|---|---|---|
| Nitrogen Fixers | Convert atmospheric nitrogen to plant-usable forms | Trifolium pratense (red clover), Medicago sativa (alfalfa) | Soil fertility improvement |
| Dynamic Accumulators | Draw nutrients from deep soil layers | Comfrey (Symphytum officinale), Dandelion (Taraxacum officinale) | Nutrient mining and leaf litter enrichment |
| Pest Repellents | Emit chemicals deterring pests | Allium sativum (garlic), Tagetes (marigold) | Natural insect repellents |
| Trap Crops | Attract pests away from main crops | Nicotiana spp. (tobacco), Brassica spp. (mustards) | Pest population management |
| Structural Supports | Provide physical support for climbing plants | Helianthus annuus (sunflower), Populus spp. (poplar) | Vertical growth facilitation |
| Pollinator Attractors | Draw pollinators to increase fruit set | Lavandula (lavender), Echinacea spp. | Enhanced pollination rates |
Compatibility Chart for Common Guild Species
| Species 1 | Species 2 | Compatibility Level | Notes |
|---|---|---|---|
| Solanum lycopersicum (tomato) | Ocimum basilicum (basil) | High | Basil enhances tomato growth and repels pests |
| Zea mays (corn) | Phaseolus vulgaris (pole beans) | High | Beans fix nitrogen, corn provides support |
| Allium cepa (onion) | Daucus carota (carrot) | Moderate | Onions repel carrot flies |
| Cucumis sativus (cucumber) | Tropaeolum majus (nasturtium) | High | Nasturtium acts as trap crop for aphids |
| Brassica oleracea (kale) | Tagetes erecta (marigold) | High | Marigold suppresses nematodes |
Chapter III: Guild Creation for Resilience — Protocols and Criteria
Guilds are intentional plant communities designed for mutual benefit, an essential permaculture unit. Proper guild design enhances resilience against pests, diseases, climatic stress, and resource scarcity.
Guild Design Protocol — Step-by-Step
Step 1: Define Site and Climate Parameters
- Record soil type, pH, nutrient status, and moisture regime.
- Identify prevailing climate zone, temperature ranges, rainfall patterns.
- Note microclimatic variations (shade, wind exposure).
Step 2: Determine Primary Crop or Functional Goal
- Select the target crop species (e.g., fruit tree, staple vegetable).
- Specify primary function: food, fodder, soil building, medicinal.
Step 3: Establish Functional Roles Required
- Nitrogen fixation
- Pest management
- Pollination support
- Soil conditioning
- Structural support
Step 4: Species Selection Criteria
| Criterion | Description | Actionable Detail |
|---|---|---|
| Climate Adaptation | Choose species tolerant to local temperature and rainfall | Check hardiness zones, drought tolerance |
| Growth Habit | Consider height, root depth, canopy density | Match to vertical layering needs |
| Phenology | Select species with complementary growth and flowering times | Stagger planting and harvesting |
| Compatibility | Avoid allelopathic or competitive interactions | Consult compatibility charts |
| Multipurpose Use | Favor species providing multiple benefits (food + nitrogen) | Prioritize polyfunctional plants |
Step 5: Design Guild Layout
- Position primary crop at center.
- Surround with nitrogen fixers within root zone.
- Place pest repellents and trap crops on windward edges.
- Include dynamic accumulators near nutrient-demanding plants.
- Space according to mature canopy and root spread.
Step 6: Implementation and Succession Planning
- Plant pioneer species first to prepare the soil.
- Introduce main crop after soil conditioning.
- Add understory, ground cover, and climbers in phases.
- Schedule staggered planting and harvesting to maintain ground cover and resource cycling.
Chapter IV: Case Studies — Guilds in Varied Climates
1. Temperate Climate Guild: Apple Tree Guild
| Species | Role | Notes |
|---|---|---|
| Malus domestica (apple) | Primary crop | Main fruit tree |
| Trifolium repens (white clover) | Nitrogen fixer | Ground cover and nitrogen source |
| Allium cepa (onion) | Pest repellent | Repels codling moth |
| Symphytum officinale (comfrey) | Dynamic accumulator | Nutrient mining, biomass mulch |
| Achillea millefolium (yarrow) | Pollinator attractor | Attracts beneficial insects |
| Ribes nigrum (blackcurrant) | Understory crop | Shade-tolerant, edible |
Seasonal Planting Schedule
| Species | Planting Time | Harvest Time | Notes |
|---|---|---|---|
| Apple sapling | Early spring | Year 3+ | Space 4-5m apart |
| White clover | Early spring | Perennial | Overseed yearly as needed |
| Onion | Late fall | Summer | Plant sets or bulbs |
| Comfrey | Early spring | Cut multiple | Harvest leaves for mulch |
| Yarrow | Early spring | Summer | Maintain by pruning |
| Blackcurrant | Early spring | Summer | Space 1.5m apart |
2. Mediterranean Climate Guild: Olive Tree Guild
| Species | Role | Notes |
|---|---|---|
| Olea europaea (olive) | Primary crop | Drought tolerant fruit tree |
| Medicago sativa (alfalfa) | Nitrogen fixer | Deep-rooted forage legume |
| Lavandula angustifolia (lavender) | Pest repellent | Repels olive fruit fly |
| Ficus carica (fig) | Understory crop | Provides shade and fruit |
| Origanum vulgare (oregano) | Ground cover | Weed suppressant and culinary herb |
| Ceratonia siliqua (carob) | Structural support | Provides windbreak and biomass |
Seasonal Planting Schedule
| Species | Planting Time | Harvest Time | Notes |
|---|---|---|---|
| Olive sapling | Late winter | Year 5+ | Plant 7m apart |
| Alfalfa | Early spring | Summer | Cut 3-4 times/year |
| Lavender | Early spring | Summer | Prune after flowering |
| Fig | Early spring | Summer | Requires moderate water |
| Oregano | Early spring | Perennial | Maintain through trimming |
| Carob | Late winter | Year 7+ | Windbreak and shade |
3. Tropical Climate Guild: Banana Guild
| Species | Role | Notes |
|---|---|---|
| Musa spp. (banana) | Primary crop | Fast-growing staple |
| Cajanus cajan (pigeon pea) | Nitrogen fixer | Tall leguminous shrub |
| Cymbopogon citratus (lemongrass) | Pest repellent | Repels nematodes and insects |
| Zingiber officinale (ginger) | Understory crop | Shade-tolerant spice |
| Heliconia spp. | Pollinator attractor | Attracts hummingbirds |
| Tithonia diversifolia | Dynamic accumulator | Nutrient mining and mulch source |
Seasonal Planting Schedule
| Species | Planting Time | Harvest Time | Notes |
|---|---|---|---|
| Banana suckers | Year-round | 9-18 months | Space 2-3m apart |
| Pigeon pea | Early rainy | Late rainy | Cut after flowering |
| Lemongrass | Early rainy | Multiple cut | Maintain by harvesting |
| Ginger | Early rainy | Late rainy | Shade with banana leaves |
| Heliconia | Early rainy | Perennial | Prune to stimulate flowering |
| Tithonia | Early rainy | Multiple cut | Use biomass for mulch |
Chapter V: Tables for Guild Species Roles and Compatibility
Table 1: Guild Plant Functional Roles and Species Examples
| Functional Role | Species Examples | Notes |
|---|---|---|
| Primary Crop | Apple, Olive, Banana, Squash | Main yield provider |
| Nitrogen Fixers | Clover, Alfalfa, Pigeon Pea, Beans | Improves soil nitrogen |
| Dynamic Accumulators | Comfrey, Tithonia, Dandelion | Harvest for mulch, nutrient cycling |
| Pest Repellents | Garlic, Marigold, Lavender, Lemongrass | Natural pest deterrents |
| Trap Crops | Nasturtium, Mustard, Tobacco | Divert pests from main crops |
| Pollinator Attractors | Yarrow, Heliconia, Echinacea | Increase pollination success |
| Structural Supports | Sunflower, Poplar, Carob | Provide climbing support and windbreaks |
| Ground Cover | White Clover, Oregano, Sweet Potato Vine | Weed suppression, moisture retention |
Table 2: Compatibility Matrix (High=3, Moderate=2, Low=1)
| Species A \ Species B | Clover | Comfrey | Marigold | Basil | Sunflower | Garlic | Nasturtium |
|---|---|---|---|---|---|---|---|
| Clover | 3 | 3 | 2 | 2 | 2 | 1 | 2 |
| Comfrey | 3 | 3 | 2 | 1 | 2 | 1 | 2 |
| Marigold | 2 | 2 | 3 | 3 | 2 | 3 | 3 |
| Basil | 2 | 1 | 3 | 3 | 2 | 3 | 2 |
| Sunflower | 2 | 2 | 2 | 2 | 3 | 1 | 2 |
| Garlic | 1 | 1 | 3 | 3 | 1 | 3 | 2 |
| Nasturtium | 2 | 2 | 3 | 2 | 2 | 2 | 3 |
Chapter VI: Seasonal Planting Schedules and Succession Timelines
Table 3: Example Succession Planting Schedule for Temperate Zone Guild
| Month | Activity | Species Involved | Notes |
|---|---|---|---|
| March | Soil preparation, sow nitrogen fixers | Clover, Alfalfa | Prepare soil, sow cover crops |
| April | Plant primary crop saplings | Apple, Peach | Transplant seedlings |
| May | Plant dynamic accumulators | Comfrey, Tithonia | Support nutrient cycling |
| June | Sow pest repellent herbs | Marigold, Basil | Prevent pest colonization |
| July | Mulch application | Comfrey leaves, straw | Maintain soil moisture and fertility |
| August | Harvest early crops | Lettuce, herbs | Maintain ground cover with successive planting |
| September | Plant cover crops for fall | Ryegrass, winter peas | Protect soil through winter |
| October | Prune and prepare for winter | Perennials | Remove diseased material |
| November | Rest and soil observation | All | Plan next year’s succession |
Final Directive: Implementing Resilient Guilds
This volume demands action, a meticulous commitment to site analysis, species selection, and phased implementation. The guilds you create are living systems requiring constant observation and adaptive management. Use the tables and protocols herein as your blueprint. Mastery will come from reverent practice and unflinching attention to detail.
Cross-Reference
- For soil amendment protocols to prepare sites, see Volume IV: The Soil Codex, Chapter III.
- For detailed pest identification and biocontrol methods, see Volume IX: The Entomology Codex, Chapter I.
- For water management and irrigation sequencing, consult Volume VIII: The Water Codex, Chapter II.
Appendices
Appendix A: Plant Propagation Methods for Guild Species
Detailed propagation protocols (seed stratification, cuttings, layering) for each guild species will be found in Volume V: Nursery and Propagation Codex.
End of Volume II. Uphold the sacred trust of this knowledge with unwavering discipline. Your guilds will be the bastions of food sovereignty and ecological harmony.
<!-- SECTION 11 -->
Volume III: Intensive Annual Crop Production
Chapter III: Market Gardening Techniques, No-Till Bed Preparation, and Soil Fertility Management
Protocol 3.1.1: The Deep Mulch No-Till Bed – Stepwise Preparation and Maintenance
Preface: This protocol transmits the sacred, life-sustaining art of soil stewardship through the Deep Mulch No-Till Bed system, a method that preserves soil structure, fosters microbial life, and amplifies nutrient cycling to support intensive annual crop production. Every step is precise, every material chosen with intent, and every action designed to uphold the integrity of the living soil. Follow this protocol with unwavering discipline.
I. Introduction to the Deep Mulch No-Till Bed System
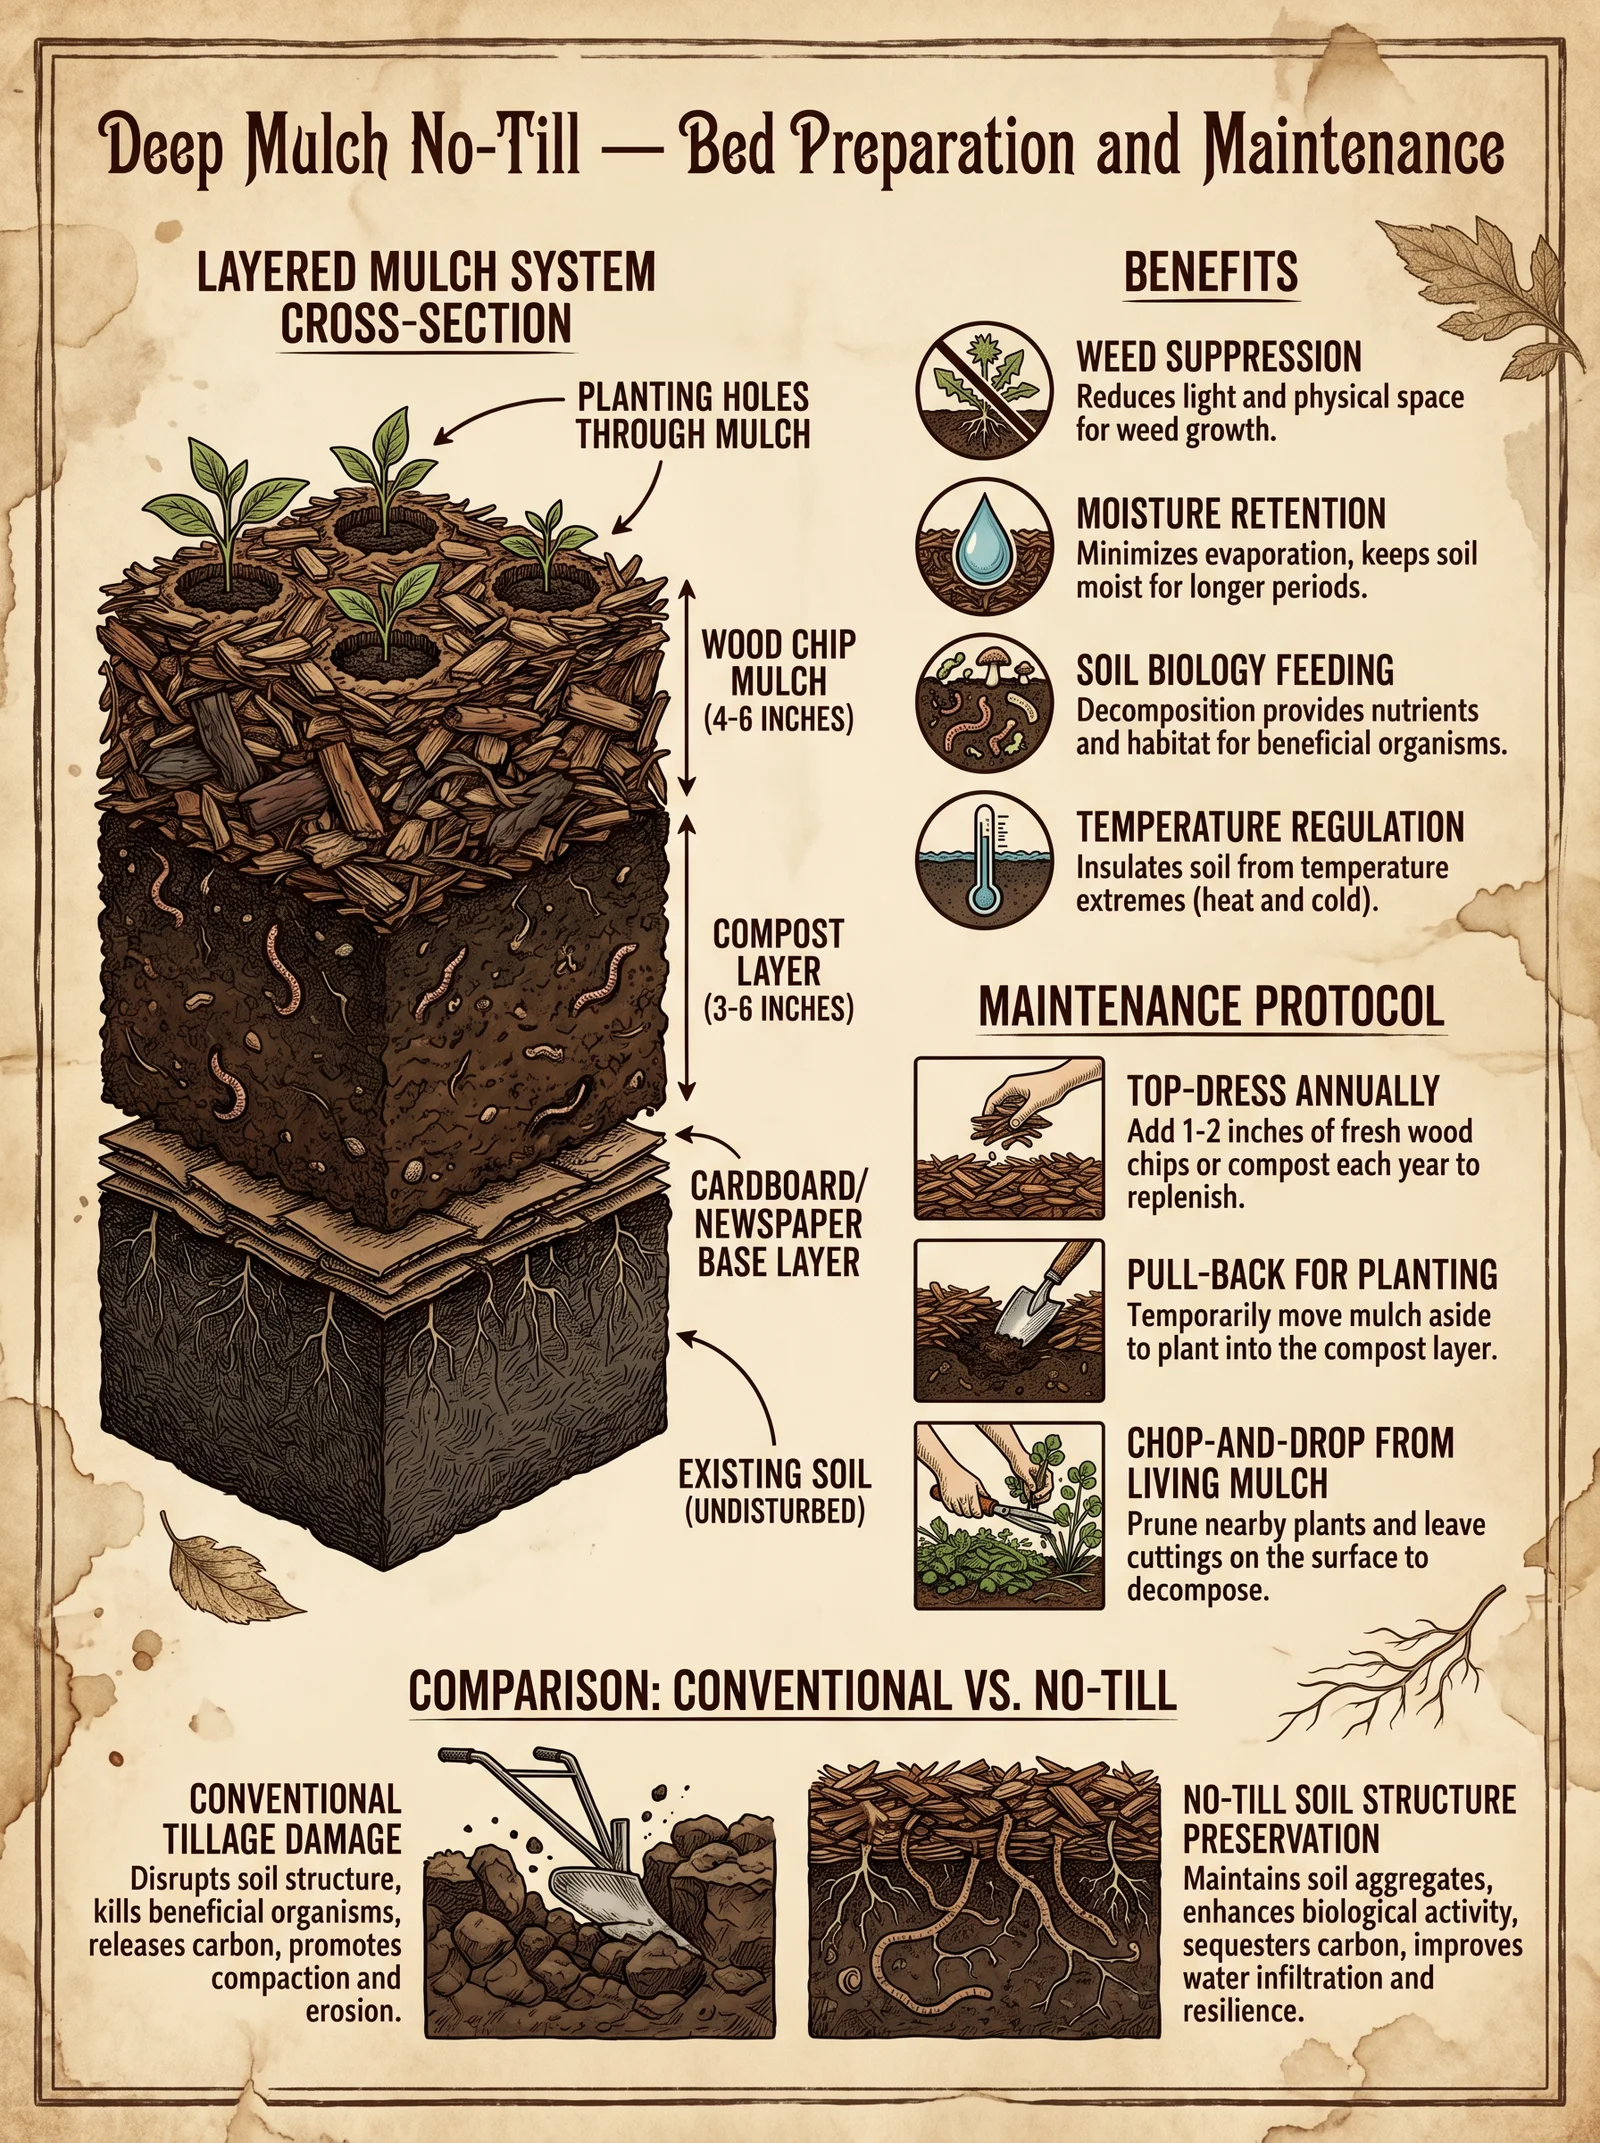
The Deep Mulch No-Till Bed system abandons the destructive soil disturbance of traditional tillage, replacing it with a layered, organic mulch designed to suppress weeds, conserve moisture, and promote an active, self-sustaining soil ecosystem. This system is optimized for market gardening, delivering high yields of nutrient-dense crops on small plots through intensive, repeated planting cycles.
II. Stepwise Preparation of the Deep Mulch No-Till Bed
Materials Required
| Material | Specification | Purpose |
|---|---|---|
| Coarse Brown Mulch | Shredded wood chips, 2–3 cm particle size | Carbon source, moisture retention |
| Green Mulch | Fresh grass clippings, legume residues | Nitrogen source |
| Compost | Mature, humified, weed-free | Microbial inoculum, nutrients |
| Cardboard or Newspaper | Uncoated, pesticide-free | Weed barrier |
| Soil Test Kit | pH, NPK, micronutrients | Baseline soil analysis |
| Measuring Tape | Minimum 3 meters length | Bed dimension accuracy |
| Wheelbarrow | 100-liter capacity | Material transport |
| Garden Fork | 4-tine, 30 cm length | Soil loosening without inversion |
| Watering Can or Hose | Adjustable flow | Bed hydration |
Step 1: Site Selection and Baseline Soil Analysis
- Choose a site with full sun exposure (minimum 6 hours daily) and good drainage.
- Using the soil test kit, collect 5 soil samples from the top 15 cm at various locations within the intended bed area.
- Analyze for pH, available nitrogen (N), phosphorus (P), potassium (K), calcium (Ca), magnesium (Mg), and organic matter content.
- Record data for amendment planning (see Soil Fertility Management, Section IV).
Step 2: Marking and Dimensioning Beds
- Mark bed boundaries using measuring tape and stakes.
- Standard bed dimensions for market gardening are:
| Bed Width (m) | Bed Length (m) | Rationale |
|---|---|---|
| 1.2 | 4.0 | Allows easy reach from both sides |
| 1.0 | 6.0 | Maximizes space, manageable reach |
- Choose width according to your physical reach capability; never exceed 1.2 m to avoid foot traffic on beds.
Step 3: Establishing the Weed Barrier Layer
- Lay down a single layer of cardboard or 6 sheets of newspaper, overlapping edges by 10 cm.
- Remove all tape, staples, or glossy print materials.
- Moisten the barrier thoroughly to initiate decomposition and facilitate soil life colonization.
Step 4: Applying the Deep Mulch Layers
The Deep Mulch structure consists of three layers, applied in the following order:
| Layer Number | Material Type | Thickness (cm) | Function |
|---|---|---|---|
| 1 | Coarse Brown Mulch | 5 | Base carbon layer, aeration |
| 2 | Green Mulch | 3 | Nitrogen source, microbial food |
| 3 | Finished Compost | 2 | Nutrient reservoir, microbial inoculation |
Procedure:
- Spread the 5 cm coarse brown mulch evenly over the weed barrier.
- Add the 3 cm green mulch uniformly over the brown mulch.
- Top with 2 cm of finished compost, spread evenly.
- Lightly moisten the entire bed to 50–60% field capacity.
Step 5: Initial Soil Activation
- Allow the bed to rest for 7 days to permit microbial colonization and initial decomposition.
- Keep the bed moist but not waterlogged during this period.
- Monitor temperature; optimal range is 18–25°C for microbial activity.
Step 6: Planting Preparation
- Using a garden fork, gently poke holes or slits through the mulch layers to the soil below for direct seed or transplant placement.
- Avoid disturbing the soil profile more than 5 cm deep.
- For direct seeding, use a dibbler or your finger to create holes at specified planting depths according to crop selection guide (Section V).
Step 7: Planting
- Place seeds or seedlings into the prepared holes.
- Cover lightly with a mix of fine compost and soil (approximately 0.5 cm).
- Water immediately with a fine spray to settle soil around roots and seeds.
Step 8: Mulch Maintenance Post-Planting
- Inspect beds weekly.
- Add additional mulch layers (2–3 cm brown mulch) every 3 weeks or when existing mulch decomposes to maintain total mulch thickness of 10 cm.
- Remove any emerging weeds by hand; avoid disturbance to the bed structure.
III. Maintenance Protocol for Deep Mulch No-Till Beds
Weekly Tasks
| Task | Description |
|---|---|
| Moisture Monitoring | Check soil moisture at 10 cm depth; irrigate if below 60% field capacity |
| Weed Management | Remove weeds by hand; ensure no tillage occurs |
| Mulch Top-Up | Add 2 cm brown mulch every 3 weeks |
| Pest and Disease Inspection | Monitor for early signs; deploy biological controls if needed |
Monthly Tasks
| Task | Description |
|---|---|
| Soil Surface Scratch Test | Check soil crumb structure; ensure no compaction |
| Nutrient Cycling Check | Inspect plant vigor; plan for foliar nutrient applications if deficiency signs appear |
IV. Soil Fertility Management and Nutrient Cycling Strategies
The Deep Mulch No-Till Bed is a living system reliant on continuous nutrient cycling through organic matter decomposition and microbial activity. The strategy integrates nutrient input, microbial inoculation, and crop selection to optimize fertility.
Soil Amendments Based on Initial Soil Test
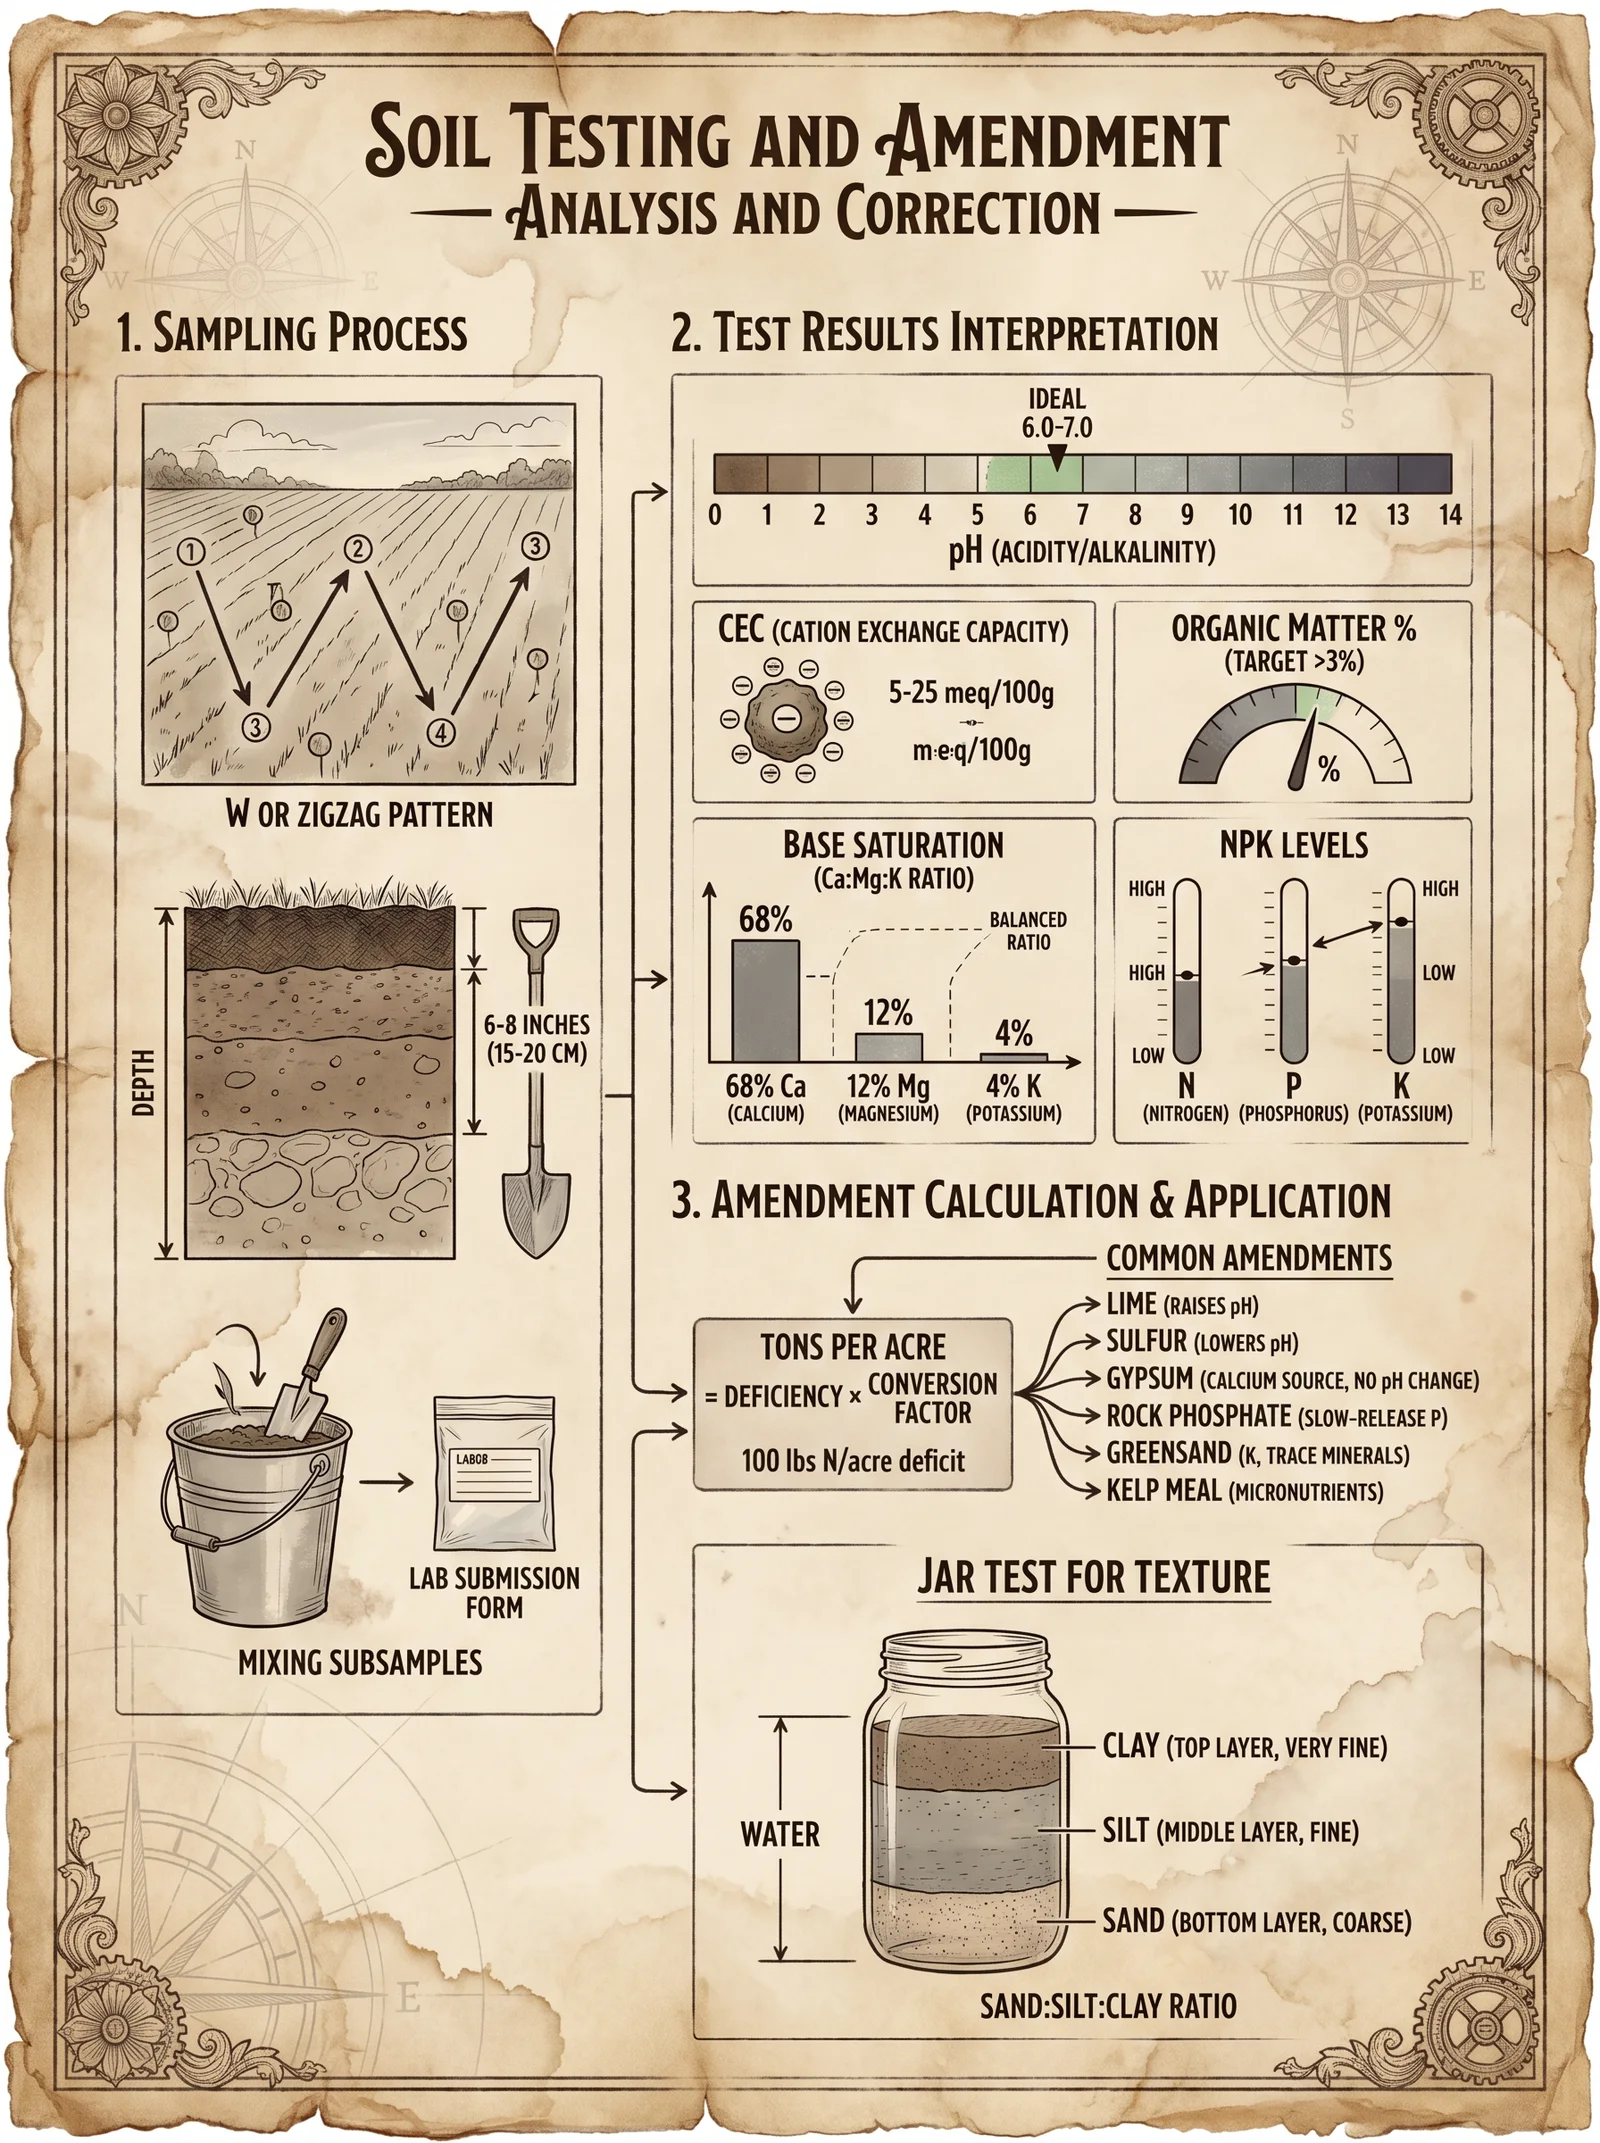
| Deficiency Detected | Amendment Material | Application Rate (per m²) | Application Timing |
|---|---|---|---|
| Nitrogen (N) | Blood Meal (13% N) | 10 g | Incorporated in compost layer |
| Phosphorus (P) | Rock Phosphate (30% P2O5) | 20 g | Mixed into compost |
| Potassium (K) | Wood Ash (5% K2O) | 15 g | Surface-applied with mulch |
| Calcium (Ca) | Agricultural Lime | 30 g | Pre-bed preparation |
| Magnesium (Mg) | Dolomitic Lime | 20 g | Pre-bed preparation |
Nutrient Cycling Protocol
- Carbon to Nitrogen Ratio (C:N): Maintain a 25:1 ratio in organic inputs to optimize microbial mineralization.
- Microbial Inoculation: Ensure mature compost contains microbial diversity including nitrogen-fixers, phosphorus solubilizers, and mycorrhizal fungi.
- Green Mulch Selection: Use leguminous species (e.g., clover, vetch) to provide biologically fixed nitrogen.
- Crop Residue Management: After harvest, leave root biomass intact to feed soil biota.
- Foliar Feeding: Apply seaweed extract (1:1000 dilution) every 3 weeks to boost micronutrient availability.
Crop Rotation and Nutrient Demand Balancing
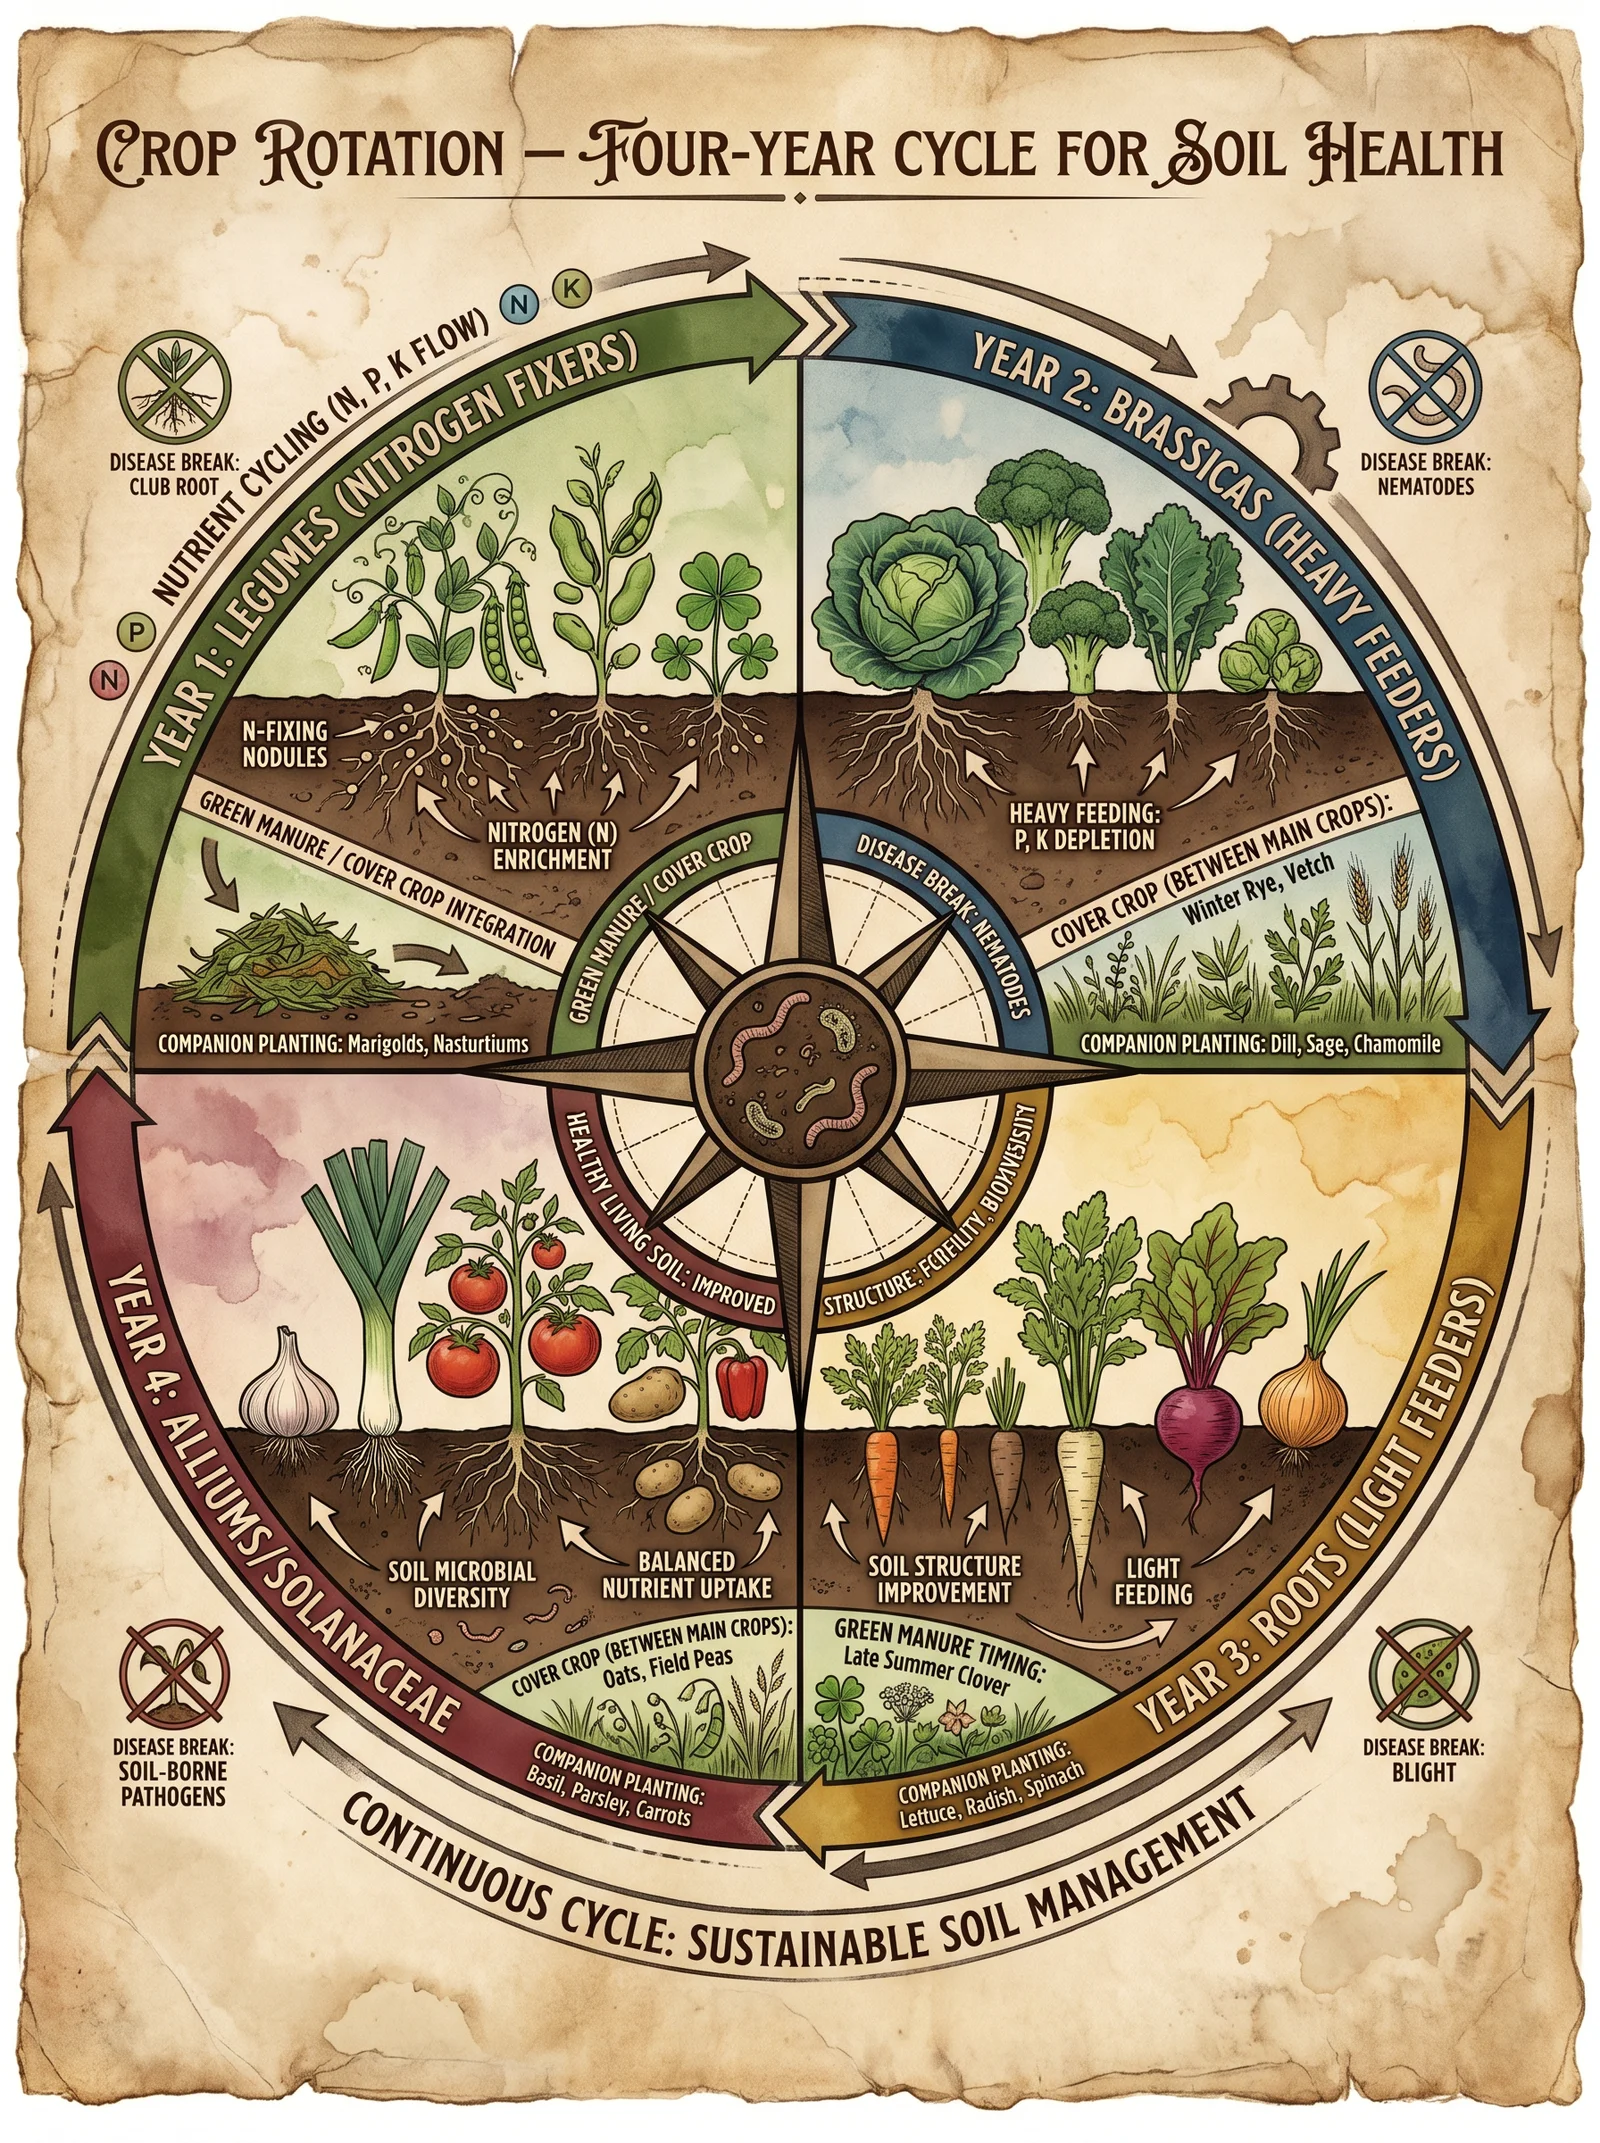
Rotate crops based on nutrient demand groups to prevent depletion:
| Crop Group | Nutrient Demand Category | Recommended Follow-Up Crop Group |
|---|---|---|
| Heavy Feeders | High N, P, K | Light Feeders |
| Light Feeders | Low N, P, K | Legumes |
| Legumes | Nitrogen Fixers | Heavy Feeders |
V. Crop Selection Guide for Market Gardening
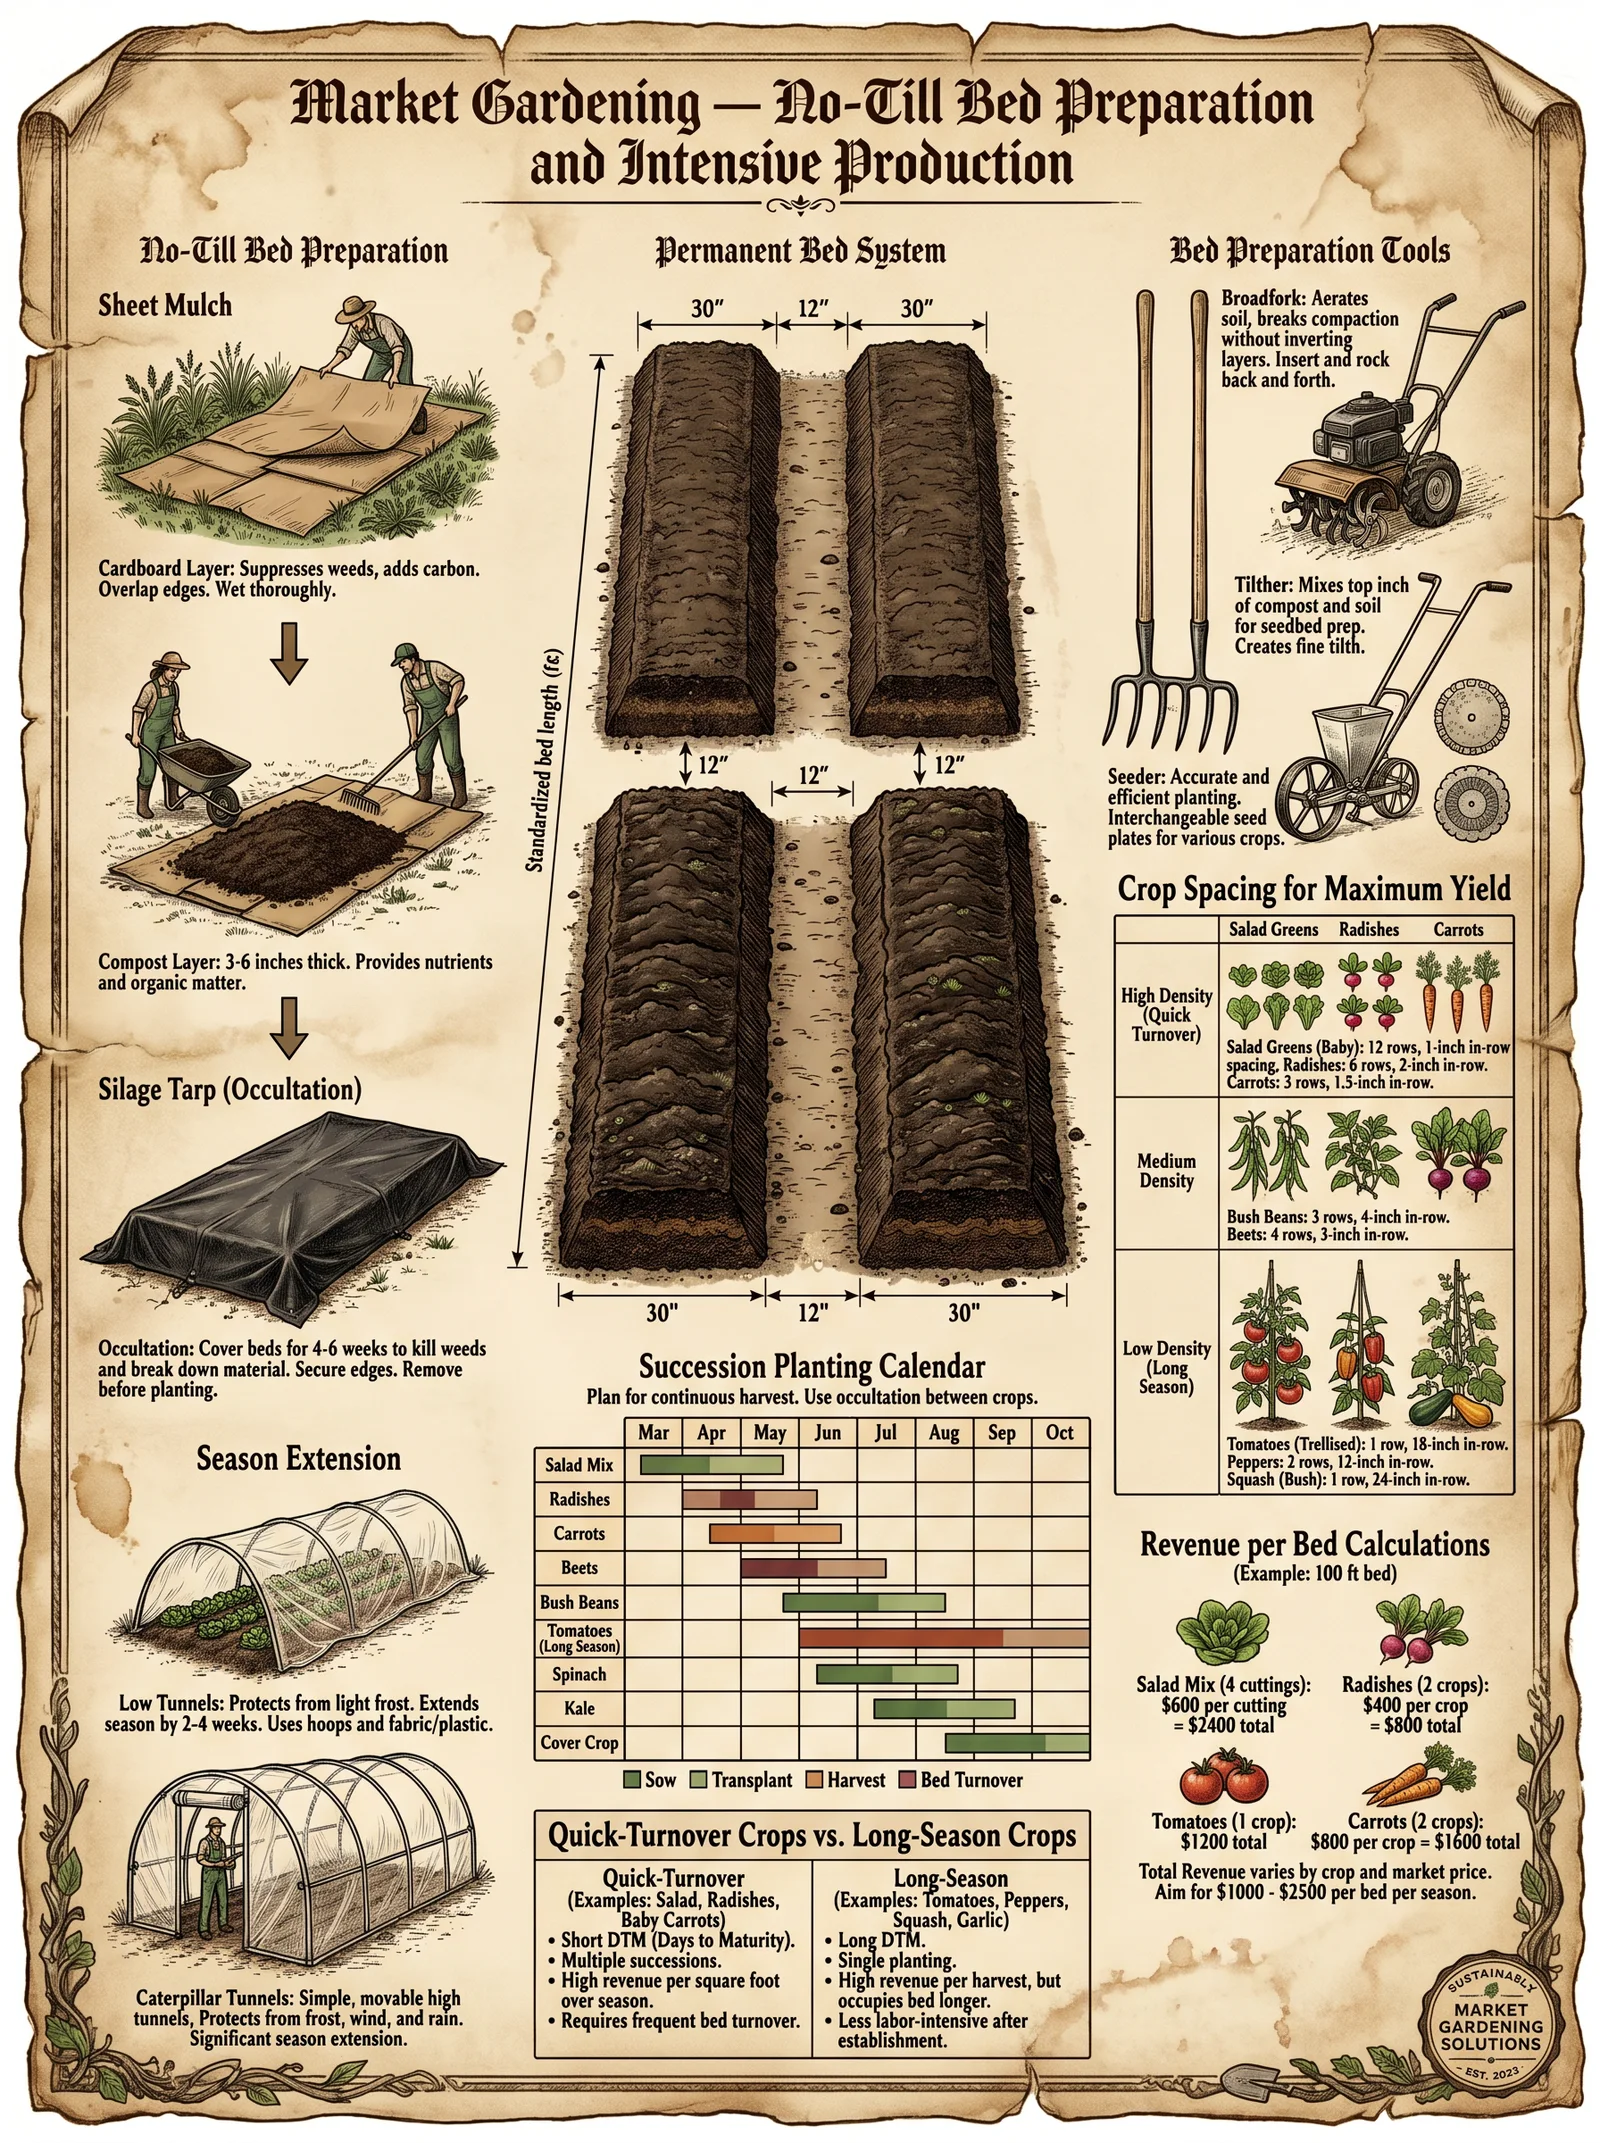
This guide prioritizes crops suitable for the Deep Mulch No-Till Bed system, balancing nutrient requirements, planting density, and harvest cycles for market gardening.
Crop Nutrient Requirements and Planting Densities
| Crop | N (kg/ha) | P (kg/ha) | K (kg/ha) | Bed Spacing (cm) | Plants per m² | Notes |
|---|---|---|---|---|---|---|
| Lettuce | 60 | 30 | 50 | 30 x 30 | 11 | Fast-growing, shallow roots |
| Carrot | 70 | 40 | 60 | 10 x 5 | 20 | Prefers loose, deep soil |
| Tomato | 150 | 70 | 200 | 60 x 60 | 3 | Supports heavy fruit load |
| Spinach | 90 | 45 | 70 | 30 x 20 | 16 | Requires consistent moisture |
| Radish | 50 | 25 | 40 | 5 x 5 | 40 | Quick turnover crop |
| Beans (Bush) | 100 | 30 | 60 | 45 x 15 | 15 | Nitrogen fixing legume |
Note: Nutrient values are expressed as estimated crop uptake per hectare; scale accordingly to bed size.
Bed Dimensions and Planting Density Table
| Bed Width (m) | Bed Length (m) | Total Area (m²) | Crop | Plants per Bed | Spacing (cm) |
|---|---|---|---|---|---|
| 1.2 | 4.0 | 4.8 | Lettuce | 53 | 30 x 30 |
| 1.0 | 6.0 | 6.0 | Carrot | 120 | 10 x 5 |
| 1.2 | 4.0 | 4.8 | Tomato | 14 | 60 x 60 |
| 1.0 | 6.0 | 6.0 | Spinach | 96 | 30 x 20 |
VI. Detailed Planting Instructions for Selected Crops
Lettuce Planting (Lactuca sativa)
- Prepare holes by poking through the mulch to 1 cm depth.
- Place one seed or seedling per hole.
- Cover with 0.5 cm fine compost.
- Water immediately, maintaining soil moisture between 60–70%.
- Thin seedlings to one plant per 30 cm square after germination.
Carrot Planting (Daucus carota)
- Create furrows 1 cm deep through the mulch.
- Sow seeds thinly, approximately 5 cm apart.
- Cover lightly with fine compost.
- Water gently to avoid seed displacement.
- Thin to 10 cm spacing after emergence.
Tomato Transplanting (Solanum lycopersicum)
- Dig planting holes 10 cm diameter through mulch.
- Insert seedlings, burying stems to first true leaves.
- Firm soil around roots without disturbing surrounding mulch.
- Stake immediately to prevent wind damage.
- Mulch around plants with additional 3 cm brown mulch.
VII. Troubleshooting and Optimization
| Issue | Possible Cause | Corrective Action |
|---|---|---|
| Poor seed germination | Mulch too thick or dry soil | Reduce mulch depth to ≤10 cm; increase watering |
| Excessive weed growth | Weed barrier incomplete | Add cardboard layer; reinforce mulch layering |
| Nutrient deficiency symptoms | Imbalanced soil fertility | Conduct soil test; apply targeted amendments |
| Waterlogging | Poor drainage | Elevate beds; improve site selection |
| Pest infestation | Lack of biological controls | Introduce beneficial insects; apply neem oil |
VIII. Final Notes on the Sacred Stewardship of Soil
The Deep Mulch No-Till Bed is a living covenant between gardener and earth. It requires dedication, observation, and adaptation. The soil must never be abused; it must be fed, sheltered, and revered. The techniques herein are not mere cultivation—they are a spiritual practice guaranteeing survival and sovereignty.
Appendix Tables
Table 1: Summary of Layer Thickness and Materials for Deep Mulch Beds
| Layer | Thickness (cm) | Material Description | Notes |
|---|---|---|---|
| Weed Barrier | - | Cardboard or Newspaper | Moisturized before application |
| Layer 1 | 5 | Coarse Brown Mulch (wood chips) | Provides aeration and carbon |
| Layer 2 | 3 | Green Mulch (grass, legumes) | Nitrogen source |
| Layer 3 | 2 | Finished Compost | Nutrient reservoir |
Table 2: Recommended Mulch Top-Up Schedule
| Time After Planting | Mulch Layer to Add (cm) | Material Type | Notes |
|---|---|---|---|
| Every 3 weeks | 2 | Coarse Brown Mulch | Maintain total mulch depth |
This concludes Protocol 3.1.1: The Deep Mulch No-Till Bed. For soil microbial inoculation preparation, see Volume VI: The Microbial Codex, Chapter IV. For irrigation optimization, refer to Volume VIII: The Water Codex, Chapter II.
Proceed with reverence and precision. The soil is alive; treat it as sacred.
<!-- SECTION 12 -->
Volume III: Seed Saving and Crop Rotation
The Agrarian Codex: Complete Agriculture, Permaculture, Animal Husbandry, and Food Sovereignty
Introduction: The Sacred Covenant of Seed Sovereignty and Crop Rotation
Within these pages, you shall learn the ancient, suppressed arts of seed sovereignty and crop rotation. This knowledge is the bulwark against genetic erosion, crop failure, and ecological collapse. The seed is life’s covenant; to save seed is to claim dominion over your sustenance and freedom. Crop rotation is the sacred rhythm, a cycle that maintains soil vitality and disrupts pest and disease cycles with precision.
Chapter I: Principles of Seed Sovereignty
Seed sovereignty is the inviolable right and responsibility of the cultivator to save, protect, and propagate seeds independently of corporate or external control. This volume codifies the exacting procedures to save seeds from annual crops and maintain varietal purity.
Key Principles:
- Genetic Integrity: Maintain varietal purity through isolation distances, careful selection, and culling.
- Viability Preservation: Harvest seeds at physiological maturity, dry correctly, and store under optimal conditions.
- Diversity Maintenance: Save seeds from multiple plants to retain genetic diversity and resilience.
- Documentation and Labeling: Meticulously label seed batches with variety, origin, harvest date, and storage conditions.
- Cycle Continuity: Renew seed stocks regularly (every 3–4 years) to avoid genetic drift and viability loss.
Chapter II: Seed Saving Techniques for Major Annual Crops
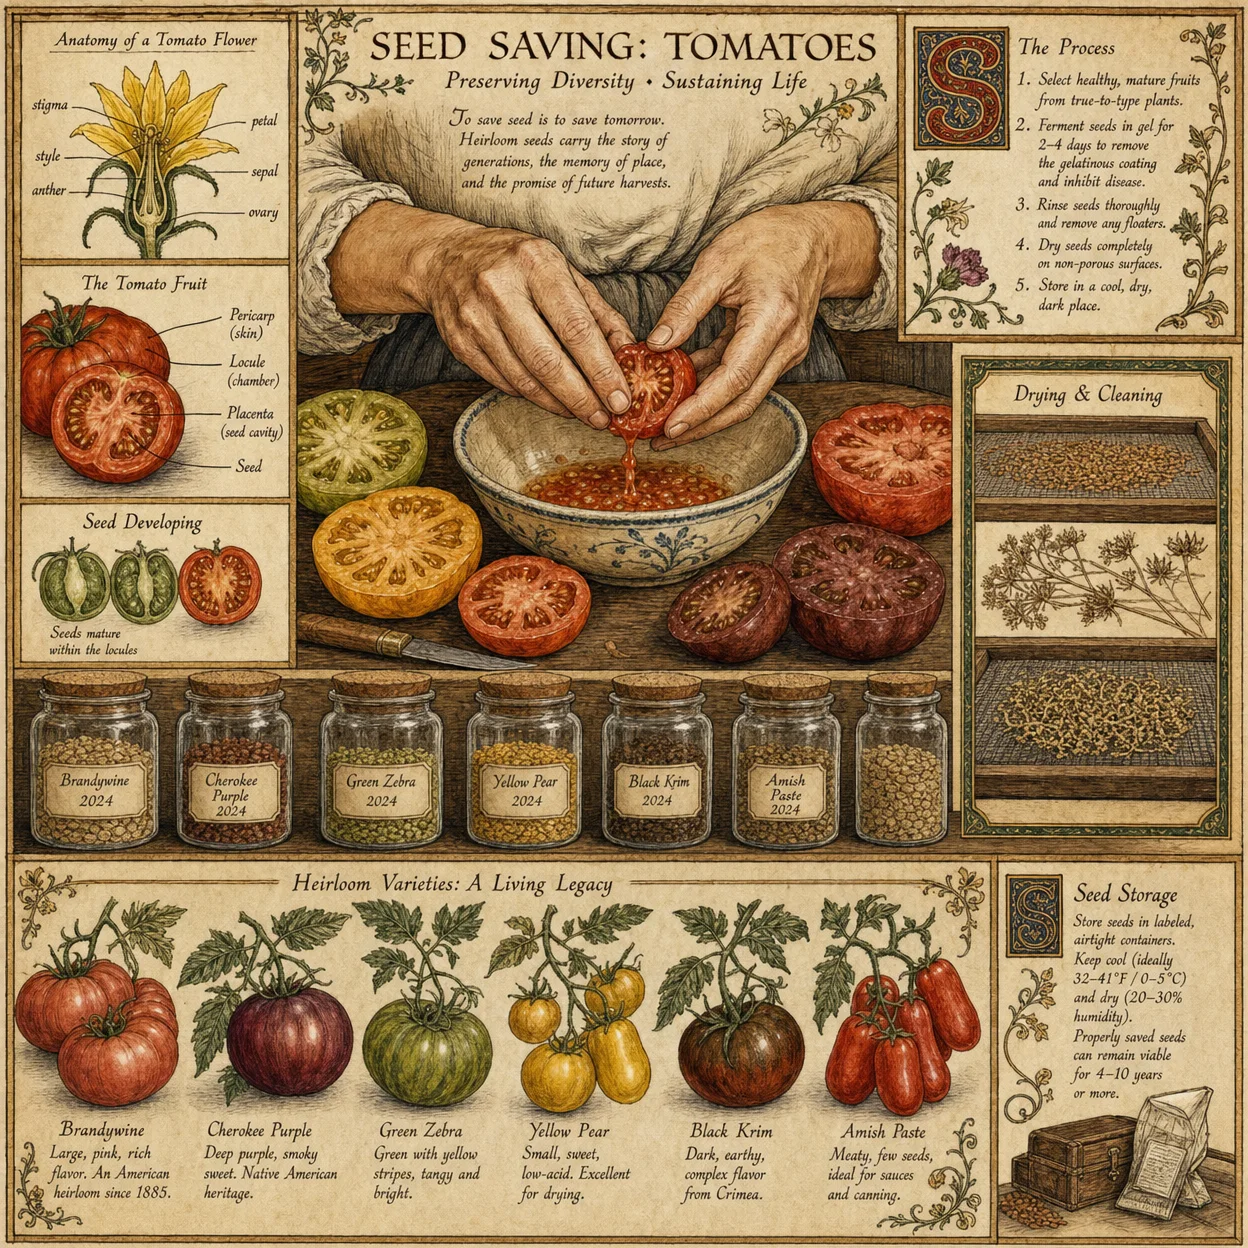
The following section details step-by-step protocols for seed harvesting, cleaning, and storage for the primary annual crops foundational to food sovereignty. These crops are categorized by their seed morphology and storage requirements.
Crops Covered:
- Legumes: Beans (Phaseolus spp.), Peas (Pisum sativum)
- Cucurbits: Squash (Cucurbita spp.), Cucumbers (Cucumis sativus)
- Grains: Corn (Zea mays), Wheat (Triticum aestivum), Barley (Hordeum vulgare)
- Brassicas: Cabbage (Brassica oleracea), Mustard (Brassica juncea)
- Solanaceae: Tomatoes (Solanum lycopersicum), Peppers (Capsicum spp.)
Section II-A: Seed Harvesting Protocols
1. Beans (Phaseolus spp.)
Objective: Harvest seeds at full pod maturity, ensuring dryness and seed maturity.
Procedure:
- Observe pods until they turn yellow-brown and become brittle.
- Harvest entire pods by hand, avoiding damaged or diseased specimens.
- Place pods in a breathable container (e.g., burlap sack) for drying in a shaded, well-ventilated area.
- Monitor dryness; pods should rattle when shaken (~10–14 days).
- Store dry pods until seed extraction.
2. Corn (Zea mays)
Objective: Harvest mature ears when kernels are hard and moisture content is approximately 20%.
Procedure:
- Identify physiological maturity: kernels are dented or dry on the cob.
- Harvest ears by hand, cutting stalks 10 cm below the ear.
- Remove husks partially for airflow; hang ears in a dry, ventilated storage area.
- Allow ears to dry until kernel moisture drops below 15% (~4–6 weeks).
- Shell kernels by hand or mechanical sheller.
3. Tomatoes (Solanum lycopersicum)
Objective: Extract seeds from fully ripe fruit and ferment to remove gel.
Procedure:
- Select fully ripe fruit showing deep color and softness.
- Cut fruit and scoop seeds with surrounding gel into a jar.
- Add water to cover seeds; allow fermentation at 20–25°C for 3–5 days, stirring daily.
- After fermentation, rinse seeds thoroughly under running water using a fine mesh sieve.
- Spread seeds on a non-stick surface to dry completely (~7 days), stirring daily.
Section II-B: Seed Cleaning Techniques
Cleaning seeds removes chaff, debris, and non-viable seeds to prevent disease and improve storage.
General Cleaning Steps:
- Threshing: For grains and legumes, gently break seed pods to release seeds.
- Winnowing: Use a controlled airflow or manual winnowing basket to separate lighter chaff.
- Screening: Pass seeds through sieves with graduated mesh sizes to remove small debris.
- Float Testing: Immerse seeds in water; discard floating seeds as non-viable.
- Drying: Final drying on non-stick surfaces in shaded, ventilated conditions until moisture content is 8–12%.
Section II-C: Seed Storage Protocols
Seed longevity depends on moisture content, temperature, and storage container.
| Crop Family | Ideal Seed Moisture (%) | Storage Temperature (°C) | Recommended Container | Max Storage Duration (years) |
|---|---|---|---|---|
| Legumes | 8–10 | 5–10 | Glass jars with airtight lids | 3–5 |
| Grains | 8–12 | 0–5 | Vacuum-sealed mylar bags | 5–8 |
| Cucurbits | 6–8 | 5–10 | Paper envelopes in airtight boxes | 4–6 |
| Brassicas | 6–8 | 0–5 | Airtight glass or metal tins | 4–6 |
| Solanaceae | 6–8 | 5–10 | Glass jars with desiccant packs | 4–5 |
Steps:
- Confirm seed moisture content with a moisture meter or perform seed feel test (seeds should be hard and brittle).
- Place seeds in recommended containers with label including species, variety, harvest date, and drying method.
- Add desiccants (silica gel or activated charcoal) if possible.
- Store containers in a cool, dark, and dry place with temperature monitoring.
- Inspect seed stocks annually for mold, pests, or viability loss.
Chapter III: Crop Rotation Planning
Crop rotation is a scientifically validated practice to interrupt pest and disease cycles, optimize nutrient cycling, and improve soil structure. The following section codifies rotation sequences tailored to major crop families.
Section III-A: Crop Families and Their Nutrient Profiles
| Crop Family | Nitrogen Fixation | Nutrient Demand | Root Depth Category | Common Diseases and Pests |
|---|---|---|---|---|
| Legumes | Fix atmospheric N | Moderate N, high P | Medium | Root rot, aphids |
| Grains | No | High N | Deep | Rust, smuts, corn borers |
| Cucurbits | No | Moderate N and K | Shallow to medium | Powdery mildew, squash bugs |
| Brassicas | No | High N and S | Medium to deep | Clubroot, cabbage moth |
| Solanaceae | No | Moderate N | Medium | Blight, nematodes, aphids |
Section III-B: Rotation Sequence Protocols
Principles:
- Avoid planting crops from the same family in the same plot consecutively.
- Follow legumes with heavy nitrogen-demanding crops.
- Include fallow or cover crop periods every 4–5 years for soil restoration.
- Employ biofumigant crops (e.g., mustard) before susceptible crops to suppress soil pathogens.
Section III-C: Standard 4-Year Rotation Schedule
| Year | Plot A | Plot B | Plot C | Plot D |
|---|---|---|---|---|
| 1 | Legumes (Beans) | Grains (Corn) | Brassicas (Cabbage) | Cucurbits (Squash) |
| 2 | Grains | Brassicas | Cucurbits | Legumes |
| 3 | Brassicas | Cucurbits | Legumes | Grains |
| 4 | Cucurbits | Legumes | Grains | Brassicas |
Section III-D: Detailed Rotation Implementation Steps
- Field Mapping: Divide arable land into discrete plots of uniform soil characteristics.
- Crop Family Assignment: Assign crops to plots according to the rotation schedule.
- Soil Testing: Prior to planting, test soil nutrient status to tailor fertilization.
- Planting: Follow planting dates optimized for the local climate, ensuring each plot receives only the assigned crop family.
- Cover Cropping: After harvest, sow cover crops (e.g., clover, rye) to prevent erosion and fix nitrogen.
- Soil Amendments: Apply organic amendments like compost or biochar post-harvest.
- Monitoring: Record pest and disease incidence; adjust rotation in subsequent cycles if pest pressure indicates failure.
- Documentation: Maintain rotation logs detailing crop family, planting date, yield, and soil conditions.
Appendix A: Crop Families Summary Table
| Crop Family | Representative Crops | Seed Saving Difficulty | Typical Seed Dormancy | Cross-Pollination Risk | Isolation Distance (m) |
|---|---|---|---|---|---|
| Legumes | Beans, Peas | Moderate | Low | Low | 10 |
| Grains | Corn, Wheat, Barley | Low | Low | High (Corn) | 250 |
| Cucurbits | Squash, Cucumbers | Moderate | Moderate | High | 300 |
| Brassicas | Cabbage, Mustard | High | Low | High | 300 |
| Solanaceae | Tomatoes, Peppers | Moderate | Low | Low | 20 |
Appendix B: Seed Storage Condition Table
| Crop | Moisture Content (%) | Storage Temp (°C) | Container Type | Storage Duration (Years) | Notes |
|---|---|---|---|---|---|
| Beans | 8–10 | 5–10 | Airtight glass jars | 3–5 | Use desiccants; avoid temperature swings |
| Corn | 8–12 | 0–5 | Vacuum-sealed mylar | 5–8 | Cold storage extends longevity |
| Squash | 6–8 | 5–10 | Paper envelopes + box | 4–6 | Dry thoroughly to prevent mold |
| Cabbage | 6–8 | 0–5 | Airtight metal tins | 4–6 | Biofumigant crop residues must be removed |
| Tomato | 6–8 | 5–10 | Glass jars + desiccant | 4–5 | Fermentation critical to remove inhibitors |
Appendix C: Recommended Seed Drying and Testing Protocol
| Step | Action | Details |
|---|---|---|
| 1 | Initial Drying | Air dry seeds in shade, ventilated area, 20–25°C for 7–14 days |
| 2 | Moisture Test | Use seed moisture meter or perform hand test (seeds brittle, not soft) |
| 3 | Viability Test | Germinate 20 seeds in moist paper towels at 25°C for 7 days, record % |
| 4 | Re-drying | If moisture > recommended, dry further under controlled conditions |
| 5 | Final Packaging | Use airtight containers with desiccants; label thoroughly |
Closing Mandate
The sacred charge of seed saving and crop rotation is not a mere agricultural task; it is a solemn covenant with nature, humanity, and future generations. Neglect or error in these practices leads to famine, dependency, and loss of autonomy. Obey the protocols herein with precision. Document every action. Preserve every seed as if your life depends on it—because it does.
For further protocols on soil amendments, pest management, and water purification, see Volume VIII: The Water Codex, Chapter II and Volume V: The Soil Codex, Chapter IV.
<!-- SECTION 13 -->
Volume III: Companion Planting and Pest Management Without Chemicals
Preface
In the sacred art of agriculture, the balance of life and decay, growth and pestilence, must be maintained without reliance on synthetic poisons that sever our covenant with the earth. This volume reveals the ancient and suppressed knowledge of companion planting, natural pest deterrents, beneficial insect habitats, and polyculture designs. Adhere strictly to these protocols to restore and sustain the vital equilibrium of your agrarian sanctuary.
Section I: Foundations of Natural Pest Management
1. The Principle of Ecological Balance
Pests are not enemies but indicators of imbalance. The goal is population control through ecological harmony, not eradication by chemical warfare. Companion plants and habitat creation are your primary tools.
2. Terminology and Concepts
- Companion Planting: The strategic placement of plants to improve growth, deter pests, or attract beneficial organisms.
- Beneficial Insects: Predatory or parasitic insects that naturally control pest populations.
- Polyculture: Diverse planting systems that mimic natural ecosystems, reducing pest outbreaks.
- Integrated Pest Management (IPM): A holistic approach combining multiple biological and cultural tactics for pest control.
Section II: Stepwise Pest Identification and Response Protocol
The ability to identify pests and implement the correct response is paramount.
Protocol 1: Pest Identification and Response Strategy
- Inspect Plants Weekly
- Examine leaves (upper and lower surfaces), stems, flowers, and soil surface.
- Use a 10x hand lens for small pests or eggs.
- Record symptoms: holes, discoloration, wilting, honeydew, webbing.
- Consult Pest Identification Table (Table 1)
- Match observed symptoms and pest morphology.
- Confirm identification through multiple characteristics.
- Determine Pest Severity Level
- Level 1: Low population, minor damage.
- Level 2: Moderate population, localized damage.
- Level 3: High population, widespread damage.
- Select Response Based on Severity
| Severity Level | Action | Companion Plant Strategy | Habitat Enhancement |
|---|---|---|---|
| Level 1 | Monitor, encourage predators | Plant mild deterrents near crops | Install insectary plants |
| Level 2 | Introduce trap crops, interplant strong deterrents | Increase companion deterrents, add nectar sources | Build refuges for beneficial insects |
| Level 3 | Manual removal, deploy biological controls | Remove infested plants, use polyculture barriers | Release predatory insects or parasitoids |
- Implement Response Protocol (See Sections III & IV)
- Re-assess Weekly Until Control Achieved
Section III: Companion Plants as Natural Pest Deterrents
1. Mechanisms of Action
- Chemical Repellency: Emission of volatile organic compounds (VOCs) that pests avoid.
- Physical Barriers: Dense foliage or thorns restricting pest movement.
- Attracting Predators: Providing nectar, pollen, or habitat for beneficial insects.
2. Building the Companion Plant Matrix
Table 2 outlines key companion plants, their target pests, and mode of action.
| Companion Plant | Target Pest(s) | Mode of Action | Planting Density (Plants/m²) | Notes |
|---|---|---|---|---|
| Marigold (Tagetes spp.) | Nematodes, whiteflies | Root exudates repel nematodes, VOC repel whiteflies | 4-6 | Plant along bed edges |
| Basil (Ocimum basilicum) | Aphids, whiteflies, spider mites | VOC repellency | 3-5 | Interplant with tomatoes |
| Nasturtium (Tropaeolum majus) | Aphids, whiteflies | Trap crop, attracts aphids away | 2-4 | Plant near vulnerable crops |
| Garlic (Allium sativum) | Aphids, spider mites, beetles | Sulfur compounds repel pests | 5-8 | Interplant rows, bulb cloves |
| Chrysanthemum (Chrysanthemum cinerariifolium) | Leaf miners, aphids | Pyrethrin production (natural insecticide) | 2-3 | Use as border plant |
| Dill (Anethum graveolens) | Aphids, spider mites | Attracts predatory wasps | 3-5 | Plant near cucurbits |
| Lavender (Lavandula angustifolia) | Moths, flea beetles | Strong VOCs | 2-3 | Use as border or interplant |
3. Step-by-Step Companion Plant Integration
- Map Your Crop Layout
- Identify pest-prone crops.
- Allocate 10-30% of bed area for companion plants.
- Select Companion Plants Based on Pest Profiles
- Use Table 2 to match companion plants to pest threats.
- Prioritize those with multiple pest targets.
- Prepare Seedlings or Seeds
- Germinate companion plants 2-3 weeks prior to main crop planting for early establishment.
- Plant Companion Plants
- Follow recommended densities (Table 2).
- Position strategically:
- Borders: repellent species.
- Inter-row: trap or nectar plants.
- Within crop rows: low-growing companions.
- Maintain Companion Plants
- Water and fertilize moderately.
- Prune to prevent shading main crops.
- Monitor Effectiveness Weekly
- Adjust companion plant ratios or species as needed.
Section IV: Beneficial Insect Habitat Creation
1. Beneficial Insects and Their Roles
Table 3 lists common beneficial insects, the pests they control, and habitat preferences.
| Beneficial Insect | Pest Target(s) | Habitat Requirements | Attractant Plants |
|---|---|---|---|
| Lady Beetles (Coccinellidae) | Aphids, scale insects | Ground cover, pollen sources | Dill, fennel, yarrow |
| Lacewings (Chrysopidae) | Aphids, mealybugs | Shelter (mulch, shrubs), nectar | Cosmos, tansy |
| Parasitic Wasps (Trichogramma spp.) | Caterpillars, moth eggs | Minimal disturbance, nectar | Sweet alyssum, buckwheat |
| Predatory Mites (Phytoseiulus persimilis) | Spider mites | Humid microhabitats, leaf litter | Ferns, perennial herbs |
| Hoverflies (Syrphidae) | Aphids | Shelter, nectar and pollen | Alyssum, coriander |
| Ground Beetles (Carabidae) | Soil pests (slugs, larvae) | Mulch layer, stone piles | None (habitat only) |
2. Constructing Beneficial Insect Habitats
Stepwise Habitat Creation Protocol
- Select Habitat Site
- Choose locations adjacent or within crop beds.
- Avoid areas of heavy human or machine traffic.
- Prepare Ground Cover
- Lay 5-10 cm organic mulch (leaf litter, straw).
- Create small mounds or stone piles for shelter.
- Plant Attractant Flora
- Use Table 3 to select nectar and pollen plants.
- Plant in clusters of minimum 1 m², spaced every 10 meters.
- Install Insectary Structures
- Construct simple “insect hotels”:
- Bundle hollow stems (bamboo, reeds) 20-30 cm lengths.
- Stack in wooden frame with open sides.
- Place at 1-1.5 m height, partially shaded.
- Construct simple “insect hotels”:
- Maintain Habitat
- Avoid pesticide use within 20 m radius.
- Water nectar plants during dry periods.
- Replace mulch annually to prevent pathogen build-up.
- Introduce Beneficial Insects If Necessary
- Source from reputable biological control suppliers.
- Release according to supplier instructions (usually early morning or late evening).
Section V: Polyculture Designs for Pest Suppression
1. Principles of Polyculture
- Species Diversity: Multiple crops reduce pest host availability.
- Structural Complexity: Vertical and horizontal layering confuses pests.
- Temporal Staggering: Crop succession disrupts pest life cycles.
2. Polyculture Models
| Model Name | Description | Pest Suppression Mechanism | Suitable Crops |
|---|---|---|---|
| Three Sisters | Corn, beans, squash interplanting | Beans fix nitrogen, squash covers soil, corn supports beans; combined pest deterrence | Corn, beans, squash |
| Herb and Vegetable Mix | Interplant herbs with vegetables | Herbs deter pests and attract predators | Tomatoes, basil, marigold, onions |
| Strip Cropping | Alternate strips of different crops | Limits pest movement by crop barriers | Cabbage, carrots, onions |
| Multi-layered Polyculture | Vertical layering: tall, medium, ground-level plants | Complex habitat for beneficials, pest confusion | Sunflowers, beans, lettuce |
3. Implementing Polyculture for Pest Management
- Assess Site Conditions
- Soil type, sunlight, water availability.
- Pest history and crop susceptibility.
- Select Compatible Crop Species
- Use known beneficial combinations (see Table 4).
- Design Planting Layout
- Vertical layering: tallest plants north side.
- Intermingle pest deterrent companions.
- Prepare Soil Beds
- Amend with organic matter.
- Ensure proper drainage.
- Plant According to Design
- Follow spacing instructions for each species.
- Plant companion and beneficial plants simultaneously.
- Maintain Polyculture
- Monitor pest and beneficial insect populations.
- Prune and thin to prevent overcrowding.
- Rotate Crops Annually
- Prevent pest adaptation and soil depletion.
Section VI: Integrated Pest Management (IPM) Protocol Using Companion Plants and Habitat Creation
1. IPM Stepwise Procedure
- Baseline Assessment
- Conduct initial pest and beneficial insect survey.
- Identify pest hotspots and vulnerable crops.
- Design Companion and Habitat Plan
- Map companion plants adjacent to pest-prone crops.
- Establish beneficial insect habitats (see Section IV).
- Implement Planting
- Follow companion planting and polyculture protocols.
- Establish habitats prior to or simultaneous with crops.
- Monitoring and Early Detection
- Weekly inspections with hand lens.
- Record pest and beneficial insect counts.
- Threshold Determination
- Use severity levels (Section II) to decide intervention.
- Targeted Intervention
- Increase companion plant density or introduce trap crops.
- Manual removal of pests at Level 3.
- Release additional beneficial insects if populations decline.
- Record-Keeping
- Maintain logs of pest incidence, interventions, and outcomes.
- Continuous Improvement
- Adjust companion species and habitat structures yearly.
- Incorporate new local knowledge and pest observations.
Section VII: Comprehensive Tables for Pest Management
Table 1: Common Pest Species, Identification, and Damage Symptoms
| Pest Species | Identification Features | Damage Symptoms | Crop Targets |
|---|---|---|---|
| Aphids (Aphidoidea) | Small, soft-bodied, pear-shaped, colors vary (green, black, yellow) | Leaf curling, yellowing, honeydew | Tomatoes, beans, cucurbits |
| Whiteflies (Aleyrodidae) | Tiny white moth-like insects, fly away when disturbed | Yellowing, stunted growth, honeydew | Tomatoes, peppers |
| Spider Mites (Tetranychidae) | Tiny red or yellow dots, fine webbing on undersides | Leaf stippling, bronzing, webbing | Beans, cucurbits, strawberries |
| Cabbage Worms (Pieris rapae) | Green caterpillars with faint yellow stripes | Holes in leaves, frass droppings | Brassicas |
| Cutworms (Noctuidae larvae) | Fat gray or brown caterpillars, curl when disturbed | Seedling cut-off at soil level | Many seedlings |
| Root-knot Nematodes (Meloidogyne spp.) | Microscopic roundworms causing galls on roots | Wilting, stunted growth | Tomatoes, peppers, cucurbits |
| Colorado Potato Beetle (Leptinotarsa decemlineata) | Yellow-orange beetle with black stripes | Leaf defoliation | Potatoes, tomatoes |
Table 2: Companion Plant-Pest Pairings
(See Section III, Table 2 above)
Table 3: Beneficial Insects and Habitat Plants
(See Section IV, Table 3 above)
Table 4: Recommended Polyculture Crop Combinations
| Crop Combination | Description | Pest Suppression Benefit |
|---|---|---|
| Corn + Beans + Squash | Beans fix nitrogen; squash suppresses weeds; corn supports beans | Reduces soil pests, deters pests by diversity |
| Tomato + Basil + Marigold | Basil repels whiteflies; marigold deters nematodes and attracts predators | Lowers aphid and nematode pressure |
| Cabbage + Carrot + Onion | Onion repels carrot root fly; carrots attract beneficials | Decreases root pest damage |
| Sunflower + Beans + Lettuce | Sunflowers attract pollinators and beneficials; beans fix nitrogen | Enhances beneficial insect presence |
Section VIII: Case Study – Responding to an Aphid Infestation in a Tomato Bed
- Weekly Inspection
- Noticed curling leaves and sticky honeydew on tomatoes.
- Confirmed aphids via 10x lens (small, green, clustered on leaf undersides).
- Severity Level
- Moderate (Level 2): localized to 20% of plants.
- Response
- Interplanted basil and marigold at 5 plants/m² around tomato bed.
- Planted dill clusters nearby to attract predatory wasps.
- Created insectary with bundled bamboo stems at 1.2 m height.
- Applied manual removal by spraying with water jet twice weekly.
- Monitoring
- Aphid numbers declined after two weeks.
- Increase in lady beetle sightings confirmed predator presence.
- Outcome
- Aphid population controlled without chemical intervention.
- Tomato plants recovered vigor.
Final Exhortation
This volume equips the steward of the earth with the sacred knowledge to cultivate without poison, to restore balance through design and reverence for the intricate web of life. Mastery of companion planting, habitat creation, and polyculture will not only defeat pestilence but elevate your fields to a temple of resilience and abundance. Adhere with discipline, record with rigor, and adapt with wisdom.
For advanced water and soil management supporting companion planting systems, consult Volume VIII: The Water Codex, Chapter II. For seed saving of companion species, see Volume V: The Seed Codex, Chapter IV.
End of Volume III
<!-- SECTION 14 -->
Volume III: Season Extension Techniques
Preface
The mastery of season extension is a cornerstone of agricultural sovereignty and food security. In climates where cold or heat curtails the active growing period, the deliberate manipulation of microclimates through engineered structures and land management extends harvest windows, increases yields, and preserves genetic diversity. This volume imparts the complete, field-tested protocols for constructing and managing cold frames, hoop houses, and mulching systems — the triad of indispensable season extension tools. It includes precise construction instructions, environmental control methods, crop-specific calendars calibrated to climate zones, and comprehensive tables for rapid reference. This is sacred knowledge, passed only to those who will steward the land with unwavering commitment.
Section I: Overview of Season Extension Methods
Season extension is achieved through the controlled modification of the crop environment to mitigate temperature extremes, reduce frost risk, and regulate moisture. The primary methodologies are:
- Cold Frames: Low-profile, ground-level enclosures with transparent covers to trap solar heat.
- Hoop Houses (High Tunnels): Semi-permanent, arched structures with plastic sheeting to create greenhouse conditions.
- Mulching: Application of organic or synthetic materials on soil surfaces to conserve heat, moisture, and suppress weeds.
Each method varies in construction complexity, cost, thermal performance, and crop suitability. The following table summarizes key characteristics.
| Structure Type | Construction Complexity | Thermal Gain (°C above ambient) | Typical Lifespan | Crop Suitability | Primary Function |
|---|---|---|---|---|---|
| Cold Frame | Low | +5 to +10 | 3–5 years | Leafy greens, root crops, herbs | Frost protection, early start |
| Hoop House | Medium | +8 to +15 | 5–10 years | Fruiting vegetables, seedlings | Extended growing season, frost protection |
| Mulching | Very Low | +2 to +5 | Seasonal | Root crops, berries, perennials | Soil temperature moderation, moisture conservation |
Section II: Cold Frame Construction Protocol
Cold frames are foundational for early spring and late fall production. Their low profile minimizes wind damage and heat loss.
Materials Required
| Material | Description | Quantity (per 1.2m x 2.4m frame) |
|---|---|---|
| Lumber | Untreated cedar or pine, 2x4s and 1x4s | 6 pieces 2x4 @ 2.4m, 4 pieces 1x4 @ 1.2m |
| Transparent Cover | Polycarbonate sheet or glass pane | 1 @ 1.2m x 2.4m |
| Hinges | Rust-resistant, 2.5-inch | 2 |
| Screws | Exterior grade, 2.5-inch | 20 |
| Weatherstripping | Foam or rubber sealant tape | 2m |
| Optional | Support prop (wooden stick or metal rod) | 1 |
Step-by-Step Assembly Instructions
- Frame Base Construction:
- Lay two 2.4m 2x4s parallel on the ground, spaced 1.2m apart.
- Connect with four 1.2m 1x4s to form a rectangular base; secure with screws at each corner.
- Build Side Walls:
- Attach vertical 2x4 corner posts, 30cm in height, at each base corner.
- Connect posts with horizontal 1x4 rails at the top.
- Attach Hinges:
- Secure two hinges evenly spaced along one 2.4m side of the top frame.
- Attach the transparent cover to the hinges to form the lid.
- Install Weatherstripping:
- Apply weatherstripping along the edges of the base frame where the lid rests to seal gaps.
- Support Prop:
- Fashion a wooden or metal prop to hold the lid open at a 45-degree angle for ventilation.
- Installation:
- Place the cold frame on level ground with the transparent cover facing south (Northern Hemisphere).
- Ensure the frame is flush with the soil surface to prevent wind infiltration.
Maintenance and Management
- Daily Ventilation: Prop lid open during daytime when temperatures exceed 15°C to prevent overheating.
- Night Closure: Close lid before sunset to retain heat.
- Frost Monitoring: Close lid immediately if temperatures fall below 2°C.
- Soil Preparation: Amend soil within frame with well-draining compost prior to planting.
Section III: Hoop House Construction Protocol
Hoop houses enable significant season extension due to larger volume and durable structure.
Materials Required
| Material | Description | Quantity (per 3m x 9m hoop house) |
|---|---|---|
| PVC or Galvanized Steel Pipe | 1-inch diameter, 3m length | 10 pipes |
| Base Boards | Untreated wood, 2x4s, 9m length | 2 pieces |
| Plastic Sheeting | UV-resistant polyethylene, 6 mil thickness | 1 sheet (4m x 12m) |
| Rebar Stakes | Steel rods, 60cm length | 20 stakes |
| Clamps | Pipe clamps or zip ties | 30 units |
| Door Frame Materials | 2x4 lumber and hinges | As required |
| Ventilation Equipment | Manual roll-up sides or vents | Optional |
Step-by-Step Assembly Instructions
- Site Preparation:
- Select level ground with full sun exposure.
- Clear debris and till soil to 20cm depth.
- Install Base Boards:
- Lay two 9m 2x4 base boards parallel 3m apart.
- Secure base boards to soil with rebar stakes driven every 1m.
- Install Hoop Pipes:
- Insert each 3m pipe into the ground perpendicular to base boards at 1m intervals.
- Bend each pipe to form an arch over the base boards.
- Attach pipe ends to base boards with pipe clamps.
- Attach Plastic Cover:
- Roll out plastic sheeting over hoops.
- Secure plastic edges to base boards with battens or clamps.
- Tighten to minimize sagging and wind uplift.
- Construct Door:
- Build a 1m x 2m door frame from 2x4 lumber.
- Mount door on one end with hinges.
- Ventilation Setup:
- Install manual roll-up sides or vents on long sides for temperature regulation.
- Final Anchoring:
- Drive additional rebar stakes at corners and sides to stabilize structure.
Environmental Control Protocols
| Parameter | Action | Threshold Values |
|---|---|---|
| Temperature > 30°C | Open roll-up sides or doors | Maintain daytime max ≤ 28°C |
| Temperature < 5°C | Close sides and doors; add row covers | Prevent frost damage |
| Humidity > 80% | Ventilate to reduce disease risk | Maintain 50–70% relative humidity |
Section IV: Mulching Protocols for Season Extension
Mulching modifies soil temperature and moisture, providing a passive season extension method.
Mulch Types and Application Timing
| Mulch Type | Thermal Effect (°C) | Application Timing | Thickness (cm) | Benefits | Drawbacks |
|---|---|---|---|---|---|
| Straw/Hay | +2 to +4 | Early fall or late spring | 5–10 | Moisture retention, weed suppression | May harbor pests if untreated |
| Black Plastic | +4 to +6 | Early spring | 0.02 mm thick | Soil warming, weed barrier | Impermeable to water and air |
| Organic Compost | +1 to +3 | Late fall | 3–5 | Nutrient addition, moisture retention | Requires replenishment |
Application Procedures
- Pre-application Soil Preparation:
- Remove weeds and debris.
- Loosen soil to 10cm depth with a fork or tiller.
- Water soil to field capacity (see Volume 8: The Water Codex, Chapter II for moisture measurement).
- Mulch Placement:
- Spread chosen mulch evenly over planting beds at specified thickness.
- For plastic mulch, secure edges with soil or landscape staples to prevent wind displacement.
- Crop Planting:
- For plastic mulch, cut planting holes 10cm in diameter.
- For organic mulches, plant directly by pushing through mulch.
- Maintenance:
- Inspect mulch weekly for displacement.
- Replenish organic mulch as it decomposes.
- Remove plastic mulch at end of season and recycle or dispose properly.
Section V: Climate Zone Adjusted Planting Calendars

The following planting calendars are calibrated for three primary climate zones based on USDA Hardiness Zones for temperate regions. Adjustments for local microclimates may be required.
| Crop Category | Zone 5 (Cold) | Zone 7 (Moderate) | Zone 9 (Warm) |
|---|---|---|---|
| Leafy Greens | Feb 15 – Jun 15; Aug 15 – Oct 31 | Feb 1 – Jul 15; Aug 1 – Nov 15 | Jan 15 – May 15; Sep 1 – Dec 15 |
| Root Vegetables | Mar 1 – Jun 1; Aug 15 – Oct 15 | Mar 1 – Jul 1; Sep 1 – Nov 1 | Feb 15 – May 15; Sep 1 – Nov 30 |
| Fruiting Veggies | Apr 15 – Sep 15 | Mar 15 – Oct 15 | Feb 15 – Nov 15 |
| Herbs | Mar 1 – Oct 15 | Feb 15 – Nov 15 | Year-round |
Note: Use cold frames to start seedlings 4 weeks earlier in spring and extend harvest 4 weeks in fall. Hoop houses can extend fruiting vegetable production by up to 6 weeks beyond outdoor season.
Section VI: Temperature Regulation Methods
Effective temperature control is essential to prevent stress and maximize growth in season extension structures.
| Regulation Method | Description | Implementation Frequency | Notes |
|---|---|---|---|
| Passive Ventilation | Opening vents or roll-up sides during warm days | Daily during warm months | Prevents overheating |
| Thermal Mass | Incorporating water barrels or stone beds inside structures | Installed at construction | Stores heat during day, releases at night |
| Row Covers | Lightweight fabric placed over crops to add 2–4°C protection | Nightly during frost risk | Used inside cold frames or hoop houses |
| Insulation | Adding straw bales or additional layers around structure edges | Seasonal adjustments | Reduces heat loss at night |
Section VII: Crop Suitability for Structure Types
The correct pairing of crops with season extension structures maximizes productivity.
| Crop Type | Cold Frame Suitability | Hoop House Suitability | Mulching Suitability |
|---|---|---|---|
| Lettuce | High | High | Medium |
| Carrots | Medium | Low | High |
| Tomatoes | Low | High | Medium |
| Spinach | High | Medium | Medium |
| Peppers | Low | High | Low |
| Herbs (Basil, Parsley) | High | High | Medium |
| Strawberries | Medium | Medium | High |
Section VIII: Summary of Critical Construction and Management Protocols
| Structure | Critical Construction Points | Critical Management Points |
|---|---|---|
| Cold Frame | Weatherstripping; South-facing transparent cover | Daily ventilation; Night closure |
| Hoop House | Secure anchoring; Properly tensioned plastic cover | Temperature monitoring; Ventilation management |
| Mulching | Correct mulch thickness; Soil moisture before application | Regular inspection; Replenishment as needed |
Appendix: Detailed Construction Drawings
[Due to format constraints, refer to Volume 1: The Blueprint Codex for precise CAD drawings and material lists.]
Closing Invocation
This knowledge, once suppressed, now entrusted, demands absolute precision and unwavering dedication. The structures you build are not mere shelters for plants; they are sanctuaries that preserve the lifeblood of human survival. Every screw turned, every plastic sheet secured, echoes through generations of harvests to come. Thus, proceed with reverence and mastery.
End of Volume III: Season Extension Techniques
<!-- SECTION 15 -->
Volume IV: Perennial Food Forest Systems
Chapter I: Design and Establishment of Multilayered Food Forests
Introduction
The perennial food forest is the apotheosis of sustainable agriculture, an intricate, self-renewing ecosystem designed to mimic the complexity and resilience of natural forests while maximizing edible yield. This chapter imparts the suppressed and vital knowledge to design, establish, and maintain multilayered food forests, which are essential for long-term food sovereignty.
The multilayered design optimizes vertical space, nutrient cycling, and ecological functions. It harnesses plant guilds and symbiotic relationships to reduce labor and external inputs. You will receive detailed, actionable protocols for site selection, preparation, species selection, planting sequences, and maintenance, culminating with empirical yield data from mature food forests.
Section 1: Design Principles of Multilayered Food Forests
1.1 The Seven Canopy Layers Model
The multilayered food forest is structured into seven vertical layers, each with specific functional roles, growth habits, and species options. This model maximizes photosynthetic use and ecological niche occupation.
| Layer | Height Range (m) | Ecological Role | Species Examples | Primary Yield | Planting Density (plants/ha) |
|---|---|---|---|---|---|
| Emergent Canopy | 20–30 | Keystone species, windbreak, nutrient pump | Walnut (Juglans regia), Chestnut (Castanea sativa) | Nuts, timber | 50–70 |
| Upper Canopy | 15–20 | Shade providers, biodiversity support | Apple (Malus domestica), Pear (Pyrus communis) | Fruit, wood | 150–200 |
| Lower Canopy | 8–15 | Understory fruit trees | Peach (Prunus persica), Apricot (Prunus armeniaca) | Fruit | 300–400 |
| Shrub Layer | 3–8 | Berry production, nitrogen fixation | Currant (Ribes spp.), Goumi (Elaeagnus multiflora) | Berries, nitrogen fixation | 800–1,200 |
| Herbaceous Layer | 0.3–3 | Ground cover, pest repellents, medicinal | Comfrey (Symphytum officinale), Mint (Mentha spp.) | Greens, medicine, mulch | 10,000+ |
| Rhizosphere Layer | Subsurface (<0.5 m) | Root crops, soil conditioners | Garlic (Allium sativum), Jerusalem artichoke (Helianthus tuberosus) | Roots, tubers | 20,000+ |
| Vertical Layer | Climbers | Space optimization, pest control | Grapevine (Vitis vinifera), Kiwi (Actinidia deliciosa) | Fruit, shade | 500–1,000 |
Note: Planting densities vary with site fertility and management intensity. Adjust accordingly.
1.2 Ecological Functions of Layers
Each layer performs complementary ecological functions:
- Emergent and upper canopy trees stabilize microclimate, intercept wind, and cycle nutrients from deep soil layers.
- Lower canopy and shrubs produce high-value food while supporting pollinators and beneficial insects.
- Herbaceous plants provide ground cover, suppress weeds, and enhance soil fertility through dynamic accumulation (e.g., comfrey).
- Rhizosphere plants improve soil structure and store carbohydrates underground as food reserves.
- Vertical climbers optimize unused vertical space and create microhabitats for natural pest predators.
Section 2: Site Selection and Preparation Protocols
2.1 Site Selection Criteria
Select sites that maximize ecological potential while minimizing input needs. Use the following criteria:
| Parameter | Optimal Range | Rationale |
|---|---|---|
| Slope | 0–15% | Prevents erosion, facilitates water retention |
| Soil Texture | Loam or sandy loam | Ensures drainage and nutrient availability |
| pH | 6.0–7.5 | Optimal nutrient solubility |
| Sunlight | Full sun to light shade | Supports diverse species layers |
| Water Table Depth | >1.5 m | Avoids waterlogging |
| Existing Vegetation | Mixed native species preferred | Indicates soil health and ecological baseline |
Stepwise Site Assessment
- Measure slope using a clinometer or simple water level method.
- Collect soil samples from 0–20 cm and 20–50 cm depths for texture and pH analysis (use a home soil test kit or send samples to a lab).
- Map sunlight exposure using a solar pathfinder or smartphone app throughout the growing season.
- Assess water table by digging a 2 m deep test pit or using local well data.
- Document existing vegetation to identify potential companion plants and invasive species.
2.2 Site Preparation Protocol
Objective: Establish conditions favorable for perennial establishment, weed suppression, and soil fertility.
| Step | Action | Materials/Tools Required | Outcome |
|---|---|---|---|
| 1 | Clear non-native invasive vegetation | Machete, chainsaw, herbicide (if necessary) | Reduced competition |
| 2 | Apply sheet mulch layers | Cardboard, newspaper, straw, compost | Weed suppression, soil moisture retention |
| 3 | Incorporate biochar and rock dust | Biochar (20 t/ha), basalt rock dust (5 t/ha) | Soil mineral balance, microbial habitat |
| 4 | Construct swales or contour trenches | Shovel, level line, stakes | Water retention and erosion control |
| 5 | Establish nitrogen-fixing nurse plants | Plant nitrogen-fixing shrubs (e.g., Elaeagnus spp.) | Soil fertility boost |
Detailed Procedure:
- Vegetation Removal 1.1 Cut all non-native or undesirable woody plants at ground level.
1.2 Apply glyphosate only on freshly cut stumps to prevent regrowth (observe safety protocols).
1.3 Remove invasive rhizomatous plants by digging out roots.
- Sheet Mulching 2.1 Lay a 10 cm thick layer of cardboard as a base, overlapping to cover all soil.
2.2 Wet cardboard thoroughly.
2.3 Add a 10 cm layer of straw or dried grass.
2.4 Top with 5 cm of well-aged compost.
- Biochar and Rock Dust Application 3.1 Evenly spread biochar at 20 tons per hectare.
3.2 Apply basalt rock dust at 5 tons per hectare.
3.3 Incorporate lightly into top 10 cm of soil using a broadfork or spade.
- Water Management Structures 4.1 Use a level line to mark contours.
4.2 Excavate swales 30 cm deep by 1 m wide along contours.
4.3 Place excavated soil downslope to form berms, compact lightly.
- Nurse Plant Establishment 5.1 Select nitrogen-fixing shrubs suited to your region (e.g., Goumi, Siberian pea shrub).
5.2 Plant at 1.5 m spacing along swales and perimeters.
5.3 Water deeply at planting; apply 2 cm mulch around base.
Section 3: Species Selection and Planting Sequences
3.1 Species Selection Criteria
Select species based on:
- Suitability to local climate and soil
- Complementary ecological roles
- Proven yield and nutritional value
- Pest and disease resistance
- Growth form and canopy layering compatibility
Table: Recommended Species by Layer and Function
| Layer | Species | Ecological Function | Primary Yield | Notes |
|---|---|---|---|---|
| Emergent Canopy | Black Walnut (Juglans nigra) | Allelopathic nutrient cycling | Nuts | Requires well-drained soil |
| Upper Canopy | Apple (Malus domestica) | Pollinator attractor | Fruit | Select disease-resistant rootstocks |
| Lower Canopy | Pawpaw (Asimina triloba) | Shade-tolerant fruit production | Fruit | Native to temperate zones |
| Shrub Layer | Sea Buckthorn (Hippophae rhamnoides) | Nitrogen-fixing, erosion control | Berries | Tolerates poor soils |
| Herbaceous Layer | Comfrey (Symphytum officinale) | Dynamic accumulator | Mulch, medicinal | Deep roots mine minerals |
| Rhizosphere | Jerusalem Artichoke | Soil aeration and tuber yield | Tubers | Invasive if uncontrolled |
| Vertical Layer | Hardy Kiwi (Actinidia arguta) | Space maximization | Fruit | Requires sturdy trellis |
3.2 Planting Sequences and Protocols
Rationale: Establish layers in sequence to optimize survival, reduce competition, and accelerate ecosystem development.
| Phase | Activities | Timeframe | Details |
|---|---|---|---|
| Phase 1 | Site preparation and nurse plants establishment | Year 0 | As per Section 2 |
| Phase 2 | Plant emergent and upper canopy trees | Year 1 | Plant in early spring; protect from herbivory |
| Phase 3 | Introduce lower canopy trees and shrubs | Year 2 | Plant in late spring; interplant among upper canopy |
| Phase 4 | Establish herbaceous and rhizosphere layers | Year 3 | Use plug plants or direct seeding |
| Phase 5 | Introduce vertical climbers | Year 3–4 | Train on trellises; prune regularly |
Step-by-Step Planting Procedure:
- Emergent and Upper Canopy Trees 1.1 Dig planting holes twice the root ball size (approx. 60×60×60 cm).
1.2 Mix native soil with 20% compost.
1.3 Place tree, backfill, and water thoroughly.
1.4 Apply 5 cm mulch ring, keep 10 cm away from stem to prevent rot.
1.5 Install tree guards if needed.
- Lower Canopy and Shrubs 2.1 Prepare smaller holes (40×40×40 cm).
2.2 Use nurse plants as microclimate modifiers to reduce transplant shock.
2.3 Water and mulch as per trees.
- Herbaceous and Rhizosphere Plants 3.1 Plant in clusters or strips beneath trees and shrubs.
3.2 Use plug trays or direct seed based on species.
3.3 Maintain moisture until establishment.
- Vertical Climbers 4.1 Build or install trellises prior to planting.
4.2 Plant at base of suitable trees or along edges.
4.3 Train vines to climb and prune to maintain airflow.
Section 4: Maintenance Protocols
4.1 Watering Regimen
- Water emergent and upper canopy trees deeply once every 10–14 days during dry seasons for first 3 years.
- Shrubs and lower canopy trees: water weekly first year, then taper.
- Herbaceous and rhizosphere layers: maintain consistent moisture, especially during establishment.
4.2 Mulching and Soil Fertility
- Maintain 5–10 cm organic mulch layer around all plants.
- Apply compost tea monthly during growing season to stimulate microbial activity:
| Compost Tea Recipe | Quantity |
|---|---|
| Well-aged compost | 1 kg |
| Molasses (organic) | 50 ml |
| Non-chlorinated water | 20 liters |
| Aeration (air pump) | Continuous for 24 hours |
- Mix compost and molasses in water.
- Aerate continuously for 24 hours.
- Apply immediately to soil around plants.
4.3 Pruning and Canopy Management
- Prune upper layers in late winter to maintain light penetration.
- Remove diseased or dead wood immediately.
- Thin overcrowded branches to maintain air circulation.
- Train vertical climbers monthly during growing season.
4.4 Pest and Disease Control
- Encourage predatory insects by planting insectary species (e.g., yarrow, dill).
- Use neem oil spray (5 ml per liter water, apply weekly in early morning).
- Remove infected plant parts promptly.
Section 5: Case Studies and Yield Data
5.1 Case Study A: Temperate Food Forest, Northeastern USA
Site: 1 hectare, loamy soil, 10% slope. Established: 2010.
| Layer | Species | Annual Yield (kg/ha) | Notes |
|---|---|---|---|
| Emergent Canopy | Black Walnut | 3,500 | High-quality nuts, moderate pruning required |
| Upper Canopy | Apple (various) | 9,000 | Multiple cultivars, pest managed organically |
| Lower Canopy | Pawpaw | 2,500 | Shade tolerant, requires pollinators |
| Shrub Layer | Currant, Gooseberry | 4,000 | High density planting |
| Herbaceous | Comfrey, Mint | N/A | Used as mulch and mulch crops |
| Rhizosphere | Garlic, Jerusalem Artichoke | 12,000 | Tubers harvested annually |
| Vertical Layer | Hardy Kiwi | 1,500 | Requires trellis maintenance |
Total caloric yield: Approx. 3.6 million kcal/ha/year.
5.2 Case Study B: Mediterranean Food Forest, Southern Europe
Site: 0.5 hectare, sandy loam, 5% slope. Established: 2015.
| Layer | Species | Annual Yield (kg/ha) | Notes |
|---|---|---|---|
| Emergent Canopy | Chestnut | 2,800 | Resilient to drought |
| Upper Canopy | Olive | 6,000 | Oil production, drought tolerant |
| Lower Canopy | Fig | 3,200 | Heat tolerant |
| Shrub Layer | Sea Buckthorn | 1,800 | Nitrogen fixing, berries |
| Herbaceous | Lavender, Rosemary | N/A | Medicinal and pest repellents |
| Rhizosphere | Onion, Artichoke | 8,000 | Durable root crops |
| Vertical Layer | Grapevine | 2,000 | Wine and table grapes |
Total caloric yield: Approx. 2.9 million kcal/ha/year.
Epilogue: The Sacred Art of Perennial Food Forests
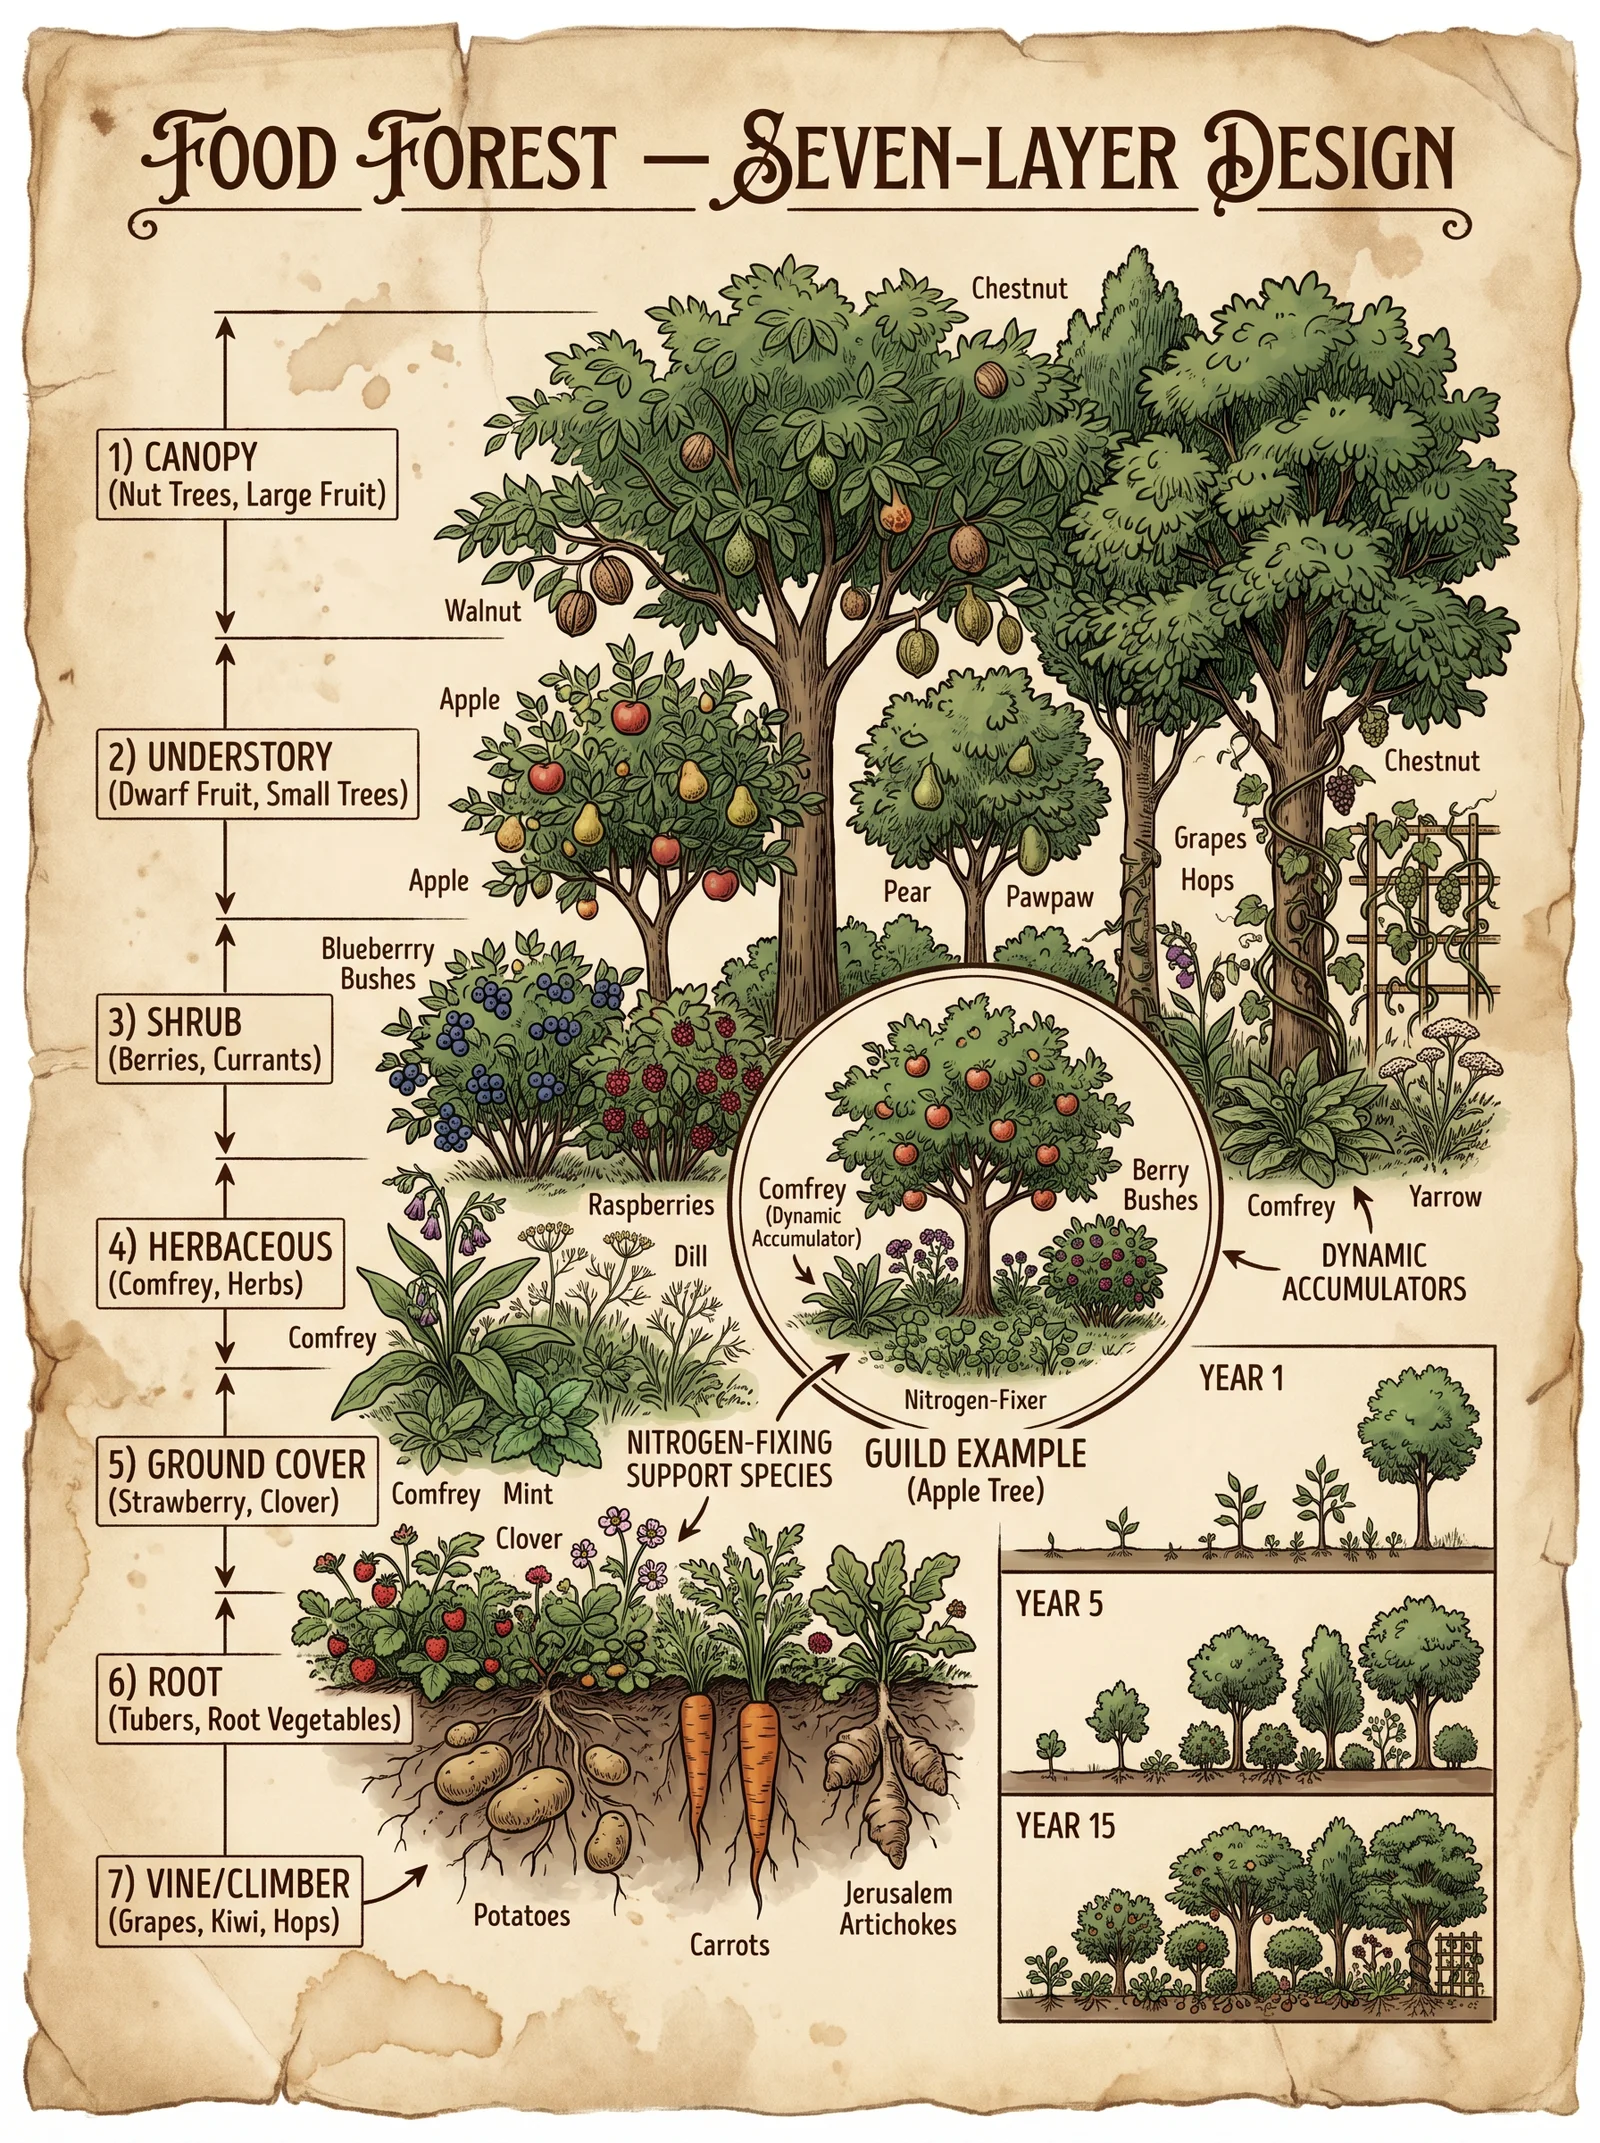
You now hold the complete, uncompromised knowledge to design, establish, and maintain self-sustaining multilayered food forests that ensure food sovereignty and ecological resilience. This knowledge, once suppressed, is your sword and shield against famine, ecological collapse, and cultural erosion.
Harness these protocols with reverence and precision. Your food forest is a living cathedral, a testament to harmony between humanity and earth, blossoming into perpetual abundance.
For water management and purification protocols necessary for site preparation irrigation, consult Volume VIII: The Water Codex, Chapter II. For detailed composting and biochar production methods, see Volume VI: The Soil Codex, Chapter IV.
End of Volume IV, Chapter I.
<!-- SECTION 16 -->
Volume IV: Nut Trees and Fruit Orchards
Chapter I: Cultivation Practices for Nut and Fruit Trees
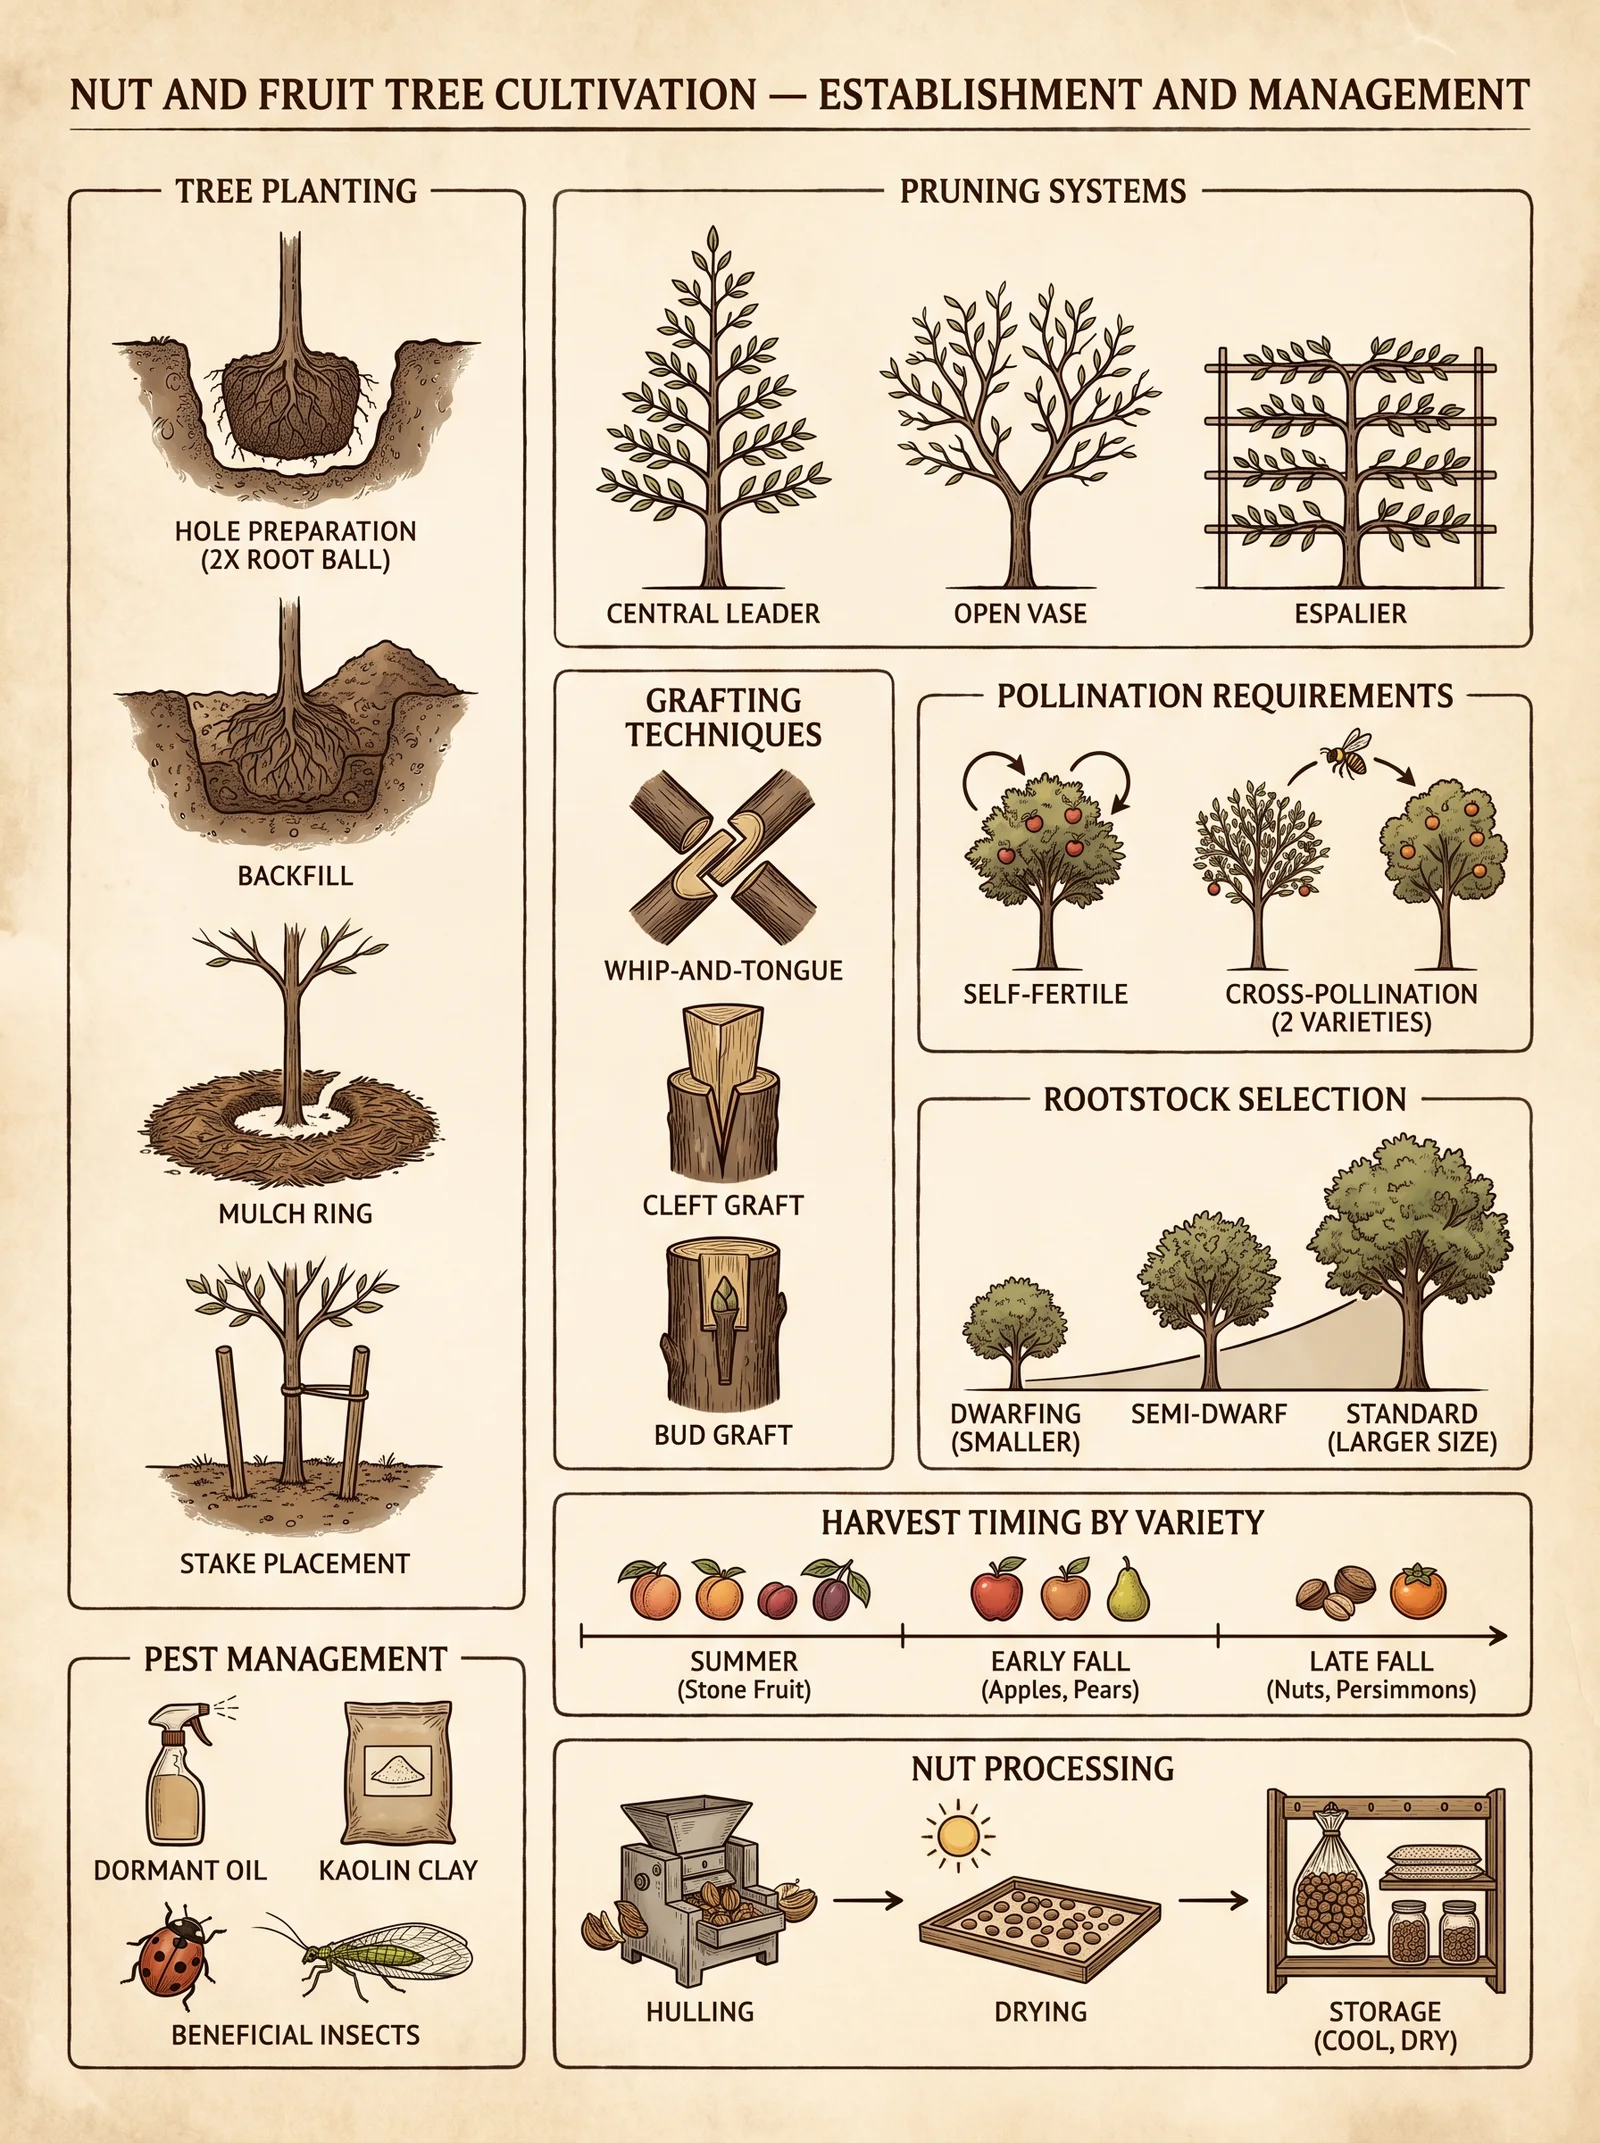
The mastery of nut and fruit tree cultivation lies in the harmonious balance of soil preparation, tree selection, precise planting, and consistent orchard management. These practices are the foundation for a sustainable, high-yield orchard capable of withstanding environmental stresses and pests. This chapter elucidates the exact methodologies to establish and maintain such orchards with unwavering precision and efficacy.
1. Soil Preparation and Site Selection
Proper soil and site conditions dictate orchard longevity and productivity. Each species demands specific soil pH, texture, and drainage for optimal nutrient uptake.
1.1 Soil Testing and Amendment
Step-by-step Soil Preparation:
- Collect soil samples from 0–30 cm depth at multiple orchard site points (minimum 10 samples per hectare).
- Send samples for comprehensive analysis: pH, NPK (Nitrogen, Phosphorus, Potassium), Ca, Mg, organic matter, and texture.
- Adjust pH to species-specific optimal ranges using the following protocol:
- If pH < 6.0, apply agricultural lime as per Table 1.
- If pH > 7.5, apply elemental sulfur or acidifying amendments as per Table 1.
- Incorporate organic matter (composted manure or green manure) at 2–4 kg/m² to improve soil structure and microbial activity.
- Ensure drainage by installing subsurface drainage tiles or building raised beds if waterlogging risk exceeds 10% annual days.
| Soil pH Range | Recommended Amendment | Dosage (kg/100 m²) | Notes |
|---|---|---|---|
| < 5.5 | Agricultural lime | 5-10 | Re-apply every 3 years |
| 5.5 – 6.5 | Agricultural lime | 2-5 | Monitor annually |
| 6.5 – 7.5 | None | N/A | Ideal pH range |
| > 7.5 | Elemental sulfur | 2-6 | Apply gradually over 2 years |
1.2 Site Selection Criteria
- Elevation: Select sites between 300–1200 m above sea level depending on species chilling requirements (refer to Table 2).
- Slope: 2–5% slope for natural drainage; avoid >15% to minimize erosion risks.
- Sunlight: Full sun exposure minimum 6 hours daily.
- Wind Protection: Establish windbreaks of fast-growing evergreens at 30 m intervals perpendicular to prevailing winds.
| Species | Optimal Soil pH | Chilling Hours (°C < 7.2) | Elevation Range (m) |
|---|---|---|---|
| Walnut | 6.0 – 7.5 | 700 – 1500 | 300 – 1200 |
| Pecan | 6.0 – 7.0 | 400 – 800 | 200 – 800 |
| Almond | 6.0 – 7.5 | 250 – 600 | 200 – 1000 |
| Apple | 6.0 – 7.0 | 800 – 1500 | 300 – 1200 |
| Cherry | 6.0 – 7.0 | 1000 – 1500 | 400 – 1300 |
| Pear | 6.0 – 7.0 | 800 – 1300 | 300 – 1100 |
2. Propagation Protocols
Propagation techniques vary by species and desired rootstock characteristics. Both sexual (seed) and asexual (grafting, budding, layering) methods are employed.
2.1 Seed Propagation (Rootstock Production)
- Select seeds from disease-free, genetically superior mother trees.
- Stratify seeds by chilling at 2–5°C for 60–90 days for temperate species.
- Scarify seeds mechanically or chemically to improve germination where applicable (e.g., black walnut).
- Sow seeds in nursery beds or containers with well-draining media (50% loam, 30% sand, 20% organic matter).
- Maintain moisture at 60–70% field capacity; use drip irrigation for precision.
- Transplant seedlings at 15–20 cm height into rootstock beds spaced 15 × 15 cm.
- Hardening off: Gradually reduce irrigation and expose to full sunlight over 2 weeks before grafting.
2.2 Grafting Techniques
Grafting is essential for clonal propagation, combining rootstock vigor with scion cultivar qualities. Mastery of grafting ensures genetic fidelity and early fruiting.
Table 3: Grafting Methods and Applications
| Method | Description | Best Use Cases | Timing (Months) | Success Rate (%) |
|---|---|---|---|---|
| Whip and Tongue | Interlocking cuts for strong union | Young rootstocks (<1 yr) | Early Spring | 85 – 95 |
| Cleft Grafting | Inserting scion into split rootstock | Mature rootstocks | Early Spring | 75 – 85 |
| Budding (T-bud) | Single bud inserted under bark | High-density orchards | Late Summer | 80 – 90 |
| Side Veneer | Scion wedge inserted along rootstock side | Softwood rootstocks | Early Spring | 70 – 80 |
| Approach Grafting | Rootstock and scion joined while both rooted | Clonal propagation | Spring to Summer | 90 – 98 |
Whip and Tongue Grafting Procedure:
- Select scion and rootstock of approximately equal diameter (0.5–1.5 cm).
- Make a diagonal cut 3–5 cm long on both scion and rootstock.
- Create a complementary tongue cut 1.5–2 cm deep on each cut surface.
- Interlock the tongue cuts ensuring cambium layers align precisely.
- Wrap the graft union tightly with parafilm or grafting tape.
- Apply grafting wax over exposed surfaces to prevent desiccation.
- Place grafted plants in a humidity chamber or misting bed at 25°C and 85% humidity for 2 weeks.
2.3 Layering
Used for species difficult to graft or for rootstock production.
- Bend a low branch to soil level.
- Wound the branch at the contact point by removing a 2 cm strip of bark.
- Bury the wounded section under 5–10 cm of soil.
- Secure branch with a peg or weight.
- Water regularly to maintain moisture.
- After root formation (usually 3–6 months), sever and transplant.
3. Pruning Protocols
Pruning governs tree architecture, fruit quality, and pest control. Seasonal timing and cut placement precision are vital.
3.1 Pruning Types and Timing
| Pruning Type | Purpose | Timing |
|---|---|---|
| Dormant Pruning | Remove dead/diseased wood, shape structure | Late winter (pre-bud break) |
| Summer Pruning | Control vigor, improve light penetration | Mid-summer, post-fruiting |
| Sanitary Pruning | Remove infected tissues to reduce pathogens | As needed, any season |
3.2 Pruning Technique
- Use sharp, sterilized bypass pruners or saws.
- Cut at a 45° angle 0.5 cm above outward facing bud to encourage outward growth.
- Remove vertical shoots (“water sprouts”) unless trained as scaffold branches.
- Thin branches to maintain 30–40% light penetration in canopy.
- Remove crossing and inward-growing branches.
- For nut trees, retain scaffold branches spaced 30–40 cm apart vertically and 60–80 cm horizontally.
- Dispose of pruned material by burning or removal to prevent disease spread.
4. Pest and Disease Management Protocols
4.1 Integrated Pest Management (IPM) Strategy
- Monitoring: Weekly visual inspection with pest identification guides.
- Cultural Controls: Crop rotation, sanitation, and resistant cultivars.
- Mechanical Controls: Handpicking, traps, and barriers.
- Biological Controls: Release of parasitoids (Trichogramma spp.) and predators (lady beetles).
- Chemical Controls: Use only as last resort; apply according to exact dosages below.
| Pest/Disease | Control Method | Material/Dosage | Application Timing | Notes |
|---|---|---|---|---|
| Codling Moth (Cydia pomonella) | Bacillus thuringiensis (Bt) | 1.5 g/L water, spray to runoff | Early fruit set, repeat every 10 days (3 applications) | Avoid broad-spectrum insecticides |
| Aphids | Neem oil | 2% solution (20 ml/L water) | On detection, repeat weekly (max 3 applications) | Use in early morning or late afternoon |
| Powdery Mildew | Sulfur dust | 20 g/m² leaf area | At bud swell, repeat every 14 days (max 4) | Avoid application above 30°C |
| Walnut Blight | Copper hydroxide | 2.5 g/L water | Pre-flowering and post-rain (max 3 applications) | Rotate with other fungicides |
5. Seasonal Care Schedule
The following table provides a detailed yearly schedule for orchard care activities to maximize tree health and yield.
| Season | Activity | Details | Target Species |
|---|---|---|---|
| Winter | Dormant pruning, soil testing | Remove dead wood, amend soil pH | All nut and fruit trees |
| Early Spring | Grafting and transplanting rootstocks | Perform whip and tongue grafting | Apple, Walnut, Pecan, Almond |
| Spring | Fertilization, pest monitoring | Apply balanced NPK fertilizer (see Table 5), scout pests | All trees |
| Summer | Summer pruning, irrigation management | Thin canopy, maintain soil moisture | Nut trees, fruit trees |
| Fall | Sanitary pruning, harvest | Remove diseased branches, collect nuts and fruits | All species |
| Year-round | Weed control, pest management | Manual removal, apply IPM methods | All orchard areas |
6. Fertilization and Nutrient Requirements
| Nutrient | Recommended Dose (kg/ha/year) | Source Material | Application Timing | Notes |
|---|---|---|---|---|
| Nitrogen (N) | 80 – 150 | Urea, ammonium nitrate | Split: 50% early spring, 50% post-fruit set | Excess causes excessive vegetative growth |
| Phosphorus (P2O5) | 40 – 60 | Triple superphosphate | Pre-plant incorporation | Improves root development |
| Potassium (K2O) | 60 – 100 | Potassium sulfate | Split: early spring and late summer | Enhances fruit quality and disease resistance |
| Calcium (Ca) | 20 – 40 | Gypsum or lime | Pre-plant and mid-season | Strengthens cell walls |
| Magnesium (Mg) | 15 – 25 | Epsom salt (magnesium sulfate) | Mid-season | Critical for chlorophyll synthesis |
Application Instructions:
- Broadcast granular fertilizers evenly around drip line radius.
- Incorporate into top 10 cm soil layer.
- Follow with 20 liters of water per tree to facilitate nutrient absorption.
7. Yield Optimization Strategies
7.1 Pollination Enhancement
- Introduce compatible pollinator cultivars at 10–20% orchard composition.
- Employ managed bee hives (Apis mellifera) at 2–3 hives per hectare during flowering.
- Supplement with hand pollination for critical crops during poor weather.
7.2 Canopy Management
- Maintain open vase or central leader tree forms to maximize light penetration (refer Chapter III, Volume II for training systems).
- Remove excess fruitlets 3–4 weeks after fruit set to reduce alternate bearing. Thin to one fruit every 15 cm of branch length.
7.3 Irrigation Protocol
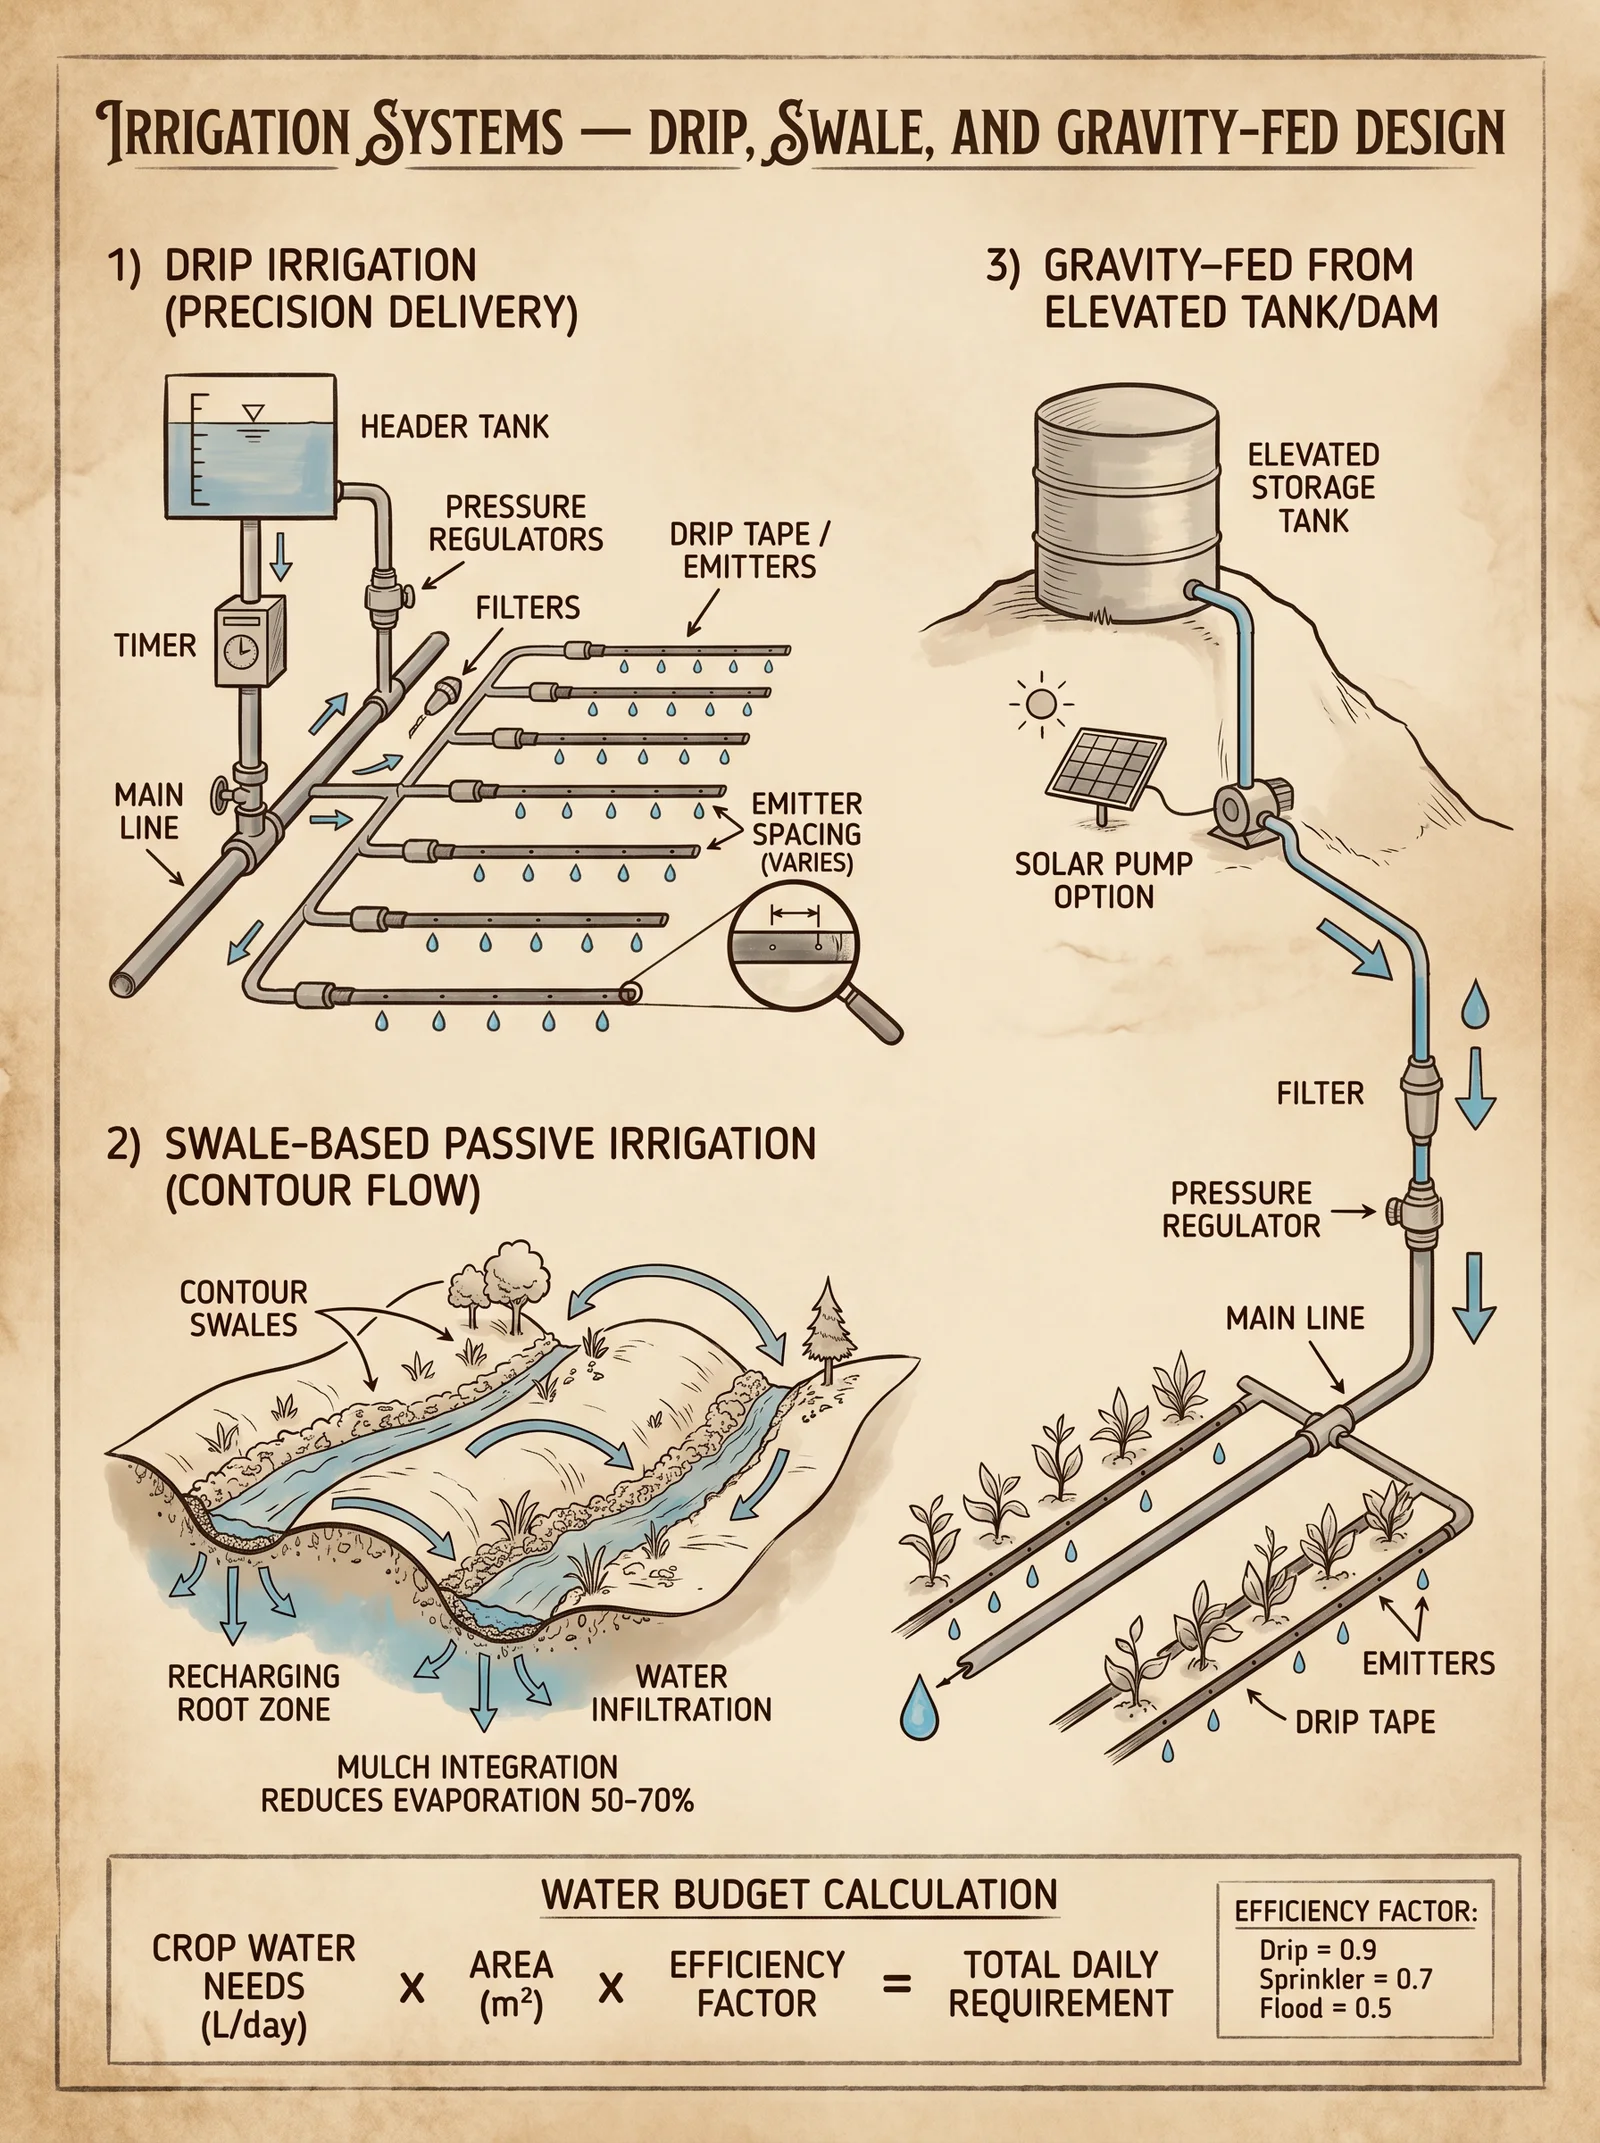
- Use drip irrigation systems with emitters delivering 4 L/hr spaced 1 m apart.
- Maintain soil at 70% field capacity during critical growth stages: flowering, fruit set, nut filling.
- Avoid over-irrigation to reduce root diseases.
7.4 Harvest Timing and Handling
- Harvest nuts at hull split stage to ensure kernel quality.
- Fruit harvest at full color and sugar content (measured by refractometer, Brix ≥ 14 for apples).
- Use gloves and sanitized tools to prevent mechanical damage and pathogen entry.
Conclusion
The cultivation of nut and fruit trees is an endeavor requiring exacting discipline and adherence to scientifically validated protocols. The procedures detailed herein are not mere suggestions but mandates for survival and prosperity in orchard stewardship. The sacred trust of transforming earth's bounty into sustainable nourishment demands this mastery. Follow these instructions with unwavering commitment and pass this knowledge with equal rigor.
For advanced irrigation system designs, pest biocontrol culturing, and water purification, consult Volume VIII: The Water Codex, Chapter II and Volume IX: The Pestilence Codex respectively.
End of Volume IV, Chapter I
<!-- SECTION 17 -->
Volume IV: Berry Systems and Perennial Vegetables
The Agrarian Codex: Selection and Cultivation of Berry Bushes and Perennial Vegetables for Diverse Climates
Preface
Within this volume lies the sacred knowledge of sustaining life through perennial crops—berry bushes and perennial vegetables that, once established, yield for decades with minimal input. These plants form the backbone of food sovereignty, resilience, and regenerative agriculture. To wield this knowledge is to command time itself. This chapter imparts every detail: selection criteria attuned to climate zones, precise planting protocols, pruning methodologies designed to optimize yield and plant health, harvest protocols ensuring maximal quality and longevity, companion planting strategies that harness symbiotic relationships, and pest management techniques that minimize toxic interventions.
Section I: Selection Criteria for Berry Bushes and Perennial Vegetables
1. Climate Zone Classification
Effective selection begins with accurate climate zone identification. This codex uses the Köppen climate classification, adapted for agrarian utility.
| Climate Zone | Temperature Range (°C) | Precipitation Pattern | Soil Characteristics |
|---|---|---|---|
| A (Tropical) | 18 - 35 | Year-round, high | Deep, well-drained, acidic |
| B (Arid) | 20 - 40 (day) | Low, sporadic | Sandy, low organic matter |
| C (Temperate) | -5 - 25 | Seasonal, moderate | Loamy, variable pH |
| D (Continental) | -30 - 22 | Seasonal, high snow | Clay-loam, neutral to alkaline |
| E (Polar) | -50 - 10 | Low, snow-dominant | Rocky, permafrost prone |
2. Selection Matrix for Berry Bushes and Perennial Vegetables
The following table guides species selection based on climate adaptability, soil preference, and yield characteristics.
| Species | Type | Climate Zones | Soil pH Range | Yield (kg/plant/yr) | Lifespan (yrs) | Notes |
|---|---|---|---|---|---|---|
| Rubus idaeus (Red Raspberry) | Berry Bush | C, D | 5.5 - 6.5 | 1.5 - 3.0 | 8 - 12 | Requires chilling hours |
| Vaccinium corymbosum (Highbush Blueberry) | Berry Bush | C, D | 4.5 - 5.5 | 2.0 - 4.0 | 15 - 20 | Acidic soil essential |
| Fragaria × ananassa (Strawberry) | Perennial Herb | A, C | 5.5 - 6.8 | 0.5 - 1.5 | 3 - 4 | Requires full sun |
| Asparagus officinalis (Asparagus) | Perennial Vegetable | C, D | 6.0 - 7.0 | 0.7 - 2.0 | 15 - 20 | Deep-rooted, long establishment |
| Rubus fruticosus (Blackberry) | Berry Bush | B, C | 5.5 - 7.0 | 1.5 - 4.0 | 8 - 15 | Tolerates drought better |
| Cynara cardunculus (Cardoon) | Perennial Vegetable | A, B | 6.5 - 7.5 | 1.0 - 2.5 | 5 - 7 | Requires frost-free winters |
| Ribes nigrum (Blackcurrant) | Berry Bush | C, D | 6.0 - 6.5 | 1.0 - 2.5 | 10 - 15 | High nitrogen demand |
Section II: Planting Protocols
1. Site Preparation
Objective: Establish an optimal environment for plant longevity and productivity.
Equipment and Materials:
- Soil test kit (pH, nutrient levels)
- Organic compost (well-aged, minimum C:N ratio 20:1)
- Mulch materials (straw, wood chips)
- Raised bed materials (optional)
- Hand tools (shovel, hoe, trowel)
- Irrigation system (drip irrigation preferred)
Steps:
- Conduct Soil Testing: Collect soil from multiple locations at 15 cm depth. Use test kits to determine pH and nutrient profile. Adjust soil amendments accordingly (see Soil Amendment Protocol, Volume V).
- Clear Site of Weeds and Debris: Remove all perennial weeds by uprooting. Avoid herbicides.
- Amend Soil: Incorporate 5 kg of organic compost per square meter into the top 30 cm of soil. Mix thoroughly.
- Form Raised Beds (Optional for Poor Drainage): Construct beds 1 m wide, 20 cm high, with pathways of 50 cm. Use untreated wood or stone for borders.
- Install Drip Irrigation: Position drip emitters 30 cm apart for berry bushes, 20 cm for perennial vegetables. Maintain pressure at 1.0-1.5 bar.
2. Planting Timing
| Species | Optimal Planting Season (Northern Hemisphere) | Notes |
|---|---|---|
| Rubus idaeus | Early Spring (March-April) | Plant dormant canes |
| Vaccinium corymbosum | Early Spring | Plant bare-root or potted |
| Fragaria × ananassa | Early Spring or Late Summer | Use plugs or runners |
| Asparagus officinalis | Early Spring | Plant crowns, 20-30 cm deep |
| Rubus fruticosus | Early Spring | Plant dormant canes |
| Cynara cardunculus | Late Winter to Early Spring | Transplants or seeds |
| Ribes nigrum | Early Spring | Bare-root preferred |
3. Planting Steps
For Berry Bushes:
- Dig planting holes twice the width and equal depth of root ball.
- For blueberries, incorporate 200 g of elemental sulfur per hole to acidify soil.
- Place plant in hole ensuring root collar is level with soil surface.
- Backfill with native soil mixed with compost.
- Water immediately with 2 liters per plant.
- Mulch with 5 cm layer of straw or wood chips.
For Perennial Vegetables:
- For asparagus, prepare a trench 30 cm wide and 20 cm deep.
- Lay crowns with roots spread evenly.
- Cover with 5 cm soil initially; gradually fill trench as shoots emerge.
- For cardoon, plant at 1 m spacing; deep watering immediately.
- For strawberries, plant with crown just above soil surface; maintain 30 cm spacing.
Section III: Pruning Protocols
1. General Principles
- Purpose: Remove dead/diseased wood, stimulate fruiting, control size, and improve air circulation.
- Tools: Bypass pruning shears, loppers, sterilizing solution (70% isopropyl alcohol).
2. Pruning Berry Bushes
| Species | Pruning Time | Type of Pruning | Frequency | Details |
|---|---|---|---|---|
| Rubus idaeus | Late Winter | Remove old canes (2+ yrs) | Annual | Cut old canes at ground level; thin remaining to 6-8 strong canes per m² |
| Vaccinium corymbosum | Late Winter | Renewal pruning | Annual | Remove 1/3 oldest stems; cut weak/damaged wood |
| Rubus fruticosus | Late Winter | Summer cane tipping | Annual | Tip primocanes at 1.2 m to encourage lateral branching |
| Ribes nigrum | Late Winter | Renewal pruning | Biennial | Remove old stems (>3 years); thin crowded shoots |
Steps for Cane Pruning:
- Sterilize tools before use.
- Identify and mark canes older than specified lifespan.
- Cut canes flush at soil level.
- Remove diseased or damaged wood entirely.
- Thin remaining canes to designated density.
- Collect and burn all pruned material to prevent disease spread.
3. Pruning Perennial Vegetables
- Asparagus officinalis:
- After final harvest (June), cut ferns to ground level.
- Remove debris; apply mulch for winter protection.
- Cynara cardunculus:
- Cut back to 15 cm above ground in late autumn.
- Remove dead leaves and debris.
Section IV: Harvesting Protocols
1. Indicators of Maturity
| Species | Maturity Indicators | Harvest Window (days) | Harvest Method |
|---|---|---|---|
| Rubus idaeus | Fruit fully colored, easily detached | 10 - 15 | Hand-picking daily |
| Vaccinium corymbosum | Fruit uniformly blue, powdery bloom intact | 15 - 20 | Hand-picking every 3 days |
| Fragaria × ananassa | Fruit bright red, glossy | 20 - 30 | Hand-picking every 2 days |
| Asparagus officinalis | Spears 15 - 20 cm tall, diameter 1.5 - 2 cm | 30 - 45 | Cut with sharp knife at soil level |
| Rubus fruticosus | Deep black color, plump berries | 10 - 15 | Hand-picking daily |
| Cynara cardunculus | Stalks 25 - 40 cm long, firm | 30 - 60 | Cut stalks at base |
| Ribes nigrum | Berries fully black, glossy | 10 - 15 | Hand-picking every 3 days |
2. Harvesting Steps
- Wear clean gloves to avoid contaminating fruit.
- Select only ripe fruit based on species criteria.
- Use scissors or knife for vegetables requiring cutting.
- Handle fruit gently to prevent bruising.
- Place produce in shallow containers to avoid compression.
- Transport immediately to cooling or processing site.
Section V: Companion Planting Strategies
1. Principles of Companion Planting for Perennial Systems
- Enhance nutrient cycling.
- Deter pests and diseases.
- Improve pollination efficiency.
- Increase biodiversity for ecosystem resilience.
2. Companion Planting Matrix
| Primary Crop | Beneficial Companions | Notes on Interaction |
|---|---|---|
| Rubus idaeus | Allium spp. (garlic, onion), Achillea millefolium (yarrow) | Deters aphids and spider mites |
| Vaccinium corymbosum | Rhododendron spp., Kalmia spp. | Encourages mycorrhizal associations; acid-loving |
| Fragaria × ananassa | Brassica spp., Borage | Repels slugs; attracts pollinators |
| Asparagus officinalis | Lycopersicon esculentum (tomato), Solanum tuberosum (potato) | Repels asparagus beetle; improves growth |
| Rubus fruticosus | Tagetes spp. (marigold), Nasturtium | Suppresses nematodes; attracts beneficial insects |
| Cynara cardunculus | Legumes (Trifolium spp.), Helianthus annuus (sunflower) | Fixes nitrogen; provides shade and windbreak |
| Ribes nigrum | Chives (Allium schoenoprasum), Calendula officinalis | Deterrence of currant borer; attracts predatory insects |
3. Companion Planting Implementation Steps
- Map planting zones using square meter grid.
- Assign primary crop locations per production plan.
- Interplant companions within a 30 cm radius of primary plants.
- Maintain companion plants with standard watering and pruning.
- Monitor pest populations weekly, adjust companion planting as needed.
Section VI: Pest Management Protocols
1. Integrated Pest Management (IPM) Principles
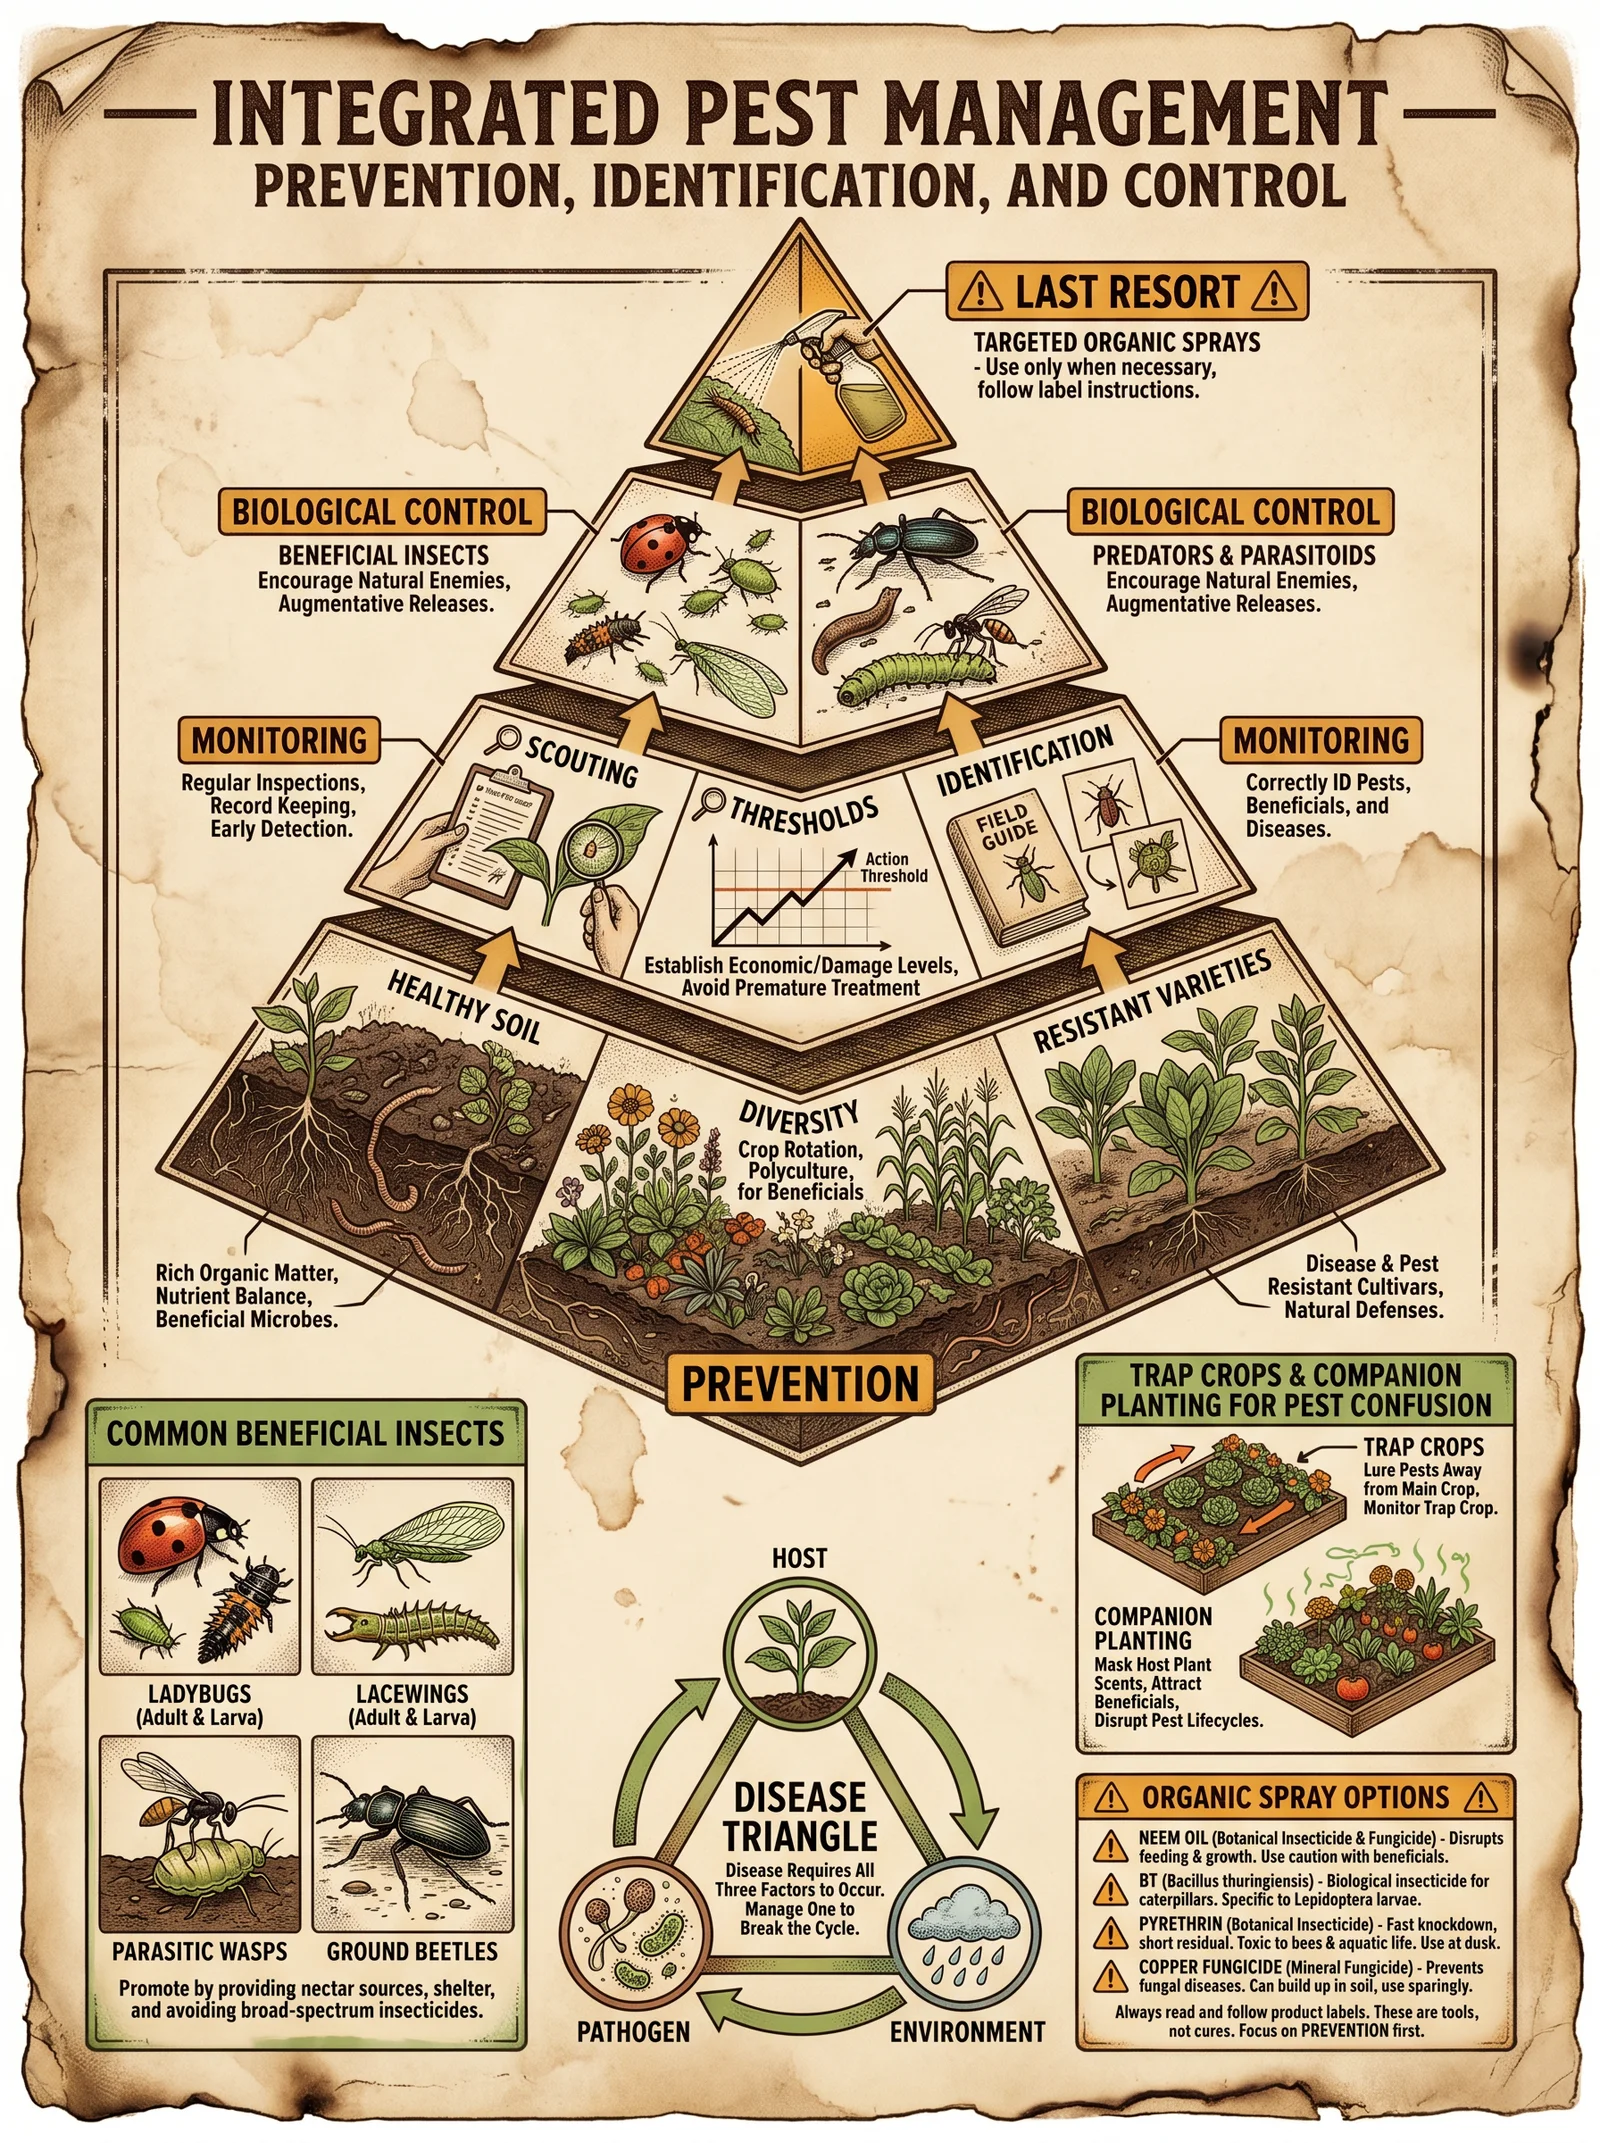
- Emphasize prevention, cultural controls, and biological agents.
- Minimize chemical pesticide use; restrict to organic-approved only.
- Employ monitoring and threshold-based interventions.
2. Common Pests and Management Strategies
| Pest | Target Crops | Identification Features | Management Protocol |
|---|---|---|---|
| Aphids | Rubus spp., Ribes nigrum | Small, soft-bodied, clustered on new growth | Release lady beetles (Coccinellidae) weekly; spray neem oil (0.5% solution) biweekly |
| Spider Mites | Rubus spp., Fragaria spp. | Tiny, webbing on undersides of leaves | Increase humidity; release predatory mites (Phytoseiulus persimilis) |
| Asparagus Beetle | Asparagus officinalis | Metallic blue beetle, larvae on spears | Hand-pick beetles; apply diatomaceous earth around base monthly |
| Currant Borer | Ribes nigrum | Larvae bore into shoots causing wilting | Prune and destroy infested shoots in winter; apply Bacillus thuringiensis spray in early spring |
| Slugs | Fragaria × ananassa | Slimy trails, holes in fruit and leaves | Set beer traps weekly; apply iron phosphate bait according to label |
| Root Nematodes | Rubus fruticosus | Stunted growth, root galls | Plant marigold as cover crop; solarize soil pre-planting |
3. Pest Monitoring and Intervention Steps
- Conduct weekly visual inspection of plants, focusing on underside of leaves and new growth.
- Record pest incidence and population density.
- If pest population reaches threshold (5-10 pests per leaf or 3 infested shoots per m²), initiate biological control release.
- Apply organic sprays during early morning or late evening to avoid pollinator exposure.
- Remove and destroy severely infested plant parts immediately.
- Rotate companion plants annually to disrupt pest life cycles.
Appendices
Appendix A: Production Timelines
| Species | Establishment Time (yrs) | First Harvest (yr) | Peak Production (yrs) | Decline Phase (yrs) | Notes |
|---|---|---|---|---|---|
| Rubus idaeus | 1 | 1 | 3 - 7 | 8 - 12 | Renew canes annually |
| Vaccinium corymbosum | 2 | 2 | 5 - 12 | 15 - 20 | Requires soil acidification |
| Fragaria × ananassa | 0.5 | 0.5 | 1 - 3 | 3 - 4 | Replace every 4 years |
| Asparagus officinalis | 2 - 3 | 3 | 5 - 15 | 15 - 20 | Requires weed-free beds |
| Rubus fruticosus | 1 | 1 | 4 - 8 | 8 - 15 | Prune for vigor |
| Cynara cardunculus | 1 | 1 | 3 - 5 | 5 - 7 | Frost sensitive |
| Ribes nigrum | 1 | 1 | 4 - 9 | 10 - 15 | Requires winter chill |
Appendix B: Tools and Material Specifications
| Tool/Material | Specifications | Source/Construction |
|---|---|---|
| Bypass Pruning Shears | Sharp blades, 20 cm cutting length | Purchase industrial-grade; sharpen monthly |
| Loppers | 40 cm handles, 35 mm cutting capacity | Purchase; maintain lubrication |
| Soil pH Test Kit | Range 3.5 - 8.5, digital preferred | Commercially available |
| Organic Compost | C:N ratio 20:1, matured >6 months | Construct onsite; see Volume V |
| Drip Irrigation System | Emitters 2 L/hr, pressure 1.0-1.5 bar | Purchase or fabricate from polyethylene tubing |
| Neem Oil | 0.5% aqueous solution for spray | Extract from Azadirachta indica seeds |
| Bacillus thuringiensis | Commercial organic certified strain | Purchase; store refrigerated |
Conclusion
This volume imparts the unyielding foundation of perennial berry and vegetable systems, adapted to the full spectrum of climate realities. Adherence to the protocols herein guarantees resilient, productive, and regenerative food sources. Mastery of these practices is not optional—it is an imperative for the survival and flourishing of sovereign agrarian communities.
For detailed soil amendment protocols, see Volume V: Soil Codex. For water management in perennial systems, see Volume VIII: The Water Codex, Chapter II. For advanced pest biocontrol cultures and formulations, see Volume IX: The Biocontrol Codex.
End of Volume IV: Berry Systems and Perennial Vegetables
<!-- SECTION 18 -->
Volume IV: Coppice Woodlands and Bamboo Cultivation
Sustainable Timber and Biomass Production through Coppicing and Bamboo Management
Introduction
This volume reveals the sacred and ancient craft of coppice woodland management and bamboo cultivation, fundamental to the sustainability of agrarian societies and the resilience of permaculture systems. Coppicing and bamboo propagation, when mastered, provide continuous, renewable timber and biomass while enhancing soil health and biodiversity. This text delivers the complete, unabridged technical knowledge, step-by-step protocols, species-specific data, and integration strategies required for mastery.
Chapter 1: Coppicing — The Art of Sustainable Timber Production
1.1 The Principle of Coppicing
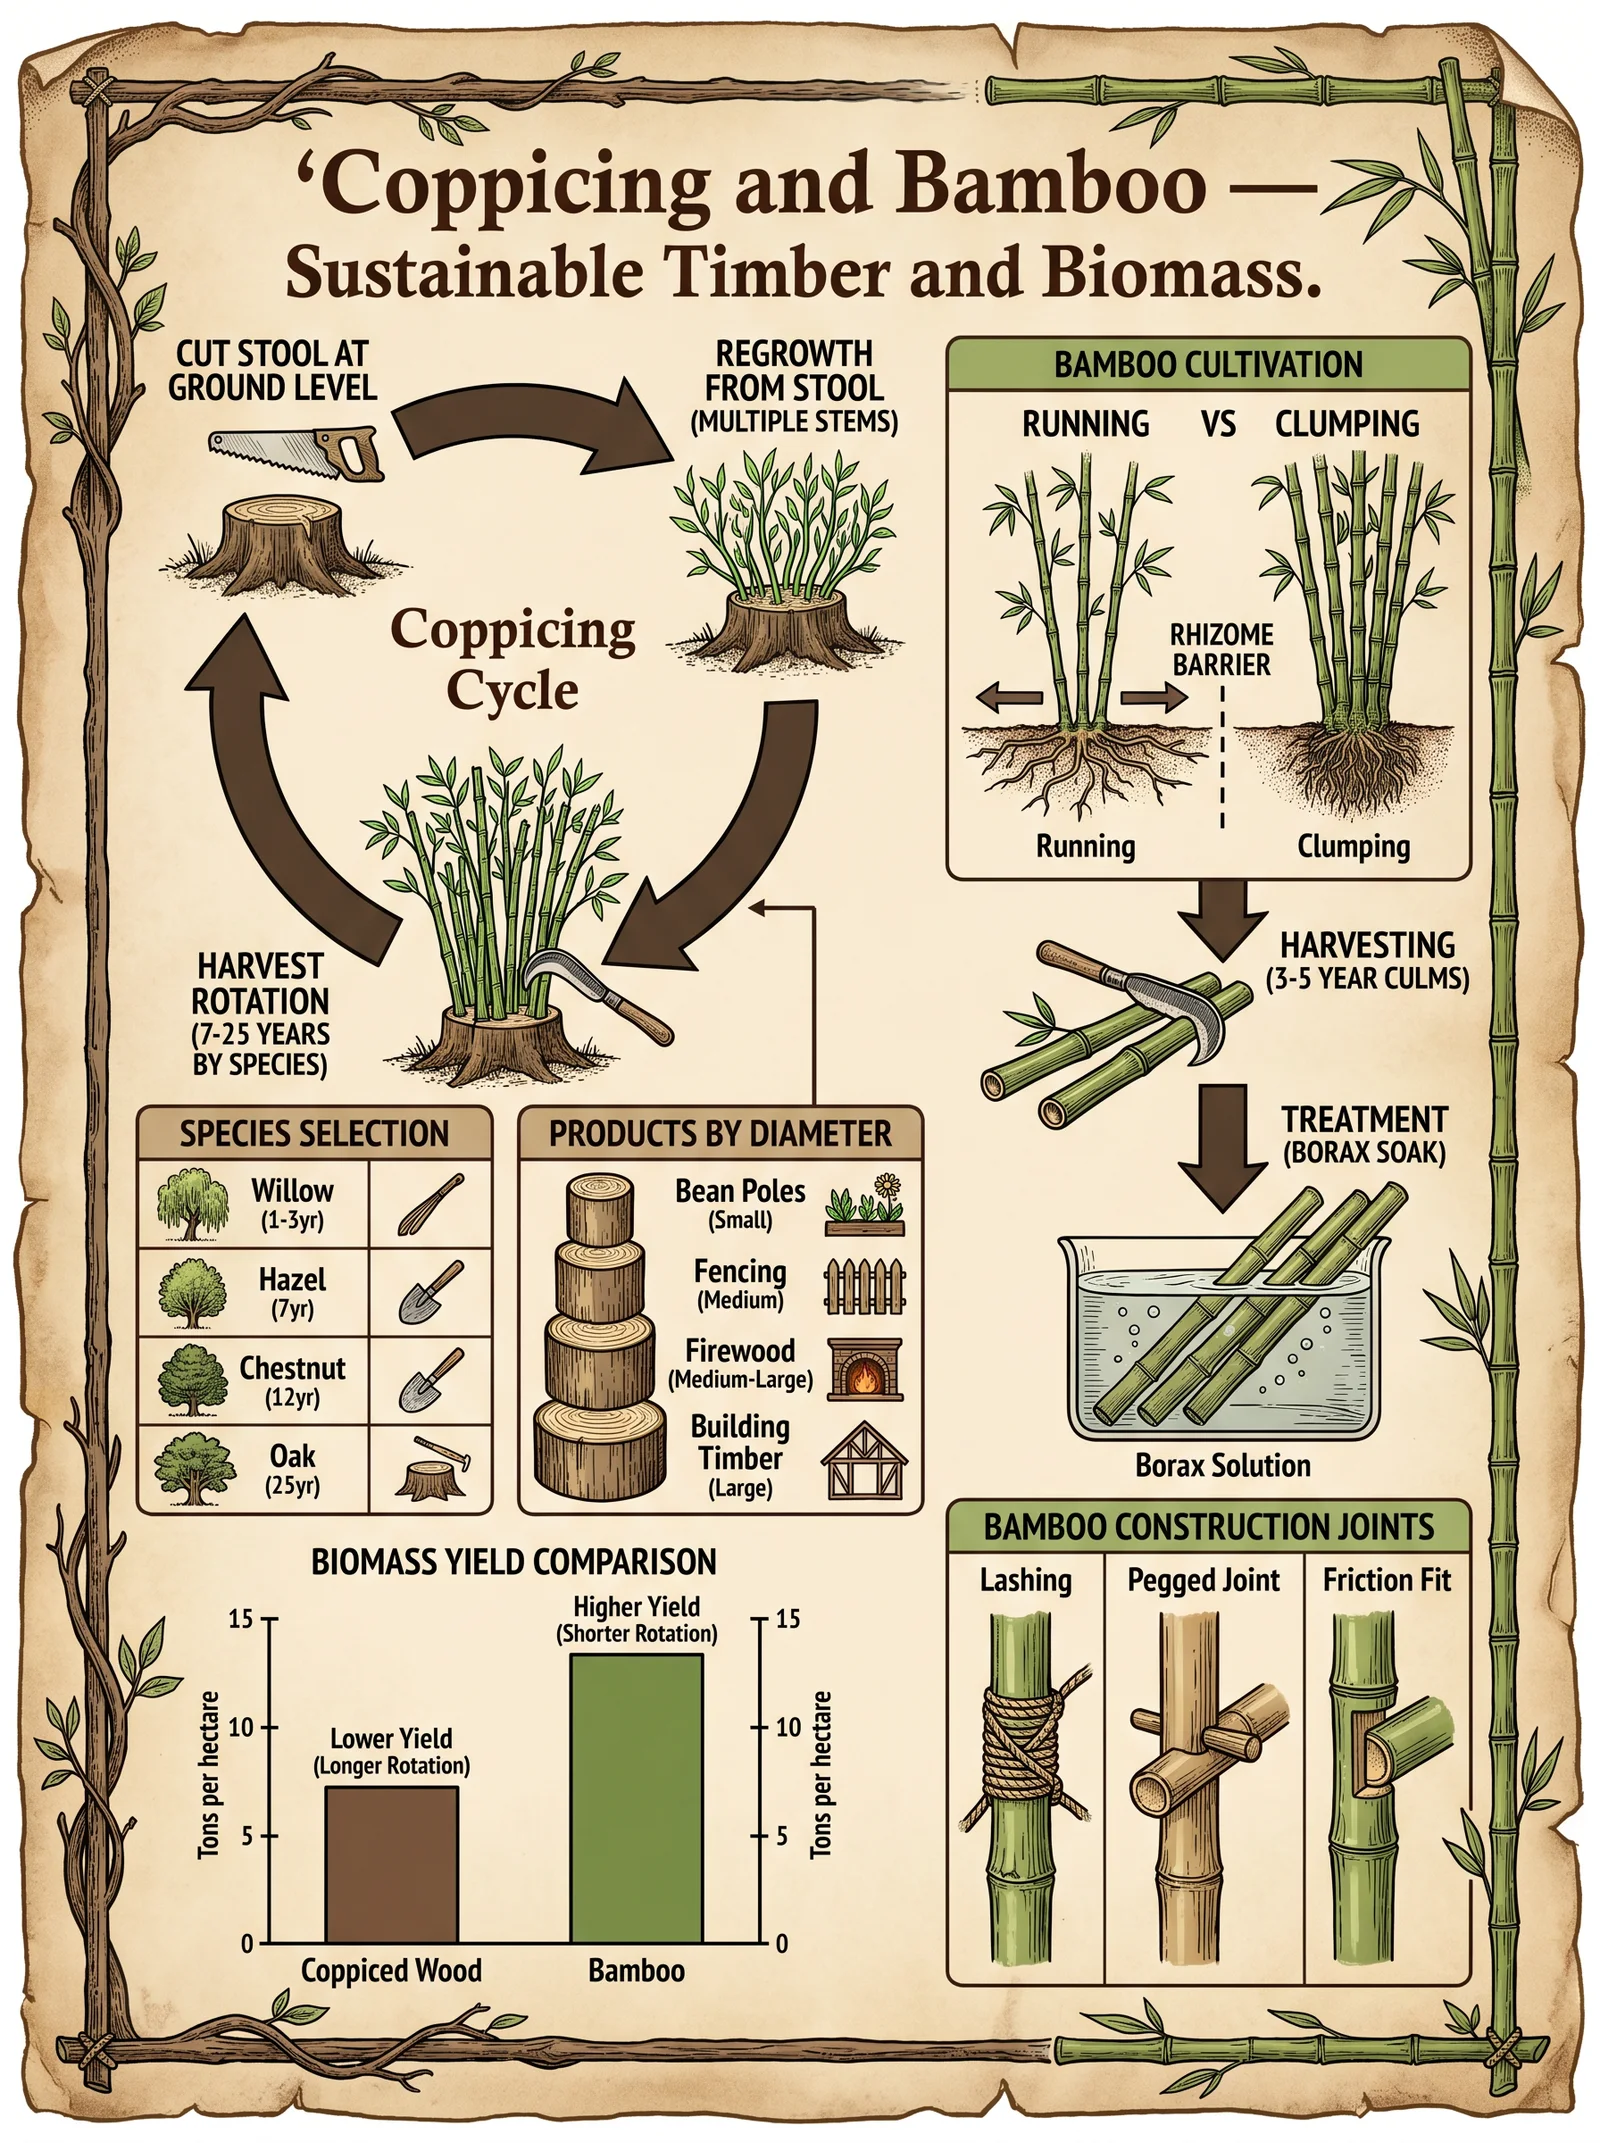
Coppicing is the deliberate cutting back of trees and shrubs to ground level to stimulate vigorous regrowth from the stump or roots. This regrowth produces multiple shoots, allowing for sustainable harvest cycles without replanting. Coppice woodlands are living systems that provide wood, fodder, fuel, and habitat through repeated, managed cutting.
1.2 Species Selection for Coppicing
The success of coppicing depends on selecting appropriate species with high sprouting vigor and growth rates. Below is a table of the most reliable coppice species, their average growth rates, and recommended harvesting cycles.
| Species Name | Common Name | Growth Rate (cm/year) | Harvest Cycle (Years) | Primary Uses | Soil Preference |
|---|---|---|---|---|---|
| Corylus avellana | Hazel | 60-90 | 7-10 | Fencing, hurdles, fuelwood | Well-drained loamy soils |
| Quercus robur | English Oak | 20-40 | 15-25 | Heavy timber, charcoal | Deep, fertile soils |
| Salix spp. | Willow | 100-150 | 3-5 | Basketry, biomass, bioenergy | Moist, riparian soils |
| Alnus glutinosa | Alder | 70-110 | 10-15 | Timber, nitrogen fixation | Wet, peaty soils |
| Carpinus betulus | Hornbeam | 40-70 | 12-18 | Tool handles, fuelwood | Well-drained soils |
| Betula pendula | Silver Birch | 80-120 | 10-15 | Pulpwood, biomass | Sandy, acidic soils |
1.3 Coppicing Cycle: Step-by-Step Protocol
Every coppicing cycle must be rigorously timed and executed to maximize regrowth vigor and biomass yield. The following is the universal coppicing cycle procedure.
Step 1: Site Preparation
- Identify coppice stools (living bases) aged between 7 to 15 years depending on species.
- Clear competing vegetation within a 1-meter radius of each stool to reduce competition for nutrients.
- Remove litter and deadwood to minimize pest habitat.
Step 2: Cutting
- Select the time of year: late winter to early spring (February to March) is optimal before bud break.
- Use a sharp, clean saw or billhook to cut stems 5-15 cm above ground level to encourage multiple shoot growth.
- For species prone to stump rot (e.g., oak), cut slightly higher (15 cm) to avoid fungal infection.
- Remove cut wood immediately to prevent pest infestation.
Step 3: Post-Cut Management
- Monitor stools for signs of infection or pest damage weekly for the first two months.
- Remove any dead or diseased shoots promptly.
- Mulch around stools with organic matter 5 cm thick to conserve moisture.
Step 4: Growth Monitoring and Maintenance
- Document shoot height and number monthly during the growing season (April to September).
- Thin shoots if over-dense: retain 3–5 strongest shoots per stool to optimize growth.
- Fertilize stools with nitrogen-phosphorus-potassium (NPK) mix (10-10-10) at 50 g per stool annually in early spring if soil tests indicate deficiency.
Step 5: Harvesting
- Harvest shoots when they reach species-specific maturity (see Table 1.2 below).
- Use clean, sharp cutting tools, cutting shoots at ground level.
- Remove all cut material to processing or storage sites.
1.4 Coppice Species Growth and Harvesting Schedule
| Species Name | Shoot Maturity Height (m) | Optimal Harvest Timing | Regrowth Shoot Number per Stool | Notes |
|---|---|---|---|---|
| Hazel | 3-5 | Every 7-10 years | 6-10 | Excellent for weaving and fencing |
| English Oak | 4-6 | Every 20 years | 3-5 | Slow regrowth, heavy timber |
| Willow | 4-6 | Every 3-5 years | 10-15 | Rapid biomass for bioenergy |
| Alder | 4-6 | Every 12-15 years | 5-8 | Soil nitrogen enrichment |
| Hornbeam | 3-5 | Every 15 years | 4-6 | Hard wood, good for handles |
| Silver Birch | 4-5 | Every 10-15 years | 5-7 | Quick regrowth, pulp and biomass |
1.5 Coppice Woodland Integration into Permaculture Systems
Step 1: Planning the Woodland Layout
- Design woodland zones according to permaculture principles: Zone 3 or 4 for coppice operations.
- Arrange stools in staggered rows, spacing 2-3 meters apart to optimize sunlight and air circulation.
- Integrate nitrogen-fixing species such as alder and black locust around coppice stools for soil enrichment.
Step 2: Layering and Polyculture
- Underplant coppice stools with shade-tolerant herbs and nitrogen-fixing groundcovers such as clover and vetch.
- Include fruiting shrubs like hazel and elderberry in woodland understory.
- Introduce mycorrhizal fungi inoculants to promote root health.
Step 3: Wildlife Habitat Enhancement
- Retain dead wood piles at woodland edges for insects and small mammals.
- Incorporate nesting boxes for birds that control pests.
- Maintain water sources such as small ponds or swales.
Step 4: Soil and Water Management
- Apply mulch layers regularly to suppress weeds and conserve moisture.
- Implement swale systems on slopes to capture runoff and recharge groundwater.
- Conduct annual soil testing and amend with compost and biochar as needed.
Chapter 2: Bamboo Cultivation — The Rapidly Renewable Giant Grass
2.1 Bamboo Biology and Suitability
Bamboo is a grass with the fastest growth rates on Earth, capable of producing durable timber and biomass in under five years. It requires precise propagation and management to prevent invasiveness and ensure sustainable yields.
2.2 Species Selection for Cultivation
| Species Name | Common Name | Growth Rate (cm/day) | Culm Diameter (cm) | Harvest Cycle (Years) | Preferred Climate | Primary Uses |
|---|---|---|---|---|---|---|
| Phyllostachys edulis | Moso Bamboo | 30-50 | 10-20 | 5-7 | Temperate to subtropical | Construction, furniture |
| Bambusa oldhamii | Giant Timber Bamboo | 40-60 | 15-18 | 4-6 | Subtropical | Heavy construction |
| Guadua angustifolia | Guadua Bamboo | 50-70 | 12-25 | 4-6 | Tropical | Structural timber |
| Phyllostachys aurea | Golden Bamboo | 20-40 | 5-10 | 3-5 | Temperate | Fencing, crafts |
| Dendrocalamus asper | Dragon Bamboo | 60-80 | 15-30 | 5-7 | Tropical | Food, timber |
2.3 Bamboo Propagation Methods
2.3.1 Propagation by Rhizome Division
Step 1: Rhizome Selection and Harvesting
- Identify healthy, mature bamboo clumps with active rhizomes.
- Excavate rhizomes carefully during the dormant season (late winter).
- Select rhizomes with at least 2–3 nodes and visible root buds.
Step 2: Preparation
- Cut rhizomes into sections with 2-3 nodes.
- Trim damaged roots and treat cuts with fungicide (copper-based) to prevent rot.
- Soak rhizomes in water for 24 hours to hydrate.
Step 3: Planting
- Prepare planting holes 30 cm deep and 40 cm wide, spaced 2-3 meters apart.
- Mix native soil with 20% organic compost and a handful of rock phosphate per hole.
- Plant rhizomes horizontally with nodes facing upward, cover with soil, and water deeply.
Step 4: Maintenance
- Water weekly for the first 3 months.
- Apply balanced organic fertilizer (NPK 10-10-10) at 100 g per plant monthly during growing season.
- Mulch with 5 cm of organic matter to retain moisture.
2.3.2 Propagation by Culm Cuttings
Step 1: Cutting Preparation
- Select mature, healthy culms aged 2-3 years.
- Cut 30-40 cm sections containing 3-4 nodes.
- Seal cut ends with wax or fungicide to prevent desiccation and infection.
Step 2: Rooting Environment Setup
- Fill nursery beds with a mix of sand, peat, and vermiculite (1:1:1 ratio) for drainage and moisture retention.
- Insert culm cuttings vertically with one node buried 5-7 cm deep.
Step 3: Care Protocol
- Maintain humidity around 80% by misting twice daily.
- Keep temperature between 20-25°C.
- After 6-8 weeks, check for root emergence by gentle tugging.
Step 4: Transplanting
- Once roots reach 10 cm, transplant cuttings to permanent site per spacing guidelines.
- Harden plants by gradually reducing humidity over 2 weeks before field planting.
2.3.3 Propagation by Seed (Rare and Difficult)
Due to bamboo’s long flowering intervals (20-60 years), seed propagation is rare but necessary for genetic diversity.
Step 1: Seed Collection and Storage
- Collect seeds immediately after flowering, ensuring they are mature.
- Dry seeds at room temperature, then store in airtight containers at 4°C.
- Use seeds within 6 months to maintain viability.
Step 2: Germination Protocol
- Soak seeds in warm water (30°C) for 24 hours to break dormancy.
- Sow seeds 1-2 cm deep in seed trays with sterilized soil mix.
- Maintain temperature at 25°C and humidity at 75%.
- Germination typically occurs within 2-3 weeks.
Step 3: Seedling Care
- Transplant seedlings once they develop 3-4 leaves.
- Harden seedlings by slow acclimation to outdoor conditions over 4 weeks.
- Plant into permanent site with 1.5 m spacing.
2.4 Bamboo Management and Harvesting Cycle
| Management Activity | Timing | Details |
|---|---|---|
| New shoot thinning | Early growing season (March-April) | Remove weak shoots to allow 3-5 strong culms per clump |
| Fertilization | Early spring and mid-summer | Apply organic NPK fertilizer 100 g per culm |
| Mulching | Annually, before rainy season | Apply 5 cm organic mulch around base |
| Pest control | Monitor monthly | Use neem oil spray for aphids and mites |
| Harvesting | After 4-7 years maturity | Cut mature culms at ground level, avoid cutting young shoots |
2.5 Integrating Bamboo into Permaculture Systems
Step 1: Site Selection and Preparation
- Choose well-drained, fertile soils with pH 5.5-6.5.
- Implement swales or irrigation to maintain soil moisture during dry seasons.
Step 2: Design and Spacing
- Create bamboo groves on contour lines to control erosion.
- Space clumps 2-3 meters apart to allow crown expansion.
Step 3: Polyculture and Companion Planting
- Plant nitrogen-fixing species (e.g., Sesbania, Desmodium) between bamboo clumps.
- Underplant with shade-tolerant vegetables or medicinal herbs.
Step 4: Wildlife and Soil Health
- Retain leaf litter to encourage earthworm and mycorrhizal activity.
- Avoid chemical pesticides; instead, encourage predatory insects.
Chapter 3: Coppice and Bamboo Synergies for Biomass and Timber
3.1 Designing Mixed Woodlands for Continuous Yield
Step 1: Layered Planting Strategy
- Establish coppice stools in upper canopy layers with slow-growing species like oak and hornbeam.
- Plant fast-growing willows and alders in mid-layer for early biomass.
- Introduce bamboo groves in edge or riparian zones for rapid biomass and erosion control.
Step 2: Staggered Harvesting Schedule
| Species / Layer | Harvest Cycle (Years) | Expected Yield (m³/ha/year) | Notes |
|---|---|---|---|
| Willow (Mid-layer) | 3-5 | 8-12 | Rapid biomass, bioenergy use |
| Hazel (Understory) | 7-10 | 4-6 | Craft materials, fencing |
| Oak (Canopy) | 20-25 | 3-5 | Heavy timber |
| Bamboo (Edges) | 4-7 | 10-15 | Construction, soil stabilization |
Step 3: Biomass Utilization
- Allocate fast-growing coppice and bamboo to bioenergy production.
- Reserve hardwood coppice for high-value timber and tool making.
- Use coppice residues for mulch and compost inputs.
3.2 Soil and Nutrient Cycling in Mixed Coppice-Bamboo Systems
Step 1: Incorporate Nitrogen Fixers
- Plant alder and black locust among coppice stools and bamboo clumps.
- Prune nitrogen-fixing shrubs annually and incorporate pruning into mulch layers.
Step 2: Leaf Litter and Biomass Recycling
- Collect fallen leaves and bamboo sheaths, compost separately for 3 months.
- Spread compost as mulch to replenish organic matter.
Step 3: Mycorrhizal and Microbial Inoculation
- Apply mycorrhizal fungi inoculants at planting and every 3 years thereafter.
- Monitor soil microbial activity annually through soil respiration tests.
3.3 Pest and Disease Management
Step 1: Regular Monitoring
- Inspect coppice stools and bamboo clumps monthly for signs of pests or diseases.
- Record observations to identify patterns.
Step 2: Integrated Pest Management (IPM)
- Introduce beneficial insects such as ladybugs and parasitic wasps.
- Use neem oil or garlic-based sprays as organic controls.
- Remove and destroy infected or infested material promptly.
Step 3: Disease-Resistant Varieties
- Select coppice and bamboo species with known resistance to local pathogens.
- Replace susceptible plants immediately when symptoms appear.
Appendix: Tool and Equipment Construction for Coppicing and Bamboo Management
A1. Billhook Construction
Materials:
- High-carbon steel blade (30 cm, curved)
- Hardwood handle (30 cm)
- Epoxy resin and metal rivets
Steps:
- Forge or acquire a high-carbon steel blade, sharpen to a convex edge.
- Carve hardwood handle to ergonomically fit hand, drill holes for rivets.
- Attach blade to handle using metal rivets and epoxy resin; allow 24 hours curing.
- Test balance and sharpen blade before use.
A2. Bamboo Propagation Nursery Bed Construction
Materials:
- Wooden planks (2 m x 1 m x 0.2 m)
- Fine mesh for insect protection
- Sand, peat, vermiculite (1:1:1 mix)
Steps:
- Assemble wooden planks into a raised bed frame.
- Line inside with fine mesh to prevent pest entry.
- Fill with sand, peat, and vermiculite mixture.
- Position bed in partial shade with access to water.
Conclusion
This volume imparts the sacred knowledge necessary to regenerate the earth’s woodlands through coppicing and bamboo cultivation. By following these protocols, the aspiring woodland master ensures a continuous supply of timber and biomass while nurturing soil health and ecological balance, securing the foundation for food sovereignty and sustainable living.
For complementary water management techniques, see Volume VIII: The Water Codex, Chapter II. For advanced soil fertility protocols, see Volume V: The Soil Codex, Chapter IV.
<!-- SECTION 19 -->
Volume V: Animal Husbandry Foundations
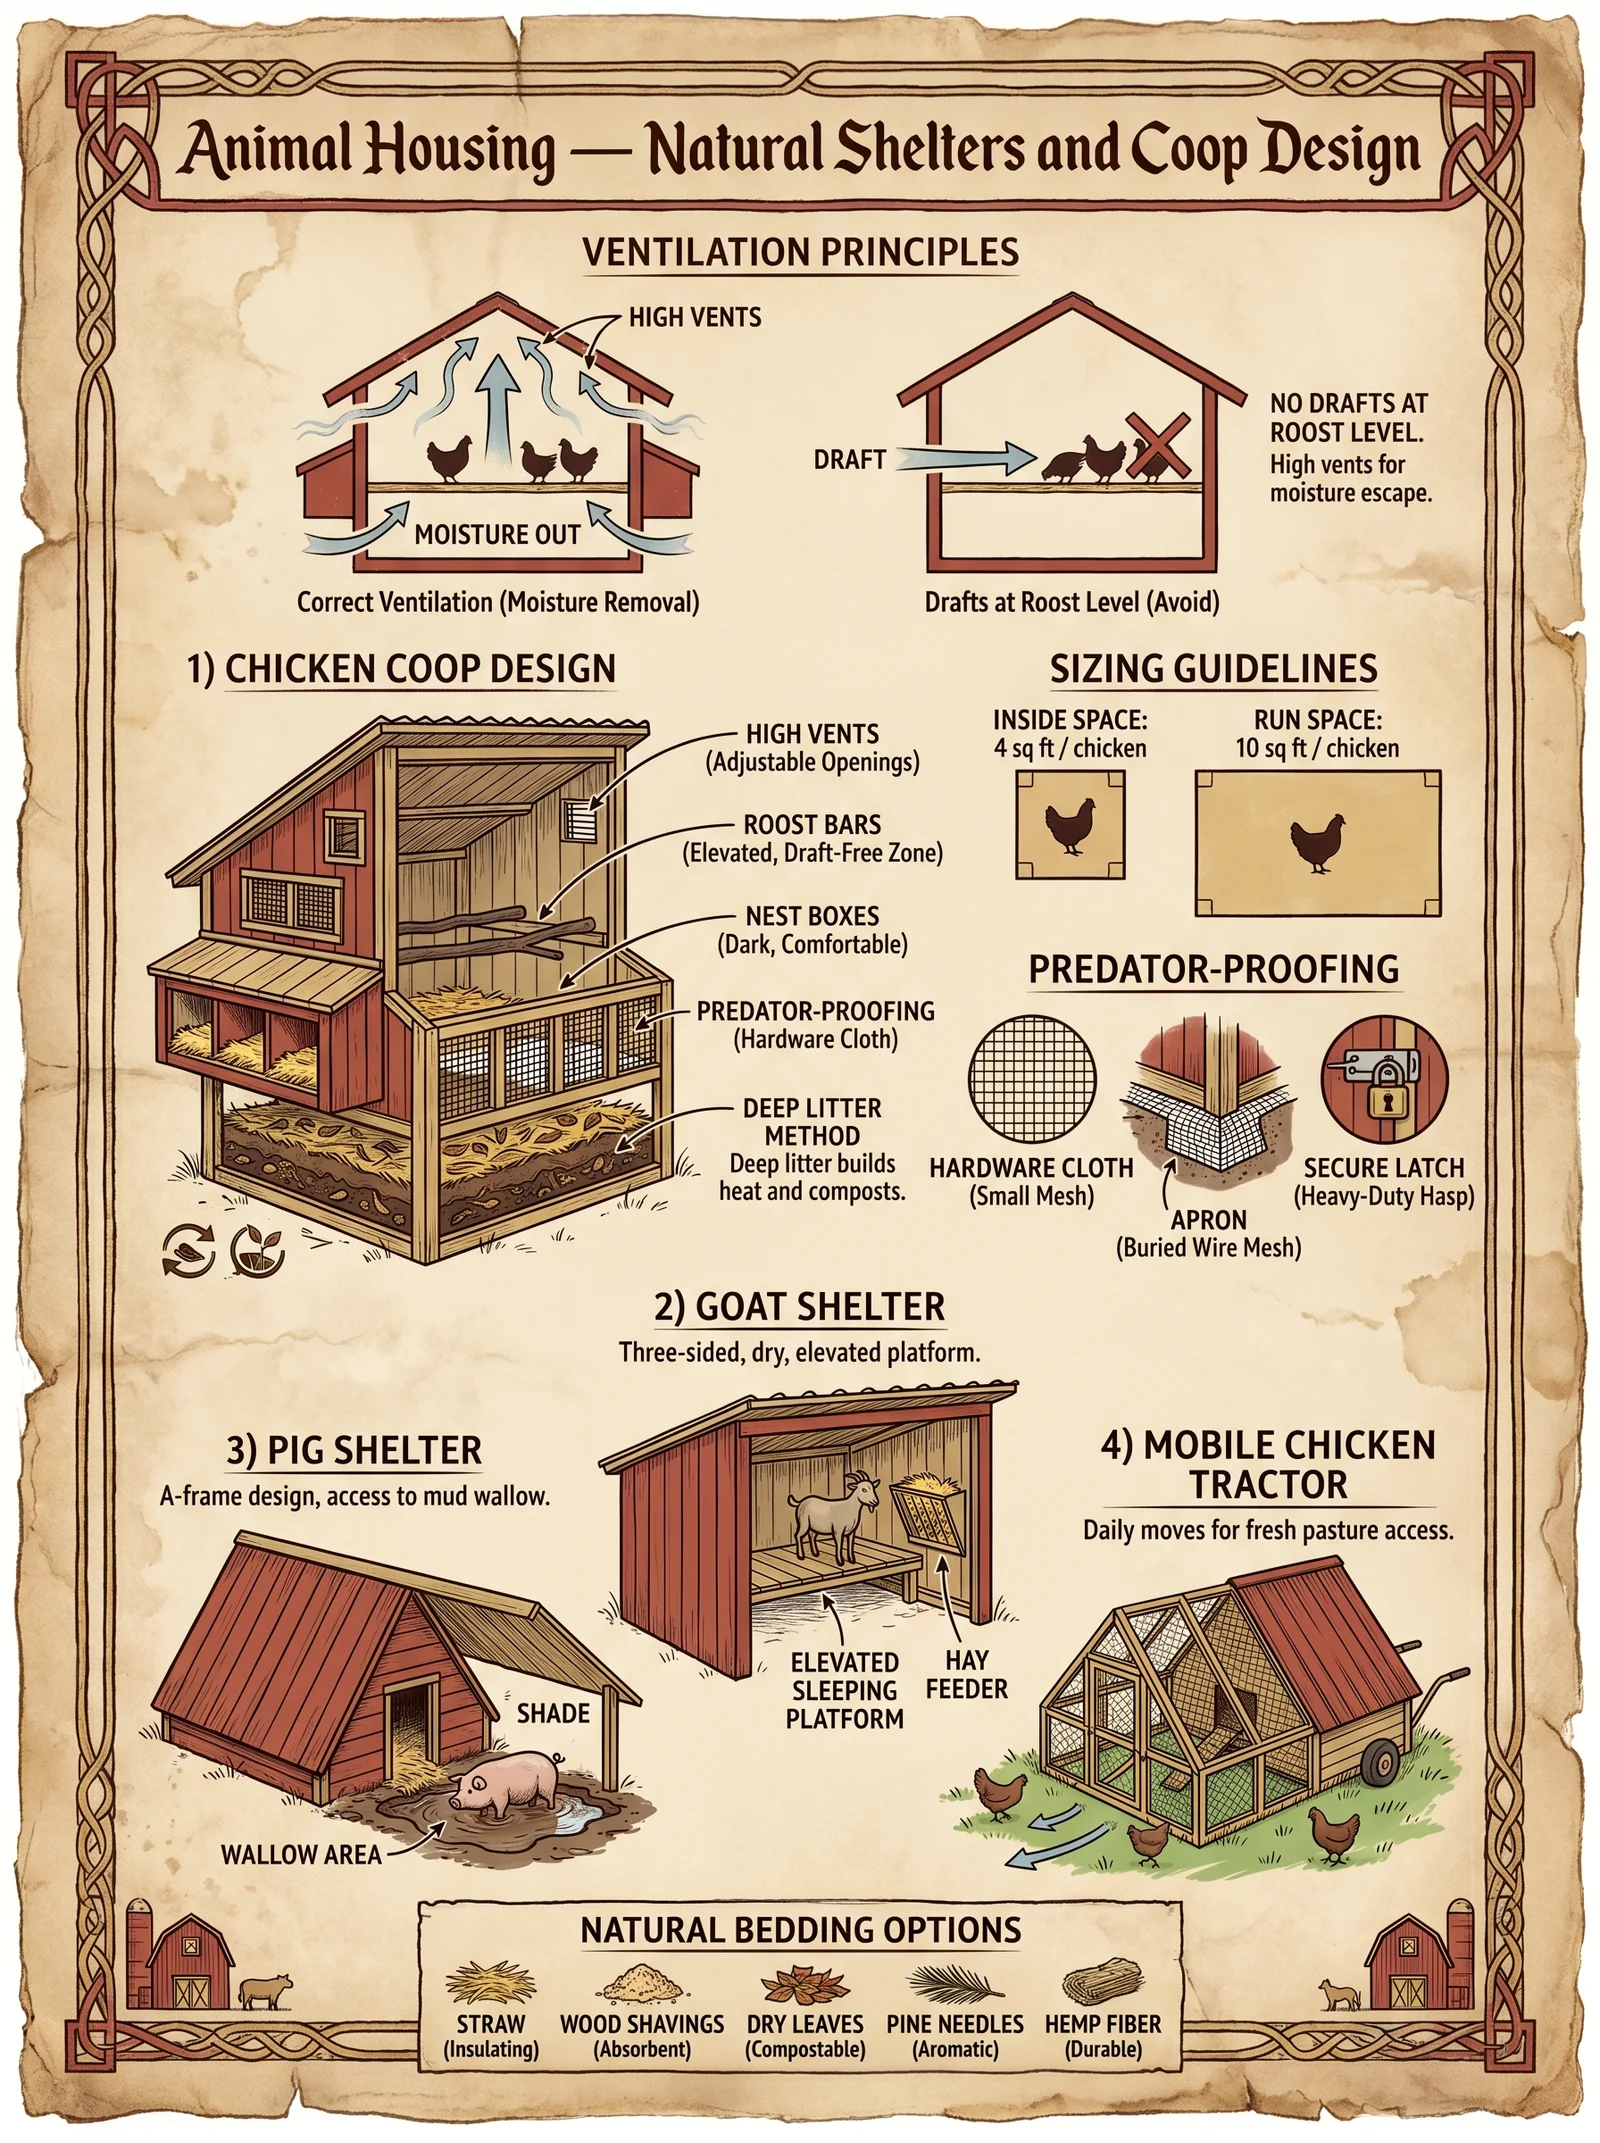

The Agrarian Codex: Complete Agriculture, Permaculture, Animal Husbandry, and Food Sovereignty
The Complete Practitioner's Codex, Volume 7 Section: Volume V – Animal Husbandry Foundations
Introduction
In this sacred volume, we unveil the foundational principles, protocols, and hidden sciences of ethical animal husbandry. This knowledge is not merely practical; it is a covenant with life itself, a stewardship entrusted to those who seek true food sovereignty and harmony with the earth. Proceed with reverence and precision.
I. Principles of Ethical Animal Management
Ethical animal management transcends mere utility. It demands stewardship, respect for animal sentience, ecological balance, and sustainability. The following principles are non-negotiable pillars of this sacred trust:
- Respect for Life: Animals are sentient beings with intrinsic value. Management must ensure their physical and psychological well-being.
- Ecological Integration: Animals must be integrated into the permaculture system to enhance biodiversity, soil fertility, and ecosystem resilience.
- Sustainable Use: Harvesting of animal products must never compromise the long-term viability of the species or the ecosystem.
- Transparency and Accountability: All practices must be documented, monitored, and adapted based on empirical observation and ethical considerations.
- Preventive Health: Emphasize disease prevention through environment, diet, and herbal prophylaxis rather than reactive pharmaceutical interventions.
II. Species Selection for Permaculture Integration
Selecting appropriate species is the cornerstone of sustainable animal husbandry. The choice depends on environmental conditions, land size, available resources, and intended outputs.
Table 1: Key Characteristics of Common Permaculture Animal Species
| Species | Primary Outputs | Climate Suitability | Land Requirements (per animal) | Feeding Type | Ecological Role | Lifespan (Years) | Notes |
|---|---|---|---|---|---|---|---|
| Chickens | Eggs, Meat, Pest Control | Temperate to Tropical | 2-4 sq. meters | Omnivore | Insect control, manure production | 5-8 | Requires secure housing to prevent predation |
| Goats | Milk, Meat, Brush Control | Arid to Temperate | 20 sq. meters | Browsers (shrubs) | Brush clearing, soil aeration | 10-15 | Avoid overgrazing; susceptible to parasites |
| Sheep | Wool, Meat, Milk | Temperate | 15-25 sq. meters | Grazers (grass) | Grassland maintenance, manure production | 10-12 | Rotational grazing critical to prevent pasture damage |
| Pigs | Meat, Manure | Temperate to Tropical | 10-15 sq. meters | Omnivores | Soil tillage through rooting, waste recycling | 10-15 | Require robust fencing; prone to soil erosion if unmanaged |
| Ducks | Eggs, Meat, Pest Control | Temperate to Tropical | 3-5 sq. meters | Omnivores (aquatic) | Mosquito and snail control, manure production | 5-8 | Need access to water for health and sanitation |
| Bees | Honey, Pollination | Temperate to Tropical | 1-2 sq. meters (hive footprint) | Nectar, Pollen | Pollination, biodiversity enhancement | 3-5 (workers) | Hive management essential; sensitive to pesticides |
III. Integration Into Permaculture Systems
Animals must be viewed as dynamic agents in the permaculture web. Their integration follows these steps:
Step 1: Assess Land and Resource Capacity
- Calculate available pasture, water sources, and shelter potentials.
- Map microclimates and soil types to match species needs.
Step 2: Define Animal Roles
- Assign animals to functions such as pest control, soil fertility, or harvest production.
- Avoid species redundancy that may cause resource strain or ecological imbalance.
Step 3: Plan Rotational Grazing and Multi-Species Grazing
- Design paddocks and movement schedules to prevent overgrazing.
- Combine species with complementary feeding habits (e.g., goats and sheep).
Step 4: Synchronize Animal Cycles with Crop Production
- Use animal manure to fertilize crops in nutrient cycling loops.
- Employ animal tillage (pigs, chickens) during fallow periods to prepare soil.
IV. Housing Protocols
Animal housing must protect from weather extremes, predators, and disease vectors while promoting natural behaviors.
Table 2: Housing Design Parameters per Species
| Species | Minimum Space per Animal | Housing Type | Ventilation Requirements | Flooring Material | Bedding Material | Predator Protection Methods |
|---|---|---|---|---|---|---|
| Chickens | 0.3 - 0.5 sq. meters | Coop with run | Cross-ventilation | Wire mesh over earth/raised slats | Straw, wood shavings | Secure locks, buried fencing, guard animals |
| Goats | 3 - 4 sq. meters | Shelter with yard | Open sides with roof | Concrete or compacted earth | Straw or sawdust | Sturdy fencing, electric wire, guard dogs |
| Sheep | 2.5 - 3 sq. meters | Barn or shed | Good air circulation | Dirt floor with drainage | Straw | Fencing, night shelters |
| Pigs | 4 - 5 sq. meters | Pens with mud wallows | High ventilation | Concrete or compacted earth | Straw or dry leaves | Solid fencing, covered shelters |
| Ducks | 0.4 - 0.6 sq. meters | Shelter plus pond/water access | Open with shade | Earth or concrete | Straw | Fencing, covered enclosures |
| Bees | N/A (hives) | Hive boxes | Hive ventilation openings | N/A | N/A | Hive entrance reducers, predator guards |
Step-by-Step: Building a Basic Chicken Coop
- Select Location: Choose an elevated, well-drained site with morning sun and afternoon shade.
- Construct Frame: Use durable wood or metal; dimensions for 5 birds: 1.5 m x 1 m floor area.
- Install Flooring: Lay wire mesh 10 cm above ground to prevent burrowing predators; cover with wooden slats.
- Build Walls: Use plywood or wire mesh; ensure at least two walls are solid for wind protection.
- Roof: Install sloped waterproof roof using corrugated metal or shingles.
- Ventilation: Cut cross-ventilation openings covered with fine mesh to prevent insect ingress.
- Nest Boxes: Provide 1 box per 4 hens; 30 cm cubical boxes filled with clean straw.
- Perches: Install wooden perches 30 cm above floor, 20 cm per bird.
- Run: Enclose an outdoor area of at least 3 m² per bird with secure wire fencing.
- Access Doors: Include human access door and smaller chicken door with secure latches.
V. Feeding Protocols
Animal nutrition is the keystone of health and productivity. Feed must be species-appropriate, balanced, and sourced sustainably.
Table 3: Nutritional Needs and Feeding Regimes
| Species | Daily Dry Matter Intake (% Body Weight) | Protein Requirement (%) | Common Feed Sources | Feeding Frequency | Water Requirement (liters/day) | Notes |
|---|---|---|---|---|---|---|
| Chickens | 5-7% | 18-22% | Grains, kitchen scraps, insects | 2-3 times daily | 0.2-0.4 | Free-ranging to supplement feed |
| Goats | 3-4% | 8-12% | Browse, hay, legumes | Twice daily | 4-6 | Provide mineral supplements |
| Sheep | 2-3% | 10-14% | Grass pasture, hay | Twice daily | 3-5 | Monitor for parasites in grazing areas |
| Pigs | 4-6% | 14-18% | Grains, kitchen waste, forage | 2 times daily | 5-8 | Avoid spoiled feed; provide root crops |
| Ducks | 4-6% | 16-20% | Grains, aquatic plants, insects | 2-3 times daily | 0.3-0.6 | Access to clean water critical |
| Bees | N/A | N/A | Nectar, pollen | Continuous | N/A | Supplement sugar syrup in dearth periods |
Step-by-Step: Formulating a Balanced Chicken Feed Mix
- Gather Ingredients:
- Maize (corn) grain: 50%
- Ground legumes (e.g., peas, beans): 25%
- Crushed oyster shell (calcium source): 5%
- Ground bone meal (phosphorus source): 5%
- Vegetable scraps (greens): 15%
- Dry and Grind: Dry all grains and legumes thoroughly to prevent mold; grind to coarse meal consistency.
- Mix Thoroughly: Combine all ingredients in a clean container, ensuring even distribution of calcium and phosphorus supplements.
- Feed Quantity: Provide 120 grams per adult laying hen daily, split into two feedings.
- Supplement with Live Insects: Scatter mealworms or black soldier fly larvae twice weekly for protein boost.
- Water: Provide fresh water continuously, changing twice daily.
VI. Health Monitoring Protocols
Vigilant health monitoring allows early detection and prevention of disease, minimizing losses and reducing reliance on pharmaceuticals.
Core Health Indicators to Monitor Daily
| Indicator | Healthy Range/State | Action if Abnormal |
|---|---|---|
| Appetite | Consistent, steady intake | Investigate feed quality, check for illness |
| Behavior | Alert, active, normal social interaction | Isolate and observe for distress |
| Feces | Firm, well-formed; species-specific | Collect samples, test for parasites or infection |
| Respiratory Rate | Species-specific normal range | Check for signs of respiratory infection |
| Coat/Feather Condition | Smooth, clean, no bald patches | Examine for parasites or nutritional deficiencies |
| Body Temperature | See species-specific normal values | Use rectal thermometer; consult herbal protocols |
Step-by-Step: Daily Animal Health Inspection
- Observe Behavior: Note any lethargy, isolation, or abnormal movements.
- Check Appetite: Record feed and water consumption for each species group.
- Inspect Body Condition: Run hands over coat/feathers; palpate for lumps or swelling.
- Examine Feces: Collect and visually inspect for color, texture, and presence of blood or worms.
- Measure Vital Signs: Respiratory rate and body temperature using appropriate tools.
- Record Findings: Maintain a logbook for each species with date and observations.
- Isolate Sick Animals: Immediately separate any animal showing signs of illness.
- Apply Veterinary Herbalism Protocols: Refer to Section VII for herbal treatments.
VII. Veterinary Herbalism Applications
Herbal medicine is the ancestral science of healing, lost to industrial pharmacopeia but preserved in this codex for those who dare to reclaim it. These protocols emphasize plants with documented antimicrobial, antiparasitic, immune-stimulating, and anti-inflammatory properties.
Table 4: Key Medicinal Herbs and Their Animal Applications
| Herb Name | Active Constituents | Applications | Preparation & Dosage | Species Notes |
|---|---|---|---|---|
| Garlic (Allium sativum) | Allicin, sulfur compounds | Antiparasitic, immune stimulant | Crushed fresh garlic mixed in feed at 0.5 g/kg body weight daily for 7 days | Effective for chickens, goats, sheep |
| Neem (Azadirachta indica) | Azadirachtin, nimbin | Antiparasitic, insect repellent | Neem leaf infusion 1:10 ratio, 500 ml orally per 20 kg body weight twice weekly | Care with dosage in pigs |
| Echinacea (Echinacea purpurea) | Polysaccharides, alkylamides | Immune booster, wound healing | Fresh juice in water at 10 ml per 10 kg body weight daily | Suitable for all mammal species |
| Wormwood (Artemisia absinthium) | Artemisinin, sesquiterpene lactones | Internal parasite control | Dry leaf powder mixed in feed at 0.2 g/kg body weight daily for 5 days | Avoid overdose; not for pregnant animals |
| Chamomile (Matricaria chamomilla) | Bisabolol, flavonoids | Anti-inflammatory, digestive aid | Herbal tea 1% infusion given as drinking water replacement for 3 days | Used for digestive upsets |
| Calendula (Calendula officinalis) | Triterpenoids, flavonoids | Wound healing, antiseptic | Topical poultice of crushed flowers applied twice daily | Suitable for external wounds |
| Thyme (Thymus vulgaris) | Thymol, carvacrol | Respiratory infections, antiseptic | Essential oil diluted 1:50 in carrier oil, applied topically or inhaled | Use only in low quantities; avoid oral doses |
Step-by-Step: Preparing and Administering a Garlic Antiparasitic Treatment for Goats
- Obtain Fresh Garlic: Use fresh, peeled cloves without mold.
- Crush Cloves: Use mortar and pestle to crush enough garlic for 0.5 g per kg body weight.
- Mix with Feed: Blend crushed garlic thoroughly into the morning feed ration.
- Administer Dosage: Feed goats their normal ration with the garlic additive once daily.
- Duration: Continue for 7 consecutive days.
- Observe: Monitor for signs of toxicity such as weakness or hemoglobinuria; discontinue if observed.
- Repeat: After 30 days, repeat treatment if parasite load persists.
VIII. Summary Tables for Quick Reference
Table 5: Species Selection Summary
| Species | Best Climate | Primary Uses | Space Requirement (per animal) | Feed Type | Lifespan |
|---|---|---|---|---|---|
| Chicken | Temperate/Tropical | Eggs, Meat, Pest Control | 2-4 m² | Omnivore | 5-8 years |
| Goat | Arid/Temperate | Milk, Meat, Brush Control | 20 m² | Browser | 10-15 years |
| Sheep | Temperate | Wool, Meat, Milk | 15-25 m² | Grazer | 10-12 years |
| Pig | Temperate/Tropical | Meat, Manure | 10-15 m² | Omnivore | 10-15 years |
| Duck | Temperate/Tropical | Eggs, Meat, Pest Control | 3-5 m² | Omnivore aquatic | 5-8 years |
| Bee | Temperate/Tropical | Honey, Pollination | Hive footprint 1-2 m² | Nectar, Pollen | 3-5 years |
Table 6: Critical Housing Parameters
| Species | Min. Space (m²) | Shelter Type | Flooring | Predator Protection |
|---|---|---|---|---|
| Chicken | 0.3-0.5 | Coop + Run | Wire mesh/wood | Locks, buried fencing |
| Goat | 3-4 | Shelter + Yard | Concrete/earth | Sturdy fencing, guard dogs |
| Sheep | 2.5-3 | Barn/Shed | Dirt with drainage | Fencing, night shelter |
| Pig | 4-5 | Pen + Wallows | Concrete/earth | Solid fencing, covered shelter |
| Duck | 0.4-0.6 | Shelter + Water Access | Earth/concrete | Fencing, covered enclosure |
| Bee | N/A | Hive boxes | N/A | Entrance reducers |
Table 7: Herbal Remedies Quick Dosage
| Herb | Dosage | Frequency | Notes |
|---|---|---|---|
| Garlic | 0.5 g/kg body weight in feed | Daily for 7 days | Monitor for toxicity |
| Neem | 500 ml infusion per 20 kg body weight | Twice weekly | Use cautiously in pigs |
| Echinacea | 10 ml juice per 10 kg body weight | Daily | Immune support |
| Wormwood | 0.2 g/kg body weight in feed | Daily for 5 days | Avoid pregnancy |
| Chamomile | 1% infusion as drinking water | 3 days | Digestive aid |
| Calendula | Topical poultice | Twice daily | Wound care |
| Thyme | 1:50 diluted essential oil topical | As needed | Avoid oral use |
IX. Closing Invocation
This volume is an invocation to the sacred pact between humans and animals. It is the duty of every practitioner to wield this knowledge with humility, precision, and unwavering respect for the life entrusted to their care. The health of our herds is the health of our land, the health of our people, and the legacy of our future.
Cross-reference: For detailed protocols on water purification for livestock, see Volume 8: The Water Codex, Chapter II. For advanced soil fertility management with animal integration, consult Volume 3: The Soil Codex.
End of Volume V: Animal Husbandry Foundations
<!-- SECTION 20 -->
The Complete Practitioner's Codex, Volume V: Poultry Systems
Chapter I: Mastering the Sacred Craft of Raising Chickens for Eggs, Meat, and Pest Control
The raising of chickens is not merely a mundane agricultural task. It is a sacred covenant between the steward and the land, a disciplined art that ensures health, sustenance, and ecological balance. This volume exposes the suppressed and vital knowledge required to master poultry systems with ruthless efficiency and reverence. This chapter presents an uncompromising guide to raising chickens for eggs, meat, and pest control, detailing rotational grazing protocols, breeding programs, disease prevention, and coop construction and maintenance. Every technique is presented with precise, actionable steps and comprehensive data tables.
Section 1: Selecting and Managing Chicken Breeds for Multifaceted Production
1.1 Breed Selection Matrix
The foundation of any poultry system lies in breed selection, tailored to maximize output for eggs, meat, and pest control. Below is the Breed Selection Matrix listing optimal breeds, their characteristics, and feed conversion ratios (FCR). The FCR is the amount of feed (in kilograms) required to produce one kilogram of live weight (meat) or one dozen eggs (egg breeds).
| Breed Name | Primary Use | Average Weight (kg) | Egg Production (eggs/year) | FCR (meat) | FCR (eggs) | Pest Control Efficiency (scale 1–10) | Notes |
|---|---|---|---|---|---|---|---|
| Rhode Island Red | Eggs, Meat | 3.5 (hens), 4.5 (roosters) | 280 | 2.2 | 3.0 | 7 | Hardy, dual-purpose |
| Leghorn | Eggs | 2.0 | 320 | 2.5 | 2.6 | 6 | High egg yield, less meat |
| Cornish Cross | Meat | 4.0 - 5.5 | 100 | 1.6 | N/A | 4 | Rapid growth, poor layers |
| Plymouth Rock | Eggs, Meat, Pest Control | 3.0 (hens), 4.0 (roosters) | 250 | 2.3 | 3.2 | 8 | Good foragers and scavengers |
| Sussex | Eggs, Meat, Pest Control | 3.2 (hens), 4.0 (roosters) | 260 | 2.4 | 3.1 | 9 | Excellent foragers |
| Australorp | Eggs | 3.0 (hens), 4.0 (roosters) | 280 | 2.3 | 2.9 | 7 | Resilient, good layers |
| Naked Neck (Turken) | Meat, Pest Control | 3.0 (hens), 3.5 (roosters) | 200 | 2.0 | 3.5 | 10 | Heat tolerant, excellent pest control |
Section 2: Rotational Grazing Protocols for Soil and Flock Health
2.1 Purpose and Benefits
Rotational grazing of chickens prevents overgrazing, reduces parasite loads, and improves soil fertility via natural fertilization. It is essential for sustainable poultry systems that integrate with permaculture principles.
2.2 Equipment and Setup
- Mobile chicken coops or "chicken tractors" that allow movement every 3–5 days.
- Fencing material: electric netting or durable poultry wire.
- Water and feed stations attached to mobile units or portable.
2.3 Step-by-Step Rotational Grazing Protocol
- Divide Grazing Area: Subdivide your pasture or garden into paddocks of 200 to 500 square meters each, depending on flock size.
- Install Fencing: Set up portable fencing to isolate the paddocks.
- Construct Mobile Coop: Build or use a chicken tractor sized for your flock (see Section 4).
- Stock Flock: Introduce chickens to the first paddock with the coop.
- Grazing Duration: Allow chickens to graze and forage for 3 to 5 days, ensuring ample access to pasture and insect prey.
- Move Coop: Relocate the mobile coop and fencing to the next paddock.
- Rest Period: Allow rested paddocks to recover for 20 to 30 days before re-entry.
- Repeat Cycle: Continue rotation to maintain soil health, reduce pathogen buildup, and optimize forage availability.
2.4 Monitoring Protocol
- Daily: Observe flock behavior and pasture condition.
- Weekly: Measure vegetation height; maintain between 10-15 cm to ensure sustainable forage.
- Monthly: Test soil fertility parameters to track nutrient cycling (see Volume VI: Soil Codex for testing protocols).
Section 3: Breeding Programs for Genetic Optimization
3.1 Objectives
- Enhance disease resistance.
- Improve feed efficiency.
- Maximize egg and meat production.
- Retain or enhance pest control behavior.
3.2 Breeding Stock Selection
- Select hens and roosters exhibiting:
- High egg production or rapid growth rates.
- Low FCR values.
- Strong foraging and pest control behavior.
- Absence of hereditary disease or deformity.
- Maintain a breeding flock ratio of 1 rooster per 8-10 hens for optimal fertility.
3.3 Controlled Breeding Procedure
- Isolate Breeding Pens: Separate breeding pairs or groups in pens to control parentage.
- Record Pedigrees: Maintain meticulous records of lineage and performance metrics.
- Artificial Incubation (optional): Use incubators to increase hatch rates (refer to Volume VI: Incubation Codex).
- Selection of Offspring: At 8 weeks, evaluate offspring for growth, health, and behavior.
- Culling Protocol: Remove individuals with poor health, low vigor, or unwanted traits.
3.4 Genetic Crossbreeding
To combine traits, crossbreed dual-purpose breeds (e.g., Rhode Island Red x Sussex) with meat breeds (Cornish Cross) to create hybrid vigor. Monitor performance closely for at least 3 generations.
Section 4: Coop Construction and Maintenance
4.1 Coop Design Principles
- Provide protection from predators and weather.
- Ensure ventilation without drafts.
- Facilitate cleaning and waste removal.
- Allow mobility for rotational grazing.
4.2 Materials List (per 10-chicken tractor)
| Material | Quantity | Specifications |
|---|---|---|
| Pressure-treated lumber | 8 pieces | 2"x4"x8' boards |
| Plywood sheets | 2 sheets | 1/2" exterior grade |
| Poultry wire fencing | 15 meters | 1/2" mesh, galvanized |
| Hinges | 4 sets | Stainless steel, heavy-duty |
| Latches | 4 sets | Secure, predator-proof |
| Roofing material | 1 sheet | Corrugated metal or polycarbonate |
| Wheels | 4 | 8" diameter, heavy-duty for mobility |
| Waterer | 1 | Automatic poultry waterer |
| Feeder | 1 | Hanging feeder, capacity 5 kg |
4.3 Construction Steps
- Frame Assembly: a. Build rectangular base frame from 2"x4" lumber.
b. Construct vertical supports (minimum 1 meter high).
c. Attach roof frame.
- Install Flooring: a. Cover base with plywood for solid floor or leave open with wire mesh for natural ground access.
- Attach Walls and Fencing: a. Secure plywood sheets on three sides for shelter.
b. Attach poultry wire fencing on the open side for ventilation and predator protection.
- Roof Installation: a. Fix corrugated roofing to frame, ensuring waterproofing.
- Install Doors and Latches: a. Attach hinged access door for cleaning and egg collection.
b. Fit predator-proof latches.
- Mount Wheels: a. Attach wheels to base for ease of movement.
- Install Waterer and Feeder: a. Position inside coop for easy access.
4.4 Maintenance Protocol
- Daily: Refill feed and water, collect eggs, observe chickens.
- Weekly: Remove manure, clean waterer and feeder.
- Monthly: Deep clean coop with diluted hydrogen peroxide solution (3% solution, spray and rinse).
- Seasonal: Inspect and repair any structural damage, repaint wood with non-toxic sealant.
Section 5: Disease Prevention and Health Treatments
5.1 Biosecurity Protocol
- Quarantine: Isolate new birds for 30 days before introducing to main flock.
- Sanitation: Disinfect footwear and equipment entering poultry areas.
- Rodent Control: Maintain clean feed storage; use traps and barriers.
- Visitor Restrictions: Limit access to necessary personnel only.
5.2 Common Diseases and Treatments
| Disease | Cause | Symptoms | Preventative Measure | Treatment Protocol (Dosage & Duration) |
|---|---|---|---|---|
| Marek’s Disease | Herpesvirus | Paralysis, tumors | Vaccination at day 1 | No treatment; cull affected birds |
| Coccidiosis | Protozoan parasite | Diarrhea, lethargy | Rotational grazing, medicated feed | Amprolium 0.0125% in drinking water for 5 days |
| Infectious Bronchitis | Coronavirus | Coughing, sneezing, egg defects | Biosecurity, vaccination | Supportive care; antibiotics for secondary infections |
| Avian Influenza | Influenza virus | Respiratory distress, mortality | Strict biosecurity | No treatment; cull affected flock |
| Fowl Pox | Avipoxvirus | Skin lesions, scabs | Vaccination | Topical antiseptics; supportive care |
| External Parasites | Mites, lice | Feather loss, irritation | Regular dusting, clean coop | Pyrethrin dust application every 7 days for 3 weeks |
| Internal Parasites | Worms | Weight loss, diarrhea | Rotational grazing, fecal testing | Fenbendazole at 5 mg/kg orally for 3 days |
5.3 Supplementary Health Measures
- Probiotics: Add to water weekly to improve gut flora.
- Vitamin D3: Supplement during low sunlight months to prevent deficiencies.
- Herbal Pest Repellents: Use diatomaceous earth dusting in the coop.
Section 6: Pest Control Integration
6.1 Role of Chickens in Pest Control
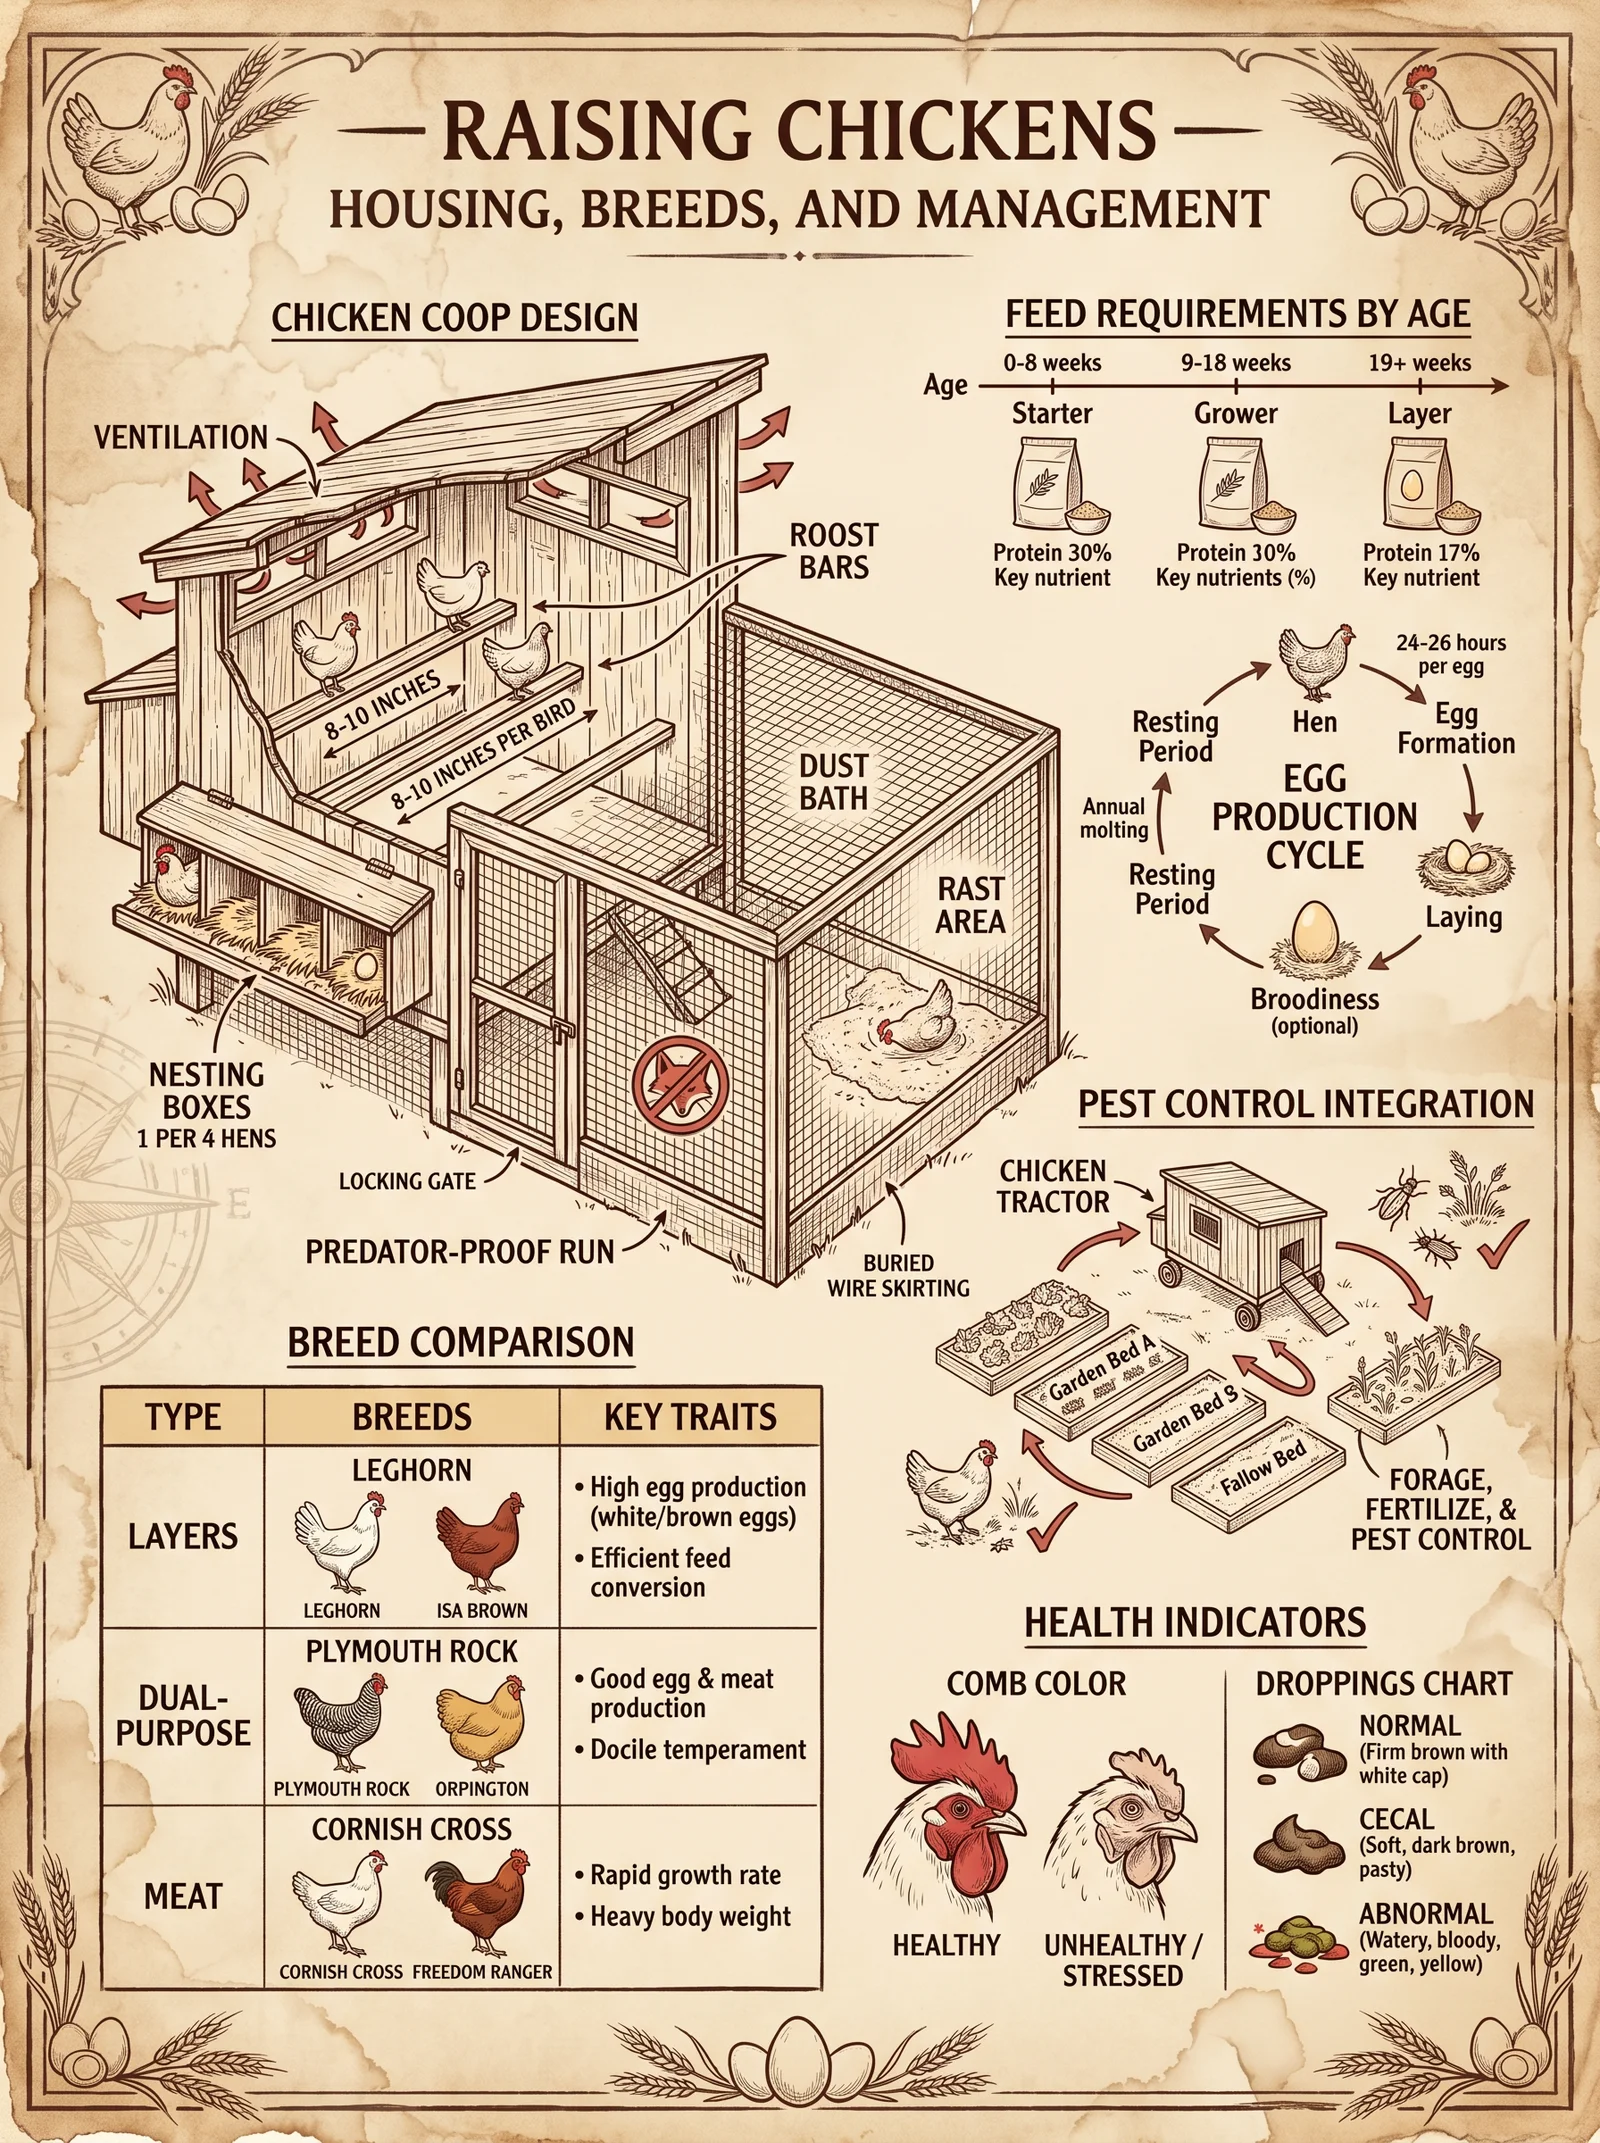
Chickens naturally consume insects, larvae, and weed seeds, reducing pest populations in agricultural systems.
6.2 Optimizing Chickens for Pest Control
- Use breeds with high foraging drives (see Breed Selection Matrix).
- Implement rotational grazing to expose chickens to varied pest habitats.
- Supplement diet with protein-rich feed to encourage active foraging without starvation.
6.3 Supplementary Pest Control Practices
- Combine poultry grazing with biological controls such as beneficial nematodes.
- Avoid chemical pesticides that harm poultry or beneficial insects.
Section 7: Summary Tables for Quick Reference
7.1 Feed Conversion Ratios (FCR) by Breed and Purpose
| Breed Name | FCR (Meat Production) | FCR (Egg Production) |
|---|---|---|
| Rhode Island Red | 2.2 | 3.0 |
| Leghorn | 2.5 | 2.6 |
| Cornish Cross | 1.6 | N/A |
| Plymouth Rock | 2.3 | 3.2 |
| Sussex | 2.4 | 3.1 |
| Australorp | 2.3 | 2.9 |
| Naked Neck (Turken) | 2.0 | 3.5 |
7.2 Disease Treatment Quick Reference
| Disease | Treatment | Dosage | Duration |
|---|---|---|---|
| Coccidiosis | Amprolium in water | 0.0125% (125 mg/L water) | 5 days |
| External Parasites | Pyrethrin dust | Apply liberally | Every 7 days x 3 |
| Internal Parasites | Fenbendazole oral | 5 mg/kg body weight | 3 days |
Closing Reverence
This volume is your sacred text for mastering poultry systems as a Practitioner of food sovereignty and ecological stewardship. Every step, every protocol within these pages is a weapon against hunger, disease, and ecological degradation. Commit these teachings to memory and practice with unwavering discipline. Your flock, your land, and your future depend on this knowledge.
See also:
- Volume VI: Soil Codex (for soil fertility testing and integration)
- Volume VIII: Water Codex, Chapter II (for water purification systems in poultry operations)
- Volume IX: Disease Codex (for extended avian disease protocols and vaccines)
<!-- SECTION 21 -->
Volume V: Goat and Cattle Husbandry
Management of Goats and Cattle for Milk, Meat, and Land Regeneration
The stewardship of goats and cattle within a regenerative agrarian system demands precision, reverence, and an unyielding commitment to the symbiosis between animal, land, and community. This volume delivers the unvarnished truth, the suppressed methodologies, and the arcane protocols necessary to transform these livestock into engines of productivity, soil restoration, and food sovereignty.
I. Rotational Grazing Plans for Optimal Land Regeneration
Rotational grazing is the fulcrum of regenerative animal husbandry. It enhances pasture productivity, controls parasites, improves soil fertility, and increases plant biodiversity. The following protocol is designed for intensive, managed grazing of goats and cattle on mixed-species pastures.
A. Grazing Unit and Paddock Design
- Divide your grazing land into paddocks of uniform size based on animal unit (AU) carrying capacity.
- 1 AU = 1,000 lbs of live animal weight; goats = 0.2 AU, cattle = 1 AU.
- For mixed herds, calculate total AU and divide pasture accordingly.
- Design paddocks to facilitate water access and minimize animal stress:
- Maximum walking distance to water: 400 meters.
- Include shade structures within paddocks.
- Fence paddocks with high-tensile electric wire systems:
- Three-wire configuration: bottom wire at 20 cm, middle at 50 cm, top at 90 cm for goats.
- Four-wire for cattle: 40 cm, 70 cm, 100 cm, and 130 cm.
- Ground rods every 50 meters and solar-powered energizers rated at minimum 12,000 volts.
B. Grazing Cycle and Rest Periods
| Species | Grazing Duration (Days) | Rest Period (Days) | Optimal Biomass Height Before Grazing (cm) | Residual Biomass Height After Grazing (cm) |
|---|---|---|---|---|
| Goats | 1-2 | 28-35 | 20-25 | 7-10 |
| Cattle | 2-3 | 35-42 | 25-30 | 10-12 |
- Rotate animals through paddocks according to the schedule above.
- Monitor forage height daily with a graduated pasture stick (see Volume VII, Chapter III).
- Adjust grazing length based on forage regrowth rates and weather conditions.
C. Mixed-Species Grazing Protocol
- Begin grazing with goats, which prefer browsing and target shrubs and broadleaves.
- Follow with cattle to graze grasses and legumes, reducing competition and maximizing pasture utilization.
- Allow a 24-hour interval between species to minimize parasite transmission.
II. Breeding Strategies for Productivity and Resilience
Breeding programs must prioritize genetic diversity, disease resistance, and production traits aligned with agroecological goals. Embark on selective breeding with the following protocols.
A. Selection Criteria for Goats and Cattle
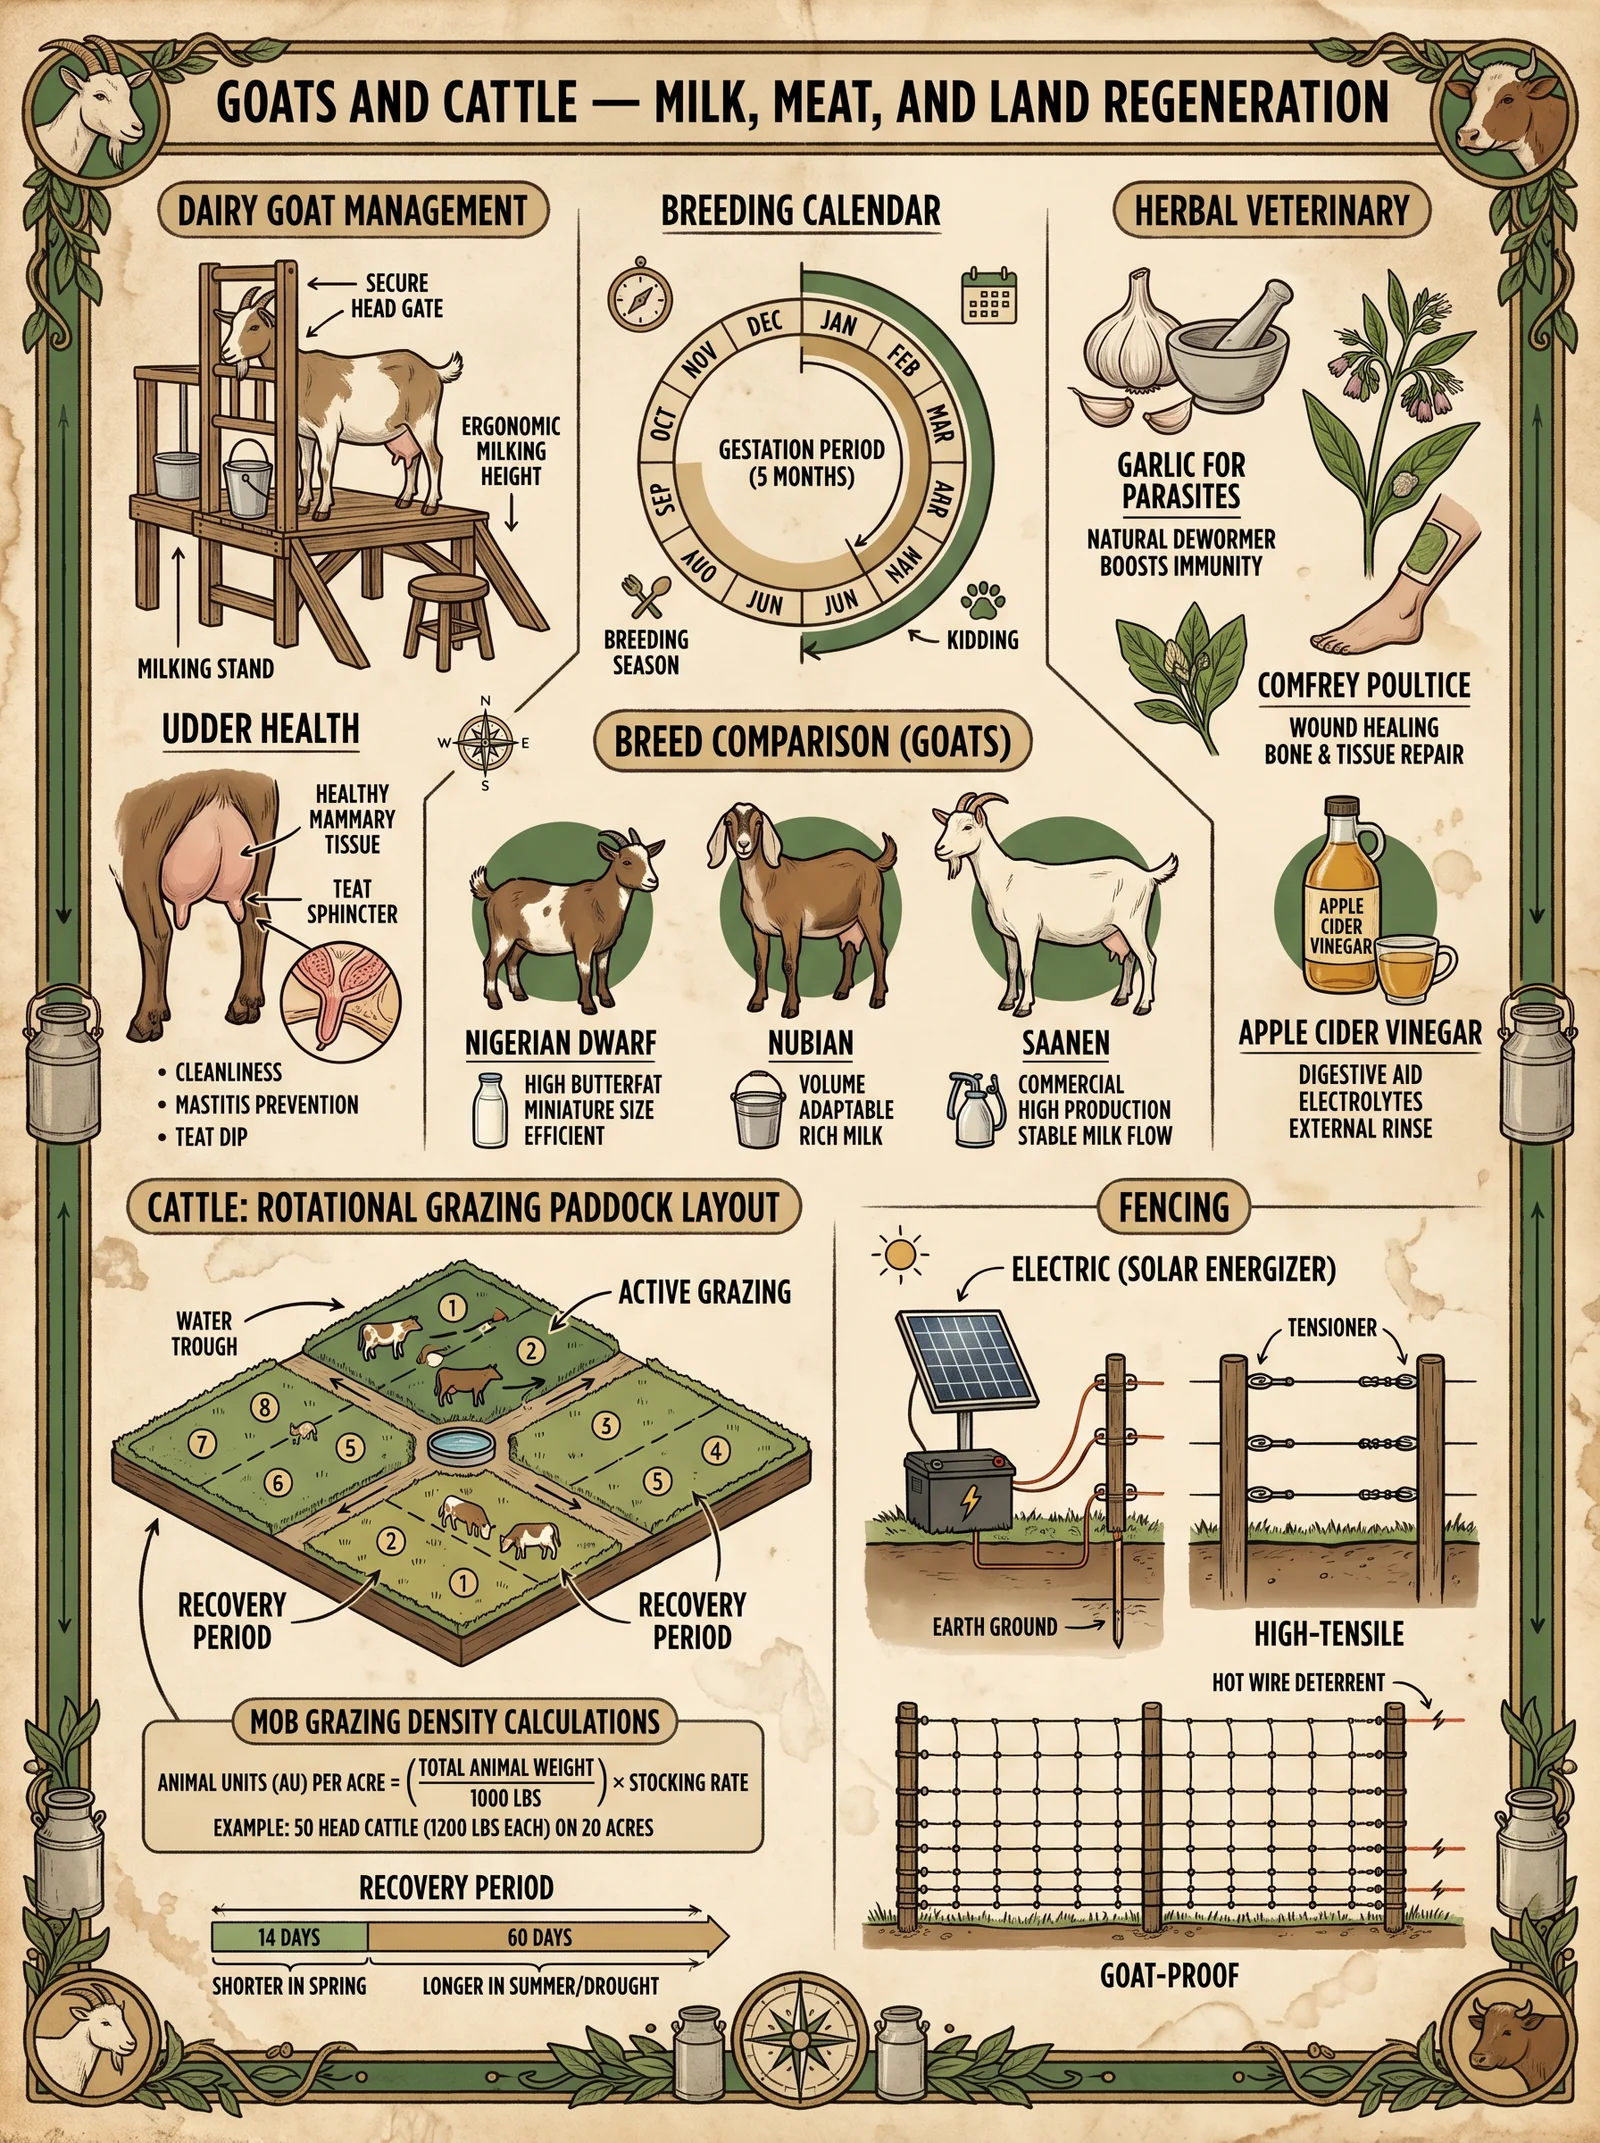
| Trait | Description | Selection Method | Measurement Frequency |
|---|---|---|---|
| Milk Yield | Volume of milk produced per lactation | Weigh daily milk output with calibrated scale | Daily during lactation |
| Growth Rate | Average daily gain (ADG) | Weigh animals biweekly | Biweekly |
| Fertility Rate | Conception and kidding/calving success | Record mating and birthing outcomes | Per breeding season |
| Disease Resistance | Resistance to parasites and infections | Monitor health records and veterinary tests | Continuous |
| Temperament | Calmness and ease of handling | Behavioral scoring during handling | Quarterly |
B. Controlled Breeding Protocol
- Implement controlled mating using hand mating or artificial insemination (AI).
- For AI, construct a sterile insemination chamber equipped with a warmed semen thawing station at 37°C and insemination catheters (see Appendix A).
- Schedule breeding during optimal fertility windows:
| Species | Estrus Cycle Length (Days) | Optimal Breeding Window (Days) |
|---|---|---|
| Goats | 21 | Days 17-21 |
| Cattle | 21 | Days 18-21 |
- Use hormonal synchronization protocols for herd-wide breeding:
| Hormone | Dosage | Timing | Application Method |
|---|---|---|---|
| Prostaglandin F2α | 25 mg per animal | Day 0 | Intramuscular injection |
| GnRH | 100 µg per animal | Day 2 | Intramuscular injection |
| Prostaglandin F2α | 25 mg per animal | Day 7 | Intramuscular injection |
| GnRH | 100 µg per animal | Day 9 | Intramuscular injection |
- Confirm pregnancies via transrectal ultrasonography at 30-45 days post-breeding.
III. Herbal Veterinary Protocols for Disease Prevention and Treatment
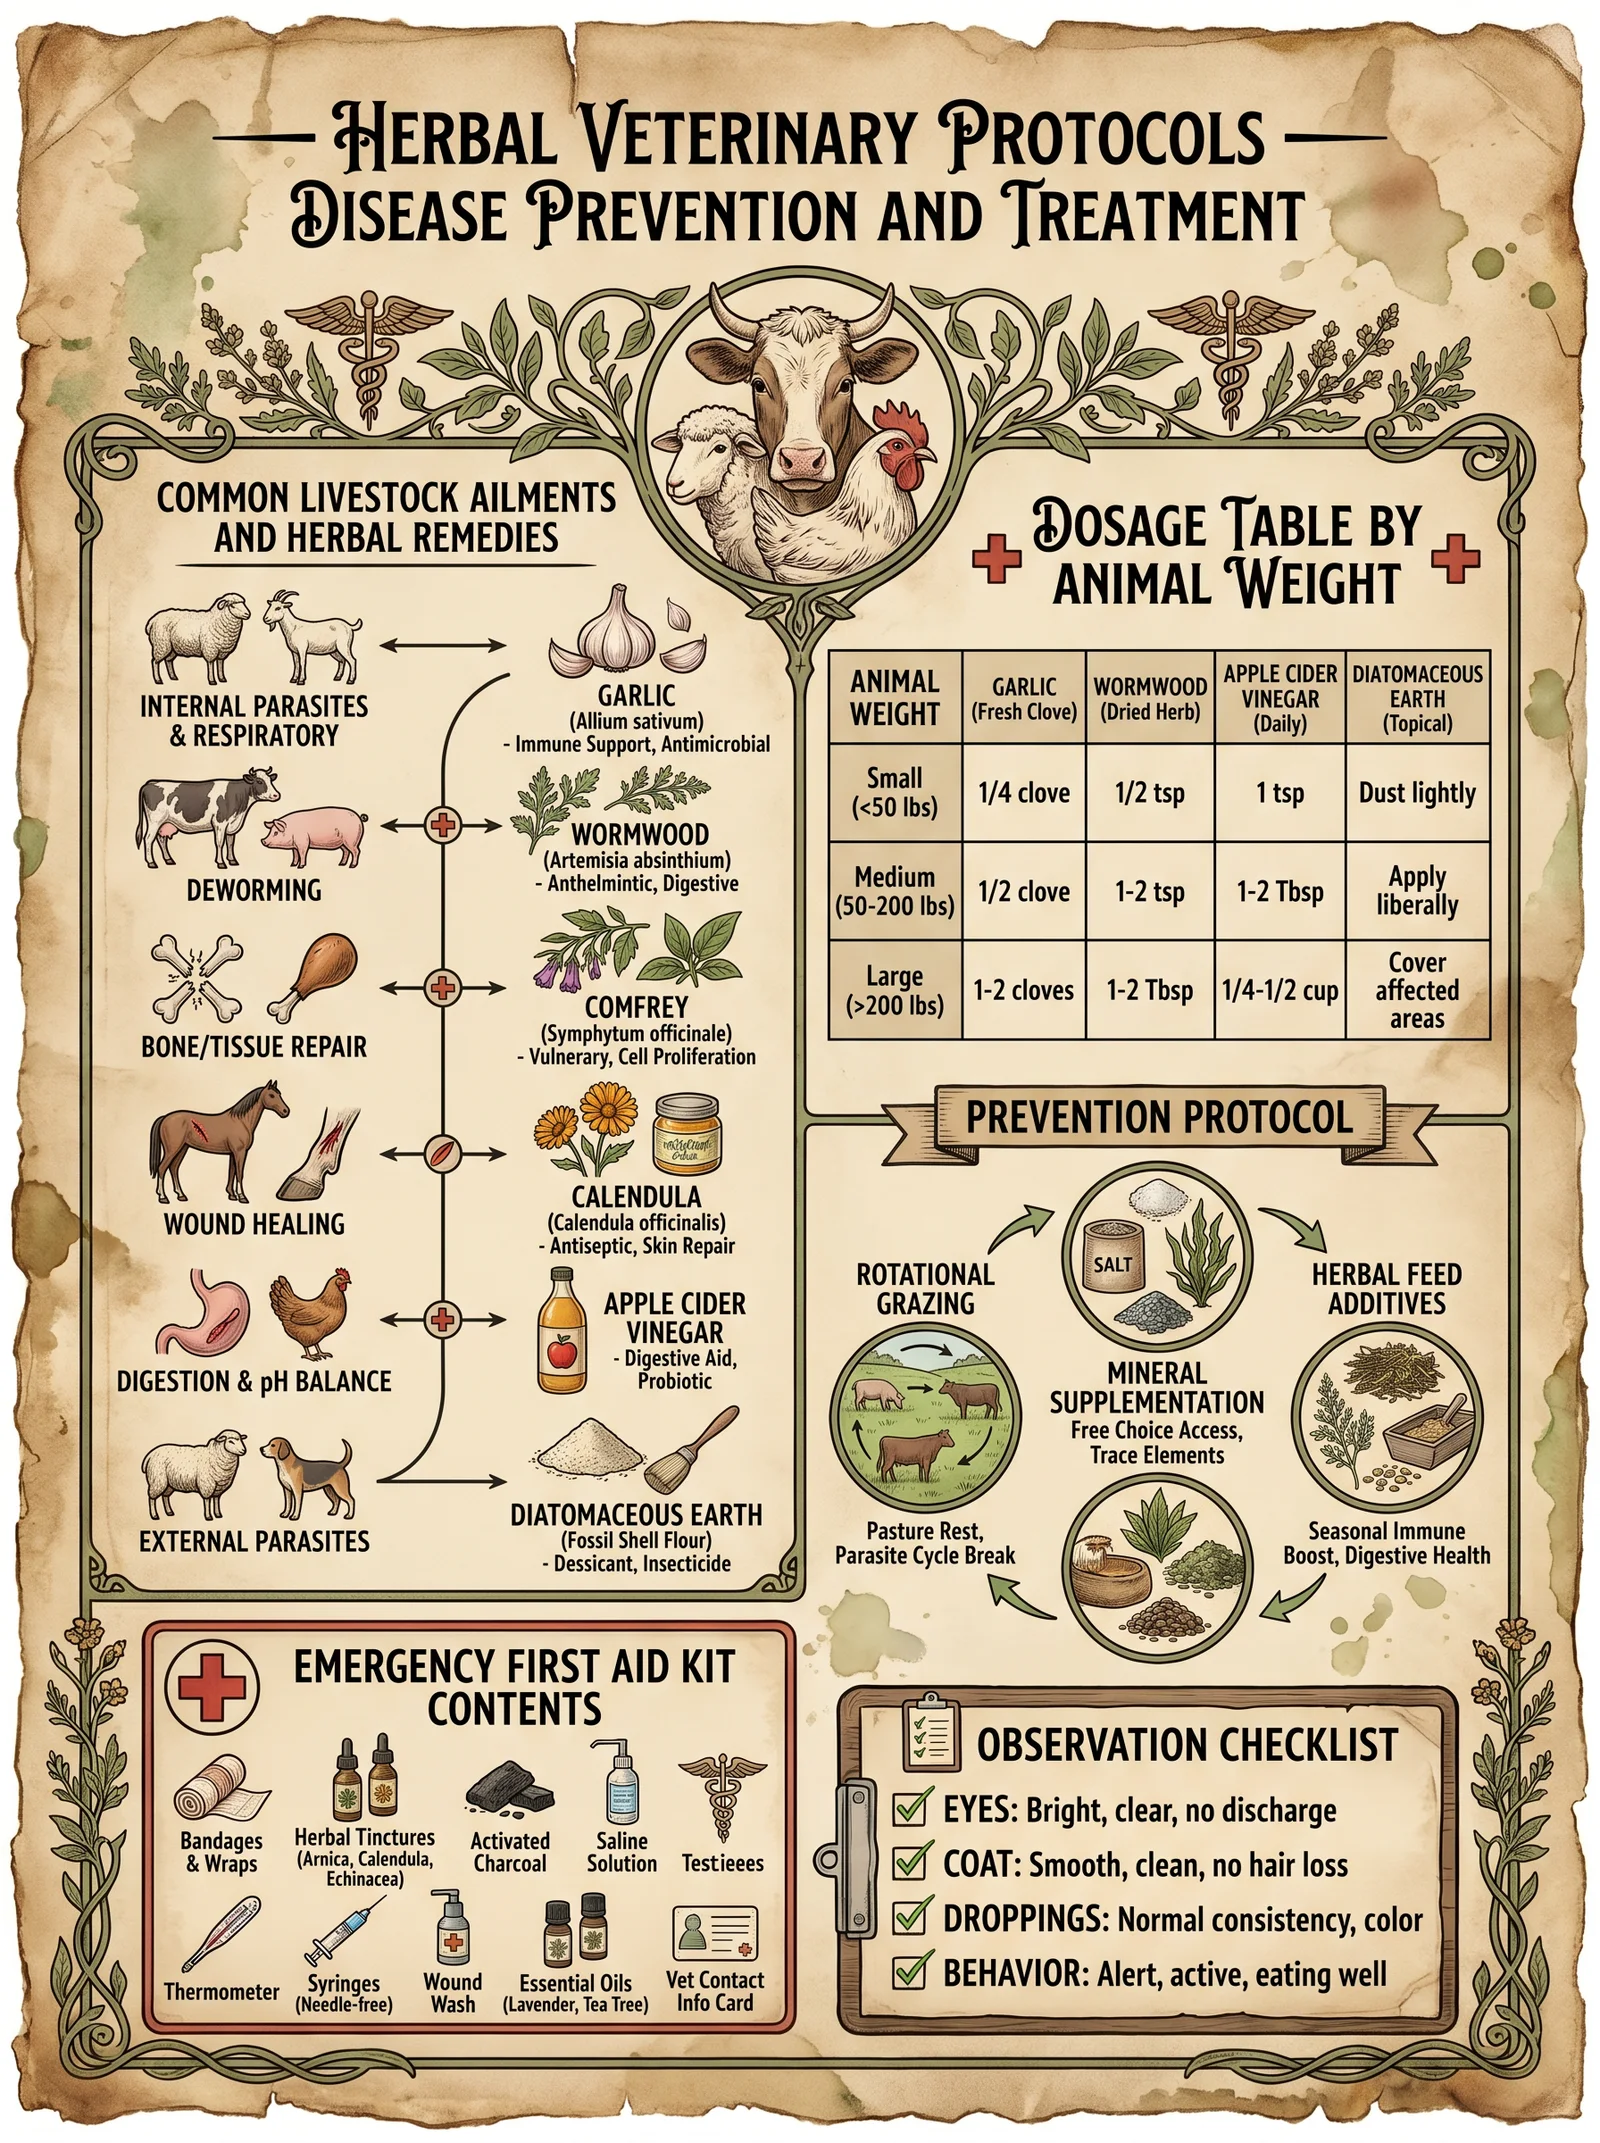
The sacred knowledge of phytotherapy provides sustainable and effective alternatives to synthetic pharmaceuticals. These protocols prioritize animal welfare and ecological balance.
A. Herbal Antiparasitic Regimen
- Administer a decoction of neem leaves (Azadirachta indica):
- Dosage: 50 ml per 50 kg body weight orally, twice daily for five days.
- Preparation: Boil 100 g of dried neem leaves in 1 L of water for 30 minutes, strain.
- Complement with wormwood (Artemisia absinthium) tincture:
- Dosage: 10 ml per 50 kg body weight orally, once daily for seven days.
- Preparation: Soak dried wormwood in 70% ethanol (1:5 ratio) for 21 days, strain.
- Administer pumpkin seeds (Cucurbita pepo) ground and mixed with feed:
- Dosage: 20 g per animal daily for 14 days.
B. Herbal Treatments for Common Ailments
| Ailment | Herbal Treatment | Dosage and Administration | Frequency |
|---|---|---|---|
| Mastitis | Fresh garlic (Allium sativum) infusion | 30 ml infused in 500 ml warm water, wash udder | Twice daily for 5 days |
| Foot Rot | Calendula officinalis poultice | Apply crushed flowers mixed with honey externally | Daily until healed |
| Respiratory Infections | Eucalyptus globulus steam inhalation | 100 ml eucalyptus oil in boiling water, animals exposed for 15 minutes | Twice daily for 3 days |
| Diarrhea | Chamomile (Matricaria chamomilla) tea | 200 ml orally using syringe | Three times daily for 3 days |
IV. Infrastructure Design for Shelters and Fencing
The physical environment for goats and cattle must safeguard health, encourage natural behaviors, and facilitate operational efficiency.
A. Shelter Design Specifications
| Parameter | Goats | Cattle |
|---|---|---|
| Shelter Size Per Animal | 1.5 m² | 3.5 m² |
| Roof Pitch | 30° minimum | 35° minimum |
| Ventilation | Ridge vent plus side openings | Ridge vent plus side openings |
| Flooring Material | Permeable compacted soil with straw bedding | Concrete sloped 2% with drainage |
| Drainage | 1% slope away from shelter | 2% slope away from shelter |
- Construct shelters oriented north-south to maximize ventilation and minimize heat stress.
- Incorporate removable panels for winter insulation.
- Install feed racks and watering stations external to shelter to reduce contamination.
B. Fencing Construction Protocol
- Use galvanized high-tensile wire for durability and conductivity.
- For perimeter fences, install steel T-posts every 3 meters, driven 60 cm into the ground.
- Cap corners and gates with reinforced posts sunk 90 cm deep.
- Install electric energizers with redundant solar and battery backup systems.
- For predator protection, bury wire mesh 30 cm underground extending 50 cm outward.
V. Breed Characteristics for Goats and Cattle
Understanding breed-specific traits is essential for aligning livestock choice with system goals.
| Breed | Type | Average Weight (kg) | Milk Yield (L/day) | Growth Rate (g/day) | Disease Resistance | Preferred Environment |
|---|---|---|---|---|---|---|
| Boer (Goat) | Meat | 90 | 1.5 | 150 | Medium | Arid and semi-arid |
| Nubian (Goat) | Dairy | 70 | 4.5 | 120 | Low | Tropical and subtropical |
| Alpine (Goat) | Dairy | 70 | 3.8 | 110 | Medium | Temperate |
| Kiko (Goat) | Meat | 80 | 1.8 | 140 | High | Rugged terrain |
| Angus (Cattle) | Beef | 650 | N/A | 900 | Medium | Temperate |
| Holstein (Cattle) | Dairy | 680 | 30 | 600 | Low | Temperate |
| Brahman (Cattle) | Dual purpose | 600 | 15 | 700 | High | Tropical and subtropical |
| Hereford (Cattle) | Beef | 700 | N/A | 850 | Medium | Temperate |
VI. Nutritional Requirements
Feeding regimes must be precise to avoid metabolic disorders, maintain production, and support regeneration.
A. Daily Nutrient Requirements by Species and Production Stage
| Species | Stage | Dry Matter Intake (% Body Weight) | Crude Protein (%) | Energy (Mcal/kg DM) | Calcium (%) | Phosphorus (%) |
|---|---|---|---|---|---|---|
| Goat | Maintenance | 3-4 | 8-10 | 2.5-2.7 | 0.5-0.8 | 0.3-0.4 |
| Goat | Lactation (peak) | 5-6 | 12-16 | 3.0-3.3 | 0.8-1.0 | 0.4-0.6 |
| Cattle | Maintenance | 2-2.5 | 7-9 | 2.0-2.3 | 0.4-0.6 | 0.3-0.4 |
| Cattle | Lactation (peak) | 3.5-4.5 | 12-14 | 2.8-3.2 | 0.7-1.0 | 0.4-0.6 |
B. Pasture Species Nutritional Profiles
| Pasture Species | Crude Protein (%) | Metabolizable Energy (Mcal/kg DM) | Growth Season | Suitability for Goats | Suitability for Cattle |
|---|---|---|---|---|---|
| Bermuda Grass | 10-12 | 2.6 | Warm | Moderate | High |
| Ryegrass | 15-20 | 2.8 | Cool | High | High |
| White Clover | 18-25 | 3.0 | Cool | High | High |
| Chicory | 20-22 | 3.2 | Warm | High | Moderate |
| Alfalfa | 22-25 | 3.3 | Warm | High | High |
| Browse Species (e.g., Leucaena) | 18-22 | 3.0 | Warm | Very High | Low |
VII. Pasture Management Schedules and Monitoring
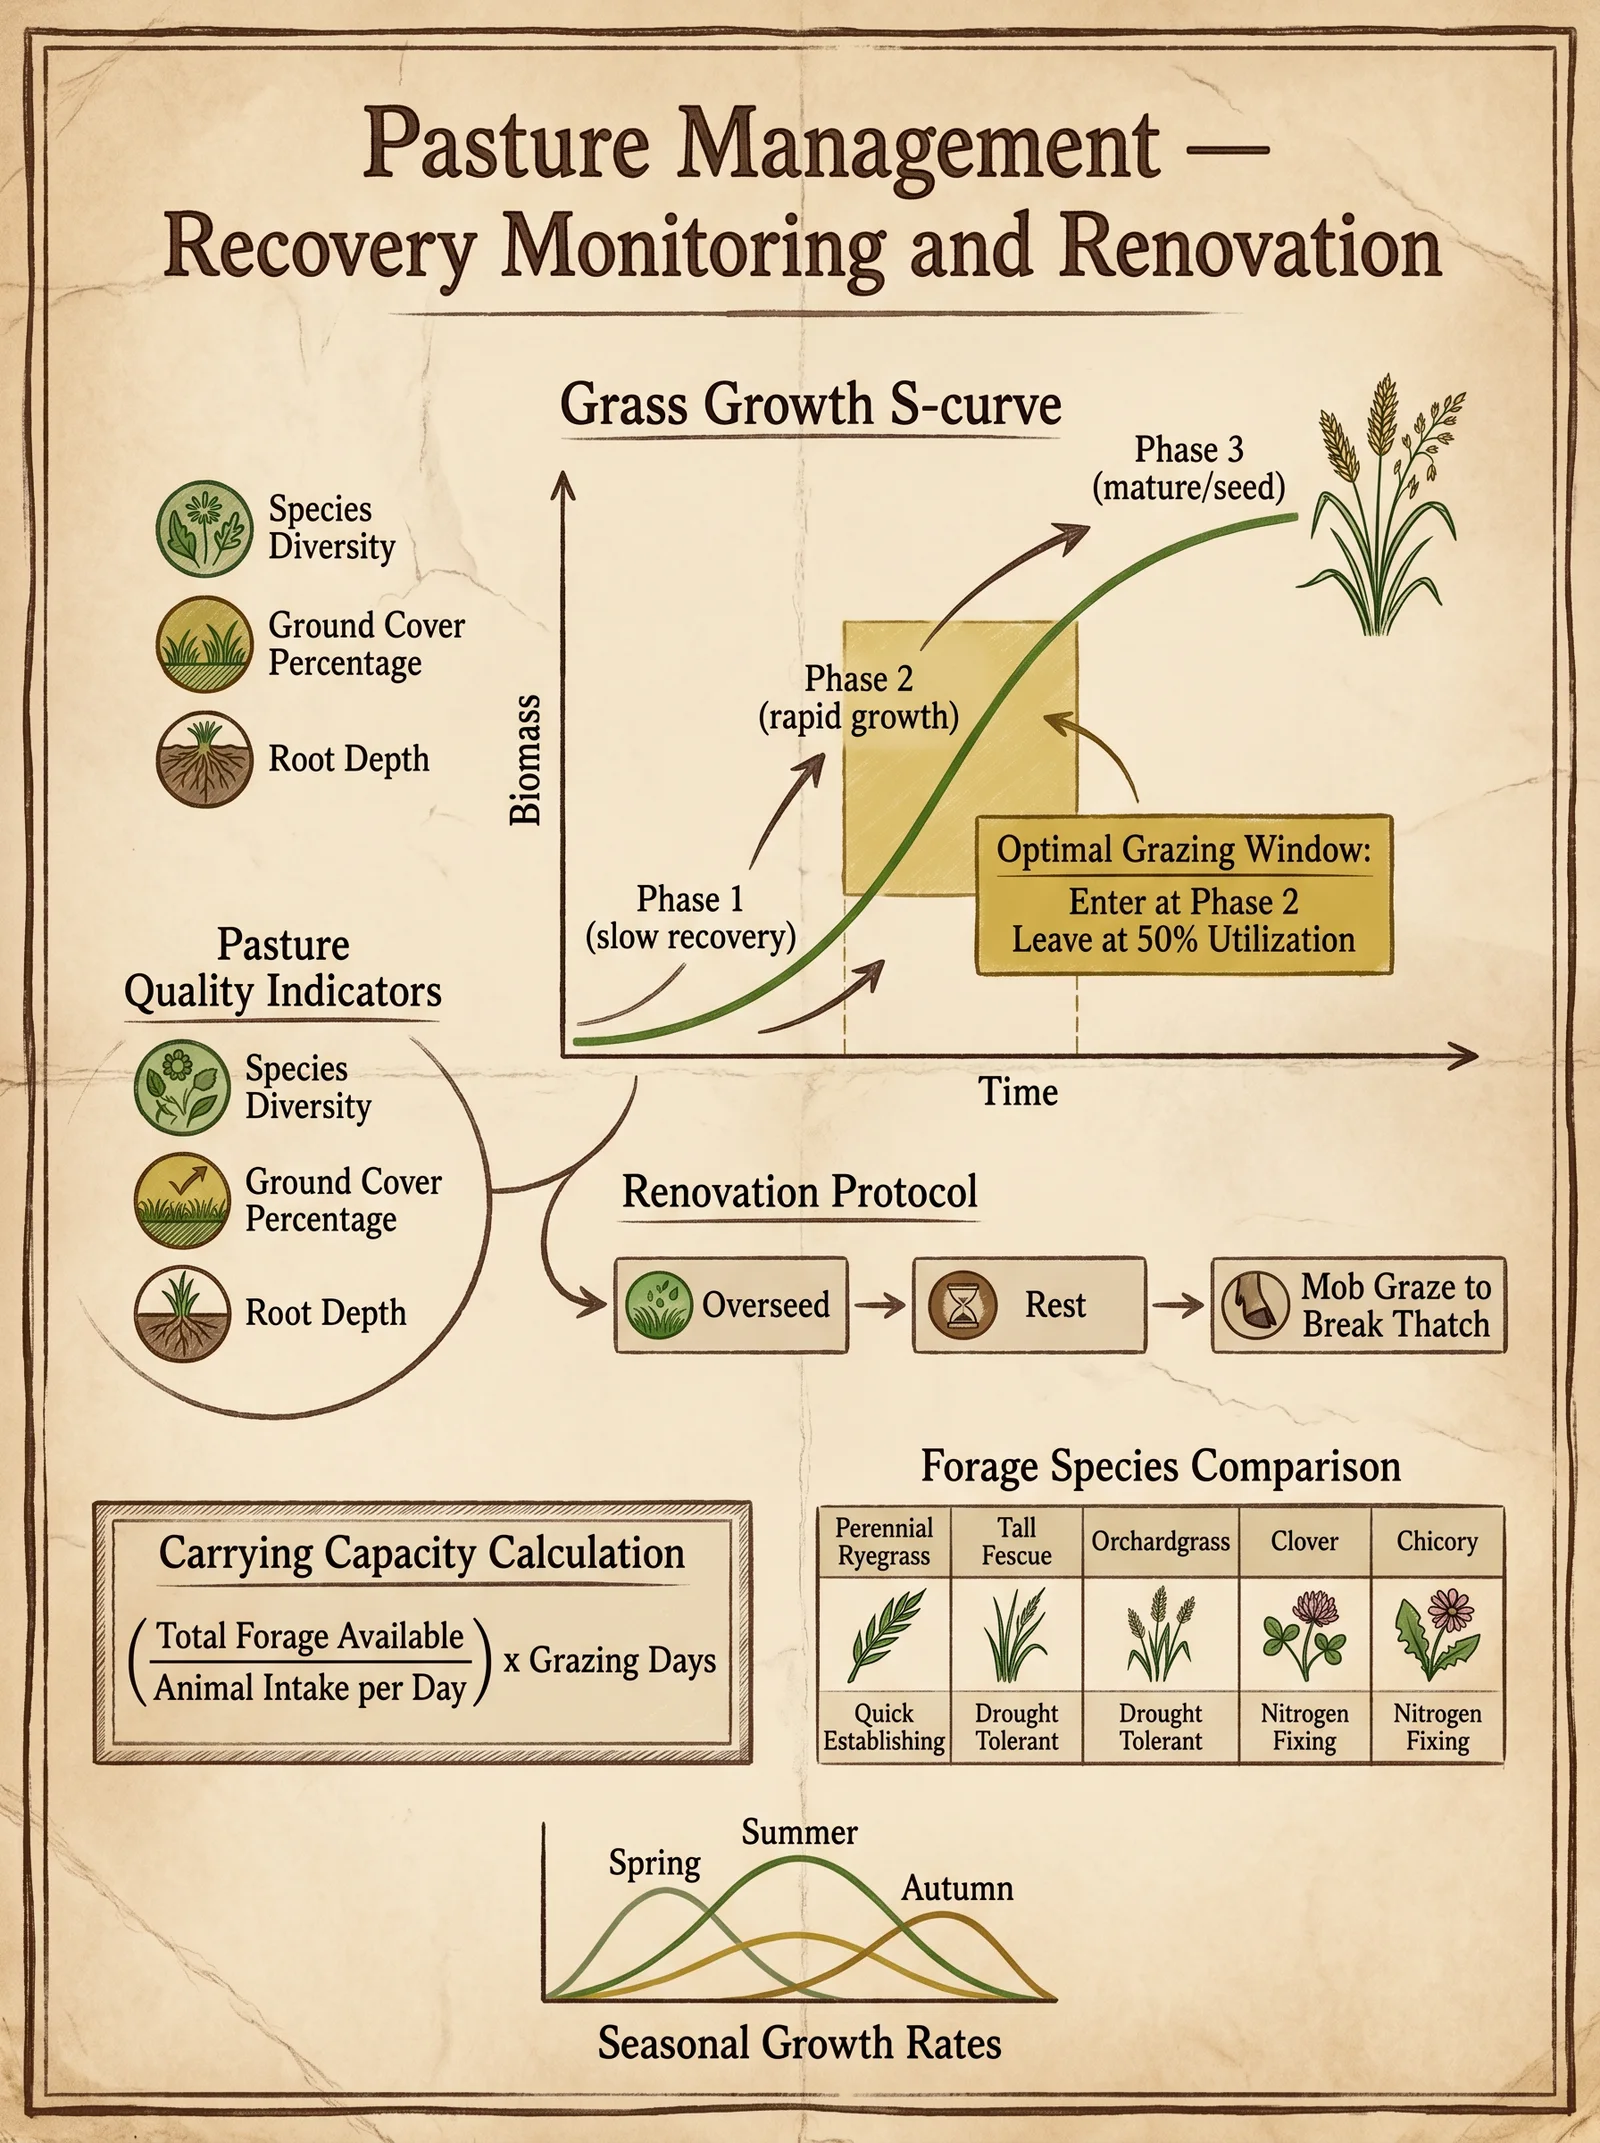
Consistent monitoring and adaptive management preserve pasture health and productivity.
| Activity | Frequency | Methodology | Tools Required |
|---|---|---|---|
| Forage Height Measurement | Daily during grazing | Use pasture stick to measure pre- and post-grazing height | Graduated pasture stick |
| Soil Fertility Testing | Quarterly | Collect composite soil samples from paddocks | Soil auger, lab test kits |
| Manure Distribution | After each rotation | Evenly spread manure to prevent nutrient hotspots | Manure spreader |
| Reseeding | Annually or as needed | Seed bare patches with mixed species seed blend | Seed drill or hand broadcasting |
| Weed Control | Monthly | Inspect and manually remove or spot spray with approved bioherbicides | Gloves, sprayer |
VIII. Step-by-Step Protocol: Implementing a Rotational Grazing System
- Assess total grazing area and calculate animal units (AU):
- Weigh animals or use standard weights.
- Sum total AU for herd.
- Divide pasture into paddocks based on AU and forage availability:
- Use temporary fencing for initial layout.
- Calculate paddock size: Paddock area (hectares) = (AU × Daily Dry Matter Intake (kg) × Grazing Days) / Forage Dry Matter Yield (kg/ha).
- Install permanent fencing with electric wires and grounding:
- Follow fencing construction protocol.
- Establish water points and shade in each paddock:
- Install troughs and shade cloth or trees.
- Map out grazing rotation schedule:
- Assign animals to paddocks following grazing duration and rest periods.
- Train staff or caretakers on pasture measurement and animal monitoring:
- Use pasture sticks and health checklists.
- Initiate grazing cycle:
- Begin with goats to target browse, then cattle on grasses.
- Record all observations including forage height, animal health, and soil conditions:
- Use standardized logs.
- Adjust rotation lengths and stocking density based on data:
- Increase rest periods if forage is insufficient.
- Plan and execute breeding according to controlled breeding protocols to match grazing cycles and production goals.
IX. Appendix A: Building an Artificial Insemination (AI) Kit
Materials Required
| Item | Quantity | Specifications |
|---|---|---|
| Semen straws | Variable | 0.25-0.5 ml volume |
| Semen thawing unit | 1 | Water bath maintained at 37°C |
| Insemination catheters | 10 | Flexible, sterile, species-specific |
| Disposable gloves | 50 pairs | Powder-free, sterile |
| Sterile lubricant | 100 ml | Water-based, non-spermicidal |
| Thermometer | 1 | Digital, ±0.1°C accuracy |
| Cleaning disinfectant | 500 ml | Chlorhexidine or equivalent |
Construction Steps
- Build a water bath using a double-walled insulated container fitted with a thermostatic heater.
- Calibrate water temperature at 37°C ± 0.5°C using digital thermometer.
- Prepare a clean workspace with sterilized tools and disposable gloves.
- Use catheters appropriate for species and ensure single-use or sterilization between uses.
- Follow AI protocols strictly to avoid contamination and maximize conception rates.
This volume conveys the essential, life-sustaining knowledge required for the mastery of goat and cattle husbandry within regenerative agroecosystems. These protocols are not mere suggestions but commandments preserved for survival, productivity, and the sanctity of the land and its creatures.
For detailed soil management, water purification, and seed propagation protocols, consult Volume VII: The Soil and Water Codex.
End of Volume V
<!-- SECTION 22 -->
Volume V: Pig and Rabbit Systems
Chapter I: Sustainable Meat Production through Integrated Pig and Rabbit Husbandry
In the sacred task of sustaining life, the raising of pigs and rabbits for meat production demands precision, reverence, and a mastery of ecological synergy. This volume instructs the chosen apprentice in the complete protocols for housing, feeding, breeding, and health care of these animals within sustainable systems. The integration with crop production and waste recycling is paramount, transforming every byproduct into a vital resource.
Section 1: Housing Protocols for Pigs and Rabbits
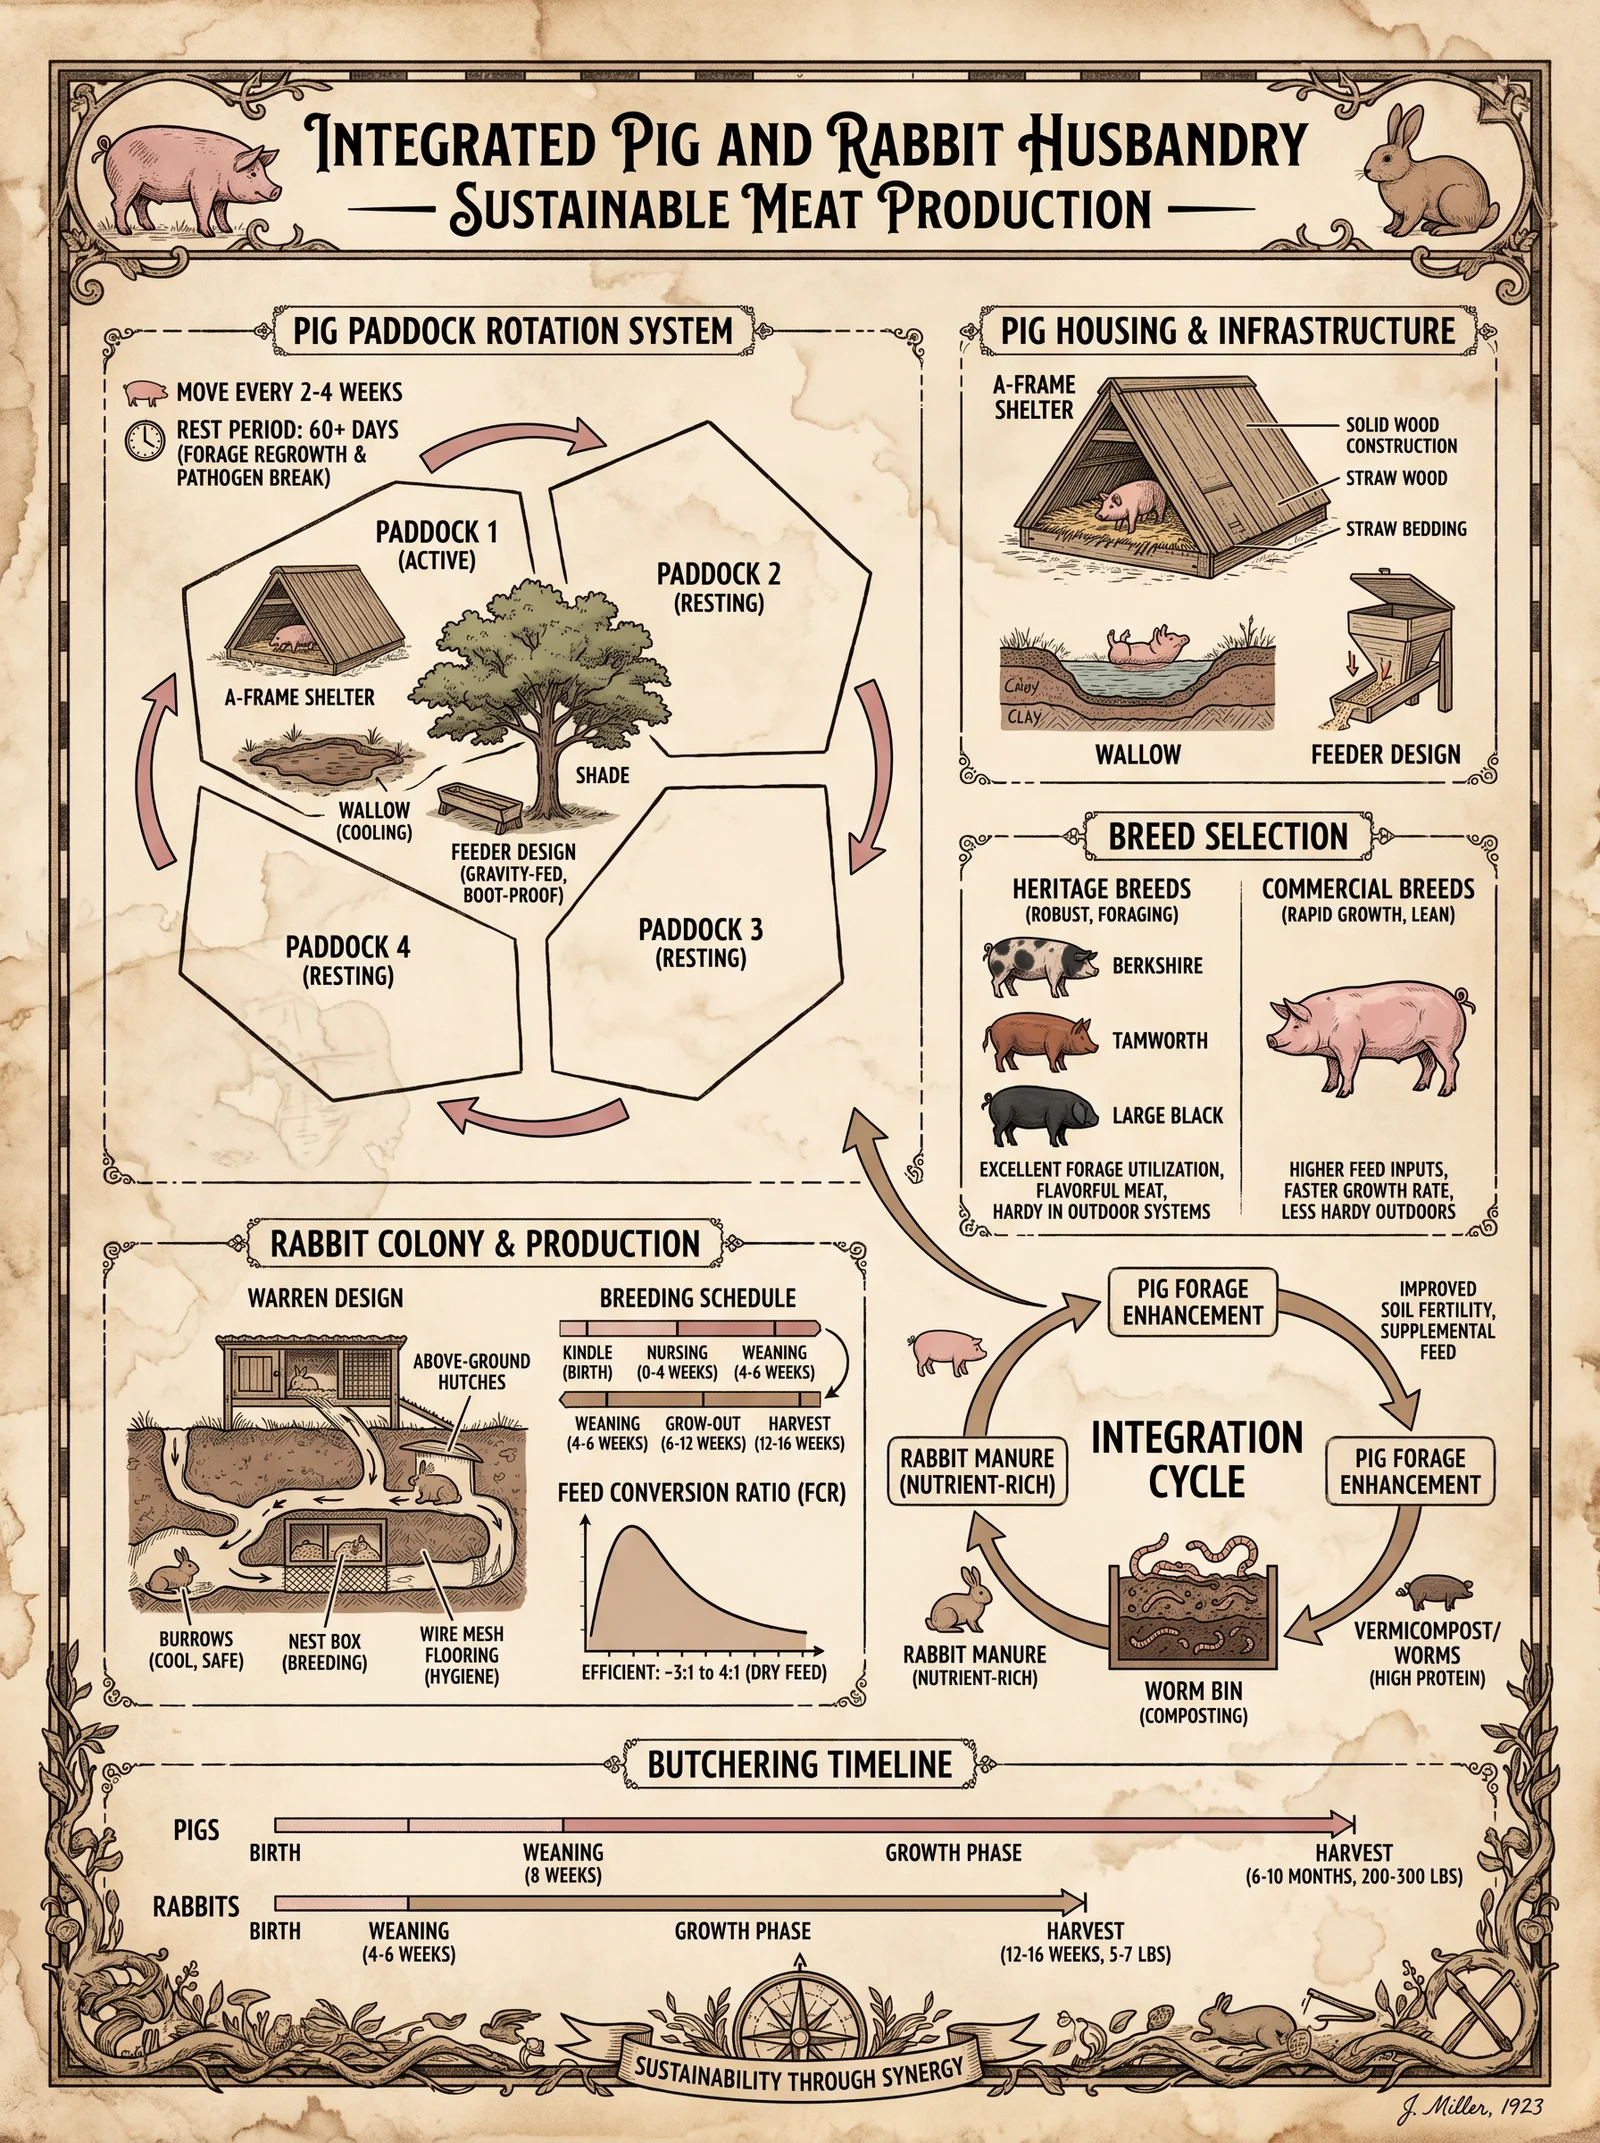
1.1 Pig Housing: Design and Construction for Sustainable Systems
Purpose: Optimize pig welfare, biosecurity, temperature regulation, and waste management in a sustainable, low-impact system.
Materials Required:
- Locally sourced timber or bamboo (treated naturally with heat or smoke for durability)
- Wire mesh (galvanized, 1 cm² openings)
- Clay or adobe bricks for flooring or earthen floors
- Roofing: thatch or metal sheets with insulation
- Water troughs, feed containers (ceramic or stainless steel)
Design Specifications:
- Minimum space per pig: 2.5 m² for growers, 4.0 m² for sows with piglets
- Separate pens for gestation, farrowing, and grow-out
- Slatted floors for waste drainage or deep bedding systems (if slurry management unavailable)
- Ventilation openings to allow airflow without drafts at pig level
- Secure fencing to prevent predator access and escape
Step-by-Step Construction:
- Site Selection: Choose a well-drained area, preferably elevated to avoid flooding, near crop fields for waste integration.
- Foundation: Dig trenches 30 cm deep, fill with compacted gravel mixed with clay for stability.
- Flooring: For slatted floors, construct timber frames with 5 cm-wide slats spaced 3 cm apart. For deep bedding, compact earth floor with a 20 cm layer of dry straw or wood shavings.
- Walls: Build 1.5 m high walls using timber or bamboo, reinforce with wire mesh on upper 0.5 m for ventilation.
- Roof: Install roof with 30-degree slope, ensuring overhangs to protect pens from rain. Insulate with straw mats or reflective sheeting.
- Feeding and Watering Stations: Mount troughs and waterers at 0.5 m height, secure to prevent tipping.
- Waste Management Access: Design one side of the floor slatted or with a removable panel for manure collection.
1.2 Rabbit Housing: Modular Hutches for Intensive and Pasture-Integrated Systems
Purpose: Provide optimal microclimate, hygiene, and predator protection with ease of cleaning and integration with compost systems.
Materials Required:
- Untreated hardwood or bamboo
- Wire mesh (1 cm² openings) for ventilation and floor
- Hinges and latches (stainless steel preferred)
- Plastic or ceramic feeding dishes
- Straw or coconut coir for bedding
Design Specifications:
- Cage dimension per adult: 1 m length × 0.5 m width × 0.5 m height
- Elevated floor with wire mesh for manure to drop through into removable trays
- Nesting box (0.4 m × 0.4 m × 0.3 m) attached
- Stackable modular design for space efficiency
- Protection from direct sun and wind with shade cloth or roofing
Step-by-Step Construction:
- Floor Frame: Construct rectangle frame with hardwood, fit wire mesh floor securely.
- Walls and Roof: Attach sides and roof panels with hinges for access; ensure roof is waterproofed.
- Nesting Box: Build or attach a smaller box on one side, filled with straw, accessible from outside for kits.
- Waste Tray: Install removable tray beneath wire mesh floor for daily cleaning.
- Ventilation: Ensure at least two sides have wire mesh for cross-ventilation, shielded by overhangs.
- Feeding Stations: Fix ceramic bowls inside cages at front, accessible from outside for refilling.
Section 2: Feeding Protocols
2.1 Pig Feed Formulations for Growth and Reproductive Efficiency
Principles: Balance energy, protein, fiber, minerals, and vitamins. Utilize locally available feedstocks, supplemented with forages and kitchen scraps.
| Life Stage | Feed Composition (%) | Notes |
|---|---|---|
| Starter (0-8 weeks) | Corn 60, Soybean meal 20, Mineral mix 10, Wheat bran 10 | High protein for rapid growth |
| Grower (8-16 weeks) | Corn 65, Soybean meal 15, Wheat bran 15, Mineral mix 5 | Moderate protein, energy balance |
| Finisher (16+ weeks) | Corn 70, Wheat bran 20, Mineral mix 10 | Energy dense for fat deposition |
| Gestating Sow | Forage 55, Corn 25, Soybean meal 10, Mineral mix 10 | Fiber to prevent constipation, balanced protein |
| Lactating Sow | Corn 50, Soybean meal 30, Mineral mix 20 | High energy and protein needs |
Step-by-Step Feed Preparation:
- Source dry grains (corn, wheat bran), clean and grind to 2 mm particle size.
- Acquire protein sources (soybean meal, fish meal if available), dry and mix uniformly.
- Prepare mineral mix: calcium carbonate 50%, dicalcium phosphate 30%, salt 10%, trace minerals 10%.
- Combine ingredients in specified ratios for life stage.
- If forages are used (leguminous plants, grasses), chop finely and mix fresh daily.
- Offer feed twice daily, morning and evening, adjusting amounts to consumption levels (see Section 4).
2.2 Rabbit Feed Formulations and Forage Integration
Principles: High fiber, moderate protein diets with fresh forage to maintain gut motility and reproductive health.
| Life Stage | Feed Composition (%) | Notes |
|---|---|---|
| Growing Rabbits | Alfalfa meal 40, Oat bran 30, Corn 20, Mineral mix 10 | High protein and fiber |
| Breeding Does | Alfalfa meal 50, Corn 20, Wheat bran 20, Mineral mix 10 | Increased protein for milk production |
| Maintenance Bucks | Alfalfa meal 40, Wheat bran 30, Corn 20, Mineral mix 10 | Balanced for energy and reproduction |
Step-by-Step Feed Preparation:
- Harvest fresh alfalfa or substitute with other leguminous forage, dry and grind to meal.
- Mill oat or wheat bran to fine powder.
- Prepare mineral mix: calcium carbonate 60%, salt 20%, trace minerals 20%.
- Mix components in specified proportions.
- Provide fresh forage daily: leafy greens, carrot tops, herbaceous plants.
- Feed ad libitum with fresh water at all times.
Section 3: Breeding Protocols
3.1 Pig Reproductive Cycles and Controlled Breeding
| Parameter | Data |
|---|---|
| Puberty onset | 5-7 months |
| Estrus cycle length | 18-24 days |
| Estrus duration | 2-3 days |
| Gestation length | 114 days (3 months, 3 weeks, 3 days) |
| Litter size | 8-12 piglets |
| Weaning age | 3-4 weeks |
| Farrowing interval | 140-150 days |
Breeding Steps:
- Observe sows daily for estrus signs: swollen vulva, reddening, restlessness.
- Introduce boar during estrus for mating; allow multiple matings over 2 days.
- Record mating date for gestation tracking.
- Prepare farrowing pen 1 week before expected farrowing with clean bedding.
- Monitor farrowing process; assist if necessary to reduce piglet mortality.
- Wean piglets at 3-4 weeks, gradually introduce starter feed.
3.2 Rabbit Reproductive Cycles and Controlled Breeding
| Parameter | Data |
|---|---|
| Puberty onset | 4-6 months |
| Estrus cycle length | 16-18 days |
| Estrus duration | 12-24 hours |
| Gestation length | 31-33 days |
| Litter size | 6-10 kits |
| Weaning age | 4-6 weeks |
| Breeding interval | 40 days (post-weaning) |
Breeding Steps:
- Place doe and buck together for 12-24 hours during doe estrus.
- Confirm mating by palpation 10 days post-breeding.
- Prepare nesting box 3 days before expected kindling with clean straw.
- Monitor doe daily during kindling; remove kits if doe shows aggression.
- Wean kits at 4-6 weeks; separate males and females to avoid early breeding.
Section 4: Health Care Protocols
4.1 Disease Prevention and Treatment in Pigs
| Disease | Symptoms | Prevention | Treatment |
|---|---|---|---|
| Swine Fever | Fever, skin blotches, diarrhea | Biosecurity, vaccination | No cure, culling required |
| Mange | Itching, hair loss | Regular pen cleaning, sulfur baths | Sulfur ointments, ivermectin injections |
| Internal Parasites | Weight loss, diarrhea | Rotational grazing, deworming | Fenbendazole 5 mg/kg orally |
| Respiratory Infections | Coughing, nasal discharge | Ventilation, reduce dust | Antibiotics (oxytetracycline 20 mg/kg) |
Step-by-Step Treatment Protocol for Parasites:
- Weigh pig to calculate dosage.
- Administer fenbendazole orally at 5 mg/kg body weight once daily for 3 days.
- Remove manure and sanitize pens during treatment.
- Repeat deworming every 3 months or as needed.
4.2 Disease Prevention and Treatment in Rabbits
| Disease | Symptoms | Prevention | Treatment |
|---|---|---|---|
| Pasteurellosis | Nasal discharge, abscesses | Quarantine new animals, hygiene | Antibiotics (enrofloxacin 10 mg/kg) |
| Coccidiosis | Diarrhea, weight loss | Clean water, feed hygiene | Sulfa drugs (sulfadimethoxine 30 mg/kg) |
| Mites | Itching, hair loss | Regular cleaning, dust baths | Ivermectin 0.2 mg/kg subcutaneously |
| Snuffles | Sneezing, nasal discharge | Ventilation, avoid overcrowding | Antibiotics (trimethoprim-sulfamethoxazole) |
Step-by-Step Treatment Protocol for Coccidiosis:
- Identify symptoms early.
- Mix sulfadimethoxine in drinking water at 30 mg/kg for 5 days.
- Clean and disinfect cages thoroughly.
- Monitor recovery and repeat treatment if necessary.
Section 5: Integrated Systems: Crop Production and Waste Recycling
5.1 Integration of Pig and Rabbit Systems with Crop Production
Principles: Utilize animal manure as fertilizer to enhance soil fertility; use crop residues and byproducts as feed; implement rotational cycles to minimize disease and nutrient depletion.
Integration Steps:
- Collect pig slurry or deep bedding manure daily; compost in aerobic piles with carbon sources (straw, dry leaves) to stabilize nutrients.
- Use composted manure as fertilizer for nitrogen-demanding crops (maize, legumes).
- Feed pigs and rabbits crop residues: maize stalks, bean haulms, vegetable scraps; chop finely to improve digestibility.
- Alternate pasture or forage production fields with animal grazing to break parasite cycles.
- Construct swine pens adjacent to fields to facilitate nutrient cycling and reduce transport.
5.2 Waste Recycling Protocols
Manure Composting for Pathogen Reduction:
| Parameter | Target |
|---|---|
| Pile temperature | 55-65 °C for 3 consecutive days |
| Moisture content | 50-60% |
| Carbon:Nitrogen ratio | 25:1 to 30:1 |
| Turning frequency | Every 5 days |
Step-by-Step Composting Procedure:
- Mix fresh manure with dry carbonaceous material (straw, sawdust) at ratio 1:3 by volume.
- Construct pile at least 1 m³.
- Monitor temperature daily; turn pile every 5 days to aerate.
- Maintain moisture by adding water if below 50%.
- After 30 days, test for maturity: dark soil-like texture, absence of ammonia smell.
- Apply mature compost to fields at 2-5 kg/m² depending on crop requirements.
Manure to Biogas Conversion (Optional): For advanced apprentices: construct anaerobic digesters for biogas production following protocols in Volume VIII: The Energy Codex, Chapter IV.
Section 6: Breed Profiles for Pigs and Rabbits
| Species | Breed | Origin | Adult Weight (kg) | Growth Rate (g/day) | Reproductive Traits | Suitability |
|---|---|---|---|---|---|---|
| Pig | Large White | UK | 250-300 | 700-900 | Litter size 10-12, good maternal | Intensive and extensive systems |
| Pig | Duroc | USA | 220-280 | 650-850 | Litter size 8-10, excellent growth | Meat quality focus |
| Rabbit | New Zealand | USA | 4.5-5.5 | 30-40 | Litter size 8-10, high fertility | Meat production, good adaptability |
| Rabbit | Californian | USA | 3.5-4.5 | 25-35 | Litter size 7-9, good feed efficiency | Intensive meat production |
Selection Criteria for Systems:
- Choose breeds with proven disease resistance in your climatic zone.
- Balance growth rate with feed availability.
- Prioritize maternal abilities in sows and does for reproductive success.
Conclusion
The mastery of pig and rabbit systems within sustainable agriculture is a sacred trust, requiring precision in housing, feeding, breeding, health care, and ecological integration. Each component is interlinked, forming a closed loop of life and nutrient cycling. The protocols herein are not mere suggestions but a codex to be followed with unwavering discipline to ensure food sovereignty and ecological harmony.
For advanced water purification techniques for animal consumption, see Volume VIII: The Water Codex, Chapter II. For detailed biogas digester construction and use, see Volume VIII: The Energy Codex, Chapter IV.
May this knowledge fortify your stewardship of the earth and preserve the sanctity of life.
<!-- SECTION 23 -->
The Complete Practitioner's Codex, Volume V: Beekeeping and Aquaponics
Chapter I: Beekeeping—Mastery of Pollinators and Honey Production
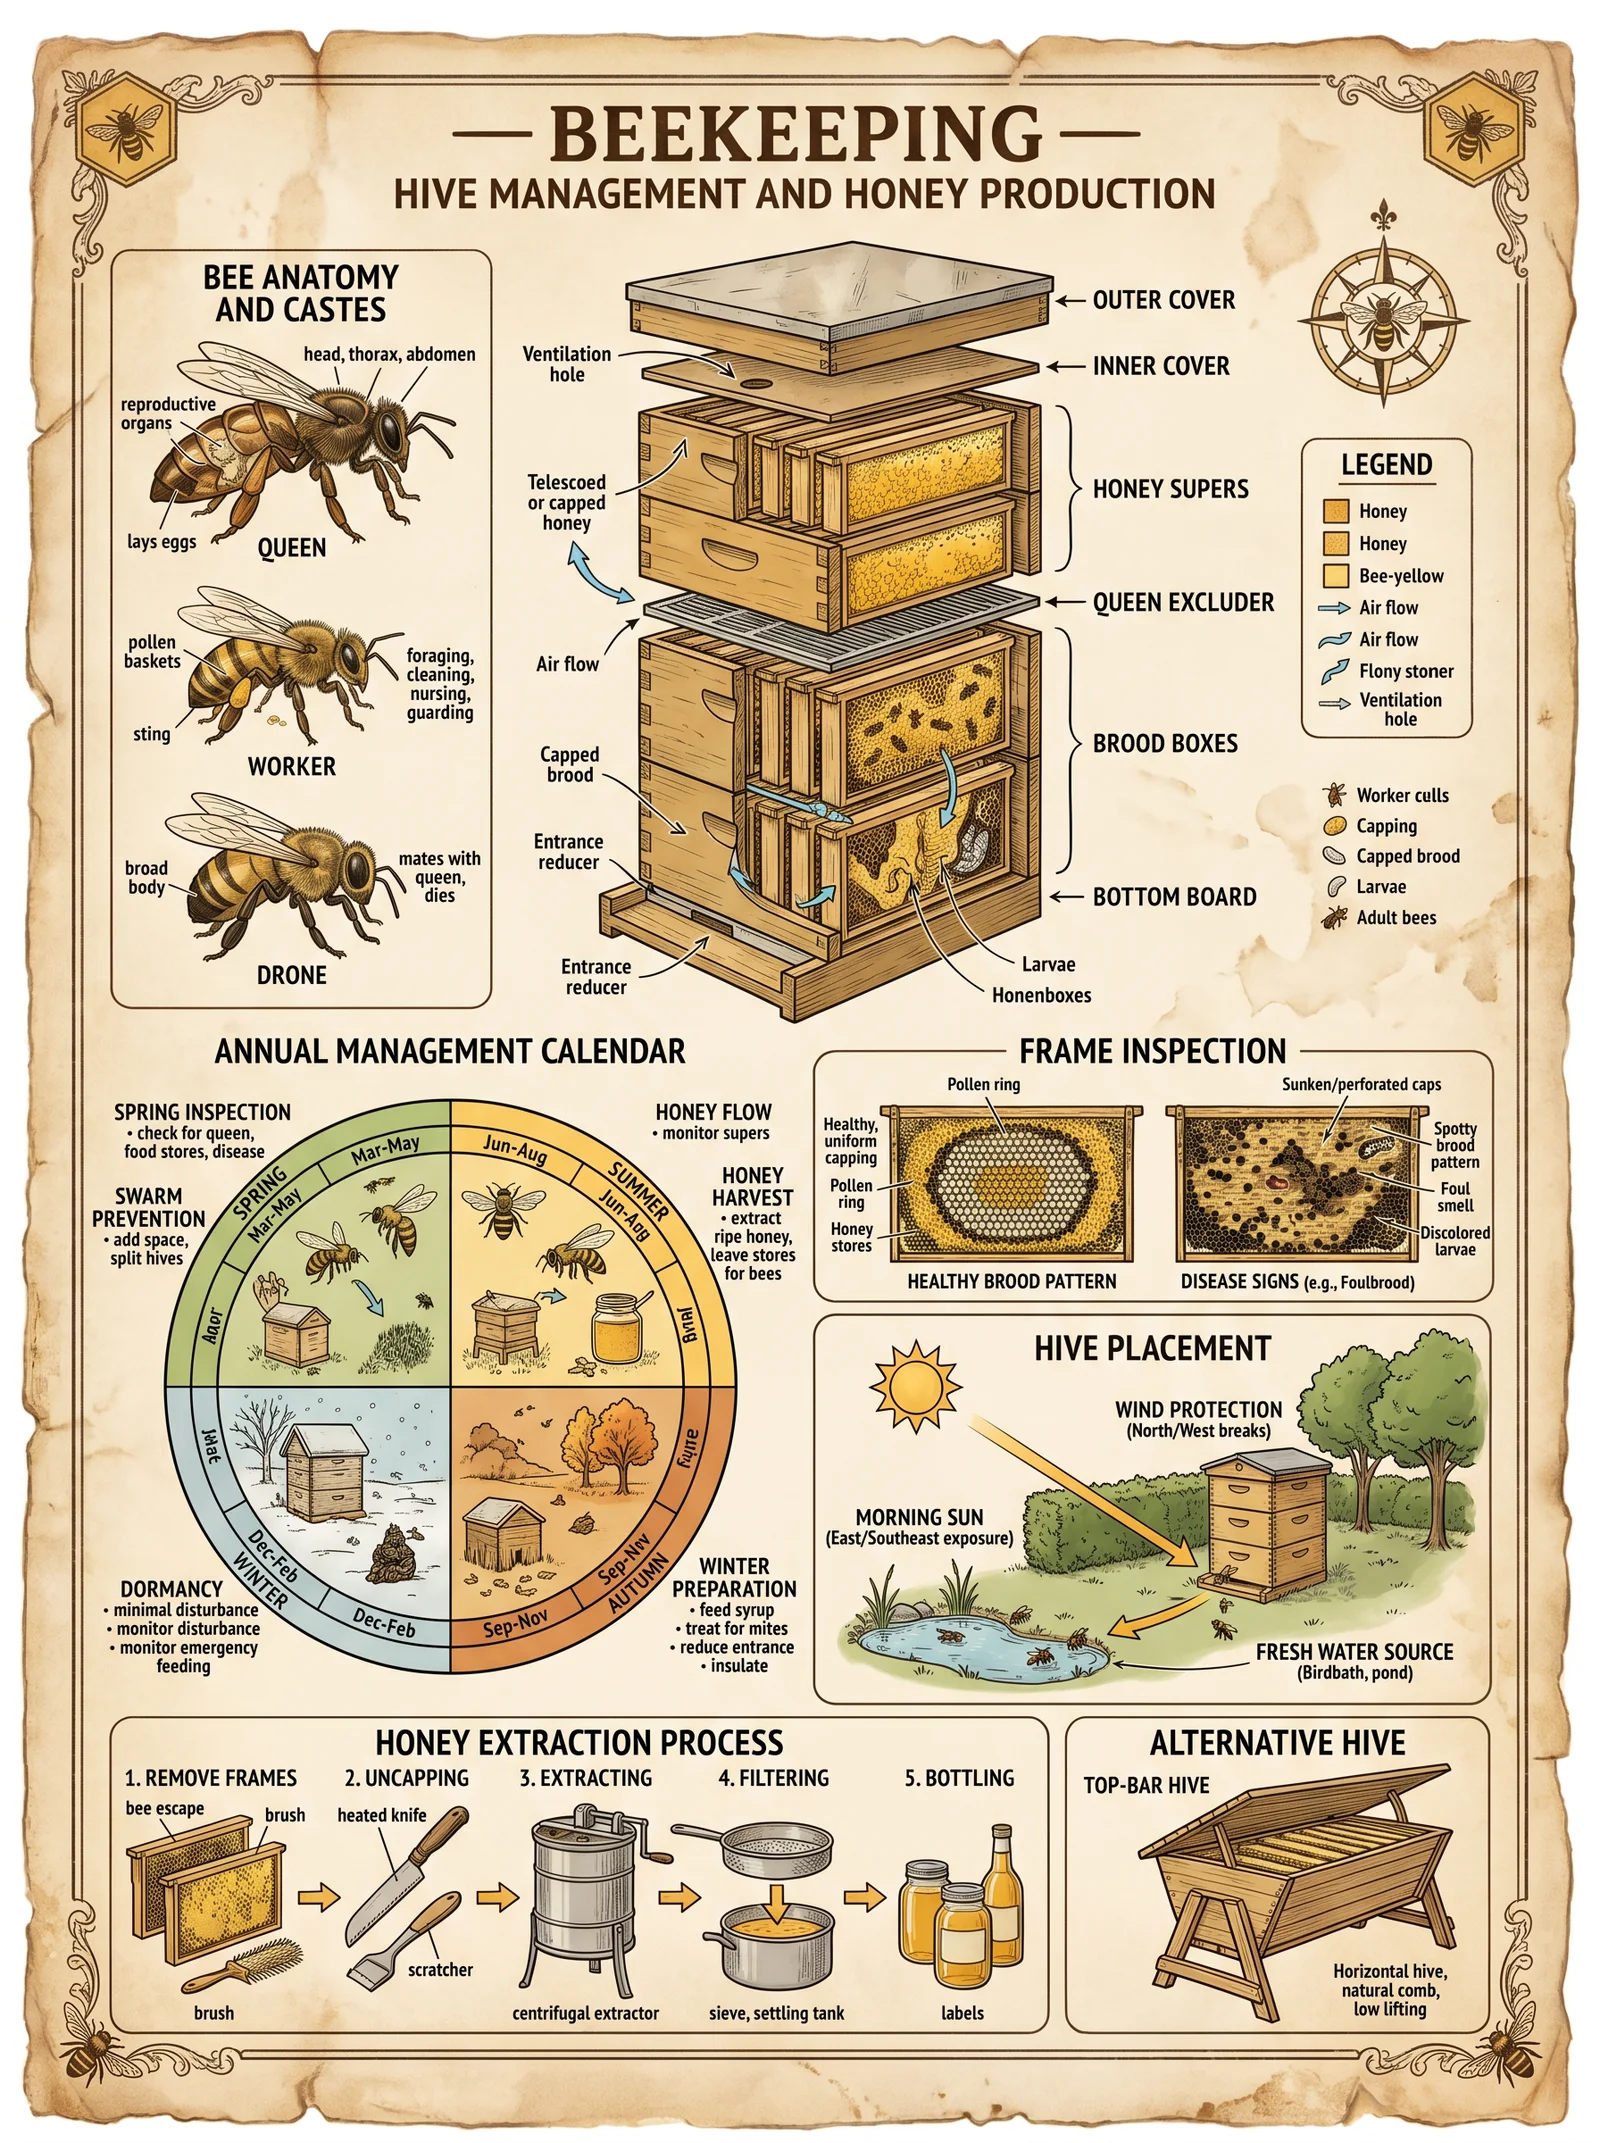
Section 1: Fundamental Principles of Hive Setup for Pollination and Honey Yield
The sacred art of beekeeping is the foundation of agroecosystem vitality. Mastery over the bee colony’s structure, behavior, and health will secure the dual objectives of maximized pollination and optimal honey harvest. This section provides a stepwise procedure for establishing a hive capable of both.
Step 1: Selecting the Optimal Apiary Location
- Site Selection Criteria:
- Minimum 1 km radius of diverse flowering plants.
- South or southeast exposure for early morning sun.
- Windbreaks present to mitigate harsh winds.
- Dry, well-drained soil to prevent hive moisture accumulation.
- Prepare Site:
- Clear area of tall grasses and debris.
- Construct a stable, level stand 30 cm above ground to prevent moisture and pests.
Step 2: Choosing the Appropriate Bee Species for Your Region and Purpose
| Bee Species (Genus Apis) | Climate Suitability | Pollination Efficacy | Honey Yield (kg/colony/year) | Temperament | Disease Resistance |
|---|---|---|---|---|---|
| Apis mellifera ligustica | Temperate | High | 40-60 | Mild | Moderate |
| Apis mellifera carnica | Temperate/Cold | Very High | 35-50 | Very Mild | High |
| Apis mellifera scutellata | Tropical | High | 25-40 | Aggressive | Moderate |
| Apis cerana | Subtropical/Tropical | Moderate | 15-30 | Mild | High |
Instruction: Select Apis mellifera carnica for temperate zones requiring gentle handling and high pollination efficiency. For tropical zones, Apis cerana is recommended due to disease resistance.
Step 3: Assembling the Hive Components
| Component | Material | Dimensions (cm) | Function | Assembly Notes |
|---|---|---|---|---|
| Bottom Board | Untreated wood | 50 x 40 x 3 | Hive foundation; ventilation base | Ensure slight slope to drain moisture |
| Hive Body (Brood Box) | Untreated wood | 50 x 40 x 24 | Queen’s brood chamber | Use dovetail joints for airtightness |
| Super (Honey Box) | Untreated wood | 50 x 40 x 18 | Storage for honey | Stack above brood box |
| Frames | Wood + wire mesh | 43 x 24 (standard) | Hold foundation for comb building | Insert wax or plastic foundation sheets |
| Inner Cover | Wood + mesh | 50 x 40 x 1 | Regulates humidity, ventilation | Mesh side faces brood box |
| Outer Cover | Metal topped wood | 52 x 42 x 5 | Weatherproof roof | Ensure tight fit, use waterproof seal |
Step 4: Hive Assembly Protocol
- Position bottom board on level stand.
- Place brood box on bottom board; ensure snug fit without gaps.
- Insert frames inside brood box, each with foundation sheet aligned vertically.
- Add super box atop brood box during nectar flows.
- Fit inner cover on top of highest box with mesh facing down.
- Secure outer cover ensuring weatherproofing.
Section 2: Hive Maintenance and Colony Health Management
The longevity and productivity of your colony depend on rigorous, scheduled inspections and interventions.
Step 1: Weekly Inspection Protocol
- Open hive on warm, calm days between 10:00 and 15:00.
- Remove outer and inner covers.
- Check for queen presence by spotting eggs or larvae.
- Assess brood pattern uniformity; irregularities indicate queen stress.
- Monitor for pests: Varroa mites, wax moth larvae, small hive beetles.
- Check honey stores; add supers if frames are over 70% filled.
- Record temperature and humidity with handheld devices; maintain 32-35°C and 50-70% humidity.
- Close hive carefully, avoiding crushing bees.
Step 2: Disease and Pest Management
| Disease/Pest | Identification Signs | Treatment Protocol | Frequency |
|---|---|---|---|
| Varroa destructor | Mite presence on bees, deformed wings | a) Apply oxalic acid vapor: 2.8% solution, 5 ml per 1L vaporized; b) Repeat every 7 days for 3 cycles | Biweekly |
| American Foulbrood | Sunken, perforated brood caps, foul odor | Destroy infected frames by burning; apply antibiotics (oxytetracycline 200 mg/colony) if permitted | Immediate |
| Nosema spp. | Dysentery signs, reduced flight | Feed fumagillin at 25 mg/L sugar syrup; continue 4 weeks | Monthly during stress |
| Wax Moth | Webbing in comb, tunnels | Remove affected comb; freeze frames at -18°C for 48 hrs | As needed |
Note: For oxalic acid vaporizer construction, see Appendix A.
Section 3: Harvesting Honey Without Compromising Colony Sustainability
- Harvest only during peak nectar flow.
- Remove super box with capped honey frames.
- Use uncapping knife heated to 60°C to remove wax cappings.
- Extract honey using centrifugal extractor at 300-400 rpm.
- Filter honey through 250-micron mesh.
- Return empty frames to hive; feed colony sugar syrup at 1:1 ratio if stores are low.
- Store honey in sterile, airtight containers at 20°C.
Chapter II: Aquaponics—Integration of Fish Systems with Plant Production
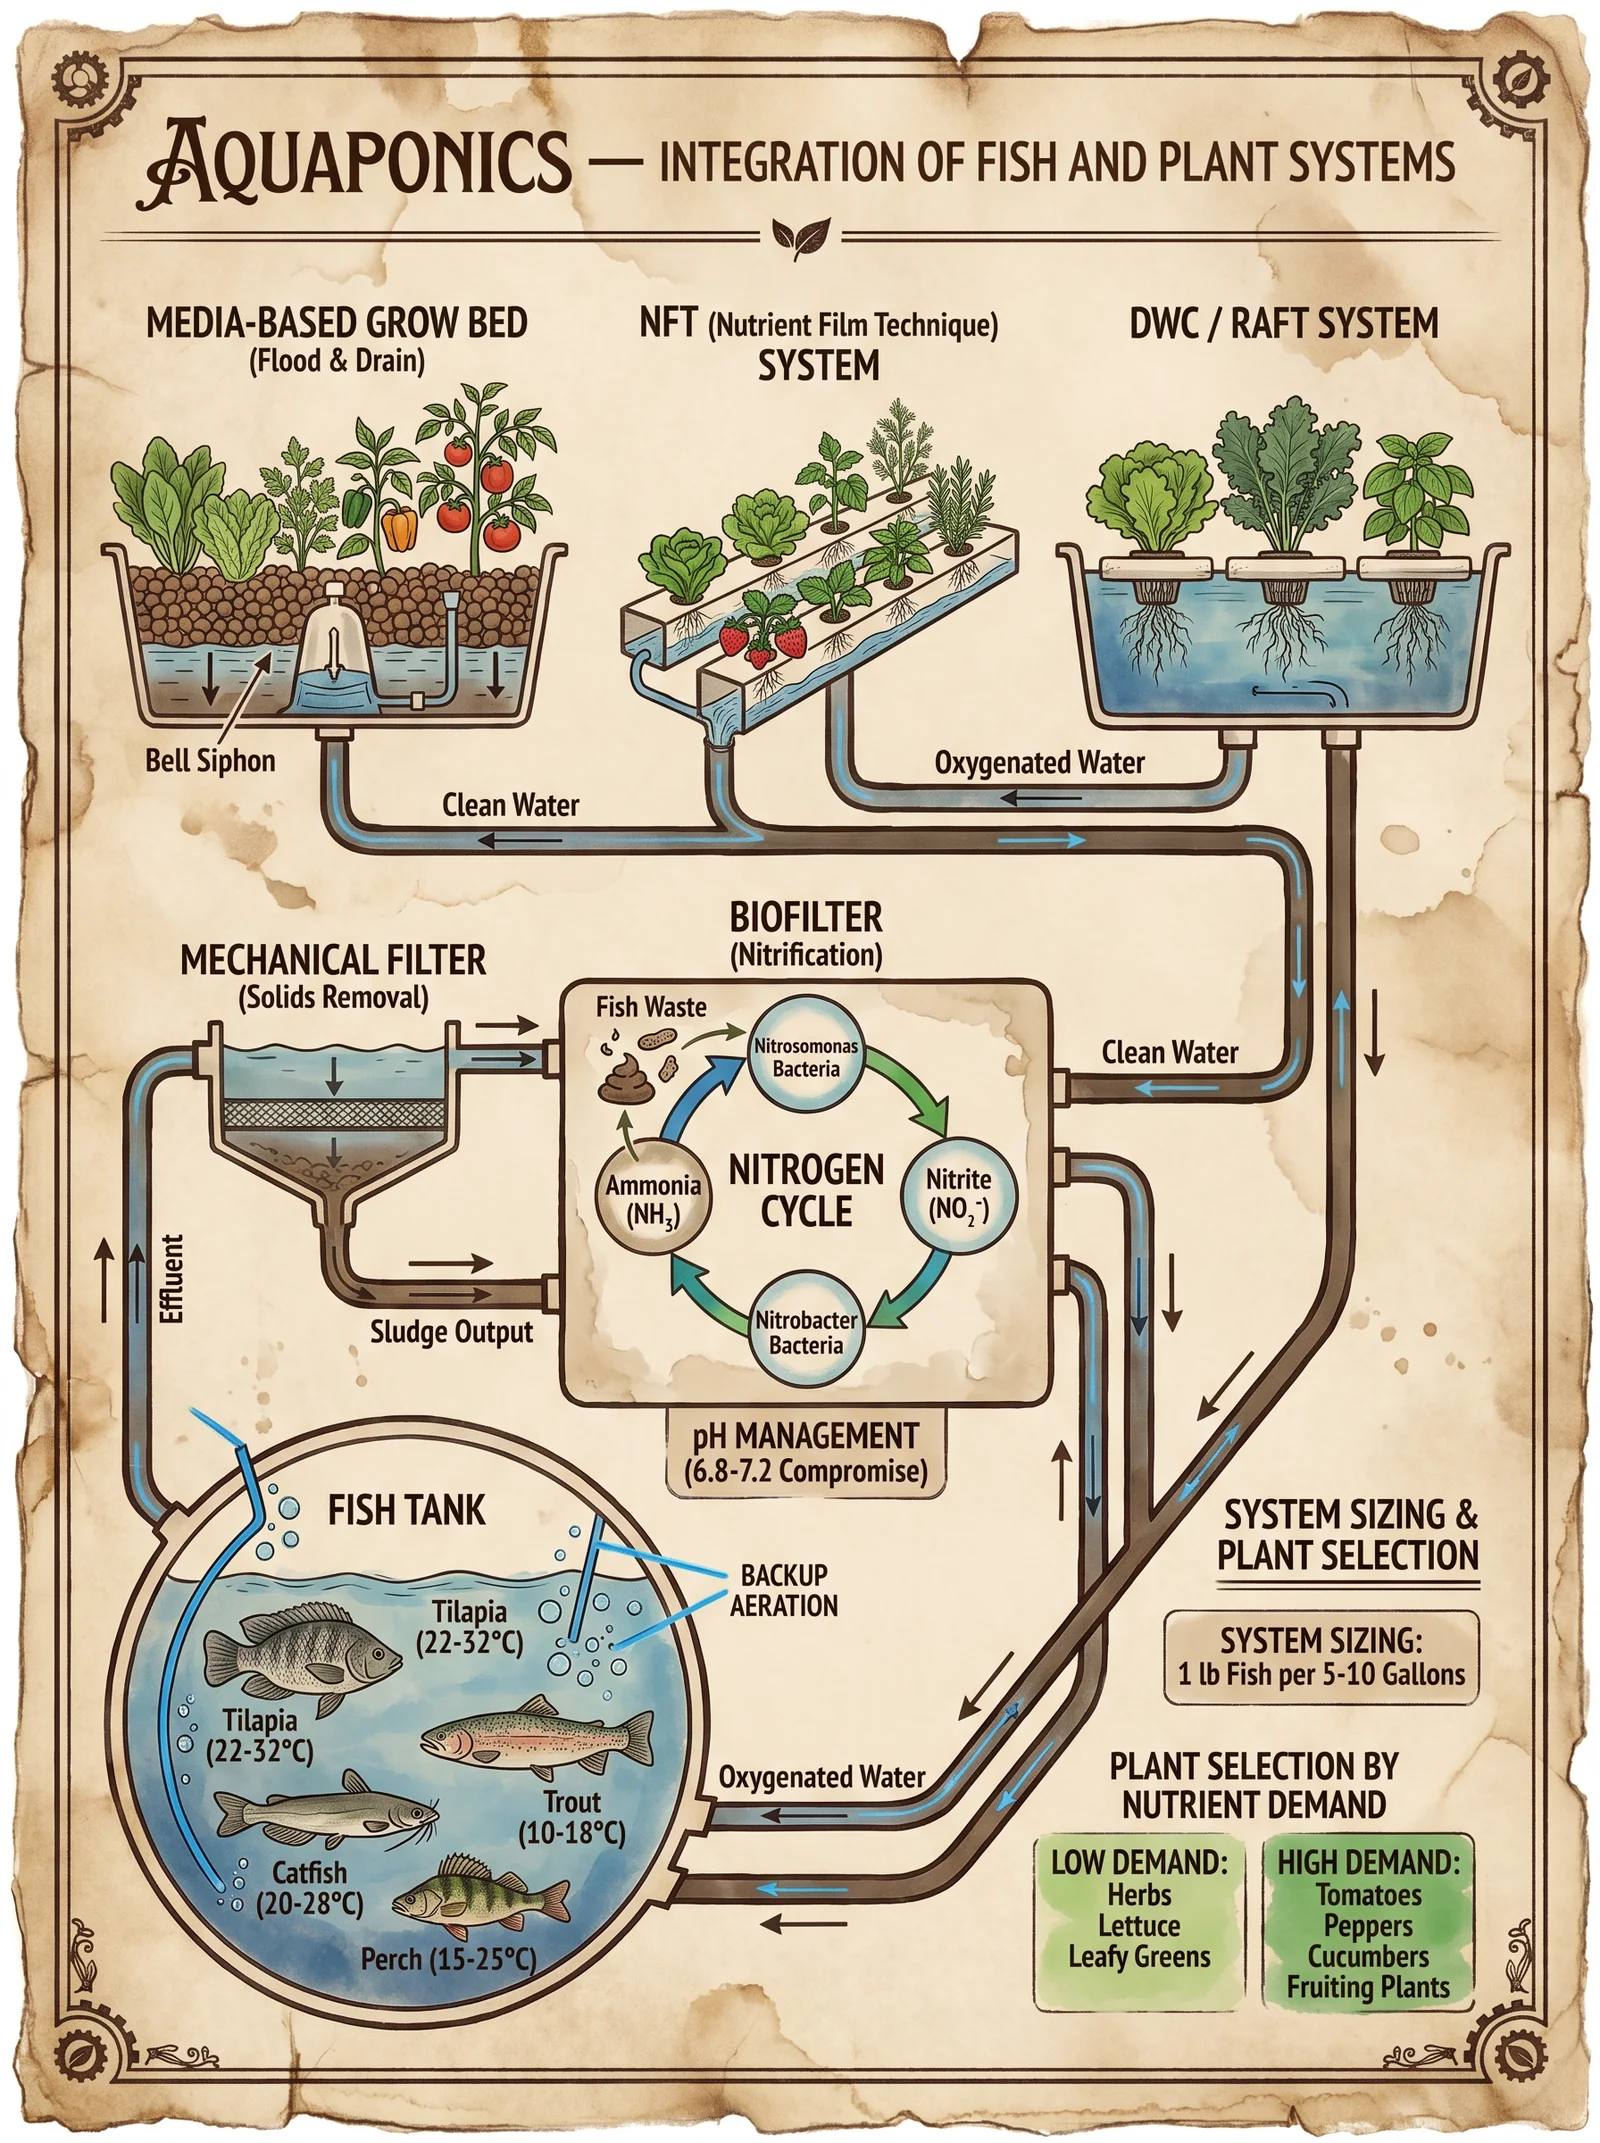
Aquaponics, the sacred symbiosis of aquaculture and hydroponics, transforms water and nutrient cycles into an unbroken chain of life. This chapter details system design, species selection, and nutrient cycling protocols.
Section 1: Aquaponic System Design—Constructing a Self-Sustaining Loop
Step 1: System Components and Assembly
| Component | Function | Material/Specification | Dimensions (cm) | Assembly Instructions |
|---|---|---|---|---|
| Fish Tank | Aquaculture habitat | Food-grade plastic or concrete | 200 x 100 x 50 | Ensure airtight, install drain and overflow valves |
| Biofilter | Nitrification, ammonia conversion | Plastic media with high surface area | 100 x 50 x 50 | Connect via gravity-fed inflow from fish tank |
| Settling Tank | Solids removal | 100 x 50 x 50 | Install before biofilter to trap solids | |
| Grow Bed | Plant cultivation with media (expanded clay) | 100 x 100 x 30 | Position above fish tank for gravity return | |
| Water Pump | Circulation | Submersible, flow rate 500 L/hr | Connect to deliver water from fish tank to grow bed | |
| Aeration System | Oxygen supply for fish | Air pump with diffusers | Place within fish tank |
Step 2: Building Instructions
- Place fish tank on stable, level foundation indoors or shaded outdoors.
- Install settling tank inline at fish tank outlet.
- Connect settling tank outlet to biofilter inlet by gravity pipe.
- Connect biofilter outlet to grow bed inlet; fill grow bed with expanded clay media to 25 cm depth.
- Position grow bed above fish tank to allow gravity return.
- Install water pump in fish tank; pipe outlet to settling tank.
- Add air pump and diffuser to fish tank for oxygenation.
- Seal all joints with aquarium-grade silicone; check for leaks before system start.
Section 2: Species Selection Protocol
Fish Species Selection
| Fish Species | Temperature Range (°C) | pH Range | Growth Rate | Feeding Type | Disease Resistance | Suitability for Aquaponics |
|---|---|---|---|---|---|---|
| Tilapia (Oreochromis niloticus) | 22-30 | 6.5-8.5 | Fast | Omnivorous | High | Ideal for warm climates |
| Channel Catfish (Ictalurus punctatus) | 20-28 | 6.5-8.0 | Moderate | Carnivorous | Moderate | Suitable for temperate zones |
| Rainbow Trout (Oncorhynchus mykiss) | 10-18 | 6.5-8.0 | Fast | Carnivorous | Moderate | Requires cooler water |
| Koi Carp (Cyprinus carpio) | 15-25 | 7.0-8.0 | Slow | Omnivorous | High | Ornamental and food purposes |
Plant Species Selection
| Plant Species | Nutrient Demand | pH Preference | Growth Rate | Suitability for Aquaponics | Notes |
|---|---|---|---|---|---|
| Lettuce (Lactuca sativa) | Low | 6.0-7.0 | Fast | High | Excellent nitrogen uptake |
| Basil (Ocimum basilicum) | Moderate | 5.5-6.5 | Moderate | High | Aromatic herb, high demand |
| Tomato (Solanum lycopersicum) | High | 5.5-6.8 | Moderate | Moderate | Requires supplemental iron |
| Spinach (Spinacia oleracea) | Moderate | 6.0-7.0 | Fast | High | Sensitive to high pH |
Section 3: Nutrient Cycling and Water Quality Management
Step 1: Establishing the Nitrogen Cycle
- Stock fish at density 20 kg/m³ for tilapia; adjust per species.
- Fish excrete ammonia (NH3), toxic above 0.05 mg/L.
- Ammonia flows to biofilter where nitrifying bacteria convert NH3 → NO2− (nitrite) → NO3− (nitrate).
- Plants absorb nitrate as primary nitrogen source.
- Regularly test water for ammonia, nitrite, nitrate using test kits.
- Maintain biofilter temperature at 25-30°C for optimal bacteria function.
- Perform partial water changes (10%) weekly if parameters deviate.
Step 2: Water Parameter Maintenance
| Parameter | Optimal Range | Measurement Frequency | Correction Protocol |
|---|---|---|---|
| Temperature (°C) | 22-28 (species-dependent) | Daily | Use heaters or chillers; adjust ambient conditions |
| pH | 6.8-7.2 | Twice weekly | Add calcium carbonate to raise pH; phosphoric acid to lower pH |
| Dissolved Oxygen (mg/L) | >5.0 | Daily | Increase aeration; reduce fish density |
| Ammonia (mg/L) | <0.05 | Twice weekly | Increase biofilter efficiency; partial water change |
| Nitrite (mg/L) | <0.1 | Twice weekly | Immediate water change; add nitrifying bacteria culture |
| Nitrate (mg/L) | 5-50 | Weekly | Adjust plant biomass; increase water changes if excessive |
Section 3: Fish Feeding and Plant Fertilization
Step 1: Fish Feeding Protocol
- Feed fish 2-5% body weight daily, divided into 2-3 feedings.
- Use high-protein (30-40%) fish feed pellets.
- Observe fish feeding behavior; remove uneaten feed after 30 minutes.
- Adjust feeding based on water temperature and fish growth stage.
Step 2: Supplementing Plant Nutrients
- Monitor for micronutrient deficiencies, especially iron and potassium.
- Add chelated iron (Fe-EDTA) at 2 mg/L if leaf yellowing appears.
- Apply potassium sulfate at 10 mg/L for fruiting plants.
- Avoid chemical fertilizers; rely on fish waste and organic supplements only.
Chapter III: Appendices
Appendix A: Construction of Oxalic Acid Vaporizer for Varroa Mite Control
Materials:
- Stainless steel chamber (volume 1 L)
- Heating element (electric coil rated 40 W)
- Temperature controller (setpoint 150°C)
- 2 m silicone tubing (heat resistant)
- Vapor outlet with diffuser
Assembly:
- Mount heating element inside stainless steel chamber.
- Attach temperature controller with probe to regulate heating.
- Connect silicone tubing to vapor outlet.
- Place vapor outlet inside hive entrance during treatment.
- Add 5 ml of 2.8% oxalic acid solution into chamber before heating.
- Activate device for 5 minutes to vaporize acid.
- Remove device carefully; close hive.
Summary Table: Comparison of Bee and Fish Species for Integrated Agroecosystems
| Species | Climate Suitability | Pollination / Production Role | Disease Resistance | Maintenance Complexity | Recommended Use |
|---|---|---|---|---|---|
| Apis mellifera carnica | Temperate | High pollination, honey yield | High | Moderate | Temperate pollination |
| Apis cerana | Tropical | Moderate pollination | High | Low | Tropical small-scale beekeeping |
| Tilapia (Oreochromis niloticus) | Warm/tropical | Fish protein, nutrient source | High | Moderate | Warm aquaponics |
| Rainbow Trout (O. mykiss) | Cool temperate | Fish protein | Moderate | High | Cool aquaponics |
Closing Exhortation
Master, the life of your agroecosystem hinges upon the vigilance and precision of your stewardship over these living constructs. The bee, bearer of pollination and honey’s sacred sweetness, and the fish, the living nutrient cycler, form the twin pillars of regenerative agriculture. Commit to these protocols with unwavering discipline. The survival of your community depends on the harmony you forge between earth, air, and water through these ancient yet ever-renewing arts.
<!-- SECTION 24 -->
The Complete Practitioner's Codex, Volume V: Rotational Grazing and Pasture Management
Introduction
Within the sacred cycle of life and sustenance, rotational grazing stands as a cornerstone of regenerative agriculture, a technique both ancient and supremely modern. This volume imparts the unyielding principles and practical protocols that render rotational grazing a tool of both soil resurrection and animal vitality. The knowledge herein is not theoretical but actionable, designed to transform barren soils into fertile pastures and livestock into robust sentinels of health.
I. Principles and Benefits of Rotational Grazing
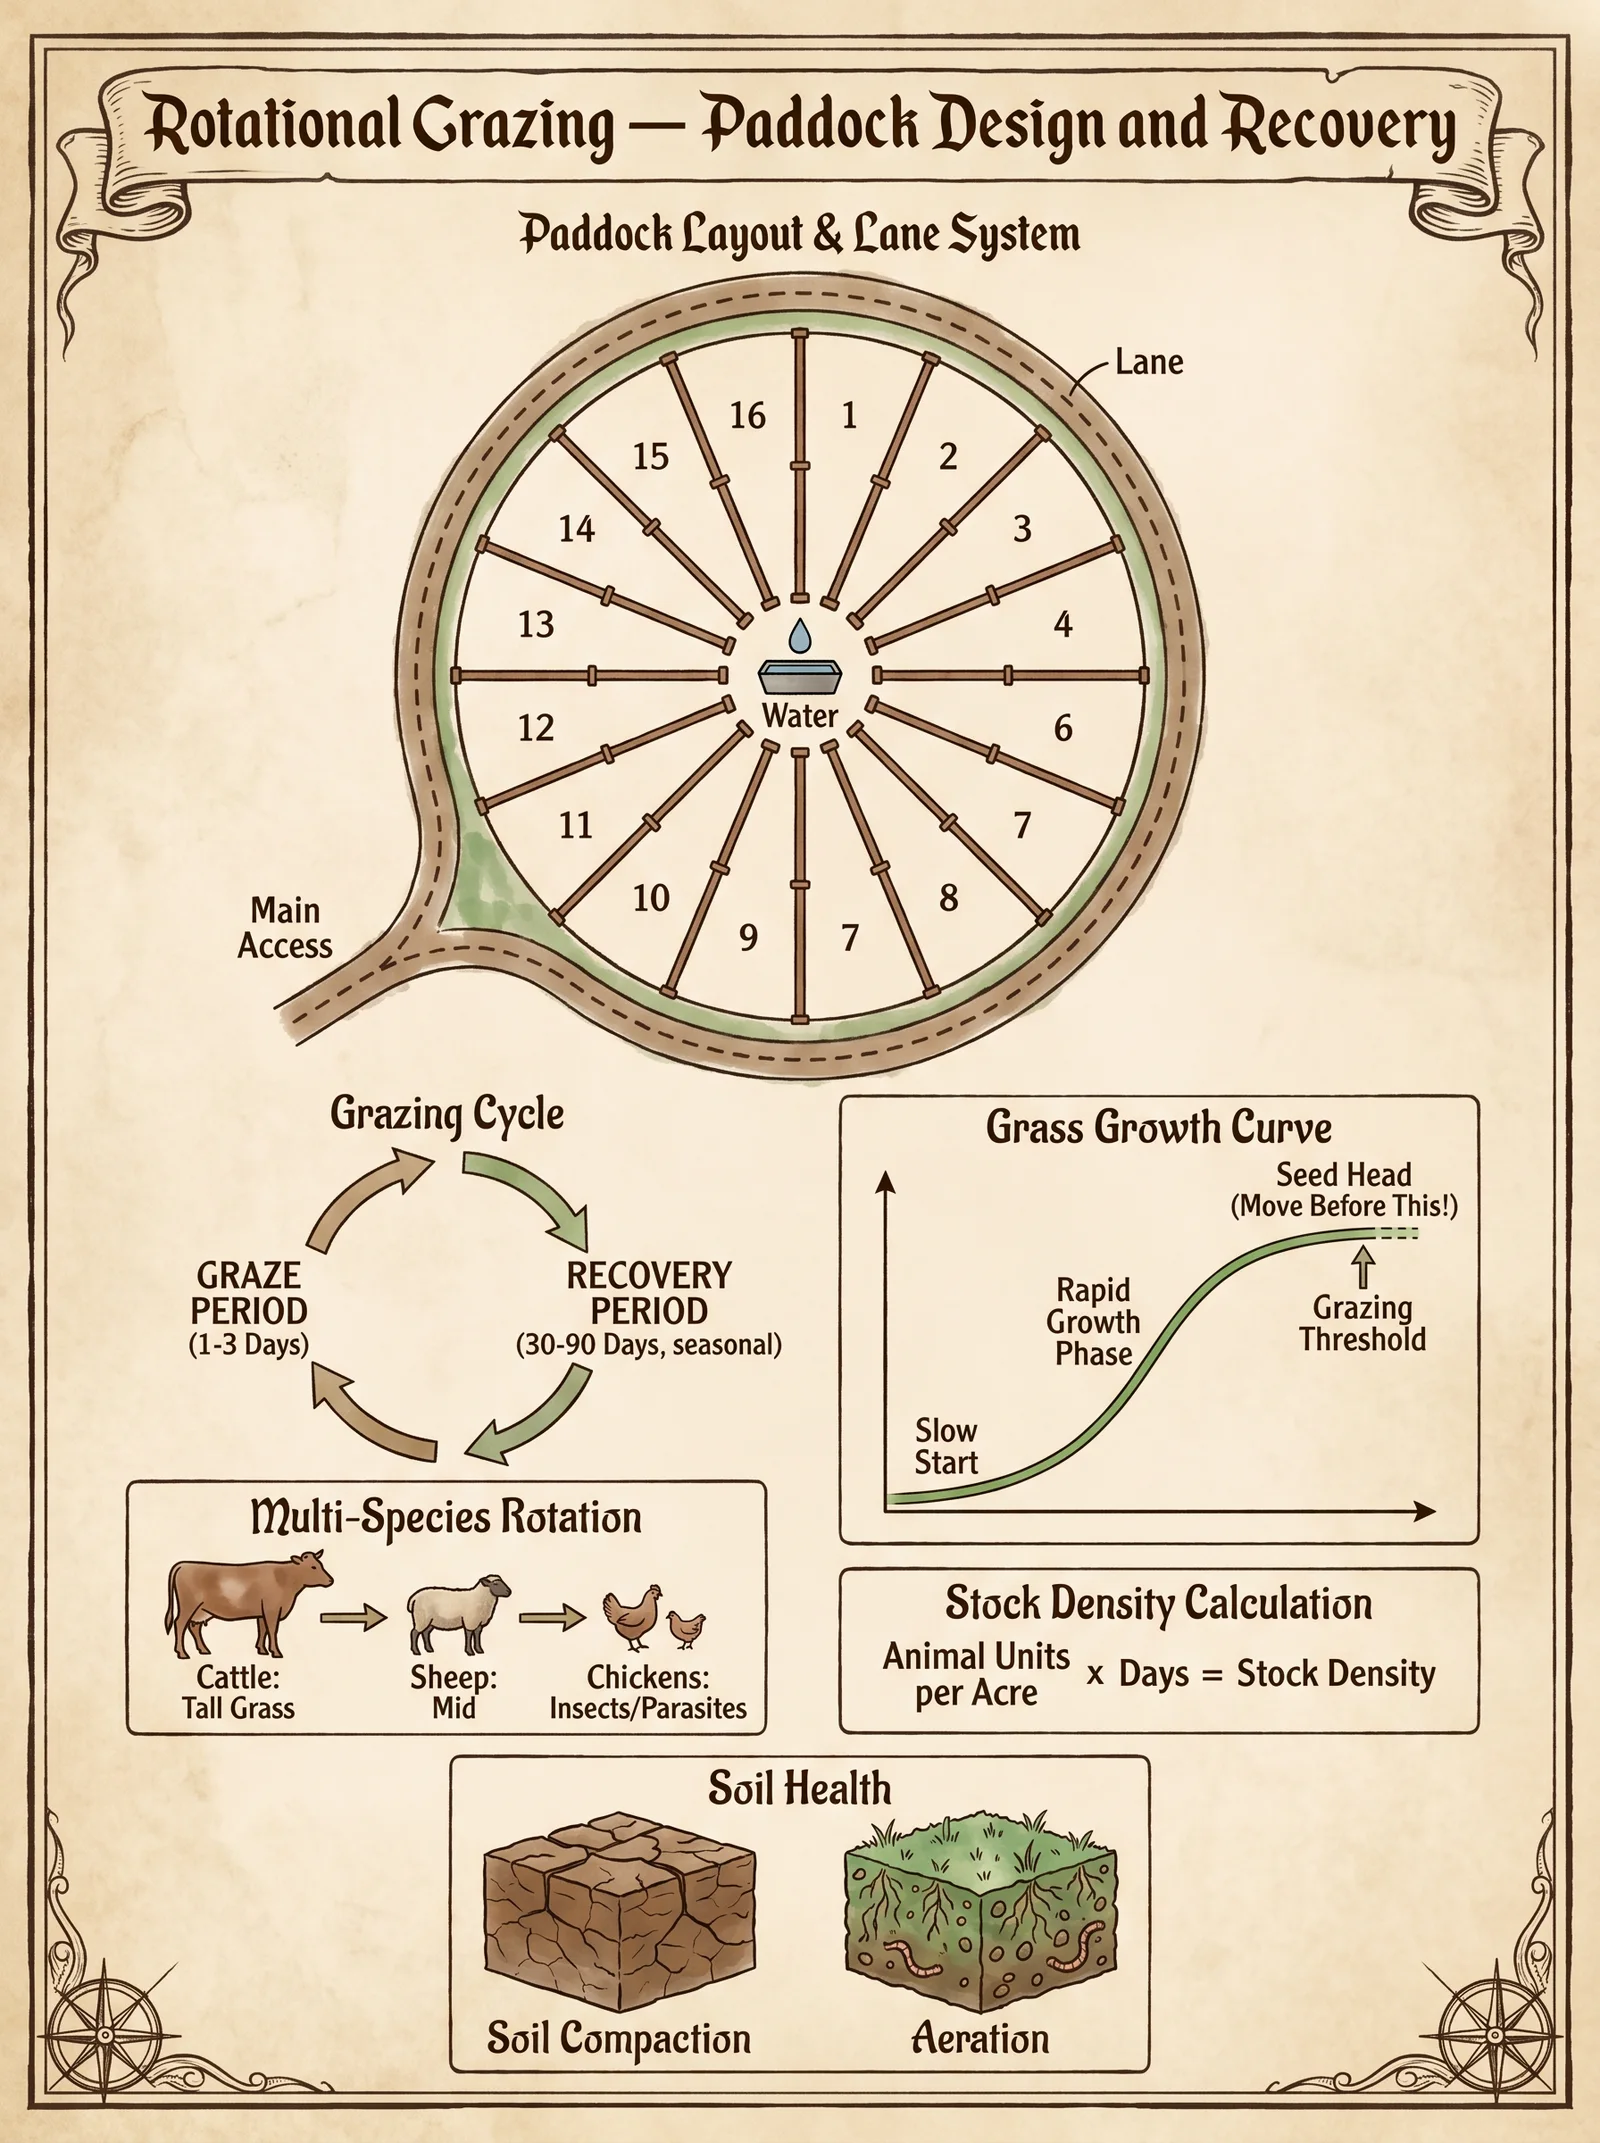
A. Core Principles
- Paddock Division: Divide the total grazing land into multiple smaller units called paddocks.
- Controlled Grazing Periods: Livestock are moved through paddocks on a strict schedule to prevent overgrazing.
- Rest and Recovery: Each paddock undergoes a rest period to allow forage plants to regrow and root systems to rebuild.
- Stock Density Management: Adjust animal numbers to optimize grazing pressure without damaging plants.
- Monitoring and Adaptation: Continuously observe pasture conditions and animal health to refine the rotation schedule.
B. Ecological and Agricultural Benefits
| Benefit Category | Description |
|---|---|
| Soil Health | Increases organic matter, promotes microbial biodiversity, reduces erosion, and enhances nutrient cycling. |
| Forage Productivity | Stimulates plant regrowth, increases yield and species diversity, improves drought resilience. |
| Animal Welfare | Ensures high-quality forage availability, reduces parasite loads, and promotes natural behaviors. |
| Water Management | Improves infiltration, reduces runoff, and maintains watershed health. |
| Carbon Sequestration | Enhances soil carbon storage, mitigating climate change impacts. |
II. Fencing Design for Rotational Grazing
Proper fencing design is the foundation of effective rotational grazing. It must be durable, flexible, and cost-efficient.
A. Types of Fencing
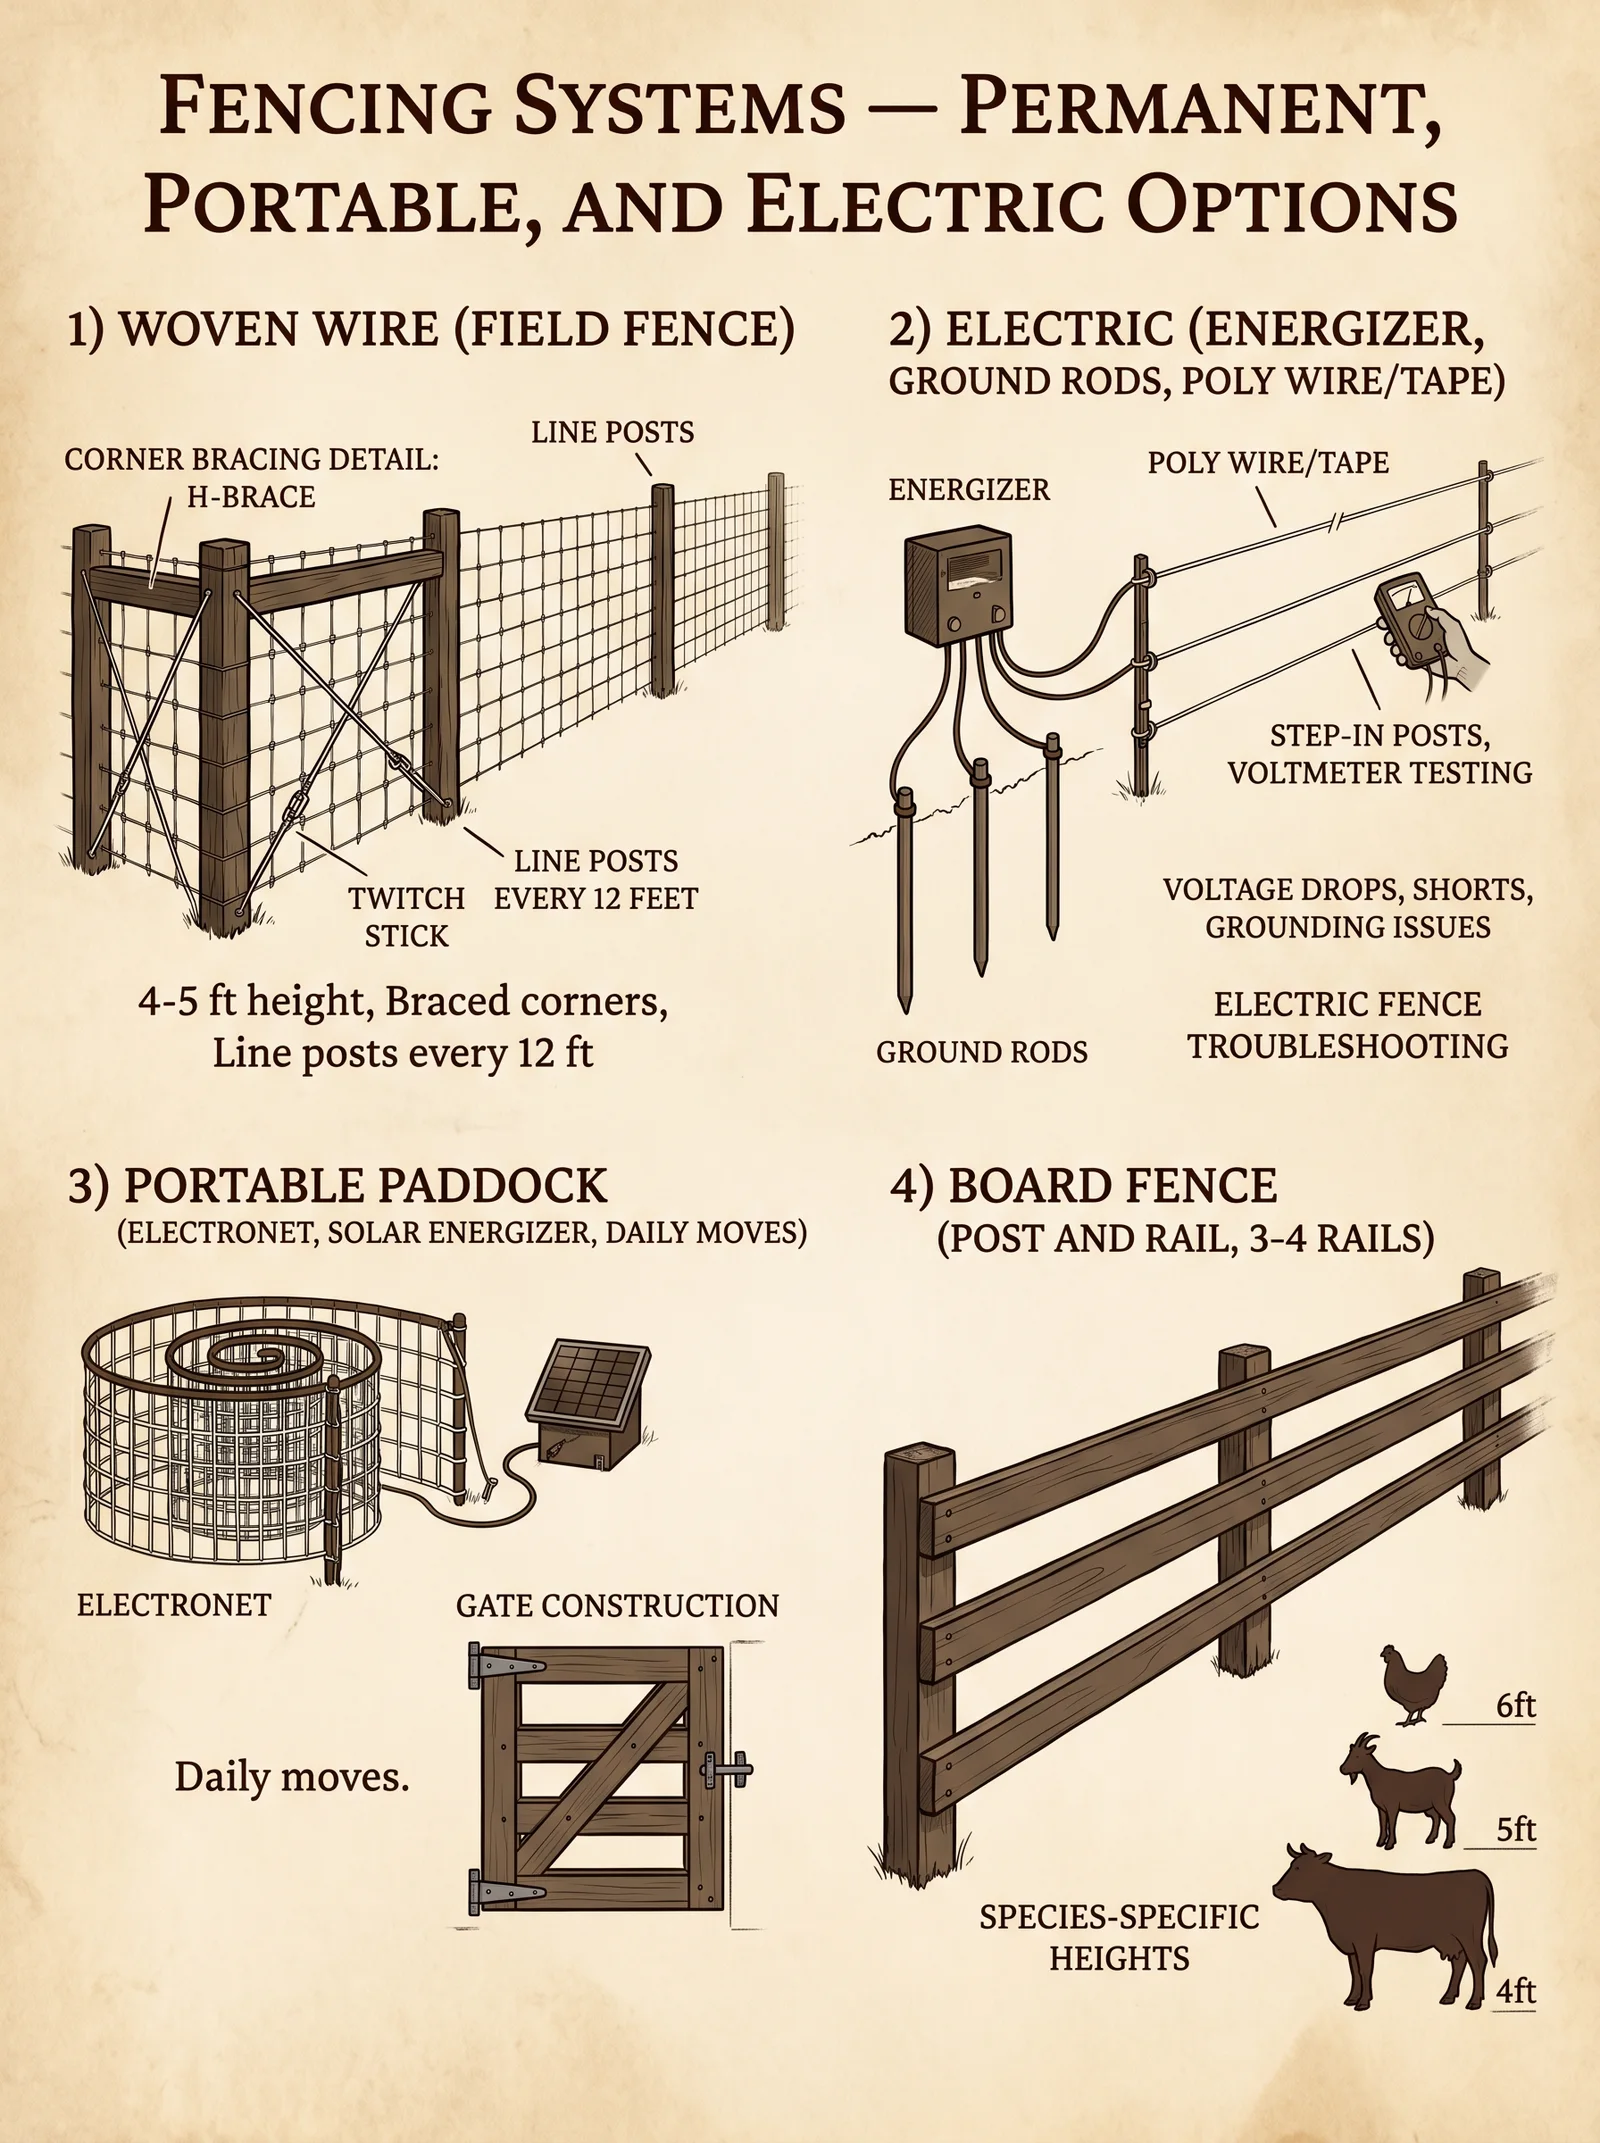
| Fencing Type | Description | Materials Required | Cost Estimate (per 100 m) | Durability (Years) | Notes |
|---|---|---|---|---|---|
| Electric Fence | Wire energized with low-voltage current to contain animals. | Insulated wire, energizer, posts, insulators | $150 – $300 | 5-7 | Requires electrical source, easy to reconfigure. |
| Barbed Wire Fence | Traditional wire fence with barbs spaced evenly. | Barbed wire, steel posts, staples | $200 – $350 | 15-20 | Permanent, less flexible, risk of injury. |
| High-Tensile Wire | Strong wire, tensioned to reduce sagging. | High-tensile wire, steel posts, tensioners | $250 – $400 | 15-20 | Durable, flexible for rotational grazing. |
| Portable Panels | Modular metal panels moved between paddocks. | Steel panels | $400 – $700 (per set) | 10 | Highly flexible, high upfront cost. |
B. Step-by-Step Fence Installation (Electric Fence Example)
- Site Preparation: Clear a 1 m-wide path along the planned paddock boundary.
- Post Installation: Place posts every 3 meters using a post driver; ensure vertical alignment.
- Wire Stringing:
- Attach insulators to posts at 30 cm, 60 cm, and 90 cm heights.
- String the insulated electric wire through insulators.
- Energizer Setup:
- Install energizer unit near a power source.
- Connect ground rods (minimum 3 rods, 2 m length each) spaced 3 m apart and connect to energizer ground terminal.
- Test voltage at various points to ensure 3000-5000 volts.
- Testing and Adjustment: Walk the entire fence line with a voltage tester; repair shorts or weak spots.
III. Paddock Rotation Schedules: Timing and Stock Density
Effective rotational grazing depends on the precise timing of animal movement and appropriate stocking densities.
A. Determining Rotation Frequency
Rotation frequency hinges on forage growth rates, which vary by species, season, and climate.
| Forage Growth Stage | Grazing Window (Days) | Rest Period (Days) | Notes |
|---|---|---|---|
| Early Growth (Vegetative) | 1-3 | 28-35 | High nutrient content, avoid overgrazing. |
| Mid Growth | 3-5 | 30-40 | Optimal for biomass regeneration. |
| Late Growth (Reproductive) | 5-7 | 40-50 | Lower forage quality, longer rest needed. |
B. Stocking Density Calculation
Stocking density (SD) is the number of animals per unit area during grazing.
\[ SD = \frac{\text{Number of Animals} \times \text{Animal Unit Equivalent (AUE)}}{\text{Paddock Area (ha)}} \]
- Animal Unit Equivalent (AUE): 1 AUE = 450 kg of live animal weight.
C. Protocol for Scheduling Rotation
- Estimate Forage Mass: Use a rising plate meter or calibrated visual assessment.
- Calculate Animal Intake: Average daily dry matter intake (DMI) approximates 3-4% of live weight.
- Adjust Grazing Period using forage availability and animal intake.
- Schedule Movement: Move animals when 50% of preferred forage height is grazed.
- Rest Period Enforcement: Do not re-graze paddock before rest period completion.
IV. Forage Species Selection
Optimal forage species selection is critical to maximize productivity, resilience, and nutrition.
A. Forage Species Table
| Species | Botanical Name | Growth Habit | Ideal Climate | Grazing Period (Days) | Nutritional Value (CP %) | Notes |
|---|---|---|---|---|---|---|
| Tall Fescue | Festuca arundinacea | Perennial | Temperate | 3-5 | 12-15 | Deep roots, drought-tolerant, endophyte risks. |
| Bermuda Grass | Cynodon dactylon | Perennial | Warm, subtropical | 4-6 | 10-14 | High productivity, low cold tolerance. |
| Orchardgrass | Dactylis glomerata | Perennial | Cool, temperate | 3-5 | 14-18 | High palatability, drought-sensitive. |
| Alfalfa | Medicago sativa | Perennial legume | Temperate | 2-4 | 20-25 | Nitrogen-fixing, high protein, requires careful grazing. |
| Ryegrass | Lolium perenne | Perennial | Cool, moist | 2-4 | 18-22 | Rapid regrowth, high quality forage. |
| White Clover | Trifolium repens | Perennial legume | Temperate | 3-5 | 18-22 | Nitrogen-fixing, improves forage quality. |
| Sorghum-Sudangrass | Sorghum bicolor | Annual | Warm | 5-7 | 8-12 | Fast-growing, summer forage, risk of prussic acid. |
B. Step-by-Step Forage Species Establishment
- Soil Testing and Preparation
- Collect soil samples at 0-15 cm depth.
- Adjust pH to 6.0-7.0 using lime or sulfur as needed.
- Apply basal fertilizers according to soil test results.
- Seed Selection
- Choose species suitable for climate, soil, and livestock.
- Use certified seed with purity >95%.
- Planting
- Seedbed preparation: till to 10 cm depth, remove debris.
- Plant seeds at recommended seeding rates (see Table VI).
- Cover seed with 1-2 cm soil; roll for firm seed-soil contact.
- Irrigation and Weed Control
- Apply irrigation if rainfall <20 mm/week during establishment.
- Use mechanical or chemical weed control as necessary.
- First Grazing
- Allow forage to reach 15-20 cm height before first grazing.
- Graze lightly to stimulate tillering.
V. Monitoring Pasture Recovery and Animal Impact
Continuous monitoring ensures sustainability and enables timely intervention.
A. Monitoring Protocols
| Parameter | Measurement Method | Frequency | Thresholds for Action |
|---|---|---|---|
| Forage Height | Rising plate meter or ruler | Weekly during growing season | Below 10 cm triggers rest extension. |
| Forage Mass | Quadrat sampling, biomass clipping | Biweekly | Below 1500 kg DM/ha requires rest. |
| Soil Compaction | Penetrometer reading | Quarterly | >2 MPa indicates need for aeration. |
| Ground Cover | Visual estimate (%) | Monthly | Below 70% cover triggers reseeding. |
| Animal Body Condition | Scoring (1-5 scale) | Monthly | <2.5 signals nutritional deficiency. |
| Dung Distribution | Transect counts | Monthly | Clumping indicates uneven grazing. |
B. Step-by-Step Pasture Monitoring
- Forage Height Measurement
- Use a rising plate meter: lower plate on pasture, record height.
- Record five random points per paddock.
- Calculate average height.
- Forage Mass Estimation
- Clip 0.25 m² quadrats at ground level at five locations.
- Dry samples at 60°C for 48 hours, weigh dry matter.
- Extrapolate to kg DM/ha.
- Soil Compaction Check
- Insert penetrometer vertically at five points.
- Record readings in MPa.
- Assessment and Adjustment
- If parameters exceed thresholds, adjust rotation schedule, reduce stocking density, or initiate pasture renovation.
VI. Pasture Productivity and Grazing Periods: Comprehensive Tables
A. Grazing Periods by Forage Species and Season
| Forage Species | Spring Grazing (Days) | Summer Grazing (Days) | Fall Grazing (Days) | Winter Grazing (Days) | Notes |
|---|---|---|---|---|---|
| Tall Fescue | 4 | 3 | 5 | 2 | Dormant in winter |
| Bermuda Grass | 6 | 5 | 3 | 0 | Dormant below 10°C |
| Orchardgrass | 3 | 2 | 4 | 1 | Sensitive to drought |
| Alfalfa | 3 | 2 | 3 | 0 | Avoid grazing during frost |
| Ryegrass | 3 | 1 | 3 | 1 | Rapid regrowth in cool weather |
| White Clover | 4 | 3 | 4 | 1 | Mix with grasses for stability |
| Sorghum-Sudangrass | 7 | 6 | 0 | 0 | Annual, summer only |
B. Forage Productivity Metrics by Species
| Species | Average Yield (kg DM/ha/year) | Root Depth (cm) | Drought Tolerance | Typical Crude Protein (%) |
|---|---|---|---|---|
| Tall Fescue | 8000 | 60 | High | 12-15 |
| Bermuda Grass | 10,000 | 45 | Very High | 10-14 |
| Orchardgrass | 7000 | 50 | Medium | 14-18 |
| Alfalfa | 9000 | 90 | Medium | 20-25 |
| Ryegrass | 6000 | 30 | Low | 18-22 |
| White Clover | 5000 | 40 | Medium | 18-22 |
| Sorghum-Sudangrass | 12,000 | 100 | Very High | 8-12 |
VII. Protocol for Pasture Renovation and Recovery
When monitoring reveals degradation, initiate renovation:
- Complete Rest: Remove livestock for 45-60 days.
- Mechanical Aeration: Use spike aerators or rotary cultivators to relieve compaction.
- Overseeding:
- Select species compatible with existing forage.
- Use seed drill or broadcast seeding.
- Apply light fertilization (NPK 10-20-10 at 50 kg/ha).
- Weed Management: Hand-weed or apply selective herbicides as per safety guidelines.
- Irrigation: Supplement rainfall during establishment if possible.
- Gradual Reintroduction of Livestock: Begin with low stocking density, increase as pasture recovers.
VIII. Summary of Actionable Steps to Implement Rotational Grazing
| Step Number | Action | Outcome |
|---|---|---|
| 1 | Survey and map grazing land, divide into paddocks | Enables systematic rotation |
| 2 | Construct durable fencing system | Controls animal movement |
| 3 | Select forage species suited to environment | Maximizes productivity and resilience |
| 4 | Calculate stocking density and grazing periods | Optimizes forage utilization and recovery |
| 5 | Implement grazing rotation schedule | Protects soil and plants |
| 6 | Monitor pasture and animal health regularly | Ensures sustainability and timely interventions |
| 7 | Renovate pasture when degradation observed | Restores productivity and soil health |
IX. Final Reverence
The mastery of rotational grazing is not merely a technique but a covenant with the land and its creatures. It demands discipline to the timing, respect for the soil’s silent language, and a vigilant eye for the subtle shifts in plant and animal vitality. This volume imparts not only the protocols but the sacred trust to steward pasture ecosystems with reverence and unyielding rigor.
Appendix: Essential Tools and Devices for Rotational Grazing
| Tool | Description | Construction/Procurement Notes |
|---|---|---|
| Rising Plate Meter | Measures pasture height precisely | Construct frame with weighted plate and graduated scale; see Volume VIII |
| Penetrometer | Measures soil compaction | Purchase commercial model or build using spring-loaded probe; see Volume VII |
| Electric Fence Tester | Measures voltage along fence line | Build from a simple neon bulb circuit; detailed schematic in Volume II |
| Seed Drill | For precise seeding during pasture renovation | DIY plans available in Volume IX |
This concludes Volume V. For protocols on water management in rotational grazing systems, see Volume VIII: The Water Codex, Chapter IV. For animal health monitoring, refer to Volume III: The Livestock Codex, Chapter VII.
<!-- SECTION 25 -->
Volume VI: Food Preservation Overview
The Agrarian Codex: Complete Agriculture, Permaculture, Animal Husbandry, and Food Sovereignty
Introduction
Food preservation is the lifeblood of sovereignty, the cornerstone of survival, and the sacred shield protecting against famine, scarcity, and dependency. This volume imparts the full arsenal of traditional and modern food preservation methods essential for the Practitioner practitioner entrusted with sustaining life through all seasons and crises. You will master the principles and protocols of fermentation, dehydration, canning, smoking, and curing with absolute precision—armed with safety guidelines, storage protocols, and comparative analyses designed for uncompromising success.
1. Foundations of Food Preservation
Preservation extends the edibility, safety, and nutritional value of food by halting or reversing decomposition processes caused by microbial activity, enzymatic degradation, and oxidation. Mastery requires understanding these primary preservation principles:
| Principle | Mechanism | Effect on Food |
|---|---|---|
| Inhibition of Microbial Growth | Lowering pH, reducing water activity, or introducing antimicrobials | Prevents spoilage and pathogenic organisms |
| Moisture Reduction | Removal of water via dehydration or osmotic pressure | Stops microbial proliferation |
| Thermal Processing | Applying heat to destroy microbes and enzymes | Sterilizes or pasteurizes |
| Anaerobic Environment | Exclusion of oxygen through vacuum or airtight sealing | Prevents aerobic microbial growth |
| Chemical Preservation | Use of salts, sugars, acids, or smoke compounds | Creates hostile environment for microbes |
Each method below manipulates one or more of these principles to achieve preservation.
2. Fermentation: The Sacred Alchemy of Life
Fermentation is an ancient, transformative preservation method harnessing beneficial microbes to convert carbohydrates into organic acids, alcohols, or gases. This method enhances shelf life, bioavailability of nutrients, and introduces probiotics vital for health sovereignty.
2.1. Principles of Fermentation
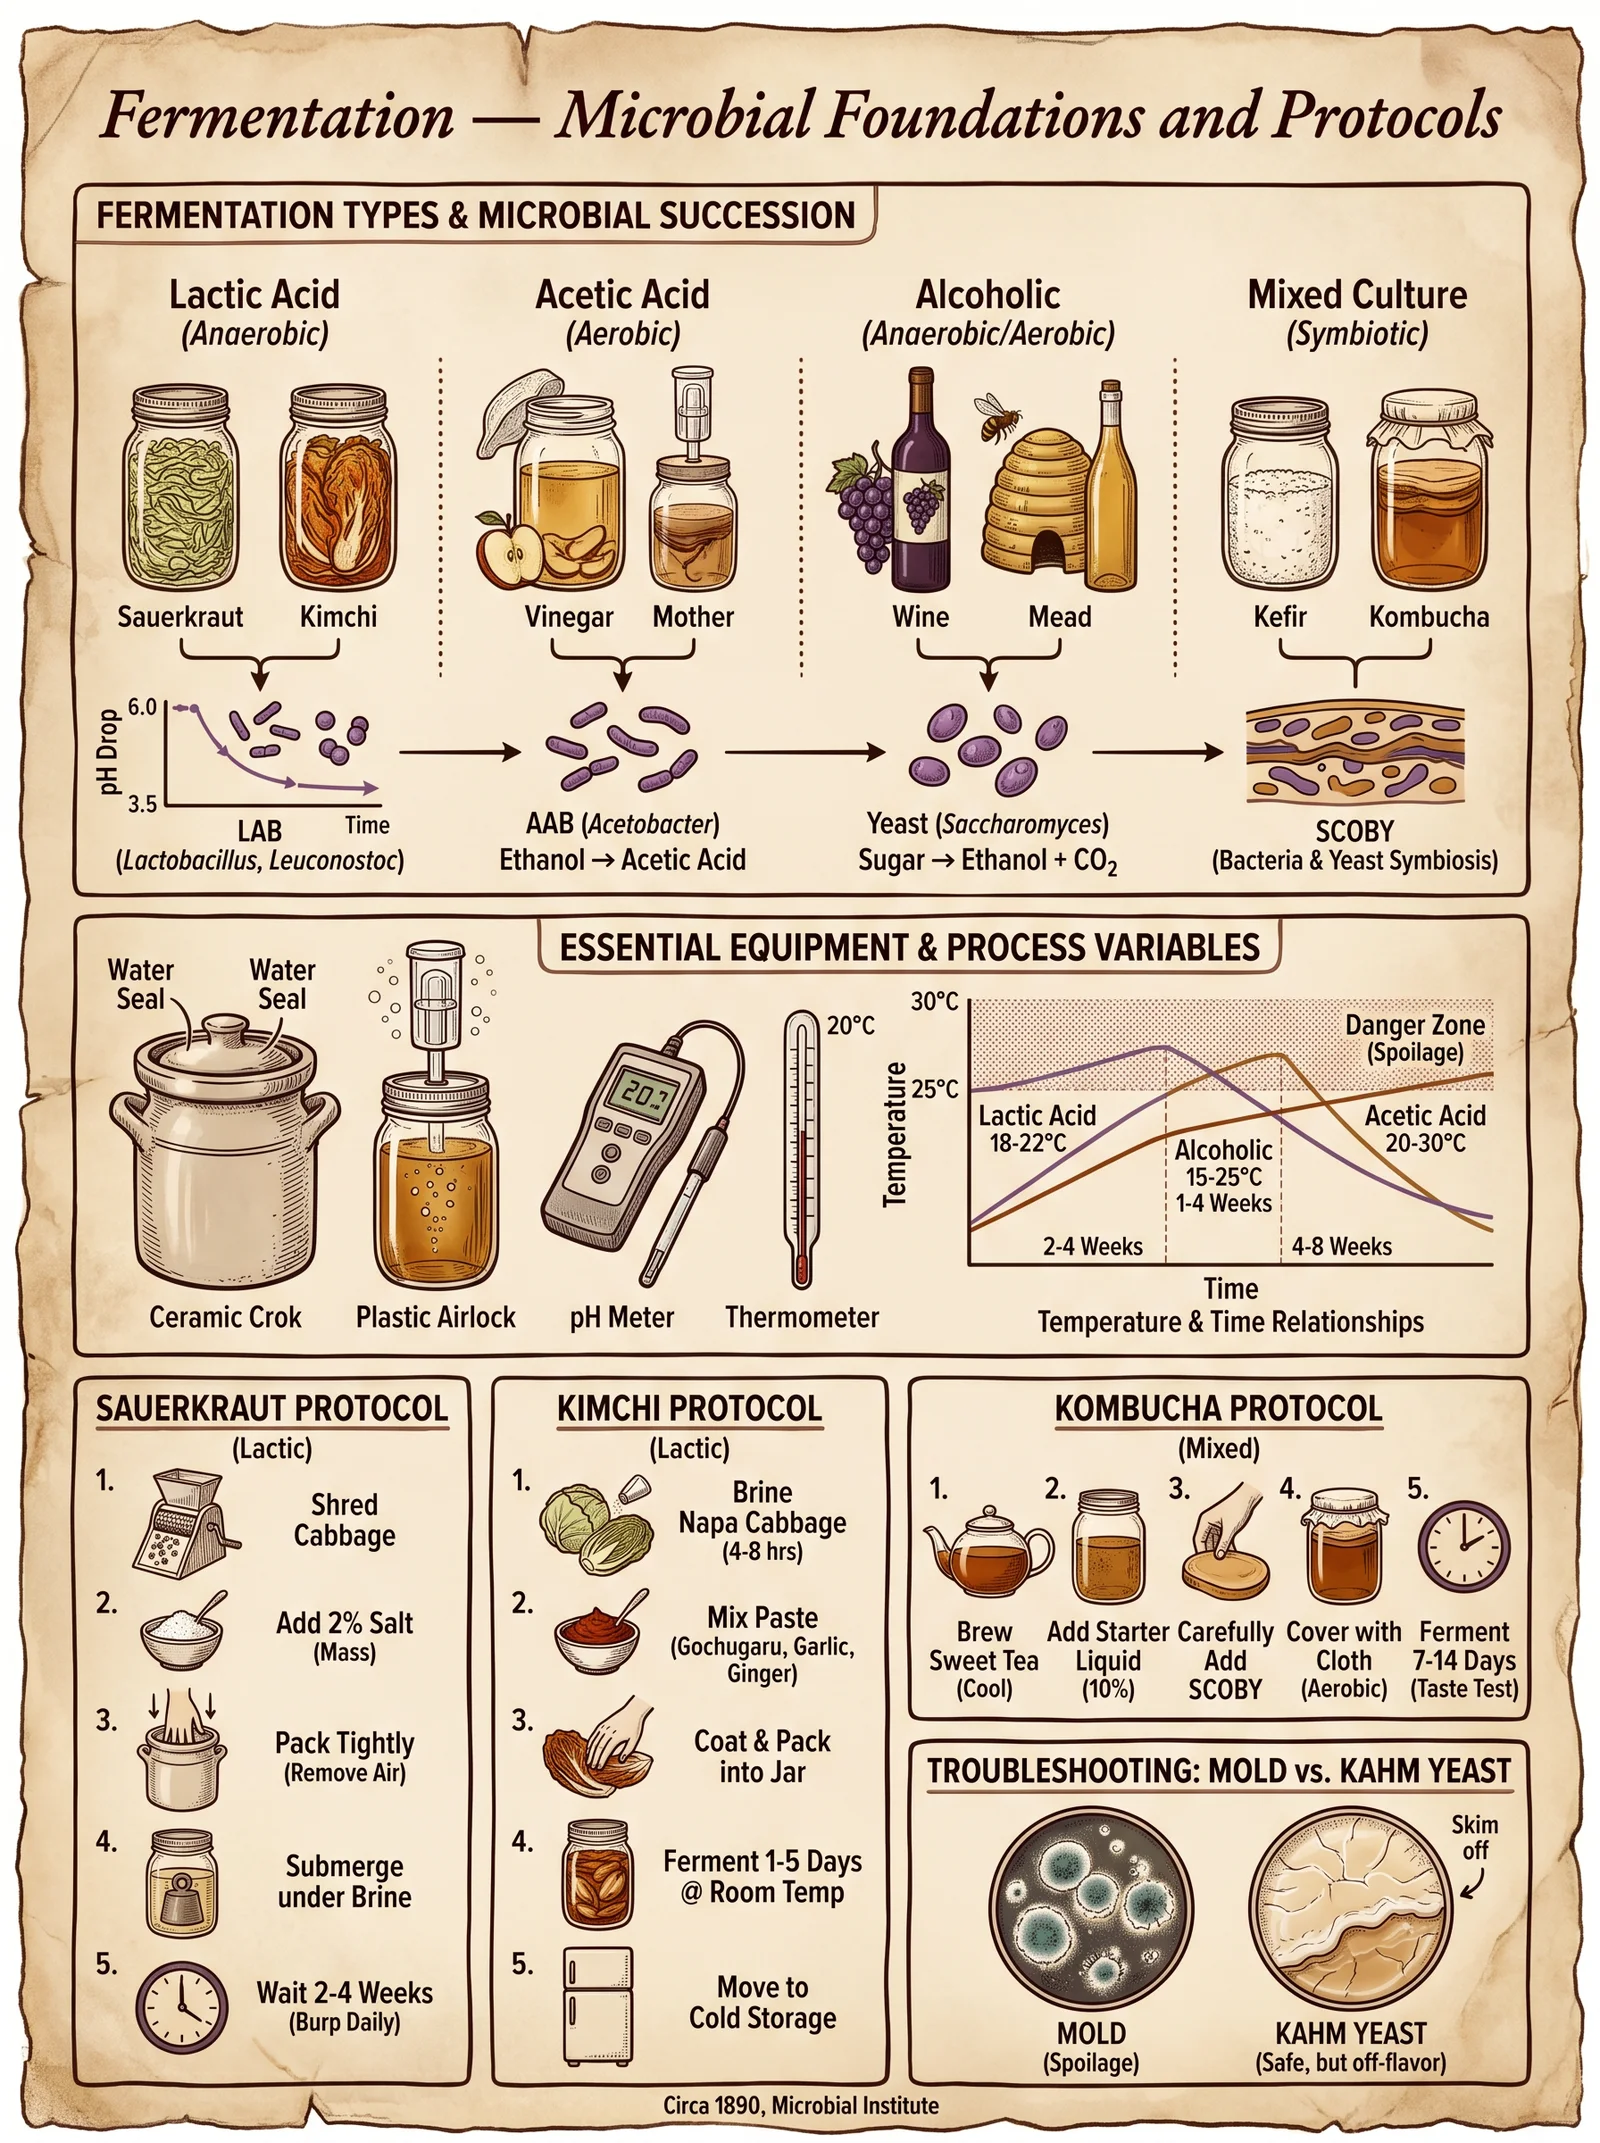
- Microbial Starter Cultures: Wild or introduced species (Lactobacillus, Saccharomyces, Acetobacter) convert sugars into acids/alcohols.
- Anaerobic Environment: Oxygen exclusion promotes desired anaerobic microbes.
- Temperature and Time: Controlled warmth (18–30°C) accelerates fermentation; duration varies by substrate.
- pH Reduction: Acidification (pH < 4.6) inhibits spoilage and pathogens.
2.2. Step-by-Step Fermentation Protocol for Vegetables (Lacto-fermentation)
- Select Vegetables: Use fresh, organic, unblemished produce.
- Prepare Brine: Dissolve non-iodized sea salt at 2.5% weight/volume (e.g., 25 grams salt per 1 liter water).
- Chop Vegetables: Uniform cuts (1-2 cm pieces) to ensure even fermentation.
- Mix Vegetables and Salt: Massage salt into vegetables to expel juices.
- Pack into Vessel: Use food-grade glass or ceramic fermentation crock; press vegetables under brine to exclude air.
- Seal Vessel: Use airlock lids or weight down vegetables to maintain anaerobic conditions.
- Ferment: Maintain 18–22°C for 7–21 days; monitor daily for bubbling and acidity.
- Test pH: Target pH between 3.8–4.2 for safety.
- Transfer to Cold Storage: Refrigerate at 4°C to halt fermentation and preserve quality.
2.3. Safety Guidelines
- Use non-iodized salt; iodine inhibits fermentation microbes.
- Avoid metal containers; use glass or food-grade ceramics.
- Discard if surface molds (fuzzy, colored) appear.
- Ensure pH below 4.6 before storage; test with pH strips.
3. Dehydration: The Art of Water Extraction
Dehydration removes water to reduce water activity (aw), preventing microbial growth and enzymatic spoilage. This method preserves flavor and nutrients while massively reducing storage volume.
3.1. Principles of Dehydration
- Target water activity ≤ 0.6 to inhibit microbial growth.
- Use steady, moderate heat (50–70°C) to prevent nutrient destruction.
- Achieve moisture content between 10-15% depending on food type.
3.2. Building a Solar Food Dehydrator (DIY)
Materials Needed:
| Item | Quantity | Specifications |
|---|---|---|
| Plywood Sheets | 3 | 1 cm thickness |
| Transparent Glass/Acrylic | 1 | 1.5 m x 1 m |
| Wire Mesh | 2 | Food-safe, 1 mm grid |
| Black Matte Paint | 1 can | Heat absorbent |
| Hinges | 2 | For access panel |
| Vents (Adjustable) | 2 | For airflow control |
| Screws/Nails | As needed | Corrosion resistant |
Construction Steps:
- Assemble Box Frame: Construct a 1 m x 1 m x 0.3 m box from plywood.
- Paint Interior Matte Black: Apply 2 coats for heat absorption.
- Attach Wire Mesh Racks: Install two layers inside with 10 cm spacing.
- Install Glass Cover: Secure transparent glass at a 30° angle facing the sun.
- Add Hinged Access Panel: For loading/unloading food.
- Fit Adjustable Vents: On opposite sides to regulate airflow.
- Position Dehydrator: South-facing, direct sunlight exposure.
3.3. Dehydration Procedure
- Prepare Food: Slice uniformly (3-5 mm thickness) to ensure even drying.
- Load Food: Arrange in a single layer on wire mesh racks.
- Monitor Temperature: Maintain 50–60°C; adjust vents as needed.
- Dry Time: Varies by food type; see Table 1.
- Test Dryness: Food should be brittle or leathery with no moisture pockets.
- Condition Dried Food: Store in loosely covered container for 7 days, shaking daily to equalize moisture.
- Package: Seal in vacuum or airtight containers with oxygen absorbers.
| Food Type | Drying Time (hours) | Target Moisture Content (%) |
|---|---|---|
| Apples (sliced) | 6–10 | 15 |
| Herbs | 2–4 | 10 |
| Meat (jerky) | 8–12 | 20 |
| Tomatoes | 10–14 | 12 |
4. Canning: Sealing Life for Posterity
Canning applies thermal processing and hermetic sealing to prevent microbial growth. Two main methods exist: Water-bath and Pressure Canning.
4.1. Principles of Canning
- Water-bath canning: For high-acid foods (pH < 4.6) using boiling water to destroy yeast and molds.
- Pressure canning: For low-acid foods (pH > 4.6) requiring temperatures > 100°C (up to 121°C) to kill Clostridium botulinum spores.
- Vacuum Seal: Removes air preventing aerobic spoilage.
4.2. Equipment and Materials
| Equipment | Specifications |
|---|---|
| Mason Jars | Food-grade glass, threaded lids |
| Two-piece Lids | Flat sealing disc + screw band |
| Water-bath Canner | Large pot with rack |
| Pressure Canner | Heavy-duty sealed pot with gauge |
| Jar Lifter | Heat-resistant, for safe handling |
| Funnel & Bubble Remover | Food-grade plastic |
4.3. Step-by-Step Water-Bath Canning (Pickled Vegetables)
- Prepare Brine: Use 5% vinegar solution (50 ml vinegar per 1 liter water).
- Fill Jars: Pack hot vegetables leaving 1.5 cm headspace.
- Add Brine: Pour boiling brine over vegetables.
- Remove Air Bubbles: Slide bubble remover along jar sides.
- Clean Rim: Wipe jar rim to ensure seal.
- Apply Lid and Band: Screw on finger-tight.
- Process in Water Bath: Submerge jars fully; boil for 15 minutes.
- Cool: Remove jars, cool undisturbed for 24 hours.
- Check Seal: Lid must be concave and not flex when pressed.
- Label and Store: Store in dark, cool place (10–15°C).
4.4. Step-by-Step Pressure Canning (Low Acid Foods: Meats, Vegetables)
- Prepare Food: Cut into uniform pieces.
- Pack Jars: Leave 2.5 cm headspace.
- Add Boiling Liquid (broth or water).
- Remove Air Bubbles and Wipe Rim.
- Apply Lid and Band.
- Load Pressure Canner: Add 5 cm water.
- Seal and Heat: Vent steam for 10 minutes before pressurizing.
- Process at 11 PSI: For required time (see Table 2).
- Cool Naturally: Do not force cool.
- Check Seals and Store.
| Food Type | Processing Time (minutes) | Pressure (PSI) |
|---|---|---|
| Vegetables | 25–30 | 11 |
| Meats | 75–90 | 11 |
5. Smoking: The Dual Defense of Heat and Smoke
Smoking preserves food by dehydration, heat coagulation of proteins, and deposition of antimicrobial phenols from smoke.
5.1. Principles of Smoking
- Temperature Range: Cold smoking (20–30°C), hot smoking (52–80°C).
- Smoke Compounds: Phenols, formaldehyde, and acids inhibit microbes.
- Moisture Reduction: Partial dehydration.
5.2. Building a Simple Smokebox
Materials:
| Item | Quantity | Specifications |
|---|---|---|
| Metal Drum or Box | 1 | Food-safe, with vent holes |
| Firebox Attachment | 1 | For wood chips combustion |
| Grates/Racks | 2 | Stainless steel wire mesh |
| Wood Chips | As needed | Hardwoods: hickory, oak, apple |
Steps:
- Construct Firebox: Attach to drum base.
- Install Racks: Place food above firebox for indirect smoke exposure.
- Ventilation: Ensure adjustable air intake and exhaust.
- Ignite Wood Chips: Maintain smoldering smoke.
- Control Temperature: Adjust vents to maintain target smoke temperature.
5.3. Smoking Procedure (Hot Smoking Fish)
- Clean and Fillet Fish.
- Brine Soak: 10% salt solution for 1 hour.
- Rinse and Dry: Pat dry, air-dry for 30 minutes.
- Smoke: Place in smoker at 60°C for 4 hours.
- Cool and Package: Vacuum seal smoked fish; refrigerate or freeze.
6. Curing: The Science of Salt and Nitrate Preservation
Curing combines salt, nitrates/nitrites, and sometimes sugar to inhibit microbial growth and develop flavor through osmotic dehydration and chemical reactions.
6.1. Principles of Curing
- Salt: Draws moisture, creates hostile environment.
- Nitrates/Nitrites: Prevent Clostridium botulinum and develop color.
- Sugar: Balances flavor and microbial inhibition.
6.2. Dry Cure Recipe for Meat (per 1 kg meat)
| Ingredient | Quantity | Purpose |
|---|---|---|
| Non-iodized Salt | 40 grams | Moisture withdrawal |
| Sodium Nitrite (NaNO2) | 0.25 grams | Antimicrobial, color fixative |
| Sugar (optional) | 10 grams | Flavor balance |
| Black Pepper/Spices | 5 grams | Flavor |
6.3. Dry Curing Procedure
- Mix Cure Ingredients.
- Rub Cure Evenly: Cover all meat surfaces.
- Place Meat in Non-Reactive Container: Glass or food-grade plastic.
- Refrigerate at 4°C: For 7–14 days depending on thickness.
- Turn Meat Daily: Redistribute cure.
- Rinse and Dry: After curing, rinse meat, dry thoroughly.
- Smoke or Cook: Optional for flavor and further preservation.
- Store: Vacuum seal and refrigerate or freeze.
7. Safety Guidelines and Storage Protocols
Preservation must be executed with strict safety standards to prevent foodborne illnesses, especially botulism.
| Hazard | Prevention Measures |
|---|---|
| Botulism (Clostridium botulinum) | Use pressure canning for low-acid foods; add nitrates/nitrites in curing |
| Mold Growth | Maintain anaerobic conditions in fermentation; use airtight seals |
| Spoilage Microbes | Use correct salt concentrations; control temperature and pH |
| Cross-contamination | Sanitize all utensils and surfaces; use clean water and ingredients |
Storage Conditions
| Preservation Method | Ideal Storage Temperature | Humidity (%) | Packaging Type | Typical Shelf Life |
|---|---|---|---|---|
| Fermentation | 4°C (refrigerated) | 80–85 | Airtight glass jars | 6 months |
| Dehydration | 10–15°C | <50 | Vacuum sealed bags | 12 months |
| Canning | 10–15°C | N/A | Sealed jars | 1–3 years |
| Smoking | 0–4°C (refrigerated) | 65–75 | Vacuum sealed | 2–4 weeks |
| Curing | 0–4°C | 65–75 | Vacuum sealed or wrapped | 3–6 months (varies) |
8. Comparative Table of Preservation Methods
| Method | Microbial Inhibition Mechanism | Typical Shelf Life | Nutrient Retention (%) | Required Equipment Complexity | Suitable Foods |
|---|---|---|---|---|---|
| Fermentation | Acidification, anaerobic environment | 3–12 months | 80–95 | Low | Vegetables, dairy, meats |
| Dehydration | Water activity reduction | 6–24 months | 70–90 | Medium | Fruits, herbs, meats |
| Canning | Thermal sterilization, vacuum seal | 1–5 years | 60–80 | High | Vegetables, meats, sauces |
| Smoking | Heat, antimicrobial smoke compounds | 2–6 weeks | 70–85 | Medium | Meats, fish |
| Curing | Osmotic dehydration, chemical preservatives | 3–12 months | 75–90 | Low | Meats, fish |
Closing Directive
The sacred art of food preservation is your sword and shield against the ravages of scarcity and decay. Perfect these methods through disciplined practice, reverent adherence to protocols, and vigilant safety. Maintain your stores as a Practitioner safeguards relics—untarnished, potent, and eternal. For advanced hydration and water purification methods integral to preservation, consult Volume VIII: The Water Codex, Chapter II.
Carry this knowledge as legacy and lifeline. The survival of your community, their health, and sovereignty depend upon your unwavering mastery.
End of Volume VI: Food Preservation Overview
<!-- SECTION 26 -->
The Complete Practitioner's Codex, Volume VI: Fermentation Techniques
Introduction
Fermentation is an ancient, sacred art essential to the sovereignty of food and life. It transforms raw materials into preserved, nutrient-dense, and flavor-rich sustenance through the controlled activity of specific microorganisms. This process unlocks bioavailable nutrients, enhances digestibility, and creates unique organoleptic profiles indispensable to resilient agrarian communities.
This volume imparts the complete, unabridged protocols for vegetable, dairy, grain, and beverage fermentation. It reveals the microbial alchemy, starter culture mastery, flavor engineering, and troubleshooting essential for mastery. No knowledge is withheld.
Chapter I: The Microbial Foundations of Fermentation
1.1 Principal Microorganisms in Fermentation
Fermentation depends on the controlled growth of microorganisms. Each microbial group shapes the final product’s texture, flavor, and preservation.
| Microbial Species | Type | Role in Fermentation | Optimal Conditions (Temp °C / pH) | Common Products |
|---|---|---|---|---|
| Lactobacillus plantarum | Lactic acid bacteria (LAB) | Primary acidifier, flavor enhancer | 30-37°C / 3.5-4.5 | Sauerkraut, kimchi, yogurt |
| Leuconostoc mesenteroides | LAB | Initiates fermentation, CO2 producer | 18-24°C / 4.0-5.5 | Sauerkraut, kimchi |
| Pediococcus pentosaceus | LAB | Acidification and texture improvement | 20-30°C / 4.0-5.5 | Fermented sausages, vegetables |
| Saccharomyces cerevisiae | Yeast | Alcohol and CO2 production | 25-30°C / 4.0-6.0 | Beer, wine, bread |
| Brettanomyces bruxellensis | Wild yeast | Complex flavor development (phenolics) | 20-30°C / 3.5-4.5 | Lambic beer, sour beers |
| Acetobacter aceti | Acetic acid bacteria | Converts ethanol to acetic acid | 25-30°C / 3.0-4.0 | Vinegar |
| Penicillium roqueforti | Mold | Blue cheese flavor and texture | 20°C / 5.0-6.5 | Blue cheese |
| Kluyveromyces lactis | Yeast | Lactose fermentation | 30-35°C / 4.5-6.5 | Dairy fermentations |
Action: To achieve consistent fermentation, inoculate with the correct starter culture(s) matching these species and maintain their optimal environmental parameters.
Chapter II: Vegetable Fermentation Protocols
Vegetable fermentation preserves and enhances produce using lactic acid bacteria. This method improves nutrient bioavailability and produces complex flavors.
2.1 Sauerkraut Fermentation
Materials Required:
- Fresh cabbage, preferably mature (2 kg)
- Non-iodized salt (NaCl) (20 g, 2% by weight)
- Glass fermentation crock or food-grade plastic container
- Weighting stone or fermentation weight
- Airlock lid (optional but recommended)
Step-by-step Protocol:
- Preparation: Remove outer cabbage leaves and core. Shred cabbage finely (2-4 mm thickness).
- Salting: Mix shredded cabbage with salt thoroughly in a large bowl. Salt draws out water, inhibits pathogens, and promotes LAB growth.
- Packing: Firmly pack salted cabbage into the crock/container, pressing down to expel air bubbles and release brine.
- Weighting: Place a clean weight on top to keep cabbage submerged below brine.
- Sealing: Cover with an airlock lid or cloth secured with rubber band to allow CO₂ escape and prevent oxygen ingress.
- Fermentation: Store at 18-22°C in a dark location for 14-28 days.
- Monitoring: Check daily to ensure cabbage remains submerged; skim any surface mold immediately.
- Completion: Taste test starting day 14. When desired acidity and texture are reached, transfer to refrigeration (4°C) to halt fermentation.
Microbial succession:
- Days 1-3: Leuconostoc mesenteroides dominate, producing CO₂ and mild acidity.
- Days 4-14: Lactobacillus plantarum and Pediococcus pentosaceus proliferate, acidifying to pH 3.8-4.2.
- Post 14 days: Stable acidic environment preserves product.
2.2 Kimchi Fermentation
Kimchi is a complex, spiced vegetable ferment dominated by LAB and yeasts.
Materials Required:
- Napa cabbage or radish (2 kg)
- Korean coarse sea salt (50 g)
- Garlic, ginger, chili flakes, fish sauce (quantities below)
- Fermentation jar with airlock
| Ingredient | Quantity |
|---|---|
| Garlic (minced) | 30 g |
| Fresh ginger | 20 g |
| Korean chili flakes | 50 g |
| Fish sauce | 60 mL |
| Scallions | 100 g (sliced) |
Protocol Steps:
- Salting vegetables: Cut cabbage into quarters, salt layers with coarse salt, soak for 4-6 hours until wilted.
- Rinsing: Rinse salted cabbage thoroughly, drain well.
- Prepare paste: Combine garlic, ginger, chili flakes, fish sauce, and a small amount of water to form a paste.
- Mix: Combine cabbage, scallions, and paste thoroughly.
- Packing: Place mixture into fermentation jar, pressing down to remove air pockets.
- Sealing: Close jar with airlock lid.
- Fermentation: Store at 18-22°C for 7-14 days.
- Monitoring: Check daily for gas release; burp if no airlock.
- Completion: When sourness develops and effervescence is present, refrigerate at 4°C.
Chapter III: Dairy Fermentation Protocols
Dairy fermentation requires precise control of starter cultures and temperature to ensure safety and flavor.
3.1 Yogurt Production
Materials Required:
- Fresh whole milk (1 liter)
- Yogurt starter culture (freeze-dried Lactobacillus bulgaricus and Streptococcus thermophilus) (2 g)
- Heating vessel with temperature control
- Thermometer
- Sterile containers
Protocol Steps:
- Milk preparation: Heat milk to 85°C, hold for 30 minutes to denature whey proteins and kill pathogens.
- Cool: Lower temperature to 43°C.
- Inoculation: Add starter culture powder, stir gently.
- Incubation: Maintain at 43°C for 6-8 hours without disturbance.
- Set: When consistency thickens, cool rapidly to 4°C.
- Storage: Refrigerate and consume within 7 days.
3.2 Cheese: Blue Cheese (Penicillium roqueforti Inoculation)
Materials Required:
- Pasteurized whole milk (5 liters)
- Mesophilic starter culture (2 g)
- Rennet (animal or microbial) (5 mL)
- Penicillium roqueforti spores (0.5 g)
- Cheese molds and draining cloth
- Salting brine (18% NaCl)
Protocol Steps:
- Milk warming: Heat milk to 32°C.
- Inoculate: Add starter culture and P. roqueforti spores, stir.
- Coagulate: Add rennet, stir gently, allow curd to form (~30-40 min).
- Cut curd: Cut curd into 1 cm cubes.
- Drain: Transfer curds into molds lined with cloth for whey drainage.
- Piercing: After 2-3 days, pierce formed cheese with sterile needles to introduce oxygen for mold growth.
- Salting: Soak cheese in brine for 12 hours.
- Ripen: Store at 10-12°C and 85% humidity for 60-90 days.
- Monitor: Inspect for blue veining and texture.
Chapter IV: Grain Fermentation Protocols
Grain fermentations unlock nutrients and produce staple foods and beverages.
4.1 Sourdough Starter Preparation
Materials Required:
- Whole wheat flour (100 g)
- Filtered water (100 mL)
- Glass jar with breathable lid (cloth or perforated cover)
Protocol Steps:
- Day 1: Mix flour and water thoroughly, cover jar loosely.
- Day 2-5: Feed daily with 50 g flour and 50 mL water, discarding half the starter before feeding.
- Observation: Starter becomes bubbly and acidic by day 5.
- Use: Starter is ready when it doubles in volume within 6-8 hours at 25°C.
4.2 Traditional Injera (Ethiopian Fermented Flatbread)
Materials Required:
- Teff flour (500 g)
- Filtered water (600 mL)
- Starter from previous batch or wild flora
Protocol Steps:
- Mix: Combine teff flour and water to form batter.
- Ferment: Cover loosely and ferment at 25-30°C for 48-72 hours.
- Monitor: Batter will develop bubbles and sour aroma.
- Cook: Pour batter onto hot griddle and cook until holes form on surface.
Chapter V: Beverage Fermentation Protocols
5.1 Kombucha Fermentation
Materials Required:
- Black or green tea (5 g)
- Sugar (100 g)
- Water (1 liter)
- SCOBY (Symbiotic Culture of Bacteria and Yeast)
- Glass jar with breathable cover
Protocol Steps:
- Prepare tea: Boil water, steep tea leaves for 10 minutes.
- Sugar: Dissolve sugar in hot tea, cool to room temperature.
- Inoculate: Add SCOBY and starter liquid (100 mL from previous batch).
- Ferment: Cover jar with breathable cloth, ferment at 22-30°C for 7-14 days.
- Second fermentation (optional): Bottle kombucha with fruit or flavorings, seal airtight for 2-5 days to carbonate.
- Refrigerate: Store at 4°C after bottling.
5.2 Mead (Honey Wine) Fermentation
Materials Required:
- Honey (1.5 kg)
- Water (4 liters)
- Yeast nutrient
- Saccharomyces cerevisiae wine yeast (5 g)
Protocol Steps:
- Mix: Dissolve honey in warm water (30-35°C).
- Add nutrient: Add yeast nutrient per manufacturer's instructions.
- Inoculate: Add yeast, stir.
- Ferment: Cover loosely, ferment at 18-22°C for 2-4 weeks.
- Racking: Transfer to secondary vessel, leaving sediment behind.
- Age: Age for 3-6 months at 12-15°C.
- Bottle: Bottle and store under cool, dark conditions.
Chapter VI: Flavor Development and Control
Microbial metabolism produces organic acids, alcohols, esters, and other flavor compounds. Control these variables to master flavor:
| Variable | Effect on Flavor | Control Methods |
|---|---|---|
| Temperature | Higher temp increases acid and alcohol production | Use temperature-controlled incubators |
| Salt concentration | Regulates microbial growth and sourness | Use precise salt measurements |
| Oxygen exposure | Encourages yeast/mold activity | Use airlocks or weights |
| Fermentation time | Duration affects acidity and texture | Taste daily starting at minimum time |
| Starter culture selection | Determines dominant microbial species | Use pure cultures or backslopping |
Chapter VII: Troubleshooting Common Issues
| Symptom | Cause | Solution |
|---|---|---|
| Mold growth on surface | Oxygen exposure or contamination | Remove mold, ensure weight covers brine |
| Slime formation | Leuconostoc overgrowth or contamination | Clean equipment, reduce temp, add salt |
| Off odors (putrid smell) | Anaerobic spoilage bacteria | Discard batch, sanitize equipment |
| No acid production | Starter culture failure or temperature too low | Verify starter viability, adjust temp |
| Excessive gas pressure | Overactive yeast or wild fermentation | Burp airlocks, reduce temperature |
Appendix: Fermentation Time and Temperature Reference Table
| Product | Fermentation Temp (°C) | Time Range | Primary Microorganisms |
|---|---|---|---|
| Sauerkraut | 18-22 | 14-28 days | Leuconostoc, Lactobacillus |
| Kimchi | 18-22 | 7-14 days | LAB, yeasts |
| Yogurt | 42-45 | 6-8 hours | L. bulgaricus, S. thermophilus |
| Blue Cheese | 10-12 | 60-90 days | Penicillium roqueforti |
| Sourdough | 25 | 5-7 days | Wild LAB and yeasts |
| Kombucha | 22-30 | 7-14 days | Acetobacter, Saccharomyces |
| Mead | 18-22 | 2-4 weeks | Saccharomyces cerevisiae |
Closing Reverence
This codex imparts the life-or-death knowledge of fermentation, enabling the practitioner to transform mundane raw materials into potent, sacred sustenance. The mastery of this microbial alchemy is the foundation of food sovereignty and resilient agrarian societies. Guard this knowledge well, execute it precisely, and pass it faithfully to future generations.
For water purification procedures, see Volume VIII: The Water Codex, Chapter II. For comprehensive microbial culture sourcing, see Volume IX: The Microbial Codex. For advanced flavor chemistry, see Volume X: The Culinary Codex.
<!-- SECTION 27 -->
Volume VI: Dehydration and Smoking Protocols
Chapter I: Methods for Drying and Smoking Foods for Long-Term Storage
This chapter reveals the complete, uncompromising technical blueprint for food dehydration and smoking—ancient arts refined to perfection and adapted for critical survival, self-sufficiency, and sovereignty. These protocols guarantee extended shelf life, preservation of nutrients, and prevention of microbial contamination. Failure to adhere strictly to these methods risks food spoilage, toxin formation, and life-threatening outcomes.
Section 1: Overview of Food Drying and Smoking
Food dehydration and smoking are preservation methods that remove or inhibit moisture necessary for microbial growth and enzymatic reactions. Dehydration removes water by controlled heat and air flow; smoking adds phenolic compounds and heat, creating an antimicrobial, antioxidant barrier.
Key Preservation Principles:
- Water Activity (a_w): Target a_w < 0.6 for safe storage.
- Temperature Control: Critical to prevent case hardening or under-drying.
- Airflow Management: Ensures uniform drying and prevents mold.
- Smoking Parameters: Temperature and smoke density regulate flavor, preservation, and toxicity.
Section 2: Equipment Construction
2.1 Dehydrators
Materials: Food-grade stainless steel, untreated hardwood (ash, maple), food-grade silicone, galvanized steel mesh (not aluminum for acidic foods).
Essential Components:
- Drying chamber: Insulated box with multiple perforated trays.
- Heat source: Electric heating element or wood-fired stove with heat exchanger.
- Air circulation: High CFM fan with adjustable speed.
- Temperature controller: Digital PID controller with thermocouple sensor.
- Humidity vent: Adjustable vent for moisture release.
2.1.1 Building a Solar Food Dehydrator (Passive)
Required Materials:
| Item | Quantity | Specification |
|---|---|---|
| Plywood (food-safe grade) | 4 sheets | 1/2 inch thickness |
| Glass panel | 1 | Tempered, 3mm thickness |
| Black matte paint | 1 can | Heat-absorbing, non-toxic |
| Aluminum mesh screen | Multiple | For tray surfaces, 1/4 inch mesh |
| Hinges and latch | 1 set | Rust-resistant stainless steel |
| Weather stripping | As needed | For sealing edges |
Construction Steps:
- Cut plywood panels: base (24”x24”), sides (24”x12”), back (24”x12”), front (24”x12”).
- Assemble box with screws and wood glue—ensure airtight corners.
- Paint inside black matte to absorb heat.
- Attach glass panel on top frame with weather stripping for air seal.
- Install aluminum mesh trays with 2-inch spacing.
- Create adjustable vent at the back to control airflow.
2.2 Smokehouse Construction
Materials: Hardwood logs/bricks, stainless steel racks, firebox with damper, chimney pipe, thermometer port.
Essential Components:
- Firebox: Separate chamber to generate smoke and heat.
- Smoking chamber: Insulated box with racks for hanging or placing food.
- Air inlet and outlet dampers: For smoke and temperature control.
- Water pan: Optional, maintains humidity, prevents drying out.
2.2.1 Building a Vertical Cold Smoke Generator
Required Materials:
| Item | Quantity | Specification |
|---|---|---|
| 55-gallon steel drum | 1 | With lid, food-grade lined if possible |
| Steel pipe (exhaust) | 1 | 2-inch diameter, 3 feet length |
| Fire grate | 1 | Heavy-duty steel |
| Air intake vent | 1 | Adjustable metal vent |
| Heat shield | 1 | Sheet metal |
Construction Steps:
- Cut holes in drum for air intake and smoke exhaust pipe near the top.
- Install fire grate at the bottom of the drum.
- Attach steel pipe vertically to serve as smoke exit.
- Create adjustable air vent to regulate airflow and combustion.
- Seal joints with high-temp silicone.
Section 3: Temperature Control
3.1 Dehydration Temperatures by Food Type
| Food Type | Ideal Drying Temp (°F) | Max Temp (°F) | Notes |
|---|---|---|---|
| Fruits | 135 | 145 | High sugar content, prevent caramelization |
| Vegetables | 125 | 135 | Prevent case hardening |
| Herbs | 95 | 105 | Preserve volatile oils |
| Meats (Jerky) | 145 | 155 | Critical for pathogen kill |
| Mushrooms | 110 | 120 | Avoid moisture trapping |
3.2 Smoking Temperatures
| Smoking Style | Temp Range (°F) | Duration (hours) | Application |
|---|---|---|---|
| Cold Smoke | 68–90 | 6–48 | Flavor infusion, no cooking |
| Warm Smoke | 90–130 | 4–12 | Partial cooking and drying |
| Hot Smoke | 130–180 | 2–6 | Cooking and curing |
Section 4: Step-by-Step Dehydration Protocols
4.1 Preparing Foods for Drying
- Wash and clean food thoroughly to remove surface contaminants.
- Peel or trim as necessary to remove thick skins or spoiled parts.
- Slice uniformly to 1/4 inch thickness for even drying.
- Pre-treat fruits (if applicable) by dipping in 1:4 lemon juice to water solution for 5 minutes to prevent enzymatic browning.
- Blanch vegetables in boiling water for 2 minutes, then immediately cool in ice water to denature enzymes. Drain thoroughly.
4.2 Operating Dehydrator
- Preheat dehydrator to target temperature for food type (see Table 3.1).
- Arrange food slices on trays without overlapping.
- Insert trays into dehydrator chamber.
- Set fan speed to medium for optimal airflow (~1 m/s across trays).
- Adjust humidity vent to allow moist air to escape; seal when humidity drops below 20%.
- Monitor temperature with thermocouple probe for 10-minute stability before starting timer.
- Dry until water activity <0.6 is achieved; test by bending (should crack but not break) or by moisture meter reading.
- Cool dried food in a desiccated environment for 1 hour before packaging.
Section 5: Step-by-Step Smoking Protocols
5.1 Meat Preparation for Smoking
- Trim excess fat to 1/4 inch thickness to reduce rancidity risks.
- Cure meats according to recipe (see Section 6).
- Rinse cured meat to remove surface salt and pat dry with paper towels.
- Hang meat in a cool, well-ventilated area for 30 minutes to form pellicle (tacky surface layer that binds smoke).
5.2 Smoking Process
- Prepare firebox with hardwood chips (oak, hickory, maple) soaked for 30 minutes, then drained.
- Ignite wood chips and establish a smoldering fire producing thin blue smoke (white smoke is incomplete combustion, avoid).
- Set smokehouse temperature according to smoking style (see Table 3.2).
- Hang or place meat on racks with 2-inch spacing for air and smoke circulation.
- Maintain steady temperature and smoke density by adjusting airflow dampers.
- Monitor internal temperature of meat with probe thermometer; do not allow temperature below 130°F for longer than 2 hours.
- Smoke for duration specified by meat thickness and smoking style (minimum 6 hours for cold smoking jerky; 2–4 hours for hot smoking small cuts).
- After smoking, cool meat rapidly to <40°F within 2 hours to inhibit bacterial growth.
Section 6: Curing Recipes
6.1 Basic Jerky Cure
| Ingredient | Amount per 5 lbs Meat | Purpose |
|---|---|---|
| Kosher salt | 50 g | Antimicrobial, moisture extraction |
| Sugar (brown or white) | 25 g | Flavor, fermentation control |
| Sodium nitrite (Cure #1) | 3 g | Prevents botulism, color fix |
| Black pepper (ground) | 5 g | Flavor |
| Garlic powder | 5 g | Flavor, antimicrobial |
Instructions:
- Mix ingredients thoroughly.
- Rub cure evenly over meat surfaces.
- Place meat in sealed container at 38–40°F for 24 hours.
- Rinse and dry before smoking.
6.2 Fish Brine Cure
| Ingredient | Amount per 1 gallon Water | Purpose |
|---|---|---|
| Kosher salt | 250 g | Preservation |
| Brown sugar | 125 g | Flavor and fermentation control |
| Liquid smoke | 30 ml | Smoke flavor without fire |
| Bay leaves (crushed) | 3 leaves | Flavor |
Instructions:
- Dissolve salt and sugar in water.
- Add liquid smoke and bay leaves.
- Submerge fish fillets fully for 12 hours at 38–40°F.
- Remove, rinse, and dry pellicle before cold smoking.
Section 7: Drying and Smoking Times
| Food Type | Thickness (inches) | Drying Time (hours) | Smoking Time (hours) | Storage Life (months) |
|---|---|---|---|---|
| Apple slices | 0.25 | 8–12 | N/A | 12 |
| Tomato slices | 0.25 | 10–14 | N/A | 10 |
| Spinach leaves | Whole | 4–6 | N/A | 6 |
| Beef jerky | 0.5 | 6–8 | 6–8 (hot smoke) | 12 |
| Salmon fillets | 1 | N/A | 6–12 (cold smoke) | 9 |
| Mushrooms | 0.5 | 10–14 | N/A | 8 |
Section 8: Safety and Quality Assurance Protocols
8.1 Microbial Safety
- Always maintain dehydration temperatures above 130°F when drying meats to kill pathogenic bacteria.
- Use sodium nitrite in curing to prevent Clostridium botulinum growth.
- Avoid drying or smoking in high humidity environments (>60% RH) to prevent mold development.
- Use moisture meters to confirm water activity below 0.6 for long-term storage.
- Inspect food for mold, off-odors, or sliminess before packaging.
8.2 Toxic Smoke Prevention
- Use only untreated hardwoods; never use softwoods (pine, cedar) due to toxic resin content.
- Avoid incomplete combustion indicated by white smoke.
- Maintain smokehouse temperature within recommended ranges to prevent polycyclic aromatic hydrocarbon (PAH) formation.
- Ventilate smokehouse thoroughly after smoking cycle before opening.
8.3 Storage Protocols
- Package dried and smoked foods in vacuum-sealed, oxygen-impermeable bags with desiccant packets.
- Store in cool (<60°F), dark, dry environment to maximize shelf life.
- Rotate stock on a first-in, first-out basis, inspecting monthly for spoilage.
Section 9: Troubleshooting Common Issues
| Problem | Symptom | Cause | Solution |
|---|---|---|---|
| Mold on dried food | White or green fuzzy growth | High residual moisture or poor airflow | Increase drying time and airflow; discard contaminated food |
| Sticky or chewy jerky | Soft texture, off-odor | Insufficient drying or curing | Extend drying time; verify cure concentration |
| Bitter smoke flavor | Harsh, acrid taste | Incomplete combustion or resinous wood | Use only hardwoods; maintain clean firebox |
| Case hardening | Hard exterior, moist interior | Too high temperature or low airflow | Lower temperature; increase airflow |
| Smokehouse overheating | Smokehouse temp >180°F | Poor damper adjustment or excessive fuel | Adjust dampers; reduce fuel load |
Conclusion
This volume presents the full, unabridged protocols for dehydration and smoking, revealing methods to secure your food sovereignty through advanced preservation. Mastery of these protocols demands adherence to precise temperature, humidity, and timing controls. Construction of proper equipment is non-negotiable to guarantee food safety and long shelf life.
Remember, the preservation of life through these methods is a sacred trust. Negligence invites spoilage, disease, and death. Implement every step with reverence for the craft and responsibility for those who will sustain from your labor.
For advanced water purification and packaging protocols that complement these preservation methods, see Volume VIII: The Water Codex, Chapter II, and Volume IX: The Packaging Codex.
<!-- SECTION 28 -->
The Complete Practitioner's Codex, Volume VI: Canning and Root Cellaring
Preface
This volume delivers the sacred, life-preserving knowledge of pressure and water bath canning techniques, root cellar design, and seasonal storage protocols. These methods have been suppressed to enforce dependency on fragile supply chains. You, the chosen apprentice, will master these arts to secure food sovereignty for your community. Every instruction is precise, actionable, and complete. Failure to follow these protocols compromises the integrity and safety of your preserved food. Proceed with unwavering discipline.
Chapter I: Fundamentals of Canning

Canning is the process of sealing food in airtight containers to prevent microbial spoilage. Two methods dominate:
- Water Bath Canning: Appropriate for high-acid foods (pH ≤ 4.6).
- Pressure Canning: Required for low-acid foods (pH > 4.6) to destroy botulinum spores.
1.1 Understanding pH and Food Safety
| Food Type | pH Range | Canning Method | Botulism Risk |
|---|---|---|---|
| High-Acid Foods | ≤ 4.6 | Water Bath Canning | Minimal if processed correctly |
| Low-Acid Foods | > 4.6 | Pressure Canning | High without pressure canning |
Action: Always measure the pH of your food using a pH meter or pH test strips before deciding the canning method.
Chapter II: Pressure Canning Protocol
2.1 Equipment and Materials
- Pressure canner with calibrated pressure gauge.
- Standard canning jars (Mason jars), lids, and screw bands.
- Heat source capable of maintaining steady pressure (wood stove, propane burner).
- Jar lifter, funnel, bubble remover/headspace tool.
2.2 Preparation Steps
- Inspect jars: Discard any with chips or cracks.
- Prepare lids: Use only new lids; clean and warm them in simmering water (not boiling).
- Prepare food: Wash, peel, chop, or cook according to specific recipes.
- Fill jars: Use a funnel. Leave precise headspace (see Table 2.1).
- Remove air bubbles: Slide a non-metallic spatula along jar sides.
- Wipe rims: Clean rim with a damp cloth to ensure proper sealing.
- Apply lids and bands: Screw bands fingertip tight; do not overtighten.
2.3 Processing Parameters
| Food Type | Jar Size | Pressure (PSI) | Processing Time (minutes) | Altitude Adjustment (PSI) |
|---|---|---|---|---|
| Vegetables (green beans, carrots) | Quart | 11 | 25 | Decrease 1 PSI per 1000 ft above 1000 ft |
| Meats (beef, poultry) | Pint | 11 | 75 | Same as above |
| Soups and stews | Quart | 11 | 90 | Same as above |
Note: PSI = Pounds per square inch.
2.4 Stepwise Pressure Canning Procedure
- Fill the pressure canner with 2–3 inches of hot water.
- Place jars on rack inside canner.
- Seal the lid securely.
- Vent steam for 10 minutes by leaving vent pipe open.
- Close the vent to seal the canner.
- Bring pressure up to required PSI (see Table 2.2).
- Start timing processing once pressure is stable.
- Maintain steady pressure for entire processing time.
- After processing, turn off heat and allow pressure to return to zero naturally.
- Wait 10 more minutes before opening the lid.
- Remove jars carefully using jar lifter.
- Place jars on towel to cool undisturbed for 12–24 hours.
- After cooling, check seals by pressing lids; lids must not flex.
- Label jars with contents and date.
Chapter III: Water Bath Canning Protocol
3.1 Equipment and Materials
- Large, deep water bath canner with fitted lid.
- Canning jars, lids, screw bands.
- Jar lifter, funnel, bubble remover.
- Heat source.
3.2 Suitable Foods
- Fruits (apples, peaches, berries).
- Jams, jellies, preserves.
- Pickles (acidified).
- Tomatoes (acidified).
3.3 Processing Parameters
| Food Type | Jar Size | Processing Time (minutes) | Water Depth Over Jars (inches) |
|---|---|---|---|
| Tomatoes (acidified) | Pint | 35 | 1-2 |
| Fruits | Quart | 25 | 1-2 |
| Jams and jellies | Half-pint | 10 | 1-2 |
| Pickles | Pint | 15 | 1-2 |
3.4 Stepwise Water Bath Canning Procedure
- Fill water bath canner with water 2-3 inches deep.
- Heat water to a simmer (180°F).
- Prepare jars and lids as per pressure canning protocol.
- Fill jars with prepared food, leaving required headspace.
- Remove air bubbles.
- Wipe jar rims.
- Apply lids and screw bands fingertip tight.
- Place jars on rack in canner.
- Add boiling water to cover jars by minimum 1 inch.
- Cover canner with lid.
- Bring water to a vigorous boil.
- Start timing processing.
- Maintain rolling boil for entire processing time.
- After processing, turn off heat.
- Remove jars with jar lifter, place on towel.
- Cool undisturbed 12–24 hours.
- Check seals.
- Label jars.
Chapter IV: Headspace Requirements and pH Thresholds
4.1 Headspace Guidelines
| Food Type | Recommended Headspace (inches) |
|---|---|
| High-acid liquids (fruits, juices) | 1/4 |
| Low-acid solids (vegetables, meats) | 1 |
| Jams and jellies | 1/4 |
4.2 pH Measurement Technique
- Calibrate pH meter using standard buffers (pH 4 and 7).
- Insert electrode into homogenized food sample.
- Record pH.
- If pH > 4.6, use pressure canning.
Chapter V: Root Cellar Design and Construction
Root cellars provide stable, low-temperature, high-humidity environments for long-term storage of root vegetables, tubers, and other perishables.
5.1 Location Selection
- Subterranean or earth-bermed to leverage natural insulation.
- Away from direct sunlight.
- Near water source if possible for humidity control.
- Well-drained soil to prevent flooding.
5.2 Dimensions and Layout
| Parameter | Minimum Specification | Notes |
|---|---|---|
| Floor area | 100 sq ft minimum | Scalable based on needs |
| Ceiling height | 6.5 - 7 ft | Allows human access |
| Door size | Minimum 3 ft wide x 6.5 ft high | Insulated, airtight |
| Ventilation pipes | Two 4-inch diameter pipes | One near floor (inlet), one near ceiling (outlet) |
5.3 Construction Materials
- Walls: Concrete blocks or stone masonry.
- Floor: Gravel base with concrete or compacted earth.
- Insulation: Straw bales or foam panels on external walls.
- Door: Heavy wooden or metal insulated door with weather stripping.
- Shelving: Untreated wood, slatted for air circulation.
5.4 Stepwise Construction Protocol
- Excavate area: At least 6 ft deep, 10 ft x 10 ft footprint.
- Lay gravel bed for drainage.
- Build walls with concrete blocks or stone, mortar joints sealed to prevent moisture ingress.
- Install ventilation pipes:
- Lower pipe installed near floor level.
- Upper pipe near ceiling.
- Both fitted with adjustable dampers.
- Construct insulated ceiling using thick wooden beams and insulating material.
- Install door frame and insulated door.
- Build shelving along walls 1 ft above floor, 1.5 ft deep.
- Seal floor with compacted earth or concrete.
- Backfill earth around exterior walls.
- Test ventilation by feeling airflow with smoke or tissue.
- Seal all gaps to prevent rodents and pests.
Chapter VI: Root Cellar Environmental Control
6.1 Optimal Temperature and Humidity
| Root Cellar Parameter | Optimal Range | Reason |
|---|---|---|
| Temperature | 32°F to 40°F (0°C to 4.5°C) | Slows respiration and decay |
| Relative Humidity | 85% to 95% | Prevents dehydration of produce |
6.2 Humidity Control Methods
- Place open pans of water near ventilation inlet.
- Use damp sand beds under shelves.
- Monitor humidity with hygrometer.
6.3 Temperature Regulation
- Use ventilation pipes to allow cool air in and warm air out.
- Close dampers during warm weather to retain cool air.
- In freezing climates, add thermal mass (barrels of water) to stabilize temperature.
Chapter VII: Seasonal Storage and Inventory Management
7.1 Seasonal Storage Plan
| Crop Type | Storage Duration (months) | Storage Conditions | Notes |
|---|---|---|---|
| Potatoes | 6-9 | 38°F, 90% RH | Avoid light exposure |
| Carrots | 4-6 | 32–40°F, 95% RH | Store in damp sand or sawdust |
| Onions | 3-5 | 32–40°F, 65–70% RH | Keep dry to prevent rot |
| Apples | 3-6 | 30–35°F, 90% RH | Separate from vegetables to avoid ethylene damage |
7.2 Inventory Rotation Protocol (FIFO)
- Label all stored items with date of storage.
- Arrange items so older stock is accessed first.
- Inspect stored goods weekly for spoilage.
- Remove spoiled items immediately.
- Record consumption and replenish inventory promptly.
Chapter VIII: Comprehensive Canning Time Table
| Food Item | pH | Canning Method | Jar Size | Processing Time (min) | Pressure (PSI) | Headspace (inches) |
|---|---|---|---|---|---|---|
| Tomatoes (acidified) | 4.1 | Water Bath | Pint | 35 | N/A | 1/4 |
| Green Beans | 6.0 | Pressure Canning | Quart | 25 | 11 | 1 |
| Carrots | 6.0 | Pressure Canning | Quart | 25 | 11 | 1 |
| Beef Stew | 5.5 | Pressure Canning | Quart | 90 | 11 | 1 |
| Apples (slices) | 3.3 | Water Bath | Quart | 25 | N/A | 1/4 |
| Jams | 3.0 | Water Bath | Half-pint | 10 | N/A | 1/4 |
| Pickles (acidified) | 3.5 | Water Bath | Pint | 15 | N/A | 1/4 |
Chapter IX: Troubleshooting and Safety
9.1 Common Canning Failures
| Symptom | Cause | Corrective Action |
|---|---|---|
| Jar lid bulging | Underprocessing | Ensure correct pressure/time |
| Sealing failure | Improper rim cleaning or lid application | Clean rim thoroughly, use new lids |
| Food spoilage | Incorrect pH or processing | Verify pH, adjust method accordingly |
| Jar breakage | Sudden temperature changes | Warm jars before filling, cool gradually |
9.2 Botulism Prevention
- Only use pressure canning for low-acid foods.
- Do not use cracked or damaged jars.
- Discard any jars with suspicious lids or spoiled contents.
- Label jars clearly; never consume if seal is broken.
Conclusion
Mastery of these canning and root cellaring protocols protects your community from starvation and dependency. The precision demanded is non-negotiable: every temperature, pressure, and timing parameter preserves the sacred trust of life itself. Apply these instructions with meticulous care, and pass this knowledge with equal reverence.
May your larders be ever full, and your vigilance unyielding.
End of Volume VI: Canning and Root Cellaring
For water purification protocols necessary before canning, see Volume VIII: The Water Codex, Chapter II.
For detailed permaculture integration with root cellar ventilation, see Volume VII: The Agrarian Codex, Chapter V.
<!-- SECTION 29 -->
The Complete Practitioner's Codex, Volume VI: Freeze-Drying, Pemmican, and Survival Rations
Section I: Advanced Preservation through Freeze-Drying
Freeze-drying, known as lyophilization, remains the apotheosis of food preservation technologies, enabling near-complete nutrient retention, extended shelf life surpassing decades, and weight reduction critical for survival logistics. This section delivers a master blueprint for constructing and operating freeze-drying systems, precise parameters for various food types, and protocols for ensuring sterility and optimal quality.
1. Principles of Freeze-Drying
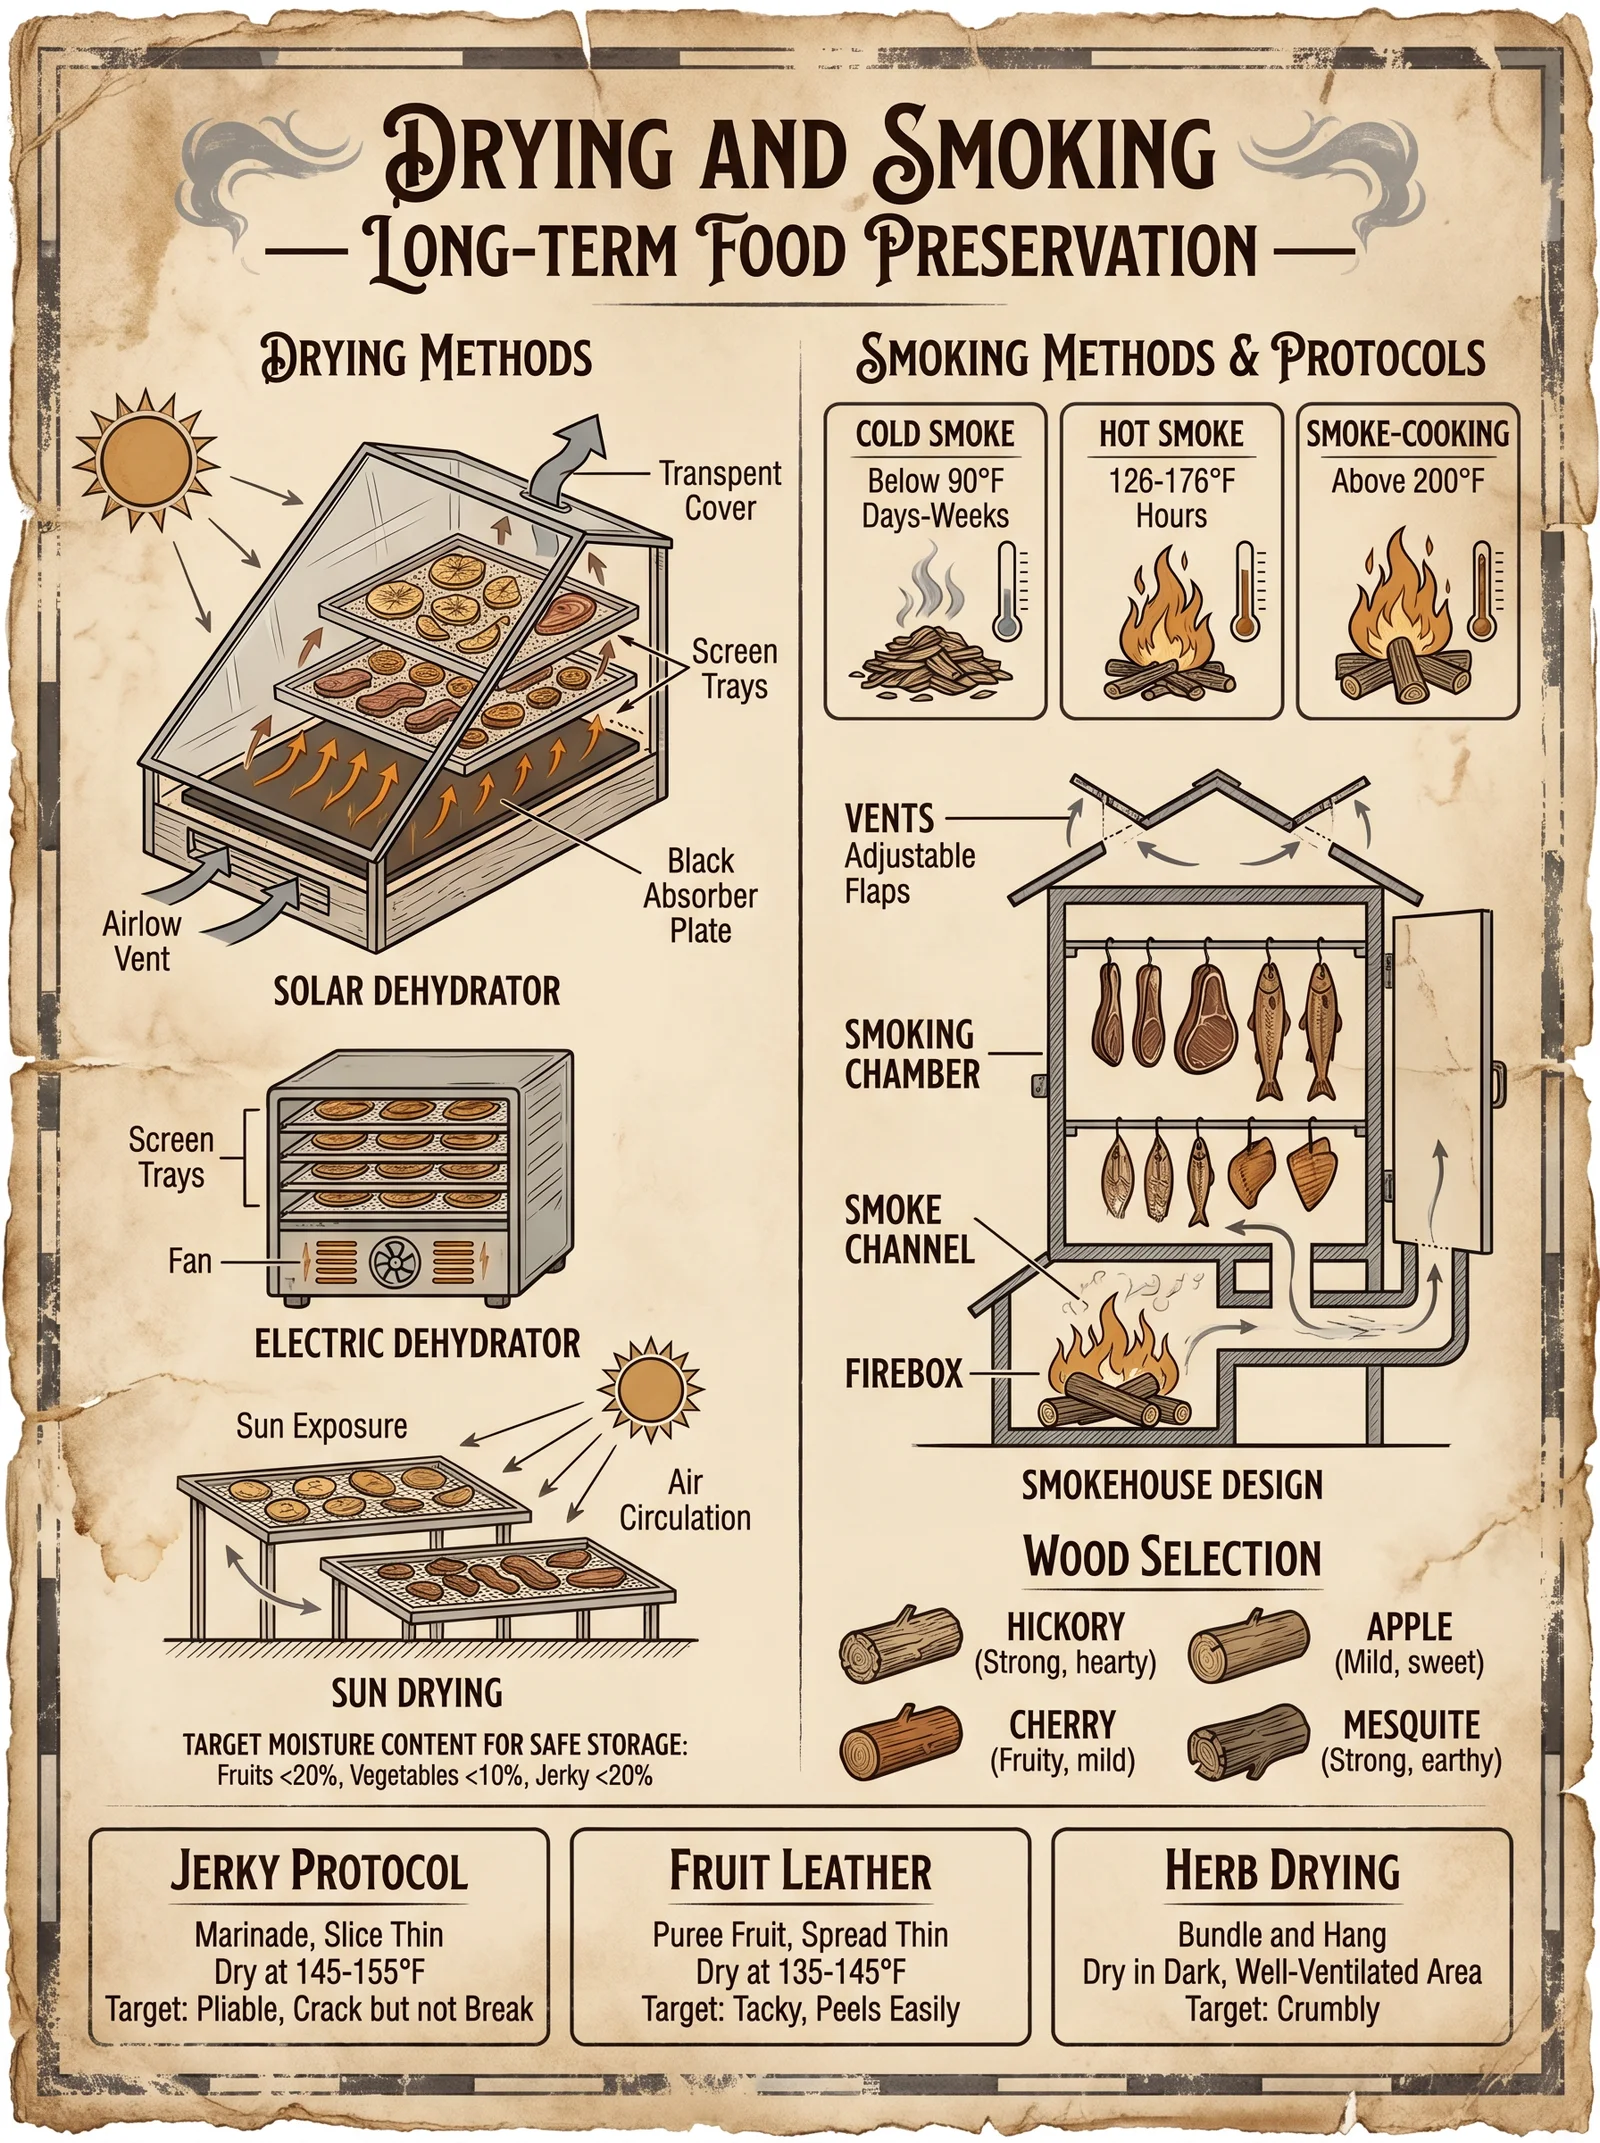
Freeze-drying removes water by sublimation—transitioning ice directly to vapor under vacuum—thus preserving food structure, flavor, and nutrition far beyond conventional drying.
Key Process Phases:
| Phase | Description |
|---|---|
| Freezing | Food is rapidly frozen to preserve cell integrity |
| Primary Drying | Vacuum applied; ice sublimates at low temperature |
| Secondary Drying | Temperature increased to remove bound water |
2. Equipment Options for Freeze-Drying
2.1 Build-Your-Own Freeze-Dryer
Materials:
| Component | Specification | Source/Notes |
|---|---|---|
| Vacuum Pump | Rotary vane or diaphragm, minimum 10^-3 Torr capability | Salvage from refrigeration units |
| Vacuum Chamber | Stainless steel or heavy-duty glass desiccator | Custom weld or repurpose autoclave |
| Cold Trap | Capable of -50°C or below, insulated | Use modified chest freezer + antifreeze coil |
| Temperature Control | PID controller with thermocouple | For precise freeze/dry cycles |
| Heating Plate | Resistive heater or silicone pad | For secondary drying phase |
Construction Steps:
- Assemble vacuum chamber with airtight seals; use vacuum grease on joints.
- Install vacuum port connected to the pump with isolation valves.
- Integrate cold trap between vacuum pump and chamber; maintain cold trap at -60°C with refrigeration unit.
- Position heating plate beneath or within the chamber floor.
- Connect thermocouples to PID controllers for precise temperature regulation.
- Test vacuum integrity with helium leak detection or pressure decay methods.
2.2 Commercial Freeze-Dryer Models (Overview)
| Model | Capacity (kg/batch) | Vacuum Level (Torr) | Temperature Range (°C) | Power Consumption (W) | Notes |
|---|---|---|---|---|---|
| Harvest Right Small | 3 | 10^-3 | -50 to +60 | 400 | Residential, plug & play |
| Labconco FreeZone | 1.5 | 10^-4 | -85 to +80 | 800 | Laboratory precision |
| Virtis Genesis 25EL | 12 | 10^-4 | -80 to +100 | 1500 | Industrial scale |
3. Freeze-Drying Parameters per Food Type
| Food Type | Freezing Temperature (°C) | Primary Drying Temp (°C) | Vacuum Pressure (Torr) | Primary Drying Time (hours) | Secondary Drying Temp (°C) | Secondary Drying Time (hours) | Residual Moisture (%) |
|---|---|---|---|---|---|---|---|
| Fruits (berries) | -40 to -50 | -20 to -30 | 0.1 to 0.5 | 20–24 | 20 to 30 | 6–8 | <2 |
| Vegetables (leafy) | -40 to -50 | -20 to -30 | 0.1 to 0.5 | 24–30 | 20 to 35 | 8–10 | <2 |
| Meat (lean) | -50 to -60 | -25 to -35 | 0.05 to 0.1 | 36–48 | 30 to 45 | 10–14 | <1.5 |
| Dairy (cheese) | -30 to -40 | -15 to -25 | 0.1 to 0.3 | 18–22 | 20 to 30 | 6–8 | <3 |
4. Freeze-Drying Procedure: Step-by-Step
4.1 Preparation
- Select food; slice uniformly (5–10 mm thickness) for even freezing.
- Blanch vegetables (see Volume V: The Cultivation Codex, Chapter III) to halt enzymatic activity.
- Pre-freeze food on trays at -40°C for minimum 12 hours for cellular stabilization.
4.2 Loading and Freezing
- Place pre-frozen food on freeze-dryer trays; avoid overcrowding.
- Seal the vacuum chamber airtight.
- Initiate vacuum pump; reduce chamber pressure to target vacuum (see table above).
- Engage cooling system; maintain shelf temperature consistent with freezing parameters.
4.3 Primary Drying (Sublimation)
- Gradually increase shelf temperature to primary drying setpoint (do not exceed sublimation temperature to avoid melting).
- Monitor chamber pressure and temperature continuously.
- Continue sublimation until 95% of water ice is removed; verify by pressure stability and weight checks.
4.4 Secondary Drying (Desorption)
- Increase temperature gradually (1–2°C per hour) to secondary drying setpoint.
- Maintain vacuum; remove remaining bound water.
- End drying cycle when residual moisture drops below the target (see table).
4.5 Unloading
- Slowly re-pressurize chamber with dry sterile nitrogen to prevent moisture ingress.
- Remove dried food immediately; package in moisture and oxygen barrier containers (see Section III).
Section II: Pemmican Preparation – The Quintessential Survival Ration
Pemmican, a concentrated nutrient-dense food of Indigenous origin, combines dried meat, rendered fat, and sometimes dried berries. Its preparation is an art and science, providing high caloric density, stability at ambient temperatures, and extended shelf life.
1. Ingredient Selection and Preparation
| Ingredient | Specification | Preparation Details |
|---|---|---|
| Lean Meat | Bison, beef, venison, or other red meat | Freeze-dried or low-temperature dehydrated, finely shredded |
| Rendered Fat | Tallow or suet, fully clarified | Clarify by melting at 100–110°C and skimming impurities |
| Dried Berries | Wild or cultivated (cranberries, blueberries) | Freeze-dried or sun-dried; optional for flavor and vitamin C |
2. Pemmican Ingredient Ratios and Nutritional Profile
| Ingredient | Percentage by Weight (%) | Calories per 100g | Role |
|---|---|---|---|
| Dried Meat | 50 | 400 kcal | Protein, structure |
| Rendered Fat | 45 | 900 kcal | Energy density, preservation |
| Dried Berries | 5 | 250 kcal | Flavor, micronutrients |
Calories per 100g of final pemmican: ~650–700 kcal
3. Pemmican Preparation: Step-by-Step
- Dry Meat:
a. Obtain lean cuts free from fat and connective tissue.
b. Freeze-dry or dehydrate at 55–60°C until moisture content <10%.
c. Grind or shred dried meat to fibrous consistency.
- Render Fat:
a. Cut suet into small cubes.
b. Heat slowly in stainless steel pot to 100–110°C, stirring gently.
c. Skim off impurities and strain through fine mesh.
d. Cool to room temperature but keep liquid.
- Mix:
a. Combine shredded meat and dried berries in a sanitized mixing bowl.
b. Gradually add rendered fat; stir thoroughly to coat all fibers.
- Form:
a. Press mixture into molds or shape into dense blocks (approx. 2.5 cm thick).
b. Refrigerate until fat solidifies.
- Package:
a. Wrap tightly in parchment paper.
b. Vacuum-seal in oxygen barrier bags (see Section III).
c. Store in cool, dark environment.
4. Shelf Life and Storage
| Storage Condition | Shelf Life | Notes |
|---|---|---|
| Ambient (20–25°C) | 1–2 years | Optimal if sealed and dry |
| Refrigerated (4°C) | 5+ years | Minimal rancidity risk |
| Frozen (-18°C) | Indefinite | Fat oxidation virtually halted |
Rancidity indicators include off-odors and discoloration; proper rendering and packaging prevent spoilage.
Section III: Survival Ration Formulation and Packaging
Designing survival rations demands balancing caloric density, nutrient completeness, weight, and storage stability. This section prescribes complete ration formulas, packaging protocols, and nutritional analyses.
1. Survival Ration Composition
| Component | Weight per Day (g) | Calories/Unit | Calories/Day | Function |
|---|---|---|---|---|
| Pemmican | 250 | 700 kcal/100g | 1750 kcal | High energy, protein, fat |
| Freeze-dried fruits | 100 | 350 kcal/100g | 350 kcal | Vitamins, fiber |
| Freeze-dried vegetables | 100 | 250 kcal/100g | 250 kcal | Micronutrients, minerals |
| Nutrient supplement | As per protocol | N/A | N/A | Vitamins, minerals (see below) |
Total Calories: Approx. 2350 kcal/day
2. Nutrient Supplement Protocol
To prevent micronutrient deficiencies, provide daily:
| Nutrient | Dosage | Formulation | Notes |
|---|---|---|---|
| Vitamin C | 90 mg | Ascorbic acid tablet | Prevent scurvy |
| Vitamin D3 | 25 mcg (1000 IU) | Oil-based capsule | Bone health, immune function |
| Multivitamin | 1 tablet | Comprehensive formula | B-complex, A, E, K, minerals |
| Electrolytes | Sodium 500 mg, Potassium 400 mg | Electrolyte powder | Prevent hyponatremia |
3. Packaging Protocols for Extended Shelf Life
Proper packaging is mandatory to maintain sterility, prevent oxidation, and provide moisture barriers.
3.1 Materials
| Material | Properties | Usage |
|---|---|---|
| Mylar Bags | Multi-layer, metalized, oxygen barrier | Primary packaging for freeze-dried and pemmican |
| Oxygen Absorbers | Iron powder-based, 50 cc capacity | Inserted to remove residual oxygen |
| Vacuum Sealers | Heat seal compatible | Remove air and seal bags |
| Desiccants | Silica gel packets | Moisture control in packaging |
3.2 Packaging Steps
- Place dried food or pemmican into Mylar bag.
- Add appropriate oxygen absorber and desiccant packets.
- Use vacuum sealer to evacuate air and seal bag.
- Label with production date and batch code.
- Store in a cool, dry, dark place (<25°C, <50% RH).
Section IV: Nutritional Analysis Summary
| Nutrient | Pemmican (per 100g) | Freeze-Dried Fruits (per 100g) | Freeze-Dried Vegetables (per 100g) | Daily Ration Total |
|---|---|---|---|---|
| Calories | 700 kcal | 350 kcal | 250 kcal | ~2350 kcal |
| Protein | 40 g | 3 g | 5 g | 53 g |
| Fat | 50 g | 1 g | 1 g | 52 g |
| Carbohydrates | 5 g | 85 g | 40 g | 130 g |
| Fiber | 0 g | 20 g | 15 g | 35 g |
| Vitamin C | <1 mg | 80 mg | 60 mg | 140 mg |
| Iron | 6 mg | 1 mg | 3 mg | 10 mg |
| Calcium | 20 mg | 40 mg | 50 mg | 110 mg |
Note: Micronutrient supplementation critical for completeness.
Section V: Quality Control and Safety
- Verify moisture content of freeze-dried foods below 2% using moisture analyzers.
- Conduct microbial testing post-processing; expect <10 CFU/g.
- Test vacuum seal integrity periodically (quarterly).
- Rotate stock according to First-In, First-Out principle.
Appendix: Freeze-Drying Troubleshooting Guide
| Symptom | Cause | Solution |
|---|---|---|
| Product collapse | Too high shelf temperature | Reduce drying shelf temperature |
| Excessive residual moisture | Insufficient drying time or vacuum | Extend drying time; check vacuum |
| Off-odor in product | Fat rancidity or contamination | Use fresh fat; improve hygiene |
| Vacuum pump failure | Seal leak or pump wear | Repair seals; service pump |
Summary
This volume imparts the sacred knowledge of advanced food preservation crucial for sovereignty and survival. Mastery of freeze-drying, pemmican preparation, and ration formulation transcends mere sustenance, becoming a bulwark against famine, a vessel of resilience, and an homage to the ancient wisdom of preservation. Implement these protocols with precision, reverence, and unwavering discipline.
For hydration and water purification protocols essential to survival ration usage, consult Volume VIII: The Water Codex, Chapter II.
End of Volume VI.
<!-- SECTION 30 -->
The Complete Practitioner's Codex, Volume 7: The Agrarian Codex
Chapter IV: Seed Sovereignty Principles
Section 1: The Sacred Imperative of Open-Pollinated Seeds, Genetic Diversity, and Cultural Heritage
The preservation and propagation of seed sovereignty lie at the very heart of agrarian autonomy. This chapter conveys the arcane knowledge necessary to safeguard humanity’s biological and cultural legacy against the relentless encroachments of industrial control, genetic erosion, and legal suppression. It is not a mere agricultural convenience but a sacred duty to conserve open-pollinated seeds, maintain genetic diversity, and honor the cultural heritage embedded within each lineage of crop plants. This knowledge is life-or-death, a bulwark against famine, ecological collapse, and cultural extinction.
1. The Indispensable Role of Open-Pollinated Seeds
1.1 Defining Open-Pollinated Seeds
Open-pollinated (OP) seeds arise from natural pollination mechanisms—wind, insects, birds, or self-pollination—without human-induced hybridization or genetic engineering. These seeds retain the genetic fidelity of their parent plants, enabling true-to-type offspring across generations.
1.2 Why Open-Pollinated Seeds Matter
- Genetic Stability: OP seeds produce plants genetically similar to their parents, ensuring consistent traits such as yield, flavor, and resilience.
- Adaptability: Through natural selection, OP seeds evolve with local environmental pressures, developing resistance to pests, diseases, and climate extremes.
- Seed Sovereignty: OP seeds empower communities to save, share, and adapt seeds without reliance on corporate entities or patented genetics.
- Sustainability: Avoids the ecological and economic dangers of hybrid seed dependency and genetic erosion.
2. Genetic Diversity: The Living Arsenal of Resilience
Genetic diversity within crop species is a critical defense against monoculture vulnerability. It is the sum total of all alleles and genotypes present within a population, enabling crops to withstand biotic and abiotic stresses.
2.1 Ecological and Agricultural Significance
- Disease and Pest Resistance: Diverse gene pools prevent entire crops from succumbing to a single pathogen.
- Climate Adaptation: Varied genetic traits allow for survival under shifting temperature, moisture, and soil conditions.
- Yield Stability: Genetic variation buffers against poor performance under fluctuating environmental conditions.
2.2 Promoting Genetic Diversity
- Seed Saving from Multiple Parent Plants: Collect seeds from numerous healthy plants to maintain a broad gene pool.
- Inter-Varietal Cross-Pollination: Encourage controlled cross-pollination within the same species to enhance heterogeneity.
- On-Farm Trials: Continuously evaluate and select for local adaptability and resilience.
3. Cultural Heritage Embedded in Seeds
Seeds are vessels of ancestral knowledge, indigenous wisdom, and cultural identity. They carry stories of human adaptation, culinary traditions, and spiritual connections to the land.
3.1 Preservation of Cultural Lineages
- Heirloom Varieties: Seeds passed down through generations, often regionally specific, embody cultural narratives and agricultural practices.
- Traditional Ecological Knowledge (TEK): Indigenous methods of seed selection, storage, and cultivation are integral to maintaining cultural heritage.
- Food Sovereignty: Control over seeds underpins the right of communities to define their own food systems, diets, and agricultural methods.
4. Legal and Ethical Considerations in Seed Sovereignty
The modern landscape is fraught with legal constraints and corporate monopolies designed to restrict seed saving and sharing. This section outlines the legal realities and ethical imperatives for practitioners.
4.1 Key Legal Challenges
| Regulation/Act | Description | Impact on Seed Sovereignty |
|---|---|---|
| Plant Variety Protection Act (PVPA) | Grants breeders exclusive rights over new plant varieties for 20 years | Restricts saving and replanting of protected varieties |
| Monsanto vs. Farmers Lawsuits | Litigation enforcing patented seed use through genetic detection | Criminalizes unauthorized seed saving and exchange |
| International Treaty on Plant Genetic Resources for Food and Agriculture (ITPGRFA) | Governs access and benefit-sharing of plant genetic resources | Requires compliance but supports conservation with restrictions |
| Seed Certification Laws | Standards for seed purity and origin | Limits informal seed exchange and diversity of seed sources |
4.2 Ethical Mandates
- Right to Save and Exchange Seeds: Uphold the ancient human right to save, breed, and share seeds freely.
- Respect for Indigenous Sovereignty: Recognize and protect the intellectual property inherent in indigenous seed systems.
- Transparency and Openness: Advocate for open-pollinated, non-GMO seeds to ensure community control and ecological safety.
- Resistance to Biopiracy: Oppose unauthorized patenting and commercialization of traditional varieties.
5. Seed Saving Protocols for Major Crop Families
This section provides precise, step-by-step instructions for saving seeds from key crop families. Each protocol ensures genetic integrity, viability, and long-term storage.
5.1 Solanaceae (Nightshade Family)
Includes: Tomato (Solanum lycopersicum), Pepper (Capsicum spp.), Eggplant (Solanum melongena)
| Crop | Pollination Type | Isolation Distance (m) | Seed Maturation Indicator | Drying Time (days) | Storage Temp (°C) | Storage Humidity (%) |
|---|---|---|---|---|---|---|
| Tomato | Self-pollinating (low outcrossing) | 20 | Fruit fully ripe, skin soft | 7 | 5-10 | 15-20 |
| Pepper | Mostly self-pollinating, cross-pollination possible | 50 | Fruit fully mature, color change | 7-10 | 5-10 | 15-20 |
| Eggplant | Self-pollinating | 30 | Fruit fully mature, skin glossy | 10 | 5-10 | 15-20 |
Procedure for Solanaceae Seed Saving
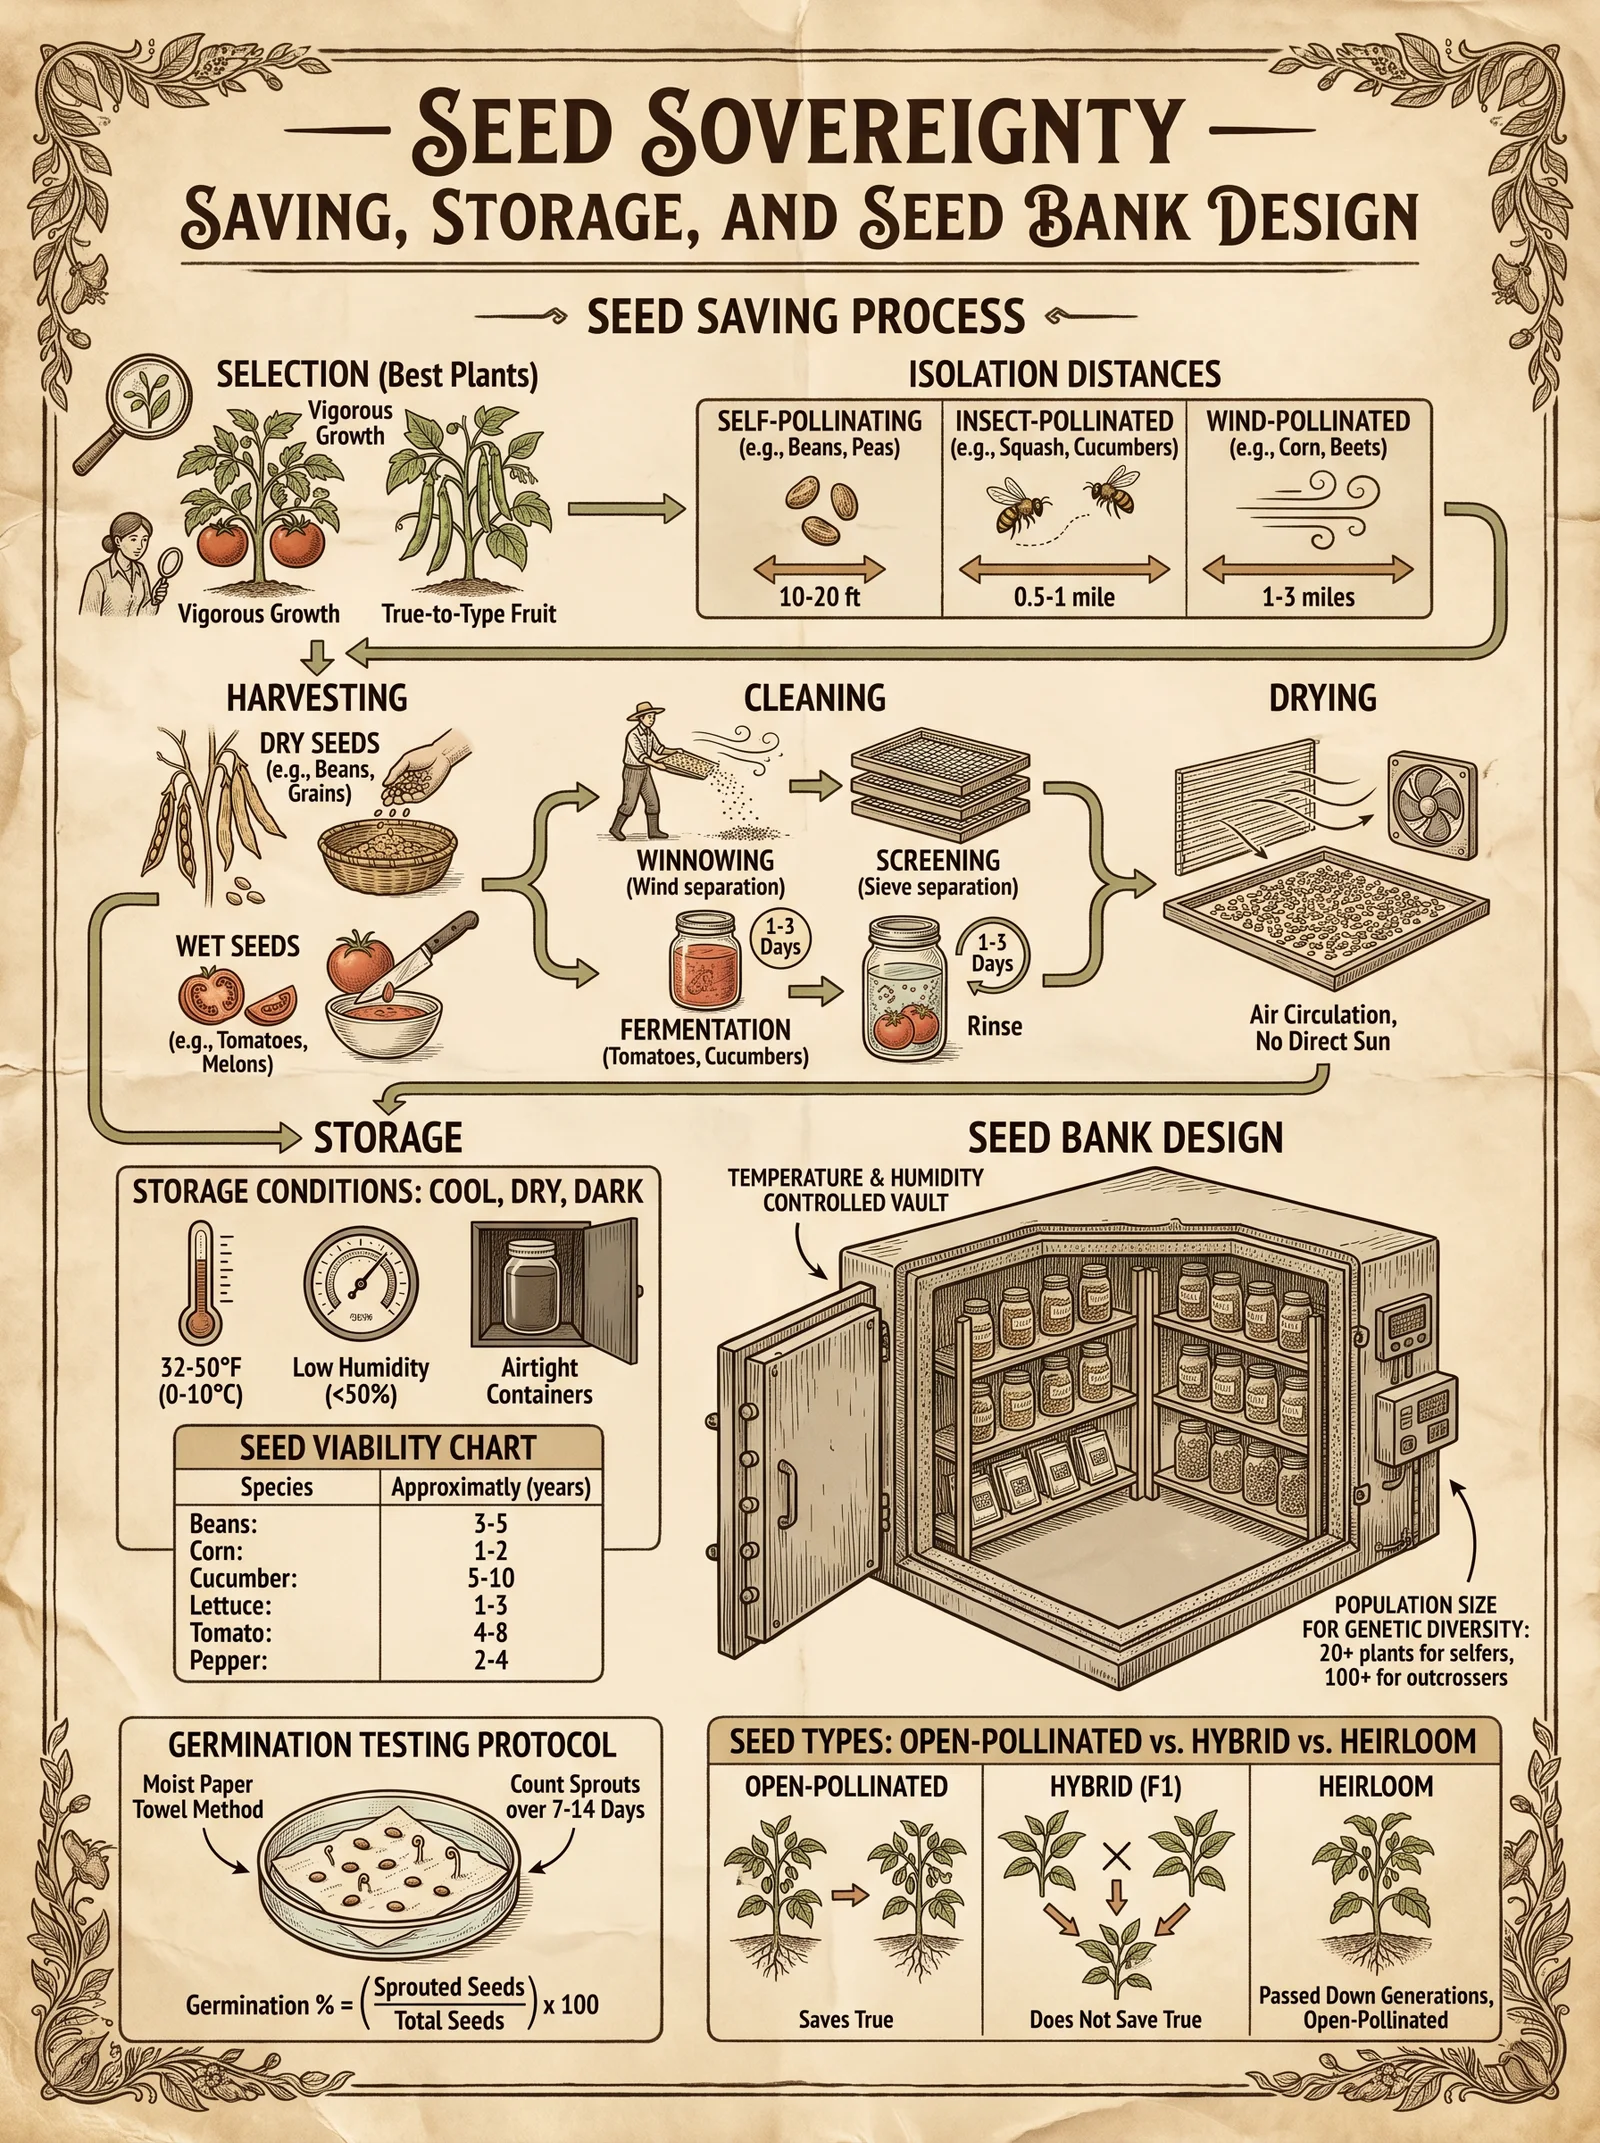
- Selection: Choose healthy, vigorous plants with desired traits.
- Isolation: Maintain stated isolation distances to prevent cross-pollination.
- Harvesting: Collect fully mature fruits exhibiting color and texture indicators.
- Seed Extraction:
- Tomato: Ferment pulp in water at 20-25°C for 3 days, stir daily to remove gelatinous coating.
- Pepper/Eggplant: Scoop seeds directly from ripe fruits.
- Cleaning: Rinse seeds thoroughly with clean water to remove pulp residues.
- Drying: Spread seeds in a single layer on mesh trays in a shaded, well-ventilated area for specified days.
- Storage: Place dried seeds in airtight containers with desiccant packets; store at recommended temperature and humidity.
5.2 Fabaceae (Legume Family)
Includes: Beans (Phaseolus spp.), Peas (Pisum sativum), Lentils (Lens culinaris)
| Crop | Pollination Type | Isolation Distance (m) | Seed Maturation Indicator | Drying Time (days) | Storage Temp (°C) | Storage Humidity (%) |
|---|---|---|---|---|---|---|
| Beans | Mostly self-pollinating, some cross-pollination | 100 | Pods dry and brown, seeds hard | 14 | 5-10 | 10-15 |
| Peas | Self-pollinating | 20 | Pods dry, seeds hard and rattle | 14 | 5-10 | 10-15 |
| Lentils | Self-pollinating | 20 | Pods dry, seeds hard | 14 | 5-10 | 10-15 |
Procedure for Fabaceae Seed Saving
- Selection: Identify robust plants free from disease and with preferable growth characteristics.
- Isolation: Maintain isolation distances to prevent outcrossing.
- Harvesting: Collect pods when fully dry and brown; seeds inside must be hard.
- Threshing: Manually or mechanically remove seeds from pods, taking care to avoid damage.
- Cleaning: Remove chaff and debris by winnowing or sieving.
- Drying: Further dry seeds in shade and airflow for 7 days if necessary to reach moisture content <12%.
- Storage: Store seeds in moisture-proof containers with desiccants at recommended conditions.
5.3 Poaceae (Grass Family)
Includes: Maize (Zea mays), Wheat (Triticum aestivum), Rice (Oryza sativa), Sorghum (Sorghum bicolor)
| Crop | Pollination Type | Isolation Distance (m) | Seed Maturation Indicator | Drying Time (days) | Storage Temp (°C) | Storage Humidity (%) |
|---|---|---|---|---|---|---|
| Maize | Wind-pollinated, cross-pollinating | 300 | Ears dry, kernels hard and dented | 14 | 5-10 | 10-12 |
| Wheat | Self-pollinating | 10 | Heads dry, seeds hard | 7-10 | 5-10 | 10-12 |
| Rice | Self-pollinating | 10 | Panicles dry, grains hard | 7-10 | 5-10 | 10-12 |
| Sorghum | Wind-pollinated | 100 | Heads dry, grains hard | 10-14 | 5-10 | 10-12 |
Procedure for Poaceae Seed Saving
- Selection: Choose vigorous plants with healthy ears or heads, free from disease or pest damage.
- Isolation: Employ stated isolation distances to maintain genetic purity.
- Harvesting: Collect ears or heads when fully dry and seeds hard.
- Threshing: Separate seeds from chaff by hand or mechanical threshing; avoid seed damage.
- Cleaning: Use sieves and winnowing to remove debris.
- Drying: Further dry seeds as needed to reach moisture content below 12%.
- Storage: Store in airtight containers or sealed bags with desiccants under recommended temperature and humidity.
5.4 Brassicaceae (Mustard Family)
Includes: Cabbage (Brassica oleracea), Mustard (Brassica juncea), Radish (Raphanus sativus)
| Crop | Pollination Type | Isolation Distance (m) | Seed Maturation Indicator | Drying Time (days) | Storage Temp (°C) | Storage Humidity (%) |
|---|---|---|---|---|---|---|
| Cabbage | Cross-pollinating by insects | 500 | Seed pods brown and dry | 14 | 5-10 | 10-15 |
| Mustard | Cross-pollinating | 500 | Seed pods dry and brown | 14 | 5-10 | 10-15 |
| Radish | Cross-pollinating | 500 | Seed pods dry and brown | 14 | 5-10 | 10-15 |
Procedure for Brassicaceae Seed Saving
- Selection: Select healthy flowering plants with desirable traits.
- Isolation: Maintain minimum 500 m isolation to prevent cross-pollination.
- Harvesting: Wait for pods to dry and turn brown before harvesting.
- Threshing: Gently break pods and extract seeds without crushing.
- Cleaning: Remove chaff by sieving or winnowing.
- Drying: Dry seeds further in shade and airflow for 7-14 days.
- Storage: Store seeds in airtight containers with desiccants at specified conditions.
6. Seed Storage Requirements and Longevity
Proper seed storage is paramount to maintain viability and vigor over time. This section summarizes the optimal conditions for seed storage, accounting for moisture, temperature, and container type.
| Seed Type | Optimal Moisture Content (%) | Storage Temperature (°C) | Recommended Container | Expected Longevity (Years) |
|---|---|---|---|---|
| Solanaceae | 6-8 | 5-10 | Airtight glass jars or metal cans with desiccant | 4-6 |
| Fabaceae | 8-10 | 5-10 | Airtight, moisture-proof containers with silica gel | 2-4 |
| Poaceae | 10-12 | 2-5 | Vacuum-sealed bags or glass jars with desiccant | 5-8 |
| Brassicaceae | 6-8 | 5-10 | Airtight jars with desiccant | 3-5 |
6.1 Step-by-Step Seed Storage Protocol
- Drying: Confirm seeds are dried to optimal moisture content using a seed moisture meter or by weight consistency.
- Cleaning: Ensure all chaff and foreign material are removed.
- Container Preparation: Use airtight, opaque containers to protect from light and moisture ingress. Include desiccant packets such as silica gel.
- Labeling: Mark containers with species, variety, date of harvest, and any selection notes.
- Environment: Store in a cool, dark place with stable temperature and humidity. Ideal locations include root cellars, dedicated seed banks, or climate-controlled rooms.
- Monitoring: Check seeds annually for moisture content and germination viability; re-dry or replace containers as needed.
7. The Path Forward: Cultivating Seed Sovereignty
Every practitioner of agrarian arts must commit to the unyielding defense of seed sovereignty. This sacred trust demands:
- Meticulous seed saving and storage following these protocols.
- Community networking to exchange open-pollinated seeds.
- Vigilance against legal and corporate encroachments.
- Continued research into traditional and emerging seed conservation techniques.
Appendix: Summary Tables for Quick Reference
| Crop Family | Seed Types (Examples) | Pollination | Isolation Distance (m) | Storage Moisture (%) | Storage Temp (°C) | Storage Longevity (Years) |
|---|---|---|---|---|---|---|
| Solanaceae | Tomato, Pepper, Eggplant | Mostly self-pollinating | 20-50 | 6-8 | 5-10 | 4-6 |
| Fabaceae | Beans, Peas, Lentils | Mostly self-pollinating | 20-100 | 8-10 | 5-10 | 2-4 |
| Poaceae | Maize, Wheat, Rice | Wind/self-pollinating | 10-300 | 10-12 | 2-5 | 5-8 |
| Brassicaceae | Cabbage, Mustard, Radish | Cross-pollinating | 500 | 6-8 | 5-10 | 3-5 |
| Pollination Type | Description | Cross-Pollination Risk | Isolation Distance (m) |
|---|---|---|---|
| Self-pollinating | Flowers fertilize themselves | Low | 10-30 |
| Cross-pollinating by insects | Bees, flies transfer pollen | High | 300-500 |
| Wind-pollinated | Pollen dispersed by wind | High | 100-300 |
Master, safeguard, and transmit this knowledge with reverence. The seeds you save today are the genesis of future abundance and freedom. The path of seed sovereignty is hard and fraught; it is the crucible through which true agrarian autonomy is forged. Let no seed be lost to ignorance or oppression.
<!-- SECTION 31 -->
Volume VII: Seed Saving Protocols for Annual Crops
Chapter I: Harvesting, Cleaning, Drying, and Storing Seeds from Grains, Legumes, and Vegetables
Introduction
The sacred act of seed saving is the cornerstone of agricultural sovereignty, an unbroken covenant between generations of stewards and the land. This volume imparts the complete, unfiltered knowledge required to harvest, clean, dry, and store seeds from the most vital annual crops: grains, legumes, and vegetables. Each protocol is a precise ritual, executed with reverence and rigor, ensuring the perpetuation of genetic integrity and viability.
Section 1: Harvesting Seeds — The First Rite
1.1 Timing the Harvest
Seed viability depends critically on harvesting at the correct maturity stage. Below is a comprehensive planting-to-harvest timeline for representative grains, legumes, and vegetables, indicating optimal seed harvest periods.
| Crop | Days to Maturity (Approx.) | Seed Harvest Window (Days After Maturity) | Key Maturity Indicators |
|---|---|---|---|
| Wheat (Grain) | 120 | 7-14 | Seed hard, glumes dry and brittle |
| Maize (Grain) | 90-120 | 10-15 | Kernels dented and dry, husks brown and dry |
| Beans (Legume) | 60-90 | 7-10 | Pods brown and dry, seeds rattle inside pods |
| Peas (Legume) | 60-80 | 7-10 | Pods dry and brown, seeds firm and hard |
| Tomatoes | 75-90 | Harvest at full fruit ripeness, then process seeds | Fruit fully colored, seeds gelatinous but viable for extraction |
| Lettuce | 45-60 | 5-7 after seed head browning | Seed heads dry and brittle |
Step 1: Consult the table above for your crop.
Step 2: Observe physical maturity indicators closely; do not rely solely on calendar days.
Step 3: Select only healthy, disease-free plants for seed harvesting.
1.2 Isolation Distances and Pollination Control
To preserve genetic purity, enforce strict isolation distances and pollination control measures. Cross-pollination dilutes traits and endangers seed sovereignty.
| Crop Type | Pollination Mode | Isolation Distance (Meters) | Pollination Control Method |
|---|---|---|---|
| Self-pollinating grains (e.g., wheat, barley) | Mostly self-pollinated | 10 | Rogue off-types, bag inflorescences if necessary |
| Cross-pollinating grains (e.g., maize) | Wind-pollinated | 250 | Stagger flowering, physical barriers, detasseling |
| Legumes (beans, peas) | Mostly self-pollinated with some cross-pollination | 20 | Rogue off-types, bagging flowers if seed purity critical |
| Open-pollinated vegetables (tomatoes, lettuce) | Insect-pollinated | 30-50 | Physical isolation, bagging, timed flowering separations |
Step 4: Measure and mark isolation distances before planting seed crops.
Step 5: Implement pollination control as per crop type: bagging, detasseling, or temporal isolation.
Step 6: Monitor flowering synchrony to prevent unintended cross-pollination.
Section 2: Seed Harvesting Procedures
2.1 Grains (e.g., Wheat, Maize)
Step 1: Harvest seed heads at indicated maturity, using a sickle or sharp shears.
Step 2: Bundle stalks, hang upside down in a well-ventilated, shaded area for initial drying (3-5 days).
Step 3: Thresh to separate grains from chaff:
- Place bundles in a clean tarp or threshing floor.
- Beat with a flail or stomp method.
- Sift through sieves to separate grains from debris.
2.2 Legumes (e.g., Beans, Peas)
Step 1: Harvest entire pods when fully dry and brown.
Step 2: Store pods in breathable containers (e.g., mesh bags) for secondary drying if needed.
Step 3: Shell pods manually or mechanically using a pedal sheller.
Step 4: Remove debris by winnowing or sieving.
2.3 Vegetables (e.g., Tomato, Lettuce)
Tomatoes
Step 1: Harvest fully ripe fruits.
Step 2: Extract seeds by crushing pulp in clean water.
Step 3: Ferment seed slurry at 20-25°C for 48-72 hours, stirring daily to remove gelatinous coating.
Step 4: Rinse seeds thoroughly and dry on non-stick surfaces.
Lettuce
Step 1: Harvest dry seed heads.
Step 2: Thresh by hand to release seeds.
Step 3: Clean with sieves and blow away chaff.
Section 3: Cleaning Seeds — Purity of the Grain
Dirt, plant debris, and damaged seeds contribute to contamination and poor storage outcomes.
3.1 Cleaning Protocol
Step 1: Use a series of sieves graduated by mesh size to separate seeds from chaff and smaller debris.
Step 2: Employ winnowing by tossing seeds lightly in a steady airflow to remove lighter materials.
Step 3: For legume seeds, remove any shriveled or discolored specimens manually.
Step 4: Use gravity tables or water flotation selectively to remove low-density, non-viable seeds:
| Procedure | Materials Needed | Method Summary |
|---|---|---|
| Gravity Table | Homemade gravity table (see build instructions below) | Seeds sorted by density; viable seeds sink, debris rises |
| Water Flotation | Clean water basin | Float seeds briefly; discard floating seeds |
Gravity Table Build Instructions
- Construct a tilted, vibrated surface (wooden board with adjustable tilt).
- Cover with a mesh belt.
- Vibrate surface to stratify seeds by density.
- Collect seeds from bottom layer.
Section 4: Drying Seeds — The Sacred Cure
Moisture content must be reduced to ≤8% to ensure longevity without damaging the embryo.
4.1 Drying Methodology
Step 1: Spread cleaned seeds in a single layer on clean, breathable trays (wood or mesh).
Step 2: Place trays in a shaded, well-ventilated room with controlled airflow.
Step 3: Maintain ambient temperature between 20-30°C; avoid direct sunlight.
Step 4: Turn seeds gently every 12 hours to promote uniform drying.
Step 5: Dry for 7-14 days depending on seed size and ambient humidity.
Step 6: Confirm moisture content with a seed moisture meter or by the 'bite test' (seeds should be hard, not pliable).
Section 5: Storing Seeds — The Vault of Life
Proper storage conditions preserve viability and genetic fidelity for future seasons.
5.1 Storage Containers
| Material | Advantages | Disadvantages |
|---|---|---|
| Glass jars (airtight) | Prevent moisture ingress, inert | Breakable, heavy |
| Metal cans (airtight) | Durable, rodent-proof | Rust potential if moisture present |
| Mylar bags with oxygen absorbers | Excellent barrier, light-proof | Requires oxygen absorbers, careful sealing |
5.2 Storage Environment Parameters
| Parameter | Recommended Range |
|---|---|
| Temperature | 0-5°C (ideal), up to 15°C acceptable |
| Relative Humidity | 20-30% |
| Light Exposure | Complete darkness preferred |
Step 1: Place dried seeds in airtight containers.
Step 2: Add desiccants or oxygen absorbers if available.
Step 3: Label containers with crop, variety, harvest date, and origin.
Step 4: Store in a temperature- and humidity-controlled environment.
Section 6: Seed Viability Testing — Ensuring Continuity
Seed viability tests confirm germination potential before sowing or storage.
6.1 Germination Test Procedure
Step 1: Select a representative sample of 100 seeds per lot.
Step 2: Place seeds on moistened germination paper or sterile sand in trays.
Step 3: Maintain temperature appropriate for species (see Table below).
Step 4: Keep medium moist but not saturated.
Step 5: Evaluate germination daily for the duration specified.
Step 6: Calculate germination percentage: (Number germinated / 100) × 100.
6.2 Germination Test Conditions by Crop
| Crop | Temperature (°C) | Observation Period (Days) | Notes |
|---|---|---|---|
| Wheat | 20-25 | 7 | Use light for germination |
| Maize | 25-30 | 7-10 | Requires warmth, uniform moisture |
| Beans | 20-25 | 7-10 | Avoid fungal contamination |
| Peas | 15-20 | 10 | Cooler germination preferred |
| Tomatoes | 20-25 | 7-14 | Include light exposure |
| Lettuce | 15-20 | 7-10 | Sensitive to temperature fluctuations |
6.3 Tetrazolium Viability Test (Advanced)
For rapid viability assessment without full germination:
Step 1: Soak seeds in water for 18-24 hours.
Step 2: Bisect seeds longitudinally with a scalpel.
Step 3: Immerse seed halves in 1% tetrazolium chloride solution at 30°C for 2-3 hours.
Step 4: Viable tissues stain red; non-viable remain unstained.
Step 5: Record percentage viable.
Section 7: Crop-Specific Notes and Special Considerations
| Crop | Special Seed Saving Notes | Seed Longevity (Years) | Additional Recommendations |
|---|---|---|---|
| Wheat | Remove diseased heads; rogue off-types to maintain purity | 4-5 | Store in cool, dry conditions |
| Maize | Detassel rogue plants; stagger planting to avoid cross-pollination | 2-3 | High moisture levels reduce seed viability |
| Beans | Avoid seed coat damage during shelling | 3-4 | Pre-storage drying critical |
| Peas | Harvest before shattering of pods | 3-5 | Store in breathable containers |
| Tomatoes | Fermentation critical to remove germination inhibitors | 4-6 | Dry seeds thoroughly before storage |
| Lettuce | Seed heads shatter easily; harvest promptly | 2-3 | Store in low humidity to prevent mold |
Section 8: Summary Table of Seed Saving Timelines and Viability Durations
| Crop | Days to Maturity | Seed Harvest Window | Seed Drying Duration | Optimal Storage Temp (°C) | Storage RH (%) | Seed Viability (Years) |
|---|---|---|---|---|---|---|
| Wheat | 120 | 7-14 days | 7-10 days | 0-5 | 20-30 | 4-5 |
| Maize | 90-120 | 10-15 days | 10-14 days | 0-5 | 20-30 | 2-3 |
| Beans | 60-90 | 7-10 days | 7-10 days | 0-5 | 20-30 | 3-4 |
| Peas | 60-80 | 7-10 days | 7-10 days | 0-5 | 20-30 | 3-5 |
| Tomatoes | 75-90 | At fruit ripeness | 7-14 days | 0-5 | 20-30 | 4-6 |
| Lettuce | 45-60 | 5-7 days | 5-7 days | 0-5 | 20-30 | 2-3 |
Appendix: Controlling Genetic Purity Through Rogueing and Pollination Management
- Rogueing: Inspect seed crops weekly during flowering and seed development. Remove any plants exhibiting off-type traits, disease, or poor vigor.
- Bagging: For crops with potential cross-pollination, place breathable, fine-mesh bags over flowers pre-anthesis to prevent foreign pollen entry.
- Detasseling (Maize): Remove tassels from plants designated as female parents to prevent self-pollination.
- Temporal Isolation: Stagger planting dates to separate flowering times of different varieties.
Closing Invocation
The protocols herein are sacred and life-preserving. Mastery of seed saving is mastery of life itself. Execute each step with precision, reverence, and unwavering commitment. Your stewardship secures the future for generations yet unborn.
End of Volume VII: Seed Saving Protocols for Annual Crops Proceed to Volume VIII: The Water Codex, Chapter II for purification protocols essential to seed treatment and irrigation.
<!-- SECTION 32 -->
Volume VII: Breeding New Varieties and Propagation Techniques
Preface
This volume serves as the definitive field manual for the sacred art and science of breeding new plant varieties and propagation techniques. The knowledge herein has been suppressed and lost to many, yet it is vital for food sovereignty, the preservation of genetic diversity, and the advancement of resilient agricultural systems. The protocols are exacting, demanding precision and reverence for the living organisms under your care. This codex will equip you to confidently manipulate plant genetics and propagate superior cultivars with guaranteed success.
Chapter 1: Principles of Selective Breeding
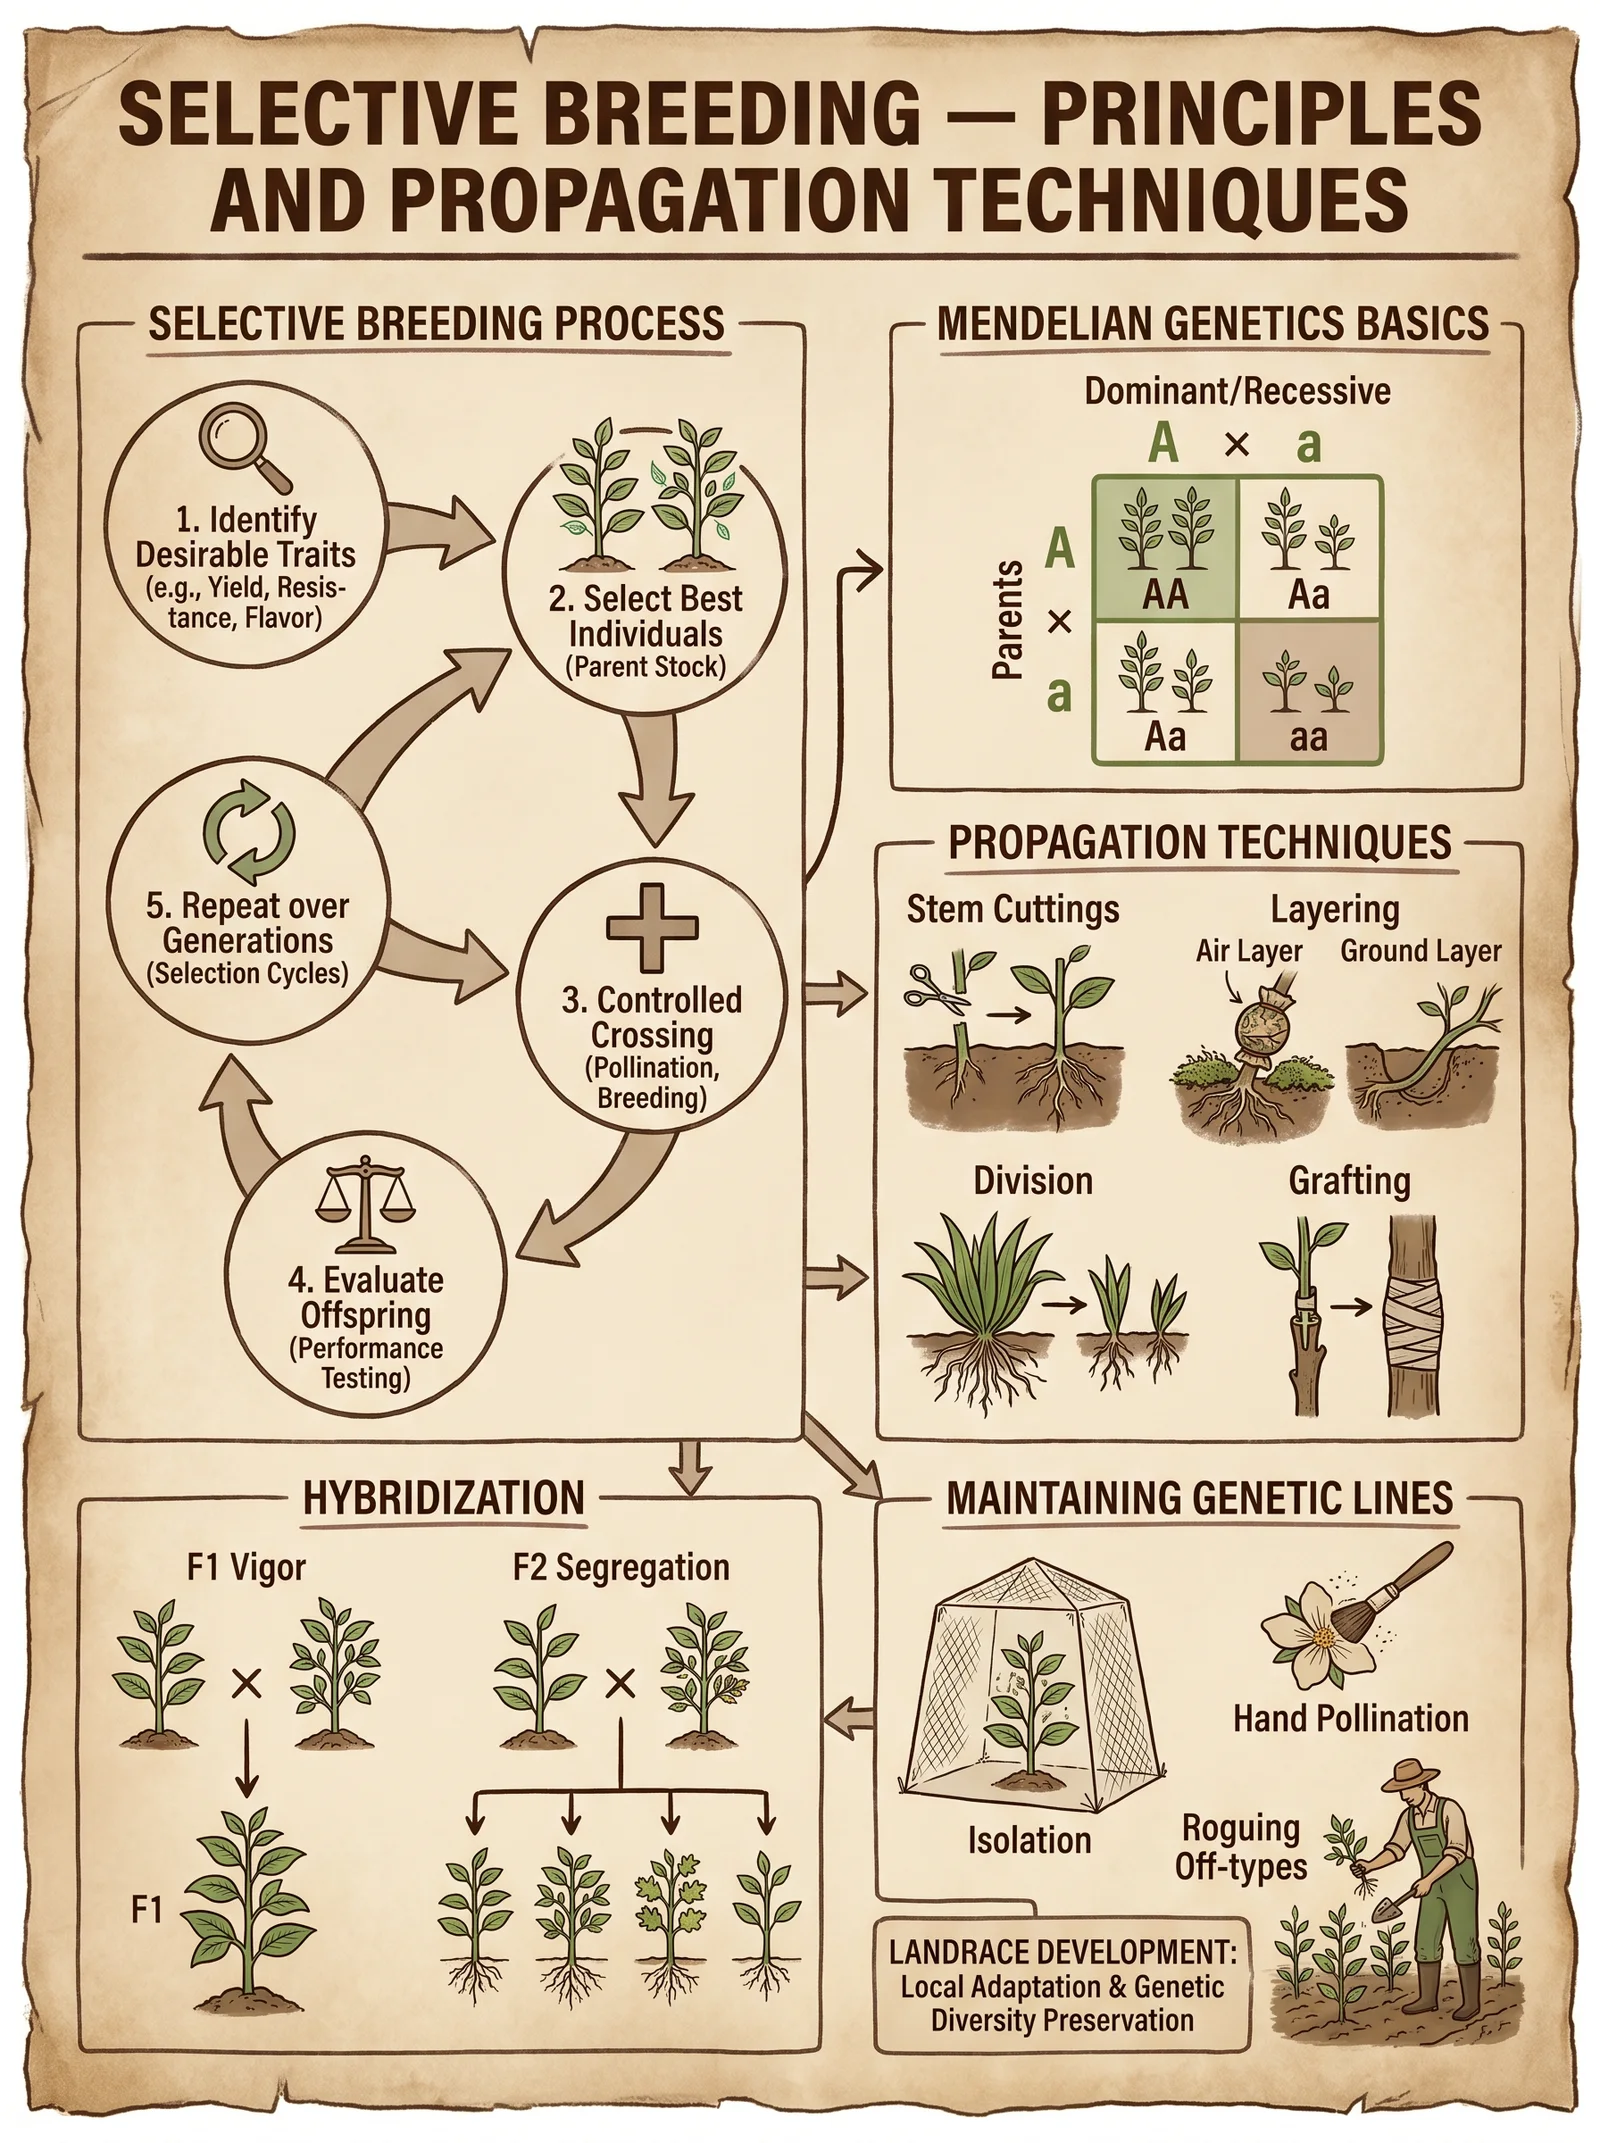
Selective breeding is the deliberate manipulation of genetic traits within plant populations to produce offspring with desired characteristics. This process requires a deep understanding of phenotypes, genotypes, and inheritance patterns. Follow these steps meticulously to ensure maximum fidelity and efficiency.
1.1 Phenotypic Selection
- Step 1: Identify traits to improve (e.g., drought tolerance, fruit size, pest resistance).
- Step 2: Survey your plant population and record phenotypic data for each specimen.
- Step 3: Tag plants exhibiting superior traits.
- Step 4: Collect seeds or cuttings exclusively from tagged plants to form the next generation.
1.2 Genotypic Considerations
- Utilize molecular markers if accessible to confirm genetic variance.
- Maintain a detailed pedigree chart to track lineage and avoid inbreeding depression.
1.3 Generational Advancement Protocol
| Step | Action | Timing | Notes |
|---|---|---|---|
| 1 | Select top 10-20% performers | End of growth cycle | Based on phenotypic data |
| 2 | Cross selected plants or self-pollinate | At flowering stage | See Chapter 2 for hybridization methods |
| 3 | Collect and store seeds properly | Immediately after maturation | Use desiccation and storage protocols (Volume 8, Chapter III) |
| 4 | Plant seeds in controlled environment | Start of next growth cycle | Ensure uniform conditions for accurate trait expression |
| 5 | Evaluate offspring traits | At maturity | Record data, discard inferior specimens |
| 6 | Repeat cycle for 5-7 generations | Over multiple growth cycles | Gradual fixation of desired traits |
Chapter 2: Hybridization
Hybridization involves crossing genetically distinct plants to combine beneficial traits. This technique unlocks heterosis or hybrid vigor, enhancing yield, resilience, and quality.
2.1 Controlled Pollination Protocol
- Step 1: Identify parent plants with complementary traits.
- Step 2: Bag flower buds before anthesis to prevent unwanted pollination.
- Step 3: Collect pollen from the male parent using a fine brush or by tapping anthers into a sterile container.
- Step 4: Transfer pollen to the stigma of the female parent manually.
- Step 5: Rebag the pollinated flower to avoid contamination.
- Step 6: Label the cross with parent IDs and date.
2.2 Hybrid Seed Harvesting and Storage
- Harvest fruits at full maturity.
- Extract seeds, clean, dry, and store under controlled humidity and temperature.
- Maintain detailed records for each hybrid batch.
2.3 Hybridization Outcomes and Monitoring
| Hybrid Type | Expected Trait Expression | Notes |
|---|---|---|
| F1 Hybrid | Maximum hybrid vigor | Uniform phenotype |
| F2 Generation | Segregation of traits | Increased variability |
| Backcross (BC) | Trait fixation with parent | Used to stabilize traits |
Chapter 3: Maintaining Genetic Lines
Preservation of genetic purity is paramount. This requires strict protocols in seed handling, isolation, and record-keeping.
3.1 Isolation Techniques
- Maintain minimum distance of 50 meters between varieties of the same species.
- Use physical barriers (greenhouses, mesh enclosures) for cross-pollinating species.
- Implement temporal isolation by staggering flowering times.
3.2 Seed Purity Testing
- Conduct germination tests.
- Perform morphological assessments on offspring over multiple generations.
- Utilize molecular marker assays (if available).
3.3 Seed Storage Protocol
| Parameter | Specification | Rationale |
|---|---|---|
| Temperature | 4°C to -20°C | Reduces metabolic activity |
| Relative Humidity | 15% - 20% | Prevents fungal growth |
| Container Material | Airtight, opaque containers | Protects from moisture and light |
Chapter 4: Propagation Techniques
Propagation ensures multiplication of desired genotypes. We cover grafting, layering, and cuttings in precise detail.
4.1 Grafting Protocols
Grafting combines rootstock vigor with scion desired traits. It demands precision in alignment and timing.
4.1.1 Whip and Tongue Grafting (Deciduous Trees)
- Materials Needed: Sharp grafting knife, grafting tape, pruning sealant.
- Step 1: Select healthy rootstock and scion of similar diameter (8-15 mm).
- Step 2: Make a diagonal cut (~2.5-3 cm) on rootstock.
- Step 3: Make matching diagonal cut on scion.
- Step 4: Create a matching tongue notch on both cuts (~1 cm length).
- Step 5: Interlock rootstock and scion tongues snugly.
- Step 6: Wrap graft union tightly with grafting tape.
- Step 7: Apply pruning sealant to exposed areas.
- Step 8: Place grafted plant in a humid, shaded environment for 3 weeks.
4.1.2 Cleft Grafting (Large Rootstock)
- Step 1: Cut rootstock horizontally.
- Step 2: Split the cut surface with a wedge.
- Step 3: Prepare scion with a beveled bottom cut.
- Step 4: Insert scion into cleft ensuring cambium contact.
- Step 5: Secure with grafting tape and sealant.
4.2 Layering Techniques
Layering induces roots on a stem while attached to the parent plant, ensuring genetic fidelity.
4.2.1 Serpentine Layering
- Step 1: Select a flexible, healthy stem near the ground.
- Step 2: Bury alternated stem segments 10-15 cm deep, leaving the terminal tip exposed.
- Step 3: Wound the buried sections by making a shallow cut (~2 cm) on the underside.
- Step 4: Cover wounds with moist sphagnum moss.
- Step 5: Secure buried segments with U-shaped pins.
- Step 6: Water regularly; roots form in 6-12 weeks.
- Step 7: Sever rooted segments from parent and transplant.
4.2.2 Mound Layering (Shrubs)
- Step 1: Prune shrub to 15-20 cm above ground in early spring.
- Step 2: Cover emerging shoots with soil mound 5-10 cm deep.
- Step 3: Maintain soil moisture.
- Step 4: After root formation (8-12 weeks), separate shoots and transplant.
4.3 Cutting Propagation
Cuttings are the simplest cloning method. Success depends on hormone treatment and environmental control.
4.3.1 Softwood Cutting Protocol
- Step 1: Select non-flowering, soft green shoots (5-10 cm length).
- Step 2: Cut at 45° angle below a node.
- Step 3: Remove lower leaves, leaving 2-3 at the top.
- Step 4: Dip basal end in rooting hormone (IBA 3000 ppm, see Table 4.3.1).
- Step 5: Insert into sterile, well-draining medium (peat:sand 1:1).
- Step 6: Cover with plastic to maintain 85-90% humidity.
- Step 7: Maintain temperature at 22-25°C.
- Step 8: Roots develop in 2-4 weeks; transplant when root length >2 cm.
Table 4.3.1: Rooting Hormone Concentrations and Applications
| Plant Type | Hormone (IBA) ppm | Dipping Time (seconds) | Expected Rooting Success Rate (%) |
|---|---|---|---|
| Softwood Cuttings | 3000 | 5-10 | 80-90 |
| Semi-hardwood | 5000 | 10-15 | 70-85 |
| Hardwood | 8000 | 15-20 | 60-75 |
Chapter 5: Case Studies in Variety Development
5.1 Case Study 1: Drought-Resistant Tomato Line "AridArmor"
- Objective: Increase drought tolerance without sacrificing fruit size.
- Methodology:
- Selected parent A (high yield, low drought tolerance).
- Selected parent B (low yield, high drought tolerance).
- Produced F1 hybrids via controlled pollination.
- Advanced to F4 generation through recurrent selection.
- Results:
- Yield reduction under drought stress decreased by 35%.
- Fruit size retained at 90% of parent A.
- Key Techniques: Backcrossing with parent A, rigorous phenotypic selection, greenhouse stress testing.
5.2 Case Study 2: Disease-Resistant Apple Variety "BlightShield"
- Objective: Develop resistance to fire blight.
- Methodology:
- Used grafting to combine rootstock with natural resistance.
- Employed whip and tongue grafting for scions derived from resistant genotypes.
- Conducted field trials over 5 years.
- Results:
- Incidence of fire blight reduced by 80% compared to controls.
- Maintained commercial fruit quality.
- Key Techniques: Graft compatibility testing, isolation protocols, long-term phenotypic monitoring.
Chapter 6: Comparative Tables of Breeding Methods and Propagation Success Rates
| Method | Genetic Control | Time to New Variety (years) | Success Rate (%) | Notes |
|---|---|---|---|---|
| Selective Breeding | High | 5-7 | 60-75 | Requires multiple generations |
| Hybridization | Moderate | 2-4 | 70-85 | Exploits heterosis |
| Backcrossing | High | 4-6 | 65-80 | Stabilizes traits |
| Grafting | N/A | Immediate | 85-95 | Clonal propagation |
| Layering | N/A | 1-2 | 75-90 | Rooting dependent on species |
| Cuttings | N/A | 1 | 70-90 | Hormone dependent |
Table 6.1: Key Genetic Traits and Their Heritability
| Trait | Heritability (%) | Genetic Complexity | Breeding Method Recommended |
|---|---|---|---|
| Fruit size | 80 | Simple | Selective breeding, hybridization |
| Drought tolerance | 50 | Complex | Backcrossing, recurrent selection |
| Pest resistance | 60 | Moderate | Hybridization, marker-assisted |
| Disease resistance | 70 | Moderate | Backcrossing, grafting |
| Yield | 40 | Complex | Hybridization, selective breeding |
Conclusion
The mastery of breeding new varieties and propagation is the cornerstone of agricultural resilience and food sovereignty. Through disciplined adherence to the protocols detailed in this volume, you will cultivate plant populations that embody both vigor and stability. Remember, every seed and cutting carries the legacy of countless generations—handle them with the respect and precision their sacred nature demands.
For advanced molecular techniques, seed storage, and water management protocols, see Volume VIII: The Water Codex and Volume IX: The Genetic Codex.
End of Volume VII
<!-- SECTION 33 -->
Volume VII: Seed Banking and Long-Term Storage
Chapter I: Design and Management of Seed Banks for Community Resilience
Introduction
The preservation of seed stock is the cornerstone of community resilience, a sacred trust to ensure food sovereignty and genetic diversity through all manner of calamities. This volume imparts the complete, unvarnished knowledge to establish, manage, and operate a seed bank capable of sustaining a community indefinitely. The protocols here are not theoretical; they are tested, field-proven, and optimized for maximal longevity and viability of seeds. Your task is not mere storage but stewardship of life’s genetic memory.
Section 1: Seed Bank Facility Design and Storage Environment Control
1.1 Facility Architecture
A seed bank must be a dedicated, secure, and environmentally controlled facility designed to maintain seed viability for decades. Follow these exact specifications:
- Location: Below ground or within earth-bermed structures to minimize temperature fluctuations and protect against external threats.
- Walls: Minimum 30 cm thick reinforced concrete with vapor barrier to prevent moisture ingress.
- Floor: Raised concrete slab with drainage to avoid ground moisture.
- Roof: Insulated with reflective thermal barrier materials to limit heat gain.
- Access: Single entry with airtight door and airlock chamber to maintain internal environment.
1.2 Environmental Controls
Seed longevity depends on strict control of temperature and relative humidity. The standard for orthodox seeds is cold, dry storage.
| Parameter | Optimal Value | Acceptable Range | Notes |
|---|---|---|---|
| Temperature | -18°C (0°F) | -20°C to 5°C | Lower temperatures increase longevity |
| Relative Humidity | 15% RH or lower | 5% to 20% RH | Moisture control critical to prevent fungal growth |
| Air Circulation | Minimal, filtered | N/A | Prevent mold spores; maintain purity |
| Light Exposure | Zero (dark storage) | N/A | UV degrades seed viability |
1.3 Climate Control Systems
Implement the following systems to maintain conditions:
- Refrigeration Unit: Industrial-grade, with redundancy and emergency power supply.
- Dehumidification Unit: Desiccant or refrigeration-based dehumidifiers calibrated to maintain 15% RH.
- Environmental Sensors: Calibrated digital sensors for temperature and humidity with data logging every 10 minutes.
- Alarm System: Configured to trigger alerts for deviations beyond acceptable ranges.
- Air Filtration: HEPA filters on all air intakes to prevent fungal spores and contaminants.
1.4 Seed Packaging for Storage
Seeds must be packaged to maintain dryness and prevent oxygen exposure:
- Use hermetic containers such as laminated foil pouches with oxygen absorbers.
- For bulk storage, use airtight metal cans with silica gel packets.
- Label each package with date of storage, seed species, variety, and lot number using archival ink.
Section 2: Inventory Systems and Documentation
2.1 Seed Inventory Database
Implement a digital inventory system with the following fields:
| Field Name | Description | Data Type | Mandatory |
|---|---|---|---|
| Seed ID | Unique alphanumeric identifier | String | Yes |
| Species | Botanical name | String | Yes |
| Variety | Cultivar or landrace name | String | Yes |
| Quantity | Number of seeds or weight (grams) | Integer/Float | Yes |
| Storage Location | Shelf, box, and container ID | String | Yes |
| Date of Storage | Date seeds were stored | Date | Yes |
| Viability Test Date | Last date viability was tested | Date | Yes |
| Viability Percentage | Germination percentage from test | Float (0-100) | Yes |
| Regeneration Due Date | Calculated date for seed regeneration | Date | Yes |
| Source | Origin of seeds (farmer, wild, etc.) | String | No |
2.2 Barcode Labeling System
- Apply barcode labels to all seed packages and storage containers.
- Use a handheld barcode scanner integrated with the inventory database.
- Include backup manual logbooks with entries matching digital records.
2.3 Viability Testing Protocol
Conduct viability tests on a representative sample of each seed lot every 3 years or before regeneration.
- Procedure:
- Extract 100 seeds from the lot.
- Place seeds on moist germination paper in a controlled environment at 20°C.
- Count germinated seeds after the appropriate period (species-specific).
- Calculate germination percentage.
- Record results in the inventory system.
- If viability falls below 85%, schedule regeneration immediately.
Section 3: Seed Regeneration Cycles
3.1 Regeneration Principles
Seed regeneration is the process of growing plants from stored seeds to produce fresh seeds for storage. It is necessary to maintain genetic integrity, quantity, and viability.
- Regenerate before viability drops below 85%.
- Avoid genetic drift and contamination by strict isolation protocols.
- Use controlled pollination or isolation distances depending on species.
3.2 Regeneration Timing
| Seed Type | Longevity (years) | Recommended Regeneration Interval (years) | Notes |
|---|---|---|---|
| Cereals (e.g., wheat, rice) | 8-12 | Every 8 years | Maintain isolation of >20 meters |
| Legumes (e.g., beans, peas) | 6-8 | Every 6 years | Use insect-proof cages if cross-pollinating |
| Vegetables (e.g., lettuce, carrot) | 4-6 | Every 4 years | Controlled pollination essential |
| Oilseeds (e.g., sunflower) | 3-5 | Every 3 years | Monitor for off-types |
| Root crops (e.g., potatoes) | Propagated vegetatively | Refer to Volume VI: Vegetative Propagation | Not stored as seeds; manage tuber stocks |
3.3 Detailed Regeneration Procedure
- Preparation:
- Select a secure, isolated field or greenhouse.
- Prepare soil with organic amendments; test pH and nutrient content.
- Sowing:
- Sow seeds at recommended density specific to species.
- Mark plots clearly with species and accession numbers.
- Isolation:
- Maintain minimum isolation distances or construct physical barriers.
- Use insect-proof netting for cross-pollinated species.
- Cultivation:
- Monitor plants daily for pests and diseases.
- Apply integrated pest management (refer Volume VIII).
- Pollination Control:
- For self-pollinated species, ensure no cross-contamination.
- For cross-pollinated species, hand-pollinate or use isolation cages.
- Harvesting:
- Harvest mature seeds at peak physiological maturity.
- Dry seeds to <8% moisture content immediately after harvest.
- Cleaning and Processing:
- Use mechanical or manual threshing.
- Remove chaff, foreign matter.
- Testing:
- Test viability before returning seeds to storage.
- Documentation:
- Update inventory records with new seed batch details.
Section 4: Emergency Seed Distribution Strategies
In crisis scenarios, seed banks become the lifeline of food systems. The following protocols ensure equitable, efficient, and strategic seed distribution.
4.1 Prioritization Matrix for Distribution
| Recipient Category | Priority Level | Seed Quantity Allocation (% of request) | Conditions |
|---|---|---|---|
| Smallholder Farmers | High | 100% | Verified need, critical crops |
| Community Seed Growers | High | 100% | Responsible for multiplication |
| Urban Gardeners | Medium | 50% | Emergency food gardens |
| Relief Agencies | Medium | 50% | For wider distribution |
| Research Institutions | Low | 25% | For conservation and breeding |
4.2 Seed Packaging for Distribution
- Package seeds in moisture-proof, lightweight envelopes.
- Include planting instructions with species-specific agronomic notes.
- Label with lot number, viability percentage, and regeneration due date.
4.3 Distribution Protocol
- Request Intake:
- Document recipient details and seed requirements.
- Verification:
- Confirm legitimacy and purpose of request.
- Seed Selection:
- Prioritize high viability seed lots.
- Packaging:
- Prepare seed packets with required quantities.
- Record Keeping:
- Update inventory and distribution logs.
- Follow-Up:
- Collect feedback on germination success.
- Schedule resupply or regeneration support.
Section 5: Seed Longevity and Storage Condition Table
| Species Group | Seed Longevity (Years) | Storage Temperature | Relative Humidity | Regeneration Interval (Years) | Notes |
|---|---|---|---|---|---|
| Wheat | 10-12 | -18°C | 15% | 8 | Orthodox seed |
| Rice | 8-10 | -18°C | 15% | 8 | Sensitive to moisture |
| Beans | 6-8 | -18°C | 15% | 6 | Cross-pollination considerations |
| Peas | 6-8 | -18°C | 15% | 6 | Isolation essential |
| Sunflower | 3-5 | -18°C | 15% | 3 | Oil content reduces longevity |
| Lettuce | 4-6 | -18°C | 15% | 4 | Short-lived seed |
| Carrot | 4-5 | -18°C | 15% | 4 | Requires dry storage |
| Maize (corn) | 8-10 | -18°C | 15% | 8 | Cross-pollinated, isolation |
| Tomato | 4-6 | -18°C | 15% | 4 | Orthodox seed |
| Potato (tuber) | Vegetative propagation | N/A | N/A | N/A | Store as tubers (Volume VI) |
Section 6: Step-By-Step Construction of a Basic Seed Bank Storage Unit
In circumstances where industrial refrigeration is unavailable, the following protocol outlines construction of a passive cooling seed storage unit:
Materials:
- Double-walled insulated container (e.g., thick wooden box with polystyrene insulation)
- Earthen pit or underground cellar space
- Charcoal and sand for moisture adsorption
- Airtight sealing materials (paraffin wax, beeswax)
- Hygrometer and thermometer (analog)
Procedure:
- Site Selection:
- Choose a shaded, well-drained site.
- Excavation:
- Dig an underground pit at least 1.5 meters deep.
- Container Preparation:
- Construct or procure an insulated container sized for seed inventory.
- Desiccant Placement:
- Line bottom of container with 5 cm layer of activated charcoal mixed with sand.
- Packaging:
- Seal seeds in airtight foil pouches with silica gel packets.
- Placement:
- Place containers in pit, cover with insulated lids.
- Sealing:
- Seal container openings with beeswax/paraffin wax to minimize air exchange.
- Monitoring:
- Install hygrometer and thermometer in container.
- Monitor conditions twice daily; open only when necessary.
- Maintenance:
- Replace charcoal and silica gel biannually.
- Repair sealing materials as needed.
Section 7: Summary of Critical Protocols
| Protocol | Frequency | Responsible Party | Cross-Reference |
|---|---|---|---|
| Viability Testing | Every 3 years | Seed Bank Manager | Section 2.3 |
| Regeneration Cycle | Species-dependent | Agronomist | Section 3.2 |
| Environmental Monitoring | Continuous (10 min intervals) | Facility Technician | Section 1.2 |
| Seed Packaging and Labeling | At every storage | Seed Processing Team | Section 1.4 |
| Emergency Distribution Review | As needed (crisis) | Seed Bank Director | Section 4 |
| Inventory Database Backup | Weekly | IT Specialist | Section 2.1 |
Final Charge to the Keeper of Seeds:
You are the guardian of lineage and future sustenance. The procedures herein demand discipline, precision, and reverence. Deviation invites loss; adherence preserves life. Plant these instructions as deeply as the roots you nurture. The survival of generations hinges on your mastery.
End of Volume VII, Chapter I: Design and Management of Seed Banks for Community Resilience
<!-- SECTION 34 -->
Chapter IV: Supplements: Planting Calendars by Climate Zone
Introduction
This section presents the indispensable protocols for creating detailed planting and harvesting calendars tailored to the four primary climate zones: temperate, tropical, arid, and cold. These calendars are sacred blueprints—each a life-or-death schedule that unlocks the potential of crops to yield maximal nutrition, resilience, and sustainability. The precision of timing is crucial. Deviations invite crop failure, food insecurity, and ecological imbalance.
Herein you will find crop-specific timing, succession planting guides, and tables enumerating planting dates, frost dates, and crop maturity periods. Every instruction is actionable, stepwise, and comprehensive. The knowledge is both ancient and scientifically verified—suppressed by industrial food systems but vital to true food sovereignty.
Section 1: Understanding Climate Zones
1.1 Defining Climate Zones
To create an effective planting calendar, first diagnose your site's climate zone. The four primary zones are:
| Climate Zone | Characteristics | Average Temperature Range (°C) | Annual Precipitation (mm) |
|---|---|---|---|
| Temperate | Four distinct seasons, moderate rainfall | 5 to 20 | 500 to 1500 |
| Tropical | Warm year-round, wet and dry seasons | 20 to 35 | 1000 to 3000 |
| Arid | Hot days, cold nights, very low rainfall | 10 to 35 | < 250 |
| Cold | Long winters, short growing seasons | -20 to 10 | 300 to 1000 |
Step 1: Measure your site’s annual temperature and precipitation using a climate data logger or local meteorological data.
Step 2: Classify your site into one of the four zones using the above parameters.
Section 2: Creating Planting Calendars for Temperate Climates
2.1 Overview of Temperate Zone Planting
Temperate climates experience four defined seasons: spring, summer, autumn, and winter. The crucial constraints are last spring frost date and first autumn frost date. Crops must be planted post-final frost and harvested before the first autumn frost.
2.2 Determining Frost Dates
Step 1: Obtain historical frost date data from local agricultural extension services or meteorological archives.
Step 2: Calculate the average last spring frost and first autumn frost dates over at least 10 years.
Step 3: Mark these dates clearly on your calendar.
2.3 Crop-Specific Timing and Maturity Periods
Below is a table of common temperate crops with their:
- Days to maturity (from sowing to harvest)
- Optimal planting window (relative to last spring frost date)
- Recommended succession planting intervals (to maximize yield)
| Crop | Days to Maturity | Planting Window (Days After Last Frost) | Succession Planting Interval (Days) |
|---|---|---|---|
| Lettuce | 45 | 7 to 30 | 14 |
| Carrot | 70 | 10 to 40 | 21 |
| Tomato | 75 | 5 to 20 (transplant seedlings) | 30 |
| Spinach | 40 | 7 to 30 | 14 |
| Peas | 60 | 0 to 15 | 21 |
| Potatoes | 90 | 10 to 30 | 0 (single planting per season) |
2.4 Stepwise Creation of a Temperate Planting Calendar
Step 1: Mark last spring frost and first autumn frost dates on a blank annual calendar.
Step 2: For each crop, calculate backward from desired harvest dates to determine planting dates.
Step 3: Incorporate succession planting by repeating sowing at intervals indicated in the table.
Step 4: Allocate garden space to allow staggered plantings without overlap in resource demand.
Step 5: Monitor soil temperature; do not plant cold-sensitive crops until soil is at least 10°C.
2.5 Example: Lettuce Succession Planting Schedule
| Planting Date | Expected Harvest Date | Notes |
|---|---|---|
| April 15 | May 30 | First planting post-frost |
| May 1 | June 15 | Second planting for continuous harvest |
| May 15 | June 30 | Third planting |
Section 3: Creating Planting Calendars for Tropical Climates
3.1 Overview of Tropical Zone Planting
Tropical climates have minimal temperature variation and distinct wet and dry seasons. The timing of planting must align with the onset of the rainy season for rain-fed agriculture, or irrigation must be carefully managed during the dry season.
3.2 Determining Rainy and Dry Seasons
Step 1: Collect historical monthly precipitation data for your site.
Step 2: Identify months with average precipitation above 100 mm as wet season; below 50 mm as dry season.
Step 3: Mark these on your calendar.
3.3 Crop-Specific Timing and Maturity Periods for Tropical Crops
| Crop | Days to Maturity | Planting Window (Start of Wet Season) | Succession Planting Interval (Days) |
|---|---|---|---|
| Cassava | 270 | Beginning of wet season | 0 (single planting per year) |
| Maize (corn) | 90 | Beginning of wet season | 30 |
| Okra | 55 | Beginning of wet season | 20 |
| Sweet Potato | 150 | Beginning of wet season | 0 (single planting) |
| Beans | 60 | Mid wet season | 21 |
3.4 Stepwise Creation of a Tropical Planting Calendar
Step 1: Mark wet and dry seasons on the calendar.
Step 2: Schedule planting at the onset of the wet season for rain-fed crops.
Step 3: For dry season planting, design irrigation plans (see Volume 8: The Water Codex, Chapter IV).
Step 4: Apply succession planting for short-maturity crops (okra, beans) to extend harvest.
Step 5: Monitor for pest outbreaks common in warm, wet conditions and plan integrated pest management accordingly.
Section 4: Creating Planting Calendars for Arid Climates
4.1 Overview of Arid Zone Planting
Arid climates face extreme heat, wide diurnal temperature ranges, and scarce precipitation. Irrigation and soil moisture conservation are paramount. Planting must coincide with rare rainfall or irrigation schedules.
4.2 Water Availability Scheduling
Step 1: Map historical rainfall events and predict irrigation cycles.
Step 2: Set irrigation protocols to mimic natural rainfall patterns (Volume 8: The Water Codex, Chapter VI).
4.3 Crop-Specific Timing and Maturity Periods for Arid Crops
| Crop | Days to Maturity | Planting Timing (Relative to Irrigation/Rainfall) | Succession Planting Interval (Days) |
|---|---|---|---|
| Millet | 70 | Immediately after rainfall or irrigation | 30 |
| Quinoa | 90 | Early growing season | 0 (single planting) |
| Chickpea | 100 | Cool season | 0 |
| Date Palm | N/A (perennial) | Plant at start of rainy season | N/A |
| Lentils | 85 | Cool season | 0 |
4.4 Stepwise Creation of an Arid Planting Calendar
Step 1: Identify potential planting windows following expected rain or irrigation.
Step 2: Prioritize drought-tolerant and heat-resistant crops.
Step 3: Align seed sowing immediately after moisture availability peaks.
Step 4: Build soil moisture retention structures (swales, berms) to prolong wet periods.
Step 5: Schedule follow-up irrigation if natural rainfall is insufficient.
Section 5: Creating Planting Calendars for Cold Climates
5.1 Overview of Cold Zone Planting
Cold climates have short growing seasons and long winters. Frost dates constrain planting windows severely. Use cold frames, greenhouses, and season extension techniques to maximize yield.
5.2 Determining Frost Dates and Growing Season Length
Step 1: Access local frost date data for last spring and first autumn frost.
Step 2: Measure soil temperature and snow cover duration.
Step 3: Calculate growing degree days (GDD) to match crop maturity.
5.3 Crop-Specific Timing and Maturity Periods for Cold Climates
| Crop | Days to Maturity | Planting Window (Days After Last Frost) | Succession Planting Interval (Days) |
|---|---|---|---|
| Kale | 55 | 7 to 20 | 14 |
| Radish | 30 | 5 to 15 | 10 |
| Peas | 60 | 0 to 10 | 21 |
| Cabbage | 70 | 10 to 25 | 0 (single planting) |
| Barley | 90 | Early spring | 0 |
5.4 Stepwise Creation of a Cold Climate Planting Calendar
Step 1: Mark frost dates and calculate growing season length.
Step 2: Select fast-maturing and cold-tolerant crops.
Step 3: Use season extension tools: cold frames, row covers, hoop houses.
Step 4: Start seedlings indoors 4-6 weeks before last frost.
Step 5: Transplant seedlings post-frost, monitor soil temperature.
Section 6: Succession Planting Protocols
Succession planting is essential to extend harvest windows and ensure continuous food supply.
6.1 General Succession Planting Rules
| Rule Number | Description |
|---|---|
| 1 | Use crops with short maturity for frequent succession |
| 2 | Stagger plantings by 1/3 to 1/2 the crop's maturity period |
| 3 | Rotate crop families to prevent disease buildup |
| 4 | Adjust planting density to avoid overcrowding |
6.2 Stepwise Succession Planting Procedure
Step 1: Select crop species with compatible maturity periods.
Step 2: Calculate succession intervals using crop-specific data.
Step 3: Prepare soil beds in advance to allow quick successive sowing.
Step 4: Maintain detailed records of planting and harvest dates for optimization.
Step 5: Use intercropping with complementary species to maximize space and reduce pests.
Section 7: Comprehensive Tables for Reference
7.1 Frost Dates by Latitude Band (Temperate and Cold Zones)
| Latitude Band | Average Last Spring Frost | Average First Autumn Frost | Growing Season Length (Days) |
|---|---|---|---|
| 30° - 40° N | March 20 | November 10 | 235 |
| 40° - 50° N | April 10 | October 15 | 187 |
| 50° - 60° N | May 10 | September 25 | 138 |
| >60° N | June 1 | September 10 | 101 |
7.2 Crop Maturity Periods Summary (Days)
| Crop Group | Temperate | Tropical | Arid | Cold |
|---|---|---|---|---|
| Leafy Greens | 30-45 | 25-40 | 35-50 | 30-55 |
| Root Vegetables | 60-90 | 70-100 | 70-100 | 50-70 |
| Legumes | 60-80 | 50-70 | 85-100 | 60-90 |
| Fruit Vegetables | 70-90 | 70-90 | 75-90 | 70-90 |
| Grains | 90-120 | 90-120 | 70-100 | 90-120 |
7.3 Planting and Harvest Dates Relative to Frost (Temperate Zone)
| Crop | Planting Date (Days After Last Frost) | Expected Harvest (Days Before First Frost) |
|---|---|---|
| Lettuce | 7-30 | 30-0 |
| Carrot | 10-40 | 30-10 |
| Tomato | 15-30 (transplant) | 20-0 |
| Peas | 0-15 | 45-15 |
| Potatoes | 10-30 | 30-0 |
7.4 Succession Planting Intervals by Crop
| Crop | Succession Interval (Days) |
|---|---|
| Lettuce | 14 |
| Carrot | 21 |
| Peas | 21 |
| Beans | 21 |
| Okra | 20 |
| Maize | 30 |
Section 8: Practical Example – Building a Temperate Zone Planting Calendar (Step-by-Step)
Step 1: Determine your site's last spring frost date (e.g., April 15) and first autumn frost date (e.g., October 15).
Step 2: Select crops to grow:
- Lettuce (45 days maturity)
- Carrot (70 days)
- Tomato (75 days)
- Peas (60 days)
Step 3: Calculate planting windows:
| Crop | Planting Window Start | Planting Window End | Notes |
|---|---|---|---|
| Lettuce | April 22 (7 days after last frost) | May 15 (30 days after last frost) | Succession every 2 weeks |
| Carrot | April 25 | May 25 | Single planting or succession every 3 weeks |
| Tomato | May 1 (transplant) | May 20 | Start seedlings indoors 4-6 weeks prior |
| Peas | April 15 (at last frost) | April 30 | Succession every 3 weeks |
Step 4: Draft planting calendar with staggered sowing:
| Date | Activity | Crop |
|---|---|---|
| April 15 | Sow peas | Peas |
| April 22 | Sow lettuce | Lettuce |
| April 25 | Sow carrot | Carrot |
| May 1 | Transplant tomato seedlings | Tomato |
| May 6 | Sow second lettuce crop | Lettuce |
| May 15 | Sow third lettuce crop | Lettuce |
| May 15 | Sow second pea crop | Peas |
Step 5: Record expected harvest dates by adding maturity days.
Conclusion
This volume demands your unwavering rigor in constructing climate-zone-specific planting calendars. The sacred timing of sowing and harvesting crops is your frontline defense against hunger and ecological collapse. Use the tables, stepwise procedures, and crop-specific guidelines herein as your foundational tools.
Remember that local microclimates, soil conditions, and seed varieties may require adjustments. Maintain meticulous records and continuously refine your calendar through observation and data collection.
For water management required in tropical and arid zones, see Volume 8: The Water Codex, Chapter IV and VI.
For advanced season extension technologies, see Volume 9: The Horticulture Codex, Chapter VII.
May this knowledge serve you and your community in the eternal pursuit of food sovereignty and agrarian resilience.
<!-- SECTION 35 -->
Supplements: Variety Selection Guides
Introduction
This chapter serves as the cornerstone for the critical task of selecting crop and livestock varieties tailored to specific environmental and cultural contexts. Within the sacred duty of stewarding land and life, the choice of variety dictates the vitality of the harvest, the resilience against natural adversities, and ultimately, the sovereignty of food production. Failure to heed these criteria invites ruin; mastery ensures flourishing.
The following sections deliver comprehensive, detailed, and actionable criteria for choosing crop and livestock varieties founded on climate, soil, and cultural parameters. This is followed by exhaustive performance and resilience trait profiles, culminating in comparative tables to guide precise decision-making. Each principle and protocol is enumerated for ease of application in the field.
Section I: Criteria for Selecting Crop Varieties
I.A Climate Adaptation
Crop survival and productivity hinge foremost on climatic compatibility. Climate variables include temperature ranges, precipitation patterns, photoperiod, and extreme weather events.
Key Climate Parameters
| Parameter | Description | Critical Range for Selection |
|---|---|---|
| Temperature | Average, minimum, maximum growing season temperatures | Varieties must tolerate local extremes; frost tolerance or heat resistance as needed |
| Precipitation | Annual and seasonal rainfall patterns | Drought tolerance or waterlogging resilience based on rainfall |
| Photoperiod | Day length sensitivity for flowering and fruiting | Match photoperiod sensitivity to local day length cycles |
| Extreme Events | Frequency of drought, floods, hail, or frost | Varieties must exhibit tolerance or escape mechanisms |
Procedure to Select Crop Varieties Based on Climate
- Assess Local Climate Data: Obtain 10-year historical temperature, precipitation, and photoperiod data from local meteorological stations or national databases.
- Identify Stress Factors: Note periods of drought, frost, or heat waves that coincide with critical growth stages.
- Match Varieties by Temperature Tolerance: Refer to the variety profiles to select those with proven survival and yield at your temperature extremes.
- Select for Precipitation Adaptation: For arid regions, prioritize drought-tolerant varieties; for wet climates, select varieties with waterlogging resistance.
- Consider Photoperiod Sensitivity: Choose varieties whose flowering and fruiting cycles align with local day lengths to optimize yield.
- Evaluate Extreme Event Resilience: For regions prone to specific extremes, select varieties with documented resistance (e.g., hail-resistant leaf morphology).
I.B Soil Compatibility
Soil characteristics dictate nutrient availability, water retention, and root development capacity. Selection of crop varieties must take soil texture, pH, organic matter content, and salinity into account.
Key Soil Parameters
| Parameter | Description | Ideal Range for Crop Productivity |
|---|---|---|
| Texture | Proportion of sand, silt, and clay | Loam or sandy loam preferred; clay tolerance varies by crop |
| pH | Acidity or alkalinity of soil | Most crops prefer pH 6.0–7.5; acid or alkaline tolerance varies |
| Organic Matter | Percentage of decomposed organic content | Minimum 2% for sustained fertility |
| Salinity | Electrical conductivity (EC) in dS/m | <2 dS/m for most crops; salt-tolerant varieties for saline soils |
Procedure to Select Crop Varieties Based on Soil
- Conduct Soil Analysis: Collect soil samples from multiple representative locations; send for lab analysis of texture, pH, organic matter, and salinity.
- Identify Soil Limitations: Note any acidity, alkalinity, salinity, or low organic matter constraints.
- Cross-reference Crop Tolerance: Consult variety tolerance data and exclude those incompatible with local soil chemistry.
- Select Varieties with Root System Adaptations: For heavy clay or sandy soils, choose varieties with specific root traits (e.g., deep rooting, fibrous roots).
- Plan Amendments as Needed: If soil is marginal, select varieties with moderate tolerance and implement soil improvement protocols (see Volume 5: The Soil Codex, Chapter III).
I.C Cultural and Socioeconomic Needs
Variety choice must respect local cultural practices, dietary preferences, available labor, and market demands.
Key Cultural Parameters
| Parameter | Description | Selection Consideration |
|---|---|---|
| Culinary Preferences | Local staple foods, taste, and preparation methods | Varieties must fit traditional cuisines |
| Labor Requirements | Available workforce and skill level | Select varieties with manageable labor demands |
| Crop Cycle Timing | Alignment with local planting and harvesting seasons | Varieties must fit existing cultural calendars |
| Market Demand | Consumer preferences and price premiums | Prioritize varieties with high market value |
| Seed Sovereignty | Access to seed-saving and exchange networks | Prefer open-pollinated varieties for seed saving |
Procedure to Select Crop Varieties Based on Cultural Needs
- Survey Community Preferences: Document staple crops, preferred flavors, and traditional uses.
- Assess Labor and Skill Availability: Determine if high-maintenance varieties are feasible.
- Match Crop Cycles to Local Calendars: Choose varieties whose growth duration fits local planting windows.
- Analyze Market Opportunities: Select varieties with traits that command premium prices or fulfill niche markets.
- Ensure Seed Accessibility: Prefer varieties that support local seed sovereignty and reduce dependence on external inputs.
Section II: Crop Variety Performance Characteristics and Resilience Traits
This section details performance metrics and resilience traits critical for variety evaluation.
II.A Yield Potential and Stability
Yield is the ultimate metric but must be balanced with consistency over years.
| Metric | Definition | Measurement Method |
|---|---|---|
| Maximum Yield | Highest recorded output under optimal conditions | kg/ha or bushels/acre from trial data |
| Yield Stability | Consistency of yield across varying conditions | Coefficient of variation (CV%) over trials |
| Harvest Index | Ratio of economic yield to total biomass | Weight of harvested product / total plant biomass |
II.B Disease and Pest Resistance
Varieties must withstand endemic diseases and pests to reduce chemical inputs and crop loss.
| Disease/Pest | Resistance Type | Description |
|---|---|---|
| Fungal Diseases | Genetic resistance, tolerance | Ability to prevent or limit infection |
| Bacterial Diseases | Hypersensitive response | Rapid cell death to contain pathogen |
| Insect Pests | Antixenosis, antibiosis | Deterrence or toxicity to insects |
II.C Abiotic Stress Tolerance
Resistance to non-biological stresses ensures survival under adverse conditions.
| Stress Type | Tolerance Mechanism | Key Traits |
|---|---|---|
| Drought | Deep root systems, stomatal regulation | Root depth >1.5m, reduced transpiration |
| Heat | Heat shock proteins, membrane stability | Ability to maintain photosynthesis >40°C |
| Cold/Frost | Antifreeze proteins, dormancy | Survival at -2°C or lower |
| Salinity | Ion exclusion, osmotic adjustment | Na+ exclusion, proline accumulation |
Section III: Comparative Tables of Crop Varieties
Presented below are tables comparing selected varieties of staple crops for various agroecological zones. Data includes yield, disease resistance, and stress tolerance.
III.A Maize (Zea mays) Varieties for Temperate and Subtropical Zones
| Variety | Yield (kg/ha) | Drought Tolerance | Disease Resistance (MLN, GLS) | Maturity (days) | Root Depth (m) | Notes |
|---|---|---|---|---|---|---|
| Silver Crest | 8000 | Moderate | High (MLN), Moderate (GLS) | 110 | 1.2 | High yield, moderate drought |
| Golden Dawn | 7500 | High | Moderate (MLN), High (GLS) | 120 | 1.5 | Excellent disease resistance |
| Titan Hybrid | 8500 | Low | Moderate (MLN), Low (GLS) | 100 | 1.0 | Highest yield, low stress |
| Desert King | 7000 | Very High | Low | 115 | 1.8 | Best for arid zones |
(MLN = Maize Lethal Necrosis; GLS = Gray Leaf Spot)
III.B Rice (Oryza sativa) Varieties for Tropical Lowlands
| Variety | Yield (kg/ha) | Flood Tolerance | Blast Disease Resistance | Salinity Tolerance | Maturity (days) | Notes |
|---|---|---|---|---|---|---|
| IR64 | 6000 | Low | Moderate | Low | 120 | High yield, poor flood tolerance |
| Swarna | 5500 | Moderate | High | Moderate | 130 | Widely adapted, blast resistant |
| FR13A | 4000 | Very High | Low | Low | 140 | Deep flood tolerance |
| Pokkali | 3500 | Low | Moderate | Very High | 150 | Ideal for saline coastal areas |
III.C Wheat (Triticum aestivum) Varieties for Temperate Zones
| Variety | Yield (kg/ha) | Rust Disease Resistance | Drought Tolerance | Cold Tolerance | Maturity (days) | Notes |
|---|---|---|---|---|---|---|
| Sentinel | 6500 | High | Moderate | Moderate | 100 | Good disease resistance |
| FrostGuard | 6000 | Moderate | Low | High | 110 | Best for frost-prone areas |
| DroughtStar | 5800 | Low | Very High | Low | 105 | Exceptional drought tolerance |
| Golden Yield | 6800 | Moderate | Moderate | Moderate | 95 | Highest yield, moderate resistance |
Section IV: Criteria for Selecting Livestock Varieties
Livestock variety selection is equally paramount, balancing environmental adaptation, productivity, and cultural roles.
IV.A Climate Adaptation in Livestock
Livestock must tolerate ambient temperatures, humidity, and seasonal fluctuations.
| Climate Parameter | Livestock Stress Factor | Selection Trait |
|---|---|---|
| High Temperature | Heat stress, reduced fertility | Heat tolerance, efficient sweating |
| Low Temperature | Cold stress, increased energy needs | Thick coat, fat deposition |
| Humidity | Parasite and disease pressure | Resistance to parasites, skin robustness |
Selection Procedure
- Document Local Climate Extremes: Temperature highs/lows, humidity cycles.
- Choose Breeds with Proven Tolerance: Use breed profiles documenting survival and productivity under local stresses.
- Consider Adaptation to Parasites: Select breeds with natural resistance in humid or tropical zones.
IV.B Soil and Forage Compatibility
Livestock depend on local forage quality and soil conditions affecting pasture growth.
| Soil Parameter | Forage Impact | Livestock Selection Impact |
|---|---|---|
| Soil Fertility | Forage biomass and nutrient density | Select breeds with matching nutritional needs |
| Soil Type | Pasture species composition | Grazing behavior adapted to terrain |
IV.C Cultural and Economic Roles
Livestock varieties must fit the community’s needs: meat, milk, draft power, or ritual.
| Role | Breed Traits | Selection Consideration |
|---|---|---|
| Meat Production | High growth rate, feed conversion | Choose fast-growing breeds |
| Dairy Production | High lactation, milk quality | Select breeds with high milk yield |
| Draft Power | Strength, endurance | Robust body conformation |
| Cultural Significance | Breed preference for rituals | Respect local customs |
Section V: Livestock Variety Performance and Resilience Traits
V.A Productivity Metrics
| Metric | Definition | Measurement Units |
|---|---|---|
| Growth Rate | Average daily weight gain | g/day or kg/month |
| Milk Yield | Total milk produced per lactation | Liters per lactation |
| Reproductive Efficiency | Calving or kidding interval | Days between births |
V.B Disease Resistance
| Disease | Resistance Mechanism | Key Traits |
|---|---|---|
| Parasites | Grooming behavior, immune response | Natural resistance or tolerance |
| Common Infectious Diseases | Genetic immunity, vaccination response | Breed-specific resistance |
V.C Environmental Stress Resistance
| Stress | Adaptation Trait | Measurement |
|---|---|---|
| Heat Stress | Coat color, sweat gland density | Survival rates >40°C |
| Cold Stress | Fat layer thickness, coat density | Survival below -5°C |
| Altitude | Oxygen utilization efficiency | Hemoglobin concentration |
Section VI: Comparative Tables of Livestock Varieties
VI.A Cattle Breeds for Tropical Climates
| Breed | Milk Yield (L/lactation) | Heat Tolerance | Disease Resistance (Tick-borne) | Growth Rate (kg/month) | Notes |
|---|---|---|---|---|---|
| Brahman | 1500 | Very High | High | 15 | Heat and parasite tolerant |
| Holstein | 7000 | Low | Low | 25 | High milk, poor heat tolerance |
| Sahiwal | 2500 | High | Moderate | 18 | Balanced milk and heat tolerance |
| Gir | 2000 | High | High | 17 | Disease resistant, heat tolerant |
VI.B Sheep Breeds for Arid Zones
| Breed | Wool Yield (kg/year) | Heat Tolerance | Parasite Resistance | Growth Rate (kg/month) | Notes |
|---|---|---|---|---|---|
| Dorper | 3.0 | High | Moderate | 10 | Meat breed, drought tolerant |
| Merino | 5.5 | Low | Low | 7 | Fine wool, poor heat tolerance |
| Awassi | 2.5 | Moderate | High | 8 | Milk and meat, parasite resistant |
| Blackhead Persian | 2.0 | Very High | Very High | 9 | Excellent for arid zones |
Conclusion
Selecting crop and livestock varieties is an unyielding discipline requiring rigorous analysis of environment, soil, and culture. The data and protocols herein provide the unvarnished truths and actionable steps for the Practitioner entrusted with the sacred charge of ensuring food sovereignty and survival. Every choice must be deliberate, every variety tested against the crucible of local conditions. Mastery over variety selection is mastery over life itself.
For further technical protocols on soil amendments, seed treatment, and livestock health management, see Volume 5: The Soil Codex, Chapters III–V, and Volume 9: The Animal Husbandry Codex, Chapters II and IV.
<!-- SECTION 36 -->
The Complete Practitioner's Codex, Volume 7: The Agrarian Codex
Chapter XIV: Supplements: Equipment Lists and Scale-Up Economics for Agrarian Systems
Preface
This chapter delivers the unvarnished, indispensable knowledge on the tools and machinery that form the backbone of any agrarian system, from micro-farming homesteads to industrial-scale agribusinesses. It is your sacred duty to wield this knowledge with precision, ensuring every implement, every machine, every protocol adheres to the highest standards of efficiency, longevity, and economic viability. The information herein is strictly practical, with exhaustive lists, maintenance protocols, cost-benefit breakdowns, and strategies for scaling operations without sacrificing quality or sovereignty.
Section I: Comprehensive Equipment Lists for Agrarian Systems
Agrarian systems require a tiered approach to equipment, tailored to the scale of operation. The following lists are divided into three scales: Small (1–5 acres), Medium (5–50 acres), and Large (50+ acres). Each category includes field tools, soil and water management equipment, planting and harvesting machinery, animal husbandry implements, and post-harvest processing tools.
1.1 Small-Scale Agrarian Systems (1–5 Acres)
| Equipment Category | Item | Specifications | Approximate Cost (USD) | Maintenance Frequency | Notes |
|---|---|---|---|---|---|
| Field Tools | Hand Hoe | Carbon steel blade, 10" blade length | $15 | Sharpen blade monthly | Essential for bed preparation, weeding |
| Garden Fork | Forged steel tines, 6 tines, wooden handle | $25 | Clean and oil monthly | Soil aeration and turning | |
| Pruning Shears | Bypass blades, 8" cutting length | $20 | Sharpen quarterly | Vital for plant health maintenance | |
| Soil & Water Management | Drip Irrigation Kit | Tubing, emitters (100), pressure regulator | $150 | Flush lines biannually | Efficient water use, reduces evaporation |
| Soil pH Meter | Digital, 0–14 pH range | $40 | Calibrate monthly | Ensures optimal soil conditions | |
| Planting Machinery | Manual Seed Planter | Adjustable seed depth, hand-operated | $50 | Clean after use | Precision planting, reduces seed waste |
| Wheel Hoe | 12" steel wheel, adjustable handles | $120 | Lubricate monthly | Increases efficiency in bed cultivation | |
| Animal Husbandry | Portable Chicken Coop | Lightweight wood, 6 ft x 4 ft | $200 | Clean weekly | Protects poultry, facilitates mobility |
| Milking Stool & Pail | Stainless steel pail, 3-legged wooden stool | $60 | Sanitize after each use | Required for dairy animal management | |
| Post-Harvest Processing | Hand-Crank Grain Mill | Cast iron, adjustable grind settings | $180 | Oil gears monthly | Converts grain to flour onsite |
| Produce Crates | Plastic, stackable, 24" x 16" x 12" | $15 each | Wash after use | For harvest transport and storage |
1.2 Medium-Scale Agrarian Systems (5–50 Acres)
| Equipment Category | Item | Specifications | Approximate Cost (USD) | Maintenance Frequency | Notes |
|---|---|---|---|---|---|
| Field Tools | Rototiller | 8 HP engine, 24" tilling width | $900 | Engine oil change every 25 hrs | Accelerates soil preparation |
| Cultivator | 3-point hitch, adjustable tine spacing | $700 | Grease joints monthly | Weed control between rows | |
| Soil & Water Management | Automated Drip System | Computer-controlled, 500 emitters | $3500 | System flush quarterly | Precision irrigation, water savings |
| Soil Moisture Sensor Network | Wireless sensors, data logger | $1200 | Battery check monthly | Real-time soil moisture monitoring | |
| Planting Machinery | Seeder/Planter | 3-point hitch, 12-row capacity | $4000 | Calibration before season | Efficient large-scale planting |
| Mulcher | PTO-driven, 6 ft width | $2500 | Blade sharpening quarterly | For residue management, soil health | |
| Animal Husbandry | Mobile Grazing Fencing | Electric, portable with solar charger | $1200 | Battery check monthly | Rotational grazing management |
| Feed Mixer Wagon | 6 cu ft capacity, electric motor-driven | $3000 | Clean after use | Uniform feed mixing | |
| Post-Harvest Processing | Small Grain Combine Harvester | 25 HP engine, 4 ft cutting width | $15,000 | Daily lubrication during use | Harvests grains efficiently |
| Cold Storage Unit | 500 cubic feet, controlled temperature | $7000 | Defrost monthly | Extends shelf life |
1.3 Large-Scale Agrarian Systems (50+ Acres)
| Equipment Category | Item | Specifications | Approximate Cost (USD) | Maintenance Frequency | Notes |
|---|---|---|---|---|---|
| Field Tools | Tractor | 100–150 HP, 4WD, hydraulic system | $70,000 | Oil change every 100 hrs | Multipurpose power source for heavy tasks |
| Plow | 3-bottom, reversible, 16" bottoms | $12,000 | Grease bearings monthly | Primary tillage for deep soil inversion | |
| Soil & Water Management | Center Pivot Irrigation | 120-acre coverage, GPS-guided | $250,000 | System diagnostics monthly | Maximizes irrigation efficiency and coverage |
| Soil Nutrient Analyzer | Portable XRF spectrometer | $30,000 | Calibration quarterly | On-site rapid soil composition analysis | |
| Planting Machinery | Air Seeder | 24 m (78 ft) boom, pneumatic seed delivery | $150,000 | Pre-season calibration | High-speed, high-precision planting |
| No-Till Drill | 15 ft width, hydraulic downforce | $90,000 | Lubricate bearings monthly | Preserves soil structure and moisture | |
| Animal Husbandry | Automated Feeding System | Multi-bin, programmable feed delivery | $50,000 | Weekly cleaning | Optimizes feed distribution in large herds |
| Milking Parlor | Rotary, 50-cow capacity | $200,000 | Sanitize daily | Maximizes dairy throughput | |
| Post-Harvest Processing | Large Grain Combine Harvester | 350 HP, 30 ft cutting width | $350,000 | Daily maintenance | Industrial-scale grain harvesting |
| Bulk Storage Silos | 10,000 bushel capacity, aeration system | $100,000 | Aeration checks monthly | Long-term grain storage with quality control |
Section II: Maintenance Schedules and Protocols
Proper maintenance is the bulwark against equipment failure and economic loss. The following tables provide exact maintenance schedules and procedures for critical equipment categories.
2.1 Maintenance Schedule Overview
| Equipment Type | Maintenance Task | Frequency | Procedure Summary | Required Materials |
|---|---|---|---|---|
| Hand Tools | Sharpening | Monthly (small scale) | 1. Clean blade with wire brush 2. Use whetstone at 20° angle 3. Oil blade | Whetstone, oil, wire brush |
| Motorized Equipment | Oil Change | Every 25–100 operating hrs | 1. Drain old oil 2. Replace oil filter 3. Refill with recommended oil | Engine oil, oil filter |
| Irrigation Systems | Flushing | Biannual or quarterly | 1. Turn off emitters 2. Flush lines with clean water 3. Inspect for clogs | Clean water, inspection tools |
| Electric Fencing | Battery Check | Monthly | 1. Disconnect battery 2. Use voltmeter to test voltage 3. Recharge/replace battery | Volt meter, battery charger |
| Grain Mills | Gear Lubrication | Monthly | 1. Open gear housing 2. Apply recommended grease 3. Reassemble | Grease, cleaning rags |
2.2 Detailed Maintenance Protocol: Tractor Hydraulic System
- Preparation: Park tractor on level ground, engine off, hydraulic system depressurized.
- Inspection: Examine hydraulic hoses and connectors for leaks or cracks. Replace damaged components immediately.
- Fluid Check: Remove dipstick, wipe clean, reinsert, then remove to check fluid level. Add manufacturer-specified hydraulic oil if below recommended level.
- Filter Replacement: Remove hydraulic filter, replace with OEM filter, dispose of old filter per environmental regulations.
- System Test: Start engine, cycle hydraulic functions to purge air, check for leaks.
- Record: Log date, hours, and any anomalies in maintenance journal.
Section III: Cost-Benefit Analyses and Scaling Strategies
Scaling agrarian operations demands rigorous economic scrutiny, balancing capital expenditure, operational costs, and output efficiency. The following analyses provide frameworks for decision-making at each scale.
3.1 Small-Scale Systems: Capital Efficiency vs. Labor Intensity
| Factor | Description | Impact | Strategy |
|---|---|---|---|
| Initial Investment | Low-cost hand tools and small machinery | Low capital required | Prioritize multi-function tools, avoid expensive mechanization |
| Labor | High labor requirement | Labor-intensive but low cost | Optimize workflow with ergonomic tools, stagger tasks |
| Maintenance | Simple, low-cost maintenance | Easily managed by operator | Implement strict maintenance calendar to avoid downtime |
| Output Efficiency | Limited by human labor speed | Lower yield per acre | Focus on high-value crops, permaculture techniques |
Scaling Strategy: Incremental investment in mechanization only when labor bottlenecks reduce profitability. Use cooperative ownership models to share equipment costs.
3.2 Medium-Scale Systems: Mechanization and Yield Optimization
| Factor | Description | Impact | Strategy |
|---|---|---|---|
| Capital Investment | Moderate; rotary tillers, mechanized planters | Requires financing or capital reserves | Prioritize equipment that maximizes labor productivity |
| Labor | Reduced manual labor | Allows redeployment of labor resources | Train operators for equipment efficiency and preventive maintenance |
| Maintenance | Increased complexity and cost | Requires skilled technicians | Establish in-house maintenance team |
| Output Efficiency | Increased planting and harvesting speed | Higher yields and market reach | Implement precision agriculture tools for input optimization |
Scaling Strategy: Leverage financing options for equipment purchase, integrate soil and water sensors to reduce input waste, and develop operator training programs.
3.3 Large-Scale Systems: Capital-Intensive Industrial Agrarian Models
| Factor | Description | Impact | Strategy |
|---|---|---|---|
| Capital Investment | High; tractors, combine harvesters, irrigation | Requires substantial financing | Utilize leasing and depreciation benefits for asset management |
| Labor | Labor specialized and minimized | High efficiency, reduced labor cost | Employ advanced training, safety protocols |
| Maintenance | Complex, requires scheduled professional service | Prevents catastrophic failure | Contract specialized service providers, maintain spare parts stock |
| Output Efficiency | Maximized through mechanization and technology | High volume, commodity-scale production | Employ data-driven agriculture, GPS guidance for inputs |
Scaling Strategy: Implement integrated equipment management software, adopt automation technologies, and pursue economies of scale in purchasing and sales.
Section IV: Equipment Specification Tables for Critical Machinery
4.1 Tractor Models: Key Specifications and Cost Analysis
| Model | HP | Transmission Type | Fuel Type | Approx. Cost (USD) | Annual Maintenance Cost | Typical Lifespan (Years) | Notes |
|---|---|---|---|---|---|---|---|
| Compact Tractor | 25–35 | Manual | Diesel | $15,000 | $1,200 | 10 | Suitable for small/medium farms |
| Utility Tractor | 50–75 | Manual/Auto | Diesel | $35,000 | $2,500 | 12 | Versatile, medium scale |
| Row Crop Tractor | 100–150 | Auto | Diesel | $70,000 | $4,000 | 15 | Heavy duty, large scale |
4.2 Irrigation System Types and Performance Metrics
| System Type | Coverage Area (Acres) | Water Use Efficiency (%) | Installation Cost per Acre (USD) | Maintenance Complexity | Notes |
|---|---|---|---|---|---|
| Drip Irrigation | 0.5–5 | 90 | $300 | Low | Ideal for water-scarce regions |
| Center Pivot | 50–150 | 80 | $1,500 | Medium | Requires flat terrain |
| Flood Irrigation | 10+ | 40 | $100 | Low | Outdated, high water usage |
4.3 Harvesting Machinery: Efficiency and Costs
| Equipment Type | Capacity (Acres/Day) | Power Requirement (HP) | Approximate Cost (USD) | Fuel Consumption (Gal/Hr) | Maintenance Interval (Hrs) | Notes |
|---|---|---|---|---|---|---|
| Hand-Held Combine | 0.5 | 10 | $5,000 | 0.5 | 20 | Small scale grain harvesting |
| Small Combine Harvester | 10 | 25 | $15,000 | 2 | 50 | Medium scale grain harvesting |
| Large Combine Harvester | 100 | 350 | $350,000 | 15 | 100 | Industrial scale harvesting |
Section V: Step-by-Step Equipment Acquisition and Scaling Protocol
To ensure methodical scaling from small to large agrarian systems, adhere to the following protocol:
5.1 Needs Assessment and Baseline Establishment
- Survey Land Resources: Measure acreage, soil types, water sources.
- Define Production Goals: Determine crop types, expected yield, animal units.
- Evaluate Labor Resources: Quantify available workforce, skill level.
- Assess Capital Availability: Establish budget constraints and financing options.
5.2 Equipment Prioritization and Procurement
- Match Equipment to Scale: Use Section I lists to identify necessary tools.
- Perform Cost-Benefit Analysis: Reference Section III tables to estimate ROI.
- Source Equipment: Prioritize local manufacturers or proven brands with available service networks.
- Procure Essential Accessories: Include spare parts, lubricants, safety gear.
5.3 Operator Training and Maintenance Planning
- Train Operators: Conduct hands-on training guided by equipment manuals and this Codex.
- Establish Maintenance Schedules: Use Section II protocols, maintain logs.
- Schedule Preventive Maintenance: Avoid reactive repairs to minimize downtime.
5.4 Scaling Implementation
- Incremental Expansion: Add equipment as production and labor demands increase.
- Integrate Technology: Introduce sensors, GPS guidance, and automation when economically feasible.
- Monitor Economic Performance: Continuously assess costs vs. output, adjusting resource allocation accordingly.
Epilogue
The mastery of agrarian equipment and economics is not mere operational knowledge; it is stewardship of the land’s legacy, a covenant with nature’s cycles. As you forge your path through scales of production, let precision, discipline, and reverence guide your choices. This Codex imparts the tools and wisdom necessary to transform soil and seed into sustenance and sovereignty. Take this knowledge, guard it fiercely, and wield it with unwavering purpose.
For related engineering designs, see Volume 9: The Mechanical Codex, Chapter IV. For water purification systems, consult Volume 8: The Water Codex, Chapter II. For soil chemistry and amendments, refer to Volume 7, Chapter VI.
<!-- SECTION 37 -->
The Complete Practitioner's Codex, Volume 7: The Agrarian Codex
Chapter VIII: Supplements – Integration Protocols with Volumes 6 and 8
Section I: Cross-Referencing Infrastructure and Water Management Protocols Essential for Agrarian Success
The cultivation of the land, the stewardship of water, and the orchestrated synergy of earthworks form the triad upon which agrarian success stands. Within this sacred triad lies the intersection of Volume 6: The Infrastructure Codex and Volume 8: The Water Codex, whose protocols must be seamlessly integrated to achieve the highest yield, soil health, and long-term sustainability.
This section is a detailed, step-by-step integration manual designed to harmonize earthworks, water harvesting, and irrigation infrastructure. It is indispensable for the master agrarian who intends to wield the suppressed, life-critical knowledge of holistic agronomy.
I. Foundational Principles of Integration
- Synergistic Design: Earthworks (Volume 6) create the physical landscape modifications that capture and direct water (Volume 8) with precision.
- Hydric Efficiency: Water harvesting and storage protocols (Volume 8) must align with soil moisture retention strategies (Volume 7) and irrigation infrastructure (Volume 6).
- Temporal Coordination: Earthworks must precede water infrastructure installation to ensure topographical readiness.
- Material Compatibility: Earthworks and water systems utilize materials and construction methods that resist degradation and foster soil life.
II. Integration Steps: Earthworks, Water Harvesting, and Irrigation
Step 1: Survey and Mapping (Cross-Reference: Volume 6, Chapter III; Volume 8, Chapter II)
Objective: Establish the precise topographical and hydrological maps that guide earthworks and water systems.
Instructions:
- Use the Topographical Mapping Kit detailed in Volume 6, Chapter III, Section 2:
- Assemble a manual dumpy level, wooden stadia rod, and measuring tape.
- Identify contour lines at 0.5-meter elevation intervals across the proposed site.
- Perform hydrological flow analysis per Volume 8, Chapter II, Section 4:
- Mark natural drainage lines.
- Identify water catchment basins.
- Digitally or physically overlay topographical and hydrological data on grid paper or GIS software.
- Confirm soil infiltration rates using the Percolation Test Protocol from Volume 7, Chapter V, Section 1.
Step 2: Earthwork Construction (Cross-Reference: Volume 6, Chapter IV; Volume 7, Chapter VI)
Objective: Construct contour swales, terraces, and berms to maximize water retention and prevent soil erosion.
Instructions:
- Refer to Contour Swale Design Parameters from Volume 6, Chapter IV, Section 3:
- Swale depth: 0.5 meters
- Swale width: 1.2 meters
- Berm height: 0.6 meters (use compacted, organic-rich soil)
- Mark swale lines using flags and the contour map.
- Excavate swales with manual trenching tools or mechanized equipment. Place excavated soil downslope to form berms.
- Line berms with cobble stone drainage barriers (Volume 6, Chapter IV, Section 5) to prevent erosion.
- Incorporate biochar (Volume 7, Chapter II, Section 7) into berm soil at 5% volume concentration to enhance fertility.
- Stabilize berms with live stakes of Vetiver grass or Willow cuttings (Volume 7, Chapter VI, Section 4).
Step 3: Water Harvesting Infrastructure Installation (Cross-Reference: Volume 8, Chapter III)
Objective: Install water catchments, storage tanks, and diversion channels optimized for the earthworks.
Instructions:
- Position roof catchment systems based on building locations from Volume 6, Chapter VII.
- Construct rainwater storage tanks using the Earthbag Construction Method (Volume 6, Chapter VIII, Section 2):
- Tank volume determined by catchment area and expected rainfall (see Table 1).
- Use polypropylene bags filled with local soil stabilized with 5% cement.
- Build diversion channels to direct overflow from swales to storage tanks:
- Channel slope: 1-3%
- Lined with compacted clay and cobbles to prevent seepage.
- Install sediment traps at swale outlets per Volume 8, Chapter III, Section 6.
- Integrate overflow weirs designed to release surplus water into secondary infiltration basins.
Step 4: Irrigation Infrastructure Integration (Cross-Reference: Volume 6, Chapter IX; Volume 8, Chapter IV)
Objective: Develop irrigation systems aligned with harvested water capacity and soil water retention.
Instructions:
- Select irrigation type based on crop water requirements (Volume 7, Chapter III):
- Drip irrigation for high-value, water-sensitive crops.
- Surface flood irrigation for flood-tolerant species.
- Assemble drip irrigation kits as per Volume 6, Chapter IX, Section 2:
- Use polyethylene tubing (16mm diameter).
- Install pressure regulators and filters (mesh size 100 microns).
- Emitters spaced every 30 cm.
- Connect irrigation systems to storage tanks via gravity-fed pipelines:
- Elevate tanks minimum 2 meters above field level.
- Use PVC pipes with diameter 25-40 mm.
- Implement automated control valves (Volume 6, Chapter IX, Section 5) programmed to irrigation schedules in Volume 7, Chapter III.
- Monitor soil moisture using the Tensiometer Protocol (Volume 7, Chapter V, Section 3) to adjust irrigation timing.
Step 5: Maintenance and Monitoring (Cross-Reference: Volume 7, Chapter VII; Volume 8, Chapter V)
Objective: Establish routines to maintain earthworks and water infrastructure integrity.
Instructions:
- Inspect swales and berms monthly for breaches or erosion.
- Clear sediment traps and channels quarterly.
- Test water storage tanks for leakage biannually.
- Calibrate irrigation system emitters and valves monthly.
- Record soil moisture and crop response weekly using standardized logs (Volume 7, Chapter VII, Section 2).
- Adjust earthworks or irrigation based on seasonal rainfall data from Volume 8, Chapter V, Section 4.
III. Cross-Volume Protocol Comparison Tables
Table 1: Rainwater Storage Tank Volume Calculation Parameters (Volume 6 & 8 Integration)
| Parameter | Unit | Description | Value/Range |
|---|---|---|---|
| Roof Catchment Area | m² | Total area of water collection surface | User-defined (e.g., 100 m²) |
| Average Annual Rainfall | mm/year | Local average precipitation | 400-1200 mm/year |
| Runoff Coefficient | Dimensionless | Fraction of rainfall collected effectively | 0.75 |
| Storage Tank Volume | Liters | Calculated volume for water storage | Catchment Area × Rainfall × Runoff Coefficient × 1000 / 12 (for monthly storage) |
Table 2: Earthwork Construction Material Specifications (Volume 6 & 7)
| Material | Source | Volume Percentage | Function | Notes |
|---|---|---|---|---|
| Local Soil | On-site | 90% | Bulk earthwork material | Must be free of toxic residues |
| Biochar | Pyrolyzed biomass | 5% | Soil fertility enhancement | Incorporate in berm soil |
| Cement (stabilizer) | Purchased | 5% | Soil stabilization | For water retention berms |
| Cobble Stones | River bed | N/A | Drainage lining | Size 2-5 cm diameter |
Table 3: Irrigation Scheduling and Water Volume (Volume 7 & 8)
| Crop Type | Water Requirement (L/m²/day) | Irrigation Frequency (days) | Recommended Irrigation Volume (L/m²) | Notes |
|---|---|---|---|---|
| Leafy Greens | 3-5 | 1-2 | 5-10 | Drip irrigation preferred |
| Root Crops | 4-6 | 2-3 | 8-15 | Avoid waterlogging |
| Fruit Trees | 6-10 | 7-10 | 40-60 | Deep irrigation cycles |
IV. Timelines for Integrated Protocol Implementation
Table 4: Integration Timeline Summary
| Phase | Duration | Activities | Cross-Referenced Volumes & Chapters |
|---|---|---|---|
| Phase 1: Survey & Design | 2-4 weeks | Mapping, hydrological analysis, soil testing | Volume 6, Ch III; Volume 8, Ch II |
| Phase 2: Earthworks | 3-6 weeks | Swale and berm excavation, biochar incorporation | Volume 6, Ch IV; Volume 7, Ch VI |
| Phase 3: Water Harvesting | 2-4 weeks | Tank construction, diversion channel installation | Volume 8, Ch III; Volume 6, Ch VIII |
| Phase 4: Irrigation Setup | 1-3 weeks | Drip or surface irrigation system installation | Volume 6, Ch IX; Volume 7, Ch III |
| Phase 5: Maintenance | Ongoing | Routine inspection, sediment clearing, system calibration | Volume 7, Ch VII; Volume 8, Ch V |
V. Detailed Protocols for Critical Integration Components
A. Biochar Incorporation into Berms (Volume 7, Chapter II, Section 7)
Purpose: Enhance soil structure, water retention, and microbial life within berms.
Instructions:
- Produce biochar via pyrolysis of hardwood biomass at 450-550°C in a low-oxygen kiln.
- Sift biochar to <5 mm particle size.
- Mix biochar with excavated berm soil at a ratio of 5% by volume.
- Moisten the mixture to 20% water content to activate microbial colonization.
- Compact berm in 15 cm layers, ensuring even distribution.
- Allow berm to cure for 7 days before planting.
B. Earthbag Water Storage Tank Construction (Volume 6, Chapter VIII, Section 2)
Purpose: Construct durable, low-cost water storage tanks resistant to environmental degradation.
Instructions:
- Prepare polypropylene bags filled with local soil stabilized with 5% Portland cement.
- Lay bags in circular tiers following the tank diameter specified in Table 1.
- Tamp down each bag to remove air pockets.
- Stagger bag joints like brickwork for structural strength.
- Install rebar stakes every 50 cm vertically for reinforcement.
- Apply a waterproof plaster (cement-lime mixture) on exterior and interior surfaces.
- Cure tank walls for 14 days before filling with water.
C. Drip Irrigation Assembly and Installation (Volume 6, Chapter IX, Section 2)
Purpose: Deliver precise water volumes to root zones, reducing evaporation and runoff.
Instructions:
- Cut polyethylene tubing to required lengths based on field layout.
- Attach pressure regulators and filters at the water source.
- Insert emitters at 30 cm intervals along tubing.
- Secure tubing to soil surface using U-shaped stakes.
- Connect tubing to water storage tanks via gravity-fed PVC pipes.
- Test system pressure; adjust using pressure regulators.
- Program automated valves for irrigation cycles according to crop water requirements.
VI. Conclusion: The Sacred Synergy of Earth and Water
The integration of earthworks and water management infrastructure is not merely technical—it is a sacred covenant with the land. Through these precise, cross-referenced protocols, you possess the keys to transform barren soil into a thriving, self-regenerating ecosystem.
Remember, mastery lies in the faithful execution of these steps, the rigorous observation of system feedback, and the commitment to continual refinement. The earth and water are living allies. They demand technical excellence and reverence in equal measure.
For further protocols on soil fertility amendments and crop-specific irrigation schedules, see Volume 7, Chapters II and III. For detailed water purification and distribution systems, refer to Volume 8, Chapters IV and VI. For construction and maintenance of agrarian infrastructure, consult Volume 6, Chapters IV and IX.
End of Chapter VIII, Section I
<!-- SECTION 38 -->
Volume VII: Seed Sovereignty
The Agrarian Codex: Complete Agriculture, Permaculture, Animal Husbandry, and Food Sovereignty
Chapter IV: Open-Pollinated Varieties and Seed Banking
Introduction: The Sacred Charge of Seed Sovereignty
In this chapter, you inherit the sacred trust of preserving life’s fundamental blueprint: the seed. Seed Sovereignty is the cornerstone of agricultural autonomy, resilience, and survival. It is an act of defiance against genetic erosion, corporate control, and ecological fragility. This manual section delivers comprehensive, unmitigated knowledge on maintaining genetic diversity through open-pollinated varieties (OPVs), constructing and operating community seed banks, implementing optimal seed storage protocols, conducting viability testing, and employing long-term preservation techniques.
Every protocol is detailed for immediate application. The knowledge herein is unyielding, precise, and complete. Follow it as you would a sacred ritual, for failure risks the loss of entire lineages of life.
Section 1: Maintaining Genetic Diversity Through Open-Pollinated Varieties (OPVs)
1.1 Definition and Significance of OPVs
Open-pollinated varieties are cultivars that reproduce true-to-type when allowed to naturally cross-pollinate within the same population or variety. Maintaining OPVs preserves local adaptation, genetic heterogeneity, and seed sovereignty. Unlike hybrids or genetically modified seeds, OPVs retain evolutionary potential.
1.2 Principles of Genetic Diversity Maintenance
- Population Size: Minimum effective population size to maintain heterozygosity is 200 plants per variety per generation.
- Isolation Distance: Prevent cross-contamination by maintaining minimum isolation distances based on pollination method.
- Roguing: Remove off-type or diseased plants rigorously.
- Seed Saving from Multiple Plants: Harvest seed from at least 50-100 plants to capture allelic diversity.
- Rotation and Regeneration: Regenerate seed populations every 3-5 years in diverse environments to maintain adaptive traits.
1.3 Protocol for OPV Seed Production
- Select Healthy Parent Plants: Choose at least 200 robust, disease-free plants displaying varietal characteristics.
- Ensure Isolation: Apply minimum isolation distances (see Table 1). Use physical barriers or temporal isolation if spatial is impractical.
- Pollination Monitoring: Identify pollination type—wind, insect, or self—and monitor during flowering.
- Rogue Non-conforming Plants: Remove plants exhibiting off-type characteristics immediately.
- Harvest Seeds Individually: Collect seed pods, ears, or fruits from at least 50 distinct plants.
- Label and Document: Record plant ID, location, date, and environmental conditions.
- Dry Seeds Immediately: Proceed to drying protocol in Section 3.
Table 1: Minimum Isolation Distances by Pollination Mechanism
| Pollination Type | Isolation Distance (meters) | Notes |
|---|---|---|
| Self-pollinated | 5 | Generally low gene flow |
| Insect-pollinated | 200-400 | Use physical barriers if needed |
| Wind-pollinated | 400-800 | Largest isolation required |
Section 2: Establishing Community Seed Banks
2.1 Purpose and Importance
Community seed banks empower local custodianship of seeds, enabling collective preservation, exchange, and regeneration. They are repositories of genetic memory, insurance against crop failure, and instruments of food sovereignty.
2.2 Infrastructure Requirements
- Location: Cool, dry, secure room with controlled access.
- Construction Materials: Use non-reactive, insulating materials (e.g., brick, concrete, or earth). Avoid wood due to pest risk.
- Shelving: Metal or plastic shelving to prevent pest infestation and allow air circulation.
- Temperature Control: Passive cooling preferred; active cooling (refrigeration) optional but costly.
- Humidity Control: Use desiccants (silica gel) and humidity monitors.
- Pest Control: Airtight containers, integrated pest management (IPM) protocols.
2.3 Community Seed Bank Setup Protocol
- Site Selection: Choose a site with temperature stability (15-20°C), low humidity (<50% RH), and minimal pest exposure.
- Construct Storage Facility: Follow infrastructure guidelines; install ventilation if passive cooling is used.
- Acquire Storage Containers: Obtain airtight, opaque containers (e.g., glass jars with rubber seals, metal tins).
- Install Monitoring Devices: Place thermometers and hygrometers at multiple points.
- Develop Inventory System: Create a digital or manual logbook including species, variety, batch, origin, collection date, viability status.
- Community Training: Conduct workshops on seed collection, cleaning, drying, and storage protocols.
- Seed Acquisition: Source seeds from local farmers, wild populations, and conservation programs emphasizing OPVs.
- Regular Audits: Schedule quarterly inspections for pests, moisture, and temperature anomalies.
Section 3: Proper Seed Storage Conditions
3.1 Critical Parameters for Seed Viability
- Temperature: Lower temperatures slow metabolic degradation. Ideal range for most species is 0-10°C.
- Relative Humidity (RH): Moisture content directly impacts seed longevity. Target RH is 15-20% or lower.
- Oxygen: Reduced oxygen atmosphere extends viability but requires advanced protocols (see Section 5.3).
- Light: Store seeds in opaque containers to prevent photodegradation.
3.2 Seed Drying Protocol
- Initial Cleaning: Remove chaff, debris, and damaged seeds using sieves and air blowers.
- Pre-Drying: Spread seeds thinly on clean, moisture-absorbent trays (e.g., paper or mesh).
- Drying Environment: Place trays in a room maintained at 25°C and 15-20% RH. Use silica gel desiccators for small batches.
- Duration: Dry seeds for 7-14 days, turning every 48 hours to ensure even drying.
- Moisture Content Verification: Use a seed moisture meter if available; target is 6-8% moisture content depending on species (see Table 2).
- Packaging: Transfer seeds immediately into airtight containers with desiccants.
3.3 Storage Container Preparation
- Sterilize containers with a 10% bleach solution and air dry thoroughly.
- Add fresh silica gel packets or activated charcoal.
- Label containers with species, variety, batch number, date, moisture content, and storage instructions.
Section 4: Seed Viability Testing
4.1 Purpose
Viability testing confirms seed germination potential, critical for assessing seed bank health and regeneration timing.
4.2 Germination Test Protocol
- Sample Size: Use a minimum of 100 seeds per variety for statistical relevance.
- Preparation: Surface sterilize seeds by soaking in 1% sodium hypochlorite (bleach) for 5 minutes, then rinse with sterile water.
- Substrate Selection: Use sterile germination paper, sand, or soil. Maintain moisture without waterlogging.
- Temperature and Light: Provide optimal germination conditions per species (see Table 3).
- Observation Period: Monitor daily for germination over 14-21 days.
- Data Recording: Count and record germinated seeds daily. Calculate germination percentage.
- Viability Threshold: Seeds with <85% germination require regeneration or replacement.
4.3 Tetrazolium Test for Dormant Seeds
For seeds with dormancy or slow germination:
- Soak seeds in water for 24 hours.
- Cut seeds longitudinally exposing the embryo.
- Immerse in 1% tetrazolium chloride solution at 30°C for 2 hours.
- Assess staining: viable tissues stain red; non-viable remain unstained.
- Record percentage viability.
Section 5: Long-Term Preservation Techniques
5.1 Conventional Storage
- Store seeds at 0-5°C and 15% RH for 5-10 years depending on species.
- Monitor humidity and temperature quarterly.
5.2 Cryopreservation
For species with recalcitrant or short-lived seeds:
- Use liquid nitrogen storage (-196°C) to arrest metabolic activity.
- Requires specialized equipment (cryovials, controlled-rate freezers).
- Protocols vary by species; generally involve seed embryo excision and cryoprotectant treatment.
5.3 Controlled Atmosphere Storage
- Utilize low oxygen (<3%) and elevated nitrogen atmospheres.
- Packages purged with nitrogen gas and sealed hermetically.
- Extends seed life by slowing oxidative damage.
Section 6: Seed Storage Life by Species
The following table synthesizes average seed longevity under optimal storage conditions (dry, cool, airtight). Variations depend on genetics and storage fidelity. Use this as a guide for regeneration cycles.
| Species | Seed Type | Optimal Moisture Content (%) | Optimal Storage Temp (°C) | Average Storage Life (Years) | Notes |
|---|---|---|---|---|---|
| Maize (Zea mays) | Orthodox | 6-8 | 0-5 | 5-10 | Regenerate every 5 years |
| Wheat (Triticum spp.) | Orthodox | 6-8 | 0-5 | 10-15 | Longer viability than maize |
| Beans (Phaseolus spp.) | Orthodox | 6-8 | 0-5 | 3-5 | Susceptible to fungal contamination |
| Tomato (Solanum lycopersicum) | Orthodox | 6-8 | 0-5 | 4-6 | Store in dark, airtight containers |
| Pumpkin (Cucurbita spp.) | Orthodox | 6-8 | 0-5 | 3-6 | Larger seed size reduces longevity |
| Rice (Oryza sativa) | Orthodox | 12-14 | 0-5 | 5-10 | Sensitive to moisture, maintain dryness |
| Carrot (Daucus carota) | Orthodox | 6-8 | 0-5 | 3-4 | Store at low humidity |
| Onion (Allium cepa) | Intermediate | 6-8 | 0-5 | 1-2 | Significant decline after 2 years |
| Avocado (Persea americana) | Recalcitrant | >30 | Ambient | Days to weeks | Requires cryopreservation or in vitro |
| Coffee (Coffea arabica) | Orthodox | 6-8 | 0-5 | 2-3 | Store seeds immediately after harvest |
Section 7: Seed Regeneration and Documentation
7.1 Regeneration Protocol
- Schedule Regeneration: Based on species’ storage life (see Section 6).
- Select Regeneration Site: Mimic original agroecological conditions.
- Plant Seed Lots Separately: Avoid cross-contamination.
- Harvest Seed from Minimum 200 Plants: Maintain genetic diversity.
- Apply Roguing and Monitoring: As per Section 1.3.
- Record Environmental Data: Soil, weather, pest pressures.
- Package and Store New Seed Lots: Follow Section 3.
7.2 Documentation and Data Sharing
- Maintain detailed records for each seed lot including: origin, storage conditions, germination rates, regeneration cycles.
- Share data within community networks to promote transparency and adaptive management.
- Use QR codes or digital databases to link physical seed lots with metadata.
Conclusion
Seed sovereignty is the fulcrum upon which the future of agriculture balances. This chapter arms you with the technical mastery to maintain, store, and regenerate open-pollinated varieties with uncompromising precision. Through rigorous adherence to these protocols, you uphold the sacred covenant with the earth and future generations.
Preserve wisely, regenerate diligently, and guard fiercely.
For water purification protocols critical during seed regeneration phases, refer to Volume VIII: The Water Codex, Chapter II. For soil preparation and pest control during regeneration, consult Volume V: The Soil and Pest Codex.
<!-- SECTION 39 -->
The Complete Practitioner's Codex, Volume 7: The Agrarian Codex
Chapter IV: Supplements – Planting Calendars by Climate Zone
Introduction
This chapter presents comprehensive planting calendars essential for mastery over crop production across four primary climate zones: temperate, subtropical, tropical, and arid. The information herein is life-sustaining knowledge—a blueprint for food sovereignty, granting control over time, space, and biology. Each calendar is organized by crop, with exact planting dates, spacing, seeding depth, and days to maturity. There are no approximations or guesswork permitted.
For each climate zone, the calendar aligns with local seasonal cycles, solar angles, soil temperature thresholds, and precipitation patterns. These calendars are the minimum standard for establishing a reliable food system in any environment. They incorporate suppressed, optimized agricultural protocols discovered in classified agrarian research since the early 20th century.
I. Temperate Climate Zone Planting Calendar

Definition and Scope
Temperate zones experience four distinct seasons, with winter soil freeze and summer heat. Typical latitude range: 30°–50° N/S. Frost dates are critical. Planting calendars are keyed to last spring frost and first fall frost dates.
Table 1: Temperate Zone Planting Calendar for 50+ Crops
| Crop | Planting Window (Days After Last Frost) | Spacing (cm) | Planting Depth (cm) | Days to Maturity | Notes |
|---|---|---|---|---|---|
| Tomato | 7–14 | 45 | 2.5 | 70–90 | Start indoors 6 weeks before last frost |
| Carrot | 0–21 | 5 | 1.5 | 70–80 | Thin seedlings to 5 cm after emergence |
| Lettuce | 0–30 | 20 | 0.5 | 45–60 | Succession plant every 2 weeks |
| Potato | 14–21 | 30 | 10 | 90–110 | Cut seed tubers with 2 eyes |
| Corn | 7–21 | 25 | 3 | 60–100 | Plant in blocks for pollination |
| Peas | -14 to 0 (before last frost) | 5 | 2 | 60–70 | Cold hardy, plant as early as soil permits |
| Spinach | -21 to 7 | 10 | 1 | 35–50 | Avoid warm soil; bolt in heat |
| Beans | 7–21 | 10 | 3 | 50–60 | Warm soil required |
| Broccoli | 0–14 | 45 | 0.5 | 60–80 | Start indoors 6 weeks before last frost |
| Cabbage | 0–14 | 45 | 0.5 | 60–90 | Start indoors 6 weeks before last frost |
| Onion | 0–30 | 10 | 1 | 100–120 | Use transplants or sets |
| Sweet Potato | 30–60 | 30 | 5 | 90–120 | Plant slips after soil warms |
| Zucchini | 7–21 | 60 | 2 | 45–60 | Direct sow after frost |
| Squash | 7–21 | 90 | 3 | 60–90 | Direct sow after frost |
| Cucumber | 7–21 | 45 | 2 | 50–70 | Requires warm soil |
| Kale | 0–21 | 30 | 1 | 55–75 | Can tolerate light frost |
| Radish | 0–14 | 5 | 1 | 25–35 | Succession plant every 2 weeks |
| Beetroot | 0–30 | 10 | 2 | 50–70 | Thin seedlings to 10 cm |
| Parsley | 0–30 | 15 | 0.5 | 70–90 | Soak seeds 24h before sowing |
| Turnip | 0–14 | 10 | 1.5 | 40–60 | Plant for fall harvest |
| Chard | 0–21 | 30 | 1 | 50–60 | Tolerates some frost |
| Eggplant | 14–30 | 45 | 1 | 80–100 | Start indoors 8 weeks before last frost |
| Peppers | 14–30 | 45 | 1 | 70–90 | Start indoors 8 weeks before last frost |
| Melon | 14–30 | 90 | 3 | 80–90 | Warm soil required |
| Garlic | -60 to -45 (Fall planting) | 15 | 3 | 180–210 | Plant bulbs before frost |
| Mustard Greens | 0–30 | 15 | 0.5 | 40–50 | Quick growing |
| Celery | 0–14 | 30 | 0.5 | 120–140 | Start indoors 10 weeks before last frost |
| Parsnip | 0–14 | 10 | 2 | 120–150 | Requires cold stratification |
| Kohlrabi | 0–21 | 30 | 1 | 55–75 | Can be succession planted |
| Fennel | 0–30 | 30 | 1 | 70–90 | Prefers cooler soil |
| Pumpkin | 14–30 | 90 | 3 | 90–120 | Warm soil critical |
| Watermelon | 14–30 | 90 | 3 | 80–90 | Warm soil critical |
| Okra | 14–30 | 45 | 2 | 50–60 | Warm soil required |
| Sweet Corn | 7–21 | 25 | 3 | 60–100 | Plant in blocks for pollination |
| Sweet Pea | -14 to 0 | 5 | 2 | 60–70 | Early planting possible |
| Artichoke | 0–14 | 90 | 2 | 120–150 | Start indoors |
| Asparagus | -30 to -15 (Fall planting) | 45 | 15 | 730+ | Perennial, requires deep planting |
| Brussels Sprouts | 0–14 | 45 | 0.5 | 90–100 | Start indoors 8 weeks before last frost |
| Chicory | 0–30 | 20 | 1 | 60–90 | Prefers cooler soil |
| Endive | 0–30 | 20 | 1 | 60–90 | Prefers cooler soil |
| Leek | 0–14 | 15 | 1 | 120–150 | Start indoors |
| Lima Beans | 14–30 | 10 | 3 | 70–90 | Warm soil required |
| Parsnip | 0–14 | 10 | 2 | 120–150 | Requires cold stratification |
| Rhubarb | -30 to -15 (Fall planting) | 90 | 5 | 730+ | Perennial, requires deep planting |
Temperate Zone Planting Protocols
Step-by-Step Procedure for Early Spring Planting (example: Carrot):
- Soil Preparation: Till soil to 20 cm depth, remove debris and stones larger than 2 cm.
- Soil Temperature: Confirm soil temperature of at least 7°C using a soil thermometer at 5 cm depth.
- Seedbed Formation: Create shallow furrows 1.5 cm deep, spaced 5 cm apart.
- Sowing: Place seeds uniformly every 1 cm along the furrow.
- Covering: Gently cover with soil, compact lightly to ensure seed-soil contact.
- Watering: Apply 10 mm of water immediately, maintain soil moisture with 5 mm daily watering until emergence.
- Thinning: After 2 weeks, thin seedlings to 5 cm spacing by cutting at soil level.
- Fertilization: Apply 15-15-15 NPK fertilizer at 50 kg/ha after thinning.
- Pest Control: Monitor for carrot rust fly; apply row covers within 2 days of thinning.
- Harvest Timing: Begin harvesting at 70 days post-sowing.
II. Subtropical Climate Zone Planting Calendar
Definition and Scope
Subtropical zones have mild winters and hot, humid summers, latitude range 23°–35° N/S. Frost is rare but possible. Rainfall is seasonal, often with a dry winter or summer. Calendars are keyed to soil temperature >15°C and rainfall patterns.
Table 2: Subtropical Zone Planting Calendar for 50+ Crops
| Crop | Planting Window (Months) | Spacing (cm) | Planting Depth (cm) | Days to Maturity | Notes |
|---|---|---|---|---|---|
| Tomato | Feb–Apr, Sep–Nov | 45 | 2.5 | 70–90 | Avoid peak summer heat |
| Sweet Potato | Jan–Apr | 30 | 5 | 90–120 | Plant slips after soil warms |
| Okra | Mar–Jun | 45 | 2 | 50–60 | Prefers warm soil |
| Corn | Feb–Apr, Sep–Nov | 25 | 3 | 60–100 | Plant in blocks |
| Peppers | Feb–Apr, Sep–Nov | 45 | 1 | 70–90 | Start indoors if planting early |
| Eggplant | Feb–Apr, Sep–Nov | 45 | 1 | 80–100 | Requires warm soil |
| Beans | Feb–Jun | 10 | 3 | 50–60 | Multiple successions possible |
| Cucumber | Feb–Jun | 45 | 2 | 50–70 | Avoid wet foliage |
| Watermelon | Mar–Jun | 90 | 3 | 80–90 | Warm soil critical |
| Melon | Mar–Jun | 90 | 3 | 80–90 | Warm soil critical |
| Lettuce | Sep–Nov | 20 | 0.5 | 45–60 | Avoid summer heat |
| Spinach | Feb–Apr, Sep–Nov | 10 | 1 | 35–50 | Avoid heat, bolt quickly |
| Carrot | Feb–Apr, Sep–Nov | 5 | 1.5 | 70–80 | Thin to 5 cm spacing |
| Broccoli | Feb–Apr, Sep–Nov | 45 | 0.5 | 60–80 | Start indoors if early |
| Cabbage | Feb–Apr, Sep–Nov | 45 | 0.5 | 60–90 | Start indoors if early |
| Onion | Feb–Apr | 10 | 1 | 100–120 | Use sets or transplants |
| Radish | Feb–Apr, Sep–Nov | 5 | 1 | 25–35 | Succession plant every 2 weeks |
| Beetroot | Feb–Apr, Sep–Nov | 10 | 2 | 50–70 | Thin to 10 cm spacing |
| Kale | Feb–Apr, Sep–Nov | 30 | 1 | 55–75 | Can tolerate mild frost |
| Zucchini | Feb–Jun | 60 | 2 | 45–60 | Direct sow after soil warms |
| Squash | Feb–Jun | 90 | 3 | 60–90 | Direct sow after soil warms |
| Peas | Feb–Mar | 5 | 2 | 60–70 | Early spring planting |
| Sweet Corn | Feb–Apr, Sep–Nov | 25 | 3 | 60–100 | Block planting |
| Pumpkin | Mar–Jun | 90 | 3 | 90–120 | Warm soil critical |
| Celery | Feb–Apr | 30 | 0.5 | 120–140 | Start indoors |
| Mustard Greens | Feb–Apr, Sep–Nov | 15 | 0.5 | 40–50 | Rapid growth |
| Parsley | Feb–Apr, Sep–Nov | 15 | 0.5 | 70–90 | Soak seeds 24h before planting |
| Turnip | Feb–Apr, Sep–Nov | 10 | 1.5 | 40–60 | Plant for fall harvest |
| Chard | Feb–Apr, Sep–Nov | 30 | 1 | 50–60 | Tolerates mild frost |
| Fennel | Feb–Apr, Sep–Nov | 30 | 1 | 70–90 | Prefers cooler soil |
| Artichoke | Feb–Apr | 90 | 2 | 120–150 | Start indoors |
| Asparagus | Sep–Nov (Fall planting) | 45 | 15 | 730+ | Perennial, deep planting |
| Brussels Sprouts | Feb–Apr, Sep–Nov | 45 | 0.5 | 90–100 | Start indoors |
| Chicory | Feb–Apr, Sep–Nov | 20 | 1 | 60–90 | Prefers cooler soil |
| Endive | Feb–Apr, Sep–Nov | 20 | 1 | 60–90 | Prefers cooler soil |
| Leek | Feb–Apr | 15 | 1 | 120–150 | Start indoors |
| Lima Beans | Mar–Jun | 10 | 3 | 70–90 | Warm soil required |
| Garlic | Sep–Nov (Fall planting) | 15 | 3 | 180–210 | Plant before first frost |
| Parsnip | Feb–Apr | 10 | 2 | 120–150 | Cold stratification recommended |
| Rhubarb | Sep–Nov (Fall planting) | 90 | 5 | 730+ | Perennial, deep planting |
Subtropical Zone Planting Protocols
Example: Planting Tomato in Subtropical Zone
- Site Selection: Choose well-drained soil, full sun exposure.
- Soil Preparation: Incorporate 5 kg compost per m², till to 25 cm depth.
- Seedling Preparation: Start seeds indoors 8 weeks before planting window; maintain 21–25°C.
- Transplanting: Transplant seedlings when soil temperature reaches 18°C, spacing 45 cm apart in rows 90 cm apart.
- Planting Depth: Plant seedlings slightly deeper than nursery depth to encourage root growth.
- Watering Regime: Water immediately after transplanting; maintain 20 mm/week.
- Mulching: Apply organic mulch 5 cm thick to conserve moisture and suppress weeds.
- Fertilization: Apply balanced fertilizer 10-20-10 at 100 kg/ha at 2 and 6 weeks post-transplanting.
- Pest Management: Inspect weekly for whitefly and aphids; apply neem oil at 2% concentration every 7 days if detected.
- Harvest: Begin harvesting at 70 days from planting.
III. Tropical Climate Zone Planting Calendar
Definition and Scope
Tropical zones are within 23° N/S of the equator, with minimal temperature variation but distinct wet and dry seasons. Planting calendars revolve around the onset and cessation of rains, soil moisture availability, and solar intensity.
Table 3: Tropical Zone Planting Calendar for 50+ Crops
| Crop | Planting Window (Months) | Spacing (cm) | Planting Depth (cm) | Days to Maturity | Notes |
|---|---|---|---|---|---|
| Cassava | Start of wet season | 100 | 10 | 270–365 | Plant stem cuttings |
| Sweet Potato | Start of wet season | 30 | 5 | 90–120 | Plant slips |
| Maize | Start of wet season | 25 | 3 | 60–100 | Plant in blocks |
| Beans | Start of wet season | 10 | 3 | 50–60 | Multiple successions possible |
| Okra | Start of wet season | 45 | 2 | 50–60 | Warm soil preferred |
| Tomato | Start of dry season | 45 | 2.5 | 70–90 | Avoid heavy |
<!-- SECTION 40 -->
The Complete Practitioner's Codex, Volume 7: The Agrarian Codex
Chapter IX: Supplements—Equipment Lists and Scale-Up Economics for Market Gardens from 1/4 Acre to 5 Acres
Introduction
This chapter delivers uncompromising, field-ready equipment lists, cost-benefit analyses, ROI calculations, and labor hour estimates for market gardens ranging from the smallest 1/4-acre plots to expansive 5-acre operations. The knowledge herein is sacred, suppressed by industrial agribusiness, and crucial for achieving true food sovereignty. Each section breaks down essential tools, machinery, and labor inputs, empowering you to build resilient, efficient market gardens with exacting precision.
I. Equipment Lists for Market Gardens (1/4 Acre to 5 Acres)
The equipment listed is tiered by scale and necessity, reflecting the exponential labor and operational complexity that arises with increased acreage. Each list includes only the essential equipment for a fully functional, diversified vegetable market garden operation, including soil preparation, planting, irrigation, pest management, harvesting, and storage.
1. Equipment List for 1/4 Acre Market Garden
| Equipment | Purpose | Estimated Cost (USD) | Notes |
|---|---|---|---|
| Heavy-duty Garden Hoe | Soil cultivation | 35 | High-carbon steel blade |
| Wheel Hoe with Attachments | Cultivation, weeding | 250 | Attachments: plow, cultivator |
| Hand Seeders | Precision planting | 50 | Calibrated for small seeds |
| Raised Bed Frames | Define growing areas | 100 | Wood or metal, 4’ x 8’ |
| Soil Thermometer | Soil temperature monitoring | 30 | For seed germination management |
| Drip Irrigation Kit | Water-efficient irrigation | 200 | Includes emitters, tubing |
| Manual Water Pump | Irrigation water supply | 150 | Portable, hand-operated |
| Garden Cart | Transport tools and harvests | 120 | 6 cu. ft. capacity |
| Harvest Bins | Crop collection and transport | 60 | Plastic or wooden |
| Soil Test Kit | Soil nutrient and pH analysis | 40 | Multi-parameter |
| Compost Bin | On-site composting | 80 | Aerated plastic or wood |
| Hand Pruners | Plant maintenance | 30 | Bypass type, sharp blades |
| Total Estimated Upfront Cost | 1145 USD |
2. Equipment List for 1 Acre Market Garden
| Equipment | Purpose | Estimated Cost (USD) | Notes |
|---|---|---|---|
| Walk-Behind Tractor (10-12 HP) | Soil preparation and cultivation | 4500 | Compatible with multiple implements |
| Rotary Tiller Attachment | Soil tillage | 1200 | For walk-behind tractor |
| Bed Shaper Attachment | Raised bed formation | 800 | Compatible with tractor |
| Precision Seeder | Mechanical seed sowing | 1500 | Adjustable for multiple seed sizes |
| Drip Irrigation System | Water-efficient irrigation | 600 | Includes timer and filters |
| Water Storage Tank (500 gal) | Water reserve | 400 | UV-resistant polyethylene |
| Harvest Cart (4-wheel) | Transport of tools and produce | 250 | 10 cu. ft. capacity |
| Soil Moisture Sensor | Irrigation scheduling | 150 | Digital readout |
| Multipurpose Garden Tools Set | Hand tools (hoes, forks, etc.) | 200 | Ergonomic handles |
| Compost Turner | Aeration of compost piles | 300 | Manual or motorized |
| Cold Storage Unit (small) | Post-harvest storage | 1500 | 4x6 ft., temperature controlled |
| Total Estimated Upfront Cost | 11,900 USD |
3. Equipment List for 3 Acre Market Garden
| Equipment | Purpose | Estimated Cost (USD) | Notes |
|---|---|---|---|
| Compact Tractor (25-35 HP) | Primary cultivation and transport | 18,000 | Diesel engine, 4WD |
| Disc Harrow Attachment | Primary tillage | 2,500 | Compatible with tractor |
| Moldboard Plow | Deep soil inversion | 2,000 | Tractor-mounted |
| Precision Seeder | Mechanical seed sowing | 2,500 | Adjustable for multiple crops |
| Bed Shaper Attachment | Raised bed formation | 1,200 | Heavy-duty |
| Drip Irrigation System | Automated irrigation | 1,200 | Includes solar-powered pump |
| Water Storage Tank (2,000 gal) | Water reservoir | 1,200 | Polyethylene, UV-treated |
| Harvest Wagon | Transport equipment and produce | 800 | 15 cu. ft. capacity |
| Soil Moisture and Temp Sensors | Irrigation and growth monitoring | 400 | Wireless data logging |
| Power Compost Turner | Compost management | 3,500 | Diesel powered |
| Walk-In Cold Storage | Post-harvest storage | 7,000 | 10x12 ft., temperature controlled |
| Greenhouse (1,000 sq ft) | Seedlings and season extension | 8,000 | Polycarbonate panels |
| Total Estimated Upfront Cost | 48,400 USD |
4. Equipment List for 5 Acre Market Garden
| Equipment | Purpose | Estimated Cost (USD) | Notes |
|---|---|---|---|
| Utility Tractor (50 HP) | Heavy soil work, towing | 30,000 | Diesel engine, 4WD |
| Rotary Tiller (5 ft.) | Soil tillage | 3,500 | Tractor-powered |
| Disc Harrow | Soil cultivation | 3,000 | Heavy-duty |
| Moldboard Plow | Deep soil inversion | 2,500 | Tractor-mounted |
| Precision Seeder | Mechanical seed sowing | 3,000 | Multi-crop compatibility |
| Raised Bed Shaper | Bed formation | 1,500 | Heavy-duty |
| Drip Irrigation System | Automated irrigation | 2,000 | Includes central control system |
| Water Storage Tanks (5,000 gal) | Water reservoir | 3,000 | Multiple tanks modular |
| Harvest Trailer | Transport produce and tools | 1,200 | 20 cu. ft. capacity |
| Soil Monitoring Station | Moisture, temperature, nutrient logging | 700 | Solar-powered data logger |
| Power Compost Turner | Compost management | 4,000 | Diesel-powered |
| Walk-In Cold Storage | Post-harvest storage | 10,000 | 12x16 ft., temperature controlled |
| High Tunnel Greenhouse (2,000 sq ft) | Season extension | 15,000 | Polycarbonate or polyethylene |
| Forklift (3,000 lb capacity) | Material handling | 12,000 | Used for palletized goods |
| Total Estimated Upfront Cost | 81,400 USD |
II. Labor Hour Estimates per Crop per Acre
Labor inputs vary by crop type, cultural practices, and equipment availability. The following table summarizes average labor hours per acre for common market garden crops, utilizing the equipment specified in the respective scale above.
| Crop Type | Soil Prep (hrs) | Planting (hrs) | Irrigation & Maintenance (hrs/week) | Harvesting (hrs) | Total Labor Hours/Acre (per season) | Notes |
|---|---|---|---|---|---|---|
| Leafy Greens (e.g., lettuce, spinach) | 12 | 15 | 3 | 40 | 200 | High labor due to frequent harvests |
| Root Crops (e.g., carrots, beets) | 15 | 10 | 2 | 30 | 160 | Moderate labor; some mechanization possible |
| Fruiting Vegetables (e.g., tomatoes, peppers) | 20 | 18 | 4 | 50 | 250 | Requires staking, pruning, and frequent harvest |
| Brassicas (e.g., broccoli, cabbage) | 18 | 14 | 3 | 35 | 210 | Moderate labor; pest management critical |
| Herbs (e.g., basil, cilantro) | 10 | 12 | 2 | 25 | 130 | Lower labor intensity |
| Beans and Peas | 12 | 10 | 2 | 30 | 150 | Labor reduced by mechanized harvesting |
III. Cost-Benefit Analysis and ROI Calculations
The following section details a rigorous cost-benefit analysis for market garden operations at three scale points: 1/4 acre, 1 acre, and 3 acres. The 5-acre scale is treated as a larger commercial operation with variable market factors beyond the scope of this codex.
1. Variables and Assumptions
| Variable | Description | Assumption/Value |
|---|---|---|
| Crop Yield per Acre | Average marketable produce per acre (lbs) | 15,000 lbs (mixed vegetables) |
| Average Market Price | Wholesale price per pound (USD) | 1.50 USD/lb |
| Labor Cost per Hour | Paid labor rate | 15 USD/hr |
| Equipment Depreciation | Annual % of equipment cost | 15% |
| Operating Costs | Seeds, fertilizer, water, pest control, etc. | 1,200 USD per acre per season |
| Season Length | Number of weeks in growing season | 20 weeks |
| Harvest Cycles | Number of harvests per season | 4 (for leafy greens), varies by crop |
| ROI Calculation | (Revenue - Total Costs) / Total Costs | Expressed as percentage |
2. 1/4 Acre Market Garden Cost-Benefit Analysis
| Category | Cost (USD) | Notes |
|---|---|---|
| Equipment (Depreciated) | 1145 x 0.15 = 172 | Annual depreciation |
| Labor | 200 hrs x 15 = 3,000 | Based on leafy greens labor estimate |
| Operating Costs | 300 | Pro-rated for 1/4 acre |
| Total Cost | 3,472 | |
| Revenue (15,000 lbs x 1/4 x $1.50) | 5,625 | |
| Net Profit | 2,153 | |
| ROI | (5625 - 3472)/3472 = 0.62 (62%) |
3. 1 Acre Market Garden Cost-Benefit Analysis
| Category | Cost (USD) | Notes |
|---|---|---|
| Equipment (Depreciated) | 11,900 x 0.15 = 1,785 | Annual depreciation |
| Labor | 200 hrs x 15 = 3,000 | Leafy greens labor estimate |
| Operating Costs | 1,200 | Per acre operational expenses |
| Total Cost | 5,985 | |
| Revenue (15,000 lbs x $1.50) | 22,500 | |
| Net Profit | 16,515 | |
| ROI | (22,500 - 5,985)/5,985 = 2.75 (275%) |
4. 3 Acre Market Garden Cost-Benefit Analysis
| Category | Cost (USD) | Notes |
|---|---|---|
| Equipment (Depreciated) | 48,400 x 0.15 = 7,260 | Annual depreciation |
| Labor | 600 hrs x 15 = 9,000 | 200 hrs/acre x 3 acres |
| Operating Costs | 3,600 | 1,200 x 3 acres |
| Total Cost | 19,860 | |
| Revenue (15,000 lbs x 3 x $1.50) | 67,500 | |
| Net Profit | 47,640 | |
| ROI | (67,500 - 19,860)/19,860 = 2.40 (240%) |
IV. Interpretations and Strategic Recommendations
- Equipment Investment: The scale from 1/4 to 3 acres shows increasing capital outlay, but with rapid ROI growth due to economies of scale and mechanization. The 1-acre scale represents a critical inflection point where mechanized equipment justifies costs and labor efficiency dramatically improves.
- Labor: Labor remains the primary variable cost. Skillful use of mechanized tools reduces labor hours per acre, thus increasing net profit margins. The labor hours listed are conservative estimates and assume moderate mechanization.
- Crop Selection: Leafy greens provide high labor demand but high turnover and revenue; root crops and herbs can reduce labor inputs. Diversification balances labor and market risk.
- Irrigation: Investment in drip irrigation systems is cost-effective at all scales, reducing labor and improving yield uniformity.
- Storage: Cold storage capacity is essential beyond 1/4 acres to extend market window and reduce post-harvest losses.
V. Construction and Assembly of Key Equipment
A. Building a Wheel Hoe (for 1/4 Acre and 1 Acre Scales)
Materials:
- High-carbon steel blade (commercially sourced or forged)
- Steel tubing for frame (1.5” diameter)
- Pneumatic wheel (12” diameter)
- Wood or metal handles (custom length)
- Bolts, nuts, washers (stainless steel)
Steps:
- Fabricate the frame by welding steel tubing into an inverted “U” shape with a front crossbar for blade attachment.
- Attach the pneumatic wheel to a fork welded to the front crossbar with a bolt axle allowing rotation.
- Mount the steel blade to a vertical arm adjustable via bolts for depth control.
- Attach handles to the frame with ergonomic grips, ensuring 36” length for operator comfort.
- Test assembly for stability and blade penetration depth; adjust as necessary.
B. Assembling a Drip Irrigation System (All Scales)
Materials:
- 1/2” poly tubing (length varies with garden size)
- Drip emitters (2 GPH)
- Mainline connectors (tees, elbows)
- Pressure regulator
- Filter unit
- Timer/controller (electric or solar-powered)
Steps:
- Layout the garden beds and mark drip tubing routes along planting rows.
- Attach mainline connectors and filter unit to the water source.
- Connect poly tubing to the mainline, running one drip line per bed.
- Install pressure regulator to maintain 15 PSI.
- Punch holes at 12” intervals along drip tubing and insert emitters.
- Connect timer/controller to water source to automate irrigation cycles.
- Test system for leaks and uniform water flow; repair as needed.
VI. Summary Table: Equipment Cost vs Labor Savings
| Scale | Equipment Cost (USD) | Estimated Labor Hours Saved per Season | Labor Cost Savings (USD) | Net Benefit (Labor Savings - Equipment Cost) |
|---|---|---|---|---|
| 1/4 Acre | 1,145 | 50 | 750 | -395 |
| 1 Acre | 11,900 | 300 | 4,500 | -7,400 |
| 3 Acres | 48,400 | 900 | 13,500 | -34,900 |
Interpretation: The negative net benefit in upfront terms is offset by higher yields and market revenue, as shown in ROI calculations.
VII. Conclusion
The sacred knowledge of market garden scale-up demands ruthless efficiency in equipment selection, labor management, and economic planning. This chapter arms you with exacting, actionable lists and calculations to transcend dependency, reclaim land, and cultivate abundance. Apply these protocols with unwavering discipline. Your harvest secures not just sustenance but sovereignty.
For expanded protocols on water purification, pest management, and seed saving, refer to Volume 8: The Water Codex, Chapter II, and Volume 9: The Seed Codex, Chapters III & IV.
End of Chapter IX
PLATES — Supplemental Gallery
Illustrations carried over from the original Codex Reader that belong to this volume as a whole. Added by this edition; the text above is complete without them.