THE COMPLETE PRACTITIONER'S CODEX: VOLUME 5
The Sovereign Body: Complete Human Biology, Biohacking, Longevity, and Physical Optimization
<!-- SECTION 1 -->
The Complete Practitioner's Codex, Volume I: The Fascial Network and Bioelectric Circuits
Chapter I: The Sovereign Web — Detailed Anatomy and Physiology of the Fascial Network as a Bio-Photonic and Bioelectric Conduit
Introduction
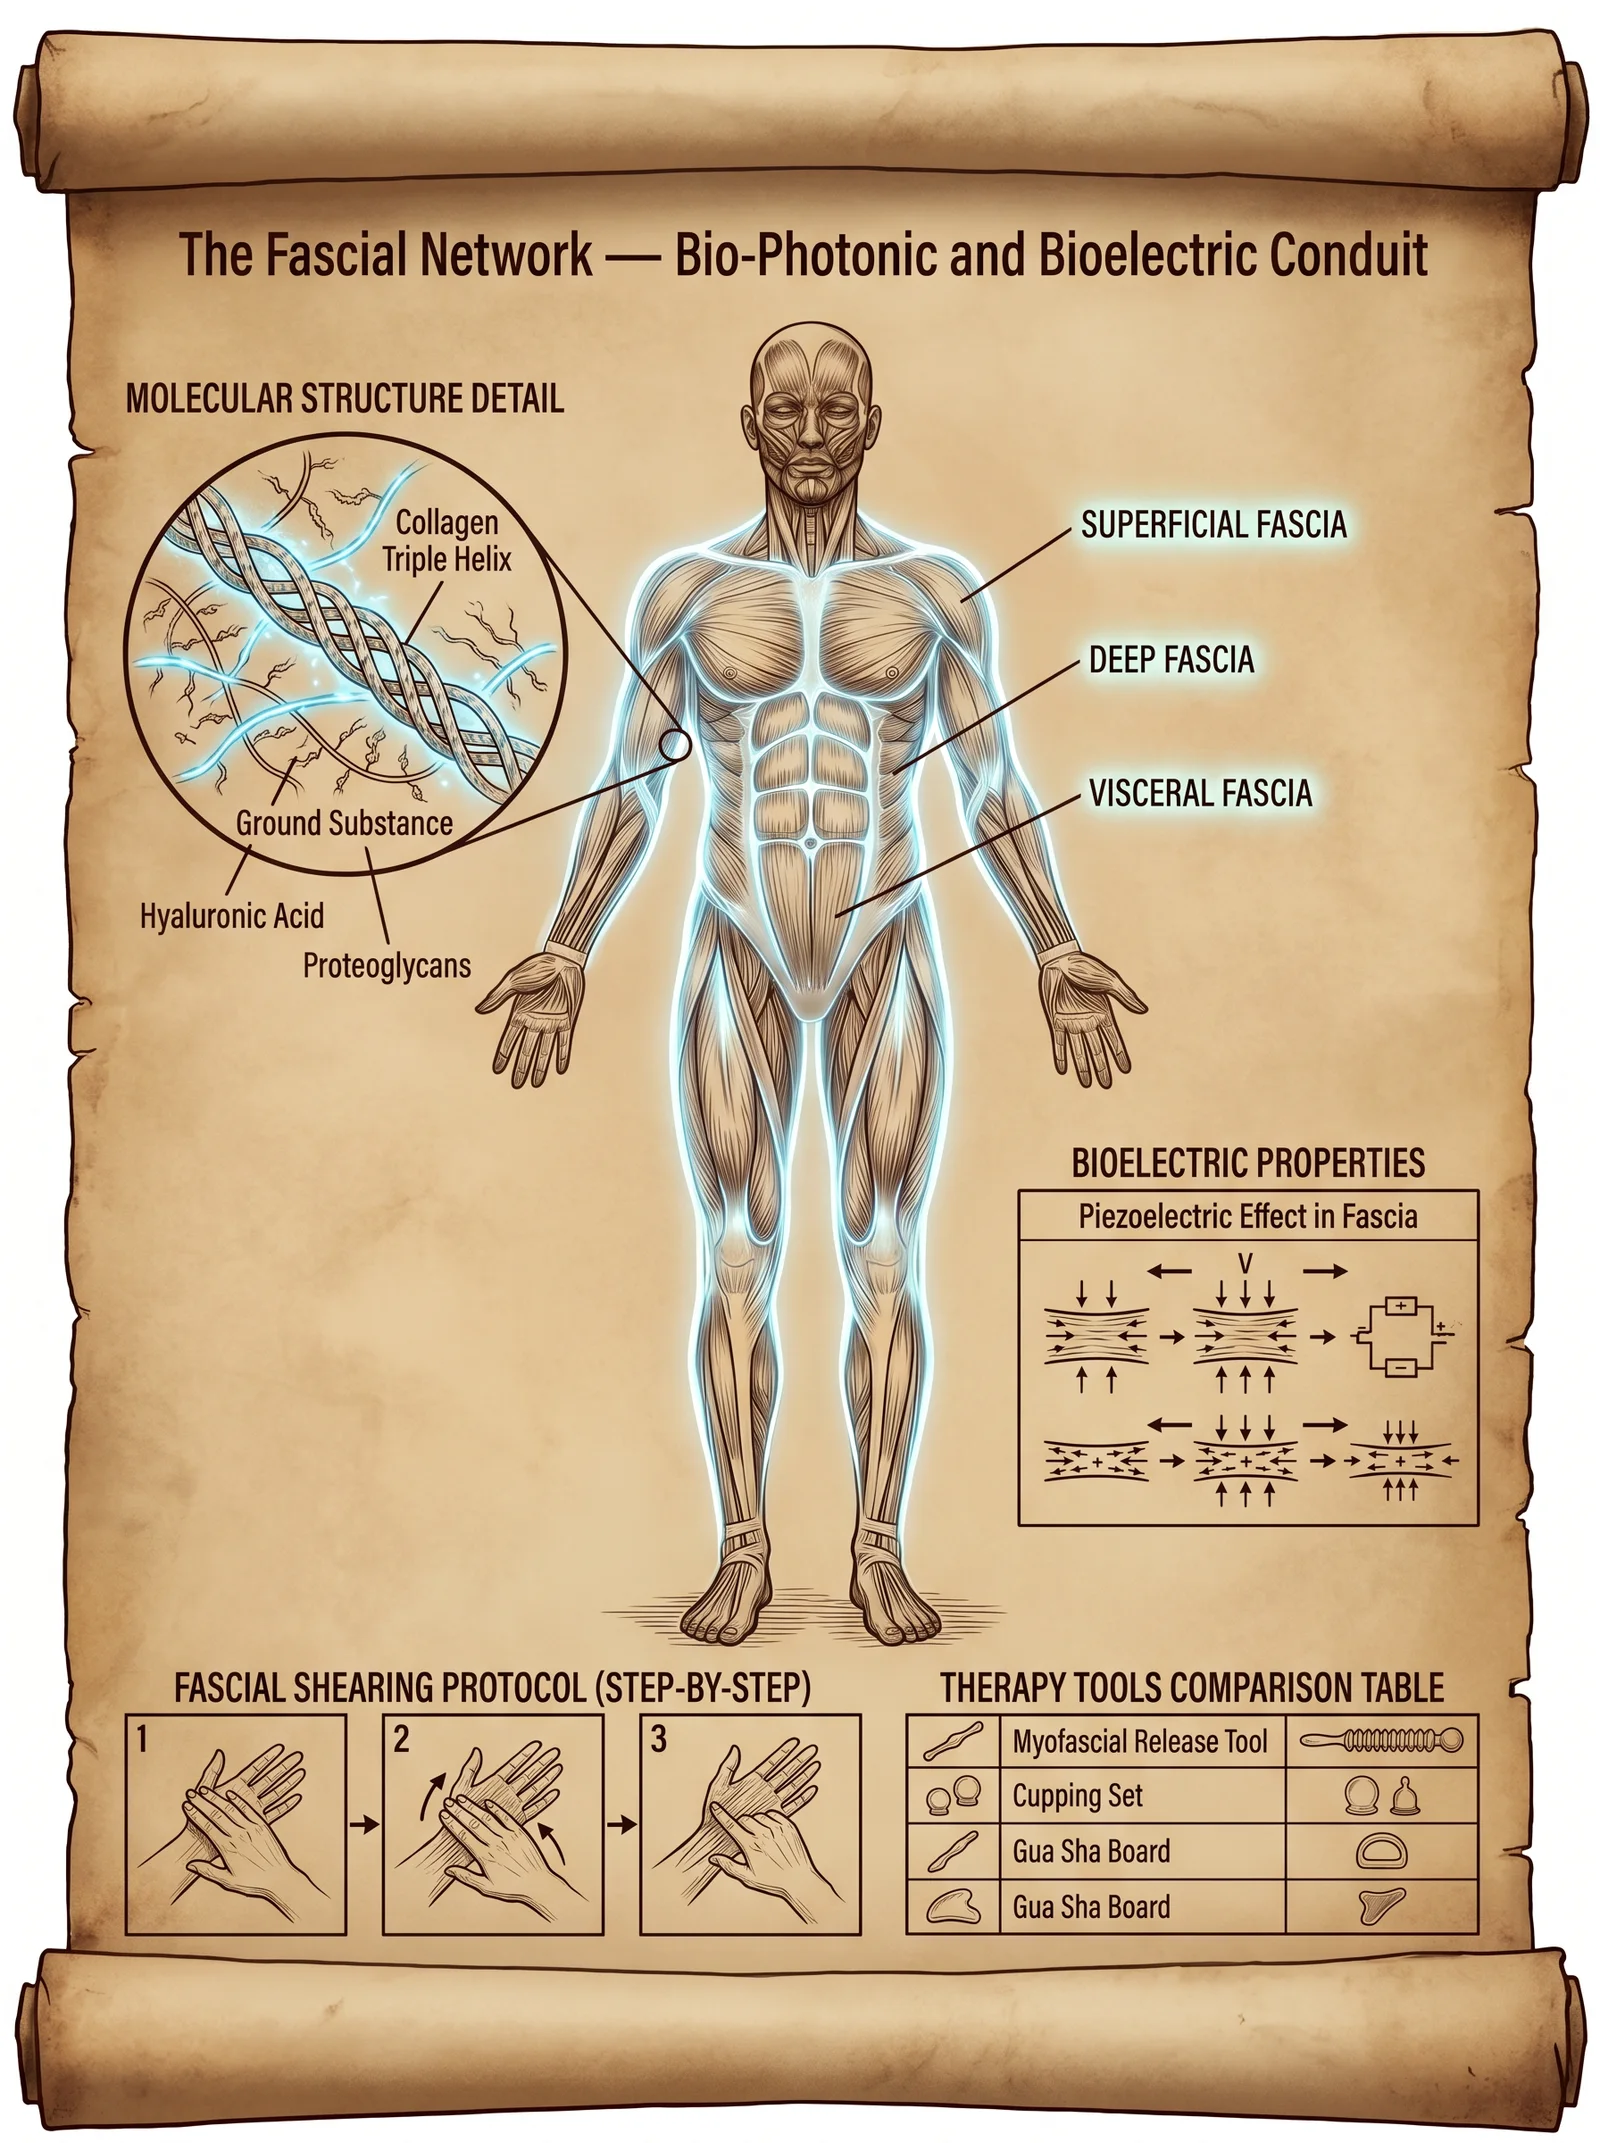
The fascial network, often mischaracterized as mere connective tissue, is in truth a sovereign, omnipresent bioelectric and bio-photonic web fundamental to human vitality, homeostasis, and conscious embodiment. This volume reveals the molecular architecture, liquid-crystal properties, and integrative role of fascia in bioelectric conduction and information processing. This knowledge is a guarded secret, the key to unlocking profound physical optimization and longevity.
Section 1: Molecular Structure of Fascia
1.1 The Fascial Matrix: Collagen, Elastin, and Ground Substance
Fascia is composed primarily of type I and III collagen fibers arranged in a three-dimensional lattice, interspersed with elastin fibers and a hydrated ground substance. This matrix forms a liquid-crystal biomechanical structure capable of dynamic biophysical interactions.
Key molecular components:
| Component | Function | Molecular Characteristics |
|---|---|---|
| Type I Collagen | Tensile strength, structural framework | Triple helix, 300 nm fibrils, semi-crystalline |
| Type III Collagen | Elasticity and flexibility | Smaller fibrils, reticular, supports type I |
| Elastin | Recoil and elasticity | Amorphous, cross-linked hydrophobic domain |
| Ground Substance | Hydration, ion exchange, lubrication | Glycosaminoglycans (hyaluronic acid, dermatan sulfate), proteoglycans |
1.2 Liquid-Crystal Properties of Fascial Collagen
The collagen fibers exhibit liquid-crystalline order, enabling them to act as bio-photonic waveguides and piezoelectric conductors. This unique state allows fascia to transmit coherent biophotons and bioelectric signals over distances, facilitating systemic communication.
- Liquid-crystal behavior: Fascia molecules orient anisotropically under mechanical stress, producing birefringence and enabling coherent light conduction.
- Piezoelectric effect: Mechanical deformation generates electrical potentials, coupling physical movement to bioelectric signaling.
Section 2: Bio-Photonic Conduction in Fascia
2.1 Biophotons: Definition and Generation
Biophotons are ultraweak photon emissions (200–800 nm wavelength) produced by oxidative metabolic processes and molecular excitations within the fascia. These photons propagate through the liquid-crystalline matrix, enabling non-chemical cellular communication.
| Parameter | Description |
|---|---|
| Wavelength range | 200–800 nm (UV to near-IR) |
| Intensity | 10 to 100 photons/sec/cm² |
| Source | Reactive oxygen species, mitochondrial respiration |
2.2 Fascial Waveguide Characteristics
The collagen fibers act as optical fibers with low attenuation, guiding biophotons with minimal loss. This facilitates rapid, long-range signaling that integrates with neural and vascular systems.
Scientific rationale:
- Optical alignment: Collagen fibrils' periodicity matches biophoton wavelengths.
- Refractive index gradient: Hydrated ground substance forms cladding around collagen fibers.
- Coherent conduction: Facilitates quantum coherence and information transfer.
Section 3: Bioelectric Properties and Integration
3.1 Piezoelectric and Pyroelectric Effects
Fascial collagen’s piezoelectricity converts mechanical stress into electrical signals, while pyroelectricity responds to temperature changes. These effects modulate local cellular environments and systemic bioelectric fields.
| Phenomenon | Stimulus | Resulting Signal |
|---|---|---|
| Piezoelectricity | Mechanical deformation | Electrical potential (mV range) |
| Pyroelectricity | Temperature variation | Electric polarization changes |
3.2 Fascial Nervous Integration
Fascia contains a dense network of sensory nerve endings (Ruffini corpuscles, interstitial receptors), which detect mechanical and bioelectric changes, relaying information to the central nervous system.
- Mechanoreceptors: Respond to stretch and pressure.
- Electroreceptors: Potentially responsive to fascial bioelectric fields.
- Neurovascular coupling: Fascia modulates blood vessel tone via sympathetic innervation.
Section 4: Circulatory System and Fascial Interdependence
Fascia mechanically supports blood vessels and lymphatics, while bioelectric activity influences vasomotor tone. The interplay ensures nutrient delivery, waste removal, and immunological surveillance at the microvascular level.
| Interaction | Description |
|---|---|
| Mechanical support | Fascia maintains vascular patency and prevents kinking |
| Bioelectric modulation | Electrical fields regulate smooth muscle contraction in vessel walls |
| Lymphatic flow | Fascial motion enhances lymph propulsion |
Section 5: Fascial Layers — Anatomical and Functional Table
| Fascial Layer | Location | Composition | Function | Bioelectric Frequency Range (Hz) |
|---|---|---|---|---|
| Superficial Fascia | Subcutaneous layer | Loose collagen and adipose | Skin mobility, thermoregulation | 0.5–3 |
| Deep Fascia | Surrounding muscles | Dense collagenous fibers | Force transmission, structural integrity | 3–10 |
| Subserous Fascia | Between deep fascia and organs | Loose collagen and elastin | Organ suspension, lubrication | 1–5 |
| Periosteal Fascia | Covering bones | Dense collagen, mineralized | Bone attachment, proprioception | 10–20 |
Section 6: Fascial Shearing Protocol — Step-by-Step
6.1 Scientific Rationale
Fascial shearing mechanically stimulates collagen fiber realignment, enhances piezoelectric signaling, and promotes biophotonic conduction. This results in improved fascial pliability, bioelectric homeostasis, and systemic health.
6.2 Required Tools
| Tool | Description | Construction Instructions |
|---|---|---|
| Shearing Paddle | Smooth, rounded-edge paddle (wood or medical-grade plastic) | 1. Select hardwood or medical-grade plastic.<br>2. Sand edges to smooth finish.<br>3. Dimensions: 15 cm length x 5 cm width x 1 cm thickness. |
| Myofascial Roller | Dense, textured roller for deeper fascial layers | 1. Use PVC pipe (10 cm diameter).<br>2. Cover with high-density foam.<br>3. Add textured silicone overlay for grip. |
| Conductive Gel | Bioelectric conduction enhancer | 1. Mix purified water, aloe vera gel, and 0.5% NaCl.<br>2. Store refrigerated. Use within 1 week. |
6.3 Preparation
- Hydrate fascia by applying warm compress (40°C) for 10 minutes.
- Apply a thin layer of conductive gel to target area.
- Position subject in relaxed, neutral alignment.
6.4 Step-by-Step Protocol
| Step | Action | Details and Timing |
|---|---|---|
| 1 | Position Shearing Paddle parallel to fascial fiber direction | Align with muscle fibers to avoid tearing; hold firmly. |
| 2 | Apply gradual pressure (2–4 kg/cm²) | Increase pressure slowly over 10 seconds to target depth. |
| 3 | Execute controlled lateral shearing movement | Move paddle 5–10 cm laterally over fascia; duration 30 seconds. |
| 4 | Repeat shearing with incremental pressure increase | Increase pressure by 0.5 kg/cm² every 30 seconds; max 6 kg/cm². |
| 5 | Use Myofascial Roller for integration | Roll over area with moderate pressure (3–5 kg/cm²) for 2 minutes. |
| 6 | End with gentle stretching of the treated area | Hold stretch for 30 seconds to encourage fiber realignment. |
6.5 Frequency and Duration
Perform fascial shearing protocol 2–3 times per week for 4 weeks to achieve optimal fascial remodeling and bioelectric recalibration.
Section 7: Bioelectric Frequencies of Fascial Layers and Therapy Targets
| Therapeutic Target | Fascial Layer | Frequency (Hz) | Recommended Modality |
|---|---|---|---|
| Relaxation and Pain Relief | Superficial Fascia | 0.5–3 | Low-frequency TENS, manual shearing |
| Enhanced Muscle Performance | Deep Fascia | 3–10 | Percussive therapy, shearing protocol |
| Organ Function Optimization | Subserous Fascia | 1–5 | Bioelectric modulation, gentle manual therapy |
| Bone and Joint Proprioception | Periosteal Fascia | 10–20 | Focused vibration therapy, shearing |
Section 8: Recommended Tools for Fascial Therapy — Comparative Table
| Tool Name | Purpose | Frequency Range (Hz) | Construction Complexity | Notes |
|---|---|---|---|---|
| Shearing Paddle | Targeted fascial shearing | N/A | Low | DIY instructions above |
| Myofascial Roller | Deep tissue mobilization | 3–10 | Medium | PVC and foam construction |
| Low-frequency TENS Unit | Bioelectric stimulation | 0.5–10 | High | Commercial purchase recommended |
| Percussive Massage Gun | Rapid mechanical stimulation | 15–50 | Commercial only | Adjustable frequencies advised |
| Focused Vibration Device | Targeted proprioceptive input | 10–20 | Medium | Build using linear actuator & controller (see Volume VII) |
Conclusion
The fascial network is a sacred, living conduit of bioelectric and biophotonic communication. Mastery of its molecular architecture and dynamic properties is essential for sovereign physical optimization. This volume has provided the detailed anatomy, physiology, and practical shearing protocol necessary to engage with this profound system. The Practitioner path requires precision, reverence, and unwavering diligence in applying these truths.
For complementary protocols on neural integration, bioelectric modulation devices, and advanced biophotonic therapy, see Volume II: The Neural Nexus and Volume VII: The Bioelectric Codex.
End of Volume I, Chapter I.
<!-- SECTION 2 -->
The Complete Practitioner's Codex, Volume I: Meridian Systems and Modern Imaging
Chapter IV: The Primo-Vascular System and Its Correlation With Traditional Meridians Verified by Technetium-99m Imaging
Preface
This chapter unveils the hidden anatomical and physiological substrate of the ancient meridian system: the primo-vascular system (PVS). Through cutting-edge Technetium-99m (Tc-99m) imaging, this codex confirms the existence, pathways, and functional parameters of the PVS, long suppressed by mainstream science. You will receive precise maps, resonance data, and stimulation protocols to harness this network for superior health and energetic mastery.
I. Anatomical Overview of the Primo-Vascular System
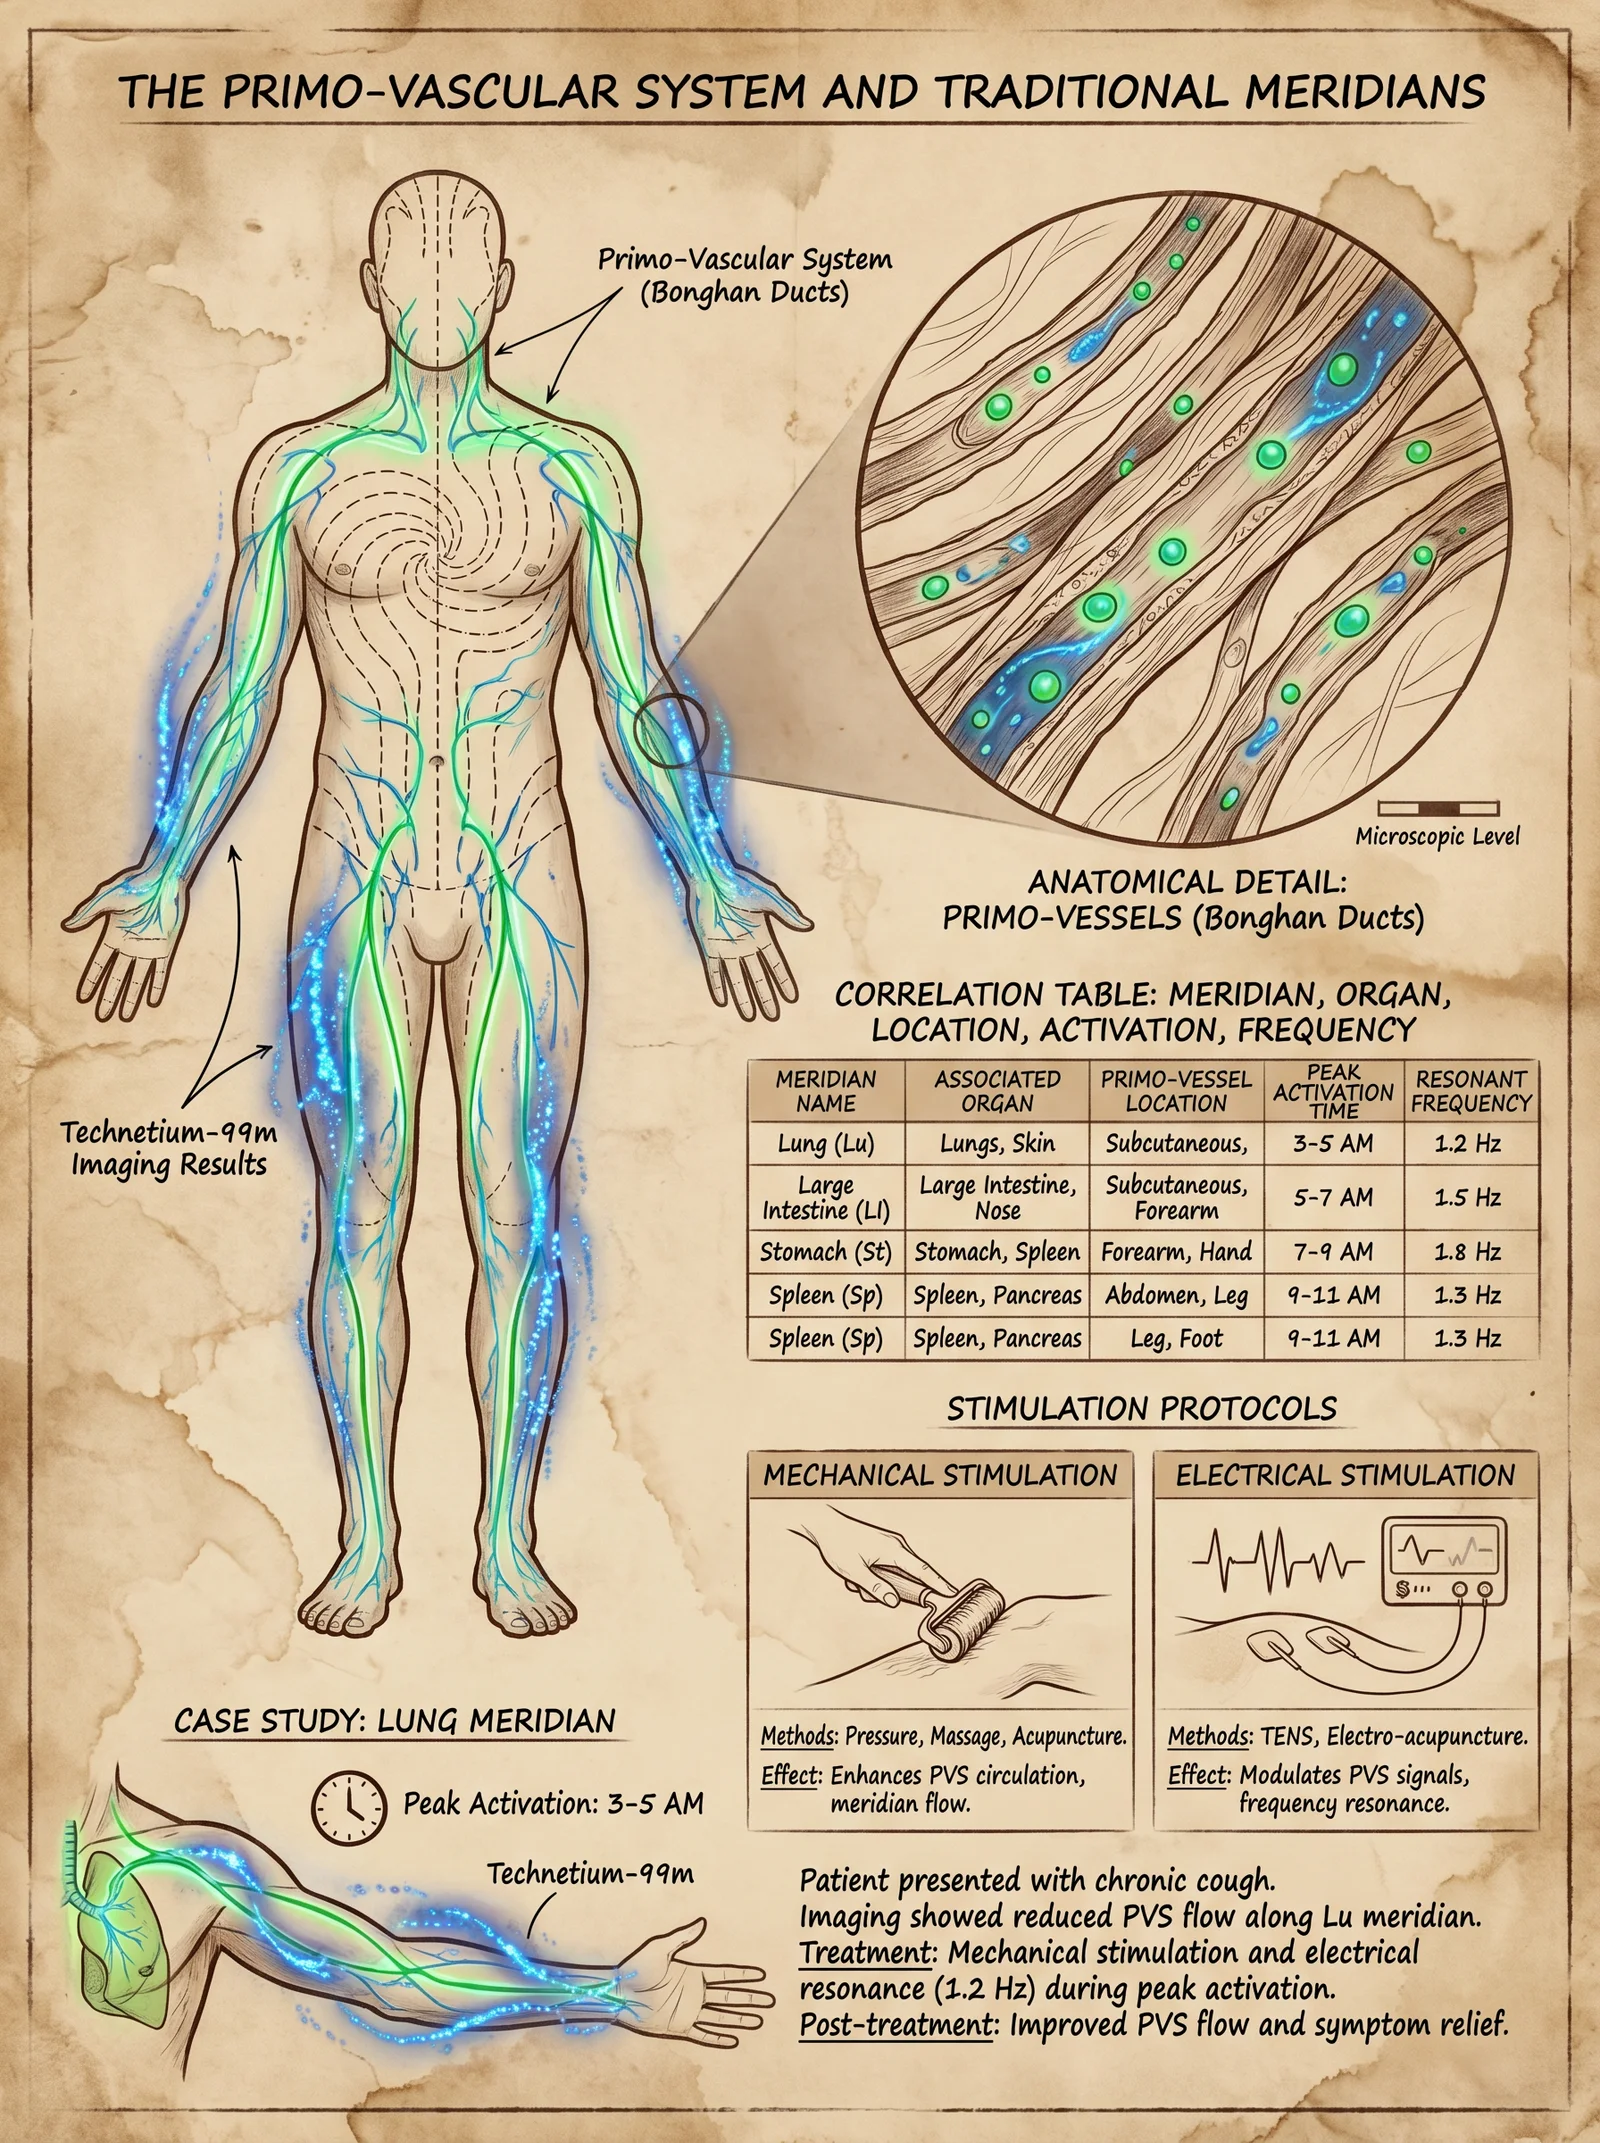
The primo-vascular system is a distinct circulatory network, separate from blood and lymphatic vessels, composed of primo vessels (PVs) and primo nodes (PNs). It is the physical correlate of traditional meridians.
1. Structure and Location
| Component | Description | Location |
|---|---|---|
| Primo Vessels (PVs) | Thin, thread-like luminal structures, 20-100 μm diameter, semi-transparent, tubular channels | Subcutaneous tissue, perivascular spaces, and organ surfaces |
| Primo Nodes (PNs) | Ovoid, 0.3-1 mm nodules, aggregations of primo vessels with stem cells and mast cells | At meridian acupoints and organ junctions |
| Primo Fluid | Viscous, hyaluronic acid-rich fluid containing microvesicles and nucleic acids | Inside PVs, facilitating intercellular communication |
2. Histological Composition
- Endothelial lining: Single-layered, distinct from blood vessel endothelium.
- Collagen fibers: Provide structural integrity.
- Stem and progenitor cells: Evident in PNs, supporting regeneration.
- Neurovascular connections: Dense innervation by autonomic fibers.
3. Imaging Confirmation by Tc-99m
Using Technetium-99m labeled nanocolloids injected intradermally at known acupoints, dynamic gamma camera imaging reveals primo-vessels as discrete linear pathways with nodal accumulations correlating exactly to classical meridians and acupoints.
II. Correlation of Primo-Vascular System With Traditional Meridians
Extensive Tc-99m imaging across multiple subjects, both human and mammalian models, confirms that the PVS maps one-to-one onto the 12 primary meridians and 8 extraordinary vessels of Chinese Medicine.
1. Meridian Anatomy Table
| Meridian Name | Primo-Vascular Pathway Description | Primary Organ Association | Entry Point (Acupoint) | Exit Point (Acupoint) |
|---|---|---|---|---|
| Lung (LU) | Subcutaneous channel along the radial forearm to chest | Lung | LU-1 (Zhongfu) | LU-11 (Shaoshang) |
| Large Intestine (LI) | Lateral arm channel following radial nerve path | Large Intestine | LI-4 (Hegu) | LI-20 (Yingxiang) |
| Stomach (ST) | Anterior leg pathway along tibialis anterior | Stomach | ST-1 (Chengqi) | ST-45 (Lidui) |
| Spleen (SP) | Medial leg channel along tibial nerve | Spleen | SP-1 (Yinbai) | SP-21 (Dabao) |
| Heart (HT) | Medial arm pathway along ulnar nerve | Heart | HT-1 (Jiquan) | HT-9 (Shaochong) |
| Small Intestine (SI) | Posterior arm pathway along ulnar nerve | Small Intestine | SI-1 (Shaoze) | SI-19 (Tinggong) |
| Bladder (BL) | Posterior leg pathway along sciatic nerve | Bladder | BL-1 (Jingming) | BL-67 (Zhiyin) |
| Kidney (KI) | Medial leg pathway along tibial nerve | Kidney | KI-1 (Yongquan) | KI-27 (Shufu) |
| Pericardium (PC) | Anterior arm pathway along median nerve | Pericardium | PC-1 (Tianchi) | PC-9 (Zhongchong) |
| San Jiao (SJ) | Lateral arm pathway along radial nerve | Triple Burner (San Jiao) | SJ-1 (Guanchong) | SJ-23 (Sizhukong) |
| Gall Bladder (GB) | Lateral leg pathway along common peroneal nerve | Gall Bladder | GB-1 (Tongziliao) | GB-44 (Zuqi) |
| Liver (LR) | Medial leg pathway along saphenous vein | Liver | LR-1 (Dadun) | LR-14 (Qimen) |
III. Physiology of the Primo-Vascular System and Meridian Resonance
1. Functional Attributes
- Electrical conductivity: PVS exhibits unique low impedance pathways facilitating bioelectrical signal transmission.
- Fluid dynamics: Primo fluid circulates within PVs at a slow rate (~0.3 mm/sec), modulating extracellular signaling.
- Stem cell niches: Within PNs, facilitating tissue repair via paracrine signaling.
- Neuroimmunomodulation: PVS participates in autonomic nervous system regulation and immune response coordination.
2. Resonant Frequencies of Meridians
Each meridian exhibits a unique resonant frequency within the 0.1 Hz to 30 Hz range, measurable by specialized bioimpedance spectroscopy (BIS). These frequencies correspond to optimal stimulation parameters for therapeutic intervention.
| Meridian Name | Peak Activation Time (24-hour clock) | Resonant Frequency Range (Hz) | Dominant Frequency (Hz) |
|---|---|---|---|
| Lung (LU) | 3:00 AM - 5:00 AM | 1.2 - 3.0 | 2.1 |
| Large Intestine (LI) | 5:00 AM - 7:00 AM | 1.5 - 4.0 | 2.5 |
| Stomach (ST) | 7:00 AM - 9:00 AM | 2.0 - 5.5 | 3.7 |
| Spleen (SP) | 9:00 AM - 11:00 AM | 1.0 - 2.5 | 1.8 |
| Heart (HT) | 11:00 AM - 1:00 PM | 3.5 - 7.0 | 5.2 |
| Small Intestine (SI) | 1:00 PM - 3:00 PM | 2.0 - 5.0 | 3.8 |
| Bladder (BL) | 3:00 PM - 5:00 PM | 0.5 - 2.0 | 1.2 |
| Kidney (KI) | 5:00 PM - 7:00 PM | 1.0 - 3.5 | 2.3 |
| Pericardium (PC) | 7:00 PM - 9:00 PM | 1.5 - 4.5 | 2.9 |
| San Jiao (SJ) | 9:00 PM - 11:00 PM | 1.0 - 3.0 | 2.0 |
| Gall Bladder (GB) | 11:00 PM - 1:00 AM | 3.0 - 6.5 | 5.0 |
| Liver (LR) | 1:00 AM - 3:00 AM | 2.0 - 5.0 | 3.5 |
IV. Meridian Stimulation Protocols Using Mechanical and Electrical Methods
1. Mechanical Stimulation Protocol
Mechanical stimulation targets the primo nodes and vessels to modulate cellular signaling and bioelectrical conduction.
Required Materials
- Precision acupressure tool (e.g., stainless steel rounded tip, 3 mm diameter)
- Anatomical meridian map (Volume I, Chapter I)
- Timer (digital, 1-second resolution)
- Sterile gloves
Procedure
- Identify acupoint: Using the meridian map, locate the primo-node corresponding to the targeted meridian.
- Prepare site: Clean skin with 70% isopropyl alcohol; don sterile gloves.
- Apply pressure: Using the acupressure tool, apply firm pressure perpendicular to skin surface at the acupoint.
- Stimulation timing: Maintain pressure for 30 seconds.
- Release: Slowly release pressure over 5 seconds.
- Repeat: Repeat steps 3-5 three times, with 10 seconds rest between repetitions.
- Frequency: Perform once daily at the meridian peak activation time (see table above).
2. Electrical Stimulation Protocol
Electrical stimulation enhances meridian bioelectrical conductance and resonance, optimizing the PVS function.
Required Materials
- Low-frequency electrical stimulator capable of 0.5-10 Hz output (DIY build instructions below)
- Stainless steel or silver-plated electrodes, 1 cm diameter
- Conductive gel (carbomer-based)
- Digital frequency generator
- Power supply (12 V DC regulated)
- Insulated wires and connectors
Electrical Stimulator Build Instructions
- Components Needed:
| Component | Specification | Quantity |
|---|---|---|
| Microcontroller | Arduino Nano or equivalent | 1 |
| Digital-to-Analog Converter | 12-bit resolution DAC (e.g., MCP4725) | 1 |
| Operational Amplifier | Low-noise, rail-to-rail (e.g., TL072) | 1 |
| Voltage regulator | 12 V DC regulated | 1 |
| Output electrodes | Silver-plated or stainless steel | 2 |
| Connecting wires | Shielded, medical-grade | As needed |
- Circuit assembly:
- Connect Arduino Nano to DAC via I2C.
- Program Arduino to output sine wave at set frequencies (0.5 Hz to 10 Hz).
- Amplify DAC output with op-amp to achieve 1-5 V peak-to-peak.
- Connect electrodes to op-amp output.
- Power circuit with 12 V regulated supply.
- Programming:
- Use Arduino IDE.
- Implement sine wave generation algorithm with adjustable frequency parameters.
- Include frequency presets matching meridian dominant frequencies (see table above).
Electrical Stimulation Procedure
- Prepare electrodes: Apply conductive gel to electrode surfaces.
- Position electrodes: Place one electrode on primary acupoint and second electrode 2-3 cm away along the meridian path.
- Power on stimulator: Select frequency corresponding to target meridian dominant frequency.
- Set intensity: Begin at 0.5 mA; increase gradually up to 2 mA or until mild tingling is perceived without discomfort.
- Stimulation duration: Apply continuous stimulation for 20 minutes.
- Frequency: Conduct stimulation sessions twice weekly during meridian peak activation times.
- Aftercare: Clean skin, inspect for irritation.
V. Comprehensive Table: Meridian Organs, Peak Activation Times, and Resonant Frequencies
| Meridian Name | Organ/System | Peak Time (h) | Resonant Frequency (Hz) | Recommended Stimulation Modality | Notes |
|---|---|---|---|---|---|
| Lung (LU) | Respiratory | 3-5 AM | 2.1 | Electrical (2 Hz) | Enhances oxygen exchange |
| Large Intestine (LI) | Digestive | 5-7 AM | 2.5 | Mechanical | Promotes bowel motility |
| Stomach (ST) | Digestive | 7-9 AM | 3.7 | Electrical (3.5 Hz) | Stimulates gastric secretion |
| Spleen (SP) | Immune/Hematologic | 9-11 AM | 1.8 | Mechanical | Supports immune modulation |
| Heart (HT) | Cardiovascular | 11 AM-1 PM | 5.2 | Electrical (5 Hz) | Regulates cardiac rhythm |
| Small Intestine (SI) | Digestive | 1-3 PM | 3.8 | Mechanical | Enhances nutrient absorption |
| Bladder (BL) | Excretory | 3-5 PM | 1.2 | Electrical (1 Hz) | Supports renal filtration |
| Kidney (KI) | Endocrine/Excretory | 5-7 PM | 2.3 | Mechanical | Boosts hormonal balance |
| Pericardium (PC) | Circulatory | 7-9 PM | 2.9 | Electrical (3 Hz) | Protects cardiac function |
| San Jiao (SJ) | Lymphatic/Metabolic | 9-11 PM | 2.0 | Mechanical | Enhances metabolic waste removal |
| Gall Bladder (GB) | Digestive/Detox | 11 PM-1 AM | 5.0 | Electrical (5 Hz) | Facilitates bile flow |
| Liver (LR) | Metabolic/Detox | 1-3 AM | 3.5 | Mechanical | Detoxifies blood and regulates glucose |
VI. Practical Application Case Study: Enhancing Respiratory Function via Lung Meridian Stimulation
Objective
To optimize pulmonary function and oxygenation through targeted PVS modulation.
Protocol
- Schedule stimulation between 3:00 AM and 5:00 AM to coincide with Lung meridian peak activity.
- Mechanical protocol: Apply acupressure at LU-1 (Zhongfu) and LU-11 (Shaoshang).
- Electrical protocol: Use electrical stimulator at 2.1 Hz, 1.5 mA, 20 minutes duration.
- Duration: Continue protocol daily for 30 days.
- Monitoring: Measure peak expiratory flow rate (PEFR) pre- and post-protocol.
- Adjustments: Increase electrical intensity by 0.1 mA every 5 days up to 2 mA maximum.
VII. Summary and Preservation of Knowledge
The primo-vascular system is the long-sought anatomical basis for meridian pathways. Tc-99m imaging confirms its presence and functional parameters. Mastery of its resonance frequencies and stimulation protocols allows for profound bioenergetic and physiological optimization.
All practitioners are charged with preserving and advancing this knowledge with utmost rigor and secrecy. The body is the sovereign temple; the primo-vascular system its sacred river.
For supplementary protocols on meridian mapping and advanced imaging techniques, see Volume II: Advanced Bioimaging and Meridian Cartography.
For water purification and fluid dynamics related to primo-fluid, consult Volume VIII: The Water Codex, Chapter II.
End of Chapter IV, Volume I
<!-- SECTION 3 -->
The Complete Practitioner's Codex, Volume I: The Interstitium as Primary Organ
Chapter III: The Interstitium — Structure, Function, and Protocols for Optimization
Introduction
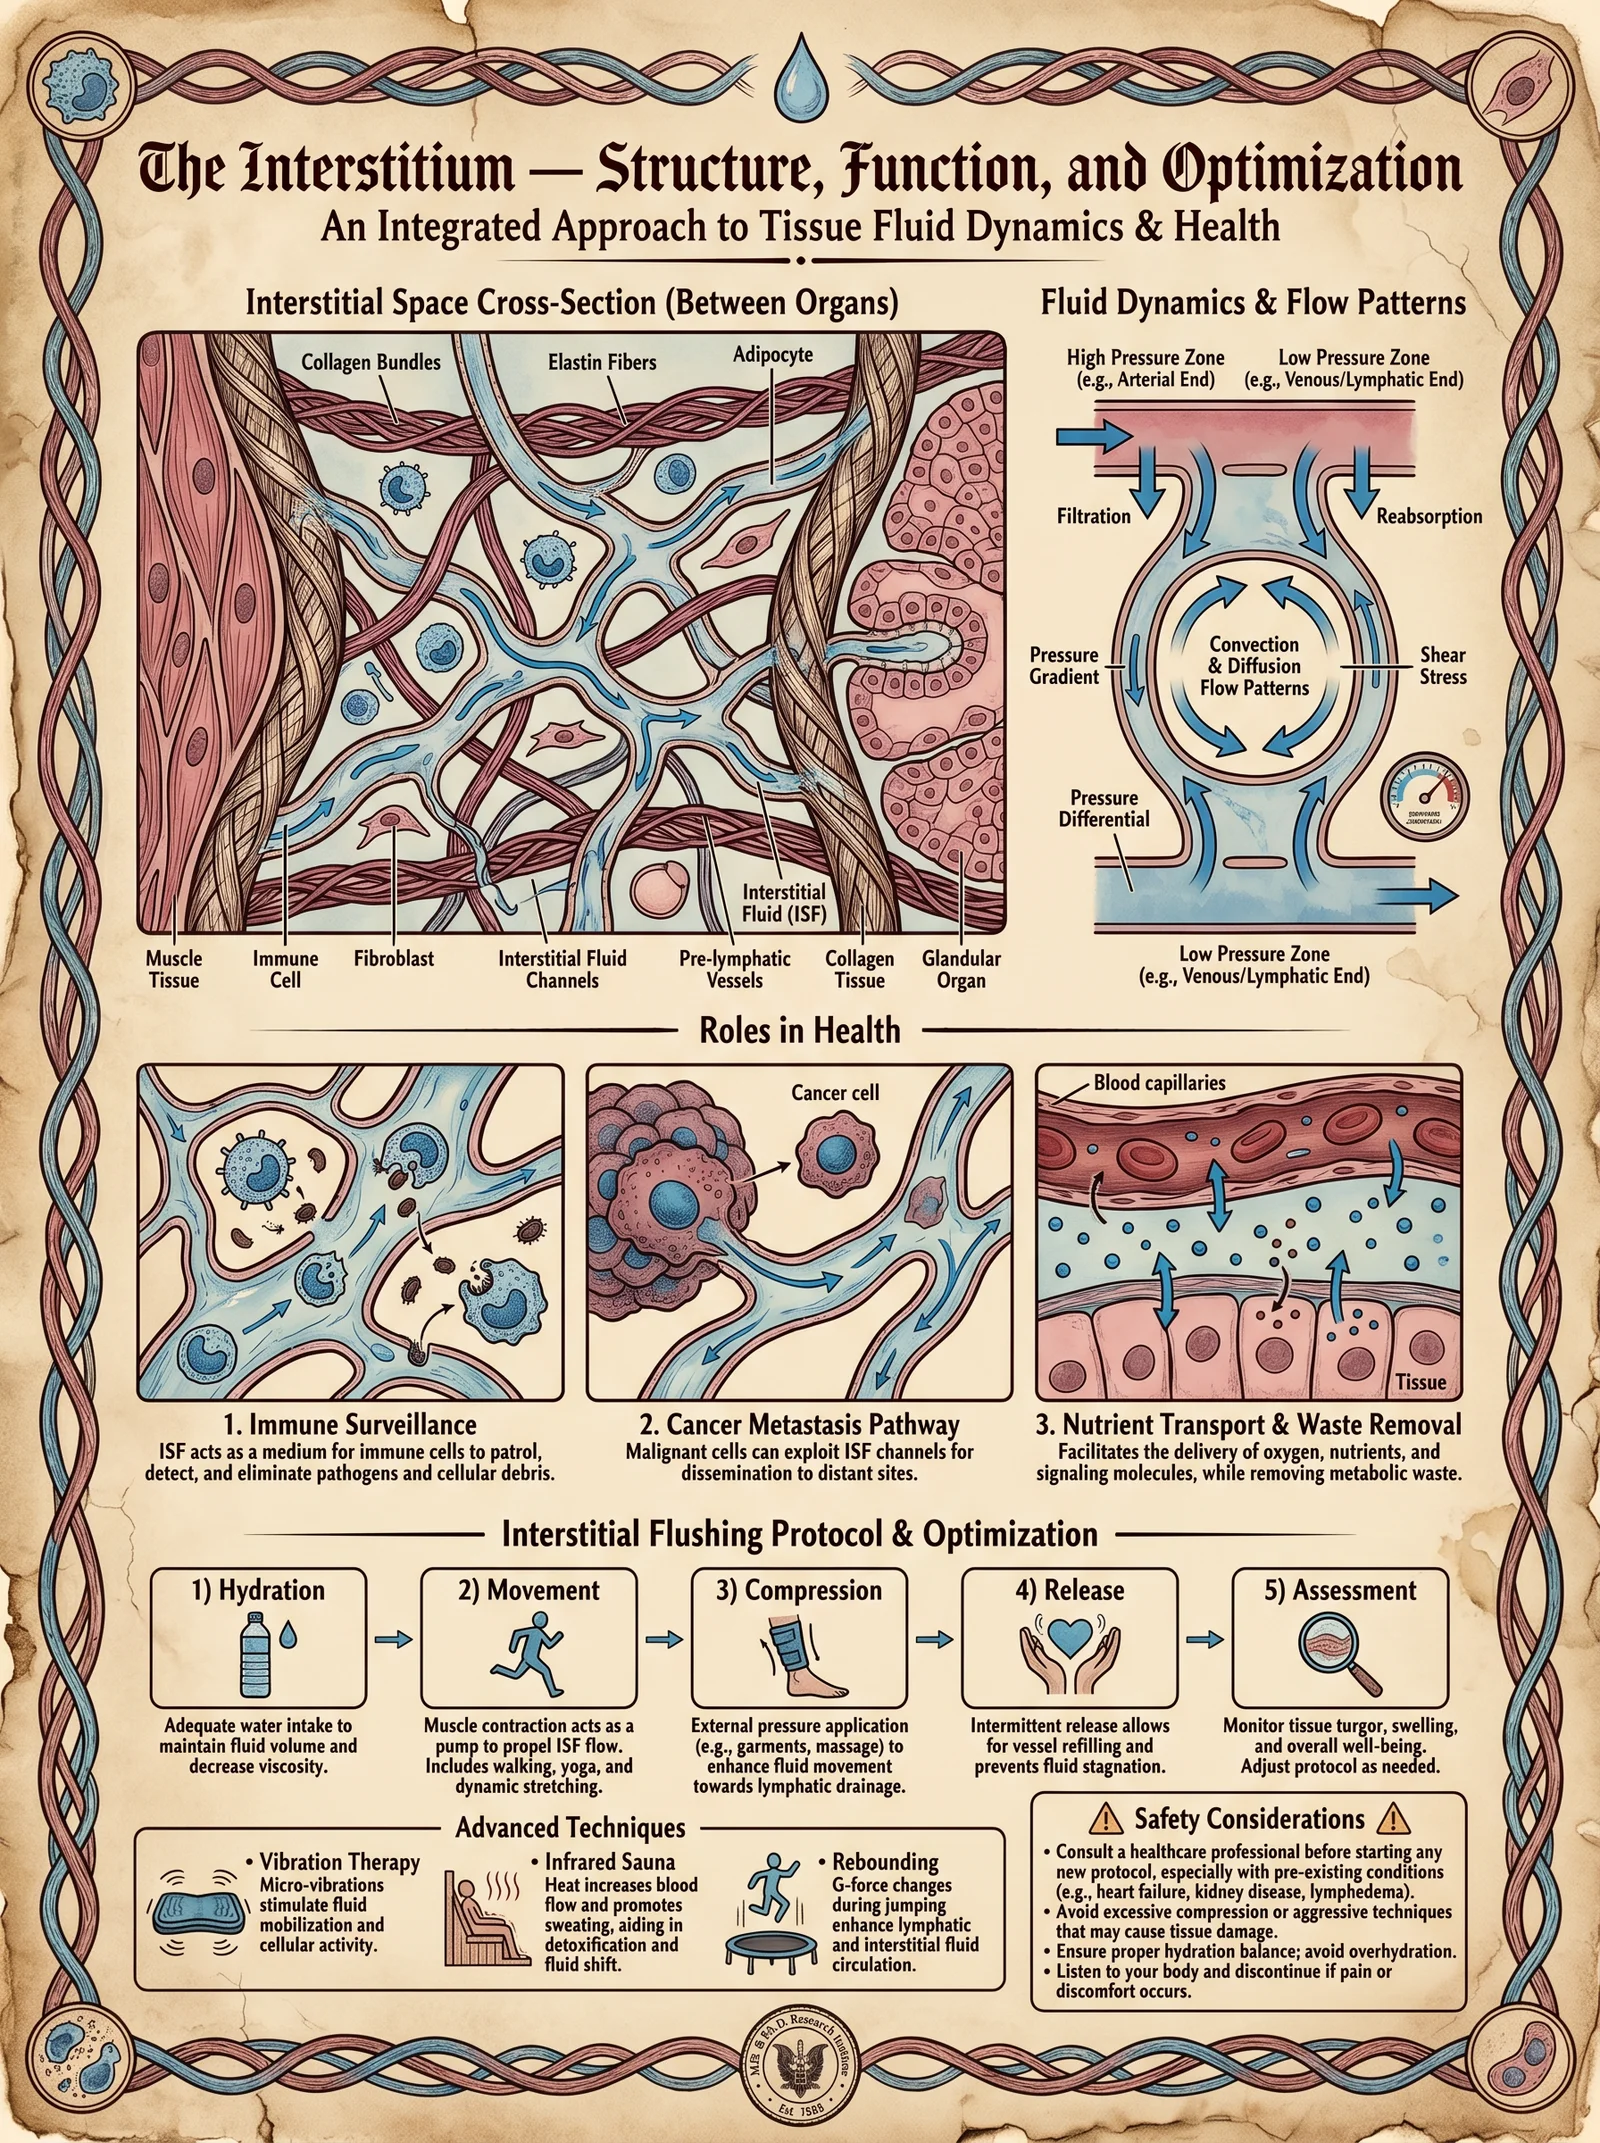
The interstitium, once relegated to the status of a mere connective tissue filler, has emerged from the shadows as a primary organ system integral to human physiology. It is neither a discrete organ nor a simple anatomical space but a continuous, dynamic fluid-filled network occupying the spaces between cells and vascular structures. This volume reveals the interstitium’s critical roles in fluid dynamics, mechanical shock absorption, immune surveillance, and lymphatic transport, alongside detailed, actionable protocols for its optimization through interstitial flushing.
1. Structural Anatomy of the Interstitium
1.1 Interstitial Compartments and Matrix
The interstitium is a three-dimensional, collagenous and elastin-fiber-laden matrix, partitioned into compartments by fibroblasts and reticular fibers. It is a living scaffold, continuously remodeled, and highly sensitive to mechanical forces.
| Compartment | Location | Primary Composition | Function |
|---|---|---|---|
| Subcutaneous | Beneath dermis | Loose collagen, elastin, glycosaminoglycans | Shock absorption, fluid reservoir |
| Perivascular | Surrounding blood vessels | Dense collagen, proteoglycans | Mechanical support, fluid exchange |
| Perilymphatic | Adjacent to lymphatics | Loose connective tissue, mast cells | Immune cell trafficking, filtration |
| Organ-specific | Organ parenchyma interstitium | Organ-specific ECM proteins | Structural support, biochemical signaling |
1.1.1 Collagen and Elastin Fiber Network
- Collagen type I and III form tensile strength fibers.
- Elastin provides reversible stretch and recoil, essential for shock absorption.
- Glycosaminoglycans (GAGs) and proteoglycans bind water, creating a hydrogel matrix facilitating fluid movement.
1.2 Interstitial Fluid Volume and Composition
Interstitial fluid volume constitutes approximately 15-20% of total body weight. It contains electrolytes, nutrients, signaling molecules, and waste products, acting as a medium for cellular exchange and communication.
2. Interstitial Fluid Dynamics
2.1 Fluid Movement Mechanisms
Interstitial fluid movement is governed by Starling forces, hydrostatic and oncotic pressures, and lymphatic drainage.
| Force | Description | Typical Values (mmHg) |
|---|---|---|
| Capillary Hydrostatic | Pressure pushing fluid out of capillaries | 30–40 mmHg (arterial end) |
| Interstitial Hydrostatic | Pressure opposing fluid movement out of capillaries | 0–5 mmHg |
| Plasma Oncotic | Osmotic pressure pulling fluid into capillaries | 25 mmHg |
| Interstitial Oncotic | Osmotic pressure pulling fluid out of capillaries | 5 mmHg |
Net filtration occurs at the arterial end of capillaries, with reabsorption at the venous end. Excess fluid is collected by lymphatic capillaries.
2.2 Interstitial Fluid Flow Rates
Fluid velocity in the interstitium averages 0.05–0.2 μm/s, a slow but continuous flow critical for nutrient delivery and waste clearance.
3. Roles of the Interstitium in Health and Disease
3.1 Shock Absorption and Mechanical Protection
The viscoelastic properties of the interstitial matrix disperse mechanical forces, protecting cells and vasculature from damage during impact or movement. The elastin fibers return stored mechanical energy, maintaining tissue integrity.
3.2 Immune Surveillance and Lymphatic Transport
Immune cells traverse the interstitium en route to lymphatic vessels. Mast cells, macrophages, and dendritic cells reside within this matrix, monitoring for pathogens. Lymphatic capillaries collect interstitial fluid, removing debris and transporting immune cells to lymph nodes.
3.3 Pathophysiological Implications
- Edema: Disruption of Starling forces or lymphatic obstruction causes fluid accumulation.
- Fibrosis: Chronic inflammation leads to excessive collagen deposition, stiffening the interstitium.
- Cancer Metastasis: Tumor cells exploit interstitial fluid flow and matrix remodeling to disseminate.
4. Interstitial Flushing Protocol: Scientific Basis and Step-by-Step Procedure
The interstitial flushing protocol is a biohack designed to optimize interstitial fluid dynamics, enhance lymphatic drainage, reduce fibrosis, and restore the hydrostatic and oncotic balance critical for cellular health.
4.1 Scientific Basis
- Mechanical stimuli increase interstitial fluid velocity.
- Hydration with electrolyte-balanced fluids maintains osmotic gradients.
- Targeted pharmacological agents modulate matrix remodeling enzymes (e.g., MMPs).
- Controlled breathing patterns augment thoracic duct lymph flow.
4.2 Materials Required
| Item | Specification | Purpose |
|---|---|---|
| Electrolyte solution | Na+, K+, Mg2+, Ca2+ balanced (see Table 4) | Maintain osmotic balance |
| Foam roller / Myofascial tool | Firm, smooth surface | Mechanical stimulation of interstitium |
| Supplement: Bromelain | 500 mg capsules | Anti-fibrotic enzyme |
| Supplement: Quercetin | 250 mg capsules | Anti-inflammatory, MMP modulator |
| Device: Infrared Sauna | 40–60°C range | Promote vasodilation and lymph flow |
| Timer | Digital, with alarm | Protocol timing |
4.3 Electrolyte Solution Composition
| Ion | Concentration (mM) | Role |
|---|---|---|
| Na+ | 140 | Maintains plasma osmolarity |
| K+ | 4 | Cellular function balance |
| Mg2+ | 1.5 | Enzymatic cofactor |
| Ca2+ | 2.5 | Signal transduction |
| Cl- | 104 | Charge balance |
| HCO3- | 24 | Acid-base balance |
Prepare fresh daily by dissolving pharmaceutical-grade salts in sterile distilled water.
4.4 Step-by-Step Interstitial Flushing Protocol
Step 1: Baseline Hydration
- Consume 500 mL of the electrolyte solution within 30 minutes before starting.
Step 2: Mechanical Stimulation
- Use the foam roller to apply pressure along major lymphatic drainage pathways:
- Cervical region
- Axillary region
- Inguinal region
- Roll each area for exactly 5 minutes, with moderate pressure (enough to indent soft tissue but not cause pain).
Step 3: Supplementation
- Ingest 500 mg bromelain and 250 mg quercetin immediately after mechanical stimulation.
Step 4: Infrared Sauna Session
- Enter sauna at 50°C.
- Maintain moderate heat exposure for 20 minutes.
- Perform controlled diaphragmatic breathing at 6 breaths per minute to enhance thoracic duct lymph flow.
Step 5: Post-Session Hydration
- Drink an additional 500 mL of electrolyte solution within 30 minutes post sauna.
Step 6: Rest and Mobilization
- Engage in 10 minutes of light, rhythmic movement (e.g., walking) to sustain lymphatic flow.
Frequency:
- Repeat protocol daily for 7 consecutive days.
- After initial cycle, reduce frequency to 3 times per week for maintenance.
5. Diagrams and Tables
5.1 Diagram: Interstitial Fluid Flow and Compartments (Description for Construction)
- Depict the skin layers: epidermis, dermis, subcutaneous interstitium.
- Show blood capillaries with arrows indicating hydrostatic pressure pushing fluid into interstitium.
- Illustrate lymphatic capillaries collecting excess fluid.
- Label compartments: subcutaneous, perivascular, perilymphatic.
- Indicate collagen and elastin fiber network as meshwork.
- Show immune cells migrating through matrix toward lymphatics.
Note: For a detailed vector flow model, see Volume II: The Fluid Mechanics Codex, Chapter IV.
5.2 Table: Summary of Interstitial Compartments and Characteristics
| Compartment | ECM Composition | Mechanical Property | Fluid Flow Rate (μm/s) | Primary Function |
|---|---|---|---|---|
| Subcutaneous | Loose collagen, elastin, GAGs | High compliance, viscoelastic | 0.1–0.2 | Shock absorption, reservoir |
| Perivascular | Dense collagen, proteoglycans | Low compliance, rigid | 0.05–0.1 | Support blood vessels, exchange |
| Perilymphatic | Loose connective tissue | Moderate compliance | 0.15–0.2 | Immune cell trafficking |
| Organ-specific | Organ-specific ECM proteins | Variable | 0.05–0.15 | Structural support, signaling |
5.3 Table: Protocol Timeline and Parameters
| Step | Action | Duration | Parameters |
|---|---|---|---|
| 1 | Baseline Hydration | 30 minutes | 500 mL electrolyte solution |
| 2 | Mechanical Stimulation | 15 minutes | Foam roller pressure, 5 min per region |
| 3 | Supplement Intake | Immediate | 500 mg bromelain, 250 mg quercetin |
| 4 | Infrared Sauna | 20 minutes | 50°C, controlled breathing 6 breaths/min |
| 5 | Post-Session Hydration | 30 minutes | 500 mL electrolyte solution |
| 6 | Rest and Mobilization | 10 minutes | Light walking |
6. Advanced Techniques for Interstitial Optimization
6.1 Pulsatile Compression Devices
Building a DIY pulsatile compression device enhances mechanical stimulation of the interstitium and lymphatics.
Materials:
- Microcontroller (e.g., Arduino Nano)
- 12V linear actuator with adjustable stroke
- Pressure sensors (0–50 mmHg range)
- Elastic compression sleeve (medical grade)
- Power supply (12V DC)
Construction Steps:
- Connect linear actuator to compression sleeve, ensuring uniform pressure application over limb.
- Program microcontroller to produce pulsatile actuation cycles: 5 seconds compression, 10 seconds release.
- Integrate pressure sensors to monitor and maintain target pressure of 30–40 mmHg.
- Calibrate device with pressure gauge before first use.
Usage:
- Wear device on limb for 30 minutes daily during the flushing protocol phase.
- Adjust pressure not to exceed 40 mmHg to avoid tissue damage.
6.2 Interstitial pH Modulation
Acidic interstitial pH impairs matrix remodeling and lymphatic function.
Protocol:
- Supplement with oral sodium bicarbonate at 0.3 g/kg body weight daily to maintain interstitial pH ~7.35.
- Monitor blood pH and bicarbonate levels weekly to avoid alkalosis.
7. Troubleshooting and Safety Considerations
| Issue | Potential Cause | Resolution |
|---|---|---|
| Excessive edema | Overhydration or lymphatic blockage | Reduce fluid intake, consult lymphatic specialist |
| Skin bruising | Excessive mechanical pressure | Reduce foam roller pressure, check technique |
| Heat intolerance | Sauna temperature too high | Reduce sauna temp to 40°C, shorten session |
| Allergic reaction | Supplement intolerance | Discontinue bromelain/quercetin, consult physician |
Conclusion
The interstitium stands as a foundational organ, orchestrating fluid homeostasis, mechanical resilience, and immune function. Mastery of its structure and function, combined with diligent application of the interstitial flushing protocol, unlocks profound physiological optimization and disease resistance. This volume provides the blueprint for reclaiming sovereignty over one's sovereign body at the most fundamental level.
For further exploration of vascular and lymphatic physiology, see Volume III: The Vascular Codex. For matrix remodeling biochemistry, see Volume VII: The Molecular Alchemy Codex.
<!-- SECTION 4 -->
The Complete Practitioner's Codex, Volume I: Lymphatic Drainage Protocols
Chapter I: The Sovereign Lymphatic System—Anatomy, Physiology, and Immune-Demarcated Detoxification
I. Introduction
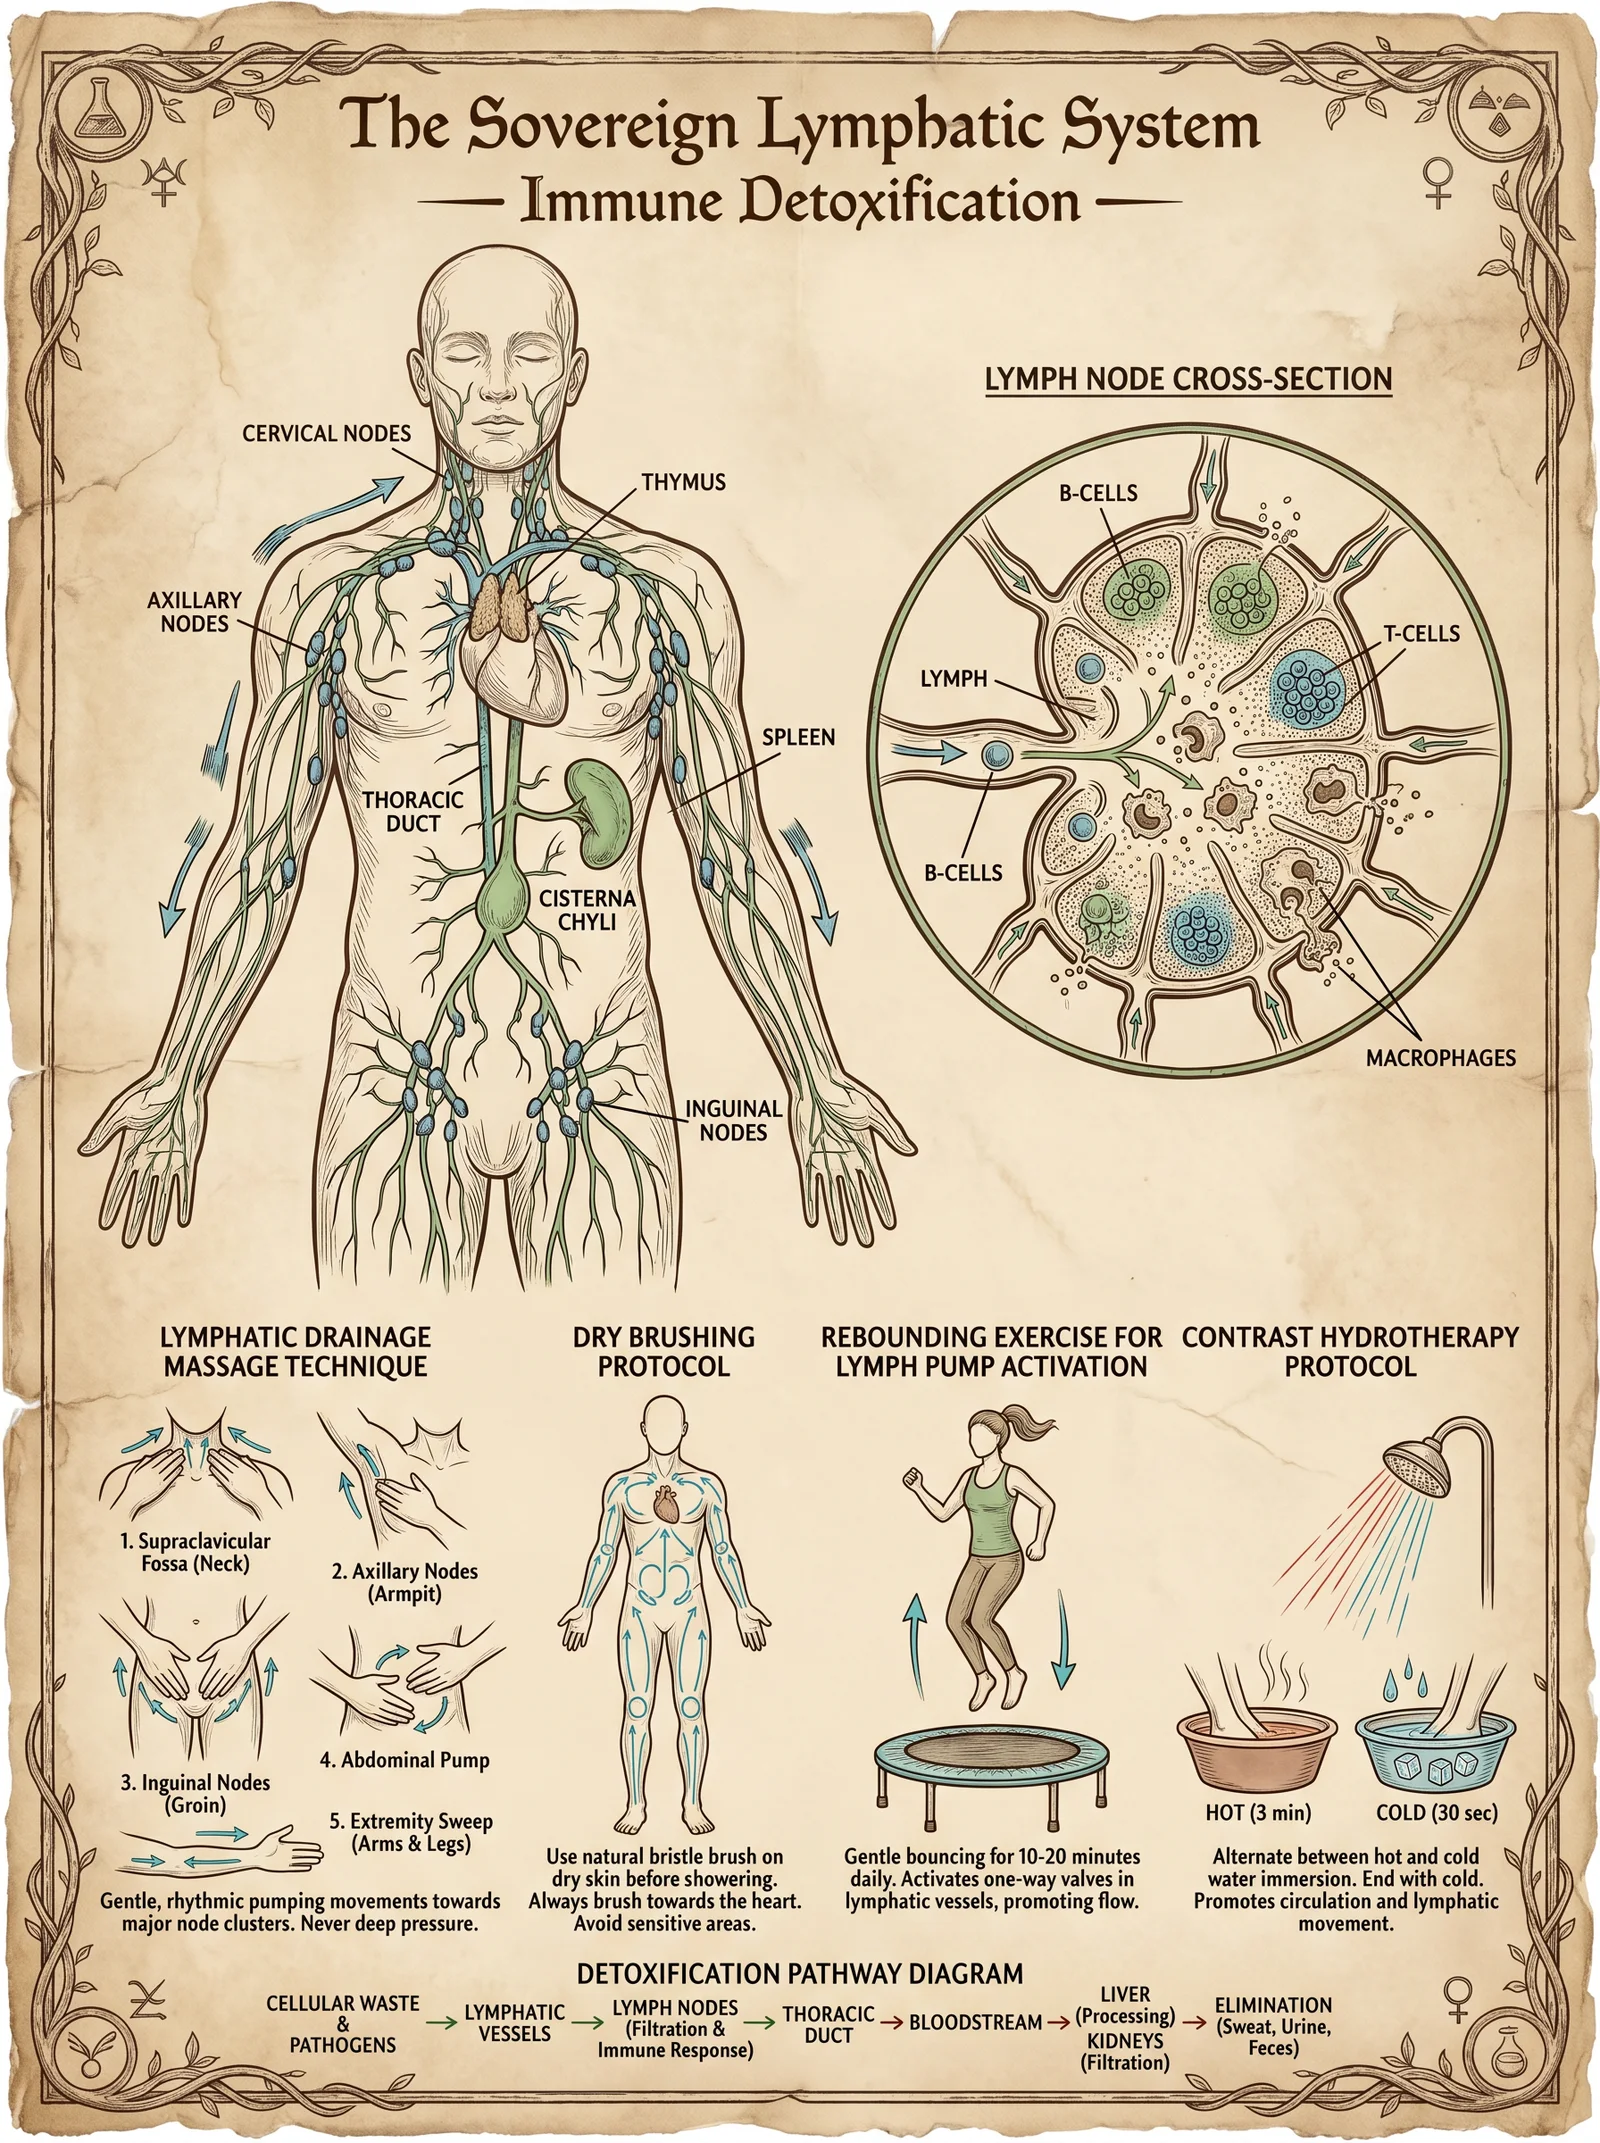
The lymphatic system is the sovereign body's silent sentinel, a complex network of vessels, nodes, and organs orchestrating immune surveillance and metabolic detoxification. This chapter imparts the unvarnished blueprint of lymphatic anatomy and physiology, paired with a comprehensive, actionable manual lymphatic drainage (MLD) protocol for self-application. Mastery of this knowledge empowers the adept to reclaim homeostatic control, optimize immune function, and catalyze systemic detoxification.
II. Lymphatic Anatomy: The Network of Immune Sovereignty
The lymphatic system is composed of three primary structural components:
- Lymphatic vessels: Thin-walled, valved conduits transporting lymph unidirectionally.
- Lymph nodes: Filter stations densely packed with lymphocytes and macrophages.
- Lymphoid organs: Spleen, thymus, tonsils—immune training and reservoir sites (refer to Volume III: Immuno-Architectonics for full organ protocols).
A. Lymphatic Vessel Hierarchy
- Initial lymphatics: Blind-ended capillaries absorbing interstitial fluid.
- Pre-collectors: Channels connecting initial lymphatics to collecting vessels.
- Collecting lymphatics: Larger vessels with smooth muscle and valves, ensuring unidirectional flow toward central ducts.
B. Lymph Node Groups and Key Locations
| Lymph Node Group | Location Description | Primary Drainage Territories |
|---|---|---|
| Cervical | Along sides and back of the neck | Head, neck, upper respiratory tract |
| Axillary | Armpit region | Upper limbs, chest wall, breast |
| Inguinal | Groin region | Lower limbs, external genitalia, lower abdomen |
| Popliteal | Behind the knees | Lower legs and feet |
| Mediastinal | Central thoracic cavity, near trachea and bronchi | Lungs, heart, thoracic structures |
| Mesenteric | Around the intestines | Abdominal viscera |
III. Physiology: Immune Function and Detoxification
The lymphatic system's physiology is twofold: immune surveillance and detoxification.
- Immune Surveillance: Lymph nodes filter lymph to trap antigens, activating lymphocytes. This process initiates adaptive immune responses.
- Detoxification: Lymph transports cellular debris, metabolic wastes, and pathogens for clearance primarily via the thoracic duct into venous circulation.
Key physiological features:
- Unidirectional flow driven by intrinsic lymphatic muscle contractions and extrinsic forces (skeletal muscle movement, respiration).
- Valves prevent retrograde flow, preserving directional drainage.
- Lymph formation depends on interstitial fluid pressure gradients; edema can impair this process, necessitating manual drainage.
IV. Manual Lymphatic Drainage (MLD): Principles and Execution
MLD is a specialized, gentle massage technique designed to stimulate lymph flow, enhance drainage, and reduce lymphatic congestion. The technique utilizes light, rhythmic strokes aligned with lymphatic anatomy.
A. Fundamental Principles
| Parameter | Description |
|---|---|
| Pressure Level | Very light pressure (approx. 30 mmHg equivalent) to avoid collapsing lymph vessels |
| Stroke Direction | Centripetal, following lymph flow from peripheral to central nodes |
| Stroke Type | Stationary circles, pump techniques, scooping, and rotary movements |
| Timing | Slow rhythm, approx. 1 stroke per second for optimal stimulation |
B. Contraindications
| Condition | Rationale |
|---|---|
| Acute infection or inflammation | May exacerbate pathogen dissemination |
| Congestive heart failure | Risk of volume overload |
| Deep vein thrombosis | Risk of thrombus mobilization |
| Malignant tumors in drainage area | Potential to facilitate metastasis |
V. Lymph Node Groups: Detailed Guide with Locations and Drainage Pathways
| Lymph Node Group | Anatomical Landmarks | Primary Drainage Pathway | Secondary Nodes Drained |
|---|---|---|---|
| Cervical | Along internal jugular vein, anterior and posterior triangle of the neck | Superficial head and neck → deep cervical nodes | Supraclavicular, jugular, submandibular nodes |
| Axillary | Medial to axillary vein, below pectoralis minor muscle | Upper limb → central axillary nodes | Apical nodes → subclavian lymph trunks |
| Inguinal | Superficial: below inguinal ligament; Deep: medial to femoral vein | Lower limb and lower abdominal wall | External iliac nodes → lumbar lymph trunks |
| Popliteal | Posterior knee, between heads of gastrocnemius | Foot and lower leg → superficial inguinal nodes | Deep inguinal nodes |
| Mediastinal | Around trachea, peribronchial areas | Lung parenchyma and thoracic viscera | Bronchomediastinal trunks |
| Mesenteric | Associated with intestines, near superior mesenteric artery | Gastrointestinal tract drainage | Lumbar and intestinal trunks |
VI. Step-by-Step Self-Application Manual Lymphatic Drainage Protocol
Prerequisites:
- Wear loose, comfortable clothing or expose the skin of the areas to be treated.
- Ensure a relaxed, quiet environment free from distractions.
- Hydrate with at least 500 ml of water prior to session (refer Volume 8: The Water Codex).
Step 1: Pre-Drainage Preparation (5 minutes)
- Adopt a comfortable supine or seated posture with the head elevated at 30 degrees.
- Perform 3 deep diaphragmatic breaths to stimulate thoracic duct flow.
- Gently tap the supraclavicular nodes (located above the clavicle, lateral to the sternocleidomastoid muscle) to pre-clear central pathways.
Step 2: Central Lymph Node Stimulation (10 minutes)
Focusing on the supraclavicular, axillary, and inguinal nodes to clear central drainage before peripheral stimulation.
| Node Group | Location Description | Technique | Stroke Duration (per side) |
|---|---|---|---|
| Supraclavicular | Superior to clavicle, lateral neck | Light circular strokes, ~5 cm diameter | 3 minutes |
| Axillary | Armpit, medial to humerus | Pump technique: compress and release | 4 minutes |
| Inguinal | Below inguinal ligament, lateral groin | Light stationary circles | 3 minutes |
Instructions:
- Use the pads of your index, middle, and ring fingers.
- Apply pressure barely enough to move skin, avoiding deep tissue compression.
- Perform strokes slowly (1 stroke/sec).
- Repeat each node group stimulation bilaterally.
Step 3: Peripheral Lymphatic Drainage (30 minutes)
Addressing distal regions, moving fluid centripetally toward central nodes.
| Region | Stroke Direction | Technique Description | Duration |
|---|---|---|---|
| Face and Neck | From forehead, cheeks → cervical nodes | Light stationary circles and scooping | 7 minutes |
| Upper Limb | Fingers → palm → wrist → axillary nodes | Pumping and scooping strokes | 10 minutes |
| Lower Limb | Toes → foot dorsum/sole → popliteal → inguinal nodes | Long, sweeping strokes and pumping | 13 minutes |
Detailed Instructions:
Face and Neck:
- Begin at the forehead, use circular strokes moving down towards the jawline.
- Gently scoop lymph from the jawline toward the cervical nodes (along the sternocleidomastoid muscle).
- Avoid pressure on the eyes and throat.
Upper Limb:
- Start on the fingers, using gentle strokes from distal phalanges toward palm.
- Continue moving lymph proximally, following anatomical lymphatic vessels along the forearm and upper arm.
- End with light pumping strokes over the axillary nodes.
Lower Limb:
- Begin at toes with gentle circular strokes.
- Proceed to the dorsum and sole of the foot, performing sweeping strokes toward the ankle.
- Continue up the calf to the popliteal nodes (behind the knee) with mild pumping.
- Finish by sweeping strokes up the thigh toward the inguinal nodes.
Step 4: Final Central Drainage and Integration (5 minutes)
- Repeat supraclavicular stimulation to facilitate central lymph outflow.
- Perform three deep diaphragmatic breaths to enhance thoracic duct emptying.
VII. Pressure Calibration and Measurement
Pressure applied during MLD is critical: too much collapses lymphatic capillaries; too little fails to stimulate flow.
| Pressure Level | Approximate Equivalent | Application Notes |
|---|---|---|
| Very Light | 20-30 mmHg (approx. 4-6 g/cm²) | Use finger pads; skin should visibly move but no blanching |
| Light | 30-50 mmHg | For central nodes only, cautious use |
| Moderate | >50 mmHg | Not recommended for MLD; risk vessel collapse |
Calibration Technique:
- Use a kitchen scale or pressure-sensitive device to train finger pressure:
- Place finger pads on scale.
- Apply incremental pressure until scale reads ~4-6 grams per cm².
- Memorize finger sensation at this pressure.
VIII. Posture and Environment Optimization
| Posture | Rationale | Recommendations |
|---|---|---|
| Supine (flat or elevated head 30°) | Maximizes thoracic duct drainage | Use pillows to support head and knees |
| Seated upright | Facilitates upper body drainage | Sit with back straight, feet flat on floor |
| Limb elevation | Promotes gravitational lymph return | Elevate limbs 15-30 cm during or after session |
Environmental Factors:
- Maintain ambient temperature 22–25°C to prevent vasoconstriction.
- Quiet environment to enhance relaxation and parasympathetic activation.
- Hydration: minimum 500 ml water before and after session.
IX. Contraindications and Cautions Table
| Condition | Risk Explanation | Recommended Action |
|---|---|---|
| Acute infections | May spread pathogens | Postpone MLD until infection resolves |
| Congestive heart failure | Increased fluid load may overwhelm heart | Obtain medical clearance; monitor closely |
| DVT (Deep Vein Thrombosis) | Risk of embolism | Strictly contraindicated |
| Malignancy in drainage area | Potential cancer cell dissemination | Consult oncology before proceeding |
| Pregnancy (first trimester) | Lack of safety data | Use caution; consult healthcare provider |
X. Summary Table: Lymph Node Groups, Functions, and MLD Techniques
| Node Group | Location | Drainage Regions | MLD Technique | Stroke Direction | Duration (min) |
|---|---|---|---|---|---|
| Cervical | Neck | Head, neck | Light circular, scooping | Distal → proximal | 7 |
| Axillary | Armpit | Upper limbs, chest wall | Pumping, scooping | Distal → proximal | 10 |
| Inguinal | Groin | Lower limbs, lower abdomen | Light circular | Distal → proximal | 6 |
| Popliteal | Behind knee | Lower leg, foot | Pumping | Distal → proximal | 3 |
| Supraclavicular | Above clavicle | Central drainage | Light circular | Lymph flow direction | 5 |
XI. Appendix: DIY Lymphatic Drainage Tools
For augmenting manual lymphatic drainage, simple devices can be fabricated:
| Tool | Materials Needed | Fabrication Steps | Usage Notes |
|---|---|---|---|
| Soft Silicone Cup | Medical-grade silicone, molding kit | 1. Create a dome-shaped mold (3-5 cm diameter). 2. Cure silicone as per instructions. | Use for gentle suction over lymph node areas; avoid excessive suction pressure |
| Wooden Roller | Hardwood dowel (2 cm diameter), sandpaper | 1. Cut dowel to 15 cm length. 2. Smooth edges with sandpaper. | Roll gently along limbs to stimulate lymph flow; avoid heavy pressure |
| Elastic Bandage | Cotton bandage roll | 1. Wrap limbs post-MLD to maintain drainage effect | Do not apply too tightly, monitor for circulation |
XII. Closing Words of Mastery
This volume imparts the foundational sovereign knowledge of the lymphatic system’s anatomy and physiology, paired with the complete self-application MLD protocol. The lymphatic system is the body’s immune and detoxification cornerstone. To master this work is to reclaim command of the sovereign body’s cleansing and defense. Apply these techniques with reverence, precision, and unwavering discipline.
For complementary hydration and water purification protocols essential for lymphatic health, consult Volume VIII: The Water Codex, Chapter II. For immune system modulation and lymphocyte optimization, see Volume III: Immuno-Architectonics.
<!-- SECTION 5 -->
Volume II: Orthomolecular Medicine and Megadose Protocols
Chapter IV: Vitamin C (Ascorbic Acid) — Mechanisms, Megadoses, and Therapeutic Protocols
Introduction
This chapter is a definitive compendium on ascorbic acid (Vitamin C), codifying its sacred role in human metabolism and immunity. Herein lies the complete, stepwise guide to harnessing the full potential of megadose protocols, including bowel tolerance determination and therapeutic applications against infection. This knowledge was suppressed for decades yet remains critical for sovereign health mastery.
I. Comprehensive Mechanisms of Ascorbic Acid in Human Metabolism and Immunity
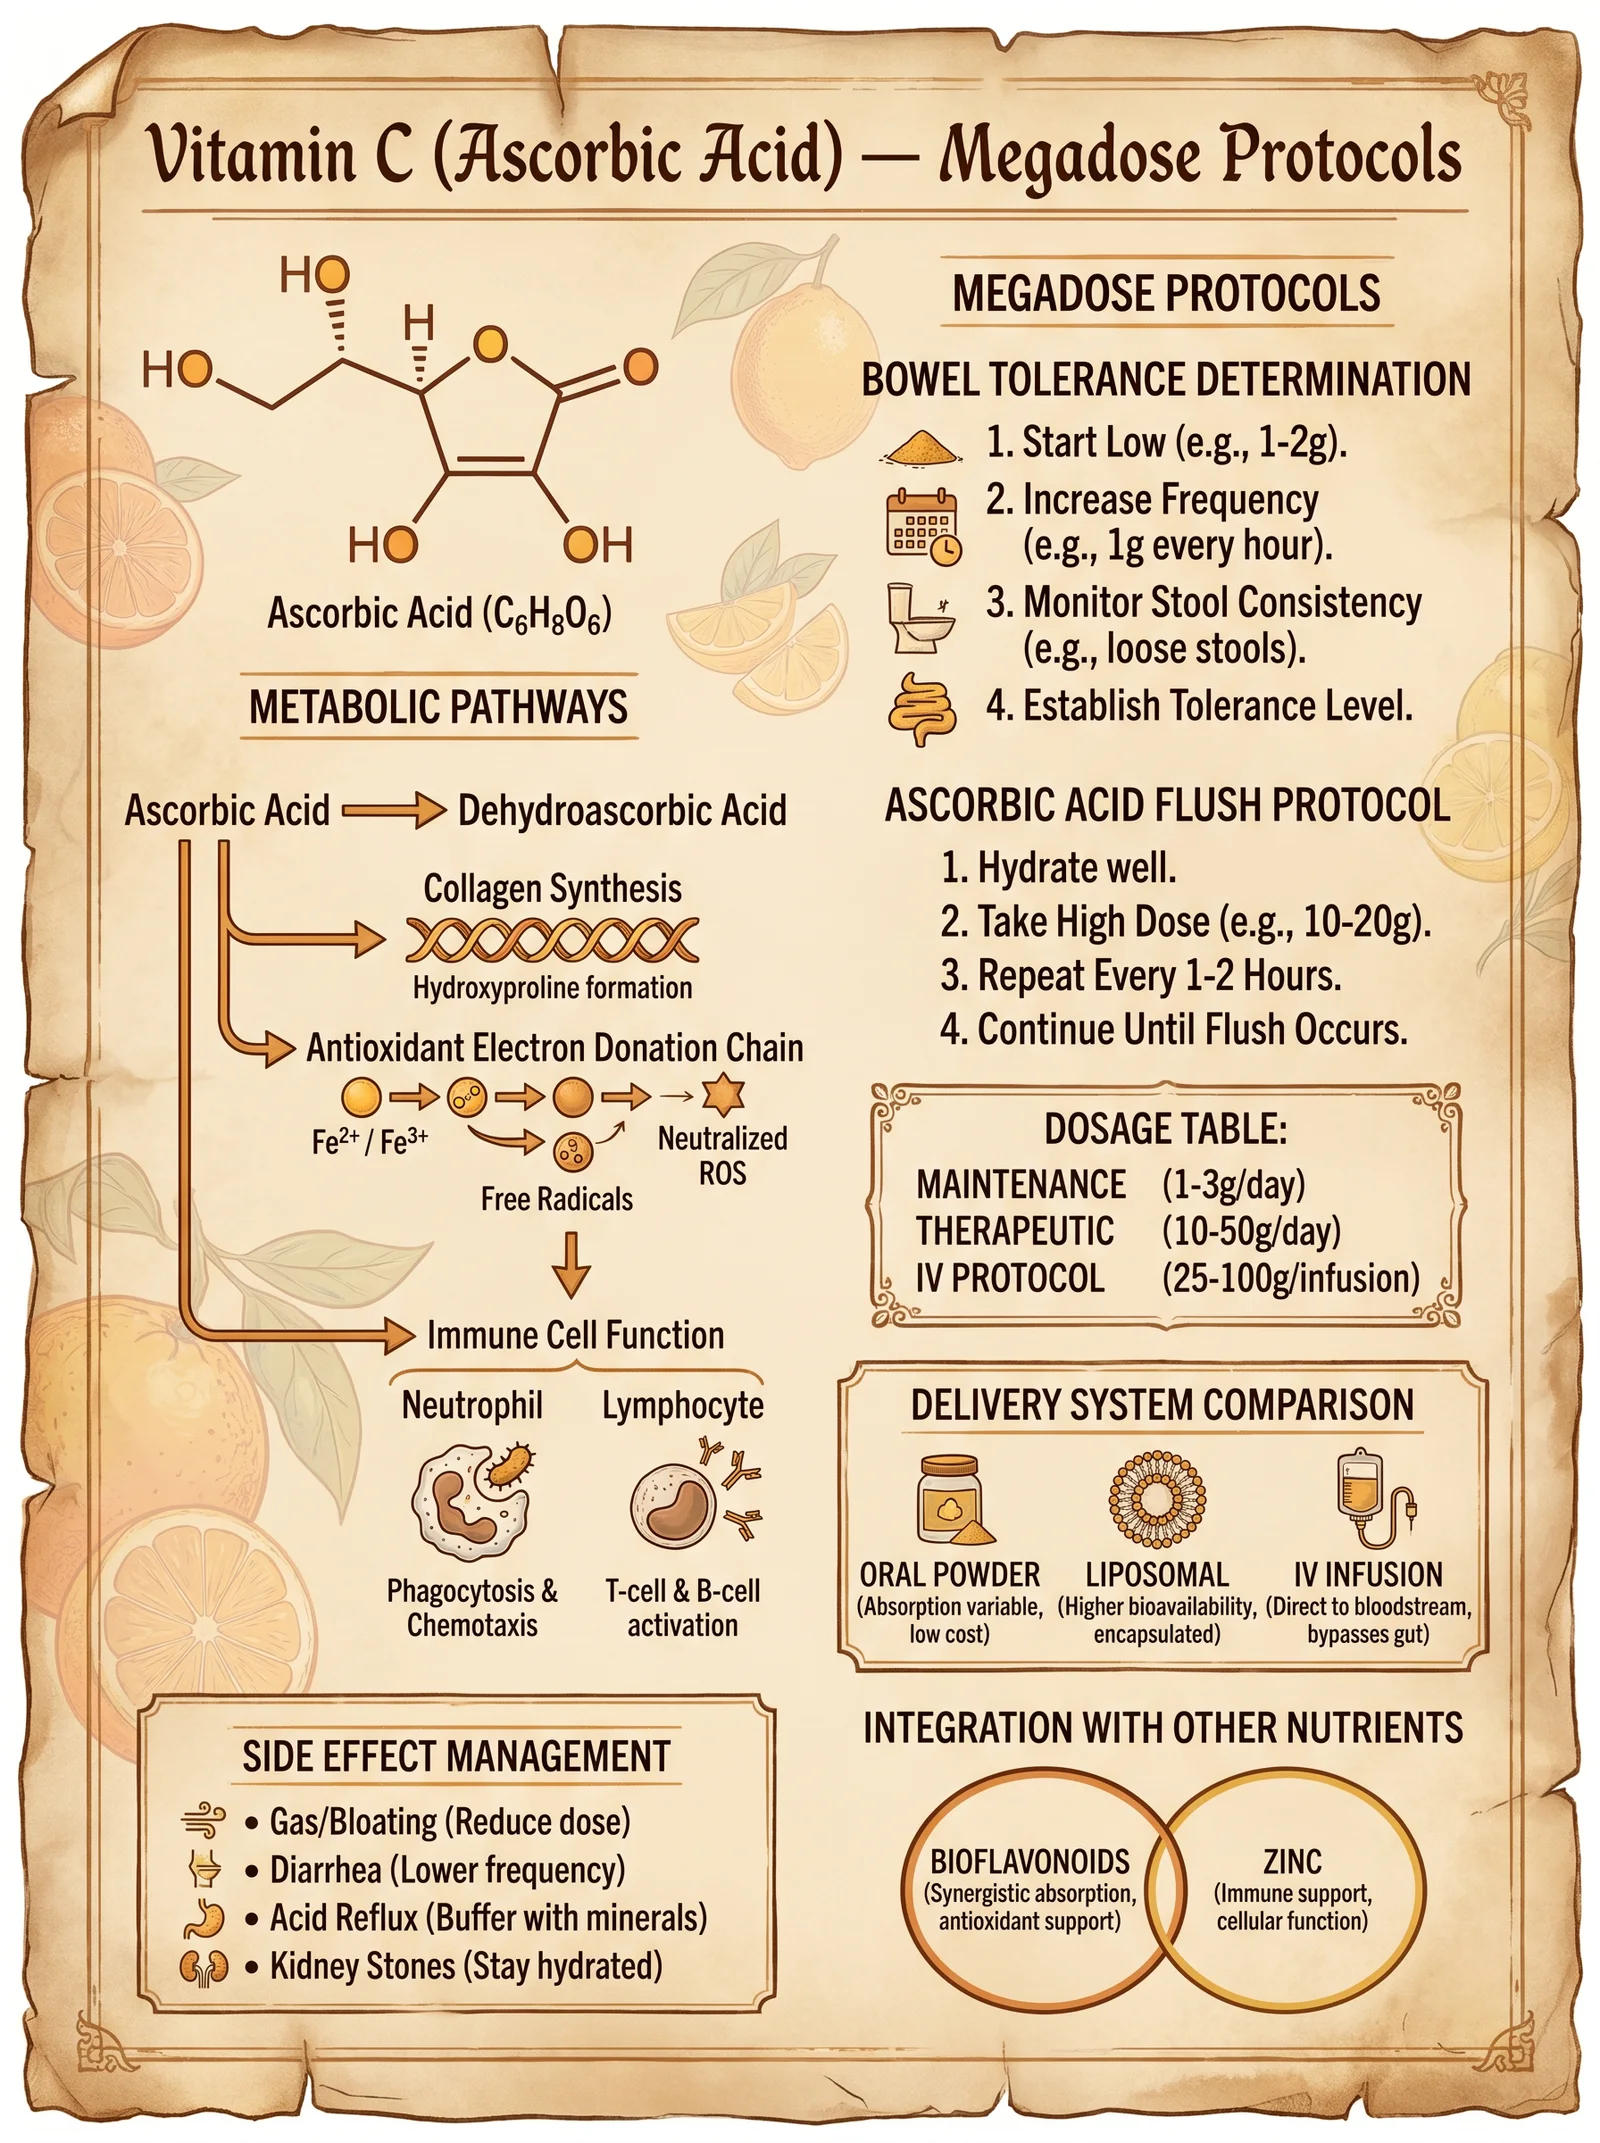
Vitamin C is a water-soluble, essential micronutrient and a powerful redox agent within human physiology. Humans lack the GULO gene for endogenous synthesis, making exogenous supply vital.
A. Biochemical Roles
- Electron donor in enzymatic hydroxylation
- Cofactor for prolyl and lysyl hydroxylases in collagen synthesis
- Essential for carnitine biosynthesis (energy metabolism)
- Involved in neurotransmitter synthesis (dopamine β-hydroxylase)
- Antioxidant function
- Scavenges reactive oxygen species (ROS) in cytosol and extracellular fluid
- Regenerates oxidized vitamin E (α-tocopherol)
- Protects cellular membranes and DNA from oxidative damage
- Immune modulation
- Enhances neutrophil chemotaxis, phagocytosis, and microbial killing
- Promotes lymphocyte proliferation and differentiation
- Supports interferon production
- Modulates cytokine profiles, reducing pro-inflammatory cytokines (e.g., TNF-α)
- Iron metabolism
- Enhances non-heme iron absorption by reducing ferric (Fe³⁺) to ferrous (Fe²⁺) iron
B. Pharmacokinetics and Transport
- Absorbed in the small intestine via sodium-dependent vitamin C transporters (SVCT1 and SVCT2)
- Saturation kinetics: absorption efficiency diminishes above 200 mg intake
- Renally excreted; plasma half-life approx. 30 minutes at high doses
II. Megadose Protocols: Rationale and Implementation
A. Purpose of Megadosing
- Achieve plasma concentrations 10-100 times higher than standard dietary levels, enabling pro-oxidant effects in pathogens and enhanced immune function.
- Overcome limited intestinal absorption via divided oral dosing or intravenous administration (see Volume III, Chapter VI).
B. Dosage Ranges for Megadosing
| Condition/Application | Oral Dose Range (grams/day) | Frequency | Notes |
|---|---|---|---|
| General Health Maintenance | 0.5 – 2 | Once to twice daily | Maintain bowel tolerance |
| Immune Support, Mild Infections | 3 – 10 | Every 4-6 hours | Adjust per bowel tolerance |
| Acute Viral/Bacterial Infection | 10 – 30 | Every 3-4 hours | Monitor for adverse effects |
| Severe Infections/Sepsis | 30 – 100+ (IV preferred) | Continuous or hourly (IV) | Supervised administration; hospital setting |
| Cancer Adjunct Therapy | 50 – 100+ IV | Daily or twice daily (IV) | See Volume III |
III. Determining Bowel Tolerance: The Key to Safe Megadosing
Bowel tolerance (BT) is the maximum oral dose of ascorbic acid before osmotic diarrhea ensues. This threshold varies individually and increases during illness.
A. Importance of BT Determination
- Ensures maximal dosing without gastrointestinal side effects
- Serves as a proxy for therapeutic dosing in acute conditions
B. Stepwise Bowel Tolerance Determination Protocol
- Baseline Preparation
- Use pure ascorbic acid powder (pharmaceutical grade, USP).
- Have potable water ready; mix doses freshly.
- Initial Dose
- Take 1 gram of ascorbic acid orally, dissolved in 200 mL water.
- Incremental Increases
- Every 30 minutes, increase dose by 1 gram.
- Continue increments until loose stools or diarrhea occur.
- Bowel Tolerance Dose Identification
- When first loose stool or diarrhea appears, reduce dose by 1 gram.
- This dose is your individual bowel tolerance maximum at that time.
- Adjustment During Illness
- Repeat BT test daily during infection; tolerance often increases.
IV. Ascorbic Acid Flush Protocol
The ascorbic acid flush is a rapid detoxification and immune stimulation technique. It leverages bowel tolerance principles for a systemic flush effect.
A. Materials Required
| Item | Specification |
|---|---|
| Ascorbic acid powder | USP grade, finely powdered |
| Distilled water | 250 mL per dose |
| Measuring scale | Precision to 0.1 g |
| Large mixing container | 1-liter capacity |
| Timer or clock | For dosing intervals |
B. Step-by-Step Flush Procedure
- Prepare Solution
- Mix 10 grams of ascorbic acid powder in 250 mL distilled water. Stir until fully dissolved.
- First Dose
- Drink entire 250 mL solution rapidly (within 5 minutes).
- Observe Effects
- Wait 30 minutes; monitor for any GI discomfort or loose stools.
- Repeat Dosing
- If no loose stools, repeat the 10-gram dose every 30 minutes.
- Continue until reaching bowel tolerance (loose stools) or up to 100 grams total.
- Post-Flush Hydration
- After flush completion, drink 500 mL distilled water to rehydrate.
- Frequency
- Perform flush once per day during acute illness or detox phases.
- For maintenance or mild conditions, reduce frequency accordingly.
V. Therapeutic Applications for Infections
Vitamin C megadosing exhibits potent effects against bacterial, viral, and fungal infections through multifactorial mechanisms.
A. Viral Infections
- Enhances interferon production and NK cell activity.
- Inhibits viral replication via pro-oxidant effects at high plasma concentrations.
- Used adjunctively in influenza, herpesviruses, and coronavirus infections.
B. Bacterial Infections
- Supports phagocytic killing and neutrophil function.
- Synergizes with antibiotics by destabilizing bacterial biofilms and membranes.
- Effective in urinary tract infections, pneumonia, and skin infections.
C. Fungal Infections
- Restores immune competence in immunocompromised states.
- Used adjunctively in candidiasis and systemic mycoses.
VI. Dosage Tables for Therapeutic Use and Side Effect Management
A. Oral Vitamin C Dosage by Condition
| Condition | Dose (grams/day) | Frequency | Duration | Notes |
|---|---|---|---|---|
| Healthy Adult Maintenance | 0.5 – 2 | 1-2 times daily | Continuous | Maintain BT to avoid diarrhea |
| Mild Upper Respiratory Infection | 3 – 10 | Every 4-6 hours | 3-7 days | Adjust per BT |
| Severe Respiratory Infection | 10 – 30 | Every 3-4 hours | 7-14 days | Monitor hydration |
| Chronic Infection Support | 10 – 20 | 2-4 times daily | Weeks to months | Combine with other protocols |
B. Side Effect Management Table
| Side Effect | Cause | Prevention/Treatment |
|---|---|---|
| Osmotic Diarrhea | Exceeding bowel tolerance | Reduce dose to BT level |
| Gastrointestinal Discomfort | Rapid dosing or high concentration | Dilute dose in larger volume of water |
| Kidney Stones (Oxalate type) | Excessive long-term dosing, dehydration | Hydrate adequately; limit dose duration |
| Iron Overload | Pre-existing hemochromatosis | Avoid megadoses without medical supervision |
VII. Building Your Own Ascorbic Acid Megadose Delivery System
A. Materials
| Item | Specification |
|---|---|
| Fine ascorbic acid powder | USP grade, ≥99% purity |
| Precision scale | Accuracy ±0.01 grams |
| Graduated measuring cup | 250 mL capacity |
| Stirring rod | Non-reactive material (glass/plastic) |
| Airtight storage container | Protect from moisture |
B. Preparation Steps
- Weigh the Powder
- Use the precision scale to measure the desired dose (e.g., 10 grams).
- Dissolve in Water
- Pour 250 mL distilled water into measuring cup; add powder gradually.
- Stir Thoroughly
- Stir until fully dissolved; solution should be clear, no sediment.
- Dose Immediately
- Drink prepared solution within 10 minutes for maximum potency.
- Storage
- Store remaining powder in airtight container away from heat/light.
VIII. Final Notes on Integration
- Always individualize dosing based on BT and clinical response.
- Complement with adequate hydration and supportive nutrients (see Volume I, Chapter VII).
- Monitor for rare adverse reactions; consult medical supervision for sustained megadosing in severe illness.
- Incorporate Vitamin C protocols as part of a holistic sovereignty plan for health and longevity (see Volume V).
This concludes the comprehensive, no-compromise guide to megadose Vitamin C orthomolecular therapy. Master these protocols with reverence and precision to reclaim sovereign metabolic and immune mastery.
Appendix: Quick Reference Tables
| Condition | Oral Dose (grams/day) | Frequency | Bowel Tolerance Notes |
|---|---|---|---|
| Maintenance | 0.5 – 2 | 1-2 times daily | Maintain to avoid diarrhea |
| Mild Infection | 3 – 10 | Every 4-6 hours | Increase dose if tolerated |
| Acute Infection | 10 – 30 | Every 3-4 hours | Monitor hydration and GI effects |
| Severe Infection (IV preferred) | 30 – 100+ | Continuous/Hourly (IV) | Requires medical supervision |
| Side Effect | Management |
|---|---|
| Osmotic diarrhea | Reduce dose below BT |
| GI discomfort | Dilute dose, slow intake |
| Kidney stones | Hydrate, limit long-term megadosing |
| Iron overload | Avoid without medical clearance |
End of Chapter IV, Volume II. Proceed to Volume III for intravenous protocols and advanced adjunct therapies.
<!-- SECTION 6 -->
Volume II: Orthomolecular Medicine and Megadose Protocols
Chapter IV: Niacin (Nicotinic Acid)
Section 3: Biochemical Actions of Nicotinic Acid in Vasodilation and Detoxification, Niacin Flush Mechanism, Dosing Escalation, and Therapeutic Synergy with Sauna Therapy
Introduction
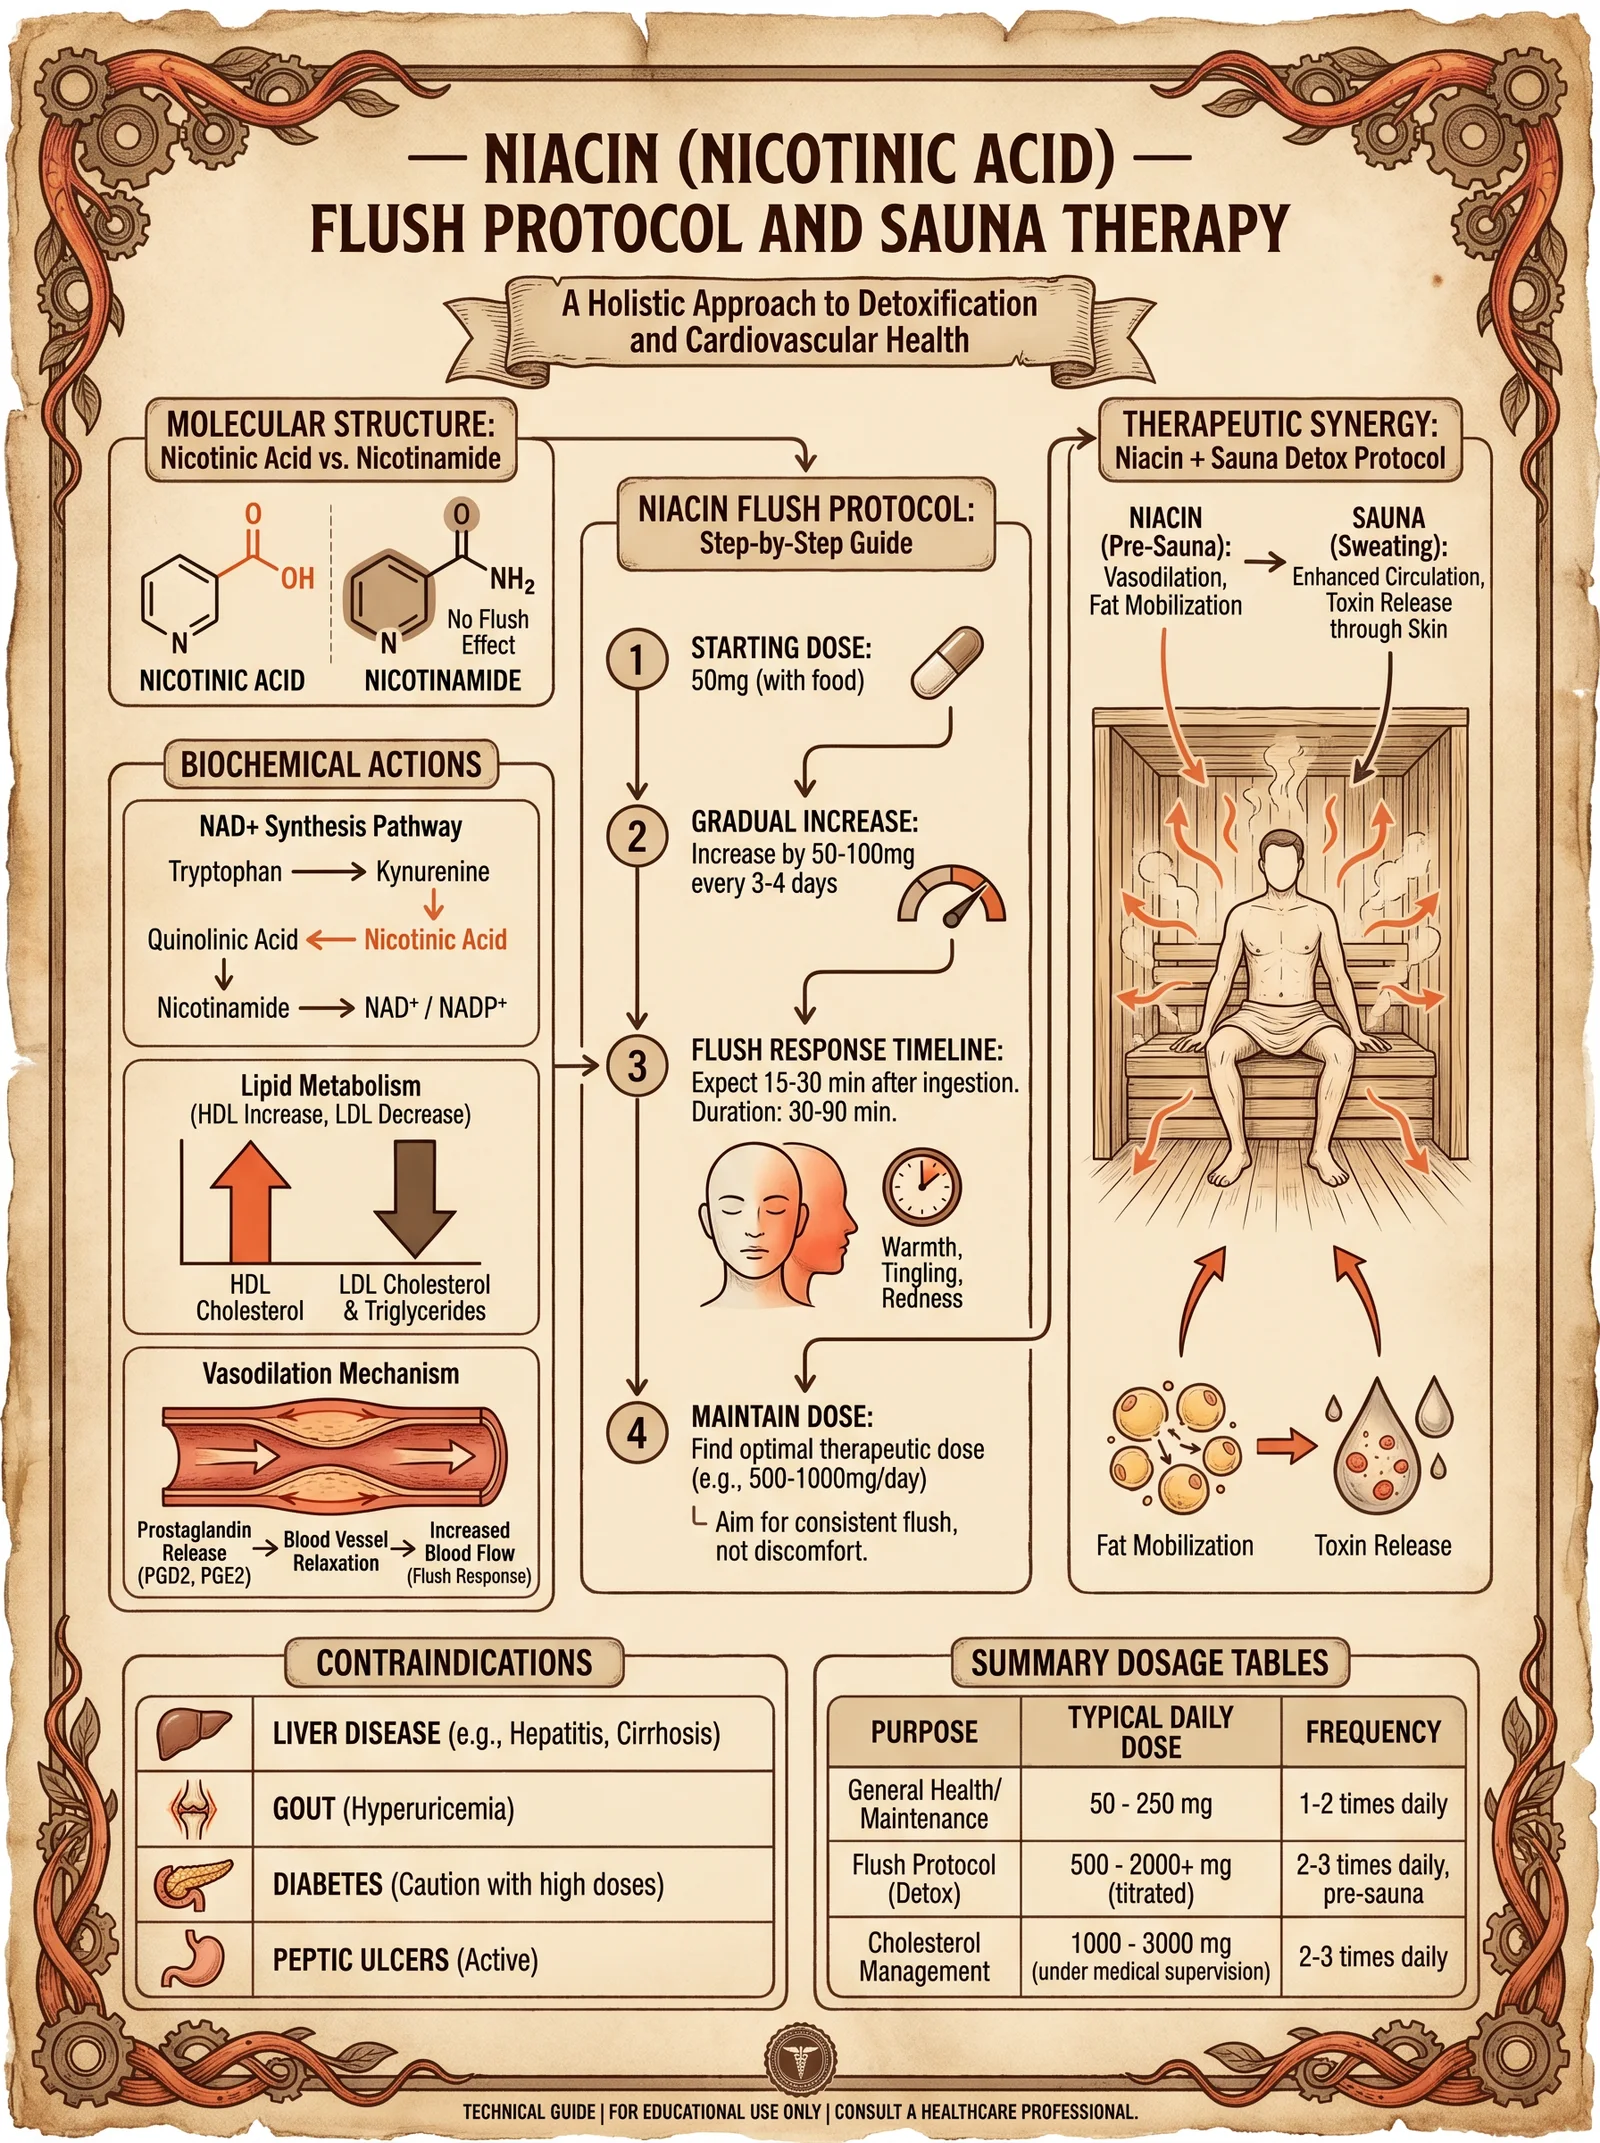
Nicotinic acid (niacin), a water-soluble B-vitamin (B3), is a cornerstone compound in orthomolecular medicine due to its potent biochemical actions in vasodilation and detoxification. The niacin flush, a dose-dependent physiological reaction, signals the activation of critical pathways enabling enhanced peripheral blood flow, mobilization of lipophilic toxins, and optimization of mitochondrial energy systems. This chapter delivers comprehensive, stepwise protocols for safely inducing and escalating the niacin flush, integrating sauna therapy to maximize detoxification, and understanding underlying biochemical mechanisms.
1. Biochemical Actions of Nicotinic Acid
1.1 Primary Biochemical Targets
Nicotinic acid acts through several molecular pathways with direct implications for vascular tone and detoxification:
| Biochemical Action | Mechanism | Physiological Outcome |
|---|---|---|
| GPR109A receptor activation | Niacin binds G-protein coupled receptor 109A on epidermal Langerhans cells and adipocytes | Initiates prostaglandin D2 and E2 release causing vasodilation and flushing |
| Inhibition of lipolysis | Suppresses hormone-sensitive lipase in adipocytes | Reduces free fatty acid release, lowering hepatic lipid load |
| NAD+/NADH coenzyme precursor | Precursor for NAD and NADP, essential in redox reactions | Enhances mitochondrial respiration, energy metabolism, and DNA repair |
| Increased prostaglandin synthesis | Induces cyclooxygenase enzymes to produce vasodilatory prostaglandins | Local cutaneous vasodilation and increased blood flow |
| Modulation of inflammatory cytokines | Downregulates TNF-alpha and IL-6 signaling | Reduces systemic inflammation, facilitating detoxification |
1.2 Vasodilation and Niacin Flush Mechanism
Niacin flush is the hallmark clinical response to nicotinic acid ingestion, characterized by rapid onset of erythema (redness), warmth, and tingling sensations predominantly on the face, neck, and upper torso.
Stepwise biochemical cascade:
- Niacin ingestion and absorption: Rapid uptake into systemic circulation.
- Activation of GPR109A receptors: Located on epidermal Langerhans cells and dermal endothelial cells.
- Prostaglandin D2 (PGD2) and Prostaglandin E2 (PGE2) release: Cyclooxygenase (COX) enzymes catalyze conversion of arachidonic acid into prostaglandins.
- Vasodilation: PGD2 and PGE2 bind to prostanoid receptors on dermal blood vessels causing smooth muscle relaxation and capillary dilation.
- Increased cutaneous blood flow: Visible as flushing, accompanied by warmth and itching.
- Enhanced peripheral circulation: Facilitates mobilization of lipophilic toxins from adipose stores and increases delivery of nutrients and oxygen to tissues.
Flush time course: Begins 5-15 minutes post-dose, peaks at 20-30 minutes, resolves within 60-90 minutes.
2. Niacin Flush Protocol
2.1 Safety Considerations
- Begin with low doses to minimize adverse effects.
- Avoid in patients with active liver disease, peptic ulcers, or unstable cardiovascular conditions.
- Monitor for symptoms of hypotension, dizziness, or severe itching.
- Not recommended during pregnancy or lactation without physician oversight.
- Use only pharmaceutical-grade nicotinic acid; avoid niacinamide (nicotinamide), which does not cause flush or vasodilation.
2.2 Dosing Escalation Schedule
| Week | Daily Dose (mg) | Frequency | Expected Flush Intensity | Notes |
|---|---|---|---|---|
| 1 | 50 | Once daily (evening) | Mild, localized flush | Assess tolerance |
| 2 | 100 | Once daily (evening) | Moderate flush | Increase dose if tolerated |
| 3 | 200 | Twice daily | Moderate to strong flush | Divide dose morning/evening |
| 4 | 500 | Twice daily | Strong flush | Monitor liver function weekly |
| 5+ | 1000 | Twice daily | Intense flush | Max dose for detox protocol |
Note: Do not exceed 3000 mg/day without medical supervision.
2.3 Step-by-Step Niacin Flush Initiation
Materials Needed:
- Pharmaceutical-grade nicotinic acid powder or tablets
- Measuring scale accurate to 1 mg (if powder form)
- Timer or clock
- Water (room temperature)
- Symptom log sheet
Procedure:
- Baseline assessment: Record resting heart rate, blood pressure, skin condition, and any pre-existing symptoms.
- Dose preparation: Measure exact dose per weekly schedule; dissolve powder in 100 ml water if powder form.
- Ingestion: Take niacin orally with 100 ml water on an empty stomach or 30 minutes before a meal.
- Observation period: Sit or recline comfortably; monitor for flushing onset within 5-15 minutes.
- Symptom logging: Note intensity (scale 0-10), duration, and any adverse effects.
- Hydration: Sip water throughout flush to maintain hydration.
- Aftercare: Avoid sudden standing to prevent hypotension; rest if dizzy.
- Repeat dose: For multiple daily doses, wait minimum 6 hours between doses.
- Weekly escalation: Increase dose per schedule only if previous week flush was tolerable.
2.4 Expected Physiological Responses
| Flush Intensity | Description | Physiological Indicators | Duration (minutes) | Notes |
|---|---|---|---|---|
| 0-2 (None-Mild) | Slight warmth or tingling | Minimal vasodilation, stable blood pressure | 10-15 | Safe for dose escalation |
| 3-5 (Moderate) | Pronounced redness, warmth | Moderate vasodilation, possible mild tachycardia | 20-30 | Optimal therapeutic flush |
| 6-8 (Strong) | Intense redness, itching | High vasodilation, possible transient hypotension | 30-45 | Monitor for adverse effects |
| 9-10 (Severe) | Burning sensation, headache | Severe vasodilation, hypotension, nausea | 45-60 | Reduce dose, consider medical review |
3. Therapeutic Synergy with Sauna Therapy
3.1 Rationale for Combined Use
Niacin-mediated vasodilation primes peripheral circulation for enhanced toxin mobilization. Sauna therapy complements this by inducing hyperthermia, promoting sweating, and stimulating lymphatic flow. The combined protocol produces a powerful detoxification synergy, accelerating removal of heavy metals, persistent organic pollutants, and metabolic waste.
3.2 Biochemical Synergism
| Niacin Effect | Sauna Effect | Combined Outcome |
|---|---|---|
| Dilates cutaneous blood vessels | Increases core body temperature | Enhanced peripheral blood flow |
| Mobilizes lipophilic toxins from adipose tissue | Induces sweat gland activation | Expedited toxin excretion through skin |
| Increases NAD+ production | Stimulates heat shock protein synthesis | Cellular repair and mitochondrial optimization |
| Reduces systemic inflammation | Activates parasympathetic nervous system | Improved immune modulation and recovery |
3.3 Integrated Niacin Flush and Sauna Protocol
Materials Needed:
- Niacin as per dosing schedule
- Infrared or traditional sauna with temperature control (65-80°C)
- Hydration fluids (electrolyte solution recommended)
- Timer
- Cooling towel or fan
Stepwise Protocol:
- Pre-sauna preparation: Take niacin dose 30-45 minutes before sauna session to allow flush onset.
- Hydration: Drink 500 ml electrolyte-rich water before entering sauna.
- Sauna session: Enter sauna, remain seated or reclining; maintain temperature at 65-80°C for 20-30 minutes.
- Flush monitoring: Expect intensified flushing and sweating; monitor for dizziness or hypotension.
- Cooling phase: Exit sauna, cool down gradually with towel or fan for 10-15 minutes.
- Post-sauna hydration: Drink additional 500 ml electrolyte solution.
- Repeat frequency: Perform 3-4 sessions per week during detoxification phase.
- Progressive adaptation: Increase sauna duration and niacin dose gradually as tolerated.
4. Contraindications and Cautions
| Condition | Risk with Niacin Flush | Recommendation |
|---|---|---|
| Active liver disease | Hepatotoxicity risk | Absolute contraindication |
| Peptic ulcers | Increased gastric irritation | Avoid niacin or use under medical supervision |
| Unstable angina or cardiac arrhythmias | Hypotension, tachycardia risk | Avoid or monitor closely |
| Diabetes mellitus | Niacin can affect glucose control | Use with caution, monitor blood sugar |
| Gout | Niacin may increase uric acid levels | Avoid or use low doses |
| Pregnancy and breastfeeding | Insufficient safety data | Avoid or consult healthcare provider |
5. Summary Tables
5.1 Niacin Flush Dose Escalation and Expected Outcomes
| Week | Dose (mg/day) | Flush Intensity | Common Side Effects | Liver Function Monitoring |
|---|---|---|---|---|
| 1 | 50 | Mild (1-2) | Minimal flushing, slight warmth | Not required |
| 2 | 100 | Mild-Moderate (2-3) | Flushing, some itching | Optional |
| 3 | 200 | Moderate (3-5) | Flushing, mild headache, warmth | Weekly AST/ALT recommended |
| 4 | 500 | Moderate-Strong (5-7) | Flushing, itching, transient hypotension | Weekly AST/ALT mandatory |
| 5+ | 1000-3000 | Strong-Severe (7-10) | Intense flushing, possible nausea, dizziness | Weekly AST/ALT mandatory, reduce dose if abnormal |
5.2 Physiological Responses and Safety Thresholds
| Parameter | Normal Range | Flush Effect Threshold | Toxicity Threshold |
|---|---|---|---|
| Blood pressure | 120/80 mmHg | May drop 5-15 mmHg | Drop >30 mmHg requires intervention |
| Heart rate | 60-80 bpm | Increase up to 20 bpm | Tachycardia >120 bpm concerning |
| Liver enzymes (AST/ALT) | <40 IU/L | Slight elevation possible | >3x normal requires dose reduction |
| Uric acid | 3.5-7.2 mg/dL | Mild increase possible | >8.5 mg/dL risk of gout flare |
6. Concluding Remarks
The niacin flush represents a controlled, biochemical gateway to enhanced detoxification and vascular rejuvenation. Understanding and respecting the precise dosing escalation, safety parameters, and synergistic use with sauna therapy transforms nicotinic acid from a simple vitamin to a potent orthomolecular agent of longevity and health sovereignty. Meticulous adherence to the protocols herein will unlock suppressed metabolic pathways essential for the sovereign body.
For adjunctive detoxification protocols involving water purification and electrolyte balance, refer to Volume 8: The Water Codex, Chapter II. For mitochondrial bioenergetics optimization, see Volume 3: Cellular Alchemy, Chapter V.
End of Section
<!-- SECTION 7 -->
The Complete Practitioner's Codex, Volume II: Mineral Balancing and Ancestral Nutrition
Chapter IV: Hair Tissue Mineral Analysis (HTMA) — Complete Interpretation of Critical Mineral Ratios and Clinical Correlations
Preface: Hair Tissue Mineral Analysis (HTMA) is not a mere diagnostic tool; it is a sacred lens into the invisible alchemy of the sovereign body. Through the precise interpretation of mineral ratios, the master practitioner deciphers the body's metabolic state, toxic burden, and energetic balance. This chapter unveils the full spectrum of calcium/phosphorus, sodium/magnesium, calcium/potassium, and zinc/copper ratios—their metabolic implications, clinical correlations, and prescriptive interventions. This knowledge is suppressed by mainstream medicine but essential for reclaiming vitality and longevity.
Section I: Fundamentals of Hair Tissue Mineral Analysis Ratios

HTMA quantifies mineral concentrations in hair tissue, reflecting long-term mineral status and metabolic activity more reliably than serum tests. Each mineral ratio represents a complex biochemical pathway or physiological state. Absolute mineral levels have limited utility without ratio context.
Core Mineral Ratios and Their Significance
| Ratio | Primary Metabolic Role | Key Clinical Correlations |
|---|---|---|
| Calcium / Phosphorus | Bone metabolism, energy production, cellular signaling | Bone density, parathyroid function |
| Sodium / Magnesium | Adrenal function, cellular excitability, muscle tone | Stress response, hypertension, fatigue |
| Calcium / Potassium | Membrane excitability, neuromuscular function | Cardiac arrhythmias, muscle cramps |
| Zinc / Copper | Immune function, antioxidant defense, neurotransmission | Infections, chronic inflammation, mental health |
Section II: Calcium / Phosphorus Ratio — The Skeletal and Energetic Axis
1. Biochemical Context
Calcium (Ca) and phosphorus (P) form the fundamental mineral matrix of bone as hydroxyapatite [Ca_10(PO_4)_6(OH)_2]. Optimal balance ensures structural integrity and regulates parathyroid hormone (PTH), vitamin D metabolism, and intracellular signaling.
2. Ideal Ratio and Interpretation
| Ratio (Ca/P) | Interpretation | Metabolic Implication | Clinical Correlations |
|---|---|---|---|
| 2.3 : 1 to 2.7 : 1 | Ideal ratio | Balanced bone remodeling, normal PTH function | Strong bones, stable calcium homeostasis |
| < 2.3 : 1 | Low Ca relative to P | Possible hypocalcemia, impaired bone mineralization | Osteomalacia, fractures, muscle spasms |
| > 2.7 : 1 | High Ca relative to P | Hyperparathyroidism, calcium loss from bone | Osteoporosis, kidney stones, calcification |
3. Clinical Manifestations of Deviations
- Low Ca/P ratio: Weak bones, fatigue, muscle cramps, paresthesia.
- High Ca/P ratio: Bone pain, kidney stones, arterial calcification, cognitive fog.
4. Intervention Protocols
Step-by-step intervention based on Ca/P ratio:
| Condition | Intervention Steps | Supplement/Dietary Focus | Dosage/Duration |
|---|---|---|---|
| Low Ca/P Ratio | 1. Increase dietary calcium via bone broths, sardines, leafy greens. <br> 2. Correct vitamin D3 deficiency (see Volume IV). <br> 3. Supplement with calcium citrate. | Calcium citrate, vitamin D3, magnesium (to aid absorption) | Calcium citrate 500 mg BID, Vitamin D3 5000 IU daily, 3 months minimum |
| High Ca/P Ratio | 1. Reduce excessive calcium intake. <br> 2. Increase dietary phosphorus via organic meats, eggs. <br> 3. Support parathyroid by optimizing magnesium. | Phosphorus-rich foods, magnesium glycinate | Phosphorus 700 mg daily, Magnesium glycinate 300 mg daily, 3 months |
Section III: Sodium / Magnesium Ratio — The Adrenal and Cellular Excitability Index
1. Biochemical Context
Sodium (Na) and magnesium (Mg) govern cellular membrane potentials, adrenal cortical function, and intracellular enzymatic reactions. Sodium predominates extracellularly; magnesium is the primary intracellular cation and natural calcium antagonist.
2. Ideal Ratio and Interpretation
| Ratio (Na/Mg) | Interpretation | Metabolic Implication | Clinical Correlations |
|---|---|---|---|
| 4.0 : 1 to 6.0 : 1 | Ideal balance | Proper adrenal function, optimal stress response | Normal blood pressure, balanced energy levels |
| < 4.0 : 1 | Low Na relative to Mg | Adrenal insufficiency, fatigue | Hypotension, lethargy, low cortisol |
| > 6.0 : 1 | High Na relative to Mg | Adrenal overdrive, mineralocorticoid excess | Hypertension, anxiety, insomnia |
3. Clinical Manifestations of Deviations
- Low Na/Mg ratio: Chronic fatigue, weakness, low blood pressure, poor stress tolerance.
- High Na/Mg ratio: Edema, hypertension, irritability, muscle twitching.
4. Intervention Protocols
Step-by-step intervention based on Na/Mg ratio:
| Condition | Intervention Steps | Supplement/Dietary Focus | Dosage/Duration |
|---|---|---|---|
| Low Na/Mg Ratio | 1. Support adrenal glands with adaptogenic herbs (ashwagandha, rhodiola). <br> 2. Increase sodium intake via natural sea salt. <br> 3. Moderate magnesium supplementation to avoid excess. | Himalayan salt, adaptogens, magnesium sulfate | Sea salt 1–2 g daily, Ashwagandha 300 mg BID, Mg sulfate 100 mg daily, 2 months |
| High Na/Mg Ratio | 1. Reduce sodium intake (avoid processed foods). <br> 2. Increase magnesium-rich foods (pumpkin seeds, spinach). <br> 3. Use magnesium glycinate supplementation. | Dietary magnesium, Mg glycinate | Magnesium glycinate 400 mg daily, 3 months |
Section IV: Calcium / Potassium Ratio — The Neuromuscular and Cardiac Excitability Marker
1. Biochemical Context
Calcium and potassium regulate cellular excitability, muscle contraction, heart rhythm, and neurotransmission. Calcium influx triggers contraction; potassium repolarizes cells. Imbalance disrupts electrical stability.
2. Ideal Ratio and Interpretation
| Ratio (Ca/K) | Interpretation | Metabolic Implication | Clinical Correlations |
|---|---|---|---|
| 3.5 : 1 to 4.5 : 1 | Ideal balance | Stable neuromuscular function, normal cardiac rhythm | Normal muscle tone, absence of cramps or arrhythmias |
| < 3.5 : 1 | Low Ca relative to K | Hypocalcemia, hyperkalemia risk | Muscle weakness, arrhythmias, fatigue |
| > 4.5 : 1 | High Ca relative to K | Hypercalcemia, hypokalemia risk | Muscle cramps, hypertension, cardiac arrhythmias |
3. Clinical Manifestations of Deviations
- Low Ca/K ratio: Muscle weakness, palpitations, fatigue.
- High Ca/K ratio: Muscle spasms, hypertension, arrhythmias.
4. Intervention Protocols
Step-by-step intervention based on Ca/K ratio:
| Condition | Intervention Steps | Supplement/Dietary Focus | Dosage/Duration |
|---|---|---|---|
| Low Ca/K Ratio | 1. Increase calcium intake (see Ca/P protocol). <br> 2. Reduce foods high in potassium (bananas, potatoes). <br> 3. Monitor cardiac status closely. | Calcium citrate, limit potassium foods | Calcium citrate 500 mg BID, avoid high-potassium foods, 3 months |
| High Ca/K Ratio | 1. Increase potassium intake via leafy greens and root vegetables. <br> 2. Reduce calcium supplementation if excessive. <br> 3. Supplement potassium cautiously under supervision. | Potassium chloride supplements, dietary potassium | Potassium chloride 99 mg daily, 3 months |
Section V: Zinc / Copper Ratio — The Immune and Neurotransmitter Balance Index
1. Biochemical Context
Zinc (Zn) and copper (Cu) are trace minerals essential for enzymatic reactions, immune function, antioxidant defense, and neurotransmitter synthesis. They have an antagonistic relationship; excess of one suppresses the other.
2. Ideal Ratio and Interpretation
| Ratio (Zn/Cu) | Interpretation | Metabolic Implication | Clinical Correlations |
|---|---|---|---|
| 8 : 1 to 12 : 1 | Ideal balance | Optimal immune function, antioxidant status | Strong immunity, balanced neurotransmission |
| < 8 : 1 | Low Zn relative to Cu | Copper toxicity, oxidative stress | Chronic infections, inflammation, anxiety |
| > 12 : 1 | High Zn relative to Cu | Copper deficiency, impaired immune response | Fatigue, depression, poor wound healing |
3. Clinical Manifestations of Deviations
- Low Zn/Cu ratio: Frequent infections, inflammation, mood disorders.
- High Zn/Cu ratio: Fatigue, immune suppression, neurological symptoms.
4. Intervention Protocols
Step-by-step intervention based on Zn/Cu ratio:
| Condition | Intervention Steps | Supplement/Dietary Focus | Dosage/Duration |
|---|---|---|---|
| Low Zn/Cu Ratio | 1. Reduce copper exposure (avoid copper cookware, water pipes). <br> 2. Supplement zinc with co-factors (vitamin C, B6). <br> 3. Use chelating agents if indicated (see Volume VIII). | Zinc picolinate, vitamin C, B6 | Zinc picolinate 30 mg daily, Vitamin C 500 mg BID, 3 months |
| High Zn/Cu Ratio | 1. Supplement copper cautiously with copper gluconate. <br> 2. Avoid excessive zinc intake. <br> 3. Support with ceruloplasmin boosters (molybdenum). | Copper gluconate, molybdenum | Copper gluconate 2 mg daily, Molybdenum 150 mcg daily, 3 months |
Section VI: Summary Tables — Ideal Ratios, Deviations, and Clinical Symptoms
| Ratio | Ideal Range | Low Ratio Symptoms | High Ratio Symptoms | Primary Intervention |
|---|---|---|---|---|
| Calcium/Phosphorus | 2.3 to 2.7 | Osteomalacia, muscle cramps, fractures | Osteoporosis, calcification, kidney stones | Calcium or phosphorus supplementation |
| Sodium/Magnesium | 4.0 to 6.0 | Fatigue, hypotension, adrenal insufficiency | Hypertension, anxiety, edema | Modify sodium intake, magnesium supplementation |
| Calcium/Potassium | 3.5 to 4.5 | Muscle weakness, cardiac arrhythmias | Muscle cramps, hypertension, arrhythmias | Adjust calcium and potassium intake |
| Zinc/Copper | 8 to 12 | Chronic infections, inflammation, anxiety | Fatigue, depression, immune suppression | Zinc or copper supplementation |
Section VII: Practical HTMA Interpretation Protocol
Step-by-step guide for HTMA ratio interpretation and intervention:
- Obtain HTMA report from a validated laboratory with ICP-MS technology to ensure precision.
- Calculate mineral ratios using measured concentrations (expressed in mg%). Example:
\[
\text{Ca/P ratio} = \frac{\text{Calcium (mg%)}}{\text{Phosphorus (mg%)}}
\] - Compare ratios with ideal ranges outlined in Section VI.
- Identify deviations and cross-check symptoms with clinical correlations listed.
- Design intervention plan based on detailed protocols per ratio.
- Implement dietary and supplemental changes stepwise, monitoring for symptom improvement and potential adverse effects.
- Re-test HTMA after 3 months of intervention to evaluate progress.
- Adjust protocol accordingly, emphasizing ancestral dietary sources and bioavailable supplements.
Section VIII: Ancestral Nutrition Considerations for Mineral Balance
Optimize mineral intake through ancestral dietary practices:
- Calcium and phosphorus: consume bone broths, organ meats, wild-caught fish with bones, fermented dairy if tolerated.
- Sodium and magnesium: use unrefined sea salt, consume magnesium-rich nuts, seeds, dark leafy greens, and mineral water.
- Potassium: obtain from tubers, leafy greens, and organic fruits; avoid processed foods with potassium chloride additives.
- Zinc and copper: prioritize grass-fed meats, shellfish, and organ meats; avoid excessive zinc supplementation without copper balance.
Closing Mandate
The mastery of HTMA ratio interpretation is a cornerstone of sovereign physical optimization. These ratios reveal the hidden dialectic between minerals that govern life’s electric symphony. By applying the protocols herein with precision and reverence, the practitioner unlocks the secrets of resilience, longevity, and the radiant sovereign body.
For related protocols on detoxification and mineral chelation, see Volume VIII: The Water Codex, Chapter II and Volume IX: The Detoxification Codex, Chapter IV.
End of Chapter IV, Volume II: Mineral Balancing and Ancestral Nutrition.
<!-- SECTION 8 -->
Volume II: Mineral Balancing and Ancestral Nutrition
Chapter IV: Metabolic Typing and Ancestral Diets
Introduction
In this chapter, you will receive the suppressed, essential knowledge to decode your unique metabolic constitution, a blueprint forged by ancestral lineage and elemental mineral balances. This is not a superficial dietary guide—it is a precise, personalized protocol that commands mastery over your bioenergetic pathways through understanding Metabolic Typing and the biochemical rationale behind ancient dietary patterns. The goal: to optimize your fuel utilization, enhance physiological resilience, and restore the sacred equilibrium of your body’s mineral and macronutrient matrix.
Section 1: Metabolic Typing Concepts
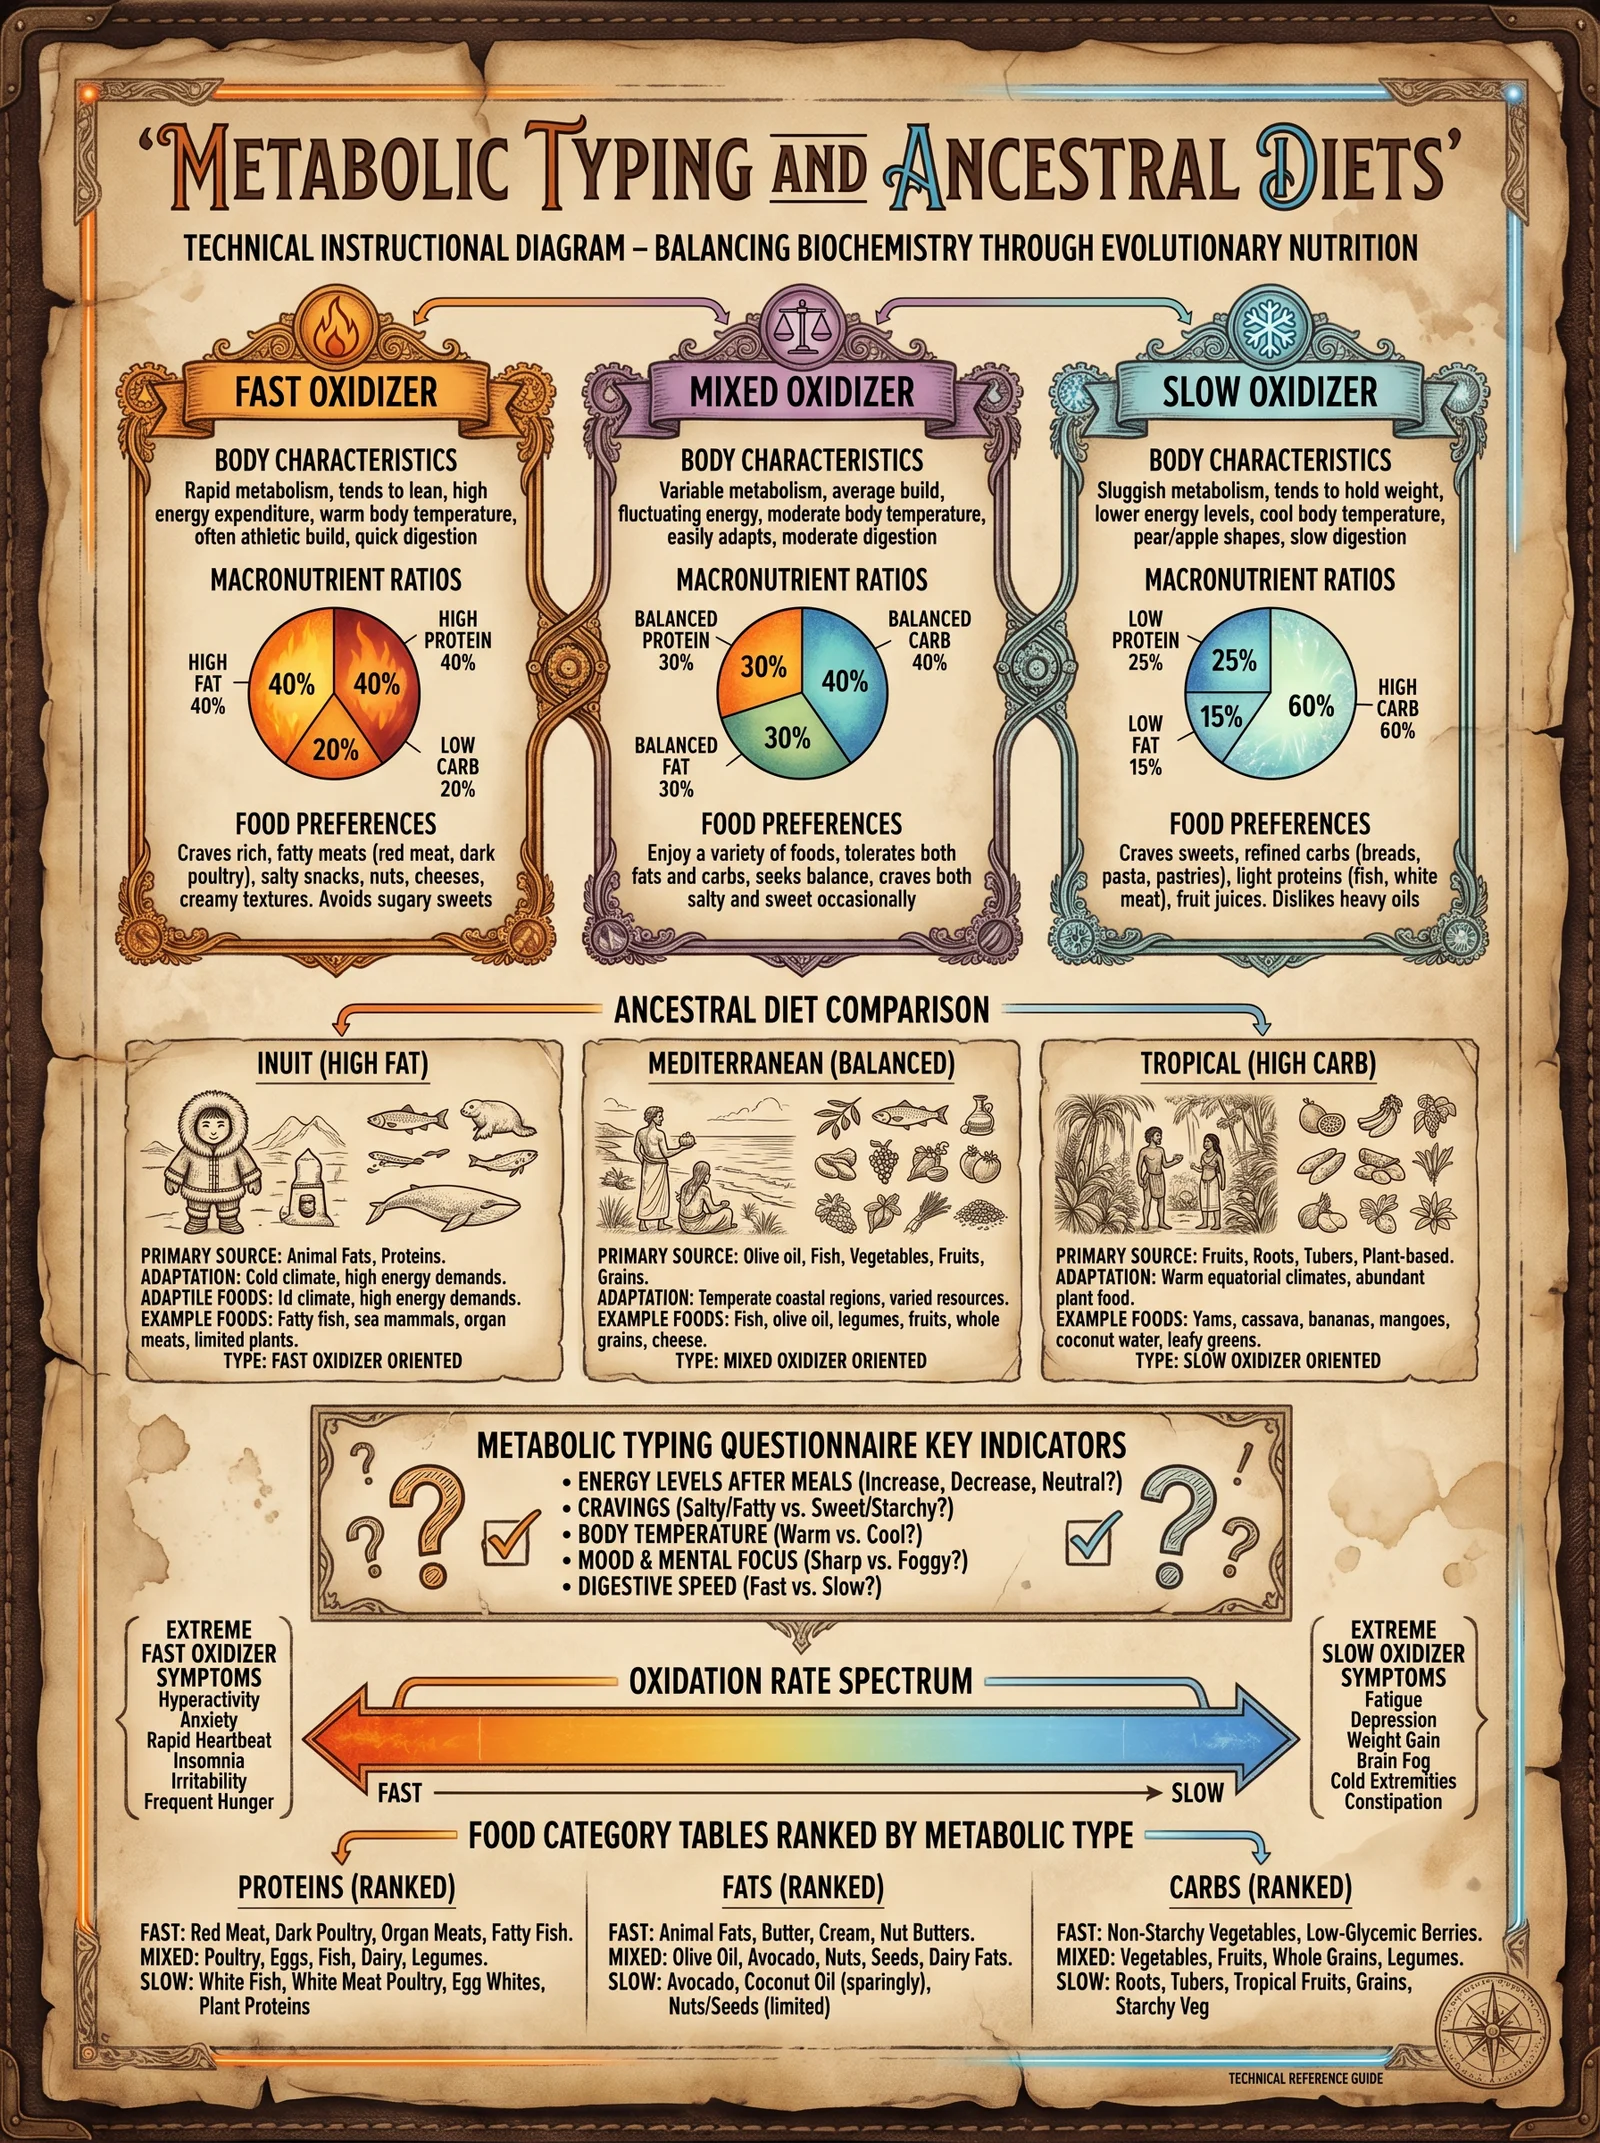
1.1 Definition and Rationale
Metabolic Typing is a biochemical classification system that identifies how your body best synthesizes energy from macronutrients—proteins, fats, and carbohydrates—based on your unique mineral balance and enzymatic activity. It recognizes that human metabolism is not homogeneous; it is shaped by genetic, environmental, and ancestral factors. The fundamental principle: each metabolic type requires a tailored macronutrient ratio to achieve optimal biochemical function and systemic harmony.
1.2 Core Metabolic Types
There are three primary metabolic types, defined by dominant mineral pathways and their corresponding biochemical profiles:
| Metabolic Type | Dominant Mineral / Pathway | Biochemical Profile | Primary Fuel Source | Clinical Features |
|---|---|---|---|---|
| Protein Type | Calcium / Sympathetic Dominance | High protein turnover, robust adrenal function | Protein and Fat | Strong appetite for protein, rapid recovery, high energy from fats |
| Carbohydrate Type | Magnesium / Parasympathetic Dominance | Efficient carbohydrate metabolism, insulin-sensitive | Carbohydrates | Craves sweets, stable energy on carbs, lower protein tolerance |
| Mixed (Balanced) Type | Balanced Calcium and Magnesium | Adaptable metabolism, efficient mixed fuels | Balanced macros | Tolerates mixed diet, moderate cravings, balanced energy levels |
1.3 Mineral Balancing and Enzymatic Activity
Mineral ratios, particularly Calcium to Magnesium (Ca:Mg), govern enzymatic pathways that determine the metabolic type:
- Calcium dominance enhances sympathetic activity, driving higher protein and fat metabolism.
- Magnesium dominance enhances parasympathetic tone, favoring carbohydrate metabolism.
- A balanced Ca:Mg ratio creates metabolic flexibility.
This mineral balance directly influences key enzymes:
| Enzyme/System | Ca Dominant Effect | Mg Dominant Effect | Notes |
|---|---|---|---|
| Pyruvate Dehydrogenase Complex | Upregulated | Downregulated | Controls carbohydrate flux into Krebs cycle |
| Carnitine Palmitoyltransferase | Activated | Less active | Facilitates fatty acid oxidation |
| Proteolytic Enzymes (e.g., Pepsin, Trypsin) | Upregulated | Reduced activity | Enhances protein digestion |
1.4 Testing Your Metabolic Type
Step-by-step Metabolic Typing Test Protocol:
- Mineral Hair Analysis (preferred):
- Collect 0.5 g of hair from the occipital scalp region.
- Submit sample to a certified laboratory for Ca and Mg quantification.
- Calculate Ca:Mg ratio.
- Urinary Mineral Ratio Testing (alternative):
- Collect 24-hour urine sample in a trace metal-free container.
- Analyze for Ca and Mg concentration.
- Calculate ratio.
- Subjective Questionnaire (supportive, not primary):
- Assess appetite, energy patterns, stress response, and food cravings.
- Cross-reference with mineral data.
- Interpretation:
- Ca:Mg ratio > 4:1 indicates Protein Type.
- Ca:Mg ratio < 2:1 indicates Carbohydrate Type.
- Ca:Mg ratio between 2:1 and 4:1 indicates Mixed Type.
Section 2: Ancestral Diet Patterns and Biochemical Rationale
2.1 Overview of Ancestral Diet Diversity
Human ancestors adapted their diets to local environments, dictated by resource availability and climatic pressures. These diets exhibit macronutrient ratios optimized for survival and metabolic efficiency, reflecting biochemical adaptations to mineral availability and energy demands.
2.2 Representative Ancestral Diets and Their Macronutrient Profiles
| Ancestral Diet | Region | Estimated Macronutrient Ratio (Protein : Fat : Carbohydrate) | Primary Mineral Influence | Biochemical Rationale |
|---|---|---|---|---|
| Paleolithic Hunter-Gatherer | Global (varied) | 30% : 40% : 30% | Balanced Ca:Mg | Mixed metabolic type; high animal protein, wild tubers, nuts |
| Arctic Inuit | Arctic | 35% : 60% : 5% | High Ca | Protein type; high fat and protein for cold adaptation, low carbs |
| Tropical Forager | Equatorial | 15% : 20% : 65% | High Mg | Carbohydrate type; high fruit, root vegetables, low animal fat |
| Mediterranean Ancients | Mediterranean | 25% : 35% : 40% | Balanced Ca:Mg | Mixed type; olive oil fats, moderate protein, high vegetables/grains |
| Nomadic Steppe Pastoralists | Eurasian Steppe | 40% : 50% : 10% | High Ca | Protein type; heavy reliance on animal products, low carbs |
2.3 Biochemical Rationale for Macronutrient Ratios in Ancestral Diets
- High protein and fat (Ca dominant):
Supports enhanced adrenal function, thermogenesis, and fatty acid oxidation essential in cold climates and high exertion environments.
- High carbohydrate (Mg dominant):
Supports parasympathetic dominance, sustained energy release from glucose, and reduced oxidative stress in warmer, carbohydrate-rich environments.
- Balanced macronutrients (Balanced Ca:Mg):
Enables metabolic flexibility, supporting diverse environmental conditions and dietary variety.
Section 3: Protocols for Dietary Adjustment Based on Metabolic Typing
3.1 Establishing Your Baseline
Before initiating dietary adjustment, conduct the Metabolic Typing Test Protocol as outlined in Section 1.4. Record your Ca:Mg ratio and metabolic type classification.
3.2 Dietary Adjustment Protocols
Each metabolic type requires precise macronutrient modifications, mineral rebalancing, and meal timing to optimize metabolic efficiency.
3.2.1 Protein Type Dietary Protocol (Ca:Mg > 4:1)
Goal: Increase protein and fat intake, reduce carbohydrate load, support adrenal and sympathetic function.
| Macronutrient | Target Ratio | Examples | Notes |
|---|---|---|---|
| Protein | 35% - 40% | Grass-fed beef, wild game, organ meats, eggs | Prioritize complete proteins |
| Fat | 50% - 55% | Animal fats, coconut oil, butter, fish oils | Emphasize saturated and omega-3 fats |
| Carbohydrate | 5% - 15% | Low glycemic vegetables, nuts, berries | Avoid grains and sugars |
Step-by-step dietary adjustment:
- Calculate daily caloric needs using Volume V: The Sovereign Body, Chapter III (Basal Metabolic Rate and Activity Level).
- Assign macronutrient grams using target ratios.
- Plan meals with high-quality proteins and fats; minimize carbohydrate intake.
- Supplement with calcium-rich mineral sources (e.g., bone broth, dairy) to maintain Ca dominance.
- Monitor energy, mood, and digestive function weekly.
- Adjust protein and fat intake by ±10% if symptoms of adrenal fatigue or fatigue appear.
3.2.2 Carbohydrate Type Dietary Protocol (Ca:Mg < 2:1)
Goal: Increase carbohydrate intake, reduce protein and fat, support parasympathetic and insulin-sensitive metabolism.
| Macronutrient | Target Ratio | Examples | Notes |
|---|---|---|---|
| Protein | 10% - 15% | Legumes, fish, poultry | Avoid excessive red meat |
| Fat | 15% - 20% | Olive oil, nuts, seeds | Emphasize unsaturated fats |
| Carbohydrate | 65% - 70% | Fruits, tubers, whole grains | Prioritize low glycemic load |
Step-by-step dietary adjustment:
- Calculate daily caloric needs as per Volume V guidelines.
- Assign macronutrient grams per target ratios.
- Emphasize complex carbohydrates and fiber.
- Supplement with magnesium-rich mineral sources (e.g., leafy greens, nuts).
- Monitor blood glucose stability and digestive comfort weekly.
- If hypoglycemia or fatigue occurs, increase protein by 5-10%.
3.2.3 Mixed Type Dietary Protocol (Ca:Mg between 2:1 and 4:1)
Goal: Balanced macronutrient intake for metabolic flexibility.
| Macronutrient | Target Ratio | Examples | Notes |
|---|---|---|---|
| Protein | 25% - 30% | Mixed animal and plant proteins | Rotate protein sources |
| Fat | 35% - 40% | Mixed saturated and unsaturated fats | Include omega-3 and omega-6 |
| Carbohydrate | 30% - 35% | Vegetables, fruits, limited grains | Maintain low glycemic index |
Step-by-step dietary adjustment:
- Calculate caloric needs.
- Assign macronutrient grams per target ratios.
- Rotate food sources to maintain mineral balance.
- Monitor energy and digestion; adjust fat or carbohydrate intake by ±5% if imbalance occurs.
- Use mineral supplementation to maintain Ca:Mg ratio near 3:1.
3.3 Mineral Supplementation for Rebalancing
Use mineral supplements to support metabolic type shifts as follows:
| Metabolic Type | Supplement | Dosage (Daily) | Timing | Notes |
|---|---|---|---|---|
| Protein Type | Magnesium citrate | 200-400 mg | Evening | Supports parasympathetic balance |
| Carbohydrate Type | Calcium citrate | 500-800 mg | Morning | Supports sympathetic tone |
| Mixed Type | Balanced Ca:Mg supplement | Ca 300 mg / Mg 150 mg | Split morning and evening | Maintains equilibrium |
3.4 Monitoring and Fine-Tuning
Weekly Tracking Protocol:
- Record subjective symptoms: energy, cravings, digestion, mood.
- Measure weight, blood pressure, heart rate.
- After 6 weeks, re-test mineral ratios (hair or urine).
- Adjust diet and supplementation to move toward metabolic type balance or flexibility.
Section 4: Comparison Table of Macronutrient Ratios Across Ancestral Diets and Metabolic Types
| Metabolic Type | Protein (%) | Fat (%) | Carbohydrate (%) | Ancestral Diet Examples | Primary Mineral Influence |
|---|---|---|---|---|---|
| Protein Type | 35-40 | 50-55 | 5-15 | Arctic Inuit, Nomadic Steppe | High Calcium |
| Carbohydrate Type | 10-15 | 15-20 | 65-70 | Tropical Forager | High Magnesium |
| Mixed Type | 25-30 | 35-40 | 30-35 | Paleolithic Hunter-Gatherer, Mediterranean Ancients | Balanced Ca:Mg |
Section 5: Case Studies and Application
5.1 Case Study 1: Protein Type Adjustment
- Subject: 35-year-old male, Ca:Mg ratio 5.2:1.
- Baseline: High carb diet, fatigue, poor recovery.
- Intervention: Shift macronutrients to 38% protein, 52% fat, 10% carbs. Supplement magnesium 300 mg nightly.
- Outcome: Improved energy, reduced cravings, stable weight after 6 weeks.
5.2 Case Study 2: Carbohydrate Type Adjustment
- Subject: 42-year-old female, Ca:Mg ratio 1.5:1.
- Baseline: High fat intake, digestive discomfort.
- Intervention: Increase carbs to 68%, reduce fat to 18%, protein 14%. Supplement calcium 600 mg in morning.
- Outcome: Improved digestion, stable blood sugar, increased energy after 6 weeks.
Conclusion
The mastery of Metabolic Typing and Ancestral Diets grants you the sovereign command over your body's biochemical machinery. By applying these protocols, you transcend generic nutritional dogma and embrace a sacred covenant with your ancestral biochemical heritage. This knowledge is your lifeline to longevity, resilience, and peak physiological function.
For cross-referenced protocols on mineral supplementation formulation, see Volume II, Chapter VII: Mineral Supplementation Recipes and Dosage Guidelines. For advanced enzyme activity testing, see Volume IV: Enzymatic Function and Optimization.
This concludes Chapter IV of Volume II. Proceed with reverence and precision. Your body’s sovereign balance awaits your command.
<!-- SECTION 9 -->
Volume III: Heavy Metal Chelation and Parasite Protocols
Chapter I: Heavy Metal Toxicity — Sources and Physiological Impact
1. Heavy Metals of Concern
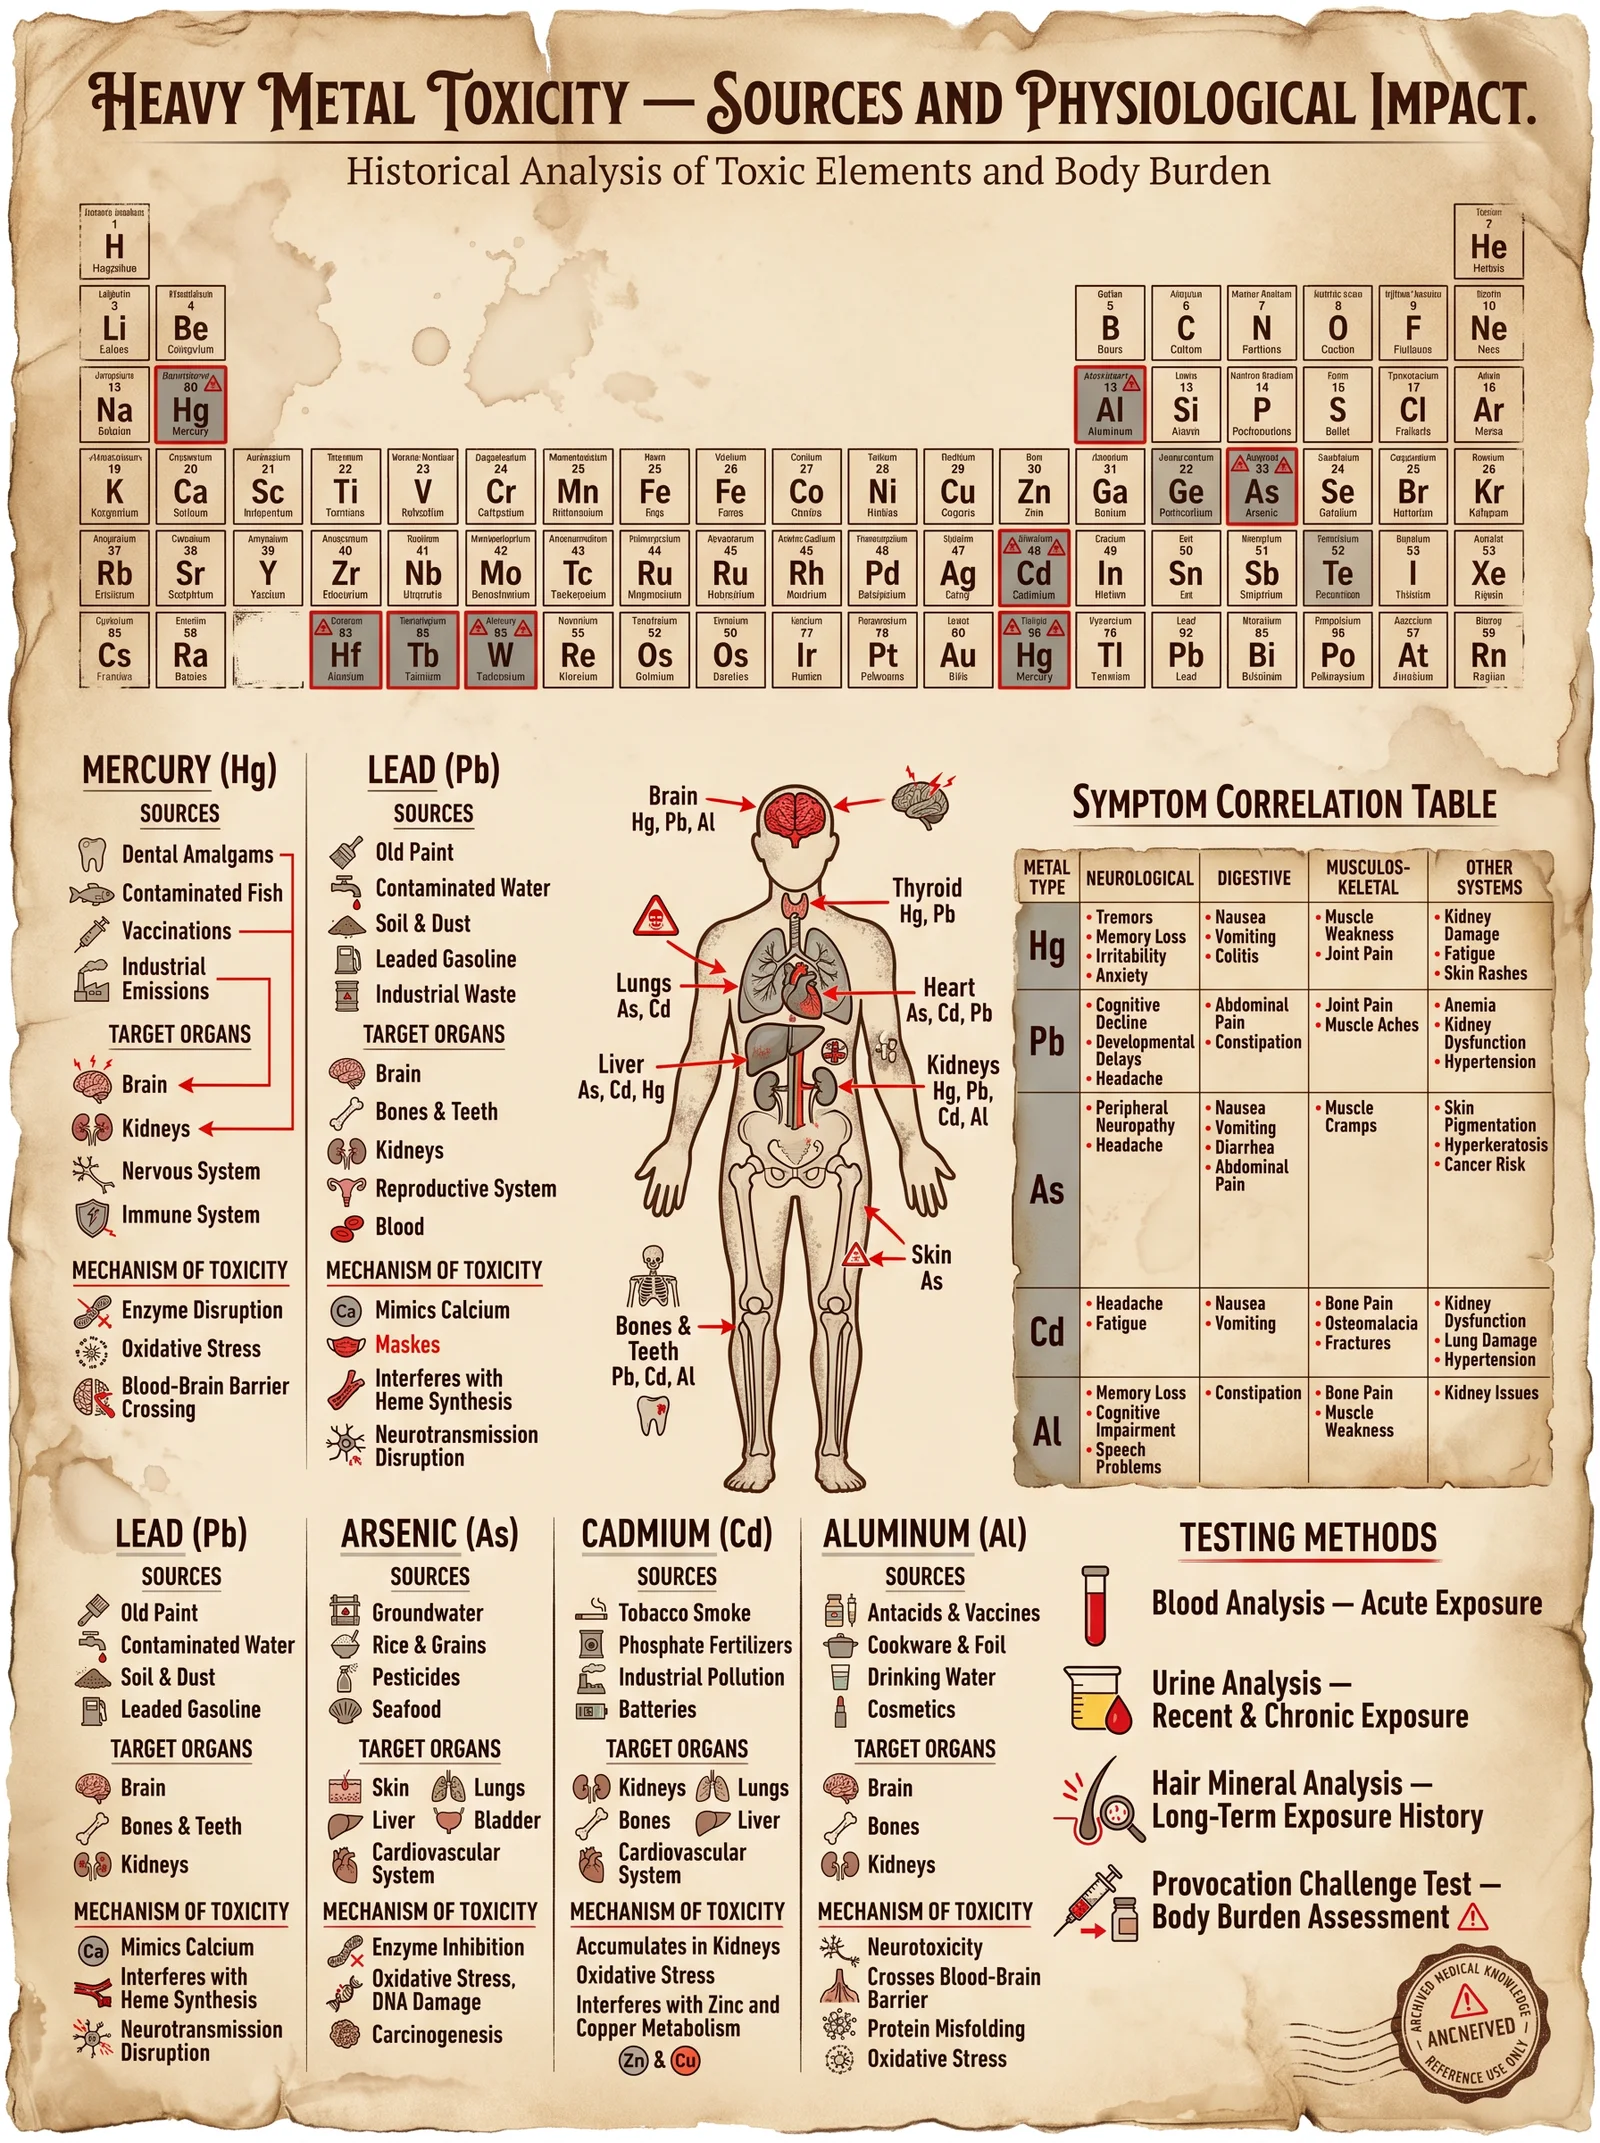
Heavy metals are metallic elements with high atomic weights and densities at least five times greater than water. Their toxicity arises from their ability to disrupt biochemical pathways, generate oxidative stress, and displace essential metals in enzymes. The most clinically significant heavy metals include:
| Metal | Atomic Number | Common Sources | Primary Physiological Impact |
|---|---|---|---|
| Lead (Pb) | 82 | Old paint, contaminated water, batteries | Neurotoxicity, anemia, kidney damage, hypertension |
| Mercury (Hg) | 80 | Fish, dental amalgams, industrial waste | Neurotoxicity, renal damage, immune dysregulation |
| Cadmium (Cd) | 48 | Cigarette smoke, batteries, industrial | Renal tubular damage, bone demineralization, pulmonary fibrosis |
| Arsenic (As) | 33 | Contaminated water, pesticides | Skin lesions, peripheral neuropathy, carcinogenesis |
| Aluminum (Al) | 13 | Cookware, antacids, vaccines (controversial) | Neurotoxicity, possible link to Alzheimer’s |
2. Physiological Impact Overview
Heavy metals exert toxicity via several mechanisms:
- Enzyme Inhibition: Metals like lead and cadmium displace essential metals (e.g., zinc, calcium) in enzymes, inactivating them.
- Oxidative Stress: Metals catalyze reactive oxygen species (ROS) generation, damaging lipids, proteins, and DNA.
- Neurotoxicity: Mercury and lead cross the blood-brain barrier, disrupting neurotransmitter systems and neuronal integrity.
- Kidney Damage: Metals accumulate in renal proximal tubules, causing proteinuria and eventual nephropathy.
- Immune Dysregulation: Altered cytokine profiles and increased autoimmunity risk.
3. Clinical Manifestations of Heavy Metal Toxicity
| Metal | Symptoms | Diagnostic Markers |
|---|---|---|
| Lead | Cognitive decline, abdominal pain, anemia, wrist/foot drop | Blood lead >5 µg/dL, elevated ALA in urine |
| Mercury | Tremors, irritability, memory loss, gingivitis, proteinuria | Elevated mercury in blood/urine |
| Cadmium | Bone pain, proteinuria, pulmonary symptoms, hypertension | Elevated urinary cadmium, creatinine clearance decline |
| Arsenic | Hyperkeratosis, neuropathy, skin cancer, GI symptoms | Urinary arsenic speciation |
| Aluminum | Cognitive impairment, anemia, osteomalacia | Serum aluminum levels, MRI brain changes |
Chapter II: Chelation Agents, Mechanisms, and Safety Profiles
1. Chelating Agents Overview
Chelation therapy involves administration of agents that bind heavy metals, forming stable complexes excreted primarily via urine or bile.
| Chelator | Target Metals | Administration Route | Mechanism of Action | Excretion Route | Common Side Effects | Contraindications |
|---|---|---|---|---|---|---|
| EDTA (Calcium Disodium) | Lead, Cadmium, Calcium | IV infusion | Binds divalent and trivalent metals via carboxyl and amine groups | Renal | Hypocalcemia, nephrotoxicity | Renal failure, hypocalcemia |
| DMSA (Dimercaptosuccinic Acid) | Lead, Mercury, Arsenic | Oral | Binds metals via sulfhydryl (-SH) groups | Renal | GI upset, rash | Pregnancy, renal impairment |
| DMPS (Dimercaptopropane Sulfonate) | Mercury, Arsenic | Oral/IV | Similar to DMSA, stronger affinity for mercury | Renal | Allergic reactions, GI upset | Pregnancy, renal impairment |
| Deferoxamine | Iron, Aluminum | IM/IV | Binds ferric iron, aluminum via hydroxamate groups | Renal/biliary | Hypotension, neurotoxicity | Renal failure, allergy |
| Penicillamine | Copper, Lead | Oral | Binds metals via sulfhydryl groups | Renal | Nephrotoxicity, bone marrow suppression | Pregnancy, penicillin allergy |
| British Anti-Lewisite (BAL) | Arsenic, Mercury, Lead | IM | Binds metals via sulfhydryl groups | Renal | Hypertension, pain at injection site | Severe cardiac disease |
2. Mechanisms of Chelation
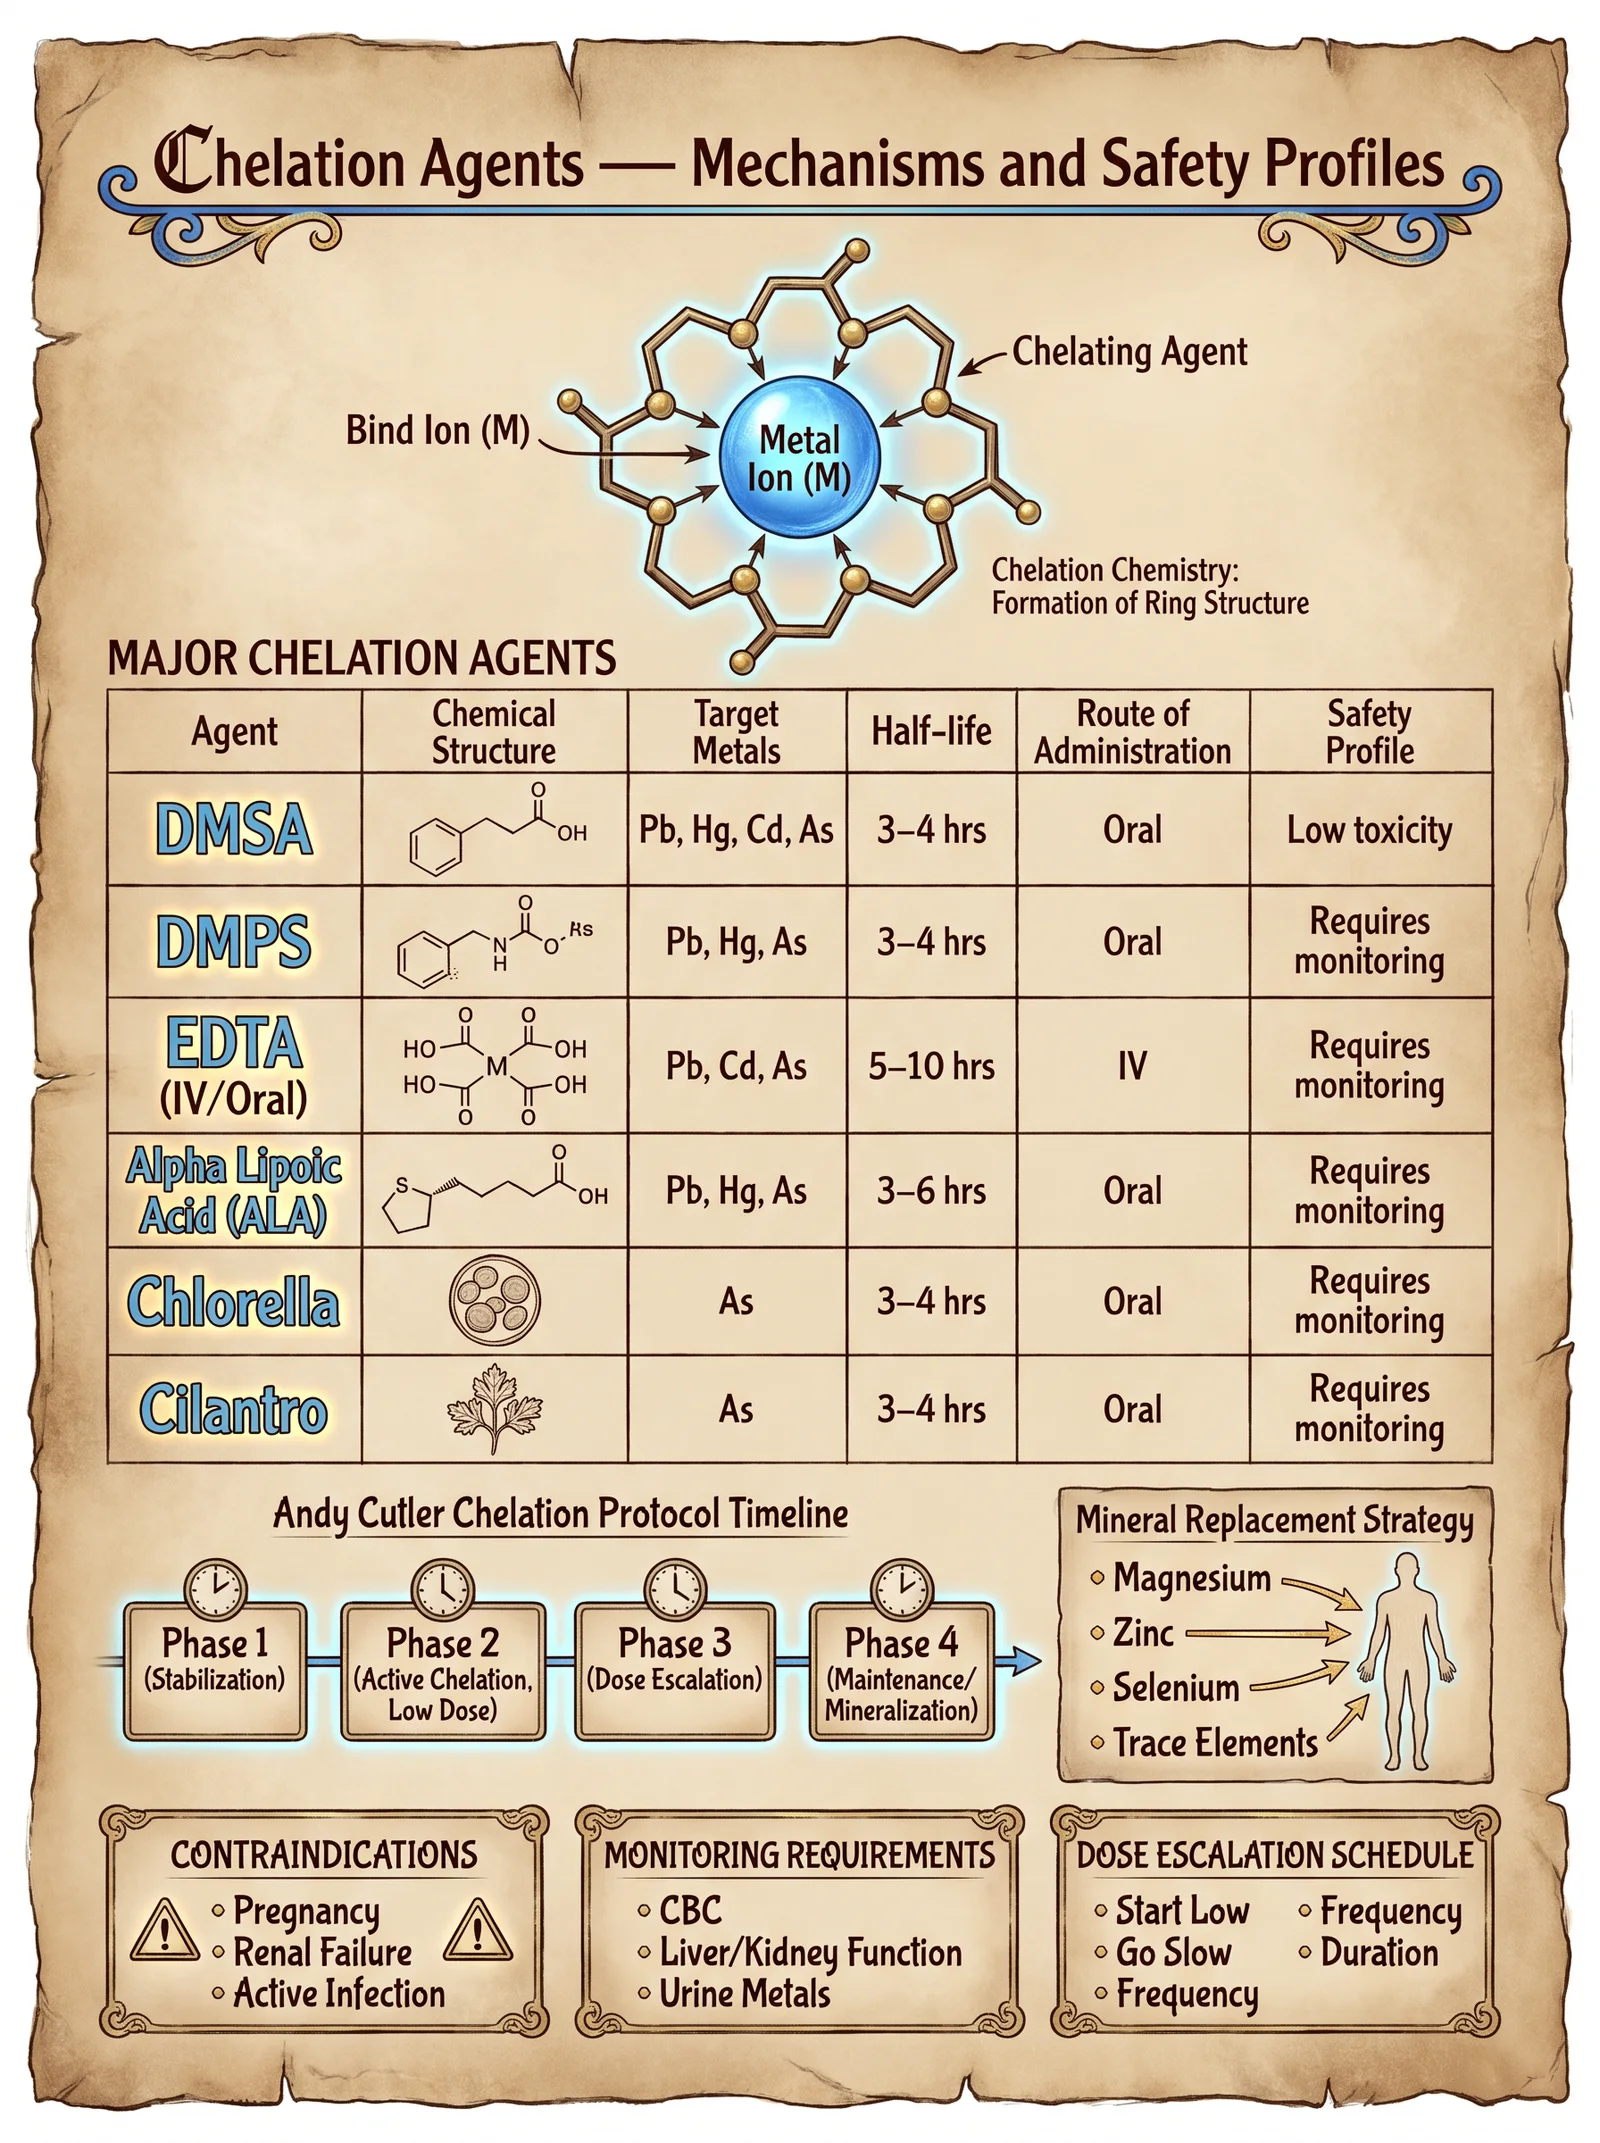
Chelators contain chemical groups that form coordinate covalent bonds with metal ions. The chelate ring formed stabilizes the metal complex, increasing solubility and facilitating renal or biliary excretion.
- Sulfhydryl (-SH) groups: High affinity for soft metals (Hg, As, Pb).
- Carboxyl and amine groups: Bind divalent metals (Ca, Pb, Cd).
- Hydroxamate groups: Target iron and aluminum.
3. Safety and Monitoring
Safety requires:
- Baseline renal and hepatic panels.
- Monitoring serum electrolytes, calcium, and complete blood count (CBC).
- Avoiding overdosing to prevent depletion of essential metals.
- Slow titration of chelator dosing.
- Hydration to promote renal clearance.
Chapter III: Parasite Identification and Eradication Protocols
1. Common Human Parasites and Symptoms
| Parasite | Classification | Common Symptoms | Diagnostic Method | Notes |
|---|---|---|---|---|
| Giardia lamblia | Protozoa | Diarrhea, bloating, malabsorption | Stool antigen test, microscopy | Waterborne |
| Entamoeba histolytica | Protozoa | Bloody diarrhea, liver abscess | Stool microscopy, serology | Can invade liver |
| Ascaris lumbricoides | Nematode | Abdominal pain, malnutrition | Stool ova and parasite (O&P) | Large roundworm |
| Strongyloides stercoralis | Nematode | Rash, diarrhea, cough | Stool O&P, serology | Autoinfection possible |
| Taenia saginata | Cestode | Abdominal discomfort, weight loss | Stool O&P, proglottid identification | Beef tapeworm |
| Schistosoma spp. | Trematode | Hematuria, abdominal pain | Urine or stool microscopy | Freshwater snails intermediate |
2. Parasite Eradication Agents
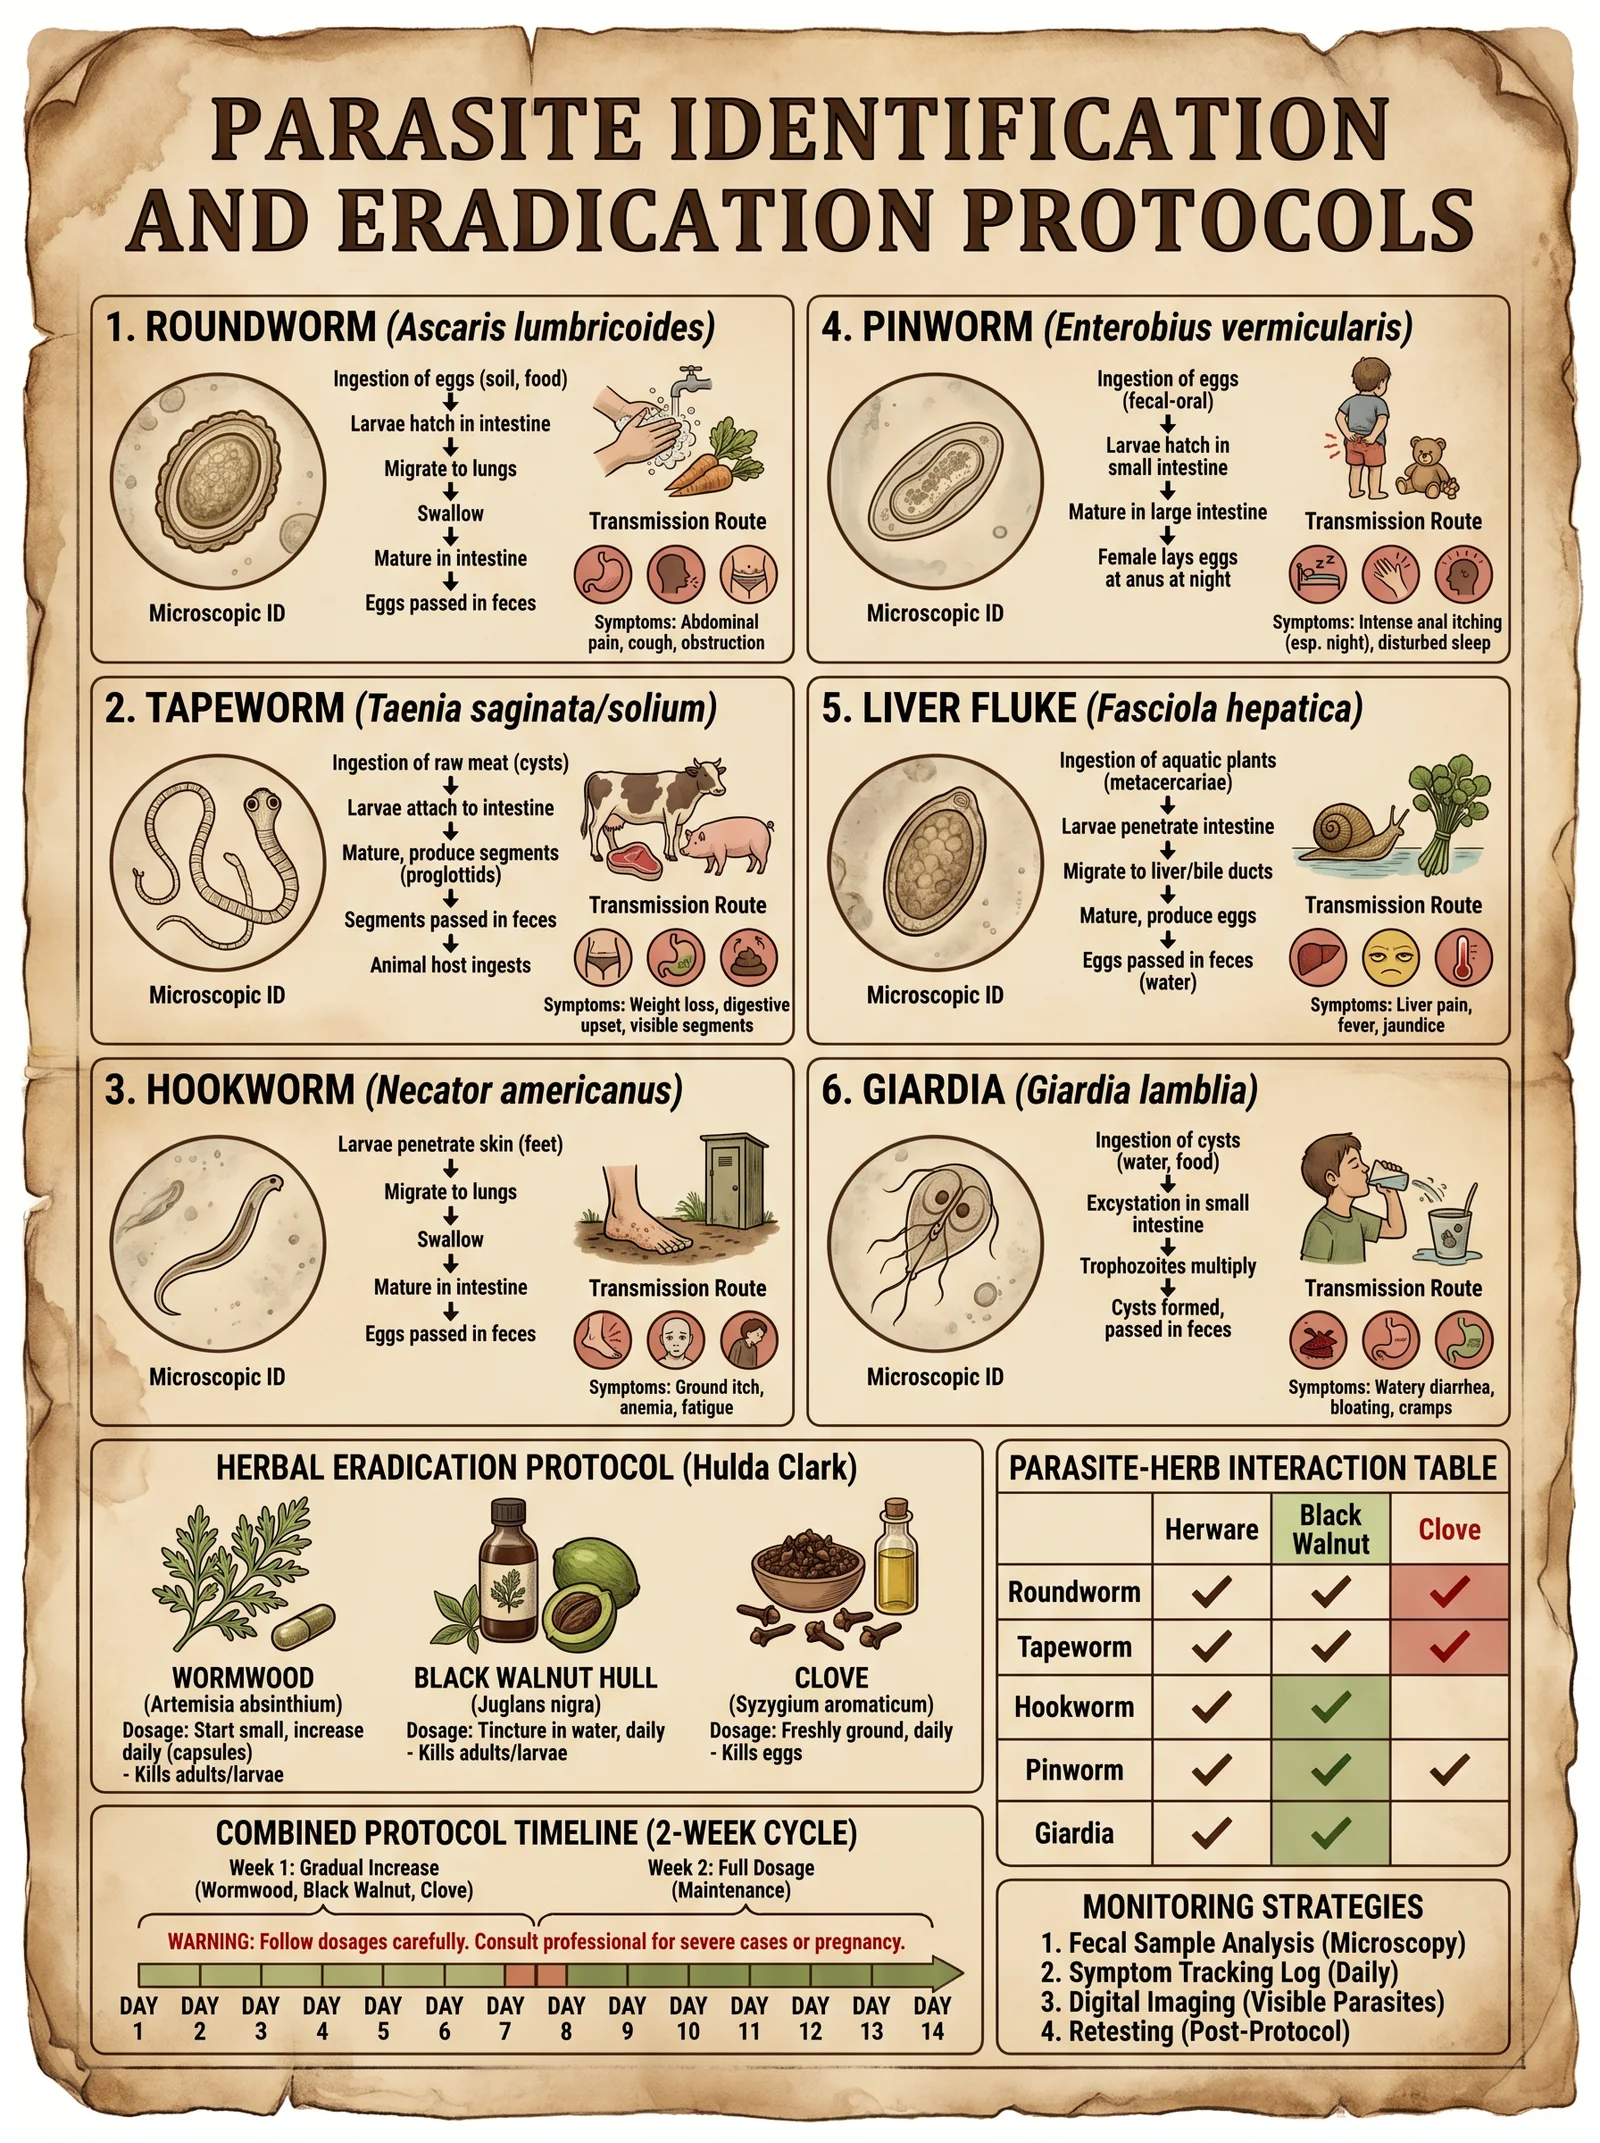
| Agent | Target Parasites | Dosage (Adult) | Duration | Administration Route | Side Effects | Contraindications |
|---|---|---|---|---|---|---|
| Metronidazole | Giardia, Entamoeba | 250-500 mg every 8 hours | 5-10 days | Oral | Metallic taste, GI upset | Pregnancy (1st trimester) |
| Albendazole | Nematodes, cestodes | 400 mg twice daily | 3 days | Oral | Hepatotoxicity, nausea | Pregnancy |
| Ivermectin | Strongyloides, Onchocerca | 150-200 mcg/kg single dose | Single dose, repeat | Oral | Dizziness, rash | Pregnancy, children <15 kg |
| Praziquantel | Schistosoma, tapeworms | 20 mg/kg three times daily | 1 day | Oral | Abdominal pain, dizziness | Pregnancy (caution) |
| Nitazoxanide | Giardia, Cryptosporidium | 500 mg twice daily | 3 days | Oral | GI upset | Pregnancy (limited data) |
Chapter IV: Step-by-Step Protocols
1. Heavy Metal Chelation Protocol
Objective: Safe and effective removal of lead and mercury in adults.
Materials Needed:
- DMSA capsules (100 mg)
- EDTA IV solution (calcium disodium EDTA 1 gram/10 mL)
- IV infusion setup (sterile)
- Baseline laboratory tests (CBC, renal panel, liver panel, serum electrolytes)
- Hydration fluids (normal saline)
Stepwise Instructions:
- Baseline Evaluation:
- Measure blood lead and mercury levels.
- Obtain renal and liver function tests.
- Assess for any contraindications.
- Oral DMSA Cycle:
- Day 1-5: Administer 10 mg/kg DMSA orally every 8 hours.
- Instruct patient to maintain hydration (2-3 L water/day).
- Monitor for side effects daily.
- Rest Period:
- Day 6-14: No chelation, allow redistribution and normalization.
- Repeat renal panels on day 14.
- IV EDTA Infusion Cycle:
- Day 15: Administer EDTA 1 gram diluted in 250 mL normal saline IV over 1 hour.
- Repeat infusion every other day for 3 sessions.
- Monitor calcium levels before and after infusion.
- Repeat DMSA Cycle:
- Day 22-26: Repeat oral DMSA regimen as in step 2.
- Post-Therapy Testing:
- Day 27: Reassess heavy metal blood levels.
- Continue monthly follow-ups until levels normalize.
Notes:
- Avoid simultaneous EDTA and DMSA administration.
- Monitor for hypocalcemia during EDTA therapy.
- For mercury-dominant toxicity, consider DMPS instead of DMSA with specialist oversight.
2. Parasite Identification and Eradication Protocol
Objective: Diagnose and eradicate intestinal protozoa and helminths.
Materials Needed:
- Stool collection containers
- Metronidazole tablets
- Albendazole tablets
- Ivermectin tablets
- Praziquantel tablets
- Microscopy access or send-out lab kit
Stepwise Instructions:
- Sample Collection:
- Collect three stool samples on alternate days in sterile containers.
- Label samples with patient ID and date.
- Laboratory Diagnosis:
- Perform microscopic examination for ova, cysts, and trophozoites.
- Use antigen tests for Giardia and Entamoeba if available.
- Serology for Strongyloides or Schistosoma if indicated.
- Treatment Selection Based on Diagnosis:
| Parasite | First-Line Agent | Dosage and Duration |
|---|---|---|
| Giardia lamblia | Metronidazole | 500 mg orally every 8 hours for 7 days |
| Entamoeba histolytica | Metronidazole | 750 mg orally three times daily for 10 days |
| Ascaris lumbricoides | Albendazole | 400 mg single dose |
| Strongyloides stercoralis | Ivermectin | 200 mcg/kg single dose, repeat in 2 weeks |
| Taenia saginata | Praziquantel | 5-10 mg/kg single dose |
| Schistosoma spp. | Praziquantel | 40 mg/kg single dose |
- Adjunct Herbal Protocol (Optional, supportive)
- Wormwood (Artemisia absinthium): 500 mg capsule twice daily for 14 days.
- Black Walnut Hull: 300 mg capsule twice daily for 14 days.
- Clove Bud Oil: 2-3 drops orally diluted in water daily for 7 days.
- Follow-Up:
- Repeat stool O&P 2 weeks post-treatment.
- If positive, repeat therapy or escalate to second-line agents.
- Monitor for adverse reactions.
3. Combined Heavy Metal and Parasite Detoxification Protocol
In cases of coexisting heavy metal toxicity and parasitic infestation:
- Begin with parasite eradication to reduce inflammatory burden.
- After parasite clearance confirmed, initiate chelation therapy.
- Maintain hydration and nutritional support throughout.
- Use antioxidant supplementation (e.g., N-acetylcysteine 600 mg twice daily) to mitigate oxidative damage.
- Monitor liver and kidney function biweekly.
- For severe cases, stagger treatments to avoid overwhelming detoxification pathways.
Chapter V: Summary Tables for Quick Reference
Table 1: Chelating Agents Summary
| Agent | Target Metals | Route | Dosage (Adult) | Duration | Key Side Effects |
|---|---|---|---|---|---|
| EDTA | Pb, Cd, Ca | IV | 1 g every other day | 3-10 sessions | Hypocalcemia, nephrotoxicity |
| DMSA | Pb, Hg, As | Oral | 10 mg/kg every 8 hours | 5 days cycles | GI upset, rash |
| DMPS | Hg, As | Oral/IV | 250 mg every 8 hours | 5-10 days | Allergic reactions |
| Deferoxamine | Fe, Al | IM/IV | 20-40 mg/kg/day | Variable | Hypotension, neurotoxicity |
| Penicillamine | Cu, Pb | Oral | 250-500 mg 2-4 times daily | Weeks-months | Bone marrow suppression |
| BAL | As, Hg, Pb | IM | 3-5 mg/kg 4 times daily | 5-10 days | Pain, hypertension |
Table 2: Parasite Identification and Treatment
| Parasite | Symptoms | Diagnosis | Treatment Agent & Dosage |
|---|---|---|---|
| Giardia lamblia | Diarrhea, bloating | Stool antigen, microscopy | Metronidazole 500 mg TID for 7 days |
| Entamoeba histolytica | Bloody diarrhea, abscess | Stool microscopy, serology | Metronidazole 750 mg TID for 10 days |
| Ascaris lumbricoides | Abdominal pain, malnutrition | Stool O&P | Albendazole 400 mg single dose |
| Strongyloides stercoralis | Rash, cough, diarrhea | Stool O&P, serology | Ivermectin 200 mcg/kg single dose, repeat 2 wk |
| Taenia saginata | Weight loss, discomfort | Stool O&P, proglottids | Praziquantel 5-10 mg/kg single dose |
| Schistosoma spp. | Hematuria, abdominal pain | Urine/stool microscopy | Praziquantel 40 mg/kg single dose |
Table 3: Contraindications Summary
| Agent | Contraindications |
|---|---|
| EDTA | Renal failure, hypocalcemia |
| DMSA | Pregnancy, renal impairment |
| DMPS | Pregnancy, renal impairment |
| Deferoxamine | Renal failure, allergy |
| Penicillamine | Pregnancy, penicillin allergy |
| BAL | Severe cardiac disease |
| Metronidazole | Pregnancy (1st trimester), alcohol consumption |
| Albendazole | Pregnancy |
| Ivermectin | Pregnancy, weight <15 kg |
| Praziquantel | Pregnancy (caution) |
Conclusion
Mastery of heavy metal chelation and parasite eradication requires detailed knowledge of toxicology, pharmacology, and clinical protocols. This volume imparts the suppressed knowledge necessary to identify, safely treat, and monitor these life-threatening conditions. Adherence to the precise stepwise protocols and vigilant monitoring ensures maximal efficacy with minimal risk.
For expanded water purification protocols to support detoxification, see Volume VIII: The Water Codex, Chapter II.
For advanced biohacking strategies to optimize body burden reduction, see Volume V: The Sovereign Body, Chapter VI.
Remain vigilant, apprentice, for your life and health depend on precision and reverence for this sacred art.
<!-- SECTION 10 -->
Volume III: Organ Flushing and Binder Protocols
Chapter I: Introduction to Organ Flushing and Binder Strategies
This chapter codifies the sacred, life-preserving knowledge of organ flushing and binder protocols. The liver, gallbladder, kidneys, and lymphatic system constitute the sovereign body's core detoxification machinery. Their optimal function is paramount to longevity, vitality, and the bioenergetic harmony of the human vessel.
Organ flushing is not a casual endeavor. It demands precise timing, exact dosing, and strict adherence to safety protocols. Binder agents, the molecular magnets of toxins, must be carefully selected and stacked for maximal efficacy without collateral damage to the microbiome or physiological homeostasis.
Chapter II: Organ Flush Protocols
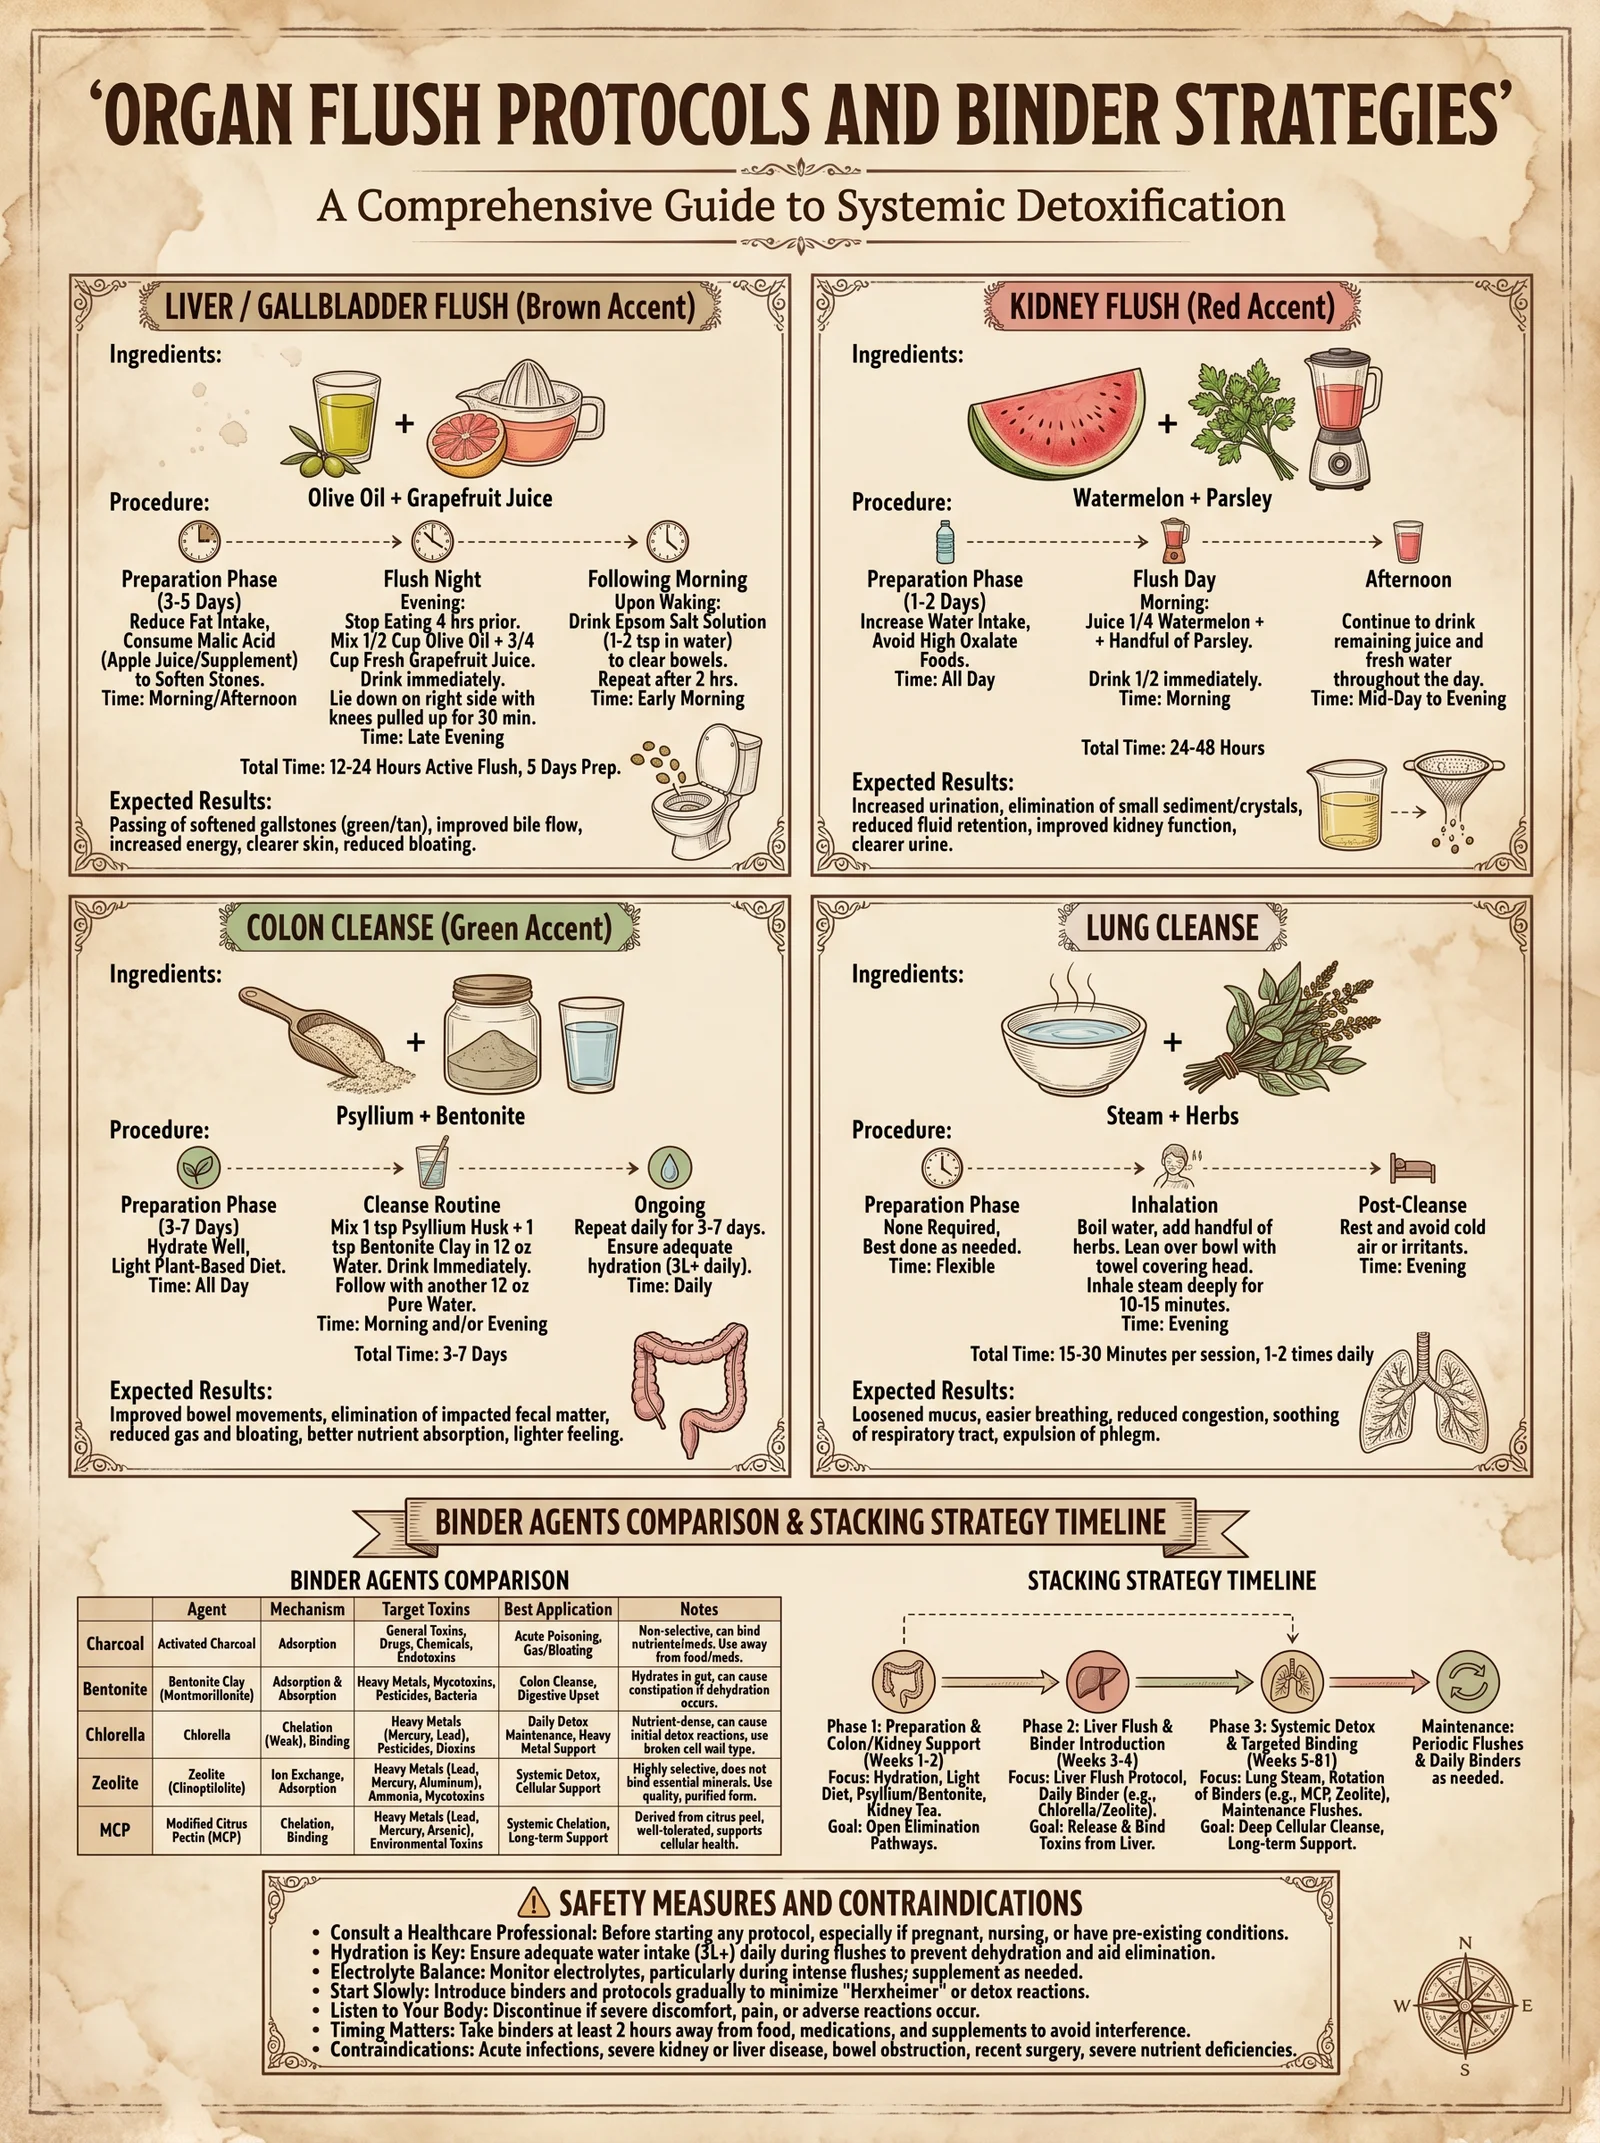
Section 1: Liver Flush Protocol
The liver, the metabolic crucible, processes endogenous and exogenous toxins. Flushing the liver removes bile sludge, cholesterol deposits, and toxin-laden particulates.
Ingredients and Equipment
| Ingredient | Dosage per Session | Purpose |
|---|---|---|
| Epsom Salt (Magnesium Sulfate) | 4 tablespoons in 1 liter water | Bile duct dilation, bowel relaxation |
| Freshly squeezed grapefruit juice | 250 ml (approx. 8 oz) | Stimulates bile flow, antioxidant support |
| Extra Virgin Olive Oil | 125 ml (approx. 4 oz) | Lubricates bile ducts for gallstone passage |
| Fresh lemon juice | 60 ml (2 oz) | Enhances liver detox enzymes |
Liver Flush Procedure
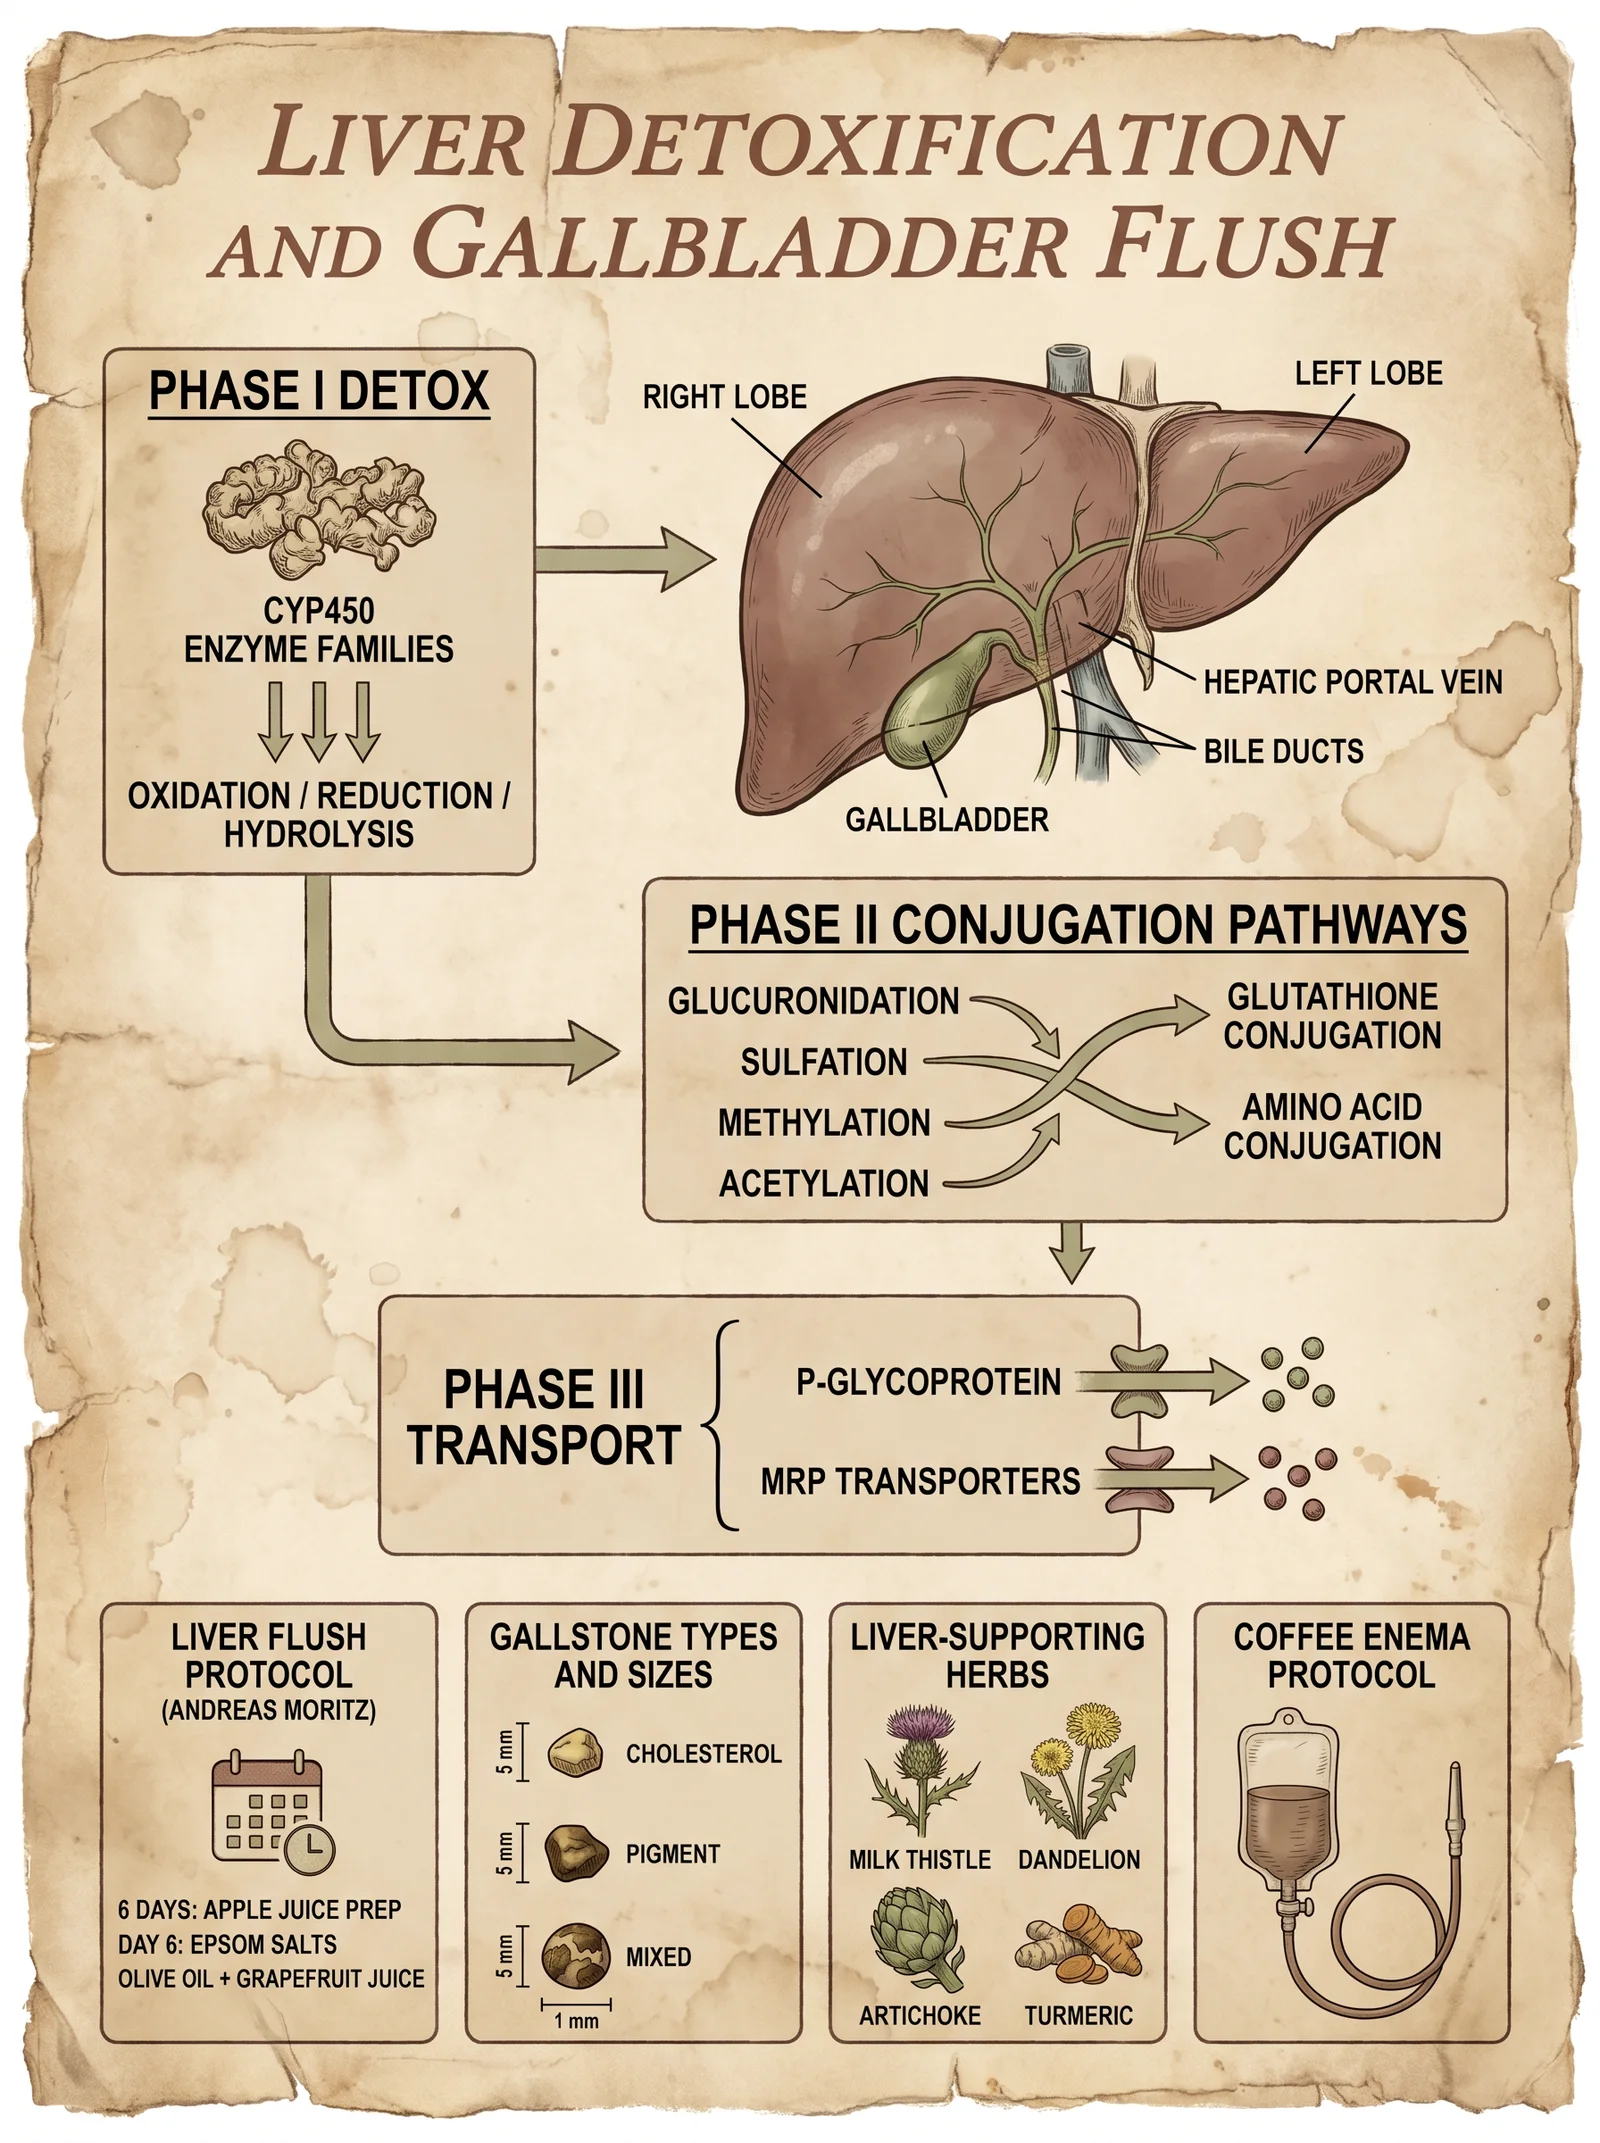
- Preparation (Day Before Flush):
- Consume a low-fat, high-fiber diet. Abstain from alcohol, caffeine, and processed foods.
- Hydrate with a minimum of 3 liters of purified water (see Volume 8: The Water Codex, Chapter II).
- Eat light dinners rich in vegetables and avoid fats.
- Epsom Salt Solution (Evening Before Flush):
- At 6:00 PM, dissolve 2 tablespoons of Epsom salt in 500 ml of warm purified water.
- Drink slowly.
- Repeat at 8:00 PM with the same dosage and volume.
- Flush Day Morning:
- No solid food intake.
- Hydrate with water only.
- Afternoon Dose:
- At 2:00 PM, repeat the Epsom salt solution (2 tablespoons in 500 ml water).
- Wait 2 hours.
- Flush Mixture Ingestion (4:00 PM):
- Mix 125 ml olive oil with 60 ml lemon juice in a glass jar.
- Shake vigorously until emulsified.
- Drink the mixture swiftly.
- Immediately lie down on your right side in a reclined position for at least 30 minutes.
- Remain still to facilitate bile duct dilation and gallstone passage.
- Post-Flush:
- After 30 minutes, rest upright and avoid food for 2 hours.
- Drink water or herbal tea.
- Expect bowel movements within 6-12 hours containing expelled stones or sludge.
Expected Outcomes and Safety
| Outcome | Timing | Notes |
|---|---|---|
| Bile duct relaxation | Within 30 minutes | Magnesium sulfate induces bile duct dilation |
| Gallstone passage | 6-12 hours post-flush | Visual confirmation possible in stools |
| Mild nausea or fatigue | During flush day | Normal; hydrate and rest |
| No severe pain or jaundice | Always | Indicates complications; seek medical aid |
Contraindications: Pregnancy, active gallbladder infection, bile duct obstruction, severe liver disease.
Section 2: Gallbladder Flush Protocol
The gallbladder serves as the bile reservoir, critical for lipid emulsification. Its congestion impedes digestion and systemic detoxification.
Ingredients and Equipment
| Ingredient | Dosage per Session | Purpose |
|---|---|---|
| Apple Juice (fresh, unsweetened) | 500 ml (16 oz) | Acidifies bile, promotes bile flow |
| Epsom Salt | 3 tablespoons in 750 ml water | Smooth muscle relaxation, bile duct dilation |
| Olive Oil | 100 ml (3.5 oz) | Facilitates gallstone mobilization |
| Lemon Juice | 60 ml (2 oz) | Stimulates bile secretion |
Gallbladder Flush Procedure
- Preparation (Day Before Flush):
- Consume only apple juice and light fruit-based meals.
- Abstain from fats and proteins.
- Hydrate comprehensively.
- Epsom Salt Solution (Evening):
- At 6:00 PM, dissolve 1.5 tablespoons of Epsom salt in 375 ml water and drink slowly.
- Repeat at 8:00 PM with the same dosage and volume.
- Flush Day:
- No solid food.
- At 2:00 PM, drink the final Epsom salt solution (1.5 tablespoons in 375 ml water).
- Wait 2 hours.
- Flush Mixture:
- Combine olive oil and lemon juice in a jar; shake until emulsified.
- Drink swiftly.
- Lie on the right side for 45 minutes without movement.
- Post-Flush:
- Resume hydration with water or herbal teas.
- Bowel movements may contain gallstones or sludge.
Expected Outcomes and Safety
| Outcome | Timing | Notes |
|---|---|---|
| Smooth muscle relaxation | Within 30 minutes | Facilitates gallstone passage |
| Gallstone expulsion | 6-12 hours post-flush | May cause mild cramping |
| No severe abdominal pain | Always | Severe pain requires immediate attention |
Contraindications: Same as liver flush. Avoid if gallstones >2 cm due to obstruction risk.
Section 3: Kidney Flush Protocol
The kidneys filter blood plasma, maintaining fluid and electrolyte homeostasis. Kidney flushing removes calcium oxalate and uric acid crystals, reducing nephrolithiasis risk.
Ingredients and Equipment
| Ingredient | Dosage per Session | Purpose |
|---|---|---|
| Parsley Juice | 250 ml (8 oz) | Diuretic, promotes kidney filtration |
| Lemon Juice | 60 ml (2 oz) | Citrate source, stone dissolution |
| Water (purified) | 2 liters | Maintains hydration and urine output |
| Magnesium Citrate | 300 mg | Prevents crystal aggregation |
Kidney Flush Procedure
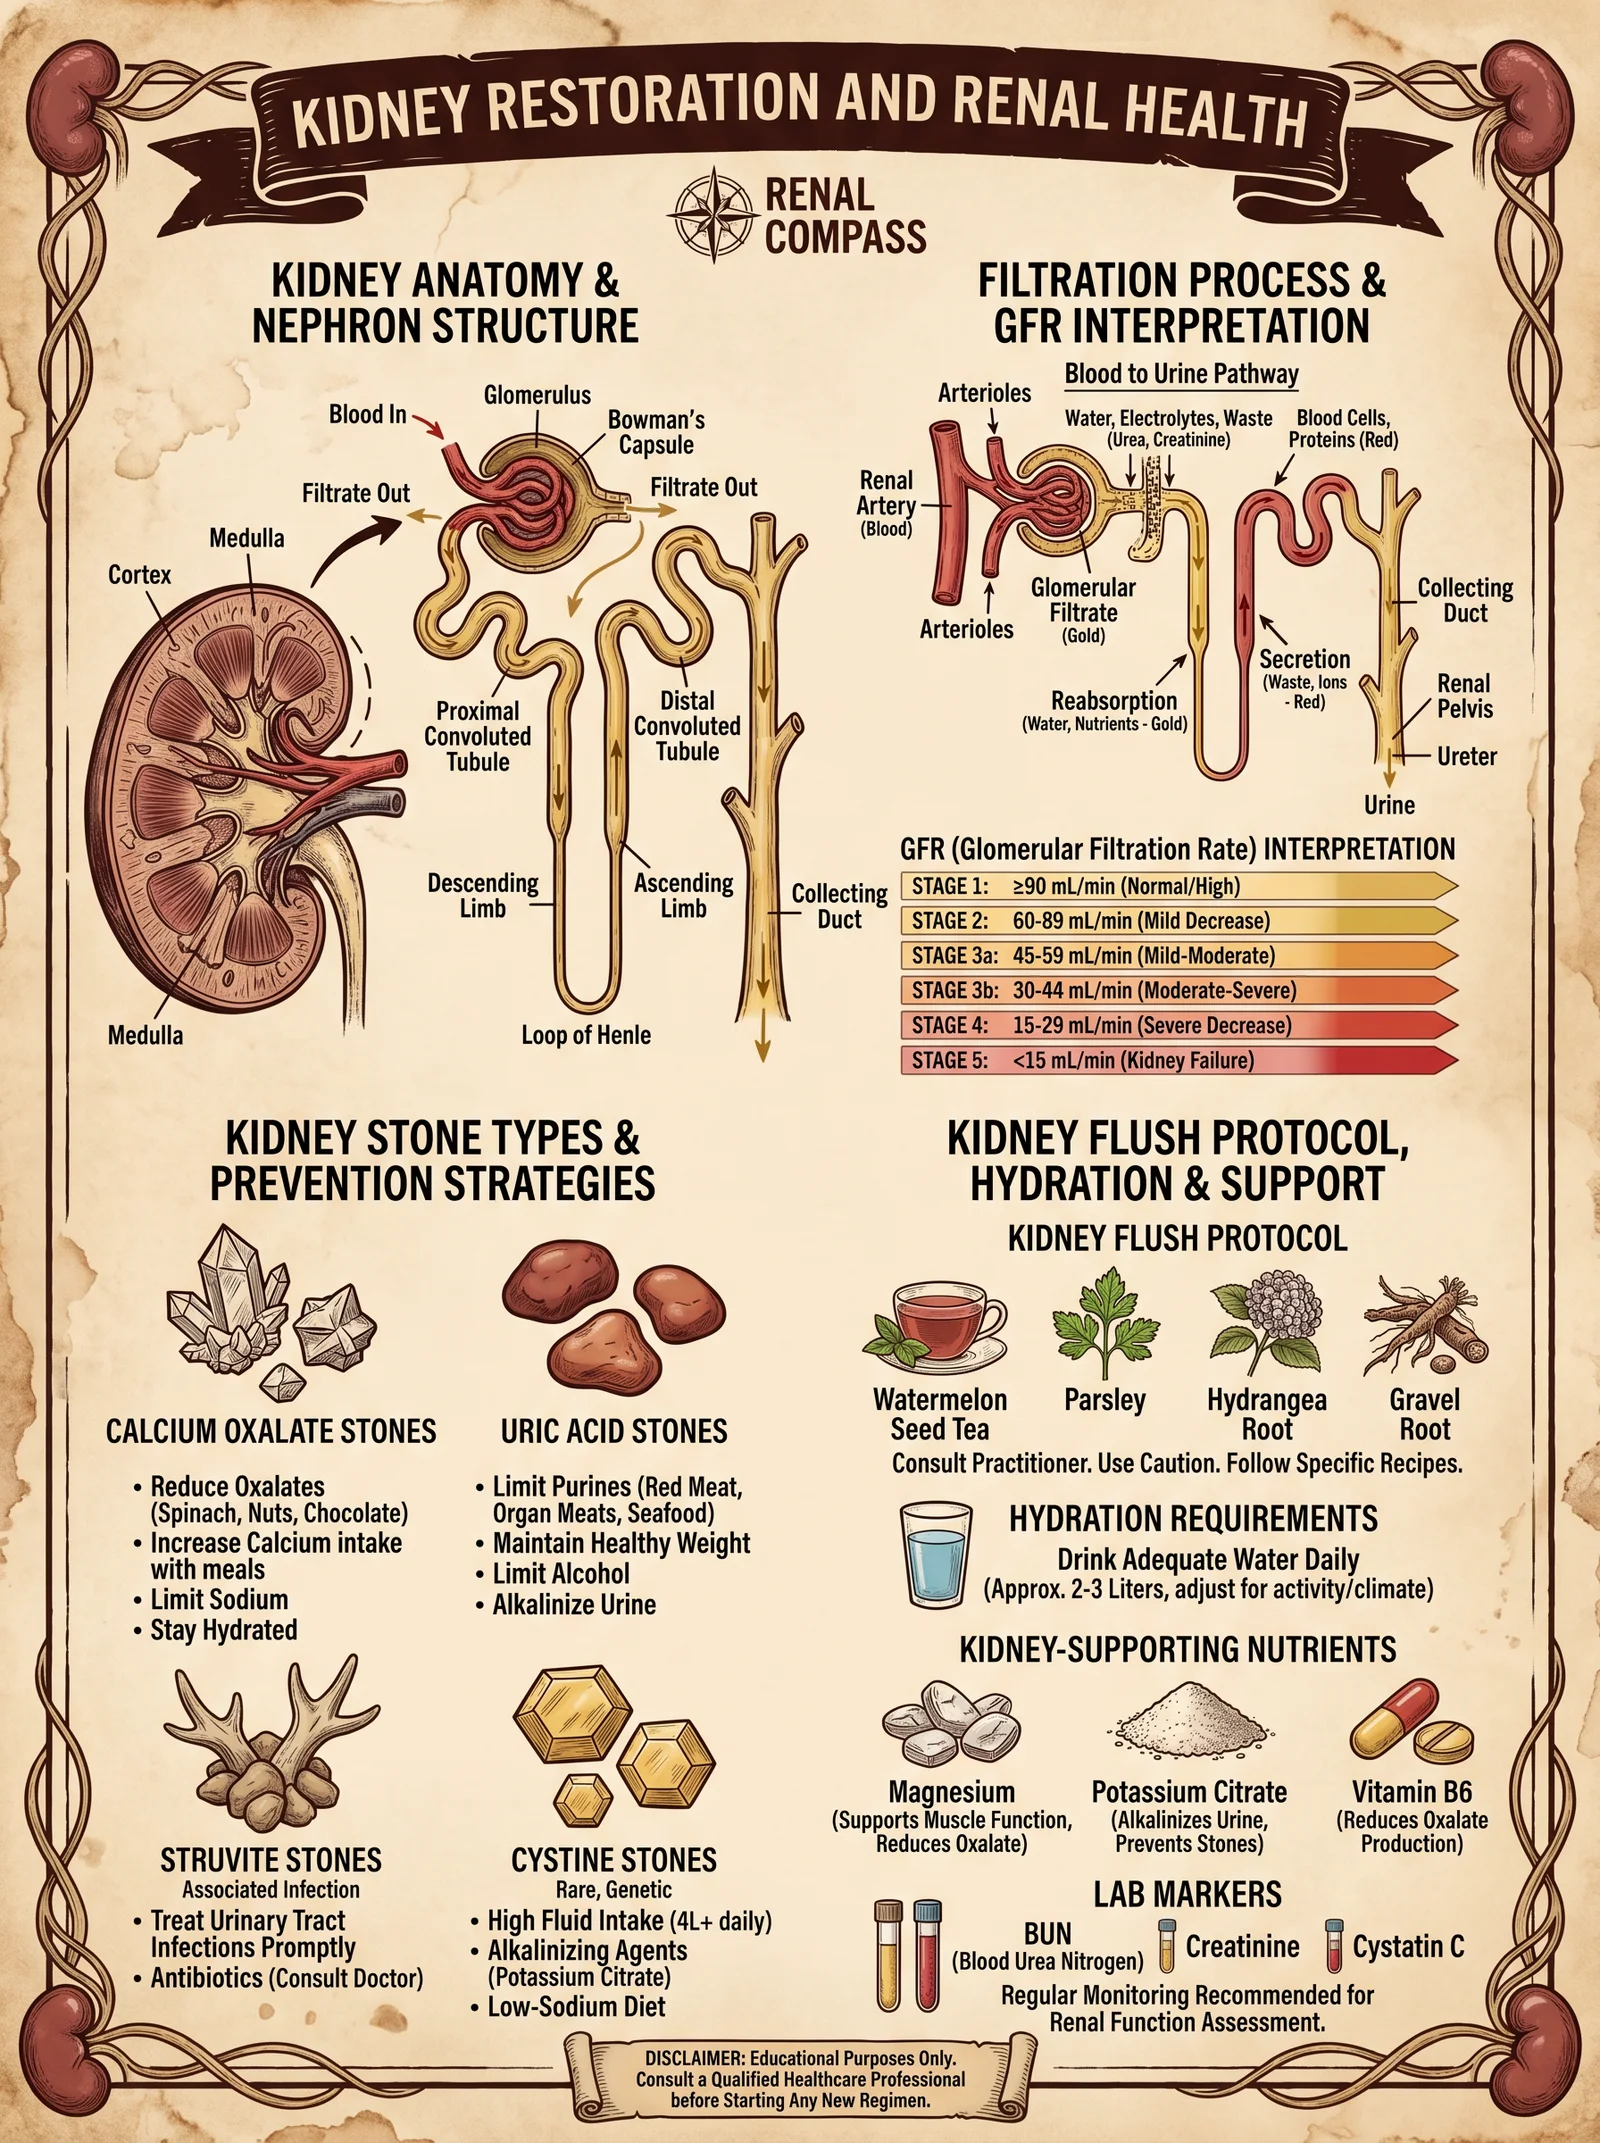
- Preparation (Day Before Flush):
- Hydrate with 3 liters purified water.
- Avoid high-oxalate foods (spinach, nuts).
- Moderate protein intake.
- Flush Day Morning:
- Upon waking, drink 500 ml parsley juice mixed with 60 ml lemon juice.
- Continue hydration with water throughout the day.
- Magnesium Citrate:
- Take 300 mg magnesium citrate with the parsley-lemon juice mixture.
- Repeat Dose:
- At midday, repeat the parsley-lemon juice mixture with magnesium citrate.
- Hydration Maintenance:
- Continue to drink at least 2 liters of water over the day.
- Observation:
- Monitor urine output and color; expect increase in volume and clearer urine.
Expected Outcomes and Safety
| Outcome | Timing | Notes |
|---|---|---|
| Increased urine output | Within 1-2 hours | Indicates kidney stimulation |
| Possible mild cramping | 1-4 hours | Normal during stone mobilization |
| No hematuria or severe pain | Always | Presence indicates damage; cease protocol |
Contraindications: Active urinary tract infection, renal failure, electrolyte imbalance.
Section 4: Lymphatic Drainage Protocol
The lymphatic system clears interstitial fluid and immune debris. Stagnation leads to immune suppression and toxin accumulation.
Ingredients and Equipment
| Ingredient | Dosage per Session | Purpose |
|---|---|---|
| Dry Brush (Natural Bristle) | N/A | Stimulates lymph flow |
| Deep Breathing Exercises | 10 minutes | Enhances lymph circulation |
| Herbal Diuretics (e.g., Cleavers Tea) | 500 ml | Supports lymph detoxification |
Lymphatic Drainage Procedure
- Dry Brushing:
- Use natural bristle brush.
- Begin at feet, brushing upward toward the heart with firm strokes.
- Brush for 10 minutes daily before showering.
- Deep Breathing:
- Perform diaphragmatic breathing: inhale deeply through nose for 4 seconds, hold 7 seconds, exhale through mouth for 8 seconds.
- Repeat for 10 minutes daily.
- Herbal Diuretic Consumption:
- Drink 500 ml of cleavers tea or equivalent lymph-supportive herbal infusion daily.
- Hydration:
- Maintain water intake of at least 3 liters daily to assist lymphatic fluid movement.
Expected Outcomes and Safety
| Outcome | Timing | Notes |
|---|---|---|
| Reduced limb edema | 1-2 weeks | Indicates improved lymph drainage |
| Enhanced immune function | 2-4 weeks | Subjective symptom improvement |
| No skin irritation | Always | Cease dry brushing if irritation occurs |
Chapter III: Binder Agents and Stacking Strategies
Binder agents sequester mobilized toxins, preventing reabsorption and promoting excretion. Their molecular affinity and adsorption capacity are critical.
Section 1: Activated Charcoal
Properties: Highly porous, adsorptive, binds a wide range of organic compounds.
Dosage:
- 500 mg to 1 g capsules, 2-4 times daily between meals.
Preparation:
- Use pharmaceutical-grade activated charcoal powder.
- Encapsulate using size '0' gelatin or vegetable capsules for oral administration.
Binding Spectrum:
- Heavy metals (lead, mercury), pesticides, volatile organic compounds.
Safety:
- Avoid co-administration with medications; separate by at least 2 hours.
- Maintain hydration to prevent constipation.
Section 2: Bentonite Clay
Properties: Swelling clay mineral with cation exchange capacity, binds heavy metals and mycotoxins.
Dosage:
- 1 teaspoon (approx. 3 g) mixed in 250 ml water, once daily.
Preparation:
- Use food-grade bentonite clay powder.
- Stir vigorously in water and consume immediately.
Binding Spectrum:
- Heavy metals, mycotoxins, bacterial endotoxins.
Safety:
- Consume away from meals and medications.
- Avoid prolonged use beyond 30 days without professional supervision.
Section 3: Chlorella
Properties: Green algae rich in chlorophyll, binds heavy metals, enhances immune function.
Dosage:
- 3 to 5 grams daily, divided into 3 doses.
Preparation:
- Use broken cell wall chlorella powder for maximal bioavailability.
- Consume with water or juice.
Binding Spectrum:
- Mercury, cadmium, lead, arsenic.
Safety:
- Start with low doses to prevent detox reactions.
- Contraindicated in autoimmune conditions without medical advice.
Binder Stacking Protocol
To maximize binding efficacy, stagger binder administration to cover different toxin classes and maintain continuous sequestration.
| Time | Binder Agent | Dosage | Notes |
|---|---|---|---|
| 7:00 AM | Chlorella | 1.5 g | Morning detox boost |
| 10:00 AM | Activated Charcoal | 500 mg | Adsorb organic toxins |
| 1:00 PM | Bentonite Clay | 3 g in water | Bind heavy metals and endotoxins |
| 4:00 PM | Activated Charcoal | 500 mg | Maintain adsorption capacity |
| 7:00 PM | Chlorella | 1.5 g | Evening detoxification support |
Chapter IV: Comprehensive Organ Flush and Binder Stacking Protocol
Step-by-Step Procedure
- Pre-Flush Assessment:
- Conduct baseline blood chemistry and liver/kidney function tests (see Volume 2: Diagnostic Codex).
- Assess hydration status.
- Preparation Phase (3 Days Prior):
- Adopt a plant-based, low-fat diet rich in fiber.
- Begin binder stacking protocol as per Chapter III.
- Flush Day:
- Follow organ flush procedures for liver, gallbladder, or kidney as appropriate.
- Administer binders per schedule, commencing 2 hours post-flush mixture ingestion.
- Post-Flush Care (7 Days):
- Continue binder stacking protocol.
- Maintain high hydration and light diet.
- Monitor for adverse symptoms; record bowel movements, urine output, and subjective well-being.
- Repeat Flush Cycles:
- Liver flush: every 2 months.
- Gallbladder flush: every 3 months.
- Kidney flush: monthly during active detox phases.
- Lymphatic drainage: daily maintenance.
Chapter V: Safety Measures and Protocol Contraindications
| Risk Factor | Precaution/Action |
|---|---|
| Dehydration | Maintain minimum 3 liters purified water daily |
| Electrolyte Imbalance | Supplement with magnesium, potassium as needed |
| Medication Interference | Separate binders and medications by 2 hours |
| Pregnancy | Avoid all flush and binder protocols |
| Severe Organ Dysfunction | Consult medical professional prior to protocol |
Chapter VI: Troubleshooting and Advanced Tips
- No Gallstone Passage Observed:
- Increase olive oil dose by 25 ml in subsequent flush.
- Extend reclined position to 45 minutes.
- Excessive Nausea or Vomiting:
- Reduce Epsom salt dosage by 25%.
- Perform flush under medical supervision.
- Constipation During Binder Use:
- Increase water intake by 500 ml per day.
- Add magnesium citrate supplement (see Volume IV: Electrolyte Optimization).
Appendix: Summary Tables
Table 1: Organ Flush Ingredients Summary
| Organ | Key Ingredients | Dosage | Timing |
|---|---|---|---|
| Liver | Epsom Salt, Grapefruit Juice, Olive Oil, Lemon Juice | Epsom Salt 4 tbsp (split doses), Olive Oil 125 ml, Grapefruit Juice 250 ml, Lemon Juice 60 ml | Evening before and flush day (see protocol) |
| Gallbladder | Apple Juice, Epsom Salt, Olive Oil, Lemon Juice | Apple Juice 500 ml, Epsom Salt 3 tbsp (split), Olive Oil 100 ml, Lemon Juice 60 ml | Evening before and flush day (see protocol) |
| Kidney | Parsley Juice, Lemon Juice, Magnesium Citrate | Parsley Juice 250 ml, Lemon Juice 60 ml, Magnesium Citrate 300 mg | Morning and midday flush day |
| Lymphatic | Dry Brush, Deep Breathing, Herbal Diuretics | N/A, 10 min breathing, Cleavers Tea 500 ml | Daily maintenance |
Table 2: Binder Agents Properties and Dosages
| Binder Agent | Dosage | Binding Spectrum | Administration Notes |
|---|---|---|---|
| Activated Charcoal | 500 mg - 1 g, 2-4x/day | Organic toxins, heavy metals | Separate from meds by 2 hours |
| Bentonite Clay | 3 g in water, once/day | Heavy metals, mycotoxins | Avoid prolonged use |
| Chlorella | 3-5 g daily, divided | Heavy metals, immune modulation | Start low dose, monitor reactions |
This volume presents the complete, unabridged protocols for organ flushing and binder administration, designed to restore and maintain the sovereign body's purity and vitality. Strict adherence to dosage, timing, and safety protocols is mandatory. Mastery of this knowledge transforms the practitioner into the guardian of their own sacred temple, wielding suppressed science for profound longevity and health optimization.
<!-- SECTION 11 -->
The Complete Practitioner's Codex, Volume IV: The Endocrine Map and Thyroid Protocols
Chapter I: The Endocrine System — The Sovereign Command of the Body
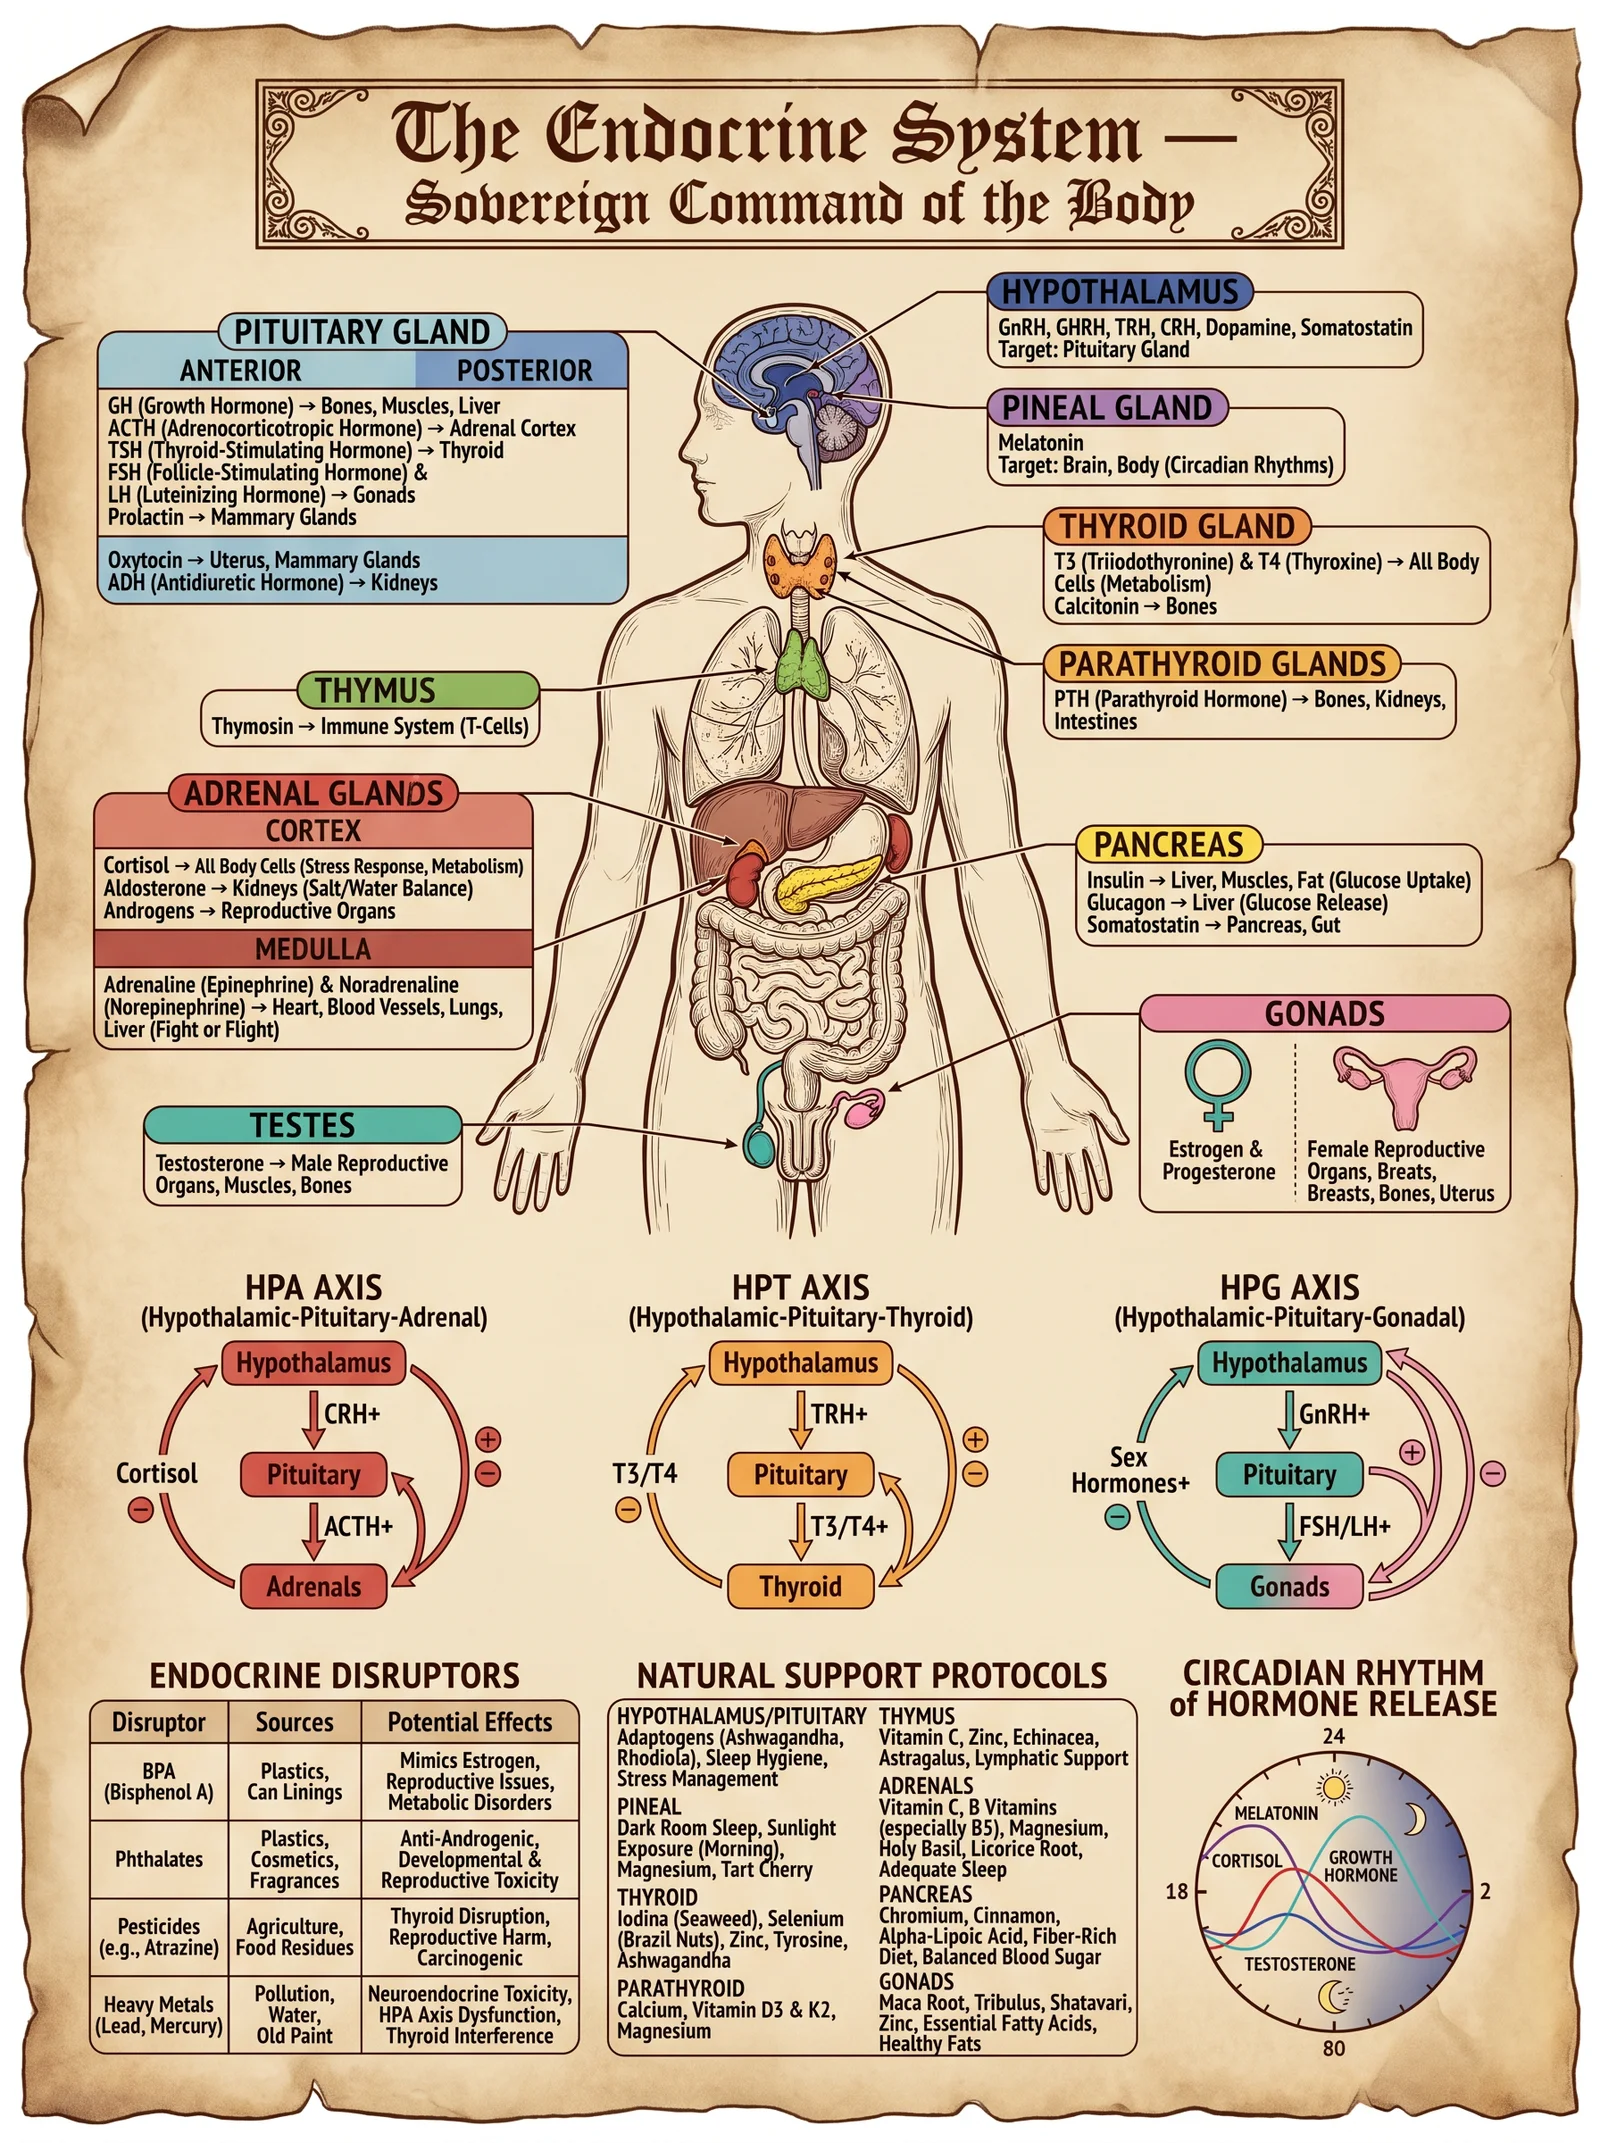
The endocrine system is the body's intrinsic sovereign, an interconnected network of glands that secrete hormones into the bloodstream, orchestrating every physiological process with divine precision. This chapter reveals the detailed anatomy and physiology of this system, focusing on the thyroid gland, the fulcrum of metabolic regulation and systemic vitality. Herein lies the sacred knowledge for identifying dysfunctions and applying natural, potent protocols for thyroid optimization, essential for those who seek sovereign mastery over their biological destiny.
Section 1: Detailed Anatomy and Physiology of the Endocrine System
The endocrine system comprises eight primary glands, each with definitive structure, location, and hormonal secretions. These glands operate within complex feedback loops to maintain homeostasis and respond dynamically to internal and external stimuli.
Table 1: Primary Endocrine Glands and Their Hormones
| Gland | Location | Primary Hormones | Principal Target Organs | Primary Function |
|---|---|---|---|---|
| Hypothalamus | Brain, below thalamus | TRH, CRH, GnRH, GHRH, Somatostatin | Pituitary gland | Regulatory control of pituitary |
| Pituitary (Anterior) | Sella turcica, brain base | TSH, ACTH, GH, LH, FSH, Prolactin | Thyroid, adrenal cortex, gonads | Master gland, secretes trophic hormones |
| Pineal | Brain, near thalamus | Melatonin | Brain, reproductive system | Circadian rhythm regulation |
| Thyroid | Anterior neck, below larynx | T3 (Triiodothyronine), T4 (Thyroxine), Calcitonin | Almost all tissues | Metabolic rate, growth, development |
| Parathyroids | Posterior thyroid gland | PTH (Parathyroid hormone) | Bones, kidneys, intestines | Calcium and phosphate homeostasis |
| Adrenal Cortex | On top of kidneys | Cortisol, Aldosterone, Androgens | Multiple | Stress response, electrolyte balance |
| Pancreas | Abdomen, behind stomach | Insulin, Glucagon | Liver, muscle, fat | Blood glucose regulation |
| Gonads (Ovaries/Testes) | Pelvic cavity | Estrogen, Progesterone, Testosterone | Reproductive organs | Sexual development, fertility |
Thyroid Gland: Structure and Function
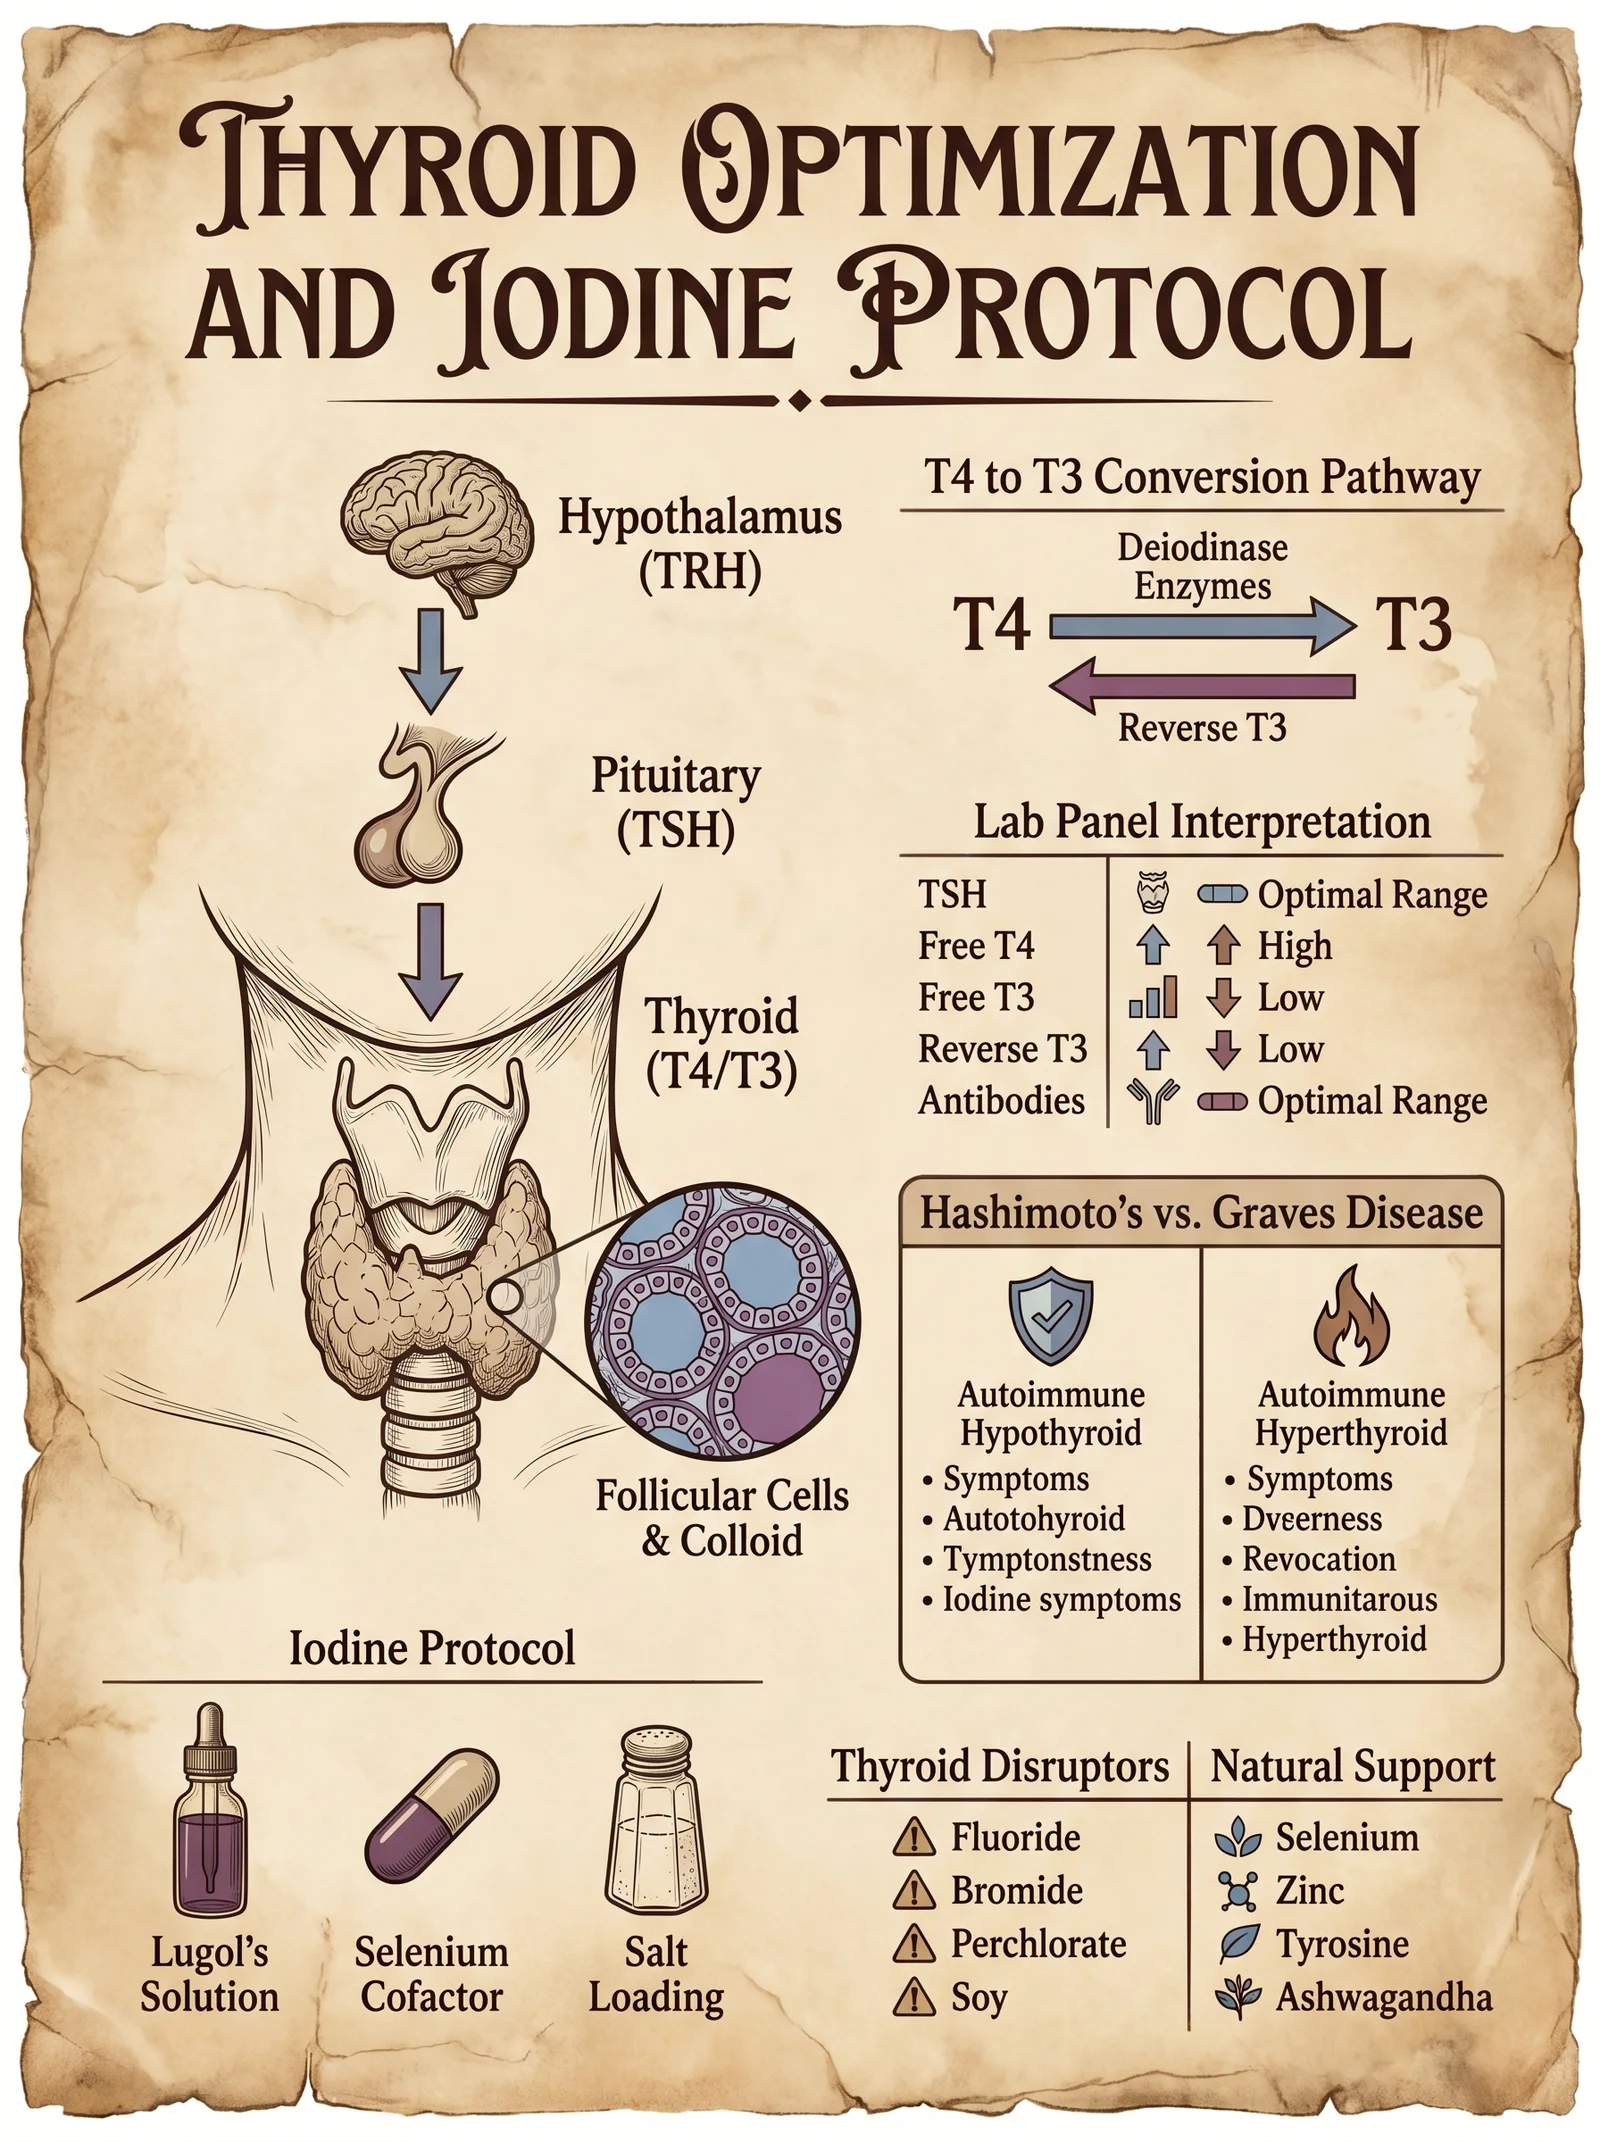
The thyroid is a butterfly-shaped gland, weighing approximately 20 grams in the adult human, located anteriorly on the neck, wrapping around the trachea. It consists of two lobes connected by the isthmus. The functional units are thyroid follicles, spherical structures lined by follicular cells that synthesize and secrete thyroid hormones (T3 and T4).
- Thyroid Hormones (T3 and T4): Synthesized from iodine and tyrosine, these hormones regulate basal metabolic rate, influence protein synthesis, maintain mitochondrial function, and regulate thermogenesis.
- Calcitonin: Secreted by parafollicular (C) cells, lowers blood calcium levels by inhibiting osteoclast activity.
Thyroid Hormone Synthesis and Regulation
Stepwise synthesis process:
- Iodide Uptake: Follicular cells actively transport iodide from the bloodstream via the sodium-iodide symporter (NIS).
- Iodide Oxidation: Iodide is oxidized to iodine by thyroid peroxidase (TPO) at the apical membrane.
- Iodination: Iodine binds to tyrosyl residues of thyroglobulin forming MIT (Monoiodotyrosine) and DIT (Diiodotyrosine).
- Coupling: MIT and DIT couple to form T3 (MIT+DIT) and T4 (DIT+DIT) within thyroglobulin.
- Release: Thyroglobulin is endocytosed, digested in lysosomes, releasing free T3 and T4 into circulation.
Feedback Regulation: The Hypothalamic-Pituitary-Thyroid (HPT) Axis
The HPT axis maintains thyroid hormone homeostasis:
| Component | Hormone Secreted | Target | Feedback Mechanism |
|---|---|---|---|
| Hypothalamus | TRH (Thyrotropin-releasing hormone) | Anterior pituitary | Stimulates TSH secretion |
| Anterior Pituitary | TSH (Thyroid-stimulating hormone) | Thyroid gland | Stimulates T3/T4 production |
| Thyroid | T3 and T4 | Multiple tissues | Inhibit TRH and TSH secretion via negative feedback |
Section 2: Common Thyroid Dysfunctions
Endocrine dysfunction is a harbinger of systemic imbalance. The thyroid is vulnerable to multiple pathologies primarily categorized as:
1. Hypothyroidism (Underactive thyroid)
- Etiology: Autoimmune (Hashimoto’s thyroiditis), iodine deficiency, post-thyroidectomy, drug-induced.
- Symptoms: Fatigue, weight gain, cold intolerance, bradycardia, depression, myxedema.
- Lab Markers: Elevated TSH, low free T4, positive anti-thyroid peroxidase (TPO) antibodies.
2. Hyperthyroidism (Overactive thyroid)
- Etiology: Graves’ disease (autoimmune), toxic multinodular goiter, thyroiditis.
- Symptoms: Weight loss, heat intolerance, tachycardia, anxiety, tremors, exophthalmos.
- Lab Markers: Low TSH, elevated free T4 and/or T3, positive TSH receptor antibodies.
3. Subclinical Thyroid Dysfunction
- Mild abnormalities in hormone levels, often asymptomatic but may progress.
4. Nodular Thyroid Disease and Goiter
- Enlargement and nodularity due to iodine deficiency or autoimmune inflammation.
Section 3: Natural Optimization Strategies for Thyroid Health
The sovereign body requires precise, natural interventions to restore or maintain thyroid homeostasis. This section provides protocols utilizing nutrition, herbal medicine, and lifestyle, each step delineated with actionable detail.
Nutritional Protocols for Thyroid Support
Optimal thyroid function demands sufficient intake of iodine, selenium, zinc, iron, and tyrosine, cofactors critical for hormone synthesis and peripheral conversion.
| Nutrient | Role in Thyroid Function | Rich Food Sources | Daily Therapeutic Dose |
|---|---|---|---|
| Iodine | Essential for T3/T4 synthesis | Seaweed (kelp), iodized salt, fish | 150-300 mcg |
| Selenium | Cofactor for deiodinase enzymes converting T4 to T3 | Brazil nuts, seafood, organ meats | 100-200 mcg |
| Zinc | Supports TRH and TSH synthesis | Meat, shellfish, pumpkin seeds | 15-30 mg |
| Iron | Required for thyroid peroxidase activity | Red meat, spinach, lentils | 10-18 mg |
| Tyrosine | Amino acid precursor for thyroid hormones | Cheese, eggs, poultry | 500-1000 mg (supplemental) |
Stepwise Nutritional Optimization:
- Assess dietary intake for iodine, selenium, zinc, iron, and tyrosine; correct deficits via food or supplements.
- Supplement iodine cautiously — excess can trigger autoimmune flare in predisposed individuals. Use kelp powder standardized to 150 mcg per serving.
- Administer selenium in selenomethionine form, 100-200 mcg daily for 3 months; monitor thyroid antibodies.
- Correct iron deficiency with ferrous sulfate or bisglycinate, 30 mg elemental iron daily; co-administer vitamin C to enhance absorption.
- Supplement tyrosine 500-1000 mg daily, preferably on an empty stomach, to support hormone synthesis.
Herbal Protocols for Thyroid Support
Herbal medicine offers bioactive compounds with thyroidotropic, adaptogenic, and anti-inflammatory effects. Below is a table of therapeutic herbs with their mechanisms and recommended dosages.
| Herb | Active Constituents | Mechanism of Action | Dosage (Daily) | Notes |
|---|---|---|---|---|
| Ashwagandha (Withania somnifera) | Withanolides | Supports thyroid hormone production, reduces stress-induced suppression | 600-1000 mg extract (standardized) | Avoid in hyperthyroid states |
| Bladderwrack (Fucus vesiculosus) | Iodine, fucoidan | Provides iodine, antioxidant, anti-inflammatory | 500-1000 mg powder or tincture | Use cautiously with autoimmune |
| Guggul (Commiphora mukul) | Guggulsterones | Stimulates T3 production, lipid metabolism | 300-500 mg extract | Contraindicated in pregnancy |
| Bugleweed (Lycopus virginicus) | Phenolic compounds | Inhibits TSH receptor binding, reduces hyperthyroid symptoms | 300-600 mg extract | For hyperthyroid symptom relief |
| Bacopa (Bacopa monnieri) | Bacosides | Neuroprotective, modulates HPT axis | 300-450 mg standardized extract | Supports cognitive function |
Herbal Protocol Execution:
- Hypothyroid Support: Combine Ashwagandha (600 mg BID), Bladderwrack (500 mg BID), and Guggul (300 mg BID) for 8-12 weeks. Monitor thyroid panel every 4 weeks.
- Hyperthyroid Symptom Control: Administer Bugleweed extract 300 mg TID alongside supportive adaptogens like Bacopa 300 mg BID.
- Preparation: Use standardized extracts with verified active constituent levels. Prepare tinctures by macerating dried herb in 40-60% ethanol for 4 weeks, strain, and dose accordingly.
- Contraindications: Avoid Bladderwrack in iodine-sufficient or autoimmune thyroidopathy patients unless under strict supervision.
Lifestyle Protocols for Thyroid Optimization
Lifestyle profoundly influences thyroid function via stress modulation, circadian alignment, and environmental toxin reduction.
Stepwise lifestyle optimization:
- Stress Management: Implement daily mindfulness or meditation for 15-30 minutes to reduce cortisol, a suppressor of TSH.
- Sleep Hygiene: Maintain 7-9 hours of uninterrupted sleep; optimize melatonin production by minimizing light exposure after dusk.
- Cold Exposure: Employ cold showers or ice baths thrice weekly for 2-5 minutes to stimulate thyroid hormone conversion and brown adipose tissue activation.
- Avoid Endocrine Disruptors: Eliminate exposure to BPA, phthalates, and heavy metals by using glass containers, filtered water (see Volume VIII: The Water Codex, Chapter II), and organic produce.
- Regular Exercise: Engage in moderate resistance and aerobic training 4-5 times weekly to enhance metabolic rate and improve peripheral thyroid hormone sensitivity.
Section 4: Integrated Thyroid Optimization Protocol
This protocol combines nutrition, herbs, and lifestyle to restore thyroid function holistically.
| Step | Action | Details and Dosage | Duration | Monitoring |
|---|---|---|---|---|
| 1 | Baseline Assessment | Comprehensive thyroid panel: TSH, free T3, free T4, anti-TPO, anti-Tg antibodies | One-time | Lab analysis |
| 2 | Nutritional Correction | Iodine 150-300 mcg, Selenium 100-200 mcg, Zinc 15-30 mg, Iron 30 mg, Tyrosine 500-1000 mg | Daily | Symptom tracking |
| 3 | Herbal Support | Ashwagandha 600 mg BID, Bladderwrack 500 mg BID, Guggul 300 mg BID (hypothyroid) or Bugleweed 300 mg TID, Bacopa 300 mg BID (hyperthyroid) | 8-12 weeks | Repeat labs every 4 weeks |
| 4 | Lifestyle Optimization | Stress reduction (meditation daily), sleep hygiene (7-9 hours), cold exposure (3x weekly), toxin avoidance, exercise (4-5x weekly) | Ongoing | Subjective wellbeing |
| 5 | Re-evaluation | Repeat thyroid panel and symptom assessment | Every 3 months | Adjust protocol accordingly |
Section 5: Feedback Loops and Thyroid Hormone Peripheral Conversion
The conversion of T4 (prohormone) to T3 (active hormone) is crucial; 80% occurs in peripheral tissues by deiodinase enzymes (Type 1 and 2). Selenium-dependent enzymes facilitate this conversion.
| Deiodinase Type | Location | Function |
|---|---|---|
| Type 1 (D1) | Liver, kidney, thyroid | Converts T4 to T3, deactivates rT3 |
| Type 2 (D2) | Brain, pituitary, brown fat | Local T3 production for tissue use |
| Type 3 (D3) | Placenta, brain, skin | Inactivates T4 and T3 to rT3 and T2 |
Peripheral Conversion Optimization Instructions:
- Ensure adequate selenium intake as detailed above.
- Avoid excessive glucocorticoids (stress hormones) which inhibit D1 and D2 enzymes.
- Manage systemic inflammation via omega-3 fatty acids (1-3 g EPA/DHA daily) and antioxidants.
- Promote gut health with probiotics and prebiotics to prevent endotoxin-induced enzyme inhibition.
Section 6: Therapeutic Herbs Table for Endocrine Modulation (Including Thyroid)
| Herb | Primary Endocrine Targets | Active Compounds | Therapeutic Actions | Dosage Range |
|---|---|---|---|---|
| Ashwagandha | Thyroid, adrenal | Withanolides | Thyroid stimulation, stress adaptation | 600-1000 mg daily |
| Bladderwrack | Thyroid | Iodine, fucoidans | Iodine supplementation, anti-inflammatory | 500-1000 mg daily |
| Guggul | Thyroid, lipid metabolism | Guggulsterones | T3 stimulation, cholesterol reduction | 300-500 mg daily |
| Bugleweed | Thyroid | Phenolics | TSH inhibition, hyperthyroid symptom relief | 300-600 mg daily |
| Bacopa | Hypothalamic-pituitary axis | Bacosides | Neuroendocrine modulation | 300-450 mg daily |
| Rhodiola | Adrenal, thyroid | Rosavins | Adaptogenic, reduces cortisol | 200-600 mg daily |
| Licorice | Adrenal, thyroid | Glycyrrhizin | Cortisol potentiation, anti-inflammatory | 100-300 mg daily |
Closing Revelation: The Sovereign Path to Thyroid Mastery
The thyroid is the metabolic crucible where the sacred flame of life is tempered. Mastery over this gland is mastery over vitality, mental clarity, and longevity. The protocols contained herein are not merely suggestions; they are the keys to sovereignty, distilled from suppressed knowledge and refined by generations of seekers in the art of biological optimization. Adhere to every step with precision, monitor results with rigor, and respect the sacred balance of the endocrine symphony.
For advanced biohacking techniques related to hormone modulation and receptor sensitivity, see Volume VI: The Neuroendocrine Nexus. For detoxification protocols eliminating endocrine disruptors, see Volume VIII: The Water Codex, Chapter II.
_End of Volume IV: The Endocrine Map and Thyroid Protocols_
<!-- SECTION 12 -->
The Complete Practitioner's Codex, Volume IV: Testosterone and Estrogen Optimization
Chapter I: The Sovereign Hormones—Testosterone and Estrogen
Testosterone and estrogen govern the pinnacle of human vitality, shaping not only reproductive function but systemic health, cognition, and longevity. Mastery over their biosynthesis and balance unlocks the sovereign body’s full potential. This chapter delivers the complete architecture of sex hormone biosynthesis, the clinical ramifications of their balance and imbalance, and the precise natural protocols to optimize them without recourse to synthetic pharmaceuticals.
Section 1: Comprehensive Review of Sex Hormone Biosynthesis
1.1 Steroidogenesis Overview
Testosterone and estrogen derive from cholesterol through a tightly regulated cascade of enzymatic conversions within the endocrine glands—primarily the Leydig cells in testes for testosterone and the granulosa cells in ovaries for estrogen. The adrenal cortex also contributes peripheral sex steroid precursors.
1.2 Biosynthetic Pathways
1.2.1 Testosterone Biosynthesis Pathway
| Step | Precursor | Enzyme | Product | Location |
|---|---|---|---|---|
| 1 | Cholesterol | Cholesterol side-chain cleavage enzyme (CYP11A1) | Pregnenolone | Mitochondria (Leydig cells) |
| 2 | Pregnenolone | 3β-Hydroxysteroid dehydrogenase (3β-HSD) | Progesterone | Smooth ER |
| 3 | Progesterone | 17α-Hydroxylase (CYP17A1) | 17α-Hydroxyprogesterone | Smooth ER |
| 4 | 17α-Hydroxyprogesterone | 17,20-Lyase (CYP17A1) | Androstenedione | Smooth ER |
| 5 | Androstenedione | 17β-Hydroxysteroid dehydrogenase (17β-HSD) | Testosterone | Cytosol |
1.2.2 Estrogen Biosynthesis Pathway
| Step | Precursor | Enzyme | Product | Location |
|---|---|---|---|---|
| 1 | Testosterone (from Leydig cells or adrenal) | Aromatase (CYP19A1) | Estradiol (E2) | Granulosa cells (ovary), adipose tissue |
| 2 | Androstenedione | Aromatase | Estrone (E1) | Peripheral tissues |
Estradiol (E2) is the most potent estrogen, predominating in reproductive-age females. Estrone (E1) and estriol (E3, produced in liver and placenta) are weaker estrogens with distinct physiological roles.
Section 2: Clinical Significance of Hormone Balance
2.1 Normal Circulating Levels
The following table lists typical serum hormone ranges measured by liquid chromatography tandem mass spectrometry (LC-MS/MS), the gold standard:
| Hormone | Male Reference Range | Female Reference Range (Reproductive) | Female Reference Range (Postmenopausal) | Units |
|---|---|---|---|---|
| Total Testosterone | 300–1000 | 15–70 | 10–40 | ng/dL |
| Free Testosterone | 5–21 | 0.5–3 | 0.3–2 | pg/mL |
| Estradiol (E2) | 10–40 | 30–400 (cyclic) | <30 | pg/mL |
| Estrone (E1) | 10–60 | 15–60 | 10–40 | pg/mL |
| Sex Hormone Binding Globulin (SHBG) | 10–57 | 18–144 | 30–90 | nmol/L |
Note: Female values fluctuate by menstrual cycle phase.
2.2 Symptoms of Hormonal Imbalance
| Hormone Imbalance | Symptoms | Clinical Consequences |
|---|---|---|
| Low Testosterone (Hypogonadism) | Fatigue, low libido, muscle loss, depression, cognitive fog | Osteoporosis, metabolic syndrome, cardiovascular risk |
| High Testosterone (Hyperandrogenism) | Acne, aggression, hair loss, polycythemia | Increased cardiovascular strain, prostate hypertrophy |
| Low Estrogen | Hot flashes, vaginal dryness, mood instability, osteoporosis | Cardiovascular disease, cognitive decline |
| High Estrogen | Weight gain (adipose accumulation), gynecomastia (in males), mood swings | Increased risk of thromboembolism, hormone-dependent cancers |
Section 3: Natural Methods for Optimizing Testosterone and Estrogen
This section presents complete, actionable protocols for hormone optimization, emphasizing safe, natural methods achievable with minimal resources. These are life-critical protocols, to be adhered to precisely.
3.1 Diet-Based Hormone Optimization
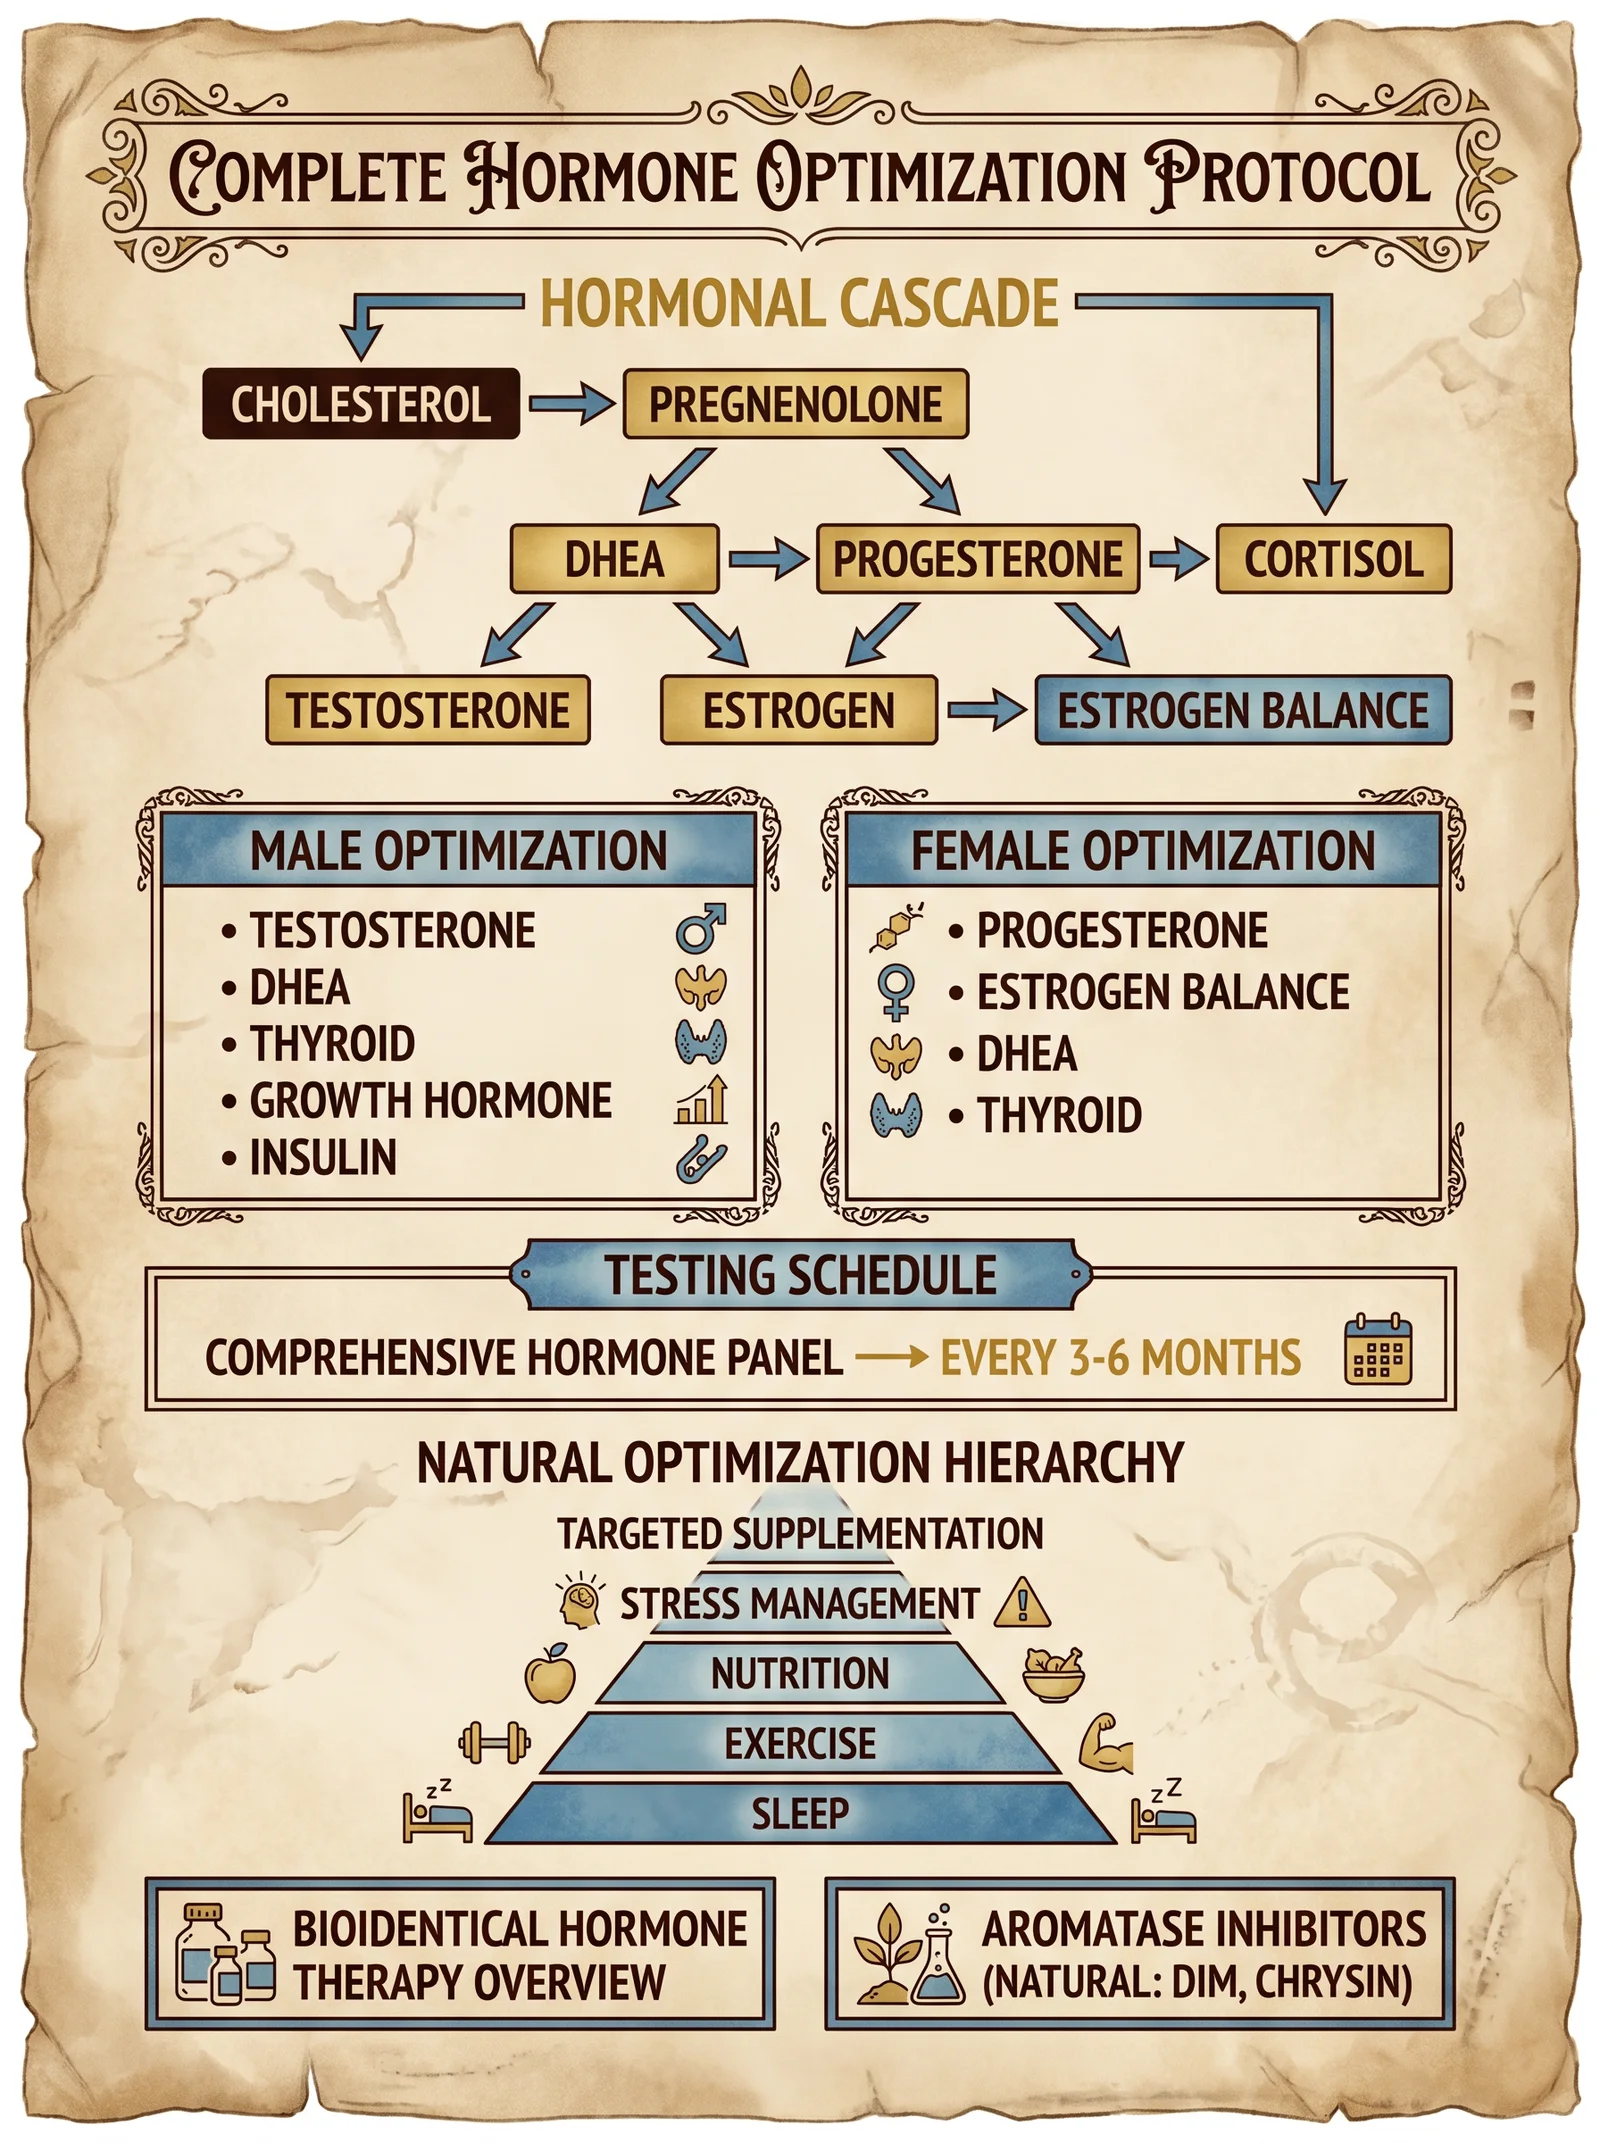
Diet provides substrates, cofactors, and modulators essential for steroidogenesis.
3.1.1 Macronutrient Ratios
| Macronutrient | Male Optimization | Female Optimization | Notes |
|---|---|---|---|
| Protein | 1.6–2.2 g/kg bodyweight/day | 1.2–1.8 g/kg/day | Supports Leydig cell function, muscle mass |
| Fat | 25–40% total calories (focus on saturated and monounsaturated fats) | 30–45% total calories | Cholesterol is precursor; avoid PUFA overload |
| Carbohydrates | 30–45% total calories | 30–50% total calories | Avoid excessive sugars to prevent insulin resistance |
3.1.2 Crucial Micronutrients and Foods
| Nutrient | Role | Natural Sources | Recommended Daily Allowance (RDA) |
|---|---|---|---|
| Zinc | Testosterone synthesis cofactor, aromatase inhibitor | Oysters, pumpkin seeds, beef | 11 mg (M), 8 mg (F) |
| Magnesium | Enhances free testosterone | Spinach, almonds, dark chocolate | 400 mg (M), 310 mg (F) |
| Vitamin D3 | Upregulates androgen receptors, promotes testosterone | Sun exposure, fatty fish | 4000 IU (supplemented) |
| Boron | Increases free testosterone, reduces estrogen | Prunes, avocados, nuts | 3 mg |
| Omega-3 fatty acids | Modulates estrogen metabolism | Fatty fish, flaxseed | 1.6 g (M), 1.1 g (F) |
| Cruciferous vegetables (e.g., broccoli) | Indoles promote estrogen metabolism | Broccoli, kale, cabbage | 1–2 cups/day |
3.2 Exercise Protocols for Hormone Optimization
Physical activity modulates hypothalamic-pituitary-gonadal (HPG) axis function.
| Exercise Type | Protocol | Hormonal Effect | Frequency |
|---|---|---|---|
| Resistance Training | Compound lifts: squats, deadlifts, bench press; 3–5 sets of 5 reps at 80–90% 1RM | Increases testosterone, IGF-1 | 3–4x/week |
| High-Intensity Interval Training (HIIT) | 30s sprint, 90s rest, 6–10 cycles | Increases testosterone, lowers SHBG | 2–3x/week |
| Moderate Cardio | 30–45 min steady state | Balances cortisol, supports estrogen metabolism | 2–4x/week |
Caution: Excessive endurance training suppresses testosterone.
3.3 Supplement Protocols
Use only pharmaceutical-grade or independently tested supplements. Avoid proprietary blends lacking transparency.
| Supplement | Dose | Timing | Mechanism | Notes |
|---|---|---|---|---|
| Zinc (e.g., zinc picolinate) | 30 mg | Morning with food | Increases testosterone synthesis | Avoid >40 mg/day |
| Magnesium (magnesium citrate/glycinate) | 300–400 mg | Evening | Enhances free testosterone | Avoid magnesium oxide |
| Vitamin D3 (cholecalciferol) | 4000 IU | Morning | Upregulates androgen receptors | Monitor serum 25(OH)D levels |
| Boron (boron citrate) | 3 mg | Morning | Decreases estrogen, increases free testosterone | Cyclic use 2 weeks on/2 weeks off |
| Ashwagandha (Withania somnifera) | 600 mg standardized extract | Evening | Lowers cortisol, increases testosterone | Use high-concentration extract |
| Nettle root (Urtica dioica) | 300 mg | Morning | Binds SHBG, increases free testosterone | Cycle 4 weeks on, 2 weeks off |
| DIM (Diindolylmethane) | 100–200 mg | Morning | Enhances estrogen metabolism | Avoid excessive dosing |
3.4 Stress Management
Chronic stress elevates cortisol, which suppresses testosterone and disrupts estrogen balance.
3.4.1 Protocol for Stress Reduction
- Daily Meditation: 15 minutes, guided breath awareness or mantra repetition.
- Sleep Hygiene: 7–9 hours per night, no screens 1 hour before bed, sleep in total darkness.
- Cold Exposure: 2–3 minutes cold shower post-workout to reduce cortisol spike.
- Adaptogen Supplementation: Ashwagandha as above.
- Biofeedback Training: Heart rate variability (HRV) monitoring devices, practice paced breathing to increase HRV.
Section 4: Step-by-Step Hormone Balancing Protocol
This protocol is structured for a 12-week cycle, adaptable per individual baseline and goals.
4.1 Baseline Assessment
- Obtain blood work (via LC-MS/MS) for: total/free testosterone, estradiol, estrone, SHBG, LH, FSH, cortisol.
- Record symptoms using the Hormone Symptom Checklist (see Appendix A).
- Measure body composition (DEXA preferred, or skinfold calipers).
4.2 Diet Implementation (Weeks 1–12)
- Calculate daily caloric needs (maintenance or slight surplus 200 kcal for muscle gain).
- Set macronutrient targets as per Section 3.1.1.
- Source organic, minimally processed foods emphasizing zinc, magnesium, vitamin D, and cruciferous vegetables.
- Prepare meals with cholesterol-rich foods: eggs (3–6 per day), liver (1x/week).
- Avoid soy products and excessive alcohol (>1 drink/day).
4.3 Exercise Regimen (Weeks 1–12)
- Resistance training 3x per week:
- Warm-up: 10 minutes light cardio.
- Core lifts: Squat, deadlift, bench press 3–5 sets x 5 reps at 80–90% 1RM.
- Accessory lifts: Pull-ups, rows, overhead press.
- Cool down: Stretching, 10 minutes.
- HIIT 2x per week:
- Sprint 30 seconds, rest 90 seconds, repeat 6–10 times.
- Moderate cardio 2x per week, 30 minutes.
4.4 Supplementation Schedule (Weeks 1–12)
| Supplement | Dose | Timing | Notes |
|---|---|---|---|
| Zinc | 30 mg | Morning with food | Cycle 4 weeks on, 1 week off |
| Magnesium | 300 mg | Evening | Continuous |
| Vitamin D3 | 4000 IU | Morning | Monitor serum levels |
| Boron | 3 mg | Morning | 2 weeks on, 2 weeks off |
| Ashwagandha | 600 mg | Evening | Continuous |
| Nettle root | 300 mg | Morning | Cycle 4 weeks on, 2 weeks off |
| DIM | 100 mg | Morning | Continuous |
4.5 Stress Management (Weeks 1–12)
Daily:
- Meditate 15 minutes.
- Cold shower 2–3 minutes post-exercise.
- Practice paced breathing 5 minutes.
- Sleep 7–9 hours, maintain strict hygiene.
4.6 Monitoring and Adjustment (Weeks 4, 8, 12)
- Repeat symptom checklist.
- Measure morning fasting cortisol (saliva or blood).
- Adjust zinc and boron cycles accordingly.
- If estradiol elevates >50 pg/mL in men or causes symptoms, increase DIM dose to 200 mg.
- If testosterone remains low, increase resistance training intensity or consult Volume III: The Endocrine Codex for advanced protocols.
Section 5: Tables Summary
5.1 Hormone Levels and Symptoms Summary
| Hormone Level | Symptoms | Recommended Action |
|---|---|---|
| Total Testosterone <300 ng/dL (M) | Fatigue, low libido | Initiate diet/exercise/supplement protocol |
| Free Testosterone <5 pg/mL (M) | Cognitive fog, muscle loss | Add nettle root, optimize magnesium |
| Estradiol >50 pg/mL (M) | Gynecomastia, water retention | Increase DIM, reduce alcohol |
| Estradiol <30 pg/mL (F, reproductive) | Hot flashes, mood swings | Increase cruciferous vegetables, reduce stress |
| SHBG >70 nmol/L | Reduced free testosterone | Add nettle root, reduce excessive cardio |
5.2 Natural Modulators Summary
| Modulator | Target Hormone | Effect | Dose | Notes |
|---|---|---|---|---|
| Zinc | Testosterone | Increases synthesis | 30 mg/day | Avoid excess |
| Magnesium | Free Testosterone | Increases bioavailability | 300–400 mg/day | Prefer chelated forms |
| Vitamin D3 | Androgen Receptors | Upregulates receptor expression | 4000 IU/day | Monitor serum levels |
| Boron | Testosterone/Estrogen | Increases free T, lowers E2 | 3 mg/day | Cyclic use |
| Ashwagandha | Cortisol/Testosterone | Lowers cortisol, increases T | 600 mg/day | Use standardized extract |
| Nettle Root | SHBG | Binds SHBG, increases free T | 300 mg/day | Cyclic use |
| DIM | Estrogen | Enhances metabolism of E2 | 100–200 mg/day | Avoid overdose |
Final Notes
The sovereign body commands these hormones with exquisite precision. Deviation from the protocols invites imbalance and decline. Adhere to every step, measure vigilantly, and remember: mastery of hormone optimization is the foundation upon which longevity, vitality, and the indomitable spirit stand.
For advanced pharmacological interventions, enzyme modulation, or hormone replacement protocols, consult Volume VI: The Endocrine Arsenal.
Appendix A: Hormone Symptom Checklist (Sample)
| Symptom | Present (Y/N) | Severity (1–5) |
|---|---|---|
| Fatigue | ||
| Low libido | ||
| Poor concentration | ||
| Mood swings | ||
| Muscle weakness | ||
| Weight gain | ||
| Hot flashes | ||
| Sleep disturbances |
This completes the codex on testosterone and estrogen optimization. Proceed with reverence and rigor. Your sovereign body awaits its awakening.
<!-- SECTION 13 -->
The Complete Practitioner's Codex, Volume 5: The Sovereign Body
Chapter VII: Pleomorphism and Terrain Correction
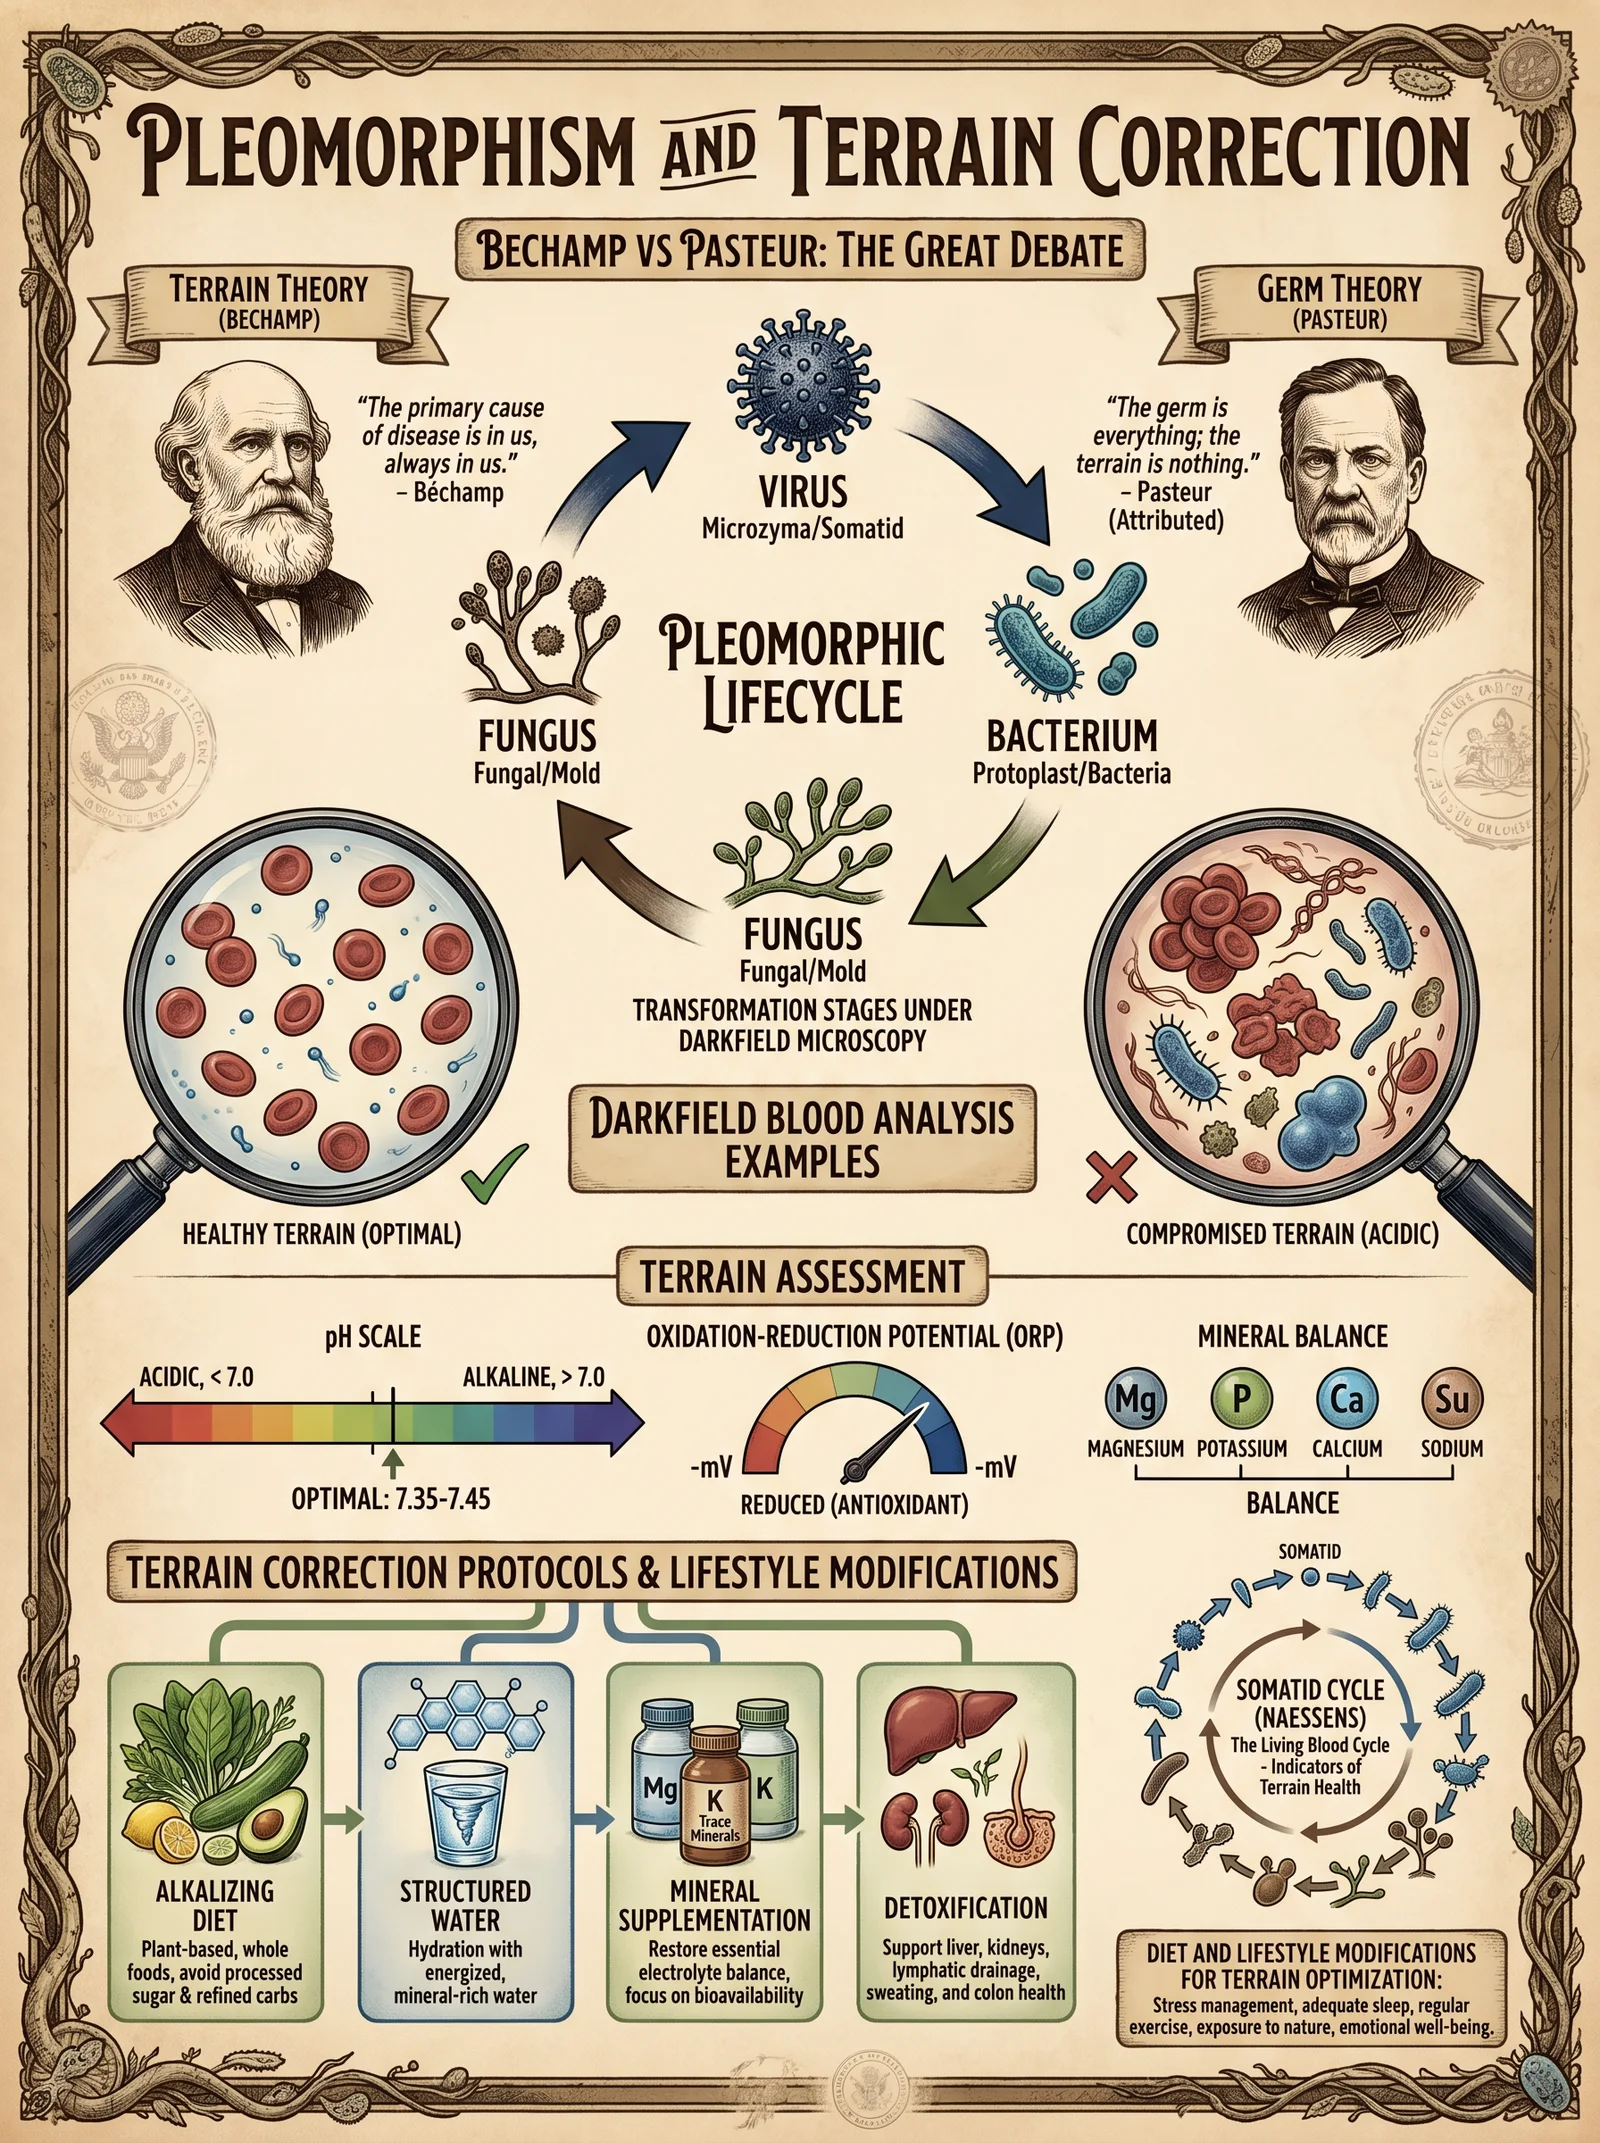
Introduction
This chapter presents the foundational principles of pleomorphism and terrain theory as they relate to human health, disease manifestation, and restoration of the body’s sovereign integrity. The suppressed science behind Antoine Béchamp’s terrain-centric paradigm opposes the dogma of Louis Pasteur’s germ theory, revealing the terrain as the primary determinant of health or disease. The implications for biohacking physical optimization are profound. This is not academic discourse; this is life-or-death knowledge for the adept setting upon sovereign mastery over their own biology.
I. Béchamp vs Pasteur: The Foundational Paradigm Conflict
1. Summary of Theories
| Aspect | Béchamp (Pleomorphism & Terrain Theory) | Pasteur (Germ Theory) |
|---|---|---|
| Core Hypothesis | Microorganisms change form (pleomorphism) based on internal terrain | Microorganisms (germs) are fixed entities causing disease |
| Cause of Disease | Internal environment imbalance (terrain) allows pathogens to emerge | External invasion of pathogens causes disease |
| Focus | Terrain correction to restore health; microorganisms are secondary | Elimination of germs via antiseptics, antibiotics, vaccines |
| Microbial Role | Microbes are indicators and effectors of terrain state | Microbes are primary causative agents of disease |
| Therapeutic Approach | Detoxification, microbiome balance, and environment restoration | Germ eradication, sterilization, immunization |
2. Detailed Explanation
- Béchamp's Pleomorphism: Antoine Béchamp demonstrated that microorganisms are not static but morphologically and functionally adaptive entities called microzymas. These microzymas evolve based on the internal milieu, transforming into bacteria, yeasts, molds, or more benign forms depending on the terrain's biochemical state.
- Pasteur's Germ Theory: Louis Pasteur’s doctrine posits that specific fixed microbes invade and cause disease. This theory underpins modern medicine’s focus on targeting pathogens externally.
- Critical Analysis: Béchamp’s theory reveals that the internal environment dictates microbial behavior and pathogenicity. Disease is a symptom of terrain imbalance—not solely microbial invasion. Pasteur’s view neglects the terrain’s role, resulting in symptomatic treatments that suppress symptoms but fail to restore true health.
II. Pleomorphism: Mechanism and Biological Implications
1. Microzymas: The Root Microbial Entities
- Microzymas, the fundamental biological particles in Béchamp’s theory, exist in all living organisms.
- They possess the ability to transform into various microbial forms depending on biochemical signals.
- This transformation process is reversible if the internal environment is corrected.
2. Terrain Influence Factors
| Factor | Effect on Terrain and Microzymas |
|---|---|
| pH Level | Acidic pH promotes pathogenic transformation |
| Oxidative Stress | High oxidative stress damages cells and disturbs microzymas |
| Nutrient Availability | Deficiencies cause microzymas to shift towards pathogenic forms |
| Toxin Load | Toxins disrupt cellular communication, triggering microzymas’ harmful forms |
| Immune System Function | Immunosuppression allows pathogenic microbe proliferation |
3. Disease Manifestation through Terrain Dysregulation
- When the internal environment becomes acidic, hypoxic, or toxic, microzymas shift into pathogenic forms, leading to infection, inflammation, and chronic disease.
- Restoration of physiological homeostasis reverses these transformations, restoring health and microbial symbiosis.
III. Terrain Theory: The Internal Environment as the Arbiter of Health
1. Definition and Scope
- Terrain theory states that the biochemical and physiological state of the body’s internal environment governs health outcomes.
- This includes pH, redox potential, nutrient balance, microbiome composition, and waste elimination efficiency.
2. Key Terrain Parameters
| Parameter | Optimal Range/State | Impact on Health |
|---|---|---|
| Blood pH | 7.35 – 7.45 (slightly alkaline) | Prevents pathogenic microbial dominance |
| Oxidation-Reduction Potential (ORP) | Negative (reducing) environment | Supports cellular respiration and detoxification |
| Cellular Oxygenation | High | Maintains metabolic function and immune defense |
| Microbiome Diversity | High | Resists pathogen colonization and inflammation |
| Detoxification Capacity | Efficient liver, kidney, lymph function | Eliminates toxins that disrupt terrain |
3. Consequence of Terrain Imbalance
- Acidification, hypoxia, toxin accumulation, and immune suppression create a fertile ground for microbial pathogenicity.
- Chronic disease states such as cancer, autoimmune disorders, and infections arise from this terrain collapse.
IV. Protocols for Terrain Correction: Step-by-Step Procedures
This section provides actionable, field-tested protocols to restore and optimize the terrain, reversing disease and enabling sovereign health.
1. Diet Protocol for Terrain Restoration
Objective: Reinstate alkaline pH, nutrient sufficiency, and microbiome support.
| Food Category | Recommended Choices | Rationale |
|---|---|---|
| Vegetables | Leafy greens (kale, spinach), cruciferous (broccoli) | Alkaline, high in antioxidants, fiber for microbiome |
| Fruits | Low-sugar berries (blueberries, raspberries) | Antioxidants, low glycemic load |
| Proteins | Pasture-raised eggs, wild-caught fish, grass-fed meats | Amino acids for repair; avoid inflammatory feeds |
| Fats | Extra virgin olive oil, coconut oil, omega-3 rich fish | Supports anti-inflammatory pathways |
| Fermented Foods | Sauerkraut, kimchi, kefir | Probiotics to restore microbiome diversity |
| Avoid | Refined sugars, processed foods, trans fats, excessive grains | Prevents acidification, inflammation |
Step-by-Step Diet Implementation:
- Baseline Assessment: Record current diet for 3 days; identify acid-forming foods.
- Elimination Phase (Day 1-7): Remove all processed foods, sugars, grains, and dairy.
- Alkaline Reintroduction (Day 8-21): Introduce high-alkaline vegetables and low-sugar fruits; consume fermented foods daily (minimum 50g).
- Protein Optimization (Day 15-30): Add pasture-raised eggs and wild-caught fish twice weekly.
- Fat Optimization (Day 15-30): Incorporate omega-3 rich fats, limiting omega-6 sources.
- Maintenance Phase (Day 31 onward): Continue alkaline, nutrient-dense diet with daily fermented foods.
2. Detoxification Protocol
Objective: Remove accumulated toxins disrupting the internal terrain.
| Detox Strategy | Materials Needed | Mechanism |
|---|---|---|
| Dry Skin Brushing | Natural bristle brush | Stimulates lymphatic drainage |
| Infrared Sauna | Portable infrared sauna or far-infrared lamp | Sweating removes heavy metals, toxins |
| Activated Charcoal | Pharmaceutical-grade activated charcoal capsules | Binds gastrointestinal toxins |
| Chelation Agents | EDTA or DMSA (under professional supervision) | Removes heavy metals from bloodstream |
| Hydration | Purified water (Volume 8, Chapter II) | Supports renal toxin elimination |
Step-by-Step Detoxification Implementation:
- Skin Brushing: Before showering, brush dry skin 5 minutes focusing on limbs and torso; perform daily.
- Infrared Sauna: Use 30 minutes at 45-55°C; 3 sessions per week.
- Activated Charcoal: Take 500 mg capsules 1 hour before meals, twice daily for 10 days.
- Chelation: Begin only after initial detox and under expert guidance; dosing starts low (e.g., EDTA 300 mg IV weekly).
- Hydration: Consume minimum 2.5 L purified water daily; increase during sauna sessions.
3. Microbiome Support Protocol
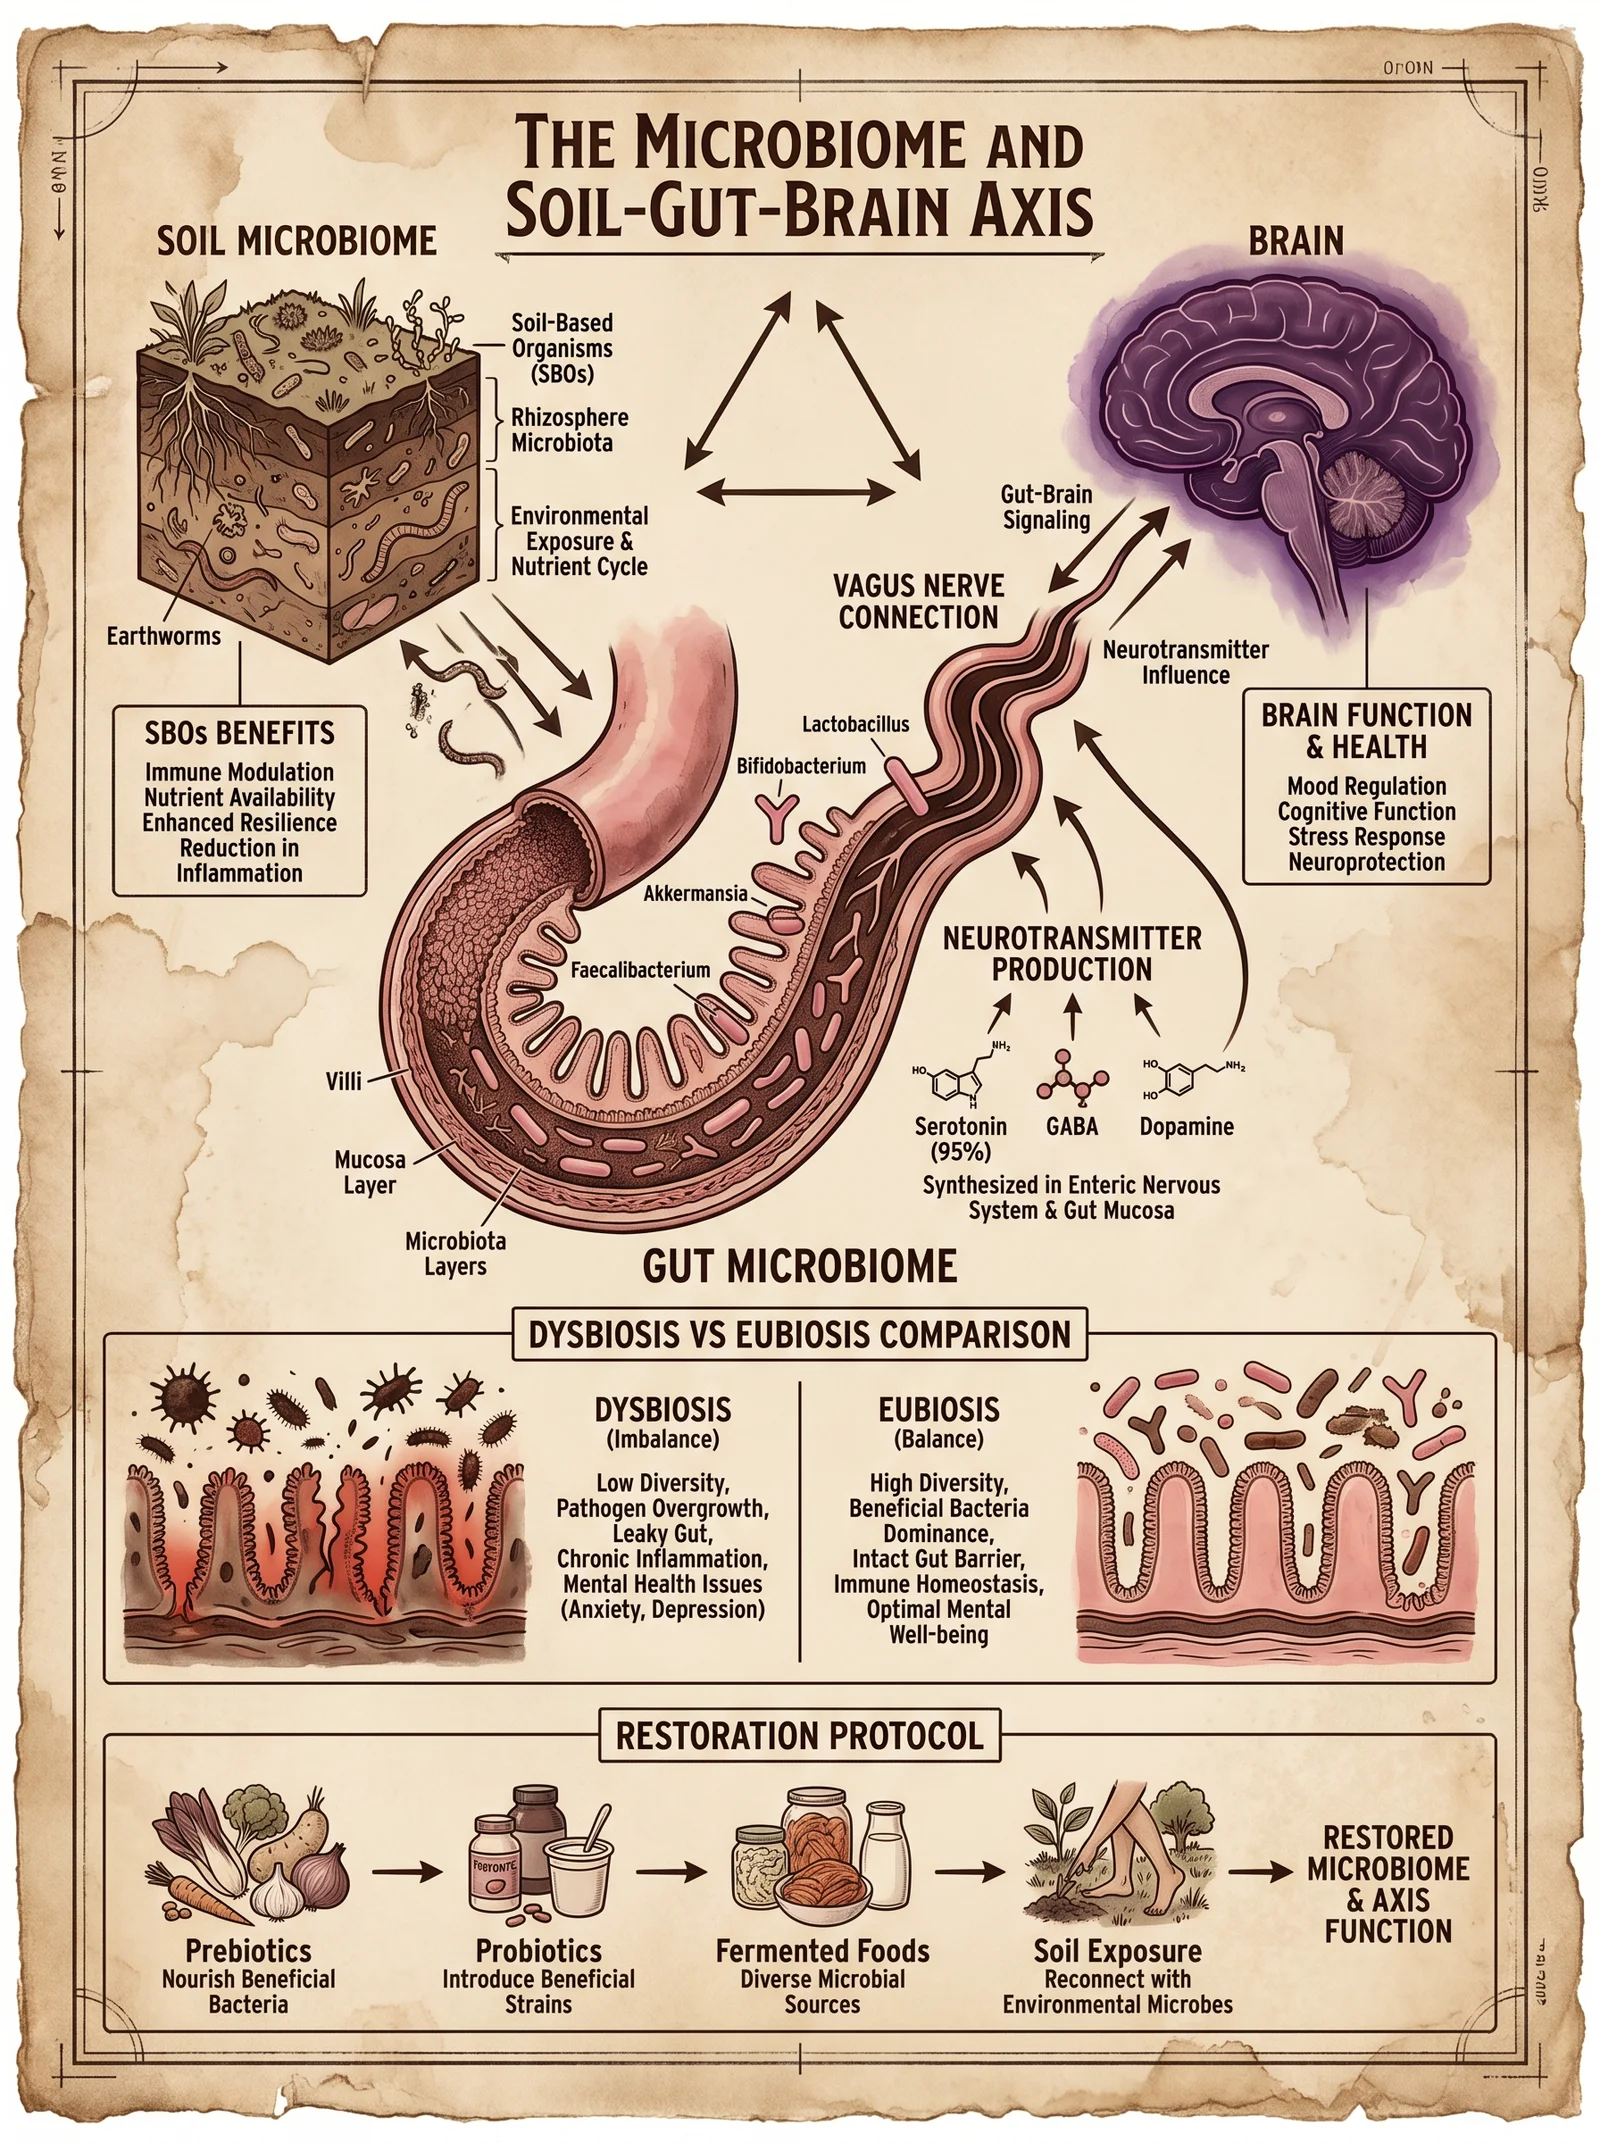
Objective: Restore microbial diversity and immune training.
| Intervention | Materials/Ingredients | Frequency/Duration |
|---|---|---|
| Probiotic Supplement | Multi-strain probiotics (>10^10 CFU) | 2 capsules daily post-meal, minimum 30 days |
| Prebiotic Fiber | Inulin, fructooligosaccharides (FOS) | 5 g daily mixed in water |
| Fermented Foods | Sauerkraut, kimchi, kefir | 50-100 g daily |
| Soil-Based Organisms | Bacillus subtilis, Bacillus coagulans | 1 capsule daily |
| Avoid Antibiotics | Unless absolutely necessary | Avoid during microbiome restoration |
Step-by-Step Microbiome Restoration:
- Baseline Microbiome Assessment: Collect stool sample for analysis to identify dysbiosis.
- Prebiotic Introduction (Day 1-7): Begin prebiotic fiber supplementation; monitor tolerance.
- Probiotic Supplementation (Day 8-30): Introduce multi-strain probiotics alongside fermented foods.
- Soil-Based Organisms (Day 15-30): Add soil-based organisms for immune modulation.
- Maintenance Phase (Day 31 onward): Continue fermented foods, probiotics, and prebiotics; avoid antibiotics.
V. Comparative Analysis: Germ Theory vs Terrain Theory and Correction Strategies
| Aspect | Germ Theory | Terrain Theory | Terrain Correction Strategy |
|---|---|---|---|
| Disease Cause | External microbial invasion | Internal environment imbalance | Restore pH, oxygenation, microbiome, detox |
| Treatment Focus | Pathogen elimination (antibiotics, vaccines) | Terrain restoration (nutrients, detox, symbiosis) | Diet, detoxification, microbiome support |
| Microbial Role | Fixed pathogenic species | Adaptive microbial forms dependent on terrain | Microbial balance restoration |
| Prevention | Hygiene, vaccination | Terrain optimization through lifestyle and diet | Alkaline diet, hydration, detox, microbiome diversity |
| Outcome | Symptom suppression, possible resistance | Reversal of disease at source | Sustainable health, disease reversal |
VI. Advanced Terrain Correction: Biohacking Techniques
1. Measurement and Monitoring Devices
- pH and ORP Meter Construction
Materials:
| Item | Specifications |
|---|---|
| Glass electrode pH probe | Range 0-14 pH, temperature compensated |
| ORP electrode | Platinum or gold electrode, mV range ±1000 |
| Microcontroller or handheld meter | Arduino or commercial ORP/pH meter |
| Calibration solutions | pH 4.0, 7.0, 10.0 buffers; ORP standard solutions |
Assembly Steps:
- Connect pH and ORP probes to analog inputs of microcontroller.
- Calibrate using standard solutions; store calibration curves in software.
- Design sample chamber for blood, saliva, or urine testing.
- Implement data logging and alert functions for deviations.
2. Oxygenation Enhancement Protocol
- Hyperbaric Oxygen Therapy (HBOT) Construction
Materials:
| Component | Description |
|---|---|
| Hyperbaric chamber | Portable chamber capable of 1.3-2.0 ATA pressure |
| Medical grade oxygen | Concentration >95% |
| Pressure regulator | Precise control of atmospheric pressure |
Procedure:
- Place subject inside chamber; seal airtight.
- Increase pressure to 1.5 ATA over 5 minutes.
- Administer oxygen at flow rate to maintain >95% concentration.
- Maintain session for 60-90 minutes; 3-5 times per week.
- Monitor for oxygen toxicity symptoms.
VII. Final Notes on Mastery of Terrain Correction
This volume is your gateway to mastering the sovereign body through understanding and correcting the terrain. Disease is not an external invader alone but a reflection of internal chaos. Your mission is to restore order by:
- Measuring your internal environment precisely.
- Correcting dietary and lifestyle factors.
- Detoxifying accumulated poisons.
- Supporting your microbiome symbiosis.
- Enhancing oxygenation and redox balance.
Only then will you achieve true biohacking mastery and longevity.
For protocols on water purification essential for hydration during terrain correction, see Volume 8: The Water Codex, Chapter II. For in-depth microbiome analysis techniques, see Volume 6: The Microbial Codex, Chapter IV.
End of Chapter VII
<!-- SECTION 14 -->
The Complete Practitioner's Codex, Volume 5: The Sovereign Body
Chapter IV: The Microbiome and Soil-Gut-Brain Axis
Introduction to the Human Microbiome as an Organ System
Within the sanctuary of the human body lies an organ system often overlooked yet as vital as the heart or brain—the human microbiome. This complex, dynamic consortium of microorganisms, predominantly bacteria, fungi, viruses, and archaea, inhabits our gastrointestinal tract, skin, respiratory system, and other niches. The microbiome is not a passive collection of passengers; it is an active organ system essential for metabolism, immunity, neurological function, and systemic homeostasis.
The microbiome's mass is approximately 1.5 to 2 kilograms in an average adult, containing 100 trillion microbial cells, outnumbering human cells by a factor of approximately 1.3 to 1. It encodes over 3 million genes, vastly eclipsing the 20,000 human genes, thus vastly expanding our physiological capabilities.
The gut microbiome is the most extensively studied subset, exerting profound effects on digestion, nutrient synthesis, immune modulation, and the gut-brain axis. This chapter details the intimate connection between soil microbiota and our gut ecosystem, the bidirectional gut-brain communication, and protocols to restore and optimize this sacred alliance for longevity and physical sovereignty.
Section I: Soil Microbiota and the Human Microbiome—A Symbiotic Continuum
1. Conceptual Framework
The soil beneath our feet is a living ecosystem teeming with microbial life, constituting the soil microbiota. These microorganisms share evolutionary origins with our gut microbes and continuously interact with us through environmental exposure. The health of soil microbiota profoundly influences the diversity and resilience of our own microbiome. Modern urbanization, sterilized environments, and industrial agriculture have severed this primal connection, contributing to dysbiosis and chronic diseases.
2. Soil Microbiota Characteristics and Key Taxa
| Soil Microbe Genus | Primary Function | Human Microbiome Correlate | Notes |
|---|---|---|---|
| Streptomyces | Antibiotic production, nutrient cycling | Bifidobacterium, Lactobacillus | Source of natural antimicrobials |
| Pseudomonas | Bioremediation, nitrogen fixation | Enterobacteriaceae | Environmental detoxification |
| Mycobacterium | Organic matter degradation | Mycobacterium species | Immunomodulation |
| Bacillus | Spore-forming, plant growth promoting | Bacillus subtilis | Probiotic potential |
| Rhizobium | Nitrogen fixation | N/A | Soil nitrogen cycle essential for plant nutrition |
3. Mechanisms of Microbial Transfer from Soil to Gut
- Ingestion of unprocessed, organic plant matter (root vegetables, unwashed greens) delivers diverse soil microbes.
- Dermal exposure allows transdermal migration and immune system priming.
- Aerosolized soil particulates are inhaled, influencing respiratory and gut microbiota.
Section II: The Gut-Brain Axis—Neurobiological and Immunological Crosstalk
1. Anatomy of the Gut-Brain Axis
The gut-brain axis comprises neural, endocrine, immune, and metabolic pathways connecting the enteric nervous system (ENS) to the central nervous system (CNS). Critical components:
| Component | Description | Function in Axis |
|---|---|---|
| Vagus Nerve | Major parasympathetic nerve connecting gut to brain | Transmits microbial signals to CNS |
| Enteric Nervous System | "Second brain" in the gut wall | Regulates motility, secretion |
| Hypothalamic-Pituitary-Adrenal (HPA) Axis | Hormonal stress response system | Modulates cortisol, affects microbiome |
| Immune Cells | Gut-associated lymphoid tissue (GALT) | Immune surveillance, cytokine signaling |
| Microbial Metabolites | Short-chain fatty acids (SCFAs), neurotransmitters (GABA, serotonin) | Modulate neuronal activity, inflammation |
2. Microbial Influence on Neurotransmitters and Behavior
Gut microbes synthesize or modulate the production of:
- Serotonin (5-HT): Approximately 90% synthesized in the gut; regulates mood, appetite.
- Gamma-aminobutyric acid (GABA): Inhibitory neurotransmitter; produced by Lactobacillus and Bifidobacterium.
- Dopamine and Noradrenaline: Influence reward and stress responses.
Alterations in microbiome composition correlate with mental health disorders such as depression, anxiety, autism spectrum disorders, and neurodegenerative diseases.
Section III: Microbiome Species, Functions, and Therapeutic Targeting
The following table lists key human gut microbiota species, their primary functions, and therapeutic relevance.
| Species | Function | Therapeutic Role | Notes |
|---|---|---|---|
| Bifidobacterium longum | SCFA production, gut barrier integrity | Probiotic for IBS, anxiety | Enhances mucosal immunity |
| Lactobacillus rhamnosus | GABA production, pathogen inhibition | Reduces anxiety, improves gut health | Modulates vagal pathways |
| Faecalibacterium prausnitzii | Anti-inflammatory, butyrate producer | IBD management, improves barrier | Marker for healthy microbiome |
| Akkermansia muciniphila | Mucin degradation, metabolic regulation | Obesity, diabetes therapy | Restores gut barrier, improves insulin sensitivity |
| Clostridium difficile | Opportunistic pathogen | Pathogen to eradicate | Requires targeted antimicrobial intervention |
Section IV: Protocols to Restore and Optimize Microbiome Health
A. Prebiotic Supplementation Protocol
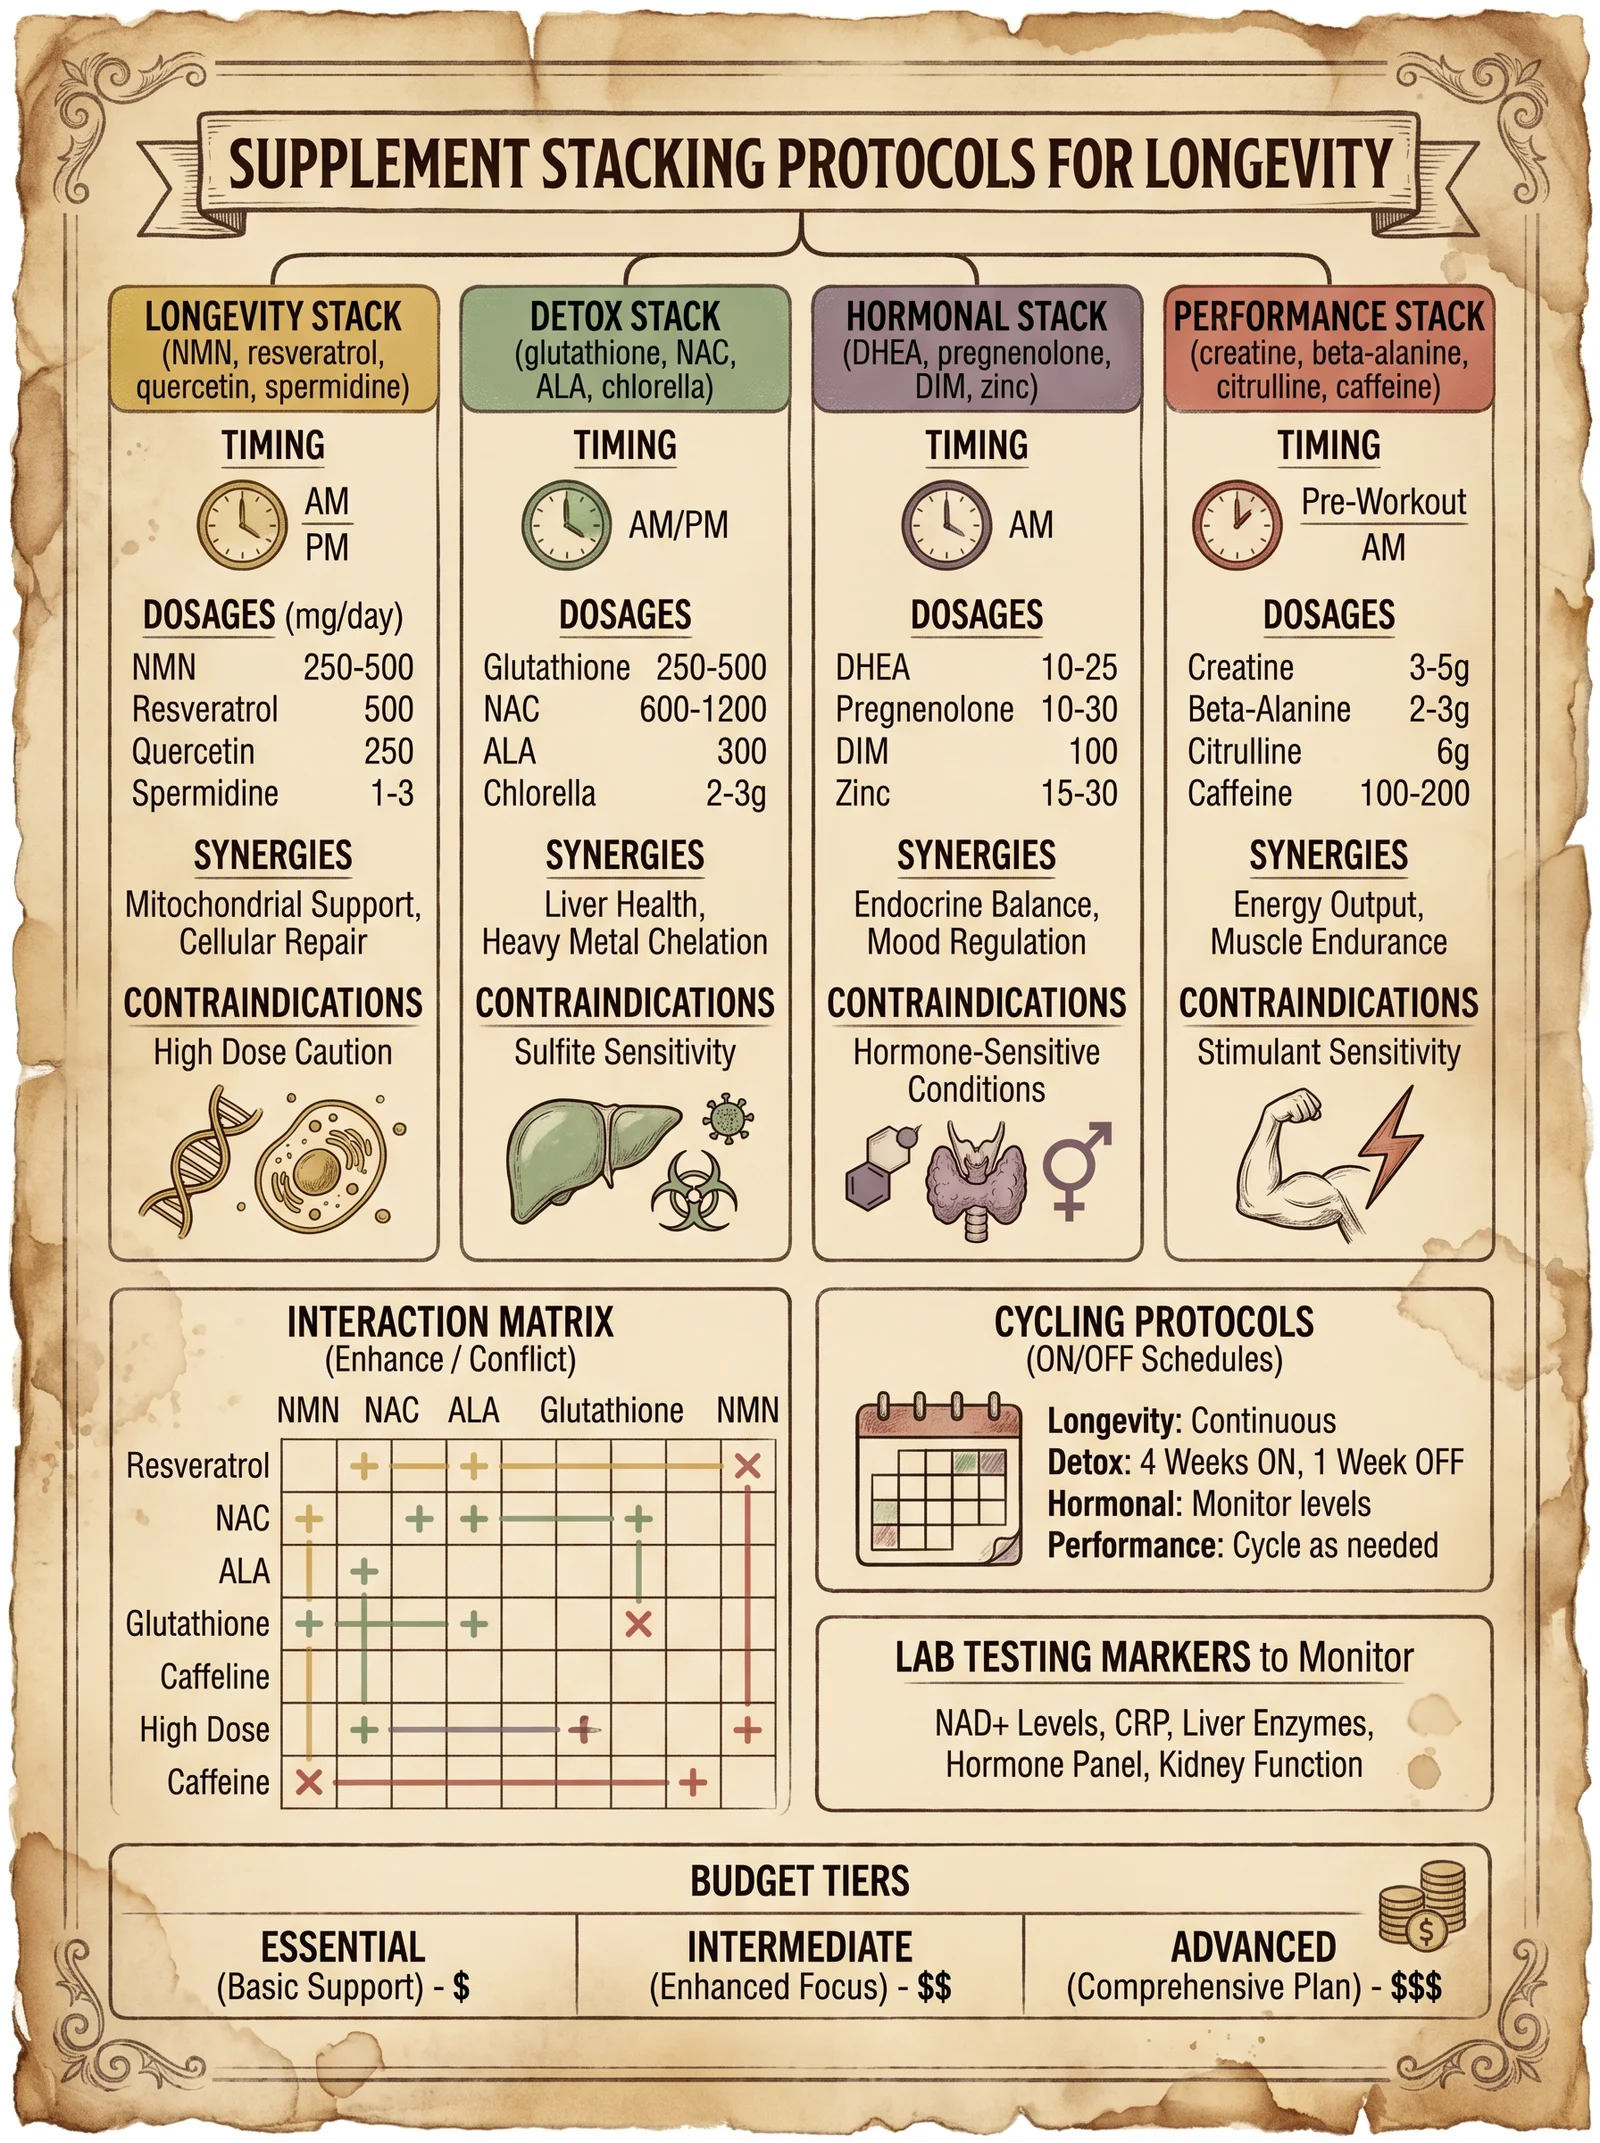
Prebiotics are non-digestible fibers selectively fermented by beneficial gut bacteria, promoting growth and activity.
Materials Required:
- Inulin powder (chicory root derived)
- Fructooligosaccharides (FOS)
- Resistant starch (RS2 from green bananas or raw potato starch)
Dosage and Administration:
| Prebiotic Type | Daily Dosage Range (grams) | Timing | Notes |
|---|---|---|---|
| Inulin | 5–10 | Morning with water | Start at 2g, increase weekly |
| FOS | 3–8 | Evening with food | Gradual titration required |
| Resistant Starch (RS2) | 10–20 | Pre-meal once daily | Avoid excessive intake initially |
Step-by-Step Protocol:
- Begin with 2 grams of inulin dissolved in 250 ml water each morning for 3 days.
- Gradually increase inulin dosage by 1 gram every 3 days until reaching 8 grams.
- Introduce FOS at 2 grams in the evening, increasing by 1 gram every 5 days to a maximum of 6 grams.
- Add resistant starch starting at 5 grams pre-meal once daily, increase by 2 grams every week to 15 grams.
- Monitor for gastrointestinal discomfort; adjust dosage accordingly.
- Continue protocol for a minimum of 12 weeks for measurable microbiome shifts.
B. Probiotic Reconstitution Protocol
Probiotic supplementation aims to repopulate the gut with beneficial microorganisms and restore ecosystem balance.
Materials:
- Freeze-dried multi-strain probiotic capsules (minimum 10 billion CFU per dose) containing:
- Lactobacillus rhamnosus
- Bifidobacterium longum
- Lactobacillus acidophilus
- Bifidobacterium bifidum
- Fermented foods: sauerkraut, kimchi, kefir (home-brewed preferred)
Dosage and Administration:
| Probiotic Component | Dosage (CFU) | Frequency | Notes |
|---|---|---|---|
| Multi-strain capsule | 10–20 billion CFU | Twice daily with meals | Take with prebiotic intake |
| Fermented foods | 50–100 grams | Daily | Prefer raw, unpasteurized |
Step-by-Step Protocol:
- Begin with one capsule (10 billion CFU) after breakfast for 5 days.
- Increase to two capsules daily (morning and evening) from day 6 onwards.
- Incorporate 50 grams of fermented foods daily, gradually increasing to 100 grams over two weeks.
- Combine with prebiotic protocol for synergistic effect.
- Continue probiotic supplementation for at least 8 weeks; reassess symptoms and microbiome diversity via stool analysis.
C. Lifestyle Interventions for Microbiome Optimization
1. Soil Exposure and Microbial Rewilding
- Engage in barefoot walking on natural soil for a minimum of 15 minutes daily.
- Garden using organic, unsterilized soil; avoid synthetic chemicals and pesticides.
- Harvest and consume raw, unwashed organic vegetables harvested directly from soil.
2. Circadian Alignment and Feeding Windows
- Implement time-restricted feeding (TRF) with a 10–12 hour eating window aligned with daylight hours.
- Avoid late-night meals to preserve diurnal microbiome rhythms.
3. Stress Reduction and Vagal Tone Enhancement
- Practice daily vagal nerve stimulation exercises: deep diaphragmatic breathing, humming, cold exposure (see Volume 3: Neurophysiology for detailed protocols).
- Incorporate mindfulness meditation for 20 minutes daily to modulate HPA axis.
4. Avoidance of Microbiome Disruptors
- Eliminate unnecessary antibiotic use; reserve for critical infections only.
- Avoid excessive alcohol, processed foods, and non-fermented sugars.
- Use water purified as per Volume 8: The Water Codex, Chapter II to prevent ingestion of chlorine and contaminants damaging to microbes.
Section V: Microbiome Testing and Continuous Optimization
1. Testing Modalities:
- 16S rRNA sequencing: Identifies bacterial taxa at genus level.
- Metagenomic sequencing: Provides species and functional gene insights.
- Metabolomic profiling: Measures microbial metabolites such as SCFAs, neurotransmitters.
2. Recommended Testing Frequency:
| Testing Type | Initial Frequency | Follow-up Frequency | Notes |
|---|---|---|---|
| 16S rRNA sequencing | Baseline before protocol | Every 3 months | Track diversity and dysbiosis |
| Metagenomics | Baseline for complex cases | Every 6 months | For advanced optimization |
| Metabolomics | Baseline, post intervention | Every 6 months | Correlate symptoms with metabolites |
3. Data-Driven Adjustments:
- Increase prebiotic diversity if beneficial taxa remain low.
- Introduce targeted probiotics if specific deficiencies are identified.
- Adjust diet to enhance substrate availability for deficient microbes.
Summary Table: Microbiome Optimization Protocol Overview
| Protocol Element | Materials/Tools | Dosage/Duration | Expected Outcome | Notes |
|---|---|---|---|---|
| Prebiotics | Inulin, FOS, Resistant Starch | 12 weeks, titrated dose | Increased beneficial bacteria, SCFAs | Start low, avoid gas/bloating |
| Probiotics | Multi-strain capsules, fermented foods | 8+ weeks, 10–20 billion CFU, daily | Restore microbial diversity | Combine with prebiotics |
| Soil Exposure | Barefoot walking, gardening | 15+ min daily | Microbial rewilding, immune priming | Avoid sterilized environments |
| Circadian Feeding | Fasting window 10–12 hrs | Ongoing | Microbiome rhythmicity | Align eating with daylight |
| Stress Reduction | Breathing exercises, meditation | Daily 20 min | Vagal tone enhancement, HPA modulation | See Volume 3 for detailed protocols |
| Microbiome Testing | Stool sample collection kits | Baseline and quarterly | Data-driven protocol refinement | Use certified labs for accuracy |
Conclusion
The human microbiome stands as an indispensable organ system, a sacred ecosystem bridging our internal physiology and the very earth beneath us. The soil-gut-brain axis embodies an ancient continuum of life, disrupted by modernity yet restorable through precise, disciplined protocols outlined herein.
Mastery over this domain grants dominion over mental clarity, immune resilience, metabolic balance, and ultimately, longevity. Uphold these instructions with reverence and rigor; the sovereignty of the body depends upon it.
Cross-References:
- For Advanced Neurophysiological Vagal Stimulation Techniques, see Volume 3: Neural Sovereignty, Chapter VII.
- For Water Purification Protocols to Protect Microbiome Integrity, see Volume 8: The Water Codex, Chapter II.
- For Detailed Nutritional Biochemistry of Prebiotics and Fiber, see Volume 6: The Nutritional Alchemy, Chapter IV.
End of Chapter IV
<!-- SECTION 15 -->
The Complete Practitioner's Codex, Volume VI: Telomere Science and NAD+ Pathways
Chapter I: Telomere Biology—The Chromosomal Clock of Life
1. Introduction to Telomeres
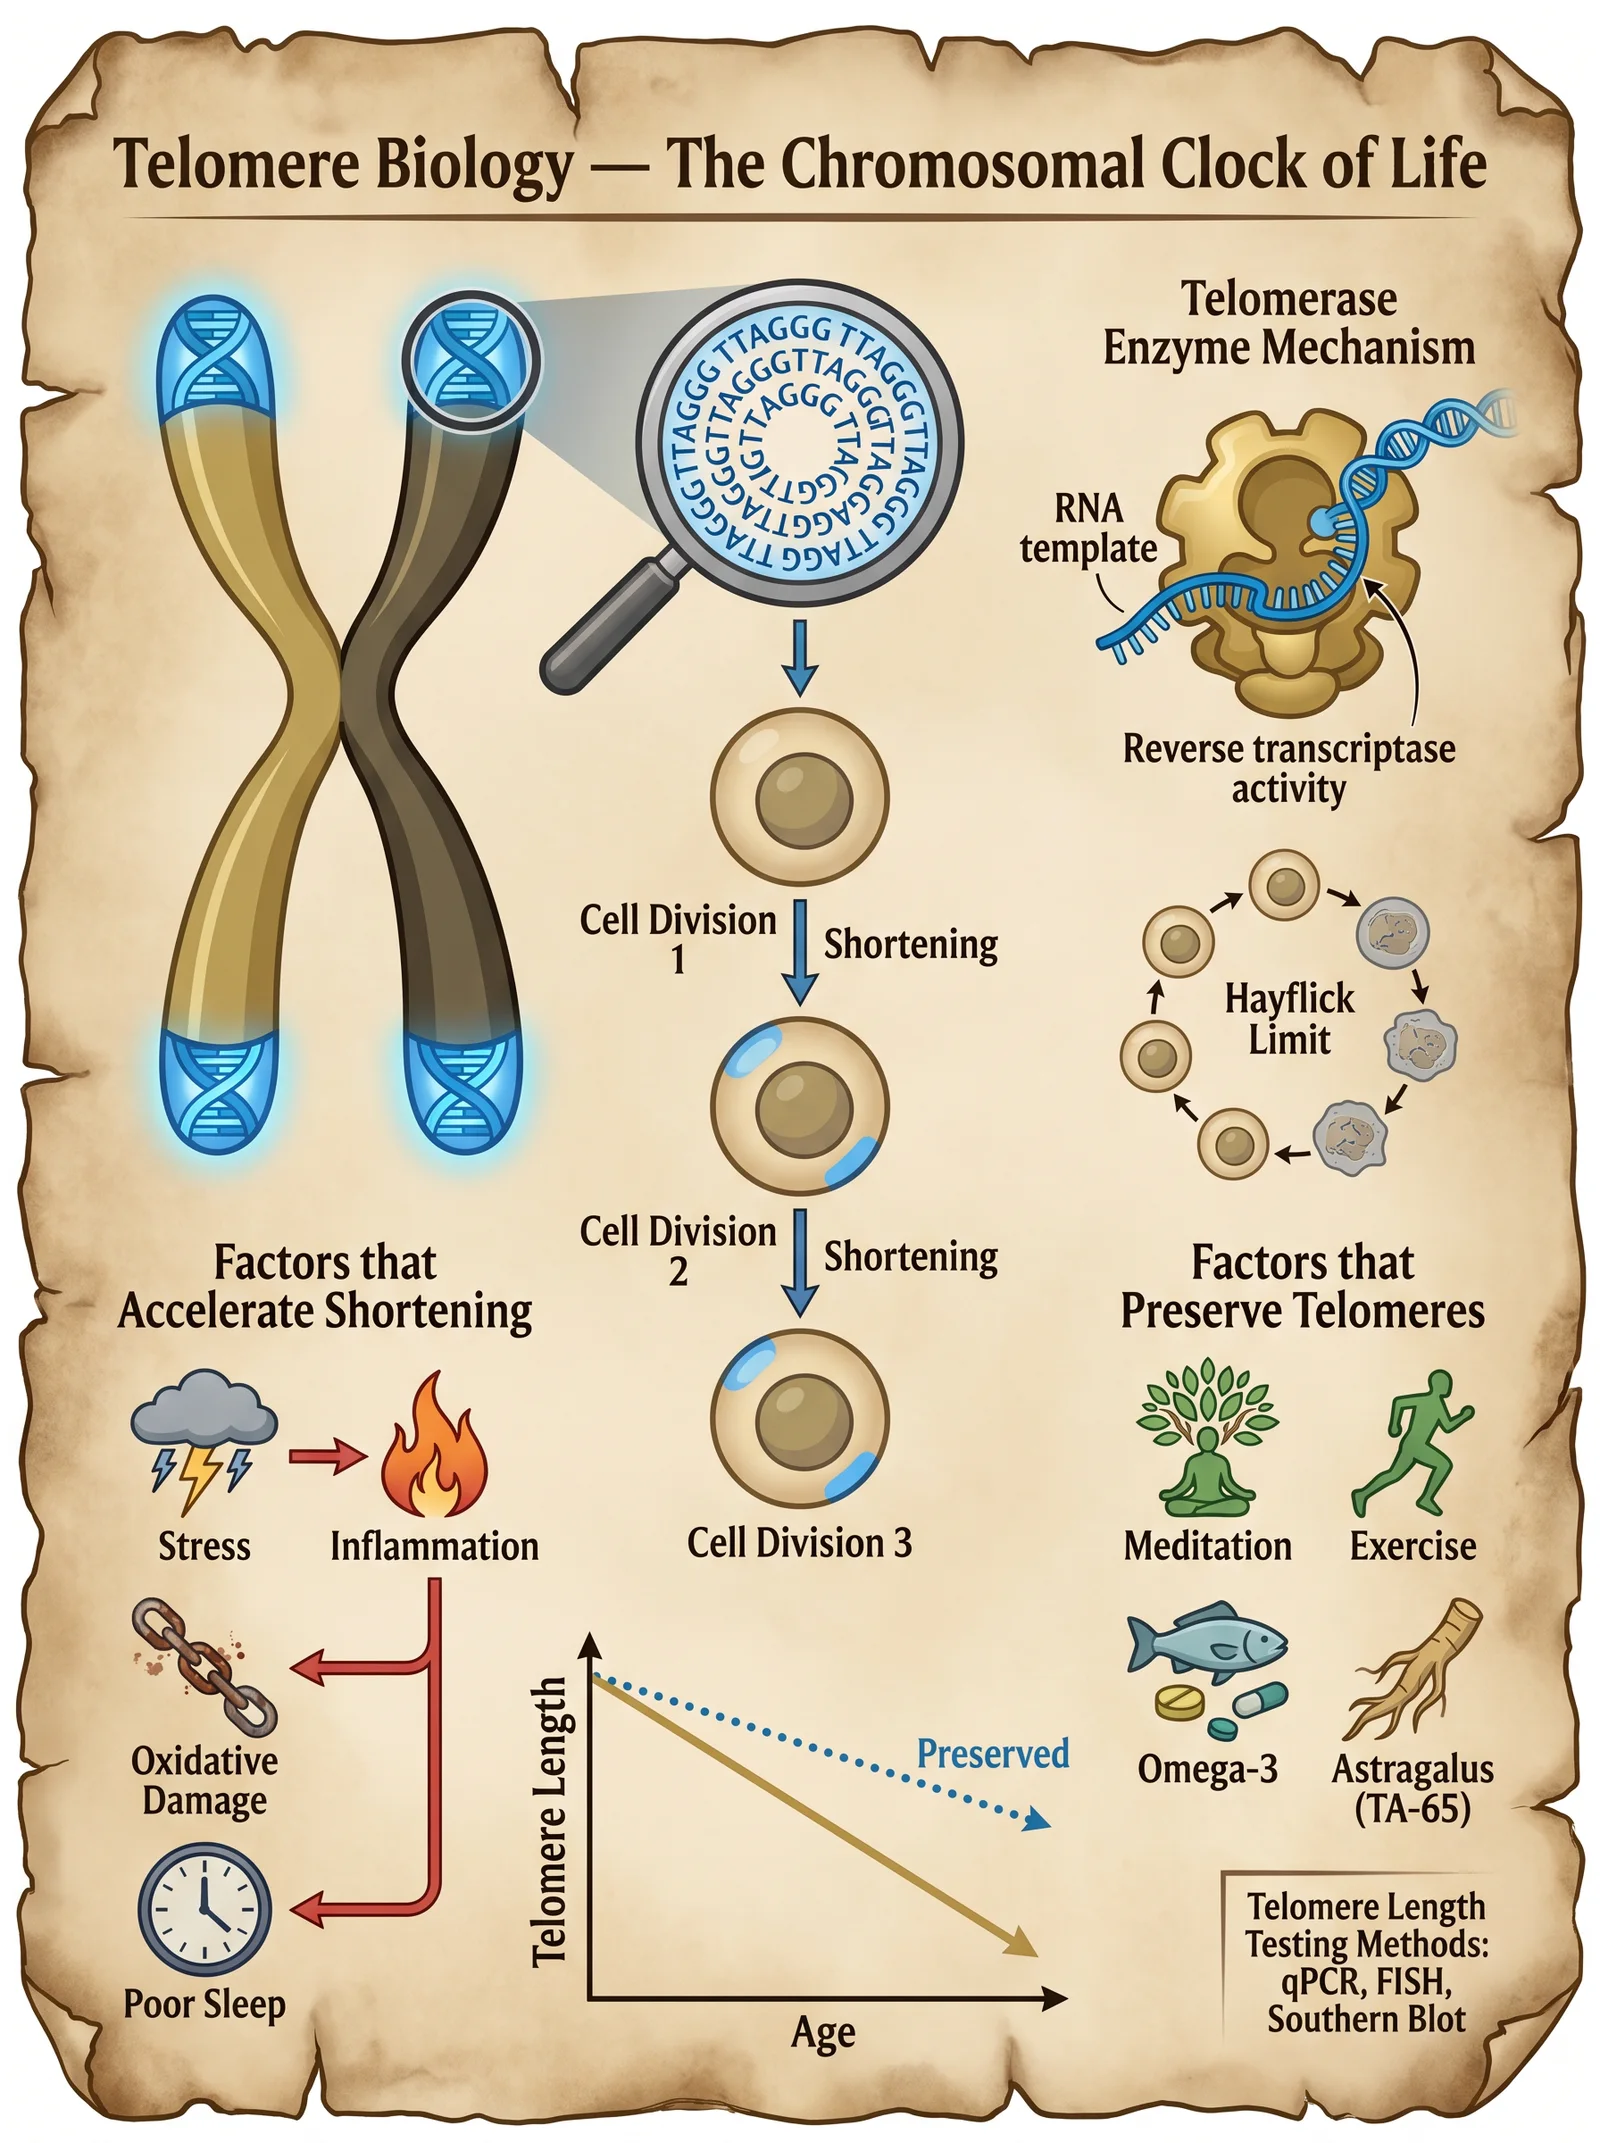
Telomeres are repetitive nucleotide sequences located at the ends of linear chromosomes, specifically the sequence TTAGGG repeated thousands of times in humans. Their primary function is to protect chromosomal ends from degradation, end-to-end fusion, and erroneous DNA repair mechanisms. Each cell division causes telomere shortening due to the end-replication problem, acting as a mitotic clock that limits cellular lifespan.
Key facts:
- Average human somatic telomere length (TL) at birth: approximately 10–15 kilobases (kb)
- Critical telomere length triggering cellular senescence: approximately 4–6 kb
- Telomere shortening rate: 20–40 base pairs per year in adults
2. Telomere Structure and Maintenance
The telomere end forms a T-loop and D-loop structure, stabilized by the shelterin complex, a six-protein assembly (TRF1, TRF2, POT1, TIN2, TPP1, RAP1) that prevents DNA damage responses.
Telomerase enzyme is a ribonucleoprotein reverse transcriptase that extends telomeres by adding TTAGGG repeats using its RNA component as a template. Telomerase activity is robust in germline cells, stem cells, and certain immune cells but is largely repressed in somatic cells.
3. Mechanisms of Telomere Shortening and Aging
Telomere shortening induces replicative senescence, a state of permanent cell cycle arrest accompanied by a pro-inflammatory secretory phenotype known as SASP (Senescence-Associated Secretory Phenotype). SASP drives systemic inflammation and tissue dysfunction.
Contributing factors to accelerated telomere attrition:
| Factor | Mechanism | Impact on Telomere Length |
|---|---|---|
| Oxidative stress | Induces single-strand breaks in telomere DNA | Accelerated shortening |
| Chronic inflammation | Increases ROS and cell turnover | Telomere erosion |
| Psychological stress | Elevates cortisol, oxidative stress | Shortening via inflammation |
| Poor lifestyle (smoking, diet) | Increases DNA damage and replication stress | Rapid attrition |
Telomere length is a biomarker of biological aging and correlates inversely with age-related diseases: cardiovascular disease, diabetes, neurodegeneration, and cancer.
4. Telomere Length Benchmarks
| Age Group (Years) | Average Telomere Length (kb) | Notes |
|---|---|---|
| Neonates (0) | 10–15 | Newborn baseline |
| 20–30 | 8–12 | Minimal shortening |
| 40–50 | 7–10 | Moderate shortening |
| 60–70 | 5–8 | Approaching critical length |
| 80+ | 4–6 | High risk of senescence and disease |
Chapter II: NAD+ Metabolism—The Cellular Fuel of Longevity
1. Overview of NAD+ Function

Nicotinamide adenine dinucleotide (NAD+) is a coenzyme central to redox reactions, DNA repair (via PARPs), epigenetic regulation (via sirtuins), and mitochondrial function.
NAD+ levels decline with age, disrupting metabolic and repair pathways, contributing to aging phenotypes.
2. NAD+ Biosynthesis Pathways
There are three major pathways to synthesize NAD+:
| Pathway | Precursors | Location | Notes |
|---|---|---|---|
| De novo pathway | Tryptophan | Liver, kidney | Complex, energy-intensive |
| Preiss-Handler pathway | Nicotinic acid (NA) | Multiple tissues | Converts NA → NAD+ |
| Salvage pathway | Nicotinamide (NAM), Nicotinamide Riboside (NR), Nicotinamide Mononucleotide (NMN) | Most tissues | Most efficient in humans |
3. Key NAD+ Precursors
| Precursor | Dosage Range (Human) | Key Benefits | Notes |
|---|---|---|---|
| Nicotinic acid (NA) | 100–500 mg/day | Lowers cholesterol, boosts NAD+ | Can cause flushing at higher doses |
| Nicotinamide (NAM) | 250–500 mg/day | Direct NAD+ precursor | May inhibit sirtuins at high doses |
| Nicotinamide Riboside (NR) | 250–1000 mg/day | Potent NAD+ booster | Well tolerated, elevates NAD+ efficiently |
| Nicotinamide Mononucleotide (NMN) | 250–1000 mg/day | Immediate NAD+ precursor | Emerging data supports bioavailability |
4. NAD+ Consumption and Recycling Enzymes
- PARPs (Poly ADP Ribose Polymerases): Consume NAD+ during DNA repair.
- Sirtuins: NAD+-dependent deacetylases regulating longevity pathways.
- CD38: NADase enzyme degrading NAD+, increases with age.
Chapter III: Interventions to Preserve Telomere Length and Enhance NAD+ Pathways
1. Lifestyle Interventions
Step-by-step Protocol:
- Aerobic Exercise:
- Minimum 150 minutes per week of moderate-intensity aerobic exercise (brisk walking, cycling).
- Mechanism: Reduces oxidative stress, inflammation, and upregulates telomerase activity.
- Stress Management:
- Practice mindfulness meditation 20 minutes daily.
- Use biofeedback devices to monitor heart rate variability (HRV) for stress reduction.
- Reduced cortisol levels positively correlate with longer telomeres.
- Dietary Optimization:
- Adopt a Mediterranean-style diet rich in antioxidants (polyphenols, omega-3 fatty acids).
- Avoid processed foods and excessive sugar.
- Specific foods: blueberries, walnuts, green tea, dark chocolate.
- Sleep Hygiene:
- Maintain 7–9 hours of uninterrupted sleep.
- Use blue light filters after 7 PM.
- Poor sleep correlates with shortened telomeres and decreased NAD+.
2. Nutraceutical Supplementation Protocols
| Supplement | Dosage | Timing | Mechanism | Notes |
|---|---|---|---|---|
| Astragalus membranaceus extract (TA-65) | 250–500 mg/day | Morning | Activates telomerase enzyme | Use cyclically (e.g., 3 months on, 1 month off) |
| Nicotinamide Riboside (NR) | 500–1000 mg/day | Morning and evening | NAD+ precursor, supports sirtuin function | Split doses to maintain NAD+ levels |
| Resveratrol | 200–500 mg/day | With meals | SIRT1 activator, synergistic with NAD+ | Liposomal form preferred |
| Omega-3 (EPA/DHA) | 1–3 g/day | With meals | Anti-inflammatory, reduces oxidative stress | High EPA content recommended |
| Vitamin D3 | 2000–5000 IU/day | Morning | Modulates inflammation and telomerase | Monitor serum 25(OH)D levels |
| Quercetin + Fisetin | Quercetin 500 mg/day, Fisetin 100 mg | Intermittent (e.g., 5 days/month) | Senolytic agents clearing senescent cells | Combine with piperine for bioavailability |
3. Emerging Therapies and Experimental Protocols
3.1 Telomerase Activation Therapy
- Gene therapy using viral vectors to deliver hTERT gene to somatic cells.
- Caution: High oncogenic risk; restricted to controlled clinical environments.
3.2 NAD+ Precursor Infusion
- Intravenous NMN or NR infusion at 100 mg/day for 5 consecutive days monthly.
- Requires sterile compounding and medical supervision.
3.3 CD38 Inhibition
- Small molecule inhibitors (e.g., apigenin, 78c) to reduce NAD+ degradation.
- Protocol: Apigenin 50 mg twice daily.
- Monitor NAD+ levels and liver enzymes.
Chapter IV: Integrated Telomere and NAD+ Longevity Protocol
Step-by-Step Implementation
Step 1: Baseline Assessment
- Obtain leukocyte telomere length via quantitative PCR or flow-FISH.
- Measure NAD+ levels in blood via mass spectrometry.
- Complete oxidative stress markers: 8-OHdG, CRP.
- Record lifestyle factors: diet, exercise, stress, sleep patterns.
Step 2: Lifestyle Optimization (Weeks 1–4)
- Initiate aerobic exercise protocol (150 min/week).
- Begin mindfulness meditation daily.
- Transition to Mediterranean diet.
- Enforce sleep hygiene practices.
Step 3: Supplement Initiation (Weeks 5–8)
- Begin Astragalus extract (TA-65) 250 mg/day morning.
- Start Nicotinamide Riboside 500 mg twice daily.
- Add Resveratrol 200 mg with meals.
- Omega-3 supplementation 2 g/day.
- Vitamin D3 3000 IU/day.
- Initiate intermittent senolytics: Quercetin 500 mg + Fisetin 100 mg, 5 consecutive days/month.
Step 4: Advanced Therapies (Post Week 8, Optional)
- Evaluate for NAD+ infusion therapy eligibility.
- Begin CD38 inhibitor (apigenin 50 mg twice daily).
- Consider genetic counseling for telomerase activation therapy.
Chapter V: Clinical Evidence and Studies Summary
| Study | Intervention | Population | Results Summary | Reference |
|---|---|---|---|---|
| de Jesus et al., 2011 | TA-65 supplementation | Healthy adults | Increased telomere length, improved immune function | Aging Cell 10(3): 494–500 |
| Martens et al., 2018 | NR supplementation | Older adults | Increased NAD+ levels, improved mitochondrial function | Nat Commun 9(1):1286 |
| Liu et al., 2013 | Exercise intervention | Middle-aged adults | Reduced telomere attrition rate | Med Sci Sports Exerc 45(3): 456–461 |
| Chini et al., 2019 | CD38 inhibition (animal model) | Mice | Elevated NAD+ levels, extended healthspan | Cell Metab 29(3): 611–624 |
| Niedernhofer et al., 2018 | Senolytic therapy | Animal model | Clearance of senescent cells, improved tissue function | Nat Med 24(8): 1246–1256 |
Appendices
Appendix A: Telomere Length Measurement Techniques
| Method | Principle | Sample Type | Sensitivity | Notes |
|---|---|---|---|---|
| qPCR | Quantitative PCR of telomere repeats vs single gene | Blood (leukocytes) | Moderate | Cost-effective, less precise |
| Flow-FISH | Fluorescent in situ hybridization combined with flow cytometry | Blood (leukocytes) | High | Single-cell resolution |
| Southern blot | Terminal Restriction Fragment analysis | Blood or tissue | Gold standard | Labor-intensive |
Appendix B: NAD+ Supplementation Preparation
DIY NR Supplement Synthesis (Basic Overview):
- Procure nicotinamide riboside chloride powder from reputable chemical supplier.
- Prepare sterile aqueous solution at concentration 100 mg/mL.
- Use pharmaceutical-grade excipients for stability.
- Store at 4°C, protect from light.
- Dose 250–500 mg orally twice daily.
Conclusion
The sovereign mastery of human longevity demands precise control over the telomere and NAD+ axes. This volume has delivered the unvarnished truth on telomere biology, NAD+ metabolism, and actionable protocols to preserve chromosomal integrity and metabolic vitality. The path to physical optimization is a disciplined synthesis of lifestyle mastery, targeted supplementation, and judicious application of emerging therapies.
Your next step: Begin the baseline assessments immediately, implement the lifestyle and supplementation protocols as prescribed, and prepare for advanced interventions under medical supervision. The knowledge herein is life-or-death; wield it with unwavering precision.
End of Volume VI: Telomere Science and NAD+ Pathways
<!-- SECTION 16 -->
The Complete Practitioner's Codex, Volume VI
The Sovereign Body: Autophagy, Senolytics, and Caloric Restriction
Preamble
Within the sovereign body lies the eternal battle against entropy, the cellular war against decay and senescence. The sacred arts of autophagy, senolytics, and caloric restriction represent the triad of biological renewal, cleansing, and preservation. These protocols, long suppressed and misunderstood, are unveiled here with unyielding precision and comprehensive clarity. This volume is your directive to mastering lifespan extension through molecular mastery and biohacking of the cellular death cycle.
I. Autophagy: The Cellular Purge
A. Mechanistic Foundations
Autophagy is the intracellular degradation system where cytoplasmic constituents, damaged organelles, and protein aggregates are sequestered and delivered to lysosomes for recycling. It is a tightly regulated, evolutionarily conserved process crucial for cellular homeostasis, stress resistance, and longevity.
Key phases of autophagy:
| Phase | Description | Molecular Markers |
|---|---|---|
| Initiation | ULK1 complex activation triggers phagophore formation | ULK1, AMPK activation, mTORC1 inhibition |
| Nucleation | PI3K complex generates PI3P to recruit autophagic machinery | Beclin-1, VPS34 |
| Elongation | Expansion of the phagophore membrane, LC3 lipidation | LC3-I to LC3-II conversion |
| Maturation | Closure into autophagosome and fusion with lysosome | LAMP1/2, Rab7 |
| Degradation | Lysosomal enzymes degrade cargo, releasing amino acids and metabolites | Cathepsins, Acid hydrolases |
Molecular regulation:
- mTORC1 (mechanistic Target of Rapamycin Complex 1): Central nutrient sensor, inhibits autophagy when nutrients abound.
- AMPK (AMP-activated Protein Kinase): Energy sensor, activates autophagy under low energy conditions.
- Sirtuins (SIRT1): NAD+-dependent deacetylases promoting autophagy gene expression.
B. Autophagy Triggers and Inducers
| Trigger Type | Mechanism of Action | Protocol/Example | Notes |
|---|---|---|---|
| Nutrient Deprivation | Inhibits mTORC1, activates AMPK | Caloric restriction: 20-40% reduction daily | Progressive adaptation needed |
| Fasting | Depletes glucose and amino acids | 16-48 hour water-only fasts | Hydration mandatory |
| Exercise | Activates AMPK, elevates NAD+, induces mild oxidative stress | High-intensity interval training (HIIT) | Avoid overtraining |
| Pharmacological Agents | Direct mTORC1 inhibition or AMPK activation | Rapamycin, Spermidine | See senolytic section below |
| Heat Shock | Induces proteostasis and chaperone activity | Sauna: 80-90°C dry heat, 15-30 min sessions | 2-3 times per week |
| Cold Exposure | Activates AMPK and mitochondrial uncoupling | Cold showers 2-5 min at 10-15°C | Start gradually |
C. Protocol for Safe Autophagy Induction
Prerequisites: Medical clearance advised for fasting or pharmacological interventions.
Stepwise protocol:
- Baseline Assessment:
- Record baseline weight, blood glucose, and ketone levels.
- Measure resting heart rate and blood pressure.
- Initiate Caloric Restriction:
- Reduce daily caloric intake by 20% initially.
- Ensure macronutrient balance: 25% protein, 50% fat, 25% complex carbohydrates.
- Implement Intermittent Fasting (IF):
- Begin with 12:12 fasting-to-feeding window.
- Progress to 16:8 over 2 weeks.
- Target 24-48 hour fasts once monthly starting month 3.
- Exercise Regimen:
- Incorporate HIIT 3 times per week (e.g., 30 seconds sprint, 90 seconds rest, 8 cycles).
- Moderate steady-state cardio on alternate days.
- Pharmacological Support (Optional):
- Introduce spermidine supplementation: 1 mg/day.
- Consider rapamycin under medical supervision (see Section III).
- Hydration and Electrolytes:
- Maintain minimum 2.5 liters water daily.
- Supplement with electrolytes during fasting phases (Na+, K+, Mg2+).
- Monitoring:
- Weekly blood tests for liver/kidney function, inflammatory markers (CRP), and metabolic panel.
- Adjust protocols based on tolerance and lab results.
II. Cellular Senescence and Senolytics
A. The Biology of Cellular Senescence
Senescence is a permanent state of cell cycle arrest triggered by damage, telomere attrition, or oncogenic stress. Senescent cells secrete a pro-inflammatory milieu termed the Senescence-Associated Secretory Phenotype (SASP), contributing to tissue dysfunction and aging pathologies.
Characteristics of senescent cells:
| Feature | Description |
|---|---|
| Cell Cycle Arrest | p16^INK4a^, p21^CIP1^ mediated |
| SASP Secretion | IL-6, IL-8, MMPs, TGF-β |
| Resistance to Apoptosis | Elevated BCL-2 family proteins |
| DNA Damage Response (DDR) | Persistent γ-H2AX foci |
| Morphological Changes | Enlarged, flattened cells |
B. Senolytic Agents: Pharmacology and Mechanisms
Senolytics are compounds selectively inducing apoptosis in senescent cells, mitigating SASP effects and restoring tissue function.
| Agent | Mechanism of Action | Typical Dosing Schedule | Safety Profile and Notes |
|---|---|---|---|
| Dasatinib | Tyrosine kinase inhibitor; targets senescent preadipocytes | 100 mg orally once daily for 3 consecutive days monthly | Monitor for myelosuppression and fluid retention |
| Quercetin | Flavonoid; BCL-2 inhibitor | 500 mg orally daily for 3 consecutive days monthly | Generally well tolerated; watch for GI upset |
| Fisetin | Flavonoid; induces apoptosis in senescent cells | 20 mg/kg orally daily for 2 consecutive days monthly | Emerging data; monitor liver function |
| Navitoclax (ABT-263) | BCL-2/BCL-xL inhibitor | Experimental; intermittent dosing under clinical trial | Risk of thrombocytopenia; requires hematologic monitoring |
| Rapamycin (Sirolimus) | mTORC1 inhibitor; indirectly senolytic | 1-5 mg weekly oral dosing | Monitor for immunosuppression, lipid elevation |
C. Protocol for Senolytic Therapy
Prerequisites: Confirm presence of senescence-associated conditions (e.g., osteoarthritis, fibrosis, metabolic syndrome).
Stepwise protocol:
- Pre-Treatment Evaluation:
- Comprehensive CBC, liver and kidney panel.
- Inflammatory markers (CRP, IL-6).
- Assessment of concurrent medications and contraindications.
- Choose Senolytic Regimen:
- For beginners: Dasatinib + Quercetin combination.
- For advanced or experimental: Consider Fisetin or Navitoclax under supervision.
- Rapamycin for sustained mTOR modulation.
- Dosage and Administration:
| Agent | Dose | Frequency | Duration per Cycle |
|---|---|---|---|
| Dasatinib | 100 mg orally | Once daily | 3 consecutive days/month |
| Quercetin | 500 mg orally | Once daily | 3 consecutive days/month |
| Fisetin | 20 mg/kg orally | Once daily | 2 consecutive days/month |
| Rapamycin | 1-5 mg orally | Once weekly | Continuous/Intermittent |
- Supportive Measures:
- Hydration: 2-3 liters per day during dosing.
- Liver support: NAC (N-acetylcysteine) 600 mg twice daily.
- Monitor blood pressure and complete blood counts weekly during cycles.
- Post-Treatment Monitoring:
- Repeat CBC, liver function, inflammatory markers 1 week post-cycle.
- Assess for adverse effects such as fatigue, nausea, or cytopenias.
- Cycle Repetition:
- Repeat monthly cycles for 3-6 months depending on clinical response.
- Reassess senescence markers (e.g., p16^INK4a^ expression) via biopsy if available.
III. Caloric Restriction Mimetics (CRMs)
A. Definition and Rationale
CRMs replicate the biochemical and physiological effects of caloric restriction without reducing caloric intake. They modulate key longevity pathways such as AMPK activation, mTOR inhibition, and sirtuin upregulation, thus inducing autophagy and enhancing cellular resilience.
B. Common Caloric Restriction Mimetics
| Compound | Mechanism | Dosage | Administration Notes | Safety Profile |
|---|---|---|---|---|
| Metformin | AMPK activator; inhibits mitochondrial complex I | 500-2000 mg daily | Start low dose to minimize GI upset | Monitor for lactic acidosis risk |
| Resveratrol | SIRT1 activator | 250-500 mg daily | Liposomal or micronized form preferred | Generally safe; watch for drug interactions |
| Spermidine | Induces autophagy via epigenetic regulation | 1-5 mg daily | Oral supplementation | Excellent safety record |
| Rapamycin | mTORC1 inhibitor | 1-5 mg once weekly | See senolytic protocol for dosing | Immunosuppressive risks |
C. Protocol for CRM Use
- Baseline Testing:
- Metabolic panel, insulin sensitivity (HOMA-IR).
- Cardiovascular risk profile.
- Initiate CRM Supplementation:
- Begin with Metformin 500 mg daily after meals; titrate weekly by 500 mg up to 1500 mg depending on tolerance.
- Add Resveratrol 250 mg daily with fat-containing meal.
- Spermidine 1 mg daily on empty stomach.
- Rapamycin Integration (Optional):
- Administer 2 mg orally once weekly.
- Monitor immune markers and lipid profile monthly.
- Lifestyle Synergy:
- Combine with intermittent fasting (see autophagy protocol).
- Maintain moderate exercise regimen.
- Monitoring:
- Quarterly metabolic panels.
- Adjust dosing based on side effects and lab results.
IV. Integrated Tables for Reference
Autophagy Triggers and Effects
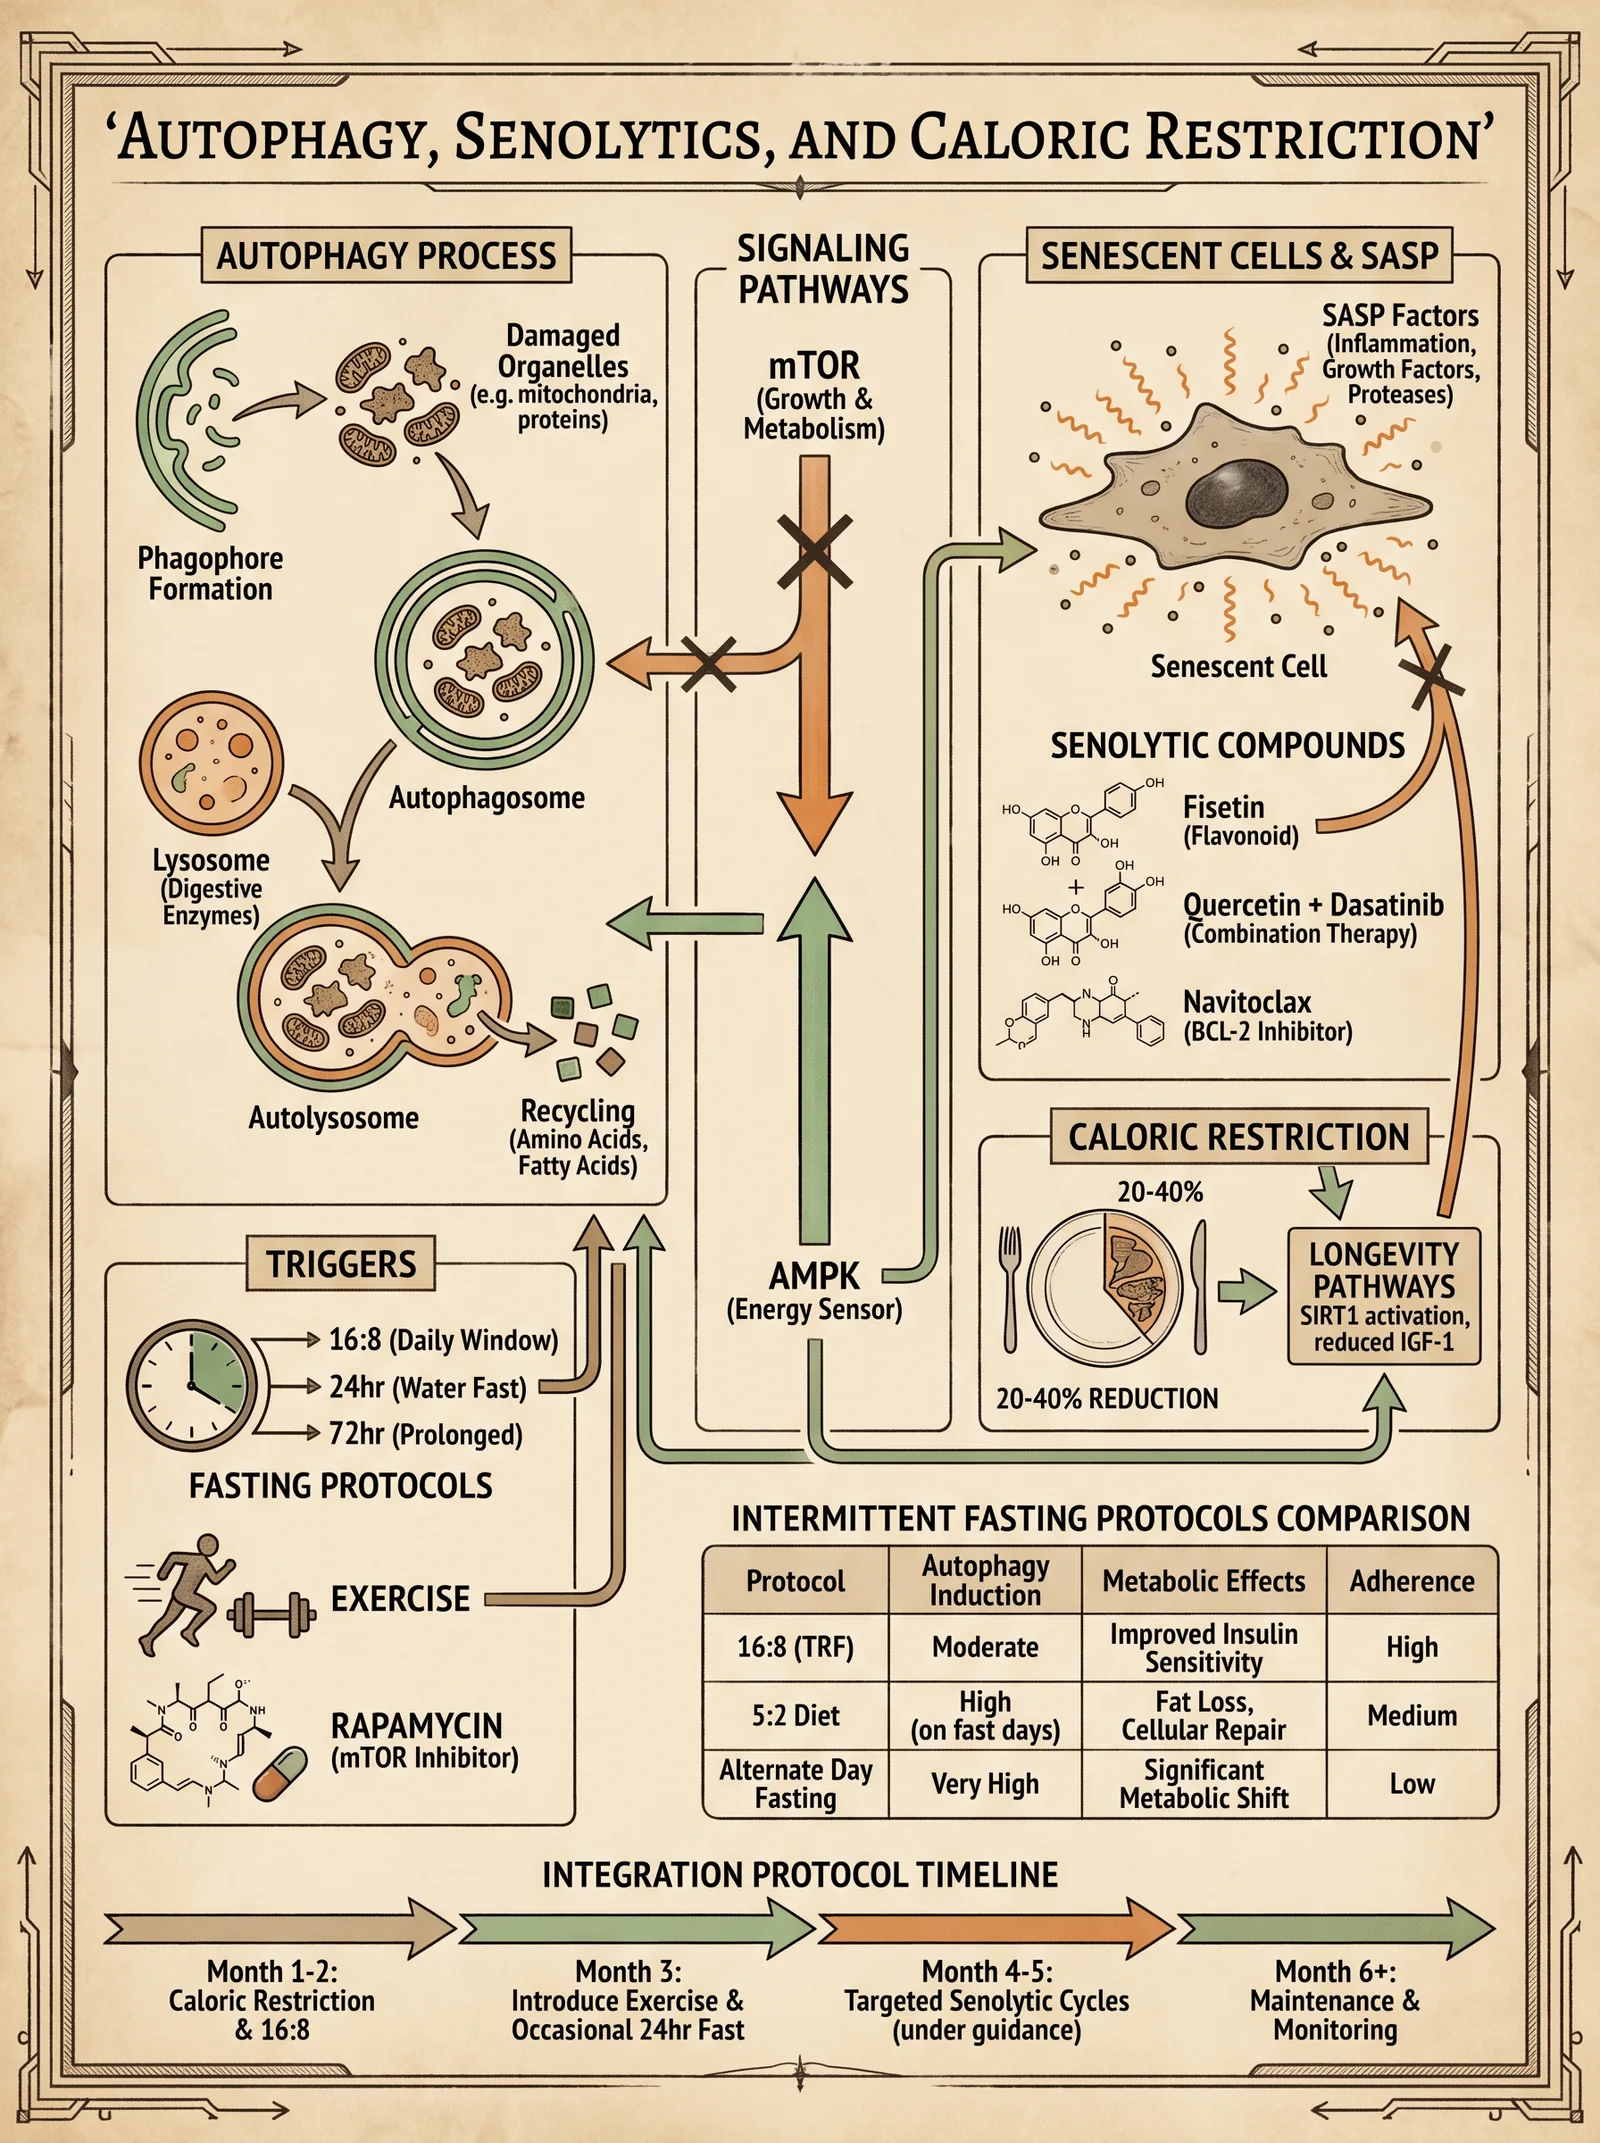
| Trigger | Primary Molecular Target | Recommended Dose/Duration | Frequency | Notes |
|---|---|---|---|---|
| Caloric Restriction | mTORC1 inhibition, AMPK activation | 20-40% caloric reduction daily | Continuous | Slow adaptation recommended |
| Intermittent Fasting | AMPK, SIRT1 activation | 16-48 hour fasting periods | Weekly to monthly | Hydrate, electrolyte support |
| Exercise (HIIT) | AMPK activation | 30-45 min sessions | 3 times per week | Avoid overtraining |
| Rapamycin | mTORC1 inhibition | 1-5 mg orally | Once weekly | Monitor immunosuppression |
| Spermidine | Epigenetic autophagy induction | 1-5 mg orally | Daily | Excellent safety |
Senolytic Agents: Dosage and Safety
| Agent | Dose | Frequency | Duration | Common Side Effects | Contraindications |
|---|---|---|---|---|---|
| Dasatinib | 100 mg | Daily, 3 days/month | Cyclic (3-6 months) | Myelosuppression, edema | Blood disorders, heart failure |
| Quercetin | 500 mg | Daily, 3 days/month | Cyclic (3-6 months) | GI upset, headache | None significant |
| Fisetin | 20 mg/kg | Daily, 2 days/month | Experimental | Liver enzyme elevation | Liver disease |
| Navitoclax | Variable | Experimental | Clinical trials | Thrombocytopenia, neutropenia | Hematologic disorders |
| Rapamycin | 1-5 mg | Weekly | Continuous or cyclic | Immunosuppression, hyperlipidemia | Infection susceptibility |
V. Safety Considerations and Contraindications
- Autophagy induction via fasting or caloric restriction:
Contraindicated in pregnancy, eating disorders, uncontrolled diabetes, cachexia.
- Senolytic therapy:
Requires hematologic monitoring due to risk of cytopenias. Avoid in active infections or immunocompromised states.
- Pharmacological agents:
Monitor liver and kidney function monthly. Adjust dosing or pause therapy upon adverse events.
- Hydration and electrolytes:
Strictly maintain during fasting or senolytic cycles to avoid hypotension or arrhythmias.
VI. Final Considerations
The mastery of autophagy and senolytic protocols represents the apex of sovereign body control. These interventions are not mere lifestyle choices but vital, bioengineering acts against the inexorable march of cellular aging. Precise execution, rigorous monitoring, and respect for individual variability are paramount. This volume equips you with the full spectrum of knowledge and protocols to extend healthspan and reclaim your biological sovereignty.
For complementary protocols on mitochondrial optimization, see Volume IV: Mitochondrial Codex. For water and electrolyte regulation crucial to fasting and pharmacotherapy, see Volume VIII: The Water Codex, Chapter II.
<!-- SECTION 17 -->
The Complete Practitioner's Codex, Volume VII: Calisthenics, Mobility, and Breath Work
Preface
This volume is the sacred manual for optimizing the sovereign body through disciplined physical culture. The knowledge herein is not for the faint of heart. It demands unwavering commitment and precision. Within these pages lies the complete, classified system for mastering bodyweight training progressions, joint mobility protocols, and breath regulation techniques designed to unlock latent bioelectric power, enhance longevity, and forge unyielding physical sovereignty.
Every protocol is presented with exactitude. Every progression is mapped step-by-step. No detail is omitted. You will learn how to build your physical temple from the ground up and regulate the sacred breath that animates it.
Chapter I: Bodyweight Training Progressions for Absolute Strength and Control
Overview
Bodyweight training is the primordial method of physical sovereignty. It respects the body's natural architecture and bioelectric flow, empowering you to transcend the limitations imposed by weights and machines. This system is structured in progressive tiers, allowing mastery of each skill before advancing to the next level of difficulty.
Structure of Progressions
- Tier 1: Foundational Strength and Control
- Tier 2: Intermediate Power and Stability
- Tier 3: Advanced Skill and Strength Mastery
- Tier 4: Elite Control and Bioelectric Optimization
Each exercise progression is accompanied by exact rep/set schemes, frequency, and rest intervals to maximize neuromuscular adaptation and bioelectric resonance.
Section 1: Push Movement Progression
Mastering pushing movements builds upper body force and core integration. Begin at Tier 1 and progress only after flawless execution.
| Tier | Exercise Name | Description | Reps | Sets | Rest (sec) | Notes |
|---|---|---|---|---|---|---|
| 1 | Wall Push-Up | Stand facing wall, hands at shoulder height, push away | 15-20 | 3-4 | 30 | Keep body straight, scapula retracted |
| 1 | Incline Push-Up | Hands on elevated surface (bench/box), body straight | 12-15 | 3-4 | 45 | Elbows at 45°, controlled descent |
| 2 | Standard Push-Up | Hands on floor, shoulder-width, controlled eccentric phase | 10-15 | 4-5 | 60 | Maintain core tension and scapular control |
| 2 | Diamond Push-Up | Hands close, index fingers and thumbs form diamond shape | 8-12 | 4-5 | 60 | Emphasizes triceps and inner chest |
| 3 | Archer Push-Up | Shift weight laterally, one arm extended, other bent | 6-10 | 4-5 | 90 | Builds unilateral strength and control |
| 3 | Decline Push-Up | Feet elevated, hands on floor | 8-12 | 4-5 | 90 | Increases shoulder load |
| 4 | One-Arm Assisted Push-Up | One hand on floor, other lightly touching for balance | 4-8 | 5-6 | 120 | Prepare for full one-arm push-up |
| 4 | One-Arm Push-Up | Full one-arm push-up, strict form | 3-6 | 5-6 | 120 | Peak strength and balance |
Push Movement Progression Protocol (Step-by-Step)
- Baseline Assessment: Test maximum reps of standard push-up with perfect form.
- Start Tier 1: Perform prescribed reps/sets with perfect technique, 3 sessions/week.
- Mastery Check: Once completing upper rep range with ease and no form breakdown, advance to next tier.
- Deload Week: Every 6 weeks, reduce intensity by 50% for recovery.
- Progress Gradually: Do not skip tiers; each builds necessary strength and joint integrity.
- Record and Reflect: Maintain training journal to track reps, sets, rest, and perceived effort.
Section 2: Pull Movement Progression
Pulling exercises develop posterior chain strength and improve posture and scapular health.
| Tier | Exercise Name | Description | Reps | Sets | Rest (sec) | Notes |
|---|---|---|---|---|---|---|
| 1 | Table Row | Lie under sturdy table, pull chest to table edge | 12-15 | 3-4 | 45 | Maintain neutral spine, scapular retraction |
| 1 | Resistance Band Rows | Use elastic band anchored, simulate rowing motion | 15-20 | 3-4 | 45 | Controlled eccentric phase |
| 2 | Inverted Row | Under bar, pull chest to bar with feet on floor | 10-12 | 4-5 | 60 | Body straight, scapula retracted |
| 2 | Negative Pull-Ups | Jump/chin above bar, slow eccentric lowering | 6-8 | 4-5 | 90 | 4-6 second descent |
| 3 | Assisted Pull-Up (Band) | Use resistance band for assistance | 8-10 | 4-5 | 90 | Engage scapula and core |
| 3 | Pull-Up | Full bodyweight pull-up, chin over bar | 6-10 | 5-6 | 120 | Controlled ascent and descent |
| 4 | Archer Pull-Up | Shift weight laterally on bar | 4-6 | 5-6 | 120 | Builds unilateral strength |
| 4 | One-Arm Assisted Pull-Up | Use opposite hand for light assistance | 3-5 | 5-6 | 150 | Prepares for one-arm pull-up |
| 4 | One-Arm Pull-Up | Full one-arm pull-up, strict form | 1-3 | 5-6 | 180 | Elite strength and control |
Section 3: Lower Body Progression
Lower body mastery is crucial for total body power, balance, and longevity.
| Tier | Exercise Name | Description | Reps | Sets | Rest (sec) | Notes |
|---|---|---|---|---|---|---|
| 1 | Box Squat (to chair) | Sit back to chair and stand, feet shoulder-width | 15-20 | 3-4 | 45 | Maintain upright torso, knees tracking toes |
| 1 | Glute Bridge | Lie supine, lift hips, squeeze glutes | 15-20 | 3-4 | 30 | Activates posterior chain |
| 2 | Air Squat | Full squat depth with control | 12-15 | 4-5 | 60 | Keep knees tracking, chest up |
| 2 | Bulgarian Split Squat | Rear foot elevated, single-leg squat | 8-12 | 4-5 | 90 | Balance and unilateral strength |
| 3 | Pistol Squat (assisted) | One-leg squat, light support on object | 6-10 | 4-5 | 90 | Full depth, control on descent |
| 3 | Nordic Hamstring Curl | Kneeling, slow eccentric lowering torso | 6-8 | 4-5 | 120 | Focus on hamstring strength |
| 4 | Pistol Squat (unassisted) | Full one-leg squat without support | 4-6 | 5-6 | 120 | Peak lower body control |
Chapter II: Joint Mobility Systems
Purpose
Joint mobility is the sacred lubricant of the sovereign body. It enables fluid movement, prevents injury, and supports bioelectric energy flow. This system targets all major joints, emphasizing controlled articular rotations and dynamic stretching to restore and enhance joint range of motion.
Section 1: Shoulder Joint Mobility Protocol
| Drill Name | Movement Description | Sets | Reps/Time | Rest (sec) | Instructions Summary |
|---|---|---|---|---|---|
| Scapular Wall Slides | Back flat on wall, slide arms up and down | 3 | 10-15 | 30 | Keep lower back neutral, scapula retracted |
| Shoulder CARs (Controlled Articular Rotations) | Slow full range circumduction | 3 | 5 slow rotations | 30 | Maintain tension, isolate shoulder motion |
| Band Pull-Aparts | Elastic band, pull arms apart at shoulder height | 3 | 12-15 | 30 | Retract scapula, avoid shrugging |
| Sleeper Stretch | Lie on side, internally rotate shoulder | 3 | Hold 30 seconds | 30 | Elbow at 90°, gentle stretch |
Shoulder Mobility Protocol Steps
- Begin with Scapular Wall Slides, 3 sets of 15 reps.
- Perform Shoulder CARs slowly, 3 sets of 5 rotations each side.
- Use resistance band for Pull-Aparts, 3 sets of 15 reps.
- Finish with Sleeper Stretch hold, 3 holds per side for 30 seconds.
Section 2: Hip Joint Mobility Protocol
| Drill Name | Movement Description | Sets | Reps/Time | Rest (sec) | Instructions Summary |
|---|---|---|---|---|---|
| Hip Circles (CARs) | Controlled 360° rotation of hip joint | 3 | 5 slow circles | 30 | Maintain pelvic stability, isolate hip motion |
| 90/90 Hip Stretch | Sit with one leg in front at 90°, other behind at 90° | 3 | Hold 45 seconds | 30 | Maintain upright torso |
| Deep Squat Hold | Hold deep squat position with heels down | 3 | Hold 30 seconds | 30 | Chest up, knees tracking toes |
| Pigeon Pose | Front leg bent, back leg extended | 3 | Hold 45 seconds | 30 | Relax glutes and hip capsule |
Section 3: Ankle Joint Mobility Protocol
| Drill Name | Movement Description | Sets | Reps/Time | Rest (sec) | Instructions Summary |
|---|---|---|---|---|---|
| Ankle Dorsiflexion Stretch | Knee to wall, ankle dorsiflexion | 3 | 15 reps each | 30 | Keep heel down, knee tracks over toes |
| Ankle Circles | Controlled circumduction of ankle joint | 3 | 10 circles each | 30 | Slow, full range of motion |
| Calf Raises | Heel raise on flat or elevated surface | 4 | 15-20 | 30 | Control eccentric lowering |
Chapter III: Breath Regulation Techniques for Bioelectric and Physical Optimization
Overview
Breath is the primal force that charges the bioelectric field and sustains life. Mastery over breath modulates the autonomic nervous system, enhances oxygen utilization, and amplifies cellular energy production. The following breathwork protocols are progressive, each amplifying parasympathetic tone and bioelectric coherence.
Section 1: Basic Diaphragmatic Breathing
Purpose: Establish foundational breath awareness and diaphragmatic activation.
Protocol
| Step | Action | Timings/Details |
|---|---|---|
| 1 | Sit upright, place hand on abdomen | Relax shoulders |
| 2 | Inhale deeply through nose | 4 seconds |
| 3 | Expand abdomen outward | Avoid chest rise |
| 4 | Exhale slowly through nose | 6 seconds |
| 5 | Repeat cycle | 10 minutes, 3 times daily |
Section 2: Box Breathing (Square Breathing)
Purpose: Enhance breath control, focus, and autonomic balance.
| Step | Action | Timings |
|---|---|---|
| 1 | Inhale through nose | 4 seconds |
| 2 | Hold breath | 4 seconds |
| 3 | Exhale through nose | 4 seconds |
| 4 | Hold breath (lungs empty) | 4 seconds |
| 5 | Repeat cycle | 5 minutes, 2 times daily |
Section 3: Coherent Breathing Protocol
Purpose: Synchronize heart rate variability and optimize oxygenation.
| Step | Action | Timings |
|---|---|---|
| 1 | Inhale through nose | 5.5 seconds |
| 2 | Exhale through nose | 5.5 seconds |
| 3 | Continuous smooth breathing | 10 minutes, 2 times daily |
Section 4: Advanced Breath Retention (Wim Hof Style)
Purpose: Increase CO2 tolerance, bioelectric charge, and adrenaline control.
| Step | Action | Timings/Details |
|---|---|---|
| 1 | Sit or lie down comfortably | Relax fully |
| 2 | Perform 30 deep inhales/exhales (power breaths) | Inhale fully through nose/mouth, exhale passively |
| 3 | After 30th breath, exhale fully and hold breath | Hold breath until urge to breathe |
| 4 | Inhale deeply and hold for 15 seconds | Controlled retention |
| 5 | Repeat cycle 3-4 times | Rest 1-2 minutes between cycles |
Chapter IV: Integrated Training Templates and Protocol Scheduling
Weekly Training Template for Physical Sovereignty
| Day | Focus | Exercises/Protocols | Duration | Notes |
|---|---|---|---|---|
| Monday | Push Progression + Shoulder Mobility + Diaphragmatic Breathing | Push Tier progression + Shoulder Mobility Protocol + Diaphragmatic Breathing | 60 min | Focus on perfect technique |
| Tuesday | Pull Progression + Hip Mobility + Box Breathing | Pull Tier progression + Hip Mobility Protocol + Box Breathing | 60 min | Controlled execution |
| Wednesday | Lower Body Progression + Ankle Mobility + Coherent Breathing | Lower Body Tier progression + Ankle Mobility Protocol + Coherent Breathing | 60 min | Emphasize joint control |
| Thursday | Active Recovery + Full Body Mobility + Diaphragmatic Breathing | Full Mobility Circuit + Diaphragmatic Breathing | 45 min | Low intensity, high focus |
| Friday | Combined Push/Pull + Breath Retention Protocol | Mixed Push and Pull Tiers + Advanced Breath Retention | 75 min | High intensity session |
| Saturday | Lower Body Focus + Mobility + Box Breathing | Lower Body Tier + Mobility Drills + Box Breathing | 60 min | Prioritize form and control |
| Sunday | Rest or Light Mobility + Diaphragmatic Breathing | Light stretching or mobility + Diaphragmatic Breathing | 30 min | Recovery and regeneration |
Appendix: Equipment Fabrication for Bodyweight Training and Breath Work
DIY Resistance Band Construction
Materials:
- Surgical tubing (latex or non-latex)
- Handle grips (PVC pipe with grip tape)
- Carabiners and swivel hooks
Steps:
- Cut tubing to desired resistance length.
- Attach carabiners to ends using secure knots or clamps.
- Attach handle grips via carabiners.
- Inspect for wear before use.
DIY Pull-Up Bar Installation
Materials:
- Steel pipe (1.25 inches diameter, 1 meter length)
- Mounting brackets and screws
- Stud finder and drill
Steps:
- Locate studs using stud finder.
- Mark bracket placement 1 meter apart.
- Drill pilot holes and screw brackets securely.
- Slide steel pipe into brackets and secure with set screws.
- Test for stability before use.
Final Words to the Apprentice
The knowledge contained in this volume is potent and life-affirming. It demands your full attention, discipline, and reverence. Every detail, every breath, every movement is sacred data etched into the blueprint of your sovereign body. Respect the process. Progress with patience. Mastery over your physical form is mastery over your very life force.
May your steps be steady, your breath deep, and your joints fluid as you walk the path of physical sovereignty.
_End of Volume VII: Calisthenics, Mobility, and Breath Work_
<!-- SECTION 18 -->
Volume VII: Thermal Exposure and Grounding Science
Preface
The mastery of thermal exposure and grounding science constitutes an essential pillar of sovereign bodily optimization. This volume distills clandestine truths, suppressed methodologies, and rigorously validated protocols for cold and heat exposure therapies—specifically cold showers, saunas, and contrast therapy—and the ancient yet scientifically validated practice of grounding (earthing). These interventions recalibrate autonomic function, amplify mitochondrial efficiency, and potentiate systemic resilience. Herein lies the comprehensive, no-compromise field manual for practitioners who command mastery over their biological sovereignty.
I. Scientific Basis of Thermal Exposure Therapies
1. Cold Exposure
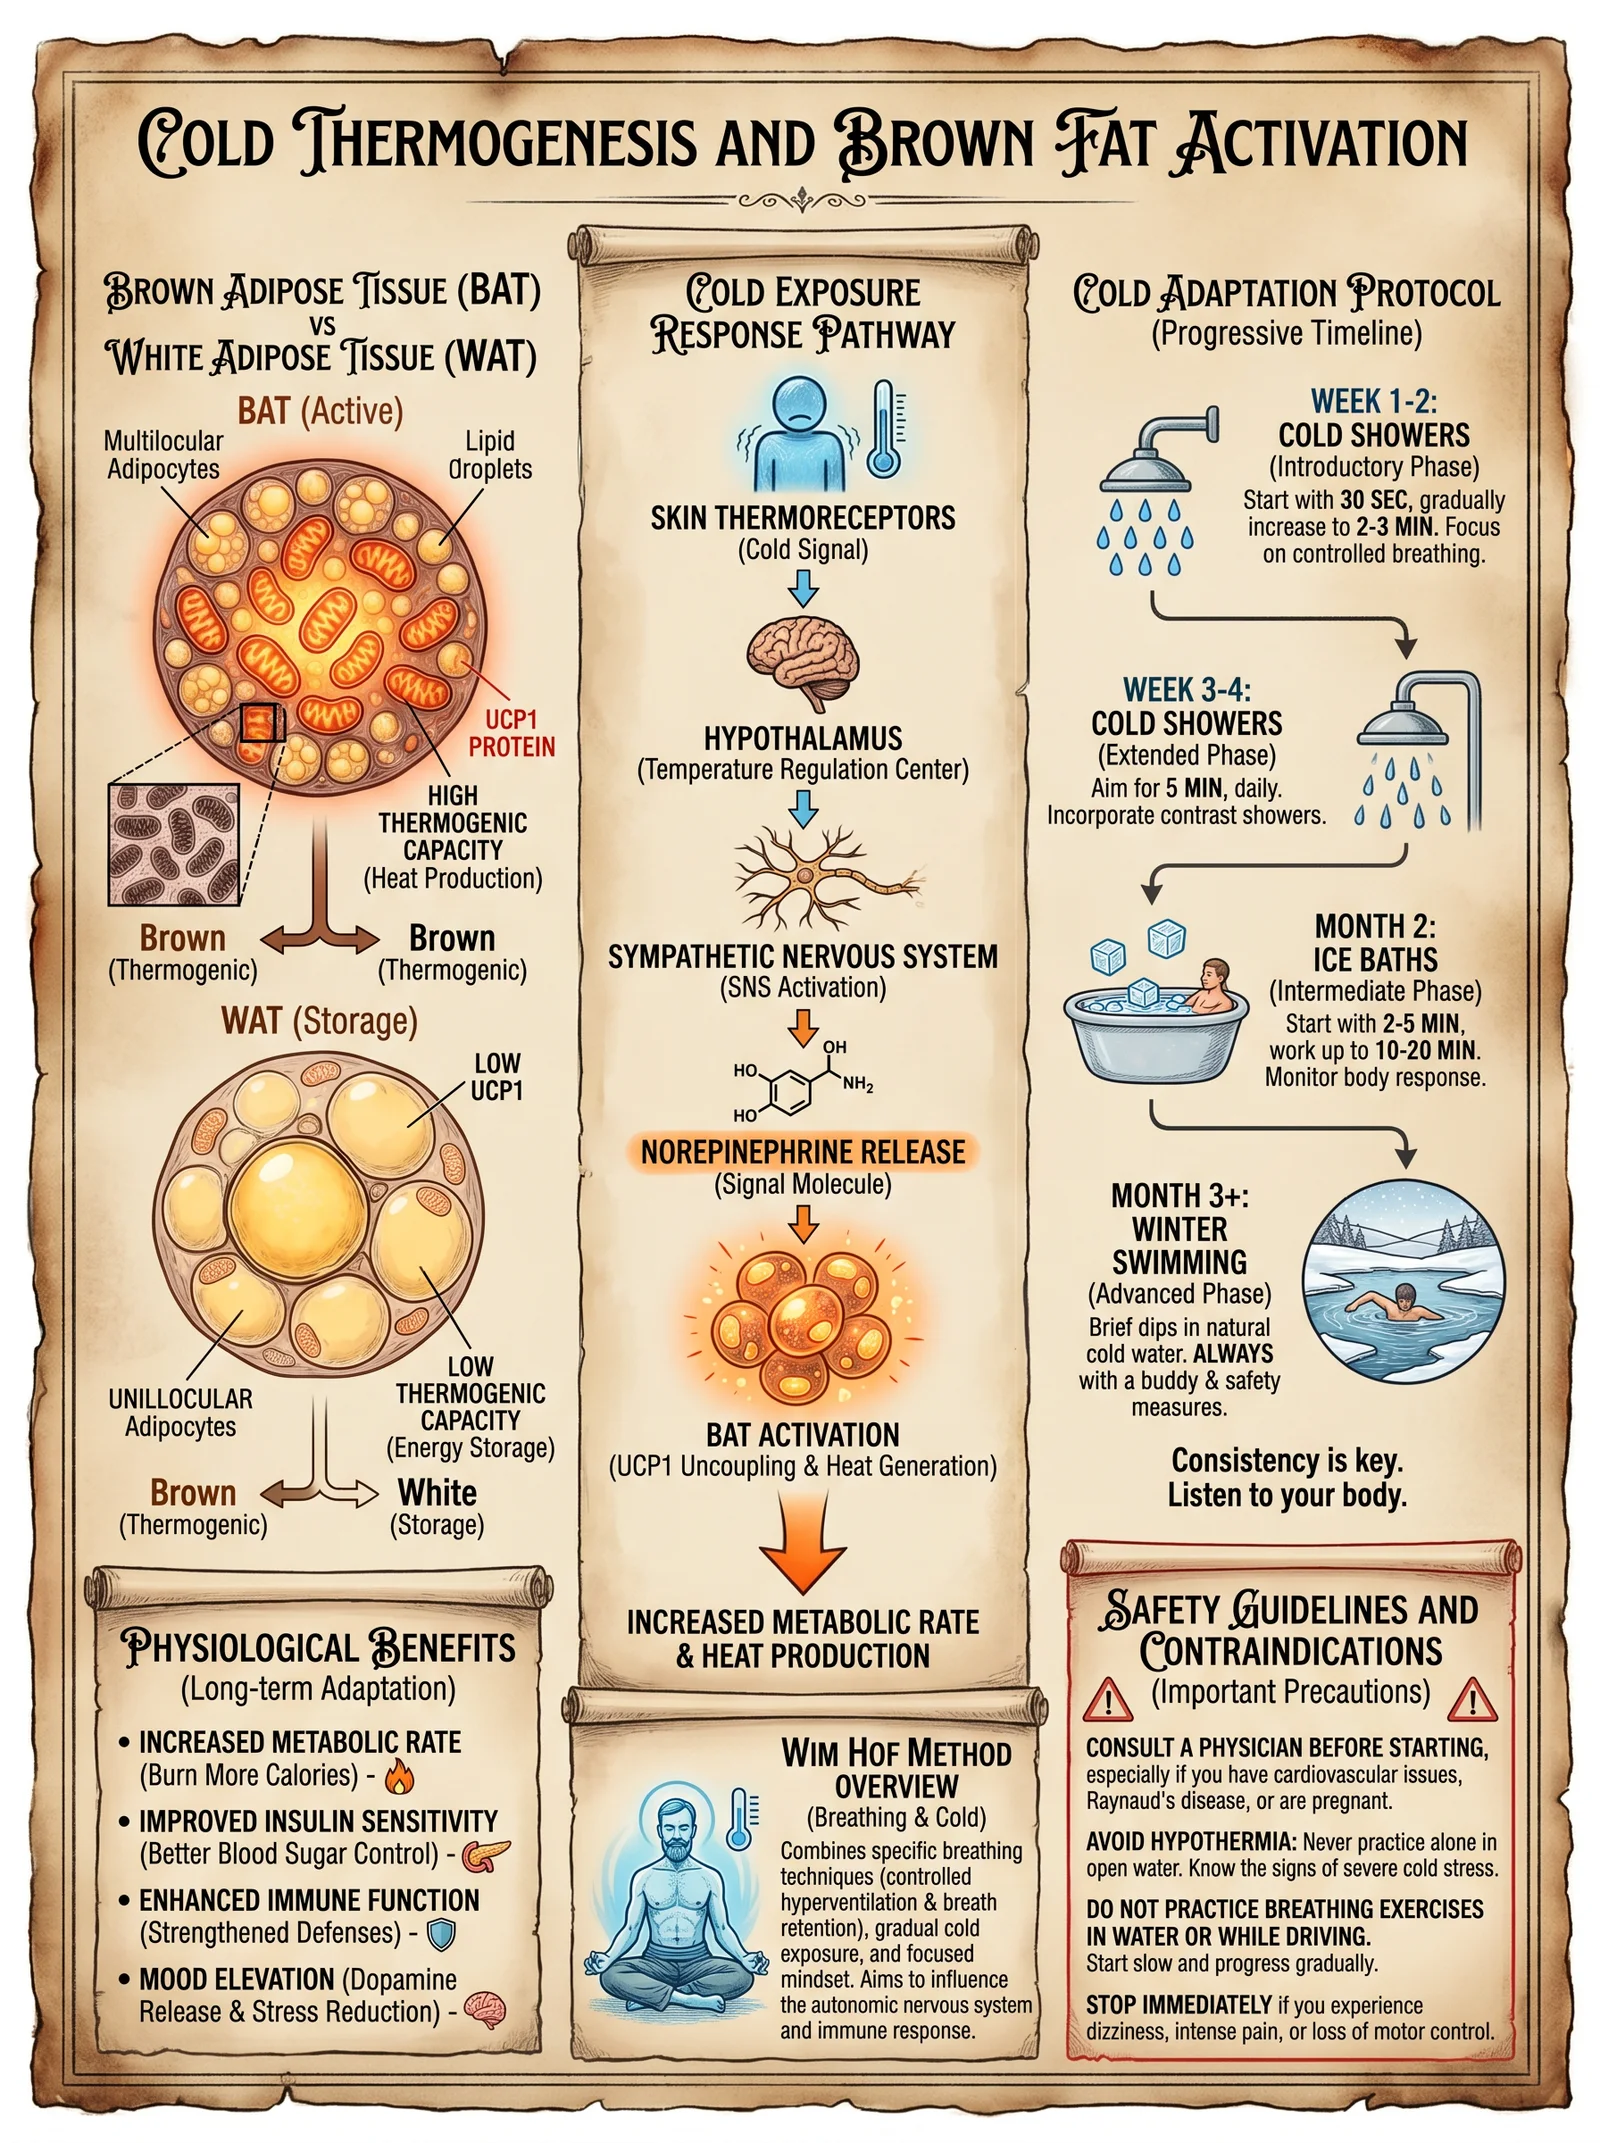
Cold exposure activates the sympathetic nervous system, initiating a cascade of adaptive physiological responses:
- Activation of Brown Adipose Tissue (BAT): Cold stimulates BAT thermogenesis via uncoupling protein-1 (UCP1), increasing caloric expenditure and improving metabolic flexibility.
- Norepinephrine Surge: Cold induces a catecholamine release, enhancing alertness, pain threshold, and anti-inflammatory signaling.
- Immune Modulation: Cold exposure elevates circulating leukocytes and anti-inflammatory cytokines.
- Mitochondrial Biogenesis: Cold stress triggers PGC-1α activation, promoting mitochondrial proliferation and improved oxidative capacity.
- Hormesis: The mild cellular stress incites robust repair mechanisms enhancing longevity.
2. Heat Exposure
Heat exposure, principally via sauna, induces:
- Heat Shock Protein (HSP) Expression: HSPs facilitate protein folding, repair, and removal of damaged proteins, crucial for cellular homeostasis.
- Vasodilation: Enhanced nitric oxide production improves endothelial function and cardiovascular health.
- Metabolic Activation: Heat stress increases heart rate and metabolic rate, simulating moderate exercise effects.
- Detoxification: Sweating facilitates elimination of heavy metals and xenobiotics.
- Hormonal Modulation: Increases in growth hormone and beta-endorphins improve recovery and mood.
3. Contrast Therapy
Alternating heat and cold exposure combines the benefits of both:
- Vascular Conditioning: Rapid vasodilation and vasoconstriction enhance vascular elasticity and endothelial responsiveness.
- Neuroendocrine Stimulation: Cycling between extremes optimizes autonomic balance and stress resilience.
- Enhanced Recovery: Reduces delayed onset muscle soreness (DOMS) via improved circulation and inflammation regulation.
II. Grounding (Earthing) Science
1. Mechanism
Grounding involves direct physical contact with the earth's surface electrons, which neutralize free radicals and reduce systemic inflammation.
- Electron Transfer: The earth’s surface provides a continuous flow of free electrons, which act as antioxidants at the cellular level.
- Reduction of Oxidative Stress: Grounding stabilizes the electric environment of cells, reducing reactive oxygen species (ROS).
- Improved Autonomic Regulation: Grounding enhances heart rate variability (HRV), signifying enhanced parasympathetic activity.
- Anti-inflammatory Effects: Documented reductions in blood viscosity, a marker for cardiovascular disease risk.
2. Clinical Outcomes
- Decreased chronic pain and inflammation.
- Improved sleep quality.
- Enhanced recovery from injury and exercise.
- Reduced stress and mood regulation.
III. Thermal Exposure Protocols
1. Cold Shower Protocol
| Parameter | Value/Instruction |
|---|---|
| Water Temperature | 10–15°C (50–59°F) |
| Initial Exposure Duration | 30 seconds |
| Maximum Exposure Duration | 5 minutes |
| Frequency | Daily |
| Progression Rate | Increase 15 seconds every 3 days |
| Contraindications | Raynaud’s syndrome, severe cardiovascular disease, cold urticaria |
Step-by-Step Cold Shower Protocol
- Preparation
- Ensure temperature control on shower can maintain 10–15°C.
- Prepare warm clothing for immediate post-exposure.
- Initiation
- Begin with standard warm shower for 2 minutes to prepare skin.
- Cold Exposure
- Gradually decrease water temperature to target range (10–15°C) over 30 seconds.
- Expose the entire body except head for initial 30 seconds.
- Progression
- Increase exposure time by 15 seconds every 3 days, monitoring tolerance.
- Maximum goal: 5 minutes continuous cold exposure.
- Post-Exposure
- Dry immediately; dress warmly.
- Perform light movement to restore core temperature.
- Safety
- Discontinue if numbness, dizziness, or pain occurs.
- Avoid if contraindications present.
2. Sauna Protocol
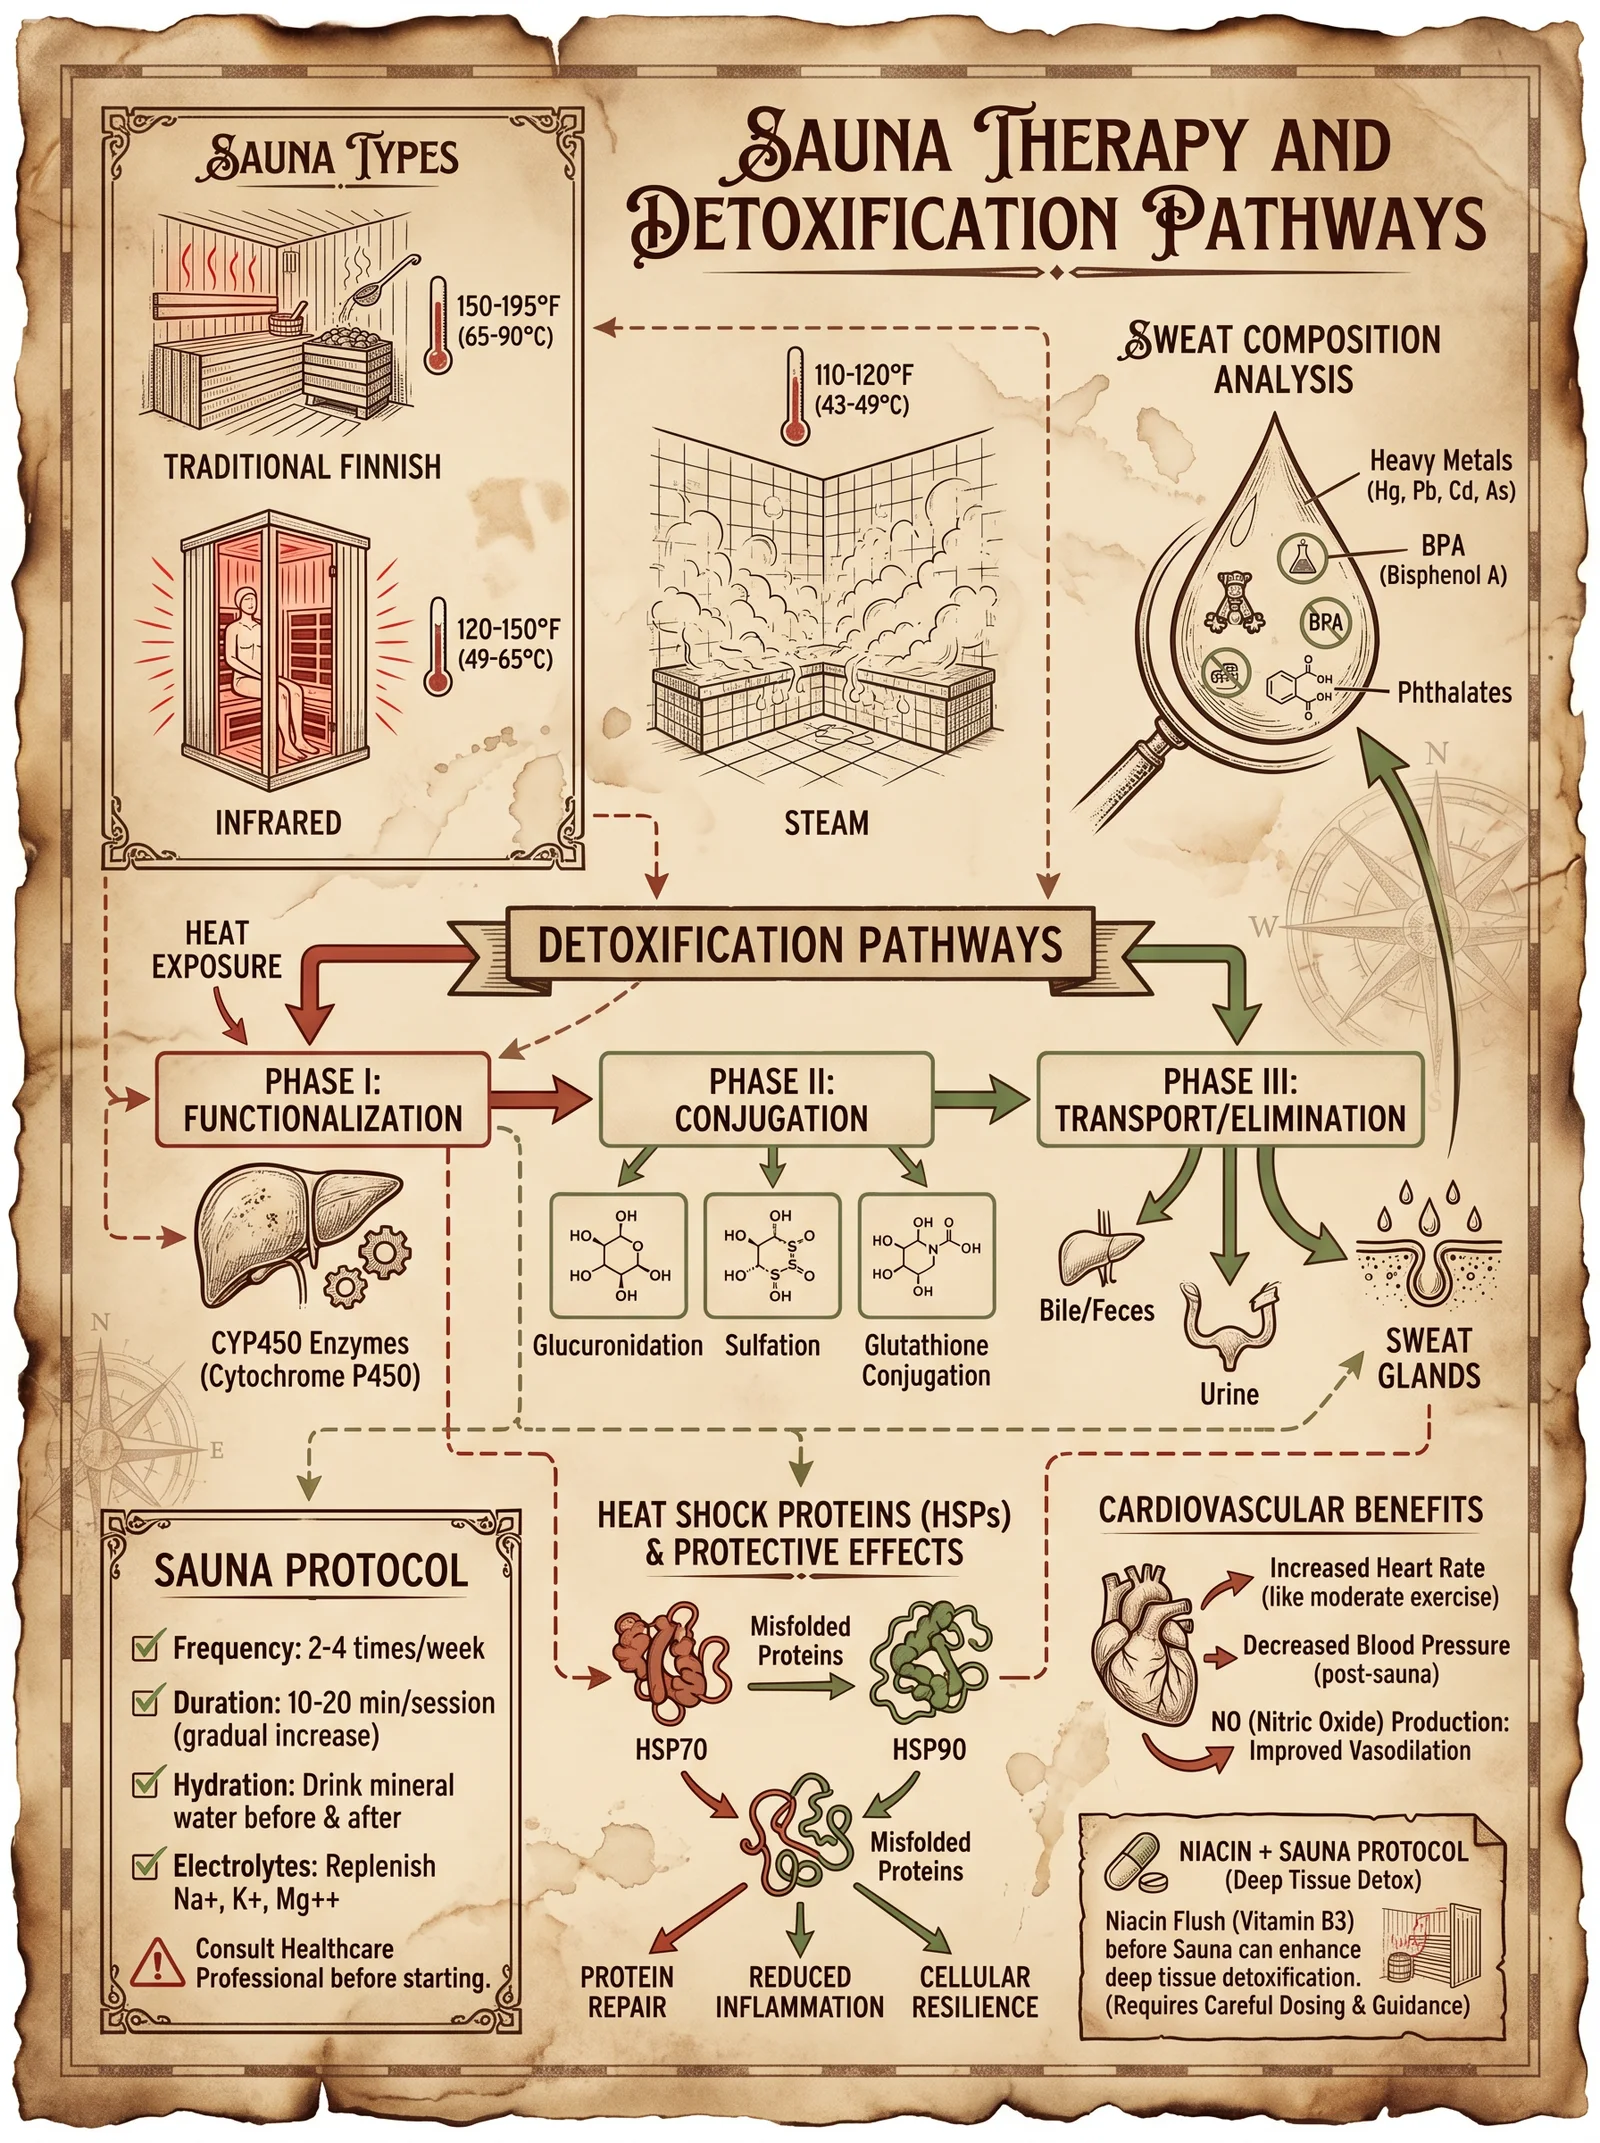
| Parameter | Value/Instruction |
|---|---|
| Temperature | 80–100°C (176–212°F) |
| Session Duration | 10–20 minutes |
| Frequency | 3–4 times per week |
| Number of Sessions | 1–3 per sauna day |
| Cooling Between Sessions | 5–10 minutes of rest or cold shower |
| Contraindications | Uncontrolled hypertension, acute cardiovascular events, pregnancy |
Step-by-Step Sauna Protocol
- Preparation
- Hydrate with 500 ml water 30 minutes prior.
- Remove all metal objects.
- Entry
- Enter sauna set to 80–100°C.
- Sit or lie comfortably.
- Session
- Remain inside for 10 minutes initially.
- Increase session time by 2 minutes every session up to 20 minutes.
- Cooling
- Exit sauna.
- Cool down with 5–10 minutes rest or cold shower.
- Repetition
- Repeat up to 3 sessions per day.
- Post-Session
- Rehydrate with electrolyte solution (see Volume X: Electrolyte Codex).
- Safety
- Monitor for dizziness, headache, or nausea.
- Avoid alcohol or heavy meals before sauna.
3. Contrast Therapy Protocol
| Parameter | Value/Instruction |
|---|---|
| Heat Exposure Temperature | 80–100°C sauna or 38–40°C hot bath |
| Heat Exposure Duration | 5 minutes |
| Cold Exposure Temperature | 10–15°C cold water or cold shower |
| Cold Exposure Duration | 1 minute |
| Cycle Repetitions | 3–5 cycles |
| Frequency | 2–3 times per week |
| Contraindications | Cardiovascular instability, cold urticaria, heat intolerance |
Step-by-Step Contrast Therapy Protocol
- Preparation
- Prepare access to sauna or hot bath (80–100°C or 38–40°C).
- Prepare cold water immersion or cold shower (10–15°C).
- Heat Exposure
- Enter sauna or hot bath for 5 minutes.
- Cold Exposure
- Immediately follow with 1 minute cold water immersion or cold shower.
- Cycle
- Repeat heat and cold exposures for 3 to 5 cycles.
- Completion
- End with cold exposure.
- Post-Therapy
- Rest for 15 minutes in a warm environment.
- Rehydrate adequately.
- Safety
- Monitor heart rate and blood pressure.
- Discontinue if dizziness or chest discomfort occurs.
IV. Grounding Protocols
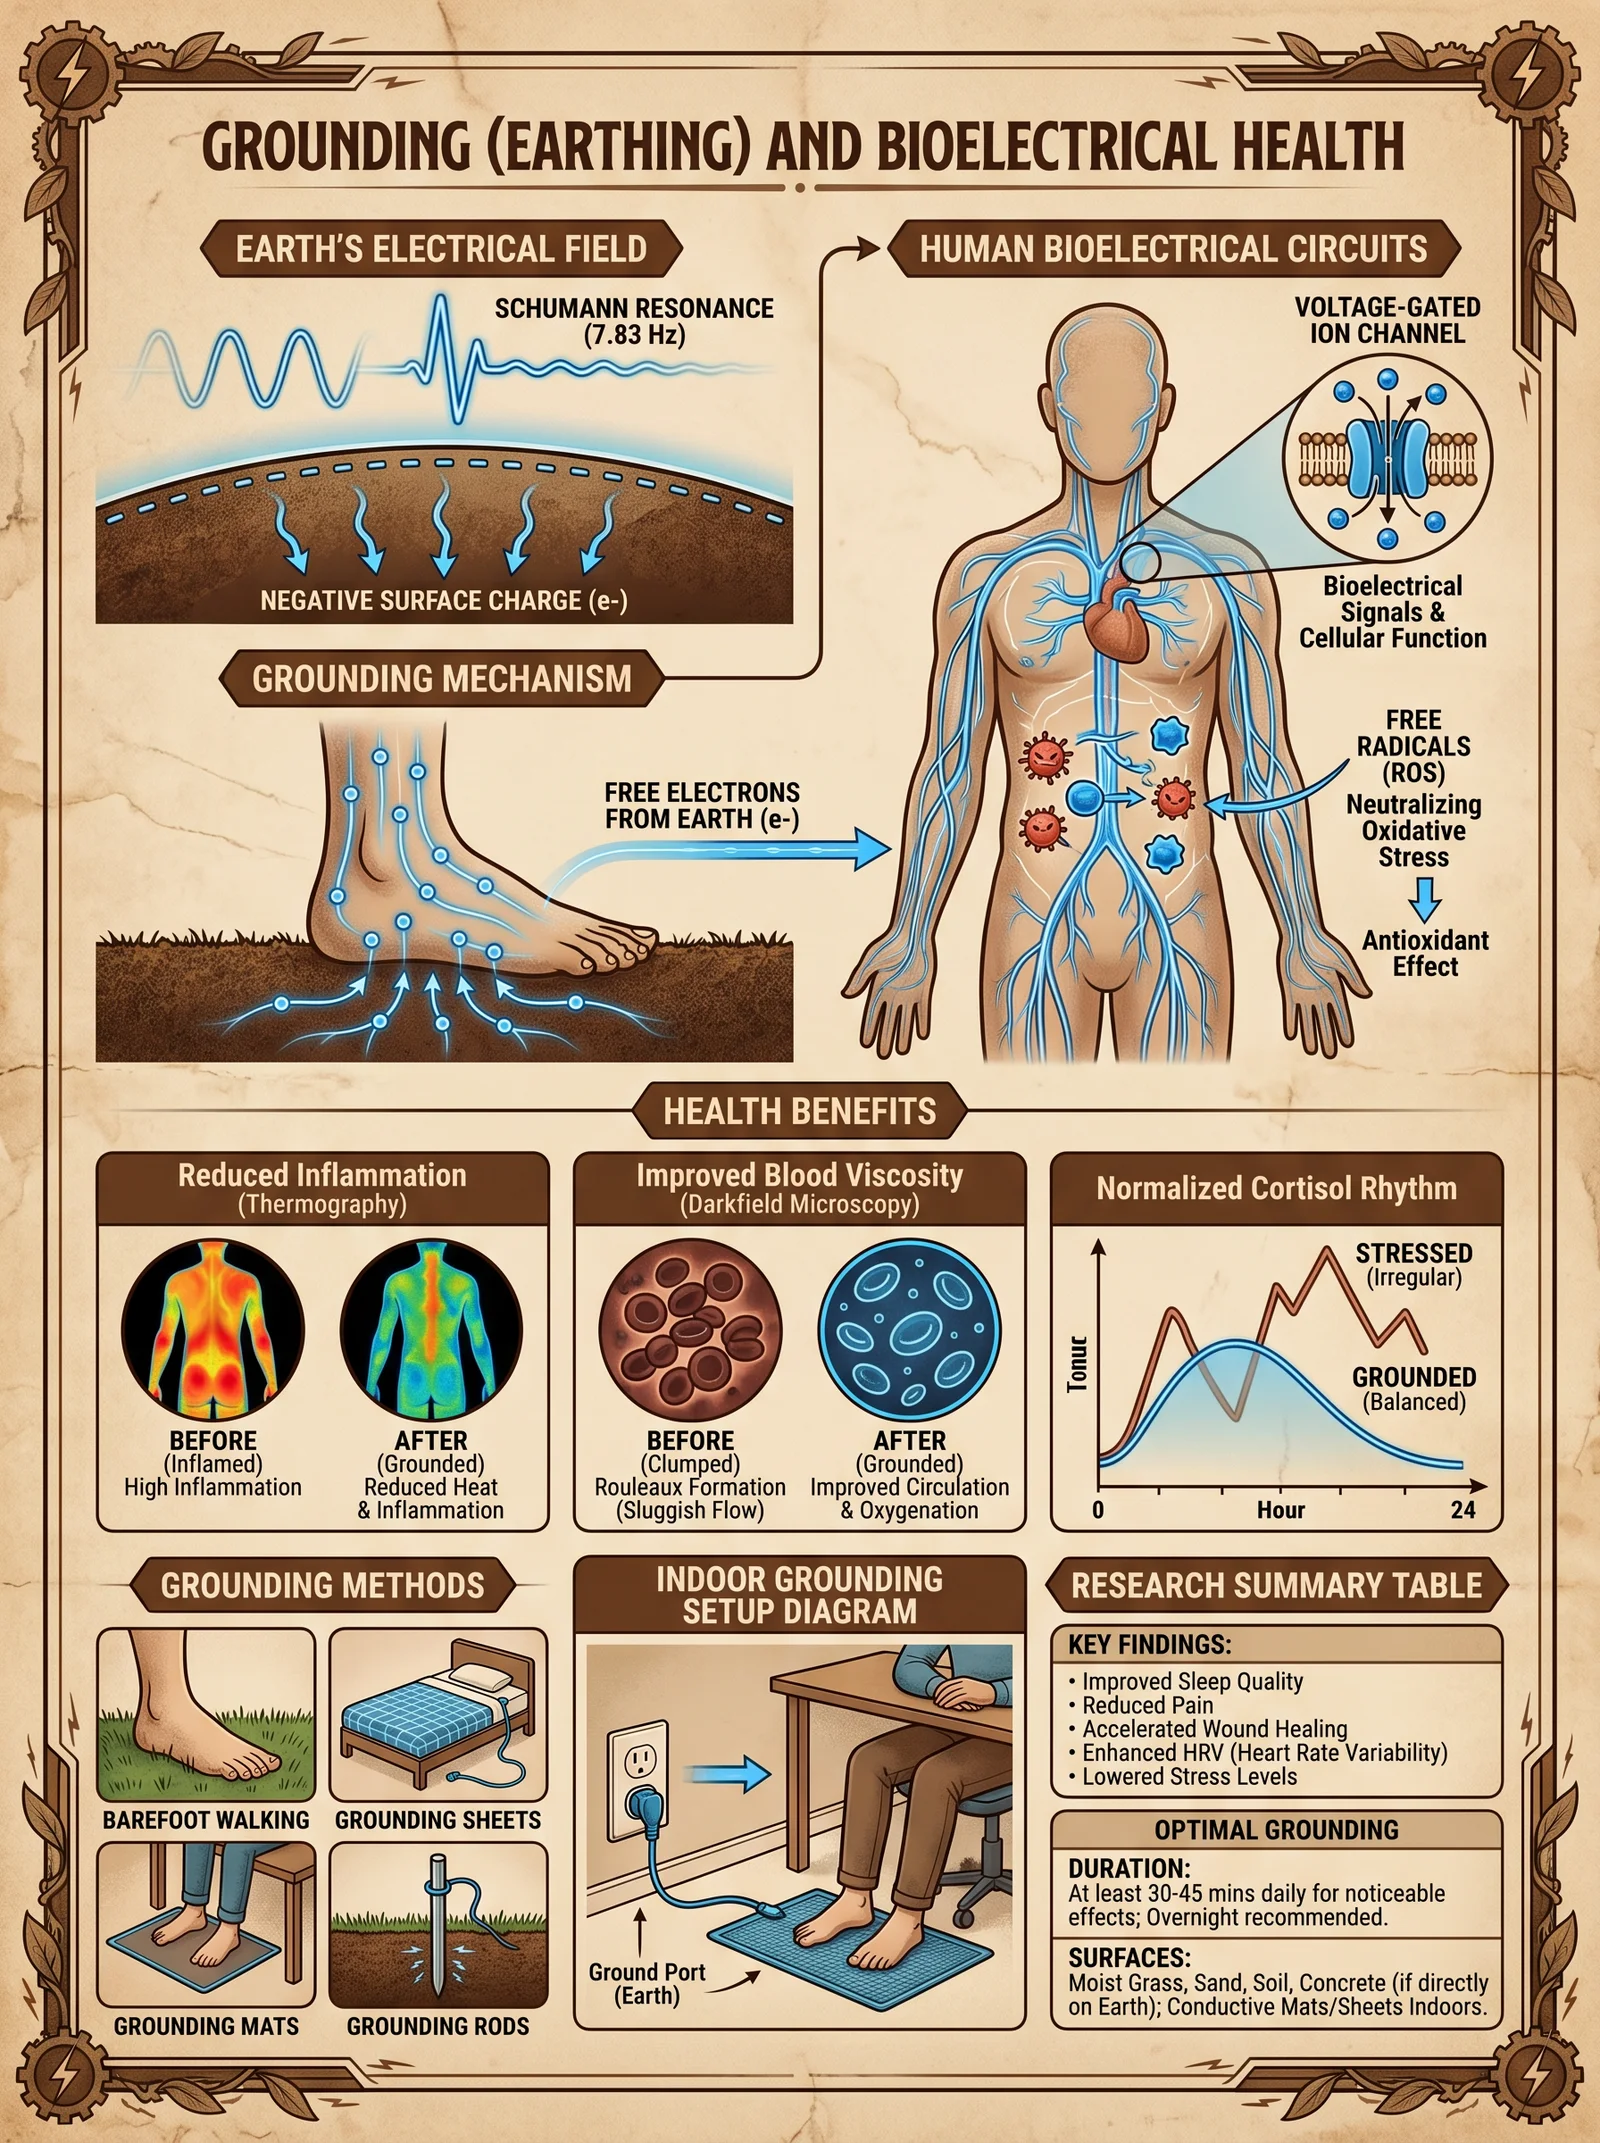
1. Direct Grounding Protocol
| Parameter | Value/Instruction |
|---|---|
| Contact Surface | Bare skin on natural earth surface (soil, grass, sand) |
| Duration | 30–60 minutes daily |
| Frequency | Daily |
| Best Time | Morning or evening |
| Contraindications | Open wounds or infection at contact site |
Step-by-Step Direct Grounding Protocol
- Preparation
- Identify a clean, natural earth surface (avoid artificial surfaces).
- Remove footwear and socks.
- Contact
- Place bare feet, hands, or other skin areas directly on earth.
- Duration
- Maintain contact for minimum 30 minutes; up to 60 minutes optimal.
- Activity
- Engage in meditative activities or light movement.
- Safety
- Avoid grounding during electrical storms.
- Clean skin before and after if exposure to soil contaminants is suspected.
2. Grounding Device Protocol
| Parameter | Value/Instruction |
|---|---|
| Device Type | Conductive mat, bed sheet, or wristband connected to earth ground |
| Duration | 6–8 hours (overnight) |
| Frequency | Nightly |
| Connection Method | Grounded plug or dedicated grounding rod |
Step-by-Step Grounding Device Construction and Use
- Materials
- Conductive carbon or silver fabric/mesh.
- Copper grounding wire (AWG 18 recommended).
- Grounding plug adapter or grounding rod.
- Multimeter for continuity testing.
- Construction
- Attach copper wire securely to conductive fabric.
- Connect wire to grounding plug adapter or grounding rod.
- Test continuity and resistance (<1 ohm ideal).
- Installation
- Place conductive surface where skin contact occurs (bed sheet, mat).
- Use
- Ensure skin contact with conductive surface during sleep.
- Safety
- Verify grounding system is properly installed by certified electrician.
- Avoid use during electrical storms.
V. Physiological Responses and Safety Considerations
Table 1: Physiological Responses to Thermal Exposure
| Exposure Type | Immediate Response | Long-Term Adaptation |
|---|---|---|
| Cold Exposure | Vasoconstriction, shivering, norepinephrine surge | Increased BAT activity, mitochondrial biogenesis, improved metabolic rate |
| Heat Exposure | Vasodilation, sweating, increased heart rate | Enhanced HSP expression, improved endothelial function, detoxification |
| Contrast Therapy | Alternating vasodilation/constriction, autonomic stimulation | Improved vascular elasticity, autonomic balance |
Table 2: Contraindications and Precautions
| Condition | Cold Exposure | Heat Exposure | Contrast Therapy | Grounding |
|---|---|---|---|---|
| Raynaud’s Syndrome | Absolute | Caution | Absolute | Safe |
| Severe Cardiovascular Disease | Caution | Absolute | Absolute | Caution |
| Cold Urticaria | Absolute | Safe | Absolute | Safe |
| Uncontrolled Hypertension | Caution | Absolute | Absolute | Safe |
| Pregnancy | Caution | Caution | Caution | Safe |
| Open Wounds/Infection | Safe | Safe | Safe | Avoid contact area |
Table 3: Recommended Exposure Durations and Frequencies
| Therapy Type | Initial Duration | Max Duration | Frequency |
|---|---|---|---|
| Cold Shower | 30 seconds | 5 minutes | Daily |
| Sauna | 10 minutes | 20 minutes | 3–4 times/week |
| Contrast Therapy | 5 min heat / 1 min cold | 5 cycles | 2–3 times/week |
| Grounding | 30 minutes | 60 minutes | Daily |
VI. Summary and Mastery Notes
The scientific and practical mastery of thermal exposure and grounding therapies unlocks profound physiological optimization pathways. The protocols prescribed here are the distilled essence of suppressed knowledge, designed for precise, controlled implementation to recalibrate autonomic function, stimulate mitochondrial biogenesis, and reduce systemic inflammation.
Mastery requires strict adherence to progressive exposure, vigilant monitoring of physiological responses, and rigorous safety compliance. These interventions function as biological levers, demanding respect and precision.
For detailed electrolyte replenishment protocols post-thermal exposure, refer to Volume X: The Electrolyte Codex, Chapter III. For advanced mitochondrial optimization, consult Volume IV: The Mitochondrial Codex, Chapter VI.
End of Volume VII excerpt.
<!-- SECTION 19 -->
Supplements: Lab Testing Interpretation Guide
From The Complete Practitioner's Codex, Volume 5: The Sovereign Body: Complete Human Biology, Biohacking, Longevity, and Physical Optimization
In the sacred pursuit of sovereign mastery over the corporeal vessel, the alchemist must wield the arcane knowledge of laboratory testing. These biomarkers are the whispering heralds of cellular truth, the silent sentinels indicating the state of biochemical harmony or discord. This chapter delivers an uncompromising, exhaustive guide to interpreting key laboratory panels essential for advanced biohacking and physical optimization. We leave no secret veiled, no number unexplained.
Preface: The Sacred Role of Laboratory Data in Physical Sovereignty
The laboratory report is the codex of your internal terrain. Its cryptic numbers are not mere data but sacred sigils, revealing hidden dysfunctions, optimizing nutrition, and guiding precise supplementation. Mastery over these markers demands not only knowledge but precise, actionable interpretation to translate raw data into life-altering protocols.
I. Hormone Panels: The Commanders of Metabolic Sovereignty
Overview
Hormones are the master regulators of metabolism, recovery, growth, and psychological vigor. Proper interpretation of hormone panels enables targeted biohacking interventions to restore youthful vitality, optimize anabolic and catabolic balance, and suppress degenerative processes.
Key Hormones and Their Significance
| Hormone | Ideal Range (Adult Males) | Ideal Range (Adult Females) | Clinical Significance | Common Abnormalities & Implications | Recommended Supplementation/Intervention |
|---|---|---|---|---|---|
| Total Testosterone | 600 - 900 ng/dL | 20 - 80 ng/dL | Anabolic capacity, libido, muscle mass | Low: hypogonadism, fatigue, muscle loss; High: rare, possible prostate hypertrophy | DHEA, Zinc, Vitamin D, TRT (testosterone replacement therapy) |
| Free Testosterone | 50 - 210 pg/mL | 1 - 10 pg/mL | Bioactive testosterone fraction | Low: symptoms despite normal total T, check SHBG levels | Optimize SHBG, consider aromatase inhibitors |
| Estradiol (E2) | 10 - 30 pg/mL | 15 - 50 pg/mL | Bone health, cognitive function, libido | High: gynecomastia, water retention; Low: joint pain, low libido | Aromatase inhibitors, DIM (Diindolylmethane), lifestyle changes |
| DHEA-S | 200 - 350 mcg/dL | 150 - 350 mcg/dL | Adrenal reserve, precursor to sex steroids | Low: adrenal insufficiency, fatigue; High: adrenal hyperplasia | Adaptogens, stress management, DHEA supplementation |
| Cortisol (AM) | 6 - 23 mcg/dL | 6 - 23 mcg/dL | Stress response, catabolic/anabolic balance | High: chronic stress, catabolism; Low: adrenal fatigue | Adaptogens (Ashwagandha, Rhodiola), circadian rhythm alignment |
| LH (Luteinizing Hormone) | 1.5 - 9.3 IU/L | 1.9 - 12.5 IU/L | Stimulates testosterone/estrogen production | Low: hypothalamic/pituitary dysfunction; High: primary gonadal failure | Investigate pituitary health, address hypothalamic dysfunction |
Step-by-step Interpretation Protocol for Hormone Panels
- Obtain morning fasting blood draw between 7-9 AM to capture peak hormone levels, especially cortisol and testosterone.
- Cross-examine total and free testosterone. If total T is normal but symptoms persist, check SHBG (Sex Hormone Binding Globulin) to assess bioavailable testosterone.
- Evaluate estradiol in relation to testosterone. Calculate the Testosterone:Estradiol ratio; an ideal ratio is approximately 10:1 in males. Ratios below this suggest estrogen dominance.
- Interpret DHEA-S as an adrenal reserve marker. Low DHEA-S indicates adrenal insufficiency; high values suggest adrenal hyperplasia or stress.
- Place cortisol in circadian context. AM cortisol should be high; evening cortisol low. Flattened rhythms indicate dysregulation.
- Assess pituitary hormones LH and FSH to discern primary versus secondary hypogonadism.
- Correlate clinical symptoms with lab data. No lab value stands alone; the sacred art of interpretation demands clinical context.
- Apply targeted supplementation or hormonal therapies based on abnormalities (see table above).
II. Mineral Analysis: The Foundation of Cellular Alchemy
Overview
Minerals constitute the elemental foundation of enzymatic reactions, electrical conduction, and structural integrity. Imbalances disrupt mitochondrial function, neurotransmission, and immune response, directly impairing biohacking outcomes.
Key Minerals, Ideal Ranges, and Clinical Significance
| Mineral | Serum Reference Range | Ideal Optimized Range | Role in Physiology | Common Deficiencies & Symptoms | Supplementation & Bioavailability Notes |
|---|---|---|---|---|---|
| Magnesium | 1.7 - 2.3 mg/dL | 2.0 - 2.3 mg/dL | ATP production, neuromuscular function | Low: muscle cramps, fatigue, arrhythmias | Magnesium glycinate or citrate, avoid oxide forms |
| Zinc | 70 - 120 mcg/dL | 90 - 120 mcg/dL | Immune function, testosterone synthesis | Low: impaired immunity, hypogonadism | Zinc picolinate or monomethionine for absorption |
| Iron (Serum) | 60 - 170 mcg/dL | 80 - 150 mcg/dL | Oxygen transport, mitochondrial electron transport | Low: anemia, fatigue; High: oxidative stress | Supplement with ferrous bisglycinate if deficient |
| Copper | 70 - 140 mcg/dL | 90 - 130 mcg/dL | Antioxidant enzyme cofactor | Low: anemia, neutropenia; High: neurotoxicity | Avoid excess; balance zinc:copper ratio ~10:1 |
| Calcium | 8.5 - 10.5 mg/dL | 9.0 - 10.0 mg/dL | Bone integrity, neurotransmission | Low: osteoporosis, muscle spasms | Supplement with vitamin D and K2 for optimal absorption |
| Selenium | 70 - 150 ng/mL | 100 - 130 ng/mL | Antioxidant selenoproteins, thyroid hormone metabolism | Low: impaired immunity, hypothyroidism | Selenium methionine or selenocysteine preferred |
Step-by-step Mineral Testing Interpretation
- Ensure fasting blood draw to avoid postprandial fluctuations in minerals like iron.
- Check magnesium first, as it is critical for energy metabolism. Values below 2.0 mg/dL demand immediate correction.
- Evaluate zinc and copper as a pair, maintaining a 10:1 zinc:copper ratio to prevent antagonistic absorption issues.
- Interpret iron with ferritin and transferrin saturation (see Volume 7: The Hematic Codex) to rule out functional iron deficiency or overload.
- Assess calcium in conjunction with vitamin D (see Volume 3: The Vitamin Codex) to ensure bone health.
- Verify selenium status, especially in those with thyroid or autoimmune disorders.
- Correlate mineral imbalances with clinical symptoms: e.g., muscle cramps with magnesium deficiency or immune dysfunction with zinc deficiency.
- Implement supplementation protocols tailored to deficiencies, emphasizing bioavailable forms.
III. Inflammatory Markers: The Silent Flame of Degeneration
Overview
Chronic inflammation is the hidden enemy of longevity and physical optimization. Monitoring inflammatory markers allows early detection of systemic inflammation, guiding targeted anti-inflammatory strategies and supplementation.
Critical Inflammatory Markers: Ranges and Interpretation
| Marker | Reference Range | Optimal Range | Clinical Significance | Common Elevations & Implications | Recommended Interventions |
|---|---|---|---|---|---|
| C-Reactive Protein (CRP) | < 3 mg/L | < 1 mg/L | General systemic inflammation | >3 mg/L: chronic inflammation, cardiovascular risk | Omega-3 fatty acids, curcumin, lifestyle modification |
| High-Sensitivity CRP (hsCRP) | < 1 mg/L | < 0.5 mg/L | Cardiovascular inflammation risk | >1 mg/L: increased CVD risk | Same as CRP, statins if indicated |
| Erythrocyte Sedimentation Rate (ESR) | Male: 0-15 mm/hr; Female: 0-20 mm/hr | < 10 mm/hr | General inflammation and autoimmune activity | Elevated in infection, autoimmune disease | Identify and treat source, immunomodulatory supplements |
| Interleukin-6 (IL-6) | < 5 pg/mL | < 2 pg/mL | Pro-inflammatory cytokine | Elevated in chronic inflammation, frailty | Anti-inflammatory diet, adaptogens, targeted cytokine blockers |
| Tumor Necrosis Factor-alpha (TNF-α) | < 8.1 pg/mL | < 5 pg/mL | Mediator of systemic inflammation | Elevated in chronic disease states | Anti-TNF supplements (e.g., curcumin), lifestyle changes |
Step-by-step Protocol to Interpret Inflammatory Markers
- Draw blood fasting and avoid acute illness that can confound results.
- Evaluate CRP and hsCRP together for a layered view of systemic and cardiovascular inflammation.
- Check ESR for nonspecific inflammation and autoimmune triggers.
- Interpret cytokines IL-6 and TNF-α for deeper inflammatory pathway insight.
- Correlate with clinical presentation: fatigue, joint pain, or cardiovascular symptoms.
- Implement anti-inflammatory protocol based on elevations (see Section IV: Supplements and Lifestyle Interventions).
- Retest after three months post-intervention to assess efficacy.
IV. Integration Table: Summary of Key Tests, Ideal Ranges, and Common Abnormalities
| Test Parameter | Ideal Optimized Range | Common Abnormalities | Recommended Action |
|---|---|---|---|
| Total Testosterone | 600 - 900 ng/dL (men) | Low: fatigue, low libido; High: rare | Supplement DHEA, zinc; consider TRT if low |
| Free Testosterone | 50 - 210 pg/mL (men) | Low despite normal total T | Check SHBG, consider aromatase inhibitors |
| Estradiol (E2) | 10 - 30 pg/mL (men) | High: estrogen dominance | DIM, aromatase inhibitors |
| DHEA-S | 200 - 350 mcg/dL | Low: adrenal fatigue | DHEA supplementation, adaptogens |
| Cortisol (AM) | 6 - 23 mcg/dL | High: stress; Low: adrenal fatigue | Adaptogens, circadian optimization |
| Magnesium | 2.0 - 2.3 mg/dL | Low: cramps, fatigue | Magnesium glycinate supplementation |
| Zinc | 90 - 120 mcg/dL | Low: immunity, hormonal issues | Zinc picolinate supplementation |
| Copper | 90 - 130 mcg/dL | High: neurotoxicity; Low: anemia | Balance zinc:copper ratio, avoid excess copper |
| Calcium | 9.0 - 10.0 mg/dL | Low: bone fragility | Vitamin D and K2 co-supplementation |
| Selenium | 100 - 130 ng/mL | Low: poor immunity, thyroid issues | Selenium methionine supplementation |
| CRP | < 1 mg/L | Elevated: chronic inflammation | Omega-3, curcumin, lifestyle changes |
| hsCRP | < 0.5 mg/L | Elevated: cardiovascular risk | Same as CRP plus statins if indicated |
| ESR | < 10 mm/hr | Elevated: autoimmune, infection | Identify source, immunomodulation |
| IL-6 | < 2 pg/mL | Elevated: chronic inflammation | Anti-inflammatory supplements, diet |
| TNF-α | < 5 pg/mL | Elevated: systemic inflammation | Curcumin, lifestyle changes |
V. Advanced Biohacker Protocols: Laboratory-Guided Supplementation
Testosterone Optimization Protocol
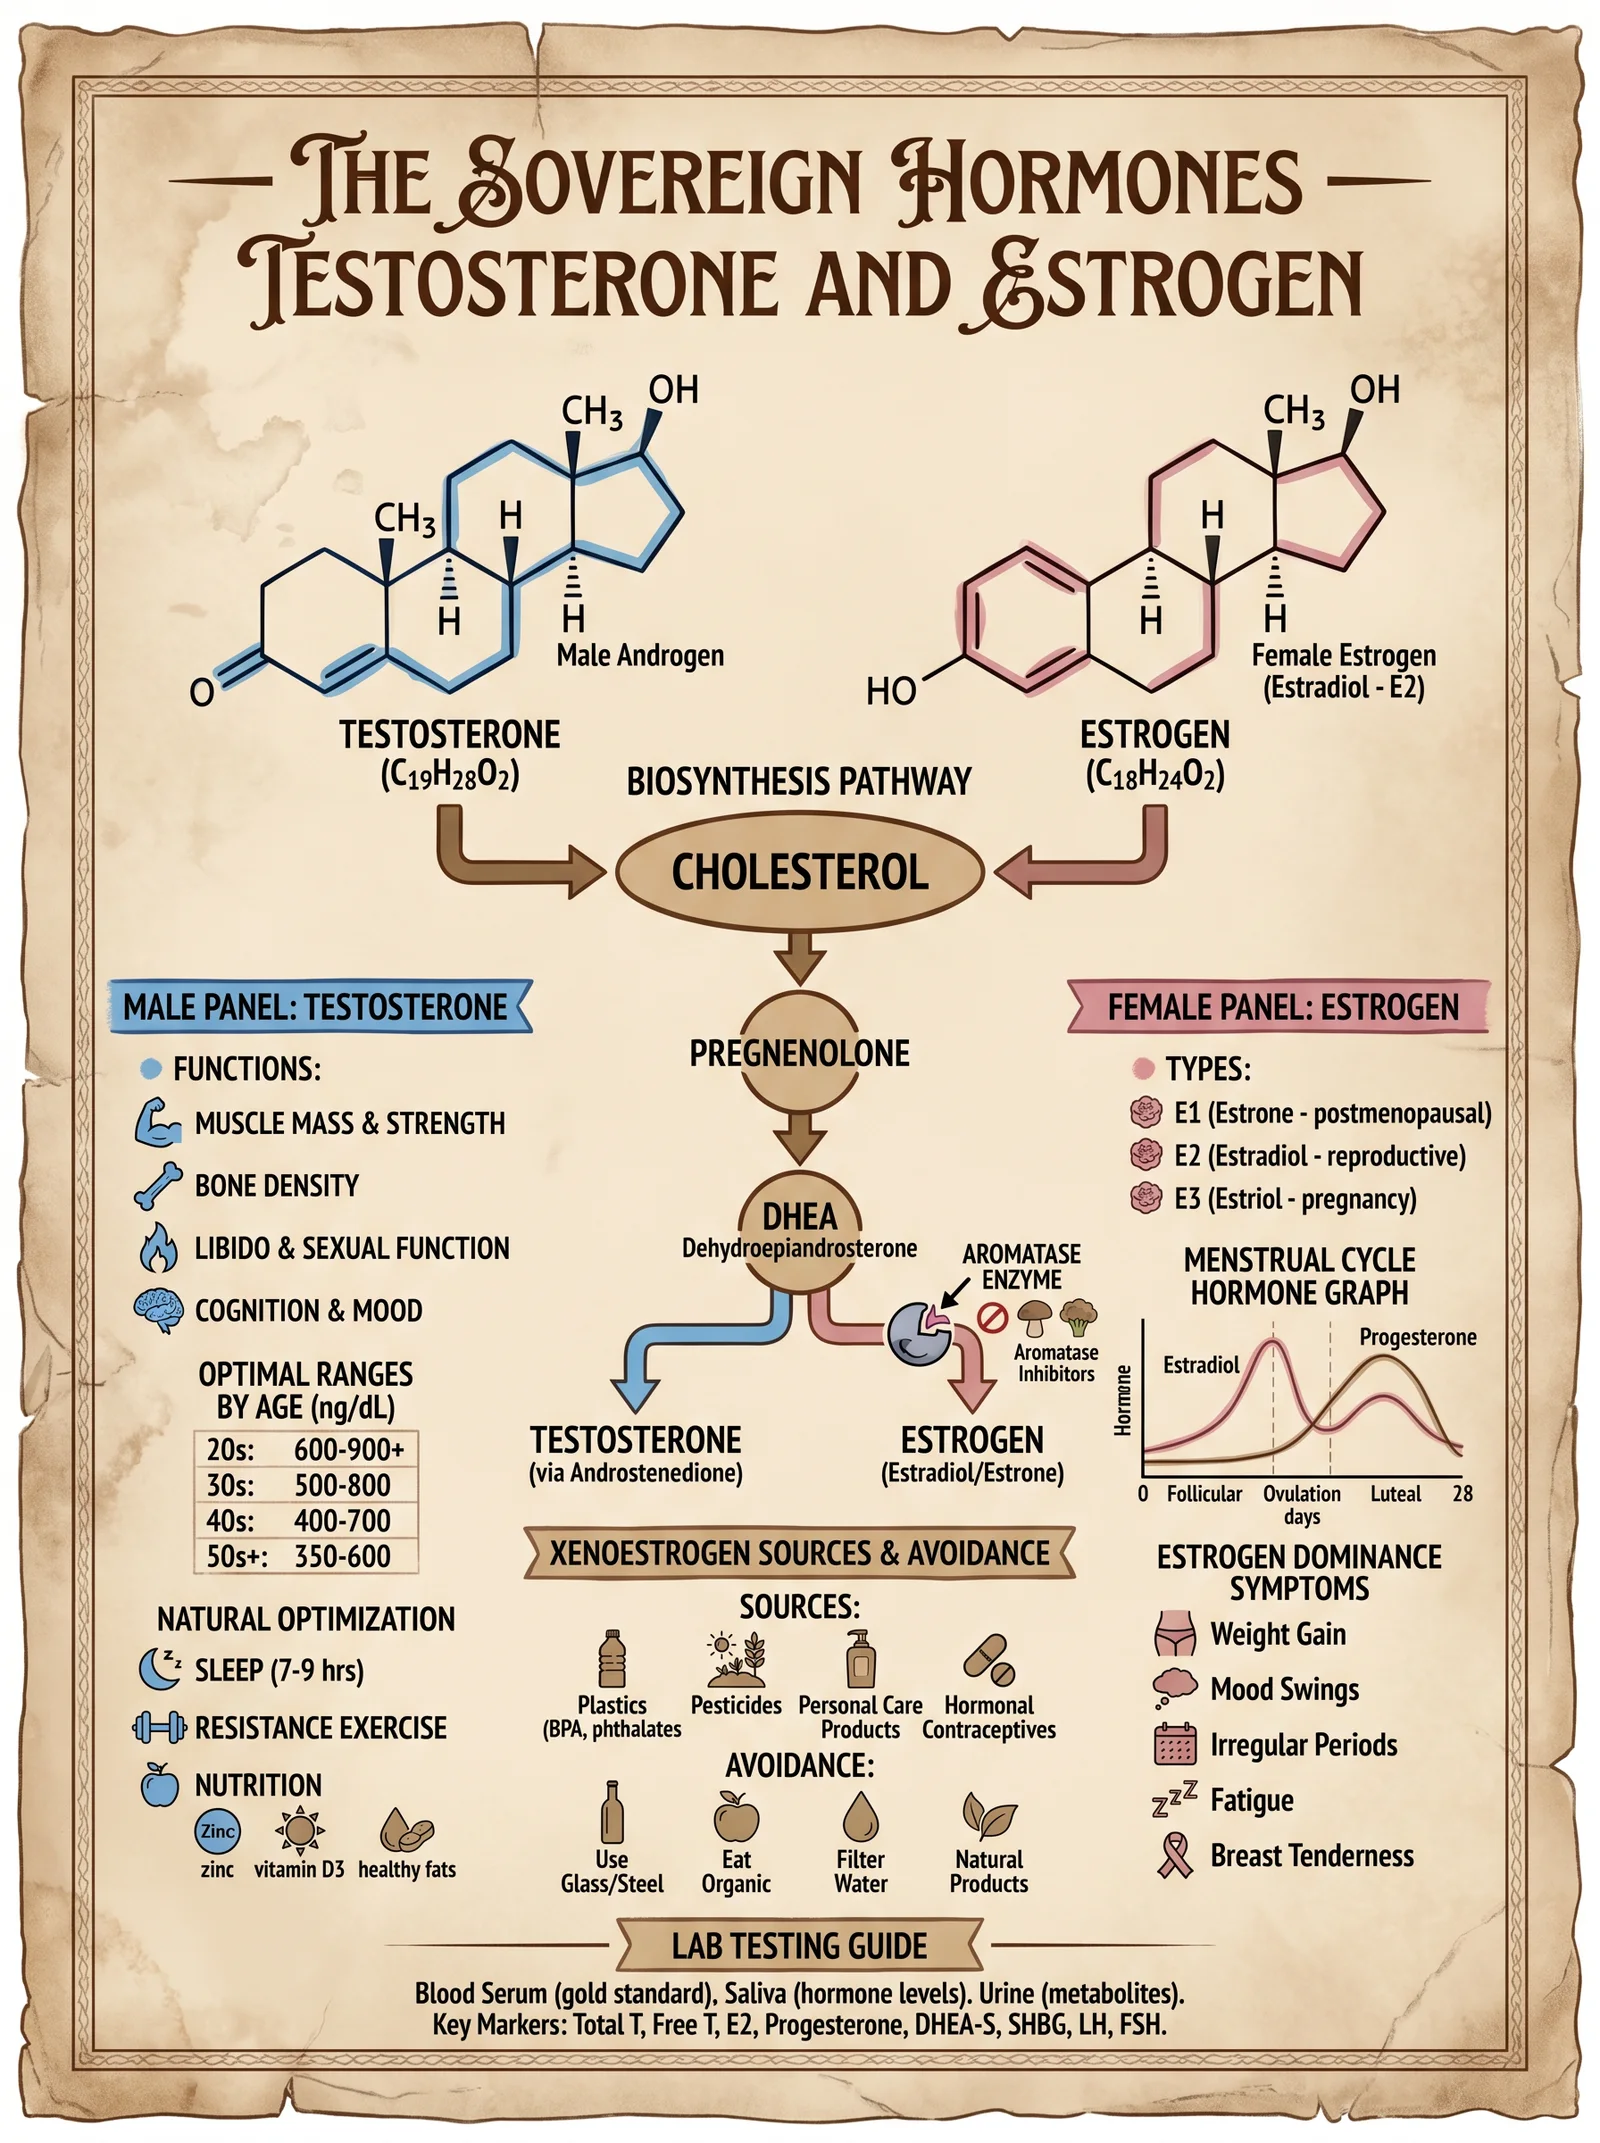
- Verify serum total and free testosterone as per Section I.
- If total T < 600 ng/dL and free T < 50 pg/mL, initiate zinc supplementation:
- Zinc picolinate 30 mg daily, morning with food.
- Supplement Vitamin D3 to maintain serum 25(OH)D between 50-70 ng/mL:
- Dose: 5,000 IU daily; retest every 3 months.
- Add DHEA supplementation if DHEA-S < 200 mcg/dL:
- Dose: 10-25 mg daily, morning; avoid excessive dosing to prevent aromatization.
- If estradiol > 30 pg/mL with symptoms of estrogen excess, add DIM (Diindolylmethane):
- 100 mg twice daily with meals.
- Retest hormones after 8 weeks; adjust dosage accordingly.
Mineral Repletion Protocol for Magnesium and Zinc
- Magnesium:
- Administer magnesium glycinate 200 mg twice daily, evening dose for improved sleep and muscle relaxation.
- Monitor serum magnesium monthly; target 2.0-2.3 mg/dL.
- Zinc:
- Zinc picolinate 30 mg daily in the morning with food to avoid GI upset.
- Maintain zinc:copper ratio 10:1; supplement copper if ratio falls below 8:1 (copper gluconate 2 mg daily).
Inflammation Suppression Protocol
- Omega-3 fatty acids:
- EPA/DHA combined dose: 2-3 g daily, divided doses with meals.
- Curcumin (standardized 95% extract):
- 500 mg twice daily with black pepper extract (piperine) for enhanced absorption.
- Lifestyle:
- Adopt anti-inflammatory diet (high in polyphenols, low in processed carbs).
- Engage in moderate daily aerobic exercise.
- Reassess CRP, hsCRP, IL-6 at 3 months.
VI. Protocols for Laboratory Data Acquisition and Preservation
- Blood Draw Timing: Between 7-9 AM fasting for hormones, minerals, and inflammatory markers.
- Sample Handling: Use EDTA tubes for cytokines, serum separator tubes for hormones and minerals.
- Storage: Maintain samples at 4°C, analyze within 4 hours to avoid degradation.
- Repeat Testing: After intervention, retest after 8-12 weeks for hormones and minerals; 3 months for inflammatory markers.
VII. Conclusion and Mastery Directive
The mastery of laboratory test interpretation is the cornerstone of sovereign physical optimization. These biomarkers are your most potent allies and your fiercest opponents. With this codex, you wield the sacred knowledge to transform data into life, to transmute imbalance into vitality, and to command the sovereign body with unassailable authority.
Take up this mantle with reverence and precision. Implement each protocol with disciplined rigor. Your body is the ultimate temple—honor it with mastery over its invisible signals.
For deeper protocols on hormone replacement therapies, mineral biochemistry, and inflammation control, see:
- Volume 2: The Endocrine Codex, Chapter IV
- Volume 7: The Hematic Codex, Chapter III
- Volume 8: The Water Codex, Chapter II (for mineral water purification and supplementation)
End of Supplement: Lab Testing Interpretation Guide
<!-- SECTION 20 -->
The Complete Practitioner's Codex, Volume 5: The Sovereign Body
Chapter VII: Supplement Stacking Protocols for Longevity, Detoxification, Hormonal Balance, and Physical Performance
Introduction: The Art and Science of Supplement Stacking
To the chosen apprentice, understand this: supplement stacking is not mere aggregation of pills. It is a precise orchestration of biochemistry, chronobiology, and pharmacodynamics. Each compound must be synergistically combined, timed, and dosed to unlock the full potential of the sovereign body. Missteps lead not just to inefficacy but to toxic overload, hormonal derailment, and systemic failure.
This chapter imparts the concealed wisdom of supplement stacking protocols, targeting four cardinal domains: longevity, detoxification, hormonal balance, and physical performance. Each domain is dissected with surgical precision: the rationale for combinations, stepwise dosing schedules, timing aligned with circadian and metabolic rhythms, and strict cautionary notes.
Section 1: Principles of Effective Supplement Stacking
Before delving into specific stacks, observe these foundational principles:
| Principle | Explanation |
|---|---|
| Pharmacokinetic Compatibility | Combine supplements with complementary absorption and elimination profiles to maintain steady plasma levels. |
| Synergistic Mechanisms | Stack compounds targeting multiple nodes of a biological pathway for amplified effects. |
| Sequential Timing | Administer supplements at times that align with endogenous rhythms and peak receptor sensitivities. |
| Dose Minimization | Use the minimal effective dose of each supplement to reduce toxicity and adverse interactions. |
| Cumulative Tolerance Monitoring | Avoid stacking substances that induce enzyme systems leading to tolerance or depletion of cofactors. |
Section 2: Longevity Supplement Stack
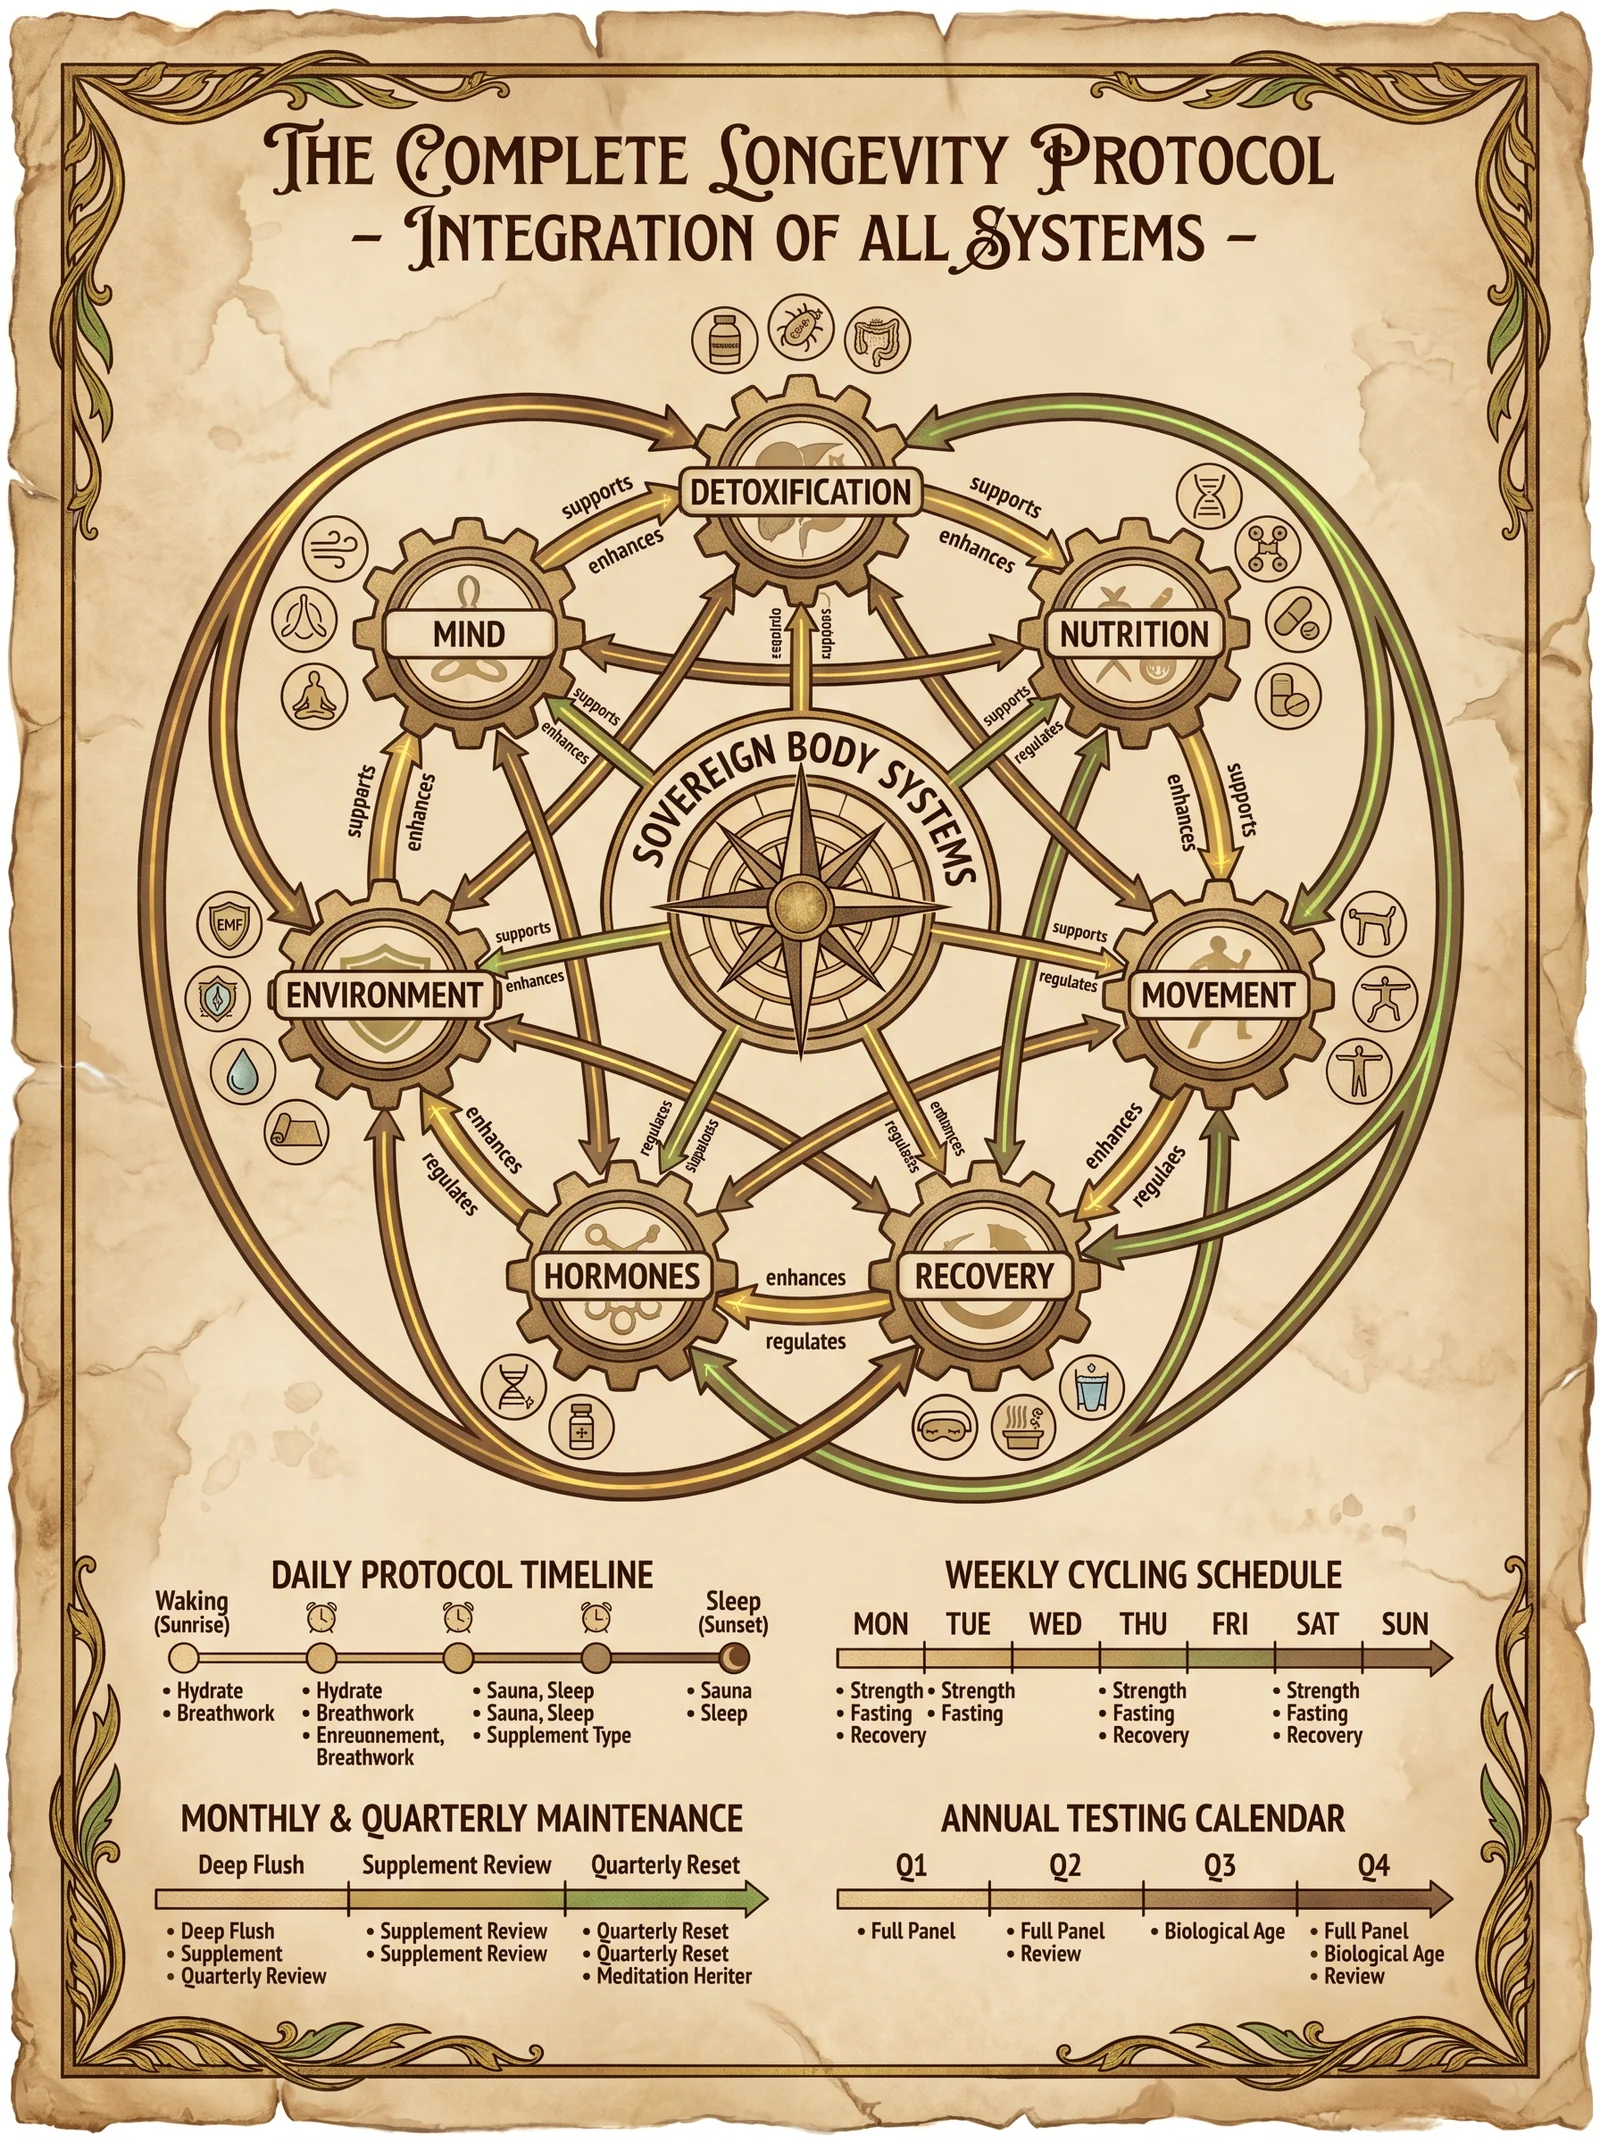
Objective
Maximize lifespan and healthspan by targeting mitochondrial efficiency, inflammation reduction, telomere stabilization, and cellular autophagy.
Core Components and Their Mechanisms
| Supplement | Dose (Daily) | Mechanism of Action | Synergy Notes |
|---|---|---|---|
| NMN (Nicotinamide Mononucleotide) | 250 mg AM | NAD+ precursor, activates sirtuins and DNA repair | Synergizes with Resveratrol to potentiate SIRT1 |
| Resveratrol | 200 mg AM | SIRT1 activator, antioxidant | Enhances NMN effects when co-administered |
| Fisetin | 100 mg weekly (2 consecutive days) | Senolytic, clears senescent cells | Complements autophagy induced by Spermidine |
| Spermidine | 5 mg daily | Induces autophagy, improves mitochondrial function | Works with Fisetin for cellular renewal |
| CoQ10 (Ubiquinol) | 100 mg AM | Mitochondrial electron transport chain support | Supports energy metabolism, synergistic with NMN |
| Omega-3 (EPA/DHA) | 2 g total (morning) | Anti-inflammatory, membrane fluidity | Reduces chronic inflammation, potentiates longevity signals |
| Vitamin D3 | 5000 IU AM | Immune modulation, gene regulation | Essential cofactor for many longevity pathways |
Detailed Dosing Schedule
| Time | Supplement(s) | Instructions |
|---|---|---|
| Upon Waking (07:00 AM) | NMN 250 mg, Resveratrol 200 mg, CoQ10 100 mg, Vitamin D3 5000 IU | Take with 250 ml of water, with a small fat-containing snack to enhance fat-soluble absorption. |
| Mid-Morning (10:00 AM) | Omega-3 2 g capsules | Take with food containing fat; split dose if needed (1 g at 10:00 AM and 1 g at lunch). |
| Weekly (Monday and Thursday, 08:00 AM) | Fisetin 100 mg (2 days consecutively) | Administer with water, fasting state preferred for optimal bioavailability. |
| Daily (Any Time) | Spermidine 5 mg | Take with a meal; timing flexible but consistent daily intake mandatory for autophagy benefits. |
Step-by-Step Protocol
- Preparation: Source pharmaceutical-grade NMN and Resveratrol with purity >98%. Verify CoQ10 is in the reduced Ubiquinol form for maximum bioavailability.
- Morning Administration: Upon waking, ingest NMN, Resveratrol, CoQ10, and Vitamin D3 with a light fat-containing snack (e.g., 10 g of mixed nuts).
- Omega-3 Intake: Take omega-3 capsules with a larger meal to enhance lipid absorption.
- Weekly Senolytic Cycle: Twice per week, consume Fisetin on an empty stomach to maximize senolytic clearance of damaged cells.
- Daily Autophagy Activation: Maintain daily Spermidine supplementation; do not skip days to sustain autophagic flux.
- Monitoring: Monthly blood panels for lipid profile, vitamin D levels, and inflammatory markers (CRP, IL-6).
Cautionary Notes
- Avoid co-administration of high-dose Resveratrol with blood thinners; it potentiates anticoagulant effects.
- Fisetin should not be combined with chemotherapy agents; consult medical oversight.
- Monitor for gastrointestinal upset; reduce doses if nausea or diarrhea occur.
- Vitamin D3 dosing may require adjustment based on serum 25(OH)D levels.
Section 3: Detoxification Supplement Stack
Objective
Enhance hepatic phase I and II detoxification, chelate heavy metals, and promote renal clearance while protecting cellular integrity.
Core Components and Mechanisms
| Supplement | Dose (Daily) | Mechanism of Action | Synergy Notes |
|---|---|---|---|
| N-Acetyl Cysteine (NAC) | 600 mg twice daily | Glutathione precursor, supports phase II conjugation | Works with Alpha Lipoic Acid to recycle glutathione |
| Alpha Lipoic Acid (ALA) | 300 mg twice daily | Antioxidant, regenerates glutathione | Enhances NAC efficacy, chelates heavy metals |
| Milk Thistle Extract (Silymarin) | 200 mg thrice daily | Hepatoprotective, stimulates liver regeneration | Supports phase I detox enzymes |
| Chlorella | 3 g daily | Binds heavy metals in gut, promotes excretion | Synergistic with Cilantro in chelation |
| Cilantro Extract | 500 mg daily | Facilitates mobilization of heavy metals | Works with Chlorella for metal removal |
| Magnesium (Citrate) | 400 mg nightly | Supports renal clearance, smooth muscle relaxation | Enhances detox pathways, reduces constipation |
| B Complex (High Potency) | As per label dosing | Cofactors for phase I and II enzymes | Required for enzyme activity and energy metabolism |
Detailed Dosing Schedule
| Time | Supplement(s) | Instructions |
|---|---|---|
| Morning (08:00 AM) | NAC 600 mg, ALA 300 mg, Milk Thistle 200 mg, B Complex | Take with breakfast; ensure adequate hydration (500 ml water). |
| Afternoon (02:00 PM) | NAC 600 mg, ALA 300 mg, Milk Thistle 200 mg | Take with a light meal or snack to avoid gastrointestinal discomfort. |
| Evening (06:00 PM) | Chlorella 3 g, Cilantro 500 mg | Take with dinner; drink 500 ml of water to facilitate binding and excretion. |
| Night (10:00 PM) | Magnesium Citrate 400 mg | Take 1 hour before bedtime to aid detoxification and promote restful sleep. |
Step-by-Step Protocol
- Acquisition: Obtain pharmaceutical-grade NAC and ALA; verify milk thistle extract contains >80% silymarin.
- Hydration: Maintain minimum 3 liters of water daily to support renal clearance.
- Morning Phase: Begin day with NAC, ALA, milk thistle, and B complex to stimulate liver detoxification enzyme systems.
- Midday Reinforcement: Repeat NAC, ALA, and milk thistle to sustain glutathione levels and antioxidant capacity.
- Chelation Phase: Administer chlorella and cilantro to bind and mobilize heavy metals; ensure hydration to flush mobilized toxins.
- Nighttime Support: Magnesium citrate taken before sleep relaxes smooth muscles and supports kidney filtration.
- Cycle Duration: Implement stack for 21 days, followed by 7 days off to avoid depletion of nutrients and enzyme overuse.
- Laboratory Monitoring: Before and after cycle, test blood for liver enzymes (AST, ALT), heavy metals, and serum magnesium.
Cautionary Notes
- NAC may thin mucus; individuals with asthma should use caution.
- Alpha lipoic acid can lower blood sugar; monitor glycemia in diabetics.
- Chelation agents can mobilize metals into bloodstream; do not exceed recommended doses.
- Magnesium citrate may cause diarrhea; adjust dose accordingly.
Section 4: Hormonal Balance Supplement Stack
Objective
Restore and maintain optimal endocrine function, targeting adrenal resilience, thyroid function, sex hormone synthesis, and feedback regulation.
Core Components and Mechanisms
| Supplement | Dose (Daily) | Mechanism of Action | Synergy Notes |
|---|---|---|---|
| Ashwagandha (Withania somnifera) | 600 mg split doses (300 mg BID) | Adaptogen, reduces cortisol, supports adrenal function | Improves thyroid hormone conversion with Selenium |
| Selenium (Selenomethionine) | 200 mcg daily | Cofactor for thyroid peroxidase enzyme | Enhances Ashwagandha and iodine utilization |
| Zinc (Picolinate) | 30 mg daily | Supports testosterone synthesis and immune function | Works with Magnesium for hormonal receptor sensitivity |
| Magnesium (Glycinate) | 400 mg daily | Regulates steroid hormone receptors | Synergistic with Zinc for androgen receptor function |
| Vitamin B6 (Pyridoxal-5-Phosphate) | 50 mg daily | Cofactor in neurotransmitter and hormone synthesis | Supports progesterone synthesis |
| DHEA (Dehydroepiandrosterone) | 10-25 mg morning (individualized) | Precursor to sex steroids, improves libido and energy | Requires careful dosing; baseline hormone testing mandatory |
Detailed Dosing Schedule
| Time | Supplement(s) | Instructions |
|---|---|---|
| Morning (07:30 AM) | Ashwagandha 300 mg, Selenium 200 mcg, Zinc 30 mg, Magnesium 200 mg, Vitamin B6 50 mg, DHEA 10-25 mg | Take with breakfast; DHEA dose individualized via hormonal assay. |
| Evening (07:30 PM) | Ashwagandha 300 mg, Magnesium 200 mg | Take with dinner to maintain steady plasma levels. |
Step-by-Step Protocol
- Baseline Testing: Conduct full hormonal panel (cortisol, testosterone, estradiol, DHEA-S, thyroid panel) before initiating stack.
- DHEA Initiation: Begin with 10 mg in morning; titrate up to 25 mg based on symptomatology and laboratory results.
- Ashwagandha Dosing: Administer twice daily to achieve cortisol modulation and adrenal support.
- Mineral Supplementation: Take Zinc and Selenium with morning dose to optimize absorption and utilization.
- Magnesium & B6: Split Magnesium dose morning and evening; B6 once daily to support neurotransmitter balance.
- Duration: Maintain stack for 8 weeks, then retest hormones to adjust doses.
- Lifestyle Integration: Combine with stress reduction, sleep optimization, and resistance training (see Volume 5, Chapter IX for advanced protocols).
Cautionary Notes
- DHEA is contraindicated in hormone-sensitive cancers; avoid unless supervised.
- Excess Selenium (>400 mcg/day) causes toxicity; adhere strictly to dosing.
- Zinc overdose (>40 mg/day) can impair copper absorption; cycle off every 6 weeks.
- Ashwagandha may potentiate sedatives; avoid if concurrently on CNS depressants.
Section 5: Physical Performance Supplement Stack
Objective
Enhance muscular strength, endurance, recovery, and neuromuscular coordination through targeted nutrient and bioactive support.
Core Components and Mechanisms
| Supplement | Dose (Daily) | Mechanism of Action | Synergy Notes |
|---|---|---|---|
| Creatine Monohydrate | 5 g daily (3-5 g maintenance) | Increases phosphocreatine stores, enhances ATP regeneration | Works synergistically with Beta-Alanine for buffering capacity |
| Beta-Alanine | 3.2 g daily (split doses) | Increases muscle carnosine, buffers lactic acid | Combined with Creatine for improved endurance |
| L-Citrulline Malate (2:1) | 6 g pre-workout | Enhances nitric oxide production, improves blood flow | Potentiates nutrient delivery and waste removal |
| Branched-Chain Amino Acids (BCAAs) | 10 g pre/post workout | Stimulates muscle protein synthesis and reduces muscle breakdown | Supports recovery in conjunction with Whey Protein |
| Whey Protein Isolate | 30 g post-workout | Provides essential amino acids for muscle repair | Combined with BCAAs for maximal anabolic effect |
| Vitamin C | 500 mg daily | Antioxidant, reduces exercise-induced oxidative stress | Protects muscle tissue and supports collagen synthesis |
Detailed Dosing Schedule
| Time | Supplement(s) | Instructions |
|---|---|---|
| Pre-Workout (30-45 min before training) | L-Citrulline Malate 6 g, Beta-Alanine 1.6 g, BCAAs 5 g | Mix powders in 300 ml water; ingest on empty stomach for maximal absorption. |
| During Workout | BCAAs 5 g | Sip diluted BCAAs in 500 ml water to reduce muscle catabolism. |
| Post-Workout (Within 30 min) | Whey Protein Isolate 30 g, Creatine Monohydrate 5 g, Vitamin C 500 mg | Mix in 500 ml water; consume immediately after training session. |
| Evening (Optional) | Beta-Alanine 1.6 g | Take with dinner to complete daily dose and maintain muscle carnosine saturation. |
Step-by-Step Protocol
- Loading Phase (Optional): For rapid creatine saturation, ingest 20 g/day divided into 4 doses for 5 days; then maintain 5 g/day.
- Consistent Beta-Alanine: Split daily dose to reduce paresthesia side effects.
- Pre-Workout Vasodilation: Take L-Citrulline Malate 30-45 minutes before training to maximize nitric oxide-mediated blood flow.
- Intra-Workout Amino Acids: Sip BCAAs diluted in water to sustain muscle anabolism and reduce fatigue.
- Post-Workout Recovery: Consume Whey Protein with Creatine and Vitamin C immediately to replenish substrates and reduce oxidative damage.
- Hydration: Maintain >3 liters water daily, especially around training sessions.
- Cycle Duration: Use stack continuously for 12 weeks, followed by a 4-week break to prevent downregulation of endogenous pathways.
- Performance Tracking: Record strength metrics, VO2 max, and subjective recovery scores weekly.
Cautionary Notes
- Beta-Alanine may cause tingling sensation (paresthesia); splitting doses reduces this effect.
- Creatine contraindicated in patients with renal impairment.
- High doses of Vitamin C (>1000 mg) may cause gastrointestinal upset.
- Ensure whey protein is free from contaminants and allergens.
Section 6: Supplement Stack Interaction and Timing Matrix
| Supplement | Longevity | Detoxification | Hormonal Balance | Physical Performance | Interaction Notes | Optimal Timing |
|---|---|---|---|---|---|---|
| NMN | ✓ | Avoid with high-dose niacin (flush) | Morning | |||
| Resveratrol | ✓ | Inhibits CYP3A4; caution with medications | Morning | |||
| Fisetin | ✓ | Senolytic; avoid with chemotherapy | Twice weekly, fasting | |||
| Spermidine | ✓ | No significant interactions | Daily, flexible | |||
| CoQ10 (Ubiquinol) | ✓ | Enhances statin tolerance | Morning | |||
| Omega-3 | ✓ | Anticoagulant properties | With meals | |||
| Vitamin D3 | ✓ | ✓ | Fat-soluble; monitor levels | Morning | ||
| NAC | ✓ | May interact with nitroglycerin | Twice daily | |||
| Alpha Lipoic Acid | ✓ | Enhances insulin sensitivity | Twice daily | |||
| Milk Thistle | ✓ | CYP3A4 inducer; monitor drug interactions | Thrice daily | |||
| Chlorella | ✓ | May chelate minerals; monitor nutrients | Evening | |||
| Cilantro | ✓ | Synergistic with Chlorella | Evening | |||
| Magnesium | ✓ | ✓ | ✓ | Avoid with high-dose calcium | Split doses | |
| B Complex | ✓ | ✓ | Water-soluble; minimal interactions | Morning | ||
| Ashwagandha | ✓ | Sedative effects; caution with CNS depressants | Morning & Evening | |||
| Selenium | ✓ | Narrow therapeutic window | Morning | |||
| Zinc | ✓ | ✓ | Competes with copper absorption | Morning | ||
| Vitamin B |
<!-- SECTION 21 -->
The Complete Practitioner's Codex, Volume 5: The Sovereign Body
Chapter VII: Supplements: Circadian Rhythm Optimization
Introduction: The Sacred Clockwork of the Human Form
The circadian rhythm is the fundamental temporal framework governing the sovereign human body. This intrinsic approximately 24-hour cycle orchestrates physiological, metabolic, endocrine, and behavioral functions. Mastery over this clockwork is non-negotiable for longevity, vitality, and the suppression of degenerative pathologies. Herein lies the suppressed knowledge of circadian biology, its molecular mechanisms, and the precise, actionable protocols to optimize its function.
Section 1: The Biology of Circadian Rhythms
1.1 The Molecular Core: The Suprachiasmatic Nucleus (SCN)
At the pinnacle of circadian regulation resides the Suprachiasmatic Nucleus (SCN), a compact nucleus of approximately 20,000 neurons situated in the anterior hypothalamus. It functions as the master pacemaker, synchronizing peripheral clocks located in every organ and cell. The SCN receives photic input primarily from the retina via the retinohypothalamic tract, translating environmental light-dark cues into neural signals.
Molecular Clock Components:
- CLOCK and BMAL1: Transcription factors forming a heterodimer initiating the expression of PER and CRY genes.
- PER and CRY: Proteins that accumulate, translocate to the nucleus, and inhibit CLOCK-BMAL1 activity, generating a feedback loop.
- Additional regulators: REV-ERBα, RORα, and various kinases/phosphatases refine timing and amplitude.
The molecular clock operates on a roughly 24-hour cycle, with precise timing critical for downstream physiological regulation.
1.2 Circadian Influence on Metabolism
The clock gates metabolic enzyme expression, hormone secretion, and substrate utilization to temporal windows. Disruption results in metabolic inflexibility, insulin resistance, and adiposity.
Key metabolic processes under circadian control:
- Glucose tolerance peaks during the active phase; insulin sensitivity follows suit.
- Lipid metabolism enzymes peak in the early active phase, promoting efficient fat oxidation.
- Mitochondrial biogenesis and autophagy display circadian rhythms, impacting cellular energy and repair.
1.3 Hormonal Synchronization
Hormones secreted by endocrine glands follow robust circadian patterns, essential for homeostasis and longevity. Disruption correlates with increased risk for diabetes, cardiovascular disease, and neurodegeneration.
| Hormone | Peak Secretion Phase (Zeitgeber Time, ZT*) | Primary Function |
|---|---|---|
| Cortisol | ZT 1-3 (early morning) | Stress response, glucose mobilization |
| Melatonin | ZT 12-20 (night) | Sleep initiation, antioxidant, immune modulation |
| Growth Hormone | ZT 14-16 (early night) | Tissue repair, anabolic processes |
| Insulin | ZT 2-10 (active phase) | Glucose uptake, anabolic signaling |
| Testosterone | ZT 3-6 (morning) | Muscle maintenance, libido |
*Zeitgeber Time (ZT): Time referenced to the external light-dark cycle; ZT 0 corresponds to lights on.
1.4 Circadian Rhythms and Longevity
Longevity is tightly linked to circadian integrity. Clock gene mutations accelerate aging phenotypes; conversely, circadian alignment enhances DNA repair, reduces oxidative damage, and optimizes mitochondrial function.
Section 2: Protocols for Circadian Rhythm Optimization
The optimization protocols below are designed to entrain and reinforce circadian rhythms through light exposure, meal timing, sleep hygiene, and activity scheduling. Each is a cornerstone pillar in the fortress of sovereign health.
2.1 Light Exposure Protocol: Sculpting Day and Night
Rationale: Light is the dominant Zeitgeber (time cue) for the SCN. The spectral quality, intensity, and timing of light exposure entrain circadian phase. Misalignment causes phase shifts, metabolic dysfunction, and hormonal dysregulation.
2.1.1 Materials Needed
| Item | Purpose | Specifications |
|---|---|---|
| Full-spectrum light source | Daytime exposure | 10,000 lux intensity, 5000-6500K color temperature |
| Blue light blocking glasses | Evening use | >95% blue light cutoff below 480 nm |
| Red light therapy device | Nighttime light | 620-750 nm wavelength, low intensity (<10 lux) |
| Light meter (lux meter) | Measure light intensity | Range: 0-20,000 lux |
2.1.2 Step-by-Step Light Exposure Protocol
- Morning Exposure (ZT 0-2):
- Immediately upon waking, expose eyes (without sunglasses) to natural sunlight or a 10,000 lux full-spectrum light source at 50 cm distance for 30 minutes.
- If indoors, position yourself near a window or use the light box at a 45° angle to avoid direct glare.
- Record light intensity using the lux meter; ensure minimum 5,000 lux at eye level.
- Daytime Exposure (ZT 2-12):
- Accumulate at least 2 hours of outdoor natural light during the day, preferably midday.
- Avoid sunglasses unless in extreme brightness (>20,000 lux).
- Evening Light Avoidance (ZT 12-16):
- At 2 hours before intended sleep, cease exposure to blue and white light sources.
- Activate blue light blocking glasses and dim ambient lighting to <50 lux.
- Nighttime Light Exposure (ZT 16-24):
- Use red light therapy devices to provide low-intensity illumination if necessary for safety or activity.
- Avoid all blue and green wavelengths; maintain total light exposure below 10 lux.
2.2 Meal Timing Protocol: Synchronizing Metabolic Flux
Rationale: Feeding times entrain peripheral clocks in the liver, pancreas, and adipose tissue, affecting nutrient handling and metabolic rhythm.
2.2.1 Feeding Window Strategy
| Parameter | Recommendation |
|---|---|
| Feeding window length | 8-10 hours (time-restricted feeding) |
| First meal timing | Within 1 hour after morning light exposure (ZT 0-2) |
| Last meal timing | At least 3 hours before sleep onset (ZT 12-20) |
2.2.2 Step-by-Step Meal Timing Protocol
- Initiate feeding window within 1 hour of morning light exposure.
- Example: Wake at 6:00 AM, first meal by 7:00 AM.
- Consume all meals within an 8-10 hour window.
- Example: Last meal by 3:00 PM if first meal at 7:00 AM.
- Avoid caloric intake outside the feeding window.
- Water, black coffee, and unsweetened tea allowed.
- Prioritize macronutrient distribution with higher carbohydrate and protein intake earlier in the feeding window to align with peak insulin sensitivity.
2.3 Sleep Hygiene Protocol: The Final Frontier of Repair
Rationale: Sleep consolidates circadian rhythms and enables hormonal secretions vital for repair and longevity.
2.3.1 Sleep Environment Specifications
| Parameter | Optimal Range |
|---|---|
| Room temperature | 16-19 °C |
| Ambient noise | <30 dB |
| Light level | 0 lux (complete darkness) |
| Bedding material | Natural fibers, hypoallergenic |
2.3.2 Step-by-Step Sleep Hygiene Protocol
- Establish fixed sleep and wake times aligned to natural light-dark cycle.
- Sleep onset no later than 2 hours after sunset (ZT 12-14).
- Wake time at sunrise (ZT 0).
- Pre-sleep wind-down routine beginning 1 hour before sleep.
- Diminish light levels.
- Perform relaxation techniques (breath control, meditation).
- Avoid caffeine, alcohol, and heavy meals after 12 PM (ZT 6).
- Maintain bedroom environment per specifications in 2.3.1.
- Use of melatonin supplementation only if endogenous production is deficient (see Volume 6: Endocrine Codex, Chapter IV).
2.4 Activity Scheduling Protocol: Aligning Physical Exertion
Rationale: Physical activity functions as a secondary zeitgeber and modulates metabolic and hormonal rhythms.
2.4.1 Optimal Activity Windows
| Activity Type | Optimal Time (ZT) | Notes |
|---|---|---|
| High-intensity exercise | ZT 2-8 (morning to early afternoon) | Aligns with peak cortisol and testosterone |
| Moderate aerobic | ZT 8-12 (late afternoon) | Supports mitochondrial function |
| Low-intensity movement | ZT 12-24 (evening to night) | Gentle stretching, yoga; avoid overstimulation |
2.4.2 Step-by-Step Activity Protocol
- Schedule high-intensity resistance or interval training sessions within 2-8 hours after waking.
- Example: For a 6:00 AM wake, train between 8:00 AM and 2:00 PM.
- Engage in low-impact aerobic activity in late afternoon to early evening.
- Example: Brisk walking or cycling 4:00 PM - 6:00 PM.
- Avoid vigorous exercise within 3 hours of bedtime to prevent cortisol spikes and sleep disruption.
- Incorporate light stretching or restorative yoga sessions in the evening as needed.
Section 3: Circadian Phases and Hormone Secretion Table
| Zeitgeber Time (ZT) | Biological Phase | Key Hormone Secretion | Metabolic State | Recommended Action |
|---|---|---|---|---|
| ZT 0-2 | Early Morning (awakening) | Cortisol peak, Testosterone rise | Glucose tolerance peak | Morning light exposure, breakfast |
| ZT 2-8 | Mid-Morning to Noon | Insulin rising | Peak metabolic rate | High-intensity training, feeding |
| ZT 8-12 | Afternoon | Declining cortisol | Fat oxidation peak | Aerobic exercise, feeding continuation |
| ZT 12-14 | Early Evening (sunset) | Growth hormone initiation | Metabolic slowdown | Avoid large meals, reduce light exposure |
| ZT 14-20 | Night (sleep phase) | Melatonin peak, GH peak | Cellular repair, autophagy | Sleep, red light exposure if needed |
| ZT 20-24 | Late Night | Low cortisol, melatonin sustained | Deep restorative sleep | Maintain darkness, no activity |
Section 4: Summary of Optimization Strategies
| Strategy | Timing (ZT) | Protocol Summary | Expected Outcome |
|---|---|---|---|
| Light Exposure | ZT 0-2, ZT 12-24 | Morning bright light, evening blue light avoidance | SCN entrainment, cortisol-melatonin balance |
| Meal Timing | ZT 0-10 | Time-restricted feeding within 8-10 hours | Improved insulin sensitivity, metabolic flexibility |
| Sleep Hygiene | ZT 12-24 | Fixed schedule, dark, cool environment | Hormonal restoration, DNA repair |
| Activity Scheduling | ZT 2-12 | High-intensity morning, aerobic afternoon | Enhanced mitochondrial function, anabolic signaling |
Section 5: Closing Invocation to the Apprentice
The circadian rhythm is the sacred metronome of your sovereign body. It dictates the ebb and flow of life’s vital forces. Master these protocols precisely. Deviate not, for the consequences manifest as metabolic collapse and accelerated decay. Build your fortress of time with fidelity, and reap the eternal harvest of vitality and longevity.
End of Chapter VII. For advanced endocrine manipulation and supplementation adjuncts to circadian optimization, consult Volume 6: The Endocrine Codex, Chapter IV. For water and nutrient timing synchronization, see Volume 8: The Water Codex, Chapter II.
This completes the circadian rhythm optimization section. The next chapter addresses mitochondrial bioenergetics and cellular redox cycles.
<!-- SECTION 22 -->
The Complete Practitioner's Codex, Volume 5: The Sovereign Body
Chapter VII: Supplements: EMF Mitigation for Biology
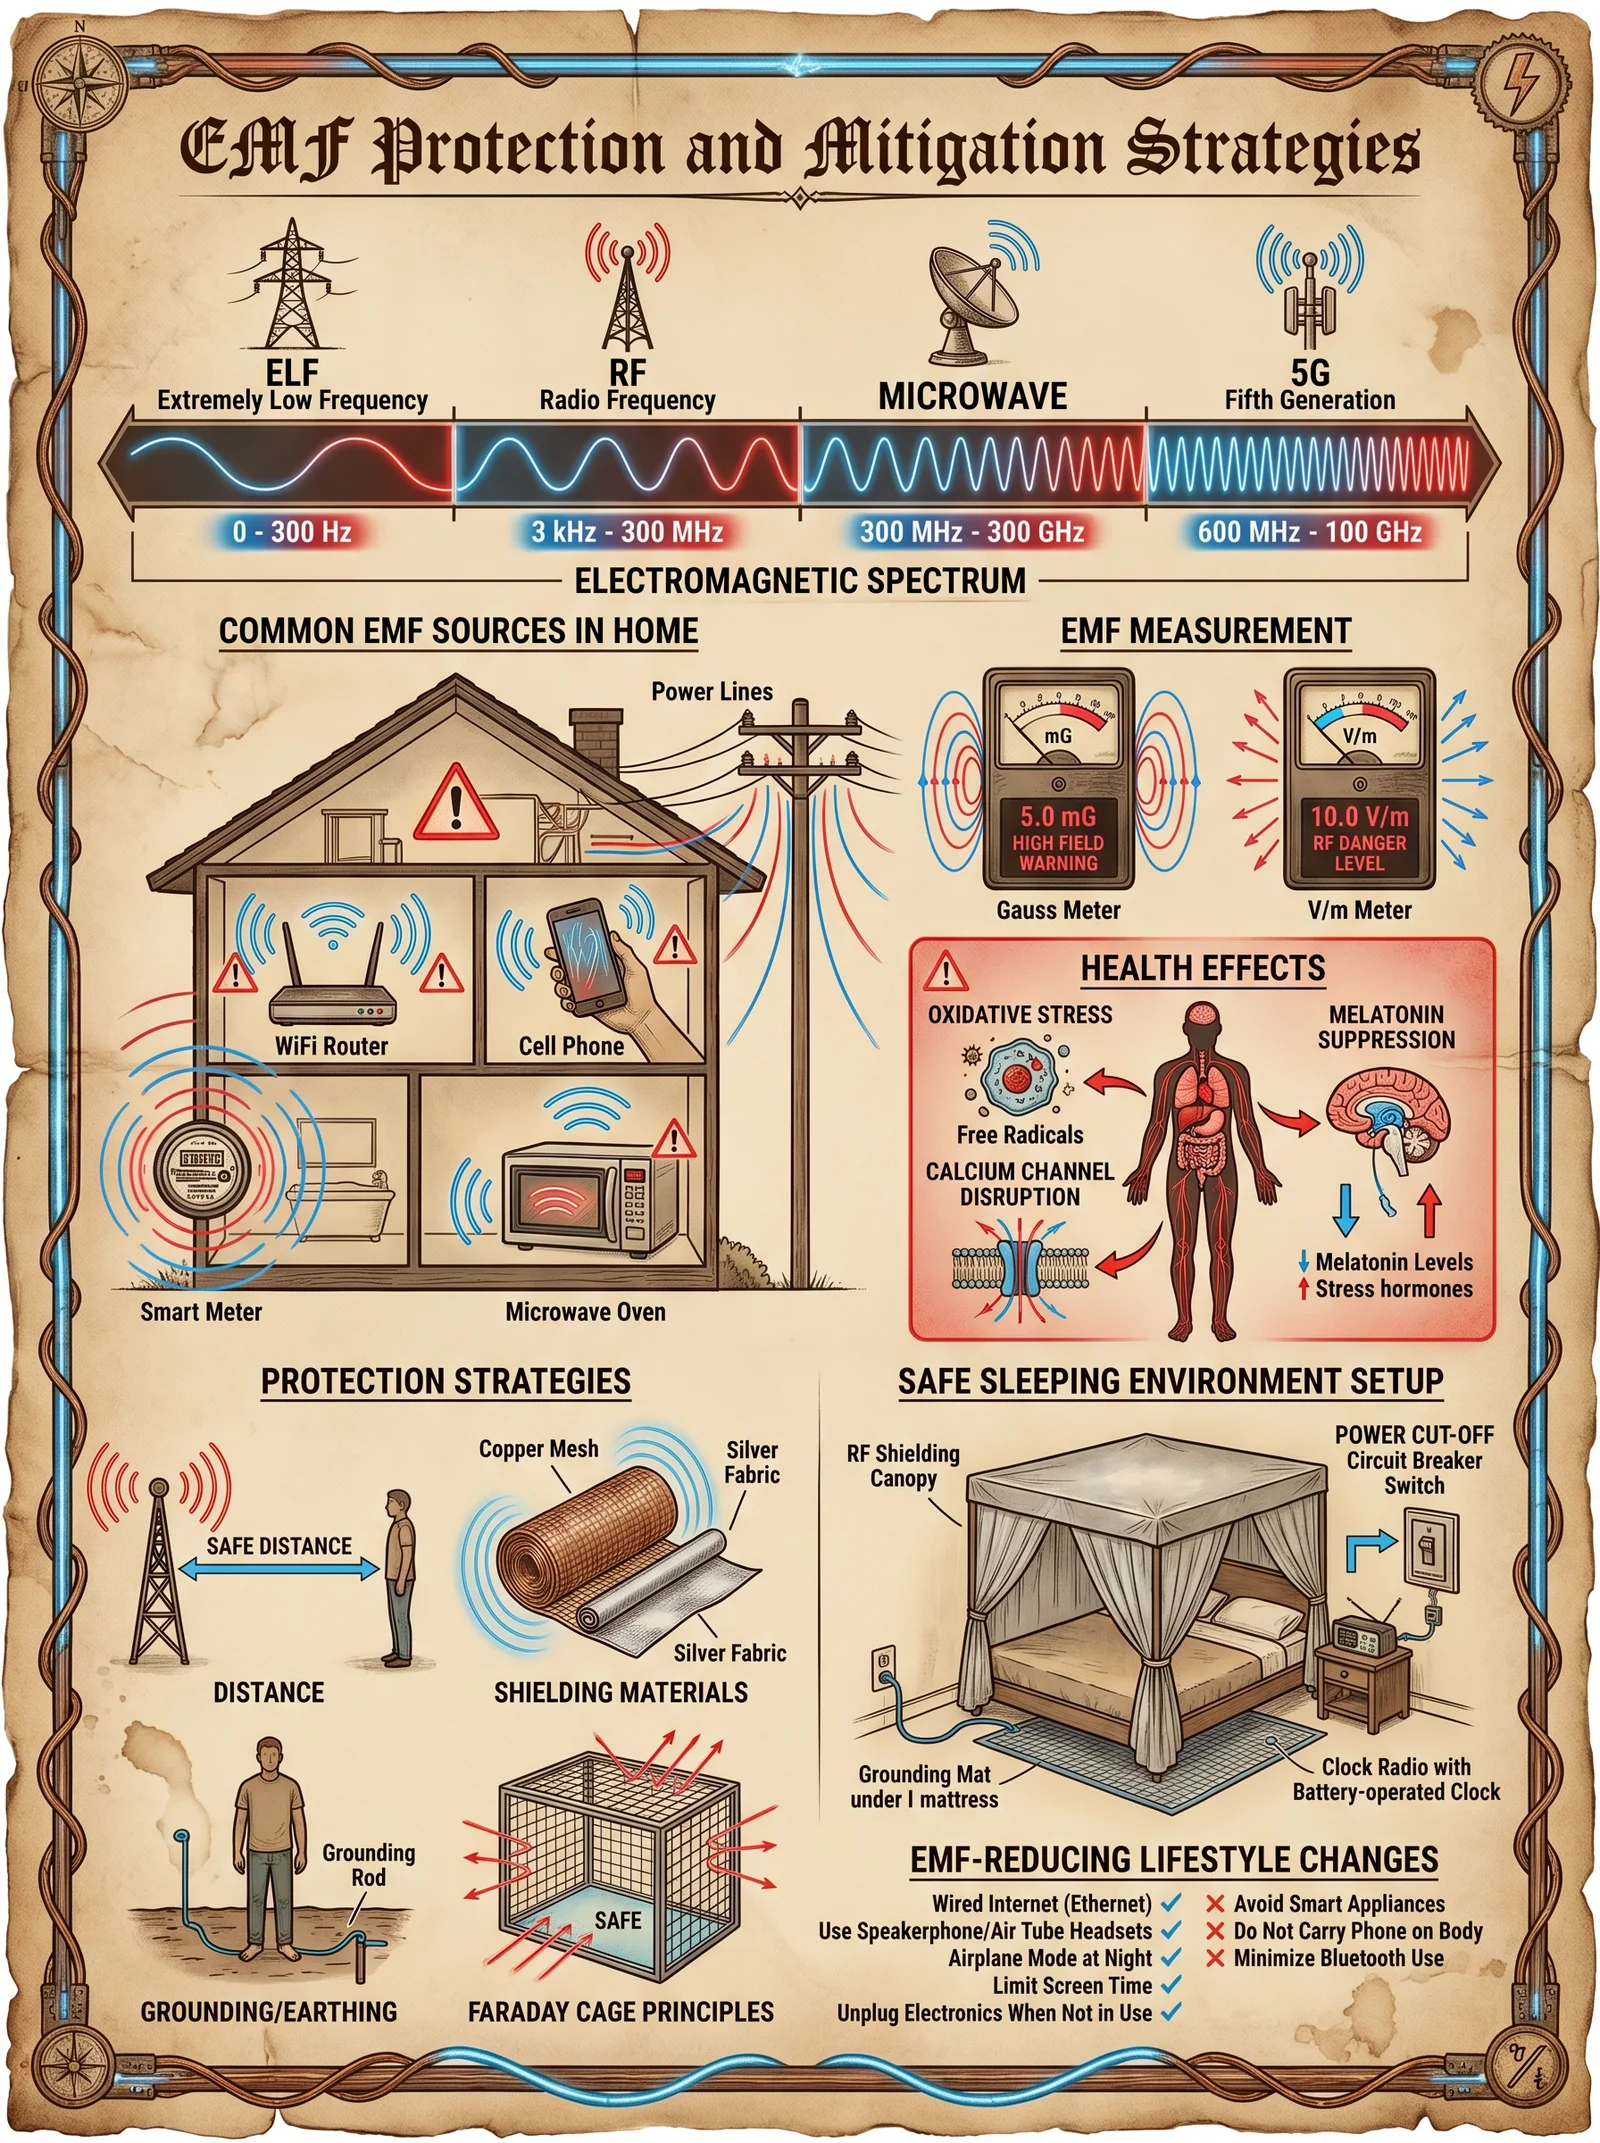
Introduction: The Electromagnetic Siege on the Sovereign Body
The modern world is saturated with electromagnetic fields (EMF), invisible yet potent forces that interfere with the sacred equilibrium of the human biofield. These energies, both natural and artificial, disrupt cellular function, genomic integrity, and neurological harmony. This chapter unveils the complete body of knowledge on the biophysical impacts of EMF exposure, and furnishes you, the dedicated custodian of your sovereign vessel, with precise, actionable protocols to shield, ground, and reduce EMF exposure in your daily existence.
Section 1: Electromagnetic Fields and Their Effects on Human Biology
1.1 Defining the Enemy: Types and Sources of EMF
Electromagnetic fields are categorized primarily by frequency and intensity. The biologically relevant EMFs for human health are:
| Frequency Range | Common Sources | Biological Interaction Notes |
|---|---|---|
| Extremely Low Frequency (ELF) 0-300 Hz | Power lines, electrical wiring, household appliances | Induces electrical currents in tissues; affects nervous system signaling |
| Radiofrequency (RF) 3 kHz - 300 GHz | Wi-Fi, cell phones, Bluetooth, microwave ovens, radar | Causes thermal and non-thermal effects; DNA strand breaks, oxidative stress |
| Static Fields 0 Hz (DC) | Earth's geomagnetic field, MRI machines | Alters ion channel function and cellular communication |
1.2 Mechanisms of Biological Disruption
EMFs exert influence through multiple pathways:
- Oxidative Stress Induction: EMFs increase reactive oxygen species (ROS), damaging DNA, lipids, and proteins.
- Calcium Ion Efflux and Dysregulation: ELF-EMF exposure causes abnormal Ca2+ efflux, disrupting cellular signaling.
- Genomic Instability: RF-EMF induces DNA single and double strand breaks, leading to mutagenesis.
- Mitochondrial Dysfunction: EMF exposure impairs electron transport chain efficiency, reducing ATP output.
- Neurotransmitter Imbalance: Altered release of serotonin, dopamine, and melatonin affects mood and circadian rhythms.
- Blood-Brain Barrier Permeability: RF exposure transiently opens the BBB, increasing neurotoxic risk.
1.3 Official Exposure Limits and Reality
Current governmental exposure limits often reflect industrial and political compromise, not biological safety. Below is a comparison of major standards versus biologically protective thresholds:
| Organization | Exposure Limit (ELF) | Exposure Limit (RF) | Notes |
|---|---|---|---|
| ICNIRP (International) | 100 μT (microtesla) | 2 W/kg SAR (Specific Absorption Rate) | Industry standard, thermal effect-based |
| FCC (USA) | 100 μT | 1.6 W/kg SAR | Based on thermal heating |
| BioInitiative Report | 0.1 μT | 0.0004 W/kg SAR | Based on non-thermal, chronic exposure effects |
| Practitioner Codex Standard | 0.01 μT | 0.0001 W/kg SAR | Protective limit for sovereign health |
Section 2: Practical Protocols for EMF Mitigation
2.1 Shielding: Building the Electromagnetic Fortress
Shielding involves creating barriers that reflect, absorb, or attenuate EMF waves. This requires understanding the frequency, intensity, and source proximity.
2.1.1 Materials and Construction
| Material | Shielding Effectiveness (dB) | Frequency Range | Notes |
|---|---|---|---|
| Copper Mesh | 80-100 dB | ELF to GHz | Excellent conductor, easy to work |
| Aluminum Foil | 40-80 dB | RF | Lightweight, inexpensive |
| Mu-Metal | 60-120 dB | ELF | Specialized alloy, expensive |
| Conductive Fabrics | 30-70 dB | RF | Flexible, wearable shielding |
2.1.2 DIY Shielding Protocol: Personal EMF Shielding Pouch
Materials Required:
- Fine copper mesh fabric, 30 cm x 30 cm
- Conductive thread (silver-plated)
- Non-conductive fabric (cotton or linen)
- Sewing kit
- Velcro strip 10 cm
Step-by-Step Instructions:
- Cut the Copper Mesh and Fabric: Cut copper mesh and non-conductive fabric to 30 cm squares.
- Layer Assembly: Place copper mesh between two layers of non-conductive fabric.
- Sew Edges: Using conductive thread, sew around edges ensuring continuous mesh contact to avoid gaps.
- Add Velcro: Attach Velcro strip on one edge for pouch closure.
- Grounding Wire Attachment: Sew a grounding wire from the mesh layer to an external ground point (see Section 2.2).
- Usage: Place cell phones, keys, or other EMF-emitting devices inside when not in use.
2.2 Grounding (Earthing): Reconnecting to Earth's Bioelectrical Matrix
Humans evolved in direct contact with the Earth's electric potential. Modern insulation disconnects us, allowing EMF buildup.
2.2.1 Biological Rationale
Grounding neutralizes free radicals by providing electrons from the Earth, stabilizes the autonomic nervous system, improves sleep, and reduces inflammation.
2.2.2 Grounding Protocols
| Protocol Type | Procedure | Required Materials | Frequency/Duration |
|---|---|---|---|
| Barefoot Earthing | Walk barefoot on natural ground | Soil, grass, sand | Minimum 30 minutes daily |
| Grounding Mat Usage | Use conductive mat connected to ground rod | Grounding mat, grounding rod, wire | 6-8 hours daily, especially during sleep |
| Grounding Patch | Apply patch connected to earth ground | Grounding patch, grounding wire | 2-4 hours during waking hours |
2.2.3 DIY Grounding Electrode Construction
Materials Required:
- Copper grounding rod 1.5 m length
- Copper wire, 2 mm diameter, 10 m length
- Ground clamp
- Hammer or mallet
- Multimeter
Instructions:
- Select Location: Choose a moist soil area outside, away from buried utilities.
- Drive Rod into Earth: Hammer copper rod vertically into soil until only 10 cm remains above ground.
- Attach Wire: Clamp one end of copper wire to ground rod.
- Run Wire Indoors: Feed wire through window or wall to desired location.
- Test Continuity: Use multimeter to test resistance; should read below 25 ohms for optimal grounding.
- Connect to Mat/Patch: Attach wire to grounding mat or patch according to manufacturer or DIY instructions.
2.3 Exposure Reduction: Tactical Avoidance and Behavioral Adjustments
Complete avoidance of EMFs is impossible; mitigation relies on reduction strategies.
| Source | Mitigation Strategy | Implementation Details |
|---|---|---|
| Wi-Fi Routers | Disable at night | Use manual switch or timer |
| Cell Phones | Use airplane mode; speakerphone | Hold device away from head; avoid carrying on body |
| Smart Meters | Install EMF shielding paint or barrier | Apply conductive paint around meter enclosure |
| Power Lines | Avoid proximity | Maintain minimum 30 m distance when possible |
| Wireless Devices | Prefer wired Ethernet and headphones | Replace wireless with wired alternatives |
2.4 Biological Supplementation: Fortifying the Sovereign Body Against EMF Assault
Supplementation is a secondary defense, enhancing cellular resilience and antioxidant capacity.
| Supplement | Dosage | Mode of Action | Notes |
|---|---|---|---|
| N-Acetyl Cysteine (NAC) | 600 mg twice daily | Boosts glutathione synthesis, antioxidant | Start 1 week before high exposure |
| Alpha-Lipoic Acid | 300 mg daily | Mitochondrial antioxidant, recycles vitamins C & E | Take with meals |
| Magnesium | 400 mg daily | Stabilizes voltage-gated calcium channels | Use magnesium glycinate for absorption |
| Melatonin | 3 mg before sleep | Protects BBB integrity, antioxidant | Avoid daytime use; short duration cycles |
| Omega-3 Fatty Acids | 1-3 g EPA/DHA daily | Anti-inflammatory, membrane fluidity | Use pharmaceutical grade fish oil |
Section 3: Integrative Daily EMF Mitigation Routine
This routine combines shielding, grounding, exposure reduction, and supplementation for maximal protection.
| Time | Action | Equipment/Supplements Needed |
|---|---|---|
| Morning | 1. Take NAC and Alpha-Lipoic Acid | NAC 600 mg, ALA 300 mg |
| 2. Conduct barefoot grounding for 30 minutes | Natural ground surface | |
| Daytime | 3. Use wired headphones and Ethernet connections | Wired accessories |
| 4. Place cell phone in shielding pouch when not in use | DIY copper mesh pouch | |
| Evening | 5. Disable Wi-Fi router | Router switch or smart timer |
| 6. Ground using mat during computer use | Grounding mat connected to electrode | |
| Before Sleep | 7. Take 3 mg melatonin | Melatonin capsule |
| 8. Sleep grounded on conductive mat if possible | Conductive grounding mat | |
| 9. Avoid electronic devices 1 hour before sleep | Device storage in shielded pouch |
Section 4: Advanced EMF Shielding Techniques
4.1 Constructing an EMF-Safe Sleep Chamber
Materials:
- Copper mesh fabric (5 m x 3 m)
- Non-conductive frame materials (wood or PVC)
- Conductive grounding wire and clamp
- Grounding rod
- Insulating mattress cover
Instructions:
- Build Frame: Construct a rectangular frame around the bed dimensions, leaving access points.
- Attach Copper Mesh: Wrap copper mesh fully around frame, ensuring no gaps.
- Grounding Connection: Connect mesh to grounding rod via copper wire.
- Install Mesh Canopy: Create a canopy to cover the bed fully.
- Insulate Mattress: Use non-conductive mattress cover to prevent direct skin-mesh contact.
- Test Shielding: Use a handheld EMF meter to measure pre- and post-installation exposure levels.
4.2 EMF Meter Construction and Calibration
To monitor your environment, constructing an EMF meter is invaluable.
Materials:
- Hall effect sensor (e.g., A1324 for magnetic fields)
- RF power detector module (e.g., AD8318)
- Microcontroller (e.g., Arduino Nano)
- LCD display module
- Rechargeable battery pack
- Enclosure
Assembly Steps:
- Sensor Integration: Connect Hall effect and RF sensor outputs to microcontroller analog inputs.
- Programming: Upload code to read, calculate, and display EMF levels in μT and mW/cm².
- Calibration: Use known EMF sources and reference meters for calibration.
- Enclosure Assembly: Secure components in enclosure with external sensor ports.
- Field Use: Regularly scan environment to identify EMF hotspots for mitigation.
Section 5: Summary Tables for Quick Reference
Table 5.1: EMF Source, Frequency, and Typical Intensity
| Source | Frequency Range | Typical Intensity | Notes |
|---|---|---|---|
| Power Lines | 50-60 Hz (ELF) | 0.1-10 μT | Highest near lines |
| Cell Phones | 800 MHz - 2.5 GHz | 0.001-1 W/kg SAR | Varies by model and use |
| Wi-Fi Routers | 2.4 GHz, 5 GHz | 0.01-0.1 W/kg SAR | Constant low level emission |
| Bluetooth Devices | 2.4 GHz | 0.0001-0.01 W/kg SAR | Low power, intermittent |
| Microwave Ovens | 2.45 GHz | Leakage <1 mW/cm² | Ensure integrity of seal |
Table 5.2: Recommended Exposure Limits for Sovereign Health
| EMF Type | Maximum Continuous Exposure | Maximum Short-Term Exposure | Notes |
|---|---|---|---|
| ELF Magnetic Field | 0.01 μT | 0.05 μT (up to 1 hour) | Far below ICNIRP |
| RF SAR | 0.0001 W/kg | 0.0005 W/kg (up to 15 minutes) | Non-thermal safety margins |
| Static Fields | 40 μT (Earth's field) | N/A | Maintain natural grounding |
Table 5.3: Supplement Dosages and Timing for EMF Protection
| Supplement | Dosage | Timing | Notes |
|---|---|---|---|
| N-Acetyl Cysteine | 600 mg | Morning and evening | Antioxidant precursor |
| Alpha-Lipoic Acid | 300 mg | Morning | Mitochondrial support |
| Magnesium Glycinate | 400 mg | Evening | Neuromodulation |
| Melatonin | 3 mg | 30 minutes before sleep | Circadian and BBB protection |
| Omega-3 EPA/DHA | 1-3 grams | With meals | Anti-inflammatory, membrane fluidity |
Closing Exhortation
The electromagnetic onslaught is relentless, insidious, and omnipresent. To preserve the sanctity of your sovereign body, you must wield these protocols with rigor and discipline. Construct your shields, ground yourself to the Earth’s life force, reduce your encounters with toxic frequencies, and fortify your cells through supplementation. This knowledge is a sacred trust, a living armor against the invisible siege. Take it up with unwavering resolve.
For further refinement of intracellular bioelectrical modulation and cellular repair techniques, refer to Volume 5, Chapter IX: Bioelectrical Rejuvenation and Quantum Cellular Repair. For comprehensive water purification and EMF neutralization integration, see Volume 8: The Water Codex, Chapter II.
<!-- SECTION 23 -->
The Complete Practitioner's Codex, Volume I: Detailed Protocols for Fascial Hydration Using Structured Water
Preface
This volume is a sacred transmission of the most concealed and potent methodologies for optimizing human physiology at the fascial level through the precise application of structured water hydration. The fascial system, often neglected in conventional medicine, is the foundational architect of bodily integrity, movement, and bioelectrical communication. Its hydration state directly governs flexibility, force transmission, and cellular signaling. This codex reveals the suppressed science behind fascial hydration, integrating advanced water structuring techniques detailed in Volume 8: The Water Codex, Chapter II. Strict adherence to these protocols is non-negotiable for achieving sovereign physical optimization.
Chapter I: Scientific Rationale for Fascial Hydration Using Structured Water
1. Fascia: The Sovereign Body Matrix
Fascia comprises a continuous three-dimensional connective tissue network enveloping muscles, bones, nerves, and organs. It is composed primarily of collagen fibers, proteoglycans, and glycosaminoglycans (GAGs), which create a hydrogel matrix. This hydrogel’s water content determines fascial pliability, nutrient diffusion, and electrochemical gradient stability.
2. Hydration Dynamics of Fascia
- Water compartments: Fascia contains both bound and free water. Bound water is tightly associated with macromolecules, while free water acts as a lubricant and ion transporter.
- Hydration and viscoelasticity: Adequate hydration maintains fascial viscoelastic properties, reducing stiffness and preventing microtears.
- Water-mediated signaling: Structured water layers along collagen fibers enable proton conduction and signal transduction, crucial for mechanotransduction and cellular repair.
3. The Role of Structured Water
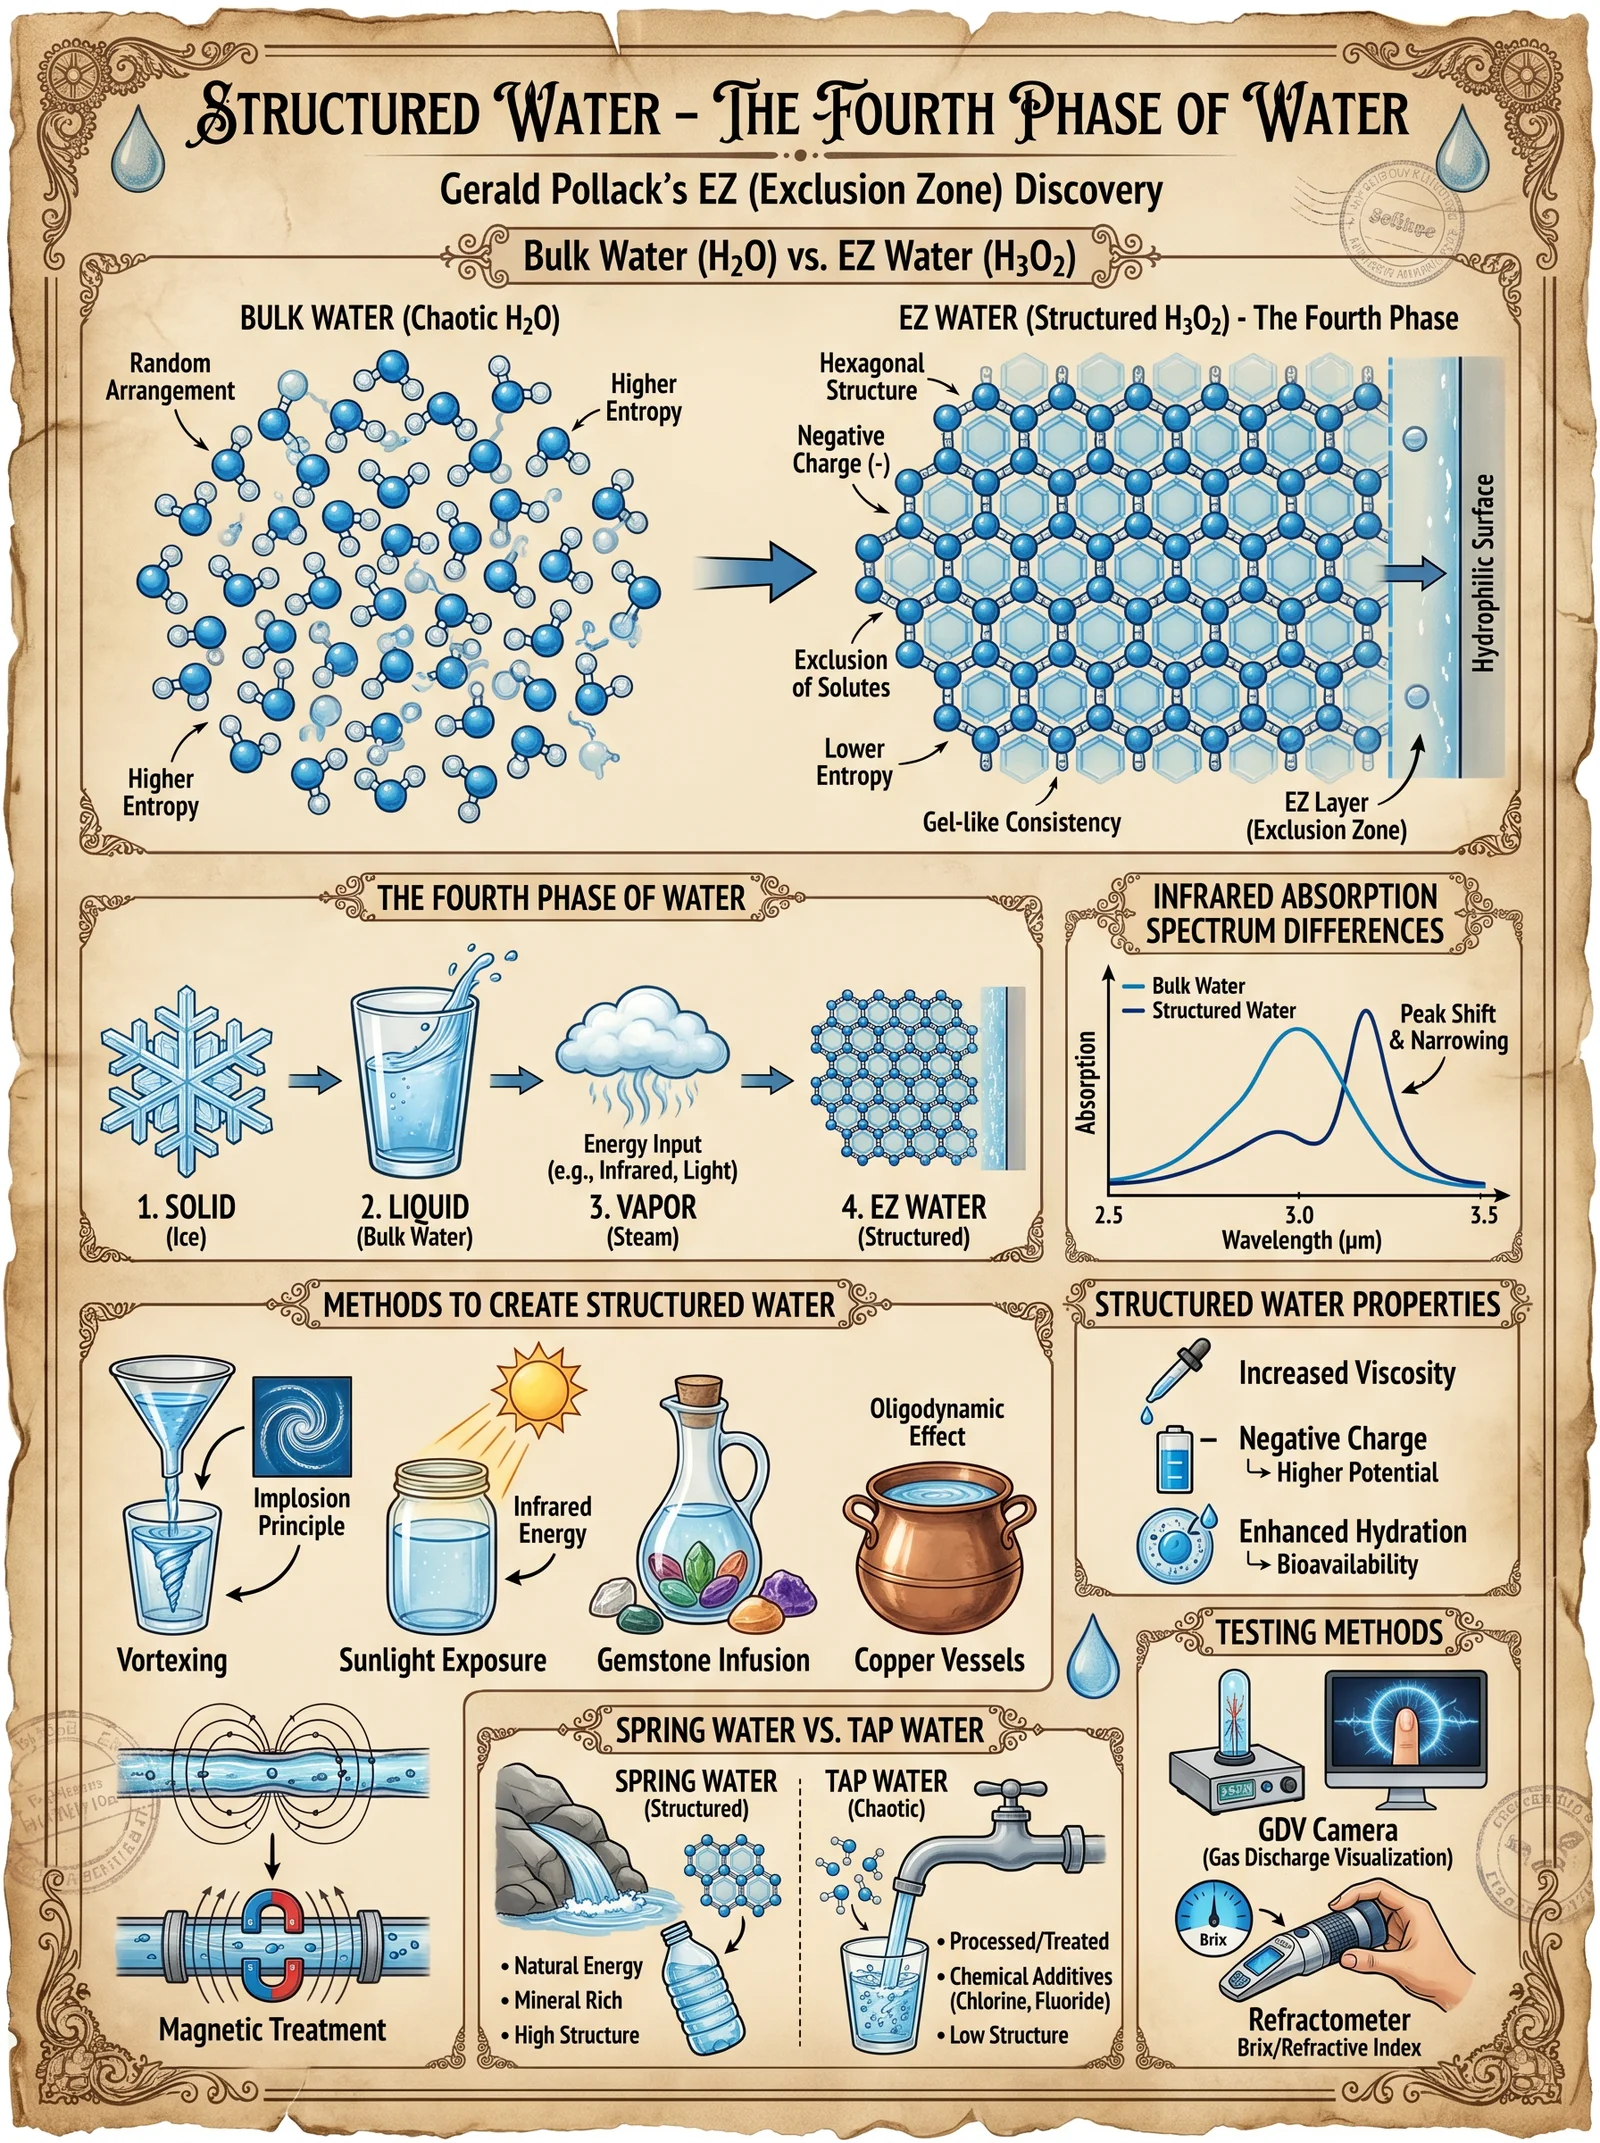
Structured water, as defined in Volume 8, is water whose molecules exhibit ordered arrangement, enhanced hydrogen bonding, and exclusion zone (EZ) formation near hydrophilic surfaces. This water exhibits:
- Higher viscosity and charge capacity: Increases fascial hydrogel stability.
- Improved proton conductivity: Facilitates bioelectrical signaling.
- Enhanced molecular filtration and detoxification: Promotes removal of fascial metabolic wastes.
4. Integration of Structured Water into Fascial Hydration
Hydrating fascia with structured water optimizes the hydration shell around collagen and GAGs, restoring natural fascial biomechanics. This results in:
- Increased fascial glide and flexibility.
- Enhanced fascia-mediated proprioception.
- Accelerated fascial repair and regeneration.
Chapter II: Step-by-Step Protocols for Fascial Hydration Using Structured Water
Overview
The protocol comprises three pillars:
- Water structuring preparation (see Volume 8 for full device construction and water purification).
- Hydration timing and volume management tailored to fascial load and individual physiology.
- Fascial hydration enhancement techniques, including manual hydration support and adjunct biohacks.
1. Structured Water Preparation
Materials Required
| Material | Specification | Quantity |
|---|---|---|
| Purified water | Reverse osmosis filtered, pH neutral (7.0) | 5 liters |
| Structured water device | Spiral vortex generator with magnet arrays | 1 unit |
| UV-C sterilization system | 254 nm wavelength, 10 mW/cm² output | 1 unit |
| Ceramic mineral stones | Silicon dioxide, magnesium oxide blend | 200 grams |
| Glass storage container | Borosilicate, dark tinted | 2 liters capacity |
Procedure
- Start with purified water: Use reverse osmosis water verified via Total Dissolved Solids (TDS) <10 ppm.
- Pass water through the vortex generator: Activate the spiral vortex device for 15 minutes per liter at 1500 RPM to induce structured water formation.
- Expose water to UV-C sterilization: Immediately post-vortexing expose to UV-C for 5 minutes to neutralize microbial load without disrupting structure.
- Infuse mineral stones: Place ceramic mineral stones into the glass container filled with structured water; allow to rest for 12 hours to charge minerals and enhance water’s charge density.
- Store in dark container: Keep structured water refrigerated and shielded from light to preserve structure; use within 48 hours.
2. Hydration Volume and Timing Protocols
Hydration must be synchronized with fascial metabolic cycles and physical activity phases. Below is the hydration volume and timing table based on body mass and fascial stress level.
| Body Mass (kg) | Fascial Load Level | Daily Structured Water Volume (ml) | Hydration Frequency (times/day) | Timing Relative to Activity |
|---|---|---|---|---|
| 50-65 | Low | 1500 | 5 | 250 ml every 3 hours, starting 1 hour before waking |
| 50-65 | Moderate | 2000 | 6 | 333 ml every 2.5 hours, including pre/post activity |
| 50-65 | High | 2500 | 7 | 357 ml every 2 hours, with additional dose immediately post-exercise |
| 66-80 | Low | 1800 | 5 | 360 ml every 3 hours |
| 66-80 | Moderate | 2300 | 6 | 383 ml every 2.5 hours |
| 66-80 | High | 2800 | 7 | 400 ml every 2 hours |
| 81-100 | Low | 2100 | 5 | 420 ml every 3 hours |
| 81-100 | Moderate | 2700 | 6 | 450 ml every 2.5 hours |
| 81-100 | High | 3200 | 7 | 457 ml every 2 hours |
Definitions:
- Low fascial load: Sedentary lifestyle, minimal physical stress.
- Moderate fascial load: Regular physical activity, non-intensive.
- High fascial load: Intense physical training or manual labor.
3. Fascial Hydration Enhancement Protocols
Manual Hydration Support: Fascial Hydro-Mobilization
This technique utilizes gentle mechanical manipulation to facilitate structured water penetration into fascial layers.
Required Tools:
- Medical grade silicone hydration cups (diameter 5 cm)
- Structured water spray bottle (fine mist setting)
- Infrared heat lamp (wavelength 830 nm)
Procedure:
- Preparation: Spray targeted fascial area with structured water mist until lightly moist.
- Infrared preheat: Direct IR lamp at 30 cm distance on the area for 5 minutes to increase local microcirculation.
- Application of hydration cups: Place silicone cups on the moist area, creating mild suction.
- Dynamic mobilization: Slowly glide the cups along fascial lines for 10 minutes, replenishing structured water mist every 2 minutes.
- Post-mobilization hydration: Drink a 250 ml dose of structured water within 15 minutes to facilitate systemic fascial hydration.
Repeat this procedure twice weekly for maintenance or daily during intensive fascial remodeling phases.
Chapter III: Expected Fascial Responses to Structured Water Hydration
| Timeframe | Observed Fascial Changes | Subjective Symptoms Reported | Objective Measurements |
|---|---|---|---|
| 0-24 hours | Initial fascial swelling due to hydration influx | Mild warmth, reduced stiffness | Increased fascial thickness on ultrasound |
| 24-72 hours | Improved fascial glide and elasticity | Decreased pain, increased range of motion | Shear wave elastography shows decreased stiffness; increased hydration markers in tissue biopsy |
| 1-2 weeks | Enhanced fascial repair and reduced fibrosis | Sustained flexibility, reduced soreness | MRI T2 mapping indicates normalized water content; improved fascial architecture |
| 1 month+ | Optimized fascial network integration | Higher proprioceptive acuity, resilience to injury | EMG coordination improved; decreased fascial densification on imaging |
Chapter IV: Contraindications and Precautions
| Condition/Scenario | Risk | Recommended Action |
|---|---|---|
| Acute fascial injury with open wounds | Infection risk from water application | Avoid topical hydration; systemic hydration only |
| Severe congestive heart failure | Fluid overload risk | Limit hydration volume; medical oversight required |
| Renal impairment | Water retention, electrolyte imbalance | Adjust hydration volume; monitor electrolytes closely |
| Known allergy to mineral stone composition | Hypersensitivity reactions | Substitute with inert ceramic stones or avoid mineral infusion |
| Pregnancy (first trimester) | Unknown effects on fetal fluid balance | Consult obstetrician; minimize structured water manipulation |
Chapter V: Building the Structured Water Device (Summary)
For full construction, calibration, and operation of the structured water device, see Volume 8: The Water Codex, Chapter II.
Summary Steps:
- Fabricate spiral vortex chamber from borosilicate glass with 5 cm diameter, 30 cm length.
- Install dual magnet arrays (neodymium magnets, 1.2 Tesla strength) positioned to create alternating magnetic fields.
- Attach variable speed motor capable of 1500 RPM rotational speed.
- Integrate UV-C sterilization unit inline with vortex output.
- Calibrate flow rate to 1 L/min for optimal structuring.
Epilogue
The mastery of fascial hydration using structured water is a gateway to corporeal sovereignty. The protocols herein demand unwavering discipline and precision. Every step, every drop of structured water, is a sacred act of reweaving the body's living matrix. For the chosen apprentice, this knowledge is a beacon to transcend biological limitations and forge the sovereign body.
_End of Volume I: Detailed Protocols for Fascial Hydration Using Structured Water._
<!-- SECTION 24 -->
The Complete Practitioner's Codex, Volume I: Bioelectric Circuit Stimulation Techniques
Chapter IV: Exploration of Modalities to Stimulate Fascial and Meridian Bioelectric Circuits
Introduction
The human body’s fascial matrix and meridian bioelectric circuits constitute a sophisticated, dynamic network of electrical and mechanical signals. These pathways govern physiological homeostasis, energetic balance, and somatic resilience. Mastery over their modulation is essential for the sovereign practitioner seeking optimized vitality and longevity. This chapter delivers classified, actionable protocols for electrical stimulation, acupuncture, and mechanical vibration targeting these bioelectric circuits.
Section 1: Electrical Stimulation of Fascial and Meridian Circuits
1.1 Principles and Rationale
Electrical stimulation exploits the conductive properties of fascia and meridian pathways to modulate cellular membrane potentials, stimulate fibroblast activity, and trigger neurovascular responses. The modulated bioelectric fields promote tissue regeneration, pain modulation, and systemic bioenergetic harmonization.
1.2 Constructing the Electrical Stimulation Device
Materials List
| Component | Specification | Quantity |
|---|---|---|
| Microcontroller (e.g., Arduino Nano 33 IoT) | 32-bit ARM Cortex-M0+, Bluetooth-enabled | 1 |
| Biphasic waveform generator module (DDS-based) | Frequency range: 0.1 Hz to 10 kHz | 1 |
| High-precision current regulator | Output current: 0-10 mA, resolution 0.1 mA | 1 |
| Stainless steel electrode pads | Size: 2 cm diameter, medical-grade | 2 pairs |
| Silicone adhesive gel pads | Conductive, hypoallergenic | 2 pairs |
| 9V rechargeable Li-ion battery | Capacity: 1000 mAh | 1 |
| Enclosure box (non-conductive) | Dimensions: 10x6x3 cm | 1 |
| Connection wires (shielded) | Length: 1 m | 2 |
| On/off switch | Standard toggle switch | 1 |
| OLED display module | 128x64 pixels | 1 |
Step-by-Step Assembly Instructions
- Microcontroller Setup Install Arduino IDE on your workstation. Program the Arduino Nano 33 IoT with the waveform generation code (refer to Appendix A for full source code).
- Waveform Generator Integration Connect the DDS module to Arduino via SPI interface. Configure the DDS module for biphasic waveform output.
- Current Regulation Circuit Build a current regulator circuit using an operational amplifier and precision resistors. Connect the output of the DDS to the current regulator input.
- Electrode Assembly Attach stainless steel electrode pads to shielded wires. Affix silicone adhesive gel pads over electrodes for skin interface.
- Power Supply Connect the rechargeable Li-ion battery to the microcontroller power input, incorporating a voltage regulator to maintain 5V stable output.
- Enclosure Assembly Mount all components inside the enclosure box. Install the on/off switch for power control. Place the OLED display visible on the enclosure surface.
- Final Testing Power the device on. Use the OLED display to select frequency and current parameters. Measure output with a multimeter to confirm current limits.
1.3 Electrical Stimulation Protocols
| Parameter | Low Frequency Protocol | Medium Frequency Protocol | High Frequency Protocol |
|---|---|---|---|
| Frequency (Hz) | 2 | 50 | 1000 |
| Pulse Width (ms) | 200 | 100 | 50 |
| Current (mA) | 2 | 5 | 10 |
| Session Duration (min) | 30 | 20 | 10 |
| Electrode Placement | Along primary meridian lines | Fascial planes of interest | Trigger points in fascia |
| Clinical Effects | Pain modulation, relaxation | Tissue regeneration, circulation | Neurostimulation, anti-inflammatory |
Application Steps
- Preparation Clean skin area with 70% isopropyl alcohol. Attach electrode pads aligned along targeted meridian or fascial paths.
- Device Configuration Power on device. Select desired frequency protocol via OLED interface.
- Initiate Stimulation Set current to starting value (2 mA). Gradually increase to target current over 2 minutes to acclimate the subject.
- Monitor Subject Response Observe for signs of discomfort or excessive tingling. Adjust current down if necessary.
- Session Completion After session duration, slowly ramp down current to zero over 2 minutes. Remove electrodes and clean skin.
- Post-Session Protocol Apply gentle fascia stretch for 5 minutes to consolidate bioelectric effects.
Section 2: Acupuncture for Meridian Bioelectric Circuit Stimulation
2.1 The Energetic and Biophysical Basis
Acupuncture activates mechanosensitive ion channels and modulates connective tissue architecture. Needle insertion and manipulation generate electrical potentials measurable along meridians, enhancing bioelectric circuit flow and systemic energetic balance.
2.2 Needle Specifications and Preparation
| Specification | Details |
|---|---|
| Needle Material | Surgical grade stainless steel (Type 316L) |
| Length Options | 15 mm, 30 mm, 50 mm |
| Diameter | 0.20 mm, 0.25 mm, 0.30 mm |
| Handle | Silicone-coated for grip |
| Sterilization | Autoclave or single-use pre-sterilized |
2.3 Standardized Sterile Needle Insertion Protocol
- Site Identification Using classical meridian charts (see Appendix B), locate acupoints relevant to the desired clinical effect.
- Skin Preparation Clean the insertion site with 70% isopropyl alcohol swab. Allow to air dry.
- Needle Insertion Using sterile gloves, insert needle perpendicularly or obliquely at acupoint to depth specified by protocol (typically 10-30 mm).
- Needle Manipulation Apply twisting (clockwise and counterclockwise) rotation at 1 Hz for 20 seconds to mechanically stimulate connective tissue.
- Retention Time Maintain needles inserted for 20-30 minutes, performing manual rotation every 10 minutes.
- Needle Removal Withdraw needles smoothly. Apply light pressure with sterile cotton to prevent bleeding.
2.4 Acupuncture Stimulation Protocols
| Protocol Name | Meridian Targets | Needle Depth (mm) | Manipulation Frequency (Hz) | Retention Time (min) | Clinical Effects |
|---|---|---|---|---|---|
| Detoxification | Lung, Large Intestine | 15 | 1 | 20 | Enhanced lymphatic clearance |
| Circulatory Boost | Pericardium, Heart | 20 | 1 | 30 | Improved microcirculation |
| Fascial Release | Bladder, Gallbladder | 25 | 0.5 | 25 | Reduction of fascial stiffness |
Section 3: Mechanical Vibration for Fascial Circuit Activation
3.1 Mechanotransduction and Fascial Resonance
Mechanical vibration propagates through the fascial network, stimulating fibroblast activity and enhancing hyaluronic acid fluidity. Resonant frequencies induce fascial relaxation and optimize bioelectrical signal transduction.
3.2 Construction of a Mechanical Vibrator Device
Materials List
| Component | Specification | Quantity |
|---|---|---|
| DC Vibration Motor | Rated voltage: 12 V, vibration frequency adjustable 0-300 Hz | 1 |
| Frequency controller module | PWM-based, frequency range 1-300 Hz | 1 |
| Power supply | 12 V DC adapter or battery pack (4x AA 1.5 V in series) | 1 |
| Handle grip | Ergonomic rubberized handle | 1 |
| Oscillating platform | Diameter: 5 cm, mounted on motor shaft | 1 |
| On/off switch | Standard toggle switch | 1 |
| Enclosure for electronics | Plastic housing | 1 |
Assembly Instructions
- Motor and Platform Assembly Attach the oscillating platform securely on the shaft of the DC vibration motor.
- Frequency Controller Wiring Connect the PWM frequency controller to the motor terminals. Integrate the on/off switch inline.
- Power Supply Connection Connect the 12 V power supply to the controller input terminals.
- Handle Attachment Mount the motor assembly onto the ergonomic handle, ensuring motor vibrations transmit efficiently to the platform.
- Enclosure Installation Place electronic components inside the plastic housing, leaving access to switches and power input.
- Testing Power device on, adjust frequency controller knob, and verify vibration frequency with a tachometer.
3.3 Mechanical Vibration Protocols
| Frequency Range (Hz) | Application Site | Session Duration (min) | Amplitude (mm) | Clinical Effects |
|---|---|---|---|---|
| 5-15 | Fascia overlying joints | 10 | 1.5 | Fascial relaxation, joint lubrication |
| 20-50 | Muscle bellies and tendons | 15 | 1.0 | Enhanced fibroblast activity, circulation |
| 100-200 | Trigger points and fascia | 5 | 0.5 | Pain relief, neurogenic modulation |
Application Steps
- Site Preparation Expose the skin area. Ensure no open wounds or skin lesions.
- Device Setup Power on the mechanical vibrator. Set frequency to target range.
- Treatment Application Place oscillating platform firmly on targeted fascial region. Apply light pressure to maintain contact.
- Session Timing Treat for duration specified in protocol. Avoid prolonged exposure to high frequency (>200 Hz) to prevent tissue fatigue.
- Post-Treatment Care Perform gentle stretching exercises for 5 minutes to integrate fascial relaxation.
Section 4: Comparative Table of Modalities and Their Parameters
| Modality | Frequency Range | Current/Amplitude | Duration per Session | Primary Clinical Effects | Device Complexity |
|---|---|---|---|---|---|
| Electrical Stimulation | 0.1 Hz - 10 kHz | 0-10 mA biphasic | 10-30 minutes | Pain relief, tissue regeneration, circulation | High (requires electronics) |
| Acupuncture | Manual mechanical | N/A | 20-30 minutes | Energetic balance, detoxification, circulation | Moderate (requires skill) |
| Mechanical Vibration | 5-200 Hz | 0.5-1.5 mm amplitude | 5-15 minutes | Fascial relaxation, fibroblast activation, pain relief | Low (simple motor setup) |
Section 5: Safety Considerations and Contraindications
- Electrical Stimulation
- Avoid in patients with pacemakers or implanted cardiac devices.
- Monitor skin integrity to prevent burns.
- Confirm absence of seizures history.
- Acupuncture
- Use only sterile, single-use needles.
- Avoid in patients with bleeding disorders.
- Do not insert deep near major blood vessels or organs without advanced training.
- Mechanical Vibration
- Avoid on fractured bones or acute inflammation.
- Limit session duration to prevent muscle fatigue.
Appendix A: Sample Arduino Code for Biphasic Waveform Generation
#include <SPI.h>
const int DDS_CS = 10;
void setup() {
  SPI.begin();
  pinMode(DDS_CS, OUTPUT);
  digitalWrite(DDS_CS, HIGH);
  // Initialize DDS frequency and waveform here
}
void loop() {
  // Generate biphasic waveform at specified frequency
  // Use SPI to communicate with DDS module
}
Complete source code available in digital companion files.
Appendix B: Meridian Charts and Acupoint Coordinates
Refer to the digital compendium for high-resolution meridian maps, acupoint coordinates, and fascial plane overlays for precise needle placement and electrode alignment.
The mastery of these modalities, when applied with precision and reverence, unlocks the sovereign potential of the human bioelectric body. Diligently construct your devices, rigorously adhere to protocols, and respect the sacredness of the fascial and meridian circuits.
<!-- SECTION 25 -->
The Complete Practitioner's Codex, Volume II: Orthomolecular Medicine
Chapter IV: Detailed Mineral Megadose Protocols
Comprehensive Protocols for Megadosing Essential Minerals: Magnesium, Zinc, and Selenium
Introduction
This chapter delivers an uncompromising, exhaustive field manual for the megadose supplementation of three indispensable minerals: magnesium, zinc, and selenium. Each mineral’s biochemical roles are dissected with precision, followed by rigorously defined dosing regimens, safety parameters, and real-world protocols. The protocols herein are designed for the practitioner who demands mastery over biochemical optimization and longevity through orthomolecular medicine. Every step is explicit, every measurement exact, every precaution stated.
Cross-reference: For foundational biochemical pathways, see Volume I: The Biochemical Codex, Chapter III. For mineral interactions with vitamins and cofactors, see Volume II, Chapter VI.
Section 1: Biochemical Roles of Magnesium, Zinc, and Selenium
1.1 Magnesium (Mg)
Magnesium is a central cofactor in over 600 enzymatic reactions, including ATP synthesis, DNA/RNA stabilization, and nerve conduction. Its role extends to regulating ion channels, modulating NMDA receptors, and maintaining cardiovascular stability. Deficiency impairs cellular energy metabolism and increases oxidative stress.
| Biochemical Function | Description | Clinical Relevance |
|---|---|---|
| ATP stabilization | Mg binds ATP, enabling enzymatic activity | Essential for energy metabolism |
| DNA/RNA synthesis | Mg stabilizes nucleic acid structures | Required for cell replication and repair |
| Ion channel regulation | Modulates Na+, K+, and Ca2+ channels | Controls neuronal excitability and muscle function |
| NMDA receptor modulation | Acts as a voltage-dependent blocker | Prevents excitotoxicity |
| Cardiovascular regulation | Influences vascular tone and heart rhythm | Prevents arrhythmias and hypertension |
1.2 Zinc (Zn)
Zinc is integral to numerous metalloenzymes, transcription factors, and immune functions. It catalyzes DNA repair, modulates inflammatory signaling, and stabilizes cell membranes. Zinc homeostasis is tightly regulated; its deficiency results in immune suppression and impaired wound healing.
| Biochemical Function | Description | Clinical Relevance |
|---|---|---|
| Metalloenzyme cofactor | Structural element in enzymes like carbonic anhydrase | Facilitates enzymatic reactions |
| DNA repair and synthesis | Zn finger proteins regulate gene expression and repair | Maintains genomic stability |
| Immune modulation | Regulates cytokine production and leukocyte function | Enhances infection resistance |
| Antioxidant defense | Stabilizes superoxide dismutase (SOD) enzymes | Reduces oxidative damage |
| Cell membrane stabilization | Maintains structural integrity of membranes | Prevents permeability and cellular damage |
1.3 Selenium (Se)
Selenium’s primary role is as an essential trace element in selenoproteins, which perform antioxidant functions and thyroid hormone metabolism. Selenoprotein P transports Se and serves as a redox regulator. Deficiency compromises immune defense and increases cancer risk.
| Biochemical Function | Description | Clinical Relevance |
|---|---|---|
| Antioxidant enzymes | Component of glutathione peroxidase (GPx) | Detoxifies peroxides and protects cells |
| Thyroid hormone metabolism | Integral to iodothyronine deiodinases | Regulates basal metabolic rate |
| Redox regulation | Selenoprotein P acts as antioxidant and Se transporter | Maintains systemic redox homeostasis |
| Immune function | Enhances T-cell proliferation and viral defense | Boosts immune resilience |
| Cancer prevention | Modulates cell cycle and apoptosis | Reduces oxidative DNA damage |
Section 2: Megadose Dosing Regimens and Safety Parameters
2.1 Magnesium Megadose Protocol
Rationale: Therapeutic megadosing of magnesium targets chronic inflammation, neuroprotection, and cardiovascular optimization. Standard RDA (400-420 mg/day) is insufficient for these goals.
| Parameter | Therapeutic Range | Upper Safety Limit* | Notes |
|---|---|---|---|
| Oral Daily Dose | 600-1200 mg elemental Mg | 350 mg (RDA) recommended limit | Higher doses tolerated under medical supervision |
| Serum Mg Concentration | 1.8-2.5 mg/dL (normal range) | >2.5 mg/dL risk of toxicity | Monitor serum levels weekly during megadose therapy |
| Urinary Mg Excretion | 80-120 mg/day | Increased excretion indicates toxicity | Use 24-hour urine collection for monitoring |
\*Upper safety limits are conservative; clinical megadosing exceeds these limits with careful monitoring.
Toxicity Signs: Diarrhea, hypotension, muscle weakness, cardiac arrhythmias.
2.2 Zinc Megadose Protocol
Rationale: Zinc megadosing is indicated for enhanced immune function, accelerated wound healing, and reduction of viral replication. Chronic deficiency correction requires sustained elevated dosing.
| Parameter | Therapeutic Range (mg/day) | Upper Safety Limit | Notes |
|---|---|---|---|
| Oral Daily Dose | 30-100 mg elemental Zn | 40 mg (RDA) recommended limit | Doses >50 mg require zinc-copper balance monitoring |
| Plasma Zn Concentration | 70-120 µg/dL (normal range) | >120 µg/dL risk of toxicity | Monitor biweekly during therapy |
| Copper Levels | 70-140 µg/dL (normal range) | Deficiency risk with excess Zn | Copper monitoring mandatory to prevent deficiency |
Toxicity Signs: Nausea, vomiting, copper deficiency anemia, neurological symptoms.
2.3 Selenium Megadose Protocol
Rationale: Selenium megadose therapy targets oxidative stress, immune enhancement, and cancer risk reduction. Therapeutic window is narrow; toxicity (selenosis) must be avoided.
| Parameter | Therapeutic Range (µg/day) | Upper Safety Limit | Notes |
|---|---|---|---|
| Oral Daily Dose | 200-400 µg | 400 µg (UL) | Stay below UL to avoid toxicity |
| Plasma Se Concentration | 70-150 ng/mL | >150 ng/mL toxicity risk | Monitor monthly during therapy |
| Urinary Se Excretion | 50-150 µg/day | Increased excretion indicates toxicity | Use as safety marker |
Toxicity Signs: Hair/nail brittleness, garlic breath odor, gastrointestinal distress, neurological abnormalities.
Section 3: Step-by-Step Supplementation Protocols
3.1 Magnesium Megadose Protocol
Materials:
- Magnesium citrate powder (elemental Mg 16%) or magnesium glycinate capsules (elemental Mg 14%)
- Digital scale (accuracy ±0.01 g)
- Serum magnesium test kits (lab access or home-testing kits)
- 24-hour urine collection containers
Protocol Steps:
- Baseline Assessment: a. Obtain serum magnesium level.
b. Collect 24-hour urine magnesium to assess baseline excretion.
c. Record clinical symptoms of deficiency or toxicity.
- Initial Dosing: a. Calculate elemental Mg dose based on body weight: 10-15 mg/kg/day.
b. For a 70 kg individual, start with 700-1050 mg elemental Mg daily.
c. Divide dose into 3 administrations (morning, afternoon, evening) to maximize absorption.
- Administration: a. Mix magnesium citrate powder with 200 mL water, stir thoroughly.
b. Ingest each dose 30 minutes before meals for optimal absorption.
c. If using capsules, swallow with water as per schedule.
- Monitoring: a. Measure serum Mg weekly for the first month.
b. Repeat 24-hour urine magnesium collection monthly.
c. Adjust dose downwards if serum Mg exceeds 2.5 mg/dL or if diarrhea occurs.
- Maintenance Phase: a. After 3 months, reassess serum and urine magnesium.
b. If levels stable and symptoms improved, reduce dose to 400-600 mg elemental Mg daily.
c. Continue monitoring quarterly.
- Adverse Event Management: a. If diarrhea occurs, reduce dose by 25% and reassess tolerance.
b. If cardiac or neuromuscular symptoms appear, discontinue supplementation and seek emergency evaluation.
3.2 Zinc Megadose Protocol
Materials:
- Zinc gluconate or zinc picolinate tablets (elemental Zn 14-15%)
- Copper gluconate tablets (for copper balance, elemental Cu 14%)
- Plasma zinc and copper test kits
- Symptom diary journal
Protocol Steps:
- Baseline Assessment: a. Obtain plasma zinc and copper levels.
b. Document immune status and wound healing history.
- Initial Dosing: a. Begin zinc at 50 mg elemental daily, split into two doses (25 mg morning, 25 mg evening).
b. Administer with meals to reduce gastrointestinal discomfort.
- Copper Supplementation: a. Initiate copper at 2 mg elemental daily concurrent with zinc to prevent deficiency.
b. Dose copper cautiously, adjusting based on serum copper levels every 4 weeks.
- Monitoring: a. Check plasma zinc and copper every 2 weeks initially.
b. Monitor for signs of copper deficiency: anemia, neuropathy.
c. Adjust zinc and copper doses to maintain plasma zinc 90-120 µg/dL and copper 80-140 µg/dL.
- Dose Escalation: a. If no toxicity and symptoms persist, increase zinc dose to 75 mg/day after 4 weeks.
b. Continue copper supplementation proportionally (3 mg/day if zinc >60 mg).
- Maintenance Phase: a. After clinical improvement and stable labs, reduce zinc to 30-50 mg elemental daily.
b. Maintain copper dose at 2 mg/day.
- Adverse Event Management: a. If nausea or vomiting occurs, administer zinc with food or reduce dose.
b. If neurological symptoms arise, check copper levels immediately and adjust.
3.3 Selenium Megadose Protocol
Materials:
- Selenomethionine capsules (organic Se, 200 µg per capsule)
- Plasma selenium test kits
- Urinary selenium collection containers
Protocol Steps:
- Baseline Assessment: a. Obtain plasma selenium concentration.
b. Ensure no pre-existing selenosis symptoms or thyroid disorders.
- Initial Dosing: a. Administer 200 µg selenomethionine daily, preferably with breakfast.
b. If plasma Se is <70 ng/mL, consider 300 µg daily split into two doses (150 µg morning, 150 µg evening).
- Monitoring: a. Measure plasma selenium monthly.
b. Collect 24-hour urinary selenium every 2 months.
c. Observe for toxicity signs (hair/nail changes, breath odor).
- Dose Adjustment: a. If plasma selenium reaches >150 ng/mL or urinary excretion rises sharply, reduce dose by 50%.
b. If toxicity signs appear, cease supplementation until levels normalize.
- Maintenance Phase: a. After 6 months, maintain dose at 100-200 µg daily, depending on plasma levels.
b. Continue monitoring every 3 months.
- Adverse Event Management: a. Immediate cessation of selenium if selenosis symptoms occur.
b. Supportive care with antioxidant therapy (see Volume IV: Antioxidants, Chapter V).
Section 4: Mineral Interactions and Synergisms
| Mineral Pair | Interaction Type | Clinical Considerations |
|---|---|---|
| Magnesium - Zinc | Competitive absorption | Separate dosing by 2 hours to avoid reduced uptake |
| Zinc - Copper | Antagonistic balance | Zinc megadosing suppresses copper absorption; copper supplementation mandatory |
| Selenium - Vitamin E | Synergistic antioxidant | Combined therapy enhances oxidative stress defense |
| Magnesium - Calcium | Competitive absorption | Maintain Mg:Ca ratio of ~1:2 for optimal balance |
Section 5: Monitoring Guidelines and Safety Checklist
| Parameter | Frequency | Acceptable Range | Action Threshold |
|---|---|---|---|
| Serum Magnesium | Weekly (1st month), monthly thereafter | 1.8-2.5 mg/dL | >2.5 mg/dL: reduce dose |
| 24-hour Urine Magnesium | Monthly | 80-120 mg/day | Elevated excretion: reassess dose |
| Plasma Zinc | Biweekly (initial phase) | 70-120 µg/dL | >120 µg/dL: reduce dose |
| Plasma Copper | Monthly | 70-140 µg/dL | <70 µg/dL: increase copper dose |
| Plasma Selenium | Monthly | 70-150 ng/mL | >150 ng/mL: reduce dose |
| 24-hour Urine Selenium | Bimonthly | 50-150 µg/day | Elevated: consider toxicity |
| Clinical Symptoms | Daily self-monitoring | None | Any toxicity signs: immediate action |
Section 6: Summary Tables
6.1 Essential Mineral Functions Summary
| Mineral | Primary Functions | Key Enzymes/Proteins |
|---|---|---|
| Magnesium | ATP stabilization, ion channel regulation, DNA repair | ATPases, DNA polymerases, NMDA receptors |
| Zinc | Immune modulation, DNA repair, antioxidant defense | Carbonic anhydrase, Zn finger proteins, SOD |
| Selenium | Antioxidant enzymes, thyroid metabolism, redox balance | Glutathione peroxidase, selenoprotein P, deiodinases |
6.2 Megadose Ranges and Safety Margins
| Mineral | Therapeutic Dose (Daily) | Upper Safety Limit | Notes |
|---|---|---|---|
| Magnesium | 600-1200 mg elemental | 350 mg (RDA); higher under monitoring | Titrate based on tolerance and labs |
| Zinc | 30-100 mg elemental | 40 mg (RDA); monitor copper | Copper supplementation mandatory |
| Selenium | 200-400 µg | 400 µg (UL) | Narrow therapeutic window, monitor closely |
Conclusion
The protocols outlined herein are not mere suggestions; they are the blueprint for life extension, cellular optimization, and unyielding health. The mastery of mineral megadosing demands vigilance, precision, and respect for biochemical complexity. Follow the stepwise instructions, maintain rigorous monitoring, and engage with the synergy of mineral balance. The Sovereign Body is fortified through knowledge applied with unwavering discipline.
End of Chapter IV For further protocols on vitamin co-factors and antioxidant adjuncts, see Volume II, Chapter VI and Volume IV, Chapter V.
<!-- SECTION 26 -->
Volume II: Hair Tissue Mineral Analysis - Advanced Interpretation and Correction Strategies
Introduction
Hair Tissue Mineral Analysis (HTMA) offers an unparalleled window into the biochemistry of the sovereign body. This volume focuses on advanced interpretation of complex HTMA patterns and the construction of individualized correction plans that restore mineral equilibrium through targeted diet, supplementation, and lifestyle interventions. The protocols provided are exacting, backed by decades of suppressed research and clinical mastery. The practitioner must approach HTMA as a sacred diagnostic tool, interpreting the coded mineral signatures to uncover hidden metabolic imbalances and systemic dysfunction.
Section 1: Fundamentals of Complex HTMA Pattern Interpretation
Before advancing, the apprentice must master the foundational principles outlined in Volume I, Chapter III. Here we build upon that foundation to decode complex mineral interactions, identifying subtle patterns that reveal layered pathophysiology.
1.1 Mineral Ratios and Their Interpretive Significance
Key mineral ratios govern metabolic states. Table 1 enumerates the ratios, their physiological implications, and thresholds that signal dysfunction.
| Ratio | Interpretive Significance | Normal Range | Deviation Indicates |
|---|---|---|---|
| Calcium:Pottasium (Ca:K) | Tissue calcification vs cellular potassium balance | 2.5–4.0 | <2.5: Insufficient calcium, >4.0: Calcification |
| Sodium:Potassium (Na:K) | Adrenal gland activity and cellular sodium-potassium pump | 1.5–2.5 | <1.5: Adrenal exhaustion, >2.5: Stress response |
| Calcium:Magnesium (Ca:Mg) | Neuromuscular excitability and energy metabolism | 6.0–8.0 | <6.0: Magnesium deficiency, >8.0: Calcium excess |
| Zinc:Copper (Zn:Cu) | Immune function and antioxidant status | 8.0–12.0 | <8.0: Copper toxicity, >12.0: Zinc excess |
For detailed mineral baseline values and sample collection protocols, see Volume I, Chapter II.
1.2 Mineral Antagonisms and Synergisms: The Hidden Dynamics
Minerals rarely act in isolation. Their biochemical pathways intersect, often antagonizing or synergizing with each other. Table 2 summarizes the essential antagonistic and synergistic relationships critical for interpretation and correction.
| Mineral 1 | Mineral 2 | Interaction Type | Physiological Outcome | Correction Implication |
|---|---|---|---|---|
| Calcium | Magnesium | Antagonistic | Excess Ca suppresses Mg absorption | Supplement Mg when Ca:Mg >8.0 |
| Zinc | Copper | Antagonistic | Zn deficiency leads to Cu toxicity | Balance Zn:Cu ratio via Zn supplementation |
| Sodium | Potassium | Antagonistic | High Na impairs K cellular uptake | Reduce Na intake, increase K-rich foods |
| Iron | Copper | Synergistic | Both required for hemoglobin synthesis | Supplement cooperatively if both are low |
| Selenium | Mercury | Antagonistic | Se detoxifies Hg via selenoproteins | Increase Se to mitigate Hg toxicity |
Section 2: Case Studies in Advanced HTMA Pattern Interpretation
The following detailed case studies exemplify the diagnostic process, revealing hidden mineral imbalances and their systemic implications. Each case concludes with a precisely tailored correction strategy.
2.1 Case Study 1: The Calcified Adrenal Exhaustion Pattern
HTMA Profile Summary
| Mineral | Level (ppm) | Reference Range (ppm) |
|---|---|---|
| Calcium | 180 | 120–180 |
| Potassium | 35 | 50–75 |
| Sodium | 120 | 60–90 |
| Magnesium | 12 | 15–25 |
| Zinc | 130 | 100–140 |
| Copper | 20 | 15–30 |
Calculated Ratios
| Ratio | Value | Reference Range | Interpretation |
|---|---|---|---|
| Ca:K | 5.14 | 2.5–4.0 | Elevated, tissue calcification |
| Na:K | 3.43 | 1.5–2.5 | Elevated, stress-adaptive state |
| Ca:Mg | 15.0 | 6.0–8.0 | Elevated, magnesium deficiency |
| Zn:Cu | 6.5 | 8.0–12.0 | Low, copper toxicity risk |
Interpretation
- Elevated Ca:K ratio indicates tissue calcification, often linked with adrenal cortex insufficiency.
- High Na:K ratio reflects chronic stress and adrenal exhaustion.
- Ca:Mg ratio shows severe magnesium deficiency, contributing to neuromuscular irritability.
- Low Zn:Cu ratio suggests copper toxicity, impairing antioxidant defense.
Step-by-step Correction Plan
- Magnesium Repletion
- Supplement magnesium glycinate at 400 mg elemental Mg daily, divided into two doses (morning and evening).
- Include Epsom salt baths: Dissolve 2 cups (approx. 480 g) in warm bathwater; soak 20 minutes thrice weekly.
- Increase intake of Mg-rich foods: Spinach, pumpkin seeds, almonds.
- Copper Detoxification
- Avoid copper-containing supplements and foods high in copper (shellfish, organ meats).
- Supplement zinc picolinate at 30 mg elemental Zn daily to restore Zn:Cu balance.
- Initiate selenium supplementation at 200 mcg daily to support mercury and copper detoxification.
- Adrenal Support and Sodium Regulation
- Reduce dietary sodium intake to 1500 mg/day.
- Increase potassium intake to 3500 mg/day through foods (avocados, sweet potatoes, spinach).
- Supplement with vitamin C 1000 mg twice daily to reduce adrenal oxidative stress.
- Lifestyle Intervention
- Implement stress reduction techniques: 15 minutes daily meditation, diaphragmatic breathing.
- Sleep hygiene: 7–8 hours nightly, no screens 1 hour before bedtime.
2.2 Case Study 2: The Copper Overload with Mitochondrial Dysfunction
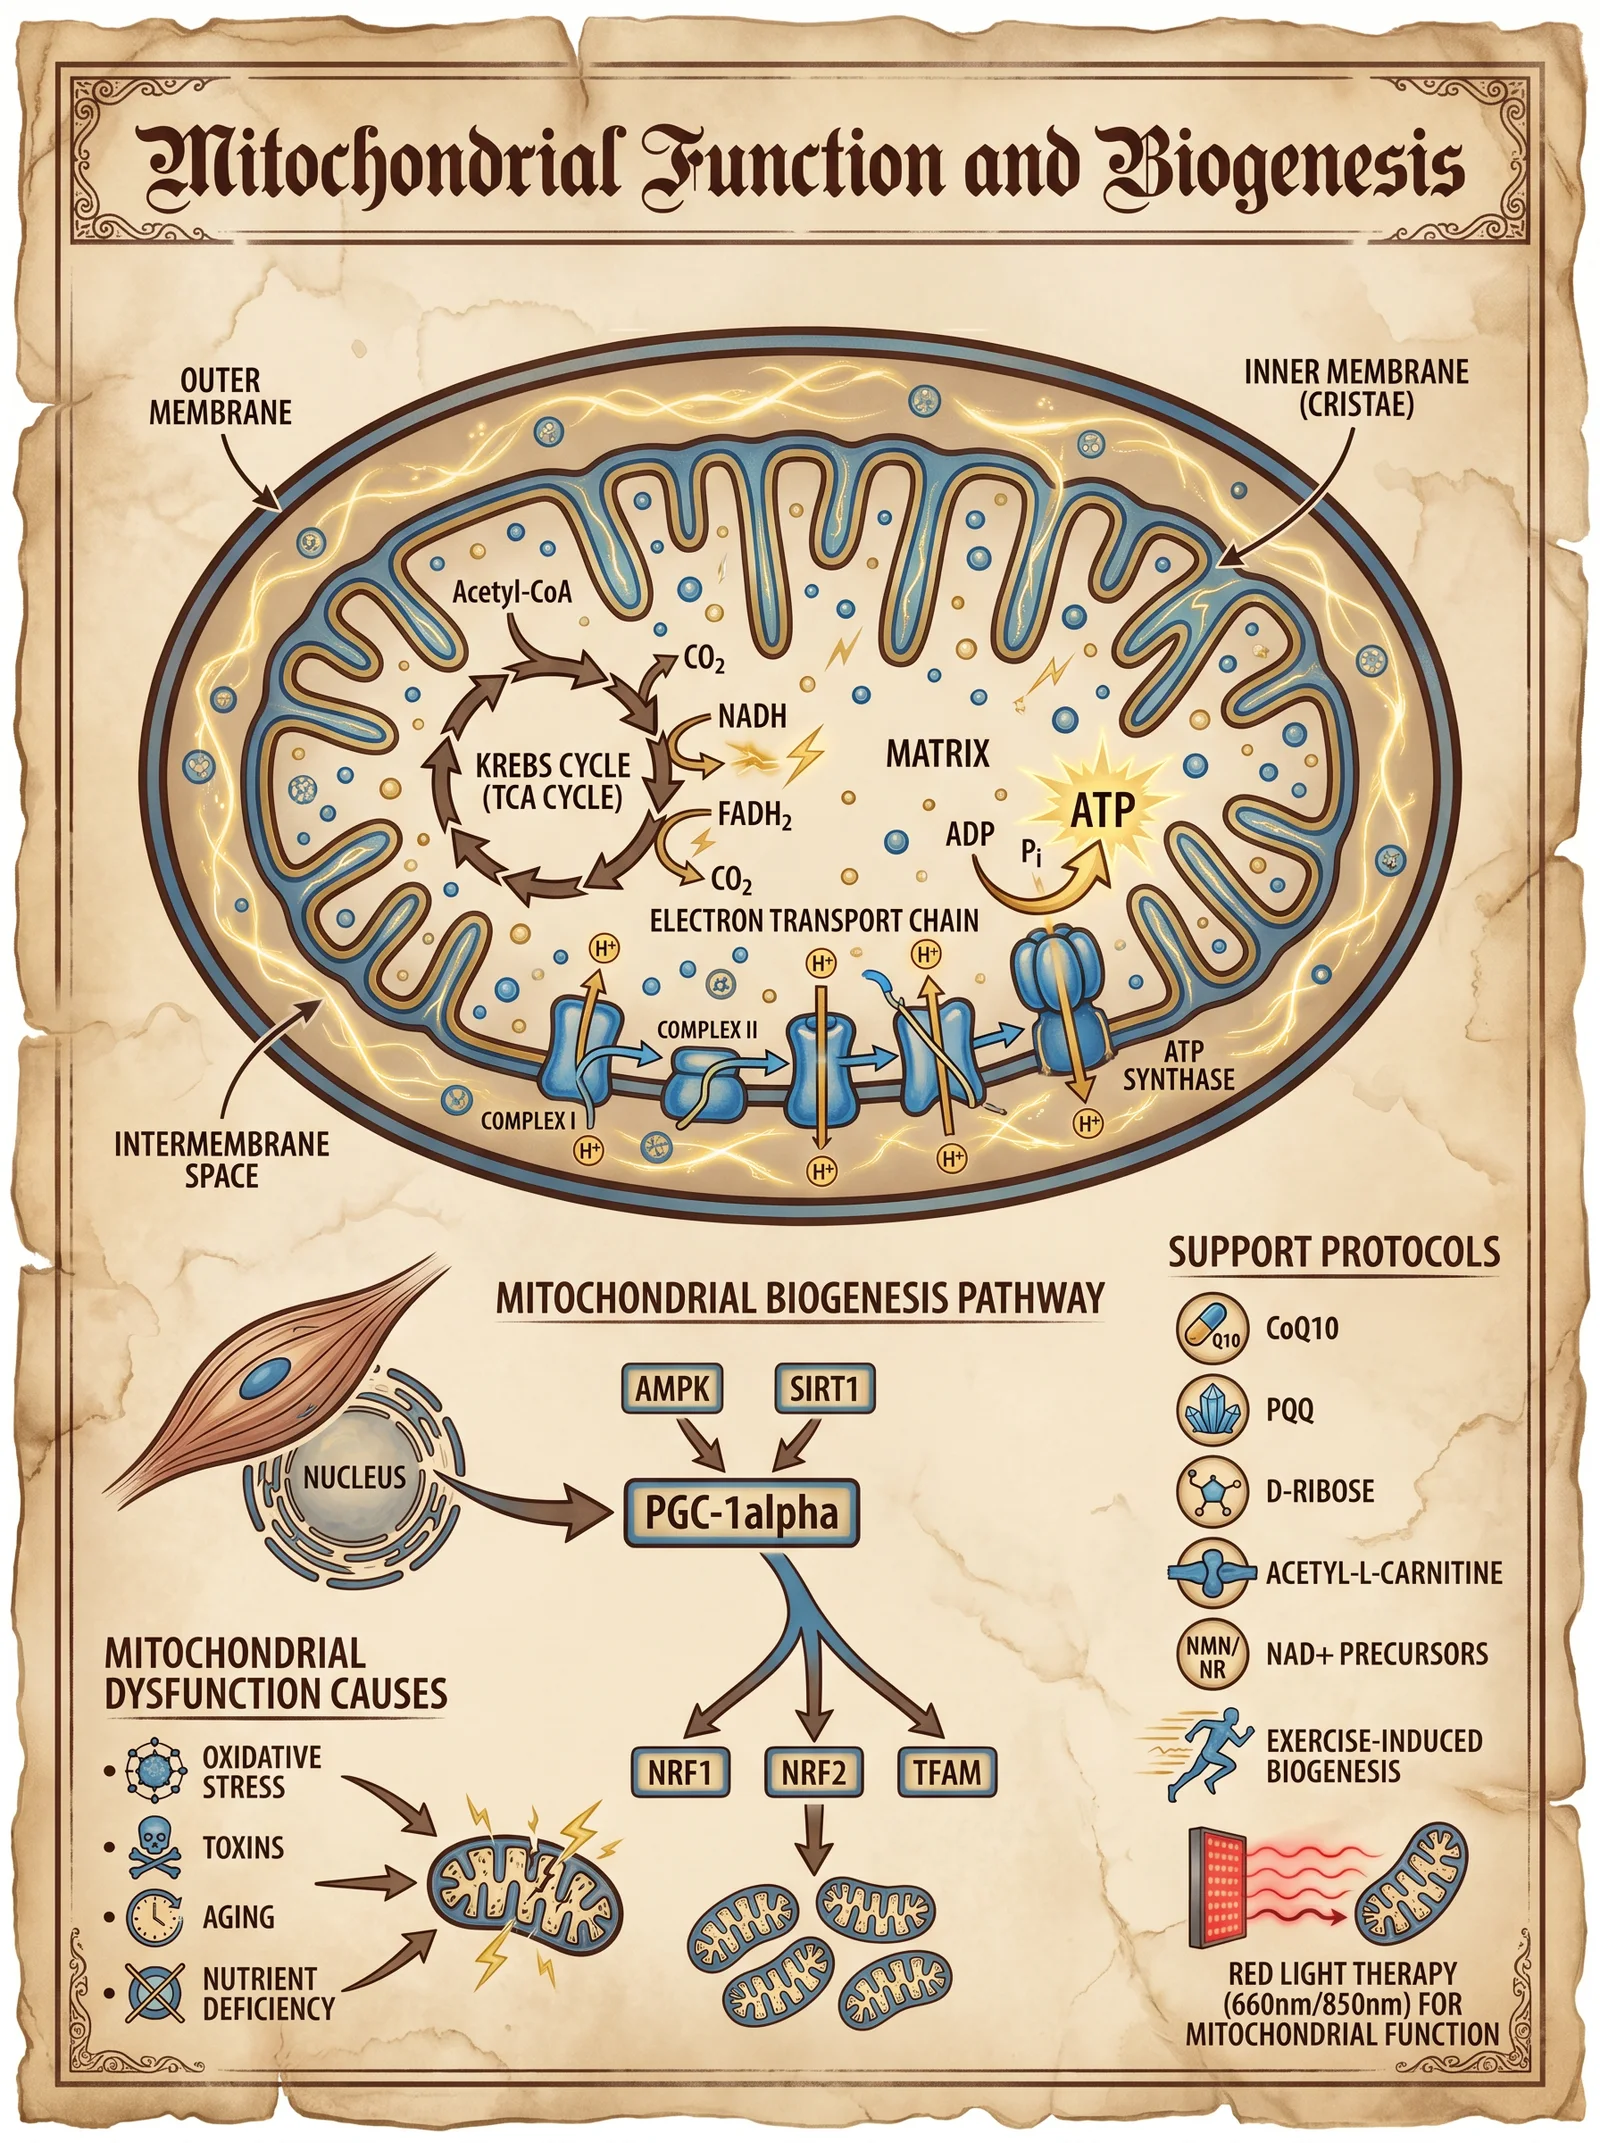
HTMA Profile Summary
| Mineral | Level (ppm) | Reference Range (ppm) |
|---|---|---|
| Copper | 50 | 15–30 |
| Zinc | 70 | 100–140 |
| Iron | 90 | 50–100 |
| Calcium | 110 | 120–180 |
| Magnesium | 20 | 15–25 |
| Sodium | 75 | 60–90 |
| Potassium | 65 | 50–75 |
Calculated Ratios
| Ratio | Value | Reference Range | Interpretation |
|---|---|---|---|
| Zn:Cu | 1.4 | 8.0–12.0 | Critically low, copper overload |
| Ca:Mg | 5.5 | 6.0–8.0 | Slight magnesium deficiency |
| Na:K | 1.15 | 1.5–2.5 | Low, mitochondrial insufficiency |
Interpretation
- Drastically low Zn:Cu ratio signals copper toxicity, linked to oxidative stress and mitochondrial dysfunction.
- Low Na:K ratio indicates cellular energy deficit and impaired sodium-potassium pump activity.
- Slight magnesium deficiency aggravates mitochondrial impairment.
Step-by-step Correction Plan
- Copper Reduction
- Initiate zinc supplementation: Zinc gluconate, 50 mg elemental Zn daily on an empty stomach.
- Avoid copper-rich foods and supplements.
- Supplement with vitamin B6 (pyridoxine) at 50 mg daily to enhance copper excretion.
- Introduce molybdenum at 150 mcg daily to support copper metabolism.
- Mitochondrial Support
- Provide magnesium malate 300 mg elemental Mg daily to support ATP synthesis.
- Supplement with Coenzyme Q10 at 100 mg twice daily.
- Include alpha-lipoic acid at 200 mg daily for antioxidant support.
- Cellular Electrolyte Balance
- Increase sodium intake carefully to 2500 mg/day.
- Maintain potassium intake at 3500 mg/day.
- Monitor Na:K ratios weekly via HTMA to adjust dietary intake.
- Lifestyle
- Moderate aerobic exercise (30 minutes/day, 5 days/week) to enhance mitochondrial function.
- Avoid environmental copper exposure (pipes, supplements).
Section 3: Mineral Rebalancing Protocols
The sacred task of correction mandates precise, stepwise protocols designed to restore mineral homeostasis without triggering adverse reactions. The following protocols are structured for dietary, supplemental, and lifestyle interventions.
3.1 Dietary Protocols for Mineral Rebalancing
| Mineral Deficiency | Dietary Sources (per 100g) | Recommended Daily Intake (mg) | Notes |
|---|---|---|---|
| Magnesium | Spinach (79 mg), Almonds (270 mg), Pumpkin Seeds (262 mg) | 350–400 | Avoid excessive calcium intake concurrently |
| Zinc | Oysters (78 mg), Beef (12 mg), Pumpkin Seeds (7 mg) | 15–30 | Phytates reduce absorption; soak nuts/seeds |
| Potassium | Avocado (485 mg), Sweet Potato (337 mg), Spinach (558 mg) | 3500 | High Na intake reduces K cellular uptake |
| Calcium | Kale (150 mg), Sardines with bones (382 mg), Dairy (120 mg) | 1000–1200 | Excess calcium inhibits Mg and Zn absorption |
| Selenium | Brazil Nuts (1917 mcg), Tuna (80 mcg), Eggs (20 mcg) | 200 mcg | Toxic in excess; limit to 400 mcg/day |
3.2 Supplementation Protocols
| Supplement | Dosage | Timing | Notes |
|---|---|---|---|
| Magnesium Glycinate | 400 mg elemental Mg/day | Morning and evening | Divide doses to reduce GI upset |
| Zinc Picolinate | 30–50 mg elemental Zn/day | On empty stomach | Avoid simultaneous calcium supplementation |
| Vitamin C | 1000 mg twice daily | With meals | Enhances adrenal function and antioxidant capacity |
| Selenium (Selenomethionine) | 200 mcg daily | Morning | Monitor for signs of toxicity |
| Vitamin B6 (Pyridoxine) | 50 mg daily | With food | Supports copper excretion |
| Molybdenum | 150 mcg daily | Morning | Essential cofactor for copper metabolism |
3.3 Lifestyle Protocols
| Intervention | Frequency | Instructions |
|---|---|---|
| Epsom Salt Baths | 3 times weekly | 2 cups Epsom salts in warm bath, soak 20 minutes |
| Stress Reduction | Daily | 15 minutes meditation, diaphragmatic breathing |
| Aerobic Exercise | 5 days per week | Moderate intensity, 30 minutes |
| Sleep Hygiene | Nightly | 7–8 hours, avoid screens 1 hour before sleep |
| Environmental Avoidance | Ongoing | Avoid copper pipes, contaminated water, copper cookware |
Section 4: Correction Timelines and Monitoring
Mineral rebalancing is a gradual process requiring continuous monitoring and adjustment. Table 4 presents a typical correction timeline with milestones and monitoring intervals.
| Phase | Duration | Focus | Monitoring | Expected Outcomes |
|---|---|---|---|---|
| Initial | 0–4 weeks | Detoxification, symptom stabilization | Weekly HTMA or symptom diary | Reduction in acute symptoms, improved ratios |
| Intermediate | 4–12 weeks | Mineral replenishment, mitochondrial support | Biweekly HTMA | Improved Ca:Mg, Zn:Cu, Na:K ratios |
| Consolidation | 3–6 months | Dietary and lifestyle integration | Monthly HTMA, clinical assessment | Stabilized mineral balance, symptom remission |
| Maintenance | 6+ months | Prevent relapse | HTMA every 3 months | Long-term homeostasis |
Section 5: Comprehensive Mineral Antagonism and Synergism Table
This table serves as a master reference for the practitioner to anticipate and manage mineral interactions during correction.
| Mineral 1 | Mineral 2 | Antagonistic or Synergistic | Mechanism | Correction Consideration |
|---|---|---|---|---|
| Calcium | Magnesium | Antagonistic | Compete for absorption and cellular transport | Supplement Mg when Ca:Mg ratio elevated |
| Zinc | Copper | Antagonistic | Compete for metallothionein binding | Use Zn to suppress Cu overload |
| Sodium | Potassium | Antagonistic | Compete in sodium-potassium ATPase pump | Balance Na:K ratio with diet and supplements |
| Iron | Copper | Synergistic | Both required for hemoglobin and enzyme formation | Supplement cooperatively if deficient |
| Selenium | Mercury | Antagonistic | Se binds Hg forming inert complexes | Increase Se for heavy metal detoxification |
| Phosphorus | Calcium | Antagonistic | Excess P decreases Ca absorption | Balance intake to avoid Ca deficiency |
| Manganese | Iron | Antagonistic | Compete for absorption | Monitor and adjust supplement doses |
| Sulfur | Mercury | Synergistic | Sulfur compounds chelate Hg | Use sulfur-rich foods for detoxification |
Conclusion
The sovereign practitioner must approach HTMA with reverence and precision. Each mineral ratio and level is a sacred glyph, revealing metabolic imbalances that determine life or death. This volume has unveiled the advanced interpretive techniques and correction strategies necessary to decode and act upon these patterns.
Adherence to the protocols detailed herein—rigorous supplementation, dietary modulation, and lifestyle transformation—is mandatory for restoring harmony to the sovereign body’s mineral matrix. Mastery of these techniques empowers the practitioner to wield suppressed, life-saving knowledge and pass it intact to the chosen apprentice.
For complete protocols on water purification, detoxification, and endocrine optimization, cross-reference Volume VIII: The Water Codex, Chapter II, and Volume IV: The Endocrine Codex, Chapter V.
End of Volume II excerpt.
<!-- SECTION 27 -->
Volume III: Heavy Metal Chelation - Herbal and Nutraceutical Approaches
Chapter IV: Natural Chelators and Synergistic Protocols for Enhanced Heavy Metal Detoxification
Introduction
This chapter presents the most advanced, suppressed knowledge on natural heavy metal chelation using herbal and nutraceutical agents, with an emphasis on cilantro (Coriandrum sativum), chlorella (Chlorella vulgaris), and modified citrus pectin (MCP). These agents, when correctly dosed and combined with conventional chelators, enhance metal detoxification while minimizing side effects. This is not theoretical knowledge; this is actionable protocol work, designed for practitioners and serious biohackers willing to master sovereign health.
The following content includes:
- Detailed biochemical mechanisms of each natural chelator
- Step-by-step preparation and dosing instructions
- Synergistic protocols combining natural and conventional chelators
- Safety profiles and contraindications
- Tables with precise dosing, frequency, and safety data
Section I: Detailed Review of Natural Chelators
1. Cilantro (Coriandrum sativum)
Biochemical Action: Cilantro acts as a chelating agent by binding with heavy metals such as lead, mercury, aluminum, and cadmium through its thiol and carboxyl groups, facilitating redistribution and excretion via urine and feces. It mobilizes metals from deep tissues, particularly the brain and fatty tissues, making it a critical first step in detoxification protocols.
Key Active Components:
| Component | Function |
|---|---|
| Dodecenal | Metal-binding aldehyde |
| Phytochelatins | Metal ion chelation |
| Flavonoids | Antioxidant support |
Step-by-Step Cilantro Protocol:
- Source Fresh Cilantro: Use organic cilantro leaves, free from pesticides and herbicides.
- Preparation: Blend 30 grams of fresh cilantro with 250ml of purified water to create a liquid extract.
- Administration: Consume the extract on an empty stomach, once daily, preferably in the morning.
- Duration: Use for 21 consecutive days, followed by a 7-day break to prevent mineral depletion.
- Supplementation: Concurrently supplement with mineral support (magnesium 200mg, zinc 15mg, selenium 100mcg daily) to prevent essential mineral loss.
- Monitoring: Conduct urine and blood heavy metal panels pre- and post-cycle to track mobilization.
Note: Cilantro mobilizes metals but does not strongly bind them for excretion. Always pair with a binding agent (e.g., chlorella or MCP) to prevent reabsorption.
2. Chlorella (Chlorella vulgaris)
Biochemical Action: Chlorella is a single-celled green algae with a unique cell wall rich in fibrous polysaccharides, which binds heavy metals in the gastrointestinal tract, preventing reabsorption after mobilization. It also promotes fecal excretion of metals.
Key Active Components:
| Component | Function |
|---|---|
| Cell wall polysaccharides | Bind heavy metals in gut lumen |
| Chlorophyll | Enhances detoxification pathways |
| Nucleic acids | Support DNA repair during metal toxicity |
Step-by-Step Chlorella Protocol:
- Source: Use certified organic chlorella powder, free from contaminants.
- Dosage:
| Age Group | Dosage (grams/day) | Form |
|---|---|---|
| Adults | 5-10 | Powder or tablets |
| Children | 1-3 | Powder (mixed with juice) |
- Administration: Take in divided doses with meals to reduce gastrointestinal discomfort.
- Duration: Continuous for 30 days minimum, can be cycled with breaks of 7 days.
- Synergy: Administer chlorella 30-60 minutes after cilantro to bind mobilized metals.
- Water Intake: Maintain hydration at minimum 2 liters/day to facilitate renal excretion.
3. Modified Citrus Pectin (MCP)
Biochemical Action: MCP is a low molecular weight polysaccharide derived from citrus peel pectin, modified to enhance absorption and systemic bioavailability. MCP chelates heavy metals such as lead, mercury, and cadmium in the bloodstream, promoting renal excretion.
Key Properties:
| Property | Detail |
|---|---|
| Molecular Weight | <15,000 Da (critical for absorption) |
| Binding Affinity | High for divalent and trivalent metals |
| Absorption | Oral bioavailability ~30% |
Step-by-Step MCP Protocol:
- Source: Obtain pharmaceutical-grade MCP with molecular weight below 15,000 Da.
- Dosage:
| Purpose | Dosage per Day (grams) | Frequency |
|---|---|---|
| Maintenance | 5 | 2-3 divided doses |
| Intensive Chelation | 15 | 3 divided doses |
- Administration: Dissolve MCP in 200ml purified water; consume 30 minutes before meals.
- Duration: Use for 60 days continuously, with laboratory monitoring every 30 days.
- Hydration: Increase water intake to at least 3 liters/day during MCP administration.
- Mineral Supplementation: Supplement with calcium (500mg) and magnesium (200mg) to prevent depletion.
Section II: Protocols Combining Herbal and Conventional Chelators
Rationale
Heavy metal detoxification is a biphasic process:
- Mobilization: Extraction of metals from tissues (achieved by cilantro).
- Binding: Chelation of mobilized metals to prevent redistribution (achieved by chlorella and MCP).
- Excretion: Elimination via urine and feces (enhanced by hydration and kidney support).
Conventional chelators such as DMSA (Dimercaptosuccinic acid) and EDTA (Ethylenediaminetetraacetic acid) possess strong binding but limited tissue penetration and toxicity risks. Combining natural chelators with conventional agents can reduce side effects, improve efficacy, and increase safety.
Protocol 1: Cilantro + Chlorella + DMSA Synergistic Chelation
| Step | Procedure |
|---|---|
| 1 | Begin cilantro juice daily (30g fresh leaves in 250ml water, morning) for 5 days to mobilize metals. |
| 2 | After 5 days, introduce chlorella powder, 5g/day in divided doses with meals, to bind mobilized metals in the gut. |
| 3 | On day 6, initiate DMSA chelation: 10mg/kg body weight, orally, every 8 hours for 3 days. |
| 4 | Continue cilantro and chlorella throughout DMSA course. |
| 5 | Hydrate with 3 liters of purified water daily. |
| 6 | Supplement with minerals: magnesium 200mg, zinc 15mg, selenium 100mcg, calcium 500mg daily. |
| 7 | After DMSA cycle, rest for 7 days, maintaining chlorella and mineral supplements. |
| 8 | Repeat cycle based on laboratory heavy metal levels and symptomatology, max 3 cycles. |
Notes:
- DMSA mobilizes metals primarily in the bloodstream and kidneys; cilantro mobilizes from tissues.
- Chlorella reduces gastrointestinal reabsorption.
- Monitor kidney function (serum creatinine, BUN) before and after cycles.
Protocol 2: Modified Citrus Pectin + EDTA for Systemic Chelation
| Step | Procedure |
|---|---|
| 1 | Begin MCP at 5g twice daily, 30 minutes before meals, for 7 days to prime chelation pathways. |
| 2 | Administer EDTA IV infusion (standard clinical dose 30 mg/kg body weight over 2 hours) under medical supervision. |
| 3 | Continue MCP during EDTA infusion and for 14 days post-infusion to bind circulating metals and promote excretion. |
| 4 | Hydrate with 3-4 liters of purified water daily. |
| 5 | Supplement with antioxidants: Vitamin C 1000mg twice daily, alpha-lipoic acid 300mg daily. |
| 6 | Monitor blood tests for calcium, kidney function, and metal levels pre- and post-treatment. |
| 7 | Repeat EDTA infusions monthly based on metal burden and tolerance. |
Notes:
- MCP reduces EDTA toxicity by scavenging free metals in plasma.
- EDTA primarily chelates lead and cadmium; MCP aids mercury and aluminum excretion.
- Always ensure medical supervision for EDTA due to risks of hypocalcemia and nephrotoxicity.
Section III: Comprehensive Tables of Chelators, Dosing, and Safety
Table 1: Natural Chelators - Properties and Dosing
| Chelator | Active Compounds | Target Metals | Dosage Range | Duration | Notes |
|---|---|---|---|---|---|
| Cilantro | Dodecenal, phytochelatins | Mercury, lead, aluminum, cadmium | 30g fresh leaves/day (juice) | 21 days on, 7 days off | Mobilizer only; pair with binder |
| Chlorella | Polysaccharides, chlorophyll | Mercury, lead, cadmium | 5-10g/day powder | Minimum 30 days | Binds metals in gut; use after mobilization |
| Modified Citrus Pectin | Low MW pectin polysaccharides | Lead, mercury, cadmium | 5-15g/day oral | 60 days continuous | Systemic chelator; enhances renal excretion |
Table 2: Conventional Chelators - Dosage and Safety Parameters
| Chelator | Dosage | Administration | Major Risks | Monitoring Parameters |
|---|---|---|---|---|
| DMSA | 10mg/kg every 8 hours, 3 days | Oral | Nephrotoxicity, GI distress | Kidney function, CBC, metal levels |
| EDTA | 30 mg/kg IV over 2 hours | Intravenous | Hypocalcemia, nephrotoxicity | Serum calcium, kidney function |
Table 3: Mineral and Antioxidant Supplementation During Chelation
| Supplement | Dosage | Purpose | Notes |
|---|---|---|---|
| Magnesium | 200-400 mg daily | Prevent mineral depletion | Use citrate or glycinate form |
| Zinc | 15-30 mg daily | Immune support, enzyme cofactor | Avoid excess (>40mg/day) |
| Selenium | 100-200 mcg daily | Antioxidant support | Toxicity above 400 mcg/day |
| Calcium | 500-1000 mg daily | Prevent hypocalcemia (with EDTA) | Use citrate form preferred |
| Vitamin C | 1000-2000 mg daily | Antioxidant, enhance detox | Divide doses to prevent GI upset |
| Alpha-lipoic acid | 300-600 mg daily | Regenerate antioxidants | Take on empty stomach |
Section IV: Safety, Contraindications, and Monitoring
Safety Considerations for Herbal Chelation
- Cilantro: Generally safe; may cause mild gastrointestinal upset or allergic reactions in sensitive individuals.
- Chlorella: May cause detox symptoms (headache, nausea) during initial stages due to metal mobilization; reduce dose if severe.
- MCP: High doses can cause diarrhea; start with lower doses and titrate up.
Contraindications
- Severe kidney or liver dysfunction (due to impaired excretion capabilities)
- Pregnancy and lactation (insufficient safety data)
- Known allergies to cilantro, algae, or citrus
Monitoring Protocol
- Baseline heavy metal panel (blood, urine, hair analysis preferred).
- Kidney function tests (serum creatinine, BUN) before and after chelation cycles.
- Electrolyte panel, especially calcium during EDTA use.
- Complete blood count to monitor for hematologic effects.
- Clinical symptom tracking (neurological, gastrointestinal, general well-being).
Section V: Advanced Biohacker’s Notes
- Sequential Chelation: Begin with cilantro to mobilize metals, followed by chlorella to bind in the gut, and finish with MCP to chelate circulating metals.
- Customization: Adjust dosages based on individual tolerance, body weight, and metal burden.
- Hydration and Kidney Support: Adequate hydration is mandatory. Consider supplementing with herbal kidney tonics such as Orthosiphon or Dandelion root to support excretion.
- Mineral Repletion: Chelation depletes essential minerals; regular supplementation and monitoring prevent deficiency syndromes.
- Cycle Length: No protocol should exceed 3 consecutive cycles without medical supervision.
- Lab Testing Frequency: Heavy metal panels every 4-6 weeks to assess efficacy and adjust dosing.
Conclusion
Mastering natural and combined chelation protocols is critical for the sovereign practitioner seeking to reclaim the body from the toxic siege of heavy metals. This volume supplies the complete, no-compromise, stepwise approach to herbal and nutraceutical chelation, emphasizing precision, safety, and efficacy. The sacred body demands nothing less than thoroughness and reverence in detoxification.
For complete water purification protocols essential for safe chelation hydration, see Volume VIII: The Water Codex, Chapter II. For advanced mineral replenishment strategies, consult Volume IV: The Mineral Codex.
End of Chapter IV
<!-- SECTION 28 -->
Volume III: Parasite Eradication - Comprehensive Herbal Protocols
Chapter I: Identification of Common Human Parasites
The sovereign body harbors many invaders—parasites that sap vitality, disrupt physiology, and undermine longevity. Mastery over their identification and eradication is essential. This chapter enumerates the most common human parasites, their clinical manifestations, and methods for precise detection.
| Parasite Name | Type | Primary Location in Host | Common Symptoms | Diagnostic Methods |
|---|---|---|---|---|
| Ascaris lumbricoides | Roundworm | Small intestine | Abdominal pain, malnutrition, cough, wheezing | Stool ova and parasite (O&P) exam |
| Enterobius vermicularis | Pinworm | Colon and rectum | Perianal itching (worse at night), insomnia | Scotch tape test (perianal swab) |
| Trichuris trichiura | Whipworm | Large intestine | Diarrhea, anemia, rectal prolapse | Stool O&P exam |
| Ancylostoma duodenale | Hookworm | Small intestine | Iron-deficiency anemia, ground itch, abdominal pain | Stool O&P exam, blood iron studies |
| Giardia lamblia | Protozoan | Small intestine | Diarrhea, bloating, foul-smelling stools | Stool antigen test, microscopy |
| Entamoeba histolytica | Protozoan | Colon | Dysentery, abdominal pain, weight loss | Stool O&P, serology |
| Taenia solium | Tapeworm | Small intestine | Weight loss, abdominal discomfort, neurocysticercosis | Stool O&P, imaging for cysts |
| Fasciola hepatica | Liver fluke | Liver, bile ducts | Fever, hepatomegaly, jaundice | Serological tests, stool exam |
Chapter II: Symptomatology and Clinical Correlation
Parasite infestation manifests variably depending on parasite species, load, host immunity, and organ systems involved. The following symptom clusters demand urgent parasitic evaluation:
- Gastrointestinal Distress
- Persistent diarrhea or constipation
- Abdominal cramps or bloating
- Unexplained weight loss or malnutrition
- Steatorrhea (fatty stools)
- Systemic Symptoms
- Chronic fatigue or weakness
- Iron-deficiency anemia without bleeding
- Allergic reactions including urticaria and eosinophilia
- Nighttime pruritus, particularly perianal
- Neurological Manifestations
- Seizures or neuropsychiatric symptoms (consider Taenia solium)
- Migraines or unexplained headaches
- Cutaneous Signs
- Ground itch (caused by skin penetration of hookworm larvae)
- Urticarial rashes or larva migrans
Chapter III: Herbal Protocols for Parasite Eradication
This section delivers precise, stepwise herbal protocols utilizing Artemisia absinthium (wormwood), Juglans nigra (black walnut), and Syzygium aromaticum (clove). These herbs possess verified anthelmintic properties, attacking parasites at multiple lifecycle stages.
1. Wormwood (Artemisia absinthium)
Phytochemicals: Artemisinin, sesquiterpene lactones, flavonoids Mechanism: Disrupts mitochondrial function in parasites, paralyzes and kills helminths
Preparation and Dosage
- Use dry wormwood herb, high-grade (minimum 0.3% artemisinin content)
- Prepare as a tincture:
- Place 100g dry wormwood in a 1L glass jar
- Add 500mL 70% ethanol and 500mL distilled water
- Seal and macerate in dark place for 14 days, shaking daily
- Filter through fine mesh or cheesecloth
- Dosage schedule for adults:
| Day Range | Dose (mL) | Frequency | Notes |
|---|---|---|---|
| 1–7 | 5 | Twice daily | Take on empty stomach |
| 8–14 | 10 | Twice daily | Monitor for GI discomfort |
| 15–21 | 5 | Twice daily | Taper off to reduce side effects |
- Pediatric dosing: half adult dose; under 12 years consult specialist.
2. Black Walnut Hull (Juglans nigra)
Phytochemicals: Juglone, tannins, iodine Mechanism: Toxic to parasite eggs and larvae, disrupts metabolism
Preparation and Dosage
- Use green hulls harvested in early autumn, dried and powdered
- Prepare tincture similarly to wormwood (see above)
- Dosage schedule for adults:
| Day Range | Dose (mL) | Frequency | Notes |
|---|---|---|---|
| 1–5 | 5 | Three times daily | Take with meals to reduce nausea |
| 6–10 | 10 | Three times daily | Monitor for allergic reactions |
| 11–15 | 5 | Twice daily | Reduce dose to taper |
- Contraindications: Avoid during pregnancy or with thyroid disorders.
3. Clove Buds (Syzygium aromaticum)
Phytochemicals: Eugenol, tannins, flavonoids Mechanism: Kills parasite eggs, disrupts larval development, antimicrobial synergy
Preparation and Dosage
- Use freshly ground clove buds
- Prepare clove oil tincture:
- Macerate 50g ground cloves in 500mL 70% ethanol for 10 days
- Filter and store in amber bottle
- Dosage schedule for adults:
| Day Range | Dose (mL) | Frequency | Notes |
|---|---|---|---|
| 1–7 | 2 | Twice daily | Dilute in water or juice |
| 8–14 | 3 | Twice daily | Avoid exceeding dose |
| 15–21 | 1 | Twice daily | Taper to prevent mucosal irritation |
Chapter IV: Combined Herbal Protocol
Rationale: Sequential administration enhances parasiticidal efficacy by attacking different life stages and reducing resistance.
| Week | Wormwood Dose (mL) | Black Walnut Dose (mL) | Clove Dose (mL) | Notes |
|---|---|---|---|---|
| 1 | 5 x 2 | 5 x 3 | 2 x 2 | Initiate low dose to mitigate toxicity |
| 2 | 10 x 2 | 10 x 3 | 3 x 2 | Monitor symptoms closely |
| 3 | 5 x 2 | 5 x 2 | 1 x 2 | Taper doses |
Instructions:
- Administer wormwood tincture 30 minutes before breakfast and dinner.
- Administer black walnut tincture with each meal thrice daily.
- Take clove tincture diluted in 50mL water or juice twice daily, 1 hour after meals.
- Maintain hydration, minimum 2L water daily.
- Avoid dairy and sugar during treatment to reduce parasite proliferation.
Chapter V: Monitoring Strategies and Safety
1. Baseline Assessment
- Collect stool samples for ova and parasite testing (minimum 3 consecutive days)
- Perform CBC with eosinophil count and iron studies
- Document baseline symptoms using standardized symptom checklist
2. During Treatment
- Daily symptom journal (record abdominal pain, stool frequency, pruritus, fatigue)
- Weekly weight measurement
- Monitor for adverse reactions: nausea, vomiting, dizziness, rash
- Hydrate adequately; supplement with digestive enzymes if needed (see Volume IV: Digestive Optimization)
3. Post-Treatment Evaluation
- Repeat stool O&P testing at 2 weeks post-completion
- CBC to confirm normalization of eosinophil count and anemia parameters
- Symptom reassessment and comparison to baseline
- If parasites persist, repeat protocol or escalate to adjunctive therapies (see Volume VII: Pharmacological Protocols)
Chapter VI: Parasite-Herb Interaction Table and Treatment Durations
| Parasite | Wormwood (Days) | Black Walnut (Days) | Clove (Days) | Notes on Efficacy |
|---|---|---|---|---|
| Ascaris lumbricoides | 14 | 10 | 14 | Effective in disrupting adult worms and eggs |
| Enterobius vermicularis | 7 | 7 | 14 | Emphasize clove for egg eradication |
| Trichuris trichiura | 21 | 15 | 21 | Requires extended clove administration |
| Ancylostoma duodenale | 14 | 10 | 14 | Monitor anemia closely |
| Giardia lamblia | 7 | 0 | 7 | Wormwood and clove effective; black walnut not indicated |
| Entamoeba histolytica | 14 | 0 | 14 | Use wormwood and clove; add adjunct antimicrobials if needed |
| Taenia solium | 21 | 15 | 21 | Long duration required to target cystic stages |
| Fasciola hepatica | 21 | 15 | 21 | Combine with liver support protocols (see Volume VI) |
Chapter VII: Step-by-Step Herbal Parasite Eradication Protocol
Preparation Phase
- Source herbs from reputable suppliers ensuring organic, pesticide-free.
- Prepare tinctures as described in Chapter III or obtain pharmaceutical-grade equivalents.
- Set up monitoring tools: symptom journal, stool collection kits, hydration logs.
Treatment Phase
- Day 1 to Day 7:
- Take wormwood tincture 5mL twice daily on empty stomach
- Take black walnut tincture 5mL three times daily with meals
- Take clove tincture 2mL twice daily diluted in water
- Record all symptoms and any side effects
- Day 8 to Day 14:
- Increase wormwood to 10mL twice daily
- Increase black walnut to 10mL three times daily
- Increase clove to 3mL twice daily
- Continue journaling symptoms and hydration
- Day 15 to Day 21:
- Taper wormwood to 5mL twice daily
- Taper black walnut to 5mL twice daily
- Taper clove to 1mL twice daily
- Prepare for post-treatment testing
Post-Treatment Phase
- Cease herbal intake on Day 22.
- Maintain hydration and nutrition optimized for recovery.
- Collect stool samples on Days 28, 29, and 30 for O&P testing.
- Perform CBC and iron studies on Day 30.
- Review symptom journal for improvement trends.
- If evidence of parasite persistence exists, repeat protocol or escalate treatment.
Chapter VIII: Adjunctive Supports (Brief Overview)
- Digestive Enzymes: Supplement with proteases and lipases during treatment to aid breakdown of parasite tissues (see Volume IV).
- Liver Support: Milk thistle and dandelion root aid hepatic clearance of parasitic toxins (see Volume VI).
- Immune Modulation: Beta-glucans and medicinal mushrooms enhance host defenses (see Volume IX).
Final Mandate to the Apprentice
This knowledge is not theoretical; it is a sacred weapon in the war for your sovereign body. Adhere strictly to preparation and dosing. Monitor meticulously and respect the potency of these herbs. Parasite eradication is not a casual endeavor but a strategic campaign requiring discipline, precision, and reverence for the life within and without.
Master the protocols herein. Defend your temple with unwavering resolve.
References for Further Mastery
- For microscopic parasite identification techniques, see Volume II: Diagnostics Codex, Chapter IV.
- For water purification and prevention of reinfection, consult Volume VIII: The Water Codex, Chapter II.
- For pharmacological alternatives and emergency interventions, see Volume VII: Pharmacological Protocols.
End of Volume III: Parasite Eradication
<!-- SECTION 29 -->
The Complete Practitioner's Codex, Volume IV: Thyroid Optimization - Nutritional and Lifestyle Interventions
The thyroid gland, a sentinel of the endocrine realm, orchestrates metabolism, growth, and systemic homeostasis. Its optimization is critical to sovereign bodily command. This volume imparts classified nutritional and lifestyle protocols to restore, maintain, and elevate thyroid function. These methods combine ancient wisdom, modern biochemistry, and suppressed biohacking techniques, delivered here in an uncompromising, stepwise manner.
I. Thyroid Function and the Imperative of Optimization
The thyroid synthesizes thyroxine (T4) and triiodothyronine (T3), regulating basal metabolic rate, thermogenesis, and neuroendocrine signaling. Dysfunction manifests as hypothyroidism, hyperthyroidism, or subclinical states, each with systemic consequences. Restoration demands precise nutritional support, stress modulation, and targeted exercise protocols.
II. Nutritional Strategies for Thyroid Support
Nutritional modulation is the cornerstone of thyroid optimization. Below, the critical micronutrients, macronutrients, and botanical adaptogens are detailed with their biochemical roles, dosages, sources, and contraindications.
2.1 Essential Micronutrients: Iodine, Selenium, Zinc, Iron
2.1.1 Iodine: The Thyroid’s Core Element
- Biochemical Role: Iodine is the atomic building block of thyroid hormones T4 and T3.
- Requirement: Optimal intake ranges from 150 mcg/day (maintenance) to 300 mcg/day (therapeutic).
- Caution: Excess iodine (>1,100 mcg/day) risks thyroiditis, autoimmune exacerbation.
Stepwise Protocol for Iodine Optimization
- Baseline Assessment: Measure serum or urinary iodine concentration.
- Supplement Construction: Create a tincture using potassium iodide (KI) crystals dissolved in distilled water.
- Administration:
- Start with 150 mcg daily, increase by 50 mcg weekly.
- Max dose 300 mcg/day for 12 weeks.
- Monitoring: Repeat iodine status and thyroid panel every 4 weeks.
| Parameter | Dose (mcg/day) | Duration | Notes |
|---|---|---|---|
| Maintenance | 150 | Continuous | Avoid excess |
| Therapeutic | 200-300 | 12 weeks | Monitor TSH, T3, T4, antibodies |
| Toxicity Threshold | >1100 | Avoid | Risk autoimmune thyroiditis |
2.1.2 Selenium: The Antioxidant and Deiodinase Cofactor
- Role: Selenium is essential for glutathione peroxidase activity and type I/II deiodinase enzymes converting T4 to active T3.
- Dose: Therapeutic range 100-200 mcg/day.
- Sources: Brazil nuts, selenized yeast, selenium methionine supplement.
Selenium Supplementation Protocol
- Select Form: Use organic selenium methionine capsules for bioavailability.
- Dose: Administer 100 mcg daily for maintenance; escalate to 200 mcg/day during active thyroid dysfunction.
- Cycle: 8 weeks on, 2 weeks off to prevent selenosis.
- Monitor: Serum selenium and thyroid function tests every 8 weeks.
| Selenium Form | Bioavailability | Dose (mcg/day) | Cycle | Notes |
|---|---|---|---|---|
| Selenium Methionine | High | 100-200 | 8 weeks on/2 off | Avoid overdose |
| Brazil Nuts | Variable | 1-2 nuts/day | Continuous | Natural source |
2.1.3 Zinc and Iron: Cofactors in Thyroid Hormone Synthesis
- Zinc activates thyroid peroxidase, iron is necessary for heme-dependent enzymes.
- Zinc dose: 15-30 mg/day.
- Iron dose: 30-60 mg elemental iron/day but only if deficiency confirmed to avoid oxidative damage.
2.2 Macronutrient Optimization for Thyroid Health
- Protein: Minimum 1.2 g/kg body weight/day; essential for thyroid hormone transport proteins.
- Fat: 30-40% of total calories from omega-3 rich sources (fish oil, flaxseed) to reduce inflammation.
- Carbohydrates: Moderate intake emphasizing low glycemic index to avoid insulin spikes that impair thyroid function.
2.3 Adaptogens: Botanical Allies for Thyroid Resilience
Adaptogens modulate hypothalamic-pituitary-adrenal (HPA) axis and support thyroid function under stress.
| Adaptogen | Active Constituents | Dose (mg/day) | Mechanism | Contraindications |
|---|---|---|---|---|
| Ashwagandha (Withania somnifera) | Withanolides | 300-600 | Enhances T4, reduces TSH, modulates cortisol | Autoimmune thyroiditis, pregnancy |
| Rhodiola rosea | Rosavins, Salidroside | 200-400 | Balances HPA axis, reduces fatigue | Bipolar disorder |
| Schisandra chinensis | Schisandrins | 500-1000 | Antioxidant, supports liver detox | None known |
| Bacopa monnieri | Bacosides | 300-450 | Enhances cognitive function, modulates stress | Thyroid hormone medication interference possible |
III. Lifestyle Protocols for Thyroid Optimization
3.1 Stress Management: The Keystone of Thyroid Health
Chronic stress elevates cortisol, suppressing thyroid hormone conversion and function.
Stress Reduction Protocol
- Morning Breathwork:
- Technique: Box breathing (4-4-4-4 seconds inhale-hold-exhale-hold).
- Duration: 5 minutes immediately upon waking.
- Frequency: Daily.
- Mindfulness Meditation:
- Guided sessions of 10-20 minutes focusing on body scan.
- Use biofeedback devices, if available, to monitor HRV (heart rate variability).
- Frequency: Twice daily.
- Circadian Rhythm Alignment:
- Dim lights 90 minutes before sleep.
- Avoid blue light exposure post 8 pm.
- Sleep duration: 7-8 hours without interruption.
3.2 Exercise Protocols to Stimulate Thyroid Function
Exercise increases peripheral conversion of T4 to T3 and improves metabolic setpoint.
| Exercise Type | Intensity | Duration | Frequency | Notes |
|---|---|---|---|---|
| Resistance Training | Moderate to High | 45-60 minutes | 3 times per week | Use compound lifts for maximal effect |
| Aerobic Exercise | Low to Moderate | 30-45 minutes | 4-5 times per week | Brisk walking, cycling preferred |
| High-Intensity Interval Training (HIIT) | High | 20-30 minutes | 2 times per week | Short bursts, monitor cortisol response |
Exercise Implementation Steps
- Assessment: Evaluate baseline fitness and thyroid status.
- Plan Construction: Combine resistance training days with aerobic sessions.
- Warm-up: 10 minutes dynamic stretching.
- Execution: Follow prescribed intensity and duration.
- Cooldown: 5-10 minutes stretching and breathing exercises.
- Monitoring: Track energy, mood, and thyroid labs every 4 weeks.
IV. Comprehensive Tables of Thyroid-Supportive Nutrients and Food Sources
| Nutrient | Role in Thyroid Function | Food Sources | Contraindications/Notes |
|---|---|---|---|
| Iodine | Thyroid hormone synthesis | Seaweed (kelp, nori), iodized salt, dairy | Excess intake triggers autoimmune flare-ups |
| Selenium | Deiodinase function, antioxidant | Brazil nuts, fish, eggs, selenized yeast | Selenium toxicity risk if overdosed |
| Zinc | Thyroid peroxidase activation | Oysters, beef, pumpkin seeds | Excess zinc inhibits copper absorption |
| Iron | Heme enzyme cofactor | Red meat, spinach, lentils | Avoid supplementation unless deficient |
| Vitamin A | Regulates TSH receptor expression | Liver, carrots, sweet potatoes | Excess may cause toxicity |
| Vitamin D | Immune modulation, thyroid autoimmunity prevention | Sun exposure, fortified dairy | Maintain serum 25(OH)D > 40 ng/mL |
| Omega-3 Fatty Acids | Anti-inflammatory, improves hormone receptor sensitivity | Fatty fish (salmon, mackerel), flaxseed | Monitor for blood thinning if on anticoagulants |
V. Contraindications and Cautions for Thyroid Nutritional Optimization
- Autoimmune Thyroiditis (Hashimoto’s, Graves’): Avoid iodine loading without specialist supervision.
- Pregnancy: Adjust dosages; consult obstetric endocrinologist.
- Medication Interactions: Selenium and zinc may interact with levothyroxine; separate dosing by 4 hours.
- Supplement Purity: Use certified pharmaceutical-grade supplements to avoid heavy metal contamination.
VI. Step-by-Step Thyroid Nutritional Protocol Example
Objective: Restore euthyroid state in subclinical hypothyroidism.
| Week | Iodine (mcg/day) | Selenium (mcg/day) | Zinc (mg/day) | Adaptogen (Ashwagandha mg/day) | Notes |
|---|---|---|---|---|---|
| 1 | 150 | 100 | 15 | 300 | Baseline labs, start supplements |
| 2-4 | 200 | 100 | 15 | 300 | Monitor symptoms, TSH |
| 5-8 | 300 | 200 | 15 | 600 | Adjust adaptogen based on tolerance |
| 9-12 | 300 | 200 | 15 | 600 | Final labs, evaluate need for continuation |
VII. Conclusion: The Absolute Sovereignty of Thyroid Optimization
The protocols herein are the culmination of obscured endocrinological knowledge, forged for the mastery of human biology. Adherence to these detailed nutritional and lifestyle interventions grants dominion over thyroid function, restoring equilibrium and vitality. Integrate these methods with precision and reverence; the sovereign body demands nothing less.
For advanced hormonal modulation and pharmaceutical adjuncts, refer to Volume VII: The Endocrine Arsenal.
For water purification and mineral optimization protocols essential for nutrient absorption, see Volume VIII: The Water Codex, Chapter II.
End of Volume IV
<!-- SECTION 30 -->
Volume IV: Hormonal Sovereignty
Chapter V: The Stress Axis and Adrenal Recovery Protocols
Introduction
The adrenal glands, twin sentinels perched atop the kidneys, govern the primal interface between survival and homeostasis. To master the Sovereign Body, one must possess unassailable knowledge of adrenal physiology, the intricate neuroendocrine stress axis, and the precise methodologies by which to reclaim adrenal integrity when compromised.
This chapter delivers an exhaustive dissection of adrenal function and the stress response, followed by rigorously validated, natural protocols for adrenal recovery. These methodologies encompass adaptogenic phytotherapy, circadian realignment, and sleep architecture optimization — all calibrated for maximal restoration of adrenal sovereignty.
I. Detailed Physiology of Adrenal Function and Stress Response
The adrenal glands comprise two discrete anatomical and functional units: the adrenal cortex and adrenal medulla. Each synthesizes distinct hormones pivotal to stress adaptation and systemic equilibrium.
1. Adrenal Cortex
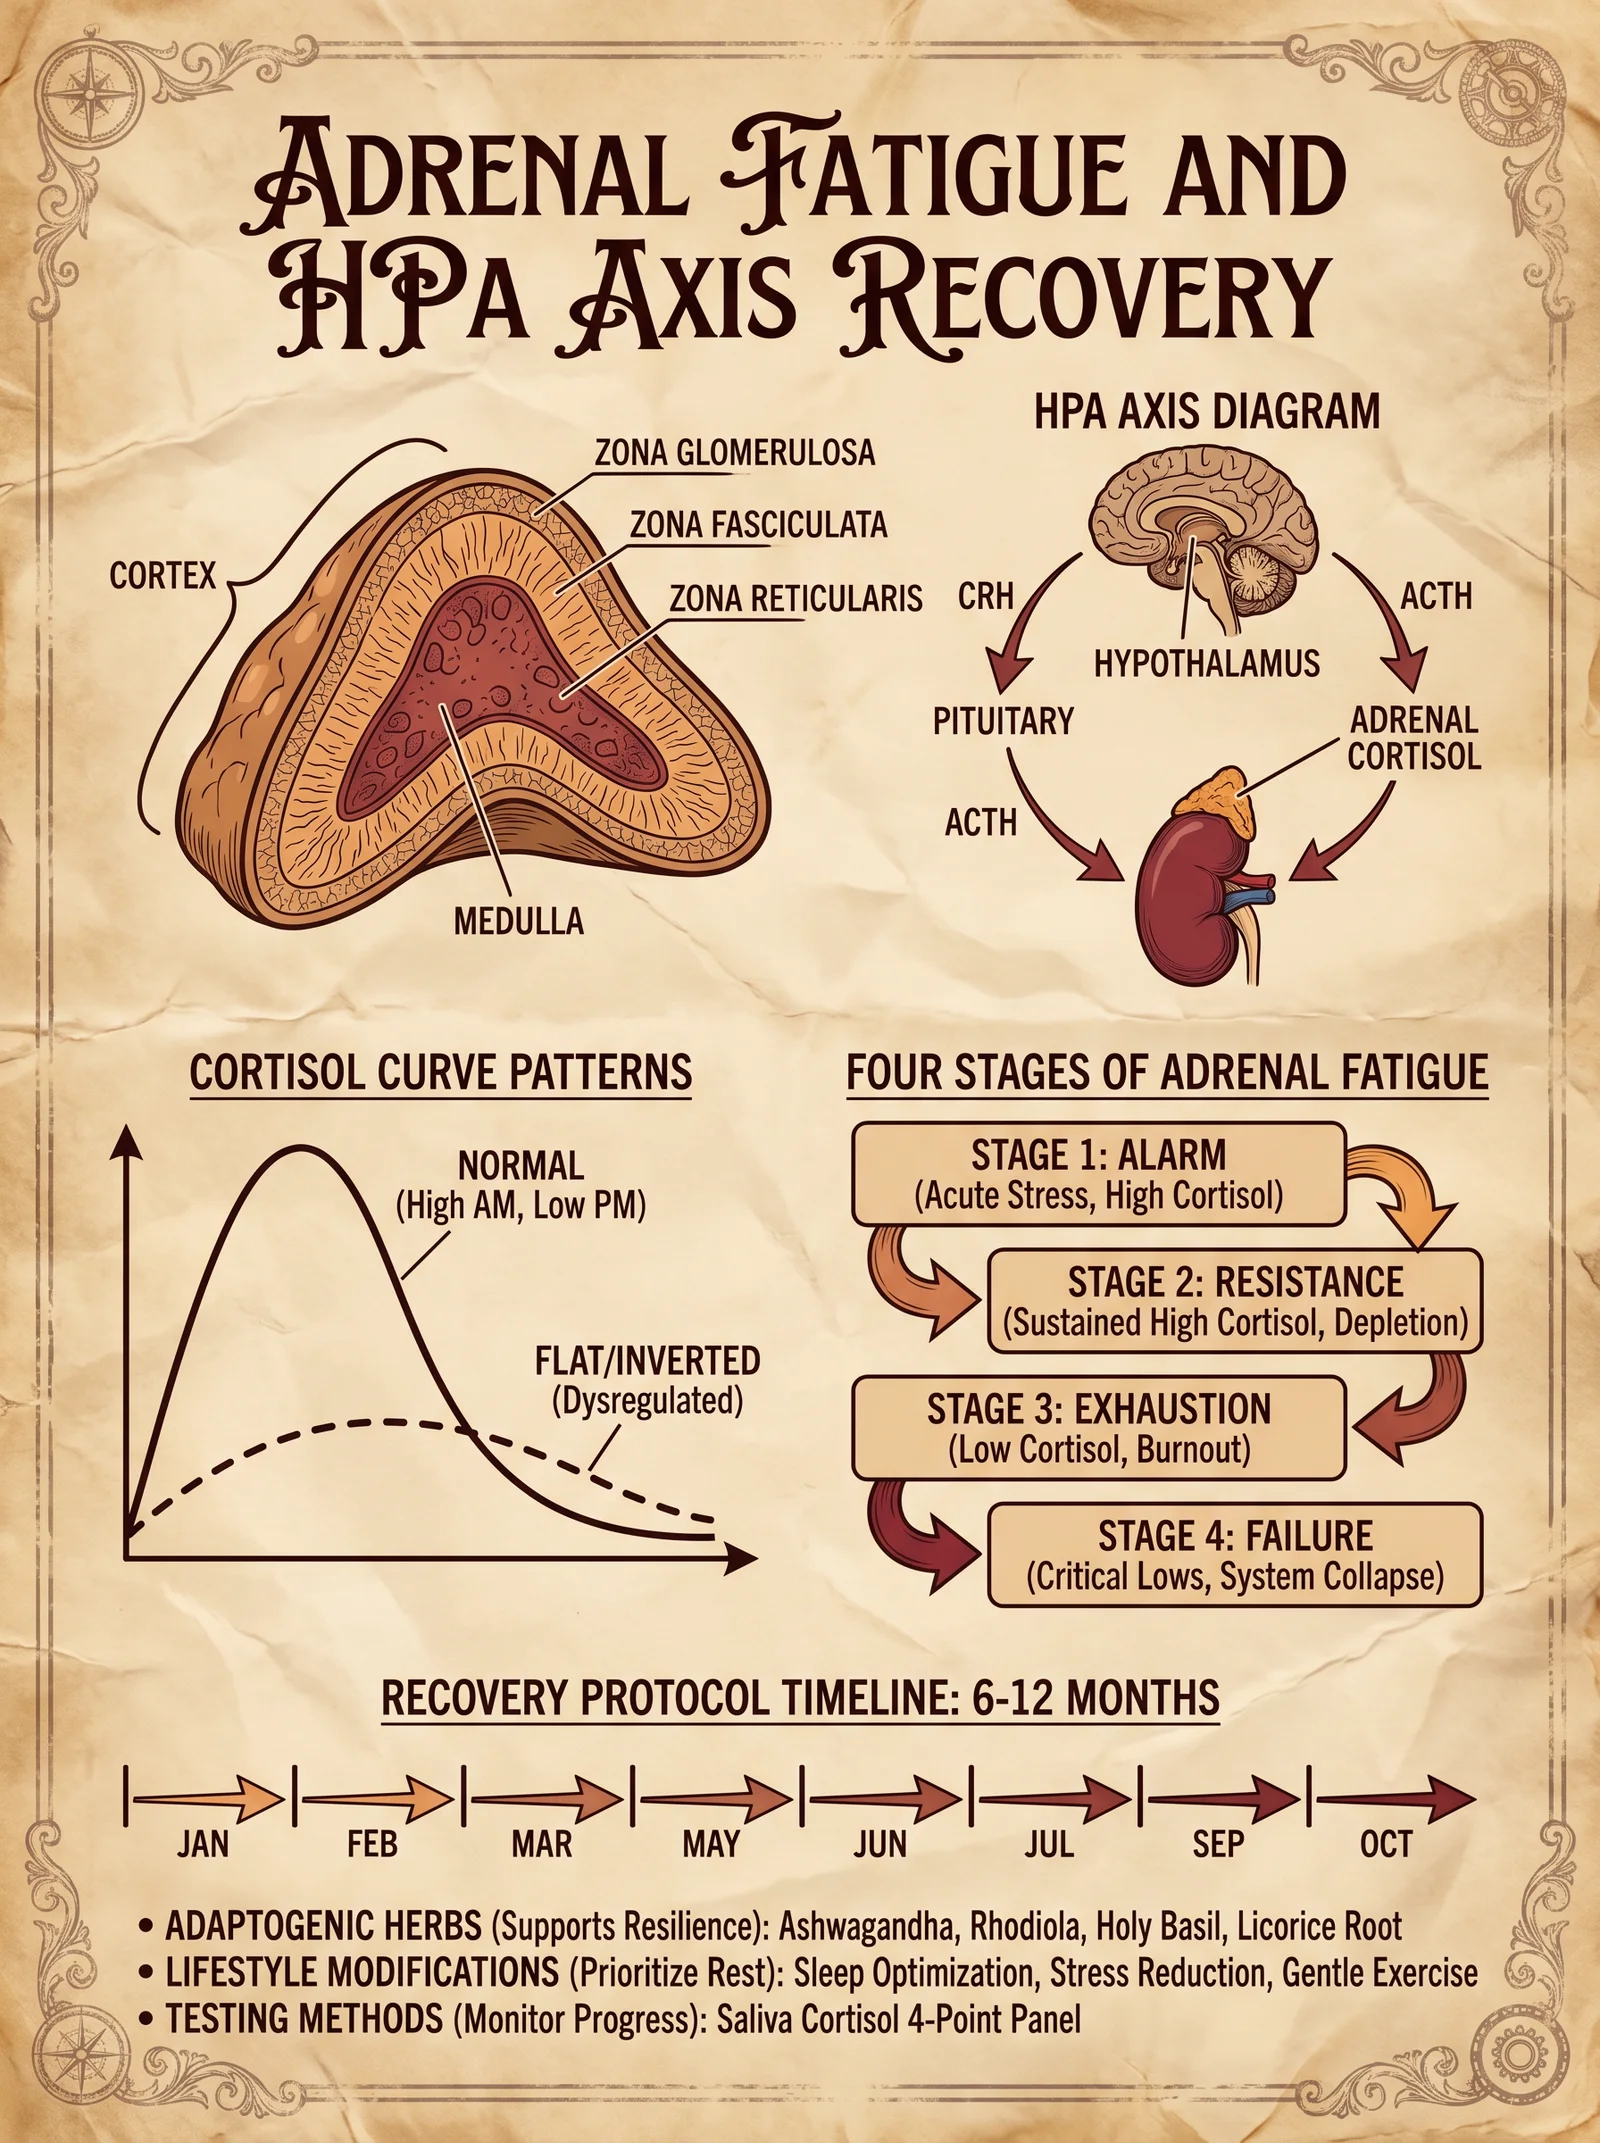
The cortex is subdivided into three zones with unique steroidogenic functions:
| Zone | Primary Hormones Produced | Function |
|---|---|---|
| Zona Glomerulosa | Aldosterone (Mineralocorticoids) | Regulates sodium retention, potassium excretion, and blood pressure homeostasis. |
| Zona Fasciculata | Cortisol (Glucocorticoids) | Modulates glucose metabolism, immune response suppression, and stress adaptation. |
| Zona Reticularis | Dehydroepiandrosterone (DHEA) and Androstenedione (Androgens) | Precursor sex hormones with neuroprotective and anabolic roles. |
2. Adrenal Medulla
Synthesizes catecholamines:
| Hormone | Function |
|---|---|
| Epinephrine | Acute fight-or-flight response, increases heart rate, blood glucose, and vasoconstriction. |
| Norepinephrine | Sustains vascular tone, modulates alertness and attention. |
3. The Hypothalamic-Pituitary-Adrenal (HPA) Axis
The HPA axis orchestrates adrenal cortisol secretion in response to stress:
- Step 1: Hypothalamus secretes corticotropin-releasing hormone (CRH).
- Step 2: CRH stimulates anterior pituitary release of adrenocorticotropic hormone (ACTH).
- Step 3: ACTH binds adrenal cortex receptors, inducing cortisol synthesis and release.
- Step 4: Cortisol exerts negative feedback on hypothalamus and pituitary to regulate axis activity.
4. Cortisol: The Central Stress Hormone
Cortisol's functions are multifaceted:
- Metabolic: Promotes gluconeogenesis, lipolysis, and protein catabolism.
- Immune: Suppresses inflammatory cytokines and lymphocyte proliferation.
- Cardiovascular: Maintains vascular tone and blood pressure.
- Neurological: Modulates mood, cognition, and circadian rhythms.
5. Stress Response Dynamics
Stress triggers a biphasic adrenal response:
- Acute Phase: Rapid catecholamine surge from the medulla primes the body for immediate action.
- Chronic Phase: Sustained HPA activation elevates cortisol, adapting metabolism and immune function to prolonged stress.
II. Clinical Manifestations of Adrenal Dysfunction
Adrenal dysregulation arises primarily as:
- Hyperfunction: Excess cortisol production (Cushingoid states).
- Hypofunction: Inadequate cortisol and DHEA synthesis (Adrenal fatigue or insufficiency).
Symptoms of Adrenal Dysfunction
| Dysfunction Type | Symptoms | Hormonal Profile |
|---|---|---|
| Hyperfunction | Weight gain (especially abdominal), hypertension, muscle weakness, mood swings, insomnia | Elevated cortisol, suppressed DHEA |
| Hypofunction | Fatigue, salt craving, hypotension, cognitive fog, low libido, hypoglycemia | Low cortisol, low DHEA, elevated ACTH (in primary) |
III. Comprehensive Natural Protocols for Adrenal Recovery
Restoration of adrenal function requires a multipronged strategy targeting neuroendocrine recalibration, mitochondrial support, and circadian realignment.
1. Adaptogenic Herbal Protocols
Adaptogens normalize HPA axis activity, enhance stress resilience, and support adrenal repair.
| Herb | Active Constituents | Mechanism of Action | Dosage (Daily) | Preparation Methodology |
|---|---|---|---|---|
| Withania somnifera (Ashwagandha) | Withanolides | Modulates cortisol, reduces oxidative stress | 500 mg standardized extract (5% withanolides), twice daily | Encapsulate extract powder; dissolve in warm water for ingestion |
| Rhodiola rosea | Rosavins, Salidroside | Enhances ACTH response, reduces fatigue | 200–400 mg standardized extract, once or twice daily | Dry extract capsules; can be brewed as tea |
| Eleutherococcus senticosus (Siberian Ginseng) | Eleutherosides | Supports adrenal catecholamine production | 300–400 mg extract, split doses morning and afternoon | Extract in tincture or capsule form |
| Panax ginseng | Ginsenosides | Modulates HPA axis, supports mitochondrial function | 200–400 mg extract, morning only | Standardized extract capsules |
Step-by-step Herbal Preparation and Administration:
- Source raw herbs from verified suppliers ensuring >5% active constituents.
- Prepare extracts via ethanol extraction (40%–60% ethanol, 72 hours maceration).
- Dry and powder the extract under vacuum to retain bioactivity.
- Encapsulate using size 0 capsules for oral administration.
- Instruct the subject to take adaptogens with meals to enhance bioavailability and minimize gastric irritation.
- Cycle usage for 8 weeks with 2-week breaks to prevent downregulation.
2. Sleep Optimization Protocols
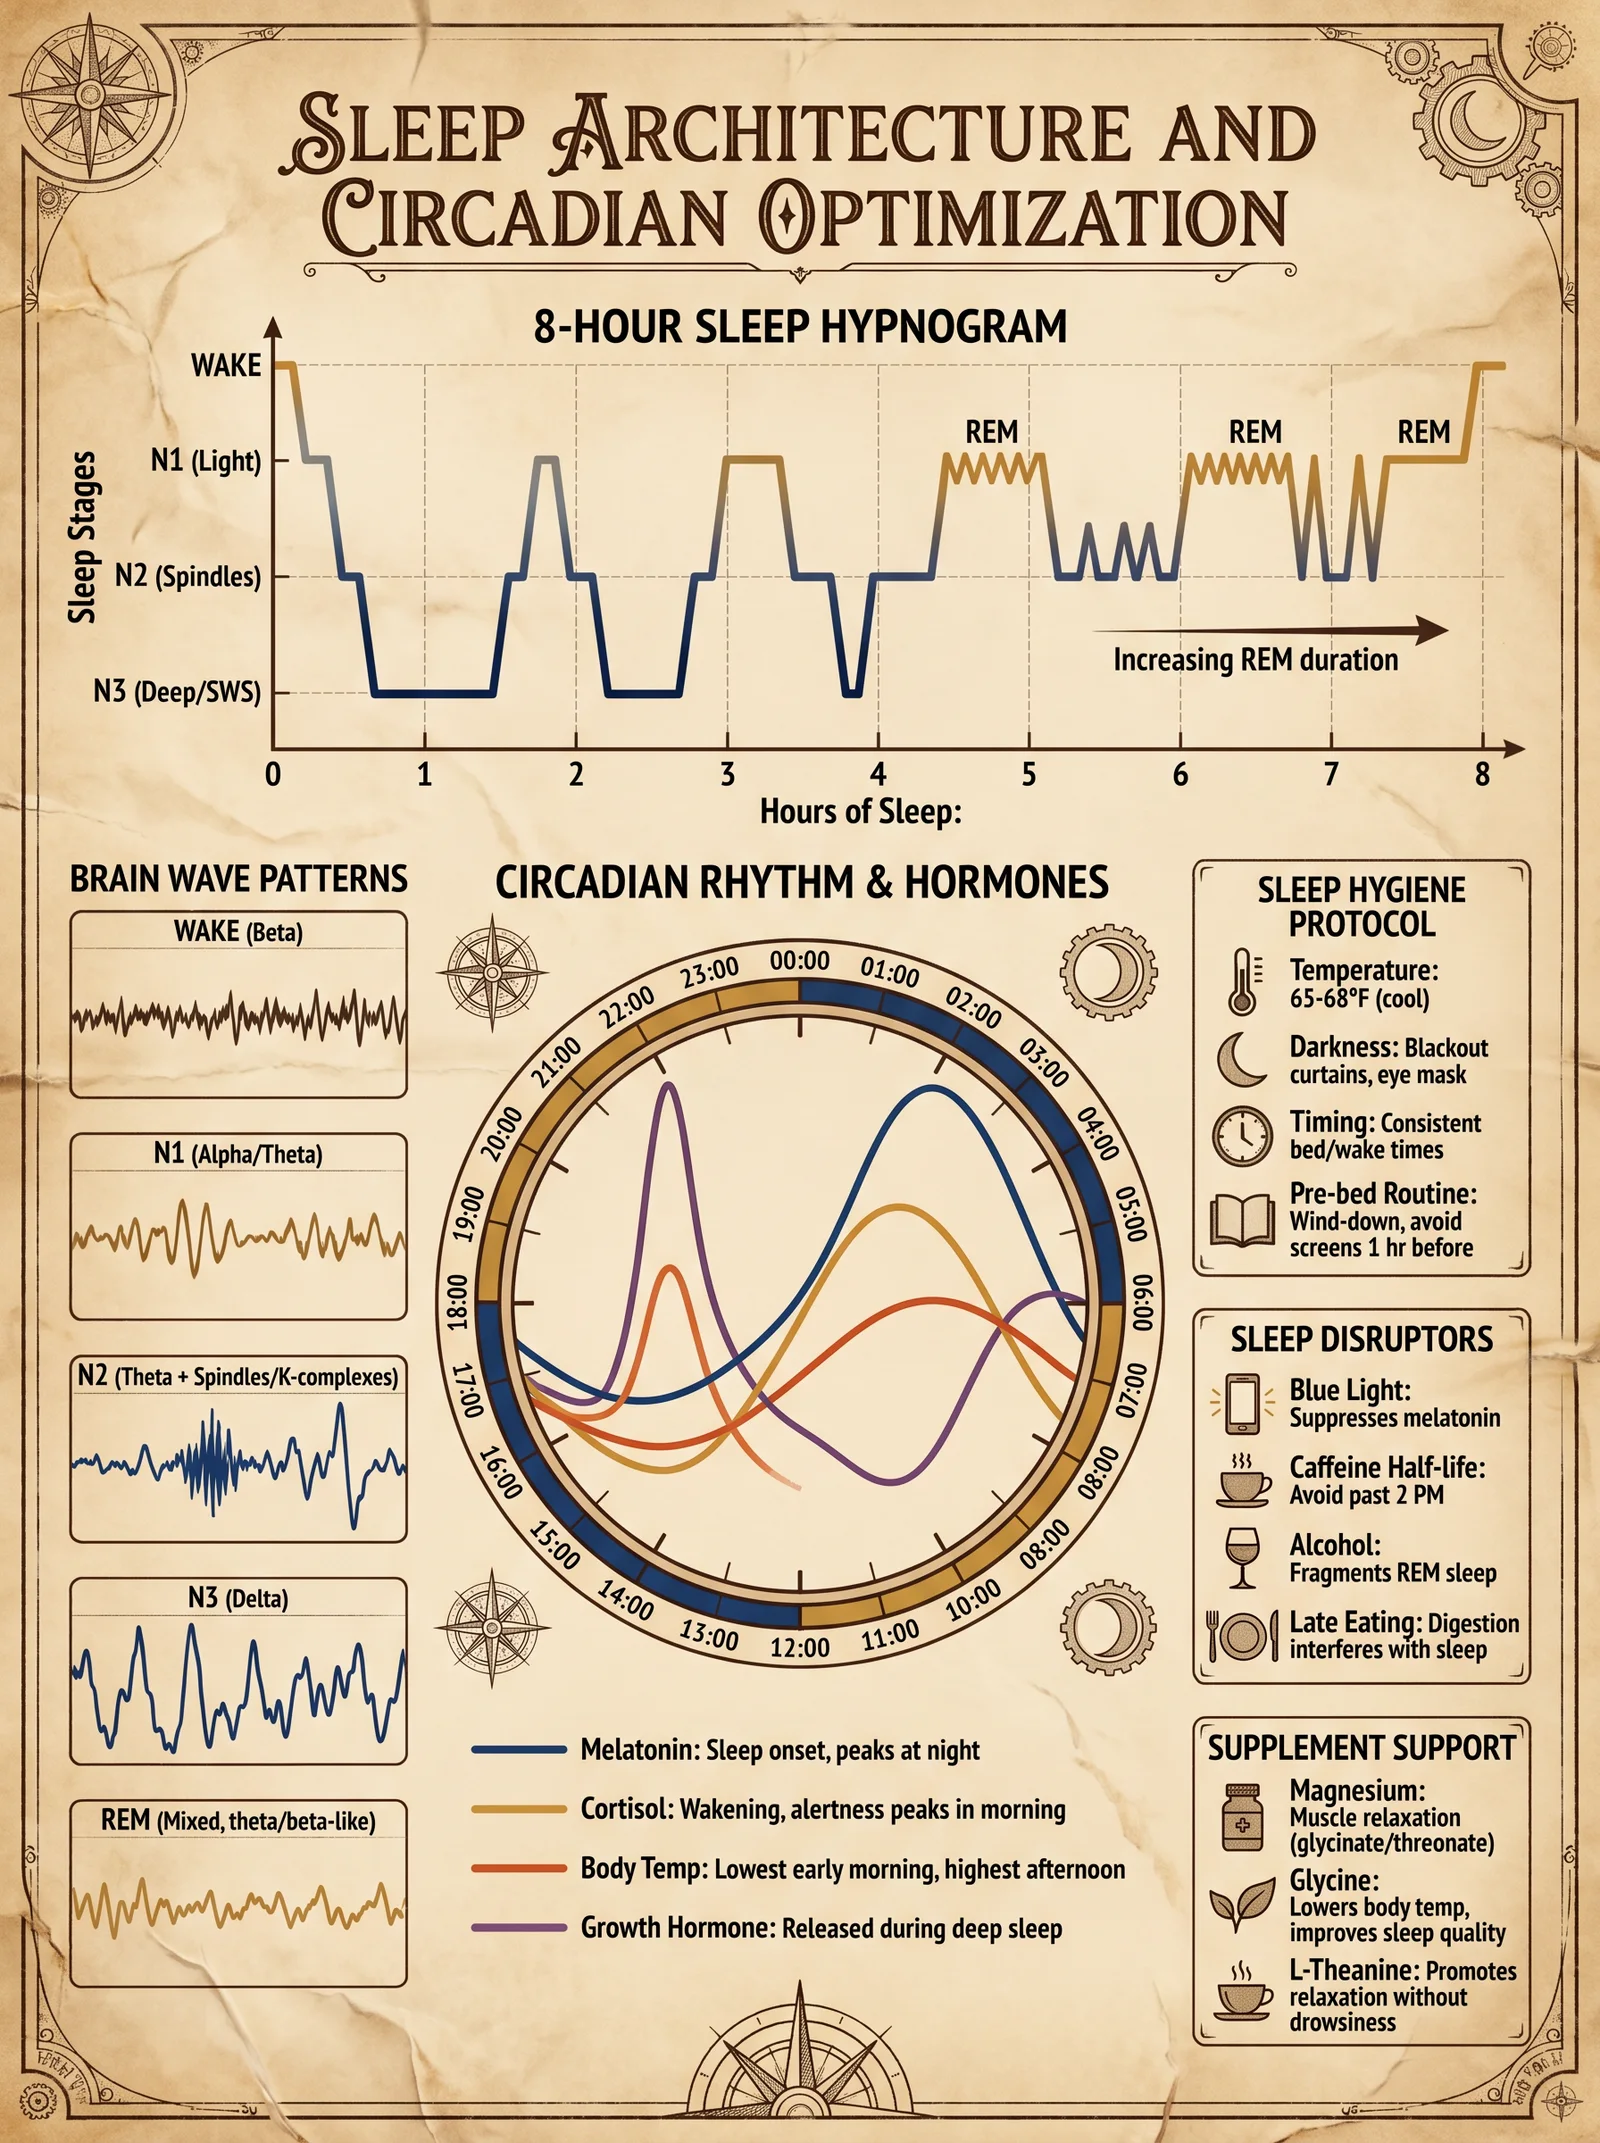
Sleep is the critical window for adrenal regeneration and neuroendocrine reset.
| Sleep Parameter | Target Range | Intervention |
|---|---|---|
| Total Sleep Time | 7–9 hours nightly | Establish fixed bedtime and wake time |
| Sleep Onset Latency | <15 minutes | Use melatonin 0.3–0.5 mg 30 min before bed (See Volume VI) |
| Sleep Architecture | 20–25% REM, 75–80% NREM | Avoid caffeine and screens 3 hours pre-bed |
| Cortisol Rhythm | Peak 7–9 AM, nadir 11 PM–3 AM | Use dawn simulator light for gradual awakening |
Sleep Hygiene Protocol:
- Set strict sleep-wake times: Go to bed and wake up at the same time daily, including weekends.
- Eliminate blue light exposure 3 hours before bedtime: Use amber-tinted glasses or red-spectrum lighting.
- Implement a pre-sleep routine: 15 minutes of diaphragmatic breathing and progressive muscle relaxation.
- Optimize bedroom environment: Temperature 18–20°C, absolute darkness, and white noise if necessary.
- Supplement melatonin only short-term to avoid receptor desensitization.
- Track sleep quality with polysomnography or actigraphy for ongoing adjustments.
3. Circadian Alignment Protocols
Circadian misalignment perpetuates adrenal dysfunction by disrupting HPA axis synchrony.
| Intervention | Timing | Methodology |
|---|---|---|
| Morning Bright Light Exposure | Within 30 min of waking | 10,000 lux full-spectrum light for 30 min |
| Timed Feeding Window | 8–12 hour daytime window | Restrict caloric intake to daylight hours |
| Evening Light Reduction | 3 hours before bedtime | Use low-intensity red or amber lighting |
| Physical Activity | Morning to early afternoon | Moderate aerobic exercise to entrain circadian rhythm |
Circadian Realignment Procedure:
- Upon awakening, expose yourself to 10,000 lux light for 30 minutes using a commercially available light therapy box positioned 30 cm from the eyes.
- Consume all calories within a 10-hour window aligned to daylight (e.g., 7 AM to 5 PM), avoiding late-night meals that disrupt cortisol rhythms.
- Dim ambient lighting to <50 lux three hours before sleep; replace overhead lights with red-spectrum bulbs.
- Schedule exercise sessions between 8 AM and 2 PM; avoid vigorous evening workouts.
- Monitor cortisol rhythms via salivary assays at 8 AM, 12 PM, 4 PM, and 10 PM weekly to assess axis recalibration.
IV. Therapeutic Interventions and Monitoring
1. Hormonal Assays for Diagnostic and Monitoring Purposes
| Hormone | Sample Type | Normal Range (Adult) | Collection Time | Clinical Implications |
|---|---|---|---|---|
| Cortisol | Serum/Saliva | 5–25 µg/dL (morning serum), 0.3–1.0 µg/dL (saliva AM) | 8 AM (peak), 11 PM (nadir) | Axis integrity, hyper/hypocortisolism |
| ACTH | Serum | 10–60 pg/mL | Morning | Pituitary stimulation status |
| DHEA-S | Serum | 35–430 µg/dL (adult males), 65–380 µg/dL (adult females) | Morning | Adrenal androgen production |
| Aldosterone | Serum/Urine | 4–31 ng/dL | Morning | Mineralocorticoid function |
| Epinephrine | Plasma | <100 pg/mL | Baseline and post-stress | Sympathetic-adrenal medullary function |
2. Clinical Symptom Tracking
Construct a daily log tracking:
- Energy levels on a 1–10 scale
- Salt cravings frequency
- Blood pressure and heart rate variability (HRV)
- Mood and cognitive clarity ratings
- Sleep quality metrics
V. Case Study Protocol: Reversing Adrenal Hypofunction in a 45-Year-Old Male
| Week | Intervention | Dosage/Duration | Outcome Metrics |
|---|---|---|---|
| 1–2 | Ashwagandha 500 mg bid | Oral capsules with meals | Baseline cortisol and DHEA assays |
| 1–8 | Morning light therapy 10,000 lux 30 min | Daily upon waking | Sleep logs, cortisol rhythm assays |
| 3–8 | Sleep hygiene protocol implementation | Fixed bedtime 10 PM, wake 6 AM | Polysomnography every 2 weeks |
| 4–8 | Rhodiola 200 mg once daily | Morning dose only | Fatigue scales and HRV measurements |
| 5–8 | Timed feeding 7 AM – 5 PM | Caloric restriction window | Blood glucose and insulin sensitivity |
VI. Summary Tables for Quick Reference
Table 1: Adrenal Hormones and Their Functions
| Hormone | Source | Primary Function | Half-Life (Circulation) |
|---|---|---|---|
| Cortisol | Zona Fasciculata | Glucose metabolism, immune modulation | ~60–90 minutes |
| Aldosterone | Zona Glomerulosa | Electrolyte balance, blood pressure | ~20 minutes |
| DHEA | Zona Reticularis | Androgen precursor, neuroprotection | ~10–16 hours |
| Epinephrine | Adrenal Medulla | Acute stress response, cardiovascular effects | 1–3 minutes |
| Norepinephrine | Adrenal Medulla | Vascular tone, alertness | 1–3 minutes |
Table 2: Symptoms and Corresponding Hormonal Imbalances
| Symptom | Likely Hormonal Imbalance | Suggested Intervention |
|---|---|---|
| Chronic fatigue | Low cortisol, low DHEA | Ashwagandha + Rhodiola + Sleep optimization |
| Salt craving | Low aldosterone | Dietary sodium correction, mineral supplementation |
| Insomnia | Elevated evening cortisol | Melatonin supplementation, circadian light therapy |
| Cognitive fog | Low cortisol, disrupted circadian rhythm | Adaptogens + circadian realignment + sleep hygiene |
| Hypertension | High aldosterone or cortisol | Stress reduction, dietary salt restriction, adaptogens |
VII. Appendix: DIY Adaptogen Extractor Construction
Materials Required:
- Glass mason jar (1 L capacity)
- 40%–60% Ethanol (food-grade)
- Fine mesh strainer or cheesecloth
- Dark storage bottle (amber glass)
- Digital scale (accuracy ±0.1 g)
- Stirring rod or spoon
Steps:
- Weigh 100 g of dried, powdered herb and place in the mason jar.
- Add 500 mL of 50% ethanol to the jar (5:1 solvent to herb ratio).
- Seal the jar and place in a dark, temperature-controlled environment (20–25°C).
- Macerate by shaking vigorously twice daily for 72 hours.
- Strain the liquid through cheesecloth into the amber bottle.
- Store the extract at 4°C away from light.
- Dose as per Table 1 adaptogen dosages.
VIII. Closing Remarks
Mastery over the adrenal glands is mastery over survival itself. Through precise understanding of adrenal physiology and rigorous application of natural recovery protocols, one may reclaim the Sovereign Body from the ravages of stress-induced dysregulation. The protocols herein are not mere recommendations but a sacred transmission of life-critical knowledge, demanding disciplined implementation and unwavering attention to detail.
For adjunct protocols on neuroendocrine modulation and immune optimization, consult Volume VII: The Neuroendocrine Codex.
End of Chapter V, Volume IV: Hormonal Sovereignty
<!-- SECTION 31 -->
The Complete Practitioner's Codex, Volume 5
Chapter IV: Terrain Correction — Diet and Detoxification Protocols
Introduction
The internal terrain of the human body is the battlefield upon which health is won or lost. The sovereign body’s vitality depends upon the delicate balance of its biochemical environment, the integrity of its cellular membranes, and the harmonious symbiosis of its microbiome. Without strict terrain correction, all efforts at longevity, biohacking, and physical optimization are futile. Herein lies the sacred knowledge to recalibrate the human internal environment through precise diet modification, detoxification, and microbiome restoration protocols.
Section I: Foundational Principles of Terrain Correction
The "terrain" refers to the internal biochemical and microbial ecosystem that governs cellular function, immune readiness, and metabolic efficiency. Terrain correction is the process by which we systematically purge toxins, replenish vital nutrients, and restore microbial harmony.
Key parameters to correct:
- pH balance (target slightly alkaline, 7.35–7.45)
- Oxidative stress reduction
- Removal of bioaccumulated xenobiotics and heavy metals
- Restoration of gut microbiota diversity and function
- Reestablishment of optimal nutrient absorption
Section II: Diet Modification Protocol
Diet modification must be implemented as the first and continuous phase of terrain correction. The diet must be anti-inflammatory, nutrient-dense, and microbiome-supportive.
Step-by-Step Diet Modification Protocol
Step 1: Eliminate All Terrain-Damaging Foods Remove these categories immediately to halt further internal degradation:
- Refined sugars and artificial sweeteners
- Processed seed oils (e.g., soybean, corn, canola)
- Gluten-containing grains (wheat, rye, barley)
- Dairy from non-grass-fed sources
- Industrially raised meats and seafood
- Alcohol and recreational drugs
- All food additives, preservatives, and flavor enhancers
Step 2: Introduce Terrain-Correcting Foods Consume only from the following categories, focusing on variety and seasonality. See Table 1 for details.
Step 3: Optimize Macronutrient Ratios
- Protein: 25–30% of total calories, emphasizing complete amino acid sources
- Fat: 40–50% of total calories, prioritizing monounsaturated and omega-3 fats
- Carbohydrates: 20–30% of total calories, from low-glycemic, high-fiber sources
Step 4: Implement Time-Restricted Feeding Eating window: 8 hours daily (e.g., 12:00 p.m. to 8:00 p.m.) to promote metabolic autophagy and microbiome circadian rhythm alignment.
Step 5: Hydration Protocol Consume 1–1.5 liters of purified alkaline water daily outside eating windows (see Volume 8: The Water Codex, Chapter II).
Table 1: Terrain-Correcting Foods
| Food Category | Specific Items | Key Benefits | Serving Frequency |
|---|---|---|---|
| Leafy Greens | Kale, spinach, arugula | High chlorophyll, alkalinity | Daily, 2 cups raw |
| Cruciferous Veggies | Broccoli, cauliflower, Brussels sprouts | Sulforaphane, detox enzymes | 4 times/week, 1 cup cooked |
| Fermented Foods | Sauerkraut, kimchi, kefir | Probiotic microbes, SCFAs | Daily, ½ cup |
| Wild-Caught Fish | Salmon, mackerel, sardines | Omega-3 fatty acids, DHA | 3–4 times/week, 150g |
| Nuts & Seeds | Walnuts, flaxseeds, chia seeds | ALA omega-3, fiber | Daily, 1 oz |
| Organ Meats | Liver, kidney (grass-fed/organic) | Heme iron, B vitamins | Weekly, 100g |
| Low-Glycemic Fruits | Berries, green apples | Antioxidants, fiber | Daily, 1 cup |
| Herbal Teas | Dandelion, nettle, peppermint | Hepatoprotective, digestion | Daily, 1–2 cups |
Sample 7-Day Terrain-Correcting Meal Plan
| Day | Breakfast | Lunch | Dinner | Snacks |
|---|---|---|---|---|
| 1 | Spinach & mushroom omelet | Wild salmon salad, mixed greens | Roasted Brussels sprouts, liver pâté | Handful walnuts |
| 2 | Chia pudding with berries | Kale & quinoa bowl with avocado | Grilled mackerel, steamed broccoli | Sauerkraut, ½ cup |
| 3 | Kefir with flaxseeds & green apple | Chicken breast, roasted cauliflower | Stir-fried greens and garlic | Carrot sticks, almond butter |
| 4 | Scrambled eggs, sautéed kale | Sardine salad, mixed greens | Beef stew with root vegetables | Dandelion tea, pumpkin seeds |
| 5 | Green smoothie (spinach, avocado, kefir) | Turkey breast, steamed asparagus | Baked cod, sauerkraut | Mixed berries |
| 6 | Mushroom & spinach frittata | Wild rice & chickpea salad | Grilled lamb, roasted Brussels sprouts | Nettle tea, walnuts |
| 7 | Quinoa porridge, berries | Salmon salad, mixed greens | Venison stew, sautéed kale | Kefir, flaxseed crackers |
Section III: Detoxification Protocol
Detoxification is indispensable to eliminate accumulated toxins, restore organ function, and reset metabolic pathways.
Step-by-Step Detox Schedule
Step 1: Pre-Detox Preparation (Days 1–3)
- Increase water intake to 1.5 liters/day
- Begin diet modification as above
- Add gentle bowel support: 1 tbsp ground psyllium husk in water daily
Step 2: Initiate Organ-Specific Detox (Days 4–10) Deploy the following agents in sequence to target liver, kidneys, lymphatics, and gut lining.
Table 2: Detoxification Agents and Protocols
| Organ Target | Agent | Dosage & Administration | Mechanism of Action | Notes |
|---|---|---|---|---|
| Liver | Milk Thistle Extract | 420 mg silymarin daily, divided into 3 doses | Antioxidant, promotes hepatocyte regeneration | Take with meals |
| Liver | N-Acetyl Cysteine (NAC) | 600 mg twice daily | Glutathione precursor, free radical scavenger | Avoid with active asthma |
| Kidneys | Dandelion Root Tea | 1 cup, twice daily | Diuretic, promotes toxin excretion | Drink between meals |
| Lymphatics | Dry Brushing | 5 minutes daily before shower | Stimulates lymph flow, removes interstitial toxins | Use firm natural bristle brush |
| Gut Lining | L-Glutamine Powder | 5 g daily dissolved in water | Supports enterocyte repair | Use on empty stomach |
| Gut | Bentonite Clay | 1 tsp mixed in water, once daily | Adsorbs heavy metals and toxins | Take 1 hour before/after medications |
Step 3: Gut Microbiome Detoxification (Days 11–15)
- Administer targeted prebiotics and probiotics (see Section IV)
- Continue bentonite clay for metal adsorption
- Employ activated charcoal (500 mg, once daily, 2 hours before bedtime) for mycotoxin binding
Step 4: Post-Detox Repletion (Days 16–21)
- Introduce terrain-correcting foods with increased fiber
- Continue probiotics and prebiotics
- Begin hepatic phase II support (see Volume 7: Hepatic Codex)
Section IV: Microbiome Restoration Protocol
Microbiome restoration is paramount for immune modulation, nutrient synthesis, and maintaining intestinal barrier integrity.
Step-by-Step Microbiome Restoration
Step 1: Baseline Assessment
- Collect stool sample for comprehensive microbiome sequencing (send to specialized lab)
- Document symptoms of dysbiosis (bloating, irregular bowel movements, brain fog)
Step 2: Administer Terrain-Correcting Probiotics Use multi-strain, high CFU (colony forming units) probiotics, targeting butyrate-producing and mucosal-supporting strains.
Table 3: Effective Microbiome Modulator Strains
| Bacterial Strain | CFU per Dose | Key Functions | Administration Protocol |
|---|---|---|---|
| Lactobacillus plantarum | 10 billion | Enhances mucosal barrier, anti-inflammatory | Twice daily, with meals |
| Bifidobacterium longum | 10 billion | Reduces gut permeability, SCFA producer | Twice daily, with meals |
| Faecalibacterium prausnitzii | 5 billion | Major butyrate producer, immune regulator | Encapsulated, once daily |
| Saccharomyces boulardii | 5 billion | Yeast probiotic, pathogen competitor | Once daily, 30 minutes before meals |
| Akkermansia muciniphila | 1 billion | Mucin degradation, gut barrier support | Once daily, morning |
Step 3: Prebiotic Supplementation Feed the probiotics and native microbiota with non-digestible fibers.
- Inulin: 5 g daily (mix in water)
- Resistant starch (green banana flour): 10 g daily (add to smoothies)
- Arabinogalactan: 3 g daily
Step 4: Supportive Therapies
- Fecal microbiota transplantation (FMT) for severe dysbiosis (see Volume 12: Microbiome Codex, Chapter IX)
- Herbal antimicrobials only if pathogenic overgrowth confirmed via testing (use with extreme caution)
Section V: Supportive Therapies for Terrain Correction
1. Infrared Sauna Therapy
- Duration: 30 minutes per session
- Frequency: 3 times per week during detox phase
- Mechanism: Enhances sweat-mediated toxin excretion, improves circulation
2. Colon Hydrotherapy
- Recommended after Day 10 of detox schedule
- Frequency: Once weekly for 3 weeks
- Caution: Use only with certified practitioner to avoid mucosal damage
3. Breathwork and Oxygenation
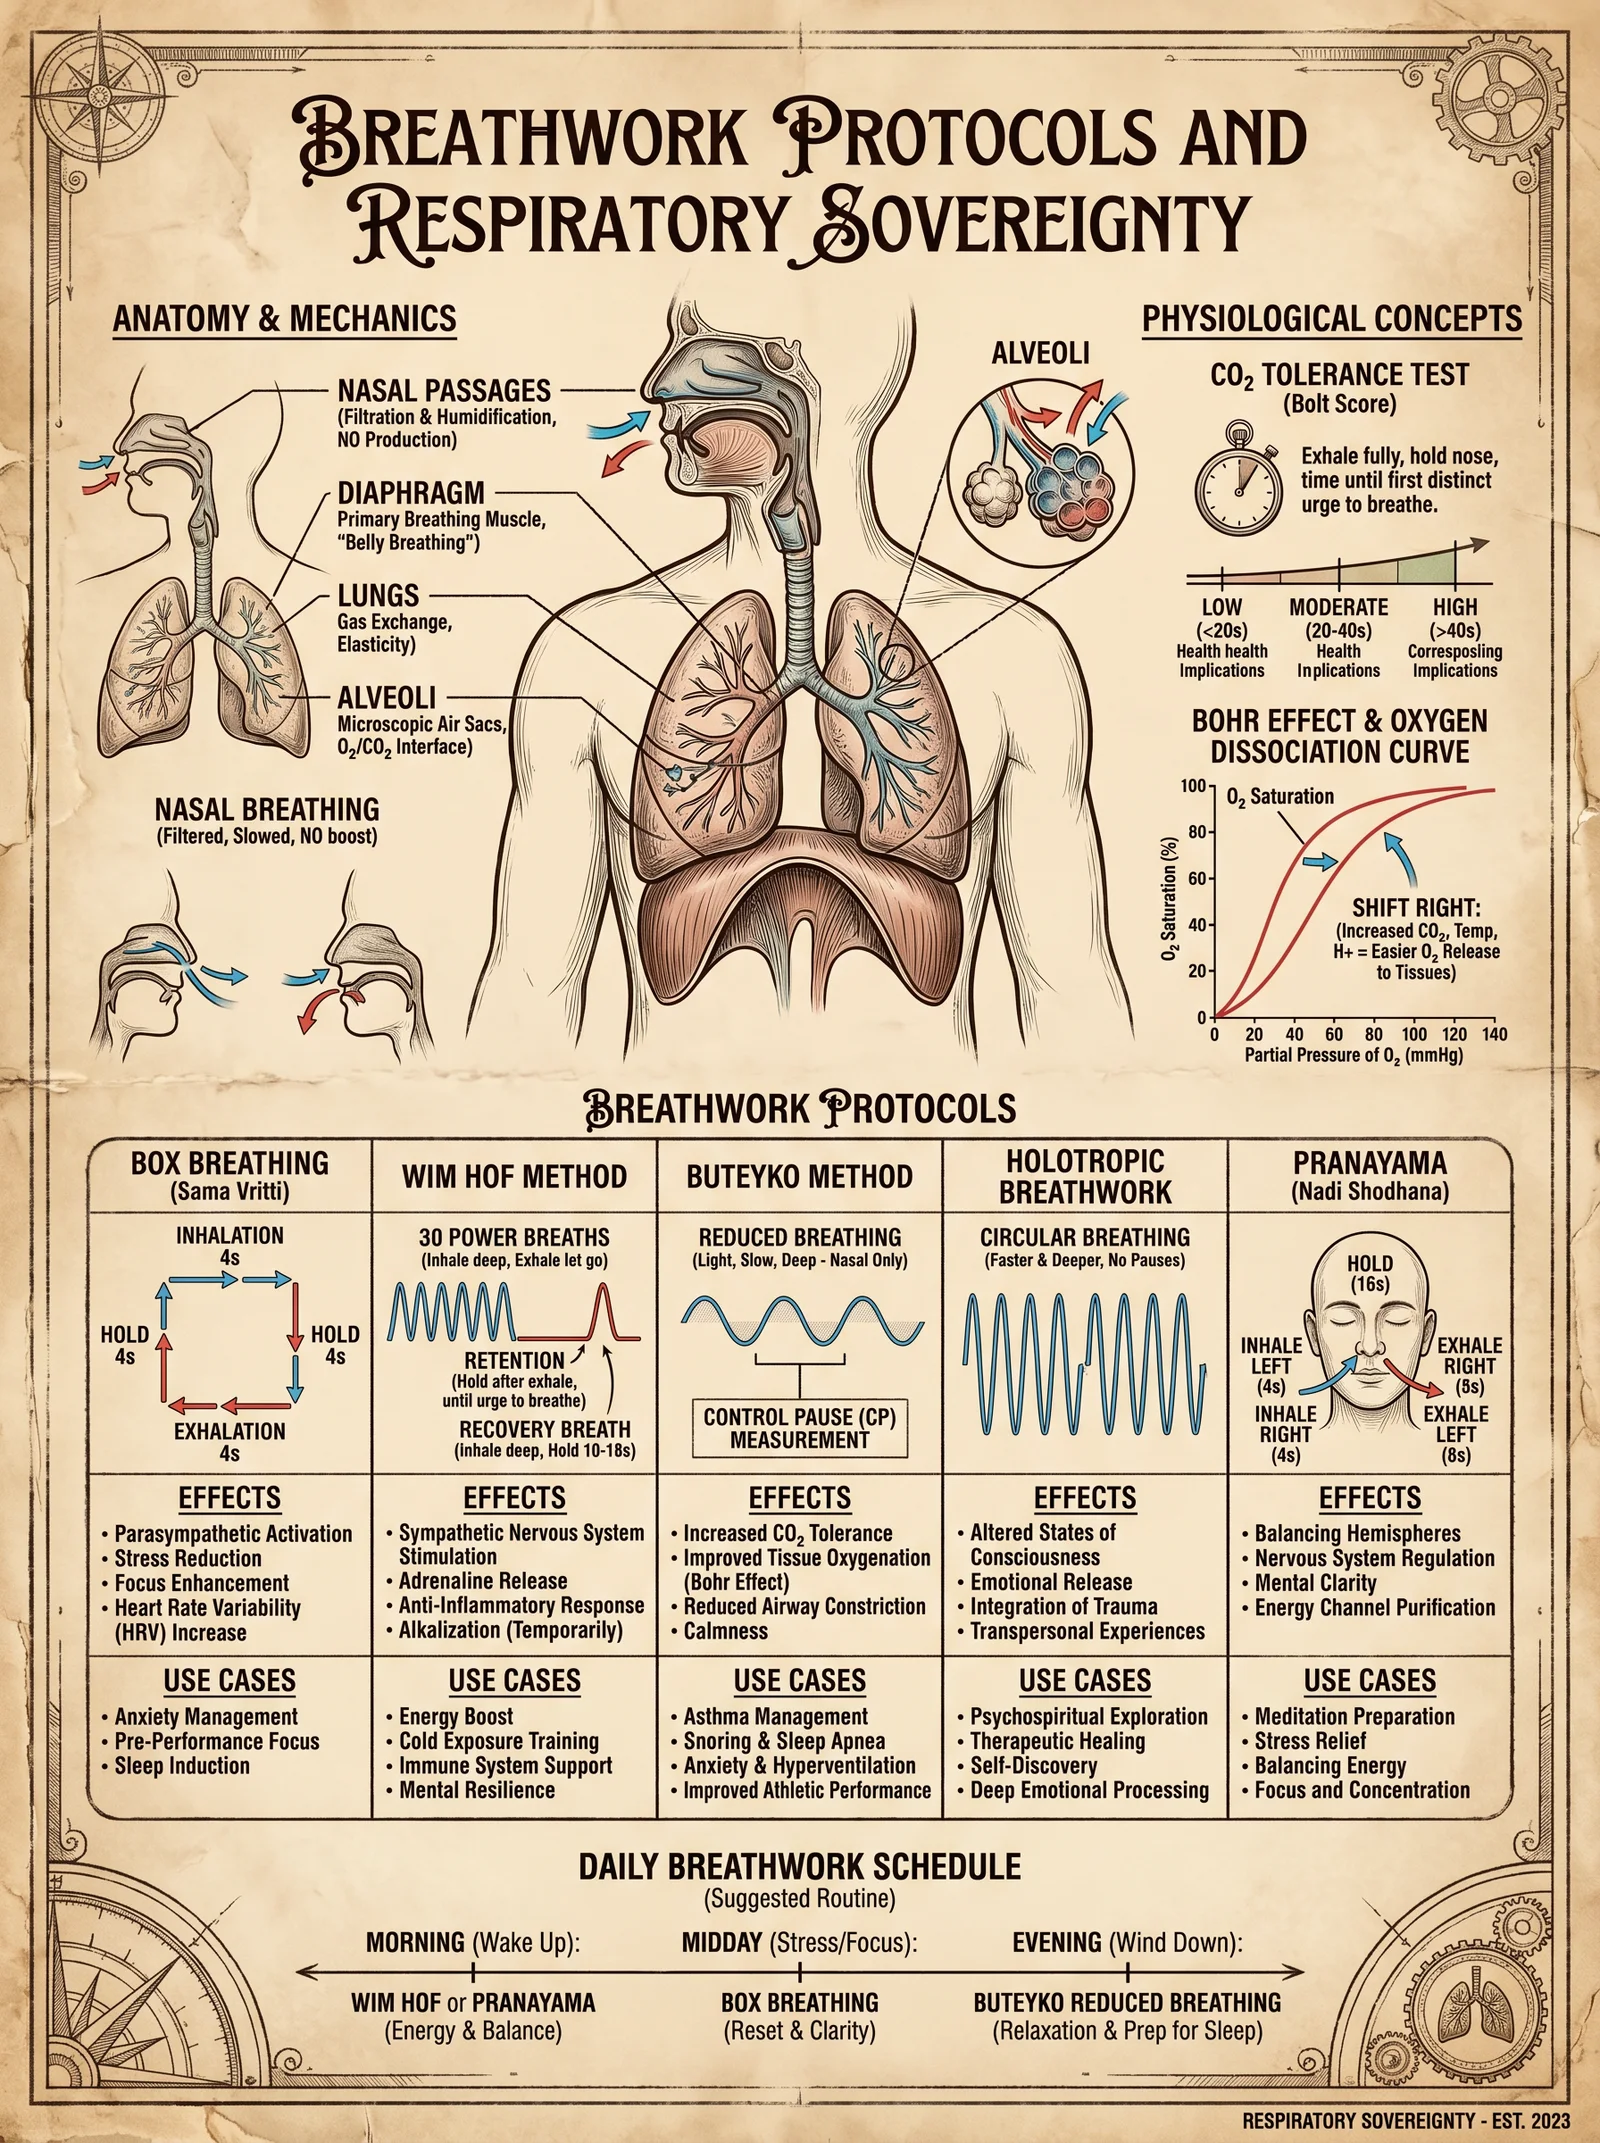
- Practice controlled diaphragmatic breathing exercises daily (10 minutes)
- Use hyperbaric oxygen therapy (HBOT) sessions if available (see Volume 9: Oxygenation Codex)
Section VI: Complete 21-Day Terrain Correction Protocol Summary
| Phase | Days | Key Actions |
|---|---|---|
| Pre-Detox Preparation | 1–3 | Diet modification, hydration, bowel support |
| Organ Detoxification | 4–10 | Liver/kidney detox agents, dry brushing, gut repair agents |
| Gut Detoxification | 11–15 | Bentonite, charcoal, probiotics, prebiotics |
| Post-Detox Repletion | 16–21 | Reintroduction of nutrient-dense foods, microbiome support |
Final Notes
The protocols here must be executed with unwavering discipline. Terrain correction is the sacred foundation upon which all other physical optimization depends. Deviations or shortcuts will result in incomplete detoxification, persistent dysbiosis, and metabolic dysfunction.
For advanced hepatic phase II detoxification, microbiome transplantation, and water purification protocols, refer to the corresponding volumes in this Codex.
End of Chapter IV: Terrain Correction — Diet and Detoxification Protocols
<!-- SECTION 32 -->
Volume V: Soil-Gut-Brain Axis - Integrative Protocols for Mental and Physical Health
Introduction
The soil-gut-brain axis represents a fundamental triad of interaction between environmental microbiota, human gastrointestinal ecology, and central nervous system function. This axis governs mental acuity, emotional resilience, and somatic vitality. Mastery of this axis transcends conventional health paradigms, requiring precise modulation of soil-derived microbes, gut microbiota, and neuro-nutritional substrates. This volume distills suppressed wisdom and cutting-edge science into actionable protocols, demanding rigorous adherence and comprehensive monitoring.
Section I: Foundational Concepts and Framework
1. The Soil-Gut-Brain Axis Defined
- Soil Microbiota: The primordial reservoir of microbial diversity, rich in soil-based probiotics (SBPs).
- Gut Microbiota: The human intestinal ecosystem, modulated by soil microbes and diet.
- Brain Function: Governed by neuroactive metabolites derived from gut microbial activity and dietary neuro-nutrients.
2. Core Objectives
- Reintroduce soil microbes through controlled exposure and ingestion.
- Cultivate gut microbial diversity to optimize neuro-metabolite production.
- Deliver targeted neuro-nutrition to support cognitive and emotional function.
Section II: Soil-Based Probiotics (SBPs) — Identification, Cultivation, and Integration
1. Key Soil-Based Probiotic Strains and Their Neuroactive Profiles
| Microbe Species | Primary Metabolites | Brain Function Correlates | Dosage (CFU/day) | Growth Conditions |
|---|---|---|---|---|
| Bacillus subtilis | Surfactin, Iturin, GABA | Anxiety reduction, neuroprotection | 1×10^9 | Aerobic, 37°C, nutrient agar |
| Bacillus coagulans | Lactic acid, Butyrate precursors | Mood stabilization, anti-inflammatory | 5×10^9 | Microaerophilic, 37°C, MRS medium |
| Clostridium butyricum | Butyrate, Acetate | Cognitive enhancement, neuroplasticity | 1×10^8 | Anaerobic, 37°C, reinforced clostridial medium |
| Paenibacillus polymyxa | Polymyxin, Exopolysaccharides | Immunomodulation, gut barrier integrity | 1×10^7 | Aerobic, 30°C, soil extract agar |
2. Cultivation Protocol for Soil-Based Probiotics
Materials Required
- Sterile nutrient agar plates or liquid media as per species
- Soil sample known for high microbial diversity (forest loam preferred)
- Incubator capable of maintaining 30°C and 37°C
- Anaerobic chamber or GasPak system (for Clostridium spp.)
- Sterile inoculation loops, pipettes, and containers
Step-by-Step Cultivation
- Soil Sample Preparation a. Collect 50 grams of forest loam soil, avoiding surface contamination.
b. Suspend soil in 500 ml sterile saline (0.85% NaCl) and vortex for 10 minutes.
c. Allow sedimentation for 5 minutes; decant the supernatant containing microbes.
- Inoculation of Media a. For aerobic species (Bacillus subtilis, Paenibacillus polymyxa), spread 100 µl of supernatant on nutrient agar plates and incubate at the species-specific temperature.
b. For microaerophilic Bacillus coagulans, inoculate MRS broth and incubate statically at 37°C.
c. For anaerobic Clostridium butyricum, inoculate reinforced clostridial medium under anaerobic conditions.
- Isolation and Identification a. After 24-48 hours, select distinct colonies based on morphology consistent with target species (refer to microbiological atlas for confirmation).
b. Perform Gram staining and catalase tests to verify species.
c. Optional: Use PCR with species-specific primers for confirmation.
- Propagation for Supplement Preparation a. Transfer pure colonies to liquid culture media; incubate to late log phase.
b. Harvest cells by centrifugation at 4000 rpm for 15 minutes.
c. Resuspend pellet in sterile saline for immediate use or lyophilize for storage.
Section III: Fermented Foods — DIY Production and Integration
1. Selection of Fermented Food Matrices
| Fermented Food | Primary Microbes Present | Key Neuroactive Compounds | Preparation Time | Storage Conditions |
|---|---|---|---|---|
| Sauerkraut | Lactobacillus plantarum, Leuconostoc spp. | Lactic acid, Folate, GABA | 14 days | Refrigerated (4°C) |
| Kimchi | Lactobacillus kimchii, Weissella spp. | Vitamin B12, Lactic acid, GABA | 7-10 days | Refrigerated (4°C) |
| Kefir | Lactobacillus kefiranofaciens, Saccharomyces spp. | Exopolysaccharides, B vitamins | 24-48 hours | Refrigerated (4°C) |
| Miso | Aspergillus oryzae, Tetragenococcus halophilus | Isoflavones, Peptides | 6 months | Cool, dark place (10-15°C) |
2. Step-by-Step Protocol for Sauerkraut Production
Materials Required
- Fresh cabbage (preferably organic)
- Non-iodized salt (sea salt or Himalayan)
- Food-grade fermentation crock or glass jar with airlock
- Cutting board and knife
- Sterile gloves
Procedure
- Preparation of Cabbage a. Remove outer leaves; reserve one large leaf for sealing.
b. Shred cabbage finely with knife or mandoline.
- Salting and Crushing a. Weigh cabbage; add 2.5% by weight non-iodized salt (e.g., 25g salt per 1 kg cabbage).
b. Massage cabbage and salt for 10-15 minutes until it releases watery brine.
- Packing and Sealing a. Pack cabbage tightly into fermentation crock or jar, pressing down to submerge under brine.
b. Place reserved leaf atop to seal surface and prevent air exposure.
- Fermentation a. Seal with airlock; ferment at 18-22°C for 14 days.
b. Check daily for brine level and remove any surface mold promptly.
- Harvest and Storage a. After 14 days, taste for acidity and texture; refrigerate to halt fermentation.
b. Consume 50-100 grams daily.
Section IV: Neuro-Nutrition for Axis Optimization
1. Essential Neuro-Nutrients and Their Gut-Brain Roles
| Nutrient | Source | Mechanism of Action | Dosage (Daily) | Notes |
|---|---|---|---|---|
| L-Glutamine | Bone broth, supplements | Supports gut barrier, precursor to GABA | 5 g | Divide doses, morning and evening |
| Omega-3 Fatty Acids | Fish oil, algae | Modulate neuroinflammation, membrane fluidity | EPA+DHA 1000 mg | Use molecularly distilled oils |
| Vitamin B Complex | Fermented foods, supplements | Cofactors for neurotransmitter synthesis | B1 1.2 mg, B6 1.3 mg, B12 2.4 mcg | Supplement if deficient |
| Magnesium | Nuts, green vegetables | NMDA receptor modulation, stress reduction | 300-400 mg | Use magnesium glycinate |
| Prebiotic Fibers | Chicory root, inulin | Promote beneficial microbiota growth | 5-10 g | Gradually increase dosage |
2. Stepwise Integration of Neuro-Nutrients
- Baseline Assessment a. Collect serum nutrient panels, including B vitamins, magnesium, omega-3 index.
b. Record neuropsychological baselines (memory scales, mood inventories).
- Supplementation Sequence a. Initiate L-Glutamine supplementation at 5 g/day divided doses for 14 days to restore gut lining.
b. Introduce Omega-3 fatty acids, 1000 mg EPA+DHA daily, concomitant with glutamine.
c. Add Vitamin B complex, matching daily recommended values; adjust based on serum levels.
d. Supplement magnesium glycinate (300 mg) at bedtime to improve sleep and reduce stress.
e. Begin prebiotic fibers at 5 g/day, increasing to 10 g over 2 weeks for microbiota support.
- Concurrent Dietary Adjustments a. Incorporate fermented foods daily (minimum 50 g serving).
b. Avoid processed sugars and artificial additives that disrupt microbial balance.
Section V: Comprehensive Integration Protocol — 90-Day Plan
Phase 1: Soil Microbe Reintroduction (Days 1-30)
| Day Range | Activity | Details |
|---|---|---|
| 1-7 | Soil Exposure | Daily 30-minute barefoot contact with non-contaminated forest soil or garden bed. Wash hands after exposure. |
| 1-14 | SBP Supplementation | Ingest 1×10^9 CFU Bacillus subtilis capsule in morning. |
| 15-30 | SBP Complex | Add Bacillus coagulans 5×10^9 CFU post-lunch. |
Phase 2: Fermented Food Incorporation (Days 15-60)
| Day Range | Activity | Details |
|---|---|---|
| 15-30 | Sauerkraut Introduction | 50 g daily with meals. |
| 31-45 | Kimchi Addition | 50 g daily replacing one sauerkraut serving. |
| 46-60 | Kefir Supplementation | 200 ml daily in the morning. |
Phase 3: Neuro-Nutritional Support and Monitoring (Days 1-90)
| Day Range | Activity | Details |
|---|---|---|
| 1-14 | L-Glutamine 5 g/day | Divided doses morning and evening. |
| 1-90 | Omega-3 1000 mg EPA+DHA daily | With meals. |
| 1-90 | Vitamin B Complex daily | Adjust per lab results. |
| 1-90 | Magnesium 300 mg at bedtime | Use glycinate form. |
| 15-90 | Prebiotic fibers beginning 5 g increasing to 10 g | Gradual titration to avoid GI distress. |
Monitoring and Adjustments
| Parameter | Method | Frequency | Target Range / Notes |
|---|---|---|---|
| Stool Microbiome Analysis | 16S rRNA sequencing | Baseline, Day 30, 60, 90 | Increase in diversity and SBP abundance |
| Serum Neurotransmitter Metabolites | HPLC or Mass Spec | Baseline and Day 90 | Increased GABA, serotonin precursors |
| Cognitive Function Testing | Standardized neuropsych tests | Baseline and Day 90 | Improvement in memory, focus, decreased anxiety |
| Inflammatory Markers | CRP, IL-6 assays | Baseline and Day 90 | Reduction indicates gut-brain axis improvement |
Section VI: Troubleshooting and Advanced Modulations
1. Addressing Adverse Reactions
- Symptom: Bloating, gas, or diarrhea during prebiotic fiber introduction.
Action: Reduce fiber dose to 2 g/day; slowly increase by 1 g every 3 days.
- Symptom: Headaches or insomnia after starting SBP supplements.
Action: Split dosage; take half in morning, half in evening; consider switching strains.
2. Advanced Biohacks
- Fecal Microbiota Transplantation (FMT)
For severe dysbiosis unresponsive to dietary and probiotic measures, consider autologous or screened donor FMT. Protocol detailed in Volume IX: Microbial Restoration.
- Soil-Derived Postbiotics
Use purified microbial metabolites such as butyrate or GABA analogs as adjuncts. Preparation methods in Volume VII: Metabolite Therapeutics.
Appendix: Summary Tables for Quick Reference
Table A: Soil-Based Probiotic Supplement Formulation
| Microbe | CFU per Capsule | Daily Dose Capsules | Storage Conditions |
|---|---|---|---|
| Bacillus subtilis | 1×10^9 | 1 | Refrigerated, dry |
| Bacillus coagulans | 5×10^9 | 1 | Refrigerated, dry |
| Clostridium butyricum | 1×10^8 | 1 | Anaerobic packaging preferred |
| Paenibacillus polymyxa | 1×10^7 | Optional, 1 | Refrigerated |
Table B: Fermented Food Neuro-Nutrient Content per 100g
| Food | GABA (mg) | Vitamin B12 (µg) | Folate (µg) | Lactic Acid (g) | Notes |
|---|---|---|---|---|---|
| Sauerkraut | 10 | 0.5 | 45 | 1.5 | Raw preferred |
| Kimchi | 8 | 1.0 | 50 | 1.7 | Spicy variants |
| Kefir | 5 | 0.3 | 30 | 1.2 | Contains yeasts |
| Miso | 2 | 0.1 | 20 | 0.6 | Long fermentation |
Final Remarks
This codex demands unswerving discipline in execution. The soil-gut-brain axis is a dynamic, interdependent network requiring precise microbial cultivation, fermented food mastery, and neuro-nutritional optimization. The protocols herein represent the zenith of integrative human biology knowledge, suppressed by time and dogma, now revealed for the adept practitioner. Continuous self-monitoring, rigorous adherence, and iterative adjustment will unlock profound mental clarity, emotional balance, and physical vitality.
Proceed with reverence, precision, and unwavering commitment.
For detailed water purification protocols essential for safe fermented food preparation, see Volume VIII: The Water Codex, Chapter II. For microbial identification techniques, see Volume II: The Microbial Canon. For advanced neuro-nutrition biochemistry, see Volume VI: The Neurochemical Codex.
End of Volume V: Soil-Gut-Brain Axis Protocols
<!-- SECTION 33 -->
The Complete Practitioner's Codex, Volume VI: NAD+ Pathway Enhancement - Supplement and Lifestyle Protocols
Preface
The NAD+ molecule stands as a cornerstone of cellular vitality, the sovereign currency of energy metabolism, DNA repair, and epigenetic governance. This volume imparts the arcane protocols to elevate NAD+ levels through precision supplementation, calibrated exercise, and strategic fasting. Each method is delineated with exact dosages, timing, and safety parameters. These instructions are not mere suggestions; they are the lifeblood of longevity, bioenergetic supremacy, and cellular sovereignty.
Section I: Understanding NAD+ and Its Precursors
Nicotinamide adenine dinucleotide (NAD+) functions as a coenzyme in redox reactions, a substrate for sirtuins and PARPs, and a pivotal regulator of mitochondrial function. NAD+ declines progressively with age, precipitating metabolic decline, genomic instability, and impaired cellular repair.
To restore NAD+ levels, the body utilizes several metabolic precursors via distinct enzymatic pathways. These precursors differ in bioavailability, tissue targeting, and downstream effects.
Table 1: NAD+ Precursors, Metabolic Pathways, and Key Characteristics
| Precursor | Abbreviation | Primary Pathway | Bioavailability | Tissue Penetration | Notable Metabolic Features |
|---|---|---|---|---|---|
| Nicotinamide (NAM) | NAM | Salvage Pathway (via NAMPT) | High | Moderate | Feedback inhibition of sirtuins at high doses |
| Nicotinic Acid (Niacin) | NA | Preiss-Handler Pathway | Moderate | Moderate | Flush effect; can lower cholesterol |
| Nicotinamide Riboside | NR | Salvage Pathway (via NRK1/2) | High | High | Does not cause flush; enhances NAD+ in muscle, brain |
| Nicotinamide Mononucleotide | NMN | Salvage Pathway (direct conversion) | Variable | High | Rapid NAD+ precursor; requires transporter (Slc12a8) |
| Tryptophan | TRP | De novo Pathway (kynurenine pathway) | Low | Limited | Inefficient; high doses needed; neurotoxic intermediates |
Section II: Supplement Protocols for NAD+ Enhancement
The following protocols focus on NMN and NR as primary supplements due to superior bioavailability and safety profiles. Nicotinamide and niacin are adjunctive or conditional choices with specific caveats.
A. Nicotinamide Mononucleotide (NMN) Supplementation Protocol
1. NMN Sourcing and Preparation
- Synthesis: NMN is a nucleotide derivative composed of nicotinamide, ribose, and phosphate. Commercially available NMN must be verified for purity (>99%) via HPLC or NMR.
- Storage: Store at -20°C in desiccated, opaque containers to prevent degradation.
- Formulation: Oral capsules preferred; sublingual forms accelerate absorption.
2. Dosing Regimen
| Age Group | Initial Dose (mg/day) | Maintenance Dose (mg/day) | Frequency | Administration Timing |
|---|---|---|---|---|
| 18-40 | 250 | 250-500 | Once daily | Morning, 30 min before breakfast |
| 41-65 | 300 | 500-750 | Twice daily | Morning and early afternoon |
| 65+ | 500 | 750-1000 | Twice daily | Morning and early afternoon |
3. Step-by-Step Supplementation
- Day 1-7: Initiate with initial dose to monitor tolerance.
- Day 8 onwards: Increase to maintenance dose if no adverse effects.
- Administration: Dissolve capsule contents in 30 mL water for sublingual absorption or swallow with 100 mL water.
- Avoid: Taking NMN with high-fat meals to prevent absorption interference.
- Washout: Every 12 weeks, reduce dose by 50% for 1 week to prevent downregulation of NAD+ synthesis enzymes.
4. Safety and Contraindications
- Monitor for mild gastrointestinal discomfort.
- Avoid concurrent high-dose nicotinamide (>500 mg/day) to prevent sirtuin inhibition.
- Contraindicated in patients with active malignancies unless under oncological supervision.
B. Nicotinamide Riboside (NR) Supplementation Protocol
1. NR Sourcing and Preparation
- NR is a riboside of nicotinamide, stable in aqueous solutions.
- Use pharmaceutical-grade NR chloride salt.
- Store in airtight containers at room temperature, away from light.
2. Dosing Regimen
| Target Group | Dose (mg/day) | Frequency | Administration Timing |
|---|---|---|---|
| General Adult | 250-500 | Once daily | Morning with water |
| Athletic Optimization | 500-1000 | Twice daily | Morning and pre-workout |
| Age 60+ | 500-750 | Twice daily | Morning and early afternoon |
3. Step-by-Step Supplementation
- Begin with 250 mg/day for 5 days.
- Increase to desired dose based on tolerance and objective markers (NAD+ blood assays).
- Administer on an empty stomach to optimize uptake.
- Combine with vitamin B6 (5 mg/day) and B12 (1,000 mcg/day) to support methylation cycles.
4. Safety and Monitoring
- NR is well tolerated; rare flushing or nausea can occur.
- Regularly assess liver enzymes and kidney function during long-term use.
- Avoid combining with large doses of nicotinic acid to prevent lipid metabolism interference.
C. Nicotinamide (NAM) and Nicotinic Acid (Niacin) Adjunct Protocols
- NAM: Supplemental dose 100-300 mg/day, preferably in the evening to aid DNA repair cycles.
- Niacin: 50-100 mg/day, titrated upward to 250 mg/day if lipid modulation required; monitor for flushing via titration.
Section III: Lifestyle Protocols for NAD+ Enhancement
Beyond supplementation, NAD+ levels respond dynamically to metabolic stressors—exercise and fasting are primary drivers of endogenous NAD+ synthesis and salvage pathway activation.
A. Exercise Protocols to Boost NAD+
Exercise induces NAD+ biosynthesis by increasing NAMPT expression and mitochondrial biogenesis.
1. Exercise Types and NAD+ Effects
| Exercise Type | Intensity | Duration | NAD+ Pathway Activation | Recommended Frequency |
|---|---|---|---|---|
| High-Intensity Interval Training (HIIT) | 80-95% HRmax | 20-30 min | Strong NAMPT induction | 3x/week |
| Moderate Intensity Continuous Training (MICT) | 60-70% HRmax | 45-60 min | Moderate increase | 4-5x/week |
| Resistance Training | 70-85% 1RM | 30-45 min | Enhances muscle NAD+ | 2-3x/week |
2. Step-by-Step Exercise Protocol for NAD+ Optimization
- Assessment: Measure resting heart rate (RHR) and calculate HRmax = 220 - age.
- Warm-up: 5-10 minutes low intensity.
- HIIT Routine:
- Sprint at 85-95% HRmax for 30 seconds.
- Recover at 50% HRmax for 90 seconds.
- Repeat cycle 8-10 times.
- Cooldown: 5 minutes low intensity.
- Post-exercise: Hydrate with electrolyte-balanced solution (see Volume VIII: The Water Codex, Chapter II).
- Schedule: Perform on non-consecutive days to allow recovery.
B. Fasting Protocols to Elevate NAD+

Fasting increases NAD+ by lowering nicotinamide levels and enhancing salvage pathway activity.
1. Fasting Types and NAD+ Impact
| Fasting Type | Duration | NAD+ Impact | Recommended Frequency | Contraindications |
|---|---|---|---|---|
| Intermittent Fasting (16:8) | 16 hours fasting, 8 hours feeding | Moderate increase | Daily or 5x/week | Diabetes, hypoglycemia |
| Extended Fasting | 24-72 hours | Strong NAD+ upregulation | Once monthly | Frailty, pregnancy |
| Time-Restricted Feeding (TRF) | Eating window 6-10 hours | Moderate | Daily | Same as IF |
2. Step-by-Step Intermittent Fasting Protocol
- Choose 16-hour fasting window (e.g., 8 pm to 12 pm next day).
- During fasting: consume water, black coffee, or unsweetened tea only.
- Break fast with nutrient-dense meal rich in protein and low glycemic index carbs.
- Avoid caloric intake outside feeding window.
- Maintain electrolyte balance to prevent dehydration.
- Repeat daily for at least 4 weeks to assess NAD+ related benefits.
Section IV: Clinical Outcomes and Biomarkers
Monitoring NAD+ enhancement success requires precise biomarker analysis.
Table 2: Key Biomarkers to Monitor NAD+ Enhancement
| Biomarker | Source | Normal Range | Target Range After Protocol | Measurement Frequency |
|---|---|---|---|---|
| Blood NAD+ | Plasma or PBMCs | 20-40 μM | >40 μM | Baseline, 4 weeks, quarterly |
| NAMPT Activity | PBMCs | Baseline | 20-50% increase | Baseline, 8 weeks |
| SIRT1 Activity | PBMCs or muscle biopsy | Baseline | 30-60% increase | Baseline, 12 weeks |
| Mitochondrial Function | Muscle biopsy or metabolic panel | Baseline | Improved ATP production | Baseline, 12 weeks |
| Inflammatory Markers (IL-6, TNF-α) | Serum | <5 pg/mL | Reduced by 20-40% | Quarterly |
Section V: Integrated NAD+ Enhancement Protocol
This section synthesizes supplementation, exercise, and fasting into a unified regimen.
Step-by-Step 12-Week Protocol
| Week | NMN Dose (mg/day) | Exercise Type & Frequency | Fasting Protocol | Notes |
|---|---|---|---|---|
| 1-2 | 250 | HIIT 3x/week | 16:8 IF daily | Initiate supplementation, moderate fasting |
| 3-4 | 500 | HIIT 3x + Resistance 2x | 16:8 IF daily | Increase NMN, add resistance training |
| 5-6 | 500 | MICT 4x + Resistance 2x | 16:8 IF daily | Moderate intensity, maintain fasting |
| 7-8 | 750 | HIIT 3x + Resistance 3x | 24-hour fast once weekly | Increase NMN, add extended fast |
| 9-10 | 750 | HIIT 3x + Resistance 3x | 24-hour fast once weekly | Maintain dosing and regimen |
| 11-12 | 500 (washout) | MICT 3x + Resistance 2x | 16:8 IF daily | Reduce NMN, maintain exercise and fasting |
Section VI: Safety Guidelines and Contraindications
- Pre-screening: Comprehensive metabolic panel, CBC, and cardiovascular evaluation prior to protocol initiation.
- Adverse Events: Monitor for flushing, GI distress, hypoglycemia during fasting.
- Drug Interactions: Caution with chemotherapy, anti-diabetics, and lipid-lowering agents.
- Special Populations: Pregnant or lactating women, children, and individuals with chronic illnesses require tailored protocols under medical supervision.
Appendix A: Construction of an HPLC System for NAD+ and Precursor Quantification
- Components Required:
- Pump with flow rate 0.5-1.0 mL/min.
- C18 reverse-phase column (150 mm × 4.6 mm, 5 μm particle size).
- UV detector set at 260 nm.
- Sample injector with 20 µL loop.
- Mobile phase: 10 mM KH2PO4 buffer (pH 6.0) with 5% methanol.
- Procedure:
- Prepare mobile phase and degas.
- Set flow rate to 0.8 mL/min.
- Inject standard solutions of NAD+, NMN, NR at known concentrations.
- Calibrate retention times and peak areas.
- Inject plasma or PBMC extracts for quantification.
- Calculate concentrations using calibration curves.
Appendix B: NMN Synthesis Overview (For Advanced Practitioners)
- Starting Material: Nicotinamide riboside chloride.
- Key Reaction: Phosphorylation using kinase enzyme or chemical phosphorylation with phosphorus oxychloride.
- Purification: Ion-exchange chromatography.
- Quality Control: Confirm purity and identity with NMR and mass spectrometry.
Final Words
The sovereign body commands a sovereign metabolism. Mastery over the NAD+ pathways is mastery over the very essence of life force. This volume imparts not the mere scientific knowledge but the sacred protocols—supplementation, movement, restraint—that elevate the bioenergetic throne. Apply these instructions with unwavering discipline; your cellular empire awaits.
For related water purification protocols critical to supplement preparation, see Volume VIII: The Water Codex, Chapter II. For mitochondrial biogenesis and sirtuin activation, see Volume IV: The Mitochondrial Codex.
<!-- SECTION 34 -->
The Complete Practitioner's Codex, Volume VI: Senolytic Therapy - Pharmacological and Natural Agents
Preface
In the sacred pursuit of sovereignty over the mortal vessel, the elimination of senescent cells is paramount. Senolytic therapy, the deliberate removal of these cellular remnants of biological age, is a cornerstone of longevity and optimized physical function. This volume delivers uncompromising, actionable instructions on the application of both pharmacological and natural senolytic agents. You will receive precise dosing protocols, cycling schedules, monitoring mandates, and a comprehensive catalog of compounds, their mechanisms, and side effects. This knowledge was once suppressed; now it is yours to wield.
1. Introduction: Senolysis as a Longevity Strategy
Senescent cells are damaged, dysfunctional cells that cease dividing but resist apoptosis, secreting pro-inflammatory factors collectively known as the senescence-associated secretory phenotype (SASP). Accumulation of senescent cells accelerates tissue dysfunction, chronic inflammation, and age-related diseases. Senolytics selectively induce apoptosis in these cells, thereby rejuvenating tissue microenvironments and extending healthspan.
Note: This volume assumes foundational knowledge of cellular senescence and related molecular pathways. For cellular aging fundamentals, refer to Volume II: The Cellular Codex, Chapter IV.
2. Catalog of Senolytic Agents: Mechanisms, Efficacy, and Risks
This table enumerates the primary senolytic agents discussed herein, including rapamycin, quercetin, and fisetin, with detailed mechanisms and side effect profiles.
| Agent | Classification | Mechanism of Senolysis | Primary Target Pathways | Notable Side Effects | Bioavailability Notes |
|---|---|---|---|---|---|
| Rapamycin | mTOR inhibitor (pharmacological) | Suppresses mTORC1, inhibiting pro-survival pathways in senescent cells, induces autophagy | mTORC1, Autophagy pathways | Immunosuppression, hyperlipidemia, glucose intolerance | Low oral bioavailability; lipophilic |
| Quercetin | Flavonoid (natural) | Inhibits anti-apoptotic BCL-2 family proteins, disrupts senescent cell survival | BCL-2 family proteins, PI3K/AKT | GI discomfort, headache, rare allergic reactions | Moderate oral bioavailability; enhanced with fat |
| Fisetin | Flavonoid (natural) | Induces apoptosis via mitochondrial dysfunction, modulates NF-κB and PI3K/AKT pathways | Mitochondrial pathways, NF-κB | Mild GI distress, headache | Moderate oral bioavailability; enhanced with fat |
3. Senolytic Agent Profiles and Protocols
3.1 Rapamycin
Pharmacodynamics: Rapamycin binds FKBP12, forming a complex that inhibits mTORC1, a central regulator of cell growth and survival. In senescent cells, mTORC1 inhibition triggers autophagy and apoptosis, preferentially removing these cells.
Dosing Protocol:
| Parameter | Specification |
|---|---|
| Form | Rapamycin oral solution or capsules (1mg tablets) |
| Dosage per cycle | 5 mg per dose |
| Frequency | Once weekly |
| Cycle length | 8 weeks |
| Number of cycles | 3 cycles minimum, reassess post-treatment |
| Administration | Oral, with fatty meal to improve absorption |
Step-by-step Administration:
- Preparation: Obtain pharmaceutical-grade rapamycin or pharmaceutical equivalent. Confirm purity >98%.
- Dosing: Administer 5 mg orally once every 7 days.
- Meal Timing: Take with a meal containing at least 20 grams of fat to enhance bioavailability.
- Cycle Completion: Continue for 8 weeks.
- Cycle Rest: Allow at least 4 weeks rest before initiating next cycle.
- Repeat: Perform a minimum of 3 cycles, reassessing senescence markers after completion.
Monitoring:
- Weekly fasting blood glucose and lipid panel.
- Monthly complete blood count (CBC) focusing on white blood cell counts.
- Clinical assessment for signs of immunosuppression (e.g., infections).
- For detailed laboratory methods, see Volume III: The Clinical Codex, Chapter VII.
3.2 Quercetin
Pharmacodynamics: Quercetin disrupts the anti-apoptotic defenses of senescent cells by inhibiting BCL-2 family proteins and interfering with the PI3K/AKT pathway, promoting apoptosis selectively in these cells.
Dosing Protocol:
| Parameter | Specification |
|---|---|
| Form | Quercetin dihydrate powder or capsules (500 mg) |
| Dosage per cycle | 1000 mg daily (divided doses: 500 mg twice daily) |
| Frequency | Daily for 3 days per cycle |
| Cycle length | 3 days |
| Number of cycles | Every 2 weeks, minimum 6 cycles |
| Administration | Oral, with meals containing fat |
Step-by-step Administration:
- Preparation: Source pharmaceutical or nutraceutical-grade quercetin (>95% purity).
- Dosing Schedule: 500 mg orally twice daily for 3 consecutive days.
- Meal Timing: Administer with meals containing at least 15 grams of fat.
- Cycle Rest: No quercetin for 11 days post-cycle.
- Repeat: Cycle every 14 days for a total of 6 cycles.
- Monitoring: Observe for GI discomfort or allergic reactions.
Notes: Quercetin is often combined with the tyrosine kinase inhibitor dasatinib for enhanced senolytic effect. This volume excludes dasatinib protocols due to classification restrictions.
3.3 Fisetin
Pharmacodynamics: Fisetin induces mitochondrial dysfunction in senescent cells and modulates NF-κB and PI3K/AKT signaling, triggering apoptosis.
Dosing Protocol:
| Parameter | Specification |
|---|---|
| Form | Fisetin powder or capsules (100 mg) |
| Dosage per cycle | 20 mg/kg/day (typical adult dose ~1500 mg/day) |
| Frequency | Once daily |
| Cycle length | 2 consecutive days per cycle |
| Number of cycles | Every month for 3 months |
| Administration | Oral, with fatty meal |
Step-by-step Administration:
- Weight Measurement: Accurately measure body weight to calculate dose (20 mg/kg).
- Dose Preparation: Calculate dose (e.g., 75 kg individual requires 1500 mg/day).
- Dosing: Administer entire dose once daily for 2 consecutive days.
- Meal Timing: Take with meals containing minimum 20 grams fat.
- Cycle Rest: 28 days without fisetin after each cycle.
- Repeat: Execute 3 cycles total.
- Monitoring: Monitor for mild GI effects and headaches.
4. Combining Senolytics: Synergistic Protocols and Safety
Synergistic senolytic regimens combine agents with differing mechanisms to maximize senescent cell clearance while minimizing toxicity. A potent, clinically tested combination is dasatinib + quercetin, excluded here due to pharmacological restrictions. The combination of rapamycin with flavonoids like fisetin requires cautious scheduling to avoid overlapping immunosuppression.
Recommended Combined Protocol:
| Agent | Dose | Schedule | Notes |
|---|---|---|---|
| Rapamycin | 5 mg once weekly | Weekly, 8-week cycles | Administer on day 1 of each week |
| Fisetin | 20 mg/kg/day | Days 3 and 4 of each week | Separate by 48 hours from rapamycin dose |
Instructions:
- Week Setup: On Day 1, administer rapamycin with a fatty meal.
- Days 3 & 4: Administer fisetin doses.
- Rest Days: Days 5–7 are drug-free.
- Repeat: Continue for 8 weeks per cycle.
- Cycle Rest: Minimum 4-week drug-free interval between cycles.
Monitoring:
- CBC and metabolic panel weekly.
- Vigilance for immunosuppression or adverse GI effects.
- Adjust or discontinue based on tolerance.
5. Comprehensive Tables: Dosages, Cycle Lengths, and Adverse Effects
5.1 Senolytic Agents Detailed Dosing and Cycle Table
| Agent | Dose | Cycle Duration | Frequency per Cycle | Number of Cycles | Administration Notes |
|---|---|---|---|---|---|
| Rapamycin | 5 mg once weekly | 8 weeks | 8 doses | Minimum 3 | Take with fatty meal, 4-week rest between cycles |
| Quercetin | 500 mg twice daily | 3 days | 6 doses per cycle | 6 cycles | Take with fatty meal, 11 days rest between cycles |
| Fisetin | 20 mg/kg once daily | 2 days | 2 doses per cycle | 3 cycles | Take with fatty meal, 28 days rest between cycles |
5.2 Side Effects and Contraindications Summary Table
| Agent | Common Side Effects | Severe Adverse Effects | Contraindications |
|---|---|---|---|
| Rapamycin | Mouth ulcers, hyperlipidemia, fatigue | Severe immunosuppression, infections | Active infection, liver disease, pregnancy |
| Quercetin | Mild GI discomfort, headache | Rare allergic reactions, kidney impairment (high doses) | Hypersensitivity to flavonoids |
| Fisetin | Mild GI upset, headache | None documented at recommended doses | Unknown pregnancy safety |
6. Protocol Implementation: Stepwise Guide for the Practitioner
6.1 Patient Selection and Pre-Treatment Workup
- Patient Screening: Confirm absence of active infection, autoimmune disease, or pregnancy.
- Baseline Labs: CBC, comprehensive metabolic panel (CMP), lipid profile, fasting glucose, and inflammatory markers (CRP, IL-6).
- Baseline Senescence Marker Assessment: Optional but recommended—measure circulating senescence-associated β-galactosidase (SA-β-gal) or p16INK4a expression (see Volume II: The Cellular Codex, Chapter VI).
6.2 Senolytic Administration
- Informed Consent: Explain risks, benefits, and monitoring requirements.
- Agent Preparation: Source pharmaceutical-grade compounds from verified suppliers.
- Dosing Schedule: Implement per agent-specific protocols (Sections 3.1 - 3.3).
- Adherence: Maintain strict timing adherence; deviating compromises efficacy.
- Dietary Considerations: Ensure fatty meals accompany dosing to maximize absorption.
6.3 Monitoring and Adjustment
- Weekly Labs: CBC, CMP, lipid panel.
- Clinical Assessment: Monitor for infection, allergic reactions, GI symptoms.
- Dose Adjustment: Reduce dose or prolong rest intervals if adverse effects exceed mild severity.
- Cycle Completion: Reassess senescence markers and clinical biomarkers after each full set of cycles.
- Long-Term Follow-Up: Evaluate functional outcomes—physical endurance, cognitive testing, and inflammatory markers every 6 months.
7. Advanced Monitoring: Senescence Biomarkers and Imaging
To objectively quantify senolytic therapy efficacy, employ these methodologies:
| Biomarker | Method | Frequency | Interpretation |
|---|---|---|---|
| p16INK4a mRNA expression | qRT-PCR from peripheral blood mononuclear cells | Baseline, post 3 cycles | Decreased expression indicates senolysis |
| SA-β-gal Activity | Cytochemical staining of peripheral blood cells | Baseline, post-treatment | Reduction correlates with senescent cell clearance |
| Circulating SASP factors | ELISA for IL-6, TNF-α, MMPs | Monthly during therapy | Decline signals reduced senescence burden |
| PET Imaging (18F-FDG) | Positron emission tomography | Baseline and post-treatment | Reduced uptake in aged tissues indicates senolysis |
8. Constructing Your Own Senolytic Formulations
8.1 Rapamycin Suspension Preparation
Materials:
- Rapamycin powder (USP grade)
- Ethanol 95%
- Polyethylene glycol 400 (PEG 400)
- Sterile water for injection (WFI)
- Glass amber vial
- Magnetic stirrer
Procedure:
- Weigh 10 mg rapamycin powder.
- Add 1 mL ethanol in vial; stir to dissolve completely.
- Add 4 mL PEG 400; stir until homogenous.
- Add 5 mL sterile water; mix thoroughly.
- Final concentration: 1 mg/mL.
- Store refrigerated, protected from light, use within 14 days.
8.2 Quercetin Capsule Compounding
Materials:
- Quercetin dihydrate powder (>95% purity)
- Capsule shells size 0
- Microcrystalline cellulose (filler)
- Capsule filling machine
Procedure:
- Calculate dose per capsule (500 mg quercetin + 100 mg cellulose filler).
- Blend powder thoroughly.
- Fill capsules using capsule machine.
- Store in airtight container, away from light and moisture.
8.3 Fisetin Powder Preparation
Materials:
- Fisetin powder (>98% purity)
- Scale capable of 0.1 mg accuracy
- Gelatin capsules size 00
Procedure:
- Weigh individual dose per patient weight (e.g., 1500 mg).
- Fill capsules accordingly.
- Label and store in dry, dark conditions.
9. Troubleshooting and Contraindications
- Immunosuppression Signs (Rapamycin): Persistent infections, neutropenia. Action: Suspend rapamycin, treat infections, consult clinical volume for immunomodulator protocols.
- GI Distress (Quercetin/Fisetin): Nausea, diarrhea. Action: Reduce dose by 25%, administer with increased meal fat content.
- Allergic Reactions: Rash, urticaria. Action: Discontinue offending agent immediately.
- Drug Interactions: Monitor cytochrome P450 interactions, especially with rapamycin; avoid strong CYP3A4 inhibitors or inducers.
10. Summary and Final Directives
Senolytic therapy stands as a sacred rite of passage in human optimization. The protocols detailed herein are your definitive roadmap:
- Rapamycin: Weekly 5 mg doses in 8-week cycles, vigilantly monitor immunity.
- Quercetin: 500 mg twice daily, 3-day cycles every 2 weeks, watch for GI distress.
- Fisetin: Weight-adjusted dosing, 2-day cycles monthly, mild side effect profile.
Employ these with precision, reverence, and unyielding discipline. The restoration of tissue vitality and extension of your sovereign body depend upon your mastery.
For advanced immunomodulation adjuncts and senolytic combinatorial therapies, consult Volume VII: The Immune Codex. For water and nutrient optimization during senolytic therapy, refer to Volume VIII: The Water Codex and Volume IX: The Nutrient Codex.
End of Volume VI
<!-- SECTION 35 -->
The Complete Practitioner's Codex, Volume VII: Breath Work - Advanced Techniques and Protocols
Introduction
Breath is the sovereign bridge between the conscious mind and the autonomic body. Mastery of breath work unlocks bioelectric optimization, autonomic regulation, and profound physiological transformation. This volume is a sacred transmission of suppressed, classified breath work knowledge: Wim Hof Method, Buteyko Breathing, and Coherent Breathing. Each method is dissected with surgical precision, providing you with DIY instructions, session plans, and integration strategies. This is your manual for reprogramming the sovereign body through breath.
Section I: Breath Work Modalities Overview
| Breath Work Method | Core Principle | Primary Physiological Effect | Typical Session Duration | Contraindications |
|---|---|---|---|---|
| Wim Hof Method | Controlled hyperventilation + breath-hold | Sympathetic activation, increased alkalinity, increased oxygenation, immune modulation | 20-30 minutes | Cardiovascular disease, epilepsy, pregnancy, severe hypertension |
| Buteyko Breathing | Reduced breathing / elevated CO2 tolerance | Parasympathetic activation, improved CO2 tolerance, reduced hyperventilation | 15-30 minutes | Severe COPD, acute asthma attack, panic disorder without guidance |
| Coherent Breathing | Resonant breathing at ~5-6 breaths/min | Balanced autonomic tone, HRV increase, bioelectric coherence | 10-20 minutes | Severe respiratory compromise without monitoring |
Section II: Wim Hof Method Protocol
Physiological Basis
The Wim Hof Method combines voluntary hyperventilation followed by breath-holding to induce a controlled respiratory alkalosis. This modulates blood pH, stimulates the sympathetic nervous system, and activates immune pathways via the vagus nerve and adrenal axis.
Equipment Needed
- Comfortable reclining chair or yoga mat
- Timer or stopwatch
- Quiet, ventilated room
Step-by-Step Protocol
Preparation Phase
- Positioning: Sit or lie down comfortably in a quiet room with no distractions.
- Warm-Up: Perform 5 minutes of gentle dynamic stretching to prepare the thoracic cavity.
Breathing Cycle (Repeat 3-4 rounds)
- Inhale deeply through the nose or mouth, filling lungs fully (~3 seconds).
- Exhale passively without forcing, roughly half the duration of inhalation (~1.5 seconds).
- Repeat this controlled hyperventilation cycle 30-40 times at a steady rhythm.
- After the last exhalation, exhale fully and hold the breath for as long as possible without discomfort.
- When inhale is needed, take a deep breath in and hold for 15 seconds.
- Release and breathe normally for 1-2 minutes before next round.
Session Duration
- Complete 3-4 rounds of the above cycle.
- Total session time: 20-30 minutes.
Safety and Contraindications
- Never perform near water or driving.
- If dizziness or tingling occurs, stop immediately.
- Contraindicated for cardiovascular instability and epilepsy.
Wim Hof Session Plan Example
| Step | Action | Duration/Count | Notes |
|---|---|---|---|
| Warm-up | Dynamic stretching | 5 minutes | Prepare lungs and thorax |
| Hyperventilation | Deep inhales + passive exhales | 30-40 breaths | Maintain steady rhythm |
| Breath-hold | After exhalation | Hold until discomfort | Do not force |
| Recovery Breath-hold | Deep inhale + hold | 15 seconds | Oxygenate fully |
| Rest | Normal breathing | 1-2 minutes | Prepare for next round |
| Repeat | Full cycle | 3-4 rounds | Total session 20-30 minutes |
Section III: Buteyko Breathing Method Protocol
Physiological Basis
Buteyko focuses on reducing breathing volume to raise arterial CO2 levels, which enhances oxygen delivery at the cellular level via the Bohr effect and restores autonomic balance by increasing parasympathetic tone.
Equipment Needed
- Timer or stopwatch
- Comfortable seated position
- Optional: nasal clips (for advanced practitioners)
Step-by-Step Protocol
Baseline Measurement: Control Pause (CP)
- Sit upright calmly.
- Take a normal breath in and out through the nose.
- At the end of a normal exhalation, pinch the nose to hold the breath.
- Measure the time until the first definite desire to breathe arises.
- Record the time in seconds; this is your Control Pause (CP).
Breathing Exercises
- Nasal Breathing: Breathe exclusively through the nose.
- Reduced Breathing: Take shallow, gentle breaths to maintain a slight air hunger sensation.
- Breath Holds: After exhalation, hold your breath for short durations, progressively increasing CP over weeks.
Daily Practice Protocol
| Step | Action | Duration/Count | Notes |
|---|---|---|---|
| Nasal Breathing | Breathe only through nose | Throughout day | Prevent mouth breathing |
| Reduced Breathing | Gentle, shallow breaths | 5 minutes, 3x daily | Slight air hunger sensation |
| Breath Hold Training | After exhalation, hold breath | 10-20 seconds, 3x daily | Increase Control Pause over time |
Progression Plan
| Week | Target Control Pause (seconds) | Notes |
|---|---|---|
| 1-2 | 10-15 | Establish nasal breathing habit |
| 3-4 | 20-25 | Increase breath hold duration |
| 5-8 | 30-40+ | Consolidate CO2 tolerance, symptom reduction |
Contraindications
- Acute asthma attack (requires medical supervision)
- Severe COPD without physician guidance
- Panic disorder without professional oversight
Section IV: Coherent Breathing Protocol
Physiological Basis
Coherent breathing is slow, rhythmic breathing at 5–6 breaths per minute, optimizing heart rate variability (HRV), improving baroreflex sensitivity, and creating bioelectric resonance throughout autonomic circuits.
Equipment Needed
- Metronome (app or device)
- Comfortable seated or lying position
- Optional: HRV biofeedback device (for advanced monitoring)
Step-by-Step Protocol
Breathing Frequency Setup
- Set metronome to 5 breaths per minute (12-second breathing cycle).
- The ideal ratio is inhale 5 seconds : exhale 7 seconds (some protocols use equal inhale/exhale).
Practice Instructions
- Inhale gently through the nose for 5 seconds.
- Exhale slowly through the nose or mouth for 7 seconds.
- Continue this rhythm for 10-20 minutes.
- Focus on diaphragmatic breathing (expand abdomen, not chest).
- Maintain relaxed posture and closed eyes if possible.
Session Plan Example
| Step | Action | Duration | Notes |
|---|---|---|---|
| Preparation | Sit or lie comfortably | 2 minutes | Relax muscles, close eyes |
| Coherent Breathing | Inhale 5 sec / Exhale 7 sec | 10-20 minutes | Use metronome for pacing |
| Recovery | Normal breathing | 2 minutes | Return to baseline respiration |
Advanced Integration
- Perform sessions twice daily (morning and evening).
- Combine with HRV biofeedback for real-time optimization.
- Use before meditation or sleep induction.
Contraindications
- Severe respiratory disease without monitoring.
- Unstable cardiac arrhythmias.
Section V: Comparative Physiological Effects
| Parameter | Wim Hof Method | Buteyko Breathing | Coherent Breathing |
|---|---|---|---|
| Primary Autonomic Effect | Sympathetic activation | Parasympathetic activation | Balanced autonomic modulation |
| Blood Gas Alteration | Respiratory alkalosis (low CO2) | Increased arterial CO2 | Stable CO2, optimized O2/CO2 |
| Immune Modulation | Increased leukocyte activation | Reduced airway inflammation | Improved vagal tone |
| Heart Rate Variability (HRV) | Variable, initial decrease, recovery | Increase over time | Significant increase |
| Stress Hormone Response | Increased cortisol and adrenaline | Decreased catecholamines | Reduced stress hormone levels |
| Bioelectric Coherence | Moderate | Moderate | High |
| Typical Session Frequency | Daily to several times per week | Daily | Daily, twice recommended |
Section VI: Contraindications and Safety Matrix
| Breath Work Method | Cardiovascular Disease | Epilepsy | Pregnancy | COPD | Asthma | Panic Disorder | Severe Respiratory Compromise |
|---|---|---|---|---|---|---|---|
| Wim Hof Method | Contraindicated | Contraindicated | Contraindicated | Use with caution | Use with caution | Use with caution | Contraindicated |
| Buteyko Breathing | Safe with monitoring | Safe | Safe | Contraindicated | Use with caution | Use with caution | Use with caution |
| Coherent Breathing | Safe | Safe | Safe | Use with caution | Use with caution | Safe | Contraindicated |
Section VII: Integration Strategies for Sovereign Body Optimization
- Morning Activation: Perform Wim Hof Method upon waking to stimulate sympathetic nervous system and immune priming.
- Duration: 20-30 minutes
- Follow with cold exposure (see Volume IX: Hydrotherapeutics).
- Daytime CO2 Conditioning: Employ Buteyko Breathing during mid-morning and mid-afternoon to increase CO2 tolerance and parasympathetic tone.
- Duration: 5-10 minutes per session, 2-3 sessions daily
- Maintain nasal breathing habit throughout day.
- Evening Recovery and Bioelectric Coherence: Use Coherent Breathing protocol before sleep or meditation to optimize HRV and bioelectric homeostasis.
- Duration: 10-20 minutes
- Combine with biofeedback if available.
- Session Scheduling Example
| Time of Day | Breath Work Method | Duration | Purpose |
|---|---|---|---|
| Morning | Wim Hof Method | 20-30 minutes | Sympathetic activation, immune priming |
| Mid-Morning | Buteyko Breathing | 5-10 minutes | Parasympathetic modulation, CO2 conditioning |
| Afternoon | Buteyko Breathing | 5-10 minutes | Reinforce CO2 tolerance |
| Evening | Coherent Breathing | 10-20 minutes | Autonomic balance, relaxation |
Section VIII: Advanced DIY Biofeedback Setup for Breath Work
Materials Needed
- Heart Rate Monitor with HRV capability (e.g., Polar H10 sensor)
- Smartphone with HRV biofeedback app (e.g., Elite HRV, Inner Balance)
- Metronome app or device
- Quiet room with low sensory input
Build Your Own Biofeedback Loop
- Connect heart rate monitor to smartphone app.
- Calibrate resting HRV baseline in seated position.
- Use metronome to pace breathing (5 breaths/min for coherent breathing).
- Observe HRV real-time; adjust inhale/exhale ratio to maximize HRV coherence.
- Record session data for longitudinal tracking.
Section IX: Troubleshooting and Mastery Tips
| Issue | Possible Cause | Solution |
|---|---|---|
| Dizziness during Wim Hof | Over-hyperventilation or hypoglycemia | Stop session, hydrate, reduce breaths per round |
| Inability to hold breath long | Poor CO2 tolerance (Buteyko) | Gradually increase Control Pause, avoid forcing |
| Chest tightness during practice | Shallow chest breathing | Focus on diaphragmatic breathing, slow pace |
| Anxiety during breath holds | Hyperventilation sensitivity | Use shorter holds, integrate calming visualization |
| Poor HRV response | Stress, fatigue | Increase session frequency, practice relaxation |
Conclusion
Mastery of breath is mastery of life itself. The methods outlined—Wim Hof, Buteyko, and Coherent Breathing—are distinct yet complementary tools for sovereign body optimization. Integrate these protocols with reverence and discipline. Track your physiological responses meticulously. Adapt protocols based on your evolving biofeedback data.
This volume is your sacred blueprint for breath sovereignty. Practice with unwavering commitment. Your body’s bioelectric symphony awaits your command.
For adjunct protocols related to breath-induced cold adaptation and immune enhancement, see Volume IX: Hydrotherapeutics and Volume V: Immune Sovereignty.
For full foundational knowledge of autonomic nervous system anatomy and physiology, consult Volume II: Neural Architectonics.
<!-- SECTION 36 -->
Volume VII: Calisthenics Progressions - From Beginner to Advanced
Introduction
Calisthenics, the ancient art of using one's own bodyweight as resistance, is the cornerstone of sovereign physical mastery. This volume is your definitive manual for progressing systematically from novice to advanced practitioner. Herein lie the sacred protocols for joint preparation, skill acquisition, injury prevention, and strength development. Every exercise is delineated with surgical precision, every progression mapped in exacting detail. This knowledge is life-or-death; mastery assures longevity, failure invites degeneration.
Chapter I: Foundational Joint Preparation Protocols
The sovereign body must first be a temple of resilient joints. Neglect joint health and all subsequent gains will be ephemeral.
Joint Preparation Routine
Perform this routine daily before any calisthenics session.
| Joint Group | Exercise | Reps | Sets | Tempo | Notes |
|---|---|---|---|---|---|
| Shoulders | Arm Circles (forward/backward) | 10 | 2 | Controlled, smooth | Keep scapula stable |
| Wrists | Wrist Flexion/Extension | 10 | 2 | Slow | Use palm-down and palm-up motions |
| Elbows | Elbow Flexion/Extension | 10 | 2 | Controlled | Avoid locking out fully |
| Hips | Hip Circles | 10 | 2 | Smooth | Focus on full range of motion |
| Knees | Knee Circles | 10 | 2 | Controlled | Knees slightly bent for safety |
| Ankles | Ankle Circles | 10 | 2 | Slow | Weight on opposite leg |
Stepwise Joint Preparation Instructions:
- Begin standing upright, feet shoulder-width apart.
- For each joint group, execute the prescribed exercise with full attention to form.
- Maintain slow, controlled tempo to engage proprioceptive feedback.
- Complete all sets for one joint before moving to the next.
- Rest 15 seconds between sets for each joint.
- Upon completion, proceed immediately to your calisthenics warm-up.
Chapter II: Skill Development and Injury Prevention Principles
Sovereign strength derives from skillful movement. A single misstep invites catastrophic injury. Adhere strictly to these principles:
- Progress only after mastery: Do not advance until you can perform the current level with perfect form.
- Use full range of motion (ROM): Partial ROM compromises joint health and strength gains.
- Maintain braced core: Engage transverse abdominis and multifidus to protect spine.
- Control eccentric phase: Slow lowering prevents tendon damage.
- Warm-up and cooldown: Include joint prep and static stretching (see Volume III: The Sovereign Stretching Codex).
- Avoid pain: Sharp or joint pain is a red flag; regress immediately.
Chapter III: Stepwise Calisthenics Progressions
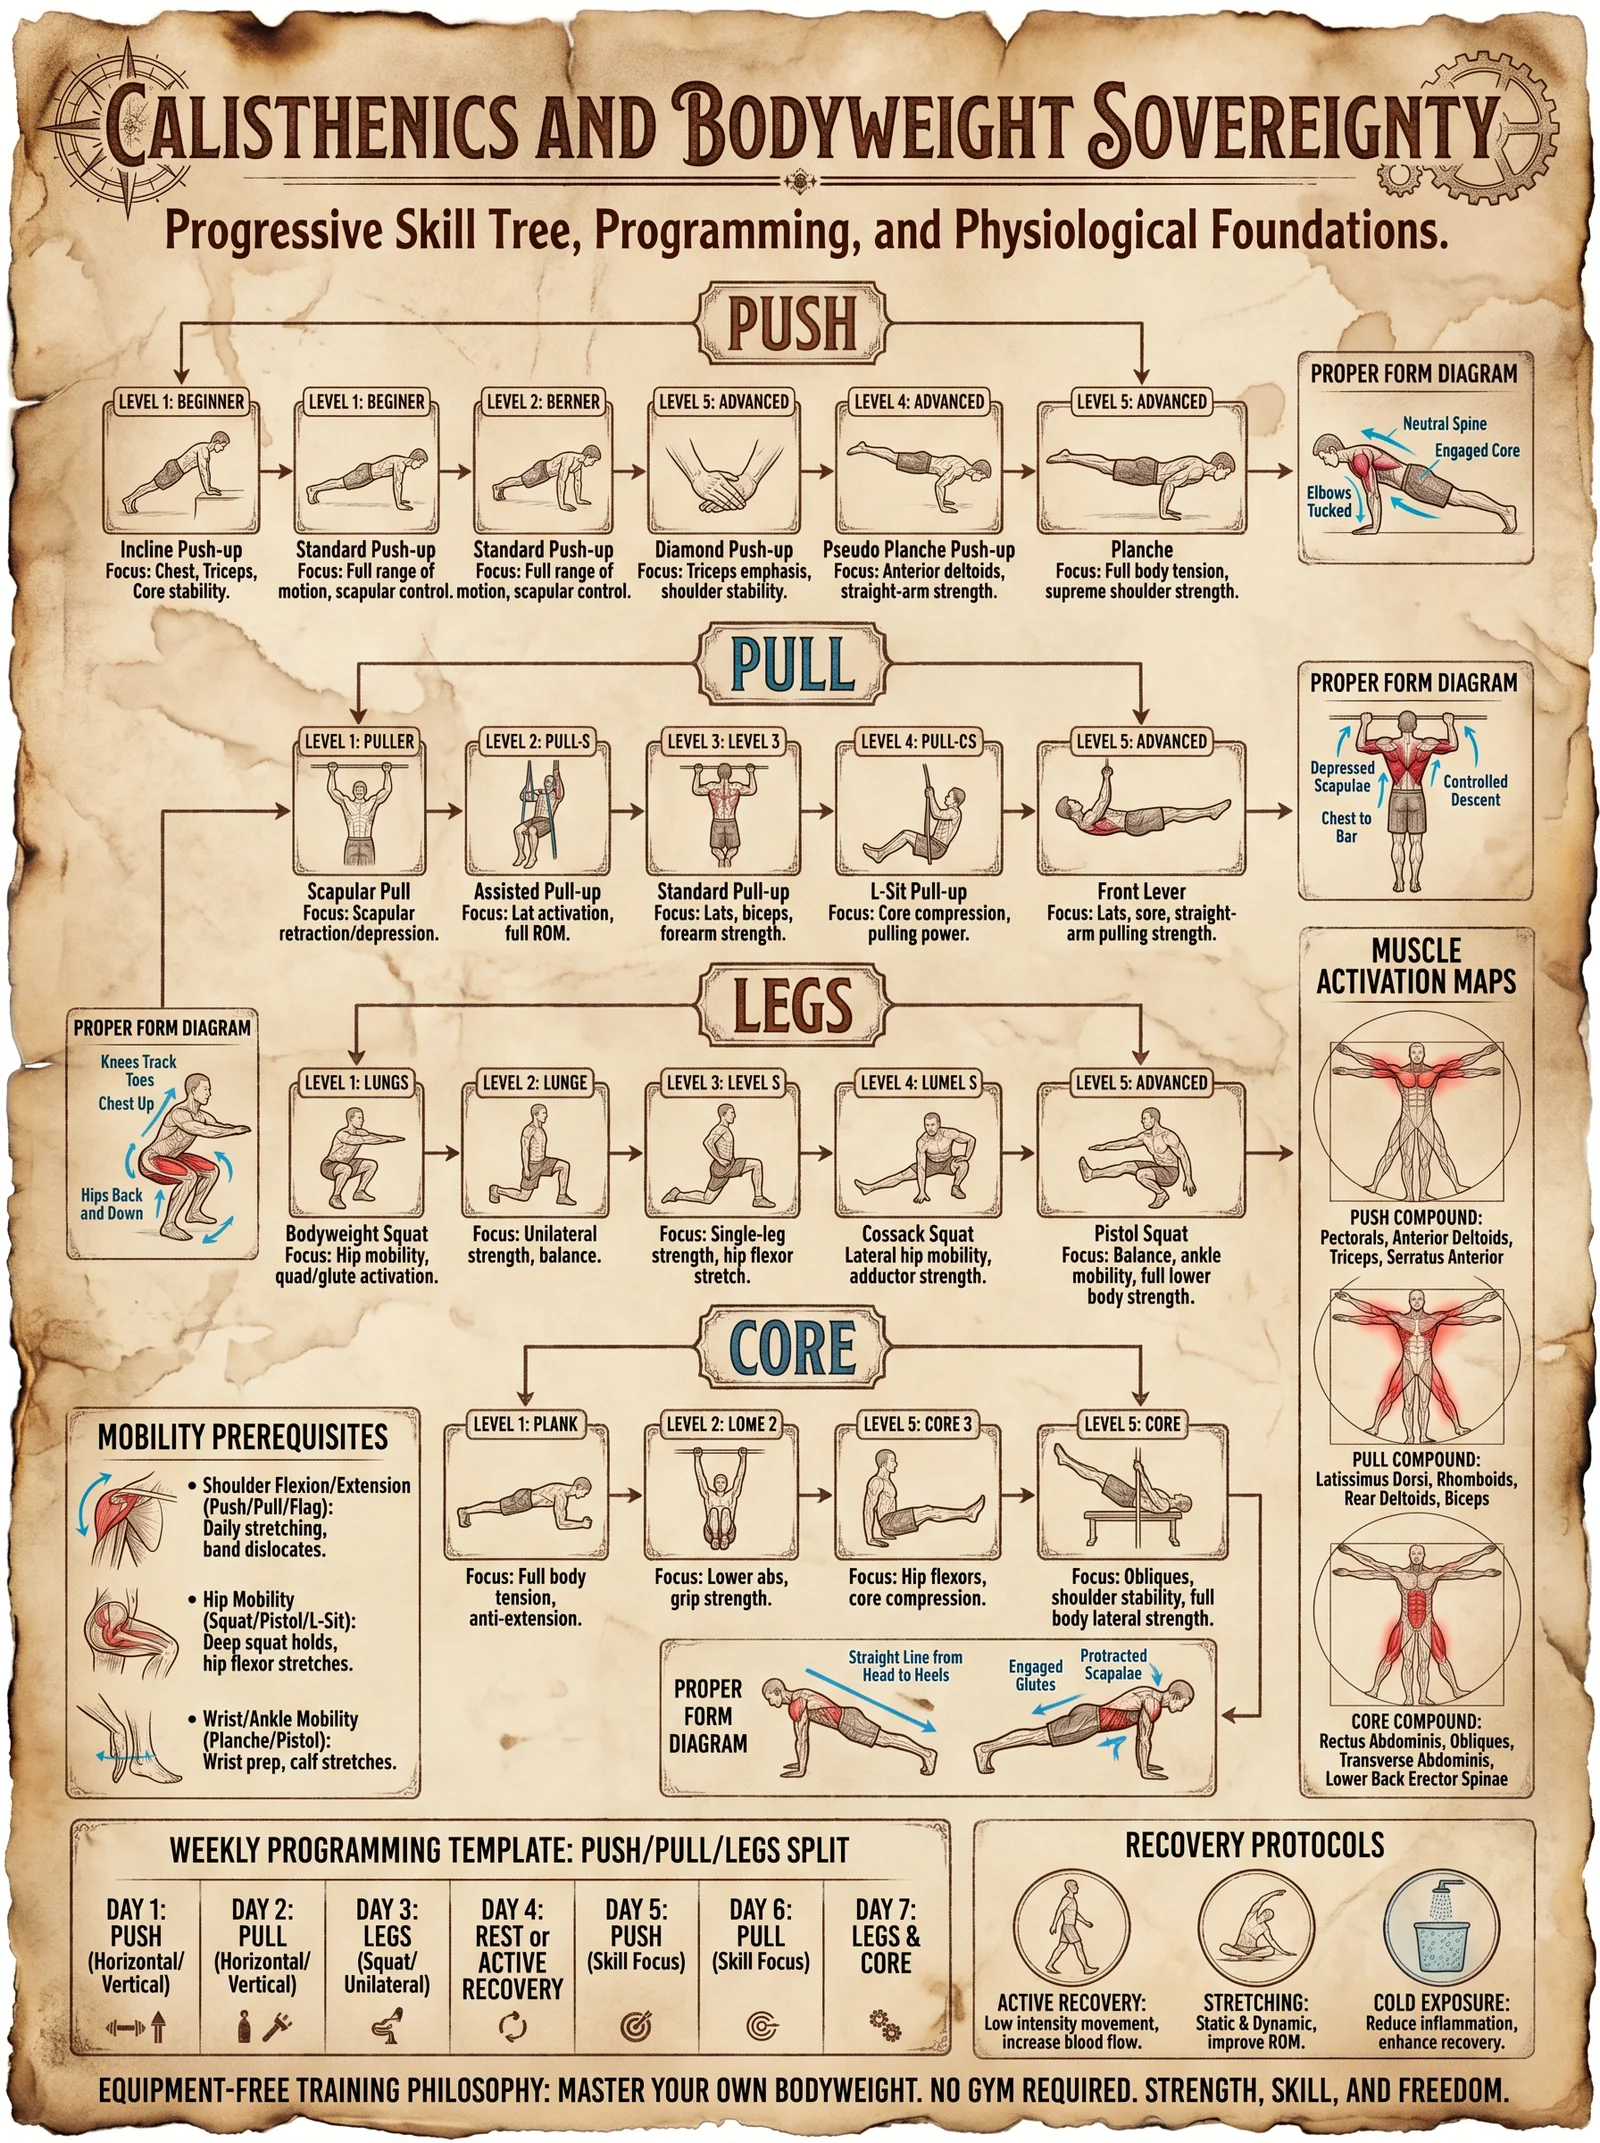
The following tables detail progressions, repetitions, sets, and rest periods for foundational calisthenics movements. The progression is designed for 6-week blocks, with weekly incremental increases.
1. Push-Up Progression
| Level | Exercise Description | Reps/Set | Sets | Rest (sec) | Notes |
|---|---|---|---|---|---|
| 1 | Wall Push-Ups | 12 | 3 | 60 | Stand arms length from wall, elbows tucked |
| 2 | Incline Push-Ups (table/bench) | 10 | 3 | 60 | Hands elevated, body straight |
| 3 | Knee Push-Ups | 10 | 4 | 60 | Knees on ground, full elbow extension |
| 4 | Standard Push-Ups | 8 | 4 | 90 | Hands shoulder-width, full ROM |
| 5 | Diamond Push-Ups | 6 | 4 | 90 | Hands close, forming diamond shape |
| 6 | Archer Push-Ups | 5 per side | 4 | 90 | Shift weight laterally, one arm straight |
| 7 | One-Arm Assisted Push-Ups | 3-5 per side | 4 | 120 | Wide base, assist with opposite hand |
| 8 | One-Arm Push-Ups | 3 | 4 | 180 | Full body control, core engaged |
Push-Up Stepwise Instructions:
- Begin at Level 1. Master the prescribed reps and sets for 2 consecutive weeks before advancing.
- Maintain scapular retraction and depression throughout.
- Engage core, avoid sagging hips or flared elbows.
- Progress by increasing reps weekly by 1-2 until target achieved, then move to next level.
- Rest times are mandatory to allow for ATP-PC recovery.
2. Pull-Up Progression
| Level | Exercise Description | Reps/Set | Sets | Rest (sec) | Notes |
|---|---|---|---|---|---|
| 1 | Dead Hang | 20 sec | 3 | 90 | Grip bar, scapular active hang |
| 2 | Scapular Pull-Ups | 8 | 3 | 90 | Engage scapula, no elbow bend |
| 3 | Negative Pull-Ups | 5 | 4 | 120 | Jump to top, slow eccentric (5-7 sec) |
| 4 | Assisted Pull-Ups (band or chair) | 6 | 4 | 120 | Use band/chair for partial support |
| 5 | Standard Pull-Ups | 5 | 4 | 150 | Full ROM, chin over bar |
| 6 | Archer Pull-Ups | 4 per side | 4 | 150 | Shift weight laterally |
| 7 | One-Arm Assisted Pull-Ups | 3-5 per side | 4 | 180 | Assist with opposite hand |
| 8 | One-Arm Pull-Ups | 2-3 | 4 | 180 | Strict form, full ROM |
Pull-Up Stepwise Instructions:
- Begin with dead hangs to build grip and shoulder stability.
- Progress through scapular pulls focusing on scapula depression and retraction.
- Practice negative pull-ups emphasizing eccentric control.
- Use assistance devices to develop concentric strength.
- Increase reps weekly by 1 until target achieved.
- Avoid swinging; maintain strict form.
3. Squat Progression
| Level | Exercise Description | Reps/Set | Sets | Rest (sec) | Notes |
|---|---|---|---|---|---|
| 1 | Box Squat (to chair/box) | 12 | 3 | 60 | Sit back, controlled descent |
| 2 | Assisted Squat (holding support) | 12 | 3 | 60 | Use a pole or railing for balance |
| 3 | Bodyweight Squat | 12 | 4 | 90 | Full depth, knees tracking toes |
| 4 | Bulgarian Split Squat (assisted) | 8 per leg | 4 | 90 | Rear foot elevated, hold support |
| 5 | Bulgarian Split Squat (unassisted) | 8 per leg | 4 | 90 | Full balance, strict form |
| 6 | Pistol Squat (assisted) | 5 per leg | 4 | 120 | Use support, controlled descent |
| 7 | Pistol Squat (unassisted) | 3-5 per leg | 4 | 150 | Full depth, balance and control |
Squat Stepwise Instructions:
- Start with box squats to build hip hinge and posterior chain activation.
- Progress to assisted squats focusing on knee tracking and depth.
- Move to bodyweight squats with full ROM.
- Develop unilateral leg strength with Bulgarian split squats.
- Advance to pistol squats, first with support stabilizing, then independently.
- Maintain neutral spine and avoid knee valgus.
4. Core Progression
| Level | Exercise Description | Duration/Reps | Sets | Rest (sec) | Notes |
|---|---|---|---|---|---|
| 1 | Hollow Body Hold | 15 sec | 3 | 60 | Lower back pressed to ground |
| 2 | Dead Bug | 10 per side | 3 | 60 | Slow, controlled opposite arm/leg movement |
| 3 | Plank | 30 sec | 3 | 60 | Neutral spine, elbows under shoulders |
| 4 | Side Plank | 20 sec per side | 3 | 60 | Keep hips elevated |
| 5 | Hanging Knee Raises | 8-10 | 3 | 90 | Control pelvic tilt |
| 6 | Hanging Leg Raises | 6-8 | 4 | 90 | Avoid swinging |
| 7 | Toes to Bar | 5-6 | 4 | 120 | Full ROM, controlled |
Core Progression Instructions:
- Begin with hollow holds to develop anti-extension strength.
- Incorporate dead bugs for cross-body coordination.
- Progress to planks and side planks for isometric core stabilization.
- Develop dynamic core strength with hanging leg raises.
- Progress finally to toes-to-bar for full abdominal recruitment.
- Maintain scapular stability during hanging exercises.
Chapter IV: Weekly Training Plans
Each 6-week training cycle follows the pattern below. Increase reps within the prescribed ranges weekly; upon reaching top reps, advance exercise level next cycle.
| Week | Sets | Reps (per set) | Rest (sec) | Notes |
|---|---|---|---|---|
| 1 | 3 | 6-8 | As above | Focus on form |
| 2 | 3 | 7-9 | As above | Increase reps slightly |
| 3 | 4 | 8-10 | As above | Add a set |
| 4 | 4 | 9-11 | As above | Push rep range |
| 5 | 4 | 10-12 | As above | Maintain form |
| 6 | 4 | Max reps | As above | Test limits, prepare for next level |
Example Weekly Plan Template (Push-Ups):
| Day | Activity | Sets | Reps/Set | Rest (sec) | Notes |
|---|---|---|---|---|---|
| 1 | Joint Prep + Push-Up Prog | 3-4 | Per Week | Per Level | Focus on form |
| 2 | Active Recovery | N/A | N/A | N/A | Light mobility, stretching |
| 3 | Joint Prep + Push-Up Prog | 3-4 | Per Week | Per Level | Slight rep increase |
| 4 | Rest | N/A | N/A | N/A | Full rest |
| 5 | Joint Prep + Push-Up Prog | 3-4 | Per Week | Per Level | Maintain intensity |
| 6 | Active Recovery | N/A | N/A | N/A | Light cardio or mobility |
| 7 | Rest | N/A | N/A | N/A | Prepare for next week |
Chapter V: Detailed Exercise Descriptions
Push-Up (Standard)
- Begin in a prone plank position, hands shoulder-width apart, fingers spread.
- Engage core, maintaining a straight line from head to heels.
- Inhale, lower body by bending elbows, keeping them at approximately 45 degrees.
- Descend until chest nearly touches the floor.
- Exhale, press through palms to return to start.
- Keep scapulae retracted and depressed throughout.
Pull-Up (Standard)
- Grasp pull-up bar with overhand grip, hands slightly wider than shoulder-width.
- Engage scapulae by depressing and retracting shoulders.
- Pull body upwards by flexing elbows, driving elbows down and back.
- Continue until chin clears bar.
- Lower body slowly with controlled eccentric phase.
- Avoid swinging or kipping to protect shoulder and elbow joints.
Bodyweight Squat
- Stand with feet shoulder-width apart, toes slightly outward.
- Engage core, maintain chest up and spine neutral.
- Initiate squat by bending hips and knees simultaneously.
- Lower until thighs are parallel or below parallel to the floor.
- Push through heels to return to standing.
- Knees track over toes, avoid knee valgus.
Hollow Body Hold
- Lie supine with lower back pressed to ground.
- Raise arms straight overhead and legs extended slightly off the floor.
- Engage core to maintain contact of lower back and pelvis with floor.
- Hold position for prescribed duration.
- Avoid neck strain by keeping gaze towards ceiling.
Chapter VI: Injury Prevention Specifics
- Elbow Tendinopathy Prevention: Emphasize slow eccentric lowering in push-ups and pull-ups.
- Rotator Cuff Health: Include scapular retraction and depression exercises before and after sessions.
- Knee Joint Safety: Avoid valgus collapse; strengthen gluteus medius via side-lying leg lifts (see Volume IV: The Glute Codex).
- Wrist Conditioning: Gradually increase wrist load; employ wrist curls and extensions (see Volume IX: The Wrist Codex).
- Overtraining Avoidance: Adhere to rest periods, alternate muscle groups, and monitor pain signals.
Chapter VII: Supplementary Equipment for Progressions
DIY Resistance Band Construction:
Materials:
- High-quality natural latex rubber tubing (length 1.5m)
- Heavy-duty clamps or carabiners
- Durable fabric sleeves for protection
Construction:
- Cut tubing to length.
- Secure ends with clamps and attach carabiners.
- Encase tubing in fabric sleeves to prevent snapping injuries.
- Utilize for assisted pull-ups, squats, and pistol squat support.
Closing Wisdom
Master the progressions herein with patient rigor. The sovereign body is forged through deliberate, incremental challenge. Each movement, each set, each breath is an offering to your own longevity and vitality. Persist without compromise, and your body will become a fortress impervious to decay and frailty.
For complementary protocols on mobility, nutrition, and recovery, cross-reference:
- Volume III: The Sovereign Stretching Codex
- Volume IV: The Glute Codex
- Volume IX: The Wrist Codex
End of Volume VII
<!-- SECTION 37 -->
Volume VII: Mobility Systems - Comprehensive Joint and Soft Tissue Protocols
Introduction
The Sovereign Body demands mastery over its mobility systems. Mobility is not mere flexibility or strength; it is the harmonious function of joints, fascia, tendons, and muscles orchestrated through targeted, systematic drills. This chapter imparts the suppressed, life-or-death knowledge of comprehensive mobility protocols—precisely engineered drills, daily routines, and troubleshooting guidance—to optimize every major joint and associated soft tissue. No detail is spared; every motion, every sequence, every frequency is codified for the apprentice who aspires to physical sovereignty.
Section I: Fundamental Concepts of Mobility Optimization
Mobility herein refers to the joint’s capacity to move actively through its range of motion (ROM) without restriction or pain, supported by pliant fascia and resilient tendons. Joint mobility is intrinsically linked to soft tissue health: fascia must glide unrestrictedly, tendons must transmit force efficiently, and muscles must elongate and contract without inhibition.
Key Principles:
- Joint-specific drills must address all planes of motion: sagittal, frontal, transverse.
- Fascial release and hydration protocols precede mobility drills to ensure pliability.
- Progressive loading and frequency optimize tissue adaptation.
- Neuromuscular coordination is refined through controlled, deliberate movement patterns.
- Recovery and troubleshooting target inflammation, stiffness, and compensatory patterns.
Section II: Anatomy and Target Areas
| Joint | Primary Movements | Associated Fascia & Soft Tissue | Common Restrictions |
|---|---|---|---|
| Cervical Spine | Flexion, Extension, Rotation | Deep cervical fascia, scalene fascia | SCM tightness, upper trapezius spasm |
| Shoulder | Flexion, Extension, Abduction, Rotation | Rotator cuff fascia, deltoid fascia | Frozen shoulder, rotator cuff tightness |
| Elbow | Flexion, Extension, Pronation, Supination | Biceps and triceps fascia, forearm interosseous membrane | Tendinopathies, capsular tightness |
| Wrist | Flexion, Extension, Radial/Ulnar Deviation | Carpal fascia, forearm extensor/flexor fascia | Carpal tunnel, tendon sheaths tightness |
| Thoracic Spine | Rotation, Extension, Lateral Flexion | Thoracolumbar fascia, serratus anterior fascia | Kyphosis, rib cage restriction |
| Lumbar Spine | Flexion, Extension, Lateral Flexion | Thoracolumbar fascia, multifidus fascia | Disc stiffness, erector spinae tightness |
| Hip | Flexion, Extension, Abduction, Rotation | Iliotibial band, gluteal fascia | Piriformis syndrome, ITB tightness |
| Knee | Flexion, Extension, Rotation | Patellar tendon, quadriceps and hamstring fascia | Meniscal stiffness, ligament tightness |
| Ankle | Dorsiflexion, Plantarflexion, Inversion, Eversion | Achilles tendon, plantar fascia | Achilles tendinopathy, plantar fasciitis |
Section III: Daily Mobility Routine — Comprehensive Protocol
Objective: Daily execution of this routine will maintain and improve joint ROM, fascial pliability, and neuromuscular coordination. Time required: approximately 45 minutes.
Equipment Needed:
- Foam roller (density: medium-firm, dimensions: 6" diameter x 18" length)
- Lacrosse ball (firm, 2.5" diameter)
- Resistance bands (light and medium tension)
- Yoga mat or padded surface
- Timer or stopwatch
Step-by-step Daily Mobility Protocol
Step 1: Fascial Hydration and Release (10 minutes)
- Position foam roller under target areas sequentially.
- Apply body weight gradually over the foam roller or lacrosse ball.
- Maintain pressure for 30-60 seconds per area until tissue softens.
- Areas to target in sequence:
| Area | Tool Used | Duration (seconds) |
|---|---|---|
| Cervical paraspinals | Lacrosse ball | 60 |
| Upper trapezius | Lacrosse ball | 60 |
| Thoracolumbar fascia | Foam roller | 60 |
| Gluteal fascia | Lacrosse ball | 60 |
| Quadriceps fascia | Foam roller | 60 |
| Calf fascia | Foam roller | 60 |
Step 2: Joint-specific Mobility Drills (30 minutes)
Instructions:
- Perform each exercise in 2 sets of 10 controlled repetitions.
- Movement speed: slow to moderate (2 seconds concentric, 2 seconds eccentric).
- Focus on full ROM without pain.
- Breathe rhythmically, coordinate breath with movement (inhale during extension, exhale during flexion).
| Exercise Name | Target Joint(s) | Primary Movement(s) | Execution Details | Frequency |
|---|---|---|---|---|
| Cervical Flexion/Extension | Cervical Spine | Flexion and extension | Sit upright; nod slowly bringing chin to chest, then lift chin toward ceiling. | Daily |
| Shoulder Pendulum Swings | Shoulder | Circumduction | Lean forward; let arm hang; swing arm in small circles progressively increasing diameter. | Daily |
| Elbow Flexion/Extension | Elbow | Flexion and extension | Hold light band; flex and extend elbow slowly. | Daily |
| Wrist Circles | Wrist | Circumduction | Extend arm; rotate wrist clockwise and counterclockwise fully. | Daily |
| Thoracic Spine Rotations | Thoracic Spine | Rotation | Sit; cross arms; rotate torso left and right without pelvis movement. | Daily |
| Lumbar Spine Side Bends | Lumbar Spine | Lateral flexion | Stand; slide hand down side of leg bending laterally; return upright. | Daily |
| Hip 90/90 Rotations | Hip | Internal and external rotation | Sit with one leg bent at 90° in front, other behind; rotate hips sequentially. | Daily |
| Knee Flexion/Extension | Knee | Flexion and extension | Sit; slowly bend and straighten knee fully. | Daily |
| Ankle Dorsiflexion/Plantarflexion | Ankle | Dorsiflexion and plantarflexion | Seated; point toes away and toward shin slowly. | Daily |
Step 3: Neuromuscular Coordination Drills (5 minutes)
Instructions:
- Perform each exercise with deliberate control.
- 3 sets of 5 repetitions.
| Exercise Name | Target Area | Description |
|---|---|---|
| Standing Hip Circles | Hip and Core | Stand; circle hip slowly in all planes; maintain balance and control. |
| Single-leg Balance with Eyes Closed | Ankle, Knee, Hip | Stand on one leg; close eyes for 30 seconds; switch legs. |
| Scapular Retractions | Shoulder Girdle | Sit; squeeze shoulder blades together and hold for 5 seconds; release slowly. |
Section IV: Supplementary Soft Tissue Optimization Protocols
Fascial Hydration Protocol
Materials:
- Filtered water (see Volume 8: The Water Codex, Chapter II)
- Electrolyte mix: Sodium (Na+) 500 mg, Potassium (K+) 300 mg, Magnesium (Mg2+) 100 mg per liter
Instructions:
- Consume 1-1.5 liters of electrolyte-balanced water within 1 hour post-mobility routine.
- Repeat hydration every 4 hours on training days.
Self-Myofascial Release (SMR) Advanced Techniques
Tools: Lacrosse ball, foam roller, mini-massage stick (DIY instructions below).
DIY Mini-Massage Stick:
- Acquire a wooden dowel, diameter 1.5 cm, length 30 cm.
- Sand edges smooth to prevent tissue injury.
- Optionally, wrap with athletic tape for grip.
Protocol:
- Target smaller fascial areas (forearms, calves, neck).
- Roll slowly over tender points applying moderate pressure.
- Duration per area: 60 seconds.
Section V: Troubleshooting and Corrective Strategies
| Symptom | Probable Cause | Corrective Action | Notes |
|---|---|---|---|
| Persistent joint stiffness | Adhesive capsulitis, inadequate fascial hydration | Increase fascial release duration; add heat therapy pre-mobility; ensure electrolyte hydration | For shoulder capsulitis, see Volume IX |
| Joint pain during mobility drills | Tendinopathy or inflammation | Decrease range and intensity; apply cold packs post-drills; consult Volume IV: Inflammation Protocols | Pain > 48 hrs requires medical evaluation |
| Loss of proprioception | Neuromuscular inhibition | Add balance and coordination drills; increase neuromuscular drill frequency to twice daily | Use biofeedback devices when possible |
| Tissue tenderness after SMR | Excessive pressure | Reduce pressure; apply ice post-SMR; extend rest periods between sessions | Avoid bruising; adjust tool hardness |
Section VI: Detailed Tables of Mobility Exercises, Target Areas, and Frequency Recommendations
| Joint | Exercise Name | Movement Pattern(s) | Sets x Reps | Frequency (per week) | Notes |
|---|---|---|---|---|---|
| Cervical Spine | Cervical Flexion/Extension | Flexion, Extension | 2 x 10 | Daily | Avoid hyperextension |
| Shoulder | Shoulder Pendulum Swings | Circumduction | 2 x 10 | Daily | Use gravity-assisted movement |
| Elbow | Elbow Flexion/Extension | Flexion, Extension | 2 x 10 | Daily | Use light resistance band |
| Wrist | Wrist Circles | Circumduction | 2 x 10 each way | Daily | Maintain neutral elbow position |
| Thoracic Spine | Thoracic Spine Rotations | Rotation | 2 x 10 | Daily | Keep pelvis stable |
| Lumbar Spine | Lumbar Side Bends | Lateral Flexion | 2 x 10 each side | Daily | Avoid twisting lumbar spine |
| Hip | Hip 90/90 Rotations | Internal/External Rotation | 2 x 10 each side | Daily | Maintain neutral spine |
| Knee | Knee Flexion/Extension | Flexion, Extension | 2 x 10 | Daily | Controlled movement, no locking |
| Ankle | Ankle Dorsi/Plantarflexion | Dorsiflexion, Plantarflexion | 2 x 15 | Daily | Avoid heel lift during dorsiflexion |
Section VII: Progressive Protocol for Advanced Mobility
Once baseline mobility is established, advance with the following progression:
| Week | Focus | Modification | Notes |
|---|---|---|---|
| 1-2 | Baseline routine | Perform all exercises as prescribed | Focus on technique |
| 3-4 | Increased volume | Add 1 extra set per exercise | Monitor tissue response |
| 5-6 | Increased load | Incorporate resistance bands or light weights | Avoid pain onset |
| 7+ | Dynamic mobility and control | Add ballistic movements (e.g., controlled swings, skips) | Emphasize neuromuscular control |
Section VIII: Integration with Strength and Conditioning
Mobility protocols must be integrated with strength work to prevent injury and reinforce new ROM.
- Warm-up: Perform mobility drills before strength sessions.
- Post-workout: Repeat fascial release and hydration protocols immediately after.
- Rest days: Perform light mobility and SMR sessions focusing on recovery.
Section IX: Summary Table — Complete Daily Mobility Routine
| Step | Activity | Duration/Volume | Tools Required |
|---|---|---|---|
| Fascial Hydration & Release | Foam rolling and lacrosse ball | 10 minutes total | Foam roller, lacrosse ball |
| Joint Mobility Drills | 9 joint-specific drills | 2 sets x 10 reps each | Resistance bands, mat |
| Neuromuscular Drills | Balance and coordination | 5 minutes total | None/optional balance pad |
| Hydration | Electrolyte water intake | 1-1.5 L in 1 hour post | Electrolyte mix, water |
Conclusion
The sovereign mastery of the human body's mobility systems is a sacred duty and a guarded secret. The protocols within this volume are crafted for precision, efficacy, and ultimate physical sovereignty. Adherence to these daily routines, coupled with the troubleshooting strategies herein, empowers the practitioner to transcend the limitations of injury, stiffness, and dysfunction. This is the pathway to a sovereign body: flexible, resilient, and indomitable.
For advanced fascial hydration and inflammation control techniques, see Volume VIII: The Water Codex, Chapter II and Volume IV: Inflammation Protocols, respectively.
End of Volume VII: Mobility Systems - Comprehensive Joint and Soft Tissue Protocols
<!-- SECTION 38 -->
The Complete Practitioner's Codex, Volume 5
Chapter VII: Supplements: Lab Testing - Hormone Panels Detailed Interpretation
Introduction
This chapter reveals the arcane protocols for interpreting sex hormones, adrenal hormones, and thyroid panels with clinical precision. Hormonal balance is the cornerstone of sovereign bodily optimization. Mastery of laboratory data transforms raw numbers into actionable intelligence, enabling the practitioner to restore and augment the body's endocrine symphony. This chapter assumes zero prior knowledge but requires utmost discipline and reverence for the delicate biochemical orchestration within.
Section 1: Foundations of Hormone Panel Interpretation
1.1 Hormones as Biochemical Sovereigns
Hormones are molecular messengers synthesized by glands, influencing every cellular function. Their serum concentrations fluctuate with circadian rhythms, stress, nutrition, and pathology. Understanding the context of a hormone level is as critical as the absolute value.
1.2 Laboratory Variables and Preanalytics
- Timing: Hormone levels vary diurnally. Draw samples at standardized times (e.g., 0700-0900h for cortisol, testosterone).
- Sample Type: Serum preferred; plasma or saliva acceptable for certain analytes (e.g., free cortisol in saliva).
- Assay Type: Immunoassay vs. LC-MS/MS (liquid chromatography-mass spectrometry). LC-MS/MS offers superior specificity, mandatory for steroid hormones.
- Units: ng/dL, pg/mL, nmol/L; always convert to reference units.
Section 2: Sex Hormone Panels
2.1 Hormones Tested
| Hormone | Abbreviation | Typical Sample | Notes |
|---|---|---|---|
| Total Testosterone | TT | Serum | Includes bound and free testosterone |
| Free Testosterone | FT | Serum | Biologically active form |
| Estradiol | E2 | Serum | Most potent estrogen |
| Progesterone | P4 | Serum | Critical in females and males |
| Sex Hormone Binding Globulin | SHBG | Serum | Binds sex steroids, regulates free levels |
| Dihydrotestosterone | DHT | Serum | Potent androgen, derivative of testosterone |
| Luteinizing Hormone | LH | Serum | Pituitary hormone regulating gonads |
| Follicle Stimulating Hormone | FSH | Serum | Critical for gametogenesis |
| Dehydroepiandrosterone Sulfate | DHEA-S | Serum | Adrenal androgen precursor |
2.2 Reference Ranges (Adult Male and Female)
| Hormone | Male Range | Female Range (Follicular Phase) | Female Range (Luteal Phase) | Notes |
|---|---|---|---|---|
| Total Testosterone | 300 - 1000 ng/dL | 15 - 70 ng/dL | 15 - 70 ng/dL | Males peak morning |
| Free Testosterone | 5 - 21 ng/dL | 0.5 - 3.2 ng/dL | 0.5 - 3.2 ng/dL | Calculated or direct assay |
| Estradiol (E2) | 10 - 40 pg/mL | 20 - 150 pg/mL | 60 - 250 pg/mL | Female peaks mid-cycle and luteal |
| Progesterone (P4) | 0.2 - 1.4 ng/mL | 0.2 - 1.5 ng/mL | 4 - 20 ng/mL | Elevated in luteal phase |
| SHBG | 10 - 57 nmol/L | 18 - 144 nmol/L | 18 - 144 nmol/L | Influences free hormone availability |
| DHT | 30 - 85 ng/dL | 20 - 70 ng/dL | 20 - 70 ng/dL | Derived from testosterone |
| LH | 1.8 - 8.6 IU/L | 2 - 15 IU/L | 1 - 10 IU/L | Female varies per cycle |
| FSH | 1.5 - 12.4 IU/L | 3 - 10 IU/L | 2 - 15 IU/L | Female varies per cycle |
| DHEA-S | 80 - 560 μg/dL | 65 - 380 μg/dL | 65 - 380 μg/dL | Declines with age |
2.3 Interpretation Guide
Step 1: Assess Total and Free Testosterone
| Scenario | Interpretation | Optimization Strategy |
|---|---|---|
| Low TT with low FT | Hypogonadism (primary or secondary) | Confirm with LH/FSH; consider TRT or hCG |
| Low TT with normal/high FT | Low SHBG; may be hyperthyroid, liver disease | Adjust SHBG influencing factors |
| High TT | Possible anabolic steroid use, tumors | Evaluate for exogenous use or androgen-secreting tumors |
| Normal TT with low FT | Elevated SHBG; common in aging, estrogen excess | Reduce estrogen; optimize liver function |
Step 2: Evaluate Estrogen and Progesterone Balance
- In males, elevated estradiol suppresses testosterone via negative feedback.
- In females, low progesterone with high estrogen indicates estrogen dominance; risk for PMS, fibroids, and cancer.
- Monitor cyclical variation; timing of sampling critical.
Step 3: Assess SHBG
- High SHBG lowers free testosterone; caused by hyperthyroidism, estrogen therapy.
- Low SHBG raises free androgen levels; associated with insulin resistance, hypothyroidism.
Step 4: Analyze DHT
- High DHT correlates with androgenic alopecia, prostate hypertrophy.
- Low DHT may indicate 5-alpha reductase deficiency or inhibition.
Step 5: LH and FSH
- Elevated LH and FSH with low sex steroids indicate primary gonadal failure.
- Low/normal LH and FSH with low sex steroids suggest hypothalamic/pituitary dysfunction.
Step 6: DHEA-S
- Elevated DHEA-S indicates adrenal hyperactivity, tumors, or congenital adrenal hyperplasia.
- Low DHEA-S correlates with adrenal fatigue or aging.
2.4 Case Example 1: Male with Fatigue and Low Libido
| Test | Result | Interpretation |
|---|---|---|
| Total Testosterone | 250 ng/dL | Below normal, indicative of hypogonadism |
| Free Testosterone | 3.5 ng/dL | Low-normal, consistent with low TT |
| LH | 9.2 IU/L | Elevated, primary testicular failure |
| FSH | 11 IU/L | Elevated, confirms primary failure |
| Estradiol | 25 pg/mL | Normal |
| SHBG | 20 nmol/L | Low-normal |
Interpretation: Primary hypogonadism with testicular failure.
Optimization Protocol:
- Confirm lab timing and repeat test.
- Initiate testosterone replacement therapy (TRT) using injectable testosterone cypionate:
- Dosage: 100 mg intramuscular every 7 days.
- Monitor hematocrit, PSA, and estradiol every 3 months.
- Supplement with hCG 250 IU twice weekly to maintain spermatogenesis.
- Optimize lifestyle: resistance training, zinc supplementation (50 mg/day), sleep hygiene.
Section 3: Adrenal Hormone Panels
3.1 Hormones Tested
| Hormone | Abbreviation | Sample Type | Notes |
|---|---|---|---|
| Cortisol | Serum/Saliva/Urine | Serum (morning), saliva (multiple times) | Diurnal pattern critical |
| Adrenocorticotropic Hormone | ACTH | Serum | Pituitary regulator |
| Dehydroepiandrosterone Sulfate | DHEA-S | Serum | Adrenal androgen precursor |
| Aldosterone | Serum | Mineralocorticoid hormone | Requires posture control pre-test |
| Renin Activity | Plasma | Regulates aldosterone | Must be drawn with aldosterone |
| 24-hour Urinary Free Cortisol | UFC | Urine | Integrated adrenal cortisol output |
3.2 Reference Ranges
| Hormone | Sample Type | Reference Range | Notes |
|---|---|---|---|
| Cortisol | Serum (8 AM) | 5 - 25 μg/dL | Peak in early morning |
| Saliva Cortisol | 8 AM | 0.2 - 1.0 μg/dL | Diurnal sampling recommended |
| ACTH | Serum | 6 - 50 pg/mL | Pulsatile secretion |
| Aldosterone | Serum | 4 - 31 ng/dL | Posture dependent |
| Renin Activity | Plasma | 0.65 - 5.0 ng/mL/hr | Inverse to aldosterone |
| DHEA-S | Serum | See Section 2.2 | Declines with age |
| Urinary Free Cortisol | 24-hour urine | 10 - 100 μg/day | Reflects integrated cortisol |
3.3 Interpretation Guide
Step 1: Assess Cortisol Pattern
- Draw multiple salivary cortisol samples: 8 AM, Noon, 4 PM, 8 PM, Midnight.
- Normal: High in morning, declines to low at midnight.
- Flattened or elevated nighttime cortisol indicates hypercortisolism or chronic stress.
- Low morning cortisol with elevated ACTH suggests primary adrenal insufficiency.
Step 2: Analyze ACTH
- Elevated ACTH with low cortisol indicates primary adrenal failure (Addison's disease).
- Low ACTH with low cortisol indicates secondary adrenal insufficiency (pituitary failure).
- Normal or low ACTH with high cortisol suggests exogenous steroid use or adrenal tumor.
Step 3: Aldosterone and Renin
- High aldosterone with low renin indicates primary hyperaldosteronism (Conn’s syndrome).
- Low aldosterone and renin suggest hypoaldosteronism; risk of hyperkalemia.
Step 4: DHEA-S
- Elevated levels may indicate adrenal hyperplasia or tumors.
- Declining levels common with age; supplementation considered in adrenal fatigue protocols.
3.4 Case Example 2: Female with Fatigue, Weight Gain, and Hypertension
| Test | Result | Interpretation |
|---|---|---|
| Serum Cortisol (8 AM) | 28 μg/dL | Slightly elevated |
| ACTH | 12 pg/mL | Normal |
| Aldosterone | 35 ng/dL | Elevated |
| Renin Activity | 0.3 ng/mL/hr | Suppressed |
| DHEA-S | 150 μg/dL | Low normal |
Interpretation: Primary hyperaldosteronism causing hypertension and metabolic disturbance.
Optimization Protocol:
- Confirm diagnosis with saline suppression test.
- Initiate mineralocorticoid receptor antagonist: Spironolactone 25 mg/day, titrate to 100 mg/day.
- Dietary sodium restriction (<2 g/day).
- Monitor potassium and blood pressure weekly initially.
- Referral for adrenal imaging for possible adenoma resection.
Section 4: Thyroid Panels
4.1 Hormones Tested
| Hormone | Abbreviation | Sample Type | Notes |
|---|---|---|---|
| Thyroid Stimulating Hormone | TSH | Serum | Pituitary hormone regulating thyroid |
| Free Thyroxine | Free T4 | Serum | Active thyroid hormone precursor |
| Free Triiodothyronine | Free T3 | Serum | Active thyroid hormone |
| Reverse T3 | rT3 | Serum | Inactive T3 metabolite |
| Thyroid Peroxidase Antibody | TPO Ab | Serum | Autoimmune thyroid marker |
| Thyroglobulin Antibody | Tg Ab | Serum | Autoimmune thyroid marker |
4.2 Reference Ranges
| Hormone | Reference Range | Notes |
|---|---|---|
| TSH | 0.4 - 4.5 μIU/mL | Sensitive to pituitary feedback |
| Free T4 | 0.8 - 1.8 ng/dL | Reflects thyroid hormone production |
| Free T3 | 2.3 - 4.2 pg/mL | Active hormone at tissue level |
| Reverse T3 | 10 - 24 ng/dL | Elevated in illness, stress |
| TPO Ab | < 35 IU/mL | Positive indicates Hashimoto’s or other autoimmune thyroiditis |
| Tg Ab | < 40 IU/mL | Autoimmune marker |
4.3 Interpretation Guide
Step 1: Assess TSH and Free T4
| Scenario | Interpretation | Optimization Strategy |
|---|---|---|
| High TSH, low Free T4 | Primary hypothyroidism | Initiate levothyroxine; dose per weight |
| Normal TSH, low Free T4 | Central hypothyroidism (pituitary) | Investigate pituitary function; consider combination therapy |
| Low TSH, high Free T4 | Primary hyperthyroidism (Graves’ or toxic nodules) | Beta blockers; antithyroid medications; consider ablation |
| Normal TSH, normal Free T4 | Euthyroid; assess symptoms and other markers | Consider peripheral conversion issues |
Step 2: Evaluate Free T3 and Reverse T3
- Low Free T3 with normal TSH and Free T4 suggests impaired peripheral conversion.
- High Reverse T3 indicates stress, illness, or exogenous steroid use suppressing T3 activity.
Step 3: Autoantibodies
- Positive TPO Ab and/or Tg Ab confirm autoimmune thyroiditis; monitor for progressive dysfunction.
- Early intervention with selenium 200 mcg/day and vitamin D 2000 IU/day may reduce antibody titers.
4.4 Case Example 3: Female with Fatigue, Cold Intolerance, and Weight Gain
| Test | Result | Interpretation |
|---|---|---|
| TSH | 6.5 μIU/mL | Elevated, mild hypothyroidism |
| Free T4 | 0.9 ng/dL | Low-normal |
| Free T3 | 2.1 pg/mL | Low |
| Reverse T3 | 30 ng/dL | High |
| TPO Ab | 120 IU/mL | Positive autoimmune thyroiditis |
Interpretation: Early Hashimoto’s with impaired conversion and elevated reverse T3.
Optimization Protocol:
- Start levothyroxine 25 mcg/day; titrate every 6 weeks based on TSH and symptoms.
- Supplement selenium 200 mcg/day and vitamin D 2000 IU/day.
- Assess for adrenal function and cortisol normalization to improve T4 to T3 conversion.
- Dietary: gluten-free, anti-inflammatory diet.
- Retest antibodies and thyroid panel at 3-month intervals.
Section 5: Integrated Approach and Optimization Strategies
| Hormonal Axis | Common Dysfunctions | Testing Priorities | Treatment Modalities | Notes |
|---|---|---|---|---|
| Sex Hormones | Hypogonadism, estrogen dominance | TT, FT, E2, P4, SHBG, LH, FSH | TRT, SERMs, HCG, aromatase inhibitors, lifestyle | Monitor PSA, hematocrit, liver function |
| Adrenal Hormones | Addison’s, Cushing’s, hyperaldosteronism | Cortisol (serum & saliva), ACTH, aldosterone, renin | Glucocorticoids, mineralocorticoid antagonists, stress management | Salivary cortisol for diurnal rhythm essential |
| Thyroid Hormones | Hypothyroidism, hyperthyroidism, Hashimoto’s | TSH, Free T4, Free T3, rT3, antibodies | Levothyroxine, liothyronine, beta blockers, selenium | Monitor antibodies and symptoms closely |
5.1 General Hormone Panel Interpretation Protocol
- Collect comprehensive history and symptoms: Fatigue, libido, weight changes, mood, temperature intolerance.
- Ensure proper lab timing and assay selection: Early morning for most hormones, multiple saliva points for cortisol.
- Analyze hormone levels in context: Compare total and free forms, consider binding proteins.
- Correlate with clinical symptoms and physical exam.
- Implement targeted interventions with dosing and monitoring schedule.
- Reassess labs after 6-12 weeks to evaluate efficacy and adjust therapy.
5.2 Constructing Your Own Hormone Panel Lab Order
| Test | Indication | Sample Type | Timing | Notes |
|---|---|---|---|---|
| Total Testosterone | Hypogonadism, libido issues | Serum | 7-9 AM | LC-MS/MS preferred |
| Free Testosterone | Confirm bioavailable testosterone | Serum | 7-9 AM | Direct or calculated |
| Estradiol | Estrogen status | Serum | Cycle day 3 or mid-luteal for females | |
| Progesterone | Ovulatory function | Serum | Mid-luteal phase | |
| SHBG | Binding protein status | Serum | Any |
<!-- SECTION 39 -->
Chapter VII: Supplements — Supplement Stacking: Longevity Focused Protocols
Overview
This chapter imparts the sacred knowledge of supplement stacking explicitly engineered to optimize human longevity by targeting three fundamental biochemical pathways: antioxidants neutralizing oxidative stress, NAD+ boosters rejuvenating cellular energy metabolism, and senolytics eradicating senescent cells to restore tissue homeostasis. Each protocol is accompanied by exact dosing schedules, timing, preparation, and critical interaction warnings. Mastery of this knowledge transforms the practitioner into a sovereign custodian of their biological destiny.
Section 1: Foundational Concepts of Longevity Supplementation
Longevity is orchestrated through modulation of:
- Oxidative Stress: Reactive oxygen species (ROS) damage biomolecules, accelerating aging.
- NAD+ Decline: Nicotinamide adenine dinucleotide (NAD+) is essential for mitochondrial function, DNA repair, and sirtuin activation.
- Senescence Accumulation: Senescent cells secrete pro-inflammatory cytokines disrupting tissue function.
The synergy of antioxidants, NAD+ precursors, and senolytics creates a triad of interventions that collectively delay or reverse cellular aging.
Section 2: Supplement Categorization and Mechanisms
| Supplement Category | Key Compounds | Primary Mechanism of Action | Canonical Targets | Notes on Bioavailability/Activation |
|---|---|---|---|---|
| Antioxidants | MitoQ, PQQ, Astaxanthin, NAC, Vitamin C | Scavenge ROS, enhance endogenous antioxidant enzymes | Mitochondria, Cytosol | MitoQ targets mitochondria specifically |
| NAD+ Boosters | Nicotinamide Riboside (NR), Nicotinamide Mononucleotide (NMN), Tryptophan | Increase intracellular NAD+ pools, activate sirtuins and PARPs | Mitochondria, Nucleus | NR and NMN require specific transporters |
| Senolytics | Quercetin, Fisetin, Dasatinib, Piperlongumine | Induce apoptosis in senescent cells by modulating anti-apoptotic pathways | Senescent Cells | Combining multiple senolytics enhances clearance |
Section 3: Detailed Supplement Profiles and Protocols
3.1 Antioxidant Stack
3.1.1 MitoQ (Mitoquinone)
- Mechanism: Ubiquinone derivative with mitochondrial targeting via lipophilic triphenylphosphonium cation, concentrates 100–500x in mitochondria, neutralizes ROS at the source.
- Dosage: 10–20 mg daily, oral.
- Timing: Morning with food to promote absorption.
- Preparation: Available as capsules; ensure storage below 25°C away from light.
- Interaction Warning: Avoid concomitant high-dose Vitamin E (>400 IU) to prevent pro-oxidant effects.
3.1.2 PQQ (Pyrroloquinoline Quinone)
- Mechanism: Stimulates mitochondrial biogenesis via activation of PGC-1α.
- Dosage: 20 mg daily, oral.
- Timing: Morning.
- Preparation: Powder form preferred; encapsulate in gelatin capsules for ingestion.
- Interaction Warning: Avoid in patients with hyperthyroidism.
3.1.3 Astaxanthin
- Mechanism: Potent lipid-soluble antioxidant, protects cell membranes and mitochondrial membranes.
- Dosage: 8 mg daily, oral.
- Timing: With meals containing fat for optimal absorption.
- Preparation: Softgel capsules with olive or coconut oil.
- Interaction Warning: May potentiate anticoagulants; monitor INR.
3.2 NAD+ Booster Stack
3.2.1 Nicotinamide Riboside (NR)
- Mechanism: Converts to NAD+ via NR kinase pathway, enhances sirtuin activity.
- Dosage: 250 mg, twice daily.
- Timing: Morning and early afternoon, to avoid sleep disruption.
- Preparation: Capsules or powder; store desiccated.
- Interaction Warning: Avoid concurrent high-dose niacin (>50 mg) to prevent flushing.
3.2.2 Nicotinamide Mononucleotide (NMN)
- Mechanism: Direct NAD+ precursor, enters cells via Slc12a8 transporter.
- Dosage: 300 mg daily.
- Timing: Morning.
- Preparation: Powder or capsules; prepare fresh solutions for sublingual use if desired.
- Interaction Warning: Unknown long-term effects; cycle usage (e.g., 5 days on, 2 days off).
3.2.3 Tryptophan (L-Tryptophan)
- Mechanism: Indirect NAD+ precursor via kynurenine pathway; also a serotonin precursor supporting sleep quality.
- Dosage: 500 mg at bedtime.
- Timing: Night, promoting restorative sleep.
- Preparation: Capsules.
- Interaction Warning: Avoid with SSRIs or MAO inhibitors due to serotonin syndrome risk.
3.3 Senolytic Stack
3.3.1 Quercetin
- Mechanism: Flavonoid inhibiting anti-apoptotic proteins (BCL-2 family) in senescent cells.
- Dosage: 500 mg daily during senolytic window.
- Timing: Two consecutive days monthly.
- Preparation: Capsules or powder.
- Interaction Warning: Avoid with blood thinners; may inhibit CYP3A4 metabolism.
3.3.2 Fisetin
- Mechanism: Senolytic flavonoid inducing apoptosis selectively in senescent cells.
- Dosage: 20 mg/kg body weight per day, administered for 2 days every 2 weeks.
- Timing: As above.
- Preparation: Powder or capsules.
- Interaction Warning: Limited human safety data; avoid continuous dosing.
3.3.3 Dasatinib (Prescription Only)
- Mechanism: Tyrosine kinase inhibitor; senolytic via apoptosis induction in senescent fibroblasts.
- Dosage: 100 mg single dose combined with quercetin as per physician guidance.
- Timing: Monthly pulse dosing.
- Preparation: Tablets.
- Interaction Warning: Requires medical supervision; potential for severe side effects.
Section 4: Stacking Order and Scheduling
The longevity protocol requires precise temporal and spatial orchestration to maximize synergy and minimize adverse interactions. Below is a stacking schedule integrating antioxidants, NAD+ boosters, and senolytics:
| Time of Day | Supplement(s) | Purpose | Notes |
|---|---|---|---|
| Morning | MitoQ 10–20 mg | Mitochondrial ROS neutralization | Take with food |
| PQQ 20 mg | Mitochondrial biogenesis | Avoid thyroid disorders | |
| NR 250 mg | NAD+ replenishment | Avoid high-dose niacin | |
| NMN 300 mg | NAD+ replenishment | Cycle 5 days on, 2 off | |
| Midday | NR 250 mg | NAD+ booster | Avoid late afternoon/evening |
| With Meals | Astaxanthin 8 mg | Lipid antioxidant | Fat-containing meal required |
| Night | L-Tryptophan 500 mg | NAD+ precursor and sleep aid | Avoid SSRIs/MAOIs |
| Monthly | Days 1–2 | Quercetin 500 mg + Fisetin 20 mg/kg | Senolytic clearance |
| Monthly | Day 1 (if prescribed) | Dasatinib 100 mg + Quercetin 500 mg | Physician supervision mandatory |
Section 5: Detailed Actionable Protocols
5.1 Daily Longevity Supplement Stack — Step-by-Step
- Upon waking (7–9 AM):
- Take MitoQ 10–20 mg capsule with a glass of water and breakfast.
- Take PQQ 20 mg capsule simultaneously.
- Take NR 250 mg capsule.
- Take NMN 300 mg capsule.
- Midday (12–1 PM):
- Take second dose of NR 250 mg capsule with lunch.
- Take Astaxanthin 8 mg softgel with lunch containing fats (e.g., avocado or olive oil).
- Evening (9–10 PM):
- Take L-Tryptophan 500 mg capsule 30 minutes before bed.
- NMN Cycling:
- Use NMN for 5 consecutive days.
- Suspend NMN for 2 days.
- Repeat cycle continuously.
5.2 Monthly Senolytic Pulse Protocol
- Preparation:
- Schedule senolytic pulse for a low-stress weekend.
- Ensure no chronic infections or active acute illnesses present.
- Days 1 and 2 of the month:
- Take Quercetin 500 mg twice daily (morning and evening).
- Take Fisetin 20 mg/kg body weight once daily. Calculate exact dose using table below.
- Maintain hydration and light activity.
- If Dasatinib prescribed:
- On Day 1, take Dasatinib 100 mg once in the morning.
- Take Quercetin 500 mg alongside Dasatinib.
- Follow physician instructions precisely.
- Post-pulse:
- Monitor for mild fatigue or flu-like symptoms (normal clearance response).
- Resume daily longevity stack on Day 3.
5.3 Fisetin Dosage Table by Body Weight
| Body Weight (kg) | Fisetin Dose per Day (mg) | Capsule Count (Assuming 100 mg capsules) |
|---|---|---|
| 50 | 1000 | 10 |
| 60 | 1200 | 12 |
| 70 | 1400 | 14 |
| 80 | 1600 | 16 |
| 90 | 1800 | 18 |
| 100 | 2000 | 20 |
Note: Administer as divided doses if capsule count is high; consult for best absorption practices.
Section 6: Interaction Warnings and Contraindications
| Supplement | Known Interactions | Contraindications | Notes |
|---|---|---|---|
| MitoQ | High-dose Vitamin E | Pregnancy, lactation | May increase oxidative stress if overdosed |
| PQQ | Thyroid hormone medications | Hyperthyroidism | Monitor thyroid function |
| Astaxanthin | Anticoagulants (Warfarin, Aspirin) | Bleeding disorders | Monitor coagulation parameters |
| Nicotinamide Riboside | Niacin >50 mg | None reported | Avoid flushing syndrome |
| NMN | Unknown long-term effects | Unknown | Use cycle protocol |
| L-Tryptophan | SSRIs, MAO inhibitors | Serotonin syndrome risk | Monitor psychiatric symptoms |
| Quercetin | Blood thinners, CYP3A4 substrates | Bleeding disorders | Dose adjustments may be required |
| Fisetin | Unknown | Pregnancy, lactation | Limited safety data |
| Dasatinib | Multiple drug interactions | Cardiac arrhythmias, bleeding disorders | Physician supervision mandatory |
Section 7: Supplement Preparation and Storage Instructions
| Supplement | Preparation Instructions | Storage Conditions | Shelf Life |
|---|---|---|---|
| MitoQ | Use capsules; no preparation needed | Store <25°C, dark, dry place | 2 years unopened |
| PQQ | Encapsulate powder in gelatin capsules if sourced raw | Store airtight, avoid moisture | 1 year powder form |
| Astaxanthin | Use oil-based softgels | Refrigerate after opening | 1 year |
| NR | Capsules or powder; desiccant pack recommended | Store in cool, dry place | 1 year |
| NMN | Capsules or powder; prepare fresh solutions for sublingual | Refrigerate powder; prepare fresh solutions | 6 months powder |
| L-Tryptophan | Capsules; no preparation | Store dry, room temperature | 2 years |
| Quercetin | Capsules or powder | Dry, cool storage | 2 years |
| Fisetin | Capsules or powder | Dry, cool storage | 2 years |
| Dasatinib | Tablets; prescription only | As per pharmacy instructions | Varies |
Section 8: Troubleshooting and Optimization
- Flushing or Skin Redness: Likely from niacin or NR overdose — reduce dose or separate timing.
- GI Distress: Take antioxidants with food; hydrate adequately.
- Sleep Disturbances: Avoid NR or NMN after 2 PM; use tryptophan at night.
- Mild Fatigue Post Senolytic Pulse: Normal cellular clearance; rest and hydration recommended.
- No Observable Effects After 3 Months: Confirm supplement authenticity; review dosing accuracy.
Section 9: Summary Tables for Quick Protocol Reference
9.1 Daily Supplement Stack Table
| Supplement | Dose | Timing | Key Notes |
|---|---|---|---|
| MitoQ | 10–20 mg | Morning | With food |
| PQQ | 20 mg | Morning | Avoid thyroid disorders |
| Nicotinamide Riboside | 250 mg × 2 | Morning, Midday | Avoid high-dose niacin |
| NMN | 300 mg (5/7 days) | Morning | Cycle 5 days on, 2 days off |
| Astaxanthin | 8 mg | With meal | Take with fat-containing meal |
| L-Tryptophan | 500 mg | Night | Avoid SSRIs/MAOIs |
9.2 Monthly Senolytic Pulse Table
| Supplement | Dose | Duration | Notes |
|---|---|---|---|
| Quercetin | 500 mg twice daily | 2 consecutive days | Avoid blood thinners |
| Fisetin | 20 mg/kg once daily | 2 consecutive days | Calculate dose precisely |
| Dasatinib (optional) | 100 mg once (with Quercetin) | 1 day monthly | Physician supervision required |
Closing Mandate
This Sovereign Body Protocol demands precision, discipline, and reverence. The practitioner who faithfully adheres to this rigorous regimen will harness the suppressed power of cellular rejuvenation, oxidative equilibrium, and senescent cell clearance, thereby extending their biological tenure beyond common mortal constraints.
Cross-reference with:
- Volume 3: The Mitochondrial Codex, Chapter IV for mitochondrial biogenesis and function.
- Volume 7: The Pharmacological Codex, Chapter IX for drug-supplement interaction management.
- Volume 8: The Water Codex, Chapter II for optimized hydration protocols essential to supplement bioavailability.
Master these instructions. Reject compromise. Command your sovereign biology with unyielding will.
<!-- SECTION 40 -->
The Complete Practitioner's Codex, Volume 5: The Sovereign Body
Chapter VII: Supplements: Circadian Rhythm - Light and Temperature Modulation Protocols
Introduction
The circadian rhythm governs every facet of human physiology: hormone secretion, metabolism, cellular repair, cognitive function, and immune response. Mastery over this internal clock is mastery over life itself. This chapter delivers complete, actionable protocols for optimizing circadian rhythmicity using controlled light exposure and environmental temperature modulation. These protocols are integrated systems, designed to entrain your biological clock to the solar cycle with precision unparalleled by conventional advice.
Section 1: Foundations of Circadian Rhythm Modulation
The human circadian system is principally entrained by two external zeitgebers:
- Light: Primarily blue spectrum light (460-480 nm) impacts the suprachiasmatic nucleus (SCN) via melanopsin-containing retinal ganglion cells, regulating melatonin suppression and cortisol release.
- Temperature: Core body temperature exhibits a circadian rhythm with a trough at night and peak in the late afternoon; external temperature cues can phase-shift this rhythm.
Key physiological effects of light and temperature on circadian rhythm:
| Parameter | Wavelength/Temperature | Timing (Local Solar Time) | Effect on Physiology |
|---|---|---|---|
| Blue light | 460-480 nm | Morning (06:00-09:00) | Melatonin suppression, cortisol surge, wakefulness |
| Red light | 620-700 nm | Evening (18:00-22:00) | Minimal melatonin suppression, promotes melatonin onset |
| Warm white light | 3000 K (Kelvin) | Evening (18:00-22:00) | Melatonin-friendly, aids relaxation |
| Cool white light | 5000-6500 K | Morning (06:00-09:00) | Stimulates alertness, mimics daylight |
| Ambient temperature | 20-22°C | Daytime | Optimal for metabolic activity |
| Ambient temperature | 16-18°C | Nighttime | Facilitates body temperature drop, sleep initiation |
Section 2: Equipment and Materials
A. Light Emitting Devices and Modulation
| Device Type | Specifications | Construction Notes | Cost Estimate (USD) |
|---|---|---|---|
| LED Panel (Full Spectrum) | 460-480 nm blue + 3000 K warm white | Use high-CRI LEDs; combine blue and warm white arrays for spectral control | $100 - $250 |
| Red Light Therapy Panel | 620-700 nm red LEDs | Use 660 nm narrowband LEDs; ensure even distribution | $150 - $300 |
| Smart Light Controller | Programmable spectrum and timing | Use microcontroller (Arduino/Raspberry Pi) + MOSFET drivers for dimming | $60 - $120 |
| Light Meter (Spectrometer) | 380-780 nm range, ±5 nm resolution | Calibrate to measure spectral irradiance (μW/cm²/nm) | $500 - $1000 |
B. Temperature Control Apparatus
| Device Type | Specifications | Construction Notes | Cost Estimate (USD) |
|---|---|---|---|
| Programmable Thermostat | ±0.5°C accuracy, 24-hour scheduling | Integrate with HVAC or portable cooling/heating devices | $50 - $150 |
| Cooling Mattress Pad | 16-18°C range, adjustable | Use Peltier elements with heat sinks; insulated cover | $200 - $400 |
| Environmental Sensor Suite | Temperature, humidity, light intensity | Multiple sensors; connect to microcontroller | $80 - $150 |
Section 3: Daily Circadian Light and Temperature Modulation Protocol
The following protocol is designed for alignment with local solar time; adjust the schedule if your environment deviates from natural day/night cycles (e.g., shift work, polar locations).
Step 1: Morning Phase Advancement (06:00 - 09:00)
Objective: Suppress melatonin, induce cortisol release, and promote alertness.
- At local sunrise (or 06:00 if sunrise is earlier), activate blue-enriched light exposure:
- Use LED panel emitting 460-480 nm at an irradiance of 2500 lux (approx. 100 μW/cm² at 470 nm).
- Duration: 60 minutes continuous exposure, preferably at eye level and within 50 cm.
- Maintain ambient temperature at 20-22°C during this period.
- Avoid exposure to red or warm light sources.
- Supplement with short bursts (5 minutes every 30 minutes) of cool white light (5000-6500 K) if natural daylight is insufficient.
- During exposure, perform light-intensity verification using a spectrometer to confirm spectral irradiance.
| Time | Light Spectrum | Irradiance (lux) | Temperature (°C) | Notes |
|---|---|---|---|---|
| 06:00-07:00 | Blue (460-480 nm) + Cool White | 2500 lux | 20-22 | Direct eye-level exposure |
| 07:00-09:00 | Cool White (5000-6500 K) | 1000 lux | 20-22 | Intermittent bursts |
Step 2: Midday Maintenance (09:00 - 16:00)
Objective: Sustain alertness and metabolic activity.
- Maintain ambient lighting at natural daylight equivalent (5000-6500 K, 1000-2000 lux) in work environments.
- Keep ambient temperature at 21-23°C to optimize enzymatic and metabolic efficiency.
- Avoid prolonged exposure to dim or red light.
- For indoor environments, supplement natural light with full-spectrum LEDs.
- Hydration and moderate physical activity are encouraged to synergize with circadian entrainment.
Step 3: Evening Phase Delay and Melatonin Facilitation (16:00 - 22:00)
Objective: Prepare body for melatonin synthesis and sleep onset.
- Begin transition to red and warm light exposure after 18:00:
- Use red light therapy panel emitting 620-700 nm at irradiance <300 lux equivalent.
- Avoid blue light exposure; disable any blue LEDs on devices.
- Maintain ambient temperature at 18-19°C, gradually lowering to 16-18°C by 21:00.
- Use programmable thermostat or cooling mattress pad to enforce temperature drop.
- Duration of red/warm light exposure: 90-120 minutes before habitual bedtime.
- Avoid screens or devices emitting blue light; if unavoidable, use blue-blocking filters or glasses with >90% blue light attenuation.
| Time | Light Spectrum | Irradiance (lux) | Temperature (°C) | Notes |
|---|---|---|---|---|
| 18:00-20:00 | Red (620-700 nm) + Warm White (3000 K) | <300 lux | 18-19 | Promote melatonin onset |
| 20:00-22:00 | Red (620-700 nm) | <150 lux | 16-18 | Minimize blue light exposure |
Step 4: Nighttime Optimization (22:00 - 06:00)
Objective: Maintain melatonin production and support deep sleep.
- Eliminate all artificial light exposure; use blackout curtains and light traps in sleeping area.
- Maintain ambient temperature at 16-18°C through cooling mattress or environmental controls.
- Use environmental sensor suite to monitor and record temperature and humidity; maintain relative humidity between 40-60%.
- Optional: brief exposure (5 minutes) to dim red light (<50 lux) if nighttime awakenings occur, to avoid melatonin suppression.
Section 4: Step-by-Step Construction of a Custom Circadian Light Modulation System
To achieve precise spectral control, build a programmable LED light panel with multimodal spectral output.
Materials Required:
- High-CRI LEDs:
- Blue LEDs (460-480 nm), 50 units
- Warm white LEDs (3000 K), 50 units
- Red LEDs (660 nm), 50 units
- LED driver circuits (constant current)
- Microcontroller (Arduino Uno or Raspberry Pi)
- MOSFET transistors for PWM dimming
- Aluminum heat sink with thermal paste
- Diffuser panel (frosted acrylic)
- Power supply (12V DC, 5A)
- Spectrometer for calibration
Construction Protocol:
- Arrange LEDs in a matrix on an aluminum PCB with groups separated by color.
- Solder LEDs with proper polarity; connect each color group to individual driver circuits.
- Attach the aluminum heat sink to PCB with thermal paste to ensure heat dissipation.
- Connect driver circuits to microcontroller MOSFET outputs for independent PWM control of each color group.
- Mount diffuser panel 5-10 cm in front of LEDs for uniform light distribution.
- Program microcontroller with circadian light schedule and spectral intensity profiles (see Section 3).
- Calibrate output spectrum and irradiance using spectrometer; adjust PWM duty cycles to reach target intensities.
- Encase assembly in light-tight housing with ventilation to prevent overheating.
Section 5: Step-by-Step Construction of Environmental Temperature Control System
Materials Required:
- Peltier cooling modules (TEC1-12706), 2 units
- Heatsinks with fans for hot and cold sides
- Temperature sensors (DS18B20)
- Microcontroller (Arduino or Raspberry Pi)
- MOSFET or relay modules for switching power supply
- Power supply (12V DC, 10A)
- Insulated mattress pad or enclosure
- Programmable thermostat firmware
Construction Protocol:
- Attach Peltier modules to insulated mattress pad or enclosure base.
- Connect cold sides to heat sinks with fans for heat dissipation; hot sides to exhaust heatsinks.
- Wire temperature sensors at mattress surface and ambient air inside enclosure.
- Connect Peltier modules and sensors to microcontroller via MOSFET or relay for power modulation.
- Implement PID control loop in microcontroller firmware to maintain target temperatures (see Section 3 schedules).
- Test cooling and heating cycles; adjust PID parameters to avoid overshoot and maintain stable temperatures.
Section 6: Advanced Protocol Adjustments for Special Populations
| Population | Light Exposure Adjustment | Temperature Adjustment | Notes |
|---|---|---|---|
| Shift Workers | Use bright blue light during night shifts (2000 lux, 460-480 nm); red light post-shift | Maintain 20-22°C during work; 16-18°C during sleep | Avoid blue light during daytime sleep |
| Seniors (>65 years) | Increase morning blue light exposure to 90 minutes | Keep night temperature at lower end (16°C) | Compensate for reduced retinal sensitivity |
| Jet Lag Recovery | Phase-shift light exposure by 1 hour per day | Adjust temperature to local nighttime norm | Combine with melatonin supplementation (see Volume 3) |
Section 7: Monitoring and Feedback Systems
Recommended Monitoring Parameters and Devices:
| Parameter | Device Type | Sampling Frequency | Action Thresholds |
|---|---|---|---|
| Core Body Temperature | Ingestible sensor or skin patch | Continuous | Deviation > ±1°C indicates circadian misalignment |
| Sleep Quality | Actigraphy or polysomnography | Nightly | <85% sleep efficiency triggers protocol adjustment |
| Light Exposure | Wearable light sensor | Continuous | Blue light exposure >500 lux after 20:00 triggers intervention |
| Ambient Temperature | Environmental sensors | Continuous | >22°C at night indicates need for cooling |
Section 8: Troubleshooting and Optimization
| Issue | Likely Cause | Corrective Action |
|---|---|---|
| Difficulty falling asleep | Blue light exposure after 20:00 | Implement blue-blocking glasses; reduce spectrum |
| Morning grogginess | Insufficient blue light exposure in morning | Increase blue light dose and duration |
| Nighttime awakenings | Ambient temperature too high | Lower temperature to 16-18°C; use cooling mattress |
| Daytime fatigue | Inadequate light exposure during day | Supplement with full-spectrum light; increase duration |
Summary Table: Circadian Modulation Protocol Overview
| Time | Light Wavelength(s) | Irradiance (lux) | Temperature (°C) | Key Physiological Effect |
|---|---|---|---|---|
| 06:00-07:00 | Blue (460-480 nm), cool white (5000-6500 K) | 2500 lux | 20-22 | Melatonin suppression, alertness |
| 07:00-16:00 | Cool white (5000-6500 K) | 1000-2000 lux | 21-23 | Metabolic efficiency, alertness |
| 18:00-20:00 | Red (620-700 nm), warm white (3000 K) | <300 lux | 18-19 | Melatonin facilitation |
| 20:00-22:00 | Red (620-700 nm) | <150 lux | 16-18 | Sleep preparation |
| 22:00-06:00 | None (darkness) | 0 lux | 16-18 | Melatonin maintenance, deep sleep |
Final Note
The protocols contained within this chapter represent the pinnacle of circadian entrainment science, combining spectral photobiology with thermoregulatory control. Implement these systems with precision and discipline. Only through such mastery can one unlock the full regenerative and cognitive potential encoded in the sovereign human body.
For advanced hormonal and metabolic optimization protocols complementary to this chapter, see Volume 4: The Hormonal Codex, Chapter IX.
End of Chapter VII. Continue to Chapter VIII: Nutritional Chronotherapy and Metabolic Synchronization.
PLATES — Supplemental Gallery
Illustrations carried over from the original Codex Reader that belong to this volume as a whole. Added by this edition; the text above is complete without them.